vl-100u-e-operating_installation_instructions
DESCRIPTION
Operating and Installation Instructions of the ERV Lossnay VL-100U-ETRANSCRIPT

BeÍoro using this Lossnay Ventilator, please read through these instructions. Keep theseinstructionŠ in a sale place Íor future reÍeÍence.
. The displays havé lhé Íollowing significance.
^ |This appli€s to mlshandling or mis_
^\ WABNING loperalion ot the product which mayas I l€ad to a fatal or sorious injury'
2\ crunorThis applie6 to mlshandling or mis-op€Iation oí tho prcducl, which will leadto an iniury or damage to your home,hous€hold éíectg, glc.
Essential SaÍeý Precautions. Boíore proco€ding with operalion, pleaso bo suro to ígad "Ess€ntial
saíety Precautionď as it will tell you how to opgralo lh€ productpropeíly and saÍely'
. The graphic symbols havo tho following €ignificanc€.
o Prohibited
@ Do NOTdisassomblé-
@ Do NOT touch,
@Use is prohlbitedwherevér water lsprosent.
o You must íollow théinslructions alvon.
o Dlsconnect thepow9Í plug.
-í-

SaÍety Precautions
. Do nol fu.n thé Lo65náy's switch oN oÍ oFF lÍ t'lé.€ ls a flammable gas l€eku(spaíG fÍom gl€cÍic contácts may cáuse exploGions' )
open a windovil and vé llato th6 rcom'
Do noi ďlempt lo dlsassgmbl€ o' aliéí the unlt.(FiÍe. eléctÍic shock or injury máy res!lt')
Do not l€t thé unlt get wst (Firg, gl€ctÍic shock may íeq]n. )Do not use the unll ln a balhřooíň or olhef haghly humid localion.(Fire or elecťic shock may íesult' )
. use ifie untt ď ilE r6!ed volLge and wtthln thé contťol capaclty aangé.(Failuíe lo do so Íliay í€sult in fir6 or eleclíjc shoc*')
. check lhero is ílo dust on the powgr plug. lnsarl the plug completely iÍÍo th€ sockď'making sure it ia not loo€€' (Failuíe to (b so rnay Íesult in fre or gl€ctric shock.]
. Make $Íe lhe orrtside air intaké opéning 13 posÍúoned 3o thát it will not take incombus{on qEses or o|tÉÍ exlrausl. (l intake áÍ is not ířesh' oxygen may become depleled in řle
. Be sutt to lernove tfie power plug Ířo'n thg wall ouťet wlren performing maintenance. Donď i se'lo. réltlove tfié poweř plug lvfth vJgt háÍids.(El€cltb sňod( oÍ injury may r€sun.)
. lÍ you smel! buming, o. anoifiel malÍunctlon occurs, tuÍn thé unlt oÍí and Íemové thepoureÍ plug. (contnuing operason may resull in blgakdown' eleclic shock oÍ fi e.)
CAUTION. Do no| placé combusdon equlpment in th6 dircct pqth ď thg alÍ ftom the unil
(lncompléte combuslion may rcsult in acciderís.). Do nol us€ th6 unit in exctssively hol ařeas, ar€ás ol olly stnokg, o. n€ar opén íames.
(FirÓ may result')
. A Ían rotale6 in5ide tlle unit during operation. Never stick anythlng lnsid€ tt€ unit duÍingoparatlon. (lniuíy may result.)
. Never atlach lhe unit to the ceiling. (lt can only be aťbch€d lo a wall')
. lÍ the aupp|y cořd is damaged, il must be Íeplaced by the manuÍaclur€r, lts seďlceagont or slmlla.ly qualiíied péÍsons in orde.lo avoid a haztÍd.(Not having the cod rcplaced could resul in el€cLic shoď')
. Attách paÍts 3ecuÍely aÍle] mainlenancé. (DÍopping paÍts colld rgsull in injury.)
. ch€ck lhál ttio unft ánd outdooř reáthér covérs at€ attached a€curg|y'(Rainwal€í enleÍing fie unit could íesul in eleclric shoď' f,re oÍ indoor it€ms gelting wet')
. The appllancé 18 not to bé uséd by chlldíen oÍ peÍsons with r€duced phyalcal' lén3oly oa
Ínenlal cap€blltlo5, or lack ď experieílc€ ánd lclowledgE, unless théy have baén glvensupeřvb|on oí lnařuc{on.
. childrcn should bo 6upéívlsed to ensur€ that th€y do not play with the applláncé.
t{e!'er r€movg lhé potvér plug by pulling on the cord. Always grasp the plug }tgélÍ.(Failure lo cto so could lesult ln electÍc shock or
'iÍe from a shoÍ circuit. )
Be surc to 'qnow
the povi6ř plug Ířom the wall oudď when not uslng the unll Íoř anoxl€nd€d p€rlod.(Fáluré to do so coLlld caus€ insula|ion deteÍlolalion' lesulling in el€ctric shock or fiÍe írom a shoí-ciG]il')
-2-

When using the unit. Do not plac€ obl€ďB a]ound thg unlt.
The air outlel or intake opénings may b€ blocked orserviclng oÍthe Lossnay olement may become impossibl€.lt may bocomo impossibl€ lo íemovg the power plug írom the wall outlei-
. Do nol u6o aero3ol 9prays (such aa lnaecl sprays, hal' sprays oř cleanséÍs ) diÍ€cťy on thé unit.The panel may degéneralo or bocome damaged'
. Do nol obslructlho p.nel.sutíici€nl venljlation may bo impéded'
. Do nol pulltho cord dlagonally.Thg unit will nol oporalé corréctly.
. To píovont Íroozlng oř damago io the Lossnay co.€, stop lhe unil iÍ the outside tempéaatu]e Íalls be|ow"'lo"c ořlhe room'a humldlty rlaé6 abové 4o%.
Names oÍ parts
Operation
Lossnay Core (H6at 6xchang6r)
oí
Knob
1.
2.
3.
lns6nth€ powgl plug into lh€ walloutlel'
slid6 lhe shun6l knob lo lhé leíl (op€n) position. (The shutteímust bo op€n lor v€ntllation.)
Pull th€ cord'
(operaton lndiBiotlights') (op€ration indicato'opes oul )
awh€í th6 unit is not op€Éling slid€ lhe 6hutt9r lo lhe c1osed position il the weather is windy.aYou can op€n th€ shuttel whén the unil is oÍl to use il as a natuÍal venťlation.
shutt6r (přsv€nls outsldé alÍbging blown ln wnon unltis ď)
-3-

MaintenanceTo maximize the liÍe ď Los9nay, clean oÍÍ any accumulat9d dlrt and duat on the alr
'ilter and Loaanay
coÍ€ at leaď once every slx months.
IBe sure lo stand oír a stable surfac€ when atlaching or Íemoving paÍts duÍing maintenance'
Á WARN|NG. Always .emove the ]'oÝ€. plug íÍom the well
outlď b€Íorc steňing mainlenance workoo noi insert or remove lhe pluq wlth tťelhands(electÍic shock or iniury could Íesult).
Pullthé cold tofum ď.Make suíe lhe fan has stopp€d fuming.Remove lhe power plug from the walloullel.
1.
2.3.
Maké suře the lan has stopped tu]ning and lhenremove lhe panol.. Loosen the screw holding the panel, and pull the
panel íorwaíd to remove it.
nemove the Loasnay co]€.. PUll it Íoíwaíd to remove it.
Remove th€ eir liltél.. Bemove it from the catches on the Lossnay coÍé.
Clganlng : Use a vacuum cloaner 10 remove dusl.. You can also rins€ it wilhlukewarm water or wash it with aneutral detergent solution.
RopLcémonl: Réplacé thé fillél with the sépaíat€lysold parts (P-30F) when it has beeníinsod about Íivé oí six timés' YoU willneed lo trim the filtér to a size o' 346 x115 (mm).
TrE fihel my be &ma@d by timinq h liťl tbt wá6í or scn]bt'ng í.Afi€r idng' be gÉ to ďy řE flteroo íÉr Í'!ór b p.d tlb Ílď b6.k
-4-
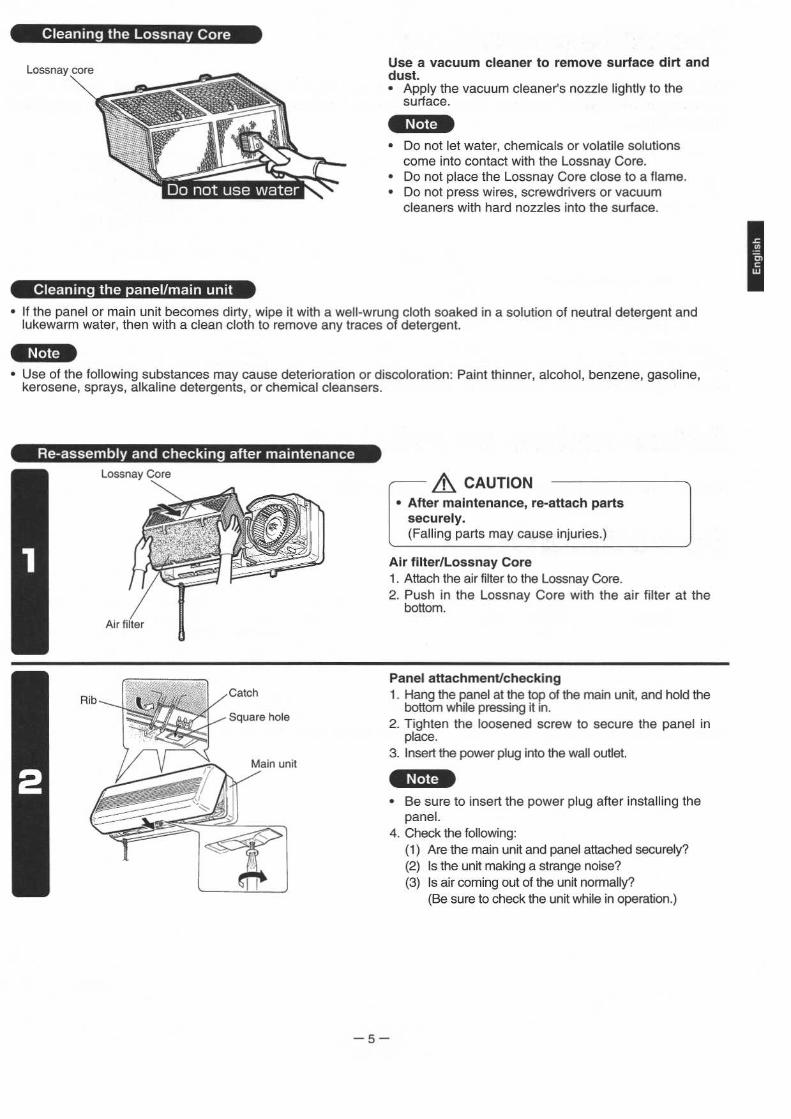
use a vacuum cléan6Í to lomovo aurfaco diřt anddust.. App|y lhe vacuum cleanéí's nozzle lighlly to thé
Do not let waler. chemicals or volatile solutionscome into contact with tho Lossnay coré.Do not place the Lossnay coíe close to a ílame.Do not press Wires, scíéwddvers or vacuumcléanels with hard nozzles into thé suíece.
. lí the panel or main unit b€comes diÍty' Wipe it with a Well_wrung cloth soaked in a solu|ion oÍ neutral detergent andlukgwarm water. then with a clean cloth lo remove any tíacés oí détéígént.
. U6é oí lhé following substances may cause deteíioration or discoloration: Painl thjnnéí' alcohol, benzene, gasoliné,kérosén€, sprays, alkaline deteígents, oa chemical cleansels.
2\ crurroH. AÍtéÍ malntenance, Íe_atlach pans
aecuÍely.(Falling parts may cause injuries.)
Air f ilteř/Lossnay coag1' Attach thé air fltér lo lh€ Lossnay core'2. Push in the Lossnay core with the air Íilter a| lhe
bottom.
Panel attachmenťchackln91. Hang the panel at the top oí th6 main unit, and hold the
bottom while pressing it in.2. Tighten the loosened screw to secure the panel in
place.3. lnseÍt thé power plug into th€ wall outlel'
. Be sure to insert the powér pluo áfter lnstallang thepanel-
4' check the íollowing;(1) Aíé lhé main unit and panél attached securely?(2) !s the unit making a strang€ noisé?(3) ls air coming out oÍ the unit noÍmally?
(Be sulé to cheÓk lhé unit wh é in operaťon.)
-5-

E
Tloubleshootingcheck the unlt lf any oÍ tho íollotťing pÍoblems oc,curs. lÍ lha pÍobl€m ls not listed belo$l, oÍ thepÍoblem p€r8bt3 aíter checklng, contact your dealoÍ belng sur€ to í1€l ]€rnorre lňe potreÍ plug Ířomthe wall outlst-
Problem causé check lhe íollowing
unil do€s not operate' No power to main unil
Ch6ck the power plug.ch€ck that a circuit bíeaker(fus€) has not trjppéd.chsck a powerÍailure hasnot occurred.
Unlt is making a slrange noise
Panel oí íiller is not attachedsecuÍoly.
Be-attach panel or filter.
Filteí is cloogéd' cléan íilter.
shuiteÍ is closed' open shutteí.Léss ař lhan normal is comingoul of !nit.
Filtér is cloooéd' clean filtéí-
shutteÍ is clos€d. ODen shutter,
lí the supply coÍd is damaged, it must be řeplaced by the manuÍactuÍer, its service agentgimil8rly qualmed persons ln oÍdeÍ to avold a hazaÍd. (contact youÍ dealéÍ.)
After-sales servicingcontaď youř dealeř Íor service ď your Logsnay Ventilator.
SpeciÍicationsModel
Supplyvollago
(v)
Power linefíoquéncy
(Hz)Notch consumplion
(w) (m"/hÍ)
Tomp6íatuleoxchango
etficiency (%)
Nolse
(dB)
Weight
(ks)
VL-1OOU-E220-240 50
HI 105 70 39
6.5LO 23 65 77 29.5
20 60HI 90 37LO 21 50 ao
Noise valuB mat' b9 hlghca lhan tho6e llgted depeídirrg on thé strrcfuÍě oí the room.
-6-

BeÍore proceeding with the installation Work, be sure to read through thsse instructions.The installation Work should be done by an authorized dealer or qualiÍied conlractor.
Please ensure that the sepante ,operating lnstrucIions'' arc handed oveÍ to the cuďomeř
Essentia! safety precautions. Before proceeding with opération, please be sure to réad
"Essential safety Precautions"as it will lell you how to opératethe produď propedy and saíely.
. Th€ displays have the Íollowing significance.
WABNINGThis appIiés to mishandling ormisoperation oí the productwhich may lead to a fatal oíserious injury.
This applies lo mishandling ormisoperalion of the produci
cAUTloN I Which will lead to an injury oídamage to Vour home,household effects, etc.
. Thé graphic symbols have the íollowing signiíicance.
s Prohibitéd
@ Do NOTdisassemble.
@Usé is pÍohibited
present,
o You mustfollowtheinstructions given.
o Disconnectthepower plug.
-1-

BeÍore installation
- Safety precautions
Do not a]bř lhe unit oÍ dlsšsemble lt moře than nec€€€ary.(Fire' eleclÍjc shoc* ol injury may íesun.)
Do not install lhe unit in a balhÍoom oÍ olher highly humid location.(FiÍ€ or el€clÍic shock may r€sun.)
use lhe unlt ď lhe Íatéd vo]lage and wllhin the control capacity Íange'(Failurc to do so may result in íiíe oí eleclÍic shock')
Make suÍe lhe outside air inlake opening is positioned so that it will not take incombrrslion geses or olheÍ exhauď. Position thé unit so lhat it \ryill not bécome coveÍedwilh snow. (l intake aií is nol fÍesh' ox}gen may b€come deplďed in lhe loom')
lnstall lhé unit sécuřély to a sufÍlciently sfong t^'ell surÍace.(lniuňe6 may €sult í !hé unil falls')
. lnatall the unit only on a wall. Do not install it on a c€iling.(lnjuňas could r€sul| ií thg unil fáb.)
. Do nď iÍistall thé unlt ln exceBsively hď ař€as, ar€as oí oily smoké, oř near op€n Ílames(Fir€ may result)'
. wéář gloves when attaching the unit (oř injury may r€suh).
. A ach thé unit so thď the air supply/exhauď pipés slopé downlrard to^/aÍd outdooÍs'(Rainwaleí entédng lhe unil could cause slectÍic shock oÍ fiíe, or wet indooí ilems')
. lnstall the supplied ouldooÍ w€álheÍ coveÍs.(Bainwater éntéÍing lh6 unil could cause electÍic shock oÍ fiÍe' or wel indoor ilems.)
AÍteÍ installation, be suÍe to r€nrove thé pov'ér plug ÍŤom ihe wall outlet when not usingthé unit ío] an extended péňod. (Failuré lo do so could caus€ irÉulďion deteÍiomlion' řesuhing in
ebdnc shock or íire írom a shoí'cjrcun.)
- Qulline drawingsFrssh air supply grills lndoor ail éxhalsl grille
(Unil: mm)
]Í lhe wallÉ lhlckérlhan 3o0 mm' uss thé gxl€nsion plpesand lhé pipe oxtenson ioints {sepaíalely sold paíls)'
on ",oo'nt"'nuuo
op" $1$/--1fT\ -r \ *l*
-2-

- lnstallation positions
Edge olMounling plate main unit,2
s€cunng Unil hoÍizontally
36_í6
ACŽ0-24ov 5oHz
?20Y 6oHz
( l 8o lo ý 90 watl holé) ( ý 80 to l90 wall hole)
(Unit mm)
BLÁcK PINK
LACK BLACK
GREEN/YELLOW
-3-

lnstalling the unit
- Unpacking
(For atlaching mounling plal€/Íol s€cudngmaln Lrnil horizontally)
R9mové mountlng platé.. Remove two scléWs for se-curingmain unit.
. K€ep lhe screws for secuíng thé main unit in a saí€ place. scréws are neédéd whén installinq the main unit.
BP@@bb
mounting plat€| 2
ďďďď
Pips mounťng plal€s: 2
@O',
"r0ltrr"rhuu"t e,e""fu@
@av"l"u*w.zo.ktsgp.
ďď6f ď ďďď{ď ď
scr6ws Ío. secuinq main
-4-

- Wall hole construction
A3 mm
Dolořming lhe inatallalion pogiÍon.1. Place the mounting plat€ on the wall.2. chéck that the reiníolcement (indooÍ wall) is
positioned proper|y to secure the mourÍing plate'3' Anach lhé mounting plale loosely (with single wood
Dďormin€ the Position oÍ th6 wall holes.1' Place a caljpel on lhé calibratjons on the mounting
plate.2. Mark the center position of lhs wall hole.. Posillon the wall holés away
'íom obstructions in
the wall, wllhin thé íangés shown in the tablebelow,
From main uĎil csnlsr15 tm bdN to 25 mm ábové
fhiooís I
Drillthé wall holo8.1. Remove lhe mounting plate.2. Drillwall holés o{ c 80 to c90 mm.
. To prevent rainwater entéring indools, dlill theholes so they slope downwaíd toward ouldoors'
Cutting air supply/cxhaust pipes.1. Measure the walllhickness.2' cut the pipes to a léngth oí lwall thickness] + 30
LT
Tfidoo,s I
-
!Preparations beÍore installation
Air s!pply/exhaust pipe
.Tll
. Be sure to cut ofÍ the énd without the flange.
Cut
30mm
|-ud-oďšl
-5-
socura eir supply/exhausl pipeslo mouÍ ingplatc.1. InseÍt pipe into mounling plale'2. Rotate pipe counlerclockwise.3' sécure ílange (four catches)'

- If the wall is more than 300 mm thick
-lJa€_lhe'eltension pipaa (3aperalély sold PaÍla P.l00P.E) and piP€ éxt9nslon iolnts (5eparal6ly sold Pa.laP-í ooPJ-E). Attach lhom to ihe pipes a3 shown bclow. (Éach s'eť can €xtond $e pipis 6y 3oo ňm.)
cluanťty R€quiřEmont2 sets oí P_l ooP_E for 'l VLí 00u-É1 s€t o' P_100PJ-E for 1 VL_looU_E
l. Screw ihe extension ioints all lhé wáv inlo the airsupply/exhausl pipes, ňaking surs they íít securely.
l Belore screwing the exlénsion joints intoL the pipes, apply caulking (commercially
Noté avai|ab|e) 1o lhe o-dngs on lhe joinls (toprevenl condensation insrde lhe pipeswetting the indoor wall),
2. screw lhé extension oioes all the wav into theext6nsion ]oints, making šuie they íit s€cureíy.
3. cul thé pipes to a length ot [wa|l thicknessl + 30 mm.
lnstalling the mounting plate(Íor loo€€ ánachmgnt)
securo mounting platé.. securé lhe mounhng plate lo tho wall (uslng séven
wood screws and lhe sinolé screw for loosealtachment).
. You can align the plate honzontally by suspendinga weighl Írom the lop and aligning ils strinq with lhecenter line.
Bé sule lo secuíe the mounlinq plate with lhe twoscíews neaí lhe calchés. and w.lh screws insymmetrical positions.To attach the plate lo a concréle wall, use concráescíews lo securé il (commercially available)'
Airsupply/exhaustpip6 Aluminumlape
socuré alÍ supply/éxhaust plpés.
A cAUToNlnstall the alř aupply/€xhaust plpes 3o thatthey slop€ downward loward ouldoora.(Bainwater entgnng lhe unil mav caus€ el€chicshock oríire' or Wéi indool items.)
1. Pass lhe air supply/exhaust pipes lhrough the wallholes. fihe "undeť mark should be on thd bottom.)
2. secure the pipés with aluminum tape.
secuře m6ln unlt.1. Hang main unil on mounting plate.2. Secure main unit with the two screws provided.
(Press main unlt into wall.)
- lnstalling the main unit
-6-

- Outdoor constructionWoathe] coveB packed togetheř Wlth unit.
. Caulking
Attach
EWall hole caulking. Fill in anv oaos bélween lhe air suoo|V/ exhaust
plpes ahď'the wall holes Wiih-caulking(coínmeÍcially available)'
Attaching w6ath.] covcřs1. lnsert weather cover mounling
supply/exhausl pipos.2. Tighten Ílangé nuts' (s€cure so that
on ílangés are on top.)
. Wéather cover mounting plate have two holes ( /smm) in them. Use these holes lo secure theÍlangés lo the wall.
3' secure lhe wealheř covers with lhe scr€ws.
. To keep lhe arr supply and exhaust sides separate,each weátheí covel attaches onlv to ono side.checl( thal each 'cap" aíéa is positio'Ír€d on the left.as shown in the diagÉm.
platé into ai.
'uppoť' marksAir supply/exhaust pips
To prevent ]ainwater léakage. caulk any gaps aíound the woather covers.
. AÍtel lnstalling the unlt, béÍoÍe conduotlng a leat run! chéck the unit agaln lo mak6 suřc ll hss been installgdcorrootly.
. Bo 3ule to coÍÍ€ct any problems dlscov€řed. (Failurcto coÍ€ct píoblems may íésult in poor períořmance as wgllas causing
-7-
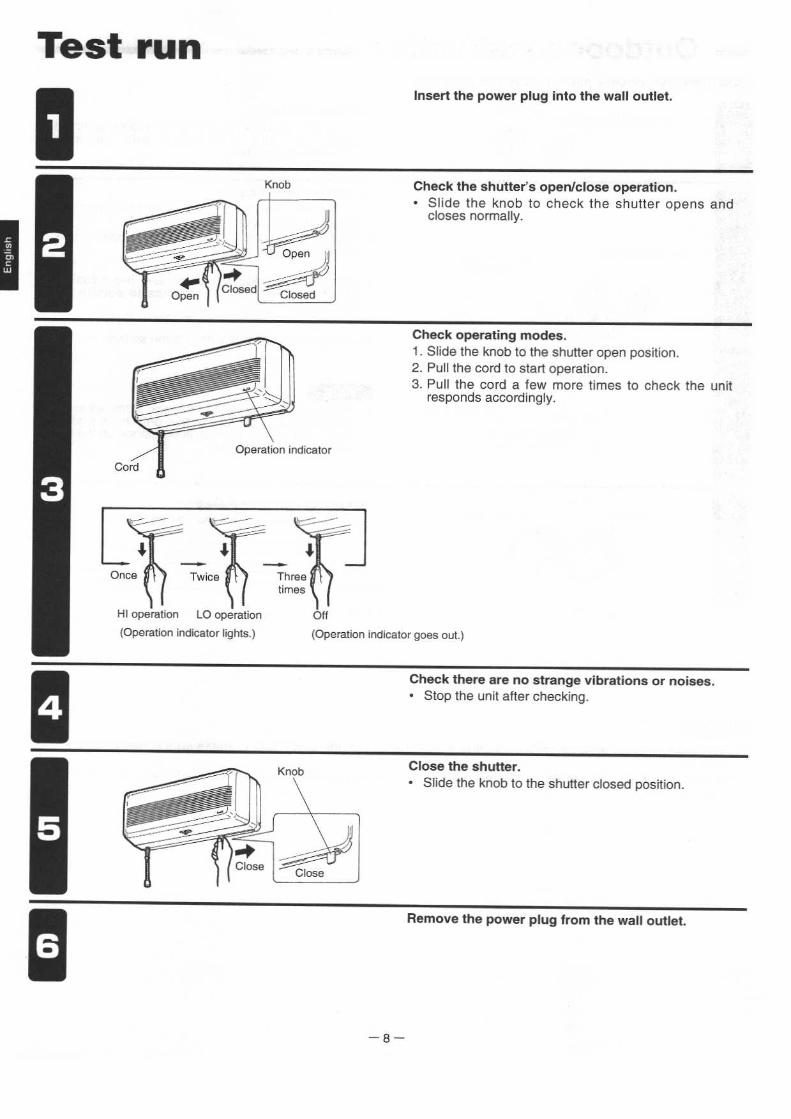
Test runlns€ň lhe polve] plug into lhe wall outlet.
check lhé shutteÍ's opalýclose opé]ation.. Slide the knob 10 check the shutter opens andcloses normally.
check opeÍating modes.1. slide the knob to the shuttér open2. Pull the cord to start operation.3. Pull the cord a Íéw more times
responds accordingly.
posilion.
to check the unit
(Operation lndicaro. tiohrs.)
chéck thefa ara no strange vlbrálions or nois63.. stop the unit aíleÍ checking.
close lh6 shutloÍ.. Slide the knob to the shutter closed posilion.
-8-
Removo the pow€r plug íÍom the wall oullet.