vivotek 8332 setup 2012-04-03 - node9ravenshoesecurity.com/pdf/vivotek_8332_setup.pdf · for an...
TRANSCRIPT

Vivotek 8332
Network Camera Setup Manual
for the RavenShoeSecurity.com
Internet Recording Service
Copyright © 2012 RavenShoeSecurity.com Vivotek 8332 Setup Manual v2012-04-03(1)
2
Notice
CCooppyyrriigghhtt ©© 22001122 RRaavveennSShhooeeSSeeccuurriittyy..ccoomm..
All rights reserved. No part of this document may be reproduced by any
mechanical, photographic, or electronic process without the prior written
permission of the publisher. This document is authorized solely for 1) the use of
RavenShoeSecurity.com customers or 2) review by potential customers.
Vivotek Vivotek is a trademark of the VIVOTEK Inc., New Taipei City, Taiwan. Vivotek
is not connected in any way to RavenShoeSecuirty.com. The camera
configuration information included in this document has not been reviewed by
Vivotek and serves solely as a record of our endeavours to use Vivotek cameras
with our service.
DDiissccllaaiimmeerr
While best efforts have been made to ensure that the content of this document is
accurate and free of errors, the publisher is not responsible for any consequential
or incidental damages arising from the information presented here-in.
PPuubblliisshheerr CCoonnttaacctt IInnffoo RavenShoeSecurity.com
Box 82, Suite 437
130 Davis Dr.
Newmarket, Ontario
Canada L3Y 8V4

Copyright © 2012 RavenShoeSecurity.com Vivotek 8332 Setup Manual v2012-04-03(1)
3
Table of Contents
Introduction ...................................................................................................................... 4 Preparation ........................................................................................................................ 5
8332 root Login Credentials ........................................................................................... 5 Internet Connection ......................................................................................................... 5 Access to Camera’s Internal Website ............................................................................. 7
Vivotek Setup Software .............................................................................................. 7 Camera Setup Procedure .............................................................................................. 10
Step 1: Initial Power Up ................................................................................................ 10 Step 2: Access the Camera’s Admin Functions ............................................................ 10 Step 3: Set the Camera Time ........................................................................................ 13 Step 4: Video................................................................................................................. 14 Step 5: Motion detection ............................................................................................... 17 Step 6: Application ....................................................................................................... 22
Motion Event ............................................................................................................ 23 Ftp Server .................................................................................................................. 24 Snapshot Parameters ................................................................................................. 28 Video Clip Parameters .............................................................................................. 29 Finalize Motion Event Settings ................................................................................. 30 Periodic Event ........................................................................................................... 32
Video Clip Access .......................................................................................................... 35 Micro SD Maintenance ................................................................................................. 35
Format ....................................................................................................................... 36 Mass Downloading Using FileZilla ............................................................................. 39
Downloading FileZilla Ftp Client ................................................................................. 39 Downloading VLC Video Player .................................................................................. 39 Connect to the 8332’s Internal Ftp Server .................................................................... 39 Locating the Video Clips .............................................................................................. 40
Glossary ........................................................................................................................... 43

Copyright © 2012 RavenShoeSecurity.com Vivotek 8332 Setup Manual v2012-04-03(1)
4
Introduction
The Vivotek 8332 is a network camera that is capable of sending motion
activated pictures over the Internet to RavenShoeSecurity.com.
This document gives the step by step instructions needed to set up a 8332
network camera to send motion activated pictures to RavenShoeSecurity.com as
well as optionally record motion activated video clips to the onboard micro SD.
Information is included on retrieving the video clips one by one using the built-
in website or on-mass using ftp.
The skills required to follow these instructions would include:
1) Be able to use a web browser and have experience with the advanced user
features and settings of Gmail, Hotmail, Yahoo, eBay, Facebook, LinkedIn,
FileZilla, VLC, and so forth.
2) Be able to identify and physically access the Internet router or modem
provided by your telephone or cable company. Be comfortable with
connecting computer devices using RJ45 cables.

Copyright © 2012 RavenShoeSecurity.com Vivotek 8332 Setup Manual v2012-04-03(1)
5
Preparation
In order to set up the camera to operate with RavenShoeSecurity.com you will
need the following items:
8332 root Login Credentials
Internet Connection
Access to the camera’s Internal Website
RavenShoeSecurity.com ftp Account
88333322 rroooott LLooggiinn CCrreeddeennttiiaallss
For an 8332 out of the box the administrator userID is “root” and the password is
blank. If this has been changed and you do not have this information it will be
necessary to hard reset the camera.
A hard reset is performed by opening the back of the camera and pressing the
reset button with an unfolded paper clip until the status LED rapidly blinks. This
will set all parameters back to their factory default values.
Refer to the user manual for specific instructions on removing the back cover as
the correct procedure is not entirely obvious. The cable grommet must be loosed
up first before unscrewing the back cover. Failure to loosen the cable grommet
before removing the back cover will cause the writing inside the camera to twist
and damage the camera.
IInntteerrnneett CCoonnnneeccttiioonn
The camera requires an RJ45 Ethernet connection that provides access to the
Internet in the physical area where the camera is being deployed. This cable
should run from the camera site to your router.
Using a PoE (Power Over Ethernet) injector the Ethernet cable can also provide
power, making for a single wire installation.
The camera comes with a short Ethernet cable and a double female adapter.

Copyright © 2012 RavenShoeSecurity.com Vivotek 8332 Setup Manual v2012-04-03(1)
6
It is possible (see user manual) to remove this short cable and plug the Ethernet
cable from the router directly into the motherboard. Sealing this cable with the
included cable grommet would make for a more weatherproof install since the
connections would be protected from the elements inside the camera housing.
The router is usually a single box that your ISP (Internet Service Provider)
installs to provide Internet service. These single boxes are actually a combo of
modem and router all-in-one. Other times the ISP provides just a modem, and
you add your own router to the mix, which may or may not provide a WiFi
access point. For the purposes of this discussion the router and modem are
assumed to be integrated into one appliance referred to as simply a router.
The router does require power and generally has a few flashing lights. The router
can be identified by a connection from your physical cable TV wire or physical
phone line into the router. This physical wire is the electronic path to and from
the Internet. In a home environment the router is often installed near a TV, if it
has been provided by a cable TV company. In an office environment there is
often a Telephone Room where routers and other telecom equipment are
installed.
Routers generally have 4 or more RJ45 Ethernet connectors to plug in devices
(computers, Internet radios, etc). Some routers also provide wireless access using
WiFi and may or may not have one to three antennae. Any devices connected to
the router either physically with an RJ45 Ethernet cable or wirelessly through
WiFi are said to be on the LAN (Local Area Network).
Devices on the LAN can initiate connections with other devices on the LAN or
the Internet (known as the WAN [Wide Area Network]). However devices on the
WAN are not permitted to initiate connections with devices on the LAN as the
router will not allow it. In this capacity the router functions as a firewall.

Copyright © 2012 RavenShoeSecurity.com Vivotek 8332 Setup Manual v2012-04-03(1)
7
AAcccceessss ttoo CCaammeerraa’’ss IInntteerrnnaall WWeebbssiittee
During the setup you will need to connect an Internet Explorer computer
browser to the internal admin website of your camera. While each camera has a
full blown computer inside, there is no keyboard, mouse, or screen. To provide a
human interface for this computer the camera has an “internal website” with
admin and setup functions as well as access to live video. You can access the
admin functions of the camera from a computer connected to the same LAN
(Local Area Network) as the subject camera.
Note that 8332 web access requires an ActiveX control that only works with
Internet Explorer. The first time you visit the 8332’s internal website home page
you will be prompted to install this component. Once installed the ActiveX
control remains in place indefinitely. If you are using Firefox, Chrome, or Safari
(Mac) browsers then some of the internal website functions will not operate.
Vivotek Setup Software
To access the camera first download and install the Vivotek IW2 setup software
for Windows XP and Windows 7:
http://www.vivotek.com/downloads/downloads.php?modelnick=iw2
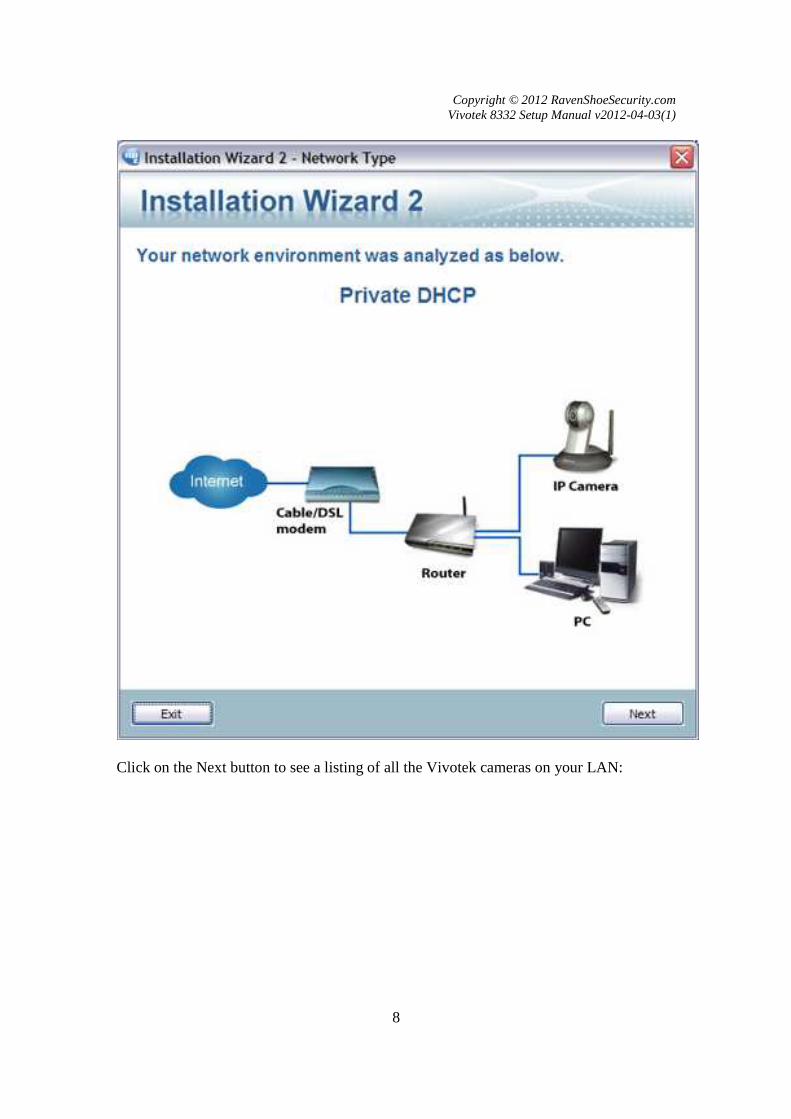
Scroll down to the Software section to download and install this software. Run
the “IW2” once to make sure it is working. First the software will analyze your
network and then present a pictorial of your LAN configuration as shown below:
Copyright © 2012 RavenShoeSecurity.com Vivotek 8332 Setup Manual v2012-04-03(1)
8
Click on the Next button to see a listing of all the Vivotek cameras on your LAN:

Copyright © 2012 RavenShoeSecurity.com Vivotek 8332 Setup Manual v2012-04-03(1)
9
Double click the subject camera to get Internet Explorer to connect to the
camera’s internal website.
The main purpose of the Vivotek IW2 software will be to find the LAN IP
address of the camera when it powers up and connects to your router.

Copyright © 2012 RavenShoeSecurity.com Vivotek 8332 Setup Manual v2012-04-03(1)
10
Camera Setup Procedure
SStteepp 11:: IInniittiiaall PPoowweerr UUpp
To start the camera setup process, first connect the camera to the router using the
supplied RJ45 Ethernet cable. Power the camera up and wait a minute or so for it
to boot up.
SStteepp 22:: AAcccceessss tthhee CCaammeerraa’’ss AAddmmiinn FFuunnccttiioonnss
Start the Vivotek setup software known as IW2. Locate your camera in the listing
and double click the entry. Internet Explorer will start up and then you should be
prompted to login to the camera’s internal website:
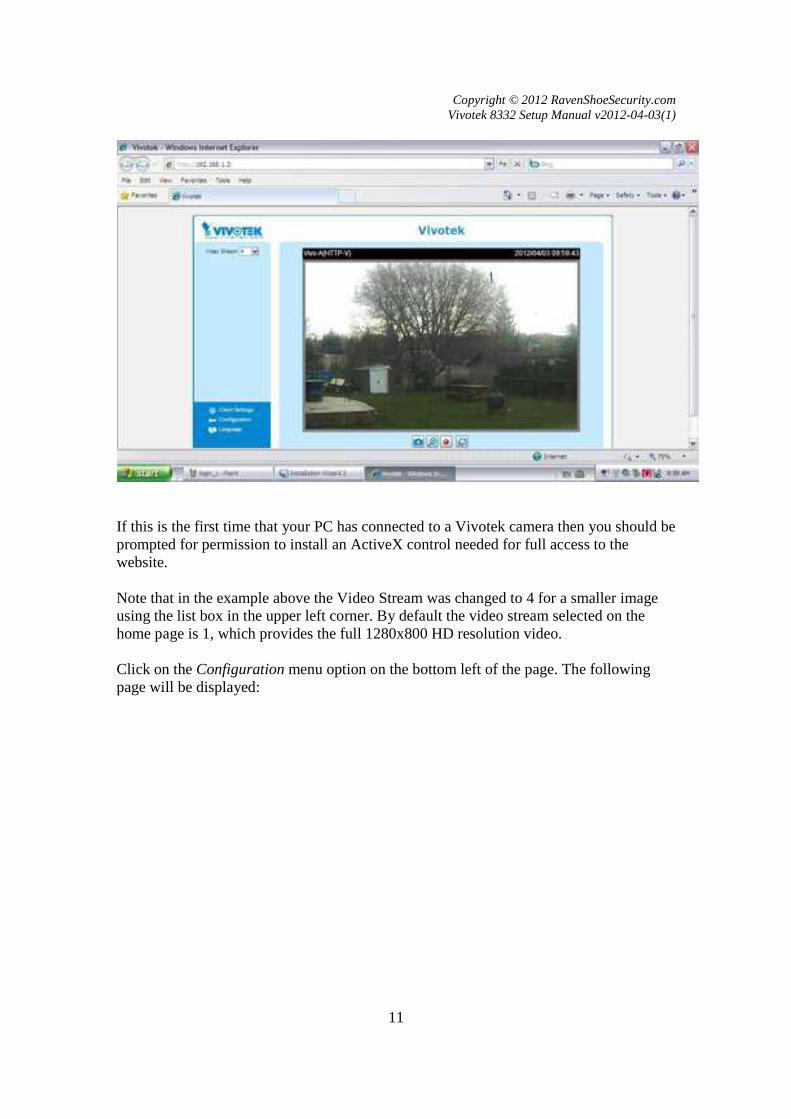
The User Name is “root”. For a camera out-of-the-box or given a hard reset, the Password is blank. Once logged on you should be presented with the home page:
Copyright © 2012 RavenShoeSecurity.com Vivotek 8332 Setup Manual v2012-04-03(1)
11
If this is the first time that your PC has connected to a Vivotek camera then you should be prompted for permission to install an ActiveX control needed for full access to the website. Note that in the example above the Video Stream was changed to 4 for a smaller image using the list box in the upper left corner. By default the video stream selected on the home page is 1, which provides the full 1280x800 HD resolution video. Click on the Configuration menu option on the bottom left of the page. The following page will be displayed:

Copyright © 2012 RavenShoeSecurity.com Vivotek 8332 Setup Manual v2012-04-03(1)
12
When the [Advanced Mode] menu shows on the bottom left it means the camera is in the Basic Mode of operation. Many administration functions are hidden in this mode. Click on the Advanced Mode menu option to switch show all the admin functions:
Copyright © 2012 RavenShoeSecurity.com Vivotek 8332 Setup Manual v2012-04-03(1)
13
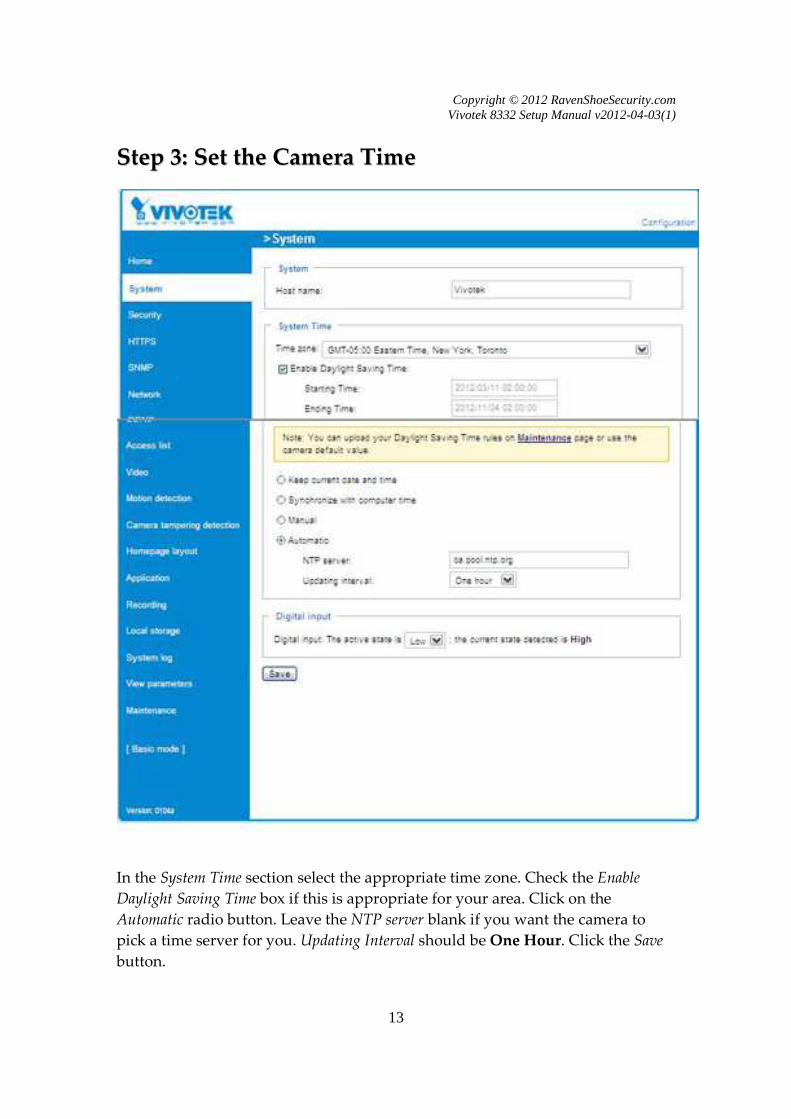
SStteepp 33:: SSeett tthhee CCaammeerraa TTiimmee
In the System Time section select the appropriate time zone. Check the Enable
Daylight Saving Time box if this is appropriate for your area. Click on the
Automatic radio button. Leave the NTP server blank if you want the camera to
pick a time server for you. Updating Interval should be One Hour. Click the Save
button.

Copyright © 2012 RavenShoeSecurity.com Vivotek 8332 Setup Manual v2012-04-03(1)
14
SStteepp 44:: VViiddeeoo
The first thing we will setup is the video parameters. There are 4 video channels.
We are going to use #1 and #4. Click on the Video menu to see the following
page:
Note that to the left of the Video quality settings for stream 1: there is a small
chevron that points to the right. This convention indicates that there is hidden
information.
Click in the chevron beside Video quality settings for stream 1: to see the following:

Copyright © 2012 RavenShoeSecurity.com Vivotek 8332 Setup Manual v2012-04-03(1)
15
Note that the chevron now points downward indicating that there is no hidden
information.
These are the recommended settings for stream 1 which will be used to record
video clips to the micro SD drive. Click the H.264 radio button. Set Frame size to
1280x800, Maximum frame rate to 30 fps, Intra frame period to ¼ S. For Video quality
check the Constant bit rate radio button and set to 2 Mbps.
Feel free to adjust these to your suiting. Constant bit rate does produce a varying
video quality but SD usage will be directly proportional to the length of the
recording times. Fixed quality, on the other hand, will use varying amounts of
storage for any given second depending on the complexity of the images.
A small frame size is probably the best parameter to reduce if you want to
sacrifice video quality for greater capacity (measured in time) stored on a given
SD card.
Scroll down a little further and click on the chevron beside the Video quality
settings for stream 4: to see this page:

Copyright © 2012 RavenShoeSecurity.com Vivotek 8332 Setup Manual v2012-04-03(1)
16
Video stream 4 is used to send snapshots to RavenShoeSecurity.com. Click the JPEG radio button. Set the Frame size to 640x480, Maximum frame rate to 30 fps, and Video quality to Detailed. Click the Save button.

Copyright © 2012 RavenShoeSecurity.com Vivotek 8332 Setup Manual v2012-04-03(1)
17
SStteepp 55:: MMoottiioonn ddeetteeccttiioonn
The 8332 has very sophisticated motion detection with up to 6 rectangular zones
(up to 3 for day vision and up to 3 for night vision). Each zone has it’s own
Sensitivity and Percentage settings. Refer to the user’s manual for full details.
One great feature of the 8332 is that on the home page video feed it will show the
motion detection areas that are being triggered with red rectangles that match
the one or more of the 6 rectangular motion detection zones.

Copyright © 2012 RavenShoeSecurity.com Vivotek 8332 Setup Manual v2012-04-03(1)
18
To access the motion detection setup pages click on the Motion detection menu
item to see this page:
Click on the New button to create a motion detection rectangle:
Enter a name for this motion detection area in the Window Name box. Set the
Sensitivity and Percentage slide bars. Respectively 80% and 5% are good starting
values.

Copyright © 2012 RavenShoeSecurity.com Vivotek 8332 Setup Manual v2012-04-03(1)
19
Click and hold the blue title bar of the new motion window and drag it around
the scene to place it appropriately. Hover over the edges or corners of the motion
window to get a double arrow cursor then click and drag the size of the
rectangle. You may use up to three separate motion detection windows as shown by
repeatedly clicking on the New button. Click on the title bar of any of these
motion windows to turn the title bar blue, at which point adjustments can be
made using the Sensitivity and Percentage controls on the right.
Motion detection windows are deleted by clicking the small X in the upper right
corner.
Once your have the motion detection window(s) in place click on the Save
button. Wait for the Save windows completed dialog to confirm that the changes
have been processed.

Copyright © 2012 RavenShoeSecurity.com Vivotek 8332 Setup Manual v2012-04-03(1)
20
If this your first experience with the 8332 motion detection we would suggest
that you use one motion window that covers the entire scene named “All” with
starting Sensitivity and Percentage values of 80% and 5% respectively.
The motion area(s) setup above are for day mode only. The 8332 has a separate
set of motion detection windows for night vision. These are accessed by clicking
the Profile button which causes a separate window to pop-up:
Copyright © 2012 RavenShoeSecurity.com Vivotek 8332 Setup Manual v2012-04-03(1)
21
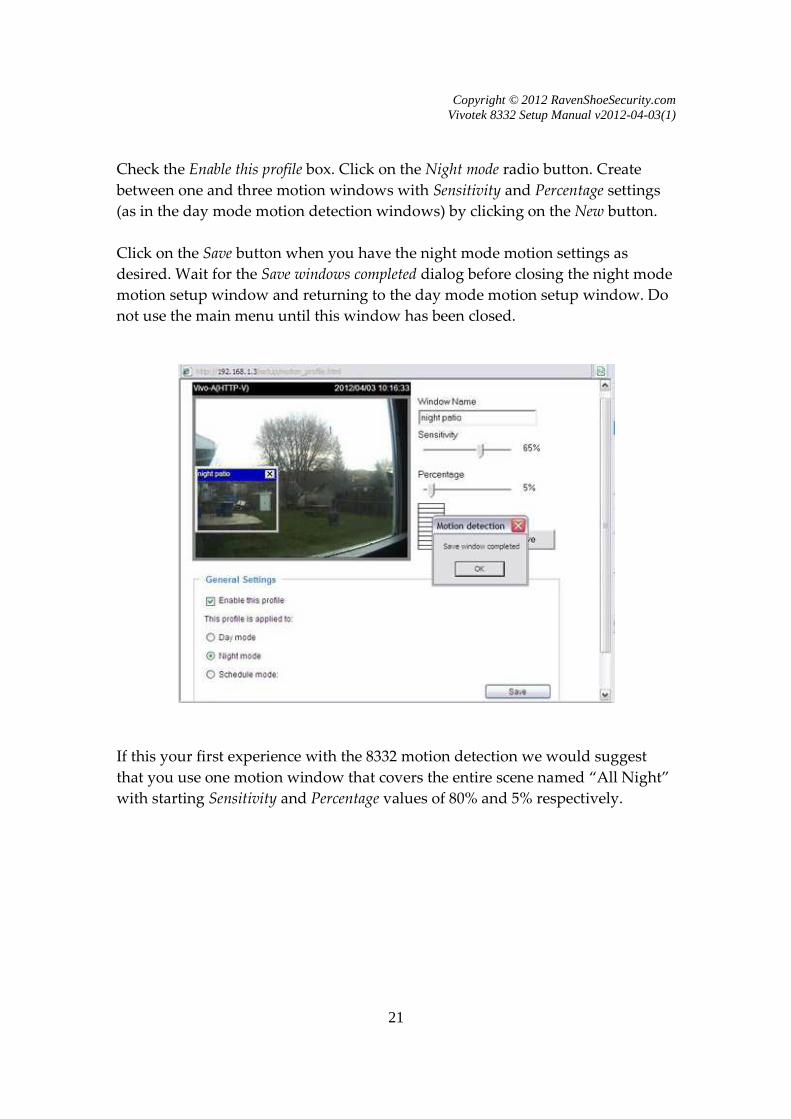
Check the Enable this profile box. Click on the Night mode radio button. Create
between one and three motion windows with Sensitivity and Percentage settings
(as in the day mode motion detection windows) by clicking on the New button.
Click on the Save button when you have the night mode motion settings as
desired. Wait for the Save windows completed dialog before closing the night mode
motion setup window and returning to the day mode motion setup window. Do
not use the main menu until this window has been closed.
If this your first experience with the 8332 motion detection we would suggest
that you use one motion window that covers the entire scene named “All Night”
with starting Sensitivity and Percentage values of 80% and 5% respectively.

Copyright © 2012 RavenShoeSecurity.com Vivotek 8332 Setup Manual v2012-04-03(1)
22
SStteepp 66:: AApppplliiccaattiioonn
Now that the motion detection zones have been setup the next step will be to
create the 8332 application entries that use these zones to:
1) Send motion activated snapshots to RavenShoeSecurity.com
2) Send hourly snapshots to RavenShoeSecuirty.com
3) Record motion activated video clips to the onboard micro SD
This is where the 8332 really shows off it’s powerful and very flexible
configuration interface.
Click on the Application menu to see this page:

Copyright © 2012 RavenShoeSecurity.com Vivotek 8332 Setup Manual v2012-04-03(1)
23
Motion Event
Under Event Settings click on the Add button. The following window should pop-
up:

Copyright © 2012 RavenShoeSecurity.com Vivotek 8332 Setup Manual v2012-04-03(1)
24
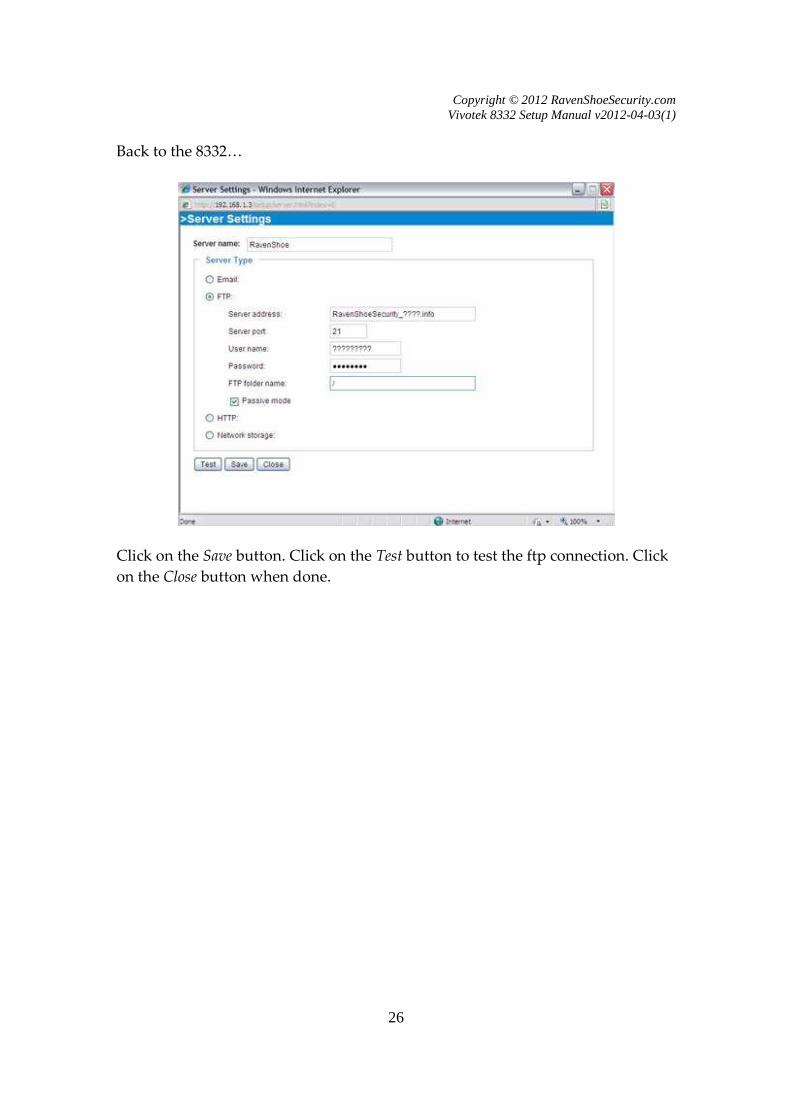
Ftp Server
Under Action click on the Add Server button to see this pop-up window:
In the Server name box enter RavenShoe. Click on the FTP radio button. Set the
Server port to 21. FTP folder name to /. Check the Passive mode box.

Copyright © 2012 RavenShoeSecurity.com Vivotek 8332 Setup Manual v2012-04-03(1)
25
Copy and paste the following from the Settings area of your
RavenShoeSecurity.com home page (shown below) to the 8332 Server Settings
page (shown above).
-from-
RavenShowSecurity.com Settings
-to-
8332 Server Settings Page
ftp Host Server address
ftp UserID User name
ftp Password Password
Copyright © 2012 RavenShoeSecurity.com Vivotek 8332 Setup Manual v2012-04-03(1)
26
Back to the 8332…
Click on the Save button. Click on the Test button to test the ftp connection. Click
on the Close button when done.

Copyright © 2012 RavenShoeSecurity.com Vivotek 8332 Setup Manual v2012-04-03(1)
27
After the Server Settings page closes you should be back at the Event settings
page:

Copyright © 2012 RavenShoeSecurity.com Vivotek 8332 Setup Manual v2012-04-03(1)
28
Snapshot Parameters
Click on the Add Media button to see the following pop-up window:
Enter snapshot into the Media name field. Click the Snapshot radio button. Select
Stream 4 as the Source.
Enter the number of pre-event and post-event images that you want the 8332 to send
on top of the motion triggered image. Normally we use 0, but you may want to
include a couple of more shots before and after depending on your application. Enter the camera name that will be shown on your RavenShoeSecurity.com
account into the File name prefix box.
Check the Add date and time suffix to file name box
Click the Save button. Then Click the Close button to return to the Event Settings
Page.

Copyright © 2012 RavenShoeSecurity.com Vivotek 8332 Setup Manual v2012-04-03(1)
29
Video Clip Parameters
Click the Add Media button a second time to setup the recording of video clips.
Enter video_clip into the Media name field. Click on the Video Clip radio button.
Select Stream 1 as the Source.
Enter the number of seconds for Pre-event recording and the Maximum duration of
a video clip. Good starting numbers for these parameters would be 2 and 5
seconds respectively. These values will yield video clips that are between 2 and 5
seconds long. Each video clip will start with the 2 seconds before the motion
event and will continue as long as there is motion detected for up to 3 more
seconds. If motion continues beyond 3 seconds then the camera will record back
to back video clips.
We set the Maximum file size to the maximum value (4MB) and let the Maximum
duration parameter limit the video clip sizes. Enter 4096 into the Maximum file size
field.
Enter a name for the camera in the File name prefix box. All video clip file names
are prefixed with this value. It is a good practice to give each 8332 a unique File
name prefix so that when video clips from multiple cameras are mass downloaded
using ftp the source camera can be easily determined.

Copyright © 2012 RavenShoeSecurity.com Vivotek 8332 Setup Manual v2012-04-03(1)
30
Finalize Motion Event Settings
Click on the Save Button. Click on the Close button to return to the Event Settings
page:
For Event name enter motion_all. Check the Enable this event box. Set Priority to
Normal. Enter 1 for Detect next event after.
Under Trigger click on the Video motion detection radio button. Check the boxes for
the desired motion detect zones that you want used for this event.

Copyright © 2012 RavenShoeSecurity.com Vivotek 8332 Setup Manual v2012-04-03(1)
31
Under Event Schedule check all 7 days-of-the-week boxes and the Always radio
button.
Under Action check the SD box if you have installed a micro SD in the camera.
Select video_clip as the Media.
Under Action check the Ravenshoe box. Select snapshot as the Media.
Click the Save button. Click the Close button to return to the Application page:
Confirm that under Event Settings that motion_all has a status of ON, a V under
each day of the week, 00:00-24:00 for Time, and a Trigger of motion.

Copyright © 2012 RavenShoeSecurity.com Vivotek 8332 Setup Manual v2012-04-03(1)
32
Periodic Event
With motion detection properly tuned up, the 8332 is one of the best network
cameras for low junk image content. That is the 8332 is quite good at only
sending pictures when interesting things are happening.
The downside to this is that when there are long periods of no activity, no
pictures are sent to your RavenShoeSecurity.com account. When you check up
on your camera(s) online, it is difficult to know if a) there genuinely was zero
motion activity, b) your house burned to the ground (hopefully not), or c) there is
some other temporary disruption. Since there are a number of scenarios that can
interrupt the flow of pictures, it is hard to know exactly what might be going on
when there are no images being received. There could be an Internet outage. Or
perhaps a breaker popped when your sister plugged in too many hair dryers?
To address this issue the 8332 can send a snapshot to your
RavenShoeSecurity.com account on a periodic basis to let you know everything
is OK. A one hour interval seems to work well. In that way the latest image from
your network cameras, as recorded on your RavenShoeSecuritylcom home page,
should never be more than one hour old if everything is working properly.

Copyright © 2012 RavenShoeSecurity.com Vivotek 8332 Setup Manual v2012-04-03(1)
33
On the Application page in the Event Settings section click on the Add button to
view this page:
Enter periodic for the Event name. Set the Priority to Normal. Enter 10 for the
Detect next event after.
Under Trigger click the Periodically radio button. Enter 60 in the Trigger every other
box. This will trigger a snapshot every 60 minutes. Feel free to tune this to better
suit your needs.
Under Schedule check all the days-of-the-week boxes. Click the Always radio
button.

Copyright © 2012 RavenShoeSecurity.com Vivotek 8332 Setup Manual v2012-04-03(1)
34
Under Action uncheck the SD box and set the Media to ----None----. As well check
the RavenShoe box and set the Media to snapshot.
Click on the Save button. Click on the Close button to return to the Application
page:
Verify that in the Event Settings section that periodic has a Status of ON, that each
day of the week has a V, the Time is 00:00-24:00, and Trigger is seq.
Yeah! The camera is setup and ready for deployment! Do your best happy dance
in front of the camera and refresh your RavenShoeSecurity.com home page to see
the images. Refer to the section on Video Clip Access to check the HD video of
your dance act.
Keep in mind that every time you physically move the camera you will need to
tune the Motion detection windows unless you are using a simple single motion
detect window that covers the entire scene.

Copyright © 2012 RavenShoeSecurity.com Vivotek 8332 Setup Manual v2012-04-03(1)
35
Video Clip Access
Login to the camera’s internal website and click on the Configuration menu (lower
left). If the [Advanced Mode] menu option is showing then click it to toggle into
Advanced Mode.
MMiiccrroo SSDD MMaaiinntteennaannccee
Click on the Local storage menu option to see this page:
In the SD Card Management section click on the two chevrons next to SD card
status and SD card control to see this page:
Ensure that the Enable cyclic storage box is checked and click the Save button.

Copyright © 2012 RavenShoeSecurity.com Vivotek 8332 Setup Manual v2012-04-03(1)
36
Format
To format the micro SD click the Format button. ** Be warned that the camera
does not prompt you to confirm the formatting operation and immediately
starts erasing the micro SD chip ** An empty window pops up like this when
the formatting action begins:
After a period of time (depending on the capacity of the micro SD chip) this
message will appear to confirm the operation is finished:
Click on the chevrons to hide the SD Card Management sections. The Format
button is particularly touchy and should be hidden when not needed.

Copyright © 2012 RavenShoeSecurity.com Vivotek 8332 Setup Manual v2012-04-03(1)
37
Scroll down to the Searching and viewing the records section:
Click the Search button to retrieve a listing of all the available files on the
camera’s micro SD. You may refine your search with the File attributes and
Trigger time criteria.
All the video clips recorded using the application settings specified in this
document will have a Trigger type of Motion, A Media Type of Video Clip, and
Locked status of Unlocked.
A typical video clip listing is shown below:

Copyright © 2012 RavenShoeSecurity.com Vivotek 8332 Setup Manual v2012-04-03(1)
38
Video clips may be bulk deleted, bulk locked, and bulk unlocked, but they can
only be viewed or downloaded through the web interface one file at a time. To
mass download the video clips refer to the section on Mass Downloading Using
FileZilla.

Copyright © 2012 RavenShoeSecurity.com Vivotek 8332 Setup Manual v2012-04-03(1)
39
Mass Downloading Using FileZilla
The 8332 internal camera website supports downloading and viewing video clips
one file at a time. This may be tedious when trying to download a large number
of video clips.
For mass downloading and viewing we recommend using FileZilla to connect to
the 8332’s internal ftp server and transfer the files to a PC or Mac. Then use VLC
(or other media player) to view the downloaded clips.
DDoowwnnllooaaddiinngg FFiilleeZZiillllaa FFttpp CClliieenntt
FileZilla can be downloaded for PCs and Macs at this link:
http://filezilla-project.org/download.php?type=client
DDoowwnnllooaaddiinngg VVLLCC VViiddeeoo PPllaayyeerr
VLC can be downloaded for PCs and Macs at this link:
http://www.videolan.org/vlc/#download
CCoonnnneecctt ttoo tthhee 88333322’’ss IInntteerrnnaall FFttpp SSeerrvveerr
The PC (or Mac) running FileZilla and the 8332 camera must be connected to the
same LAN. The PC may be on a WiFi connection. Since the 8332 does not have
WiFi functionality it must be hardwired to the LAN.
Start up FileZilla on the PC. Click on the File/Site Manager menu item. Click on
New Site.
Under the General tab enter the IP address of the 8332 camera (as reported by the
Vivotek setup software IW2) into the Host field. Leave Port blank. Set Protocol to
FTP – File Transfer Protocol. Set Encryption to Use plain FTP. Set Logon Type to
Normal. Set User to root. Enter the camera’s password in the Password box. Click
on the Connect button to initiate a connection.

Copyright © 2012 RavenShoeSecurity.com Vivotek 8332 Setup Manual v2012-04-03(1)
40
You should see a screen very similar to the following:
The Local site section on the left will vary from PC to PC. The Remote site section
on the right is where we will locate the video clips stored on the 8332’s micro SD.
LLooccaattiinngg tthhee VViiddeeoo CClliippss Click on the “? mnt” under Remote site to see this screen:

Copyright © 2012 RavenShoeSecurity.com Vivotek 8332 Setup Manual v2012-04-03(1)
41
Under mnt click “? auto” to see this screen:
User auto click “? CF” to see this screen:
Copyright © 2012 RavenShoeSecurity.com Vivotek 8332 Setup Manual v2012-04-03(1)
42
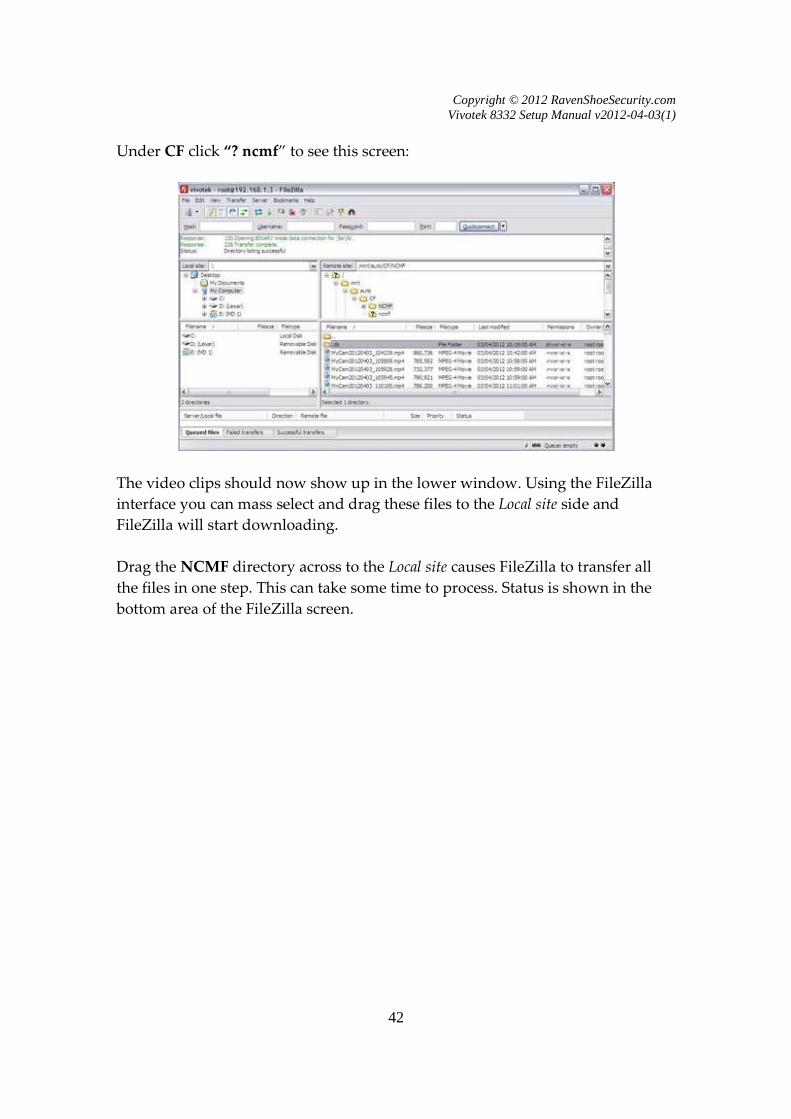
Under CF click “? ncmf” to see this screen:
The video clips should now show up in the lower window. Using the FileZilla
interface you can mass select and drag these files to the Local site side and
FileZilla will start downloading.
Drag the NCMF directory across to the Local site causes FileZilla to transfer all
the files in one step. This can take some time to process. Status is shown in the
bottom area of the FileZilla screen.

Copyright © 2012 RavenShoeSecurity.com Vivotek 8332 Setup Manual v2012-04-03(1)
43
Glossary
DVR – Digital Video Recorder: Device that records video (and optionally sound)
from one or more network cameras.
GB – GigaByte (1,000,000,000 bytes)
IP – Internet Protocol
IR – Infrared: A type of light that network cameras can see but the human cannot
see that is used for night vision.
ISP – Internet Service Provider: Company that provides your Internet Service.
Usually the telephone or cable company.
KB – KiloByte (1,000 bytes)
LAN – Local Area Network: Computer network that is isolated from the Internet
by a router/firewall. A home based WiFi service or Ethernet jacks on the office
wall would be examples of LAN connections.
MB – MegaByte (1,000,000 bytes)
RJ45 – Physical Ethernet connector. Looks like a telephone connector, but bigger.
SSID – Service Set Identifier: Also known as the name of your WiFi network.
UPS - Uninterruptible Power Supply: A device that provides continuous power
to computer equipment during short power outages.
URL – Universal Resource Locator: What you type into a browser to go to a
website. Example: www.RavneShoeSecurity.com
VA – Volt Amps: A measure of UPS capacity.
WAN – Wide Area Network. A network that interconnects LANs. Generally
known as the Internet.
WEP/WPA/WPA2 – Encryption methods used for WiFi.

Copyright © 2012 RavenShoeSecurity.com Vivotek 8332 Setup Manual v2012-04-03(1)
44
WiFi – Wireless IP protocol used in homes and businesses
WPS – Wireless Protected Setup: A feature where a button is pressed on the WiFi
router and a new WiFi device at the same time. This causes the router to send the
SSID/key info to the new WiFi device.