vivado design suite user guide - · pdf filevivado design suite user guide release notes,...
TRANSCRIPT

Vivado Design Suite User Guide
Release Notes, Installation, and Licensing
UG973 (v2017.4) December 20, 2017

Vivado Design Suite 2017.4 Release Notes 2UG973 (v2017.4) December 20, 2017 www.xilinx.com
Revision HistoryThe following table shows the revision history for this document.
Date Version Revision
12/20/2017 2017.4 2017.4 What’s New Featuring the latest:
• New Device Support.
10/04/2017 2017.3 2017.3 What’s New Featuring the latest:
• New Device Support.
• Removed Activation Licensing support in the Obtaining and Managing a License in Chapter 5.
06/22/2017 2017.2 2017.2 What’s New Featuring the latest:
• New Device Support.
06/07/2017 2017.2 2017.2 What’s New Featuring the latest:
• New Device Support.
• New Vivado Naming Conventions.
04/20/2017 2017.1 • In Device Support in Chapter 1, added Virtex® UltraScale+™: XCVU3P.
• In System Memory Recommendations in Chapter 2, fixed link.
04/05/2017 2017.1 2017.1 What’s New Featuring the latest:
• New Device Support.
• New Vivado Naming Conventions.
Send Feedback

Table of ContentsChapter 1: Release Notes 2017.4
What’s New . . . . . . . . . . . . . . . . . . . . . . . . . . . . . . . . . . . . . . . . . . . . . . . . . . . . . . . . . . . . . . . . . . . . . . 5Important Information . . . . . . . . . . . . . . . . . . . . . . . . . . . . . . . . . . . . . . . . . . . . . . . . . . . . . . . . . . . . . 7Known Issues . . . . . . . . . . . . . . . . . . . . . . . . . . . . . . . . . . . . . . . . . . . . . . . . . . . . . . . . . . . . . . . . . . . . . 8
Chapter 2: Architecture Support and RequirementsOperating Systems . . . . . . . . . . . . . . . . . . . . . . . . . . . . . . . . . . . . . . . . . . . . . . . . . . . . . . . . . . . . . . . . . 9Architectures . . . . . . . . . . . . . . . . . . . . . . . . . . . . . . . . . . . . . . . . . . . . . . . . . . . . . . . . . . . . . . . . . . . . 10Compatible Third-Party Tools . . . . . . . . . . . . . . . . . . . . . . . . . . . . . . . . . . . . . . . . . . . . . . . . . . . . . . . 11System Requirements . . . . . . . . . . . . . . . . . . . . . . . . . . . . . . . . . . . . . . . . . . . . . . . . . . . . . . . . . . . . . 12
Chapter 3: Download and InstallationDownloading the Vivado Design Suite Tools . . . . . . . . . . . . . . . . . . . . . . . . . . . . . . . . . . . . . . . . . . . 14Installing the Vivado Design Suite Tools . . . . . . . . . . . . . . . . . . . . . . . . . . . . . . . . . . . . . . . . . . . . . . 15Installing Cable Drivers . . . . . . . . . . . . . . . . . . . . . . . . . . . . . . . . . . . . . . . . . . . . . . . . . . . . . . . . . . . . 20Installing Windows Driver . . . . . . . . . . . . . . . . . . . . . . . . . . . . . . . . . . . . . . . . . . . . . . . . . . . . . . . . . . 20Uninstalling Cable Drivers . . . . . . . . . . . . . . . . . . . . . . . . . . . . . . . . . . . . . . . . . . . . . . . . . . . . . . . . . . 20Installing Linux Driver . . . . . . . . . . . . . . . . . . . . . . . . . . . . . . . . . . . . . . . . . . . . . . . . . . . . . . . . . . . . . 20Uninstalling Linux Driver . . . . . . . . . . . . . . . . . . . . . . . . . . . . . . . . . . . . . . . . . . . . . . . . . . . . . . . . . . . 21Adding Additional Tools and Devices . . . . . . . . . . . . . . . . . . . . . . . . . . . . . . . . . . . . . . . . . . . . . . . . . 21Network Installations . . . . . . . . . . . . . . . . . . . . . . . . . . . . . . . . . . . . . . . . . . . . . . . . . . . . . . . . . . . . . 22Batch Mode Installation Flow . . . . . . . . . . . . . . . . . . . . . . . . . . . . . . . . . . . . . . . . . . . . . . . . . . . . . . . 24Obtaining Quarterly Releases . . . . . . . . . . . . . . . . . . . . . . . . . . . . . . . . . . . . . . . . . . . . . . . . . . . . . . . 27Uninstalling the Vivado Design Suite Tool . . . . . . . . . . . . . . . . . . . . . . . . . . . . . . . . . . . . . . . . . . . . . 28
Chapter 4: WebTalkWebTalk Participation . . . . . . . . . . . . . . . . . . . . . . . . . . . . . . . . . . . . . . . . . . . . . . . . . . . . . . . . . . . . . 30Setting WebTalk Install Preference . . . . . . . . . . . . . . . . . . . . . . . . . . . . . . . . . . . . . . . . . . . . . . . . . . 31Setting WebTalk User Preferences . . . . . . . . . . . . . . . . . . . . . . . . . . . . . . . . . . . . . . . . . . . . . . . . . . . 32Checking WebTalk Install and User Preferences . . . . . . . . . . . . . . . . . . . . . . . . . . . . . . . . . . . . . . . . 33Types of Data Collected . . . . . . . . . . . . . . . . . . . . . . . . . . . . . . . . . . . . . . . . . . . . . . . . . . . . . . . . . . . . 33Transmission of Data . . . . . . . . . . . . . . . . . . . . . . . . . . . . . . . . . . . . . . . . . . . . . . . . . . . . . . . . . . . . . . 34
Vivado Design Suite 2017.4 Release Notes 3UG973 (v2017.4) December 20, 2017 www.xilinx.com
Send Feedback

Chapter 5: Obtaining and Managing a LicenseLicensing Overview . . . . . . . . . . . . . . . . . . . . . . . . . . . . . . . . . . . . . . . . . . . . . . . . . . . . . . . . . . . . . . . 35Generating/Installing Certificate-Based Licenses . . . . . . . . . . . . . . . . . . . . . . . . . . . . . . . . . . . . . . . 36Managing Licenses On Your Machine. . . . . . . . . . . . . . . . . . . . . . . . . . . . . . . . . . . . . . . . . . . . . . . . . 42Using the Xilinx Product Licensing Site. . . . . . . . . . . . . . . . . . . . . . . . . . . . . . . . . . . . . . . . . . . . . . . . 44
Chapter 6: Older Release NotesRelease Notes 2017.3 . . . . . . . . . . . . . . . . . . . . . . . . . . . . . . . . . . . . . . . . . . . . . . . . . . . . . . . . . . . . . 57Release Notes 2017.2 . . . . . . . . . . . . . . . . . . . . . . . . . . . . . . . . . . . . . . . . . . . . . . . . . . . . . . . . . . . . . 67Release Notes 2017.1 . . . . . . . . . . . . . . . . . . . . . . . . . . . . . . . . . . . . . . . . . . . . . . . . . . . . . . . . . . . . . 69
Appendix A: Additional Resources and Legal NoticesXilinx Resources . . . . . . . . . . . . . . . . . . . . . . . . . . . . . . . . . . . . . . . . . . . . . . . . . . . . . . . . . . . . . . . . . . 87Solution Centers. . . . . . . . . . . . . . . . . . . . . . . . . . . . . . . . . . . . . . . . . . . . . . . . . . . . . . . . . . . . . . . . . . 87Documentation Navigator and Design Hubs . . . . . . . . . . . . . . . . . . . . . . . . . . . . . . . . . . . . . . . . . . . 87Licenses and End User License Agreements . . . . . . . . . . . . . . . . . . . . . . . . . . . . . . . . . . . . . . . . . . . . 88Registered Guest Resources . . . . . . . . . . . . . . . . . . . . . . . . . . . . . . . . . . . . . . . . . . . . . . . . . . . . . . . . 88References . . . . . . . . . . . . . . . . . . . . . . . . . . . . . . . . . . . . . . . . . . . . . . . . . . . . . . . . . . . . . . . . . . . . . . 88Training Resources. . . . . . . . . . . . . . . . . . . . . . . . . . . . . . . . . . . . . . . . . . . . . . . . . . . . . . . . . . . . . . . . 89Please Read: Important Legal Notices . . . . . . . . . . . . . . . . . . . . . . . . . . . . . . . . . . . . . . . . . . . . . . . . 90
Vivado Design Suite 2017.4 Release Notes 4UG973 (v2017.4) December 20, 2017 www.xilinx.com
Send Feedback
Vivado Design Suite 2017.4 Release Notes 5UG973 (v2017.4) December 20, 2017 www.xilinx.com
Chapter 1
Release Notes 2017.4
What’s New• Vivado® Design Suite 2017.4 introduces Model Composer, a new Model-based Design
tool to enable rapid design exploration within the MathWorks Simulink® environment and accelerate the path to production on Xilinx All Programmable Devices through automatic code generation. Model Composer is an add-on tool to all the Vivado editions. More information about Model Composer can be found at www.xilinx.com/modelcomposer.
The following Devices and features are also updated in this release.
Device SupportThe following devices are in production:
• Zynq® UltraScale+™ MPSoC:
° XCZU4EV/CG/EG (-1, -2)
° XCZU19EG (-1L, 2L)
° XCZU7EV/CG/EG (-1,-2)
° XCZU5EV/CG/EG (-1, 2)
• Kintex® UltraScale+:
° XCKU5P (-1L, -2L)
° XCKU15P (-1L,-2L)
• Artix®-7 and Spartan®-7
° XC7S25 (-1, -2, -1LI)
° XC7A25T(-1,-2, -2LE (1.0V))
° XC7A12T(-1, 2, -2LE (1.0V))
Send Feedback
Vivado Design Suite 2017.4 Release Notes 6UG973 (v2017.4) December 20, 2017 www.xilinx.com
Chapter 1: Release Notes 2017.4
Vivado Tools
System Generator for DSP
• Supported MATLAB Versions: R2016a, R2016b, R2017a and R2017b.
• Single-port RAM, Dual-port RAM, ROM, FIFO and AXI-FIFO blocks updated to use new Block Memory Generator and FIFO Generator IPs.
• Enhancements to Error Messaging for all high-level System Generator for DSP blocks with AXI interface.
Vivado HLS
• New methodology design rule check section in the GUI to point to potential design enhancements.
• Improved tool messages for DATAFLOW optimizations.
• Optimized math.h functions for fixed arithmetic data types.
Simulation Flows and Verification IP
• Verify UltraScale+ MPSoC PL and PS AXI interactions with the new MPSoC Verification IP.
Model Composer
• High-level of Abstraction: Algorithm-centric bocks and support for vectors and 2D matrices enables frame-based algorithm design that saves you the time and effort to move to an intermediate low-level model for implementation.
• Performance-optimized Block Libraries: Computer Vision(xfOpenCV), Math, and Linear Algebra libraries available as blocks for design and simulation of algorithms within Simulink’s graphical environment.
• Custom User-Imported Blocks: Ability to import HLS synthesizable C/C++ code as custom blocks, providing greater flexibility to design your differentiated algorithms and leverage automatic test bench generation from test cases in simulation.
• Automatic Code Generation: Automatic optimizations steer towards a micro-architecture that meets target performance. You can synthesize your algorithm into 3 Export types: Packaged RTL IP, System Generator for DSP IP and Vivado HLS synthesizable code.
• Supported MATLAB Versions: R2016a, R2016b, R2017a and R2017b.
• For more information on pre-requisites, product features, and getting access, see the Model Composer product page at www.xilinx.com/modelcomposer.
Send Feedback

Vivado Design Suite 2017.4 Release Notes 7UG973 (v2017.4) December 20, 2017 www.xilinx.com
Chapter 1: Release Notes 2017.4
Important Information
LicensingThe Vivado 2017.3 beyond releases introduces the following changes in licensing that are listed below:
• Starting with Vivado 2017.3, activation licensing is no longer supported. Existing activation licenses have been replaced with certificate based license that can be accessed from www.xilinx.com/getlicense.
• Flexera version for license management tool has been upgraded to 11.14.1. Vivado 2017.3 is the last release that will support Solaris operating system for Flex license management tools. Xilinx will continue to support Window and Linux operating systems for Flex license management tools.
• Anyone using floating license will require to upgrade licensing utilities to Flex 11.14.1. These new licensing utilities are available on download page of www.xilinx.com.
• Please note that Flex version upgrade does not affect valid license files, in other words, existing valid license files will work just fine with Vivado 2017.3 release after you upgrade licensing utilities.
Vivado Naming ConventionsThe following are the required naming conventions when working with the Vivado Design Suite. Failing to follow these naming conventions might introduce potential risk to the design or the tool, and cause unpredictable behavior in the design flow.
• Source files names must start with a letter (A-Z, a-z) and must contain only alphanumeric characters (A-Z, a-z, 0-9) and underscores (_).
• Output files names must start with a letter (A-Z, a-z) and must contain only alphanumeric characters (A-Z, a-z, 0-9) and underscores (_).
• Project names must start with a letter (A-Z, a-z) and must contain only alphanumeric characters (A-Z, a-z, 0-9) and underscores (_).
• Project directory names must start with a letter (A-Z, a-z) and should contain only alphanumeric characters (A-Z, a-z, 0-9), tilde (~) and underscores (_).
CAUTION! The Windows operating system has a 260 character limit for path lengths which can affect the Vivado tools. To avoid this issue, use the shortest possible names and directory locations when creating projects, defining IP or managed IP projects, or creating block designs.
The following characters are not supported for project, file, or directory names:
Send Feedback

Vivado Design Suite 2017.4 Release Notes 8UG973 (v2017.4) December 20, 2017 www.xilinx.com
Chapter 1: Release Notes 2017.4
• ! # $ % ^ & * ( ) ` ; < > ? , [ ] { } ' " |
• tab (\t)
• return (\r)
• new line (\n)
• / or \ (As part of the directory or file name rather than as a path delimiter)
The following character is not supported for directory names:
• . (dot as terminal character)
The following character is not supported for file or project names:
• @
Note: In the Vivado IDE, the @ character is not supported for new file or project names. The Vivado IDE does allow an existing file on disk that uses the @ character to be added to a project. The Vivado IDE can open a project that includes the @ character in the project name. Using the Tcl Console, you can create a project with a name that contains the @ character.
IMPORTANT: Spaces in directory and file names are supported by the Windows operating system. However, you should avoid using spaces in order to preserve portability of the project or files between the Windows and Linux operating systems.
The Vivado Design Suite supports the use of forward slashes (/) as path delimiters for both Windows and Linux platforms. Backslashes (\) are allowed as path delimiters on the Windows platform only.
Any characters not explicitly mentioned above are not supported for project, file, or directory names.
Vivado Design Suite Documentation UpdateIn the 2017.4 Vivado Design Suite Documentation release, not all documentation will be available at first customer ship. Use the Update Catalog button in DocNav to stay up-to-date with the 2017.4 documentation suite.
Known IssuesVivado® Design Suite Tools Known Issues can be found at Answer Record 68923.
Send Feedback

Vivado Design Suite 2017.4 Release Notes 9UG973 (v2017.4) December 20, 2017 www.xilinx.com
Chapter 2
Architecture Support and Requirements
Operating SystemsXilinx® supports the following operating systems on x86 and x86-64 processor architectures.
Microsoft Windows Support• Windows 7 SP1 Professional (64-bit), English/Japanese.
• Windows 10 Professional Creators Update (64-bit), English/Japanese.
Linux Support• Red Hat Enterprise Workstation/Server 7.2 and 7.3 (64-bit)
• Red Hat Enterprise Workstation 6.6, 6.7, 6.8, and 6.9 (64-bit)
• SUSE Linux Enterprise 11.4 and 12.2 (64-bit)
• Cent OS 7.2 and 7.3 (64-bit)
• Cent OS 6.7, 6.8, and 6.9 (64-bit)
• Ubuntu Linux 16.04.2 LTS (64-bit)
Send Feedback

Vivado Design Suite 2017.4 Release Notes 10UG973 (v2017.4) December 20, 2017 www.xilinx.com
Chapter 2: Architecture Support and Requirements
ArchitecturesThe following table lists architecture support for commercial products in the Vivado Design Suite WebPACK™ tool versus all other Vivado Design Suite editions. For non-commercial support all Xilinx Automotive devices are supported in the Vivado Design Suite WebPACK tool when available in the tools.
Table 2-1: Architecture Support
Vivado WebPACK Tool Vivado Design Suite(All Other Editions)
Zynq® Device Zynq-7000 AP SoC Device
• XC7Z010, XC7Z015, XC7Z020, XC7Z030, XC7Z007S, XC7Z012S, and XC7Z014S
Zynq-7000 AP Soc Device
• All
UltraScale™+ MPSoC UltraScale+ MPSoC
• XCZU2EG, XCZU2CG, XCZU3EG, XCZU3CG XCZU4EG, XCZU4CG, XCZU4EV, XCZU5EG, XCZU5CG, XCZU5EV, XCZU7EV, XCZU7EG, and XCZU7CG
UltraScale+ MPSoC
• All
Virtex® FPGA Virtex-7 FPGA
• None
Virtex UltraScale™ FPGA
• None
Virtex-7 FPGA
• All
Virtex UltraScale FPGA
• All
Virtex UltraScale+ FPGA
• All
Kintex® FPGA Kintex-7 FPGA
• XC7K70T, XC7K160T
Kintex UltraScale™ FPGA
• XCKU025, XCKU035
Kintex UltraScale+ FPGA
• XCKU3P. XCKU5P
Kintex-7 FPGA
• All
Kintex UltraScale FPGA
• All
Kintex UltraScale+ FPGA
• All
Artix® FPGA Artix-7 FPGA
• XC7A12T, XC7A15T, XC7A25T, XC7A35T, XC7A50T, XC7A75T, XC7A100T, XC7A200T
Artix-7 FPGA
• All
Spartan®-7 Spartan-7
• XC7S25, XC7S50
Spartan-7
• All
Send Feedback

Vivado Design Suite 2017.4 Release Notes 11UG973 (v2017.4) December 20, 2017 www.xilinx.com
Chapter 2: Architecture Support and Requirements
Compatible Third-Party Tools
IMPORTANT: The versions listed in Table 2-2 are the minimum required versions to use with the Vivado tools. Previous versions are not tested.
Table 2-2: Compatible Third-Party Tools
Third-Party Tool Red Hat Linux
Red Hat Linux-64
SUSE Linux
Windows-7/10 32-bit
Windows-7/10 64-bit Ubuntu
Simulation
Mentor Graphic ModelSim SE/DE/PE (10.6b) Yes Yes Yes Yes Yes N/A
Mentor Graphics Questa Advanced Simulator(10.6b) Yes Yes Yes Yes Yes N/A
Cadence Incisive Enterprise Simulator (IES) (15.20.028) Yes Yes Yes N/A N/A N/A
Synopsys VCS and VCS MX (M-2017.03-SP1) Yes Yes Yes N/A N/A N/A
The MathWorks MATLAB® and Simulink® with Fixed Point Designer (R2016a, R2016b, R2017a and R2017b)
Yes Yes No N/A Yes Yes(5)
Aldec Active-HDL (10.4a)(1) N/A N/A N/A Yes Yes N/A
Aldec Riviera-PRO (2017.02) Yes Yes Yes Yes Yes N/A
Synthesis(2)
Synopsys Synplify/Synplify Pro (M-2017.03-SP1)(3) Yes Yes Yes Yes Yes N/A
Mentor Graphics Precision RTL/Plus (2016.1) Yes Yes Yes Yes Yes N/A
Equivalence Checking
Cadence Encounter Conformal (9.1)(4) Yes Yes Yes N/A N/A N/A
OneSpin 360 (2016_12) Yes Yes Yes N/A N/A N/A
Notes: 1. Support for Aldec simulators is offered by Aldec.2. Most Vivado IP can only be synthesized by Vivado synthesis, because the RTL source can include encrypted files.
To use this IP in a third-party synthesis flow, the synthesized netlist can be exported from the Vivado tool in a suitable format for use in the third-party synthesis project.
3. Contact Synopsys for availability of Synplify Overlay or Service Pack.4. Cadence Encounter Conformal Support is for RTL2Gate using Synopsys Synplify only.5. Supported for System Generator for DSP and not Model Composer
Send Feedback

Vivado Design Suite 2017.4 Release Notes 12UG973 (v2017.4) December 20, 2017 www.xilinx.com
Chapter 2: Architecture Support and Requirements
System RequirementsThis section provides information on system memory requirements, cable installation, and other requirements and recommendations.
The lab exercises require the installation of MATLAB 2014a (or later) and Vivado Design Suite 2014.2 (or later).
System Memory RecommendationsFor memory recommendations for the Vivado Design Suite tools, see: System Memory Requirements.
Operating Systems and Available Memory
The Microsoft Windows and Linux operating system (OS) architectures have limitations on the maximum memory available to a Xilinx program. Users targeting the largest devices and most complex designs might encounter this limitation. The Vivado Design Suite has optimized memory and enabled support for applications to increase RAM memory available to Xilinx tools.
Cable Installation RequirementsPlatform Cable USB II is a high-performance cable that enables Xilinx design tools to program and configure target hardware.
Note: The Xilinx Parallel Cable IV is no longer supported for debugging or programming.
RECOMMENDED: To install Platform Cable USB II, a system must have at least a USB 1.1 port. For maximum performance, Xilinx recommends using Platform Cable USB II with a USB 2.0 port.
Send Feedback

Vivado Design Suite 2017.4 Release Notes 13UG973 (v2017.4) December 20, 2017 www.xilinx.com
Chapter 2: Architecture Support and Requirements
The cable is officially supported on the 64-bit versions of the following operating systems: Windows-7, Windows-10, Red Hat Linux Enterprise, and SUSE Linux Enterprise 12. Additional platform specific notes are as follows:
• Root privileges are required.
• SUSE Linux Enterprise 11: The fxload software package is required to ensure correct Platform Cable USB II operation. The fxload package is not automatically installed on SUSE Linux Enterprise 11 distributions, and must be installed by the user or System Administrator.
For additional information regarding Xilinx cables, see the following documents:
• Platform Cable USB II Data Sheet (DS593) [Ref 13]
Equipment and PermissionsThe following table lists related equipment, permissions, and network connections.
Table 2-3: Equipment and Permissions Requirements
Note: X Servers/ Remote Desktop Servers, such as Exceed, ReflectionX, and XWin32, are not supported.
Network Time Synchronization
When design files are located on a network machine, other than the machine with the installed software, the clock settings of both machines must be set the same. These times must be synchronized on a regular basis for continued proper functioning of the software.
Item Requirement
Directory permissions Write permissions must exist for all directories containing design files to be edited.
Monitor 16-bit color VGA with a minimum recommended resolution of 1024 by 768 pixels.
Ports To program devices, you must have an available parallel or USB port appropriate for your Xilinx programming cable. Specifications for ports are listed in the documentation for your cable.
Note: Installation of the cable driver software requires Windows-10. If you are not using one of these operating systems, the cables might not work properly.
Send Feedback
Vivado Design Suite 2017.4 Release Notes 14UG973 (v2017.4) December 20, 2017 www.xilinx.com
Chapter 3
Download and InstallationThis guide explains how to download and install the Vivado® Design Suite tools, which includes the Vivado Integrated Design Environment (IDE), High Level Synthesis tool, and System Generator for DSP and Model Composer.
Downloading the Vivado Design Suite ToolsXilinx® Design Tools users have multiple choices for download and installation.
Xilinx introduced Vivado Lab Edition, which features a dedicated and streamlined environment for programming and debugging devices in lab settings.
TIP: No license is required to use Vivado Lab Edition tools.
For users wishing to install one of the full Vivado Editions, there are three choices.
Vivado Design Suite - HLx Editions:
• WebPack and Editions: Web installer for windows
• WebPack and Editions: Web installer for Linux
• All OS Single File Download
All Editions and download options are available on the Xilinx website: Downloads
For the optimum download experience:
• Allow pop-ups from https://www.o-ms.com/.
• Set security settings to allow for secure and non-secure items to be displayed on the same page.
To download a full Edition of the Vivado Design Suite:
1. Select the Vivado Design Tools tab in the web page.
2. Under the Version heading, click the version of the tools you want to download.
3. Click the link for the installer you want to download.
Send Feedback

Vivado Design Suite 2017.4 Release Notes 15UG973 (v2017.4) December 20, 2017 www.xilinx.com
Chapter 3: Download and Installation
To download the Vivado Lab Edition tools, go to the Vivado Design Tools tab, select a version of 2016.4 or newer, and download the file associated with the Vivado Lab Edition.
Note: Lab Edition installer can be run on both 32 or 64-bit machines. The Full Edition installers work only on 64-bit machines.
Installing the Vivado Design Suite ToolsThis section explains the installation process for all platforms for the Vivado Design Suite.
Installation PreparationIMPORTANT: Before starting installation the follow steps must be completed:
• Check the links in Important Information section in Chapter 1 for any installation issues pertaining to your system or configuration.
• Make sure your system meets the requirements described in Chapter 2, Architecture Support and Requirements.
• Disable anti-virus software to reduce installation time.
• Close all open programs before you begin installation.
• The Vivado Design Suite installer does not set global environment variables, such as XILINX, on Windows.
Lab Edition, Full Product Download, or DVDIf you downloaded the Lab Edition or full product installation, decompress the file and run xsetup (for Linux) or xsetup.exe (for Windows) to launch the installation. If you received a DVD, which only contains the full Edition products, launch xsetup(.exe) directly.
RECOMMENDED: Xilinx recommends the use of 7-zip or WinZip (v.15.0 or newer) to decompress the downloaded tar.gz file.
Lightweight Installer DownloadIf you downloaded the lightweight installer, launch the downloaded file. You are prompted to log in and use your regular Xilinx login credentials to continue with the installation process.
After entering your login credentials, you can select between a traditional web-based installation or a full install image download.
Send Feedback
Vivado Design Suite 2017.4 Release Notes 16UG973 (v2017.4) December 20, 2017 www.xilinx.com
Chapter 3: Download and Installation
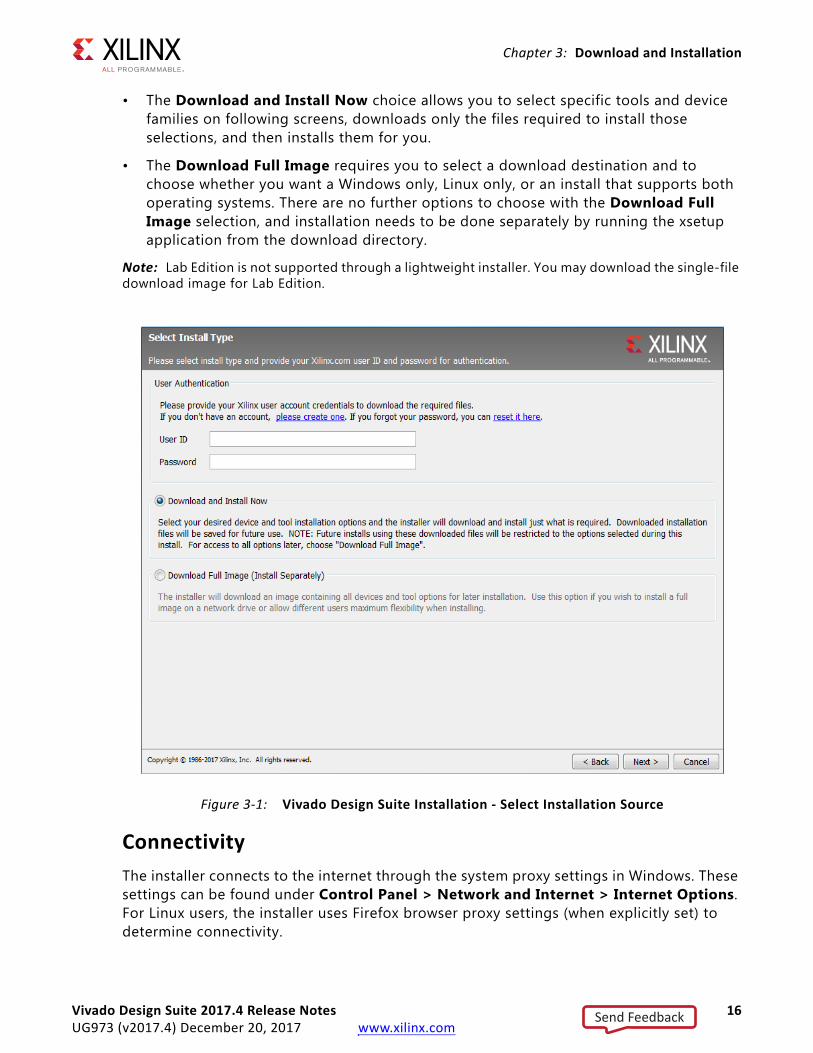
• The Download and Install Now choice allows you to select specific tools and device families on following screens, downloads only the files required to install those selections, and then installs them for you.
• The Download Full Image requires you to select a download destination and to choose whether you want a Windows only, Linux only, or an install that supports both operating systems. There are no further options to choose with the Download Full Image selection, and installation needs to be done separately by running the xsetup application from the download directory.
Note: Lab Edition is not supported through a lightweight installer. You may download the single-file download image for Lab Edition.
ConnectivityThe installer connects to the internet through the system proxy settings in Windows. These settings can be found under Control Panel > Network and Internet > Internet Options. For Linux users, the installer uses Firefox browser proxy settings (when explicitly set) to determine connectivity.
X-Ref Target - Figure 3-1
Figure 3-1: Vivado Design Suite Installation - Select Installation Source
Send Feedback
Vivado Design Suite 2017.4 Release Notes 17UG973 (v2017.4) December 20, 2017 www.xilinx.com
Chapter 3: Download and Installation
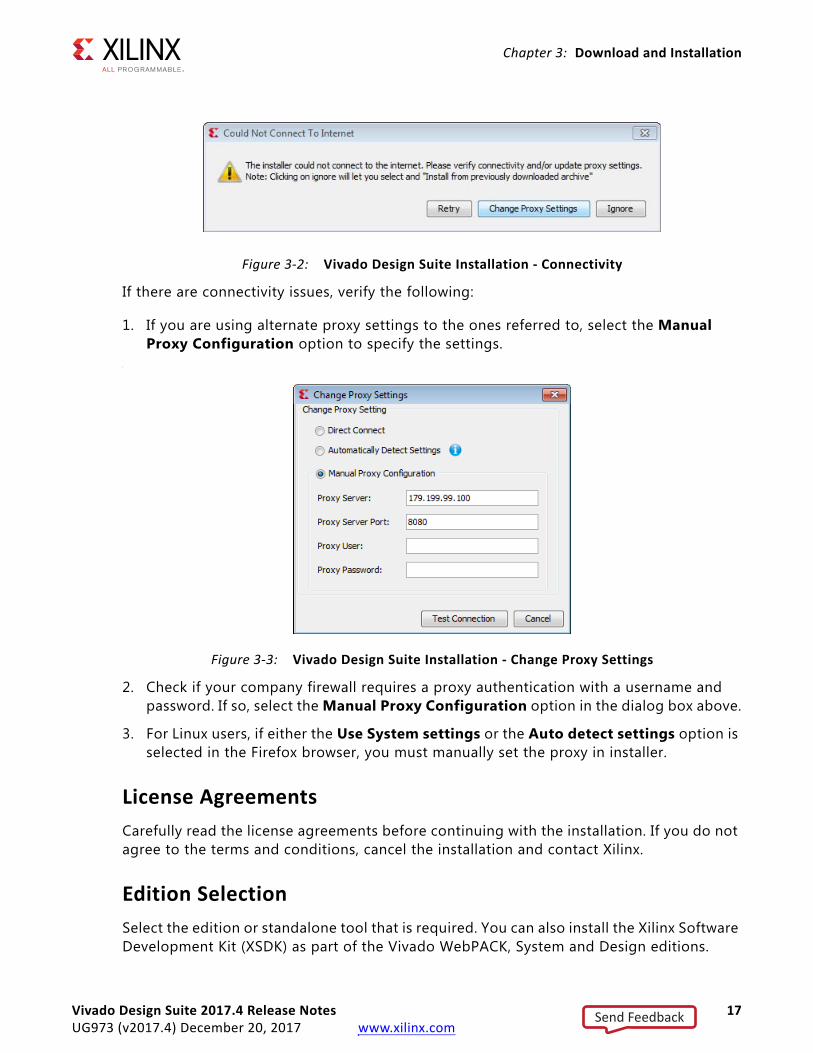
If there are connectivity issues, verify the following:
1. If you are using alternate proxy settings to the ones referred to, select the Manual Proxy Configuration option to specify the settings.
‘
2. Check if your company firewall requires a proxy authentication with a username and password. If so, select the Manual Proxy Configuration option in the dialog box above.
3. For Linux users, if either the Use System settings or the Auto detect settings option is selected in the Firefox browser, you must manually set the proxy in installer.
License AgreementsCarefully read the license agreements before continuing with the installation. If you do not agree to the terms and conditions, cancel the installation and contact Xilinx.
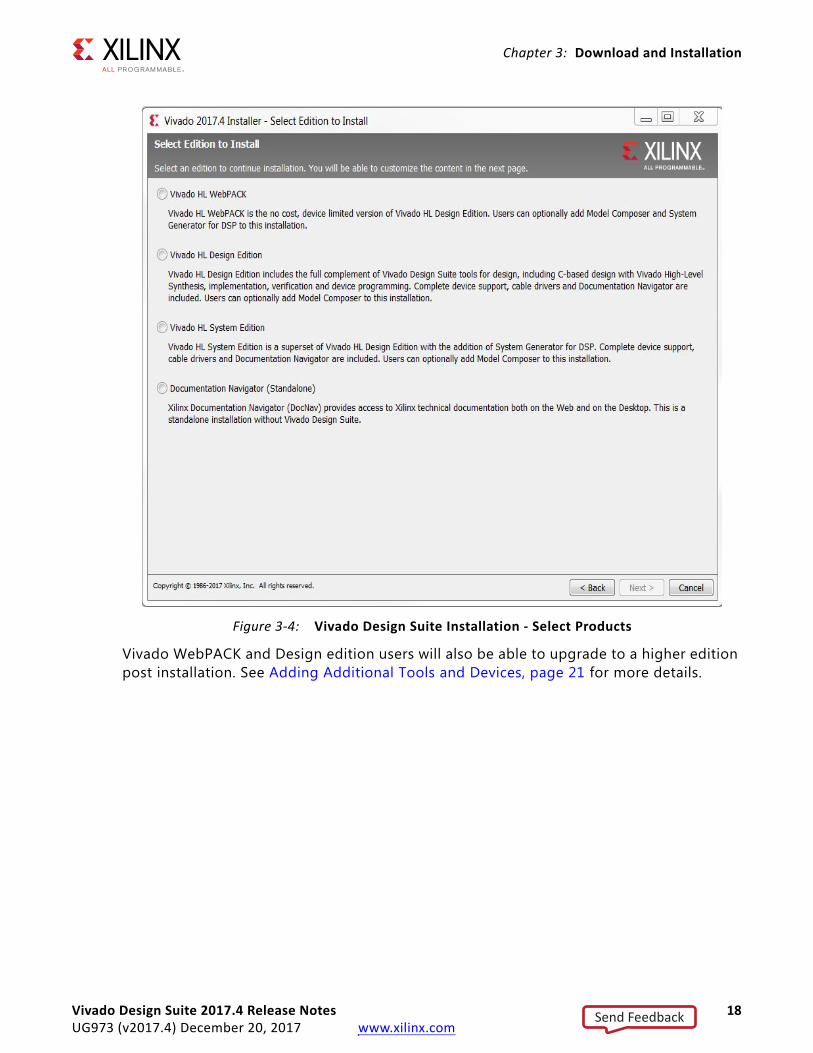
Edition SelectionSelect the edition or standalone tool that is required. You can also install the Xilinx Software Development Kit (XSDK) as part of the Vivado WebPACK, System and Design editions.
X-Ref Target - Figure 3-2
Figure 3-2: Vivado Design Suite Installation - Connectivity
X-Ref Target - Figure 3-3
Figure 3-3: Vivado Design Suite Installation - Change Proxy Settings
Send Feedback
Vivado Design Suite 2017.4 Release Notes 18UG973 (v2017.4) December 20, 2017 www.xilinx.com
Chapter 3: Download and Installation
Vivado WebPACK and Design edition users will also be able to upgrade to a higher edition post installation. See Adding Additional Tools and Devices, page 21 for more details.
X-Ref Target - Figure 3-4
Figure 3-4: Vivado Design Suite Installation - Select Products
Send Feedback
Vivado Design Suite 2017.4 Release Notes 19UG973 (v2017.4) December 20, 2017 www.xilinx.com
Chapter 3: Download and Installation
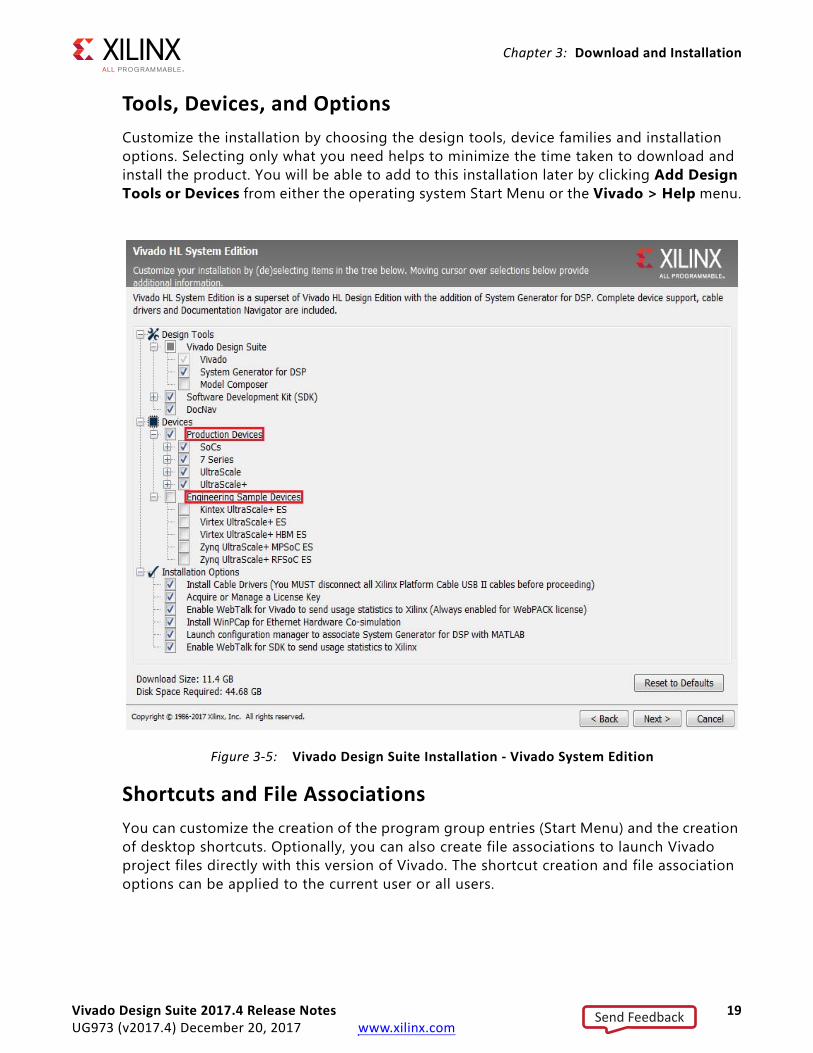
Tools, Devices, and OptionsCustomize the installation by choosing the design tools, device families and installation options. Selecting only what you need helps to minimize the time taken to download and install the product. You will be able to add to this installation later by clicking Add Design Tools or Devices from either the operating system Start Menu or the Vivado > Help menu.
Shortcuts and File AssociationsYou can customize the creation of the program group entries (Start Menu) and the creation of desktop shortcuts. Optionally, you can also create file associations to launch Vivado project files directly with this version of Vivado. The shortcut creation and file association options can be applied to the current user or all users.
X-Ref Target - Figure 3-5
Figure 3-5: Vivado Design Suite Installation - Vivado System Edition
Send Feedback

Vivado Design Suite 2017.4 Release Notes 20UG973 (v2017.4) December 20, 2017 www.xilinx.com
Chapter 3: Download and Installation
Installing Cable DriversOn Windows, Install Cable Drivers is an optional selection in the installer.
For Linux, because root or sudo access is required to install drivers, this option has been removed from the Linux installer beginning in Vivado 2015.4. The general Vivado installer can now be run on Linux without root or sudo privileges. To install cable drivers on Linux, there is now a script that must be run as root or sudo post installation.
Script Location: <Vivado Install Dir>/data/xicom/cable_drivers/lin64/install_script/install_drivers/
Script Name: install_drivers
Installing Windows DriverRun the following commands in an Aministrator command prompt. Note, set or replace %VIVADO_INSTALL_DIR% with the location of your install directory. Replace %log_dir% with the location of the log directory. Note if %log_dir% is not specified a file named install_drivers_wrapper.log will be placed under %VIVADO_INSTALL_DIR%.
cd %VIVADO_INSTALL_DIR%\data\xicom\cable_drivers\nt64install_drivers_wrapper.bat %log_dir% %log_dir%
Uninstalling Cable DriversOn Windows, to uninstall cable drivers run the following commands in an Administrator command prompt. Note, set or replace %VIVADO_INSTALL_DIR% with the location of your install directory.
cd %VIVADO_INSTALL_DIR%\data\xicom\cable_drivers\nt64wdreg -inf %cd%\xusbdrvr.inf uninstallnet stop XilinxPC4Driverdel %WINDIR%\system32\drivers\windrvr6.sysdel %WINDIR%\system32\drivers\xusb*.sysdel %WINDIR%\system32\drivers\xpc4drvr.sys
Installing Linux DriverFor Linux, because root or sudo access is required to install drivers, this option has been removed from the Linux installer beginning in Vivado 2015.4. The general Vivado installer
Send Feedback

Vivado Design Suite 2017.4 Release Notes 21UG973 (v2017.4) December 20, 2017 www.xilinx.com
Chapter 3: Download and Installation
can now be run on Linux without root or sudo privileges. To install cable drivers on Linux, there is now a script that must be run as root or sudo post installation.
Run these commands as root. Note replace ${vivado_install_dir} with the location of your vivado install location.
${vivado_install_dir}/data/xicom/cable_drivers/lin64/install_script/install_drivers/install_drivers
Uninstalling Linux DriverRun these commands as root:
rm -f /etc/udev/rules.d/52-xilinx-digilent-usb.rulesrm -f /etc/udev/rules.d/52-xilinx-ftdi-usb.rulesrm -f /etc/udev/rules.d/52-xilinx-pcusb.rules
Adding Additional Tools and DevicesYou can incrementally add additional tools, devices or even upgrade Vivado editions post-install. This is useful for users that have chosen to install a subset of devices and/or tools.
To add new tools or devices:
• Start Menu > Xilinx Design Tools > Vivado <version> > Add Design Tools or Devices.
• Launch Vivado > Help > Add Design Tools or Devices.
If you have installed the Vivado WebPACK or Design Edition, you are presented with the option to upgrade the edition.
Send Feedback

Vivado Design Suite 2017.4 Release Notes 22UG973 (v2017.4) December 20, 2017 www.xilinx.com
Chapter 3: Download and Installation
Based on the above selection, you are presented with all available tools and devices that can be added to the current installation.
You can also add tools or devices from the Xilinx Information Center (XIC). See the Obtaining Quarterly Releases section for using this flow.
Network InstallationsInstalling to a network location provides a way for client machines to access the design tools by pointing to it on the network drive. To run the design tools on the network, the client machines must be set up correctly to ensure the environment variables, registry, and program groups all point to the network. The following sections describe the procedure for network setups.
X-Ref Target - Figure 3-6
Figure 3-6: Vivado Design Suite Installation - Select Edition
Send Feedback

Vivado Design Suite 2017.4 Release Notes 23UG973 (v2017.4) December 20, 2017 www.xilinx.com
Chapter 3: Download and Installation
Linux ClientsYou must source settings32.(c)sh or settings64.(c)sh (whichever is appropriate for your operating system) from the area in which the design tools are installed. This sets up the environment to point to this installed location.
To run the design tools from a remotely installed location, run an X Windows display manager, and include a DISPLAY environment variable. Define DISPLAY as the name of your display. DISPLAY is typically unix:0.0. For example, the following syntax allows you to run the tools on the host named bigben and to display the graphics on the local monitor of the machine called mynode.
setenv DISPLAY mynode:0.0 xhost = bigbenPC Clients
Microsoft Windows Clients1. Install design tools to a PC network server. Make sure your users know the location of
the design tools and have access to the installation directory, and they have Administrator privileges for the following steps.
2. From the local client machine, browse to the following directory: network_install_location\.xinstall\Vivado_<version> and run the program networkShortcutSetup.exe.
Running this program sets up the Windows settings batch files and Program Group or Desktop shortcuts to run the Xilinx tools from the remote location.
3. From the client machine, launch the Vivado Design Suite tools by clicking the Program Group or Desktop shortcuts, or by running the applications on the network drive.
Installing to a Mounted Network DriveXilinx design tools are designed to be installed in a directory under ROOT (typically C:\Xilinx). The installer normally presents this option when installing to a local driver.
To work around this issue, either specify a UNC path (for example, \\network_loc\Xilinx\) or define your target installation directory as \Xilinx under the network mount point (For example: N:\Xilinx).
Windows 7 default security levels do not allow you to select remote mapped drives. To install Xilinx Design Tools on remote mapped drives, you must change your account control settings using the following steps:
1. Open the Windows Control Panel, from the Windows Start menu, and select ‘User Accounts’. If your Control Panel Uses ‘Category View’, click ‘User Accounts’ on two successive screens
2. Click ‘Change User Account Control settings’ and allow the program to make changes.
Send Feedback
Vivado Design Suite 2017.4 Release Notes 24UG973 (v2017.4) December 20, 2017 www.xilinx.com
Chapter 3: Download and Installation
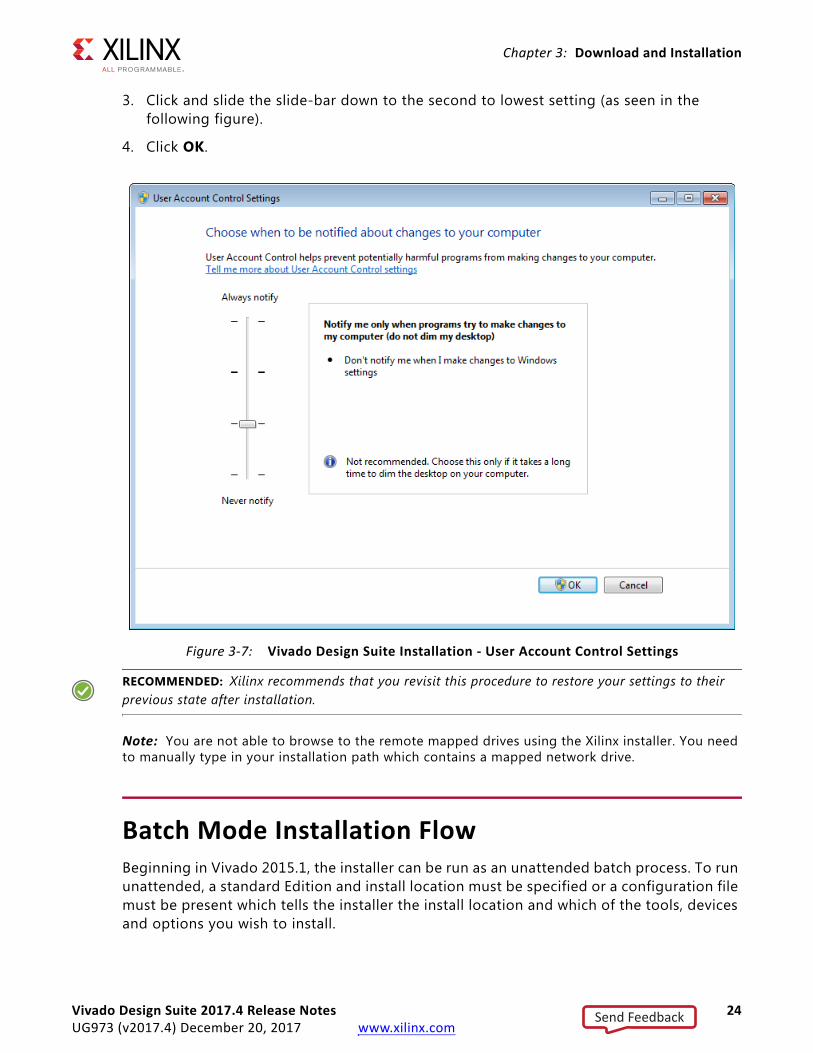
3. Click and slide the slide-bar down to the second to lowest setting (as seen in the following figure).
4. Click OK.
RECOMMENDED: Xilinx recommends that you revisit this procedure to restore your settings to their previous state after installation.
Note: You are not able to browse to the remote mapped drives using the Xilinx installer. You need to manually type in your installation path which contains a mapped network drive.
Batch Mode Installation FlowBeginning in Vivado 2015.1, the installer can be run as an unattended batch process. To run unattended, a standard Edition and install location must be specified or a configuration file must be present which tells the installer the install location and which of the tools, devices and options you wish to install.
X-Ref Target - Figure 3-7
Figure 3-7: Vivado Design Suite Installation - User Account Control Settings
Send Feedback
Vivado Design Suite 2017.4 Release Notes 25UG973 (v2017.4) December 20, 2017 www.xilinx.com
Chapter 3: Download and Installation
The installer has a mode in which it can generate a reference option file for you based on common configurations, which you can further edit to customize your installation.
RECOMMENDED: It is recommended that you generate this reference for each new quarterly release, so that new devices, tools, options or other changes will be accounted for in your options file.
To begin using batch mode, open a command shell and change to the directory where you have stored your extracted installer.
Note: For Windows, open the command window with administrator privileges and run the xsetup.bat file, found in the \bin directory, and not xsetup.exe with the options below.
Generate Configuration FileRun: xsetup -b ConfigGen
This will put you in an interactive mode where you will see the following menu. Choose an edition from the list given below.
1. Vivado HL WebPACK
2. Vivado HL Design Edition
3. Vivado HL System Edition
4. Documentation Navigator (Standalone)
After you select an edition, you will be prompted for a location/filename for your configuration file and the interactive mode will exit.
Below is a sample of a WebPACK configuration file:
#### Vivado WebPACK Install Configuration ####Edition=Vivado WebPACKDestination=C:\XilinxModules=Vivado:1,Vivado High Level Synthesis:0,Software Development Kit:0,DocNav:0,Artix-7,Kintex-7,Zynq-7000:1#### Shortcut creation ####CreateProgramGroupShortcuts=1CreateShortcutsForAllUsers=0ProgramGroupFolder=Xilinx Design ToolsCreateDesktopShortcuts=1CreateFileAssociation=1#### Post install tasks ###### Post install tasks can be configured as shown below.InstallOptions=Configure WebTalk:1,Install and Initialize Trusted Storage Licensing:1,Generating installed device list:1,Install VC++ runtime libraries for 64-bit OS:1,Install Cable Drivers:0,Acquire or Manage a License Key:0,run:xic:1
Basically, each option in the configuration file matches a corresponding option in the GUI. A value of 1 means that option is selected, a value of 0 means the option is unselected.
Send Feedback

Vivado Design Suite 2017.4 Release Notes 26UG973 (v2017.4) December 20, 2017 www.xilinx.com
Chapter 3: Download and Installation
Run the InstallerNow that you have edited your configuration file to reflect your installation preferences, you are ready to run the installer. As part of the installer command-line, you will need to indicate your acceptance of the Xilinx and Third Party license agreements, and confirm you understand the WebTalk Terms and Conditions.
Xilinx End-User License Agreement (EULA)
• Xilinx End-User License Agreement
Third Party End-User License Agreement (EULA)
• Third Party End-User License Agreement
WebTalk Terms and Conditions
By indicating I AGREE, I also confirm that I have read Section 13 of the terms and conditions above concerning WebTalk and have been afforded the opportunity to read the WebTalk FAQ posted at Xilinx Design Tools Webtalk. I understand that I am able to disable WebTalk later if certain criteria described in Section 13(c) apply. If they don't apply, I can disable WebTalk by uninstalling the Software or using the Software on a machine not connected to the internet. If I fail to satisfy the applicable criteria or if I fail to take the applicable steps to prevent such transmission of information, I agree to allow Xilinx to collect the information described in Section 13(a) for the purposes described in Section 13(b).
There is a command-line switch, -a or --agree for you to indicate your agreement to each of the above. If one of the above is left out of the list, or the agree switch is not specified, the installer will exit with an error and will not install.
Example Command Lines
This is an example of the command line for a typical new installation using a configuration file.
xsetup --agree XilinxEULA,3rdPartyEULA,WebTalkTerms --batch Install --config install_config.txt
If you wish to use one of Xilinx’s default Edition configurations, you do not have to specify the --config option, but since the destination directory is included in the configuration file, you will be required to specify this on the command-line.
xsetup --agree 3rdPartyEULA,WebTalkTerms,XilinxEULA --batch Install --edition "Vivado System Edition" --location "C:\Xilinx"
The above command will utilize the default configuration options for the edition specified. To see the default configuration options, use the –b ConfigGen mode as described
Send Feedback

Vivado Design Suite 2017.4 Release Notes 27UG973 (v2017.4) December 20, 2017 www.xilinx.com
Chapter 3: Download and Installation
above.The batch mode of the Vivado installer can also perform uninstallation and upgrades (adding additional tools and devices). For the full list of the options in the installer batch mode run xsetup -h or xsetup --help.
Obtaining Quarterly ReleasesXilinx releases quarterly versions of the Vivado Design Suite tools throughout the year. Each quarterly version contains device support updates, new features and bug fixes. The following sections describe how to obtain updates through the Xilinx Information Center.
Xilinx Information CenterXilinx Information Center (XIC) is the next generation replacement of XilinxNotify. This functionality resides in the task bar (Windows) and periodically checks for new releases and updates from Xilinx. Users can view and dismiss notifications as well as update installations.
In addition, XIC now includes a cockpit from which you can manage all of your Xilinx tool installations. Update, check licenses or uninstall all from the new Manage Installs tab as shown in Figure 3-8.
Send Feedback

Vivado Design Suite 2017.4 Release Notes 28UG973 (v2017.4) December 20, 2017 www.xilinx.com
Chapter 3: Download and Installation
Uninstalling the Vivado Design Suite ToolBefore uninstalling, make sure to have moved any project files you want to keep outside your Xilinx installation directory structure, or they are deleted.
Note: Xilinx Documentation Navigator is not removed during uninstallation. It is intended to be a standalone application common to multiple versions of Xilinx tools. You need to uninstall it separately if it is no longer required.
UninstallationBefore uninstalling, make sure to have moved any project files you want to keep outside your Xilinx installation directory structure, or they will be deleted. See below for information on uninstalling Documentation Navigator and Xilinx Information Center.
X-Ref Target - Figure 3-8
Figure 3-8: Xilinx Information Center (XIC)
Send Feedback
Vivado Design Suite 2017.4 Release Notes 29UG973 (v2017.4) December 20, 2017 www.xilinx.com
Chapter 3: Download and Installation
Uninstalling Documentation NavigatorXilinx Documentation Navigator will not be removed during uninstallation. It is intended to be a standalone application common to multiple versions of Xilinx tools. If it is no longer required, you will need to uninstall separately either from the Start Menu program group entry ‘Uninstall DocNav’ or through the corresponding entry in the ‘Uninstall or change a program’ control panel option (for Windows).
Uninstalling Xilinx Information CenterXilinx Information Center will not be removed during uninstallation. It is intended to be a standalone application common to multiple versions of Xilinx tools. If it is no longer required, you will need to uninstall separately through the corresponding entry in the ‘Uninstall or change a program’ control panel option (for Windows).
Uninstalling on Microsoft WindowsTo uninstall any Xilinx product, select the Uninstall item from that product’s Start Menu folder. For instance, to uninstall Vivado Design Suite: Edition, select Start > All Programs > Xilinx Design Tools > Vivado 2017.4 > Uninstall.
If you do not have a program group entry, use the command line option to uninstall: <install_path>\.xinstall\Vivado_2017.4\ xsetup.exe –Uninstall
Alternatively, use the corresponding entry in the Uninstall or change a program control panel option (for Windows).
Uninstalling on Linux To uninstall the Vivado Design Suite tool product, launch the uninstaller from the launcher menu: select Applications > Xilinx Design Tools > Vivado 2017.4 > Uninstall.
Send Feedback

Vivado Design Suite 2017.4 Release Notes 30UG973 (v2017.4) December 20, 2017 www.xilinx.com
Chapter 4
WebTalkThe WebTalk feature helps Xilinx® understand how you use Xilinx FPGA devices, software, and intellectual property (IP). The information collected and transmitted by WebTalk allows Xilinx to improve the features most important to you as part of our ongoing effort to provide products that meet your current and future needs. When enabled, WebTalk provides information on your use of the Vivado Design Suite tools, SDK, and Petalinux.
WebTalk ParticipationYour participation in WebTalk is voluntary except when a paid license is not found.
In these cases, WebTalk data collection and transmission always occurs, regardless of your preference settings. For all other cases, data is not transmitted if you disable WebTalk.
The following table summarizes WebTalk behavior for data transmission to Xilinx from your post-route design, based on your Xilinx license, WebTalk install preference, and user preference settings.
Note: If the device is a WebPACK device, the Tools first look for a WebPACK license.
Table 4-1: WebTalk Behavior for Bitstream Generation or Route Design Flow
LicenseWebTalk Install
Preference Selected as “Enabled”
WebTalk User Preference Selected as “Enabled”
Send WebTalk Data to Xilinx
WebPACK X X Yes
Edition License No X No
Edition License Yes No No
Edition License Yes Yes Yes
Send Feedback
Vivado Design Suite 2017.4 Release Notes 31UG973 (v2017.4) December 20, 2017 www.xilinx.com
Chapter 4: WebTalk
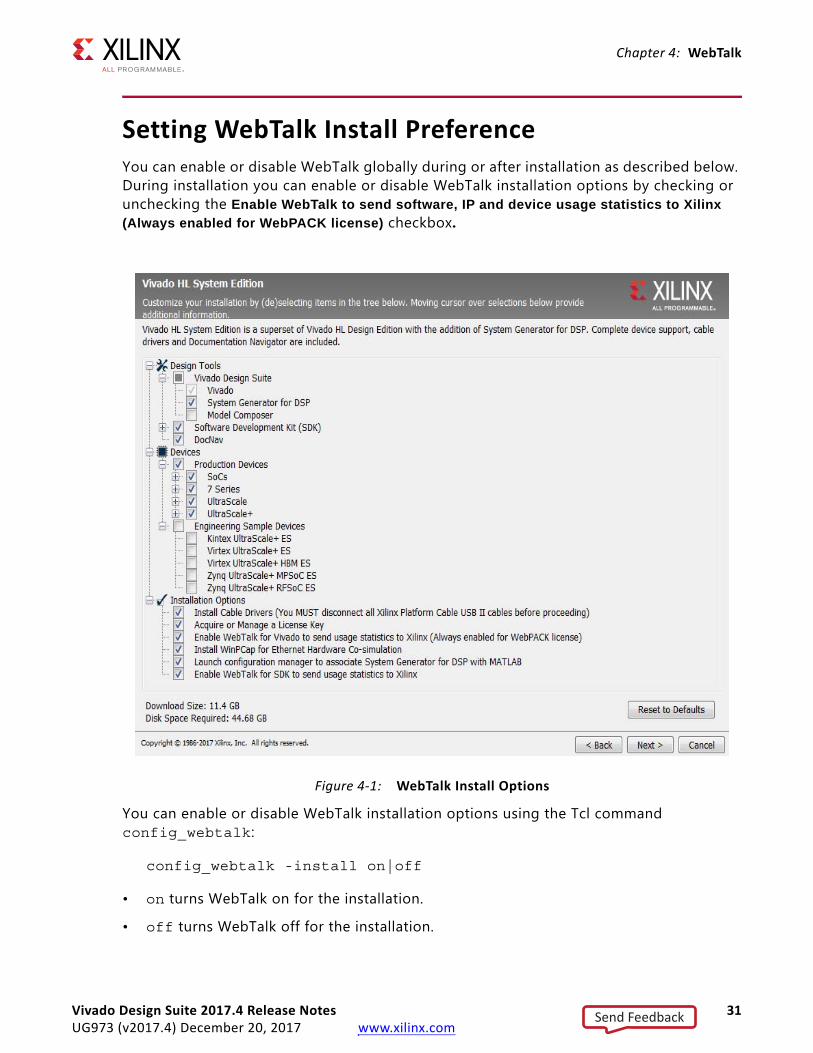
Setting WebTalk Install PreferenceYou can enable or disable WebTalk globally during or after installation as described below. During installation you can enable or disable WebTalk installation options by checking or unchecking the Enable WebTalk to send software, IP and device usage statistics to Xilinx
(Always enabled for WebPACK license) checkbox.
You can enable or disable WebTalk installation options using the Tcl command config_webtalk:
config_webtalk -install on|off
• on turns WebTalk on for the installation.
• off turns WebTalk off for the installation.
X-Ref Target - Figure 4-1
Figure 4-1: WebTalk Install Options
Send Feedback

Vivado Design Suite 2017.4 Release Notes 32UG973 (v2017.4) December 20, 2017 www.xilinx.com
Chapter 4: WebTalk
Install settings are saved in the following location:
• Windows 7 and 10: <install dir>/vivado/data/webtalk/webtalksettings
• Linux: <install dir>/vivado/data/webtalk/webtalksettings
Note: You need administrator privileges to write to the install location.
Setting WebTalk User PreferencesYou can enable or disable WebTalk user options by selecting Tools > Settings. In the Settings dialog box, click the WebTalk category as shown in the following figure.
After installation, you can enable or disable WebTalk user options using the config_webtalk Tcl command:
config_webtalk -user on|off
X-Ref Target - Figure 4-2
Figure 4-2: WebTalk User Preferences
Send Feedback

Vivado Design Suite 2017.4 Release Notes 33UG973 (v2017.4) December 20, 2017 www.xilinx.com
Chapter 4: WebTalk
• on turns WebTalk on for the current user.
• off turns WebTalk off for the current user.
User settings are saved in the following location:
• Windows 10 or earlier:
%APPDATA%\Xilinx\Common\<version>\webtalk
where:
%APPDATA% is:
C:\Users\<user>\AppData\Roaming
• Linux:
%APPDATA%/.Xilinx/Common/<version>/webtalk
where:
%APPDATA% is:
/home/<user>
Checking WebTalk Install and User PreferencesYou can also use the config_webtalk Tcl command to check the current status of WebTalk settings. The command line option -info reports the values for the install setting and the user setting:
config_webtalk -info
Types of Data CollectedWebTalk does not collect your design netlist or any other proprietary information that can be used to reverse engineer your design. The data Xilinx collects through WebTalk includes:
• Software version
• Platform information (for example, operating system, speed and number of processors, and main memory)
• Unique project ID
• Authorization code
Send Feedback

Vivado Design Suite 2017.4 Release Notes 34UG973 (v2017.4) December 20, 2017 www.xilinx.com
Chapter 4: WebTalk
• Date of generation
• Targeted device and family information
For more information on the type of data that is collected, see the Xilinx Design Tools WebTalk web page [Ref 16]. To see the specific WebTalk data collected for your design, open the usage_statistics_webtalk.xml file in the project directory. You can also open the usage_statistics_webtalk.html file for easy viewing of the data transmitted to Xilinx. Additionally, additional data collection files for sub-flows in the Xilinx tools are also generated which include:
• usage_statistics_ext_xsim.xml
• usage_statistices_ext_labtools.xml
• usage_statistics_ext_sdk.xml
• usage_statistics_ext_petalinux.xml (along with corresponding html files)
Transmission of DataWebTalk is invoked after bitstream or route design compilation. WebTalk bundles the collected data in an usage_statistics_webtalk.xml file and sends this file to Xilinx by https (hypertext transfer protocol secure) post. Every new compilation for a given design overwrites the previous usage_statistics_webtalk.xml file. WebTalk also writes an HTML file equivalent usage_statistics_webtalk.html file for easy viewing of the data transmitted to Xilinx. WebTalk also writes to the vivado.log (or runme.log) file that contains additional information about whether the file was successfully transmitted to Xilinx.
Send Feedback

Vivado Design Suite 2017.4 Release Notes 35UG973 (v2017.4) December 20, 2017 www.xilinx.com
Chapter 5
Obtaining and Managing a LicenseThe Xilinx® Product Licensing site is an online service for licensing and administering evaluation and full copies of Xilinx design tools and intellectual property (IP) products. This chapter describes the FLEXnet license generation functionality of the Product Licensing Site.
Licensing Overview
Product LicensingXilinx enforces the Xilinx End-User License Agreement at run time in the Xilinx design tools using certificate-based licensing.
• Certificate-Based Licenses: This is the license enforcement method Xilinx introduced for the ISE® Design Suite in the ISE 11.1 release. A certificate, commonly referred to as a “license file (.lic)” is issued from the Xilinx Product Licensing Site. The certificate is matched to a given machine, server or licensing dongle using your entering host-id which uniquely identifies the machine. This license certificate must remain present on the machine and in the license search path, because the Vivado tools need access to this file to check for a valid license feature during run time.
Note: Flex-ID Dongle licensing for Xilinx Software is supported only on Windows platforms.
IMPORTANT: Starting with Vivado 2017.4 - Activation Licensing support has been removed. Existing activation licenses have been replaced with certificate based license that can be accessed from www.xilinx.com/getlicense.
Certificate Licensing Terminology• Host ID: An identifier, placed within certificate licenses, which binds the license to the
computer using this identifier. Typical identifiers are: Hard-drive volume ID, Ethernet port MAC address, or USB Dongle ID.
• Node-Locked License: A node-locked license allows for the use of a single seat of a product entitlement on a specific machine.
Send Feedback

Vivado Design Suite 2017.4 Release Notes 36UG973 (v2017.4) December 20, 2017 www.xilinx.com
Chapter 5: Obtaining and Managing a License
• Floating License: A floating license resides on a network server and enables applications to check out a license when they are invoked. At any one time, the number of licenses for simultaneous users is restricted to the number of license seats purchased.
• License Rehosting: The act of changing the host ID of a generated license due to machine hardware changes, hard-drive failure or the moving of a license from one machine to another.
• License Deletion: The act of removing a license from a machine, and having the entitlement placed back into the Xilinx Product Licensing Account.
• Affidavit of Destruction: A click through agreement by which you certify that the license file (.lic) for a rehosted or deleted license will be destroyed and no longer used.
Generating/Installing Certificate-Based LicensesFor certificate-based licenses, as long as you know the Flexera Host ID (Ethernet MAC ID, Drive Serial Number or Dongle ID) you want to lock your license to, you do not need to enter the Xilinx License Management site from one of our utilities. Instead, go directly to www.xilinx.com/getlicense. After logging in and selecting your account, you can select products as described in the Product Selection section.
After one or more licenses are selected on the Create New Licenses page, click the Generate License button corresponding to the type of license file you are generating (client/node-locked or server/floating).
The step-by-step instructions below are for generating a floating certificate-based license as this process contains a superset of all other certificate-based license generation flows.
Send Feedback

Vivado Design Suite 2017.4 Release Notes 37UG973 (v2017.4) December 20, 2017 www.xilinx.com
Chapter 5: Obtaining and Managing a License
Certificate-Based Node Locked LicenseAfter generating a license file, you will receive an email from ‘[email protected]’.
1. Save the license file (.lic) attached to the e-mail to a temporary director y on your local system.
2. Run the Vivado License Manager:
° For Windows 10 or earlier: Select Start > All Programs > Xilinx Design Tools > Vivado 2017.4 > Manage Xilinx Licenses.
X-Ref Target - Figure 5-1
Figure 5-1: Generate Certificate-Based Floating License
Send Feedback

Vivado Design Suite 2017.4 Release Notes 38UG973 (v2017.4) December 20, 2017 www.xilinx.com
Chapter 5: Obtaining and Managing a License
° Windows 8.1: Run the Manage Xilinx Licenses app from the full listing of Apps on your Start screen.
° For Linux: Type vlm in a command-line shell.
3. On the left hand pane of Vivado License Manager, expand Getting a License and choose Load License.
4. If you received a certificate license (.lic) file, click the Copy License button on the Load License screen.
5. Browse to your license file (Xilinx.lic) and click Open.
6. This action copies the license file to the <Homedrive (typically C)>:\.Xilinx (Windows) or <Home>/.Xilinx directory of your computer where it will be automatically found by the Xilinx tools.
Certificate-Based Floating License1. Select the number of seats required for each product license.
This is for floating licenses only. All node-locked licenses are for one seat. The number of seats available for a product entitlement is automatically maintained by the system. The Requested Seats field is populated, by default, with zero, although you are allowed to enter any number up to the full number of seats remaining on the product entitlement. A product is removed from the product entitlement table once all seats have been generated.
2. Enter system information.
For floating certificate-based licenses, the first field is redundancy. A triple-redundant server configuration, also known as a triad, provides a fail over for the license manager software. As long as two of the three servers are running, the license manager can continue to run. This does not apply to node-locked licenses.
The system information is pre-populated in the Host ID drop-down menu if you arrived at the Product Licensing Site from a link within the Vivado License Manager. If you do not have pre-populated system information, or if you want to add a different host, select the Add a host option.
Send Feedback

Vivado Design Suite 2017.4 Release Notes 39UG973 (v2017.4) December 20, 2017 www.xilinx.com
Chapter 5: Obtaining and Managing a License
The Host ID value uniquely identifies the machine to which your design tools or IP is licensed. You can choose a Host ID Type to be a MAC address, a hard drive serial number or a dongle ID.
Note: Not all host ID types are supported for all operating systems. The easiest way to obtain your host ID is to run Vivado License Manager on the machine that serves as the license host.
3. Add a comment.
Adding a comment to the license key file makes it easier for an administrator to track the allocation of design tools and IP product entitlements among users.
4. Click Next.
The Review License Request form opens, as shown in Figure 5-3.
X-Ref Target - Figure 5-2
Figure 5-2: Add a Host
Send Feedback

Vivado Design Suite 2017.4 Release Notes 40UG973 (v2017.4) December 20, 2017 www.xilinx.com
Chapter 5: Obtaining and Managing a License
5. Review your selections.
6. If you are satisfied with your selections, click Next.
End-User License Agreements
Xilinx Design Tools and No Charge IP product End User License Agreements (EULAs) are agreed to during the product installation process. A complete copy of this license agreement is located at: <install directory>/.xinstall/Vivado_2017.4/data/ unified_xilinx_eulas.txt.
If you license IP products, you must accept the terms of the associated IP product EULAs before the license file can be generated.
X-Ref Target - Figure 5-3
Figure 5-3: Review License Request
Send Feedback

Vivado Design Suite 2017.4 Release Notes 41UG973 (v2017.4) December 20, 2017 www.xilinx.com
Chapter 5: Obtaining and Managing a License
Third-Party Licenses
A complete copy of the third-party licenses is located at: <install_directory>/.xinstall/Vivado_2017.4/data/unified_3rd_party_eula.txt.
License Generation Confirmation
When you finish generating the licenses, you receive a confirmation message summarizing your licensing activity.
You will also receive a license generation confirmation email. This message contains the generated license key file as an attachment. Add [email protected] as a trusted sender in your email address book.
If you do not receive your license by email, you can download it directly from the Xilinx Licensing Site. See the Managing Licenses on the Xilinx Product Licensing Site section for details.
Serving Certificate-Based Floating Licenses
For existing FLEXnet license servers serving certificate-based licenses, a common practice is to copy the contents of the license file, mailed from [email protected], into the existing license file on your FLEXnet server.
Note: Restart the floating license server to ensure the new Xilinx licenses are enabled.
X-Ref Target - Figure 5-4
Figure 5-4: License Generation Confirmation
Send Feedback
Vivado Design Suite 2017.4 Release Notes 42UG973 (v2017.4) December 20, 2017 www.xilinx.com
Chapter 5: Obtaining and Managing a License
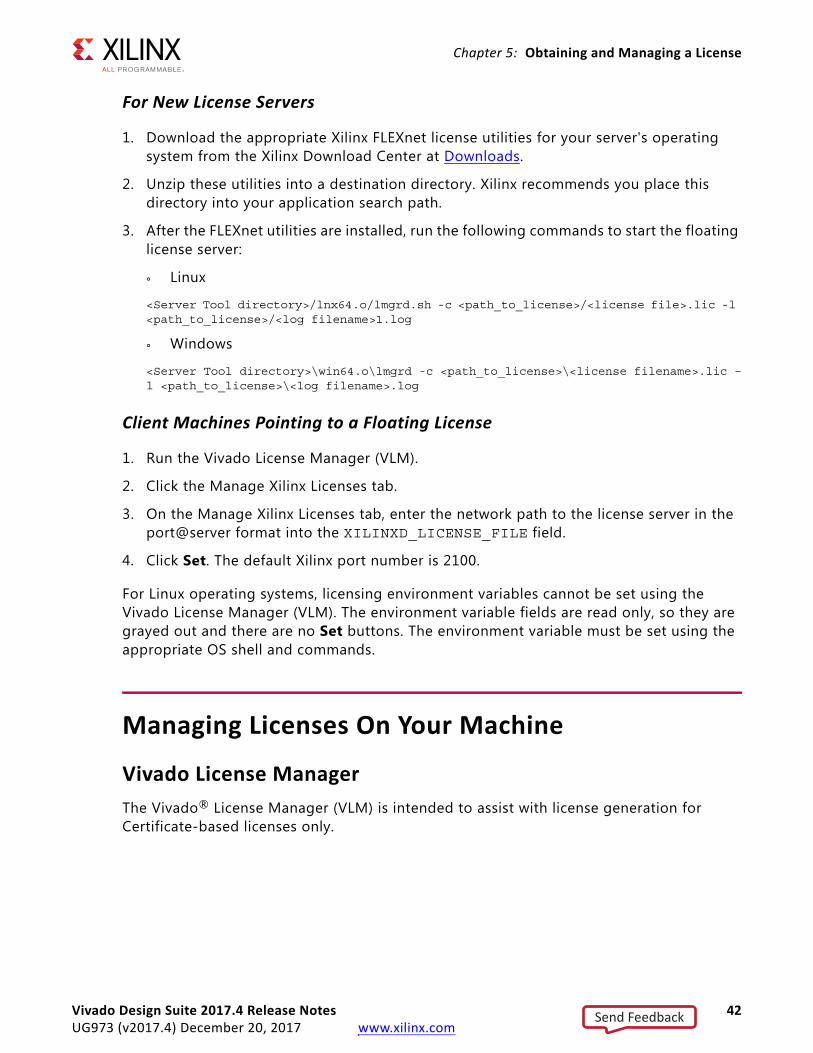
For New License Servers
1. Download the appropriate Xilinx FLEXnet license utilities for your server's operating system from the Xilinx Download Center at Downloads.
2. Unzip these utilities into a destination directory. Xilinx recommends you place this directory into your application search path.
3. After the FLEXnet utilities are installed, run the following commands to start the floating license server:
° Linux
<Server Tool directory>/lnx64.o/lmgrd.sh -c <path_to_license>/<license file>.lic -l <path_to_license>/<log filename>1.log
° Windows
<Server Tool directory>\win64.o\lmgrd -c <path_to_license>\<license filename>.lic –l <path_to_license>\<log filename>.log
Client Machines Pointing to a Floating License
1. Run the Vivado License Manager (VLM).
2. Click the Manage Xilinx Licenses tab.
3. On the Manage Xilinx Licenses tab, enter the network path to the license server in the port@server format into the XILINXD_LICENSE_FILE field.
4. Click Set. The default Xilinx port number is 2100.
For Linux operating systems, licensing environment variables cannot be set using the Vivado License Manager (VLM). The environment variable fields are read only, so they are grayed out and there are no Set buttons. The environment variable must be set using the appropriate OS shell and commands.
Managing Licenses On Your Machine
Vivado License ManagerThe Vivado® License Manager (VLM) is intended to assist with license generation for Certificate-based licenses only.
Send Feedback
Vivado Design Suite 2017.4 Release Notes 43UG973 (v2017.4) December 20, 2017 www.xilinx.com
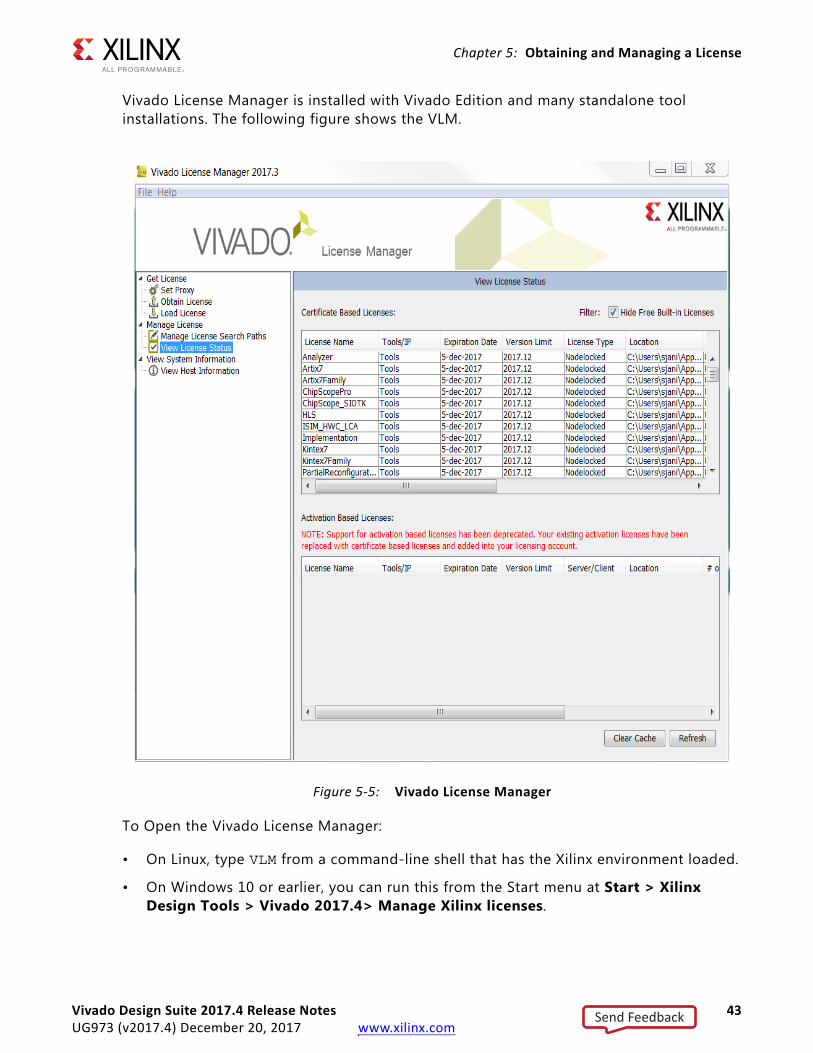
Chapter 5: Obtaining and Managing a License
Vivado License Manager is installed with Vivado Edition and many standalone tool installations. The following figure shows the VLM.
To Open the Vivado License Manager:
• On Linux, type VLM from a command-line shell that has the Xilinx environment loaded.
• On Windows 10 or earlier, you can run this from the Start menu at Start > Xilinx Design Tools > Vivado 2017.4> Manage Xilinx licenses.
X-Ref Target - Figure 5-5
Figure 5-5: Vivado License Manager
Send Feedback

Vivado Design Suite 2017.4 Release Notes 44UG973 (v2017.4) December 20, 2017 www.xilinx.com
Chapter 5: Obtaining and Managing a License
• On Windows 8.1, run the Manage Xilinx Licenses app from the full listing of Apps on your Start screen. You can also run Vivado License Manager from the Help menu of Vivado: Help > Obtain A License Key or Help > Manage License.
The typical tasks that Vivado License Manager is used for are:
• Obtaining A License: Choose from several license options and go to the Xilinx Product Licensing Site to complete the license generation process.
• Viewing License Status: See which licenses are visible to the local machine. This is a useful view for debugging licensing issues.
• Loading Licenses Onto a Local Machine: After a certificate license (.lic) file has been received, it can be placed into the appropriate location on the machine. For step-by-step instructions, see the Installing Your License key section for your license type below.
• Viewing and Setting (Windows) License Search Locations: Vivado tools will look in several default locations to try to find authorization to run. If your license is located elsewhere on the machine or on a floating license server, a path to that license must be specified.
RECOMMENDED: It is recommended that the XILINXD_LICENSE_FILE environment variable be used to specify Xilinx license file locations. LM_LICENSE_FILE can also be used, but is mainly intended for non-Xilinx or legacy license path use.
Using the Xilinx Product Licensing SiteThe Xilinx Product Licensing site is where certificate based licenses are generated, where certificate-based licenses are modified and where information about license orders reside.
You can access the Xilinx Product Licensing Site in various ways depending upon the type of license being generated.
• If you purchased products which use certificate-based licenses, follow the link included in your order confirmation email. It provides direct access to an account containing your product entitlements.
• To evaluate the Vivado® Design Suite products, go to the Vivado Design Suite Evaluation and WebPACK page.
• To evaluate IP products, go to Intellectual Property page and follow the Evaluate link on the IP product page of interest.
• To access the Product Licensing Site directly, go to https://www.xilinx.com/getlicense. By accessing the site this way, you will be able to create certificate-based licenses as well as perform license account management functions.
Send Feedback

Vivado Design Suite 2017.4 Release Notes 45UG973 (v2017.4) December 20, 2017 www.xilinx.com
Chapter 5: Obtaining and Managing a License
When entering the Xilinx Product Licensing Site, you must first register or enter your registration information.
5. You must first sign in. If you already have a Xilinx user account, enter your user ID and password, and then confirm your contact information is current. If you do not have an account, click the Create Account button.
Product SelectionTo begin the license generation process for products you have purchased or want to evaluate:
1. Select a product licensing account from the Account drop-down list.
Note: This selection is not available if you are entitled to evaluation or free products only.
2. Enter product voucher codes for design tools or IP product licenses purchased with kits or for tools purchased from the Xilinx online store (optional).
3. Add evaluation or no-charge IP product entitlements to the product entitlement table (optional).
X-Ref Target - Figure 5-6
Figure 5-6: Xilinx Product Licensing Site - Sign In Page
X-Ref Target - Figure 5-7
Figure 5-7: Create New License
Send Feedback

Vivado Design Suite 2017.4 Release Notes 46UG973 (v2017.4) December 20, 2017 www.xilinx.com
Chapter 5: Obtaining and Managing a License
4. Make your product selections from the product entitlement table.
Entitlement is available for following category: Certificate-based licensing. The type of product entitlements available are Full (purchased), No Charge, or Evaluation. Full and No Charge licenses have a subscription period of one year. Design tool evaluation is for 30 days and IP evaluations are for 120 days.
Floating/server and node-locked/client licenses cannot be combined in the same license file. Selecting an entitlement that contains only one license type causes the Generate button for the other license type to become inactive.
For design tools, available seats represents the number of seats available for licensing over the total number of seats purchased. For IP, seats are managed according to the terms of the site-wide license agreement.
Products with a status of Current are within their warranty period. Products with a status of Expired have a warranty period end date that has passed. If seats are available, licenses can be generated for either Current or Expired product entitlements.
The Vivado Design Suite: 30-Day System Edition evaluation product entitlement provides access to all the capabilities in the Vivado Design Tools. This product entitlement is automatically included in your product licensing account.
Product vouchers for design tools and IP product licenses can be shipped with a Xilinx or partner development board or design kit. If you have a product voucher card, you can enter the voucher code on the card into the associated text field and click Redeem Now. This places the corresponding design tools or IP product entitlement in the product entitlement table which you can use to generate a license key.
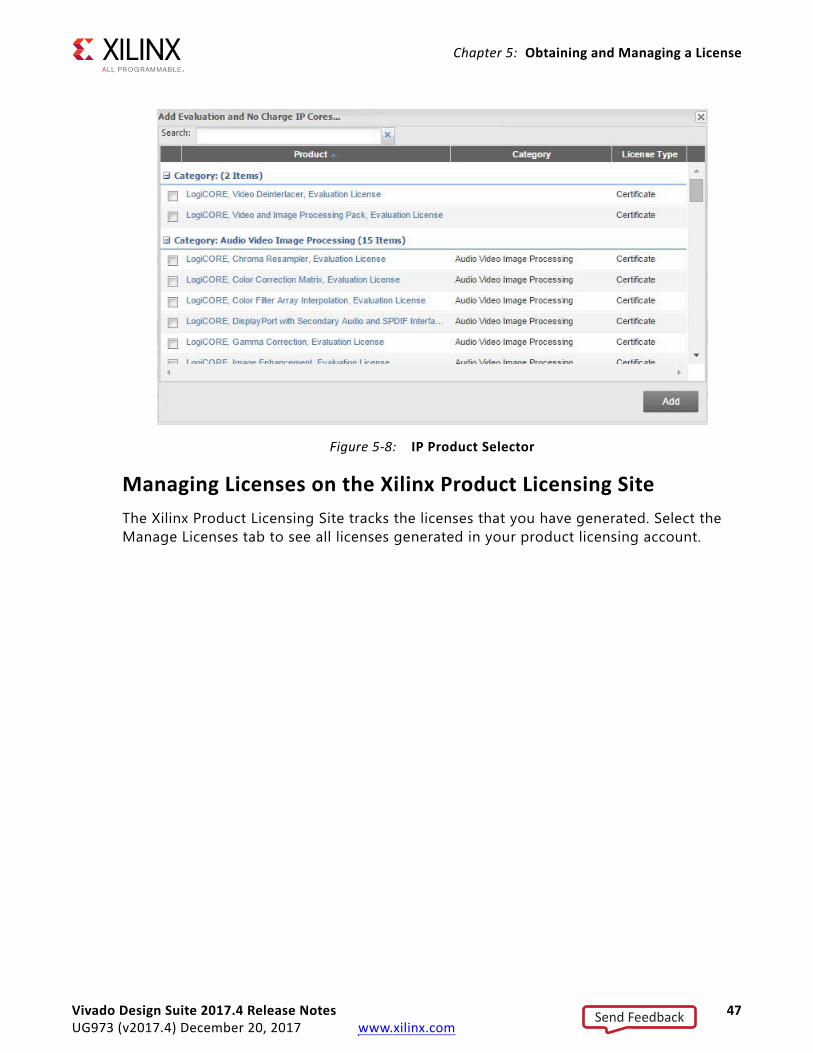
To add Evaluation and No Charge IP to the list of product entitlements, click the Search Now button in the Add Evaluation and No Charge IP Cores section of the page. This opens an IP product finder tool.
Send Feedback
Vivado Design Suite 2017.4 Release Notes 47UG973 (v2017.4) December 20, 2017 www.xilinx.com
Chapter 5: Obtaining and Managing a License
Managing Licenses on the Xilinx Product Licensing SiteThe Xilinx Product Licensing Site tracks the licenses that you have generated. Select the Manage Licenses tab to see all licenses generated in your product licensing account.
X-Ref Target - Figure 5-8
Figure 5-8: IP Product Selector
Send Feedback
Vivado Design Suite 2017.4 Release Notes 48UG973 (v2017.4) December 20, 2017 www.xilinx.com
Chapter 5: Obtaining and Managing a License
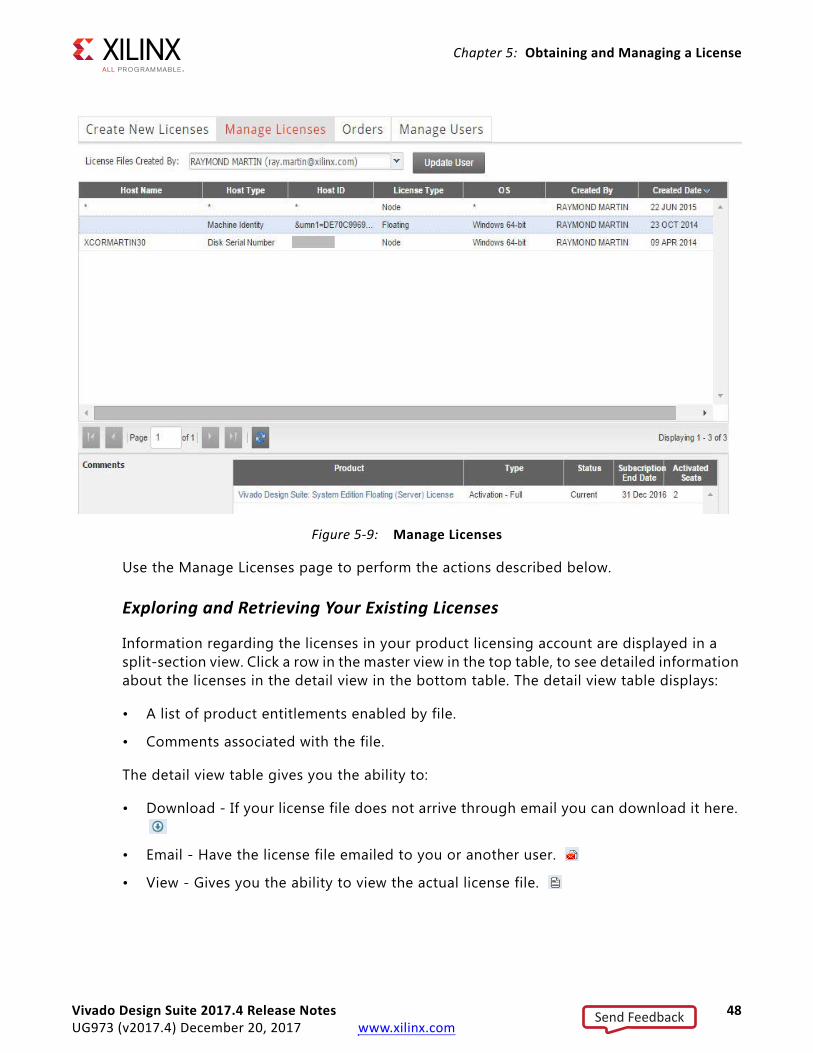
Use the Manage Licenses page to perform the actions described below.
Exploring and Retrieving Your Existing Licenses
Information regarding the licenses in your product licensing account are displayed in a split-section view. Click a row in the master view in the top table, to see detailed information about the licenses in the detail view in the bottom table. The detail view table displays:
• A list of product entitlements enabled by file.
• Comments associated with the file.
The detail view table gives you the ability to:
• Download - If your license file does not arrive through email you can download it here.
• Email - Have the license file emailed to you or another user.
• View - Gives you the ability to view the actual license file.
X-Ref Target - Figure 5-9
Figure 5-9: Manage Licenses
Send Feedback
Vivado Design Suite 2017.4 Release Notes 49UG973 (v2017.4) December 20, 2017 www.xilinx.com
Chapter 5: Obtaining and Managing a License
• Delete - Delete the license file. After a file is deleted the entitlement will then become available on the Create New License page and can be regenerated for another host ID.
• View the end user license agreement (IP only).
Modifying Licenses
To modify an existing certificated-based license, select the license file in the master view. You can modify a certificated-based license as follows:
Delete Entire License File and Place Entitlement Back into Your Account
1. From the Manage Licenses Tab (see Figure 5-9), select the license file you wish to delete.
2. Click the Delete button located below and to the left of the license file details.
3. Click the Accept button to accept the Affidavit of Destruction.
Note: This will delete all license seats in the entire license file and return the entitlements to your account.
Rehost: Change the Node-Locked or License Server Host ID for a License File
1. From the Manage Licenses Tab (see Figure 5-9), select the license file you wish to rehost.
2. Click the Modify License button. The Modify License screen appears.
3. Go to System Information.
4. Change or add new Host ID and/or Host Name by using the drop-down list and text entry boxes respectively.
5. Click the Next button twice and then click Accept to accept the Affidavit of Destruction.
Add Additional Seats to an Existing Licensed Product Entitlement
1. From the Manage Licenses Tab (see Figure 5-9), select the license file to which you wish to add seats.
2. Click the Modify License button. The Modify License screen appears.
3. Go to Product Selection.
4. For floating licenses, you will be able to change the Requested Seats field and add seats up to the total number of seats available in your entitlement.
5. Click Next twice. No Affidavit of Destruction is required for adding seats.
Send Feedback

Vivado Design Suite 2017.4 Release Notes 50UG973 (v2017.4) December 20, 2017 www.xilinx.com
Chapter 5: Obtaining and Managing a License
Remove Seats From an Existing Licensed Product Entitlement
1. From the Manage Licenses Tab (see Figure 5-9), select the license file from which you wish to remove seats.
2. Click the Modify License button. The Modify License screen appears.
3. Go to Product Selection.
4. For floating licenses, you will be able to change the Requested Seats field and reduce the number of seats that will be authorized by this license file.
5. Click the Next button twice and then click Accept to accept the Affidavit of Destruction.
Add Additional Product Entitlements to a License Key File
1. From the Manage Licenses Tab (see Figure 5-9), select the license file to which you wish to add features/entitlements.
2. Click the Modify License button. The Modify License screen appears.
3. Go to Product Selection.
4. Check boxes of any new entitlements you wish to add to this license file.
5. Click Next twice. No Affidavit of Destruction is required for adding features.
Delete Product Entitlements From a License Key File
1. From the Manage Licenses Tab (see Figure 5-9), select the license file to which you wish to delete features/entitlements.
2. Click the Modify License button. The Modify License screen appears.
3. Go to Product Selection.
4. Check boxes of any entitlements you wish to remove from this license file.
5. Click the Next button twice and then click Accept to accept the Affidavit of Destruction.
Modifying a key file uses the same input form as when the license key file was created, except that additional product entitlements of the same license type (floating or node-locked) are made available for adding to the license file.
If, during any of the modification steps, you receive a message that you have exceeded your number of rehost attempts, email [email protected] to request additional rehost options.
Reclaiming Deleted License Components
A product entitlement is deleted when one of the following occurs:
• Changing the license server host for a license key file.
Send Feedback
Vivado Design Suite 2017.4 Release Notes 51UG973 (v2017.4) December 20, 2017 www.xilinx.com
Chapter 5: Obtaining and Managing a License
• Removing seats from an existing licensed product entitlement.
• Deleting product entitlements from a license key file.
When you delete seats or remove products from your certificate-based license files, the entitlement is essentially “put back” or reallocated into your licensing account. You will find that the number of entitled seats in the Create New Licenses tab of your account is incremented by the same number of seats you deleted previously from existing license files.
Before the reallocation of entitlement occurs, you must first agree to an Affidavit of Destruction. This legal agreement is required to ensure the deactivated product entitlements are no longer being used.
The number of allocation operations is recorded for each user. Administrators are allowed to reallocate product entitlements five times per major release. End users are allowed to reallocate product entitlements three times per major release.
What Happens to Your License Key File
Each time a license is generated for a product entitlement, a FLEXnet increment line and corresponding package line is added to the license key file. When a license key file is modified to add seats for an existing or new product entitlement, additional increment or package lines are added to the license key file.
When a license key file is rehosted or is modified to delete seats or product entitlements, the corresponding increment lines are regenerated or removed from the modified license key file.
Your Licensing Account
Product Licensing Accounts
When you purchase a design tool edition or IP product from Xilinx, you are purchasing a license to use and receive updates for that product for one year. The license to use Xilinx deign tools and IP products is managed through the use of product entitlements. A product entitlement is the determination of:
• Which product was purchased
• The number of seats purchased
• The license type (certificate based, floating, or node-locked)
• The product subscription period (product updates are provided throughout the year)
In addition to managing the product entitlements for your purchased design tools and IP, you can also access product entitlements for No Charge or Evaluation products. Full and No Charge licenses have a subscription period of one year. Design tools evaluations are for 30 days, and IP evaluations are for 120 days.
Send Feedback

Vivado Design Suite 2017.4 Release Notes 52UG973 (v2017.4) December 20, 2017 www.xilinx.com
Chapter 5: Obtaining and Managing a License
Generating a license from a product entitlement results in one or more license keys being generated by the website. When installed, the license keys enable the use of the design tools and IP that were purchased or are being evaluated. Your product entitlements and resulting license key files are managed in a product licensing account on the Xilinx website.
Product licensing accounts are specific to the individual listed on the Xilinx Software Purchase Order, who is either the end-user or administrator of the design tools. All purchases made can be managed in the same product licensing account if a single administrator is named. A company site can have multiple accounts managed by different administrators. The latter is helpful if a site has multiple design teams working on differing projects with different budget pools.
Note: A license can be generated for a product entitlement that has expired; however, it only enables product releases up to the subscription end date. Applying a product update made available after the subscription end date of your license will result in a licensing error the next time the tool is used.
LogiCORE IP License Generation in the Xilinx Design Tools
Any LogiCORE™ IP and design tools entitlements you have purchased appear in your list of entitled products when you log into the Product Licensing Site. Currently, all IP entitlements will generate certificate-based licenses. Licenses for Evaluation and No Charge IP are available on the site in a separate area. Licenses for all your certificate-based design tools and IP can now be generated in one pass. They are emailed to you in a single license file.
User Types and ActionsThere are three user types for the Product Licensing Site: customer account administrator, end user, and no-charge user.
Customer Account Administrator
An example of a typical customer account administrator is a CAD tools manager. Every product licensing account must have at least one customer account administrator. A customer account administrator can manage more than one product licensing account.
The responsibilities as the customer account administrator include:
• Generating node-locked or floating licenses for Xilinx design tools and IP products.
• Adding and removing users from the product licensing account.
• Assigning administrative privileges to other users.
The original customer account administrator is the Ship To contact identified during the product ordering process. That person receives an email with instructions on how to download and license each purchased product. The customer account administrator must follow the link in the email, to ensure access to the purchased products.
Send Feedback

Vivado Design Suite 2017.4 Release Notes 53UG973 (v2017.4) December 20, 2017 www.xilinx.com
Chapter 5: Obtaining and Managing a License
End User
Adding end users to a product licensing account allows an engineer or design team member the flexibility to manage and generate license keys on their own. The end user can generate license keys for node-locked products entitlements within the account as well as evaluation and “no charge” license keys for design tools and IP products. A customer account administrator can also configure the end user account to allow an end user to generate floating licenses. An end user cannot:
• View or generate floating license keys by default. This privilege can be assigned to them by the customer account administrator.
• View the license keys generated by other users.
• Add or remove other users to or from the product licensing account.
No-Charge User
No-Charge users can:
• Generate a 30-day free evaluation license key that enables Vivado System Edition.
• Generate a 30-day free evaluation license that enables Vivado HLS.
• Generate license keys for evaluation and no charge IP products.
• Generate a WebPACK™ tool license that enables WebPACK features in both ISE and Vivado.
All user types can download products electronically.
Note: A customer who is already licensed for a full version of a Xilinx Design Tools product edition can evaluate other Xilinx Design Tools product editions or IP. These product entitlements are made available in the same product licensing account.
Changing Xilinx User Account InformationIMPORTANT: It is important to keep your Xilinx User Account up to date. As you change companies, addresses or emails might change.
Modifying Your Corporate Email Address
1. Go to www.xilinx.com.
2. Click Sign In.
3. Expand Personal Information.
4. Enter your new corporate email address in the Enter new Corporate email address box.
5. Click Save Profile button for changes to take effect.
Send Feedback

Vivado Design Suite 2017.4 Release Notes 54UG973 (v2017.4) December 20, 2017 www.xilinx.com
Chapter 5: Obtaining and Managing a License
Understanding Your Tool and IP Orders
The Orders tab displays information regarding the purchasing orders that created the entitlements you see in this account.
• Xilinx order numbers are listed on the left panel of the screen.
X-Ref Target - Figure 5-10
Figure 5-10: Orders
Send Feedback
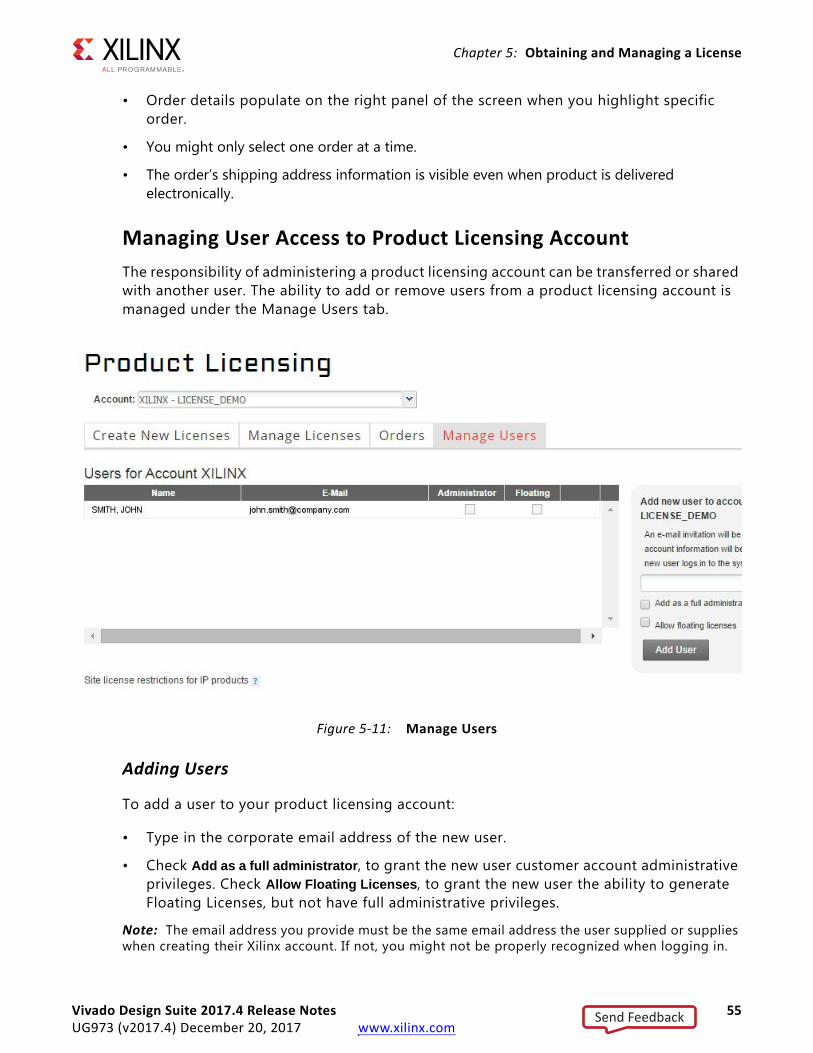
Vivado Design Suite 2017.4 Release Notes 55UG973 (v2017.4) December 20, 2017 www.xilinx.com
Chapter 5: Obtaining and Managing a License
• Order details populate on the right panel of the screen when you highlight specific order.
• You might only select one order at a time.
• The order’s shipping address information is visible even when product is delivered electronically.
Managing User Access to Product Licensing AccountThe responsibility of administering a product licensing account can be transferred or shared with another user. The ability to add or remove users from a product licensing account is managed under the Manage Users tab.
Adding Users
To add a user to your product licensing account:
• Type in the corporate email address of the new user.
• Check Add as a full administrator, to grant the new user customer account administrative privileges. Check Allow Floating Licenses, to grant the new user the ability to generate Floating Licenses, but not have full administrative privileges.
Note: The email address you provide must be the same email address the user supplied or supplies when creating their Xilinx account. If not, you might not be properly recognized when logging in.
X-Ref Target - Figure 5-11
Figure 5-11: Manage Users
Send Feedback

Vivado Design Suite 2017.4 Release Notes 56UG973 (v2017.4) December 20, 2017 www.xilinx.com
Chapter 5: Obtaining and Managing a License
If added users have already logged into the Product Licensing Site, their name appears in the user list. If they have never been to the site, the words Not Yet Registered appears in the space for their name. After they registered, their name is filled in.
In some instances, a customer account administrator might wish to have design team members administer license key files for their own use. By leaving both Add as full administrator and Allow Floating Licenses check boxes unchecked, you grant the user the following restricted privileges:
• User can generate node-locked license keys only.
• User can view and modify only those license key files they generated for themselves.
• User cannot manage users.
If you check Allow Floating Licenses only, the restriction on node-locked keys is lifted, but the others remain. You cannot check both boxes because it is not allowed. Full administrators already have floating license generation capability.
Removing Users
To remove administrative or floating license generation privileges from a user, uncheck the Administrator or Floating check box for that user.
To remove a user from a product licensing account, click the Delete button for that user.
Send Feedback

Vivado Design Suite 2017.4 Release Notes 57UG973 (v2017.4) December 20, 2017 www.xilinx.com
Chapter 6
Older Release Notes
Release Notes 2017.3
What’s NewVivado® Design Suite 2017.3 introduces the following Device Support and Vivado System Edition Products.
Device SupportThe following devices are in production:
• Zynq® UltraScale+™ MPSoC:
° XCZU11EG (-1, -2)
• Kintex® UltraScale+:
° XCKU11P (-1, -2)
• XA UltraScale+ MPSoC:
° XAZU2EG and XAZU3EG (-1Q)
• Spartan®-7
° XC7S50 (-1Q)
• XA Spartan-7
° XA7S50 (-1Q)
Additional devices introduced in this release
• Zynq UltraScale+ MPSoC:
° XCZU4EV/CG/EG, XCZU5EV/CG/EG, XCZU7EV/CG/EG
• XA Zynq UltraScale+ MPSoC:
° XAZU4EV and XAZU5EV
• Spartan-7
Send Feedback

Vivado Design Suite 2017.4 Release Notes 58UG973 (v2017.4) December 20, 2017 www.xilinx.com
Chapter 6: Older Release Notes
° XC7S25
• Artix-7
° XC7A12T
Vivado System Edition Tools
General
• Install
° SDK installed by default in the installer.
° Ability to select the compiler tool chains as part of SDK install to reduce disk space.
• Licensing
° Flexera version upgraded to 11.14.1.
° Removal of Activation Licensing support.
Note: Check the Important Information section to see if you are required to upgrade Flex licensing utilities.
Integrated Design Environment
• Reporting
° Vivado now offers a method to be able to generate reports (timing, DRC, utilization, etc) at different steps of the flow (synth_design, place_design, opt_design, etc).
° Users can create custom report strategies to simplify reuse.
° Understand the arrival time of bits across a bus with the new Report Bus Skew report.
• Text Editor
° Text editor now offers a way to identify usage and declarations for signals and constants, further simplifying navigation between files in designs.
Power Analysis and Xilinx Power Estimator (XPE)
• XPE
° Environment can be exported as XDC to setup Vivado.
° Includes full set of GTY IP configurations and power-down analysis.
• Report Power
° Now reports margin against a user-defined power budget.
° Switching activity displayed on schematics in IDE.
Send Feedback

Vivado Design Suite 2017.4 Release Notes 59UG973 (v2017.4) December 20, 2017 www.xilinx.com
Chapter 6: Older Release Notes
° Power GUI reports display yellow staleness banner similar to timing reports.
Vivado IP Integrator and IP Flows
• Enhanced ability to integrate RTL into block designs.
° Added support for majority of the IP in the catalog.
° Ease of use increased by enabling drag and drop from the sources view to the canvas.
• Revision control improvements
° Checks put in place to ensure that IP is available when invoking write_bd_tcl command.
° write_project_tcl command now includes Block designs if they are part of the project.
• Board Awareness and Designer Assistance
° Hard 100GE Subsystem VCU118 UltraScale+ Board awareness and assistance support added.
° Hard Interlaken Subsystem VCU118 UltraScale+ Board awareness and assistance support enabled.
° CMAC_UltraScale+ IPI support and designer assistance added.
Board Flows and Example Designs
• Board Support
° Support added for ZCU106 and VCU118 production reference boards.
• FMC Support
° FMC Support added to ZCU102 and ZCU106 reference boards.
Simulation Flows and Verification IP
• Reduced compilation time with the new incremental compilation capability.
• Verification IP
° Verification IP now included as part of pre-compiled IP libraries.
° Support enabled for AXI-Stream VIP.
Vivado Simulator
• Support for AXI-Stream VIP & MPSoC VIP
• SystemVerilog enhancements
Send Feedback
Vivado Design Suite 2017.4 Release Notes 60UG973 (v2017.4) December 20, 2017 www.xilinx.com
Chapter 6: Older Release Notes
° Support for fine grain process control
° Support for Array locator methods for queue
° Support for clocking block
° Parallel block support
° Support for dynamic casting & bit-stream casting
° Built-in class support for supporting synchronization & communication mechanism
° Support for virtual interface
• VHDL-2008 enhancements
° Support for matching relation operator, unary logical operator and binary operator (Mixing scalar and vector)
RTL Synthesis
• Language Support
° Support for hierarchical path names (Verilog 2001 and SystemVerilog).
° Case Range support (SystemVerilog).
• Attribute Support
° New attributes for local retiming control (retiming_forward and retiming_backward).
° Inference:
- Added RTL language template for SIMD (Single Instruction Multiple Data) inference of quad or dual add/sub into a single DSP block.
Implementation
• Logic Opt
° Transform SRLs to register chains and vice versa.
° Improved carry_remap optimization to prevent severe timing degradation.
° Enhanced remap optimization to work across hierarchical boundaries.
° Improved equivalent driver merging to skip obvious cases where replication is needed.
• Physical Opt
° Improved PSIP (Physical Synthesis In Placer) performance.
° Added new -directive RuntimeOptimized to trade design performance for faster runtime.
Send Feedback

Vivado Design Suite 2017.4 Release Notes 61UG973 (v2017.4) December 20, 2017 www.xilinx.com
Chapter 6: Older Release Notes
° Improved optimization coverage for a single pass to reduce the need for multiple runs of phys_opt_design.
° Introduced a new option to insert negative-edge-triggered registers to fix difficult hold violations.
• Placer
° New reserved property value for HLUTNM of "DISABLED" which prevents placer LUT combining.
° New low-fanout clock placement algorithms by applying the CLOCK_LOW_FANOUT property.
• Router
° The tns_cleanup option is now re-entrant making it easier to iteratively reduce TNS.
• Incremental Compile
° Improved heuristics to automatically choose between high-reuse and low-reuse modes.
° Support for place_design and route_design "Quick" directive options to trade design performance for faster runtime.
• Report Design Analysis
° New logic-levels options: -routes (instead of logic levels), min/max_levels for binning and improved cross probing in the IDE.
• Report QoR Suggestions
° Additional suggestions and improved suggestions for congestion and high clock skew.
° Skips suggestions on Xilinx IP.
° New option -report_all_paths to cover all related paths covered by particular checks.
Static Timing Analysis
• Bus skew reports (report_bus_skew) now available in the Vivado IDE.
• Report CDC returns violations as objects, available from get_cdc_violations.
Vivado Debug
• Enhanced ‘Replace Debug Probes’ feature in ECO flow and now leverages physical synthesis Place and Route to improve QoR especially if pipeline stages are used for ILA IP.
Send Feedback

Vivado Design Suite 2017.4 Release Notes 62UG973 (v2017.4) December 20, 2017 www.xilinx.com
Chapter 6: Older Release Notes
• XVC remote debugging now supports MicroBlaze MDM (debug via SDK), JTAG fallback, and better integration with Partial Reconfiguration flow.
• Enhanced ease of use for debug over PCIe using XVC:
° Example design generation for XDMA PCIe IP for both UltraScale and UltraScale+.
° Example design generation for UltraScale Gen3 PCIe Integrated Block.
Vivado Programmer
• SmartLynq cable is in production. The new Xilinx cable offers faster debug and programming along with Ethernet remote connectivity to the host.
Hierarchical Design Flows
• All UltraScale+ devices in production for the Partial Reconfiguration (PR) flow.
• All UltraScale+ devices in production for the Tandem Configuration flow for the base AXI -Stream core.
° Tandem Configuration for the XDMA/Bridge IP supported for six UltraScale+ devices.
• PR in project mode now allows IPs in Reconfigurable Modules to be synthesized out of context.
• PR controller IP enables a new bitstream compression algorithm.
• Enhanced example designs
° The PR Tutorial (UG947) now targets UltraScale+ boards for labs 2, 3 and 4.
° Tandem with Field Updates examples now include debug cores.
Xilinx Parameterized Macro
• XPM FIFO: Support for optional flags (Almost Full, Almost Empty, Read Data Valid).
• XPM Memory: Now supports different read and write widths and still be able to use the Byte Write Enable.
Intellectual Property (IP)
• Embedded IP
° New Avalon to AXI bridge IP.
° Support for new MCDMA IP.
° Detect hangs and protocol violations with the new AXI Firewall IP.
• Ethernet IP
Send Feedback

Vivado Design Suite 2017.4 Release Notes 63UG973 (v2017.4) December 20, 2017 www.xilinx.com
Chapter 6: Older Release Notes
° New USXGMII Subsystem
- Switches 10M/100M/1G/2.5G/5G/10G on 10GBASE-R 10G GT line rate for NBASE-T standard.
° New 1G/10G Ethernet MAC/PCS switches GT rate from 1G to 10G.
° New TSN Subsystem.
° New feature to 25GBASE-KR IP.
- Enables RS-FEC in 10G/25G switchable mode.
Processing System Configuration Wizard
• Improvements to DDR configuration
° Simplified interface for improve ease of use.
° Presets for 3 DDR parts.
• Fractional Clock support for DisplayPort Audio and Video to reduce BOM costs.
• Enhanced address fragmentation to reduce fabric utilization by leveraging PS resources.
Xilinx Embedded Software and Tools
• SDK Infrastructure Updates
° R5 Compiler updated to Linaro version 6.2.
° Support fro Artix-7 and Spartan-7 Devices.
° SDK installation now selected by default in Vivado installation.
° Option to choose compilers that are installed with SDK SmartLynq.
• Cable Support
° USB and Ethernet capable JTAG cable.
° Improved performance for Linux and Hypervisor-Aware Debug.
° Faster FPGA programming.
• OS / Hypervisor Aware Debugging
• MicroBlaze
° System Cache support for CCIX interface.
° MicroBlaze Presets added to IP Integrator.
° Microcontroller Preset.
° Real-Time Processor Preset.
Send Feedback

Vivado Design Suite 2017.4 Release Notes 64UG973 (v2017.4) December 20, 2017 www.xilinx.com
Chapter 6: Older Release Notes
° Applications Processor Preset.
° Mailbox IP enhanced with software reset capability.
° Lockstep support as option in MicroBlaze TMR.
° MicroBlaze based embedded scheduler for SDx.
• Tools Support
° Hardware platform extraction from repositories implemented.
° Support for hard floating-point for 32-bit BSP targeting A53.
° Support for latest flash devices in SDK Flash Programmer.
• U-Boot
° U-Boot 2017.01 (Same as the 2017.1 release)
° SD3.0 support (200MHz)
° UBIFS file system for on-die ECC enabled NAND Flash.
• Linux
° Linux Kernel V4.9 (same as 2017.1 release)
° SD 3.0 Support (200MHz)
° 10G/25G Ethernet 1588 MCDMA Driver
° USXGMII Linux data plane Driver (2017.4)
° 1G/2.5G Ethernet Linux driver with MCDMA
° VLAN and Priority queue support in macb Driver.
° New Flash Parts supported
° QSPI N25Q00
° QSPI: MT25Q 128 Mb and 256 Mb
° Parallel NOR: MT28EW devices 128Mb, 256Mb
° QSPI: IS25LP256D
• Yocto
° Morty 2.2 (same as 2017.1 release)
° Internal improvements for Xilinx meta layers
• PetaLinux
° RHEL 6.x Dropped.
° Multiple Internal Improvements.
• Xen
Send Feedback

Vivado Design Suite 2017.4 Release Notes 65UG973 (v2017.4) December 20, 2017 www.xilinx.com
Chapter 6: Older Release Notes
° Improved wiki documentation.
• OpenAMP
° Documentation and demo source code improvements for customer use of LibMetal to create shared memory regions.
Important Information
LicensingThe Vivado 2017.3 release introduces the following changes in licensing that are listed below:
• Starting with Vivado 2017.3, activation licensing is no longer supported. Existing activation licenses have been replaced with certificate based license that can be accessed from www.xilinx.com/getlicense.
• Flexera version for license management tool has been upgraded to 11.14.1. Vivado 2017.3 is the last release that will support Solaris operating system for Flex license management tools. Xilinx will continue to support Window and Linux operating systems for Flex license management tools.
• Anyone using floating license will require to upgrade licensing utilities to Flex 11.14.1. These new licensing utilities are available on download page of www.xilinx.com.
• Please note that Flex version upgrade does not affect valid license files, in other words, existing valid license files will work just fine with Vivado 2017.3 release after you upgrade licensing utilities.
Vivado Naming ConventionsThe following are the required naming conventions when working with the Vivado Design Suite. Failing to follow these naming conventions might introduce potential risk to the design or the tool, and cause unpredictable behavior in the design flow.
• Source files names must start with a letter (A-Z, a-z) and must contain only alphanumeric characters (A-Z, a-z, 0-9) and underscores (_).
• Output files names must start with a letter (A-Z, a-z) and must contain only alphanumeric characters (A-Z, a-z, 0-9) and underscores (_).
• Project names must start with a letter (A-Z, a-z) and must contain only alphanumeric characters (A-Z, a-z, 0-9) and underscores (_).
• Project directory names must start with a letter (A-Z, a-z) and should contain only alphanumeric characters (A-Z, a-z, 0-9), tilde (~) and underscores (_).
Send Feedback

Vivado Design Suite 2017.4 Release Notes 66UG973 (v2017.4) December 20, 2017 www.xilinx.com
Chapter 6: Older Release Notes
CAUTION! The Windows operating system has a 260 character limit for path lengths which can affect the Vivado tools. To avoid this issue, use the shortest possible names and directory locations when creating projects, defining IP or managed IP projects, or creating block designs.
The following characters are not supported for project, file, or directory names:
• ! # $ % ^ & * ( ) ` ; < > ? , [ ] { } ' " |
• tab (\t)
• return (\r)
• new line (\n)
• / or \ (As part of the directory or file name rather than as a path delimiter)
The following character is not supported for directory names:
• . (dot as terminal character)
The following character is not supported for file or project names:
• @
Note: In the Vivado IDE, the @ character is not supported for new file or project names. The Vivado IDE does allow an existing file on disk that uses the @ character to be added to a project. The Vivado IDE can open a project that includes the @ character in the project name. Using the Tcl Console, you can create a project with a name that contains the @ character.
IMPORTANT: Spaces in directory and file names are supported by the Windows operating system. However, you should avoid using spaces in order to preserve portability of the project or files between the Windows and Linux operating systems.
The Vivado Design Suite supports the use of forward slashes (/) as path delimiters for both Windows and Linux platforms. Backslashes (\) are allowed as path delimiters on the Windows platform only.
Any characters not explicitly mentioned above are not supported for project, file, or directory names.
Vivado Design Suite Documentation UpdateIn the 2017.3 Vivado Design Suite Documentation release, not all documentation will be available at first customer ship. Use the Update Catalog button in DocNav to stay up-to-date with the 2017.3 documentation suite.
Send Feedback

Vivado Design Suite 2017.4 Release Notes 67UG973 (v2017.4) December 20, 2017 www.xilinx.com
Chapter 6: Older Release Notes
Known IssuesVivado® Design Suite Tools Known Issues can be found at Answer Record 68923.
Release Notes 2017.2
What’s NewVivado® Design Suite 2017.2 introduces the following Device Support and Vivado System Edition Products.
Device SupportThe following UltraScale+™ devices are in production:
• Kintex® UltraScale+:
° XCKU13P
• Zynq® UltraScale+ MPSoC:
° XCZU15EG
New XA Zynq UltraScale+ MPSoC devices introduced:
• XAZU2EG, XAZU3EG
Additional Zynq UltraScale+ MPSoC devices introduced:
• XCZU7EG, XCZU7CG
The following Spartan®-7 devices are in production and enabled in WebPack:
• XC7S50
Important Information
Vivado Naming ConventionsThe following are the required naming conventions when working with the Vivado Design Suite. Failing to follow these naming conventions might introduce potential risk to the design or the tool, and cause unpredictable behavior in the design flow.
Send Feedback

Vivado Design Suite 2017.4 Release Notes 68UG973 (v2017.4) December 20, 2017 www.xilinx.com
Chapter 6: Older Release Notes
• Source files names must start with a letter (A-Z, a-z) and must contain only alphanumeric characters (A-Z, a-z, 0-9) and underscores (_).
• Output files names must start with a letter (A-Z, a-z) and must contain only alphanumeric characters (A-Z, a-z, 0-9) and underscores (_).
• Project names must start with a letter (A-Z, a-z) and must contain only alphanumeric characters (A-Z, a-z, 0-9) and underscores (_).
• Project directory names must start with a letter (A-Z, a-z) and should contain only alphanumeric characters (A-Z, a-z, 0-9), tilde (~) and underscores (_).
CAUTION! The Windows operating system has a 260 character limit for path lengths which can affect the Vivado tools. To avoid this issue, use the shortest possible names and directory locations when creating projects, defining IP or managed IP projects, or creating block designs.
The following characters are not supported for project, file, or directory names:
• ! # $ % ^ & * ( ) ` ; < > ? , [ ] { } ' " |
• tab (\t)
• return (\r)
• new line (\n)
• / or \ (As part of the directory or file name rather than as a path delimiter)
The following character is not supported for directory names:
• . (dot as terminal character)
The following character is not supported for file or project names:
• @
Note: In the Vivado IDE, the @ character is not supported for new file or project names. The Vivado IDE does allow an existing file on disk that uses the @ character to be added to a project. The Vivado IDE can open a project that includes the @ character in the project name. Using the Tcl Console, you can create a project with a name that contains the @ character.
IMPORTANT: Spaces in directory and file names are supported by the Windows operating system. However, you should avoid using spaces in order to preserve portability of the project or files between the Windows and Linux operating systems.
The Vivado Design Suite supports the use of forward slashes (/) as path delimiters for both Windows and Linux platforms. Backslashes (\) are allowed as path delimiters on the Windows platform only.
Any characters not explicitly mentioned above are not supported for project, file, or directory names.
Send Feedback
Vivado Design Suite 2017.4 Release Notes 69UG973 (v2017.4) December 20, 2017 www.xilinx.com
Chapter 6: Older Release Notes
Integrated Simulation (launch_simulation)• Starting in Vivado 2016.1, the Generate Scripts Only capability has been deprecated
and removed from the IDE.
• User should use the Export Simulation capability instead. This provides the functionality for exporting files from Vivado (IP and IP Integrator) to use in external verification environments.
Vivado Design Suite Documentation UpdateIn the 2017.2 Vivado Design Suite Documentation release, not all documentation will be available at first customer ship. Use the Update Catalog button in DocNav to stay up-to-date with the 2017.2 documentation suite.
Note: DocNav is a 32-bit application and requires the installation of 32-bit libraries on Linux in order to function.
Known IssuesVivado® Design Suite Tools Known Issues can be found at Answer Record 68923.
Release Notes 2017.1
What’s NewVivado® Design Suite 2017.1 introduces the following Device Support and Vivado System Edition Products.
Device Support
The following UltraScale+™ devices are in production:
• Kintex® UltraScale+:
° XCKU3P, XCKU5P, XCKU9P
• Virtex® UltraScale+:
° XCVU3P
• Zynq® UltraScale+ MPSoC:
° XCZU2EG/CG, XCZU3EG/CG, XCZU6EG/CG, XCZU9EZG/CG
• Spartan®-7 devices are introduced in this release:
° XC7S50
Send Feedback

Vivado Design Suite 2017.4 Release Notes 70UG973 (v2017.4) December 20, 2017 www.xilinx.com
Chapter 6: Older Release Notes
This release enables initial Vivado WebPack support for UltraScale+:
• Kintex UltraScale+:
° XCKU3P, XCKU5P
• Zynq UltraScale+ MPSoC:
° XCZU2EG/CG, XCZU3EG/CG
Vivado System Edition Products
Vivado High Level Synthesis
• Enhancements to the math.h library.
° Added functions for complete coverage.
° New native optimized support for half-precision floating point.
• Dataflow pragma supports loops with variable bounds.
• User assistance functionality enabled in co-simulation for ease of use.
System Generator for DSP
• Supported MATLAB Versions: R2016a, R2016b, and R2017a.
• New MRI Image Reconstruction with 2D-FFT demo.
• Enhancements to Digital Filtering and Digital Communications demos.
Vivado Design Edition Tools
General
• Engineering Sample parts are disabled by default in the installer to ensure lowest disk footprint.
• Webinstaller now provides ability to archive the download image to easily share with others in the same company.
Integrated Design Environment
• Brand new refreshed and improved Vivado IDE.
• Standardized between Windows and Linux to give a unified look and feel.
• Simplified icons and standardized locations of toolbar, tabs, and settings.
• Unified project and user settings.
Send Feedback

Vivado Design Suite 2017.4 Release Notes 71UG973 (v2017.4) December 20, 2017 www.xilinx.com
Chapter 6: Older Release Notes
° Ability to search for settings.
° Text editor has ability to preview as part of settings.
° Vivado .ini file swapped out with the a more scalable XML based file.
• Simplified Add sources dialog.
° DSP, Block Designs, and IP are consolidated into one selection.
° Possibility of adding duplicate sources significantly reduced.
° When adding directories, design precedence observed (block designs first, then IP and last RTL).
Vivado Power Analysis
• Reporting of block RAM cascades in report_power text and IDE reports.
• Power Constraints Advisor: improved usability and performance.
Vivado IP Integrator
• Improvements to write_bd_tcl to aid in version control.
° write_bd_tcl, with switches, can emit output resembling BD-inside-BD functionality, traversing a user’s hierarchy. This helps users more easily understand what piece(s) of their design changed.
• Differential CLK pins in IP integrator schematic can now connect to multiple destinations (“slaves”).
• Module Referencing (“modref”)
° RTL on the canvas has been improved:
- A “white list” of Xilinx IP in user RTL is now allowed via ModRef.
- User-defined custom interfaces in RTL can be prioritized for designer automation.
• AXI designer assistance:
° Ability to choose between AXI Interconnect (old) or AXI SmartConnect (new).
° Designer automation extended to AXI Stream interfaces, CLK, and reset.
• User comments added to IPI canvas appear in generated HDL to aid in DO-254 compliance.
Vivado IP Catalog
• IP caching
° Performance improvements
Send Feedback

Vivado Design Suite 2017.4 Release Notes 72UG973 (v2017.4) December 20, 2017 www.xilinx.com
Chapter 6: Older Release Notes
° Intelligently identifies and caches only cacheable IP
• File updates optimized
° File on disk only updated with save invocation or tool flow invocation
° No unnecessary updates
• IP XCI/XCIX files are used for IP check-points rather than design checkpoint file
Board Flows and Example Designs
• FMC Support added
° KC705, ZC702, ZC706, and KCU105
° XM105 (LEDs)
• Zynq UltraScale+ MPSoC Configurable Example design added
Simulation Flows and Verification IP
• Simulation Flows
° Support for SystemVerilog package libraries in launch simulation and export simulation.
° Ability for users to have finer control of compilation and simulation scripts using the new Pre and Post Tcl script method.
° Standalone UpdateMEM supports the ability for users to generate simulation MEM files directly from ELF (without having to go through the Vivado flow).
• Verification IP
° This releases introduces the very first AXI Verification IP
- SystemVerilog based; License-free solution
- Support for AXI3, AXI4, and AXI4-Lite.
- All protocol data widths and address widths, transfer types, and responses supported
- Full AXI Protocol Checker support
- Integrated ARM Licensed Protocol Assertions
- Pass through mode enables synthesis (synthesizes to wires)
- Configurable simulation messaging
- Example designs and test benches delivered in IP Integrator
° New Zynq-7000 VIP introduced (based on the AXI VIP listed above)
- License-free and SystemVerilog based
Send Feedback

Vivado Design Suite 2017.4 Release Notes 73UG973 (v2017.4) December 20, 2017 www.xilinx.com
Chapter 6: Older Release Notes
- Delivered as an output product of the configuration wizard
- Complete backward compatibility to existing API for Zynq-7000 BFM
Vivado Simulator
• Debug
° Verilog/VHDL subprogram debug: Allows setting break point inside subprogram (task/function) and stepping through execution.
° VHDL: 2008 support enhanced.
- Operators: Matching relation, Unary logical, binary operator (Mixing scalar and vector).
• Waveform Viewer
° Values search capability in the waveform viewer.
° Radix option for sign magnitude.
RTL Synthesis
• Strategies and specific logic options can be set on individual instances
° Preset strategies targeted at design area, performance, or routability can now be mixed for a given design.
° Additional logic optimization options previously only available for a global compile can now be specified on instances.
• New language template to infer quad or dual adders onto a single DSP block leveraging its SIMD mode of operation.
• New attribute for power optimized large RAM decomposition.
° Allows for minimum amount of BRAM cells for large non-power of two address RTL RAMs.
• BRAM inference enhancements
° Cascade support for BRAM cells in SDP mode.
° Byte write enable support for asymmetric port width BRAMs.
Implementation
• Faster Implementation compile time when using Explore directives.
° 40% faster for UltraScale+ vs. 2016.4.
° 20% faster for UltraScale™ vs. 2016.4.
• Improved Fanout Handling
Send Feedback

Vivado Design Suite 2017.4 Release Notes 74UG973 (v2017.4) December 20, 2017 www.xilinx.com
Chapter 6: Older Release Notes
° Fanout optimization now run before and during placement leading to reduced delay and better placement.
° New placement fanout optimization (place_design -fanout_opt).
• opt_design command now remaps MUXF*/CARRY* to LUTs for improved routability.
• Optimization and Analysis.
° Simple path group priority: group_path -weight 1|2 (1 - normal, 2 - high).
° New opt_design option -debug_log provides better messages for logic reduction and removal.
° power_opt_design now includes URAM optimization for XPM_MEMORY-based instances.
• Additional Design Analysis Features
° New reporting command report_qor_suggestions.
- Automated analysis and suggestions to fix timing closure issues.
- Generates XDC constraints and Tcl scripts to apply suggestions.
° Improved accuracy of congestion reports from report_design_analysis.
• Incremental Compile
° Reuse place and route data by physical region.
° Compatible with -directive (except RuntimeOptimized and Quick).
° Pin-level place and route reuse in IDE timing reports.
° IDE support for report_incremental_reuse -name <named tab>.
Static Timing Analysis
• New mechanism to rename auto-derived clocks.
• Enhancements to report_exceptions.
° Write valid exception constraints.
° Write merged exception constraints.
• Improvements in runtime throughout the flow.
Vivado Debug
• System Debug in IP Integrator now supports viewing AXI transactions at runtime.
° Waveform shows transaction rows.
° Improved flow from IP Integrator to bitstream.
Send Feedback
Vivado Design Suite 2017.4 Release Notes 75UG973 (v2017.4) December 20, 2017 www.xilinx.com
Chapter 6: Older Release Notes
- Enhanced Design Assistance in IP integrator.
- System ILA shown in the Debug window post-synth.
• Debug (XVC) over PCIe
° IP & HW blocks
- Debug Bridge connects to PCIe Extended Config Space interface.
- PCIe example design support.
° Software and driver
- XVC-PCIe drivers
- Updated xvc_server
• IBERT
° New advanced features (For example, insertion loss) to customize IP generation.
° Support for 1D bathtub plot in both 1D and 2D.
° Early Access support for Zynq UltraScale+ GTR.
• Memory Debug
° Calibration support for LPDDR3 added.
Vivado Programmer
• GUI support for SVF in HW Manager
° Allows addition of Xilinx and non-Xilinx parts.
° Allows import of previously created chains.
Hierarchical Design Flows
• Partial Reconfiguration (PR) licenses included with all System Edition and Design Edition seats at no additional cost.
° Price reduced for WebPACK users.
° Available for any in-warranty customer as well as new purchases. Simply regenerate your System Edition or Design Edition license to add the Partial Reconfiguration feature.
• Partial Reconfiguration project support improvements.
° IP supported within Reconfigurable Modules – set each IP to global not out-of-context.
° Parameters and generics supported on Reconfigurable Partition instantiations.
° write_project_tcl now supported for project recreation.
Send Feedback

Vivado Design Suite 2017.4 Release Notes 76UG973 (v2017.4) December 20, 2017 www.xilinx.com
Chapter 6: Older Release Notes
• Debug within Reconfigurable Modules.
° Instantiation flow for debug cores only, no MARK_DEBUG support.
° Example design using project mode.
• Additional UltraScale+ devices supported, some moved to production.
° See Vivado Design Suite User Guide: Partial Reconfiguration (UG909) [Ref 6] for the complete list.
• Expanded PCIe Tandem IP features for UltraScale+.
° More devices supported.
° DMA core support added, limited devices.
° Field Updates added as beta for AXI4-stream core.
Xilinx Parameterized Macro
• Auto Sleep Support
° Available for only URAM in XPM.
° Support for FIFO and memory.
° Asymmetric Configurations.
- Works with memory initialization.
- Works with byte write enables.
Intellectual Property (IP)
• Memory
° LPDDR3 for UltraScale/UltraScale+ (<=16Gb component).
° DDR4 3DS Components (32Gb MT40A4G8-083J).
• Ethernet
° SGMII over LVDS for UltraScale/UltraScale+ (Asynchronous and synchronous clocking mode).
° 10Gb Ethernet Subsystem (32b data path for reduced latency and utilization).
° 10Gb Ethernet MAC standalone (XAUI/RXAUI support.)
° See the new PS and PL-Based 1G/10G Ethernet Solution (XAPP1305) [Ref 19] for connecting 1GbE or 10GbE core to Zynq UltraScale+ with AXI DMA and Linux drivers.
• Interconnect
° PCIe DMA Subsystem (Windows driver added).
Send Feedback

Vivado Design Suite 2017.4 Release Notes 77UG973 (v2017.4) December 20, 2017 www.xilinx.com
Chapter 6: Older Release Notes
° JESD204c for UltraScale/UltraScale+.
° Aurora.
- 25G support for UltraScale+.
- Transceiver outside of IP as an option.
• Video
° HDMI (Linux drivers/size reduction).
° UHD-SDI (UltraScale+ support).
° Video Processing Subsystem (Linux drivers).
° Video Mixer (Linux drivers/10bpp and semi planar pixel support).
° MIPI (Linux drivers/ 7 series support added).
Processing System Configuration Wizard (PCW)
• CCI Enablement Supported in Advanced Configuration.
• Isolation Configuration.
• Ability to save & restore presets.
• DDR Configuration Simplifications.
• Driving PS Peripherals from PL Masters - finer control of PS resources.
Xilinx Embedded Software and Tools
SDK Infrastructure Updates
• Update Eclipse and Toolchain versions.
° Compiler Tool chain update to 6.2 version (A9, A53, MicroBlaze).
° Eclipse to Neon (version 4.6).
° Floating point support added for R5s.
• BSP Configuration for use at EL3, EL2, EL1 (Xen).
° SDK now enables the user to create application for the Hypervisor Guest.
• Linker Script Enhancements.
° Change memory section names fixed.
° Linker Script display is synchronized with linker script changes.
° Ability to add new Data sections.
• Isolation Configuration Supported in SDK.
Send Feedback

Vivado Design Suite 2017.4 Release Notes 78UG973 (v2017.4) December 20, 2017 www.xilinx.com
Chapter 6: Older Release Notes
° Memory map of each processor core only includes the slaves that are configured to be accessible from that core.
° Linker script uses memory range from the configured slave regions with appropriate EL/Security settings.
° Secure applications are assigned secure memory regions for program sections.
Cable Support
• Cable Frequency Support.
° Provide GUI to set frequency of JTAG cable.
• SmartLynq JTAG Programming and Debug Cable.
° Early Access Support in 2017.1, Public Access in 2017.2.
° Provides faster download and debug.
° Uses Zynq to run HW_Server on the cable itself.
• USB 2.0 and Ethernet host interfaces.
OS/Hypervisor Aware Debugging
• Linux OS Aware Debugging
° OS aware debug over JTAG helps users visualize OS specific information such as:
- processes/threads that are currently running
- process/thread specific stack trace
- registers, variables view
° To support this, the JTAG debugger should identify the OS running on the target, and know about the intrinsics of the OS.
° Users can debug the OS running on the processor cores and the processes/threads running on the OS simultaneously.
• Xen Aware Debugging (BETA)
° Helps users to visualize hypervisor specific information
- Different domains (Dom-0 and Dom-U)
- Virtual processors (VCPUs) on each domain
° Ability to debug Xen components:
- Hypervisor
- Dom-0/Dom-U kernel
- Dom-0/Dom-U user space processes
Send Feedback

Vivado Design Suite 2017.4 Release Notes 79UG973 (v2017.4) December 20, 2017 www.xilinx.com
Chapter 6: Older Release Notes
- Dom-U standalone applications
BootGen
• Bootgen Enhancements
° Support for Zynq UltraScale+ and other families.
° TrustZone support such that the flag is set explicitly.
° BootGen GUI now explicitly sets flags for exception levels and TrustZone in the bif attributes.
• Bootgen "Release Mode" support for Zynq UltraScale+ (See the Secure Boot of Zynq-7000 All Programmable SoC (XAPP1175) [Ref 20].
° Uses only public keys and HSM generated signatures to create the bootimage.
• Key Rolling Enhancement
° Key/Seed Pair
- The key will be used to encrypt the secure header and first partition.
- The seed is used to generate the rest of the keys.
° Multiple Keys (Future BootGen release)
• Secure FSBL Authentication
° FSBL reads the PL partition header to determine the Header, CRAM data and footers in the boot image.
° All authentication operations done in OCM.
° CRAM data is copied, validated, and decrypted.
° For any validation failure FSBL soft resets the system which leads to image search by CBR.
MicroBlaze
• MicroBlaze Triple Module Redundancy Beta
° 5 New IP cores.
° New flow in IP integrator that allows you to create a TMR MicroBlaze system (just like the PMU).
° New tab on MicroBlaze page on Xilinx.com.
• Big-endian MicroBlaze support added in XSDB / XSCT for existing Big-Endian users.
° Starting new designs with Big Endian is not recommended.
• XilKernel Hidden
Send Feedback

Vivado Design Suite 2017.4 Release Notes 80UG973 (v2017.4) December 20, 2017 www.xilinx.com
Chapter 6: Older Release Notes
° FreeRTOS is the recommended solution now.
Tools Support
• Support eMMC Flash programming in SDK and XSCT
° Two new options have been added to command line:
- -flash_type, eMMC
- -emmc_partition_size
- small, - size upto 34MB (default)
- large, - size upto 128MB
° Several files can be programmed using a space separated list
- program_flash -f /test/path/boot.bin /test/path/boot1.bin
• XSCT command: changebsp
° Mirrors function in SDK GUI where users can switch the BSP for a given application project.
• Serial Vector Format (SVF) support in XSDB
° A9 support in 2016.3
° A53 support in 2017.1
° For PMU support, contact Xilinx Technical Support.
U-Boot
• Frameworks:
° Secure library for Decryption and Authentication.
° PL bitstream loading secure mode.
• Drivers:
° Non-Processor mode configuration support in AXI_Ethernet Driver.
° QSPI flash programming support:
- For Single mode: x1 and x2 and Stacked mode: x1 and x2
- 1-bit and 2-bit mode
° eMMC HS200 mode support.
° SD3.0 Booting.
° UBIFS File system for QSPI flash
Send Feedback

Vivado Design Suite 2017.4 Release Notes 81UG973 (v2017.4) December 20, 2017 www.xilinx.com
Chapter 6: Older Release Notes
• New Boot Device Support:
° EMMC Device: EMMC64G-W525
° eMMC: MTFC4GMVEA-4M IT
° QSPI: MT25QL02G (and MT25QU02G)
° QSPI: S25FL128S
° QSPI: N25Q256
° QSPI: MT25QL512A
° QSPI: N25Q64
° QSPI: MX25L25645G
° QSPI: MX25L51245G
° QSPI: MX66L1G45G
° NAND: S34ML01G1
° NAND: MT29F2G08AB
Linux
• Linux 4.9 https://kernelnewbies.org/Linux_4.9
• Drivers and Frameworks (New/Enhancements)
° FPGA Manage: Full bitstream, Secure bitstream loading
° 10G Ethernet 1588 enhancements
° External PCS-PMA core support
° CCF (Common Clock Framework) enhancements
° USB2.0 OTG Driver
° OpenAMP - Examples
° Sysfs loading of executables to RPU
° Video stacks (DRM, GStreamer, V4L2, and OpenMax)
Yocto
• Yocto Project: Morty 2.2
• meta-Xilinx
° VCU support for Zynq UltraScale+ MPSoC
° 32-bit rootfs support
Send Feedback

Vivado Design Suite 2017.4 Release Notes 82UG973 (v2017.4) December 20, 2017 www.xilinx.com
Chapter 6: Older Release Notes
• meta-petalinux (Distro):
° Self-hosting capability.
° Run-time package management on Target (smart package manager).
° Yocto meta files for Video stack (DRM, gstreamer, V4L2, and OpenMax).
° Support building Linux Tool chain using meta-linaro (Beta).
PetaLinux
• Yocto build system under the hood, for Example, eSDK (Morty 2.2).
• Yocto built Compiler tool chain version 6.2.
• Rootfs: Yocto-generated (Morty 2.2).
• sstate-cache Support.
• Video stack added in to ZCU106 rootfs
• 64-bit and procedure to build 32-bit rootfs
° No offcial support for 32-bit rootfs.
° Video stack for 32-bit rootfs will come in a later release
Xen
• Linux + Bare-metal on Xen
° Foundation to deploy bare-metal AMP configurations on the Zynq UltraScale+ MPSoC APU
° Software
- Xen hypervisor
- Linux configuration
- bare-metal BSP
° Tools
° PetaLinux Tools: Xen and Linux
° XDSK Linux and bare-metal debug
OpenAMP
• Solutions and Framework to ease key aspects of AMP systems:
° Interrupts
° Communications
Send Feedback

Vivado Design Suite 2017.4 Release Notes 83UG973 (v2017.4) December 20, 2017 www.xilinx.com
Chapter 6: Older Release Notes
° Processor resets, life-cycle management
• Topologies
° Master/Remote
° Master-less
- FSBL boot + RPMsg
• OpenAMP Master (APU)
° Linux (native)
° Linux supports sysfs/remoteproc (new)
• OpenAMP Remote (RPU)
° Lock-step or split (new)
° Bare-metal
° FreeRTOS
• Restart-Friendly
° If Linux is restarted, then RPU may remain running
° Communications resume when Linux restarts
• Linux kernel
° Sysfs/remoteproc (new)
° Resource table changes (new)
° remote shmem memory
° Firmware checksum
° PM API changes (new)
° ATF APIs/hooks
° Linux user space
° Sysfs/remoteproc access (new)
Note: Available in addition to OpenAMP 2016.4 features
• OpenAMP library
° Runs in Linux user space
• ATF
° New CPU reset flow: APU → ATF → PMU → RPU
- No developer impact when using Xilinx kernel/firmware
• PMU-FW
Send Feedback

Vivado Design Suite 2017.4 Release Notes 84UG973 (v2017.4) December 20, 2017 www.xilinx.com
Chapter 6: Older Release Notes
° New reset flow: APU→ ATF→PMU→RPU
° No special edit required by developer
• Master Components
° Remoteproc
- Life-cycle management
- Load, Start, Stop remote processors
° Linux Sysfs (new)
- Application can dynamically start/stop arbitrary RPU firmware
- Remote SW checksum
- Remoteproc/RPMsg decoupling: no need for RPMsg to be included in firmware load
° RPMsg
- Short Communications
- Control and Status
- 256KB message buffer size
- Device memory (non-cacheable)
• Configurations (Master)
° rproc(k) + rpmsg (k)
- Legacy Linux model
- load/start/stop/communicate
° rpmsg (u) only
° APU to RPU communicate post-FSBL start of RPU
LibMetal
• Provides software primitives for OpenAMP
° Low level functions for device/memory access and interrupt handling
° Shared memory, interrupts, Atomics
° Linux (user space), Xilinx bare-metal, FreeRTOS
• Shared memory
° Linux to RPU and RPU to Linux
° I/O non-cacheable shared memory (UIO)
Send Feedback

Vivado Design Suite 2017.4 Release Notes 85UG973 (v2017.4) December 20, 2017 www.xilinx.com
Chapter 6: Older Release Notes
• Interrupts - Linux to RPU/RPU to Linux
° user application can register an interrupt handler
° Supports UIO - one interrupt per Device Tree device
• Atomics
° C 2011 standard (C++ 11 and C11) atomics
° Mutexes, spinlocks
° Zynq-7000 and Zynq UltraScale+ MPSoC
- MicroBlaze does not support atomic instructions
FSBL
• Memory Flash support for:
° QSPI: MT25QL02G (and MT25QU02G)
° QSPI: MT25QL512A
° QSPI: N25Q256
° QSPI: S25FL128S
° QSPI: MX66L1G45G
° QSPI: MX25L51245G
° QSPI: MX25L25645G
° QSPI: N25Q64
° NAND: S34ML01G1
° NAND: MT29F2G08AB
° eMMC: MTFC4GMVEA-4M IT
• Support USB boot mode
• Support for Warm Restart
• Option to change address of booting starting code
• Support PMF (Power Management Framework) configuration change by PCW
• FSBL Secure Authentication
PMU Firmware
• Support for Warm Restart
• Productization of Isolation Configuration
Send Feedback

Vivado Design Suite 2017.4 Release Notes 86UG973 (v2017.4) December 20, 2017 www.xilinx.com
Chapter 6: Older Release Notes
• New PMU documentation
• PMU code is modular. Option to remove part of the code user is not interested
• PMU Firmware has a memory portion allocated for "Customer Code"
• Support Latency configuration for islands during suspend/resume
Power Management
• XilPM baremetal APIs implemented
• Power off individual CPU cores
• Support for CPU frequency scaling
• 4 power scaling use-cases:
° Sleep
° Full Power Domain off
° R5 Sleep
° Deep Sleep
• Wake-up support for LAN, UART, GPIO, USB, RTC
Important Information
Integrated Simulation (launch_simulation)
• Starting in Vivado 2016.1, the Generate Scripts Only capability has been deprecated and removed from the IDE.
• User should use the Export Simulation capability instead. This provides the functionality for exporting files from Vivado (IP and IP Integrator) to use in external verification environments.
Vivado Design Suite Documentation Update
In the 2017.1 Vivado Design Suite Documentation release, not all documentation will be available at first customer ship. Use the Update Catalog button in DocNav to stay up-to-date with the 2017.1 documentation suite.
Note: DocNav is a 32-bit application and requires the installation of 32-bit libraries on Linux in order to function.
Known IssuesVivado® Design Suite Tools Known Issues can be found at Answer Record 68923.
Send Feedback

Vivado Design Suite 2017.4 Release Notes 87UG973 (v2017.4) December 20, 2017 www.xilinx.com
Appendix A
Additional Resources and Legal Notices
Xilinx ResourcesFor support resources such as Answers, Documentation, Downloads, and Forums, see Xilinx Support.
Solution CentersSee the Xilinx Solution Centers for support on devices, software tools, and intellectual property at all stages of the design cycle. Topics include design assistance, advisories, and troubleshooting tips.
Documentation Navigator and Design HubsXilinx Documentation Navigator provides access to Xilinx documents, videos, and support resources, which you can filter and search to find information. To open the Xilinx Documentation Navigator (DocNav):
• From the Vivado IDE, select Help > Documentation and Tutorials.
• On Windows, select Start > All Programs > Xilinx Design Tools > DocNav.
• At the Linux command prompt, enter docnav.
Xilinx Design Hubs provide links to documentation organized by design tasks and other topics, which you can use to learn key concepts and address frequently asked questions. To access the Design Hubs:
• In the Xilinx Documentation Navigator, click the Design Hubs View tab.
• On the Xilinx website, see the Design Hubs page.
Note: For more information on Documentation Navigator, see the Documentation Navigator page on the Xilinx website.
Send Feedback

Vivado Design Suite 2017.4 Release Notes 88UG973 (v2017.4) December 20, 2017 www.xilinx.com
Appendix A: Additional Resources and Legal Notices
Licenses and End User License AgreementsThe third-party licenses govern the use of certain third-party technology included in and/or distributed in connection with the Xilinx design tools. Each license applies only to the applicable technology expressly governed by such license and not to any other technology. You must accept the terms of the End User License Agreements (EULAs) for Xilinx design tools and third-party products before license files can be generated.
To view the third-party license details and EULA, see End User License Agreement.
To view the Xilinx design tools license details and EULA, see https://www.xilinx.com/cgi-bin/docs/rdoc?v=2017.4;d=end-user-license-agreement.pdf.
Registered Guest ResourcesTo view source packages which may be referenced in the Xilinx 3rd party licenses EULA, see https://www.xilinx.com/guest_resources/gnu/.
References1. UltraFast Design Methodology Guide for the Vivado Design Suite (UG949)
2. UltraFast™ High-Level Productivity Design Methodology Guide (UG1197)
3. UltraFast Embedded Design Methodology Guide (UG1046)
4. Vivado Design Suite User Guide: Logic Simulation (UG900)
5. Vivado Design Suite User Guide: High-Level Synthesis (UG902)
6. Vivado Design Suite User Guide: Partial Reconfiguration (UG909)
7. Vivado Design Suite Tutorial: Partial Reconfiguration (UG947)
8. Vivado Design Suite User Guide: Hierarchical Design (UG905)
9. Vivado Design Suite User Guide: Model-Based DSP Design Using System Generator (UG897)
10. Vivado Design Suite User Guide: Implementation (UG904)
11. Vivado Design Suite User Guide: Power Analysis and Optimization (UG907)
12. IP Release Notes Guide (XTP025)
13. Platform Cable USB II Data Sheet (DS593)
Send Feedback

Vivado Design Suite 2017.4 Release Notes 89UG973 (v2017.4) December 20, 2017 www.xilinx.com
Appendix A: Additional Resources and Legal Notices
14. Parallel Cable IV Data Sheet (DS097)
15. Xilinx Download Center
16. Xilinx Design Tools WebTalk page
17. Vivado Design Suite QuickTake Video Tutorials
18. Vivado Design Suite Documentation
19. PS and PL-Based 1G/10G Ethernet Solution (XAPP1305)
20. Secure Boot of Zynq-7000 All Programmable SoC (XAPP1175)
Training ResourcesXilinx provides a variety of training courses and QuickTake videos to help you learn more about the concepts presented in this document. Use these links to explore related training resources:
1. Vivado Design Suite Hands-on Introductory Workshop
2. Vivado Design Suite Tool Flow
Send Feedback

Vivado Design Suite 2017.4 Release Notes 90UG973 (v2017.4) December 20, 2017 www.xilinx.com
Appendix A: Additional Resources and Legal Notices
Please Read: Important Legal NoticesThe information disclosed to you hereunder (the “Materials”) is provided solely for the selection and use of Xilinx products. To the maximum extent permitted by applicable law: (1) Materials are made available "AS IS" and with all faults, Xilinx hereby DISCLAIMS ALL WARRANTIES AND CONDITIONS, EXPRESS, IMPLIED, OR STATUTORY, INCLUDING BUT NOT LIMITED TO WARRANTIES OF MERCHANTABILITY, NON-INFRINGEMENT, OR FITNESS FOR ANY PARTICULAR PURPOSE; and (2) Xilinx shall not be liable (whether in contract or tort, including negligence, or under any other theory of liability) for any loss or damage of any kind or nature related to, arising under, or in connection with, the Materials (including your use of the Materials), including for any direct, indirect, special, incidental, or consequential loss or damage (including loss of data, profits, goodwill, or any type of loss or damage suffered as a result of any action brought by a third party) even if such damage or loss was reasonably foreseeable or Xilinx had been advised of the possibility of the same. Xilinx assumes no obligation to correct any errors contained in the Materials or to notify you of updates to the Materials or to product specifications. You may not reproduce, modify, distribute, or publicly display the Materials without prior written consent. Certain products are subject to the terms and conditions of Xilinx’s limited warranty, please refer to Xilinx’s Terms of Sale which can be viewed at https://www.xilinx.com/legal.htm#tos; IP cores may be subject to warranty and support terms contained in a license issued to you by Xilinx. Xilinx products are not designed or intended to be fail-safe or for use in any application requiring fail-safe performance; you assume sole risk and liability for use of Xilinx products in such critical applications, please refer to Xilinx’s Terms of Sale which can be viewed at https://www.xilinx.com/legal.htm#tos.AUTOMOTIVE APPLICATIONS DISCLAIMERAUTOMOTIVE PRODUCTS (IDENTIFIED AS “XA” IN THE PART NUMBER) ARE NOT WARRANTED FOR USE IN THE DEPLOYMENT OF AIRBAGS OR FOR USE IN APPLICATIONS THAT AFFECT CONTROL OF A VEHICLE (“SAFETY APPLICATION”) UNLESS THERE IS A SAFETY CONCEPT OR REDUNDANCY FEATURE CONSISTENT WITH THE ISO 26262 AUTOMOTIVE SAFETY STANDARD (“SAFETY DESIGN”). CUSTOMER SHALL, PRIOR TO USING OR DISTRIBUTING ANY SYSTEMS THAT INCORPORATE PRODUCTS, THOROUGHLY TEST SUCH SYSTEMS FOR SAFETY PURPOSES. USE OF PRODUCTS IN A SAFETY APPLICATION WITHOUT A SAFETY DESIGN IS FULLY AT THE RISK OF CUSTOMER, SUBJECT ONLY TO APPLICABLE LAWS AND REGULATIONS GOVERNING LIMITATIONS ON PRODUCT LIABILITY.© Copyright 2012–2017 Xilinx, Inc. Xilinx, the Xilinx logo, Artix, ISE, Kintex, Spartan, Virtex, Vivado, Zynq, and other designated brands included herein are trademarks of Xilinx in the United States and other countries. All other trademarks are the property of their respective owners.
Send Feedback