vitavm 9 - uab vikadentvikadent.lt/download/vita/vita_1190e_vm9_va_en_v02.pdf · 2 vitavm ®9 vita...
TRANSCRIPT

VITAVM®9
VITA shade, VITA made.
Date of issue: 08.13
Working Instructions
VITA Farbkommunikation
VITA Farbkommunikation
VITA shade controlVITA shade reproductionVITA shade communicationVITA shade taking
For veneering zirconia substructures and for individualizing VITABLOCS and VITA PM 9 restorations.Available in VITA SYSTEM 3D-MASTER and VITA classical A1–D4 shades.

2
VITAVM®9
VITA SYSTEM 3D-MASTER 3
Fine-structure ceramic 4
Data – facts 5
Indication range 6
Facts worth knowing about the CTE 7
Firing result 8
Substructure design and layer thicknesses 9
Material-scientific aspects of VITA In-Ceram YZ / VITA YZ HT 10
VITA VM 9 in combination with VITA In-Ceram YZ / VITA YZ HT 11
Expansion cooling when veneering zirconium dioxide substructures 11
Procedure for VITA In-Ceram YZ / VITA YZ HT 12
Processing information on YZ COLORING LIQUID for VITA In-Ceram YZ 13
BASIC layering 14
BUILD UP layering 18
Firing chart 23
Classification tables 24
Liquids 25
Additional materials 26
VITA VM 9 in combination with VITA PM 9 28
VITA VM 9 in combination with VITABLOCS 30
Assortments 32
Information 35
Table of contents

VITA SYSTEM 3D-MASTER®
3
Competence for more than 80 yearsShade management is more than just shade determination. At VITA, shade management means incorporating our ever better solutions into a complete process. The key question we have always asked ourselves is: How can we improve shade determination and reproduction? By establishing standardized process steps to increase the efficiency. Today, dental specialists are expected to achieve better results while spending less time and money. It is this goal that brings us together.
VITA shade taking The accurate determination of the basic shade of a tooth is the key prerequisite for patient acceptance. The basic shade is generally found in the dentine center (central to gingival area).
The determination of the effectsNatural teeth are unique and a perfect creation of nature. Therefore, after determining the base shade, details of a tooth (translucent zones or anomalies, for example) need to be recorded to obtain a perfect match. We recommend the use of a digital photo to analyze details or effects.
VITA shade communicationTo ensure perfect reproduction of the determined shade, it is essential to ensure that all parameters are communicated accurately to the dental laboratory. Any misunderstanding leads to expensive and unnecessary extra work. For this reason we recommend using the color communication form to describe the basic shade and a digital photo for the analysis of effects or details. The software of VITA Easyshade provides a template to have all data on a single sheet – a laboratory communication form. This information will enable you to create a restoration that matches the remaining teeth perfectly in a quick and reliable manner.
VITA shade reproductionThe most important step in reproducing a tooth is to ensure that the determined tooth shade is accurately reproduced. Then the shade effects of the tooth can be reproduced to obtain a high-quality restoration. You can be sure that whichever VITA materials you choose, you will be able to achieve this objective without time-consuming mixing or testing.
VITA shade controlIn the final step, qualitative shade evaluation no longer needs to be left to the subjective opinion of an individual. Within the VITA process, objective control of the final restoration is the most important prerequisite for ensuring satisfied patients and avoiding additional work.

4
VITAVM®9
VITA VM 9 has been designed as a special ceramic featuring a fine structure for partially yttrium-stabilized ZrO2 substructures with a CTE of approx. 10.5 · 10-6 · K-1, such as VITA In-Ceram YZ. The material is also perfectly suited for individualizing VITABLOCS (see Working Instructions, No. 1219E) and for individualizing VITA PM 9 restorations.
Like all VITA VM materials, VITA VM 9 excels in its refraction and reflection behavior which can be compared to that of enamel. Accordingly, the BASE DENTINE and TRANSPA DENTINE porcelains which have been perfectly matched allow the fabrication of restorations with a highly natural appearance. The use of additional fluorescent and opalescent materials results in individual and esthetically appealing restorations.
A modified manufacturing process helped to create a new type of ceramic. Compared to conventional ceramics, the structure that is obtained after firing reveals particularly homogeneous distribution of the crystal and glass phase. This type of structure is described as a "fine structure".
Fig. 1:The etched surface (etched for 20 seconds with VITA CERAMICS ETCH) of a conventional ceramic shows agglomerations of leucite crystals of up to 30 μm in diameter. The differences between the CTE values of the leucite agglomerations and those of the glass phase can lead to stress cracks, which can be seen at the bright rims of the cracks in the photo.
Fig. 2:The etched surface of VITA VM 9 (etched with VITA CERAMICS ETCH for 20 sec) reveals particularly fine distribution of the leucite crystals in the glass phase, which avoids the formation of stress cracks.
Good surface structureThe fine structure provides a number of benefits for dental technicians, dentists and patients alike. Thanks to the homogeneous, sealed surface, VITA VM 9 offers excellent grinding and polishing properties in situ to ensure smooth and perfectly sealed surfaces.Accumulation of plaque on the ceramic surface is reduced considerably; hence easy care and cleaning of the high-quality restoration are supported.
Fig. 1: SEM image of the surface of a ceramic with conventional structure (magnification 5000 x).
Fig. 2: SEM image of the etched surface of VITA VM 9 (magnification 5000 x).
Fine-structure ceramic

5
VITAVM®9
0
20
40
60
80
100
120
Data – facts
Physical propertiesIn addition to the favorable homogeneous surface, VITA VM 9 features high flexural strength and very low solubility in acid.
Flexural strengthFlexural strength of VITA VM 9 compared with that of the previous product and the ISO limit according to ISO 6872.
Enamel-like propertiesIn a study carried out by McLaren (UCLA School of Dentistry, UCLA Center for Esthetic Dentistry, Los Angeles, CA) and Giordano (Goldman School of Dental Medicine, University of Boston, MA) VITA VM 9 showed a similar abrasion behavior as natural enamel.
Note: If the processing instructions and the guidelines on substructure design recommended by VITA are observed, VITA VM 9 is suitable for all substructures made from 3Y-TZP (-A). Since the function depends on a variety of parameters, only the user can ensure the quality in the individual case.
Literature: E. A. McLaren, DDS; R. A. Giordano II, DMD, DMedSc „Zirconia Based Ceramics: Material Properties, Esthetics and Layering Technique of a new Veneering Porcelain, VM 9”, (Quintessenz of Dental Technology 28, 99–111 [2005])
VITAVM®9 – Physical properties
CTE (25–500°C)
Softening point
Transformation temperature
Solubility in acid
Average particle size
3-point flexural strength
Unit of measure
10-6 K-1
°C
°C
μg/cm2
μm (d50)
MPa
Value
9.0–9.2
approx. 670
approx. 600
approx. 10
approx. 18
approx. 100
ISO limit
3-point flexural strength [MPa]
Previousproduct
VITA VM 9

6
VITAVM®9
10001000
950950
900900
850850
800800
750750
1716151413121110987
*
*
Indication range
– for veneering zirconia substructure materials in the CTE range of approx. 10.5, such as VITA In-Ceram YZ / VITA YZ HT– for individualizing VITABLOCS– for individualizing VITA PM 9 restorations
Firing temperature of ceramic [°C]
Firing temperature of ceramic [°C]Linear coefficient of thermal expansion of the ceramic, measured at 25–500°C
sub- structure
sub- structure substructure substructure substructure
VITA TITANIUM PORCELAIN
Linear coefficient of thermal expansion of the ceramic, measured at 25–500°C(alloys measured at 25–600°C)
VITA VM 7CTE (25–500°C) 6.9–7.3 · 10-6 · K-1
VITA TITANIUM PORCELAINCTE (25–500°C) 8.2–8.9 · 10-6 · K-1
VITA VM 9CTE (25–500°C) 9.0–9.2 · 10-6 · K-1
VITA VM 13 CTE (25–500°C) 13.1–13.6 · 10-6 · K-1
VITA VM 15CTE (25–500°C) 15.5–15.7 · 10-6 · K-1
VITA In-Ceram ALUMINA, CTE (25–500°C) 7.2–7.6 · 10-6 · K-1
VITA In-Ceram ZIRCONIA, CTE (25–500°C) 7.6–7.8 · 10-6 · K-1
for titanium and titanium alloysTitanium CTE (25–500°C), approx. 9.6 · 10-6 · K-1
Ti6AI4V CTE (25–500°C), approx. 10.2 · 10-6 · K-1
VITA In-Ceram YZ, CTE (25–500°C), approx. 10.5 · 10-6 · K-1
VITA YZ HT, CTE (25–500°C), approx. 10.5 · 10-6 · K-1
VITABLOCS, CTE (25–500°C) approx. 9.4 · 10-6 · K-1
VITA PM 9, CTE (25–500°C) 9.0–9.5 · 10-6 · K-1
High gold content-, reduced precious metal content, palladium based and non-precious alloys
CTE (25–600°C) 13.8–15.2 · 10-6 · K-1
Multi-indication alloysCTE (25–600°C) 16.0–17.3 · 10-6 · K-1
* visit the download section of our website for more information about alloys

7
VITAVM®9
If the CTE of the substructure material is considerably higher than the CTE of the veneering ceramic, tangential compressive stress will increase and form cracks that run almost parallel to the substructure. This may result in chipping.
If the CTE of the substructure material is considerably higher than the CTE of the veneering ceramic, tangential compressive stress will increase and form cracks that run almost parallel to the substructure. This may result in chipping.
The ideal tangential and radial tensile stress is ensured if the CTE of the ceramic has been optimally matched with the CTE of the substructure material.
Optimal preconditions are given if the veneering ceramic features a somewhat lower CTE value than the substructure material. Due to adhesive bonding, the ceramic must follow the thermal behavior of the substructure material. If cooled down, the ceramic is exposed to slight tangential compressive stress.
If a substructure material is veneered with ceramic, the layer thickness of the veneer is a decisive factor in addition to the CTE value. Accordingly, differences in strain (radial tensile stress) are obtained, which will grow in case of increasing layer thickness.
Facts worth knowing about the CTE
Ceramic
Subs
tructure material
Subs
tructure material
Subs
tructure material
Ceramic
Ceramic
Horizontalsection
through aschematic
crown
Horizontalsection
through aschematic
crown
Horizontalsection
through aschematic
crown

8
VITAVM®9 Firing result
The firing result obtained with dental ceramics depends to a great extent on the individual user's firing procedure. The type of furnace, the location of the temperature sensor, the firing trays and the size of the workpiece during the firing cycles are decisive for the result of firing. Our application-technical recommendations for the firing temperatures (regardless of whether they have been provided orally, in writing or in the form of practical instructions) are based on extensive experience and tests. The user, however, should consider this information only as a reference. Should the surface quality or the degree of transparency or glaze not correspond to the result that is achieved under optimum conditions, the firing procedure must be adjusted correspondingly.
Note: Firing trays may also have significant influence on the result. All firing temperatures for VITA VM are based on the use of dark-colored ceramic firing trays. When using light-colored firing trays, the temperature may vary by 10–20°C - in some cases even by up to 40° - from the reference value given depending on the furnace that is used and needs to be adjusted correspondingly.
The crucial factors for the firing procedure are not the firing temperature displayed by the furnace but the appearance and the surface condition of the veneering ceramic after the firing process.
A slight luster of the ceramic surface is an evidence for correct firing. If the ceramic, however, appears to be milky and non-homogeneous, the firing temperature is too low. Approach the correct firing temperature in steps of 5–10°C.

9
VITAVM®9
Veneering premolars and molars
Veneering anterior teeth
Substructure design and layer thicknesses
max. 2 mm
max. 2 mm
Zirconia crowns and bridge units to be veneered with ceramic must have a reduced anatomical size.The wall thickness of crowns must be at least 0.5 mm and that of bridges must be at least 0.7 mm.
A table with details on further indications can be found in the Working Instructions for VITA In-Ceram YZ/VITA YZ HT(publication No. 1649).
Layer thicknesses for ceramics
When preparing a ceramic veneer, a uniform layer thickness across the entire surface to be veneered must be ensured. The entire thickness of the ceramic layer, however, should not exceed 2 mm (the optimum layer thickness ranges from 0.7 to 1.2 mm).

10
VITAVM®9
0
200
400
600
800
1000
300
500
700
900
100
MPa
ALUMINA ZIRCONIA YZ YZ HT
0
2
4
6
3
5
7
1
MPa · √m
ALUMINA YZZIRCONIA YZ HT
Material-scientific aspects of VITA In-Ceram® YZ/VITA YZ HT
Zirconia (ZrO2) is an oxide ceramic with many fascinating properties, such as its translucency in the case of thin wall thicknesses, its bright color and its outstanding biocompatibility. It is no coincidence that this material is frequently used in the field of implantology. In addition to this, it features a high degree of crack resistance which distinguishes it among oxide ceramics.
The latter results from the possibility of stabilizing ZrO2 in its tetragonal high temperature phase through the appropriate addition (doping) of e.g. yttrium oxide. Only if external energy is supplied – as it occurs e.g. when a crack is formed (see fig.1) – individual ZrO2 particles are transformed locally into their stable monoclinic phase at room temperature while their volume increases (see fig.1 - pink ZrO2 particles). This procedure is described as transformation strengthening. The compressive stress that is formed in the structure (see arrows in fig. 1) prevents unhindered growth of a crack that would lead to the failure of the ceramic. This property is also reflected in the long life of zirconia under permanent loading.
VITA In-Ceram YZ/VITA YZ HT is porously presintered zirconia (see fig. 2) partially stabilized with yttrium oxide (Y-TZP, yttria stabilized tetragonal zirconia polycrystal). In this condition the blocks are easily machined and used to mill enlarged bridge and crown substructures using CAD/CAM techniques.
Shrinkage which occurs during the subsequent sintering process in a special high-temperature furnace (VITA ZYrcomat) is precisely accounted for. The end result: substructures with a high degree of strength and marginal accuracy which feature all the advantageous physical properties of zirconia.
Fig. 1: Schematic diagram of the phase transformation process of ZrO2
Fig. 2: SEM micrograph of the microstructure of sintered VITA In-Ceram YZ (magnification x 20,000)
Fig. 3: SEM micrograph of the microstructure of sintered VITA In-Ceram YZ (magnification x 20,000)
Fig. 4: Comparison of the 3-point flexural strength of various VITA oxide ceramics according to ISO 6872
Fig. 5: Comparison of the fracture toughness (SEVNB method)of various substructure materials

11
VITAVM®9
VITAVM®9
25 30 35 40 45 50 55 60 65
in combination with VITA In-Ceram® YZ/VITA YZ HT
Mechanical surface treatment such as grinding with diamond tools and sandblasting may supply hypercritical quantities of energy to the zirconia substructure, which may result in deformation of large areas of the crystal lattice or even in the phase transition of ZrO2. As a consequence, complex stress can be formed at the interface of the veneer which may result in immediate failure or also in critical crack growth and consequential late damage to the restoration. This effect can be detected e.g. by radiographic phase analysis (fig.1). Compared with tetragonal ZrO2, monoclinic ZrO2 features a lower CTE of approx. 7.5 · 10-6 · K-1*.
If the zirconia restoration is to be cemented using a phosphate monomer containing composite (e.g. PANAVIA), sandblasting of the adhesion surfaces with AL2O3 (max. 50 μm) at a pressure of ≤ 2.5 bar will create a per-manent bond between the composite and the oxide ceramic.
* D.J. Green, R.H.J. Hannik, M.V. Swain: Transformation Toughening of Ceramics, CRC Press USA, 1989
If reworking of sintered Y-TZP is required, the following basic guidelines must be observed:
• Grinding should only be performed using fine diamond tools. Cool with water and exert only little pressure when grinding.
• Areas exposed to considerable tensile stress during the clinical use, e.g. connectors of bridge structures, should not be ground.
• Final thermal treatment of the substructure is recommended to reverse any phase transitions. A single firing process at 1000°C and a holding time of 15 minutes are sufficient.
Fig. 1: X-ray diffraction diagram of a Y-TZP (blue) and its phase transition after sandblasting (red).
Expansion cooling when veneering zirconia substructures
Scientific studies and ongoing market observation have formed the basis of VITA Zahnfabrik's recommendations for decades in order to offer customers the best possible solution for dental restorations. New results confirm that great care is required particularly when veneering and processing zirconia substructures. As a result, the following procedures are recommended in order to offer even more safety:
Owing to the poor thermal conductivity of both materials (Y-TZP and veneering ceramic), higher residual stress can occur in this compound system than is known in the case of metal ceramics. This residual thermal stress in the veneering ceramic, in particular in the case of large restorations, can be counteracted by means of slow cooling to below the transformation temperature of the veneering ceramic during the last firing cycle (approx. 600°C for VITA VM 9). Such a firing procedure with expansion cooling is well known as a metal ceramic technique to dental technicians. A step of
this nature is necessary to reduce stress in the case of some gold alloys. It is also necessary to adhere to the standard and familiar guidelines for all-ceramic dental restorations as follows:
• dentists must carry out the preparation correctly according to the recommended procedure for all-ceramic restorations; for instance, a circumferential chamfer (not a tangential preparation) is required in the case of all-ceramic restorations.
• after grinding in situ by the dentist in order to adjust the occlusion, either polishing must be repeated or glaze firing needs to be carried out.
More information on this subject:K.H. Kunzelmann, M. Kern, P. Pospiech, A. Mehl, R. Frankenberger, B. Reiss and K. Wiedhahn: Vollkeramik auf einen Blick – 3. Auflage Herausgeber AG Keramik, ISBN-Nr. 3-00-017195-0.
coun
ts
sinteredsandblasted
monoclinic
12
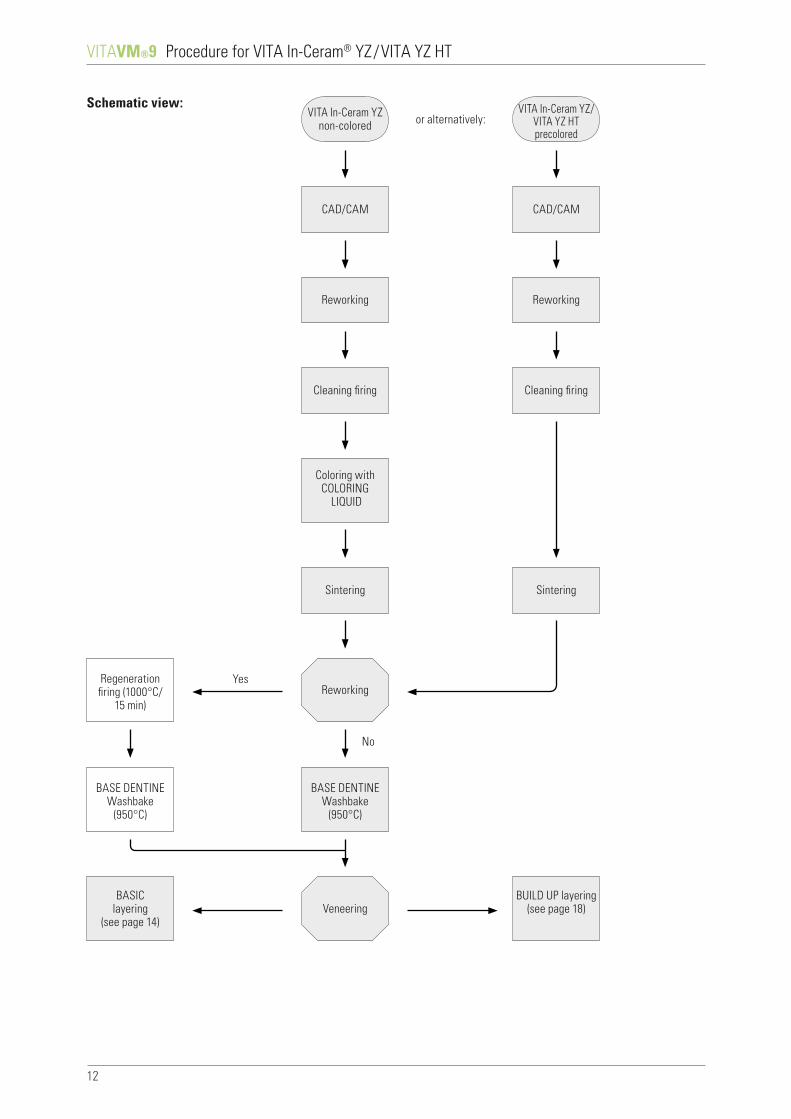
VITAVM®9 Procedure for VITA In-Ceram® YZ/VITA YZ HT
Schematic view:VITA In-Ceram YZ
non-colored
CAD/CAM
Reworking
Cleaning firing
Coloring withCOLORING
LIQUID
Sintering
Reworking
BASE DENTINEWashbake
(950°C)
VeneeringBASIC
layering(see page 14)
BUILD UP layering(see page 18)
BASE DENTINEWashbake
(950°C)
Regeneration firing (1000°C/
15 min)
CAD/CAM
Reworking
Cleaning firing
Sintering
or alternatively:
Yes
No
VITA In-Ceram YZ/VITA YZ HTprecolored

13
VITAVM®9
500 3.00 6.00 33 700 5.00 –
The restorations should be cleaned in distilled water and grinding dust should be removed prior to the application. Cleaning fi ring should be performed on a fi brous pad in a ceramic furnace (e.g. VITA VACUMAT) to remove the cooling and lubricating liquid from the porous structure.
According to the shade to be reproduced, the restoration is immersed into the coloring liquid in the working container. The recommended immersion time is 2 minutes. When immersing the substructure, vacuum or pressure (2 bars) can be used additionally.
Important: Use only plastic tweezers or a plastic sieve.
Then remove excess COLORING LIQUID with a paper tissue and let dry. Do not sinter the object in wet condition.
The substructure can be colored from within and without at the margins in order to ensure complete penetration of the color.
Attention: The application brush should only be used to apply COLORING LIQUID! The use of a fl at brush is recommended. Do not use for layering the ceramic: risk of discoloration! The brush may only be cleaned with distilled water.
Restorations colored with COLORING LIQUID should only be sintered using the slotted crucible. Accordingly, perfect fi ring of the organic components is ensured.
More information on further processing can be found in the Working Instructions for VITA In-Ceram YZ (publication No. 1649).
Processing information on YZ COLORING LIQUID for VITA In-Ceram® YZ
Cleaning fi ring in the VITA VACUMAT®
Predry. °C min. min. °C/min.
approx. temp.°C min.
VACmin.

14
VITAVM®9
VITA VM 9 ENAMEL
VITA VM 9 BASE DENTINE
VITA VM 9 BASIC layering consists of the application of the two materials BASE DENTINE and ENAMEL.
The color-bearing BASE DENTINE materials, which provide good coverage, offer the perfect precondition for the preparation of veneers with intensive shades. With this two-layer alternative VITA offers an ideal solution for the reproduction of optimal shade results in case of thin walls. Additionally, the intensive shade effect of the BASE DENTINE materials permits generous use of the ENAMEL materials which create the desired translucency. The user is able to prepare a natural restoration with a lifelike appearance with only two layers.
Note: The intensity of the restoration can be varied with different layer thicknesses of BASE DENTINE and ENAMEL. The thicker the BASE DENTINE layer, the more intensive is the shade of the restoration. The thicker the ENAMEL layer, the paler is the shade of the restoration. The use of CHROMA PLUS materials helps to achieve perfect shade reproduction in the cervical area.
To obtain a brighter or warmer shade, the respective TRANSPA DENTINE can either be mixed with SUN DENTINE or replaced by SUN DENTINE. When using CHROMA PLUS or SUN DENTINE materials, the final result of the restoration may differ significantly from the shade sample.
BASIC layering
Colored all-ceramicsubstructure (CTE approx. 10.5)

15
VITAVM®9
500 2.00 8.11 55 950 1.00 8.11
Colored VITA In-Ceram® YZ crown and bridge substructure (CTE approx. 10.5)Substructure colored with COLORING LIQUID ready for veneering with VITA VM 9. To allow easy removal of the restoration later on, the model must be previously insulated using the VITA Modisol pen.
Washbake fi ringTo achieve adequate bonding of colored VITA In-Ceram YZ / VITA YZ HT substructures and VITA VM 9, we recommend carrying out a BASE DENTINE washbake. The BASE DENTINE powder is mixed with MODELLING LIQUID to obtain a thin aqueous mixture and applied very thinly to the dry andclean substructure while ensuring uniform coverage.
To support and intensify the base shade in case of thin walls or non-colored zirconia substructures, CHROMA PLUS materials may be used for the washbake.
BASIC layering
Recommended fi ring
Application of VITAVM®9 BASE DENTINEApply the desired shade of BASE DENTINE that has been mixed with MODELLING LIQUID starting from the neck to obtain the required complete tooth shape. The centric, lateral and protrusive occlusion should be checked in the articulator already during this stage.
To obtain adequate space for the enamel, removal of corresponding amount of the BASE DENTINE material according to the layering pattern is required.
Predry. °C min. min. °C/min.
approx. temp.°C min.
VACmin.

16
VITAVM®9
500 6.00 7.27 55 910 1.00 7.27
BASIC layering
Application of VITAVM®9 ENAMELApply several small portions of ENAMEL to complete the crown mould beginning from the middle third of the crown. To compensate fi ring shrinkage, the size of the mould must be prepared somewhat larger.
The classifi cation table for the ENAMEL materials can be found on page 26.
Prior to the fi rst dentine fi ring, the individual units of bridges must be separated in the interproximal areas down to the substructure.
Recommended fi ring - fi rst dentine fi ring*
Restoration after fi rst dentine fi ring.
Corrections of shape/further layeringInsulate the model once more with the VITA Modisol pen. The interdental spaces and the basal surface of the pontic must be fi lled with BASE DENTINE.
Restoration ready for fi rst dentine fi ring.Only fi ring pad for ceramic may be used for fi ring!
* For further details on the recommended fi ring procedures in the case of larger restorations please refer to page 23.
Predry. °C min. min. °C/min.
approx. temp.°C min.
VACmin.

17
VITAVM®9
500 2.00 8.11 55 950 1.00 8.11
500 4.00 5.00 80 900 1.00 –
Apply BASE DENTINE starting from the neck and add ENAMEL in the body area up to the incisal area to perform subsequent corrections of the shape.
Bridge and crown after second dentine fi ring.
BASIC layering
Recommended fi ring - second dentine fi ring*
If required, the entire restoration can be coated with VITA AKZENT Plus GLAZE and then individualization can be carried out using the VITA AKZENT Plus stains. (see VITA AKZENT Plus working instructions, No. 1925)
Completed restoration on the model.
Note: If the restoration needs to be adjusted (ground) when it is tried in, it must be smoothed again. Polishing or glaze fi ring have proved to be very suitable.
* For further details on the recommended fi ring procedures in the case of larger restorations please refer to page 23.
FinishingFinish the bridge or crown respectively. For glaze fi ring, the entire surface must be ground evenly and grinding particles must be removed carefully.
When processing the interdental spaces with the diamond separating disc, please ensure that no damage is caused to the substructure.
In case of formation of dust, use an extraction system or wear a face mask. Additionally, protective goggles must be worn when grinding the fi red ceramic.
Recommended fi ring - glaze fi ring with VITA AKZENT® Plus*
* For further details on the recommended fi ring procedures in the case of larger restorations please refer to page 23.
Predry. °C min. min. °C/min.
approx. temp.°C min.
VACmin.
Predry. °C min. min. °C/min.
approx. temp.°C min.
VACmin.

18
VITAVM®9
VITA VM 9 ENAMEL
VITA VM 9 BASE DENTINE VITA VM 9 TRANSPA DENTINE
The VITA VM 9 BUILD UP layering includes the application of the three materials BASE DENTINE, TRANSPA DENTINE and ENAMEL.
The combination of color-bearing BASE DENTINE and translucent TRANSPA DENTINE in the VITA VM 9 BUILD UP layering creates an enhanced effect of depth in the restoration,
which results in even more convincing reproduction of the natural example. The use of the three-layer method permits reduced and more individual application of the ENAMEL materials.
By combining ENAMEL and TRANSPA DENTINE according to the layer thickness of BASE DENTINE, the intensity of the shade can be individualized. An increased proportion of BASE DENTINE results in an intensified shade whereas larger quantities of TRANSPA DENTINE and ENAMEL will reduce the chroma of the shade.
Note: The shade effect of the restoration is mainly influenced by BASE DENTINE. Analogously to natural teeth, the TRANSPA DENTINE materials create a harmonious transition to the enamel. The use of CHROMA PLUS materials helps to achieve perfect shade reproduction in the cervical area.
To obtain a brighter or warmer shade, the respective TRANSPA DENTINE can either be mixed with SUN DENTINE or replaced by SUN DENTINE. When using CHROMA PLUS or SUN DENTINE materials, the final result of the restoration may differ significantly from the shade sample.
BUILD UP layering
Colored all-ceramicsubstructure (CTE approx. 10.5)

19
VITAVM®9
500 2.00 8.11 55 950 1.00 8.11
Colored VITA In-Ceram® YZ crown and bridge substructure (CTE approx. 10.5)Substructure colored with COLORING LIQUID ready for veneering with VITA VM 9. To allow easy removal of the restoration later on, the model must be previously insulated using the VITA Modisol pen.
Washbake fi ringTo achieve adequate bonding of colored VITA In-Ceram YZ/VITA YZ HT substructures and VITA VM 9, we recommend carrying out a BASE DENTINE washbake. The BASE DENTINE powder is mixed with MODELLING LIQUID to obtain a thin aqueous mixture and applied very thinly to the dry and clean substructure while ensuring uniform coverage.
To support and intensify the base shade, CHROMA PLUS materials may be used for the washbake. This is recommended for very thin walls or non-colored zirconia substructures.
BUILD UP layering
Recommended fi ring
Application of VITAVM®9 BASE DENTINEApply the desired shade of BASE DENTINE that has been mixed with MODELLING LIQUID over the whole surface starting from the neck in reduced tooth size. The centric, lateral and protrusive occlusion should be checked in the articulator already during this stage.
Completely layered BASE DENTINE.
Predry. °C min. min. °C/min.
approx. temp.°C min.
VACmin.

20
VITAVM®9
500 6.00 7.27 55 910 1.00 7.27
BUILD UP layering
Application of VITAVM®9 TRANSPA DENTINETRANSPA DENTINE is applied in the required complete tooth shape.
To obtain suffi cient space for the enamel, the volume of the TRANSPA DENTINE must be reduced correspondingly.
Recommended fi ring - fi rst dentine fi ring*
Restoration ready for fi rst dentine fi ring.Only fi ring pad for ceramic may be used for fi ring!
Application of VITAVM®9 ENAMELTo complete the crown, apply several small portions of ENAMEL to the upper third of the crown. To compensate fi ring shrinkage, the size of the mould must be prepared somewhat larger.
The classifi cation table for the VITA VM 9 ENAMEL materials can be found on page 26.
Prior to fi ring, the individual units of bridges must be separated in the interdental areas down to the substructure.
* For further details on the recommended fi ring procedures in the case of larger restorations please refer to page 23.
Predry. °C min. min. °C/min.
approx. temp.°C min.
VACmin.

21
VITAVM®9
500 6.00 7.16 55 900 1.00 7.16
Restoration after fi rst dentine fi ring.
Corrections of shape / further layeringInsulate the model once more at the pontic with the VITA Modisol pen. The interdental spaces and the basal surface of the pontic must be fi lled with BASE DENTINE.
BUILD UP layering
... and ENAMEL in the incisal area.
Bridge and crown after second dentine fi ring.
Subsequent corrections of the shape in the body area are carried out using TRANSPA DENTINE ...
Recommended fi ring - second dentine fi ring*
* For further details on the recommended fi ring procedures in the case of larger restorations please refer to page 23.
Predry. °C min. min. °C/min.
approx. temp.°C min.
VACmin.

22
VITAVM®9
500 4.00 5.00 80 900 1.00 –
BUILD UP layering
FinishingFinish the bridge or crown respectively. For glaze fi ring, the entire surface must be ground evenly and grinding particles must be removed carefully.
When processing the interdental spaces with the diamond separating disc, please ensure that no damage is caused to the substructure.
In case of formation of dust, use an extraction system or wear a face mask. Additionally, protective goggles must be worn when grinding the fi red ceramic.
If required, the entire restoration can be coated with VITA AKZENT Plus GLAZE and then individualization can be carried out using the VITA AKZENT Plus stains. (see VITA AKZENT Plus working instructions, No. 1925)
Recommended fi ring - glaze fi ring with VITA AKZENT® Plus*
Completed restoration on the model.
Note: If the occlusion of the restoration needs to be adjusted using abrasive tools when it is tried in, it must be smoothed again. Polishing or glaze fi ring have proved to be very suitable.
* For further details on the recommended fi ring procedures in the case of larger restorations please refer to page 23.
Predry. °C min. min. °C/min.
approx. temp.°C min.
VACmin.

23
VITAVM®9
500 3.00 6.00 33 700 5.00 – – –
500 0.00 5.00 100 1000 1 5.00 – – –
500 2.00 8.11 55 950 1.00 – – 8.11
500 6.00 8.21 55 960 1.00 – – 8.21
500 6.00 7.49 55 930 1.00 – – 7.49
500 6.00 7.27 55 910 1.00 600** – 7.27
500 6.00 7.16 55 900 1.00 600** – 7.16
500 0.00 5.00 80 900 1.00 600** – –
500 4.00 5.00 80 900 1.00 600** – –
500 4.00 4.20 80 760 1.00 500** – 4.20
Firing chart
Owing to the poor thermal conductivity of both materials (Y-TZP and veneering ceramic), higher residual stress can occur in this compound system than is known in the case of metal ceramics. This residual thermal stress in the veneering
ceramic can be counteracted by means of slow cooling to below the transformation temperature of the veneering ceramic during the last fi ring cycle (approx. 600°C for VITA VM 9).
Predry. °C min. min. °C/min.
approx. temp.°C min. °C min.
VACmin.
Cleaning fi ring
Regeneration fi ring (optional, see page 11)
Washbake fi ring
MARGIN* fi ring
EFFECT LINER* fi ring
First dentine fi ring
Second dentine fi ring
Glaze fi ring
Glaze fi ring with AKZENT PlusCorrective fi ring with CORRECTIVE*
*Indication range, see pages 27/28
** Long-term cooling down to the respective temperature is recommended for the respective last fi ring cycle of the veneering ceramic. The lift position for VITA VACUMAT furnaces should be > 75%. Firing object must be protected against direct supply of air.
When using dental ceramics, the fi ring result largely depends on the individual fi ring procedure of the user, i.e. among other aspects, the type of furnace, the location of the temperature sensor, the fi ring tray as well as the size of the object during the fi ring cycles.
Our application-technical recommendations for the fi ring temperatures (regardless of whether they have been provided orally, in writing or in the form of practical instructions) are based on extensive experience and tests. The user, however, should consider this information only as a reference.
Should the surface quality or the degree of transparency or glaze not correspond to the fi ring result that is achieved under optimum conditions, the fi ring procedure must be adjusted correspondingly. The crucial factors for the fi ring procedure are not the fi ring temperature indicated on the furnace display, but the appearance and the surface quality of the fi ring object after fi ring.
Explanation of the fi ring parameters:
Start temperature
Predrying time in minutes, closing time
Heating time in minutes
Temperature rise rate in degrees Celsius per minute
End temperature
Holding time for end temperature
Long-term cooling
Vacuum holding time in minutes
Predr. °C
Temp. approx. °C
VAC min.

24
VITAVM®9
VITA In-Ceram YZCOLORING LIQUID
MARGIN EFFECTLINER
CHROMA PLUS
ENAMEL
0M1 – M1 EL1 – ENL
0M2 – M1 EL1 – ENL
0M3 – M1 EL1/EL2* – ENL
1M1 CLL/P M1/M7* EL1/EL2* – ENL
1M2 CLL/P M1/M7* EL2 – ENL
2L1.5 CLL/P M1/M7* EL1/EL2* CP2 ENL
2L2.5 CLM M1/M4* EL1/EL3* CP2 ENL
2M1 CLL/P M1/M4* EL1/EL6* CP2 ENL
2M2 CLL/P M1/M4* EL1/EL3* CP2 ENL
2M3 CLL/P M4 EL2/EL4* CP2 ENL
2R1.5 CLL/P M1/M7* EL1/EL6* CP2 ENL
2R2.5 CLM M1/M4* EL2/EL4* CP2 ENL
3L1.5 CLM M4/M7* EL2/EL6* CP3 ENL
3L2.5 CLM M4/M7* EL4/EL6* CP3 ENL
3M1 CLL/P M7 EL1/EL6* CP3 ENL
3M2 CLM M4/M7* EL2/EL6* CP3 ENL
3M3 CLM M4/M9* EL4/EL6* CP3 ENL
3R1.5 CLM M7 EL2/EL3* CP3 ENL
3R2.5 CLM M4/M7* EL5/EL6* CP3 ENL
4L1.5 CLM M7 EL6 CP4 END
4L2.5 CLM M4/M9* EL3/EL4* CP4 END
4M1 CLL/P M7 EL6 CP4 END
4M2 CLM M7/M9* EL2/EL3* CP4 END
4M3 CLM M9 EL5/EL6* CP4 END
4R1.5 CLM M7/M8* EL2/EL3* CP4 END
4R2.5 CLM M7/M9* EL3/EL4* CP4 END
5M1 CLM M7/M8* EL3/EL6* – END
5M2 CLM M7/M9* EL5/EL6* – END
5M3 CLM M5/M9* EL3/EL4* – END
VITA In-Ceram YZCOLORING LIQUID
MARGIN EFFECTLINER
CHROMA PLUS
ENAMEL
A1 CLL/P M1/M7* EL2 CP1 ENL
A2 CLM M4/M7* EL1/EL3* CP2 ENL
A3 CLM M4 EL4/EL6* CP2/CP3* ENL
A3.5 CLM M4/M9* EL5/EL6* CP2/CP3* END
A4 CLM M4/M9* EL1/EL4* CP2/CP4* END
B1 CLL/P M1/M4* EL1/EL2* CP1 END
B2 CLM M1/M4* EL1/EL3* CP1 END
B3 CLM M4 EL2/EL4* CP2/CP3* END
B4 CLM M4/M9* EL4/EL6* CP3 END
C1 CLL/P M1/M4* EL1/EL6* CP1 END
C2 CLM M4/M7* EL2/EL6* CP1/CP5* END
C3 CLM M4/M7* EL6 CP1/CP5* ENL
C4 CLM M4/M7* EL3/EL6* CP5 ENL
D2 CLM M1/M9* EL2/EL6* CP1/CP5* END
D3 CLM M4/M7* EL2/EL3* CP2/CP5* END
D4 CLM M1/M4* EL2/EL6* CP2/CP5* END
The classifications given below are only intended to provide reference values!
* Mixing ratio 1:1
Classification tables for VITA SYSTEM 3D-MASTER® and VITA classical A1–D4
VITA SYSTEM 3D-MASTERshades
VITA classical A1–D4 shades
25
VITAVM®9 Liquids
VITAVM® MODELLING LIQUIDFor mixing BASE DENTINE, TRANSPA DENTINE, ENAMEL and all additional materials.
VITA MODELLING FLUIDFor mixing all dentine, incisal and additional materials.The MODELLING FLUID avoids rapid drying of the ceramic material. Moreover increased plasticity during layering is achieved.

26
VITAVM®9
EE1EE2EE3EE4EE5EE6EE7EE8EE9EE10EE11
mint creampastelmisty rosevanillasun lightnavajogolden glowcoralwater dropsilver lake bluedrizzle
EP1EP2EP3
pearlpearl blushpearl rose
EO1EO2EO3EO4EO5
opalopal whitishopal bluishopal blueopal dark violet
EL1EL2EL3EL4EL5EL6
snowcreamtabacgolden fleecepapayasesame
M1M4M5M7M8M9
beigewheatamberseashelltanbeach
9
Additional materials
VITAVM®9 EFFECT ENAMEL– can be used for all enamel areas of the
natural tooth– universally suitable translucent enamel
effect material– to achieve a natural effect of depth
whitish-translucentpastelpink-translucentyellowishyellowish-translucentreddish-translucentorange-translucentred-translucentbluish translucentbluegreyish-translucent
VITAVM®9 EFFECT PEARL– only suitable for effects on the surface,
not for layering in– perfectly suitable for bleached
restorations– to obtain nuances of yellow and red
shade in pastel-yellowshade in pastel-orangeshade in pastel-rosé
VITAVM®9 EFFECT OPAL– to create the opal effect
in restorations of young and translucent teeth
neutral, universally suitablewhitishbluishbluedark violet
VITAVM®9 EFFECT LINER– to control the fluorescence from the
depth of the restoration– universally suitable to support and
intensify the base shade– applied in the gingival area,
they enhance the distribution of light– can also be used for the washbake; the
firing temperature, however, must be 970°C
whitebeigebrownyelloworangegreen-yellow
VITAVM®9 MARGIN– for minor corrections at the margin area– after the application, the plastified
MARGIN material must be hardened through the supply of heat; it is recommended to use a hair-drier or radiated heat from the furnace to stabilize the shoulder
whiteyellowamberlight beigepastel-brownlight orange

27
VITAVM®9
SD1SD2SD3
sun lightsun risesun set
MM1MM2MM3
ecrumellow buffpeach puff
G1G2G3G4G5
rosenectarinepink grapefruitrosewoodcherry brown
CP1CP2CP3CP4CP5
ivoryalmondmoccasincaramelburlywood
EC1EC2EC3EC4EC5EC6EC7EC8EC9EC10EC11
ghostlinenpale bananalemon dropgolden rodsunflowerlight salmontoffeedoelarchgravel
COR1COR2COR3
neutralsandochre
9
9
SD
1361
SUNDENTINE
9
Additional materials
VITAVM®9 SUN DENTINE– to obtain a brighter or warmer shade, the
respective TRANSPA DENTINE can either be mixed with SUN DENTINE or replaced by SUN DENTINE
light yellow light orangeorange-red
VITAVM®9 MAMELON– highly fluorescent porcelain which is
mainly used in the incisal area– for shade characterization
between incisal edge and dentine
beigewarm yellow-browntender orange
VITAVM®9 GINGIVA– to restore the original gingival situation– are applied and fired during the first
and / or second dentine firing– color nuances range from
orange-red and reddish to brown-red
dusky pinkorange-pinkpinkbrown-reddark red
VITAVM®9 CHROMA PLUS– Chroma Plus materials can be used to
achieve more intensive shade reproduction in the cervical region (especially with VITA classical A1–D4 shades)
– in case of thin walls, they enhance the shade in an efficient manner
ivorybeigelight orange-brownorangegreen-brown
VITAVM®9 EFFECT CHROMA– color-intensive modifier porcelains– to accentuate certain color areas of the
tooth– to vary the lightness value in the neck,
dentine and enamel areas
whitesand-beigelight yellowtender lemon yellowlight orangeorangepinkbeige-brownbrowngreen-browngreen-grey
VITAVM®9 CORRECTIVE– with reduced firing temperature (760°C)
for corrections after glaze firing– in three nuances for neck,
dentine and enamel areas
neutralbeigebrown
28
VITAVM®9
12 μm
in combination with VITAPM®9
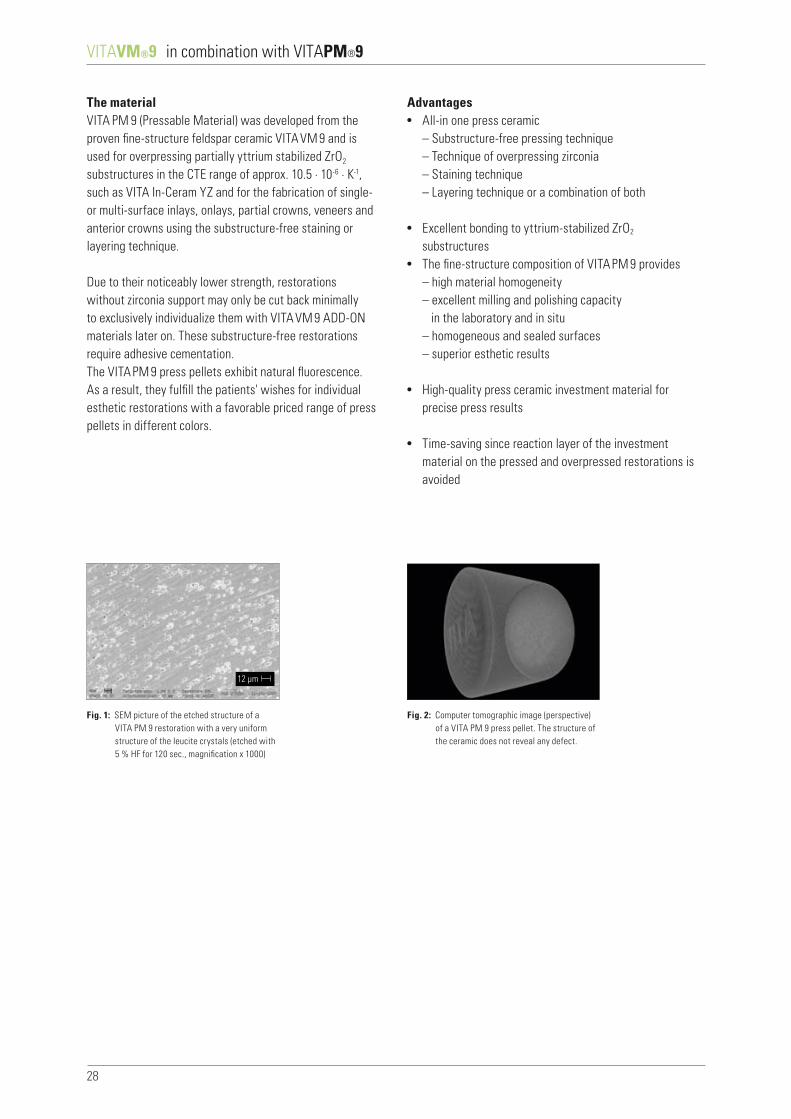
The materialVITA PM 9 (Pressable Material) was developed from the proven fine-structure feldspar ceramic VITA VM 9 and is used for overpressing partially yttrium stabilized ZrO2 substructures in the CTE range of approx. 10.5 · 10-6 · K-1, such as VITA In-Ceram YZ and for the fabrication of single- or multi-surface inlays, onlays, partial crowns, veneers and anterior crowns using the substructure-free staining or layering technique.
Due to their noticeably lower strength, restorations without zirconia support may only be cut back minimally to exclusively individualize them with VITA VM 9 ADD-ON materials later on. These substructure-free restorations require adhesive cementation.The VITA PM 9 press pellets exhibit natural fluorescence. As a result, they fulfill the patients' wishes for individual esthetic restorations with a favorable priced range of press pellets in different colors.
Advantages• All-in one press ceramic
– Substructure-free pressing technique – Technique of overpressing zirconia – Staining technique – Layering technique or a combination of both
• Excellent bonding to yttrium-stabilized ZrO2 substructures
• The fine-structure composition of VITA PM 9 provides – high material homogeneity – excellent milling and polishing capacity in the laboratory and in situ – homogeneous and sealed surfaces – superior esthetic results
• High-quality press ceramic investment material for precise press results
• Time-saving since reaction layer of the investment material on the pressed and overpressed restorations is avoided
Fig. 1: SEM picture of the etched structure of a VITA PM 9 restoration with a very uniform structure of the leucite crystals (etched with 5 % HF for 120 sec., magnification x 1000)
Fig. 2: Computer tomographic image (perspective) of a VITA PM 9 press pellet. The structure of the ceramic does not reveal any defect.

29
VITAVM®9
VITAPM®9
– •
•– •
•
• •
• –
• •
• –
VITA AKZENT Plus VITA AKZENT Plus
•
VITA VM 9 VITA VM 9
in combination with VITAPM®9
* The technical-physical values are typical measuring results and refer to internal samples and measurement equipment available on site. If samples are prepared using different methods and measurement equipment, other measuring results may be produced.
Indication:
• Overpressing technique overpressing of colored and non-colored partially yttrium-stabilized ZrO2 crown and bridge substructures in the CTE range of approx. 10.5 · 10-6 · K-1 , such as substructures made of VITA In-Ceram YZ.*
• Substructure-free staining and layering technique
Individualizing• Overpressing technique:
With all VITA VM 9 materials.
• Substructure-free staining and layering technique: With VITA VM 9 ADD-ON materials. Subsequent glazing with VITA AKZENT Plus GLAZE LT.
Staining techniqueCharacterization with the stains of the VITA AKZENT Plus assortment
Contraindication• bridges without zirconia substructure• overpressing of zirconia substructures beyond the CTE
range given• for patients with parafunctions (e.g. bruxism)• in cases of inadequate oral hygiene• if minimum layer thicknesses of the ceramic can not be
adhered to
For detailed information on processing VITA PM 9 please refer to the Working Instructions No. 1450.
* If the information in the working instructions and the guidelines on substructure fabrication/design provided by VITA are adhered to, VITA PM 9 can be used for substructures made from 3Y-TZP (-A) regardless of the respective manufacturer. Since the function depends on a variety of different parameters, the quality of the individual restoration can only be ensured by the user.
Property Value
CTE (25–500°C) 9.0–9.5 · 10-6 · K-1
Flexural strength approx. 100 MPa
Solubility in acid < 20 μg/cm2
VITAPM®9 – technical data*
recommendedpossible
Overpressing technique
Substructure-free staining and layering
technique
Staining technique
Layering technique
with all VITA VM 9 materials
only with VITA VM 9 ADD-ON materials

30
VITAVM®9
* **
A
B
C
in combination with VITABLOCS®
Clinically proven a million times overThe advantages of the material and processing properties of the VITABLOCS proven by scientific studies have been confirmed by over 16 million clinically successful restorations made of this material to date. The VITABLOCS were rated to be the best material in the CRA newsletter (06/2006). The clinical success rate of inlays and full crowns made of VITABLOCS after 7 years was 94%. In contrast, only 71% of the restorations manufactured from a competitor's glass ceramic were free from defects. Moreover it was demonstrated that clinical abrasion of the restorations made of VITABLOCS corresponded to that of natural tooth enamel.
VITABLOCS: The chameleon among the ceramicsThe high translucency of VITBLOCS guarantees excellent shade matching with the patient's residual tooth substance (known as the "chameleon effect"). The shade of the restorations can be individualized and esthetically perfected with the porcelains of the VITA VM 9 ESTHETICS KIT or VITA AKZENT Plus.
High quality and antagonist friendlyThe unique fine structure of the VITABLOCS ceramic and the industrial sintering process at over 1150 °C provide perfect conditions for distinct advantages such as the good polishing properties and superior abrasion resistance of restorations. Restorations made of VITABLOCS abrade the enamel antagonist at approximately the same rate as does natural tooth enamel. As a result, harmful "sandpaper effects" are avoided.
The left figure shows an inlay made of VITABLOCS (A) with an adhesive margin (B) and tooth enamel (C) after 10 years of function in the patient's mouth. The abraded facet (arrows) shows identical abrasion behavior on tooth enamel and VITABLOCS. The smooth surface in the area of the abraded facet indicates the chemical durability of the material.The inlay surface (A) outside the abraded facet shows the different surface polishing and traces of processing by contouring diamonds.The adhesive cementation groove (B) is essentially well preserved.
Fig. 1: Press ceramic (magnification 500 x) Fig. Russell A. Giordano, DMD, DMSc, Boston University.
Fig. 2: Excellent homogeneity of the structures of industrially sintered VITABLOCSFig. Russell A. Giordano, DMD, DMSc, Boston University.
Fig. 3: SEM picture of the VITABLOCS surface (magnification 1000 x), to the left: polished, to the right: etched for 60 seconds.
The uniform and highly retentive etching pattern caused by homogeneous distribution of the crystal and glass phase can be recognized. * Prof. Dr. Russel A. Giordano II, Boston University ** VITA Zahnfabrik
Fig. 4: Enamel-like abrasion properties of the VITABLOCS. Clinical case of Prof. Dr. W. H. Mörmann, University of Zurich

31
VITAVM®9
0
0,2
0,4
0,6
0,8
1,0
1,2
1,4
0
50
100
0,5 2,7 51
0
0,1
0,2
0,3
0,4
0,5
0,6
0,7
0,8
0,9
1,0
0 2 4 6 8 10 12 14 16 18
VITADUR ALPHA Finesse d. Sign OMEGA 900 VITABLOCS ENAMEL VITA VM 7 VITA VM 9 Softspar Creation Mz 100
• • • • • • VITA VM 9
•
in combination with VITABLOCS®
Abrasion properties of various ceramic materialsThe abrasion behavior of the VITABLOCS ceramic is very similar to that of natural tooth enamel. The left half of the diagram shows the increasing enamel loss caused by abrasion.
The right half shows the increasing substance loss of the test material.Prof. Dr. Russel A. Giordano II, Boston UniversityProf. Dr. Edward A. McLaren, UCLA
Vertical substance loss (μm) Clinical survival rate of restorations made of VITABLOCS Kaplan-Meier index
VITABLOCS *Enamel**
years
yearsWear on opposing enamel teeth in vitro.
Source: * according to Krejci, l.: Wear of CEREC and other restorative materials.
Mörmann, W. H. (publ.): International Symposium on Computer Restorations, Quintessence Publishing Co. Chicago, 245-251, 1991
** according to Krejci et al.: Verschleiß von Schmelz, Amalgam und ihrer Schmelzantagonisten im computergesteuerten Kausimulator. Schweiz Monatsschr, Zahnmed 100: 1285, 1990
Probability of success according to Kaplan-Meier procedure, all restorations, n = 1011
Source:Klinische Überlebensrate von Restaurationen aus VITABLOCS, Dr. B. Reiss, Malsch in: International Journal of Computerized Dentistry 2006; 9:11-22
Ratio
of l
oss
of s
ubst
ance
Ratio enamel loss > 1 material loss > 1
Individualization
Indication of VITABLOCS
recommended

32
VITAVM®9 Assortments
Quantity Content Material
3 12 g CHROMA PLUS CP2– CP4
26 12 g BASE DENTINE 1M1–5M3**
3 12 g SUN DENTINE SD1–SD3
2 12 g ENAMEL ENL, END***
1 12 g NEUTRAL NT***
1 12 g WINDOW WIN***
3 12 g CORRECTIVE COR1–COR3
1 50 ml VITA VM MODELLING LIQUID
– – Accessories
1 – Shade indicator
1 – VITA Toothguide 3D-MASTER
1 – Working Instructions
VITAVM®9 BASIC KIT*/**BASIC assortment for BASIC layering
* also available as BASIC KIT SMALL with reduced range of materials ** also available as BASIC KIT classical (A1–D4) and as BASIC KIT SMALL classical
in the following six shades: A1, A2, A3, A3.5, B3, D3*** also available in 50 g
Quantity Content Material
26 12 g TRANSPA DENTINE 1M1– 5M3
1 50 ml VITA VM MODELLING LIQUID
VITAVM®9 BUILD UP KIT*/**Add-on assortment for BUILD UP layering
* also available as BUILD UP KIT SMALL with reduced range of materials ** also available as BUILD UP KIT classical (A1–D4) and as BUILD UP KIT SMALL
classical with 6 shades *** also available in 50 g
Quantity Content Material
16 12 g BASE DENTINE A1–D4
16 12 g TRANSPA DENTINE A1–D4
2 12 g CHROMA PLUS CP1, CP5
1 50 ml VITA VM MODELLING LIQUID
1 – Shade indicator
1 – VITA classical A1-D4 shade guide
1 – Working Instructions
VITAVM®9 CLASSICAL COLOR KIT*Add-on assortment for VITA VM 9 3D-MASTER users
* Assortment for VITA VM 9 3D-MASTER customers who wish to add VITA classical A1–D4 shades to their assortment

33
VITAVM®9 Assortments
Quantity Content Material
3 12 g BASE DENTINE 0M1–0M3
3 12 g TRANSPA DENTINE 0M1– 0M3
1 12 g ENAMEL ENL
1 12 g NEUTRAL NT
1 12 g WINDOW WIN
1 50 ml VITA VM MODELLING LIQUID
1 –BLEACHED SHADE GUIDESHADE GROUP 0M
1 – Working Instructions
VITAVM®9 BLEACHED COLOR KITUltra-bright shades for the reproduction of bleached teeth
Quantity Content Material
11 12 g EFFECT CHROMA EC1–EC11
11 12 g EFFECT ENAMEL EE1–EE11
6 12 g EFFECT LINER EL1–EL6
3 12 g MAMELON MM1–MM3
3 12 g EFFECT PEARL EP1–EP3
5 12 g EFFECT OPAL EO1–EO5
4 – Shade guides
VITAVM®9 PROFESSIONAL KIT*For incorporating natural effects and characteristics
* Also available as PROFESSIONAL KIT SMALL (EC1, EC4, EC6, EC8, EC9, MM2, EP1, EO2, EE1, EE3, EE7, EE8, EE9, EE10, EE11)
Quantity Content Material
5 12 g GINGIVA G1–G5
1 – GINGIVA shade guide
VITAVM®9 GINGIVA KITGingiva materials with natural effects

34
VITAVM®9 Assortments
Quantity Content Material
6 12 g MARGIN M1, M4, M5, M7, M8, M9
1 – MARGIN shade guide
VITAVM®9 MARGIN KITFor minor corrections in the area of margins
Quantity Content Material
8 12 g ADD-ON ADD1–ADD8
1 5 g VITA AKZENT Plus GLAZE LT
1 50 ml VITA VM MODELLING LIQUID
1 20 ml VITA AKZENT Plus POWDER Fluid
– – Accessories
1 – ADD-ON shade guide
1 – VITA PM 9 working instructions
VITAVM®9 ADD-ON KITFor individualizing substructure-free, pressed VITA PM 9 restorations
Quantity Content Material
1 SetVITABLOCS 3D-MASTER (10 pieces of Mark II I12)
1 12 g WINDOW WIN
1 12 g NEUTRAL NT
2 12 g ENAMEL ENL, END
1 12 g EFFECT PEARL EP1
2 12 g EFFECT ENAMEL EE1, EE10
1 12 g CORRECTIVE COR1
1 4 g AKZENT Plus FINISHING AGENT PASTE
1 4 g AKZENT Plus GLAZE PASTE
1 12 g EFFECT OPAL EO2
2 12 g EFFECT CHROMA EC1, EC4
1 12 g MAMELON MM2
– – Accessories
1 – Working Instructions
VITAVM®9 ESTHETIC KIT for VITABLOCSAdditional assortment for individualizing VITABLOCS

35
VITAVM®9 Information
Safety at work and health protection When working with the product, wear suitable safety goggles/face protection, gloves and safety clothing.
IMPORTANT INFORMATION: Information on troubleshooting can be found under FAQs - all-ceramics - on our website.

VITA Zahnfabrik H. Rauter GmbH & Co.KGPostfach 1338 · D-79704 Bad Säckingen · GermanyTel. +49 (0) 7761/ 562-0 · Fax +49 (0) 7761/ 562-299Hotline: Tel. +49 (0) 7761/ 562-222 · Fax +49 (0) 7761/ 562-446www.vita-zahnfabrik.com · [email protected]
facebook.com/vita.zahnfabrik
1190
E –
0813
(X.)
S –
Vers
ion
(02)
Please note: Our products must be used in accordance with the instructions for use. We accept no liability for any damage resulting from incorrect handling or usage. The user is furthermore obliged to check the product before use with regard to its suitability for the intended area of application. We cannot accept any liability if the product is used in conjunction with materials and equipment from other manufac- turers that are not compatible or not authorized for use with our product. Furthermore, our liability for the accuracy of this information is independent of the legal basis and, in as far as legally permissible, shall always be limited to the value as invoiced of the goods supplied, excluding value-added tax. In particular, as far as legally permis-sible, we do not assume any liability for loss of earnings, indirect damages, ensuing damages or for third-party claims against the purchaser. Claims for damages based on fault liability (culpa in contrahendo, breach of contract, unlawful acts, etc.) can only be made in the case of intent or gross negligence. The VITA Modulbox is not necessarily a component of the product. Date of issue of this information: 08.13
After the publication of these working instructions any previous versions become obsolete. The current version can be found at www.vita-zahnfabrik.com
VITA Zahnfabrik has been certified in accordance to the Medical Device Directive and the following products bear the mark :
VITAVM®9 · VITAPM®9 · VITABLOCS® · VITA In-Ceram® YZ · VITA YZ HT · VITA AKZENT® Plus
VITA VM 9 veneering material is available in VITA SYSTEM 3D-MASTER and VITA classical A1–D4 shades. Shade compatibility with all VITA 3D-MASTER and VITA classical materials is ensured.
With the unique VITA SYSTEM 3D-MASTER all natural toothshades are systematically determined and completely repro-duced.