visualizing effects1108032/fulltext01.pdf · ue4 - the game engine unreal 4. fluid simulation -...
TRANSCRIPT

Visualizing effectsIn stereoscopic images
Kim Seefried
Computer Graphic Arts, bachelor's level
2017
Luleå University of Technology
Department of Arts, Communication and Education

Department of Arts, Communication and Education Luleå University of Technology, Skellefteå 2017
Thesis Computer Graphics, 15hp Bachelor of Fine Arts, Specialization Computer Graphics
Art, 180hp
Visualizing effects
in stereoscopic images
Kim Seefried
Computer Graphics May 20, 2017

Foreword This thesis concludes my Bachelor’s degree of Fine Arts, with a specialization in Computer Graphic Arts at Luleå Technical University. The research was written and conducted at North Kingdom, an experience design agency in Skellefteå. Special thanks to all the people at North Kingdom, my family and friends for the support during this project.
Kim Seefried

Sammanfattning
Denna rapport undersöker och innehåller forskning om olika uppfattningar som uppkommer i stereo rendering när eld skapas på tre olika metoder. Allteftersom tekniken utvecklas blir stereo rendering allt mer populär. Både filmer och spel visas i VR för att ge användaren en mer tillfredsställande och verklighetstrogen upplevelse i en virtuell miljö.
Tre olika versioner av eld skapades i en spelmotor och granskades sedan via en HTC Vive. Jämförandet av mono och stereo rendering gav en insikt i hur de olika metoderna uppvisas med användning av stereo rendering, och vilka uppfattningar de olika metoderna gav användaren.
De olika eldarna testades av flera användare. Tillslut, avslutades denna tes med en intervju med en av användarna och hans uppfattningar av eldarna.
Abstract
This thesis explores and includes research on different impressions given in stereo rendering when creating a fire in three different manners. As technology progresses, stereoscopic rendering becomes increasingly more popular. Both movies and games are shown through VR to give users a more satisfying and lifelike interaction with a virtual environment. Three different versions of a fire were created in a game engine and then viewed with HTC Vive. Comparing mono and stereo rendering gave insights on how the different method looks when using stereoscopic rendering, and what impression the different methods gave the user. The different fires were tested with several users. Finally, this thesis concludes with an interview to one of the users and his different impressions of the fires.
Keywords: rendering, stereo, real-time, fire

Table of contents
1 Introduction ....................................................................................................... 1 1.1 Background ............................................................................................................................................... 2 1.2 Research questions ............................................................................................................................... 3 1.3 Aim of research ....................................................................................................................................... 3 1.4 Limitations ................................................................................................................................................ 3
2 Glossary ............................................................................................................. 4
3 Theory ................................................................................................................ 5 3.1 The virtual reality .................................................................................................................................. 6 3.2 HMD ............................................................................................................................................................. 6
4 Method .............................................................................................................. 7
4.1 The Visual effects .............................................................................................................. 7 4.1.1 Animated textures .................................................................................................................................. 8 4.1.2 Particle system ......................................................................................................................................... 9 4.1.3 Vertex animation ................................................................................................................................. 13
4.2 Imagery comparison ........................................................................................................................... 15 4.3 Data collection ....................................................................................................................................... 16 4.4 Method Critique .................................................................................................................................... 16
5 Result ............................................................................................................... 17
6 Discussion ........................................................................................................ 20
7 Conclusion ........................................................................................................ 22
8 References ....................................................................................................... 23

1
1 Introduction
Adding visual details to a virtual environment, such as dust in a room, burning fires, snow or other elements that exist in reality, creates a more interesting picture in a scene. Adding these visual effects in a virtual reality can give the viewer a more realistic feeling in the virtual world and make it more interesting. However, creating good looking visual effects can be challenging and placing them in a virtual reality creates even more challenges, both technically and artistically. Two different images are needed in order to use stereo rendering. The way in which visual effects are created can produce artifacts that are different than intended, therefore giving less interesting visual effects to a scene. The images displayed can differ between the left and right eye, therefore causing problems for the viewer. To give the viewer a good experience when using an HMD, there should be an understanding about what impression the different methods give when using two images that merge together
This research will be looking at the results and distinguishing the issues and impressions amongst the different approaches created throughout this report. By comparing mono and stereo rendering, finding out the difference between the imagery and what impression the viewer has of the fires when visualizing through an HMD. But also comparing the two stereo rendered images to notice the difference between mono and stereo viewing.

2
1.1 Background In 1838 Sir Charles Wheatstone invented a stereoscope method with reflection, using two plane mirrors placed at an angle of 90 degrees (Brewster 1856, 21-23 [1]). However, the stereoscope did not get very popular until Oliver Wendell Holme’s wooden designed stereoscope was created (Image, Journal of Photography 1(3) George Eastman House 1952). Ivan Sutherland created the first HMD that was attached to a computer system. The HMD had to have support from cables, which was attached to a metal stand. This gave the person the possibility to safely move around (Sutherland 1968, 760).

3
1.2 Research questions How is a fire effect perceived differently by a user when using 3 different rendering methods (texture animation, particle system and vertex animation) and how do these perceptions differ between stereoscopic and mono viewing?
1.3 Aim of research The aim of this research is finding out what the user experiences when viewing FX created with the three methods used in this thesis. The focus of this thesis is on the viewer's impression of the three-dimensional image when adding the visual effects in the picture, using different methods created in these effects.
1.4 Limitations Considering the focus of this thesis, the main limitation is time. Therefore, this research will only extend to three different ways to create fire in the game engine, in order to determine what the viewer’s perception is in these particular cases. There will be no focus on the beautiful picture.

4
2 Glossary ● Binocular vision - The eye's ability to work together and merge two images into
a three-dimensional image. ● UE4 - The game engine Unreal 4. ● Fluid simulation - Techniques for generating realistic animations of fluids
● Billboarding - A textured flat object, that can rotate to faces the cameras direction.
● Sub UV textures - A texture that contains many smaller images. ● Real time graphics - Graphics that are rendered in real time. ● Transparency - This determines in which degree the opacity is set on a graphic
object ● VR - Virtual reality. ● Vive - HTC´s virtual set ● FOV - Field of view. The part of the observable world that is seen at the given
time. ● HMD - Head-mounted display ● FPS - Frames per second

5
3 Theory As claimed by Ramachandran and Rogers-Ramachandran (2009), in everyday life, our brain is able to judge depth and 3 dimensions. This is because we have two eyes slightly offset from each other. When the eyes are focused on an object, they provide two slightly different pictures to the brain, allowing the brain to merge these images and giving the perception of depth (Ramachandran and Rogers-Ramachandran 2009).
Hoffman (2008) explains when creating stereoscopic imagery, the eyes are looking at flat images. Looking only at flat images, the binocular disparities, as well as the muscle tensions rotating the eye to focus on a point, are used correctly when looking at the pictures. However, the muscle tension, which is used to being able to focus on a specific depth within the FOV, is not able to do this when changing the focal length because there is no real depth. The visual system tolerates this but it can cause visual fatigue (Hoffman et al. 2008, 33). According to Bourke (1999) to be able to create stereoscope, two images should be set next to each other, one two-dimensional image for each corresponding eye. The brain processes the two images and merges them together, giving the perception of depth (Bourke 1999, 1). The different methods can give a viewer different impressions and experiences depending on the method they are created with and how they are viewed.

6
3.1 The virtual reality In order to create VR for movies or games with the illusion of depth, the images are rendered with two different cameras that are slightly offset from each other. This is called stereoscopic imagery.
With stereoscopic images, we can fool the brain into thinking that it sees the same image but from two different angles. There are different ways to create stereo rendering. One example is using two cameras that are set on a ramp about 2.5 inches (6.3 cm) apart from each other. This is called interocular distance (Grasberg, 2008). Another example is using a single camera with a mirror splitter.
3.2 HMD An HMD is a computer display mounted on the head, allowing it to follow the viewer's movements at all times and keeping the monitors in front of the viewer´s eyes. An HMD usually has two monitors, one for each eye. There are also monitors, like a mobile phone, that can be divergent into two sections and used as an HMD. Motion sickness can be a problem when using VR. When the head and body stand still but the imagery is moving, it can cause disorientation, dizziness or nausea, due to rapid movement and jump cuts. In addition, if the FPS is under 90, the different frames could be visible. Keeping the FPS over 90 prevents the world to lag or stammer while moving in the virtual reality.

7
4 Method
4.1 The Visual effects This research explored three different methods to create fire and it includes a comparison of a user’s impression when viewing the effect in stereo and mono render. Reading academic papers and books to understand the background of the stereoscopic viewing. This created a greater understanding why the viewing in VR would have a different impression on the viewer then the mono viewing. Having the people at North Kingdom give feedback and participate in creative discussions, gave a better understanding of the overall feel from the different methods.
In this case, a fire was created in three different ways; animated textures (billboarding), particle system and vertex animation. When creating visual effects with stereoscopic imagery, it is important to keep in mind that in VR one can approach the effect and move around it, therefore seeing the effect up close. It is also important to keep in mind that the image is being rendered in a stereoscopic view. To conclude this research with insights on user experience, the Vive was used to look at the different fires with stereoscopic imagery in virtual reality. Additionally, a split screen on a monitor with the stereoscopic images was compared with the mono image in order to conclude the impression of the fires when using these different methods. Different users also tested the VR experience and gave feedback on their thoughts about it. As a last step, the results were evaluated in an interview with one of the designers at North Kingdom.
(Figure 1. Flowchart)

8
4.1.1 Animated textures
The fire made up by animated textures (see Figure 2) was created in UE4 with four elements; two textures, a normal map to give a sense of depth and panner nodes to create movement in the texture. Using a simple black-and-white image of a flame gave the texture a flame-like opacity on the billboard. Inside the flame texture, to give the fire some life, an image of roiling fire and a normal map created a fake depth to the roiling texture. This was then applied to the opacity texture. Adding a glow to the fire using a power node and two vector parameters with a warm and a cooler color, gave the fire its color. The normal map was duplicated 4 times creating irregularities in the fire. Then hooked up to panner nodes to create upward and slightly sideways movements, with different speeds to create a moving fire texture. To get more distortion further up on the fire, while ignoring the bottom, a gradient that was black at the bottom and white at the top, masked the normals vertically to control the distortion.
(Figure 2. Fire Material Node Tree in Unreal)

9
4.1.2 Particle system Fire particle: This method was used to create a torch flame with a particle system. The torch fire was built with three emitters in a particle system, collaborating to create a fire with smoke and embers, while using a sub-UV texture on the fire that randomly spawns between four different images (see Figure 3.1). The texture was created in Photoshop, fitted side by side and given a gray scale value.
(Figure 3.1. Fire textures downloaded from textures.com then edited in Photoshop, fitted on a 1024x512 canvas.1)
The particle system was given its translucency via the subUV textures, using an unlit material to keep texture's edges. The sub-UV textures' count was changed to four in the horizontal line in order to interpolate randomly between the images and at random. The orange/red color of a fire was given through the alpha, with RGB values of 55,2 and 10. Then, to give it more randomness, a Color over life module was added and it was applied to a curve, making the color fade in and out over its lifespan. The size of the particles' were changed and they were given velocity to create a non-repetitive movement in the fire. They were also stretched over time, so that the fire particles' were shorter in the beginning, becoming longer over time. This made the fire look like it was growing, scattering the particles' spawning position to give the fire a larger range. To keep the fire from looking like it moved in slow motion, an acceleration module was added to the fire emitter. Creating a material UV distortion gave the fire more movement inside the fire itself, making the textures move together with the fire. This was produced by adding a repeatable noise, which was created in Photoshop with a cloud filter in each of the RGB channels. The noise was panned in different directions, giving the texture a waving motion in the fire material. To create even more variation with direction and speed, another panner node and noise texture were added to the fire texture. Using a
1Fire and flame, image no. 3, 49, 55 and 6 http://www.textures.com/browse/flames/60042

10
texture coordinate node and tiling it four times, gave the noise movement the same amount of distortion per flame. The distortion was controlled with a dynamic parameter, which gave it distortion more turbulence over time. A second parameter was used to randomize the beginning and then multiplied by a curve, giving it even more distortion over time. To give higher contrast to the texture in the black-and-white values, a power node was added and controlled by a parameter for variation. With the distortion, the edges got passed over to the other side of the flames. A white box texture with faded edges created a black edged mask. Then, a texture coordinate that was tiled by four was connected to the mask previously created with the same layout for the mask as the sub-UV texture. This process allowed the passing of textures to become faded out. A macroUV node was tiled and then multiplied with a texture coordinate that stretched the macroUV, which was inputted noise texture and connected to a planner for movement. With this connected to a ConstatBiasScale2 node adding a value of 0.1 was added to keep it from going to pure black. This multiplied with the particle color and inputted to the material's emissive color gave the fire some black spots flying through. Masking out a gradient from the green channel in a texture coordinate node and multiplying it to power node made the fire dissipate at the top.
(Figure 3.2. Particles’ fire material)
Smoke particle: As a next step, a new material was created, attached to a cloud texture that included an alpha channel. Furthermore, to be able to change the color of the particles, a particle color node was applied. Adding an emitter to the particle system and applying the material gave the particles their opacity and emissive color. To increase the variation in size, a Size by life module was added to make the particles grow larger over their lifetime. Just like the fire, scatter was added to make the particles randomize their spawning points, and the emitter was moved up to make the smoke start higher in the flames.
2 x = (Input + Bias) * Scale

11
When the emitters spawned, their initial velocity was increased and a velocity over life made the smoke become slightly slower the longer it lived. Adding an Initial rotation and an Initial rotation rate module added rotation and a sense of spinning to the smoke; this made the smoke seem less repetitive. A Color over life module gave the smoke the color of fire at the beginning of the particles´ life, making it blend in with the fire and then progress into a gray smoke color. After multiplying a noise texture with the cloud texture and controlling them with a Lerp3, different values were given. With a value of 0, only the texture connected to pipe A would be visible. With a value of 1, only the texture connected to pipe B would be visible. However, any value between 0 and 1 blends the two textures. Furthermore, an alpha erode parameter controls the transparency given by the Lerp to animate it over time.
(Figure 3.3. Smoke material)
Ember particle: By applying a new material with an additive blend mode to another emitter and by using a black-and-white texture, along with a particle color node to color tint the particles, the base of the embers was created. The embers got a color over life with the RGB values of 25, 10 and 2. To create a pulsing look in the embers, two sine waves were added together and they were controlled by a dynamic parameter and a time, giving them a randomized pulsing speed. Afterwards, the particles' spawning area was expanded. This combined with giving them initial velocity gave them better scatter and allowed them to fly around randomly. Also, the embers were made to be quick in the beginning and then become slower as they lived with a Velocity over life module. As an additional step, randomizing their lifetime made them even more irregular. 3 Lerp - linear interpolation

12
(Figure 3.4 Ember material)
Last touch: Adding a linked Initial velocity curve (see Figure 3.5) to all the emitters gave the effect a cohesive motion, so all the particles moved together and got some random motion in the flame.
(Figure 3.5. Screenshot UE4)
13
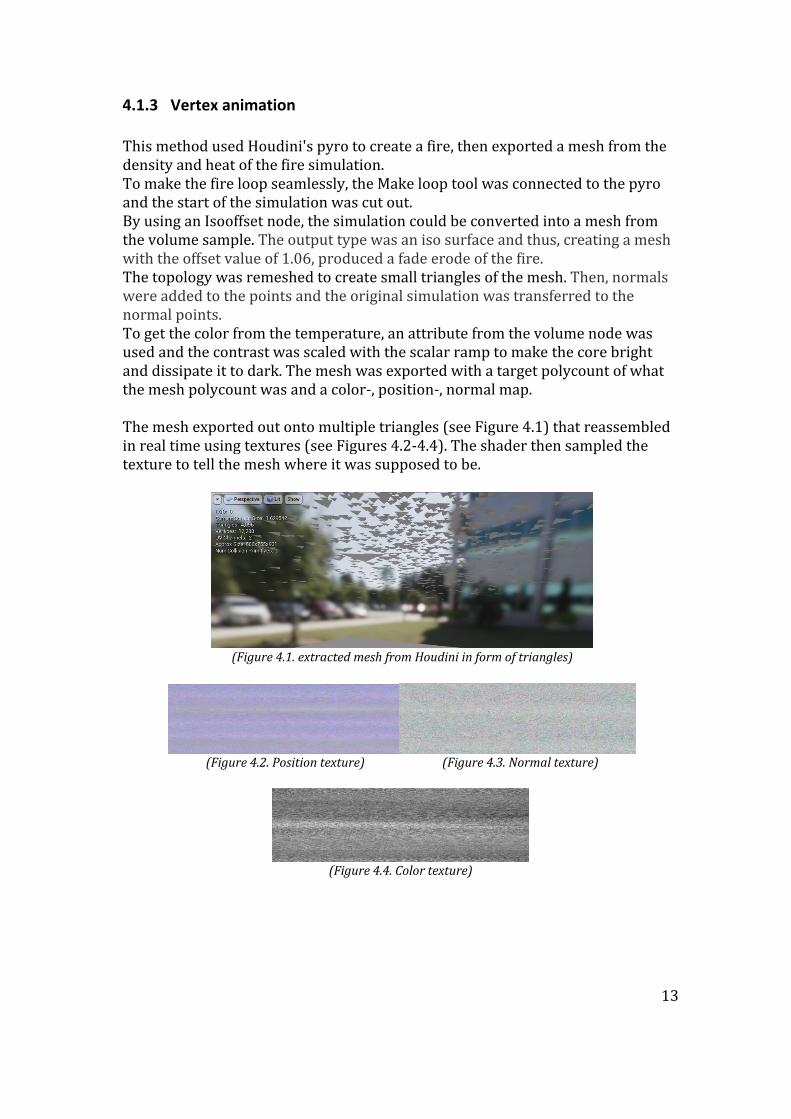
4.1.3 Vertex animation This method used Houdini's pyro to create a fire, then exported a mesh from the density and heat of the fire simulation. To make the fire loop seamlessly, the Make loop tool was connected to the pyro and the start of the simulation was cut out. By using an Isooffset node, the simulation could be converted into a mesh from the volume sample. The output type was an iso surface and thus, creating a mesh with the offset value of 1.06, produced a fade erode of the fire. The topology was remeshed to create small triangles of the mesh. Then, normals were added to the points and the original simulation was transferred to the normal points. To get the color from the temperature, an attribute from the volume node was used and the contrast was scaled with the scalar ramp to make the core bright and dissipate it to dark. The mesh was exported with a target polycount of what the mesh polycount was and a color-, position-, normal map. The mesh exported out onto multiple triangles (see Figure 4.1) that reassembled in real time using textures (see Figures 4.2-4.4). The shader then sampled the texture to tell the mesh where it was supposed to be.
(Figure 4.1. extracted mesh from Houdini in form of triangles)
(Figure 4.2. Position texture) (Figure 4.3. Normal texture)
(Figure 4.4. Color texture)

14
For this to work, the shader code from Houdini needed to be applied to a UE4 material (see Figure 4.5) and an instance needed to be made with that material. The scale parameter in the instance material needed the bounding values and the information on number of frames from Houdini.
(Figure 4.5. UE4 fluid vertex animation shader code, exported from Houdini to UE4)
A texture map ramp (see Figure 4.6) was created with two points, with values of 0.01, 0.01, 0.01 and 15, 5.8, 2.7, and with the size of 256 x 4. Applying the texture ramp in the Vertex animation shader materials color ramp gave the fire its color values.
(Figure 4.6. Fire texture ramp)

15
4.2 Imagery comparison This section describes the method used for image comparison. At this point, the project was moved to a computer in which an HMD was already set up. The fire was then viewed and analyzed from all different angles through three-dimensional viewing. Then, both the mono and the two stereo viewing were compared with one another to find differences in the experience. All this was done in an interview with a designer at North Kingdom. The interview questions were:
What is your impression of the effects? What differences do you experience viewing the effect in VR and on
the flat screen? What is your judgment of the effects? Do you have the same impression of the effects close up as you do
far way, or do you experience them differently?

16
4.3 Data collection Apparatus and programs that was used through this research 4.3.1 HTC Vive The Vive has 110 degrees FOV, with 32 headset sensors for 360 degrees motion tracking. Its combined resolution is 2160 x 1200 with a 90 Hz refresh rate. This gives users the impression that the VR world is all around them. (HTC Vive, 2017). 4.3.2 UE4 Game engine developed by Epic Games 4.3.3 Autodesk Maya 3D computer graphics software 4.3.4 Side FX Houdini Apprentice 3D computer graphics software
4.4 Method Critique If a bigger variation of effects would have been included in the research, for example, water, portals or sand, could this have given a greater picture of the difference between the methods explored throughout this thesis?
Since the effects are only in an empty scene, would the experience be different if they would have been added into an environment? Also, these methods are only using one type of texture and settings. If the settings or texture would be changed, would this exclude some artifacts or give new ones?
If other people would look at the effects, would they have different opinions and thoughts about the visual effect?

17
5 Result These results are based on an interview with one of the designers at North Kingdom.
Animated textures:
This method resulted in a fire that resembled an open fire or a car fire created for a game. The fire could fit in a well-made, modern game and it had no obvious pixelation or weird shadow. It looked like the fire was burning from a log of wood and like heat came from it. The fire had a sense of depth but it instantly became very flat if the user moved around it (see Figure 5.2 and 5.4). However, it did not appear to be flat when looking at it straight ahead (see Figure 5.1 and 5.3). Something at the top felt unnatural and when looking at the animated textures in VR, it looked more real than when only looking at the fire in mono view. As a final insight to the result from this method, the animated textures had a flat sense when viewing in mono and more depth in stereo viewing.
(Figure 5.1. Stereo front) (Figure 5.2. Stereo sideways)
(Figure 5.3. Mono front) (Figure 5.4. Mono sideways)

18
Particle system:
The particle system (see Figure 6.1-6.4) did not feel as real as the animated texture. Because of the way it appeared, a feeling of lightning was perceived, instead of the feeling of actually fire.
The embers looked like something from a fairy tale rather than embers from a fire. The best part of this method was the smoke; it appeared in puffs and gave a bonfire feeling. Altho the fire had no apparent flaws, it felt fast and bilious, but only on the sides of the fire. The particle system always looked as though electrical and there was no difference in this between mono and VR. However, when approaching the fire in VR, the bottom half was not visible and this made it look more realistic.
(Figure 6.1. Stereo front) (Figure 6.2. Stereo sideways)
(Figure 6.3. Mono front) (Figure 6.4. Mono sideways)
Vertex animation:
This method felt more like a volcano outburst or an explosion (see Figure 7.1-7.4), since it appeared to be building up from the bottom and melting out towards the top. When viewed in VR, the vertex animation felt a lot more realistic than in the mono viewing. However, this method gave a pixelated feeling. In the words of

19
the user: “It looks like a fire that would fit in the first Doom4 game”. It had a low poly look to it and a very repetitive feeling when studying the fire, but not something noticeable in the beginning.
(Figure 7.1. Stereo front) (Figure 7.2. Stereo sideways)
(Figure 7.3. Mono front) (Figure 7.4. Mono sideways)
Overall:
The animated texture method felt most realistic when closer to the fires; however, this method has a limited area of use due to the billboard. Viewed at a distance, the particle system felt most realistic because the particles were not visible in the same sense, but rather the smoke had the attention, as it blended in with the fire. This reduced focus from the fire when standing close to it. The particle system area of use could be unlimited, as long as the visual aspects do not break the illusion; such as in the case when the fire looked more like electric sparks. Finally, the vertex animation method is a good fit for VR because the fire is built with triangles that create a mesh, giving the fire a greater depth. Therefore, the user can actually move around the fire and see it from different angles.
4 A first person shooter game by id Software created in 1993
20
6 Discussion These methods all gave a very different impression to the user, not only because they look like different fires, but because with the way they were created made a big difference of how the fire was perceived. The following discussion is based on personal observations, rather than on feedback from the user as in the previous section.
Animated textures:
When looking at the animated textures placed on a billboard, it was not apparent that the fire was placed on a flat surface. However, when moving to the side of the billboard it became very apparent and the fire became skewed because of the perspective of the billboard when moving to the side. With animated textures, there was a nice movement both on the inside and on the edges of the fire, and the fire had no particular repetitive movement. At a distance, the fire looked well, but when moving close and looking at the inside of the fire, the look was similar to being on a moving treadmill However, the top of the fire seemed to be cut off, like it was sliced in places where it should not be, making the user notice there was something wrong at the top of the fire. In certain moments, there was an unexplained fire edge popping out of nowhere on the side of the fire. This might be avoided using a different alpha for the fire. In addition, some parts of the fire seemed to be standing still because the silhouette of the fire had very much the same form all the time. When the fire had a little less distortion, it seemed to be a waving flag rather than a moving fire; this made the animated textures seem stiff.
Looking at the animated textures in mono viewing, the fire looked flat. Other than that, the user’s perception was the same as in stereo viewing.
The animated textures could then be used in an environment where the user would not be able to move around or behind it, since the illusion of the fire would be broken when moving around the fire at a bigger angle. Particle system: The fire particles were emitted in such a way that the fire looked electric – like it was popping “in and out” – more than a burning fire. The fire particles also looked flat when viewing it with the HMD. The edges were very stiff and had the same look; this might have been improved with a fading on the edges. The fire had a very repetitive look. However, with additional subUV’s, the fire could get more variation and this might have been avoided. When looking at the fire from overhead, the flat planes of the spawning particles were very visible, showing big planes popping in and out of view. The smoke had a very fluffy appearance and had no apparent repetition, but the smoke particles did not fade in together. All the particles' edges were visible; this

21
gave the smoke more of a puffing look rather than a consistent smoke. Looking at the particles form overhead, the smoke did not seem unified but the particles seemed to transition better into each other. When looking at the ember particles through the VR and approaching them, they all looked the same, like flat squares flying around. When moving around the virtual reality and looking at the fire, the sprites rotated along with the headset, always pointing the particles towards the camera. From a far distance, the fire built with this method was most appealing, probably due to the smoke.
When viewed with mono, the embers looked less like a fairy tale, since they did not seem repetitive. Otherwise, the particle system had the same issues with the mono viewing as it had in stereo rendering, although they were more noticeable in stereo. Vertex animation: The vertex animation felt very repetitive, but this might have been avoided with a better and longer simulation from Houdini. Also, there was a popping in the animation where the fire was seamed together; this could also be reviewed in Houdini to make sure the seam was better fitted. This method looked good from all angles due to the fact that triangles building up the fire. This also gave a lot of depth to the fire; however, it had a sense of hollowness. Another interesting insight was that this method can easily become cartoony if not enough triangles are added. When looking at this through the Vive, the fire seemed to move in slow motion. In addition, when using this method, the fire had a very noticeable edge, and when looking at the vertex animation from a distance, it seemed like it gave aliasing on the edges. This might be fixed using an anti-aliasing technique or a higher count of triangles in the fire.
The mono viewing had the same issues as when looking through the VR, but in the mono viewing, the fire did not feel as slow.

22
7 Conclusion This research started with the question; How is a fire effect perceived differently by a user when using 3 different rendering methods (texture animation, particle system and vertex animation) and how do these perceptions differ between stereoscopic and mono viewing?
The results conclude that all the different method has its good and bad qualities, so depending on what and where the effect is used for would be the choice of method. However, using planes for stereoscopic viewing, the images can easily seem flat and fake. So, the better-suited method for stereoscopic rendering would be the Vertex animated method due to the use of an actual mesh, instead of using planes because this is very noticeable in a stereoscopic view. All the methods had different artifacts both in stereoscopic and mono viewing. But the one with the least issues was the vertex animation and due to the fact that it gave a depth to the fire that was not given by the other methods, the vertex animation would be better suited for stereoscopic viewing.

23
8 References 1. Brewster, D. (1856). The Stereoscope; Its History, Theory and Construction, with Its Application to the Fine and Useful Arts and to Education, London: Etc. John Murray. Pp.21-23 https://archive.org/stream/stereoscopeitshi00brewrich#page/n31/mode/2up/search/holmes (Accessed: 2017-03-23) 2.Holmes, O.W.: The American stereoscope. Image, Journal of Photography 1(3) George Eastman House (1952) Reprint v. “Philadelphia Photographer” 1896 http://www.luminous-lint.com/libraryvault/GEH_Image/GEH_1952_01_03.pdf (Accessed: 2017-04-29) 3. Sutherland, I. E. (1968, December). A head-mounted three dimensional display. In Proceedings of the December 9-11, 1968, fall joint computer conference, part I (pp. 757-764). ACM. http://141.84.8.93/lehre/ss09/ar/p757-sutherland.pdf (Accessed: 2017-04-12) 4. Ramachandran, V. S., & Rogers-Ramachandran, D. (2009). Two eyes, two views. Scientific American Mind, 20(5), 22-24. 5. Hoffman, D. M., Girshick, A. R., Akeley, K., & Banks, M. S. (2008). Vergence–accommodation conflicts hinder visual performance and cause visual fatigue. Journal of vision, 8(3), 33-33. http://jov.arvojournals.org/article.aspx?articleid=2122611 (Accessed: 2017-04-05) 6. Bourke, P. (1999). Calculating stereo pairs, 1999. Se e http://astronomy. swin. edu. au/~ pbourke/stereographics/stereorender. http://paulbourke.net/stereographics/stereorender/ (Accessed: 2017-03-23) 7. Grasberger, H. (2008). Introduction to stereo rendering. Student Project, Institute of Computer Graphics and Algorithms-Vienna University of Technology. https://www.cg.tuwien.ac.at/research/publications/2008/Grasberger_2008_ISR/Grasberger_2008_ISR-Paper.pdf (Accessed: 2017-03-23) 8. Inside the headset, HTC 2011-2017, https://www.vive.com/eu/product/ (Accessed: 2017-04-13)