vistamart user guide
DESCRIPTION
Infovista Table MappingsTRANSCRIPT

7/17/2019 VistaMart User Guide
http://slidepdf.com/reader/full/vistamart-user-guide 1/265
VistaMart® 4.0
User Guide

7/17/2019 VistaMart User Guide
http://slidepdf.com/reader/full/vistamart-user-guide 2/265
2
VistaMart® 4.0
User Guide
Part Number: 40_300_000_40
Copyright 1996-2007 InfoVista S.A.
All rights reserved.
InfoVista®, VistaView®, VistaBridge®, VistaMart®, VistaDiscovery®, VistaPortal®,
VistaFoundation™, VistaInsight®, VistaLink®, Vista Plug-In®, VistaProvisioner®,
Vista Troubleshooter®, VistaCockpit®, and Vista Watch® are trademarks or
registered trademarks of InfoVista S.A. in the United States and/or other countries.
The information contained in this document is the property of InfoVista S.A. No part of
this publication may be reproduced in any form (including photocopying or electronic
storage on any medium) or by any means or used to make any derivative work (suchas translation, transformation or adaptation) without the express written permission of
InfoVista S.A.
The information contained in this document is subject to change without notice and
does not carry any contractual obligation for InfoVista. InfoVista reserves the right to
make changes to any products or services described in this document at any time
without notice. InfoVista shall not be held responsible for the direct or indirect
consequences of the use of the information contained in this document.
Brand and product names mentioned in this publication may be registered trademarksor trademarks of their respective holders.
web : www.infovista.com
E-mail: [email protected]
7/17/2019 VistaMart User Guide
http://slidepdf.com/reader/full/vistamart-user-guide 3/265
VistaMart® 4.0 User Guide Contents
Contents
1 Getting started with VistaMart®
VistaMart in a nutshell . . . . . . . . . . . . . . . . . . . . . . . . . . . . . . . . . . . . . . . . . . . . . . . . . . . . . . . . . . . . . 9
How does VistaMart work? . . . . . . . . . . . . . . . . . . . . . . . . . . . . . . . . . . . . . . . . . . . . . . . . . . . . . . . . 9
VistaMart’s role within the VistaFoundation® . . . . . . . . . . . . . . . . . . . . . . . . . . . . . . . . . . . . . . . . . 10
Coming from earlier VistaMart versions . . . . . . . . . . . . . . . . . . . . . . . . . . . . . . . . . . . . . . . . . . . . . . . . 11
Introducing the VistaMart Application Services. . . . . . . . . . . . . . . . . . . . . . . . . . . . . . . . . . . . . . . . 11
What’s new between version 2.2 SP2 and 4.0 . . . . . . . . . . . . . . . . . . . . . . . . . . . . . . . . . . . . . . . . . 12Connecting to VistaMart . . . . . . . . . . . . . . . . . . . . . . . . . . . . . . . . . . . . . . . . . . . . . . . . . . . . . . . . . . . 13
Getting acquainted with the Inventory Manager . . . . . . . . . . . . . . . . . . . . . . . . . . . . . . . . . . . . . . . 13
Configuring VistaMart for your VistaInsight solution. . . . . . . . . . . . . . . . . . . . . . . . . . . . . . . . . . . . . . . 15
Checking initialization settings . . . . . . . . . . . . . . . . . . . . . . . . . . . . . . . . . . . . . . . . . . . . . . . . . . . 16
Installing libraries (VistaViews®) . . . . . . . . . . . . . . . . . . . . . . . . . . . . . . . . . . . . . . . . . . . . . . . . . . 16
Configuring Zonesets and Zones . . . . . . . . . . . . . . . . . . . . . . . . . . . . . . . . . . . . . . . . . . . . . . . . . . 17
Configuring the reporting scope . . . . . . . . . . . . . . . . . . . . . . . . . . . . . . . . . . . . . . . . . . . . . . . . . . 18
Provisioning the VistaMart database . . . . . . . . . . . . . . . . . . . . . . . . . . . . . . . . . . . . . . . . . . . . . . . 21
Synchronizing VistaMart with InfoVista Servers. . . . . . . . . . . . . . . . . . . . . . . . . . . . . . . . . . . . . . . . 22
Modifying miscellaneous settings . . . . . . . . . . . . . . . . . . . . . . . . . . . . . . . . . . . . . . . . . . . . . . . . . . . . 23
Registering user services . . . . . . . . . . . . . . . . . . . . . . . . . . . . . . . . . . . . . . . . . . . . . . . . . . . . . . . . 23
Setting preferences. . . . . . . . . . . . . . . . . . . . . . . . . . . . . . . . . . . . . . . . . . . . . . . . . . . . . . . . . . . . 24
Receiving traps from InfoVista Server . . . . . . . . . . . . . . . . . . . . . . . . . . . . . . . . . . . . . . . . . . . . . . 25
Setting VistaMart data lifetime and aggregation. . . . . . . . . . . . . . . . . . . . . . . . . . . . . . . . . . . . . . . 26
Adding data sources . . . . . . . . . . . . . . . . . . . . . . . . . . . . . . . . . . . . . . . . . . . . . . . . . . . . . . . . . . . 27
2 Provisioning VistaMart
Understanding centralized provisioning . . . . . . . . . . . . . . . . . . . . . . . . . . . . . . . . . . . . . . . . . . . . . . . . 30
Using the Inventory Manager for provisioning . . . . . . . . . . . . . . . . . . . . . . . . . . . . . . . . . . . . . . . . 30
Importing topologies for provisioning . . . . . . . . . . . . . . . . . . . . . . . . . . . . . . . . . . . . . . . . . . . . . . 31
Selecting Zones and Zonesets to provision . . . . . . . . . . . . . . . . . . . . . . . . . . . . . . . . . . . . . . . . . . . . . . 32
Understanding Zones . . . . . . . . . . . . . . . . . . . . . . . . . . . . . . . . . . . . . . . . . . . . . . . . . . . . . . . . . . 32
Understanding Zonesets . . . . . . . . . . . . . . . . . . . . . . . . . . . . . . . . . . . . . . . . . . . . . . . . . . . . . . . . 33About change management and provisioning . . . . . . . . . . . . . . . . . . . . . . . . . . . . . . . . . . . . . . . . . . . . 34
Recognizing Instance modifications. . . . . . . . . . . . . . . . . . . . . . . . . . . . . . . . . . . . . . . . . . . . . . . . 34
Moving proxy Instances . . . . . . . . . . . . . . . . . . . . . . . . . . . . . . . . . . . . . . . . . . . . . . . . . . . . . . . . 36
Managing groups Instances . . . . . . . . . . . . . . . . . . . . . . . . . . . . . . . . . . . . . . . . . . . . . . . . . . . . . . 37
Understanding synchronization levels . . . . . . . . . . . . . . . . . . . . . . . . . . . . . . . . . . . . . . . . . . . . . . 38
Exercising object ownership and priority . . . . . . . . . . . . . . . . . . . . . . . . . . . . . . . . . . . . . . . . . . . . 39
Applying provisioning modes. . . . . . . . . . . . . . . . . . . . . . . . . . . . . . . . . . . . . . . . . . . . . . . . . . . . . 40
Selecting topology files for provisioning . . . . . . . . . . . . . . . . . . . . . . . . . . . . . . . . . . . . . . . . . . . . . . . 44
Using VistaDiscovery for provisioning . . . . . . . . . . . . . . . . . . . . . . . . . . . . . . . . . . . . . . . . . . . . . . 44Using external topology files for provisioning . . . . . . . . . . . . . . . . . . . . . . . . . . . . . . . . . . . . . . . . 44
Choosing a file format . . . . . . . . . . . . . . . . . . . . . . . . . . . . . . . . . . . . . . . . . . . . . . . . . . . . . . . . . 45
7/17/2019 VistaMart User Guide
http://slidepdf.com/reader/full/vistamart-user-guide 4/265
4
VistaMart® 4.0 User Guide Contents
Provisioning with XML topology files . . . . . . . . . . . . . . . . . . . . . . . . . . . . . . . . . . . . . . . . . . . . . . . 45
Provisioning with CSV topology files . . . . . . . . . . . . . . . . . . . . . . . . . . . . . . . . . . . . . . . . . . . . . . . 48
Generating automatically a configuration file . . . . . . . . . . . . . . . . . . . . . . . . . . . . . . . . . . . . . . . . . 49
Following-up your provisioning . . . . . . . . . . . . . . . . . . . . . . . . . . . . . . . . . . . . . . . . . . . . . . . . . . . 51Managing topology objects manually . . . . . . . . . . . . . . . . . . . . . . . . . . . . . . . . . . . . . . . . . . . . . . . . . . 52
Searching inventory objects . . . . . . . . . . . . . . . . . . . . . . . . . . . . . . . . . . . . . . . . . . . . . . . . . . . . . 60
Deleting inventory Objects . . . . . . . . . . . . . . . . . . . . . . . . . . . . . . . . . . . . . . . . . . . . . . . . . . . . . . 61
Command-line provisioning options . . . . . . . . . . . . . . . . . . . . . . . . . . . . . . . . . . . . . . . . . . . . . . . . 65
3 Managing InfoVista Servers
Overview of InfoVista Server management . . . . . . . . . . . . . . . . . . . . . . . . . . . . . . . . . . . . . . . . . . . . . . 68
InfoVista Servers in the production context . . . . . . . . . . . . . . . . . . . . . . . . . . . . . . . . . . . . . . . . . . 69
Assigning zones to Groups of InfoVista Servers . . . . . . . . . . . . . . . . . . . . . . . . . . . . . . . . . . . . . . . . . . 70
Understanding Zone assignments. . . . . . . . . . . . . . . . . . . . . . . . . . . . . . . . . . . . . . . . . . . . . . . . . . 70
Assigning Instances to an InfoVista Server group . . . . . . . . . . . . . . . . . . . . . . . . . . . . . . . . . . . . . . 70
Examples of Zone/InfoVista Server Management . . . . . . . . . . . . . . . . . . . . . . . . . . . . . . . . . . . . . . . 71
Declaring a New InfoVista Server Group . . . . . . . . . . . . . . . . . . . . . . . . . . . . . . . . . . . . . . . . . . . . . . . . 72
Declaring a new InfoVista Server . . . . . . . . . . . . . . . . . . . . . . . . . . . . . . . . . . . . . . . . . . . . . . . . . . . . . 73
Checking InfoVista Server properties . . . . . . . . . . . . . . . . . . . . . . . . . . . . . . . . . . . . . . . . . . . . . . . 74Synchronizing InfoVista Server groups . . . . . . . . . . . . . . . . . . . . . . . . . . . . . . . . . . . . . . . . . . . . . . . . . 75
Getting InfoVista Server feedback . . . . . . . . . . . . . . . . . . . . . . . . . . . . . . . . . . . . . . . . . . . . . . . . . 77
Handling ‘unstable’ servers . . . . . . . . . . . . . . . . . . . . . . . . . . . . . . . . . . . . . . . . . . . . . . . . . . . . . . 78
Managing InfoVista Server loads . . . . . . . . . . . . . . . . . . . . . . . . . . . . . . . . . . . . . . . . . . . . . . . . . . . . . 79
Redistributing Instances between InfoVista Servers . . . . . . . . . . . . . . . . . . . . . . . . . . . . . . . . . . . . 79
4 Understanding the Vistamart Forwarding ServiceBasic principles in data forwarding . . . . . . . . . . . . . . . . . . . . . . . . . . . . . . . . . . . . . . . . . . . . . . . . . . . 85
Benefits of forwarding data instead of collecting data . . . . . . . . . . . . . . . . . . . . . . . . . . . . . . . . . . 85
Forwarding data from InfoVista Servers to VistaMart . . . . . . . . . . . . . . . . . . . . . . . . . . . . . . . . . . . . 85
Forwarding service implementations . . . . . . . . . . . . . . . . . . . . . . . . . . . . . . . . . . . . . . . . . . . . . . . 86
Forwarding concepts and terminology . . . . . . . . . . . . . . . . . . . . . . . . . . . . . . . . . . . . . . . . . . . . . . . . . 87
Connecting to the forwarding service . . . . . . . . . . . . . . . . . . . . . . . . . . . . . . . . . . . . . . . . . . . . . . . . . 88
Recovering missing data (VistaMart) . . . . . . . . . . . . . . . . . . . . . . . . . . . . . . . . . . . . . . . . . . . . . . . . . . 89
Requesting a recovery (VistaMart) . . . . . . . . . . . . . . . . . . . . . . . . . . . . . . . . . . . . . . . . . . . . . . . . . 89
Requesting a recovery (InfoVista Server) . . . . . . . . . . . . . . . . . . . . . . . . . . . . . . . . . . . . . . . . . . . . 89
Ensuring data availability . . . . . . . . . . . . . . . . . . . . . . . . . . . . . . . . . . . . . . . . . . . . . . . . . . . . . . . . . . 90
How VistaMart manages data flows . . . . . . . . . . . . . . . . . . . . . . . . . . . . . . . . . . . . . . . . . . . . . . . . 90
Avoiding a saturated situation . . . . . . . . . . . . . . . . . . . . . . . . . . . . . . . . . . . . . . . . . . . . . . . . . . . 92

7/17/2019 VistaMart User Guide
http://slidepdf.com/reader/full/vistamart-user-guide 5/265
5
VistaMart® 4.0 User Guide Contents
5 Aggregating and calculating data
Understanding aggregation and display rates . . . . . . . . . . . . . . . . . . . . . . . . . . . . . . . . . . . . . . . . . . . . 94
Defining aggregation settings . . . . . . . . . . . . . . . . . . . . . . . . . . . . . . . . . . . . . . . . . . . . . . . . . . . . . . . 96
Using ‘timeout’ to handle missing data . . . . . . . . . . . . . . . . . . . . . . . . . . . . . . . . . . . . . . . . . . . . . 97
Setting aggregation attributes . . . . . . . . . . . . . . . . . . . . . . . . . . . . . . . . . . . . . . . . . . . . . . . . . . . . . . 98
Selecting the aggregation Type . . . . . . . . . . . . . . . . . . . . . . . . . . . . . . . . . . . . . . . . . . . . . . . . . . . 98
Using the ‘current aggregation’ . . . . . . . . . . . . . . . . . . . . . . . . . . . . . . . . . . . . . . . . . . . . . . . . . . . 98
Selecting an alternative value for aggregation . . . . . . . . . . . . . . . . . . . . . . . . . . . . . . . . . . . . . . . . 99
Setting the Indicator’s aggregation attributes . . . . . . . . . . . . . . . . . . . . . . . . . . . . . . . . . . . . . . . . 99
Calculating group Indicator values . . . . . . . . . . . . . . . . . . . . . . . . . . . . . . . . . . . . . . . . . . . . . . . . . . 101
Setting the group Indicator attributes . . . . . . . . . . . . . . . . . . . . . . . . . . . . . . . . . . . . . . . . . . . . . 104
6 Accessing Data
Overview . . . . . . . . . . . . . . . . . . . . . . . . . . . . . . . . . . . . . . . . . . . . . . . . . . . . . . . . . . . . . . . . . . . . . 106
Displaying Slot data . . . . . . . . . . . . . . . . . . . . . . . . . . . . . . . . . . . . . . . . . . . . . . . . . . . . . . . . . . 106
Displaying Report data . . . . . . . . . . . . . . . . . . . . . . . . . . . . . . . . . . . . . . . . . . . . . . . . . . . . . . . . 108
7 Customizing the InfoVista model for your reporting solution
Overview of the InfoVista Model . . . . . . . . . . . . . . . . . . . . . . . . . . . . . . . . . . . . . . . . . . . . . . . . . . . . 110
Defining the Model . . . . . . . . . . . . . . . . . . . . . . . . . . . . . . . . . . . . . . . . . . . . . . . . . . . . . . . . . . . . . . 111
Browsing the Model . . . . . . . . . . . . . . . . . . . . . . . . . . . . . . . . . . . . . . . . . . . . . . . . . . . . . . . . . . . . . 112
About Libraries. . . . . . . . . . . . . . . . . . . . . . . . . . . . . . . . . . . . . . . . . . . . . . . . . . . . . . . . . . . . . . 113
Searching the Model . . . . . . . . . . . . . . . . . . . . . . . . . . . . . . . . . . . . . . . . . . . . . . . . . . . . . . . . . . 114
Customizing the Model . . . . . . . . . . . . . . . . . . . . . . . . . . . . . . . . . . . . . . . . . . . . . . . . . . . . . . . . . . . 115
Overview . . . . . . . . . . . . . . . . . . . . . . . . . . . . . . . . . . . . . . . . . . . . . . . . . . . . . . . . . . . . . . . . . . 115
New Object Wizards . . . . . . . . . . . . . . . . . . . . . . . . . . . . . . . . . . . . . . . . . . . . . . . . . . . . . . . . . . 115
Creating a Vista . . . . . . . . . . . . . . . . . . . . . . . . . . . . . . . . . . . . . . . . . . . . . . . . . . . . . . . . . . . . . 116
Creating a VistaMart Library . . . . . . . . . . . . . . . . . . . . . . . . . . . . . . . . . . . . . . . . . . . . . . . . . . . . 117
Creating Rules . . . . . . . . . . . . . . . . . . . . . . . . . . . . . . . . . . . . . . . . . . . . . . . . . . . . . . . . . . . . . . 117
Modifying VistaMart Libraries . . . . . . . . . . . . . . . . . . . . . . . . . . . . . . . . . . . . . . . . . . . . . . . . . . . . . . 118
Modifying Objects. . . . . . . . . . . . . . . . . . . . . . . . . . . . . . . . . . . . . . . . . . . . . . . . . . . . . . . . . . . . 119
Deleting VistaMart Objects . . . . . . . . . . . . . . . . . . . . . . . . . . . . . . . . . . . . . . . . . . . . . . . . . . . . . 119Creating an Indicator . . . . . . . . . . . . . . . . . . . . . . . . . . . . . . . . . . . . . . . . . . . . . . . . . . . . . . . . . 119
Creating a Property. . . . . . . . . . . . . . . . . . . . . . . . . . . . . . . . . . . . . . . . . . . . . . . . . . . . . . . . . . . 122
Creating a Global Variable . . . . . . . . . . . . . . . . . . . . . . . . . . . . . . . . . . . . . . . . . . . . . . . . . . . . . . 123
Creating patches . . . . . . . . . . . . . . . . . . . . . . . . . . . . . . . . . . . . . . . . . . . . . . . . . . . . . . . . . . . . 124
Managing Libraries . . . . . . . . . . . . . . . . . . . . . . . . . . . . . . . . . . . . . . . . . . . . . . . . . . . . . . . . . . . . . . 125
Importing InfoVista Libraries . . . . . . . . . . . . . . . . . . . . . . . . . . . . . . . . . . . . . . . . . . . . . . . . . . . 125
Exporting InfoVista Libraries . . . . . . . . . . . . . . . . . . . . . . . . . . . . . . . . . . . . . . . . . . . . . . . . . . . . 126
Deleting InfoVista Libraries . . . . . . . . . . . . . . . . . . . . . . . . . . . . . . . . . . . . . . . . . . . . . . . . . . . . . 126
Importing VistaMart Libraries . . . . . . . . . . . . . . . . . . . . . . . . . . . . . . . . . . . . . . . . . . . . . . . . . . . 127Exporting VistaMart Libraries. . . . . . . . . . . . . . . . . . . . . . . . . . . . . . . . . . . . . . . . . . . . . . . . . . . . 127
Deleting VistaMart Libraries . . . . . . . . . . . . . . . . . . . . . . . . . . . . . . . . . . . . . . . . . . . . . . . . . . . . 128
7/17/2019 VistaMart User Guide
http://slidepdf.com/reader/full/vistamart-user-guide 6/265
6
VistaMart® 4.0 User Guide Contents
8 Working with Modules and Rules
About Rules . . . . . . . . . . . . . . . . . . . . . . . . . . . . . . . . . . . . . . . . . . . . . . . . . . . . . . . . . . . . . . . . . . . 130
Setting conditions and actions . . . . . . . . . . . . . . . . . . . . . . . . . . . . . . . . . . . . . . . . . . . . . . . . . . 130
Executing Rules . . . . . . . . . . . . . . . . . . . . . . . . . . . . . . . . . . . . . . . . . . . . . . . . . . . . . . . . . . . . . 131
Making Rules . . . . . . . . . . . . . . . . . . . . . . . . . . . . . . . . . . . . . . . . . . . . . . . . . . . . . . . . . . . . . . . . . . 133
Managing Properties using Rules . . . . . . . . . . . . . . . . . . . . . . . . . . . . . . . . . . . . . . . . . . . . . . . . . 133
Determining Rule priority for execution . . . . . . . . . . . . . . . . . . . . . . . . . . . . . . . . . . . . . . . . . . . . 134
Creating a new Rule . . . . . . . . . . . . . . . . . . . . . . . . . . . . . . . . . . . . . . . . . . . . . . . . . . . . . . . . . . 135
Editing a Rule . . . . . . . . . . . . . . . . . . . . . . . . . . . . . . . . . . . . . . . . . . . . . . . . . . . . . . . . . . . . . . 136
Examining conditions in detail . . . . . . . . . . . . . . . . . . . . . . . . . . . . . . . . . . . . . . . . . . . . . . . . . . . . . 138
Getting into actions . . . . . . . . . . . . . . . . . . . . . . . . . . . . . . . . . . . . . . . . . . . . . . . . . . . . . . . . . . . . . 149Building a string to set values . . . . . . . . . . . . . . . . . . . . . . . . . . . . . . . . . . . . . . . . . . . . . . . . . . . 150
Setting actions to trigger data acquisition . . . . . . . . . . . . . . . . . . . . . . . . . . . . . . . . . . . . . . . . . . 151
Setting actions for multivalued Properties . . . . . . . . . . . . . . . . . . . . . . . . . . . . . . . . . . . . . . . . . . 153
Working with Rules. . . . . . . . . . . . . . . . . . . . . . . . . . . . . . . . . . . . . . . . . . . . . . . . . . . . . . . . . . . . . . 167
Applying or Reapplying Rules . . . . . . . . . . . . . . . . . . . . . . . . . . . . . . . . . . . . . . . . . . . . . . . . . . . 167
Enabling/disabling and removing Rules . . . . . . . . . . . . . . . . . . . . . . . . . . . . . . . . . . . . . . . . . . . . 168
Using ‘resource activation’ . . . . . . . . . . . . . . . . . . . . . . . . . . . . . . . . . . . . . . . . . . . . . . . . . . . . . 169
Putting Rules inside Modules . . . . . . . . . . . . . . . . . . . . . . . . . . . . . . . . . . . . . . . . . . . . . . . . . . . . . . 170
Working with Modules . . . . . . . . . . . . . . . . . . . . . . . . . . . . . . . . . . . . . . . . . . . . . . . . . . . . . . . . . 171
9 Handling events in VistaMart
Purpose of generating events . . . . . . . . . . . . . . . . . . . . . . . . . . . . . . . . . . . . . . . . . . . . . . . . . . . . . . 176
Handling the event and trap flow in the VistaFoundation . . . . . . . . . . . . . . . . . . . . . . . . . . . . . . . 176
Viewing events in VistaPortal . . . . . . . . . . . . . . . . . . . . . . . . . . . . . . . . . . . . . . . . . . . . . . . . . . . 177
Defining events . . . . . . . . . . . . . . . . . . . . . . . . . . . . . . . . . . . . . . . . . . . . . . . . . . . . . . . . . . . . . 178Distinguishing events from traps . . . . . . . . . . . . . . . . . . . . . . . . . . . . . . . . . . . . . . . . . . . . . . . . . 178
Determining how wrong and for how long (why) . . . . . . . . . . . . . . . . . . . . . . . . . . . . . . . . . . . . . . . . 179
Establishing event duration. . . . . . . . . . . . . . . . . . . . . . . . . . . . . . . . . . . . . . . . . . . . . . . . . . . . . 180
Classifying events by type . . . . . . . . . . . . . . . . . . . . . . . . . . . . . . . . . . . . . . . . . . . . . . . . . . . . . . 181
Applying a severity level to an event . . . . . . . . . . . . . . . . . . . . . . . . . . . . . . . . . . . . . . . . . . . . . . 183
Identifying an event with a unique key . . . . . . . . . . . . . . . . . . . . . . . . . . . . . . . . . . . . . . . . . . . . 183
Developing formulas to generate events . . . . . . . . . . . . . . . . . . . . . . . . . . . . . . . . . . . . . . . . . . . . . . 184
Applying specific conditions to send events . . . . . . . . . . . . . . . . . . . . . . . . . . . . . . . . . . . . . . . . . 184
Defining event syntax . . . . . . . . . . . . . . . . . . . . . . . . . . . . . . . . . . . . . . . . . . . . . . . . . . . . . . . . . 186
Using event operators. . . . . . . . . . . . . . . . . . . . . . . . . . . . . . . . . . . . . . . . . . . . . . . . . . . . . . . . . 188
List of event operators . . . . . . . . . . . . . . . . . . . . . . . . . . . . . . . . . . . . . . . . . . . . . . . . . . . . . . . . 190
Examples of event formulas . . . . . . . . . . . . . . . . . . . . . . . . . . . . . . . . . . . . . . . . . . . . . . . . . . . . . 204
Purging events. . . . . . . . . . . . . . . . . . . . . . . . . . . . . . . . . . . . . . . . . . . . . . . . . . . . . . . . . . . . . . . . . 205

7/17/2019 VistaMart User Guide
http://slidepdf.com/reader/full/vistamart-user-guide 7/265
7
VistaMart® 4.0 User Guide Contents
10 Writing formulas using the formula editor
Developing a formula . . . . . . . . . . . . . . . . . . . . . . . . . . . . . . . . . . . . . . . . . . . . . . . . . . . . . . . . . . . . 207
Distinguishing type of values in an expression . . . . . . . . . . . . . . . . . . . . . . . . . . . . . . . . . . . . . . . 208
Making references to objects . . . . . . . . . . . . . . . . . . . . . . . . . . . . . . . . . . . . . . . . . . . . . . . . . . . . 208
Using the formula editor. . . . . . . . . . . . . . . . . . . . . . . . . . . . . . . . . . . . . . . . . . . . . . . . . . . . . . . . . . 209
Working with the formula editor . . . . . . . . . . . . . . . . . . . . . . . . . . . . . . . . . . . . . . . . . . . . . . . . . 210
Creating expressions to send traps . . . . . . . . . . . . . . . . . . . . . . . . . . . . . . . . . . . . . . . . . . . . . . . . 211
List of operators . . . . . . . . . . . . . . . . . . . . . . . . . . . . . . . . . . . . . . . . . . . . . . . . . . . . . . . . . . . . . . . 212
Conditional operators . . . . . . . . . . . . . . . . . . . . . . . . . . . . . . . . . . . . . . . . . . . . . . . . . . . . . . . . . 213
Basic arithmetic operators . . . . . . . . . . . . . . . . . . . . . . . . . . . . . . . . . . . . . . . . . . . . . . . . . . . . . 215
Advanced arithmetic operators . . . . . . . . . . . . . . . . . . . . . . . . . . . . . . . . . . . . . . . . . . . . . . . . . . 217Reduction operators . . . . . . . . . . . . . . . . . . . . . . . . . . . . . . . . . . . . . . . . . . . . . . . . . . . . . . . . . . 219
Miscellaneous operators . . . . . . . . . . . . . . . . . . . . . . . . . . . . . . . . . . . . . . . . . . . . . . . . . . . . . . . 222
Temporal operators . . . . . . . . . . . . . . . . . . . . . . . . . . . . . . . . . . . . . . . . . . . . . . . . . . . . . . . . . . . 224
A Rule user cases
Duplicate Property from Basic to Proxies . . . . . . . . . . . . . . . . . . . . . . . . . . . . . . . . . . . . . . . . . . . . . . 233Feed Groups with Members . . . . . . . . . . . . . . . . . . . . . . . . . . . . . . . . . . . . . . . . . . . . . . . . . . . . . . . . 235
Start Reports according to Agent Vendor . . . . . . . . . . . . . . . . . . . . . . . . . . . . . . . . . . . . . . . . . . . . . . 237
B XML Topology files examples
Example #1 - Topology file defining Instances . . . . . . . . . . . . . . . . . . . . . . . . . . . . . . . . . . . . . . . . . . 240
Example #2 - Topology file defining groups . . . . . . . . . . . . . . . . . . . . . . . . . . . . . . . . . . . . . . . . . . . . 241
Example #3 - Defining proxies. . . . . . . . . . . . . . . . . . . . . . . . . . . . . . . . . . . . . . . . . . . . . . . . . . . . . . 242
Example #4 - Defining group contents . . . . . . . . . . . . . . . . . . . . . . . . . . . . . . . . . . . . . . . . . . . . . . . . 243
Example #5 - Instance defined with several Vistas . . . . . . . . . . . . . . . . . . . . . . . . . . . . . . . . . . . . . . . 244
C Glossary of terms
Index . . . . . . . . . . . . . . . . . . . . . . . . . . . . . . . . . . . . . . . . . . . . . . . . . . . . . . . . . . . . . . . . . . . . . . . . . . 261
Remarks. . . . . . . . . . . . . . . . . . . . . . . . . . . . . . . . . . . . . . . . . . . . . . . . . . . . . . . . . . . . . . . . . . . . . . . 265
7/17/2019 VistaMart User Guide
http://slidepdf.com/reader/full/vistamart-user-guide 8/265
8
1 Getting started with VistaMart®
At the heart of the VistaFoundat ion, VistaMart acts as the pivota l point that
provisions, forwards, and computes data to transform it from its raw state to
processed values displayed in VistaPortal for your reporting solution.
"VistaMart in a nutshell" on page 9
"Coming from earlier VistaMart versions" on page 11
"Connecting to VistaMart" on page 13
"Configuring VistaMart for your VistaInsight solution" on page 15
"Modifying miscellaneous settings" on page 23
7/17/2019 VistaMart User Guide
http://slidepdf.com/reader/full/vistamart-user-guide 9/265
VistaMart® 4.0 VistaMart in a nutshell 9
User Guide - Chapter 1 Getting started with VistaMart®
VistaMart in a nutshell
VistaMart is a global data mart that performs two primary functions: data inventory
and data computation.
At the heart of the VistaFoundation, VistaMart gathers data from various sources and
computes it to generate reports on your monitored resources.
These reports are ultimately available for viewing in VistaPortal. They generally
display the results according to the VistaInsight® reporting solutions, which are a
series of Web pages containing real time, dynamic, and customized monitoring for
specific types of IT infrastructures.
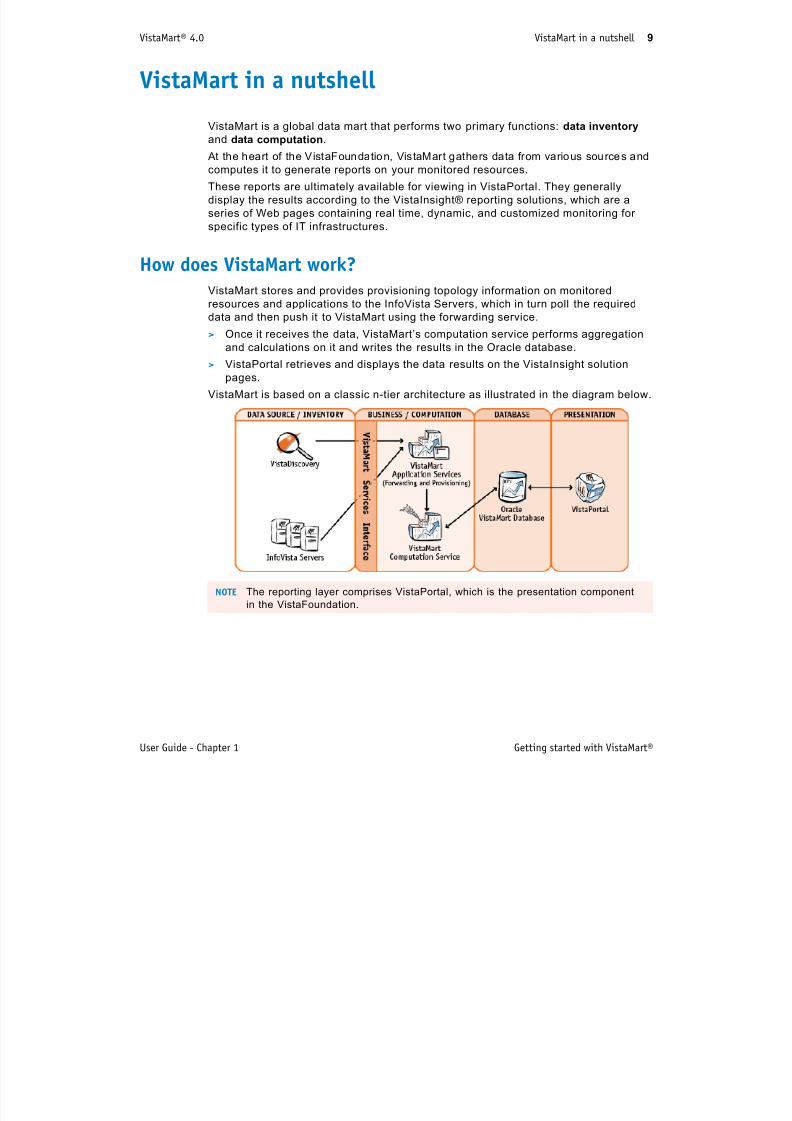
How does VistaMart work?VistaMart stores and provides provisioning topology information on monitored
resources and applications to the InfoVista Servers, which in turn poll the required
data and then push it to VistaMart using the forwarding service.
> Once it receives the data, VistaMart’s computation service performs aggregation
and calculations on it and writes the results in the Oracle database.
> VistaPortal retrieves and displays the data results on the VistaInsight solution
pages.
VistaMart is based on a classic n-tier architecture as illustrated in the diagram below.
NOTE The reporting layer comprises VistaPortal, which is the presentation component
in the VistaFoundation.
7/17/2019 VistaMart User Guide
http://slidepdf.com/reader/full/vistamart-user-guide 10/265
VistaMart® 4.0 VistaMart in a nutshell 10
User Guide - Chapter 1 Getting started with VistaMart®
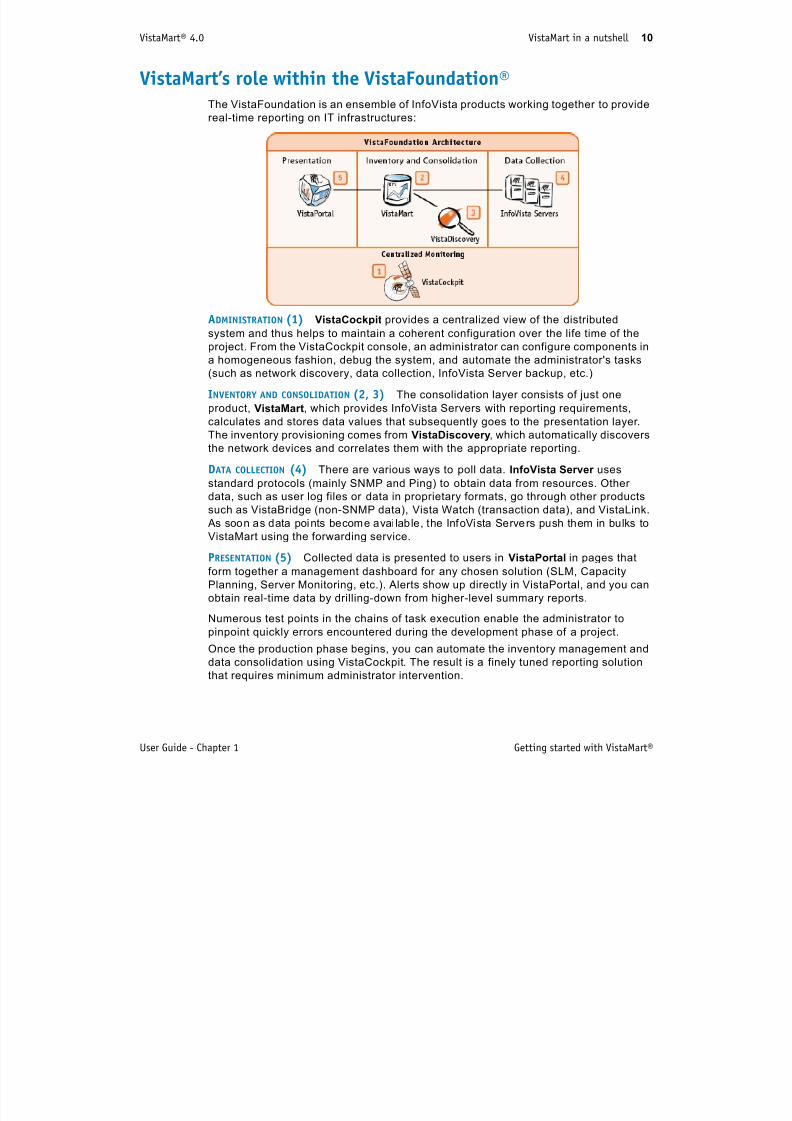
VistaMart’s role within the VistaFoundation®The VistaFoundation is an ensemble of InfoVista products working together to provide
real-time reporting on IT infrastructures:
ADMINISTRATION (1) VistaCockpit provides a centralized view of the distributed
system and thus helps to maintain a coherent configuration over the life time of the
project. From the VistaCockpit console, an administrator can configure components ina homogeneous fashion, debug the system, and automate the administrator's tasks
(such as network discovery, data collection, InfoVista Server backup, etc.)
INVENTORY AND CONSOLIDATION (2, 3) The consolidation layer consists of just one
product, VistaMart, which provides InfoVista Servers with reporting requirements,
calculates and stores data values that subsequently goes to the presentation layer.
The inventory provisioning comes from VistaDiscovery, which automatically discovers
the network devices and correlates them with the appropriate reporting.
DATA COLLECTION (4) There are various ways to poll data. InfoVista Server uses
standard protocols (mainly SNMP and Ping) to obtain data from resources. Other
data, such as user log files or data in proprietary formats, go through other products
such as VistaBridge (non-SNMP data), Vista Watch (transaction data), and VistaLink.
As soon as data points become avai lable, the InfoVista Servers push them in bulks to
VistaMart using the forwarding service.
PRESENTATION (5) Collected data is presented to users in VistaPortal in pages that
form together a management dashboard for any chosen solution (SLM, CapacityPlanning, Server Monitoring, etc.). Alerts show up directly in VistaPortal, and you can
obtain real-time data by drilling-down from higher-level summary reports.
Numerous test points in the chains of task execution enable the administrator to
pinpoint quickly errors encountered during the development phase of a project.
Once the production phase begins, you can automate the inventory management and
data consolidation using VistaCockpit. The result is a finely tuned reporting solution
that requires minimum administrator intervention.

7/17/2019 VistaMart User Guide
http://slidepdf.com/reader/full/vistamart-user-guide 11/265
VistaMart® 4.0 Coming from earlier VistaMart versions 11
User Guide - Chapter 1 Getting started with VistaMart®
Coming from earlier VistaMart versions
If you upgraded from previous versions of VistaMart, you undoubtedly noticed the
absence of the Gateway component and VistaNotifier from the VistaMart architecture.
> The Gateway’s data collection function gives way to the forwarding service, which
InfoVista Servers use to push polled data to VistaMart.
> VistaNotifier takes its retirement from trap sending and receiving functions. The
new event management feature provides an advanced filtering system to identify,
locate, and prioritize detected problems in order to take appropriate remedial
action.
Introducing the VistaMart Application ServicesThe VistaMart Application Services, formerly the ‘VistaMart Server’ is the main
component that processes polled data and transforms the results into meaningful
values for users to analyze in VistaPortal.
The Application Services component includes the provisioning, forwarding and
computation services:
PROVISIONING The provisioning service oversees VistaMart’s inventory which
includes:
> topology information gathered from resources on the network
> the type of measurements (Indicators) to compute. These measurements use
Indicators that are defined in a set of Libraries (called ‘VistaViews’).
VistaMart keeps these Libraries in its repository and downloads them to InfoVista
Servers. This means that all InfoVista Servers refer to the same set of Indicatorsto ensure consistency in data calculations.
> the type of reports to start and what kind of data to poll depending on your chosen
reporting solution
DATA FORWARDING VistaMart’s forwarding service is in charge of commuting data from
InfoVista Servers as well as external sources.
InfoVista Servers become an active component that push newly polled data or
computed points to VistaMart in bulks, as they become available.VistaMart also receives and processes other non-SNMP such as VistaBridge or
external data from topology files.
DATA COMPUTING As the database gets regularly populated with da ta samples from the
forwarding service, the VistaMart computation service permanently executes the
aggregation and calculation on this data for all specified Instances (individual and
group) according to the reporting solution’s requirements.

7/17/2019 VistaMart User Guide
http://slidepdf.com/reader/full/vistamart-user-guide 12/265
VistaMart® 4.0 Coming from earlier VistaMart versions 12
User Guide - Chapter 1 Getting started with VistaMart®
What’s new between version 2.2 SP2 and 4.0NEW FORWARDING PROCESS The Forwarding Service is a process which allows InfoVista
Servers (pollers) to send or ‘forward’ data and traps to VistaMart as they arrive usingone or several forwarding services comprised within the VistaMart Applications
Services. See "Understanding the Vistamart Forwarding Service" on page 84.
EVENT MANAGEMENT From a reporting solution’s point of view, an event signals an
abnormal occurrence in the normal working process and assists users in locating and
remedying the problem as necessary. The new event management system uses an
advanced filtering method and provides formulas using specific operators to generate
events. See "Handling events in VistaMart" on page 175.
FORMULA EDITOR AND NEW OPERATORS The VistaMart formula editor facilitates the
creation of custom to compute data values using a range of operators from simple
mathematical operators to the more complex trend and property management
operators. See "Writing formulas using the formula editor" on page 206.
PROXY MOVE ‘Proxy move’ is a VistaMart feature to manage customer inventory that
allows the redirecting of a proxy Instance from one basic Instance to another basic
Instance. For example, it is possible to move a customer interface from router A to
router B without losing VistaMart data. See "Moving proxy Instances" on page 36.
CSV WIZARD VistaMart accepts custom topology files in CSV format.
Each CSV file that you submit must have an associated XML ‘configuration file’ to
map its contents to InfoVista objects (such as Vistas, Instances, and Properties).
During the import, the Inventory Manager uses the configuration file to ‘convert’ the
CSV file into an equivalent XML file.
Rather than manually writing a configuration file in XML, you can generate it
automatically using the ‘CSV Wizard’. See "Generating automatically a configuration
file" on page 49.
MONITORING VISTAMART VistaMart 4.0 provides a set of KPIs aimed at monitoring the
performance and activity of the entire VistaMart environment, including the Oracle
instance, the database, the services and the synchronized servers. You consult a set
of VistaPortal pages to access the VistaMart Tuning reports. See the VistaMart 4.0
Administ ration Guide, chapter Adminis ter ing VistaMart , section Monitoring Vis taMart.
7/17/2019 VistaMart User Guide
http://slidepdf.com/reader/full/vistamart-user-guide 13/265
VistaMart® 4.0 Connecting to VistaMart 13
User Guide - Chapter 1 Getting started with VistaMart®
Connecting to VistaMart
To begin working with VistaMart, it is essential to have the software installed and
running on a machine with a valid connection to a database.
If necessary, refer to the VistaMart Installation Guide, and specifically the Database
Manager and the Configuration Manager context-sensitive online help systems for
precise instructions.
Once you establish a connection with VistaMart, the Inventory Manager displays. This
is VistaMart’s graphic user interface.
Start the Inventory Manager
1 From the Start menu, select InfoVista/VistaMart Inventory Manager. A connection
box appears.
2 From the ‘Service’ drop-down list box, select a service (this list is defined at
installation time).
3 Enter the user name and password and click OK.
Getting acquainted with the Inventory Manager Using the Inventory Manager, you can:
> Create, delete, update and query InfoVista objects (Libraries, Vistas, Properties
Reports, Slots, Instances etc.).
> Manage topologies to provision your inventory according to your reporting needs.
> Launch the discovery tool to update topology information and incorporate any
change since the previous discovery (e.g. new or modified Instances, Slots andReports).
> Create and edit Rules. Rules are an association of conditions and actions
(example ‘For all Juniper routers, start daily reports’). They allow you to define
specific groups of Instances on multiple resources and customize your reporting
accordingly by setting owner priorities, Report Template filters, etc.).
> Manage Libraries. VistaViews (or Libraries) get added or updated automatically to
drive the polling functions for InfoVista Servers.
7/17/2019 VistaMart User Guide
http://slidepdf.com/reader/full/vistamart-user-guide 14/265
VistaMart® 4.0 Connecting to VistaMart 14
User Guide - Chapter 1 Getting started with VistaMart®
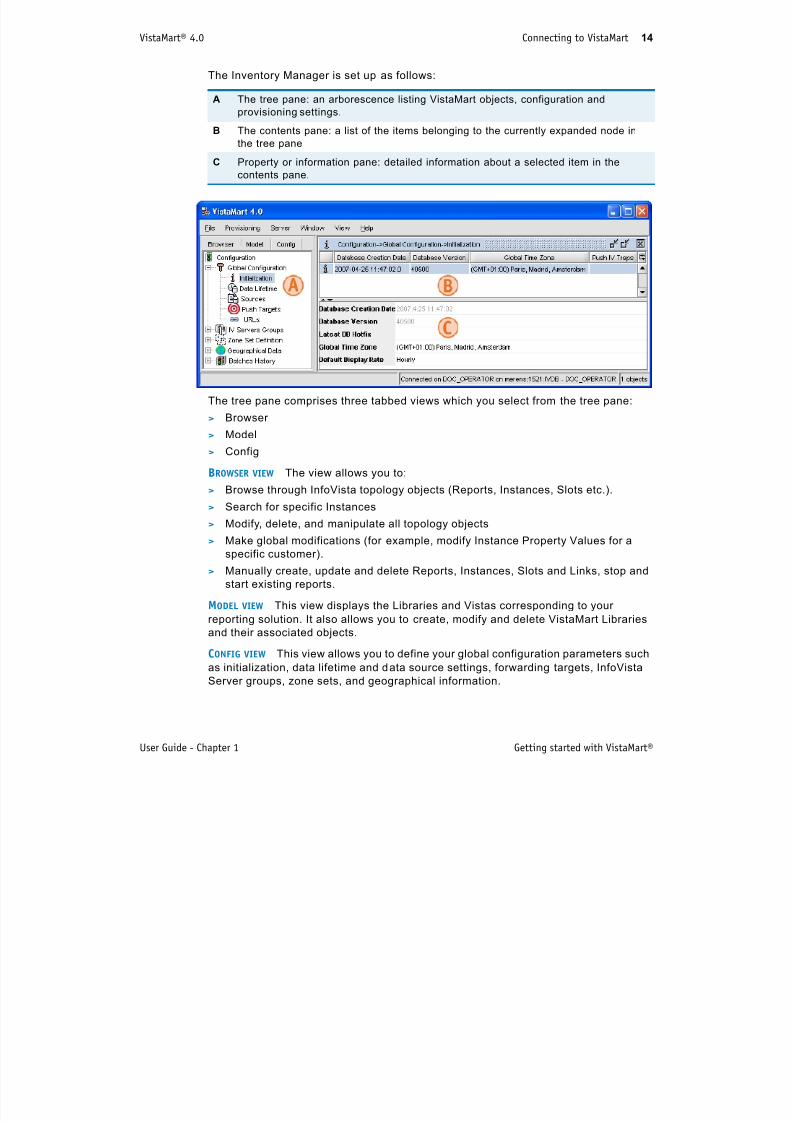
The Inventory Manager is set up as follows:
The tree pane comprises three tabbed views which you select from the tree pane:
> Browser
> Model
> Config
BROWSER VIEW The view allows you to:
> Browse through InfoVista topology objects (Reports, Instances, Slots etc.).
> Search for specific Instances
> Modify, delete, and manipulate all topology objects
> Make global modifications (for example, modify Instance Property Values for a
specific customer).
> Manually create, update and delete Reports, Instances, Slots and Links, stop andstart existing reports.
MODEL VIEW This view displays the Libraries and Vistas corresponding to your
reporting solution. It also allows you to create, modify and delete VistaMart Libraries
and their associated objects.
CONFIG VIEW This view allows you to define your global configuration parameters such
as initialization, data lifetime and data source settings, forwarding targets, InfoVista
Server groups, zone sets, and geographical information.
A The tree pane: an arborescence listing VistaMart objects, configuration and
provisioning settings.
B The contents pane: a list of the items belonging to the currently expanded node in
the tree pane
C Property or information pane: detailed information about a selected item in the
contents pane.
7/17/2019 VistaMart User Guide
http://slidepdf.com/reader/full/vistamart-user-guide 15/265
VistaMart® 4.0 Configuring VistaMart for your VistaInsight solution 15
User Guide - Chapter 1 Getting started with VistaMart®
Configuring VistaMart for your VistaInsight
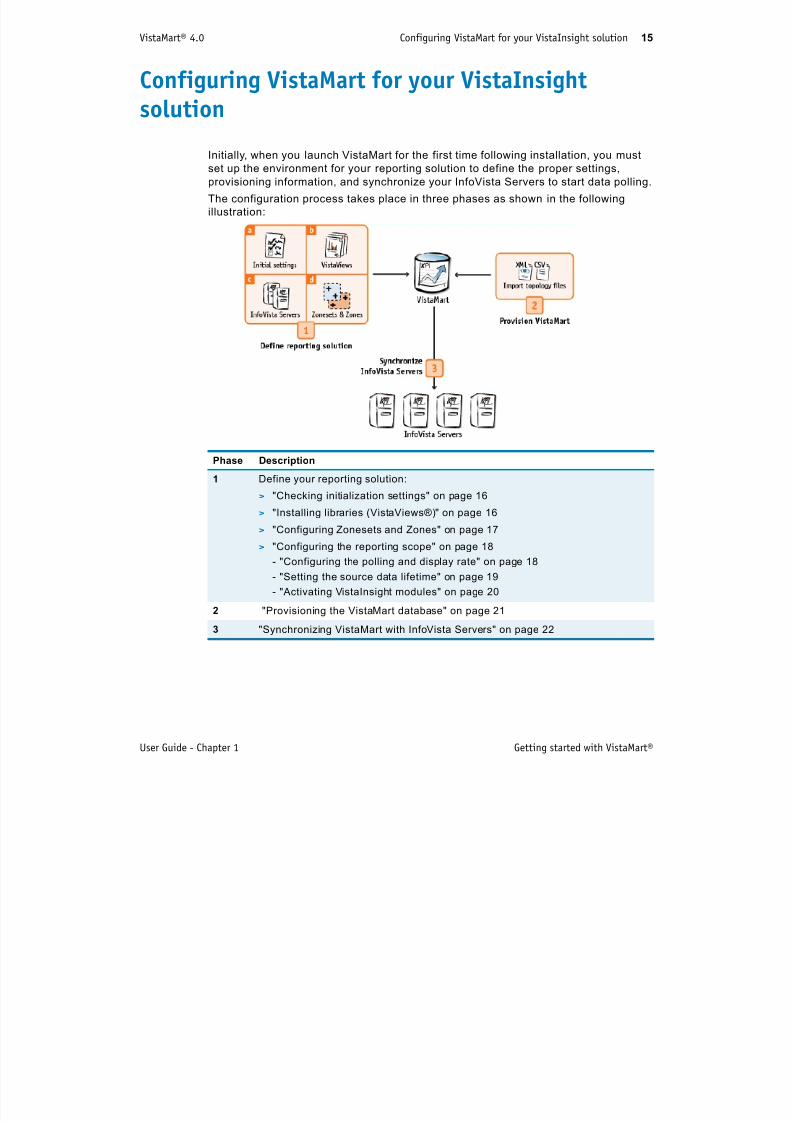
solutionInitially, when you launch VistaMart for the first time following installation, you must
set up the environment for your reporting solution to define the proper settings,
provisioning information, and synchronize your InfoVista Servers to start data polling.
The configuration process takes place in three phases as shown in the following
illustration:
Phase Description
1 Define your reporting solution:
> "Checking initialization settings" on page 16
> "Installing libraries (VistaViews®)" on page 16
> "Configuring Zonesets and Zones" on page 17
> "Configuring the reporting scope" on page 18
- "Configuring the polling and display rate" on page 18
- "Setting the source data lifetime" on page 19
- "Activating VistaInsight modules" on page 20
2 "Provisioning the VistaMart database" on page 21
3 "Synchronizing VistaMart with InfoVista Servers" on page 22
7/17/2019 VistaMart User Guide
http://slidepdf.com/reader/full/vistamart-user-guide 16/265
VistaMart® 4.0 Configuring VistaMart for your VistaInsight solution 16
User Guide - Chapter 1 Getting started with VistaMart®
Checking initialization settingsThe main initialization settings are made at the time of installation. However, before
you start, double-check that these settings are correct for your reporting solutions.
Check VistaMart initialization settings
1 From the VistaMart Inventory Manager, click the Config tab and expand the
Global Configuration node.
2 Double-click on Initialization.
3 In the contents pane, click the first item. A property sheet displays at the bottom of
the pane.4 Check the following values:
• Global Time zone: select your time zone
• Default display rate: default display rate is hourly
Installing libraries (VistaViews®)When you start VistaMart for the first time after installation, you must begin by
installing the required libraries for your VistaInsight solution.
Libraries, or VistaViews, contain the necessary objects for reporting on a given
resource. These objects include metrics, indicators, variables, report templates, etc.
VistaMart keeps these Libraries in its repository and downloads them to InfoVista
Servers. This means that all InfoVista Servers refer to the same set of Indicators to
ensure consistency in data calculations.
The set of libraries that VistaMart uses include VistaMart libraries (i.e. VistaInsight
solution libraries) and InfoVista Server libraries.
VISTAMART LIBRARY VistaMart Libraries contain the same range of objects as InfoVista
Libraries. They differ from these Libraries in that they:
> generally manage lower-frequency data points
> handle only scalar, numeric, and trap indicator values
> contain rules used to define which reports to start and properties to update
> do not contain report templates
VistaMart Libraries can be customized using the VistaMart Inventory Manager (unlike
InfoVista Libraries). You can add new indicators and properties to VistaMart libraries.
Libraries can also be exported from one VistaMart database to another.
INFOVISTA SERVER LIBRARY Also known as a VistaView, the Library represents a
package of objects that represent a particular type of resource (for example, frame
relay networks or Compaq servers or Oracle databases etc.) InfoVista libraries can beimported or exported to or from one VistaMart database to another.
NOTE You can change this display rate to a lower value depending on your solution.
This allows VistaMart to insert data values with a smaller display period.
7/17/2019 VistaMart User Guide
http://slidepdf.com/reader/full/vistamart-user-guide 17/265
VistaMart® 4.0 Configuring VistaMart for your VistaInsight solution 17
User Guide - Chapter 1 Getting started with VistaMart®
Install libraries on VistaMart
1 From the Inventory Manager’s File menu, select Manage Libraries.
2 In this window, click the Set the repository of libraries button .
3 Browse to the folder containing your solution libraries (for example,
\vmart\VIS40_CI.zip) and click OK.
4 In the Library Management window, there are several libraries (in bold) that come
with the .zip file. Select them and click Import.
The VistaViews are now imported into your VistaMart configuration.
Configuring Zonesets and ZonesVistaInsight solutions monitor network resources and groups of resources.
To do this, the reporting solution requires the configuration of zones. You can use the
‘default’ zone or set up a new zone or zone set.
> A Zone contains a list of specific Instances.
> A Zoneset contains a list of specific zones.
Create a Zone Set
1 From the VistaMart Inventory Manager Config tab, right-click Zoneset definition
and select New Zoneset from the short-cut menu.
2 A dia log box appears. Enter the Zone Set name, ident if ier, and description.3 Click Finish to validate your choice and create the new zone set.
Create a Zone
1 From the VistaMart Inventory Manager Config tab, expand the Zone set
definition node.
2 Right-click the zone set to which you want to add a new zone and select New
Zone from the short-cut menu. A dialog box appears.
3 Enter the parameters for the zone: name, identifier, InfoVista Servers Group.
4 Click Finish to validate your choice and create the new zone.
NOTE Refer to the readme file for detail on the current VistaView versions.
NOTE Do this only if you want to use a different zone set than the ‘default’ zone set.
7/17/2019 VistaMart User Guide
http://slidepdf.com/reader/full/vistamart-user-guide 18/265
VistaMart® 4.0 Configuring VistaMart for your VistaInsight solution 18
User Guide - Chapter 1 Getting started with VistaMart®
Configuring the reporting scopeThe reporting scope designates which network devices to monitor in your
infrastructure.The configuration of the reporting scope consists in customizing the way you want the
data to appear in the VistaPortal pages, notably the polling rate and the rules that
dictate which types of resource to monitor.
POLLING AND DISPLAY RATE sets the frequency of data acquisition and report display
rate.
RULE ACTIVATION selects the type of measurements (Indicators or KPIs) to display in
VistaPortal pages. A Rule defines the fil tering criteria for a report ing solut ion by determining for as many
related Instances as possible, the actions that VistaMart performs, and the type of
reporting you want your solution to display.
A ‘module’ is a container for a set of Rules. To select the KPIs, you must activate or
deactivate modules delivered with your VistaInsight solution. Depending on the
module you activate, you obtain different pages in VistaPortal.
The reporting scope configuration takes place in the following order:
"Configuring the polling and display rate" on page 18
"Activating VistaInsight modules" on page 20
Configuring the polling and display rate
Depending on your reporting solution, it is possible to configure the data acquisition(polling) and display rate either to 1 minute, 5 minutes or 15 minutes. You can
subsequently modify this setting if necessary.
Set the display and polling rate
1 In VistaMart Inventory Manager, select the Model tab and expand the VistaMart
Libraries node.
2 Expand InfoVista Common library and then select Global Variables.
3 In the contents pane, select Minimum Report Display Rate (to set the display rate
of InfoVista Server reports) or Minimum Report Slot Acquisition Rate (to set the
polling rate for a given instance/indicator in VistaMart) to display its properties.
4 In the property pane, set Value either to ‘1_min’, ‘5_min’ or ‘15_min’ and press
[ENTER] to validate the change.
NOTE For further information on Rules and module, refer to the section "Working with
Modules and Rules" on page 129 in this guide.
NOTE It is mandatory that you check these values after each import of VistaMart
libraries.
Make sure that you use the correct syntax (i.e. ‘5_ min’), otherwiseVistaMart cannot take the setting into account.
Vi ® C fi i Vi f Vi i h l i 19
7/17/2019 VistaMart User Guide
http://slidepdf.com/reader/full/vistamart-user-guide 19/265
VistaMart® 4.0 Configuring VistaMart for your VistaInsight solution 19
User Guide - Chapter 1 Getting started with VistaMart®
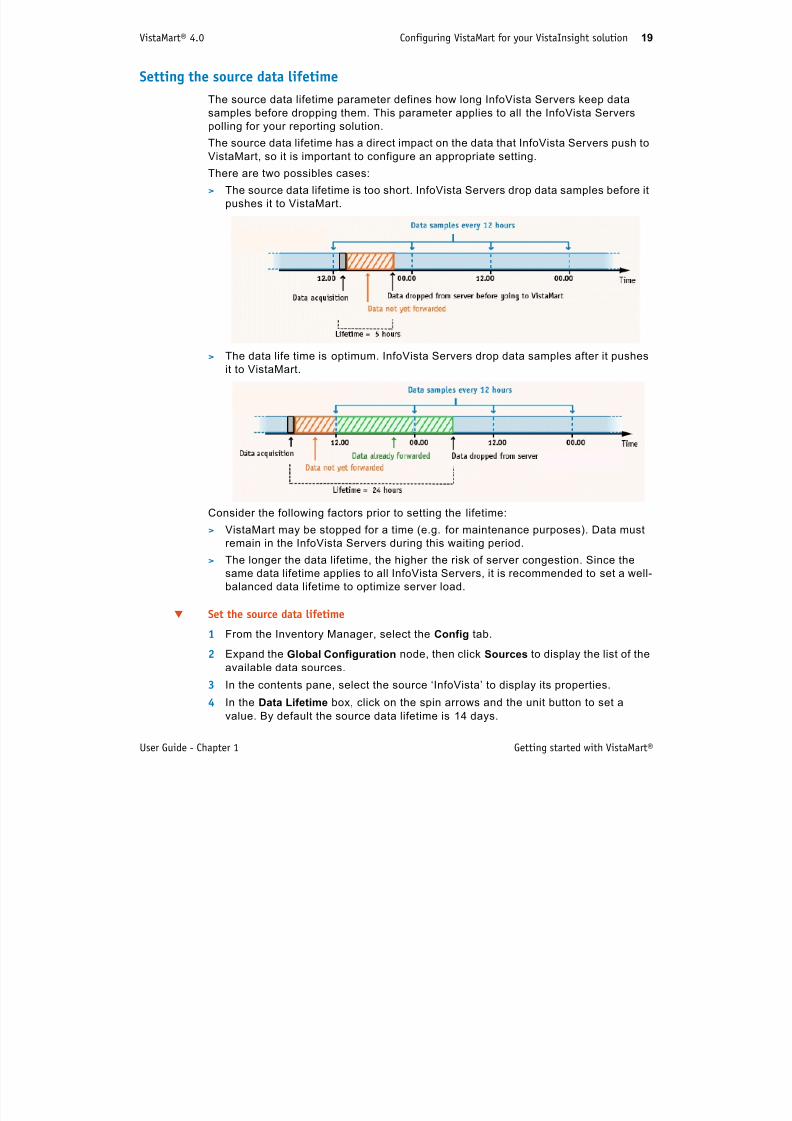
Setting the source data lifetime
The source data lifetime parameter defines how long InfoVista Servers keep data
samples before dropping them. This parameter applies to all the InfoVista Servers
polling for your reporting solution.
The source data lifetime has a direct impact on the data that InfoVista Servers push to
VistaMart, so it is important to configure an appropriate setting.
There are two possibles cases:
> The source data lifetime is too short. InfoVista Servers drop data samples before it
pushes it to VistaMart.
> The data life time is optimum. InfoVista Servers drop data samples after it pushes
it to VistaMart.
Consider the following factors prior to setting the lifetime:
> VistaMart may be stopped for a time (e.g. for maintenance purposes). Data must
remain in the InfoVista Servers during this waiting period.
> The longer the data lifetime, the higher the risk of server congestion. Since the
same data lifetime applies to all InfoVista Servers, it is recommended to set a well-balanced data lifetime to optimize server load.
Set the source data lifetime
1 From the Inventory Manager, select the Config tab.
2 Expand the Global Configuration node, then click Sources to display the list of the
available data sources.
3In the contents pane, select the source ‘InfoVista’ to display its properties.
4 In the Data Lifetime box, click on the spin arrows and the unit button to set a
value. By default the source data lifetime is 14 days.
Vi t M t® 4 0 C fi i Vi t M t f Vi t I i ht l ti 20

7/17/2019 VistaMart User Guide
http://slidepdf.com/reader/full/vistamart-user-guide 20/265
VistaMart® 4.0 Configuring VistaMart for your VistaInsight solution 20
User Guide - Chapter 1 Getting started with VistaMart®
Activating VistaInsight modules
Each InfoVista solution comes with a set of modules containing VistaMart Rules,
which are associated with VistaMart libraries.
The following is an example of VistaInsight for Servers module organization.
There are two ways to execute the Rules in a module:
> Global: VistaMart always activates the module. For example, VistaInsight for
Servers solution requires that VistaMart always executes the Servers module
when a server figures in the topology file.
> Rules: VistaMart activates the module only when a Rule calls for its activation. For
example, a Rule in VistaInsight for Servers solution can request the execution of
the module containing the KPIs related to Server Groups.
These modules are activated by default when you install the VistaInsight solution.
You can choose to de-activated them at a later stage.
Activate a module as ‘global’ or ‘rule’
1 From the tree pane, select the ‘Model’ tab and expand the ‘VistaMart Libraries’
node.
2 Expand the node of the library that has the associated module you want to
activate.
3 Click on ‘Modules’. The list of modules associated to the selected library displaysin the contents pane.
4 From the contents pane, click on the module name to display its properties.
5 In the property pane, in the ‘Scope’ box, click on the drop-down arrow to select
either ‘Global’ or ‘Rules’.
VistaMart Library Modules
InfoVista Common Startup
InfoVista VM VIS Server > VIS Server Basic
> VIS Server Capacity Planning
> VIS Server Advanced
InfoVista VM VIS Server Groups > VIS Server Groups Advanced
InfoVista VM VIS Application Process > VIS Application Process Basic
> VIS Application Process Group Advanced
NOTE Startup is a Global module, which comes with all VistaInsight solutions. The
Startup module automatically activates the Rules modules.
VistaMart® 4 0 Configuring VistaMart for your VistaInsight solution 21

7/17/2019 VistaMart User Guide
http://slidepdf.com/reader/full/vistamart-user-guide 21/265
VistaMart® 4.0 Configuring VistaMart for your VistaInsight solution 21
User Guide - Chapter 1 Getting started with VistaMart®
Provisioning the VistaMart database After you configure VistaMart for the proper reporting settings, you provide it with
information about which network resources to monitor. This is called the ‘inventoryprovisioning’ process.
The provisioning information comes in a topology file, which is a flat file describing the
devices in an IT infrastructure, with basic information pertaining to that device, such as IP
address, manufacturer, etc. The topology file can either be in ‘csv’ or ‘xml’ format.
The topology file can come from either VistaDiscovery or an external source.
Each line in the topology file is an Instance for which VistaMart must get data. An
Instance is a representation of a monitored IT resource, as seen by the data collection
engine (InfoVista Server) that gathers status and performance data.When you import this topology file in VistaMart, you ‘provision’ its inventory with
Instances to monitor.
This section explains how to provision VistaMart. The provisioning process takes
place in the following order:
"Discovering the infrastructure topology" on page 21
"Importing topology information" on page 21
Discovering the infrastructure topology
This provisioning procedure uses VistaDiscovery to discover the network devices.
To apply the appropriate discovery parameters required for your VistaInsight solution,
refer to your VistaInsight Installation Guide.
Importing topology information
Import topology file
1 Connect to your VistaMart Inventory Manager.
2 From the Provisioning menu, select Import Topology. A dialog box appears.
3 In the Zone box, select the zone assigned to monitored resources.
4 In the Provisioning Mode box, select Full Synchronization (Change) from the drop
down list.
5 In the Topology file box, click the browse button to select the CSV file to import.
6 In the Configuration file box, click the browse button to open the corresponding
XML configuration file (example: TOPOLOGY_definition.xml.)
7 Select the option ‘Allow proxy move’ box if you want to enable the transfer of a
proxy instance from one basic instance to another (see "Provisioning VistaMart" onpage 29).
WARNING Ensure you import the correct CSV file and its corresponding XML
configuration file. For further information on the syntax of XML files, refer to
the section "Provisioning VistaMart" on page 29.
VistaMart® 4 0 Configuring VistaMart for your VistaInsight solution 22

7/17/2019 VistaMart User Guide
http://slidepdf.com/reader/full/vistamart-user-guide 22/265
VistaMart 4.0 Configuring VistaMart for your VistaInsight solution 22
User Guide - Chapter 1 Getting started with VistaMart®
8 Click on Preview to simulate the topology import. This is useful to validate any
change and check for any error before you commit them in VistaMart.
9 Click on Run to import the group definition into VistaMart.
Once the groups are created in VistaMart, you can verify them by browsing theInstances from the Model tab in the corresponding Vistas. You can also connect to
your VistaPortal site to visualize groups in the system navigator.
Synchronizing VistaMart with InfoVista ServersThe synchronization process from VistaMart to InfoVista Servers is necessary to
update the InfoVista Servers with new topology information in order to poll data for
VistaInsight reports.
At this point, al l Instances are correctly provisioned in the VistaMart repository.
Synchronize VistaMart with InfoVista Servers
1 Log on to the VistaMart Inventory Manager.
2 In the Server menu, select Synchronize Server Group. A new window opens.
3 In the new window, select your Server Group and click the Synchronize button.
VistaViews and Instances are uploaded to the InfoVista Servers. This may take a
few minutes. You can close the synchronization windows.
At this point , the InfoVista Servers can start to poll immediately for the provisioned
Instances.
VistaMart® 4.0 Modifying miscellaneous settings 23
7/17/2019 VistaMart User Guide
http://slidepdf.com/reader/full/vistamart-user-guide 23/265
y g g
User Guide - Chapter 1 Getting started with VistaMart®
Modifying miscellaneous settings
After you configured VistaMart to begin receiv ing data for your reporting solution, you
can modify certain settings if necessary.
Registering user services A user service defines the name of a user allowed to access a VistaMart database.
Each user service includes an alias, the database hostname, the Oracle System
identifier (SID), and the VistaMart repository user identification and password.
Add a user service
1 From the Windows Start Menu, select InfoVista/VistaMart Inventory Manager .
The VistaMart Connection dialog box opens.
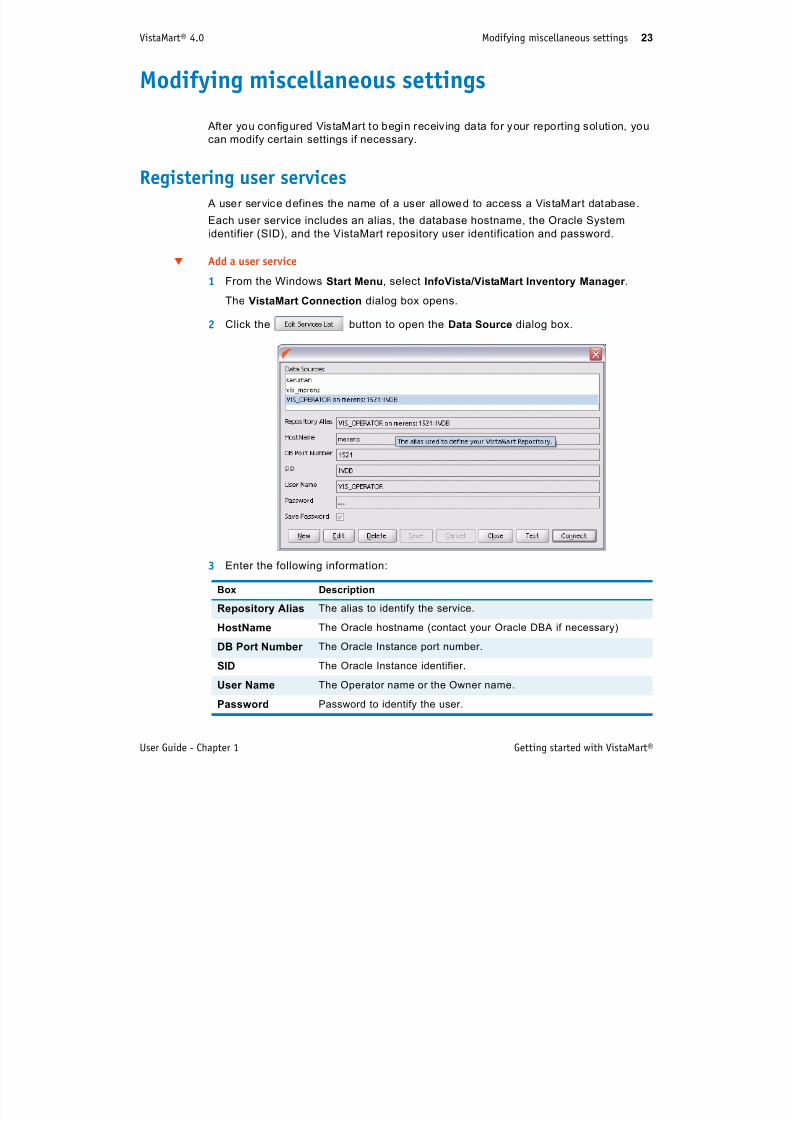
2 Click the button to open the Data Source dialog box.
3 Enter the following information:
Box Description
Repository Alias The alias to identify the service.
HostName The Oracle hostname (contact your Oracle DBA if necessary)
DB Port Number The Oracle Instance port number.
SID The Oracle Instance identifier.
User Name The Operator name or the Owner name.
Password Password to identify the user.
VistaMart® 4.0 Modifying miscellaneous settings 24
7/17/2019 VistaMart User Guide
http://slidepdf.com/reader/full/vistamart-user-guide 24/265
User Guide - Chapter 1 Getting started with VistaMart®
4 Click Save to save these connection details and click Connect to access the
VistaMart database defined above.
5 The next time you connect to VistaMart, select the Service (VistaMart database
user connection) from the drop-down box and click OK.
Connect to a VistaMart database (command-line)
1 Browse to the directory <installdir>\bin.
2 Execute the inventory.exe file.
Details of each database connection are stored in an XML file under:
<installdir>\config\dblist.xml. We recommend that you save a copy of this
file for reference purposes (for example, when you re-install the InventoryManager.)
Setting preferencesYou can set your user settings when connecting to the VistaMart Inventory Manager.
Set preferences
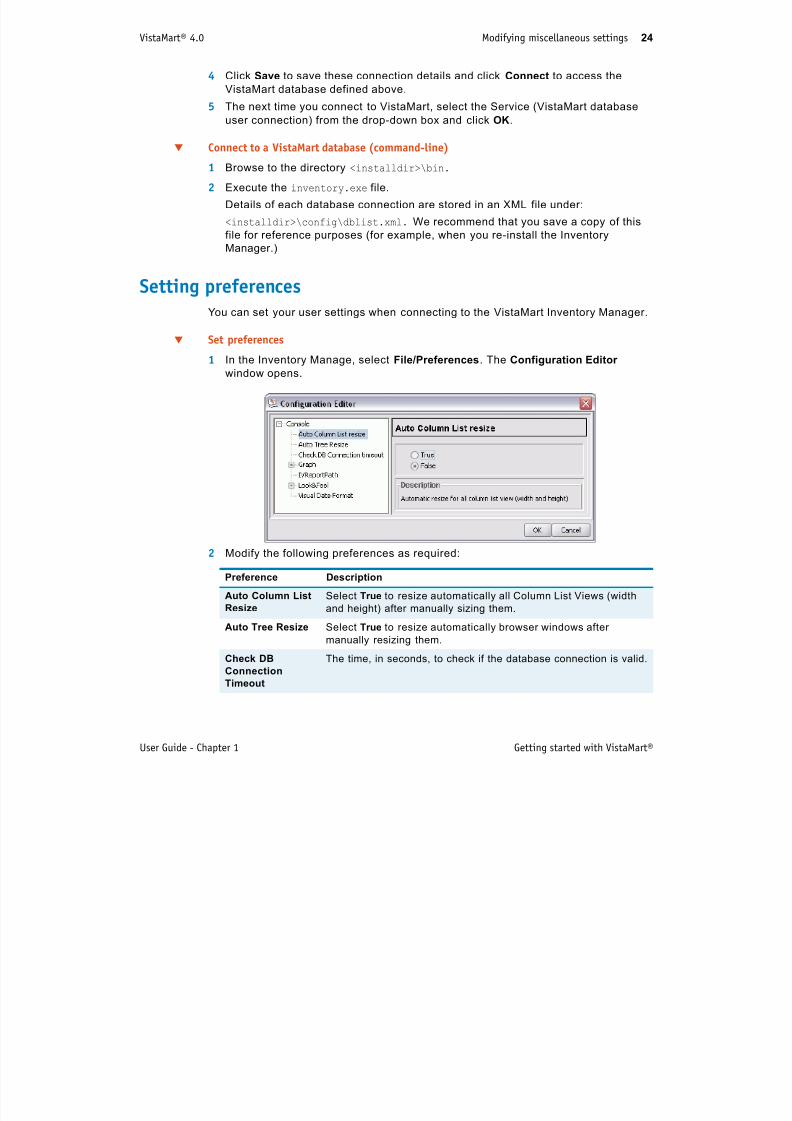
1 In the Inventory Manage, select File/Preferences. The Configuration Editor
window opens.
2 Modify the following preferences as required:
Preference Description
Auto Column List
Resize
Select True to resize automatically all Column List Views (width
and height) after manually sizing them.
Auto Tree Resize Select True to resize automatically browser windows after
manually resizing them.
Check DB
Connection
Timeout
The time, in seconds, to check if the database connection is valid.
VistaMart® 4.0 Modifying miscellaneous settings 25
7/17/2019 VistaMart User Guide
http://slidepdf.com/reader/full/vistamart-user-guide 25/265
User Guide - Chapter 1 Getting started with VistaMart®
Receiving traps from InfoVista Server
InfoVista Server uses the forwarding to push data as well as traps to VistaMart.You enable the trap reception in the Inventory Manager.
Enable trap reception
1 In the Inventory Manager, and expand the ‘Global Configuration’ node.
2 Select the ‘Config’ tab and click on ‘Initialization’ to display the list of databases.
3 Select the database where you want to receive traps.
4 In the property pane, select the option ‘Push IV traps’.
Graph This node allows you to configure how to display data samples in
the graphs. See "Accessing Data" on page 173.
IVReport Path The path used by VistaMart to access IVReport, the InfoVista
Server’s graphic interface. By default, this path is:
<InfoVista_install_dir>/Essentials/bin
Click Choose file, to modify this location.
Look & Feel You can change the fonts used by the Inventory Manager. Select
an available font from the drop down list and choose a font size,
weight and angle.
By default, the Inventory Manager uses Tahoma, 11 point, normal.
Visual Date Format Modify the date and time format used by the Inventory Manager.
By default, the Inventory Manager uses yyyy.M.dd HH:mm:ss for
its visual date format.
Preference Description
VistaMart® 4.0 Modifying miscellaneous settings 26

7/17/2019 VistaMart User Guide
http://slidepdf.com/reader/full/vistamart-user-guide 26/265
User Guide - Chapter 1 Getting started with VistaMart®
Setting VistaMart data lifetime and aggregationVISTAMART DATA LIFETIME This parameter determines how long VistaMart keeps data
values in its repository. You can make a data lifetime setting for each display rate ifnecessary.
DATA AGGREGATION VistaMart takes data samples and calculates them for any
specified display rate.
You enable aggregations according to your reporting requirements and database
capacity. For instance, if you want to show data values in VistaPortal for an hourly
display rate, you would set the aggregation at one hour.
Set data lifetime
1 From the Inventory Manager, select the ‘Config’ tab and expand the Global
configuration node.
2 Click on ‘Data Lifetime’ to display the list of display rates.3 Select a display rate for which you want to specify the data lifetime.
4 In the property pane, in the ‘Lifetime’ box, click on the spin arrows and the unit
button to set a value.
NOTE The VistaMart data lifetime setting is not the same as the source data lifetime
setting, which determines how long InfoVista Servers keep data samples before
dropping them. See the section "Setting the source data lifetime" on page 19 for
more details.
VistaMart® 4.0 Modifying miscellaneous settings 27
7/17/2019 VistaMart User Guide
http://slidepdf.com/reader/full/vistamart-user-guide 27/265
User Guide - Chapter 1 Getting started with VistaMart®
Set aggregation
1 From the Inventory Manager, and select the Config tab and expand the Global
configuration node.
2 Click on ‘Data Lifetime’ to display the list of display rates.
3 Select a display rate for which you want VistaMart to aggregate data.
4 In the property pane, select the ‘Aggregation’ option.
A message box appears to prompt you to restart VistaMart in order to take the new
setting into account.
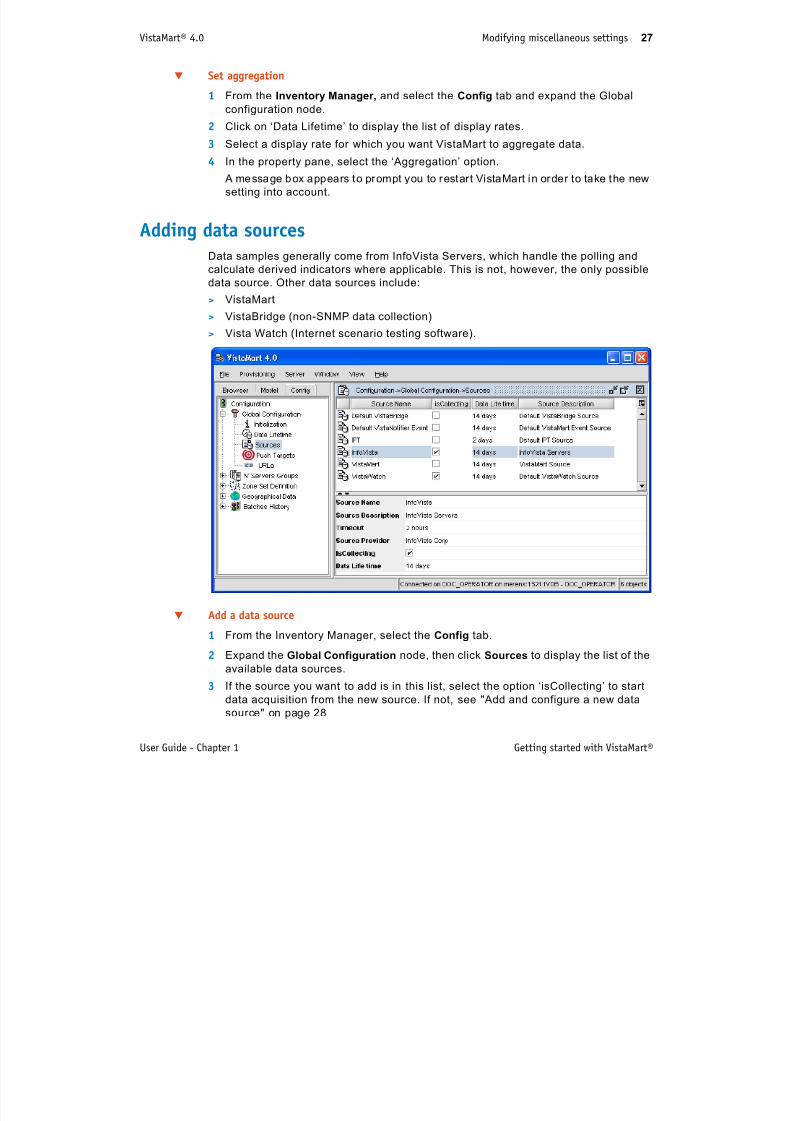
Adding data sourcesData samples generally come from InfoVista Servers, which handle the polling and
calculate derived indicators where applicable. This is not, however, the only possible
data source. Other data sources include:
> VistaMart
> VistaBridge (non-SNMP data collection)
> Vista Watch (Internet scenario testing software).
Add a data source
1 From the Inventory Manager, select the Config tab.
2 Expand the Global Configuration node, then click Sources to display the list of the
available data sources.
3 If the source you want to add is in this list, select the option ‘isCollecting’ to start
data acquisition from the new source. If not, see "Add and configure a new data
source" on page 28
VistaMart® 4.0 Modifying miscellaneous settings 28

7/17/2019 VistaMart User Guide
http://slidepdf.com/reader/full/vistamart-user-guide 28/265
User Guide - Chapter 1 Getting started with VistaMart®
Add and configure a new data source
1 From the Inventory Manager, select the Config tab.
2Expand the Global Configuration node, then click Sources to display the list of the
available data sources. If the source you want to add does not figure in this list,
right-click ‘Sources’ in the tree pane again and select ‘New source’. A ‘New
source’ wizard appears.
3 Enter the source name, description, and provider in the respective boxes.
4 In the Timeout box, click on the spin arrows and the unit button to set a value. The
timeout is the interval that VistaMart waits for a data sample to arrive from a
source in order to perform aggregation. Past the timeout interval, the data sample
is considered missing. See5 Select the IsCollecting option to start data acquisition from the source.
6 In the Data Lifetime box, click on the spin arrows and the unit button to set a
value. This defines how long the source poller keeps data samples before
deleting them. By default the source data lifetime is 14 days. See "Setting the
source data lifetime" on page 19 for more details.
7 Click ‘Finish’ to add the new source.
7/17/2019 VistaMart User Guide
http://slidepdf.com/reader/full/vistamart-user-guide 29/265
29
2 Provisioning VistaMart
This section explains the basic provisioning concepts as well the ways to provision
VistaMart. It also shows how to manipulate VistaMart objects using the Inventory
Manager.
"Understanding centralized provisioning" on page 30
"Selecting Zones and Zonesets to provision" on page 32
"About change management and provisioning" on page 34
"Selecting topology files for provisioning" on page 44
"Managing topology objects manually" on page 52
VistaMart® 4.0 Understanding centralized provisioning 30
7/17/2019 VistaMart User Guide
http://slidepdf.com/reader/full/vistamart-user-guide 30/265
User Guide - Chapter 2 Provisioning VistaMart
Understanding centralized provisioning
Initially, performance data comes from the monitored resources themselves or theprobes that monitor them. The InfoVista Servers process the data samples, which are
then stored in the VistaMart repository for final viewing in VistaPortal.
The ‘centralized’ architecture in which VistaMart functions uses a central provisioning
process to drive this information flow. The VistaMart inventory contains:
> the topology information (gathered from resources on the network),
> the type of measurements (Indicators) to compute,
> the provisioning information (i.e. which type of reports to start and what data tocollect).
Using the Inventory Manager for provisioningThe ‘Inventory Manager’ is the main user interface to the VistaMart repository. Its role
includes:
> Managing the topology files which define the resources that the InfoVista Servers
must monitor. These files come from either the user who manually generates themor automatically using VistaDiscovery, which scans the network for resources of a
specified type.
VistaMart keeps the topology information in its repository and downloads it to the
groups of InfoVista Servers that monitor the resources.
> Determining the type of data to collect from the resources and the measurements
(called ‘Indicators’) which the InfoVista Servers compute for the data.
The Indicators are defined in a set of Libraries (called ‘VistaViews’) and are
initially stored in the VistaMart repository and subsequently downloaded to the
InfoVista Servers. This means that all InfoVista Servers refer to the same set of
Indicators to ensure consistency in data calculation.
> Checking for coherence of the data in the VistaMart repository before it gets
downloaded to the InfoVista Servers. This is the ‘synchronization’ process during
which the InfoVista Servers create the Instances (representing the monitored
resources), import the VistaView Libraries (to get the Indicators), and begin to
collect data.
VistaMart® 4.0 Understanding centralized provisioning 31
7/17/2019 VistaMart User Guide
http://slidepdf.com/reader/full/vistamart-user-guide 31/265
User Guide - Chapter 2 Provisioning VistaMart
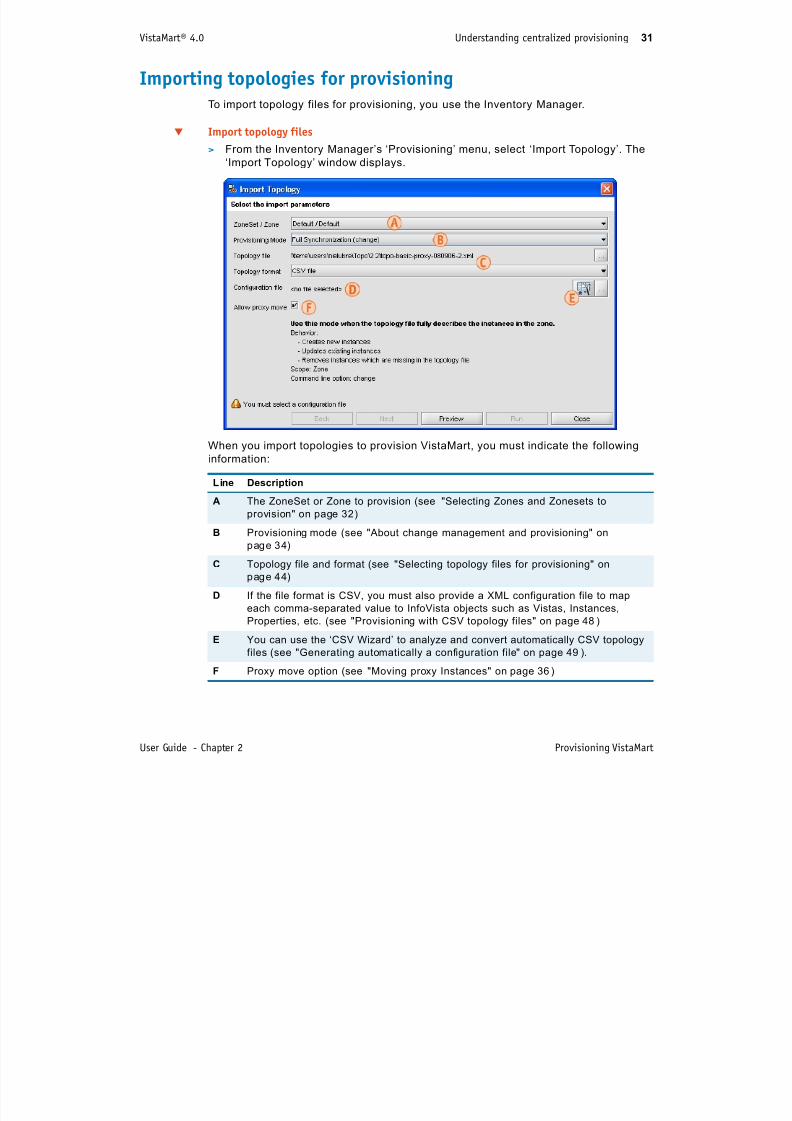
Importing topologies for provisioningTo import topology files for provisioning, you use the Inventory Manager.
Import topology files
> From the Inventory Manager’s ‘Provisioning’ menu, select ‘Import Topology’. The
‘Import Topology’ window displays.
When you import topologies to provision VistaMart, you must indicate the following
information:
Line Description
A The ZoneSet or Zone to provision (see "Selecting Zones and Zonesets to
provision" on page 32)
B Provisioning mode (see "About change management and provisioning" on
page 34)
C Topology file and format (see "Selecting topology files for provisioning" on
page 44)D If the file format is CSV, you must also provide a XML configuration file to map
each comma-separated value to InfoVista objects such as Vistas, Instances,
Properties, etc. (see "Provisioning with CSV topology files" on page 48)
E You can use the ‘CSV Wizard’ to analyze and convert automatically CSV topology
files (see "Generating automatically a configuration file" on page 49).
F Proxy move option (see "Moving proxy Instances" on page 36)
VistaMart® 4.0 Selecting Zones and Zonesets to provision 32
7/17/2019 VistaMart User Guide
http://slidepdf.com/reader/full/vistamart-user-guide 32/265
User Guide - Chapter 2 Provisioning VistaMart
Selecting Zones and Zonesets to provision
Topology files give information about the resources on the network that the InfoVistaServers must monitor.
There are two main sources of topology information:
> Automatically created VistaDiscovery topology files
> Manually edited topology files (user edited, VistaBridge, Vista Watch, etc.)
"Understanding Zones" on page 32
"Understanding Zonesets" on page 33
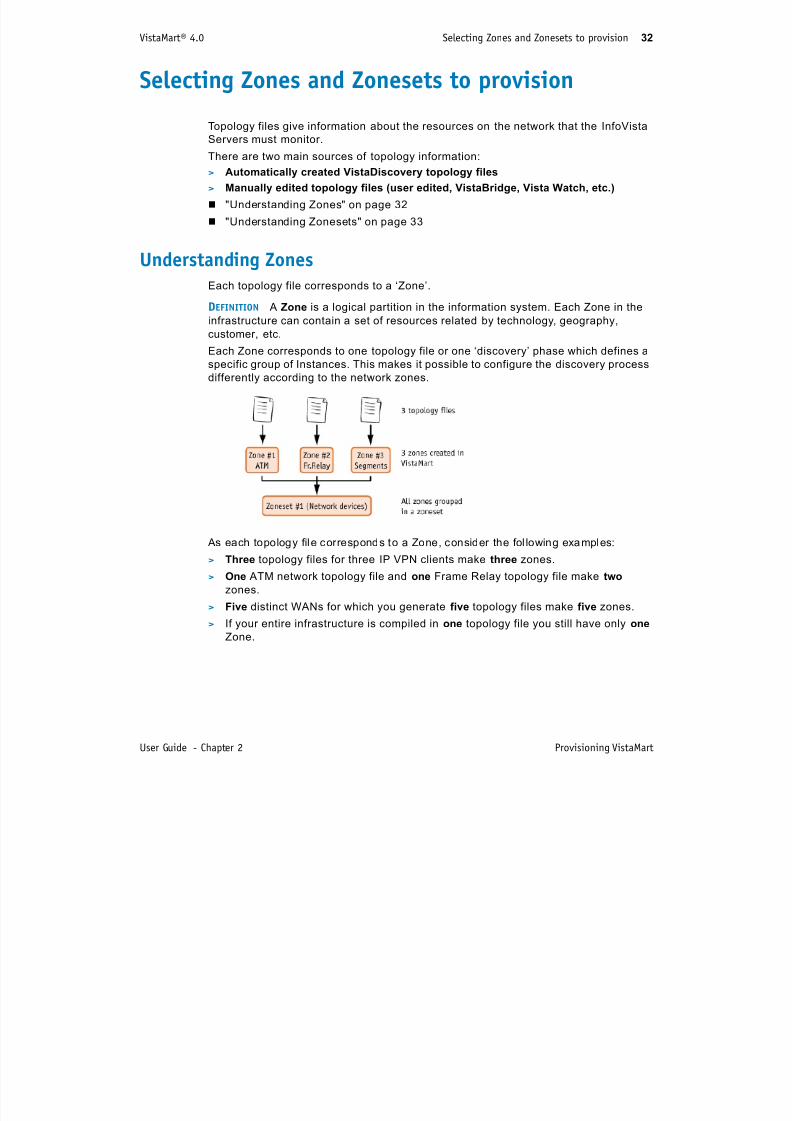
Understanding ZonesEach topology file corresponds to a ‘Zone’.
DEFINITION A Zone is a logical partition in the information system. Each Zone in the
infrastructure can contain a set of resources related by technology, geography,
customer, etc.
Each Zone corresponds to one topology file or one ‘discovery’ phase which defines aspecific group of Instances. This makes it possible to configure the discovery process
differently according to the network zones.
As each topology file corresponds to a Zone, consider the fol lowing examples:
> Three topology files for three IP VPN clients make three zones.
> One ATM network topology file and one Frame Relay topology file make two zones.
> Five distinct WANs for which you generate five topology files make five zones.
> If your entire infrastructure is compiled in one topology file you still have only one
Zone.
VistaMart® 4.0 Selecting Zones and Zonesets to provision 33

7/17/2019 VistaMart User Guide
http://slidepdf.com/reader/full/vistamart-user-guide 33/265
User Guide - Chapter 2 Provisioning VistaMart
Understanding ZonesetsDEFINITION A Zoneset contains a group of zones. Typically, you create a Zone set to
provide reporting for a specific environment.
Zoneset(s) can contain two or more Instances with the same name but which must
always have unique TAGs. In other words, Instances with the same name are made
unique by the Instance’s TAG attribute.
DEFINITION The TAG attribute is the primary identifier of an Instance. It must be
unique inside a ZoneSet. TAG computation Rules depend on the environment, andare subject to change.
If you define two zonesets, one for environment #1 and one for environment #2, you
might have a situation where one Instance exists in both Zone sets, with an identical
tag (and possibly an identical name). There is no conflict since both Zone sets are
clearly differentiated.
VistaMart® 4.0 About change management and provisioning 34
7/17/2019 VistaMart User Guide
http://slidepdf.com/reader/full/vistamart-user-guide 34/265
User Guide - Chapter 2 Provisioning VistaMart
About change management and provisioning
The provisioning modes use ‘change management’ to determine which part of theinventory to add, update, archive, or delete in the VistaMart Repository. The
provisioning modes apply to Instances, Vistas and Properties.
Change management takes place for individual zones. Deletions are detected for one
Zone only. When a basic Instance is deleted, its associated proxy Instances get
deleted as well.
> A new topology f ile for one Zone is compared to a prior version of the same
topology file/Zone pair.
> Any changes (new Instance addit ions, modified Properties, Library versions,
deleted objects, etc.) are analyzed by VistaMart.
> If you accept the differences, Instances which require modification are updated,
and merged with the VistaMart database.
> These Instances can now be downloaded to a group of InfoVista Servers and
polling can begin and return report/slot data.
Recognizing Instance modificationsTAG RECOGNITION Instances are recognized in the change management process using
the TAG attribute. The tag must be set to ensure that the Instance is unique in the
database.
Every Instance must have a tag value. In the case of automatic discoveries, tags are
generated automatically based on information in the VistaDiscovery mapping file.
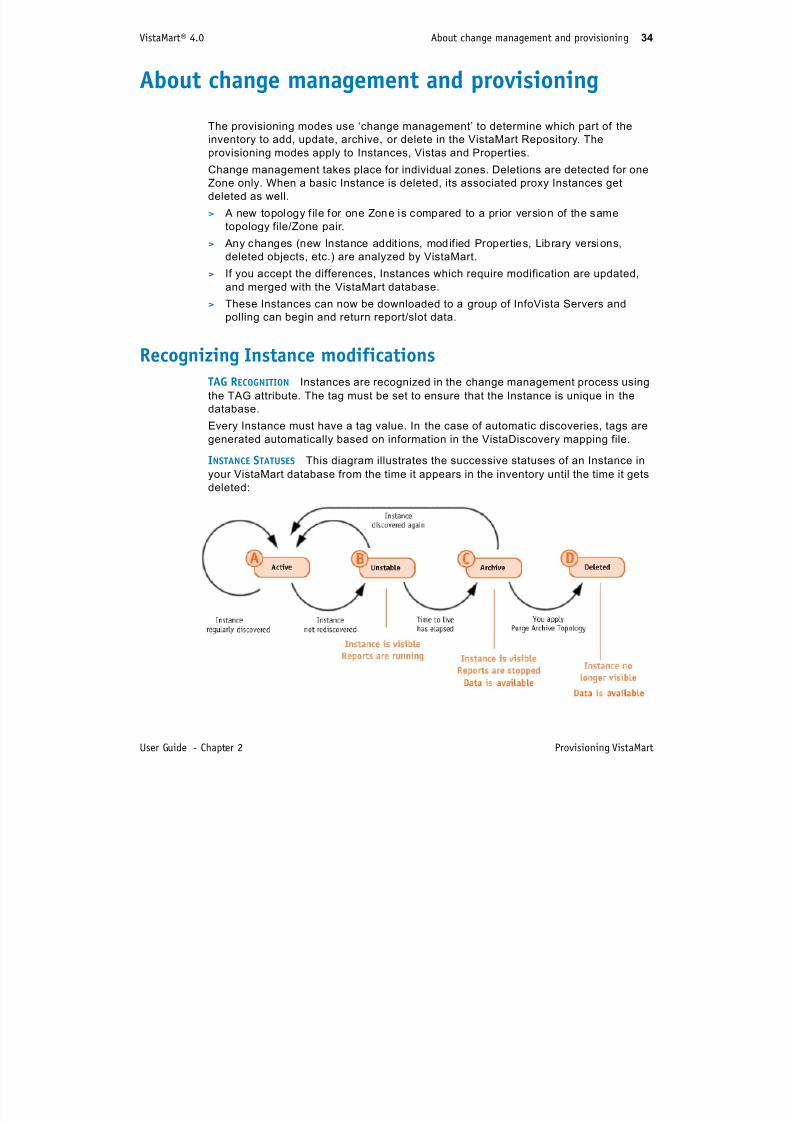
INSTANCE
STATUSES
This diagram illustrates the successive statuses of an Instance in
your VistaMart database from the time it appears in the inventory until the time it gets
deleted:
VistaMart® 4.0 About change management and provisioning 35
7/17/2019 VistaMart User Guide
http://slidepdf.com/reader/full/vistamart-user-guide 35/265
User Guide - Chapter 2 Provisioning VistaMart
See also:
"Lifetime before Archiving" on page 54
A new Ins tance is active as soon as it appears in the inventory for the first time
following import. Provided that the Rules trigger slots and real-time reports for this
Instance, reporting data is available upon the InfoVista Servers synchronization.
The Instance status remains active as long as the Instance is present when youupdate your topology information.
The Instance status is turned to unstable if the Instance is no longer part of the
topology list. However, the reporting data flow remains active as previously. In
term of reporting, there is no difference between the active and unstable statuses.
The Instance attribute LastDiscoveryTime is set to the date the Instance has been
discovered the last time.
The Instance remains unstable as long as the Lifetime Before Archiving period
has not elapsed. This parameter set at Zone level.
If the Instance is submitted again (rediscovered) during the Lifetime Before
Archiv ing period, it is re-act ivated.
If the Instance is not re-activated during the Lifetime Before Archiving, it becomes
an archive. This means:
> The real-time reports and slots are suspended. There is no more data
collection for this Instance. However, the historical data is still available and
the Instance still appears in the VistaPortal reports.
> The Instance is removed from the InfoVista Server.
The Instance remains visible in the database, as an archive, until you launch the
Archived Topology process.
If the monitored entity reappears in the topology before the archive purging, the
Instance is re-activated. That is, reporting data become available again. However,
historical data is missing for the period covering the Instance's archive status.
As soon as you archive the topology, the Instance becomes Deleted. This means:
In terms of reporting, the Instance does not exist anymore and is no longer
available. Its associated reporting data cannot be accessed anymore.
The Instance's tag is modified. That is, the Instance cannot be identified as
previously. If the monitored network entity corresponding to the deleted Instance
re-appears in the provisioning topology, the new resulting Instance cannot be
correlated with the former one.
Finally, all the Instances with the Deleted status are physically removed from the
database when you apply the Instance purging process.
Note that data associated to deleted Instances are regularly dropped as ordinary
obsolete data when you apply the data purging.
VistaMart® 4.0 About change management and provisioning 36
7/17/2019 VistaMart User Guide
http://slidepdf.com/reader/full/vistamart-user-guide 36/265
User Guide - Chapter 2 Provisioning VistaMart
Moving proxy Instances‘Proxy move’ is a VistaMart feature to manage customer inventory that allows the
redirecting of a proxy Instance from one basic Instance to another basic Instance. For
example, it is possible to move a customer interface from router A to router B without
losing VistaMart data.
The activation of this feature requires a rigorous tagging policy for proxies in
VistaDiscovery.
USING VISTADISCOVERY DEFAULT TAGGING The default tag for the proxy Instance contains
the tag of the basic (parent) Instance, as in the following example:
tag=”LAN_%parent.build.tag%_%IfName%“
The result, if you keep this tagging policy when using the proxy move feature, youduplicate the Instance because the tag is now different due to the change in the basic
Instance, and you lose your data.
USING CUSTOM TAGGING This gives the proxy Instance a unique tag:
> In the tagging policy of the proxy Instance, do not include any reference to the
basic (parent) Instance, as in this example:
tag=”LAN_%IfAlias%”, where the alias contains the customer and site name
> Using VistaDiscovery’s integration mode, force the tag to a column value (see the
VistaDiscovery User Guide for complete details.)
EXAMPLE Moving Interface 1 from Router B to Router C:
> Case 1: default tagging policy for Interface 1
Tag=Router B_Interface 1 becomes Tag=Router C_Interface 1
Result: Creation of new Instance with tag Router C_Interface 1; loss of data
> Case 2: custom tagging policy using Customer and Site Name for Interface 1Tag=CustomerName_SiteName remains Tag=CustomerName_SiteName
Result: the tag for the interface does not contain any reference to the parent device,
but only information on the object. The ‘proxy move’ function redirects the interface
to the new router, and data polling continues without interruption.
WARNING By default, the ‘proxy move’ feature is disabled as a safeguard against
accidental moves of Instances, causing widespread changes to your
inventory. This can be complicated, if not impossible, to reverse.
Use this function cautiously when you must redirect your proxy Instances
for specific Zones only.
VistaMart® 4.0 About change management and provisioning 37

7/17/2019 VistaMart User Guide
http://slidepdf.com/reader/full/vistamart-user-guide 37/265
User Guide - Chapter 2 Provisioning VistaMart
Managing groups InstancesThe ability to group individual Instances is especially useful when you must group
network resources in your reports according to specific criteria.
The objective is to facilitate group reporting by starting a slot or report for the group
Instance. Everything required for the calculation such as Instances, Indicators, and
Report Templates are launched automatically.
A group Instance is an Instance with:
> Dedicated Properties which qualify the related members within the group.
> Dedicated Indicators, whose values are calculated through formulas from the
respective members’ Indicator values.
About group members
Within the VistaMart database, each individual Instance has a Property ‘Member of
Group’ which identifies the group(s) to which it is related. There are two different
ways to assign members to a group:
> For each related Instance, you explicitly declare the ‘Member of group’ Property
value in the topology file you import to provision the VistaMart Zone.
> Using Rules, you modify the Property value according to a given set of conditions.
Note that a given group can federate Instances sourced from different zones -
individual members and their group(s) do not necessarily belong to the same Zone.
This gives you the flexibility to use specific topology files for defining the groups.
An Instance can be a member of several groups using a mul ti-valued Property. For
example, a server can be a member of the groups ‘Servers’, ‘Database’, and
‘Windows’.
Groups can also be members of groups. This allows you to define a flexible structure
and create as many reporting combinations as you need.
VistaMart® 4.0 About change management and provisioning 38
U d di h i i l l
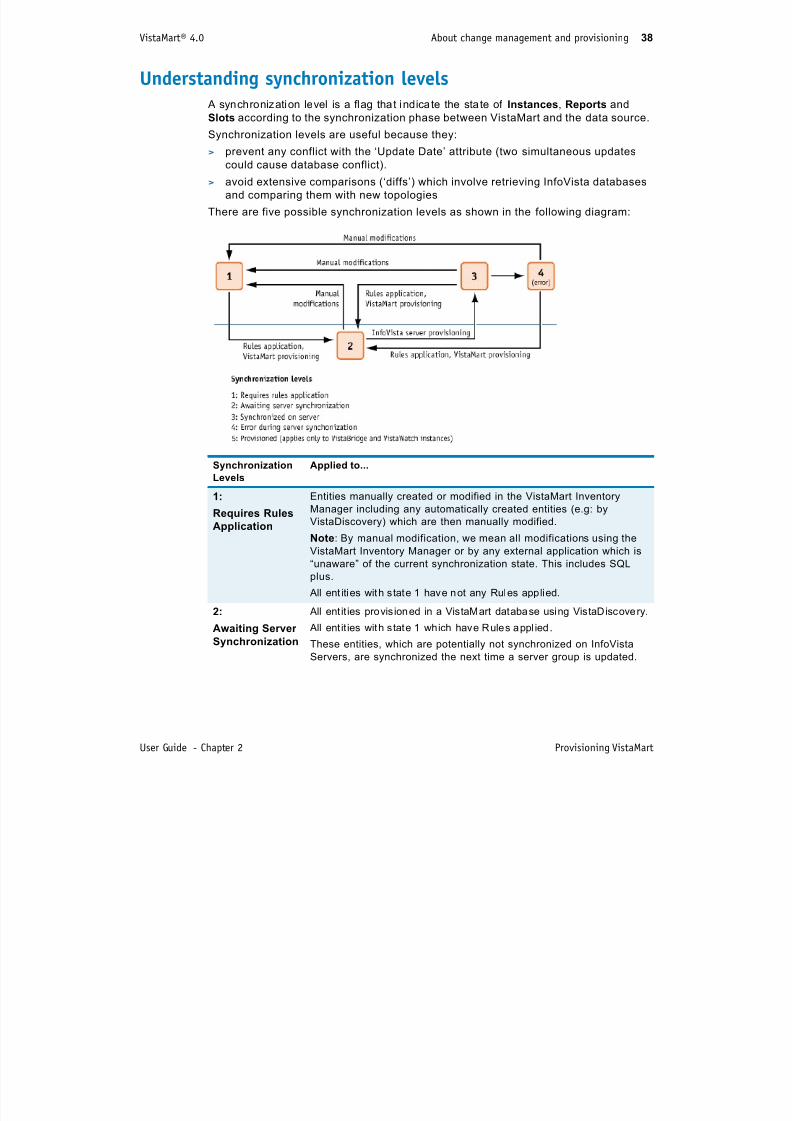
7/17/2019 VistaMart User Guide
http://slidepdf.com/reader/full/vistamart-user-guide 38/265
User Guide - Chapter 2 Provisioning VistaMart
Understanding synchronization levels A synchronization level is a flag that indicate the state of Instances, Reports and
Slots according to the synchronization phase between VistaMart and the data source.
Synchronization levels are useful because they:
> prevent any conflict with the ‘Update Date’ attribute (two simultaneous updates
could cause database conflict).
> avoid extensive comparisons (‘diffs’) which involve retrieving InfoVista databases
and comparing them with new topologies
There are five possible synchronization levels as shown in the following diagram:
SynchronizationLevels
Applied to...
1:
Requires Rules
Application
Entities manually created or modified in the VistaMart Inventory
Manager including any automatically created entities (e.g: by
VistaDiscovery) which are then manually modified.
Note: By manual modification, we mean all modifications using the
VistaMart Inventory Manager or by any external application which is
“unaware” of the current synchronization state. This includes SQL
plus.
All ent ities with state 1 have not any Rules applied.
2:
Awaiting Server
Synchronization
All ent it ies provis ioned in a VistaMart database using VistaDiscovery.
All ent it ies with state 1 which have Rules appl ied .
These entities, which are potentially not synchronized on InfoVista
Servers, are synchronized the next time a server group is updated.
VistaMart® 4.0 About change management and provisioning 39
7/17/2019 VistaMart User Guide
http://slidepdf.com/reader/full/vistamart-user-guide 39/265
User Guide - Chapter 2 Provisioning VistaMart
Exercising object ownership and priorityObjects on the VistaMart repository (such as Instances, Property Values, Slots,
Reports, Links) that come from provisioning have an ‘owner ’ attribute. This attribute
indicates the priority exercised when updating, inserting, or removing these objectsfrom the database.
‘Owner’ priorities allow you to protect database coherence. In order to modify or
delete an existing object, an owner must have the same priority or higher than the
current owner of the object. For example, if an object has ‘Application’ as owner, it
cannot be modified by the owner ‘Auto’; it can only be modified by the owner
‘Application’ or higher.
The following table lists the various owners and their related priorities:
3:
Synchronized onServer
All ent it ies successfu lly uploaded and synchronized on an InfoVista
Server. Any ent ity which is rediscovered and which exists in the same form
on an InfoVista Server is therefore not resynchronized, thus saving
resources.
4:
Error during
Server
Synchronization
An unrecoverable error has occurred while uploading this entity. It is
not considered for InfoVista Server uploads in future unless it is
changed (automatically or manually) and returns to state 1 or 2.
You need to use the repair mode to recover the entity.
5:
Provisioned
VistaBridge and Vista Watch Instances are successfully provisioned.
Name Priority Description
Default
(lowest)
0 Property Values which st il l mainta in thei r defaul t values .
Auto 50 This priority is set for all objects imported by provisioning using
the ‘change’ and ‘proxy’ modes.
Rules 50 Objects created or modified by VistaMart Rules
Application 100 Objects created by applications such as VistaBridge
User 200 Objects modified by a user or by provisioning in the ‘update’
mode
Specific
(highest)
500 Objects created by applications such as Vista Watch that need to
keep strict control over the Instances it generates.
NOTE Properties Values and Instances have separate owners that are not
necessarily the same. Thus, you can set Instance attributes at a ‘User’ owner
level and maintain Property Values under ‘Auto’ owner.
Synchronization
Levels
Applied to...
VistaMart® 4.0 About change management and provisioning 40
Applying provisioning modes
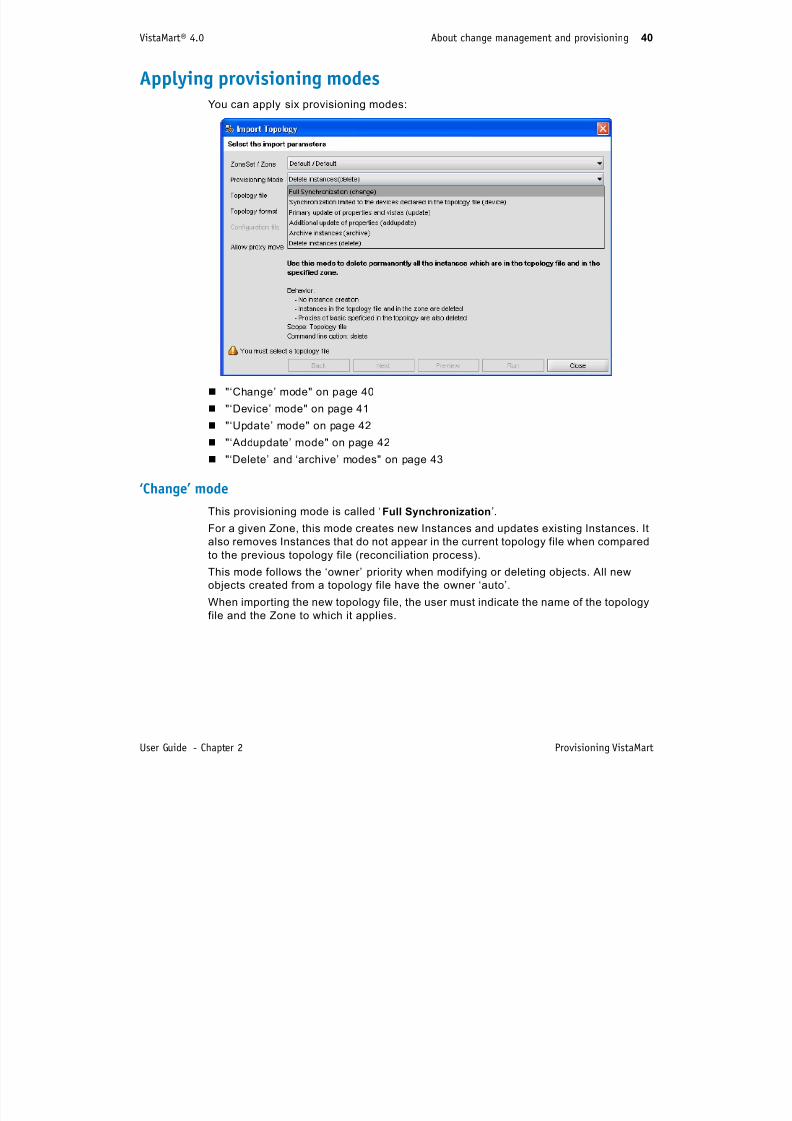
7/17/2019 VistaMart User Guide
http://slidepdf.com/reader/full/vistamart-user-guide 40/265
User Guide - Chapter 2 Provisioning VistaMart
Applying provisioning modesYou can apply six provisioning modes:
"‘Change’ mode" on page 40
"‘Device’ mode" on page 41
"‘Update’ mode" on page 42
"‘Addupdate’ mode" on page 42
"‘Delete’ and ‘archive’ modes" on page 43
‘Change’ mode
This provisioning mode is called ‘Full Synchronization’.
For a given Zone, this mode creates new Instances and updates existing Instances. It
also removes Instances that do not appear in the current topology file when compared
to the previous topology file (reconciliation process).
This mode follows the ‘owner’ priority when modifying or deleting objects. All new
objects created from a topology file have the owner ‘auto’.
When importing the new topology file, the user must indicate the name of the topology
file and the Zone to which it applies.
VistaMart® 4.0 About change management and provisioning 41
‘Device’ mode

7/17/2019 VistaMart User Guide
http://slidepdf.com/reader/full/vistamart-user-guide 41/265
User Guide - Chapter 2 Provisioning VistaMart
Device mode
This provisioning mode is called ‘Synchronization limited to devices declared in the
topology file’.
The objective of this mode is to limit the change management to the Instances
defined in the topology files for a subset of the Zone:
> It creates new Instances defined in the topology file
> It updates existing Instances defined in the topology file
> Removes proxy instances if these do not appear in the topology file. Their
associated basic instances remain.
For glossary definitions of basic and proxy instances, see the entry "instance" on
page 250.
DEVICE UPDATE CASE When you define a basic Instance in the topology file, you must
also provide the definition of all its related proxies within that same topology file (for
example, a router and all its interfaces). The basic and proxy instances belong to the
same Zone. Since change management applies to the whole device, the related
proxies that are not in the topology file are deleted.
PROBE /INTERFACE UPDATE CASE This provisioning mode also manages proxy Instances
without affecting other Instances in the Zone. It is particularly useful when detecting
new probes or QoS interfaces on routers, which are by definition proxy type
Instances.
This type of configuration requires at least two separate Zones:
> The first Zone is dedicated to the network device definitions,
> The second Zone is strictly dedicated to the related proxy definitions.
For example, VistaDiscovery discovers the routers contained in ‘Zone 1’ and the
probes in ‘Zone 2’. The provisioning process automatically makes the link between
the routers and the probes and updates only the probes in a given Zone. The proxyInstances linked to the same basic Instances located in other zones are not affected.
The ownership hierarchy applies in this provisioning mode.
VistaMart® 4.0 About change management and provisioning 42
‘Update’ mode
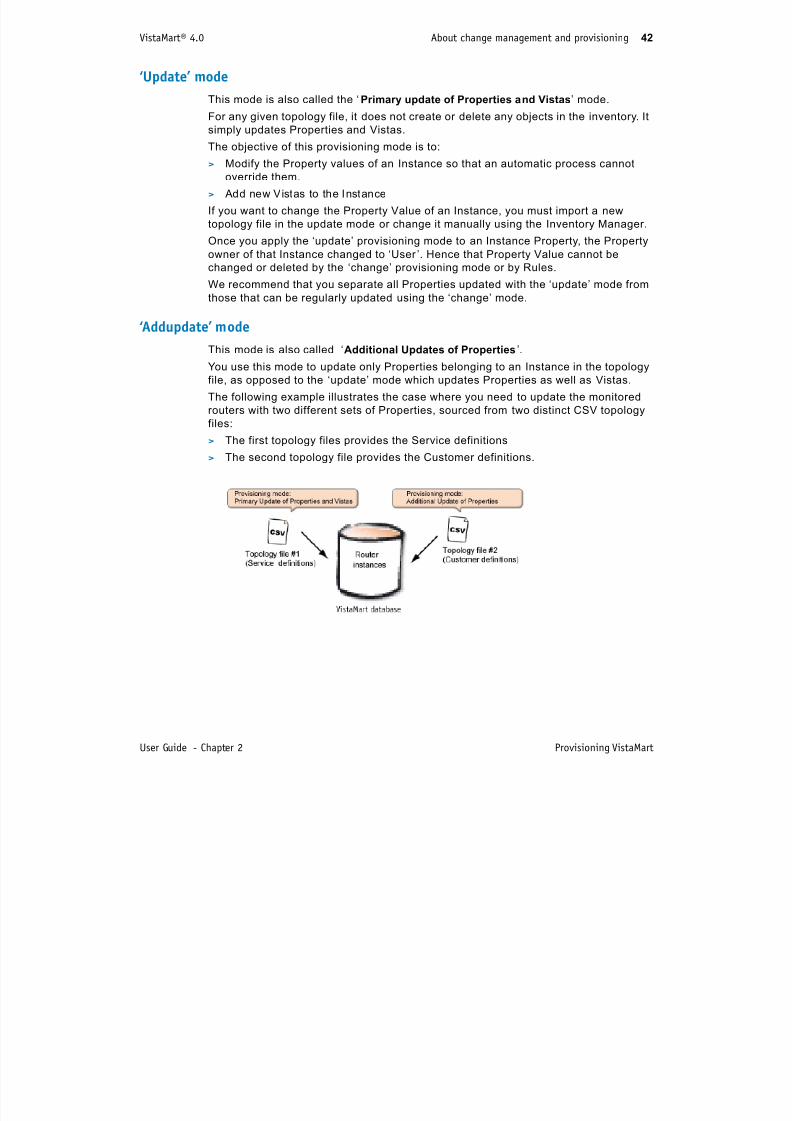
7/17/2019 VistaMart User Guide
http://slidepdf.com/reader/full/vistamart-user-guide 42/265
User Guide - Chapter 2 Provisioning VistaMart
Update mode
This mode is also called the ‘Primary update of Properties and Vistas’ mode.
For any given topology file, it does not create or delete any objects in the inventory. It
simply updates Properties and Vistas.
The objective of this provisioning mode is to:
> Modify the Property values of an Instance so that an automatic process cannot
override them.
> Add new Vistas to the Instance
If you want to change the Property Value of an Instance, you must import a new
topology file in the update mode or change it manually using the Inventory Manager.
Once you apply the ‘update’ provisioning mode to an Instance Property, the Propertyowner of that Instance changed to ‘User ’. Hence that Property Value cannot be
changed or deleted by the ‘change’ provisioning mode or by Rules.
We recommend that you separate all Properties updated with the ‘update’ mode from
those that can be regularly updated using the ‘change’ mode.
‘Addupdate’ mode
This mode is also called ‘Additional Updates of Properties’.You use this mode to update only Properties belonging to an Instance in the topology
file, as opposed to the ‘update’ mode which updates Properties as well as Vistas.
The following example illustrates the case where you need to update the monitored
routers with two different sets of Properties, sourced from two distinct CSV topology
files:
> The first topology files provides the Service definitions
> The second topology file provides the Customer definitions.
VistaMart® 4.0 About change management and provisioning 43
‘Delete’ and ‘archive’ modes

7/17/2019 VistaMart User Guide
http://slidepdf.com/reader/full/vistamart-user-guide 43/265
User Guide - Chapter 2 Provisioning VistaMart
elete a d a c e odes
The objective of these two removal modes is to remove Instances from a given Zone.
The topology file contains a list of Instances to remove. It only requires the tag of
each Instance to remove.
> when using the ‘delete’ mode, VistaMart deletes the Instances. The Instance is
permanently destroyed.
> when using the ‘archive’ mode, VistaMart archives the Instances. The reporting
associated to the archived Instance is suspended even though it still appears in
VistaPortal. This function can be reversed. Data polling stops, but the user can still
access the data.
When you remove or archive basic Instances, the associated proxies are also
removed or archived.
LINKS The links between the deleted or archived Instances and other Instances are
deleted as well.
REFERENCED PROPERTIES AND GROUPS When you remove an Instance, all referenced
Properties and Groups from this Instance are reset to null.
VistaMart® 4.0 Selecting topology files for provisioning 44
Selecting topology files for provisioning
7/17/2019 VistaMart User Guide
http://slidepdf.com/reader/full/vistamart-user-guide 44/265
User Guide - Chapter 2 Provisioning VistaMart
Selecting topology files for provisioning
A topology file is a fla t f ile describing the devices in an IT infrastructure with basicinformation pertaining to that device such as IP address, manufacturer, etc.
In addition, it gives information about Instances, Indicators, Property Values, Vistas,
that VistaMart uses to provide the reporting you need.
> You can declare multiple Vistas in a topology file. This is the case when an
Instance belongs to several Vistas (for example, a ‘server’ Instance can belong to
the ‘Database’ and ‘Server’ Vistas).
> It is possible to declare proxy Instances without explicitly declaring the basic
Instance. It is only necessary to include a reference or link to the basic Instance.
> You can use the Property Value ‘Member of Group’ to identify the members of a
given group (i.e. ‘Cisco Routers’). You can also use this Property to create groups
of groups.
Using VistaDiscovery for provisioning
VistaDiscovery allows you to automate the network discovery process. During adiscovery phase, it may find new objects which you can incorporate into the VistaMart
inventory.
VistaDiscovery produces topology files that are formatted in XML to work compatibly
with VistaMart. The file details each Instance, its related Vista and its Property
Values.
Zones created in VistaDiscovery carry the tag ‘Automatic.’ You can either create
these Zones in VistaDiscovery or the VistaMart Inventory Manager to use in the
discovery.
You can modify the topology file generated by VistaDiscovery for a Zone to suit your
reporting requirements. For example, you can use Rules to modify Instance Property
Values or create/delete/modify objects individually and manually.
For comprehensive details about VistaDiscovery features, see the VistaDiscovery
User Guide.
Using external topology files for provisioningYou can create topology files manually or through other applications such as
VistaBridge or Vista Watch and import them into VistaMart using the Inventory
Manager.
VistaMart® 4.0 Selecting topology files for provisioning 45
Choosing a file format

7/17/2019 VistaMart User Guide
http://slidepdf.com/reader/full/vistamart-user-guide 45/265
User Guide - Chapter 2 Provisioning VistaMart
gTopology files come in two possible formats:
XML The file complies with the standard XML syntax and conforms to a built-inVistaMart schema. You can submit this file directly for provisioning.
CSV This customized format must be converted to XML so VistaMart can read it.This
conversion process uses an additional Configuration file that maps the comma-
separated values to objects in the VistaMart inventory such as Instances, Property
Values, etc.
Provisioning with XML topology filesYou manually provision VistaMart with an XML topology file that follows XML syntax.
Import a topology file
1 In the Inventory Manager, select Provisioning/Import Topology. The Import
Topology window opens. This window allows you to:
• set your VistaMart provisioning parameters,
• preview your topology files (use test small Instance groups as it is a memory-
consuming process),
• launch provisioning,
• monitor changes in the integrated log window.
2 Select the appropriate Zone and Provisioning Mode.
3 Click the browse button in the Topology file box to select the XML topologyfile to import and click Open.
• The option topology file is selected by default to XML File. Do not change it.
4 Click Preview. This allows you to test the validity of the submitted file and display
the changes compared to the previous topology.
VistaMart uses the submitted topology file to show what changes (additions,
deletions, modifications) it would make in the database for these objects:
• Instances: Inserted (blue), changed (green), removed (red). Any Instanceneeding resynchronization appear in yellow (see "Understanding
synchronization levels" on page 38).
• Reports (for each Instance)
• Slots (for each Instance)
• Properties (for each Instance)
To display Reports/Slots/Property information for each Instance, select an
Instance in the contents pane of the ‘Browser ’ tab.
5 Click OK to close the Preview window.
NOTE You can only provision one Zone at a time.
VistaMart® 4.0 Selecting topology files for provisioning 46
6 Click Run to apply the changes.
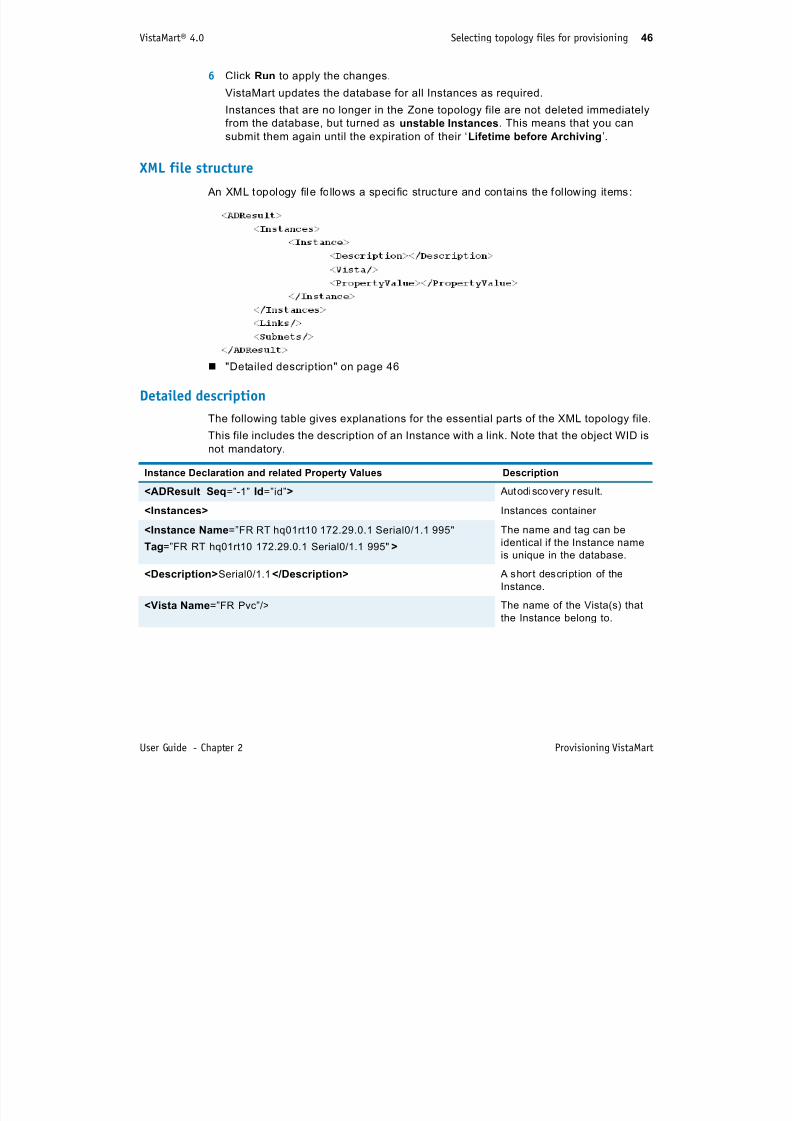
7/17/2019 VistaMart User Guide
http://slidepdf.com/reader/full/vistamart-user-guide 46/265
User Guide - Chapter 2 Provisioning VistaMart
VistaMart updates the database for all Instances as required.
Instances that are no longer in the Zone topology file are not deleted immediately
from the database, but turned as unstable Instances. This means that you cansubmit them again until the expiration of their ‘Lifetime before Archiving’.
XML file structure
An XML topology file follows a speci fic structure and contains the following items:
"Detailed description" on page 46
Detailed description
The following table gives explanations for the essential parts of the XML topology file.
This file includes the description of an Instance with a link. Note that the object WID is
not mandatory.
Instance Declaration and related Property Values Description
<ADResult Seq=”-1” Id=”id”> Autodiscovery result.
<Instances> Instances container
<Instance Name=”FR RT hq01rt10 172.29.0.1 Serial0/1.1 995"
Tag=”FR RT hq01rt10 172.29.0.1 Serial0/1.1 995">
The name and tag can be
identical if the Instance name
is unique in the database.
<Description>Serial0/1.1</Description> A short descript ion of the
Instance.
<Vista Name=”FR Pvc”/> The name of the Vista(s) that
the Instance belong to.
VistaMart® 4.0 Selecting topology files for provisioning 47
Instance Declaration and related Property Values Description
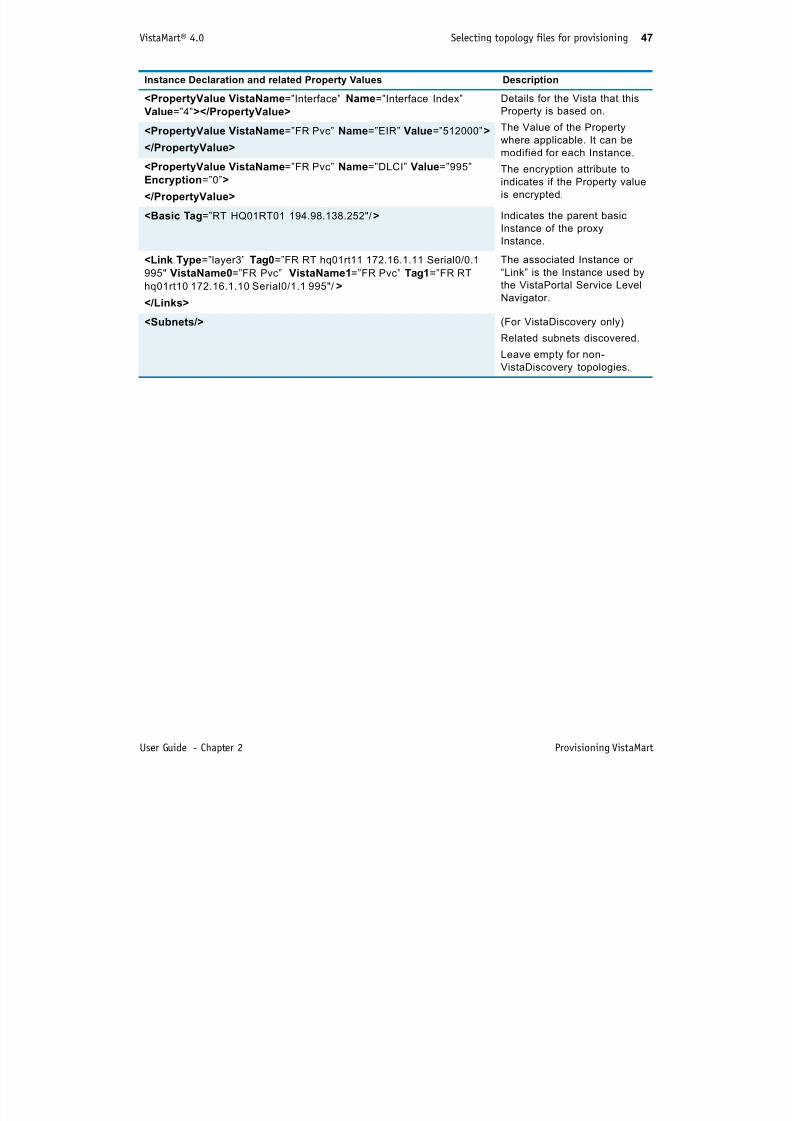
7/17/2019 VistaMart User Guide
http://slidepdf.com/reader/full/vistamart-user-guide 47/265
User Guide - Chapter 2 Provisioning VistaMart
<PropertyValue VistaName=”Interface” Name=”Interface Index”
Value=”4”></PropertyValue>
Details for the Vista that this
Property is based on.
The Value of the Propertywhere applicable. It can be
modified for each Instance.
The encryption attribute to
indicates if the Property value
is encrypted.
<PropertyValue VistaName=”FR Pvc” Name=”EIR” Value=”512000”>
</PropertyValue>
<PropertyValue VistaName=”FR Pvc” Name=”DLCI” Value=”995”
Encryption=”0”>
</PropertyValue>
<Basic Tag=”RT HQ01RT01 194.98.138.252"/> Indicates the parent basic
Instance of the proxy
Instance.
<Link Type=”layer3” Tag0=”FR RT hq01rt11 172.16.1.11 Serial0/0.1
995" VistaName0=”FR Pvc” VistaName1=”FR Pvc” Tag1=”FR RT
hq01rt10 172.16.1.10 Serial0/1.1 995"/>
</Links>
The associated Instance or
“Link” is the Instance used by
the VistaPortal Service Level
Navigator.
<Subnets/> (For VistaDiscovery only)
Related subnets discovered.
Leave empty for non-VistaDiscovery topologies.
VistaMart® 4.0 Selecting topology files for provisioning 48
Provisioning with CSV topology files
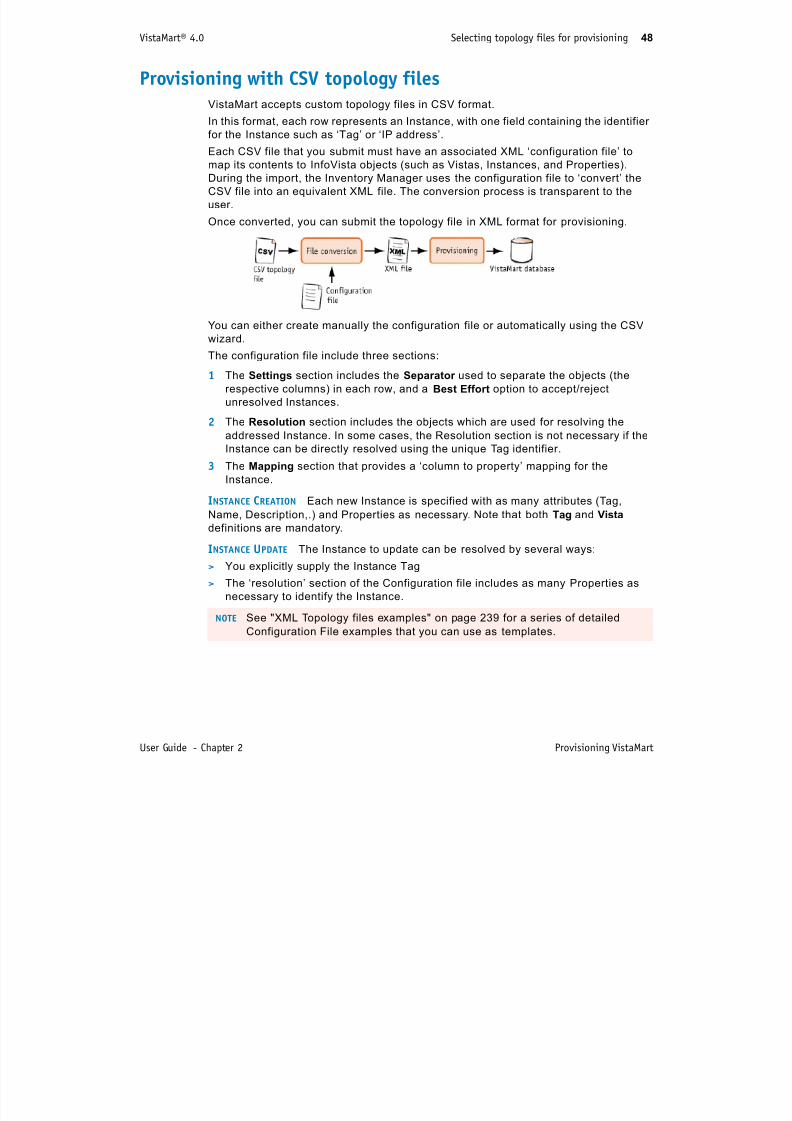
7/17/2019 VistaMart User Guide
http://slidepdf.com/reader/full/vistamart-user-guide 48/265
User Guide - Chapter 2 Provisioning VistaMart
VistaMart accepts custom topology files in CSV format.
In this format, each row represents an Instance, with one field containing the identifier
for the Instance such as ‘Tag’ or ‘IP address’.
Each CSV file that you submit must have an associated XML ‘configuration file’ to
map its contents to InfoVista objects (such as Vistas, Instances, and Properties).
During the import, the Inventory Manager uses the configuration file to ‘convert’ the
CSV file into an equivalent XML file. The conversion process is transparent to the
user.
Once converted, you can submit the topology file in XML format for provisioning.
You can either create manually the configuration file or automatically using the CSV
wizard.
The configuration file include three sections:
1 The Settings section includes the Separator used to separate the objects (the
respective columns) in each row, and a Best Effort option to accept/reject
unresolved Instances.
2 The Resolution section includes the objects which are used for resolving the
addressed Instance. In some cases, the Resolution section is not necessary if the
Instance can be directly resolved using the unique Tag identifier.
3 The Mapping section that provides a ‘column to property’ mapping for theInstance.
INSTANCE CREATION Each new Instance is specified with as many attributes (Tag,
Name, Description,.) and Properties as necessary. Note that both Tag and Vista
definitions are mandatory.
INSTANCE UPDATE The Instance to update can be resolved by several ways:
> You explicitly supply the Instance Tag
> The ‘resolution’ section of the Configuration file includes as many Properties asnecessary to identify the Instance.
NOTE See "XML Topology files examples" on page 239 for a series of detailed
Configuration File examples that you can use as templates.
VistaMart® 4.0 Selecting topology files for provisioning 49
Generating automatically a configuration file
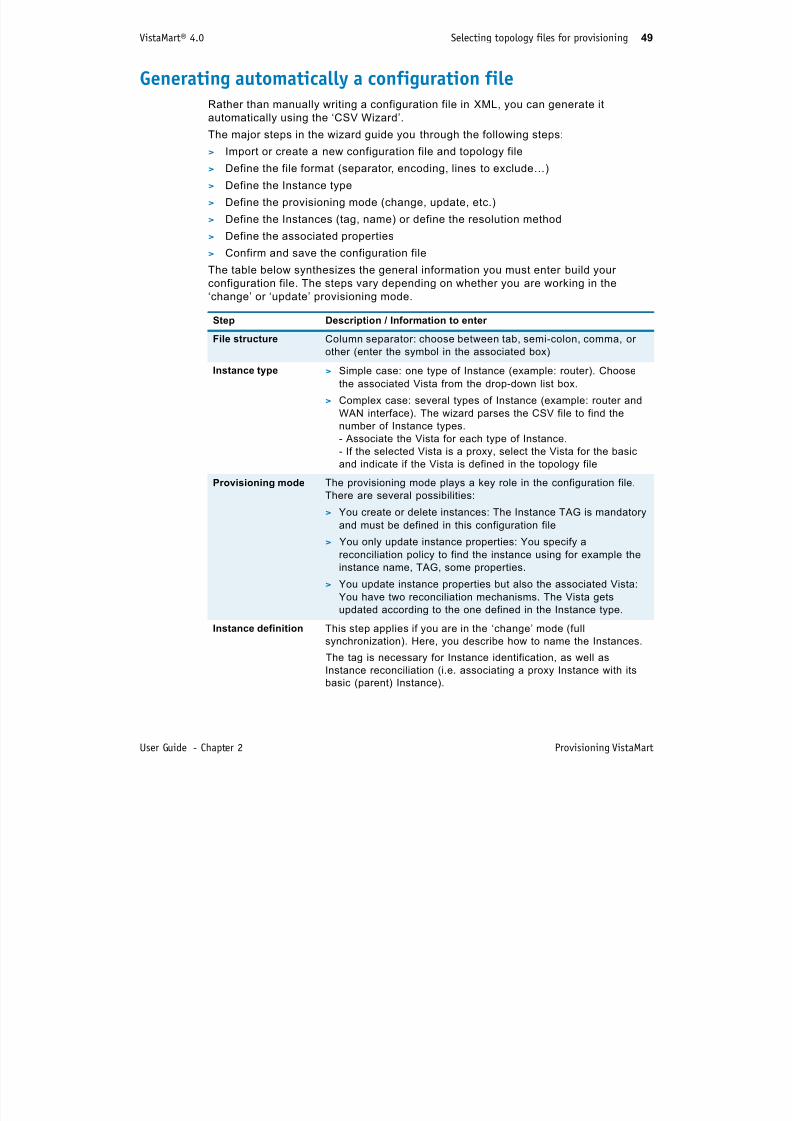
7/17/2019 VistaMart User Guide
http://slidepdf.com/reader/full/vistamart-user-guide 49/265
User Guide - Chapter 2 Provisioning VistaMart
Rather than manually writing a configuration file in XML, you can generate it
automatically using the ‘CSV Wizard’.
The major steps in the wizard guide you through the following steps:
> Import or create a new configuration file and topology file
> Define the file format (separator, encoding, lines to exclude…)
> Define the Instance type
> Define the provisioning mode (change, update, etc.)
> Define the Instances (tag, name) or define the resolution method
>Define the associated properties
> Confirm and save the configuration file
The table below synthesizes the general information you must enter build your
configuration file. The steps vary depending on whether you are working in the
‘change’ or ‘update’ provisioning mode.
Step Description / Information to enter
File structure Column separator: choose between tab, semi-colon, comma, or
other (enter the symbol in the associated box)Instance type > Simple case: one type of Instance (example: router). Choose
the associated Vista from the drop-down list box.
> Complex case: several types of Instance (example: router and
WAN interface). The wizard parses the CSV file to find the
number of Instance types.
- Associate the Vista for each type of Instance.
- If the selected Vista is a proxy, select the Vista for the basic
and indicate if the Vista is defined in the topology file
Provisioning mode The provisioning mode plays a key role in the configuration file.
There are several possibilities:
> You create or delete instances: The Instance TAG is mandatory
and must be defined in this configuration file
> You only update instance properties: You specify a
reconciliation policy to find the instance using for example the
instance name, TAG, some properties.
> You update instance properties but also the associated Vista:You have two reconciliation mechanisms. The Vista gets
updated according to the one defined in the Instance type.
Instance definition This step applies if you are in the ‘change’ mode (full
synchronization). Here, you describe how to name the Instances.
The tag is necessary for Instance identification, as well as
Instance reconciliation (i.e. associating a proxy Instance with its
basic (parent) Instance).
VistaMart® 4.0 Selecting topology files for provisioning 50
I t Thi t li if i th ‘ d t ’ d Y d fi h
Step Description / Information to enter

7/17/2019 VistaMart User Guide
http://slidepdf.com/reader/full/vistamart-user-guide 50/265
User Guide - Chapter 2 Provisioning VistaMart
Instance
reconciliation
This step applies if you are in the ‘update’ mode. You define how
to find the Instance through a mapping of column to properties.
The list of the properties displays automatically filtered dependingon the Instance type Vista and associated basic Vista (if the
instance is a proxy).
Properties definition Here you update the Instance properties according to one or
several columns.
Validation This final step guarantees that:
> The configuration file is properly updated and saved
> All columns are used
> Resolution process is matching instances (in update mode)
> No errors when processing the first lines for each type of
instance.
VistaMart® 4.0 Selecting topology files for provisioning 51
Following-up your provisioning
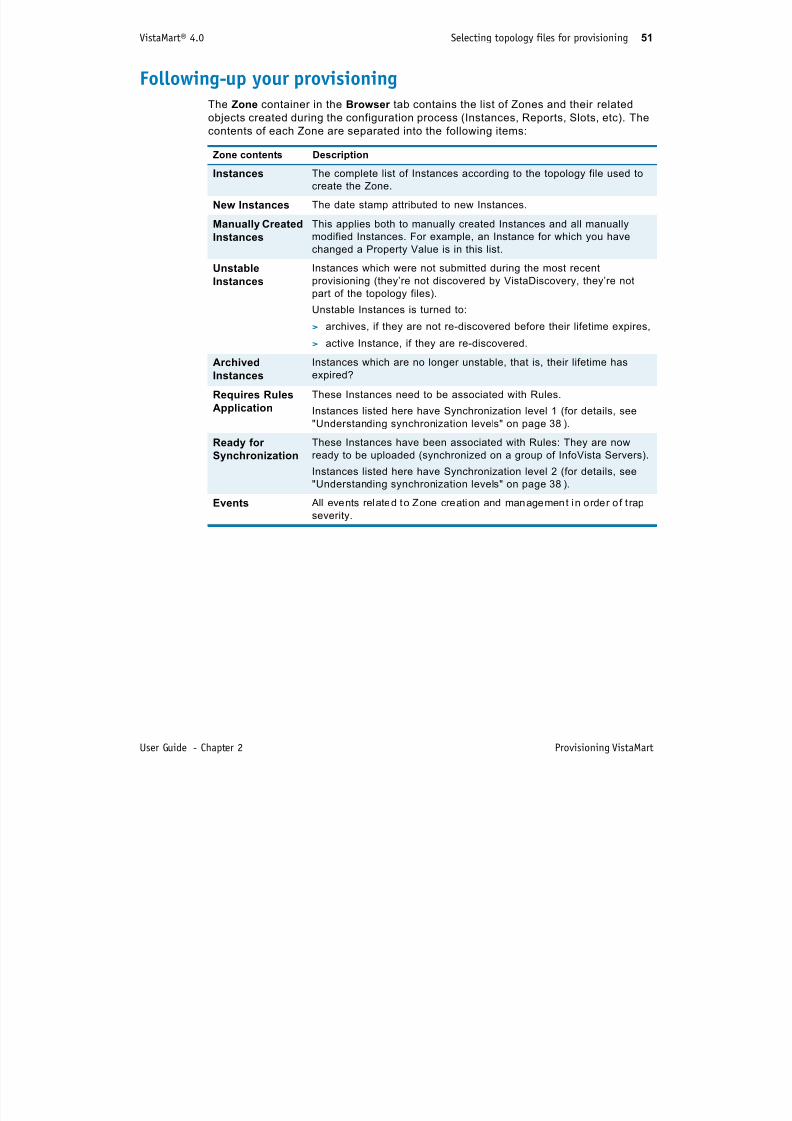
7/17/2019 VistaMart User Guide
http://slidepdf.com/reader/full/vistamart-user-guide 51/265
User Guide - Chapter 2 Provisioning VistaMart
The Zone container in the Browser tab contains the list of Zones and their related
objects created during the configuration process (Instances, Reports, Slots, etc). The
contents of each Zone are separated into the following items:
Zone contents Description
Instances The complete list of Instances according to the topology file used to
create the Zone.
New Instances The date stamp attributed to new Instances.
Manually Created
Instances
This applies both to manually created Instances and all manually
modified Instances. For example, an Instance for which you have
changed a Property Value is in this list.
Unstable
Instances
Instances which were not submitted during the most recent
provisioning (they’re not discovered by VistaDiscovery, they’re not
part of the topology files).
Unstable Instances is turned to:
> archives, if they are not re-discovered before their lifetime expires,
> active Instance, if they are re-discovered.
Archived
Instances
Instances which are no longer unstable, that is, their lifetime has
expired?
Requires Rules
Application
These Instances need to be associated with Rules.
Instances listed here have Synchronization level 1 (for details, see
"Understanding synchronization levels" on page 38).
Ready for
Synchronization
These Instances have been associated with Rules: They are now
ready to be uploaded (synchronized on a group of InfoVista Servers).
Instances listed here have Synchronization level 2 (for details, see"Understanding synchronization levels" on page 38).
Events All events related to Zone creation and management in order o f t rap
severity.
VistaMart® 4.0 Managing topology objects manually 52
Managing topology objects manually
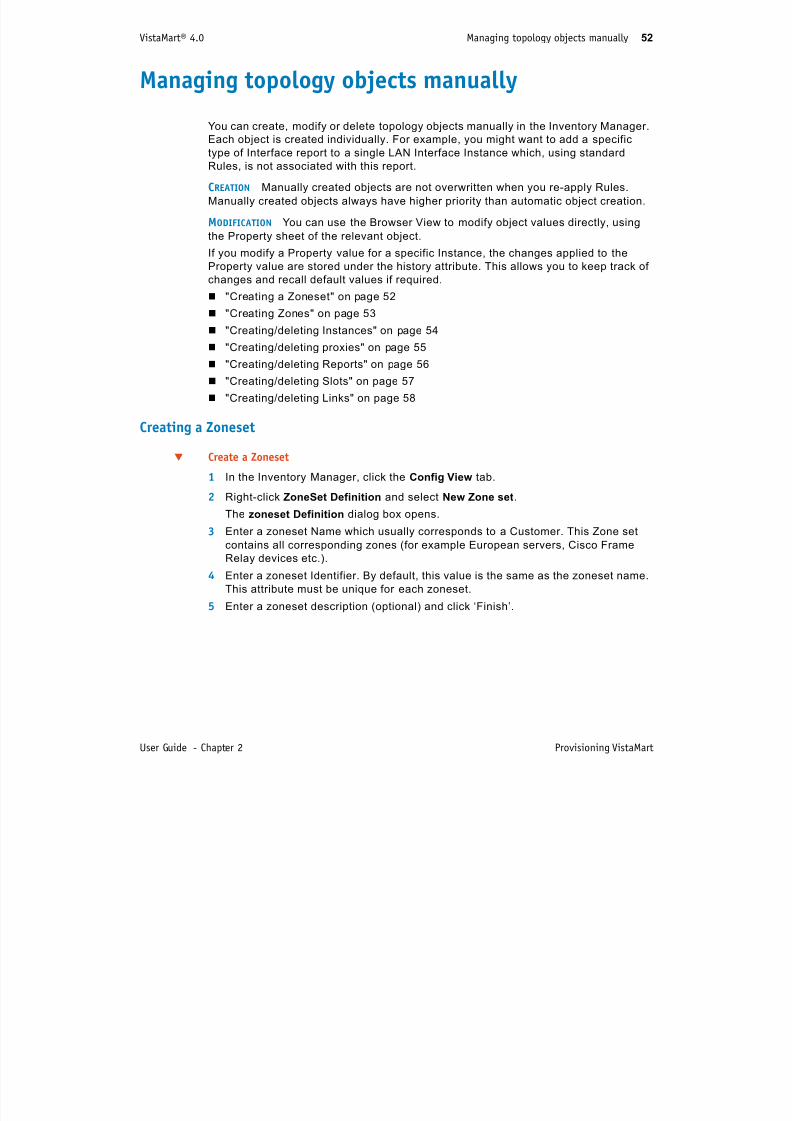
7/17/2019 VistaMart User Guide
http://slidepdf.com/reader/full/vistamart-user-guide 52/265
User Guide - Chapter 2 Provisioning VistaMart
You can create, modify or delete topology objects manually in the Inventory Manager.Each object is created individually. For example, you might want to add a specific
type of Interface report to a single LAN Interface Instance which, using standard
Rules, is not associated with this report.
CREATION Manually created objects are not overwritten when you re-apply Rules.
Manually created objects always have higher priority than automatic object creation.
MODIFICATION You can use the Browser View to modify object values directly, using
the Property sheet of the relevant object.
If you modify a Property value for a specific Instance, the changes applied to the
Property value are stored under the history attribute. This allows you to keep track of
changes and recall default values if required.
"Creating a Zoneset" on page 52
"Creating Zones" on page 53
"Creating/deleting Instances" on page 54
"Creating/deleting proxies" on page 55
"Creating/deleting Reports" on page 56
"Creating/deleting Slots" on page 57
"Creating/deleting Links" on page 58
Creating a Zoneset
Create a Zoneset
1 In the Inventory Manager, click the Config View tab.
2 Right-click ZoneSet Definition and select New Zone set.
The zoneset Definition dialog box opens.
3 Enter a zoneset Name which usually corresponds to a Customer. This Zone set
contains all corresponding zones (for example European servers, Cisco Frame
Relay devices etc.).
4 Enter a zoneset Identifier. By default, this value is the same as the zoneset name.
This attribute must be unique for each zoneset.
5 Enter a zoneset description (optional) and click ‘Finish’.
VistaMart® 4.0 Managing topology objects manually 53
Creating Zones

7/17/2019 VistaMart User Guide
http://slidepdf.com/reader/full/vistamart-user-guide 53/265
User Guide - Chapter 2 Provisioning VistaMart
Create a Zone
1 In the Inventory Manager, open the Config tab.
2 Expand Zone Set Definition, right-click the Zone set to associate with the new
Zone and select New Zone.
3 Add the parameters as requi red.
All under lined parameters, flagged with a ‘*’ in this list, are mandatory.
Parameter Description
Zone name* A name (up to 64 characters) which cor responds to a type of
reporting you want it to handle (for example European Servers,
Cisco Frame Relay, Customer X IP VPN devices, etc.).
Zone Identifier* By default the Identifier takes the same value as the Zone name.
Zone Description A relevant description (up to 2048 characters).Zone Kind Two possible options:
> Manual”. The Zone is populated using topology files
> “Automatic”. The Zone is populated using VistaDiscovery.
Default InfoVista
Servers Group*
Associate the new Zone with an InfoVista group. By defaul t the
“Default” server group is used. You can modify this parameter at a
later date.
Default Location You can set a physical location for the Instances in this Zone.Select any Country/City combination from the drop-down list.
VistaMart® 4.0 Managing topology objects manually 54
Resource By default, all related values for the following resources are
Parameter Description

7/17/2019 VistaMart User Guide
http://slidepdf.com/reader/full/vistamart-user-guide 54/265
User Guide - Chapter 2 Provisioning VistaMart
4 Click ‘Finish’.
Creating/deleting Instances
Create Instances manually
1 In the Inventory Manager, open the Browser View tab.
2 Expand the Zone container.
3 Expand the Zone where you want to create the Instance.
4 Right-click the Instances icon to access the New Instance Wizard.
5 Enter the following attributes in the New Instance Property sheet (Note: most of
these attributes can be modified after the Instance is created).
Underlined attributes, flagged with a ‘*’ in this list, are mandatory.
Activation*
y g
activated:
> Solution> Report Template Capabilities
> Indicators Capabilities
> Vendor
> Template Frequency
> Vistas
> Template/Indicator Library
They can be deactivated or reactivated using Zone filters.
Lifetime before
Archiving
The lifetime of Instances in unstable status. Once this time has
elapsed, the Instance is archived.
Attribute Description
Name* Any unique name (string max 255 charac ters).
Instance
Identifier*
Corresponds to the TAG attribute - the primary identifier of an
Instance. It must be unique inside a ZoneSet. The Rules to compute
the TAG depend on the customer, and are subject to change.
By default the Instance Identifier has the same value as theInstance name.
Kind* “Basic” or “Group: according to the specified Vistas. This value is
fixed and cannot be modified.
Description A textual description (2055 character maximum).
Zone* By default, the Zone you are using to create the Instance. You can
change this Zone here if required.
VistaMart® 4.0 Managing topology objects manually 55
Location* The geographical location of the Instance to be created.
Attribute Description
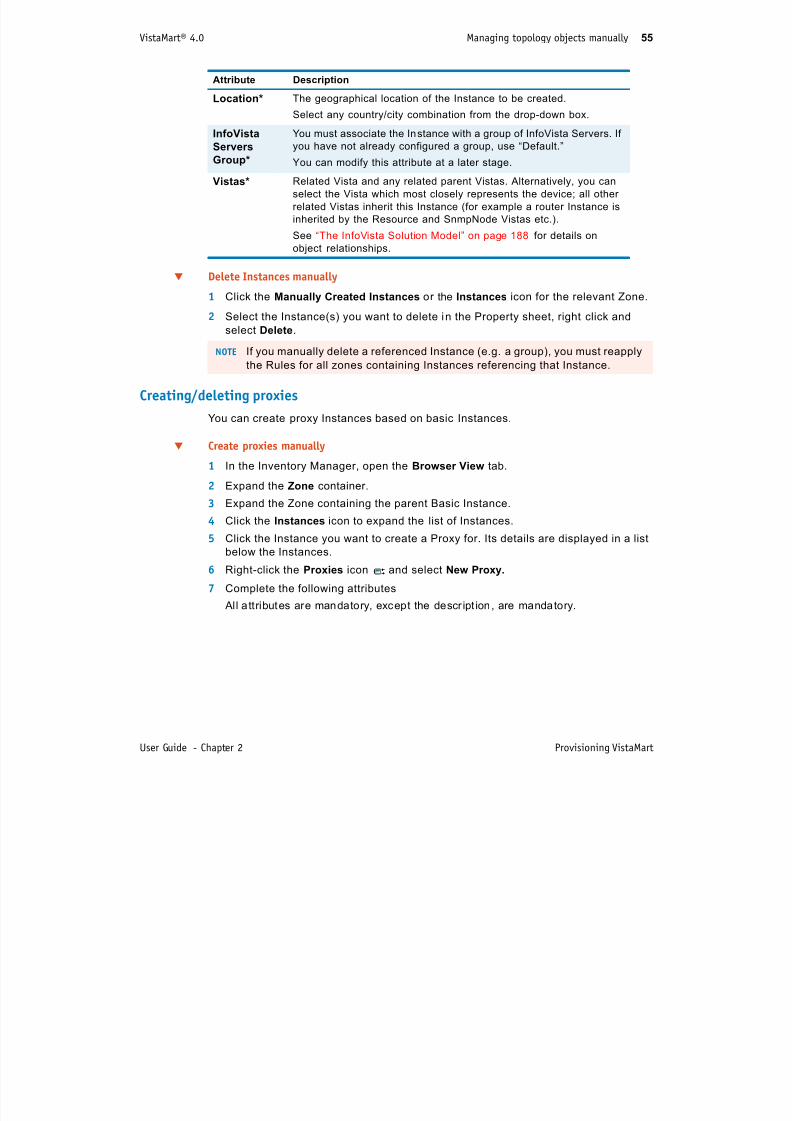
7/17/2019 VistaMart User Guide
http://slidepdf.com/reader/full/vistamart-user-guide 55/265
User Guide - Chapter 2 Provisioning VistaMart
Delete Instances manually
1 Click the Manually Created Instances or the Instances icon for the relevant Zone.
2 Select the Instance(s) you want to delete in the Property sheet, right click and
select Delete.
Creating/deleting proxies
You can create proxy Instances based on basic Instances.
Create proxies manually
1 In the Inventory Manager, open the Browser View tab.
2 Expand the Zone container.
3 Expand the Zone containing the parent Basic Instance.
4 Click the Instances icon to expand the list of Instances.
5 Click the Instance you want to create a Proxy for. Its details are displayed in a list
below the Instances.
6 Right-click the Proxies icon and select New Proxy.
7 Complete the following attributes
All a ttributes are mandatory, except the descr ipt ion , are mandatory.
Select any country/city combination from the drop-down box.
InfoVista
Servers
Group*
You must associate the Instance with a group of InfoVista Servers. If
you have not already configured a group, use “Default.”
You can modify this attribute at a later stage.
Vistas* Related Vista and any related parent Vistas. Alternatively, you can
select the Vista which most closely represents the device; all other
related Vistas inherit this Instance (for example a router Instance is
inherited by the Resource and SnmpNode Vistas etc.).
See “The InfoVista Solution Model” on page 188 for details on
object relationships.
NOTE If you manually delete a referenced Instance (e.g. a group), you must reapply
the Rules for all zones containing Instances referencing that Instance.
VistaMart® 4.0 Managing topology objects manually 56
Attribute Description
Name* Any unique name (string max 255 characters).

7/17/2019 VistaMart User Guide
http://slidepdf.com/reader/full/vistamart-user-guide 56/265
User Guide - Chapter 2 Provisioning VistaMart
Delete proxies manually1 Click the Proxy in an Instance Property sheet. It appears in the pane to the right.
2 Right-click this Proxy and select Delete.
Creating/deleting Reports
Create Reports manually
1 In the Inventory Manager, open the Browser View tab and expand the Zone container.
2 Expand the Zone where you want to create the Report.
3 Click the Instances icon to open the Instances Property sheet.
4 Click the Instance you want to create a report for. Its details are displayed in a list
below the Instances.
5 Right-click the Reports icon and select New Report Wizard.
6 Enter the following attributes (all attributes are mandatory, except ‘Description’.)
Name Any unique name (string max 255 characters).
Instance
Identifier*
Corresponds to the TAG attribute (primary Instance identifier) which must
be unique inside a ZoneSet. Rules to compute the TAG depend on the
customer and can change.
By default the Instance Identifier takes has the same value as the Instance
name.
Description A textual description (2055 charac ter maximum).
Zone* By default, the Zone you are using to create the Instance. You can change
this Zone here if required.
Vistas* Related Vista and any related parent Vistas. Alternatively, you can selectthe Vista which most closely represents the device; all other related Vistas
inherit this Instance (for example a LAN Interface Instance is inherited by
the Router, Resource, Common and SnmpNode Vistas).
Location* The Location can be different from the Instance used to create the proxy.
Proxy* The name of the Instance used to create the proxy.
Attribute Description
Name Any unique name (str ing max 255 characters).
Description A textual description (2055 character maximum).
VistaMart® 4.0 Managing topology objects manually 57
Report
Template
You must associate a Vista and Report Template to create a report based
on the selected Instance Select any Vista/Report Template combination
Attribute Description
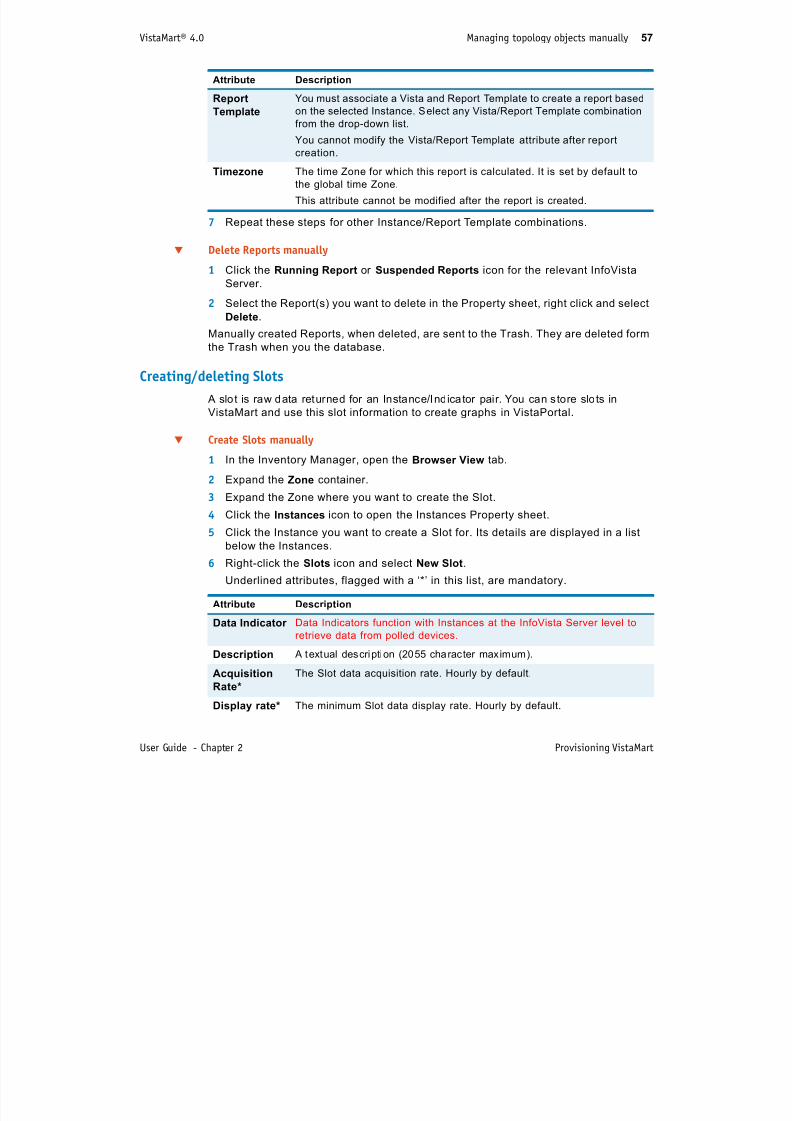
7/17/2019 VistaMart User Guide
http://slidepdf.com/reader/full/vistamart-user-guide 57/265
User Guide - Chapter 2 Provisioning VistaMart
7 Repeat these steps for other Instance/Report Template combinations.
Delete Reports manually
1 Click the Running Report or Suspended Reports icon for the relevant InfoVista
Server.
2 Select the Report(s) you want to delete in the Property sheet, right click and select
Delete.
Manually created Reports, when deleted, are sent to the Trash. They are deleted form
the Trash when you the database.
Creating/deleting Slots
A slot is raw data returned for an Instance/Indicator pair. You can s tore slots in
VistaMart and use this slot information to create graphs in VistaPortal.
Create Slots manually
1 In the Inventory Manager, open the Browser View tab.
2 Expand the Zone container.
3 Expand the Zone where you want to create the Slot.
4 Click the Instances icon to open the Instances Property sheet.
5 Click the Instance you want to create a Slot for. Its details are displayed in a list
below the Instances.
6 Right-click the Slots icon and select New Slot.
Underlined attributes, flagged with a ‘*’ in this list, are mandatory.
Template on the selected Instance. Select any Vista/Report Template combination
from the drop-down list.
You cannot modify the Vista/Report Template attribute after report
creation.
Timezone The time Zone for which this report is calculated. It is set by default to
the global time Zone.
This attribute cannot be modified after the report is created.
Attribute Description
Data Indicator Data Indicators function with Instances at the InfoVista Server level to
retrieve data from polled devices.
Description A textual description (2055 character maximum).
Acquisition
Rate*
The Slot data acquisition rate. Hourly by default.
Display rate* The minimum Slot data display rate. Hourly by default.
VistaMart® 4.0 Managing topology objects manually 58
Source* The default data source types are:
I f Vi t l t h dl d b d f lt b I f Vi t S
Attribute Description
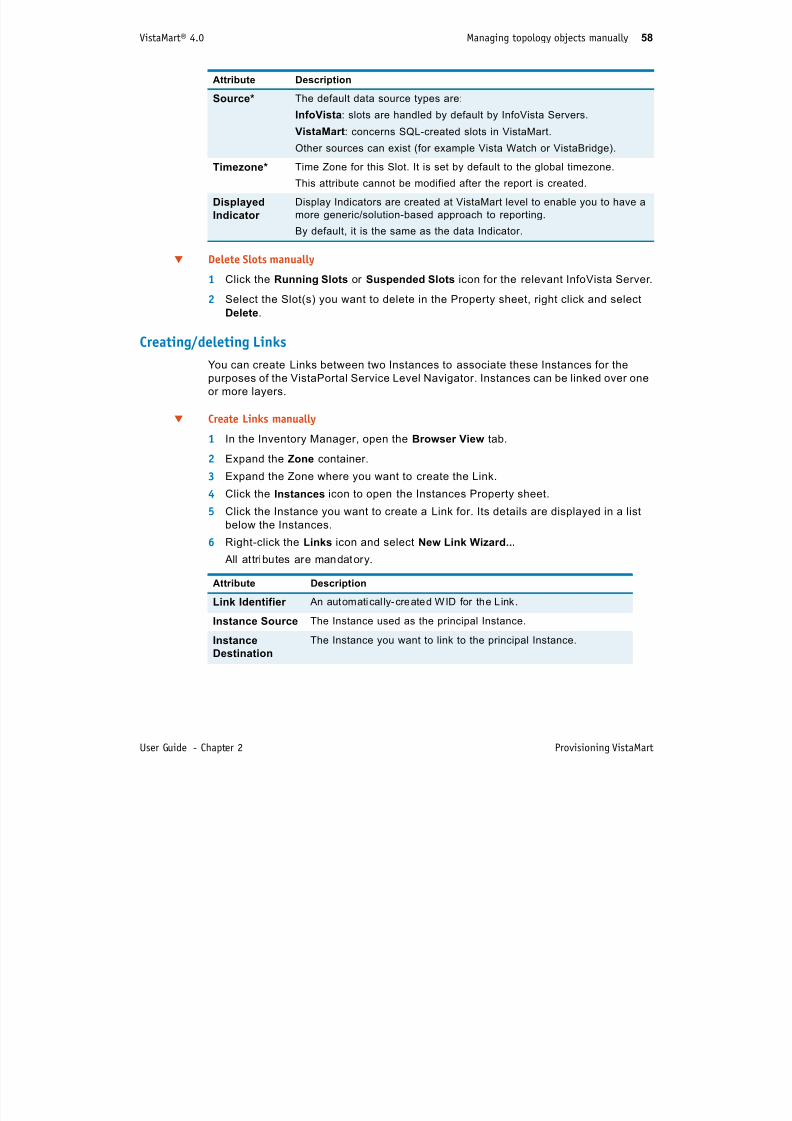
7/17/2019 VistaMart User Guide
http://slidepdf.com/reader/full/vistamart-user-guide 58/265
User Guide - Chapter 2 Provisioning VistaMart
Delete Slots manually
1 Click the Running Slots or Suspended Slots icon for the relevant InfoVista Server.
2 Select the Slot(s) you want to delete in the Property sheet, right click and select
Delete.
Creating/deleting Links
You can create Links between two Instances to associate these Instances for the
purposes of the VistaPortal Service Level Navigator. Instances can be linked over one
or more layers.
Create Links manually
1 In the Inventory Manager, open the Browser View tab.
2 Expand the Zone container.
3 Expand the Zone where you want to create the Link.
4 Click the Instances icon to open the Instances Property sheet.
5 Click the Instance you want to create a Link for. Its details are displayed in a list
below the Instances.
6 Right-click the Links icon and select New Link Wizard...
All attributes are mandatory.
InfoVista: slots are handled by default by InfoVista Servers.
VistaMart: concerns SQL-created slots in VistaMart.
Other sources can exist (for example Vista Watch or VistaBridge).
Timezone* Time Zone for this Slot. It is set by default to the global timezone.
This attribute cannot be modified after the report is created.
Displayed
Indicator
Display Indicators are created at VistaMart level to enable you to have a
more generic/solution-based approach to reporting.
By default, it is the same as the data Indicator.
Attribute DescriptionLink Identifier An automatical ly-created WID for the Link.
Instance Source The Instance used as the principal Instance.
Instance
Destination
The Instance you want to link to the principal Instance.
VistaMart® 4.0 Managing topology objects manually 59
Link Type The layer number used to define the link. “Undefined” by default.
O f f
Attribute Description

7/17/2019 VistaMart User Guide
http://slidepdf.com/reader/full/vistamart-user-guide 59/265
User Guide - Chapter 2 Provisioning VistaMart
Delete Links manually
1 Click the Link in an Instance Property sheet. The Link is displayed in the pane to
the right.
2 Right-click this Link and select Delete.
Is Oriented The direction of the Link is usually oriented from the Instance
Source to the Instance Destination. If you do not want to orientthe Link, select “Unoriented”.
VistaMart® 4.0 Managing topology objects manually 60
Searching inventory objectsThe VistaMart Inventory Manager incorporates a sophisticated search engine which
allo s o to la nch cascade q eries to locate in entor objects
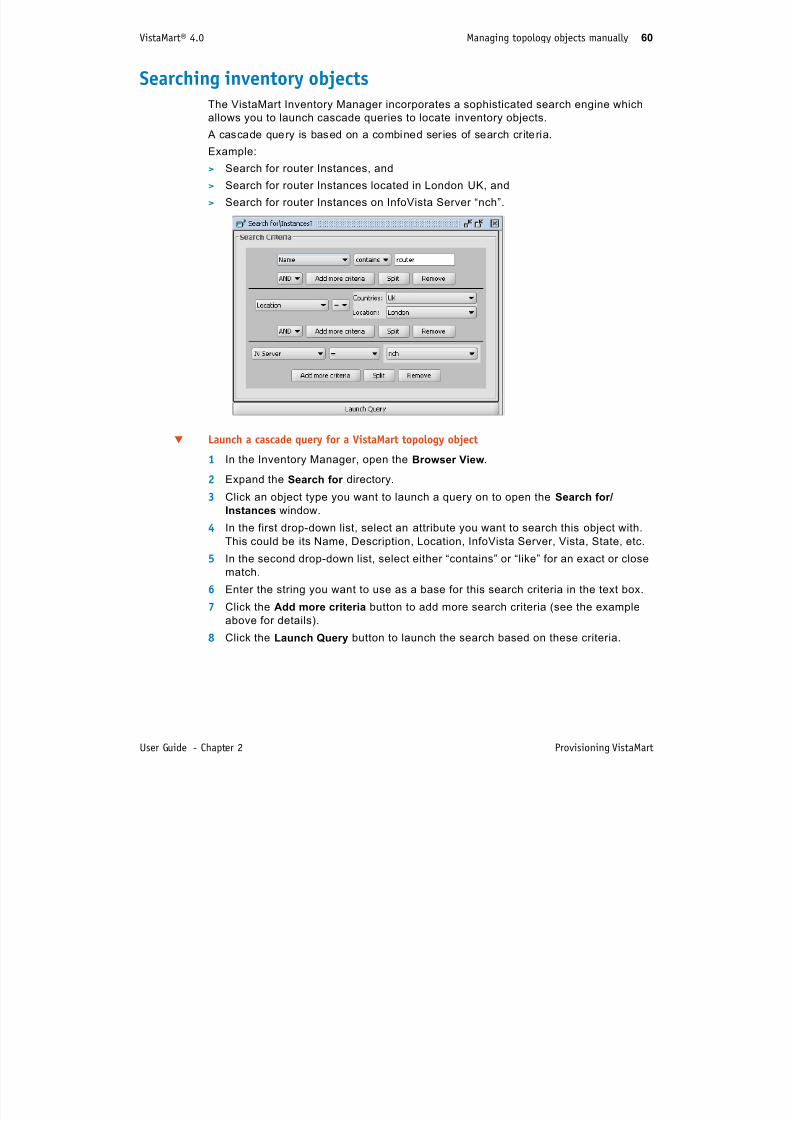
7/17/2019 VistaMart User Guide
http://slidepdf.com/reader/full/vistamart-user-guide 60/265
User Guide - Chapter 2 Provisioning VistaMart
allows you to launch cascade queries to locate inventory objects.
A cascade query is based on a combined ser ies of search criteria.
Example:
> Search for router Instances, and
> Search for router Instances located in London UK, and
> Search for router Instances on InfoVista Server “nch”.
Launch a cascade query for a VistaMart topology object
1 In the Inventory Manager, open the Browser View.
2 Expand the Search for directory.
3 Click an object type you want to launch a query on to open the Search for/
Instances window.
4 In the first drop-down list, select an attribute you want to search this object with.
This could be its Name, Description, Location, InfoVista Server, Vista, State, etc.
5 In the second drop-down list, select either “contains” or “like” for an exact or close
match.
6 Enter the string you want to use as a base for this search criteria in the text box.
7 Click the Add more criteria button to add more search criteria (see the example
above for details).
8 Click the Launch Query button to launch the search based on these criteria.
VistaMart® 4.0 Managing topology objects manually 61
Deleting inventory ObjectsThis section explains how to manually delete zones and zonesets and all the
respective objects they contain
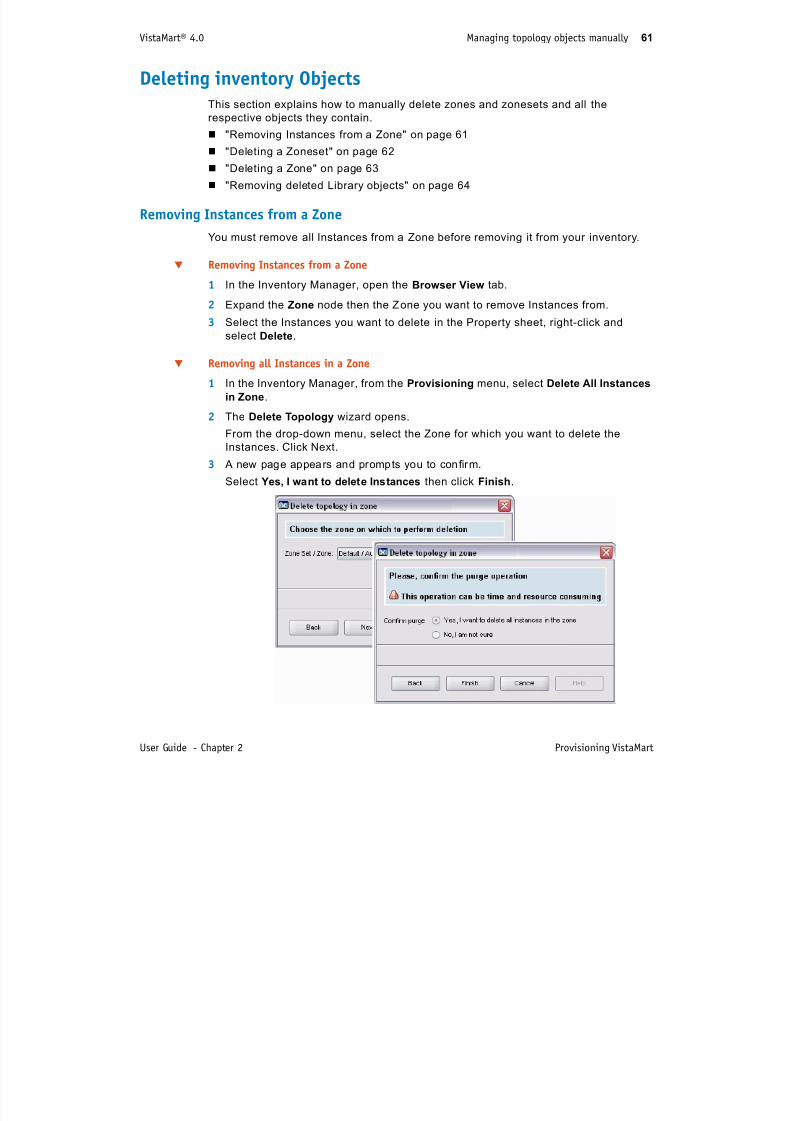
7/17/2019 VistaMart User Guide
http://slidepdf.com/reader/full/vistamart-user-guide 61/265
User Guide - Chapter 2 Provisioning VistaMart
respective objects they contain.
"Removing Instances from a Zone" on page 61
"Deleting a Zoneset" on page 62
"Deleting a Zone" on page 63
"Removing deleted Library objects" on page 64
Removing Instances from a Zone
You must remove all Instances from a Zone before removing it from your inventory.
Removing Instances from a Zone
1 In the Inventory Manager, open the Browser View tab.
2 Expand the Zone node then the Zone you want to remove Instances from.
3 Select the Instances you want to delete in the Property sheet, right-click and
select Delete.
Removing all Instances in a Zone
1 In the Inventory Manager, from the Provisioning menu, select Delete All Instances
in Zone.
2 The Delete Topology wizard opens.
From the drop-down menu, select the Zone for which you want to delete the
Instances. Click Next.
3 A new page appears and prompts you to confirm.
Select Yes, I want to delete Instances then click Finish.
VistaMart® 4.0 Managing topology objects manually 62
Deleting a Zoneset
You cannot delete a Zoneset if it contains zones.
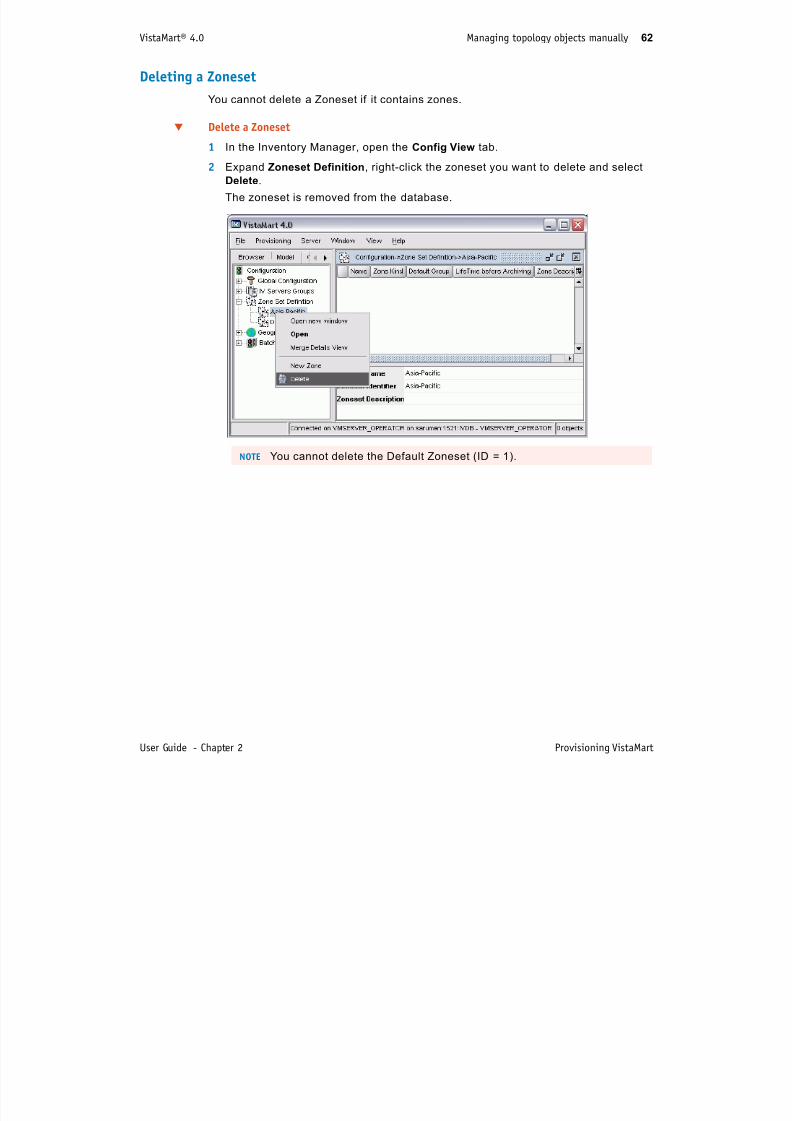
7/17/2019 VistaMart User Guide
http://slidepdf.com/reader/full/vistamart-user-guide 62/265
User Guide - Chapter 2 Provisioning VistaMart
Delete a Zoneset1 In the Inventory Manager, open the Config View tab.
2 Expand Zoneset Definition, right-click the zoneset you want to delete and select
Delete.
The zoneset is removed from the database.
NOTE You cannot delete the Default Zoneset (ID = 1).
VistaMart® 4.0 Managing topology objects manually 63
Deleting a Zone
You cannot delete a Zone if it contains Instances. Prior to deleting a Zone, you may:
> Remove all the Instances it contains,

7/17/2019 VistaMart User Guide
http://slidepdf.com/reader/full/vistamart-user-guide 63/265
User Guide - Chapter 2 Provisioning VistaMart
,
> Import its topology in a different Zone in the same zoneset.
Delete a Zone
1 In the Inventory Manager, open the Config View tab.
2 Expand Zoneset Definition and click the Zoneset which contains the Zone you
want to delete.
The list of Zones is displayed in the List View pane.
3 Right-click the Zone and select Delete.
The Zone is removed from the database.
VistaMart® 4.0 Managing topology objects manually 64
Removing deleted Library objects
The Purge Repository function allows you to purge, from the trash, Library objects
which are no longer used.
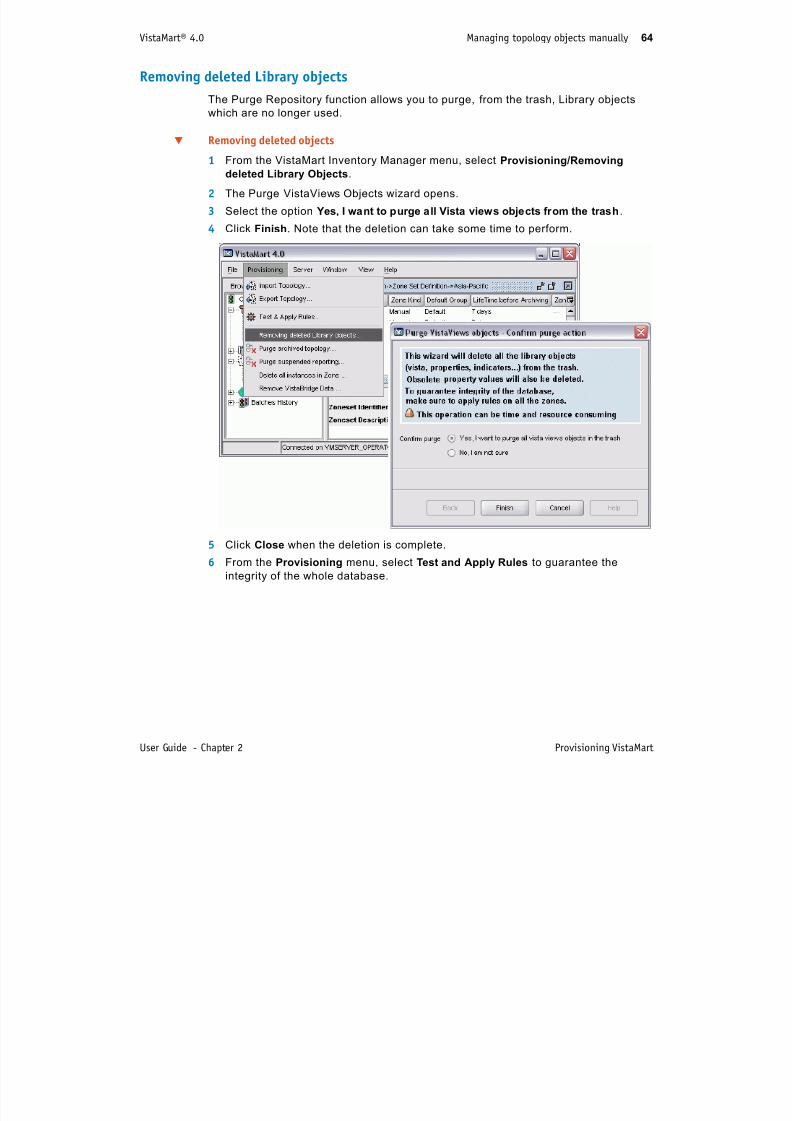
7/17/2019 VistaMart User Guide
http://slidepdf.com/reader/full/vistamart-user-guide 64/265
User Guide - Chapter 2 Provisioning VistaMart
Removing deleted objects
1 From the VistaMart Inventory Manager menu, select Provisioning/Removing
deleted Library Objects.
2 The Purge VistaViews Objects wizard opens.
3 Select the option Yes, I want to purge all Vista views objects from the trash.
4 Click Finish. Note that the deletion can take some time to perform.
5 Click Close when the deletion is complete.
6 From the Provisioning menu, select Test and Apply Rules to guarantee the
integrity of the whole database.
VistaMart® 4.0 Managing topology objects manually 65
Command-line provisioning optionsYou can activate provisioning features using the command-line options.
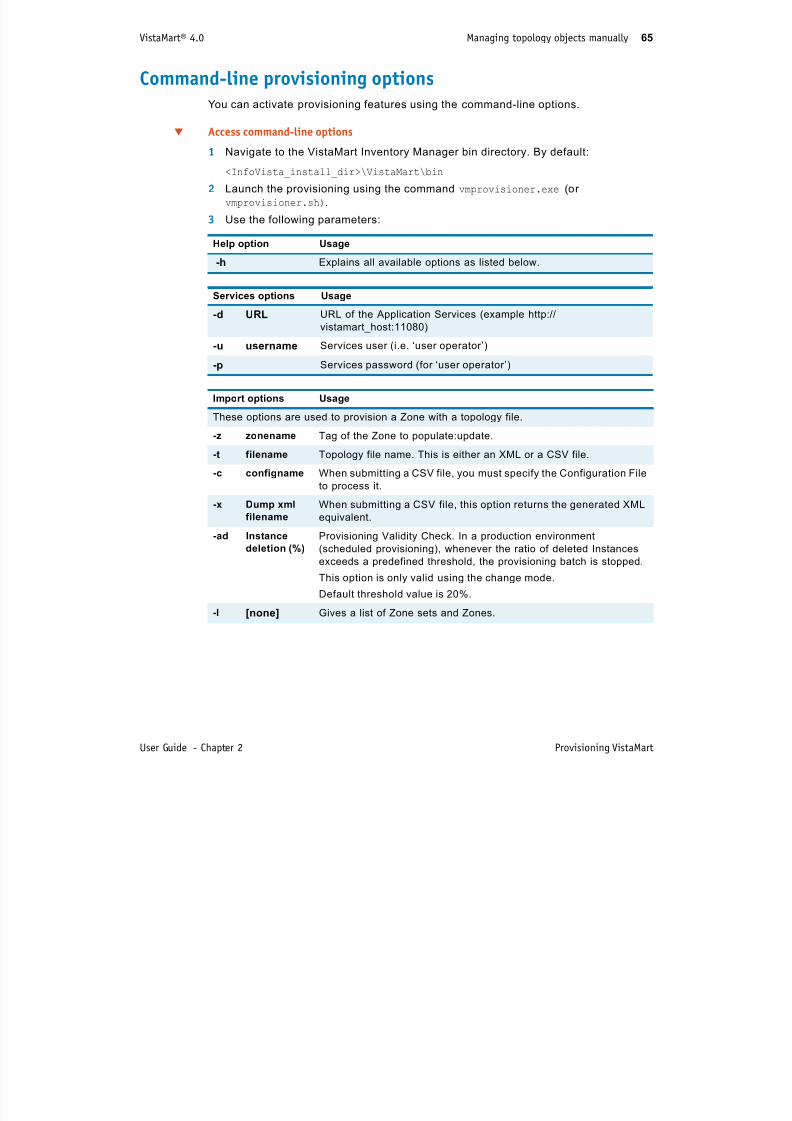
7/17/2019 VistaMart User Guide
http://slidepdf.com/reader/full/vistamart-user-guide 65/265
User Guide - Chapter 2 Provisioning VistaMart
Access command-line options1 Navigate to the VistaMart Inventory Manager bin directory. By default:
<InfoVista_install_dir>\VistaMart\bin
2 Launch the provisioning using the command vmprovisioner.exe (or
vmprovisioner.sh).
3 Use the following parameters:
Help option Usage
-h Explains all available options as listed below.
Services options Usage
-d URL URL of the Application Services (example http://
vistamart_host:11080)
-u username Services user (i.e. ‘user operator’)
-p Services password (for ‘user operator’)
Import options Usage
These options are used to provision a Zone with a topology file.
-z zonename Tag of the Zone to populate:update.
-t filename Topology file name. This is either an XML or a CSV file.
-c configname When submitting a CSV file, you must specify the Configuration Fileto process it.
-x Dump xml
filename
When submitting a CSV file, this option returns the generated XML
equivalent.
-ad Instance
deletion (%)
Provisioning Validity Check. In a production environment
(scheduled provisioning), whenever the ratio of deleted Instances
exceeds a predefined threshold, the provisioning batch is stopped.
This option is only valid using the change mode.
Default threshold value is 20%.
-l [none] Gives a list of Zone sets and Zones.
VistaMart® 4.0 Managing topology objects manually 66
-s stop before
provisioning
When submitting a CSV, this option allows you to check the
generated XML equivalent before provisioning.
Import options Usage
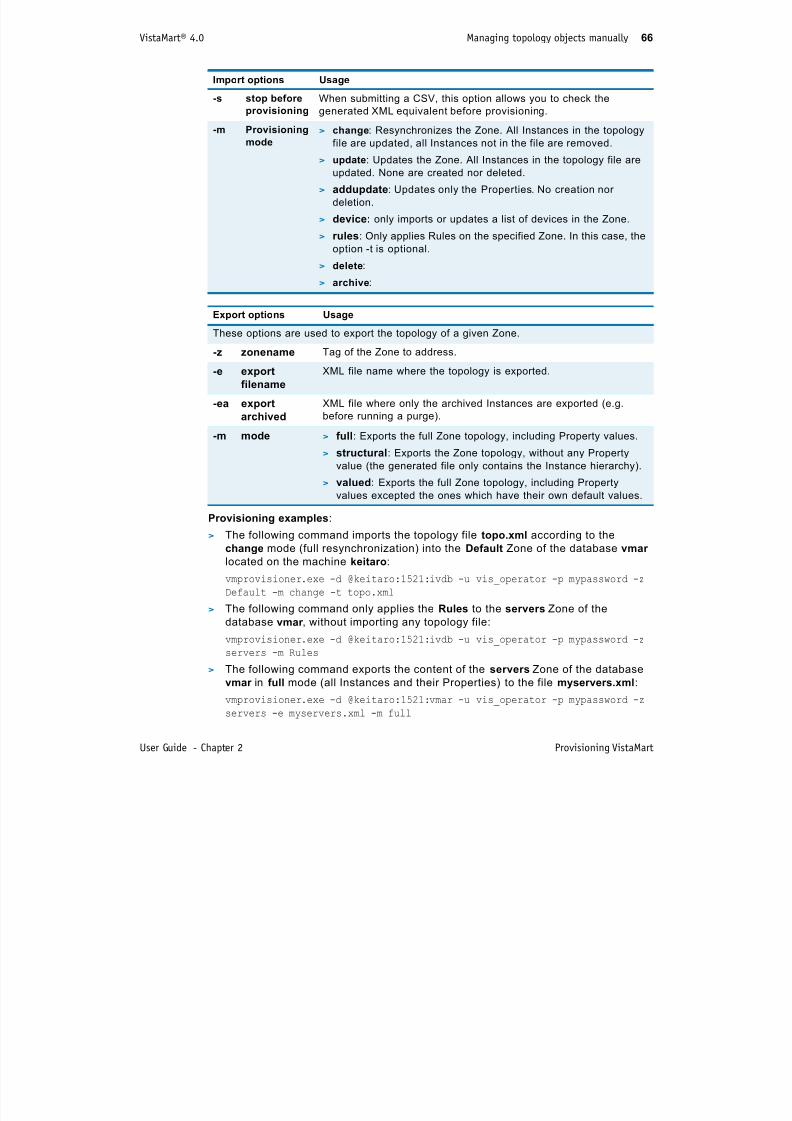
7/17/2019 VistaMart User Guide
http://slidepdf.com/reader/full/vistamart-user-guide 66/265
User Guide - Chapter 2 Provisioning VistaMart
Provisioning examples:
> The following command imports the topology file topo.xml according to the
change mode (full resynchronization) into the Default Zone of the database vmar
located on the machine keitaro:
vmprovisioner.exe -d @keitaro:1521:ivdb -u vis_operator -p mypassword -z
Default -m change -t topo.xml
> The following command only applies the Rules to the servers Zone of the
database vmar , without importing any topology file:
vmprovisioner.exe -d @keitaro:1521:ivdb -u vis_operator -p mypassword -z
servers -m Rules
> The following command exports the content of the servers Zone of the database
vmar in full mode (all Instances and their Properties) to the file myservers.xml :
vmprovisioner.exe -d @keitaro:1521:vmar -u vis_operator -p mypassword -zservers -e myservers.xml -m full
-m Provisioningmode > change: Resynchronizes the Zone. All Instances in the topology
file are updated, all Instances not in the file are removed.
> update: Updates the Zone. All Instances in the topology file are
updated. None are created nor deleted.
> addupdate: Updates only the Properties. No creation nor
deletion.
> device: only imports or updates a list of devices in the Zone.
> rules: Only applies Rules on the specified Zone. In this case, the
option -t is optional.
> delete:
> archive:
Export options Usage
These options are used to export the topology of a given Zone.
-z zonename Tag of the Zone to address.
-e export
filename
XML file name where the topology is exported.
-ea export
archived
XML file where only the archived Instances are exported (e.g.
before running a purge).
-m mode > full: Exports the full Zone topology, including Property values.
> structural: Exports the Zone topology, without any Property
value (the generated file only contains the Instance hierarchy).
> valued: Exports the full Zone topology, including Property
values excepted the ones which have their own default values.
7/17/2019 VistaMart User Guide
http://slidepdf.com/reader/full/vistamart-user-guide 67/265
67
3 Managing InfoVista Servers
Data samples are sourced from either InfoVista Servers or external sources such as
VistaBridge and Vista Watch.
This section shows you how to declare new Server groups in VistaMart and assign
new InfoVista Servers to the respective groups. Then it describes how VistaMart
distributes the Instances over the Server groups and controls data acquisition.
"Overview of InfoVista Server management" on page 68
"Assigning zones to Groups of InfoVista Servers" on page 70
"Declaring a New InfoVista Server Group" on page 72
"Declaring a new InfoVista Server" on page 73
"Synchronizing InfoVista Server groups" on page 75
"Managing InfoVista Server loads" on page 79
VistaMart® 4.0 Overview of InfoVista Server management 68
Overview of InfoVista Server management
The InfoVista Servers used for polling are entirely driven by VistaMart. Upon the
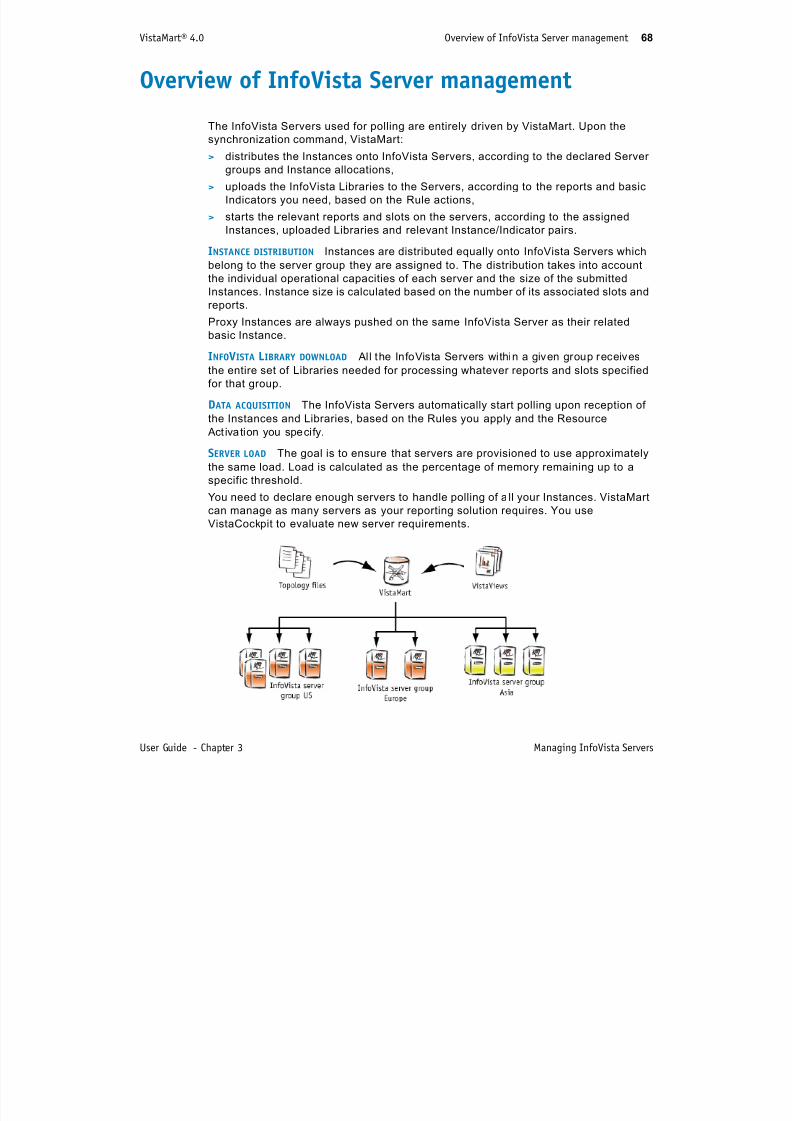
7/17/2019 VistaMart User Guide
http://slidepdf.com/reader/full/vistamart-user-guide 68/265
User Guide - Chapter 3 Managing InfoVista Servers
p g y y p
synchronization command, VistaMart:
> distributes the Instances onto InfoVista Servers, according to the declared Server
groups and Instance allocations,
> uploads the InfoVista Libraries to the Servers, according to the reports and basic
Indicators you need, based on the Rule actions,
> starts the relevant reports and slots on the servers, according to the assigned
Instances, uploaded Libraries and relevant Instance/Indicator pairs.
INSTANCE DISTRIBUTION Instances are distributed equally onto InfoVista Servers which
belong to the server group they are assigned to. The distribution takes into account
the individual operational capacities of each server and the size of the submitted
Instances. Instance size is calculated based on the number of its associated slots and
reports.
Proxy Instances are always pushed on the same InfoVista Server as their related
basic Instance.
INFOVISTA LIBRARY DOWNLOAD All the InfoVista Servers within a given group receivesthe entire set of Libraries needed for processing whatever reports and slots specified
for that group.
DATA ACQUISITION The InfoVista Servers automatically start polling upon reception of
the Instances and Libraries, based on the Rules you apply and the Resource
Act ivation you specify.
SERVER LOAD The goal is to ensure that servers are provisioned to use approximately
the same load. Load is calculated as the percentage of memory remaining up to a
specific threshold.
You need to declare enough servers to handle polling of a ll your Instances. VistaMart
can manage as many servers as your reporting solution requires. You use
VistaCockpit to evaluate new server requirements.
VistaMart® 4.0 Overview of InfoVista Server management 69
InfoVista Servers in the production contextInfoVista Servers are locked as soon as they are under control of VistaMart. They are
independent polling tools. This means:
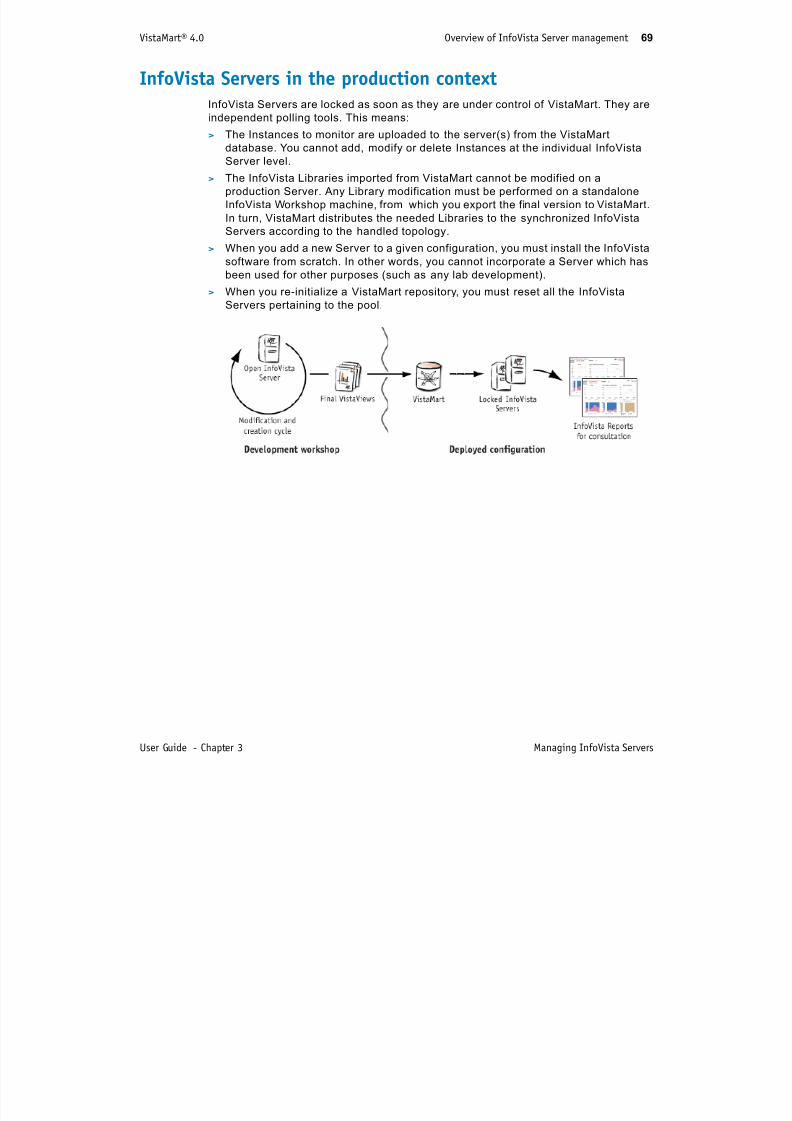
7/17/2019 VistaMart User Guide
http://slidepdf.com/reader/full/vistamart-user-guide 69/265
User Guide - Chapter 3 Managing InfoVista Servers
> The Instances to monitor are uploaded to the server(s) from the VistaMartdatabase. You cannot add, modify or delete Instances at the individual InfoVista
Server level.
> The InfoVista Libraries imported from VistaMart cannot be modified on a
production Server. Any Library modification must be performed on a standalone
InfoVista Workshop machine, from which you export the final version to VistaMart.
In turn, VistaMart distributes the needed Libraries to the synchronized InfoVista
Servers according to the handled topology.
> When you add a new Server to a given configuration, you must install the InfoVistasoftware from scratch. In other words, you cannot incorporate a Server which has
been used for other purposes (such as any lab development).
> When you re-initialize a VistaMart repository, you must reset all the InfoVista
Servers pertaining to the pool.
VistaMart® 4.0 Assigning zones to Groups of InfoVista Servers 70
Assigning zones to Groups of InfoVista Servers
In VistaMart’s Centralized Architecture, zones are used for provisioning (one topology
fil Z ) I f Vi t S d f lli
7/17/2019 VistaMart User Guide
http://slidepdf.com/reader/full/vistamart-user-guide 70/265
User Guide - Chapter 3 Managing InfoVista Servers
file per Zone); InfoVista Server groups are used for polling.
Zones and InfoVista Server Groups are strictly independent. This means:
> You can define one Zone for several groups of InfoVista Servers.
> You can define several zones for one group of InfoVista Servers.
To make the link between a Zone and an InfoVista Server group, an assignment is
made either manually using the management Inventory Manager or by using Rules.
Understanding Zone assignmentsDEFAULT INFOVISTA SERVER GROUP When there is a single InfoVista Server group, the
Zone is directly associated with a Default InfoVista Server group defined by the user.
ZONE ASSIGNMENT BY RULES When you have several groups of InfoVista Servers, a Zone
can potentially be assigned to several groups of InfoVista Servers. Hence, you use a
Rule.
Assigning Instances to an InfoVista Server group
Once you created your Zones and provisioned the topology file contents on aVistaMart database:
> The Instances are mapped to the InfoVista Server group as defined previously.
> The automatic load balancing mechanism assigns the Instance to a given
InfoVista Server.
For scalability purposes, topology files are synchronized on a group of InfoVista
Servers, and not a any single InfoVista Server.
NOTE Whenever you create a new default InfoVista Server group, all Instances
previously assigned to the former default group are not automatically moved
to the new one. You need to use a Rule to transfer the Instances to the new
default InfoVista Server group.
VistaMart® 4.0 Assigning zones to Groups of InfoVista Servers 71
Examples of Zone/InfoVista Server ManagementThe following examples show different configurations of Zones and InfoVista Servers.
Si l l ( l d I f Vi t S )
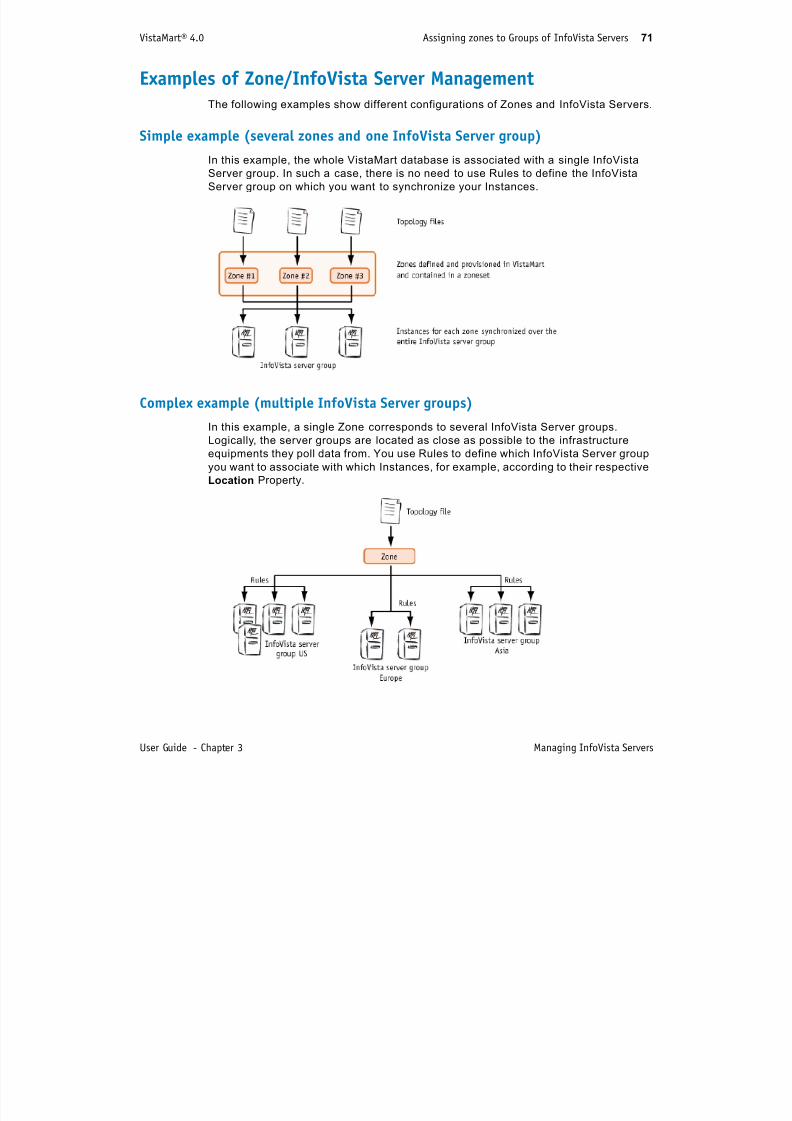
7/17/2019 VistaMart User Guide
http://slidepdf.com/reader/full/vistamart-user-guide 71/265
User Guide - Chapter 3 Managing InfoVista Servers
Simple example (several zones and one InfoVista Server group)
In this example, the whole VistaMart database is associated with a single InfoVista
Server group. In such a case, there is no need to use Rules to define the InfoVista
Server group on which you want to synchronize your Instances.
Complex example (multiple InfoVista Server groups)
In this example, a single Zone corresponds to several InfoVista Server groups.
Logically, the server groups are located as close as possible to the infrastructure
equipments they poll data from. You use Rules to define which InfoVista Server group
you want to associate with which Instances, for example, according to their respective
Location Property.*
VistaMart® 4.0 Declaring a New InfoVista Server Group 72
Declaring a New InfoVista Server Group
An InfoVista Server group is a user-defined pool of pre-instal led InfoVista Servers. A
server group can be associated with several Zones Rules associate InfoVista Server
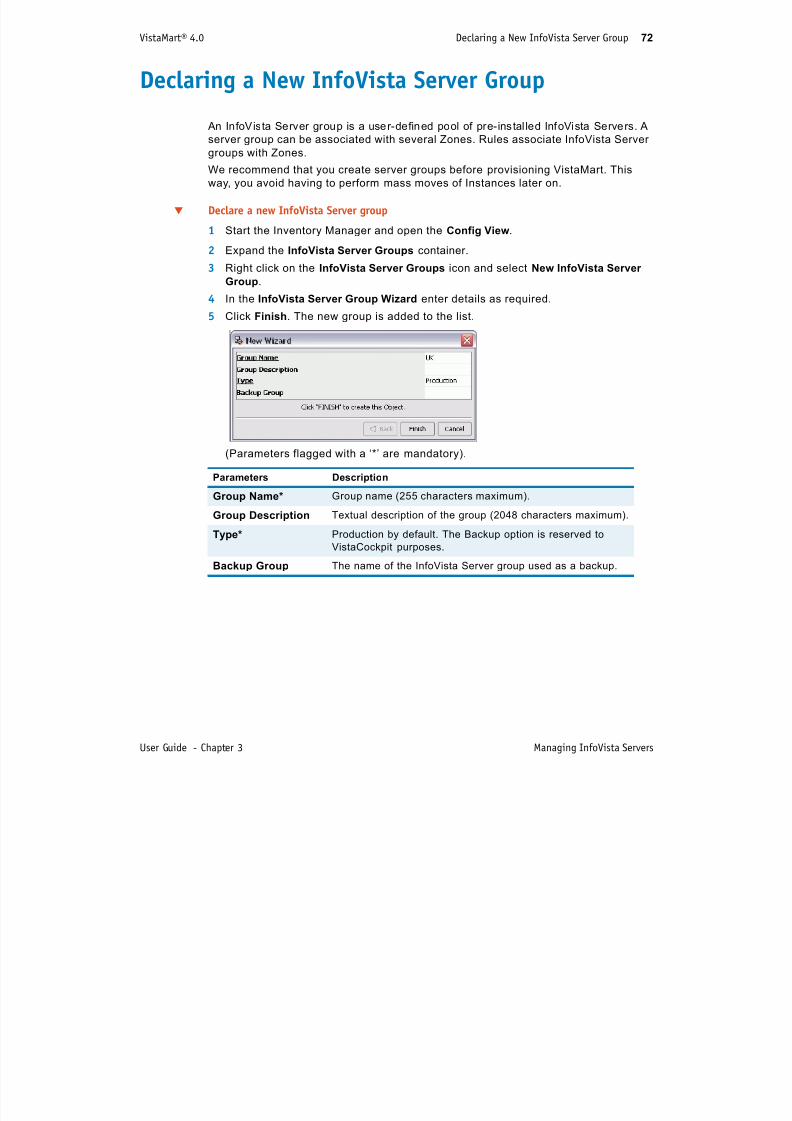
7/17/2019 VistaMart User Guide
http://slidepdf.com/reader/full/vistamart-user-guide 72/265
User Guide - Chapter 3 Managing InfoVista Servers
server group can be associated with several Zones. Rules associate InfoVista Server
groups with Zones.
We recommend that you create server groups before provisioning VistaMart. This
way, you avoid having to perform mass moves of Instances later on.
Declare a new InfoVista Server group
1 Start the Inventory Manager and open the Config View.
2 Expand the InfoVista Server Groups container.
3 Right click on the InfoVista Server Groups icon and select New InfoVista Server
Group.
4 In the InfoVista Server Group Wizard enter details as required.
5 Click Finish. The new group is added to the list.
(Parameters flagged with a ‘*’ are mandatory).
Parameters Description
Group Name* Group name (255 characters maximum).
Group Description Textual description of the group (2048 characters maximum).
Type* Production by default. The Backup option is reserved to
VistaCockpit purposes.
Backup Group The name of the InfoVista Server group used as a backup.
VistaMart® 4.0 Declaring a new InfoVista Server 73
Declaring a new InfoVista Server
If you need to install new production or backup servers, see the InfoVista Installation
Guide For guidelines on how many servers you need for the number of Instances you

7/17/2019 VistaMart User Guide
http://slidepdf.com/reader/full/vistamart-user-guide 73/265
User Guide - Chapter 3 Managing InfoVista Servers
Guide. For guidelines on how many servers you need for the number of Instances you
want to monitor, refer to the InfoVista Sizing kit.
Declare a new InfoVista Server
1 Open the Inventory Manager and open the Config View.
2 Expand the InfoVista Server Groups container.
3 Right click the server group where you want to create the server, then select New
InfoVista Server Wizard.... The server is “created” in this group.
4 In the InfoVista Server Wizard enter details as required.
5 Click Finish. The new InfoVista Server appears in the group list.
(Parameters flagged with a ‘*’ are mandatory).
Server Parameter Description
Name* Name by which the server is known.
Type* Select InfoVista Server for real servers that poll equipments or,
either VistaBridge or Vista Watch in case of external sources.
Synchronize? Check the box to force topology synchronization on the server.
Location Geographical location of the InfoVista Server.
Description Textual description of the InfoVista Server (2048 characters max.).
VistaMart® 4.0 Declaring a new InfoVista Server 74
InfoVista Server
Connection String*
There are three available string syntaxes:
> hostname. A single server is installed on the machine, and
there is no firewall.
> Instance@hostname As of InfoVista 3 1 in case of several
Server Parameter Description

7/17/2019 VistaMart User Guide
http://slidepdf.com/reader/full/vistamart-user-guide 74/265
User Guide - Chapter 3 Managing InfoVista Servers
Checking InfoVista Server propertiesWhen you select a InfoVista Server from a group in the Browser View, it contains thefollowing properties:
> Instance@hostname. As of InfoVista 3.1, in case of several
servers installed on a single machine.
> hostname:mport:cport:bport. The server is installed on a
machine behind a firewall.
Administrator
Username*
An administrator user name for users with administrator ’s rights
(“Administrator” by default).
Administrator
Password*
A valid password for this administrator.
Viewer User name* An InfoVista user who can connect to the InfoVista Server and
view report data (“Viewer” by default).
Viewer Password* A valid password for this v iewer.
Element Description
Instances All Instances currently uploaded on this InfoVista Server.
Running
Reports
The list of all Reports which have their state set to “Running” are
uploaded onto this server.
RunningSlots
The list of all Slots which have their state set to “Running” that arecurrently uploaded onto this server.
Information includes the displayed Instance, associated Vista and the
name of the InfoVista Server which is collecting data for this slot.
Suspended
Slots
A l ist of all suspended Slots (by Rules and/or manually).
If you have Slots which are suspended by the InfoVista Server due to
memory overload, consider adding another server to your group and
redistributing Instances to balance the load.
To beremoved
Instances which are deleted from VistaMart are placed in this folder.However, there are still present in the InfoVista Server.
VistaMart® 4.0 Synchronizing InfoVista Server groups 75
Synchronizing InfoVista Server groups
The Server synchronization process consists of:
> Distributing the Instances over the InfoVista Servers of the group

7/17/2019 VistaMart User Guide
http://slidepdf.com/reader/full/vistamart-user-guide 75/265
User Guide - Chapter 3 Managing InfoVista Servers
> Distributing the Instances over the InfoVista Servers of the group
> Launching the real-time reports and slots for the designated Instances.
Servers are always updated per group. A group of servers is configured to manage
one or more Zones. The server group is populated automatically with Instances,
Reports, Slots, and any required Libraries.
Instances are distributed evenly over all configured servers. The load is evaluated in
terms of memory (See: "Managing InfoVista Server loads" on page 79).
Synchronize a Server Group using the Inventory Manager
1 Open the Inventory Manager and select Server/Synchronize Server Group.... The
Server Group Synchronization window opens.
2 Select the name of the server group from the Server Group drop-down list.
All the server belonging to that group are displayed with their respective current
load and status. Possible statuses are as follows:
• Computing. The server is retrieving the load information.• Nominal. The server is up and running. Possibly, it can handle more Instances.
• Overloaded. The server is stressed - it is not recommended to add anymore
Instances, it is automatically unselected.
• Empty. The server has just been added to the group, it doesn’t handle any
Instance yet.
• Classic architecture. This server cannot be synchronized. It should be
removed from the group.
• No collector . The collector process is not running on the server. It should be
fixed before attempting a synchronization.
• Error . The server cannot accept any synchronization.
3 Unselect the servers to which you don’t want to add new Instances (you suspect
they are soon overloaded). Select the servers which can potentially accept
additional load.
VistaMart® 4.0 Synchronizing InfoVista Server groups 76
4 Click Synchronize. The servers of the group are updated with the latest available
Instances, Reports, and Slots. The displayed window logs all details.
5 After the update, click Close.
Synchronize a Server Group using the Command-line Option
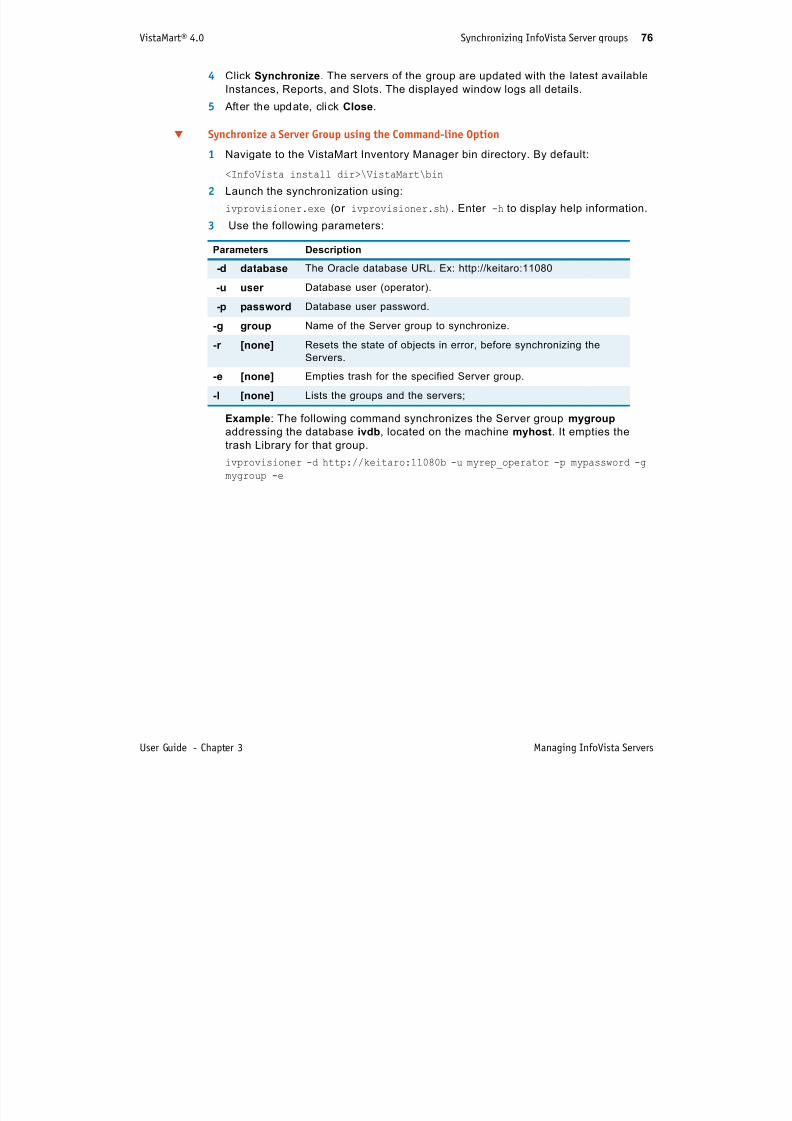
7/17/2019 VistaMart User Guide
http://slidepdf.com/reader/full/vistamart-user-guide 76/265
User Guide - Chapter 3 Managing InfoVista Servers
1 Navigate to the VistaMart Inventory Manager bin directory. By default:
<InfoVista_install_dir>\VistaMart\bin
2 Launch the synchronization using:
ivprovisioner.exe (or ivprovisioner.sh). Enter -h to display help information.
3 Use the following parameters:
Example: The following command synchronizes the Server group mygroup
addressing the database ivdb, located on the machine myhost. It empties the
trash Library for that group.
ivprovisioner -d http://keitaro:11080b -u myrep_operator -p mypassword -g
mygroup -e
Parameters Description
-d database The Oracle database URL. Ex: http://keitaro:11080
-u user Database user (operator).
-p password Database user password.
-g group Name of the Server group to synchronize.
-r [none] Resets the state of objects in error, before synchronizing the
Servers.
-e [none] Empties trash for the specified Server group.
-l [none] Lists the groups and the servers;
VistaMart® 4.0 Synchronizing InfoVista Server groups 77
Getting InfoVista Server feedbackUpon synchronization, the InfoVista Server provides a status of the reports and slots
triggered by the Rules.
1 From the Browser view, open the server group then the server you want to check.

7/17/2019 VistaMart User Guide
http://slidepdf.com/reader/full/vistamart-user-guide 77/265
User Guide - Chapter 3 Managing InfoVista Servers
2 Click Running reports / Running slots.
The right hand pane lists all the reports/slots running on the server.
For each launched slot and report, the displayed icon reflects the status as illustrated
below:
Successful synchronization. The slots are started correctly.
Incorrect synchronization. The slots are not started correctly.
Check the Rules and your InfoVista Libraries.
Successful synchronization. The reports are up and running.
Incorrect synchronization. The reports are not running correctly.
Check the Rules and the report templates;
VistaMart® 4.0 Synchronizing InfoVista Server groups 78
Handling ‘unstable’ serversFor a given server, any decision regarding a potential load increase is based on the
server’s current load, provided that the load value the server returns is reliable.
Whenever a server is stopped, e.g. for maintenance purposes, and then restarted,you cannot rely on the value it returns for a period of 4 hours after it is restarted. The
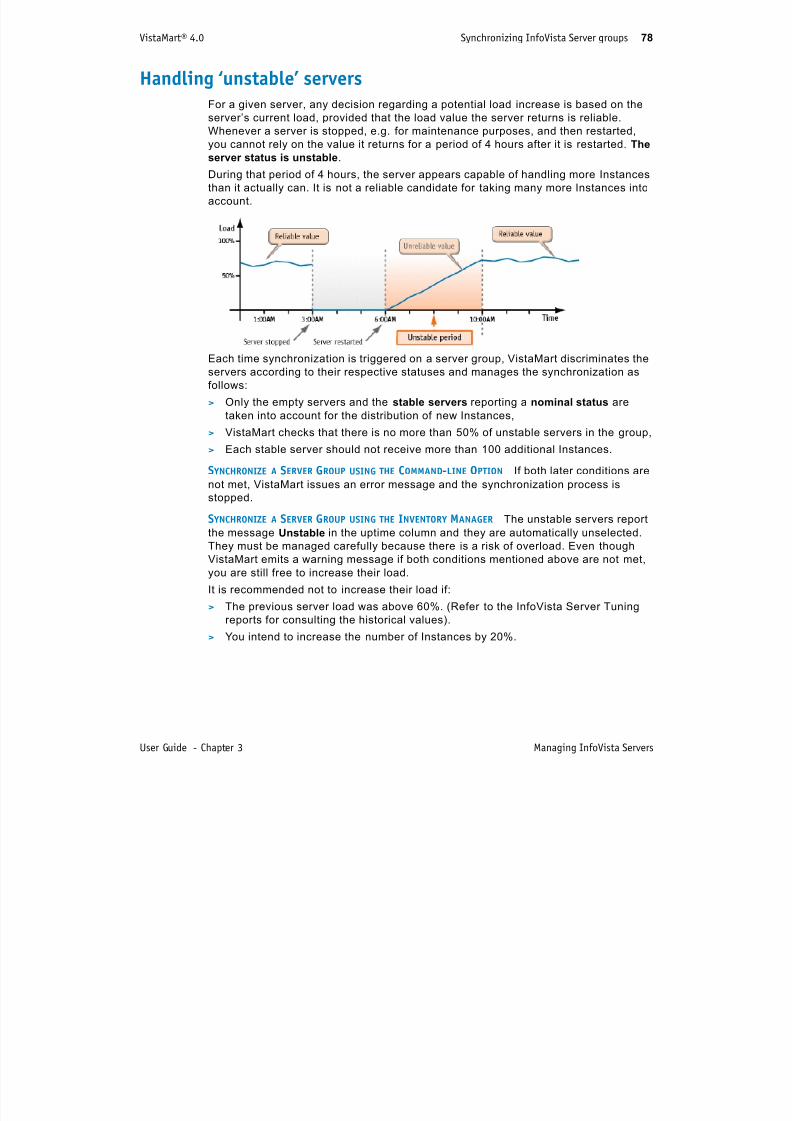
7/17/2019 VistaMart User Guide
http://slidepdf.com/reader/full/vistamart-user-guide 78/265
User Guide - Chapter 3 Managing InfoVista Servers
server status is unstable.
During that period of 4 hours, the server appears capable of handling more Instances
than it actually can. It is not a reliable candidate for taking many more Instances into
account.
Each time synchronization is triggered on a server group, VistaMart discriminates the
servers according to their respective statuses and manages the synchronization as
follows:
> Only the empty servers and the stable servers reporting a nominal status are
taken into account for the distribution of new Instances,
> VistaMart checks that there is no more than 50% of unstable servers in the group,
> Each stable server should not receive more than 100 additional Instances.
S YNCHRONIZE A SERVER GROUP USING THE COMMAND-LINE OPTION If both later conditions are
not met, VistaMart issues an error message and the synchronization process is
stopped.
S YNCHRONIZE A SERVER GROUP USING THE INVENTORY MANAGER The unstable servers report
the message Unstable in the uptime column and they are automatically unselected.
They must be managed carefully because there is a risk of overload. Even though
VistaMart emits a warning message if both conditions mentioned above are not met,
you are still free to increase their load.
It is recommended not to increase their load if:> The previous server load was above 60%. (Refer to the InfoVista Server Tuning
reports for consulting the historical values).
> You intend to increase the number of Instances by 20%.
VistaMart® 4.0 Managing InfoVista Server loads 79
Managing InfoVista Server loads
LOAD BALANCING InfoVista Server loads are handled automatically. VistaMart uploads
Instances onto servers in such as way that each server has an equal load. Whenever
you update a topology new Instances are distributed to ensure balance between
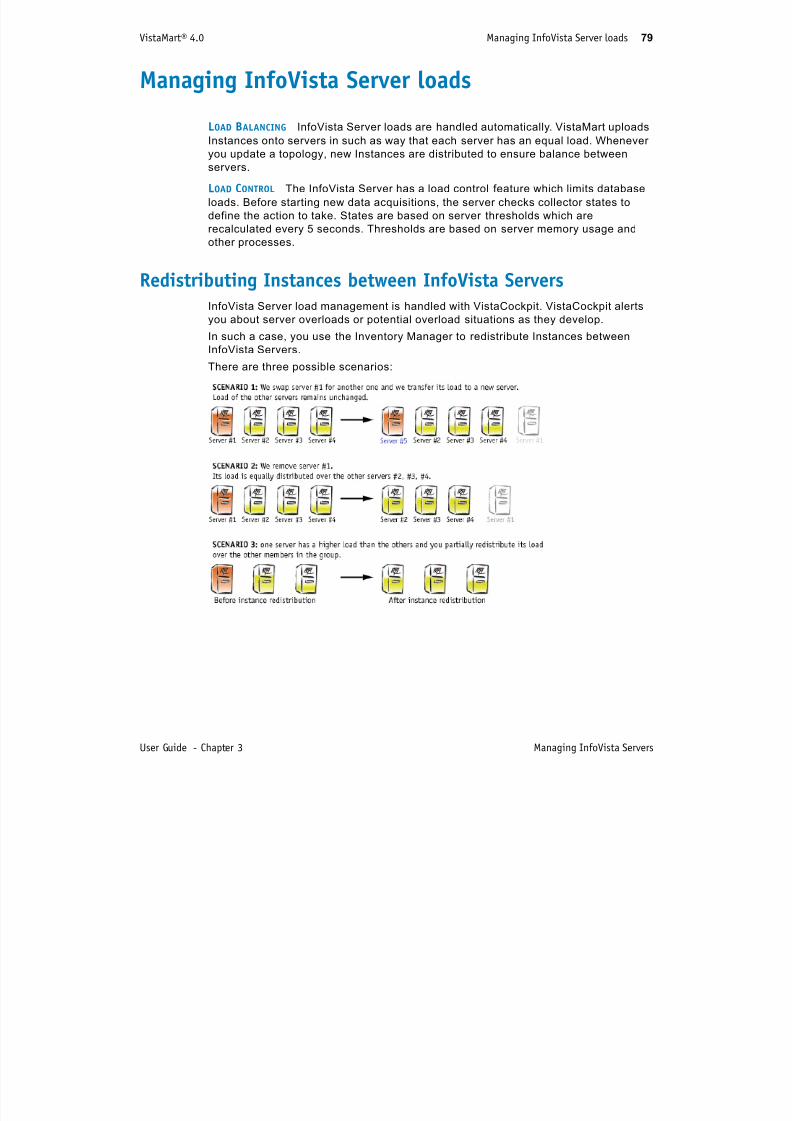
7/17/2019 VistaMart User Guide
http://slidepdf.com/reader/full/vistamart-user-guide 79/265
User Guide - Chapter 3 Managing InfoVista Servers
you update a topology, new Instances are distributed to ensure balance between
servers.
LOAD CONTROL The InfoVista Server has a load control feature which limits database
loads. Before starting new data acquisitions, the server checks collector states to
define the action to take. States are based on server thresholds which are
recalculated every 5 seconds. Thresholds are based on server memory usage and
other processes.
Redistributing Instances between InfoVista ServersInfoVista Server load management is handled with VistaCockpit. VistaCockpit alerts
you about server overloads or potential overload situations as they develop.
In such a case, you use the Inventory Manager to redistribute Instances between
InfoVista Servers.
There are three possible scenarios:
VistaMart® 4.0 Managing InfoVista Server loads 80
Scenarios When to use
1. Transfer
Instances from one
InfoVista Server to
another
A server is no longer in use and you want to t ransfer a ll Ins tances
from that server to a new machine you install and declare for the
group.
The redistribution method is a direct machine-to-machine transfer.
Th hi t h ffi i t it t h dl th

7/17/2019 VistaMart User Guide
http://slidepdf.com/reader/full/vistamart-user-guide 80/265
User Guide - Chapter 3 Managing InfoVista Servers
Redistribute Instances
1 Select Server/Redistribute Instances...The Redistribute Instances window opens.
2 Select one of the following redistribution options:
3 Click Next.
Option 1: Transfer Instances from one InfoVista Server to another
1 In the Select Source window, select a server as the source. In other words, the
server you want to transfer Instances from. Click Next.
2 In the Select Destination window, select the server you want to sen Instances to.
3 Click Next twice.
4 To start the redistribution, click “ Yes: I want to start the redistribution now”. Click
“No, I do it later ” if you have other transfer operations to perform. Transfer
parameters are saved and executed when you reopen the wizard or if you
synchronize servers.
The new machine must have sufficient capacity to handle the
transfer.
2. Distribute
Instances from an
inactive server over
the entire group
A server is no longer in use and you want to spread its load over the
other servers in the group.
Redistribution automatically balances load according to the
remaining server capacity of the other servers.
3. TransferInstances from one
server the others
VistaCockpit notifies you that a server is overloaded. You perform apartial transfer of Instances from that server to other servers
belonging to the group;.
NOTE In all cases, real-time data for all Instances moved from the source Server
are lost.
VistaMart® 4.0 Managing InfoVista Server loads 81
Option 2: Redistribute Instances from an inactive server over the entire group
1 In the Select Source window, select a server as the source. In other words, the
server you want to redistribute Instances from. Click Next.
2 In the Select Destination window, the server group for the server you selected
above is displayed. This is the server group where you transfer or redistribute
Instances to
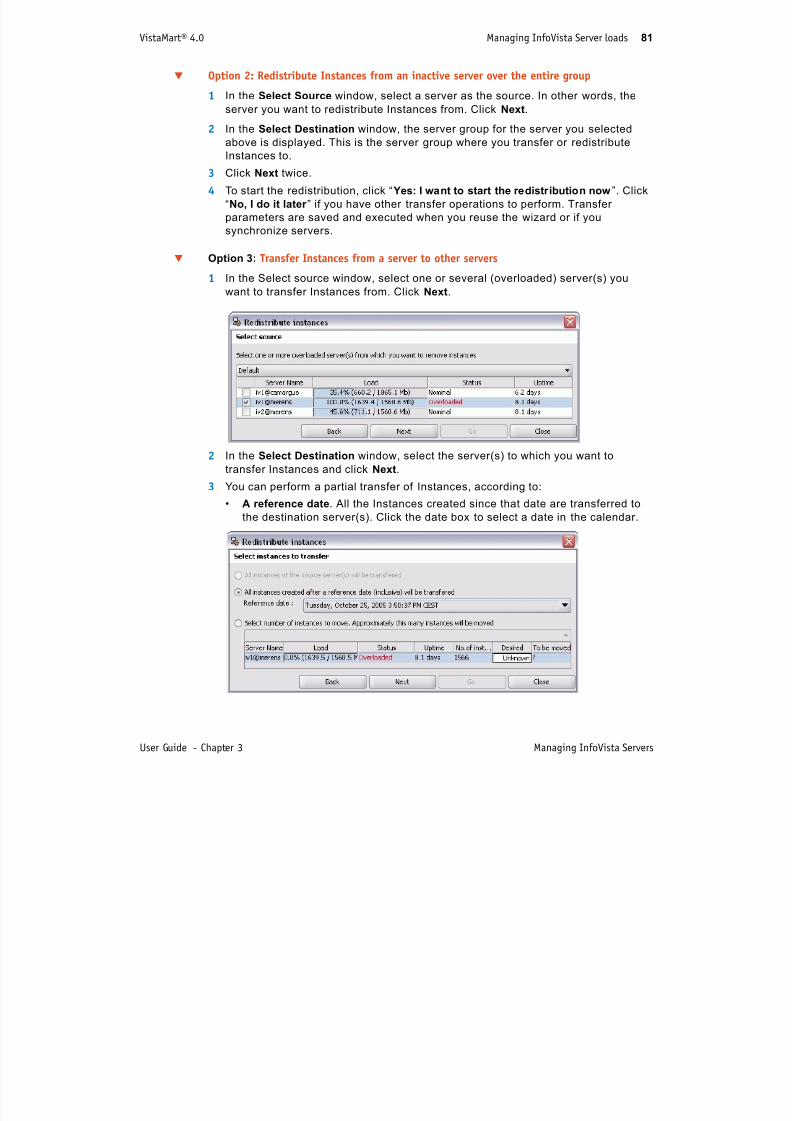
7/17/2019 VistaMart User Guide
http://slidepdf.com/reader/full/vistamart-user-guide 81/265
User Guide - Chapter 3 Managing InfoVista Servers
Instances to.
3 Click Next twice.
4 To start the redistribution, click “ Yes: I want to start the redistribution now”. Click
“No, I do it later ” if you have other transfer operations to perform. Transfer
parameters are saved and executed when you reuse the wizard or if you
synchronize servers.
Option 3: Transfer Instances from a server to other servers
1 In the Select source window, select one or several (overloaded) server(s) you
want to transfer Instances from. Click Next.
2 In the Select Destination window, select the server(s) to which you want to
transfer Instances and click Next.
3 You can perform a partial transfer of Instances, according to:
• A reference date. All the Instances created since that date are transferred to
the destination server(s). Click the date box to select a date in the calendar.
VistaMart® 4.0 Managing InfoVista Server loads 82
• A given number of Instances. VistaMart displays the total number of Instance
handled by the overloaded server. You enter the approximate number of
Instances you want to move, which is recalculated more accurately according
to the basic/proxy relationship of Instances.

7/17/2019 VistaMart User Guide
http://slidepdf.com/reader/full/vistamart-user-guide 82/265
User Guide - Chapter 3 Managing InfoVista Servers
4 Click Next.
5 To start the redistribution, click “ Yes: I want to start the redistribution now”. Click
“No, I do it later ” if you have other transfer operations to perform.
Transfer parameters are saved and executed when you reuse the wizard or if you
synchronize servers.
6 Click Next.
7 VistaMart displays a summary of the impacted Instances.
8 Click Go, then Close.
NOTE Keep in mind that real-time data for the Instances you transfer are lost.
The older the Instances the more real-time data is lost. Consequently,
you should prefer transferring the data according to the reference date
whenever possible so as to minimize the loss of data.
VistaMart® 4.0 Managing InfoVista Server loads 83
Restarting suspended reports and slots
It is likely that Reports and Slots are suspended on the Source server.
1 From the Server menu, select Restart suspended reports/Slots.
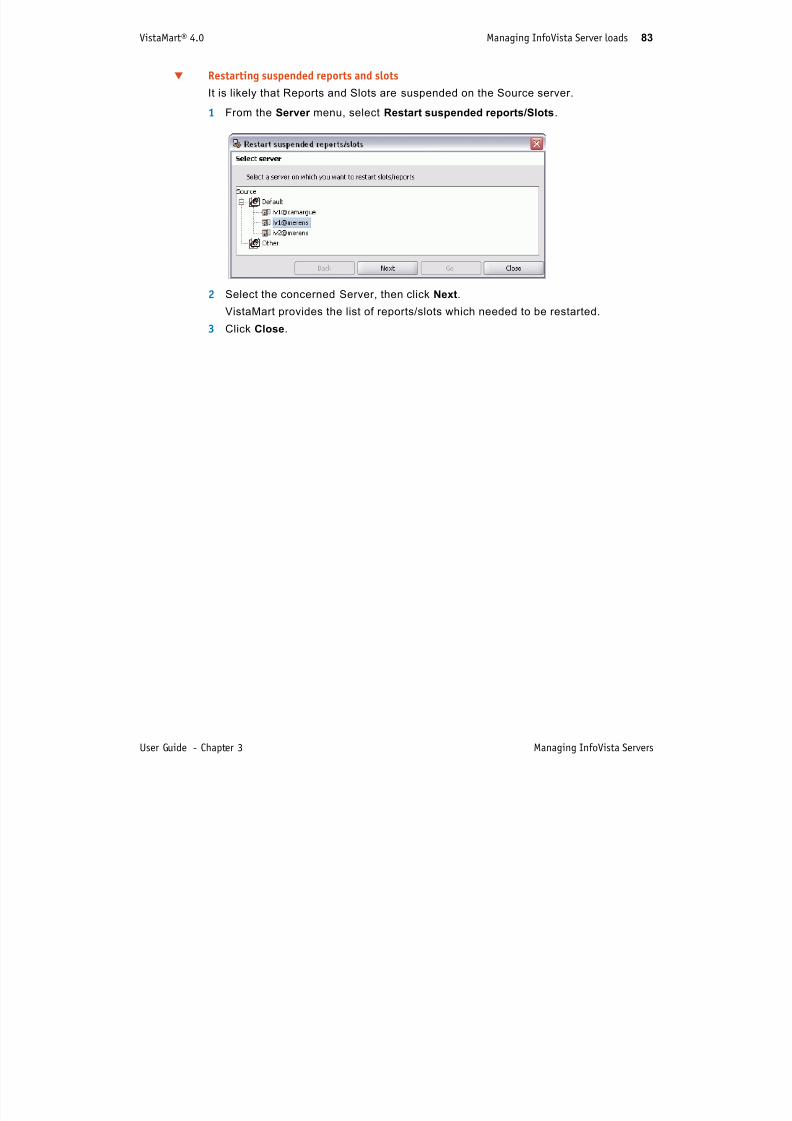
7/17/2019 VistaMart User Guide
http://slidepdf.com/reader/full/vistamart-user-guide 83/265
User Guide - Chapter 3 Managing InfoVista Servers
2 Select the concerned Server, then click Next.
VistaMart provides the list of reports/slots which needed to be restarted.
3 Click Close.
4 Understanding the Vistamart

7/17/2019 VistaMart User Guide
http://slidepdf.com/reader/full/vistamart-user-guide 84/265
84
4 gForwarding Service
The Forwarding Service is a process which allows InfoVista Servers (pollers) to send
or ‘forward’ data and traps to VistaMart as they arrive using one or several forwarding
services comprised within the VistaMart Applications Services.
"Basic principles in data forwarding" on page 85
"Forwarding concepts and terminology" on page 87
"Connecting to the forwarding service" on page 88
"Recovering missing data (VistaMart)" on page 89
"Ensuring data availability" on page 90
VistaMart® 4.0 Basic principles in data forwarding 85
Basic principles in data forwarding
By default, VistaMart has the forwarding service already enabled to retrieve data and
traps automatically. There is no (or minimum user) configuration required.
The following sections contain descriptive explanations of how the forwarding service
h i k ithi th Vi t M t i t
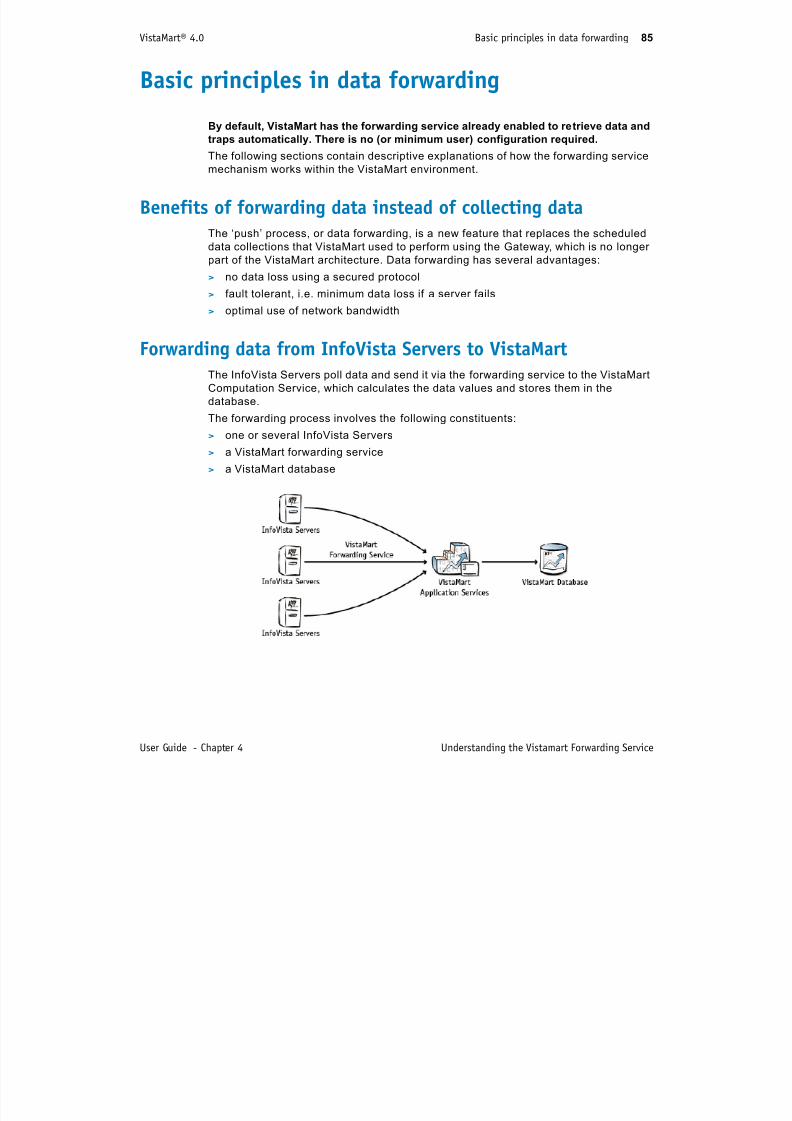
7/17/2019 VistaMart User Guide
http://slidepdf.com/reader/full/vistamart-user-guide 85/265
User Guide - Chapter 4 Understanding the Vistamart Forwarding Service
mechanism works within the VistaMart environment.
Benefits of forwarding data instead of collecting dataThe ‘push’ process, or data forwarding, is a new feature that replaces the scheduled
data collections that VistaMart used to perform using the Gateway, which is no longer
part of the VistaMart architecture. Data forwarding has several advantages:
> no data loss using a secured protocol
> fault tolerant, i.e. minimum data loss if a server fails
> optimal use of network bandwidth
Forwarding data from InfoVista Servers to VistaMartThe InfoVista Servers poll data and send it via the forwarding service to the VistaMart
Computation Service, which calculates the data values and stores them in the
database.
The forwarding process involves the following constituents:
> one or several InfoVista Servers
> a VistaMart forwarding service
> a VistaMart database
VistaMart® 4.0 Basic principles in data forwarding 86
Forwarding service implementationsThere are three implementation of the forwarding service:
T HE PRIMARY VISTAMART FORWARDING SERVICE Responsible for sending VistaMart data to
the VistaMart Computation Service for calculation.
VISTAPORTAL FORWARDING SERVICE Embedded forwarding service in charge of
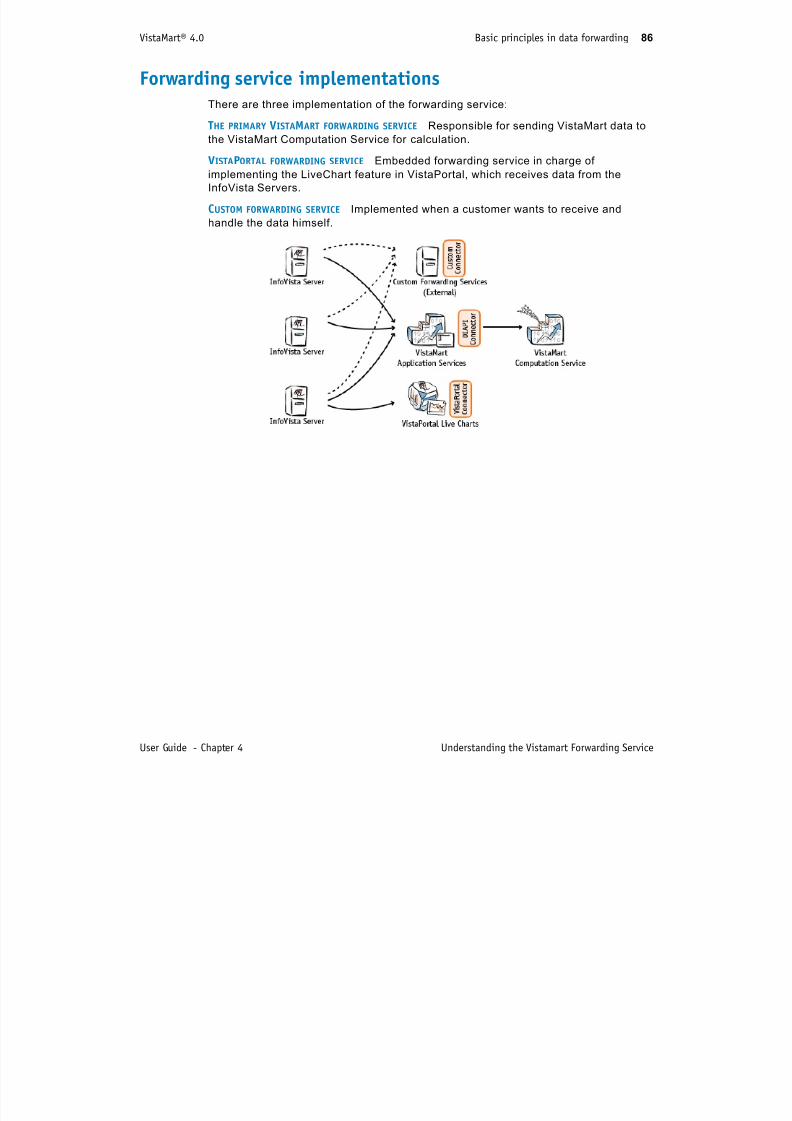
7/17/2019 VistaMart User Guide
http://slidepdf.com/reader/full/vistamart-user-guide 86/265
User Guide - Chapter 4 Understanding the Vistamart Forwarding Service
implementing the LiveChart feature in VistaPortal, which receives data from the
InfoVista Servers.
CUSTOM FORWARDING SERVICE Implemented when a customer wants to receive and
handle the data himself.
VistaMart® 4.0 Forwarding concepts and terminology 87
Forwarding concepts and terminology
The following concepts and terminology are regularly encountered when speaking of
the forwarding feature:
FLOW CONTROL InfoVista Servers send data in bursts at specified timestamps and the
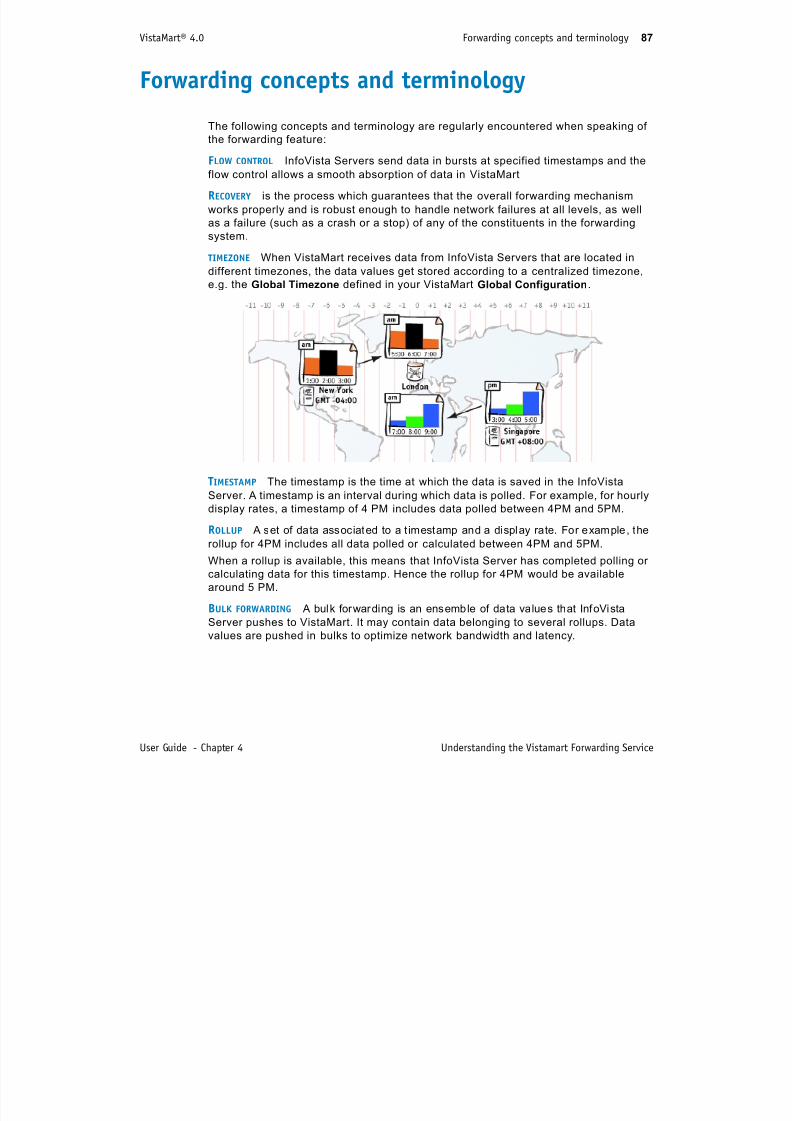
7/17/2019 VistaMart User Guide
http://slidepdf.com/reader/full/vistamart-user-guide 87/265
User Guide - Chapter 4 Understanding the Vistamart Forwarding Service
flow control allows a smooth absorption of data in VistaMart
RECOVERY is the process which guarantees that the overall forwarding mechanism
works properly and is robust enough to handle network failures at all levels, as well
as a failure (such as a crash or a stop) of any of the constituents in the forwarding
system.
TIMEZONE When VistaMart receives data from InfoVista Servers that are located in
different timezones, the data values get stored according to a centralized timezone,
e.g. the Global Timezone defined in your VistaMart Global Configuration.
T IMESTAMP The timestamp is the time at which the data is saved in the InfoVistaServer. A timestamp is an interval during which data is polled. For example, for hourly
display rates, a timestamp of 4 PM includes data polled between 4PM and 5PM.
ROLLUP A set of data associated to a t imestamp and a display rate. For example, the
rollup for 4PM includes all data polled or calculated between 4PM and 5PM.
When a rollup is available, this means that InfoVista Server has completed polling or
calculating data for this timestamp. Hence the rollup for 4PM would be available
around 5 PM.
BULK FORWARDING A bulk forwarding is an ensemble of data values that InfoVista
Server pushes to VistaMart. It may contain data belonging to several rollups. Data
values are pushed in bulks to optimize network bandwidth and latency.
VistaMart® 4.0 Connecting to the forwarding service 88
Connecting to the forwarding service
SETTING THE FORWARDING SERVER URL In order for InfoVista Server to forward data to the
correct VistaMart, you must define the target URL.
NOTE In a NAT environment, this is the URL that you see in InfoVista Server.
7/17/2019 VistaMart User Guide
http://slidepdf.com/reader/full/vistamart-user-guide 88/265
User Guide - Chapter 4 Understanding the Vistamart Forwarding Service
This URL is defined at the time of installation. However, you can change it as required
in the Configuration Manager.
VistaMart updates the URL during the InfoVista Server synchronization phase. Hence
if you change the URL (port, address, etc.) you must resynchronize your InfoVista
Server to take the new URL into account and forward the data to the correct target.
SECURITY AND AUTHENTICATION With regards to security and authentication, there is no
need to define a user or a passwords. VistaMart automatically generates them during
the repository creation or upgrade.
VistaMart sends these user credentials to InfoVista Server the first time it sends the
subscription information, which InfoVista Server uses to forward data.
The forwarding protocol implements security based on the DIGEST authentication.
The user and password never go through the network.
FORWARDING SERVICE CONNECTIVITY The forwarding service uses HTTP as the underlyingprotocol because it is simple, robust, safe, and can easily support SSL and data
transport over WANs.
By default, the URL for the forwarding service is:
http://hostname:11080/push/push
CHANGING THE SUBSCRIPTION INFORMATION Manually:
> Update subscription info in Configuration Manager
• change the URL
• update the Tomcat configuration
> Synchronize InfoVista Server to update URL
VistaMart® 4.0 Recovering missing data (VistaMart) 89
Recovering missing data (VistaMart)
Recovery is the process through which the forwarding service can request data from
the InfoVista Server when it becomes aware that certain data is missing.
R ti (Vi t M t)
7/17/2019 VistaMart User Guide
http://slidepdf.com/reader/full/vistamart-user-guide 89/265
User Guide - Chapter 4 Understanding the Vistamart Forwarding Service
Requesting a recovery (VistaMart)The forwarding service makes the recovery request indirectly via a response to a
forwarding bulk. This response contains a list of timestamps and intervals for the data
to recover.
This means that the granularity of a recovered slots corresponds to the display rate,
timezone, and timestamp of the missing data.
The recovery request therefore contains the following information:
> a unique ID
> an interval list sorted from the most recent to the least recent and includes:
• display rate, t imezone
• first timestamp (inclusive) and last timestamp (inclusive)
• a maximum duration (in seconds)
Requesting a recovery (InfoVista Server)On the InfoVista Server side, the recovery works as follows:
> The collector process connects to the forwarding service
> The forwarding service answer ‘OK’ and puts in a recovery request in the
response body (potentially empty). If the recovery request is not empty, the
collector sends this request to the browser.
> The browser process the recovery request.
VistaMart® 4.0 Ensuring data availability 90
Ensuring data availability
The average rate of data availability in the VistaMart database largely depends on two
primary factors which affect how VistaMart handles the data flow from the time dataarrives via the forwarding services and other sources to its output as processed
values:
7/17/2019 VistaMart User Guide
http://slidepdf.com/reader/full/vistamart-user-guide 90/265
User Guide - Chapter 4 Understanding the Vistamart Forwarding Service
ENTRANCE The size of the solution, i.e. the number of slots to poll, the number of
connections, etc.
EXIT The size of the physical hardware and the available storage space. In other
words, how much charge the machine can handle, taking into account not only the
database activity, but also various other client applications such as VistaPortal,provisioning, and database statistics.
How VistaMart manages data flowsTake as an example, a bathtub that represents VistaMart and which receives and
processes data, and computes results for storage in the database.
INCOMING DATA FLOWS There are three sources of data that arrive in VistaMart (see
illustrations below):
> data from InfoVista Servers (A) (fixed flow, for example 1000 rows/s)
> data in aggregation and calculation (A) (variable flow, for example 200 rows/s)
> recovered data, i.e. missing data that VistaMart requests from InfoVista Servers
(C) (variable flow, for example 600 rows/s)
OUTGOING DATA FLOW The processed results of the cumulated data flows described
above.
VistaMart® 4.0 Ensuring data availability 91
Optimum scenario
In an ideal case, where there is no missing data (hence no need for recovered data):
A + B < exit flow
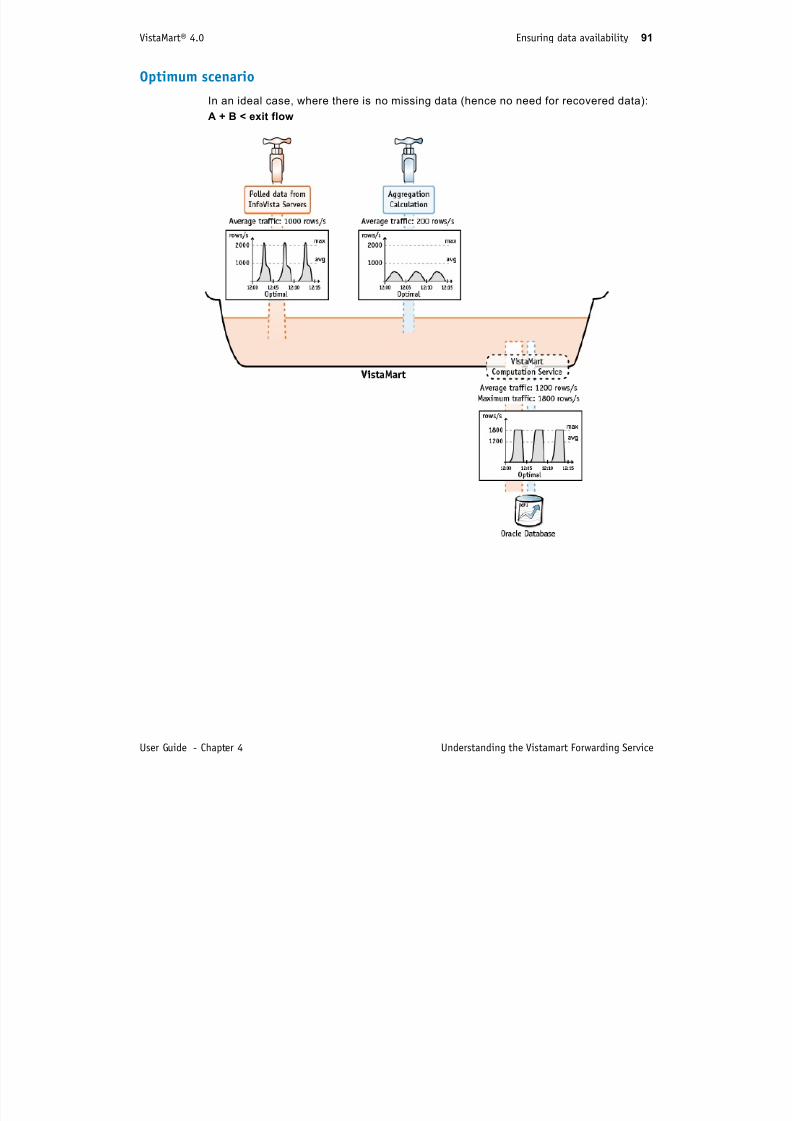
7/17/2019 VistaMart User Guide
http://slidepdf.com/reader/full/vistamart-user-guide 91/265
User Guide - Chapter 4 Understanding the Vistamart Forwarding Service
VistaMart® 4.0 Ensuring data availability 92
Saturated scenario
When VistaMart must also handle recovered data and the output capacity does not
have extra room to accommodate the cumulative flows, the result is saturation:
A + B + C = exit flow
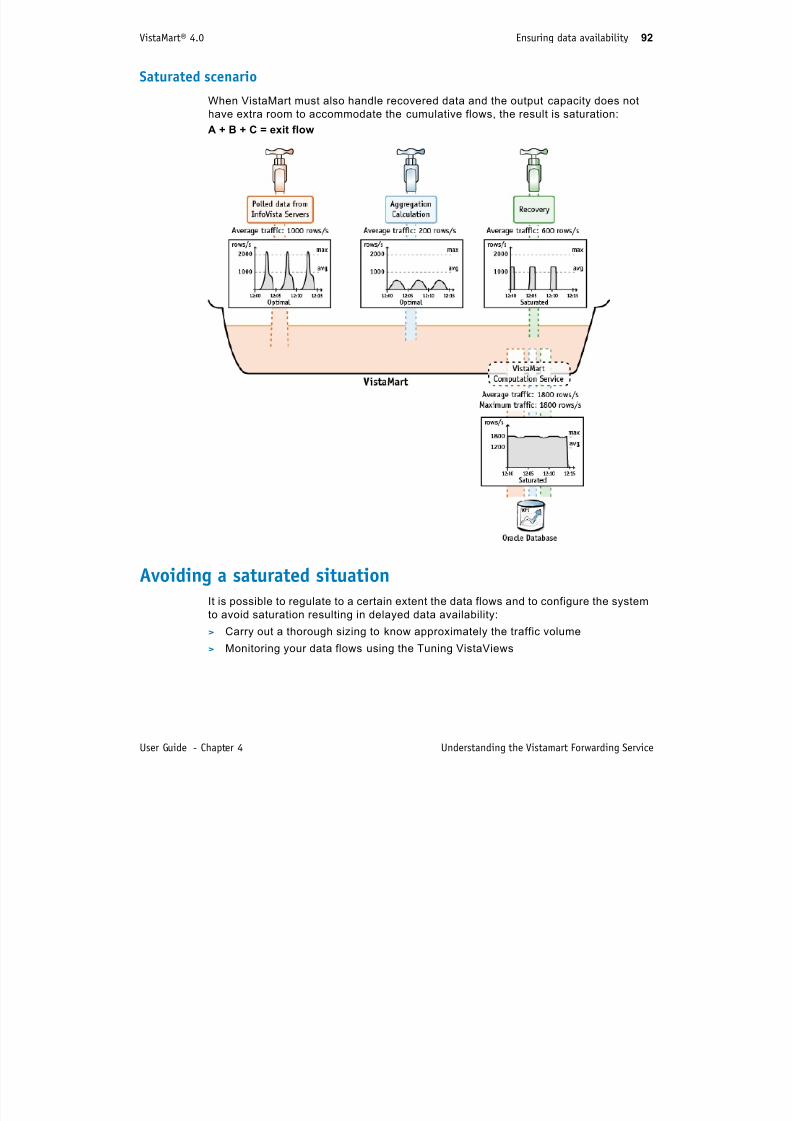
7/17/2019 VistaMart User Guide
http://slidepdf.com/reader/full/vistamart-user-guide 92/265
User Guide - Chapter 4 Understanding the Vistamart Forwarding Service
Avoiding a saturated situationIt is possible to regulate to a certain extent the data flows and to configure the systemto avoid saturation resulting in delayed data availability:
> Carry out a thorough sizing to know approximately the traffic volume
> Monitoring your data flows using the Tuning VistaViews
5 Aggregating and calculating data

7/17/2019 VistaMart User Guide
http://slidepdf.com/reader/full/vistamart-user-guide 93/265
93
Data aggregation is the process of combining several data samples with a short
display rate (such as an hourly interval) into a single data sample representing a
longer display rate (such as a daily interval).
Data aggregation allows you to generate data samples for different time intervals
without having to retrieve data for each interval.
"Understanding aggregation and display rates" on page 94
"Defining aggregation settings" on page 96
"Setting aggregation attributes" on page 98 "Calculating group Indicator values" on page 101
VistaMart® 4.0 Understanding aggregation and display rates 94
Understanding aggregation and display rates
Since the database is regularly populated with the data samples, the VistaMart Server
permanently supervises the database to perform the following tasks:> Aggregation of data samples for all provis ioned Instances, according to the
Aggregations you def ine.
C l l ti d A ti f th I di t d t l f h G
7/17/2019 VistaMart User Guide
http://slidepdf.com/reader/full/vistamart-user-guide 94/265
User Guide - Chapter 5 Aggregating and calculating data
> Calculation and Aggregation of the Indicator data samples for each Group
Instance provisioned in your database, provided that you have defined the
Indicators you need.
Data aggregation is the process of calculating data samples of a given interval by
combining samples of smaller intervals. VistaMart aggregates the data samples as
follows:
> The 15-minute value is based on 5-minute data
> The 30-minute value is based on calculated 15-minute or 5-minute data. VistaMart
automatically uses the highest display rate available.
> The hourly value is based on calculated 30-minute, 15-minute or 5-minute data.
> The daily value is based on calculated hourly data, and so on.
T IMESTAMP ASSIGNMENT For a given display rate, the aggregated value is given the
timestamp of the beginning of the time period corresponding to the aggregated datasamples.
VistaMart® 4.0 Understanding aggregation and display rates 95
AGGREGATION SEQUENCING VistaMart aggregates data asynchronously. That is, data for
a given display rate will be calculated only when the data points from the lower
display rate are available. Whenever recent data samples are available earlier than
older ones, they are aggregated first. As a consequence, the database is populated
asynchronously and ‘holes’ may appear in the VistaPortal reports.
The following example illustrates how data aggregation for the15-minute and hourly
display rates progresses between 2.19 and 2.26 o’clock.

7/17/2019 VistaMart User Guide
http://slidepdf.com/reader/full/vistamart-user-guide 95/265
User Guide - Chapter 5 Aggregating and calculating data
VistaMart® 4.0 Defining aggregation settings 96
Defining aggregation settings
You can enable and disable aggregation for the entire range of Slot display rates
(excepted for the 5 minute. display rate which is the smallest one). For this, you usethe Global Configuration/Data LifeTime setting.
WARNING Aggregations are defined all inclusively. If you d isable one aggregation,
this will apply to all slots

7/17/2019 VistaMart User Guide
http://slidepdf.com/reader/full/vistamart-user-guide 96/265
User Guide - Chapter 5 Aggregating and calculating data
For each display rate, you can:
> Enable the data aggregation according to your reporting requirements and the
database capacity.
> Define the lifetime of the data samples. Historical reports will be available from
VistaPortal as long as the lifetime has not expired.
A key consideration is the number of samples stored in the database.
Typically, a data consolidation strategy might be defined by Slot aggregation in Real
Time (5 minutes), Hourly, Daily and Weekly. The intermediate and longer display rate
aggregations can be disabled, therefore saving database space.
Note that the lifetime for samples stored on VistaMart is not necessarily the same as
the lifetime of data stored on InfoVista Servers.
Set the Aggregations and Lifetimes
1 Open the Inventory Manager and click the Config View tab.
2 Expand the Global Configuration folder and select Data lifetime.
The right-hand pane displays all possible display rates.
3 Click each display rate for which you need aggregated data.
The editor opens at the bottom of the pane.
4 Check the Aggregation check box to enable aggregation for that display rate.
Make sure that you disable aggregation for all rates you do not want to have data
for. This can considerably reduce database load.
5 Click the lifetime value then use the spin arrows and the unit button to define the
value.
Consideration about timezones and aggregationWith respect to the weekly display rate, VistaMart aggregates data according to the
specifics of the timezone you set in the Global Configuration/Initialization section.
The first day of the week depends on this timezone (Monday or Sunday).
this will apply to all slots.
NOTE See Appendix F for the complete list of the official timezones.
VistaMart® 4.0 Defining aggregation settings 97
Using ‘timeout’ to handle missing dataThe VistaMart Server processes data asynchronously on the fly as it becomes
available from an input buffer. Whenever data samples are not available during a
given Timeout interval, VistaMart does not perform the aggregation and ignore those
samples until they become available.
The following example illustrates the case of three samples which are left empty since
the timestamps (1:30, 1:45 and 2:00) take place within the Timeout interval:
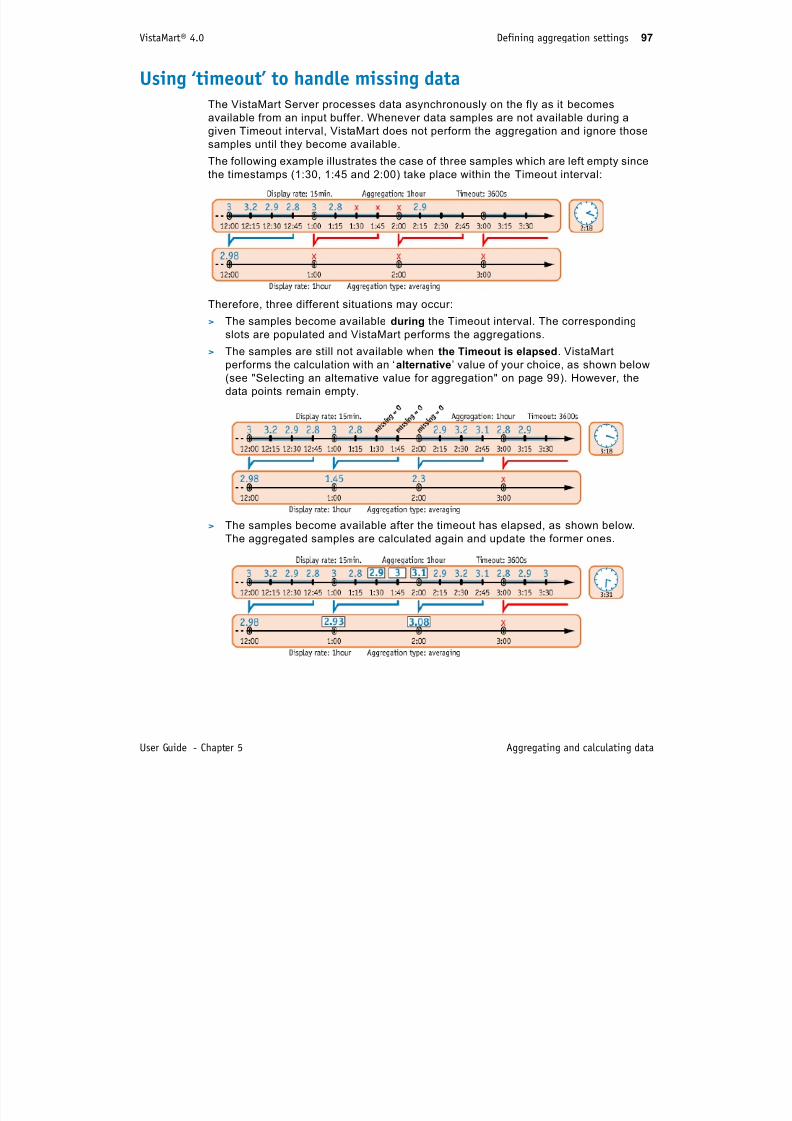
7/17/2019 VistaMart User Guide
http://slidepdf.com/reader/full/vistamart-user-guide 97/265
User Guide - Chapter 5 Aggregating and calculating data
Therefore, three different situations may occur:
> The samples become available during the Timeout interval. The corresponding
slots are populated and VistaMart performs the aggregations.
> The samples are still not available when the Timeout is elapsed. VistaMart
performs the calculation with an ‘alternative’ value of your choice, as shown below(see "Selecting an alternative value for aggregation" on page 99). However, the
data points remain empty.
> The samples become available after the timeout has elapsed, as shown below.
The aggregated samples are calculated again and update the former ones.
VistaMart® 4.0 Setting aggregation attributes 98
Setting aggregation attributes
For each Indicator, you can configure the way you want VistaMart to aggregate data.
Selecting the aggregation TypeTo calculate the Indicator’s value for a given display rate VistaMart can apply one of

7/17/2019 VistaMart User Guide
http://slidepdf.com/reader/full/vistamart-user-guide 98/265
User Guide - Chapter 5 Aggregating and calculating data
To calculate the Indicator s value for a given display rate, VistaMart can apply one of
the following aggregation types to the lower display rate samples:
Using the ‘current aggregation’When you select this option, VistaMart does not wait for the complete series of data
samples for the considered aggregation period. Instead it calculates a temporary
aggregated value each time a new sample is available.
In the example above where the Current Aggregation is enabled, the Indicator’s value
at 12:19 o’clock for the 30 mn display rate is calculated from the four available
samples taken since 12.00 o’clock.
In this second example where the Current Aggregation is disabled, the Indicator’s
value for the 30 mn display rate will not be available before 12:25 since VistaMartneeds 6 samples for calculating the aggregating value.
None / Void The values of the Indicator are not aggregated. The only available
values are those of the lowest display rate.
Note: Refer to the next section, for understanding the differencebetween the None and Void options with regard to group Indicators.
Averaging Data is aggregated by averaging all values.
Additive Data is aggregated by adding all values together.
Minimum VistaMart retains the minimum value from the series of samples.
Maximum VistaMart retains the maximum value from the series of samples.
First VistaMart retains the first value from the series of samples.Latest VistaMart retains the last value from the series of samples.
VistaMart® 4.0 Setting aggregation attributes 99
S l ti lt ti l f ti
NOTE As a consequence of selecting the Curren t Aggregation option, data
becomes immediately available in VistaPortal reports, whatever the used
display rate.
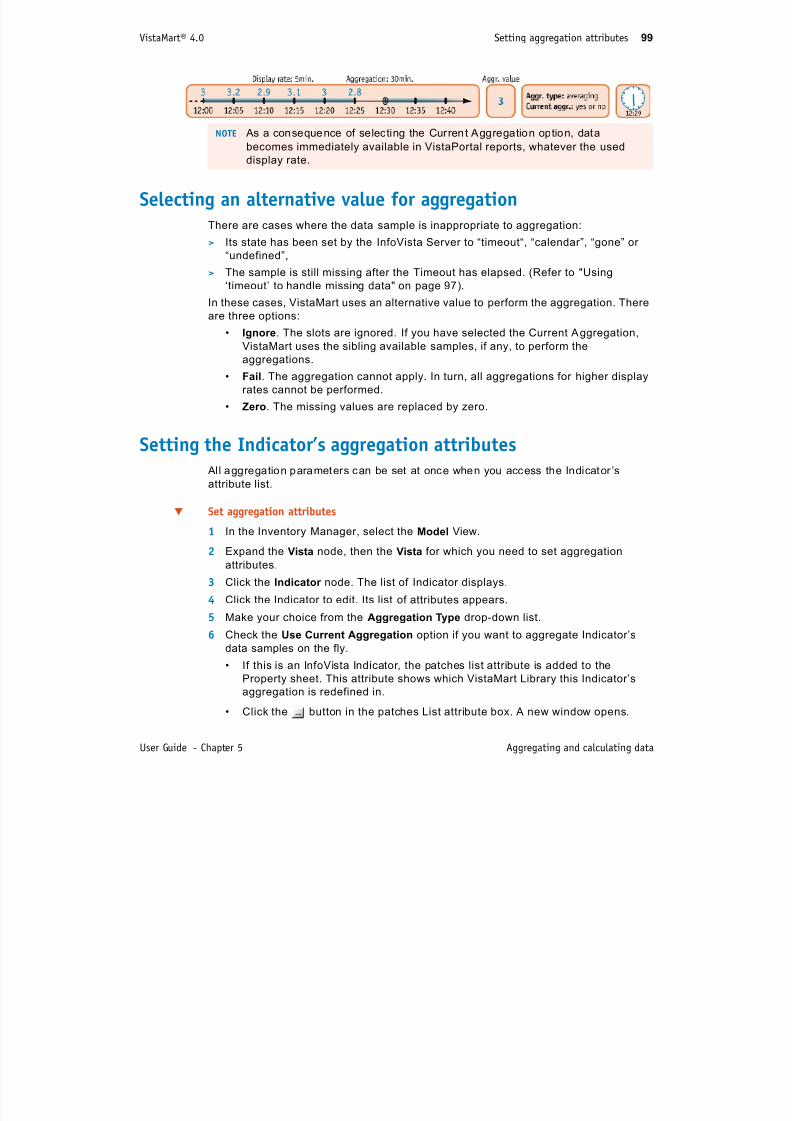
7/17/2019 VistaMart User Guide
http://slidepdf.com/reader/full/vistamart-user-guide 99/265
User Guide - Chapter 5 Aggregating and calculating data
Selecting an alternative value for aggregationThere are cases where the data sample is inappropriate to aggregation:
> Its state has been set by the InfoVista Server to “timeout“, “calendar”, “gone” or
“undefined”,> The sample is still missing after the Timeout has elapsed. (Refer to "Using
‘timeout’ to handle missing data" on page 97).
In these cases, VistaMart uses an alternative value to perform the aggregation. There
are three options:
• Ignore. The slots are ignored. If you have selected the Current Aggregation,
VistaMart uses the sibling available samples, if any, to perform the
aggregations.
• Fail. The aggregation cannot apply. In turn, all aggregations for higher display
rates cannot be performed.
• Zero. The missing values are replaced by zero.
Setting the Indicator’s aggregation attributes All aggregation parameters can be set at once when you access the Indicator ’s
attribute list.
Set aggregation attributes
1 In the Inventory Manager, select the Model View.
2 Expand the Vista node, then the Vista for which you need to set aggregation
attributes.
3 Click the Indicator node. The list of Indicator displays.
4 Click the Indicator to edit. Its list of attributes appears.
5 Make your choice from the Aggregation Type drop-down list.
6 Check the Use Current Aggregation option if you want to aggregate Indicator’s
data samples on the fly.
• If this is an InfoVista Indicator, the patches list attribute is added to the
Property sheet. This attribute shows which VistaMart Library this Indicator’s
aggregation is redefined in.
• Click the button in the patches List attribute box. A new window opens.
VistaMart® 4.0 Setting aggregation attributes 100
• A VistaMart Library is selected by default which is used to redefine the
InfoVista Indicator. To select another VistaMart Library, click the existing
Library in the ‘Redefine’ column and select another available Library in the
drop-down list.
7 Make your choice from the Handle missing as popup list.

7/17/2019 VistaMart User Guide
http://slidepdf.com/reader/full/vistamart-user-guide 100/265
User Guide - Chapter 5 Aggregating and calculating data
VistaMart® 4.0 Calculating group Indicator values 101
Calculating group Indicator values
Each group Indicator is based on a single Indicator common to all members and a
formula that computes the respective member data samples altogether. As soon as individual data samples are available f rom the members of the group,
VistaMart calculates the derived Indicator values for a given display rate and feeds
the database.
Th f ll i l ill t t th l l ti f th I di t A b

7/17/2019 VistaMart User Guide
http://slidepdf.com/reader/full/vistamart-user-guide 101/265
User Guide - Chapter 5 Aggregating and calculating data
The following example illustrates the calculation of the group Indicator A, by
averaging the respective values of the Indicator 1 sourced from all the members of
the group.
There are four available formulas:
Averaging VistaMart calculates the mean value from all Indicator’s values.
Additive VistaMart sums up the individual values from all Indicators.
Minimum VistaMart retains the smallest Indicator’s value.
Maximum VistaMart retains the highest Indicator’s value.
VistaMart® 4.0 Calculating group Indicator values 102
Consolidation and group aggregation
Once the derived Indicator’s values are calculated and stored in the database for the
lowest display rate, VistaMart calculates the values for each needed display rate,
according to a specified aggregation type that you specify.
There are three possible cases:
1 Consolidated Indicators. From the lowest display rate to the highest one, the
aggregation applies in cascade as per any basic Instance’s Indicator.
The Aggregation types Averaging Additive Minimum Maximum First and Latest
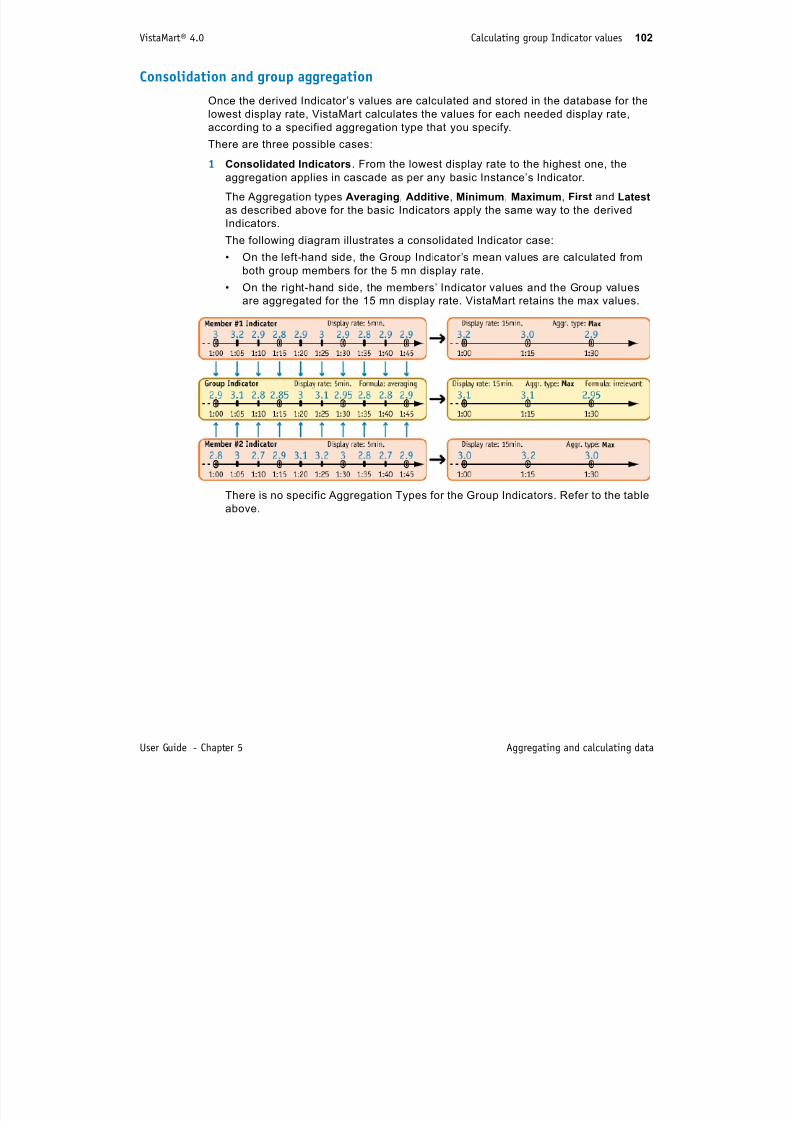
7/17/2019 VistaMart User Guide
http://slidepdf.com/reader/full/vistamart-user-guide 102/265
User Guide - Chapter 5 Aggregating and calculating data
The Aggregation types Averaging, Additive, Minimum, Maximum, First and Latest
as described above for the basic Indicators apply the same way to the derived
Indicators.
The following diagram illustrates a consolidated Indicator case:
• On the left-hand side, the Group Indicator’s mean values are calculated fromboth group members for the 5 mn display rate.
• On the right-hand side, the members’ Indicator values and the Group values
are aggregated for the 15 mn display rate. VistaMart retains the max values.
There is no specific Aggregation Types for the Group Indicators. Refer to the table
above.
VistaMart® 4.0 Calculating group Indicator values 103
2 Non-consolidated Indicators. No aggregation is applied to the Group Indicator’s
values. VistaMart applies the formula to the aggregated data samples sourced
from the members’ Indicators for each display rate.
VistaMart generates non-consolidated Indicators when you select the type
Aggregation ‘None’.
The example that follows uses the same values as above. This time, VistaMart
calculates non-consolidated Indicators. The group values for the 15 mn display
rate are calculated from the respective member’s Indicator values.
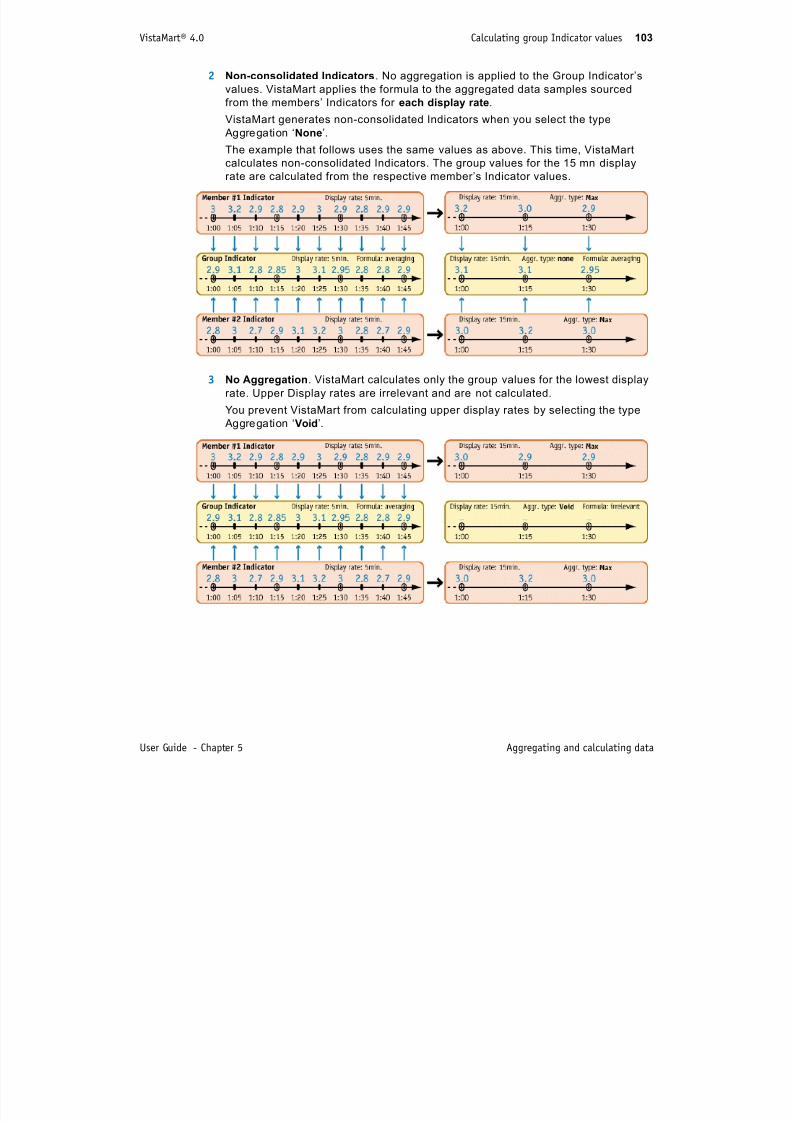
7/17/2019 VistaMart User Guide
http://slidepdf.com/reader/full/vistamart-user-guide 103/265
User Guide - Chapter 5 Aggregating and calculating data
3 No Aggregation. VistaMart calculates only the group values for the lowest display
rate. Upper Display rates are irrelevant and are not calculated.
You prevent VistaMart from calculating upper display rates by selecting the type
Aggregation ‘Void’.
VistaMart® 4.0 Calculating group Indicator values 104
Setting the group Indicator attributesThe following procedures allows you to set a new Instance Group Indicator and all its
attributes, then to define the formula and the basic Indicator it is derived from.
Set Group Indicator Attributes
1 In the Inventory Manager, select the Model View.
2 Expand the VistaMartGroup Vista. Right click the Indicator node.
3 Select New Indicator The New Wizard windows opens

7/17/2019 VistaMart User Guide
http://slidepdf.com/reader/full/vistamart-user-guide 104/265
User Guide - Chapter 5 Aggregating and calculating data
3 Select New Indicator . The New Wizard windows opens.
4 Give the new Indicator a Name and a Description.
5 Select the Aggregation type from the drop-down list.
6 If needed, check the Use Current Aggregation check box.7 From the Handle Missing drop-down list, select the alternative value you want to
substitute for the missing value when Vistamart aggregates this Indicator’s data
samples.
8 Enter the unit from the Unit box. Of course, it must be identical to the unit of the
group member’s Indicator you derive this Indicator from.
9 Click Finish. The new Indicator displays in the list and its attributes appear in the
Property sheet at the bottom of the window.
Define the formula
1 In the attributes sheet of the Indicator, click the button in the Formula box. The
New Wizard window opens.
2 Enter a description.
3 From the Formula drop-down list, select the appropriate formula.
4 Click the button in the Indicator Used box. The Indicator Selection windowappears (see below), from which you select the basic Vista then its Indicator to
take into account for your group Indicator. Click OK.
5 From the Handle Missing As drop-down list, select an alternative value you want
to use for the calculation in case the basic Indicator value is not available.
6 Click OK.
Your New Indicator description is complete.
6 Accessing Data

7/17/2019 VistaMart User Guide
http://slidepdf.com/reader/full/vistamart-user-guide 105/265
105
This section describes how to display data samples using the VistaMart Inventory
Manager.
"Overview" on page 106
"Displaying Slot data" on page 106
"Displaying Report data" on page 108
VistaMart® 4.0 Overview 106
Overview
You normally use VistaPortal to examine your data displayed in advanced reports.
However, VistaMart allows you to access and visualize collected and calculated datastored in the VistaMart database, directly from the Inventory Manager.
The data display schema is as follows:

7/17/2019 VistaMart User Guide
http://slidepdf.com/reader/full/vistamart-user-guide 106/265
User Guide - Chapter 6 Accessing Data
Displaying Slot dataYou can display Slot data for one or more Instances in the Inventory Manager.
Display Slot data in the Inventory Manager
1 In the Inventory Manager, open the Browser View.
2 Expand the Zone which contains the Instances for which you want to view Slot
data.
3 In the list of Instances for the selected Zone, right-click the required Instance(s)
and select Display Data.
The Slot Display window displays Slot samples for each Indicator associated with
this selected Instance.
VistaMart® 4.0 Overview 107
4 The Slot Display window allows you to:
• View the latest or historical data for each slot. You can view one or more Slots
by selecting them from the list and clicking Refresh.
• View details on the selected Slots such as the acquisition rate, the InfoVista
Server used to poll data and the aggregation type used.
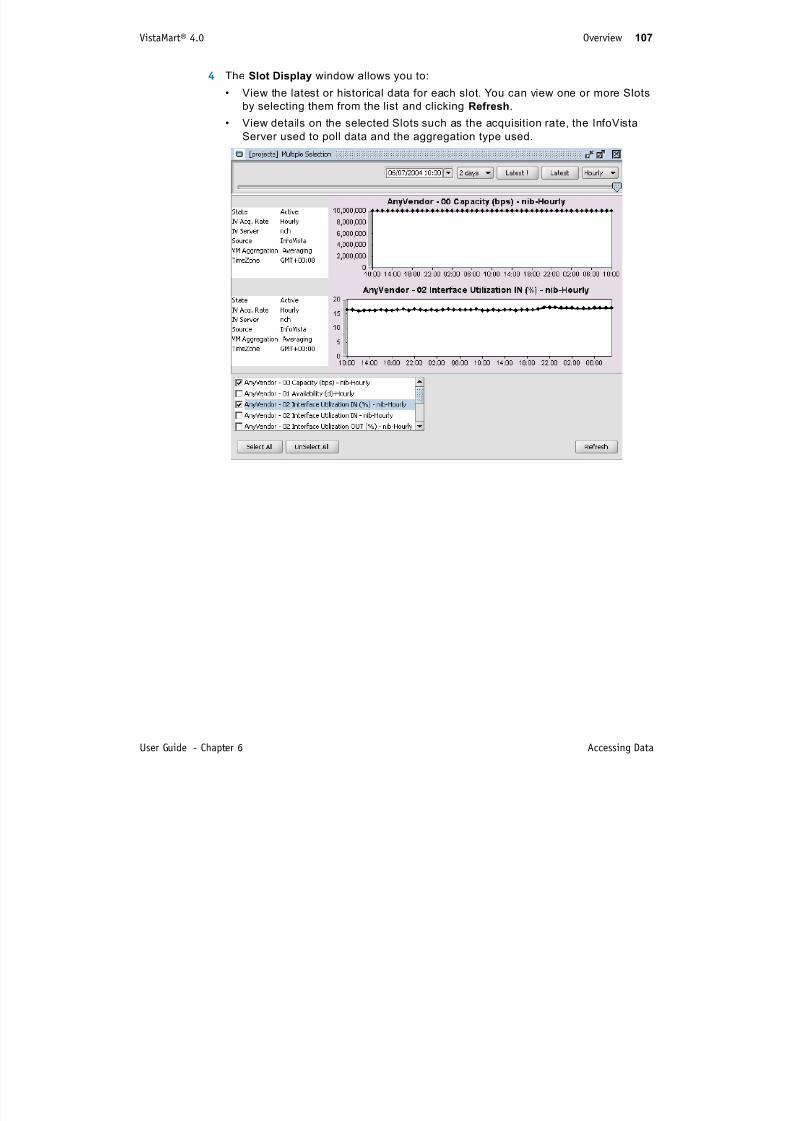
7/17/2019 VistaMart User Guide
http://slidepdf.com/reader/full/vistamart-user-guide 107/265
User Guide - Chapter 6 Accessing Data
VistaMart® 4.0 Overview 108
Displaying Report dataYou can open InfoVista reports from the Inventory Manager. Reports are viewed in the
InfoVista graphical client IVreport. To access reports, you need to have an InfoVista
client installed on the same machine as the VistaMart installation.
Display Report data in the Inventory Manager
1 In the Inventory Manager, open the Browser View.
2 Expand the Server which contains the Reports for which you want to view data.
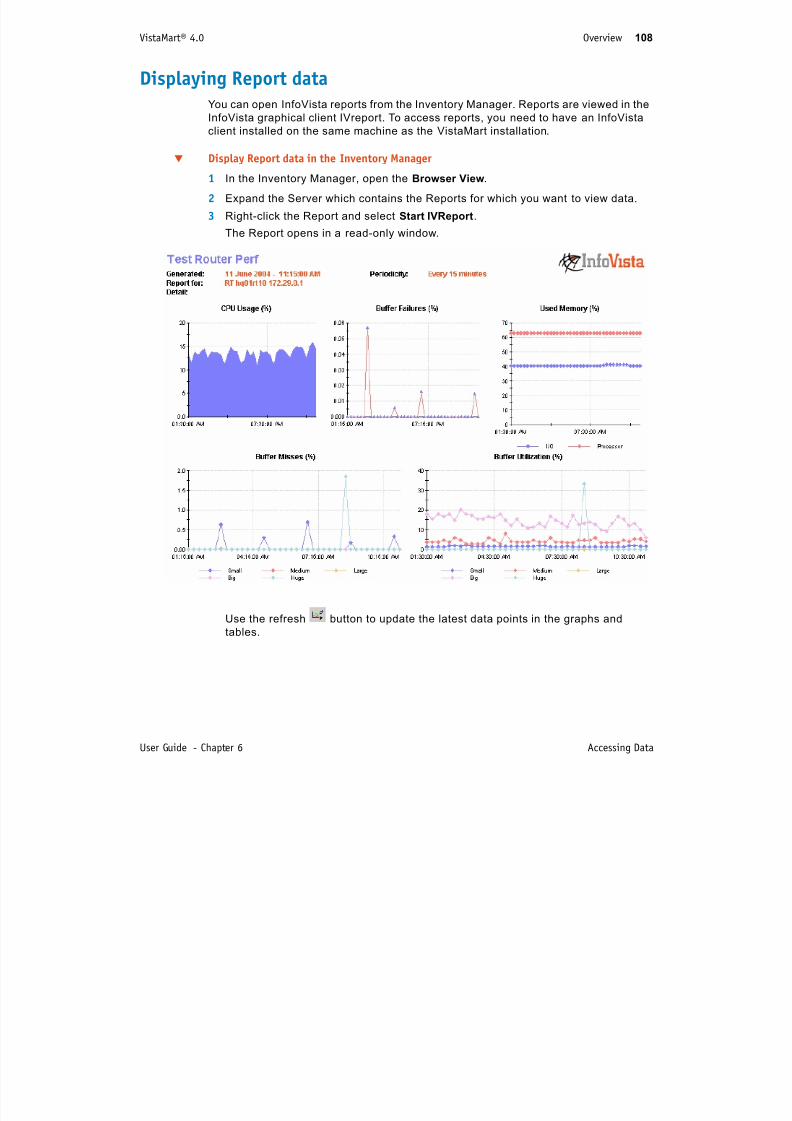
7/17/2019 VistaMart User Guide
http://slidepdf.com/reader/full/vistamart-user-guide 108/265
User Guide - Chapter 6 Accessing Data
3 Right-click the Report and select Start IVReport.
The Report opens in a read-only window.
Use the refresh button to update the latest data points in the graphs and
tables.
7 Customizing the InfoVista model for your reporting solution
7/17/2019 VistaMart User Guide
http://slidepdf.com/reader/full/vistamart-user-guide 109/265
109
This section shows you how to define the appropriate model to suit your reporting
requirements, that is, how to define the Vistas, Instances Properties and Indicators.
"Overview of the InfoVista Model" on page 110
"Defining the Model" on page 111
"Browsing the Model" on page 112 "Customizing the Model" on page 115
"Modifying VistaMart Libraries" on page 118
"Managing Libraries" on page 125
VistaMart® 4.0 Overview of the InfoVista Model 110
Overview of the InfoVista Model
The InfoVista object model is entirely managed in VistaMart. Using the VistaMart
Inventory Manager, you can do the following:
Feature Description
Define the
model
Loads your reference InfoVista VistaView Libraries, and their related
Vistas and Properties into VistaMart.
Visualize Visualizes the principal objects in the InfoVista model The VistaMart
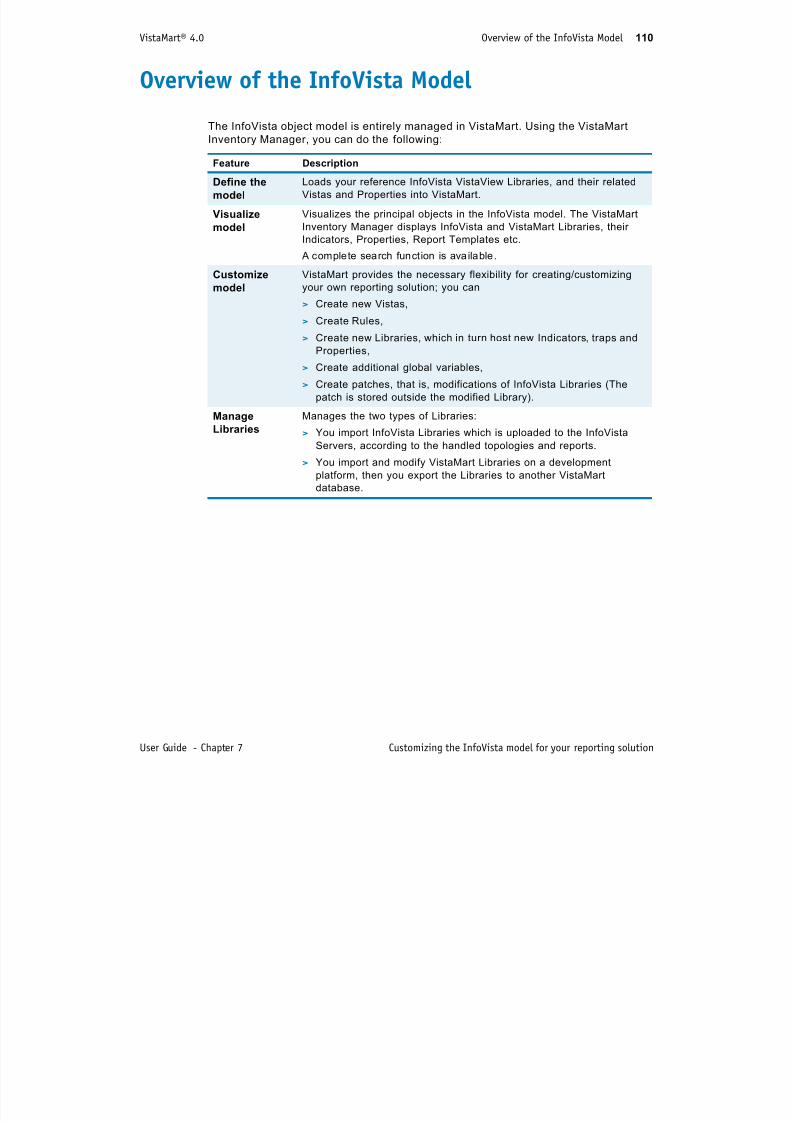
7/17/2019 VistaMart User Guide
http://slidepdf.com/reader/full/vistamart-user-guide 110/265
User Guide - Chapter 7 Customizing the InfoVista model for your reporting solution
Visualize
model
Visualizes the principal objects in the InfoVista model. The VistaMart
Inventory Manager displays InfoVista and VistaMart Libraries, their
Indicators, Properties, Report Templates etc.
A complete search function is ava ilable.Customize
model
VistaMart provides the necessary flexibility for creating/customizing
your own reporting solution; you can
> Create new Vistas,
> Create Rules,
> Create new Libraries, which in turn host new Indicators, traps and
Properties,
> Create additional global variables,
> Create patches, that is, modifications of InfoVista Libraries (The
patch is stored outside the modified Library).
Manage
Libraries
Manages the two types of Libraries:
> You import InfoVista Libraries which is uploaded to the InfoVista
Servers, according to the handled topologies and reports.
> You import and modify VistaMart Libraries on a development
platform, then you export the Libraries to another VistaMart
database.
VistaMart® 4.0 Defining the Model 111
Defining the Model
A key in it ial consideration when using the VistaMart is to define which InfoVista model
is most suitable for each configuration you want to manage.
Use the following workflow:
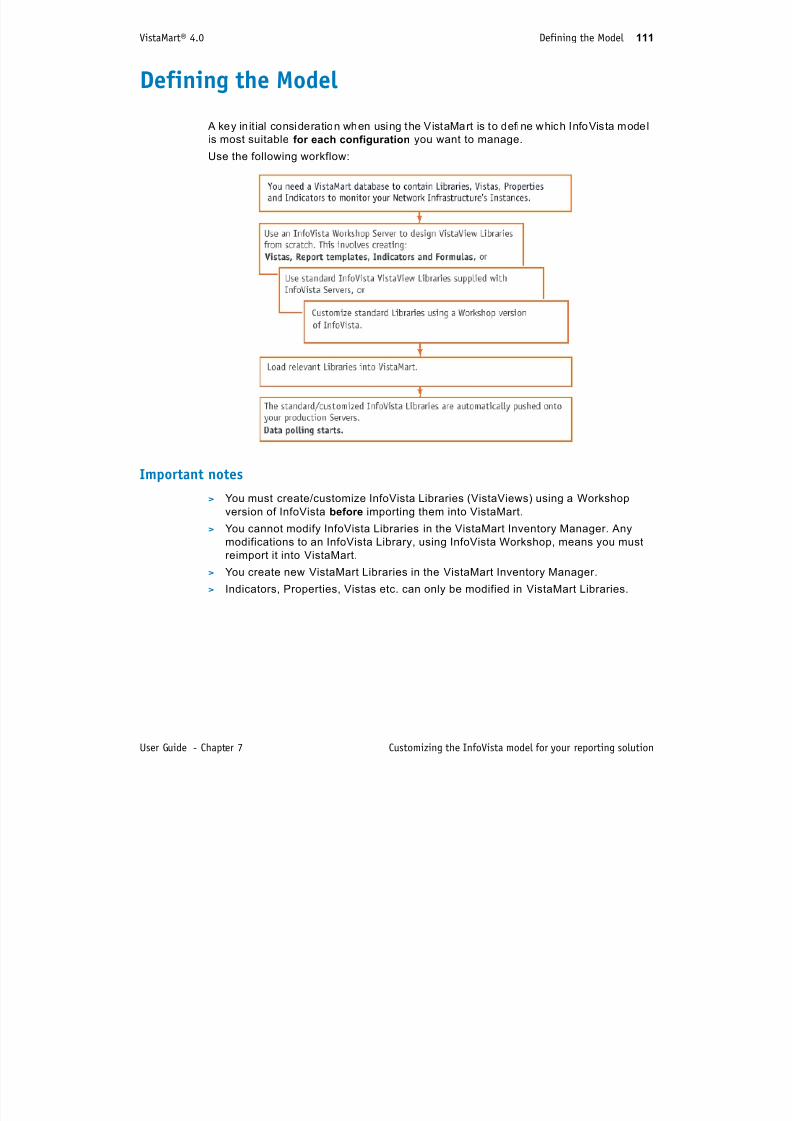
7/17/2019 VistaMart User Guide
http://slidepdf.com/reader/full/vistamart-user-guide 111/265
User Guide - Chapter 7 Customizing the InfoVista model for your reporting solution
Important notes
> You must create/customize InfoVista Libraries (VistaViews) using a Workshop
version of InfoVista before importing them into VistaMart.
> You cannot modify InfoVista Libraries in the VistaMart Inventory Manager. Any
modifications to an InfoVista Library, using InfoVista Workshop, means you must
reimport it into VistaMart.
> You create new VistaMart Libraries in the VistaMart Inventory Manager.
> Indicators, Properties, Vistas etc. can only be modified in VistaMart Libraries.
VistaMart® 4.0 Browsing the Model 112
Browsing the Model
You can visualize the following objects in the Model View:
Object Type Displays
Vistas All Ind icators, Properties and Repor t Templates associated w ith a
specific type of technology. You can customize objects associated with
Vistas if you have sufficient access rights.
InfoVista All instal led InfoVista Librar ies currently imported for this database
7/17/2019 VistaMart User Guide
http://slidepdf.com/reader/full/vistamart-user-guide 112/265
User Guide - Chapter 7 Customizing the InfoVista model for your reporting solution
"About Libraries" on page 113
"Searching the Model" on page 114
Libraries configuration.
VistaMart
Libraries
Default or customized VistaMart Libraries. The two basic VistaMart
Libraries are:> “Default” where you can create all generic VistaMart Library entities
(Indicators, Properties, Global Variables, etc.). Note that you can of
course create new VistaMart Libraries to add and customize
VistaMart Library entities.
> “Common” which contains all default Rules associated with the
Solution Model. This Library is not installed by default; you need to
import it using the Manage Libraries... feature.
Rules All standard and customized Rules are displayed in the Model View.
VistaMart® 4.0 Browsing the Model 113
About Libraries A Library represents a package of objects created by developers and grouped
according to common purposes. For example, one Library might contain objects
which model routers and another might contain objects for modeling servers.
The Library is the only object which can be imported or exported from one VistaMartdatabase to another. Therefore, to import a Vista, for example, the Vista must first be
placed in a Library and the Library then imported.
A Library (InfoVista and VistaMart) can contain the fol lowing objects:
Library object Description
7/17/2019 VistaMart User Guide
http://slidepdf.com/reader/full/vistamart-user-guide 113/265
User Guide - Chapter 7 Customizing the InfoVista model for your reporting solution
y j
Vistas A general type or category of resource, such as “IP node,” “Server,”
“Database,” etc.
Standard Vistas (Router, ATM Switch, etc.) are contained in theInfoVista Solution Model Library.
Properties Represent one “aspect” of a Vista. For example, the Vista “IP node” has
the Property “IP address.” A Property is either associated with either:
> a single value for each Instance created from the Vista, or
> multiple values.
Report
Templates
Represent the graphical layout of a report.
Standard InfoVista Libraries contain a selection of standard ReportTemplates which cover basic and advanced reporting metrics.
Report Templates are always part of an InfoVista Library and cannot be
modified in VistaMart.
Indicators Represent a measurement data sourced from the monitored resource.
They measure performance, such traffic, availability, response time, or
quality of service.
Global
Variables
(VistaMart
Libraries only)
Global variables are used for setting Rules. You may use variables
instead of setting hard coded values in Rules.
For example, if you set a Global Variable to 15 minutes in one Library,
all Rules using this Library take the value. You do not have to change
each individual Rule if this value changes.
Rules Using Rules, you can automatically set Instance Properties, assign
members to groups and manage Instance reports and slots according to
various parameters.
VistaMart® 4.0 Browsing the Model 114
Searching the ModelIn a database containing several thousand Instances, it is important to be able to
locate specific objects with powerful integrated search tools.
You use the Inventory Manager to search the model for: Vistas, Report Templates,
Indicators, Properties, Rules and Global Variables.
EXAMPLE OF A QUERY In this example, we want to locate a Property which handles
SNMP v3 authentication. We know the Property has v3 in its name and also that it is
part of the InfoVista Core Library. Proceed as follows:
Query the Model (example)
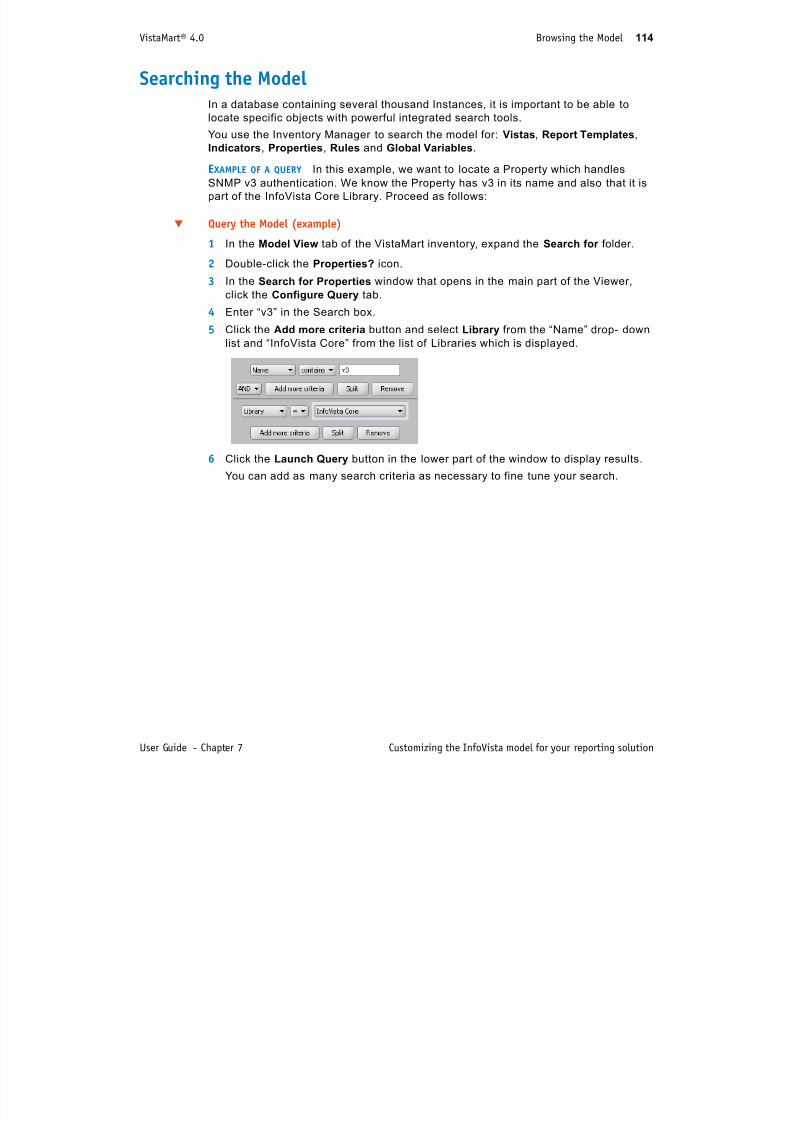
7/17/2019 VistaMart User Guide
http://slidepdf.com/reader/full/vistamart-user-guide 114/265
User Guide - Chapter 7 Customizing the InfoVista model for your reporting solution
Query the Model (example)
1 In the Model View tab of the VistaMart inventory, expand the Search for folder.
2 Double-click the Properties? icon.
3 In the Search for Properties window that opens in the main part of the Viewer,
click the Configure Query tab.
4 Enter “v3” in the Search box.
5 Click the Add more criteria button and select Library from the “Name” drop- down
list and “InfoVista Core” from the list of Libraries which is displayed.
6 Click the Launch Query button in the lower part of the window to display results.
You can add as many search criteria as necessary to fine tune your search.
VistaMart® 4.0 Customizing the Model 115
Customizing the Model
You can extensively customize the model with the Inventory Manager. All
modifications and creations are automatically performed in a VistaMart Library. You
cannot create or modify objects which are part of InfoVista Libraries.
See:
"New Object Wizards" on page 115
NOTE You must have at least read/write/delete access rights to customize objects.

7/17/2019 VistaMart User Guide
http://slidepdf.com/reader/full/vistamart-user-guide 115/265
User Guide - Chapter 7 Customizing the InfoVista model for your reporting solution
"Creating a Vista" on page 116
"Creating a VistaMart Library" on page 117
"Creating Rules" on page 117
OverviewYou add entities with the help of built-in wizards. Existing or customized entities can
be deleted or modified as required.
You can create entities with identical names. Each new entity is given a unique
identifier (WID). However, when you create entities manually, we recommend that you
vary your naming pattern for future ease of use.
Remember that:
> you can only create/delete/modify entities in VistaMart Libraries.
> other InfoVista entities used to create VistaViews (Formulas, Metrics, Graph
Templates) are not part of the VistaMart Inventory.
New Object WizardsWhen defining your model configuration, you might need to modify or delete existing
objects or create new ones. You can do this on:
> An individual level. For example, when you create a new CMTS Indicator in a
VistaMart Library,> A Library level. For example, when you modify a Property in the VistaMart
Common Library which can change, using dependencies, this Property in all
related Libraries.
Create new entities with in-built wizards. Access the wizards by r ight-clicking the
entity you want to create.
NOTE All new entities (Vistas, Properties, Indicators, Global Variables and Rules)
are created in a VistaMart Library (“default” unless stated otherwise).
NOTE Entities created using InfoVista Libraries are added to a VistaMart Library
(Default unless stated otherwise).
VistaMart® 4.0 Customizing the Model 116
Creating a VistaEach Vista you create is automatically integrated into a VistaMart Library. Logically,
when you create a Vista for a specific network resource, this Vista is associated with
the Resource Vista which is in turn associated with the Common Vista (see “The
InfoVista Solution Model” for details).You might need to create a new Vista to incorporate objects relative to VistaBridge or
Vista Watch data. The new Vista allows you to add Indicators to define reporting and
slot measurements and Properties to define grouping criteria.
Create a Vista

7/17/2019 VistaMart User Guide
http://slidepdf.com/reader/full/vistamart-user-guide 116/265
User Guide - Chapter 7 Customizing the InfoVista model for your reporting solution
1 In the Inventory Manager, click the Model View tab.
2Right-click the Vista icon and select New Vista.
3 Enter the following attributes in the New Vista Property sheet.
All underlined attributes, flagged with a ‘*’ in this list, are mandatory.
4 Specify the new Vista inheritance and click ‘Next’, then ‘Finish’.
Attribute Description
Name* Any unique name (str ing max 255 characters).
Kind* Basic, Proxy or Group.
Description A textual description (string max 2048 characters).Library* The Library associated with the Vista object. Note that this Library
can only be a VistaMart Library.
VistaMart® 4.0 Customizing the Model 117
Creating a VistaMart LibraryYou use the Inventory Manager to create VistaMart Libraries and enter the
identification attributes.
Create a VistaMart Library1 In the Inventory Manager, click the Model View tab.
2 Right-click VistaMart Libraries and select New Library.
3 In the Wizard, enter the following parameters as required.
All underlined attributes, flagged with a ‘*’ in this list, are mandatory.
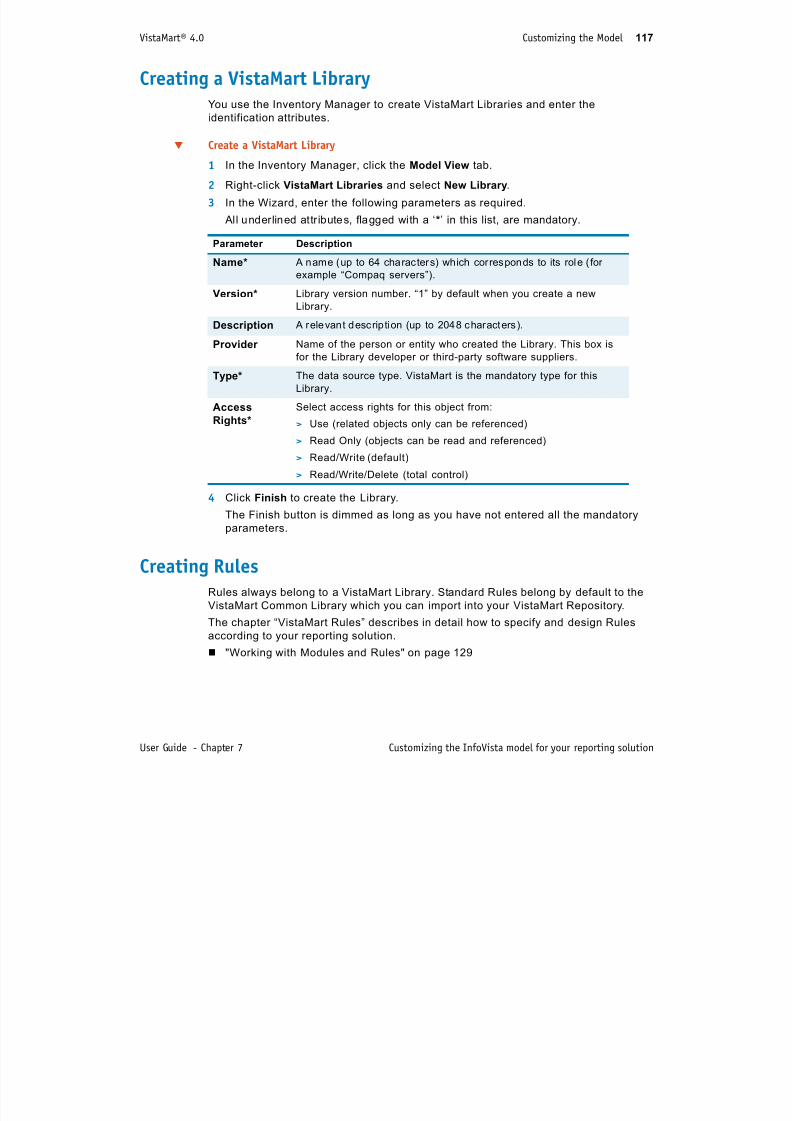
7/17/2019 VistaMart User Guide
http://slidepdf.com/reader/full/vistamart-user-guide 117/265
User Guide - Chapter 7 Customizing the InfoVista model for your reporting solution
4 Click Finish to create the Library.
The Finish button is dimmed as long as you have not entered all the mandatory
parameters.
Creating RulesRules always belong to a VistaMart Library. Standard Rules belong by default to the
VistaMart Common Library which you can import into your VistaMart Repository.
The chapter “VistaMart Rules” describes in detail how to specify and design Rules
according to your reporting solution.
"Working with Modules and Rules" on page 129
Parameter Description
Name* A name (up to 64 characters) which corresponds to its role ( forexample “Compaq servers”).
Version* Library version number. “1” by default when you create a new
Library.
Description A relevant description (up to 2048 characters).
Provider Name of the person or entity who created the Library. This box is
for the Library developer or third-party software suppliers.
Type* The data source type. VistaMart is the mandatory type for thisLibrary.
Access
Rights*
Select access rights for this object from:
> Use (related objects only can be referenced)
> Read Only (objects can be read and referenced)
> Read/Write (default)
> Read/Write/Delete (total control)
VistaMart® 4.0 Modifying VistaMart Libraries 118
Modifying VistaMart Libraries
If you have read/write access rights, you can modify all the Library identification
attributes except for the Type parameter which is not user dependent.
In addition to these attributes, you can set the following:
Parameter Description
State
(View only)
Shows the Library State which can be “active” or “deleted.” If you
delete a VistaMart Library, it continues to exist in the VistaMart
Repository (see the Recycle Bin).
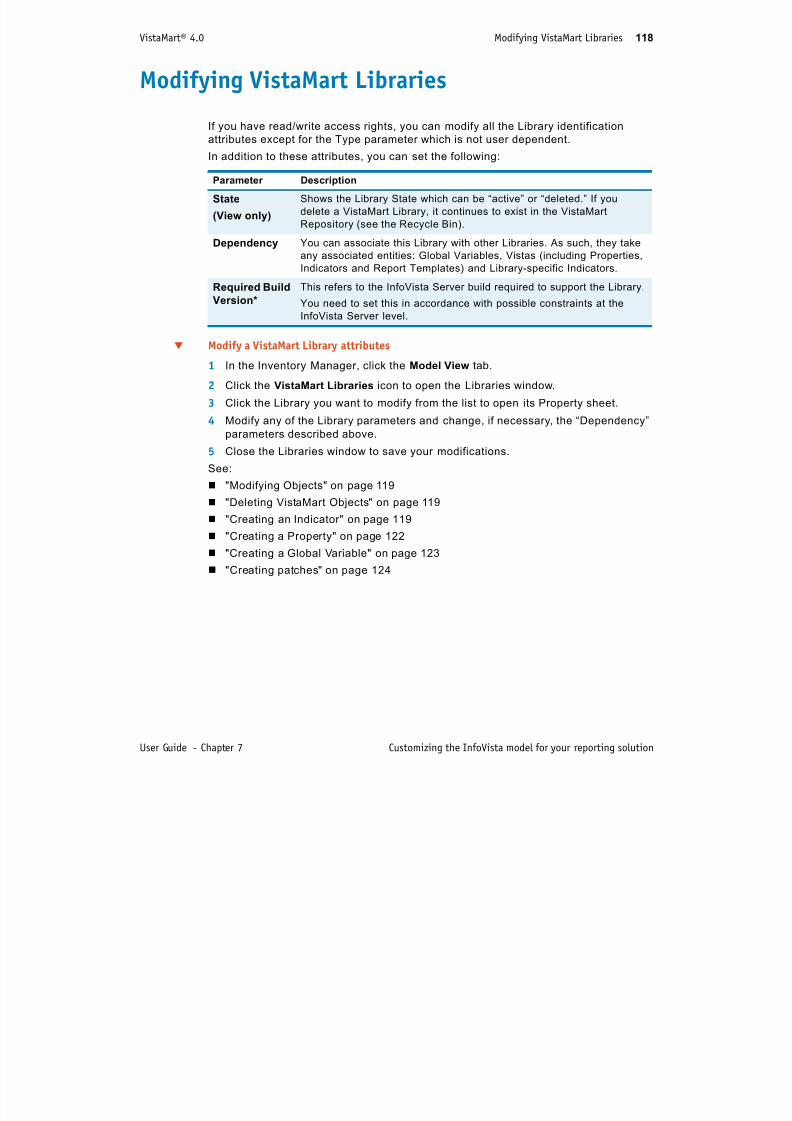
7/17/2019 VistaMart User Guide
http://slidepdf.com/reader/full/vistamart-user-guide 118/265
User Guide - Chapter 7 Customizing the InfoVista model for your reporting solution
Modify a VistaMart Library attributes
1 In the Inventory Manager, click the Model View tab.
2 Click the VistaMart Libraries icon to open the Libraries window.
3 Click the Library you want to modify from the list to open its Property sheet.
4 Modify any of the Library parameters and change, if necessary, the “Dependency”
parameters described above.
5 Close the Libraries window to save your modifications.
See:
"Modifying Objects" on page 119 "Deleting VistaMart Objects" on page 119
"Creating an Indicator" on page 119
"Creating a Property" on page 122
"Creating a Global Variable" on page 123
"Creating patches" on page 124
Dependency You can associate this Library with other Libraries. As such, they take
any associated entities: Global Variables, Vistas (including Properties,
Indicators and Report Templates) and Library-specific Indicators.
Required Build
Version*
This refers to the InfoVista Server build required to support the Library.
You need to set this in accordance with possible constraints at the
InfoVista Server level.
VistaMart® 4.0 Modifying VistaMart Libraries 119
Modifying ObjectsYou can modify most of the VistaMart Library objects provided that you have read/
write rights. As a general Rule, any attribute which cannot be modified is dimmed in
the Object Property sheet, which means the attribute is locked.
Proceed as follows to modify objects
1 From the Model View, click the object in the object tree. Its Property sheet opens
in the main part of the window.
2 Modify any attribute which is not locked by the system.
7/17/2019 VistaMart User Guide
http://slidepdf.com/reader/full/vistamart-user-guide 119/265
User Guide - Chapter 7 Customizing the InfoVista model for your reporting solution
Deleting VistaMart ObjectsYou can, with sufficient user rights, delete entities in your VistaMart Libraries. Note
that you cannot delete InfoVista Server Library entities.
Delete objects
1 Select the entity in the VistaMart object Tree.
2 Right click the entity and select Delete.
The object is sent to the relevant container in the Recycle Bin. To remove the
Library entity completely from the VistaMart database, you must perform a purge.
Creating an Indicator Most Indicators are created using InfoVista Server Libraries. All Operators and
Formulas used to construct your Indicators can only be created and modified on an
InfoVista Server (using IVReport, the InfoVista graphical user interface).
The Indicators created in VistaMart could be intended, for example, to model non-
polled devices managed by VistaBridge. New Indicators can also be used as Display
Indicators in VistaPortal (for details, see “Understanding Data Indicators and Display
Indicators” on page 125).
Create an Indicator
1 In the Inventory Manager, click the Model View tab.
2 Expand the Vista where you want to create the Indicator, right click the Indicator
icon and select New Indicator .
3 Enter the following attributes in the New Indicator Property sheet.
All underlined attributes, flagged with a ‘*’ in this list, are mandatory.
WARNING If the object has any related child objects (that is, a Library withmanually-created Properties), you must delete the child objects first.
VistaMart® 4.0 Modifying VistaMart Libraries 120
Attribute Description
Name* Any unique name (string max. 255 characters) .
Vista* The Vista associated with the Indicator.
Description A textual descrip tion (str ing max. 2048 characters).Unit The text to display on the axis of graphs using this Indicator. For
example “%” or “Megabytes.”
Type* Type of data this Indicator returns data on (float, integer etc.).
This attribute cannot be modified after the object is created.
Aggregation Defines what method is used to aggregate data.
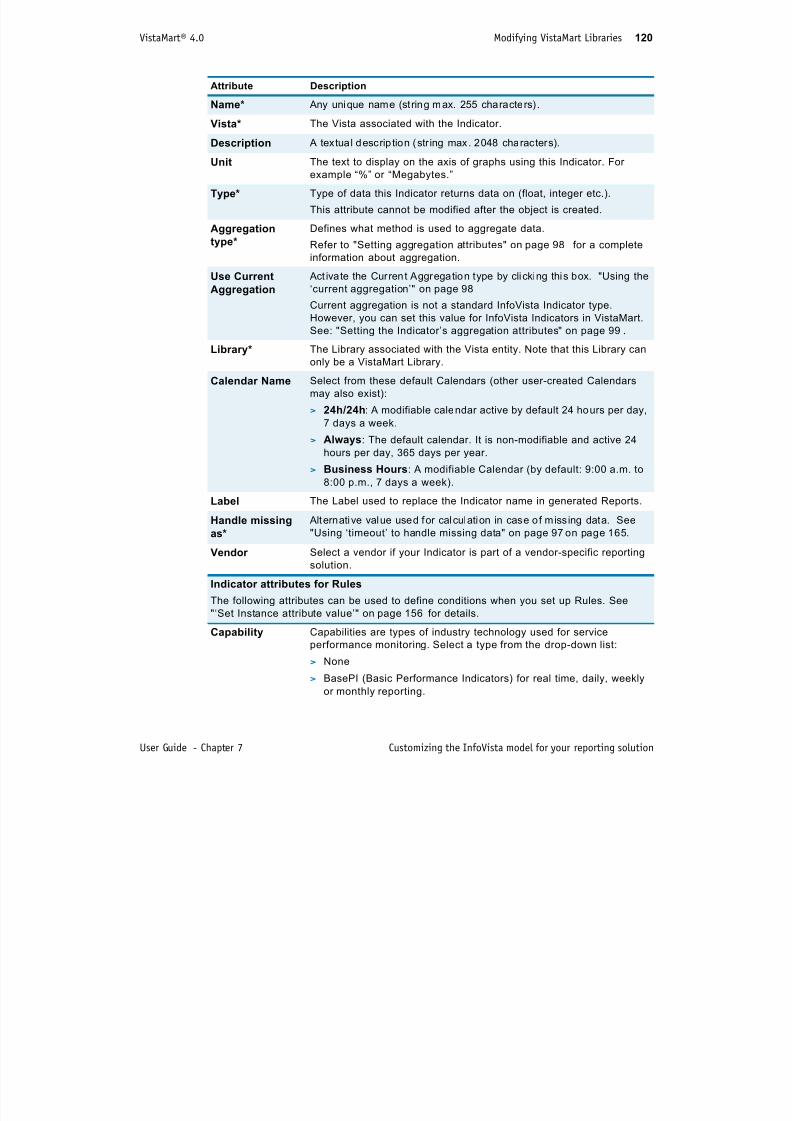
7/17/2019 VistaMart User Guide
http://slidepdf.com/reader/full/vistamart-user-guide 120/265
User Guide - Chapter 7 Customizing the InfoVista model for your reporting solution
type* Refer to "Setting aggregation attributes" on page 98 for a complete
information about aggregation.Use Current
Aggregation
Act ivate the Current Aggregation type by clicking this box. "Using the
‘current aggregation’" on page 98
Current aggregation is not a standard InfoVista Indicator type.
However, you can set this value for InfoVista Indicators in VistaMart.
See: "Setting the Indicator’s aggregation attributes" on page 99.
Library* The Library associated with the Vista entity. Note that this Library can
only be a VistaMart Library.
Calendar Name Select from these default Calendars (other user-created Calendars
may also exist):
> 24h/24h: A modifiable calendar active by default 24 hours per day,
7 days a week.
> Always: The default calendar. It is non-modifiable and active 24
hours per day, 365 days per year.
> Business Hours: A modifiable Calendar (by default: 9:00 a.m. to
8:00 p.m., 7 days a week).
Label The Label used to replace the Indicator name in generated Reports.
Handle missing
as*
Alternative value used for calculation in case o f missing data. See
"Using ‘timeout’ to handle missing data" on page 97on page 165.
Vendor Select a vendor if your Indicator is part of a vendor-specific reporting
solution.
Indicator attributes for Rules
The following attributes can be used to define conditions when you set up Rules. See"‘Set Instance attribute value’" on page 156 for details.
Capability Capabilities are types of industry technology used for service
performance monitoring. Select a type from the drop-down list:
> None
> BasePI (Basic Performance Indicators) for real time, daily, weekly
or monthly reporting.
VistaMart® 4.0 Modifying VistaMart Libraries 121
User box Any other informat ion you want to inc lude for this Indicator (512
characters max.).
Solution Enter a Solution type from the drop-down list (by default).
> None> IP telephony (VistaInsight for IP Telephony)
> Operation Center (troubleshooting solutions)
> Service Manager
> VIA (VistaInsight for Applications)
> VIN (VistaInsight for Networks)
Attribute Description
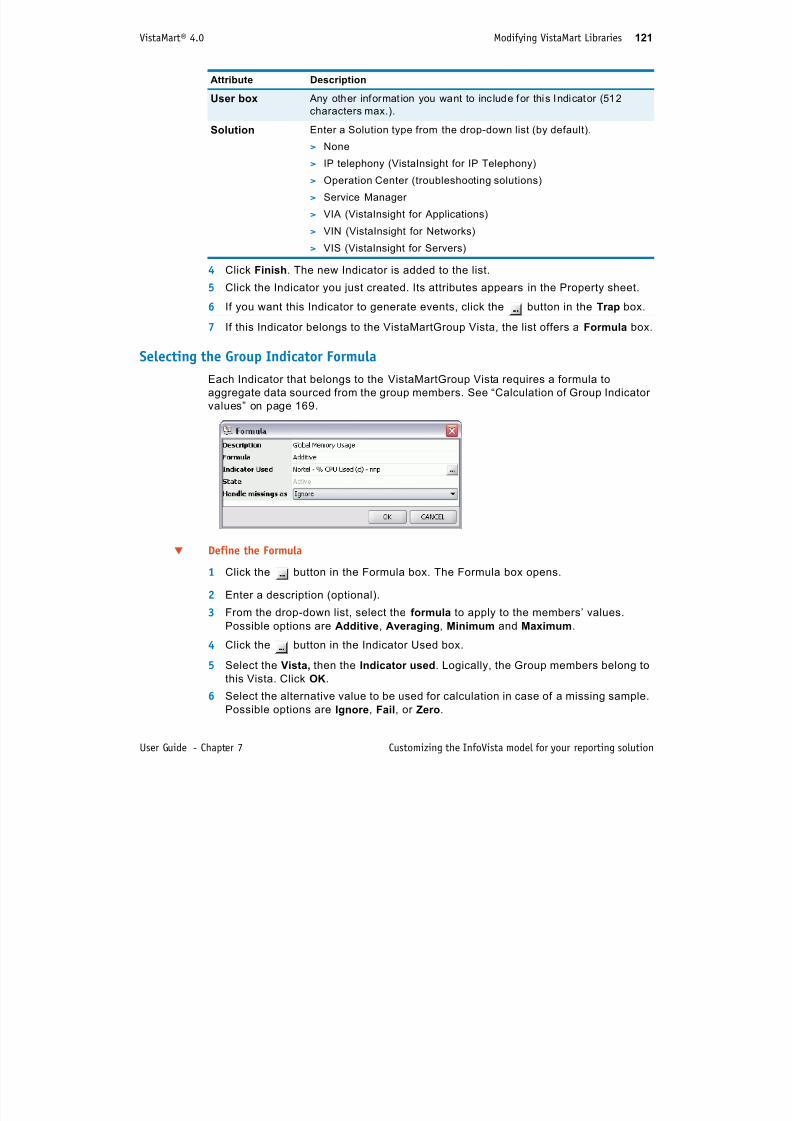
7/17/2019 VistaMart User Guide
http://slidepdf.com/reader/full/vistamart-user-guide 121/265
User Guide - Chapter 7 Customizing the InfoVista model for your reporting solution
4 Click Finish. The new Indicator is added to the list.
5 Click the Indicator you just created. Its attributes appears in the Property sheet.
6 If you want this Indicator to generate events, click the button in the Trap box.
7 If this Indicator belongs to the VistaMartGroup Vista, the list offers a Formula box.
Selecting the Group Indicator Formula
Each Indicator that belongs to the VistaMartGroup Vista requires a formula toaggregate data sourced from the group members. See “Calculation of Group Indicator
values” on page 169.
Define the Formula
1 Click the button in the Formula box. The Formula box opens.
2 Enter a description (optional).
3 From the drop-down list, select the formula to apply to the members’ values.
Possible options are Additive, Averaging, Minimum and Maximum.
4 Click the button in the Indicator Used box.
5 Select the Vista, then the Indicator used. Logically, the Group members belong to
this Vista. Click OK.
6 Select the alternative value to be used for calculation in case of a missing sample.
Possible options are Ignore, Fail, or Zero.
> VIS (VistaInsight for Servers)
VistaMart® 4.0 Modifying VistaMart Libraries 122
Creating a Property
Create a Property
1 In the Inventory Manager, click the Model View tab.
2 Expand the Vista where you want to create the Property, right click the Propertiesicon and select New Property.
3 Enter the following attributes in the New Property sheet.
(All attributes flagged with ‘*’ are mandatory).
Attribute Description
N * A i ( t i 255 h t )
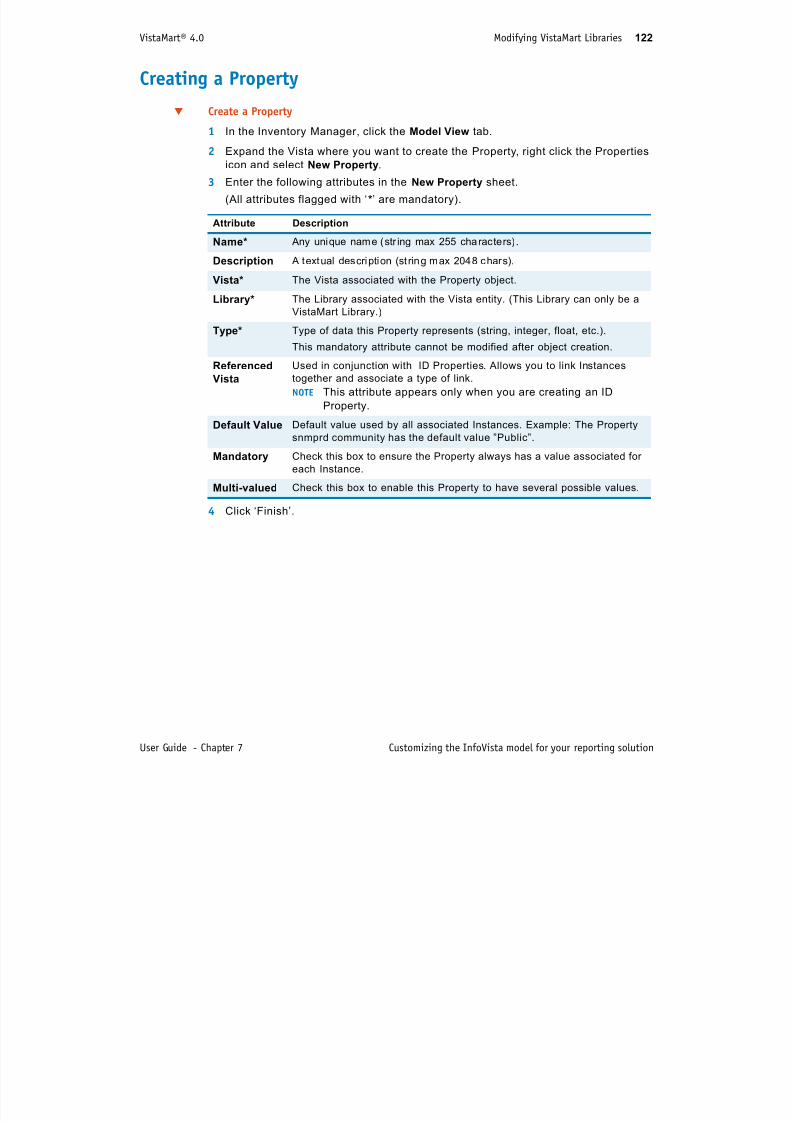
7/17/2019 VistaMart User Guide
http://slidepdf.com/reader/full/vistamart-user-guide 122/265
User Guide - Chapter 7 Customizing the InfoVista model for your reporting solution
4 Click ‘Finish’.
Name* Any unique name (str ing max 255 characters) .
Description A textual description (st ring max 2048 chars).
Vista* The Vista associated with the Property object.
Library* The Library associated with the Vista entity. (This Library can only be a
VistaMart Library.)
Type* Type of data this Property represents (string, integer, float, etc.).
This mandatory attribute cannot be modified after object creation.
Referenced
Vista
Used in conjunction with ID Properties. Allows you to link Instances
together and associate a type of link.NOTE This attribute appears only when you are creating an ID
Property.
Default Value Default value used by all associated Instances. Example: The Property
snmprd community has the default value ”Public”.
Mandatory Check this box to ensure the Property always has a value associated for
each Instance.
Multi-valued Check this box to enable this Property to have several possible values.
VistaMart® 4.0 Modifying VistaMart Libraries 123
Single value vs. multi-valued Properties
Most Properties take one value which is used by default by all associated Instances.
The Property can be modified at Instance level.
If you want the Property (and not an associated Instance/Property Value pair) to take
more than one value, you must define a multi-value Property attribute.
EXAMPLE “Ping Availability Very Poor” in the InfoVista Problem Resolution Library
takes the value “50%”. If, for one or more Instances, you want to modifythis value, you can do so at Property Value level.
EXAMPLE “Capabilities” in the InfoVista Solution Model Library is a multi-valued
Property: Cisco router may have several “capabilities” (e.g. Cisco Router

7/17/2019 VistaMart User Guide
http://slidepdf.com/reader/full/vistamart-user-guide 123/265
User Guide - Chapter 7 Customizing the InfoVista model for your reporting solution
Creating a Global Variable A Global Variable def ines a value which, when modified, changes a ll attributes which
have this value.
An example of Global Variable is a minimum report display rate. I f you set this value
to 15 minutes as a Global Variable in one Library, all Rules using this variable set the
report display rate accordingly and you do not have to change each Rule individually
if this value changes.
Set a Global Variable for any attribute/Property you want to change across your entire
reporting solution.
Create a Global Variable
1 In the Inventory Manager, click the Model View tab and expand the VistaMart
Library node.
2 Select the VistaMart library where you want to create the new Global Variable andexpand this node.
3 Right-click ‘Global Variables’ and select New Global Variable. A property sheet
opens.
4 Enter the following attributes:
All underlined attributes flagged with ‘ *’ in this lis t are mandatory.
Details, Cisco SAA, etc.).
Attribute Description
Name* Any unique name (str ing max 255 characters).
Description A textual description (st ring max 2048 characters).
Library* The Library associated with the Global Variable object (this Library can
only be a VistaMart Library).
VistaMart® 4.0 Modifying VistaMart Libraries 124
5 Click Finish.
Creating patches As a general Rule, you cannot modify InfoVista Library objects. However, consider the
following exceptions:
F th I di t
Type* String by default.
Value A s tring or integer defining the Globa l Var iable (fo r example : the display
rate).
Attribute Description
7/17/2019 VistaMart User Guide
http://slidepdf.com/reader/full/vistamart-user-guide 124/265
User Guide - Chapter 7 Customizing the InfoVista model for your reporting solution
> For the Indicators, you can:
• Adjust the Current Aggregation Attribute and set the Aggregation Type,• Define a User box. The user box gives you additional flexibility for filtering
Indicators in the Rules’ conditions.
> For the report templates, you can:
• Modify the User box. The user box gives you additional flexibility for filtering
Indicators in the Rules’ conditions.
• Modify the report lifetime once it is instantiated, at the Rules level.
By default, the modified parameters are stored as external patches in the defaultVistaMart Library. Afterwards, it is recommended to move the patches to your Library
where you can manage customized parameters.
VistaMart® 4.0 Managing Libraries 125
Managing Libraries
This section explains how to handle the Libraries from your Inventory Manager
(Import, Export and Deletion).
Importing InfoVista LibrariesYou can import standard or customized InfoVista Libraries into VistaMart, provided
that they are version 6.0 or higher.
Import InfoVista Libraries
7/17/2019 VistaMart User Guide
http://slidepdf.com/reader/full/vistamart-user-guide 125/265
User Guide - Chapter 7 Customizing the InfoVista model for your reporting solution
Import InfoVista Libraries
1 In the Inventory Manager, select File/Manage Libraries.... The LibraryManagement window opens.
2 Click the open folder button to browse for the directory or ZIP file where the
VistaView Libraries are located.
3 Select the VistaView ZIP file and click OK.
Libraries are uploaded into the VistaMart Repository. You can see them listed in
the Library Management window.
4 Select the Libraries you want to use for reporting purposes. You can import all the
Libraries which display in bold.
5 Click the Import Libraries button .
6 Close the Library Management window and check that the Libraries are imported
correctly in the Model View.
VistaMart® 4.0 Managing Libraries 126
Exporting InfoVista LibrariesYou can make standard or customized InfoVista Libraries available to other users or
store them for backup purposes.
Export InfoVista Libraries1 In the Inventory Manager, click the Model View tab.
2 Right-click the InfoVista Library you want to export and select Export Library....
3 Select a destination folder for the Library file and click Export.
Deleting InfoVista Libraries
7/17/2019 VistaMart User Guide
http://slidepdf.com/reader/full/vistamart-user-guide 126/265
User Guide - Chapter 7 Customizing the InfoVista model for your reporting solution
Deleting InfoVista Libraries
You can delete any InfoVista Library from your VistaMart database at any time. If theLibrary you want to delete has dependent Libraries, they are also deleted from the
database.
Delete InfoVista Libraries
1 In the Inventory Manager, select File/Manage Libraries... to open the Library
Management window.
2 Select the InfoVista Libraries) you want to delete and click the button. If
related Libraries exist, they too is deleted. These Libraries are listed in an
information window.
3 In the confirmation window, click Go on, please to delete the Libraries) or No,
thanks to cancel the operation.
VistaMart® 4.0 Managing Libraries 127
Importing VistaMart LibrariesYou can import standard or customized VistaMart Libraries into VistaMart.
Import VistaMart Libraries
1 In the Inventory Manager, select File/Manage Libraries.... The LibraryManagement window opens.
2 Click the open folder button to browse for the directory or ZIP file where the
VistaView Libraries are located.
3 Select the ZIP file and click OK.
Libraries are uploaded into the VistaMart Repository. You can see them l isted in

7/17/2019 VistaMart User Guide
http://slidepdf.com/reader/full/vistamart-user-guide 127/265
User Guide - Chapter 7 Customizing the InfoVista model for your reporting solution
p p y
the Library Management window.
4 Select the Libraries you want to use for reporting purposes. You can import all the
Libraries which display in bold.
5 Click the Import Libraries button .
6 Close the Library Management window and check that the Libraries are imported
correctly in the Model View.
Exporting VistaMart LibrariesYou can export any VistaMart Library to a file of your choice. This is useful if you want
to use an identical feature (e.g. identical Rules) with another VistaMart Repository.
Export VistaMart Libraries (1)
1 In the Inventory Manager, select File/Manage Libraries....
2 Select the VistaMart Library you want to export and click the button.
3 Select a destination folder for the Library file and click Export.
Export VistaMart Libraries (2)
Alternatively, you can export VistaMart Libraries from the Inventory Manager.
1 In the Inventory Manager, click the Model View tab.
2 Click the VistaMart Libraries icon to open the Libraries window.3 Right-click the VistaMart Library you want to export and select Export Library....
4 Select a destination folder and click Export.
VistaMart® 4.0 Managing Libraries 128
Deleting VistaMart LibrariesYou can delete a VistaMart Library as long as it does not have any related Instances.
Delete VistaMart Libraries
1 In the Inventory Manager, select File/Manage Libraries... to open the LibraryManagement window.
2 Select the Libraries to delete and click the button.
3 In the confirmation window, click Go on, please to delete the Libraries) or No,
thanks to cancel the operation.

7/17/2019 VistaMart User Guide
http://slidepdf.com/reader/full/vistamart-user-guide 128/265
User Guide - Chapter 7 Customizing the InfoVista model for your reporting solution
8 Working with Modules and Rules

7/17/2019 VistaMart User Guide
http://slidepdf.com/reader/full/vistamart-user-guide 129/265
129
VistaMart Rules provide you with an effective means to generate Reports and startSlots for Instances according to their requirements.
Modules take Rules one level beyond by encompassing a set of Rules -- acting in
effect as a container of Rules. The objective of the Module function, among others, is
to facilitate the customization and evolution of InfoVista solutions by attaching the
Modules to a VistaMart Library, rather than to the Libraries packaged within the
solution itself.
To understand how Modules function, it is first necessary to understanding how Rules
work in general:
’About Rules’ (p. 130)
’Making Rules’ (p. 133)
’Examining conditions in detail’ (p. 138)
’Getting into actions’ (p. 149)
’Working with Rules’ (p. 167)
’Putting Rules inside Modules’ (p. 170)
VistaMart® 4.0 About Rules 130
About Rules
A Rule is an object in the InfoVista Model. I t defines the fi ltering criteria for a reporting
solution by determining for as many related Instances as possible, the actions that
VistaMart performs and the type of reporting you want your solution to display.
Several Rules can apply to one Instance. For example, a server Instance can have
related reports based on Rules for ’Generic Servers’ and ’Sun Servers’.
VistaMart stores the Rules in its Libraries You edit them using a Rule Editor in the
EXAMPLE A Rule can state that VistaMart start reports using the minimum display
rate for all Compaq Servers Instances which do not have the Property
Value ’Capabilities/HostResources’.

7/17/2019 VistaMart User Guide
http://slidepdf.com/reader/full/vistamart-user-guide 130/265
User Guide - Chapter 8 Working with Modules and Rules
VistaMart stores the Rules in its Libraries. You edit them using a Rule Editor in the
Inventory Manager, where you define the conditions and actions for each Rule.
A Library can contain several Rules which VistaMart executes based on a user-
defined priority value.
’Setting conditions and actions’ (p. 130)
’Example of a Rule’ (p. 132)
Setting conditions and actionsRules require two essential components: conditions and actions:
CONDITION is a prerequisite that must be present in order for an event to occur. In this
case, VistaMart checks each Instance for the fulfillment of the condition before it
executes a Rule.For example, you can instruct VistaMart to ’Start a Report’ if the ’Region’ Property of
the Instance equals ’Europe.’
Conditions enable you to define which Instances to select based on:
WARNING Each Rule can make comprehensive modifications to several thousand
Instances. Therefore, use them with caution. InfoVista recommends that
you use the default Rules that come with the InfoVista Common Library
and those tested with InfoVista solutions. If you create your own Rules,
test them thoroughly prior to application in a production environment.
> Vistas > Property Values
> Proxy Instances > Vendor and Capabilities
VistaMart® 4.0 About Rules 131
ACTIONS determines what to do when the conditions meet the criteria. This means
that VistaMart only executes the action(s) if the Instance Properties match the
condition(s), i.e. VistaMart starts reports on all Instances located in Paris and Madrid,
but not those in New York.
Actions enable you to:
> make modifications to Attributes, Property Values, Vistas, Locations, etc.> choose the Report Templates to apply to all Instances matching the conditions.
> start Slots for Instance/Indicator pairs for all Instances matching the conditions.
Executing RulesVistaMart attempts to apply Rules to each Zone until it finds an Instance that matches
7/17/2019 VistaMart User Guide
http://slidepdf.com/reader/full/vistamart-user-guide 131/265
User Guide - Chapter 8 Working with Modules and Rules
the conditions for that Rule.For each Instance that matches the conditions, VistaMart starts related Slots and
reports defined in the Rule, starting with:
> the Slot with the smallest display rate, then
> the Slot with the smallest Acquisition Rate
PRIORITY VistaMart executes Rules by order of priority: first by alphabetical order andthen numerical. The highest numerical priority value has the highest execution
priority.
QUALIFIER ATTRIBUTE When two Rules have the same priority, VistaMart executes them
according to a Qualifier Attribute which separates Rules alphanumerically.
If two separate Rules create the same Report, VistaMart executes the second Rule
and creates the Properties which this Rule specifies (e.g.Timezone, display rate, etc.)
See:
’Determining Rule priority for execution’ (p. 134)
’Example of a Rule’ (p. 132)
NOTE If the Rule does not find related Report Template/Indicators, it cannot start
Reports or Slots.
EXAMPLE In the case with two standard server Rules, ’Cisco1’ and ’Cisco2’, with
priority 150, the former takes priority.
VistaMart® 4.0 About Rules 132
Example of a Rule
The following is an example of the Rule template used to define reporting on
Microsoft Servers.
EXAMPLE Conditions: Select all Server Instances whose Capabilities Property
is’MicrosoftNT4’, and exclude the cases where the Propertyis’CompaqMib’ or ’HostResources’.
Actions: Select the Report Templates whose capability is set to
’ServerBasic’ and Vendor is set to ’Microsoft’. Start Reports with a
frequency value as set in the global variable Minimum display rate Vis.
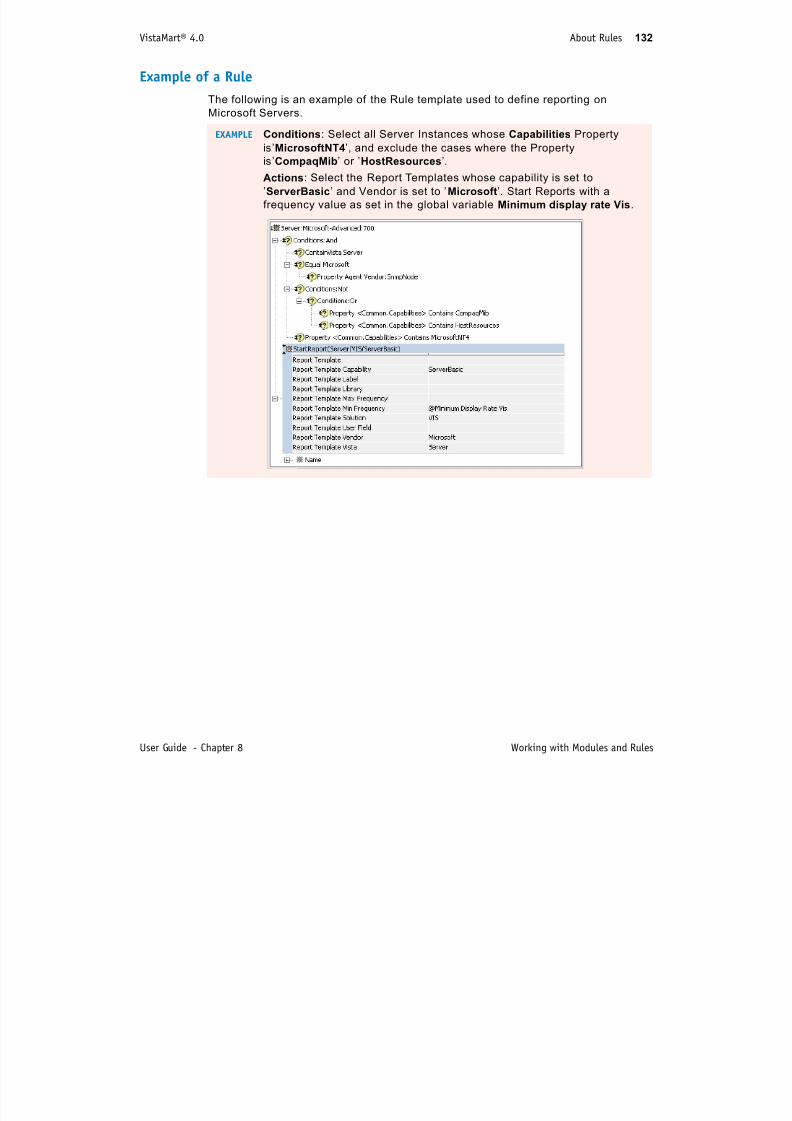
7/17/2019 VistaMart User Guide
http://slidepdf.com/reader/full/vistamart-user-guide 132/265
User Guide - Chapter 8 Working with Modules and Rules
VistaMart® 4.0 Making Rules 133
Making Rules
Rules always belong to a VistaMart Library.
Standard Rules belong by default to the VistaMart Common Library which you can
import into your VistaMart Repository.
The Rule Editor is the VistaMart interface that lets you create, edit, and set priorities
for Rules.
Managing Properties using RulesRules allow you to set Properties. When you set a Property using Rules, you must
7/17/2019 VistaMart User Guide
http://slidepdf.com/reader/full/vistamart-user-guide 133/265
User Guide - Chapter 8 Working with Modules and Rules
subsequently continue to use only Rules to set Properties.For a given provisioning workflow, you must determine whether to use Rules or the
change mode (i.e. via VistaDiscovery) or the update mode to manage a Property.
By not mixing provisioning modes, this ensures that each mode is responsible for the
Properties that it manages (i.e. the action sets the owner).
EXAMPLE The following is a scenario that does not work:
You have a Property Threshold with default value equal to 0.
1. You use the mode ‘change’ to set the Property to 100.2. You use a Rule to set the Property to 200 when the Property equals
100.
3. First execution: the Property gets set to 200
4. Second execution: the Property gets set to 0. This is an unexpected
value but imputed to the fact that you used two different processes to
manage the same Property.
The reason is that before the Rule execution, Property values managed
by Rules (owner = Rules) are reset to 0. Hence, the condition = 100 no
longer applies to this Property.
VistaMart® 4.0 Making Rules 134
Determining Rule priority for executionIn general, VistaMart executes all Rules in its database for all Instances that match
the conditions set for them, regardless of their name and Library which contains them.
Using different priority levels, VistaMart lets you set conditional blocks where several
Rules with identical names can mutually exclude each other:INSIDE A CONDITIONAL BLOCK VistaMart executes only one Rule for which the submitted
Instance matches the conditions.
A RULE WITH THE HIGHEST PRIORITY LEVEL takes precedence over the other ones.
EXAMPLE The Library Contracts has three different Rules dealing with Servers, i.e.
Servers/Microsoft, Servers/Sun and Servers/Generic. Each Rule has a
different priority level. Rules for Microsoft and Sun have the highest
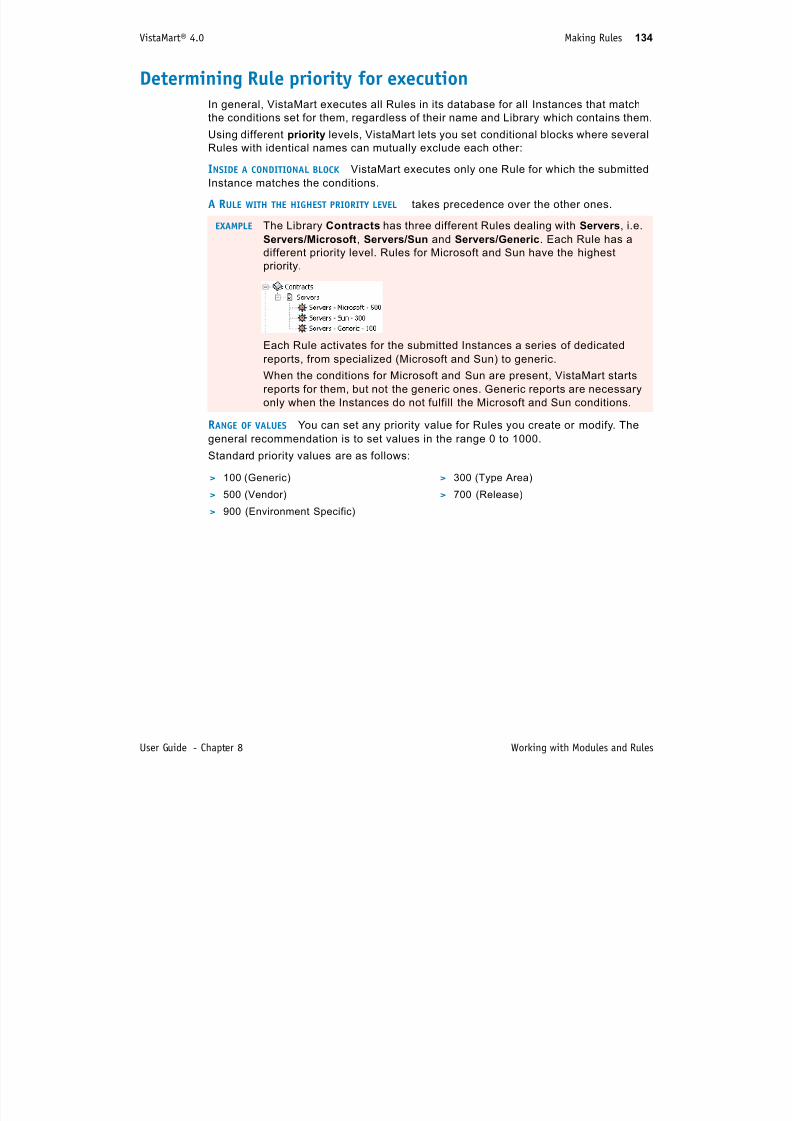
7/17/2019 VistaMart User Guide
http://slidepdf.com/reader/full/vistamart-user-guide 134/265
User Guide - Chapter 8 Working with Modules and Rules
RANGE OF VALUES You can set any priority value for Rules you create or modify. The
general recommendation is to set values in the range 0 to 1000.
Standard priority values are as follows:
priority.
Each Rule activates for the submitted Instances a series of dedicated
reports, from specialized (Microsoft and Sun) to generic.
When the conditions for Microsoft and Sun are present, VistaMart startsreports for them, but not the generic ones. Generic reports are necessary
only when the Instances do not fulfill the Microsoft and Sun conditions.
> 100 (Generic) > 300 (Type Area)
> 500 (Vendor) > 700 (Release)> 900 (Environment Specific)
VistaMart® 4.0 Making Rules 135
Creating a new RuleYou create Rules based on a series of templates.
Create a new Rule
1 In the VistaMart Inventory Manager, click the Model View tab.2 Right-click the Rules icon and select Add Rules.
The Select template from new Rule window opens. VistaMart classifies the Rule
templates as follows:
• At the top, the ‘Empty Rule’ sets up a skeletal structure of conditions and
actions on which to base a Rule.
• For example, the Report & Slot folder of templates contains template Rules
dealing with Report and Slot actions. For a description of each Rule template,
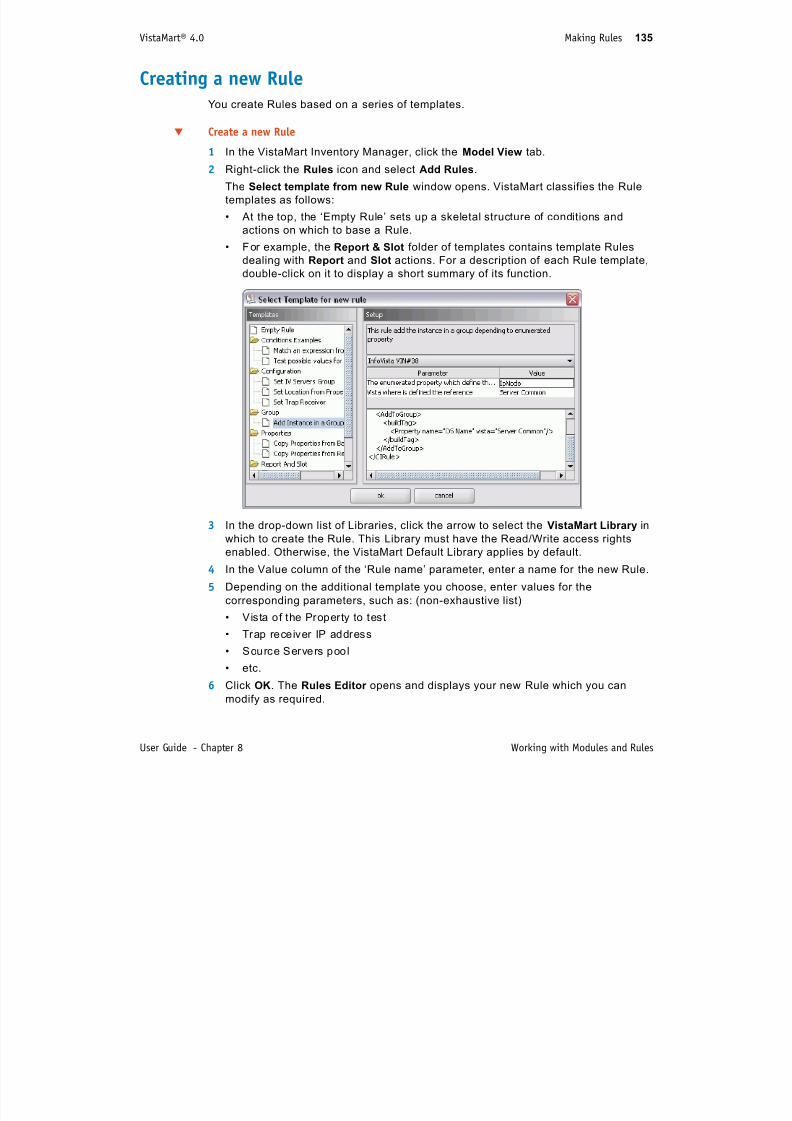
7/17/2019 VistaMart User Guide
http://slidepdf.com/reader/full/vistamart-user-guide 135/265
User Guide - Chapter 8 Working with Modules and Rules
g p p p ,
double-click on it to display a short summary of its function.
3 In the drop-down list of Libraries, click the arrow to select the VistaMart Library in
which to create the Rule. This Library must have the Read/Write access rights
enabled. Otherwise, the VistaMart Default Library applies by default.
4 In the Value column of the ‘Rule name’ parameter, enter a name for the new Rule.
5 Depending on the additional template you choose, enter values for the
corresponding parameters, such as: (non-exhaustive list)
• Vista of the Property to test
• Trap receiver IP address
• Source Servers pool
• etc.
6 Click OK. The Rules Editor opens and displays your new Rule which you can
modify as required.
VistaMart® 4.0 Making Rules 136
Editing a RuleThe following section shows you how to edit existing Rules in the Rules Editor . In
general, you have to edit to fine-tune a new Rule after you create it.
Note that each time you modify a Rule, you must reapply it in the VistaMart Inventory
Manager in order for the system to take changes into account.You can edit a Rule either in the ‘tree view’ or ‘xml’.
’Using the ‘tree view’’ (p. 136)
’Using XML’ (p. 137)
Using the ‘tree view’
Edit a Rule in the tree view
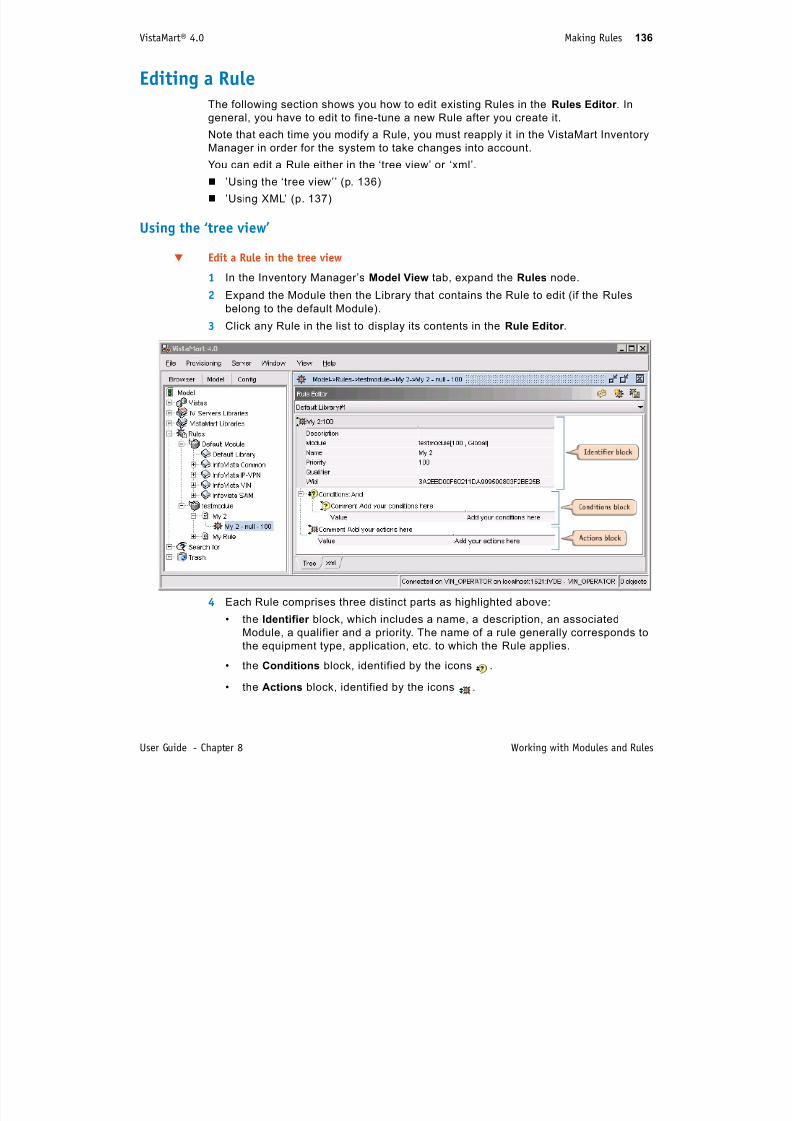
7/17/2019 VistaMart User Guide
http://slidepdf.com/reader/full/vistamart-user-guide 136/265
User Guide - Chapter 8 Working with Modules and Rules
1 In the Inventory Manager’s Model View tab, expand the Rules node.
2 Expand the Module then the Library that contains the Rule to edit (if the Rules
belong to the default Module).
3 Click any Rule in the list to display its contents in the Rule Editor .
4 Each Rule comprises three distinct parts as highlighted above:
• the Identifier block, which includes a name, a description, an associated
Module, a qualifier and a priority. The name of a rule generally corresponds to
the equipment type, application, etc. to which the Rule applies.
• the Conditions block, identified by the icons .
• the Actions block, identified by the icons .
VistaMart® 4.0 Making Rules 137
5 Click the double arrow to the left of the icons and to expand the blocks and
display the detailed Conditions and Actions.
6 Enter appropriate values in the in the corresponding text box for each attribute or
select a predefined value from a drop down list.
7 VistaMart saves the changes when you click Save, or when you close the Rule
Editor, or switch to another window.
Using XML
Editing the XML contents of a Rule is an time-efficient way to create a new Rule from
an existing one. You simply copy, paste, and edit the children elements of the original
CIRule element when you select Add Rules.
However, it is best to keep the modifications of the XML contents of a Rule to a
i i (i h i i l l ) t li it th ibilit f

7/17/2019 VistaMart User Guide
http://slidepdf.com/reader/full/vistamart-user-guide 137/265
User Guide - Chapter 8 Working with Modules and Rules
minimum (i.e. changing a single value) to limit the possibility of errors.If an error arises, an integrated object corrector function allows you to detect it
directly on the screen. A click on the ‘error’ button takes you directly to the location of
the offending syntax.
Edit Rules in XML
1 In the Rules Editor, select a Rule and click the XML tab at the bottom of the main
window to display the XML contents of this Rule.
2 Manually enter or delete element attributes. Any errors in syntax are highlighted in
the bottom section of the window.
VistaMart® 4.0 Examining conditions in detail 138
Examining conditions in detail
This section provides an overview and corresponding examples for each condition
type available for the customization of Rules.
View available conditions
> In the Rule Editor, right-click the ‘Conditions’ icon to display the conditions:
> ’Add conditions’’ (p. 139)
> ’‘Add condition on proxies’’ (p. 140)
> ’‘Add conditions on referenced Instances’’
(p. 141)
’‘Add true condition’’ (p 142)
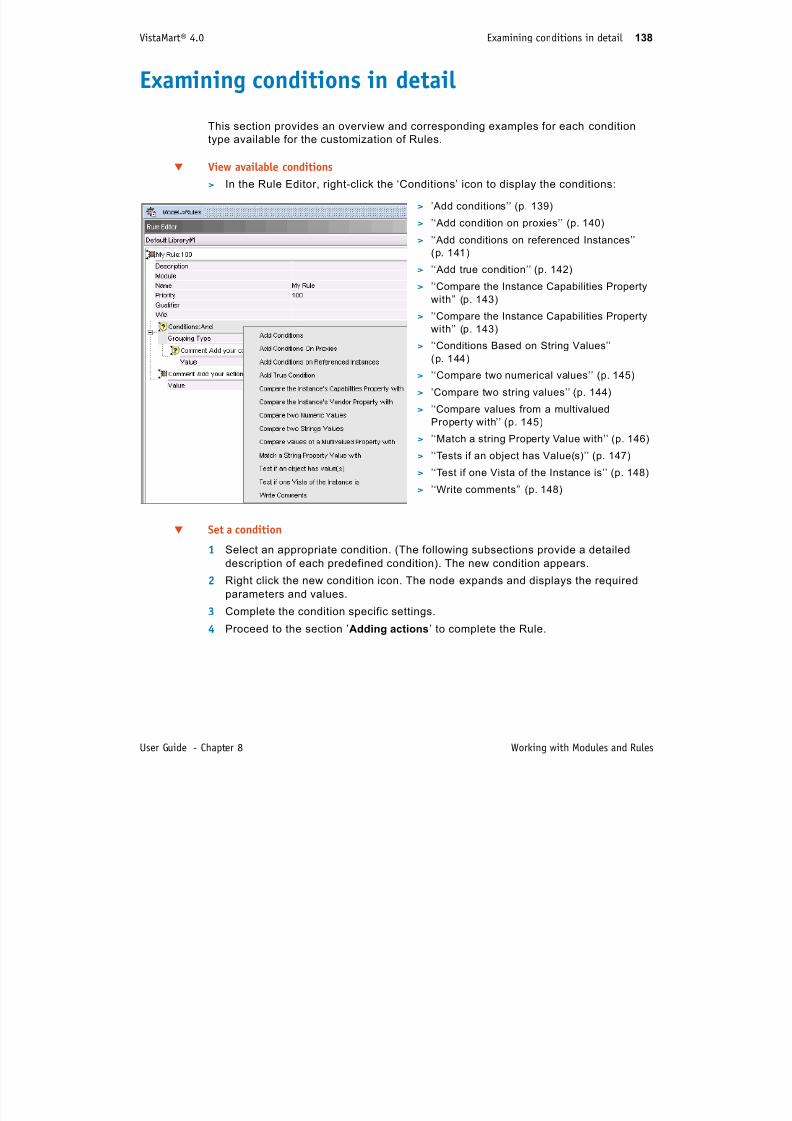
7/17/2019 VistaMart User Guide
http://slidepdf.com/reader/full/vistamart-user-guide 138/265
User Guide - Chapter 8 Working with Modules and Rules
Set a condition
1 Select an appropriate condition. (The following subsections provide a detailed
description of each predefined condition). The new condition appears.
2 Right click the new condition icon. The node expands and displays the required
parameters and values.
3 Complete the condition specific settings.
4 Proceed to the section ’Adding actions’ to complete the Rule.
> Add true condition (p. 142)
> ’‘Compare the Instance Capabilities Property
with’’ (p. 143)
> ’‘Compare the Instance Capabilities Property
with’’ (p. 143)
> ’‘Conditions Based on String Values’’
(p. 144)
> ’‘Compare two numerical values’’ (p. 145)
> ’Compare two string values’’ (p. 144)
> ’‘Compare values from a multivalued
Property with’’ (p. 145)
> ’‘Match a string Property Value with’’ (p. 146)
> ’‘Tests if an object has Value(s)’’ (p. 147)
> ’‘Test if one Vista of the Instance is’’ (p. 148)
> ’‘Write comments’’ (p. 148)
VistaMart® 4.0 Examining conditions in detail 139
Add conditions’
By default, if you use the standard templates to build your own Rules, or if you
customize existing Rules in the VistaMart Common Library, you always start with a
condition that specifies the Vista which contains the Instance you submit.
This condition is the ’Conditions:And’ in the Rule Editor.
From this starting point you can add more conditions on Properties, Proxies and
Variables for VistaMart to apply to an Instance.
As a minimum, all conditions belong to the ’Conditions:And’ grouping type. In
addition, you can use the following alternative logical operators:
> ’Not’ conditions to exclude Vistas, Property Values, Proxies, Vendor and
Capabilities.
> ’Or ’ conditions to include one or more of a series of Vistas, Property Values,
Proxies and Vendor/Capabilities attributes
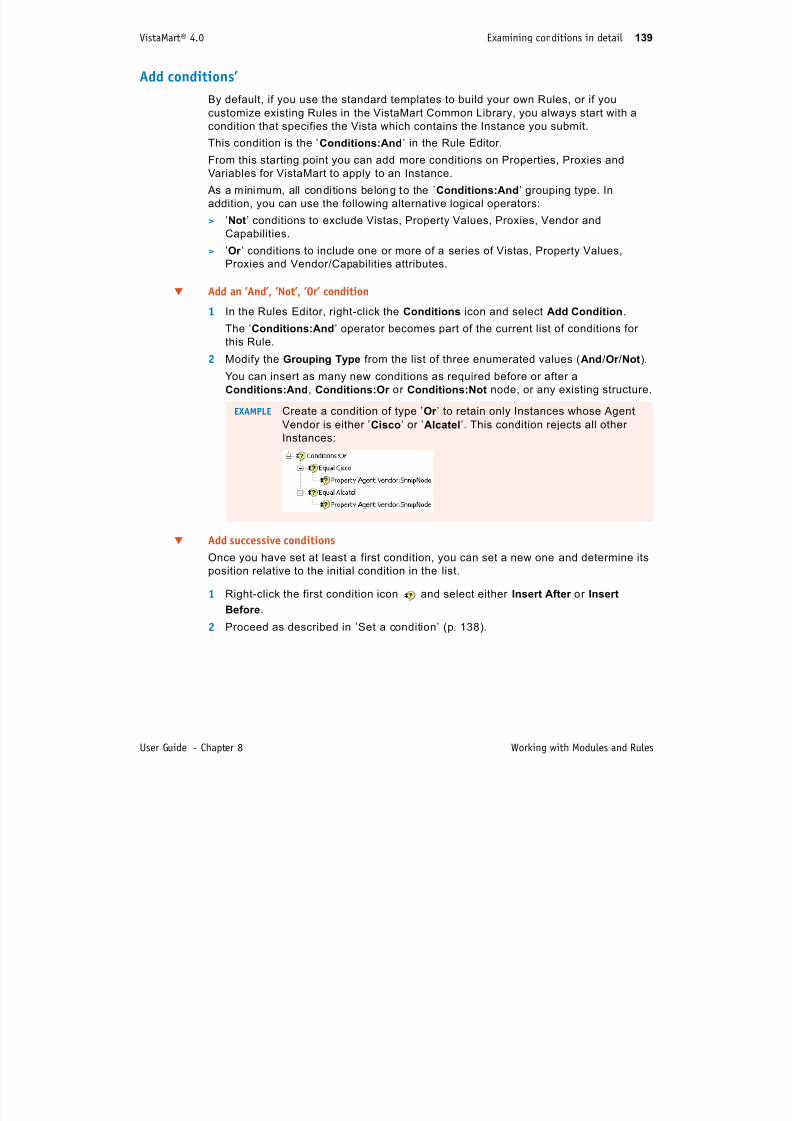
7/17/2019 VistaMart User Guide
http://slidepdf.com/reader/full/vistamart-user-guide 139/265
User Guide - Chapter 8 Working with Modules and Rules
Proxies and Vendor/Capabilities attributes.
Add an ’And’, ’Not’, ’Or’ condition
1 In the Rules Editor, right-click the Conditions icon and select Add Condition.
The ’Conditions:And’ operator becomes part of the current list of conditions for
this Rule.
2 Modify the Grouping Type from the list of three enumerated values (And/Or /Not).
You can insert as many new conditions as required before or after a
Conditions:And, Conditions:Or or Conditions:Not node, or any existing structure.
Add successive conditions
Once you have set at least a first condition, you can set a new one and determine its
position relative to the initial condition in the list.
1 Right-click the first condition icon and select either Insert After or Insert
Before.2 Proceed as described in ’Set a condition’ (p. 138).
EXAMPLE Create a condition of type ’Or ’ to retain only Instances whose Agent
Vendor is either ’Cisco’ or ’Alcatel’. This condition rejects all other
Instances:
VistaMart® 4.0 Examining conditions in detail 140
‘Add condition on proxies’
This Rule checks if the Instance has proxy Instances. If it finds any, it may apply the
conditions to one, all, or none of the proxies:
Condition Description
AtLeastOneProxy The submit ted Instance has proxies. At least one proxy matches thecondition.
AllProxies The submitted Instance has proxies. A ll p roxies match the condit ion.
NoProxy The submitted Instance does not have any proxy, or all proxies do
not match the condition.
EXAMPLE The Rule below checks if the submitted Instance is a Router and if it
includes at least one LAN interface.
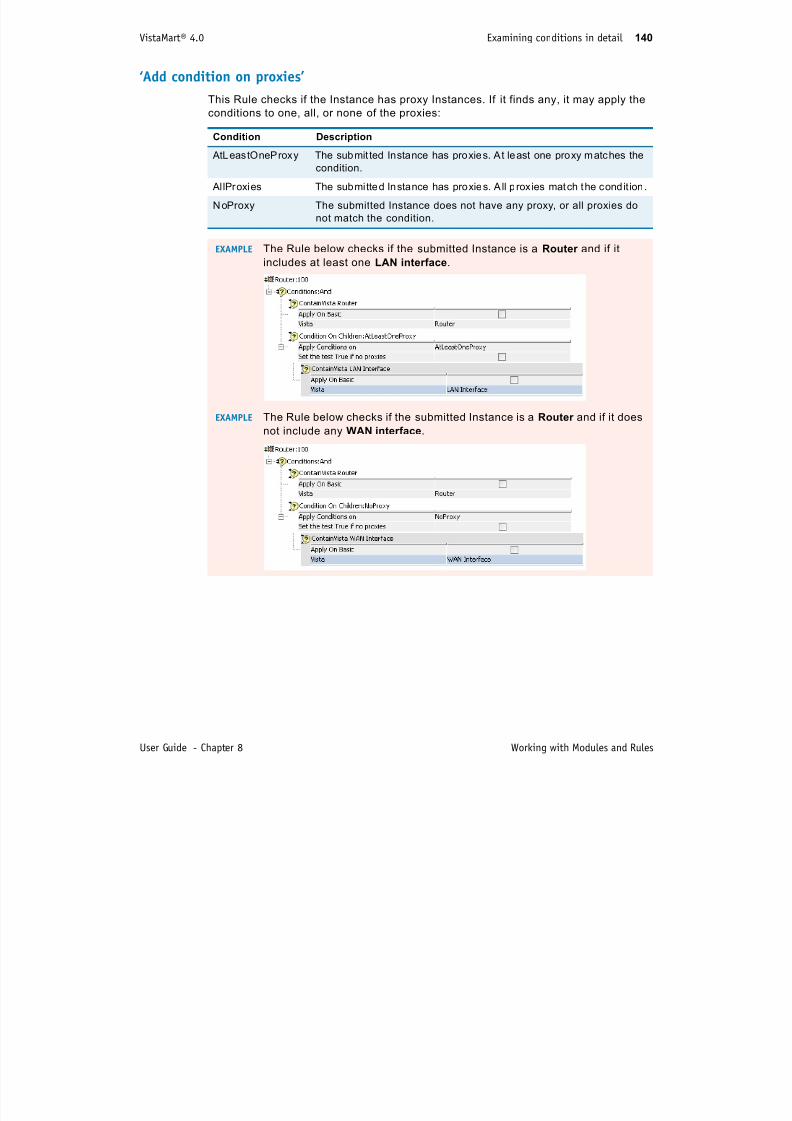
7/17/2019 VistaMart User Guide
http://slidepdf.com/reader/full/vistamart-user-guide 140/265
User Guide - Chapter 8 Working with Modules and Rules
EXAMPLE The Rule below checks if the submitted Instance is a Router and if it does
not include any WAN interface.
VistaMart® 4.0 Examining conditions in detail 141
‘Add conditions on referenced Instances’
The Rule does not check the condition for the submitted Instance. Instead, the
condition addresses an Instance that the submitted Instance references.
When the condition verifies, the Rule applies the action to the submitted Instance.
Conditions on Referenced Instances includes three distinct cases:
> “The reference is a group containing the Instance”
> “The reference is a Property of the Instance”
“The reference is a the Basic of the proxy Instance”

7/17/2019 VistaMart User Guide
http://slidepdf.com/reader/full/vistamart-user-guide 141/265
User Guide - Chapter 8 Working with Modules and Rules
> The reference is a the Basic of the proxy Instance
T HE REFERENCE IS A GROUP CONTAINING THE INSTANCE This Rule applies to Instances which
belong to a group. It redirects the condition to the group of that submitted Instance.
T HE REFERENCE IS A THE BASIC OF THE PROXY INSTANCE In case of proxy Instances, the Rule
redirects the condition to its parent Basic.
EXAMPLE The condition below matches all Instances that are members of the group
Fiat, when the Contract Property Value for that group is Platinum.
EXAMPLE The condition matches all proxy Instances whose parent Basic Instance is
located in Italy (Property Location of Vista Common = string ‘Italy’).
VistaMart® 4.0 Examining conditions in detail 142
T HE REFERENCE IS A PROPERTY OF THE INSTANCE This Rule redirects the condition to an
Instance referenced as a Property, instead of addressing the submitted Instance.
EXAMPLE In the Vista Routers, the Property ShadowRouters references shadow
router Instances. This condition matches all Instances referencing
shadow routers located in Italy (Property Location of Vista Common
equals string ‘Italy’).

7/17/2019 VistaMart User Guide
http://slidepdf.com/reader/full/vistamart-user-guide 142/265
User Guide - Chapter 8 Working with Modules and Rules
‘Add true condition’
When using this condition, the Rule applies in every case.Example: You want to set the IP trap receiver for all Instances equal to a global
variable.
VistaMart® 4.0 Examining conditions in detail 143
‘Compare the Instance Capabilities Property with’
This condition checks if the submitted Instance has a specifically associated
capability (such as CiscoRouterDetails, CompaMib, etc). It is equivalent to testing the
multivalued Property Capabilities of the Common Vista.
When you select the option’ Apply On Basic’, the Rule redirects this condition to the
Instance’s parent Basic.
EXAMPLE The condition below checks if the submitted Instance is a Router
associated to the CiscoNBAR capability.

7/17/2019 VistaMart User Guide
http://slidepdf.com/reader/full/vistamart-user-guide 143/265
User Guide - Chapter 8 Working with Modules and Rules
‘Compare the Instance vendor Property with’
This condition checks the Property Value of the vendor equipment specified for an
Instance. It is equivalent to checking the AgentVendor Property Value for the Vista
SnmpNode.
EXAMPLE The condition below checks if the submitted Instance is a LAN interface
of a Router associated to the CiscoNBAR capability.
EXAMPLE The condition below checks that the submitted Instance pertains to Nortel
equipments.
VistaMart® 4.0 Examining conditions in detail 144
‘Conditions Based on String Values’
VistaMart offers two important conditions based on string values, ‘Compare Two
String values’ and ‘Match a String Property Value with’ to use with the following
parameters:
Parameter DescriptionProperty The condition applies to a Property Value of one of the Instance’s
inherited Vistas.
Property On Basic In case of proxy Instances, the condition applies to a Property
Value of one of the Basic Instance’s inherited Vistas.
Instance Attribute The condition applies to one of the Instance’s predefined attributes
such as Description, Config, Name, Tag, location, Zone, Zone Set,
etc.
Instance Attribute The condition applies to one of the Basic Instance’s predefined
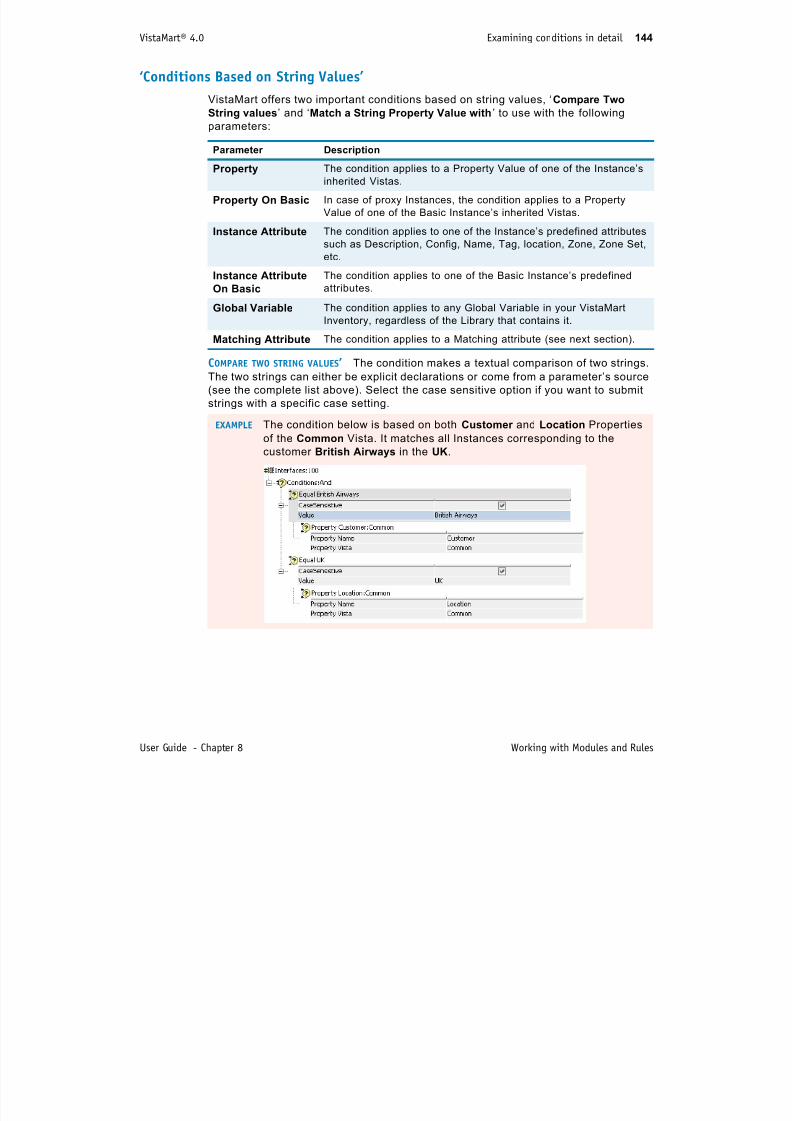
7/17/2019 VistaMart User Guide
http://slidepdf.com/reader/full/vistamart-user-guide 144/265
User Guide - Chapter 8 Working with Modules and Rules
COMPARE TWO STRING VALUES’ The condition makes a textual comparison of two strings.
The two strings can either be explicit declarations or come from a parameter’s source
(see the complete list above). Select the case sensitive option if you want to submit
strings with a specific case setting.
On Basic attributes.
Global Variable The condition applies to any Global Variable in your VistaMart
Inventory, regardless of the Library that contains it.
Matching Attribute The condition applies to a Matching attribute (see next section).
EXAMPLE The condition below is based on both Customer and Location Properties
of the Common Vista. It matches all Instances corresponding to the
customer British Airways in the UK.
VistaMart® 4.0 Examining conditions in detail 145
‘COMPARE TWO NUMERICAL VALUES’ This condition determines whether the specified
numerical value matches the defined value entered in the Nvalue box.
The available comparison operators are:
> Equal to > Less than
> Greater than > LessOrEqual to
> GreaterOrEqual to
EXAMPLE The condition below bases on the ’Ex 0 - Load’ Property in the Interface
Vista with a value set to greater than ’70’:
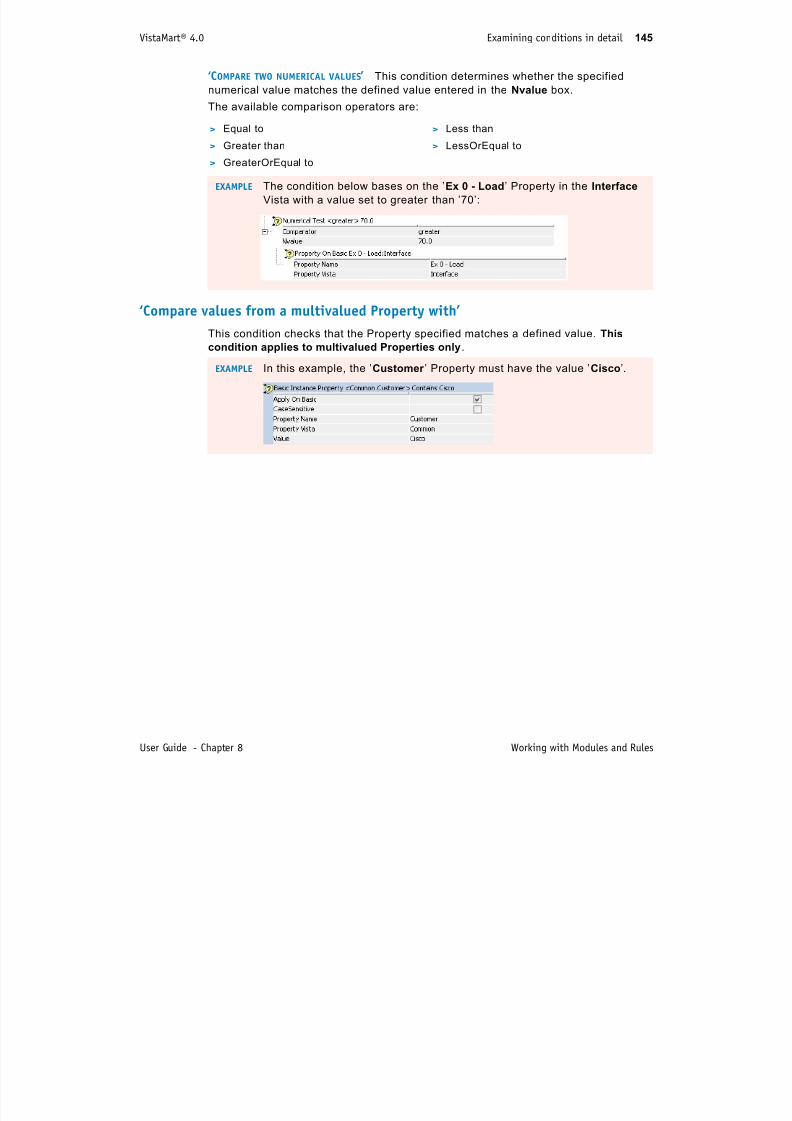
7/17/2019 VistaMart User Guide
http://slidepdf.com/reader/full/vistamart-user-guide 145/265
User Guide - Chapter 8 Working with Modules and Rules
‘Compare values from a multivalued Property with’
This condition checks that the Property specified matches a defined value. This
condition applies to multivalued Properties only.
EXAMPLE In this example, the ’Customer ’ Property must have the value ’Cisco’.
VistaMart® 4.0 Examining conditions in detail 146
‘Match a string Property Value with’
Instead of simply comparing string values, this Rule uses a ‘regular expression’ to
split a submitted string value into substrings. This gives you the flexibility to:
> analyze a string in detail and extract as many subvalues as necessary.
> check subvalues individually, using additional conditions.
> reuse the extracted values as parameters when defining actions.
The regular expression sets a Matching Group (in the form of a table), which
comprises as many Matching Properties (in the form of table cells) as the extracted
substrings.
Thereafter, the regular expression addresses the Matching Properties individually
using their respective GroupNumbers (or table cell indexes).
EXAMPLE The Description attribute of the submitted Instance includes useful
parameters. We extract the Major Version and Minor Version numbersfrom the Instance to set the values for the Properties IOSMajorVersion

7/17/2019 VistaMart User Guide
http://slidepdf.com/reader/full/vistamart-user-guide 146/265
User Guide - Chapter 8 Working with Modules and Rules
from the Instance to set the values for the Properties IOSMajorVersion
and IOSMinorVersion, respectively.
We use the regular expression Cisco IOS (\d+)\.(\d+)\s.* to extract
the value 12 and 3 out of the string Cisco IOS 12.3 RELEASE SOFTWARE,
etc.
The expression reads as follows: Where a line starts with ’Cisco
Version’, a white space, 1 to n digits, a period, 1 to n digits, a
white space, any character.
VistaMart® 4.0 Examining conditions in detail 147
‘Tests if an object has Value(s)’
This Rule checks if an Instance has a specified object and this object has a value.
The Rule applies to single value Properties, multivalued Properties and Attributes.
When you select the option ‘Apply On Basic’, the Rule redirects the condition to the
parent Basic of the Instance.
This condition verifies if:
> Single value Property or Attribute: The Property Value is not null and the string
value is not empty.
> Multivalued Properties: The list of values is not null and contains at least one
element.
EXAMPLE The condition below checks if the submitted Instance is a Router and that
router is a member of a group, regardless of the group name.

7/17/2019 VistaMart User Guide
http://slidepdf.com/reader/full/vistamart-user-guide 147/265
User Guide - Chapter 8 Working with Modules and Rules
EXAMPLE The condition below addresses interfaces. It verifies for all Voice Gateway
interfaces that have a value set for the parent Basic’s VoIP Call Round
Trip Delay Property.
VistaMart® 4.0 Examining conditions in detail 148
‘Test if one Vista of the Instance is’
This Rule allows you to check if:
> The submitted Instance has a specific associated Vista. In this case, do not select
the ‘Apply On Basic’ option.
> the parent Basic has a specific associated Vista, as with proxies. In this case, you
must select the ‘Apply On Basic’ option.
EXAMPLE The condition below matches all ‘Router ’ Instances:
EXAMPLE The condition below matches all Instances whose parent Basic is a
R t
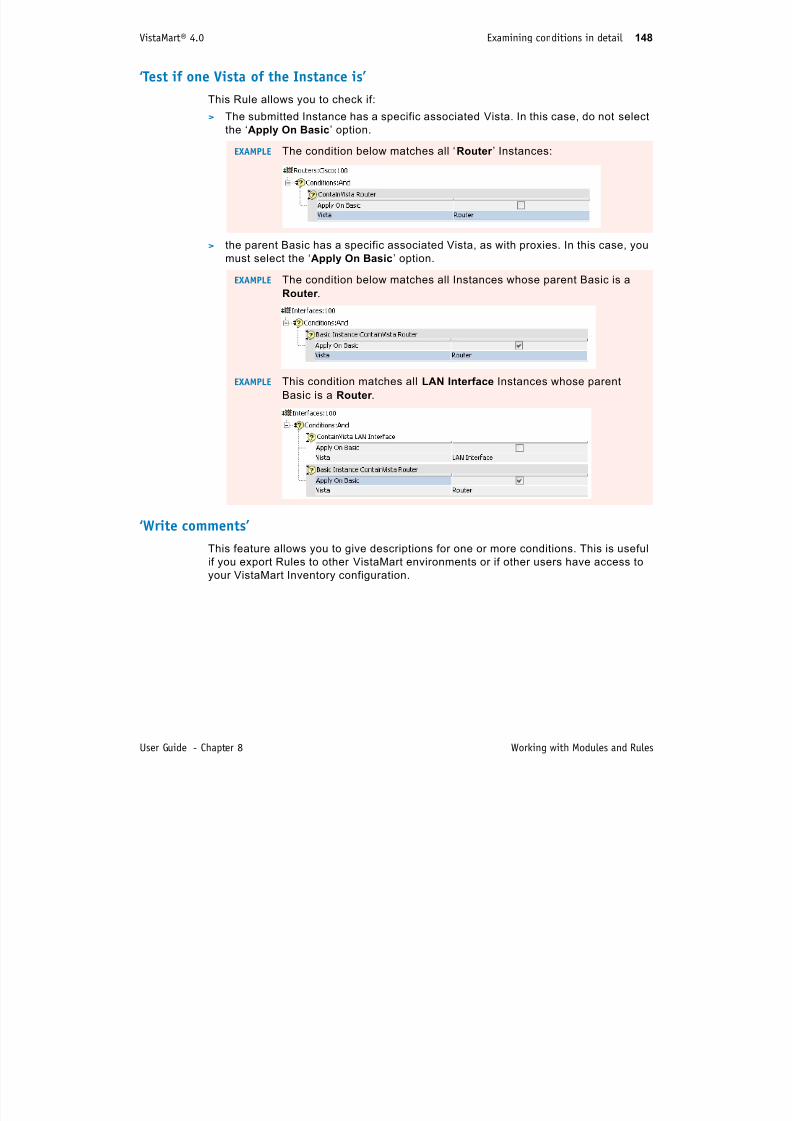
7/17/2019 VistaMart User Guide
http://slidepdf.com/reader/full/vistamart-user-guide 148/265
User Guide - Chapter 8 Working with Modules and Rules
‘Write comments’
This feature allows you to give descriptions for one or more conditions. This is useful
if you export Rules to other VistaMart environments or if other users have access to
your VistaMart Inventory configuration.
Router .
EXAMPLE This condition matches all LAN Interface Instances whose parentBasic is a Router .
VistaMart® 4.0 Getting into actions 149
Getting into actions
After you impose your conditions, you determine all requi red actions to execute each
time the submitted Instance fulfills these conditions.
Set an action
1 In the Rule Editor, right-click the Rule Identifier icon and select Add Action.
The list of action appears.
> ’‘Activate Module’’ (p. 173)
> ’‘Add Instance to group’’ (p. 152)
> ’‘Add Value to Multivalued Property’’
(p. 153)
> ’‘Add/Remove a Vista’’ (p. 154)
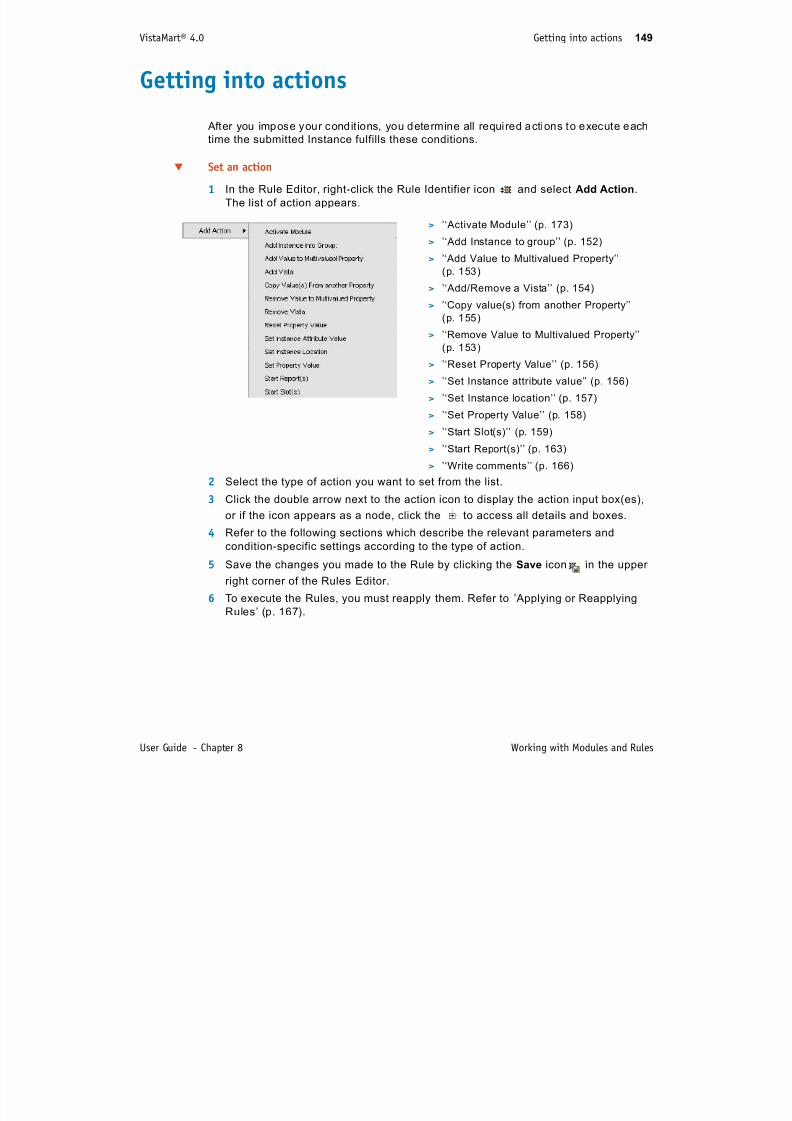
7/17/2019 VistaMart User Guide
http://slidepdf.com/reader/full/vistamart-user-guide 149/265
User Guide - Chapter 8 Working with Modules and Rules
2 Select the type of action you want to set from the list.
3 Click the double arrow next to the action icon to display the action input box(es),or if the icon appears as a node, click the to access all details and boxes.
4 Refer to the following sections which describe the relevant parameters and
condition-specific settings according to the type of action.
5 Save the changes you made to the Rule by clicking the Save icon in the upper
right corner of the Rules Editor.
6 To execute the Rules, you must reapply them. Refer to ’Applying or Reapplying
Rules’ (p. 167).
(p )
> ’‘Copy value(s) from another Property’’
(p. 155)
> ’‘Remove Value to Multivalued Property’’
(p. 153)
> ’‘Reset Property Value’’ (p. 156)
> ’‘Set Instance attribute value’’ (p. 156)> ’‘Set Instance location’’ (p. 157)
> ’‘Set Property Value’’ (p. 158)
> ’‘Start Slot(s)’’ (p. 159)
> ’‘Start Report(s)’’ (p. 163)
> ’‘Write comments’’ (p. 166)
VistaMart® 4.0 Getting into actions 150
Building a string to set valuesFor actions such as Set a Property Value, Set an Attribute Value, Add value to
Multivalued Property, VistaMart asks for string values.
You either enter an explicit string in the relevant input box or set string values based
on the following parameters:
Parameters Descriptions
Constant value A constant string. Mainly used to set prefixes and separators.
Global variable
value
Any Globa l Var iable, regardless of the Library f rom which the
Variable originates.
Instance Attribute
Value
The value of any Attribute of the submitted Instance.
Instance AttributeValue on Basic
In case of proxies, the value of any Attribute of the submittedInstance’s parent Basic.

7/17/2019 VistaMart User Guide
http://slidepdf.com/reader/full/vistamart-user-guide 150/265
User Guide - Chapter 8 Working with Modules and Rules
Matching Property
Value
Whenever you use regular expressions to set a condition, you can
reuse the extracted substrings (MatchingProperties). You have to
indicate the used MatchingGroup and MatchNumber.
Property Value The value of any Property of the submitted Instance. Make sure
that you do not address any multivalued Property.
Property Value onBasic
In case of proxies, the value of any Property of the submittedInstance’s parent Basic. Make sure that you do not address any
multivalued Property.
Value from
Referenced
Instance
You source the value from:
1 A Group Ins tance tha t contains the submit ted Instance
2 An Instance referenced in a Property of the submit ted Instance
3 In case of proxies, the submitted Instance’s parent Basic.
After you address the referenced Instance, you can select any of
its parameters as described above.
EXAMPLE For a given set of Instances, we set a string which comprises a Prefix
(LAN_Switch_), the device Vendor’s name, and the Instance’s Basic IP
address.
VistaMart® 4.0 Getting into actions 151
The actions that call for building string values are:
’‘Set Property Value’’ (p. 158)
’‘Set Instance attribute value’’ (p. 156)
’‘Add Value to Multivalued Property’’ (p. 153)
Setting actions to trigger data acquisitionVistaMart controls entirely the data acquisition.
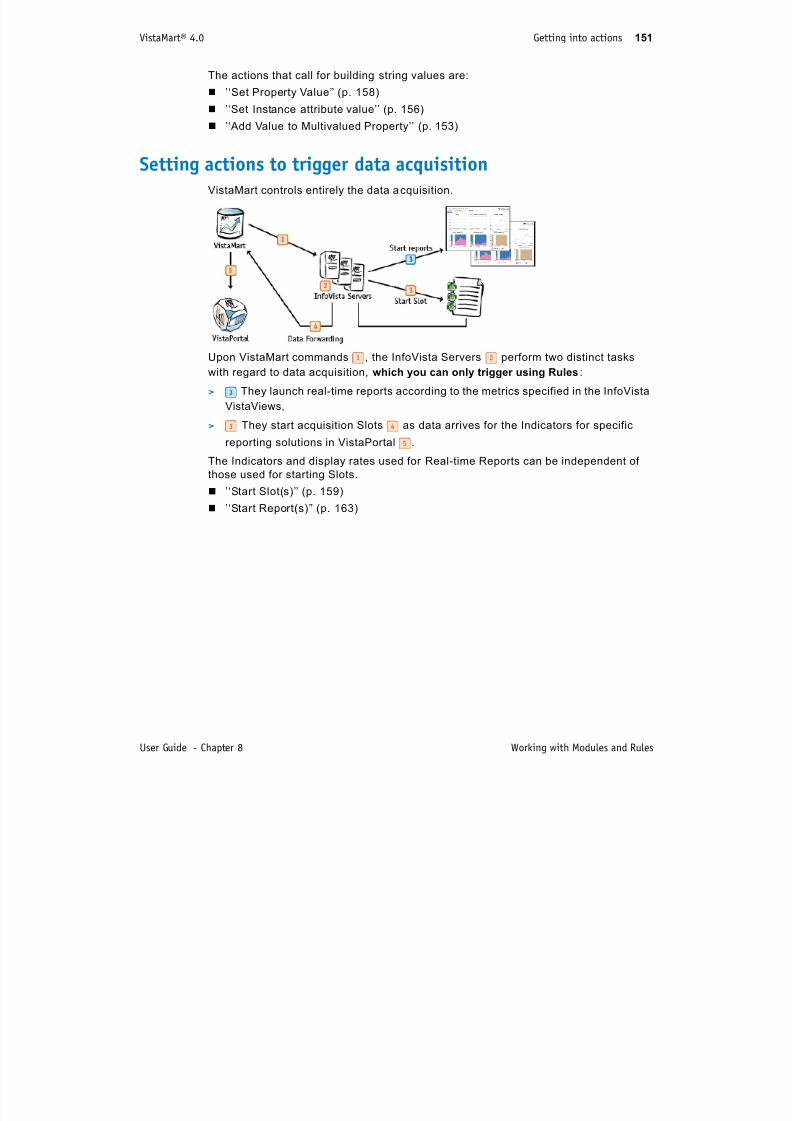
7/17/2019 VistaMart User Guide
http://slidepdf.com/reader/full/vistamart-user-guide 151/265
User Guide - Chapter 8 Working with Modules and Rules
Upon VistaMart commands , the InfoVista Servers perform two distinct tasks
with regard to data acquisition, which you can only trigger using Rules:
> They launch real-time reports according to the metrics specified in the InfoVista
VistaViews,
> They start acquisition Slots as data arrives for the Indicators for specific
reporting solutions in VistaPortal .
The Indicators and display rates used for Real-time Reports can be independent of
those used for starting Slots.
’‘Start Slot(s)’’ (p. 159)
’‘Start Report(s)’’ (p. 163)
VistaMart® 4.0 Getting into actions 152
‘Add Instance to group’
This action adds an Instance to a given Group Instance, using as reference the
Instance’s GroupTag attribute. If the target group does not exist, VistaMart generates
a warning message.
The mandatory GroupTag attribute is either an explicit definition or deduced from
other parameters.
EXAMPLE Take an inventory of all Instances related to a given service level. The
Rule below looks for all Routers whose Service Property matches the
Silver value, to populate the group SilverGroup.
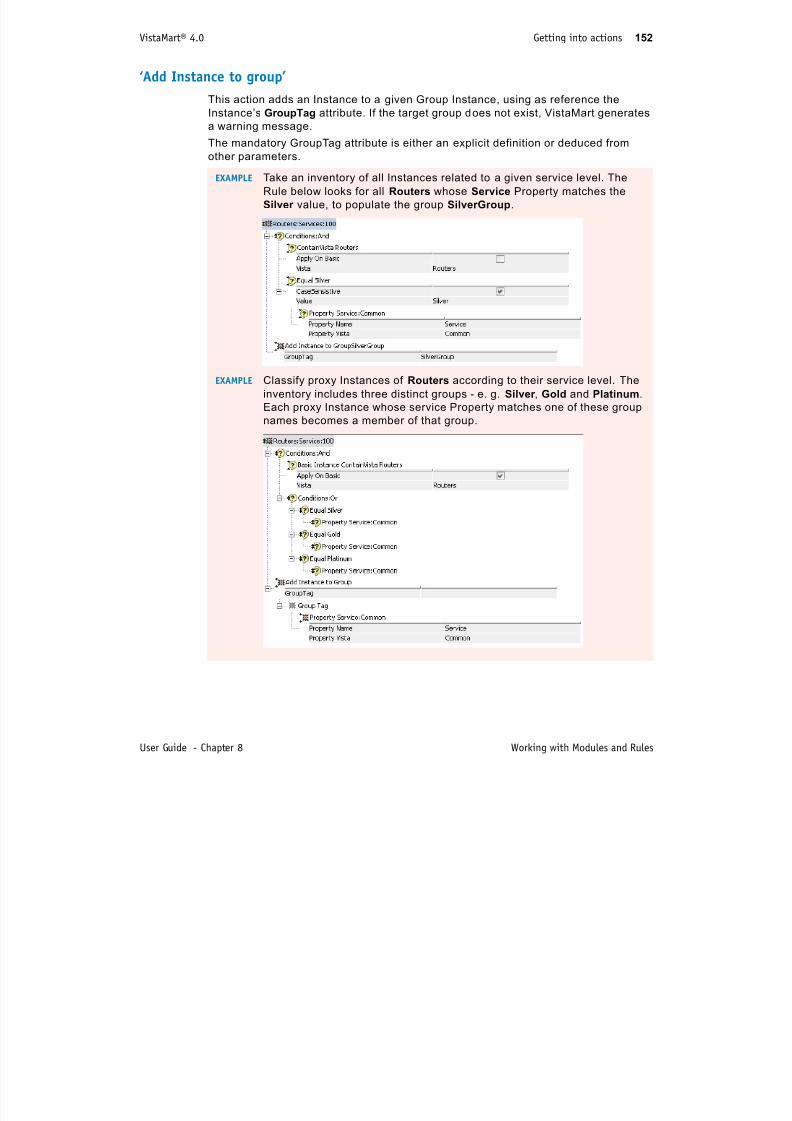
7/17/2019 VistaMart User Guide
http://slidepdf.com/reader/full/vistamart-user-guide 152/265
User Guide - Chapter 8 Working with Modules and Rules
EXAMPLE Classify proxy Instances of Routers according to their service level. The
inventory includes three distinct groups - e. g. Silver , Gold and Platinum.
Each proxy Instance whose service Property matches one of these group
names becomes a member of that group.
VistaMart® 4.0 Getting into actions 153
Setting actions for multivalued PropertiesThese actions update any multivalued Property. If you apply them to a single-value
Property, VistaMart ignores them.
"‘Add Value to Multivalued Property’"
"‘Remove Value to Multivalued Property’"
‘Add Value to Multivalued Property’
This action adds an additional value to a multivalued Property.
EXAMPLE For all Routers located in Beijing, the Rule below adds the QOS capability
to the multivalued Capabilities Property of the Common Vista.
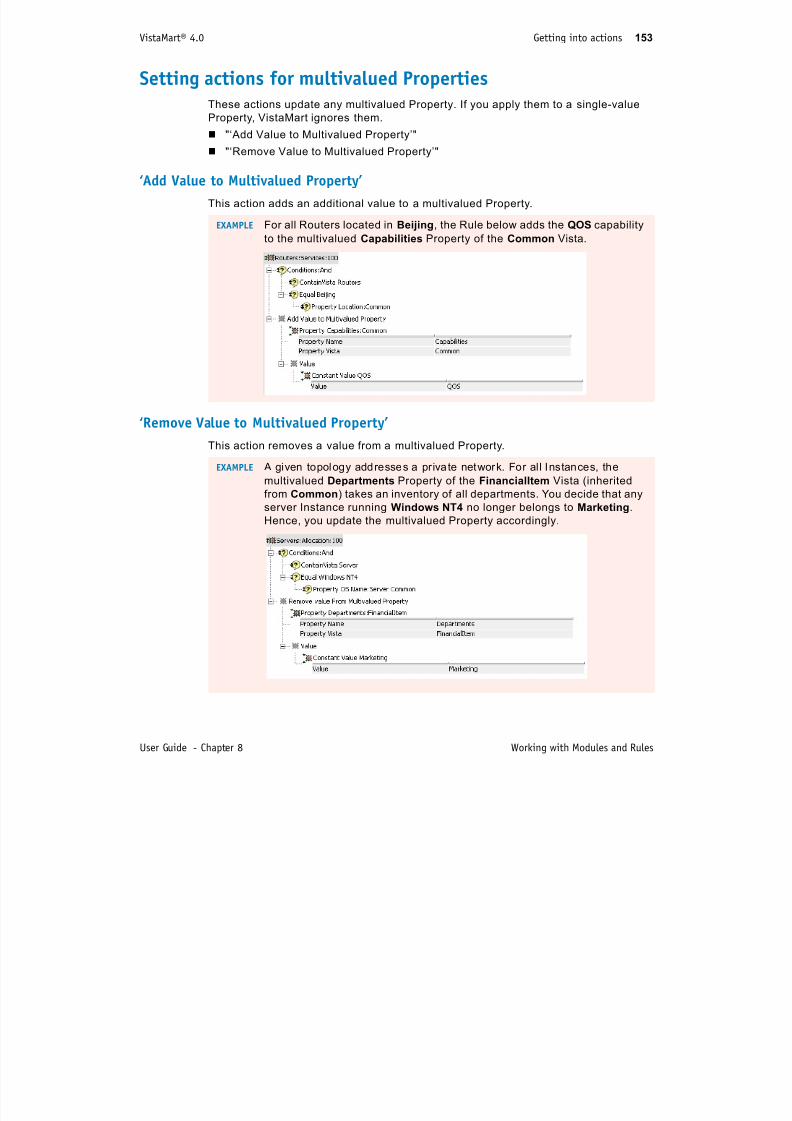
7/17/2019 VistaMart User Guide
http://slidepdf.com/reader/full/vistamart-user-guide 153/265
User Guide - Chapter 8 Working with Modules and Rules
‘Remove Value to Multivalued Property’
This action removes a value from a multivalued Property.
EXAMPLE A given topology addresses a private network. For all Instances, the
multivalued Departments Property of the FinancialItem Vista (inherited
from Common) takes an inventory of all departments. You decide that any
server Instance running Windows NT4 no longer belongs to Marketing.
Hence, you update the multivalued Property accordingly.
VistaMart® 4.0 Getting into actions 154
‘Add/Remove a Vista’
ADD VISTA This action adds a Vista to the list of Vistas associated to the current
Instance. When you associate a Vista using this action, you can also add related
Vistas. In addition, the action adds the new Vista’s Properties automatically with their
default value.
NOTE If the Vista is already associated to the Instance, this action does not change
anything and does not override customized Property Values.
EXAMPLE In a private network, the MIS department adds NBAR capabilities to the
LAN interfaces that the R&D department uses. Hence, you add the NBAR
Vista to all LAN interface Instances in the Research & Development Zone.
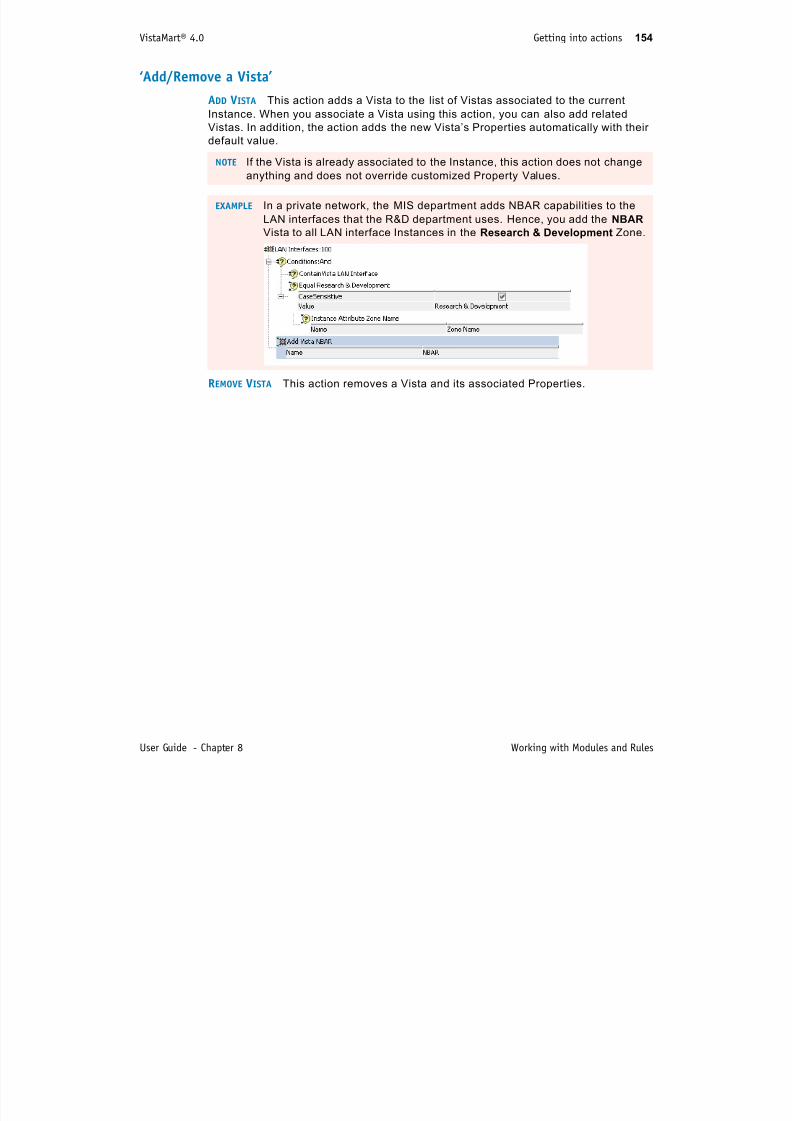
7/17/2019 VistaMart User Guide
http://slidepdf.com/reader/full/vistamart-user-guide 154/265
User Guide - Chapter 8 Working with Modules and Rules
REMOVE VISTA This action removes a Vista and its associated Properties.
VistaMart® 4.0 Getting into actions 155
‘Copy value(s) from another Property’
This action allows you to:
> copy a Property Value from one source Property to another one
> set a proxy Property Value using the parent Basic’s Property Value.
If the destination is a multivalued Property, this action either overrides the original
value or appends it to the source Property Value.
To set this action, the conditions to apply are:
> Both source and destination Property types must be strictly identical (e.g. number,
string, multivalue Property).
> If both source and destination Properties belong to the same Instance, their
respective names must be different (because it is not possible to duplicate a
Property Value on an existing one).
EXAMPLE We monitor router LAN interfaces. We want to duplicate the capabilityvalues from the respective parent routers to the interface capabilities,
only in the following cases:
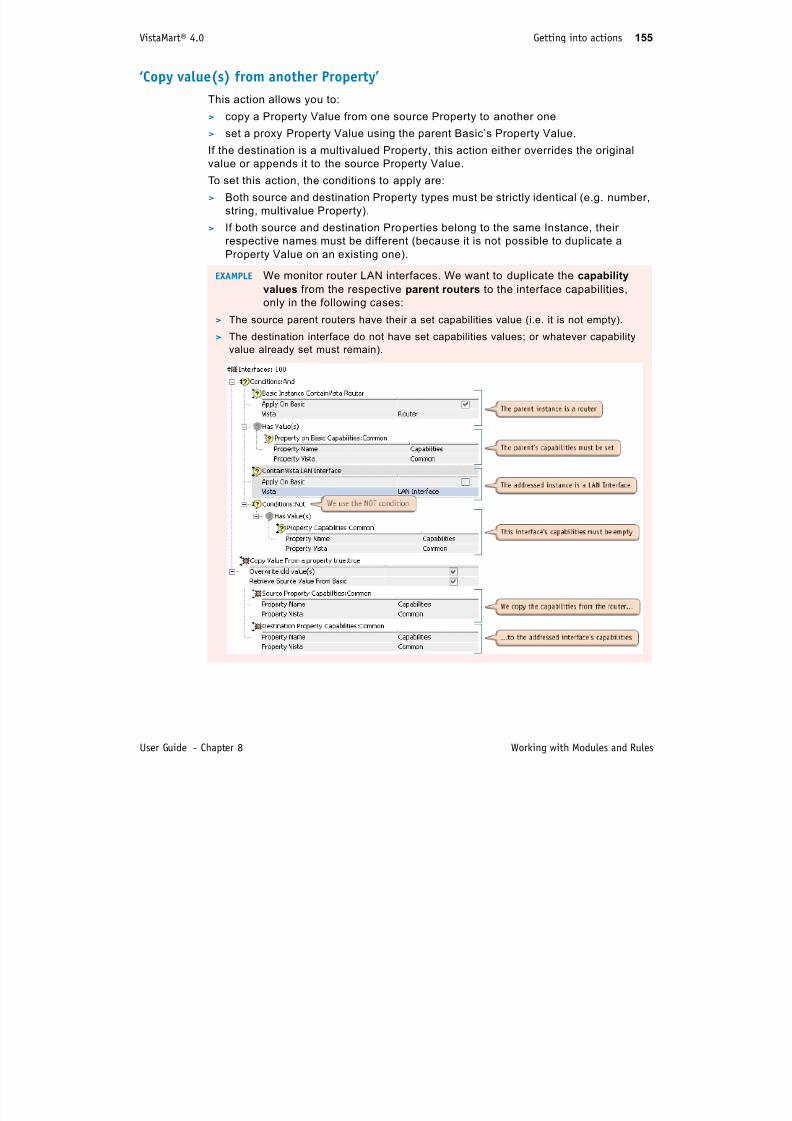
7/17/2019 VistaMart User Guide
http://slidepdf.com/reader/full/vistamart-user-guide 155/265
User Guide - Chapter 8 Working with Modules and Rules
only in the following cases:
> The source parent routers have their a set capabilities value (i.e. it is not empty).
> The destination interface do not have set capabilities values; or whatever capability
value already set must remain).
VistaMart® 4.0 Getting into actions 156
‘Reset Property Value’
This action allows you:
> To reset the value of multivalued Properties.
> To return to the default value of single-value Properties.
‘Set Instance attribute value’
This action allows you to set the following attributes: Config (for the InfoVista Server
Group), Description, Name and Location.
NOTE You can only reset a Property Value using a Rule only if the Property owneris of type User.
NOTE For updating the attribute Location, it is recommended to use the action Set
Instance Location.
EXAMPLE For all Servers, we want to set the Instance name as a function of the OS
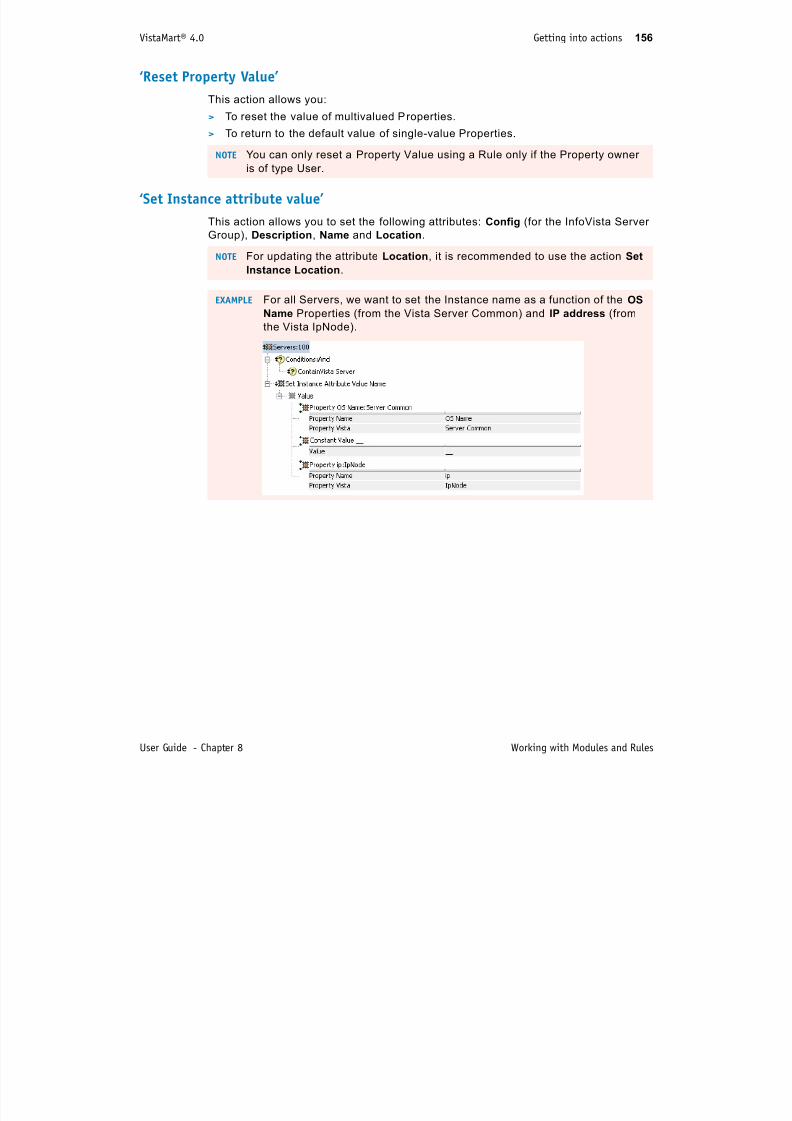
7/17/2019 VistaMart User Guide
http://slidepdf.com/reader/full/vistamart-user-guide 156/265
User Guide - Chapter 8 Working with Modules and Rules
Name Properties (from the Vista Server Common) and IP address (from
the Vista IpNode).
VistaMart® 4.0 Getting into actions 157
‘Set Instance location’
This action sets the location Attribute (Country/City combination) for the Instance. In
particular, this attribute is a prerequisite in order to display Instances geographically
on maps in the Service Level Navigator of VistaPortal.
Two methods are available:
MANUAL SELECTION OF COUNTRY AND CITY You select a country from the drop-down list,
then you select a City. If you do not set a location, VistaMart uses the default Zone.
Note that this method is not time-efficient if you must update several hundred
Instances.
AUTOMATIC CREATION OF COUNTRY AND CITY You create both country and city values from
relevant sources such as dedicated Properties or a detailed description parsed using
a regular expression.
EXAMPLE For all Servers belonging to a Zone North America, we use the PropertyLocation of the Common Vista and the Property City of the Site Vista to
set the Instance’s location attribute.
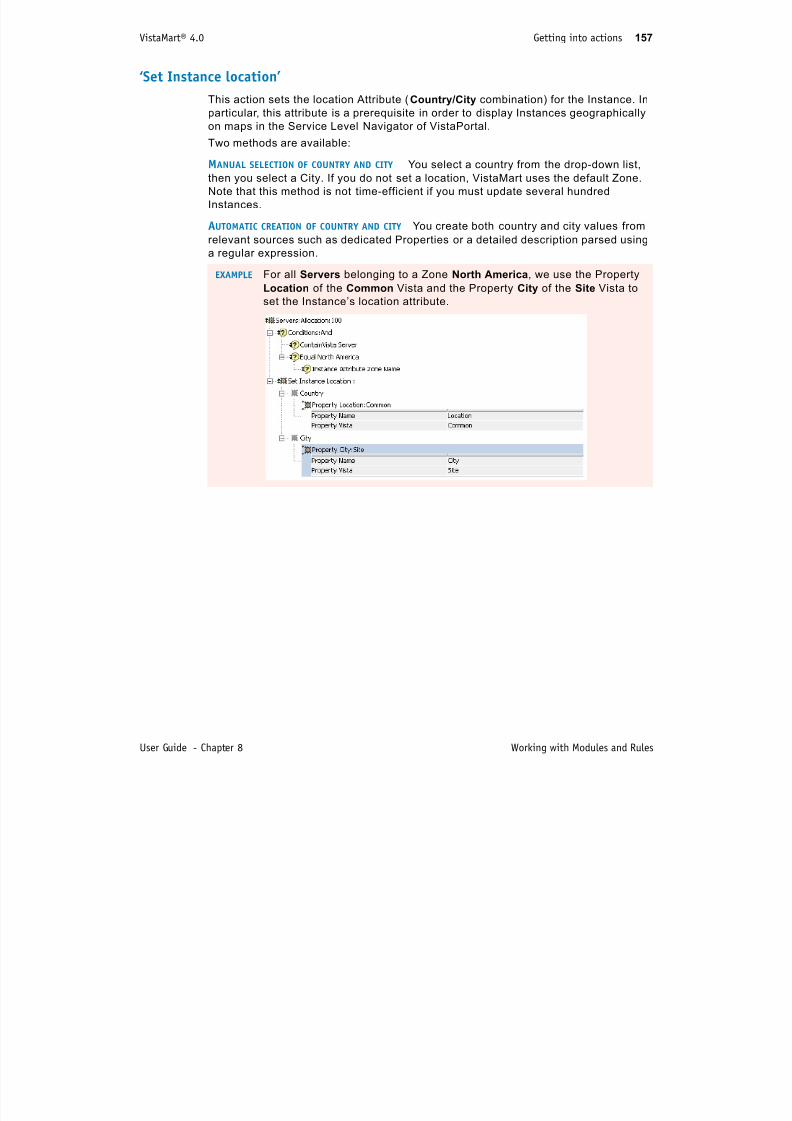
7/17/2019 VistaMart User Guide
http://slidepdf.com/reader/full/vistamart-user-guide 157/265
User Guide - Chapter 8 Working with Modules and Rules
VistaMart® 4.0 Getting into actions 158
‘Set Property Value’
This action sets a Property Value on any single-value Property. If you attempt to set a
value for a multivalued Property, VistaMart ignores it.
EXAMPLE Upgrade the contract for the customer CityBank by applying the value
Platinum for the Service Property to all Routers Instances belonging to
that customer.

7/17/2019 VistaMart User Guide
http://slidepdf.com/reader/full/vistamart-user-guide 158/265
User Guide - Chapter 8 Working with Modules and Rules
EXAMPLE For proxies of a given Router Instance, we propagate the value of the
Property Location from the basic router to the Property Source Location
of each proxy.
VistaMart® 4.0 Getting into actions 159
‘Start Slot(s)’
This action drives data collections based on Slots, which are Indicator/Instance pairs.
The Rule Editor enables you to:
> Either explicitly select a single Indicator from all available Indicators and the Vista,
> Or , set a combination of Indicator attributes to filter several Indicators accordingly.
Attributes Description
Indicator
Capability
The capability attribute associated to the Indicator. Capabilities
are types of technologies used for service performance
monitoring.
Indicator Label A string with pert inent Indications that you extract using regular
expressions.
Indicator Library The Library that contains the Indicator(s).
Indicator solution The solution associated with the Indicator (for example
CapacityAnalyser, Troubleshooter, ServiceManager).
I di t U A t i i th f l i f ti th t t t i l
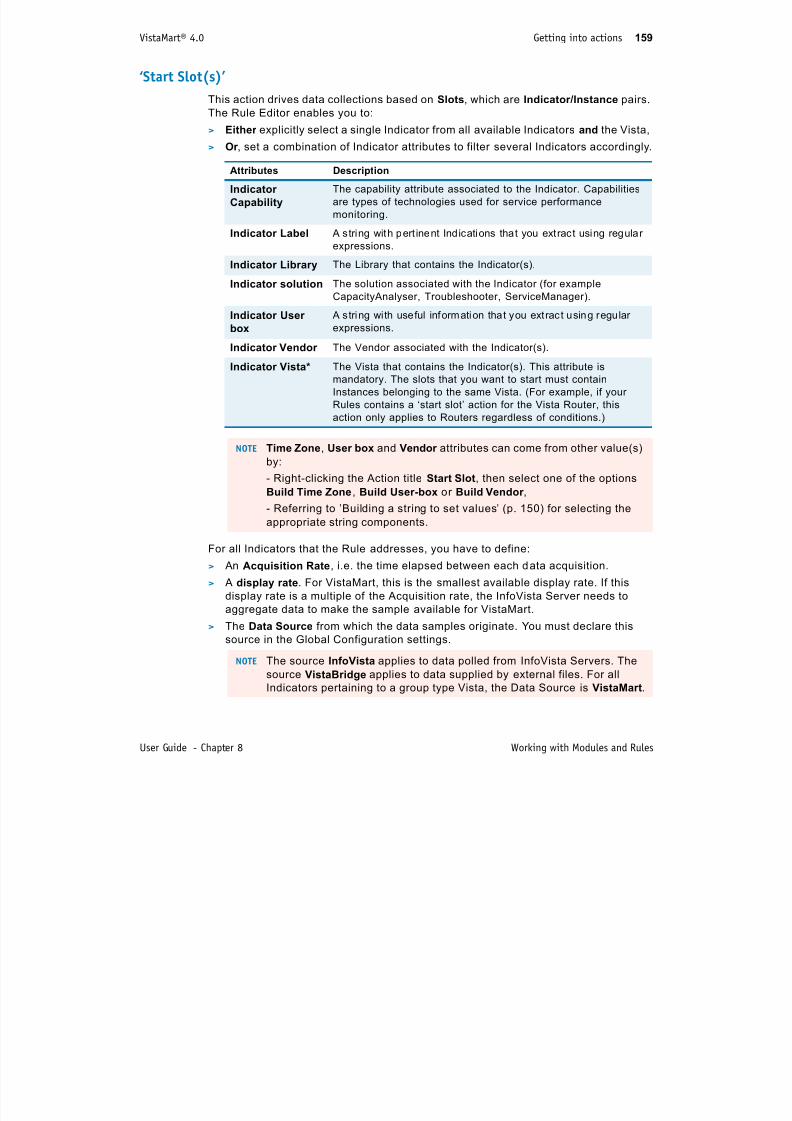
7/17/2019 VistaMart User Guide
http://slidepdf.com/reader/full/vistamart-user-guide 159/265
User Guide - Chapter 8 Working with Modules and Rules
For all Indicators that the Rule addresses, you have to define:
> An Acquisition Rate, i.e. the time elapsed between each data acquisition.
> A display rate. For VistaMart, this is the smallest available display rate. If this
display rate is a multiple of the Acquisition rate, the InfoVista Server needs to
aggregate data to make the sample available for VistaMart.
> The Data Source from which the data samples originate. You must declare this
source in the Global Configuration settings.
Indicator User
box
A string with useful information that you extrac t using regular
expressions.
Indicator Vendor The Vendor associated with the Indicator(s).
Indicator Vista* The Vista that contains the Indicator(s). This attribute is
mandatory. The slots that you want to start must contain
Instances belonging to the same Vista. (For example, if your
Rules contains a ‘start slot’ action for the Vista Router, this
action only applies to Routers regardless of conditions.)
NOTE Time Zone, User box and Vendor attributes can come from other value(s)
by:
- Right-clicking the Action title Start Slot, then select one of the options
Build Time Zone, Build User-box or Build Vendor ,
- Referring to ’Building a string to set values’ (p. 150) for selecting the
appropriate string components.
NOTE The source InfoVista applies to data polled from InfoVista Servers. The
source VistaBridge applies to data supplied by external files. For all
Indicators pertaining to a group type Vista, the Data Source is VistaMart.
VistaMart® 4.0 Getting into actions 160
UNDERSTANDING DATA INDICATORS AND DISPLAY INDICATORS Data Indicators function with
Instances at the InfoVista Server level to retrieve data from polled devices. Display
Indicators are created at the VistaMart level to enable a more generic solution-based
approach to reporting.
EXAMPLE InfoVista Servers use separate Indicators to monitor Availability on
distinct devices such as 3Com LAN Switches or Cisco LAN Switches.
VistaMart allows you to create a federated Display Indicator called Global
Availability.
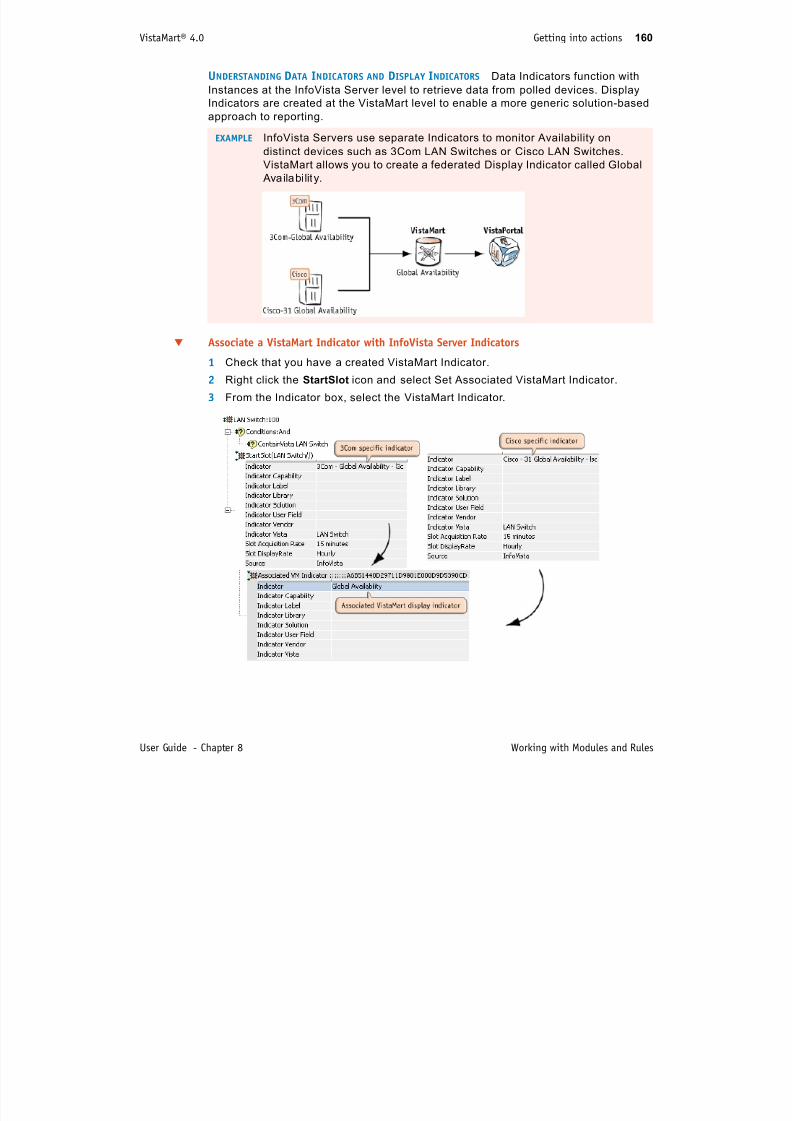
7/17/2019 VistaMart User Guide
http://slidepdf.com/reader/full/vistamart-user-guide 160/265
User Guide - Chapter 8 Working with Modules and Rules
Associate a VistaMart Indicator with InfoVista Server Indicators
1 Check that you have a created VistaMart Indicator.
2 Right click the StartSlot icon and select Set Associated VistaMart Indicator.
3 From the Indicator box, select the VistaMart Indicator.
VistaMart® 4.0 Getting into actions 161
START SLOTS EXAMPLES The following examples illustrate the most common uses of the
StartSlot action.
EXAMPLE The action below associates all Servers with the Indicator Disk Activity -
Average, for the acquisition rate specified in a global variable
my_acquisition_rate. The VistaMart Gateway collects the samples
hourly. The data values come from InfoVista Servers.

7/17/2019 VistaMart User Guide
http://slidepdf.com/reader/full/vistamart-user-guide 161/265
User Guide - Chapter 8 Working with Modules and Rules
EXAMPLE The action below applies filtering criteria. The Rule associates all
Indicators with the capability BasePI related to the Server Vista and the
IPTelephony solution for all servers. The InfoVista Server polls datasamples every 5 minutes and aggregates them every Hour .
VistaMart® 4.0 Getting into actions 162
EXAMPLE This Rule is similar to the previous one. However, instead of keeping only
Indicators related to a single Vista, this Rule applies to all Vistas of the
submitted Instance whose Indicators match the required BasePI
capability. Hence, VistaMart takes into account the Indicators from the
inherited Vistas Resources and Interfaces.
This extension works when you select the option AllInstanceVista(s).
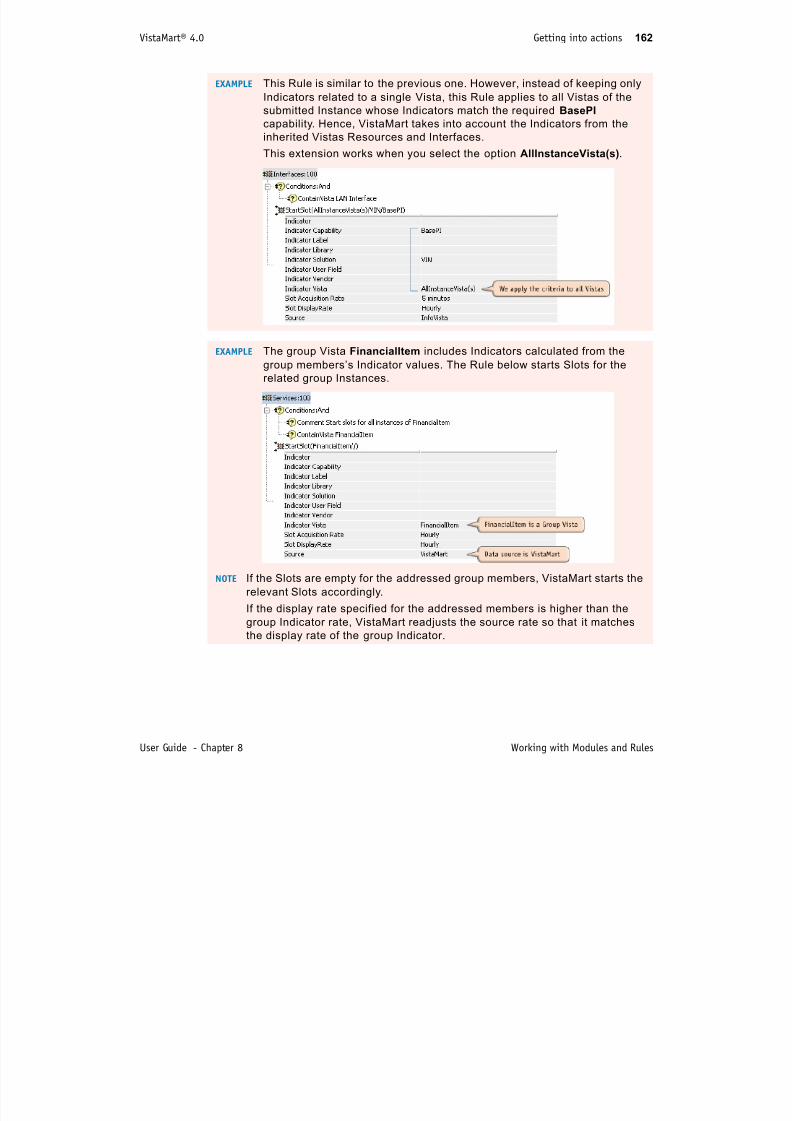
7/17/2019 VistaMart User Guide
http://slidepdf.com/reader/full/vistamart-user-guide 162/265
User Guide - Chapter 8 Working with Modules and Rules
EXAMPLE The group Vista FinancialItem includes Indicators calculated from the
group members’s Indicator values. The Rule below starts Slots for the
related group Instances.
NOTE If the Slots are empty for the addressed group members, VistaMart starts the
relevant Slots accordingly.
If the display rate specified for the addressed members is higher than the
group Indicator rate, VistaMart readjusts the source rate so that it matches
the display rate of the group Indicator.
VistaMart® 4.0 Getting into actions 163
‘Start Report(s)’
This action drives InfoVista Servers to generate real-time reports based on available
Report Templates.
The Rule Editor allows you to:
> Either explicitly select a precise InfoVista Library Report Template for a given
Vista from all available templates loaded in VistaMart,> Or select a series of Report Templates filtered according to a combination of
attributes below if you do not specify the template:
Attributes Description
Report lifetime The length of time to keep the data collected for this report.
When data is older than this lifetime, it becomes obsolete and
gets progressively purged from the system.
If you do not specify a lifetime, the default value comes from theReport Template.
Report Template
Capability
The associated capability attribute. Capabilities are types of
technologies used for service performance monitoring.
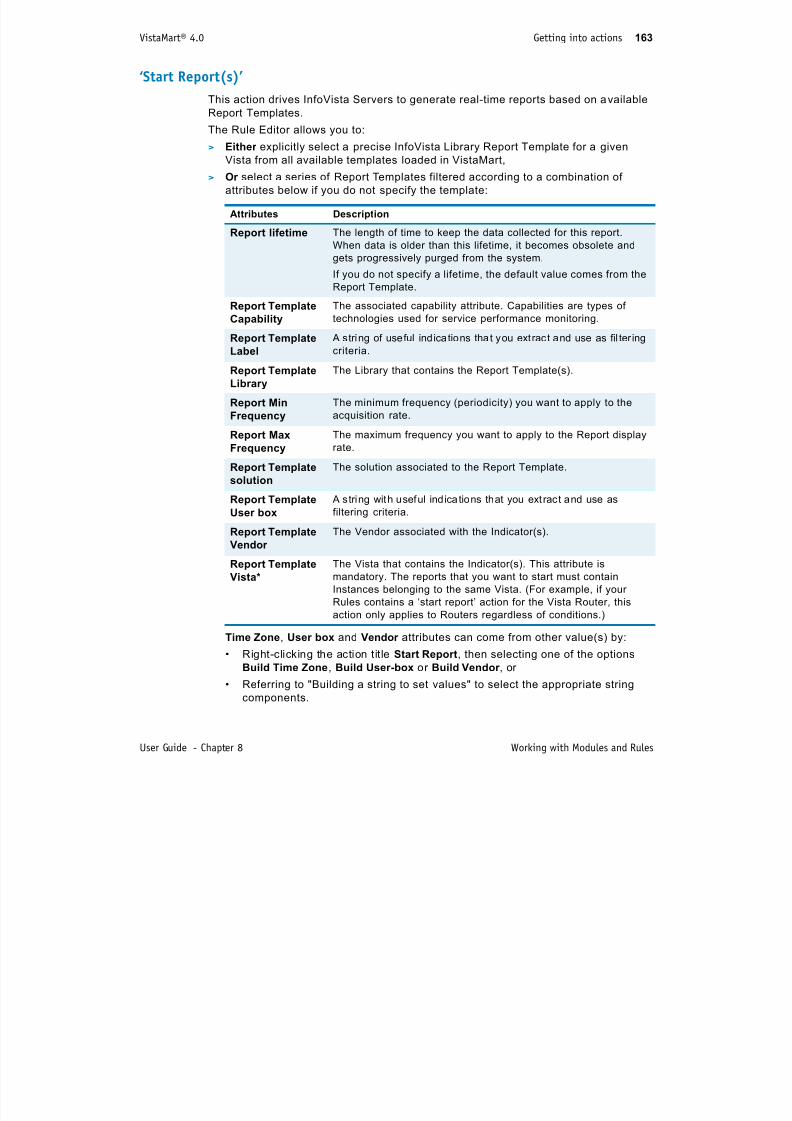
7/17/2019 VistaMart User Guide
http://slidepdf.com/reader/full/vistamart-user-guide 163/265
User Guide - Chapter 8 Working with Modules and Rules
Time Zone, User box and Vendor attributes can come from other value(s) by:
• Right-clicking the action tit le Start Report, then selecting one of the options
Build Time Zone, Build User-box or Build Vendor , or
• Referring to "Building a string to set values" to select the appropriate string
components.
Capability technologies used for service performance monitoring.
Report Template
Label
A string of useful indica tions tha t you extract and use as fil ter ing
criteria.
Report Template
Library
The Library that contains the Report Template(s).
Report Min
Frequency
The minimum frequency (periodicity) you want to apply to the
acquisition rate.
Report Max
Frequency
The maximum frequency you want to apply to the Report display
rate.
Report Template
solution
The solution associated to the Report Template.
Report TemplateUser box A string with useful indica tions that you ext ract and use asfiltering criteria.
Report Template
Vendor
The Vendor associated with the Indicator(s).
Report Template
Vista*
The Vista that contains the Indicator(s). This attribute is
mandatory. The reports that you want to start must contain
Instances belonging to the same Vista. (For example, if your
Rules contains a ‘start report’ action for the Vista Router, this
action only applies to Routers regardless of conditions.)
VistaMart® 4.0 Getting into actions 164
ATTRIBUTING A REPORT LIFETIME You customize the report lifetime value according to two
different formats:
Fixed
value
Syntax:
number + ’ ’ + period, where
period is m= minute, h=hour,
d=day, w=week, M=month or
y=year.
The specified lifetime
overwrites the value inherited
from the Report Template.
Relative
value
Syntax:
value + ’ ’ + ’%’, where value
ranges between 1 and 100.The report lifetime is a ratio of
the default lifetime value from
the Report Template.

7/17/2019 VistaMart User Guide
http://slidepdf.com/reader/full/vistamart-user-guide 164/265
User Guide - Chapter 8 Working with Modules and Rules
VistaMart allows the following adjustments:
> If the Rule addresses a single Report Template, you can adjust the lifetime using a
fixed value. In this case, make sure that the new value does not exceed the former
one.
> If the Rule addresses several Report Templates with different display rates,
therefore with specific lifetimes, you define a customized lifetime using a
percentage. The ratio applies to the individual values inherited from the respective
Report Templates.
Finally, you have to define the name syntax for all reports that InfoVista Servers
generate.
Give report name(s)
1 Click the next to Start Report definition box. The Name attribute appears.
EXAMPLE The example below shows the lifetimes specified in the ReportTemplates, then the resulting lifetimes when you apply a 50% value.
VistaMart® 4.0 Getting into actions 165
2 Right-click the Name attribute.
3 Refer to "Building a string to set values" to select the appropriate attribute
components.
EXAMPLE The Rule below triggers Performance Reports with a 15 minute
display rate for all Server Instances.The data displayed corresponds
to the last 14 days.
For each new report, the title includes the Instance Name and the
used Report Template Name.
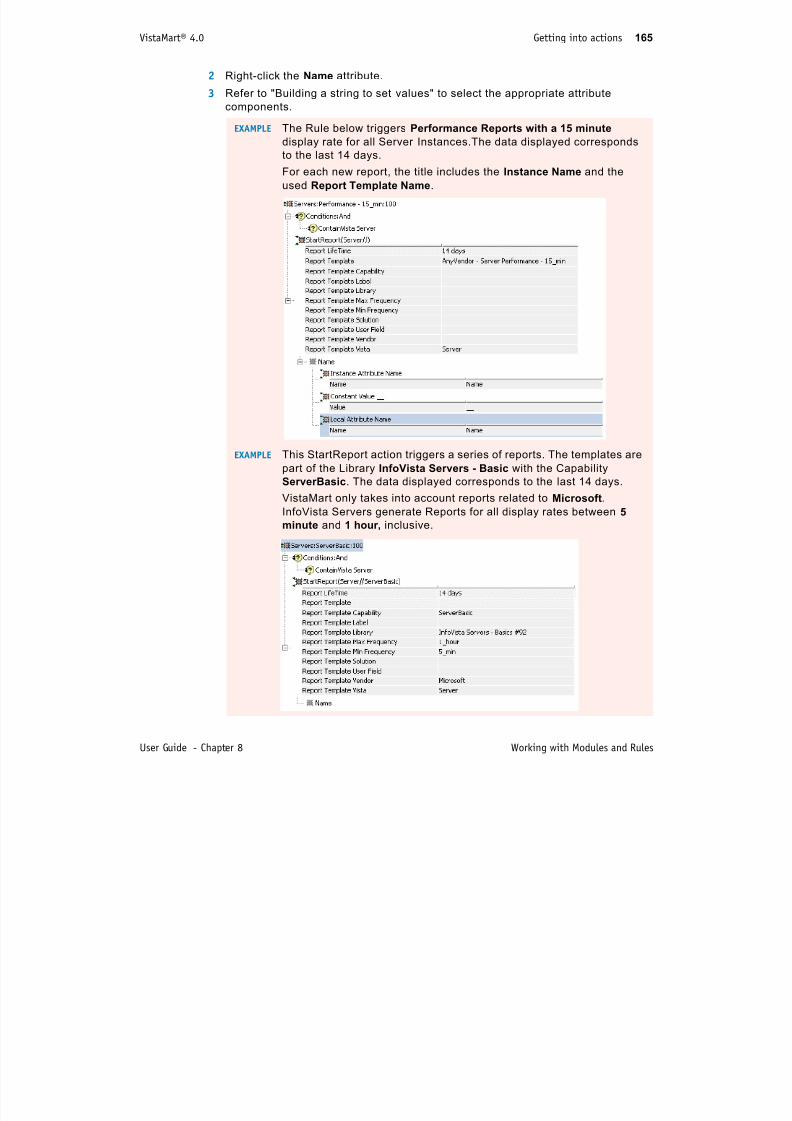
7/17/2019 VistaMart User Guide
http://slidepdf.com/reader/full/vistamart-user-guide 165/265
User Guide - Chapter 8 Working with Modules and Rules
EXAMPLE This StartReport action triggers a series of reports. The templates are
part of the Library InfoVista Servers - Basic with the Capability
ServerBasic. The data displayed corresponds to the last 14 days.
VistaMart only takes into account reports related to Microsoft.
InfoVista Servers generate Reports for all display rates between 5
minute and 1 hour, inclusive.
VistaMart® 4.0 Getting into actions 166
‘Write comments’
This feature allows you to describe one or more actions. This is particularly useful if
you export Rules to other VistaMart environments or if other users have access to
your VistaMart Inventory configuration.

7/17/2019 VistaMart User Guide
http://slidepdf.com/reader/full/vistamart-user-guide 166/265
User Guide - Chapter 8 Working with Modules and Rules
VistaMart® 4.0 Working with Rules 167
Working with Rules
Once you create or modify Rules, you must apply them in the VistaMart Inventory
Manager in order for it to take them into account.
Apply ing a Rule a ffects your VistaMart database: it can add or modify exis tingInstances, Property Values and Reports.
For example, if a Rule starts reports for Instances with specific Properties and you
use another Rule to modify the conditional Properties, the Reports using the original
Properties are suspended.
"Applying or Reapplying Rules"
"Enabling/disabling and removing Rules"
’Using ‘resource activation’’ (p. 169)
Applying or Reapplying Rules
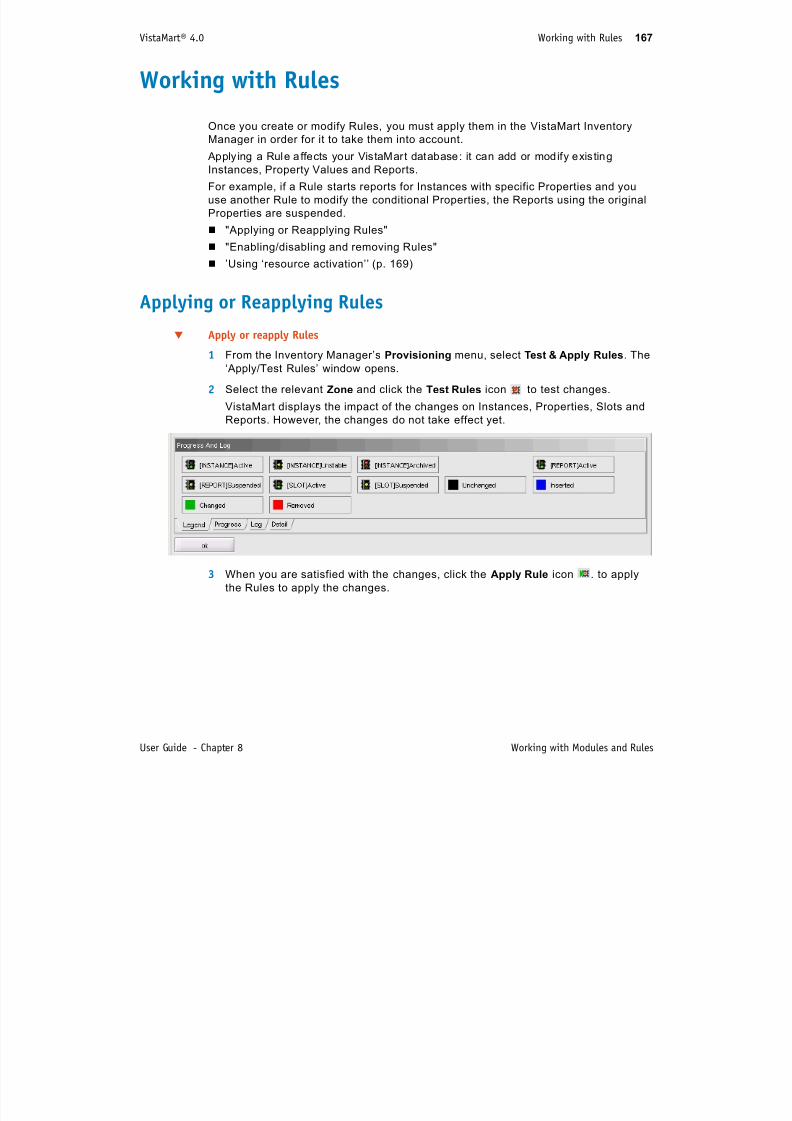
7/17/2019 VistaMart User Guide
http://slidepdf.com/reader/full/vistamart-user-guide 167/265
User Guide - Chapter 8 Working with Modules and Rules
Apply or reapply Rules
1 From the Inventory Manager’s Provisioning menu, select Test & Apply Rules. The
‘Apply/Test Rules’ window opens.
2 Select the relevant Zone and click the Test Rules icon to test changes.VistaMart displays the impact of the changes on Instances, Properties, Slots and
Reports. However, the changes do not take effect yet.
3 When you are satisfied with the changes, click the Apply Rule icon . to apply
the Rules to apply the changes.
VistaMart® 4.0 Working with Rules 168
Enabling/disabling and removing RulesYou can disable Rules at three levels in the VistaMart Inventory Manager by
selecting:
> the top-level Rules node,
> a specific VistaMart Library (this disables all Rules contained in the Library).
> all Rules which share the same name (for example: Rules contained in the
’RouterRE’ directory).
> the Rule itself as defined in the combination of Name/Priority level.
Disable and enable Rules for a Library
1 In the Inventory Manager, click the Model View tab.
2 Select the Rule you want to modify from the relevant VistaMart Library.
3 Right click the Rule in the Tree List and select Disable/Enable.
Remove a Rule
1 In the Inventory Manager click the Model View tab

7/17/2019 VistaMart User Guide
http://slidepdf.com/reader/full/vistamart-user-guide 168/265
User Guide - Chapter 8 Working with Modules and Rules
1 In the Inventory Manager, click the Model View tab.
2 Expand the Rules directories in the Library that contains the Rule.
3 Right-click the Rules icon and select Delete.
VistaMart® 4.0 Working with Rules 169
Using ‘resource activation’Resource activation is a VistaMart function that allows you to enable or disable
selectively one or several attributes that specific Rules use as filtering criteria at any
time or for any particular Zone.
This function assumes that you already created, edited, tested, and applied your
Rules.This function provides the flexibility of defining and saving as many ‘activation
configurations’ as necessary, which you can apply according to your requirements.
Set a new activation configuration
1 From the Browser View, expand the Zone node and click the appropriate Zone.
The right pane displays the Zone attributes.
2 Click the button next to the Resource Activation option.
The Resource Activation window opens. By default, all resources in all filtering
categories are enabled.
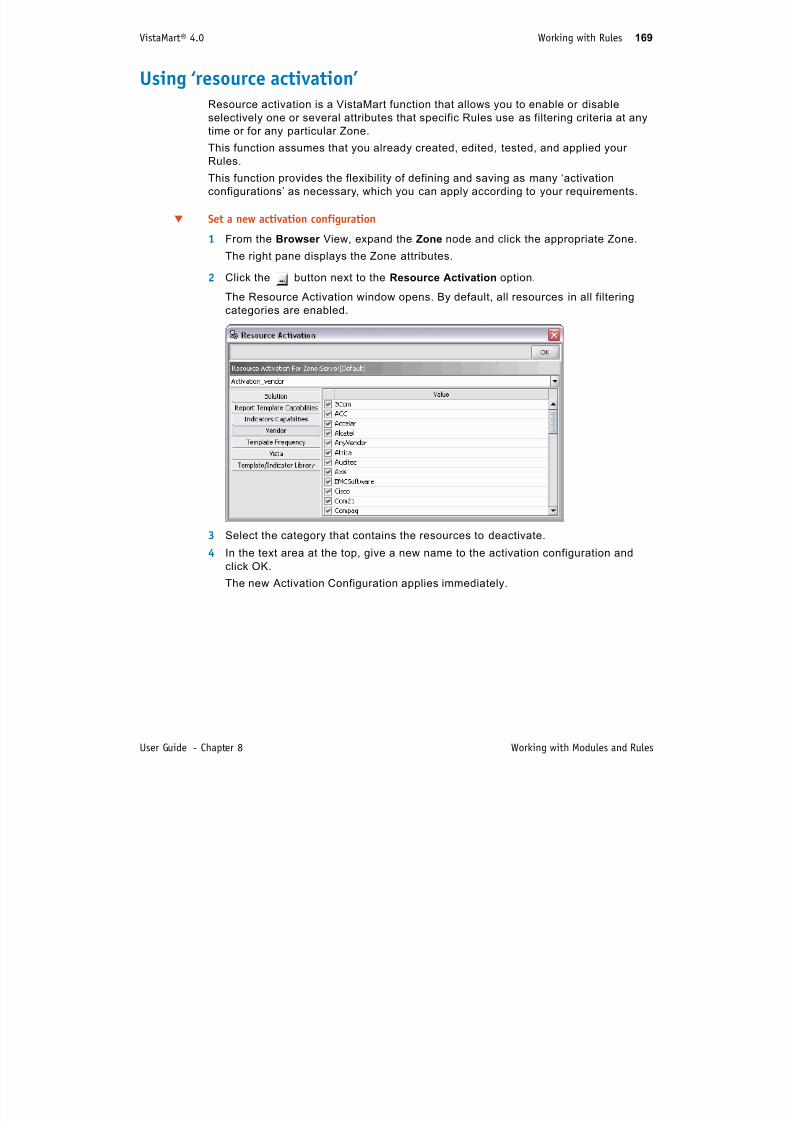
7/17/2019 VistaMart User Guide
http://slidepdf.com/reader/full/vistamart-user-guide 169/265
User Guide - Chapter 8 Working with Modules and Rules
3 Select the category that contains the resources to deactivate.
4 In the text area at the top, give a new name to the activation configuration and
click OK.
The new Activation Configuration applies immediately.
VistaMart® 4.0 Putting Rules inside Modules 170
Putting Rules inside Modules
Modules is another VistaMart object whose purpose is to act as a ‘container’ for
Rules responsible for a specific type of reporting solution, e.g. a given technology or
type of device.
Modules facilitate the customization and evolution of InfoVista solutions by their
intrinsic attachment to a VistaMart Library instead of to the Libraries packaged with
the solution itself.
CUSTOMIZATION OF A REPORTING SOLUTION The VistaInsight solutions depend on data
processed by the VistaMart Inventory Manager using Rules developed with the
VistaViews for the solution.
In this context, you can create or modify Rules to customize your reporting needs.
However, with the advent of each new version of a VistaInsight version, your changesno longer have any effect because the updated VistaViews do not take into account
your modifications.
To facilitate customization, Rules now belong inside Modules within VistaMart instead
of being part of the solution VistaViews. Henceforth, the customization takes place in
7/17/2019 VistaMart User Guide
http://slidepdf.com/reader/full/vistamart-user-guide 170/265
User Guide - Chapter 8 Working with Modules and Rules
of being part of the solution VistaViews. Henceforth, the customization takes place in
the user VistaViews (in VistaMart) rather than the solution VistaViews. This makes it
possible to keep the changes you made in order to preserve its previous
customization.
MODULES AND VISTAVIEWS By definition, a Module is linked to a specific VistaView.Nevertheless, you can define the Rules associated to a Module in any VistaMart
VistaView (for which you have ‘write’ access’) as described in the previous sections.
This function, though flexible, necessarily creates dependencies between VistaViews
due to the link between a Rule and its associated Module. A dependency exists
between the VistaView where you defined the Rule and the VistaView in which the
Module belongs.
To maintain compatibility with existing VistaViews, it is not mandatory that you define
a Module to associate with a Rule.
All Rules that do not belong to a specific Module go into a ‘default’ Module. VistaMart
executes the Rules in the default Module after those in other Modules.
MODULE PRIORITY A Module has a predefined priority. VistaMart executes the Rules
associated to a Module according to the Module’s priority.
MODULE SCOPE There are two ways to execute the Rules in a Module:
> Global: VistaMart activates the Module at all times. For example, a VistaInsight for
Servers solution requires that VistaMart always executes the Servers KPI Modulewhen a server figures in the topology file.
> Rules: VistaMart activates the Module only when a Rule calls for its activation. For
example, a Rule in an IPT solution can request the execution of the Module
containing the VIS KPIs for its Call Manager reporting.
VistaMart® 4.0 Putting Rules inside Modules 171
MODULE USER SCOPE This scope allows users to refine further the scope in which to
apply the Module by changing the ‘Global’ scope to the ‘Rules’ scope.
The activation of Modules must conform to the following constraints:
> VistaMart can apply a Module defined with a default activation state ‘Global’ as
‘Rules’ to reduce the reporting load.
> However, it cannot apply a Module with ‘Rules’ as a default activation state to
‘Global’.
Working with ModulesTo set up Modules in VistaMart, you organize the Rules following a prescribed
hierarchy.
> Modules priority
> Rule names (block) in alphabetical order
> Priority (descending rule priority)
Create a Module
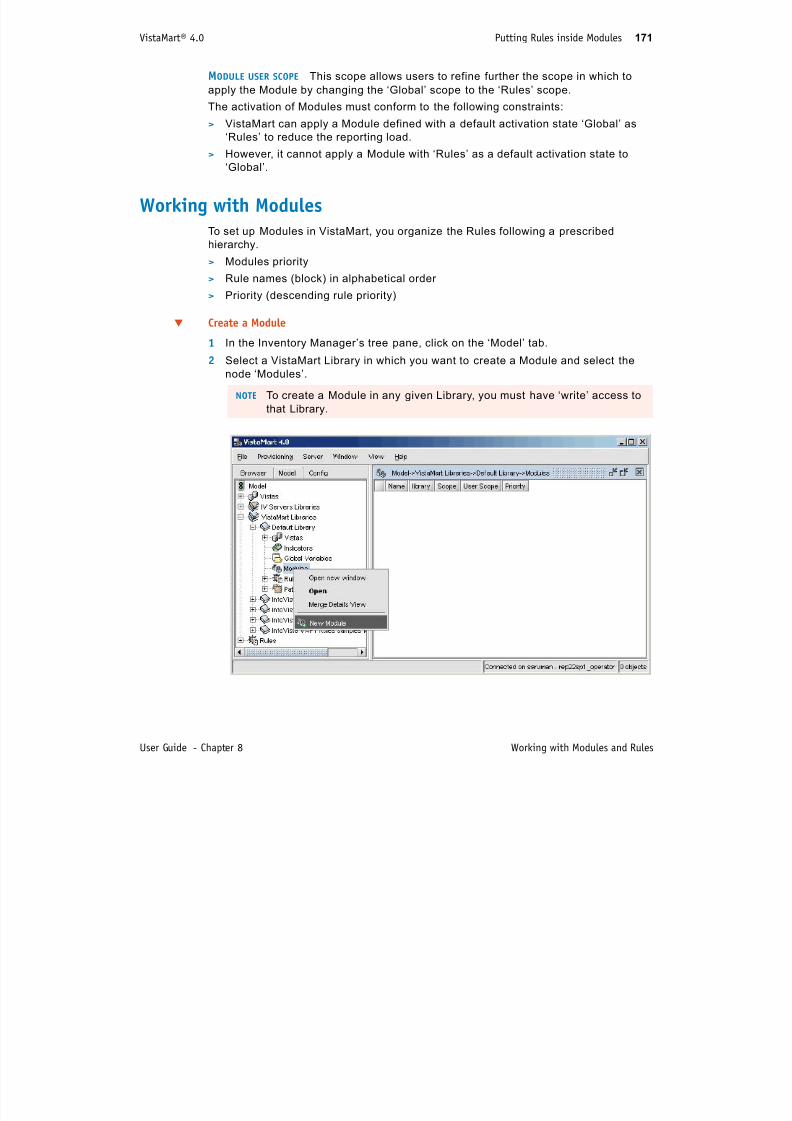
7/17/2019 VistaMart User Guide
http://slidepdf.com/reader/full/vistamart-user-guide 171/265
User Guide - Chapter 8 Working with Modules and Rules
1 In the Inventory Manager’s tree pane, click on the ‘Model’ tab.
2 Select a VistaMart Library in which you want to create a Module and select the
node ‘Modules’.
NOTE To create a Module in any given Library, you must have ‘write’ access tothat Library.
VistaMart® 4.0 Putting Rules inside Modules 172
3 Right-click it to display a short-cut menu and select ‘New Module’. A wizard
(Module editor) appears.
4 Fill in the following information:
• The Library name from the drop-down list. (This list contains all the Libraries
for which you have ‘write’ access.)• Enter a name for your Module.
• Enter a short description for the Module’s objective.
• Choose a scope (‘Global’ or ‘Rules’) for your Module. See ’Module scope’
( 170) f f th d t il b t

7/17/2019 VistaMart User Guide
http://slidepdf.com/reader/full/vistamart-user-guide 172/265
User Guide - Chapter 8 Working with Modules and Rules
(p. 170) for further details about scope.
• Enter a number of priority for your Module. The priority works in descending
order; for example, VistaMart executes a 300-priority Module before a 100-
priority Module. There is no limit to the priority number that you can assign to a
Module.
5 Click ‘Finish’ to exit the wizard. Your Module now appears under the ‘Modules’
node in the tree view.
Associate a Rule to a Module
1 In the Inventory Manager’s tree pane, click on the ‘Model’ tab.
2 You can either:
• create a new Rule as described in ’Creating a new Rule’ (p. 135) or
• expand the Rules node and select an existing Rule.
3 In the Rule Editor, select from the drop-down list a Module to which you want to
associate your Rule.
Your Module now contains a Rule and is visible under the ‘Rules’ node in the treeview.
NOTE If you choose an existing Rule that already belongs to another Module,
you dissociate it from its old Module and associate it to the new Module.
VistaMart® 4.0 Putting Rules inside Modules 173
‘Activate Module’
VistaMart does not automatically activate a Module unless there is a specific Rule
that tells to do so
Create a Rule to activate the Module
1 Create a new Rule in the Rule Editor as described in ’Creating a new Rule’
(p. 135).
2 In the Rule Editor, right-click the Rule and select ‘Add Action’, then ‘Activate
Module’.
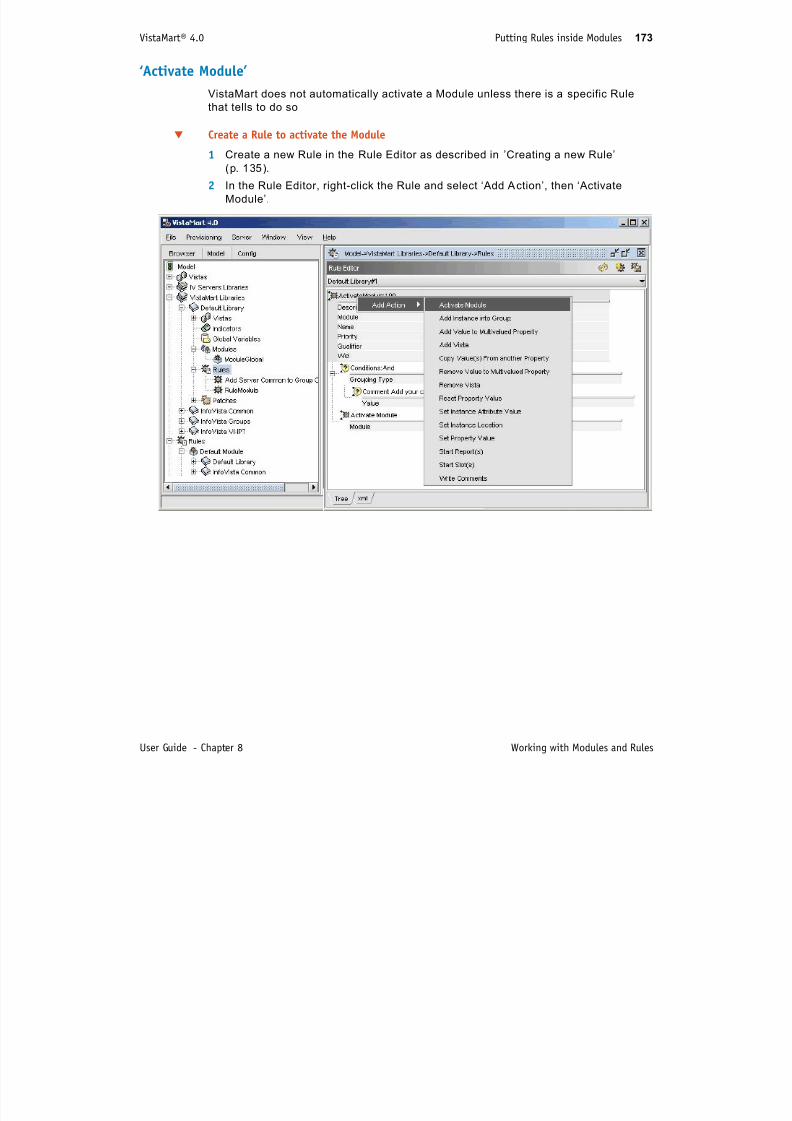
7/17/2019 VistaMart User Guide
http://slidepdf.com/reader/full/vistamart-user-guide 173/265
User Guide - Chapter 8 Working with Modules and Rules
VistaMart® 4.0 Putting Rules inside Modules 174
3 Specify the Module to activate using this Rule. VistaMart only activates the Module
only the Instance fulfills the conditions for the Rule.
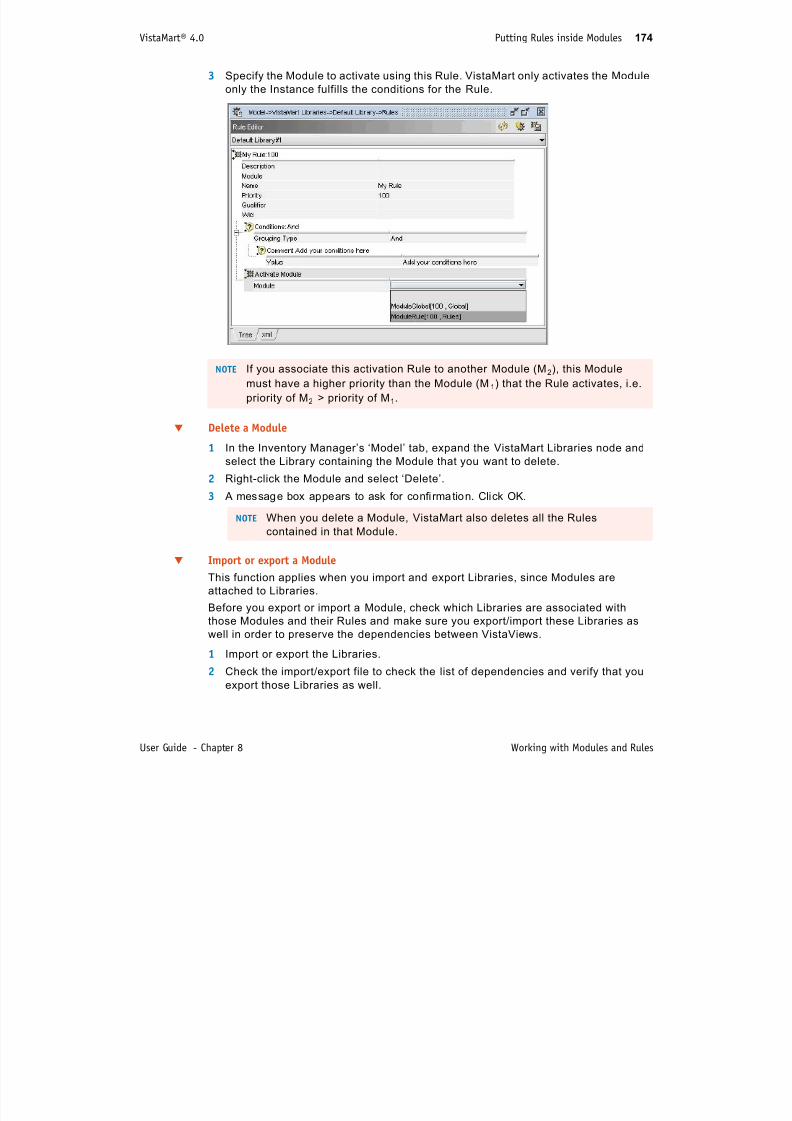
7/17/2019 VistaMart User Guide
http://slidepdf.com/reader/full/vistamart-user-guide 174/265
User Guide - Chapter 8 Working with Modules and Rules
Delete a Module
1 In the Inventory Manager’s ‘Model’ tab, expand the VistaMart Libraries node and
select the Library containing the Module that you want to delete.
2 Right-click the Module and select ‘Delete’.
3 A message box appears to ask for confi rmation. Click OK.
Import or export a Module
This function applies when you import and export Libraries, since Modules are
attached to Libraries.
Before you export or import a Module, check which Libraries are associated with
those Modules and their Rules and make sure you export/import these Libraries aswell in order to preserve the dependencies between VistaViews.
1 Import or export the Libraries.
2 Check the import/export file to check the list of dependencies and verify that you
export those Libraries as well.
NOTE If you associate this activation Rule to another Module (M2), this Module
must have a higher priority than the Module (M 1) that the Rule activates, i.e.
priority of M2 > priority of M1.
NOTE When you delete a Module, VistaMart also deletes all the Rules
contained in that Module.
9 Handling events in VistaMart
From a reporting solution’s point of view, an event signals an abnormal occurrence in
the normal working process and assists users in locating and remedying the problemas necessary.
This section explains the concept of event generation and its filtering system. It also
gives instructions on how to develop formulas using specific operators to generate
events.
7/17/2019 VistaMart User Guide
http://slidepdf.com/reader/full/vistamart-user-guide 175/265
175
"Purpose of generating events" on page 176
"Determining how wrong and for how long (why)" on page 179
"Developing formulas to generate events" on page 184
"Purging events" on page 205
VistaMart® 4.0 Purpose of generating events 176
Purpose of generating events
The objectives of generating events are to:
To meet these objectives, a dashboard displays a list of events (i.e. for networks,
servers, site, or customers) that experience problems such as threshold violation,trend, baseline deviation, etc.
Handling the event and trap flow in the VistaFoundation

7/17/2019 VistaMart User Guide
http://slidepdf.com/reader/full/vistamart-user-guide 176/265
User Guide - Chapter 9 Handling events in VistaMart
Events generated from InfoVista Servers arrive in VistaMart through the forwarding
service.
Events go out in ‘bursts’ for each display rate rather than an ‘as they come’ basis to
optimize network bandwidth.
VistaMart treats events and traps as data values in order to make recovery requests
on them whenever required.
The diagram below gives an overview of event/trap flows:
VistaMart® 4.0 Purpose of generating events 177
Viewing events in VistaPortalEvents represent data over a specific period of time on which we focus to analyze a
typical system behavior.
VistaPortal displays a consolidated view of events from the elements for which it
provides reporting based on:
> A group Instance from the inventory> Events raised for the group elements
OBJECT NAVIGATOR Using the Object Navigator, you can display for given instances:
> the maximum severity for events at a time ‘t’ (active severity)
> the maximum severity for events over a period (historical severity)
FILTERING EVENTS WITH THE EVENT LIST DISPLET From the list of events, the user can drill-
down to specific reports for additional information.

7/17/2019 VistaMart User Guide
http://slidepdf.com/reader/full/vistamart-user-guide 177/265
User Guide - Chapter 9 Handling events in VistaMart
> The event list displays a list of events for a given instance or a group of instances.
> The list of events is derived from the instance or a group of instances on which the
user is focusing (navigating)
To avoid displaying a potentially high number of events from the monitored elements,
the dashboard prioritizes them by severity or function.
ASSOCIATING EVENTS WITH INDICATORS WITH THE GRAPH-ON-DEMAND DISPLET VistaPortal’s
‘graph on demand’ displet displays the event’s maximum severity synthesis (i.e.
global state) over time. The result is shown on a curve when you synchronize theinstance.
In this displet, a given event is automatically linked to the primary indicator at the
source of this event. It also displays complementary information such as the
associated threshold and baseline indicator.
VistaMart® 4.0 Purpose of generating events 178
Defining eventsTechnically, an event reflects a period of time over which data deviates from normal
system behavior.
In order to generate an event, it must be raised:
> by an Instance
> on a primary Indicator
> for a defined period of time
EVENT LIFE CYCLE An event remains act ive until the condit ion which triggered it
becomes false.
> An event is raised (starts) when a given condition (from a formula) becomes true
> The event stops when the condition is no longer true
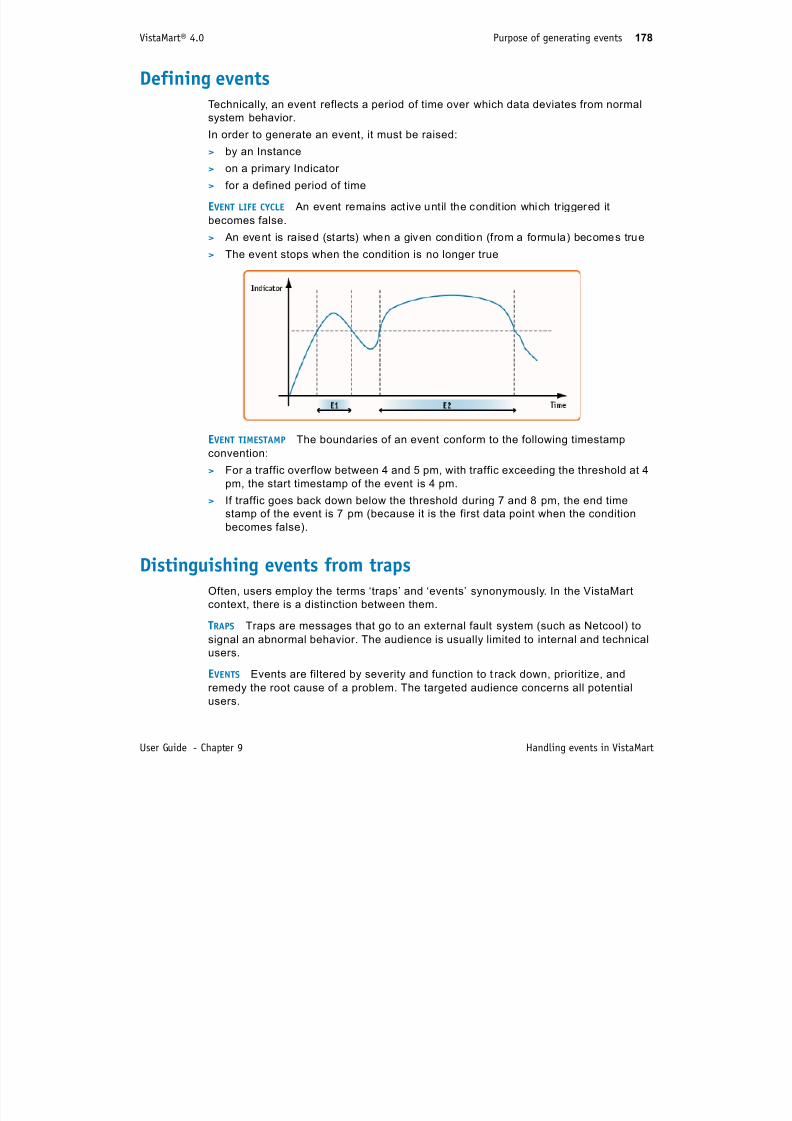
7/17/2019 VistaMart User Guide
http://slidepdf.com/reader/full/vistamart-user-guide 178/265
User Guide - Chapter 9 Handling events in VistaMart
EVENT TIMESTAMP The boundaries of an event conform to the following timestamp
convention:
> For a traffic overflow between 4 and 5 pm, with traffic exceeding the threshold at 4
pm, the start timestamp of the event is 4 pm.
> If traffic goes back down below the threshold during 7 and 8 pm, the end time
stamp of the event is 7 pm (because it is the first data point when the condition
becomes false).
Distinguishing events from trapsOften, users employ the terms ‘traps’ and ‘events’ synonymously. In the VistaMart
context, there is a distinction between them.
T RAPS Traps are messages that go to an external fault system (such as Netcool) tosignal an abnormal behavior. The audience is usually limited to internal and technical
users.
EVENTS Events are filtered by severity and function to t rack down, prioritize, and
remedy the root cause of a problem. The targeted audience concerns all potential
users.
VistaMart® 4.0 Determining how wrong and for how long (why) 179
Determining how wrong and for how long (why)
When determining events, the time span is a key factor.
A list of events identif ied only with a timestamp, severity, and machine name does not
go far in helping the system administrator determine what damage was done, for how
long, and to what extent.
In order to be meaningful, it is essential to know which indicator (i.e. CPU, availability,
etc.) raised the event and the length of time during which it persisted.
For example, the usage of a CPU can reach 100% at any one instant during a given
period and this would not be cause for alarm. However, if the CPU usage remains
consistently at 100% over more than half that entire period, then it is possible that
there is a CPU overload, and hence cause for alarm.
To do this analysis, we apply a ‘time frame window’ and a ‘ condition window’ to focus
on the period over which the event occurred.
A ‘TIME FRAME WINDOW’ is an interval of time under focus on for a certain indicator.
A CONDITION ‘WINDOW’ is the length of time that the condition that triggered the event
on this indicator remains true.
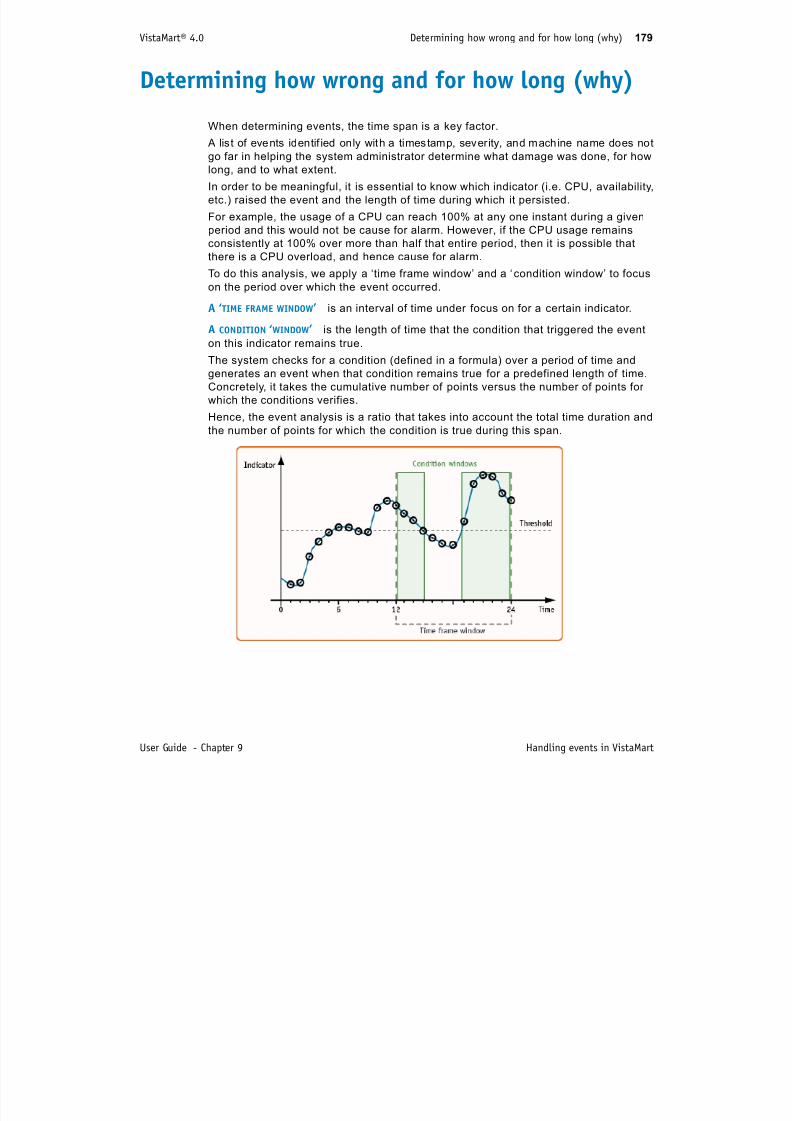
7/17/2019 VistaMart User Guide
http://slidepdf.com/reader/full/vistamart-user-guide 179/265
User Guide - Chapter 9 Handling events in VistaMart
The system checks for a condition (defined in a formula) over a period of time and
generates an event when that condition remains true for a predefined length of time.
Concretely, it takes the cumulative number of points versus the number of points for
which the conditions verifies.
Hence, the event analysis is a ratio that takes into account the total time duration and
the number of points for which the condition is true during this span.
VistaMart® 4.0 Determining how wrong and for how long (why) 180
This method of event analysis has another major advantage: by using the time frame
and condition windows, we can exclude repetitive event generation when the indicator
continuously vacillates around a threshold:
> Without the time consideration events get continually generated as soon as an

7/17/2019 VistaMart User Guide
http://slidepdf.com/reader/full/vistamart-user-guide 180/265
User Guide - Chapter 9 Handling events in VistaMart
> Without the time consideration, events get continually generated as soon as an
Indicator either approaches or exceeds a threshold
> Using the time span analysis, only one event is raised after determining that this
Indicator already exceeded the threshold for a longer duration than acceptable
(e.g. after a certain number of data points exceeded the threshold).
Establishing event durationThe system generates an event using the time frame and condition window analysis.
It moves the time frame window over successive timestamps to check if the condition
that raised the event for this Indicator remains true.The event continues to be active until the condition becomes false. The period
between the first time stamp and last time stamp during which the event is active
constitutes the validity period for the event.
VistaMart® 4.0 Determining how wrong and for how long (why) 181
Classifying events by typeFrom a reporting solution perspective, it is possible to have several ‘types’ of events
adapted to the context of the customer, such as:
> Events on baseline for troubleshooting. Typically these events are related to
saturation, overload, or abnormal deviation from a baseline
> Events on time-to-thresholds for capacity planning purposes> Events on availability and performance for Service Level Agreements (SLA) that
have an impact on the service contract
Hence, the type of event is related to the formula used to trigger the event, and
specifically the types of operators used to generate the event.
EVENTS ON BASELINE The principle is the following:
> An indicator value is compared to its basel ine value ( i.e . the average value for the
same hour over x days, shown by the plain line)> A ‘tunnel’, i.e . the leeway between a threshold and the basel ine value, is defined
> If the indicator value is over the threshold, the system generates an event.

7/17/2019 VistaMart User Guide
http://slidepdf.com/reader/full/vistamart-user-guide 181/265
User Guide - Chapter 9 Handling events in VistaMart
VistaMart® 4.0 Determining how wrong and for how long (why) 182
EVENTS ON TIME-TO-THRESHOLD The principle is the following:
> Using a trend analysis of past data values, VistaMart calculates for a given
indicator the number of days left before the real value is expected to reach the
threshold.
> If the number of days remaining reaches a value that is below a threshold (for
example, 10 days), the system generates an alarm. A typical example is the disk
space on a SAN.
EVENTS ON AVAILABILITY AND PERFORMANCE This is the simplest type of event:

7/17/2019 VistaMart User Guide
http://slidepdf.com/reader/full/vistamart-user-guide 182/265
User Guide - Chapter 9 Handling events in VistaMart
> When an indicator value goes over or below a threshold, an event is generated.
> It is possible to have several thresholds with different severities associated to
them.
VistaMart® 4.0 Determining how wrong and for how long (why) 183
Applying a severity level to an event An event is always associated to a severity (e.g. info, minor, major, fatal , cri tical) .
An event can switch to dif ferent severit ies over time.
Identifying an event with a unique keyTo identify an event the system uses a unique key that comprises:
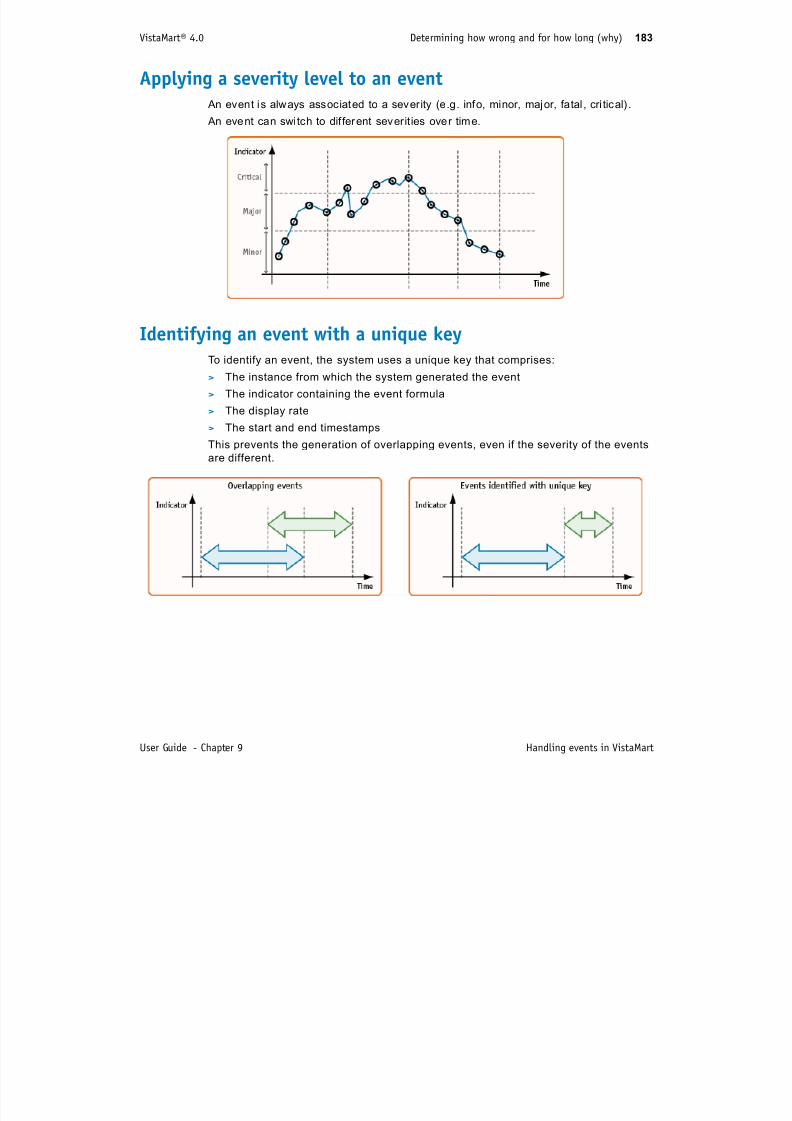
7/17/2019 VistaMart User Guide
http://slidepdf.com/reader/full/vistamart-user-guide 183/265
User Guide - Chapter 9 Handling events in VistaMart
To identify an event, the system uses a unique key that comprises:
> The instance from which the system generated the event
> The indicator containing the event formula> The display rate
> The start and end timestamps
This prevents the generation of overlapping events, even if the severity of the events
are different.
VistaMart® 4.0 Developing formulas to generate events 184
Developing formulas to generate events
The following sections give details about event parameters, attributes, and operators
when writing formulas to generate events. It also gives the precise syntax and
examples for each operator.
Applying specific conditions to send eventsThe system raises an event when a condition in a formula becomes true. There are
several applicable conditions, listed in the table below:
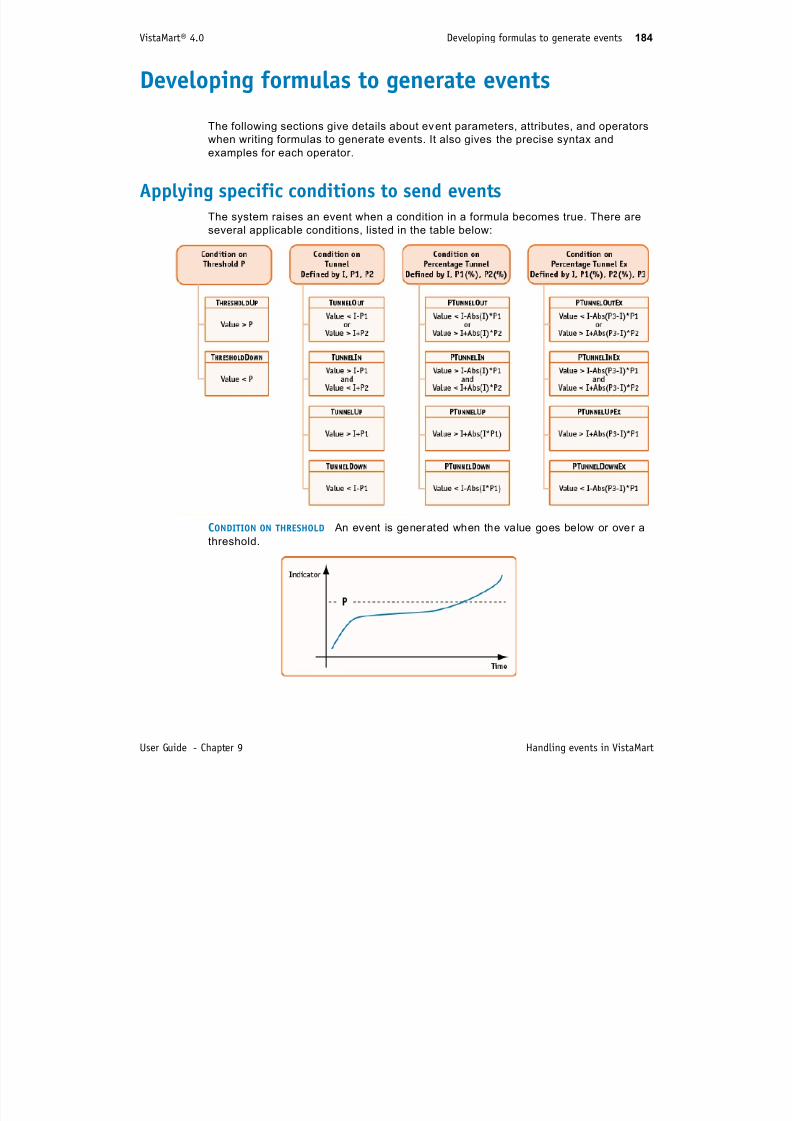
7/17/2019 VistaMart User Guide
http://slidepdf.com/reader/full/vistamart-user-guide 184/265
User Guide - Chapter 9 Handling events in VistaMart
CONDITION ON THRESHOLD An event is generated when the value goes below or over a
threshold.
VistaMart® 4.0 Developing formulas to generate events 185
CONDITION ON TUNNEL USING A CONSTANT MARGIN ‘P1’ An event is generated if the value is
outside of a tunnel defined by a baseline (in blue), plus or minus a constant P1 and
P2. P1 defines the upper tunnel and P2 the lower tunnel.
The following case scenarios are possible:
> The indicator value is inside the tunnel
> The indicator value is outside the tunnel
> The indicator value is under the tunnel
> The indicator value is over the tunnel
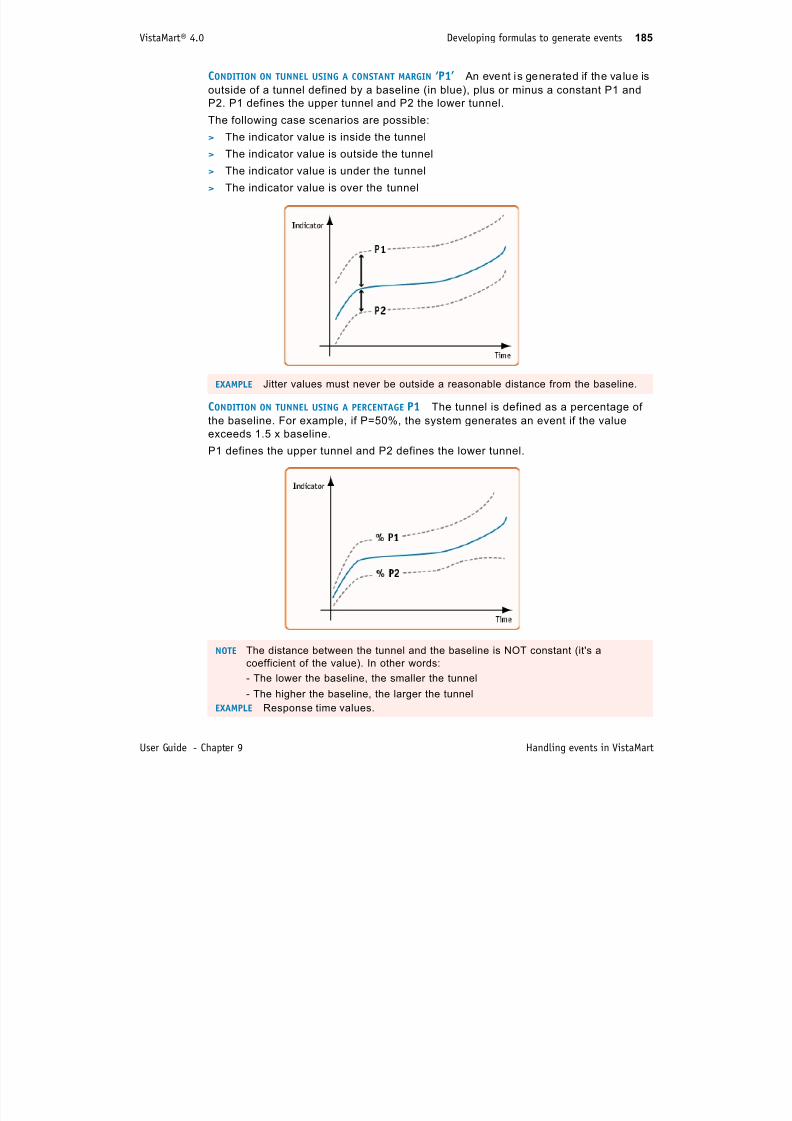
7/17/2019 VistaMart User Guide
http://slidepdf.com/reader/full/vistamart-user-guide 185/265
User Guide - Chapter 9 Handling events in VistaMart
CONDITION ON TUNNEL USING A PERCENTAGE P1 The tunnel is defined as a percentage of
the baseline. For example, if P=50%, the system generates an event if the value
exceeds 1.5 x baseline.
P1 defines the upper tunnel and P2 defines the lower tunnel.
EXAMPLE Jitter values must never be outside a reasonable distance from the baseline.
NOTE The distance between the tunnel and the baseline is NOT constant (it's a
coefficient of the value). In other words:
- The lower the baseline, the smaller the tunnel
- The higher the baseline, the larger the tunnel
EXAMPLE Response time values.
VistaMart® 4.0 Developing formulas to generate events 186
CONDITION ON T UNNEL USING A PERCENTAGE P1 AND A THRESHOLD The tunnel principle is
identical to the previous case, except that the reference is not 0, but a reference
value:
> The closer the baseline is to the reference value, the smaller the tunnel
> The further the baseline is from the reference value, the larger the tunnel
Defining event syntax
EXAMPLE Traffic monitoring, where P3 is the maximum capacity. If you are close to the
maximum capacity, you want to be warned that you are outside of the normal
baseline as soon as possible.
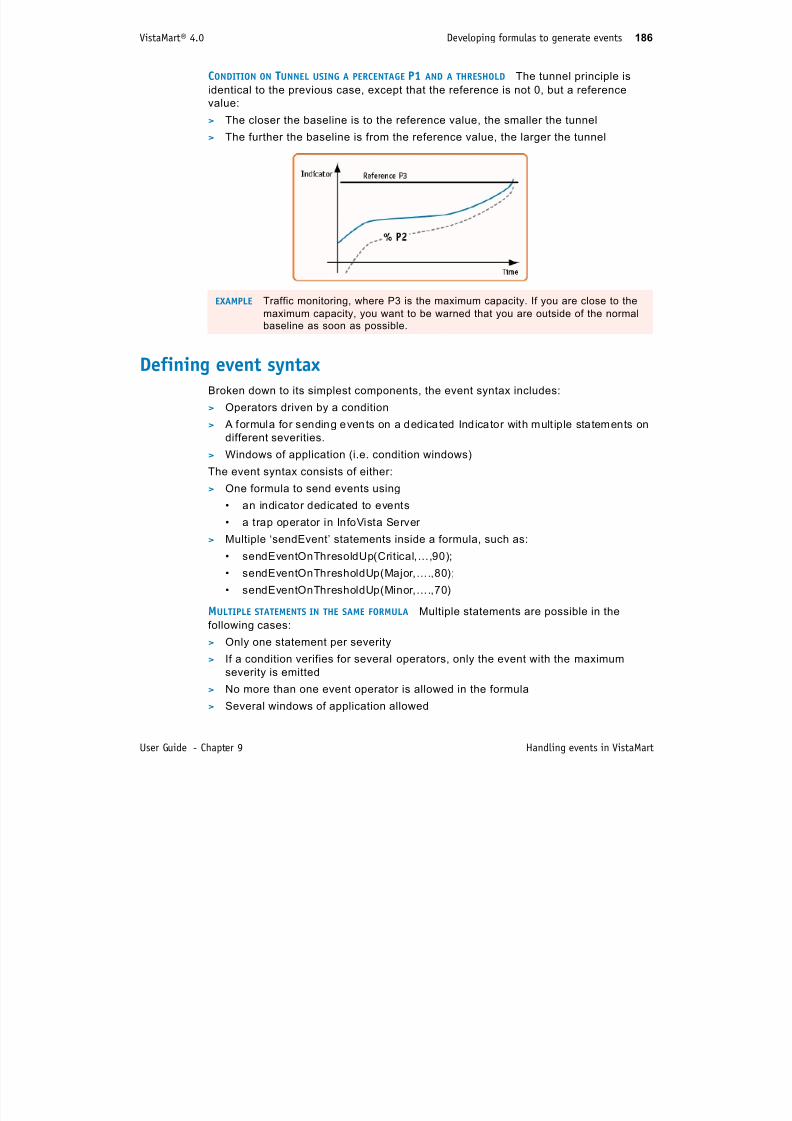
7/17/2019 VistaMart User Guide
http://slidepdf.com/reader/full/vistamart-user-guide 186/265
User Guide - Chapter 9 Handling events in VistaMart
Defining event syntax
Broken down to its simplest components, the event syntax includes:> Operators driven by a condition
> A formula for sending events on a dedicated Indicator with mult iple statements on
different severities.
> Windows of application (i.e. condition windows)
The event syntax consists of either:
> One formula to send events using
• an indicator dedicated to events• a trap operator in InfoVista Server
> Multiple ‘sendEvent’ statements inside a formula, such as:
• sendEventOnThresoldUp(Critical,…,90);
• sendEventOnThresholdUp(Major,….,80);
• sendEventOnThresholdUp(Minor,….,70)
MULTIPLE STATEMENTS IN THE SAME FORMULA Multiple statements are possible in the
following cases:> Only one statement per severity
> If a condition verifies for several operators, only the event with the maximum
severity is emitted
> No more than one event operator is allowed in the formula
> Several windows of application allowed
VistaMart® 4.0 Developing formulas to generate events 187
WINDOW OF APPLICATION
> For each ‘sendEvent’ operator, we define a window of application
> This window makes it possible to send an event only if the condition is true for N
times over a given period.
> This window includes two parameters:
• The size of the window consisting of a number of samples
• The validity count is in [1, size] and defines the number of TRUE conditions in
the window to trigger an event.
MANAGING MULTIPLE THRESHOLDS Multiple thresholds are deduced automatically from the
formula.
The thresholds are retrieved from all ‘sendEvent’ statements with the same indicator,
instance, and operator.
EVENT STRUCTURE An Event is uniquely ident ified by the following key:
> Instance
> Indicator
> Display rate (DR)
> Temporal interval (start + end)
Other parts of an event are invariant.
7/17/2019 VistaMart User Guide
http://slidepdf.com/reader/full/vistamart-user-guide 187/265
User Guide - Chapter 9 Handling events in VistaMart
EVENT ATTRIBUTES In addition to its key, an event contains a set of properties:
> The function (SLA/CP/TS/Unknown)
> The severity (Critical/Major/Minor/Warning)
> The conditional type of the event (with additional attributes depending on event
type)
> The description
> The type (InfoVista Server Trap, InfoVista Server event, VistaMart event, etc.)
> The end date (can be null if unknown)
> Event state (terminated or not)
> Event duration
> Various report template WIDs (only when the source is InfoVista Server)
HANDLING ERRORS When a value is bad, the condition is assumed to be FALSE (no
violation):
> The values are ignored
> The window is not extended
> The number of valid samples required to emit the event is not decreased
VistaMart® 4.0 Developing formulas to generate events 188
Using event operators> Events are composed of three things: Object(s) (Instance, Indicator), various
attributes and a temporal interval.
> Events are defined using the operation [x,P, t]. A unique event is defined by two
principles: the existence condition and the identity condition.
• The existence condition states “[x, P, t] exists if and only if object x exemplifiesthe n-adic P at time t”.
• This means a unique event exists if the above is met. The identity condition
states “[x, P, t] is [y, Q, t`] if and only if x=y, P=Q and t=t`].
COMMON EVENT PARAMETERS All event operators inc lude cer tain common parameters:
Window A global variable or a constant of type str ing which represents two
parameters. The format is “[int]/[int]”. The first integer represents
the [Application size] (in a number of period) and the second onethe [Window size] (in a number of period). The following
constraints apply:
> [Window Size] >= [Application Size]
> [Window Size] <= 32
> [Application Size] > 0
I di t t f i di t
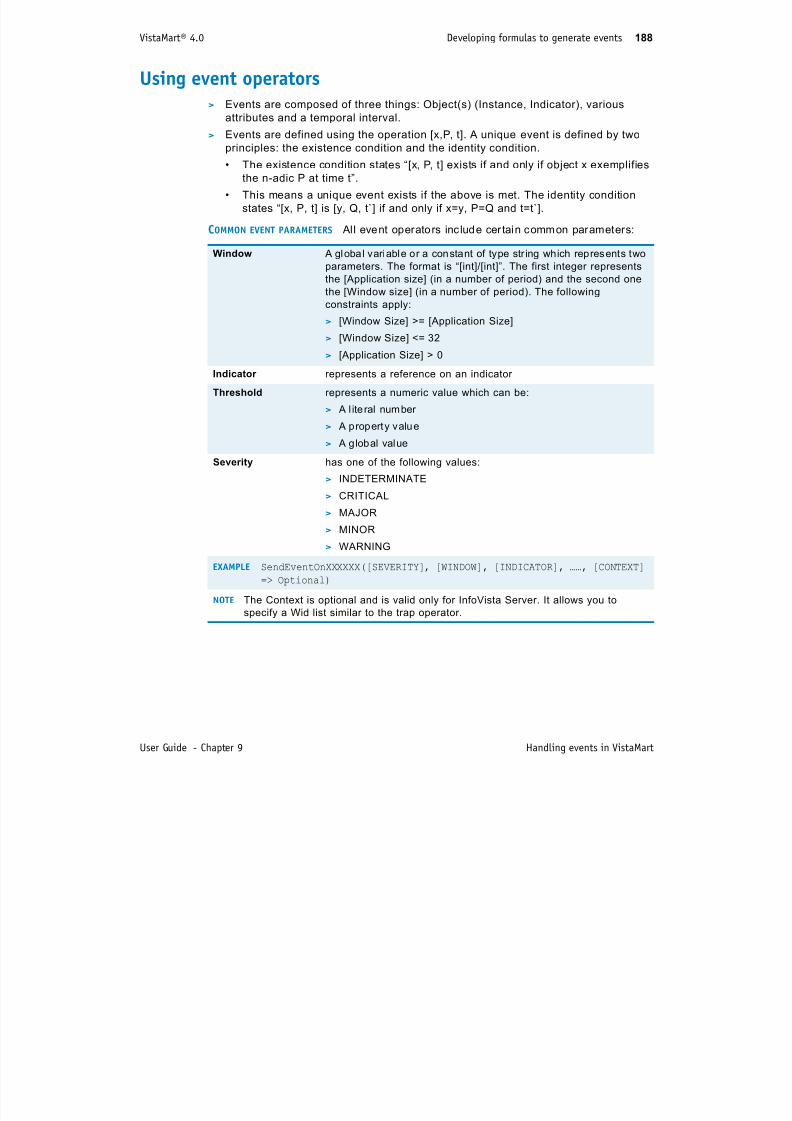
7/17/2019 VistaMart User Guide
http://slidepdf.com/reader/full/vistamart-user-guide 188/265
User Guide - Chapter 9 Handling events in VistaMart
Indicator represents a reference on an indicator
Threshold represents a numeric value which can be:> A l ite ral number
> A property value
> A global value
Severity has one of the following values:
> INDETERMINATE
> CRITICAL
> MAJOR
> MINOR
> WARNING
EXAMPLE SendEventOnXXXXXX([SEVERITY], [WINDOW], [INDICATOR], ……, [CONTEXT]
=> Optional)
NOTE The Context is optional and is valid only for InfoVista Server. It allows you to
specify a Wid list similar to the trap operator.
VistaMart® 4.0 Developing formulas to generate events 189
COMMON EVENT ATTRIBUTES If an operator has its conditions verified, it emits an event
which has at minimum the following attributes. Additional or variable attributes can be
specified for each operator.
ADDITIONAL COMMON ATTRIBUTES This list of attributes get added to each operator when
there is an event generated. Additional attributes are specified for each operator.
Severity [SEVERITY]
INSID The instance Ref where the event formula started
INSID The indicator Ref of the indicator which contains the event formulaTYPE Dependent on the process which generated the event
FUNCTION The function of the indicator that contains the event formula
PERIOD The period for which the event formula applies (in seconds)
TIMEZONE The timezone of the slot (status)
TIME The date rounded down to the period under evaluation.
Context A l ist of Wids (opt ional)
Reference Attribute Data Type
[Window] Constant or global
[Wi d ] C t t l b l
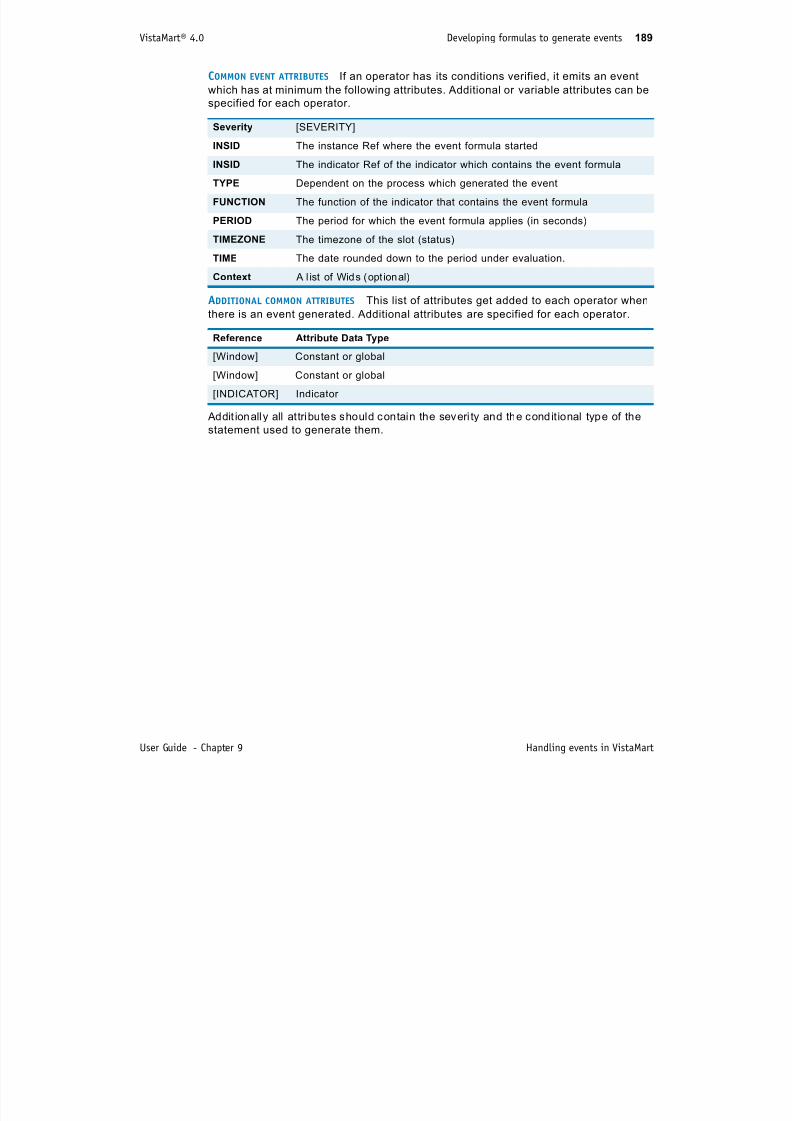
7/17/2019 VistaMart User Guide
http://slidepdf.com/reader/full/vistamart-user-guide 189/265
User Guide - Chapter 9 Handling events in VistaMart
Addit ionally all attributes should contain the severi ty and the conditional type of the
statement used to generate them.
[Window] Constant or global
[INDICATOR] Indicator
VistaMart® 4.0 Developing formulas to generate events 190
List of event operatorsThe following operators apply in formulas designed to generate events:
"sendEventOnThresholdDown()" on page 190
"sendEventOnThresholdUp()" on page 191
"sendEventOnTunnelUp()" on page 192
"sendEventOnTunnelDown()" on page 193
"sendEventOnTunnelIn()" on page 194
"sendEventOnTunnelOut()" on page 195
"sendEventOnPTunnelOut()" on page 196
"sendEventOnPTunnelIn()" on page 197
"sendEventOnPTunnelUp()" on page 198
"sendEventOnPTunnelDown()" on page 199
"sendEventOnPTunnelOutEx()" on page 200
"sendEventOnPTunnelInEx()" on page 201
"sendEventOnPTunnelUpEx()" on page 202
"sendEventOnPTunnelDownEx()" on page 203
sendEventOnThresholdDown()
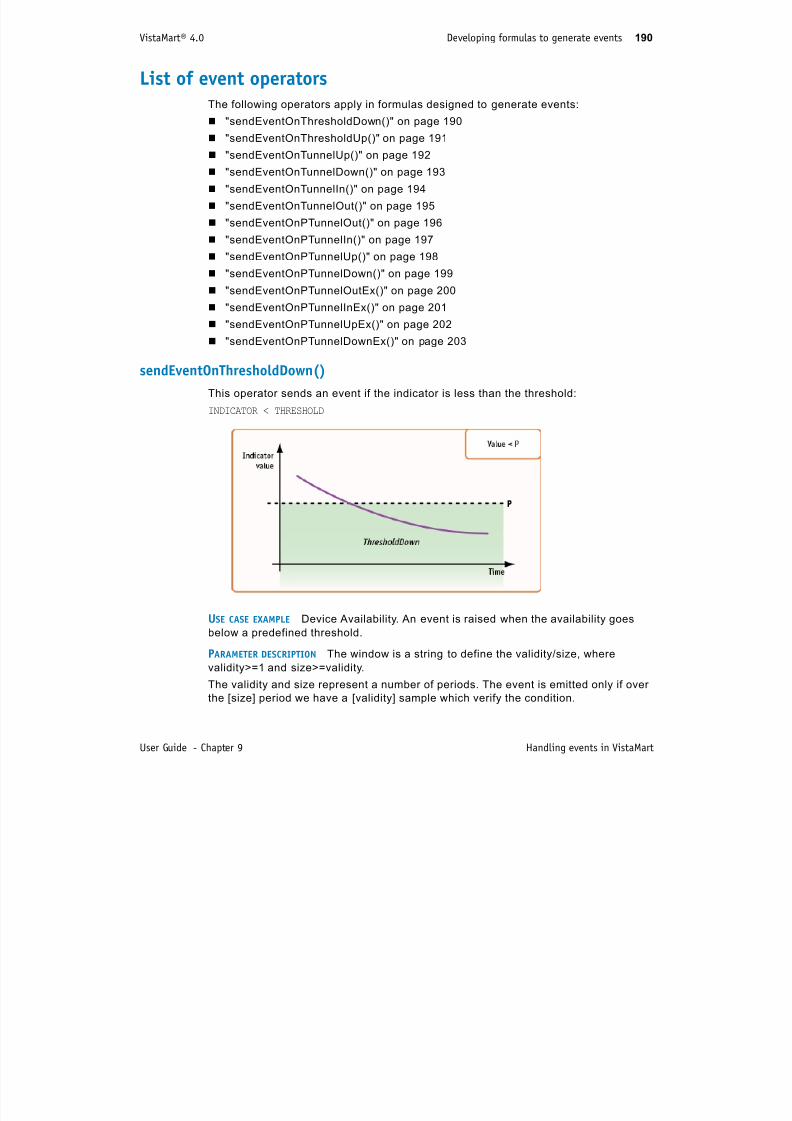
7/17/2019 VistaMart User Guide
http://slidepdf.com/reader/full/vistamart-user-guide 190/265
User Guide - Chapter 9 Handling events in VistaMart
sendEventOnThresholdDown()
This operator sends an event if the indicator is less than the threshold:INDICATOR < THRESHOLD
USE CASE EXAMPLE Device Availability. An event is raised when the availability goes
below a predefined threshold.
PARAMETER DESCRIPTION The window is a string to define the validity/size, where
validity>=1 and size>=validity.
The validity and size represent a number of periods. The event is emitted only if over
the [size] period we have a [validity] sample which verify the condition.
VistaMart® 4.0 Developing formulas to generate events 191
sendEventOnThresholdUp()
This operator sends an event if the indicator is greater than the threshold:
INDICATOR > THRESHOLD
Type Function
Reduction false
Syntax sendEventOnThresholdDown(SEVERITY,WINDOW,INDICATOR,THRESHOLD)
Severity NDETERMINATE, CRITICAL, MAJOR, MINOR, WARNING
Parameters window:[STRING][STRING_PROPERTY][STRING_GLOBAL]
indicator:[INDICATOR]
Threshold:[PROPERTY][GLOBAL][FLOAT]
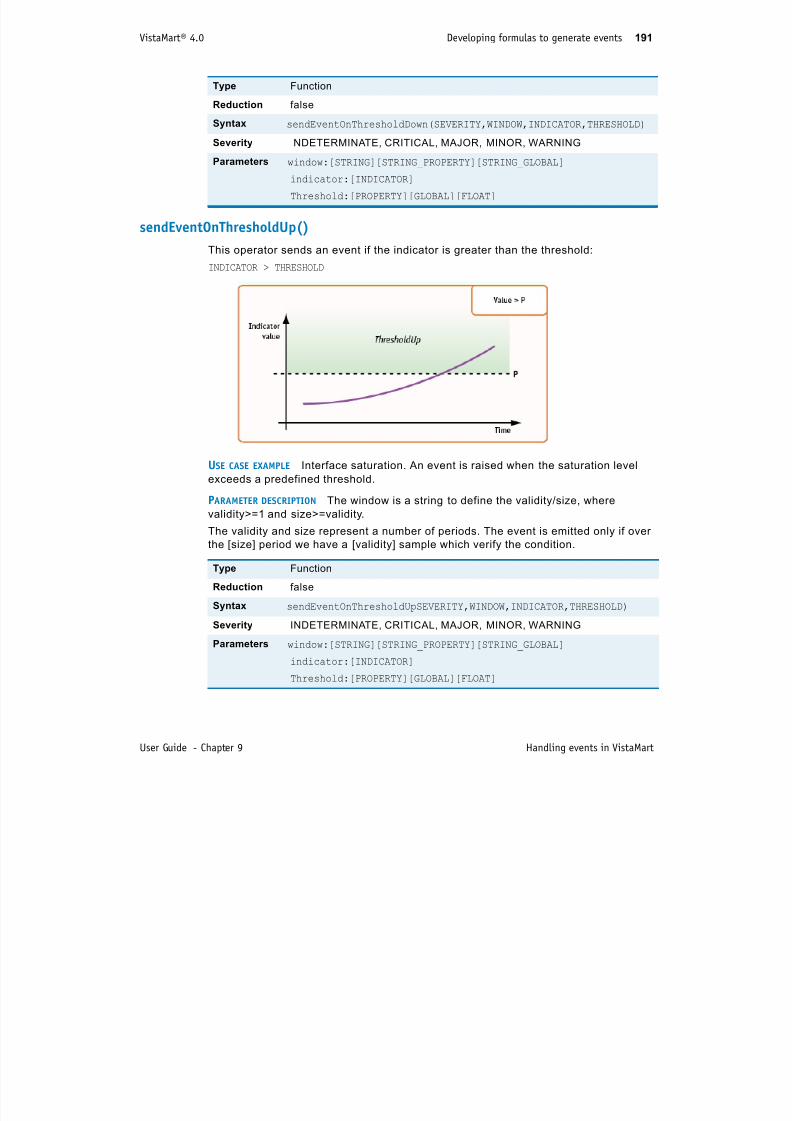
7/17/2019 VistaMart User Guide
http://slidepdf.com/reader/full/vistamart-user-guide 191/265
User Guide - Chapter 9 Handling events in VistaMart
USE CASE EXAMPLE Interface saturation. An event is raised when the saturation level
exceeds a predefined threshold.
PARAMETER DESCRIPTION The window is a string to define the validity/size, where
validity>=1 and size>=validity.
The validity and size represent a number of periods. The event is emitted only if over
the [size] period we have a [validity] sample which verify the condition.
Type Function
Reduction false
Syntax sendEventOnThresholdUpSEVERITY,WINDOW,INDICATOR,THRESHOLD)
Severity INDETERMINATE, CRITICAL, MAJOR, MINOR, WARNING
Parameters window:[STRING][STRING_PROPERTY][STRING_GLOBAL]
indicator:[INDICATOR]
Threshold:[PROPERTY][GLOBAL][FLOAT]
VistaMart® 4.0 Developing formulas to generate events 192
sendEventOnTunnelUp()
This operator sends an event if the indicator verifies the following condition:
[INDICATOR] > ([INDICATOR2] + [THRESHOLD])
USE CASE EXAMPLE Response time monitoring. We want to raise an event as soon as
the response time abnormally increases by a fixed value.
PARAMETER DESCRIPTION The window is a string to define the validity/size, where
validity>=1 and size>=validity.
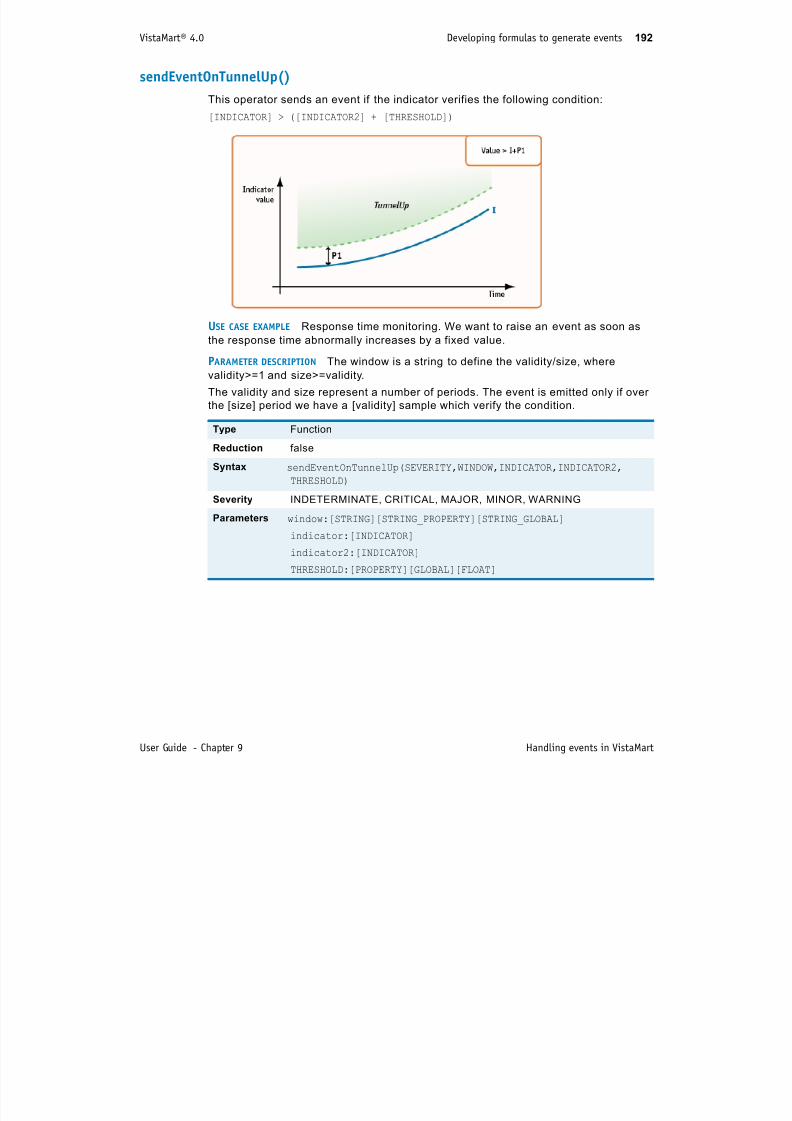
7/17/2019 VistaMart User Guide
http://slidepdf.com/reader/full/vistamart-user-guide 192/265
User Guide - Chapter 9 Handling events in VistaMart
validity 1 and size validity.
The validity and size represent a number of periods. The event is emitted only if overthe [size] period we have a [validity] sample which verify the condition.
Type Function
Reduction false
Syntax sendEventOnTunnelUp(SEVERITY,WINDOW,INDICATOR,INDICATOR2,
THRESHOLD)
Severity INDETERMINATE, CRITICAL, MAJOR, MINOR, WARNING
Parameters window:[STRING][STRING_PROPERTY][STRING_GLOBAL]
indicator:[INDICATOR]
indicator2:[INDICATOR]
THRESHOLD:[PROPERTY][GLOBAL][FLOAT]
VistaMart® 4.0 Developing formulas to generate events 193
sendEventOnTunnelDown()
This operator sends an event if the indicator verifies the following condition:
[INDICATOR] < ([INDICATOR2] - [THRESHOLD])
USE CASE EXAMPLE Traffic monitoring. We want to raise an event as soon as the
reported traffic abnormally decreases by a fixed value.
PARAMETER DESCRIPTION The window is a string to define the validity/size, where
validity>=1 and size>=validity

7/17/2019 VistaMart User Guide
http://slidepdf.com/reader/full/vistamart-user-guide 193/265
User Guide - Chapter 9 Handling events in VistaMart
validity>=1 and size>=validity.
The validity and size represent a number of periods. The event is emitted only if overthe [size] period we have a [validity] sample which verify the condition.
Type Function
Reduction false
Syntax sendEventOnTunnelDown(SEVERITY,WINDOW,INDICATOR,INDICATOR2,TH
RESHOLD)
Severity INDETERMINATE, CRITICAL, MAJOR, MINOR, WARNING
Parameters window:[STRING][STRING_PROPERTY][STRING_GLOBAL]
indicator:[INDICATOR]
Indicator2:[INDICATOR]
Threshold:[PROPERTY][GLOBAL][FLOAT]
VistaMart® 4.0 Developing formulas to generate events 194
sendEventOnTunnelIn()
This operator sends an event if the indicator verifies the following condition:
[INDICATOR] > ([INDICATOR2] - [THRESHOLD]) AND
[INDICATOR] < ([INDICATOR2] + [THRESHOLD2])
PARAMETER DESCRIPTION The window is a string to define the validity/size, where
validity>=1 and size>=validity.
The validity and size represent a number of periods. The event is emitted only if over
the [size] period we have a [validity] sample which verify the condition

7/17/2019 VistaMart User Guide
http://slidepdf.com/reader/full/vistamart-user-guide 194/265
User Guide - Chapter 9 Handling events in VistaMart
the [size] period we have a [validity] sample which verify the condition.
Type Function
Reduction false
Syntax sendEventOnTunnelIn(SEVERITY,WINDOW,INDICATOR,INDICATOR2,THRES
HOLD,THRESHOLD2)
Severity INDETERMINATE, CRITICAL, MAJOR, MINOR, WARNING
Parameters window:[STRING][STRING_PROPERTY][STRING_GLOBAL]
indicator:[INDICATOR]indicator2:[INDICATOR]
THRESHOLD:[PROPERTY][GLOBAL][FLOAT]
THRESHOLD2:[PROPERTY][GLOBAL][FLOAT]
VistaMart® 4.0 Developing formulas to generate events 195
sendEventOnTunnelOut()
This operator sends an event if the indicator verifies the following condition:
[INDICATOR] > ([INDICATOR2] - [THRESHOLD]) OR
[INDICATOR] < ([INDICATOR2] + [THRESHOLD2])
USE CASE EXAMPLES 1) Jitter values must never be outside a reasonable deviation from
the baseline. 2) Traffic monitoring. We want to raise an event as soon as the reported
traffic increases or decreases by a fixd value.
PARAMETER DEFINITIONS The window is a string to define the validity/size where

7/17/2019 VistaMart User Guide
http://slidepdf.com/reader/full/vistamart-user-guide 195/265
User Guide - Chapter 9 Handling events in VistaMart
PARAMETER DEFINITIONS The window is a string to define the validity/size, where
validity>=1 and size>=validity.The validity and size represent a number of periods. The event is emitted only if over
the [size] period we have a [validity] sample which verify the condition.
Type Function
Reduction false
Syntax sendEventOnTunnelOut(SEVERITY,WINDOW,INDICATOR,INDICATOR2,
THRESHOLD,THRESHOLD2)
Severity INDETERMINATE, CRITICAL, MAJOR, MINOR, WARNING
Parameters window:[STRING][STRING_PROPERTY][STRING_GLOBAL]
indicator:[INDICATOR]
indicator2:[INDICATOR]
THRESHOLD:[PROPERTY][GLOBAL][FLOAT]
THRESHOLD2:[PROPERTY][GLOBAL][FLOAT]
VistaMart® 4.0 Developing formulas to generate events 196
sendEventOnPTunnelOut()
This operator sends an event if the indicator verifies the following condition:
[INDICATOR] < ([INDICATOR2] - ABS([INDICATOR2]) * [THRESHOLD]) OR
[INDICATOR] > ([INDICATOR2] + ABS([INDICATOR2]) * [THRESHOLD2])
USE CASE EXAMPLE We monitor IP phones and the indicator represents the number of
registered units. In a large infrastructure, the baseline normally increases regularly
during the working hours and decreases at the end of the day. We want to raise an
event if the number of units goes above or drops below acceptable percentages, in
the middle of the day
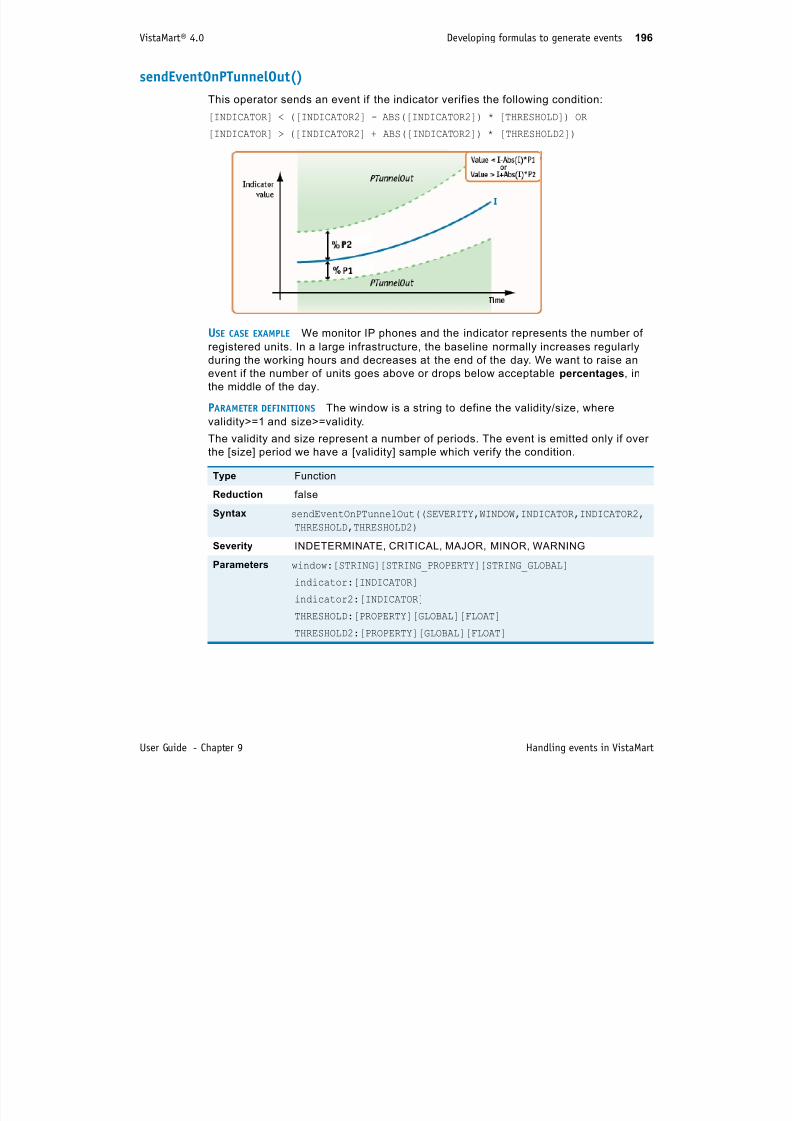
7/17/2019 VistaMart User Guide
http://slidepdf.com/reader/full/vistamart-user-guide 196/265
User Guide - Chapter 9 Handling events in VistaMart
the middle of the day.
PARAMETER DEFINITIONS The window is a string to define the validity/size, where
validity>=1 and size>=validity.
The validity and size represent a number of periods. The event is emitted only if over
the [size] period we have a [validity] sample which verify the condition.
Type Function
Reduction false
Syntax sendEventOnPTunnelOut((SEVERITY,WINDOW,INDICATOR,INDICATOR2,THRESHOLD,THRESHOLD2)
Severity INDETERMINATE, CRITICAL, MAJOR, MINOR, WARNING
Parameters window:[STRING][STRING_PROPERTY][STRING_GLOBAL]
indicator:[INDICATOR]
indicator2:[INDICATOR]
THRESHOLD:[PROPERTY][GLOBAL][FLOAT]
THRESHOLD2:[PROPERTY][GLOBAL][FLOAT]
VistaMart® 4.0 Developing formulas to generate events 197
sendEventOnPTunnelIn()
This operator sends an event if the indicator verifies the following condition:
[INDICATOR] > ([INDICATOR2] - ABS ([INDICATOR2]) * [THRESHOLD]) AND
[INDICATOR] < ([INDICATOR2] +ABS([INDICATOR2]) * [THRESHOLD2])
PARAMETER DEFINITIONS The window is a string to define the validity/size, where
validity>=1 and size>=validity.
The validity and size represent a number of periods. The event is emitted only if over
th [ i ] i d h [ lidit ] l hi h if th diti
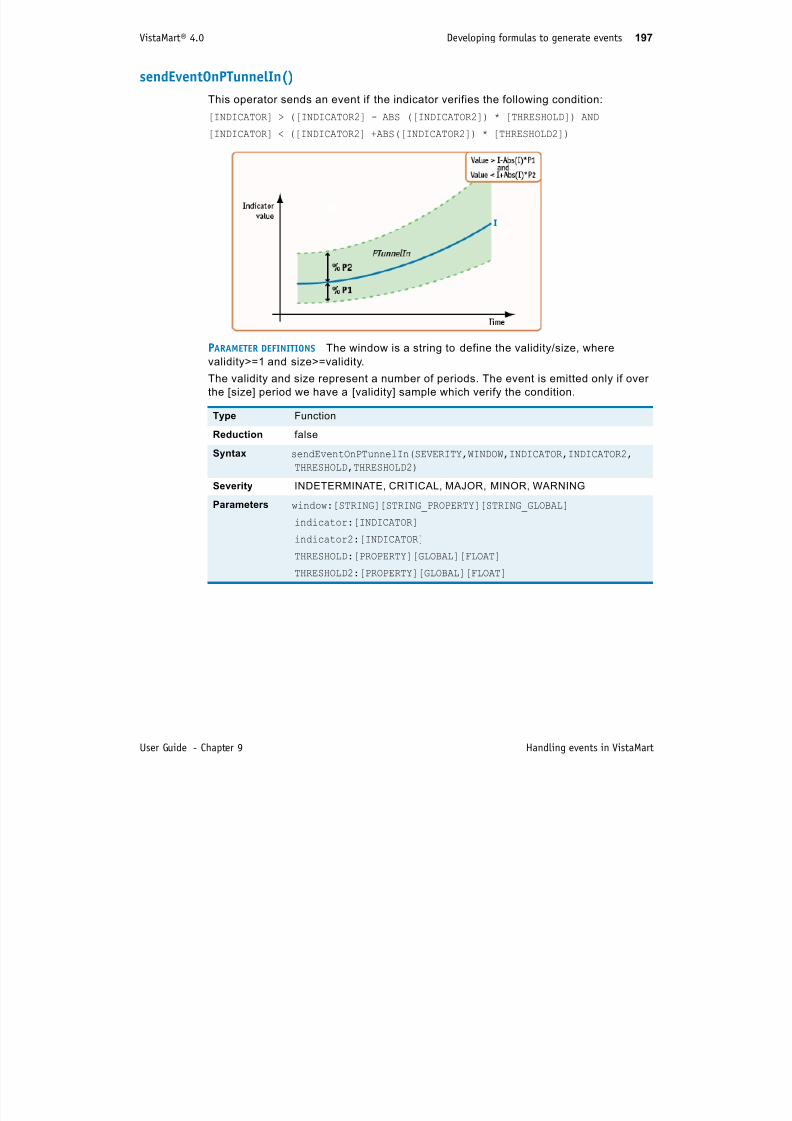
7/17/2019 VistaMart User Guide
http://slidepdf.com/reader/full/vistamart-user-guide 197/265
User Guide - Chapter 9 Handling events in VistaMart
the [size] period we have a [validity] sample which verify the condition.
Type Function
Reduction false
Syntax sendEventOnPTunnelIn(SEVERITY,WINDOW,INDICATOR,INDICATOR2,
THRESHOLD,THRESHOLD2)
Severity INDETERMINATE, CRITICAL, MAJOR, MINOR, WARNING
Parameters window:[STRING][STRING_PROPERTY][STRING_GLOBAL]
indicator:[INDICATOR]
indicator2:[INDICATOR]
THRESHOLD:[PROPERTY][GLOBAL][FLOAT]
THRESHOLD2:[PROPERTY][GLOBAL][FLOAT]
VistaMart® 4.0 Developing formulas to generate events 198
sendEventOnPTunnelUp()
This operator sends an event if the indicator verifies the following condition:
[INDICATOR] > ([INDICATOR2] + ABS ([INDICATOR2]) * [THRESHOLD])
USE CASE EXAMPLE Monitoring a server activity. We want to raise an event if the number
of connections to a server suddenly increases, out of an acceptable percentage.
PARAMETER DEFINITIONS The window is a string to define the validity/size, where
validity>=1 and size>=validity.
The validity and size represent a number of periods The event is emitted only if over

7/17/2019 VistaMart User Guide
http://slidepdf.com/reader/full/vistamart-user-guide 198/265
User Guide - Chapter 9 Handling events in VistaMart
The validity and size represent a number of periods. The event is emitted only if over
the [size] period we have a [validity] sample which verify the condition.
Type Function
Reduction false
Syntax sendEventOnPTunnelUp(SEVERITY,WINDOW,INDICATOR,INDICATOR2,THR
ESHOLD)
Severity INDETERMINATE, CRITICAL, MAJOR, MINOR, WARNING
Parameters window:[STRING][STRING_PROPERTY][STRING_GLOBAL]
indicator:[INDICATOR]
Indicator2:[INDICATOR]
Threshold:[PROPERTY][GLOBAL][FLOAT]
VistaMart® 4.0 Developing formulas to generate events 199
sendEventOnPTunnelDown()
This operator sends an event if the Indicator verifies the condition
[INDICATOR] < ([INDICATOR2] - ABS ([INDICATOR2]) * [THRESHOLD])
USE CASE EXAMPLE Monitoring a server activity. We want to raise an event as soon as
the number of connections to a server drops down abnormally.
PARAMETER DEFINITIONS The window is a string to define the validity/size, where
validity>=1 and size>=validity.
The validity and size represent a number of periods. The event is emitted only if over
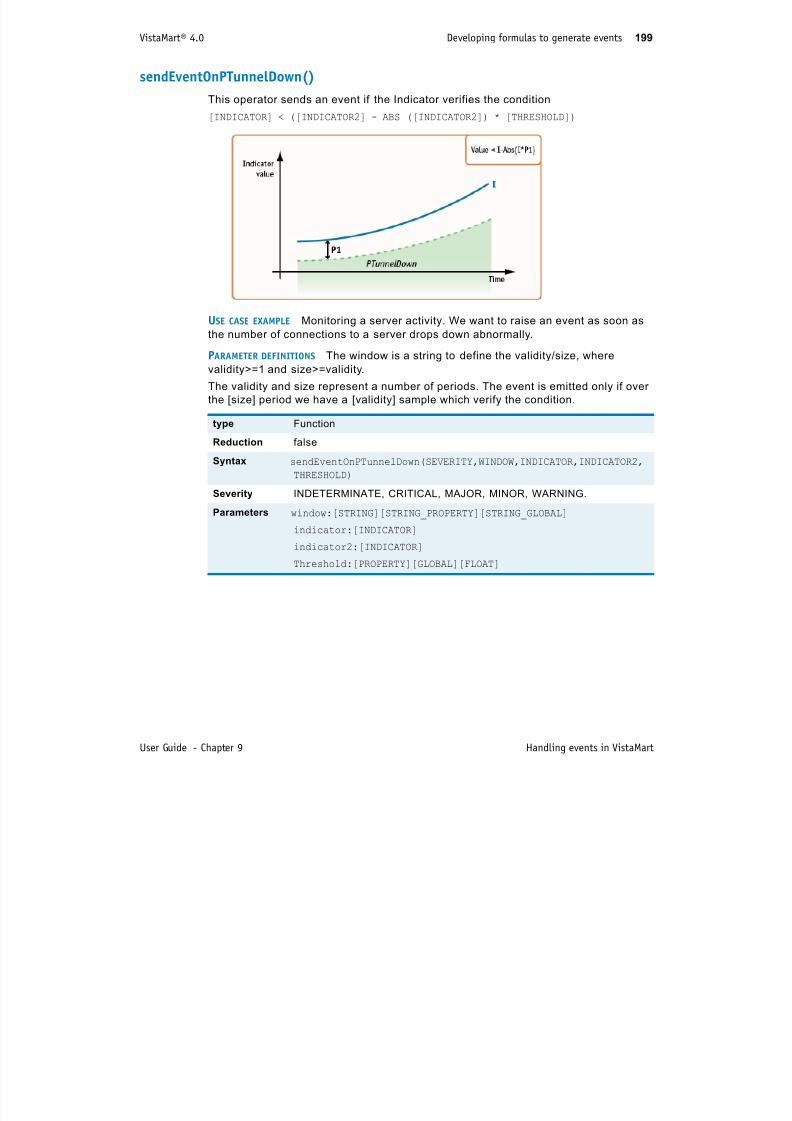
7/17/2019 VistaMart User Guide
http://slidepdf.com/reader/full/vistamart-user-guide 199/265
User Guide - Chapter 9 Handling events in VistaMart
the [size] period we have a [validity] sample which verify the condition.
type Function
Reduction false
Syntax sendEventOnPTunnelDown(SEVERITY,WINDOW,INDICATOR,INDICATOR2,
THRESHOLD)
Severity INDETERMINATE, CRITICAL, MAJOR, MINOR, WARNING.
Parameters window:[STRING][STRING_PROPERTY][STRING_GLOBAL]indicator:[INDICATOR]
indicator2:[INDICATOR]
Threshold:[PROPERTY][GLOBAL][FLOAT]
VistaMart® 4.0 Developing formulas to generate events 200
sendEventOnPTunnelOutEx()
This operator sends an event if the indicator verifies the following condition:
[INDICATOR] < ([INDICATOR2] - ABS([MAXTHRESHOLD] - [INDICATOR2]) * [THRESHOLD])
OR
[INDICATOR] > ([INDICATOR2] + ABS([MAXTHRESHOLD] - [INDICATOR2]) * [THRESHOLD2])
PARAMETER DEFINITIONS The window is a string to define the validity/size, where
validity>=1 and size>=validity.
The validity and size represent a number of periods. The event is emitted only if over
the [size] period we have a [validity] sample which verify the condition.

7/17/2019 VistaMart User Guide
http://slidepdf.com/reader/full/vistamart-user-guide 200/265
User Guide - Chapter 9 Handling events in VistaMart
[ ] p [ y] p y
Type Function
Reduction false
Syntax sendEventOnPTunnelOutEx(SEVERITY,WINDOW,INDICATOR,INDICATOR2,
THRESHOLD,THRESHOLD2,MAXTHRESHIOLD)
Severity INDETERMINATE, CRITICAL, MAJOR, MINOR, WARNING
Parameters window:[STRING][STRING_PROPERTY][STRING_GLOBAL]
indicator:[INDICATOR]
indicator2:[INDICATOR]
THRESHOLD:[PROPERTY][GLOBAL][FLOAT]
THRESHOLD2:[PROPERTY][GLOBAL][FLOAT]
MAXTHRESHOLD:[PROPERTY][GLOBAL][FLOAT]
VistaMart® 4.0 Developing formulas to generate events 201
sendEventOnPTunnelInEx()
This operator sends an event if the indicator verifies the following condition:
[INDICATOR] > ([INDICATOR2] - ABS ([MAXTHRESHOLD] - [INDICATOR2]) * [THRESHOLD])
AND
[INDICATOR] < ([INDICATOR2] +ABS([MAXTHRESHOLD] - [INDICATOR2]) * [THRESHOLD2])
PARAMETER DEFINITIONS The window is a string to define the validity/size, where
validity>=1 and size>=validity.
The validity and size represent a number of periods. The event is emitted only if over

7/17/2019 VistaMart User Guide
http://slidepdf.com/reader/full/vistamart-user-guide 201/265
User Guide - Chapter 9 Handling events in VistaMart
y p p y
the [size] period we have a [validity] sample which verify the condition.
Type Function
Reduction false
Syntax sendEventOnPTunnelInEx(SEVERITY,WINDOW,INDICATOR,INDICATOR2,
THRESHOLD,THRESHOLD2,MAXTHRESHIOLD)
Severity INDETERMINATE, CRITICAL, MAJOR, MINOR, WARNING
Parameters window:[STRING][STRING_PROPERTY][STRING_GLOBAL]
indicator:[INDICATOR]
indicator2:[INDICATOR]
THRESHOLD:[PROPERTY][GLOBAL][FLOAT]
THRESHOLD2:[PROPERTY][GLOBAL][FLOAT]
MAXTHRESHOLD:[PROPERTY][GLOBAL][FLOAT]
VistaMart® 4.0 Developing formulas to generate events 202
sendEventOnPTunnelUpEx()
This operator sends an event if the indicator verifies the following condition:
[INDICATOR] > ([INDICATOR2] + ABS ([MAXTHRESHOLD] - [INDICATOR2]) * [THRESHOLD])
USE CASE EXAMPLE The baseline represents the evolution of a monitored traffic over
time, and the max. threshold is the maximum capacity. When the baseline is close to
the max capacity, we need to raise an event as soon as the traffic deviates from the
baseline, even slightly. On the other hand, the deviation does not represent any
critical risk when the traffic is low.
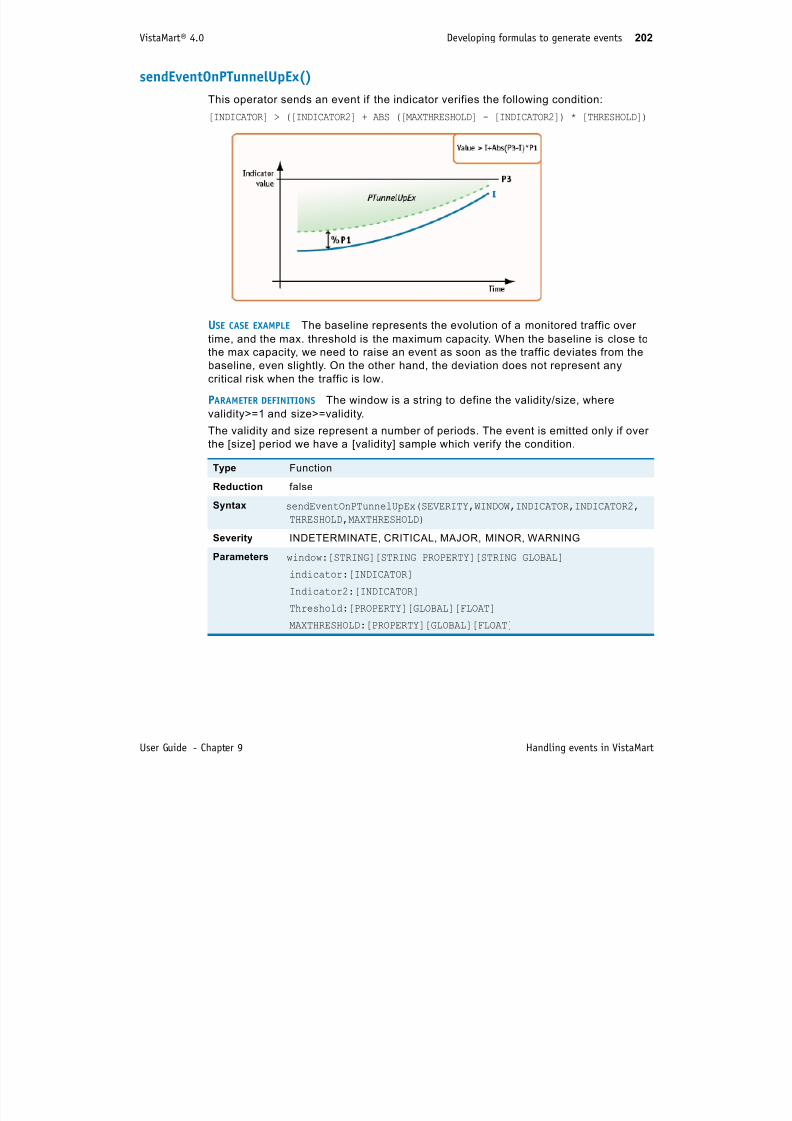
7/17/2019 VistaMart User Guide
http://slidepdf.com/reader/full/vistamart-user-guide 202/265
User Guide - Chapter 9 Handling events in VistaMart
PARAMETER DEFINITIONS The window is a string to define the validity/size, wherevalidity>=1 and size>=validity.
The validity and size represent a number of periods. The event is emitted only if over
the [size] period we have a [validity] sample which verify the condition.
Type Function
Reduction false
Syntax sendEventOnPTunnelUpEx(SEVERITY,WINDOW,INDICATOR,INDICATOR2,
THRESHOLD,MAXTHRESHOLD)
Severity INDETERMINATE, CRITICAL, MAJOR, MINOR, WARNING
Parameters window:[STRING][STRING_PROPERTY][STRING_GLOBAL]
indicator:[INDICATOR]
Indicator2:[INDICATOR]
Threshold:[PROPERTY][GLOBAL][FLOAT]
MAXTHRESHOLD:[PROPERTY][GLOBAL][FLOAT]
VistaMart® 4.0 Developing formulas to generate events 203
sendEventOnPTunnelDownEx()
This operator sends an event if the indicator verifies the following condition:
[INDICATOR] < ([INDICATOR2] - ABS ([MAXTHRESHOLD] - [INDICATOR2]) *
[THRESHOLD])
PARAMETER DEFINITIONS The window is a string to define the validity/size, where
validity>=1 and size>=validity.
The validity and size represent a number of periods. The event is emitted only if over
the [size] period we have a [validity] sample which verify the condition.
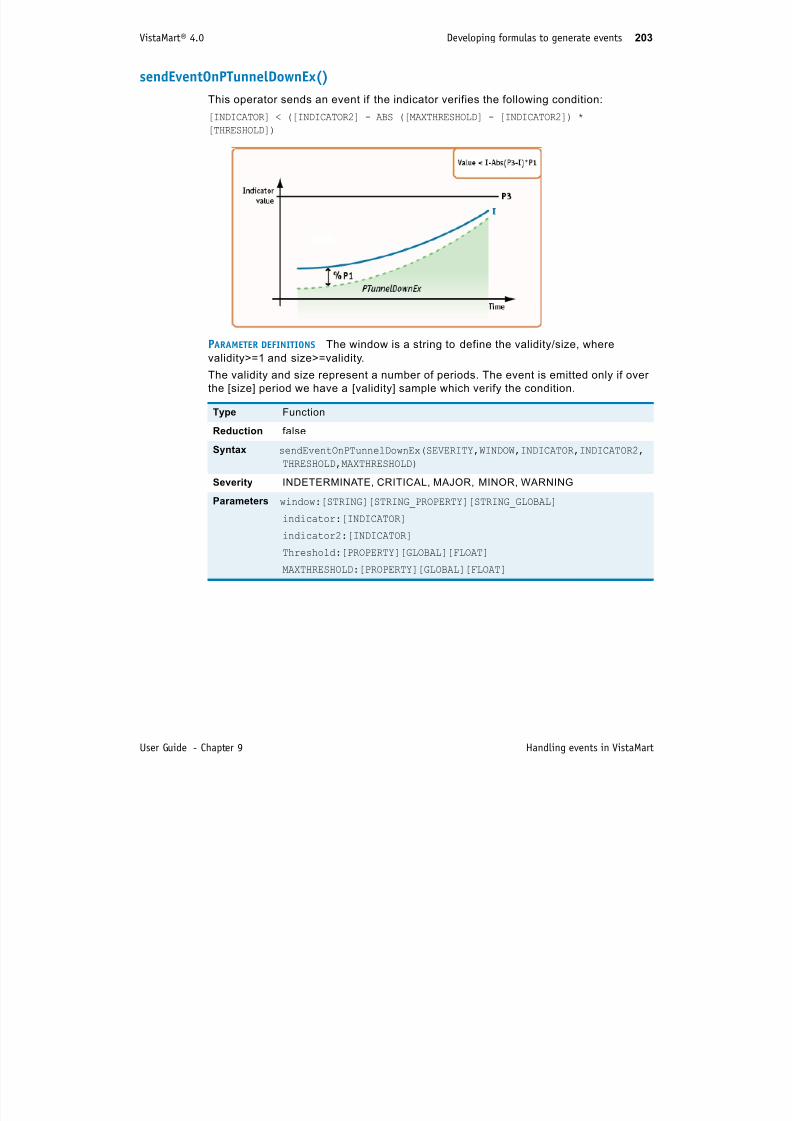
7/17/2019 VistaMart User Guide
http://slidepdf.com/reader/full/vistamart-user-guide 203/265
User Guide - Chapter 9 Handling events in VistaMart
Type Function
Reduction false
Syntax sendEventOnPTunnelDownEx(SEVERITY,WINDOW,INDICATOR,INDICATOR2,
THRESHOLD,MAXTHRESHOLD)
Severity INDETERMINATE, CRITICAL, MAJOR, MINOR, WARNING
Parameters window:[STRING][STRING_PROPERTY][STRING_GLOBAL]
indicator:[INDICATOR]
indicator2:[INDICATOR]
Threshold:[PROPERTY][GLOBAL][FLOAT]
MAXTHRESHOLD:[PROPERTY][GLOBAL][FLOAT]
VistaMart® 4.0 Developing formulas to generate events 204
Examples of event formulasEXAMPLES WITH MULTIPLE THRESHOLDS The following are examples of formulas that send
events with different severities for different thresholds using default window = 1/1:
EXAMPLES WITH DIFFERENT SEVERITIES The following are examples of formulas that send
events with different severities depending of the duration of the threshold violation:
Critical window=3/3 Major-Window=2/3 Minor-Window=1/3
EXAMPLES OF ABNORMAL DEVIATION The following are examples of formulas that send an
t i f b l d i ti if h th h ld i l t d i d f lt
EXAMPLE sendEventOnThresholdUp(CRITICAL,global(‘default-
window’),’BandWidth Usage’,property(‘Critical Threshold’));
EXAMPLE sendEventOnThresholdUp(MAJOR,global(‘default-window’),’BandWidthUsage’,property(‘Major Threshold’));
EXAMPLE sendEventOnThresholdUp(MINOR,global(‘default-window’),’BandWidth
Usage’,property(‘Minor Threshold’))
EXAMPLE sendEventOnThresholdUp(CRITICAL,global(‘Critical-window’),’Disk
Saturation’,property(‘Threshold’));
EXAMPLE sendEventOnThresholdUp(MAJOR,global(‘Major-window’),’ DiskSaturation’,property(‘Threshold’));
EXAMPLE sendEventOnThresholdUp(MINOR,global(‘Minor-window’),’ Disk
Saturation’,property(‘Threshold’))
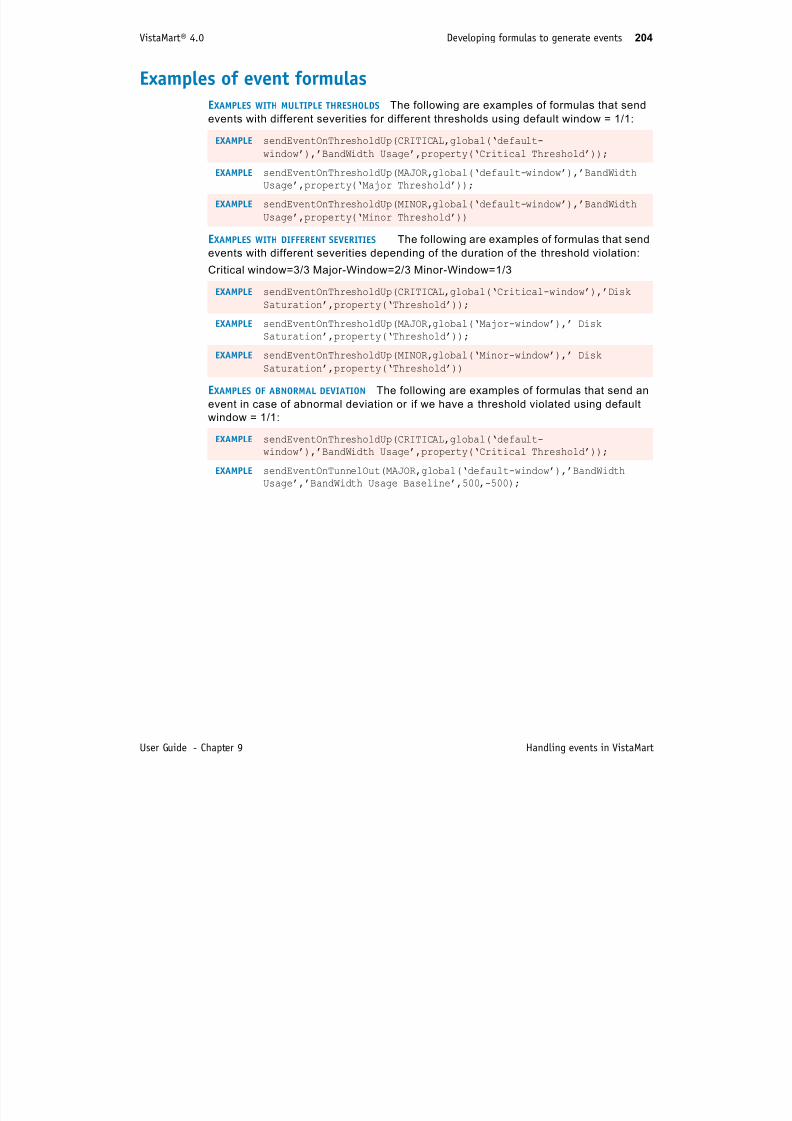
7/17/2019 VistaMart User Guide
http://slidepdf.com/reader/full/vistamart-user-guide 204/265
User Guide - Chapter 9 Handling events in VistaMart
event in case of abnormal deviation or if we have a threshold violated using defaultwindow = 1/1:
EXAMPLE sendEventOnThresholdUp(CRITICAL,global(‘default-window’),’BandWidth Usage’,property(‘Critical Threshold’));
EXAMPLE sendEventOnTunnelOut(MAJOR,global(‘default-window’),’BandWidthUsage’,’BandWidth Usage Baseline’,500,-500);
VistaMart® 4.0 Purging events 205
Purging events
You can group events to purge by:
CREATION DATE /DR (COMPOSITE KEY) enables the removal events older than a specified
date.
FUNCTION Allows dif ferent management policies depending of the funct ion (for
example, keeping the SLA longer than the troubleshooting events)
MAXIMUM LIFETIME You can also define a maximum lifetime of an event:
> Remove only events with an end time before now
> Use partitioning with an adapted process to avoid deletions in the table by moving
events that are still valid to a more recent partition before dropping it.
7/17/2019 VistaMart User Guide
http://slidepdf.com/reader/full/vistamart-user-guide 205/265
User Guide - Chapter 9 Handling events in VistaMart
10 Writing formulas using the formula
editor
The VistaMart formula editor facilitates the creation of custom to compute data values
using a range of operators from simple mathematical operators to the more complex
trend and property management operators.

7/17/2019 VistaMart User Guide
http://slidepdf.com/reader/full/vistamart-user-guide 206/265
206
The formula editor provides:
> a graphic interface to write expression with ready access to available operators,
indicators applicable in the formula, the properties of a Vista
> A syntax analyzer to detect errors
This section details the process of writing formulas with the assistance of the formulaeditor, as a list of commonly used operators.
"Developing a formula" on page 207
"Using the formula editor" on page 209
"List of operators" on page 212
VistaMart® 4.0 Developing a formula 207
Developing a formula
Formulas must be defined using expressions.
DEFINITION A formula is always associated to an indicator (also cal led derived
indicator). The same formula is used for any display rate and any instance.
Rules are in charge of starting different derived indicators depending on the instance
type, if necessary.
PARAMETERS The parameters in the formula calculate a data value for:
> a predefined slot (instance and indicator)
> a defined timestamp
> a defined display rate
RESULT The result of an expression is always a float. Nevertheless, if the expressiontype is an integer, the result gets converted automatically to a float.
SCOPE OF INDICATORS A formula is associated to an indicator. Nevertheless, a formula
could contain references to other indicators.
Example: You define a derived indicator on the Vista Resource. The formula can
reference:
> An indicator defined in the same Vis ta (an indicator on the Vista Resource)
> An Indicator defined in an inherited Vista such as an indicator on the VistaC
7/17/2019 VistaMart User Guide
http://slidepdf.com/reader/full/vistamart-user-guide 207/265
User Guide - Chapter 10 Writing formulas using the formula editor
> An Indicator defined in an inherited Vista, such as an indicator on the VistaCommon
A formula can also contain indicators def ined on other instances:
> If the instance contains a multivalued property of ID type (therefore referencing
other instances), the formula can address an indicator defined on the referenced
instances.
In all cases, the suggested syntax ensure that there is no ambiguity (i.e. no need to
resolve the object during the execution of the formula).
SCOPE OF PROPERTIES A formula also uses properties:
> Defined in the instance’s Vista or inherited Vistas (in the above example, the Vista
Resource or the Vista Common)
> Properties of referenced instances
> In the case of referenced properties, there are two cases:
> The Property used is defined in the Vista (or inherited Vista) used in the reference
property definition. For example, if the reference is a Customer, the formula uses a
threshold defined in the Vista Customer > The property used is not defined in the Vista. The resolution checks that this
property is really accessible. For example, the reference is Common but the
formula uses a threshold defined in the Vista Customer.
VistaMart® 4.0 Developing a formula 208
Distinguishing type of values in an expressionFLOAT Constants and single-valued properties are always considered as float by
default.
INTEGER Some operators require integer parameters (for example a number of
periods). Because our VistaMart model is fully based on float (Indicators & Property
values), the float value is automatically rounded to the nearest integer.
ARRAY OF FLOATS Multi-valued properties are considered as array of float. Dedicated
operators can manage this type of array.
INSTANCE IDENTIFIER Expressions must be able to manage relations between Instances
such as basic, proxy relation and ID property type. Dedicated operators can follow the
relationship to retrieve remote properties or indicators.
INDICATORS Some operators specifically require the name of an indicator (for
example: Trend operator).Otherwise, the indicator can still be considered as the float data value for the defined
time stamp.
BOOLEAN Conditional operators require boolean expressions.
PERIOD The period is meant as a number of samples. According to the display rate
used during the execution, the same number of samples spans different time periods.
Making references to objects
7/17/2019 VistaMart User Guide
http://slidepdf.com/reader/full/vistamart-user-guide 208/265
User Guide - Chapter 10 Writing formulas using the formula editor
Making references to objectsObject reference indicates how to reference indicators and properties in a formula.
Basically, a formula may contain references to other indicators belonging to the
addressed indicator’s vista or it can reference to another vista. There are ways to
reference explicitly these objects.
T YPE OF OBJECTS Objects include:
> Indicators
> Properties (single or multi-valued).
OBJECT NAME Object names may contain spaces in their definition. Properties or
Indicators containing spaces must be enclosed inside quotes (otherwise quotes are
not mandatory.)
REFERENCING AN INDICATOR OR A PROPERTY Indicators can be directly referenced in the
formula using their name. Properties can be referenced by their ID.
This convention simplifies the resolution part because properties and indicators can
potentially have the same name.
VistaMart® 4.0 Using the formula editor 209
Using the formula editor
You access the formula editor by selecting the Indicator for which you want to write a
formula in a VistaMart Library.
Open the formula editor
1 In the Inventory Manager, click the ‘Model’ tab and expand the VistaMart Libraries
node.
2 Select the Library that contains the Indicator you want to edit.
• If you want to write a formula for a new Indicator, you must first create the
Indicator (right-click ‘Indicators’ in the tree pane and select ‘New Indicator’).
3 In the tree pane, click on ‘Indicators’ to display a list of Indicators.
4 In the contents pane, select the Indicator for which you want to edit a formula.5 In the property pane, in the ‘Indicator formula’ box, click the browse (‘...’) button to
open the formula editor.
• If the formula in this box is grayed out, you are in a read-only library.

7/17/2019 VistaMart User Guide
http://slidepdf.com/reader/full/vistamart-user-guide 209/265
User Guide - Chapter 10 Writing formulas using the formula editor
VistaMart® 4.0 Using the formula editor 210
Working with the formula editor You use the interactive Formula Editor window to enter and modify a formula. To
facilitate this task, the editor provides the following keyboard shortcuts:
Keyboard
combination
Action
CTRL + Space According to the position of the cursor, a l ist of operators ,indicators or properties appears. You select the appropriate object
from the list.
CTRL + W Wraps text
EXAMPLE The cursor is placed at the beginning of the line. This list appears:

7/17/2019 VistaMart User Guide
http://slidepdf.com/reader/full/vistamart-user-guide 210/265
User Guide - Chapter 10 Writing formulas using the formula editor
EXAMPLE In the formula, the cursor is placed where an indicator is expected. The
following list appears:
VistaMart® 4.0 Using the formula editor 211
Checking your formula syntax
The formula editor also applies a syntax corrector to detect errors in your formula:
> green: correct
> red: incorrect
> blue: inserted value
The pane at the bottom of the window indicates either an error or an ‘OK’ message.
EXAMPLE A formula contain ing syntax error
EXAMPLE A formula without error

7/17/2019 VistaMart User Guide
http://slidepdf.com/reader/full/vistamart-user-guide 211/265
User Guide - Chapter 10 Writing formulas using the formula editor
Creating expressions to send traps A trap is a place in an application for handling unexpected or unacceptable condi tions
by sending a text message to a log or to a program user.
In VistaMart, each Indicator can have a trap associated to its value. But the condition
required to send the trap is a boolean expression. In addition, there are specific
operators to detect when the value went below or exceeded a threshold.
Traps are computed using expressions which contain:
> Values, properties
> Functions
> Operators
> Indicators
VistaMart® 4.0 List of operators 212
List of operators
Most of the operators listed in this section are the same as those used in InfoVista
Server.
For all operators specific to the event management, refer to the chapter Handling
events in VistaMart.
"Conditional operators" on page 213
"Basic arithmetic operators" on page 215
"Advanced arithmetic operators" on page 217
"Reduction operators" on page 219
"Miscellaneous operators" on page 222
"Temporal operators" on page 224
WARNING Operator names are case-sensitive.
7/17/2019 VistaMart User Guide
http://slidepdf.com/reader/full/vistamart-user-guide 212/265
User Guide - Chapter 10 Writing formulas using the formula editor
VistaMart® 4.0 List of operators 213
Conditional operatorsConditional operators take an action or select a value if a specific condition is true.
< (less than)
<= (less than or equals to)
<> (within)
> "< (less than)" > ">= (greater than or equals to)"
> "<= (less than or equals to)" > "and"
> "<> (within)" > "not"
> "= (equals)" > "or"
> "> (greater than)"
Type Conditional Function
Parameters expression1 < expression2
Type Conditional Function
Parameters expression1 <= expression2
Type Conditional Function
Parameters expression1 <> expression2
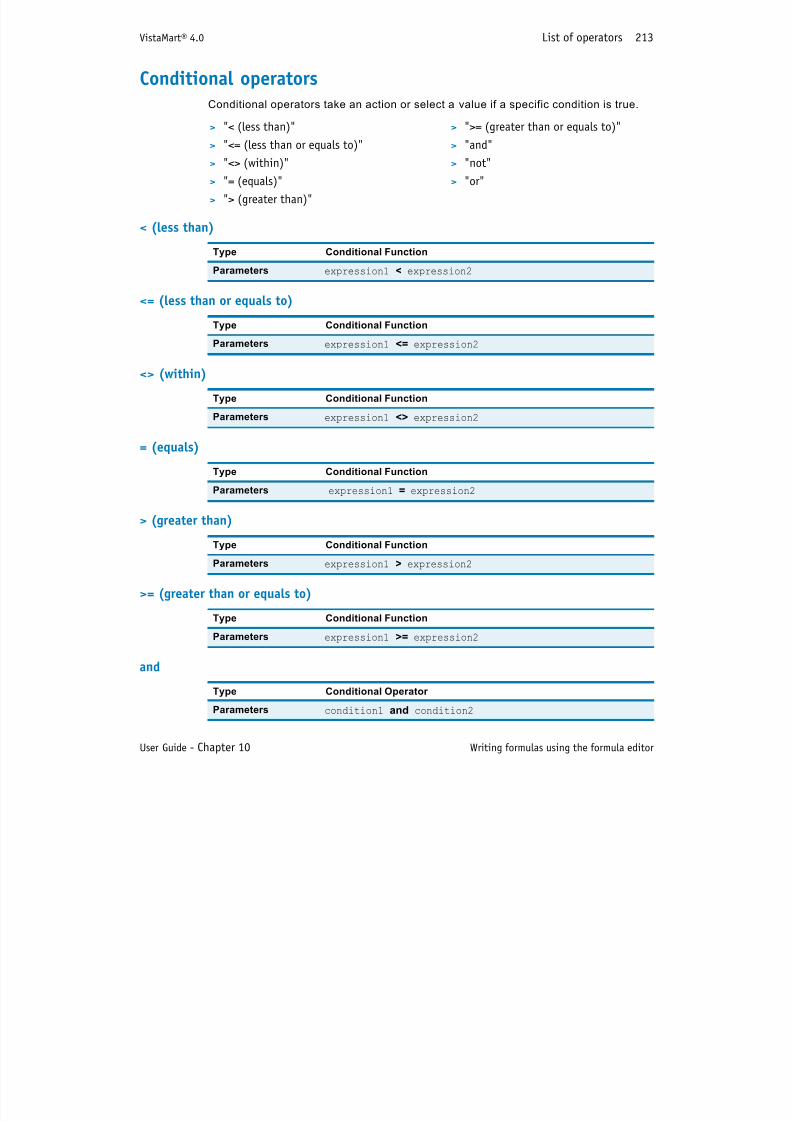
7/17/2019 VistaMart User Guide
http://slidepdf.com/reader/full/vistamart-user-guide 213/265
User Guide - Chapter 10 Writing formulas using the formula editor
= (equals)
> (greater than)
>= (greater than or equals to)
and
e p ess o e p ess o
Type Conditional Function
Parameters expression1 = expression2
Type Conditional Function
Parameters expression1 > expression2
Type Conditional Function
Parameters expression1 >= expression2
Type Conditional Operator
Parameters condition1 and condition2
VistaMart® 4.0 List of operators 214
not
or
Type Conditional operator
Parameters condition1 not condition2
Type Conditional Operator
Parameters condition1 or condition2
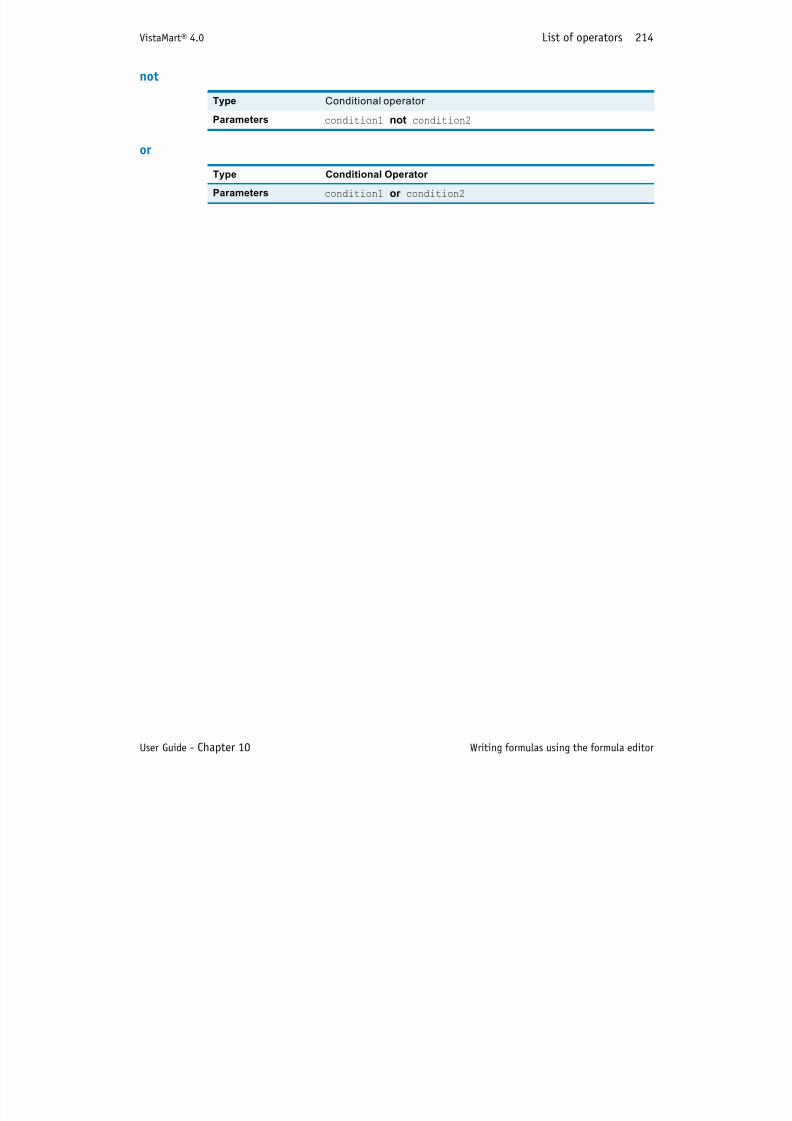
7/17/2019 VistaMart User Guide
http://slidepdf.com/reader/full/vistamart-user-guide 214/265
User Guide - Chapter 10 Writing formulas using the formula editor
VistaMart® 4.0 List of operators 215
Basic arithmetic operatorsThese operators enable you to perform mathematical operations in a Formula.
% (modulo) It divides the values of two expressions and returns the remainder.
* (multiply) It multiplies the values of two expressions.
> "% (modulo)" > "- (subtract)"
> "* (multiply)" > "/ (divide)"
> "+ (add)" > "^ (power)"
Type Function
Reduction false
Parameters expression1 % expression2
EXAMPLE floor ((Timer % 3600)/60)If Timer is an Indicator which returns a number of seconds, this fFormula
allows you to calculate the number of minutes. If the Timer Indicator = 9024,
the remainder after dividing by 3600 = 1824. 1824 divided by 60 = 30.4.
The floor() operator converts this value to an integer by rounding down. The
result is therefore 30 minutes.
Type Function
Reduction false
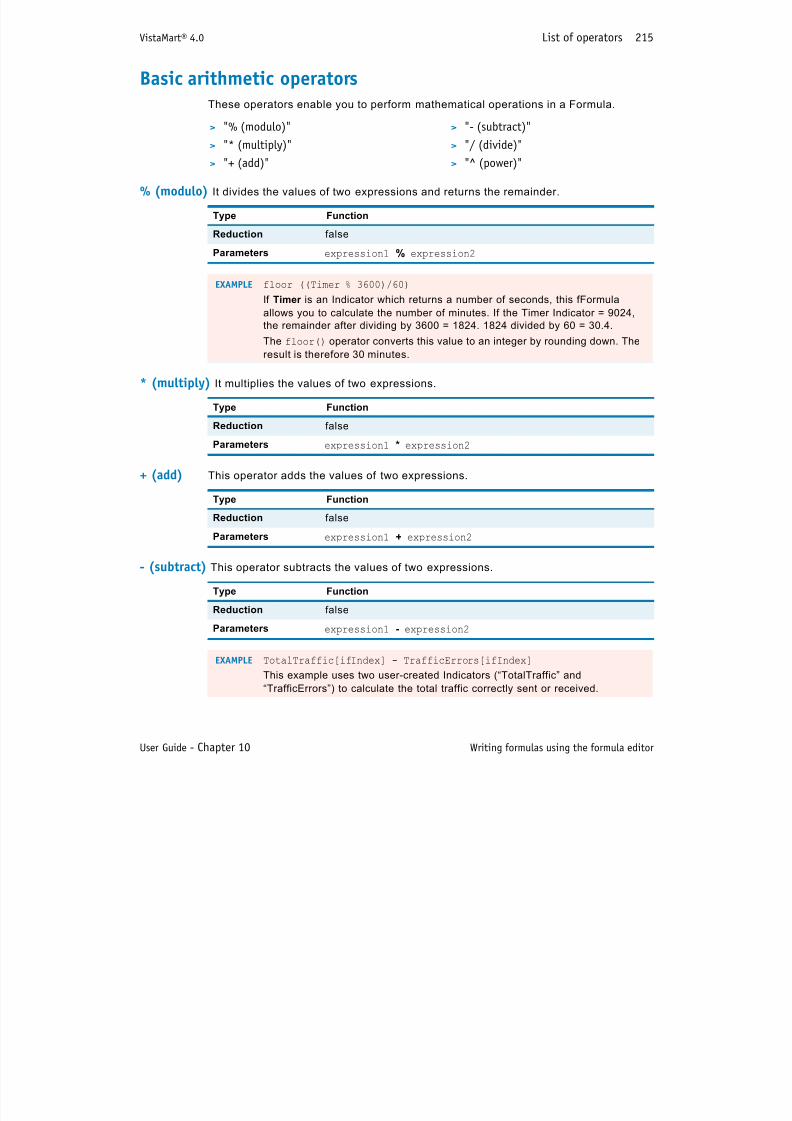
7/17/2019 VistaMart User Guide
http://slidepdf.com/reader/full/vistamart-user-guide 215/265
User Guide - Chapter 10 Writing formulas using the formula editor
+ (add) This operator adds the values of two expressions.
- (subtract) This operator subtracts the values of two expressions.
Reduction false
Parameters expression1 * expression2
Type Function
Reduction false
Parameters expression1 + expression2
Type Function
Reduction false
Parameters expression1 - expression2
EXAMPLE TotalTraffic[ifIndex] - TrafficErrors[ifIndex]
This example uses two user-created Indicators (“TotalTraffic” and
“TrafficErrors”) to calculate the total traffic correctly sent or received.
VistaMart® 4.0 List of operators 216
/ (divide) The operator divides the value of expression1 by the value of expression2.
^ (power) The operator ^ raises expression 1 to the power of expression 2.
If power is null, the result is 1 and if power is negative and expression is null, the
result is #undefined.
Type Function
Reduction false
Parameters expression1 / expression2
EXAMPLE 100 * 8 * (ifInOctets[ifIndex] + ifOutOctets[ifIndex]) /ifSpeed[ifIndex]
This expression calculates interface bandwidth usage.
Type Function
Reduction false
Parameters expression ^ expression2
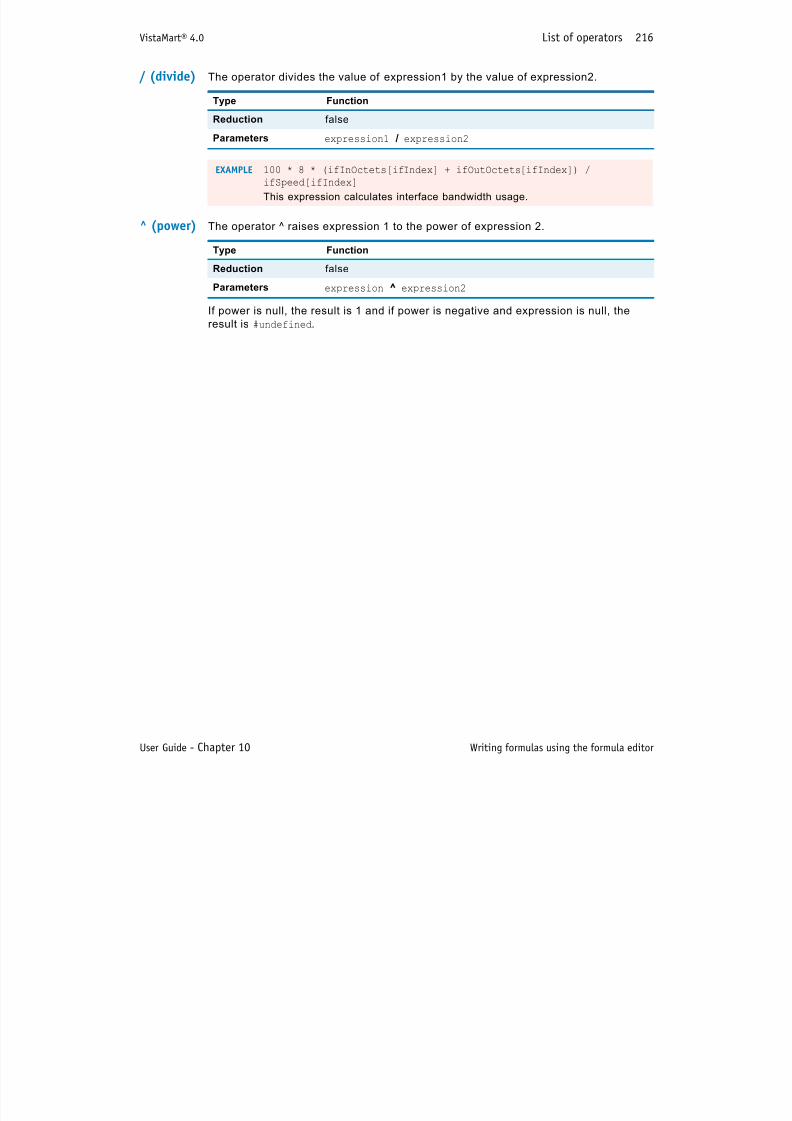
7/17/2019 VistaMart User Guide
http://slidepdf.com/reader/full/vistamart-user-guide 216/265
User Guide - Chapter 10 Writing formulas using the formula editor
VistaMart® 4.0 List of operators 217
Advanced arithmetic operatorsThese operators enable you to perform mathematical operations in a Formula.
abs() This operator returns the absolute value of the submitted expression.
ceil() This operator returns the smallest (closest to negative infinity) value that is greater
than or equal to the expression and is equal to a mathematical integer.
> "abs()" > "log()"
> "ceil()" > "pow()"
> "floor()" > "rint()"
> "ln()" > "sqrt()"
Type Function
Parameters abs (expression)
EXAMPLE abs (traffic1 - traffic2)
This expression always gives a positive result for the difference between the
two traffic values.
Type Function
Parameters ceil(expression)
EXAMPLE ceil ((Timer)/60)
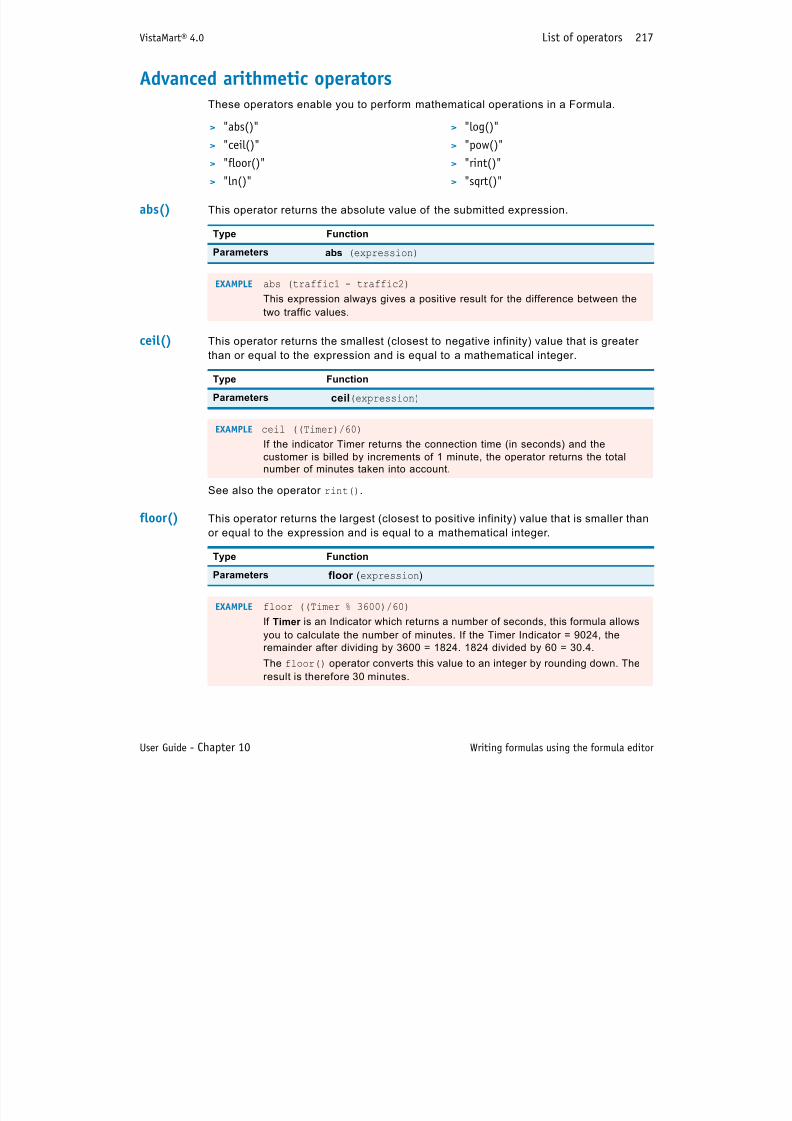
7/17/2019 VistaMart User Guide
http://slidepdf.com/reader/full/vistamart-user-guide 217/265
User Guide - Chapter 10 Writing formulas using the formula editor
See also the operator rint().
floor() This operator returns the largest (closest to positive infinity) value that is smaller thanor equal to the expression and is equal to a mathematical integer.
EXAMPLE ceil ((Timer)/60)
If the indicator Timer returns the connection time (in seconds) and the
customer is billed by increments of 1 minute, the operator returns the total
number of minutes taken into account.
Type Function
Parameters floor (expression)
EXAMPLE floor ((Timer % 3600)/60)
If Timer is an Indicator which returns a number of seconds, this formula allows
you to calculate the number of minutes. If the Timer Indicator = 9024, theremainder after dividing by 3600 = 1824. 1824 divided by 60 = 30.4.
The floor() operator converts this value to an integer by rounding down. The
result is therefore 30 minutes.
VistaMart® 4.0 List of operators 218
ln() This operator calculates the natural logarithm of the expression (Indicator, Property...)
log() This operator calculates the logarithm of the expression (Indicator, Property...)
pow() This operator returns the value of the first argument raised to the power of the second
argument.
Both operators pow() and ^ are identical.
rint() This operator returns the integer value of the submitted expression. According to the
decimal part of the value, the returned value is either rounded down or rouded up (thedecimal part is compared to 0.5).
Type Function
Parameters ln (expression)
EXAMPLE ln('my_float_indicator')
Type Function
Parameters log (expression)
EXAMPLE log('my_float_indicator')
Type Function
Parameters pow (expression1, expression2)

7/17/2019 VistaMart User Guide
http://slidepdf.com/reader/full/vistamart-user-guide 218/265
User Guide - Chapter 10 Writing formulas using the formula editor
See also the operators ceil() and floor().
sqrt() (where expression is a numerical expression). The operator returns the square root
of the expression. If the expression is negative, the result is undefined.
Type Function
Parameters rint (expression)
EXAMPLE rint ((Timer)/60)
The indicator Timer returns the connection time (in seconds) and the system
calculates the equivalent duration in minutes:Timer = 318s, that is 5min (318 / 60 = 5.3).
Timer = 341s, that is 6min (341 / 60 = 5.6833)
Type Function
Parameters sqrt (expression)
VistaMart® 4.0 List of operators 219
Reduction operators A reduction operat ion can be def ined as an operation on:
> a dimension 1 indicator (a table) , i.e. the operation takes into account all the
individual values of the indicator,
> several indicators submitted in a list.
count() This operator counts the number of values contained in the submitted indicator. TheIndicator should have a dimension 1 (table).
It also supports count(isnull(indicator[,defautvalue]))
countin() This operator counts the number of values contained in the submitted indicator, which
satisfy the conditions value <= threshold min and value <= threshold max. The
Indicator should have a dimension 1 (table).
> "count()" > "max()"> "countin()" > "mean()"
> "countless()" > "min()"
> "countlessorequal()" > "stddev()"
> "countmore ()" > "sum()"
> "countmoreorequal()" > "variance()"
Type Function
Parameters count (indicator)
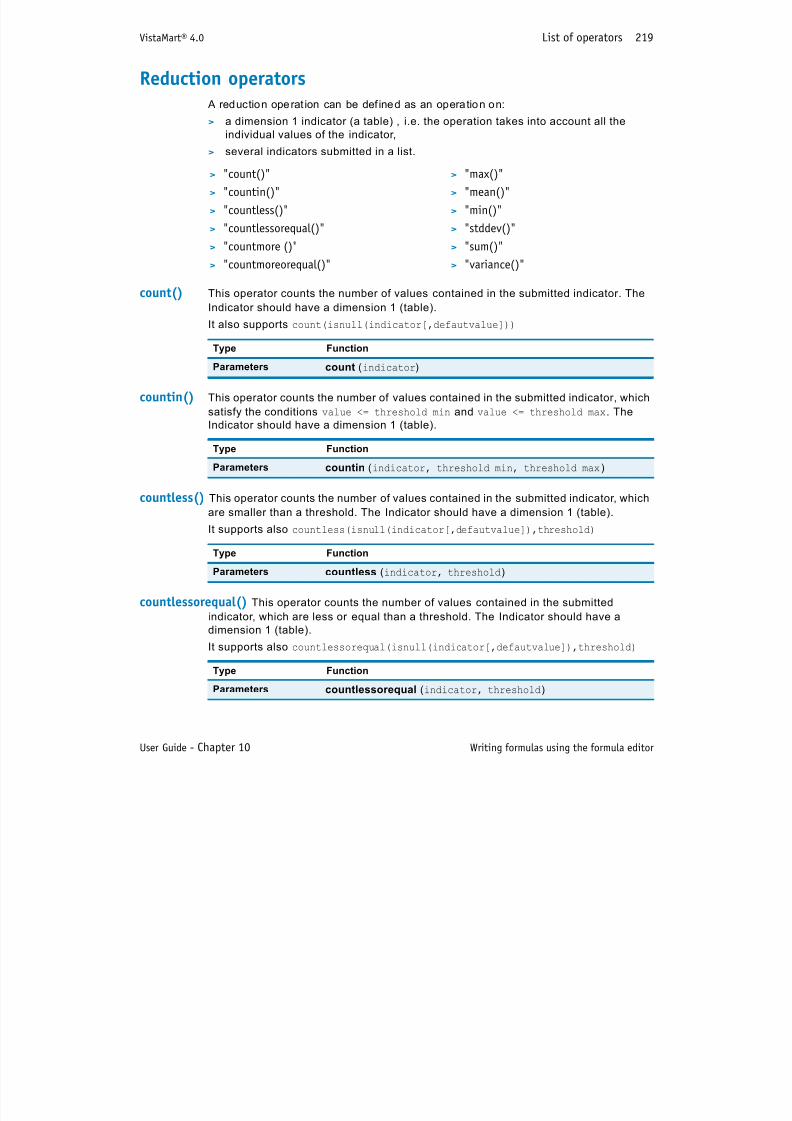
7/17/2019 VistaMart User Guide
http://slidepdf.com/reader/full/vistamart-user-guide 219/265
User Guide - Chapter 10 Writing formulas using the formula editor
countless() This operator counts the number of values contained in the submitted indicator, which
are smaller than a threshold. The Indicator should have a dimension 1 (table).
It supports also countless(isnull(indicator[,defautvalue]),threshold)
countlessorequal() This operator counts the number of values contained in the submitted
indicator, which are less or equal than a threshold. The Indicator should have a
dimension 1 (table).It supports also countlessorequal(isnull(indicator[,defautvalue]),threshold)
Type Function
Parameters countin (indicator, threshold min, threshold max)
Type Function
Parameters countless (indicator, threshold)
Type Function
Parameters countlessorequal (indicator, threshold)
VistaMart® 4.0 List of operators 220
countmore () This operator counts the number of values contained in the submitted indicator,
which are higher than a threshold. The Indicator should have a dimension 1 (table).
It supports also countmore (isnull(indicator[,defautvalue]),threshold)
countmoreorequal() This operator counts the number of values contained in the submitted
indicator which are higher or equal to a threshold. The Indicator should have a
dimension 1 (table).
It supports also countmoreorequal(isnull(indicator[,defautvalue]),threshold)
max() The operator returns the highest expression out of a list of submitted expressions.
You can have 1 to n expressions.
This operator supports scalar expressions and dimension 1 (table) expressions.
When a dimension 1 expression is submitted, the system processes its values as per
individual scalars.
mean() This operator returns the mean value of all the expressions submitted in a list. You
Type Function
Parameters countmore (indicator, threshold)
Type Function
Parameters countmoreorequal (indicator, threshold)
Type Function
Parameters max (expression1, expression2, expression n, ...)

7/17/2019 VistaMart User Guide
http://slidepdf.com/reader/full/vistamart-user-guide 220/265
User Guide - Chapter 10 Writing formulas using the formula editor
() p p
can have 1 to n expressions.
This operator supports scalar expressions and dimension 1 (table) expressions.
When a dimension 1 expression is submitted, the system processes its values as per
individual scalars.
min() This operator returns the smallest expression out of a list of submitted expressions.
You can have 1 to n expressions.
This operator supports scalar expressions and dimension 1 (table) expressions.
When a dimension 1 expression is submitted, the system processes its values as per
individual scalars.
Type Function
Parameters mean (expression1, expression2, expression n, ...)
Type Function
Parameters min (expression1, expression2, expression n, ...)
VistaMart® 4.0 List of operators 221
stddev() This operator returns the standard deviation of all the expressions submitted in a list.
You can have 1 to n expressions.
This operator supports scalar expressions and dimension 1 (table) expressions.
When a dimension 1 expression is submitted, the system processes its values as per
individual scalars.
sum() The operator returns the sum of all the expressions submitted in a list. You can have
1 to n expressions.
This operator supports scalar expressions and dimension 1 (table) expressions.
When a dimension 1 expression is submitted, the system processes its values as per
individual scalars.
variance() The operator returns the variance (square of standard deviation) of all the
expressions submitted in a list. You can have 1 to n expressions.
This operator supports scalar expressions and dimension 1 (table) expressions.
When a dimension 1 expression is submitted, the system processes its values as per
individual scalars.
Type Function
Parameters stddev(expression1, expression2, expression n,...)
Type Function
Parameters sum(expression1, expression2, expression n,...)
Type Function
Parameters i ( i 1 i 2 t i )

7/17/2019 VistaMart User Guide
http://slidepdf.com/reader/full/vistamart-user-guide 221/265
User Guide - Chapter 10 Writing formulas using the formula editor
Parameters variance (expression1, expression2, exptression n, ...)
VistaMart® 4.0 List of operators 222
Miscellaneous operatorsThis category of operators regroups various types of operators used in Formulas.
currenttime() This operator returns the timestamp of the currently computed value. The time is
returned in ms starting from 01/01/1970.
isnull() This operator normally returns an expression which contains the values of
expression1 except if any value is invalid within expression1 (An invalid value is one
of the undefined data states).
In this case, you can:
> remove the invalid value(s) from the expression. Do not specify expression2. or,
> replace the invalid value(s) with a valid one. You specify expression2.
The isnull() operator is typically used before a ‘mean’ or a ‘sum’ operator to avoid
an undefined result if one value of the original expression is invalid.
> "currenttime()"
> "isnull()"
> "now()"
> "random()"
Type Function
Parameters currentime()
Type Function

7/17/2019 VistaMart User Guide
http://slidepdf.com/reader/full/vistamart-user-guide 222/265
User Guide - Chapter 10 Writing formulas using the formula editor
now() This operator returns the number of seconds since 01/01/1970.
Parameters isnull (expression1 [,expression2])
expression2 is optional.
EXAMPLE mean (isnull (actSrc, actDst))
This expression removes any bad values from the submitted acSrc list by
acDst before applying the mean() operator.
Type Function
Parameters now ()
EXAMPLE now() - sysUpTime.
This example calculates the system boot date. To display a readable date,
use the “Float to Timestamp” mode on the associated Format object. For
accurate returns, use only derived Indicators in the Formula.
VistaMart® 4.0 List of operators 223
random() Returns a random float number between 0.0 and 1.0
Type Function
Parameters random ()
EXAMPLE 40 + 60 * random()
Returns a random number between 40 and 100.

7/17/2019 VistaMart User Guide
http://slidepdf.com/reader/full/vistamart-user-guide 223/265
User Guide - Chapter 10 Writing formulas using the formula editor
VistaMart® 4.0 List of operators 224
Temporal operatorsTemporal operators perform data aggregation over time (temporal aggregation).
Expressions using temporal operators return a single value for a display rate.
lstrend() This operator returns the estimated value for the submitted indicator, over p periods,
by using the n most recent indicator’s values in input.
The system normally starts the calculation as soon as n/2 points are available.However, you can force calculation if the sample number is less than n/2 by setting
the parameter BestEffort to 1.
This operator is based on the linear regression algorithm. Linear regression is a
mathematical optimization technique that attempts to find a ‘best fit’ to a set of data
by minimizing as much as possible the sum of the squares of the ordinate differences
(called residuals) between the fitted function and the data.
> "lstrend()" > "timetothresholdupex()"
> "lstrendt()" > "percentile()"
> "offset()" > "percentilex()"> "timetothresholddown()" > "sabaselineday()"
> "timetothresholdup()" > "sabaselineweek()"
> "timetothresholddownex()"

7/17/2019 VistaMart User Guide
http://slidepdf.com/reader/full/vistamart-user-guide 224/265
User Guide - Chapter 10 Writing formulas using the formula editor
> The Indicator containing lsTrend() operator must be a non-consolidated derivedIndicator (i.e. the aggregation attribute on the Indicator must = ‘none’).
> Parameter p can be a constant or a Property.
Type Function
Parameters lsTrend (indicator, p, n, BestEffort)
where p and n are constants and 1 <= n <= 32.
VistaMart® 4.0 List of operators 225
lstrendt() This operator returns the numbers of periods before the Indicator’s value reaches the
threshold v, assuming a linear evolution in the most recent n values.
> The Indicator containing lsTrendt() operator must be a non-consolidated derived
Indicator (i.e. the aggregation attribute on the Indicator must = ‘none’.
> The threshold can be a constant or a Property.
offset() This operator returns the indicator’s value calculated n periods ago. In other words, itprovides the value of the Indicator at some time in the past. The first argument of this
operator must be a single Indicator.
Type Function
Parameters lstrendt (indicator, n, v)
n is a positive constant, and 1 <= n <= 32.
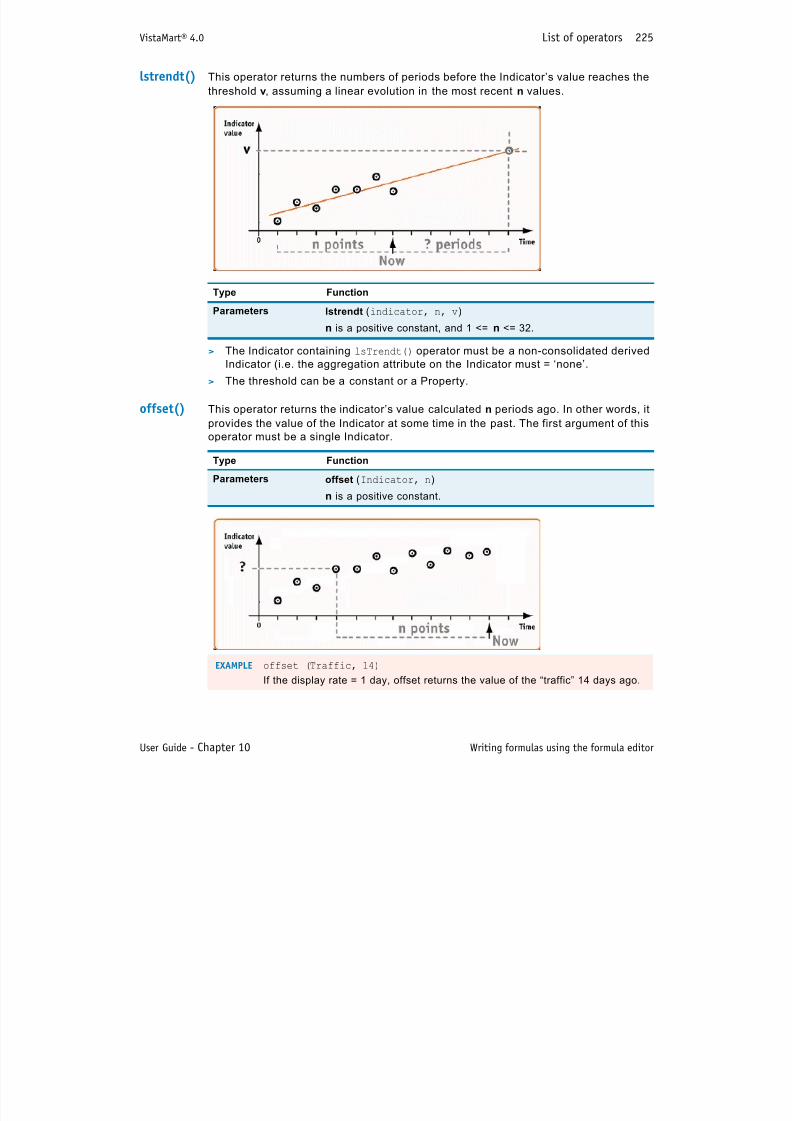
7/17/2019 VistaMart User Guide
http://slidepdf.com/reader/full/vistamart-user-guide 225/265
User Guide - Chapter 10 Writing formulas using the formula editor
Type Function
Parameters offset (Indicator, n)
n is a positive constant.
EXAMPLE offset (Traffic, 14)
If the display rate = 1 day, offset returns the value of the “traffic” 14 days ago.
VistaMart® 4.0 List of operators 226
timetothresholddown() Returns the number of periods before reaching the lower threshold v.
This assumes linear evolution; as per both lstrend() and lstrendt() operators, the
timetothresholddown operator is based upon the linear regression algorithm, where:
> The number of samples used to compute the regression is a function of the
Display Rate, as displayed below.
> The computed value must fall within a defined number of periods (‘visibility’), as
displayed below. Otherwise, the system returns the infinite (that is, value =
123456789).
Display rate Number of samples Visibility (# of periods)
Yearly 12 24 (24 years)
Quaterly 12 24 (6 years)
Monthly 12 24 (2 years)
Weekly 13 26 (6 months)
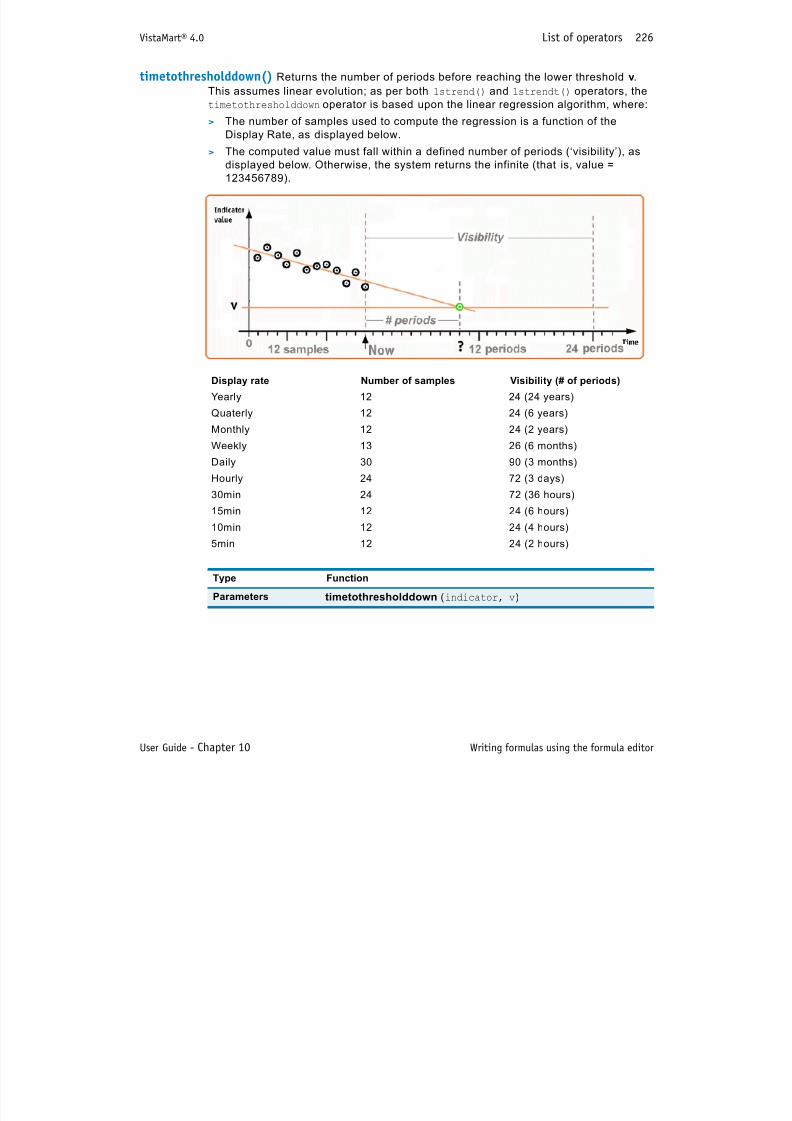
7/17/2019 VistaMart User Guide
http://slidepdf.com/reader/full/vistamart-user-guide 226/265
User Guide - Chapter 10 Writing formulas using the formula editor
Weekly 13 26 (6 months)
Daily 30 90 (3 months)
Hourly 24 72 (3 days)
30min 24 72 (36 hours)
15min 12 24 (6 hours)
10min 12 24 (4 hours)
5min 12 24 (2 hours)
Type Function
Parameters timetothresholddown (indicator, v)
VistaMart® 4.0 List of operators 227
timetothresholdup() Returns the number of periods before reaching the upper threshold v. This
assumes linear evolution; as per both lstrend() and lstrendt() operators, the
timetothresholdup operator is based upon the linear regression algorithm, where:
> The number of samples used to compute the regression is a function of the
Display Rate, as displayed below.
> The computed value must fall within a defined number of periods (‘visibility’), as
displayed below. Otherwise, the system returns the infinite (that is, value =
123456789).
Display rate Number of samples Visibility (# of periods)
Yearly 12 24 (24 years)
Quaterly 12 24 (6 years)
Monthly 12 24 (2 years)
Weekly 13 26 (6 months)
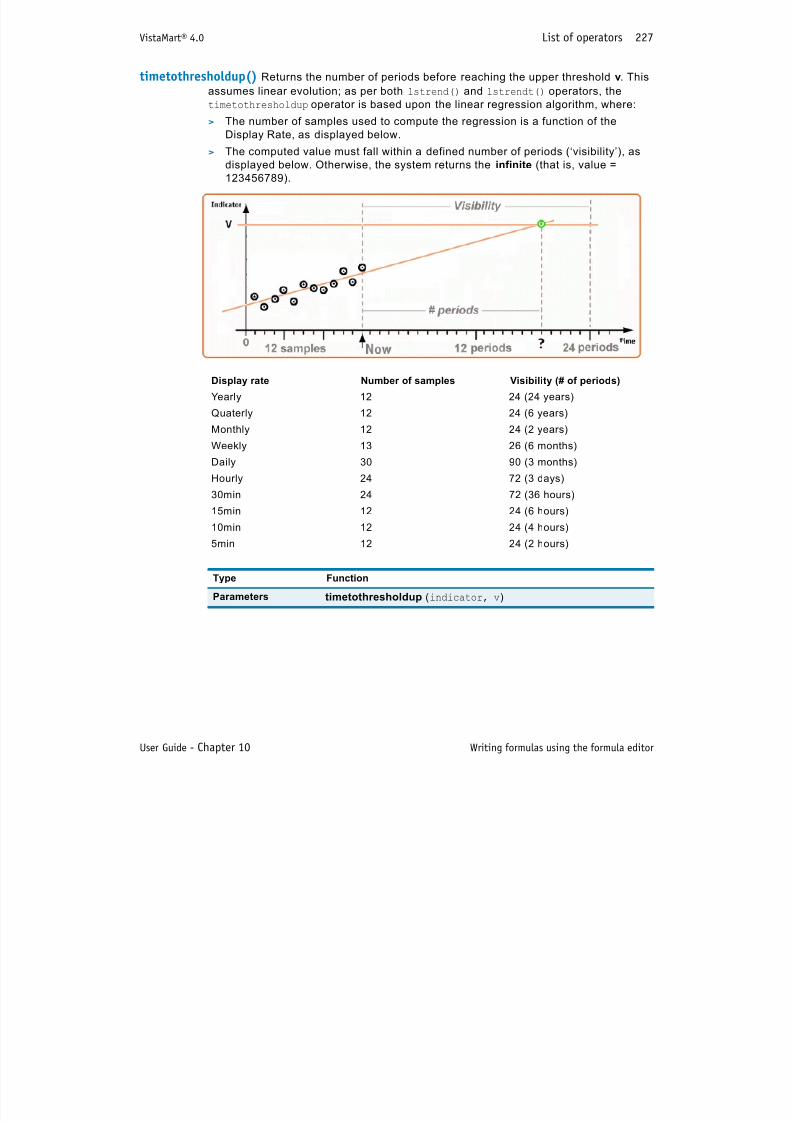
7/17/2019 VistaMart User Guide
http://slidepdf.com/reader/full/vistamart-user-guide 227/265
User Guide - Chapter 10 Writing formulas using the formula editor
Weekly 13 26 (6 months)
Daily 30 90 (3 months)
Hourly 24 72 (3 days)
30min 24 72 (36 hours)
15min 12 24 (6 hours)
10min 12 24 (4 hours)
5min 12 24 (2 hours)
Type Function
Parameters timetothresholdup (indicator, v)
VistaMart® 4.0 List of operators 228
timetothresholddownex() Returns the number of periods before reaching the lower threshold v
using a user-specified number of past data points n and a defined maximum visibility.
This assumes linear evolution.
Both timetothrsholddown() and timetothresholddownex() are similar. For the latest
one, you define both data samples and visibility upon your convenience.
timetothresholdupex() Returns the number of periods before reaching the upper threshold v
using a user-specified number of past data points n and a defined maximum visibility.This assumes linear evolution.
Both timetothrsholdup() and timetothresholdupex() are similar. For the latest one,
d fi b th d t l d i ibilit i
Type Function
Parameters timetothresholddownex (indicator, visibility, n, v)

7/17/2019 VistaMart User Guide
http://slidepdf.com/reader/full/vistamart-user-guide 228/265
User Guide - Chapter 10 Writing formulas using the formula editor
you define both data samples and visibility upon your convenience.
Type Function
Parameters timetothresholdupex (indicator, visibility, n, v)
VistaMart® 4.0 List of operators 229
percentile() Returns the value of the kth percentile of the n samples collected for the defined
display period. This period is a mandatory fixed expression.
If a period is defined, it must be >= acquisition rate and < display rate.
For each of periods, the system sorts the n samples by increasing order before
returning the (k*n)th value, that is, it drops all the highest values.
If (k*n) is not a whole number, the system returns the value of the next lowest sample.
This operator may only contain Indicators (not an expression). The Indicator
containing the percentile operator must be a non-consolidated derived Indicator (the
Indicator Aggregation attribute must be set = None).
Type Function
Parameters percentile (Indicator, k, period)
> k is a float constant between 0 and 1
> The period is a fixed expression you select from the list:
5min|10min|15min|30min|Hourly|Daily|Weekly|Monthly|Quaterly|Yearly.
> The period must be > display rate.
EXAMPLE percentile (Traffic, 0.84, Hourly))
A 5min display rate provides 12 samples/s. The 84th percentile corresponds
to the 10th highest value (12*0.84 = 10.08) measured over a 1-hour period, as
illustrated below.
This expression returns the 10th value. In other words it returns the maximum
value measured over the period, after dropping the top 16% values (that is,both 11th &nd 12th values).
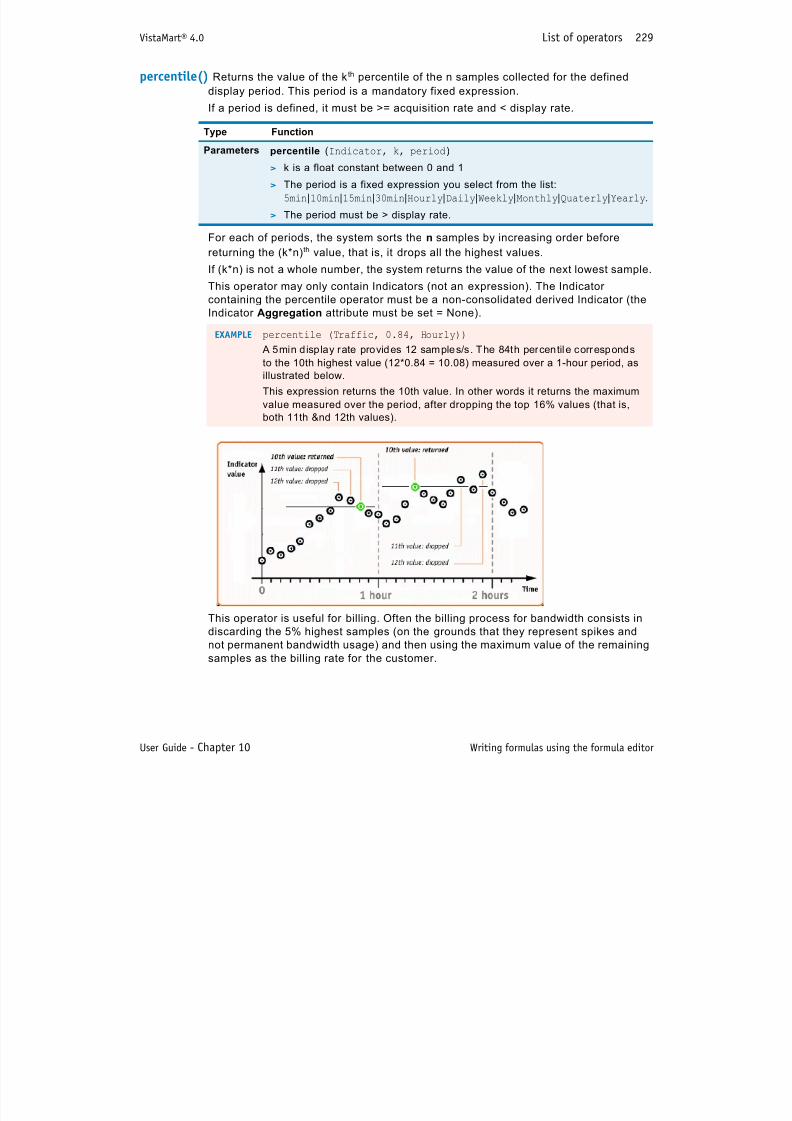
7/17/2019 VistaMart User Guide
http://slidepdf.com/reader/full/vistamart-user-guide 229/265
User Guide - Chapter 10 Writing formulas using the formula editor
This operator is useful for billing. Often the billing process for bandwidth consists in
discarding the 5% highest samples (on the grounds that they represent spikes and
not permanent bandwidth usage) and then using the maximum value of the remaining
samples as the billing rate for the customer.
VistaMart® 4.0 List of operators 230
percentilex() This operator performs the same function as percentile(). However, if (k*n) is not a
whole number, the system interpolates a value for the k th percentile.
INTERNAL OPERATION Suppose k*n = i.d where i.d is a decimal number, ‘i’ is the integer
part and ‘d’ is the decimal part. The value of the kth percentile is calculated as:
value[ith sample] +.d * (value[(i + 1)th sample] - value[ith sample])
Type Function
Parameters percentilex (Indicator, k, period)
> k is a float constant between 0 and 1
> The period is a fixed expression you select from the list
5min|10min|15min|30min|Hourly|Daily|Weekly|Monthly|Quaterly|Yearly.
> The period must be > display rate
EXAMPLE til (T ffi 0 84 H l )
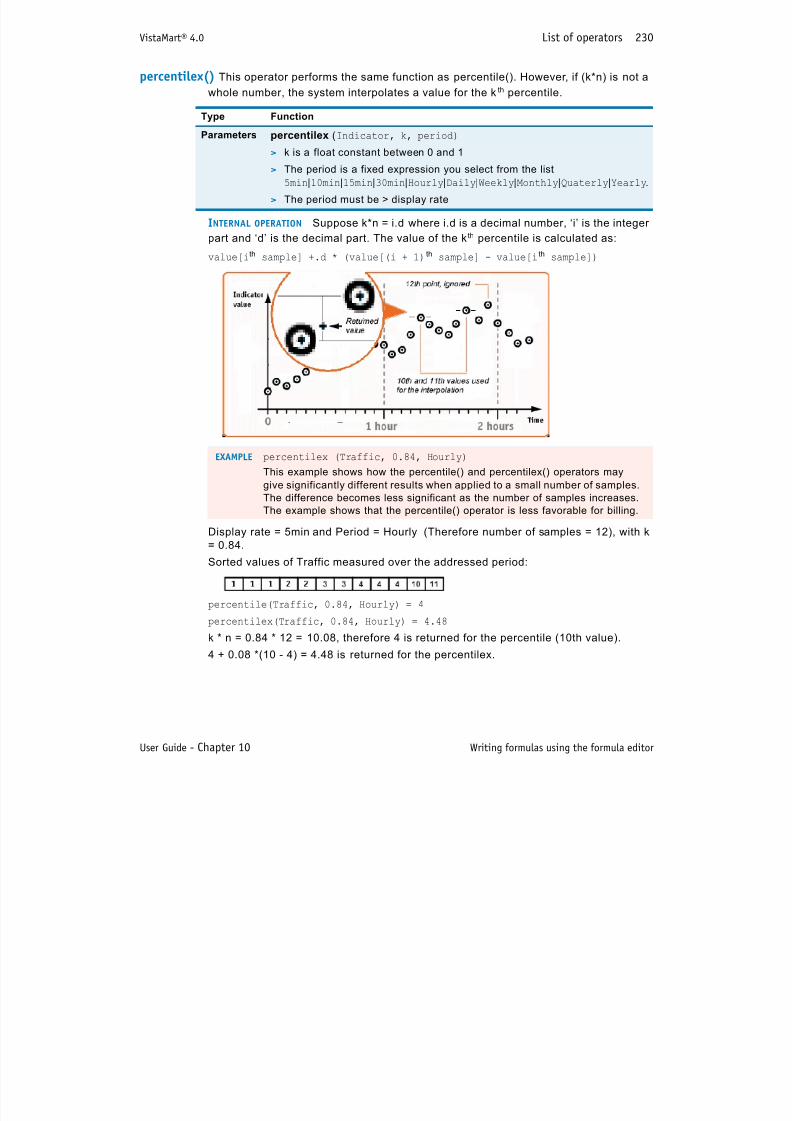
7/17/2019 VistaMart User Guide
http://slidepdf.com/reader/full/vistamart-user-guide 230/265
User Guide - Chapter 10 Writing formulas using the formula editor
Display rate = 5min and Period = Hourly (Therefore number of samples = 12), with k
= 0.84.
Sorted values of Traffic measured over the addressed period:
percentile(Traffic, 0.84, Hourly) = 4
percentilex(Traffic, 0.84, Hourly) = 4.48
k * n = 0.84 * 12 = 10.08, therefore 4 is returned for the percentile (10th value).4 + 0.08 *(10 - 4) = 4.48 is returned for the percentilex.
EXAMPLE percentilex (Traffic, 0.84, Hourly)
This example shows how the percentile() and percentilex() operators may
give significantly different results when applied to a small number of samples.
The difference becomes less significant as the number of samples increases.
The example shows that the percentile() operator is less favorable for billing.
VistaMart® 4.0 List of operators 231
sabaselineday() Generates a daily baseline graph that is consolidated over n days. This is a
reference graph showing the ‘average’ daily variation of an Indicator.
The sabaselineday operator calculates each data point (including the last point) by
averaging the Indicator values taken at the same time on each ‘n’ previous days.
This expression generates a graph of the following type:
This operator can only contain Indicators (not expressions).
• An Indicator containing saBaselineDay() must be non-consolidated.
• Display Rate < 1 day.
Type Function
Parameters sabaselineday (indicator, n)
The constant n is the number of samples to be integrated in thecalculation.
n is not dependent on acquisition rates.
EXAMPLE saBaselineDay (Traffic, 3)The baseline operator calculates a baseline value at each display period,
based on the average values of Traffic, over the last 3 days. The baseline
Indicator must be a non-consolidated Indicator (aggregation is applied to
the values of Traffic)
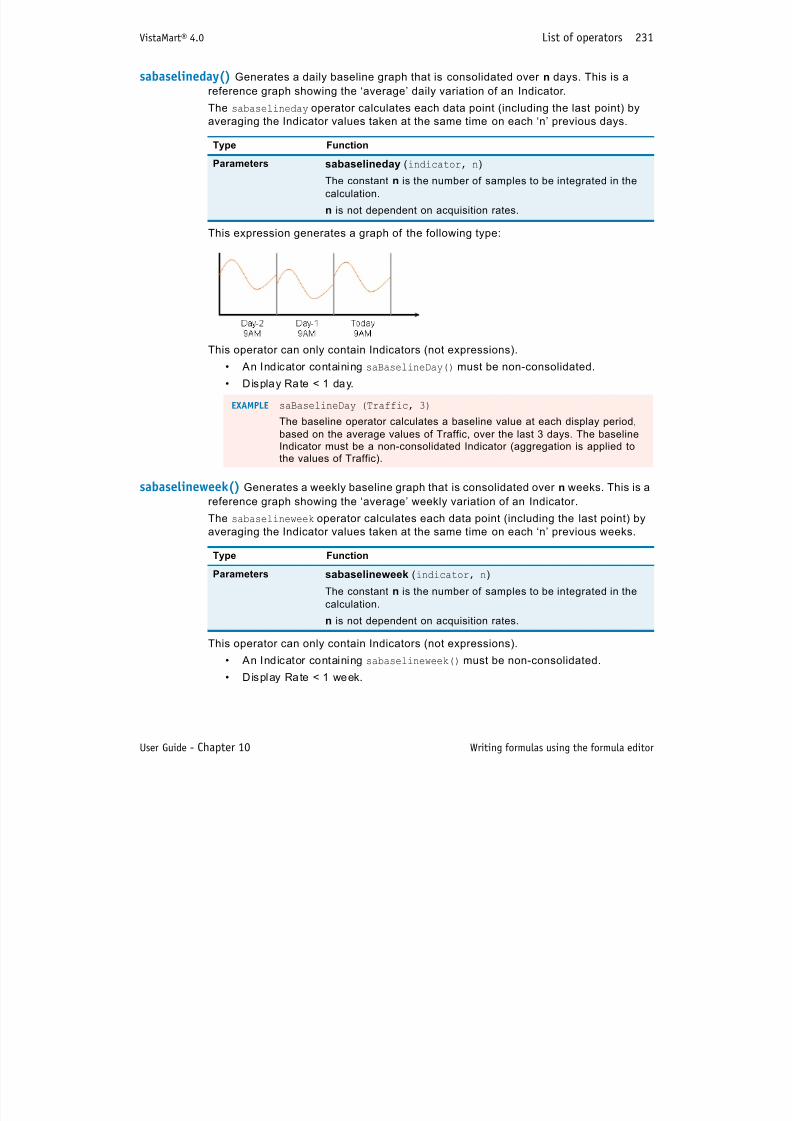
7/17/2019 VistaMart User Guide
http://slidepdf.com/reader/full/vistamart-user-guide 231/265
User Guide - Chapter 10 Writing formulas using the formula editor
sabaselineweek() Generates a weekly baseline graph that is consolidated over n weeks. This is a
reference graph showing the ‘average’ weekly variation of an Indicator.
The sabaselineweek operator calculates each data point (including the last point) byaveraging the Indicator values taken at the same time on each ‘n’ previous weeks.
This operator can only contain Indicators (not expressions).
• An Indicator containing sabaselineweek() must be non-consolidated.
• Display Rate < 1 week.
the values of Traffic).
Type Function
Parameters sabaselineweek (indicator, n)
The constant n is the number of samples to be integrated in the
calculation.
n is not dependent on acquisition rates.
A Rule user cases
This appendix provides a series of individual Rule data sheets which address typical
user cases.
Each data sheets includes a synthetic analysis of the Rule context and construction,
so as to enable you to adapt it according to your own needs and context.
See:
7/17/2019 VistaMart User Guide
http://slidepdf.com/reader/full/vistamart-user-guide 232/265
232
’Duplicate Property from Basic to Proxies’ on page 233
’Feed Groups with Members’ on page 235
’Start Reports according to Agent Vendor’ on page 237
VistaMart® 4.0 Duplicate Property from Basic to Proxies 233
Duplicate Property from Basic to Proxies
Context
VistaPortal uses the Property values (e.g. Customer Property) as filtering criteria for
generating advanced reports.
We have merged a topology file (containing Instance details) with the raw topology -
the basic Property values are now updated. We want to propagate a Property value
(e.g. Customer Property) from all basic Instances to each of their respective proxy
Instances.
Input and Analysis
Condition:
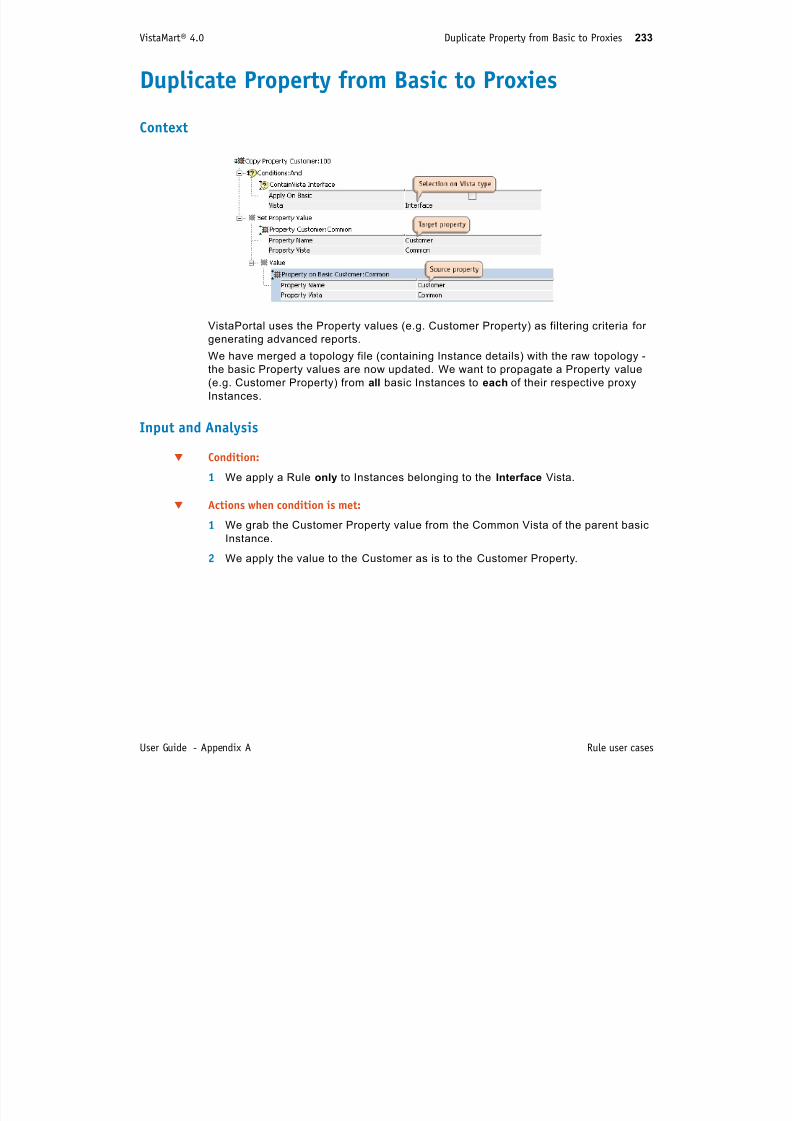
7/17/2019 VistaMart User Guide
http://slidepdf.com/reader/full/vistamart-user-guide 233/265
User Guide - Appendix A Rule user cases
Condition:
1 We apply a Rule only to Instances belonging to the Interface Vista.
Actions when condition is met:
1 We grab the Customer Property value from the Common Vista of the parent basicInstance.
2 We apply the value to the Customer as is to the Customer Property.
VistaMart® 4.0 Duplicate Property from Basic to Proxies 234
Syntax
Tips
The following alternative allows you to apply the Rule only to proxies of routers. It
reads as follows:
Select the Instances whose basic parent belongs to the router Vista.
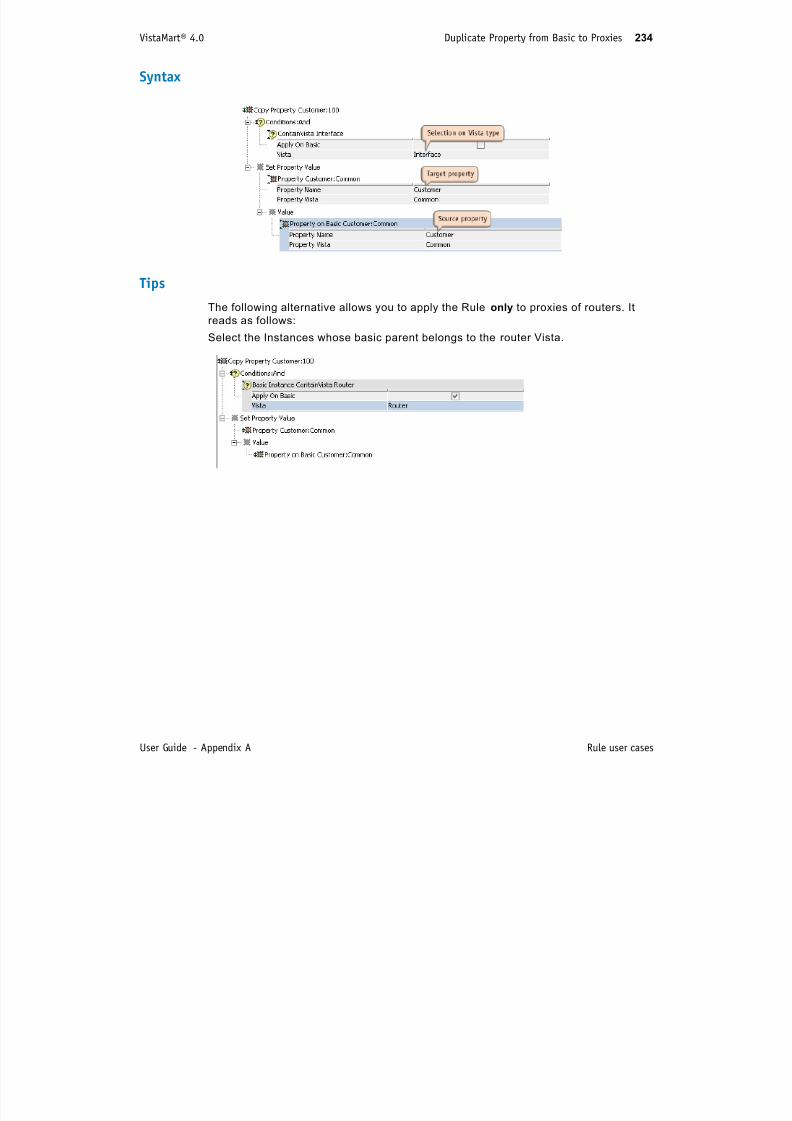
7/17/2019 VistaMart User Guide
http://slidepdf.com/reader/full/vistamart-user-guide 234/265
User Guide - Appendix A Rule user cases
VistaMart® 4.0 Feed Groups with Members 235
Feed Groups with Members
Context
We need to assign Basic Server Instances to distinct Instance groups according to
their respective Operating System.
For each server, the OS Name Property value is available as a string which includes
both OS type and version (e .g. Solaris 2.8, Windows 2000, Windows 2003).
For each addressed Operating System, the target group Instance has been initially
provisioned.
Input and Analysis
Condition:
1 We apply the Rule only to the Instances belonging to the Server Vista.
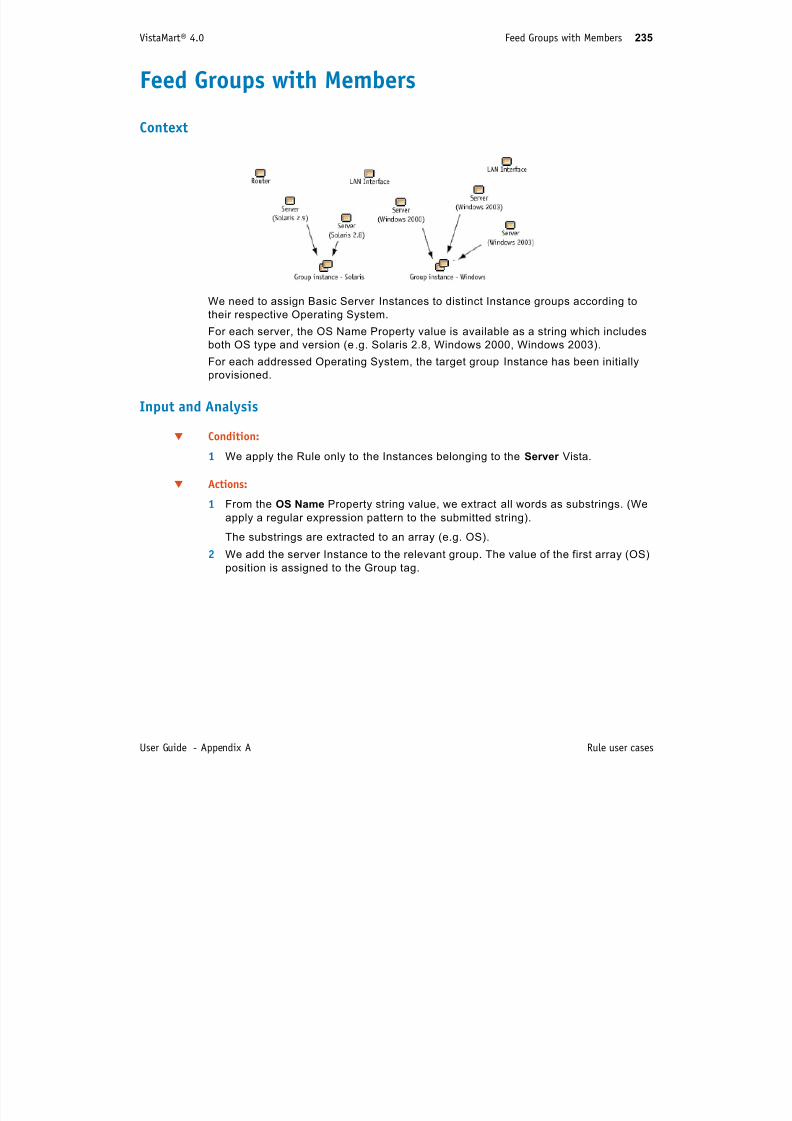
7/17/2019 VistaMart User Guide
http://slidepdf.com/reader/full/vistamart-user-guide 235/265
User Guide - Appendix A Rule user cases
Actions:
1 From the OS Name Property string value, we extract all words as substrings. (We
apply a regular expression pattern to the submitted string).
The substrings are extracted to an array (e.g. OS).
2 We add the server Instance to the relevant group. The value of the first array (OS)
position is assigned to the Group tag.
VistaMart® 4.0 Feed Groups with Members 236
Syntax
Tips
Carefully define your group names in such a way that they can easily match a ll the
potential substrings that the regular expression extracts. This precaution may
dramatically simplify the Rule syntax and construction.
When using a ‘Match’ condition (regular expression), make sure that you use the
same array in both the condition and action.
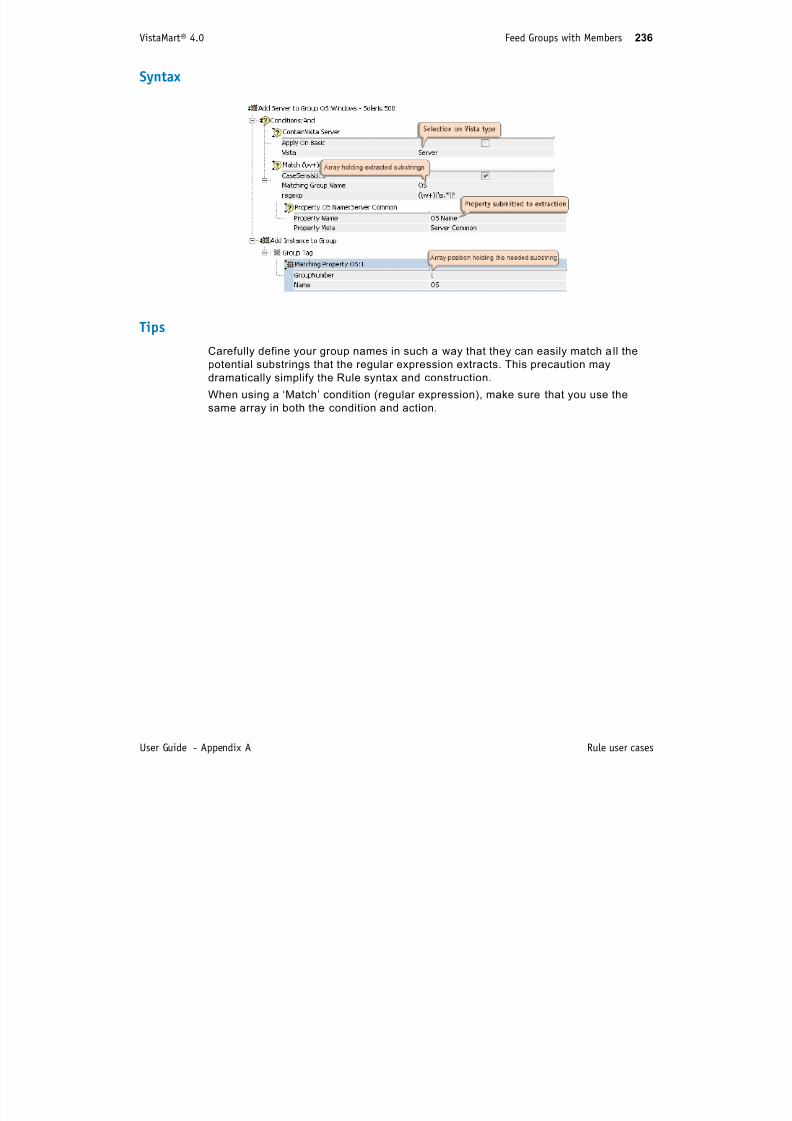
7/17/2019 VistaMart User Guide
http://slidepdf.com/reader/full/vistamart-user-guide 236/265
User Guide - Appendix A Rule user cases
VistaMart® 4.0 Start Reports according to Agent Vendor 237
Start Reports according to Agent Vendor
Context
The topology includes different types of routers. We want to start specific InfoVista
reports for all Cisco and Juniper routers.
Input and Analysis
We need two similar Rules which specifically address the Cisco and Juniper contexts,
with different priorities.
Each individual Rule is structured as follows:
Conditions:
1 We apply the Rule only when:
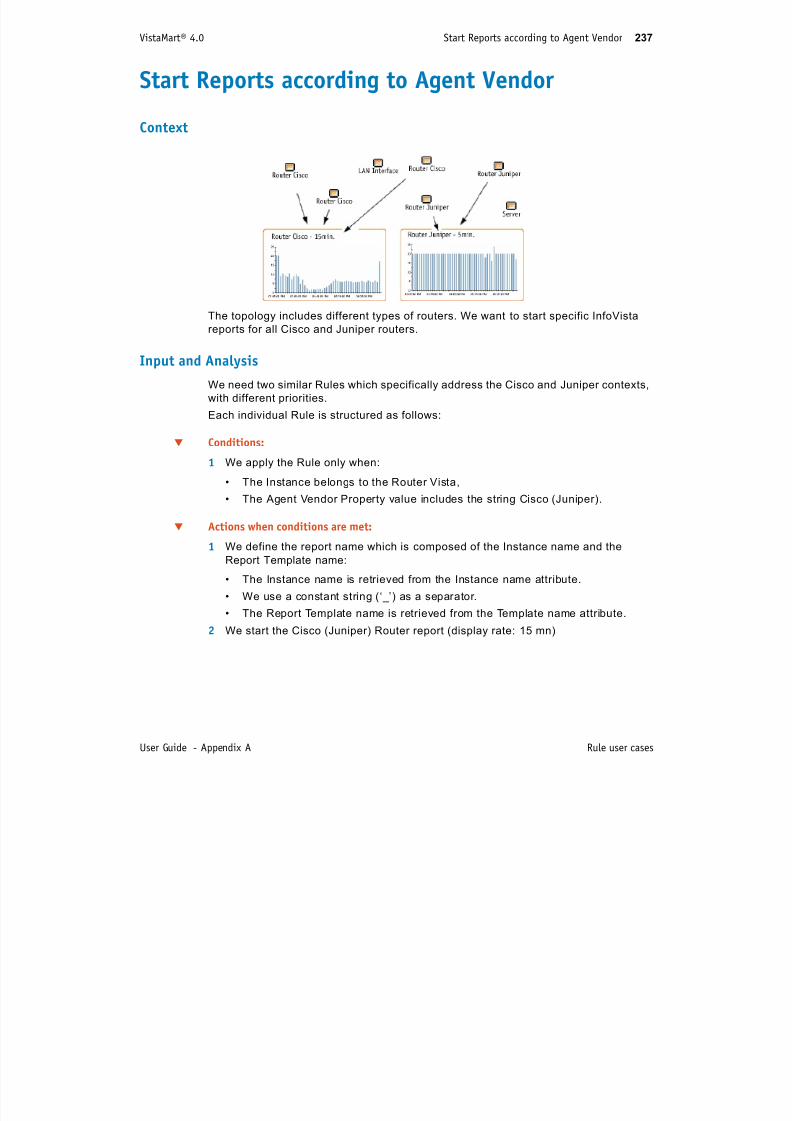
7/17/2019 VistaMart User Guide
http://slidepdf.com/reader/full/vistamart-user-guide 237/265
User Guide - Appendix A Rule user cases
• The Instance belongs to the Router Vista,
• The Agent Vendor Property value includes the string Cisco (Juniper).
Actions when conditions are met:
1 We define the report name which is composed of the Instance name and the
Report Template name:
• The Instance name is retrieved from the Instance name attribute.
• We use a constant string (‘_’) as a separator.
• The Report Template name is retrieved from the Template name attribute.
2 We start the Cisco (Juniper) Router report (display rate: 15 mn)
VistaMart® 4.0 Start Reports according to Agent Vendor 238
Syntax

7/17/2019 VistaMart User Guide
http://slidepdf.com/reader/full/vistamart-user-guide 238/265
User Guide - Appendix A Rule user cases
B XML Topology files examples
This section includes a series of typical XML examples which describe different
methods for configuring the external topology files.
See:
’Example #1 - Topology file defining Instances’ on page 240
7/17/2019 VistaMart User Guide
http://slidepdf.com/reader/full/vistamart-user-guide 239/265
239
’Example #2 - Topology file defining groups’ on page 241
’Example #3 - Defining proxies’ on page 242
’Example #4 - Defining group contents’ on page 243
’Example #5 - Instance defined with several Vistas’ on page 244
VistaMart® 4.0 Example #1 - Topology file defining Instances 240
Example #1 - Topology file defining Instances
The following topology file contains basic Instances, which will be imported in a
‘routers’ Zone:
<!-- Routers Instances imported using Change Mode in Zone “Routers”-->
<?xml version=”1.0” encoding=”UTF-8” standalone=”yes”?><ADResult =”” Seq=”-1”>
<Instances>
<Instance Tag=”RT HQ01RT01 194.98.138.255" Name=”RT HQ01RT01”>
<Vista Name=”Router”/>
<PropertyValue VistaName=”IpNode” Name=”ip” Value=”194.98.138.255”/>
<PropertyValue VistaName=”MacNode” Name=”mac” Value=”00027E23C48C”/>
<PropertyValue VistaName=”SnmpNode” Name=”Agent Vendor” Value=”Cisco”/></Instance>
<Instance Tag=”RT HQ01RT02 194.98.138.252" Name=”RT HQ01RT02”>
<Vista Name=”Router”/>
<PropertyValue VistaName=”IpNode” Name=”ip” Value=”194.98.138.252”/>
<PropertyValue VistaName=”MacNode” Name=”mac” Value=”00028E2FC48D”/>
<PropertyValue VistaName=”SnmpNode” Name=”Agent Vendor” Value=”Cisco”/>
</Instance>
</Instances>
<Links/>
<Subnets/>
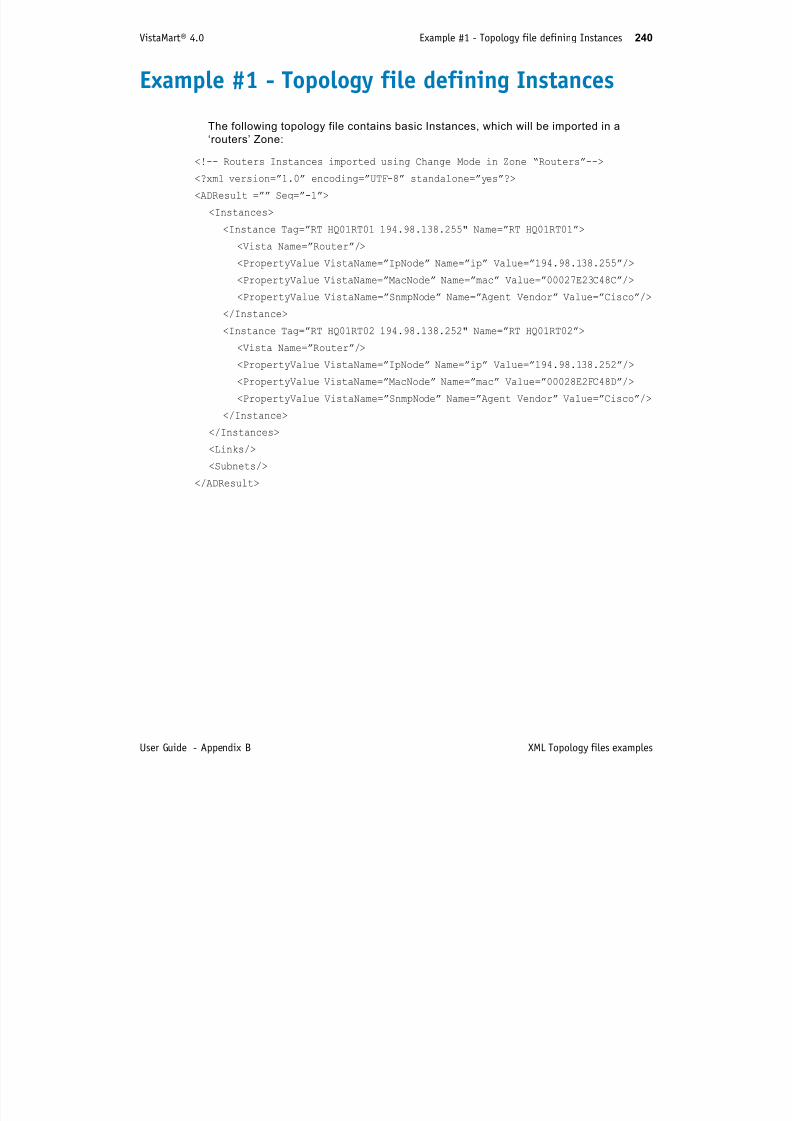
7/17/2019 VistaMart User Guide
http://slidepdf.com/reader/full/vistamart-user-guide 240/265
User Guide - Appendix B XML Topology files examples
</ADResult>
VistaMart® 4.0 Example #2 - Topology file defining groups 241
Example #2 - Topology file defining groups
The following topology file contains group Instances, to be loaded in a specific Zone:
<!-- Groups Definition imported using Change Mode in Zone “Groups”-->
<?xml version=”1.0” encoding=”UTF-8” standalone=”yes”?>
<ADResult =”” Seq=”-1”><Instances>
<Instance Tag=”Europe” VistaName=”VistaMartGroup”></Instance>
<Instance Tag=”UK” VistaName=”VistaMartGroup”></Instance>
<Instance Tag=”France” VistaName=”VistaMartGroup”></Instance>
</Instances>
<Links/>
<Subnets/>
</ADResult>

7/17/2019 VistaMart User Guide
http://slidepdf.com/reader/full/vistamart-user-guide 241/265
User Guide - Appendix B XML Topology files examples
VistaMart® 4.0 Example #3 - Defining proxies 242
Example #3 - Defining proxies
Both following topology files are similar. They illustrate two different ways for defining
proxy Instances related to basics.
Basic/Proxy definition syntax 1, Embedded proxies
Basic/Proxy definition syntax 2, separate blocks
<?xml version=”1.0” encoding=”UTF-8” standalone=”yes”?>
<ADResult =”” Seq=”-1”>
<Instances>
<Instance Tag=”RT HQ01RT01 194.98.138.255" VistaName=”Router”>>
<PropertyValue VistaName=”IpNode” Name=”ip” Value=”194.98.138.255”/>
<Instance Tag=”LAN RT HQ01RT01 VLAN24 4" VistaName=”LAN Interface”>
<PropertyValue VistaName=”Interface” Name=”Interface Index” Value=”4”/></Instance>
</Instance>
</Instances>
<Links/>
<Subnets/>
</ADResult>
<?xml version=”1.0” encoding=”UTF-8” standalone=”yes”?>
<ADResult =”” Seq=”-1”>

7/17/2019 VistaMart User Guide
http://slidepdf.com/reader/full/vistamart-user-guide 242/265
User Guide - Appendix B XML Topology files examples
<Instances>
<Instance Tag=”RT HQ01RT01 194.98.138.255" VistaName=”Router”>>
<PropertyValue VistaName=”IpNode” Name=”ip” Value=”194.98.138.255”/>
</Instance>
<Instance Tag=”LAN RT HQ01RT01 VLAN24 4" VistaName=”LAN Interface”>
<PropertyValue VistaName=”Interface” Name=”Interface Index” Value=”4”/>
<Basic Tag=”RT HQ01RT01 194.98.138.255"/>
</Instance>
</Instances>
<Links/>
<Subnets/>
</ADResult>
NOTE During Change Management, proxy Instances cannot be moved from their
parent basic to a different basic.
VistaMart® 4.0 Example #4 - Defining group contents 243
Example #4 - Defining group contents
The following topology file contains new routers which will also populate the ‘routers’
Zone (Example #1) and which will be members of the groups defined in example #3.
Note that an Instance can be a member of several groups.
<!-- Groups Content Definition imported using Update Mode in Zone ‘Routers’ -->
<?xml version=”1.0” encoding=”UTF-8” standalone=”yes”?>
<ADResult =”” Seq=”-1”>
<Instances>
<Instance Tag=”RT HQ01RT03 194.98.138.250">
<PropertyValue VistaName=”Common” Name=”MemberOfGroup” Value=”Europe”/>
<PropertyValue VistaName=”Common” Name=”MemberOfGroup” Value=”UK”/>
</Instance><Instance Tag=”RT HQ01RT03 194.98.138.249">
<PropertyValue VistaName=”Common” Name=”MemberOfGroup” Value=”Europe”/>
<PropertyValue VistaName=”Common” Name=”MemberOfGroup” Value=”France”/>
</Instance>
</Instances>
<Links/>
<Subnets/></ADResult>

7/17/2019 VistaMart User Guide
http://slidepdf.com/reader/full/vistamart-user-guide 243/265
User Guide - Appendix B XML Topology files examples
VistaMart® 4.0 Example #5 - Instance defined with several Vistas 244
Example #5 - Instance defined with several Vistas
The following topology file illustrates the multi Vista support case.
<!-- Multi Vistas Support -->
<?xml version=”1.0” encoding=”UTF-8” standalone=”yes”?>
<ADResult =”” Seq=”-1”><Instances>
<Instance Tag=”RT HQ01RT10 194.98.138.248" Name=”RT HQ01RT10”>
<Vista Name=”Router”/>
<Vista Name=”VPN_Qantas”/>
<PropertyValue VistaName=”IpNode” Name=”ip” Value=”194.98.138.248”/>
<PropertyValue VistaName=”VPN_Qantas” Name=”priority” Value=”3”/>
</Instance>
</Instances>
<Links/>
<Subnets/>
</ADResult>
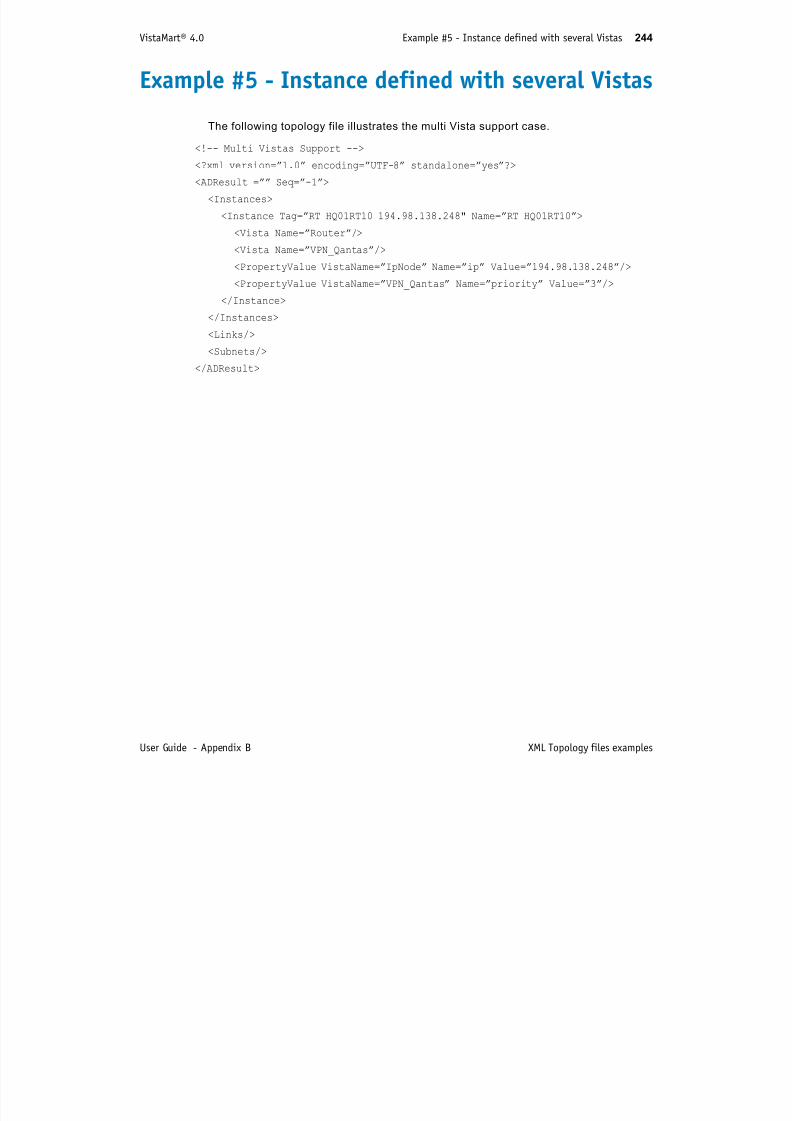
7/17/2019 VistaMart User Guide
http://slidepdf.com/reader/full/vistamart-user-guide 244/265
User Guide - Appendix B XML Topology files examples
C Glossary of terms
This section provides definitions for terms that you commonly encounter when
working with VistaMart and/or InfoVista Server.

7/17/2019 VistaMart User Guide
http://slidepdf.com/reader/full/vistamart-user-guide 245/265
245
InfoVista Server 4.0 246
Term Definition
access list Defines the user access to reports. When you create a report, it is
initially defined as public (the scope attribute is set to public). This
means that all other users can access the report. To prevent other
users from accessing single/group Reports, set scope to “private”.
acquisition rate The sampling rate that determines how often InfoVista Server
collects data for the Indicators used in the graph.
agent A program that gathers information or per forms some other
service without your immediate presence and on some regular
schedule. Typically, an agent program, using parameters which
you provide, gathers information that you require and presents it
to you on a daily or other periodic basis.
aggregation When the display rate is greater than the acquisition rate, each
data point on a graph is the result of aggregating the collected
data. Data aggregation involves three major functions:
> aggregation specifies how to aggregate the calculated values
(an mean function, a max function, etc.)
> consolidation specifies where the aggregation is applied if one
or more Formulas are used to calculate the displayed values
(aggregation before or after the Formulas).
> recovery specifies how to aggregate data if polled data is not
complete (for example, network delays can cause some polls to
remain unanswered).
alert A message to VistaCockpit tha t comes from another
VistaFoundation product to signal an anomaly and triggers a chain
of remedial actions (an alert workflow).
availability In a network system, availability is the accessibility of input and
output ports or IT devices.
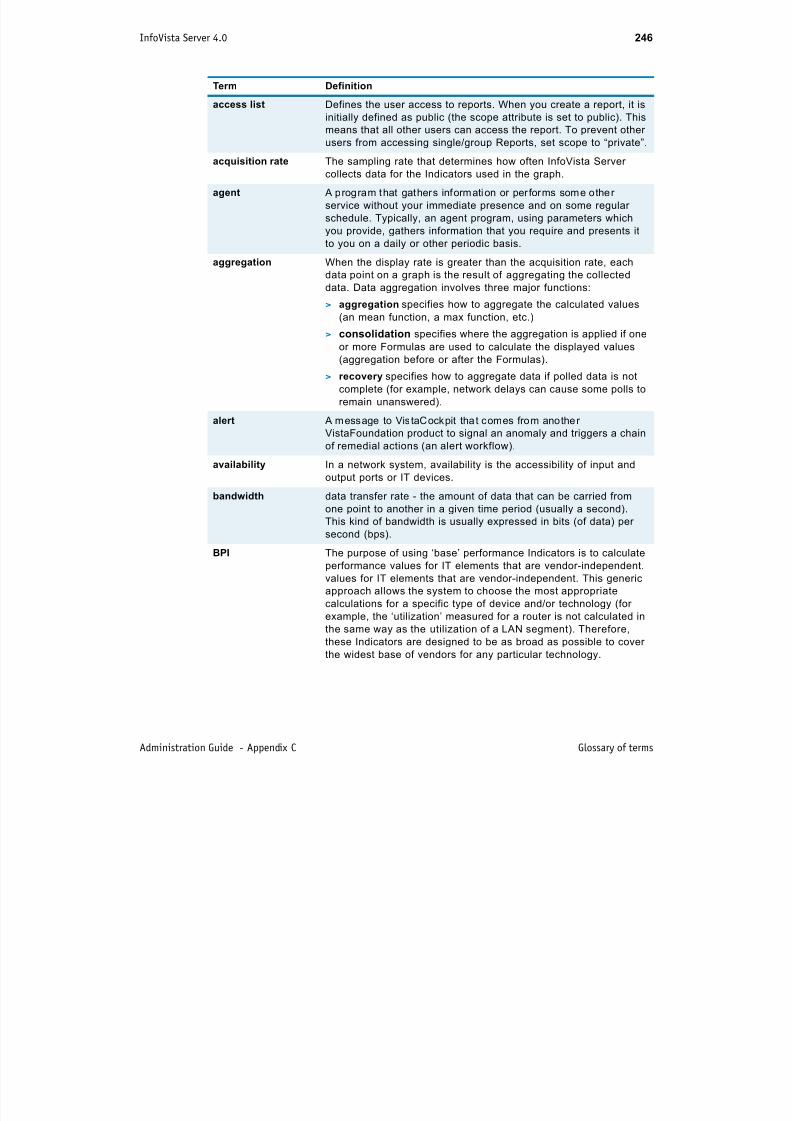
7/17/2019 VistaMart User Guide
http://slidepdf.com/reader/full/vistamart-user-guide 246/265
Administration Guide - Appendix C Glossary of terms
bandwidth data transfer rate - the amount of data that can be carried from
one point to another in a given time period (usually a second).
This kind of bandwidth is usually expressed in bits (of data) per
second (bps).
BPI The purpose of using ‘base’ performance Indicators is to calculate
performance values for IT elements that are vendor-independent.
values for IT elements that are vendor-independent. This generic
approach allows the system to choose the most appropriate
calculations for a specific type of device and/or technology (for
example, the ‘utilization’ measured for a router is not calculated in
the same way as the utilization of a LAN segment). Therefore,
these Indicators are designed to be as broad as possible to coverthe widest base of vendors for any particular technology.
InfoVista Server 4.0 247
browser A serv ice tha t prov ides an InfoVista client with any data which is
committed in the ObjectStore database. Committed data is data
which has been acquired and computed in the database since the
last commit time. This does not include data stored in the cache
which remains accessible only to the Collector. The Browser
relieves the load on the Collector by acting as a data server for
such applications as VistaPortal® SE and VistaMart®. This means
that the Collector can concentrate on data calculation and storage.
calendar This object specifies the periods when calculation of an Indicator
is not required, for example during weekends or holiday shutdown
periods. The Indicator values are set to “Calendar” for these
periods. The Calendar is mapped to an Indicator using the
Calendar attribute at Indicator level. Every Calendar consists of a
Week plan and a Days off list. They define the periods when
Indicator values are not required.
capability Capability is an expression given to properties available onmonitored network resources. The capabilities define the type of
reports that VistaMart must start for the corresponding instance.
chunk (of events) A large group o f events (up to several megabytes) that the
InfoVista Server forwards to VistaMart. Each chunk goes out as an
individual HTTP call.
codec an acronym for coder/decoder. This type of codec combines
analog-to-digital conversion and digital-to-analog conversion
functions in a single chip. In personal and business computingapplications, the most common use for such a device is in a
modem.
collector An InfoVista serv ice responsib le for collect ing data, calculating the
Indicators and storing the results. This data is collected over a
period of time specified by the lifetime of each Report. It may be
Term Definition

7/17/2019 VistaMart User Guide
http://slidepdf.com/reader/full/vistamart-user-guide 247/265
Administration Guide - Appendix C Glossary of terms
p p y p y
as short as a few minutes or as long as a few years.
connectivity The interconnection of system devices and applications via ports
and protocols
InfoVista Server 4.0 248
data mart, data
warehouse
A data mar t is a reposi tory of data gathered from operat ional data
and/or other sources designed to serve a particular community of
knowledge workers. In scope, the data may derive from an
enterprise-wide database or data warehouse.
The emphasis of a data mart is to meet the specific demands of a
specific group of knowledge users in terms of analysis, contents,
presentation, and ease-of-use. In practice, the terms 'data mart'
and 'data warehouse' are often complementary in many ways. In
general, the design of a data mart tends to start from an analysis
of user needs, while a data warehouse tends to start from an
analysis of existing data and how to collect it for later use.
A data warehouse is a centra l aggregation of data (which can be
distributed physically); a data mart is a data repository that may
derive from a data warehouse and emphas izes ease of access and
usability for a particular purpose.
In general, a data warehouse tends to be a strategic but somewhattheoretical concept; a data mart tends to be tactical and aims at
meeting an immediate need. VistaMart would lean towards the
data mart model.
disk Part of a unit, often called a disk drive, hard drive, or hard disk
drive, that stores and provides relatively quick access to large
amounts of data on the computer.
digest access
authentication
One of the agreed methods a web page can use to negotiate
credentials with a web user (using the HTTP protocol). Thismethod builds upon (and obsoletes) the basic authentication
scheme, allowing user identity to be established without having to
send a password in plaintext over the network.
display rate The frequency at which data points show up on the graph (i.e.
every fifteen minutes, etc.)
Term Definition
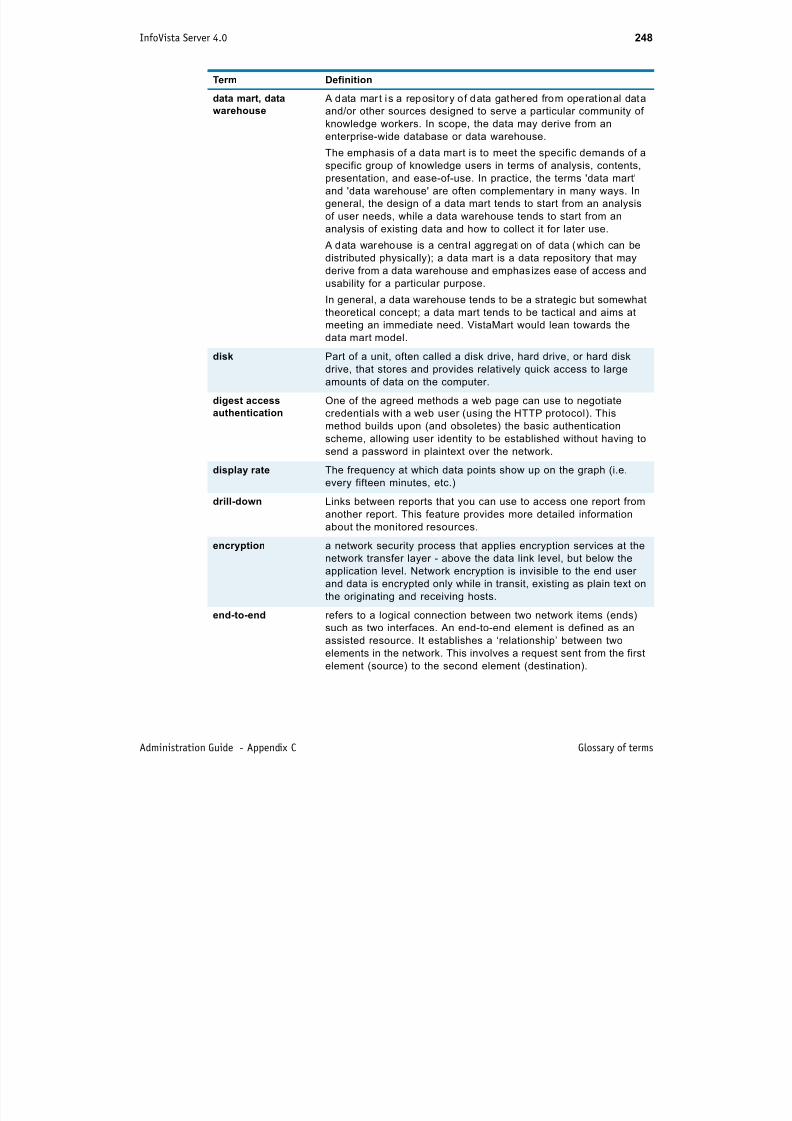
7/17/2019 VistaMart User Guide
http://slidepdf.com/reader/full/vistamart-user-guide 248/265
Administration Guide - Appendix C Glossary of terms
drill-down Links between reports that you can use to access one report from
another report. This feature provides more detailed information
about the monitored resources.
encryption a network security process that applies encryption services at the
network transfer layer - above the data link level, but below the
application level. Network encryption is invisible to the end user
and data is encrypted only while in transit, existing as plain text on
the originating and receiving hosts.
end-to-end refers to a logical connection between two network items (ends)
such as two interfaces. An end-to-end element is defined as an
assisted resource. It establishes a ‘relationship’ between twoelements in the network. This involves a request sent from the first
element (source) to the second element (destination).
InfoVista Server 4.0 249
enumeration In mathematics and theoretical computer science, an enumeration
of a set is a either a procedure for listing all members of the set in
some definite sequence, or a count of objects of a specified kind.
The two kinds of enumeration often, but not always, overlap.
environment variable An environment var iable def ines some aspect of a specif ic user or
a program environment that can vary. Generally set during the
login procedure, environment variables are used across multiplelanguages and operating systems to provide information to
applications that may be specific to the user request.
event A message from a VistaFoundation product that s ignals an
unexpected or unacceptable condition (such as a threshold
violation) and gets logged in VistaCockpit. Unlike an 'alert', and
does not trigger a workflow of remedial tasks.
hotfix code (sometimes called a patch) that fixes a coding error in a
software.
expression Expressions are the central logic of Indicators. They are attributes
of Formulas, which in turn are attributes of the Indicator.
An Expression can contain: MIB variables, constants or var iables,
properties, and logical operators
file system the way in which files are named and where they are placed
logically for storage and retrieval.
filter a program or section of code that is designed to examine each
input or output request for certain qualifying criteria and thenprocess or forward it accordingly. A filter is pass-through code that
takes input data, makes some specific decision about it, and
passes it on to another program in a kind of pipeline. Usually, a
filter does no input/output operation on its own.
formula A mathematical expression used to calculate an Indicator, which
Term Definition
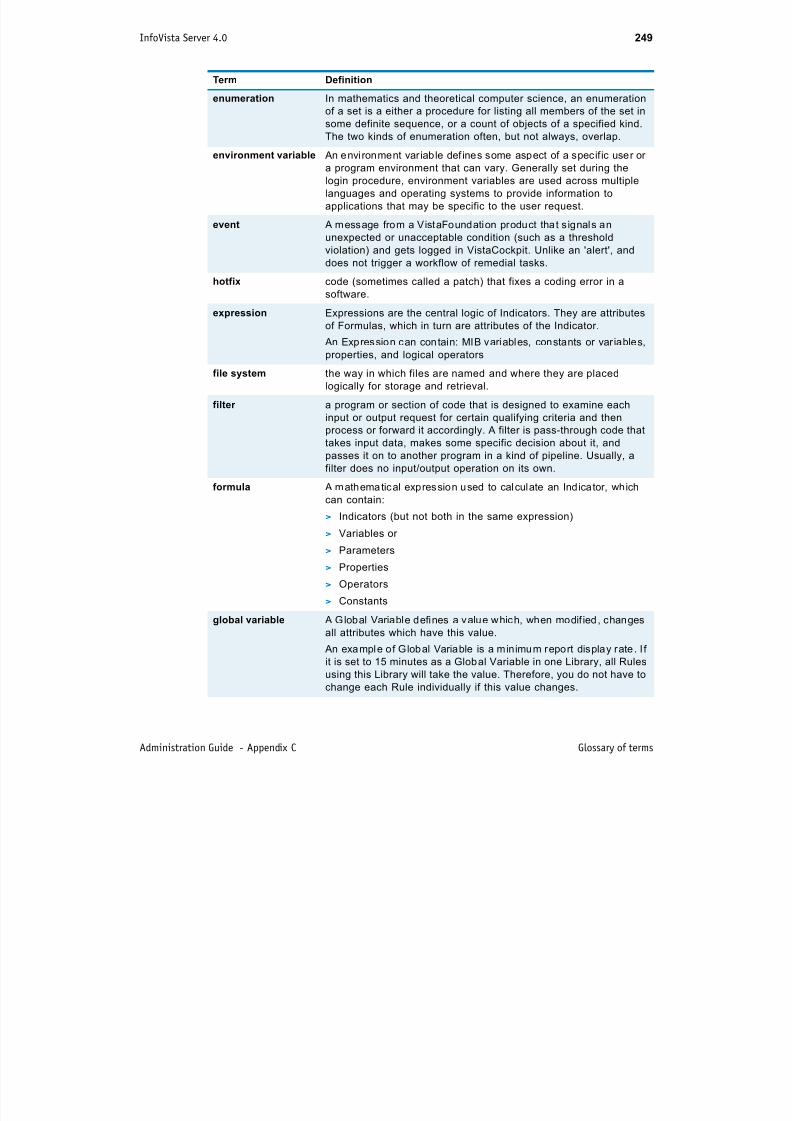
7/17/2019 VistaMart User Guide
http://slidepdf.com/reader/full/vistamart-user-guide 249/265
Administration Guide - Appendix C Glossary of terms
can contain:
> Indicators (but not both in the same expression)
> Variables or
> Parameters
> Properties
> Operators
> Constants
global variable A Global Variable defines a value which, when modif ied , changes
all attributes which have this value.
An example of Global Variable is a minimum report display rate . I f
it is set to 15 minutes as a Global Variable in one Library, all Rules
using this Library will take the value. Therefore, you do not have to
change each Rule individually if this value changes.
InfoVista Server 4.0 250
graph An object tha t represents a real working graph (a h istogram, a p ie
chart, a table, etc.) that displays a set of Indicators for one or more
Instances.
harvester A legacy connector in the forwarding mechanism that works as an
active thread to poll the event queue table to guarantee that
legacy applications work without modification.
help system a documentation component of a software program that explainsthe features of the program and helps the user understand its
capabilities.
indicator An ind icator is a measurement that can be made for a resource.
instance An Instance is a representation o f a monitored IT resource, as
seen by the data collection engine that gathers status and
performance data.
An Instance comes with a ‘property sheet’ (or an identi fication
card) indicating its name, description, and property values. It also
names the Vista to which the monitored resource belongs.
You create an Instance for each IT element that you want to
monitor using the appropriate Vista. Example: If you want to
monitor a Cisco router, you create a router Instance from the ‘Vista
Router’ with a name (ex. Router Alpha), a description (ex. Cisco),
and a property value (ex. IP address 164.59.13.75.)
instance (basic) represents a physical IT resource (for example a router). It is
created from a Basic Vista. A basic Instance can provideinformation on itself using its MIB.
instance (proxy) represents a logical IT resource (for example a WAN interface). A
‘proxy’ Instance contains the type and characteristics of the ‘basic’
Instance to which it is associated (in this case, the router). By
definition, a logical resource cannot provide information on itself
d d d ‘ ’ t d thi it b h lf H WAN
Term Definition
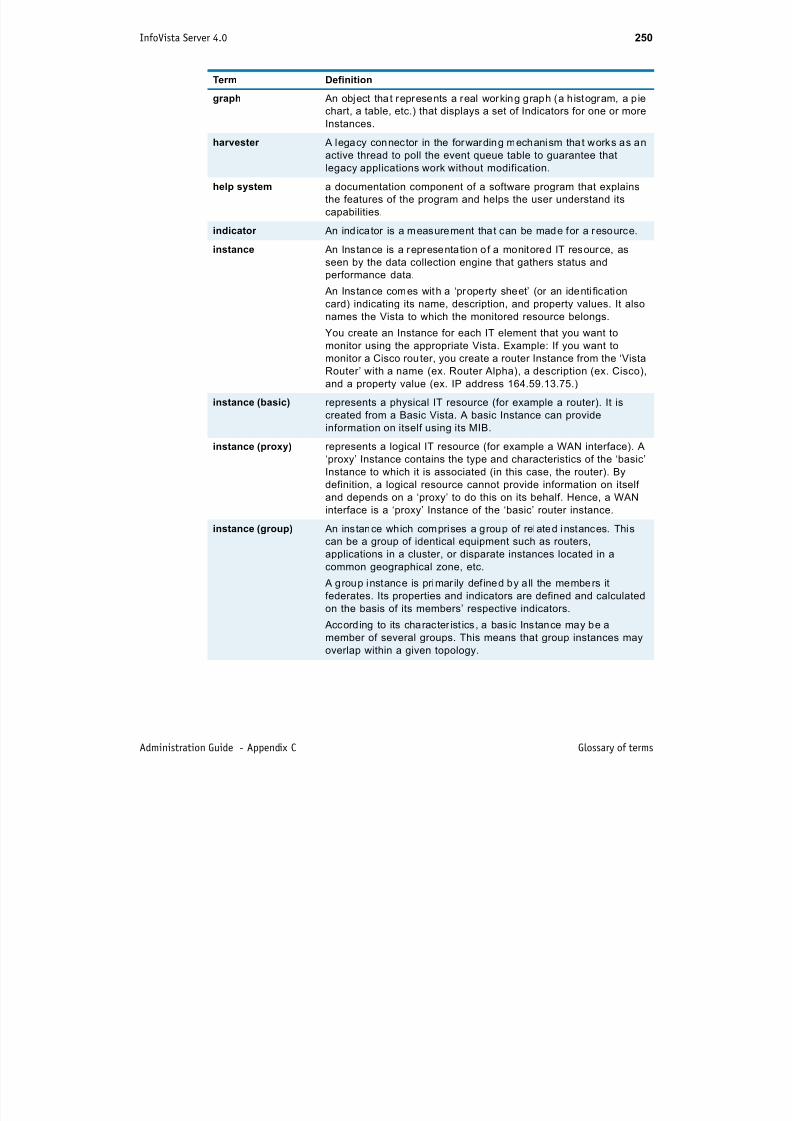
7/17/2019 VistaMart User Guide
http://slidepdf.com/reader/full/vistamart-user-guide 250/265
Administration Guide - Appendix C Glossary of terms
and depends on a ‘proxy’ to do this on its behalf. Hence, a WAN
interface is a ‘proxy’ Instance of the ‘basic’ router instance.
instance (group) An instance which comprises a group of related instances. Thiscan be a group of identical equipment such as routers,
applications in a cluster, or disparate instances located in a
common geographical zone, etc.
A group instance is primar ily def ined by all the members it
federates. Its properties and indicators are defined and calculated
on the basis of its members’ respective indicators.
According to its character ist ics , a basic Instance may be a
member of several groups. This means that group instances may
overlap within a given topology.
InfoVista Server 4.0 251
IP Telephony (Internet Protocol telephony) General term for the technologies
that use the Internet Protocol's packet-switched connections to
exchange voice, fax, and other forms of information that have
traditionally been carried over the dedicated circuit-switched
connections of the public switched telephone network (PSTN).
failover Failover is a backup operational mode in which the functions of a
system component (such as a processor, server, network, ordatabase, for example) are assumed by secondary system
components when the primary component becomes unavailable
through either failure or scheduled down time.
ivcmd The command line interface for InfoVista Server
ivreport The client graphic interface for InfoVista Server
jitter Variations in packet arrival time.
KPI KPIs are Indicators and therefore they are essentially
measurements like other indicators. The difference is that they
depend on other ‘lower level’ Indicators, which derive from other
base Indicators to calculate their values.
KPIs are dependent on the resources for which you design them.
For Instance, the KPI ‘Horsepower’ in the Servers solution is a
Property value that returns the processor’s power as defined by
industry standards.
latency An expression of how much time it takes for a packet of data to get
from one designated point to another.
library - InfoVista Also known as a VistaView, the Library represents a package of
objects created by the user and organized and used for any
purpose the user chooses. For example, one library might contain
objects that model frame relay networks or Compaq servers or
Oracle databases etc. InfoVista libraries are imported or exported
t f Vi t M t d t b t th
Term Definition

7/17/2019 VistaMart User Guide
http://slidepdf.com/reader/full/vistamart-user-guide 251/265
Administration Guide - Appendix C Glossary of terms
to or from one VistaMart database to another.
library - VistaMart VistaMart Libraries contain the same range of objects as InfoVista
Libraries. They differ from these Libraries in that they:
> generally handle lower-frequency data points (although you can
start slots at high-frequency intervals if required)
> handle only scalar, numeric, and trap indicator values
> contain rules used to define which reports/slots to start and
properties to update
> do not contain report templates
VistaMart Libraries can be customized using the VistaMartInventory Manager (unlike InfoVista Libraries). You can add new
indicators and properties to VistaMart libraries. Libraries can also
be exported from one VistaMart database to another.
InfoVista Server 4.0 252
license key Each InfoVista Server is protected by a license key. This key
allows you to install the server and use it for a period of time that
depends on the type of key. It is linked to the MAC address of the
InfoVista Server system.
lifetime This setting determines the amount of time that InfoVista Server
keeps raw data before it overwrites it with new data (all expired
data get purged). The value for this setting generally takes into
account the Report Template display rate.
link - VistaMart Links are a means to associate two Instances. This is useful for
integration with the VistaPortal Service Level Navigator. To
confirm whether SLN still exists in 4.0.
load balancing Dividing the amount of work that a computer has to do between
two or more computers so that more work gets done in the same
amount of time and, in general, all users get served faster. Load
balancing can be implemented with hardware, software, or a
combination of both.
lookup (IVCmd only) This object represents the internal lookup table used by the
system to resolve an indirect Parameter reference in a Formula. It
is a read-only object used primarily for troubleshooting purposes.
There is one Lookup for a given Instance-Variable pair. It shows
the lookup values currently used to resolve the indirect Parameter
references specified at Formula level for this pair.
manager (InfoVista) An InfoVista service responsib le for maintain ing the InfoVista
object model. This model represents the resources in your IS
which InfoVista monitors, the Indicators it calculates, and the
Reports it generates.
The Manager has its own database file: manager.db. It contains
the data which represent InfoVista’s added value to your company.
Back it up regularly if it is often modified.
Term Definition
7/17/2019 VistaMart User Guide
http://slidepdf.com/reader/full/vistamart-user-guide 252/265
Administration Guide - Appendix C Glossary of terms
metric The measurement of a particular characteristic of a program's
performance or efficiency. In InfoVista lingo, a metric is a
container of indicators whose values appear in a graph.
mib A management information base (MIB) is a formal descript ion of a
set of network objects that can be managed using the Simple
Network Management Protocol (SNMP). The format of the MIB is
defined as part of the SNMP. MIB-I refers to the initial MIB
definition; MIB-II refers to the current definition. SNMPv2 includes
MIB-II and adds some new objects.
middleware A general term for any programming tha t serves to glue together
or mediate between two separate and often already existingprograms.
InfoVista Server 4.0 253
migration The process of moving from one environment to another
environment which can involve moving to new hardware, new
software, or both. Migration can be small-scale, such as migrating
a single system, or large-scale, involving many systems, new
applications, or a redesigned network.
model a coherent and logical structure that defines all the objects that
may exist in an IT infrastructure. This structure, or the InfoVista
[Object] Model, organizes these IT objects into functional
categories and establishes the relationships between them.
module In VistaMart, a module is a container for a set of rules.
operators Operators are used in formulas to compare or equate values and
in formulas for computation.
patch A quick-repair job for a p iece of p rogramming.
persistence (data) The storage of data for a certain length of time.
ping A basic Internet p rogram that allows a user to ver ify tha t a
particular IP address exists and can accept requests. Ping is used
diagnostically to ensure that a host computer you are trying to
reach is actually operating.
poller An informal appellat ion for a server tha t polls data, which in this
case the InfoVista Server
port mapper An InfoVista service (or daemon) that a llows you to open a
connection in CORBA and to communicate with the InfoVistaServer using the IVApi, IVCmd, or IVReport.
This service is mandatory for applications and servers to
communicate with each other. The Port Mapper also allows you to
connect to an InfoVista Server Instance using its Instance name.
As its name indicates, the Port Mapper maps the different end
points (Manager, Collector and Browser services).
Term Definition
7/17/2019 VistaMart User Guide
http://slidepdf.com/reader/full/vistamart-user-guide 253/265
Administration Guide - Appendix C Glossary of terms
probe A program or other device inserted at a key juncture in a network
for the purpose of monitoring or collecting data about networkactivity.
process (Unix, Linux) A process is an ins tance of a program running in a computer. It is
close in meaning to task, a term used in some operating systems.
In Unix and some other operating systems, a process is started
when a program is initiated.
InfoVista Server 4.0 254
property - InfoVista A defining charac ter ist ic or att ribute of a Vista. For example the
Vista “IP node” has the property “IP address”. A property is
associated with a real (often IS-dependent) value for each
Instance created from the Vista. The real value, associated with a
specific Instance, is represented by a Property Value object.
Some Properties of a Vista are dictated by the type of resource
modeled by the Vista. For example, a Vista designed to monitor
devices in an IP network must have a Property which represents
an IP address as this is an intrinsic Property of any IP device.
Some Properties can be invented according to the type of reports
required.
property value the specific value of a Property for a specific Instance (for
example, “ipAddress=192.192.192.192”).
property -VistaMart Whereas InfoVista Server Properties are “polling based,”
VistaMart Properties are used to define and manage groups. They
are also intended for VistaPortal presentation purposes.
All Properties you create are automatical ly part of a VistaMart
library.
protocol A special set of rules tha t end points in a telecommunication
connection use when they communicate. Protocols exist at several
levels in a telecommunication connection. For example, there are
protocols for the data interchange at the hardware device level
and protocols for data interchange at the application program
level.
provisioning A process that feeds the VistaMar t central repository with topology
information (gathered from resources on the network), the type of
measurements to compute, and the reporting information (type of
report to start and what data to compute)
proxy move A VistaMart feature to manage customer inventory that a llows the
move of a proxy instance from one basic instance to another basic
Term Definition

7/17/2019 VistaMart User Guide
http://slidepdf.com/reader/full/vistamart-user-guide 254/265
Administration Guide - Appendix C Glossary of terms
move of a proxy instance from one basic instance to another basic
instance. For example, it is possible to move a customer interface
from a router to another one without losing VistaMart data.The activation of this feature requires an appropriate tagging
policy for proxies in VistaDiscovery.
forwarding service -
internal
A process where the InfoVista Server automatically sends new
incoming data to VistaMart as soon as it becomes available.
forwarding service -
external
A mechanism that forwards data and events to another (non-
VistaMart) customized processing.
QoS Quality of Service'. The idea that transmission rates, error rates,and other characteristics can be measured, improved, and, to
some extent, guaranteed in advance.
InfoVista Server 4.0 255
real-time Communications wherein perceptible delays between the sender
and receiver are minimal and easily tolerated are considered to
take place in real-time. Real-time reports display data collected for
indicators at a specific point in time.
recovery A process tha t invo lves copying backup files from secondary
storage (tape, Zip disk or other backup media) to hard disk.
Recovery is performed in order to return data to its original
condition if files have become damaged.
reference time The reference time in a report is generally the current time.
report An object containing one or more graphs, with each graph
displaying a set of Indicators on one or several Instances. The
report object is created by applying Instances to a report template.
report template defines the general layout of a report and contains the graphs
using the metrics and indicators you developed.
repository a central place in which a collection of data is kept and maintained
in an organized way and allows a selective extraction of data for
the purpose of computation, analysis, etc.
resource include physical objects in the IT infrastructure such as a server, a
network device, a network interface, or an application.
resource (logical) a logical resource such as a LAN or WAN (local or wide area
network)
resource (physical) a physical resource in the infrastructure, such as a server or arouter,
rule Rules define the global characteristics of your reporting solution.
They define, for a specific number of instances, all related reports
and slots to create. Note: do not confuse this object with the other
“rule” object used by InfoVista Servers which defines relationships
between vistas, such as “all routers are IP nodes.” When a vista
h l hi h f t th i t th ti f b th
Term Definition
7/17/2019 VistaMart User Guide
http://slidepdf.com/reader/full/vistamart-user-guide 255/265
Administration Guide - Appendix C Glossary of terms
has a rule which refers to another vista, the properties of both
vistas are combined when an instance is created from the original
vista that contains the rule.
SCN # (acronym to
define later)
A unique increasing number attached to each message that goes
out from the InfoVista Server to the VistaMart data forwarding
service (push). This is a tracking number to ensure that the data
forwarding service does not miss any message from the InfoVista
Server.
service level
management
A serv ice level agreement (SLA) is a cont ract between a network
service provider and a customer that specifies, usually in
measurable terms, what services the network service provider willfurnish. Some metrics for SLAs may include: what percentage of
the time services will be available; the number of users that can be
served simultaneously; specific performance benchmarks to which
actual performance will be periodically compared, etc.
InfoVista Server 4.0 256
signals Signals are used with InfoVista's command-line interface (IVCmd)
to understand how data is handled by the different layers which
comprise InfoVista software. The output from signals can be used
to analyze and troubleshoot various situations encountered while
running InfoVista Server.
sizing The sizing exercise gathers inputs necessary to have an
accurately tailored reporting solution according to customer
specifications. Factors that affect sizing can be the number of
instances and connections and hardware constraints.
slot In VistaMart, the definition for data collected for a given Instance,
Indicator, display rate, and acquisition (polling) rate.
See also: ’xslot’ on page 259.
snmp Simple Network Management Protocol (SNMP) is the protocol that
governs network management, and thereby allows the monitoring
of network devices and their functions. Each Network device iscovered by one SNMP agent.
solution A suite of InfoVIsta products that assembles data and gives
meaningful analysis about a specific part of the infrastructure,
such as for a group of IT devices, servers, or applications.
ssl Secure Sockets Layer. A commonly-used protocol for managing
the security of a message transmission on the Internet.
ssl certificate A digital cert ifi cate that establishes your c redent ials when sending
transactions over the network. It is issued by a certificationauthority (CA). It contains your name, a serial number, expiration
dates, a copy of the certificate holder's public key (used for
encrypting messages and digital signatures), and the digital
signature of the certificate-issuing authority so that a recipient can
verify that the certificate is real.
threshold provide the system with a comparative value against which the
Term Definition

7/17/2019 VistaMart User Guide
http://slidepdf.com/reader/full/vistamart-user-guide 256/265
Administration Guide - Appendix C Glossary of terms
system automatically checks if the calculated values correspond to
an optimal range. If not, it generates a trap or an exception for the
user to act upon.
timestamp The time at which data is calculated. It is a UTC value
(monotonously increasing). For timestamps representing periods,
we use the first date of the period:
> the 12h00 timestamp for hourly values correspond for the [12h-
00,13h00] period
> the 01/01/2006 00:00 (daily) is for the [01/01/2006 – 02/01/
2006] period. Note that an event will only be sent on the 02/01around 02:00 (delay due to daily data processing).
InfoVista Server 4.0 257
topology file Topology is a schematic description of the arrangement of a
network, including its nodes and connecting lines. There are two
ways of defining network geometry: the physical topology and the
logical (or signal) topology. The physical topology of a network is
the actual geometric layout of workstations. Logical (or signal)
topology refers to the nature of the paths the signals follow from
node to node. In many instances, the logical topology is the same
as the physical topology, but not always. A topology file is a flatfile describing the devices in an IT infrastructure with basic
information pertaining to that device such as IP address,
manufacturer, etc.
trap a mechanism in the software for handling unexpected or
unacceptable conditions such as a threshold violation - for
example, by sending an error message to a log or to a system
user; and depending on the type of application, it could specify a
remedial action.
tuning reports Reports monitoring the performance of the InfoVista Server and
the traffic it sends or receives. The key performance Indicators for
the InfoVista Server concern the load on the server, as well as the
input and output traffic. They use source data generated internally
by the server so they can be run on any InfoVista Server without
installing specific MIBs.
tuning traps Certain events can disrupt the proper functioning of the Collector.
The tuning traps allows the system to log these events in the
Collector’s log file as well as send e-mail messages to alert
administrators through VistaCockpit. Circumstances that can
trigger a Collector event are large database size, high latency, or
high percentage of bad data values.
tuple An ordered set of values . Common uses for the tuple as a data
type are (1) for passing a string of parameters from one program
to another, and (2) representing a set of value attributes in a
Term Definition
7/17/2019 VistaMart User Guide
http://slidepdf.com/reader/full/vistamart-user-guide 257/265
Administration Guide - Appendix C Glossary of terms
( ) p g
relational database.
VPN Acronym for Virtual Private Network, which provides remote
offices or individual users with secure access to their
organization's network.
variable A piece of data which is available on the monitored resource. It is
used by formulas to calculate base indicators. Variables are
created by the system when a MIB file is loaded.
InfoVista Server 4.0 258
vista The InfoVista model separates and categorizes all monitored IT
elements into functional categories or ‘Vistas’. A Vista is a
template that describes the types and characteristics of a class of
monitored resources. A Vista can describe either:
> a physical resource in the infrastructure, such as a server or a
router, or
> a logical resource such as a LAN or WAN (local or wide areanetwork)
A Vista comes with a set of properties. There are minimum
properties which all Vistas share. It can be either of a Basic kind or
Proxy kind.
vista (basic) ‘Known as the ‘self-reliant’ Vista, the Basic Vista is a template for
physical IT elements that rely on their built-in capability to provide
their own source data.
EXAMPLE A router is bui lt with the necessary capabi lit y (using
SNMP and MIB technology, see next chapter) to respond
directly to external data collection requests about its
overall status and performance. Therefore the ‘Router’
Vista is a Basic Vista.
vista (common) Despite its name, there is nothing insignificant about this Vista.
This Vista contains the ‘common denominator’, or minimum
properties, that all other Vistas share. The ‘Common Vista’
includes properties such as location, customer names, and service
names.
vista (proxy) By definition, ‘proxy’ means ‘substitute’. The Proxy Vista is a
template for ‘logical’ or other IT elements that cannot supply their
own source data.
Hence, a Proxy Vista is always contingent on a Basic Vista, but
not vice versa.
The mandatory property values for a Proxy Vista depend on the
Term Definition
7/17/2019 VistaMart User Guide
http://slidepdf.com/reader/full/vistamart-user-guide 258/265
Administration Guide - Appendix C Glossary of terms
types of resources monitored.
EXAMPLE A ‘logical’ IT element (such as a WAN interface)cannot provide source data about itself. Therefore, it
‘needs’ help.
Since the WAN interface is located on the Router, it depends on
the Router to ‘help’ it get its source data. Therefore, the ‘Interface’
Vista is a ‘proxy’ Vista that relies on the ‘basic’ Router Vista for
information.
vistafoundation The VistaFoundation is an ensemble of InfoVista products working
in conjunction with each other to provide real-time reporting on ITinfrastructures such as administration, inventory and
consolidation, data collection, and presentation. Specifically, it
includes VistaMart, InfoVista Server, VistaCockpit, VistaDiscovery,
and VistaPortal.
InfoVista Server 4.0 259
vistaview see InfoVista library
voip Voice over IP. Term used in IP telephony for a set of facilities for
managing the delivery of voice information using the Internet
Protocol (IP).
workflow A series of tasks tha t are regularly scheduled for execut ion.
xindicator This object represents the stored tuples for each sample of a given
Instance-Indicator pair. Each tuple consists of all the Parameter
values used in the calculation of the Indicator. It is a read-only
object created automatically by the system and used primarily for
troubleshooting purposes.
xslot In InfoVista Server, the definition for the collection data for a given
Instance-Indicator-display and/or acquisition rate triplet.
When the display rate for an instance-indicator differs from the
acquisition (polling) rate, InfoVista Server creates an xslot to store
the polled data samples and another for the aggregated value forthose samples.
For example, if you have a display rate of 1 hour and an
acquisition rate of 5 minutes, InfoVista Server stores the polled
samples at 5 minutes in one xslot and the calculated result for the
display rate of 1 hour (12 data samples) in another xslot before it
pushes it to VistaMart.
It is a read-only object created automatically by the system and
used for troubleshooting purposes.See also ’slot’ on page 256.
zone A logical partit ion in the information system. Each Zone in the
infrastructure can contain a set of resources related by
technology, geography, customer, etc. Each Zone corresponds to
one topology file or one ‘discovery’ phase which defines a specific
group of Instances. This makes it possible to configure the
discovery process differently according to the network zones
Term Definition

7/17/2019 VistaMart User Guide
http://slidepdf.com/reader/full/vistamart-user-guide 259/265
Administration Guide - Appendix C Glossary of terms
discovery process differently according to the network zones.
zone set Contains a group of zones. Typically, you create a zone set toprovide reporting for a specific environment.
Vista Watch Vista Watch is an InfoVista application suite that actively monitors
complex multi-step Web transactions using synthetic simulations
(called ‘scenarios’). The Vista Watch Agent is a program that plays
the simulation (or scenario) at specified times. It is deployed on
the machines from which you want to collect source data.
response time measures the average response time of an end-to-end element. It
is calculated as the average time it takes for a request to reach atarget and return.
InfoVista Server 4.0 260
RMI Remote Method Invocation. A protocol used in Java language and
development environment to write object-oriented programming in
which objects on different computers can interact in a distributed
network.
flow control The process which guarantees that the overall data forwarding
(push) mechanism behaves correctly, and is robust enough to
handle network failures at all levels, including failures (either
crash or stop) of any constituents in the data forwarding chain.
recovery (VistaMart) The process through which the VistaMart data forwarding (push)
recognizes that some data is missing (or that VistaMart did not
receive for some reason), and can make a request for the data
from the InfoVista Server.
rollup (VistaMart) A rollup is a timestamp. There is one rol lup for each disp lay rate
and time zone. This is the greatest timestamp for which the
InfoVista Server has polled for all slots in this display rate and time
zone. The timestamp of the rollup is a UTC value (monotonously
increasing) in the reference time of the InfoVista Server emitting
this rollup.
Term Definition
7/17/2019 VistaMart User Guide
http://slidepdf.com/reader/full/vistamart-user-guide 260/265
Administration Guide - Appendix C Glossary of terms
261
Index
A Action . . . . . . . . . . . . . . . . . . . . . . . . . . . . . . . .
Add multi-valued Property Value. . . . . . . . 153
Add Vista . . . . . . . . . . . . . . . . . . . . . . . . . . 154
Remove multi-valued Property Value . . . . 153Remove Vista . . . . . . . . . . . . . . . . . . . . . . 154
Reset Property Value . . . . . . . . . . . . . . . . 156
Set Attribute Value. . . . . . . . . . . . . . . . . . . 156
Set Location. . . . . . . . . . . . . . . . . . . . . . . . 157
Set Property Value . . . . . . . . . . . . . . . . . . 158
Start Report(s) . . . . . . . . . . . . . . . . . . . . . . 163
Start Slot(s) . . . . . . . . . . . . . . . . . . . . . . . . 159
add. . . . . . . . . . . . . . . . . . . . . . . . . . . . . . . . . .Rule Condition. . . . . . . . . . . . . . . . . . . . . . 139
add (+) operator . . . . . . . . . . . . . . . . . . . . . . . . 215
Add Contain Property Value condition . . . . . . . 145
Add Contain Vista condition . . . . . . . . . . . . . . . 145
Add Documentation condition. . . . . . . . . . . . . . 148
Add Equal condition . . . . . . . . . . . . . . . . . . . . . 145
Add Match condition . . . . . . . . . . . . . . . . . . . . . 146
Add multi-valued Property Value action . . . . . . 153
Add Numerical condition. . . . . . . . . . . . . . . . . . 145 Add Test on Capabilities condition . . . . . . . . . . 143
Add Test on Vendor condition . . . . . . . . . . . . . 143
Add Vista action . . . . . . . . . . . . . . . . . . . . . . . . 154
administration . . . . . . . . . . . . . . . . . . . . . . . . . . . 10
C
Indicator . . . . . . . . . . . . . . . . . . . . . . . . . . 119
Instance manually . . . . . . . . . . . . . . . . . . . . 54
Links manually . . . . . . . . . . . . . . . . . . . . . . 58
new objects . . . . . . . . . . . . . . . . . . . . . . . . 115
Property. . . . . . . . . . . . . . . . . . . . . . . . . . . 122
Proxy manually . . . . . . . . . . . . . . . . . . . . . . 55Report . . . . . . . . . . . . . . . . . . . . . . . . . . . . . 56
Rule. . . . . . . . . . . . . . . . . . . . . . . . . . . . . . 133
Slot manually. . . . . . . . . . . . . . . . . . . . . . . . 57
Vista . . . . . . . . . . . . . . . . . . . . . . . . . . . . . 116
VistaMart Library. . . . . . . . . . . . . . . . . . . . 117
customize . . . . . . . . . . . . . . . . . . . . . . . . . . . . .InfoVista Model . . . . . . . . . . . . . . . . . . . . . 115
Ddata collection . . . . . . . . . . . . . . . . . . . . . . . . . . 10
database . . . . . . . . . . . . . . . . . . . . . . . . . . . . . .alias. . . . . . . . . . . . . . . . . . . . . . . . . . . . . . . 23
port number. . . . . . . . . . . . . . . . . . . . . . . . . 23
declare . . . . . . . . . . . . . . . . . . . . . . . . . . . . . . .new InfoVista server group . . . . . . . . . . . . . 72
delete . . . . . . . . . . . . . . . . . . . . . . . . . . . . . . . .InfoVista Libraries . . . . . . . . . . . . . . . . . . . 126
Instance. . . . . . . . . . . . . . . . . . . . . . . . . . . . 55
Libraries . . . . . . . . . . . . . . . . . . . . . . . . . . 128
Link manually . . . . . . . . . . . . . . . . . . . . . . . 59
Proxy manually . . . . . . . . . . . . . . . . . . . . . . 56
Report manually . . . . . . . . . . . . . . . . . . . . . 57
Rule. . . . . . . . . . . . . . . . . . . . . . . . . . . . . . 168
7/17/2019 VistaMart User Guide
http://slidepdf.com/reader/full/vistamart-user-guide 261/265
VistaMart® 4.0 User Guide Index
cascade query . . . . . . . . . . . . . . . . . . . . . . . . . .launch . . . . . . . . . . . . . . . . . . . . . . . . . . . . . 60
overview . . . . . . . . . . . . . . . . . . . . . . . . . . . 60
Condition . . . . . . . . . . . . . . . . . . . . . . . . . . . . .add. . . . . . . . . . . . . . . . . . . . . . . . . . . . . . . 139
Add Contain Property Value . . . . . . . . . . . 145
Add Contain Vista . . . . . . . . . . . . . . . . . . . 145
Add Documentation. . . . . . . . . . . . . . . . . . 148
Add Equal . . . . . . . . . . . . . . . . . . . . . . . . . 145
Add Match . . . . . . . . . . . . . . . . . . . . . . . . . 146 Add Numerical . . . . . . . . . . . . . . . . . . . . . . 145
Add Test on Capabilities . . . . . . . . . . . . . . 143
Add Test on Vendor. . . . . . . . . . . . . . . . . . 143
create . . . . . . . . . . . . . . . . . . . . . . . . . . . . . . . .Global Variable . . . . . . . . . . . . . . . . . . . . . 123
Rule. . . . . . . . . . . . . . . . . . . . . . . . . . . . . . 168
Slot . . . . . . . . . . . . . . . . . . . . . . . . . . . . . . . 58
VistaMart Library. . . . . . . . . . . . . . . . . . . . 128
VistaMart objects. . . . . . . . . . . . . . . . . . . . 119
disable . . . . . . . . . . . . . . . . . . . . . . . . . . . . . . .Rule. . . . . . . . . . . . . . . . . . . . . . . . . . . . . . 168
display . . . . . . . . . . . . . . . . . . . . . . . . . . . . . . .Report data . . . . . . . . . . . . . . . . . . . . . . . . 108
Slot data . . . . . . . . . . . . . . . . . . . . . . . . . . 106
divide (/) operator . . . . . . . . . . . . . . . . . . . . . . . 216
Eenable. . . . . . . . . . . . . . . . . . . . . . . . . . . . . . . .
Rule. . . . . . . . . . . . . . . . . . . . . . . . . . . . . . 168
export . . . . . . . . . . . . . . . . . . . . . . . . . . . . . . . .
262
VistaMart Library . . . . . . . . . . . . . . . . . . . . 127
GGlobal Variable . . . . . . . . . . . . . . . . . . . . . . . . .
create. . . . . . . . . . . . . . . . . . . . . . . . . . . . . 123
IImporting a library . . . . . . . . . . . . . . . . . . . 125, 127
Indicator . . . . . . . . . . . . . . . . . . . . . . . . . . . . . .create. . . . . . . . . . . . . . . . . . . . . . . . . . . . . 119
data type . . . . . . . . . . . . . . . . . . . . . . . . . . 160
display type . . . . . . . . . . . . . . . . . . . . . . . . 160
InfoVista . . . . . . . . . . . . . . . . . . . . . . . . . . . . . .display report data. . . . . . . . . . . . . . . . . . . 108
display Slot data . . . . . . . . . . . . . . . . . . . . 106
Library, delete . . . . . . . . . . . . . . . . . . . . . . 126InfoVista Model . . . . . . . . . . . . . . . . . . . . . . . . .
define. . . . . . . . . . . . . . . . . . . . . . . . . . . . . 111
defining . . . . . . . . . . . . . . . . . . . . . . . . . . . 111
overview . . . . . . . . . . . . . . . . . . . . . . . . . . 110
visualize. . . . . . . . . . . . . . . . . . . . . . . . . . . 112
InfoVista Server . . . . . . . . . . . . . . . . . . . . . . . . .group, declare new . . . . . . . . . . . . . . . . . . . 72
load balancing . . . . . . . . . . . . . . . . . . . . . . . 79manage loads . . . . . . . . . . . . . . . . . . . . . . . 79
populate with Instances. . . . . . . . . . . . . . . . 75
redistribute Instances . . . . . . . . . . . . . . . . . 79
synchronize . . . . . . . . . . . . . . . . . . . . . . . . . 75
Instance . . . . . . . . . . . . . . . . . . . . . . . . . . . . . .manually create . . . . . . . . . . . . . . . . . . . . . . 54
manually delete . . . . . . . . . . . . . . . . . . . . . . 55
populate InfoVista Servers with 75
LLibrary. . . . . . . . . . . . . . . . . . . . . . . . . . . . . . . .
import . . . . . . . . . . . . . . . . . . . . . . . . . . . . 127
objects. . . . . . . . . . . . . . . . . . . . . . . . . . . . 125
Link. . . . . . . . . . . . . . . . . . . . . . . . . . . . . . . . . .manually create. . . . . . . . . . . . . . . . . . . . . . 58
manually delete. . . . . . . . . . . . . . . . . . . . . . 59
ln() operator . . . . . . . . . . . . . . . . . . . . . . . . . . . 218
load . . . . . . . . . . . . . . . . . . . . . . . . . . . . . . . . .balancing. . . . . . . . . . . . . . . . . . . . . . . . . . . 79
control . . . . . . . . . . . . . . . . . . . . . . . . . . . . . 79
log() operator . . . . . . . . . . . . . . . . . . . . . . . . . . 218
lstrend() operator . . . . . . . . . . . . . . . . . . . . . . . 224
lstrendt() operator. . . . . . . . . . . . . . . . . . . . . . . 225
Mmathematical operators . . . . . . . . . . . . . . 215, 217
Model . . . . . . . . . . . . . . . . . . . . . . . . . . . . . . . .customize . . . . . . . . . . . . . . . . . . . . . . . . . 115
InfoVista define . . . . . . . . . . . . . . . . . . . . . 111
search . . . . . . . . . . . . . . . . . . . . . . . . . . . . 114
modify . . . . . . . . . . . . . . . . . . . . . . . . . . . . . . . .objects. . . . . . . . . . . . . . . . . . . . . . . . . . . . 119
Rule. . . . . . . . . . . . . . . . . . . . . . . . . . . . . . 136
VistaMart Library. . . . . . . . . . . . . . . . . . . . 118
Modifying VistaMart Libraries. . . . . . . . . . . . . . 118
Modules . . . . . . . . . . . . . . . . . . . . . . . . . . . . . . 170
modulo (%) operator. . . . . . . . . . . . . . . . . . . . . 215
Multi-value Property . . . . . . . . . . . . . . . . . . . . . 122
N
7/17/2019 VistaMart User Guide
http://slidepdf.com/reader/full/vistamart-user-guide 262/265
VistaMart® 4.0 User Guide Index
populate InfoVista Servers with. . . . . . . . . . 75
redistribute on IV server . . . . . . . . . . . . . . . 79remove from Zone . . . . . . . . . . . . . . . . . . . . 61
unstable, description . . . . . . . . . . . . . . . . . . 51
instance . . . . . . . . . . . . . . . . . . . . . . . . . . . . . .provisioning . . . . . . . . . . . . . . . . . . . . . . . . . 29
inventory, consolidation . . . . . . . . . . . . . . . . . . . 10
isnull() operator. . . . . . . . . . . . . . . . . . . . . . . . . 222
IVReport . . . . . . . . . . . . . . . . . . . . . . . . . . . . . .display report data in . . . . . . . . . . . . . . . . . 108
set path . . . . . . . . . . . . . . . . . . . . . . . . . . . . 25
start . . . . . . . . . . . . . . . . . . . . . . . . . . . . . . 108
New object wizards . . . . . . . . . . . . . . . . . . . . . 115now() operator . . . . . . . . . . . . . . . . . . . . . . . . . 222
Oobject . . . . . . . . . . . . . . . . . . . . . . . . . . . . . . . .
create new. . . . . . . . . . . . . . . . . . . . . . . . . 115
delete . . . . . . . . . . . . . . . . . . . . . . . . . . . . 119
modify . . . . . . . . . . . . . . . . . . . . . . . . . . . . 119Wizards . . . . . . . . . . . . . . . . . . . . . . . . . . . 115
offset() operator . . . . . . . . . . . . . . . . . . . . . . . . 225
operator . . . . . . . . . . . . . . . . . . . . . . . . . . . . . .add(+ ). . . . . . . . . . . . . . . . . . . . . . . . . . . . 215
divide (/) . . . . . . . . . . . . . . . . . . . . . . . . . . 216
263
isnull() . . . . . . . . . . . . . . . . . . . . . . . . . . . . 222ln() . . . . . . . . . . . . . . . . . . . . . . . . . . . . . . . 218
log() . . . . . . . . . . . . . . . . . . . . . . . . . . . . . . 218
lstrend() . . . . . . . . . . . . . . . . . . . . . . . . . . . 224
lstrendt. . . . . . . . . . . . . . . . . . . . . . . . . . . . 225
modulo (%) . . . . . . . . . . . . . . . . . . . . . . . . 215
now() . . . . . . . . . . . . . . . . . . . . . . . . . . . . . 222
offset() . . . . . . . . . . . . . . . . . . . . . . . . . . . . 225
percentile(). . . . . . . . . . . . . . . . . . . . . . . . . 229
percentilex(). . . . . . . . . . . . . . . . . . . . . . . . 230
power (^) . . . . . . . . . . . . . . . . . . . . . . . . . . 216
random . . . . . . . . . . . . . . . . . . . . . . . . . . . 223
sabaselineday() . . . . . . . . . . . . . . . . . . . . . 231
stddev() . . . . . . . . . . . . . . . . . . . . . . . . . . . 221
substract (-) . . . . . . . . . . . . . . . . . . . . . . . . 215
timetothresholddown(). . . . . . . . . . . . . . . . 226
timetothresholddownex() . . . . . . . . . . . . . . 228
timetothresholdup() . . . . . . . . . . . . . . . . . . 227timetothresholdupex() . . . . . . . . . . . . . . . . 228
variance()on() . . . . . . . . . . . . . . . . . . . . . . 221
ownership of objects . . . . . . . . . . . . . . . . . . . . . . 39
Ppercentile() operator . . . . . . . . . . . . . . . . . . . . . 229
percentilex() operator . . . . . . . . . . . . . . . . . . . . 230
port number, database . . . . . . . . . . . . . . . . . . . . 23
power (^) operator. . . . . . . . . . . . . . . . . . . . . . . 216
priority . . . . . . . . . . . . . . . . . . . . . . . . . . . . . . .values in database. . . . . . . . . . . . . . . . . . . . 39
Property . . . . . . . . . . . . . . . . . . . . . . . . . . . . . .create. . . . . . . . . . . . . . . . . . . . . . . . . . . . . 122
multi-value . . . . . . . . . . . . . . . . . . . . . . . . . 122
single-value . . . . . . . . . . . . . . . . . . . . . . . . 122
Rrandom operator. . . . . . . . . . . . . . . . . . . . . . . . 223
redistribute Instances . . . . . . . . . . . . . . . . . . . . . 79
Regular Expressions. . . . . . . . . . . . . . . . . . . . . .use . . . . . . . . . . . . . . . . . . . . . . . . . . . . . . 146
Remove multi-valued Property Value action . . 153
Remove Vista action . . . . . . . . . . . . . . . . . . . . 154
Report. . . . . . . . . . . . . . . . . . . . . . . . . . . . . . . .display data. . . . . . . . . . . . . . . . . . . . . . . . 108
manually create. . . . . . . . . . . . . . . . . . . . . . 56
manually delete. . . . . . . . . . . . . . . . . . . . . . 57
running . . . . . . . . . . . . . . . . . . . . . . . . . . . . 74
timezone . . . . . . . . . . . . . . . . . . . . . . . . . . . 57
Report Template . . . . . . . . . . . . . . . . . . . . . . . .create Report based on. . . . . . . . . . . . . . . . 57
Reset Property Value action. . . . . . . . . . . . . . . 156
Rule . . . . . . . . . . . . . . . . . . . . . . . . . . . . . . . . . Action . . . . . . . . . . . . . . . . . . . . . . . . . . . . 132
add a Condition. . . . . . . . . . . . . . . . . . . . . 139
Condition. . . . . . . . . . . . . . . . . . . . . . . . . . 132
create . . . . . . . . . . . . . . . . . . . . . . . . . . . . 133
delete . . . . . . . . . . . . . . . . . . . . . . . . . . . . 168
disable and enable . . . . . . . . . . . . . . . . . . 168
modify . . . . . . . . . . . . . . . . . . . . . . . . . . . . 136
standard example . . . . . . . . . . . . . . . . . . . 132
running . . . . . . . . . . . . . . . . . . . . . . . . . . . . . . .Report . . . . . . . . . . . . . . . . . . . . . . . . . . . . . 74
Ssabaselineday() operator . . . . . . . . . . . . . . . . . 231
search. . . . . . . . . . . . . . . . . . . . . . . . . . . . . . . .InfoVista Model . . . . . . . . . . . . . . . . . . . . . 114

7/17/2019 VistaMart User Guide
http://slidepdf.com/reader/full/vistamart-user-guide 263/265
VistaMart® 4.0 User Guide Index
g
Provisioning . . . . . . . . . . . . . . . . . . . . . . . . . . . . 29provisioning. . . . . . . . . . . . . . . . . . . . . . . . . . . .
follow-up . . . . . . . . . . . . . . . . . . . . . . . . . . . 51
Proxy . . . . . . . . . . . . . . . . . . . . . . . . . . . . . . . .manually create . . . . . . . . . . . . . . . . . . . . . . 55
manually delete . . . . . . . . . . . . . . . . . . . . . . 56
proxy move . . . . . . . . . . . . . . . . . . . . . . . . . . 12, 36
Qquery . . . . . . . . . . . . . . . . . . . . . . . . . . . . . . . .
cascade . . . . . . . . . . . . . . . . . . . . . . . . . . . . 60
InfoVista Model . . . . . . . . . . . . . . . . . . . . . 114
Server loads . . . . . . . . . . . . . . . . . . . . . . . . . . .manage . . . . . . . . . . . . . . . . . . . . . . . . . . . . 79
Set Attribute Value action. . . . . . . . . . . . . . . . . 156
Set Location action. . . . . . . . . . . . . . . . . . . . . . 157
Set Property Value action. . . . . . . . . . . . . . . . . 158
SID (Oracle ID), set . . . . . . . . . . . . . . . . . . . . . . 23
Single-value Property. . . . . . . . . . . . . . . . . . . . 122
Slot . . . . . . . . . . . . . . . . . . . . . . . . . . . . . . . . . .display data. . . . . . . . . . . . . . . . . . . . . . . . 106
manually create. . . . . . . . . . . . . . . . . . . . . . 57manually delete. . . . . . . . . . . . . . . . . . . . . . 58
suspended. . . . . . . . . . . . . . . . . . . . . . . . . . 74
timezone . . . . . . . . . . . . . . . . . . . . . . . . . . . 58
start . . . . . . . . . . . . . . . . . . . . . . . . . . . . . . . . .
264
IVReport . . . . . . . . . . . . . . . . . . . . . . . . . . 108Start Report(s) action . . . . . . . . . . . . . . . . . . . . 163
Start Slot(s) action . . . . . . . . . . . . . . . . . . . . . . 159
stddev() operator . . . . . . . . . . . . . . . . . . . . . . . 221
substract (-) operator . . . . . . . . . . . . . . . . . . . . 215
suspended . . . . . . . . . . . . . . . . . . . . . . . . . . . .Slot . . . . . . . . . . . . . . . . . . . . . . . . . . . . . . . 74
synchronize. . . . . . . . . . . . . . . . . . . . . . . . . . . .InfoVista Servers . . . . . . . . . . . . . . . . . . . . . 75
T timetothresholddown() operator . . . . . . . . . . . . 226
timetothresholddownex() operator . . . . . . . . . . 228
timetothresholdup() operator . . . . . . . . . . . . . . 227
timetothresholdupex() operator. . . . . . . . . . . . . 228
Timezone . . . . . . . . . . . . . . . . . . . . . . . . . . . . .
Reports . . . . . . . . . . . . . . . . . . . . . . . . . . . . 57Slot . . . . . . . . . . . . . . . . . . . . . . . . . . . . . . . 58
Uunstable Instance, description . . . . . . . . . . . . . . 51
Vvariance()on() operator . . . . . . . . . . . . . . . . . . . 221
Vista . . . . . . . . . . . . . . . . . . . . . . . . . . . . . . . . .create. . . . . . . . . . . . . . . . . . . . . . . . . . . . . 116
VistaMart . . . . . . . . . . . . . . . . . . . . . . . . . . . . .connect to database (command line) . . . . . 24
Library, create . . . . . . . . . . . . . . . . . . . . . . 117
Library, delete . . . . . . . . . . . . . . . . . . . . . . 128
Library export 127
delete in VistaMart . . . . . . . . . . . . . . . . . . . 63remove Instances from . . . . . . . . . . . . . . . . 61
Zoneset. . . . . . . . . . . . . . . . . . . . . . . . . . . . . . .delete in VistaMart . . . . . . . . . . . . . . . . . . . 62

7/17/2019 VistaMart User Guide
http://slidepdf.com/reader/full/vistamart-user-guide 264/265
VistaMart® 4.0 User Guide Index
Library, export . . . . . . . . . . . . . . . . . . . . . . 127
Library, modify . . . . . . . . . . . . . . . . . . . . . . 118VistaView . . . . . . . . . . . . . . . . . . . . . . . . . . . . .
import. . . . . . . . . . . . . . . . . . . . . . . . . . . . . 125
Visualizing the InfoVista Model. . . . . . . . . . . . . 115
Wwizard. . . . . . . . . . . . . . . . . . . . . . . . . . . . . . . .
create new objects. . . . . . . . . . . . . . . . . . . 115
X,Y,ZZone. . . . . . . . . . . . . . . . . . . . . . . . . . . . . . . . .
and InfoVista server groups. . . . . . . . . . . . . 70
Remarks
We welcome any comments you have on our product and its documentation. We examinethoroughly your remarks and take them into account whenever possible for future product versions.
ERRORS DETECTED
SUGGESTED IMPROVEMENTS
VistaMart® 4.0 User Guide 2007

7/17/2019 VistaMart User Guide
http://slidepdf.com/reader/full/vistamart-user-guide 265/265
Please send this completed form to:
InfoVista SA
6 rue de la Terre de Feu
91952 Courtaboeuf cedex
France
If you prefer, you may send your remarks via E-mail to [email protected]
Thank you for your cooperation.