visma software international | contents · pdf filevisma software international | visma...
TRANSCRIPT

User Guide

Visma Software International | Contents
2 |
Table of Contents
Visma Approval Center................................................................................................................................. 3Visma On Demand initialisation....................................................................................................... 3Visma On Demand provisioning interface........................................................................................ 3
User groups............................................................................................................................3Users...................................................................................................................................... 6Roles...................................................................................................................................... 9
Sign on Visma Approval Center......................................................................................................12Logging in Visma Approval Center from an email notification......................................... 12Logging in Visma Approval Center from Visma On Demand............................................12
Visma Approval Center user interface............................................................................................ 13The Task List....................................................................................................................... 16My History Window............................................................................................................20The Settings window........................................................................................................... 21The System Overview window............................................................................................24Task Overview Window......................................................................................................26Help Window.......................................................................................................................27
About workflow tasks......................................................................................................................28Types of workflow tasks......................................................................................................28Email notifications...............................................................................................................28Operations on a task............................................................................................................ 28Due date on tasks.................................................................................................................29
Working with tasks..........................................................................................................................29Approving a document task.................................................................................................30Editing and approving a document task.............................................................................. 30Rejecting a document task...................................................................................................30Sending a document task on review.................................................................................... 31Forwarding a document task................................................................................................31Approving a line task...........................................................................................................31Editing and approving a line task........................................................................................ 32Rejecting a line task.............................................................................................................32Adding new information on a document............................................................................. 32
About substitutes............................................................................................................................. 33Working with substitutes................................................................................................................. 33
Adding a new substitute...................................................................................................... 34Activating a substitute......................................................................................................... 34Deactivating a substitute......................................................................................................34Managing substitutes........................................................................................................... 35
Working with system overview.......................................................................................................35Managing active processes.................................................................................................. 35Managing completed processes........................................................................................... 36
Best Practices...................................................................................................................................36

Visma Software International | Visma Approval Center
| 3
Visma Approval Center
Visma Approval Center gathers workflow tasks (approval tasks) for several Visma applications in one interface.
Visma Approval Center is a self-service solution designed for users to approve tasks assigned to them.
Visma Approval Center will normally be used in conjunction with another Visma application responsible for providingworkflow tasks. This will make it easier for you to complete your work tasks at any time and in any place with Internetaccess.
Visma Approval Center consists of:• a list of tasks that can be sorted and ordered• a flow for each task• comments on each step in the flow• operations for each task (approve, reject, review and forward)• a viewer showing the content of the task (for example, an invoice)
Visma On Demand initialisationExisting on-premises customers must do some administrative set-up in order to be able to use Visma Approval Center.In the Visma On Demand provisioning interface you can manage user, user groups and assign roles to users.
Customers must have an on demand account in order to be able to access Visma Approval Center.
The customer administrator logs on and creates users and grants them access to Visma Approval Center. The customeradministrator can optionally group users in various user groups depending on their role in the company or the tasks theyhave to perform.
Visma On Demand provisioning interfaceThe Visma On Demand provisioning interface gives access to a number of settings for the end user and the customeradministrator.
As an end user you have access to the following settings:• Edit your personal details such as name, address and language• Change your email address• Change your passwordAs a customer administrator you have access to the following settings:• Create new users and invoke/revoke roles for existing users• Create new groups, edit or delete existing ones• Add new users or remove users from an existing user group
User groupsGroup of users who are authorized to use certain Visma On Demand applications. User groups are owned by thecustomers.
Customer administrator is responsible for creating and managing user groups. Users and User groups are the only objecttypes that can have Roles in Visma On Demand.
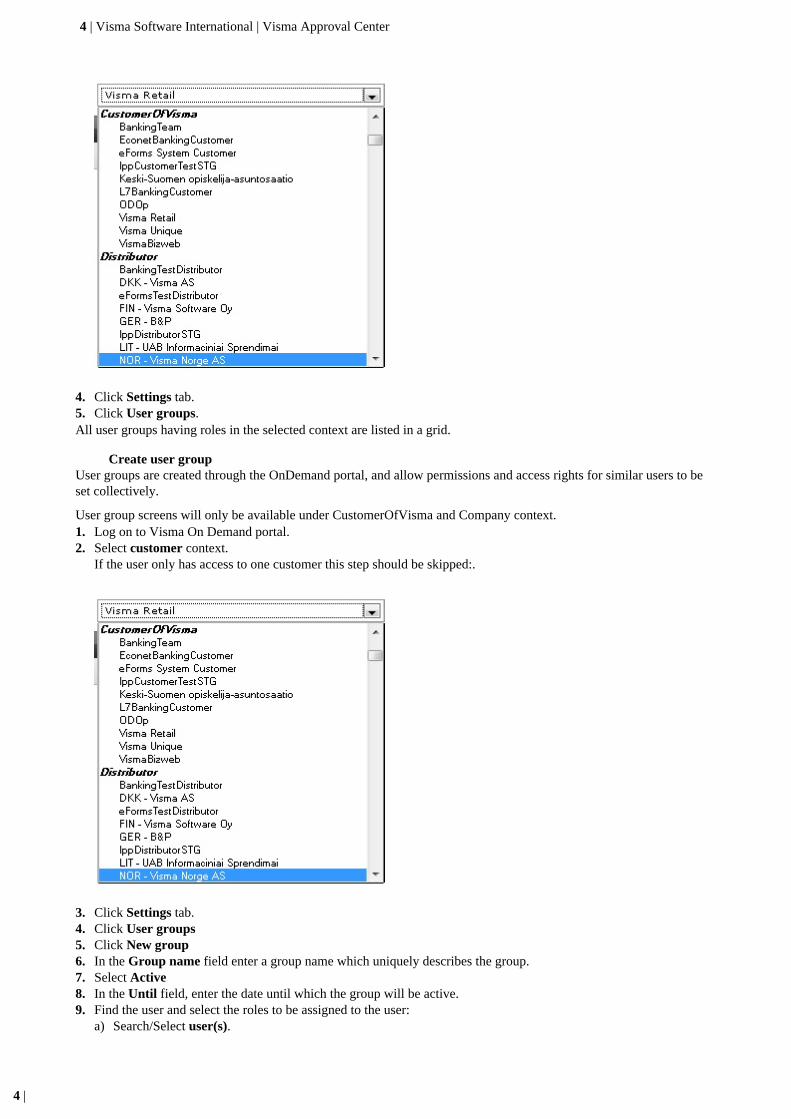
View user groupsAll user groups for the selected customer context are listed on the view grid.
The user can view the user groups that have roles in the selected context. User group screens will only be availableunder the context of either CustomerOfVisma or Company.1. Browse to the Visma On Demand URL.2. Log on to Visma On Demand portal.3. Select customer context.
If the user only has access to only one customer this step should be skipped:
4 | Visma Software International | Visma Approval Center
4 |
4. Click Settings tab.5. Click User groups.All user groups having roles in the selected context are listed in a grid.
Create user groupUser groups are created through the OnDemand portal, and allow permissions and access rights for similar users to beset collectively.
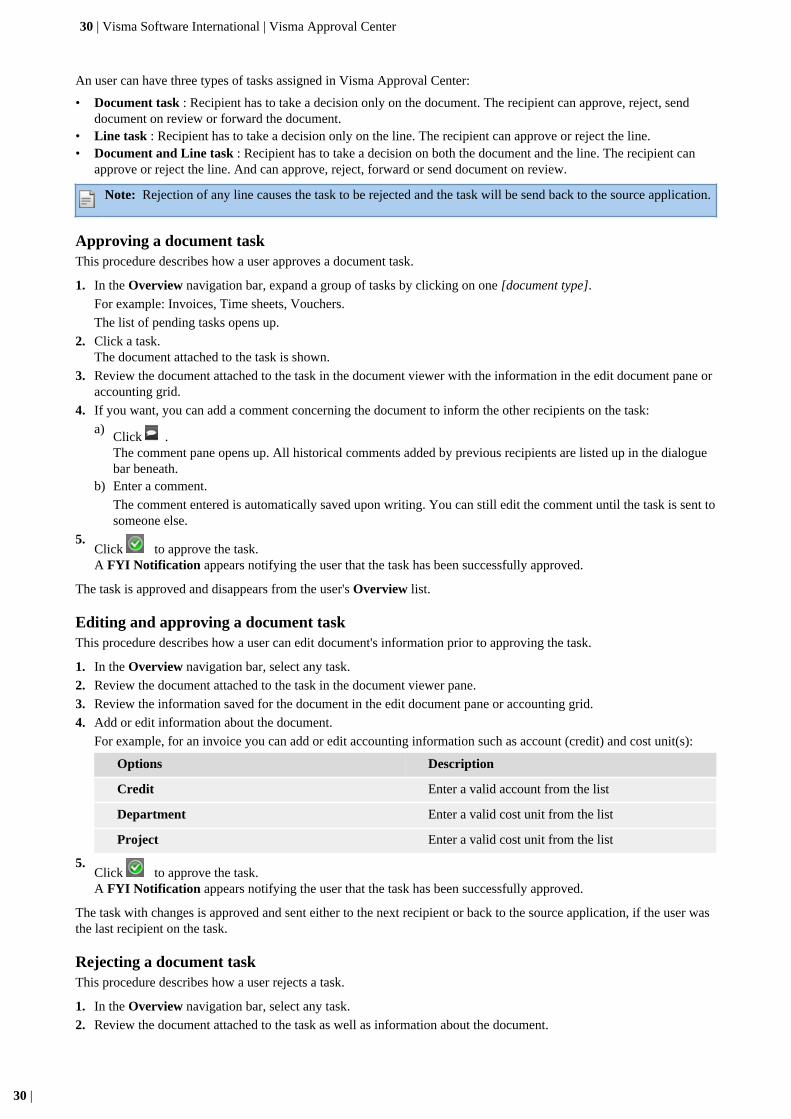
User group screens will only be available under CustomerOfVisma and Company context.1. Log on to Visma On Demand portal.2. Select customer context.
If the user only has access to one customer this step should be skipped:.
3. Click Settings tab.4. Click User groups5. Click New group6. In the Group name field enter a group name which uniquely describes the group.7. Select Active8. In the Until field, enter the date until which the group will be active.9. Find the user and select the roles to be assigned to the user:
a) Search/Select user(s).

Visma Software International | Visma Approval Center
| 5
a) Enter the user email address in search bar.a) Click Magnifier glass.a) Select the User(s) option.a) Click Add Usersa) Select the role(s) option.
10. Click Create.A user group with the defined settings will be created. Users can now be added to the created user group(s).
Edit user groupSettings of a User group can be edited when needed.
User group screens will only be available under the context of either CustomerOfVisma or Company.1. Log on to Visma On Demand portal.2. Select customer context.
If the user only has access to only one customer this step should be skipped:.
3. Click Settings tab.4. Click User groups.5. Search/Select a user group and click the appropriate user group name under Group.
The user group opens in edit mode.6. Edit the user group details as required. You can change the group name, add/remove users, invoke/revoke roles:7. To change the name of a user group:
a) Enter a new name in Group name8. To add one or more users to a user group:
a) Click Add usersa) Search/Select user
Enter the user's email address.a) Click Addb) Click DoneUser will be added to the user group
9. To remove user(s) from a user group:a) Check User(s).a) Click Remove user
10. To invoke role(s)a) Click the role(s) option.
11. To revoke role(s)a) Clear the role(s) option.

6 | Visma Software International | Visma Approval Center
6 |
12. Click Update group.
This will save the edited settings of the user group.
Delete user groupWhen user groups are no longer required, they can be deleted from the system.
User group screens will only be available under the context of either CustomerOfVisma or Company.
1. Log on to Visma On Demand portal.2. Select customer context.
If the user only has access to one customer this step should be skipped:.
3. Click Settings tab.4. Click User groups.5. Search/Select a User group.6. Click Delete Group.
Verify the delete operation.
This will delete the user group from OnDemand portal.
UsersUsers will be given access to Visma Approval Center when a customer has bought a license.
Users and User groups are the only object types that can have Roles in Visma On Demand. Users are registered withcredentials (user names and passwords). Credentials are information that can be used to authenticate users (i.e. verifythe user's identity).
The customer administrator is responsible for creating users for one or more companies for the given on demandcustomer.
Each user is created with a user name , an existing email address (which must be valid) and a password. Each user mustalso be given at minimum a role that defines the access rights within Visma Approval Center. The following roles canbe given to a user:
• Approver• System Operator
At least two users must have the System Operator role at any time. If there is no user with System Operator role inApproval Center, workflows will not be uploaded from Visma Document Center to Approval Center.
Each user can be added to one or more user groups, if it has been previously created by the customer administrator.
Viewing User(s)Customer administrators can search and view Users and their roles in the selected context.
User can view the Users as well as which roles they have in the selected context.

Visma Software International | Visma Approval Center
| 7
1. Browse to the Visma On Demand URL.
2. Log on to Visma On Demand portal.
3. Select context object.Context object can be Visma, Distributor, Customer, Company and Partner.
4. Click Settings tab.
5. Click Users.
All users having roles in the selected context are listed in a grid.
Creating UserEveryone using Visma On Demand platform must have a user and a role defined for that user.
Administrator(s) can create user accounts and grant them roles to use Visma OnDemand and Visma OnDemandapplications.
1. Log on to Visma On Demand portal.
2. Select context.Context object can be Visma, Distributor, and Customer or Partner.
3. Click Settings tab.

8 | Visma Software International | Visma Approval Center
8 |
4. Click Users.
5. Click Create user.
6. Enter user name, email address and other necessary details.
All the mandatory fields have ¤ sign on them. An activation mail will be sent on that email address, so ensure thatthe email address is valid.
7. In the Roles panel, select all the roles appropriate for the user.
The user will only see the roles activated for the selected context object.
For Visma Approval Center there are two roles: Approver and System Operator.
8. ClickCreate.
Selected roles are invoked for the user, and an activation email will be sent to the given email address. .
Users must follow the activation instructions in the activation email link to set a password and activate their accounts.
Batch user registerationCustomer administrators can create set of users all together at once provided a file.
This procedure can be followed to create number of user at a time. It can be useful for accounting solutions. The fileformat can be found under help on the portal.
1. Log on to Visma On Demand portal.
2. Click Settings tab.
3. Select Customer context
4. Click Users
5. Click Create user
6. Click Import
a) Click Browseb) Click Upload
User file format should be according to the format specified in Help file.
7. Click Process
The User file will be processed. If the system finds any errors in the file format, the error will be highlighted on thenext screen, and the user will be asked to correct them.
8. Click Submit
All users specified in the file will be created, and user activation mails will be sent to the users.
Editing personal detailsUsers can edit their own personal details through the Edit my details feature.
1. Browse to the Visma On Demand URL.
2. Log on to Visma On Demand portal.
3. Select context object.
Context object can be Visma, Distributor, CustomerOfVisma, Partner or Company.

Visma Software International | Visma Approval Center
| 9
4. Click Edit my detailsThe Edit Details window opens up.
5. Click Change Email to change your email address.
6. Click Change Password to reset your password.
7. Edit any additional information among the following:
Options Description
First Name User's first name
Middle Name User's middle name
Last Name User's last name
Country User's country
Language User's language
Display Name Name as displayed when logged in
Title Job title
Web Page
Mobile Number User's mobile number
State Province User's address information
City User's address information
Street Address User's address information
Zip Code User's address information
8. Click Update my details when finished.You will get a confirmation that your user details have been updated.
RolesRoles describe which operations can and cannot be performed in the system.
Roles are created for various job functions. Members of staff (or other system users) are granted particular roles, andthrough those roles acquire the permissions to perform particular system functions.
Users are not assigned access rights directly in Visma On Demand, but only acquire them through their role (or roles).Management of individual user rights becomes a matter of simply assigning the appropriate role(s) to the user.
Upon installation, standard set of a roles are added for the corresponding application. But it is also possible to createcustom roles in Visma On Demand.

10 | Visma Software International | Visma Approval Center
10 |
View RolesCustomer administrators can view all activated roles for the selected context.
1. Browse to the Visma On Demand URL.2. Log on to Visma On Demand portal.3. Select context object.
Context object can be Visma, Distributor, Customer and Partner.
4. Click Settings tab.5. Click Roles.
All the roles activated for the selected context are listed.
Edit/Change Role SettingSettings of roles can be edited by customer administrators when needed
1. Log on to Visma On Demand portal.2. Select context object.
Context object can be Visma, Distributor, Customer and Partner.
3. Click Settings tab.4. Click Roles.

Visma Software International | Visma Approval Center
| 11
5. Search/Select a Role.The role screen opens in edit mode.
6. To add users to a role, click Add users:a) Enter user email address.b) Click magnifier glass.c) Select user.d) Click Add.Repeat these steps to add several users.
7. To remove user(s) for a role:a) Select user(s).b) Click Remove users.
8. Click Done.9. To add user group(s) to a role, click Add user groups:
a) Enter user group nameb) Click magnifier glassc) Select user groupd) Click AddRepeat these steps to add several user groups to the same role.
10. Click Done11. To remove user(s):
a) Select user(s).b) Click Remove users.
12. To remove user group(s):a) Select user group(s).b) Click Remove user groups.
Users and user groups will be added/removed to the selected role.
Update user (invoke/revoke roles for selected user)When a user changes roles, the roles will be either invoked (added) or revoked (deleted) from the user.
Only active roles in the selected context can be invoked/revoked for the user.1. Browse to the Visma On Demand URL.2. Log on to Visma On Demand portal.3. Select context object.
Context object can be Visma, Distributor, Customer and Partner.
4. Click Settings tab.5. Click Users.

12 | Visma Software International | Visma Approval Center
12 |
6. Click user email.The user screen opens in edit mode.
7. Select User role(s).Role(s) will be invoked.
8. Clear role(s).Role(s) will be revoked.
9. Click Update.Roles will be invoked/revoked for the selected user
Sign on Visma Approval CenterThere are two methods to log in Visma Approval Center.
If you do not have any tasks assigned the following start page will be shown upon logging.
Logging in Visma Approval Center from an email notificationThe user can log in Visma Approval Center directly from an email.
You need to have a valid user name (email address) and password.1. From your mail inbox, open the Notification from Approval Center email.2. Click Visma OnDemand Home link within the email body.
The sign on window appears.3. Enter your email address in the Username field and your password in the Password field.4. Press Enter.
The Welcome page opens up.5. From the list of companies, choose the company for which to handle tasks.6. Click Visma Approval Center tab
The Visma Approval Center application opens up.
Logging in Visma Approval Center from Visma On DemandThe user can log in Visma Approval Center directly from Visma On Demand portal.
You need to have a valid user name (email address) and password.

Visma Software International | Visma Approval Center
| 13
1. Browse to the logon page at: https://login.visma.com//loginwebapp/loginPage.xhtml
2. Logon using the username and password
3. Select context object.
Context object is Company.
4. From the list of companies, choose the company for which to handle tasks.
5. Click the Visma Approval Center tabThe Visma Approval Center application opens up.
Visma Approval Center user interfaceThe user interface of Visma Approval Center consists of four sections allowing access to tasks, settings and statusinformation.
There are four main sections:
• The Task List window; where the user reviews and handles pending tasks through:
• An overview pane with all pending tasks grouped by document type• A document viewer pane to show the content of the document• A textual flow pane that lists the flow history and future recipients• A graphical flow pane that shows a graphical representation of the textual flow• A comment pane to add comments on a task and look at previous comments• An accounting grid to review and make changes to the document's information, e.g. accounting details
Figure 1: Visma Approval Center's Task List window

14 | Visma Software International | Visma Approval Center
14 |
• The My History window, where the user gets an overview of the status of all the processes of the user throughActive Processes and Completed processes.
• Active Processes pane with all ongoing processes active for the user.• Complete processes pane with all processes completed by the user.

Visma Software International | Visma Approval Center
| 15
•
• The Settings window; where the user enters a substitute in order to route the user's tasks when the user is absent(i.e.vacation, other absence) through:
• A My substitute pane with the name of the substitute for the user and an option to activate/de-activate it.
Figure 2: Visma Approval Center's Settings window

16 | Visma Software International | Visma Approval Center
16 |
• TheOverview window; where the user gets an overview of the status of processes in Visma Approval Centerthrough two main panes:
• An Active Processes pane with all ongoing processes• A Complete Processes pane with all processes that are been either approved,rejected, forwarded or processed
Figure 3: Visma Approval Center's Overview window
The Task ListYou access and handle your pending tasks in the Task List window.
The Task List window gives you access to the following work areas:
• an Overview pane (A) where user's pending tasks are listed• a work flow pane to represent a work flow task as both a textual flow and as a graphical flow (B)• a document viewer pane (C)• a comment pane (D)• a fullscreen mode (E)• operations available for a task (F)• operations for attachment of documents (G)• an edit document pane (H)
Figure 4: The Task List window

Visma Software International | Visma Approval Center
| 17
Document tasks overviewThe Overview pane list all pending tasks grouped by document type.
Figure 5: Overview navigation bar
Document types can be invoices (from Visma Document Center), travel expenses (from Visma Travel Expense) ortimesheets (from Visma Employee Portal).
Documents in the list are sorted ascending on the task's due date.
Document viewerYou view the document attached to a task in the document viewer pane. Documents can be of different formats such aspng, jpeg, tiff, pdf and xml.
Figure 6: Document viewer pane

18 | Visma Software International | Visma Approval Center
18 |
You manage the content of a document by means of various operations:• Edit the document by using the right mouse button (right-click) to access to document's available operations such as
print or save.•
Magnify detailed information in the document by use of the magnifier button: . Press and move the mousearound the document to magnify details of the document.
• Send the document by email to an external person to ask for additional details about the document. Press •
Zoom in and out in the document by use of the zoom out and zoom in buttons: ; .•
Browse a document with several pages with the previous and next buttons: ; .•
Rotate a document in clockwise and anticlockwise directions
Textual flowThe textual flow pane list all recipients assigned to a task.
The icon shows all recipients assigned to the selected task.
Figure 7: Textual flow pane for a taskFor each recipient the following information is displayed:• Event date• Name• Status• Activation date• Due dateThe active user(s) on the task is highlighted in blue. Recipients are listed in the same order as defined in the Vismasource application.
If a recipient has entered a comment on a task this appears as an icon besides the Event date field. The commentadded by the active user is, by default, shown the Last Messagepanel at the bottom of the textual flow pane. To readcomments added by other recipients on the task, the user has to click on this icon besides the recipient that added thecomment.
Graphical flowThe graphical flow pane shows in a graph all recipients assigned to a task, either in a sequential or parallel manner.
The icon shows each recipient assigned to the selected task with its name and status in the workflow.
Figure 8: Graphical flow pane for a taskThe active user(s) on the task is highlighted in blue. Recipients are shown in the same order as defined in the Vismasource application.
If a recipient has entered a comment about the document, this is shown when you move the mouse over the recipient.The comment text is shown in the Last Message panel at the bottom of the graphical flow pane.
Edit documentThe edit document pane shows information about the document attached to a task.
The grid shows information about the document. It can be, for example, accounting information for an invoice such assupplier name, amount, currency and due date.
Figure 9: Edit document pane for a document approval taskIn the edit document pane the user is able to control and review the information from the document. All fields shownhere come from the Visma source application responsible for sending workflow tasks.

Visma Software International | Visma Approval Center
| 19
For example, for a supplier invoice sent by Visma Document Center, the following information is shown:
• Text, free text that can be edited if needed.• Debit, both the name of the supplier and the supplier account• Credit, credit supplier account information• Amount, document's amount in the original currency• Currency, document's currency code• Voucher date, document's voucher date• Due date, document's due date.
Note: This date is not to be confused with the task's due date in Visma Document Center.
• Department, as one possible cost unit• Project, as one possible cost unit• Campaign, as one possible cost unit
Note: The number and types of cost unit shown in Visma Approval Center is set in the Visma sourceapplication.
Line Approval - Edit Pane
Figure 10: Edit document pane for a line approval task
For a line approval task, the user is able to control and review the information from the document about each lineassigned. All fields shown here come from the source application responsible for sending workflow tasks.
For example, for a supplier invoice with line approvals sent by Visma Document Center, the following information isshown:
• Line Approver, name of the approver who is responsible for taking a decision on the line• Debit, both the name of the supplier and the supplier account• Credit, credit supplier account information• Amount, document's amount in the original currency• Currency, document's currency code• Voucher date, document's voucher date• Due date, document's due date• Department, as one possible cost unit• Status, decision that has been taken on the line. There can be three statuses: Approved, Rejected or Not Evaluated.• Decision, decision buttons for the line approver to take action. The decision buttons are highlighted only for the line
owner. The line owner can either approve the line or reject the line . For all other approvers in the workflowthe approve and reject buttons are grayed out.
•Note: The information icon shows the approval history for the line. On pressing the information icon itgives the following information: Approver names, Status, In Process since and Approved on.
CommentThe comment pane allows a user to add any relevant comment on a given task.
The icon shows both historical comments from previous recipients and comments from the actual recipient on thetask.
Figure 11: Comment pane for a task
In the comment pane the user can add any comment text that is relevant for the chosen document (from the Overviewpane) for the next recipient(s) receiving the document in flow. Comments added are automatically saved upon writing.Changes to the text can be done at any time as long as the document stays in the recipient's document list. It is the latestcomment that will be sent to the next recipient in the flow once the task is handled by the recipient.
Comments from previous recipients on the task are shown in the message panel beneath at the bottom of the commentpane. Each comment shows the name of the recipient, the text and the date the comment was added to the document.

20 | Visma Software International | Visma Approval Center
20 |
Upload attachmentsThe upload icon allows the user to attach documents for an active task.
The icon allows the user to upload additional documents or invoices to support his approval decision. Thedocument format currently supported is PNG. Multiple documents can be uploaded within a total size limit of 3MB.
An attachment can be added in Visma Approval Center only for an active task. On pressing the upload icon an uploadwindow is opened. The user has to provide the following information for each upload:
• Title of the document• Description for the document
Once the attachment has been added, an information icon and delete icon becomes enabled for the document.
All the approvers in the workflow can view information about the attached document on clicking the information icon
on the bottom task bar .
The delete functionality is available only for the user who uploads the document. When the invoice is send onflow, other approvers can view the attachment by browsing to the right page in the document viewer and view theinformation about the document through the info icon but cannot delete the document.
Full Screen ModeThe full screen mode displays the task in full screen.
Users can both expand and collapse the working area by using:
for having a Full Screen view and
for restoring the Normal view.
My History WindowMy History Window gives access to all active and completed workflow processes for an user.
Concept definition.The System Overview navigation bar gives the user access to the following links:
• Active Processes: You can access the Active processes pane by navigating to My history > System overview >Processes Overview .The user is able to view information about all ongoing processes and to search these basedon a number of criteria such as document type (Group), Visma host application (Application Name), DocumentID (From the host application), Description (Document name), by the number of days on flow (Status) or the lastchanged by user.
• Complete Processes: The Complete processes pane list all workflow processes that have been completed in VismaApproval Center. You access the Complete processes pane by navigating to My history > System overview >Processes Overview.
The Complete Process shows information such as document type, Visma host application, the number ofattachments that have been added for each completed tasks(Attachments), and the workflow status - if it has beenacknowledged by the host application(Acknowledged). The user is able to view and search for information based onthe criterias such as Document type (Group), Visma host application (Application Name), Document ID (From thehost application), Description (Document name), by the number of days on flow (Received, Last Changed), Statusor the last changed by user.
Figure 12: My History Window

Visma Software International | Visma Approval Center
| 21
The Settings windowYou manage substitutes for users of Visma Approval Center in the Settings window. A substitute handles the tasks onbehalf of the user when the person is away.
If you have the Approver role, the Settings window gives access to the My settings menu and My substitute pane toactivate/de-activate your substitute for a specific period of time.
If you have the System operator role, the Settings window gives access to the System settings menu and the Managesubstitutes pane where the system operator is able to both search and manage substitutes on behalf of users of VismaApproval Center
Figure 13: The Settings window

22 | Visma Software International | Visma Approval Center
22 |
My substituteThe My substitute pane shows details about your substitute.Figure 14: My substitute pane

Visma Software International | Visma Approval Center
| 23
You activate or deactivate your substitute and edit the period of time the substitution will last.
The system operator is able to override the substitute's information entered here in the Manage substitutes pane.
My mail settingsThe my mail settings shows details about the users notification email preferences.
Figure 15: My mail settings
My mail settings provides the user with option of setting the email notification preferences from Approval Center.There are three options defined for the user to select from:
• I want to receive notifications from Approval Center when I receive a new task - Choosing this gives the user theoption of receiving emails as soon as the user gets a new task.
• Specify when mail should be sent - This allows the user to define the specific time at which he would like to receivesummary emails.
• Do not send me any notifications - The user can select this option if he does not want to receive any emailnotifications.
Manage substitutesThe Manage substitutes pane list all existing substitutes, both active and inactive for any user.
The user must have the System operator role in order to have access to this feature.
Figure 16: Manage substitutes pane

24 | Visma Software International | Visma Approval Center
24 |
The system operator has access to three different views:
• All showing all active and inactive substitutes• Active showing only active substitutes• Inactive showing previous substitutes now deactivated
The System Overview windowThe System Overview window gives access to all ongoing and completed workflow processes. You must have theSystem operator or System Administrator role.
The System Overview navigation bar gives the user access to the following links:
• Active Processes• Complete Processes
Active processesThe Active processes pane lists all workflow processes that are still active in Visma Approval Center.
You access the Active processes pane by navigating to Overview > System overview > Processes Overview .
Figure 17: Active Processes pane

Visma Software International | Visma Approval Center
| 25
The system operator is able to view information about all ongoing processes in a quick and easy manner, and to filterthese based on a number of criteria such as document type (Group), Visma host application (Application Name) or bythe number of days on flow (Received, Last Changed) and by last changed by user.
Complete processesThe Complete processes pane list all workflow processes that have been completed in Visma Approval Center.
You access the Complete processes pane by navigating to Overview > System overview > Processes Overview .
Figure 18: Complete Processes pane
The system operator is able to view information about all completed processes and to filter these basedon a number of criteria such as document type (Group), Visma host application (Application Name) ,Document ID ( from the host application), Description, number of days on flow(Received, Last Changed)

26 | Visma Software International | Visma Approval Center
26 |
by the status of each process (Status). The date picker allows the user to search based on specific dates:
Task Overview WindowTask Overview Window gives access to all active and completed tasks for a company to the System Operator andSystem Administrator.
The Task overview navigation bar is visible only if you have either of the above two roles:
Blocked Tasks: Tasks that are assigned to unknown users or users with no approver rights.
You can access the Blocked tasks pane by navigating to Task Overview > Status .The user is able to viewinformation about all tasks for the company and to search these based on a number of criteria such as DocumentID(From the host application) , User Name, Description (Document name), Type of document, Recieved date, Taskstart date, Task due date or the role of the assignee(Approver/Substitute).
Overdue Tasks:Tasks that are past the due date but still pending action.
You can access the Overdue tasks pane by navigating to Task Overview > Status .The user is able to viewinformation about all overdue tasks for the company and search for these based on a number of criteria such asDocument ID(From the host application) , User Name, Description (Document name), Type of document, Recieveddate, Task start date, Task due date or the role of the assignee( Approver/Substitute).
Started Tasks:Tasks that are assigned to a user and awaiting approvals. Started tasks also include blocked tasks andoverdue tasks.
You can access the Started tasks pane by navigating to Task Overview > Status .The user is able to view informationabout all tasks for the company and to search these based on a number of criteria such as Document ID(From the hostapplication) , User Name, Description (Document name), Type of document, Recieved date, Task start date, Task duedate or the role of the assignee( Approver/Substitute).
Planned Tasks:Tasks that will begin when approval action on a Started task is completed.
You can access the Planned tasks pane by navigating to Task Overview > Status .The user is able to viewinformation about all tasks for the company and to search these based on a number of criteria such as DocumentID(From the host application) , User Name, Description (Document name), Type of document, Recieved date, Taskstart date or Task due date.
Completed Tasks:Tasks on which approval actions have already been taken.
You can access the Completed tasks pane by navigating to Task Overview > Status .The user is able to viewinformation about all tasks for the company and to search these based on a number of criteria such as DocumentID(From the host application) , User Name, Description (Document name), Type of document, Recieved date, Taskstart date, Task due date or the role of the assignee( Approver/Substitute).
All Statuses: All the tasks for a company are shown in this view. It includes Started tasks, planned tasks and completedtasks.

Visma Software International | Visma Approval Center
| 27
Handling Blocked and Overdue TasksBlocked tasks and overdue tasks can be handled by the Customer Administrator, System Operator and SystemAdministrator in the following ways:
Customer Administrator, System Operator and System Administartor will be notified by email about blocked tasks.
System Operator and System Administrator will be notified by email about overdue tasks.
The Customer Administrator can take the following actions on blocked tasks:
• Can create and assign roles to the unknown users on Visma On Demand Portal.• Can assign roles to user with "no approver" role.
When an unknown user or user with "no approver" role is assigned the "approver" role, the user can login to ApprovalCenter and approve his assigned tasks. The tasks then get unblocked.
The System Operator and System Administrator can take the following actions on blocked tasks and overduetasks:
• Reassign blocked or overdue tasks to other users.
Help WindowHelp Window gives access to documentation for Visma Approval Center.
Users can now access all documentation from the Help Window like Release Notes and User Guide.
The documents open in pdf viewer. You can read the document or save the document using the save button in adobereader.The user must have Adobe Reader installed on their machines. You can download Adobe Reader from herehttp://get.adobe.com/reader/

28 | Visma Software International | Visma Approval Center
28 |
About workflow tasksIn Visma Approval Center documents and lines can be assigned to you as tasks for approval. When the user finishes thetask, it is sent to the next recipient as defined in the workflow from theVisma source application.
Types of workflow tasksVisma Approval Center supports several types of workflow tasks. The workflow tasks can be either for Documentapproval or for Line approval.
When a document is sent on flow to Visma Approval Center, it can be sent in two ways:
• as a sequential workflow: The document is sent from one recipient to the next recipient in a given order• as a parallel workflow: The document is sent to all recipients simultaneously
When a line is sent on flow to Visma Approval Center, it can be sent as a sequential workflow. The line is sent fromone recipient to the next in a given order.
Email notificationsVisma Approval Center uses email notifications to inform users about pending tasks.
Recipients of tasks receive periodic email notifications which list pending lines and documents that they need to doattend to.
Every time a task is about to expire the user will receive an email notification about the tasks that are close to expire.
Customer Administrators, System Administrators and System Operators will receive email notifications whenever thereis a blocked task.
System Operators and System Administrators also recieve email notifications whenever there is an overdue task.
Operations on a taskThere are a number of operations that a recipient can do with a pending task.
A. For a pending document approval task the recipient can: :
• Approve the document. The document continues then in the work flow and is sent to the next recipient in the list

Visma Software International | Visma Approval Center
| 29
• Reject the document. The document is sent back to the original sender in the Visma source application• Forward the document to another person. The user hands over the document task to another person.• Send the document on review. The document is sent to another person to ask for a review. Once the document is
approved, it is returned to the user who started the review.
During the approval process the recipient can add or edit information for the document provided the necessaryauthorization. These changes are then sent back to the Visma source application once the task is completed(i.e.approved or rejected).
When the recipient decides how to handle the task, comments can be added to explain the decisions taken.
B. For a pending line approval task the recipient can:
• Approve the line: The line continues in the workflow and is sent to the next recipient in the list.• Reject the line: The line is rejected and the workflow is sent back to the source application.
The recipient can add new lines for a given task. The recipient then becomes the default line owner for the line taskscreated. The user who creates the line can also delete the lines. Once the operations are completed at the line level therecipient can:
• Proceed the workflow: The workflow continues to the next recipient if the line is approved or goes back to thesource application if the line is rejected..
C. For a pending document and line approval task the recipient can:
• Approve the line & document: The task continues in the workflow and is sent to the next recipient in the list• Reject the line and/or document: The task is rejected and the workflow is sent back to the source application.• Send the document on review: The document is sent to another person to ask for a review. Once the document is
approved, it is returned to the user who started the review. This is independent of the line and line approvers are notchanged.
• Forward the document: The user hands over the document task to another person.This is independent of the line andline approvers are not changed..
Due date on tasksWorkflow tasks will normally have a due date representing the number of working days available to the user tocomplete the task.
This due date represents the number of working days the recipient of the document has for handling the document. Thisis not the due date of the document itself, for example, for a supplier invoice. A task not handled within the given duedate is called an Overdue task.
Due date is handled in either one of the following two ways:
• When the recipient either approves or forwards a task to another recipient, a new due date is automatically set forthe next recipient. This new due date is calculated based on the same number of working days originally availablefor the task on flow.
• When the recipient sends a task on review, the same due date, as for the original document task, applies for therecipient doing the review.
• If the due date is set to today's date, it implies that the recipient(s) of the document only have 24 hours at theirdisposal. At the end of the day the task will be listed as Overdue and will remain in the approver's task list. It willalso be shown in the Overview Task under Task Overview which is accessible for System Operator and SystemAdministrator. System Operator and System Administrator can reassign this task to any other approver if needed.
Working with tasksRecipients of tasks sent on flow will handle these in various ways.
Users will be regularly notified by email, informing you about pending tasks that you need to do attend to.
Operations available to a user includes controlling the information of the document and deciding on how to handle it.
Only users with approver role, at minimum, can change the information stored for a document.
There are a number of pre-requisites before starting working on a task:
• The user needs to be logged in with its user (email address) and password.• The user must have approver role at minimum.
30 | Visma Software International | Visma Approval Center
30 |
An user can have three types of tasks assigned in Visma Approval Center:
• Document task : Recipient has to take a decision only on the document. The recipient can approve, reject, senddocument on review or forward the document.
• Line task : Recipient has to take a decision only on the line. The recipient can approve or reject the line.• Document and Line task : Recipient has to take a decision on both the document and the line. The recipient can
approve or reject the line. And can approve, reject, forward or send document on review.
Note: Rejection of any line causes the task to be rejected and the task will be send back to the source application.
Approving a document taskThis procedure describes how a user approves a document task.
1. In the Overview navigation bar, expand a group of tasks by clicking on one [document type].
For example: Invoices, Time sheets, Vouchers.
The list of pending tasks opens up.
2. Click a task.The document attached to the task is shown.
3. Review the document attached to the task in the document viewer with the information in the edit document pane oraccounting grid.
4. If you want, you can add a comment concerning the document to inform the other recipients on the task:
a)Click .The comment pane opens up. All historical comments added by previous recipients are listed up in the dialoguebar beneath.
b) Enter a comment.
The comment entered is automatically saved upon writing. You can still edit the comment until the task is sent tosomeone else.
5.Click to approve the task.A FYI Notification appears notifying the user that the task has been successfully approved.
The task is approved and disappears from the user's Overview list.
Editing and approving a document taskThis procedure describes how a user can edit document's information prior to approving the task.
1. In the Overview navigation bar, select any task.
2. Review the document attached to the task in the document viewer pane.
3. Review the information saved for the document in the edit document pane or accounting grid.
4. Add or edit information about the document.
For example, for an invoice you can add or edit accounting information such as account (credit) and cost unit(s):
Options Description
Credit Enter a valid account from the list
Department Enter a valid cost unit from the list
Project Enter a valid cost unit from the list
5.Click to approve the task.A FYI Notification appears notifying the user that the task has been successfully approved.
The task with changes is approved and sent either to the next recipient or back to the source application, if the user wasthe last recipient on the task.
Rejecting a document taskThis procedure describes how a user rejects a task.
1. In the Overview navigation bar, select any task.
2. Review the document attached to the task as well as information about the document.

Visma Software International | Visma Approval Center
| 31
3.Click .
a) Enter a comment in the Message dialogue box as required upon rejection of a task.
If you already had entered a comment on the document, the text is automatically shown in this dialogue box.You can either overwrite or edit it.
A FYI Notification appears notifying the user that the task has been successfully rejected.
The task is rejected and sent back to the original sender in the source application.
Sending a document task on reviewThis procedure describes how a user sends a document on review to be checked by an additional person.
1. In the Overview navigation bar, select any task.
2.Click to send the document to another person for review.The dialogue box for choosing a recipient opens up.
3. Choose a user from the list after entering the name.
In case the user in question is unavailable, this person will be marked in the list with (Away) together with the datethis person will be back.
4. Enter a comment in the Message dialogue box.
If you already had entered a comment on the document, the text is automatically shown in this dialogue box. Youcan either overwrite or edit it.
5. Click OK when finished.The dialogue box closes.
6. A FYI Notification appears informing the user that the document has been successfully sent on review.
The document disappears from your Overview list. The document is sent to the given recipient. Once this other personhas reviewed the document, it is sent back to you.
Forwarding a document taskThis procedure describes how a user forward to another user when the recipient of the document is not correct.
1. In the Overview navigation bar, select any task.
2.Click to forward the document to another person.The dialogue box for choosing a recipient opens up.
3. Choose a user by entering the name.
In case the user in question is unavailable, this person will be marked in the list with (Away) together with the datethis person will be back.
4. Enter a comment in the Message dialogue box.
5. Click OK when finished.The dialogue box closes.
6. A FYI Notification appears informing the user that the document has been successfully forwarded.
The task disappears from your Overview list.
Approving a line taskThis procedure describes how a user approves a line task.
1. In the Overview navigation bar, expand a group of tasks by clicking on one [document type]The list of pending tasks opens up.
2. Click a task.The document attached to the task is shown.
3. Review the document attached to the task in the document viewer
4. Review that the information saved for the line corresponds with document's content by comparing the edit documentpane or accounting grid information.
5. If you want, you can add a comment concerning the line/document to inform the other recipients on the task:
a)Click .

32 | Visma Software International | Visma Approval Center
32 |
The comment pane opens up. All historical comments added by previous recipients are listed up in the dialoguebar beneath.
b) Enter a commentThe comment entered is automatically saved upon writing. You can still edit the comment until the task is sendon flow.
6.You can check the approval history for the line by clicking .The Approval preview opens up. It shows the history of the approval process and the future approvers in the flow.
7.Review the line information and approve the line by clicking in the accounting grid.
8.
Click Proceed from the bottom task bar to send the task on flow to the next recipient.The line task is approved and disappears from the user's task list.
The task is approved and sent either to the next recipient or back to the source application, if the user was the lastrecipient on the task.
Editing and approving a line taskThis procedure describes how a user can edit a line information prior to approving the task.
1. In the Overview navigation bar, select any task.
2. Review the document attached to the task in the document viewer pane.
3. Review the information saved for the lines assigned to you.
4. Add or edit information. For example:
a) For an invoice you can add or edit accounting information such as account (credit) and cost unit(s):b) Or you can add a new accounting line by clicking in the accounting grid. You will be the default approver for
every line you create. You can also delete the line you have created by clicking .
5.Click Proceed from the bottom task bar to send the task on flow.A FYI Notification appears notifying the user that the task has been successfully send on flow.
The task with changes is approved and sent either to the next recipient or back to the source application, if the user wasthe last recipient on the task.
Rejecting a line taskThis procedure describes how a user rejects a line task.
1. In the Overview navigation bar, select any task.
2. Review the document attached to the task as well as information about the document.
3.Click in the accounting grid against the line .
a) Enter a comment in the Message dialogue box as required upon rejection of a task.
4.
Click Proceed on the bottom task bar to send the task back to the source application.
The task is rejected and sent back to the source application.
Adding new information on a documentA document such as a supplier invoice comes with accounting information. This procedure describes how to addadditional information to a document prior to approving it.
1. From the Overview navigation bar, select any task.The document attached to the task appears in the viewer pane.
2. The edit document pane displays the information of the document.
3. If you need to add more information, click .A blank line is inserted beneath.
4. Fill in fields as needed.
5.
If you need to delete the newly added information, click .

Visma Software International | Visma Approval Center
| 33
Enter new values directly or use the list of values provided for each editable field to find the appropriate value.Values you enter are automatically saved when you navigate to the next field.
When information has been added, the user can further handle the task as needed.
About substitutesIn Visma Approval Center you can define another user as your temporary substitute in order to take over your tasksduring your absence.
New incoming tasks and existing tasks will be automatically routed to the user's assigned substitute.
The following rules applies when assigning a substitute:
• you cannot register yourself as a substitute• two users cannot be substitute for each other either over the same period of time or for an overlapping period of time• two or more substitutes with the same name can be distinguished based on their email address• in case a substitute is also away, information about its unavailability is shown in order to avoid picking this person
as a replacement• once a substitute becomes active, both the original assignee and substitute can see and work on the tasks assigned to
original assignee• once a substitute becomes active, all the tasks in the original assignee's task list
becomes visible in the substitute's task list as : Task Name(on behalf of Assignee A)
• all approval decisions made by the substitute is registered as "on behalf of the original assignee" in the textual flowand graphical flow
•
in the graphical flow, the substitute name displayed on top of the original approver name:• in the textual flow, the substitute and original approver both will be shown. When the task is completed the name of
the user (substitute or original approver) who took action on the task is shown in the textual flow.• once a substitute becomes inactive, all the tasks of the original assignee disappear from the substitute's task list.
Working with substitutesA substitute will be notified about a user's pending tasks.
Pre-requisites for working with substitutes:

34 | Visma Software International | Visma Approval Center
34 |
• The user needs to be logged in with its user (email address) and password and has chosen a company context.• The user must have approver role at minimum.
Adding a new substituteA user can choose to select a substitute to take over his or her tasks for a period of time. The substitute user is selectedthrough the My Substitute window.
1. Click Settings toolbar button on the menu bar.
2. Click My Settings menu and then click My Substitute link in the left navigation bar.The window for entering a substitute opens up.
3. To enter a new substitute, click the Active check box.The fields for adding a new substitute will be activated.
4. Choose a substitute in the Substitute field by entering the name of a user.A list of possible names is shown.
5. Choose a name from the list.
6. Navigate to the date fields From and To to enter the period of time for the temporary replacement.
In case you choose a substitute for which you are the substitute for an overlapping period of time, an error messagewill be displayed.
If you click a date field, a calendar window open up for picking a date.
7. Click on Save when finished.The new substitute is registered and activated.
All new tasks as well as existing tasks will be automatically sent to the user's substitute next time a reminder is sent.Once the replacement period has come to an end, new tasks will then be sent to the original user. Tasks still pending forthe substitute will remain on this person's task list.
Activating a substituteYou can choose to activate a substitute for your user. The substitute is activated through the My Substitute window.
A substitute was previously registered and de-activated for the user. A substitute must be activated when the user is notavailable for handling tasks in the system.
1. Click Settings toolbar button on the menu bar.
2. Click My Settings menu and then click My Substitute link in the left navigation bar.The window for entering a substitute open up.
3. To activate your substitute, click the Active check box.
4. Navigate to the date fields: From and To to enter the new period of time for the temporary replacement.
If you omit to enter an end date then the substitution will be indefinitely. You will need to de-activate the substituteto end the replacement.
In case you enter a period of time that overlaps with your substitute, an error message will be displayed.
If you click a date field, a calendar window open up for picking a date.
5. Click on Save when finished.The existing substitute is activated.
All new tasks will now be sent to the user's substitute.
Deactivating a substituteYou can choose to deactivate your substitute. The substitute is deactivated through the My Substitute window.
A user must deactivate its substitute in case the user is back before the period of replacement has come to an end.
1. Click Settings toolbar button on the menu bar.
2. Click My Settings menu and then click My Substitute link in the left navigation bar.The window that shows the user's substitute open up.
3. To deactivate your substitute, click the Active check box.
4. Click on Save when finished.The existing substitute is deactivated.
Only new tasks will be automatically sent to the original user from the day the user's substitute has being deactivated.

Visma Software International | Visma Approval Center
| 35
Managing substitutesThe system operator can manage substitutes on behalf of users. Changes made by the system operator overrides user'schanges.
1. Click Settings toolbar button on the menu bar.
2. Click Manage Settings menu and then click Manage Substitutes link in the left navigation bar.The pane for searching and entering all substitutes opens up.
3. To search substitutes the following choices are available:
• Click All to search all substitutes both active and inactive ones• Click Active to search all active substitutes only• Click Inactive to search all inactive substitutes only
4. Choose to search either substitutes or users with their substitutes, by selecting either Substitute or User
5. In the Name field enter a partial or complete name to search for substitutes.
6. To activate or deactivate substitutes, for one or several substitutes, click on the Activate check box.
7. To change the period of replacement for one or several substitutes searched, enter different dates in From and/or Tofields.
If you click a date field, a calendar window opens up for picking a date.
You cannot enter a start date that is later than the end date and vice versa.
In case you choose a substitute for a user that is also a substitute for another user over an overlapping period of time,an error message will be displayed.
8. Click on Save when finished.
At any time if you regret the changes entered you can click on Cancel to cancel these changes.
Changes to active and inactive substitutes are saved and all incoming or existing tasks are redirected to the substitute(s)based on the changes entered in this window.
Working with system overviewThe system operator can quickly and easily check the status of ongoing and completed processes and in this wayidentify potential bottlenecks in the Visma Approval Center application.
Pre-requisites for working with system overview:
• The user needs to be logged in with its user (email address) and password and has chosen a company context.• The user must have system operator role.
Managing active processesThe system operator can view how far ongoing processes have come, who is the last recipient working with it as well asthe length of time it has been on flow.
1. Click Overview toolbar button on the menu bar.
2. Click Process Overview menu and then click Active Processes link in the left navigation bar.The window for viewing active documents on flow in Visma Approval Center opens up.
3. Click on a bar in the Active Processes graph in order to only list documents based on a specific number of days old.
4. To search active processes by document type, choose from the Group drop-down list the type of document.For example, you can choose Invoices.The list of all active processes for the given document type is listed independent of the Visma Approval Center hostapplication from which the document is originating.
5. To search existing processes for a specific type of document and an host application, choose from the Group drop-down list the type of document and choose from the Application Name drop-down list the host application fromyou which you have received documents.
6. To search existing processes for a specific document enter the Document Id in the document Id column.
7. To search existing processes for a specific document enter the task name in the Description
8. To search existing processes based on the number of days there were received, choose the number of days old fromthe Received drop-down list.

36 | Visma Software International | Visma Approval Center
36 |
9. To search processes based on the last changed time, choose from the search options under Last changed.For example, you can choose invoices that were changed Today, Week till date, Month till date or search withSpecific date ranges.
10. To search processes based on the last changed user, enter the username in Last changed by column.
Managing completed processesOne can view completed processed and retrieve information for each process.
1. Click Overview toolbar button on the menu bar.
2. Click Process Overview menu and then click Completed Processes link in the left navigation bar.The window for entering a substitute opens up.
3. To search completed processes by document type, choose from the Group drop-down list the type of document.For example, you can choose Invoices.The list of all completed processes for the given document type is listed independent of the Visma Approval Centerhost application from which the document is originating.
4. To search processes for a specific type of document and an host application, choose from Group the type ofdocument and choose from the Application Name drop-down list the host application from you which you havereceived documents.
5. To search existing processes for a specific document enter the Document Id in the document Id column.
6. To search existing processes for a specific document enter the task name in the Description
7. To search existing processes based on the number of days there were received, choose the number of days old fromthe Received drop-down list.
8. To search processes based on the last changed time, choose from the search options under Last changed.For example, you can choose invoices that were changed Today, Week till date, Month till date or search withSpecific date ranges.
9. To search processes based on the last changed user, enter the username in Last changed by column.
10. To search processes with a specific status, choose from the Status drop-down list the status desired.For example, Approved or Rejected.
11. To sort processes based on the status of the workflow acknowledgement by the source application, click onAcknowledgedtab.
Best PracticesThe following Best Practices will enable ease of set-up and usage with Visma Approval on Demand.
Best Practices for User Groups:
1. Customer Administrator: As a Customer Administrator while you set up a new user, create and assign an usergroup under the create user tab. Do not assign roles from the user tab. Once the user is created, then go to the UserGroup Tab, and assign roles. This will ensure that you have a consolidated view of the roles and user groups.
2. System Operator: For any company, there must be a minimum of 2 System Operators.