visitor administration user guide · 2019-01-15 · visitor administration user guide 7 chapter 1...
TRANSCRIPT

Visitor Administration User Guide


Table of Contents
CHAPTER 1 Introduction . . . . . . . . . . . . . . . . . . . . . . . . . . . . . . . . . . . . . . . . . . . . . 7
Conventions Used in this Documentation . . . . . . . . . . . . . . . . . . . . . . . . . . . . . . . . . . . . . . . . . . . . .7
Prerequisites . . . . . . . . . . . . . . . . . . . . . . . . . . . . . . . . . . . . . . . . . . . . . . . . . . . . . . . . . . . . . . . . . . .8Licensing . . . . . . . . . . . . . . . . . . . . . . . . . . . . . . . . . . . . . . . . . . . . . . . . . . . . . . . . . . . . . . . . . . . . . . . . . . 8
Visitor Management Version Compatibility . . . . . . . . . . . . . . . . . . . . . . . . . . . . . . . . . . . . . . . . . . .8
Visitor Administration . . . . . . . . . . . . . . . . . . . . . . . . . . . . . . . . . . . . . . . . . . . . . . 9
CHAPTER 2 Permissions . . . . . . . . . . . . . . . . . . . . . . . . . . . . . . . . . . . . . . . . . . . . 11
Administrator Permissions . . . . . . . . . . . . . . . . . . . . . . . . . . . . . . . . . . . . . . . . . . . . . . . . . . . . . . . 11
Host Permissions . . . . . . . . . . . . . . . . . . . . . . . . . . . . . . . . . . . . . . . . . . . . . . . . . . . . . . . . . . . . . . .13
Front Desk Attendant Permissions . . . . . . . . . . . . . . . . . . . . . . . . . . . . . . . . . . . . . . . . . . . . . . . . .15Cardholder Options . . . . . . . . . . . . . . . . . . . . . . . . . . . . . . . . . . . . . . . . . . . . . . . . . . . . . . . . . . . . . . . . . 19
Kiosk User Permissions . . . . . . . . . . . . . . . . . . . . . . . . . . . . . . . . . . . . . . . . . . . . . . . . . . . . . . . . .19
CHAPTER 3 Visitor Administration . . . . . . . . . . . . . . . . . . . . . . . . . . . . . . . . . . . . 23
Browser Settings . . . . . . . . . . . . . . . . . . . . . . . . . . . . . . . . . . . . . . . . . . . . . . . . . . . . . . . . . . . . . . .23Update the URL . . . . . . . . . . . . . . . . . . . . . . . . . . . . . . . . . . . . . . . . . . . . . . . . . . . . . . . . . . . . . . . . . . . . 24
Editing SilverlightApplicationConfiguration.xml . . . . . . . . . . . . . . . . . . . . . . . . . . . . . . . . . 24
Getting Started . . . . . . . . . . . . . . . . . . . . . . . . . . . . . . . . . . . . . . . . . . . . . . . . . . . . . . . . . . . . . . . .24Web Address . . . . . . . . . . . . . . . . . . . . . . . . . . . . . . . . . . . . . . . . . . . . . . . . . . . . . . . . . . . . . . . . . . . . . . . 24
Logging In. . . . . . . . . . . . . . . . . . . . . . . . . . . . . . . . . . . . . . . . . . . . . . . . . . . . . . . . . . . . . . . . 24Logging Out . . . . . . . . . . . . . . . . . . . . . . . . . . . . . . . . . . . . . . . . . . . . . . . . . . . . . . . . . . . . . . 25
Configuration . . . . . . . . . . . . . . . . . . . . . . . . . . . . . . . . . . . . . . . . . . . . . . . . . . . . . . . . . . . . . . . . .25
Visitor Administration User Guide 3

Table of Contents
Sign-in Locations . . . . . . . . . . . . . . . . . . . . . . . . . . . . . . . . . . . . . . . . . . . . . . . . . . . . . . . . . . . . . . . . . . . 25
Adding a Sign-in Location. . . . . . . . . . . . . . . . . . . . . . . . . . . . . . . . . . . . . . . . . . . . . . . . . . . . 25Modifying a Sign-in Location . . . . . . . . . . . . . . . . . . . . . . . . . . . . . . . . . . . . . . . . . . . . . . . . . 25Deleting a Sign-in Location . . . . . . . . . . . . . . . . . . . . . . . . . . . . . . . . . . . . . . . . . . . . . . . . . . . 25Kiosk . . . . . . . . . . . . . . . . . . . . . . . . . . . . . . . . . . . . . . . . . . . . . . . . . . . . . . . . . . . . . . . . . . . . . . . . . . . . 26Badge Type . . . . . . . . . . . . . . . . . . . . . . . . . . . . . . . . . . . . . . . . . . . . . . . . . . . . . . . . . . . . . . . . . . . . . . . . 26
Choosing the Badge Type . . . . . . . . . . . . . . . . . . . . . . . . . . . . . . . . . . . . . . . . . . . . . . . . . . . . 26
Visitor Kiosk . . . . . . . . . . . . . . . . . . . . . . . . . . . . . . . . . . . . . . . . . . . . . . . . . . . 27
CHAPTER 4 Kiosk Setup . . . . . . . . . . . . . . . . . . . . . . . . . . . . . . . . . . . . . . . . . . . . 29
Prerequisites . . . . . . . . . . . . . . . . . . . . . . . . . . . . . . . . . . . . . . . . . . . . . . . . . . . . . . . . . . . . . . . . . . 29Touch-screen Monitor . . . . . . . . . . . . . . . . . . . . . . . . . . . . . . . . . . . . . . . . . . . . . . . . . . . . . . . . . . . . . . . 29Windows License . . . . . . . . . . . . . . . . . . . . . . . . . . . . . . . . . . . . . . . . . . . . . . . . . . . . . . . . . . . . . . . . . . . 30USB Ports . . . . . . . . . . . . . . . . . . . . . . . . . . . . . . . . . . . . . . . . . . . . . . . . . . . . . . . . . . . . . . . . . . . . . . . . 30
Changing Port Settings. . . . . . . . . . . . . . . . . . . . . . . . . . . . . . . . . . . . . . . . . . . . . . . . . . . . . . . 30Virtual Keyboard . . . . . . . . . . . . . . . . . . . . . . . . . . . . . . . . . . . . . . . . . . . . . . . . . . . . . . . . . . . . . . . . . . . 30
Installing the Virtual Keyboard . . . . . . . . . . . . . . . . . . . . . . . . . . . . . . . . . . . . . . . . . . . . . . . . 30Registering the Touch-It Software . . . . . . . . . . . . . . . . . . . . . . . . . . . . . . . . . . . . . . . . . . . . . . 31
Information Capture . . . . . . . . . . . . . . . . . . . . . . . . . . . . . . . . . . . . . . . . . . . . . . . . . . . . . . . . . . . . 31Setting Up the Camera . . . . . . . . . . . . . . . . . . . . . . . . . . . . . . . . . . . . . . . . . . . . . . . . . . . . . . . 31
Printing . . . . . . . . . . . . . . . . . . . . . . . . . . . . . . . . . . . . . . . . . . . . . . . . . . . . . . . . . . . . . . . . . . . . . . 32Installing the Printer. . . . . . . . . . . . . . . . . . . . . . . . . . . . . . . . . . . . . . . . . . . . . . . . . . . . . . . . . 32Label Settings . . . . . . . . . . . . . . . . . . . . . . . . . . . . . . . . . . . . . . . . . . . . . . . . . . . . . . . . . . . . . . . . . . . . . . 32
Installation Site . . . . . . . . . . . . . . . . . . . . . . . . . . . . . . . . . . . . . . . . . . . . . . . . . . . . . . . . . . . . . . . . 33
CHAPTER 5 On-site Configuration of Kiosk . . . . . . . . . . . . . . . . . . . . . . . . . . . . . 35
Configuration of the Kiosk . . . . . . . . . . . . . . . . . . . . . . . . . . . . . . . . . . . . . . . . . . . . . . . . . . . . . . . 35Defining a Kiosk Profile . . . . . . . . . . . . . . . . . . . . . . . . . . . . . . . . . . . . . . . . . . . . . . . . . . . . . 35Modifying a Kiosk Profile . . . . . . . . . . . . . . . . . . . . . . . . . . . . . . . . . . . . . . . . . . . . . . . . . . . . 35Deleting a Kiosk Profile. . . . . . . . . . . . . . . . . . . . . . . . . . . . . . . . . . . . . . . . . . . . . . . . . . . . . . 36Configuring a Kiosk. . . . . . . . . . . . . . . . . . . . . . . . . . . . . . . . . . . . . . . . . . . . . . . . . . . . . . . . . 36Modifying a Kiosk . . . . . . . . . . . . . . . . . . . . . . . . . . . . . . . . . . . . . . . . . . . . . . . . . . . . . . . . . . 36Deleting a Kiosk. . . . . . . . . . . . . . . . . . . . . . . . . . . . . . . . . . . . . . . . . . . . . . . . . . . . . . . . . . . . 36
Visit Key . . . . . . . . . . . . . . . . . . . . . . . . . . . . . . . . . . . . . . . . . . . . . . . . . . . . . . . . . . . . . . . . . . . . . 36Configuring the Visit Key . . . . . . . . . . . . . . . . . . . . . . . . . . . . . . . . . . . . . . . . . . . . . . . . . . . . 36Designing a Badge with the Visit Key . . . . . . . . . . . . . . . . . . . . . . . . . . . . . . . . . . . . . . . . . . . 37
BadgeDesigner Layout . . . . . . . . . . . . . . . . . . . . . . . . . . . . . . . . . . . . . . . . . . . . . . . . . . . . . . . . . . 37
ClickOnce Setup . . . . . . . . . . . . . . . . . . . . . . . . . . . . . . . . . . . . . . . . . . . . . . . . . . . . . . . . . . . . . . . 38Methods of Deployment . . . . . . . . . . . . . . . . . . . . . . . . . . . . . . . . . . . . . . . . . . . . . . . . . . . . . . . . . . . . . . 38Server Name . . . . . . . . . . . . . . . . . . . . . . . . . . . . . . . . . . . . . . . . . . . . . . . . . . . . . . . . . . . . . . . . . . . . . . . 38
Using SSL . . . . . . . . . . . . . . . . . . . . . . . . . . . . . . . . . . . . . . . . . . . . . . . . . . . . . . . . . . . . . . . . 38Installation . . . . . . . . . . . . . . . . . . . . . . . . . . . . . . . . . . . . . . . . . . . . . . . . . . . . . . . . . . . . . . . . . . . . . . . . 38
Installing the Application via Network . . . . . . . . . . . . . . . . . . . . . . . . . . . . . . . . . . . . . . . . . . 39Installing the Application via Server . . . . . . . . . . . . . . . . . . . . . . . . . . . . . . . . . . . . . . . . . . . . 39
4 Visitor Administration User Guide

Table of Contents
Workaround for Security Policies . . . . . . . . . . . . . . . . . . . . . . . . . . . . . . . . . . . . . . . . . . . . . . . . . .39Support Two Security Policies . . . . . . . . . . . . . . . . . . . . . . . . . . . . . . . . . . . . . . . . . . . . . . . . . . . . . . . . . 39
Creating Two Copies of the Service File . . . . . . . . . . . . . . . . . . . . . . . . . . . . . . . . . . . . . . . . 39Creating a New Virtual Directory . . . . . . . . . . . . . . . . . . . . . . . . . . . . . . . . . . . . . . . . . . . . . . 39Updating the ClickOnce Deployment. . . . . . . . . . . . . . . . . . . . . . . . . . . . . . . . . . . . . . . . . . . 39
Kiosk Startup . . . . . . . . . . . . . . . . . . . . . . . . . . . . . . . . . . . . . . . . . . . . . . . . . . . . . . . . . . . . . . . . . .40
Kiosk Settings . . . . . . . . . . . . . . . . . . . . . . . . . . . . . . . . . . . . . . . . . . . . . . . . . . . . . . . . . . . . . . . . .40Choosing the Location and Name. . . . . . . . . . . . . . . . . . . . . . . . . . . . . . . . . . . . . . . . . . . . . . 41Choosing the Default Printer . . . . . . . . . . . . . . . . . . . . . . . . . . . . . . . . . . . . . . . . . . . . . . . . . 41
Appendices . . . . . . . . . . . . . . . . . . . . . . . . . . . . . . . . . . . . . . . . . . . . . . . . . . . . . 43
APPENDIX A Security Guidelines . . . . . . . . . . . . . . . . . . . . . . . . . . . . . . . . . . . . . . 45
Accounts . . . . . . . . . . . . . . . . . . . . . . . . . . . . . . . . . . . . . . . . . . . . . . . . . . . . . . . . . . . . . . . . . . . . .45B.A.S.I.S. Accounts . . . . . . . . . . . . . . . . . . . . . . . . . . . . . . . . . . . . . . . . . . . . . . . . . . . . . . . . . . . . . . . . . . 45Windows Accounts . . . . . . . . . . . . . . . . . . . . . . . . . . . . . . . . . . . . . . . . . . . . . . . . . . . . . . . . . . . . . . . . . . 45
Secure the Kiosk . . . . . . . . . . . . . . . . . . . . . . . . . . . . . . . . . . . . . . . . . . . . . . . . . . . . . . . . . . . . . . .46Password Protection for BIOS . . . . . . . . . . . . . . . . . . . . . . . . . . . . . . . . . . . . . . . . . . . . . . . . . . . . . . . . . 46Prerequisite Software and Drivers . . . . . . . . . . . . . . . . . . . . . . . . . . . . . . . . . . . . . . . . . . . . . . . . . . . . . . 46Dedicated Windows User . . . . . . . . . . . . . . . . . . . . . . . . . . . . . . . . . . . . . . . . . . . . . . . . . . . . . . . . . . . . . 46
B.A.S.I.S. Configuration . . . . . . . . . . . . . . . . . . . . . . . . . . . . . . . . . . . . . . . . . . . . . . . . . . . . . . . . .47B.A.S.I.S. User Accounts . . . . . . . . . . . . . . . . . . . . . . . . . . . . . . . . . . . . . . . . . . . . . . . . . . . . . . . . . . . . . 47
Kiosk Configuration . . . . . . . . . . . . . . . . . . . . . . . . . . . . . . . . . . . . . . . . . . . . . . . . . . . . . . . . . . . .47Screen Saver . . . . . . . . . . . . . . . . . . . . . . . . . . . . . . . . . . . . . . . . . . . . . . . . . . . . . . . . . . . . . . . . . . . . . . . 47
User Account Settings . . . . . . . . . . . . . . . . . . . . . . . . . . . . . . . . . . . . . . . . . . . . . . . . . . . . . . . . . . .48Proxy Settings . . . . . . . . . . . . . . . . . . . . . . . . . . . . . . . . . . . . . . . . . . . . . . . . . . . . . . . . . . . . . . . . . . . . . 48
Configuring Proxy Settings . . . . . . . . . . . . . . . . . . . . . . . . . . . . . . . . . . . . . . . . . . . . . . . . . . 48Preventing Log Off and Shut Down . . . . . . . . . . . . . . . . . . . . . . . . . . . . . . . . . . . . . . . . . . . . 48Automatic Logon . . . . . . . . . . . . . . . . . . . . . . . . . . . . . . . . . . . . . . . . . . . . . . . . . . . . . . . . . . . . . . . . . . . 49
Setting up Automatic Logon of the Windows User . . . . . . . . . . . . . . . . . . . . . . . . . . . . . . . . 49
APPENDIX B Group Policy Object . . . . . . . . . . . . . . . . . . . . . . . . . . . . . . . . . . . . . 51
Group Policy Management . . . . . . . . . . . . . . . . . . . . . . . . . . . . . . . . . . . . . . . . . . . . . . . . . . . . . . .51Editing Group Policy Objects . . . . . . . . . . . . . . . . . . . . . . . . . . . . . . . . . . . . . . . . . . . . . . . . . 51
APPENDIX C Windows SteadyState . . . . . . . . . . . . . . . . . . . . . . . . . . . . . . . . . . . . . 55
Configuration of Windows SteadyState . . . . . . . . . . . . . . . . . . . . . . . . . . . . . . . . . . . . . . . . . . . . .55Enabling Computer Restrictions . . . . . . . . . . . . . . . . . . . . . . . . . . . . . . . . . . . . . . . . . . . . . . . 55Enabling User Restrictions . . . . . . . . . . . . . . . . . . . . . . . . . . . . . . . . . . . . . . . . . . . . . . . . . . . 55
Visitor Administration User Guide 5

Table of Contents
6 Visitor Administration User Guide

CHAPTER 1 Introduction
Visitor Management is for managing and tracking visitors within your organization.
The hosting party logs into a browser-based application to add a visitor or schedule a visit. The web application allows users to log into the visitor management system from any desktop.
The front desk attendant can search for visitors, sign visitors in or out, capture information, determine status, and have e-mail notifications sent to the host and visitor. Front desk attendants can also view upcoming visits.
Scheduled visitors use the Kiosk for self sign-in. When the visit is scheduled, a notification e-mail is sent to the host and visitor. The visitor’s e-mail will contain a bar code which is the visit key. This is used to sign in or out for the scheduled visit.
Configuration of these applications is done with Visitor Administration. This is also a browser-based application. It is used to configure settings such as sign-in locations and kiosks.
Conventions Used in this Documentation
The text in this documentation is formatted to make it easy for you to identify what is being described.
• Where a term is defined, the word is represented in italics.
• Field names are shown in bold.
• Menus and menu choices are shown in bold italics. All menu choices have accelerator keys, which enable you to select the menu choices using the keyboard. The underlined letter represents the accelerator key for that menu item. Accelerator keys are written, for example, <Alt>, <C>.
• Keyboard keys are represented in angle brackets. For example: <Tab>, <Ctrl>.
• Keyboard key combinations are written in two ways:
<Ctrl> + <Z> means hold down the first key and press the second
<Alt>, <C> means press the first key, then press the second
• Buttons on the screen are represented in square brackets; for example: [Modify], [Cancel].
Visitor Administration User Guide 7

8
Prerequisites
The Web Application Server is installed through a custom installation of the access control software. For more information, refer to the Installation Guide.
Other considerations:
• Your server must be a member of a domain. Workgroups are not supported.
• You should be logged into the computer as a domain user.
• Use the fully qualified name of the computer for the URL. This is important when typing the computer name in the configuration file.
• The LS Application Server service’s “Log On” user should be a domain user.
• Be sure the LS Application Server service is running.
• Be sure that the user has access to B.A.S.I.S., permissions assigned, and linked to a directory account.
• When making changes, restart IIS when you are done.
• Sign-in locations should be configured in Visitor Administration before using Visitor Management Front Desk or Host.
Licensing
Visitor Management is a licensed module. To use these applications, the license must be set to a number greater than zero. The Visitor Management section of the license indicates the number of concurrent licenses being used and the number purchased. The maximum number of visits indicates the number of visits you are allowed to have stored in the system.
Note: For group visits, each invited visitor is counted as a single visit event. For example, if a group visit contains 10 visitors, this uses 10 visits of the license.
Visitor Management Version Compatibility
There are two options for Visitor Management.
• The existing Visitor Management application can be accessed through System Administration, ID CredentialCenter, or Visitor Management.
• The B.A.S.I.S. ET693 Visitor Management is comprised of the new smart client Front Desk application, the browser-based Host application, browser-based Administration application, and the Kiosk. Visits scheduled in System Administration, ID CredentialCenter, or Visitor Management can be viewed and modified in these other applications.
However, when group visits are scheduled using the Front Desk or Host, they cannot be changed in System Administration, ID Credential Center, or Visitor Management. Group visits are not supported through these user interfaces.
For visits scheduled in System Administration, ID CredentialCenter, or Visitor Management, the sign-in location does not exist. When these visits are seen in Visitor Management Host, this field will be blank. In Front Desk, these visits will only be seen when All is selected for the sign-in location, and will not show up in any other location selected.
When an event has been created in System Administration, ID CredentialCenter, or Visitor Management, the notification e-mail does not have the scheduled time or visit key. Visit events should be scheduled in Visitor Management Host or Front Desk.
Visitor Administration User Guide

Visitor Administration


CHAPTER 2 Permissions
B.A.S.I.S. user permissions are enforced. These permissions are configured in System Administration or ID CredentialCenter in the Users folders. These permissions should be configured for the user to access components of Visitor Management.
A change in user permissions requires restarting IIS. Restarting IIS will allow the correct permissions to be applied.
The Users folder allows for granular control of the permissions assigned to users within each group.
Administrator Permissions
Configure the following user permissions for administrators who will be defining sign-in locations, Kiosk settings, and badge printers.
Visitor Administration User Guide 11

12
Permissions for Visitor Administration — System Permission Groups
* This permission only applies in a segmented system.
Visitor Administration User Guide

Host Permissions
Permissions for Visitor Administration — Cardholder Permission Groups
* This permission only applies in a segmented system.
Host Permissions
For users who will view their visit calendar in Visitor Management Host, schedule visit events, add and invite visitors, the following permissions should be configured.
Visitor Administration User Guide 13

14
Permissions for Host — System Permission Groups
Permissions for Host — Cardholder Permission Groups
* This permission only applies in a segmented system.
Visitor Administration User Guide
Front Desk Attendant Permissions
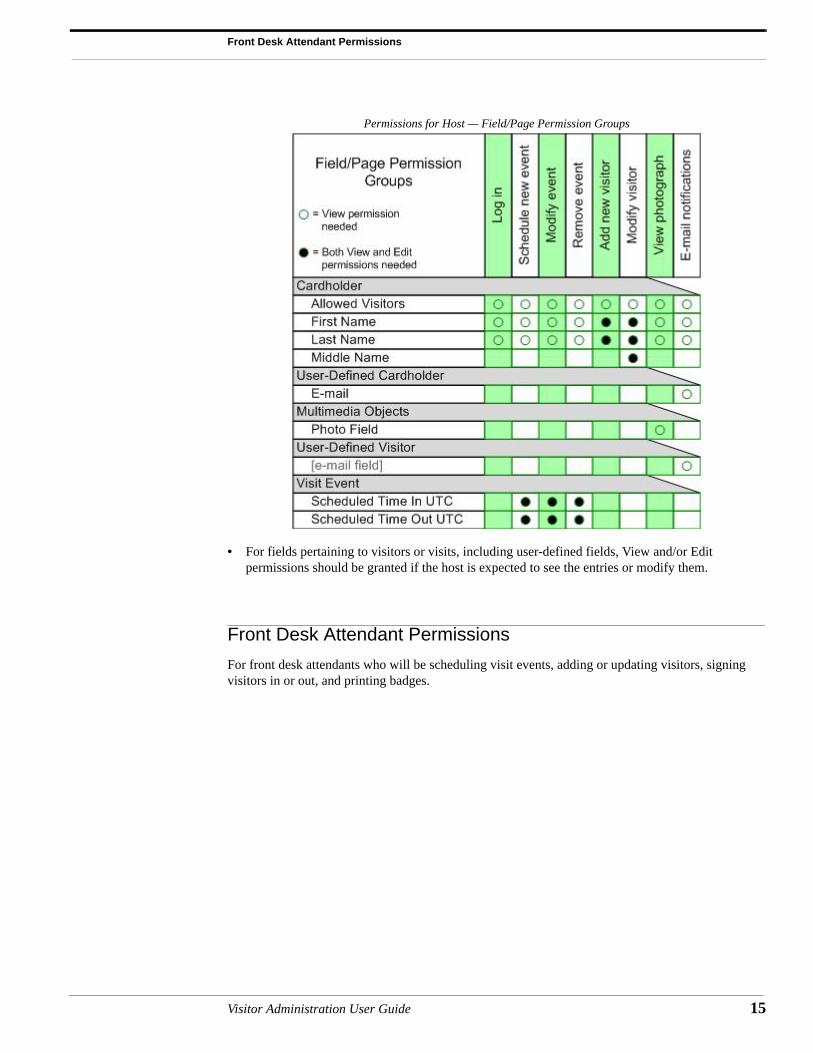
Permissions for Host — Field/Page Permission Groups
• For fields pertaining to visitors or visits, including user-defined fields, View and/or Edit permissions should be granted if the host is expected to see the entries or modify them.
Front Desk Attendant Permissions
For front desk attendants who will be scheduling visit events, adding or updating visitors, signing visitors in or out, and printing badges.
Visitor Administration User Guide 15

16
Permissions for Front Desk — System Permission Groups
* This permission only applies in a segmented system.
Visitor Administration User Guide

Front Desk Attendant Permissions
Permissions for Front Desk — Cardholder Permission Groups
* This permission only applies in a segmented system.
Visitor Administration User Guide 17

18
Permissions for Front Desk — Field/Page Permission Groups
• If there are required fields, toggle the View permission to Yes to be able to print badges.
• Also, if there are other user-defined fields on the badge layout, toggle the View permission to Yes to be able to print badges.
Visitor Administration User Guide

Kiosk User Permissions
• For fields pertaining to visitors or visits, Edit permissions should be granted if the front desk attendant is expected to see the entries or modify them.
• All user-defined fields that are drop-down lists require View permissions.
• All List Builder user-defined fields must have View permissions. This includes fields that may or may not be relevant to Visitor Management.
Note: List Builder items sometimes do not appear in user-defined drop-down fields. After making changes in List Builder, it is necessary to restart IIS.
Cardholder Options
Additional options can be configured in the Cardholder Options folder on the Visits form. These settings will apply to the Front Desk. After making changes to the Cardholder Options, you must log out and then log in again for the settings to take effect. For more information, refer to the System Administration or ID CredentialCenter User Guide.
Kiosk User Permissions
This user account will be used to run the Kiosk. Kiosk users will be signing in or out, capturing photographs, and printing badges.
Permissions for Kiosk — System Permission Groups
* This permission only applies in a segmented system.
Visitor Administration User Guide 19

20
Permissions for Kiosk — Cardholder Permission Groups
Visitor Administration User Guide

Kiosk User Permissions
Permissions for Kiosk — Field/Page Permission Groups
• For fields pertaining to visitors, including user-defined fields, Edit permissions should be granted if the Kiosk user is expected to see the entries and modify them.
• All user-defined fields that are drop-down lists require View permissions.
• All List Builder user-defined fields must have View permissions. This includes fields that may or may not be relevant to Visitor Management.
Note: List Builder items sometimes do not appear in user-defined drop-down fields. After making changes in List Builder, it is necessary to restart IIS.
Visitor Administration User Guide 21

22
Visitor Administration User Guide
CHAPTER 3 Visitor Administration
The browser-based Visitor Administration is for configuring Visitor Management. The web page can be accessed and used from any workstation within an organization. You must have proper credentials to log in and use this browser-based application.
For proper functionality, Visitor Administration requires:
• Internet Explorer 7 or later
• Silverlight 2.0 or later (available from http://www.microsoft.com/silverlight/. If you are having difficulties, contact your administrator.)
Due to the default Internet Explorer enhanced security settings preventing the use of some browser components, Visitor Administration is not supported on Windows Server 2003 or Windows Server 2008. The Internet Explorer security settings can be adjusted to provide support but it is not recommended due to potential insecure Internet Explorer security setting modifications.
Browser Settings
Visitor Administration is currently supported with Internet Explorer. Certain browser controls must be enabled to display its functionality. ActiveX controls and File download must be enabled.
In Internet Explorer, add the Visitor Administration URL to the list of Trusted Sites on the Security tab of the Internet Options and set the security level for this zone to medium-low. JavaScript should be enabled for the browser. The following options must be configured in the custom security settings:
Item Setting
ActiveX controls and plug-ins > Automatic prompting for ActiveX controls Enable
Downloads > File Download Enable
Miscellaneous > Access data sources across domains Prompt
Scripting > Active Scripting Enable
Visitor Administration User Guide 23

24
To enhance Visitor Administration performance, bypass the proxy server for local addresses and add the web server address to the list of proxy server exceptions.
Update the URL
The full name of the computer is usually configured during the installation process. However, if you want to change it, this can be done in the SilverlightApplicationConfiguration.xml file. This is located in C:\Inetpub\wwwroot\AdminApp.
The full name of the computer can be found by right-clicking on My Computer and selecting Properties. Then select the Computer Name tab. For cluster configurations, use the fully qualified virtual computer name.
SSL
If SSL (Secure Sockets Layer) is used, you must change the URL from http to https.
Editing SilverlightApplicationConfiguration.xml
1. Navigate to C:\Inetpub\wwwroot\AdminApp and edit the SilverlightApplicationConfiguration.xml file.
2. Locate the URL.
3. Change http to https.
4. Save the file.
Getting Started
Use the <Internal> directory and the user credentials for System Administration to log in.
Web Address
To get started, you will need the web address. The URL to access Visitor Administration consists of the fully qualified server name and the location of the application on the server. The location of the application is different depending on the application used. There is not a central log in web site for all B.A.S.I.S. web-based applications. To connect to Visitor Administration, type the following address into a browser, where <server name> is the location of the B.A.S.I.S. server:
http://<server name>/AdminApp
When accessing this site for the first time, if you do not have Silverlight installed, you will be asked to do so.
Logging In
1. Go to the Visitor Administration web page,
http://<server name>/AdminApp
If you have configured SSL (Secure Sockets Layer) for Visitor Management, remember that the URL for the server must start with https://...
2. Type in your user name.
3. Type in your password.
Visitor Administration User Guide

Configuration
4. Select the Directory from the drop-down.
5. Click [Login].
When the correct user name and password has been typed in and there is a failure to log in, check that the user account has access to the system. This is configured in System Administration or ID CredentialCenter on the General form of the Users folder.
Logging Out
1. On the web page, click on the lock icon to log out.
You will be logged out of the application.
Configuration
The different properties that can be configured are displayed in this application. To view the details, click on the property.
Sign-in Locations
Click Location. The list of sign-in locations is displayed along with their time zones. If segments are being used, this is also displayed.
Adding a Sign-in Location
1. Click [+].
2. Enter the information for the new sign-in location.
a. Type a unique name for the sign-in location. Duplicate names will result in an error.
b. Choose the correct time zone.
c. If you are using a segmented database, choose the appropriate segment.
3. Click [Save].
Modifying a Sign-in Location
1. Select the sign-in location.
2. Make changes to the sign-in location name, time zone, or segment.
3. Click [Save].
Deleting a Sign-in Location
A sign-in location cannot be deleted if it has been selected for a visit event or has been assigned to a Kiosk.
1. Select the sign-in location.
2. Click [–].
Visitor Administration User Guide 25

26
Kiosk
For information pertaining to the Kiosk, refer to the Configuration of the Kiosk on page 35.
Badge Type
Printing badges for visitors requires configuration of a disposable visitor badge. The badge type selected will be used when printing in Visitor Management Front Desk and Kiosk.
Configuration must take place prior to printing. First, the badge type should be created in System Administration. It should be a badge type of the visitor class and configured to be disposable. Then choose the badge type in Visitor Administration.
Note: In segmented systems, the primary segment for the badge type should be All Segments.
Choosing the Badge Type
1. In Visitor Administration, click Other Settings.
2. Under Badge Type for Disposable Badges Printed from Front Desk and Kiosk, select the badge type from the list. The list contains disposable visitor badge types configured in System Administration.
3. Click [Save].
Visitor Administration User Guide

Visitor Kiosk


CHAPTER 4 Kiosk Setup
The Visitor Kiosk allows visitors to sign in or out themselves without the assistance of a front desk attendant. After visitors are scheduled, they will receive a confirmation e-mail containing a visit key, which is a bar code allowing them to sign in.
By using the Kiosk to sign in, visitors will capture their own photograph and print a temporary badge. That same temporary badge can be designed to have a bar code for signing out visitors.
When the Kiosk is delivered to the installation site, much of the setup has already been done. If you are uncertain, contact your Value Added Reseller. Otherwise, you may skip to Configuration of the Kiosk on page 35.
Prerequisites
The Kiosk should have the following installed:
• Windows XP Professional with Service Pack 3 and associated security patches
• Microsoft .NET Framework 4.0
• Touch-It Virtual Keyboard 4.5
The Kiosk utilizes the following devices and needs the appropriate drivers.
• Touch-screen monitor
• Logitech QuickCam Orbit AF camera
• Parabit printer
The bar code scanner does not require a driver.
Touch-screen Monitor
The touch-screen monitor also has a driver which needs to be installed. After connecting the monitor, if the driver was unsucessfully installed, it may be necessary to uninstall it and reinstall it again.
Visitor Administration User Guide 29

30
Windows License
Upon the first time starting up the computer, you will be required to enter a valid Windows license number and activate it. To do so, you must have a network connection.
USB Ports
The USB ports vary depending on the order in which the devices are connected. If a ghost image is being used, the USB ports must match the original configuration.
These settings must be manually changed as follows.
Changing Port Settings
1. Under Printers and Faxes, locate the printer, “Microcom 428M 300DPI.” Right-click on the printer and select Properties.
2. On the Ports tab, select the COM3 port check box and then click [Configure Port]. An error may appear stating, “The port may be in use or may not exist.” If this occurs,
a. Click [OK].
b. Select another COM port, such as COM4, and then click [Configure Port].
3. Change Bits per second to 115200.
4. Change Flow control to Hardware.
5. On the General tab, click [Print Test Page].
6. If a test page is printed successfully, the correct port has been configured. If nothing prints, then try another COM port.
Virtual Keyboard
The Touch-It virtual keyboard is used to mimic a physical keyboard, allowing typing to be done on screen. The virtual keyboard must be installed before using ClickOnce.
The software has five files: TouchIt.exe, LogOnKeyboard.exe, MixedKeyboard.exe, NumericKeyBoard.exe, and TouchIt.ini. These files can be found on the Supplemental disc.
Installing the Virtual Keyboard
1. Install TouchIt.exe.
a. Double-click on it to start the installation. Click [Next].
b. Choose the destination location. Click [Next].
c. Choose the data directory. Click [Next].
d. Select Full installation from the drop-down. Click [Next].
e. You may choose to have shortcut icons. Click [Next].
f. When the installation is complete, click [Finish].
2. Install keyboard templates.
a. Double-click on LogOnKeyboard.exe to start the installation. Click [Install].
b. The template will be installed. When it is complete, click [Close].
c. Repeat this step for MixedKeyboard.exe and NumericKeyboard.exe.
3. Locate the file, TouchIt.ini,and move it to the TouchIt directory on the computer. If you used the default location, it should be C:\Program Files\Chessware\TouchIt.
Visitor Administration User Guide

Information Capture
Registering the Touch-It Software
Before using the virtual keyboard, it must be registered.
1. You may access the setup in one of the following ways:
a. Click the Start button, then select All Programs > Touch-It Virtual Keyboard > Register.
b. From the Touch-It menu on the virtual keyboard, select Setup.
The Touch-It Setup window will appear.
2. Under Licenses, in the Name field, type the name obtained from the registration exactly as it appears.
3. In the Key field, type the key obtained from the registration.
4. Click [Save].
Information Capture
Photographs of visitors are taken when they arrive for their visit.
Photograph
To capture the visitor photograph, it is necessary to properly install and configure a camera for the Kiosk. The camera currently supported is the Logitech QuickCam Orbit AF.
Currently, drivers for these cameras are only supported on Windows XP.
Setting Up the Camera
1. Insert the CD provided with the camera and run the installation program.
2. Connect the USB cable provided with the camera to a USB port and Windows will install the camera.
Be sure to consult the manufacturer documentation.
Automatic Cropping
Automatic cropping occurs to frame the face and shoulder area of the subject, and is relative to the location of the eyes. The cropped image area and aspect ratio are pre-configured. If necessary, the image will be rotated such that the eyes are level in the photograph.
For proper function of this feature:
• The subject’s eyes must be visible.
• There should only be one face in the image.
• A plain background must be used.
• The image includes the subject’s head and at least the top of the shoulders.
In cases where automatic cropping does not function properly, the crop window will appear and you will be able to manually drag it to the correct position.
Visitor Administration User Guide 31

32
Printing
A printer inside the Kiosk is used to print temporary adhesive badges for visitors. It must be installed with the proper settings.
Installing the Printer
1. Install the printer driver from the disc (\usb-serial\PL-2303 Driver Installation_v20026.exe).
2. Connect the printer to the computer.
3. Run PrnInst.exe. This will place the printer in Printers & Faxes.
a. From the list of printers, select Microcom 428M 300DPI. This information is located on the bottom of the printer.
b. Select the COM port from the list.
4. Right-click on the printer and select Properties.
5. On the Ports tab, click [Configure Port].
6. For the Port Settings, configure the following:
• Bits per second: 115200
• Flow control: Hardware
Verify the configuration by printing a test page.
Label Settings
For labels that are 4 x 2 5/16 (2.3125") inches in size with a 3/16 (0.1875) inch gap between labels, the following printing preferences should be set:
Options
• Paper Format: Portrait
• Size (in inches):
Width: 2.3125 (will get truncated to 2.31)
Height 4.00
• Unprintable Area: All 0.00
Advanced Setup
• Operation Mode: Cut
Offset: 0.48 inch
• Paper Type: Die-cut
• Media Settings:
Gap Length: 0.1875 (will get truncated to 0.19) inch
Remaining values: 0.00 inch
Label Y-Offset: 0.30 inch (This should be configured if you are using the 30256 label with the BadgeDesigner Layout on page 37.)
Visitor Administration User Guide

Installation Site
Installation Site
IMPORTANT: All setup described before this point should be done by the Kiosk manufacturer. Configuration of the Kiosk should resume at the installation site. Proceed to the next chapter for installation instructions.
Visitor Administration User Guide 33

34
Visitor Administration User Guide
CHAPTER 5 On-site Configuration of Kiosk
IMPORTANT: All setup described before this point should be done by the Kiosk manufacturer. Configuration of the Kiosk should resume at the installation site using the following instructions.
Configuration of the Kiosk
Kiosk configuration is primarily done with Visitor Administration. You must configure the Kiosk profile and assign it to a Kiosk before using it for the first time. The profile stores information for a Kiosk to personalize the user experience, such as on-screen text.
Defining a Kiosk Profile
1. In Visitor Administration, click Kiosk Profiles.
2. Click [+].
3. Enter the information for the profile. Fields denoted with an exclamation point are required.
a. Name: Type in a unique name to identify the Kiosk profile.
b. Welcome Screen Title: Type in the title of the welcome screen. This text will appear on main screen of the Kiosk.
c. Forgotten E-mail Instructions: Type in instructions for what to do in cases where visitors have forgotten to print and bring their e-mail which contains the visit key.
Note: This text will also appear whenever the visitor cannot sign in.
d. Message to Show Visitors: Type in a message to show the visitor, such as a non-disclosure agreement. To show the message on the screen, select the Enable check box.
4. Click [Save Changes]. If you do not want to save the information, click [Cancel].
Modifying a Kiosk Profile
1. Select the profile by clicking on it.
2. Make changes to the profile.
Visitor Administration User Guide 35

36
3. Click [Save Changes]. If you do not want to save the information, click [Cancel].
Deleting a Kiosk Profile
1. Select the profile by clicking on it.
2. Click [–].
3. When prompted for a confirmation to delete the profile, click [Yes].
Configuring a Kiosk
1. In Visitor Administration, click Kiosks.
2. Click [+].
3. Type the name of the Kiosk.
4. Select the sign-in location from the drop-down. For more information, refer to Sign-in Locations on page 25.
5. Select the Kiosk profile from the drop-down.
6. Click [Save Changes]. If you do not want to save the information, click [Cancel].
Modifying a Kiosk
1. Select the Kiosk by clicking on it.
2. Make changes to the Kiosk.
3. Click [Save Changes]. If you do not want to save the information, click [Cancel].
Deleting a Kiosk
1. Select the Kiosk to be deleted.
2. Click [–].
3. When promoted for a confirmation to delete the Kiosk, click [Yes].
Visit Key
A visit key is a unique identifier assigned to a scheduled visit. It is used to sign visitors in or out and must be configured for the Kiosk.
When a visit is scheduled, a notification is e-mailed containing a bar code which is the visit key. The visitor can print this e-mail and use the bar code to sign in. This must be a 3 of 9 3:1 or 3 of 9 2:1 bar code.
When visitors sign in, they will receive a temporary adhesive badge. The visit key can be printed as a bar code on the adhesive badge and presented to a reader to sign out when the visit is done. You must configure the system so that the bar code will be printed and read properly.
Configuring the Visit Key
The visit key is not available until it is configured in FormsDesigner.
1. In FormsDesigner, open the Visit form to edit it.
2. From the Insert menu, select View Only Control. (The visit key cannot be edited.)
Visitor Administration User Guide

BadgeDesigner Layout
3. Select Visit Key from the list and click [OK].
4. The new field will be inserted on the form. You may move the field to the desired location on the form and add a label for it. For more information, refer to the FormsDesigner User Guide.
5. Save the form and exit FormsDesigner.
Designing a Badge with the Visit Key
The badge layout must be modified to have the visit key in BadgeDesigner prior to printing a bar code on the badge to be used for signing out.
1. In BadgeDesigner, on the layout that will be used for visitor badges, create a 3 of 9 3:1 or 3 of 9 2:1 bar code. This bar code is for the visit key.
2. Barcode Properties are displayed. To configure it, click [Insert Field].
3. Choose Database Field and click [OK].
4. Select Visit Key (View Only). Click [OK]. For more information, refer to the BadgeDesigner User Guide.
This badge layout can now be used for visitor badges so that the bar code can be printed and used to sign out. The badge type is configured through Visitor Administration. For more information, refer to Badge Type on page 26.
BadgeDesigner Layout
If you are using the 30256 label, the following settings are recommended when creating the badge layout. To configure these settings in BadgeDesigner, select View > Layout.
On the Page tab:
• Width: 3.504 inches
• Height: 2.205 inches
• Left Margin: 0 inches
• Right Margin: 0 inches
• Top Margin: 0 inches
• Bottom Margin: 0 inches
On the Badge Area tab:
• Width: 3.504 inches
• Height: 2.205 inches
IMPORTANT: When viewing the layout in BadgeDesigner, it will appear without a margin. The Dymo LabelWriter 400/400Turbo automatically adds a margin when printing. Changing the margin on the badge layout in BadgeDesigner will cause the printed badge to be shifted or clipped.
For more information, refer to the BadgeDesigner User Guide.
Visitor Administration User Guide 37

38
ClickOnce Setup
To utilize ClickOnce, B.A.S.I.S. must first be installed on the server. Doing so will install a folder, KioskClickOnce, with the required files. In most typical installations, the folder will be C:\Inetpub\wwwroot\KioskClickOnce.
The Touch-It Virtual Keyboard is not installed with Clickonce. It must be installed separately.
Methods of Deployment
One option for deployment is to make it available through a shared network location. To do this, move the ClickOnce directory to the appropriate location on your network.
Another option is to deploy through the server. With this method, the application can be installed on the computer by accessing the files with a browser.
Server Name
The name of the server is usually configured during the installation process. However, if you wish to change it, this can be done in the serviceModelClient.config.deploy file. This is located in C:\inetpub\wwwroot\KioskClickOnce\config.
Using SSL
The configuration files will also need to be changed when using SSL.
1. Locate the following file:
Navigate to C:\inetpub\wwwroot\KioskClickOnce\config and edit the serviceModelClient.config.deploy file.
2. Locate the section that states
<!-- Points to the endpoint that supports a security policy with HTTP and Windows Authentication enabled-->
• Comment markers <!-- and --> are used to indicate a portion of the code that will be ignored.
3. Comment out the endpoint address section of code for http by surrounding it with comment markers.
a. Type <!-- at the beginning of the section, before <endpoint address="http...
b. Type --> at the end of the section, after “BasicHttpBinding_IIdvmService”></endpoint>.
4. Locate the section that states
<!-- Points to the endpoint that supports a security policy with HTTPS and Windows Authentication enabled-->
The code for https is commented out by default.
5. Remove the comment markers <!-- and --> surrounding that section to enable the code.
6. For the address in that same section, change http to https.
Installation
Once the ClickOnce deployment site has been created and configured, it is possible to install the application.
Visitor Administration User Guide

Workaround for Security Policies
Installing the Application via Network
1. Obtain the location of the deployment site.
2. Navigate to the directory, KioskClickOnce for Kiosk.
3. To install Kiosk, run Lnl.OG.VM.Kiosk.View.application.
4. Click [Install].
Installing the Application via Server
Note: To use this method of installation, JavaScript should be enabled for the browser. If it is not, contact your administrator for assistance.
1. Use a browser to go to the address,
http://<server name>/KioskClickOnce
where <server name> is the name of the B.A.S.I.S. server. If SSL has been configured, the URL will start with https://...
2. Click [Install].
The progress bar will indicate when installation is complete.
Workaround for Security Policies
A Front Desk or Kiosk error may occur, stating, “The HTTP request is unauthorized with client authentication scheme ‘Negotiate’. The authentication header received from the server was ‘Negotiate,NTLM’” This error occurs because only one security policy is typically supported by the Windows Communication Foundation (WCF) service for Visitor Management, regardless of the IIS setting to support both anonymous and Windows Authentication.
Support Two Security Policies
Two security policies may be supported, requiring two webservices, two virtual directories, and two copies of the service file.
Creating Two Copies of the Service File
1. Navigate to C:\Inetpub\wwwroot\Lnl.OG.Services. Copy the directory, IdvmWebHost.
2. Name the copied directory IdvmAnonWebHost.
3. In the IdvmAnonWebHost directory, locate the HttpServices.config file and rename it to Services.config.
Creating a New Virtual Directory
1. In IIS, create a new virtual directory named Lnl.OG.AnonServices.
2. For the path, browse to and select the new directory, C:\Inetpub\wwwroot\Lnl.OG.Services\IdvmAnonWebHost.
Updating the ClickOnce Deployment
1. Navigate to C:\Inetpub\wwwroot. Copy the directory, KioskClickOnce.
Visitor Administration User Guide 39

40
2. Name the copied directory AnonKioskClickOnce.
3. Locate the following file:
Navigate to C:\inetpub\wwwroot\AnonKioskClickOnce\config and edit the serviceModelClient.config.deploy file.
4. Locate the section that states
<!-- Points to the endpoint that supports a security policy with HTTP and Windows Authentication enabled-->
• Comment markers <!-- and --> are used to indicate a portion of the code that will be ignored.
5. Comment out the endpoint address section of code for http by surrounding it with comment markers.
a. Type <!-- at the beginning of the section, before <endpoint address="http...
b. Type --> at the end of the section, after “BasicHttpBinding_IIdvmService”></endpoint>.
6. Locate the section that states
<!-- Points to the endpoint that supports a security policy with HTTP and anonymous -->
This code is commented out by default.
7. Remove the comment markers <!-- and --> surrounding that section to enable the code.
8. In IIS, create a new virtual directory named AnonKioskClickOnce.
9. For the path, browse to and select the new directory, C:\Inetpub\wwwroot\AnonKioskClickOnce.
From a non-domain account, start Internet Explorer and go to:
http://<server name>/AnonKioskClickOnce for KioskInstall the application. After doing so, you should be able to log in and use the application.
Kiosk Startup
For the Kiosk to start each time the computer is started, the program should be included in the startup menu. This customization is done by right-clicking the Start button and selecting Properties. For information on creating a startup shortcut, refer to the Windows documentation.
Alternatively, in the Start menu, you may drag and drop the Kiosk icon into the Startup folder.
Kiosk Settings
When starting the Kiosk for the first time, the Kiosk settings are displayed. This profile consists of the sign-in location and on-screen text, which was configured in Visitor Administration. At this time, change Kiosk settings.
After these selections are made, the Kiosk will use these default settings. To change the configuration, the deployment site must be used again. Refer to the procedure for Installing the Application via Server on page 39. Repeating this procedure will allow access to this configuration.
Visitor Administration User Guide

Kiosk Settings
Choosing the Location and Name
1. Using the touch-screen, select [Change Kiosk].
2. Select the sign-in location.
3. Select the name of the Kiosk. The information will be saved. The Kiosk profile configured in Visitor Administration will be downloaded.
4. You may choose another setting to change or start the Kiosk by touching [Start Kiosk].
Choosing the Default Printer
1. Using the touch-screen, select [Change Badge Printer].
2. Select the badge printer. The information will be saved.
3. You may choose another setting to change or start the Kiosk by touching [Start Kiosk].
Visitor Administration User Guide 41

42
Visitor Administration User Guide
Appendices


APPENDIX A Security Guidelines
When setting up the Kiosk, it is important to prevent unauthorized access and use of the system. Lack of security may cause threats such as installation of harmful software or unwanted access to protected data on your network. These security considerations are provided to help you reduce these risks and ensure adequate protection.
Accounts
Separate accounts should be set up for separate Kiosk functions. The role of each account should be determined ahead of time to ensure that only the necessary permissions are configured. An account with administrative permissions should not be used to run the Kiosk.
B.A.S.I.S. Accounts
The following B.A.S.I.S. accounts are recommended:
B.A.S.I.S. AdministratorThe B.A.S.I.S. Administrator account should have permission for all Kiosk configuration.
B.A.S.I.S. Kiosk UserThe B.A.S.I.S. Kiosk User account should only have permission that is minimally required to run the Kiosk.
Windows Accounts
The following Windows accounts are recommended:
Active Directory AdministratorThe Active Directory Administrator is a Windows account that should be used to configure Active Directory with Active Directory Users and Computers.
Visitor Administration User Guide 45

:
46
Windows AdministratorThe Windows Administrator is a Windows account that belongs to the Kiosk’s Administrator group. This can be either a local account or a domain account.
Windows UserThe Windows User is a Windows account that belongs to the Kiosk’s Users group. This account should not belong to the Power Users or Administrator group.
Secure the Kiosk
These steps should be taken to secure the Kiosk. These are just recommendations. Your organization should determine its own policies regarding security.
Password Protection for BIOS
A password should be set to protect the computer’s BIOS. This will prevent unauthorized users from accessing the BIOS and changing the settings without supplying the correct password.
Prerequisite Software and Drivers
The Windows Administrator account should be used to install the virtual keyboard software and device drivers. These should already be installed before the Kiosk’s arrival at the installation site. For these procedures, refer to Prerequisites on page 29.
Dedicated Windows User
A dedicated Windows User account should be created. This account is specifically for running the Kiosk. Do not use an administrator account to run the Kiosk.
In an Active Directory environment... In a Windows Workgroup environment...
Perform the following steps the as Active Directory Administrator using Active Directory Users and Computers:
1. Create an organizational unit for Kiosk users so that a specific Group Policy Object can be set for only Kiosk users.
2. Create an organizational unit for Kiosk machines so that a specific Group Policy Object can be set for only Kiosk machines.
3. Assign the Kiosk to the Kiosk machine organizational unit.
4. Create domain user in the Kiosk users organizational unit.
Create a Limited User account in Windows for the Kiosk.
Visitor Administration User Guide

B.A.S.I.S. Configuration
B.A.S.I.S. Configuration
The B.A.S.I.S. Administrator should create dedicated permission groups for B.A.S.I.S. Kiosk Users. The permissions assigned may vary for your organization. Do not expose cardholder/host information in the Kiosk.
B.A.S.I.S. User Accounts
The B.A.S.I.S. Administrator should create a separate, dedicated B.A.S.I.S. Kiosk User account for each Kiosk. This facilitates better auditing. Assign the permission groups created to the B.A.S.I.S. Kiosk Users.
The association of the Windows User and B.A.S.I.S. Kiosk User accounts is done through the creation and linking of a directory account. For more information, refer to the System Administration or ID CredentialCenter User Guides.
Kiosk Configuration
The B.A.S.I.S. Administrator should use Visitor Administration to configure the sign-in location, Kiosk profile, and Kiosk.
Logging in as the Windows User, install the Kiosk using ClickOnce. Refer to ClickOnce Setup on page 38. Create a startup shortcut for the Kiosk so that it will automatically start when Windows starts.
Also note that in a Windows Workgroup environment, the Kiosk will time out and must have the B.A.S.I.S. Kiosk User credentials entered again.
Screen Saver
To prevent damage to the screen, configure a screen saver using the Windows User account. Omit the required password by clearing the check box, On resume, password protect. For example, you could use the Marquee screen saver and enter text that says, “Visitors, please touch screen to begin.”
In an Active Directory environment... In a Windows Workgroup environment...
Link the Windows User account to the B.A.S.I.S. Kiosk User. Linking the two accounts will enable automatic single sign-on for the Kiosk.
Create an B.A.S.I.S. internal account for the user.
In an Active Directory environment... In a Windows Workgroup environment...
Kiosk will use automatic single sign-on. The B.A.S.I.S. Kiosk User must manually log in.
Visitor Administration User Guide 47

:
48
User Account Settings
The Windows User account should have limits or restrictions configured.
Proxy Settings
If a proxy is required to access the Visitor Management Web services machine, consult your IT department. They may configure the proxy that is already in use to limit the Kiosk’s access to Web sites.
If a proxy is not normally required, configure the proxy settings as follows.
Configuring Proxy Settings
As the Windows User, ensure that the proxy is configured so that there will be no Internet access.
1. In Internet Explorer, select Tools > Internet Options.
2. On the Connections tab, click [LAN settings].
3. Select the Use a proxy server for your LAN check box.
4. For the proxy server, enter an address that will not allow Internet access, such as “NoInternetAddress” and port “80.”
5. Clear the Bypass proxy server for local addresses check box.
6. Click [Advanced].
7. Select the Use the same proxy server for all protocols check box.
8. Enter the name of the server running Visitor Management Web services in the Exceptions field. This should be the only exception.
9. Click [OK].
Preventing Log Off and Shut Down
As the Windows Administrator, prevent Kiosk log off and shut down.
1. Click the Start button, then select Run.
2. Type gpedit.msc and click [OK]. The Group Policy window appears.
3. Go to Local Computer Policy\User Configuration\Administrative Templates\Start Menu and Taskbar.
4. Enable these settings:
• Remove Logoff on the start menu
• Remove and prevent access to Shut Down command
In an Active Directory environment... In a Windows Workgroup environment...
As the Windows Administrator, create a Group Policy Object and assign it to the Kiosk users organizational unit to limit what the Windows User can do.
As the Windows Administrator, download and install Windows SteadyState. Configure it to limit what the Windows User can do.
Visitor Administration User Guide

User Account Settings
These settings will remove the Log Off and Shut Down options from the Start menu. However, an administrator can establish a remote desktop connection and log off or shut down the machine from the command line:
Automatic Logon
The Kiosk machine can be configured for the Windows User to automatically log on.
Note: The password stored for the Windows User is not encrypted in the registry. If you are following the guidelines of this documentation, this should not be a concern. Alternatively, you may manually log on the Windows User when necessary.
Setting up Automatic Logon of the Windows User
As the Windows Administrator, configure the Windows User to be automatically logged on. This procedure will apply to both Active Directory and Windows Workgroup environments, except for where otherwise noted.
1. Click the Start button, then select Run.
2. Type regedit and click [OK]. The Registry Editor appears.
3. Go to HKEY_LOCAL_MACHINE\SOFTWARE\Microsoft\Windows NT\CurrentVersion\Winlogon.
4. If in an Active Directory environment, modify DefaultDomainName to be the domain name of the Windows User. Otherwise, proceed to the next step.
5. For DefaultUserName, enter the user name of the Windows User.
6. For DefaultPassword, enter the password of the Windows User.
7. Modify AutoAdminLogon to be 1.
8. Restart the computer.
After restarting, the Windows User should be logged on automatically.
Run Description
cmd /k “shutdown -l” Log off the user
cmd /k “shutdown -s” Shut down the computer
cmd /k “shutdown -r” Shut down and restart the computer
Visitor Administration User Guide 49

:
50
Visitor Administration User Guide
APPENDIX B Group Policy Object
Group Policy Objects (GPO) should be used by the Active Directory Administrator to define and configure settings for users.
Note: This documentation is based on Windows Server 2008. If you are running another operating system, some of the options or names may differ.
Group Policy Management
The Active Directory Administrator should create a GPO for Kiosk users. Then link this GPO to the organizational unit for Kiosk users.
Editing Group Policy Objects
Edit the GPO for Kiosk users with the Group Policy Management Editor.
Note: This is a suggestion — the Active Directory Administrator may have other restrictions that should be placed on the Kiosk machine and users.
1. In Group Policy Management, right-click the GPO for Kiosk users and select Edit.
2. Go to User Configuration\Policies\Administrative Templates: Policy definitions (ADMX files) and configure the following.
Control Panel
Prohibit access to the Control Panel Enabled
Desktop
Hide and disable all items on the desktop Enabled
Network
Visitor Administration User Guide 51

:
52
Shared Folders
Start Menu and Taskbar
Lock the Taskbar Enabled
Remove Balloon Tips on Start Menu items Enabled
Remove Drag-and-drop context menus on the Start Menu Enabled
Remove and prevent access to the Shut Down, Restart, Sleep, and Hibernate commands
Enabled
Remove common program groups from Start Menu Enabled
Remove Favorites menu from Start Menu Enabled
Remove Search link from Start Menu Enabled
Remove frequent programs list from the Start Menu Enabled
Remove Games link from Start Menu Enabled
Remove Help menu from Start Menu Enabled
Remove Network Connections from Start Menu Enabled
Remove pinned programs list from the Start Menu Enabled
Do not keep history of recently opened documents Enabled
Remove Recent Items menu from Start Menu Enabled
Remove Run menu from Start Menu Enabled
Remove Documents icon from Start Menu Enabled
Remove Music icon from Start Menu Enabled
Remove Network icon from Start Menu Enabled
Remove Pictures icon from Start Menu Enabled
Remove programs on Settings menu Enabled
Prevent changes to Taskbar and Start Menu Settings Enabled
Remove access to the context menus for the taskbar Enabled
Hide the notification area Enabled
Remove Logoff on the Start Menu Enabled
Lock all taskbar settings Enabled
Turn off all balloon notifications Enabled
System
Prevent access to the command prompt Enabled
Prevent access to registry editing tools Enabled
Visitor Administration User Guide

Group Policy Management
Don't run specified Windows applications (explorer.exe, iexplore.exe, mobsync.exe, notepad.exe, osk.exe, rcimlby.exe, tourstart.ex)
Enabled
Windows Components
Internet Explorer Browser menus
• File menu: Disable Save As menu option Enabled
• File menu: Disable Save As Web Page Complete Enabled
• Disable Context menu Enabled
• Hide Favorites menu Enabled
• Disable Save this program to disk option Enabled
• Tools menu: Disable Internet Options menu option Enabled
• View menu: Disable Full Screen menu option Enabled
• View menu: Disable Source menu option Enabled
Internet Explorer Toolbars
• Turn off Developer Tools Enabled
• Turn off toolbar upgrade tool Enabled
• Hide the Command Bar Enabled
• Hide the Status Bar Enabled
• Lock all Toolbars Enabled
• Disable customizing browser toolbars Enabled
• Disable customizing browser toolbar buttons Enabled
Turn on menu bar by default Disabled
Prevent Internet Explorer Search box from displaying Enabled
Disable AutoComplete for forms Enabled
Disable Find Files via F3 within the browser Enabled
Windows Explorer
No Entire Network in Network Locations Enabled
Remove Shared Documents from My Computer Enabled
Remove “Map Network Drive” and “Disconnect Network Drive” Enabled
Remove Search button from Windows Explorer Enabled
Remove Windows Explorer's default context menu Enabled
Prevent access to drives from My Computer Enabled
Turn off Windows+X hotkeys Enabled
No Computers Near Me in Network Locations Enabled
Visitor Administration User Guide 53

:
54
Visitor Administration User Guide
APPENDIX C Windows SteadyState
Windows SteadyState can be used to maintain Kiosk stability. It can be downloaded from: http://www.microsoft.com/windows/products/winfamily/sharedaccess/default.mspx. Install SteadyState according to the instructions provided with the software.
Configuration of Windows SteadyState
In a Windows Workgroup environment, the Windows Administrator should configure computer and user restrictions to limit what the user can do. The following settings are recommended for the Kiosk.
For detailed instructions, refer to the Windows SteadyState documentation.
Enabling Computer Restrictions
The Windows Administrator should perform the following steps.
1. In Windows SteadyState, click Set Computer Restrictions.
2. Select all of the Computer Restrictions except for:
• Prevent users from creating folders and files on drive C:\
• Turn on the Welcome screen (Windows XP only)
Enabling User Restrictions
As the Windows Administrator, configure the following restrictions for the Windows User.
1. In Windows SteadyState, click on the Windows User.
2. Do not enable General settings. On the General tab, make sure all the check boxes are cleared.
3. Select all of the Windows Restrictions except for:
• Allow only programs in the Programs Files and Windows folders to run
4. Hide all drives.
5. Select all Feature Restrictions except for:
Visitor Administration User Guide 55

:
56
• Prevent Internet access (except Web sites below). This should be covered by the Proxy Settings in Internet Explorer if you followed the Security Guidelines.
6. Block the following programs:
• hypertrm.exe
• Internet Explorer
• On-Screen Keyboard (C:\Windows\system32\osk.exe)
• System Information
• Touch-It Designer
• Touch-It Setup
• Windows Movie Maker
• WordPad MFC Application
Visitor Administration User Guide

Index
AAdd sign-in location ....................................... 25Administrator permissions ............................ 11All permissions ............................................... 11Automatic cropping ........................................ 31Automatic Logon ............................................ 49
Bbadge layout ..................................................... 37BadgeDesigner layout .................................... 37BIOS ................................................................. 46Browser settings .............................................. 23
CCardholder options ......................................... 19ClickOnce ........................................................ 38Configure kiosk ............................................... 36
Ddefault printer .................................................. 41Delete sign-in location ................................... 25Deployment ..................................................... 38Design badge with a visit key ....................... 37
EError .................................................................. 39
FFront desk attendant permissions ................. 15
GGPO .................................................................. 51Group policy objects ...................................... 51
HHost permissions ............................................ 13Https .................................................................. 24
IInstall virtual keyboard .................................. 30Installation ....................................................... 38Introduction ....................................................... 7
KKiosk
configuration ........................................... 47location ..................................................... 41name .......................................................... 41on-site configuration .............................. 35photograph ............................................... 31prerequisites ............................................ 29printing ..................................................... 32profile ....................................................... 35setup .......................................................... 29startup ....................................................... 40user permissions ..................................... 19
LLicensing ............................................................ 8Log in ............................................................... 24Log out ............................................................. 25
MMessage ............................................................ 35Modify sign-in location ................................. 25
NNDA .................................................................. 35
Visitor Administration User Guide 57

Index
58
Non-disclosure agreement ............................. 35
OOn-site configuration ..................................... 35
PPassword protection ....................................... 46Permissions
administrator ............................................ 11by function ............................................... 11front desk attendant ................................ 15host ............................................................ 13kiosk user ................................................. 19
Photograph ....................................................... 31Prerequisites ............................................... 8, 29Prevent log off, shut down ............................ 48Printing ............................................................. 32Proxy settings .................................................. 48
RRegister virtual keyboard .............................. 31
SScreen saver ..................................................... 47Secure kiosk ..................................................... 46Security guidelines ......................................... 45Security policy ................................................ 39Sign-in locations ............................................. 25SSL .................................................................... 24SteadyState ....................................................... 55
TTouch-It ............................................................ 30Touch-screen monitor .................................... 29
UURL ................................................................... 24User
accounts ............................................. 45, 47configuration ........................................... 47
User account settings ..................................... 48
VVersion compatibility ....................................... 8Virtual keyboard ............................................. 30Visit key ........................................................... 36Visitor administration .................................... 23Visitor kiosk .................................................... 35
WWeb address ..................................................... 24Windows
accounts .................................................... 45steadystate ................................................ 55user ............................................................ 46user account settings .............................. 48
Visitor Administration User Guide

Index
Visitor Administration User Guide 59

B.A.S.I.S. ET693 Visitor Administration User Guide, product version 6.5Item number E896, revision 2.006, January 2013
Content of this document copyright © 2009-2012. Lenel is a registered trademark used by Stanley Security Solutions with permission from Lenel Systems International, Inc. Windows, Windows Server, and Windows Vista are trademarks and Microsoft is a registered trademark of Microsoft Corporation. Integral and FlashPoint are trademarks of Integral Technologies, Inc. Crystal Reports for Windows is a trademark of Crystal Computer Services, Inc. Other product names mentioned in this User Guide may be trademarks or registered trademarks of their respective companies and are hereby acknowledged.
Information in this document is subject to change without notice. No part of this document may be reproduced or transmitted in any form or by any means, electronic or mechanical, for any purpose, without the express written permission of the authors.
The software described in this document is licensed to Stanley Security Solutions by Lenel Systems International, Inc. Portions of this product were created using LEADTOOLS © 1991-2012, LEAD Technologies, Inc. ALL RIGHTS RESERVED. The software includes ImageStream® Graphic Filters. Copyright © 1991-2012 Inso Corporation. All rights reserved. ImageStream Graphic Filters and ImageStream are registered trademarks of Inso Corporation.
6161 East 75th Street
Indianapolis, IN 46250
Phone: (317) 849-2250