vision plug-in user guide - netop welcome to surf-lock this guide explains how to use surf-lock to...
TRANSCRIPT

Vision Plug-In
USER GUIDE
Surf•Lock2

NoticeCopyright© 2007, GenevaLogic. All rights reserved. Document Date: January 7, 2008Document Version: 3.1The content in this document represents the current view of GenevaLogic as of the date of publication. Because GenevaLogic responds continually to changing market conditions, this document should not be interpreted as a commitment on the part of GenevaLogic. GenevaLogic cannot guarantee the accuracy of any information presented after the date of publication.Vision is a registered trademark of GenevaLogic. Accel, App-Control, Plan-It, Pointer, Print-Limit, Protect-On, Surf-Lock, GenevaLogic and the GenevaLogic logo are trademarks of GenevaLogic. Microsoft, Windows, and the Windows logo are trademarks, or registered trademarks of Microsoft Corporation in the United States and/or other countries. All other brand names are trademarks or registered trademarks of their respective companies.Information in this document is subject to change without notice. For the latest documentation, visit our Web site at www.genevalogic.com.
North America All Other Locations
[email protected] [email protected]
15725 SW Greystone Court, Suite 105 Chasseralstrasse 1-9
Beaverton, OR 97006 USA CH-4900 Langenthal Switzerland
Phone: 503-352-3599 Phone: +41-(0)62-957-70-40
Fax: 503-352-3413 Fax: +41-(0)62-957-70-50
Contents
Welcome to Surf-Lock . . . . . . . . . . . . . . . . . . . . . . . . . . . . . . . . . . . . 1
Technical Support . . . . . . . . . . . . . . . . . . . . . . . . . . . . . . . . . . . . . . . . 2
Activate Surf-Lock . . . . . . . . . . . . . . . . . . . . . . . . . . . . . . . . . . . . . . . 3
Licensing Surf-Lock . . . . . . . . . . . . . . . . . . . . . . . . . . . . . . . . . . . . . . . . 3
Lock and Unlock Access to the Web . . . . . . . . . . . . . . . . . . . . . . . . . . 5
Lock Access to the Web . . . . . . . . . . . . . . . . . . . . . . . . . . . . . . . . . . . . . 6
Unlock Access to the Web. . . . . . . . . . . . . . . . . . . . . . . . . . . . . . . . . . . . 7
About Site Lists . . . . . . . . . . . . . . . . . . . . . . . . . . . . . . . . . . . . . . . . . 8
How Site Lists Work. . . . . . . . . . . . . . . . . . . . . . . . . . . . . . . . . . . . . . . . 8
Create a Site List. . . . . . . . . . . . . . . . . . . . . . . . . . . . . . . . . . . . . . . . . . 9
Edit a Web Address or Site List . . . . . . . . . . . . . . . . . . . . . . . . . . . . . . . 11
Delete a Web Address or Site List . . . . . . . . . . . . . . . . . . . . . . . . . . . . . 12
Apply or Release a Site List . . . . . . . . . . . . . . . . . . . . . . . . . . . . . . . . 13
Sharing Site Lists . . . . . . . . . . . . . . . . . . . . . . . . . . . . . . . . . . . . . . . 15
Preview a Web Site . . . . . . . . . . . . . . . . . . . . . . . . . . . . . . . . . . . . . . 18
Change Web Address in a Site List . . . . . . . . . . . . . . . . . . . . . . . . . . . 19
Cut Copy and Paste . . . . . . . . . . . . . . . . . . . . . . . . . . . . . . . . . . . . . . . 19
i


Welcome to Surf-Lock
This guide explains how to use Surf-Lock to manage student access to the Web during class time. Surf-Lock is a plug-in for Vision that allows you to:
• Turn Web surfing off for a group of students or the entire class with a single mouse click.
• Limit student browsing and research to Web sites appropriate for the assignment.
• Grant Web access as a reward for good work.
• Organize Internet shortcuts to your favorite Web sites so you can access them quickly during class.
1

2 Welcome to Surf-Lock
Technical SupportGenevaLogic offers a number of resources to help you make the most of Surf-Lock. When you need additional support, try one of the following.
Refer to Surf-Lock Help
Surf-Lock Help offers information about common features. You can open Help from the toolbar on the dashboard.
Visit Our Web Site
Our Web site, www.genevalogic.com, offers a list of support resources, including a knowledge base, user documentation, and software updates.
Contact Our Technical Support Team
You can contact Technical Support through by phone, e-mail, or our Web site.
In North America All Other Locations
Phone: 866-725-7803 (toll free)
E-mail: [email protected]
Web: www.genevalogic.com
Our hours are 7:30 AM–4:30 PMPacific Time.
Outside of North America, the technical support of our products is provided through our international network of distributors and resellers. Please contact the local GenevaLogic distributor in your area. For a list of distributors, visit our international support page at www.genevalogic.com.

Activate Surf-Lock
Starting with Vision6 version 6.7, Surf-Lock is automatically installed with Vision. You can run Surf-Lock in a 30 day Trial mode free of charge or apply a license key to use it indefinitely. Either of these actions activates Surf-Lock.
If you choose not to run the 30 day Trial, or simply allow it to expire, Surf-Lock is deactivated. You may reactivate Surf-Lock at any time by applying a license key via the GenevaLogic Licensing Utility (see the Vision User Guide for additional information)
Licensing Surf-LockSurf-Lock is most easily licensed and activated by entering a valid license key during the installation process. If you need to enter a license key afterwards, navigate to Start Menu -> All Programs -> GenevaLogic -> GenevaLogic Licensing Utility.Once open, all of your current licenses and their status are shown:
• To add or update a license for Surf-Lock, choose Surf-Lock2 in the main window and enter the new license key in the License Field. This is most easily accomplished via copy and paste from an email or text document.
3

4 Activate Surf-Lock
• To begin a 30 day Trial of Surf-Lock, click the checkbox labeled “Begin 30 day Trial” for the plug-in.
NOTE: You may only run a 30 day Trial once. If you require additional time to evaluate the product, please contact GenevaLogic sales.

Licensing Surf-Lock 5
Lock and Unlock Access to the Web
Surf-Lock helps you control student access to the Web. Use this feature to remove the ability to surf the Web during class time or reward students with access to the Web when they have completed their work.
When you lock the Internet, Surf-Lock prevents access to Web site addresses that use the Hypertext Transfer Protocol (HTTP). This is a typical protocol used by Web addresses, such as http://www.genevalogic.com. By blocking addresses that use HTTP, Surf-Lock can work with any Web browser. Surf-Lock does not prevent access to non-HTTP protocol items such as FTP and HTTPS.

Lock Access to the Web
• On the Vision toolbar, click the Surf-Lock button, and then click Lock Internet. Students cannot access the Internet.
On the dashboard, a red badge on a student computer indicates that the Internet is locked on the student computer
.
TIP: To control Web access for selected student computers (instead of the entire class), press and hold down CTRL, and click each student computer you want. Then click Lock Internet.
6
Unlock Access to the Web 7
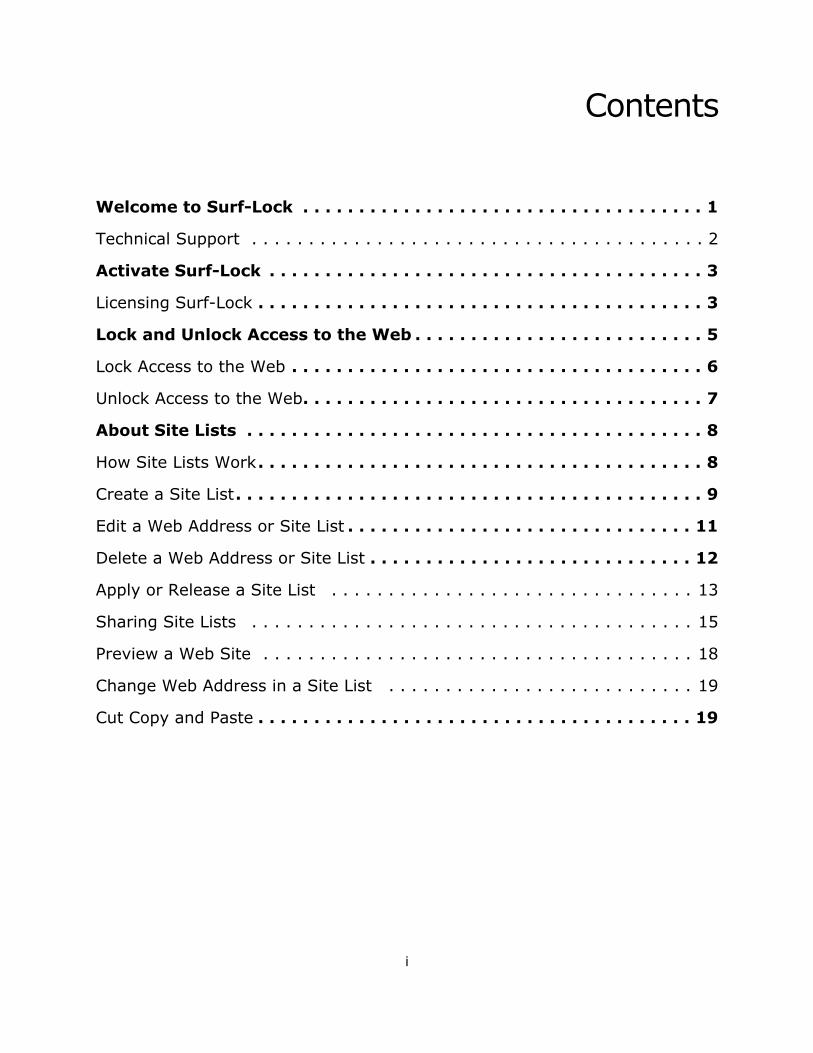
Unlock Access to the Web
• To turn off Surf-Lock, click the Surf-Lock button again, and then click Unlock Internet. Students regain access to the Web and the red badge is removed.

About Site Lists
A site list stores Web page addresses. By creating a site list of the Web pages that you use most often for teaching, you can quickly limit student Web access to the sites that are appropriate to your lesson. For example, you can create a list of your favorite biology sites and use Surf-Lock to grant your students access to only those sites and their pages.
Site lists are in full effect immediately upon application to student computers. Disallowed web pages that may be cached in student Web browsers are also blocked from view.
How Site Lists WorkWhen you apply a site list, Surf-Lock permits students to browse within the domain or Internet address of each Web site in the list. For example, if you add the New York Times Web site to your list, students may browse to any page with an address that begins with www.nytimes.com; however, if you add a Web address to a particular article, such as www.nytimes.com/articlename.html, students are limited to viewing only the article and cannot browse to other areas of nytimes.com.Add this Web address
to a site list To allow access to And prevent access to
www.nytimes.com All pages within www.nytimes.com. Any Web pages that do not use the nytimes.com domain.
www.nytimes.com/articlename.html
A specific article on the New York Times Web site.
Any other Web pages, including other pages on nytimes.com.
8

Create a Site List 9
Create a Site List
1. On the Vision toolbar click the Surf-Lock button, and then click Site List Manager.
The Site List Manager window opens.
TIP: To view Web sites directly from the Site List Manager window, click the View menu, and then click Preview Pane.
2. From the File menu, click New Site List.

10 About Site Lists
3. In the New name box, enter the name of your site list. This name appears in the Vision toolbar from the Surf-Lock drop-down menu.
4. Next, add Web sites to the list. From the File menu, click New Internet Shortcut. Enter a name for the site (Title) and its Web address (URL).
Your site list is now available from the Surf-Lock drop-down menu on the Vision toolbar.

Edit a Web Address or Site List 11
Additional Ways to Add a Web Site to Your Site Lists
There are a number of other ways you can add a Web address to a site list.
• From the Site List Manager window, in the address bar, type a Web address and then click the Add Internet Shortcut button.
• From a browser such as Internet Explorer or Mozilla Firefox, locate the page you want, and then drag the icon for the Web site from the browser address bar to a site list folder in the Site List Manager window.
• From Internet Explorer, locate the page you want. From the Favorites menu, click Add to Favorites. Open the Surf-Lock folder, select the site list folder you created, and then click OK.
Edit a Web Address or Site ListYou can edit Web addresses (URLs) and site lists to change content or repair dead links.
1. On the Vision toolbar click the Surf-Lock button, and then click Site List Manager.
2. Locate the Site List folder or Web address that you want to edit. Right-click it, and then click Edit....
• If you have selected a Site List Folder, you may change the name
Add Internet Shortcut button

12 About Site Lists
• If you have selected a Web address, you may change both the displayed name and URL
3. To add new Web addresses to an existing Site List, locate the Site List folder you wish to edit. Right-click it, and then click New Internet Shortcut..
4. Enter a name for the site (Title) and its Web address (URL).
TIP: You can edit a site list while it is active on student computers. Any changes that you make are automatically updated on student computers without restarting the Surf-Lock session.
Delete a Web Address or Site ListYou can delete Web addresses (URLs) and site lists that you no longer use.
1. On the Vision toolbar click the Surf-Lock button, and then click Site List Manager.
2. Locate the folder or Web address that you want to delete. Right-click it, and then click Delete.
TIP: You can delete all your site lists at one time. From the Edit menu, click Select All. Next, right-click one of the site list folders, and then click Delete.
TIP: You can delete a site list while it is active on student computers. Any changes that you make are automatically updated on student computers without restarting the Surf-Lock session.

Delete a Web Address or Site List 13
Apply or Release a Site ListSite lists allow you to limit student Web access to pages that are appropriate to your lesson. For example, you can create a list of your favorite biology sites and use Surf-Lock to grant your students access to only those sites. Site lists ensure that students will not be able to visit Web sites that are not appropriate to the class subject.
To apply a site list
• On the Vision toolbar, click the Surf-Lock button, and then click the name of the site list you want to use. You can choose more than one. Students have Web access only to the sites in the applied lists.
On the dashboard, a yellow badge indicates that a site list has been applied to the student computer.
TIP: You can also apply all your site lists at one time. Click the Surf-Lock button, and then click Apply All Site Lists.

14 About Site Lists
To release a site list
• On the Vision toolbar, click the Surf-Lock button, and then click the name of the site list in use, which is marked with a check mark. Students regain access to the Web. In the dashboard, the yellow badge is removed from the student computer thumbnail, unless another site list is in use.
TIP: You can release all applied site lists at one time. Click the Surf-Lock button, and then click Release All Site Lists.

Delete a Web Address or Site List 15
Sharing Site ListsYou can easily share your favorite Web sites by exporting and importing your site lists. This is helpful when you want your site lists to be available from different computers or when you want to share the links with students or other teachers.
To export a site list
1. On the Vision toolbar click the Surf-Lock button, and then click Site List Manager.
2. In the Site List Manager window, select the folder of the site list you want to export. You can select multiple folders or individual Web sites.
3. From the File menu, click Export.
4. Specify where you want to save the site list. In the File Name box, type in a name for the saved HTML file (filename.htm), and then click Save.
TIP: To view the site list that you exported, open the HTML file in a Web browser.
16 About Site Lists
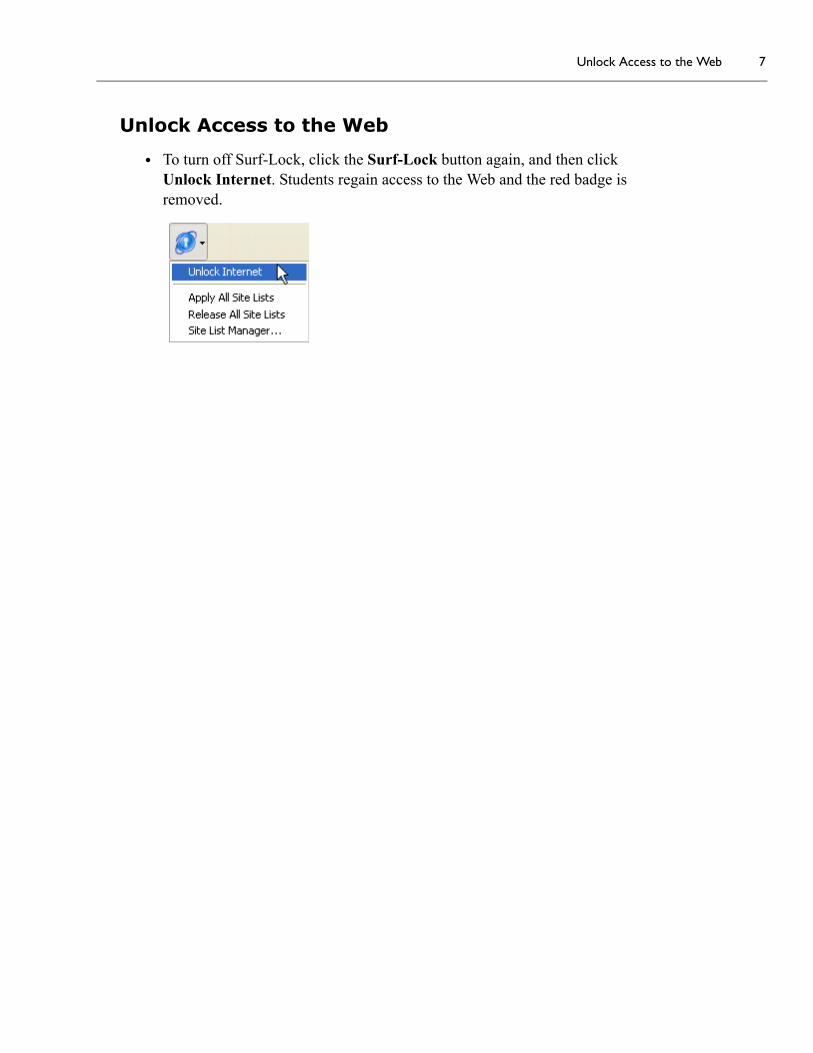
Share Your List of Approved Web Sites with Students
Surf-Lock2 version 2.1 allows students to easily see all approved web sites that are currently active. Students will see a special web page that displays these links whenever they attempt to visit a disallowed web site or if they click the Home Page button on the browser being used.
1. When a student attempts to visit a disallowed web page when site lists are applied, the following page is displayed, providing the student with links to all site list web sites:
2. If a student wishes to see all approved web sites for the current session, clicking the Home Page button will display the following page, providing links to all site list web sites:
Delete a Web Address or Site List 17
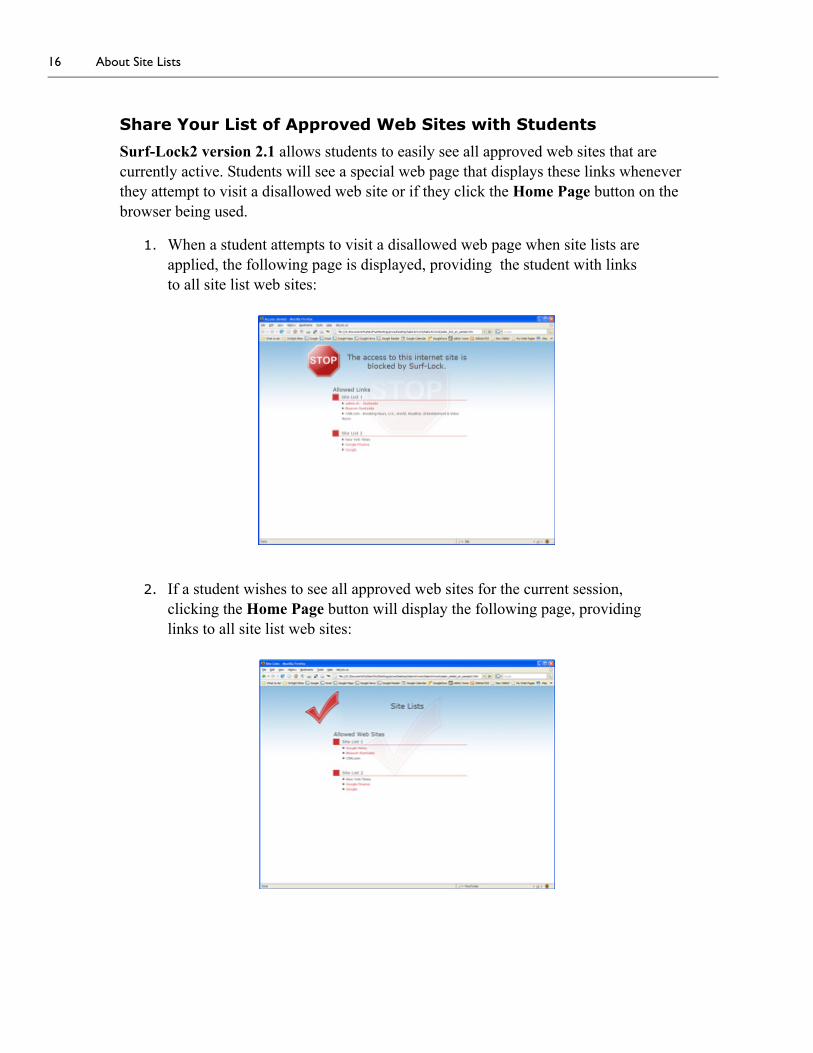
To import a site list
1. On the Vision toolbar click the Surf-Lock button, and then click Site List Manager.
2. In the Site List Manager window, from the File menu, click Import.
3. Select the name of the HTML file (filename.htm or filename.html) that contains the site list or Web site that you want to import, and then click Open. A new site list folder appears in your list.

Preview a Web SiteYou can preview a Web page before you add it to your site list.
1. On the Vision toolbar click the Surf-Lock button, and then click Site List Manager.
2. In the Site List Manager window, from the View menu, click Preview Pane.
3. Select a Web site from a site list or type a location in the address bar, and then click the Go to button next to the address bar or press ENTER.
The Web site appears in the Preview window.
TIP: To stop loading a Web page, click the Stop button next to the address bar.
Go to button

Cut Copy and Paste 19
Change Web Address in a Site ListYou can update the Web addresses (URLs) in your site lists. This is useful when a Web page you use has been moved or renamed.
1. On the Vision toolbar click the Surf-Lock button, and then click Site List Manager.
2. In the Site List Manager window, select a site list folder and open it.
3. Right-click the Web site you want to change and select Edit.
4. In the URL box, enter the new Web address (URL) and click OK.
TIP: You can also update a selected Web site in a list to use the address (URL) that is currently in the address bar. From the Edit menu, click Update URL.
TIP: Changes made to currently active site lists are immediately applied to student computers.
Cut Copy and PasteYou can cut, copy, and paste text in the Site List Manager window. This is useful when you want to use a Web address you have copied from another browser or to edit the name of a site list folder.
To Click
Cut Text Select the text you want to cut, and then on the Edit menu, click Cut.
Copy Text Select the text you want to copy, and then on the Edit menu, click Copy.
Paste TextPlace your cursor where you want to past the text you have cut or copied, and then on the Edit menu, click Paste.

20 About Site Lists