vision development sensory activities - aph · vision development sensory activities ... sensory...
TRANSCRIPT

Vision DevelopmentSensory Activities
Catalog No. 7 - 081 41 - 0 0

1
Vision Development
Activi t ies
Elaine Kitchel, M.Ed.
Sheri Moore, Ph.D.
Christine Pitzer
Suzette Wright
Amie Dennison
Judy Cernkovich
Sharon Bensinger
Sensory
Activities
Book
2
NOTICE
The pages within this book contain print on one side
only to allow adequate space for the writing of your own
activities on the back of each page.
Substitute items may be included in your kit due to the
occasional unavailability of commercial items. Such
items have been selected to serve a similar function.
None of the items in your kit were designed for use by
unattended children. Children should always be
supervised by an adult when using the items in your kit.

3
Elaine Kitchel, M.Ed., Project Director
American Printing House for the Blind, Inc.
1839 Frankfort Ave. P.O. Box 6085
Louisville, Kentucky 40206-0085

4
Contributors
APH Project Leader: Elaine Kitchel, M.Ed.
Activities written by: Elaine Kitchel, M.Ed.
Sheri Moore, Ph.D.
Christine Pitzer
Suzette Wright
Amie Dennison
Judy Cernkovich
Sharon Bensinger
Artwork by: Rosie Felfle
Scott Blome
Desktop Publishing: Loretta Curry
Kristopher Scott
5
Production Team: Anna Fox
Frank Hayden
David Hines
Phil Moore
Steve Paris
David Mantueffel
Betty Jean Reece
Phyllis Williams
Bob Phelps
Jane Peyton
Tony Grantz
Carol Stewart

6
Revised August, 1999
Copyright ©1984 by American Printing House
for the Blind. All rights reserved. Revised ©1999.
In keeping with our philosophy to provide access to
information for people who are blind or visually im-
paired, the American Printing House for the Blind of-
fers this document in one or more of the following
alternative formats: electronic file, braille, large print
and audio recording.
This initiative is made possible through the generosity
of individuals who support the mission of APH. For
more information, please call 1-800-223-1839.

7
CONTENTS
Page
Introduction .................................................................... 9
Acknowledgments ......................................................... 10
Black Light Warning and References ............................ 11
Kit Items–Sensory Level ................................................ 16
Sensory Activities .......................................................... 20
Quilt ............................................................................ 21
Foam shapes ............................................................. 23
Puppet ........................................................................ 25
Socks with bells ......................................................... 27
Clutch ball .................................................................. 29
Rubber balls ............................................................... 31
Whistle stick ............................................................... 33
Putty balls .................................................................. 34
Moon ball ................................................................... 35
Bunji ball .................................................................... 37
Bell bracelets ............................................................. 39
Light-up wand ............................................................ 41
Koosh ball .................................................................. 43
Yo-yo .......................................................................... 45
Sensory Activities For Items From Let’s See: Vision
Development Perceptual Kit .......................................... 47

8
Blocks ........................................................................ 48
Shape deck ................................................................ 49
Snap-lock beads ........................................................ 50
Pail ............................................................................. 51
Paper (cardboard and adhesive) ............................... 52
Crayons...................................................................... 54
Streamers................................................................... 55
Flexible shaft penlight ................................................ 57
Form board and form board inserts ........................... 59
Slinky.......................................................................... 61
Vision Development Teacher-Generated Ideas ............. 62
Materials to Develop Remaining Vision ......................... 64
Commercial Toys of High Visual Interest ....................... 66
List of Manufacturers ..................................................... 68
Vision Development Materials Commercial Items
Suggested by Teachers ................................................. 70
Other Suggested Fluorescent Materials ........................ 75
Vision Development Bibliography .................................. 76

9
INTRODUCTION
The need for materials to stimulate residual vision in young
multihandicapped students has been repeatedly voiced by con-
sumers. The Let's See materials have been developed to respond
to this specific need.
A variety of materials, adapted commercial items, APH-devel-
oped prototypes and fluorescent materials were tested by teach-
ers with visually impaired students functioning at birth-5 years.
Even though the teacher-evaluators had the most success elic-
iting visual responses with the fluorescent items, our project
development activities, include daylight activities. Research
shows that children who learn under black light are easily weaned
to do the same activities in daylight or with flashlight. Materials
were deleted from or added to the kit, or were revised according
to the cumulative research and the recommendations of 30 teach-
ers using the materials with some 125 students. The Let's See
materials are a result of these efforts.
The materials consist of 26 tangible child-use items and two
activity books. Much of the content of the activity books can be
used independently of the fluorescent materials in designing a
vision development program for preacademic level students. The
activity book should be thoroughly reviewed before initiating use
of the training items. The tangible items are divided into two
categories: sensory and perceptual. The sensory level materials
are designed to be used in eliciting initial visual interest, atten-
tion, and localization skills. The perceptual level materials are
useful in developing visual-perceptual and visual-discrimination
behaviors.

10
ACKNOWLEDGMENTS
Over the past several years, many people have been involved
in the development of the Low Vision Stimulation and Training
Kit, which resulted in the product Bright Sights. Now, the devel-
opers of Let’s See would like to thank the dozens of administra-
tors, teachers, paraprofessionals, parents and children all over
the United States who participated in the field testing.
A special thanks goes to Christine Pitzer, who evaluated and
updated the activities from the old Bright Sights. Another special
thank you goes to Judy Cernkovich for her helpful suggestions.
Thanks also to Sheri Moore for her efforts in compiling the
original Bright Sights materials, to Kristopher Scott for sharing
his excellent editing skills, to Loretta Curry for her skill in desk-
top publishing and to Frank Hayden for his expertise and unfail-
ing, good advice.
11
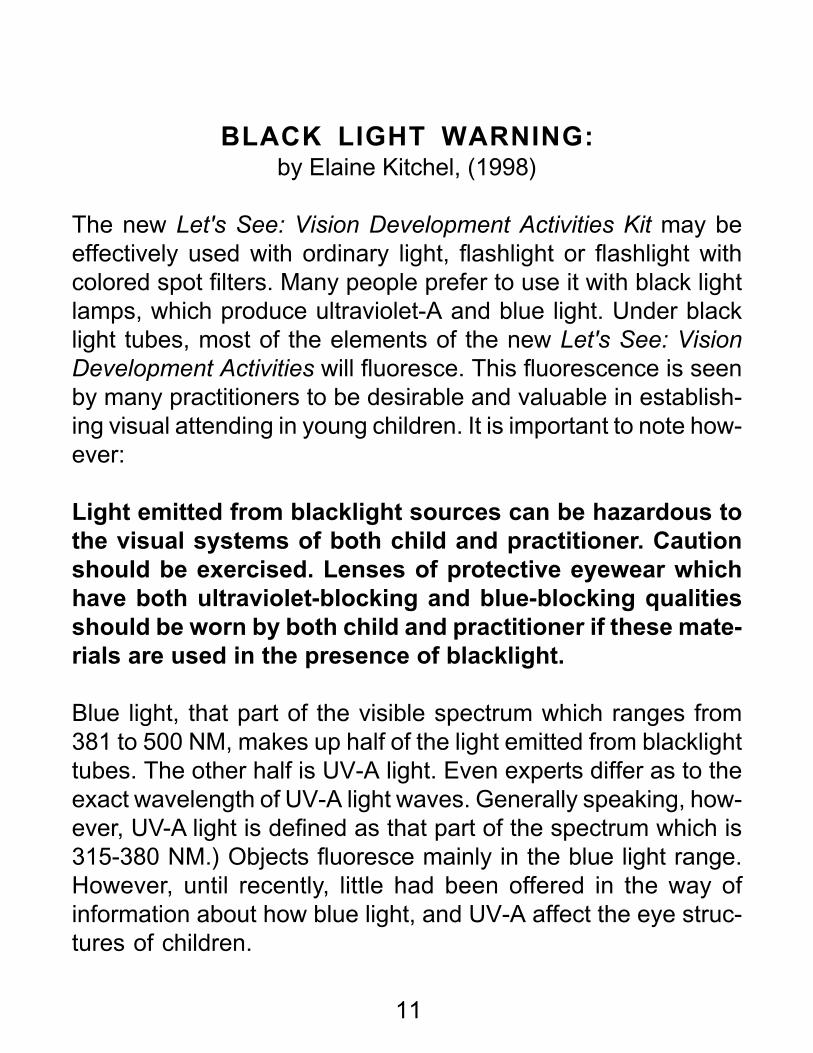
BLACK LIGHT WARNING:
by Elaine Kitchel, (1998)
The new Let's See: Vision Development Activities Kit may be
effectively used with ordinary light, flashlight or flashlight with
colored spot filters. Many people prefer to use it with black light
lamps, which produce ultraviolet-A and blue light. Under black
light tubes, most of the elements of the new Let's See: Vision
Development Activities will fluoresce. This fluorescence is seen
by many practitioners to be desirable and valuable in establish-
ing visual attending in young children. It is important to note how-
ever:
Light emitted from blacklight sources can be hazardous to
the visual systems of both child and practitioner. Caution
should be exercised. Lenses of protective eyewear which
have both ultraviolet-blocking and blue-blocking qualities
should be worn by both child and practitioner if these mate-
rials are used in the presence of blacklight.
Blue light, that part of the visible spectrum which ranges from
381 to 500 NM, makes up half of the light emitted from blacklight
tubes. The other half is UV-A light. Even experts differ as to the
exact wavelength of UV-A light waves. Generally speaking, how-
ever, UV-A light is defined as that part of the spectrum which is
315-380 NM.) Objects fluoresce mainly in the blue light range.
However, until recently, little had been offered in the way of
information about how blue light, and UV-A affect the eye struc-
tures of children.

12
A recent increase in the number of practitioners engaging in black
light activities has brought about high levels of exposure to UV-A
and blue light for a significant number of children. Why is that a
problem? Recent research in cellular biology has shown that
exposure to the UV-A and blue light waves emitted by blacklight
tubes can have long term negative effects on the visual systems
of persons exposed to it (Fedorovich, I. B., Zak, P. P., & Ostrovskii,
M. A., 1994). The natural yellowing which occurs with aging of-
fers adults some protection, however inadequate. Children are
especially vulnerable because their lenses have not yet yellowed.
What is it about UV-A and blue light which make them hazard-
ous? Tests done by Drs. Ham and Chen show that when UV-A
and blue light strike the retina the light waves inhibit the forma-
tion of a chemical called cytochrome oxidase. This chemical is
an important part of retinal cells because it transports oxygen to
photoreceptor and other retinal cells. Without cytochrome oxi-
dase, the cells become deprived of oxygen and eventually die.
When enough cells die, retinal degeneration occurs (Chen, E.,
1993; Ham, W. T., Jr. 1983). Blue light damage is cumulative
and may go unnoticed for many years. (Pautler, E. L., Morita, M.,
& Beezley, D., 1989).
Protection against UV-A and blue light damage is simple. Yellow
polycarbonate lenses offer complete protection, in most cases,
against the potential hazards of both. The protective UltraLens,
UltraLens Jr., UltraLens Infant and UltraLens Jr. clip-on are in-
cluded in the kit. They are also sold separately from American
Printing House for the Blind. Objects will still appear to fluoresce
if viewed through these special yellow polycarbonate filters.

13
If you decide to use the new Let's See: Vision Development
Activities Kit with a blacklight:
1. Make sure child and practitioner always wear UV and blue-
blocking eyewear.
2. Keep training sessions short. Any suggested guideline is
guesswork. However, it is safe to say that the shorter the
session, the safer.
3. Position the black light so the child is not able to look di-
rectly at the exposed fluorescent tube. Placing the lamp
above and behind the child is best. Black lights should al-
ways be fitted with a shade or a hood.
4. When you use a fluorescent tube, either black light or regu-
lar daylight tube, examine it for flickering to guard against
seizure activity in a seizure-prone child.
5. Eventually, wean the child from the black light by trying the
same activities under normal lighting conditions.
6. Persons who take photosensitizing medications, who have
albinism or are otherwise very fair-skinned, need to protect
their skin by wearing long-sleeved clothing and using sun-
blocking creams on exposed skin when participating in black
light activities.

14
REFERENCES
Chen, E. (1993). Inhibition of cytochrome oxidase and blue-light dam-
age in rat retina. Graefe’s Archive for Clinical and Experimental Oph-
thalmology, 231(7), 416-423.
Chylack, L. T. (1984). Mechanisms of senile cataract formation. Oph-
thalmology, 91, 596-602.
Fedorovich, I. B., Zak, P. P., & Ostrovskii, M. A. (1994). Enhanced trans-
mission of UV light by human eye lens in early childhood and age-
related yellowing of the lens. Doklady Biological Sciences, 336(1),
204-206.
Gorgels, T. G., & van Norren, D. (1995). Ultraviolet and green light
cause different types of damage in rat retina. Investigative Ophthal-
mology & Visual Science, 36(5), 851-863.
Ham, W. T., Jr. (1983). Ocular hazards of light sources: review of current
knowledge. Journal of Occupational Medicine, 25(2), 101-103.
Ham, W. T., Ruffolo, J. J., Mueller, H. A., & Guerry, D. (1980). The nature
of retinal radiation damage: Dependence on wavelength, power level,
and exposure time. Vision Research, 20, 1105-1111.
Ham, W. T., Jr., Ruffolo, J. J., Jr., Mueller, H. A., & Guerry, D., III. (1980).
The nature of retinal radiation damage: dependence on wavelength,
power level and exposure time; the quantitative dimensions of intense
light damage as obtained from animal studies, Section II. Applied Re-
search, 20, 1005-1111.
Hollows, F., & Moran, D. (1981). Cataract-the ultraviolet risk factor. Lan-
cet, 2, 1249-1250.
Kraff, M. C., Sanders, D. R., Jampol, L. M., & Lieberman, H. L. (1981).
Effect of an ultraviolet filtering intraocular lens on cystoid macular

15
REFERENCES, Cont.
edema. Ophthalmology, 92, 366-369.
Lerman, S., Megaw, J., & Gardner, K. (1982). Psoralen-long wave ultra-
violet therapy and human cataractogenesis. Investigative Ophthal-
mology, 23, 801-804.
Pautler, E. L., Morita, M., & Beezley, D. (1989). Reversible and irrevers-
ible blue light damage to the isolated, mammalian pigment epithe-
lium. Proceedings of the International Symposium on Retinal Degen-
eration (pp. 555-567). New York: Liss.
Poland, D. J., & Diebler, I. K. (1980). Effects of a black light visual field
on eye contact training of spastic cerebral palsied children. Percep-
tual Motor Skills, 51, 335-338.
Potenski, D. (1983). Use of black light in training retarded
multihandicapped deaf-blind children. Journal of Visual Impairment &
Blindness, 77, 347-348.
Rozanowska, M., Wessels, J., Boulton, M., Burke, J. M., Rodgers, M. A.,
Truscott, T. G., & Sarna, T. (1998). Blue light-induced singlet oxygen
generation by retinal lipofuscin in nonpolar media. Free Radical Biol-
ogy and Medicine, 24, 1107-1112.
Sperling, H. G., Johnson, C., & Harwerth, R. S. (1980). Differential spec-
tral photic damage to primate cones. Vision Research, 20, 1117-1125.
Tucker, M., Shields, J., Hartge, P., Augsburger, M., Hoover, R., & Fraumeni,
J. (1985). Sunlight exposure as risk factor for intraocular malignant
melanoma. New England Journal of Medicine, 313, 789-792.
Zigman, S., & Vaughan, T. (1974). Near-ultraviolet effects on the lenses
and retinas of mice. Investigative Ophthalmology, 13, 462-465.

1616

1717

1818

1919
Light-Up Wand

20
Sensory Activities
WARNING:
ULTRA LENS
ULTRA LENS, INFANT
ULTRA LENS, JR.
ULTRA LENS, CLIP-ON
The Ultra Lens products are included in this kit to protect both
the practitioner and the student from the potential hazards of
ultraviolet A and blue light, which are abundant in the light emit-
ted from blacklight tubes and bulbs. Please read the warning on
pages 11-15. The practitioner should ALWAYS wear the Ultra
Lens adult while performing vision development activities with a
blacklight. Please make sure that ALL children and adults ex-
posed to the light are wearing the Ultra Lenses which are the
correct sizes for them.
21
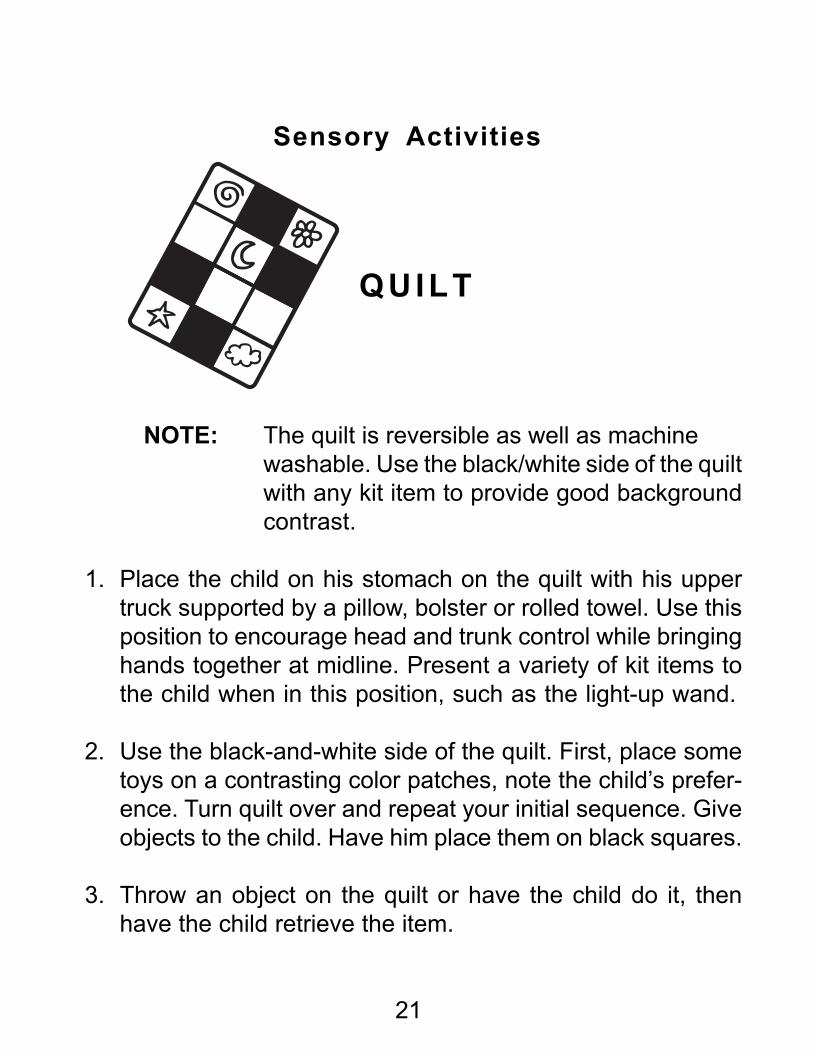
Sensory Activities
QUILT
NOTE: The quilt is reversible as well as machine
washable. Use the black/white side of the quilt
with any kit item to provide good background
contrast.
1. Place the child on his stomach on the quilt with his upper
truck supported by a pillow, bolster or rolled towel. Use this
position to encourage head and trunk control while bringing
hands together at midline. Present a variety of kit items to
the child when in this position, such as the light-up wand.
2. Use the black-and-white side of the quilt. First, place some
toys on a contrasting color patches, note the child’s prefer-
ence. Turn quilt over and repeat your initial sequence. Give
objects to the child. Have him place them on black squares.
3. Throw an object on the quilt or have the child do it, then
have the child retrieve the item.

22
4. Place items on the quilt for children to swipe at, stack up or
knock down. Practice knocking down stacks. Show the child
the cause-and-effect relationship.
5. Place the quilt on the floor and pull a yo-yo or ball on a
string across it to encourage the child to follow. Allow the
child to pull the item across the quilt. He may want to call out
the colors of the squares as the item crosses them.

23
Sensory Activities
FOAM SHAPES
1. Hang shapes over crib or from ceiling and use as a mobile.
2. Place several shapes around the child or on his body while
encouraging him to locate and reach for the shapes.
3. Attach a string to a foam shape and pull it across the floor
slowly in front of the child to stimulate attending and track-
ing.
4. Allow the child to practice visual motor skills by taking each
shape, grasping it and releasing it into the pail or other con-
tainer.
5. Position foam shapes on left side of the child and hold his
left hand, forcing him to use his right hand to reach for and
cross midline to pick up items off the quilt. Have him put
them into the bucket located on the child’s left side. Repeat
this activity, using the right side for the items and his left

24
hand to reach for the items.
6. Use the foam shapes and their frame as a puzzle. Mix the
colors of the shapes and borders.
7. Use the shapes as little stepping stones. Allow the child to
use his fingers as little legs to step from one to another. Di-
rect his path as in, “Now step on the triangle.”
8. Sing “Skip to My Lou” and allow the child to skip his fingers
along the little path in item #7.

25
Sensory Activities
PUPPET
1. With a puppet on your hand, move it through the child’s vi-
sual field from left to right, then right to left, to encourage
tracking. If the child has difficulty, wear the bell bracelet
around your wrist. Later, when the child is tracking well,
withdraw the auditory cue.
2. Place puppet on the whistle stick. Note whether she visu-
ally attends to the puppet. Encourage tracking by moving
the whistle stick back and forth. Try this again while the
puppet holds the flexible shaft penlight.
3. With puppet on your hand, touch and name appropriate
body parts of the child.
4. Place the puppet on your hand and have the child reach for
it. The child may initially need an auditory cue paired with
the puppet. If so, you may use the whistle stick or bell bracelet
to provide the cue.

26
5. Place a puppet on your hand with the beak closed. Fold
your hand so the solid color inside the beak does not show.
To gain the child’s visual attention, “flash” the open beak of
the puppet by opening your hand briefly. Do this in various
parts of his visual field, encouraging him to localize the pup-
pet.
6. Give the child the whistle stick. Hold the puppet while the
child touches the bill, head, eyes with the whistle stick as
you call the names out to him.

27
Sensory Activities
SOCKS WITH BELLS
1. Put the child-sized socks on the child’s hands. Note whether
he visually attends to them. Encourage him to shake the
bells, twice, three times, etc.
2. With adult socks on your hands, talk to the child, wave your
hands, ask the child to look at your hand, to touch it to “see
how nice it feels,” etc. Ask him to shake hands with you.
Encourage him to play pat-a-cake with you.
3. With a sock on your hand, touch different, appropriate body
parts of the child. Say the names of the body parts as you
touch them.
4. Place socks on the child’s feet and encourage him to reach
for them. Place a sock on child’s left foot. Place another
sock on the right hand. Ask child to use right hand to touch
foot with the sock on it (same).
5. Put the socks on the child’s feet and encourage him to walk

28
and watch his feet, stepping on designated spots or a wide
line. You may have him step on only the white squares of
the quilt.
6. With socks on both the child’s hands and yours, wave or
point while standing right in front of him. Have him mimic
your movements.
7. If a child has a favored hand, put the sock on the favored
hand and have him pull it off with the weaker hand. You
may want to use the bell bracelet on the favored hand as
well, for the color interest.

29
Sensory Activities
CLUTCH BALL
1. Suspend the ball from a mobile for the child to reach for,
grasp, bat and kick.
2. Tie a string to the ball and swing it slowly in front of the child
for tracking. Try to get him to reach for the ball or visually
follow it.
3. Cover the ball with a cloth or quilt, first partially, then com-
pletely. Have the child find the hidden ball.
4. Sit the child on the floor with the ball between his legs and
gently bounce the ball. Sing or hum a rhythmic tune and
have him bounce the ball. Encourage and assist the child to
maintain balance and body control while he manipulates
the ball.
5. Sit on the floor with the child and pass the ball back and
forth, talking as you play. Say such things as, “I’m giving the
ball to you, and now you’re giving the ball to me.” Roll the
ball to the child and have him roll it back.

30
6. Squeak the clutch ball. Have the child visually track the ball
as you move it slowly across his visual field.
7. Squeak the ball then hide it under the bucket. Let the child
find the ball. Show him how to squeak the ball.
8. Allow the child to touch the ball with the whistle stick and
roll it gently along.
9. As the child rolls or bounces the ball, you or a second child
may shake the streamers and shout, “Hooray!”

31
Sensory Activities
RUBBER BALLS
I. Help the child track a ball as you hold it, or, initially, place the
ball in the child’s hand and move it with your own in a hori-
zontal plane.
2. Encourage the child to reach for and grasp the ball. Ask
him to describe how the ball feels in his hand.
3. Give the ball to the child, show him the pail and help him
drop the ball in the pail. Help him retrieve it.
4. Roll a ball to the child, both of you sitting on the floor oppo-
site each other with legs apart. Begin with the largest ball.
Encourage him to catch the ball before it bumps him.
5. Draw or cut out a cardboard track or roadway on which to
roll the ball. Make several tracks, varying the design and
complexity. An aluminum pie plate can be placed at the end
for an auditory effect. Use motion sensor at end of track.
6. Use a motion sensor night light at the end of the roadway to

32
elicit a visual response for “the winner.” This light could also
be used at the starting line, too. A motion sensor auditory
figure such as a croaking frog or chirping bird can be used
for an auditory response to stimulate the visual one. A baby
toy that plays music and lights up could be used. Press the
button when the car or ball crosses the finish line so the
child will look toward the end of the track. Have him watch
for the ball or car and let him press the button on the toy
when the ball or car goes in front of him.
7. If the child is advanced enough, have him roll one, two, or
three balls to you as you call the number to him. Make sure
to praise him or sing a little tune as a reward.

33
Sensory Activities
WHISTLE STICK
I. Help the child become aware of the whistle stick by pairing
your voice with it and touching the child with it.
2. Wearing the puppet, have it pick up and shake the whistle
stick in different locations around the child (check for child’s
location response to front, back side, side, etc.).
3. Have the puppet hold a whistle stick and use the whistle
stick to touch appropriate body parts. Ask the child to name
the body parts as they are touched.
4. Move the whistle stick in your hand toward the child and
encourage him to grasp it and shake it.
5. Give the child a whistle stick. Have him listen as you tip your
stick slowly or rapidly. Have him imitate with his stick the
patterns you make with yours.
6. Sing a song together. Both of you pretend you are conduct-
ing music with your whistle sticks.

34
Sensory Activities
PUTTY BALLS
1. Give the child an opportunity to grasp and hold the putty
balls. Their changing shape makes it easy for a child to
grasp. Let her manipulate the balls.
2. Place the putty balls on the child’s arm, leg, other appropri-
ate body parts. Have her locate the balls and push them off.
3. Have the child drop the putty balls into the pail. Later, have
the child retrieve each ball from the pail. You may want to
use color cues
4. Put putty balls on various quilt squares that provide a good
contrast. Have the child visually locate the putty balls and
pick them up. Other kit items can also be used in the same
manner as the putty balls.
5. Cut out a large circle from paper. Place it on the GrandStand
or other stand. Have the child gently throw the putty balls at
the circle. Note how many times she hits the target.
6. Have the child pat all the putty balls flat in front of her with
faces upward. Have her count them. Ask the child to re-
trieve the balls one-at-a-time as you call out the color. She
can then reshape them.

35
Sensory Activities
MOON BALL
1. Roll the ball over the child’s body. Name appropriate body
parts as you touch them. Encourage him to locate the ball
and reach for it. Allow him to roll, bounce, or nuzzle the ball.
2. Gently bump the child with the ball, then withdraw it. Be-
fore you bump him tell him what you are about to do, “I’m
going to bump you!” Encourage the child to look for, reach
out, and intercept the ball before it reaches him. Present
the ball in different locations around the child.
3. Move the ball slowly across the child’s visual field. If he
does not visually track the ball, place it in his hand and help
him move it in an arc across his field of vision. Try a variety
of visual field positions. If necessary, gently direct his head
to follow the motion of the ball. You may want to illuminate
the ball with a flashlight or in a dim light, allow the ball to
glow. (The ball is phosphorescent.)
4. Attach a length of elastic to the ball and hang it near the

36
child for him to bounce, kick, and grasp.
5. Practice rolling, tossing and catching the ball. This is a good
small group activity. If necessary, sit behind the child facing
a wall and assist the child in rolling or tossing the ball in a
overhand manner.
6. Have the child sit on the floor with his legs spread apart, or
in another comfortable seated position. Roll the ball to him.
Help him roll it back to you if necessary.
7. Roll the ball away from the child and have him crawl or walk
after it. Illuminate the ball if necessary.
8. Hide the ball under a cloth a little at a time. Have the child
retrieve the ball.

37
Sensory Activities
BUNJI BALL
CAUTION: Do not, under any circumstances, allow a child
to use the bunji ball on elastic string indepen-
dently. Activities with the ball and elastic string
should be closely supervised to avoid the pos
sibility of strangulation.
1. Dangle the ball in front of the child or pull it across the floor
while he tracks it. Be sure to move the ball in various pat-
terns, vertical, horizontal, circular, diagonal. Be sure to use
in the area you believe to be his peripheral field. Illuminate
the ball if necessary.
2. Bounce and dangle the ball from the elastic and ask the
child to reach out and catch it.
3. Suspend the ball over the child on his right side; allow him to
bat at it using his hands or a plastic bat. Repeat on his left
side. Note whether his hits or misses are consistent on each
side.
4. With the elastic strap still visible, place the ball under the

38
quilt. Have the child pull on the elastic strap. When he re-
trieves the ball, clap for him. Do this activity again, placing
the ball inside a sock.
5. Briefly attach the ball to the child’s hand or foot. Encourage
the child to reach for and grasp the ball. Place the bell bracelet
around the ball to make it jingle.

39
Sensory Activities
BELL BRACELET
1. Slip the bracelets on the child’s wrists or feet and help the
child shake them. As she listens to the bell, encourage the
child to look at her hands or feet and bring them together at
midline.
2. Hang a bracelet from a mobile or tie it to a crib rod or rail for
the child to grasp, bat and kick.
3. Dangle a bracelet in various positions around the child. While
jingling the bell, encourage the child to visually locate, reach
for and grasp the bracelet.
4. Attach a long string to the bracelet and move it slowly in
front of the child to encourage tracking. You may initially jingle
it to give the child an auditory cue. Be sure to move it in
various parts of the child’s visual field. Note if the child tracks
the bracelet.
5. Put a bracelet on both yourself and the child. Jingle yours
in a 1-2-1-2 pattern. Have her imitate your pattern, while
looking at her bracelet.

40
6. Put a string through the center of the bracelet and hold the
ends of the string with each hand. Allow the child to move
the bracelet back and forth along the string, making it jingle.

41
Sensory Activities
LIGHT-UP WAND
CAUTION: Always supervise the child closely while using
the light-up wand. Take care to keep it a safe
distance (12-18 inches) from the child’s face.
Take care to always put the light-up wand away
so the child cannot retrieve it independently.
1. Touch the tip of the light-up wand to the fingertips of the
child. Touch his knees and elbows. Name the body parts as
you touch them.
2. In darkened room, turn on the light-up wand and pass the
tip past the child’s gaze from a 1-foot distance. Note if the
child tracks the movement of the wand. Repeat the activity
from a 2-foot distance.
3. In a darkened room, about 18 inches from the child’s face,
make the light-up wand dance slowly to music. Be sure to
rotate the light-up wand on its axis so the child can see all
sides.

42
4. Let the child hold the light-up wand, taking care to point the
tip away from his eyes. Direct the child in stroking his legs
and arms with the tip.
5. Play some slow, soft music. Assist the child in moving the
light wand to the music. After assisting, let him do it alone.

43
Sensory Activities
KOOSH BALL
1. Have the child hold the ball in one hand. Shine a flashlight
on his hand so he can spot the ball. Have him squeeze the
ball with one hand, then the other. Have him roll the ball
between his palms. Have him touch the ball to his face. Ask
him what it feels like.
2. Allow the child to remove his shoes and socks and roll up
his pant legs. Help the child run the koosh ball down his legs
and on to the bottoms of his feet. Ask him if it feels different
on the bottoms of his feet than it does on his legs. Ask him to
describe the feeling if he can. If he is nonverbal, watch his
face to see if he responds differently to the ball touching his
feet than he does when it touches his legs. Note if he tracks
the ball as you move it down his legs.
3. Have the child hold the koosh ball by a few of its elastic
hairs and bounce it gently up and down. Instruct him to
listen to the rustling sound while continuing to bounce the
ball. Move the palm of his other hand into the path of the
bouncing koosh ball. If this is done right, the elastic hairs of

44
the koosh ball should just barely touch the palm of his hand
on its downward stroke. Ask the child if it tickles; watch his
face to see if he is ticklish.
4. Toss the ball gently to the child. Ask him to catch it or to
cover it with his hand when it lands near him. Ask him to
toss it back to you. Make whooshing sounds to one another
as the ball is tossed back and forth.
5. Place the koosh ball in the child’s hand. Ask him to finish
this sentence, “This ball feels like _______.” (Hopefully he
will name an object such as string, worms, etc.) Have him
finish this sentence, “When I squeeze this ball it is _______.”
(stringy, etc.)
6. Make up a little tune to sing to the words:
My Koosh ball is so squishy,
I play with it each day.
I like to bounce it on its strings,
And whoosh it as I play.
Allow the child to whoosh the ball through the air as you
sing. Note if he follows the ball with his eyes. If not, encour-
age him to do so.

45
Sensory Activities
YO-YO
1. Place the yo-yo loosely in the child’s hands. Pull on the
string, making the yo-yo rotate in her clasp. Show her how
to wind up the yo-yo. Repeat the activity, saying “yo-yo” in
excited tones.
2. Place the child upright, bolstering her head and arms if
necessary. Stand directly in front of her about 2 feet away.
Work the yo-yo for her. Notice if she follows the path of
the yo-yo as it travels up and down the string. Repeat this
activity standing slightly to the right, then the left. If your
yo-yo makes noise or music, repeat this activity standing
directly behind the child. Note if she turns to locate the
yo-yo.
3. Extend the string on the yo-yo. Pull the yo-yo along the
floor as if it were a puppy on a leash. Allow the child to
repeat this activity. Talk about puppies and look at a large
colorful picture of a puppy. Read the story of the “Pokey
Little Puppy.”

46
4. Let the child play with the yo-yo while you supervise. Note
if she watches the movement of the yo-yo or if she attends
more to the sound it makes.
5. Cut a short piece (about 12 inches) of fat string or rope.
Allow the child to feel the yo-yo string. Show her how yo-yo
string is “thin,” while the rope is “thick.” Examine flexibility of
the rope and string. Form the string into a circle.
6. Cut a circle from a piece of paper. Have the child place the
yo-yo string around the edge of the circle.

47
Sensory Activities
For Items From
Kit

48
Sensory Activities
BLOCKS
1. Show the blocks to the child. Allow her to randomly play with
them in order to get accustomed to their sizes and surface
textures. Ask her to name their colors.
2. With the flexible shaft penlight, cast the light on one block at
a time. Ask the child to pick up the lit block and put it in the
pail. Dump them out. Repeat.
3. With the pail half-full of blocks, shake the pail. Ask the child
to complete this sentence, “This sounds like _____.” Allow
the child to put blocks in and out of the pail while listening
to their clatter.
4. Line up a block, a foam shape and a ball. Explore the sur-
face textures of each with the child. Ask her to pick up “the
hard one.” Then ask her to pick up “the squishy one, etc.”
You may repeat the exercise with other objects.
5. Direct the child in stacking the blocks. Allow her to knock
them down and stack them again by herself. Shine the
flexible shaft penlight up and down a stack of blocks she
has built. Ask her to follow the light with her finger.

49
Sensory Activities
SHAPE DECK
1. Use the shape deck as a stimulus for the child to track or
attend. Move the shape deck item in vertical, horizontal, di-
agonal and peripheral patterns. Do this about 2 feet from
the child, then gradually move farther away. Discontinue
when the child fails to track.
2. Have the child turn the pages of the shape deck book while
you encourage visual attending to each item pictured. Note
the child’s behaviors. You may want to name the shapes
and their colors.
3. Lay the shape deck items out on the floor or table. Encour-
age the child to locate each shape deck item visually and
collect it.
4 Use a clothespin and yarn to hang several shape deck items
from a mobile suspended over the child.
5. Use the shape deck to name items of similar shape. “This is
round. What else is round?” The child may reply, “Ball,
marble, head” etc.

50
Sensory Activities
SNAP-LOCK
BEADS
1. With beads attached in one string, pull them around in a
swirling and twisting pattern on a table or on the floor in
front of the child. Look for visual attending behaviors.
2. Help the child put the beads together to make a necklace.
3. Pull the beads apart one at a time and drop each one into
the pail. Then reverse the procedure.
4. Hold or hang the string of beads in front of the child within
arm’s reach for swiping, batting and kicking.
5. Give the child two beads. Show him how to snap and un-
snap them. Have him listen to the popping sound. Ask him
to repeat the sound.
6. Have the child sort the beads by shape or color.
7. Have the child make a circle out of the beads and place it on
the floor. Ask him to throw putty balls or rolled-up socks into
the circle.

51
Sensory Activities
PA IL
1. Have the child drop putty balls into the pail. Have her re-
move them and clap the putty balls together. Point out how
they flatten.
2. Have the child place items in the pail and then retrieve the
items. The child may need hand-over-hand assistance.
3. Use the pail to collect favorite kit items. One by one, take
them out of the pail and place them on quilt squares.
4. Have the child wear the pail as a hat and view himself in the
mirror. Make up a pretend story about the child who wore a
pail as a hat.
5. Talk about all the things one can do with a pail. Ask the child
to examine the pail and tell its shape, color, texture, etc.
6. Hide something such as the yo-yo under the pail. Ask the
child to search for the object. When she finds the object
allow her to play with it as a reward.

52
Sensory Activities
PAPER (CARDBOARD
AND ADHESIVE)
1. Cut out shapes from various colors to hang over a crib,
from the ceiling or to stick to the crib. Be sure to hang the
shapes so they are visible to the child underneath, not to
the adult standing next to him.
2. Hold a whole or partial sheet above the child’s head and
bring it down in front of the child (minimizing air movement).
Note his responses. Help the child reach out and
pat the sheet, saying, “It’s here.” Remove the sheet and
say, “It’s gone.” Repeat several times.
3. Make colored confetti. Place in box or pail. Add auditory
cues such as bells, etc. Have the child play with and ma-
nipulate the confetti.
4. Create bold and interesting patterns for fixation: large geo-
metric designs, a face. Attach to a playpen, wheelchair tray,
the floor or wall. Ask the child to throw a putty ball toward
the object.

53
5. Use the paper for a high contrast background or place mat
to identify various work stations and play areas.
6. Using the adhesive paper, cut out a variety of shapes and
designs. Use to develop body awareness by sticking to the
child on various body parts. You may also wish to have the
child find the designs and shapes pasted to a door.
7. Cut out a large shape and present it on the GrandStand at
the floor or tabletop level. Ask the child to point the light-
up wand at the shape. Repeat for other shapes.
8. Use the stickers in the paper packet as rewards, or stick
them to the paper in shapes or patterns.

54
Sensory Activities
CRAYONS
1. Trace around the child’s hand or foot. Encourage her to do
likewise.
2. Scribble on the paper as the child watches or draw a par-
ticular pattern-stripes, face or checkerboard. Ask the child
to do it too.
3. Color the child’s fingernails to draw attention to her hands.
4. Draw a shape or outline of a toy or common object. Have
the child color inside the outlined shape.
5. Make parallel lines using yarn and glue, crayons or pipe
cleaners. Have the child draw a line between the parallel
guidelines.
6. Cut some basic shapes such as animals, car, truck or toys
out of poster board. Let the child trace around a shape,
then color it in.

55
Sensory Activities
STREAMERS
CAUTION: Take care to keep streamer sticks away from
children’s faces. Do not allow children to play
with the streamers unattended. Take care to
always put the streamers away so the child
cannot retrieve them independently.
1. Gently wave a streamer about 2 feet from the child’s face.
Move it closer, then farther away, noting the child’s attend-
ing behaviors.
2. Touch a streamer to the top of your head, then to the top of
the child’s head. Say “head.” Repeat for hands, elbows and
feet.
3. Anchor a streamer handle with a lump of clay or play-doh.
Ask the child to crawl or walk to retrieve the streamer.
4. Play or sing a happy tune. Move the streamers in unison
with the beat of the music. After a bit, give one streamer to

56
the child. Show him how to move it to the music.
5. Ask the child to name the colors of the streamers. Show him
how to shake them to produce the whooshing sound.
6. You hold a streamer, then give one to the child. Ask him to
imitate your movements with the streamer.
7. Do a cheer spelling out the child’s name. “Give me a ‘C.’
Give me an ‘H,’” and so on until the child’s name is spelled
out. Then ask, “What does it spell?” Shout the child’s name
excitedly while you and the child cheer for him with the
streamers.

57
Sensory Activities
FLEXIBLE
SHAFT
PENLIGHT
CAUTION: Do not allow your student to use this item
unsupervised. This item has two small parts.
1. Make sure your flexible shaft penlight has working batter-
ies. In a darkened room, make the child comfortable and, if
necessary, support her head and neck. Then, without turn-
ing on the flexible shaft penlight, slowly drag the tip along
the child’s bare arms and legs. Allow the child to enjoy the
sensation.
2. Turn on the flexible shaft penlight. Repeat the previous ac-
tivity. Note if the child responds differently to the same exer-
cises.
3. Play some soft music. With the flexible shaft penlight turned
on, move it very slowly in long horizontal patterns in the child’s
field of view. If the child is able to follow the movement of the
penlight, then begin moving the penlight in slow circles within
her field of view. Take care to avoid shining the light directly
in the child’s eyes.

58
4. In a darkened room, and with the penlight turned on, touch
the tip of the penlight to the child’s hands, feet, knees, shoul-
ders. Say the names of the child’s body parts as you touch
them. Encourage the child to repeat or to name them her-
self.
5. Place the puppet on your left hand and hold the penlight in
your right hand. With the penlight turned on, gently touch it
to the top of the puppet’s head, mouth and neck. Name the
parts of the puppet as you touch them. Encourage the child
to repeat or name them herself.
6. If the child is 4 years old or older, hand the penlight to the
child and ask her to move it to music. Do not allow the child
to move the flexible shaft penlight close to her eyes.
7. Repeat the above exercises in a daylight setting.

59
Sensory Activities
FORM BOARD
1. Show the child the inserts. Name the shapes with him. Allow
the child to trace the outside shape with his index finger.
Show him the difference in the shapes, “the square has four
corners, while the triangle has only three, etc.”
2. Next, give the child the form boards. Let the child play freely
with the inserts and the form boards. Notice if he tries to fit
the inserts into the form boards. If he does not, eventually
you may demonstrate to him how to fit the inserts into the
form board.
3. Give the child a small amount of Chex or other square ce-
real. Let him explore the shape of the cereal. Ask him which
insert is the same shape as the cereal. You may repeat this
exercise using candy hearts, round vanilla wafers or other
foods which have the same shapes as the inserts. After the
exercise, you may want to let the child choose a wafer for a
snack.
4. Allow the child to explore the outer edges of the form boards.
If he does not notice it himself, show him how the form boards

60
can all be linked together to form a train. Allow him to make
a train of form boards. Them let him put the inserts into the
form boards. Give the train a name such as “the form train.”
Make train sounds during your form train activity. You may
want to talk a little about trains and how many cars are linked
together to make a train.
5. After the activity, read the child the story of “The Little En-
gine That Could,” and talk about trains.

61
Sensory Activities
SLINKY
1. While seated at a table, introduce the child to the slinky. While
it sits on the table, allow her to feel the hollow center of the
cylinder it forms. Allow her to explore the rings and ridges.
2. Now take the top part of the slinky, pulling it over so it sits
next to the bottom part of the slinky on a flat table. The
slinky will now form an upside-down “U” shape. Let the child
explore with her fingers the gaps between the rings of the
slinky.
3. Allow the child to take half the slinky in her right hand and
half in her left hand and pour the slinky back and forth
between her two hands. Listen to the sound the rings make
as they move against one another. You may want the child
replicate the sound, if she can.
4. Allow her to play with it freely so she becomes familiar with
the way it moves and can be manipulated. Talk about how
the slinky can change its shape. Let the slinky come to rest
on a flat table.
5. You may want to talk about animals or other objects which
change shapes. Examples: marshmallows, earthworms, pil-
lows, snakes, hedgehogs.

62
VISION DEVELOPMENT
TEACHER-GENERATED IDEAS
Perception
1. Make large dot-to-dot duplicate sheets using various shapes
as guides
2. Use different sized baskets and boxes for sequencing, big-
little, in-out.
3. Have colored egg and jelly bean hunts either indoors or out.
4. Use colored sand, available in craft shops, in trays for trac-
ing hands and objects.
5. Make bowling pins from painted milk cartons; use rubber
ball to roll at pins.
6. Take photograph of child and other familiar faces. Enlarge
photo and glue it to a hard backing, then cut into simple
puzzle pieces.
7. Paint footprints onto sidewalk or draw on paper and paste
to floor; have child walk in them.
8. Place colored circles or squares on a drum and have child
hit the yellow, red, blue, etc. shape.
9. Cover one-half pint, quart, and one-half gallon ice cream

63
containers and milk cartons with bright, colorful, textured ma-
terials. Use for nesting, comparison, etc.
10. Take two simply-drawn pictures of an item in child’s environ-
ment and cut one into four pieces. Encourage child to put
pieces together to match whole.
11. Use carpet squares in bright colors to distinguish and iden-
tify colors, develop gross motor skills and follow directions,
e.g., “Step from red square to yellow square.”
12. Make a set of cards with lines to be finger-traced. They can
be made from ribbon, yarn, sandpaper, felt, etc. The more
curves or angles, the more difficult the task.
13. Outline simple pictures with colored yarn to help with color-
ing.

64
MATERIALS TO DEVELOP
REMAINING VISION
One of the primary problems of the low vision child is that
there is very little incidental learning through the visual sense.
The visual functioning ability of the child is primarily develop-
mental. The more the child looks, especially at close range, the
more he stimulates the pathways to the brain. As the brain is
given more information, the child begins the process of discrimi-
nating forms, pictures and symbols. Some children with low vi-
sion are reluctant to use their vision, and it is difficult to motivate
them to do so. Since they have never used their vision, they do
not miss it.
Teachers need to give each child an opportunity to develop all
his senses, and to work with children in visual experiences as
well as tactile ones. The primary goal of the teacher should be to
permit each child to develop his visual ability to the highest pos-
sible efficiency in order to supplement his tactile and auditory
senses.
In choosing toys for this project, our criteria were complex.
Initially we wanted to catch the child’s attention. To do this we
sought items with bright colors, appealing sounds or interesting
movements. We also selected the toys on the basis of how eas-
ily they could be used by the children and whether they could
be used for more than one purpose.
The following general guidelines should be used in choosing
toys for children with low vision:
65
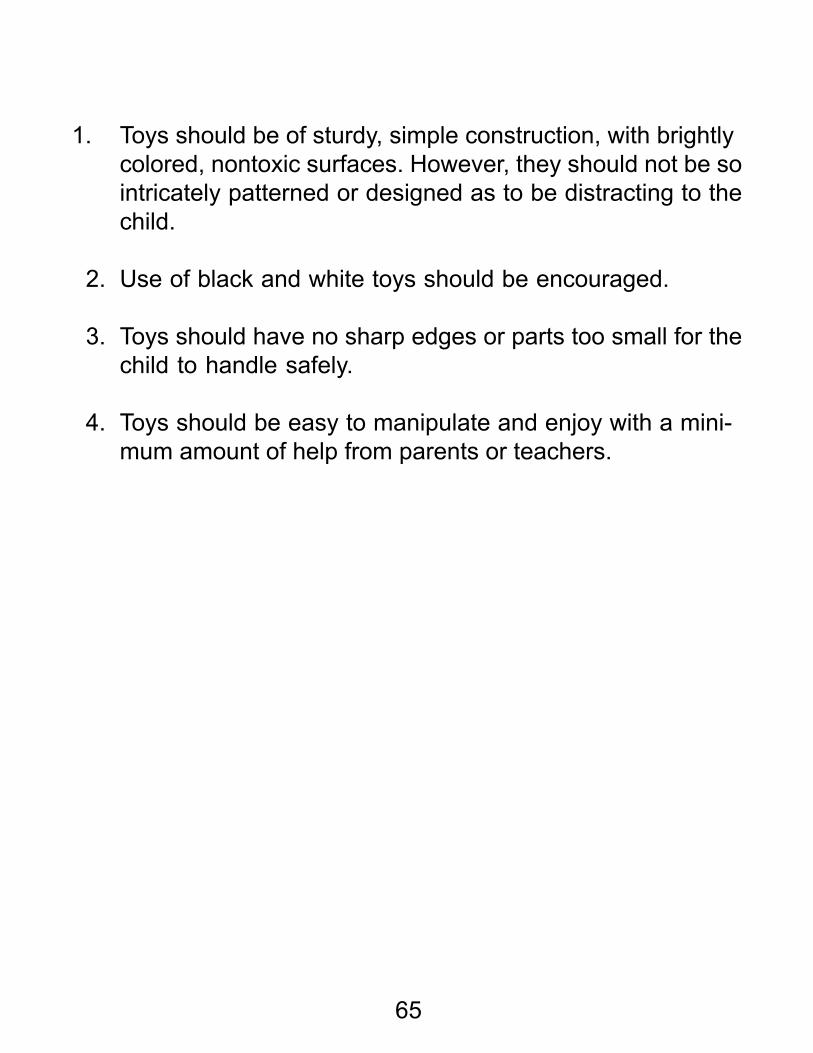
1. Toys should be of sturdy, simple construction, with brightly
colored, nontoxic surfaces. However, they should not be so
intricately patterned or designed as to be distracting to the
child.
2. Use of black and white toys should be encouraged.
3. Toys should have no sharp edges or parts too small for the
child to handle safely.
4. Toys should be easy to manipulate and enjoy with a mini-
mum amount of help from parents or teachers.

66
COMMERCIAL TOYS OF
HIGH VISUAL INTEREST
A list of the complete addresses of the manufacturers
follows this section.
1. Jumping Frog by Fisher-Price
2. Disney Poppin Pals by Gabriel
3. Happy Apple by Fisher-Price
4. Puzzle, crib & playpen by Fisher-Price
5. Tote ‘n’ Play by Playskool-Milton Bradley
6. Sound train set by Arco Industries
7. Roto-rattle by Ambi Toys Europlastic
8. Clatterpillar by Knickerbocker Toy Co.
9. Playpath Peek-a-boo Ball by Johnson & Johnson
Baby Products
10. Playpath Stand-up Man by Johnson & Johnson
Baby Products
11. Rock ‘n’ roll by Ambi Toys
12. Wobble Globe by Kiddicraft
13. Ring around top by Gabriel
14. Squeeze ‘n’ Squeak by Playcraft-Mettoy
15. Pull toys and Music Box by Kouvalias
16. Plastic Slinky by James Industries
17. Mother Duck pull toy by Brio-Scanditoy
18. Stack ‘n’ Ring by Tonka
19. Melody Mike by Gabriel
20. Simple Picture Books by Bruna Books and
Brimax Books
21. Twin rattle by Ambi Toys
22. Animal Ring by Fisher-Price

67
23. Lots o’ Gears by Childcraft
24. Winnie the Pooh Pop-up by Gabriel-Child Guidance
25. Jack-in-the-Box by Hasbro
26. Circus Top by Lorenz Bolz
27. Take-apart Ball by Ambi Toys
28. Musical Calliope by Mattel
29. Doggone Doggie by Tomy
30. Postal Station by Playskool
31. Active Baby by Ambi Toys
32. Happy teether by Playskool-Milton
Bradley
33. Pull Toys by Kouvalias
34. Big Bird Chair by Knickerbocker Toys
35. Baby Butterfly, teether
and rattle by Fisher-Price
36. Finger Puppets by Gabriel
37. Windup Animals by Aviva Toys
38. Crib action toys by Gabriel
39. Crib toys by Semper
40. Loop the Loop by Mickey Mouse- Walt
Disney
41. Push toys: Corn Popper by Fisher-Price
42. Cheerleader Pompom by Cheerleader Division -
Valley Decorating Co.
43. Singing Bird by Playart
44. Pound-a-ball by Gabriel
45. Tuneyville Choo Choo by Tomy
46. Handy Dandy by Ambi Toys
47. Dalmations by Nursery Originals
48. Sleepy Friends Mobile by Nursery Originals
Most above-named toys are available at commercial toy stores or
outlets.

68
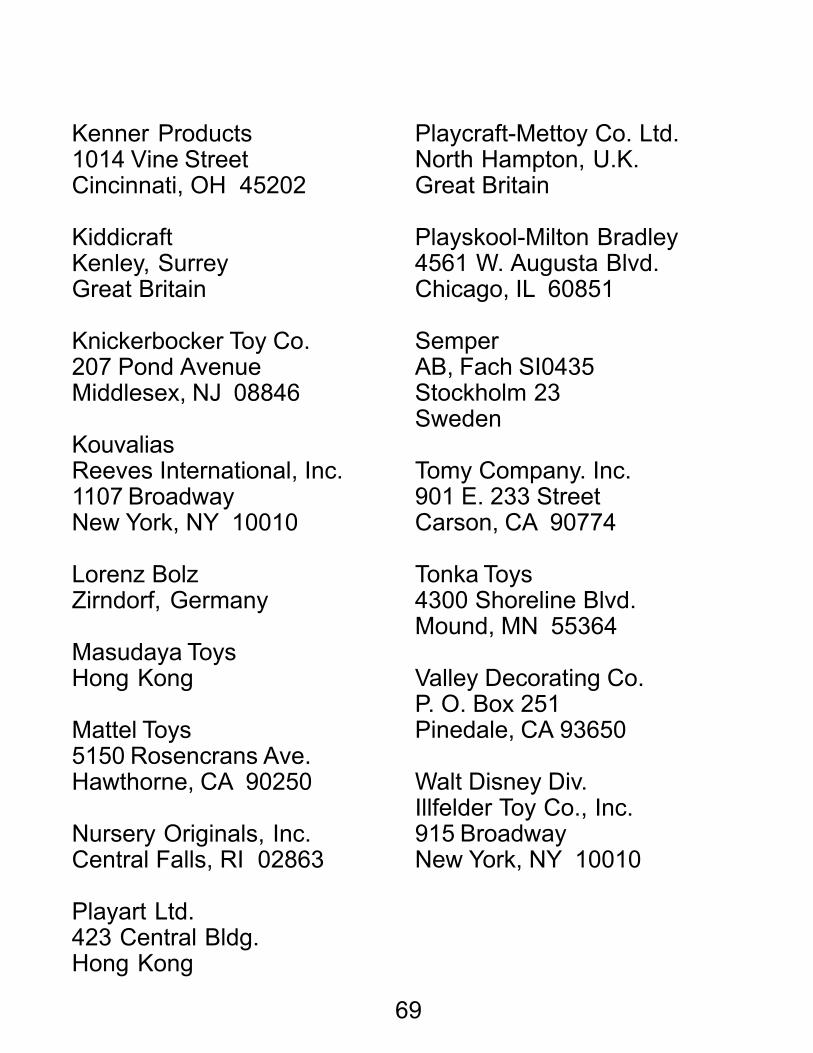
Ambi Toys Europlastic
Amsterdam, Holland
Amloid Company
5th Street
Saddle Brook, NJ 07662
Arco Industries
503 Star House
Kowloon, Hong Kong
Aviva Toy Co.
13009 Saticoy St.
N. Hollywood, CA 91605
Brimax Books
Bobbs Merrill
P.O. Box558
4300 W. 62nd St.
Indianapolis, IN 46206
Brio-Scanditoy Corp.
6531 N. Sidney Place
Milwaukee, WI 53209
Bruna Books
Methuen Inc.
733 Third Ave.
New York, NY 10017
Childcraft
Edison, NJ 08817
Enco Industries
Jericho, NY 11753
Fisher-Price Toys
606 Girard Avenue
East Aurora, NY 14052
Gabriel Industries, Inc.
200 Fifth Ave.
New York, NY 10010
Hasbro Industries, Inc.
1027 Newport Avenue
Pawtucket, RI 02826
Ideal Toy Corp.
184-10 Jamaica Avenue
Hollis, NY 11423
James Industries, Inc.
P.O. Box 4O7
Hollidaysburg, PA 16648
Johnson & Johnson
Baby Products
Skillman, NJ 08558
LIST OF MANUFACTURERS
69
Kenner Products
1014 Vine Street
Cincinnati, OH 45202
Kiddicraft
Kenley, Surrey
Great Britain
Knickerbocker Toy Co.
207 Pond Avenue
Middlesex, NJ 08846
Kouvalias
Reeves International, Inc.
1107 Broadway
New York, NY 10010
Lorenz Bolz
Zirndorf, Germany
Masudaya Toys
Hong Kong
Mattel Toys
5150 Rosencrans Ave.
Hawthorne, CA 90250
Nursery Originals, Inc.
Central Falls, RI 02863
Playart Ltd.
423 Central Bldg.
Hong Kong
Playcraft-Mettoy Co. Ltd.
North Hampton, U.K.
Great Britain
Playskool-Milton Bradley
4561 W. Augusta Blvd.
Chicago, IL 60851
Semper
AB, Fach SI0435
Stockholm 23
Sweden
Tomy Company. Inc.
901 E. 233 Street
Carson, CA 90774
Tonka Toys
4300 Shoreline Blvd.
Mound, MN 55364
Valley Decorating Co.
P. O. Box 251
Pinedale, CA 93650
Walt Disney Div.
Illfelder Toy Co., Inc.
915 Broadway
New York, NY 10010

70
VISION DEVELOPMENT MATERIALS
COMMERCIAL ITEMS
SUGGESTED BY TEACHERS
Nondirection light: May be turned off and on by means of a
long string switch
Futura Disco Light: Heat causes colored and patterned drum
to revolve; light shining through the drum is refracted by prism-
like shell
Lava Lamp: Brightly colored fluid changes shape within lighted
cylinder
Light Box & Level I Materials, APH Catalog No.: 1-0866-00 &
1-0867-00
Lite Brite: Brightly colored plexiglas pegs fit into lighted peg-
board
Star Wars Force Sword: Flashlight with colored lens attaches
to narrow, translucent, plastic tube
Whisperlite: Mounted light with control which allows it to light up
to various levels of sound
Auditory light: Flickers with sound
Light organ: Flashing lights are synchronized with sound: often
has lights of several colors
Colored cellophane: Tape over holes cut in cardboard template.
71
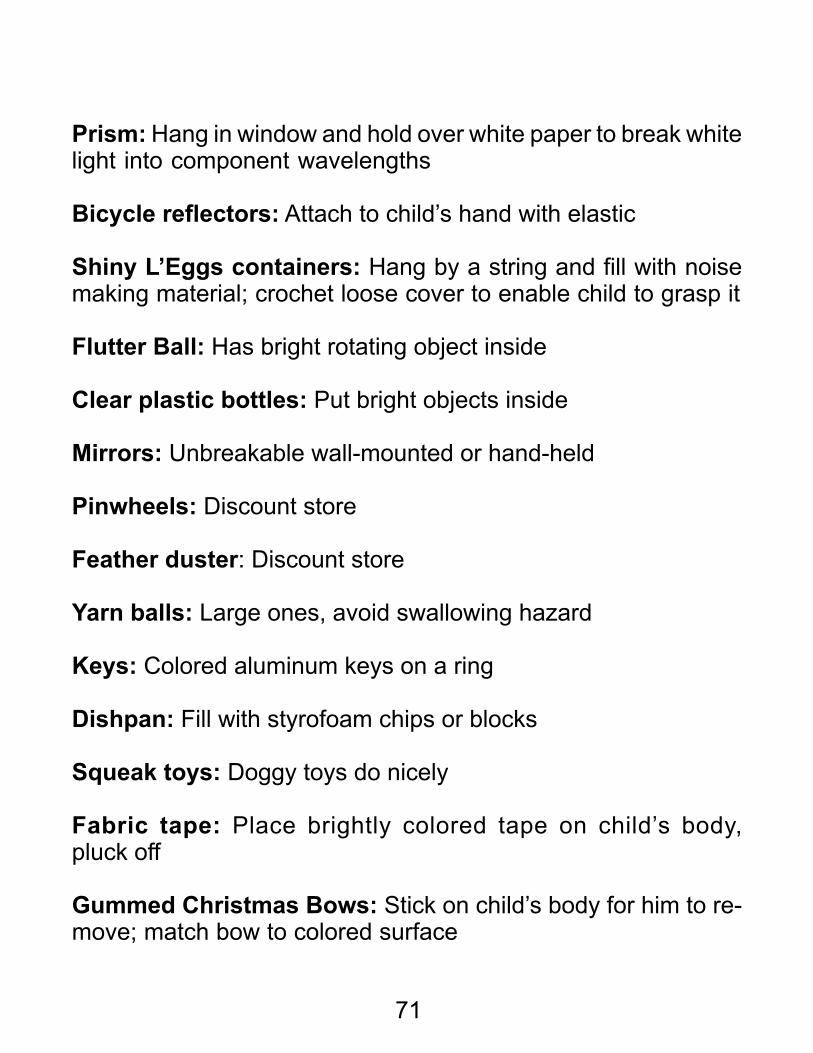
Prism: Hang in window and hold over white paper to break white
light into component wavelengths
Bicycle reflectors: Attach to child’s hand with elastic
Shiny L’Eggs containers: Hang by a string and fill with noise
making material; crochet loose cover to enable child to grasp it
Flutter Ball: Has bright rotating object inside
Clear plastic bottles: Put bright objects inside
Mirrors: Unbreakable wall-mounted or hand-held
Pinwheels: Discount store
Feather duster: Discount store
Yarn balls: Large ones, avoid swallowing hazard
Keys: Colored aluminum keys on a ring
Dishpan: Fill with styrofoam chips or blocks
Squeak toys: Doggy toys do nicely
Fabric tape: Place brightly colored tape on child’s body,
pluck off
Gummed Christmas Bows: Stick on child’s body for him to re-
move; match bow to colored surface

72
Mobiles: Brightly-colored, sewn figures made of reflective mate-
rial.
Foil: Tape sheets of aluminum foil in one corner of the room;
hang lights nearby and out of reach of child.
Fluorescent orange safety vests: Worn by teacher to be local-
ized and followed by student
Musical Merry-Go-Round, music box with toy merry-go-
round: Place candy on merry-go-round for child to track and re-
move
Clown and ladder: Clown “climbs” down ladder
Flurry: Red and yellow paper and cardboard toy, accordion
shaped, which hangs from ceiling
Formboard & jumbo pegboard made of wood, tactilmat, or
crepe rubber: Put shapes in and out using tactile sense.
Overhead projector or slide projector: Project interesting pic-
tures, colors, configurations
Party favor blowers: Make interesting noises
Glow-in-Dark Stars: 1" dia. stars to put on walls or ceiling, by
Edmund Scientific
Tambourine: Shine penlight from underneath and have child tap
the light

73
Simon: Colorful light game
Kites: Japanese style plastic kite with streamer tails
Glow ball: Inflatable yellow ball with light inside
Bubble pipe and soap bubbles: Feel them explode
Funlight: Battery-operated toy which projects images onto a wall.
Discs with pictures or patterns are inserted and focused
Developmental Learning: Tracking cards, perception cards, dis-
crimination, etc., can be purchased from:
Developmental Learning Materials
1 DLM Park
Allen, Texas 75002
Penlight with Color Cups and Flashlight with Color Discs:
Battery-operated lights which can project colored lights onto walls
and other objects. Designed to help students develop visual
awareness and visual tracking skills; can be purchased from:
American Printing House for the Blind. Inc.
1839 Frankfort Avenue
Louisville, KY, 40206-0085
1-800-223-1839

74
Art supplies which fluoresce are available from some hobby
shops, art supply stores and from:
Dick Blick Dick Blick
P.O. Box 26 P.O. Box 1267
Allentown, PA 18105 Galesburg, IL 61401
These include:
Paper
Posterboard
Vinylized cloth
Adhesive-backed paper
Crayons
Chalk
Pastels
Felt tip markers
Spray paint
Fluorescent fabric, fringe, ribbons and feathers may be found
in some fabric stores or purchased from:
Associated Fabrics Corporation
10 East 39th
New York, NY 10016
Activity Panels: Series of raised shapes with grooved borders
Exceptional Play, Inc.
Box 1015
Lawrence, Kansas 66044

75
OTHER SUGGESTED
FLUORESCENT MATERIALS
A number of commercial toys are made from plastic which ap-
pears day-glo pink, red, orange, yellow, or green. A few ex-
amples:
Fisher Price Ring Stack
Fisher Price Animal Ring Teether
Fisher Price Squeaky Bear
Fisher Price Creative Blocks
Fisher Price Magnetic Letters
Playskool plastic tool set
Frisbee
Beach pail and shovel
Plastic Halloween pumpkin
Plastic Easter eggs
Inflatable toys
Phosphorescent Glow-Stix
Phosphorescent Moon and Stars
Glow-in-the-Dark Pumpkin

76
VISION DEVELOPMENT BIBLIOGRAPHY
Allport, F. H. (1955). Theories of perception and the concept of structure.
New York: John Wiley and Sons.
Apple, L. E., & May, M. (1971). Distance vision and perceptual training:
A concept for use in the mobility training of low vision clients. New
York: American Foundation for the Blind.
Barraga, N. C. (1964). Increased visual behavior in low vision children.
New York: American Foundation Fall for the Blind, Research Series
No. 13.
Barraga, N. C. (1964). Teaching children with low vision. New Outlook for
the Blind, 58 (10), 313-326.
Barraga, N. C. (Ed.). (1970). Teacher’s guide for development of visual
learning abilities and utilization of low vision. Louisville, KY: American
Printing House for the Blind.
Barraga, N. C. (1976). Visual handicaps and learning: A developmental
approach. Belmont, CA: Wadsworth Publishing Co.
Barraga, N. C., & Morris, J. E. (1980). Program to develop efficiency in
visual functioning: Sourcebook on low vision. Louisville, KY: Ameri-
can Printing House for the Blind.
Barry, M. A. (1973). How to play with your partially sighted preschool child:
Suggestions for early sensory and educational activities. New Out-
look for the Blind, 67 (10), 457-465.
Bernstein, G. B. (1979, Spring). Integration of vision stimulation in the
classroom 1: Individual programming. Education of the Visually Handi-
capped, 11 (1), 14-18.

77
Bernstein, G. B. (1979, Summer). Integration of vision stimulation in the
classroom 11: Group programming. Education of the Visually Handi-
capped, 11 (2), 39-48.
Bernstein, G. B. (1979, Fall). Integration of vision stimulation in the class-
room III: A total approach. Education of the Visually Handicapped, 11
(3), 80-85.
Bortner, S. (1979). Sensory stimulation kit: A teacher’s guidebook. Lou-
isville, KY: American Printing House for the Blind.
Brush, P. (1981, Summer). Vision observation form for multi-impaired
and/or infants. The National Newspatch, 6 (2), 6-9.
Bryan, D. (1972). Guide for parents of preschool visually handicapped
children. Springfield, IL: Office of Superintendent of Public Instruc-
tion.
Carolan, R. H. (1973). Sensory stimulation and the blind infant. New
Outlook for the Blind, 67 (3), 119 126.
Connelly, W. (1969). Visually handicapped children—birth to three years.
Unpublished manuscript. Ann Arbor: University of Michigan Medical
Center.
Cook, K. M. (1983). Project IVEY: Increasing visual efficiency. Tallahas-
see: State of Florida Department of Education.
Corbett, M. D. (1953). How to improve your sight. New York: Bonanza
Books.
Drouillard, R., & Raynor, S. (1977). Move it. Mason, MI: Ingham Inter-
mediate School District.

78
Efron, M. (1981). Understanding and educating the deaf-blind/severely
and profoundly handicapped. Springfield, IL: Charles C. Thomas.
Efron, M., & DuBoff, B. (1975). A vision guide for teachers of deaf-blind
children. Winston-Salem, N.C.: Special Education Instructional Mate-
rials Development Center.
Ferrell, K. A. (1977, July). Sequence of visual development. The National
Newspatch, 2 (5),2-6.
Ferrell, K. A. (1984). Parenting preschoolers: Suggestions for raising
young blind and visually impaired children. New York: American
Foundation for the Blind.
Gates, C. F. (1981). Vision assessment and stimulation for deaf-blind/
severely-profoundly handicapped children. Viewpoints in Teaching and
Learning, 57 (1), 43,53.
Gesell, A., IIg, F. L., & Bullins, G. E. (1967). Vision—its development in
infant and child. New York: Hofner Publishing Company.
Gibson, E. J. (1969). Principles of perceptual learning and development.
New York: Meredith Corp.
Halliday, C. (1970). The visually impaired child: Growth, learning, devel-
opment, infancy to school age. Louisville, KY: American Printing House
for the Blind.
Home stimulation for the young developmentally disabled child. (1973).
Lexington: Massachusetts Department of Mental Health, Division of
Mental Retardation.

79
Jose, R. T. Smith, A. J., & Shane, K. G. (1890, January). Evaluating and
stimulating vision in the multiply impaired. Journal of Visual Impair-
ment and Blindness, 74 (1), 2-8.
Jose, R. T. (Ed.). (1983). Understanding low vision. New York: American
Foundation for the Blind.
Kitchel, J.E. (in press). The Effects of Blue Light on Ocular Health. Journal
of Visual Impairment and Blindness.
Kraskin, R. (1973). How to improve your vision. Hollywood, CA: Wilshire
Book Co.
Langley, M. B. (1980). Functional vision inventory for the multiply and
severely handicapped. Chicago: Stoelting Co.
Langley, M. B., & DuBose, R. (1976). Functional vision screening for
severely handicapped children. New Outlook for the Blind, 70 (8),
346-350.
Langley, M. B. (1999). Individualized Systematic Assessment of Visual
Efficiency. Louisville: American Printing House for the Blind.
Lowenfeld, B. (1973). The visually handicapped child in school. New
York: The John Day Co.
Muniz, J. V. (1980, Fall). The development of specific visual skills in low-
functioning, nonverbal children who are hearing impaired as well as
visually impaired. Education of the Visually Handicapped, 12 (3), 79-
82.
O’Brien, R. (1976). Alive ... aware ... a person. Rockville, MD: Mont-
gomery Public Schools.

80
Orlansky, M. D. (1977). Maintaining the visually handicapped child. Austin,
TX: Learning Concepts.
Raynor, S., & Drouillard, R. (1975). Get a wiggle on. Mason, MI: Ingham
Intermediate School District.
Scott, E. (1977). Can’t your child see? Baltimore: University Park.
Smith, A. J., & Cote, K. S. (1982). Look at me. Philadelphia: College of
Optometry Press.
Van Hof-Van Duin, J., Mohn, G., & Batenburg, A. M. (1982). Simple tests
of visual function in multiply handicapped children. International Jour-
nal of Rehabilitation Research, 5, 239-240.

81
Sensory Level Kit ........................................... 1-08141-00
Perceptual Level Kit....................................... 1-08151-00
Sensory Activities Book, Print ........................ 7-08141-00
Perceptual Activities Book, Print .................... 7-08151-00
Sensory Activities Book, Braille ..................... 5-08141-00
Perceptual Activities Book, Braille ................. 5-08151-00
Sensory Activities Book, Audio Cassette ....... C-08141-00
Perceptual Activities Book, Audio Cassette ... C-08151-00