viewplus emfuse color braille stationviewplus.com/downloads/docs/manuals/emfuse-manual… · web...
TRANSCRIPT

ViewPlus EmFuse Color Braille StationRevision: 20130131

Table of Contents
I. Introduction
A. Preface
B. Certifications
C. Safety Instructions
D. Specifications
II. Installation
A. Unpacking and Hardware Setup
B. Software Installation
III. Printer Properties
A. Windows Printer Settings
B. Device Settings
C. Service Settings
IV. Operator Panel
A. Displays
B. Functions
C. Tones
V. Paper Handling
A. Paper Loading
B. Paper Jams
VI. Replacing Printer Consumables

A. Toner Cartridges
B. Image Drums
C. Transfer Belt
D. Fuser
E. Waste Toner Box
VII. Braille, Translation and Printing
A. ViewPlus Tiger Software Suite
B. Fonts
C. Math and Braille
D. Printing
VIII. Support, Maintenance and Warranty
A. Training and Support Packages
B. Maintenance and Technical Support
C. Warranty
D. Extended Warranty and Maintenance Plan
I. Introduction
A. Preface
ViewPlus EmFuse Color Braille StationPowered By Tiger
User's Manual Congratulations on owning a ViewPlus EmFuse Color Braille Station, the world's only double-sided color print, braille and tactile graphics production machine. This manual will introduce you to basic information regarding your new equipment. The ViewPlus web site is another resource for information on your EmFuse including examples, tutorials and other useful downloads.

Visit the web site at: http://www.viewplus.com
Your EmFuse is Powered by Tiger. This means you receive: Tiger Software Suite: Powerful addition to Windows adds braille and tactile graphic functionality to MS Office.
Windows Printer Driver: Connects ViewPlus printers and embossers to the power of Windows, embossing and networking just like a mainstream printer.
Roller Die Technology: Patented hardware allowing high quality, high resolution braille and graphics to be embossed quickly, easily and quietly.For more information on ViewPlus Powered by Tiger functionality, visit http://www.viewplus.com/products/powered-by-tiger/
Model Number 241201USER'S Manual
B. Certifications
FCC Compliance Statement (USA)This equipment has been tested and found to comply with the limits for a Class A digital device, pursuant to Part 15 of the FCC Rules. Operation is subject to the following two conditions: (1) this device may not cause harmful interference, and (2) this device must accept any interference received, including interference that may cause undesired operation. If this equipment does cause harmful interference to radio or television reception, which can be determined by turning the equipment off and on, the user is encouraged to try to correct the interference by one or more of the following measures:
Reorient or relocate the receiving antenna. Increase the separation between the equipment and receiver. Connect the equipment to an outlet on a circuit different from that to which the receiver is
connected. Consult the dealer or an experienced radio/TV technician for help.
FCC Warning: Changes or modifications not expressly approved by the party responsible for compliance could void the user's authority to operate the equipment.Note the following:
The use of a non-shielded interface cable with the referenced device is prohibited. The length of the power cord must be 3 meters (10 feet) or less.
This unit is also intended for connection to IT distribution systems. Compliance Statement (Canada)This digital apparatus is in conformity with standard ICES-003 of Canada.Cet appareil numérique est conforme à la norme NMB-003 du Canada. Compliance Statement (Germany)Bescheinigung des Herstellers/Importeurs: Hiermit wird bescheinigt, dass der Drucker der

Maschinenlärminformationsverordnung 3. GSGV, 18.01.1991 entspricht: Der höchste Schalldruckpegel beträgt 70 dB(A) oder weniger gemaß EN27779-1991. Compliance Statement (Europe)Warning: This product meets the interference requirements of EN55022. In a domestic environment, this product may cause radio interference in which case, the user may be required to take adequate measures. Compliance Statement (Korea)This apparatus complies with CISPR22 requirements. International Compliance
EN55022:2006 (Amended by A1:2007) Class A Emissions seriesEN55024:1998 (Amended by A1:2001 and A2:2003) Immunity characteristicsEN61000-3-2:2006 (Amended by A1:2009 and A2:2009) Power line harmonicsEN61000-3-3:2008 Power line flickerEN61000-4-2:2008 Electrostatic dischargeEN61000-4-3:2010 Radiated susceptibilityEN61000-4-4:2004 (Amended by A1:2010) Electrical fast transient/burstEN61000-4-5:2005 SurgeEN61000-4-6:2008 Conducted immunityEN61000-4-8:2009 Magnetic Field Immunity EN61000-4-11:2004 Input voltage interruptions/DIPS CE MDDAuthorized European RepresentativeViewPlus BV - EuropeRudolf Dieselweg 36D5928 RA VenloThe Netherlands+31 (0)77-7676001e-mail: [email protected]
Waste Electrical and Electronic Equipment (WEEE) ComplianceViewPlus BV complies with EU Directive 2002/96 regarding WEEE recycling; upon the conclusion of the product lifecycle, please contact ViewPlus BV concerning proper disposal.
C. Safety Instructions
Read all of these safety instructions before using the EmFuse. In addition, follow all warnings and instructions marked on the EmFuse itself.
Ensure that there is adequate ventilation around the unit. Do not place unit near a radiator or heat source. Keep unit out of direct sunlight.

Do not block or cover slots and openings in the unit's case; do not insert objects through slots. Use only the type of power source indicated on the unit's labels. Connect all equipment to properly grounded electrical outlets. Do not use frayed or damaged power cords. After connecting power cords, ensure that they are
not twisted, knotted or pinched before using the unit. Do not use an extension cord with the unit. If using a surge protector, ensure that the total current rating of all connected equipment does not
exceed the maximum rating of the surge protector or wall outlet. Unplug the unit before cleaning it; always clean it with a piece of damp cloth only. Do not spill liquid into the unit. Detach the unit from power source and refer to qualified service personnel under the following
conditions: If the power cord or plug is damaged. If liquid has entered the unit. If the unit has been dropped or tipped over or if the case is damaged. If the unit does not operate properly or exhibits a distinct change in performance. If the unit becomes extremely hot, or if smoke, unusual smells or abnormal noises are
emitted from the printer. Except as specifically explained in the user's manual, do not attempt to service the unit. Only adjust those controls that are covered in the user's manual. Keep hair, jewelry and clothing clear of moving parts in the printer and embosser. When clearing paper jams or performing routine cleaning of parts as directed in this manual, use
caution to prevent touching the printer's fuser unit or the embosser's motors, as these parts can be hot and contact may cause injury.
Do not touch or attempt to replace the printer's battery. Replacing the printer's battery with an incorrect type may cause explosion.
Use caution when exchanging toner cartridges or other parts that come into contact with toner powder.
If toner powder is swallowed, induce vomiting and seek medical attention. Never attempt to induce vomiting if the person is unconscious.
If toner powder is inhaled, move the person to an open area for fresh air and seek medical attention.
If toner powder comes into contact with eyes, flush with large amounts of water for 15 minutes, keeping eyelids open. Seek medical attention.
If toner powder is spilled on skin or clothing, treat with cold water and soap to help reduce the risk of staining.
Do not dispose of toner cartridges or image drums in a fire, as dust explosion may occur and injury may result.
D. Specifications
ViewPlus EmFuse Color Braille StationPaper Feed Method Front-load cut sheet trays; multipurpose cut sheet trayPaper Input Capacity Up to 2350 sheets (copy paper)Paper Width 4.0 to 12.9 inches (102 to 328 mm) Maximum Print Width 12 inches (305 mm) Paper Length 10.0 to 18.0 inches (254 to 457 mm)Paper Weight Adjustable from thin (copier type) paper to heavy
cardstock/plastic (90 to 220 g/m2)

Power Supply (Embosser) Voltage: 100 to 240 VAC (+ 10/- 15%) Frequency: 50-60 ± 1Hz
Power Supply (Printer) Voltage: 110 to 127 VAC (120V model), 220 to 240 VAC (230V model)Frequency: 50/60 Hz (120V model), 50 Hz ± 2 Hz (230V model)
Power Consumption (Embosser)
Standby: 24 WAverage Emboss: 164 WHeavy Emboss: 349 W
Power Consumption (Printer) Standby: 200 W (average)Power Save: 33 WTypical Printing: 780 WPeak Printing: >1500 W
Fuses (Embosser) 5 A, 250 V slow blow long time lag 5x20mmUnit Dimensions Width Depth Height Weight
45" (114 cm), 63.5" (161 cm) with output tray25" (63.5 cm)37" (94 cm)Approximately 475 lb (216 kg); printer: 167.5 lb (76 kg), printer paper trays: 118 lb (53.5 kg), embosser: 189.5 lb (86.5 kg)
Connectivity USB2 and Ethernet 10/100 BASE-TOperating Conditions Operating Temperature Storage Temperature Relative Humidity
59 to 90 °F (15 to 32 °C) -4 to 113 °F (-20 to 45 °C) 20 to 80% RH (non-condensing)
Computer Requirements Operating System
64-bit Windows 7 or Vista; 32-bit Windows 7, Vista or XP
Lifetime 5 years or 500,000 pages, whichever occurs first
II. Installation
A. Unpacking and Hardware Setup
The ViewPlus EmFuse ships on two separate pallets. Remove the outer wrapping around both pallets. One of the pallets contains two boxes and the other only one box. Begin with the pallet with only one box. Open the top of the box and remove the small box inside. Set the small box aside.

Next, remove the rest of the packaging from the embosser. Using the handholds on the sides of the embosser, lift it from its pallet using at least two people and set it on the floor.
Next, return to the pallet that contains two boxes. Using at least two people, lift the top box from this pallet using the plastic grip handles and place it on the floor. Locate the box marked "High Capacity Feeder" and carefully turn it over.

Remove the four plastic grip inserts and remove the packaging from the bottom of the box to expose the printer paper tray unit's wheels.
Carefully, gripping both the box and the printer paper tray unit, turn the box right-side up, resting the printer paper tray unit on its wheels. Remove the rest of the packaging, including the blue tape, from the paper tray unit. Make sure to also remove the paper tray insert labels that are taped to the top of the paper tray unit.

Remove the four plastic grip handles from the second box from the first pallet and lift the box off of the printer. Remove the cardboard tray containing consumables and accessories and set it aside, then remove the rest of the packaging, including the blue tape, from the printer. Roll the paper tray unit over next to the printer, orienting it so that the curved face of the paper trays is facing the same direction as the printer's operator panel. Lift the printer onto the paper tray unit, aligning the posts on the paper tray unit with the holes on the bottom of the printer before carefully setting it down.

Roll the printer to the location in which the EmFuse will be used. Open the printer lid by squeezing the handle above the operator panel and remove all of the orange packing inserts from the printer's image drums.


Unpack and install the toner cartridges one by one. Gently shake each toner cartridge before removing the white plastic tape over the bottom of the cartridge and installing it. Insert toner cartridges into the appropriate locations in the printer (from left to right: cyan, magenta, yellow, black), locking them into place with the blue toner locks.

Close the printer lid when finished. Install the printer paper guide onto the top of the printer next. First, locate the printer paper guide in the box in which the toner and cords were also shipped. Remove the access panel at the back of the top of the printer by gently pressing the front edge back, rotating the panel up and lifting it out of the printer. Install the paper guide by lining up the prongs on the bottom of the guide with the holes in the top of the printer exposed by the removal of the access panel. The guide will snap firmly into place.


Remove the orange shipping locks from all four paper trays. To do this, open a paper tray. Adjust the paper guides by squeezing the blue button on the front guide and gently sliding the guide toward the front of the tray until the edge of the shipping lock is accessible.
Grasp the edge of the shipping lock and pull it toward the front of the tray, lifting when the back end of the lock is clear of the back paper guide.
Now remove the finisher stacker cover from the printer. This is the panel right above the duplexer unit, at the top of the left side of the printer. Remove this cover by gripping the top edge and rotating the panel down.
Detach the panel from the printer by grasping the curved connectors on either side of the cover and unhooking them from the printer. Press the cover gently toward the front of the printer to free the back peg from the printer, then lift the cover out away from the printer to remove it.

Next, retrieve the small box that shipped on the embosser pallet. Locate the embosser alignment pins and rail, which are wrapped in green bubble wrap, in this box. Set the remaining contents aside.
Now install the embosser mounting hardware to the printer. All three pieces attach to the left side of the printer. The alignment rail attaches to a rectangular piece of metal at the bottom of the printer. Locate the two screws needed to attach the rail. Line up the alignment rail, open side down, with the rail mount at the bottom of the printer and insert the screws.

To attach the alignment pins, first remove the plastic tabs on the side of the printer. The two tabs are located just below the duplexer panel, about half way down the left side of the printer, toward the front

and back of the embosser. To remove the tabs, weaken the plastic connecting them to the main printer case using a flat head screwdriver or a box knife. Once the plastic tabs are removed, locate the two screws needed to attach the pins (one screw per pin). Then hold each pin with the rectangular cut-out up and the other flat side toward the printer. The lower of the small holes in each alignment pin lines up with a locator mark on the printer, and the upper hole is for a screw. Install the screw through the screw hole and tighten to secure each alignment pin.

Next, roll the embosser up next to the printer, orienting the front of the embosser (the side with the indicator panel on it) the same direction as the front of the printer (the side with the display panel and the handles to open the paper trays).

Line up the alignment rail on the printer with the rectangular opening in the bottom of the right side of the embosser's case and gently roll the embosser toward the printer. The rail will stop a short distance into the embosser; lift the rail slightly and roll the embosser toward the printer. After several inches, let go of the rail. Roll the embosser up next to the printer, latching it firmly into place.
Next, attach the data cables and power cords. Two USB cables were shipped with the EmFuse. Attach the square end of the shorter of the USB cables to the square USB port on the left side of the printer at the back, and the flat end of the same cable to the back of the embosser just above the serial cable connection.

A serial cable was shipped with the EmFuse. Attach one end to the serial port on the right side of the printer toward the back, and the other end to the serial port on the back of the embosser.

Two power cables were shipped with the EmFuse. Attach the thicker of the two power cables to the back of the printer and to a grounded power outlet. Note: Do not turn on power to the printer until instructed to do so during the printer driver installation.

Attach the other power cable to the back of the embosser and to a grounded power outlet. Note: Do not turn on power to the embosser until instructed to do so during the printer driver installation.
Attach a data cable to the EmFuse. If it will be used locally via a USB connection to a computer, connect the second USB cable shipped with the EmFuse to the square USB port (located below the LAN port) on the back of the embosser and to the computer.

If the EmFuse will be used on a network, attach a standard network cable (not provided) to the LAN port on the back of the embosser (located above the USB port) and to a network data port.
Next, retrieve the output tray that shipped in the small box on the embosser pallet. Remove anything that may be packed inside the tray. Attach the output tray to the left side of the embosser by inserting the output tray tabs through the slots in the embosser case and sliding the output tray down.

Fasten the thumbscrews on the underside of the tray securely to lock the tray in place. Your EmFuse hardware setup is now complete.
B. Software Installation
Please follow the easy installation instructions available on the software CD to install the EmFuse driver. NOTE: Do not power on the EmFuse until instructed to do so. After installing the EmFuse driver, install the ViewPlus Tiger Software Suite (TSS), a copy of which was shipped with the EmFuse. This easy-to-use software should be used for most braille documents printed from the EmFuse. Instructions for installation and use come with TSS.
III. Printer Properties
A. Windows Printer Settings
The Windows printer settings for the EmFuse are accessible from its printing preferences dialog. To open the printing preferences dialog, choose Start>Printers and Faxes on Windows XP or Start>Devices and

Printers on Windows 7 or Vista. In the printer list, right-click on the EmFuse and choose the 'Printing Preferences...' option. In addition, the printing preferences dialog is accessible using the 'Properties' button next to the printer selection box on the standard Windows print dialog used to print from most programs. The printing preferences options are organized onto three tabs. The Layout tab contains options pertaining to the page layout of the document to be printed. Use the descriptions of the options on the Layout tab to help make the appropriate selections for the document.
Shows Layout tab
Output - Select the desired duplexing option.o Single Sided - Select this option if you do not want the back sides of the pages printed.o Double Sided (Interpoint) - Select this option if you want the back sides of the pages
printed. If Double Sided (Interpoint) is selected, make selections for the following options: Open to Left/Open to Top - Select the orientation of the back page with respect
to the front when printing double sided. Choosing Open to Left means that the text and images will be in the same orientation on both sides of the page when the paper is flipped over its left edge. Choosing Open to Top means that the text and images will be in the same orientation on both sides of the page when the paper is flipped over its top edge.

Insert an empty page to the front or back of a graphics page - Select whether to insert a blank page on the back side of pages that contain graphics. Do not select this option if you have already inserted blank pages after graphics pages in your document.
Print - Select the desired printing options:o Collate - When the collate box is checked and multiple copies of a document are printed,
one complete document will be embossed at a time. If the collate box is left unchecked all copies of each page will be embossed before embossing of the next page in the document begins.
o Preview - If this option is checked, a preview of how the document will print and emboss will be shown in Tiger Viewer instead of printing.
o Add Magazine Fold Line - If this option is checked, a light line to be used for folding will be printed in the center of the document when booklet-style printing is selected in the application.
The Paper/Media tab contains options related to the type of paper or media being used for printing. Select the desired options for your media.
Shows Paper/Media tab
Paper and Media - Select the options that apply to your media.o Paper Size - Select the paper size you are using from the list.

o Media Type - Select the type of media you are using. Default 1 (Braille Paper) - Use this media type for standard braille paper. The
default settings were developed using US 90 lb Index paper weighing about 160 grams per square meter (gsm).
Default 2 (Light Braille Paper) - Use this media type for light braille paper. The default settings were developed using US 80 lb Index paper (about 145 gsm weight).
Default 3 (Copy Paper) - Use this media type for thinner papers such as copy paper. The default settings were developed using US 24 lb copy paper (about 90 gsm weight). Using paper lighter than 90 gsm is not recommended.
Default 4 (Premium Copy Paper) - Use this media type for premium copy paper. The default settings were developed using US 28 lb copy paper (about 105 gsm weight).
Default 5 (Card Stock) - Use this media type for very thick paper. The default settings were developed using US 110 lb card stock (about 200 gsm weight). Using paper heavier than 220 gsm is not recommended.
Default 6 (Synthetic) - Use this media type for specialty synthetic media.o Media Surface - Select the option that most closely matches the type of surface your
media has. Paper Source - Choose the tray from which you wish to print. The default option, Automatic
Select, will allow the printer to choose a tray containing the paper size selected in the Paper and Media section.
Advanced - Selecting the 'Advanced...' button brings up the Advanced dialog, which allows you to create and manage custom media types and paper sizes.
o Media Types Choosing the 'Add...' button will allow you to define a new custom media type.
The 'Print Media Type Test Pattern' button will print a selection of punch forces from which you can choose to set the highest and lowest punch force values that work for your media.
Selecting a media type from the drop-down list and choosing 'Edit...' will allow you to edit that media type. Note: Default media types can not be edited.
Selecting a media type from the drop-down list and choosing 'Remove' will delete that media type from the list. Note: Default media types can not be removed.
o Available Forms Choosing the 'Add Custom Form...' button will allow you to define a new paper
size. Note: Paper sizes wider than 12 inches may not be added. Selecting a paper size in the list will show the paper dimensions in the selected
units of measure. If the selected size is a custom size, the 'Delete Form' button will be available.
Choosing the 'Delete Form' button will remove the selected form.
The Tiger tab allows you to control braille and print options for printing. Use the descriptions below to help you make your selections.

Shows Tiger tab
How to Print - Select the print and braille options appropriate for your document.o Emboss - When this option is checked, the EmFuse will create embossed output.
Dot Quality - Select Standard or Best dots. Printing with standard dot quality is the faster option. Selecting best dot quality causes the printer to punch each dot twice, leading to rounder, smoother dots.
Braille Height - Select Low, Normal or High braille dot height. Normal dot height sets the braille dots to the same height as the highest graphics dots. Adjust the braille dot height higher or lower to suit the reader.
Emboss Standard Text - When checked, all text except interline will be embossed. This is helpful when used with a large font to print raised letters.
o Print - When this option is checked, the EmFuse will create print output. Note: When both Emboss and Print are checked (default), the EmFuse will create both embossed and print output.
Print Quality - Select Normal (300x300) or Fine (600x600). Grayscale or Color - Choose whether to print color. Selecting grayscale when
color is not needed will save color toner and increase color image drum life. Advanced - Select the advanced printing options appropriate for your document.
o 2 in 1 - When this option is checked, the EmFuse will generate embossed output from every odd page and print output from every even page of the document. This is helpful

when you wish to have the embossed page differ from the print page (for example, if you wish to simplify a complex image on the embossed page but retain the original detail on the print page).
o More Options - Selecting the 'More Options...' button brings up an Advanced dialog, which from this tab allows you to set advanced options.
Images - Select the desired image options. These settings apply only to the embossed output.
Invert Colors - When checked, this option embosses light colors as high dots and dark colors as low dots.
Contrast - The default setting is 0. The range is from -100 to 100. Increasing the contrast increases the dot height difference of two colors that have intensities that are nearly the same. By increasing the contrast, light colors get lighter and dark colors get darker.
Brightness - The default setting is 0. The range is from -100 to 100. Increasing the brightness can be useful to increase the intensity of all the colors. This option is most often used with images in which lines are thin and light.
Apply Chessboard Pattern - If this option is checked, solid color areas of graphics are printed with every other dot removed, creating a chessboard pattern. This option is helpful for large, dark graphics where the embossing might be likely to wrinkle the paper.
Thin Line Intensity - If lines in graphics are too thin to emboss correctly, slide the indicator to the right.
Defaults - The 'Defaults...' button will restore all settings on the Advanced dialog to their default values.
Defaults - The 'Defaults...' button will restore all settings on the Tiger tab to their default values.
B. Device Settings
The Device Settings options allow you to control settings in the printer and embosser. You can access the Device Settings page through Start>Printers and Faxes on Windows XP or Start>Devices and Printers on Windows 7 or Vista. In the printer list, right-click on the EmFuse and choose the 'Properties' option. On the dialog that comes up, select the Device Settings tab.
The first section of the Device Settings tab controls the printer's tray assignments, allowing you to set what paper size is in each tray of the printer from a drop-down list.

Shows Device Settings tab The second section of the Device Settings controls the EmFuse's legacy settings. These settings are used when you print to the EmFuse from programs that do not use the Windows printer driver, including some braille programs. Use the descriptions below to make your selections.
Form Size - Select a standard page size, or select Custom to set the page size manually. Form Width - This field shows the page width. For standard page sizes, this field is informational
only. If the Form Size is set to Custom, this field is editable. Form Length - This field shows the page length. For standard page sizes, this field is
informational only. If the Form Size is set to Custom, this field is editable. Top Margin - Set the top margin to be used when printing in legacy mode. Note: If you are
printing from an application that sends margin information with the print job, set the top margin to 0.
Left Margin - Set the left margin to be used when printing in legacy mode. Note: If you are printing from an application that sends margin information with the print job, set the left margin to 0.
Right Margin - Set the right margin to be used when printing in legacy mode. Note: If the left and right margins are set differently, the margins will be applied as binding margins, meaning the same amount of margin is applied to the same edges of the page on both sides. This means that

the left margin setting will be applied to the right margin of the back side of the page and the right margin setting will be applied to the left margin of the back side of the page. Set the left and right margin settings based on how the front side of the page should be printed.
Text/Graphics Mode - Select Text mode if your legacy document contains text. If the document is a graphic, select Graphics mode to remove the space between braille lines so that dots may be printed in an even grid.
Dots Per Character - Select 6 or 8 dots. Automatic Text Wrapping - Select 'On' if lines in the document are longer than will fit on one
printed line and you do not wish the lines to be truncated. If the document is formatted correctly for the page size and margins you are using, or if you do not wish to have long lines wrapped to the next line, select 'Off'.
Extra Line Spacing - Set the amount of extra space desired between braille lines. This setting can only be set in multiples of 0.05 inches.
Media Type - Select a default media type from the list, or choose Custom to set the punch forces manually for non-standard media.
Custom Media Lowest Force - Enter the punch force value to be used for the lowest dots on a custom media type.
Custom Media Highest Force - Enter the punch force value to be used for the highest dots on a custom media type.
Paper Source - Select the tray from which you wish to print. Braille Table... - This option allows you to load a braille table. The EmFuse can store up to six
braille tables. Braille Table - Select which braille table to use when printing. Braille Dot Height - Select Low, Normal or High to control how tall the braille dots print. Duplex - Choose whether to print single sided or interpoint (double sided). If selecting interpoint,
choose whether to flip the paper over the short edge or the long edge of the page.
C. Service Settings
The Service tab provides information about and servicing functions for your EmFuse. When contacting ViewPlus Support, please have the driver and firmware versions and the serial and model numbers of your EmFuse, shown on this tab, available.

Shows Service tab
Alignment Settings o Interpoint Calibration - This button allows the user to adjust the horizontal placement of
interpoint (the placement of dots horizontally on the back side of the page with respect to the placement of dots on the front of the page). The calibration pattern is 11 cells of four dots on the front side and 11 cells of one dot on the back side. The dots on the back side have varying horizontal alignment with respect to the dots on the front. With the four-dot cells facing up, find the cell with the best interpoint alignment and count the cells, from left to right starting with 1, to determine its number. Enter this number in the Figure box.
o Print-Emboss Alignment - This function should be used if the color image does not line up with the embossed output on either or both sides of the page. To correct the print-emboss alignment on the front side of the page, choose the 'Print Front Side Pattern' button. Choose the best-aligned square from the pattern and enter its figure label in the Front Side Figure field. To correct the print-emboss alignment on the back side of the page, choose the 'Print Back Side Pattern' button. Choose the best-aligned square from the pattern and enter its figure label in the Back Side Figure field. To verify the print-emboss alignment on both sides of the page, choose the 'Print Verification Pattern' button. If either side does not match up on the verification pattern, print the alignment pattern for that side again and pick a different value from the pattern. Print the verification

pattern again. Repeat this process until the print-emboss alignment shown for both sides on the verification pattern is satisfactory.
Network Settingso Ethernet Settings - This button opens a dialog displaying the network information for the
printer, including its MAC and IP addresses. Printer Usage
o Emboss Usage - This button opens a dialog displaying embosser usage information. It includes the average solenoid lifetime remaining for each carriage in the embosser, as well as the number of pages that have been printed and the number of hours of use.
Enable Status Monitoring - Checking this box and selecting the Apply button will collect information about the printer's current status. The information will appear just below the check box and may be particularly useful when contacting ViewPlus Support.
EmFuse Information - At the bottom of the Service tab, information about your EmFuse will be displayed, including the printer driver and firmware version numbers, the EmFuse serial number and the model number.
IV. Operator Panel
A. Displays
On the EmFuse there are two display panels. The first is on the front of the embosser.
Shows embosser display panel This panel has two indicator lights and no buttons. The left light is a warning light, and it flashes when there is an error with the embosser. A flashing warning light is accompanied by an error tone. The right light is the power indicator. When lit, it indicates that power to the embosser is on. When flashing, it indicates that the embosser is receiving or processing data.
There is also a display panel on the front of the printer.

Shows printer display panel This panel has two indicator lights, eight buttons and an LCD display screen. Both indicator lights are located to the left of the large rectangular LCD display. The smaller green light, which is lit when the printer is powered on and ready and blinks when the printer is receiving or processing data, is located above the larger orange warning light. The warning light is lit when there is a notification, such as toner low, that does not prevent printing and blinks when there is an error, such as out of paper, that prevents printing. The LCD screen displays different information depending on the printer status. When the warning light is not flashing, the LCD displays the printer status, toner fill levels for all cartridges and any notifications that do not prevent printing. When the warning light is flashing, the LCD displays information about the error that is preventing printing. The LCD can also display other information when the user accesses menus through the operator panel buttons.
B. Functions
The buttons on the printer's operator panel allow the user to perform many functions. The buttons and their functions are described below in left to right order:
Shut Down/Restart (round button) - This button allows the user to reboot the printer without shutting it off.
Help (round button) - When an error occurs, pressing the help button will usually bring up more information about the error and will often give troubleshooting information.
Back (triangular button) - This button allows the user to move back a level in a menu or go back a screen in a series of screens.
Menu/Up (trapezoid-shaped button with triangular indentation pointing up) - When the printer is 'Ready to Print', pressing this button accesses the printer's menus. On menu screens, this button allows the user to scroll up in a list.
Down (trapezoid-shaped button with triangular indentation pointing down) - This button allows the user to scroll down in a list.
Enter (round button) - Pressing this button selects the currently highlighted item. On Line (round button) - If the printer is ready, pressing this button takes the printer offline. If the
printer is offline or in a menu, pressing this button returns the printer to 'Ready to Print', exiting the menus if the user had been accessing them.
Cancel - Pressing this button while the printer is receiving or printing a print job cancels printing. Any pages that have already been loaded for printing from the paper tray will be ejected from the machine.

C. Tones
When the EmFuse encounters an error, the warning light flashes on the printer and/or embosser and an error tone plays. Described below are the most common error tones. If any other error tone plays and restarting both the printer and embosser does not clear the error, consult the Service tab of the printer driver for more information.
Out of paper (high-low beep sequence repeating every four seconds) - This tone plays when there is no paper loaded in the tray from which you are attempting to print. Load more paper into the specified tray to clear the error and resume printing.
Housing open (short, high beep repeating every ten seconds) - This tone plays when one or more parts of the embosser housing are open. Ensure that the lid and door of the embosser are firmly closed.
Paper jam (high-low-high beep sequence repeating every five seconds) - Paper has jammed in the printer and/or embosser. Consult the printer's LCD or the Service tab of the driver for information on where the paper has jammed and remove the jammed paper. For more information on clearing paper jams, consult the Paper Jams section of this manual. Note: The printer's LCD refers to the embosser as the "finisher".
Cannot detect printer (short, low beep repeating every ten seconds) - The embosser is unable to contact the printer. Ensure that the printer is connected to the embosser via serial and USB cables and that the printer is powered on. This tone plays while the printer is initializing when first powered on, but should stop as soon as the printer LCD says 'Ready to Print'.
Embosser detached (two short, high beeps repeating every three seconds) - The embosser is physically detached from the printer. Connect the units and ensure that they are firmly latched. Note: The printer's LCD panel will say "Finisher is removed" when this error occurs.
V. Paper Handling
A. Paper Loading
To load paper into one of the standard paper trays, grip the handle on the front of the tray and slide the tray out. Orient the paper landscape in the tray and adjust the paper guides to fit the paper. Note: The landscape orientation of the paper in the tray is very important for proper printing. Ensure that the width of the paper (for example, 8.5" for letter-size paper) runs from the front of the tray to the back, and the length of the paper (for example, 11" for letter-size paper) runs from the left side of the tray to the right. Adjust the width guide by pressing the blue button on the front guide and sliding it toward or away from you. Release the button when the guide is in the desired position. Adjust the length guide by pressing the ridged tabs toward the bottom of the guide in and sliding the guide left or right to fit the paper. The guides should fit snugly around the paper.

The standard paper trays can automatically detect and use mainstream paper sizes (Letter, A4, Legal, A3, Tabloid, Tabloid Extra, etc). If you wish to use a custom paper size, such as 11.5" x 11" braille paper, the paper trays from which you wish to print must be configured to properly identify and load this size. To configure a paper tray for a non-standard paper size, follow these steps:
1. Turn on the printer and press the Menu button on the operator panel.2. Use the up or down arrow button to highlight the Menus option, then press the Enter button.3. Use the up or down arrow button to highlight the Tray Configuration option, then press the Enter
button.4. Use the up or down arrow button to highlight the TrayX Config option, where X is the number of
the tray being configured, then press the Enter button. Note: The trays are numbered 1 through 4 from top to bottom.
5. Use the up or down arrow button to highlight the Paper Size option, then press the Enter button.6. Use the up or down arrow button to highlight the Custom option, then press the Enter button.7. Press the Back button, then use the up or down arrow button to highlight the X Dimension option
and press the Enter button.8. Use the up or down arrow button to set the width of the paper, then press the Enter button.9. Press the Back button, then use the up or down arrow button to highlight the Y Dimension option
and press the Enter button.10. Use the up or down arrow button to set the length of the paper, then press the Enter button.11. Press the On Line button to exit the menus and ready the printer for printing.
Paper can also be loaded into the multipurpose (MP) tray, located toward the top of the right side of the printer. To load paper into this tray, press the tray release button in the center of the top of the tray and rotate the tray down. Rotate the tray extension out, and swivel the paper supports on the bottom of the tray extension out into their locked positions. Place paper in the MP tray and adjust the paper guides to fit snugly to the sides of the stack of paper.

If the paper is not a standard size, set the paper size in the printer following the directions above, selecting MPTray Config instead of TrayX Config in Step 4.

B. Paper Jams
Occasionally paper may jam in the embosser or printer. If this happens, turn off the embosser and the printer and follow the directions below to check for and clear paper jams.
In the embosser - There are several locations through which to clear a paper jam in the embosser.
o Through the front door - Check this location if paper is jammed in the paper buffer (also called the inverter) in the embosser.
Open the front door by gripping it just below the printer's power switch and pulling gently forward. The door swings forward, allowing access to the paper buffer area.
The paper buffer area is between two pieces of sheet metal on the right side of the embosser near the printer. Reach between the sheet metal guides and remove the jammed paper.

After removing the jammed paper, close the front door of the embosser by swinging it shut and pressing gently until it latches.
o Through the lid - Check this location if the paper jam is reported in the embosser in a location other than the paper buffer (inverter).
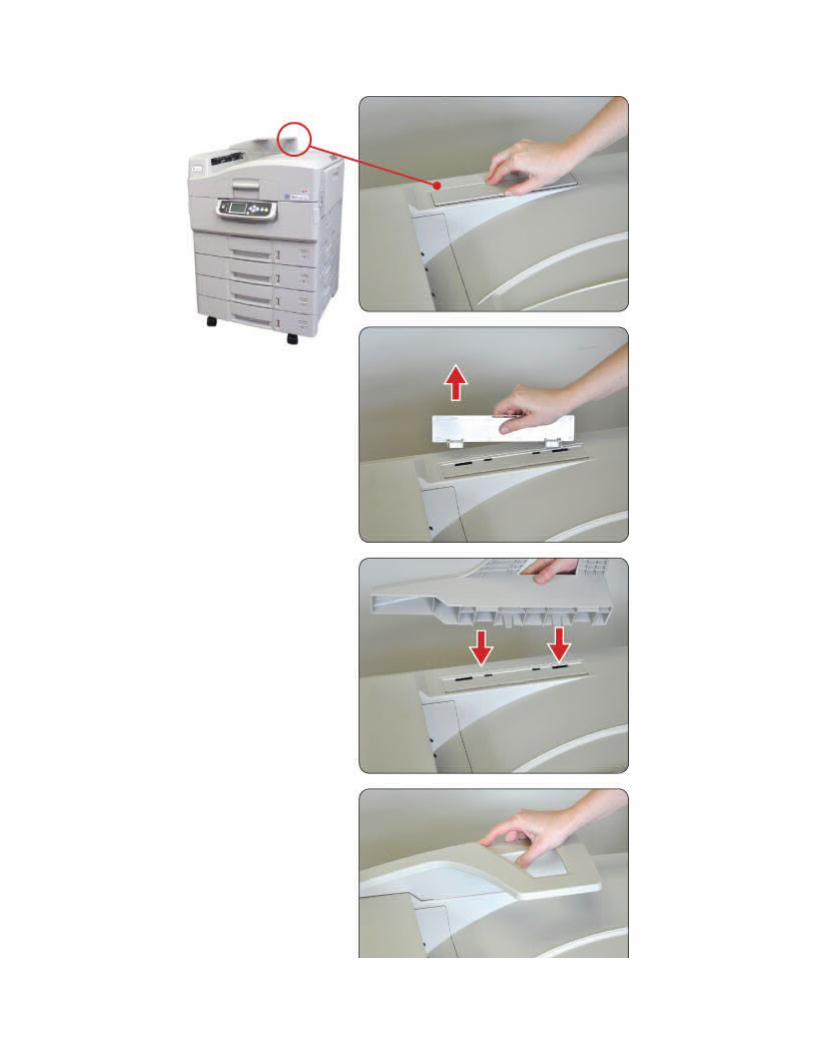
Remove the output paper tray. To do this, first empty the output tray of paper, then unscrew the three thumbscrews on the underside of the tray. Lift the tray up and out of the printer.

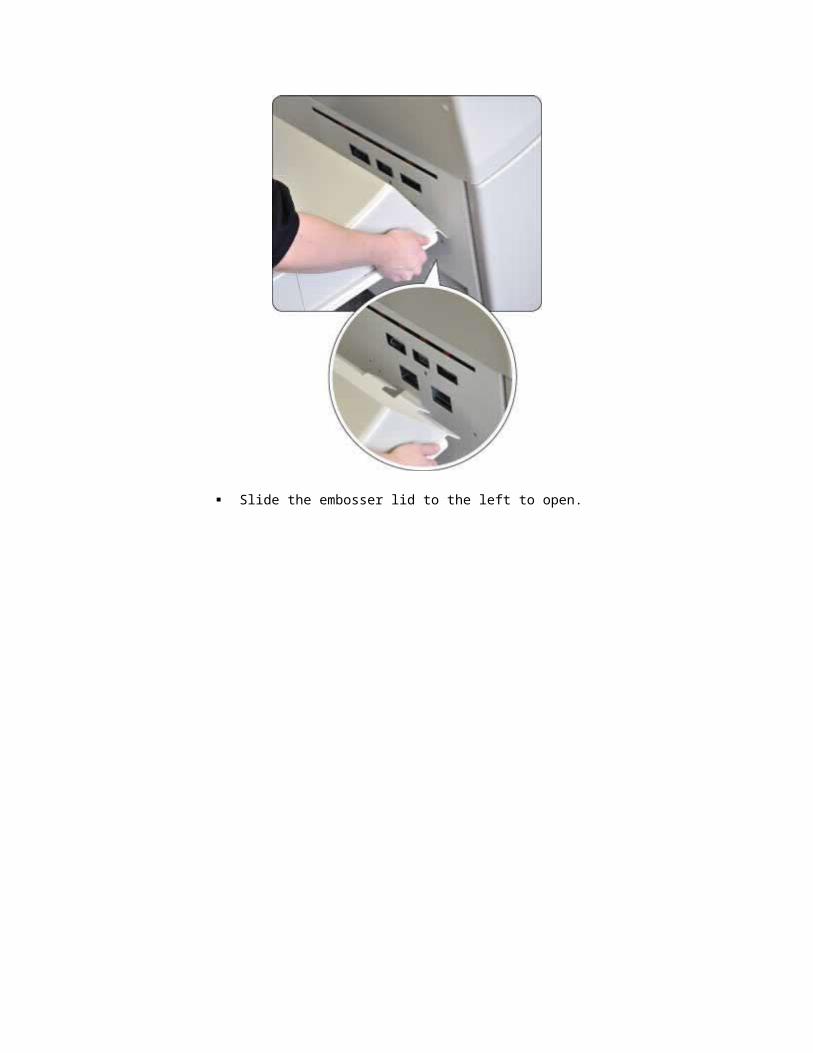
Slide the embosser lid to the left to open.

Open the paper jam clean-out close to the printer by lifting the handle. Check for jammed paper. If paper is visible with the clean-out open, grip it firmly and apply firm, even pressure to remove the paper. Close the clean-out by pressing down on the handle, using caution to avoid slamming it shut.

If the paper jam can not be cleared from the paper jam clean-out, check the area of the embosser near the paper exit. If paper is visible in this area, grip the paper firmly and apply firm, even pressure to remove the paper.
Close the embosser lid by sliding it to the right until it settles into place. Reinstall the output paper tray by inserting the flanges through the slots in the
case and sliding the tray down. Fasten the thumbscrews.o In between the embosser and printer
Open the front door of the embosser. Grip the release handle near the printer's power switch and rotate away from the
printer to release the latch between the printer and embosser. Roll the embosser away from the printer a few inches.
o Remove the jammed paper.o Roll the embosser up against the printer and apply gentle pressure until it latches into
place. In the printer - There are many locations through which to clear a paper jam in the printer. The
printer's LCD panel will often display a helpful diagram showing where the paper is jammed, and pressing the help button will display instructions on how to clear the jam. To access this information, switch the printer on and follow the instructions. Alternatively, you can check the printer for jammed paper while it is switched off by following the instructions below.
o Through the lid - Check this location for jammed paper if the printer reports a "top cover" paper jam. Note: Use caution to avoid touching the fuser unit at the left of the printer when the printer lid is open. The fuser can be very hot.
Squeeze the lid release under the handle in the printer's top lid and rotate the lid upward.

Squeeze the blue toner rack release at the front right of the opening and rotate the toner rack upward.
Remove any paper under the toner rack. If there is paper partway through the fuser unit at the left of the printer, wait until
the fuser has cooled before clearing the paper. Release the blue fuser lock at the front of the fuser unit by rotating it to
the right. Lift the fuser by the handle and remove the jammed paper. Replace the fuser and lock it back into place.
Gripping the toner rack handle in the center, rotate the toner rack back into place and press gently until it latches.
Rotate the printer lid back into place and press gently until it latches.o Through the side doors - On the right side of the printer, below the MP tray, are four
doors. Check these locations for jammed paper if the printer reports a "side door" paper jam.

Open the top side door by squeezing the release, located in the center of the door just below the MP tray, and rotating it down.
Remove any jammed paper, then rotate the door back up until it latches closed securely.
Repeat the process for the remaining three side doors beneath the top side door.
o Through the duplexer - Check this location if the printer reports a paper jam in the duplexer.
Open the front door of the embosser. Grip the release handle near the printer's power switch and rotate away from the
printer to release the latch between the printer and embosser. Roll the embosser away from the printer.

Open the duplexer, located above the alignment pins for the embosser, by pressing the grey button on the front side of the duplexer door and rotating it downward.
Release the door by gripping the black door rotation channel at the back of the duplexer door and gently pressing the duplexer door toward the back of the printer.
Pull out the duplexer unit by rotating the duplexer latches on either side of the duplexer just above the duplexer door hinge downward. This releases the duplexer.
Slide the duplexer part of the way out of the printer.
Lift the duplexer access panels and remove any paper on top of or below them.

Slide the duplexer back into the printer. Rotate the duplexer door up, press it back toward the back of the printer gently
and hook the black door rotation channel back around the pin on the duplexer. Close the duplexer door firmly. Roll the embosser up against the printer until it latches into place. Close the front door of the embosser.
VI. Replacing Printer Consumables
A. Toner Cartridges
The EmFuse will display a warning message on the printer's display panel when toner is getting low. When a toner cartridge runs out, the printer will not print until the cartridge is replaced.

Additional toner cartridges can be purchased from ViewPlus. For replacement cartridges, use the following:
Black toner cartridge, product number 150-52125304 Cyan toner cartridge, product number 150-52125303 Magenta toner cartridge, product number 150-52125302 Yellow toner cartridge, product number 150-52125301
Toner cartridge packages may also be available. Please visit our website at www.viewplus.com for package availability and pricing information.
To replace a toner cartridge, first open the printer's top lid by squeezing the lid release under the handle in the center of the lid and rotating the lid upward. Note: If you have been printing, let the printer's fuser cool before reaching into the printer to replace the toner cartridge. Locate the toner cartridge you wish to replace; in order from left to right, the cartridges are cyan, magenta, yellow and then black.
Remove the new toner cartridge from the box and from the plastic bag. Save the plastic bag. Unlock the old toner cartridge by rotating the blue toner lock switch at the front of the cartridge counterclockwise until it stops. Carefully lift the old toner cartridge from the printer, place it in the plastic bag and discard it. Shake the new toner cartridge gently, then turn it upside down and remove the white plastic tape.

Insert the new toner cartridge into the printer by lining it up with its corresponding image drum and turning it carefully right-side up as you place it into the image drum. Rotate the toner lock switch clockwise until it stops to lock the new toner cartridge into place, then close the printer lid.
B. Image Drums
The EmFuse will display a warning message on the printer's display panel when an image drum is nearing the end of its life. When an image drum reaches the end of its life, the printer will stop printing until the drum is replaced. Additional image drums can be purchased from ViewPlus. For replacement drums, use the following:
Black image drum, product number 151-56127004 Cyan image drum, product number 151-56127003 Magenta image drum, product number 151-56127002 Yellow image drum, product number 151-56127001
Image drum packages may also be available. Please visit our website at www.viewplus.com for package availability and pricing information.
To replace an image drum, first open the printer's top lid by squeezing the lid release under the handle in the center of the lid and rotating the lid upward. Note: If you have been printing, let the printer's fuser cool before reaching into the printer to replace the image drum. Locate the toner cartridge for the image drum you wish to replace; in order from left to right, the cartridges are cyan, magenta, yellow and then black.

Remove the new image drum from the box and from the plastic bag. Save the plastic bag. Set the new image drum on a flat, level surface like a desk. Remove the image drum and toner cartridge assembly for the image drum you wish to replace from the printer by lifting it up and then out of the printer. Set the cartridge and drum assembly next to the new drum, oriented the same direction. Remove the orange packaging from the new image drum carefully and discard the packaging. Unlock the toner cartridge from the old drum by rotating the blue toner lock switch at the front of the cartridge counterclockwise until it stops. Carefully lift the toner cartridge from the old image drum and place it into the new drum, using caution not to spill the toner. Rotate the toner lock switch clockwise until it stops to lock the toner cartridge into place, then place the image drum and toner cartridge assembly back into the printer and close the printer lid.

Place the old image drum into the plastic bag and discard it.
C. Transfer Belt
The EmFuse will display a warning message on the printer's display panel when the transfer belt is nearing the end of its life. When the transfer belt reaches the end of its life, the printer will stop printing until the belt is replaced. Additional transfer belts can be purchased from ViewPlus. The replacement belt product number is 153-42931602. Please visit our website at www.viewplus.com for pricing information.
To replace the transfer belt, first open the printer's top lid by squeezing the lid release under the handle in the center of the lid and rotating the lid upward. Note: If you have been printing, let the printer's fuser cool before reaching into the printer. Remove all four image drum and toner cartridge assemblies from the printer by lifting each one up and out of the printer. Place them on a flat, level surface like a desk.

To remove the old transfer belt, rotate the blue transfer belt locks at the front and back of the right side of the printer (underneath the yellow image drum) counterclockwise.
Using the blue handles at the left and right sides of the transfer belt, lift the old transfer belt up and out of the printer. Remove the new transfer belt from its packaging. Orient the new transfer belt in the same direction as the old one and install it into the printer. Rotate the transfer belt locks clockwise to lock the transfer belt into place. Place the image drum and toner cartridge assemblies back in the printer and close the printer lid.

D. Fuser
The EmFuse will display a warning message on the printer's display panel when the fuser is nearing the end of its life. When the fuser reaches the end of its life, the printer will stop printing until the fuser is replaced. Additional fusers can be purchased from ViewPlus. For replacement fusers, use the following:
Fuser (120V), product number 153-42931701 Fuser (230V), product number 153-42931702
Please visit our website at www.viewplus.com for pricing information.
To replace the fuser, first open the printer's top lid by squeezing the lid release under the handle in the center of the lid and rotating the lid upward. Note: If you have been printing, let the fuser cool before reaching into the printer. The fuser is located on the left side of the printer. To remove it, rotate the blue fuser lock clockwise until it stops to unlock it, then lift it up and out of the printer. Discard the old fuser.

Remove the new fuser from its packaging. Orient it with the blue fuser lock toward the front of the printer and lower the fuser into the printer. Lock it into place by rotating the blue fuser lock counterclockwise until it stops and close the printer lid.
E. Waste Toner Box
The EmFuse will display a warning message on the printer's display panel when the waste toner box is getting full. When the box can no longer accept waste toner, the printer will stop printing until the waste toner box is replaced. Additional waste toner boxes can be purchased from ViewPlus. For replacement boxes use product number 152-57108501. Please visit our website at www.viewplus.com for pricing information.
To replace the waste toner box, lift the printer's display panel until it is parallel with the floor. Grip the waste toner box access panel handles on both sides of the printer and rotate the panel down.

Press the blue tab at the top right of the waste toner box and rotate the box down. Remove the box from the printer.
Remove the clear plastic cap from the top right side of the waste toner box (next to the blue tab) and place it over the hole in the back of the box. Discard the waste toner box.

Remove the new waste toner box from its packaging. With the blue tab at the top right of the box, insert it bottom edge first into the printer and rotate the top edge up until it locks into place.
Rotate the access panel up until it latches into place. If desired, tilt the printer's display panel back down.
VII. Braille, Translation and Printing
A. ViewPlus Tiger Software Suite
Most braille should be produced using the Tiger Software Suite. The Tiger Software Suite is part of your embosser package. Instructions for installation and use come with the software package.

B. Fonts
Tiger screen fonts are alternative braille fonts installed during the installation of the ViewPlus EmFuse driver. They can be chosen as output options in Tiger Software Suite (TSS) and other software programs like MathType. Tiger screen fonts appear as standard text characters on the screen and print as braille dot patterns. It is very important to use the default font size and spacing for braille fonts. If the font size or spacing is changed, the braille will not be printed with the correct standards. For Tiger fonts, a point size of 36 is suggested. Most other braille fonts will use a point size of 29. Characters or text not translated to braille will print as graphic images of the visual character. This enables embossing of visual print characters.
C. Math and Braille
The Tiger Software Suite can be used to translate math equations to braille. MathType by Design Science can be used with Tiger braille fonts for producing spatial math equations. More information on MathType can be found on the ViewPlus website.
D. Printing
Most documents should be prepared using the ViewPlus Tiger Software Suite (TSS). Instructions for use come with the software package. When not using TSS, the following steps should be used to print to the ViewPlus EmFuse:
Open the document to be printed. Note: Most document types can be printed, but documents containing text must either be translated with TSS, use one of the braille fonts included with the printer driver or use the EmFuse in legacy mode in order to print braille.
Open the program's File menu and choose Print. On the Print dialog, make sure the EmFuse is selected. Choose the Properties button next to the
printer name and ensure that the correct paper size and print options are selected. Choose OK on the Printer Properties dialog to save any changes and close the dialog. Choose OK on the print dialog to print the document.
Visit the Downloads section of the ViewPlus website at http://downloads.viewplus.com/ for access to example documents and helpful tutorials.

VIII. Support, Maintenance and Warranty
A. Training and Support Packages
Tutorials and other support materials are available on the ViewPlus website. For these resources and other support inquiries, please visit http://www.viewplus.com/support/. Additional training and support is available for purchase through your authorized ViewPlus distributor or from ViewPlus Technologies.
B. Maintenance and Technical Support
It is important to choose a suitable location for the ViewPlus EmFuse. The location should be sturdy and level. The EmFuse should not be exposed to direct sunlight, extreme heat, cold, dust or humidity. The AC power outlet must be compatible with the plugs of the EmFuse power cords. Dot quality should be monitored; poor alignment can cause permanent damage to the platens of the embosser. Software updates can be downloaded from the ViewPlus Technologies web site. You should occasionally check the web site for the latest developments. There is also a support page with helpful hints on the ViewPlus web site. Additional support packages can be purchased from ViewPlus Technologies. For technical support questions, contact your ViewPlus embosser sales representative if you did not purchase directly from ViewPlus Technologies. If you purchased directly from ViewPlus Technologies:
In the US/Canada:
Visit us on the web at http://www.viewplus.com/support/, E-mail [email protected], or Call +1 (541) 754-4002 and select the support option (Monday through Friday from 9 AM to 5 PM
Pacific time).
In Europe:
Visit us on the web at http://www.viewplus.eu/support/, E-mail [email protected], or Call +31 77 76 76 001 and select the support option.
Outside of the US/Canada or Europe:
Visit us on the web at http://www.viewplus.com/support/, E-mail [email protected], or Call +1 (541) 754-4002 and select the support option (Monday through Friday from 9 AM to 5 PM
Pacific time).

C. Warranty
For information on your product warranty, please visit our web site. Select the appropriate link to your warranty information based on your region from the choices below.
For the US/Canada, please see your manufacturer's warranty information at http://www.viewplus.com/support/warranty
For Europe, please see your manufacturer's warranty information at http://www.viewplus.eu/support/warranty
For Asia, please see your manufacturer's warranty information at http://www.viewplus.com/support/warranty
For South America, please see your manufacturer's warranty information at http://www.viewplus.com/support/warranty
For Australia, please see your manufacturer's warranty information at http://www.viewplus.com/support/warranty
For Africa, please see your manufacturer's warranty information at http://www.viewplus.com/support/warranty
D. Extended Warranty and Maintenance Plan
An extended warranty and maintenance plan may be available through ViewPlus Technologies or your ViewPlus representative. Availability is limited to customers with valid existing warranty.