search.ca.com · web viewmake sure the java path is set for the system environment variable and...
TRANSCRIPT

CA Patch Manager – CA Service Desk Manager Integration
Configuration steps on the CA Service Desk Manager machine
1. Create a batch file named capminteg.bat in any directory. In this example, the file is created directly in the c:\ directory.
2. Make sure the java path is set for the system environment variable and copy the following command to the batch file:java -Djava.class.path="<Path to event.jar>" com.ca.unicenter.upm.eventmanager.UPMEMSAck "http://<Patch Manager Server Name>/upm/services/UPMEMS" %2 true
3. Copy the event.jar file located under <Patch Manager Installation Directory>\bin from the Patch Manager (PM) machine to the Service Desk Manager (SDM) machine where the file capminteg.bat is placed.
4. Create a remote reference in SDM using the following steps:
From the main CA SDM window, click the Administration tab and select Servicedesk, Application Data, Remote References. Click Create New on the left side of the window. Complete the fields in the Create New Remote Reference window as shown in the following screenshot and click Save.
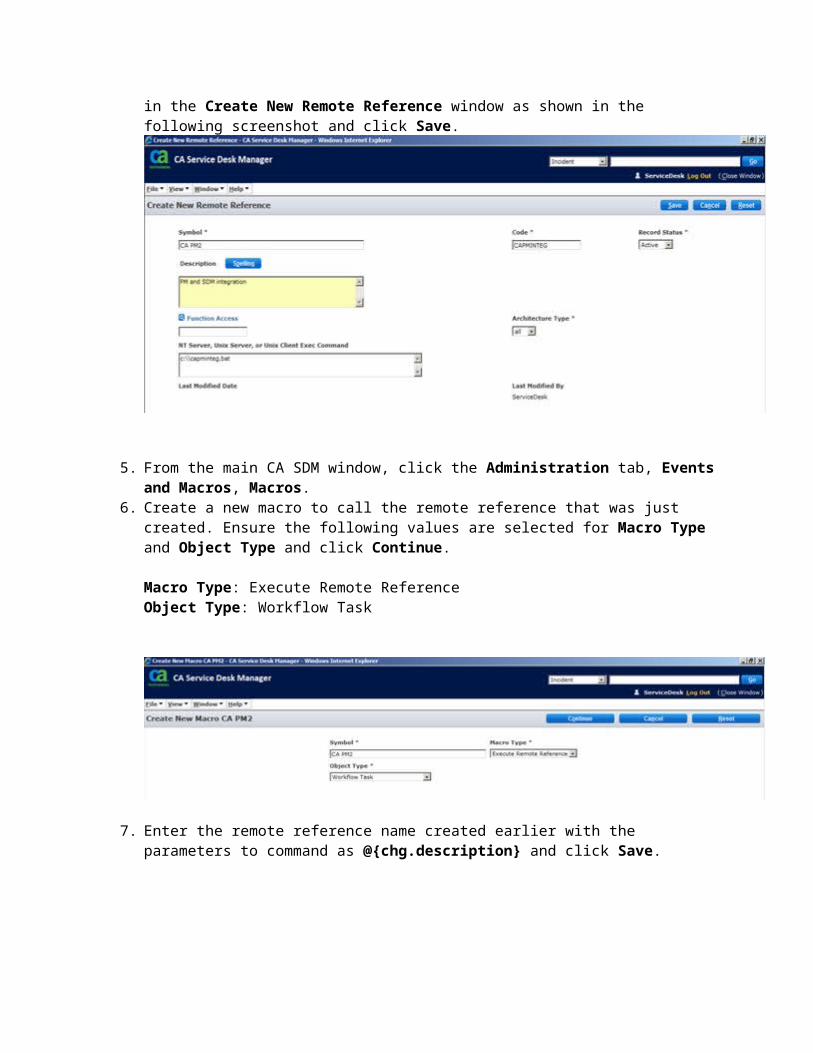
5. From the main CA SDM window, click the Administration tab, Events and Macros, Macros. 6. Create a new macro to call the remote reference that was just created. Ensure the following
values are selected for Macro Type and Object Type and click Continue.
Macro Type: Execute Remote Reference Object Type: Workflow Task
7. Enter the remote reference name created earlier with the parameters to command as @{chg.description} and click Save.

8. Create a new change order category. Example: PM.IT.Workstation.Config.

9. Add a work flow task named Approval, and in the task behavior for the approve status, add the macro previously created in step 7 as the action on true.


Create Change Order Template in CA Service Desk Manager
A CA SDM change order template is a change order model that is used when creating new change orders. Create a change order template for each status selected in the Patch Manager Administration tab.
Follow these steps to create a change order template:
1. Log in to CA SDM as an Administrator or Analyst.2. Click the Service Desk tab and choose File, New Change Order.3. Enter the information for the new change order.
4. Click the Additional Information tab and then the Template tab.5. In the Template Name field, enter a name for the change order template.

6. Click Save to save this change order as a template.
The change order template is created.
Configuration steps on the CA Patch Manager machine
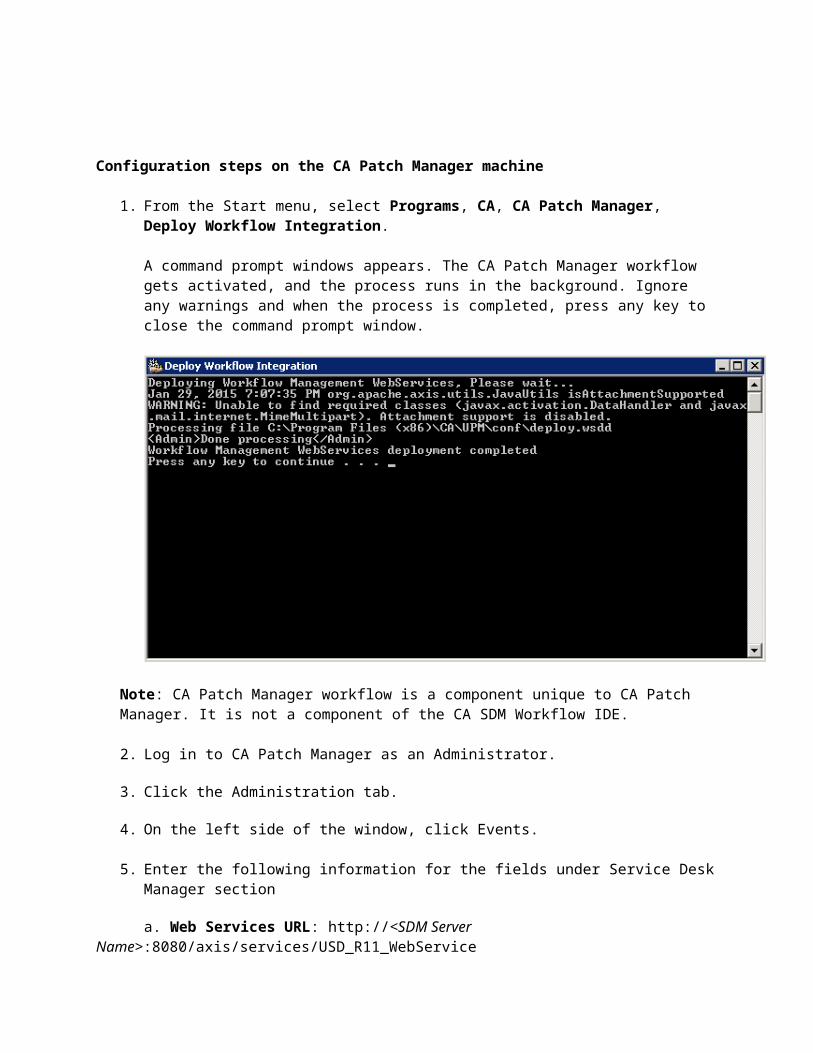
1. From the Start menu, select Programs, CA, CA Patch Manager, Deploy Workflow Integration.
A command prompt windows appears. The CA Patch Manager workflow gets activated, and the process runs in the background. Ignore any warnings and when the process is completed, press any key to close the command prompt window.
Note: CA Patch Manager workflow is a component unique to CA Patch Manager. It is not a component of the CA SDM Workflow IDE.
2. Log in to CA Patch Manager as an Administrator.
3. Click the Administration tab.
4. On the left side of the window, click Events.
5. Enter the following information for the fields under Service Desk Manager section
a. Web Services URL: http://<SDM Server Name>:8080/axis/services/USD_R11_WebService Note: The URL mentioned above is applicable to SDM 12.9.
b. User: ServiceDesk
c. Password: Enter the password of the ServiceDesk user.
Note: As a best practice, replace the CA SDM user with a different user (that is, System_UPM_generated). This name is used when configuring CA Patch Manager. This user must exist in CA SDM and the Access type must be Analyst.

6. Under the Event Notification section, select the required action - Patch Acceptance, Patch Deferral, Patch Approval, Patch Deployment, Policy Update. Specify the corresponding SDM change order template for each action.
Note: For each action selected in this step, a Change Order Template should exist in CA SDM.
This completes the configuration of integration.
Testing the Integration
To verify that the integration is working correctly, follow these steps:
Note: The below steps assume that the integration is configured for Patch Acceptance action and the change order which gets created automatically is intended to be Approved.
1. Log in to CA Patch Manager.
2. From the Dashboard tab, click one of the patches in the Patches Pending Acceptance portlet. On the Patch Details page, select Accept as the action and click on Go. The status of the patch should automatically change to pending_workflow_acceptance. The event is recorded in upm.log file and can also be seen from Dashboard -> Status page as shown below.
Note: The event is recorded as an Informational severity event. Please ensure to select Informational under Show Severity to be able to view the message.

If the integration is successful, a new change order is created in CA SDM, as illustrated in the following sample window. The description contains all the information defined in CA Patch Manager for the patch, as well as the Status based on the Workflow functionality active in CA Patch Manager.

3. Click on the Seq link of the Approval workflow task. On the subsequent window that appears, click Edit and set the status to Approve. This will set the status of the approval task as Approved.

4. Now, on the change order details page, click on the Activities drop down on the top menu bar and select Update Status. On the pop-up window that appears, set the New Status as Approved and click Save. This will set the status of the change order as Approved.
5. An acknowledgement will be received on Patch Manager for the workflow id. This will move the patch status from Pending_Workflow_Acceptance to Accepted state and upon successful packaging, the status is set to Testing.
