videoscape control suite database user guide - cisco.com · space, such as a non-partitioned table...
TRANSCRIPT

OL-28290-01
Videoscape Control Suite Database
User Guide


Please Read
Important
Please read this entire guide. If this guide provides installation or operation instructions, give particular attention to all safety statements included in this guide.

Notices
Trademark Acknowledgments
Cisco and the Cisco logo are trademarks or registered trademarks of Cisco and/or its affiliates in the U.S. and other countries. To view a list of Cisco trademarks, go to this URL: www.cisco.com/go/trademarks.
Third party trademarks mentioned are the property of their respective owners.
The use of the word partner does not imply a partnership relationship between Cisco and any other company. (1110R)
Publication Disclaimer
Cisco Systems, Inc. assumes no responsibility for errors or omissions that may appear in this publication. We reserve the right to change this publication at any time without notice. This document is not to be construed as conferring by implication, estoppel, or otherwise any license or right under any copyright or patent, whether or not the use of any information in this document employs an invention claimed in any existing or later issued patent.
Copyright
© 2013 Cisco and/or its affiliates. All rights reserved.
Information in this publication is subject to change without notice. No part of this publication may be reproduced or transmitted in any form, by photocopy, microfilm, xerography, or any other means, or incorporated into any information retrieval system, electronic or mechanical, for any purpose, without the express permission of Cisco Systems, Inc.

OL-28290-01 iii
Contents
About This Guide v
Chapter 1 Oracle Database 1
Terminology ............................................................................................................................. 2 Preparing the Oracle Database............................................................................................... 3 Tablespace_Builder: Manual Installation or Upgrade ........................................................ 4 Using the Tablespace_Builder Oracle Stored Procedure .................................................... 5 Creating Tablespaces Manually ........................................................................................... 10 Increasing the Maximum Number of Datafiles Allowed in the Oracle System ............ 12 Rectifying Misspelled or Incorrect Component Names ................................................... 13
Chapter 2 Oracle Database Configuration for the Videoscape Control Suite Installation 15
Required Users for the Videoscape Control Suite Installation ........................................ 16 Prepare Oracle for UPM ........................................................................................................ 17 Migrating AlertManager Oracle Data ................................................................................. 18 Create the External Oracle User ........................................................................................... 21 Create the AlertManager Oracle User ................................................................................. 23 Create the ECS User ............................................................................................................... 24 Configure Oracle for TMS .................................................................................................... 25 Configure Oracle for PPS ...................................................................................................... 26
Chapter 3 The NOSQLCB Server 27
Configure the NOSQLCB Server for Auto-Failover ......................................................... 28 Rebalance NOSQLCB Servers to Remove a Failed Node ................................................ 29 Add a Node Back/Add a Node to the Cluster .................................................................. 31 GUI Operations on the NOSQLCB Servers ........................................................................ 32 Types of Resources ................................................................................................................ 35 NOSQLCB COP Support of LVM ........................................................................................ 36 Troubleshooting the NOSQLCB Server .............................................................................. 49
Chapter 4 Customer Information 51
Appendix A Tablespace_builder File Creation 53
Creating the Tablespace_builder File .................................................................................. 54

Contents
iv OL-28290-01
Appendix B The TmsDbLayer_create_tables-3.36.0-2.sql Script 63
TmsDbLayer_create_tables-3.36.0-2.sql .............................................................................. 64
Appendix C The Create_PPS_database_3_36_2-0.sql Script 81
Create_PPS_database_3_36_2-0.sql ..................................................................................... 82

About This Guide
OL-28290-01 v
About This Guide
Introduction
This Cisco Videoscape Control Suite Database User Guide describes the steps necessary to configure the Oracle and NoSQLCB databases for use with the Videoscape Control Suite.
The Oracle section explains the types of users needed for the installation of the Videoscape Control Suite, as well as the numerous COP files (AlertManager(AM), User Profile Manager(UPM), Target Messaging Service(TMS), Personal Purchase Service(PPS), and Explorer Control Suite(ECS)) that require the Oracle database.
The NoSQLCB section explains what configurations need to be in place on the Couchbase server, as well as the operation of the CMC UI options associated with the NoSQLCB server.
Installation
See the following publications for additional information about this Videoscape Control Suite release:
Getting Started Guide for Videoscape Control Suite (OL-27702)
Installing COP Files for the Videoscape Control Suite (part number OL-27753)
Document Version
This is the first formal release of this document.


OL-28290-01 1
Introduction
This chapter describes the manual installation, usage, and limitations of the Tablespace_Builder Oracle Stored Procedure, which is part of all new Videoscape Control Suite database installations and described in the Oracle RAC Installation Guide, from NDS. When the Tablespace_Builder Oracle Stored Procedure is not present, or is in need of an update, the procedure can be executed manually, as well.
The procedures contained in this chapter create two standard tablespaces for each component. One of the tablespaces is intended for data and the other for indices. Each tablespace is created with two datafiles.
1 Chapter 1 Oracle Database
In This Chapter
Terminology ............................................................................................ 2
Preparing the Oracle Database ............................................................. 3
Tablespace_Builder: Manual Installation or Upgrade ....................... 4
Using the Tablespace_Builder Oracle Stored Procedure................... 5
Creating Tablespaces Manually .......................................................... 10
Increasing the Maximum Number of Datafiles Allowed in the Oracle System ........................................................................................ 12
Rectifying Misspelled or Incorrect Component Names .................. 13

Chapter 1 Oracle Database
2 OL-28290-01
Terminology Following is a short glossary of terms crucial to the understanding of this chapter, as well as a list of the acronyms and abbreviations used in the chapter.
Term Definition
Oracle Instance A set of dedicated O.S. processes which are associated to one, and only one, set of database files which are located on a storage device that is physically connected to the same computer.
Oracle Database Server An Oracle Instance connected to an Oracle Database whose data files (database files) are physically connected to the computer.
Oracle Stored Procedure A piece of code which can be invoked that is stored in the Oracle database.
Datafile A file which can be used for the storage of the data of multiple database base-level objects.
Tablespace A logical entity which is always associated with one or more physical data files. All base-level objects which consume space, such as a non-partitioned table or index, reside in one, and one only, tablespace. The data of such a base-level object can reside in multiple datafiles, all of which must be associated with the tablespace. It is not possible to choose in which datafile new data will be physically stored. It can be physically stored in any of the datafiles which are online and have space available.
ASM Oracle’s Automatic Storage Management System, which includes the functions of a file system and volume manager.

Preparing the Oracle Database
OL-28290-01 3
Preparing the Oracle Database Create database entries, as follows:
1 Create the SYSTEM user in Oracle.
2 Give the SYSTEM user the following access: su - oracle
sqlplus / as sysdba
SQL> GRANT CREATE TABLESPACE TO SYSTEM;
SQL> GRANT SELECT ON dba_tablespaces TO SYSTEM;
SQL> GRANT SELECT ON dba_data_files TO SYSTEM;
SQL> GRANT SELECT ON v_$database TO SYSTEM;
3 See Tablespace_builder File Creation (on page 53) for the Tablespace_builder file creation procedure.

Chapter 1 Oracle Database
4 OL-28290-01
Tablespace_Builder: Manual Installation or Upgrade
1 Installation is generally not required, because all MGDB rpms now install the TableSpace_Builder Oracle stored procedure upon database creation. In order to verify if the procedure exists in your database, execute the following SQL statement as the the SYS user. su – oracle
. /opt/oracle/SID.env
sqlplus / as sysdba
COL Status FORMAT A15
SELECT DECODE(COUNT(*),0,’Does Not Exist’,’Exists’) Status
FROM dba_source
WHERE name = 'TABLESPACE_BUILDER'
AND owner = ‘SYSTEM’;
2 If the stored procedure either does not exist or needs to be updated, then continue to perform all of the steps in this section.
3 The following SQL statement grants explicit database privileges to the SYSTEM Oracle user. These commands must be run as the Oracle SYS user. su – oracle
. /opt/oracle/SID.env
sqlplus / as sysdba
GRANT CREATE TABLESPACE TO SYSTEM;
GRANT SELECT ON dba_tablespaces TO SYSTEM;
GRANT SELECT ON dba_data_files TO SYSTEM;
GRANT SELECT ON v_$database TO SYSTEM;
4 Installing or upgrading the TableSpace_Builder Oracle stored procedure must be done as the Oracle SYSTEM user. . /opt/oracle/SID.env
sqlplus SYSTEM/<SYSTEM_PASSWORD>
@tablespace_builder_proc.sql
5 Repeat step 1 in order to verify that the procedure has been successfully installed in the database.

Using the Tablespace_Builder Oracle Stored Procedure
OL-28290-01 5
Using the Tablespace_Builder Oracle Stored Procedure
The procedure must be run as the Oracle SYSTEM user, which can be connected to the database from either the Oracle server or any other client server which is connected to it.
Pre-Execution Checks 1 In order to successfully execute the Tablespace_Builder Oracle Stored Procedure,
verify the existence of these five conditions.
a Whether tablespaces already exist with the name(s) of those that will be created upon invocation of the procedure.
– su – oracle
. /opt/oracle/SID.env
sqlplus / as sysdba
OR
– sqlplus SYSTEM/<SYSTEM_PASSWORD>
SELECT DECODE(COUNT(*),0,’Tablespace Does Not Exist’,
1,’Tablespace Exists’)
FROM dba_tablespaces
WHERE tablespace_name = ‘COMPONENT_DATA_SPACE’;
SELECT DECODE(COUNT(*),0,’Tablespace Does Not Exist’,
1,’Tablespace Exists’)
FROM dba_tablespaces
WHERE tablespace_name = ‘COMPONENT_INDEX_SPACE’;
b Whether datafiles already exist with the same name and path as those that will be created upon invocation of the procedure.
i Obtain the path of the first datafile associated with the SYSTEM tablespace.
– su – oracle
. /opt/oracle/SID.env
sqlplus / as sysdba
OR
– sqlplus SYSTEM/<SYSTEM_PASSWORD>
SELECT SUBSTR(file_name,1,INSTR(file_name,'/',-1))
FROM sys.dba_data_files
WHERE tablespace_name = ‘SYSTEM’
AND ROWNUM < 2;

Chapter 1 Oracle Database
6 OL-28290-01
ii Now, using the path from step (i) or an alternative path if you plan to use one, verify that there are no files with the names of those that will be created. ls –ltrah
PATH_OR_ALTERNATIVE_PATH/component_data_SID_01.dbf
ls –ltrah
PATH_OR_ALTERNATIVE_PATH/component_data_SID_02.dbf
ls –ltrah
PATH_OR_ALTERNATIVE_PATH/component_index_SID_01.dbf
ls –ltrah
PATH_OR_ALTERNATIVE_PATH/component_index_SID_02.dbf
c The maximum number of datafiles and tempfiles that the Oracle engine will allow to be created in the particular database. su – oracle
. /opt/oracle/SID.env
sqlplus / as sysdba
SHOW PARAMETER files
d The number of datafiles and tempfiles that already exist in the database.
– su – oracle
. /opt/oracle/SID.env
sqlplus / as sysdba
OR
– sqlplus SYSTEM/<SYSTEM_PASSWORD>
SELECT SUM(file_count)
FROM (SELECT COUNT(*) file_count
FROM dba_data_files
UNION
SELECT COUNT(*) file_count
FROM dba_temp_files);
Note: If the number of datafiles and tempfiles that already exist in the database, plus four, is greater than the maximum number of datafiles and tempfiles that the Oracle engine will allow to be created in the particular database, then it is necessary to increase this limitation.
e The availability of sufficient free space on the file system where the datafiles will be created. This can be checked by issuing the following command.
du –h PATH_OR_ALTERNATIVE_PATH
Note: If the above total is under 128 MBs, which is four files (each 32 MBs), then there is insufficient disk space at that location.

Using the Tablespace_Builder Oracle Stored Procedure
OL-28290-01 7
Parameters
The Tablespace_Builder Oracle Stored Procedure has two parameters which control its behavior:
COMPONENT (Mandatory)
Note: These are the restrictions:
The length of a component name cannot exceed 18 characters.
The legal characters for a component name are:
[ a - z ], [ A - Z ], [ 0 - 9 ], _ , $ , #
The Legal characters for the first character of a component name are:
[ a - z ], [ A - Z ]
A tablespace with the same name of those that will be created cannot already exist.
A datafile with the same name in the same location of those that will be created cannot already exist in the same location.
If the parameter ALTERNATIVE_DATAFILE_LOCATION is used, the directory designated by its value must already exist, be owned by the O.S. oracle user, and have sufficient space available to create the datafiles.
The procedure will work only for computers with Oracle Servers which have either a Unix or Linux O.S.
This parameter is the name of the required component. It is used as the base name for these items:
The tablespace names
– The tablespace name for data — <COMPONENT>_DATA_SPACE
– The tablespace name for indices — <COMPONENT>_INDEX_SPACE
Important: The component name for the tablespace name is always in UPPERCASE letters and prefixed to both _DATA_SPACE and _INDEX_SPACE, as shown in the previous list.
The datafile names:
– The first datafile name for data — <component>_data_SID_01.dbf
– The second datafile name for data — <component>_data_SID_02.dbf
– The first datafile name for indices — <component>_index_SID_01.dbf
– The second datafile name for indices — <component>_index_SID_02.dbf
Important: The component name for the datafile name is always in lowercase letters and prefixed to to both _data_SID_01/2.dbf and _index_SID_01/2.dbf, as shown in the previous list.

Chapter 1 Oracle Database
8 OL-28290-01
ALTERNATIVE_DATAFILE_LOCATION (Optional)
This parameter is the path of the O.S. directory where the datafiles will be created.
Important: The value of this parameter defaults to the directory where the first datafile of the SYSTEM tablespace has been created.
- /oradata/SID/ (for file systems)
- +ORADATA/sid/datafile/ (for ASM)
Execution
The Tablespace_Builder Oracle Stored Procedure must be executed by the Oracle SYSTEM user from either the Oracle server or from any client server that is connected to an active Oracle Instance in either of the following two methods:
Positional Dependent Invocation EXEC tablespace_builder('Componen>');
OR EXEC
tablespace_builder('Component',‘Alternative_Datafile_Location’
);
Note: The second parameter, which is optional, may be omitted, in which case it will assume the default value, being the path of the first datafile which is associated with the SYSTEM tablespace.
Implicit Invocation EXEC tablespace_builder(COMPONENT_NAME=>'Component');
EXEC
tablespace_builder(COMPONENT_NAME=>'Component',
ALTERNATIVE_DATAFILE_LOCATION
=>‘Alternative_Datafile_Location’);
- EXEC
tablespace_builder(ALTERNATIVE_DATAFILE_LOCATION
=>‘Alternative_Datafile_Location’,
COMPONENT_NAME=>'Component');
Note: The order of the parameters is not important. The optional parameter of ALTERNATIVE_DATAFILE_LOCATION may be omitted, in which case it will assume the default value, which is the path of the first datafile which is associated with the SYSTEM tablespace.
Example:
sqlplus system/systemPWD@DB_ALIAS
EXEC tablespace_builder('FUNFUN');
The resulting tablespaces that should have been created will be
created are
FUNFUN_DATA_SPACE and FUNFUN_INDEX_SPACE

Using the Tablespace_Builder Oracle Stored Procedure
OL-28290-01 9
Verification After Invocation
The successful execution of the Tablespace_Builder Oracle Stored Procedure can be verified either from the Oracle SYS or the SYSTEM user.
su – oracle
. /opt/oracle/SID.env
sqlplus / as sysdba
OR
sqlplus SYSTEM/<SYSTEM_PASSWORD>
SELECT tablespace_name
FROM dba_tablespaces
ORDER BY 1;
Note: The two new tablespaces that have been created in the displayed list should be present.
SELECT tablespace_name, file_name
FROM dba_data_files
ORDER BY 1,2;
Notes:
The two new tablespaces that have been created, which have two datafiles each, should be displayed in the list.
If fewer than two rows are returned by the previous query for each of the new tablespaces, this may indicate that either some of the files already exist or that there is a problem.

Chapter 1 Oracle Database
10 OL-28290-01
Creating Tablespaces Manually
Manually Creating the Component Tablespace for Data and Associated Datafiles
The following is an example of how to create a tablespace which is designated for data and which has two associated datafiles.
su – oracle
. /opt/oracle/SID.env
sqlplus / as sysdba
CREATE TABLESPACE <component>_DATA_SPACE LOGGING
DATAFILE
'<data_file_location>/<component>_data_<SID>_01.dbf'
SIZE 32m REUSE
AUTOEXTEND ON
MAXSIZE UNLIMITED,
DATAFILE
'<data_file_location>/<component>_data_<SID>_02.dbf'
SIZE 32m REUSE
AUTOEXTEND ON
MAXSIZE UNLIMITED,
EXTENT MANAGEMENT LOCAL
SEGMENT SPACE MANAGEMENT 'AUTO;

Creating Tablespaces Manually
OL-28290-01 11
Manually Creating the Component Tablespace for Indices and Associated Datafiles
The following is an example of how to create a tablespace which is designated for indices and which has two associated datafiles.
su – oracle
. /opt/oracle/SID.env
sqlplus / as sysdba
CREATE TABLESPACE <component>_INDEX_SPACE LOGGING
DATAFILE
'<data_file_location>/<component>_index_<SID>_01.dbf'
SIZE 32m REUSE
AUTOEXTEND ON
MAXSIZE UNLIMITED,
DATAFILE
'<data_file_location>/<component>_index_<SID>_02.dbf'
SIZE 32m REUSE
AUTOEXTEND ON
MAXSIZE UNLIMITED,
EXTENT MANAGEMENT LOCAL
SEGMENT SPACE MANAGEMENT 'AUTO;

Chapter 1 Oracle Database
12 OL-28290-01
Increasing the Maximum Number of Datafiles Allowed in the Oracle System
Important: This process involves a restart of the database (downtime) and should be performed with caution by an Oracle DBA or with careful guidance.
1 Back up the existing spfile<SID>.ora file by copying it to a different location or by giving it a different name in the same directory.
2 Change the contents of the spfile<SID>.ora file to its new value. su – oracle
. /opt/oracle/SID.env
sqlplus / as sysdba
SHOW PARAMETER db_files
ALTER SYSTEM SET db_files = nn SCOPE=SPFILE;
Note: nn represents a number larger than the current value of the db_files parameter.
3 Restart all of the instances connected to this database, as needed.

Rectifying Misspelled or Incorrect Component Names
OL-28290-01 13
Rectifying Misspelled or Incorrect Component Names
The following script shows how to drop a tablespace so that you can recreate it.
su – oracle
. /opt/oracle/SID.env
sqlplus / as sysdba
DROP TABLESPACE <component>_data_space
INCLUDING CONTENTS AND DATAFILES;
DROP TABLESPACE <component>_index_space
INCLUDING CONTENTS AND DATAFILES;


OL-28290-01 15
Introduction
This chapter describes how to configure the Oracle database for use with the Videoscape Control Suite.
2 Chapter 2 Oracle Database Configuration for the Videoscape Control Suite Installation
In This Chapter
Required Users for the Videoscape Control Suite Installation ....... 16
Prepare Oracle for UPM ....................................................................... 17
Migrating AlertManager Oracle Data ................................................ 18
Create the External Oracle User .......................................................... 21
Create the AlertManager Oracle User................................................ 23
Create the ECS User .............................................................................. 24
Configure Oracle for TMS ................................................................... 25
Configure Oracle for PPS ..................................................................... 26

Chapter 2 Oracle Database Configuration for the Videoscape Control Suite Installation
16 OL-28290-01
Required Users for the Videoscape Control Suite Installation
Two users must be created prior to starting the Videoscape Control Suite installation. One user is needed to support the Messages Infrastructure (MSGINFRA tables and schema. Another user is needed to support the platform tables and schema.
Example:
sqlplus / as sysdba
grant resource,connect to MSGINFRA identified by Cisco123;
grant resource,connect to PLATFORM identified by Cisco123;
commit;
quit

Prepare Oracle for UPM
OL-28290-01 17
Prepare Oracle for UPM 1 Create the tablespace_builder sql file and execute it following the procedures in
Tablespace_builder File Creation (on page 53).
2 Create tablespaces: (the path is the path to your oradata files)
sqlplus system/cisco (Oracle system user and Oracle system user password) SQL> EXEC tablespace_builder('UPM');
SQL> create tablespace LOB_DATA_MANUAL datafile
'/opt/oracleSE/app/oracleSE/oradata/ORCLSE/datafile/lob_data_m
anual_01.dbf' size 500M REUSE autoextend on EXTENT MANAGEMENT
LOCAL UNIFORM SIZE 128M SEGMENT SPACE MANAGEMENT MANUAL;
3 Create the UPM user: sqlplus / as sysdba
grant resource,connect to UPM identified by <upm user
password>;
commit;
quit

Chapter 2 Oracle Database Configuration for the Videoscape Control Suite Installation
18 OL-28290-01
Migrating AlertManager Oracle Data If it is necessary to convert AlertManager data from internal Oracle (Conductor 2.1) use to external Oracle usage (Videoscape Control Suite 2.5), follow these procedures to move the data.
1 Log on to the CMC node of Conductor 2.1 as the root user from a terminal window.
2 Change to the Oracle user. su – oracle
3 Source in the Oracle user's environment.
source coracleenv
4 Execute the following command. exp USERID=csamdb1/csamdb1 OWNER=csamdb1 FILE=csamdb1.dmp
Example: exp USERID=csamdb1/csamdb1 OWNER=csamdb1 FILE=csamdb1.dmp
Sample Output: Export: Release 11.2.0.2.0 - Production on Wed Jan 23 15:17:08 2013
Copyright (c) 1982, 2009, Oracle and/or its affiliates. All rights
reserved.
Connected to: Oracle Database 11g Enterprise Edition Release 11.2.0.2.0 -
64bit Production With the Partitioning, OLAP, Data Mining and Real Application Testing
options Export done in US7ASCII character set and AL16UTF16 NCHAR character set server uses WE8MSWIN1252 character set (possible charset conversion)
About to export specified users ... . exporting pre-schema procedural objects and actions . exporting foreign function library names for user CSAMDB1 . exporting PUBLIC type synonyms . exporting private type synonyms . exporting object type definitions for user CSAMDB1 About to export CSAMDB1's objects ... . exporting database links . exporting sequence numbers . exporting cluster definitions . about to export CSAMDB1's tables via Conventional Path ... . . exporting table CAPCONFIG 2 rows
exported EXP-00091: Exporting questionable statistics. . . exporting table EAC 1 rows
exported EXP-00091: Exporting questionable statistics. . . exporting table EVENTCFGASSOC 54 rows
exported EXP-00091: Exporting questionable statistics.

Migrating AlertManager Oracle Data
OL-28290-01 19
. . exporting table GEOCODES 1 rows
exported EXP-00091: Exporting questionable statistics. . . exporting table HAPSNAFFILIATIONS 2 rows
exported EXP-00091: Exporting questionable statistics. . . exporting table HASTATE 1 rows
exported EXP-00091: Exporting questionable statistics. . . exporting table MAJORS 76 rows
exported EXP-00091: Exporting questionable statistics. . . exporting table MESSAGES 0 rows
exported . . exporting table METADATA 1 rows
exported EXP-00091: Exporting questionable statistics. . . exporting table MINORS 3790 rows
exported EXP-00091: Exporting questionable statistics. . . exporting table MSGPSNPUBIDASSOC 0 rows
exported . . exporting table PUBSUBS 1 rows
exported EXP-00091: Exporting questionable statistics. . . exporting table PUBSUBSENTMSG 0 rows
exported . . exporting table SENTMESSAGES 0 rows
exported . . exporting table SOCKET 3 rows
exported EXP-00091: Exporting questionable statistics. . . exporting table SUBDIV 10 rows
exported EXP-00091: Exporting questionable statistics. . . exporting table UNSENTMESSAGES 0 rows
exported . . exporting table USERPARAM 0 rows
exported . . exporting table USERS 2 rows
exported EXP-00091: Exporting questionable statistics. . exporting synonyms . exporting views . exporting stored procedures . exporting operators . exporting referential integrity constraints . exporting triggers . exporting indextypes . exporting bitmap, functional and extensible indexes . exporting posttables actions . exporting materialized views . exporting snapshot logs . exporting job queues . exporting refresh groups and children

Chapter 2 Oracle Database Configuration for the Videoscape Control Suite Installation
20 OL-28290-01
. exporting dimensions
. exporting post-schema procedural objects and actions
. exporting statistics Export terminated successfully with warnings.
5 Copy the file to the new Oracle server.
6 Log in as the Oracle user.
7 Source the Oracle user's environment.
8 Log in to the Oracle database and create the AM user by running these commands. sqlplus / as sysdba
grant resource, connect to csamdb1 identified by csamdb1;
commit;
quit
9 Import the AlertManager data into the Oracle database. imp USERID=csamdb1/csamdb1 OWNER=csamdb1 FILE=csamdb1.dmp

Create the External Oracle User
OL-28290-01 21
Create the External Oracle User File name — create_externally_defined_oracle_user.sql
Purpose — To guarantee the existence of an externally defined Oracle database user, with DBA privileges, in the Oracle database
Usage — sqlplus SYSTEM/<system_password>@<db_alias>@create_externally_defined_oracle_user.sql
Notes:
If an Oracle database user, ORACLE, already exists and is not externally defined, it will be defined as such after this procedure has been run.
If an Oracle database user, ORACLE, already exists and lacks DBA privileges, then it will have them after this procedure has been run.
Reference this example to create the external Oracle user.
/*
||
|| File Name: create_externally_defined_oracle_user.sql
||
|| Purpose: To guarantee the existence of an Externally Defined ORACLE
|| Database User in the Oracle Database which has DBA Privileges.
||
|| Usage: sqlplus SYSTEM/<system_password>@<db_alias>
|| @create_externally_defined_oracle_user.sql
||
|| Notes:(1) If there already exists an Oracle Database user ORACLE which is
|| not Externally Defined it will be defined as such after this
|| procedure has been run.
||
|| (2) If there already exists an Oracle Database user ORACLE that lacks
|| DBA Privileges, then it will have them after this procedure has
|| been run.
||
|| Created By: Shmuel Fischler Cisco SVPTG Division
||
|| Created On: Feb. 06, 2013
||
*/

Chapter 2 Oracle Database Configuration for the Videoscape Control Suite Installation
22 OL-28290-01
DECLARE
l_cursor_c1_count NUMBER;
CURSOR c1 IS
SELECT COUNT(*)
FROM dba_users
WHERE username = 'ORACLE';
BEGIN
OPEN c1;
FETCH c1
INTO l_cursor_c1_count;
CLOSE c1;
IF (l_cursor_c1_count = 0)
THEN
EXECUTE IMMEDIATE 'CREATE ' || 'USER oracle IDENTIFIED EXTERNALLY';
ELSE
EXECUTE IMMEDIATE 'ALTER ' || 'USER oracle IDENTIFIED EXTERNALLY';
END IF;
EXECUTE IMMEDIATE 'GRANT CONNECT ' || 'TO oracle';
EXECUTE IMMEDIATE 'GRANT RESOURCE ' || 'TO oracle';
EXECUTE IMMEDIATE 'GRANT SELECT ANY TABLE ' || 'TO oracle';
EXECUTE IMMEDIATE 'GRANT SELECT ANY DICTIONARY ' || 'TO oracle';
EXECUTE IMMEDIATE 'GRANT DBA ' || 'TO oracle';
END;
/
EXIT;
/*
||
|| End of File: create_externally_defined_oracle_user.sql
||
*/

Create the AlertManager Oracle User
OL-28290-01 23
Create the AlertManager Oracle User 1 Log in as the Oracle user.
2 Source in the Oracle user's environment.
Shell (based upon the shell you are using):
sh — . oracleenv
csh/tcsh — source coracleenv
3 Log into the Oracle database and create the AlertManager user. sqlplus / as sysdba
grant resource,connect to csamdb1 identified by csamdb1;
commit;
quit
Chapter 2 Oracle Database Configuration for the Videoscape Control Suite Installation
24 OL-28290-01
Create the ECS User 1 Log in as the Oracle user.
2 Source the Oracle user's environment.
Shell (based upon the shell you are using):
sh — . oracleenv
csh/tcsh — source coracleenv
3 Log into the Oracle database and create the ECS user. sqlplus / as sysdba
grant resource, connect to ECSUSER identified by cisco123;
commit;
quit

Configure Oracle for TMS
OL-28290-01 25
Configure Oracle for TMS 1 Create the data and index tablespace.
Note: See Tablespace_builder File Creation (on page 53) for the procedures.
2 Create the TmsDbLayer_create_tables-3.36.0-2.sql file by copying it from The TmsDbLayer_create_tables-3.36.0-2.sql Script (on page 63).
3 Supply the <user name>, <user password>, and <service name> as an input for COP parameters "TMS DB User", "DB User Password", and "DB Service Name".

Chapter 2 Oracle Database Configuration for the Videoscape Control Suite Installation
26 OL-28290-01
Configure Oracle for PPS 1 Create the data and index tablespace.
Note: See Tablespace_builder File Creation (on page 53) for the procedures.
2 Create the Create_PPS_database_3_36_2-0.sql file by copying the file from The Create_PPS_database_3_36_2-0.sql Script (on page 81).
3 Supply the <user name>, <user password>, and <service name> as an input for COP parameters "PPS DB User", "DB User Password", and "DB Service Name".

OL-28290-01 27
Introduction
The NOSQLCB server (formerly called the Couchbase server) is a distributed key-value ("NoSQL") database management system that incorporates a view-based query and retrieval system. NOSQLCB servers primarily use RAM as the storage mechanism, enabling it to support efficient create, store, update, and retrieval operations. To retrieve and query information stored with the NOSQLCB server, the View interface allows you to build custom lists and structures from your core data. This allows the core key/value information to be exposed in the form of lists and tables of data, and also enables summary information (sum, count, and custom configurations) to be generated using the key/value datastore.
The cluster component distributes data over multiple servers. This allows the servers to share the data and the I/O load, while incorporating intelligence into the server and client-access libraries that enable clients to quickly access the right node within the cluster for the needed information. The distribution of data and I/O load grants the NOSQLCB server the ability to scale with the growth of data and/or load by simply adding more servers to the cluster.
3 Chapter 3 The NOSQLCB Server
In This Chapter
Configure the NOSQLCB Server for Auto-Failover ........................ 28
Rebalance NOSQLCB Servers to Remove a Failed Node ............... 29
Add a Node Back/Add a Node to the Cluster ................................. 31
GUI Operations on the NOSQLCB Servers ....................................... 32
Types of Resources ............................................................................... 35
NOSQLCB COP Support of LVM ....................................................... 36
Troubleshooting the NOSQLCB Server ............................................. 49

Chapter 3 The NOSQLCB Server
28 OL-28290-01
Configure the NOSQLCB Server for Auto-Failover Auto-Failover will automatically mark a node as "failed-over" if the node has been identified as unresponsive or unavailable. Once the failover has occurred, your cluster performance will have degraded and the replicas of your data will be reduced by one.
To address this problem, once a node has failed-over, you should perform a rebalance as soon as possible. During the rebalance, the data will be redistributed among the remaining nodes of the cluster. The replicas of the vBuckets will be recreated and enabled.
After the NOSQLCB server has been installed, log onto the NOSQLCB server and enable Auto-Failover.
1 Log onto the NOSQLCB server. http://<NOSQLCB server>:8091
Notes:
The user is Administrator.
The password is Public123.
2 From the UI, click Settings.
3 Click Auto-Failover.
4 Select Enable auto-failover.
5 Click Save.

Rebalance NOSQLCB Servers to Remove a Failed Node
OL-28290-01 29
Rebalance NOSQLCB Servers to Remove a Failed Node
When a NOSQLCB server has an issue and cannot be reached, the Auto-Failover scenario is activated. In this scenario, the NOSQLCB server that is having the issue is placed in a pending state. The Pending Rebalance button, under Server Nodes, lists a number representing the number of servers that need to be rebalanced. The Rebalance button will now be in an “active state” so that it can be selected.
1 Click Reset Quota (top right of window) to reset the quota for Auto-Failover.
2 Click Rebalance to redistribute the data across the remaining NOSQLCB servers and to move the replica, if it is on the failed server.
Note: This operation removes the server from the cluster.
Result: The Rebalance operation begins and can take up to 40 minutes to complete.

Chapter 3 The NOSQLCB Server
30 OL-28290-01
The following image is of a completed Rebalance operation with the failed node removed from the cluster. Now you can diagnose the failed node and correct any errors.

Add a Node Back/Add a Node to the Cluster
OL-28290-01 31
Add a Node Back/Add a Node to the Cluster 1 Follow the instructions in Installing COP Files for the Videoscape Control Suite (part
number OL-27753) to uninstall the NOSQLCB COP file under these two circumstances:
If it is a node on which the NOSQLCB COP file has been installed
If you have not yet reinstalled the Videoscape Control Suite software
Note: Reinstalling the Videoscape Control Suite software removes all data from the VM.
2 After you have uninstalled the NOSQLCB COP file, reinstall the NOSQLCB COP file, using the instructions in Installing COP Files for the Videoscape Control Suite (part number OL-27753).
3 Open the NOSQLCB server UI and monitor the Rebalance operation, which occurs automatically as part of the installation.
4 If you install the server as the first NOSQLCB server, you will have to use the NOSQLCB UI to add the server to the cluster.
a Click Server Nodes.
b Click Add Server.
c Enter the Server IP Address of the server you would like to add.
d Enter the Username (Administrator, by default) and the Password (Public123).
e Click Add Server to initiate the Rebalance operation, to add the server to the NOSQLCB cluster, and to distribute the data across all of the servers.
Note: The password must be the same for all servers in the cluster.
Note: Monitor the NOSQLCB server cluster if you notice the memory utilization approaching 80 percent, and contact Cisco Services.

Chapter 3 The NOSQLCB Server
32 OL-28290-01
GUI Operations on the NOSQLCB Servers New services have been added to the Videoscape Control Suite Management Console (CMC or management console) and the Command Line Interface (CLI) to support backup and restore of the NOSQLCB server database. These operations are explained in this section.
1 Log into the management console.
2 Click Service.
3 Click Couchbase.
4 Click Operations.
Result: The system displays a list of NOSQLCB nodes upon which you can perform either a backup or a restoration.
5 Select the NOSQLCB node on which you want to perform the backup or restore
operation.
Back Up the NOSQLCB Server 1 Click Backup. The Couchbase Bucket Backup window opens that lists the
buckets available to be backed-up.

GUI Operations on the NOSQLCB Servers
OL-28290-01 33
2 Select the bucket that you want to back up.
3 Click Backup to begin the backup.
Result: The Conductor Couchbase Nodes window updates with the status of the backup operation (Status Message field).
Restore the NOSQLCB Server 1 Click Restore. The Couchbase Bucket Restore window opens that lists the
buckets available to be restored.
2 Select the file you would like to restore to the NOSQLCB server.
3 Click Restore. The restoration process begins.
Note: A SUCCESS message appears when the restoration has completed.

Chapter 3 The NOSQLCB Server
34 OL-28290-01
Delete an Unneeded NOSQLCB Backup File
You can delete a backup file once it is no longer needed.
1 Click Delete from the Couchbase Bucket Restore window. A confirmation message appears.
2 Click OK.

Types of Resources
OL-28290-01 35
Types of Resources The following are the types of resources available on the NOSQLCB server.
Cluster/Pool — A cluster is a group of one or more nodes. It is a collection of physical resources that are grouped together to provide services and a management interface. A single default cluster exists for every deployment of the NOSQLCB server. A node or instance of the NOSQLCB server is a member of a cluster. The NOSQLCB server collects run-time statistics for clusters, and maintains a pool-level data view of counters, as well as periodic metrics for the overall system. The NOSQLCB Management REST API can be used to retrieve historic statistics for a cluster.
Server Node — A Server node, also known as a 'node', is a physical or virtual machine running on the NOSQLCB server. Each node is also a member of a cluster.
Bucket — A bucket is a logical grouping of data within a cluster. It provides a namespace for all the related data in an application. Therefore, you can use the same key in two different buckets and they are treated as unique items by the NOSQLCB server.
The NOSQLCB server collects run-time statistics for buckets, maintaining an overall bucket-level data view of counters, as well as periodic metrics for the system. Buckets are categorized by storage type:
- Memcached buckets are for in-memory, RAM-based information
- NOSQLCB buckets are for persistent data

Chapter 3 The NOSQLCB Server
36 OL-28290-01
NOSQLCB COP Support of LVM In Videoscape Control Suit version 2.5, the NOSQLCB COP file supports the Logical Volume Manager (LVM). The installation will automatically detect the presence of new hard drive(s) added to the Virtual Machine (VM). They will be grouped together to form a large storage which is used to store large NOSQLCB data. The following figure shows the hard drives mapped in the Videoscape platform. Hard drives 1 and 2 are reserved for system use, while hard drive 3 to n are used to store NOSQLCB data.

NOSQLCB COP Support of LVM
OL-28290-01 37
As seen in the following figure, the additional hard drives can be quite large. The NOSQLCB COP upgrade using the Upgrade button on the CMC GUI is not supported because the system does not have enough intermediate large storage for backing up existing NOSQLCB data. The administrator will need to follow the procedure of how to upgrade the NOSQLCB COP file from R2.1 to R2.5, as shown in NOSQLCB Upgrade Procedure from R2.1 to R2.5 (on page 38).
When hard drives 3 to n are not installed (additional hard drives are not detected), a /common directory as part of hard drive 1 is used to store NOSQLCB data. This /common storage has been used in R2.5 and earlier. Note that hard drive 1 is relatively small and the size is configured in the OVM template.

Chapter 3 The NOSQLCB Server
38 OL-28290-01
NOSQLCB Upgrade Procedure from R2.1 to R2.5
Before upgrading the NOSQLCB COP file from R2.1 to R2.5, the administrator will need to upgrade the management node first and then upgrade the NOSQLCB nodes.
Upgrade the Management Node from R2.1 to R2.5
With multiple NOSQLCB nodes, the administrator can remove and rebalance most R2.1 NOSQLCB nodes and just keep one node on the NOSQLCB UI. Then, the administrator can install new R2.5 ISO and NOSQLCB COP files on the nodes that were removed earlier. Add the nodes back and rebalance from the NOSQLCB UI. Repeat until all R2.1 NOSQLCB nodes are upgraded to R2.5.
The detailed procedure follows.
1 Log on to the NOSQLCB UI, and enter the NOSQLCB username and password.
2 Click the Server Nodes tab.
3 For the last NOSQLCB Server Node in the list, click Remove.

NOSQLCB COP Support of LVM
OL-28290-01 39
4 When the confirmation message appears, click Remove.
Result: A 1 appears over the Pending Rebalance button to let you know that one server needs to be rebalanced.
5 Select the next node and click Remove.
6 Repeat step 5 until only one NOSQLCB node is left. Referring to the example in the Result of step 4, we can remove nodes 10.90.185.173 and 10.90.185.172, leaving node 10.90.185.171.
7 Click Rebalance to redistribute the data across the remaining node.
Result: The Rebalancing indicator appears in the top right-hand corner.
8 Before moving to the next step, wait for the Rebalancing indicator to disappear.
9 Log on to the CMC UI and click Operator --> COP Install to uninstall the R2.1 NOSQLCB nodes that were removed earlier in this procedure.
10 Log on to the vSphere/vCenter of the blades of the nodes you just removed, and power off the VMs of these nodes.
Chapter 3 The NOSQLCB Server
40 OL-28290-01
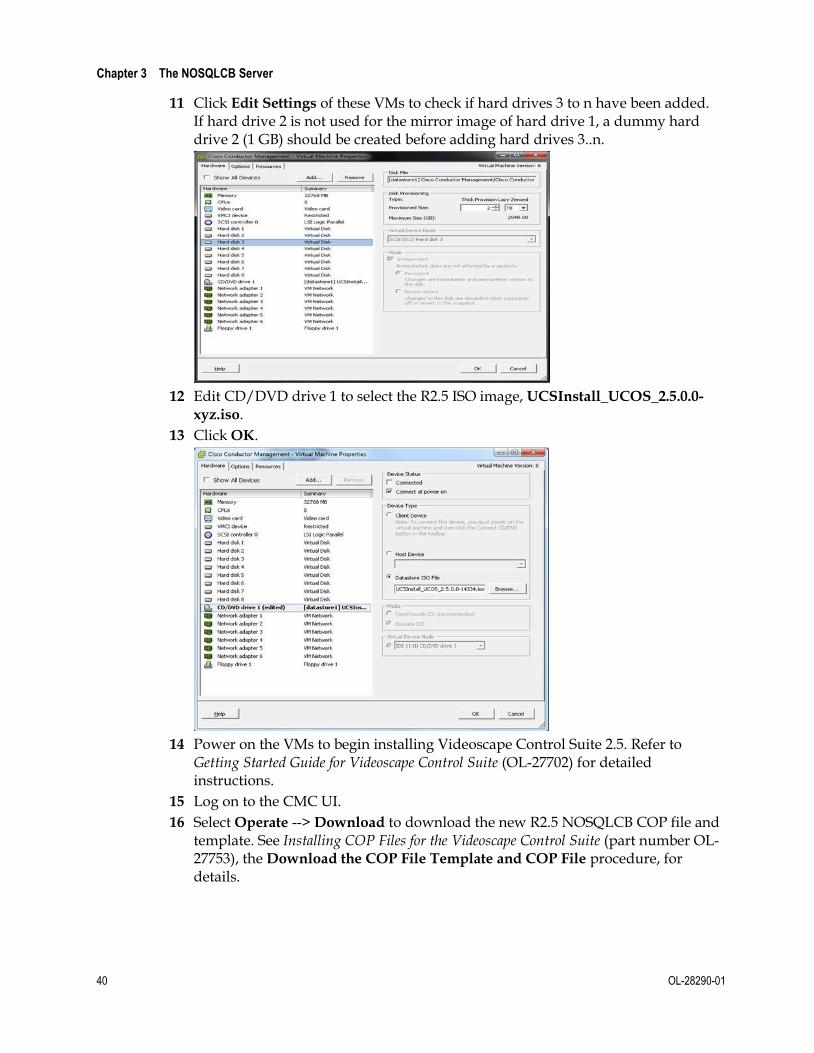
11 Click Edit Settings of these VMs to check if hard drives 3 to n have been added. If hard drive 2 is not used for the mirror image of hard drive 1, a dummy hard drive 2 (1 GB) should be created before adding hard drives 3..n.
12 Edit CD/DVD drive 1 to select the R2.5 ISO image, UCSInstall_UCOS_2.5.0.0-
xyz.iso.
13 Click OK.
14 Power on the VMs to begin installing Videoscape Control Suite 2.5. Refer to
Getting Started Guide for Videoscape Control Suite (OL-27702) for detailed instructions.
15 Log on to the CMC UI.
16 Select Operate --> Download to download the new R2.5 NOSQLCB COP file and template. See Installing COP Files for the Videoscape Control Suite (part number OL-27753), the Download the COP File Template and COP File procedure, for details.

NOSQLCB COP Support of LVM
OL-28290-01 41
17 Select Operate --> COP Install to install the NOSQLCB COP file. See Installing COP Files for the Videoscape Control Suite (part number OL-27753), the Install the
NoSql Couchbase COP File chapter, for details.
Note: You can simultaneously perform this procedure on multiple nodes.
18 When the installation has completed, log on to the NOSQLCB UI.
19 Click Server Nodes and then click Add Server.
20 Enter the IP Address of the server you would like to add, the Username (default is Administrator), and the Password (default is Public123).
21 Click Add Server again to add the server.
Important: The password must be the same for all servers in the cluster.
Result: The Rebalance operation begins to distribute the data across all NOSQLCB servers in the cluster.
22 When the rebalance completes, verify that the Total Cluster Storage is the sum of all LVM hard drives on the NOSQLCB nodes.
23 Repeat these steps for the remaining NOSQLCB servers.

Chapter 3 The NOSQLCB Server
42 OL-28290-01
24 Set up a Service Account from the CMC UI by clicking Administration --> Users, Roles & AAA --> Service Account.
Note: The Username and Password must be the same as the username and password of the version 2.1 NOSQLCB server (username, by default, is Administrator; password, by default, is Public123).
25 On the CMC UI, click Operate --> COP Install to install the NOSQLCB UI
component for the Management node.
26 Click Services --> Nosqlcb Database --> Operations to confirm that the backup and restore GUI appears.
Upgrading a Cluster with Only One NOSQLCB Server
The single Couchbase COP file is typically used in lab and development environments because administrators cannot use the backup/restore bucket due to the system not having large intermediate storage. In order to upgrade to NOSQLCB R2.5, the administrator needs to install an additional temporary NOSQLCB node with the R2.5 ISO and NOSQLCB COP files.
First, add and rebalance the new temporary NOSQLCB R2.5 node. Then, remove and rebalance the old R2.1 NOSQLCB node. Install new R2.5 ISO and NOSQLCB COP files on the old R2.1 node. Add the node back and rebalance from the NOSQLCB UI. Then, remove and rebalance the temporary NOSQLCB R2.5 node from the NOSQLCB UI. Uninstall the NOSQLCB COP file from the temporary NOSQLCB node. Finally, power down the VM of the temporary NOSQLCB node.
1 Create a new VM for the temporary R2.5 NOSQLCB node with the same number of LVM hard drives that exist in the current NOSQLCB R2.1 node.
2 Install the ISO R2.5 image on this temporary VM.
3 When the ISO installation has completed, log on to the CMC UI.
4 Select Operate --> Download to download the new NOSQLCB COP file and template. Follow the instructions in Installing COP Files for the Videoscape Control Suite (part number OL-27753).

NOSQLCB COP Support of LVM
OL-28290-01 43
5 Select Operate --> COP Install to install the R2.5 NOSQLCB file. Follow the instructions in Installing COP Files for the Videoscape Control Suite (part number OL-27753).
6 When the COP file has finished installing, log on to the R2.1 NOSQLCB server UI.
7 Select Server Nodes --> Add Server.
8 Enter the IP Address of the server you would like to add, as well as the Username (default is Administrator), and Password (default is Public123).
Important: The password must be the same for all servers in the cluster.
9 Click Add Server.
Result: The Rebalance operation begins to redistribute the data across all NOSQLCB servers in the cluster.
10 When the rebalance completes, verify that the Total Cluster Storage is the sum of all LVM hard drives on the NOSQLCB nodes.

Chapter 3 The NOSQLCB Server
44 OL-28290-01
11 Go back and click the Server Nodes tab to remove the R2.1 NOSQLCB node.
12 Click Remove on the confirmation message.
Result: A 1 appears over the Pending Rebalance button to let you know that one server needs to be rebalanced.
13 Click Rebalance to redistribute the data across the remaining node.
Result: The Rebalancing indicator appears in the top right-hand corner.
14 Before moving to the next step, wait for the Rebalancing indicator to disappear.
15 Log on to the CMC UI and click Operator --> COP Install to uninstall the R2.1 NOSQLCB node.

NOSQLCB COP Support of LVM
OL-28290-01 45
16 Log on to the vSphere/vCenter of the blade of the node you just removed, and power off the VM.
17 Click Edit Settings on this VM to check if hard drives 3 to n have been added. If hard drive 2 is not used for the mirror image of hard drive 1, a dummy hard drive 2 (1 GB) should be created before adding hard drives 3..n.
18 Edit CD/DVD drive 1 to select the R2.5 ISO image, UCSInstall_UCOS_2.5.0.0-
xyz.iso.
19 Click OK.
20 Power on the VM to begin installing R2.5. Refer to Getting Started Guide for
Videoscape Control Suite (OL-27702) for detailed instructions.
21 From the CMC, Select Operate --> COP Install to install the NOSQLCB COP file. See Installing COP Files for the Videoscape Control Suite (part number OL-27753), the Install the NoSql Couchbase COP File chapter, for details.

Chapter 3 The NOSQLCB Server
46 OL-28290-01
22 When the installation has completed, log on to the NOSQLCB UI.
23 Click Server Nodes and then click Add Server.
24 Enter the IP Address of the server you would like to add, the Username (default is Administrator), and the Password (default is Public123).
25 Click Add Server again to add the server.
Important: The password must be the same for all servers in the cluster.
Result: The Rebalance operation begins to distribute the data across all NOSQLCB servers in the cluster.
26 When the rebalance completes, verify that the Total Cluster Storage is the sum of all LVM hard drives on the NOSQLCB nodes.
27 Go back and select the Server Nodes tab and remove the temporary R2.5
NOSQLCB node.

NOSQLCB COP Support of LVM
OL-28290-01 47
28 Click Remove from the confirmation message.
Result: A 1 appears over the Pending Rebalance button to let you know that one server needs to be rebalanced.
29 Click Rebalance to redistribute the data across the remaining node.
Result: The Rebalancing indicator appears in the top right-hand corner.
30 Log on to the CMC UI and click Operator --> COP Install to uninstall the
temporary R2.5 NOSQLCB node.
31 Select the temporary NOSQLCB server node you just removed.
32 Select COP Uninstall from the middle set of menus.
33 From the resulting pop-up menu, select the Couchbase COP file installed on that server.

Chapter 3 The NOSQLCB Server
48 OL-28290-01
34 When the uninstall operation has completed, power down the VM of the temporary NOSQLCB node, if required.
35 Set up a Service Account from the CMC UI by clicking Administration --> Users, Roles & AAA --> Service Account.
Note: The Username and Password must be the same as the username and password of the version 2.1 NOSQLCB server (username, by default, is Administrator; password, by default, is Public123).
36 On the CMC UI, click Operate --> COP Install to install the NOSQLCB UI
component for the Management node.
37 Click Services --> Nosqlcb Database --> Operations to confirm that the backup and restore GUI appears.

Troubleshooting the NOSQLCB Server
OL-28290-01 49
Troubleshooting the NOSQLCB Server 1 You can monitor the NOSQLCB server by looking at the NOSQLCB UI and
examining the log files. The log files should display any major/minor errors that are occurring in the NOSQLCB cluster.
2 If there are issues, Cisco may request that you send them the log files.
a Log onto the NOSQLCB server. http://<couchbase server>:8091
Notes:
– The user is Administrator.
– The password is Public123.
b From the UI, click Log.
c Click Generate Diagnostic Report (just info level).
Note: Cisco will request that you send additional log files if more are needed to resolve the issue.


OL-28290-01 51
If You Have Questions
If you have technical questions, call Cisco Services for assistance. Follow the menu options to speak with a service engineer.
Access your company's extranet site to view or order additional technical publications. For accessing instructions, contact the representative who handles your account. Check your extranet site often as the information is updated frequently.
4 Chapter 4 Customer Information


OL-28290-01 53
A Appx auto letter Appendix A Tablespace_builder File Creation
Introduction
This appendix contains the tablespace_builder_proc.sql file.
In This Appendix
Creating the Tablespace_builder File ................................................. 54
Appendix A Tablespace_builder File Creation
54 OL-28290-01
Creating the Tablespace_builder File 1 Copy and paste the following script to a file named
"tablespace_builder_proc.sql" on the Oracle server in the Oracle user's home directory. --#$Revision: 4.0.1.3
/*
|| File Name: tablespace_builder_proc.sql
||
|| Purpose:
|| Creates a two standard tablespaces for each component,
|| one for data and the other for indices. Each tablespace
|| is created with two datafiles.
||
|| Installation:
|| -------------
|| On the Oracle Server Machine from the oracle O.S. account only:
|| ----------------------------------------------------------------
|| su - oracle
||
|| . /opt/oracle/SID.env
||
|| sqlplus / as sysdba
|| SQL> GRANT CREATE TABLESPACE TO SYSTEM;
|| SQL> GRANT SELECT ON dba_tablespaces TO SYSTEM;
|| SQL> GRANT SELECT ON dba_data_files TO SYSTEM;
|| SQL> GRANT SELECT ON v_$database TO SYSTEM;
||
|| sqlplus system/<pwd>
||
|| SQL> @tablespace_builder_proc.sql
||
|| Restrictions:
|| ------------------
|| 1.) The length of a component name cannot exceed 18 characters
||
|| 2.) Legal characters for a component name are
|| [ a - z ], [ A - Z ], [ 0 - 9 ], _ , $ , #
||
|| 3.) Legal characters for the first character of a component name are
|| [ a - z ], [ A - Z ]
|| 4.) A tablespace with the same name cannot already exist before being created
||
|| 5.) A datafile with the same name in the same location cannot already exist
|| before being created
||
||6.) The ALTERNATIVE_DATAFILE_LOCATION directory must already exist and be
|| owned by the O.S. oracle user
||
|| 7.) The procedure will work only for Oracle Servers which have either a Unix

Creating the Tablespace_builder File
OL-28290-01 55
|| or Linux O.S.
||
|| Parameters:
|| -----------
|| 1.) COMPONENT_NAME (Mandatory) the name of the desired component
|| used as the base name for:
|| - the tablespace name, i.e.
|| table space name for data == COMPONENT_NAME_DATA_SPACE
|| table space name for indices == COMPONENT_NAME_INDEX_SPACE
||
|| - the data file name, i.e.
|| first data file name for data ==
|| component_name_data_SID_01.dbf
|| second data file name for data ==
|| component_name_data_SID_02.dbf
|| first data file name for indices ==
|| component_name_index_SID_01.dbf
|| second data file name for indices ==
|| component_name_index_SID_02.dbf
|| 2) ALTERNATIVE_DATAFILE_LOCATION (Optional) the O.S. directory
|| where the datafiles will be created
|| [Defaults to the directory where the first datafile of the
|| SYSTEM tablespace has been created (Generally /oradata/SID/)]
||
|| Usage:
|| ------
|| From an Oracle Client or Server Machine from ANY O.S. account:
|| --------------------------------------------------------------
|| sqlplus system/systemPWD@DB_ALIAS
||
|| SQL> EXEC tablespace_builder('My_Component_Name');
||
|| From an Oracle Server Machine from the oracle O.S. account only:
|| ----------------------------------------------------------------
|| su - oracle
||
|| . /opt/oracle/SID.env
|| sqlplus system/systemPWD
|| or
|| sqlplus /
|| or
|| sqlplus / as sysdba
||
|| SQL> EXEC tablespace_builder('My_Component_Name');
||
|| Verification AFTER Usage:
|| -------------------------
|| sqlplus system/systemPWD
||
|| SQL> SELECT tablespace_name
|| FROM dba_tablespaces
|| ORDER BY 1;

Appendix A Tablespace_builder File Creation
56 OL-28290-01
||
|| --You should see the two tablespaces that have been created in
|| the list created by the above SQL statement
||
|| SQL> SELECT tablespace_name,
|| file_name
|| FROM dba_data_files
|| ORDER BY 1,2;
||
|| --You should see the two tablespaces,each having two datafiles
|| that have been created in the list created by the above SQL
|| statement.
|| Note:
|| ----- If less than 4 ROWs are returned by the above query,
|| then this means that some of the files already existed
|| prior to the EXECution of the procedure.
||
||
|| WHOOPS! A tablespace has been created by Mistake!!! H E L P !!!
|| ---------------------------------------------------------------
|| In order to rectify such a situation, for whatever reason, be it testing
|| purposes or just plain "Butter Fingers" don't panic! Just calm down and
|| do the following:
||
|| From an Oracle Client or Server Machine from ANY O.S. account:
|| --------------------------------------------------------------
|| sqlplus system/systemPWD@DB_ALIAS
||
|| SQL> DROP TABLESPACE tablespace_name
|| INCLUDING CONTENTS AND DATAFILES;
||
|| From an Oracle Server Machine from the oracle O.S. account only:
|| ----------------------------------------------------------------
|| su - oracle
||
|| . /opt/oracle/SID.env
||
|| sqlplus system/systemPWD
|| or
|| sqlplus /
|| or
|| sqlplus / as sysdba
||
|| SQL> DROP TABLESPACE tablespace_name
|| INCLUDING CONTENTS AND DATAFILES;
||
*/
SET TRIMSPOOL ON
SET LINESIZE 1000
SET TERMOUT ON
SET ECHO ON
SET FEEDBACK ON

Creating the Tablespace_builder File
OL-28290-01 57
SET VERIFY ON
CREATE OR REPLACE PROCEDURE tablespace_builder
(
component_name VARCHAR2,
alternative_datafile_location VARCHAR2 DEFAULT 'NONE'
)
AS
l_component_name VARCHAR2(18);
l_sid VARCHAR2(8);
l_ts VARCHAR2(30);
l_ts_data VARCHAR2(30);
l_df_data VARCHAR2(30);
l_ts_index VARCHAR2(30);
l_df_index VARCHAR2(30);
l_c3_count NUMBER;
l_c4_count NUMBER;
l_ts_data_exists VARCHAR2(1);
l_ts_index_exists VARCHAR2(1);
l_file_path VARCHAR2(513);
l_path_and_name VARCHAR2(513);
l_ts_data_01_path_and_name VARCHAR2(513);
l_ts_data_02_path_and_name VARCHAR2(513);
l_ts_index_01_path_and_name VARCHAR2(513);
l_ts_index_02_path_and_name VARCHAR2(513);
l_data_01_file_exists VARCHAR2(1);
l_data_02_file_exists VARCHAR2(1);
l_index_01_file_exists VARCHAR2(1);
l_index_02_file_exists VARCHAR2(1);
e_component_name_too_long EXCEPTION;
e_component_name_bad_character EXCEPTION;
e_comp_name_bad_1st_character EXCEPTION;
e_tablespace_for_comp_exists EXCEPTION;
e_datafile_exists EXCEPTION;
CURSOR c1 IS
SELECT name
FROM sys.v_$database;
CURSOR c2 IS
SELECT SUBSTR(file_name,1,INSTR(file_name,'/',-1))
FROM sys.dba_data_files
WHERE tablespace_name = 'SYSTEM'
AND ROWNUM < 2;
CURSOR c3 IS
SELECT COUNT(*)
FROM sys.dba_tablespaces
WHERE tablespace_name = l_ts;
CURSOR c4 IS
SELECT COUNT(*)

Appendix A Tablespace_builder File Creation
58 OL-28290-01
FROM sys.dba_data_files
WHERE file_name = l_path_and_name;
BEGIN
OPEN c1;
FETCH c1
INTO l_sid;
CLOSE c1;
IF (LENGTH(component_name) > 18)
THEN
RAISE e_component_name_too_long;
END IF;
IF (INSTR(component_name,'^') > 0)
THEN
RAISE e_component_name_bad_character;
END IF;
IF (TRANSLATE(UPPER(SUBSTR(component_name,1,1)),
'ABCDEFGHIJLKMNOPQRSTUVWXYZ','^') != '^')
THEN
RAISE e_comp_name_bad_1st_character;
END IF;
IF (REPLACE(TRANSLATE(UPPER(component_name),
'ABCDEFGHIJLKMNOPQRSTUVWXYZ0123456789_$#','^'),'^',NULL) IS NOT
NULL)
THEN
RAISE e_component_name_bad_character;
END IF;
l_component_name := UPPER(component_name);
IF (alternative_datafile_location = 'NONE')
THEN
OPEN c2;
FETCH c2
INTO l_file_path;
CLOSE c2;
ELSE
IF (SUBSTR(alternative_datafile_location,
LENGTH(alternative_datafile_location),1) = '/')
THEN
l_file_path := alternative_datafile_location;
ELSE
l_file_path := alternative_datafile_location || '/';
END IF;
END IF;
l_ts_data := l_component_name || '_DATA_SPACE';
l_df_data := LOWER(l_component_name) || '_data';
l_ts_index := l_component_name || '_INDEX_SPACE';
l_df_index := LOWER(l_component_name) || '_index';
l_ts := l_ts_data;
l_ts := l_ts_data;
OPEN c3;
FETCH c3
INTO l_c3_count;

Creating the Tablespace_builder File
OL-28290-01 59
CLOSE c3;
IF (l_c3_count = 0)
THEN
l_ts_data_exists := 'N';
ELSE
l_ts_data_exists := 'Y';
END IF;
l_ts := l_ts_index;
OPEN c3;
FETCH c3
INTO l_c3_count;
CLOSE c3;
IF (l_c3_count = 0)
THEN
l_ts_index_exists := 'N';
ELSE
l_ts_index_exists := 'Y';
END IF;
IF ( (l_ts_data_exists = 'Y')
AND
(l_ts_index_exists = 'Y')
)
THEN
RAISE e_tablespace_for_comp_exists;
END IF;
IF (l_ts_data_exists = 'N')
THEN
l_ts_data_01_path_and_name := l_file_path || l_df_data || '_' ||
l_sid || '_01.dbf';
l_path_and_name := l_ts_data_01_path_and_name;
OPEN c4;
FETCH c4
INTO l_c4_count;
CLOSE c4;
IF (l_c4_count = 0)
THEN
l_data_01_file_exists := 'N';
ELSE
l_data_01_file_exists := 'Y';
END IF;
IF (l_data_01_file_exists = 'Y')
THEN
RAISE e_datafile_exists;
END IF;
l_ts_data_02_path_and_name := l_file_path || l_df_data || '_' ||
l_sid || '_02.dbf';
l_path_and_name := l_ts_data_02_path_and_name;
OPEN c4;
FETCH c4
INTO l_c4_count;

Appendix A Tablespace_builder File Creation
60 OL-28290-01
CLOSE c4;
IF (l_c4_count = 0)
THEN
l_data_02_file_exists := 'N';
ELSE
l_data_02_file_exists := 'Y';
END IF;
IF (l_data_02_file_exists = 'Y')
THEN
RAISE e_datafile_exists;
END IF;
EXECUTE IMMEDIATE 'CREATE TABLESPACE ' || l_ts_data || '
LOGGING ' ||
'DATAFILE ' ||
'''' || l_ts_data_01_path_and_name ||
''' ' ||
'SIZE ' || '32m REUSE ' ||
'AUTOEXTEND ' || 'ON ' ||
'MAXSIZE ' || 'UNLIMITED ' ||
',''' || l_ts_data_02_path_and_name ||
''' ' ||
'SIZE ' || '32m REUSE ' ||
'AUTOEXTEND ' || 'ON ' ||
'MAXSIZE ' || 'UNLIMITED ' ||
'EXTENT ' || 'MANAGEMENT ' ||
'LOCAL ' ||
'SEGMENT SPACE ' || 'MANAGEMENT ' ||
'AUTO';
END IF;
IF (l_ts_index_exists = 'N')
THEN
l_ts_index_01_path_and_name := l_file_path || l_df_index || '_' ||
l_sid || '_01.dbf';
l_path_and_name := l_ts_index_01_path_and_name;
OPEN c4;
FETCH c4
INTO l_c4_count;
CLOSE c4;
IF (l_c4_count = 0)
THEN
l_index_01_file_exists := 'N';
ELSE
l_index_01_file_exists := 'Y';
END IF;
IF (l_index_01_file_exists = 'Y')
THEN
RAISE e_datafile_exists;
END IF;
l_ts_index_02_path_and_name := l_file_path || l_df_index || '_' ||
l_sid || '_02.dbf';
l_path_and_name := l_ts_index_02_path_and_name;
OPEN c4;

Creating the Tablespace_builder File
OL-28290-01 61
FETCH c4
INTO l_c4_count;
CLOSE c4;
IF (l_c4_count = 0)
THEN
l_index_02_file_exists := 'N';
ELSE
l_index_02_file_exists := 'Y';
END IF;
IF (l_index_02_file_exists = 'Y')
THEN
RAISE e_datafile_exists;
END IF;
EXECUTE IMMEDIATE 'CREATE TABLESPACE ' || l_ts_index || '
LOGGING ' ||
'DATAFILE ' ||
'''' || l_ts_index_01_path_and_name ||
''' ' ||
'SIZE ' || '32m REUSE ' ||
'AUTOEXTEND ' || 'ON ' ||
'MAXSIZE ' || 'UNLIMITED ' ||
',''' || l_ts_index_02_path_and_name ||
''' ' ||
'SIZE ' || '32m REUSE ' ||
'AUTOEXTEND ' || 'ON ' ||
'MAXSIZE ' || 'UNLIMITED ' ||
'EXTENT ' || 'MANAGEMENT ' ||
'LOCAL ' ||
'SEGMENT SPACE ' || 'MANAGEMENT ' ||
'AUTO';
END IF;
EXCEPTION
WHEN e_component_name_too_long THEN
RAISE_APPLICATION_ERROR(
-20001,
'Illegal Inputted Component Name "' ||
component_name ||
'" cannot exceed 18 characters'
);
WHEN e_comp_name_bad_1st_character THEN
RAISE_APPLICATION_ERROR(
-20002,
'Illegal Inputted Component Name "' ||
component_name ||
'" Valid first Characters are a-z,A-Z'
);
WHEN e_component_name_bad_character THEN
RAISE_APPLICATION_ERROR(
-20003,
'Illegal Inputted Component Name "' ||
component_name ||
'" Valid Characters are a-z,A-Z,0-9,_,$,#'
);

Appendix A Tablespace_builder File Creation
62 OL-28290-01
WHEN e_tablespace_for_comp_exists THEN
RAISE_APPLICATION_ERROR(
-20004,
'All Tablespaces "' || l_ts_data || '" and
"' ||
l_ts_index || '" for the inputted component
"' ||
component_name || '" already exist'
);
WHEN e_datafile_exists THEN
RAISE_APPLICATION_ERROR(
-20005,
'The datafile "' || l_path_and_name ||
'" for the inputted component "' ||
component_name || '" already exist'
);
WHEN OTHERS THEN
RAISE_APPLICATION_ERROR(-20006,
'Error: ' || SQLERRM || ' in ' ||
'Stored Procedure "tablespace_builder"'
);
END tablespace_builder;
/
SET LINESIZE 80
SHOW ERRORS
/*
||
|| End of File: tablespace_builder_proc.sql
||
*/
2 After you have saved this sql file, execute it. sqlplus system/cisco
SQL> @tablespace_builder_proc.sql

OL-28290-01 63
B Appx auto letter Appendix B The TmsDbLayer_create_tables-3.36.0-2.sql Script
Introduction
This appendix contains the TmsDbLayer_create_tables-3.36.0-2.sql script.
In This Appendix
TmsDbLayer_create_tables-3.36.0-2.sql ............................................. 64

Appendix B The TmsDbLayer_create_tables-3.36.0-2.sql Script
64 OL-28290-01
TmsDbLayer_create_tables-3.36.0-2.sql DEFINE username = &1;
DEFINE password = &2;
DEFINE data_space = &3;
DEFINE index_space = &4;
DEFINE db_alias = &5;
DECLARE
v_count INTEGER := 0;
BEGIN
SELECT COUNT(1) INTO v_count FROM dba_users WHERE
username = '&username';
IF v_count != 0
THEN
EXECUTE IMMEDIATE ('DROP USER &username
CASCADE');
END IF;
END;
/
CREATE USER &username
IDENTIFIED BY "&password"
DEFAULT TABLESPACE &data_space;
GRANT CONNECT, RESOURCE, CREATE SESSION TO &username;
CONNECT &username/&password@&db_alias
--DROP SEQUENCE Profile_Alias_SEQ;
--DROP SEQUENCE Message_Id_SEQ;
--DROP SEQUENCE Token_SEQ;
--DROP TABLE TMS_Addressing;
--DROP TABLE TMS_Messages;
--DROP TABLE TMS_Profiles;
--DROP TABLE TMS_OTA_PROFILES;
--DROP TABLE TMS_Profile_Alias;
--DROP TABLE TMS_Info;
--==--==--==--==--==--==--==--==--==--==--==--==--==--==--==--
CREATE SEQUENCE Token_SEQ
MINVALUE 1

TmsDbLayer_create_tables-3.36.0-2.sql
OL-28290-01 65
MAXVALUE 281474976710655
START WITH 1
INCREMENT BY 1
CACHE 1000
CYCLE
ORDER;
--==--==--==--==--==--==--==--==--==--==--==--==--==--==--==--
CREATE SEQUENCE Profile_Alias_SEQ
MINVALUE 1
MAXVALUE 281474976710655
START WITH 1
INCREMENT BY 1
CACHE 1000
CYCLE
ORDER;
--==--==--==--==--==--==--==--==--==--==--==--==--==--==--==--
CREATE TABLE TMS_Profile_Alias
(
ProfileName VARCHAR2(100) NOT NULL,
ProfileId VARCHAR2(32) NOT NULL,
isOTAProfile CHAR(1 BYTE) DEFAULT 'N' NOT NULL ENABLE,
expirationDate DATE
);
ALTER TABLE TMS_Profile_Alias ADD CONSTRAINT TMS_Profile_Alias_PK
PRIMARY KEY (ProfileId);
CREATE INDEX TMS_Profile_Alias_Name_IDX ON TMS_Profile_Alias
(ProfileName);
ALTER TABLE TMS_Profile_Alias ADD CONSTRAINT
TMS_ProfileId_isOTA_CHK CHECK (isOTAProfile IN ('Y', 'N'));
--==--==--==--==--==--==--==--==--==--==--==--==--==--==--==--
CREATE TABLE TMS_Profiles
(
Addressing VARCHAR2(300) NOT NULL,
AddressingType VARCHAR2(50) NOT NULL,
ProfileId VARCHAR2(32) NOT NULL,
subsystemId VARCHAR2(20) NOT NULL,

Appendix B The TmsDbLayer_create_tables-3.36.0-2.sql Script
66 OL-28290-01
EntryTimestamp DATE DEFAULT SYSDATE NOT
NULL
);
ALTER TABLE TMS_Profiles ADD CONSTRAINT TMS_Profiles_PK PRIMARY
KEY (Addressing, AddressingType, ProfileId, subsystemId) USING
INDEX;
CREATE INDEX TMS_Profiles_Id_IDX ON TMS_Profiles (ProfileId);
ALTER TABLE TMS_Profiles ADD CONSTRAINT TMS_ProfileId_FK FOREIGN
KEY (ProfileId)
REFERENCES TMS_Profile_Alias (ProfileId) ON DELETE CASCADE;
--==--==--==--==--==--==--==--==--==--==--==--==--==--==--==--
CREATE TABLE TMS_OTA_PROFILES
(
profileId VARCHAR2(20)
, swId NUMBER
, hwId NUMBER
, popId VARCHAR2(20)
);
ALTER TABLE TMS_OTA_PROFILES
ADD CONSTRAINT TMS_OTA_PROFILES_UK1 UNIQUE
(
profileId
)
ENABLE;
ALTER TABLE TMS_OTA_PROFILES
ADD CONSTRAINT TMS_OTA_PROFILES_CHK1 CHECK
(swId > 0 AND swId < 163)
ENABLE;
ALTER TABLE TMS_OTA_PROFILES
ADD CONSTRAINT TMS_OTA_PROFILES_CHK2 CHECK
(hwId > -1 AND hwId < 54)
ENABLE;
ALTER TABLE TMS_OTA_PROFILES
ADD CONSTRAINT TMS_OTA_PROFILES_PK PRIMARY KEY (swId)
ENABLE;
ALTER TABLE TMS_OTA_PROFILES

TmsDbLayer_create_tables-3.36.0-2.sql
OL-28290-01 67
ADD CONSTRAINT TMS_OTA_PROFILES_TMS_PROF_FK1 FOREIGN KEY
(profileId) REFERENCES TMS_PROFILE_ALIAS (PROFILEID)
ENABLE;
INSERT INTO TMS_OTA_PROFILES(swId,hwId)
VALUES(1,0);
INSERT INTO TMS_OTA_PROFILES(swId,hwId)
VALUES(2,1);
INSERT INTO TMS_OTA_PROFILES(swId,hwId)
VALUES(3,2);
INSERT INTO TMS_OTA_PROFILES(swId,hwId)
VALUES(4,3);
INSERT INTO TMS_OTA_PROFILES(swId,hwId)
VALUES(5,4);
INSERT INTO TMS_OTA_PROFILES(swId,hwId)
VALUES(6,5);
INSERT INTO TMS_OTA_PROFILES(swId,hwId)
VALUES(7,6);
INSERT INTO TMS_OTA_PROFILES(swId,hwId)
VALUES(8,7);
INSERT INTO TMS_OTA_PROFILES(swId,hwId)
VALUES(9,8);
INSERT INTO TMS_OTA_PROFILES(swId,hwId)
VALUES(10,9);
INSERT INTO TMS_OTA_PROFILES(swId,hwId)
VALUES(11,10);
INSERT INTO TMS_OTA_PROFILES(swId,hwId)
VALUES(12,11);
INSERT INTO TMS_OTA_PROFILES(swId,hwId)
VALUES(13,12);
INSERT INTO TMS_OTA_PROFILES(swId,hwId)
VALUES(14,13);
INSERT INTO TMS_OTA_PROFILES(swId,hwId)
VALUES(15,14);
INSERT INTO TMS_OTA_PROFILES(swId,hwId)
VALUES(16,15);
INSERT INTO TMS_OTA_PROFILES(swId,hwId)

Appendix B The TmsDbLayer_create_tables-3.36.0-2.sql Script
68 OL-28290-01
VALUES(17,16);
INSERT INTO TMS_OTA_PROFILES(swId,hwId)
VALUES(18,17);
INSERT INTO TMS_OTA_PROFILES(swId,hwId)
VALUES(19,18);
INSERT INTO TMS_OTA_PROFILES(swId,hwId)
VALUES(20,19);
INSERT INTO TMS_OTA_PROFILES(swId,hwId)
VALUES(21,20);
INSERT INTO TMS_OTA_PROFILES(swId,hwId)
VALUES(22,21);
INSERT INTO TMS_OTA_PROFILES(swId,hwId)
VALUES(23,22);
INSERT INTO TMS_OTA_PROFILES(swId,hwId)
VALUES(24,23);
INSERT INTO TMS_OTA_PROFILES(swId,hwId)
VALUES(25,24);
INSERT INTO TMS_OTA_PROFILES(swId,hwId)
VALUES(26,25);
INSERT INTO TMS_OTA_PROFILES(swId,hwId)
VALUES(27,26);
INSERT INTO TMS_OTA_PROFILES(swId,hwId)
VALUES(28,27);
INSERT INTO TMS_OTA_PROFILES(swId,hwId)
VALUES(29,28);
INSERT INTO TMS_OTA_PROFILES(swId,hwId)
VALUES(30,29);
INSERT INTO TMS_OTA_PROFILES(swId,hwId)
VALUES(31,30);
INSERT INTO TMS_OTA_PROFILES(swId,hwId)
VALUES(32,31);
INSERT INTO TMS_OTA_PROFILES(swId,hwId)
VALUES(33,32);
INSERT INTO TMS_OTA_PROFILES(swId,hwId)
VALUES(34,33);

TmsDbLayer_create_tables-3.36.0-2.sql
OL-28290-01 69
INSERT INTO TMS_OTA_PROFILES(swId,hwId)
VALUES(35,34);
INSERT INTO TMS_OTA_PROFILES(swId,hwId)
VALUES(36,35);
INSERT INTO TMS_OTA_PROFILES(swId,hwId)
VALUES(37,36);
INSERT INTO TMS_OTA_PROFILES(swId,hwId)
VALUES(38,37);
INSERT INTO TMS_OTA_PROFILES(swId,hwId)
VALUES(39,38);
INSERT INTO TMS_OTA_PROFILES(swId,hwId)
VALUES(40,39);
INSERT INTO TMS_OTA_PROFILES(swId,hwId)
VALUES(41,40);
INSERT INTO TMS_OTA_PROFILES(swId,hwId)
VALUES(42,41);
INSERT INTO TMS_OTA_PROFILES(swId,hwId)
VALUES(43,42);
INSERT INTO TMS_OTA_PROFILES(swId,hwId)
VALUES(44,43);
INSERT INTO TMS_OTA_PROFILES(swId,hwId)
VALUES(45,44);
INSERT INTO TMS_OTA_PROFILES(swId,hwId)
VALUES(46,45);
INSERT INTO TMS_OTA_PROFILES(swId,hwId)
VALUES(47,46);
INSERT INTO TMS_OTA_PROFILES(swId,hwId)
VALUES(48,47);
INSERT INTO TMS_OTA_PROFILES(swId,hwId)
VALUES(49,48);
INSERT INTO TMS_OTA_PROFILES(swId,hwId)
VALUES(50,49);
INSERT INTO TMS_OTA_PROFILES(swId,hwId)
VALUES(51,50);
INSERT INTO TMS_OTA_PROFILES(swId,hwId)

Appendix B The TmsDbLayer_create_tables-3.36.0-2.sql Script
70 OL-28290-01
VALUES(52,51);
INSERT INTO TMS_OTA_PROFILES(swId,hwId)
VALUES(53,52);
INSERT INTO TMS_OTA_PROFILES(swId,hwId)
VALUES(54,53);
INSERT INTO TMS_OTA_PROFILES(swId,hwId)
VALUES(55,0);
INSERT INTO TMS_OTA_PROFILES(swId,hwId)
VALUES(56,1);
INSERT INTO TMS_OTA_PROFILES(swId,hwId)
VALUES(57,2);
INSERT INTO TMS_OTA_PROFILES(swId,hwId)
VALUES(58,3);
INSERT INTO TMS_OTA_PROFILES(swId,hwId)
VALUES(59,4);
INSERT INTO TMS_OTA_PROFILES(swId,hwId)
VALUES(60,5);
INSERT INTO TMS_OTA_PROFILES(swId,hwId)
VALUES(61,6);
INSERT INTO TMS_OTA_PROFILES(swId,hwId)
VALUES(62,7);
INSERT INTO TMS_OTA_PROFILES(swId,hwId)
VALUES(63,8);
INSERT INTO TMS_OTA_PROFILES(swId,hwId)
VALUES(64,9);
INSERT INTO TMS_OTA_PROFILES(swId,hwId)
VALUES(65,10);
INSERT INTO TMS_OTA_PROFILES(swId,hwId)
VALUES(66,11);
INSERT INTO TMS_OTA_PROFILES(swId,hwId)
VALUES(67,12);
INSERT INTO TMS_OTA_PROFILES(swId,hwId)
VALUES(68,13);
INSERT INTO TMS_OTA_PROFILES(swId,hwId)
VALUES(69,14);

TmsDbLayer_create_tables-3.36.0-2.sql
OL-28290-01 71
INSERT INTO TMS_OTA_PROFILES(swId,hwId)
VALUES(70,15);
INSERT INTO TMS_OTA_PROFILES(swId,hwId)
VALUES(71,16);
INSERT INTO TMS_OTA_PROFILES(swId,hwId)
VALUES(72,17);
INSERT INTO TMS_OTA_PROFILES(swId,hwId)
VALUES(73,18);
INSERT INTO TMS_OTA_PROFILES(swId,hwId)
VALUES(74,19);
INSERT INTO TMS_OTA_PROFILES(swId,hwId)
VALUES(75,20);
INSERT INTO TMS_OTA_PROFILES(swId,hwId)
VALUES(76,21);
INSERT INTO TMS_OTA_PROFILES(swId,hwId)
VALUES(77,22);
INSERT INTO TMS_OTA_PROFILES(swId,hwId)
VALUES(78,23);
INSERT INTO TMS_OTA_PROFILES(swId,hwId)
VALUES(79,24);
INSERT INTO TMS_OTA_PROFILES(swId,hwId)
VALUES(80,25);
INSERT INTO TMS_OTA_PROFILES(swId,hwId)
VALUES(81,26);
INSERT INTO TMS_OTA_PROFILES(swId,hwId)
VALUES(82,27);
INSERT INTO TMS_OTA_PROFILES(swId,hwId)
VALUES(83,28);
INSERT INTO TMS_OTA_PROFILES(swId,hwId)
VALUES(84,29);
INSERT INTO TMS_OTA_PROFILES(swId,hwId)
VALUES(85,30);
INSERT INTO TMS_OTA_PROFILES(swId,hwId)
VALUES(86,31);
INSERT INTO TMS_OTA_PROFILES(swId,hwId)

Appendix B The TmsDbLayer_create_tables-3.36.0-2.sql Script
72 OL-28290-01
VALUES(87,32);
INSERT INTO TMS_OTA_PROFILES(swId,hwId)
VALUES(88,33);
INSERT INTO TMS_OTA_PROFILES(swId,hwId)
VALUES(89,34);
INSERT INTO TMS_OTA_PROFILES(swId,hwId)
VALUES(90,35);
INSERT INTO TMS_OTA_PROFILES(swId,hwId)
VALUES(91,36);
INSERT INTO TMS_OTA_PROFILES(swId,hwId)
VALUES(92,37);
INSERT INTO TMS_OTA_PROFILES(swId,hwId)
VALUES(93,38);
INSERT INTO TMS_OTA_PROFILES(swId,hwId)
VALUES(94,39);
INSERT INTO TMS_OTA_PROFILES(swId,hwId)
VALUES(95,40);
INSERT INTO TMS_OTA_PROFILES(swId,hwId)
VALUES(96,41);
INSERT INTO TMS_OTA_PROFILES(swId,hwId)
VALUES(97,42);
INSERT INTO TMS_OTA_PROFILES(swId,hwId)
VALUES(98,43);
INSERT INTO TMS_OTA_PROFILES(swId,hwId)
VALUES(99,44);
INSERT INTO TMS_OTA_PROFILES(swId,hwId)
VALUES(100,45);
INSERT INTO TMS_OTA_PROFILES(swId,hwId)
VALUES(101,46);
INSERT INTO TMS_OTA_PROFILES(swId,hwId)
VALUES(102,47);
INSERT INTO TMS_OTA_PROFILES(swId,hwId)
VALUES(103,48);
INSERT INTO TMS_OTA_PROFILES(swId,hwId)
VALUES(104,49);

TmsDbLayer_create_tables-3.36.0-2.sql
OL-28290-01 73
INSERT INTO TMS_OTA_PROFILES(swId,hwId)
VALUES(105,50);
INSERT INTO TMS_OTA_PROFILES(swId,hwId)
VALUES(106,51);
INSERT INTO TMS_OTA_PROFILES(swId,hwId)
VALUES(107,52);
INSERT INTO TMS_OTA_PROFILES(swId,hwId)
VALUES(108,53);
INSERT INTO TMS_OTA_PROFILES(swId,hwId)
VALUES(109,0);
INSERT INTO TMS_OTA_PROFILES(swId,hwId)
VALUES(110,1);
INSERT INTO TMS_OTA_PROFILES(swId,hwId)
VALUES(111,2);
INSERT INTO TMS_OTA_PROFILES(swId,hwId)
VALUES(112,3);
INSERT INTO TMS_OTA_PROFILES(swId,hwId)
VALUES(113,4);
INSERT INTO TMS_OTA_PROFILES(swId,hwId)
VALUES(114,5);
INSERT INTO TMS_OTA_PROFILES(swId,hwId)
VALUES(115,6);
INSERT INTO TMS_OTA_PROFILES(swId,hwId)
VALUES(116,7);
INSERT INTO TMS_OTA_PROFILES(swId,hwId)
VALUES(117,8);
INSERT INTO TMS_OTA_PROFILES(swId,hwId)
VALUES(118,9);
INSERT INTO TMS_OTA_PROFILES(swId,hwId)
VALUES(119,10);
INSERT INTO TMS_OTA_PROFILES(swId,hwId)
VALUES(120,11);
INSERT INTO TMS_OTA_PROFILES(swId,hwId)
VALUES(121,12);
INSERT INTO TMS_OTA_PROFILES(swId,hwId)

Appendix B The TmsDbLayer_create_tables-3.36.0-2.sql Script
74 OL-28290-01
VALUES(122,13);
INSERT INTO TMS_OTA_PROFILES(swId,hwId)
VALUES(123,14);
INSERT INTO TMS_OTA_PROFILES(swId,hwId)
VALUES(124,15);
INSERT INTO TMS_OTA_PROFILES(swId,hwId)
VALUES(125,16);
INSERT INTO TMS_OTA_PROFILES(swId,hwId)
VALUES(126,17);
INSERT INTO TMS_OTA_PROFILES(swId,hwId)
VALUES(127,18);
INSERT INTO TMS_OTA_PROFILES(swId,hwId)
VALUES(128,19);
INSERT INTO TMS_OTA_PROFILES(swId,hwId)
VALUES(129,20);
INSERT INTO TMS_OTA_PROFILES(swId,hwId)
VALUES(130,21);
INSERT INTO TMS_OTA_PROFILES(swId,hwId)
VALUES(131,22);
INSERT INTO TMS_OTA_PROFILES(swId,hwId)
VALUES(132,23);
INSERT INTO TMS_OTA_PROFILES(swId,hwId)
VALUES(133,24);
INSERT INTO TMS_OTA_PROFILES(swId,hwId)
VALUES(134,25);
INSERT INTO TMS_OTA_PROFILES(swId,hwId)
VALUES(135,26);
INSERT INTO TMS_OTA_PROFILES(swId,hwId)
VALUES(136,27);
INSERT INTO TMS_OTA_PROFILES(swId,hwId)
VALUES(137,28);
INSERT INTO TMS_OTA_PROFILES(swId,hwId)
VALUES(138,29);
INSERT INTO TMS_OTA_PROFILES(swId,hwId)
VALUES(139,30);

TmsDbLayer_create_tables-3.36.0-2.sql
OL-28290-01 75
INSERT INTO TMS_OTA_PROFILES(swId,hwId)
VALUES(140,31);
INSERT INTO TMS_OTA_PROFILES(swId,hwId)
VALUES(141,32);
INSERT INTO TMS_OTA_PROFILES(swId,hwId)
VALUES(142,33);
INSERT INTO TMS_OTA_PROFILES(swId,hwId)
VALUES(143,34);
INSERT INTO TMS_OTA_PROFILES(swId,hwId)
VALUES(144,35);
INSERT INTO TMS_OTA_PROFILES(swId,hwId)
VALUES(145,36);
INSERT INTO TMS_OTA_PROFILES(swId,hwId)
VALUES(146,37);
INSERT INTO TMS_OTA_PROFILES(swId,hwId)
VALUES(147,38);
INSERT INTO TMS_OTA_PROFILES(swId,hwId)
VALUES(148,39);
INSERT INTO TMS_OTA_PROFILES(swId,hwId)
VALUES(149,40);
INSERT INTO TMS_OTA_PROFILES(swId,hwId)
VALUES(150,41);
INSERT INTO TMS_OTA_PROFILES(swId,hwId)
VALUES(151,42);
INSERT INTO TMS_OTA_PROFILES(swId,hwId)
VALUES(152,43);
INSERT INTO TMS_OTA_PROFILES(swId,hwId)
VALUES(153,44);
INSERT INTO TMS_OTA_PROFILES(swId,hwId)
VALUES(154,45);
INSERT INTO TMS_OTA_PROFILES(swId,hwId)
VALUES(155,46);
INSERT INTO TMS_OTA_PROFILES(swId,hwId)
VALUES(156,47);
INSERT INTO TMS_OTA_PROFILES(swId,hwId)

Appendix B The TmsDbLayer_create_tables-3.36.0-2.sql Script
76 OL-28290-01
VALUES(157,48);
INSERT INTO TMS_OTA_PROFILES(swId,hwId)
VALUES(158,49);
INSERT INTO TMS_OTA_PROFILES(swId,hwId)
VALUES(159,50);
INSERT INTO TMS_OTA_PROFILES(swId,hwId)
VALUES(160,51);
INSERT INTO TMS_OTA_PROFILES(swId,hwId)
VALUES(161,52);
INSERT INTO TMS_OTA_PROFILES(swId,hwId)
VALUES(162,53);
--==--==--==--==--==--==--==--==--==--==--==--==--==--==--==--
CREATE TABLE TMS_Messages
(
SubsystemId VARCHAR2(50) NOT NULL,
Handle VARCHAR2(300) NOT NULL,
EntryTimestamp DATE DEFAULT SysDate NOT
NULL,
Header RAW(1000),
Token NUMBER(12) NOT NULL,
ExternalMsgId NUMBER(12) NOT NULL,
HandlingPriority VARCHAR2(50) NOT NULL,
Payload RAW(2000),
PayloadType VARCHAR2(50) NOT NULL,
TargetComponent VARCHAR2(50) NOT NULL,
DeliveryStartDate DATE,
DeliveryEndDate DATE,
Encrypted CHAR(1) NOT NULL,
Signed CHAR(1) NOT NULL,
AckRequired CHAR(1) NOT NULL,
ImmSentTS DATE,
Bootstrap CHAR(1) DEFAULT 'N' NOT NULL
)
TABLESPACE &data_space;
ALTER TABLE TMS_Messages ADD CONSTRAINT TMS_Messages_PK PRIMARY
KEY (ExternalMsgId) USING INDEX REVERSE;

TmsDbLayer_create_tables-3.36.0-2.sql
OL-28290-01 77
ALTER TABLE TMS_Messages ADD CONSTRAINT TMS_Msgs_Priority_CHK
CHECK (HandlingPriority IN ('Low', 'Once', 'High', 'Immediate'));
ALTER TABLE TMS_Messages ADD CONSTRAINT TMS_Msgs_Payload_CHK
CHECK (PayloadType IN ('URL', 'Data', 'XML', 'APS'));
ALTER TABLE TMS_Messages ADD CONSTRAINT TMS_Msgs_Encrypted_CHK
CHECK (Encrypted IN ('Y', 'N'));
ALTER TABLE TMS_Messages ADD CONSTRAINT TMS_Msgs_Signed_CHK CHECK
(Signed IN ('Y', 'N'));
ALTER TABLE TMS_Messages ADD CONSTRAINT TMS_Msgs_AckRequired_CHK
CHECK (AckRequired IN ('Y', 'N'));
ALTER TABLE TMS_Messages ADD CONSTRAINT TMS_Msgs_SUBS_HDL_CHK
UNIQUE (SubsystemId, Handle);
--no need for index because there is a unique constrant
--CREATE INDEX TMS_Msgs_Subsystm_Handle_IDX ON TMS_Messages
(SubsystemId, Handle) TABLESPACE &index_space;
CREATE INDEX TMS_Msgs_Start_Date_IDX ON TMS_Messages
(DeliveryStartDate) TABLESPACE &index_space;
CREATE INDEX TMS_Msgs_Sent_Date_IDX ON TMS_Messages (ImmSentTS)
TABLESPACE &index_space;
CREATE UNIQUE INDEX TMS_TOKEN_IDX ON TMS_Messages (Token)
TABLESPACE &index_space;
--ALTER TABLE TMS_Messages ADD CONSTRAINT
TMS_External_Msgs_Unq UNIQUE (ExternalMsgId) tablespace
&index_space;
--==--==--==--==--==--==--==--==--==--==--==--==--==--==--==--
CREATE TABLE TMS_Addressing
(
Addressing VARCHAR2(300) NOT NULL,
AddressingType VARCHAR2(50) NOT NULL,
ExternalMsgId NUMBER(12) NOT NULL,
AckReceived DATE DEFAULT NULL
)
TABLESPACE &data_space;
ALTER TABLE TMS_Addressing ADD CONSTRAINT TMS_Addressing_PK
PRIMARY KEY (Addressing, AddressingType, ExternalMsgId);
CREATE INDEX TMS_Addressing_MsgId_IDX ON TMS_Addressing
(ExternalMsgId) REVERSE TABLESPACE &index_space;
ALTER TABLE TMS_Addressing ADD CONSTRAINT TMS_Addressing_FK
FOREIGN KEY (ExternalMsgId)
REFERENCES TMS_Messages (ExternalMsgId) ON DELETE CASCADE;

Appendix B The TmsDbLayer_create_tables-3.36.0-2.sql Script
78 OL-28290-01
--==--==--==--==--==--==--==--==--==--==--==--==--==--==--==--
CREATE TABLE TMS_Info
(
Version_Id VARCHAR2(20),
Version_Description VARCHAR2(80),
Data_Dictionary XMLTYPE
)
TABLESPACE &data_space;
--==--==--==--==--==--==--==--==--==--==--==--==--==--==--==--
CREATE OR REPLACE PROCEDURE DeleteExpiredMsgsAfterSeconds
(afterSeconds IN NUMBER,
maxRowsInTrx IN PLS_INTEGER := 1000,
rowsDeleted OUT NUMBER)
IS
TYPE ARROWID IS TABLE OF ROWID INDEX BY BINARY_INTEGER;
tbrows ARROWID;
row PLS_INTEGER;
CURSOR delete_table IS
SELECT rowid
FROM TMS_Messages msg
WHERE msg.DeliveryEndDate < SYSDATE -
(afterSeconds/86400)
ORDER BY ROWID;
BEGIN
rowsDeleted := 0;
OPEN delete_table;
LOOP
FETCH delete_table BULK COLLECT INTO tbrows LIMIT
maxRowsInTrx;
rowsDeleted := rowsDeleted + tbrows.count();
FORALL row IN 1 .. tbrows.count()
DELETE FROM TMS_Messages WHERE rowid = tbrows(row);
COMMIT;
EXIT WHEN delete_table%NOTFOUND;
END LOOP;
CLOSE delete_table;

TmsDbLayer_create_tables-3.36.0-2.sql
OL-28290-01 79
END;
/
CREATE OR REPLACE PROCEDURE DeleteAckedMsgsAfterSeconds
(afterSeconds IN NUMBER,
maxRowsInTrx IN PLS_INTEGER := 1000,
rowsDeleted OUT NUMBER)
IS
TYPE ARROWID IS TABLE OF ROWID INDEX BY BINARY_INTEGER;
tbrows ARROWID;
row PLS_INTEGER;
CURSOR delete_table IS
SELECT addr.rowid
FROM TMS_ADDRESSING addr, TMS_MESSAGES msgs
WHERE addr.AckReceived + (afterSeconds / 86400) <
SYSDATE
AND addr.ExternalMsgId = msgs.ExternalMsgId
AND msgs.Bootstrap = 'N'
ORDER BY ROWID;
BEGIN
rowsDeleted := 0;
OPEN delete_table;
LOOP
FETCH delete_table BULK COLLECT INTO tbrows LIMIT
maxRowsInTrx;
rowsDeleted := rowsDeleted + tbrows.count();
FORALL row IN 1 .. tbrows.count()
DELETE FROM TMS_ADDRESSING WHERE rowid = tbrows(row);
COMMIT;
EXIT WHEN delete_table%NOTFOUND;
END LOOP;
CLOSE delete_table;
END;
/
CREATE OR REPLACE PROCEDURE DeleteMsgsWithoutAddressing
(maxRowsInTrx IN PLS_INTEGER := 1000,
rowsDeleted OUT NUMBER)

Appendix B The TmsDbLayer_create_tables-3.36.0-2.sql Script
80 OL-28290-01
IS
TYPE ARROWID IS TABLE OF ROWID INDEX BY BINARY_INTEGER;
tbrows ARROWID;
row PLS_INTEGER;
CURSOR delete_table IS
SELECT rowid
FROM TMS_MESSAGES MSG WHERE 0 = (SELECT COUNT(TOKEN)
FROM TMS_ADDRESSING ADDR WHERE MSG.ExternalMsgId =
ADDR.ExternalMsgId)
ORDER BY ROWID;
BEGIN
rowsDeleted := 0;
OPEN delete_table;
LOOP
FETCH delete_table BULK COLLECT INTO tbrows LIMIT
maxRowsInTrx;
rowsDeleted := rowsDeleted + tbrows.count();
FORALL row IN 1 .. tbrows.count()
DELETE FROM TMS_MESSAGES WHERE rowid = tbrows(row);
COMMIT;
EXIT WHEN delete_table%NOTFOUND;
END LOOP;
CLOSE delete_table;
END;
/
--==--==--==--==--==--==--==--==--==--==--==--==--==--==--==--
INSERT INTO TMS_Info (Version_Id, Version_Description)
VALUES ('3.36.0-2', 'DB schema for TMS ver.
3.36.0-2 and up');
COMMIT;
EXIT;

OL-28290-01 81
C Appx auto letter Appendix C The Create_PPS_database_3_36_2-0.sql Script
Introduction
This appendix contains the Create_PPS_database_3_36_2-0.sql script.
In This Appendix
Create_PPS_database_3_36_2-0.sql .................................................... 82

Appendix C The Create_PPS_database_3_36_2-0.sql Script
82 OL-28290-01
Create_PPS_database_3_36_2-0.sql DEFINE username = &1;
DEFINE password = &2;
DEFINE data_space = &3;
DEFINE index_space = &4;
DEFINE db_alias = &5;
DEFINE lob_space = "LOB_DATA_MANUAL";
SPOOL db_log.log
DECLARE
v_count INTEGER := 0;
BEGIN
SELECT COUNT(1) INTO v_count FROM dba_users WHERE
username = '&username';
IF v_count != 0
THEN
EXECUTE IMMEDIATE ('DROP USER &username
CASCADE');
END IF;
END;
/
CREATE USER &username
IDENTIFIED BY "&password"
DEFAULT TABLESPACE &data_space;
GRANT CONNECT,RESOURCE,CREATE SESSION TO &username;
CONNECT &username/&password@&db_alias;
--------------------------------------------------------
-- File created - Monday-June-04-2012
--------------------------------------------------------
--------------------------------------------------------
-- DDL for Sequence SEQ_MDP_CONTENT
--------------------------------------------------------

Create_PPS_database_3_36_2-0.sql
OL-28290-01 83
CREATE SEQUENCE "SEQ_MDP_CONTENT" MINVALUE 1 MAXVALUE
999999999999999999999999999 INCREMENT BY 1 START WITH 26381 CACHE
20 NOORDER NOCYCLE ;
--------------------------------------------------------
-- DDL for Sequence SEQ_MDP_INSTANCE
--------------------------------------------------------
CREATE SEQUENCE "SEQ_MDP_INSTANCE" MINVALUE 1 MAXVALUE
999999999999999999999999999 INCREMENT BY 1 START WITH 26321 CACHE
20 NOORDER NOCYCLE ;
--------------------------------------------------------
-- DDL for Sequence SEQ_METADATA
--------------------------------------------------------
CREATE SEQUENCE "SEQ_METADATA" MINVALUE 1 MAXVALUE
999999999999999999999999999 INCREMENT BY 1 START WITH 36201 CACHE
20 NOORDER NOCYCLE ;
--------------------------------------------------------
-- DDL for Sequence SEQ_PLANNER
--------------------------------------------------------
CREATE SEQUENCE "SEQ_PLANNER" MINVALUE 1 MAXVALUE
999999999999999999999999999 INCREMENT BY 1 START WITH 33041 CACHE
20 NOORDER NOCYCLE ;
--------------------------------------------------------
-- DDL for Sequence SEQ_PLANNER_ITEM
--------------------------------------------------------
CREATE SEQUENCE "SEQ_PLANNER_ITEM" MINVALUE 1 MAXVALUE
999999999999999999999999999 INCREMENT BY 1 START WITH 49001 CACHE
100 NOORDER NOCYCLE ;
--------------------------------------------------------
-- DDL for Sequence SEQ_REQUEST_TRANSACTION
--------------------------------------------------------
CREATE SEQUENCE "SEQ_REQUEST_TRANSACTION" MINVALUE 1
MAXVALUE 999999999999999999999999999 INCREMENT BY 1 START WITH
15401 CACHE 20 NOORDER NOCYCLE ;
--------------------------------------------------------
-- DDL for Table MDP_CONTENT_METADATA
--------------------------------------------------------
CREATE TABLE "MDP_CONTENT_METADATA"
( "PVR_CONTENT_ID" NUMBER(20,0),
"CONTENT_ID" VARCHAR2(255 CHAR),

Appendix C The Create_PPS_database_3_36_2-0.sql Script
84 OL-28290-01
"IN_SCHEDULE" NUMBER(1,0),
"METADATA_CONTENT" CLOB,
"CONTENT_HANDLE" VARCHAR2(255),
"LAST_UPDATE_DATE" TIMESTAMP (6),
"IS_DELETED" NUMBER(1,0),
"EXPIRATION_DATE" DATE
)
TABLESPACE &data_space
LOB (METADATA_CONTENT) STORE AS
( TABLESPACE &lob_space
NOCACHE
);
--------------------------------------------------------
-- DDL for Table MDP_INSTANCE_METADATA
--------------------------------------------------------
CREATE TABLE "MDP_INSTANCE_METADATA"
( "PVR_INSTANCE_ID" NUMBER(18,0),
"PVR_CONTENT_ID" NUMBER(18,0),
"CONTENT_INSTANCE_ID" VARCHAR2(255),
"IN_SCHEDULE" NUMBER(1,0),
"METADATA_CONTENT" CLOB,
"LAST_UPDATE_DATE" TIMESTAMP (6),
"INSTANCE_HANDLE" VARCHAR2(255),
"IS_DELETED" NUMBER(1,0),
"EXPIRATION_DATE" DATE,
"BASIC_METADATA_CONTENT" CLOB,
RECORDING_ID VARCHAR2(1000)
)
TABLESPACE &data_space
LOB (METADATA_CONTENT) STORE AS
( TABLESPACE &lob_space
NOCACHE
)
LOB (BASIC_METADATA_CONTENT) STORE AS

Create_PPS_database_3_36_2-0.sql
OL-28290-01 85
( TABLESPACE &lob_space
NOCACHE
);
--------------------------------------------------------
-- DDL for Table MDP_PERSISTENCE
--------------------------------------------------------
CREATE TABLE "MDP_PERSISTENCE"
( "PERSISTENCE_ID" VARCHAR2(255),
"PERSISTENCE_VALUE" NUMBER(20,0)
) ;
--------------------------------------------------------
-- DDL for Table PLANNER
--------------------------------------------------------
CREATE TABLE "PLANNER"
( "PLANNER_ID" NUMBER(18,0),
"LAST_SYNC_DATE" DATE,
"DELETED" NUMBER(1,0) DEFAULT 0,
"LAST_UPDATE_DATE" TIMESTAMP (6) DEFAULT SYSDATE,
"HOUSEHOLD_ID" VARCHAR2(200),
"DEVICE_ID" VARCHAR2(200),
"IS_REAL_TIME" NUMBER(1,0) DEFAULT 0,
"TOTAL_DISK_SPACE" NUMBER(18,0),
"REGION" VARCHAR2(200 CHAR),
REPORTING_ERROR_DATE TIMESTAMP,
BASELINE_SENT TIMESTAMP,
ONLINE_CHECK_SENT TIMESTAMP
) ;
--------------------------------------------------------
-- DDL for Table PLANNER_ITEM
--------------------------------------------------------
CREATE TABLE "PLANNER_ITEM"
( "ITEM_ID" NUMBER(18,0),
"DELETED" NUMBER(1,0) DEFAULT 0,
"EVENT_URL" VARCHAR2(1000),

Appendix C The Create_PPS_database_3_36_2-0.sql Script
86 OL-28290-01
"TYPE" VARCHAR2(25),
"STATE" VARCHAR2(20),
"KEEP" NUMBER(1,0) DEFAULT 0,
"LOCKED" NUMBER(1,0) DEFAULT 0,
"CDS_OBJECT_ID" VARCHAR2(100),
"PLANNER_ID" NUMBER(18,0),
"RECORDED_START_TIME" DATE,
"RECORDED_DURATION_SECONDS" NUMBER(8,0),
"SIZE_ON_DISK" NUMBER(18,0),
"LAST_PLAYBACK_POSITION_SECONDS" NUMBER(8,0),
"IS_VIEWED" NUMBER(1,0),
"PARTIAL_CONTENT" NUMBER(1,0),
"LAST_UPDATE_DATE" TIMESTAMP (6),
"LOCAL_ASSET_URI" VARCHAR2(1000),
"PROFILE" VARCHAR2(1000),
"PVR_INSTANCE_ID" NUMBER(18,0),
"NPVR_REQUEST_ID" VARCHAR2(1000),
"NPVR_ASSET_URI" VARCHAR2(1000),
"SCHEDULED_START_TIME" DATE,
"SCHEDULED_DURATION_SECONDS" NUMBER(8,0),
"TITLE" VARCHAR2(1000 CHAR),
"GROUP_ID" VARCHAR2(100),
"FREQUENCY" VARCHAR2(100)
) ;
--------------------------------------------------------
-- DDL for Table PPS_SCHEMA_VERSION
--------------------------------------------------------
CREATE TABLE "PPS_SCHEMA_VERSION"
( "VERSION" VARCHAR2(40),
"DESCRIPTION" VARCHAR2(200)
) ;
--------------------------------------------------------
-- DDL for Table REQUEST_TRANSACTION
--------------------------------------------------------

Create_PPS_database_3_36_2-0.sql
OL-28290-01 87
CREATE TABLE "REQUEST_TRANSACTION"
( "TRANSACTION_ID" NUMBER(18,0),
"STATE" VARCHAR2(30),
"PLANNER_ITEM_ID" NUMBER(18,0),
"CREATED_AT" DATE DEFAULT SYSDATE,
"PLANNER_ID" NUMBER(18,0)
) ;
--------------------------------------------------------
-- Constraints for Table PLANNER_ITEM
--------------------------------------------------------
ALTER TABLE "PLANNER_ITEM" ADD CONSTRAINT "PLANNER_ITEM_PK"
PRIMARY KEY ("ITEM_ID") ENABLE;
ALTER TABLE "PLANNER_ITEM" MODIFY ("ITEM_ID" NOT NULL ENABLE);
ALTER TABLE "PLANNER_ITEM" MODIFY ("DELETED" NOT NULL ENABLE);
ALTER TABLE "PLANNER_ITEM" MODIFY ("TYPE" NOT NULL ENABLE);
ALTER TABLE "PLANNER_ITEM" MODIFY ("STATE" NOT NULL ENABLE);
ALTER TABLE "PLANNER_ITEM" MODIFY ("KEEP" NOT NULL ENABLE);
ALTER TABLE "PLANNER_ITEM" MODIFY ("LOCKED" NOT NULL ENABLE);
ALTER TABLE "PLANNER_ITEM" MODIFY ("PLANNER_ID" NOT NULL
ENABLE);
ALTER TABLE "PLANNER_ITEM" MODIFY ("LAST_UPDATE_DATE" NOT NULL
ENABLE);
--------------------------------------------------------
-- Constraints for Table PLANNER
--------------------------------------------------------
ALTER TABLE "PLANNER" ADD CONSTRAINT "PLANNER_PK" PRIMARY KEY
("PLANNER_ID") ENABLE;
ALTER TABLE "PLANNER" MODIFY ("PLANNER_ID" NOT NULL ENABLE);
ALTER TABLE "PLANNER" MODIFY ("LAST_SYNC_DATE" NOT NULL
ENABLE);
ALTER TABLE "PLANNER" MODIFY ("LAST_UPDATE_DATE" NOT NULL
ENABLE);
ALTER TABLE "PLANNER" MODIFY ("DEVICE_ID" NOT NULL ENABLE);
--------------------------------------------------------
-- Constraints for Table MDP_PERSISTENCE
--------------------------------------------------------
ALTER TABLE "MDP_PERSISTENCE" ADD CONSTRAINT
"MDP_PERSISTENCY_PK" PRIMARY KEY ("PERSISTENCE_ID") ENABLE;

Appendix C The Create_PPS_database_3_36_2-0.sql Script
88 OL-28290-01
ALTER TABLE "MDP_PERSISTENCE" MODIFY ("PERSISTENCE_ID" NOT NULL
ENABLE);
--------------------------------------------------------
-- Constraints for Table MDP_INSTANCE_METADATA
--------------------------------------------------------
ALTER TABLE "MDP_INSTANCE_METADATA" ADD CONSTRAINT
"MDP_INSTANCE_METADATA_PK" PRIMARY KEY ("PVR_INSTANCE_ID")
ENABLE;
ALTER TABLE "MDP_INSTANCE_METADATA" MODIFY ("PVR_INSTANCE_ID"
NOT NULL ENABLE);
ALTER TABLE "MDP_INSTANCE_METADATA" MODIFY ("PVR_CONTENT_ID"
NOT NULL ENABLE);
ALTER TABLE "MDP_INSTANCE_METADATA" MODIFY
("CONTENT_INSTANCE_ID" NOT NULL ENABLE);
ALTER TABLE "MDP_INSTANCE_METADATA" MODIFY ("METADATA_CONTENT"
NOT NULL ENABLE);
ALTER TABLE "MDP_INSTANCE_METADATA" MODIFY ("IS_DELETED" NOT
NULL ENABLE);
ALTER TABLE "MDP_INSTANCE_METADATA" MODIFY ("EXPIRATION_DATE"
NOT NULL ENABLE);
--------------------------------------------------------
-- Constraints for Table MDP_CONTENT_METADATA
--------------------------------------------------------
ALTER TABLE "MDP_CONTENT_METADATA" ADD CONSTRAINT
"MDG_METADATA_PK" PRIMARY KEY ("PVR_CONTENT_ID") ENABLE;
ALTER TABLE "MDP_CONTENT_METADATA" MODIFY ("PVR_CONTENT_ID" NOT
NULL ENABLE);
ALTER TABLE "MDP_CONTENT_METADATA" MODIFY ("CONTENT_ID" NOT
NULL ENABLE);
ALTER TABLE "MDP_CONTENT_METADATA" MODIFY ("METADATA_CONTENT"
NOT NULL ENABLE);
ALTER TABLE "MDP_CONTENT_METADATA" MODIFY ("IS_DELETED" NOT
NULL ENABLE);
ALTER TABLE "MDP_CONTENT_METADATA" MODIFY ("EXPIRATION_DATE"
NOT NULL ENABLE);
--------------------------------------------------------
-- Constraints for Table REQUEST_TRANSACTION
--------------------------------------------------------
ALTER TABLE "REQUEST_TRANSACTION" MODIFY ("TRANSACTION_ID" NOT
NULL ENABLE);

Create_PPS_database_3_36_2-0.sql
OL-28290-01 89
ALTER TABLE "REQUEST_TRANSACTION" MODIFY ("STATE" NOT NULL
ENABLE);
ALTER TABLE "REQUEST_TRANSACTION" MODIFY ("CREATED_AT" NOT NULL
ENABLE);
ALTER TABLE "REQUEST_TRANSACTION" MODIFY ("PLANNER_ID" NOT NULL
ENABLE);
ALTER TABLE "REQUEST_TRANSACTION" ADD CONSTRAINT
"TRANSACTION_PK" PRIMARY KEY ("TRANSACTION_ID") ENABLE;
--------------------------------------------------------
-- DDL for Index PLANNER_ITEM_IDX_SCH_TIME
--------------------------------------------------------
CREATE INDEX "PLANNER_ITEM_IDX_SCH_TIME" ON "PLANNER_ITEM"
("SCHEDULED_START_TIME")
;
--------------------------------------------------------
-- DDL for Index PLANNER_INDEX1
--------------------------------------------------------
CREATE INDEX "PLANNER_INDEX1" ON "PLANNER" ("DEVICE_ID")
;
--------------------------------------------------------
-- DDL for Index PLANNER_INDEX2
--------------------------------------------------------
CREATE INDEX "PLANNER_INDEX2" ON "PLANNER" ("HOUSEHOLD_ID")
;
--------------------------------------------------------
-- DDL for Index PLANNER_ITEM_IDX_PID_EVENTURL
--------------------------------------------------------
CREATE INDEX "PLANNER_ITEM_IDX_PID_EVENTURL" ON "PLANNER_ITEM"
("PLANNER_ID", "EVENT_URL") REVERSE
;
--------------------------------------------------------
-- DDL for Index PLANNER_ITEM_IDX_PID_CDS
--------------------------------------------------------
CREATE INDEX "PLANNER_ITEM_IDX_PID_CDS" ON "PLANNER_ITEM"
("PLANNER_ID", "CDS_OBJECT_ID")
;
--------------------------------------------------------
-- DDL for Index ACTIVE_CONTENT_BY_HANDLE_IDX

Appendix C The Create_PPS_database_3_36_2-0.sql Script
90 OL-28290-01
--------------------------------------------------------
CREATE INDEX "ACTIVE_CONTENT_BY_HANDLE_IDX" ON
"MDP_CONTENT_METADATA" ("CONTENT_HANDLE", "IN_SCHEDULE")
;
--------------------------------------------------------
-- DDL for Index ACTIVE_CONTENT_BY_ID_IDX
--------------------------------------------------------
CREATE INDEX "ACTIVE_CONTENT_BY_ID_IDX" ON
"MDP_CONTENT_METADATA" ("CONTENT_ID", "IN_SCHEDULE")
;
--------------------------------------------------------
-- DDL for Index MDP_INSTANCE_METADATA_CONTENT
--------------------------------------------------------
CREATE INDEX "MDP_INSTANCE_METADATA_CONTENT" ON
"MDP_INSTANCE_METADATA" ("PVR_CONTENT_ID", "PVR_INSTANCE_ID",
"IN_SCHEDULE")
;
--------------------------------------------------------
-- Ref Constraints for Table MDP_INSTANCE_METADATA
--------------------------------------------------------
ALTER TABLE "MDP_INSTANCE_METADATA" ADD CONSTRAINT
"MDP_INSTANCE_METADATA_MDP_FK1" FOREIGN KEY ("PVR_CONTENT_ID")
REFERENCES "MDP_CONTENT_METADATA" ("PVR_CONTENT_ID")
ENABLE;
--------------------------------------------------------
-- Ref Constraints for Table PLANNER_ITEM
--------------------------------------------------------
ALTER TABLE "PLANNER_ITEM" ADD CONSTRAINT
"FK_PLANNER_ITEM_MDP_INSTANCE" FOREIGN KEY ("PVR_INSTANCE_ID")
REFERENCES "MDP_INSTANCE_METADATA" ("PVR_INSTANCE_ID")
ENABLE;
ALTER TABLE "PLANNER_ITEM" ADD CONSTRAINT
"PLANNER_ITEM_PLANNER_FK1" FOREIGN KEY ("PLANNER_ID")
REFERENCES "PLANNER" ("PLANNER_ID") ENABLE;
--------------------------------------------------------
-- Iteration 27 new indices
--------------------------------------------------------
CREATE INDEX "MDP_CONTENT_IDX_EXPIRATION" ON
"MDP_CONTENT_METADATA" ("EXPIRATION_DATE")

Create_PPS_database_3_36_2-0.sql
OL-28290-01 91
;
CREATE INDEX "MDP_CONTENT_IDX_SCHEDULE" ON
"MDP_CONTENT_METADATA" ("IN_SCHEDULE")
;
CREATE INDEX "MDP_CONTENT_IDX_UPDATED" ON
"MDP_CONTENT_METADATA" ("LAST_UPDATE_DATE", "IS_DELETED")
;
CREATE INDEX "MDP_INSTANCE_IDX_DATE" ON "MDP_INSTANCE_METADATA"
("LAST_UPDATE_DATE", "IS_DELETED")
;
CREATE INDEX "MDP_INSTANCE_IDX_EXPIRATION" ON
"MDP_INSTANCE_METADATA" ("EXPIRATION_DATE")
;
CREATE INDEX "MDP_INSTANCE_IDX_HANDLE" ON
"MDP_INSTANCE_METADATA" ("INSTANCE_HANDLE", "IN_SCHEDULE")
;
CREATE INDEX "MDP_INSTANCE_IDX_INSTANCE_ID" ON
"MDP_INSTANCE_METADATA" ("CONTENT_INSTANCE_ID", "PVR_CONTENT_ID",
"IN_SCHEDULE", "IS_DELETED")
;
CREATE INDEX "MDP_INSTANCE_IDX_SCHEDULE" ON
"MDP_INSTANCE_METADATA" ("IN_SCHEDULE")
;
CREATE INDEX "PLANNER_ITEM_IDX_BUCKETS" ON "PLANNER_ITEM"
(TO_CHAR("PVR_INSTANCE_ID")||'-
'||TO_CHAR(FLOOR("PLANNER_ID"/1000)), "STATE", "PLANNER_ID")
;
CREATE UNIQUE INDEX "PLANNER_ITEM_IDX_DATE" ON "PLANNER_ITEM"
("LAST_UPDATE_DATE", "STATE", "ITEM_ID")
;
CREATE INDEX "PLANNER_ITEM_IDX_PVR_INSTANCE" ON "PLANNER_ITEM"
("PVR_INSTANCE_ID") REVERSE
;
--------------------------------------------------------
-- Iteration 33 new tables
--------------------------------------------------------
CREATE TABLE MDP_SCHEDULE_METADATA
(HANDLE VARCHAR2(255),
START_TIME DATE,

Appendix C The Create_PPS_database_3_36_2-0.sql Script
92 OL-28290-01
END_TIME DATE,
SERVICE_HANDLE VARCHAR2(255),
CONTENT_INSTANCE_HANDLE VARCHAR2(255),
LAST_UPDATE_DATE TIMESTAMP (6)
);
ALTER TABLE MDP_SCHEDULE_METADATA ADD CONSTRAINT
MDP_SCHEDULE_METADATA_PK PRIMARY KEY (HANDLE) ENABLE;
ALTER TABLE MDP_SCHEDULE_METADATA MODIFY (HANDLE NOT NULL
ENABLE);
ALTER TABLE MDP_SCHEDULE_METADATA MODIFY (START_TIME NOT NULL
ENABLE);
ALTER TABLE MDP_SCHEDULE_METADATA MODIFY (END_TIME NOT NULL
ENABLE);
ALTER TABLE MDP_SCHEDULE_METADATA MODIFY (SERVICE_HANDLE NOT
NULL ENABLE);
ALTER TABLE MDP_SCHEDULE_METADATA MODIFY
(CONTENT_INSTANCE_HANDLE NOT NULL ENABLE);
ALTER TABLE MDP_SCHEDULE_METADATA MODIFY (LAST_UPDATE_DATE NOT
NULL ENABLE);
CREATE INDEX MDP_SCHEDULE_IDX_END_TIME ON MDP_SCHEDULE_METADATA
(END_TIME, CONTENT_INSTANCE_HANDLE);
CREATE INDEX MDP_SCHEDULE_IDX_INSTANCE ON MDP_SCHEDULE_METADATA
(CONTENT_INSTANCE_HANDLE, LAST_UPDATE_DATE);
CREATE TABLE MDP_SERVICE_INSTANCE_METADATA
(HANDLE VARCHAR2(255),
SERVICE_ID NUMBER,
SERVICE_HANDLE VARCHAR(255)
);
ALTER TABLE MDP_SERVICE_INSTANCE_METADATA ADD CONSTRAINT
MDP_SERVICE_INSTANCE_META_PK PRIMARY KEY (HANDLE) ENABLE;
ALTER TABLE MDP_SERVICE_INSTANCE_METADATA MODIFY (HANDLE NOT
NULL ENABLE);
ALTER TABLE MDP_SERVICE_INSTANCE_METADATA MODIFY (SERVICE_ID
NOT NULL ENABLE);
ALTER TABLE MDP_SERVICE_INSTANCE_METADATA MODIFY
(SERVICE_HANDLE NOT NULL ENABLE);
--------------------------------------------------------
-- Initial data initialization
--------------------------------------------------------

Create_PPS_database_3_36_2-0.sql
OL-28290-01 93
INSERT INTO MDP_PERSISTENCE (PERSISTENCE_ID, PERSISTENCE_VALUE)
VALUES ('CCM_TOKEN', NULL);
INSERT INTO MDP_PERSISTENCE (PERSISTENCE_ID, PERSISTENCE_VALUE)
VALUES ('MDP_TOKEN', NULL);
INSERT INTO MDP_PERSISTENCE (PERSISTENCE_ID, PERSISTENCE_VALUE)
VALUES ('LSM_TOKEN', NULL);
INSERT INTO MDP_PERSISTENCE (PERSISTENCE_ID, PERSISTENCE_VALUE)
VALUES ('NM_TOKEN', NULL);
INSERT INTO MDP_PERSISTENCE (PERSISTENCE_ID, PERSISTENCE_VALUE)
VALUES ('NPVR_LAST_TIDY_DATE', NULL);
INSERT INTO pps_schema_version
(
version,
description
)
VALUES (
'3.36.0-2',
'PPS Version 3.36.0-2'
);
COMMIT;
SPOOL OFF
EXIT;

Americas Headquarters Cisco Systems, Inc. 170 West Tasman Drive San Jose, CA 95134-1706 USA
http://www.cisco.com Tel: 408 526-4000
800 553-6387 Fax: 408 527-0883
This document includes various trademarks of Cisco Systems, Inc. Please see the Notices section of this document for a list of the Cisco Systems, Inc., trademarks used in this document. Product and service availability are subject to change without notice.
© 2013 Cisco and/or its affiliates. All rights reserved. June 2013
Part Number OL-28290-01