vidar swenning - vb tutorial
DESCRIPTION
Brief VB.Net TutorialTRANSCRIPT


Table of content
Chapter #1 - Introduction and Installation ................................................................................3
Chapter #2 - Objects and Events..................................................................................................7
Chapter #3 - Variables.................................................................................................................11
Declaration................................................................................................................................11
Set and get Values.....................................................................................................................13
Constants...................................................................................................................................14
Chapter #4 - The basic data types..............................................................................................15
Boolean.....................................................................................................................................15
Integer.......................................................................................................................................15
Single........................................................................................................................................15
Double.......................................................................................................................................16
String.........................................................................................................................................16
Char...........................................................................................................................................16
Chapter #5 - Logical Operators .................................................................................................17
The Not operator.......................................................................................................................17
The And operator......................................................................................................................18
The Or operator.........................................................................................................................19
The Xor operator.......................................................................................................................20
Using Logical Operators together.............................................................................................21
Chapter #6 - Relational Operators.............................................................................................23
Equals to....................................................................................................................................23
Not Equals to.............................................................................................................................23
Greater then and Less then........................................................................................................24
Greater then or equals to and Less then or equals to................................................................24
Chapter #7 - If statements...........................................................................................................29
If Then Else Statement..............................................................................................................30
If Then ElseIf Else Statement...................................................................................................31
Chapter #8 - Arithmetical Operators ........................................................................................33
Strings.......................................................................................................................................35
Chapter #9 - Loops Part 1 ..........................................................................................................37
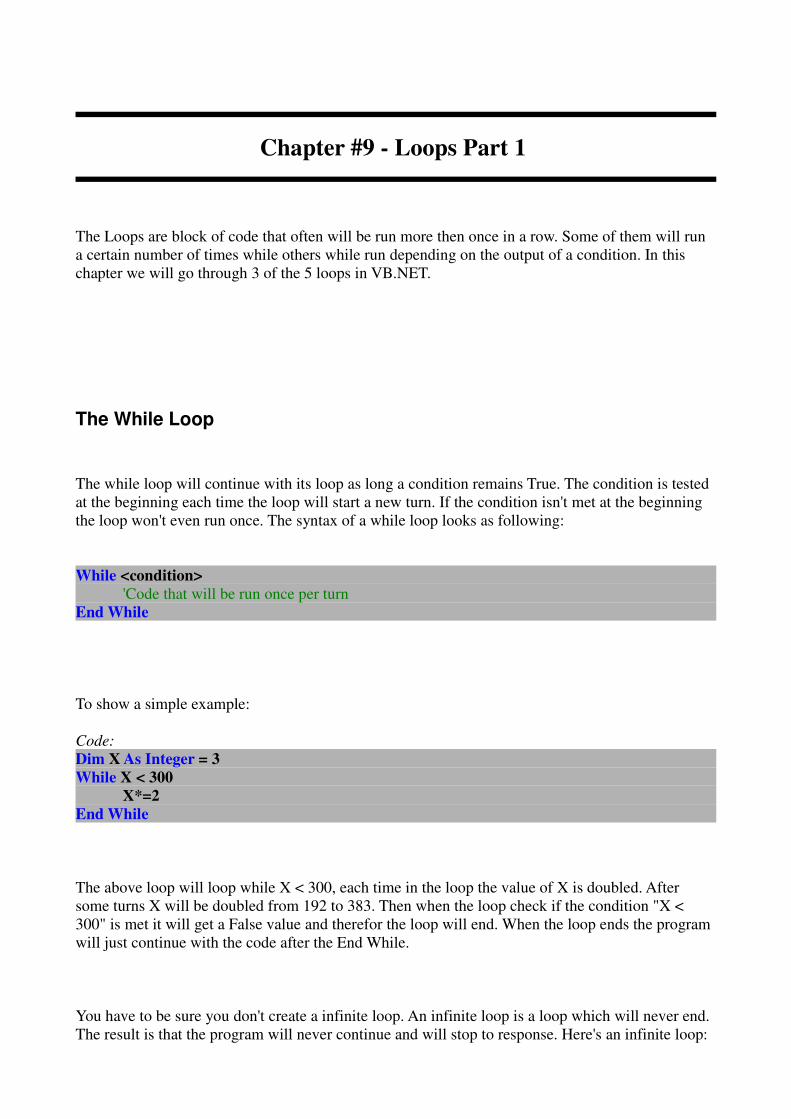
The While Loop........................................................................................................................37
Do While loop...........................................................................................................................38
Do Until loop............................................................................................................................42
Chapter #10 - Arrays ..................................................................................................................44
Redim and .GetUpperBound.....................................................................................................45
Chapter #11 - Loops Part 2 ........................................................................................................47
For Loops..................................................................................................................................47
For Each loop............................................................................................................................48
Chapter # 12 - Try Catch Statement..........................................................................................49
Chapter #13 - Subs and Functions ............................................................................................52
Using parameters.......................................................................................................................52
ByVal and ByRef......................................................................................................................53
Functions...................................................................................................................................55
Chapter #14 - Difference between scopes..................................................................................56
Private, Friend - and Public scope............................................................................................59
Two things with the same name................................................................................................60
Scopes and blocks.....................................................................................................................60
Chapter #15 - Select Case Statements........................................................................................62
More advanced Select Case Statements....................................................................................63
To..........................................................................................................................................63
Is...........................................................................................................................................64
Chapter #16 - Multidimensional arrays.....................................................................................65
Redim........................................................................................................................................66
.GetUpperBound and .Length...................................................................................................66
For each.....................................................................................................................................67
More then two dimensions........................................................................................................68
Chapter #17 - Structures.............................................................................................................69
Properties..................................................................................................................................71
Events........................................................................................................................................73
Chapter #18 - Classes..................................................................................................................76
Inherits......................................................................................................................................78
Chapter #19 - Enumerations.......................................................................................................81
Chapter #20 - Advanced Comments...........................................................................................89
Chapter #21 - Compiling directives............................................................................................93
#Region and #End Region........................................................................................................93
#Const and #If statement...........................................................................................................96
Chapter #1 - Introduction and Installation
Welcome to the VB.NET tutorial series: "VB.NET from beginner to advanced programmer" which
will take you from the very beginning to be a good programmer. VB.NET is a good first language
for new programmers so this 21 part long series is written for completely beginners but it will also
works perfectly fine if you already know another programming language.
VB.Net is a very good language for a beginners, it looks like English and is therefore very easy to
use. Before anything else you will need to download Visual Basic. It's where you'll write and
compile your programs, you can download it from this page:
“http://www.microsoft.com/Express/VB/”.
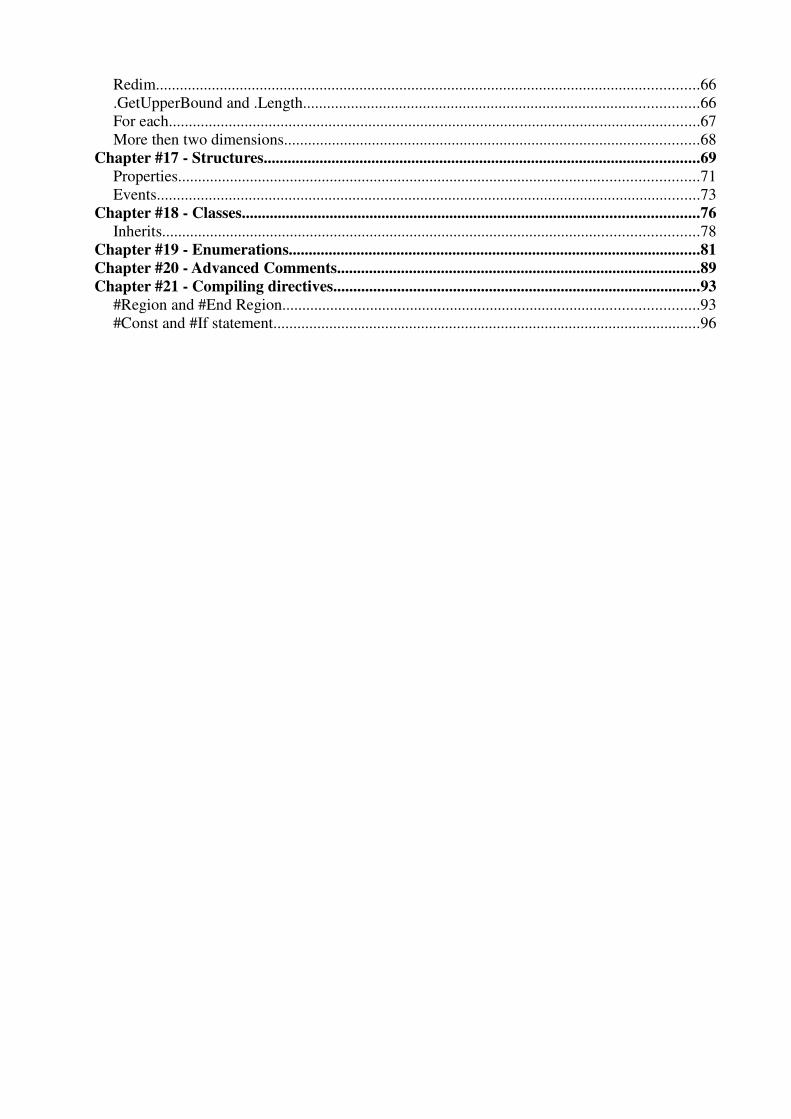
After you have downloaded, installed and started Visual Basic, you will see the Start Page. Click
File in the menu and select New Project... or you can just press Ctrl+N on your keyboard for the
same functionality.
Now you will see a new window asking which template you want to use for your program.
We'll use "Windows Forms Application", it should be selected by default but make sure that it's
actually selected. Then you will need to select a name for the project.
Note: This is not the name of the program, just the project's name.
I name mine "TestApplication". Then press the OK button.

Now you will automatically be directed to the design view of your project. As default you have the
layout of the program in the middle of the screen. This is how the program will look like. In the
design view it's WYSIWYG(What You See Is What You Get) editing, if you don't change the look
with your code too(you can code things to look differently and therefor when your program starts it
won't look exactly the same as in the design view).

But before we continue we'll need to rename our form. It's good to learn this right from the
beginning:"The name of an object should tell what it is and what it is for."
So we want to rename Form1 (this is the form you can see in the middle, a program can be made of
more then on form) to frmMain. This is so you (by only seeing the name) will know it's a form and
that it is our main one.
To change the name of the form click on Form1.vb in the menu in the upper-right corner. In this
menu you can see everything in your project (and even the whole solution, but you don't need to
think about that right now).
Then go to the menu below the other menu and change File Name from "Form1.vb" to
"frmMain.vb". In this other menu you can change the properties of the selected object.
You maybe have noticed that it still says Form1 on the form in the middle. That's because the text of
the form is still "Form1". Click on the form in the middle.
Now you will see a long list in the properties menu. Now we're going to change some values here.
Change Text to "My First Program".
If you want to see your program you can press F5 to start debugging. It's not anything to see really
since it's just an empty form with the title "My First Program".
Save your project by clicking save all under file in the top menu. The first time you'll need to
choose a name for it, but it's just to press OK since we already have chosen the name.

Chapter #2 - Objects and Events
This chapter will continue directly from the last one so we will continue on the project we had in
chapter number 1, in this chapter we will add a few objects to the form and also add some simple
code to it. So load your project you saved in chapter one and then we could start.
To the left you could find something called Toolbox. Here you will find all default objects(it's also
possible to add more then just the default ones). To add an object to your form, just click and drag
from the list to the form. You can now modify this object by just using the mouse but you could do
lots of more things with it in the properties menu to the right.
Now add one button, one label and one textbox and change these things in the properties window:
The button.
Name = "cmdOK"
Text = "OK"
The label.
Name = "labName"
Text = "Please enter your name and press OK"
The textbox.
Name = "txtName"
The thing we just did was renaming them to better names and also changing the text of the button
and the label, after placing them where you want on the form, it could now look like this if you did
everything correct:

Now we're going to add an event to the program. Events are a sort of sub(a block of code, we will
talk more about those in later chapters) which will be called(the code inside the block will do what
we've coded it to do) when something is happened to the object. There's 3 different ways to add an
event to the object.
The first way is to add the default event of the event, the default event is different depending on
which object we have. To add the default event you just double-click on the object in the design
view. The default event for a button is when it's clicked and for a textbox it is when the text is
changed. When doing this you will automatically be taken to the code view. Another way to open
the code view is to right click on the form in either the design view or the solution explorer and then
select “View Code”.
If we are in the code view we can add which event we want by just selecting the object and the
event we want at the top of the code view. Then the code for the event block is added automatically,
this is the best way to add an event if the event isn't the default one for the object.
The third way is to write them on your own, this is not a recommended way, especially not for new
programmers.
Now we want to add a click event block for the button. Since the click event is the default event for
buttons you can just double-click on the button when viewing it in the design view.

After the event have been added we will have this code:
Code:
Public Class frmMain
Private Sub cmdOK_Click(ByVal sender As System.Object, ByVal e As
System.EventArgs) Handles cmdOK.Click
End Sub
End Class
This part about a class:
Code:
Public Class frmMain
End Class
Is basically all code that exists in the form. What a class actually is and how to create and use your
own classes will be a topic of a later chapter. The only thing you actually need to know about them
now is that we should put all our code in it.
What we're actually interested in is the newly created event block:
Code:
Private Sub cmdOK_Click(ByVal sender As System.Object, ByVal e As System.EventArgs)
Handles cmdOK.Click
End Sub
All code we put in this will be run each time the user presses the button.
Add this code inside the block:
Code:
'A messagebox will be showed with the text from the textbox
MessageBox.Show(txtName.Text)
The first line of the above code is just a comment, comments are created by adding a single quote at
the beginning of the line. You should use comments a lot, it's good if someone else will look at your
code or if you look back on your code months later and have forgot what everything does.
In the second line you can see:
Code:
MessageBox.Show(txtName.Text)
in this way we access the text property of the texbox txtName. Then we are using the text as the
message of a messagebox, a messagebox does what the name says, It's just a box that'll show the
user a message. So the second line will show a messagebox with the same text as the textbox has.
Save your project now.
Then it's time to test the program, press F5 to start the debugging. Test to write different things and
then press OK. You have now coded your very first program.
Chapter #3 - Variables
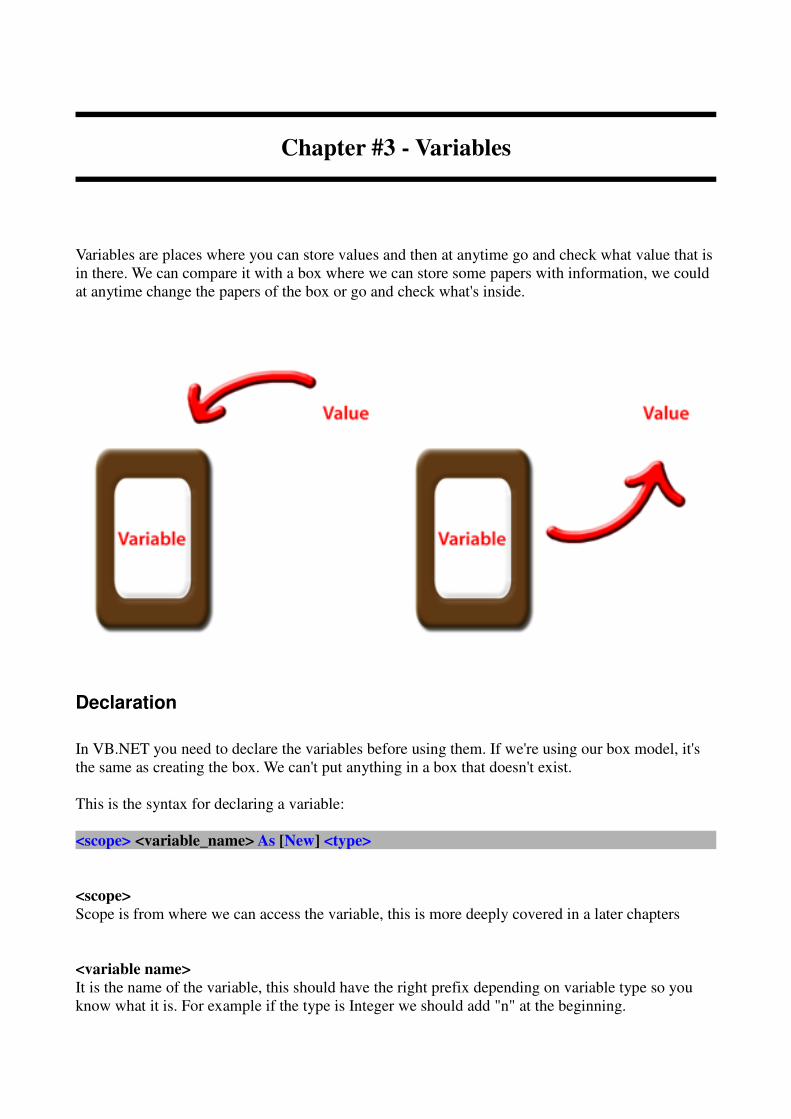
Variables are places where you can store values and then at anytime go and check what value that is
in there. We can compare it with a box where we can store some papers with information, we could
at anytime change the papers of the box or go and check what's inside.
Declaration
In VB.NET you need to declare the variables before using them. If we're using our box model, it's
the same as creating the box. We can't put anything in a box that doesn't exist.
This is the syntax for declaring a variable:
<scope> <variable_name> As [New] <type>
<scope>
Scope is from where we can access the variable, this is more deeply covered in a later chapters
<variable name>
It is the name of the variable, this should have the right prefix depending on variable type so you
know what it is. For example if the type is Integer we should add "n" at the beginning.

[New]
It's optional to add "New" here. If you do, the variable's value will be a new instance of the
variable's type, or else the variable will just be empty until we give it a value. All types can't use the
"New" option.
<type>
This is the type of the variable, this means what sort of values which can be stored in the variable,
Integer and Date is an example of two different types.
Here's an example of a declaration of a variable:
Code:
Dim nInput As Integer
Dim is the local scope, it's used inside event block and sub/functions.
nInput is the name, the n is so we know it's an integer but it doesn't have any effect really. We could
name a variable nInput even though it's not an integer but don't do that, it will only confuse anyone
reading your code. At the end we make it the type Integer. This means we can store Integer values
in it.
Look at this example:
Code:
Dim nInput
Here we didn't declared what type it was. Then it automatically gets the type Object. The object
type can store any value. Remember it's always better to set the variable type if you know what
values that should be stored in it. If you have the type object it needs to be able to store everything
and could therefor take more space even though it's empty.
The above code should actually got the prefix "o" since it's an object:
Code:
Dim oInput
It's also possible to declare more then one variable at the time by using commas, you can set the
type of all variables one by one or in groups:
One by one:
Code:
Dim a As Integer, b As Single, c As Double
• a will be declared as an Integer
• b will be a Single
• c will be a Double.
In a group:
Code:
Dim a, b, c As Integer

Here all three variables will be declared as Integers.
You can do a little like you want, as you can see in this example:
Code:
Dim a As Double, b, c As Integer, d, e, f As Date, g
• a will be a Double.
• b and c will be Integers
• d, e and f will be declared as Dates
• g will be an Object since we haven't wrote its type.
Set and get Values
When we want to store a value in the variable we write the variable name an equals to sign and the
the value:
<variable_name> = <value>
It could look like this:
Code:
nRooms = 6
In the above example the variable nRooms gets the value of 6.
It's also possible to assign a value to a variable when it's first created, like this:
Code:
Dim nRooms As Integer = 6
To get the value from a variable we just simply writes its name where we want to access the value
of it. Here's an example with a messagebox:
Code:
Messagebox.Show(sMessage)
In the above example a messagebox will be showed with the value from the string variable called
sMessage.
Don't get confused when you got a variable on both sides of an equal sign.

Code:
nValue1 = nValue2
REMEMBER: The variable is to the left and the value to the right. In this case the variable called
nValue1 will get the same value as nValue2.
Constants
Constants are like variables but they can not change their value, you set it when you declare the
constant and then it will always have that value. In our box model it would be like building a glass
box without a hole around some papers, we cannot add or change what's in it but we can see
everything through the glass.
Here's an example:
Code:
Const Pi As Single = 3.14

Chapter #4 - The basic data types
From the last chapter you learned that variables and constants use different types depending on
what values that should be stored in them. This chapter will teach you the basic types so you know
what to use.
Boolean
A Boolean value is either True or False. Boolean values are very important when using logical
operators and relational operators(See chapter 5 and 6 for more info).
Integer
The Integer types can (of course) store Integer values. There is three sizes of Integers which all can
be both Signed and Unsigned and can be written in two ways for a total of 12 "different" types.
Short or Int16
The smallest of them, can store values with a 65,535 numbers long span.
Integer or Int32
The medium size , can store values with a 4,294,967,295 numbers long span.
Long or Int64
The largest of them all , can store values with a 18,446,744,073,709,551,615 numbers long span.
By adding a "U" to them they become unsigned(UInt32,ULong etc.), When they are Unsigned the
span starts from 0 and goes up, and when they are signed they have the half span below 0 and the
other half above.
For example, Short(or Int16) has the span length 65,535.
If it's signed(Short or Int16) has its span from -32,768 to 32,767.
But if it's unsigned(UShort or UInt16) the span goes from 0 to 65,535.
Single
The single type is a numeric type which can store decimals too. It can store values from
1.401298*10-45 to 3.4028235*1038 for both positive and negative values.
Double
The type double, is also a numeric type with decimal places. The double can store bigger(and
smaller) values then the Single. The span goes from 4.94065645841246544*10-324 through
1.79769313486231570*10308 for both positive and negative values.
String
The string type can store text. To write a string you start with one double quote and end with
another, like this:
Code:
Dim sMessage = "This is a string"
In a string variable you can store up to approximately 2 billion (!) Unicode characters.
Char
Only stores one character, as with Strings you surrounds it by double quotes. In fact strings is just a
long collection of Char variables.

Chapter #5 - Logical Operators
The Logical Operators simply take two(or one) Boolean values and returns a Boolean value
depending on their values in relation to each other. The logical operators in VB.NET is AND, OR,
NOT and XOR.
The Not operator
The Not operator will return the opposite of the boolean value, Not True will return False and Not
False will return True. The Not operator is the only of the Logical Operators that only uses one
Boolean value. See the example below:
Code:
Dim P As Boolean = False
MessageBox.Show(Not P)
In the above code we have declared a Boolean variable with the value set to False. Then we show
the value of "Not P" in a messagebox. Since P is False, Not P returns True, and this is what we will
see in the box.
The table below shows the output of Not P depending on the value of P:
P Not P
True False
False True

The And operator
The And operator will check if two Boolean values are True. Both ones needs to be True or the And
operator won't return True. See the examples below:
Code:
Dim P, Q As Boolean
P = True
Q = False
MessageBox.Show(P And Q)
Q = True
MessageBox.Show(P And Q)
We declares two Boolean variable, P and Q. We set P to True and Q to False.
Then we show "P And Q", since Q is not True this will return False and this is what we'll see. Then
after changing Q to True we try to show "P And Q" again and this time we'll see True in the
messagebox since both P and Q are True.
Here below there's a table showing the value of "P And Q" depending on the values "P" and "Q":
P Q P And Q
True True True
True False False
False True False
False False False

The Or operator
For the Or operator to return True, at least one of the values have to be True. It doesn't matter if both
are true, the only important things is if at least one is True. Look at the code below for an example:
Code:
Dim P, Q As Boolean
P = True
Q = False
MessageBox.Show(P Or Q)
P = False
MessageBox.Show(P Or Q)
After declaring the boolean variables P and Q we set P to True and Q to False. So now one of the
values in the Or operation "P Or Q" are True and this means it will return True, this is what will pop
up. After changing the value of P to False the result of "P Or Q" will be False since none of them are
True.
In this table you can see the value of "P Or Q" depending on what values "P" and "Q" has:
P Q P Or Q
True True True
True False True
False True True
False False False

The Xor operator
The Xor operator will return True if only one of the values are True. This means that the different
between Or and Xor is that if both values are True, Or will return True but Xor will return False,
See the example below for showing how it works:
Code:
Dim P, Q As Boolean
P = False
Q = False
MessageBox.Show(P Xor Q)
P = True
MessageBox.Show(P Xor Q)
Q = True
MessageBox.Show(P Xor Q)
First both the boolean variables are False, this makes "P Xor Q" return False.
Then we change P to True, now the variables have a different value, P is True and Q is False. With
different values the Xor operator will now return True. At the end we also change Q to True. Now
both the variables are True. This makes the Xor operator return False again. So the outputs in this
example are False,True,False.
In the table below you can see the output from the Xor operator depending on the two values:
P Q P Xor Q
True True False
True False True
False True True
False False False

Using Logical Operators together
It's possible to use as many Logical operators together as you want, even different ones. For
example, these two code blocks below are doing the same thing, one using Xor and one using a
combination of Not, And and Or.
Code:
P Xor Q
Code:
(P Or Q) And Not (P And Q)
In the second one, the more complex one, we fist check a normal Or operation between P and Q.
But since we want this to behave like a Xor operator we also check if P and Q are the same. Then
we convert that value with the Not operator since we don't want P And Q to return True(then if it
return False everything is correct for us and therefor we want that to be True). So if both "(P Or Q)"
is True and "Not (P And Q)" is true the whole thing will return True when we compare them with a
last And operator.
This last thing was just an example how you can create more complex things, I hope it didn't
confused you too much.

Chapter #6 - Relational Operators
Relational Operators will take two values and compare them, it will then return a Boolean value
depending on the relation between the two values. There's a total of 6 Relational Operators that you
can use in VB.NET, they are: Equals to, Not equals to, Greater then, Less then, Greater then or
equals to and less then or equals to.
Equals to
Writes as "="
This relational operator checks if the two values are the same, if they are, it will return True, if they
values are different in any way it will return False instead. Here's some examples:
Code:
MessageBox.Show(False = True)
MessageBox.Show(7 = 7)
MessageBox.Show(8 = 8.000)
These three messageboxes will show False, True and True. False and True is not equals to each
other so that one returns False. In the second one both the values are 7 so that one will return True.
In the last one the both values are not written in the same way but the values are actually the same
anyway.
Remember that you also use the equals sign for setting values of variables. Don't mix them both up.
Not Equals to
Writes as "<>"
This is the opposite of the Equals to operator. The Not equals to operator will return True if the
values it compares are not the same. If we're using the Not logical operator together with the equals
to Relational Operator we can create a Not equals to operator in another way. Anyway, here's a few
example of the normal Not Equals to operator:
Code:
MessageBox.Show(1 <> 3)
MessageBox.Show(-5 <> -5)
MessageBox.Show("text" <> "another text")

1 and 3 are not the same so therefor the first messagebox will show "True". The second one's values
is the same so that one will return False. In the last one we use two string instead, the both strings
are not the same so the third messagebox will show "True".
Greater then and Less then
Writes as ">" and "<"
The Greater then and Less then operators will compare the size of the two values. If you use them
on non-numeric values you get strange results or errors so try to avoid using them together with
non-numeric values. Here is some examples on how to use them with numeric values:
Code:
MessageBox.Show(25 > 3)
MessageBox.Show(5 < 42)
MessageBox.Show(12 > 12)
Since 25 is greater then 3 the first example will return True. The second one is also True since 5 is
less then 42. The last one is a little bit trickier, but 12 is not greater then 12, therefor the last one
will return False.
Greater then or equals to and Less then or equals to
Writes as ">=" and "<="
The Greater then or equals to is the same as Greater then and Less then or equals to is the same as
Less then, both with one exception. If the two values are the same Greater then or equals to and
Less then or equals to will return True which is not the case for Greater then and Less then which
will return False. Here comes some example, these example uses the same values as in the last
subject about Greater then and Less then:
Code:
MessageBox.Show(25 >= 3)
MessageBox.Show(5 <= 42)
MessageBox.Show(12 >= 12)
In the first and second example we will get the same result as before. But in the last example we
will get a difference. 12 is not greater then 12 but 12 is equals to 12, therefor Greater then or equals
to will return True here were Greater then returned False with the same values.

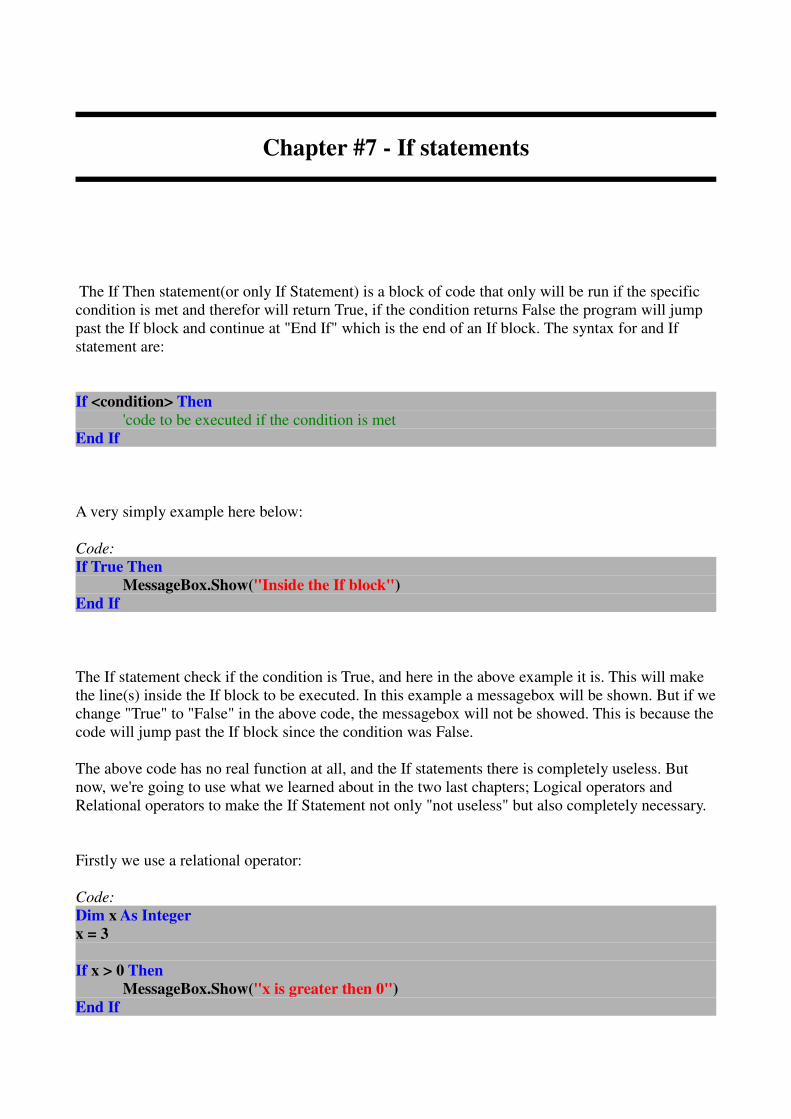
Chapter #7 - If statements
The If Then statement(or only If Statement) is a block of code that only will be run if the specific
condition is met and therefor will return True, if the condition returns False the program will jump
past the If block and continue at "End If" which is the end of an If block. The syntax for and If
statement are:
If <condition> Then
'code to be executed if the condition is met
End If
A very simply example here below:
Code:
If True Then
MessageBox.Show("Inside the If block")
End If
The If statement check if the condition is True, and here in the above example it is. This will make
the line(s) inside the If block to be executed. In this example a messagebox will be shown. But if we
change "True" to "False" in the above code, the messagebox will not be showed. This is because the
code will jump past the If block since the condition was False.
The above code has no real function at all, and the If statements there is completely useless. But
now, we're going to use what we learned about in the two last chapters; Logical operators and
Relational operators to make the If Statement not only "not useless" but also completely necessary.
Firstly we use a relational operator:
Code:
Dim x As Integer
x = 3
If x > 0 Then
MessageBox.Show("x is greater then 0")
End If

Now we can check if x is greater then 0 with a Relational operator. If x is greater then 0 the "x > 0"
operation will return True as you learned about in the last chapter, the If statement will then check
for a True and a False. If It gets a True from the Relational operator the If block will be executed.
Now just of a sudden we can test values and get our code to do different things depending on it. We
can also include Logical operators to make it a little bit more complex and also more useful.
Code:
Dim x, y As Integer
x = 7
y = 5
If x > y And y <> 0 Then
MessageBox.Show("x is greater then y and y is not 0")
End If
If Then Else Statement
The opportunities doesn't end there. We can also create something called an If Then Else statement.
This works like an If Then Statement but it has two blocks of codes. If the condition is met(True)
the first block of code will be run. But instead of just jumping to the End If straight away if the
condition isn't met(False) the second block of code is executed.
The syntax for an If Then Else Statement looks like this:
If <condition> Then
'code to be executed if the condition are met
Else
'code to be executed if the condition are NOT met
End If
Here comes an example on how to use it:
Code:
Dim x, y, z As Integer
x = 1
y = 9
z = 14
If x < y And y < z Then
MessageBox.Show("x is smallest and z is largest")
Else
MessageBox.Show("The variables are not ordered by size")
End If
The code checks if x is less the y and if y is less then z. If this is True one message will be showed
and if it's False another message will be showed.

If Then ElseIf Else Statement
We can also add something called ElseIf blocks to an If Statement. We're able to add as many
ElseIf blocks as we want in an If Statement, Not only one as it is with the If block and the Else
Block. The ElseIf blocks is working exactly the same as an If block, the If block is the first one and
then it's followed by as many ElseIf blocks as is needed and at the end you can add an else block if
you want. If the If block's condition is True that block will be run and then the code will jump to the
End If, however if it's False it will test if the condition of the first ElseIf block is True, if this also is
False it will go to the second one and so forth. If all conditions are False and there's an Else block at
the end this will be executed.
Here's the syntax for the If Then ElseIf Else Statement:
If <condition> Then
'code to be executed if the condition are met
ElseIf <condition> Then
'code to be executed if the condition are met but no conditions above are met
ElseIf <condition> Then
'code to be executed if the condition are met but no conditions above are met
ElseIf <condition> Then
'code to be executed if the condition are met but no conditions above are met
Else
'code to be executed if none of the conditions are met
End If
Here comes an example on an If Then ElseIf Else Statement:
Code:
Dim x, y, z As Integer
x = 2y = 5
z = 8
If x = 0 Then
MessageBox.Show("x is equal to 0")
ElseIf x < y And y < z Then
MessageBox.Show("x is smallest and z is largest")
ElseIf x = y And y = z Then
MessageBox.Show("all variables has the same value")
Else
MessageBox.Show("None of the conditions above are met")
End If
In the example above we will see the message "x is smallest and z is largest" since this is the first of
the conditions that is met. However, If we change x's value to 0, both the two first conditions will be
True. Then the first block which has a met condition will be the block who is executed, in this case
we will see: "x is equal to 0".
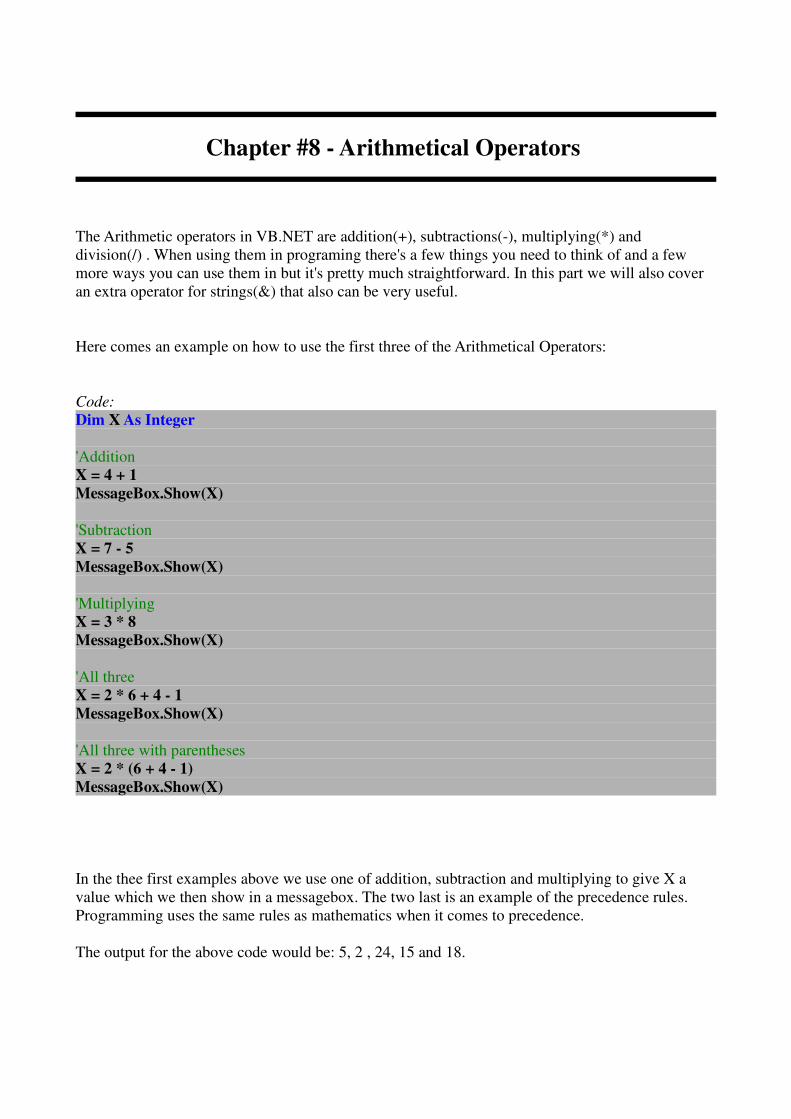
Chapter #8 - Arithmetical Operators
The Arithmetic operators in VB.NET are addition(+), subtractions(-), multiplying(*) and
division(/) . When using them in programing there's a few things you need to think of and a few
more ways you can use them in but it's pretty much straightforward. In this part we will also cover
an extra operator for strings(&) that also can be very useful.
Here comes an example on how to use the first three of the Arithmetical Operators:
Code:
Dim X As Integer
'Addition
X = 4 + 1
MessageBox.Show(X)
'Subtraction
X = 7 - 5
MessageBox.Show(X)
'Multiplying
X = 3 * 8
MessageBox.Show(X)
'All three
X = 2 * 6 + 4 - 1
MessageBox.Show(X)
'All three with parentheses
X = 2 * (6 + 4 - 1)
MessageBox.Show(X)
In the thee first examples above we use one of addition, subtraction and multiplying to give X a
value which we then show in a messagebox. The two last is an example of the precedence rules.
Programming uses the same rules as mathematics when it comes to precedence.
The output for the above code would be: 5, 2 , 24, 15 and 18.

When we're using division we need to be a little more careful though. We can not divide something
with 0, an error will occur if we do. A second thing is that even though we divide one integer with
another integer the resultt doesn't have to be an integer, just as in math.
If we keep those two things in mind we can create the code like this:
Code:
Dim nValue1, nValue2 As Integer, fAnswer As Single
nValue1 = 5
nValue2 = 2
If nValue2 <> 0 Then
fAnswer = nValue1 / nValue2
MessageBox.Show(fAnswer)
End If
In the above example we have declared the variable which will store our answer as the type Single
instead. So now we can get the answer with a few decimals too. Before we do the actual calculation
we also use an If statement to make sure the second value isn't 0. In the example the answer will be
2.5.
When programming we can use these Arithmetic operators together with an equal to sign when
setting values of variables to create some new functionalities.
By adding the Arithmetic operators before the equals to sign we do not set the variable's value to a
certain value but just change it depending on a certain value, see this list below to see how it works:
This Does the same as
variable += 1 variable = variable + 1
variable -= 1 variable = variable - 1
variable *= 1 variable = variable * 1
variable /= 1 variable = variable / 1
I'll show you an example of it down below.
Code:
Dim X As Integer = 3
X *= 5
X += 3
X -= 12
X /= 3
MessageBox.Show(X)

First X has the value 3. The second row will then take 3(the value of X) and multiply this with 5.
This is 15 and that is now the value of X. On the third row we'll increase X's value with 3. X is now
equals to 18. At the next row we use "-=" to decrease the value of X by 12. Now we only have 6 left
and we divide that with 3 and stores it as X. Now X will have the value of 2. This is what we will
see in the box.
Strings
As I mentioned before you can use the & sign for manipulation of strings. By using it you can
simply combine two strings together, one after the other.
Code:
Dim sMessage1, sMessage2 As String
sMessage1 = "Hello"
sMessage2 = "CodeCall"
MessageBox.Show(sMessage1 & " " & sMessage2)
In the example above we have one string with the value "Hello" and one with the value "CodeCall".
Then we merge them together with a space in between by using two &s. The message we will see
will then be "Hello CodeCall".
With this we could easily improve our code from Part 2. The main part of the code was:
Code:
MessageBox.Show(txtName.Text)
which showed the name the user had written to a textbox. But now by using some & signs we can
make this better:
Code:
MessageBox.Show("Welcome " & txtName.Text & "!")
Now if the user's have entered, for example, Bob, the message which will be show will be:
"Welcome Bob!", instead of just "Bob".
We can use this in exactly the same way you used the Arithmetic operators together with an equal to
sign:
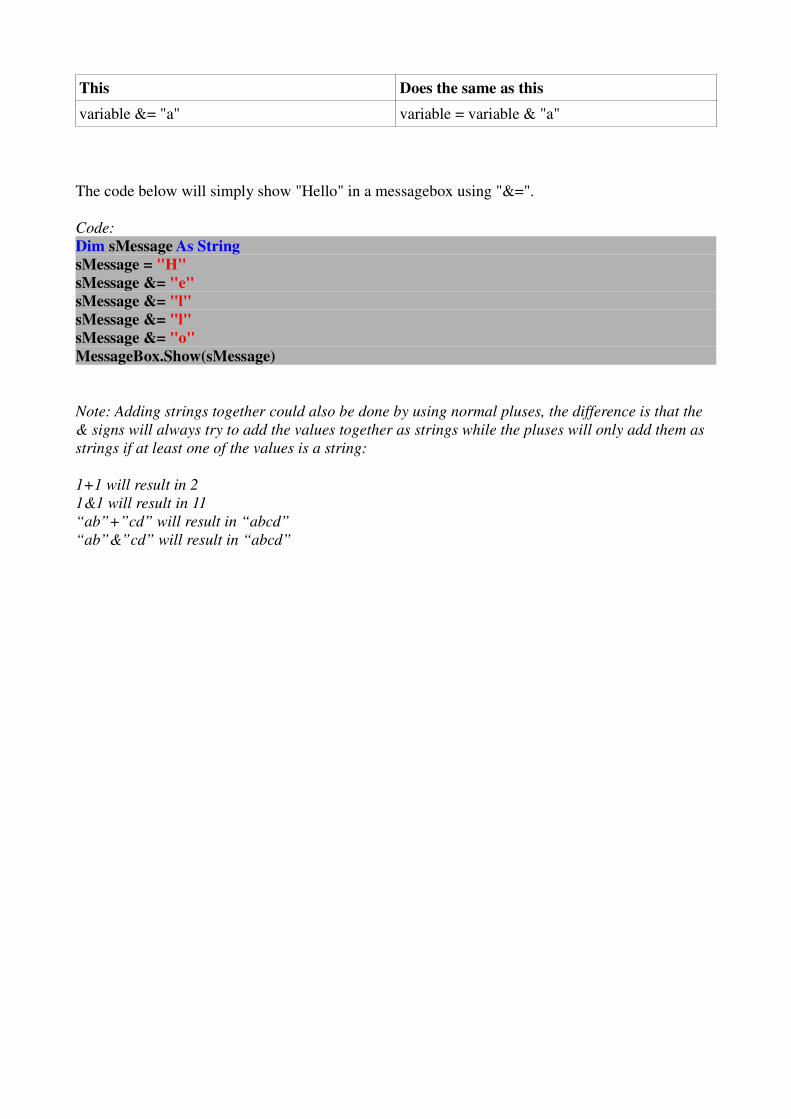
This Does the same as this
variable &= "a" variable = variable & "a"
The code below will simply show "Hello" in a messagebox using "&=".
Code:
Dim sMessage As String
sMessage = "H"
sMessage &= "e"
sMessage &= "l"
sMessage &= "l"
sMessage &= "o"
MessageBox.Show(sMessage)
Note: Adding strings together could also be done by using normal pluses, the difference is that the
& signs will always try to add the values together as strings while the pluses will only add them as
strings if at least one of the values is a string:
1+1 will result in 2
1&1 will result in 11
“ab”+”cd” will result in “abcd”
“ab”&”cd” will result in “abcd”
Chapter #9 - Loops Part 1
The Loops are block of code that often will be run more then once in a row. Some of them will run
a certain number of times while others while run depending on the output of a condition. In this
chapter we will go through 3 of the 5 loops in VB.NET.
The While Loop
The while loop will continue with its loop as long a condition remains True. The condition is tested
at the beginning each time the loop will start a new turn. If the condition isn't met at the beginning
the loop won't even run once. The syntax of a while loop looks as following:
While <condition>
'Code that will be run once per turn
End While
To show a simple example:
Code:
Dim X As Integer = 3
While X < 300
X*=2
End While
The above loop will loop while X < 300, each time in the loop the value of X is doubled. After
some turns X will be doubled from 192 to 383. Then when the loop check if the condition "X <
300" is met it will get a False value and therefor the loop will end. When the loop ends the program
will just continue with the code after the End While.
You have to be sure you don't create a infinite loop. An infinite loop is a loop which will never end.
The result is that the program will never continue and will stop to response. Here's an infinite loop:

Code:
Dim X As Integer = 141
While X < 200
X -= 5
End While
Independent on how many times the loop will loop, the loop won't end. The condition X<200 will
always be True since X will only get smaller and smaller for each turn. The program will stop to
response.
Do While loop
This type of loop has only one difference to the While loop excluding the syntax. The Do While
loop will check the condition at the end instead of in the beginning. This is actually pretty
important. Here's the syntax anyway:
Code:
Do
'Code that will be run once per turn
Loop While <condition>

So why do we sometimes want to use the Do While loop? The reason is that sometimes we wants
the loop to be run at least once even though the conditions aren't met.
The two examples below where one is using a While loop and the other a Do While loop you could
see the difference. In the examples I will use some more functionalities in the messagebox, I add a
caption and what buttons it should use, I also check what button that was pressed to use it in an If
Statement.
While Loop
Code:
Dim nPoints As Integer
While nPoints >= 15
nPoints -= 10
If MessageBox.Show("Do you want any points?", "Points=" & nPoints,
MessageBoxButtons.YesNo) = Windows.Forms.DialogResult.Yes Then
nPoints += 40
End If
End While
Do While loop
Code:
Dim nPoints As Integer
Do
nPoints -= 10
If MessageBox.Show("Do you want any points?", "Points=" & nPoints,
MessageBoxButtons.YesNo) = Windows.Forms.DialogResult.Yes Then
nPoints += 40
End If
Loop While nPoints >= 15
In both examples the loop will continue as long as the user have 15 or more points, the user loses 10
points each time but can gain 40 new if he/she answer yes on the messagebox. But we want the user
to be able to play this "game" so then the loop need to loop at least once. The while loop will test
the condition in the beginning but since the user starts with 0 points the loop won't start at all.
Because of that we use the Do While loop, then the code will run at least once so the "game" can
start. Usually Do While loops are Do While loops (instead of normal While loops) since their
condition depends on the last looping in the loop, then if it was a While loop there wouldn't be a last
looping the first time. Then the loop wouldn't probably even start.
Do Until loop
The Do Until loop is the same as the Do While loop but with one exception. The Do While loop
will continue if the condition are True and stop if the condition are False while the Do Until loop
does the opposite, it will continue if the condition are False and stop if the condition are True. It will
loop until the condition is met. I'll show the syntax of the Do Until loop and also an example of it.
Do
'Code that will be run once per turn
Loop Until <condition>

Code:
Dim X As Integer = 312
Do
X /= 10
Loop Until X = 0
The loop above will loop until X is equals to 0, then it will stop.

Chapter #10 - Arrays
Arrays are variables that contains more then one value, they are very powerful when we want to
store lots of information. To get or set a value of the array we need to refer to the index of the array.
We compared a variable with a box in chapter 3, in the same way we could compare an array with a
row of boxes. To get/set a value we need to know which of the boxes we want to handle with, we
use the index for that.
This is the syntax for declaring an array:
<scope> <array_name>([<size>]) As <Type>
The syntax is the same as when declaring normal variables with the exception of the size of the
array inside the parentheses. The size is how many elements(places to store values) there will be in
the array. The size is not necessary even though the parentheses are. Without the size you can't
referrer to any index of the array but you can set the size later.
Here below is an example on how you declare a 5 elements long Integer array.
Code:
Dim anExample(4) As Integer
The name is starting with an "a" since its an Array and then a "n" since it's an Integer. The four
means the highest index will be 4. Since the index starts at 0 this means we will get 5 elements.
This example below show how to both get and set the value of the elements in an array.
Code:
Dim anExample(2) As Integer
anExample(0) = 3
anExample(1) = 5
anExample(2) = 7
MessageBox.Show("The element at index 1 in the array has the value " & anExample(1))
In the example above you can see it's just to add the index in parentheses at the end and they work
like normal variables.
Redim and .GetUpperBound
As mentioned before you can change the size of an Array, you do this with Redim. When using
Redim you're not writing what type the array should be since it's using the same as it had. Note that
all elements will be reseted in the array if you use Redim if you're not using Preserve. By using
".GetUpperBound(<dimension>)" we gets a integer value which shows the element with the highest
index's index in an array.
Here below is an example on how to use Redim and .GetUpperBound.
Code:
Dim anExample(0) As Integer
MessageBox.Show("The Array got " & anExample.GetUpperBound(0) + 1 & " element(s)")
ReDim anExample(2)
MessageBox.Show("The Array got " & anExample.GetUpperBound(0) + 1 & " element(s)")
ReDim anExample(99)
MessageBox.Show("The Array got " & anExample.GetUpperBound(0) + 1 & " element(s)")
The code "anExample.GetUpperBound(0) + 1", means we get the maximum index of the first
dimension (index 0). As mentioned earlier the index in an Array starts at 0 and therefore we use +1
to get the total numbers of elements.
The output of the above code will be:
The Array got 1 element(s)
The Array got 3 element(s)
The Array got 100 element(s)

In this example we could also have used .Length. It's the same as .GetUpperBound + 1. So the only
difference is that .Length return a value that is 1 greater then .GetUpperBound. But this ONLY
works with one dimensional arrays, in multidimensional arrays it works completely different. More
about them in a later chapter.
To keep the values you had in the Array you need to use Preserve, like so:
Code:
ReDim Preserve anExample(10)
Chapter #11 - Loops Part 2
In this chapter I will teach you about the For loop and the For Each loop. They both work very good
with Arrays and the For Each loop can in fact only be used with Arrays.
For Loops
The For loop will loop a certain amount of times and when it have looped so many times it will
stop. When declaring a For loop you give it a name just like you do when you declares a variable.
The For loop's value(the number it's currently on) can then be accessed by using that name exactly
as you do with variables. The syntax for declaring a For loop could be viewed below.
For <loop_name> As <type> = <start> To <end> [Step <step>]
'code inside the loop
Next
• <loop_name> is the name of the loop. You often use "i" as the name if you don't want to
name it anything special.
• <type> is the type the loop should be declared as, a normal type is Integer.
• <start> is at what value the loop should start at.
• <end> is at what value the loop should end at.
• [Step <step>] is optional. <step> is how much the value should change for each turn in the
loop. The default value is 1.
An example with For loops could be seen down below, one of the loops is using the default step
while the other has set step to 3.
Code:
For i As Integer = 0 To 2
MessageBox.Show(i)
Next
For i As Integer = 1 To 10 Step 3
MessageBox.Show(i)
Next
In the first loop it will go from 0 to 2 with 1 as the step. This will result in an output of 0, 1, 2 and 3.
The second one will go from 1 to 10 with a step of 3. Its output will be: 1, 4, 7 and 10.
For Each loop
The For Each loop is a sort of For loop but its value will be the value of the element in an Array at
the current index, therefor the For Each loop is good to use to go through all elements in an Array.
Syntax:
For Each <loop_name> In <array>
'code inside the loop
Next
• <loop_name> is the name of the loop. It's this you will use to access the current element in
the Array.
• <array> is the name of the array you want to go through.
I will of course show you an example of how to use it.
Code:
Dim anExample(2) As Integer
anExample(0) = 61
anExample(1) = 15
anExample(2) = 87
For Each element In anExample
MessageBox.Show(element)
Next
In the above example the value of "element" will be 61 the first time, 15 the second and 87 the third
since this is the three values we have stored in the array.
The above example can also be created with a For loop. It's better to use the For Each loop for it but
I will now show you how it's done with the For loop so you can get a better idea how the For Each
loop works.
Code:
Dim anExample(2) As Integer
anExample(0) = 61
anExample(1) = 15
anExample(2) = 87
For i As Integer = 0 To anExample.GetUpperBound(0)
Dim element As Object = anExample(i)
MessageBox.Show(element)
Next
Chapter # 12 - Try Catch Statement
Try Catch statements are used to catch run-time errors to prevent them from ruin your program. The
most simple type of Try Catch statements could look like this:
Code:
Dim Number As Integer = 10
Try
MessageBox.Show(10 / Number)
Catch
MessageBox.Show("Can't divide by 0")
End Try
In the above example we tries to divide 10 with a variable called number in the Try block. If an
error occurs somewhere in a try block the code will immediately go to the catch block and continue
from there. So if number is 0 in this case an error will occur and we will see "Can't divide by 0".
Observe that the above code is not something you should really do, catching an error takes relative
long time, therefor you should always use if statements when it's possible, like this:
Code:
Dim Number As Integer = 10
If Number <> 0 Then
MessageBox.Show(10 / Number)
Else
MessageBox.Show("Can't divide by 0")
End If
But it's not always possible to use if statements to check if an error will occur and that's what we
have the Try Catch statements for.
We can also give a name to the exception:
Code:
Dim myVariable As Form
Try
myVariable.Show()
Catch ex As Exception
MessageBox.Show(ex.Message)
End Try
So now the catchblock is named ex and is of the type exception. Then we just show ex.message if
an error occurs to see the error message. Which in this case will be something like "The object
reference haven't been given an instance of an object.".
The type Exception is the standard one and will catch all exception, however we may add as many
catch block we want with different exception types. Then if an error occurs it tries to find the first
catch block that matches the error which occurred. If no catch blocks matched it would be exactly
the same as without any try catch statement, so a good idea is to put a general exception at the end a
Code:
Dim myVariable As Form
Try
myVariable.Show()
Catch ex As NullReferenceException
MessageBox.Show("myVariable mustn't be empty")
Catch ex As Exception
MessageBox.Show(ex.Message)
End Try
You can also specify an condition for each catch block, the condition also needs to be true for the
catch block to match with the error.
Code:
Dim Friendly As Boolean = True
Dim myVariable As Form
Try
myVariable.Show()
Catch ex As NullReferenceException When Friendly = False
MessageBox.Show("Are you stupid? myVariable can't be empty, noob!")
Catch ex As NullReferenceException
MessageBox.Show("myVariable can't be empty")
Catch ex As Exception
MessageBox.Show(ex.Message)
End Try
In the small example above the first catch block won't be executed since Friendly is not equals to
False. Therefor the next one will be run instead.
At the end we can add something called finally, the code in here will always be executed in the end,
there's no different if an error occurred or not.
Code:
Dim Friendly As Boolean = True
Dim myVariable As Form
Try
myVariable.Show()
Catch ex As NullReferenceException When Friendly = False
MessageBox.Show("Are you stupid? myVariable can't be empty, noob!")
Catch ex As NullReferenceException
MessageBox.Show("myVariable mustn't be empty")
Catch ex As Exception
MessageBox.Show(ex.Message)
Finally
MessageBox.Show("We're done")
End Try

Throw Errors
It's also possible for your code to throw its own errors, when doing so you could choose its error
type and the error message. In the example below I show how to throw a standard error.
Code:
Throw New Exception("Oh no, you did something wrong")

Chapter #13 - Subs and Functions
I mentioned as early as in chapter two that it exists something that is called a Sub and an Event
block is a type of one. A sub is a block of code where most of all codes has to be in(not variable
declarations, classes and structures, for example). A sub must then be called in some way, by
another sub/function(function is a type of sub) or by an object through an event. This means
everything has to begin with an event in one way or another.
Here below I show a simply example on how to create and use your own Sub. One of the subs is
called by the event block which is called when a button is clicked.
Code:
Private Sub cmdExample_Click(ByVal sender As System.Object, ByVal e As
System.EventArgs) Handles cmdExample.Click
ExampleSub()
ExampleSub()
End Sub
Private Sub ExampleSub()
MessageBox.Show("This is inside ExampleSub().")
End Sub
When we click the button the program will start running at the beginning of cmdExample_Click
which is the event block for cmdExample.click. From here the program calls ExampleSub by just
writing its name and two parentheses("ExampleSub()"). Now the program will continue at the
beginning of ExampleSub, here a messagebox will be shown. When the program has reached the
end of ExampleSub it goes back where it was before. Since we have wrote "ExampleSub()" twice,
the sub is called once again. This is what you use subs and functions for, you can call the sub from
anywhere in the whole program instead of writing the same code everywhere. When using
parameters it will become even more useful.
Using parameters
Parameters are Variables to a Sub that you set each time you call the sub. A parameter can be either
ByVal or ByRef, I'll show you the difference later on in this chapter. If you want you can also set
the parameter to be Optional, this means what it sounds like, you don't have to set its value. But to
the right of an Optional parameter you can't have a non-optional parameter. We modify the code we
had before to include some parameters.

Code:
Private Sub cmdExample_Click(ByVal sender As System.Object, ByVal e As
System.EventArgs) Handles cmdExample.Click
ExampleSub(3, 2, 5)
ExampleSub(3, 5)
End Sub
Private Sub ExampleSub(ByVal X As Integer, ByVal Y As Integer, Optional ByVal Z As
Integer = 1)
If Z <> 1 Then
MessageBox.Show("X*Y*Z = " & X * Y * Z)
Else
MessageBox.Show("X*Y = " & X * Y)
End If
End Sub
We have now added 3 Integer parameters to ExampleSub. Z is Optional and therefor we have to
give it a default value, Z will get this value if we aren't using it when calling the sub. Except where
and how to declare them parameters work as variables when they are ByVal. When they are ByRef
there will be another difference, more to that later. Inside ExampleSub we're using an If statement to
check if Z has its default value. If it has we show the product of only X and Y but if it has another
value we shows the product of X, Y and Z. Then in our event block for the button we first call
ExampleSub(3, 2, 5). This will run ExampleSub with X=3, Y=2 and Z=5. Since Z doesn't have its
default value the program will use that too in the calculation and we will see: "X*Y*Z = 30". Then
we'll call ExampleSub again, this time with X=3 and Y=5. Since we doesn't set the value of Z, it
will keep its default value. Since it has its default value the program will show us: "X*Y = 15"
ByVal and ByRef
When declaring a parameter you can choose to declare it By Value(ByVal) or
By Reference(ByRef). ByVal will only copy the value and use it without changing the original
value. ByRef however will not copy the value but instead receive a "link" to the original value.
When we change the value of a By Reference parameter it's actually only linking to the original
value so that is what we are changing.
ByVal
Code:
Private Sub cmdExample_Click(ByVal sender As System.Object, ByVal e As
System.EventArgs) Handles cmdExample.Click
Dim nOriginalValue As Integer = 10
ExampleSub(nOriginalValue)
MessageBox.Show(nOriginalValue)
End Sub
Private Sub ExampleSub(ByVal nParameterValue As Integer)
MessageBox.Show(nParameterValue)
nParameterValue = 5
End Sub
ByRef
Code:
Private Sub cmdExample_Click(ByVal sender As System.Object, ByVal e As
System.EventArgs) Handles cmdExample.Click
Dim nOriginalValue As Integer = 10
ExampleSub(nOriginalValue)
MessageBox.Show(nOriginalValue)
End Sub
Private Sub ExampleSub(ByRef nParameterValue As Integer)
MessageBox.Show(nParameterValue)
nParameterValue = 5
End Sub
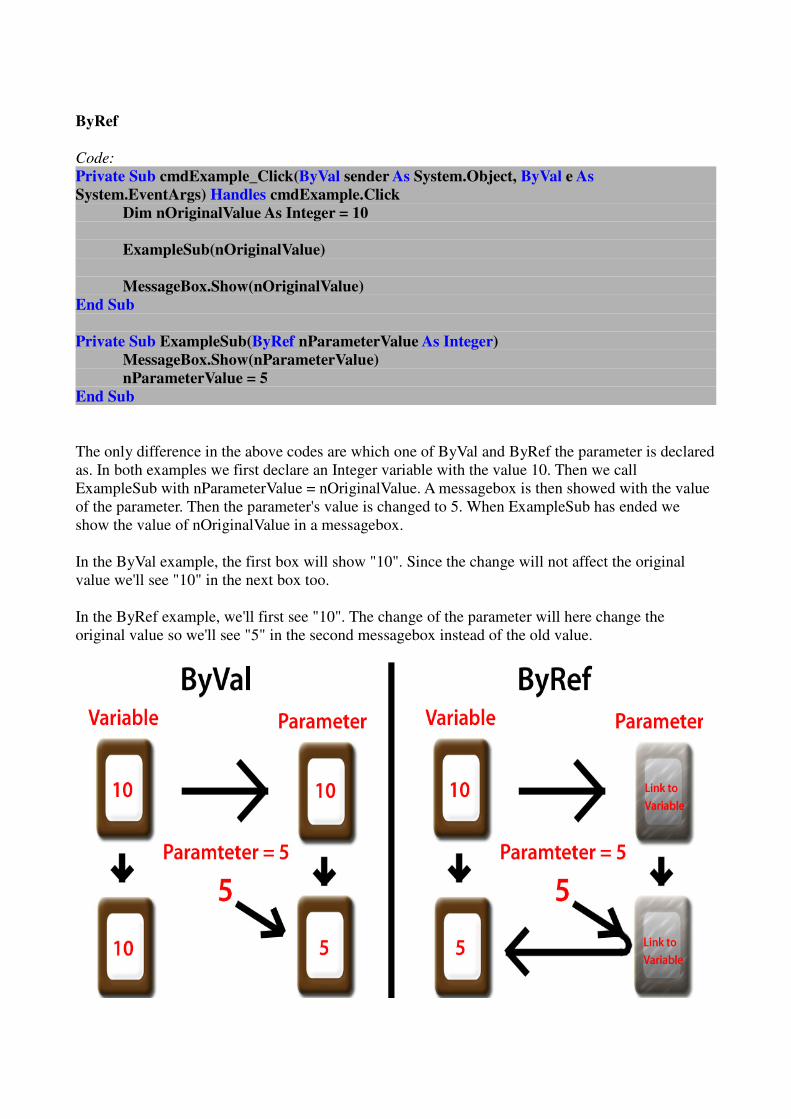
The only difference in the above codes are which one of ByVal and ByRef the parameter is declared
as. In both examples we first declare an Integer variable with the value 10. Then we call
ExampleSub with nParameterValue = nOriginalValue. A messagebox is then showed with the value
of the parameter. Then the parameter's value is changed to 5. When ExampleSub has ended we
show the value of nOriginalValue in a messagebox.
In the ByVal example, the first box will show "10". Since the change will not affect the original
value we'll see "10" in the next box too.
In the ByRef example, we'll first see "10". The change of the parameter will here change the
original value so we'll see "5" in the second messagebox instead of the old value.
Functions
By replacing Sub with Function when we create a Sub we get a Function instead. The difference is
that a Function may and must return a value. To do this we use the Functions name as a variable to
give it values. We can also use "Return <value>" where value is the value we want the function to
return. When using the return statement the function will stop right away to return the value, if we
just set the return value as a variable that value is returned when the function ends the normal way.
Code:
Private Sub cmdExample_Click(ByVal sender As System.Object, ByVal e As
System.EventArgs) Handles cmdExample.Click
MessageBox.Show(ExampleFunction(5, 4))
End Sub
Private Function ExampleFunction(ByVal X As Integer, ByVal Y As Integer) As Integer
Return X + Y
End Function
In the example above the value of "ExampleFunction(5, 4)" will be showed in a messagebox. The
value of "ExampleFunction(5, 4)" is the value that will be returned from the Function when calling
it with X=5 and Y=4. The function will simply return the sum of X and Y. So the output of this code
will be 9.
Chapter #14 - Difference between scopes
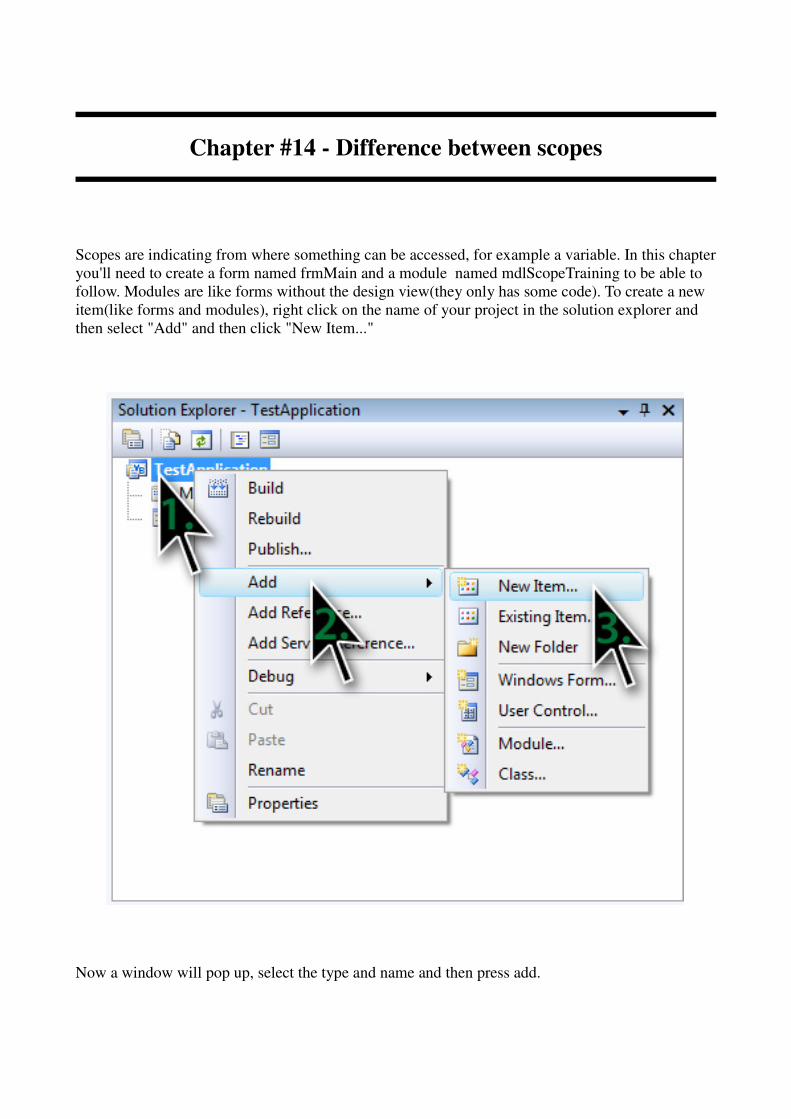
Scopes are indicating from where something can be accessed, for example a variable. In this chapter
you'll need to create a form named frmMain and a module named mdlScopeTraining to be able to
follow. Modules are like forms without the design view(they only has some code). To create a new
item(like forms and modules), right click on the name of your project in the solution explorer and
then select "Add" and then click "New Item..."
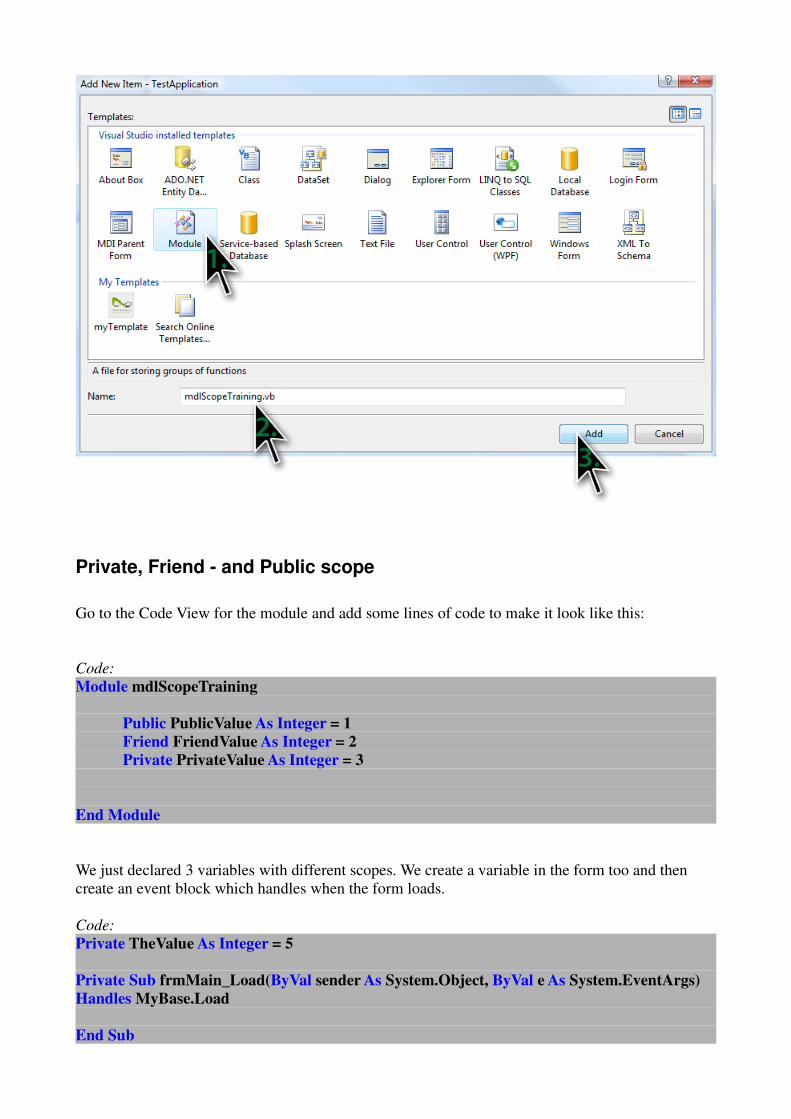
Now a window will pop up, select the type and name and then press add.
Private, Friend - and Public scope
Go to the Code View for the module and add some lines of code to make it look like this:
Code:
Module mdlScopeTraining
Public PublicValue As Integer = 1
Friend FriendValue As Integer = 2
Private PrivateValue As Integer = 3
End Module
We just declared 3 variables with different scopes. We create a variable in the form too and then
create an event block which handles when the form loads.
Code:
Private TheValue As Integer = 5
Private Sub frmMain_Load(ByVal sender As System.Object, ByVal e As System.EventArgs)
Handles MyBase.Load
End Sub
To access the values from the module we only write their names just as we have had done if they
were locally declared. But if our module instead have been a form named frmScopeTraining and we
wanted to access the variable called PublicValue we have had to write
frmScopeTraining.PublicValue. But since it's just a module this is unnecessary.
We add some code inside the Sub.
Code:
Messagebox.Show(PublicValue + FriendValue + PrivateValue)
We will now see the error:
Name 'PrivateValue' is not declared
The reason for this is that PrivateValue is declared with a Private scope and can therefor only be
accessed from inside the module itself. The Friend scope can be accessed from other items(such as
the frmMain) too and the Public scope can be accessed from everywhere.
So just remove that line again.
Two things with the same name
Now instead add these two lines to the event.
Code:
Dim TheValue As Integer = 7
Messagebox.Show(TheValue)
Now we declare an Integer variable called TheValue. So now we have two variables called
TheValue, one inside the event block and the other one outside. When referring to TheValue now
we will get the value of the most local one, in this case we will get the value 7.
Scopes and blocks
When using all sort of blocks of code(If statements, Loops, Functions etc.) we need to remember
one important thing about scopes. You can't access something declared in another block unless you
try to access it from a sub-block of the block where it's declared. That probably didn't make so
much sense so please look at the examples below.
This doesn't work, we can't set the value of the variable from the other if statement.

Code:
If X = 1 Then
Dim myVariable As Integer
End If
If Y = 1 Then
myVariable = 5
End If
This doesn't work either, the declaration is inside a block and then we can't access it from outside.
Code:
If X = 1 Then
Dim myVariable As Integer
End If
myVariable = 5
However, this will work since the If statement is inside the block where the declaration is.
Code:
Dim myVariable As Integer
If Y = 1 Then
myVariable = 5
End If

Chapter #15 - Select Case Statements
An option to If statements is called Select Case statements. The Select Case statement is good to use
when you want different blocks of code to be executed depending on different values on the same
variable. If statements is good if you only need to test one value or if you have to test different
variables(can't be done with Select Case).
Anyway, to use a Select Case statement you have to create it by writing "Select Case" and then the
value you want to test. End the statement with "End Select". There's two example just below
showing this.
Code:
Select Case "test"
End Select
Code:
Select Case myVariable
End Select
At the moment the Select Case statements are empty, inside them we will add cases by writing
"Case " and then the value for that case. Then the program will get the value of the Select Case
statement(as we did above) and then check if that value is the same as the first Case. If it is the
associated block of code will be run or else it will try next Case until it founds one. You can also
add an "Case Else" block at the end that will be executed if no "normal" Case's condition has been
True. A few examples here below.
Code:
Select Case myVariable
Case 1
MessageBox.Show("myVariable = 1")
Case 2
MessageBox.Show("myVariable = 2")
Case 3, 4
MessageBox.Show("myVariable = 3 or 4")
Case 5
MessageBox.Show("myVariable = 5")
Case Else
MessageBox.Show("myVariable is neither 1,2,3,4 or 5")
End Select
Code:
Select Case "CodeCall"
Case "test"
MessageBox.Show("Testing...")
Case "CodeCall"
MessageBox.Show("CodeCall is awesome!")
Case "hi"
MessageBox.Show("Hello")
End Select
Observe that the select case statement will always only run a maximum of one block even if more
then one condition is True. In the example below we will only see one messagebox with the
message This is True and will be shown".
Code:
Select Case 5
Case 321
MessageBox.Show("This is False")
Case 5
MessageBox.Show("This is True and will be shown")
Case 5
MessageBox.Show("This is also True but won't be shown")
End Select
More advanced Select Case Statements
You can use both To and Is to make more advanced Cases. These could be very useful when
checking for ranges of numbers or if certain conditions are met.
To
When using some certain types of values(Integers and other numeric values for example) you can
add a whole range of numbers to one single Case by using "[number] To [number]", like the
example below.
Code:
Select Case myVariable
Case 0 To 5
MessageBox.Show("myVariable is between 0 and 5")
Case 6 To 10
MessageBox.Show("myVariable is between 6 and 10")
Case 11
MessageBox.Show("myVariable = 11")
End Select

Is
You can also add relational operators to your Select Case statement. Do this by replace "Case
[value]" with "Case Is [relational operator] [value]". Actually a select case statement does always
contains a relational operator, the Is Equals to operator (=) even though it's hidden. This means that
"Case Is = myValue" is the same as "Case myValue". Here comes a little example on how to use it.
Code:
Select Case myVariable
Case Is > 0
MessageBox.Show("myVariable is greater then 0")
Case Is < 0
MessageBox.Show("myVariable is less then 0")
Case Else
MessageBox.Show("myVariable is equals to 0")
End Select
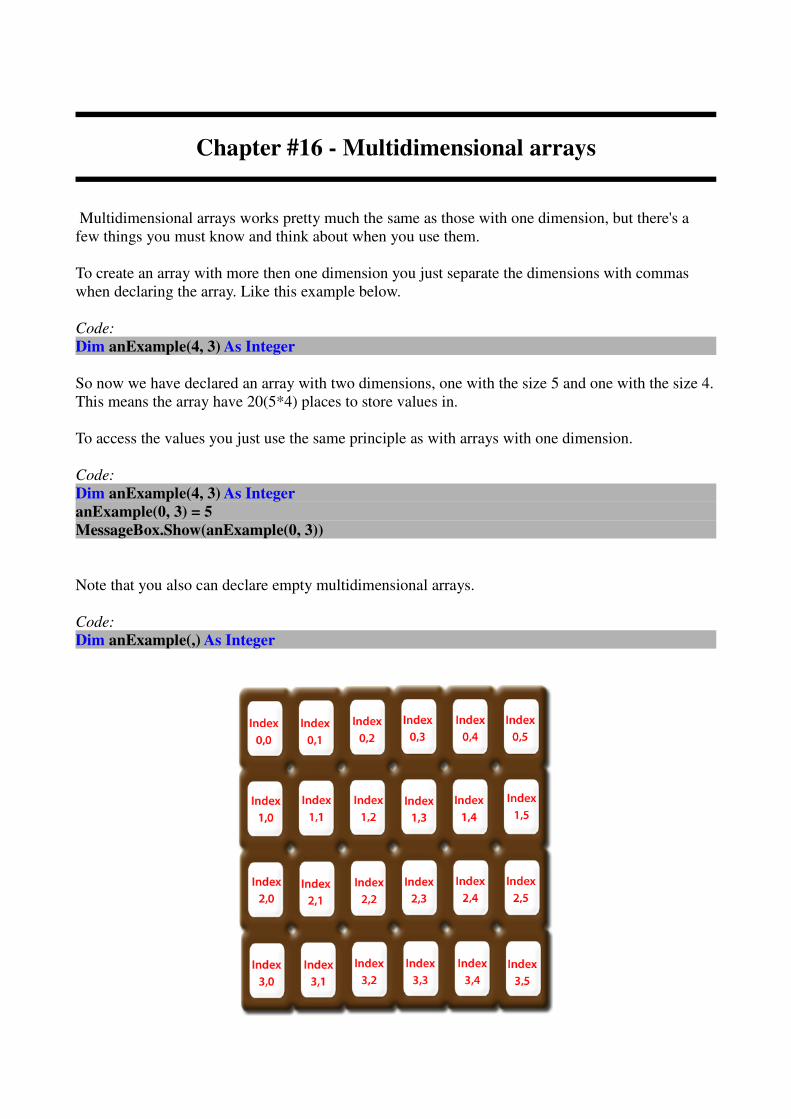
Chapter #16 - Multidimensional arrays
Multidimensional arrays works pretty much the same as those with one dimension, but there's a
few things you must know and think about when you use them.
To create an array with more then one dimension you just separate the dimensions with commas
when declaring the array. Like this example below.
Code:
Dim anExample(4, 3) As Integer
So now we have declared an array with two dimensions, one with the size 5 and one with the size 4.
This means the array have 20(5*4) places to store values in.
To access the values you just use the same principle as with arrays with one dimension.
Code:
Dim anExample(4, 3) As Integer
anExample(0, 3) = 5
MessageBox.Show(anExample(0, 3))
Note that you also can declare empty multidimensional arrays.
Code:
Dim anExample(,) As Integer

Redim
This will in some cases work a little bit different then with one dimensional arrays.
This will work as expected.
Code:
Dim anExample(,) As Integer
ReDim anExample(3, 3)
And this too.
Code:
Dim anExample(2, 1) As Integer
ReDim anExample(3, 3)
However when we use preserve to keep the values in the array we'll find a difference.
This still works.
Code:
Dim anExample(,) As Integer
ReDim Preserve anExample(3, 3)
But not this.
Code:
Dim anExample(2, 1) As Integer
ReDim Preserve anExample(3, 3)
The reason is that when you're using preserve when redimming an multidimensional array you can
only change the size of the dimension to the far right. But as you saw above we can set all sizes that
haven't been already set without any troubles. To correct the above code we change the first "3" to a
"2" we won't change the size of that dimension and therefor it will work.
Code:
Dim anExample(2, 1) As Integer
ReDim Preserve anExample(2, 3)
.GetUpperBound and .Length
.GetUpperBound will work the same as when you're using one dimensional arrays. Just remember
to use the right index(0 for the first, 1 for the second etc.). .Length will still return the length of the
array but remember that the length is now the size of the dimensions multiplied with each other.

Code:
Dim anExample(9, 99) As Integer
MessageBox.Show("Dimension 1(index 0) has the size: " & anExample.GetUpperBound(0) +
1)
MessageBox.Show("Dimension 2(index 1) has the size: " & anExample.GetUpperBound(1) +
1)
MessageBox.Show("The size of the array: " & anExample.Length & "(=" &
anExample.GetUpperBound(0) + 1 & "*" & anExample.GetUpperBound(1) + 1 & “)”)
will give us the output:
Dimension 1(index 0) has the size: 10
Dimension 2(index 1) has the size: 100
The size of the array: 1000=(10*100)
For each
When using For Each on a multidimensional array you need to know which order it retrieves the
items. This simple example show how it works, the numbers from 1 to 9 will be showed in the
correct order.
Code:
Dim anExample(2, 2) As Integer
anExample(0, 0) = 1
anExample(0, 1) = 2
anExample(0, 2) = 3
anExample(1, 0) = 4
anExample(1, 1) = 5
anExample(1, 2) = 6
anExample(2, 0) = 7
anExample(2, 1) = 8
anExample(2, 2) = 9
For Each item In anExample
MessageBox.Show(item)
Next
More then two dimensions
I have always talked about multidimensional arrays instead of two dimensional arrays, the reason is
simple, you can use three dimensions if you want or all the way up to 32 dimensions if you would
like. We can only imagine 3 dimensions normally but that doesn't mean we can't create arrays with a
huge number of dimensions. Be careful though, your arrays can easily take up a huge memory
space. For example if you have an array with dimensions with the sizes 10, 15, 20, 2 and 5 the array
will have 10*15*20*2*5=30,000 elements. A few examples is showed here below, you'll probably
get the idea.
Code:
Dim anExample(2, 1, 3, 2) As Integer
Code:
Dim anExample(,,) As Integer
ReDim anExample(1, 4, 6)
Code:
Dim anExample(5, 1, 3) As String
anExample(1, 0, 2) = "Let's store this here"
Code:
Dim anExample(0, 1, 2, 3, 4, 5, 6, 7, 8, 9, 10, 11, 12, 13, 14, 15, 16, 17, 18, 19, 20, 21, 22, 23, 24,
25, 26, 27, 28, 29, 30, 31) As Integer
Remember to not make them bigger then necessary, the array in the last example will be too big if
you doesn't have a computer with a very huge amount of memory(the array has
263,130,836,933,693,530,167,218,012,160,000,000 elements).
Chapter #17 - Structures
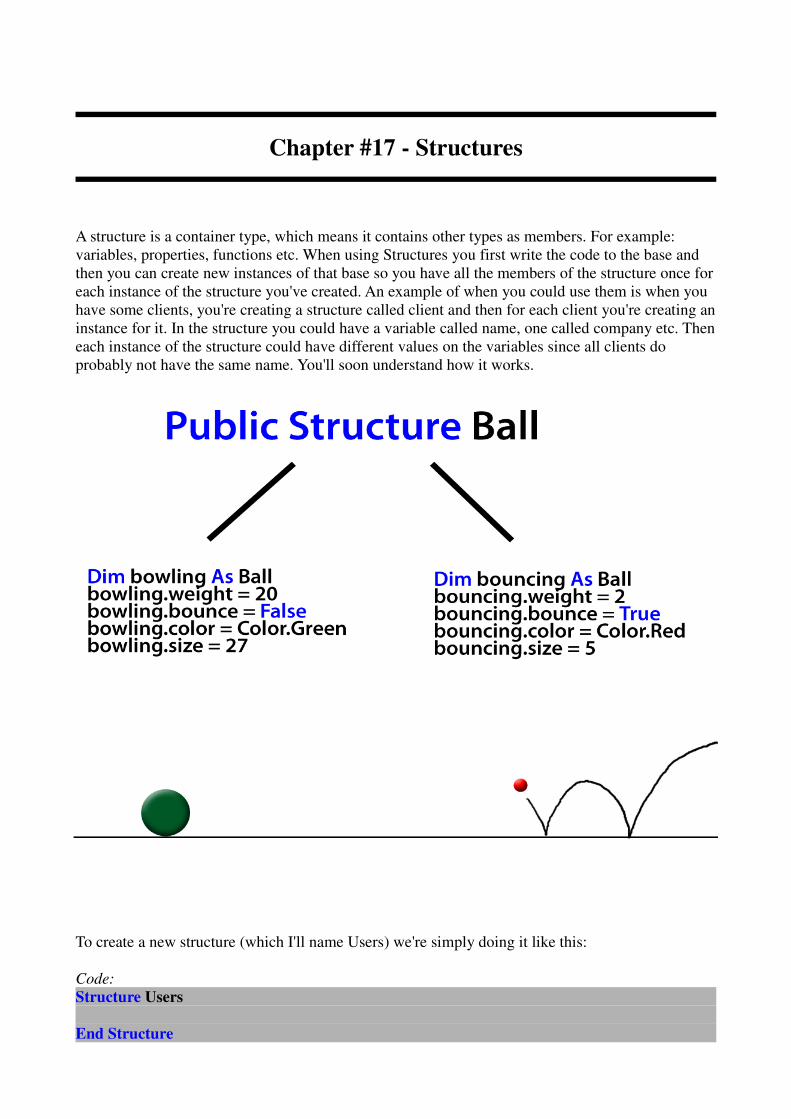
A structure is a container type, which means it contains other types as members. For example:
variables, properties, functions etc. When using Structures you first write the code to the base and
then you can create new instances of that base so you have all the members of the structure once for
each instance of the structure you've created. An example of when you could use them is when you
have some clients, you're creating a structure called client and then for each client you're creating an
instance for it. In the structure you could have a variable called name, one called company etc. Then
each instance of the structure could have different values on the variables since all clients do
probably not have the same name. You'll soon understand how it works.
To create a new structure (which I'll name Users) we're simply doing it like this:
Code:
Structure Users
End Structure

However, now the structure is empty so we'll receive this error:
Structure 'Users' must contain at least one instance member variable or Event declaration.
So then we add a variable or two. Now we need to remember a thing about scopes, If we declare
this variable as private we'll only be able to access it from within the structure itself, so therefor I
will declare it as Public.
Code:
Structure Users
Public Name As String
Public Money As Integer
End Structure
So now the Structure Users have one Public String named Name and one Integer named Money.
Even though this structure is very simple I can show you how we may use a structure after we've
created it. Observe that this code below is not inside the Structure, I will later show you all the
code(the structure and when we're using it) together so you'll see where everything is:
Code:
Dim User1 As Users
User1.Name = "Me"
User1.Money = 5
Dim User2 As Users
User2.Name = "You"
User2.Money = 5
If User1.Money = User2.Money Then
MessageBox.Show("We have exactly the same amount of cash")
End If
So in this small example above I first declared the Variable User1 as the type Users which is our
structure, then I set the value of the two variables Name and money. After that I'm doing the same
with a variable called User2. At the end, just to show you, I compared the amount of money the two
users have.
If I now take the above code and put it into a Form.Load event the whole thing should look like
this.
Code:
Public Class frmMain
Private Sub frmMain_Load(ByVal sender As System.Object, ByVal e As
System.EventArgs) Handles MyBase.Load
Dim User1 As Users
User1.Name = "Me"
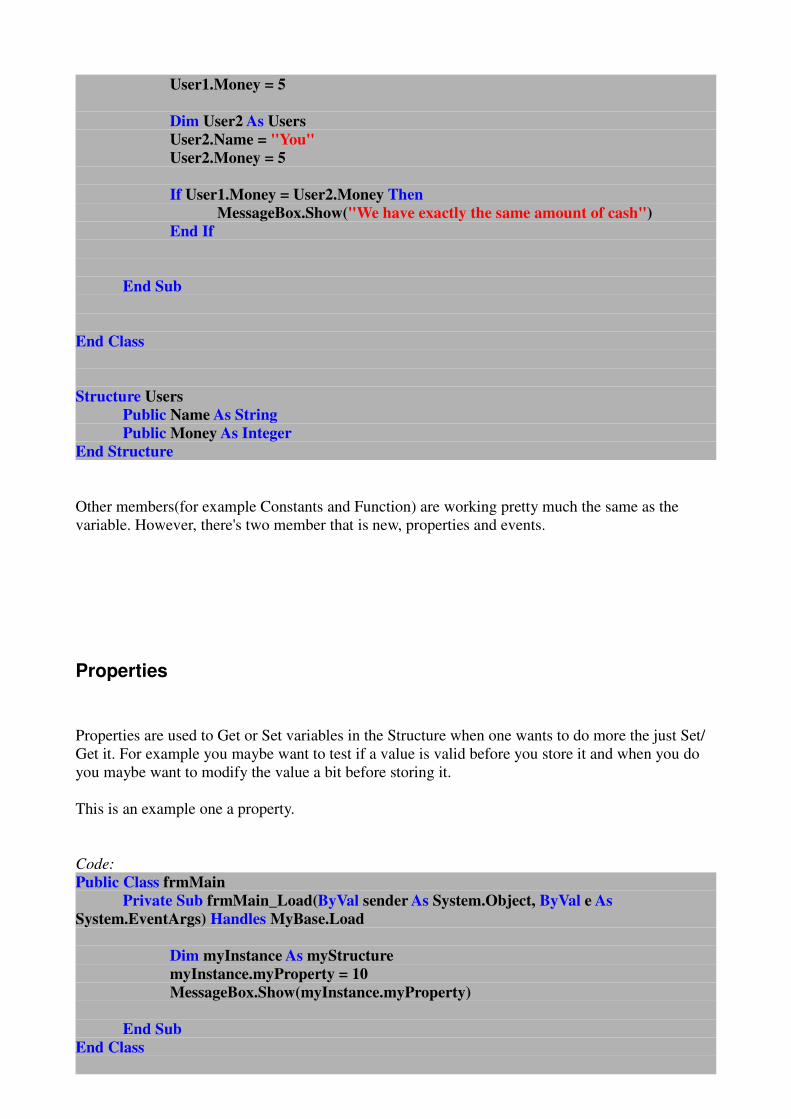
User1.Money = 5
Dim User2 As Users
User2.Name = "You"
User2.Money = 5
If User1.Money = User2.Money Then
MessageBox.Show("We have exactly the same amount of cash")
End If
End Sub
End Class
Structure Users
Public Name As String
Public Money As Integer
End Structure
Other members(for example Constants and Function) are working pretty much the same as the
variable. However, there's two member that is new, properties and events.
Properties
Properties are used to Get or Set variables in the Structure when one wants to do more the just Set/
Get it. For example you maybe want to test if a value is valid before you store it and when you do
you maybe want to modify the value a bit before storing it.
This is an example one a property.
Code:
Public Class frmMain
Private Sub frmMain_Load(ByVal sender As System.Object, ByVal e As
System.EventArgs) Handles MyBase.Load
Dim myInstance As myStructure
myInstance.myProperty = 10
MessageBox.Show(myInstance.myProperty)
End Sub
End Class

Structure myStructure
Private myVariable As Integer
Property myProperty() As Integer
Get
Return myVariable
End Get
Set(ByVal value As Integer)
myVariable = value
End Set
End Property
End Structure
In the structure in the example above we have a private variablethat the property modify and reads
from. When we're using the structure it works exactly the same as with variables, in fact in the
example above we could just have had a public variable called myProperty in the structure to get
the same result. But as I said before we can use them to do other things before actually
setting/getting the value, for example a property could look like this.
Code:
Private myVariable As Integer
Property myProperty() As Integer
Get
If myVariable > 20 Then
Return myVariable
Else
Return 0
End If
End Get
Set(ByVal value As Integer)
If value <> 0 Then
myVariable = 100 / value
End If
End Set
End Property
If you only want to allow reading, you can do a readonly property.
Code:
Private myVariable As Integer
ReadOnly Property myProperty() As Integer
Get
Return myVariable
End Get
End Property
Or only allow writing by doing a writeonly property.

Code:
Private myVariable As Integer
WriteOnly Property myProperty() As Integer
Set(ByVal value As Integer)
myVariable = value
End Set
End Property
Events
We've used events before and learned us about them early, but not how to create your own. In the
example below you can see a simple event.
Code:
Event valueChanged(ByVal fromValue As Integer, ByVal toValue As Integer)
In the above example I created an Event(valueChanged) with two Integer
parameters(fromValue,toValue).
To have any use of the event we need to raise it. When the event is raised we can catch that up by
some code, for example the form.load event is raised when the form is loaded and then we can use
that to run some code when the form loaded. I've used the above event in a structure together with a
writeonly property.
Code:
Structure myStructure
Private myvariable As Integer
Public WriteOnly Property myProperty() As Integer
Set(ByVal value As Integer)
RaiseEvent valueChanged(myvariable, value)
myvariable = value
End Set
End Property
Event valueChanged(ByVal fromValue As Integer, ByVal toValue As Integer)
End Structure
Each time we're changing the value of the property called myProperty the valueChanged event is
raised with the old value and the new value. To be able to do something each time this event is
raised for our instance of the structure we have to do something like this:

Code:
Private Sub frmMain_Load(ByVal sender As System.Object, ByVal e As System.EventArgs)
Handles MyBase.Load
Dim myInstance As myStructure
AddHandler myInstance.valueChanged, AddressOf mySub
End Sub
Private Sub mySub(ByVal oldValue As Integer, ByVal newValue As Integer)
End Sub
Here above I created a new instance of the structure called myStructure, then I added a handler for
it. To do it you first write "AddHandler " then the name of the instance dot the event
("myInstance.valueChanged"). This is to select what event we will add, then we have to choose
where by ending with ", AddressOf mySub" which adds it to the sub called mySub. Observe that
I've given mySub two Integer parameters just as the event but note that they doesn't have to be
named the same. So when we change the property myProperty it will raise the event and since we
added a handler to mySub, the code in mySub will be run.
Code:
Public Class frmMain
Private Sub frmMain_Load(ByVal sender As System.Object, ByVal e As
System.EventArgs) Handles MyBase.Load
Dim myInstance As myStructure
AddHandler myInstance.valueChanged, AddressOf mySub
myInstance.myProperty = 20
myInstance.myProperty = 20
myInstance.myProperty = 10
End Sub
Private Sub mySub(ByVal oldValue As Integer, ByVal newValue As Integer)
If oldValue <> newValue Then
MessageBox.Show("The value changed from " & oldValue & " to " &
newValue)
End If
End Sub
End Class
Structure myStructure
Private myvariable As Integer
Public WriteOnly Property myProperty() As Integer
Set(ByVal value As Integer)
RaiseEvent valueChanged(myvariable, value)
myvariable = value
End Set
End Property
Event valueChanged(ByVal fromValue As Integer, ByVal toValue As Integer)
End Structure

So we have the structure with the property and the event, we add the handler of that event to
mySub, which will check if the two values are the same or not. If they aren't it prints out how the
value changed.
After adding the handler we changed myProperty to 20. This will get us the output "The value
changed from 0 to 20". Then we set the property to 20 again but this time nothing will happen since
it's the same value. Lastly we set myProperty to 10 which of course gives us this output: "The value
changed from 20 to 10".
Why do we use events? Why couldn't we just add the code from mySub inside myProperty? Events
are used so we can add different codes for different instances when something happen. For example
we don't want all the buttons to do the same thing, therefore they have an event which we connect
to different Subs by adding handlers.
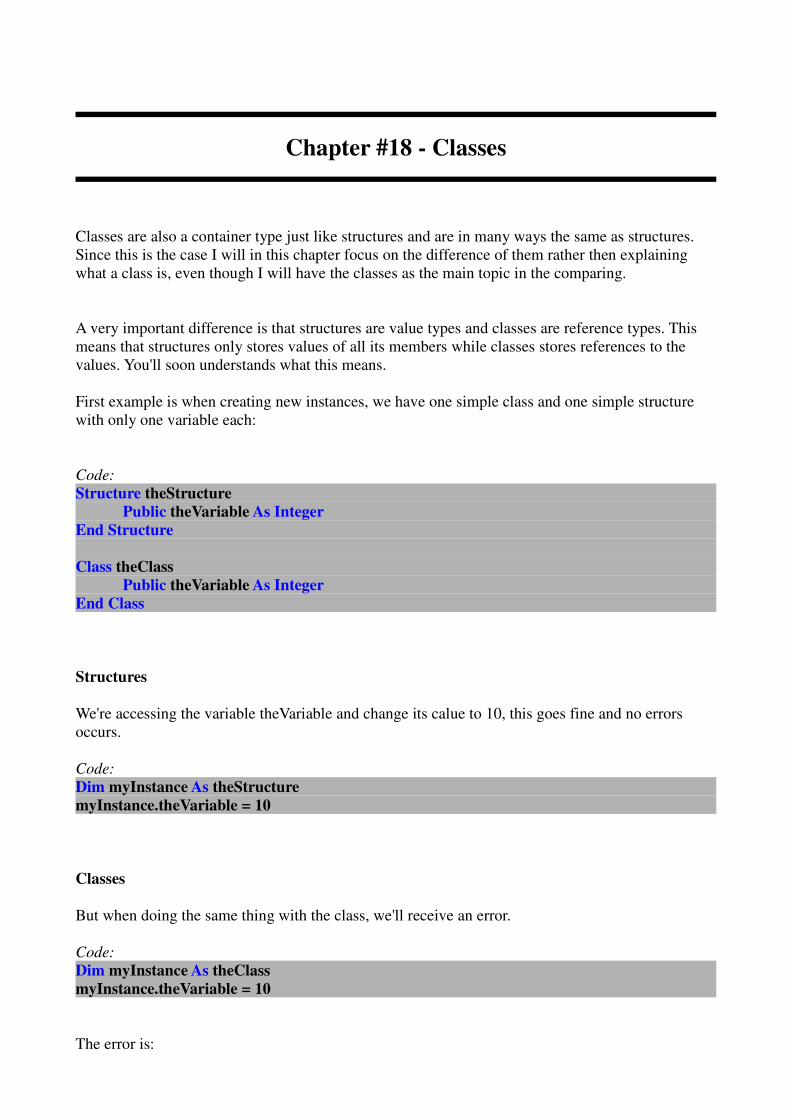
Chapter #18 - Classes
Classes are also a container type just like structures and are in many ways the same as structures.
Since this is the case I will in this chapter focus on the difference of them rather then explaining
what a class is, even though I will have the classes as the main topic in the comparing.
A very important difference is that structures are value types and classes are reference types. This
means that structures only stores values of all its members while classes stores references to the
values. You'll soon understands what this means.
First example is when creating new instances, we have one simple class and one simple structure
with only one variable each:
Code:
Structure theStructure
Public theVariable As Integer
End Structure
Class theClass
Public theVariable As Integer
End Class
Structures
We're accessing the variable theVariable and change its calue to 10, this goes fine and no errors
occurs.
Code:
Dim myInstance As theStructure
myInstance.theVariable = 10
Classes
But when doing the same thing with the class, we'll receive an error.
Code:
Dim myInstance As theClass
myInstance.theVariable = 10
The error is:

NullReferenceException was unhandled
The reason we got this is because the variable theVariable is not a part of Nothing. But we did
create an instance of theClass so why does myInstance contains nothing? The reason is that since
Classes are a reference type we haven't actually created a new instance of theClass, we have only
created a variable of the type theClass but it's still empty. To give it a value we can do it in one of
these ways:
Code:
Dim myInstance As theClass = New theClass
Code:
Dim myInstance As New theClass
This leads as to a function we can do in a class, we can create a sub that is called New that the will
be executed when a new instance is created, an example on this is showed below.
Code:
Class theClass
Private theVariable As Integer
Public Sub New(ByVal value As Integer)
theVariable = value
End Sub
End Class
In that example we accepts a parameter called value which we'll store in theVariable when the class
instance is created. If we don't have any parameters you just creates a new instance the same way as
before and if you have it's just to set some values for the required parameters, like so:
Code:
Dim myInstance As New theClass(42)
Another example is when storing a structure or a class in different variables, for this examples I use
the same class and structure as in the last example:
Code:
Structure theStructure
Public theVariable As Integer
End Structure
Class theClass
Public theVariable As Integer
End Class

Structure
Code:
Dim myInstance As theStructure
myInstance.theVariable = 20
Dim myCopy As theStructure = myInstance
myCopy.theVariable = 5
MessageBox.Show("myInstance.theVariable = " & myInstance.theVariable & " and
myCopy.theVariable = " & myCopy.theVariable)
We creates an instance of the structure and change the value of theVariable to 20. Then we creates a
copy of the instance which will copying all the values over to the new one. And then we change
theVariable to 5 in the new one. But since structures are value types myInstance.theVariable is still
20 which gives us the output:
myInstance.theVariable = 20 and myCopy.theVariable = 5
Classes
Code:
Dim myInstance As New theClass
myInstance.theVariable = 20
Dim myCopy As theClass = myInstance
myCopy.theVariable = 5
MessageBox.Show("myInstance.theVariable = " & myInstance.theVariable & " and
myCopy.theVariable = " & myCopy.theVariable)
Now we're doing the same thing with the class instead. But since classes are reference types they
just hold references to the actual values which means that myInstance and myCopy will be the same
instance of the class. Therefor when we change theVariable of myCopy we actually change the
same instance as we did before and therefor the output of this code will be:
myInstance.theVariable = 5 and myCopy.theVariable = 5
Inherits
A thing classes can do which structures can't is using Inherits. When we're doing this we're creating
a class with another one as the base, it will then inherit everything from the base class. I'll show you
a simple example.

Code:
Public Class frmMain
Private Sub frmMain_Load(ByVal sender As System.Object, ByVal e As
System.EventArgs) Handles MyBase.Load
Dim myInstance As New childClass
MessageBox.Show(myInstance.theVariable)
End Sub
End Class
Class childClass
Inherits baseClass
End Class
Class baseClass
Public theVariable As Integer = 10
End Class
The class childClass will have a public variable named theVariable with the value 10 since
childClass Inherits from baseClass which has it.
This maybe doesn't seem so useful but it's perfect when you want two or more classes who are
pretty much the same but not exactly. Then you can do a base class and two classes which inherits
from the base one.
But now we're coming to a problem with the scopes we're currently using. If we don't want a
variable(or something else) to be accessed from outside the classes, we can't use public. But if we
use private, we can't access it from the class which inherits the base class, so therefor we have to
use Protected. Check out the example below for more info.
Code:
Public Class frmMain
Private Sub frmMain_Load(ByVal sender As System.Object, ByVal e As
System.EventArgs) Handles MyBase.Load
Dim myInstance As New childClass
MessageBox.Show(myInstance.myFunction)
End Sub
End Class
Class childClass
Inherits baseClass
Public Function myFunction()
Return theVariable
End Function
End Class
Class baseClass
Protected theVariable As Integer = 10
End Class

In this example theVariable has the scope Protected, so when the base class is inherited into
childClass it can still access it in myFunction.
If you want to make a class thatmust inherits (i.e. it is a base class only) or want to forbid inherits
from that class you can also do so:
Must Inherit
Code:
MustInherit Class exampleClass
End Class
Not Inheritable
Code:
NotInheritable Class exampleClass
End Class
For a complete reference of the difference you can check out http://msdn.microsoft.com/en-
us/library/2hkbth2a(VS.80).aspx.

Chapter #19 - Enumerations
Enums, short for enumerations, are used when you have some unchanging values which is related to
each other in some way or another. So then you "group" them together and give them names.
You create an Enum like the example below.
Code:
Private Enum MyEnum
Member1
Member2
Member3
End Enum
In the example we created an Enum called MyEnum with the three members: Member1 (which get
the value 0), Member2 (value 1) and Member3 (Value 2).
We can also give the members specific values if we want to.
Code:
Private Enum MyEnum
Member1 = 10
Member2 = 15
Member3
End Enum
Since we haven't given Member3 any value it will get the value of the member above + 1(15 + 1 =
16).
What are enums good for then? I'll try to explain it better with a few examples.
Without Enums
With an ID of an animal/object we uses a function to get the number of legs it have. We have to
remember all IDs to get it right.

Code:
Private Sub frmMain_Load(ByVal sender As System.Object, ByVal e As System.EventArgs)
Handles MyBase.Load
MessageBox.Show(Legs(1))
End Sub
Private Function Legs(ByVal animal As Integer)
Select Case animal
Case 0 'Snake
Return 0
Case 1 'Dog
Return 4
Case 2 'Human
Return 2
Case 3 'Three legged table
Return 3
Case 4 'Cat
Return 4
End Select
End Function
With Enums
Now instead we'll create an Enum called Animals, we've changed the parameter to be of the type
Animals, and changed the Select Case statements' values too:
Code:
Private Sub frmMain_Load(ByVal sender As System.Object, ByVal e As System.EventArgs)
Handles MyBase.Load
MessageBox.Show(Legs(Animals.Dog))
End Sub
Private Function Legs(ByVal animal As Animals)
Select Case animal
Case Animals.Snake
Return 0
Case Animals.Dog
Return 4
Case Animals.Human
Return 2
Case Animals.Table
Return 3
Case Animals.Cat
Return 4
End Select

End Function
Private Enum Animals
Snake
Dog
Human
Table
Cat
End Enum
That was the version which looked liked the one without Enums but here a lot easier to read and
use. But we can completely remove the Select Case statement and the function, like so:
Code:
Private Sub frmMain_Load(ByVal sender As System.Object, ByVal e As System.EventArgs)
Handles MyBase.Load
MessageBox.Show(Animals.Dog)
End Sub
Private Enum Animals
Snake = 0
Dog = 4
Human = 2
Table = 3
Cat = 4
End Enum
In the code above I gave all members in the Enum the value we wanted. Then I just show
"Animals.Dog" in a messagebox. The output was 4.
A very good thing with Enums is that you'll always have a list of all the values as you can see in the
example below. That example is showing all members of the Enum DialogResult which is used to
see which button that was pressed on a messagebox. So now you also get an example on an inbuilt
Enum.
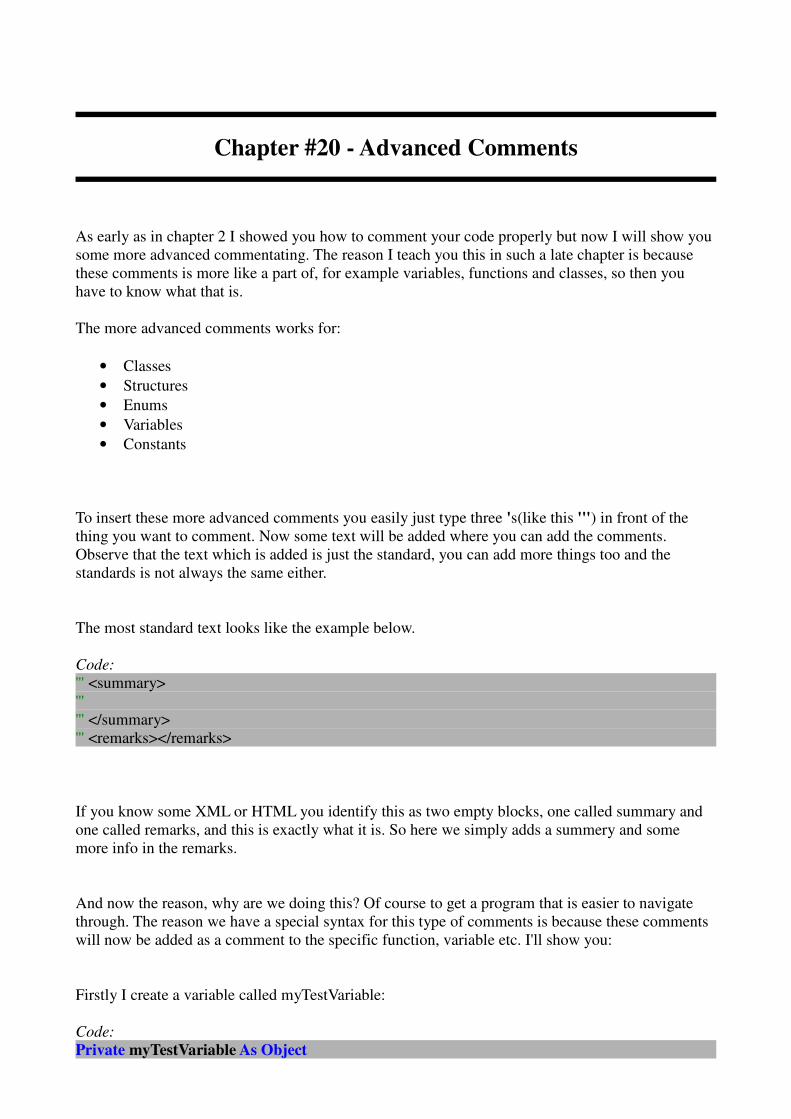
Chapter #20 - Advanced Comments
As early as in chapter 2 I showed you how to comment your code properly but now I will show you
some more advanced commentating. The reason I teach you this in such a late chapter is because
these comments is more like a part of, for example variables, functions and classes, so then you
have to know what that is.
The more advanced comments works for:
• Classes
• Structures
• Enums
• Variables
• Constants
To insert these more advanced comments you easily just type three 's(like this ''') in front of the
thing you want to comment. Now some text will be added where you can add the comments.
Observe that the text which is added is just the standard, you can add more things too and the
standards is not always the same either.
The most standard text looks like the example below.
Code:
''' <summary>
'''
''' </summary>
''' <remarks></remarks>
If you know some XML or HTML you identify this as two empty blocks, one called summary and
one called remarks, and this is exactly what it is. So here we simply adds a summery and some
more info in the remarks.
And now the reason, why are we doing this? Of course to get a program that is easier to navigate
through. The reason we have a special syntax for this type of comments is because these comments
will now be added as a comment to the specific function, variable etc. I'll show you:
Firstly I create a variable called myTestVariable:
Code:
Private myTestVariable As Object
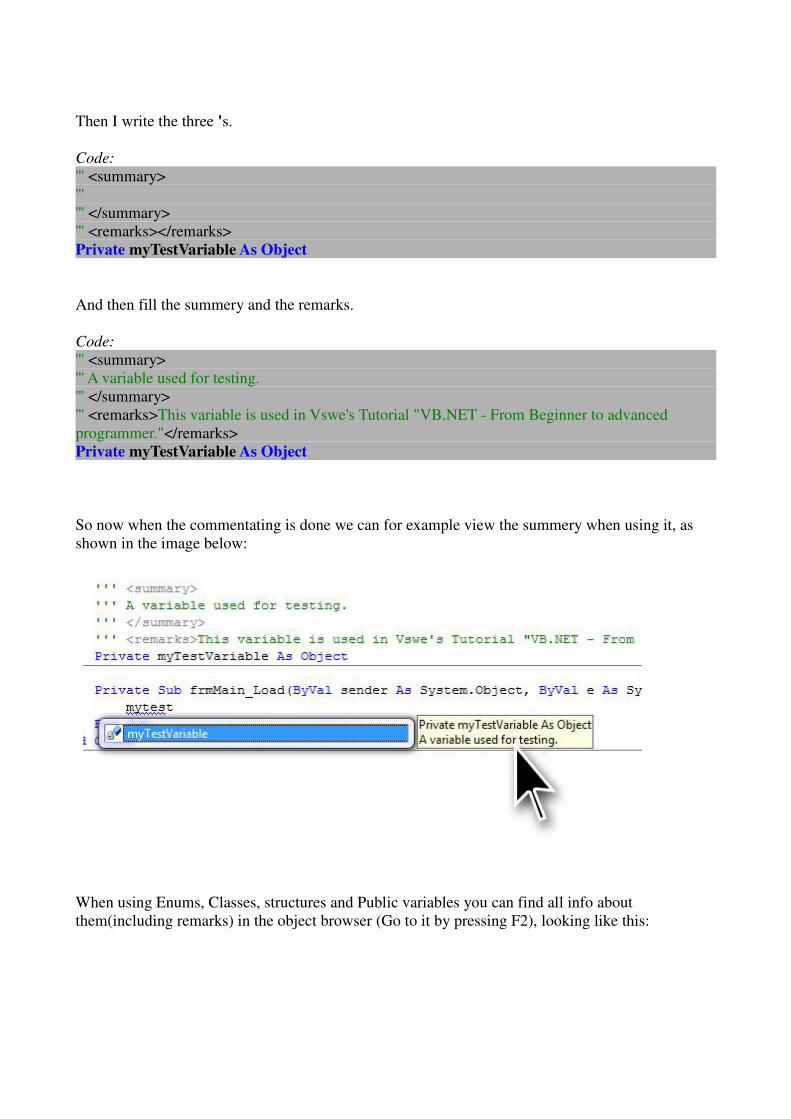
Then I write the three 's.
Code:
''' <summary>
'''
''' </summary>
''' <remarks></remarks>
Private myTestVariable As Object
And then fill the summery and the remarks.
Code:
''' <summary>
''' A variable used for testing.
''' </summary>
''' <remarks>This variable is used in Vswe's Tutorial "VB.NET - From Beginner to advanced
programmer."</remarks>
Private myTestVariable As Object
So now when the commentating is done we can for example view the summery when using it, as
shown in the image below:
When using Enums, Classes, structures and Public variables you can find all info about
them(including remarks) in the object browser (Go to it by pressing F2), looking like this:
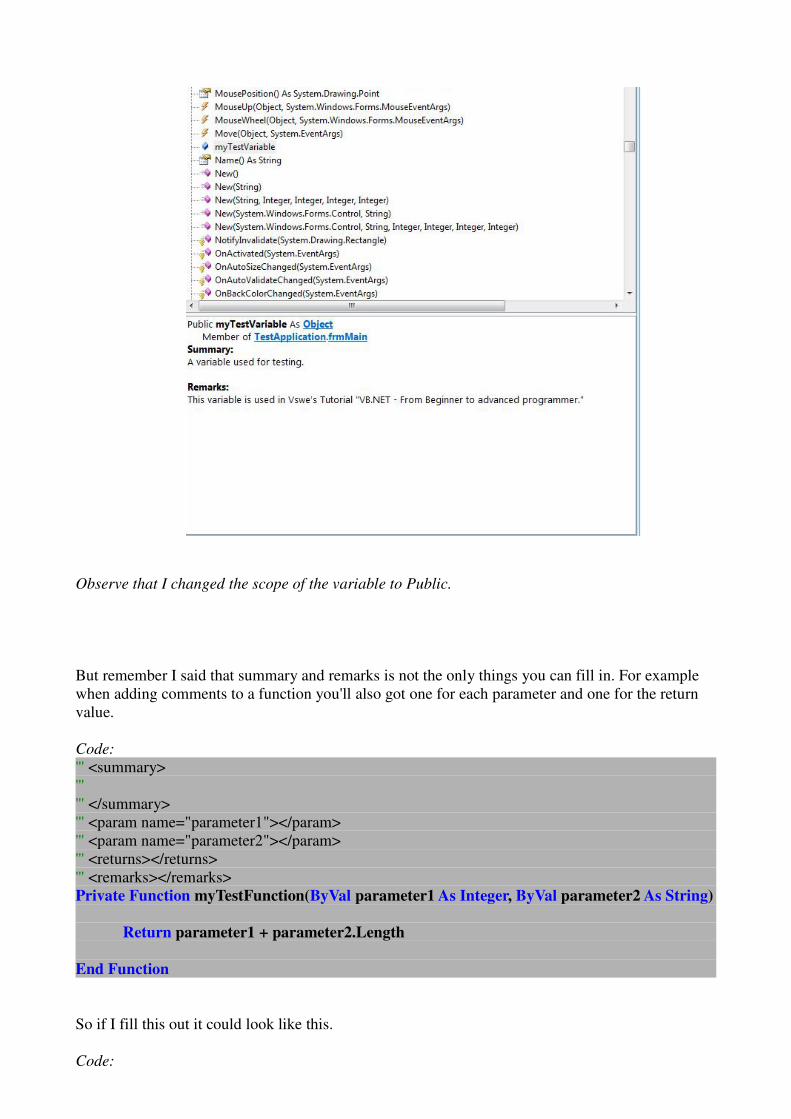
Observe that I changed the scope of the variable to Public.
But remember I said that summary and remarks is not the only things you can fill in. For example
when adding comments to a function you'll also got one for each parameter and one for the return
value.
Code:
''' <summary>
'''
''' </summary>
''' <param name="parameter1"></param>
''' <param name="parameter2"></param>
''' <returns></returns>
''' <remarks></remarks>
Private Function myTestFunction(ByVal parameter1 As Integer, ByVal parameter2 As String)
Return parameter1 + parameter2.Length
End Function
So if I fill this out it could look like this.
Code:
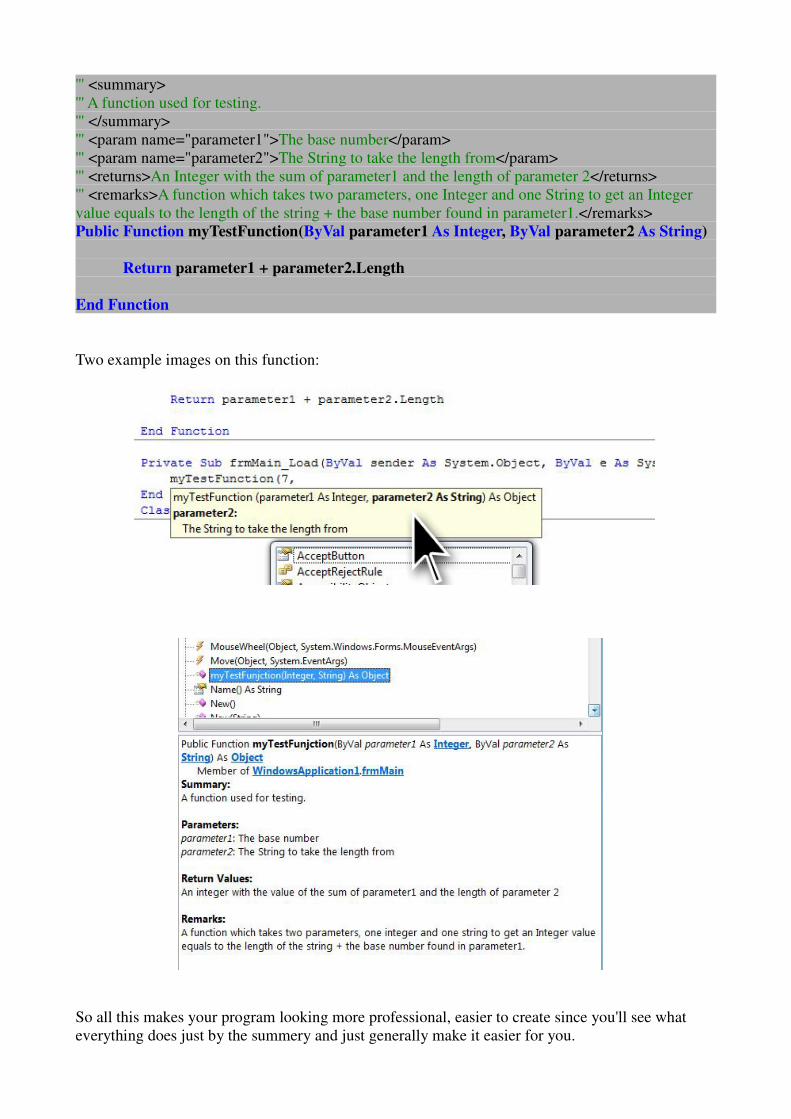
''' <summary>
''' A function used for testing.
''' </summary>
''' <param name="parameter1">The base number</param>
''' <param name="parameter2">The String to take the length from</param>
''' <returns>An Integer with the sum of parameter1 and the length of parameter 2</returns>
''' <remarks>A function which takes two parameters, one Integer and one String to get an Integer
value equals to the length of the string + the base number found in parameter1.</remarks>
Public Function myTestFunction(ByVal parameter1 As Integer, ByVal parameter2 As String)
Return parameter1 + parameter2.Length
End Function
Two example images on this function:
So all this makes your program looking more professional, easier to create since you'll see what
everything does just by the summery and just generally make it easier for you.

Chapter #21 - Compiling directives
Compiler directives is called like so because they are "taken care of" before the compiling and they
are "gone" after we've compiled the code. Compiling is the thing a program(in our case Visual
Basic) does when it takes a code(the code we've written) and creates a program with it.
#Region and #End Region
The first one I will talk about is called #region (together with #end region). This is just to make
your code easier to read and helps you to get a better overview. By adding a #region and an #end
region tag around a part of the code you can choose to show or hide that region you just created. So
if you have a long code that just makes your code long and hard to read you can just create a region
for it and then hide it. And if you want to edit anything in that part you just show the region again.
When the code later is compiled the #region blocks are just skipped and doesn't do any difference.
First we have a code with two functions with "lots" of code(they aren't that long here but it's just an
example):

But these functions are just in the way. Since we want to write code into our Form's load event we
group the functions together in a region called "Some Functions".

So now if we press at the "-" that the arrow is pointing at, it will now look like this:
The code is still there and we can view it anytime we want by pressing on the ''+'' near “Some
Functions”.

#Const and #If statement
The #Constants and #If statements is working as the normal Constants and If statements but before
the compiling instead when the program is actually used. The reason we want to use them is when
we want to make more then one version of our program, for example, for different clients, for
different languages, a trial version vs a bought version etc. Of course you can do things like that in
other ways but they have its downside. If we use normal if statements and constants all different
versions will have the code to all versions even though it doesn't use it all. This will make the
program bigger then it have to be and this could also be a security problem. Another way to create
different versions could be by simply copy all code and paste it to another project and edit it from
there. But what if you later wants to edit something, then you have to edit it in all your versions
which also could lead to that you make a typo error in just one version which will cause that to fail.
In the simple example below I'll show you how it works.
Code:
Public Class frmMain
#Const Lang = "sv"
Private Sub frmMain_Load(ByVal sender As System.Object, ByVal e As
System.EventArgs) Handles MyBase.Load
#If Lang = "sv" Then
Me.Text = "En Svensk rubrik"
cmdOk.Text = "Okej"
cmdCancel.Text = "Abvryt"
#ElseIf Lang = "no" Then
Me.Text = "En norsk tittel"
cmdOk.Text = "Okay"
cmdCancel.Text = "Avbryt"
#Else
Me.Text = "An English title"
cmdOk.Text = "Ok"
cmdCancel.Text = "Cancel"
#End If
End Sub
End Class
In this case #Lang = "sv" so therefor the code that will be compiled is:
Code:
Public Class frmMain
Private Sub frmMain_Load(ByVal sender As System.Object, ByVal e As
System.EventArgs) Handles MyBase.Load
Me.Text = "En Svensk rubrik"
cmdOk.Text = "Okej"
cmdCancel.Text = "Abvryt"
End Sub
End Class
And then if we want to compile the program in Norwegian we just change #Lang to "no", then this
will be compiled:
Code:
Public Class frmMain
Private Sub frmMain_Load(ByVal sender As System.Object, ByVal e As
System.EventArgs) Handles MyBase.Load
Me.Text = "En norsk tittel"
cmdOk.Text = "Okay"
cmdCancel.Text = "Avbryt"
End Sub
End Class
If #Lang is either "sv" or "no", the program will be compiled in English.
Code:
Public Class frmMain
Private Sub frmMain_Load(ByVal sender As System.Object, ByVal e As
System.EventArgs) Handles MyBase.Load
Me.Text = "An English title"
cmdOk.Text = "Ok"
cmdCancel.Text = "Cancel"
End Sub
End Class
In the above example we made the program compile only the necessary code. If we want the
program in English there's no idea to have the Swedish and Norwegian parts too therefore they are
just removed before the compiling. You can probably imagine of useful this is if you want to make
more then one version of some bigger programs. For example if you want to remove some features
in a trial version. The trial version will take less space and you don't have to worry about someone
hacking the trial version to get the full version since the required info for the full version isn't
included in the trial version at all.
It feels kinda sad to take farewell now after these 21 chapters. I hope you've learned lots of things
during the reading of the book and wish you good luck in your future programming. If you want
further help, is wondering about something or feel that you need to contact me for another reason
you could email me at [email protected] or you can found me as Vswe at codecall.net.