version 2 - incometaxindia.gov.in · version date version details v 1.0 24-mar-2016 initial release...
TRANSCRIPT
Registration, Upload & View Form 61, Form 61B & Form 15CC
Page 1
User Manual – Registration,
Upload & View – Form 61, Form 61B &
Form 15CC
Version 2.0

Registration, Upload & View Form 61, Form 61B & Form 15CC
Page 2
Document Revision List
Document Name: Registration, Upload & View Form 61, Form 61B & Form 15CC
Version Number:
Version Date Version Details
V 1.0 24-Mar-2016 Initial Release
V 2.0 26-May-2016 Upload and view of Nil Statement

Registration, Upload & View Form 61, Form 61B & Form 15CC
Page 3
Table of Contents
Introduction ........................................................................................................................................ 4
ITDREIN Services ............................................................................................................................. 4
Steps to Generate ITDREIN ............................................................................................. 4
Steps to Add Authorised Person ..................................................................................... 6
Steps to Upload Forms ....................................................................................................... 9
Steps to Upload Nil Statement ...................................................................................... 11
Steps to View Forms ......................................................................................................... 13
Steps to De-activate Authorised Person .................................................................... 14
Annexure 1: ...................................................................................................................................... 16

Registration, Upload & View Form 61, Form 61B & Form 15CC
Page 4
Introduction Users who have already registered in e-Filing portal can use this functionality to
generate ITDREIN (Income Tax Department Reporting Entity Identification Number) and
upload certain forms in e-Filing portal using the generated ITDREIN.
ITDREIN is the Unique ID issued by ITD which will be communicated by ITD after the
registration of the reporting entity with ITD. The ITDREIN is a 16-character identification
number in the format XXXXXXXXXX.YZNNN where
XXXXXXXXXX PAN or TAN of the reporting entity
Y Code of Form Code
Z Code of Reporting Entity Category for the Form Code
NNN Code of sequence number.
ITDREIN Services
The below table provides the services available for ITDREIN Users.
S.N Services
1 Upload and View Form 61
2 Upload and View Form 61B
3 Upload and View Form 15CC
Steps to Generate ITDREIN
Step 1 – Login to e-Filing portal using User ID, e-Filing Password and DOB/DOI.
Step 2 – Go to My Account Manage ITDREIN.
Step 3 – To generate new ITDREIN click on the button “Generate New ITDREIN”.
Step 4 – A Pop up with Form Type and Reporting Entity Category is displayed. Select
the Form Type and Reporting Entity Category from the dropdown.
Step 5 – Based on the Form Type and Reporting Entity Category selected, the ITDREIN
will be generated and the user will be able to upload and view the corresponding Form.

Registration, Upload & View Form 61, Form 61B & Form 15CC
Page 5
Step 6 – Click Generate ITDREIN button
Step 7 – Success Message is displayed as shown below. User receives a confirmation e-
mail on successful generation of ITDREIN to the registered Email ID. An SMS is also
sent to the registered Mobile number.
Step 8 – On Successful Generation of ITDREIN, the screen is displayed as shown.
Note – If the Form Type is FORM61B, than the below drop downs shall appear in
Reporting entity category.
Also, fill additional details like GIIN, Reporting Entity Type, Regulator Name, Registration
Number and the details of Sponsored Entity or Trustee Documented Trust if applicable
and Click on Generate ITDREIN.
The drop down list for Reporting entity type is available in Annexure 1.

Registration, Upload & View Form 61, Form 61B & Form 15CC
Page 6
On click of Generate ITDREIN, below table shall be displayed.
Steps to Add Authorised Person
Step 1 – Login to e-Filing portal using User ID, e-Filing Password and DOB.
Step 2 – Go to My Account Manage ITDREIN.
Step 3 – To add Authorised Person for the generated ITDREIN, click on the link provided
in the ITDREIN Column.
Step 4 – Click on the button Add Authorised Person.
Registration, Upload & View Form 61, Form 61B & Form 15CC
Page 7
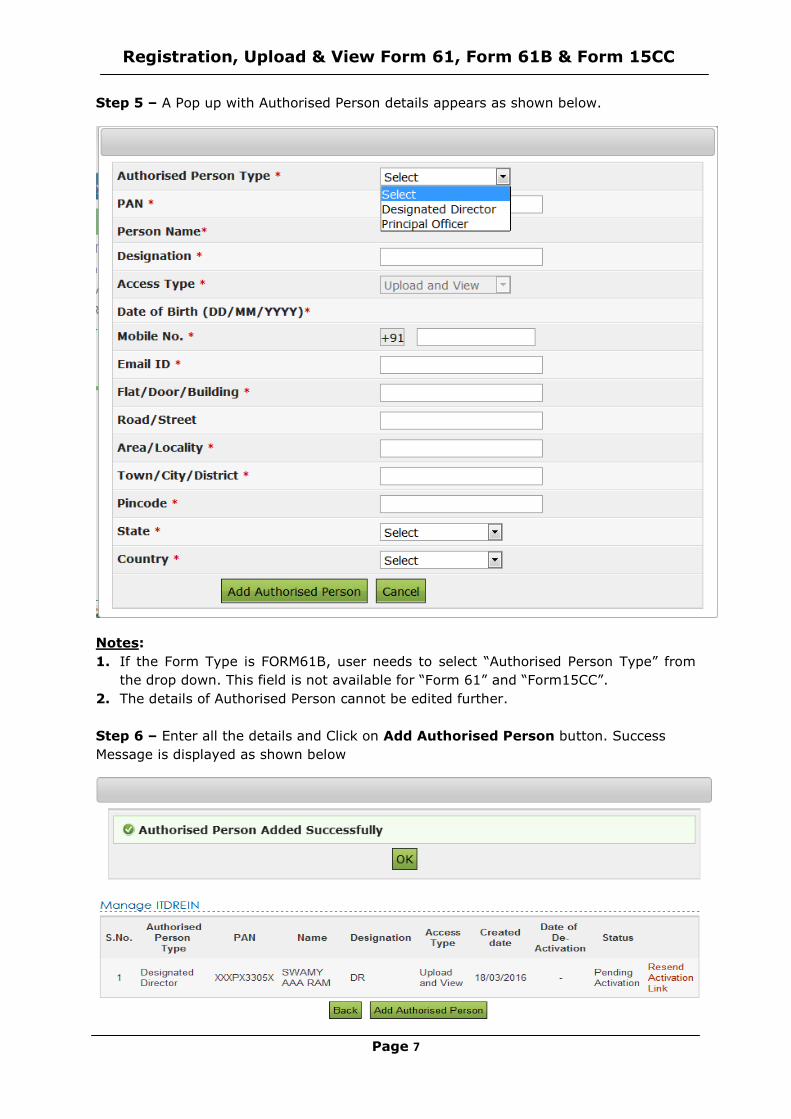
Step 5 – A Pop up with Authorised Person details appears as shown below.
Notes:
1. If the Form Type is FORM61B, user needs to select “Authorised Person Type” from
the drop down. This field is not available for “Form 61” and “Form15CC”.
2. The details of Authorised Person cannot be edited further.
Step 6 – Enter all the details and Click on Add Authorised Person button. Success
Message is displayed as shown below
Registration, Upload & View Form 61, Form 61B & Form 15CC
Page 8
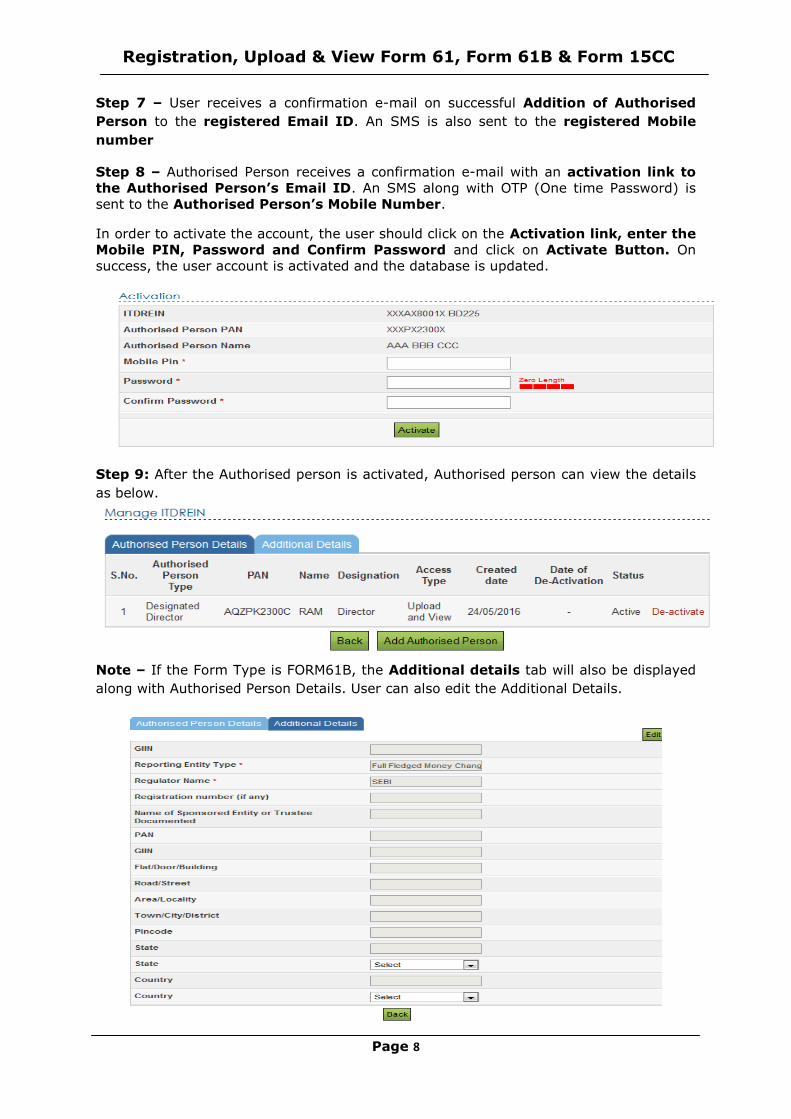
Step 7 – User receives a confirmation e-mail on successful Addition of Authorised
Person to the registered Email ID. An SMS is also sent to the registered Mobile
number
Step 8 – Authorised Person receives a confirmation e-mail with an activation link to
the Authorised Person’s Email ID. An SMS along with OTP (One time Password) is
sent to the Authorised Person’s Mobile Number.
In order to activate the account, the user should click on the Activation link, enter the
Mobile PIN, Password and Confirm Password and click on Activate Button. On
success, the user account is activated and the database is updated.
Step 9: After the Authorised person is activated, Authorised person can view the details
as below.
Note – If the Form Type is FORM61B, the Additional details tab will also be displayed
along with Authorised Person Details. User can also edit the Additional Details.
Registration, Upload & View Form 61, Form 61B & Form 15CC
Page 9
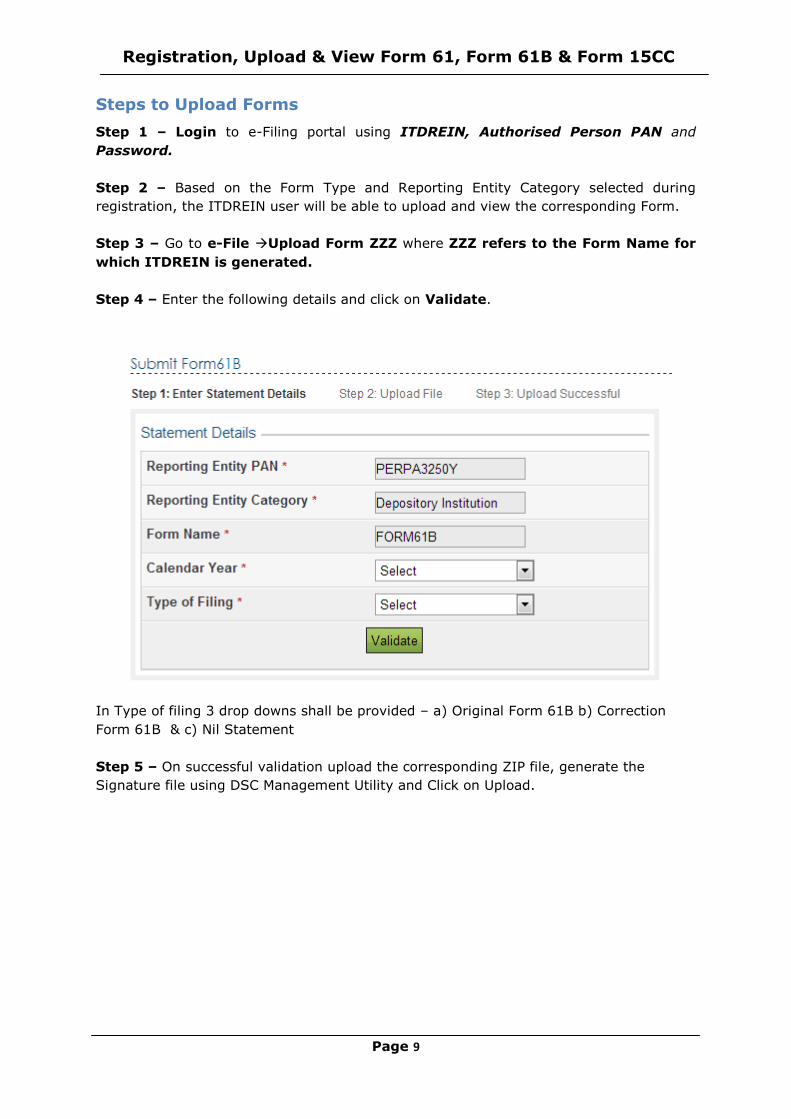
Steps to Upload Forms
Step 1 – Login to e-Filing portal using ITDREIN, Authorised Person PAN and
Password.
Step 2 – Based on the Form Type and Reporting Entity Category selected during
registration, the ITDREIN user will be able to upload and view the corresponding Form.
Step 3 – Go to e-File Upload Form ZZZ where ZZZ refers to the Form Name for
which ITDREIN is generated.
Step 4 – Enter the following details and click on Validate.
In Type of filing 3 drop downs shall be provided – a) Original Form 61B b) Correction
Form 61B & c) Nil Statement
Step 5 – On successful validation upload the corresponding ZIP file, generate the
Signature file using DSC Management Utility and Click on Upload.

Registration, Upload & View Form 61, Form 61B & Form 15CC
Page 10
Step 6 – On successful upload user records are captured in the e-Filing system and the
below success message must be displayed along with the Transaction ID.
Registration, Upload & View Form 61, Form 61B & Form 15CC
Page 11
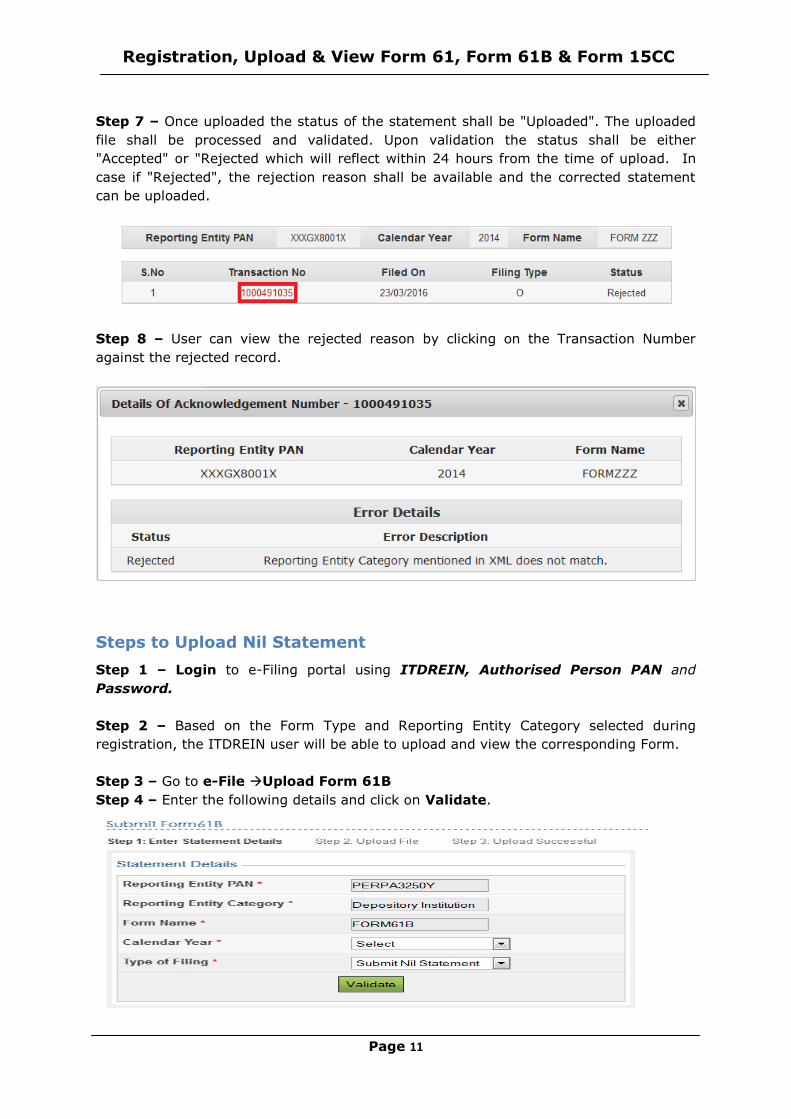
Step 7 – Once uploaded the status of the statement shall be "Uploaded". The uploaded
file shall be processed and validated. Upon validation the status shall be either
"Accepted" or "Rejected which will reflect within 24 hours from the time of upload. In
case if "Rejected", the rejection reason shall be available and the corrected statement
can be uploaded.
Step 8 – User can view the rejected reason by clicking on the Transaction Number
against the rejected record.
Steps to Upload Nil Statement
Step 1 – Login to e-Filing portal using ITDREIN, Authorised Person PAN and
Password.
Step 2 – Based on the Form Type and Reporting Entity Category selected during
registration, the ITDREIN user will be able to upload and view the corresponding Form.
Step 3 – Go to e-File Upload Form 61B
Step 4 – Enter the following details and click on Validate.

Registration, Upload & View Form 61, Form 61B & Form 15CC
Page 12
Step 5 – On successful validation generate the Signature file using DSC Management
Utility, select radio button for respective accounts and Click on Submit.
Step 6 – On successful submit user records are captured in the e-Filing system and the
below success message must be displayed along with the Transaction ID.
Registration, Upload & View Form 61, Form 61B & Form 15CC
Page 13
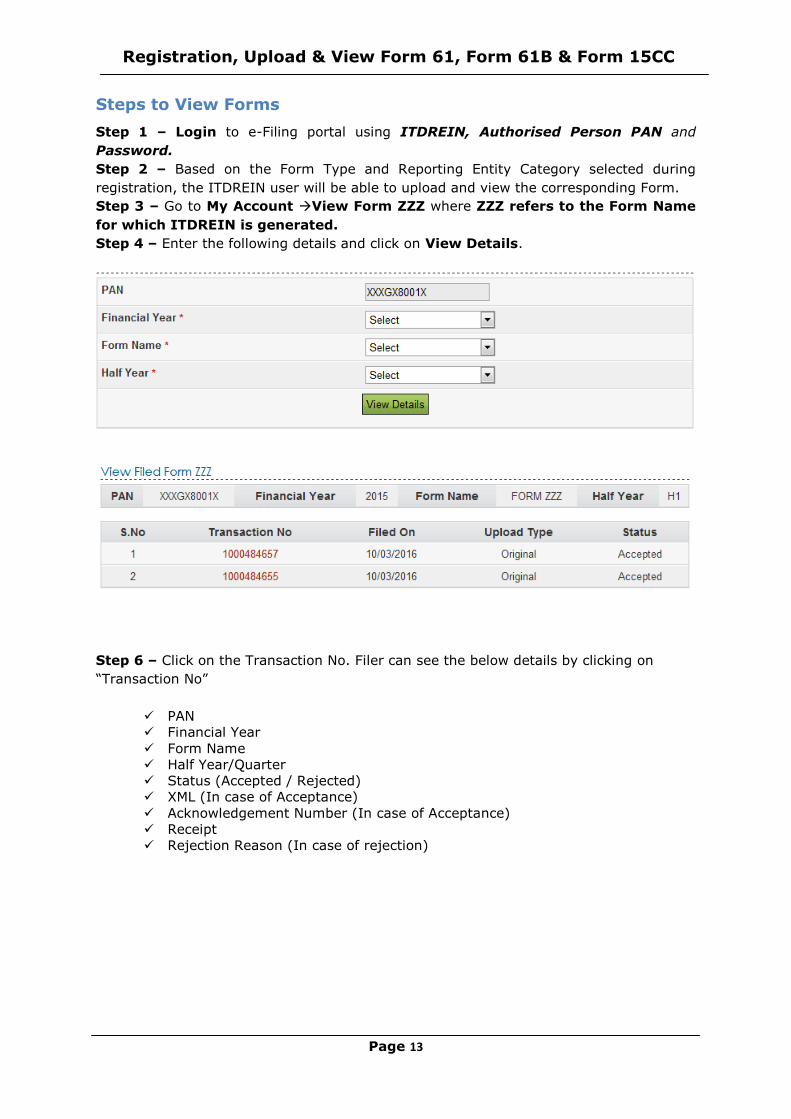
Steps to View Forms
Step 1 – Login to e-Filing portal using ITDREIN, Authorised Person PAN and
Password.
Step 2 – Based on the Form Type and Reporting Entity Category selected during
registration, the ITDREIN user will be able to upload and view the corresponding Form.
Step 3 – Go to My Account View Form ZZZ where ZZZ refers to the Form Name
for which ITDREIN is generated.
Step 4 – Enter the following details and click on View Details.
Step 6 – Click on the Transaction No. Filer can see the below details by clicking on
“Transaction No”
PAN
Financial Year
Form Name
Half Year/Quarter
Status (Accepted / Rejected)
XML (In case of Acceptance)
Acknowledgement Number (In case of Acceptance)
Receipt
Rejection Reason (In case of rejection)
Registration, Upload & View Form 61, Form 61B & Form 15CC
Page 14
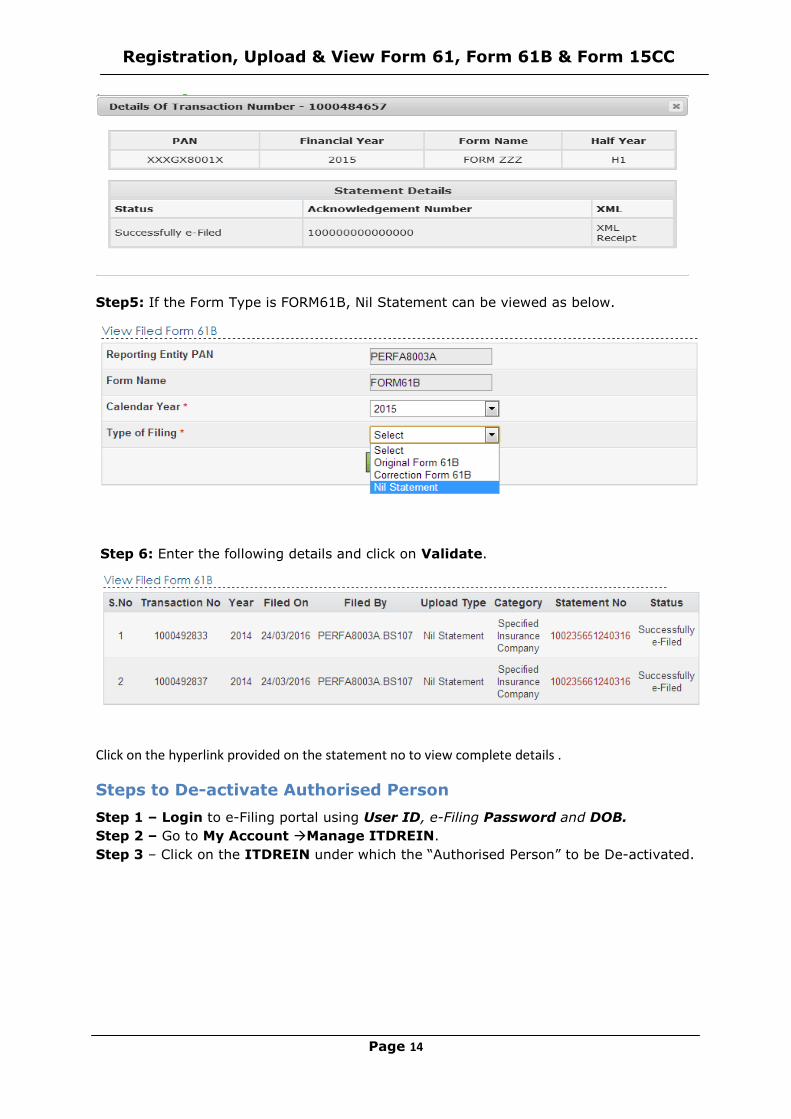
Step5: If the Form Type is FORM61B, Nil Statement can be viewed as below.
Step 6: Enter the following details and click on Validate.
Click on the hyperlink provided on the statement no to view complete details .
Steps to De-activate Authorised Person
Step 1 – Login to e-Filing portal using User ID, e-Filing Password and DOB.
Step 2 – Go to My Account Manage ITDREIN.
Step 3 – Click on the ITDREIN under which the “Authorised Person” to be De-activated.

Registration, Upload & View Form 61, Form 61B & Form 15CC
Page 15
Step 4 – Click on the De-activate link to de-activate the Authorised Person.
Step 5 –After clicking on the de-activate link, a Success Message for De-activating will
be displayed and the Date of De-activation will be recorded.
Step6: To add another Authorised Person for the generated ITDREIN, click on Add
Authorised person as appearing below the table and follow the process as mentioned
in “Steps to add Authorized person” section above

Registration, Upload & View Form 61, Form 61B & Form 15CC
Page 16
Annexure 1:
List of Drop down values provided in “Reporting entity Type”
Sl. No Types of Reporting Entity:
1 Public Sector Bank
2 Private Sector Bank
3 Foreign Bank
4 Regional Rural Bank
5 Local Area Bank
6 Scheduled Urban Cooperative Bank
7 Non Scheduled Urban Cooperative Bank
8 State Cooperative Bank
9 District Cooperative Bank
10 Life Insurance Company
11 Non-Life Insurance Company
12 Housing Finance Company
13 Authorised Dealer Category I
14 Authorised Dealer Category II
15 Authorised Dealer Category III
16 Full Fledged Money Changer (FFMC)
17 Money Transfer Service Principal
18 Money Transfer Service Agent
19 Card System Operator
20 Central Counter Party
21 All India Financial Institution
22 Hire Purchase Company
23 Chit Fund Company
24 NBFC Accepting Deposits
25 NBFC not Accepting Deposits
26 Collective Investment or MF Schemes

Registration, Upload & View Form 61, Form 61B & Form 15CC
Page 17
27 Depository
28 Depository Participant
29 Share Broker
30 Derivative Member
31 Share Transfer Agent
32 Registrars and Transfer Agent
33 Merchant Banker
34 Underwriter
35 Banker to an Issue
36 Registrar to Issue
37 Portfolio Manager
38 Investment Advisor
39 Trustees to Trust Deeds
40 Credit Rating Agency
41 Domestic Venture Capital Fund
42 Custodian of Securities
43 Foreign Institutional Investor
44 Foreign Venture Capital Fund
45 Commodity Broker
46 Sub Broker
47 Others
<<<END OF DOCUMENT>>>