version 1.19 fujitsu limited1.2 jun 9, 2016 whole document change screen images change screen name...
TRANSCRIPT

1
FUJITSU Cloud Service K5 PaaS
PaaS Service Portal User Guide
Version 1.19
FUJITSU LIMITED

2
Preface
Purpose of This Document
This manual provides PaaS Portal operation procedures for using services
provided by PaaS (hereafter referred to as K5 PaaS). FUJITSU Cloud Service
K5
It is recommended that you also refer to the following manuals:
- K5 Portal User Guide
- IaaS Service Portal User Guide
Compliance with Export Control Regulations
When exporting this document or providing it to a third party, check the export
control laws and regulations of your country and the U.S. and take necessary
procedures.
Notices
- The contents of this manual are subject to change without notice.
- The contents of this manual shall not be reproduced without express written
permission from FUJITSU LIMITED.
- FUJITSU LIMITED shall bear no responsibility for any claims of violation of a
third party’s patent or other rights arising from the use of the data described in
this document.

3
Document history
Version Date Edited places Description
1.1 Apr 27, 2016 Contents
Chapter 3 – User
Information Management
Change contents number
May 10, 2016 Preface (page 6)
1.1 PaaS Portal Overview
Table 3: Input
Restrictions (page 8)
1.2 Advisory Notes (page
9)
2.1 Login (page 11)
2.2.1 Adding a Service
Group (page 13)
2.5 Stopping Services
(page 27)
3.1 Changing User Roles
(page 30)
Change explanation
May 10, 2016 Whole document Change document format
1.2 Jun 9, 2016 Whole document Change screen images
Change screen name and
button name
1.1.2 Essential Information
for the use of the PaaS
Portal
Table 2: Service Types
(page 7)
Change explanation
1.3 July 7, 2016 2.3.1 Starting Use of a
Service (page 19)
Add explanation
1.4 Aug 1, 2016 Whole document Change screen images
and add explanation
1.5
Sep 9, 2016 Whole document Change screen images
and add explanation
2.3.1 Starting Use of a
Service
Change explanation

4
Version Date Edited places Description
1.6 Sep 16, 2016
2.4.1 Changing the
Pricing Plan of the
Services In Use
Annotate a step
Preface Correction of erroneous
description
1.7 Sep 29, 2016 Whole document Change screen shots and
modify explanations
2.1.1 Logging In to the
PaaS Portal
Add explanation on ‘FAQ’
and ‘Documentation’ tabs.
1.8 Oct 7, 2016 1.1.2 Essential
Information for the use of
the PaaS Portal
Add explanation
1.9 Oct 13, 2016 Whole document Change screen shots and
modify explanations
1.10 Nov 25,2016 1.1.2 Essential Information
for the use of the PaaS
Portal
Chapter 2 – Service Flow
Add explanations and
change screen shots
corresponding to the new
function
1.11 Jan 23, 2017 1.1.2 Essential
Information for the use of
the PaaS Portal
Add explanation
1.12 Feb 28, 2017 1.1.2 Essential
Information for the use of
the PaaS Portal
Add explanation
Whole document Replace picture images of
Web GUI
1.13 Mar 31, 2017 1.1.2 Essential
Information for the use of
the PaaS Portal
Add explanation
1,14 Apr 4, 2017 1.1.2 Essential
Information for the use of
the PaaS Portal
Add explanation
Chapter 4 Usage Fee Delete all

5
Version Date Edited places Description
1.15 Apr 12, 2017 1.1.2 Essential
Information for the use of
the PaaS Portal
Add explanation
1.16 Apr 27, 2017 1.1.2 Essential Information
for the use of the PaaS
Portal
Table 2: Service Types
Add explanation
1.17 May 15, 2017 1.1.2 Essential Information
for the use of the PaaS
Portal
Table 2: Service Types
Table 3: Input
Restrictions
Add explanation
1.18 May 19, 2017 2.1.1 Logging In to the
PaaS Portal
Change screen images
1.19 Jun 16, 2017 1.1.2 Essential Information
for the use of the PaaS
Portal
Table 2: Service Types
Add explanation

6
Contents
Preface ................................................................................................................................... 2
Document history .................................................................................................................... 3
Chapter 1 - Preface ................................................................................................................ 7
1.1 PaaS Portal Overview .............................................................................................. 8
1.1.1 PaaS Portal .......................................................................................................... 8
1.1.2 Essential Information for the use of the PaaS Portal ........................................... 8
1.2 Advisory Notes ....................................................................................................... 13
1.2.1 System Requirements ........................................................................................ 13
1.2.2 Restricted Operations ........................................................................................ 13
Chapter 2 - Service Flow ...................................................................................................... 14
2.1 Login ...................................................................................................................... 15
2.1.1 Logging In to the PaaS Portal ............................................................................ 15
2.2 Managing Service Group Information .................................................................... 18
2.2.1 Adding a Service Group ..................................................................................... 18
2.2.2 Changing a Service Group ................................................................................. 21
2.2.3 Deleting a Service Group ................................................................................... 24
2.3 Service Use ............................................................................................................ 26
2.3.1 Starting Use of a Service ................................................................................... 26
2.3.2 Using Services ................................................................................................... 33
2.4 Managing Services In Use ..................................................................................... 35
2.4.1 Changing the Pricing Plan of the Service In Use ............................................... 35
2.4.2 Register a Client ID with a corresponding service ............................................. 36
2.4.3 Change the Client ID Password for a corresponding service ............................ 38
2.5 Stopping Services .................................................................................................. 40
2.5.1 Stopping Services In Use ................................................................................... 40
Chapter 3 - User Information Management ......................................................................... 41
3.1 Changing User Roles ............................................................................................. 42
3.1.1 Changing User Roles ......................................................................................... 42

7
Chapter 1 - Preface
Topics:
- PaaS Portal Overview
- Advisory Notes

8
1.1 PaaS Portal Overview
1.1.1 PaaS Portal
The PaaS Portal is a portal site that provides access to the K5 PaaS Services.
The PaaS Portal enables the operation of PaaS services and the management
of the services in use.
1.1.2 Essential Information for the use of the PaaS Portal
The following information is essential for the use of the PaaS Portal. The PaaS
Portal can be used by the users registered with the K5 portal.
Role
Each user of the PaaS Portal is associated with specific authorization
information called a "role" that controls the operations the user is authorized to
perform on the PaaS Portal. All users of the PaaS Portal are assigned one of the
following four roles.
Contractor
Users created during new registration for use of K5 services are assigned
"Contractor". Contractors can perform the following operations: changing of
other user's roles, starting the use of services, and updating the information on
services in use. Procedure for changing a "Contractor" information requires
applying change/cancel application form.
User
Users other than "Contractor" come under "User". Users are assigned either
"Administrator" or "Developer". The roles of users registered to the K5 portal are
"Developer" in the PaaS Portal.
Administrator
An "Administrator" can perform the same operations as a "Contractor".

9
Developer
A "Developer" can refer to services in use (via links to each service) and the
interim usage fee of the month.
Table 1: Operation Authority by Role
Operation PaaS Portal Role
Contractor Users
Administrators Developers
2.2 Managing Service Group
Information
Yes Yes No
2.3 Service Use Yes Yes No
2.4 Managing Services In Use Yes Yes Yes (Read
only)
2.5 Stopping Services Yes Yes No
3.1 Changing User Roles Yes Yes No

10
Service Types
There are two types of PaaS Portal services: Immediately available services
which can be used right after application, and services available after an
application procedure which takes some time for preparation before use can
commence. Table 2 shows the service types:
Table 2: Service Types
Service Name Immediately
Available
Services
Services
Available after
an Application
Procedure
CF Yes No
PF No Yes
SF No Yes
API Management No Yes
Secure Authentication Yes No
IoT Platform Yes No
Business Support Customer Management Yes No
Contract Management Yes No
Billing Calculation Yes No
Settlement Gateway No Yes
Sharing Business Platform No Yes
Report Yes No
Voice Operation Yes(10,000
call/month)
Yes(Unlimited)
Batch Infrastructure No Yes
Personium Service No Yes
GitHub Enterprise No Yes
Batch
Infrastructure
No Yes
Zinrai Platform Service No Yes
Application Monitoring No Yes
DB powered by Oracle(R) Cloud No Yes
Software Cafeteria Yes No

11
Input Restrictions
The PaaS Portal provides input windows for each service. Each service has
restrictions, a kind of criteria, regarding input items as listed in Table 3 below.
Table 3: Input Restrictions
Input Item Number of
Characters
Acceptable Characters
Service group Up to 20
characters
Can contain letters, numbers,
and symbols as shown below:
* Uppercase letter (A-Z)
* Lowercase letter (a-z)
* Digit (0-9)
* All special characters
* White space
Service group description Up to 50
characters
Can contain letters, numbers,
and symbols as shown below:
* Uppercase letter (A-Z)
* Lowercase letter (a-z)
* Digit (0-9)
* All special characters
* White space
Sub service group Up to 20
characters
Can contain letters, numbers,
and symbols as shown below:
* Uppercase letter (A-Z)
* Lowercase letter (a-z)
* Digit (0-9)
* All special characters
* White space
Sub service group
description
Up to 50
characters
Can contain letters, numbers,
and symbols as shown below:
* Uppercase letter (A-Z)
* Lowercase letter (a-z)
* Digit (0-9)
* All special characters
* White space

12
Input Item Number of
Characters
Acceptable Characters
Client ID 4 to 32
characters
The initial letter must be a
lower or upper case of
alphabetical character.
Can contain letters, numbers,
and symbols as shown below:
* Uppercase letter (A-Z)
* Lowercase letter (a-z)
* Digit (0-9)
*Symbols ( _ (Underscore),
-(Hyphen))
Client ID Password 8 to 64
characters
All characters in the following
categories must be included:
* Uppercase letter (A-Z)
* Lowercase letter (a-z)
* Digit (0-9)
*Symbol
(`~!@#$%^&*()_-={}[]|:;"'<>,?/ )
Note that the newly set
passwords cannot be the
same as the most recently
used five passwords.

13
1.2 Advisory Notes
1.2.1 System Requirements
This section explains the requirements for the PaaS Portal.
The PaaS Portal works on the following operating systems and browsers:
- OS: Windows 7/8/8.1
- Browser: Microsoft Internet Explorer 11
1.2.2 Restricted Operations
The "Next" and "Back" buttons of your browser should not be used as this
can result in unexpected behavior or actions.

14
Chapter 2 - Service Flow
Topics:
- Login
- Managing Service Group Information
- Service Use
- Managing Services In Use
- Stopping Services
15
2.1 Login
2.1.1 Logging In to the PaaS Portal
This section describes how to log in to the PaaS Portal.
Before Starting
Log in to the [K5 Portal] or access the initial screen of the [PaaS Portal].
Outline
If you are already logged on to the [K5 Portal], clicking the PaaS Portal link will
take you to the PaaS Portal without the need to enter your PaaS login
credentials. When accessing from the initial screen of the [PaaS Portal], clicking
the [Login] button will allow you to log in to the PaaS Portal.
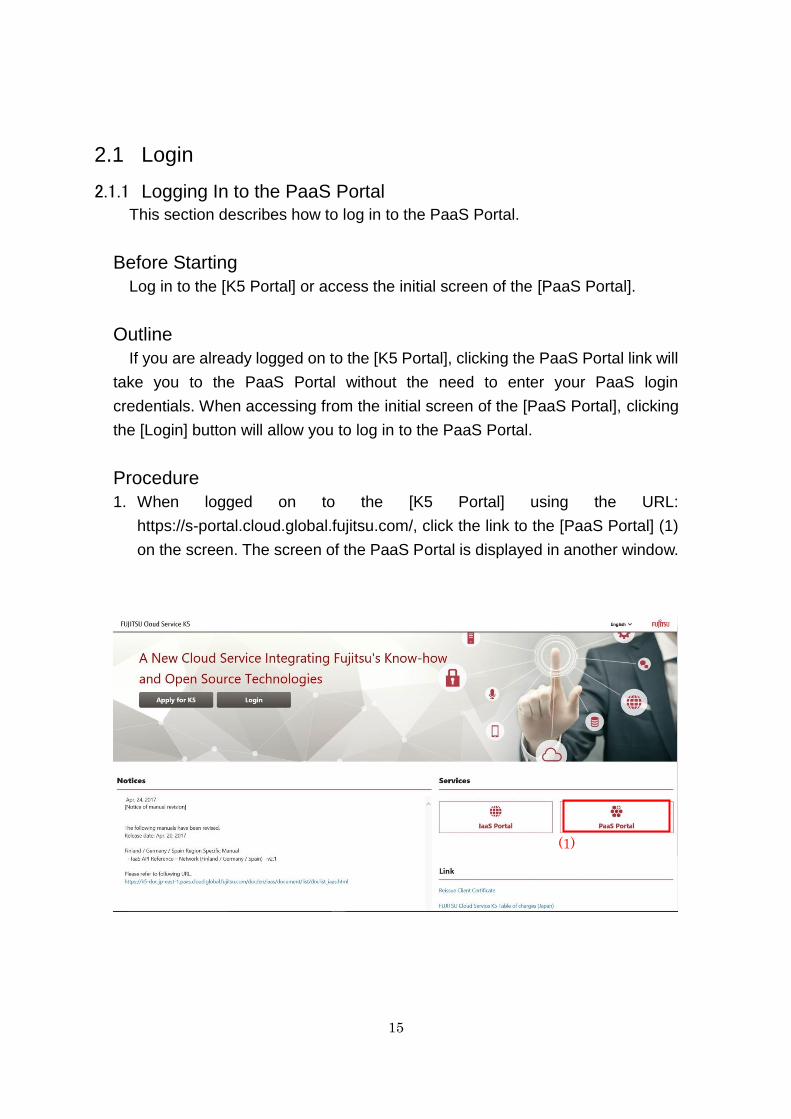
Procedure
1. When logged on to the [K5 Portal] using the URL:
https://s-portal.cloud.global.fujitsu.com/, click the link to the [PaaS Portal] (1)
on the screen. The screen of the PaaS Portal is displayed in another window.
(1)

16
2. To log in from the initial screen of the [PaaS Portal], access the URL:
https://s-portal.cloud.global.fujitsu.com/SPPSSER000/, then click [Login] (2).
3. On the [Login] screen, enter your contract number, user name, and password,
and then click the [Login] button (3).

17
4. After logging, a screen appears.
The menu items 'FAQ' and 'Documentation' (4) offer common ‘questions
and answers’, and documents on each service respectively.

18
2.2 Managing Service Group Information
2.2.1 Adding a Service Group
Services become available after a service group is added.
Before Starting
Log in to PaaS Portal as a "Contractor" or an "Administrator".
Outline
Service groups are used for grouping currently in use services on the
[Services In Use] screen and the [Usage Fee] screen. Currently in use services
can be displayed based on user system environments. Multiple sub service
groups can be created on a service group. After selecting a service to be used,
the service group and sub service group to be linked with can be specified on the
[Service settings] screen. (*1)
Create a service group following the procedure below. In the example, creation
of a service group with a single sub service group is described.
Procedure
1. On the screen, click [Service Group List] (1) in the pull-down menu on the
upper right.

19
2. On the [Edit service group] screen, enter service group information, and then
click the [Add] button (2). To add a new sub service group, click the [Add
subservice group] button (3) to display a new entry field.
Item Name Explanation
Service group Enter a service group name, considering the input
restrictions.
Service group description Enter a service group description, considering the
input restrictions.
Subservice group Enter a sub service group name, considering the
input restrictions.
Subservice group
description
Enter a sub service group description, considering
the input restrictions.
(2) (3)

20
3. Confirm that the added service group is displayed in Service group list on the
left. Clicking the added service group shows its details.
*1
This operation is not required for the CF service because the specified service
group and sub service group are set on the [Service settings] screen.

21
2.2.2 Changing a Service Group
Change the information of the created service group.
Before Starting
Log in to the PaaS Portal as a "Contractor" or an "Administrator" to display the
[Edit service group] screen (see Procedure in 2.2.1).
Outline
Edit service group information using the procedure below. In this example, you
will change the service group name added in 2.2.1 Adding a Service Group.
Procedure
1. Click the service to be changed (1) in Service group list on the left.
(1)

22
2. On the [Edit service group] screen, edit the service group information. In this
example, change the service group name. After editing the name, click the
[Change] button (2).
Item Name Explanation
Service group Enter a service group name, considering the input
restrictions.
Service group description Enter a service group description, considering the
input restrictions.
Subservice group Enter a sub service group name, considering the
input restrictions.
Subservice group
description
Enter a sub service group description, considering
the input restrictions.
(2)

23
3. Confirm that the service group name has been changed.

24
2.2.3 Deleting a Service Group
Delete the created service group information.
Before Starting
Log in to the PaaS Portal as a "Contractor" or an "Administrator" to display the
[Edit service group] screen (see Procedure in 2.2.1).
Outline
Delete the information of a service group using the procedure below. In this
example you will delete the service group added in 2.2.1 Adding a Service
Group.
Procedure
1. On the [Edit service group] screen, click the service to be deleted (1) in the
Service group list on the left.
(1)

25
2. Check the Delete check box (2) and then click the [Change] button (3).
Checking the Delete check box of a service group also checks the Delete
check box of its sub service group.
3. Confirm that the service group has been deleted. (*1)
*1
Service groups linked with a service in use cannot be deleted. Deletion
becomes possible after the service is stopped.
(2)
(3)

26
2.3 Service Use
2.3.1 Starting Use of a Service
To start using a service, select the service to be used.
Before Starting
Log in to PaaS Portal as a "Contractor" or an "Administrator".
Outline
Start using a service following the procedure below. Selected services will be
linked with the service group and the sub service group that have been added in
advance. (*1)
Procedure
1. There are 2 ways to go to service selection. On the [Features] screen or
[Services] in the menu bar, click the category of the service to be applied.

27
To make a selection on [Features] screen, click [All Services] (1) and click an
icon which exists in the target category. (In the following example, ‘PF’ (2) is
chosen.)

28
To make a selection on [Services] tab in the menu bar, click the tab and choose
the category (3) of the service to be applied.
2. Select deploying region from the pulldown menu (4) at the upper right
corner .

29
3. Select and click the service to be used (5).
4. The details of the selected service are displayed in a pop-up. Confirm the
information, and when using the service, click the [Service usage setting]
button (6). To cancel, click the greyed out part of the screen behind the
pop-up.

30

31
5. On the [Service usage setting] screen, enter the setting items (*2) and then
click the [Start] button (7) (*3). To cancel, click the [Back] button (8).
Item Name Explanation
Client ID Enter a Client ID which meets the criteria*.
Password Enter a Client ID Password which meets the criteria*.
*See ‘Table 3: Input Restrictions’ for the criteria..
(8) (7)

32
6. On the [Services In Use] screen, select the service group and the sub service
group set in the [Service usage setting] screen from the Service group list (9)
on the left, and then confirm that the set service is displayed.
*1
For the CF service, the specified service group and sub service group are set
on the [Service usage setting] screen.
*2
The setting items displayed on the [Service usage setting] screen vary
depending on the service involved. For details, refer to each service's
documentation.
*3
Immediately available services can be used right after clicking the displayed
[Start] button. For services available after an application procedure, a Fujitsu
representative will contact you when the service is ready for use.
(9)

33
2.3.2 Using Services
To use services, move to the dashboard or [login] screen of each service from
the [Services In Use] screen. (*1)
Before Starting
Log in to the PaaS Portal.
Outline
Use a service following the procedure below:
Procedure
1. Click the [Services In Use] tab (1).
2. On the [Services In Use] screen, click [>] (2) of the service group of the
service to be used in the Service group list on the left.
(2)

34
3. Confirm that the sub service group list of the selected service group is
displayed. Click the sub-service group of the service to be used (3).
4. The service list of the selected sub service group is displayed. Click the link
to the service to be used (4).
5. The screen for the service to be used is displayed.
*1
For some services the operations described in this section cannot be used.
Instead you have to follow the procedures sent to you after your application. For
more details, please refer to each service's documentation.
(3)
(4)

35
2.4 Managing Services In Use
2.4.1 Changing the Pricing Plan of the Service In Use
Change the pricing plan of a service in use.
Before Starting
Log in to the PaaS Portal as a "Contractor" or an "Administrator" to display the
service list of the sub service group of the service whose pricing plan is to be
changed (see Procedure in 2.3.2).
Outline
Change the pricing plan of a service in use following the procedure below.
Procedure
1. On the [Services In Use] screen, select a pricing plan from the [Change
pricing plan] pull-down menu of the service whose pricing plan is to be
changed (1), and then click the [Change pricing plan] button (2).
*Please be noted that only when pricing plan choices exist, the [Change
pricing plan] pull-down menu is activated.
(1) (2)

36
2. Confirm that the change has been reflected. For changes to services already
in use, the changed pricing plan will be effective from the following day.
Confirm that the new record with the effective date in the [Pricing plan start
date] (3) is added to the service list. For services still in the application
procedure, the pricing plan on the same record is changed.
2.4.2 Register a Client ID with a corresponding service
The following is the procedure to register a client ID with a service which
corresponds to client ID registration. It works when the service in use does not
have a client ID registered.
Before Starting
Log in to the PaaS Portal as a "Contractor" or an "Administrator", and display
the list of the sub service group to see the service with which a client ID is going
to be registered (see Procedure in 2.3.2).
Outline
Follow the procedure to register a client ID with a corresponding service.
1. On the [Services In Use] screen, select the service with which a client ID is
going to be registered using a radio button (1), and click the [API
Authentication Operation] button (2).
(3)
(1)
)) (2)
))

37
2. On the [Client ID Register] screen, fill in the Client ID and Password which
meet the criteria*, and click the [Register] button (3).
*See ‘Table 3: Input Restrictions’ for the criteria.
3. On the ‘Message from webpage’ popup, click the [OK] button (4).
4. On the following ‘Message from webpage’ popup, see that the registration is
completed, and click the [OK] button (5).
(3)
))
(4)
))
(5)
))

38
2.4.3 Change the Client ID Password for a corresponding service
The following is the procedure to change the client ID password for a
corresponding service. It works when the service in use has a client ID
registered.
Before Starting
Log in to the PaaS Portal as a "Contractor" or an "Administrator", and display
the list of the sub service group to see the service whose client ID password is
going to be changed (see Procedure in 2.3.2).
Outline
Follow the procedure to change the client ID password of for a corresponding
service
1. On the [Services In Use] screen, select the service whose client ID password
is going to be changed using its radio button (1), and click the [API
Authentication Operation] button (2).
(1)
))
(2)
))

39
2. On the [Client ID Register] screen, fill in the Client ID and Passwords which
meet the criteria*, and click the [Change] button (3).
*See ‘Table 3: Input Restrictions’ for the criteria.
3. On the ‘Message from webpage’ popup, click the [OK] button (4).
4. On the following ‘Message from webpage’ popup, see that the password
change is completed, and click the [OK] button (5).
(3)
))
(4)
))
(5)
))

40
2.5 Stopping Services
2.5.1 Stopping Services In Use
Stop a service in use.
Before Starting
Log in to PaaS Portal as a "Contractor" or an "Administrator" to display the
service list of the sub service group of the service to be stopped (see Procedure
in 2.3.2).
Outline
Stop a currently in use service following the procedure below.
Procedure
1. Select the radio button of the service to be stopped (1) and then click the
[Stop service usage] button (2).
2. Confirm that the service has been stopped. (*1)
*1
Some services terminate immediately after the [Stop service usage] button is
clicked, while others may take some time to stop.
(2)
(1)

41
Chapter 3 - User Information
Management
Topic:
- Changing User Roles

42
3.1 Changing User Roles
3.1.1 Changing User Roles
Contractors and administrators can change other PaaS Portal users’ roles.
Before Starting
Log in to the PaaS Portal as a "Contractor" or an "Administrator".
Outline
Change a user role following the procedure below.
Procedure
1. On the screen, click [User list] (1) in the pull-down menu on the upper right.

43
2. On the [User list] screen, click the [Change role] button of the user whose
role is to be changed (2).
3. On the [Role information] pop-up, select a new role from the [New role]
pull-down menu (3), and then click the [Change] button (4). To cancel the
change, click the [Cancel] button (5). (*1)
(3)
(5) (4)
(2)

44
4. Confirm that the role has been changed on the [User Information List] screen.
*1
Users registered as an "Administrator" cannot change their own role on the
[User list] screen. Ask another "Contractor" or "Administrator" to perform the role
change.

45
FUJITSU Cloud Service K5
PaaS Service Portal User Guide
Version 1.19
Issued June 2017
All Rights Reserved, Copyright FUJITSU LIMITED
- The contents of this manual are subject to change without any prior notice.
- No part of this manual may be reproduced in any form whatsoever without the
written permission of FUJITSU LIMITED.