version 1 - richmond, british columbia · eplan applicant user guide 5030670 v3 5 drawing numbers...
TRANSCRIPT

5030670
City of Richmond
ePlan Applicant User Guide August 2017
Version 1.3

ePlan Applicant User Guide
5030670 v3 1
Table of Contents
1. Introduction ........................................................................................................................................ 2
ePlan Review Process Overview ....................................................................................................... 2
2. Submission Standards ....................................................................................................................... 3
Submission Document Requirements ............................................................................................... 3
Drawing Numbers .............................................................................................................................. 4
File Names ......................................................................................................................................... 5
City Markup Standards ...................................................................................................................... 6
3. Login to ePlan .................................................................................................................................... 7
Project Contact Invitation ................................................................................................................... 7
Engineering Consultant Invitation ...................................................................................................... 9
New Users ......................................................................................................................................... 9
Existing Users .................................................................................................................................. 12
4. Navigating ePlan ............................................................................................................................. 12
City Permits Page ............................................................................................................................ 12
SA Permit Page ............................................................................................................................... 13
5. Accessing, Accepting and Completing Tasks .................................................................................. 13
Workflow Tasks ............................................................................................................................... 13
Accessing and Accepting Tasks ...................................................................................................... 14
Completing Tasks ............................................................................................................................ 18
6. Applicant Upload Task ..................................................................................................................... 19
Uploading Files ................................................................................................................................ 20
Modifying Files ................................................................................................................................. 24
Deleting Files ................................................................................................................................... 25
Complete Applicant Upload Task .................................................................................................... 25
7. Prescreen Correction Task .............................................................................................................. 26
8. Applicant Resubmit Task ................................................................................................................. 29
9. Approval .......................................................................................................................................... 38
10. Topics & Notes ................................................................................................................................ 39
Adding a New Topic ......................................................................................................................... 39
Respond to an Existing Topic .......................................................................................................... 42
11. Checking Application Status ............................................................................................................ 44
Appendix A – City of Richmond ePlan System ....................................................................................... 48
Terms and Conditions of Use .......................................................................................................... 48
ePlan Applicant User Guide
5030670 v3 2
1. Introduction The City of Richmond has implemented ePlan, an online system for the review of Servicing Agreement
(SA) documents.
The ePlan system improves customer service levels by providing the following benefits:
1. Reducing review times;
2. Improving tracking, reporting and accountability; and
3. Reducing resource use.
ePlan Review Process Overview
1. The ePlan review process is initiated when the Developer or their designated contact (the “Project Contact”) submits an SA application to the Zoning Counter at Richmond City Hall. The Project Contact will be provided with an SA number and be requested to pay an SA application fee an provide a contact email address. SA application forms are available online www.richmond.ca/__shared/assets/da46189.pdf.
2. ePlan will send the Project Contact an email requesting their Civil Engineering Consultant’s (the “Engineering Consultant”) contact details be sent to the City’s Development Applications Coordinator.
3. The Development Applications Coordinator will process the application and ePlan will send an email to the Engineering Consultant, requesting documents be submitted through ePlan.
4. The Engineering Consultant will upload drawings and documents to ePlan.
5. The Development Applications Coordinator pre-screens the submission to ensure completeness and compliance with City submission standards. Engineering Consultants will be notified if corrections are required; otherwise, the files will be distributed to relevant City departments for concurrent review and comment.
6. City staff will review and comment on submission documents digitally through the ePlan system. Review typically requires one month to complete, but review times may vary depending on complexity. ePlan allows both the Project Contact and the Engineering Consultant to check the status of the review at any time (Refer to Section 11 of this Guide).
7. The Project Contact and the Engineering Consultant is notified through email once the review is complete. Comments can be viewed and downloaded through ePlan.
8. The Engineering Consultant will respond to all comments through ePlan and upload revised drawings and documents.
9. Steps 5–8 are repeated until all City comments are addressed and drawings are ready for approval.
10. Once all statutory-right-of-way registration and other requirements have been met, the drawings will be stamped for approval.
11. An email will be sent to notify the Project Contact and Engineering Consultant that the drawings may be downloaded and circulated for construction. Note: Prior to construction, a Preconstruction Meeting is required with City Inspections. City Inspections will set up the meeting once all requirements have been met. The Development Applications Coordinator will notify the Project Contact and Engineering Consultant of the requirements.
ePlan Applicant User Guide
5030670 v3 3
12. The Engineering Consultant is required to send hard copies of signed and sealed approved drawings to the Development Applications Coordinator for distribution to field staff. The number of drawings required will be confirmed at the time of approval.
This User Guide provides Applicants, including Developers and their Engineering Consultants, with
directions to navigate the SA review process using ePlan system.
In addition to this User Guide, please refer to the instructions provided within the Help Manual
embedded within the ePlan system and visit the City of Richmond’s website at
www.richmond.ca/plandev/overview.htm. Please also refer to the Terms and Conditions of Use in
Appendix A.
2. Submission Standards This section outlines standard requirements for creating, naming, formatting and submitting SA
documents through ePlan. Maintaining standards minimizes SA review times and ensures that the City
obtains consistent, functional record documents.
Submission Document Requirements ePlan allows Applicants to submit drawings as well as supporting documents for the City’s review.
Drawing Files
1. Drawing files depict infrastructure to be constructed through the SA.
2. Drawing files include title sheets, key plans, survey plans, and all other plan types required to depict the infrastructure being constructed.
3. Drawings must be prepared in accordance with the City’s Engineering Drafting Standards, with the exception of one amendment according to Item #4 below. The City’s Engineering Drafting Standards is available for purchase at Richmond City Hall.
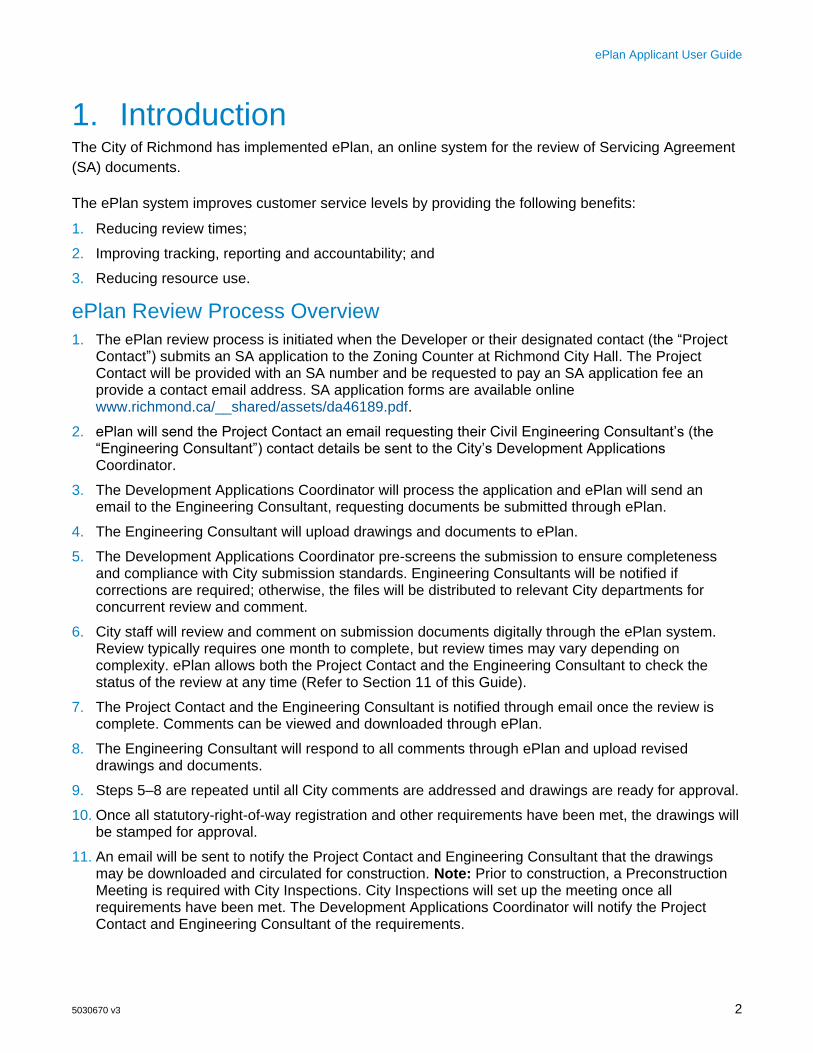
4. The bottom left corner of all drawings shall be left blank and be reserved for the City Approval stamp. BC One Call instructions originally occupying this space shall be incorporated as a standard drawing note. Required margins will position the blank space 0.5” from the bottom and left edges of the document.
ePlan Applicant User Guide
5030670 v3 4
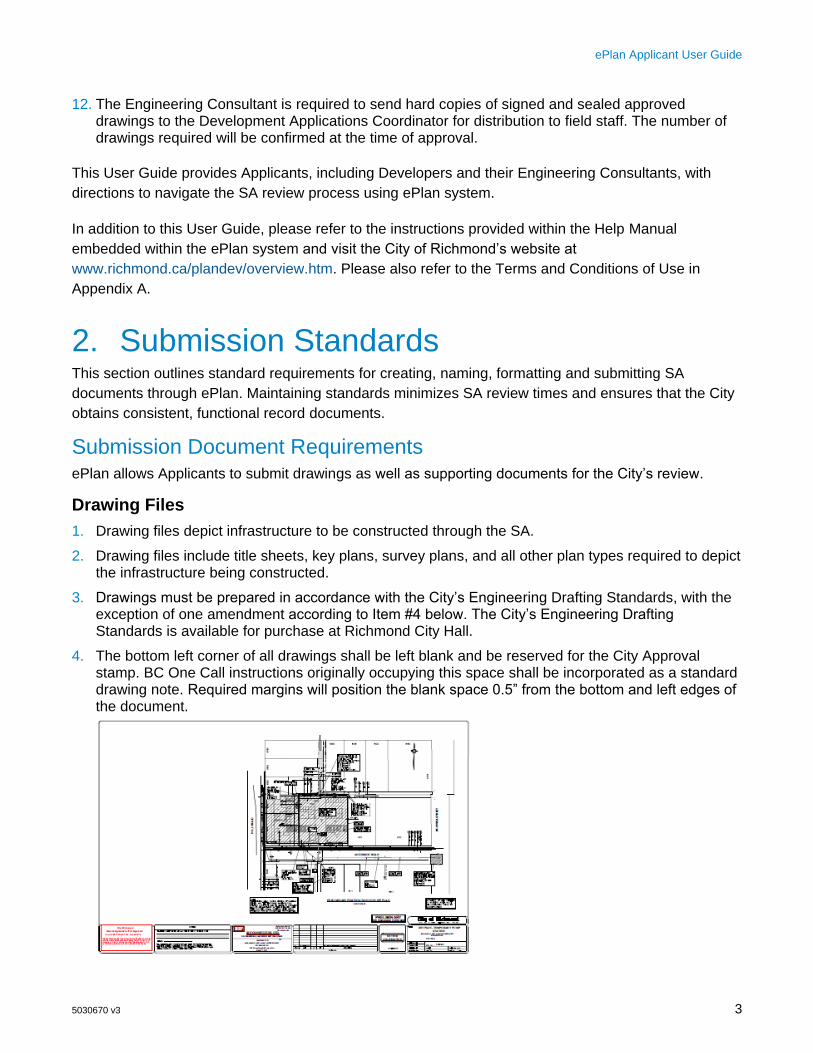
5. Drawings shall be submitted in vector PDF format. For drawing files created using AutoCAD software, it is recommended that drawings be converted to vector PDF format using the Autodesk Vector Graphic Converter “DWG to PDF.pc3 plotter driver.”
6. Drawings shall be submitted as single-page, separate files.
7. Drawings shall be uploaded into the permit’s “Drawings” folder within ePlan. Detailed file upload instructions are provided in Section 6 of this document.
8. All drawing files must be digitally sealed using APEGBC approved software. For more information, please refer to APEGBC’s guidelines found at www.apeg.bc.ca. For Landscape Architecture drawings, please see Submission of Landscape Architecture Drawings.
Submission of Landscape Architecture Drawings
As digital seals are not available at this time, it is acceptable for Registered Landscape Architects to
can a copy of their stamp without signature, add it digitally to drawings, then sign each sheet with an
electronic signature in Adobe Acrobat.
Supporting Documents
1. Supporting documents provide information to support the permit drawings. Such documents may include, but not be limited to letters, e-mails, geotechnical reports, arborist assessments, calculations or checklists.
2. Each submission must be accompanied by a sealed copy of the completed Servicing Agreement Design Drawing Checklist, available for download at www.richmond.ca/plandev/overview.htm.
3. Supporting documents shall be submitted in a searchable PDF format.
4. Supporting documents shall be uploaded into the permit’s “Documents” folder within ePlan. Detailed file upload instructions are provided in Section 6 of this document.
5. All engineering reports must be digitally sealed using APEGBC’s approved software. For more information, please refer to APEGBC’s guidelines found at www.apeg.bc.ca.
Submission of As-Constructed Drawings
Hard copies of as-constructed drawings shall be submitted to the City’s Inspection department for
review. Once drawings have been finalized, electronically sealed copies shall be uploaded to the “As-
Constructed” folder within ePlan for record purposes.
ePlan Applicant User Guide
5030670 v3 5
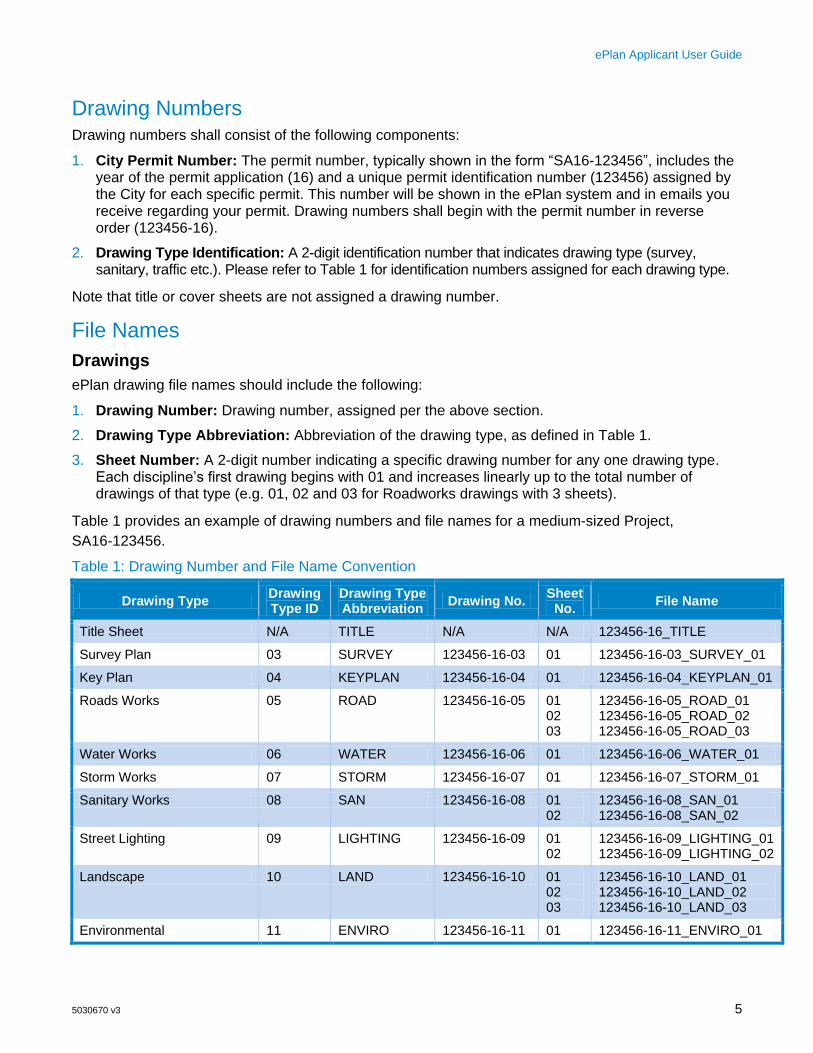
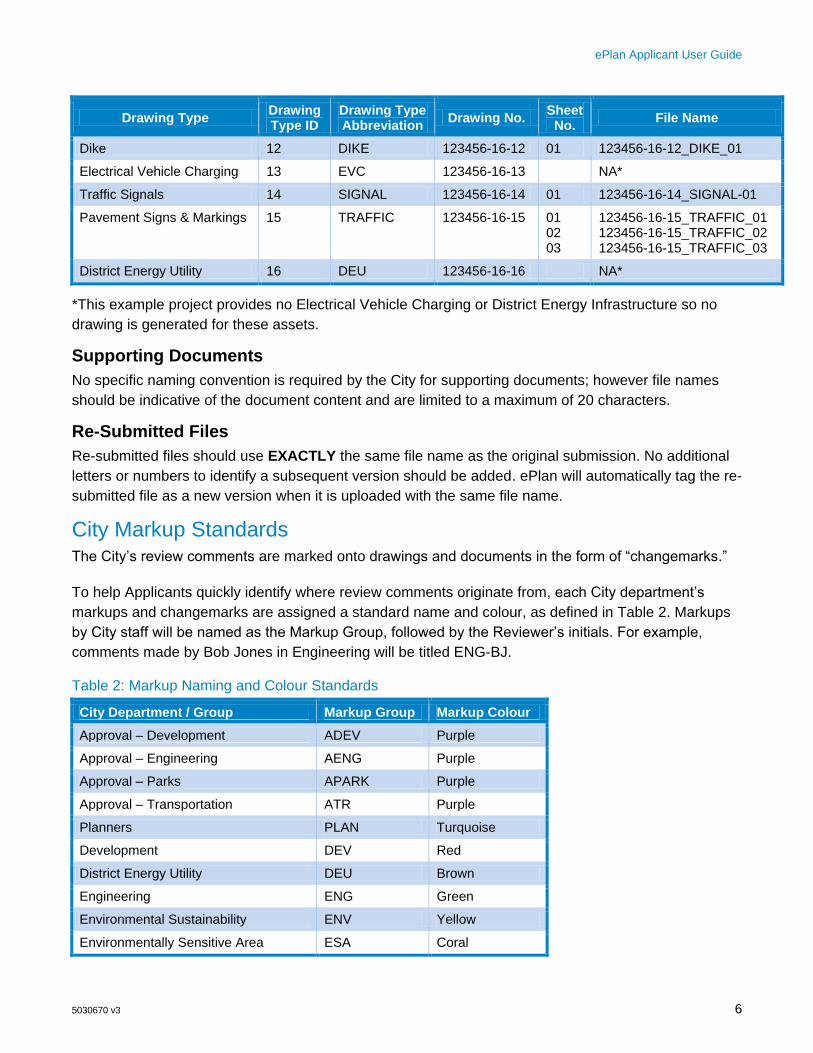
Drawing Numbers Drawing numbers shall consist of the following components:
1. City Permit Number: The permit number, typically shown in the form “SA16-123456”, includes the year of the permit application (16) and a unique permit identification number (123456) assigned by the City for each specific permit. This number will be shown in the ePlan system and in emails you receive regarding your permit. Drawing numbers shall begin with the permit number in reverse order (123456-16).
2. Drawing Type Identification: A 2-digit identification number that indicates drawing type (survey, sanitary, traffic etc.). Please refer to Table 1 for identification numbers assigned for each drawing type.
Note that title or cover sheets are not assigned a drawing number.
File Names
Drawings
ePlan drawing file names should include the following:
1. Drawing Number: Drawing number, assigned per the above section.
2. Drawing Type Abbreviation: Abbreviation of the drawing type, as defined in Table 1.
3. Sheet Number: A 2-digit number indicating a specific drawing number for any one drawing type. Each discipline’s first drawing begins with 01 and increases linearly up to the total number of drawings of that type (e.g. 01, 02 and 03 for Roadworks drawings with 3 sheets).
Table 1 provides an example of drawing numbers and file names for a medium-sized Project,
SA16-123456.
Table 1: Drawing Number and File Name Convention
Drawing Type Drawing Type ID
Drawing Type Abbreviation
Drawing No. Sheet
No. File Name
Title Sheet N/A TITLE N/A N/A 123456-16_TITLE
Survey Plan 03 SURVEY 123456-16-03 01 123456-16-03_SURVEY_01
Key Plan 04 KEYPLAN 123456-16-04 01 123456-16-04_KEYPLAN_01
Roads Works 05 ROAD 123456-16-05 01 02 03
123456-16-05_ROAD_01 123456-16-05_ROAD_02 123456-16-05_ROAD_03
Water Works 06 WATER 123456-16-06 01 123456-16-06_WATER_01
Storm Works 07 STORM 123456-16-07 01 123456-16-07_STORM_01
Sanitary Works 08 SAN 123456-16-08 01 02
123456-16-08_SAN_01 123456-16-08_SAN_02
Street Lighting 09 LIGHTING 123456-16-09 01 02
123456-16-09_LIGHTING_01 123456-16-09_LIGHTING_02
Landscape 10 LAND 123456-16-10 01 02 03
123456-16-10_LAND_01 123456-16-10_LAND_02 123456-16-10_LAND_03
Environmental 11 ENVIRO 123456-16-11 01 123456-16-11_ENVIRO_01
ePlan Applicant User Guide
5030670 v3 6
Drawing Type Drawing Type ID
Drawing Type Abbreviation
Drawing No. Sheet
No. File Name
Dike 12 DIKE 123456-16-12 01 123456-16-12_DIKE_01
Electrical Vehicle Charging 13 EVC 123456-16-13 NA*
Traffic Signals 14 SIGNAL 123456-16-14 01 123456-16-14_SIGNAL-01
Pavement Signs & Markings 15 TRAFFIC 123456-16-15 01 02 03
123456-16-15_TRAFFIC_01 123456-16-15_TRAFFIC_02 123456-16-15_TRAFFIC_03
District Energy Utility 16 DEU 123456-16-16 NA*
*This example project provides no Electrical Vehicle Charging or District Energy Infrastructure so no
drawing is generated for these assets.
Supporting Documents
No specific naming convention is required by the City for supporting documents; however file names
should be indicative of the document content and are limited to a maximum of 20 characters.
Re-Submitted Files
Re-submitted files should use EXACTLY the same file name as the original submission. No additional
letters or numbers to identify a subsequent version should be added. ePlan will automatically tag the re-
submitted file as a new version when it is uploaded with the same file name.
City Markup Standards The City’s review comments are marked onto drawings and documents in the form of “changemarks.”
To help Applicants quickly identify where review comments originate from, each City department’s
markups and changemarks are assigned a standard name and colour, as defined in Table 2. Markups
by City staff will be named as the Markup Group, followed by the Reviewer’s initials. For example,
comments made by Bob Jones in Engineering will be titled ENG-BJ.
Table 2: Markup Naming and Colour Standards
City Department / Group Markup Group Markup Colour
Approval – Development ADEV Purple
Approval – Engineering AENG Purple
Approval – Parks APARK Purple
Approval – Transportation ATR Purple
Planners PLAN Turquoise
Development DEV Red
District Energy Utility DEU Brown
Engineering ENG Green
Environmental Sustainability ENV Yellow
Environmentally Sensitive Area ESA Coral

ePlan Applicant User Guide
5030670 v3 7
City Department / Group Markup Group Markup Colour
Fire Prevention FIRE Dark Green
Park Planning PARK Pink
Street Lighting SL Orange
Transportation TR Blue
Traffic Operations TO Blue
Traffic Signals TS Blue
Note that Applicants are not permitted to add drawing mark-ups.
The Engineering Consultant is required to respond to all changemarks. Refer to Section 8 on how to
respond to City review comments.
3. Login to ePlan
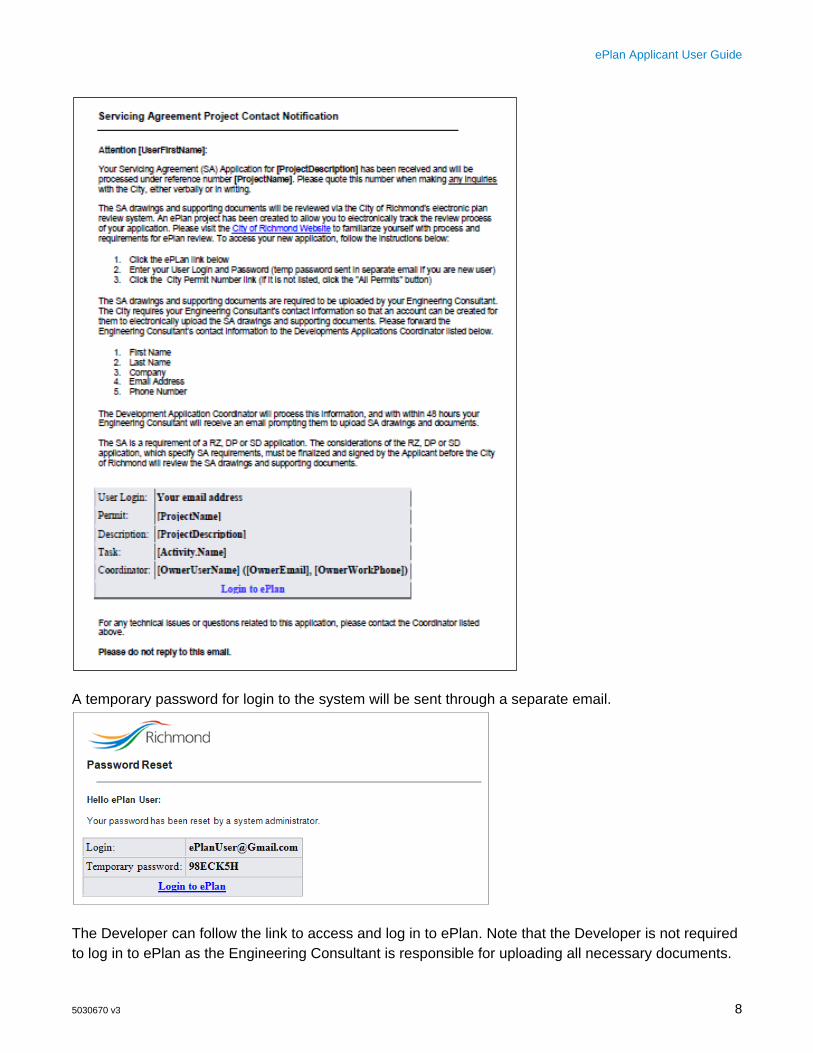
Project Contact Invitation Upon the Project Contact completing a permit application at the City’s Zoning Counter, a new project
will be created in the City’s permitting system. ePlan will automatically send an email to the Developer
containing login and permit information. The email will request the developer forward the Engineering
Consultant’s contact information to the Development Applications Coordinator.
ePlan Applicant User Guide
5030670 v3 8
A temporary password for login to the system will be sent through a separate email.
The Developer can follow the link to access and log in to ePlan. Note that the Developer is not required
to log in to ePlan as the Engineering Consultant is responsible for uploading all necessary documents.
ePlan Applicant User Guide
5030670 v3 9
Only the Engineering Consultant is able to submit documents through ePlan. However, the Developer
may access the submission status of the application through ePlan (Refer to Section 11).
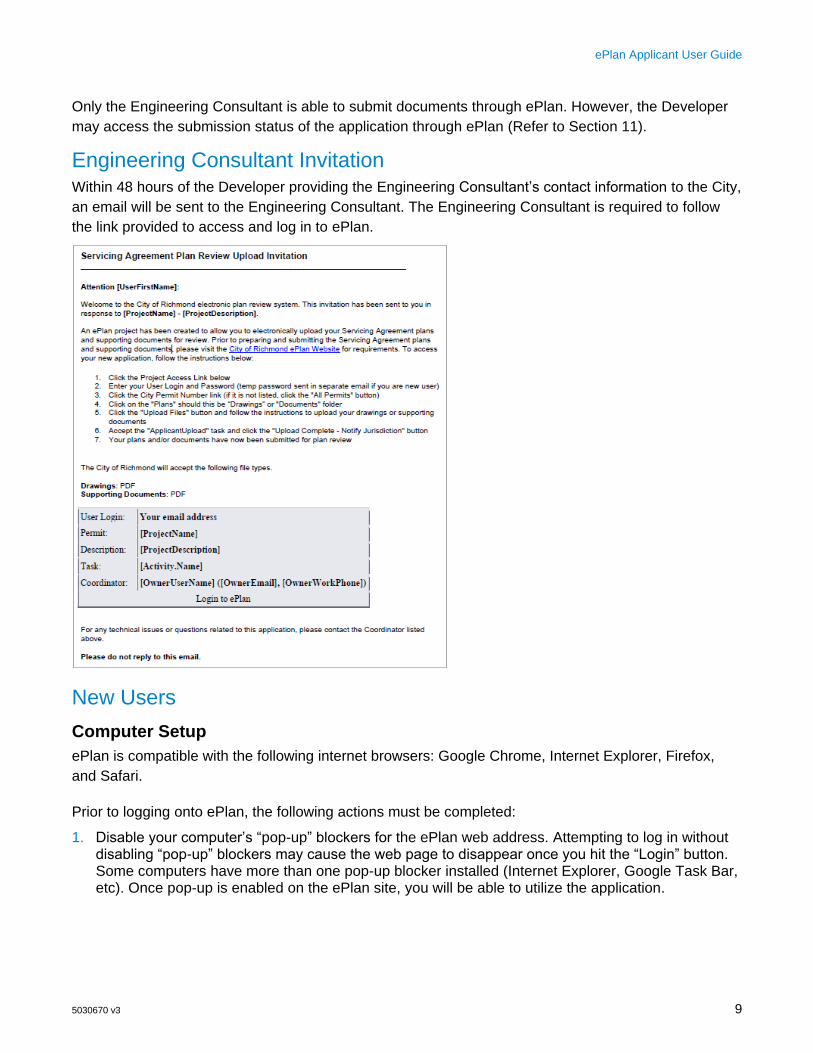
Engineering Consultant Invitation Within 48 hours of the Developer providing the Engineering Consultant’s contact information to the City,
an email will be sent to the Engineering Consultant. The Engineering Consultant is required to follow
the link provided to access and log in to ePlan.
New Users
Computer Setup
ePlan is compatible with the following internet browsers: Google Chrome, Internet Explorer, Firefox,
and Safari.
Prior to logging onto ePlan, the following actions must be completed:
1. Disable your computer’s “pop-up” blockers for the ePlan web address. Attempting to log in without disabling “pop-up” blockers may cause the web page to disappear once you hit the “Login” button. Some computers have more than one pop-up blocker installed (Internet Explorer, Google Task Bar, etc). Once pop-up is enabled on the ePlan site, you will be able to utilize the application.

ePlan Applicant User Guide
5030670 v3 10
2. If you are using Internet Explorer, you must install the necessary ActiveX Control components. Do this by clicking “Install ProjectDox Components” on the login page. This installation will need to be done once for each computer on which you access ePlan. This step is not required if you are using other internet browsers.
A ProjectDox Components Setup Wizard will pop up. Follow the prompts in the pop-up to install the
necessary ePlan ActiveX controls.
Your computer is now set up and ready to use ePlan!
ePlan Applicant User Guide
5030670 v3 11
New Account Setup
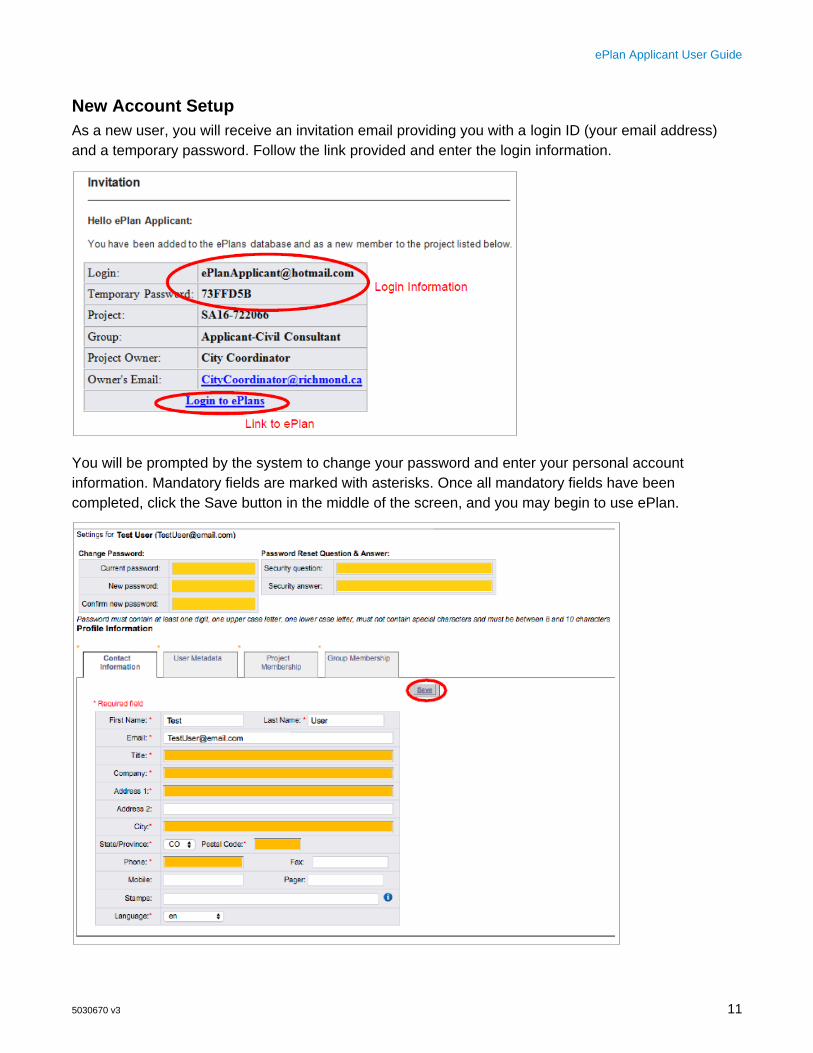
As a new user, you will receive an invitation email providing you with a login ID (your email address)
and a temporary password. Follow the link provided and enter the login information.
You will be prompted by the system to change your password and enter your personal account
information. Mandatory fields are marked with asterisks. Once all mandatory fields have been
completed, click the Save button in the middle of the screen, and you may begin to use ePlan.
ePlan Applicant User Guide
5030670 v3 12
Existing Users If you are a returning user, login to ePlan Review using your existing e-mail address and password. If
you have forgotten your password, click on the “Forgot Password” button and the information will be
emailed to you. This will work only if you have logged in once and added a security question and
answer.
4. Navigating ePlan
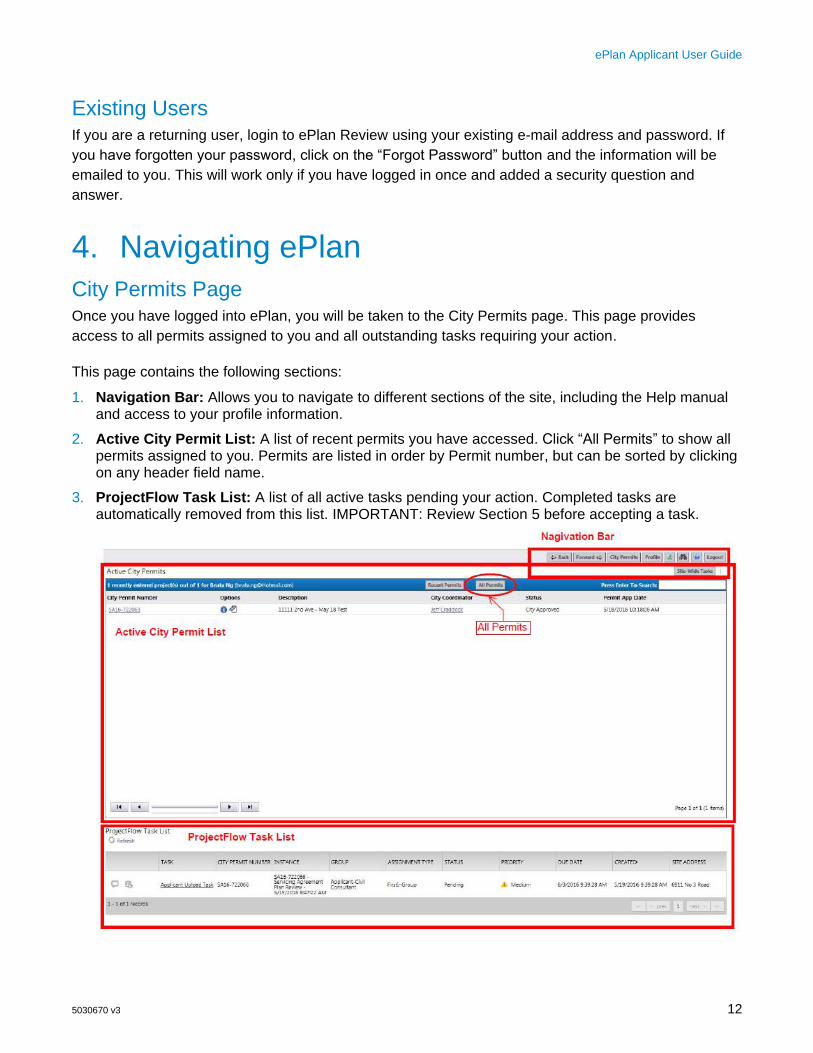
City Permits Page Once you have logged into ePlan, you will be taken to the City Permits page. This page provides
access to all permits assigned to you and all outstanding tasks requiring your action.
This page contains the following sections:
1. Navigation Bar: Allows you to navigate to different sections of the site, including the Help manual and access to your profile information.
2. Active City Permit List: A list of recent permits you have accessed. Click “All Permits” to show all permits assigned to you. Permits are listed in order by Permit number, but can be sorted by clicking on any header field name.
3. ProjectFlow Task List: A list of all active tasks pending your action. Completed tasks are automatically removed from this list. IMPORTANT: Review Section 5 before accepting a task.
ePlan Applicant User Guide
5030670 v3 13
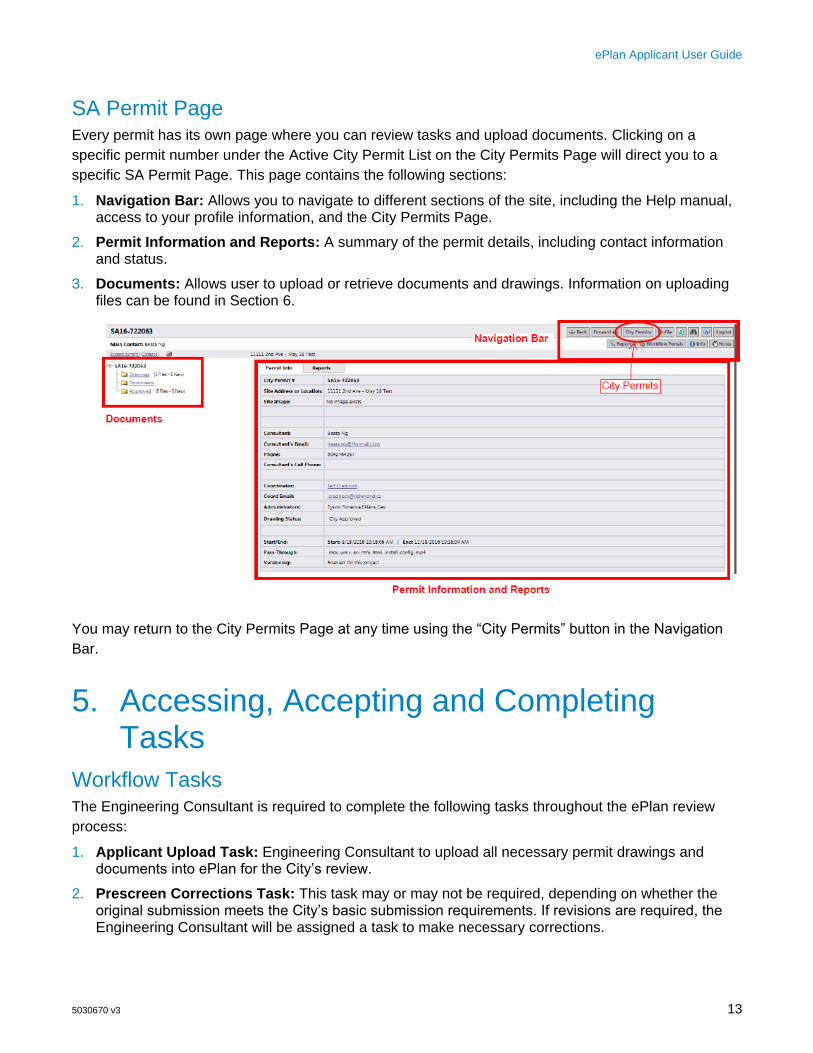
SA Permit Page Every permit has its own page where you can review tasks and upload documents. Clicking on a
specific permit number under the Active City Permit List on the City Permits Page will direct you to a
specific SA Permit Page. This page contains the following sections:
1. Navigation Bar: Allows you to navigate to different sections of the site, including the Help manual, access to your profile information, and the City Permits Page.
2. Permit Information and Reports: A summary of the permit details, including contact information and status.
3. Documents: Allows user to upload or retrieve documents and drawings. Information on uploading files can be found in Section 6.
You may return to the City Permits Page at any time using the “City Permits” button in the Navigation
Bar.
5. Accessing, Accepting and Completing Tasks
Workflow Tasks The Engineering Consultant is required to complete the following tasks throughout the ePlan review
process:
1. Applicant Upload Task: Engineering Consultant to upload all necessary permit drawings and documents into ePlan for the City’s review.
2. Prescreen Corrections Task: This task may or may not be required, depending on whether the original submission meets the City’s basic submission requirements. If revisions are required, the Engineering Consultant will be assigned a task to make necessary corrections.
ePlan Applicant User Guide
5030670 v3 14
3. Applicant Resubmit Task: Engineering Consultant to review and address the City’s review comments, and resubmit drawings and documents as required to satisfy review comments. This task may be repeated several times throughout the review process until the drawings are ready for approval.
At each stage, the Engineering Consultant will receive an email notification that the task has been
initiated and assigned to them. Developers will also receive email notifications when these tasks are
initiated, but no action from Developers is required.
More details of how to navigate through each task are provided in Sections 6, 7 and 8.
Accessing and Accepting Tasks Tasks are accessed through ePlan. Begin by logging into ePlan through the link provided in your
notification email.
Tasks can be accessed from two locations:
1. Within the SA Permit Page;
2. Within the City Permits Page.
Staff recommend accessing tasks through the SA Permit Page as it is easier to respond to them from
this location.
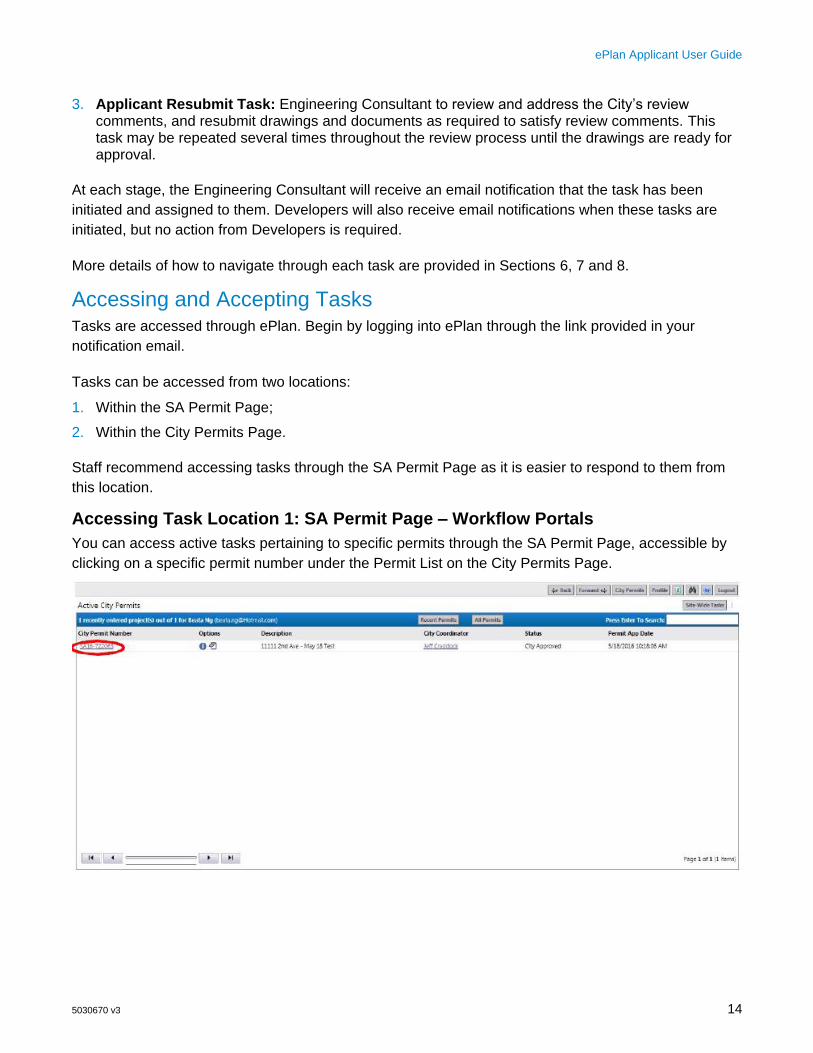
Accessing Task Location 1: SA Permit Page – Workflow Portals
You can access active tasks pertaining to specific permits through the SA Permit Page, accessible by
clicking on a specific permit number under the Permit List on the City Permits Page.
ePlan Applicant User Guide
5030670 v3 15
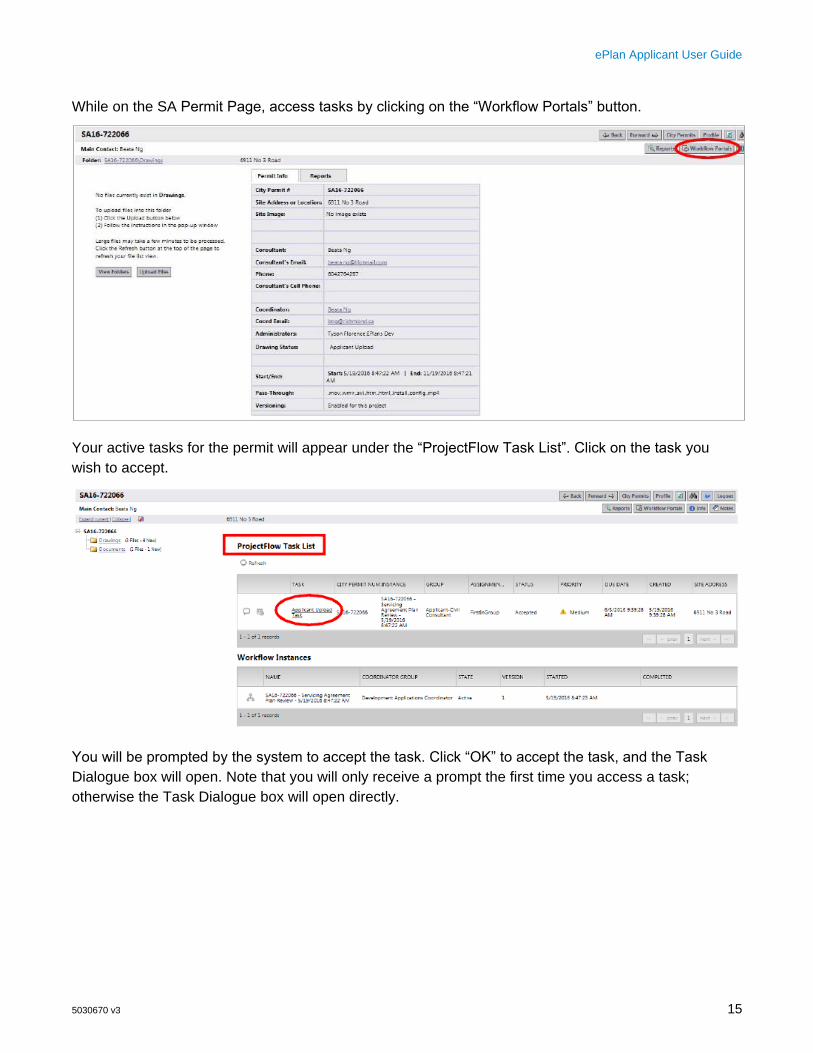
While on the SA Permit Page, access tasks by clicking on the “Workflow Portals” button.
Your active tasks for the permit will appear under the “ProjectFlow Task List”. Click on the task you
wish to accept.
You will be prompted by the system to accept the task. Click “OK” to accept the task, and the Task
Dialogue box will open. Note that you will only receive a prompt the first time you access a task;
otherwise the Task Dialogue box will open directly.

ePlan Applicant User Guide
5030670 v3 16
A Task dialogue box will open, providing instructions for completing the task. A sample dialogue box for
the Applicant Upload Task is shown below. Note that the information and instructions presented differ
for each task.
After you have accepted a task, you can close the Task dialogue box by clicking the “Complete Later”
button. The dialogue box can be re-open the same way at any time until you complete the task.
IMPORTANT: Do not click “Complete” until the task has been fully completed and is ready to be
submitted to the City.

ePlan Applicant User Guide
5030670 v3 17
Accessing Tasks Location 2: City Permits Page – Task List
All active tasks pending your action are shown in the ProjectFlow Task List at the bottom of the City
Permits Page. You can accept tasks by clicking on the Task name.
You will be prompted by the system to accept the task. Click “OK” to accept the task, and the Task
Dialogue Box will open, similar to if it were accessed through location 1.

ePlan Applicant User Guide
5030670 v3 18
Completing Tasks Once the task, such as uploading documents for the Applicant Upload Task, has been completed, open
the Task dialogue box and click on the “Task Complete” button.
You will be prompted by a dialogue box to confirm completion of the task. Click “OK” to complete the
process. The City’s Development Applications Coordinator will be notified.
ePlan Applicant User Guide
5030670 v3 19
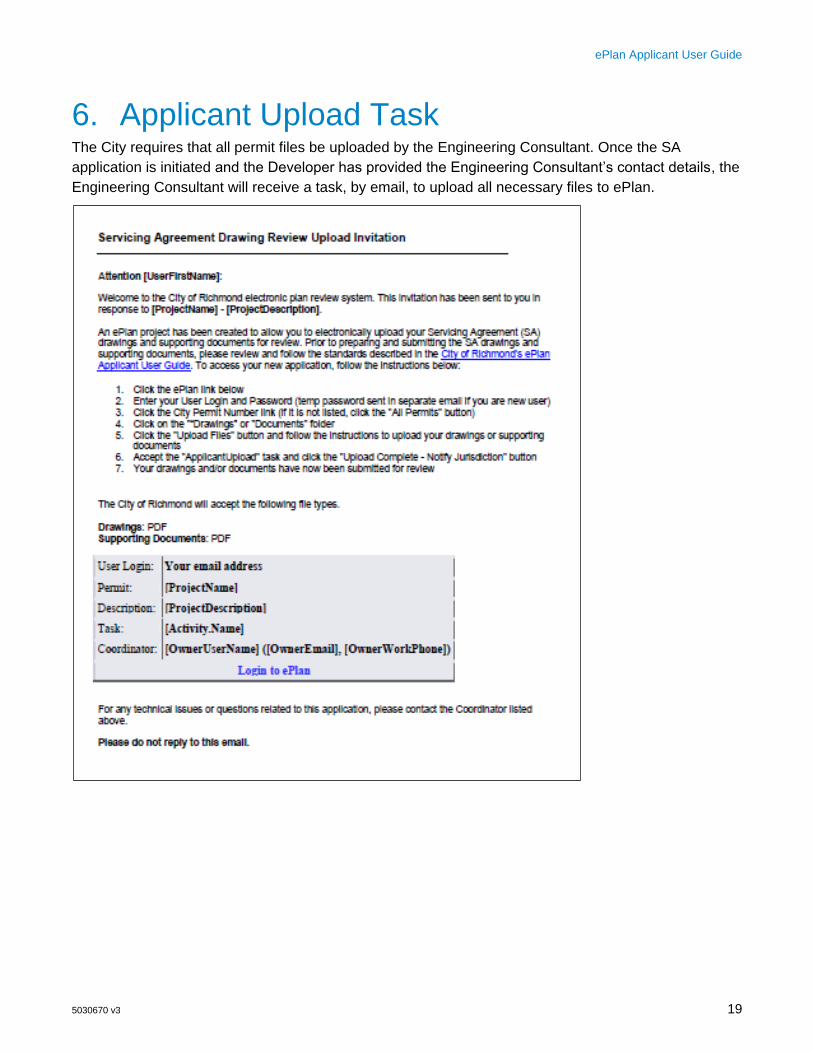
6. Applicant Upload Task The City requires that all permit files be uploaded by the Engineering Consultant. Once the SA
application is initiated and the Developer has provided the Engineering Consultant’s contact details, the
Engineering Consultant will receive a task, by email, to upload all necessary files to ePlan.
ePlan Applicant User Guide
5030670 v3 20
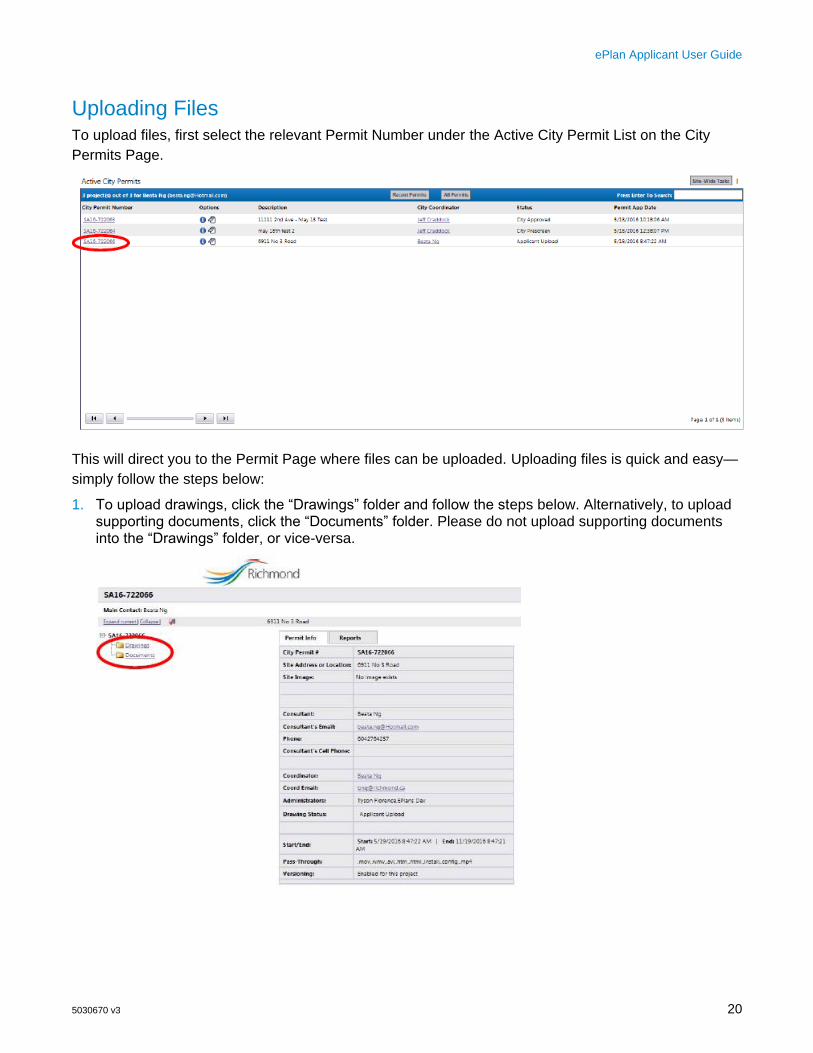
Uploading Files To upload files, first select the relevant Permit Number under the Active City Permit List on the City
Permits Page.
This will direct you to the Permit Page where files can be uploaded. Uploading files is quick and easy—
simply follow the steps below:
1. To upload drawings, click the “Drawings” folder and follow the steps below. Alternatively, to upload supporting documents, click the “Documents” folder. Please do not upload supporting documents into the “Drawings” folder, or vice-versa.
ePlan Applicant User Guide
5030670 v3 21
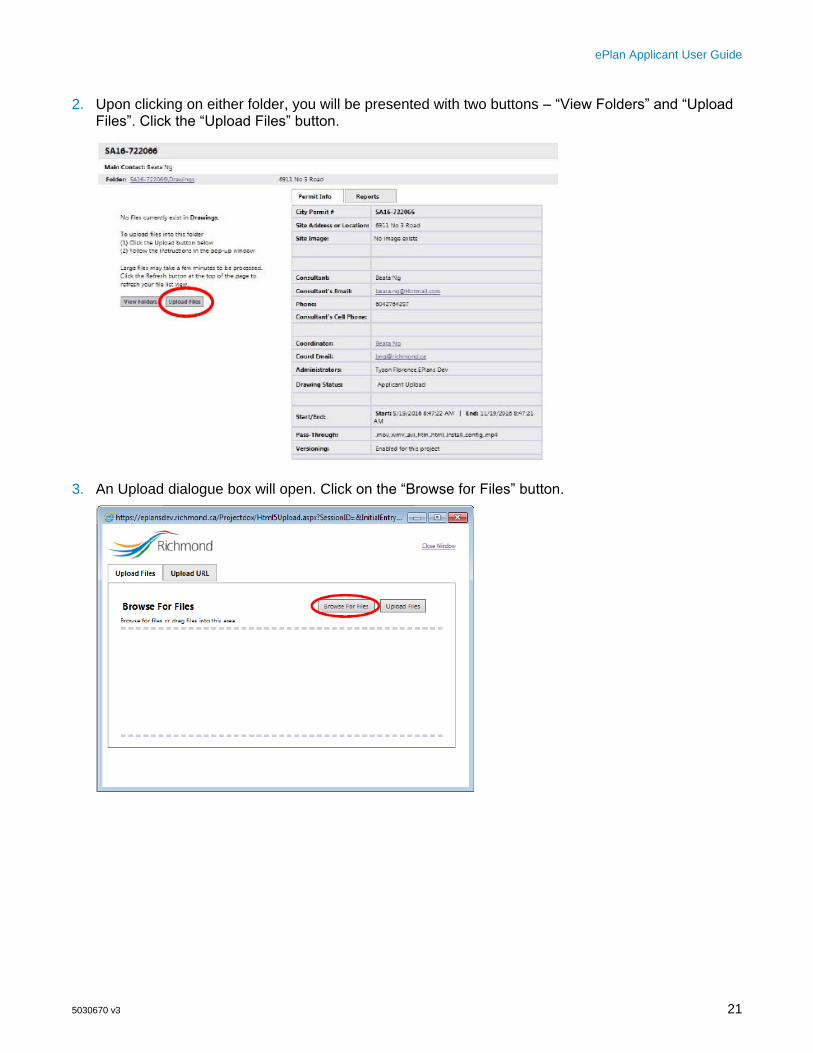
2. Upon clicking on either folder, you will be presented with two buttons – “View Folders” and “Upload Files”. Click the “Upload Files” button.
3. An Upload dialogue box will open. Click on the “Browse for Files” button.
ePlan Applicant User Guide
5030670 v3 22
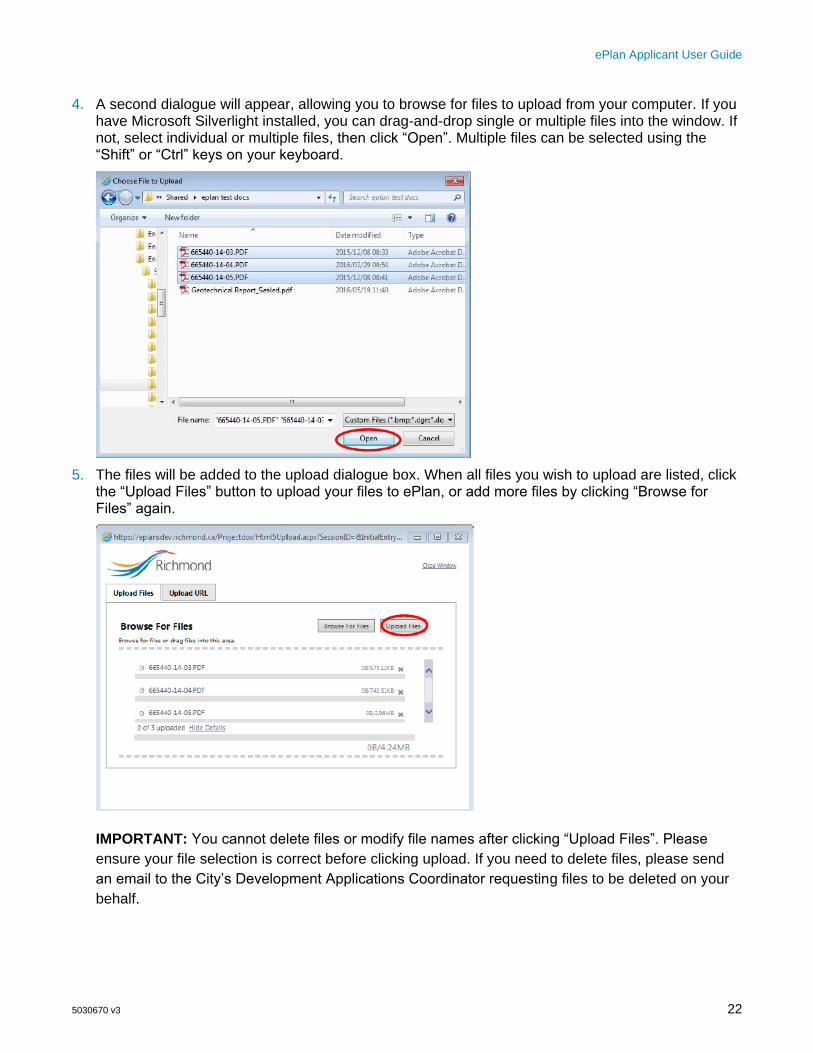
4. A second dialogue will appear, allowing you to browse for files to upload from your computer. If you have Microsoft Silverlight installed, you can drag-and-drop single or multiple files into the window. If not, select individual or multiple files, then click “Open”. Multiple files can be selected using the “Shift” or “Ctrl” keys on your keyboard.
5. The files will be added to the upload dialogue box. When all files you wish to upload are listed, click the “Upload Files” button to upload your files to ePlan, or add more files by clicking “Browse for Files” again.
IMPORTANT: You cannot delete files or modify file names after clicking “Upload Files”. Please
ensure your file selection is correct before clicking upload. If you need to delete files, please send
an email to the City’s Development Applications Coordinator requesting files to be deleted on your
behalf.
ePlan Applicant User Guide
5030670 v3 23
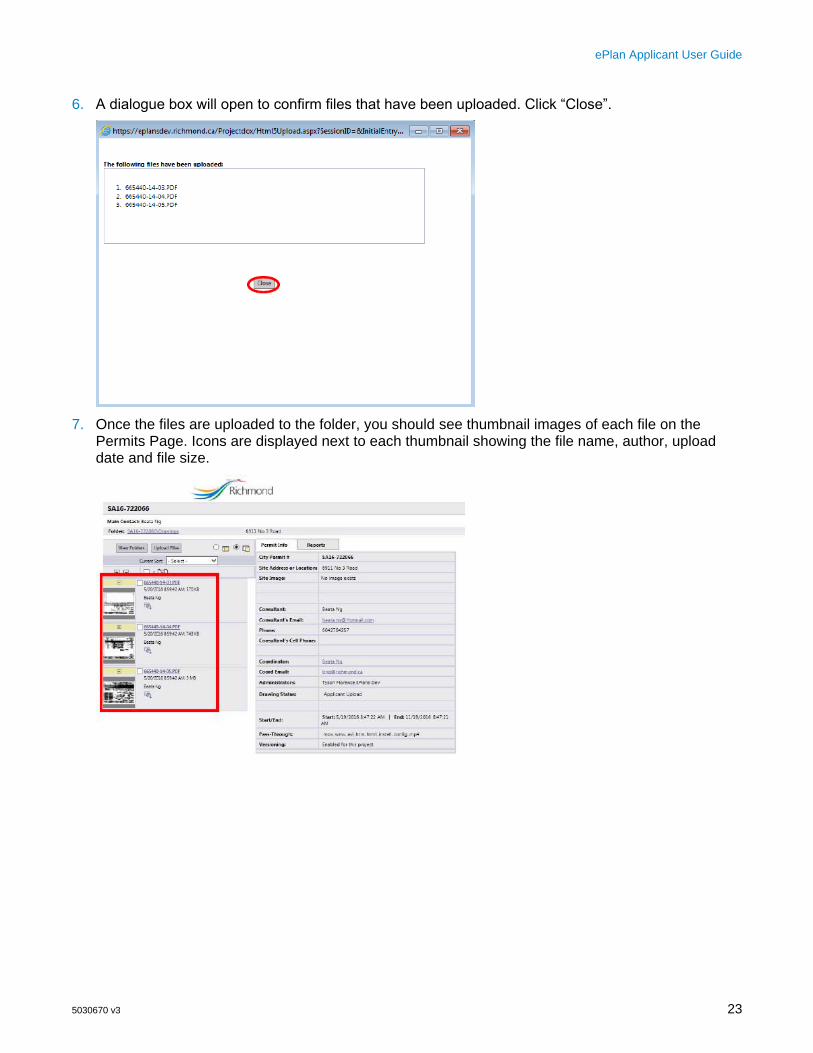
6. A dialogue box will open to confirm files that have been uploaded. Click “Close”.
7. Once the files are uploaded to the folder, you should see thumbnail images of each file on the Permits Page. Icons are displayed next to each thumbnail showing the file name, author, upload date and file size.
ePlan Applicant User Guide
5030670 v3 24
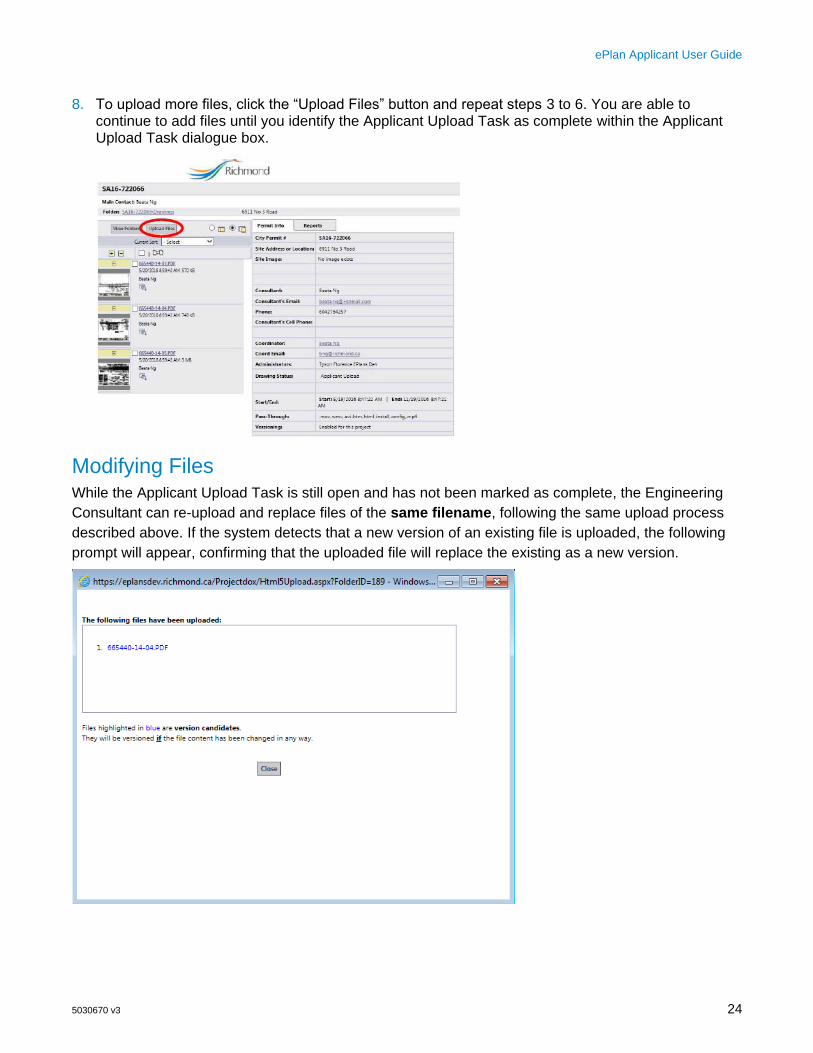
8. To upload more files, click the “Upload Files” button and repeat steps 3 to 6. You are able to continue to add files until you identify the Applicant Upload Task as complete within the Applicant Upload Task dialogue box.
Modifying Files While the Applicant Upload Task is still open and has not been marked as complete, the Engineering
Consultant can re-upload and replace files of the same filename, following the same upload process
described above. If the system detects that a new version of an existing file is uploaded, the following
prompt will appear, confirming that the uploaded file will replace the existing as a new version.

ePlan Applicant User Guide
5030670 v3 25
Within the Documents pane, the version number will now be shown next to the drawing’s thumbnail
image.
Deleting Files Once files have been uploaded to the system, the Engineering Consultant CANNOT delete the files at
any point. If a file is uploaded in error, or is uploaded with an incorrect filename, the Engineering
Consultant must notify the City’s Coordinator to request that it be deleted.
Complete Applicant Upload Task Once all drawings and documents are uploaded and ready to be submitted to the City for review,
remember to click “Upload Complete” within the ePlan Task Dialogue Box (See Section 5 for
instructions on completing tasks). Once you have identified the task as complete, a notification will be
sent to the City’s Development Applications Coordinator to initiate the Pre-screening process.

ePlan Applicant User Guide
5030670 v3 26
7. Prescreen Correction Task Once you have uploaded documents, the City’s Development Applications Coordinator will receive a
submission notification. The Coordinator will pre-screen the submission within 48 working hours of
receiving it.
Pre-screening is a cursory review to ensure that the uploaded files meet the submission requirements
and standards. Examples of where submission requirements may not be met include unreadable
drawings, incorrectly formatted PDFs, un-sealed files, missing drawings, missing documents or mis-
named drawings.
If requirements have been met, the submission will be distributed for departmental review. However, if
there are missing or erroneous items in the submittal, you will receive a “Pre-screening Rejection”
email, as shown below, directing you to make the necessary corrections on ePlan.
Follow the steps below to amend your submission:
1. Login to ePlan and open the Prescreen Correction Task for your permit. (Refer to Section 5 for instructions on accepting and opening tasks.)
ePlan Applicant User Guide
5030670 v3 27
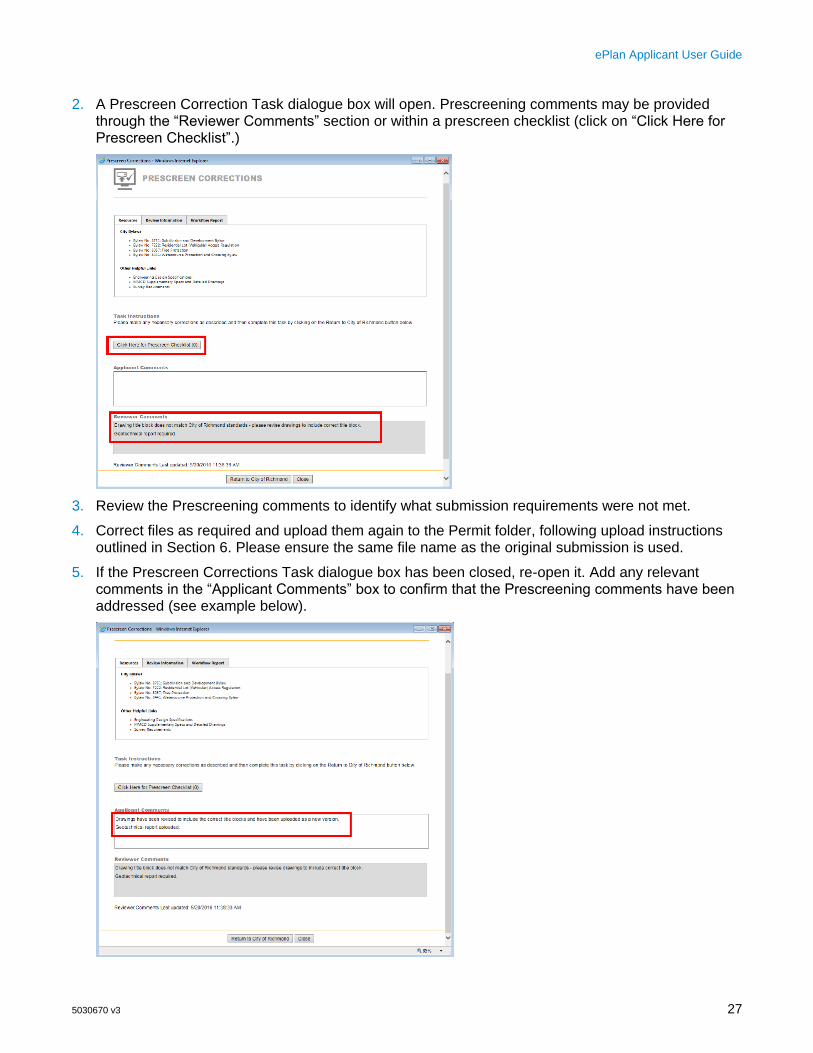
2. A Prescreen Correction Task dialogue box will open. Prescreening comments may be provided through the “Reviewer Comments” section or within a prescreen checklist (click on “Click Here for Prescreen Checklist”.)
3. Review the Prescreening comments to identify what submission requirements were not met.
4. Correct files as required and upload them again to the Permit folder, following upload instructions outlined in Section 6. Please ensure the same file name as the original submission is used.
5. If the Prescreen Corrections Task dialogue box has been closed, re-open it. Add any relevant comments in the “Applicant Comments” box to confirm that the Prescreening comments have been addressed (see example below).

ePlan Applicant User Guide
5030670 v3 28
6. Click on “Return to City of Richmond” to complete the task.
7. A dialogue box will open prompting you to confirm the task has been completed. Click “OK” to close all dialogue boxes.
Once you have identified the task as complete, the City will be notified that the corrections have been
completed. The Prescreening process will now continue. If the submission now meets all standard
requirements, it will be directed to department staff for review. If corrections are still required, an
additional Prescreening Rejection email will be sent to the Engineering Consultant.

ePlan Applicant User Guide
5030670 v3 29
8. Applicant Resubmit Task Once the permit submission has passed prescreening, it will be circulated to relevant City departments
for concurrent staff review. Staff will use ePlan to mark-up and add comments to each plan and
document.
When City staff has completed the review, the Engineering Consultant will receive a “Applicant Re-
submit Task” notification through email requesting document resubmission.
The following steps are required in completing the Applicant Resubmit Task:
1. Review Changemarks, Correction Items and Reviewer Comments
2. Respond to Changemarks and Correction Items
3. Revise and re-upload permit files based on City review comments
4. Respond to Reviewer Comments
5. Complete and close the Applicant Resubmit Task

ePlan Applicant User Guide
5030670 v3 30
Step 1: Review Changemarks and Correction Items
Accept the Applicant Resubmit Task and open the Applicant Resubmit Task dialogue box. (Refer to
Section 5 on accepting and opening tasks).
The Applicant Resubmit Task dialogue box, shown below, will open. This dialogue box will contain the
following information:
1. Access to the City’s Changemarks and Correction Items report
2. A summary of each City Department’s review status, together with the Reviewer’s contact and their Reviewer comments.
3. A checklist of task instruction.

ePlan Applicant User Guide
5030670 v3 31
Changemarks and Correction Items Report
The City’s review comments are provided to Engineering Consultants in the form of Changemarks and
Correction Items. While Correction Items are standardized comments regarding the submission,
Changemarks are unique notes from the reviewer. Both items must be addressed by the Engineering
Consultant.
Access the Changemarks or Correction Items report by clicking on their respective buttons. Clicking on
the Changemark button will open a Changemark Report dialogue box, as shown below.
By default, you will see Changemarks for the current review cycle. However, Changemarks for previous
review cycles can also be reviewed using the “Review Cycle” dropdown tab. You can also obtain an
exportable report of all Changemarks relating to the permit by clicking the “View Full Report” button.
ePlan Applicant User Guide
5030670 v3 32
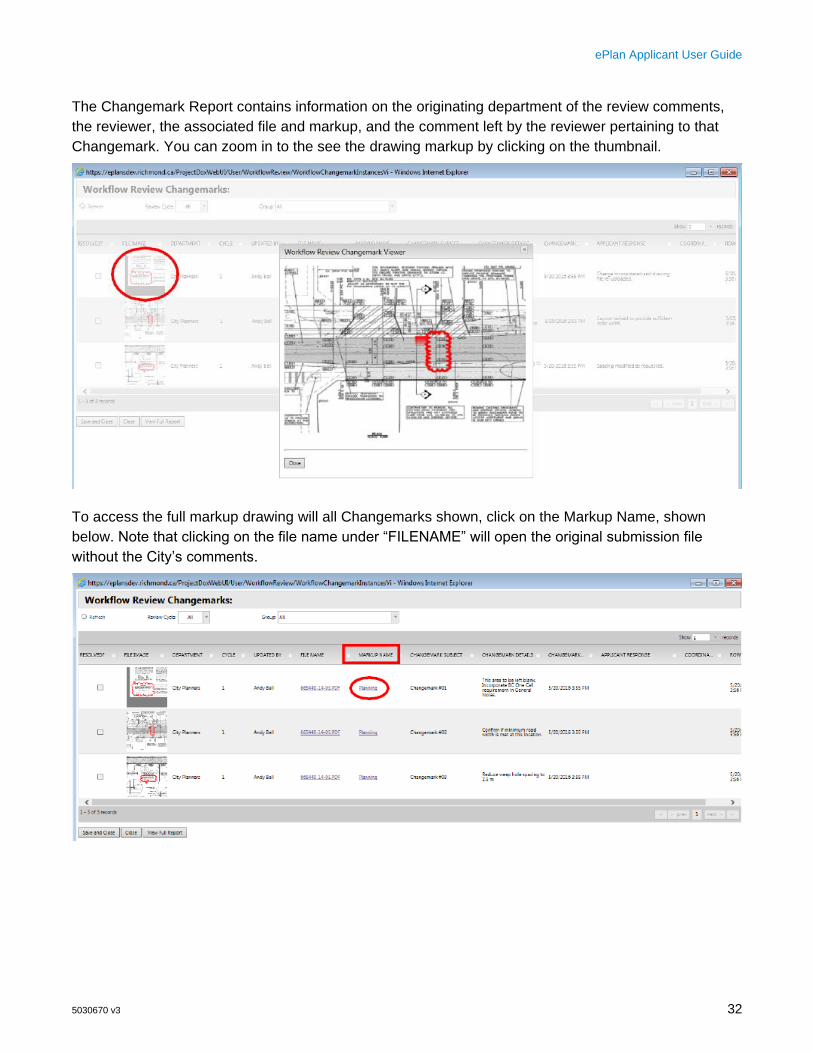
The Changemark Report contains information on the originating department of the review comments,
the reviewer, the associated file and markup, and the comment left by the reviewer pertaining to that
Changemark. You can zoom in to the see the drawing markup by clicking on the thumbnail.
To access the full markup drawing will all Changemarks shown, click on the Markup Name, shown
below. Note that clicking on the file name under “FILENAME” will open the original submission file
without the City’s comments.
ePlan Applicant User Guide
5030670 v3 33
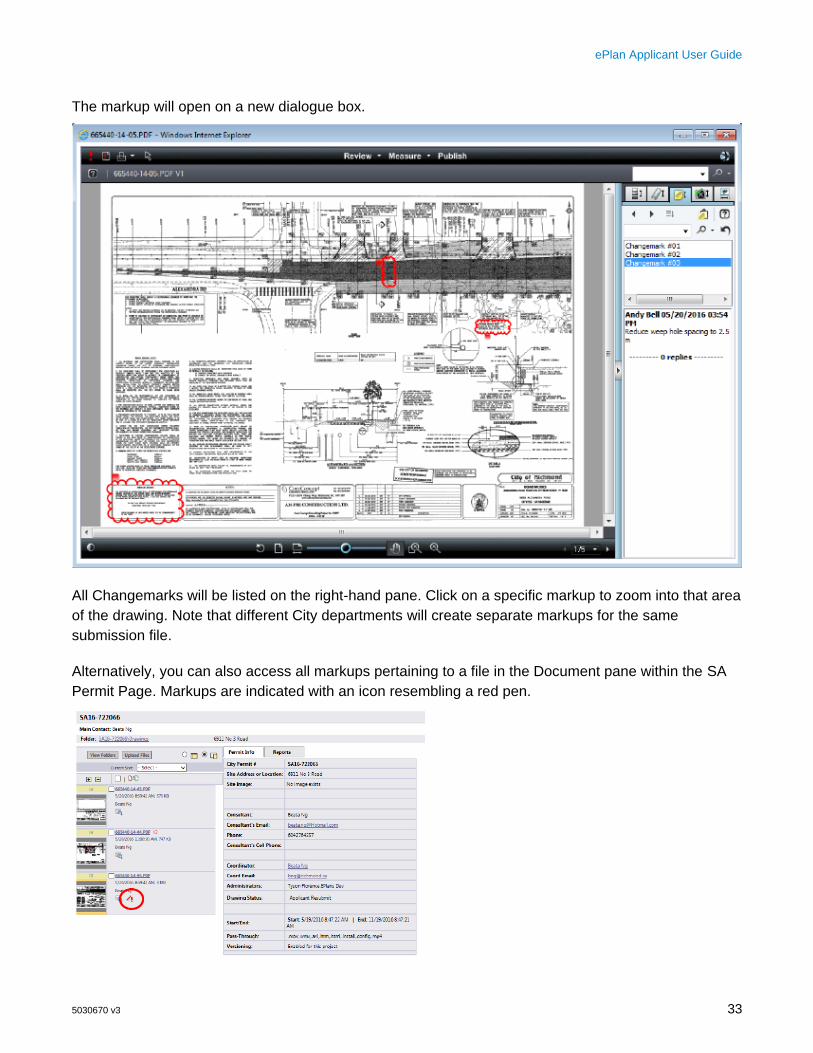
The markup will open on a new dialogue box.
All Changemarks will be listed on the right-hand pane. Click on a specific markup to zoom into that area
of the drawing. Note that different City departments will create separate markups for the same
submission file.
Alternatively, you can also access all markups pertaining to a file in the Document pane within the SA
Permit Page. Markups are indicated with an icon resembling a red pen.

ePlan Applicant User Guide
5030670 v3 34
Clicking the icon will open a dialogue box containing a list of all markups applicable to that specific
drawing or document. Check “View” for one or more of the markups, and click the “View” button to
open.
Each Markup will contain one department or reviewer’s comments. You can overlay various reviewers’
comments by selecting more than one checkbox at a time.
To review the full set of City comments, it is recommended that you download the full Changemark and
Correction Items report. To do so, click “View Full Report” in the Changemark or Correction Items
dialogue box.
ePlan Applicant User Guide
5030670 v3 35
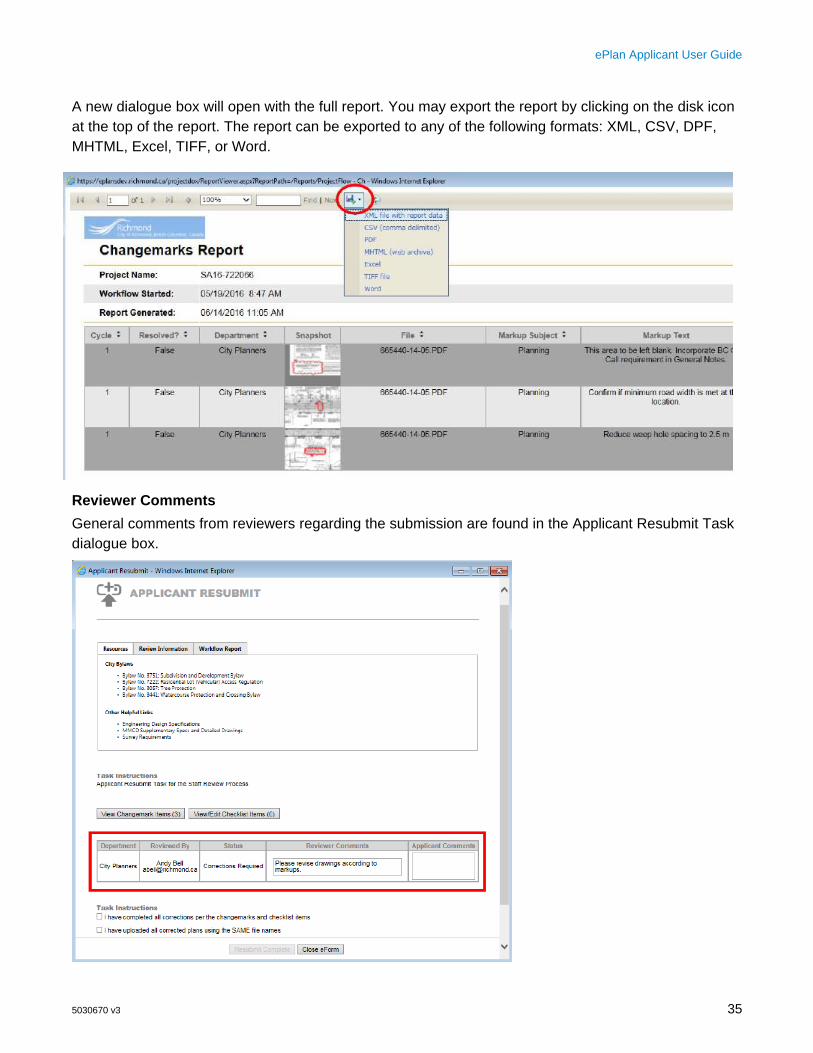
A new dialogue box will open with the full report. You may export the report by clicking on the disk icon
at the top of the report. The report can be exported to any of the following formats: XML, CSV, DPF,
MHTML, Excel, TIFF, or Word.
Reviewer Comments
General comments from reviewers regarding the submission are found in the Applicant Resubmit Task
dialogue box.
ePlan Applicant User Guide
5030670 v3 36
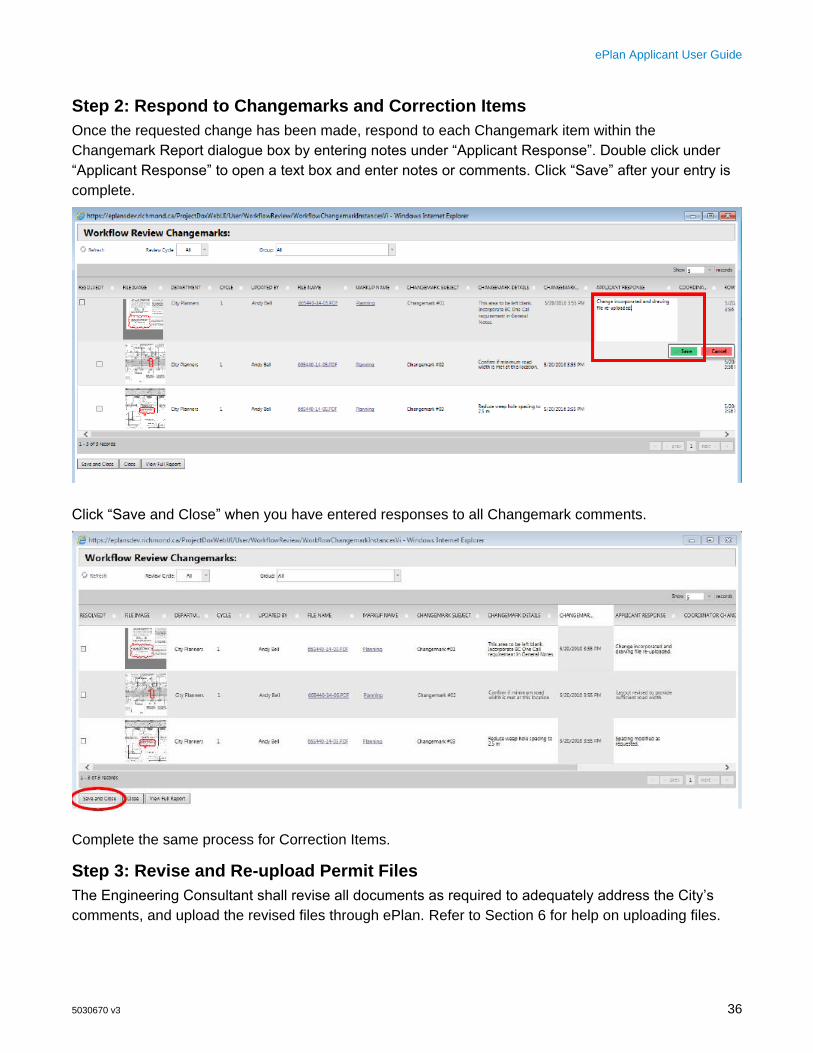
Step 2: Respond to Changemarks and Correction Items
Once the requested change has been made, respond to each Changemark item within the
Changemark Report dialogue box by entering notes under “Applicant Response”. Double click under
“Applicant Response” to open a text box and enter notes or comments. Click “Save” after your entry is
complete.
Click “Save and Close” when you have entered responses to all Changemark comments.
Complete the same process for Correction Items.
Step 3: Revise and Re-upload Permit Files
The Engineering Consultant shall revise all documents as required to adequately address the City’s
comments, and upload the revised files through ePlan. Refer to Section 6 for help on uploading files.
ePlan Applicant User Guide
5030670 v3 37
If a drawing requires no changes then it should not be re-submitted until the final approval stage when
the drawing will be marked “For City Approval”.
IMPORTANT: Be diligent when re-submitting drawings. If a review comment requires a change that
impacts multiple drawings, but the change was only identified on one sheet, it is the Engineering
Consultant’s responsibility to ensure that every drawing is amended and re-submitted accordingly.
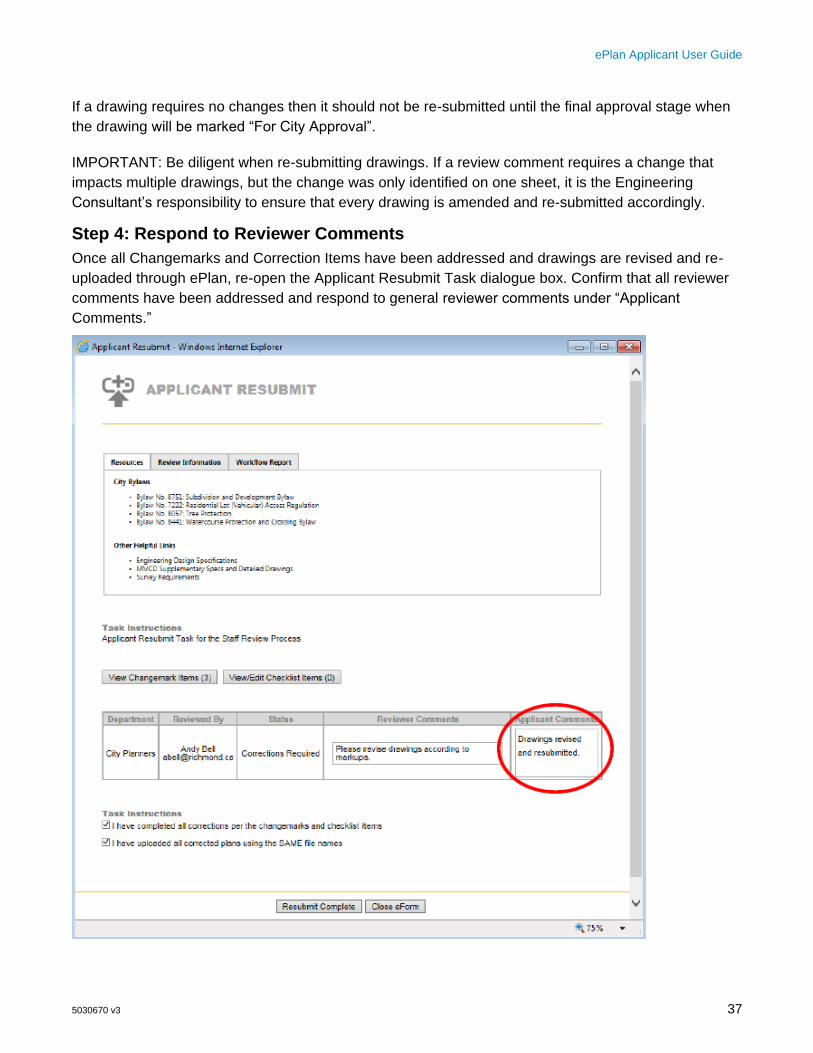
Step 4: Respond to Reviewer Comments
Once all Changemarks and Correction Items have been addressed and drawings are revised and re-
uploaded through ePlan, re-open the Applicant Resubmit Task dialogue box. Confirm that all reviewer
comments have been addressed and respond to general reviewer comments under “Applicant
Comments.”

ePlan Applicant User Guide
5030670 v3 38
Step 5: Complete and Close Task
Confirm that all tasks have been completed by checking off each item under “Task Instructions”, then
click “Resubmit Complete” to return the submission to the City for subsequent review.
9. Approval When the drawing review is approved by all reviewers, both the Applicant and Engineering Consultant
will be notified through email.
After an approval has been issued the drawings will be electronically stamped by the City. You will then
receive an e-mail indicating that your permit is ready and instructions that you may download and print
your files.
The email will indicate the number of printed, sealed drawing sets to be sent to the City for field review
purposes.

ePlan Applicant User Guide
5030670 v3 39
10. Topics & Notes The Topics & Notes feature allows the parties involved in a Permit to leave notes and comments for
each other.
Topics & Notes can be used for the following purposes:
Email Correspondence: Parties involved in the permit can email each other though Topics and
Notes. ePlan will automatically send the email to the recipient.
Partial Approval Notice: Partial approval notices from the City will be sent via Topics and Notes.
Request for Information: Either the City or the Applicant may request information or clarification
through Topics and Notes.
Telephone Conversations: For decisions made through telephone conversations, records of the
conversation can be made in Topics and Notes. This information will become available to all parties
involved in the permit, and will be kept on record through ePlan.
Using Topics & Notes, you can do the following:
1. Add a new Topic
2. Respond to an existing Topic by adding a new Note
Adding a New Topic Access the Topics & Notes function by clicking the “Notes” button within the SA Permit Page.
ePlan Applicant User Guide
5030670 v3 40
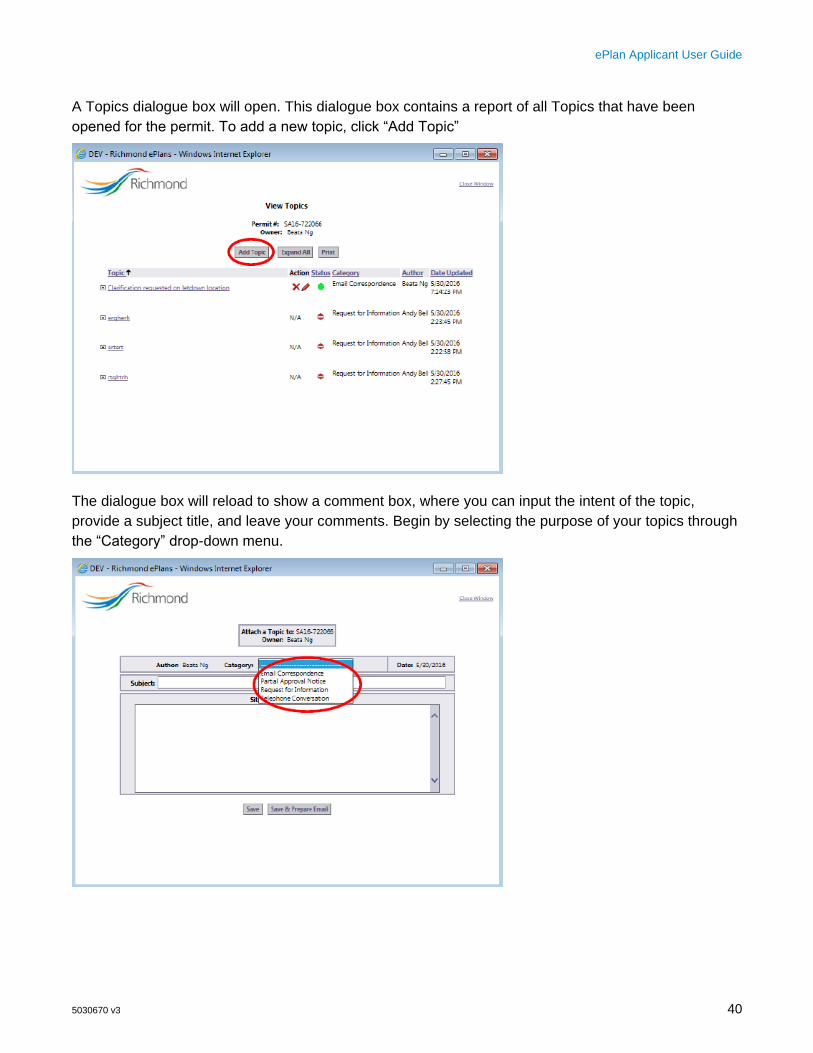
A Topics dialogue box will open. This dialogue box contains a report of all Topics that have been
opened for the permit. To add a new topic, click “Add Topic”
The dialogue box will reload to show a comment box, where you can input the intent of the topic,
provide a subject title, and leave your comments. Begin by selecting the purpose of your topics through
the “Category” drop-down menu.

ePlan Applicant User Guide
5030670 v3 41
Once you have entered the subject title and content of the Topic, click either “Save” or “Save & Prepare
Email”.
Clicking “Save” will save the topic on ePlan. Clicking “Save & Prepare Email” will allow you to send an
email notification to specified recipients with the content of your Topic. If you click “Save & Prepare
Email”, the dialogue box will update to show potential recipients. For each person you wish to email,
expand the group they belong to by clicking the “+” icon. A list of personnel within that group will
appear. Check off the person or people you wish to email, then click “Send”.

ePlan Applicant User Guide
5030670 v3 42
The dialogue box will update to confirm that the email has been sent. Click “Close Window” to exit.
Respond to an Existing Topic If another project party sends you an email through ePlan, you will receive a notification email within
information on the originator, the permit of discussion, the Topic subject and the comments left.
Respond to the comment by clicking “Topic Access”.
ePlan will open, directing you to log in and access the comment. The Topic & Notes dialogue box with
the relevant topic will automatically open. Click “Add Note” to respond to the Topic.
ePlan Applicant User Guide
5030670 v3 43
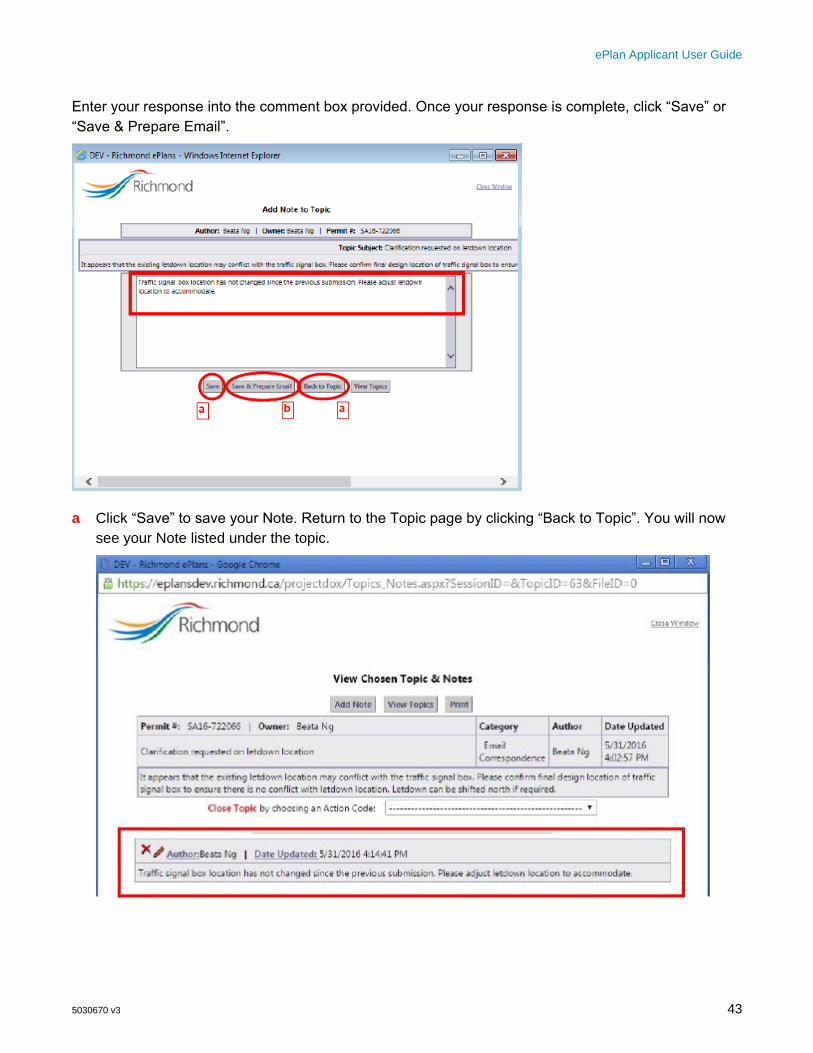
Enter your response into the comment box provided. Once your response is complete, click “Save” or
“Save & Prepare Email”.
a Click “Save” to save your Note. Return to the Topic page by clicking “Back to Topic”. You will now
see your Note listed under the topic.
ePlan Applicant User Guide
5030670 v3 44
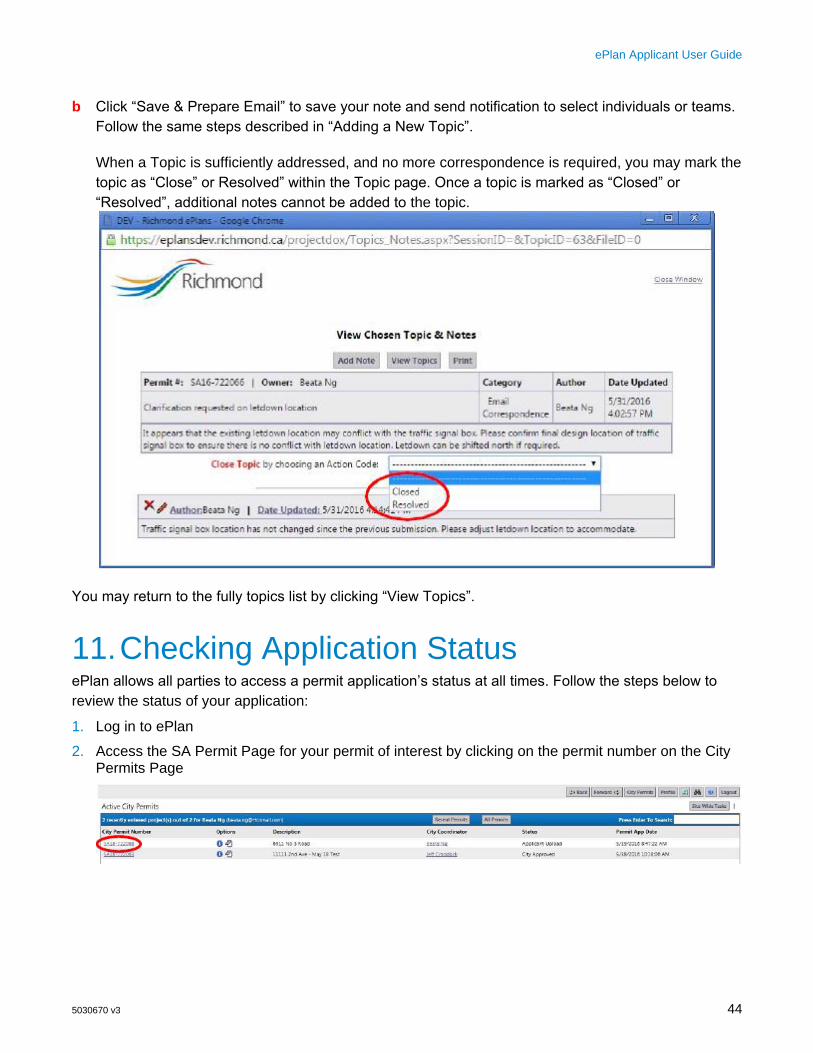
b Click “Save & Prepare Email” to save your note and send notification to select individuals or teams.
Follow the same steps described in “Adding a New Topic”.
When a Topic is sufficiently addressed, and no more correspondence is required, you may mark the
topic as “Close” or Resolved” within the Topic page. Once a topic is marked as “Closed” or
“Resolved”, additional notes cannot be added to the topic.
You may return to the fully topics list by clicking “View Topics”.
11. Checking Application Status ePlan allows all parties to access a permit application’s status at all times. Follow the steps below to
review the status of your application:
1. Log in to ePlan
2. Access the SA Permit Page for your permit of interest by clicking on the permit number on the City Permits Page
ePlan Applicant User Guide
5030670 v3 45
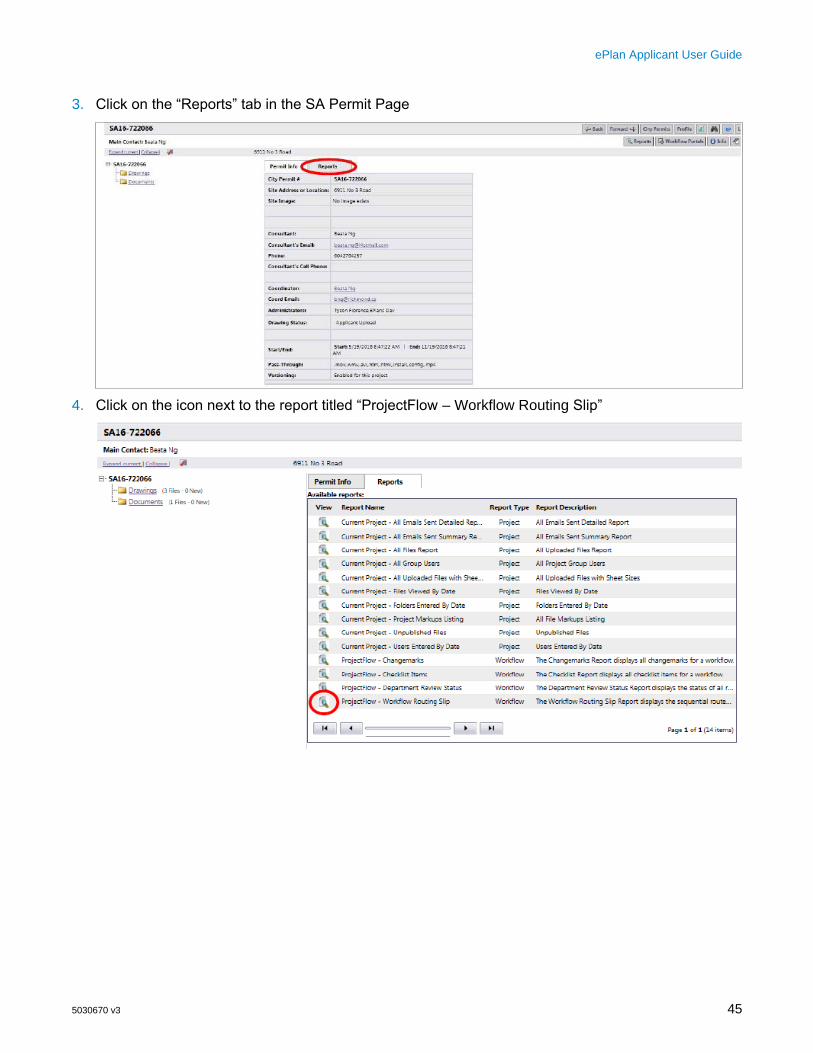
3. Click on the “Reports” tab in the SA Permit Page
4. Click on the icon next to the report titled “ProjectFlow – Workflow Routing Slip”

ePlan Applicant User Guide
5030670 v3 46
5. A dialogue box for the Workflow Routing Slip will open. Within the “Workflow Instance” dropdown, select the appropriate review cycle, then click “View Report”.
6. A Workflow Routing report will generate, providing you with the status of all tasks that have been initiated to date.

ePlan Applicant User Guide
5030670 v3 47
This report provides information on the tasks initiated, dates assigned, accepted and completed, and
the responsible group. If the task is accepted but not complete, you can check the duration the task has
been in process. Please allow staff a minimum of ten working days to complete tasks before contacting
the department for a detailed update.
Thank you for taking time to review this Applicant Guide. Should you have any questions on how to
complete your task, please contact your assigned Development Applications Coordinator.
ePlan Applicant User Guide
5030670 v3 48
Appendix A – City of Richmond ePlan System
Terms and Conditions of Use Your access to and use of the City of Richmond ("City") ePlan website (the "Site") is subject to the
following terms and conditions, as well as all applicable laws. Your access to the Site is in consideration
for your agreement to these Terms and Conditions of Use, whether or not you are a registered user. By
logging in, you accept, without limitation or qualification, these Terms and Conditions of Use.
Throughout these Terms and Conditions, the words "you" and "your" mean you and the employees,
consultants, contractors, and any other parties who access the Site using your password.
Modification of the Agreement
The City maintains the right to modify these Terms and Conditions of Use and may do so by posting
such modifications on its Site. Any modification is effective immediately upon publishing unless
otherwise stated. Your continued use of the Site following any modification signifies your acceptance of
such modification.
Conduct
You agree to access and use the Site only for lawful purposes. You are solely responsible for the
knowledge of and adherence to any and all laws, statutes, rules and regulations pertaining to your use
of the Site. By accessing the Site, you agree that you will not:
Use the Site to commit a criminal offense or to encourage others to conduct that which would
constitute a criminal offense or give rise to a civil liability;
Post or transmit any unlawful, threatening, libelous, harassing, defamatory, vulgar, obscene,
pornographic, profane, or otherwise objectionable content;
Use the Site to impersonate other parties or entities;
Use the Site to upload any content that contains a software virus, "Trojan Horse" or any other
computer code, files, or programs that may alter, damage, or interrupt the functionality of the Site or
the hardware or software of any other person who accesses the Site;
Upload, post, email, or otherwise transmit any materials that you do not have a right to transmit
under any law or under a contractual relationship;
Disrupt the normal flow of communication in any way;
Claim a relationship with or speak for any business, association, or other organization for which you
are not authorized to speak for or claim such a relationship;
Post or transmit any unsolicited advertising, promotional materials, or other forms of solicitation; or,
Post any material that infringes or violates the intellectual property rights of another.
ePlan Applicant User Guide
5030670 v3 49
Termination of Use
The City may, in its sole discretion, with or without cause, terminate or suspend your access and use of
this Site without notice and for any reason, including but not limited to:
Your violation of these Terms and Conditions of Use;
Your failure to pay any fee due in connection with the project;
Your failure to pay any fee due in connection with your use of this Site; or
Other conduct by you which the City, in its sole discretion, believes is unlawful or harmful to others.
In the event of termination, you are no longer authorized to access the Site, and the City will use
whatever means possible to enforce such termination.
Content
The City has the right to monitor the content that you provide, but is not obligated to do so. The City
reserves the right to delete, move, or edit any material that the City considers unacceptable or
inappropriate, whether for legal or other reasons. You agree to abide by all copyright laws and notices.
Timeliness
The City has the right to expire, close or terminate any account that has not been used, or had no
activity occur on the account within a term, at the discretion of the City without notice to the account
holder. It is the responsibility of the account holder to monitor and review their account for denied
projects, projects with corrections, and plan approvals. Plan review requirement responses must be
made using the system in a reasonable timely manner.
Indemnity
You agree to defend, indemnify, and hold harmless the City and its employees ("Indemnified Parties")
from any and all liabilities and costs incurred by Indemnified Parties in connection with any claim arising
from your use of the Site, including but not limited to, any breach by you of these Terms and Conditions
of Use, including reasonable attorneys' fees and costs. You agree to cooperate as fully as may be
reasonably possible in the defense of any such claim. The City reserves the right to assume, at its own
expense, the exclusive defense and control of any matter otherwise subject to indemnification by you.
You in turn shall not settle any matter without the written consent of the City.
Disclaimer of Warranty
You expressly understand and agree that your use of the Site, or any material available through this
Site, is at your own risk. Neither the City nor its employees warrant that the Site will be uninterrupted,
problem-free, free of omissions, misstatements, or errors; nor do they make any warranty as to the
results that may be obtained from the use of the Site. The content and function of the Site are provided
to you "as is," without warranties of any kind, either express or implied, including, but not limited to,
warranties of title, merchantability, fitness for a particular purpose or use.

ePlan Applicant User Guide
5030670 v3 50
Limitation of Liability
In no event will the City or its employees be liable for any incidental, indirect, special, punitive,
exemplary, or consequential damages, arising out of your use of or inability to use the Site, including
without limitation, loss of revenue or anticipated profits, loss of goodwill, loss of business, loss of data,
failure to meet deadlines, computer failure or malfunction, or any and all other damages.
Site Maintenance
The City has the right to perform periodic maintenance on the Site, which maintenance may cause
service interruption, without prior notification to you.
Modification of the Agreement
The City maintains the right to modify these Terms and Conditions of Use and may do so by posting
such modifications on this page or Site. Any modification is effective immediately upon publishing
unless otherwise stated. Your continued use of the Site following any modification signifies your
acceptance of such modification.