verbindungsaufbau gemÜ io-link geräte mit usb / …...quick guide io-link geräte mit usb /...
TRANSCRIPT
Quick Guide IO-Link Geräte mit USB / IO-Link Master
1 / 26 Rev.03, 16.11.2016
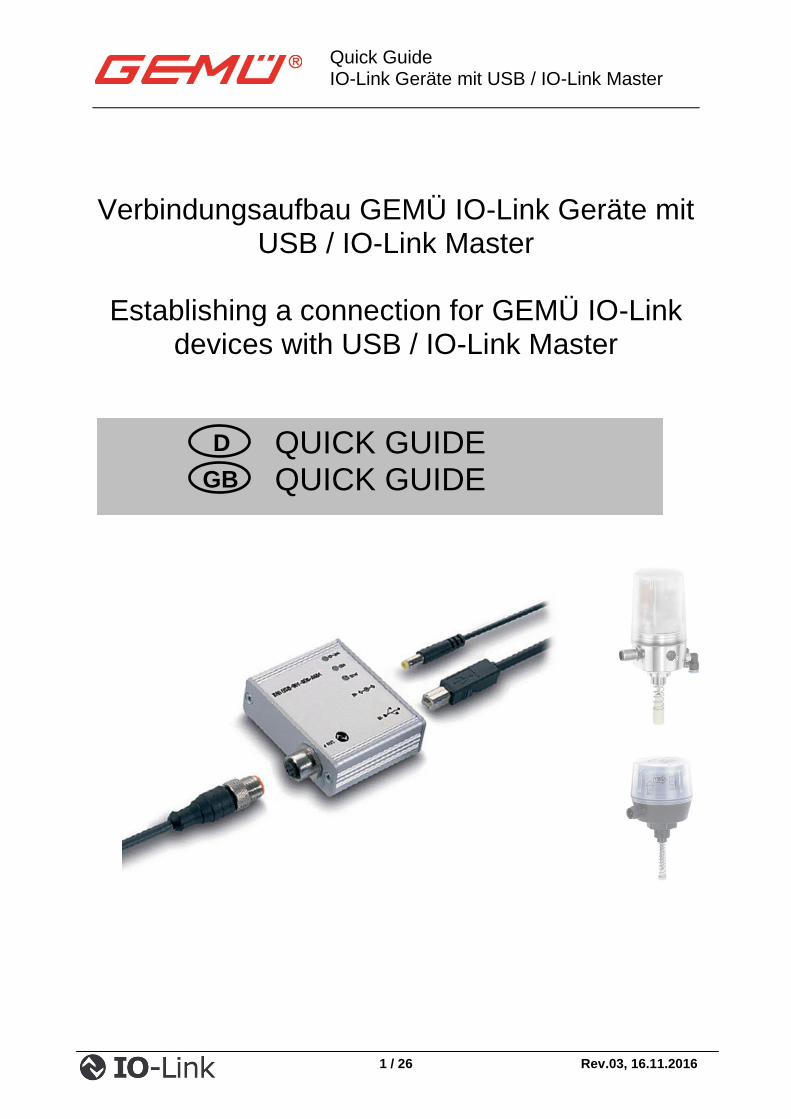
Verbindungsaufbau GEMÜ IO-Link Geräte mit
USB / IO-Link Master
Establishing a connection for GEMÜ IO-Link devices with USB / IO-Link Master
QUICK GUIDE QUICK GUIDE
D
GB
Quick Guide IO-Link Geräte mit USB / IO-Link Master
2 / 26 Rev.03, 16.11.2016
Inhalt
1 Hardware-Lieferumfang 3
2 Systemanforderungen 3
3 Software-Installation 3
3.1 Download 3
3.2 Installation - PACTware Version 4 4
3.3 Installation - Turck Software „IO-Link IODD Interpreter und DTM“ 5
3.4 Installation - Turck Software „DTM für USB IO-Link Master 6
3.5 Integration der Geräte IODD’s 7
4 Geräte verbinden und konfigurieren 8
5 Anschluss USB / IO-Link Master 9
5.1 Anschluss GEMÜ 1235/1236 Geräteausführung 3E / 4E 9
5.2 Anschluss GEMÜ 1235/1236 Geräteausführung 3S / 4S 9
5.3 Anschluss GEMÜ 4242 IO-Link Geräteausführung 4242IOL… 10
5.4 Anschluss GEMÜ 4242 24V Geräteausführung 4242000 10
6 Gerät verbinden und parametrieren 11
6.1 Gerät verbinden 11
6.2 Gerät parametrieren 12
6.3 Beobachtung – Prozessdaten – Diagnose 13
Quick Guide IO-Link Geräte mit USB / IO-Link Master
3 / 26 Rev.03, 16.11.2016
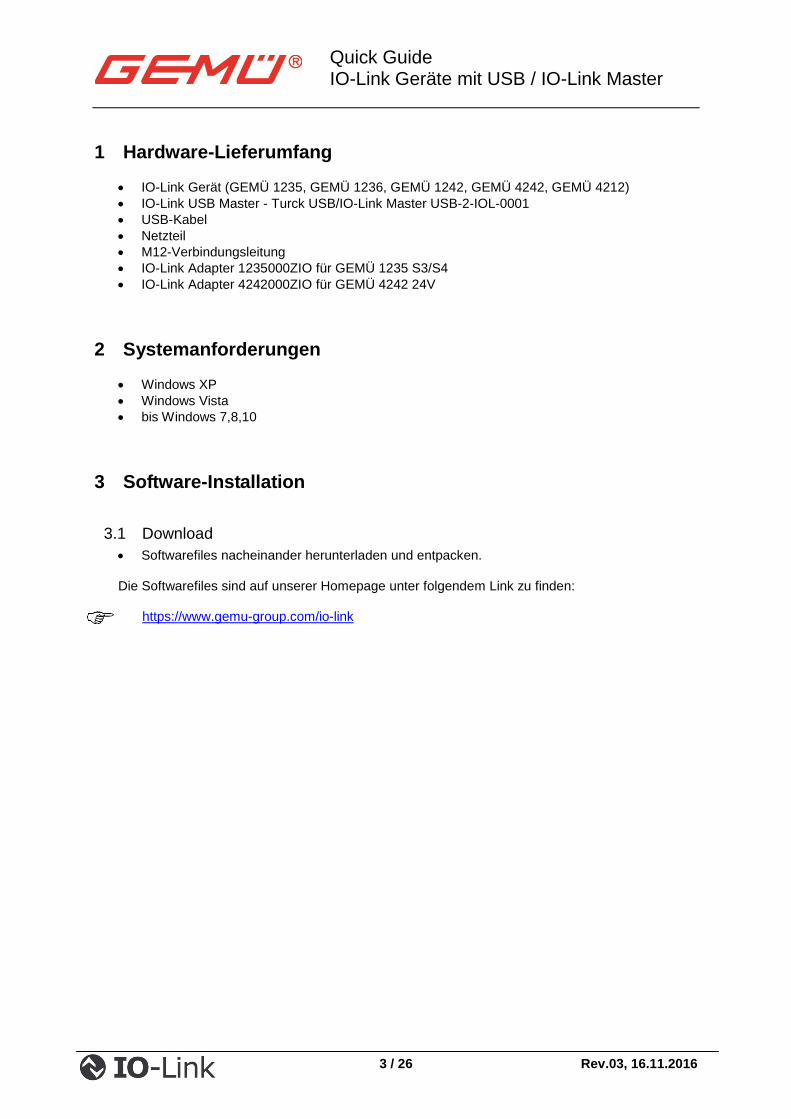
1 Hardware-Lieferumfang
IO-Link Gerät (GEMÜ 1235, GEMÜ 1236, GEMÜ 1242, GEMÜ 4242, GEMÜ 4212)
IO-Link USB Master - Turck USB/IO-Link Master USB-2-IOL-0001
USB-Kabel
Netzteil
M12-Verbindungsleitung
IO-Link Adapter 1235000ZIO für GEMÜ 1235 S3/S4
IO-Link Adapter 4242000ZIO für GEMÜ 4242 24V
2 Systemanforderungen
Windows XP
Windows Vista
bis Windows 7,8,10
3 Software-Installation
3.1 Download
Softwarefiles nacheinander herunterladen und entpacken.
Die Softwarefiles sind auf unserer Homepage unter folgendem Link zu finden:
https://www.gemu-group.com/io-link
Quick Guide IO-Link Geräte mit USB / IO-Link Master
4 / 26 Rev.03, 16.11.2016
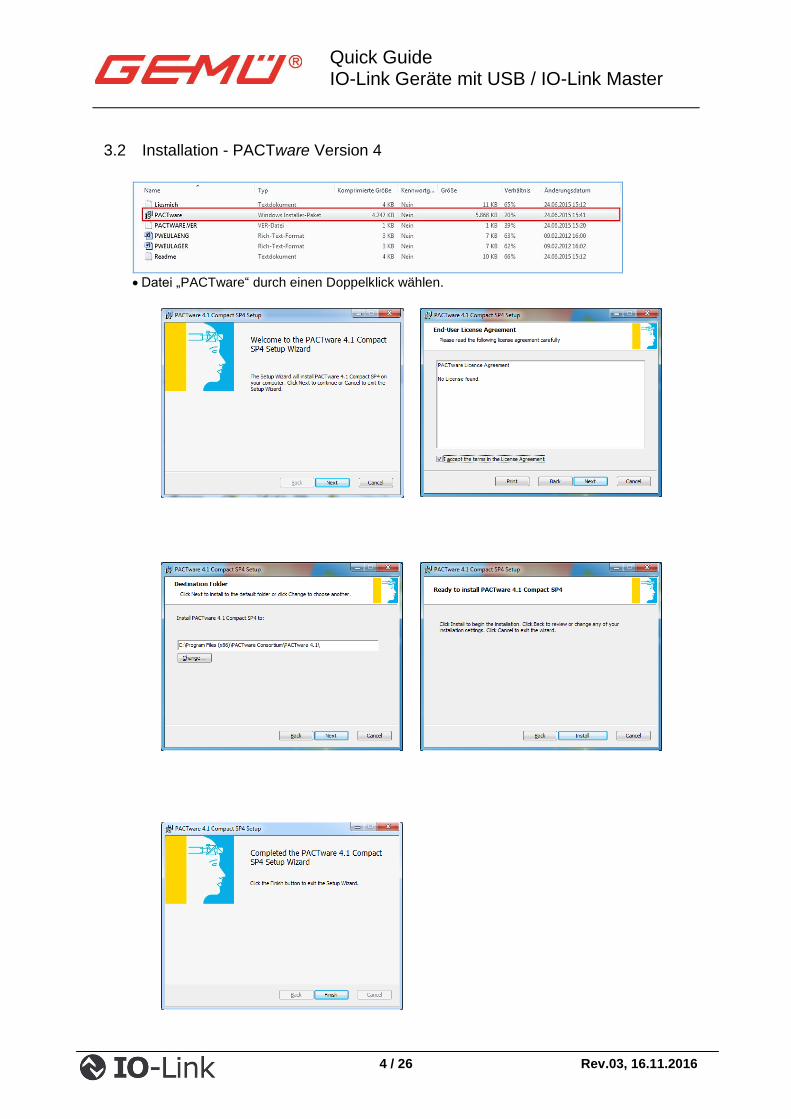
3.2 Installation - PACTware Version 4
Datei „PACTware“ durch einen Doppelklick wählen.
Quick Guide IO-Link Geräte mit USB / IO-Link Master
5 / 26 Rev.03, 16.11.2016
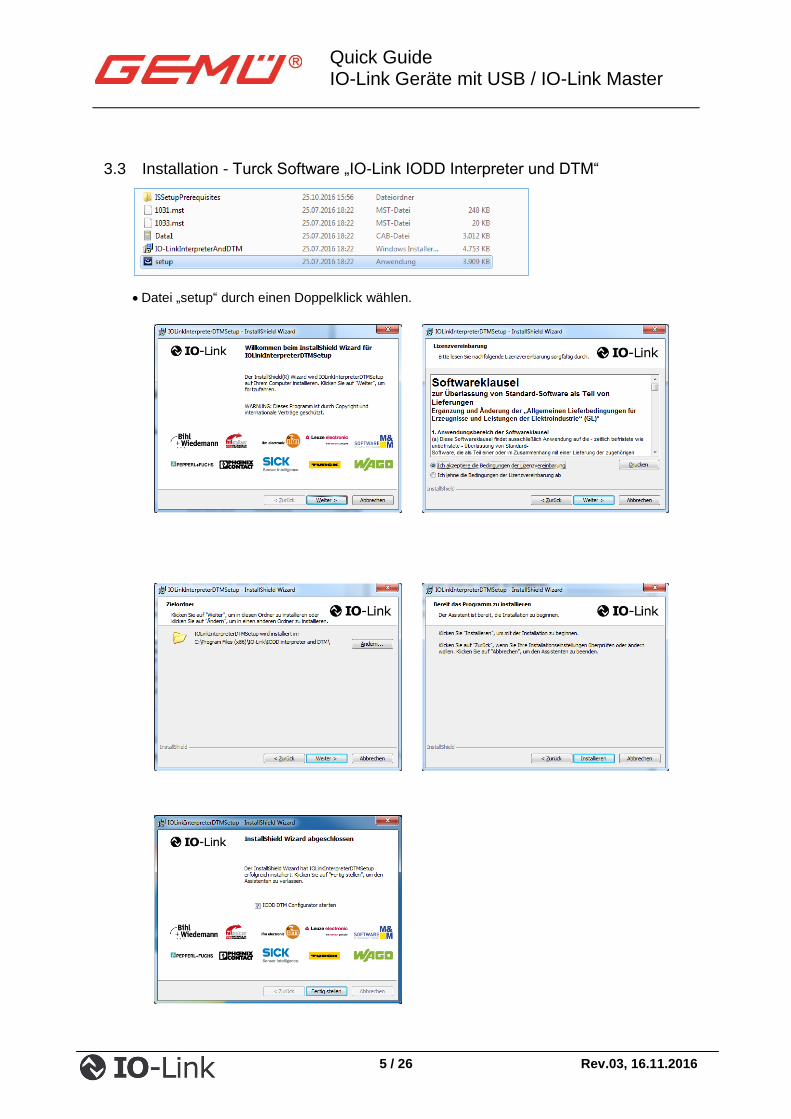
3.3 Installation - Turck Software „IO-Link IODD Interpreter und DTM“
Datei „setup“ durch einen Doppelklick wählen.
Quick Guide IO-Link Geräte mit USB / IO-Link Master
6 / 26 Rev.03, 16.11.2016
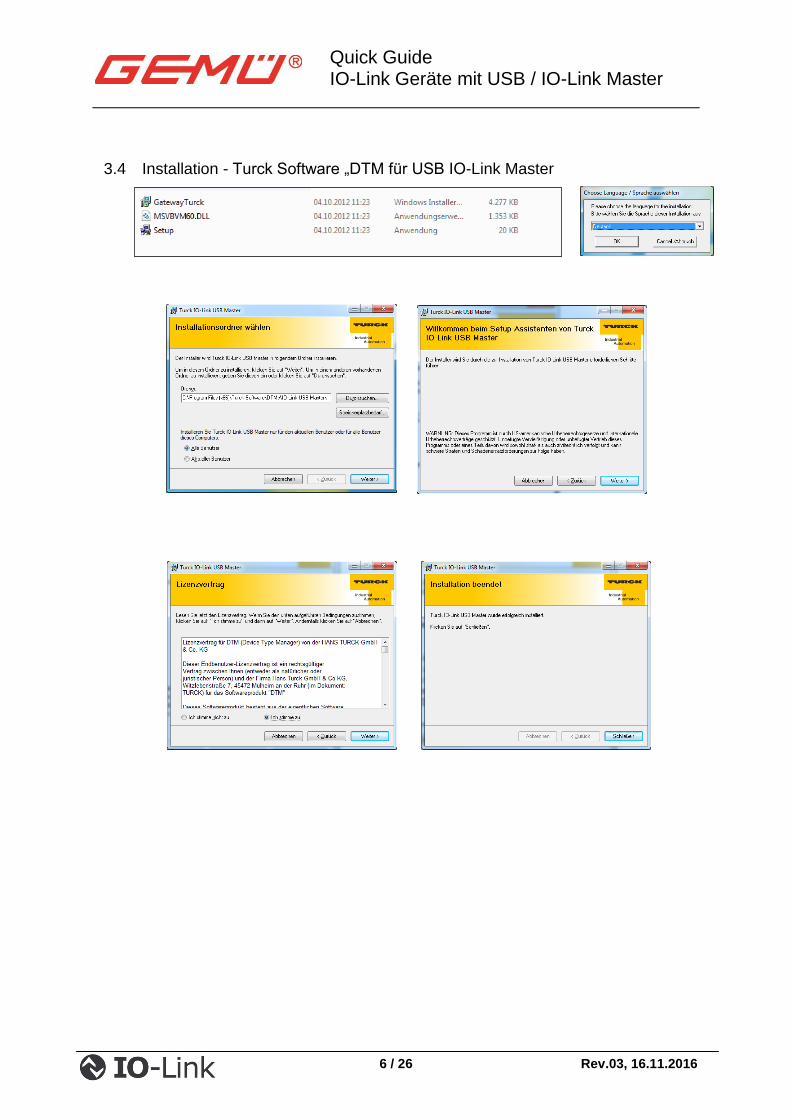
3.4 Installation - Turck Software „DTM für USB IO-Link Master

Quick Guide IO-Link Geräte mit USB / IO-Link Master
7 / 26 Rev.03, 16.11.2016
3.5 Integration der Geräte IODD’s
IODD‘s herunterladen und entpacken.
Die IODD‘s sind auf unserer Homepage unter folgendem Link zu finden:
https://www.gemu-group.com/de_DE/produktdokumentation/software/
IODD DTM Configurator starten.
IODD hinzufügen.
Heruntergeladene und endpackte IODD hinzufügen.
„Schließen“ wählen.

Quick Guide IO-Link Geräte mit USB / IO-Link Master
8 / 26 Rev.03, 16.11.2016
4 Geräte verbinden und konfigurieren
PACTware starten.
Gerätekatalog wählen (falls der Gerätekatalog seitlich rechts nicht zu sehen ist, Taste F3 wählen).
„IO-Link USB Master“ durch einen Doppelklick wählen.
„1235/1236 IODD 1.0.1“ durch einen Doppelklick wählen.
Anmerkung: Hier wurde bespielhaft mit 1235/1236 IODD gearbeitet.
Quick Guide IO-Link Geräte mit USB / IO-Link Master
9 / 26 Rev.03, 16.11.2016
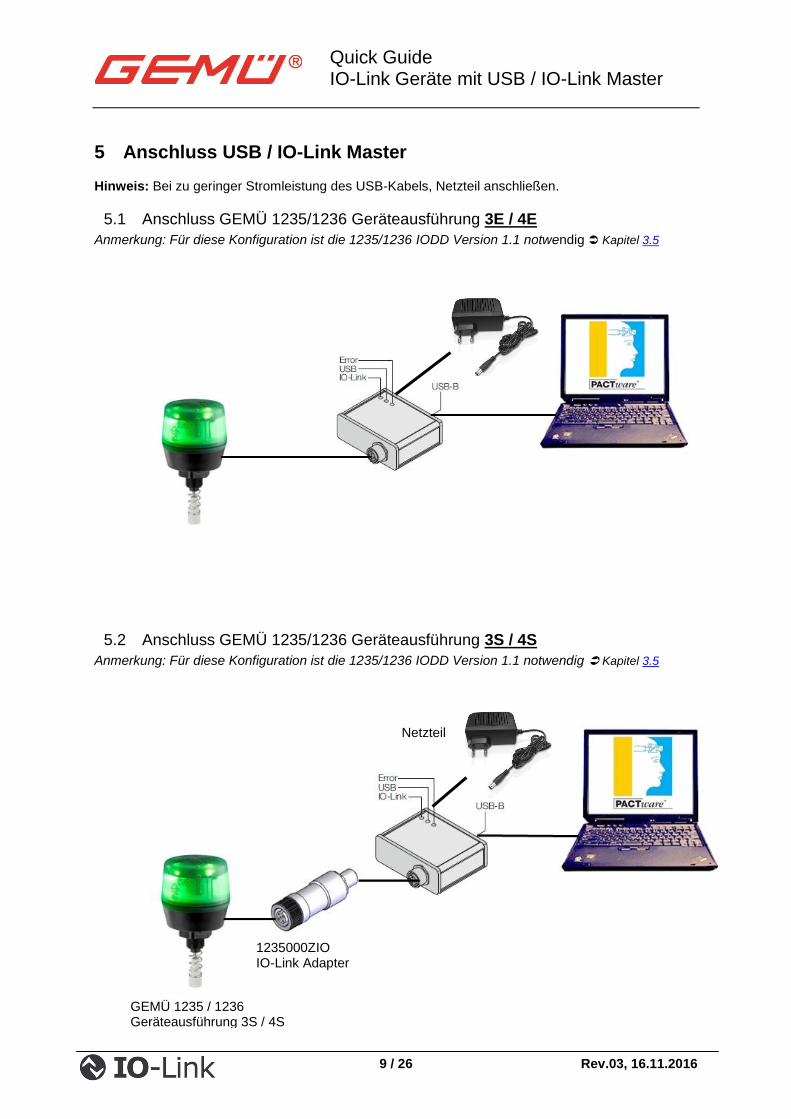
5 Anschluss USB / IO-Link Master
Hinweis: Bei zu geringer Stromleistung des USB-Kabels, Netzteil anschließen.
5.1 Anschluss GEMÜ 1235/1236 Geräteausführung 3E / 4E
Anmerkung: Für diese Konfiguration ist die 1235/1236 IODD Version 1.1 notwendig Kapitel 3.5
5.2 Anschluss GEMÜ 1235/1236 Geräteausführung 3S / 4S
Anmerkung: Für diese Konfiguration ist die 1235/1236 IODD Version 1.1 notwendig Kapitel 3.5
1235000ZIO IO-Link Adapter
GEMÜ 1235 / 1236 Geräteausführung 3S / 4S
Netzteil
Quick Guide IO-Link Geräte mit USB / IO-Link Master
10 / 26 Rev.03, 16.11.2016
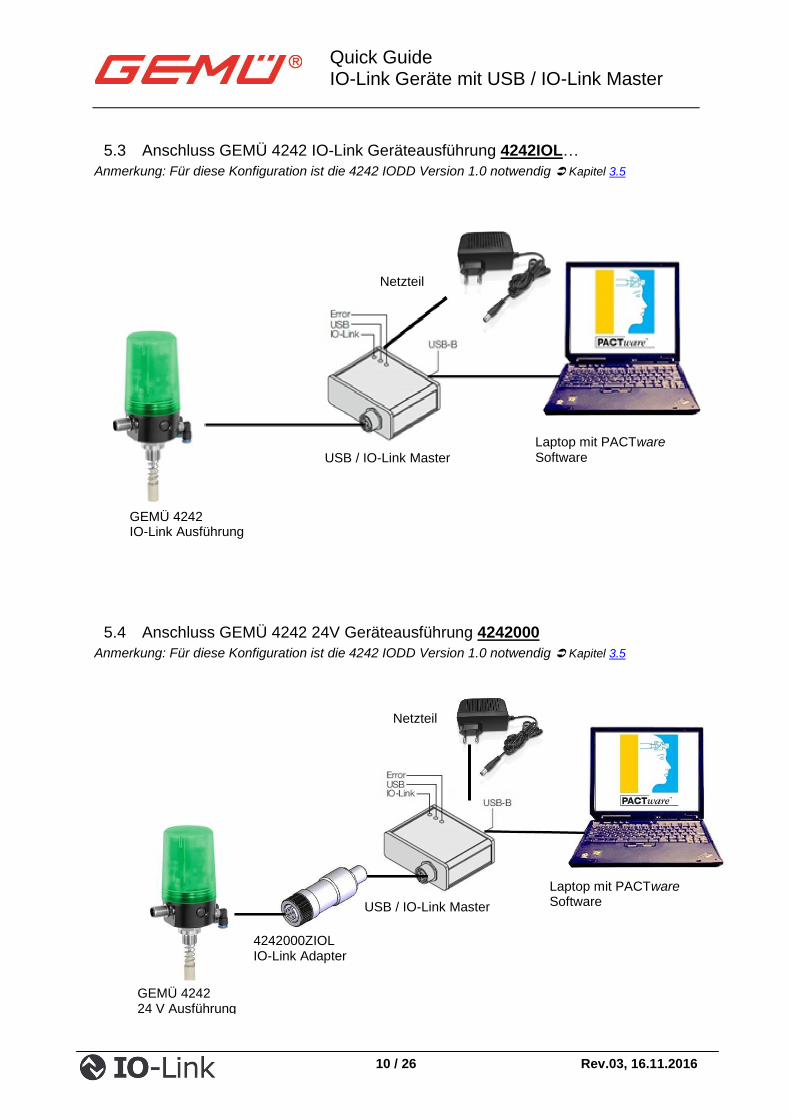
5.3 Anschluss GEMÜ 4242 IO-Link Geräteausführung 4242IOL…
Anmerkung: Für diese Konfiguration ist die 4242 IODD Version 1.0 notwendig Kapitel 3.5
5.4 Anschluss GEMÜ 4242 24V Geräteausführung 4242000
Anmerkung: Für diese Konfiguration ist die 4242 IODD Version 1.0 notwendig Kapitel 3.5
Netzteil
Laptop mit PACTware Software USB / IO-Link Master
GEMÜ 4242 IO-Link Ausführung
Netzteil
Laptop mit PACTware Software USB / IO-Link Master
4242000ZIOL IO-Link Adapter
GEMÜ 4242 24 V Ausführung
Quick Guide IO-Link Geräte mit USB / IO-Link Master
11 / 26 Rev.03, 16.11.2016
6 Gerät verbinden und parametrieren
6.1 Gerät verbinden
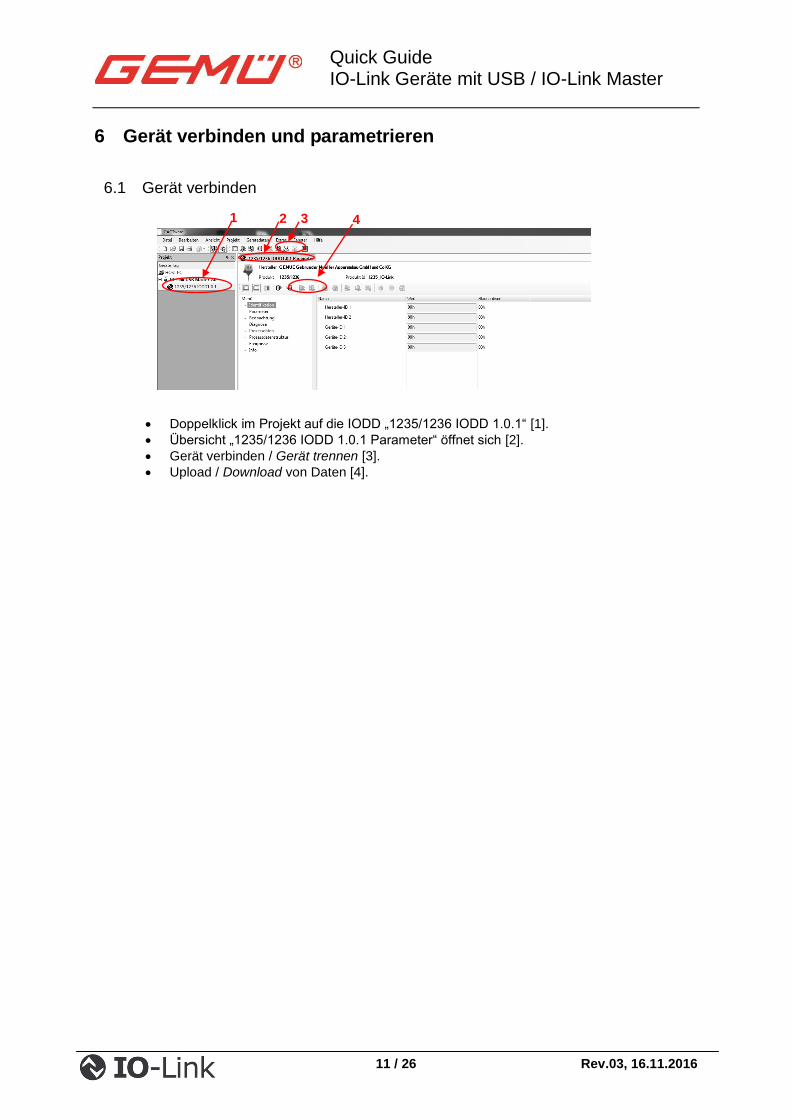
Doppelklick im Projekt auf die IODD „1235/1236 IODD 1.0.1“ [1].
Übersicht „1235/1236 IODD 1.0.1 Parameter“ öffnet sich [2].
Gerät verbinden / Gerät trennen [3].
Upload / Download von Daten [4].
2 3 1 4

Quick Guide IO-Link Geräte mit USB / IO-Link Master
12 / 26 Rev.03, 16.11.2016
6.2 Gerät parametrieren
USB/IO-Link Master anschließen (siehe Kapitel 5).
Gerät verbinden (siehe Kapitel 6.1).
Gerätedaten hochladen.
Geräteidentifikation und Geräteversionen werden angezeigt Information.
Parameter: hier erfolgt die Parametrierung des Gerätes.
Beispiel: Parameter LED’s invertieren: Parameter umstellen auf inversed.
Gerätedaten Download wählen.
So können die verschiedenen Parameter im Gerät geändert werden:
Parameter ändern.
Gerätedaten Download wählen. Anmerkung: Werden mehrere Geräte nacheinander parametriert, zuerst das Gerät in der PactWare trennen (Kapitel 6.1, Hinweis 3). Anschließend das Gerät vom IO-Link Master nehmen. Die Funktionen der Parameter können in der jeweiligen Betriebsanleitung des zu parametrierenden Gerätes nachgelesen werden.
Quick Guide IO-Link Geräte mit USB / IO-Link Master
13 / 26 Rev.03, 16.11.2016
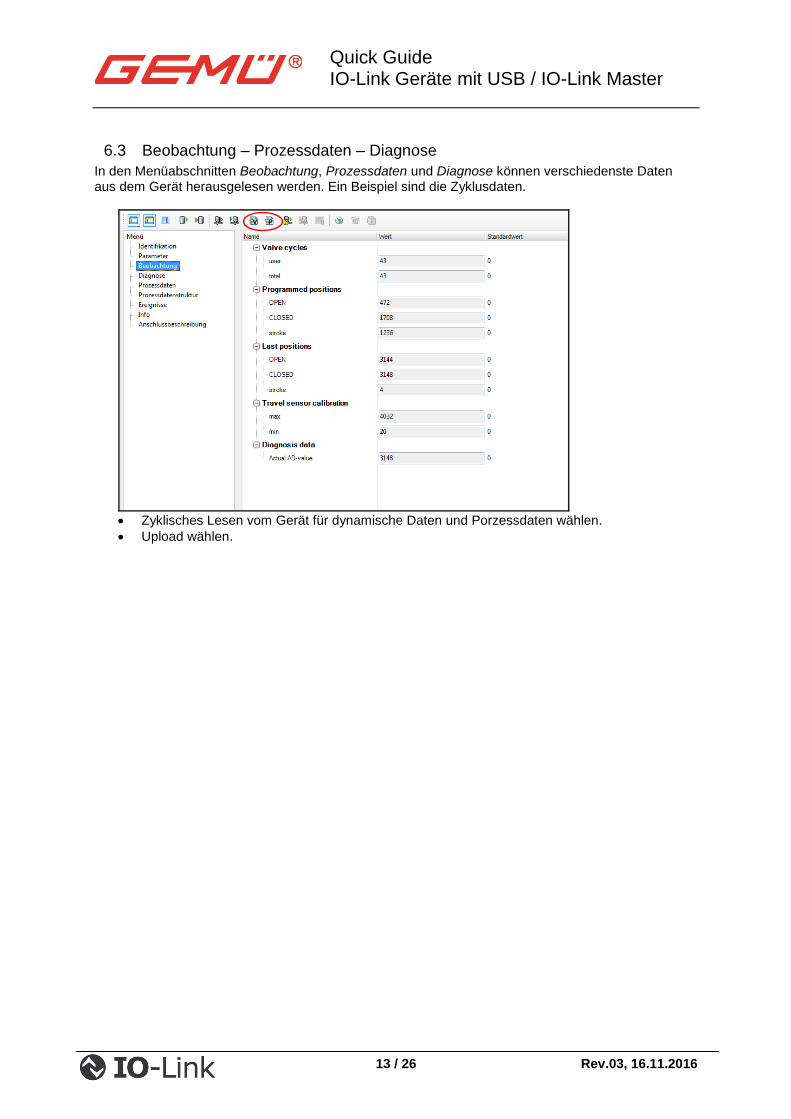
6.3 Beobachtung – Prozessdaten – Diagnose
In den Menüabschnitten Beobachtung, Prozessdaten und Diagnose können verschiedenste Daten aus dem Gerät herausgelesen werden. Ein Beispiel sind die Zyklusdaten.
Zyklisches Lesen vom Gerät für dynamische Daten und Porzessdaten wählen.
Upload wählen.
Quick Guide IO-Link Geräte mit USB / IO-Link Master
14 / 26 Rev.03, 16.11.2016
Inhalt
1 Hardware scope of delivery 155
2 System requirements 155
3 Software installation 155
3.1 Download 155
3.2 Installation – PACTware Version 4 166
3.3 Installation – Turck software "IO-Link IODD Interpreter and DTM" 177
3.4 Installation – Turck software "DTM for USB IO-Link Master" 18
3.5 Integration of the device IODDs 19
4 Connecting and configuring devices 20
5 USB / IO-Link Master connection 21
5.1 Connection for the GEMÜ 1235/1236 device version 3E/4E 21
5.2 Connection for the GEMÜ 1235/1236 device version 3S/4S 21
5.3 Connection for the GEMÜ 4242 IO-Link device version 4242IOL… 22
5.4 Connection for the GEMÜ 4242 24 V device version 4242000 22
6 Connecting and parameterizing the device 23
6.1 Connecting the device 23
6.2 Parameterize device 244
6.3 Observation – process data – diagnostics 255
Quick Guide IO-Link Geräte mit USB / IO-Link Master
15 / 26 Rev.03, 16.11.2016
1 Hardware scope of delivery
IO-Link device (GEMÜ 1235, GEMÜ 1236, GEMÜ 1242, GEMÜ 4242, GEMÜ 4212)
IO-Link USB Master – Turck USB/IO-Link Master USB-2-IOL-0001
USB cable
Power supply unit
M12 connection cable
1235000ZIO IO-Link adapter for GEMÜ 1235 S3/S4
4242000ZIO IO-Link adapter for GEMÜ 4242 24V
2 System requirements
Windows XP
Windows Vista
up to Windows 7,8,10
3 Software installation
3.1 Download
Download and unpack the software files one after the other.
The software files are available from our web site via the following link:
https://www.gemu-group.com/io-link
Quick Guide IO-Link Geräte mit USB / IO-Link Master
16 / 26 Rev.03, 16.11.2016
3.2 Installation – PACTware Version 4
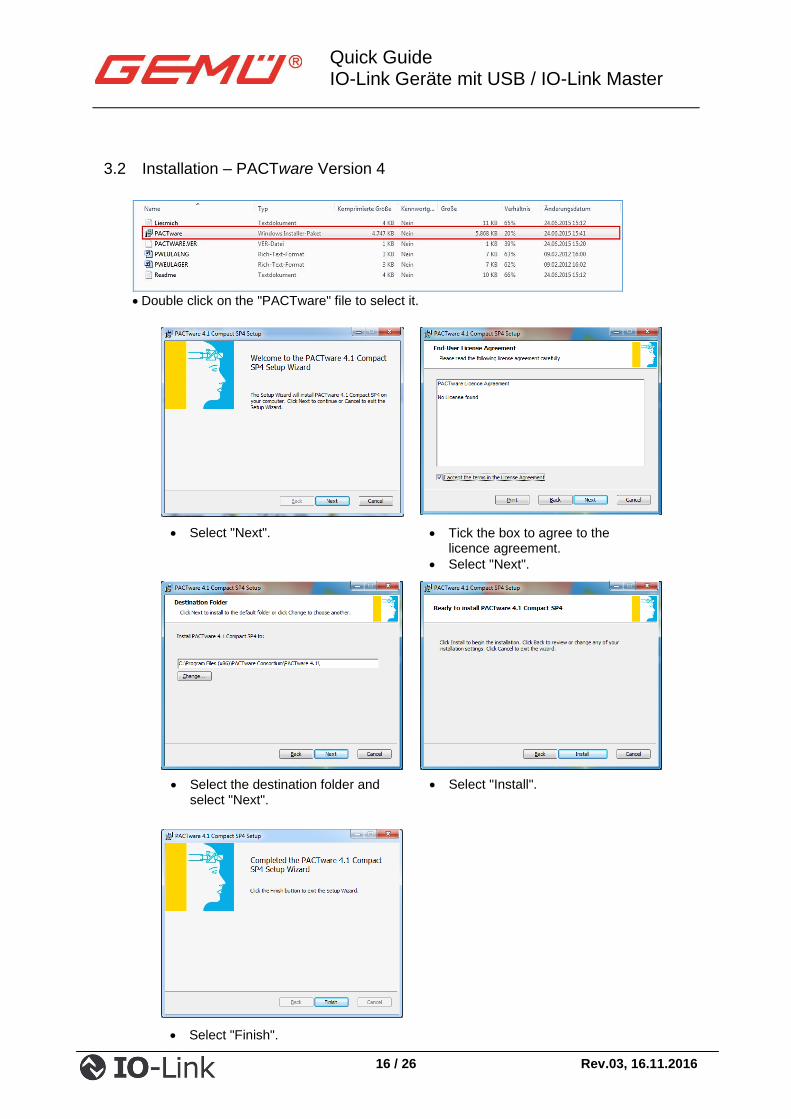
Double click on the "PACTware" file to select it.
Select "Next". Tick the box to agree to the licence agreement.
Select "Next".
Select the destination folder and select "Next".
Select "Install".
Select "Finish".
Quick Guide IO-Link Geräte mit USB / IO-Link Master
17 / 26 Rev.03, 16.11.2016
3.3 Installation – Turck software "IO-Link IODD Interpreter and DTM"
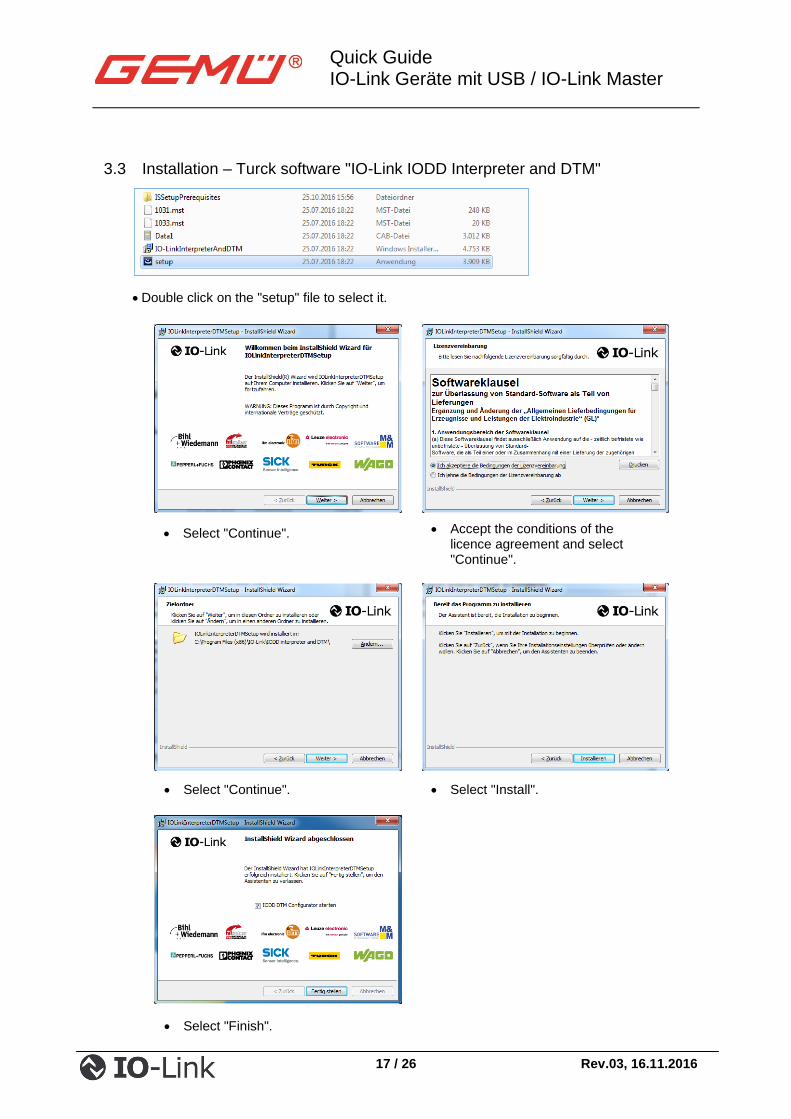
Double click on the "setup" file to select it.
Select "Continue". Select "Install".
Select "Continue". Accept the conditions of the licence agreement and select "Continue".
Select "Finish".
Quick Guide IO-Link Geräte mit USB / IO-Link Master
18 / 26 Rev.03, 16.11.2016
3.4 Installation – Turck software "DTM for USB IO-Link Master"
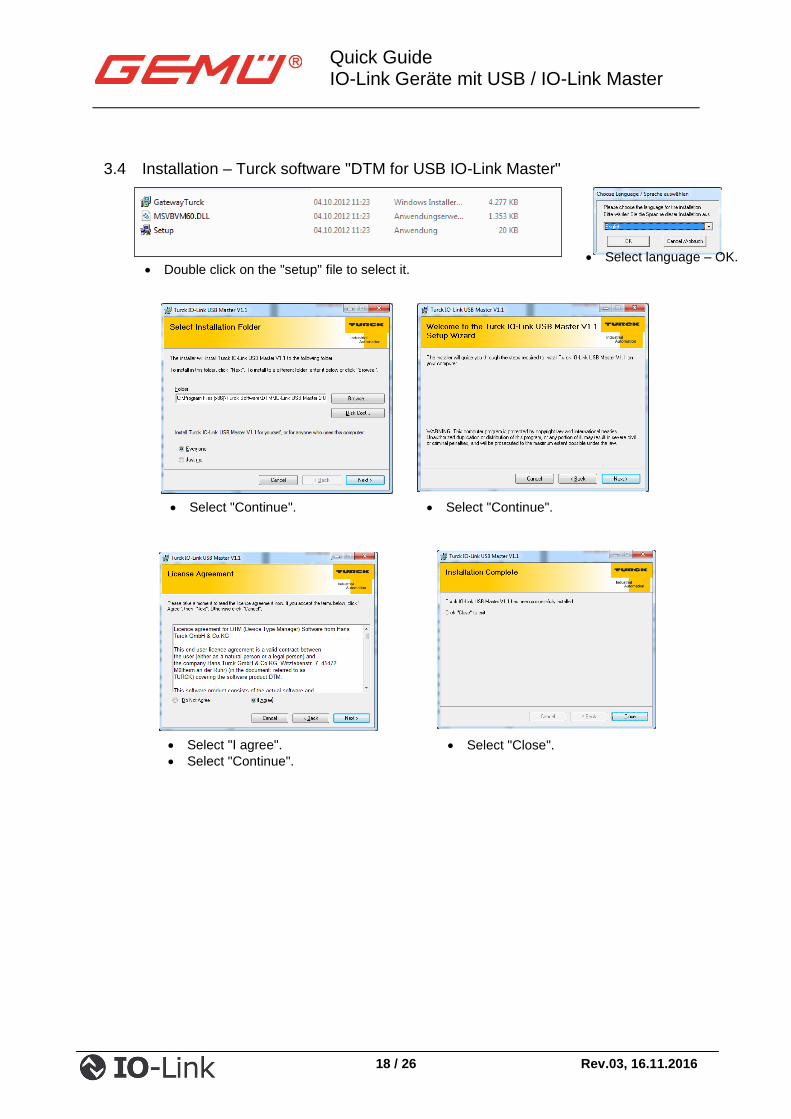
Double click on the "setup" file to select it. Select language – OK.
Select "Continue". Select "Continue".
Select "I agree".
Select "Continue".
Select "Close".
Quick Guide IO-Link Geräte mit USB / IO-Link Master
19 / 26 Rev.03, 16.11.2016
3.5 Integration of the device IODDs
Download and unpack IODDs.
The IODDs are available from our web site via the following link:
https://www.gemu-group.com/de_DE/produktdokumentation/software/
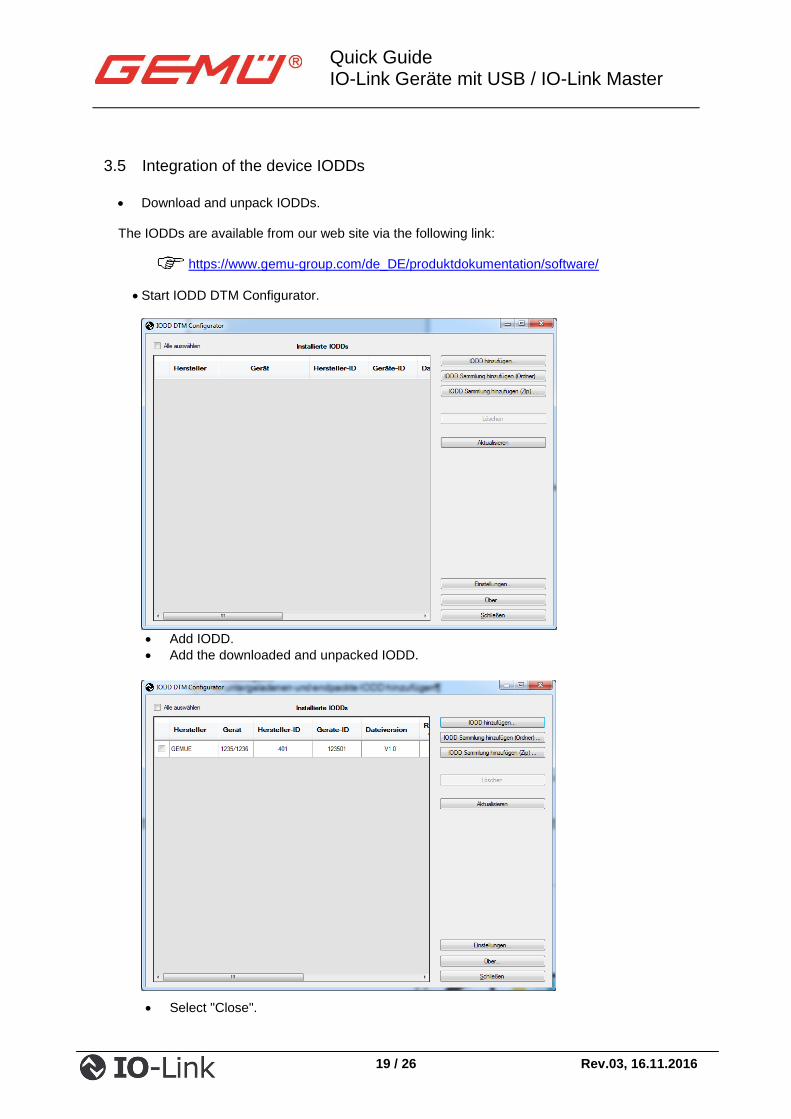
Start IODD DTM Configurator.
Add IODD.
Add the downloaded and unpacked IODD.
Select "Close".
Quick Guide IO-Link Geräte mit USB / IO-Link Master
20 / 26 Rev.03, 16.11.2016
4 Connecting and configuring devices
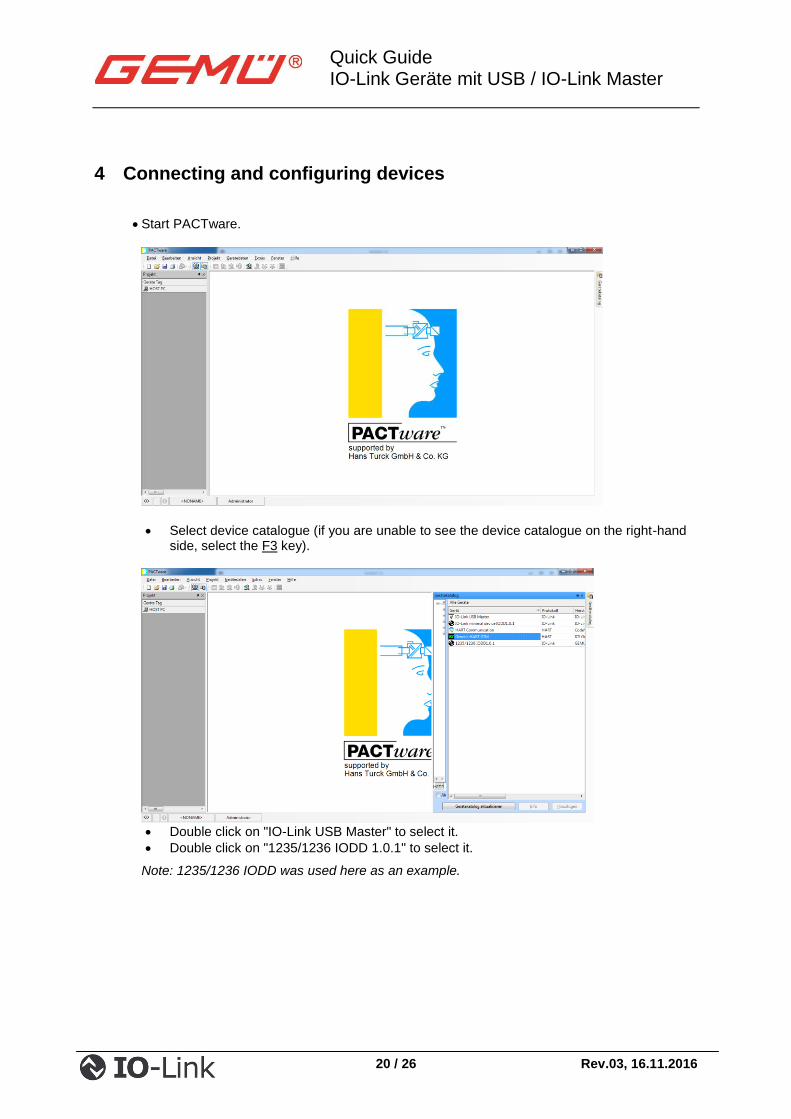
Start PACTware.
Select device catalogue (if you are unable to see the device catalogue on the right-hand side, select the F3 key).
Double click on "IO-Link USB Master" to select it.
Double click on "1235/1236 IODD 1.0.1" to select it.
Note: 1235/1236 IODD was used here as an example.
Quick Guide IO-Link Geräte mit USB / IO-Link Master
21 / 26 Rev.03, 16.11.2016
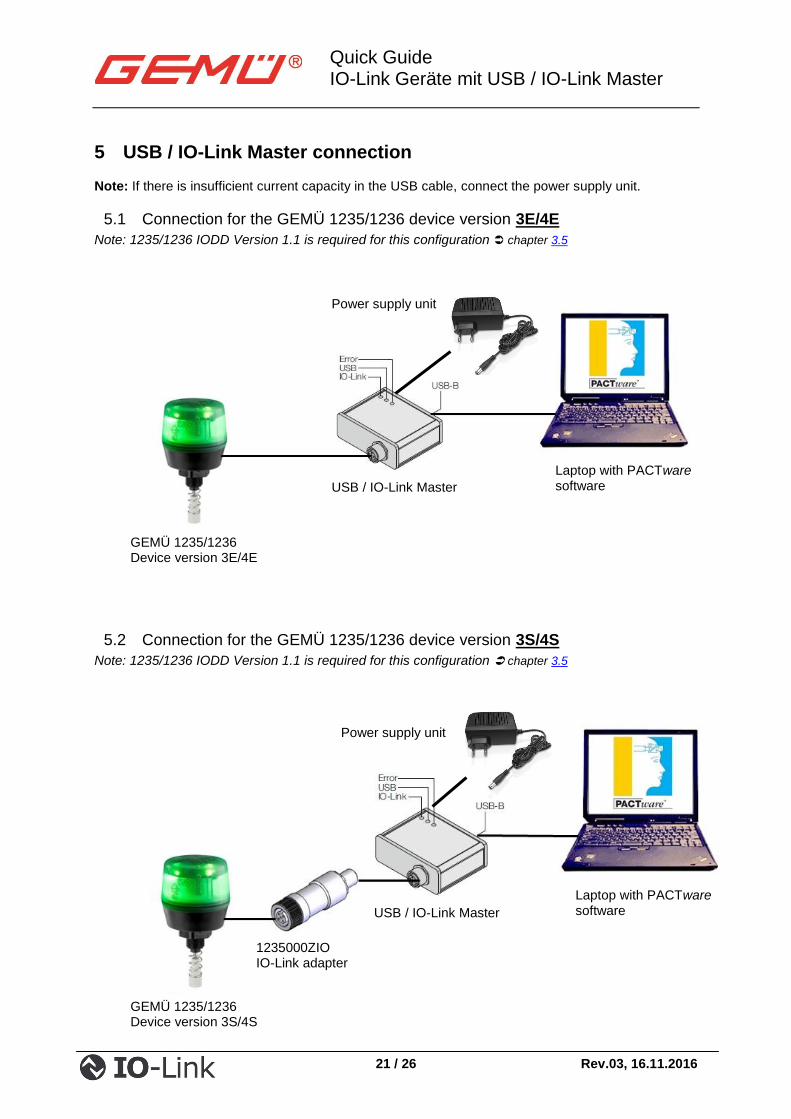
5 USB / IO-Link Master connection
Note: If there is insufficient current capacity in the USB cable, connect the power supply unit.
5.1 Connection for the GEMÜ 1235/1236 device version 3E/4E
Note: 1235/1236 IODD Version 1.1 is required for this configuration chapter 3.5
5.2 Connection for the GEMÜ 1235/1236 device version 3S/4S
Note: 1235/1236 IODD Version 1.1 is required for this configuration chapter 3.5
GEMÜ 1235/1236 Device version 3E/4E
USB / IO-Link Master
Laptop with PACTware software
Power supply unit
Laptop with PACTware software USB / IO-Link Master
1235000ZIO IO-Link adapter
GEMÜ 1235/1236 Device version 3S/4S
Power supply unit
Quick Guide IO-Link Geräte mit USB / IO-Link Master
22 / 26 Rev.03, 16.11.2016
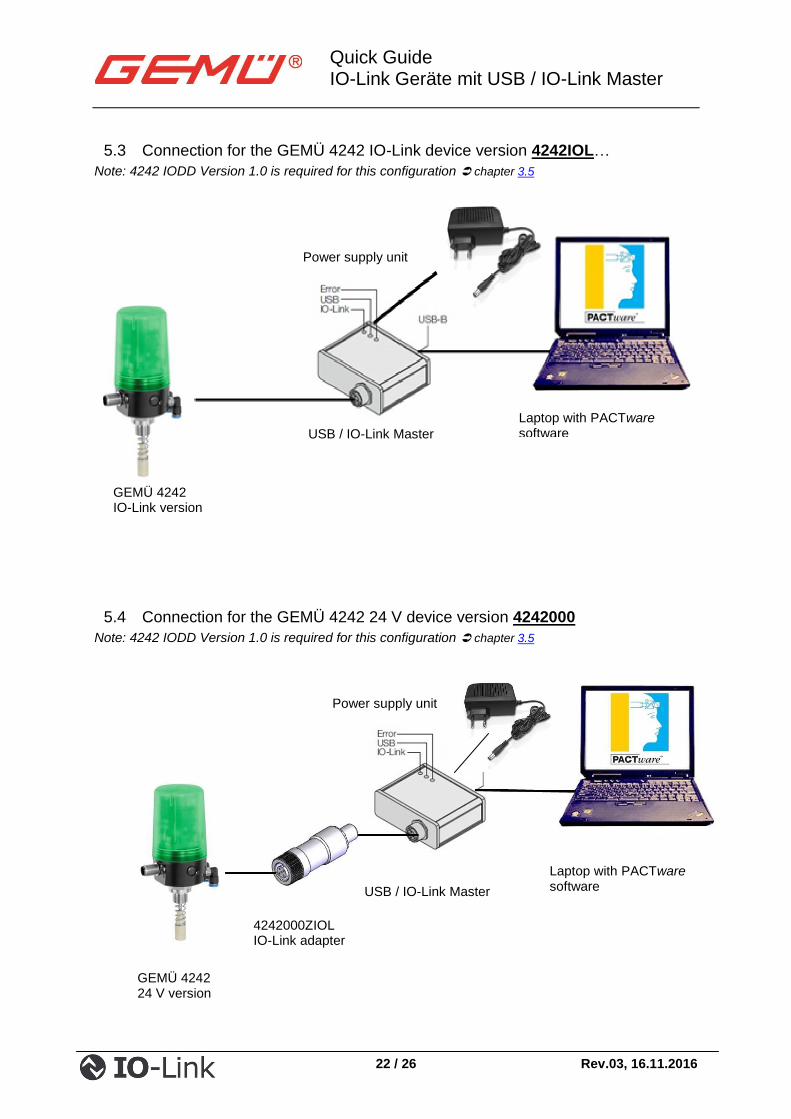
5.3 Connection for the GEMÜ 4242 IO-Link device version 4242IOL…
Note: 4242 IODD Version 1.0 is required for this configuration chapter 3.5
5.4 Connection for the GEMÜ 4242 24 V device version 4242000
Note: 4242 IODD Version 1.0 is required for this configuration chapter 3.5
Power supply unit
Laptop with PACTware software USB / IO-Link Master
GEMÜ 4242 IO-Link version
Power supply unit
Laptop with PACTware software USB / IO-Link Master
4242000ZIOL IO-Link adapter
GEMÜ 4242 24 V version
Quick Guide IO-Link Geräte mit USB / IO-Link Master
23 / 26 Rev.03, 16.11.2016
6 Connecting and parameterizing the device
6.1 Connecting the device
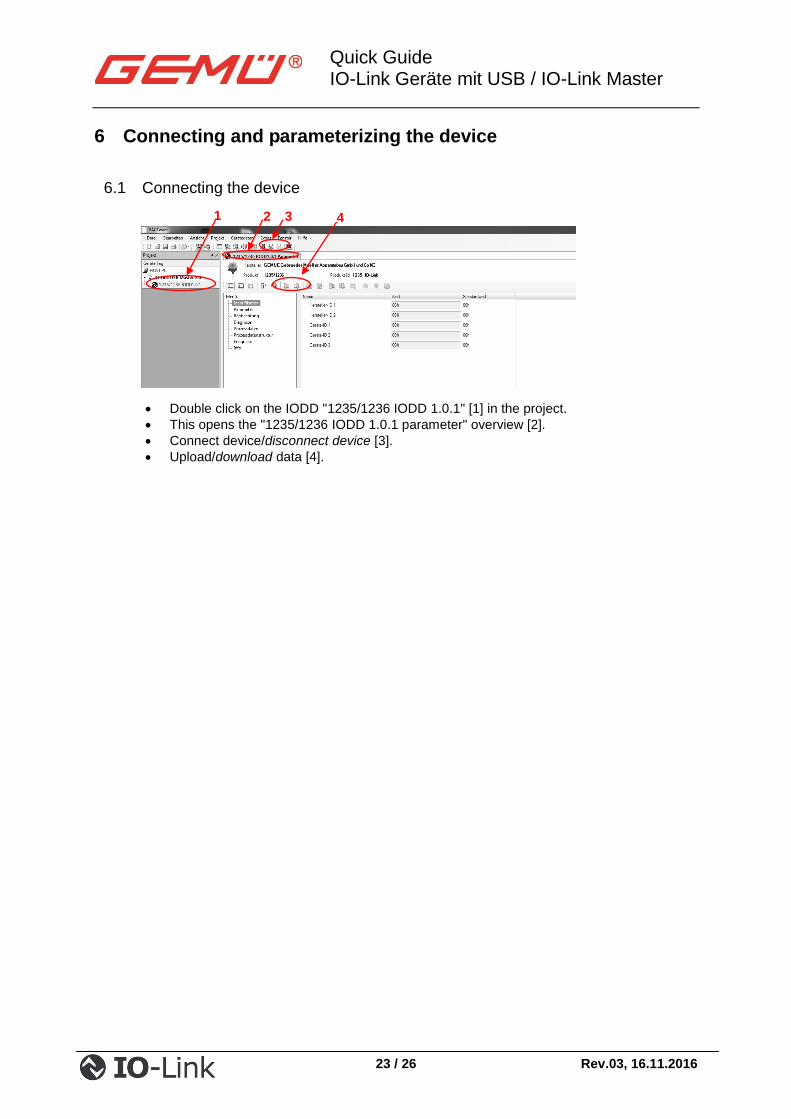
Double click on the IODD "1235/1236 IODD 1.0.1" [1] in the project.
This opens the "1235/1236 IODD 1.0.1 parameter" overview [2].
Connect device/disconnect device [3].
Upload/download data [4].
2 3 1 4
Quick Guide IO-Link Geräte mit USB / IO-Link Master
24 / 26 Rev.03, 16.11.2016
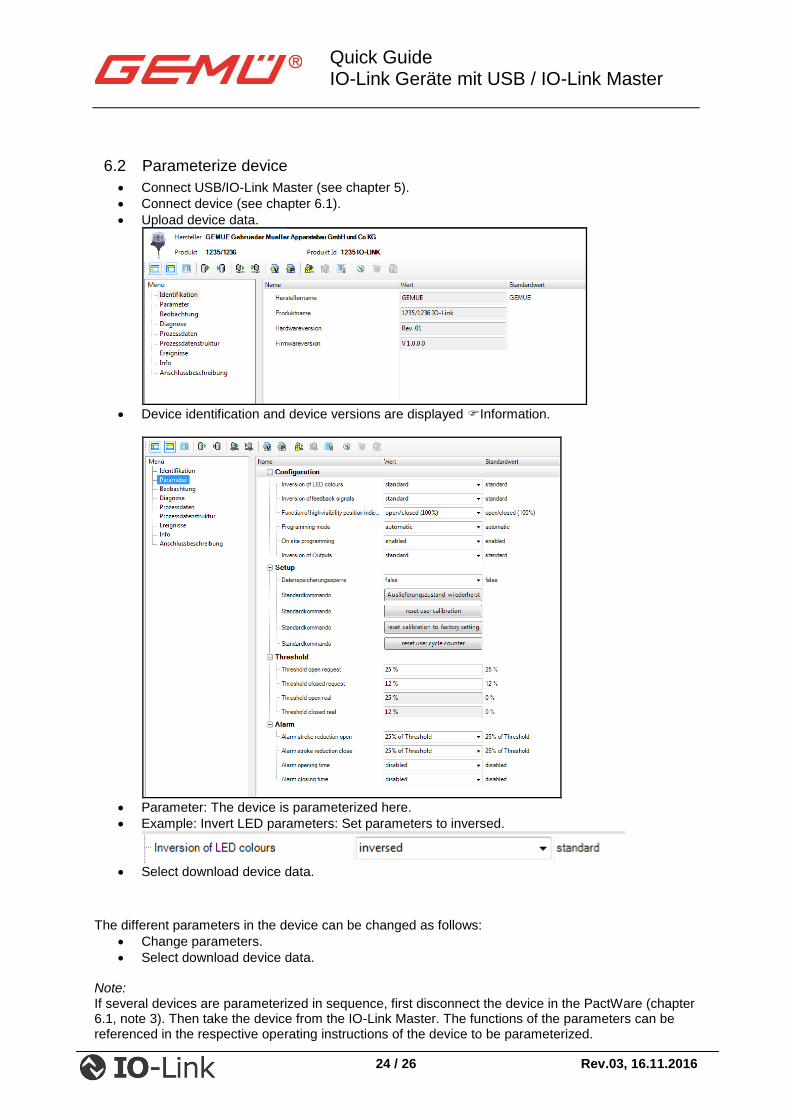
6.2 Parameterize device
Connect USB/IO-Link Master (see chapter 5).
Connect device (see chapter 6.1).
Upload device data.
Device identification and device versions are displayed Information.
Parameter: The device is parameterized here.
Example: Invert LED parameters: Set parameters to inversed.
Select download device data.
The different parameters in the device can be changed as follows:
Change parameters.
Select download device data. Note: If several devices are parameterized in sequence, first disconnect the device in the PactWare (chapter 6.1, note 3). Then take the device from the IO-Link Master. The functions of the parameters can be referenced in the respective operating instructions of the device to be parameterized.
Quick Guide IO-Link Geräte mit USB / IO-Link Master
25 / 26 Rev.03, 16.11.2016
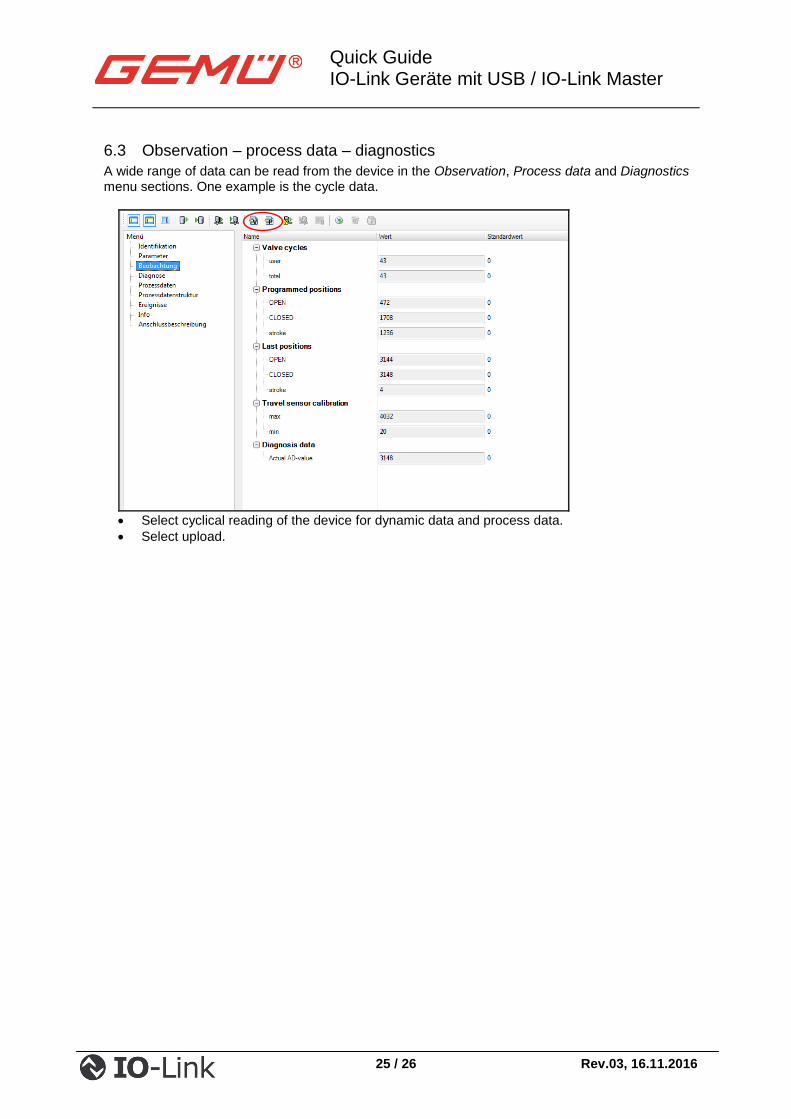
6.3 Observation – process data – diagnostics
A wide range of data can be read from the device in the Observation, Process data and Diagnostics menu sections. One example is the cycle data.
Select cyclical reading of the device for dynamic data and process data.
Select upload.
Quick Guide IO-Link Geräte mit USB / IO-Link Master
26 / 26 Rev.03, 16.11.2016
Subject to alteration · 11/2016 · 88509614