venetian mink chandelier venetian chandelier -...
TRANSCRIPT
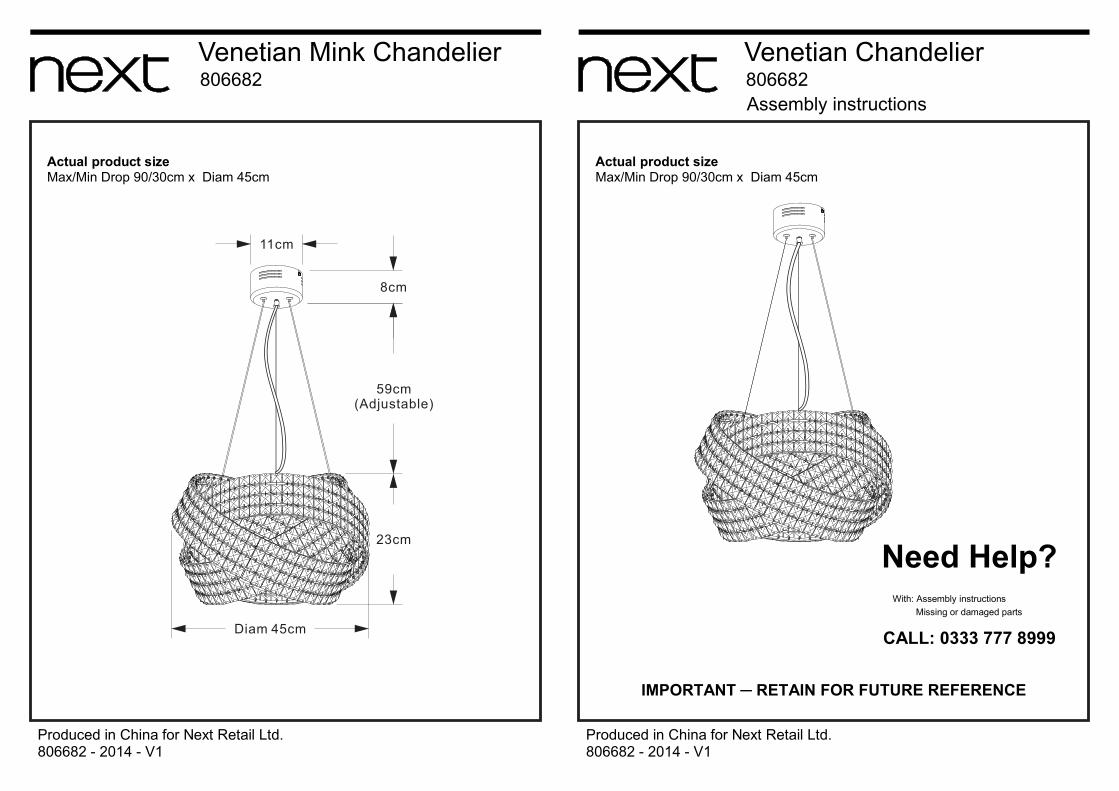
Need Help? With: Assembly instructions
Missing or damaged parts
CALL: 0333 777 8999
IMPORTANT ─ RETAIN FOR FUTURE REFERENCE
Produced in China for Next Retail Ltd.
Max/Min Drop 90/30cm x Diam 45cm
Produced in China for Next Retail Ltd.
Venetian Mink Chandelier806682
806682 - 2014 - V1
Venetian Chandelier806682
806682 - 2014 - V1
Actual product size Actual product size
Max/Min Drop 90/30cm x Diam 45cm
Assembly instructions
23cm
59cm(Adjustable)
8cm
Diam 45cm
11cm

Produced in China for Next Retail Ltd.
Assembly instructions
Produced in China for Next Retail Ltd.
Assembly instructions
Time to assembleAbout 30 minutes.
Tools requiredTwo screwdrivers one suitable for a slotted screw and one suitable for a cross-headed screwSmall electrical screwdriver Insulating tape
Missing partsIf you are missing any fixtures and fittings for your product, please contact our customer service team on 0333 777 8999 and they will be happy to arrange for a replacement to be sent to you free of charge.
You can write to us atHome Customer ServicesNext Retail Ltd,Desford Road,Leicester,LE19 4AT
To View our full light fitting range please visit www.next.co.uk
21
Before You StartWarningsFor your safety, this product must be installed in accordance with local Building Regulations. If in any doubt, or where required by the law, consult a competent person who is registered with an electrical self-certification scheme. Further information is available online or from your Local Authority.
We suggest you retain these instructions for future reference.Light fittings should be connected to a 5 amp fused circuit.This light fitting is suitable for indoor use only. When used with the supplied lightbulb it may be dimmed using a standard dimmer switch.
Before commencing installation, isolate the circuit to be used by removing the fuse or circuit breaker at the consumer distribution unit.
Do'sWe suggest you spend a short time reading through this leaflet before you start.When you are ready to start, make sure that you have theright tools and plenty of space.Unwrap all packaging materials and place the componentson a clean surface to protect it from damage.Carefully check that you have all the parts before beginning assemblyAlways switch off the supply before changing lightbulbs or cleaning. Allow bulbs to cool down before handling.
Don'tsThe fitting should not be fitted to newly painted or plastered surfaces as this may cause discolouration of the finish.We recommend cleaning with a soft dry cloth. Do not use abrasive materialsas these will rub away the protective coating.
Number of people required to assembleOne Person who is competent with electrical wiring and installation, however we do recommend that this item is installed by a qualified electrician.
Venetian Mink Chandelier806682
806682 - 2014 - V1
Venetian Chandelier806682
806682 - 2014 - V1

Step 1Dear customer, Next and our suppliers want to provide product which requires minimal assembly and can be used straight from the box. Every care is taken with the packing and handling of product to ensure you receive it in excellent condition. There is a possibility that during transit crystals may become detached. The details below show how to re-attach crystals.( See Figure at right.)Pin A: Insert pin A into the two adjacent crystals then bend over to tighten the crystals in place.Pin B: Cut away the original pin with small pliers or insulation stripper(not supplied). Holding the crystal in place, insert a spare pin B from underneath and pass it through the hole on the frame, Twist the back of the pin by needle-nose pliers (not supplied) to secure the crystal into place. Step 2Make sure that there is a solid mounting at the point of fixing. This is necessary to take the weight of the light fitting. Place the fixing bracket on the wall at desired fixing point. Ensure fixing bracket is level and mark the centre of the holes for drilling.Step 3Remove side screws and locking washers from the fixing bracket and retain for later use. (See Figure 1.)Step 4Push the steel wire into the ceiling cup to adjust it to the desired length. Make sure the three wires are the same length. (See Figure 2.)
Produced in China for Next Retail Ltd.
Assembly instructions
Produced in China for Next Retail Ltd.
Assembly instructions
3
GETTING TO KNOW YOUR PRODUCT
Components supplied. Please use this guide if you require replacement parts.
Assembly Instructions
43
2
1
6
G4 bulb
12V 20W
3 4 5
9
7 8
Pin A
Pin B
1 2
Pcd Description Spec Qty Remark
1 Light fitting H90 X Diam 45cm 1
2 Fixing bracket accessory 1 Attached on light fitting
3 3-way connection block PA7F 1 Packed in fixing pack
4 Fixing screws M4 x 38 PA 2 Packed in fixing pack
5 G4 bulb 12V 20W 5 Packed in fixing pack
6 Spare Square Crystal 22 x 22mm 2 Packed in fixing pack
7 Pin ‘A’ 10 x 12mm 5 Packed in fixing pack
8 Pin ‘B’ Diam 1.0 x 30mm 3 Packed in fixing pack
9 Assembly instructions A4 x 2 1 Packed in fixing pack
10 Re-package instructions A4 x 1 1 Packed in fixing pack
Venetian Mink Chandelier806682
806682 - 2014 - V1
Venetian Chandelier806682
806682 - 2014 - V1
10
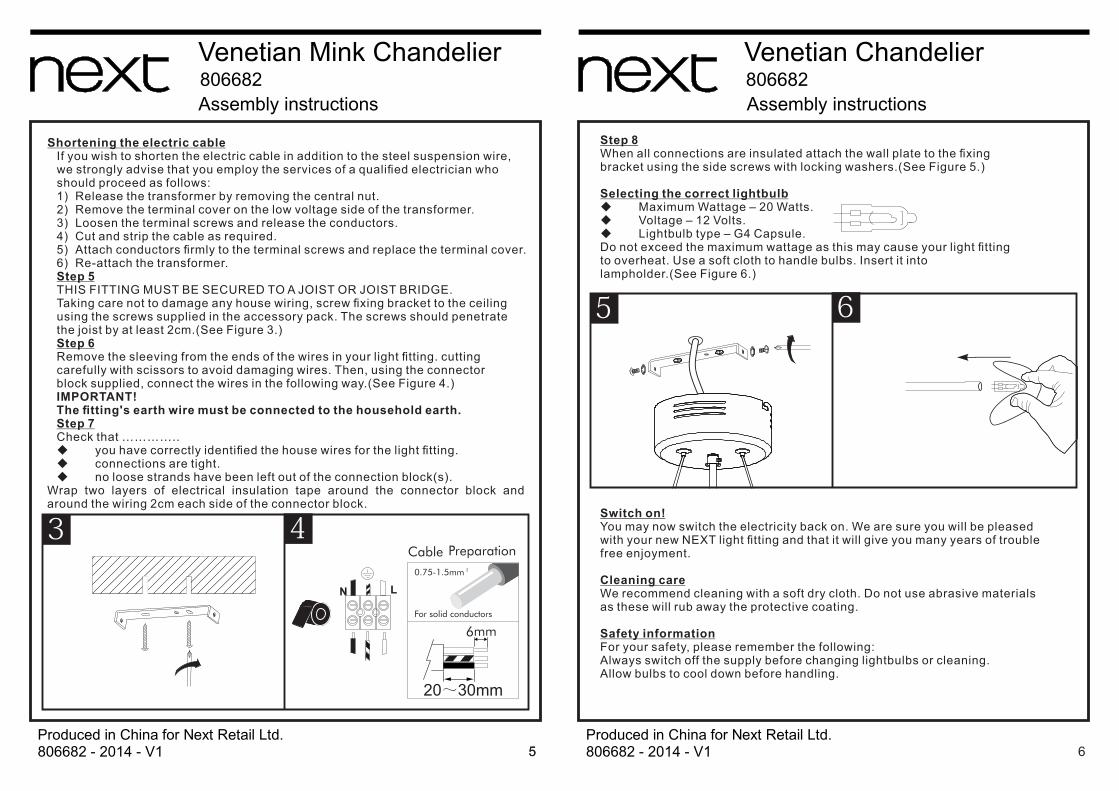
Step 8When all connections are insulated attach the wall plate to the fixing bracket using the side screws with locking washers.(See Figure 5.)
Selecting the correct lightbulb Maximum Wattage – 20 Watts. Voltage – 12 Volts. Lightbulb type – G4 Capsule.Do not exceed the maximum wattage as this may cause your light fitting to overheat. Use a soft cloth to handle bulbs. Insert it into lampholder.(See Figure 6.)
Assembly instructions
Switch on!You may now switch the electricity back on. We are sure you will be pleased with your new NEXT light fitting and that it will give you many years of trouble free enjoyment.
Cleaning careWe recommend cleaning with a soft dry cloth. Do not use abrasive materials as these will rub away the protective coating.
Safety informationFor your safety, please remember the following:Always switch off the supply before changing lightbulbs or cleaning. Allow bulbs to cool down before handling.
5 6
LN
0.75-1.5mm 2
For solid conductors
20~30mm
Produced in China for Next Retail Ltd.
Assembly instructions
65
Shortening the electric cableIf you wish to shorten the electric cable in addition to the steel suspension wire, we strongly advise that you employ the services of a qualified electrician who should proceed as follows:1) Release the transformer by removing the central nut.2) Remove the terminal cover on the low voltage side of the transformer.3) Loosen the terminal screws and release the conductors.4) Cut and strip the cable as required.5) Attach conductors firmly to the terminal screws and replace the terminal cover.6) Re-attach the transformer.Step 5THIS FITTING MUST BE SECURED TO A JOIST OR JOIST BRIDGE.Taking care not to damage any house wiring, screw fixing bracket to the ceiling using the screws supplied in the accessory pack. The screws should penetrate the joist by at least 2cm.(See Figure 3.)Step 6Remove the sleeving from the ends of the wires in your light fitting. cutting carefully with scissors to avoid damaging wires. Then, using the connector block supplied, connect the wires in the following way.(See Figure 4.) IMPORTANT!The fitting's earth wire must be connected to the household earth.Step 7Check that ………….. you have correctly identified the house wires for the light fitting. connections are tight. no loose strands have been left out of the connection block(s).
Wrap two layers of electrical insulation tape around the connector block and around the wiring 2cm each side of the connector block.
3 4
Produced in China for Next Retail Ltd.5
Venetian Mink Chandelier806682
806682 - 2014 - V1
Venetian Chandelier806682
806682 - 2014 - V1