vehicle mounted computer · ii cv41 vehicle mount computer (windows ce) user guide disclaimer...
TRANSCRIPT

User Guide
CV41Vehicle Mounted Computer Windows CE 6.0 - CV41C

ii CV41 Vehicle Mount Computer (Windows CE) User Guide
DisclaimerHoneywell International Inc. (“HII”) reserves the right to make changes in specifications and other infor-
mation contained in this document without prior notice, and the reader should in all cases consult HII to
determine whether any such changes have been made. The information in this publication does not rep-
resent a commitment on the part of HII.
HII shall not be liable for technical or editorial errors or omissions contained herein; nor for incidental or
consequential damages resulting from the furnishing, performance, or use of this material. HII disclaims
all responsibility for the selection and use of software and/or hardware to achieve intended results.
This document contains proprietary information that is protected by copyright. All rights are reserved. No
part of this document may be photocopied, reproduced, or translated into another language without the
prior written consent of HII.
Copyright © 2012-2018 Honeywell International Inc. All rights reserved.
Web Address: www.honeywellaidc.com
Microsoft®, Windows®, ActiveSync®, MSN, Outlook®, Windows Mobile®, the Windows logo, and Windows
Media are registered trademarks or trademarks of Microsoft Corporation in the United States and/or
other countries.
Wi-Fi®, WMM®, Wi-Fi Mutlimedia™, Wi-Fi Protected Access®, WPA™, WPA2™ and the Wi-Fi CERTIFIED™
logo are trademarks or registered trademarks of Wi-Fi Alliance.
The Bluetooth® word mark and logos are owned by the Bluetooth SIG, Inc.
Laird Technologies, the Laird logo, Summit Data Communications, the Summit logo, and “Connected. No
Matter What” are trademarks of Laird Technologies, Inc.
Verizon® is a registered trademark of Verizon Trademark Services LLC.
SD and SDHC are trademarks or registered trademarks of SD-3C, LLC in the United States and/or other
countries.
Other product names or marks mentioned in this document may be trademarks or registered trademarks
of other companies and are the property of their respective owners.
For patent information, refer to www.hsmpats.com.

CV41 Vehicle Moun
TABLE OF CONTENTS
Chapter 1 - Customer Support...................................................................................... 1Product Service and Repair........................................................................................................................... 1
Technical Assistance........................................................................................................................................ 1
Limited Warranty............................................................................................................................................... 1
Chapter 2 - About the Computer .................................................................................. 3About the CV41 Vehicle Mount Computer .............................................................................................. 4
Overview of the CV41 Features ............................................................................................................. 5
Power Supply Options ..................................................................................................................................... 6
About the Smart Dock ..................................................................................................................................... 7
Attach the CV41 to the Smart Dock..................................................................................................... 7
Remove the CV41 from the Smart Dock............................................................................................ 8
Secure the CV41 ................................................................................................................................................ 9
About the LEDs ................................................................................................................................................10
CV41 Accessories ............................................................................................................................................11
About Internal UPS Battery .........................................................................................................................13
Maximize the Internal UPS Battery Usage .....................................................................................13
About the Backup Battery ............................................................................................................................14
Insert an SD Card ............................................................................................................................................15
About the Touch Screen................................................................................................................................15
Protect the Touch Screen.......................................................................................................................15
Adjust the Screen Brightness...............................................................................................................16
Enable the Defroster................................................................................................................................16
Change the Volume ........................................................................................................................................17
Connect an External Antenna ....................................................................................................................17
t Computer (Windows CE) User Guide iii

About the Keypad ............................................................................................................................................19
Use the Modifier Keys .............................................................................................................................19
Capitalize Characters..............................................................................................................................20
Enable or Disable the Keypad Backlight .........................................................................................20
Set the Keypad and Display Backlight Timer.................................................................................21
Transfer Files To and From Your PC .........................................................................................................22
Chapter 3 - Understand the User Interface and Applications..............................23About the User Interface ..............................................................................................................................24
About the Desktop Screen.....................................................................................................................24
Learn the Basic Skills ..............................................................................................................................24
Use the Touch Screen.......................................................................................................................24
Use the Taskbar...................................................................................................................................25
Use Pop-Up Menus ...........................................................................................................................25
Enter Information .....................................................................................................................................25
Use Transcriber ...................................................................................................................................26
Calibrate the Screen ................................................................................................................................26
Set the Date and Time.............................................................................................................................26
Sync to a Local Time Server ...........................................................................................................26
About Applications..........................................................................................................................................27
Applications Available On the Computer ........................................................................................27
Applications You Can Download For the Computer....................................................................28
About Features Demo.......................................................................................................................28
About SmartSystems Foundation ...............................................................................................28
Chapter 4 - Manage the Computer ............................................................................29Manage the Computer in Your Network.................................................................................................30
Manage the Computer Using SmartSystems Foundation.......................................................30
Develop and Install Applications ..............................................................................................................31
Package Your Application......................................................................................................................31
Choose a Target Location......................................................................................................................31
Install Applications Using SmartSystems Foundation Console............................................31
Install Applications Using Microsoft ActiveSync .........................................................................31
Install Applications Using an SD Card .............................................................................................32
Update the Honeywell Content Software ..............................................................................................32
Update the Operating System and Low-Level Firmware..........................................................32
iv CV41 Vehicle Mount Computer (Windows CE) User Guide

Update the Honeywell Content Software........................................................................................33
Update Honeywell Content Using SmartSystems Foundation .......................................33
Update Honeywell Content Using a ActiveSync...........................................................................33
Chapter 5 - Configure the Computer.........................................................................35How to Configure the Computer ...............................................................................................................36
Use Intermec Settings on the Computer ...............................................................................................36
Start Intermec Settings ..........................................................................................................................36
About the Structure of Intermec Settings .......................................................................................37
Navigate in Intermec Settings .............................................................................................................40
Configure Profile Settings With Intermec Settings.....................................................................41
Restore Default Settings........................................................................................................................42
Hide Menu Items in Intermec Settings ............................................................................................43
Use Intermec Settings Remotely With SmartSystems Foundation ............................................43
About Network Communications..............................................................................................................43
Configure 802.11a/b/g (Wi-Fi) Radio Communications..........................................................44
Configure Bluetooth Communications............................................................................................44
Connect to a Bluetooth Scanner ..................................................................................................45
Connect to a Bluetooth Printer .....................................................................................................46
About Serial and USB Communications..........................................................................................46
Connect to a USB Scanner .............................................................................................................46
Connect to a Serially Tethered Scanner ....................................................................................47
Create an ISP Connection .....................................................................................................................48
Create a VPN Server Connection........................................................................................................50
About Wireless Security ................................................................................................................................50
Choose Between Microsoft and Funk Security.............................................................................51
CV41 Vehicle Mount Computer (Windows CE) User Guide v

Select a Funk Security Profile........................................................................................................51
Select a Funk Security Profile .................................................................................................51
Configure WPA or WPA2 Enterprise (802.1x) Security With Funk ...........................51
Configure WPA or WPA2 Personal (PSK) Security With Funk ....................................52
Configure 802.1x Security With Funk Security................................................................52
Configure LEAP Security With Funk ....................................................................................53
Configure Static WEP Security With Funk Security .......................................................53
Use Open (No Security) Associations with Funk.............................................................54
Select Microsoft as Your Security Choice.................................................................................54
Select Microsoft Security..........................................................................................................54
Configure WPA or WPA2 Enterprise (802.1x) Security With Microsoft..................55
Enable WPA or WPA2 Personal (PSK) Security With Microsoft.................................55
Configure 802.1x Security with Microsoft .........................................................................56
Configure Static WEP Security With Microsoft................................................................57
Use Open (No Security) Associations With Microsoft...................................................57
Load a Certificate .....................................................................................................................................57
Chapter 6 - Use the Auto-On Feature........................................................................59About the Auto-On Feature .........................................................................................................................60
Enable the Auto-On Feature ................................................................................................................60
Disable the Auto-On Feature ...............................................................................................................60
Chapter 7 - Use WWAN and GPS Communications ................................................61About WWAN Communications.................................................................................................................62
Activate UMTS Communications .......................................................................................................62
Activate CDMA Communications.......................................................................................................63
About GPS ..........................................................................................................................................................63
Test the GPS Receiver .............................................................................................................................64
Chapter 8 - Enable Screen Blanking..........................................................................65About Screen Blanking..................................................................................................................................66
Install the Hardware for Screen Blanking .............................................................................................66
Before You Install the Switch ...............................................................................................................66
Tools You Need...........................................................................................................................................66
Create a Custom Serial Cable ..............................................................................................................67
Install Switch for Screen Blanking.....................................................................................................67
vi CV41 Vehicle Mount Computer (Windows CE) User Guide

Enable Screen Blanking.........................................................................................................................68
Chapter 9 - Troubleshoot and Maintain the Computer .........................................69About the Intermec Dashboard .................................................................................................................70
Troubleshoot Your Computer .....................................................................................................................70
Troubleshoot the Wi-Fi Connection ..................................................................................................70
Troubleshoot 802.1x Security..............................................................................................................71
Check 802.11 Network Status .............................................................................................................71
Troubleshoot Reading Bar Codes.......................................................................................................73
Troubleshoot Operating the Computer............................................................................................74
Call Product Support .....................................................................................................................................74
Find Your Configuration Number.......................................................................................................75
Find Your Operating System Version................................................................................................75
Reset the Computer........................................................................................................................................75
Cold Boot the Computer ........................................................................................................................75
Warm Boot the Computer......................................................................................................................75
Clean Boot the Computer ......................................................................................................................76
Disconnect the UPS Battery .................................................................................................................76
Replace the Fuse .............................................................................................................................................77
Clean the Computer .......................................................................................................................................77
Appendix A - Specifications and Default Settings..................................................47Physical and Environmental Specifications.........................................................................................48
Physical Dimensions ...............................................................................................................................48
Environmental Specifications .............................................................................................................48
Power and Electrical Specifications..................................................................................................48
Hardware......................................................................................................................................................48
Wireless LAN...............................................................................................................................................49
Bluetooth......................................................................................................................................................49
Default Configuration .............................................................................................................................49
CV41 Vehicle Mount Computer (Windows CE) User Guide vii

Data Collection Settings..................................................................................................................50
Communications................................................................................................................................52
Device Settings....................................................................................................................................52
Core Messaging Service Settings ................................................................................................53
Device Monitor Settings ..................................................................................................................53
RFID Settings .......................................................................................................................................54
Virtual Wedge Settings.....................................................................................................................54
Port Pin Assignments ....................................................................................................................................54
COM 1 and COM 2 Ports........................................................................................................................54
USB Port .......................................................................................................................................................55
CANBUS/Audio Port ................................................................................................................................55
Power Supply Connector........................................................................................................................56
USB Dongle Cable ....................................................................................................................................57
Appendix B - Keypads and Keystrokes ......................................................................59Standard Characters......................................................................................................................................60
Appendix C - ScanNGo Wi-Fi Configuration Bar Codes ........................................65Radio Configuration Bar Codes.................................................................................................................66
2D Configuration Bar Codes ................................................................................................................67
1D Configuration Bar Codes ................................................................................................................68
Appendix D - CV41 Docks ............................................................................................73Standard Dock..................................................................................................................................................74
Components ...............................................................................................................................................74
Enhanced Dock for Off-Vehicle Use ........................................................................................................75
Components - Back .................................................................................................................................75
Components - Top ....................................................................................................................................76
viii CV41 Vehicle Mount Computer (Windows CE) User Guide

CHAPTER
1
CV41 Vehicle Moun
CUSTOMER SUPPORT
Product Service and RepairHoneywell International Inc. provides service for all of its products through service cen-
ters throughout the world. To obtain warranty or non-warranty service, please visit
www.honeywellaidc.com/locations to find contact information for your region’s service
center. Be sure to obtain a Return Material Authorization number (RMA #). You should
do this prior to returning the product.
Technical AssistanceIf you need assistance installing or troubleshooting your device, please contact us by
using one of the methods below:
Knowledge Base: www.hsmknowledgebase.com
Our Knowledge Base provides thousands of immediate solutions. If the Knowledge Base
cannot help, our Technical Support Portal (see below) provides an easy way to report
your problem or ask your question.
Technical Support Portal: www.hsmsupportportal.com
The Technical Support Portal not only allows you to report your problem, but it also pro-
vides immediate solutions to your technical issues by searching our Knowledge Base.
With the Portal, you can submit and track your questions online and send and receive
attachments.
Telephone: www.honeywellaidc.com/locations
For our latest contact information, please check our website at the link above.
Limited WarrantyHoneywell International Inc. (“HII”) warrants its products to be free from defects in
materials and workmanship and to conform to HII’s published specifications applicable
to the products purchased at the time of shipment. This warranty does not cover any HII
product which is (i) improperly installed or used; (ii) damaged by accident or negli-
gence, including failure to follow the proper maintenance, service, and cleaning sched-
t Computer (Windows CE) User Guide 1

ule; or (iii) damaged as a result of (A) modification or alteration by the purchaser or
other party, (B) excessive voltage or current supplied to or drawn from the interface
connections, (C) static electricity or electro-static discharge, (D) operation under condi-
tions beyond the specified operating parameters, or (E) repair or service of the product
by anyone other than HII or its authorized representatives.
This warranty shall extend from the time of shipment for the duration published by HII
for the product at the time of purchase (“Warranty Period”). Any defective product must
be returned (at purchaser’s expense) during the Warranty Period to HII factory or autho-
rized service center for inspection. No product will be accepted by HII without a Return
Materials Authorization, which may be obtained by contacting HII. In the event that the
product is returned to HII or its authorized service center within the Warranty Period
and HII determines to its satisfaction that the product is defective due to defects in
materials or workmanship, HII, at its sole option, will either repair or replace the product
without charge, except for return shipping to HII.
EXCEPT AS MAY BE OTHERWISE PROVIDED BY APPLICABLE LAW, THE FOREGOING
WARRANTY IS IN LIEU OF ALL OTHER COVENANTS OR WARRANTIES, EITHER
EXPRESSED OR IMPLIED, ORAL OR WRITTEN, INCLUDING, WITHOUT LIMITATION,
ANY IMPLIED WARRANTIES OF MERCHANTABILITY OR FITNESS FOR A PARTICULAR
PURPOSE, OR NON-INFRINGEMENT.
HII’S RESPONSIBILITY AND PURCHASER’S EXCLUSIVE REMEDY UNDER THIS WAR-
RANTY IS LIMITED TO THE REPAIR OR REPLACEMENT OF THE DEFECTIVE PRODUCT
WITH NEW OR REFURBISHED PARTS. IN NO EVENT SHALL HII BE LIABLE FOR INDI-
RECT, INCIDENTAL, OR CONSEQUENTIAL DAMAGES, AND, IN NO EVENT, SHALL ANY
LIABILITY OF HII ARISING IN CONNECTION WITH ANY PRODUCT SOLD HEREUNDER
(WHETHER SUCH LIABILITY ARISES FROM A CLAIM BASED ON CONTRACT, WAR-
RANTY, TORT, OR OTHERWISE) EXCEED THE ACTUAL AMOUNT PAID TO HII FOR THE
PRODUCT. THESE LIMITATIONS ON LIABILITY SHALL REMAIN IN FULL FORCE AND
EFFECT EVEN WHEN HII MAY HAVE BEEN ADVISED OF THE POSSIBILITY OF SUCH
INJURIES, LOSSES, OR DAMAGES. SOME STATES, PROVINCES, OR COUNTRIES DO
NOT ALLOW THE EXCLUSION OR LIMITATIONS OF INCIDENTAL OR CONSEQUEN-
TIAL DAMAGES, SO THE ABOVE LIMITATION OR EXCLUSION MAY NOT APPLY TO YOU.
All provisions of this Limited Warranty are separate and severable, which means that if
any provision is held invalid and unenforceable, such determination shall not affect the
validity of enforceability of the other provisions hereof. Use of any peripherals not pro-
vided by the manufacturer may result in damage not covered by this warranty. This
includes but is not limited to: cables, power supplies, cradles, and docking stations. HII
extends these warranties only to the first end-users of the products. These warranties
are non-transferable.
For warranty information, go to www.honeywellaidc.com and click Get Resources >
Product Warranty.
2 CV41 Vehicle Mount Computer (Windows CE) User Guide

CHAPTER
2
CV41 Vehicle Moun
ABOUT THE COMPUTER
This chapter introduces the CV41 Vehicle Mount Computer with Microsoft® Windows®
CE operating system. Use this chapter to learn about the basic features and available
accessories.
t Computer (Windows CE) User Guide 3

About the CV41 Vehicle Mount ComputerThe rugged CV41 Vehicle Mount Computer is designed for real-time data collection
applications in warehousing, distribution, work-in-process, time and attendance, and
stationary applications. The CV41 is highly configurable and runs on the Microsoft Win-
dows CE 6.0 operating system. Additionally, the CV41 supports terminal emulation
applications, browser-based applications, and custom applications.
The CV41 is used with the smart dock. The dock installs onto a vehicle and provides
conditioned power to the CV41. All peripheral connections are also made on the dock.
With the CV41 design, you can easily remove the CV41 from the smart dock and attach
it to another vehicle that is equipped with a dock.
Note: There are two docks available for the CV41. The proper dock must be selected based on
intended use:
• The Standard Dock which is used for DC powered (i.e.: vehicle mounted) applications.
• The Enhanced Dock for Off-Vehicle Use for AC powered applications.
Throughout this document, the differences in the two dock ports/connectors may not
be mentioned. See CV41 Docks for details on the ports/connectors available on each
type of dock.
CV41 Front View
Speakers
Power button
Microphone
Caution: If the CV41 has connectors for external antennas, do not power
up the CV41 without the external antennas connected.
Damage to the WLAN radio may result.
4 CV41 Vehicle Mount Computer (Windows CE) User Guide

CV41 Back View with Quick Mount Smart Dock
CV41 Back View with Quick Mount Smart Dock
Overview of the CV41 FeaturesThe CV41 includes these standard features:
• WVGA display with a resolution of 800 x 480 pixels
• 1 GB of RAM memory
CANBUS/audio connector
USB connector
COM2
COM1
Strain reliefclamps
WWAN antenna plug
GPS antenna plug
Wi-Fi (aux)antennaplug
Wi-Fiantenna plug
Fuse
Power connector
Power button
Laptop securitycable provision
Padlock provision
CV41 Vehicle Mount Computer (Windows CE) User Guide 5

• 1 GB flash memory with user-installable expansion slot supporting an additional 1
to 4 GB SD card
• 802.11a/b/g and Bluetooth® radios
• Optional WWAN radio (available in North America, Europe, and Australia only)
• Intel Atom 1.6 GHz processor
Power Supply OptionsTo use the CV41, you must apply power to it. By default, the CV41 comes with a DC
power cable that connects directly to a forklift battery running 10-60 VDC power. Other
power supply options include:
• External 6-96 DC/DC Power Converter (requires Standard Dock)
• External AC/DC Power Supply (requires Enhanced Dock for Off-Vehicle Use)
The AC/DC power supply must be connected to a 120 V, 60 Hz supply in North America,
or to a 230 V, 50 Hz power supply outside of North America (appropriate AC cable not
included). Make sure that the external AC power is properly grounded and provides a
maximum of 15 A of overcurrent protection (10 A for 230 V circuits). For more informa-
tion on installing any of these power supply options, see the CV41 Vehicle Mounting Kit
Reference Guide.
Note: In North America, the AC power supply is intended for use with a UL Listed ITE power
supply with an output rating of 12 to 48 VDC, minimum 15 W. Outside of North America,
the power supply is intended for use with an IEC certified ITE power supply with an output
rating of 12 to 48 VDC, minimum 15 W.
Contact your Honeywell representative to order one of the power supply options listed.
For installation instructions, see the CV41 Vehicle Mounting Kit Reference Guide.
The CV41 Vehicle Mount Computer has an IEEE 802.11a/b/g radio installed
and Wi-Fi® certified for interoperability with other 802.11a/b/g wireless LAN
devices.
Caution: Be sure to use the proper dock for the application. See CV41
Docks for information.
6 CV41 Vehicle Mount Computer (Windows CE) User Guide

About the Smart DockThe smart dock is secured to a forklift using a RAM mounting kit and provides condi-
tioned power to the CV41. The CV41 can then be connected or removed from the smart
dock at any time. With this unique system, you can easily move the CV41 from one vehi-
cle equipped with the smart dock to another. Additionally, the dock provides:
• a USB port
• two COM ports
• a CANBUS/audio port
• strain relief cable mounts
To connect any accessory such as a tethered scanner, an audio headset, or a USB flash
drive, you need to purchase the correct accessory cables. For more information, contact
your Honeywell representative.
Attach the CV41 to the Smart DockOnce you have secured the smart dock and connected it to power, attach the CV41 to
the smart dock.
1. Press and hold the Power button on the CV41 until the computer turns off.
2. Locate the protruding lip on the rear of the CV41.
3. Place the lip of the CV41 over the top of the dock.
4. Slide the CV41 from side-to-side until the CV41 is seated into the smart dock.
5. Push down onto the smart dock until you hear a click.
6. If necessary, adjust the viewing angle by adjusting the pivot arm on the RAM mount.
7. Press the Power button on the smart dock to turn on the dock.
Caution: Make sure the smart dock is powered off before you connect any
cables to it.
CV41 Vehicle Mount Computer (Windows CE) User Guide 7

8. Press the Power button on the CV41 to turn on the CV41.
Remove the CV41 from the Smart DockThe CV41 can easily be moved from one vehicle equipped with the smart dock to
another.
1. Press and hold the Power button on the CV41 until the computer turns off.
2. Pull down on the red quick release handle.
3. Pull the bottom of the CV41 away from the smart dock.
4. Lift the CV41 away from the dock.
8 CV41 Vehicle Mount Computer (Windows CE) User Guide

Secure the CV41If you do not want users to remove the CV41 from a forklift, use either a padlock or a lap-
top security provision to keep your CV41 safe.
Padlock Provision Location
Laptop Security Provision Location
CV41 Vehicle Mount Computer (Windows CE) User Guide 9

About the LEDsThe LEDs on the CV41 tell the state of the computer. Use this section to learn about the
connection and system LEDs.
Connection LEDs
LED State Description
WWAN Solid green The CV41 is connected to WWAN.
Off The CV41 is not connected to WWAN.
Wi-Fi Solid green The CV41 is connected to Wi-Fi.
Off The CV41 is not connected to Wi-Fi.
Bluetooth Solid blue Bluetooth is turned on.
Off Bluetooth is turned off.
Wi-Fi LED
WWAN LED
BluetoothLED
10 CV41 Vehicle Mount Computer (Windows CE) User Guide

System LEDs
CV41 AccessoriesThe CV41 does not ship with any accessories. All accessories are sold and ordered sepa-
rately. For help, contact your Honeywell sales representative.
LED State Description
System Solid green The CV41 is on, or the CV41 is on but the backlight or display may be off.
Blinking green
every 4.5 seconds
The CV41 is in suspend mode, or external power is not present.
Blinking green
every 1.5 seconds
The CPU temperature is less than -20 °C (-4 °F), the heater is warming
the CPU for 30 seconds, or the CV41 needs to be moved to a warmer
environment.
Off The CV41 is off, external power is not present, or it is in suspend mode.
UPS
battery
Solid green (External power present) The UPS battery is charging.
(External power not present) The CV41 is off or the UPS battery is not
present.
Solid amber (External power present) There is no UPS battery present, the CV41 is
out of charging temperature range, a charge timeout has occurred, or
there is a charging fault.
(External not present) UPS battery is supplying power and is
discharging.
Off The UPS battery is fully charged, or is not charging.
Solid
state
drive
Flashing green Read or write activity is occurring.
Off There is no read or write activity.
System LED
UPS batteryLED
Solid state drive LED
Accessory Description
Quick Mount Smart Dock The smart dock provides a mount for the CV41, and supplies conditioned
power to the CV41. This dock is designed for DC powered applications only.
See CV41 Docks.
For more information, see the CV41 Vehicle Mounting Kit Reference Guide.
CV41 Vehicle Mount Computer (Windows CE) User Guide 11

Dock for Off-Vehicle Use The smart dock provides a mount for the CV41, and supplies conditioned
power to the CV41. This dock is designed for off-vehicle AC powered
applications only. See CV41 Docks.
RAM Mounting Kit Use this mounting kit to attach the CV41 to a variety of surfaces, including a
vehicle or to your desktop. For more information, see the CV41 Vehicle
Mounting Kit Reference Guide.
USB Y-Cable Use the USB cable to connect USB devices and peripherals to the CV41.
Screen Blanking Box Use the screen blanking box to turn off the CV41 display while a vehicle is in
motion.
CANBUS Y-Cable Use the CANBUS Y-Cable to connect a CANBUS interface to the CV41.
UPS Battery Purchase a new UPS battery when the one in your CV41 does not provide
satisfactory operating time.
Audio Cable Use the audio cable to connect a headset to the CV41.
Headset Use the headset for a hands-free voice solution.
Touch Screen Protective
Film (10 pack)
Use the protective film to reduce wear and protect the touch screen from
being damaged.
Stylus Kit (5 pack) Use the stylus to navigate around the user interface of the CV41.
WWAN Adhesive Mount
Antenna Kit
Purchase the WWAN antenna to provide WWAN connectivity to a WWAN-
enabled CV41.
GPS Antenna Kit Purchase the GPS antenna to provide GPS connectivity to a GPS-enabled
CV41.
6-96 VDC Power
Connection Kit
Use this kit to supply power to trucks that are that run a voltage of greater
than 60 VDC.
AC Power Supply Use the AC power supply to power the CV41. The power supply can be
connected to a 120 V or to a 230 V supply. If you are outside of the United
States, you must supply your own power cord.Must use off-vehicle dock with
this power supply. See CV41 Docks.
Accessory Description
12 CV41 Vehicle Mount Computer (Windows CE) User Guide

About Internal UPS BatteryThe CV41 contains an internal UPS battery that is automatically charged when you
place the CV41 in a powered smart dock. The UPS battery can power the CV41 for a
minimum of 30 minutes at -20 °C (-40 °F) or higher. The UPS battery allows you to con-
tinue using the CV41 when it is not mounted in a dock or when the vehicle battery is
being changed.
If the UPS battery becomes critically low on power, the CV41 performs a controlled
shutdown. You can recharge it by placing the CV41 into the smart dock. You can fully
charge a discharged UPS battery in approximately 4 hours.
Maximize the Internal UPS Battery Usage
Adjust the backlight, screen, or computer turn off times to maximize the internal UPS
battery usage. The changes you make to these settings are cumulative. For example, if
you set the backlight and screen turn off times to 15 sec and the CV41 turn off times to
5 min, the CV41 actually turns off after 5 min and 15 sec.
Note: Disabling the backlight also disables the screen and the CV41 turn off times. Conversely,
disabling the screen turn off time also disables the CV41 turn off times.
1. Tap Start > Settings > Control Panel > Intermec Settings. The Intermec Settings
screen appears.
2. Tap Device Settings > Power Management > Battery Power. The Battery Power
screen appears.
3. Adjust the Backlight, Screen, and Device turn off times in the drop-down menus.
4. Tap OK when you are finished to save your changes.
Caution: If you plan on shipping the CV41 to a different location, make
sure the internal UPS battery is disconnected. For help, see
Disconnect the UPS Battery.
CV41 Vehicle Mount Computer (Windows CE) User Guide 13

About the Backup BatteryThe CV41 has a permanent Lithium-Ion battery installed to maintain the time, date, and
CMOS setup information for a minimum of 90 days. The Lithium-Ion battery is not
user-replaceable and should last five years before it needs a replacement.
The backup battery must only be changed by authorized service personnel. For more
information, contact your Honeywell service representative.
14 CV41 Vehicle Mount Computer (Windows CE) User Guide

Insert an SD CardYou can use an SD card to increase file storage and install software. The computer sup-
ports an optional 1 to 4 GB maximum capacity SD card.
1. Remove the CV41 from the smart dock.
2. Press the Power button to place the CV41 in Suspend mode.
3. Using a small Phillips screwdriver, remove the two screws that secure the SD card
access panel.
4. Insert the SD card into the SD card slot.
5. Reattach the SD card access panel and screw to a torque value of
4 to 5 in/lbs.
6. Reattach the CV41 to the smart dock.
7. Press the Power button to resume the CV41 from Suspend mode.
About the Touch ScreenThe CV41 comes with an 8-inch color touch screen display with a resolution of 800 x
480 pixels. The display also comes with an optional heater to reduce condensation on
the external surface of the display when moving between sub-freezing temperatures
and normal temperatures.
Protect the Touch ScreenApply the optional touch screen protective film to help protect the screen from minor
damage, scratches, and abrasions. Contact your Honeywell representative to order pro-
tective film for your touch screen.
SD card
CV41 Vehicle Mount Computer (Windows CE) User Guide 15

1. Clean the touch screen from fingerprints, lint particles, dust, and smudges. For
more information, see Clean the Computer.
2. Peel off the backing from the film to expose the adhesive.
3. Slide one edge of the film between the touch screen and display housing.
4. Repeat Step 3 for the other three edges of the touch screen film.
Adjust the Screen BrightnessDepending on the current lighting conditions of the environment, you may want to
adjust the screen brightness of the CV41.
Note: If the ambient light sensor is enabled, you cannot adjust the screen brightness on the
CV41.
1. On the keypad, tap the ALT key to enable the secondary keys.
2. Tap F7 to increase brightness or F8 to decrease the brightness.
3. Repeat Steps 1 and 2 to increase or decrease brightness.
Enable the DefrosterIf your CV41 contains a defroster, use it to help reduce condensation on an external sur-
face when the computer is moving between sub-freezing and normal temperatures.
1. Tap Start > Settings > Control Panel > Intermec Settings. The Intermec Settings
screen appears.
2. Tap Device Settings > Heater. The Heater screen appears.
3. In Screen heater, select Enabled.
4. In Screen heater turns on at:, set the temperature tripping point in degrees Celsius.
When the temperature reaches the trip point, the heater automatically turns on.
5. Tap OK to save and exit the Heater screen.
16 CV41 Vehicle Mount Computer (Windows CE) User Guide

Change the VolumeThe CV41 can make sounds when you tap the screen or use an attached scanner. You
can change the CV41 volume to suit your needs and the environment.
1. On the keypad, tap ALT to enable the secondary keys.
2. Tap F9 to increase volume or F10 to decrease the volume.
3. Repeat Steps 1 and 2 to increase or decrease volume.
Connect an External Antenna
The CV41 comes with either an internal or external Wi-Fi antenna option. If you ordered
the external antenna option, you can purchase antennas to mount on a wall, forklift, or
other flat surface using screws or small patches of adhesive-backed hook and loop fas-
tener material.
Note: If you have the internal 802.11 antenna option, you cannot connect an external 802.11
antenna to your CV41. If you are using GPS or WWAN, you must connect an external GPS
or WWAN antenna.
1. Using your own hardware, secure the external antenna to a wall, forklift, or other flat
surface.
2. Secure the antenna to one of the antenna plugs on the CV41.
Caution: If the CV41 has connectors for external antennas, do not power
up the CV41 without the external antennas connected.
Damage to the WLAN radio may result.
Wi-Fi antennaplug
GPSantenna plug
Wi-Fi (aux)antenna plug
WWANantenna plug
CV41 Vehicle Mount Computer (Windows CE) User Guide 17

Because system performance and antenna polarization are site-dependent, a perma-
nent mounting location may require some experimentation. In most fixed installations,
you should mount the antenna initially in a vertically-polarized position, with the cable
from the antenna parallel to the floor and ceiling. For information on purchasing an
antenna, contact your Honeywell sales representative.
18 CV41 Vehicle Mount Computer (Windows CE) User Guide

About the KeypadThe CV41 comes with one standard keypad overlay and contains a backlight for low
light conditions. Use the following sections to understand how to use the keypad.
If you need to remap the keypad, use the Device Resource Kit. You can download this
Resource Kit from the Intermec Developer Library website at www,honeywellaidc.com.
CV41 Keypad Overlay
Use the Modifier KeysThe CV41 keypad provides modifier keys to let you access additional characters, sym-
bols, and functions printed on the keypad overlay. Once you understand how to use the
modifier keys and key sequences, you can access all of the additional features printed
on the keypad overlay.
There are three modifier keys: the orange ( b ) key, the green ( Alt ) key, and the Control
( Ctrl ) key.
You want to: Press: Example:
Use an orange character or
function printed above a
key.
b key (LED turns on) and then the key
with the character or function printed
above it (LED turns off).
Press b and then ¡ to select
the F11 function.
Use a green character or
function printed above the
key.
Alt key (LED turns on) and then the key
with the character or function printed
above it (LED turns off).
Press Alt and then P to select
the Print function.
Enable the Control modifier
key.
Ctrl key (LED turns on) and then the key
with the character or function printed
above it (LED turns off)
CV41 Vehicle Mount Computer (Windows CE) User Guide 19

Capitalize CharactersYou can capitalize characters individually, or you can type all capital letters by enabling
Caps Lock.
To capitalize a single character:
• Press the ] key. The Shift key LED flashes to show that the Shift key is enabled for
one key press.
To enable Caps lock:
• Press the b key, and then the ] key. The Shift key LED lights up green to show that
the CV41 is in Caps Lock mode.
To disable Caps Lock:
• When Caps Lock is enabled, press the b key, and then the ] key. The Shift key LED
turns off to show that Caps Lock has been disabled.
Enable or Disable the Keypad BacklightThe computer has a keypad backlight for low light conditions. By default, the keypad
backlight is enabled. Disable the keypad to conserve power.
1. Tap Start > Settings > Control Panel > Intermec Settings. The Intermec Settings
screen appears.
2. Tap Device Settings > Backlight > Keypad Backlight. The Keypad Backlight screen
appears.
3. Clear the check box to disable the backlight, and select the check box to enable it.
4. Tap OK to save your changes.
20 CV41 Vehicle Mount Computer (Windows CE) User Guide

Set the Keypad and Display Backlight TimerThe keypad backlight and the display backlight share the same timer. When the display
is on, the keypad backlight is also on. Use this section to learn how to set the keypad and
display backlight timer.
1. Tap Start > Control Panel > Intermec Settings. The Intermec Settings screen
appears.
2. Tap Device Settings > Power Management > Battery Power. The Battery Power
screen appears.
3. Select the amount of time you want the backlight timer to stay on.
4. Tap OK to save your settings.
CV41 Vehicle Mount Computer (Windows CE) User Guide 21
Transfer Files To and From Your PCYou can use Microsoft ActiveSync (Windows XP or earlier) or Windows Mobile Device
Center (Windows Vista or Windows 7) to establish a connection between the CV41 and a
PC. After you connect to your PC, you can transfer files, synchronize files, remotely
debug, and perform other device management activities. ActiveSync and Windows
Mobile Device Center are free applications available from the Microsoft website at
www.microsoft.com/download.
To establish a partnership between your CV41 and a PC, you need to physically connect
your computer to your PC using a standard USB cable, and a USB cable adapter. To buy
the USB cable adapter, contact your Honeywell representative.
1. Connect the CV41 to the smart dock.
2. Secure the USB cable adapter to the smart dock.
3. Connect the USB cable to the USB cable adapter and to your PC.
4. Download ActiveSync from the Microsoft website and install ActiveSync on your PC.
5. Follow the on-screen instructions to establish a partnership. When the partnership
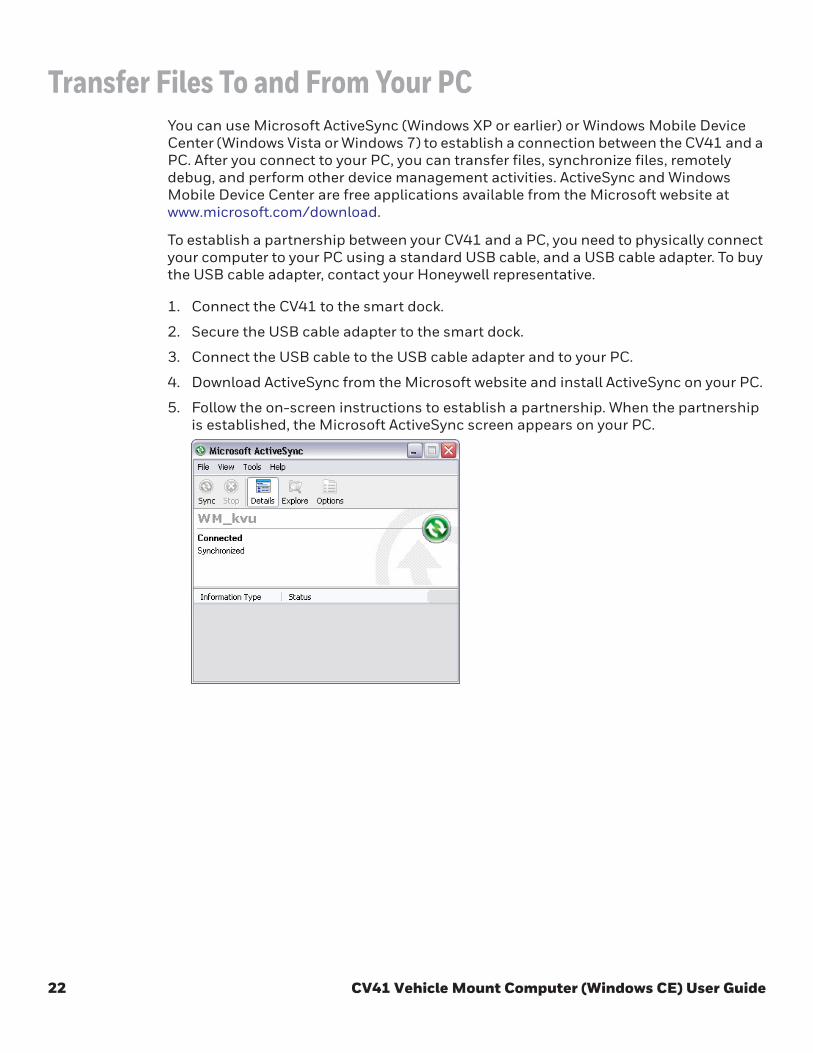
is established, the Microsoft ActiveSync screen appears on your PC.
22 CV41 Vehicle Mount Computer (Windows CE) User Guide

CHAPTER
3
CV41 Vehicle Moun
UNDERSTAND THE USER
INTERFACE AND APPLICATIONS
Use this chapter to learn about the Windows Embedded CE 6.0 user interface and how
to interact with the screen. You can also use this chapter to learn about the applications
on your computer, as well as additional applications you can download.
t Computer (Windows CE) User Guide 23

About the User InterfaceThe user interface for the Windows Embedded CE 6.0 operating system is similar to
previous versions of Windows CE. The interface is touch-friendly and easy to navigate.
Use the following sections to understand how to interact with Windows CE.
About the Desktop ScreenWhen you turn on your computer, the Desktop screen is the first screen that appears,
unless Intermec Terminal Emulator (ITE) is configured to automatically launch. The
Desktop screen contains the Desktop and the Taskbar.
Windows CE Default Screen
Tap Start > Help, then select a topic on the computer to find additional information on
Windows CE components.
Learn the Basic SkillsThis section describes the basic concepts of using and customizing the vehicle mount
computer and Windows CE.
Use the Touch ScreenUse your finger or stylus to navigate around the CV41 user interface.
Windows CE
Tasbar
Windows
Desktop
Action Description
Tap Tap the screen once with your stylus or finger to select
options, open or close applications, or launch menus.
Double-tap Double-tap the screen with your stylus or finger to
launch applications.
Drag Hold your stylus or finger on the screen and drag
across the screen to select text and images.
Tap and hold Tap and hold your stylus or finger on an item to see a
menu of actions available for that item. On the pop-up
menu that appears, tap the action you want to perform.
24 CV41 Vehicle Mount Computer (Windows CE) User Guide

Use the TaskbarThe Taskbar is located at the bottom of the screen. It displays the Start menu icon, the
current time, the Input panel icon, and the current status of information such as exter-
nal power connections, and battery power remaining. Use the following table for CV41
specific taskbar icons.
For more information on Windows CE 6.0 icons, tap Start > Help, then select a topic on
the computer to find additional information on Windows CE components.
Use Pop-Up MenusUse pop-up menus to quickly perform an action on an item. For example, you can use a
pop-up menu to delete or make a copy of an item. To access a pop-up menu, tap and
hold the item on which you want to perform the action. When the menu appears, tap the
action you want to perform, or tap anywhere outside the menu to close the menu with-
out performing the action.
Enter InformationIf you do not use the keypad, you can enter information on your vehicle mount com-
puter in several ways depending on the program you are using.
Use the input panel to enter information in any program on your computer. You can
either type using the on-screen keyboard or write using Transcriber. The characters
appear as typed text.
1. Tap the Input Panel icon. The Input Panel menu appears.
2. Tap LargeKB. The large keyboard displays on the desktop of the computer.
Icon Description
The remaining power for the UPS battery from 0 to 100 percent.
The UPS battery is charging.
The CV41 is connected to external power.
Action Description
Typing Enter typed text into the computer by tapping keys on
the on-screen keyboard or by using handwriting
recognition software.
Writing Use the stylus to write directly on the screen.
Drawing Use the stylus to draw directly on the screen.
CV41 Vehicle Mount Computer (Windows CE) User Guide 25

Use TranscriberUse Transcriber to write anywhere on the screen using the stylus just as you would on
paper. You can write an entire sentence of information, and then pause to let Transcriber
change the written characters to typed characters.
1. Double-tap the Transcriber icon on the desktop. The Transcriber Intro help box
appears on the desktop with some tips on how to use Transcriber.
2. Click OK to close the help box. The Transcriber Input Panel appears in the lower right
corner of the desktop.
3. Write anywhere on the screen. Pause and let Transcriber change the written
characters to typed characters.
Calibrate the ScreenYou may need to calibrate your screen if you tap on one area and it registers in a differ-
ent area of the screen. Make sure you use the stylus to complete the alignment process.
1. Tap Start > Settings > Control Panel > Stylus.
2. Select the Calibration tab.
3. Tap the Recalibrate button.
4. Follow the prompts on the screen to complete the alignment process.
Set the Date and TimeUse this section to learn how to set the date and time for the CV41. Optionally, you can
sync the date and time to a local time server.
1. Tap the clock on the taskbar. The Date/Time Properties screen appears.
2. Set your current date, time, and time zone.
3. Select the Automatically adjust clock for daylight savings if you want the CV41 to
automatically adjust for daylight savings time.
4. Tap Apply to save your settings.
Sync to a Local Time ServerTo keep your CV41 time and date running accurately, you can sync it to a local time
server through an Internet connection.
1. Establish an ActiveSync connection.
2. On the CV41, tap My Device > Windows.
3. Copy the GrabTime.ini file and place it onto your desktop PC.
4. Open the .ini file and add the local time server domain to the top of the .ini file.
5. (Optional) Delete the remaining time server domains from the list.
26 CV41 Vehicle Mount Computer (Windows CE) User Guide
6. Save the .ini file and copy it back to the My Device\Windows folder on the CV41.
7. On the CV41, tap Start > Settings > Control Panel > Options.
8. Select Autolaunch TimeSync and tap OK.
About ApplicationsHoneywell provides many useful applications to help you configure, troubleshoot, and
connect your computer to other devices and networks. You can also download addi-
tional applications from the Honeywell website to help you use all of the features of
your computer.
Applications Available On the ComputerUse this table to understand some of the applications available on your computer.
Icon Application Description
Intermec Settings Use Intermec Settings to configure your computer. You can use Intermec
Settings to individually configure a computer or you can use it through
SmartSystems to configure all of your computers.
iSpyWiFi Use iSpyWiFi to check your 802.11 status and diagnose issues with the
connection.
Profile Settings Use Profile Settings to easily configure the computer for a specific use.
You can choose predefined value for Power settings.
• Tap the Profile Setting you want to use.
You will see a message that changes are saved and a check mark
appears next to your choice.
Bluetooth Printing Use the Bluetooth Printing application to connect to a Bluetooth printer.
Bluetooth
Scanning
Use the Bluetooth Scanning application to connect to a Bluetooth
scanner.
Intermec Browser Intermec Browser is a locked-down web application for your computer
that is compatible with Internet Explorer 6.0. You can configure Intermec
Browser for your specific application requirements and design your own
web pages.
Intermec Terminal
Emulator (ITE)
Intermec Terminal Emulator (ITE), part of Intermec Client Pack (ICP), is a
terminal emulation client designed for enterprise-level data collection.
ITE is packed with enhancements that improve productivity, reduce
errors, and deliver fast return on investment. It supports multiple
emulation protocols in a single client and has new features such as
session persistence, remote management and configuration, and offers
a maintenance plan to keep you up-to-date with the latest releases and
upgrades.
CV41 Vehicle Mount Computer (Windows CE) User Guide 27
Applications You Can Download For the ComputerYou can download several applications from the website that extend the capabilities of
your computer. All of the applications explained below are available from the Intermec
website. Some of the applications require the purchase of a license to run.About Inter-
mec Launcher
Intermec Launcher is a Microsoft Windows application, designed for Honeywell com-
puters that provides a platform from which other applications may be launched while
attempting to provide a locked-down environment. You can configure Intermec
Launcher for your specific application requirements. You can download and use Inter-
mec Launcher for a 60-day evaluation period. After the evaluation period expires, you
will need to purchase a license.
About Features DemoFeatures Demo provides a simple way to explore the key features of your computer. You
will find applications that demonstrate scanning, document imaging, image capture,
printing, and GPS functionality. Many of the applications that are part of Features
Demo also have separate full-featured versions that you can download and license for
your computer.
About SmartSystems FoundationSmartSystems™ is an easy-to-use software platform that provides IT Administrators
and Integrators a single, integrated portal for hands-free provisioning, deployment, and
management of Honeywell devices minimizing the effort spent on software upgrades,
equipment monitoring, maintenance and troubleshooting.
SmartSystems Foundation provides a consistent way to manage Honeywell devices
including computers, vehicle mounted computers, RFID readers, printers and bar code
scanners, located on-site or remote, to make the most of limited IT resources, and lower
the total cost of ownership for Honeywell data collection equipment. SmartSystems
Foundation can be downloaded at no charge from the Honeywell website. For more
information, visit www.honeywellaidc.com.
28 CV41 Vehicle Mount Computer (Windows CE) User Guide

CHAPTER
4
CV41 Vehicle Moun
MANAGE THE COMPUTER
Use this chapter to learn how to remotely update, configure, and monitor your Honey-
well computers. You will also find information on installing and developing software
applications as we ll as how to upgrade the system software.
t Computer (Windows CE) User Guide 29

Manage the Computer in Your NetworkWhen you have multiple computers and peripherals in your network, it is essential to
have an easy way to manage updates, configure all of the devices, and remotely trouble-
shoot problems. Honeywell provides a device management software platform called
SmartSystems™ Foundation to help you manage your devices. You can also purchase
third-party device management software through a vendor.
Manage the Computer Using SmartSystems FoundationSmartSystems Foundation is a software platform that lets you manage all of your
SmartSystems-enabled devices simultaneously from a central server. The SmartSys-
tems Foundation console displays all SmartSystems-enabled computers and peripher-
als in your network.
SmartSystems Foundation Console
Through the console, you can:
• drag-and-drop configuration bundles, operating system updates, and firmware
upgrades to multiple computers.
• save configuration settings from a single device and deploy those settings to many
devices simultaneously.
• remotely change settings on SmartSystems-enabled computers and peripherals.
The SmartSystems Foundation console can report on asset locations and battery sta-
tus, making it easier to manage your devices.
With a Provisioning license, SmartSystems Foundation can automatically push soft-
ware, configuration settings, and other files to connected computers. You can download
SmartSystems Foundation from the Honeywell website. For more information, visit
www,honeywellaidc.com. To purchase a Provisioning license, contact your Honeywell
sales representative.
30 CV41 Vehicle Mount Computer (Windows CE) User Guide

Develop and Install ApplicationsUse the Intermec Resource Kits and the CV41 Software Development Kits to develop
applications to run on the computer. The Resource Kits are a library of C++, .NET, Java,
and web components grouped by functionality that you can use to create applications
for the computer. The Resource Kits are part of the Intermec Developer Library (IDL),
and can be downloaded from the Honeywell website at www.honeywellaidc.com.
For more information, see the Intermec Developer Library Resource Kit Developer Guide.
Package Your ApplicationFor very simple applications, the executable file may be the only file you need to deploy.
More typically, you will have a set of files to install.
Honeywell recommends using .cab files to install your applications. The computer uses
standard Windows CE .cab files and will install third-party .cab files.
Choose a Target LocationPlace your application in any of these memory locations on the computer:
• The ObjectStore.
• The optional SD card. Depending on available disk space, consider installing your
application files on the SD card. Using a card creates the \SD Card folder on the
computer.
• The \System folder. Applications and data in the \System folder will persist through
a clean boot.
Install Applications Using SmartSystems Foundation ConsoleYou can use the SmartSystems console to drag-and-drop applications onto your com-
puter. The console is part of SmartSystems Foundation.
1. Download your application file from the Honeywell website and unzip it on your
desktop PC.
2. Double-click the application file to install it. The application file should appear in the
Software Vault.
3. From the SmartSystems console in the Software Vault, drag-and-drop the
application onto each computer in your network, or drop the application on a group
of computers contained in a folder.
Install Applications Using Microsoft ActiveSyncWhen you only have a few computers to update with applications, you can copy files
using Microsoft ActiveSync. This procedure assumes that Microsoft ActiveSync is
installed on your PC and is up and running.
CV41 Vehicle Mount Computer (Windows CE) User Guide 31

1. Connect to the computer using ActiveSync.
2. Copy the .cab files from your PC to the CV41.
3. Browse to the .cab files and tap the files to install them.
Install Applications Using an SD CardUse an SD card to install applications on one computer at a time or if you have no net-
work connection.
1. Copy your application file to the storage card.
2. Install the SD card in the CV41.
3. On the CV41, browse to the SD Card folder and run your application.
Update the Honeywell Content SoftwareThe computer uses a series of cab files to update the operating system (OS), low-level
firmware, and Honeywell Content files.
SSPB files deliver Honeywell functionality such as data collection, configuration, and
wireless security to your CV41. As new features are added to these components, you can
upgrade your SSPB files without needing to upgrade the operating system. Similarly,
features added to the operating system do not affect the functionality of the SSPB, and
you can choose to upgrade only the operating system.
Update the Operating System and Low-Level FirmwareUse a USB flash drive to upgrade the operating system (OS) and
low -level firmware of the CV41. Before you can update your CV41, you need:
• a USB Y-Cable.
• a USB flash drive.
• the upgrade .exe file. This file is available from the Honeywell Technical Support
Downloads Portal at www.hsmftp.honeywell.com.
After you locate these items, you can update your computer.
1. Connect the USB flash drive to your PC.
2. Download and install the OS update file to your PC.
3. Click Create_CV41_Update_Drive.bat. A command window appears and scans your
PC for a connected USB flash drive.
4. In the Command window, press 3 and then Enter. The USB flash drive is formatted
and the update files are loaded onto the drive.
5. Remove the USB flash drive and insert it into the smart dock.
6. Make sure the that the smart dock is connected to power and insert the CV41 into
the dock.
32 CV41 Vehicle Mount Computer (Windows CE) User Guide

7. Turn on the CV41. A screen prompt appears.
8. Press F and then Enter to update the OS and device firmware. The installer installs
the update onto the CV41. When it is finished, the CV41 turns off.
9. Remove the USB flash drive and press the Power button. The CV41 continues the
update process. After the update is complete, the computer boots again.
Update the Honeywell Content SoftwareYou can use these methods to update the Honeywell Content software on the CV41:
• You can update individual computers, or multiple computers at the same time using
the SmartSystems console. For help, see the next section, Update Honeywell Content
Using SmartSystems Foundation.
• You can update individual computers using ActiveSync.
Update Honeywell Content Using SmartSystems FoundationYou can use the SmartSystems console to update the Honeywell Content on your CV41.
The console is part of SmartSystems Foundation and is available from the Honeywell
website. Before you can update your CV41, you need:
• SmartSystems Foundation. To find the application, go to the Technical Support
Downloads Portal at www.hsmftp.honeywell.com.
• .the SSPB files you want to install. These SSPB files are available from the Technical
Support Downloads Portal at www.hsmftp.honeywell.com.
After you locate these items, you can update your CV41 using SmartSystems Founda-
tion.
1. Open the SmartSystems console.
2. Make sure the computer is discovered.
3. Make sure the computer is in the powered smart dock and that power management
is disabled.
4. Download the SmartSystems bundle to your PC.
5. Double-click the SmartSystems bundle on your PC to extract the update files to the
software vault.
6. From the SmartSystems console, locate the bundle to install and drag it to each
computer (or group in a folder) you want to update. The SmartSystems console
installs the update to your computers.
Note: The SmartSystems console indicates that your computer is offline by displaying a red stop
symbol until the computer reboots and connects to the system.
Update Honeywell Content Using a ActiveSyncUse ActiveSync to update individual computers.
CV41 Vehicle Mount Computer (Windows CE) User Guide 33

1. Establish an ActiveSync partnership. For help, see Transfer Files To and From Your
PC.
2. From your desktop PC, download the bundle you want to install. These bundles are
available from the Technical Support Downloads Portal at
www.hsmftp.honeywell.com.
3. Transfer the bundle file to \System directory on the CV41.
4. Tap on the file on the CV41. The computer reboots. After the computer reboots, the
bundle files installs. When the installation is finished, the CV41 reboots once again.
34 CV41 Vehicle Mount Computer (Windows CE) User Guide

CHAPTER
5
CV41 Vehicle Moun
CONFIGURE THE COMPUTER
Use this chapter to learn about the available methods for configuring your computer
and how to use Intermec Settings. You can also use this chapter to learn how to config-
ure network communications and wireless security.
t Computer (Windows CE) User Guide 35

How to Configure the ComputerYou can configure many parameters on the computer such as the bar code symbologies
it decodes or the network settings. The values you set for these parameters determine
how the computer operates.
There are several ways to configure the computer:
• Directly on the computer. You can use Intermec Settings directly on the computer to
change only the settings on that computer. For more information, see the next
section.
• Remotely using SmartSystems Foundation. When you use SmartSystems, you can
remotely configure all of your CV41 vehicle mount computers as well as other
SmartSystems-enabled Honeywell computers and peripherals. For more
information, see Use Intermec Settings Remotely With SmartSystems Foundation.
• You can use a third-party device management product that supports the computer
and Intermec Settings, such as Soti MobiControl or Wavelink Avalanche. For more
information, visit the Device Management page on the Honeywell website.
You can also configure the computer with configuration bundles that you create using
SmartSystems Foundation. For more information, see the SmartSystems Foundation
Online Help.
Use Intermec Settings on the ComputerUse Intermec Settings to configure parameters for Honeywell applications on the com-
puter as well as some device-specific parameters like volume. You can configure
parameters for important functions like data collection and communications.
External bar code scanners are supported by connecting the scanner to a COM port or
by Bluetooth. When configuring a scanner using Intermec Settings, the scanner sym-
bologies can be updated through the CV41 data collection software.
Start Intermec SettingsIntermec Settings is located in the Control Panel.
• Tap Start > Settings > Control Panel > Intermec Settings. The Intermec Settings
Main Menu appears.
36 CV41 Vehicle Mount Computer (Windows CE) User Guide

About the Structure of Intermec SettingsUse the following tables to help find the parameters in Intermec Settings that you want
to configure. Each table contains the parameters for one of the Intermec Settings Main
Menu options.
If you see > next to a menu option, there are more screens available in the next level. If
you see ... next to a menu option, there is only one more screen available.
CV41 Vehicle Mount Computer (Windows CE) User Guide 37

Most parameters are saved when you tap OK. Some settings require you to reboot the
computer for the changes to take effect.
Data Collection Options Parameters You Can Configure
Tethered Scanner (COM 1) • Enable Scanner Port
• Symbologies
• Symbology options
• Scanner settings
• Scanner port settings
• Decode security
Tethered Scanner (COM 2) • Enable Scanner Port
• Symbologies
• Symbology options
• Scanner settings
• Scanner port settings
• Decode security
Bluetooth Scanner • Symbologies
• Symbology options
• Scanner settings
• Bluetooth scanner settings
• Scanner port settings
• Decode security
BT-Configure on Connect Bluetooth-configure on connect
Communications Options Parameters You Can Configure
Device Name Device name
802.11 Radio • Security choice
• Security settings (includes Wi-Fi
settings such as enable/disable
radio)
• Funk Security Settings
• Microsoft Security settings
• IP settings
• Certificates
• Radio bands
• Security changes
Bluetooth Bluetooth settings (power,
discoverable, connectable, and so on)
Device Settings Options Parameters You Can Configure
Backlight Keypad backlight
Date and Time Date and time settings
Heater Screen heater settings
IDL Runtime Versions • ITC50 (read-only)
• ITCScan (read-only)
38 CV41 Vehicle Mount Computer (Windows CE) User Guide

Note: The Printer menu displays settings for Bluetooth connected printers. The settings that
appear in the menu are dependent on the printer that is paired with the device. The printer
needs to be paired using the Bluetooth Printing application.
Keypad Keypad settings
Power Management • Battery power
• External power
• Auto-on
Profile Settings Application Whether these parameter options
appear in Profile Settings:
• Always on
• Maximize battery life
• Normal
Screen • Brightness settings
• Screen Blanking On Motion
settings
Sounds Sound settings
System Component Versions System component versions (read-
only)
Printer Options Parameters You Can Configure
Printer (if connected through
Bluetooth)
Printer settings (Information, memory,
printer definitions, power, Bluetooth
communications, and so on)
Device Settings Options Parameters You Can Configure
Application Options Parameters You Can Configure
Intermec Browser • Administration settings
• Toolbar options
• Key settings
• Printer settings
• Function key mapping
Intermec Terminal Emulation • Program name (read-only)
• Program version (read-only)
• SIP settings
• No Lockdown settings
• No Auto-Start
• OOR Monitor settings
• Chk In License settings
• Trusted App settings
• Scan Control settings
• Menu options
• Toolbar options
• Debug filters
• UDP+ options
• Sessions 1 - 4
CV41 Vehicle Mount Computer (Windows CE) User Guide 39

For more information on all parameters in Intermec Settings, see the Intermec Settings
Command Reference Manual.
Navigate in Intermec SettingsYou can easily navigate Intermec Settings to find the parameter you need to configure.
Core Messaging Service
OptionsParameters You Can Configure
Server IP Server IP (read-only)
Associated Server IP Associated server IP
Broadcast Name Broadcast name
Port Port (read-only)
Keep Alive Ping Interval Keep alive ping interval
SmartSystems Information
OptionsParameters You Can Configure
Identity Identity information (hardware
version, firmware version, OS
version, and so on) (read-only)
Administrator Administrator settings (name,
phone, and email)
Location Location settings (country, state,
city, campus, and detail)
Information Device Notes (read-only)
Device Monitor Options Parameters You Can Configure
Device Health Controls • Enable health data collection
• Set rule file location
• Set data refresh periods
Virtual Wedge Options Parameters You Can Configure
Enable Virtual Wedge Enable virtual wedge
Virtual Wedge Method Set the virtual wedge method (adapt to
application, character mode, and block
mode)
Bar Code Scanner Wedge Bar code scanner wedge settings (bar
code scanner grid and label encoding)
License Manager Options Parameters You Can Configure
About About settings (read-only)
License Vault None (displays applications that are
licensed)
RFID Options Parameters You Can Configure
RFID Service RFID Service settings
40 CV41 Vehicle Mount Computer (Windows CE) User Guide

To move down a level:
• Tap the menu item in the list.
To move back a level:
• Tap Back or Cancel on the Tile bar.
To save a parameter setting:
• Tap OK.
To exit Intermec Settings:
• Tap Menu > Exit or OK.
Configure Profile Settings With Intermec SettingsA profile is a set of predefined values that you can easily apply to the computer to
ensure optimal performance in a specific scenario. The end user does not need to figure
out the “right” settings because we have already done that work for you. Profile Settings
is available from the Start > Programs menu so you can make it available to the end
user for easy configuration.
Profile Settings Screen
Use Intermec Settings to determine the profiles you want the end user to see in the Pro-
file Settings application.
1. Go to Device Settings > Profile Settings Application.
2. Select Always on, Maximizing battery life, or Normal.
CV41 Vehicle Mount Computer (Windows CE) User Guide 41

3. From the sub-menus, select or clear the Show option in Profile Settings check box
for the settings you want to have available to the end user.
4. Click OK to save your selection.
Restore Default SettingsYou can easily restore a menu to its default settings or all of the Intermec Settings
parameters to their default settings if necessary.
1. Navigate to the menu that you want to restore to defaults.
2. Tap Menu > Restore Menu Defaults.
3. When prompted, tap Yes to restore the menu default settings.
4. If prompted to refresh the computer, tap Yes.
You can restore defaults settings for all parameters.
1. Tap Menu > Restore All Defaults. The applications asks if you are sure you want to
restore all defaults.
2. Tap Yes.
After several minutes, all of the default settings are restored.
42 CV41 Vehicle Mount Computer (Windows CE) User Guide

Hide Menu Items in Intermec SettingsYou can hide items in the Intermec Settings menus if you do not want them available for
other users to access. Hidden items are not saved when you back up your settings in the
SmartSystems console.
On the computer, you can:
• hide menu items by tapping and holding the item, and then choosing Hide Menu
Item from the popup list. When asked if you want to hide the menu, tap Yes.
• restore all hidden items in all menus, by tapping Menu > Unhide All Items.
Note: When you restore default settings in Intermec Settings, only the settings for visible items
are restored to defaults. The settings for hidden menu items are not affected.
Use Intermec Settings Remotely With SmartSystems Foundation
Your computer is SmartSystems-enabled, which lets you open Intermec Settings from
the SmartSystems console to remotely configure all of your computers. For more infor-
mation on SmartSystems, see Manage the Computer Using SmartSystems Foundation.
1. In the SmartSystems console, select a computer and right-click.
2. From the menu, select Start Intermec Settings.
3. Configure the settings you need to change. As you choose parameters from the tree
structure, help for each parameter appears in the upper right pane of Intermec
Settings.
4. When you are done making changes, choose File > Save Settings.
For help using Intermec Settings, click Help > Contents. For information on all of the
parameters in Intermec Settings, see the Intermec Settings Command Reference Man-
ual.
About Network CommunicationsYou can easily add the computer to your wireless or wired data collection network. You
can connect your computer using:
• 802.11a/b/g radio communications.
• Bluetooth communications.
• USB and serial communications.
CV41 Vehicle Mount Computer (Windows CE) User Guide 43
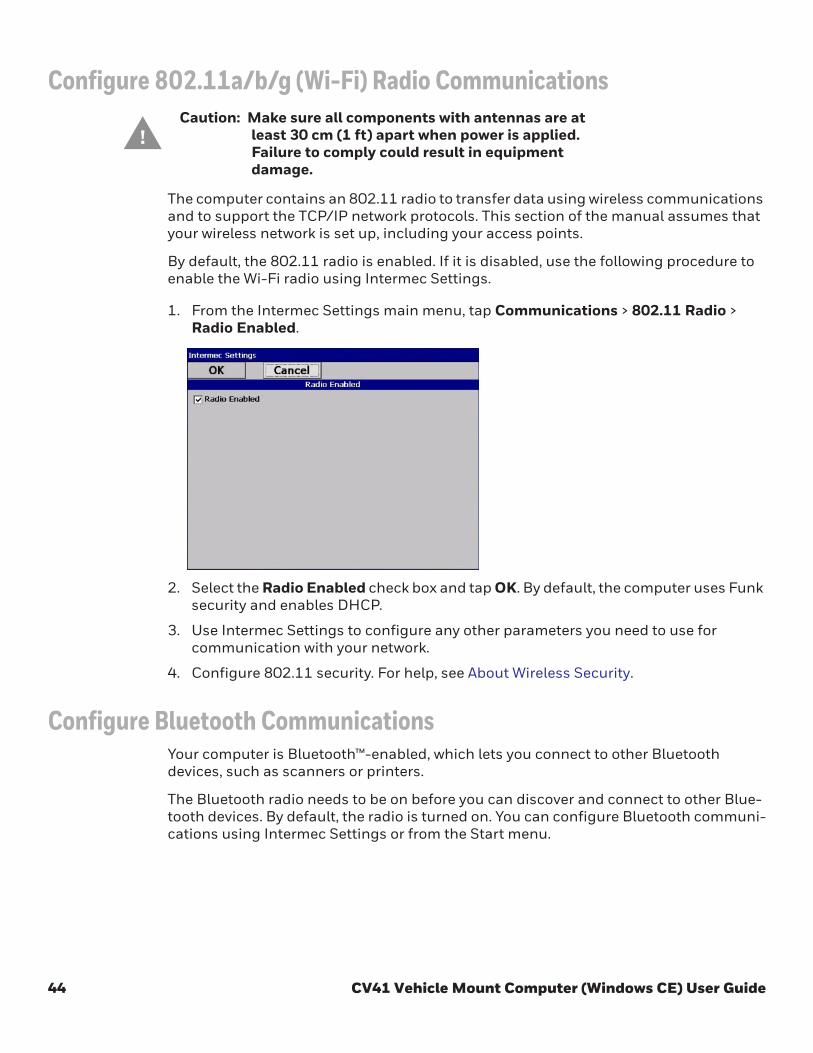
Configure 802.11a/b/g (Wi-Fi) Radio Communications
The computer contains an 802.11 radio to transfer data using wireless communications
and to support the TCP/IP network protocols. This section of the manual assumes that
your wireless network is set up, including your access points.
By default, the 802.11 radio is enabled. If it is disabled, use the following procedure to
enable the Wi-Fi radio using Intermec Settings.
1. From the Intermec Settings main menu, tap Communications > 802.11 Radio >
Radio Enabled.
2. Select the Radio Enabled check box and tap OK. By default, the computer uses Funk
security and enables DHCP.
3. Use Intermec Settings to configure any other parameters you need to use for
communication with your network.
4. Configure 802.11 security. For help, see About Wireless Security.
Configure Bluetooth CommunicationsYour computer is Bluetooth™-enabled, which lets you connect to other Bluetooth
devices, such as scanners or printers.
The Bluetooth radio needs to be on before you can discover and connect to other Blue-
tooth devices. By default, the radio is turned on. You can configure Bluetooth communi-
cations using Intermec Settings or from the Start menu.
Caution: Make sure all components with antennas are at
least 30 cm (1 ft) apart when power is applied.
Failure to comply could result in equipment
damage.
44 CV41 Vehicle Mount Computer (Windows CE) User Guide

1. From the Intermec Settings main menu, tap Communications > Bluetooth.
2. Select the On check box.
3. Tap OK.
The Bluetooth radio maintains its state through a reboot or cold boot and maintains
virtual COM ports. But, if you clean boot your computer you need to recreate pairings
to devices.
Connect to a Bluetooth ScannerYou can connect the computer to an Honeywell Bluetooth scanner, such as the SF51 or
SR61.
1. Tap Start > Settings > Control Panel > Bluetooth Scanning.
2. Tap Add Device.
CV41 Vehicle Mount Computer (Windows CE) User Guide 45

3. Select Quick Connect, Search, or Manual. Follow the onscreen instruction to add a
wireless scanner.
Connect to a Bluetooth PrinterTo configure your computer for Bluetooth wireless printing, you need to:
• create an application that opens the wireless printing COM port on your computer.
For help, see the Bluetooth Resource Kit, which is part of the Intermec Developer
Library (IDL), available from www’honeywellaidc.com.
• select the current wireless printer on your computer. For help, see the next procedure.
Note: You can also print wirelessly using Microsoft APIs with Bluetooth extensions for Winsock
and Bluetooth virtual COM ports. For help, see the Bluetooth Resource Kit documentation.
1. Tap Start > Settings > Control Panel > Bluetooth Printing.
2. Tap Search to find a printer, or tap Manual to enter a device address. Follow the
onscreen instructions to select the current wireless printer.
3. (Optional) Tap Print Test Page. The printer prints out a test page.
About Serial and USB CommunicationsUse a serial or USB cable to transmit and receive data from another device through
serial or USB communications. If you are using a USB cable, you must purchase a USB
Y-Cable. For more information, contact your Honeywell representative.
Connect to a USB ScannerWhen an HID-enabled USB scanner is used with the CV41, any data handling must be
programmed into the scanner because the data transmits to an active window as a key-
stroke message, and bypasses the Intermec Data Collection wedge. You can program
the scanner by:
• scanning the configuration bar codes from the scanner manufacturer.
• installing an application that accepts the incoming data.
46 CV41 Vehicle Mount Computer (Windows CE) User Guide

For the SR30 or SR61T, you must purchase the correct scanner USB cable to use with
the CV41. For more information, see the following table.
Connect to a Serially Tethered ScannerUse this procedure to connect your computer to connect a tethered scanner and enable
RS-232 communications. For the SR30 or SR61T, you must purchase the correct serial
cable to use with the CV41. For more information, see the following table.
1. Connect the scanner to the COM1 or COM2 port.
2. From the Intermec Settings main menu, select Tethered Scanner (COM 1 or COM
2).
3. Tap Scanner Settings.
Scanner Model Required Cable
SR30 6.5 ft (1.9 m) cable (P/N 236-159-002)
SR61T (Gen 1) 6.5 ft (1.9 m) cable (P/N 236-182-001)
SR61T (Gen 2) 6.5 ft (1.9 m) cable (P/N 236-240-001)
Scanner Model Required Cable
SR30 6.5 ft (1.9 m) cable (P/N 236-164-002)
SR61T (Gen1, Gen 2) • 6.5 ft (1.9 m) cable (P/N 236-197-001)
• 12 ft (3.6 m) cable (P/N 237-197-001)
CV41 Vehicle Mount Computer (Windows CE) User Guide 47

4. Perform one of these items based on the type of scanner you are connecting:
• For an SR30 or SR61T scanner, tap Scanner Settings, select SR Intermec
Scanner, and then tap OK.
• For an ASCII scanner, tap Scanner Settings, select ASCII, and then tap OK. Set up
the appropriate COM port settings by selecting Scanner Port Settings.
5. Tap Enable scanner port.
6. Check the Enable scanner port check box and tap OK.
Create an ISP ConnectionYou can create an Internet Service Provider (ISP) connection to send and receive email
messages using Messaging (Outlook Email) and view web pages using Internet
Explorer Mobile. You need to get your ISP dial-up access telephone number, a user
name, and a password from your ISP.
1. Tap Start > Settings > Control Panel.
2. Double-tap Network and Dial-up Connections.
3. Double-tap Make New Connection.
4. Enter a name for the connection, such as “ISP Connection.”
5. Select the Dial-up Connection radio button.
6. Tap Next.
48 CV41 Vehicle Mount Computer (Windows CE) User Guide

7. If you are using an external modem connected to your computer with a cable, select
Hayes Compatible on COM1 from the Select a modem list.
8. Tap Next.
9. Enter the access phone number and then tap Finish.
10. Double-tap on the connection you just created.
11. Tap Dial Properties.
12. On the Dialing Properties screen, configure your dialing properties and tap OK.
13. Enter the User name, Password, and Domain (if provided by an ISP or your network
administrator).
14. Tap Connect.
CV41 Vehicle Mount Computer (Windows CE) User Guide 49

Create a VPN Server ConnectionYou can create a Virtual Private Network (VPN) connection to securely connect to serv-
ers, such as a corporate network, through the Internet. Before you can create a VPN
connection, you need this information from your network administrator:
• User name
• Password
• Domain name
• TCP/IP settings
• Host name or IP address of the VPN server
After you have located this information, you can create a VPN server connection.
1. Tap Start > Settings > Control Panel.
2. Double-tap Network and Dial-up Connections.
3. Double-tap Make New Connection.
4. Double-tap either Virtual Private Network (PPTP) or Virtual Private Network
(L2TP).
5. Step through the screens to set up your VPN connection.
About Wireless SecurityThe computer provides five types of security for your wireless network:
• Wi-Fi Protected Access 2 (WPA2™)
• Wi-Fi Protected Access (WPA)
• 802.1x
• LEAP
• WEP
This section explains how to configure wireless security on your computer. Honeywell
recommends that you implement WPA2 security using PSK (Personal) or 802.1X
(Enterprise) key management as appropriate.
You must use either Funk or Microsoft security to implement your security solution. For
details, see the next section, Choose Between Microsoft and Funk Security Honeywell
recommends that you always implement WPA2 security using PSK (Personal) or 802.1X
(Enterprise) key management.
If you are using WPA-802.1x, WPA2-802.1x, or 802.1x security, this section also
assumes that your authentication server and authenticators are properly configured.
Note: Your security choice does not depend on your authentication server. For example, you can
choose Funk security if you use Microsoft Active Directory® to issue certificates.
50 CV41 Vehicle Mount Computer (Windows CE) User Guide
Choose Between Microsoft and Funk SecurityThe computer supports both Funk and Microsoft security, which dynamically select
wireless networks based on your preferences. The option you choose depends on your
network security needs.
• If you are using the computer in a static environment that requires a high level of
security, you should use Funk security, which offers CCX v4.0 compliance, support for
LEAP and TTLS, and configuration for up to four profiles.
To use Funk security, you need to select a profile. For help, see the next section, Select
a Funk Security Profile
• If you are primarily using the computer to connect to Wi-Fi hotspots, you may want
to use Microsoft security.
To use Microsoft security, you need to select it as your security choice. For help, see
Select Microsoft as Your Security Choice.
Select a Funk Security ProfileYou can define up to four profiles for Funk security. Different profiles let your computer
communicate in different networks without having to change all of your security set-
tings. For example, you may want to set up one profile for the manufacturing floor and
one for the warehouse. By default, the active profile is Profile 1.
Select a Funk Security ProfileUse the following procedure to select a Funk security profile.
1. Start Intermec Settings.
2. Choose Communications > 802.11 Radio > Funk Security.
3. Choose a profile. A list of configurable settings appears.
4. (Optional) In the Profile Label text box, enter a meaningful name for your profile.
5. Configure your security settings. For help, see the next sections.
6. Repeat Steps 3 through 5 for each profile you want to define.
7. Set an active profile by choosing it from the Active Profile list.
8. Save your settings.
Configure WPA or WPA2 Enterprise (802.1x) Security With FunkUse these procedures to set WPA-802.1x or WPA2-802.1x security on your computer
with Funk security.
1. Make sure the communications and radio parameters on your computer are config-
ured.
2. Make sure Funk is selected as your security choice.
3. Start Intermec Settings.
4. Choose Communications > 802.11 Radio > Funk Security.
CV41 Vehicle Mount Computer (Windows CE) User Guide 51

5. Select the profile you want to configure.
6. For Association, choose WPA or WPA2. Encryption automatically defaults to TKIP
or AES, respectively.
7. For 8021x, choose TTLS, PEAP, EAP-FAST, or TLS.
8. If you choose TTLS, EAP-FAST, or PEAP:
a. For Prompt for Credentials, choose Enter credentials now.
b. Enter a User Name and User Password.
c. For Validate Server Certificate, choose Yes.
Note: The correct date must be set on your computer when you enable Validate Server
Certificate.
9. If you choose TLS:
a. Load a user and root certificate on your computer. For help, see Load a Certificate.
b. Enter a User Name and Subject Name.
c. For Validate Server Certificate, choose Yes.
Configure WPA or WPA2 Personal (PSK) Security With FunkUse the following procedure to configure WPA-PSK or WPA2-PSK with Funk security.
1. Make sure the communications and radio parameters on your computer are config-
ured.
2. Make sure Funk is selected as your security choice.
3. Start Intermec Settings.
4. Choose Communications > 802.11 Radio > Funk Security.
5. Select the profile you want to configure.
6. For Association, choose WPA or WPA2.
7. For 8021x, choose None.
8. For Pre-Shared Key, enter the pre-shared key or passphrase.
The pre-shared key must be a value of 32 hex pairs preceded by 0x for a total of 66
characters. The value must match the key value on the access point. The passphrase
must be from 8 to 63 characters. After you enter a passphrase, the computer
internally converts it to a pre-shared key. This value must match the passphrase on
the authenticator.
9. Save your settings.
Configure 802.1x Security With Funk SecurityUse the following procedure to configure 802.1x-WEP security with Funk security. Hon-
eywell recommends that you use WPA2-802.1x instead of 802.1x-WEP if possible.
52 CV41 Vehicle Mount Computer (Windows CE) User Guide

1. Make sure the communications and radio parameters on your computer are config-
ured.
2. Make sure Funk is selected as your security choice.
3. Start Intermec Settings.
4. Choose Communications > 802.11 Radio > Funk Security.
5. Select the profile you want to configure.
6. For Association, choose Open.
7. For Encryption, choose WEP.
8. For 8021x, choose TTLS, PEAP, or TLS.
9. If you chose TTLS or PEAP:
a. Enter a User Name.
b. For Prompt for Credentials, choose Enter credentials now.
c. Enter a User Password.
d. For Validate Server Certificate, choose Yes.
10. If you choose TLS:
a. Load a user and root certificate on your computer. For help, see Load a Certificate.
b. For Validate Server Certificate, choose Yes.
c. Enter a User Name and Subject Name.
11. Save your settings.
Configure LEAP Security With FunkAfter you configure the communications and radio parameters on your computer and
select Funk as your security choice, you can configure LEAP.
1. Start Intermec Settings.
2. Choose Communications > 802.11 Radio > Funk.
3. Select the profile you want to configure.
4. For 8021x, choose LEAP.
5. For Association, choose Open, WPA, WPA2, or Network EAP. Encryption
automatically defaults to TKIP if you choose WPA, AES if you choose WPA2, and
WEP if you choose Open or Network EAP.
6. For Prompt for Credentials, choose Enter credentials now.
7. Enter a User Name and User Password.
8. Save your settings.
Configure Static WEP Security With Funk SecurityUse the following procedure to configure static WEP security with Funk. Honeywell rec-
ommends that you use WPA2-PSK instead of WEP if possible.
CV41 Vehicle Mount Computer (Windows CE) User Guide 53

1. Make sure the communications and radio parameters on your computer are config-
ured.
2. Make sure Funk is selected as your security choice.
3. Start Intermec Settings.
4. Choose Communications > 802.11 Radio > Funk Security.
5. Select the profile you want to configure.
6. For 8021x choose None.
7. For Association, choose Open.
8. For Encryption, choose WEP.
9. Define a value for the keys you want to use. You can define up to four keys (Key 1
through Key 4).
Enter an ASCII key or a hex key that is either 5 bytes or 13 bytes long depending on
the capability of the radio. Set a 5-byte value for 64-bit WEP or a 13-byte value for
128-bit WEP. Hex keys must be preceded by 0x and contain 5 or 13 hex pairs.
10. For Transmit key, choose the key you want to use for transmitting data.
11. Save your settings.
Use Open (No Security) Associations with FunkUse the following procedure to configure your computer for open security using Funk.
1. Start Intermec Settings.
2. Choose Communications > 802.11 Radio > Funk Security.
3. Select the active profile you are using.
4. For Association, choose Open.
5. For Encryption, choose None.
6. Tap OK. Your settings are saved.
Select Microsoft as Your Security ChoiceThe default security setting is Funk. If you want to use Microsoft Wireless Zero Configu-
ration (WZC) security, you need to select it as your security choice. After you select Mic-
rosoft as your security choice, you will be prompted to save your settings and reset the
computer for your change to take effect.
With Microsoft as your security choice, you can configure:
• WPA or WPA2
• 802.1x
• Static WEP
Select Microsoft SecurityUse the following procedure to select Microsoft security.
54 CV41 Vehicle Mount Computer (Windows CE) User Guide

1. Start Intermec Settings. For help, see Start Intermec Settings.
2. Choose Communications > 802.11 Radio > Security Choice.
3. From the Security Choice list, select Microsoft Security. An alert box appears
telling you that you must save your settings and reboot the computer for the new
security choice to take effect.
4. Tap Yes. The computer resets and starts with Microsoft Security as the Security
Choice.
Configure WPA or WPA2 Enterprise (802.1x) Security With MicrosoftUse these procedures to set WPA-802.1x security on your computer with Microsoft
security.
1. Make sure the communications and radio parameters on your computer are config-
ured.
2. Start Intermec Settings.
3. Choose Communications > 802.11 Radio > Microsoft Security.
4. For Infrastructure Mode, choose Infrastructure.
5. For Network Authentication, choose WPA or WPA2. Data Encryption automatically
defaults to TKIP for WPA and AES for WPA2.
6. For 802.1x Authentication, choose either TLS or PEAP.
7. If you choose TLS:
a. Load a user and root certificate on your computer. For help, see Load a Certificate.
b. Choose Properties. The Certificates dialog box appears.
c. Select the certificate you want to use from the list. The User Logon dialog box appears.
d. Enter a User Name and Domain and tap OK.
e. Tap OK to exit the Certificates dialog box.
f. Tap OK to save the Microsoft Security settings.
8. If you choose PEAP:
a. Load a root certificate of the authentication server on your computer. For help, see Load a Certificate.
b. Tap OK to save the security settings and the User Logon dialog box appears.
c. Tap a User Name, Password, and Domain. Select Save Password if you want to save the password for future authentication sessions.
d. Tap OK to save the Microsoft Security settings.
Enable WPA or WPA2 Personal (PSK) Security With MicrosoftUse the following procedure to enable WPA-PSK With Microsoft Security.
CV41 Vehicle Mount Computer (Windows CE) User Guide 55

1. Make sure the communications and radio parameters on your computer are config-
ured.
2. Start Intermec Settings.
3. Choose Communications > 802.11 Radio > Microsoft Security.
4. For Infrastructure Mode, choose Infrastructure.
5. For Network Authentication, choose WPA-PSK. Data Encryption automatically
defaults to TKIP for WPA and AES for WPA2.
6. For Pre-Shared Key, enter the pre-shared key or the passphrase.
The pre-shared key must be a value of 32 hex pairs preceded by 0x for a total of 66
characters. The value must match the key value on the authenticator. The passphrase
must be from 8 to 63 characters. After you enter a passphrase, the computer
internally converts it to a pre-shared key.
7. Save your settings.
Configure 802.1x Security with MicrosoftUse the following procedure to configure 802.1x security with Microsoft security. Hon-
eywell recommends that you use WPA2-802.1x instead of 802.1x-WEP if possible.
1. Make sure the communications and radio parameters on your computer are config-
ured.
2. Start Intermec Settings.
3. Choose Communications > 802.11 Radio > Microsoft Security.
4. For Infrastructure Mode, choose Infrastructure.
5. For Network Authentication, choose Open.
6. For Data Encryption, choose WEP.
7. For 802.1X Authentication, choose TLS or PEAP.
8. If you choose TLS:
a. Load a user and root certificate on your computer. For help, see Load a Certificate.
b. Choose Properties. The Certificates dialog box appears.
c. Select the certificate you want to use from the list. The User Logon dialog box appears.
d. Enter a User Name and Domain and tap OK.
e. Tap OK to exit the Certificates dialog box.
f. Tap OK to save the Microsoft Security settings.
9. If you choose PEAP:
a. Load a root certificate of the authentication server on your computer. For help, see Load a Certificate.
b. Tap OK to save the security settings and the User Logon dialog box appears.
c. Enter a User Name, Password, and Domain. Select Save Password if you want to save the password for future authentication sessions.
d. Tap OK to save the Microsoft Security settings.
56 CV41 Vehicle Mount Computer (Windows CE) User Guide

10. For Network Key Setting, choose Automatic.
11. Save your settings.
Configure Static WEP Security With MicrosoftUse the following procedure to configure static WEP security with Microsoft security.
Honeywell recommends that you use WPA2-PSK instead of WEP if possible.
1. Make sure the communications and radio parameters on your computer are config-
ured.
2. Start Intermec Settings.
3. Choose Communications > 802.11 Radio > Microsoft Security.
4. For Network Authentication, choose Open.
5. For Data Encryption, choose WEP.
6. For Network Key Setting, choose Enter Key and Index.
7. For Network Key Value, enter an ASCII key or a hex key that is either 5 bytes or 13
bytes long depending on the capability of the radio.
Set a 5-byte value for 64-bit WEP or a 13-byte value for 128-bit WEP. Hex keys must
be preceded by 0x and contain 5 or 13 hex pairs.
8. For Network Key Index, select the key you want to use for data transmission.
9. Save your settings.
Use Open (No Security) Associations With MicrosoftUse the following procedure to configure your computer for open security using Micro-
soft WZC.
1. Start Intermec Settings.
2. Choose Communications > 802.11 Radio > Microsoft Security.
3. For Network Authentication, choose Open.
4. For Data Encryption, choose Disabled.
5. Tap OK. Your settings are saved.
Load a CertificateTo use transport layer security (TLS) with WPA or 802.1x security, you need a unique cli-
ent certificate on the computer and a trusted root certificate authority (CA) certificate.
Certificates are pieces of cryptographic data that guarantee a public key is associated
with a private key. They contain a public key and the entity name that owns the key. Each
certificate is issued by a certificate authority.
1. Start Intermec Settings.
2. Tap Communications > 802.11 Radio > Certificates. The Certificates screen
appears.
CV41 Vehicle Mount Computer (Windows CE) User Guide 57

3. To import user and root certificates from a Microsoft IAS server:
a. Tap Import Certificates.
b. Tap Web Enrollment.
c. Enter the User, Password, and Server (IP address) to log into the server.
d. Tap OK. A dialog box appears asking if you want to load the root certificate.
e. Tap OK. The Enrollment Tool message box appears telling you that the certificate has been added.
f. Tap OK to close the message box.
4. To import a certificate chain:
a. Tap the Import PFX tab.
b. Tap Import Certificates to install the selected certificate.
c. In the CertImportUI screen, tap the <<< button next to the Select pfx to import text field.
d. Select the root certificate from the list.
e. Tap Import Certificate.
58 CV41 Vehicle Mount Computer (Windows CE) User Guide

CHAPTER
6
CV41 Vehicle Moun
USE THE AUTO-ON FEATURE
You can use the Auto-On feature to turn on the CV41 when apply external power to the
computer.
t Computer (Windows CE) User Guide 59

About the Auto-On FeatureThe Auto-On feature turns on the CV41 when you apply external power to the computer.
When Auto-On is disabled, the CV41 monitors the ignition input signal and turns on the
computer when the ignition on your vehicle is active.
To disable the Auto-On feature, you must wire the ignition input wire from your CV41 to
your vehicle to monitor the ignition input signal. For more information, see the CV41
Vehicle Mounting Kit Reference Guide.
Enable the Auto-On FeatureWhen Auto-On is enabled, the CV41 turns on when external power is applied. For exam-
ple, when the smart dock is powered on and:
• the CV41 is placed into the dock.
• the CV41 is placed into the dock and the vehicle is turned on.
1. Tap Start > Settings > Control Panel > Options. The Options screen appears.
2. Tap the Misc tab.
3. Select Enable Auto-On and tap OK.
Disable the Auto-On FeatureWhen Auto-On is disabled, the CV41 is turned off, and the ignition input signal:
• is inactive, the CV41 remains off.
• changes to active, the CV41 turns on.
When the Auto-On is disabled, the CV41 is turned on, and the ignition input signal:
• changes to active, the CV41 stays on.
• changes to inactive, the CV41 is placed into Suspend mode.
1. Tap Start > Settings > Control Panel > Options. The Options screen appears.
2. Tap the Misc tab.
3. Make sure that Enable Auto-On is not selected and tap OK.
60 CV41 Vehicle Mount Computer (Windows CE) User Guide

CHAPTER
7
CV41 Vehicle Moun
USE WWAN AND GPS
COMMUNICATIONS
Some configurations of the CV41 come equipped with a WWAN radio. With WWAN
enabled, you can use UMTS or CDMA communications to transmit data through cellu-
lar wide-area networks (WANs), and use the Global Positioning System Receiver (GPS).
t Computer (Windows CE) User Guide 61

About WWAN CommunicationsThe CV41 Vehicle Mount Computer has an optional WWAN radio that supports both
CDMA and UMTS cellular technology. Use either one of these technologies to transmit
data through cellular wide-area networks.
Activate UMTS CommunicationsYou use a SIM card to activate UMTS communications on your computer. You can pur-
chase the SIM card from your network provider.
1. Remove the CV41 from the smart dock.
2. Press the Power button to place the CV41 in Suspend mode.
3. Using a small Phillips screwdriver, remove the two screws that secure the SIM card
access panel.
4. Insert the SD card into the SD card slot.
5. Reattach the SD card access panel and screw to a torque value of
4 to 5 in/lbs.
6. Reattach the CV41 to the smart dock.
7. Connect an external WWAN antenna. For more information, see Connect an External
Antenna.
8. Press the Power button to resume the CV41 from Suspend mode.
9. Select Start > Programs > GobiCM > GobiCMExe.
10. In Firmware Selection, select your wireless carrier and click Update Firmware.
11. Select the UMTS tab.
12. In Data Connection Test, tap Connect.
13. Tap Save Connection Data.
SIM card
62 CV41 Vehicle Mount Computer (Windows CE) User Guide

Activate CDMA CommunicationsTo activate the CDMA radio module in your computer, you need to contact your wireless
carrier and set up an account for each computer. The following table lists the carriers
that Honeywell currently supports. If your carrier is not listed in the table, please con-
tact Honeywell product support to see if it is now supported.
The carrier requires the Mobile Equipment Identifier (MEID) to start the activation pro-
cess. You can find the MEID:
• in the Gobi Connection Manager menu. Tap Start > Settings > Control Panel > Gobi
Connection Manager > CDMA tab.
After you supply the MEID to your carrier, the carrier responds with values that you must
enter in the Gobi Connection Manager (if required). Your carrier sales contact and a
Honeywell representative can guide you through the process.
1. Press the Power button to place the CV41 in Suspend mode.
2. Connect an external WWAN antenna. For more information, see Connect an External
Antenna.
3. Press the Power button again to turn on the CV41.
4. Select Start > Programs > GobiCM > GobiCMExe.
5. In Firmware Selection, select your wireless carrier and click Update Firmware.
6. Select the CDMA tab, enter *22899 in the Activation Code field, and tap Save
Connection Data.
7. Tap Activate.
8. Tap Save Connection Data.
About GPSThe GPS receiver in the CV41 delivers standards-based National Marine Electronics
Association (NMEA) data strings to GPS applications. To use the GPS receiver, you need
to:
• enable WWAN communications. For more information, see Use WWAN and GPS
Communications.
• install an external GPS antenna to the CV41. For more information, see Connect an
External Antenna.
For more information on purchasing an external GPS antenna, contact your Honeywell
representative.
Country Carriers
United States Verizon
CV41 Vehicle Mount Computer (Windows CE) User Guide 63

Test the GPS ReceiverUse this section to learn how to test the GPS receiver on the CV41 using the Gobi Con-
nection Manager.
1. Make sure WWAN communications is enabled. For more information, see Use
WWAN and GPS Communications.
2. Make sure an external GPS antenna is connected. For more information, see
Connect an External Antenna.
3. Select Start > Programs > GobiCM > GobiCMExe.
4. Select the GPS tab and tap Start. The Gobi Connection Manager shows your current
location.
5. Tap Stop to finish the test.
64 CV41 Vehicle Mount Computer (Windows CE) User Guide

CHAPTER
8
CV41 Vehicle Moun
ENABLE SCREEN BLANKING
Enable screen blanking on your computer to turn off the computer screen while your
vehicle is in motion.
t Computer (Windows CE) User Guide 65

About Screen BlankingThe CV41 supports screen blanking. When motion is detected, a screen blanking box or
switch turns off the computer screen to avoid unnecessary driver distractions. Once the
vehicle is stationary, the screen turns back on. To enable screen blanking on your com-
puter, you must purchase one of the following:
• Screen blanking box
• Switch
Honeywell recommends that you use the screen blanking box to enable screen blank-
ing on the CV41. If your vehicle lacks an electrical signal that detects vehicle motion,
use a switch to enable screen blanking.
You can install the switch in a variety of ways, but Honeywell recommends you install a
switch that closes when the user presses the accelerator pedal on a vehicle.
Honeywell does not sell a switch for screen blanking, but you can purchase a screen
blanking box from Honeywell. For more information, contact your Honeywell represen-
tative.
Install the Hardware for Screen BlankingThis section explains how to install the switch to enable screen blanking on your com-
puter. To install the screen blanking box, see the instructions that came with the screen
blanking box.
Before You Install the SwitchBefore you install the switch or relay for screen blanking, you need to supply power to
the vehicle mount computer. For more information, see the CV41 Vehicle Mounting Kit
Reference Guide.
Tools You Need To install the switch, you need the following parts and tools:
• Switch
• Mounting hardware and tools
• Custom serial cable
Caution: Installation of the screen blanking box or switch should be done
by trained service personnel only.
66 CV41 Vehicle Mount Computer (Windows CE) User Guide

Create a Custom Serial CableTo install the switch, you need to create a custom serial cable with a DB9 connector built
to the following specifications outlined below.
Install Switch for Screen BlankingThis section explains how mount, connect, and enable the switch for screen blanking.
1. Using your own mounting hardware, secure the switch sensor to the vehicle.
2. Connect the serial cable to the switch. Make sure that Pin 7 connects to the switch
connection and Pin 8 connects to the other terminal.
3. Connect the serial cable to the COM1 or COM2 port on your computer.
Pin Signal Description
1 Not used
2 Not used
3 Not used
4 Not used
5 Not used
6 Not used
7 RTS Request to send output
8 CTS Clear to send input
9 Not used
9
5
6
1
Pin 8 Pi
CV41 Vehicle Mount Computer (Windows CE) User Guide 67

Enable Screen BlankingAfter you have wired and mounted the motion switch sensor, you must enable screen
blanking in Intermec settings on the vehicle mount computer.
1. In Intermec Settings, select Device Settings > Screen Blanking on Motion.
2. In Screen Blanking on Motion, select the COM port the custom serial cable is
connected to.
3. In Screen-on delay after motion stops (sec), enter the amount of time in seconds
that you want the display to turn on after the vehicle is stationary.
4. Tap OK. Screen blanking is enabled.
68 CV41 Vehicle Mount Computer (Windows CE) User Guide

CHAPTER
9
CV41 Vehicle Moun
TROUBLESHOOT AND MAINTAIN THE COMPUTER
If you encounter any problems while using the computer, look in this chapter to find a
possible solution. You will also find information on routine maintenance.
t Computer (Windows CE) User Guide 69

About the Intermec DashboardThe Intermec Dashboard is designed to provide proactive monitoring of your mobile
computers to prevent downtime. You can easily see the health of the device and can
help pinpoint the source of a problem to determine if it is hardware or software related.
Intermec Dashboard displays information such as the status of network connections,
battery usage, storage space, and internal devices. It also provides system information
such as the operating system, firmware, and hardware configuration.
• Press the Intermec Dashboard button ( ? ) on the keypad.
Intermec Dashboard is highly integrated with SmartSystems Foundation. You can use
SmartSystems Foundation to remotely monitor the health of your computers. For more
information, refer to the SmartSystems online help.
Troubleshoot Your ComputerUse the troubleshooting tables in this section to fix problems with the Wi-Fi connection,
802.1x security, or general problems with operating the computer.
Note: If you send the computer in for service, it is your responsibility to save the computer data
and configuration. Honeywell is responsible only for ensuring that the hardware matches
the original configuration when repairing or replacing the computer.
Troubleshoot the Wi-Fi ConnectionUse this troubleshooting table to help solve problems with your 802.11 radio connec-
tion.
Problem Solution
When you turn on the computer after it
was suspended for a while (10 to 15
minutes or longer), it can no longer send
or receive messages over the network.
Host may have deactivated or lost current terminal
emulation session. In a TCP/IP direct connect
network, turn off the “Keep Alive” message from host
to maintain the TCP session while the computer is
suspended.
The computer is connected to the
network and you move to a new site to
collect data. Your computer now shows
you are not connected to the network.
Move closer to an access point or to a different
location to reestablish communications until you
reconnect with the network.
The computer appears to be connected
to the network, but you cannot establish
a terminal emulation session with the
host computer.
There may be a problem with the host computer, or
with the connection between the access point and
the host computer. Check with the network
administrator to make sure the host is running and
allowing users to log in to the system.
The computer appears to be connected
to the network, but the host computer is
not receiving any information from the
computer.
There may be a problem with the connection
between the access point and the host computer.
Check with the network administrator or use your
access point user’s manual.
70 CV41 Vehicle Mount Computer (Windows CE) User Guide

Troubleshoot 802.1x SecurityUse the following table to troubleshoot problems with your 802.1x security that will pre-
vent you from connecting to your network, such as an incorrect password.
Check 802.11 Network StatusIf you have trouble connecting to your 802.11 wireless network:
• Make sure you have correctly set network parameters on the computer.
• Check your wireless security settings.
Follow the next procedure to verify available access points and networks, check signal
strength, and view other diagnostics. If you need to contact Honeywell Product Support,
this information can be helpful in troubleshooting wireless network connection issues.
A network connection icon appears in
the toolbar, but then disappears.
The computer may not be communicating with the
intended access point. Make sure the network name
matches the access point network name.
The access point may not be communicating with
the server. Ensure the access point is turned on,
properly configured, and has 802.1x security
enabled.
Problem Solution
Problem Solution
The computer indicates it is not
authenticated.
Make sure that:
• the User Name and Password parameters on the
computer must match the user name and password on
authentication server. You may need to reenter the
password on both the computer and authentication
server.
• on your authentication server, the user and group are
allowed and the group policy is allowed to log into the
server. For help, see the documentation that shipped with
your authentication server software.
• the IP address and secret key for access point must
match the IP address and secret key on the
authentication server. You may need to reenter the IP
address and secret key on both your access point and
authentication server.
• the authentication server software is running on the
server PC.
You receive a message saying
“The server certificate has
expired or your system date is
incorrect” after you perform a
clean boot on the computer.
Date and time are not saved when you perform a clean boot.
Reenter the date and time, and then save your changes.
CV41 Vehicle Mount Computer (Windows CE) User Guide 71

1. Tap Start > Programs > iSpyWiFi. The iSpyWiFi application launches.
The iSpyWiFi tab shows:
• MAC address and IP address of the 802.11 radio.
• network association status, including the SSID and MAC address of the access
point.
• security configuration.
• radio transmit power and signal strength information.
2. Tap the Scan tab to view a list of available 802.11 networks. The list includes the
signal strength, channel, and MAC address for each network.
• Tap Scan to refresh the screen.
3. Tap the Supp tab to view radio supplicant information, including a list of supplicant
events and authentication status.
• To verify the settings for the currently active security profile, tap Configure Profile.
Intermec Settings launches for you to configure 802.11 Radio settings.
• To try reconnecting to the network, tap Reconnect.
• To delete the events in the list, tap Clear Events.
4. Tap the Ping tab to run a ping test to the host.
a. In the Host field, enter the IP address of the host.
b. From the Repetitions list, choose the number of times the computer will ping the host.
c. Tap Ping. The graph shows the amount of time it takes for the host to return the ping. Tap List to see this information in a list format.
5. Tap the RSSI tab to view the received signal strength of the host signal.
The information box includes the current signal strength, host SSID name, MAC
address, data rate, and transmit power.
• Tap Mark to place an arrow marker above the graph.
6. Tap the Conf tab to set up a log file that lists RSSI history.
This screen includes the 802.11 radio driver version and available radio modes.
a. Check the Log to File check box.
b. (Optional) Change the sample period and number of samples displayed.
c. Tap Log File. The Save As screen appears.
d. (Optional) Change the name of the saved log file, the folder to which the file will be saved, the content type (log or text), and the location.
e. Tap OK.
72 CV41 Vehicle Mount Computer (Windows CE) User Guide

Troubleshoot Reading Bar CodesUse this section to troubleshoot problems that may prevent you from being able to read
a bar code with an Honeywell scanner. If you cannot find the solution in the following
table, refer to your scanner user guide for more information.
Problem Solution
You cannot see the illumination
beam or frame from the scanner
when you press the Scan button
and aim the imager at a bar code
label.
• You may be too far away from the bar code label. Try moving
closer to the bar code label and scan it again.
• You may be reading the bar code label “straight on.” Change
the reading angle and try again.
• The imager hardware trigger might be disabled in Intermec
Settings. To check the setting go to Start > Settings >
Control Panel > Intermec Settings > Data Collection >
Scanner Settings. Hardware trigger should be checked.
When you release a Scan button
or handle trigger, the Good Read
light does not turn off.
The Good Read light remains on if you configure the computer
to use continuous/edge triggering. If you configure the
computer for level triggering and the Good Read light remains
on, there may be a problem. Press one of the Scan buttons or
pull the trigger again without scanning a bar code label. If the
light is still on, contact your Honeywell representative.
The scanner will not read the bar
code label.
• Aim the scanner beam to cross the entire bar code label in
one pass. Vary the scanning angle.
• Check the quality of the bar code label. Scan a bar code
label that you know will scan. Compare the two bar code
labels to see if the bar code quality is too low. You may need
to replace the label that you cannot scan.
• Make sure the bar code symbology is enabled and
configured correctly. Use Intermec Settings to check the
symbologies. Expand Data Collection > Symbologies
beneath devices listed (scanner, virtual wedge) to check
and enable symbologies, then scan the bar code label
again.
• Make sure the computer application is expecting input
from a bar code. You may need to type this information
instead
• Check to see if the right scanner model is selected. To
check the setting go to Start > Settings > Control Panel >
Intermec Settings > Data Collection > Scanner Settings.
• Check to see if the scanner cable is damaged.
The scanner does not read the bar
code labels quickly, or the
scanning beam seems to be faint
or obscured.
The scanner window may be dirty. Clean the window with a
solution of ammonia and water. Wipe dry. Do not allow abrasive
material to touch the window.
When Enable Scanner Port is
checked in Intermec Settings, the
“COM port is busy. Another
application may be using the
port” error message appears.
Confirm that no other application is currently using the COM
port or select another COM port for the scanner. If that does
not work, try to restart the computer to see if the COM port
becomes available.
CV41 Vehicle Mount Computer (Windows CE) User Guide 73

Troubleshoot Operating the ComputerUse this section to troubleshoot problems that may prevent you from being able to
operate the computer.
Call Product SupportSee Customer Support.
The scanner does not read the bar
code or is corrupted when it is
enabled as an ASCII scanner.
• Check to see if the Scanner Port Settings in Intermec
Settings match those settings programmed in the scan
engine.
• The scanner may be in an unknown state. Reset the
scanner to the factory default settings by scanning the
manufacturer’s configuration bar code, and reconnect the
scanner.
You scan a valid bar code label to
enter data for your application.
The data decoded by the scanner
does not match the data encoded
in the bar code label.
The scanner may have decoded the bar code label in a
symbology other than the label’s actual symbology. Try
scanning the bar code label again. Make sure you scan the
entire label.
The input device attached to the
computer does not work well or
read bar code labels very quickly.
Set the Scanner Model command to the specific attached
input device. Check enabled bar code symbologies and enable
only the symbologies being used.
Problem Solution
Problem Solution
You press the Power button and
nothing happens.
Try the following solutions:
• Make sure that power is connected to the computer, and
that the Power switch on the smart dock is on.
• If your computer is not connected to the smart dock, you
may have run out of battery power.
• Disconnect the UPS battery and turn the power back on.
For help, see Disconnect the UPS Battery.
The computer appears to be
locked up and you cannot enter
data.
• Perform a cold boot. For help, see Cold Boot the Computer.
• Perform a warm boot. For help, see Warm Boot the
Computer
• Perform a clean boot. For help, see Clean Boot the
Computer.
• If the computer does not boot or reset, contact your
Honeywell representative for help.
You tap the screen and nothing
happens.
Align your screen. For help, see Calibrate the Screen.
You cannot type a character on
the keypad or you can only type
uppercase or lowercase letters.
You may have locked a modifier key on the keypad. Press the
necessary key sequence to unlock the key.
74 CV41 Vehicle Mount Computer (Windows CE) User Guide

Find Your Configuration NumberUse the following procedure to help you find the configuration number of your com-
puter.
• Look at the label on the back of the computer.
Find Your Operating System VersionUse the following procedure to find the OS version of your computer.
• Tap Start > Settings > Control Panel > About. The OS version is displayed in the
Version tab as the Intermec Content version.
Reset the ComputerIf the computer does not resume after pressing the Power button, or if the computer or
an application locks up, you may need to reset the computer. The computer uses the
configuration currently saved in flash memory during the boot process. There are four
ways to reset the computer:
• Cold boot
• Warm boot
• Clean boot
• Disconnect the UPS battery
Cold Boot the ComputerIf the computer seems to be locked up, try cold booting it. Cold booting the CV41
restarts the computer and RAM is cleared, while the registry and files under \System
folder are preserved.
1. Tap Start > Settings > Control Panel > Registry.
2. Tap the Coldboot button.
Warm Boot the ComputerWarm booting the CV41 restarts the computer, while the file system and registry set-
tings are preserved.
1. Tap Start > Settings > Control Panel > Registry.
2. Tap the Warmboot button.
CV41 Vehicle Mount Computer (Windows CE) User Guide 75

Clean Boot the ComputerIn some cases where the computer completely stops responding, it may be necessary to
perform a clean boot. Because clean booting may result in data loss, use this method
only if all other recovery methods have failed. This returns the computer back to its fac-
tory default settings.
Note: Clean booting the device erases all files in the ObjectStore including any file or registry
changes. Any files that are present in the \System folder are preserved.
1. Tap Start > Settings > Control Panel > Registry.
2. Tap the Load Factory Defaults button.
Disconnect the UPS BatteryIf the CV41 stops responding, or you plan on shipping the CV41, you need to disconnect
the UPS battery.
1. Remove the CV41 from the smart dock. For help, see Remove the CV41 from the
Smart Dock.
2. Using a Phillips head screwdriver, remove the two screws that secure the SIM card
access panel.
3. Press the UPS Battery Disconnect button located below the SIM card slot.
4. Reinstall the SIM card access panel and tighten the screws to a torque to a value of
4-5 in/lbs.
Once power external power is reconnected to the CV41, the UPS battery automatically
reconnects.
76 CV41 Vehicle Mount Computer (Windows CE) User Guide

Replace the FuseThe CV41 uses a 10 A time delay (slow blow) fuse, which is located on the smart dock. If
you need to replace the fuse, make sure that you replace it with the same size, rating,
and type of fuse (Littelfuse 03260 10 MXP or equivalent).
1. Remove the CV41 from the smart dock. For help, see Remove the CV41 from the
Smart Dock.
2. Disconnect the smart dock from power.
3. Using a flathead screwdriver, remove the fuse holder from the CV41.
4. Replace the fuse.
5. Secure the fuse holder back into the CV41.
Clean the ComputerTo keep the computer in good working order, you may need to clean the touch screen.
Clean the touch screen as often as needed for the environment in which you are using
the computer. To clean the computer, use a solution of ammonia and water.
1. Press the Power button to suspend the computer.
2. Dip a clean cloth towel in the ammonia solution and wring out the excess.
3. Wipe off the touch screen. Do not allow any abrasive material to touch these
surfaces.
4. Wipe dry.
CV41 Vehicle Mount Computer (Windows CE) User Guide 77

78 CV41 Vehicle Mount Computer (Windows CE) User Guide

APPENDIX
A
CV41 Vehicle Moun
SPECIFICATIONS AND DEFAULT SETTINGS
t Computer (Windows CE) User Guide 47
Physical and Environmental Specifications
Physical Dimensions
Environmental Specifications
Power and Electrical Specifications
Hardware
CV41 dimensions 21.4 x 26.8 x 4.3 /6.6 cm (8.4 x 10.6 x 1.7/2.6 in
CV41 weight 2.1 kg (5.6 lbs)
Smart dock dimensions 15.5 x 18 x 6.4 cm (6.1 x 7.1 x 2.5 in)
Smart dock weight 1.2 kg (3.2 lbs)
Standard operating temperature Non-condensing: -20 °C to 50 °C (-4 °F to 122 °F)
Extreme operating temperature Condensing: -30 °C to 50 °C (-22 °F to 122 °F
Storage temperature Non-condensing: -30 °C to 60 °C (-22 °F to 148 °F)
Relative humidity Up to 90% non-condensing at 40 °C (104 °F) with extended
temperatures up to 100%
Water and dust IP66
ESD 15 kV
Vibration MIL-STD-810F, composite wheeled vehicles
Crash SAE-J 1455
Input power DC input voltage: 10 to 60 VDC
Input current: 4.6 A
Input fuse: 10 A time delay
External power supply Internal power supply: 10-60 VDC
AC adapter: 90-240 VAC
DC power supply: 6-96 VDC
Backup battery (CMOS) Field replaceable, rechargeable lithium-ion battery, 30
minutes of life at -20 °C (-4 °F).
Touch Screen 20 cm (8 in) color WVGA 800 x 480 LED backlit display.
Standard display:
• 400 NIT indoor display
• Ambient light sensor
• Glove compatible
• Field-replaceable resistive touch screen
Optional display:
• 900 MIT outdoor display
• Defroster
48 CV41 Vehicle Mount Computer (Windows CE) User Guide

Wireless LAN
Bluetooth
Default ConfigurationThe following tables list the default values of the configuration settings supported on
the computer. If you restore the computer to factory default settings, the computer uses
these values.
The settings are grouped by function and reflect the organization of Intermec Settings.
Not all of the configuration settings are listed in this appendix. For detailed information
on most of the settings, see the Intermec Settings Command Reference Manual.
Keypad Backlit 64 QWERTY keyboard with number pad and 10
function keys. Universal keyboard overlay legend and
supports VT220, 3270, 5250. All keys (except modifiers and
the power button) are mappable.
Processor Intel Atom Z530 at 1.6 GHz
Memory 1 GB total mappable memory with 512 MB as system
memory in Windows CE.
Integrated radio 802.11a/b/g
Interfaces USB 2.0 host port, USB 1.1 client port, two RS-232 COM
ports, a CANBUS/audio port, DC power input and ignition
input, and RF antenna ports for Wi-Fi, WWAN, and GPS.
Antennas Dual internal antennas or optional external antennas
Removable storage Secure Digital
Operating system Microsoft Windows CE 6.0
Data rates Supports all 802.11a/b/g data rates.
Wireless frequencies
(varies by domain)
• 2.4 to 2.4895 GHz IEEE 802.11b/802.11g DSSS OFDM
• 5.15 to 5.82 GHz IEEE 802.11a DSSS OFDM
RF data rates 1, 2, 5.5, 6, 9, 11, 12, 18, 14, 36, 48, 54 Mbps
RF power level 64 mW (18 dBm)
Channels FCC: 1-11, 36, 40, 44, 48, 149, 153, 157, 161
ETSI: 1-13, 36, 40, 44, 48
Security WPA, WPA2, 802.1x (EAP-TLS, TTLS, LEAP, PEAP, EAP-
FAST), WEP
Cisco compatibility CCX v4 certified
Data rates Up to 3.0 Mbits over the air
Connection 10 m (32.8 ft) line of sight
Bluetooth version 2.0 + EDR
Operating frequency 2.402-2.480 GHz
QDID B013455
CV41 Vehicle Mount Computer (Windows CE) User Guide 49

Data Collection SettingsUse data collection settings to configure the Bluetooth or tethered scanner and to con-
figure the bar codes that you want the imager to be able to read.
Data Collection Setting Default Value
Enable Scanner Off
BT-Configure On Connect Overwrite with computer
settings
Symbology Default Value
AustraliaPost Disable
Aztec Disable
BPO Disable
CanadaPost Disable
Codabar Disable
Codablock A Disable
Codablock F Disable
Code 11 Disable
Code 39 Enable
Code 93 Disable
Code 128/GS1-128 Enable Code 128, GS1-
128, GS1-128 identifier
DataMatrix Enable
DutchPost Disable
EAN/UPC Enable UPC A, UPC E,
EAN 8, EAN 13
GS1 Composite Disable
GS1 DataBar Expanded Disable
GS1 DataBar Limited Disable
GS1 DataBar Omni-Directional Disable
JapanPost Disable
KoreaPost Disable
Matrix 2 of 5 Disable
Maxicode Disable
Micro PDF417 Disable
MSI Disable
PDF417 Enable
Planet Disable
Plessey Disable
Postnet Disable
QR Code Disable
Standard 2 of 5 Disable
Telepen Disable
50 CV41 Vehicle Mount Computer (Windows CE) User Guide

TLC 39 Disable
Symbology Option Settings Default Value
Preamble None (Disable)
Postamble None (Disable)
Symbology Identifier Disable
Multicode Disable
Scanner Settings Default Value
Scanner Model SR Intermec Scanner
Trigger Mode Level
Aimer Mode Typical aimer
Hardware Trigger Enable
Trigger Timeout (sec) 2
Aiming Duration (msec) 500
Turn Off After Good Read Enable/One-shot
Number of Good Read Beeps One
Scanner Port Settings Default Value
Baud Rate 57600
Decode Security Settings Default Value
Consecutive Data Validation 0
Identical Consecutive Timeout 300 ms
Different Consecutive Timeout 0
Center Decoding Disable
Center Decoding Tolerance 0
Scanner Settings Default Value
Scanner Model SR Intermec Scanner
Trigger Mode Level
Aimer Mode Typical aimer
Hardware Trigger Enable
Trigger Timeout (sec) 2
Aiming Duration (msec) 500
Turn Off After Good Read Enable/One-shot
Number of Good Read Beeps One
Symbology Default Value
CV41 Vehicle Mount Computer (Windows CE) User Guide 51

CommunicationsUse communications settings to configure how the computer communicates with the
network.
Device SettingsUse device settings to configure settings on the computer.
Communications Setting Default Value
Device Name Intermec CV41
802.11 Radio Setting Default Value
Radio Enabled Off
Security Choice Funk
Microsoft Security Disable
Active Profile Profile 1
DHCP Enable
Import Root Certificates False
Import User Certificates False
Import Pac Files False
Radio Bands Indeterminate
Allow Security Changes Enable
Bluetooth Setting Default Value
Bluetooth Power On
Backlight Setting Default Value
Keypad Backlight Enable
Screen Setting Default Value
Screen Heater Enabled
Screen Heater Turns Off at 0°C
Keypad Setting Default Value
Caps Lock on Reboot Disabled
Battery Power Setting Default Value
Backlight Turns On After (Battery Power) 3 seconds
Screen Turns Off After (Battery Power) 15 seconds
Device Turns Off After (Battery Power) 5 minutes
Backlight Turns On After (External Power) 2 minutes
Screen Turns Off After (External Power) 2 minutes
Device Turns Off After (External Power) 5 minutes
52 CV41 Vehicle Mount Computer (Windows CE) User Guide

Core Messaging Service SettingsUse core messaging service settings to configure the message routers between client
and server software applications.
Device Monitor SettingsUse device monitor settings to configure how the computer monitors the network.
Auto-on Disable
Profiles Settings Default Value
Always On Show Option in Profile Settings
Maximize Battery Life Show Option in Profile Settings
Normal Show Option in Profile Settings
Screen Settings Default Value
Brightness High
Screen Blanking On Motion Disable
Screen-On Delay After Motion Stops
(sec)
1.0
Sound Setting Default Value
Beeper and Voice 15
Headset Beeper 0
Screen Taps Off
Key Clicks Off
Battery Power Setting Default Value
Core Messaging Service Setting Default Value
Associated Server IP Null
Broadcast Name INTERMEC
Port 62241
Keep Alive Ping Interval 30 Seconds
Device Health Setting Default Value
Enable Health Data Collection On
Set Rule File Location \SmartSystems\HealthRules.tx
t
Set Data Refresh Periods
Asset Msg Send Period
System Device Health
Network Device Health
Printer
0 seconds
90 seconds
45 seconds
0
Network Device Health Refresh
(seconds)
45
CV41 Vehicle Mount Computer (Windows CE) User Guide 53

RFID SettingsUse RFID settings to enable the RFID service.
Virtual Wedge SettingsUse virtual wedge settings to configure the virtual wedge.
Port Pin AssignmentsUse this section to learn about the ports pin assignments on the CV41, smart dock, and
cables.
COM 1 and COM 2 PortsThe COM 1 and COM 2 ports are located on the smart dock. By default, Pin 9 is config-
ured to provide + 5 V for an external bar code scanner, or it can be configured to provide
RI.
RFID Settings Default Value
Enable RFID Service Off
Virtual Wedge Settings Default Value
Virtual Wedge Enable
Virtual Wedge Method Adapt to Application
Barcode Scanner Grid Null
Label Encoding (Code Page) 1252(D)-ANSI Win3.1 US
Pin Signal Description
1 DCD Data carrier detect (input)
2 RXD Receive data (input)
3 TXD Transmit data (output)
4 DTR Data terminal ready (output)
5 GND Signal/power ground
6 DSR Data set ready (input)
7 RTS Request to send (output)
8 CTS Clear to send (input)
9 +5 VDC or RI Bar code scanner power (500 mA max)
or Ring indicator (input)
Shell CGND Chassis ground
5
96
1
54 CV41 Vehicle Mount Computer (Windows CE) User Guide

USB PortThe USB port is located on the back of the smart dock.
CANBUS/Audio PortThe CV41 CANBUS and audio port is located on the smart dock. The CV41 cannot sup-
port CANBUS and audio simultaneously.
Pin Signal Description
1 GND Common ground
2 USBC_D+ USB client data signal
3 USBC_D- USN client data signal
4 USB_H1_PWR USB host 1 (5 V output power)
5 GND Common ground
6 GND Common ground
7 USB_H1_D+ USB host 1 data signal
8 USB_H1_D- USB host 1 data signal
9 USBC_VBUS USB client (5 V detect from attached
host)
5
96
1
Pin Signal Description
1 - CAN reserved
2 CAN_L CAN_L bus line dominant low
3 CAN_GND CAN ground
4 - CAN reserved
5 GND Optional ground
6 Audio return Headset return
7 Audio output Headset output
8 Mic input Microphone input
9 Mic return Microphone return
10 Audio return
11 GND Optional ground
1
11
10
5
15
6
CV41 Vehicle Mount Computer (Windows CE) User Guide 55

Power Supply ConnectorPower is supplied from the smart dock to the CV41 through the power connector. The
power supply connector also provides a connection point for the vehicle chassis ground
to be connected internally to the conductive chassis of the computer. The CV41 internal
power supply can accept DC input voltages in the range of 10 to 60 VDC.
12 CAN_SHLD
13 CAN_H CAN_H bus line dominant high
14 - CAN reserved
15 CAN_V+ Optional CAN external power supply
Pin Signal Description
Pin Signal Description
1 V In+ 10-60 nominal DC input +
2 V In+ 10-60 nominal DC input +
3 V In- Input -
4 V In- Input -
5 GND Chassis ground
6 Ignition +0 V to 60 V to start terminal
12
3
4 5
6
56 CV41 Vehicle Mount Computer (Windows CE) User Guide

USB Dongle CableUse the USB dongle cable to connect USB devices, such as a USB flash drive to the
smart dock and CV41.
Pin Signal Description
1 GND Common ground
2 USBC_D+ USB client data signal
3 USBC_D_ USN client data signal
4 USB_H1_PWR USB host 5 V output power
5 GND Common ground
6 GND Common ground
7 USB_H1_D+ USB host 1 data signal
8 USB_H1_D- USB host 1 data signal
9 USBC_VBUS USB client 5 V detect from attached host
Pin Signal Description
1 5V_USB USB power, current limited
2 USB2N_A USB D-
D9 male connector
USB clientconnector
USB hosconnecto
9
5
6
1
1234
CV41 Vehicle Mount Computer (Windows CE) User Guide 57

3 EUSB2PA_A USB D+
4 DGND USB power return
Shell CGND Chassis ground
Pin Signal Description
1 V In+ 12 to 48 V nominal DC input +
2 V In+ 12 to 48 V nominal DC input +
3 V In- Input -
4 V In- Input -
Pin Signal Description
1234
58 CV41 Vehicle Mount Computer (Windows CE) User Guide

APPENDIX
B
CV41 Vehicle Moun
KEYPADS AND KEYSTROKES
t Computer (Windows CE) User Guide 59

Standard CharactersUse the following tables to learn how to enter standard and other available characters
and functions with the keypad. If there is no sequence of keystrokes for a particular
character or function, it is only available through the soft input panel (SIP), which you
can access by tapping the keyboard icon on the touch screen.
To Enter Keypad
a A
b B
c C
d D
e E
f F
g G
h H
i I
j J
k K
l L
m M
n N
o O
p P
q Q
r R
s S
t T
u U
v V
w W
x X
y Y
z Z
To Enter Keypad
F1 ¡
F2 ¢
F3 £
F4 �
F5 ¥
F6 ¦
F7 §
60 CV41 Vehicle Mount Computer (Windows CE) User Guide

F8 ¨
F9 ©
F10 ª
F11 b ¡
F12 b ¢
F13 b £
F14 b �
F15 b ¥
F16 b ¦
F17 b §
F18 b ¨
F19 b ©
F20 b ª
F21 Alt ¡
F22 Alt ¢
F23 Alt £
F24 Alt ¤
To Enter Keypad
* (asterisk) b *
@ (at symbol) b W
# (pound) b #
& (ampersand) b &
% (percentage) b %
: (colon) b D
; (semicolon) b F
, (comma) b J
$ (dollar) b R
! (exclamation) b Q
? (question mark) b L
- (hyphen or minus) b 5
. (period) . or b K
+ (plus) b 8
‘ (apostrophe) b H
= (equals) b 2
_ (underscore) b M
^ (caret) b u
> (greater than) b V
< (less than) b C
To Enter Keypad
CV41 Vehicle Mount Computer (Windows CE) User Guide 61

( (left parenthesis) b O
) (right parenthesis) b P
[ (left square bracket) b B
] (right square bracket) b N
{ (left curly brace) b Z
} (right curly brace) b X
~ (tilde) b s
\ (backslash) b S
/ (forward slash) b A
“ (quotes) b G
Insert b 4
Delete b 6
¦ (broken vertical bar) b {
(grave) b |
Forward Tab j
Backspace {
Up Arrow u
Down Arrow d
Left Arrow l
Right Arrow r
CapsLock b ]
Enter e
ok Alt o
Shift ]
Space s
Start (Windows) ? or b ?
Esc |
Alt Alt
Ctrl Ctrl
Intermec Dashboard ?
To Enter Keypad
Attention Alt A
Autolog Alt S
Clear Alt 6Duplicate Alt D
EEOF Alt W
Erase Alt E
To Enter Keypad
62 CV41 Vehicle Mount Computer (Windows CE) User Guide

Find Alt F
Field + b 1
Field - Alt 2
Fieldmark Alt G
Help b 3
Hex Alt I
Home Alt H
Keypad Alt K
Menu Alt M
Mode Alt O
New Line Alt N
Next Screen b 9
PA1 Alt T
PA2 Alt Y
PA3 Alt U
Page Alt u
Print Alt P
Previous Screen b 7
Remove Alt R
Reset Alt |
Return Alt e
Roll Down Alt 5
Roll Up Alt 8
Select Alt Z
System Request Alt Q
View Down b d
View Up b u
To Enter Keypad
CV41 Vehicle Mount Computer (Windows CE) User Guide 63

64 CV41 Vehicle Mount Computer (Windows CE) User Guide

APPENDIX
C
CV41 Vehicle Moun
SCANNGO WI-FI CONFIGURATION BAR CODES
You can use the ScanNGo Wi-Fi configuration bar codes to quickly configure the 802.11
radio in your computer.
t Computer (Windows CE) User Guide 65

Radio Configuration Bar CodesUse the following ScanNGo bar codes to enable the 802.11 radio and set the defaults
for either Funk security or Microsoft security. After you scan the bar codes, you will still
need to use Intermec Settings or another configuration program to set network-specific
settings on your computer and to configure the wireless security.
Note: If you are using Microsoft security, you can only use the 1D configuration bar codes.
The following ScanNGo bar codes were created using SmartSystems Foundation. For
more information on SmartSystems Foundation, see Manage the Computer Using
SmartSystems Foundation.
66 CV41 Vehicle Mount Computer (Windows CE) User Guide

2D Configuration Bar CodesYou can configure the computer with a 2D imager.
1. Scan the appropriate bar code from the table and wait for the program to start.
2. Follow any instructions on the device.
2D Imager Radio Configuration Bar Codes
When You Want To: Scan This Bar Code
• Set all communication settings to defaults
(Wi-Fi, WWAN if applicable)
• Enable Wi-Fi - set Funk security to defaults
CV41 Vehicle Mount Computer (Windows CE) User Guide 67
1D Configuration Bar CodesYou can configure the computer with a 1D imager.
1. Scan the START HERE bar code from the table and wait for the program to start.
2. Scan the 1/9 bar code.
3. Scan the rest of the bar codes in any order.
4. Follow any instructions on the device.
1D Imager Radio Configuration Bar Codes
When You Want To: Scan This Bar Code
• Set all communication settings to
defaults (Wi-Fi, WWAN if
applicable)
• Enable Wi-Fi - set Funk security to
defaults
68 CV41 Vehicle Mount Computer (Windows CE) User Guide

• Set all communication settings to
defaults (Wi-Fi, WWAN if
applicable)
• Enable Wi-Fi - set Funk security to
defaults
1D Imager Radio Configuration Bar Codes (Continued)
When You Want To: Scan This Bar Code
CV41 Vehicle Mount Computer (Windows CE) User Guide 69

• Set all communication settings to
defaults (Wi-Fi, WWAN if
applicable)
• Enable Wi-Fi - set Microsoft
security to defaults
1D Imager Radio Configuration Bar Codes (Continued)
When You Want To: Scan This Bar Code
70 CV41 Vehicle Mount Computer (Windows CE) User Guide

• Set all communication settings to
defaults (Wi-Fi, WWAN if
applicable)
• Enable Wi-Fi - set Microsoft
security defaults
1D Imager Radio Configuration Bar Codes (Continued)
When You Want To: Scan This Bar Code
CV41 Vehicle Mount Computer (Windows CE) User Guide 71

72 CV41 Vehicle Mount Computer (Windows CE) User Guide

APPENDIX
D
CV41 Vehicle Moun
CV41 DOCKS
This chapter details the different docks available for the CV41:
• Standard Dock
• Enhanced Dock for Off-Vehicle Use
t Computer (Windows CE) User Guide 73

Standard Dock
Components
Caution: This dock is designed for DC power vehicle-mounted
applications only.
Power
Connection
Direct or DC/DC power supply
Serial Ports COM1 and COM2
USB Ports USB port provides host and client connections via an adapter cable. This port also
supports Honeywell external keyboards.
Ethernet N/A
CANbus CANbus connection via an adapter cable
Audio Headset connection via an adapter cable
Screen
Blanking
Supported via COM1 and COM2 connectors.
Ignition
Control
Supported
Strain Relief
Clamps
Fuse
Power
Connector
Power Switch
RAM
Ball
COM 1
COM2
USB
CANbus
/ Audio
74 CV41 Vehicle Mount Computer (Windows CE) User Guide

Enhanced Dock for Off-Vehicle Use
Components - Back
Caution: This dock is designed for AC power (non vehicle-mounted)
applications only.
Power
Connection
AC/DC Adapter
Serial Ports COM1 and COM2
USB Ports USB1 port provides host and client via an adapter cable. This port also supports
Honeywell external keyboards.
USB2 port provides two USB host ports via an adapter cable.
Direct USB host connection on top of dock.
Ethernet RJ-45 Ethernet connection on top of dock (not supported).
CANbus CANbus connection via an adapter cable
Audio Headset connection via an adapter cable
Screen
Blanking
Supported via COM1 and COM2 connectors.
Ignition
Control
Supported
Strain Relief
Clamps
CANbus
/ Audio
COM2
COM1
USB1
USB2
Fuse
Power
Connector
Power Switch
RAM
Ball
Accessory
Mount
Accessory
Mount
CV41 Vehicle Mount Computer (Windows CE) User Guide 75

Components - TopOnly the Enhanced Dock has these connectors on the top. The connectors are located
behind water tight plugs.
Note: The Ethernet port is not supported on the CV41.
USB Host Ethernet
76 CV41 Vehicle Mount Computer (Windows CE) User Guide

CV41 Vehicle Mount Computer (Windows CE) User Guide 77

™
Honeywell
9680 Old Bailes Road
Fort Mill, SC 29707
www.honeywellaidc.com
CV41-CE-UG Rev A
6/18