vegetable guide - virginia tech gh veg...800 879-ball ballseed.com 1 2012 burpee home gardens®...
TRANSCRIPT

Flower,
Vegetable & Herb
Product Information
Guide

FLOWERS 2 to 38Alyssum 6Angelonia (Summer Snap) 7Bacopa 8Begonia 9Bidens 12Calibrachoa 12Carex 13Coleus 14Coreopsis 15Dianthus 16Dichondra 17Euphorbia 18Geranium 18Gerbera 20Impatiens 21Double Impatiens 21New Guinea Impatiens 23Ipomoea (Sweet Potato Vine) 24Juncus 25Lantana 26African Marigold 27French Marigold 28Osteospermum (Spring Daisy) 28Ornamental Pepper 29Petunia 30Rudbeckia 33Salvia 33Snapdragon 35Spring Daisy (Osteospermum) 28Summer Snap (Angelonia) 7Sweet Potato Vine (Ipomoea) 24Verbena 36Vinca 37Zinnia 38
VEGEtABLES 39 to 56Artichoke 40Arugula 40Bean 41
2012 Burpee Home Gardens® Flower Listing
ALYSSUMClear Crystal® Purple Shades (S)Clear Crystal White (S)
ANGELONIA (SUMMER SNAP)Archangel™ Pink (V)Archangel Purple (V)Archangel Raspberry (V)Archangel White (V)Serena® Purple (S)Serena White (S)Serena Mix (S)
BACOPAAbunda™ Giant White (V)
BEGONIADragon Wing® Pink (S)Dragon Wing Red (S)Gryphon (S)Nightlife Red (S)Nightlife Rose (S)Nightlife White (S)
BIDENSSun Kiss (V)
CALIBRACHOAIsabells Deep Blue (V)Isabells Hot Pink (V)Isabells Orange (V)Isabells Pink Vein (V)Isabells Red Improved (V)Isabells Rose Star (V)Isabells Terracotta (V)Isabells Yellow (V)
CAREXAmazon Mist (S)Red Rooster (S)
COLEUSEmotions Inspired (S)Emotions Passionate (S)Emotions Sophisticated (S)Henna (V)Indian Summer (V)Redhead (V)Sultana (V)Wasabi (V)
COREOPSISEarly Sunrise (S)
DIANTHUSBouquet™ Purple (S)Bouquet Rose Magic (S)Floral Lace Cherry (S)Floral Lace Picotee (S)Floral Lace Violet (S)
DICHONDRASilver Falls (S)
EUPHORBIABreathless® Blush (V)Breathless White (V)
GERANIUMFantasia® Cardinal Red (V)Fantasia Dark Red (V)Fantasia Purple Sizzle (V)Fantasia Salmon (V)Fantasia Strawberry Sizzle (V)Fantasia Violet (V)Fantasia White (V)
GERBERARevolution™ Pastel Orange With Dark Center (S)Revolution Red With Dark Center (S)Revolution Yellow With Dark Center (S)
IMPATIENSCenter Stage (V)Enlighten Bright Red (S)Enlighten Cranberry Burst (S)Enlighten Gypsy Rose (S)
Enlighten Neon Punch (S)Enlighten Red Wash (S)Enlighten Rosy Starburst (S)Enlighten Sunset Beach (S)Enlighten Twilight Night (S)Enlighten White Nights (S)Fanfare® Bright Coral (V)Fanfare Fuchsia (V)Patchwork™ Lavender (V)Patchwork Peach Prism (V)Patchwork Pink Shades (V)
DOUBLE IMPATIENSFiesta™ Apple Blossom (V)Fiesta Purple (V)Fiesta Salsa Red (V)Fiesta Sparkler Cherry (V)Fiesta Sparker Hot Pink (V)Fiesta White (V)
NEW GUINEA IMPATIENSCelebrette Frost (V)Celebrette Grape Crush (V)Celebrette Orange Crush (V)Celebrette Red (V)
IPOMOEA (SWEET POTATO VINE)Blackie (V)Marguerite (V)
JUNCUSBlue Dart (S)Twisted Dart (S)
LANTANALucky™ Pure Gold (V)Lucky Red Flame (V)Lucky Sunrise Rose (V)
AFRICAN MARIGOLDTaishan® Orange (S)Taishan Yellow (S)Vanilla (S)
FRENCH MARIGOLDDurango® Bolero (S)Durango Orange (S)Durango Yellow (S)
OSTEOSPERMUM (SPRING DAISY)Voltage™ Yellow (V)
ORNAMENTAL PEPPERBlack Pearl (S)Purple Flash (S)
PETUNIABlack Velvet (V)Paparazzi™ Fashion Cherry (S)Paparazzi Glamour Pink (S)Paparazzi Glitz Yellow (S)Paparazzi Midnight Blue (S)Paparazzi Palladium Purple (S)Paparazzi Rodeo Rose (S)Paparazzi White Diamonds (S)Paparazzi Flash Cherry (S)Paparazzi Flash Midnight (S)Paparazzi Flash Plum (S)Paparazzi Flash Raspberry (S)Paparazzi Flash Red (S)Paparazzi Flash Violet (S)Paparazzi Flash White (S)Paparazzi Flash Yellow (S)Phantom (V)Pinstripe (V)Pop Rocks Coral (S)Pop Rocks Lavender (S)Pop Rocks White (S)Pop Rocks Yellow (S)Suncatcher™ Burgundy (V)Suncatcher Midnight Blue (V)Suncatcher Pink Lemonade (V)Suncatcher Red (V)Suncatcher Yellow (V)
RUDBECKIATiger Eye (S)
SALVIAMystic Spires Blue (V)Vista Purple (S)Vista Red (S)
SNAPDRAGONSnapshot™ Plumblossom (S)Snapshot Red (S)Snapshot White (S)Snapshot Yellow (S)
VERBENAAztec® Blue Velvet (V)Aztec Burgundy (V)Aztec Red Velvet (V)Aztec White (V)Quartz XP Red With Eye (S)Quartz XP White (S)Quartz XP Merlot Mix (S)
VINCAGarden Apricot (S)Garden Dark Red (S)Garden Pink (S)Garden Polka Dot (S)Garden White (S)
ZINNIABridesmaid (S)Champagne Toast (S)Double Zahara™ Cherry (S)Double Zahara Fire (S)UpTown Orange Blossom (S)UpTown Pink Champagne (S)UpTown Sunstreak (S)UpTown White Wall (S)White Wedding (S)
TABLE OF CONTENTS
Broccoli 42Brussels Sprouts 42Cabbage 43Cauliflower 43Celery 44Collards 44Cucumber 45Eggplant 46Fennel 46Kohlrabi 47Lettuce & Greens 47Melon 48Mustard 49Okra 49Onion 50Pak Choi 50Pea 51Pepper 51Pumpkin 52Spinach 52Squash 53Strawberry 54Swiss Chard 54Tomato 55Watermelon 56
HERBS 57 to 65Basil 57Catnip 57Chives 58Cilantro 58Dill 59Lavender 60Oregano 60Parsley 61Peppermint 62Rosemary 62Sage 63Spearmint 62Stevia 63Summer Savory 64Summer Thyme 65Sweet Marjoram 65
“tO GO” PLANtERS Inside back cover
(S) = seed (v) = vegetative

800 879-BALL ballseed.com 1
2012 Burpee Home Gardens® Vegetable & Herb Listing
ARTICHOKENEW Imperial Star
ARUGULAMyway
BUSH BEANBlue Lake BushGold ’N Green Mix
POLE BEANBlue Lake Pole
BROCCOLIFlash HybridPackmanRaab
BRUSSELS SPROUTSFranklinRoyal Marvel
CABBAGEBig Flat HeadFast VantagePacifica
CAULIFLOWERNEW AmazingCheddarRomanesco VeronicaSnow Crown
CELERYTango
COLLARDSGeorgia
CUCUMBERBurpee Hybrid IIBurpless No. 26Bush ChampionNEW Homemade PicklesPickalot HybridSweet Burpless Hybrid
EGGPLANTBurpee HybridNEW Pot BlackPurple BlazeWhite Star Hybrid
FENNELOrion
KOHLRABIQuickstar
LETTUCE & GREENSAlfresco Mix (multi-species, multi-pellet)Burpee BibbButtercrunchCity Garden Mix (multispecies, multi-pellet)NEW Global Gourmet MixImproved (multi-species, multi-pellet)Gourmet BlendHeatwave BlendLittle Caesar
MELONAmbrosiaDoralTwice As Nice
MUSTARDFlorida Broadleaf
OKRANEW Clemson Spineless
ONIONParade BunchingRed ZeppelinWhite Sweet SpanishYellow Sweet Spanish
PAK CHOIToy Choy
PEARSVPea
PEPPER – SWEET BELLNEW BaronBetter BelleNEW Big EarlyBig BerthaCajun BelleGreat Stuff HybridPinot Noir
PEPPER – SWEETBananaramaBig Daddy HybridCosta Rican Sweet HybridFlavorburst HybridSweet Spot X3R
PEPPER – HOTNEW Burning BushHot LemonHungarian Yellow WaxJalapeño GiganteRistra Cayenne HybridTabascoZavory
PUMPKINCasperHarvest MoonHowdenJack-Be-Little
SPINACHBaby’s Leaf HybridBloomsdale
SUMMER SQUASHBurpee Golden (Zucchini)Burpee Hybrid (Zucchini)NEW Limelight (Zucchini)NEW LunarPic-N-Pic Hybrid
WINTER SQUASHBurpee’s Bush Table QueenBurpee’s Butterbush
STRAWBERRYBerri Basket® WhiteBerries Galore® Pink, Rose and White
SWISS CHARDBright Lights
TOMATO – BEEFSTEAKBrandy Boy HybridOld Time TastySupersteak Hybrid
TOMATO – SLICERBetter BoyBig BeefBig PinkBurpee’s Big Boy®
Bush Champion IIBush Early Girl IICelebrityChampion IIDeliciousEarly GirlFourth Of JulyJet StarLemon BoyOrange WellingtonNEW PhoenixSteak Sandwich HybridSuperTasty HybridSweet Seedless HybridTye Dye
TOMATO – PASTE &SALADETTEFresh Salsa HybridBig Mama Hybrid
TOMATO – HEIRLOOMBrandywine RedCherokee PurplePineappleYellow Pear
TOMATO – SMALL–FRUITEDBlack Pearl HybridNapa Grape HybridRed GrapeSungoldSweet 100Tomatoberry GardenTumbler
WATERMELONCrimson SweetSugar Baby
HERBSBoxwood BasilCardinal BasilNufar BasilRed Rubin BasilSiam Queen BasilSweet Dani Lemon BasilSweet Italian Large Leaf BasilSweet Mammoth BasilCatnipGarlic ChivesOnion ChivesSanto CilantroDillFernleaf DillPotpourri Dark Purple, Sky Blue and White LavenderGreek OreganoOreganoItalian Dark Single ParsleyTriple Curled ParsleyPeppermintRosemarySageSummer SavorySpearmintSweet Leaf SteviaSweet MarjoramSummer Thyme
PREMIUM “TO GO” GARDENS
PATIO-READY VEGGIE PLANTERSCUCUMBERBush Champion
EGGPLANTBurpee Hybrid
PEPPERBetter BelleFlavorburst HybridJalapeño Gigante
TOMATOBush Champion IIBush Early Girl IICelebrityFourth of JulyFresh Salsa HybridNEW PhoenixTumbler
COLORFUL MIXED SALAD BOWLSAlfresco MixCity Garden MixNEW Global Gourmet Mix ImprovedGourmet BlendHeatwave Blend
CREATIVE HERB COMBOSTuscan Trio (Parsley, basil and oregano)Good Grillin’ (Parsley, rosemary and chives)Kitchen Favorites (Dill, parsley, oregano and basil)
NEW BOOSTCOLLECTION
CUCUMBERNEW Gold Standard
PEPPERNEW Sweet Heat
SALAD MIXNEW Healing Hands
TOMATONEW Cherry PunchNEW Power PopsNEW Solar Power
PROGRAM DROPS FOR 2012
CAULIFLOWERFirst White Hybrid
CUCUMBERMathilde
OKRAAnnie Oakley
PEPPERHottieRed Delicious Hybrid
SQUASHPeter Pan
TOMATOBush Early Girl

800 879-BALL ballseed.com2
Burpee Home Gardens® Flower Variety Culture Chart
Crop
Seed Germination Media Temperature *
Rooting Hormone Before Sticking Cutting
Cover/ Light Seed
Sow to Transplant (days)
Stick Cutting to Transplant (days)
Growing On Temperature (Night)
Total Crop Time for 4” (10 cm) pots (weeks) 306 Pack 4” (10 cm) Pot 6” (15 cm) Pot
FLOWERS
ALYSSUM Clear Crystal (S) 70-72°F (21-22°C) L 21-28 55-60°F (13-15°C) 8-10 X
ANGELONIA (SUMMER SNAP) Archangel (V) No 21-28 60-70°F (15-21°C) 8-12 X X
Serena (S) 72-76°F (22-24°C) L 35-42 64-66°F (18-19°C) 14-16 X X
BACOPA Abunda (V) No 21 56-61°F (13-16°C) 8-10 X
BEGONIA Dragon Wing (S) 72-75°F (22-24°C) C. Lt. 49-56 60-65°F (15-18°C) 14-17 X X
Gryphon (S) 72-78°F (22-25°C) L 56-63 62-67°F (17-19°C) 13-15 X
Nightlife (S) 75-78°F (24-25°C) L 49-56 60-65°F (15-18°C) 12-15 X X
BIDENS Sun Kiss (V) No 28-49 53-61°F (12-16°C) 8-13 X
CALIBRACHOA Isabells (V) No 21-28 50-58°F (10-14°C) 9-13 X X
CAREX Amazon Mist (S) 64-72°F (18-22°C) C 42-49 58-62°F (14-17°C) 15-18 X X
Red Rooster (S) 64-72°F (18-22°C) C 42-49 58-62°F (14-17°C) 15-18 X X
COLEUS Emotions (S) 72-75°F (22-24°C) C 32-42 62-65°F (17-18°C) 9-11 X X
Henna (V) No 14-21 59-70°F (15-21°C) 9-10 X X
Indian Summer (V) No 14-21 59-70°F (15-21°C) 9-10 X X
Redhead (V) No 14-21 59-70°F (15-21°C) 9-10 X X
Sultana (V) No 14-21 59-70°F (15-21°C) 9-10 X X
Wasabi (V) No 14-21 59-70°F (15-21°C) 9-10 X X
COREOPSIS Early Sunrise (S) 68-72°F (20-22°C) C. Lt. 35 55-60°F (13-15°C) 14-18 X X
DIANTHUS Bouquet (S) 64-68°F (18-20°C) C 28-35 50-60°F (10-15°C) 12-14 X X
Floral Lace (S) 64-68°F (18-20°C) C 28-35 50-60°F (10-15°C) 9-11 X
DICHONDRA Silver Falls (S) 72-76°F (22-24°C) C. Lt. 35 62-65°F (17-18°C) 12-13 X
EUPHORBIA Breathless (V) Yes 21-28 59-67°F (15-19°C) 8-11 X X
GERANIUM Fantasia (V) Optional 21-28 62-67°F (17-19°C) 11-13 X X
GERBERA Revolution (S) 64-68°F (18-20°C) C. Lt. 42-49 62-66°F (17-19°C) 14-17 X X
IMPATIENS Center Stage (V) No 28 66-71°F (19-21°C) 10-12 X
Enlighten (S) 72-76°F (22-24°C) L 28-35 62-65°F (17-18°C) 8-10 X X
Fanfare (V) No 21 56-61°F (13-16°C) 9-12 X X
Patchwork (V) No 21 56-61°F (13-16°C) 9-12 X X
DOUBLE IMPATIENS Fiesta (V) No 21 56-61°F (13-16°C) 9-12 X X
NEW GUINEA IMPATIENS Celebrette (V) No 21-28 59-64°F (15-18°C) 10-13 X
IPOMOEA Blackie (V) No 21 59-64°F (15-18°C) 10-12 X X
Marguerite (V) No 21 59-64°F (15-18°C) 10-12 X X
JUNCUS Blue Dart (S) 71-76°F (21-24°C) L 42-49 59-64°F (15-18°C) 13-15 X X
Twisted Dart (S) 71-76°F (21-24°C) L 42-49 59-64°F (15-18°C) 13-15 X X
LANTANA Lucky (V) Optional 24-28 62-67°F (17-19°C) 10-12 X
AFRICAN MARIGOLD Taishan (S) 68-72°F (20-22°C) C 21 59-65°F (15-18°C) 7-10 X X
Vanilla (S) 68-72°F (20-22°C) C 21 59-65°F (15-18°C) 7-10 X X
FRENCH MARIGOLD Durango (S) 70-72°F (21-22°C) C 21 60-62°F (15-17°C) 8-9 X X
OSTEOSPERMUM Voltage (V) Yes 21-28 44-55°F (7-13°C) 11-15 X X
ORNAMENTAL PEPPER Black Pearl (S) 72-76°F (22-24°C) C 35-49 65-70°F (18-21°C) 13-15 X X
Purple Flash (S) 72-76°F (22-24°C) C 35-49 65-70°F (18-21°C) 13-15 X
C: Cover C. Lt.: Cover lightly L: Light needed to germinate Optional: Cover optional
* Root vegetative cuttings at 68-72°F (20-22°C) media temperature
(S) = seed (v) = vegetative
800 879-BALL ballseed.com 3
Crop
Seed Germination Media Temperature *
Rooting Hormone Before Sticking Cutting
Cover/ Light Seed
Sow to Transplant (days)
Stick Cutting to Transplant (days)
Growing On Temperature (Night)
Total Crop Time for 4” (10 cm) pots (weeks) 306 Pack 4” (10 cm) Pot 6” (15 cm) Pot
FLOWERS
ALYSSUM Clear Crystal (S) 70-72°F (21-22°C) L 21-28 55-60°F (13-15°C) 8-10 X
ANGELONIA (SUMMER SNAP) Archangel (V) No 21-28 60-70°F (15-21°C) 8-12 X X
Serena (S) 72-76°F (22-24°C) L 35-42 64-66°F (18-19°C) 14-16 X X
BACOPA Abunda (V) No 21 56-61°F (13-16°C) 8-10 X
BEGONIA Dragon Wing (S) 72-75°F (22-24°C) C. Lt. 49-56 60-65°F (15-18°C) 14-17 X X
Gryphon (S) 72-78°F (22-25°C) L 56-63 62-67°F (17-19°C) 13-15 X
Nightlife (S) 75-78°F (24-25°C) L 49-56 60-65°F (15-18°C) 12-15 X X
BIDENS Sun Kiss (V) No 28-49 53-61°F (12-16°C) 8-13 X
CALIBRACHOA Isabells (V) No 21-28 50-58°F (10-14°C) 9-13 X X
CAREX Amazon Mist (S) 64-72°F (18-22°C) C 42-49 58-62°F (14-17°C) 15-18 X X
Red Rooster (S) 64-72°F (18-22°C) C 42-49 58-62°F (14-17°C) 15-18 X X
COLEUS Emotions (S) 72-75°F (22-24°C) C 32-42 62-65°F (17-18°C) 9-11 X X
Henna (V) No 14-21 59-70°F (15-21°C) 9-10 X X
Indian Summer (V) No 14-21 59-70°F (15-21°C) 9-10 X X
Redhead (V) No 14-21 59-70°F (15-21°C) 9-10 X X
Sultana (V) No 14-21 59-70°F (15-21°C) 9-10 X X
Wasabi (V) No 14-21 59-70°F (15-21°C) 9-10 X X
COREOPSIS Early Sunrise (S) 68-72°F (20-22°C) C. Lt. 35 55-60°F (13-15°C) 14-18 X X
DIANTHUS Bouquet (S) 64-68°F (18-20°C) C 28-35 50-60°F (10-15°C) 12-14 X X
Floral Lace (S) 64-68°F (18-20°C) C 28-35 50-60°F (10-15°C) 9-11 X
DICHONDRA Silver Falls (S) 72-76°F (22-24°C) C. Lt. 35 62-65°F (17-18°C) 12-13 X
EUPHORBIA Breathless (V) Yes 21-28 59-67°F (15-19°C) 8-11 X X
GERANIUM Fantasia (V) Optional 21-28 62-67°F (17-19°C) 11-13 X X
GERBERA Revolution (S) 64-68°F (18-20°C) C. Lt. 42-49 62-66°F (17-19°C) 14-17 X X
IMPATIENS Center Stage (V) No 28 66-71°F (19-21°C) 10-12 X
Enlighten (S) 72-76°F (22-24°C) L 28-35 62-65°F (17-18°C) 8-10 X X
Fanfare (V) No 21 56-61°F (13-16°C) 9-12 X X
Patchwork (V) No 21 56-61°F (13-16°C) 9-12 X X
DOUBLE IMPATIENS Fiesta (V) No 21 56-61°F (13-16°C) 9-12 X X
NEW GUINEA IMPATIENS Celebrette (V) No 21-28 59-64°F (15-18°C) 10-13 X
IPOMOEA Blackie (V) No 21 59-64°F (15-18°C) 10-12 X X
Marguerite (V) No 21 59-64°F (15-18°C) 10-12 X X
JUNCUS Blue Dart (S) 71-76°F (21-24°C) L 42-49 59-64°F (15-18°C) 13-15 X X
Twisted Dart (S) 71-76°F (21-24°C) L 42-49 59-64°F (15-18°C) 13-15 X X
LANTANA Lucky (V) Optional 24-28 62-67°F (17-19°C) 10-12 X
AFRICAN MARIGOLD Taishan (S) 68-72°F (20-22°C) C 21 59-65°F (15-18°C) 7-10 X X
Vanilla (S) 68-72°F (20-22°C) C 21 59-65°F (15-18°C) 7-10 X X
FRENCH MARIGOLD Durango (S) 70-72°F (21-22°C) C 21 60-62°F (15-17°C) 8-9 X X
OSTEOSPERMUM Voltage (V) Yes 21-28 44-55°F (7-13°C) 11-15 X X
ORNAMENTAL PEPPER Black Pearl (S) 72-76°F (22-24°C) C 35-49 65-70°F (18-21°C) 13-15 X X
Purple Flash (S) 72-76°F (22-24°C) C 35-49 65-70°F (18-21°C) 13-15 X
C: Cover C. Lt.: Cover lightly L: Light needed to germinate Optional: Cover optional
* Root vegetative cuttings at 68-72°F (20-22°C) media temperature
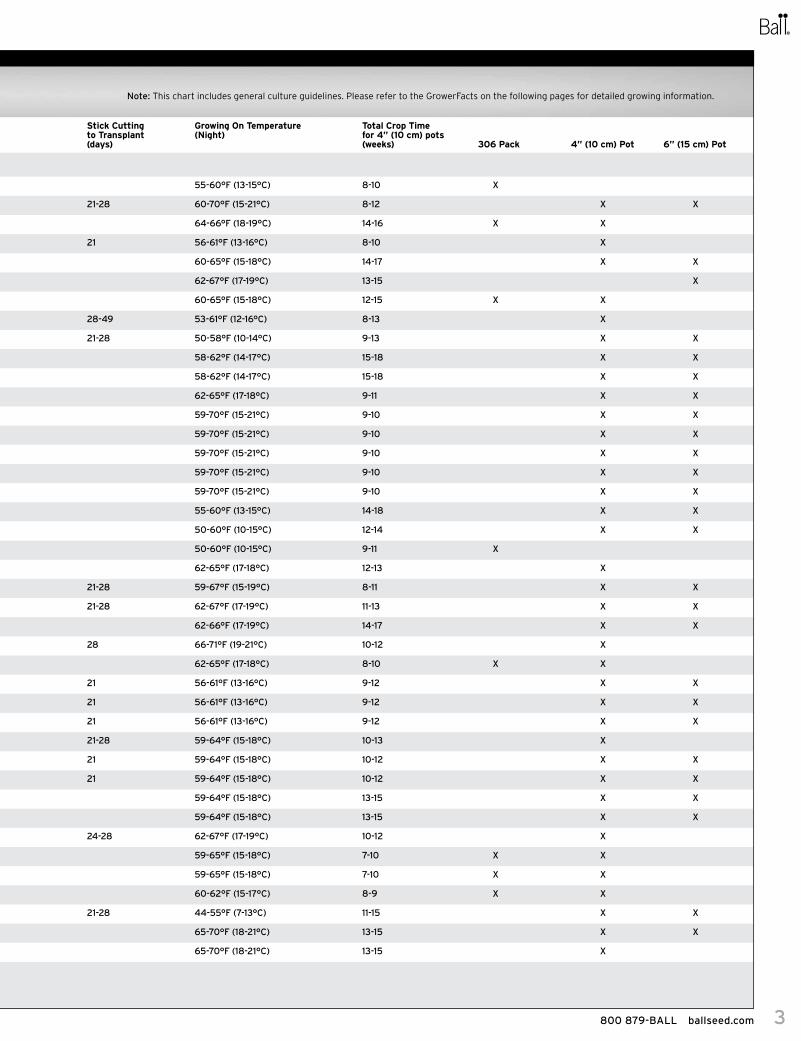
Note: This chart includes general culture guidelines Please refer to the GrowerFacts on the following pages for detailed growing information

800 879-BALL ballseed.com4
Burpee Home Gardens® Flower Variety Culture Chart
Crop
Seed Germination Media Temperature *
Rooting Hormone Before Sticking Cutting
Cover/ Light Seed
Sow to Transplant (days)
Stick Cutting to Transplant (days)
Growing On Temperature (Night)
Total Crop Time for 4” (10 cm) pots (weeks) 306 Pack 4” (10 cm) Pot 6” (15 cm) Pot
FLOWERS
PETUNIA Black Velvet (V) No 21-28 53-61°F(12-16°C) 8-11 X X
Paparazzi (S) 72-76°F (22-24°C) L 28-35 55-65°F (13-18°C) 11-13 X X
Paparazzi Flash (S) 72-76°F (22-24°C) L 28-35 55-65°F (13-18°C) 11-13 X X
Phantom (V) No 21-28 53-61°F (12-16°C) 8-11 X X
Pinstripe (V) No 21-28 53-61°F (12-16°C) 8-11 X X
Pop Rocks (S) 72-76°F (22-24°C) L 28-35 57-65°F (14-18°C) 9-12 X X
Suncatcher (V) No 21-28 53-61°F (12-16°C) 9-12 X X
RUDBECKIA Tiger Eye (S) 75-78°F (24-25°C) L 21-35 65-68°F (18-20°C) 11-15 X
SALVIA Mystic Spires Blue (V) No 21-42 62-67°F (17-19°C) 7-10 X
Vista (S) 70-75°F (21-24°C) C 28-35 64-68°F (18-20°C) 8-10 X
SNAPDRAGON Snapshot (S) 64-68°F (18-20°C) C. Lt. 35-42 45-55°F (7-13°C) 11-12 X
VERBENA Aztec (V) No 21-28 62-64°F (17-18°C) 9-11 X X
Quartz (S) 72-75°F (22-24°C) L 28 60°F (15°C) 10-12 X
VINCA Garden (S) 75-78°F (24-25°C) L 35 65-68°F (18-20°C) 9-10 X X X
ZINNIA Bridesmaid (S) 68-73°F (20-23°C) C 21 59-64°F (15-18°C) 11-12 X X
Champagne Toast (S) 68-73°F (20-23°C) C 21 59-64°F (15-18°C) 11-12 X X
Double Zahara (S) 68-73°F (20-23°C) C 21 59-64°F (15-18°C) 11-12 X X
Uptown (S) 68-73°F (20-23°C) C 21 59-64°F (15-18°C) 11-12 X X
White Wedding (S) 68-73°F (20-23°C) C 21 59-64°F (15-18°C) 11-12 X X
C: Cover C. Lt.: Cover lightly L: Light needed to germinate Optional: Cover optional
* Root vegetative cuttings at 68-72°F (20-22°C) media temperature
(S) = seed (v) = vegetative

800 879-BALL ballseed.com 5
Crop
Seed Germination Media Temperature *
Rooting Hormone Before Sticking Cutting
Cover/ Light Seed
Sow to Transplant (days)
Stick Cutting to Transplant (days)
Growing On Temperature (Night)
Total Crop Time for 4” (10 cm) pots (weeks) 306 Pack 4” (10 cm) Pot 6” (15 cm) Pot
FLOWERS
PETUNIA Black Velvet (V) No 21-28 53-61°F(12-16°C) 8-11 X X
Paparazzi (S) 72-76°F (22-24°C) L 28-35 55-65°F (13-18°C) 11-13 X X
Paparazzi Flash (S) 72-76°F (22-24°C) L 28-35 55-65°F (13-18°C) 11-13 X X
Phantom (V) No 21-28 53-61°F (12-16°C) 8-11 X X
Pinstripe (V) No 21-28 53-61°F (12-16°C) 8-11 X X
Pop Rocks (S) 72-76°F (22-24°C) L 28-35 57-65°F (14-18°C) 9-12 X X
Suncatcher (V) No 21-28 53-61°F (12-16°C) 9-12 X X
RUDBECKIA Tiger Eye (S) 75-78°F (24-25°C) L 21-35 65-68°F (18-20°C) 11-15 X
SALVIA Mystic Spires Blue (V) No 21-42 62-67°F (17-19°C) 7-10 X
Vista (S) 70-75°F (21-24°C) C 28-35 64-68°F (18-20°C) 8-10 X
SNAPDRAGON Snapshot (S) 64-68°F (18-20°C) C. Lt. 35-42 45-55°F (7-13°C) 11-12 X
VERBENA Aztec (V) No 21-28 62-64°F (17-18°C) 9-11 X X
Quartz (S) 72-75°F (22-24°C) L 28 60°F (15°C) 10-12 X
VINCA Garden (S) 75-78°F (24-25°C) L 35 65-68°F (18-20°C) 9-10 X X X
ZINNIA Bridesmaid (S) 68-73°F (20-23°C) C 21 59-64°F (15-18°C) 11-12 X X
Champagne Toast (S) 68-73°F (20-23°C) C 21 59-64°F (15-18°C) 11-12 X X
Double Zahara (S) 68-73°F (20-23°C) C 21 59-64°F (15-18°C) 11-12 X X
Uptown (S) 68-73°F (20-23°C) C 21 59-64°F (15-18°C) 11-12 X X
White Wedding (S) 68-73°F (20-23°C) C 21 59-64°F (15-18°C) 11-12 X X
C: Cover C. Lt.: Cover lightly L: Light needed to germinate Optional: Cover optional
* Root vegetative cuttings at 68-72°F (20-22°C) media temperature
Note: This chart includes general culture guidelines Please refer to the GrowerFacts on the following pages for detailed growing information

800 879-BALL ballseed.com6
FLOWER GROWERFacts
NOTE: Growers should use the information presented here as a starting point Crop times will vary depending on the climate, location, time of year, and greenhouse environmental conditions Chemical and PGR recommendations are only guidelines It is the responsibility of the applicator to read and follow all the current label directions for the specific chemical being used in accordance with all regulations
ALYSSUM (SEED)Lobularia maritime
Clear CrystalApproximate seed count: 70,875 to 87,885/oz (2,500 to 3,100/g)
PLUG PRODUCTIONMediaUse a well-drained, disease-free media with a pH range of 5 5 to 6 0, and EC less than 0 75 mmhos/cm (2:1 extraction)
Sowing• Sowmulti-seedpelletsormultiplesow
film-coated seed with 5 to 6 seeds per cell for best performance
• Themulti-seedpelletformrequiresathick layer of vermiculite and sufficient water to dissolve the pellet at sowing; this is especially true in low humidity environments
Plug Tray Size: Can be best produced in 200, 288 or similar cell-size plug trays
Stage 1 - Germination takes approximately 3 to 4 days. Germination temperature: 70 to 72°F (21 to 22°C) Light: Light is beneficial during germination Relative humidity: Maintain 95 to 97% relative humidity until cotyledons emerge Avoid excess humidity later in the plug production, as this will create conditions favorable for disease incidence
Stage 2temperature: 65 to 75°F (18 to 24°C) days; 60 to 65°F (15 to 18°C) nights Light: Can be up to 2,500 f c (26,900 Lux) during Stages 2 and 3 Media Moisture: Keep the media medium (level 3) to medium wet (level 4) Fertilizer: Apply fertilizer at rate 1 (less than 100 ppm N/less than 0 7 mS/cm EC) with a nitrate-form fertilizer with low phosphorous
Stage 3temperature: 65 to 75°F (18 to 24°C) days; 55 to 60°F (13 to 15°C) nights Media Moisture: Keep the media medium wet (level 3) during Stages 3 and 4 Fertilizer: Increase the fertilizer rate to 2 (100 to 175 ppm N/0 7 to 1 2 mS/cm EC) Maintain a media pH of 5 8 to 6 2 and EC at 0 7 to 1 0 mS/cm (1:2 extraction)
Stage 4temperature: 60 to 70°F (15 to 21°C) days; 55 to 60°F (13 to 15°C) nights Light: Light levels can be up to 5,000 f c (53,800 Lux) if temperatures can be maintained Fertilizer: Same as Stage 3
Plant Growth RegulatorsPGRs are generally not required
GROWING ON TO FINISHContainer SizeGrow in 306 pack
MediaUse a well-drained, disease-free media with a pH of 5 8 to 6 2 and a medium initial nutrient charge
Temperature• Night:55to60°F(13to15°C)• Day:60to75°F(15to24°C)
Light• Keeplightlevelsashighaspossiblewhile
maintaining appropriate temperatures during production
• Undergarden/landscapeconditions,Clear Crystal requires full sun; however, partial shade may be beneficial for retail shelf life
Fertilizer• Starting1weekaftertransplant,apply
fertilizer at rate 3 (175 to 225 ppm N/1 2 to 1 5 mS/cm) using predominantly nitrate-form fertilizer with low phosphorus
• Ifneeded,alternatewithabalancedammonium and nitrate-form fertilizer to encourage growth and balance the media pH
• MaintainthemediaECat1.50to2.00mS/cm and pH at 5 8 to 6 2
• Excessivefertilizerlevelswillresultinlarge, lush leaves and smaller flower count, whereas fertilizer stress will cause very small leaves, hard plants and yellow lower leaves
Irrigation• Maintainoptimalmediamoisture(nottoo
wet or too dry) • Avoidoverheadirrigation.• Irrigationshouldtakeplaceduringtimes
when foliage will dry quickly, to prevent any disease incidence
Plant Growth RegulatorsPGRs are not required If needed, growth can be controlled by adjusting the fertilization and day/night temperatures during the production
Crop Scheduling Sow to transplant: Approximately 4 weeks transplant to flower: 4 to 6 weeks seasonally total crop time (sow to flower): 8 to 10 weeks seasonally
Common Problems Diseases: Downy mildew Also, a preventative fungicide application for damping-off during plug production is recommended NOTE: Avoid using copper-based fungicides on Alyssum

800 879-BALL ballseed.com 7
FLOWER GROWERFacts
ANGELONIA (SEED)Angelonia angustifolia
Serena™ SeriesApproximate seed count (pelleted): 28,500 S /oz (1,000 S /g)
PLUG PRODUCTIONMediaUse a well-drained, disease-free, soilless medium with a pH of 5 5 to 6 0 and a medium initial nutrient charge (EC 0 75 mmhos/cm with a 1:2 extraction)
SowingPlug tray size from 406 to 128 Do not cover or bury the seed
Stage 1 – Germination takes 4 to 5 days.Soil temperature: 71 to 76°F (22 to 24°C) Light: 10 f c (100 Lux) or higher Light is required for germination Seeds will not germinate in the dark Moisture: Keep soil moist but not saturated (level 4) during Stage 1 for optimal germination Humidity: Maintain 95% relative humidity (RH) until radicle emergence
Stage 2 Soil temperature: 68 to 73°F (20 to 23°C) Light: Up to 2,500 f c (26,900 Lux) Moisture: Start to slightly reduce soil moisture (level 4) to allow the roots to penetrate into the media Fertilizer: Apply fertilizer at rate 1 (less than 100 ppm) from nitrate-form fertilizers with low phosphorous
Stage 3Soil temperature: 65 to 70°F (18 to 21°C) Light: Up to 2,500 f c (26,900 Lux) Moisture: Allow the media to further dry until the surface becomes light brown (level 2) before watering Keep the moisture level at wet-dry cycle (moisture level 4 to 2) Do not allow the seedlings to wilt as they do not recover very well Fertilizer: Increase fertilizer to rate 2 (100 to 175 ppm) Growth Regulators: Growth regulators are generally not needed in plug stage If necessary, B-Nine (daminozide) 5,000 ppm spray can be used
Stage 4Soil temperature: 65 to 67°F (18 to 19°C) Light: Up to 5,000 f c (53,800 Lux) if optimal temperature can be maintained Moisture: Same as Stage 3 Fertilizer: Same as Stage 3
GROWING ON TO FINISH
MediaUse a well-drained, disease-free, soilless medium with a pH of 5 4 to 6 2 and a medium initial nutrient charge
Temperature• Night:65to67°F(18to19°C)• Day:65to76°F(18to24°C)• Dailyaveragetemperaturesbelow65°F
(18°C) will slow down the crop growth rate dramatically
LightKeep light as high as possible while maintaining recommended temperatures
IrrigationAvoid both excessive watering and drought
Fertilizer• Feedplantsweeklyatrate3(175to225
ppm) using predominantly nitrate-form fertilizer with low phosphorus and high potassium
• MaintainthemediaECat1.5to2.0mS/cm and pH at 5 8 to 6 2
Growth Regulators• AtankmixofB-Nine(daminozide)2,500
ppm mixed with Cycocel (chlormequat) 750 to 1,000 ppm is the most effective growth regulator for Angelonia
• Cycocelratescanbeadjusteddependingon environmental conditions
• Uselowerratesundercoolerandshorterdaylength conditions, and higher rates under warmer and longer daylength conditions
• Growthregulatorscanbestarted2weeksafter transplanting Repeat as needed
For growers in warmer climates: A Bonzi (paclobutrazol) drench at 5-10ppm (1 3 to 2 5 ml/l, 0 4% formulation) can be used 2 weeks after transplant instead of the B-Nine/Cycocel tank mix
PinchingDo not pinch the plants! Seed Angelonia has excellent natural basal-branching Pinching will only delay flowering and make the plant habit unattractive
Crop Scheduling Sow to transplant (406 to 128-cell plug tray): 5 to 6 weeks
transplant from 406 to 288-tray to saleable finished container:
Container Size
Plants Per Pot
Weeks From transplant
total Weeks
306 pack 1 8 to 9 13 to 15
4 to 4 5-in (10 to 11-cm pot)
1 9 to 10 13 to 15
NOTE: When transplanted from a 128-tray, finish crop time for Serena can be reduced by 1 to 2 weeks
COMMON PROBLEMS Insects: No serious problems Diseases: No serious problems
ANGELONIA (VEGETATIVE) Angelonia angustifolia
Archangel™
PROPAGATION• Chooseawell-drainedmediumwithan
EC of 0 75 to 0 80 mmhos and a pH of 5 8 to 6 2
• Stickcuttingswithin12to24hoursofarrival Cuttings can be stored overnight, if necessary, at 45 to 50°F (7 to 10°C)
• Soiltemperatureshouldbemaintainedat 68 to 73°F (20 to 23°C) until roots are visible
• Toencouragebranchingandreducestemstretch, Archangel Angelonia should be propagated under as high a light as possible while avoiding unnecessary stress on the cuttings
• Beginfertilizationwith75to100ppmNwhen roots become visible Increase to 150 to 200 ppm N as roots develop Avoid phosphorous and ammoniacal nitrogen during the rooting process to reduce stretch and unwanted vegetative growth
• Astherootedcuttingsdevelop,highlight, appropriate water stress and moderate air temperatures should eliminate the need for chemical plant growth regulators (PGRs) on Archangel Angelonia Archangel Angelonia is responsive to a B-Nine and Cycocel tank mix, should PGRs be needed
• Pinchingisnotrequiredbuttoimprovebranching and habit, plants can be pinched 5 to 7 days before transplanting
• ArchangelAngeloniarootedcuttingsshould be ready for transplanting 24 to 28 days after sticking and should be transplanted as soon as possible Rooted cuttings should not be held, as Archangel Angelonia will be actively growing and plants will begin to crowd and stretch very quickly
GROWING ON TO FINISH
Scheduling• ArchangelAngeloniarequireshigher
light levels • Inareaswithlowlightlevelsinearly
Spring, Angelonia is best planted as a mid to late-Spring and Summer crop
• InareaswithmoderatetohighWinterand early Spring light levels, Archangel Angelonia can be grown year-round
MediaUse a light, well-drained soilless medium with a pH of 5 8 to 6 2
Temperature• Night:62to70°F(17to21°C)• Day:74to85°F(23to29°C)• Temperaturesbelowthoserecommended
will slow plant growth significantly and cause the lower foliage to yellow

800 879-BALL ballseed.com8
FLOWER GROWERFacts
Light• Keeplightlevelsashighaspossiblewhile
maintaining recommended temperatures • Theidealrangeis6,000to10,000f.c.
(60,000 to 100,000 Lux)• Lightlevelsbelow5,000f.c.(50,000
Lux) will promote stem stretch and reduce branching
Watering• Allowthemediatodrymoderately
between waterings • Toavoidleaftipburn,donotallowmedia
to dry completely or the plant to wilt repeatedly
Fertilizer• Useconstantfeedat175to225ppmwith
a full complement of minor elements • Excessivephosphorousandammoniacal
nitrogen will promote unwanted vegetative growth
• Bothshouldbeprovidedinverylimitedquantities
• Controlled-releasefertilizercanbeusedto supplement a liquid feed program
• Leachregularlytoavoidthebuildupofhigh soluble salt levels
Pinching• Asinglepinchisrecommendedwhen
growing Archangel Angelonia in 4 5 to 5-in (11 to 13-cm) containers
• Thefirstpinchshouldbe5to7daysafter transplanting
• Stemsshouldbepinchedto4or5nodes.• Growersmaychoosetopinchplantsin
larger, 5 to 8-in (13 to 20-cm) containers a second time to enhance branching and the number of flower spikes
• Whengrowinginlargercontainers,thesecond pinch should be applied 14 to 21 days after the first
Controlling Growth• Heightcanbecontrolled,inpart,by
maintaining moderate fertility, allowing the media to dry slightly between waterings, providing maximum light and spacing plants in advance of crowding and stretch
• Underconditionsconducivetorapidvegetative growth, chemical plant growth regulators may be needed
• ACycocel(700to1,000ppm)andB-Nine(1,500 to 2,000 ppm) tank mix applied 1 to 2 times is effective
• Thefirstapplicationshouldbe7to10days after the first pinch
• Likewise,atankmixofA-Rest(6to12ppm) and B-Nine (1,000 to 1,500 ppm) applied 1 to 2 times can be used to control growth
• Culturalpracticesshouldbeemphasizedto avoid use of PGRs on Archangel Angelonia compact varieties
• Ingeneral,morefrequentapplicationsof any growth regulator at a lower concentration will produce the best results
• Florelcausesleaftipburnwhenappliedto Archangel Angelonia
• Theserecommendationsforplantgrowth regulators should be used only as general guidelines Growers must trial all chemicals under their particular conditions
Common Problems
Problems Causes
Plant/stem collapse
Wet media for an extended period of time (Pythium, Rhizoctonia, Botrytis)
Excessive vegetative growth
Low light conditions Over-fertilization under low light conditionsOverwatering under low light conditions
Poor branching
Low fertilization, especially nitrogen Low light conditions
Stretched plants
Low light conditionsCrowding before spacingLate transplantingExcessive phosphorous
Crop Schedule & Uses(Crop Schedule in Weeks)
4 to 4.5-in. (10 to 11-cm) Pots1 PP*
6-in. (15-cm)
Pot 3 PP*
Unrooted cuttings
9 to 11 13 to 16
Rooted cuttings
5 to 8 10 to 12
*PP: Plants per pot
BACOPA (VEGETATIVE)
Sutera cordata
Abunda™
PROPAGATION• Bacopashouldbeturgidwhenplanted.
This may require rehydration of cuttings prior to sticking
• Chooseawell-drainedmediumwithanEC of 0 75 to 0 80 mmhos and a pH of 5 4 to 5 8
• Openshippingboxesimmediately.Stick cuttings within 12 hours of arrival Cuttings can be stored overnight, if necessary, at 45 to 50°F (7 to 10°C)
• Soiltemperatureshouldbemaintainedat 68 to 73°F (20 to 23°C) until roots are visible
• Oncerootsarevisible,themediashould be kept moderately wet and never saturated This will prevent iron deficiency and the associated chlorotic foliage which can develop
• Beginfertilizationwith75to100ppmNwhen roots become visible Increase to 150 to 200 ppm N as roots develop
• Astherootedcuttingsdevelop,highlightand moderate air temperatures should eliminate the need for chemical plant growth regulators (PGRs)
• AbundaBacopadoesnotrequirepinching during propagation However, to improve branching and habit, plants can be pinched 7 to 10 days before transplanting
• Bacoparootedcuttingsshouldbereadyfor transplanting 21 to 24 days after sticking
GROWING ON TO FINISH
MediaUse a well-drained, disease-free, soilless medium with a pH of 5 4 to 5 8
Temperature• Night:56to61°F(13to16°C)• Day:65to76°F(18to24°C)• Coolnighttemperatureswillcreate
maximum branching, darkest foliage color and the best possible habit
Light• Keeplightintensitiesat4,000to8,000
f c (40,000 to 80,000 Lux) • Lowlightlevelsresultinpoorbranching,
stem stretch and reduced flowering • AbundaBacopaisdaylengthneutraland
will flower year-round
WateringAbunda Bacopa is susceptible to root diseases if overwatered Allow the media to dry slightly between watering, but wilt should be avoided
ANGELONIA continued

800 879-BALL ballseed.com 9
FLOWER GROWERFacts
Fertilizer• Useconstantfeedof175to225ppmwith
a full complement of minor elements Additional iron as needed
• Controlled-releasefertilizercanbeusedto supplement a liquid feed program
• Leachregularlytoavoidthebuildupofhigh soluble salt levels
• TestsoilregularlyforhighpH/irondeficiency
Pinching• Pinchplants10to14daysafter
transplanting, as needed, to improve basal branching
• A4-in.(10-cm)cropcanbeproducedwithno pinch, if necessary
Controlling Growth• Usehighlightandmoderate
temperatures to control growth • AbundaBacopawillgenerallyflowerand
be saleable well before any plant growth regulators are needed
• BacopaishighlyresponsivetoFlorel(300 to 500 ppm) when used to improve branching and eliminate early flowering
• Theserecommendationsforplantgrowth regulators should be used only as general guidelines Growers must trial all chemicals under their particular conditions
Common Problems Insects: Aphids, thrips, whitefly, fungus gnats Diseases: Botrytis, Rhizoctonia, Pythium.
Problems Causes
Plant collapse
Wet media for an extended period (Pythium) Rhizoctonia due to planting too deep
Delayed flowering
Low light levelsExcessive Florel application
Excessive vegetative growth
High ammonia concentration in the soilOver-fertilization under low light conditionsLow light and overwatering; wet media
Poor branching
Low fertilization; lack of nitrogen
Stretched plants
Low light
Chlorosis Iron deficiency High pHNitrogen deficiency
Crop Schedule & Uses(Crop Schedule in Weeks)
4-in. (10-cm) Pots1 PP*
Unrooted cuttings 10 to 13
Rooted cuttings 5 to 7
*PP: Plants per pot
BEGONIA (SEED) B. x hybrid
Dragon Wing® Series Approximate seed count (pelleted): 28,500 S /oz (1,000 S /g)
GERMINATIONGermination takes 7 to 10 days
Plug Tray SizeDragon Wing plants are best produced in 200-cell plug trays This permits the plant enough growth at the plug stage so that the direction of the arching stem is clear for correct orientation at planting time This orientation can be seen in smaller plugs, but is less readily apparent
MediaUse a well-drained, disease-free sowing medium with a pH of 5 8 to 6 0 and electrical conductivity (EC) of 0 5 mmhos/cm A very light covering of vermiculite may be needed when germinating pelleted seed on the bench
MoistureKeep media saturated through germination
Temperature72 to 75°F (22 to 24°C) Keep temperature as constant as possible
Humidity Maintain relative humidity at approximately 95% or higher
LightLight is beneficial but not required for germination
PLUG PRODUCTION
TemperatureAfter radicle emergence, maintain a constant 70°F (21°C) soil temperature for two weeks In Week 3, the temperature can be decreased to 65°F (18°C)
Moisture• Slightlyreducemediamoisturelevels
after radicle emergence • Maintainuniformmediamoistureuntil
the true leaves appear; then allow media to dry out slightly between waterings
• DonotstressplugsuntilStage4.
Light• Lightwillhelptoensureahigher-quality
seedling • Afterradicleemergence,keeplightlevels
at 400 to 2,000 f c (4,000 to 20,000 Lux) for two weeks
Fertilizer• Beginfertilizationat5daysoutofthe
germination chamber, or 10 days after germination on the bench
• DragonWingplugsrequiremorefeedthan other fibrous begonias
• Recommendedapplicationis50ppmN,2to 3 times per week
• InWeek3,increasefeedto150to200ppm N, 2 to 3 times per week
Plant Growth RegulatorsGrowth regulators are not required to produce Dragon Wing begonia plugs
GROWING ON TO FINISH
Temperature • Night:60to65°F(15to18°C)• Day:65to70°F(18to21°C)
Container SizeDragon Wing begonias can be transplanted into a wide range of container sizes Follow these guidelines for the number of plants per pot or basket:
Container Size Bench Spacing
Plants Per Pot/Basket
4 to 4.5-in (10 to 11-cm)
Pot-tight 1
6-in. (15-cm) pots
8 in (20 cm)
2 to 3
TransplantingDue to directional stem arching, it is very important to position Dragon Wing plugs properly when placing more than one plug into baskets and containers for finishing
Plugs must be placed with the growing shoot facing outward, toward the outside of the container (see drawing) This is the side of the plant the flower is on The directional growth remains consistent as the plant matures, ensuring flowers on the outside of the finish container
MediaUse a well-drained, disease-free, soilless medium with a pH of 5 4 to 6 0 and electrical conductivity (EC) of 1 0 mmhos/cm

800 879-BALL ballseed.com10
FLOWER GROWERFacts
Light• Growoninahigh-lightenvironment–
3,000 to 7,000 f c (30,000 to 70,000 Lux)
• Daylengthandlightqualitycanhaveadramatic effect on plant habit; daylength can also affect flowering time
• DragonWingbegoniaswillflowerundernatural daylength year-round, making them a good choice for year-round production in warmer climates
• Theyflower1to3weeksfasterundershort days
• Shortdays(8to10hours)causeplantstogrow nearly horizontal
• NaturalorHIDlongdaysgiveintermediate, arching growth
• Longdaysprovidedbyincandescentlighting cause more upright growth, which is beneficial for plant shipment (tighter spacing on shelves with less breakage)
Watering• ProduceDragonWingbegoniasonthe
drier side to help prevent any fungal or water mold-type diseases
• However,allowingplantstowiltevenslightly between waterings will delay flowering, reduce branch number and result in pale foliage
Fertilizer• Afeedprogramof200ppmNoncea
week can begin as soon as the plugs have begun to root out
• Note:Severefertilityand/orwaterstresswill delay flowering 1 to 2 weeks
Plant Growth Regulators• 4-in.(10-cm)pots:Asprayof3ppm
(0 75ml/l) Bonzi can be applied weekly for 3 applications to keep plants compact Start the first application 2 weeks after transplanting
• 6-in.(15-cm)pots:Asprayof5ppm(1.25ml/l) Bonzi 2 weeks after transplant has been found to be effective in trials in Elburn, IL An additional 1 or 2 sprays of 5 ppm (1 25 ml/l) Bonzi every other week after the first application results in earlier flowering, shorter internodes, darker foliage and more uniform branches
• NOTE: In-house trials are recommended to determine the best rates for your location Always follow current manufacturer label instructions
Crop Scheduling Sow to transplant: 7 to 8 weeks Transplant to finish: 4-in. (10-cm) pot with 1 plant per pot: 7-9 weeks 6-in. (15-cm) pots with 2 to 3 plants per pot: 7 to 9 weeks
Common Problems Dragon Wing begonias are quite disease and pest-free No major problems will occur if using good cultural and IPM practices A wide range of insecticides have been tested on Dragon Wing plants with little or no phytotoxicity
BEGONIA (SEED) B. x hybrid
Gryphon Approximate seed count (multi-pelleted): 28,500 S /oz (1000 S /g)
PLUG PRODUCTION
MediaUse a well-drained, disease-free, soilless medium with a pH of 5 8 to 6 2 and a medium initial nutrient charge (EC 0 5 mmhos/cm with a 1:2 extraction)
SowingPlug Tray Size• Sowonepelletedseedpercellin288or
larger plug tray • Waterthoroughlyatsowingto
completely dissolve the pellet • Donotcoverthepelletatsowing.
Stage 1 – Germination takes approximately 10 to 12 days.Germination temperature: 72 to 78°F (22 to 25°C) Prefers warmer temperature but can also germinate well at 72°F (22°C) Light: Light is required Media Moisture: Keep the media moisture (level 5) during germination Gryphon is very sensitive to drying out during early stages of germination Relative Humidity: Maintain 95 to 97% relative humidity until cotyledons emerge A saturated media and high relative humidity is critical to germinate successfully
Stage 2temperature: Optimum 71 to 76°F (21 to 24°C) Light: Up to 2500 f c (26,900 Lux) Media Moisture: Keep the media very wet (level 5) to medium wet (level 4) during stage 2 Keep soil moisture high and maintain uniform media moisture Do not stress plugs Fertilizer: Begin fertilization at 5 days out of the germination chamber Start with 50 to 75 ppm N from ammonia-form fertilizer, 2 to 3 times per week increase slowly to 100 ppm Maintain a media pH of 5 8 to 6 2
Stage 3temperature: 68 to 73°F (20 to 22°C) Light: Up to 5,000 f c (54,000 Lux) Media Moisture: Keep media medium wet to medium (level 4 to 3) Do not allow the seedlings to wilt Maintain uniform media moisture until the true leaves appear; then allow media to dry out slightly between waterings Do not stress plugs Fertilizer: Increase the fertilizer rate to 2 (100 to 175 ppm), 2 to 3 times per week Alternate fertilizers from ammonia-form to nitrate-form Maintain a media pH of 5 8 to 6 2 and EC at 0 7 to 1 0 mS/cm (1:2 extraction)
Stage 4temperature: Can be decreased to 65 to 67°F (18 to 19°C) Light: Up to 5,000 f c (54,000 Lux) Media Moisture: Moisture level can be reduced to medium dry (level 3) Avoid excess humidity later in the plug production, as this will create conditions favorable for disease incidence Fertilizer: Same as stage 3
Growth Regulators Not needed
GROWING ON TO FINISH
MediaUse a well-drained, disease-free, soilless medium with a pH of 5 4 to 6 0 and electrical conductivity (EC) of 1 0 mmhos/cm
TemperatureNight: 62 to 67°F (17-19°C)Day: 65 to 75°F (18 to 24°C)
LightLight level from 3,000 to 7,000 f c (32,400 to 75,600 lux)
PhotoperiodGryphon is a foliage plant, but plant could flower when grown under a daylength of 11 hours or shorter Under daylength longer than 11 hours, flowering will be significantly delayed or plants will never flower
BEGONIA continued

800 879-BALL ballseed.com 11
FLOWER GROWERFacts
IrrigationAvoid both excessive watering and drought
Fertilizer• Applyfertilizeratrate3(175to225ppm)
once a week as soon as the plugs have begin to root out
• Abalancedammoniumandnitrate-formfertilizer may be applied as needed to encourage growth and balance the media pH
Growth Regulators• Generally,PGRsarenotneeded.• Ifnecessary,atankmixofB-Nine
(daminozide) 2,500 ppm nd Cycocel (chlormequat) 300 ppm or B-Nine/Alar alone (for cooler area) can be used at 2 weeks after transplanting
• AvoidusingCycocelaloneasitcancausephytotoxicity
• AlsousecautionwithBonzi,Topflor,andSumagic as they can stunt plants
NOTE: In-house trials are recommended to determine the best rates for your location Always follow current manufacturer label instructions
PinchingNo pinching is required
Crop Scheduling Sow to transplant (288 cell plug tray): 8 to 9 weeks
Container Size
Plants Per Pot
Weeks From transplant
6-in (15-cm) pot
1 to 3 5 to 6
Common Problems Gryphon begonias are quite disease and pest-free No major problems will occur if using good cultural and IPM practices A wide range of insecticides have been tested on Gryphon plants with little or no phytotoxicity
BEGONIA (SEED) B. x hybrid
Nightlife Approximate seed count (pelleted): 28,550 S /oz (1,000 S /g)
GERMINATION Germination takes 7 to 10 days
SOWING Do not cover seed Water thoroughly at sowing to completely dissolve the pellet Recommended plug sizes are 512 to 288-cell
Temperature 75 to 78°F (24 to 25°C) Keep temperature as constant as possible
Humidity Maintain relative humidity at 95%
Sowing Do not cover seed Germinating in a chamber is recommended
Light Light is beneficial, but not required
PLUG PRODUCTION
Media Use a very well-drained, disease-free soilless medium with a medium pH of 5 8 to 6 2 and an EC of about 0 5 mmhos/cm (1:2 extraction)
Temperature • Maintainsoiltemperatureat70to75°F
(21 to 24°C) after true leaves develop • Plugscanbeheldat62to65°F(17to
18°C) from maturity until transplant
Light After germination, maintain light levels between 1,000 and 2,500 f c (10,000 to 30,000 Lux) As seedlings mature, light levels can be increased up to 5,000 f c (54,000 Lux)
Moisture Nightlife is very sensitive to drying out during early stages of germination Keep soil moisture high until the first true leaf develops, then reduce moisture levels
Fertilizer The high soluble salts in fertilizers tend to affect Nightlife; however, it will also grow slowly if not fertilized Frequent light fertilization is best Use 20-10-20 about 50 ppm at Day 8 and at Day 11 Then use every other day until Stage 3 After true leaves emerge, alternate with 15-0-15 until transplant Always rinse foliage after feeding
Plant Growth Regulators None are required during the plug stage
GROWING ON TO FINISH
Container Size 306: 1 plant per cell 4 to 4.5-in. (10 to12-cm) pot: 1 plant per pot
Media Use a well-drained, disease-free soilless medium with a medium initial nutrient charge and a pH of 6 0 to 6 5
Temperature • Night:60to65°F(15to18°C)• Day:65to70°F(18to21°C)
Light Grow in a high light environment: 3,000 to 7,000 f c (30,000 to 70,000 lux) High light levels will result in earlier flowering and stronger stems
Irrigation Allow the media to dry slightly, then water liberally Water early in the day to avoid leaf burn when temperatures are high
Fertilization Fertilize every other irrigation with 15-0-15, alternating with 20-10-20 at 150 ppm N Maintain the medium EC around 1 0 mmos/cm (1:2 extraction)
Plant Growth Regulators Note: Nightlife is very responsive to Bonzi and Sumagic Avoid overspray from neighboring plants.
Pinching No pinching is required
Crop Scheduling Sow to transplant (512 or 288-cell plug tray): 7 to 8 weeks transplant to finish: 5 to 7 weeks
NOTE: Space the plants when the foliage starts touching each other
Common Problems Insects: Fungus gnats, shore flies Diseases: No major problems when using good cultural and IPM practices

800 879-BALL ballseed.com12
FLOWER GROWERFacts
BIDENS (VEGETATIVE) Bidens ferulifolia
Sun Kiss™
PROPAGATION• Chooseawell-drainedmediumwithan
EC of 0 75 to 0 80 mmhos and a pH of 5 8 to 6 2
• Stickcuttingswithin12to24hoursofarrival Cuttings can be stored overnight, if necessary, at 45 to 50°F (7 to 10°C)
• Soiltemperatureshouldbemaintainedat 68 to 73°F (20 to 23°C) until roots are visible
• Oncerootsarevisible,themediashouldbekept moderately wet, but never saturated
• Beginfertilizationwith75to100ppmNwhen roots become visible Increase to 150 to 200 ppm N as roots develop
• Astherootedcuttingsdevelop,highlightand moderate air temperatures should eliminate the need for chemical plant growth regulators (PGRs)
• SunKissBidensshouldbepinchedduringpropagation To improve branching and habit, plants should be pinched 7 to 10 days before transplanting
• Bidensrootedcuttingsshouldbereadyfor transplanting 21 to 24 days after sticking
GROWING ON TO FINISH
MediaUse a well-drained, disease-free, soilless medium Maintain a media pH of 5 8 to 6 2
Temperature• Night:53to61°F(12to16°C)• Day:59to76°F(15to24°C)• Excessivelywarmtemperatureswill
cause stretching • Recommendednighttemperatureswill
create maximum branching and the best possible habit
Light• Keeplightintensitiesat5,000to9,000
f c (50,000 to 90,000 Lux) • Lowlightlevelspromotestemstretch.• Reducelightintensitywhen
temperatures are high to prevent flower and leaf burning
Watering• SunKissBidensissusceptibletoBotrytis
– avoid high humidity and wet foliage • Whenplantsareyoung,allowthemedia
to dry slightly between waterings
Fertilizer• Useconstantfeedwithabalanced
fertilizer at 175 to 225 ppm N with full complement of minor elements Additional iron as needed
• Controlled-releasefertilizercanbeusedto supplement a liquid feed program
Pinching• Pinchplantsback7to10daysafter
transplanting to improve basal branching • Foralargerbasketorcontainer,asecond
pinch can be applied, but will delay flowering by approximately 2 weeks
• Plantswillgenerallybloom4to6weeksafter a pinch
Controlling Growth• Thebestwaytocontrolthegrowthof
Bidens is to grow the crop cool, provide bright light and apply moderate, regular water stress to promote flowering and reduce unwanted vegetative growth
• SunKissBidensisanaturallymorecompact variety compared to other Bidens If needed, control growth using 1 or more applications of B-Nine (1,500 to 2,000 ppm) starting 2 weeks after transplanting
• UseofPGRscandelayflowering1to2weeks
• Avoidsprayingonceflowerbudsappear.• Varietieswillresponddifferentlyto
growth regulators • Ingeneral,morefrequentapplications
of any growth regulator at a lower concentration will produce the best results
• Theserecommendationsforplantgrowth regulators should be used only as general guidelines Growers must trial all chemicals under their particular conditions
Common Problems Insects: Aphids, thrips, leafminers, fungus gnats Diseases: Botrytis, Rhizoctonia, Pythium
Problems Causes
Plant collapse
Wet media for an extended period (Pythium) Planting too deeply (Rhizoctonia)
Delayed flowering
Late application of growth regulatorsExcessive heat
Excessive vegetative growth
Higher than recommended air temperatures Over fertilization under low light conditionsLow light levels and overwatering; wet media
Poor branching
Low fertilization; lack of nitrogen
Stretched plants
Low light levels Excess water Higher than recommended air temperatures
Chlorosis Iron deficiency High pHNitrogen deficiency
Crop Schedule & Uses(Crop Schedule in Weeks)
4 in. (10-cm) Pots1 PP*
Unrooted cuttings 7 to 10
Rooted cuttings 4 to 6
*PP: Plants per pot
CALIBRACHOA (VEGETATIVE)
Calibrachoa hybrid
Isabells
PROPAGATION• Chooseawell-drainedmediumwithan
EC of 0 75 to 0 80 mmhos and a pH of 5 4 to 5 8
• Openboxesuponarrival.Stickcuttingswithin 12 to 24 hours of arrival Cuttings can be stored overnight, if necessary, at 45 to 50°F (7 to 10°C)
• Soiltemperatureshouldbemaintainedat 68 to 73°F (20 to 23°C) until roots are visible
• Avoidover-applicationofmistinpropagation
• Beginfertilizationwith75to100ppmNwhen roots become visible Increase to 150 to 200 ppm N as roots develop
• Oncerootsarevisible,themediashould be kept moderately wet and never saturated This will prevent iron deficiency and the associated chlorotic foliage which can develop
• Astherootedcuttingsdevelop,appropriate water stress and moderate air temperatures should eliminate the need for chemical plant growth regulators (PGRs)
• IsabellsCalibrachoacanbepinched18to 24 days after sticking, when roots are well-developed, to promote early branching and improve habit
• IsabellsCalibrachoarootedcuttingsshould be ready for transplanting 24 to 28 days after sticking
GROWING ON TO FINISH
Media• Useawell-drained,disease-free,soilless
medium with a pH of 5 4 to 5 8 • MaintainamediapHof5.4to5.8
throughout production • Themediashouldberoutinelytested
every 14 days or when early signs of elevated pH become visible These early signs can be the first indicators of the need to lower the soil pH to avoid iron deficiency
Temperature• Night:50to58°F(10to14°C)• Day:71to76°F(21to24°C)• Higherthanrecommendedtemperatures
will cause poor branching, unwanted stem stretch and reduced flowering
• Suggestednighttemperatureswillcreate maximum branching and the best possible habit
Light• Keeplightintensitiesat5,000to8,000
f c (50,000 to 80,000 Lux) • Lowlightlevelscausestemstretchand
poor flowering

800 879-BALL ballseed.com 13
FLOWER GROWERFacts
• FloweringisbestunderlongdaysofSpring and Summer Generally, flowering will begin in mid to late Spring and will be heaviest in late May to September Crop times will be increased under short daylength An Autumn crop is possible if the crop is started early enough to allow for flower initiation before days shorten significantly
• Forfastestfloweringduringshortdaylength, maintain night temperatures at 59 to 61°F (15 to 16°C) and use lighting to provide a daylength greater than 12 to 13 hrs Night-break lighting can be used
Watering• PlantsaresusceptibletoBotrytis–avoid
high humidity and wet foliage • Calibrachoaaresusceptibletoroot
diseases if over-watered Allow the media to dry slightly between watering, but avoid any wilt
• Provideplantswithadequatehorizontalair flow at all times
Fertilizer• Calibrachoarequireheavyfertilization.• Useconstantfeedwithabalanced
fertilizer at 225 to 300 ppm N with a full complement of minor elements Additional iron as needed
• Useclearwaterwitheverythirdwateringif high soluble salt problems occur
Media pH Management• Plantsmustbemonitoredregularlyfor
early, visual signs of upward pH drift (interveinal yellowing on youngest leaves) Regular soil pH tests are an excellent way to identify movements in pH before they create visual symptoms, which can be difficult to correct
• Periodicapplicationofacidicfeedor drench applications of a chelated iron product can be used to maintain appropriate pH levels
• AneffectivemethodofloweringpHisa soil drench of iron sulfate The foliage must be rinsed immediately after treatment since the iron sulfate solution which can result in phytotoxicity to flowers and foliage
Pinching• Pinchplantsback7to14daysafter
transplanting to improve basal branching Plants can be pinched as the crop matures to improve their habit, but flowering will be delayed approximately 2 to 3 weeks
• Intrials,Florelhasproveneffectiveforincreasing branching when applied 1 to 3 times at 250 to 500 ppm to a stress-free, actively growing plant Flowering will be delayed a minimum of 7 to 8 weeks, depending on the concentration used Improved branching, darker green foliage and shorter internodes will be the benefits
Controlling Growth• Usehighlightandcooltemperaturesto
control growth • IsabellsCalibrachoarespondwelltoDIF
in production
• Ifnecessary,growerscanuse1ormoreapplications of B-Nine (1,500 to 3,000 ppm) starting 2 weeks after transplant Calibrachoa growth can also be controlled with 1 to 2 spray applications of A-Rest (20 to 50 ppm) or drench applications of Bonzi (3 to 8 ppm) Sumagic (20 to 30 ppm) can effectively control the growth of Calibrachoa when applied 1 to 2 times as a spray
• GrowerscanalsouseaBonzidrench(1to8 ppm), applied when plants first reach saleable size, to slow growth, maintain a tight habit and allow normal flower development
• Plantgrowthregulatorsappliedlateinthe crop cycle can delay flowering 1 to 2 weeks Application should be avoided once flower buds appear
• Theserecommendationsforplantgrowth regulators should be used only as general guidelines Growers must trial all chemicals under their particular conditions
Common Problems Insects: Aphids, thrips, whitefly, leafminers and fungus gnats Diseases: Botrytis, Rhizoctonia, Phytophthora, Pythium, Theilaviopsis.
Problems Causes
Plant collapse
Wet media for an extended period (Phytophthora, Rhizoctonia, Theilaviopsis)
Delayed flowering
Daylength too short Late application of growth regulators
Excessive vegetative growth
High ammonia concentration in the soil Over-fertilization under low light conditionsLow light levels and over-watering; wet mediaExcessive phosphorus
Poor branching
Low fertilization; lack of nitrogenLate/no pinch
Stretched plants
Low light levels
Chlorosis Iron deficiency, high pHNitrogen deficiencyHigh salt levels in media
Crop Schedule & Uses(Crop Schedule in Weeks)
4-in. (10-cm) Pot 1 PP*
6-in. ( 15-cm) Pot
1 to 3 PP*
Unrooted cuttings
9 to 13 10 to 15
Rooted cuttings
6 to 9 7 to 11
*PP: Plants per pot
CAREX (SEED)Runbeckia hirta
Red Roosterc. buchananii
Amazon Mistc. comans Approximate seed count: 3,685 S /oz (130 S /g)
PLUG PRODUCTION
Plug Tray SizeCarex plugs are best produced in 305 to 288 plug trays The average plug production time is 6 to 8 weeks
MediaUse a well-drained, disease-free, soilless medium with a pH of 5 8 to 6 2 and a medium initial nutrient charge (EC) of 0 50 to 0 75 mmhos/cm (1:2 extraction)
SowingLightly cover the seed with a light layer of coarse grade vermiculite This helps in keeping the seed moist during germination Allow 7 to 10 days for germination
TemperatureGermination: 64 to 72°F (18 to 22°C) After Germination: Plugs can be grown in the greenhouse at 68 to 70°F (20 to 21°C) days and 64 to 67°F (18 to 19°C) nights until transplant
LightStage 1: Light is not required for germination After germination: 2,500 to 3,000 f c (25,000 to 30,000 Lux) Seedling maturity: Up to 5,000 f c (50,000 Lux)
HumidityMaintain 95 to 100% relative humidity during germination
Soil MoistureKeep soil moisture high at radicle emergence, then reduce moisture levels after cotyledon development Do not allow seedlings to wilt
FertilizerWhen cotyledons fully expand, start fertilizing with 50 ppm N twice a week As the true leaves develop, increase the fertilizer rate to 100 ppm N Maintain the plug media EC at 0 75 to 1 0 mmhos/cm and pH at 6 0 to 6 2
Plant Growth RegulatorsNot required

800 879-BALL ballseed.com14
FLOWER GROWERFacts
GROWING ON TO FINISH
Container Size4-in (10-cm ) pots 6-in (15-cm ) pots
MediaUse a well-drained, disease-free, soilless medium with a pH of 5 8 to 6 2 and medium initial nutrient charge
Temperature• Night:58to62°F(14to17°C)• Day:64to67°F(18to19°C)• Maintainthesetemperaturesuntilbud
initiation
IrrigationMaintain even moisture Avoid excessive wetness
Fertilizer• Aftertransplant,fertilizethecropwitha
balanced fertilizer supplying 150 to 200 ppm N
• MaintainthemediaECat1.0to1.5mmhos/cm and pH at 5 8 to 6 5
Plant Growth Regulators• Notneeded
Crop Scheduling Sow to transplant (288-cell plug): 5-8 weeks Transplant to finish: 6-in. (15-cm.) pot: 7 to 9 weeks, 3 to 4 plants per pot 4-in. (10-cm.) pot: 7 to 9 weeks, 1 plant per pot
COLEUS (SEED)Solenostemon scutellarioides
Emotions Approximate seed count: 27,500 S /oz (970 S /g)
PLUG PRODUCTION
Media Use a well-drained, disease-free, soilless media with a pH of 5 5 to 5 8 and a medium initial nutrient charge (EC 0 75 mS/cm)
Sowing Sow seed in 288 or larger plug trays In Europe, 264-cell trays can be used Cover lightly with vermiculite
Stage 1 – Germination takes 4 to 5 daysSoil temperature: 72 to 75°F (22 to 24°C) Light: Light is not necessary Moisture: Keep media evenly moist (level 4), but not saturated Humidity: Maintain 95%+ relative humidity (RH) until radicles emerge
NOTE: Coleus is very sensitive to high salts – particularly high ammonium – during germination Keep ammonium levels less than 10 ppm
Stage 2 Soil temperature: 72 to 75°F (21 to 24°C) Light: Up to 2,500 f c (26,900 Lux) Moisture: Reduce soil moisture slightly (level 3 to 4) to allow the roots to penetrate into the media Fertilizer: Apply fertilizer at rate 1 (less than 100 ppm) from nitrate-form fertilizers with low phosphorous Alternate feed with clear water Feed between 2 to 3 clear irrigations Irrigate early in the day so foliage is dry by nightfall to prevent diseases Keep soil pH at 5 5 to 6 2 and EC less than 1 0 mS/cm
Stage 3Soil temperature: 68 to 70°F (20 to 21°C) Light: Up to 2,500 f c (26,900 Lux) Moisture: Allow media to dry further until the surface becomes light brown (level 2) before watering but avoid excessive wilting to promote root growth and control shoot growth Keep the moisture to wet-dry cycle (moisture level 4 to 2) Fertilizer: Increase fertilizer to rate 2 (100 to 175 ppm N) Maintain soil pH at 5 5 to 5 8 and EC less than 1 0 mS/cm (1:2 extraction)
Growth Regulators: Generally not needed If necessary, A-Rest, B-Nine and Bonzi are effective on coleus Always follow label recommendations Use temperature differential (DIF) whenever possible, especially the first 2 hours after sunrise, to control plant height
Stage 4Soil temperature: 60 to 62°F (16 to 17°C) Light: Up to 5,000 f c (53,800 Lux) if temperature can be controlled Moisture: Same as Stage 3 Fertilizer: Same as Stage 3
GROWING ON TO FINISH
Container Size306 pack: 1 plant per cell 4 to 5-in. (10 to 13-cm) pots: 1 plant per pot 6-in. (15-cm) or gallon pots: 3 plants per pot
Media Use a well-drained, disease-free, soilless media with a pH of 5 5 to 6 0 and a medium initial nutrient charge (EC 0 75 mS/cm)
Temperature • Night:57to65°F(14to18°C)• Day:65to75°F(18to24°C)
Light Provide shade if over 5,000 f c (53,800 Lux)
Irrigation Avoid both excessive watering and drought
Fertilizer • Coleusarelowtomoderatefeeders.
Excessive feed can lead to dull coloration and decreased vigor
• Applyfertilizeratrate2(100to175ppmN) using predominately nitrate-form fertilizer with low phosphorus and high potassium
• Maintainmediumelectricalconductivityaround 1 0 mS/cm (using 1:2 extraction)
Growth Regulators • Controlplantgrowthfirstby
environment, nutrition and irrigation management, then with chemical plant growth regulators if needed
• Minimizeammonium-formnitrogenfertilizer to avoid stem elongation
• Coleusareresponsivetoday/nightDIFand are shorter with a negative DIF
• B-Nine(daminozide)2,500to5,000ppm can be applied at 2 to 3 weeks after transplanting Repeat if necessary
Pinching Not necessary
Spacing
Space plants when foliage is touching
Crop Scheduling Sow to transplant (288 cell plug): 5 to 6 weeks transplant to finish: 6 to 8 weeks
Common Problems Insects: Aphids, mealy bugs, whiteflies Diseases: Alternaria, Botrytis, Verticillium Other: Excessive internode elongation under low light
CAREX continued

800 879-BALL ballseed.com 15
FLOWER GROWERFacts
COLEUS (VEGETATIVE)Solenostemon hybrid
HennaIndian SummerRedheadSultanaWasabi
PROPAGATION• Chooseawell-drainedmediumwithan
EC of 0 75 to 0 80 mmhos and a pH of 5 8 to 6 2
• Openboxesimmediatelyuponarrival.Stick cuttings within 12 to 24 hours of arrival Cuttings can be stored overnight, if necessary, at 45 to 50°F (7 to 10°C)
• Soiltemperatureshouldbemaintainedat 68 to 73°F (20 to 23°C) until roots are visible
• Avoidover-applicationofmistinpropagation
• Oncerootsarevisible,themediashouldbe kept moderately wet and never saturated
• Beginfertilizationwith75to100ppmNwhen roots become visible
• Astherootedcuttingsdevelop,appropriate moisture stress, high light and moderate air temperatures will reduce the need for chemical plant growth regulators (PGRs)
• AB-Nineapplicationat1,500to2,500ppm applied as a spray 10 to 12 days after sticking is effective in reducing stem elongation
• Henna,IndianSummer,Redhead,Sultanaand Wasabi Coleus do not require pinching during propagation However, to improve branching and habit for 6-in (15-cm), plants can be pinched 5 to 7 days before transplanting
• Coleusrootedcuttingsshouldbereadyfor transplanting 21 to 24 days after sticking
GROWING ON TO FINISH
MediaUse a well-drained, disease-free, soilless medium with a pH of 5 8 to 6 2
Temperature• Night:59to70°F(15to21°C)• Day:74to85°F(23to29°C)• Coolnighttemperatureswillextendcrop
time dramatically
Light• Keeplightintensitiesat4,000to10,000
f c (40,000 to 100,000 Lux) • Extremelylowlightlevelsresultinpoor
branching, stem stretch and poor foliage color
WateringAllow the media to dry slightly between waterings but any wilt should be avoided
Fertilizer• Useconstantfeedwithabalanced
fertilizer at 175 to 225 ppm • Leachregularlytoavoidthebuildupof
soluble salts
Pinching• Pinchplants7to14daysafter
transplanting, as needed, to improve basal branching
• A4-in.(10-cm)cropcanbeproducedwithno pinch
Controlling Growth• Usehighlightandrecommended
temperatures to control growth and produce the best possible habit
• Forlargecontainers(1gallonandlarger),Coleus will generally not require any PGR applications during production
• Forsmallerpots(4to6in./10to15cm),PGRs are recommended
• Ahigh-volumeBonzidrenchat0.5to2.0ppm applied when the crop is two-thirds of finish size is effective in reducing stem elongation late in the production cycle
• ACycocel(1,000to1,500ppm)andB-Nine (2,500 to 3,500 ppm) tank mix applied 1 to 3 times, or Sumagic (5 to 10 ppm) applied as a spray, are both effective
• Theserecommendationsforplantgrowth regulators should be used only as general guidelines Growers must trial all chemicals under their particular conditions
Common Problems Insects: Aphids, whitefly Diseases: Rhizoctonia, Pythium.
Problems Causes
Plant collapse
Wet media for an extended period (Pythium)
Excessive vegetative growth
High ammonia concentration in the soil Over-fertilization under low light conditionsLow light and overwateringWet media
Poor branching
Low fertilizationLack of nitrogenLate pinch
Stretched plants
Low lightLate transplanting
Chlorosis Nitrogen deficiencyLow night temperatures
Crop Schedule & Uses(Crop Schedule in Weeks)
4-in. (10-cm) Pot 1 PP*
6-in. ( 15-cm) Pot
1 to 2 PP*
Unrooted cuttings
8 to 10 9 to 11
Rooted cuttings
5 to 7 6 to 8
*PP: Plants per pot
COREOPSIS (SEED)Coreopsis grandiflora
Early Sunrise Approximate seed count: 10,700 S /oz (375 S /g)
PLUG PRODUCTION
Plug Tray SizeEarly Sunrise Coreopsis plugs are best produced in 392-cell plug trays The average plug production time is 5 weeks
MediaUse a well-drained, disease-free, soilless medium with a pH of 5 8 to 6 2 and a medium initial nutrient charge (EC) of 0 50 to 0 75 mmhos/cm (1:2 extraction)
SowingCover the seed with a light layer of coarse grade vermiculite This helps in keeping the seed moist during germination Light is required for germination Allow 4 to 6 days for germination
TemperatureGermination: 68 to 72°F (20 to 22°C) After Germination: Plugs can be grown in the greenhouse at 70 to 75°F (21 to 24°C) days and 60 to 65°F (15 to 18°C) nights until transplant
LightStage 1: Light is required for germination After germination: 2,500 to 3,000 f c (25,000 to 30,000 Lux) Seedling maturity: Up to 5,000 f c (50,000 Lux)
HumidityMaintain 95 to 97% relative humidity during germination
Soil MoistureKeep soil moisture high at radicle emergence, then reduce moisture levels after cotyledon development Do not allow seedlings to wilt
FertilizerWhen cotyledons fully expand, start fertilizing with 50 ppm N twice a week As the true leaves develop, increase the fertilizer rate to 100 ppm N Maintain the plug media EC at 0 75 to 1 0 mmhos/cm and pH at 5 8 to 6 2
Plant Growth RegulatorsNot required

800 879-BALL ballseed.com16
FLOWER GROWERFacts
GROWING ON TO FINISH
Container Size4-in (9-cm ) or 6-in (15-cm ) pots
MediaUse a well-drained, disease-free, soilless medium with a pH of 5 8 to 6 2 and medium initial nutrient charge
Temperature• Night:55to60°F(13to15°C)• Day:60to70°F(15to21°C)• Maintainthesetemperaturesuntilbud
initiation
LightCoreopsis flowers earlier under long days Provide night interruption lighting (10 p m to 2 a m ) when grown under short days
IrrigationMaintain even moisture Avoid excessive wetness
Fertilizer• Aftertransplant,fertilizethecropwitha
balanced fertilizer supplying 150 to 200 ppm N
• MaintainthemediaECat1.50to2.00mmhos/cm and pH at 5 8 to 6 5
Plant Growth Regulators• GrowthRegulatorscanbeappliedfor
container production • FoliarspraysofB-Nineat5,000ppm
applied twice after transplant work well First application can be done 2 weeks after transplant followed by a second application 2 weeks later
Crop Scheduling Sow to transplant (392-cell plug): 5 weeks transplant to finish in a 4-in. (9-cm.) pot: 8 to 10 weeks transplant to finish in a 6-in. (15-cm.) pot: 9 to 10 weeks total crop time from sow to finished container: 13 to 15 weeks
Common Problems Insects: Whiteflies, thrips, & aphids
DIANTHUS (SEED)D. barbatus interspecific
Bouquet Approximate seed count: 8,575 S /oz (300 S /g)
PLUG PRODUCTION
Plug Tray SizeBest produced in 406-cell or larger plug trays
SowingUse a well-drained, disease-free medium with a pH of 5 8 to 6 2, as well as good aeration and water-holding capacity Cover seed with medium layer of coarse vermiculite at sowing Seed takes about 3 to 4 days to germinate
TemperatureGermination: 64 to 68°F (18 to 20°C) Cotyledon emergence: 65 to 70°F (18 to 21°C) days; 60°F (15°C) nights true leaf expansion: 60°F (15°C) days; 55°F (13°C) nights
LightLight is required for germination
HumidityMaintain 95 to 97% relative humidity until cotyledons emerge
FertilizationBeginning at Stage 3, fertilize 2 times a week with 50 ppm N Increase the nitrogen concentration to 100 ppm after 1 week, and continue this program until the plugs are finished Maintain the EC at 0 5 to 0 75 mmhos/cm, and increase to 1 0 mmhos/cm at Stages 3 and 4 pH can be maintained at 5 8 to 6 2 throughout
GROWING ON TO FINISH
Container Size Suitable for production in 4-in (10-cm) pots 6-in (15-cm ), 3 plugs per pot
Temperature• Night:50to60°F(10to15°C)• Day:60to72°F(15to22°C)
Fertilization After plants are established, apply a calcium-based fertilizer or 15-5-15 at 100 ppm, 1 to 2 times per week Dianthus require adequate calcium in their fertilization program
Growth RegulatorsSince Bouquet Dianthus are very responsive to growth regulators, growers should experiment with concentrations and application timing For example, an application of Bonzi spray at 20 ppm can be applied 2 weeks after transplanting into a 4-in (10-cm) or larger pot For 6-in (15-cm) pots, another application of Bonzi spray at 20 ppm may be required 2 weeks later
Crop Scheduling (sow to flower)Late Spring/Summer: 12 to 13 weeks Late Summer/Winter: 14 to 18 weeks
CULTURAL TIPUse a powdery mildew preventative program
DIANTHUS (SEED)D. chinensis X barbatus
Floral LaceApproximate seed count: 34,000 to 71,000 S /oz (1,200 to 2,500 S /g)
GERMINATIONLight is required for germination Use a well-drained, disease-free medium with a pH of 5 8 to 6 2, and EC about 0 75 mmhos/cm Cover the seed with a medium layer of coarse grade vermiculite at sowing It takes about 3 to 4 days to germinate
PLUG PRODUCTION
Plug Tray SizeBest produced in 406-cell size plug trays
SowingUse a well-drained, disease-free medium with a pH of 5 8 to 6 2, and EC about 0 75 mmhos/cm Cover the seed with a medium layer of coarse grade vermiculite at sowing It takes about 3 to 4 days to germinate
TemperatureGermination: 64 to 68°F (18 to 20°C) Cotyledon emergence: 65 to 70°F (18 to 21°C) days, 60°F (15°C) nights true leaf expansion: 60°F (15°C) days, 55°F (13°C) nights
LightLight is required for germination
COREOPSIS continued

800 879-BALL ballseed.com 17
FLOWER GROWERFacts
HumidityMaintain 95 to 97% relative humidity during germination until the cotyledons emerge
FertilizationBeginning at Stage 3, fertilize 2 times per week with 50 ppm N Increase the nitrogen concentration to 100 ppm after 1 week, and continue this program until the plugs are finished Maintain the EC at 0 5 to 0 75 mmhos/cm and increase to 1 0 mmhos/cm at Stages 3 and 4 Maintain pH at 5 8 to 6 2 throughout
Growth RegulatorsTreat 3 week-old plugs with a foliar spray of Bonzi at 6 ppm for toning One application in the plug stage is sufficient
Plug Production TimeAllow 4 to 5 weeks in 406-cell plug trays
GROWING ON TO FINISH
Container Size306 packs
MediaUse a well-drained, disease-free soilless medium with a medium initial nutrient charge and a pH of 5 8 to 6 5
Temperature• Night:50to60°F(10to15°C)• Day:60to75°F(15to24°C)
Fertilization• Afterplantsareestablished,applya
calcium-based fertilizer or 15-5-15 at 150 ppm, 1 to 2 times per week
• Dianthusrequireadequatecalciumintheir fertilization program
Growth RegulatorsFoliar sprays of 20 ppm Bonzi can be applied 2 to 3 times to control height The frequency of application is determined by the rate of plant growth, time of the year and location First application can be done 2 weeks after transplant, followed by subsequent applications at weekly intervals
Crop Scheduling (sow to flower)•LateSpring/EarlySummer:
9 to 10 weeks•LateSummer/Winter: 12 to 13 weeks
DICHONDRA (SEED)D. argentea
Silver Falls Approximate seed count: 6,070 S /oz (214 S /g)
PLUG PRODUCTION
MediaUse a well-drained, disease-free, soilless medium with a pH of 5 5 to 6 3 and a medium initial nutrient charge (EC 0 75 mmhos/cm with a 1:2 extraction)
SowingCover the seed lightly with coarse vermiculite
TemperatureGermination: 72 to 76°F (22 to 24°C) Cotyledon stage: 65 to 72°F (18 to 22°C) true leaves: 65 to 70°F (18 to 21°C) Hold plugs: 62 to 65°F (17 to 18°C)
LightStage one: Not required After germination: 1,000 to 2,500 f c (10,000 to 30,000 Lux) Seedling maturity: Up to 5,000 f c (54,000 Lux) if temperature can be controlled
HumidityMaintain 95% relative humidity until cotyledons emerge
Soil MoistureKeep soil moisture high until radicle emergence, then reduce moisture levels after the radicle penetrates the medium Plug development is faster with drier plug culture Do not allow the seedlings to wilt
FertilizerAt radicle emergence, apply 50 to 75 ppm N from 15-0-15 As cotyledons expand, increase to 100 to 150 ppm N
Growth RegulatorsSpray B-Nine at 2,500 ppm one week before transplant to promote branches
GROWING ON TO FINISH
MediaUse a well-drained, disease-free, soilless medium with a pH of 5 5 to 6 5 and a medium initial nutrient charge
Temperature• Night:62to65°F(17°to18°C)• Day:65to75°F(18°to24°C)
LightHigher light levels result in foliage that is more silver in color and shorter internodes
IrrigationSilver Falls Dichondra benefits from warm, dry growing conditions Let crop dry out well in between irrigations
FertilizerFeed weekly with 200 ppm N in complete fertilizer
Growth RegulatorsFor pot production, a tank mix of 5,000 ppm B-Nine and 1,000 ppm Cycocel one week after transplant can be used to increase branching, control stem length and prevent plants from becoming tangled This treatment also makes the foliage more silver
PinchingPinching is not needed
Crop Scheduling Sow to transplant (400-cell plug tray): 5 weeks transplant to saleable 4-in. (10-cm) pot: 7 to 8 weeks
Container Size
Plants Per Pot
Weeks From transplant
4 to 4 5-in (10 to 11-cm) pot
1 7 to 8
If producing liners (72-tray), allow 7 to 8 weeks from sow to transplant, and reduce post-transplant crop time by two weeks
Common Problems Insects: No serious problems Diseases: No serious problems
800 879-BALL ballseed.com18
FLOWER GROWERFacts
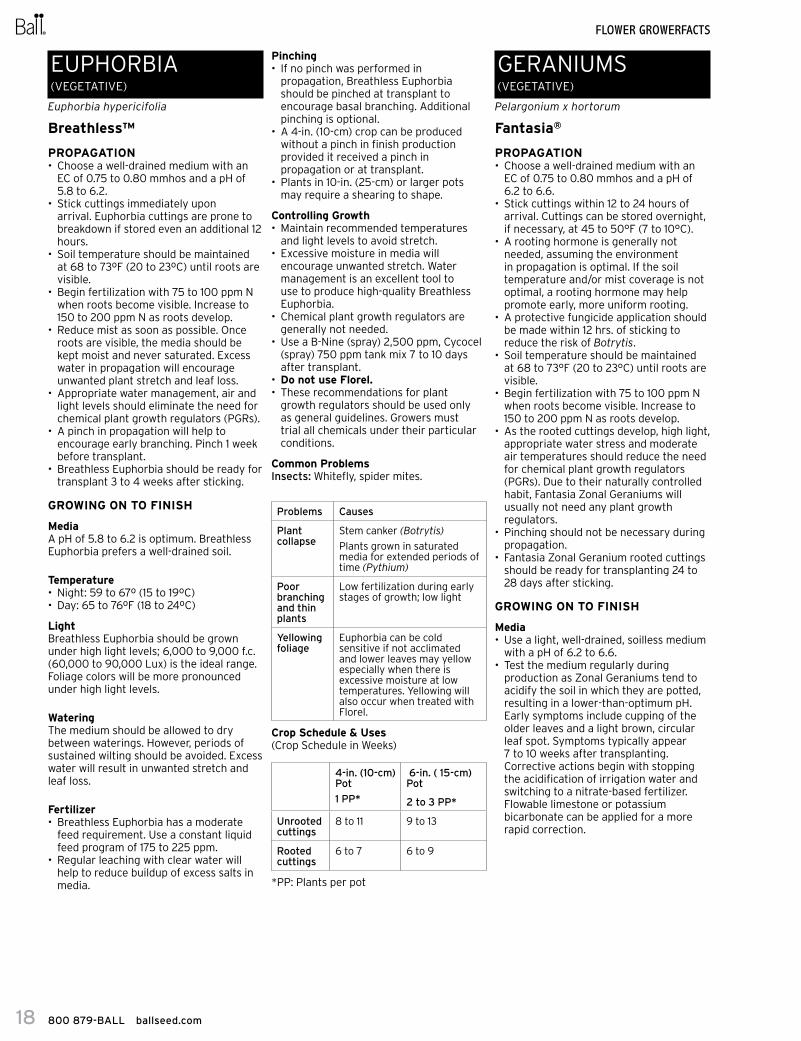
EUPHORBIA (VEGETATIVE)
Euphorbia hypericifolia
Breathless™
PROPAGATION• Chooseawell-drainedmediumwithan
EC of 0 75 to 0 80 mmhos and a pH of 5 8 to 6 2
• Stickcuttingsimmediatelyuponarrival Euphorbia cuttings are prone to breakdown if stored even an additional 12 hours
• Soiltemperatureshouldbemaintainedat 68 to 73ºF (20 to 23ºC) until roots are visible
• Beginfertilizationwith75to100ppmNwhen roots become visible Increase to 150 to 200 ppm N as roots develop
• Reducemistassoonaspossible.Onceroots are visible, the media should be kept moist and never saturated Excess water in propagation will encourage unwanted plant stretch and leaf loss
• Appropriatewatermanagement,airandlight levels should eliminate the need for chemical plant growth regulators (PGRs)
• Apinchinpropagationwillhelptoencourage early branching Pinch 1 week before transplant
• BreathlessEuphorbiashouldbereadyfortransplant 3 to 4 weeks after sticking
GROWING ON TO FINISH
MediaA pH of 5 8 to 6 2 is optimum Breathless Euphorbia prefers a well-drained soil
Temperature• Night:59to67º(15to19ºC)• Day:65to76ºF(18to24ºC)
LightBreathless Euphorbia should be grown under high light levels; 6,000 to 9,000 f c (60,000 to 90,000 Lux) is the ideal range Foliage colors will be more pronounced under high light levels
WateringThe medium should be allowed to dry between waterings However, periods of sustained wilting should be avoided Excess water will result in unwanted stretch and leaf loss
Fertilizer• BreathlessEuphorbiahasamoderate
feed requirement Use a constant liquid feed program of 175 to 225 ppm
• Regularleachingwithclearwaterwillhelp to reduce buildup of excess salts in media
Pinching• Ifnopinchwasperformedin
propagation, Breathless Euphorbia should be pinched at transplant to encourage basal branching Additional pinching is optional
• A4-in.(10-cm)cropcanbeproducedwithout a pinch in finish production provided it received a pinch in propagation or at transplant
• Plantsin10-in.(25-cm)orlargerpotsmay require a shearing to shape
Controlling Growth• Maintainrecommendedtemperatures
and light levels to avoid stretch • Excessivemoistureinmediawill
encourage unwanted stretch Water management is an excellent tool to use to produce high-quality Breathless Euphorbia
• Chemicalplantgrowthregulatorsaregenerally not needed
• UseaB-Nine(spray)2,500ppm,Cycocel(spray) 750 ppm tank mix 7 to 10 days after transplant
• Do not use Florel.• Theserecommendationsforplant
growth regulators should be used only as general guidelines Growers must trial all chemicals under their particular conditions
Common Problems Insects: Whitefly, spider mites
Problems Causes
Plant collapse
Stem canker (Botrytis) Plants grown in saturated media for extended periods of time (Pythium)
Poor branching and thin plants
Low fertilization during early stages of growth; low light
Yellowing foliage
Euphorbia can be cold sensitive if not acclimated and lower leaves may yellow especially when there is excessive moisture at low temperatures Yellowing will also occur when treated with Florel
Crop Schedule & Uses(Crop Schedule in Weeks)
4-in. (10-cm) Pot 1 PP*
6-in. ( 15-cm) Pot
2 to 3 PP*
Unrooted cuttings
8 to 11 9 to 13
Rooted cuttings
6 to 7 6 to 9
*PP: Plants per pot
GERANIUMS (VEGETATIVE)
Pelargonium x hortorum
Fantasia®
PROPAGATION• Chooseawell-drainedmediumwithan
EC of 0 75 to 0 80 mmhos and a pH of 6 2 to 6 6
• Stickcuttingswithin12to24hoursofarrival Cuttings can be stored overnight, if necessary, at 45 to 50°F (7 to 10°C)
• Arootinghormoneisgenerallynotneeded, assuming the environment in propagation is optimal If the soil temperature and/or mist coverage is not optimal, a rooting hormone may help promote early, more uniform rooting
• Aprotectivefungicideapplicationshouldbe made within 12 hrs of sticking to reduce the risk of Botrytis
• Soiltemperatureshouldbemaintainedat 68 to 73°F (20 to 23°C) until roots are visible
• Beginfertilizationwith75to100ppmNwhen roots become visible Increase to 150 to 200 ppm N as roots develop
• Astherootedcuttingsdevelop,highlight,appropriate water stress and moderate air temperatures should reduce the need for chemical plant growth regulators (PGRs) Due to their naturally controlled habit, Fantasia Zonal Geraniums will usually not need any plant growth regulators
• Pinchingshouldnotbenecessaryduringpropagation
• FantasiaZonalGeraniumrootedcuttingsshould be ready for transplanting 24 to 28 days after sticking
GROWING ON TO FINISH
Media• Usealight,well-drained,soillessmedium
with a pH of 6 2 to 6 6 • Testthemediumregularlyduring
production as Zonal Geraniums tend to acidify the soil in which they are potted, resulting in a lower-than-optimum pH Early symptoms include cupping of the older leaves and a light brown, circular leaf spot Symptoms typically appear 7 to 10 weeks after transplanting Corrective actions begin with stopping the acidification of irrigation water and switching to a nitrate-based fertilizer Flowable limestone or potassium bicarbonate can be applied for a more rapid correction

800 879-BALL ballseed.com 19
FLOWER GROWERFacts
Transplanting• Plantgeraniumrootedcuttingssothe
soil slightly covers the propagation media This will prevent the rooted cuttings from drying out unexpectedly in the early stages of the crop If this type of drying does occur, damage to the roots of the young plant can be tremendous
• Fantasiageraniumsareproducedinhigh-light areas and initiate flowers quickly For the best vegetative growth, remove any flower buds when potting rooted cuttings
• Water-inplantsthoroughlywithclearwater immediately after transplanting to ensure good contact between the soil and roots The same day or next apply liquid feed
Temperature• Dayandnighttemperaturesof71to76°F
(21 to 24°C) are ideal for the earliest stages of plant development As the crop matures, night temperatures should be maintained at 62 to 67°F (17 to 19°C) with day temperatures of 65 to 76°F (18 to 24°C)
• Significantlylowernighttemperaturesincrease crop time Higher night temperatures result in excessive stretch, softness of the crop and chlorotic foliage
• AnegativeDIFof3to5°F(2to3°C)can be used to control growth without significantly slowing the crop or reducing quality
Light• Zonalgeraniumsrequiremoderatelight
levels and grow best at 3,500 to 6,000 f c (35,000 to 60,000 Lux)
• Lowerlightintensitiescancausestretch.• DonotputhangingbasketsoverZonal
Geraniums, as this will reduce light levels and increase the likelihood of a Botrytis infection
Watering• Keepthesoilevenlymoistduring
production • Waterthoroughly,leachingregularlyto
prevent salt buildup • Oncloudy,darkdays,reducewateringto
help control Botrytis and stretch
Fertilizer• Followinitialclearwaterapplicationwith
225 ppm N of a balanced liquid feed later that day or the next morning
• Useabalancedliquidfeedatarateof225 to 300 ppm N on a constant feed basis
• MaintainapHrangeof6.0to6.5.• Checkthesolublesaltsregularlyto
maintain an EC reading between 1 5 and 2 0 mmhos (SME)
• Besuretomonitorsoilsaltsandflushpots with clear water periodically to prevent the build-up of excessive salt levels
Pinching & Disbudding• PinchingisnotrequiredforFantasia
geraniums • Forspecimenplantsinlargerpots,asoft
pinch will encourage branching and more flowers, but will delay finish at least 4 weeks
• Florelcanbeusedonzonalgeraniumsto increase branching and remove flower buds Rates will vary with individual growing conditions, but a range of 200 to 350 ppm can be used as a guideline Florel should be applied as soon as new growth is seen after transplanting, but not within the final 8 weeks of shipping Florel can be applied 1 to 3 times, depending on local conditions and container size, at 7 to 10-day intervals
Controlling Growth• Undermostconditions,plantgrowth
regulators will not be needed for Fantasia varieties
• Fantasiavarietieshavemediumvigor,requiring some growth regulators when growing in smaller containers Fantasia will fill out a 6-in (15-cm) pot with 1 cutting per pot and minimal PGR applications
• Ifneeded,Fantasiavarietiescanbetreated with Cycocel (750 to 1,500 ppm) applied 1 to 2 times at 7 to 14-day intervals A tank mix of B-Nine (2,000 to 2,500 ppm) and Cycocel (750 to 1,000 ppm) can also be used
• Theserecommendationsforplantgrowth regulators should be used only as general guidelines Growers must trial all chemicals under their particular conditions
Disease Control• Geraniumproductionareasshould
always be thoroughly sanitized prior to beginning your growing season and between crops
• Keepbenchesandfloorsfreeofplantdebris, and avoid any unnecessary handling of plants
• Fantasiageraniumsshouldbegrown drier in the first few weeks to encourage root growth and prevent Pythium problems After transplanting, a preventative fungicide drench for Pythium and Rhizoctonia is recommended If you mix your own growing media, pasteurization is required to eliminate potential soil-borne disease and pest problems
• ControlBotrytis with good air movement, adequate spacing and late afternoon venting of the greenhouse to reduce humidity Regular applications of a labeled fungicide are highly recommended Under very humid/wet conditions, no fungicide alone can prevent the spread of Botrytis Air movement and venting of excess moisture, combined with chemical controls, provide the best prevention
• Avoidgeraniumrustproblemswithpreventative applications of labeled fungicides
• AvoidanyapplicationsofMedalliontoprevent toxicity
Common Problems Insects: Aphids, thrips, whitefly, leafminers, fungus gnats, mites
Problems Causes
Plant collapse
Botrytis, Pythium, Rhizoctonia Saturated soil for extended periods of time (Pythium)
Excess vegetative growth, few flowers
Excessive ammonia in fertilizerOver-fertilization under low light conditionsLow light levels and overwatering; wet media
Foliage necrosis
Drying out between wateringsLow pHHigh salts
Cupped foliage
Low pH
Poor branching, thin plants
Low fertilization in early stages of cropLow light levels
Crop Schedule & Uses(Crop Schedule in Weeks)
4-in. (10-cm) Pot 1 PP*
6-in. ( 15-cm) Pot
1 to 2 PP*
Unrooted cuttings
12 to 13 13 to 14
Callused cuttings for direct sticking
10 to 11 11 to 12
Rooted cuttings
8 to 9 9 to 10
*PP: Plants per pot

800 879-BALL ballseed.com20
FLOWER GROWERFacts
GERBERA (SEED)Gerbera jamesonii
Revolution™ Approximate seed count (film coated): 8,550 to 11,400 S /oz (300 to 400 S /g)
PLUG PRODUCTION
MediaUse a well-drained, disease-free, soilless medium with a pH of 5 0 to 5 5 and a medium initial nutrient charge (EC 0 4 to 0 8 mmhos/cm with a 1:2 extraction)
Sowing• Sow1seedperpluginadibble.• Plugtraysizefrom144to128.• Makesureseedislyingonitssideina
dibble at sowing so radicle isn’t upside down at emergence
• Covertheseedslightlywithvermiculite(course to extra course) to prevent drying out
• Coverisimportantatsowingbuttoomuch isn’t good either Some of the top of the plug tray should be visible after covering but the seed should be covered completely
• Useapreventivetreatmentagainstdamping-off diseases after sowing
Stage 1 – Germination takes 4 to 7 days.Soil temperature: 64 to 68°F (18 to 20°C Light: Light is optional Moisture: Keep soil saturated (level 5) during Stage 1 for optimal germination Humidity: Maintain 95% relative humidity until radicle emergence
Stage 2 Soil temperature: 68 to 70°F (20 to 21°C) Light: Up to 2,500 f c (26,900 Lux) Moisture: Start to slightly reduce soil moisture (level 4) to allow the roots to penetrate into the media Fertilizer: Apply fertilizer at rate 1 (less than 100 ppm) from nitrate-form fertilizers (17-5-17 , 14-0-14, 15-5-15)
Stage 3Soil temperature: 68 to 70°F (20 to 21°C) Light: Up to 2,500 f c (26,900 Lux) Moisture: It is critical to allow the media to dry until the surface become light brown (level 2) before watering Keep the moisture level at wet-dry cycle (moisture level 4 to 2) Fertilizer: Increase fertilizer to rate 2 (100 to 175 ppm) from nitrate-form fertilizers (17-5-17 , 14-0-14, 15-5-15) Growth Regulators: None
Stage 4Soil temperature: 68 to 70°F (21 to 21°C) Light: Up to 5,000 f c (53,800 Lux) if optimal temperature can be maintained Moisture: Same as Stage 3 Fertilizer: Same as Stage 3
NOTE: During plug production, fine drip or mist is best, using a water temperature similar to or around air temperature Irrigation with too cold water will cause foliage to cup up hard and brittle Once this happens, keep media dry for a few days and water later with warmer water
GROWING ON TO FINISH
MediaUse a well-drained, disease-free, soilless medium with a pH of 5 5 to 6 0 and a medium initial nutrient charge
Container size4-6 in (10-15 cm)
Potting• Uniformityatalllevelsinproductionwill
greatly increase uniformity of overall crop
• Uniformsoillevelinpots;fillpots100%!• Dibbleincenterofpotandsetplantin
hole • Soildepthoftransplantedplugin
comparison to the soil level in the pot should be slightly above to level Plug will pull itself down to level but not bring itself back up Do not pot too deeply as this may result in crown rot
Temperature• Night:62to66°F(17to19°C)• Day:66to68°F(19to20°C)• Indarkerperiods,dayandnight
temperatures can be reversed (negative DIF) to keep stem length somewhat shorter
LightGerbera likes to be grown under high light conditions During the darker periods of the year, HID lighting can be applied
Irrigation• GenerallyGerberalikesamoderate
to drier soil condition Avoid extreme moisture swings in crop culture Overwatering is a common practice that can decrease end yield
• Overheadwateringispossibleuntiltheflower buds appear, but watering directly into pot or growing with ebb/flow floors is preferred Drip tube culture works well, too
Fertilizer• Gerberarequiresrelativelyhigh
fertilization frequencies dependent on light and temperature; less feed for lower light/shorter days, more feed for higher light/longer days Constant feed with 17-5-17 150-200 ppm is a satisfactory general feed In high light conditions 20-10-20 at 150 200 ppm also provides adequate fertility
• Maintaina5.5-5.8pHandanadequateiron
• Useclearwater1timeeachweekorwhen necessary to maintain EC below 1 5 mmhos/cm
• Avoidexcessiveammonianitrogenlevels.This will cause excessive leaf growth, lower bud counts, and increase losses
Growth RegulatorsGenerally, growth regulators are not needed To reduce stretching when growing pot tight, B-Nine (daminozide) can be applied at 1000 to 1500ppm 2 to 3 times with an interval of 5 to 7 days Do not apply when flower buds are the size of a pea or bigger to prevent decrease of flower size
PinchingNone
SpacingSpace plants when the leaves of the plants are touching each other, generally 5 to 6 weeks after transplanting
Crop Scheduling Sow to transplant (144 to 128-cell plug tray): 6 to 7 weeks Finishing the crop: 8 to 12 weeks
NOTE: Crop schedule is dependent on the sowing date, the available light and the required pot/plant ratio Total crop time is approx 14 to 15 weeks from sowing to 50% flowering 100% color will appear 10-14 days later
Common Problems Insect: White flies, thrips Disease: Downy mildew, Crown rot, Botrytis, Fusarium

800 879-BALL ballseed.com 21
FLOWER GROWERFacts
IMPATIENS (VEGETATIVE) Impatiens walleriana
Center Stage Patchwork Fiesta (Double Impatiens)
PROPAGATION• Chooseawell-drainedmediumwithan
EC of 0 75 to 0 80 mmhos and a pH of 5 8 to 6 2
• Stickcuttingswithin12to24hoursofarrival Cuttings can be stored overnight, if necessary, at 45 to 50°F (7 to 10°C)
• Soiltemperatureshouldbemaintainedat 68 to 73°F (20 to 23°C) until roots are visible
• Assoonasispractical,mistshouldbereduced This will help decrease stretch of the rooted cutting
• Beginfertilizationwith75to100ppmNwhen roots become visible Increase to 150 ppm N as roots develop
• CenterStage,PatchworkandFiestaImpatiens will not require pinching during propagation
• Astherootedcuttingsdevelop,highlight,appropriate water stress and moderate air temperatures should reduce the need for chemical plant growth regulators (PGRs)
• Underlowlightandwarmenvironmentalconditions, cuttings will stretch while in propagation Growers may need to apply PGRs during propagation to control growth An application of Bonzi (2 to 5 ppm spray) applied at Day 4 to 6 in propagation will decrease stem stretch
• Rootedcuttingsshouldbereadyfortransplanting 21 to 28 days after sticking
GROWING ON TO FINISH
Media• Useaporous,well-drained,soilless
medium • ApHof5.8to6.2isoptimum.
Temperature – Patchwork, Fiesta• Night:56to61°F(13to16°C)• Day:68to76°F(20to24°C)Temperature – Center Stage• Night:66to71°F(19to22°C)• Day:71to76°F(22to24°C)
Light• Impatiensaredaylength-neutralandwill
flower year-round • Plantsgrowbestundermoderatelight
intensity; 4,000 to 6,000 f c (40,000 to 60,000 Lux) is optimum
• Plantswillstretchatlightintensitiesbelow 3,000 f c (30,000 Lux)
• Reducelightintensitywhentemperatures are high to prevent flower and leaf burning as well as bud drop
Watering• Keepgrowingmediamoderatelymoist.
If the media stays too wet, plants will stretch and flowering will be reduced
• Asplantsreachthedesiredsize,mildwater stress will promote flowering and reduce stretch
Fertilizer• Maintainconstantfertilizationat175to
225 ppm N • Excessivephosphorousandammoniacal
nitrogen will promote unwanted vegetative growth Both should be provided in very limited quantities
• Leachpotsperiodicallywithclearwaterto avoid build-up of salts
• Controlled-releasefertilizercanbeusedto supplement a liquid feed program
PinchingDo not require pinching because they are naturally branching
Controlling Growth• Growplantswithadequatelightand
space • Avoidhighammoniumandphosphorus
fertilizers and do not overwater • Plantgrowthregulatorsshouldnotbe
needed due to Center Stage Impatiens’ naturally compact habit Patchwork and Fiesta may require PGR’s
• Ifnecessary,aBonzi(3to10ppm)spray or a 1 ppm drench is effective for controlling growth of Center Stage Impatiens
• Bonzi(3to15ppm)appliedasaspray1to2 times can be used to control growth of Patchwork and Fiesta Impatiens Mature plants which are approaching saleable size can be drenched with Bonzi (0 25 to 3 ppm) to significantly slow vegetative growth while allowing flowering to continue
• AFlorel(100to300)spraycanbeusedto improve branching but is typically not needed Do not use within 8 weeks of sale since Florel stops flowering
• Theserecommendationsforplantgrowth regulators should be used only as general guidelines Growers must trial all chemicals under their particular conditions
Common Problems Insects: Thrips, aphids, fungus gnats Diseases: Botrytis (gray mold), Pythium, Rhizoctonia.
The most important disease and insect problem associated with Impatiens is Impatiens Necrotic Spot Virus (INSV), which is transmitted by thrips Control of thrips is necessary to avoid INSV
Problems Causes
Plant collapse
Stem canker (Botrytis)Plants grown in saturated soil for extended period of time (Pythium)
Excessive vegetative growth, lack of flowers
Excessive nitrogen in fertilizer Excessive phosphorousOver-fertilization under low light conditionsLow light and overwatering; wet mediaExcess or late Florel application
Foliage necrosis, leaf spot
Drying out between waterings Excess minor nutrient levels in media
Poor branching, thin plants
Low fertilization in early stages of crop
Center Stage Impatiens Crop Schedule & Uses(Crop Schedule in Weeks)
4-in. (10-cm) Pots1 PP*
Unrooted cuttings 9 to 12
Rooted cuttings 7 to 9
*PP: Plants per pot
Patchwork and Fiesta Impatiens Crop Schedule & Uses(Crop Schedule in Weeks)
4-in. (10-cm) Pot 1 PP*
6-in. ( 15-cm) Pot
1 to 2 PP*
Unrooted cuttings
9 to 12 10 to 12
Rooted cuttings
6 to 9 7 to 9
*PP: Plants per pot

800 879-BALL ballseed.com22
FLOWER GROWERFacts
IMPATIENS (SEED)Impatiens walleriana
Enlighten
GERMINATION• Timeofradicleemergence(3to5days)• Keepmediaverymoistandnear
saturation • Donotcoverorburytheseed.• Germinationtemperature:72to76°F(22
to 24°C) • Lightlevelsat100to400f.c.(1,000to
4,000 Lux) will enhance germination • KeepsoilpHat6.0to6.2andsoluble
salts (EC) less than 0 75 mmhos/cm (2:1 extraction) Keep ammonium levels less than 10 ppm
• Impatiensaresensitivetohighsaltsduring germination
PLUG PRODUCTION
Stage 1 – Time of radicle emergence (3 to 5 days)• Keepmediaverymoistandnear
saturation • Donotcoverorburytheseed.• Germinationtemperature:72to76°F(22
to 24°C) • Lightlevelsat100to400f.c.(1,000to
4,000 Lux) will enhance germination • KeepsoilpHat6.0to6.2andsoluble
salts (EC) less than 0 75 mmhos/cm (2:1 extraction) Keep ammonium levels less than 10 ppm
• Impatiensaresensitivetohighsaltsduring germination
Stage 2 – Stem and cotyledon emergence (10 days)• Reducemoisturelevelsonceradicle
emergence occurs Allow the soil to dry out slightly before watering for best germination and rooting
• Soiltemperatureshouldbe72to75°F(22 to 24°C)
• Lightat450to700f.c.(4,500to7,000Lux) using supplemental HID lights for two weeks after cotyledons have expanded (12 to 18 hours/day) decreases plug crop time
• Maintainammoniumlevelsatlessthan10ppm and soil pH at 6 0 to 6 2 with an EC of less than 1 0 mmhos/cm
• Beginfertilizingwith50to75ppmNfrom 14-0-14 or a calcium/potassium nitrate feed once cotyledons are fully expanded
• Alternatefeedwith2to3clearwaterirrigation
Stage 3 – Growth and development of true leaves (14 to 21 days)• Allowthesoiltodryoutthoroughly
between irrigations, but avoid severe wilting to promote root growth and control shoot growth
• Soiltemperatureshouldbebetween68to 72°F (20 to 22°C)
• MaintainsoilpH6.0to6.2andEClessthan 1 0 mmhos/cm
• Increasefeedto100to150ppmNfrom20-10-20 alternating with 14-0-14 or other calcium/potassium nitrate fertilizer
• Fertilizeevery2to3irrigations.• UseDIF(temperaturedifferential)
whenever possible to control plant height – especially the first 2 hours after sunrise A-Rest, B-Nine, Bonzi or Sumagic can also be used
Stage 4 – Plants ready for transplanting or shipping (7 days)• Soilshouldstillbeallowedtodry
thoroughly • Temperatureshouldbemaintainedat62
to 65°F (17 to 18°C) • KeepsoilpHat6.0to6.2andanECless
than 0 75 mmhos/cm • Fertilizewith14-0-14orcalcium/
potassium nitrate feed at 100 to 150 ppm N as needed
• Note:Impatiensrequirelowtomoderatefeed levels Excessive amounts will result in lush, vegetative stretched plugs
GROWING ON TO FINISH
Temperature• Night:62to65°F(17to18°C)• Day:65to75°F(18to24°C)
LightMaintain light levels as high as possible while maintaining moderate temperatures
MediaUse a well-drained, disease-free soil less medium with a medium initial nutrient charge and a pH of 6 2 to 6 8
Fertilization• Fertilizeeveryotherirrigationwith15-0-
15, alternating with 20- 10-20 at 150 ppm nitrogen
• Maintainmediumelectricalconductivityaround 1 0 mmhos/cm (using 1:2 extraction)
Controlling Height• Onceplantsarerootedtothesidesof
the containers, they can be allowed to wilt prior to irrigation to provide some height control Height can also be controlled by withholding fertilizer, especially phosphorus and ammonium-form nitrogen
• Impatiensareresponsivetoday/nightDIFand shorter with a negative DIF
• B-Nine,BonziandSumagicareeffectivefor height control Always follow label instructions B-Nine and Bonzi can delay flowering
LightImpatiens are shade plants and should not be exposed to excessive amounts of sun If properly hardened, impatiens can handle up to 4 hours of morning sun
Common Problems Insects: Aphids, thrips Diseases: Pythium, Rhizoctonia, Botrytis, TSWV/INSV (Impatiens Necrotic Spot Virus) Other: Boron deficiency, high media pH The most important disease and insect problem associated with impatiens is Impatiens Necrotic Spot Virus (INSV), which is transmitted by thrips Control of thrips is necessary to avoid INSV
SPREADING IMPATIENS (VEGETATIVE) Impatiens hybrida
Fanfare®
PROPAGATION• Chooseawell-drainedmediumwithan
EC of 0 75 to 0 80 mmhos and a pH of 5 8 to 6 2
• Stickcuttingswithin12to24hoursofarrival Cuttings can be stored overnight, if necessary, at 45 to 50°F (7 to 10°C)
• Soiltemperatureshouldbemaintainedat 68 to 73°F (20 to 23°C) until roots are visible
• Assoonasispractical,mistshouldbereduced and then removed from Fanfare Spreading Impatiens This will help decrease stretch of the rooted cutting
• Beginfertilizationwith75to100ppmNwhen roots become visible Increase to 150 ppm N as roots develop
• FanfareSpreadingImpatienswillnotrequire pinching during propagation
• Astherootedcuttingsdevelop,highlight,appropriate water stress and moderate air temperatures should reduce the need for chemical plant growth regulators (PGRs)
• Underlowlightandwarmtemperatureconditions, cuttings of Fanfare Spreading Impatiens will stretch while in propagation Growers may need to apply PGRs during propagation to further control growth Bonzi applied as a 2 to 5 ppm heavy spray 4 to 6 days after sticking will decrease stem stretch
• FanfareSpreadingImpatiensrooted cuttings should be ready for transplanting 21 to 24 days after sticking
GROWING ON TO FINISH
MediaUse a soilless medium with good aeration, drainage and water-holding capacity, and a pH of 5 8 to 6 2
Temperature• Night:59to64°F(15to18°C)• Day:68to79°F(20to26°C)• Nighttemperaturesabove70°F(21°C)
will delay flowering dramatically and reduce plant quality

800 879-BALL ballseed.com 23
FLOWER GROWERFacts
Light• FanfareSpreadingImpatiensare
daylength-neutral and will flower year-round
• Plantsgrowbestundermoderatelightintensity The ideal range would be 4,000 to 9,000 f c (40,000 to 90,000 Lux)
• Plantswillstretchatlightintensitiesbelow 3,000 f c (30,000 Lux)
• Reducelightintensitywhentemperatures are high to prevent flower and leaf burning
• HIDlightingcanbeusedtoreducecroptime in areas with naturally low light levels
Watering• Allowplantstodryslightlybetween
waterings in the first half of the crop cycle Do not allow the plants to wilt during this period, as finished quality will be reduced
• Asthecropmaturesandbeginstobudup and flower, avoid water stress entirely and remember that the crop will need more frequent irrigation
• Excessivewaterstresswillcauseleafedge damage as well as bud and flower drop
Fertilizer• Maintainconstantfertilizationbetween
175 to 225 ppm N • Excessivephosphorousandammoniacal
nitrogen will promote unwanted vegetative growth Both should be provided in very limited quantities
• Leachpotsperiodicallywithclearwaterto avoid build-up of salts
• Controlled-releasefertilizercanbeusedto supplement a liquid feed program
Pinching• FanfareSpreadingImpatiensare
naturally self-branching and do not require pinching
• Pinchingwilldelayfloweringapproximately 10 to 14 days
Controlling Growth• Growplantswithadequatelightand
space • Avoidhighammoniumandphosphorus
fertilizers, and do not overwater • FanfareSpreadingImpatienswill
generally flower and be saleable well before any plant growth regulators are needed
• Bonzi(5to15ppm)appliedasaspray1to2 times can be used to control growth of Fanfare Spreading Impatiens
• Matureplantswhichareapproachingshipping can be drenched with Bonzi (0 25 to 0 50 ppm) to significantly slow vegetative growth while allowing flowering to continue
• Theserecommendationsforplantgrowth regulators should be used only as general guidelines Growers must trial all chemicals under their particular conditions
Common Problems Insects: Thrips, spider mites, aphids Diseases: Impatiens Necrotic Spot Virus (INSV), Botrytis (gray mold)
Problems Causes
Plant collapse
Stem canker (Botrytis)Plants grown in saturated soil for extended period of time (Pythium)
Excessive vegetative growth, lack of flowers
Excessive nitrogen in fertilizer Excessive phosphorousOver-fertilization under low light conditionsLow light and overwatering; wet mediaExcess or late Florel application
Foliage necrosis, leaf spot
Drying out between waterings Excess minor nutrient levels in media
Poor branching, thin plants
Low fertilization in early stages of crop
Crop Schedule & Uses(Crop Schedule in Weeks)
4-in. (10-cm) Pot 1 PP*
6-in. ( 15-cm) Pot
1 to 2 PP*
Unrooted cuttings
9 to 11 11 to 13
Rooted cuttings
6 to 8 8 to 10
*PP: Plants per pot
NEW GUINEA IMPATIENS (VEGETATIVE) Impatiens hawkerii
Celebrette
PROPAGATION• Chooseawell-drainedmediumwithan
EC of 0 75 to 0 80 mmhos and a pH of 5 8 to 6 2
• Stickcuttingswithin12to24hoursofarrival Cuttings can be stored overnight, if necessary, at 45 to 50°F (7 to 10°C)
• Soiltemperatureshouldbemaintainedat 68 to 73°F (20 to 23°C) until roots are visible
• Assoonasispractical,mistshouldbe reduced and then removed from Celebrette New Guinea Impatiens
• Asrootedcuttingsareremovedfrommist, a broad spectrum, foliar fungicide spray should be applied
• Beginfertilizationwith75to100ppmNwhen roots become visible Increase to 150 ppm N as roots develop
• CelebretteNewGuineaImpatienswillnotrequire pinching during propagation
• Astherootedcuttingsdevelop,highlight,appropriate water stress and moderate air temperatures should reduce the need for chemical plant growth regulators (PGRs)
• CelebretteNewGuineaImpatiensrooted cuttings should be ready for transplanting 21 to 24 days after sticking
GROWING ON TO FINISH
Media• Usemediawithgoodaerationand
drainage, balanced against sufficient water-holding capacity
• MaintainpHof5.8to6.2.
Temperature• Night:59to64°F(15to18°C)• Day:68to76°F(20to24°C)• Higheraveragedailytemperatureswill
result in shorter flowering time • Anaveragedailytemperatureof68ºF
(20ºC) has demonstrated optimal bloom time and bloom size for New Guinea Impatiens Lower temperatures will increase crop time
Light• Plantsshouldbegrownwiththe
highest light levels possible, while still maintaining temperatures within the acceptable ranges Light levels of 4,000 to 7,000 f c (40,000 to 70,000 Lux) are appropriate
• FloweringinNewGuineaimpatiensisdaylength neutral
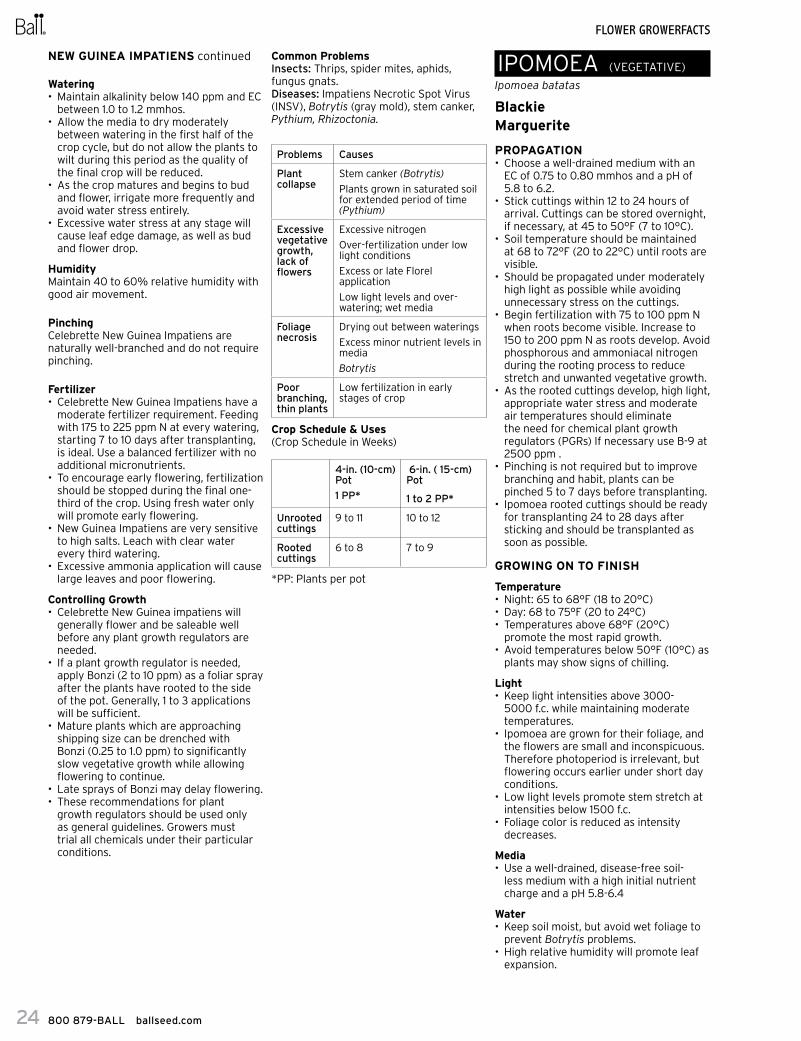
800 879-BALL ballseed.com24
FLOWER GROWERFacts
Watering• Maintainalkalinitybelow140ppmandEC
between 1 0 to 1 2 mmhos • Allowthemediatodrymoderately
between watering in the first half of the crop cycle, but do not allow the plants to wilt during this period as the quality of the final crop will be reduced
• Asthecropmaturesandbeginstobudand flower, irrigate more frequently and avoid water stress entirely
• Excessivewaterstressatanystagewillcause leaf edge damage, as well as bud and flower drop
HumidityMaintain 40 to 60% relative humidity with good air movement
PinchingCelebrette New Guinea Impatiens are naturally well-branched and do not require pinching
Fertilizer• CelebretteNewGuineaImpatienshavea
moderate fertilizer requirement Feeding with 175 to 225 ppm N at every watering, starting 7 to 10 days after transplanting, is ideal Use a balanced fertilizer with no additional micronutrients
• Toencourageearlyflowering,fertilizationshould be stopped during the final one-third of the crop Using fresh water only will promote early flowering
• NewGuineaImpatiensareverysensitiveto high salts Leach with clear water every third watering
• Excessiveammoniaapplicationwillcauselarge leaves and poor flowering
Controlling Growth• CelebretteNewGuineaimpatienswill
generally flower and be saleable well before any plant growth regulators are needed
• Ifaplantgrowthregulatorisneeded,apply Bonzi (2 to 10 ppm) as a foliar spray after the plants have rooted to the side of the pot Generally, 1 to 3 applications will be sufficient
• Matureplantswhichareapproachingshipping size can be drenched with Bonzi (0 25 to 1 0 ppm) to significantly slow vegetative growth while allowing flowering to continue
• LatespraysofBonzimaydelayflowering.• Theserecommendationsforplant
growth regulators should be used only as general guidelines Growers must trial all chemicals under their particular conditions
Common Problems Insects: Thrips, spider mites, aphids, fungus gnats Diseases: Impatiens Necrotic Spot Virus (INSV), Botrytis (gray mold), stem canker, Pythium, Rhizoctonia.
Problems Causes
Plant collapse
Stem canker (Botrytis)Plants grown in saturated soil for extended period of time (Pythium)
Excessive vegetative growth, lack of flowers
Excessive nitrogen Over-fertilization under low light conditionsExcess or late Florel applicationLow light levels and over-watering; wet media
Foliage necrosis
Drying out between wateringsExcess minor nutrient levels in media Botrytis
Poor branching, thin plants
Low fertilization in early stages of crop
Crop Schedule & Uses(Crop Schedule in Weeks)
4-in. (10-cm) Pot 1 PP*
6-in. ( 15-cm) Pot
1 to 2 PP*
Unrooted cuttings
9 to 11 10 to 12
Rooted cuttings
6 to 8 7 to 9
*PP: Plants per pot
IPOMOEA (VEGETATIVE)Ipomoea batatas
Blackie Marguerite
PROPAGATION• Chooseawell-drainedmediumwithan
EC of 0 75 to 0 80 mmhos and a pH of 5 8 to 6 2
• Stickcuttingswithin12to24hoursofarrival Cuttings can be stored overnight, if necessary, at 45 to 50°F (7 to 10°C)
• Soiltemperatureshouldbemaintainedat 68 to 72°F (20 to 22°C) until roots are visible
• Shouldbepropagatedundermoderatelyhigh light as possible while avoiding unnecessary stress on the cuttings
• Beginfertilizationwith75to100ppmNwhen roots become visible Increase to 150 to 200 ppm N as roots develop Avoid phosphorous and ammoniacal nitrogen during the rooting process to reduce stretch and unwanted vegetative growth
• Astherootedcuttingsdevelop,highlight,appropriate water stress and moderate air temperatures should eliminate the need for chemical plant growth regulators (PGRs) If necessary use B-9 at 2500 ppm
• Pinchingisnotrequiredbuttoimprovebranching and habit, plants can be pinched 5 to 7 days before transplanting
• Ipomoearootedcuttingsshouldbereadyfor transplanting 24 to 28 days after sticking and should be transplanted as soon as possible
GROWING ON TO FINISH
Temperature• Night:65to68°F(18to20°C)• Day:68to75°F(20to24°C)• Temperaturesabove68°F(20°C)
promote the most rapid growth • Avoidtemperaturesbelow50°F(10°C)as
plants may show signs of chilling
Light• Keeplightintensitiesabove3000-
5000 f c while maintaining moderate temperatures
• Ipomoeaaregrownfortheirfoliage,andthe flowers are small and inconspicuous Therefore photoperiod is irrelevant, but flowering occurs earlier under short day conditions
• Lowlightlevelspromotestemstretchatintensities below 1500 f c
• Foliagecolorisreducedasintensitydecreases
Media• Useawell-drained,disease-freesoil-
less medium with a high initial nutrient charge and a pH 5 8-6 4
Water• Keepsoilmoist,butavoidwetfoliageto
prevent Botrytis problems • Highrelativehumiditywillpromoteleaf
expansion
NEW GUINEA IMPATIENS continued

800 879-BALL ballseed.com 25
FLOWER GROWERFacts
Fertilization• Ipomoeahasamoderatefertilizer
requirement • Apply15-0-15alternatingwith20-10-20
2X/week • Astheplantsmaturetheratecanbe
increased to 200-300 ppm • Excessiveapplicationofammoniawill
promote large leaves • Waterwithclearwatereverythird
watering if high soluble salts problems occur
• Maintainmediumelectricalconductivityaround 1 0 mmhos/cm (using 1:2 extraction)
Pinching• Oncelinersareestablished,pinchplants.• Pinchplantsabovethe5th-6thleaves
about 1-1 5 inches above the soil
Controlling Height• Heightcanbecontrolledbywithholding
fertilizer, especially phosphorous and ammonium-form nitrogen
• IpomoeaalsorespondswelltotheuseofB-Nine (2500 ppm)
• Applygrowthregulatorsonceplantsreach side of container
Common Problems Diseases: Botrytis, Rhizoctonia, Pythium Insects: Aphids, Mealy bugs, Whitefly
Problems Causes
Plant collapse
Stem canker (Botrytis)Plants grown in saturated soil for extended period of time (Pythium)
Excessive vegetative growth, lack of flowers
Excessive nitrogen Over-fertilization under low light conditionsExcess or late Florel applicationLow light levels and over-watering; wet media
Foliage necrosis
Drying out between wateringsExcess minor nutrient levels in media Botrytis
Poor branching, thin plants
Low fertilization in early stages of crop
Poor branching, thin plants
Low fertilization in early stages of crop
Crop Schedule & Uses(Crop Schedule in Weeks)
4-in. (10-cm) Pot 1 PP*
6-in. ( 15-cm) Pot
1 to 2 PP*
Unrooted cuttings
10 to 12 11 to 13
Rooted cuttings
7 to 9 8 to 10
*PP: Plants per pot
JUNCUS (SEED)Juncus tenuis
Blue Dart Approximate seed count (multi-seed pellet): 19,901 S /oz (702 S /g)
Juncus tenuis – Juncus effusus spiralis
Twisted Dart Approximate seed count (multi-pelleted): 11,300 to 14,000 S /oz (400 to 500 S /g)
PLUG PRODUCTION
MediaUse a well-drained, disease-free soiless media with a pH of 5 8-6 2 and an EC of 0 75 mmhos/cm (2:1 extraction)
Sowing
Plug Tray Size: Can be produced in a 288, 128, 72 liner or a similar size plug tray Do not cover pellets
Stage 1 – Germination takes approximately 7-8 daysGermination temperature: 71 to 76°F (21 to 24°C) Light: Light is optional Media Moisture: Keep the media medium wet (level 4) during germination Relative Humidity: Maintain 95 to 97% relative humidity until cotyledons emerge
Stage 2temperature: 68 to 70°F (20 to 21°C) Light: Can be up to 2,500 f c (26,900 Lux) during Stages Media Moisture: Reduce soil moisture slightly (level 3) to allow the roots to penetrate into the media Fertilizer: Apply fertilizer at rate 1 (less than 100 ppm) with a nitrate-form fertilizer with low phosphorous Maintain a media pH of 5 8 to 6 2 and EC at 0 5 to 0 7 mS/cm (1:2 extraction)
Stage 3temperature: 68 to 70°F (20 to 21°C) Light: Can be up to 2,500 f c (26,900 Lux) Media Moisture: Moisture level can be reduced to medium to medium dry (level 3 to 2) Do not allow the seedlings to wilt Fertilizer: Increase the fertilizer rate to 2 (100 to 175 ppm) Maintain a media pH of 5 8 to 6 2 and EC at 0 7 to 1 0 mS/cm (1:2 extraction)
Stage 4temperature: 65 to 67°F (18 to 19°C) Light: Can be up to 5,000 f c (54,000 Lux) Media Moisture: Maintain wet/dry cycle Do not allow the seedlings to wilt Fertilizer: Keep the fertilizer rate to 2 (100 to 175 ppm) Maintain a media pH of 5 8 to 6 2 and EC at 0 7 to 1 0 mS/cm (1:2 extraction)
Growth RegulatorsNot needed
GROWING ON TO FINISH
MediaUse a well-drained, disease-free soiless media with a pH of 5 5 to 6 2 and an EC of 0 75 mmhos/cm
Temperature• Night:59to64°F(15to18°C).• Day:62to73°F(17to23°C).• Plantscanbegrownundertemperatures
as low as 50°F (10°C) but the crop time will increase significantly
LightAs high as possible while maintaining moderate temperature
IrrigationKeep media moisture Avoid growing dry as this will cause yellowing on the tip of shoot Can be grown under saturated conditions
FertilizerStarting a week after transplant, apply fertilizer at rate 3 (175 to 225ppm N/1 2 to 1 5 mS/cm) once a week from nitrate-form fertilizer with low phosphorus Avoid using excessive ammonia nitrogen-form fertilizers and overfeeding, as these will result in les upright plants Maintain the media EC at 1 50 to 2 00 mS/cm and pH at 5 5 to 6 2
Growth RegulatorsNot needed
PinchingPinching is not needed
Container Size 4-in. (10-cm) pot: 1 plug per pot 6-in. (15-cm) pot: 1 to 3 plugs per pot
Crop SchedulingSow to transplant (288/264-cell plug tray): Blue Dart: 6 to 7 weeks twisted Dart: 7 to 8 weeks Add one more week when using 128 or 72-cell plug tray, but reduce post-transplant crop times by one week for Blue Dart

800 879-BALL ballseed.com26
FLOWER GROWERFacts
transplant to saleable size (from 288 cell):
Container Size
Plants Per Pot/ Basket
Weeks From transplant
total Weeks
4-in (10-cm) pot, Blue Dart
1 7 to 8 13 to 15
4-in (10-cm) pot, Twisted Dart
1 7 to 8 14 to 16
6-in (15-cm) pot, Blue Dart
3 7 to 8 13 to 15
6-in (15-cm) pot, Twisted Dart
3 7 to 8 14 to 16
Note: Add 2 more weeks to the crop time when planting 1 plug per 6-in (15-cm)
Common Problems Insects: No serious problems Diseases: No serious problems
LANTANA (VEGETATIVE)Lantana camara
Lucky™
PROPAGATION• Chooseawell-drainedmediumwithan
EC of 0 75 to 0 80 mmhos and a pH of 5 8 to 6 2
• Stickcuttingsimmediatelyuponarrival.Lantana cuttings are prone to breakdown if stored even an additional 12 hours
• Soiltemperatureshouldbemaintainedat 68 to 73°F (20 to 23°C) until roots are visible
• Aprotectivefungicideapplicationshouldbe made immediately after sticking
• Oncerootsarevisible,themediashould be kept moderately wet and never saturated This will prevent iron deficiency and the associated chlorotic foliage which can develop
• Beginfertilizationwith75to100ppmNwhen roots become visible Increase to 150 to 200 ppm N as roots develop
• Asrootedcuttingsdevelop,highlightand moderate air temperatures should eliminate the need for chemical plant growth regulators (PGRs)
• LuckyLantanadoesnotrequirepinching during propagation However, to improve branching and habit, plants can be pinched 7 to 10 days before transplanting
• LuckyLantanarootedcuttingsshouldbe ready for transplanting 24 to 28 days after sticking
GROWING ON TO FINISH
MediaUse a well-drained, disease-free, soilless medium with a pH of 5 8 to 6 2
Temperature• Night:62to67°F(17to19°C)• Day:74to85°F(23to29°C)
Light• Keeplightintensitiesabove5,000f.c.
(50,000 Lux) • Lowlightlevelspromotestemstretch
and poor flowering
Water• Duringthefirst10to14days,water
media sparingly and never saturate Allow media to dry somewhat between waterings
• Avoidextendedperiodswherethemediais saturated, as this will cause root system problems
Fertilizer• LuckyLantanahasmoderatetoheavy
fertilizer requirements to keep the plants growing vigorously Reducing the feed causes the plant to become woody with reduced flowering
• Useabalancedfertilizerat225to300ppm every watering to ensure maximum growth and flowering
• Excessivephosphorousandammoniacalnitrogen will promote unwanted vegetative growth Both should be provided in very limited quantities
• Controlled-releasefertilizercanbeusedto supplement a liquid feed program
• Flushpotsperiodicallywithclearwaterto avoid build-up of salts
Pinching• LuckyLantanashouldbepinched7to10
days after transplanting When pinched, plants should be actively growing with roots at or near the edge of the pot Depending on pot size and local conditions, Lucky Lantana should be pinched 1 to 3 times
• Florelpromotesbranchingandimprovesthe habit of Lantana No Florel should be applied within 8 weeks of sale A range of 300 to 400 ppm, applied 1 to 3 times should be used as a guideline Florel must be applied to plants that are under no stress (water, temperature, etc )
Controlling Growth• LuckyLantanaisgenerallymore
compact and will require less PGRs than other lantanas
• Appropriatepinching,dependingonpotsize, combined with good crop culture and environment should minimize PGR applications If needed, a tank mix of Cycocel (750 to 1,000 ppm) and B-Nine (2,000 to 3,000 ppm) applied 7 to 10 days after pinching will encourage the naturally mounded habit of Lucky Lantana
• LuckyLantanaisalsoveryresponsivetoBonzi (10 to 40 ppm) or Sumagic (5 to 20 ppm) applied as a spray
• Theserecommendationsforplantgrowth regulators should be used only as general guidelines Growers must trial all chemicals under their particular conditions
Common ProblemsInsects: Aphids, thrips, whitefly, spider mites, leafminer Diseases: Botrytis, Rhizoctonia, Pythium, powdery mildew
Problems Causes
Plant collapse
Wet media for an extended period (Pythium, Botrytis)
Excess vegetative growth
High ammonia concentration in the soilOver-fertilization under low light conditionsLow light and overwatering; wet media
Poor branching
Low fertilization during early stages
Foliage necrosis
Drying out the plant between irrigationsHigh soluble salts in the soilPowdery mildew
Foliage chlorosis
Low temperatures
Crop Schedule & Uses(Crop Schedule in Weeks)
4-in. (10-cm) Pot1 to 2 PP*
Unrooted cuttings 9 to 10
Rooted cuttings 6 to 7
*PP: Plants per pot
JUNCUS continued

800 879-BALL ballseed.com 27
FLOWER GROWERFacts
AFRICAN MARIGOLD (SEED)Tagetes erecta
Taishan Vanilla Approximate seed count: 9,200 to 10,600 S /oz (325 to 375 S /g)
PLUG PRODUCTION
MediaUse a well-drained, disease-free soilless medium with a pH of 5 5 to 6 2, and a medium initial nutrient charge (EC less than 0 75 mmhos/cm with a 2:1 extraction)
Plug Tray SizeCan be produced in 200, 288 or similar cell-size plug trays
SowingCover the seed with a medium layer of vermiculite at sowing
Stage 1 – Germination takes approximately 2 to 3 days.Germination temperature: 68 to 72°F (20 to 22°C) Light: Light is not required for germination Moisture: Keep soil wet (level 4) during Stage 1 Humidity: Maintain 95 to 97% relative humidity (RH) until radicle emergence
Stage 2 temperature: 70 to 75°F (21 to 24°C) days; 60 to 65°F (15 to 18°C) nights Light: Can be up to 2,500 f c (26,900 Lux) during Stage 2 Moisture: Keep the media medium (level 3) to medium wet (level 4) Fertilizer: Apply fertilizer at rate 1 (less than 100 ppm) with a nitrate-form fertilizer with low phosphorous
Stage 3temperature: 70 to 75°F (21 to 24°C) days; 60 to 65°F (15 to 18°C) nights Light: Up to 2,500 f c (26,900 Lux) Moisture: Keep the media medium wet (level 3) during Stage 3 Fertilizer: Increase the fertilizer rate to level 2 (100 to 175 ppm) Maintain a media pH of 5 8 to 6 2 and EC at 0 7 to 1 0 mS/cm (1:2 extraction)
Stage 4temperature: 65 to 70°F (18 to 21°C) days; 60 to 65°F (15 to 18°C) nights Light: Light levels can be up to 5,000 f c (53,800 Lux) if temperatures can be maintained Moisture: Same as Stage 3 Fertilizer: Same as Stage 3 Growth Regulators: Generally not required during plug production Do not hold the plugs too long – transplant them on time
GROWING ON TO FINISH
Container Size306 packs: 1 plant per cell 4-in. (10-cm) pots: 1 plant per pot
MediaUse a well-drained, disease-free media with a pH of 5 8 to 6 5 and a medium initial nutrient charge
Temperature • Night:59to65°F(15to18°C)• Day:63to70°F(17to21°C)• Canbegrownatmoderatetemperatures,
minimum temperature 54°F (12°C)
LightKeep light levels as high as possible while maintaining appropriate temperatures
IrrigationMaintain optimal media moisture (not too wet or not too dry)
Fertilizer• Starting1weekaftertransplant,apply
fertilizer at rate 3 (175 to 225 ppm mS/cm) using predominantly nitrate-form fertilizer with low phosphorus
• MaintainthemediaECat1.50to2.00mS/cm and pH at 6 2 to 6 5
• Forconstantfertilizerprogram,canapplyfertilizer at rate 2 (100 to 175 ppm) while maintaining the above recommended EC and pH ranges
Plant Growth Regulators• PGRsarenotrequiredwhengrown
under short days, since plants will finish naturally shorter Taishan can be treated with PGRs when grown under long days
• B-Nine(daminozide)at5,000ppmapplied twice as a foliar spray can control the plant growth
PhotoperiodAfrican Marigolds are a facultative short-day plant and the critical daylength is about 12 hours, i e it will flower quicker when the daylength is 12 hours or shorter When grown at daylength longer than 12 hours, it will take an additional 10 to 14 days to flower
Crop Scheduling Sow to transplant: Approximately 3 weeks transplant to flower: 4 to 6 weeks in Spring, 6 to 7 weeks in Summer total crop time (sow to flower): 7 to 9 weeks in Spring, 9 to 10 weeks in Summer
Common Problems Insects: Monitor for Aphids early in production, and for Thrips and Mites during flowering

800 879-BALL ballseed.com28
FLOWER GROWERFacts
FRENCH MARIGOLD (SEED)
Tagetes patula
Durango®
Approximate de-tailed seed count: 9,500 to 10,500 S /oz (335 to 370 S /g)
PLUG PRODUCTION
Plug Tray SizeDurango marigold plugs can be produced in 200 to 288-cell plug trays
MediaUse a well-drained, disease-free, soilless medium with a pH of 6 2 to 6 5 and a medium initial nutrient charge (EC) of 0 75 mmhos/cm (1:2 extraction)
SowingCover the seed with coarse vermiculite Allow 3 to 4 days for germination
TemperatureGermination: 70 to 72°F (21 to 22°C) Cotyledon stage: 65 to 72°F (18 to 22°C) true leaves: 65 to 70°F (18 to 21°C) Hold plugs: 65 to 68°F (18 to 20°C)
LightStage 1: Light is not required for germination After germination: 1,000 to 2,500 f c (10,000 to 25,000 Lux) Seedling maturity: Up to 3,000 f c (30,000 Lux)
HumidityMaintain 95% relative humidity (RH) until cotyledons emerge
Soil MoistureKeep soil moisture high until radicle emergence, then reduce moisture levels after the radicle penetrates the medium Do not allow seedlings to wilt
FertilizerStage 2&3: Apply 50 to 75 ppm N, maintaining an EC of 1 0 Stage 4: Apply 100 to 150 ppm N, maintaining an EC of 1 0 to 1 5
Growth RegulatorsNot required
GROWING ON TO FINISH
Container SizeDurango Marigolds are well-suited to 306 packs and 4-in (10-cm) pots
MediaUse a well-drained, disease-free, soilless medium with a pH of 6 2 to 6 5 and a medium initial nutrient charge
Temperature• Night:60to62°F(15to17°C)• Day:65to68°F(18to20°C)
LightKeep light levels from moderate to high
IrrigationMaintain even moisture Do not allow plants to wilt
FertilizerFeed plants weekly with 150 to 200 ppm N in a complete fertilizer Maintain the media EC at 1 5 to 2 0 mmhos/cm and pH at 6 2 to 6 8
Growth RegulatorsTo tone the plants for best appearance, we recommend applying B-Nine at 2,500 ppm, 1 week after transplant for cell packs or 2 weeks after transplant for 6-in (15-cm) pots
Crop SchedulingSow to transplant: 3 weeks transplant to finished 306 pack: 3 to 4 weeks transplant to saleable 4-in. ( 10-cm) pot: 5 to 6 weeks with 3 plants per pot
Common ProblemsDiseases: Damping off in the seedling stage Insects: Aphids, mites, whitefly
OSTEOSPERMUM (VEGETATIVE)
Osteospermum hybrid
Voltage™ Yellow
PROPAGATION• Chooseawell-drainedmediumwithan
EC of 0 75 to 0 80 mmhos and a pH of 5 8 to 6 2
• Stickcuttingswithin12to24hoursofarrival Cuttings can be stored overnight, if necessary, at 45 to 50°F (7 to 10°C)
• Soiltemperatureshouldbemaintainedat68 to 73°F (20 to 23°C) for up to 14 days
• Oncerootsbegintoform,reducetemperature to 64 to 68°F (18 to 20°C) to avoid unnecessary stretch
• Arootinghormonecanbeappliedtopromote early, uniform rooting
• Mistmayneedtobeappliedforupto24hours per day for 3 to 5 days, depending on local conditions Frequency and run time should be reduced during the dark period, but unrooted cuttings must not be allowed to wilt
• Beginfertilizationwith75to100ppmNwhen roots become visible Increase to 150 ppm N as roots develop
• Oncerootsarevisible,themediashouldbe kept moderately wet but never saturated This will help prevent iron deficiency and the associated chlorotic foliage which can develop
• VoltageYellowOsteospermumshouldnot be pinched but flower buds can be removed if needed
• VoltageYellowOsteospermumrooted cuttings should be ready for transplanting 28 to 32 days after sticking
GROWING ON TO FINISH
Media• Usemediawithgoodaeration,drainage
and water-holding capacity • LikemostOsteospermum,VoltageYellow
prefers a medium that will dry regularly between waterings
• ApHof5.8to6.2isoptimum.
Temperature• Aftertransplanting,allowplantsto
become established for 7 to 14 days, depending on pot size, at a night temperature of 59 to 64°F (15 to 18°C) Once plants are well-established and rooted in, begin growing at recommended cool temperature
• Night:44to55°F(7to13°C).• Day:59to75°F(15to24°C);avoid
temperatures above 80°F (26°C)
TransplantingRooted cuttings should be transplanted at or slightly above the soil line of the final container This will greatly reduce problems with various root and stem rots In some situations a preventative fungicidal soil drench may be appropriate
LightVoltage Yellow Osteospermum will perform best under moderate to high light levels of 5,000 to 9,000 f c (50,000 to 90,000 Lux)
Watering• Themediashouldbeallowedtodry
regularly between waterings and never saturated However, plants should not be allowed to wilt at anytime
• Leachregularlytoavoidthebuildupofhigh soluble salt levels
FertilizerUse a balanced fertilizer at a rate of 225 to 300 ppm N When grown excessively hungry, plants will become woody and will not branch properly
PinchingA pinch is optional; however, disbudding may be necessary for better branching

800 879-BALL ballseed.com 29
FLOWER GROWERFacts
Controlling Growth• Highlightintensityandcool
temperatures are needed for optimal habit
• VoltageYellowOsteospermumareresponsive to Cycocel and Bonzi Apply Cycocel as a spray (750 to 1,000 ppm) Drench applications of Cycocel (1,000 to 1,500 ppm) have also demonstrated control Bonzi (15 to 30 ppm) applied as a spray is also effective in reducing elongation Begin PGR applications as new growth develops after pinching More frequent applications will be required for smaller container sizes or if grown under warm conditions Voltage Yellow is also responsive to B-Nine (2,500 to 4,000 ppm) alone as a spray or tank mix with Cycocel Apply B-Nine early in the crop cycle before buds are visible to avoid bloom delay or a reduction in bloom size
• Theserecommendationsforplantgrowth regulators should be used only as general guidelines Growers must trial all chemicals under their particular conditions
Common ProblemsInsects: Thrips, whitefly, aphids, fungus gnats Diseases: Botrytis (gray mold), Thielaviopsis, Pythium, Rhizoctonia, Powdery Mildew
Problems Causes
Plant collapse
Plants grown in saturated media for extended periods of time (Pythium, Thielaviopsis)Stem canker (Botrytis)Rooted cuttings transplanted too deeply
Excessive vegetative growth and lack of flowers
Excessive ammonium-based fertilizer Over-fertilization under low light conditionsLow light and overwatering, saturated media
Yellowing of young foliage
Saturated media
Foliage necrosis
High soluble salts in mediaExcessive water stress
Poor branching and thin plants
Low fertilization during early stages of growth Low light conditions
Crop Schedule & Uses(Crop Schedule in Weeks)
4-in. (10-cm) Pot 1 PP*
6-in. ( 15-cm) Pot
1 to 2 PP*
Unrooted cuttings
11 to 15 11 to 15
Rooted cuttings
8 to 11 8 to 11
*PP: Plants per pot
ORNAMENTAL PEPPERS (SEED) Capsicum annuum
Black Pearl Purple Flash Approximate seed count: 6,850 S /oz (240 S /g)
PLUG PRODUCTION
Plug Tray SizeOrnamental peppers are well-suited to 288-cell or larger plugs
Stage 1 - Radicle emergence/5 to 7 days• Maintainsoiltemperatureat72to76°F
(22 to 24°C) • Keepmediumevenlymoistbutnot
saturated (level 4) • Covertheseedlightlywithcoarse
vermiculite • Lightisnotnecessaryforgermination
until radicle emergence • MaintainsoilpHat5.5to5.8andsoluble
salts (EC) at less than 0 5 mmhos/cm (using 2:1 extraction)
• Keepammoniumlevelslessthan10ppm.
Stage 2 - Stem and cotyledon emergence/7 to 10 days• Maintainsoiltemperatureat70to75°F
(21 to 24°C) • Allowthemediumtodryoutslightly
(level 3) before watering for best germination and rooting
• Providelightlevelsofupto2,500f.c.(26,900 Lux) for the remainder of plug production
• Beginfertilizingatrate1(lessthan100 ppm) from 14-0-14 or a calcium/potassium nitrate feed once cotyledons are fully expanded
• Alternatefeedwithclearwater.
Stage 3 - Growth and development of true leaves/10 to 14 days• Maintainsoiltemperatureat70to75°F
(21 to 24°C) • Avoidwilt.• Increasefeedtorate2(100to175ppm)
from 14-0-14 or other calcium /potassium nitrate fertilizer Fertilize every 2 to 3 irrigations
Stage 4 - Plants ready for transplanting or shipping/7 days• Maintainsoiltemperatureat68to70°F
(20 to 21°C) • Providemediumsoilmoistureandavoid
wilt • MaintainsoilpHat5.5to5.8andsoluble
salts (EC) at less than 0 75 mmhos/cm • Continuetofertilizewith100to175ppm
N from 14-0-14 or calcium/potassium nitrate feed as needed
GROWING ON TO FINISH
MediaUse a well-drained, disease-free, soilless medium with a medium initial nutrient charge and a pH of 5 5 to 6 3
Temperature• Night:65to70°F(18to21°C)• Day:68to80°F(20to26°C)• Pepperswillbedamagedby
temperatures below 45°F (7°C) Prefer temperatures as warm as possible
Light Provide light levels as high as possible Peppers prefer high light with warm temperatures Foliage colors will be more intense under higher light levels and high temperatures
Fertilization• Fertilizeateveryotherirrigationwith
20-10-20 at rate 3 (175 to 225 ppm) • Maintainmediumelectricalconductivity
around 1 0 mmhos/cm (using 1:2 extraction)
Controlling Height• Highlightlevelsandspacingwillkeep
plants from stretching • Sumagiccanbeusedonpeppers.
Container Size4-in. (10-cm) pot: 1 plug per pot6-in (15-cm) pot: 1 to 3 plugs per pot
Crop Schedule (Spring Production)Plug stage: 4 to 5 weeks transplant to foliage only, no fruit: 9 to 10 weeks transplant to mature fruit: 16 to 20 weeks
NOTE: Crop time for mature fruit will be 4 to 5 weeks shorter during Summer production

800 879-BALL ballseed.com30
FLOWER GROWERFacts
PETUNIA (SEED)P. x hybrid
Paparazzi™ (grandiflora)Paparazzi™ Flash (multiflora)Pop Rocks (spreading)Approximate seed count (pelleted): 33,000 S /oz (1,200 S /g)
PLUG PRODUCTION
MediaUse a well-drained, disease-free seedling medium with a pH of 5 5 to 6 0 and EC about 0 75 mS/cm (1:2 extraction)
SowingCovering seed is not recommended Water adequately after sowing to completely dissolve the pellet
Stage 1 – Germination takes approximately 4 days.Soil temperature: 72 to 76°F (22 to 24°C) Light: Lighting is optional for all varieties Moisture: Keep soil very wet (level 5) during Stage 1 for optimal germination Humidity: Maintain 100% relative humidity (RH) until radicles emerge
Stage 2 Soil temperature: 68 to 75°F (20 to 24°C) Light: Up to 2,500 f c (26,900 Lux) Moisture: Start to slightly reduce soil moisture (level 4) to allow roots to penetrate into the media Fertilizer: Apply fertilizer at rate 1 (less than 100 ppm N/less than 0 7 mS/cm EC) from nitrate-form fertilizers with low phosphorous
Stage 3Soil temperature: 65 to 70°F (18 to 21°C) Light: Up to 2,500 f c (26,900 Lux) Moisture: Allow media to further dry until the surface becomes light brown (level 2) before watering Keep the moisture to wet-dry cycle (moisture level 4 to 2) Fertilizer: Increase fertilizer to rate 2 (100 to 175 ppm) If growth is slow, apply a balanced ammonium and nitrate-form fertilizer with every other fertilization Maintain medium pH 5 8 to 6 2 and EC between 1 0 and 1 5 mS/cm (1:2 extraction) Growth Regulators: Control plug growth first by environment, nutrition and irrigation management, then with chemical plant growth regulators if needed Minimize ammonium-form nitrogen fertilizer to avoid seedling elongation Temperature differential (DIF) can also be used to minimize height Test all chemical plant regulators first
Apply B-Nine (daminozide) 1 to 2 applications at 5,000 ppm as a spray The first application should be made when plugs have 2 to 3 true leaves A second application can be made 7 days later This treatment can improve basal branching of mature plants
Stage 4Soil temperature: 60 to 65°F (16 to 18°C) Light: Up to 5,000 f c (53,800 Lux) if temperature can be controlled Moisture: Same as Stage 3 Fertilizer: Same as Stage 3
GROWING ON TO FINISH
Container Size306 packs: 1 plant per pot Paparazzi Flash 4-in. (10-cm) pots: 1 plant per pot Paparazzi Flash, Paparazzi and Pop Rocks 6-in. (15-cm) pots: 1 to 3 plants per pot Paparazzi and Pop Rocks
MediaUse a well-drained, disease-free, soilless medium with a pH of 5 5 to 6 2 and a medium initial nutrient charge
Temperature• Night:57to65°F(14to18°C)• Day:61to75°F(16to24°C)
• Petuniascantoleratetemperaturesas low as 35°F (2°C); however, keep in mind that crop timing (time to flower) is related to daily average temperature when grown under proper daylength Plants will take longer to flower when grown in cooler conditions
LightKeep light levels as high as possible while maintaining moderate temperatures
Fertilizer• Applynitrate-formwithlowphosphorus
fertilizer at rate 3 (175 to 225 ppm) every other irrigation Apply a balanced ammonium and nitrate-form fertilizer with low phosphorus as needed to encourage growth and balance medium pH Maintain medium pH 5 8 to 6 2
• Foraconstantfertilizerprogram,applyfertilizer at rate 3 (175 to 225 ppm) while maintaining the above recommended EC and pH ranges
Growth Regulators• UseB-Nine(daminozide)at5,000ppm
for weekly application starting at 7 days after transplant, or just use the same PGR as that for other petunias
• Todeterminethebestrateforyourconditions, we recommend that you run an in-house trial
PhotoperiodPetunias can flower successfully at 10-hour daylengths Crop time is 3 to 6 days faster under longer day conditions
Crop SchedulingSow to transplant (400 to 288-cell plug): 4 to 6 weeks transplant to flower: 5 to 7 weeks
Total Crop Time:
Container Size
Number of Plants
Spring Summer
4 & 6-in (10 & 15-cm) pot
1 7 to 8 13 to 15
Common ProblemsNo major problems will occur if good cultural and IPM practices are used

800 879-BALL ballseed.com 31
FLOWER GROWERFacts
PETUNIA (VEGETATIVE)Petunia x hybrida
Black Velvet Phantom Pinstripe PROPAGATION• Chooseawell-drainedmediumwithan
EC of 0 75 to 0 80 mmhos and a pH of 5 4 to 5 8
• Stickcuttingswithin12to24hoursofarrival Cuttings can be stored overnight, if necessary, at 45 to 50ºF (7 to 10ºC)
• Soiltemperatureshouldbemaintainedat 68 to 73ºF (20 to 23ºC) until roots are visible
• Beginfertilizationwith75to100ppmNwhen roots become visible Increase to 150 to 200 ppm N as roots develop
• Oncerootsarevisible,themediashouldbe kept moderately wet and never saturated This is critical to prevent iron deficiency and the associated chlorotic foliage which can develop
• Appropriatewatermanagement,airandlight levels should eliminate the need for chemical plant growth regulators (PGRs)
• Avoidstretchbymovingcroptocoolerair temperature during the last weeks of propagation
• Apinchinpropagationisnotnecessary.• BlackVelvet,PhantomandPinstripe
Petunias should be ready for transplant 3 weeks after sticking
GROWING ON TO FINISH
Media• ApHof5.4to5.8isoptimum.• BlackVelvet,PhantomandPinstripe
Petunias prefer a well-drained soil
Temperature• Night:53to61ºF(12to16ºC)• Day:59to76ºF(15to24ºC)
Light• BlackVelvet,PhantomandPinstripe
Petunias should be grown under moderate light levels; 5,000 to 8,000 f c (50,000 to 80,000 Lux) is the ideal range
• Lowlightlevelspromotestemstretchand reduced plant quality
• Forfastestfloweringduringshortdaylength, maintain night temperatures at 59 to 61°F (15 to 16°C) and use lighting to provide a daylength of 10 hrs
WateringThe medium should be allowed to dry between waterings However, periods of sustained wilting should be avoided Petunias are susceptible to Botrytis and root diseases – avoid high humidity, constantly saturated media and wet foliage
Fertilizer• BlackVelvet,PhantomandPinstripe
Petunias have a high feed requirement
• Useconstantfeedwithabalancedfertilizer at 225 to 300 ppm N with a full complement of minor elements Additional iron as needed
• Regularleachingwithclearwaterwillhelp to reduce buildup of excess salts in media
Media pH Management• Plantsmustbemonitoredregularlyfor
early, visual signs of upward pH drift (interveinal yellowing on youngest leaves) Regular soil pH tests are an excellent way to identify movements in pH before they create visual symptoms, which can be difficult to correct
• Periodicapplicationofacidicfeedor drench applications of a chelated iron product can be used to maintain appropriate pH levels
• AneffectivemethodofloweringpHisa soil drench of iron sulfate The foliage must be rinsed immediately after treatment since the iron sulfate solution which can result in phytotoxicity to flowers and foliage
PinchingBlack Velvet, Phantom and Pinstripe Petunias are free-branching and do not require pinching Pinching will delay flowering approximately 2 weeks
Controlling Growth• Usehighlightlevelsandcool
temperatures to control growth • Tocontrolearlygrowthandimprove
flowering and habit, growers can use 1 or more applications of B-Nine (1,500 to 2,500 ppm) starting 7 to 14 days after transplant B-Nine applications late in the crop can cause instability in flower color
• Matureplantswhichareapproachingshipping size can be drenched with Bonzi (0 25 to 1 0 ppm) to significantly slow vegetative growth while allowing flowering to continue
• UseofPGRscandelayflowering1to2weeks Avoid spraying once flower buds appear
• Ingeneral,morefrequentapplicationsof any growth regulator at a lower concentration will produce the best results
• Theserecommendationsforplantgrowth regulators should be used only as general guidelines Growers must trial all chemicals under their particular conditions
Common ProblemsBlack Velvet will develop a few flowers with coloring similar to Phantom This generally occurs in low light, low fertility situtations As growing conditions improve, this is minimized Insects: Aphids, thrips, whitefly, leafminers, fungus gnats Diseases: Botrytis, Rhizoctonia, Pythium.
Because Petunias are susceptible to several viruses, it is vital to begin with cuttings supplied from clean stock
Problems Causes
Plant collapse
Wet media for an extended period (Pythium) Rhizoctonia due to planting too deep
Delayed flowering
Daylength too short Late application of growth regulators
Excessive vegetative growth
High ammonia concentration in the soil Over-fertilization under low light conditionsLow light levels and over-watering; wet media
Poor branching
Low fertilization; lack of nitrogen
Stretched plants
Low light levels
Chlorosis Iron deficiency High pHNitrogen deficiency
Crop Schedule & Uses(Crop Schedule in Weeks)
4-in. (10-cm) Pot 1 PP*
6-in. ( 15-cm) Pot
2 to 3 PP*
Unrooted cuttings
8 to 10 9 to 11
Rooted cuttings
5 to 7 6 to 8
*PP: Plants per pot

800 879-BALL ballseed.com32
FLOWER GROWERFacts
TRAILING PETUNIA (VEGETATIVE)
Petunia x hybrid
Suncatcher™
PROPAGATION• Chooseawell-drainedmediumwithan
EC of 0 75 to 0 80 mmhos and a pH of 5 4 to 5 8
• Stickcuttingswithin12to24hoursofarrival Cuttings can be stored overnight, if necessary, at 45 to 50°F (7 to 10°C)
• Soiltemperatureshouldbemaintainedat 68 to 73°F (20 to 23°C) until roots are visible
• Beginfertilizationwith75to100ppmNwhen roots become visible Increase to 150 to 200 ppm N as roots develop
• Oncerootsarevisible,themediashould be kept moderately wet and never saturated This will prevent iron deficiency and the associated chlorotic foliage which can develop
• Astherootedcuttingsdevelop,appropriate water stress and moderate air temperatures should eliminate the need for chemical plant growth regulators (PGRs)
• SuncatcherTrailingPetuniascanbepinched 18 to 24 days after sticking, when roots are well developed, to promote early branching and improve habit
• SuncatcherTrailingPetuniarootedcuttings should be ready for transplanting 21 to 28 days after sticking
GROWING ON TO FINISH
MediaUse a well-drained, disease-free, soilless medium with a pH of 5 4 to 5 8
Temperature• Night:53to61°F(12to16°C)• Day:59to76°F(15to24°C)• Higherthanrecommendedtemperatures
will cause stretch, weak stems and reduced flower size
• Recommendednighttemperatureswillcreate maximum branching and the best possible habit
Light• Keeplightintensitiesat5,000to8,000
f c (50,000 to 80,000 Lux) • Lowlightlevelspromotestemstretch
and reduced plant quality • ForSuncatcherTrailingPetunias,
flowering is best under long days of Spring and Summer Generally, flowering will be heaviest in April to September Crop times will be significantly lengthened under short daylengths
• Forfastestfloweringduringshortdaylength, maintain night temperatures at 59 to 61°F (15 to 16°C) and use lighting to provide a daylength of 12 to 13 hrs
Watering• PlantsaresusceptibletoBotrytis–avoid
high humidity, constantly saturated media and wet foliage
• Vegetativepetuniasaresusceptibletoroot diseases if overwatered Allow the media to dry slightly between waterings, but avoid any wilt
Fertilizer• Vegetativepetuniasrequireheavy,
constant fertilization • Useconstantfeedwithabalanced
fertilizer at 225 to 300 ppm N with additional iron as needed
• Afullcomplementofminorelementsshould be provided to the plant
• Applyclearwatertopreventproblemswith soluble salt buildup
Media pH Management• Plantsmustbemonitoredregularlyfor
early, visual signs of upward pH drift (interveinal yellowing on youngest leaves) Regular soil pH tests are an excellent way to identify movements in pH before they create visual symptoms, which can be difficult to correct
• Periodicapplicationofacidicfeedor drench applications of a chelated iron product can be used to maintain appropriate pH levels
• AneffectivemethodofloweringpHisa soil drench of iron sulfate The foliage must be rinsed immediately after treatment since the iron sulfate solution which can result in phytotoxicity to flowers and foliage
Pinching• Pinchplants10to14daysafter
transplanting to improve basal branching • Foralargerbasketorcontainer,asecond
pinch can be applied, but will delay flowering approximately 2 weeks
Controlling Growth• Usehighlightlevelsandcool
temperatures to control growth • Tocontrolgrowthandimproveflowering
and habit, growers can use 1 or more applications of B-Nine (1,500 to 2,500 ppm) starting 7 to 14 days after transplant
• Matureplantswhichareapproachingshipping size can be drenched with Bonzi (0 25 to 1 0 ppm) to significantly slow vegetative growth while allowing flowering to continue
• UseofPGRscandelayflowering1to2weeks Avoid spraying once flower buds appear
• Ingeneral,morefrequentapplicationsof any growth regulator at a lower concentration will produce the best results
• Theserecommendationsforplantgrowth regulators should be used only as general guidelines Growers must trial all chemicals under their particular conditions
Common ProblemsInsects: Aphids, thrips, whitefly, leafminers, fungus gnats Diseases: Botrytis, Rhizoctonia, Pythium
Because Petunias are susceptible to several viruses, it is vital to begin with cuttings supplied from clean stock Always start with clean flats and pots and apply a broad spectrum preventative fungicide drench following transplant
Problems Causes
Plant collapse
Wet media for an extended period (Pythium) Rhizoctonia due to planting too deep
Delayed flowering
Daylength too short Late application of growth regulators
Excessive vegetative growth
High ammonia concentration in the soil Over-fertilization under low light conditionsLow light levels and over-watering; wet media
Poor branching
Low fertilization; lack of nitrogen
Stretched plants
Low light levels
Chlorosis Iron deficiency High pHNitrogen deficiency
Crop Schedule & Uses(Crop Schedule in Weeks)
4-in. (10-cm) Pot 1 PP*
6-in. ( 15-cm) Pot
1 to 2 PP*
Unrooted cuttings
9 to 11 10 to 12
Rooted cuttings
6 to 8 7 to 9
*PP: Plants per pot

800 879-BALL ballseed.com 33
FLOWER GROWERFacts
RUDBECKIA (SEED)Runbeckia hirta
Tiger Eye Approximate seed count: 63,190 S /oz (2,229 S /g)
PLUG PRODUCTION
Plug Tray SizeRudbeckia Tiger Eye plugs are best produced in 288 plug trays The average plug production time is 5 – 8 weeks
MediaUse a well-drained, disease-free, soilless medium with a pH of 5 8 to 6 2 and a medium initial nutrient charge (EC) of 0 50 to 0 75 mmhos/cm (1:2 extraction)
SowingLightly cover the seed with a light layer of coarse grade vermiculite This helps in keeping the seed moist during germination Light is required for germination Allow 10 to 14 days for germination
TemperatureGermination: 75 to 78°F (24 to 25°C) After germination: Plugs can be grown in the greenhouse at 70 to 75°F (21 to 24°C) days and 64 to 67°F (18 to 19°C) nights until transplant
LightStage 1: Light is required for germination After germination: 2,500 to 3,000 f c (25,000 to 30,000 Lux) Seedling maturity: Up to 5,000 f c (50,000 Lux)
HumidityMaintain 95 to 100% relative humidity during germination
Soil MoistureKeep soil moisture high at radicle emergence, then reduce moisture levels after cotyledon development Do not allow seedlings to wilt
FertilizerWhen cotyledons fully expand, start fertilizing with 50 ppm N twice a week As the true leaves develop, increase the fertilizer rate to 100 ppm N Maintain the plug media EC at 1 0 to 1 5 mmhos/cm and pH at 6 0 to 6 2
Plant Growth RegulatorsNot required
GROWING ON TO FINISH
Container Size6-in (15-cm ) pots
MediaUse a well-drained, disease-free, soilless medium with a pH of 5 8 to 6 2 and medium initial nutrient charge
Temperature• Night:55to60°F(13to15°C)• Day:64to67°F(18to19°C)• Maintainthesetemperaturesuntilbud
initiation
LightRudbeckia flowers earlier under long days
IrrigationMaintain even moisture Avoid excessive wetness
Fertilizer• Aftertransplant,fertilizethecropwitha
balanced fertilizer supplying 150 to 200 ppm N
• MaintainthemediaECat1.50to2.00mmhos/cm and pH at 5 8 to 6 5
Plant Growth Regulators• GrowthRegulatorscanbeappliedfor
container production • FoliarspraysofB-Nineat2,500-5,000
ppm applied twice after transplant work well First application can be done 2 weeks after transplant followed by a second application 2 weeks later
Crop Scheduling Sow to transplant (288-cell plug): 5 to 8 weeks transplant to finish in a 6-in. (15-cm.) pot: 7 to 9 weeks, 1 to 3 plants per pot
Common ProblemsInsects: Whiteflies, thrips, & aphids
SALVIA (VEGETATIVE)Salvia farinacea x longispicata
Mystic Spires Blue
PROPAGATION• Chooseawell-drainedmediumwithan
EC of 0 75 to 0 80 mmhos and a pH of 5 8 to 6 2
• Stickcuttingswithin12to24hoursofarrival Cuttings can be stored overnight, if necessary, at 45 to 50°F (7 to 10°C)
• Soiltemperatureshouldbemaintainedat 68 to 73°F (20 to 23°C) until roots are visible
• Beginfertilizationwith75to100ppmNwhen roots become visible Increase to 150 to 200 ppm N as roots develop
• Oncerootsarevisible,themediashould be kept moderately wet and never saturated This will prevent iron deficiency and the associated chlorotic foliage which can develop
• Astherootedcuttingsdevelop,appropriate water stress and moderate air temperatures should eliminate the need for chemical plant growth regulators (PGRs)
• AB-Ninespray(2,500to3,000ppm)once roots have developed is effective in controlling stretch and encouraging good branching
• ABonzidrench(0.5to3ppm)10to12days after sticking is also effective in controlling stretch
• MysticSpiresBlueSalviashouldbepinched 18 to 24 days after sticking, when roots are well developed, to promote early branching and improve habit
• MysticSpiresBlueSalviarootedcuttingsshould be ready for transplanting 21 to 24 days after sticking
GROWING ON TO FINISH
Media• ApHof5.8to6.2isoptimum.• MysticSpiresBlueSalviaprefersawell-
drained soil
Temperature• Night:62to67°F(17to19°C)• Day:71to79°F(21to26°C)
Light• MysticSpiresBlueSalviashouldbe
grown in high light; 6,000 to 10,000 f c (60,000 to 100,000 Lux) is the ideal range
• Plantswillstretchbadlyatlightintensities below 4,000 f c (40,000 Lux); branching will be reduced, as will flowering, and the overall quality of Mystic Spires Blue Salvia will be reduced significantly
• MysticSpiresBlueSalviawillbloomquicker under short days
WateringThe medium must be allowed to dry between waterings However, periods of sustained wilting should be avoided

800 879-BALL ballseed.com34
FLOWER GROWERFacts
Fertilizer• MysticSpiresBlueSalviahasamoderate
fertilizer requirement • Maintainconstantfertilizationat150to
225 ppm N • Excessivephosphorousandammoniacal
nitrogen will promote unwanted vegetative growth Both should be provided in very limited quantities
• Ifnewgrowthischlorotic,addchelatediron to the feed
• Slow-releasefertilizercanbeincorporated at a moderate rate to supplement a liquid program
Pinching• MysticSpiresBlueSalviashouldbe
pinched 7 to 10 days after transplanting • Dependingonthepotsize,light
levels and other cultural factors, 1 to 2 additional pinches will be required Each pinch should be performed when 4 mature leaves can be left on the stem after the terminal is removed to ensure adequate breaks after the pinch Plants should bloom 4 to 6 weeks after a pinch
Controlling Growth• Maintainrecommendedtemperatures
and light levels to avoid stretch • Wetmediawillcausestretchingand
produce weak growth • Donotallowtheplantstobecome
crowded on the bench • MysticSpiresBlueSalviaisresponsive
to Bonzi (0 5 to 1 5 ppm drench), B-Nine (2,500 to 3,000 ppm) and Cycocel (1,000 to 1,500 ppm) tank mix (spray) applied 1 to 3 times and is effective for toning Applications should be made 10 to 14 days apart as needed
• Whenproducingunderlongdays(greaterthan 14-hr days) B-Nine at 2,500 to 5,000 ppm is useful for controlling height Flowering time is increased under long days
• Theserecommendationsforplantgrowth regulators should be used only as general guidelines Growers must trial all chemicals under their particular conditions
Common ProblemsInsects: Thrips, aphids, whitefly, fungus gnats Diseases: Botrytis, Pythium, Rhizoctonia
Problems Causes
Plant collapse
Stem canker (Botrytis) Plants grown in saturated media for extended periods of time (Pythium)
Excessive vegetative growth and lack of flowers
Excessive ammonia nitrogen in fertilizer Low light and over-watering; saturated media
Poor branching and thin plants
Low fertilization during early stages of growth; low light
Crop Schedule & Uses(Crop Schedule in Weeks)
6-in. (15-cm) Pots1 to 2 PP*
Unrooted cuttings 10 to 14
Rooted cuttings 6 to 10
*PP: Plants per pot
SALVIA (SEED)Salvia splendnes
Vista PurpleVista RedApproximate seed count 7,500 S /oz (256 S /g)
PLUG PRODUCTION
MediaUse a well-drained, disease-free seedling medium with a pH of 5 8 to 6 2 and EC about 0 5 mS/cm (1:2 extraction)
SowingCovering seed with a thin layer of vermiculite is recommended
Stage 1 – Germination takes approximately 4-5 days.Soil temperature: 75 to 78°F (24 to 25°C) Light: Lighting is not necessary Moisture: Keep soil wet (level 4) during Stage 1 for optimal germination Humidity: Maintain 100% relative humidity (RH) until radicles emerge
Stage 2 Soil temperature: 72 to 75°F (24 to 25°C) Light: Up to 2,500 f c (26,900 Lux) Moisture: Start to slightly reduce soil moisture (level 3) to allow roots to penetrate into the media Fertilizer: Apply fertilizer at rate 1 (less than 50-75 ppm) from nitrate-form fertilizers with low phosphorous
Stage 3Soil temperature: 65 to 70°F (18 to 21°C) Light: Up to 2,500 f c (26,900 Lux) Moisture: Allow media to further dry until the surface becomes light brown (level 2) before watering Keep the moisture to wet-dry cycle (moisture level 4 to 2) Fertilizer: Increase fertilizer to rate 2 (100 to 175 ppm) If growth is slow, apply a balanced ammonium and nitrate-form fertilizer with every other fertilization Maintain medium pH 5 8 to 6 2 and EC between 0 75-1 0 and 1 5 mS/cm (1:2 extraction) Growth Regulators: Control plug growth first by environment, nutrition and irrigation management, then with chemical plant growth regulators if needed Minimize ammonium-form nitrogen fertilizer to avoid seedling elongation Temperature differential (DIF) can also be used to minimize height B-Nine at 2500-5000 to tone plugs Test all chemical plant regulators first
Stage 4Soil temperature: 60 to 65°F (15 to 18°C) Light: Up to 5,000 f c (53,800 Lux) if temperature can be controlled Moisture: Same as Stage 3 Fertilizer: Same as Stage 3
SALVIA continued

800 879-BALL ballseed.com 35
FLOWER GROWERFacts
GROWING ON TO FINISH
Container Size306 tray: 1 plant per cell
MediaUse a well-drained, disease-free, soilless medium with a pH of 5 8-6 2 and a medium initial nutrient charge
Temperature• Night:55to60°F(13to15°C)• Day:70to75°F(21to24°C)
LightKeep light levels as high as possible while maintaining moderate temperatures
Fertilizer• Applynitrate-formwithlowphosphorus
fertilizer at rate 3 (175 to 225 ppm) every other irrigation Apply a balanced ammonium and nitrate-form fertilizer with low phosphorus as needed to encourage growth and balance medium pH Maintain medium pH 5 8 to 6 2
• Foraconstantfertilizerprogram,applyfertilizer at rate 2 (100 to 175ppm) while maintaining the above recommended EC and pH ranges
Growth Regulators• UseB-Nine(daminozide)at2,500-5,000
ppm 2 to 3 times starting at 7 days after transplant Bonzi, Sumagic, and B-Nine / Cycocel tank mix are also effective
• Todeterminethebestrateforyourconditions, we recommend that you run an in-house trials
Crop SchedulingSow to transplant (400 to 288-cell plug): 4 to 6 weeks transplant to flower: 5 to 7 weeks total Crop time: 306 pack 4-5 weeks
Common ProblemsInsects: Thrip, Aphids, Whitefly Diseases: Alternaria Leaf Spot, Powdery Mildew, Rust
SNAPDRAGON (SEED)Antirrhinum majus
Snapshot™ Series Approximate seed count: 180,000 S /oz (6,350 S /g)
GERMINATION AND PLUG PRODUCTION
Stage 1 - Time of radical emergence.Use a well-drained, disease-free seedling medium with a pH of 5 5 to 5 8 and EC less than 0 75 mmhos/cm (2:1 extraction) Germination: 64 to 68°F (18 to 20°C) timing: 4 to 8 days Soil temperature: 64 to 68°F (18 to 20°C) Moisture: Medium Light: Not required Cover: Lightly with vermiculite
Stage 2 - Stem and cotyledons emerge.timing: 7 to 14 days Soil temperature: 65 to 70°F (18 to 21°C) Moisture: Reduce moisture levels once radicle emergence occurs Allow the soil to dry out slightly before watering Irrigate early in the day so that foliage is dry by nightfall Light: 450 to 1,500 f c (5,000 to 16,000 Lux) Fertilizer: 50 to 75 ppm N from 14-0-14 or calcium/potassium nitrate feed once per week when cotyledons are fully expanded Alternate feed with clear water Maintain water alkalinity at 60-100 ppm and ammonium levels at less than 10 ppm Soil pH: 5 5 to 5 8 Soil EC: <0 75 mmhos/cm
Stage 3 - Growth and development of true leaves.timing: 14 days Soil temperature: 62 to 65°F (17 to 18°C) Moisture: To promote root growth and control shoot growth, allow the soil to dry between irrigations, but avoid wilting Light: 1,000 to 2,500 f c (11,000 to 27,000 Lux) Fertilizer: 100 to 150 ppm of 20-10-20 alternating with 15-5-15 or other cal-mag formulations, every 2 or 3 irrigations Soil pH: 5 5 to 5 8 Soil EC: <1 0 mmhos/cm Plant Growth Regulators: Use DIF whenever possible A-Rest sprayed 3 and 4 weeks after sowing at 10 ppm is effective in controlling height
Stage 4 - Plants are ready for transplant or shipping.timing: 7 days Soil temperature: 60 to 62°F (16 to 19°C) Moisture: Allow soil to dry thoroughly between irrigations, but avoid wilting Light: 1,000 to 2,500 f c (11,000 to 27,000 Lux) Fertilizer: 100 to 150 ppm N from 15-5-15 or other cal-mag formulation as needed Avoid ammonium fertilizers in Stage 4 Soil pH: 5 5 to 5 8 Soil EC: <0 75 mmhos/cm
GROWING ON TO FINISHUse a well-drained disease-free soilless medium with a medium initial nutrient charge and a pH of 5 5 to 6 2
Temperature• Night:45to55°F(10to13°C)• Day:55to70°F(13to21°C)• Avoidnighttemperaturesabove55°F
(13°C) as this will reduce stem strength • ThebesttimetogrowSnapdragonsis
Autumn through early Spring, when cooler growing conditions can be maintained
MoistureAllow soil to dry slightly between waterings, but avoid wilting
LightKeep light levels as high as possible while maintaining recommended temperature
FertilizerEvery other irrigation, apply 150 ppm N from 15-0-15, 15-5-15 alternating with 20-10-20 Alternate feed with clear water
Soil pH5 5 to 6 2
Soil EC1 0 mmhos/cm (using 1:2 extraction) Provide good airflow at the plant level
Controlling Height • Onceplantsarerootedtothesidesof
the containers they can be allowed to dry slightly prior to irrigation
• Withholdfertilizer,especiallyphosphorous and ammonium-form N
• Snapdragonsareresponsivetoday/nighttemperature differential (DIF) and are shorter with a negative DIF
• Whengrownasrecommendedundercool temperatures and high light, no growth regulators should be needed B-Nine, Bonzi and Sumagic are effective in controlling height in snapdragons, but may delay flowering and will lead to less uniform flowering time
Crop SchedulingSow to transplant (400-cell plug tray): 5 to 6 weeks transplant to saleable 306 packs: 4 to 6 weeks
Common ProblemsInsects: Thrips, aphids Diseases: Downy mildew, Botrytis, powdery mildew

800 879-BALL ballseed.com36
FLOWER GROWERFacts
VERBENA (VEGETATIVE)Verbena x hybrid
Aztec®
PROPAGATION• Chooseawell-drainedmediumwithan
EC of 0 75 to 0 80 mmhos and a pH of 5 8 to 6 2
• Stickcuttingswithin12to24hoursofarrival Cuttings can be stored overnight, if necessary, at 45 to 50°F (7 to 10°C)
• Soiltemperatureshouldbemaintainedat 68 to 73°F (20 to 23°C) until roots are visible
• Oncerootsarevisible,themediashould be kept moderately wet and never saturated This will prevent iron deficiency and the associated chlorotic foliage which can develop
• Asrootedcuttingsareremovedfrommist, apply a broad spectrum foliar fungicide
• Beginfertilizationwith75to100ppmNwhen roots become visible Increase to 150 to 200 ppm N as roots develop
• Astherootedcuttingsdevelop,highlightand moderate air temperatures should eliminate the need for chemical plant growth regulators (PGRs)
• Toimprovebranchingandhabit,plantscan be pinched 7 to 10 days before transplanting
• AztecVerbenarootedcuttingsshouldbe ready for transplanting 24 to 28 days after sticking
GROWING ON TO FINISH
MediaUse a well-drained, disease-free, soilless medium with a pH of 5 8 to 6 2
Temperature• Night:62to64°F(17to18°C)• Day:71to79°F(21to26°C)
Light• Keeplightintensitiesabove5,000
f c (50,000 Lux) while maintaining moderate temperatures
• Lowlightlevelspromotestemstretchand poor flowering
• AztecVerbenafloweryear-round,although shortest crop times will occur under Spring and Summer conditions
Water• Duringthefirst10to14days,water
sparingly and never saturate the media Allow the media to dry somewhat between waterings
• Avoidextendedperiodswherethemediais saturated, as this will cause root system problems
• Avoidwetfoliageinareaswherepowderymildew can be a problem
Fertilizer• AztecVerbenahavemoderatetoheavy
fertilizer requirements to keep the plants growing vigorously Reducing the feed causes the plant to become woody and foliage quality to decline
• Useabalancedfertilizerat225to300ppm every watering to ensure maximum growth and flowering
• Excessivephosphorousandammoniacalnitrogen will promote unwanted vegetative growth Both should be provided in very limited quantities
• Controlled-releasefertilizercanbeusedto supplement a liquid feed program
• Leachpotsperiodicallywithclearwaterto avoid build-up of salts
Pinching• AztecVerbenashouldbepinched7to14
days after transplanting When pinched, plants should be actively growing with roots at or near the edge of the pot
• Plantscanbesheared1to2timesasneeded if the crop must be held
• Florelpromotesbranchingandimprovesthe habit of Verbena Any application of Florel should be avoided within 8 weeks of sale A range of 300 to 400 ppm, applied 1 to 2 times should be used as a guideline
Controlling Growth• AtankmixofCycocel(750to1,500ppm)
and B-Nine (2,500 to 3,500 ppm) applied 7 to 10 days after pinching will encourage the naturally mounded habit of Aztec Verbena
• SimilarresultsoccurwithaB-Ninespray (3,000 to 4,000 ppm) Multiple applications can be made as needed
• Theserecommendationsforplantgrowth regulators should be used only as general guidelines Growers must trial all chemicals under their particular conditions
Common ProblemsInsects: Aphids, thrips, whitefly, spider mites, leafminer Diseases: Botrytis, Rhizoctonia, Pythium, powdery mildew
Problems Causes
Plant collapse
Wet media for an extended period (Pythium, Botrytis)
Excess vegetative growth
High ammonia concentration in the soilOver-fertilization under low light conditionsLow light and over-watering; wet media
Poor branching
Low fertilization during early stages
Foliage necrosis
Drying out the plant between irrigationsHigh soluble salts in the soilPowdery mildew
Foliage chlorosis
Low temperaturesPowdery mildew
Crop Schedule & Uses(Crop Schedule in Weeks)
4-in. (10-cm) Pot 1 PP*
6-in. ( 15-cm) Pot
2 PP*
Unrooted cuttings
8 to 10 10 to 11
Rooted cuttings
5 to 7 7 to 8
*PP: Plants per pot

800 879-BALL ballseed.com 37
FLOWER GROWERFacts
VERBENA (SEED)Verbena x hybrid
Quartz XP Approximate seed count: 11,900 S /oz (420 S /g)
PLUG PRODUCTION
Plug Tray Size392-cell or similar size
Sowing• Coverwithamediumcoveringofcoarse-
grade vermiculite • Moisturemanagementisthekeyto
successful verbena germination • Verbenagerminatesbestundermedium-
dry (level 2) to medium (level 3) plug media moisture levels; medium-wet (level 4), and wet (level 5) conditions will tend to decrease germination performance
• Moisturelevelsintheplugmediaatsowing can be controlled by adjusting the water pressure, number of misting nozzles and the speed of the misting tunnel in the sowing line
Stage 1 - Sow to radicle emergence; 4 to 6 daysGermination temperature: 72 to 75°F (22 to 24°C) Light: Not required for germination Relative humidity: 95 to 97%
Stage 2 - Radicle emergence to cotyledon expansion; 10 to 14 daystemperature: The day air temperatures can be set at 70 to 72°F (21 to 22°C) and the night temperature at approximately 60°F (15°C) Light: Up to 2,500 f c (26,900 Lux) during Stages 2 and 3 Moisture: Once the plug trays come out of the germination chamber, grow them under medium-wet (level 4) moisture conditions Avoid wet (level 5) moisture conditions until the seedlings establish Fertilizer: Apply fertilizer at rate 1 (less than 100 ppm) with a nitrate-form fertilizer with low phosphorous Maintain a media pH of 5 8 to 6 2 and EC at 0 5 to 0 7 mS/cm (1:2 extraction)
Stage 3 - Cotyledon expansion to growth of all set of true leaves; 10 to 14 daystemperature: The day air temperatures can be set at 68 to 70°F (20 to 21°C) and the night temperature at approximately 60°F (15°C) Fertilizer: Increase the fertilizer rate to 2 (100 to 175 ppm) Maintain a media pH of 5 8 to 6 2 and EC at 0 7 to 1 0 mS/cm (1:2 extraction)
Stage 4 - Development of all true leaves to shipping/transplant; 7 daysMaintain the recommended growing temperatures and fertilizer regime as in Stage 3 Light levels can be up to 5,000 f c (53,800 Lux) if temperatures can be maintained Check for powdery mildew from this stage onwards
Growth RegulatorsIf plant growth regulator treatments are necessary for holding/toning the plugs, apply A-Rest (ancymidol) at 10 ppm as a foliar spray
GROWING ON TO FINISH
Container Size306-cell packs
MediaUse a well-drained, disease-free soilless medium with a pH of 5 5 to 6 2 and a medium initial nutrient charge
TemperatureMaintain day temperatures at 65 to 70°F (18 to 21°C) and night temperatures at about 60°F (15°C) until finish Verbena can be grown as low as 55°F (13°C), but the crop time will be longer
LightKeep light levels as high as possible while maintaining appropriate temperatures
HumidityAvoid high humidity in the growing environment as this can induce powdery mildew
FertilizerStarting 1 week after transplant, apply fertilizer at rate 3 (175 to 225 ppm) using predominantly nitrate-form fertilizer with low phosphorus If needed, a balanced ammonium and nitrate-form fertilizer may be used as needed to encourage growth and balance the media pH
Growth Regulators Use 2 applications of A-Rest (ancymidol) at 20ppmasafoliarspray.One•applicationcan be done 1 week after transplant, and the second application can be done 10 to 14 days later
B-Nine (daminozide) at 3,500 ppm applied as a foliar spray also works well Use the same spray schedule as recommended for A-Rest
Crop SchedulingSow to transplant (392-cell plug): Approximately 4 weeks transplant to flower in 306-cell packs: 6 to 8 weeks
Total Crop Time:
Container Size
Number of Plants
Spring
306 pack 1 per cell 10 to 12 weeks
Common ProblemsInsects: Mites, thrips Diseases: Powdery mildew
VINCA (SEED)Catharanthus roseus
Garden Approximate seed count: 14,875 S /oz (525 S /g)
PLUG PRODUCTION
MediaUse a well-drained, disease-free, soilless medium with a pH of 5 8 to 6 0 and a medium initial nutrient charge (EC 0 75 mmhos/cm)
SowingCan be produced in 392, 288, or similar cell size plug trays Cover the seed with vermiculite Allow 3 to 5 days for germination
Stage 1 – Germination takes 3 to 5 days.Soil temperature: 75 to 78°F (24 to 25°C) Light: Not required Moisture: Keep soil wet (level 4) during Stage 1 Humidity: Maintain 95% relative humidity (RH) until the cotyledons emerge
Stage 2 Soil temperature: 70 to 72°F (21 to 22°C) Light: Up to 2,500 f c (26,900 Lux) Moisture: Reduce soil moisture slightly (level 3 to 4) to allow the roots to penetrate into the media Fertilizer: Apply fertilizer at rate 1 (less than 100 ppm) from nitrate-form fertilizers with low phosphorous
Stage 3Soil temperature: 70 to 72°F (21 to 22°C) Light: Up to 2,500 f c (26,900 Lux) Moisture: Allow media to dry further until the surface becomes light brown (level 2) before watering Keep the moisture to wet-dry cycle (moisture level 4 to 2) Fertilizer: Increase fertilizer to rate 2 (100 to 175 ppm) Maintain medium pH of 5 8 to 6 0 and EC between 1 0 and 1 5 mS/cm (1:2 extraction)

800 879-BALL ballseed.com38
FLOWER GROWERFacts
Stage 4Soil temperature: 70 to 72°F (21 to 22°C) Light: Up to 5,000 f c (53,800 Lux) if temperature can be controlled Moisture: Same as Stage 3 Fertilizer: Same as Stage 3
Growth Regulators: Not needed
GROWING ON TO FINISH
MediaUse a well-drained, disease-free, soilless media with a pH of 5 5 to 6 0 and a medium initial nutrient charge (EC 0 75 mmhos/cm)
Temperature• Night:65to68°F(18to20°C)• Day:75°F(24°C)orabove
LightAs high as possible while maintaining optimal production temperatures
IrrigationMaintain even moisture Avoid excessive media and foliage wetness as these conditions are favorable for disease incidence
Fertilizer• Starting1weekaftertransplant,apply
fertilizer at rate 4 (225 to 300 ppm) once a week using predominately a nitrate-form fertilizer with low phosphorus and high potassium
• MaintainthemediaECat1.5to2.0mS/cm and pH at 5 5 to 6 0
• Forconstantfertilizerprogram,fertilizercan be applied at rate 3 (175 to 225 ppm) while maintaining the above recommended EC and pH ranges
Growth RegulatorsNot required
Crop Scheduling Sow to transplant (392, 288, or similar cell plug size): 5 weeks transplant to finish in 306-packs: 3 to 5 weeks 4-in. (10-cm) pot: 3 to 5 weeks 1 plants per pot 6-in (15-cm) pot: 3 to 5 weeks 1-3 plants per pot total crop time from sow to finish: 8 to 10 weeks The timing is dependent on temperature and light levels
Common ProblemsDiseases: Incorporate a preventative fungicide program for Rhizoctonia, Botrytis and Phytophthora
ZINNIA (SEED)Zinnia spp.
Bridesmaid Champagne Toast White Wedding UpTown Double Zahara Approximate seed count: 10,000 to 17,000 S /oz (350 to 600 S /g)
PLUG PRODUCTION
MediaUse a well-drained, disease-free media with a pH range of 5 8 to 6 2, and EC less than 0 75mmhos/cm (2:1 extraction)
SOWINGPlug Tray Size: Can be produced in 288, 200 or similar cell size plug trays Cover the seed with a medium layer of vermiculite at sowing
Stage 1 – Germination takes approximately 2 to 3 daysGermination temperature: 68 to 73°F (20 to 22°C) Light: Light is not required for germination Moisture: Keep the soil wet (level 4) during Stage 1 Relative humidity: Maintain 95 to 97% relative humidity (RH) until cotyledons emerge
Stage 2 temperature: 68 to 76°F (20 to 24°C) days; 59 to 64°F (15 to 18°C) nights Light: Can be up to 2,500 f c (26,900 Lux) during Stages 2 and 3 Media Moisture: Keep the media medium (level 3) to medium wet (level 4) Fertilizer: Apply fertilizer at rate 1 (less than 100 ppm) with a nitrate-form fertilizer with low phosphorous
Stage 3temperature: 68 to 76°F (20 to 24°C) days; 59 to 64°F (15 to 18°C) nights Media Moisture: Keep the media medium wet (level 3) during Stages 3 and 4 Fertilizer: Increase the fertilizer rate to 2 (100 to 175 ppm) Maintain a media pH of 5 8 to 6 2 and EC at 0 7 to 1 0 mS/cm (1:2 extraction)
Stage 4temperature: 65 to 70°F (18 to 21°C) days; 59 to 64°F (15 to 18°C) nights Light: Light levels can be up to 5,000 f c (53,800 Lux) if optimal temperatures can be maintained Fertilizer: Same as Stage 3
Plant Growth RegulatorsPGRs are generally not required during plug production If needed, plants can be treated once during the plug stage at
about 10 to 14 days after sowing with a foliar spray of B-Nine (daminozide) at 1,250 to 2,500 ppm
GROWING ON TO FINISH
Container SizeDouble Zahara can be produced in 306 pack or 4-in (10-cm) pots
The other varieties can be produced in 4-in (10-cm) or 6-in (15-cm ) pots
MediaUse a well-drained, disease-free media with a pH of 5 8 to 6 2 and a medium initial nutrient charge
Temperature • Night:59to64°F(15to18°C)• Day:65to70°F(18to21°C)
LightKeep light levels as high as possible while maintaining appropriate temperatures Flowers will be more double with intense color under high light levels
Fertilizer• Starting1weekaftertransplant,apply
fertilizer at rate 3 (175 to 225 ppm) using predominantly nitrate-form fertilizer with low phosphorus
• Ifneeded,alternatewithabalancedammonium and nitrate-form fertilizer to encourage growth and balance the media pH
• MaintainthemediaECat1.50to2.00mS/cm and pH at 5 8 to 6 2
• Avoidfertilizer/nutritionalstressduringproduction as this can cause the flowers to be less double
IrrigationMaintain optimal media moisture (not too wet or too dry) Avoid overhead irrigation Irrigation should take place during times when foliage will dry quickly, to prevent any disease incidence
Plant Growth RegulatorsB-Nine (daminozide) at 3,500 to 5,000 ppm applied twice as a foliar spray will help in controlling the plant growth First application can be done one week after transplant, followed by a second application 7 to 10 days later
Crop Scheduling Sow to transplant: Approximately 3 weeks transplant to flower: 8 to 9 weeks in Spring, 5 to 6 weeks in Summer total crop time (sow to flower): 11 to 12 weeks in Spring, 8 to 9 weeks in Summer
Common Problems Insects: Monitor for Aphids early in production, and Thrips during flowering Disease: Avoid high humidity and condensation in the greenhouse, as these conditions are favorable for Botrytis and Powdery Mildew incidence
VINCA continued

800 879-BALL ballseed.com 39
Burpee Home Gardens® Vegetable Variety Culture ChartNote: This chart includes general culture guidelines Please refer to the GrowerFacts on the following pages for detailed growing information
See the inside back cover for Burpee Home Gardens “To Go” Culture Charts
CropGermination Temperature
Cover/Light Sow to Transplant (days)1
Growing On Temperature
Total Crop Time for 4-in. (10-cm) pots (weeks)5
VEGEtABLES
Artichoke 70-75°F (21-24°C) C. Lt. 35-45 55-58°F (13-14°C) 10-12
Arugula 65-70°F (18-21°C) C 10-15 50-60°F (10-15°C) 7-8
Bean (Pole/Bush) 72-75°F (22-24°C) C Direct sow into container2 60-65°F (15-18°C) 3-5
Broccoli 70°F (21°C) C 10-21 50-60°F (10-15°C) 8-9
Brussels Sprouts 70°F (21°C) C 10-14 50-60°F (10-15°C) 8-9
Cabbage 70°F (21°C) C 10-15 50-60°F (10-15°C) 8-9
Cauliflower 70°F (21°C) C 10-16 50-60°F (10-15°C) 8-9
Celery 70-72°F (21-22°C) C 30-35 58-60°F (14-15°C) 8-10
Collards 70°F (21°C) C 10-14 50-60°F (10-15°C) 8-9
Cucumber 72°F (22°C) C Direct sow into container2 60-65°F (15-18°C) 3-5
Eggplant 70-75°F (21-24°C) C 12-18 60-65°F (15-18°C) 8-9
Fennel 70-72°F (21-22°C) C 30-35 55-60°F (13-15°C) 9-11
Kohlrabi 65-70°F (18-21°C) C 28-30 50-60°F (10-15°C) 8-9
Lettuce & Greens 65-70°F (18-21°C) C/L Direct sow into container2 55-60°F (13-15°C) 6-9
Melon 75-78°F (24-25°C) C Direct sow into container2 65-70°F (18-21°C) 4-5
Mustard 70°F (21°C) C 10-14 50-60°F (10-15°C) 8-9
Okra 70°F (21°C) C. Lt. 14-18 60-65°F (15-18°C) 9-11
Onion 70°F (21°C) C. Lt. Direct sow into container2 55-60°F (13-15°C) 12-15
Pak Choi 65-70°F (18-21°C) C 28-32 50-60°F (10-15°C) 7-8
Pea 50-60°F (10-15°C) C Direct sow into container2 45-55°F (7-13°C) 4-5
Pepper 75-78°F (24-25°C) C/L 21-26 62-65°F (17-18°C) 9-11
Pumpkin 72°F (22°C) C Direct sow into container2 62-65°F (17-18°C) 4-6
Spinach 65-70°F (18-21°C) C/L Direct sow into container2 55-60°F (13-15°C) 6-9
Squash (Summer & Winter) 72°F (22°C) C Direct sow into container2 60-65°F (15-18°C) 4-6
Strawberry 65-70°F (18-21°C) C. Lt. 28-38 60-62°F (15-17°C) 9-10
Swiss Chard 68-72°F (20-22°C) C 30-35 55-58°F (13-14°C) 10-12
Tomato 70-75°F (21-24°C) C 12-18 62-65°F (17-18°C) 8-10
Watermelon 75-80°F (24-26°C) C Direct sow into container2 65-70°F (18-21°C) 6-7
HERBS
Basil 70°F (21°C) C 15-184 60-65°F (15-18°C) 8-10
Borage 70°F (21°C) C 14-20 55-60°F (13-15°C) 10-12
Catnip 70-75°F (21-24°C) C. Lt. 25-29 55-60°F (13-15°C) 12-13
Chives 70°F (21°C) C. Lt. Direct sow into container3 55-60°F (13-15°C) 15-17
Cilantro 68-70°F (20-21°C) C/L 14-184 55-60°F (13-15°C) 10-11
Dill 65-70°F (18-21°C) L 10-154 55-60°F (13-15°C) 9-11
Lavender 65-75°F (18-24°C) L 20-32 60-65°F (15-18°C) 18-20
Oregano 70°F (21°C) C 21-28 50-55°F (10-13°C) 12-13
Parsley 70°F (21°C) C 21-284 60-65°F (15-18°C) 10-11
Peppermint & Spearmint 70-75°F (21-24°C) C. Lt. 25-29 55-60°F (13-15°C) 12-13
Rosemary 70°F (21°C) L 21-28 55-60°F (13-15°C) 16-18
Sage 70°F (21°C) C 20-27 55-60°F (13-15°C) 12-14
Stevia 70°F (21°C) C. Lt. 10-14 60-65°F (15-18°C) 7-10
Summer Savory 70-72°F (21-22°C) L 28-30 60-62°F (16-17°C) 7-8
Summer Thyme 70°F (21°C) C 12-18 55-60°F (13-15°C) 13-15
Sweet Marjoram 70°F (21°C) C. Lt. 10-14 55-60°F (13-15°C) 11-12
C: Cover C. Lt.: Cover lightly L: Light needed to germinate C/L: Cover optional 1 Based on 512-plug (except when direct sown) 2 2-3 seeds per container 3 Broadcast seed 4 Can broadcast seed into final container to cut cost and growing time 5 Weeks from sow to saleable size: For packs, reduce the crop time 1-2 weeks For containers larger than 4-in size, increase the crop time 1-2 weeks
1

800 879-BALL ballseed.com40
VEGEtabLE GROWERFacts
NOTE: Growers should use the information presented here as a starting point Crop times will vary depending on the climate, location, time of year and greenhouse environmental conditions Chemical and PGR recommendations are only guidelines It is the responsibility of the applicator to read and follow all the current label directions for the specific chemical being used in accordance with all regulations
ARTICHOKECynara scolymus
Imperial Star
PLUG PRODUCTIONStage 1 – Time of radicle emergence (4 to 8 days)• Soiltemperature70to75°F(21to24°C).• SoilpH5.5to5.8andsolublesalts(EC)
less than 0 75 mmhos/cm (2:1 extraction) • Artichokeisverysensitivetohighsalts,
particularly high ammonium, during germination
• Keepammoniumlevelstolessthan 10 ppm
• Covertheseedlightlywithcoarsevermiculite
Stage 2 – Stem and cotyledon emergence (7 to 10 days)• Soiltemperature62to65°F(17to18°C).• Reducemoisturelevelsonceradicle
emergence occurs Allow the soil to dry out slightly before watering for best germination and rooting
• KeepsoilpHto5.5to5.8andEClessthan 0 75 mmhos/cm
• Keepammoniumlevelstolessthan 10 ppm
• Beginfertilizingwith50to75ppmN from 14-0-14, 15-5-15 or a calcium/potassium nitrate feed once cotyledons are fully expanded
• Alternatefeedwithclearwater.• Irrigateearlyinthedaysofoliageisdry
by nightfall to prevent diseases
Stage 3 – Growth and development of true leaves (14 to 18 days)• Soiltemperature62to65°F(17to18°C).• Allowthesoiltodrythoroughlybetween
irrigations but avoid permanent wilting to promote root growth and control shoot growth
• MaintainsoilpHat5.5to5.8andEC less than 1 0 mmhos/cm
• Increasefeedto100to150ppmN from 20-10-20 alternating with 14-0-14, 15-5-15 or other calcium/potassium nitrate fertilizer
• Fertilizeevery2to3irrigations.• Supplementwithmagnesium1to2times
during this stage, using magnesium sulfate or magnesium nitrate Do not mix magnesium sulfate with calcium nitrate as precipitate will form
• UseDIFwheneverpossible,especiallythe first 2 hours after sunrise, to control plant height
Stage 4 – Plugs ready for transplanting or shipping (7 days)• Soiltemperature55to60°F(13to15°C).• Allowsoiltodrythoroughlybetween
irrigations • MaintainsoilpHat5.5to5.8andECless
than 0 75 mmhos/cm • Fertilizewith14-0-14,15-5-15or
calcium/potassium nitrate feed at 100 to 150 ppm N as needed
GROWING ON TO FINISHTemperature• Night:55to58°F(13to14°C)• Day:55to62°F(13to17°C)
LightMaintain light levels as high as possible while maintaining moderate temperatures
MediaUse a well-drained, disease-free soilless medium with a medium initial nutrient charge and a pH of 5 5 to 6 2
Fertilization• Fertilizeeveryotherirrigationwith
15-0-15 or 15-5-15 alternating with 20-10-20 at 150 to 200 ppm nitrogen
• Maintainmediumelectrical conductivity around 1 0 mmhos/cm (using 1:2 extraction)
Controlling Height• Onceplantsarerootedtothesidesof
the containers, they can be allowed to wilt prior to irrigation to provide some height control
• Heightcanalsobecontrolledbywithholding fertilizer, especially phosphorous and ammonium-form nitrogen
• Artichokeisresponsivetoday/nighttemperature differential (DIF), and is shorter with a negative DIF
• ChemicalPGRscannotbeusedon most vegetables and herbs
POST-PRODUCTION CAREOptimum Temperature• Night:55to65°F(13to18°C)• Day:65to70°F(18to21°C)• Artichokepreferscooltemperatures;
below 70°F (21°C) is recommended during retail display
• Optimumconditionsmaybedifficultto maintain, especially if plants are displayed outside
LightArtichoke grows best in full sun; however partial shading may be beneficial during retail display
Common ProblemsInsects: Aphids, Whitefly, Fungus gnatsDiseases: Pythium, Rhizoctonia, Powdery Mildew
ARUGULAEruca sativa
Myway
PLUG PRODUCTIONStage 1 – Time of radicle emergence (3 to 5 days)• Soiltemperature65to70°F(18to21°C).• SoilpH5.5to5.8andsolublesalts(EC)
less than 0 75 mmhos/cm (2:1 extraction) • Arugulaisverysensitivetohighsalts,
particularly high ammonium, during germination

800 879-BALL ballseed.com 41
VEGEtabLE GROWERFacts
• Keepammoniumlevelstolessthan 10 ppm
• Covertheseedwithcoarsevermiculite.
Stage 2 – Stem and cotyledon emergence (4 to 7 days)• Soiltemperature62to65°F(17to18°C).• Reducemoisturelevelsonceradicle
emergence occurs Allow the soil to dry out slightly before watering for best germination and rooting
• KeepsoilpHto5.5to5.8andECto less than 0 75 mmhos/cm
• Keepammoniumlevelstolessthan 10 ppm
• Beginfertilizingwith50to75ppm N from 14-0-14, 15-5-15 or a calcium/potassium nitrate feed once cotyledons are fully expanded
• Alternatefeedwithclearwater.• Irrigateearlyinthedaysofoliageisdry
by nightfall to prevent diseases
Stage 3 – Growth and development of true leaves (10 to 14 days)• Soil temperature 62 to 65°F (17 to 18°C) • Allow the soil to dry thoroughly between
irrigations but avoid permanent wilting to promote root growth and control shoot growth
• Maintain soil pH at 5 5 to 5 8 and EC less than 1 0 mmhos/cm
• Increase feed to 100 to 150 ppm N from 20-10-20 alternating with 14-0-14, 15-5-15 or other calcium/potassium nitrate fertilizer
• Fertilize every 2 to 3 irrigations • Supplement with magnesium 1 to 2 times
during this stage, using magnesium sulfate or magnesium nitrate Do not mix magnesium sulfate with calcium nitrate as precipitate will form
• Use DIF whenever possible, for the first 2 hours after sunrise, to control plant height
Stage 4 – Plugs ready for transplanting or shipping (7 days)• Soil temperature 60 to 62°F (15 to 17°C) • Allow soil to dry thoroughly
between irrigations • Maintain soil pH at 5 5 to 5 8 and
EC less than 0 75 mmhos/cm • Fertilize with 14-0-14, 15-5-15 or
calcium/potassium nitrate feed at 100 to 150 ppm N as needed
GROWING ON TO FINISHTemperature• Night: 50 to 60°F (10 to 15°C)• Day: 55 to 60°F (13 to 15°C)
LightMaintain light levels as high as possible while maintaining moderate temperatures
MediaUse a well-drained, disease-free soilless medium with a medium initial nutrient charge and a pH of 5 5 to 6 2
Fertilization• Fertilize every other irrigation with
15-0-15 or 15-5-15 alternating with 20-10-20 at 150 to 200 ppm nitrogen
• Maintain medium electrical conductivity around 1 0 mmhos/cm (using 1:2 extraction)
Controlling Height• Onceplantsarerootedtothesidesof
the containers, they can be allowed to wilt prior to irrigation to provide some height control
• Heightcanalsobecontrolledbywithholding fertilizer, especially phosphorous and ammonium-form nitrogen
• Arugulaisresponsivetoday/nighttemperature differential (DIF), and is shorter with a negative DIF
• ChemicalPGRscannotbeused on most vegetables and herbs
POST-PRODUCTION CAREOptimum Temperature• Night:62to65°F(17to18°C)• Day:65to70°F(18to21°C)• Arugulapreferscooltemperatures;
temperatures below 70°F (21°C) are recommended during retail display
• Optimum conditions may be difficult to maintain, especially if plants are displayed outside
LightArugula grows best in full sun; however partial shading may be beneficial during retail display
Common ProblemsInsects: Aphids, Arugula looper, Whitefly, Stem borer, Fungus gnatsDiseases: Pythium, Rhizoctonia
BEANPhaseolus vulgaris
Blue Lake BushBlue Lake PoleGreen ‘N Gold Mix
DIRECT SOWSow seed directly into finish container
Time of radicle emergence (2 to 4 days)• Soil temperature 72 to 75°F (22 to 24°C) • Keep media very moist, near saturation • Seed are to be covered • Soil pH 5 8 to 6 2 and soluble salts (EC)
to less than 0 75 mmhos/cm (2:1 extraction)
• Avoid high salts and particularly high ammonium during germination
• Keep ammonium levels less than 10 ppm
After stem and cotyledon emergence (7 days)• Soil temperature 65 to 70°F (18 to 21°C) • Reduce moisture levels Allow the soil
to dry out slightly before watering for best rooting
• Keep soil pH to 5 8 to 6 2 and EC to less than 0 75 mmhos/cm
• Begin fertilizing with 50 to 75 ppm N from 14-0-14, 15-5-15 or a calcium/potassium nitrate feed once cotyledons are fully expanded
• Alternate feed with clear water • Irrigate early in the day so foliage is
dry by nightfall to prevent diseases
GROWING ON TO FINISHGrowth and development after the development of true leaves (3 to 5 weeks)
Temperature• Night: 60 to 65°F (15 to 18°C)• Day: 65 to 70°F (18 to 21°C)
LightMaintain light levels as high as possible while maintaining moderate temperatures
Media• Use a well-drained, disease-free soilless
medium with a medium initial nutrient charge and a pH of 5 8 to 6 2
• Allow the soil to dry thoroughly between irrigations but avoid permanent wilting to promote root growth and control shoot growth
Fertilization• Increase feed to 100 to 150 ppm N from
20-10-20, alternating with 14-0-14, 15-5-15 or other calcium/potassium nitrate fertilizer
• Fertilize every 2 to 3 irrigations • If using 15-0-15, supplement with
magnesium 1 to 2 times during this stage, using magnesium sulfate (16 oz /100 gal ) or magnesium nitrate Do not mix magnesium sulfate with calcium nitrate as precipitate will form
• Maintain soil pH at 5 8 to 6 2
Controlling Height• Use DIF whenever possible, especially
the first 2 hours after sunrise, to control plant height
• Height can also be controlled by withholding fertilizer, especially phosphorous and ammonium-form nitrogen
• Chemical PGRs can not be used on most vegetables and herbs
POST-PRODUCTION CAREOptimum Temperature• Night: 62 to 65°F (17 to 18°C)• Day: 65 to 70°F (18 to 21°C)• Optimum conditions may be difficult
to maintain, especially if plants are displayed outside
LightBeans grow best in full sun; however partial shading may be beneficial during retail display
Common ProblemsInsects: Whitefly, Spider mitesDiseases: Fungal diseases
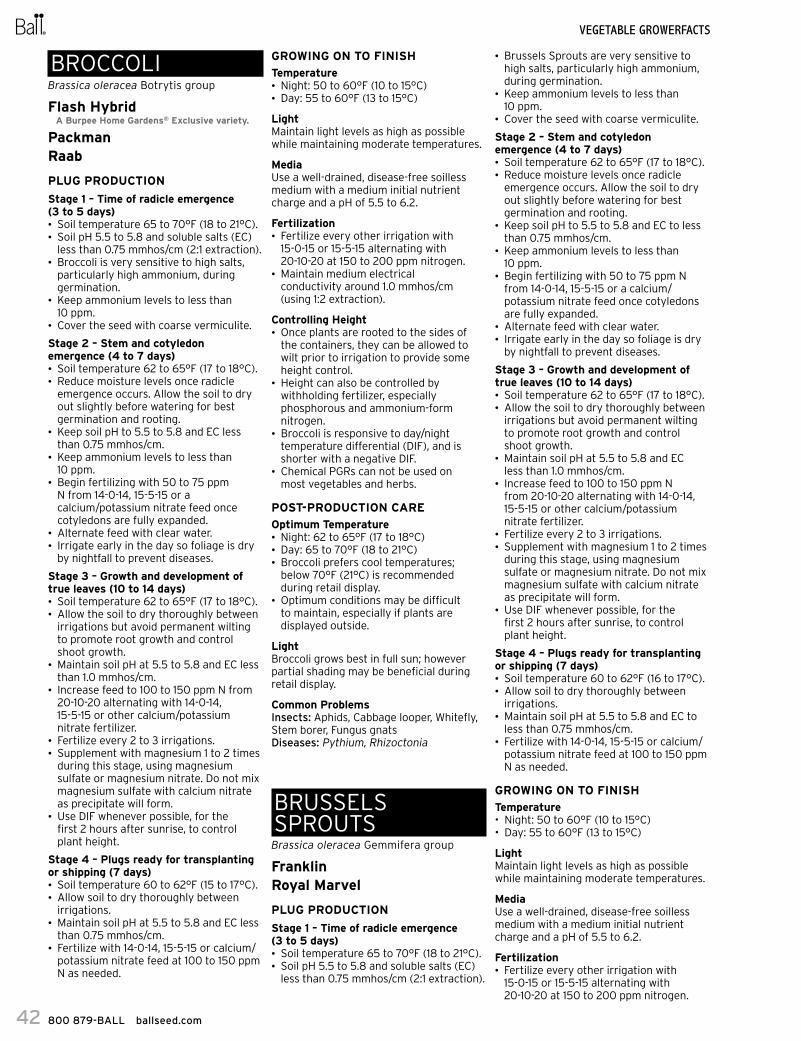
800 879-BALL ballseed.com42
VEGEtabLE GROWERFacts
BROCCOLIBrassica oleracea Botrytis group
Flash HybridA Burpee Home Gardens® Exclusive variety.
PackmanRaab
PLUG PRODUCTIONStage 1 – Time of radicle emergence (3 to 5 days)• Soil temperature 65 to 70°F (18 to 21°C) • Soil pH 5 5 to 5 8 and soluble salts (EC)
less than 0 75 mmhos/cm (2:1 extraction) • Broccoli is very sensitive to high salts,
particularly high ammonium, during germination
• Keep ammonium levels to less than 10 ppm
• Cover the seed with coarse vermiculite
Stage 2 – Stem and cotyledon emergence (4 to 7 days)• Soil temperature 62 to 65°F (17 to 18°C) • Reduce moisture levels once radicle
emergence occurs Allow the soil to dry out slightly before watering for best germination and rooting
• Keep soil pH to 5 5 to 5 8 and EC less than 0 75 mmhos/cm
• Keep ammonium levels to less than 10 ppm
• Begin fertilizing with 50 to 75 ppm N from 14-0-14, 15-5-15 or a calcium/potassium nitrate feed once cotyledons are fully expanded
• Alternate feed with clear water • Irrigate early in the day so foliage is dry
by nightfall to prevent diseases
Stage 3 – Growth and development of true leaves (10 to 14 days)• Soil temperature 62 to 65°F (17 to 18°C) • Allow the soil to dry thoroughly between
irrigations but avoid permanent wilting to promote root growth and control shoot growth
• Maintain soil pH at 5 5 to 5 8 and EC less than 1 0 mmhos/cm
• Increase feed to 100 to 150 ppm N from 20-10-20 alternating with 14-0-14, 15-5-15 or other calcium/potassium nitrate fertilizer
• Fertilize every 2 to 3 irrigations • Supplement with magnesium 1 to 2 times
during this stage, using magnesium sulfate or magnesium nitrate Do not mix magnesium sulfate with calcium nitrate as precipitate will form
• Use DIF whenever possible, for the first 2 hours after sunrise, to control plant height
Stage 4 – Plugs ready for transplanting or shipping (7 days)• Soil temperature 60 to 62°F (15 to 17°C) • Allow soil to dry thoroughly between
irrigations • Maintain soil pH at 5 5 to 5 8 and EC less
than 0 75 mmhos/cm • Fertilize with 14-0-14, 15-5-15 or calcium/
potassium nitrate feed at 100 to 150 ppm N as needed
GROWING ON TO FINISHTemperature• Night: 50 to 60°F (10 to 15°C)• Day: 55 to 60°F (13 to 15°C)
LightMaintain light levels as high as possible while maintaining moderate temperatures
MediaUse a well-drained, disease-free soilless medium with a medium initial nutrient charge and a pH of 5 5 to 6 2
Fertilization• Fertilize every other irrigation with
15-0-15 or 15-5-15 alternating with 20-10-20 at 150 to 200 ppm nitrogen
• Maintain medium electrical conductivity around 1 0 mmhos/cm (using 1:2 extraction)
Controlling Height• Once plants are rooted to the sides of
the containers, they can be allowed to wilt prior to irrigation to provide some height control
• Height can also be controlled by withholding fertilizer, especially phosphorous and ammonium-form nitrogen
• Broccoli is responsive to day/night temperature differential (DIF), and is shorter with a negative DIF
• Chemical PGRs can not be used on most vegetables and herbs
POST-PRODUCTION CAREOptimum Temperature• Night: 62 to 65°F (17 to 18°C)• Day: 65 to 70°F (18 to 21°C)• Broccoli prefers cool temperatures;
below 70°F (21°C) is recommended during retail display
• Optimum conditions may be difficult to maintain, especially if plants are displayed outside
LightBroccoli grows best in full sun; however partial shading may be beneficial during retail display
Common ProblemsInsects: Aphids, Cabbage looper, Whitefly, Stem borer, Fungus gnatsDiseases: Pythium, Rhizoctonia
BRUSSELS SPROUTS Brassica oleracea Gemmifera group
Franklin Royal Marvel
PLUG PRODUCTIONStage 1 – Time of radicle emergence (3 to 5 days)• Soil temperature 65 to 70°F (18 to 21°C) • Soil pH 5 5 to 5 8 and soluble salts (EC)
less than 0 75 mmhos/cm (2:1 extraction)
• Brussels Sprouts are very sensitive to high salts, particularly high ammonium, during germination
• Keep ammonium levels to less than 10 ppm
• Cover the seed with coarse vermiculite
Stage 2 – Stem and cotyledon emergence (4 to 7 days)• Soil temperature 62 to 65°F (17 to 18°C) • Reduce moisture levels once radicle
emergence occurs Allow the soil to dry out slightly before watering for best germination and rooting
• Keep soil pH to 5 5 to 5 8 and EC to less than 0 75 mmhos/cm
• Keep ammonium levels to less than 10 ppm
• Begin fertilizing with 50 to 75 ppm N from 14-0-14, 15-5-15 or a calcium/potassium nitrate feed once cotyledons are fully expanded
• Alternate feed with clear water • Irrigate early in the day so foliage is dry
by nightfall to prevent diseases
Stage 3 – Growth and development of true leaves (10 to 14 days)• Soil temperature 62 to 65°F (17 to 18°C) • Allow the soil to dry thoroughly between
irrigations but avoid permanent wilting to promote root growth and control shoot growth
• Maintain soil pH at 5 5 to 5 8 and EC less than 1 0 mmhos/cm
• Increase feed to 100 to 150 ppm N from 20-10-20 alternating with 14-0-14, 15-5-15 or other calcium/potassium nitrate fertilizer
• Fertilize every 2 to 3 irrigations • Supplement with magnesium 1 to 2 times
during this stage, using magnesium sulfate or magnesium nitrate Do not mix magnesium sulfate with calcium nitrate as precipitate will form
• Use DIF whenever possible, for the first 2 hours after sunrise, to control plant height
Stage 4 – Plugs ready for transplanting or shipping (7 days)• Soil temperature 60 to 62°F (16 to 17°C) • Allow soil to dry thoroughly between
irrigations • Maintain soil pH at 5 5 to 5 8 and EC to
less than 0 75 mmhos/cm • Fertilize with 14-0-14, 15-5-15 or calcium/
potassium nitrate feed at 100 to 150 ppm N as needed
GROWING ON TO FINISHTemperature• Night:50to60°F(10to15°C)• Day:55to60°F(13to15°C)
LightMaintain light levels as high as possible while maintaining moderate temperatures
MediaUse a well-drained, disease-free soilless medium with a medium initial nutrient charge and a pH of 5 5 to 6 2
Fertilization• Fertilize every other irrigation with
15-0-15 or 15-5-15 alternating with 20-10-20 at 150 to 200 ppm nitrogen

800 879-BALL ballseed.com 43
VEGEtabLE GROWERFacts
• Maintain medium electrical conductivity around 1 0 mmhos/cm (using 1:2 extraction)
Controlling Height• Once plants are rooted to the sides of
the containers, they can be allowed to wilt prior to irrigation to provide some height control
• Height can also be controlled by withholding fertilizer, especially phosphorous and ammonium-form nitrogen
• Brussels Sprouts are responsive to day/night temperature differential (DIF), and are shorter with a negative DIF
• Chemical PGRs can not be used on most vegetables and herbs
POST-PRODUCTION CAREOptimum Temperature• Night:62to65°F(17to18°C)• Day:65to70°F(18to21°C)• BrusselsSproutsprefercool
temperatures; temperatures below 70°F (21°C) are recommended during retail display
• Optimum conditions may be difficult to maintain, especially if plants are displayed outside
LightBrussels Sprouts grow best in full sun; however partial shading may be beneficial during retail display
Common ProblemsInsects: Aphids, Cabbage looper, Whitefly, Stem borer, Fungus gnatsDiseases: Pythium, Rhizoctonia
CABBAGE Brassica oleracea Capitata group
Big Flat Head Fast Vantage Pacifica
PLUG PRODUCTIONStage 1 – Time of radicle emergence (3 to 5 days)• Soil temperature 65 to 70°F (18 to 21°C) • Soil pH 5 5 to 5 8 and soluble salts (EC)
less than 0 75 mmhos/cm (2:1 extraction) • Cabbage is very sensitive to high salts,
particularly high ammonium, during germination
• Keep ammonium levels to less than 10 ppm
• Cover the seed with coarse vermiculite
Stage 2 – Stem and cotyledon emergence (4 to 7 days)• Soil temperature 62 to 65°F (17 to 18°C) • Reduce moisture levels once radicle
emergence occurs Allow the soil to dry out slightly before watering for best germination and rooting
• Keep soil pH to 5 5 to 5 8 and EC to less than 0 75 mmhos/cm
• Keep ammonium levels to less than 10 ppm
• Begin fertilizing with 50 to 75 ppm N from 14-0-14, 15-5-15 or a calcium/potassium nitrate feed once cotyledons are fully expanded
• Alternate feed with clear water • Irrigate early in the day so foliage is dry
by nightfall to prevent diseases
Stage 3 – Growth and development of true leaves (10 to 14 days)• Soil temperature 62 to 65°F (17 to 18°C) • Allow the soil to dry thoroughly between
irrigations but avoid permanent wilting to promote root growth and control shoot growth
• Maintain soil pH at 5 5 to 5 8 and EC less than 1 0 mmhos/cm
• Increase feed to 100 to 150 ppm N from 20-10-20 alternating with 14-0-14, 15-5-15 or other calcium/potassium nitrate fertilizer
• Fertilize every 2 to 3 irrigations • Supplement with magnesium 1 to 2 times
during this stage, using magnesium sulfate or magnesium nitrate Do not mix magnesium sulfate with calcium nitrate as precipitate will form
• Use DIF whenever possible, for the first 2 hours after sunrise, to control plant height
Stage 4 – Plugs ready for transplanting or shipping (7 days)• Soiltemperature60to62°F(16to17°C).• Allowsoiltodrythoroughlybetween
irrigations • MaintainsoilpHat5.5to5.8andECless
than 0 75 mmhos/cm • Fertilizewith14-0-14,15-5-15orcalcium/
potassium nitrate feed at 100 to 150 ppm N as needed
GROWING ON TO FINISHTemperature• Night:50to60°F(10to15°C)• Day:55to60°F(13to15°C)
LightMaintain light levels as high as possible while maintaining moderate temperatures
MediaUse a well-drained, disease-free soilless medium with a medium initial nutrient charge and a pH of 5 5 to 6 2
Fertilization• Fertilizeeveryotherirrigationwith
15-0-15 or 15-5-15 alternating with 20-10-20 at 150 to 200 ppm nitrogen
• Maintainmediumelectrical conductivity around 1 0 mmhos/cm (using 1:2 extraction)
Controlling Height• Onceplantsarerootedtothesidesof
the containers, they can be allowed to wilt prior to irrigation to provide some height control
• Heightcanalsobecontrolledbywithholding fertilizer, especially phosphorous and ammonium-form nitrogen
• Cabbageisresponsivetoday/nighttemperature differential (DIF), and is shorter with a negative DIF
• ChemicalPGRscannotbeusedon most vegetables and herbs
POST-PRODUCTION CAREOptimum Temperature• Night:62to65°F(17to18°C)• Day:65to70°F(18to21°C)• Cabbagepreferscooltemperatures;
temperatures below 70°F (21°C) are recommended during retail display
• Optimumconditionsmaybedifficultto maintain, especially if plants are displayed outside
LightCabbage grows best in full sun; however partial shading may be beneficial during retail display
Common ProblemsInsects: Aphids, Cabbage looper, Whitefly, Stem borer, Fungus gnatsDiseases: Pythium, Rhizoctonia
CAULIFLOWERBrassica oleracea Botrytis group
AmazingCheddarRomanesco VeronicaSnow CrownPLUG PRODUCTIONStage 1 – Time of radicle emergence (3 to 5 days)• Soil temperature 65 to 70°F (18 to 21°C) • Soil pH 5 5 to 5 8 and soluble salts (EC)
less than 0 75 mmhos/cm (2:1 extraction) • Cauliflower is very sensitive to high
salts, particularly high ammonium, during germination
• Keep ammonium levels to less than 10 ppm
• Cover the seed with coarse vermiculite
Stage 2 – Stem and cotyledon emergence (4 to 7 days)• Soil temperature 62 to 65°F (17 to 18°C) • Reduce moisture levels once radicle
emergence occurs Allow the soil to dry out slightly before watering for best germination and rooting
• Keep soil pH to 5 5 to 5 8 and EC to less than 0 75 mmhos/cm
• Keep ammonium levels to less than 10 ppm
• Begin fertilizing with 50 to 75 ppm N from 14-0-14, 15-5-15 or a calcium/potassium nitrate feed once cotyledons are fully expanded
• Alternate feed with clear water • Irrigate early in the day so foliage is dry
by nightfall to prevent diseases
Stage 3 – Growth and development of true leaves (10 to 14 days)• Soil temperature 62 to 65°F (17 to 18°C) • Allow the soil to dry thoroughly between
irrigations but avoid permanent wilting to promote root growth and control shoot growth
• Maintain soil pH at 5 5 to 5 8 and EC less than 1 0 mmhos/cm

800 879-BALL ballseed.com44
VEGEtabLE GROWERFacts
• Increase feed to 100 to 150 ppm N from 20-10-20 alternating with 14-0-14, 15-5-15 or other calcium/potassium nitrate fertilizer
• Fertilize every 2 to 3 irrigations • Supplement with magnesium 1 to 2 times
during this stage, using magnesium sulfate or magnesium nitrate Do not mix magnesium sulfate with calcium nitrate as precipitate will form
• Use DIF whenever possible, for the first 2 hours after sunrise, to control plant height
Stage 4 – Plugs ready for transplanting or shipping (7 days)• Soil temperature 60 to 62°F (16 to 17°C) • Allow soil to dry thoroughly between
irrigations • Maintain soil pH at 5 5 to 5 8 and EC less
than 0 75 mmhos/cm • Fertilize with 14-0-14, 15-5-15 or calcium/
potassium nitrate feed at 100 to 150 ppm N as needed
GROWING ON TO FINISHTemperature• Night: 50 to 60°F (10 to 15°C)• Day: 55 to 60°F (13 to 15°C)
LightMaintain light levels as high as possible while maintaining moderate temperatures
MediaUse a well-drained, disease-free soilless medium with a medium initial nutrient charge and a pH of 5 5 to 6 2
Fertilization• Fertilizeeveryotherirrigationwith
15-0-15 or 15-5-15 alternating with 20-10-20 at 150 to 200 ppm nitrogen
• Maintainmediumelectrical conductivity around 1 0 mmhos/cm (using 1:2 extraction)
Controlling Height• Once plants are rooted to the sides of
the containers, they can be allowed to wilt prior to irrigation to provide some height control
• Height can also be controlled by withholding fertilizer, especially phosphorous and ammonium-form nitrogen
• Cauliflower is responsive to day/night temperature differential (DIF), and is shorter with a negative DIF
• Chemical PGRs can not be used on most vegetables and herbs
POST-PRODUCTION CAREOptimum Temperature• Night: 62 to 65°F (17 to 18°C)• Day: 65 to 70°F (18 to 21°C)• Cauliflower prefers cool temperatures;
temperatures below 70°F (21°C) are recommended during retail display
• Optimum conditions may be difficult to maintain, especially if plants are displayed outside
LightCauliflower grows best in full sun; however partial shading may be beneficial during retail display
Common ProblemsInsects: Aphids, Cauliflower looper, Whitefly, Stem borer, Fungus gnatsDiseases: Pythium, Rhizoctonia
CELERYApium graveolens var dulce
Tango
PLUG PRODUCTIONStage 1 – Time of radicle emergence (8 to 10 days)• Soiltemperature70to72°F(21to22°C).• SoilpH5.5to5.8andsolublesalts(EC)
less than 0 75 mmhos/cm (2:1 extraction) • Celeryisverysensitivetohighsalts,
particularly high ammonium, during germination
• Keepammoniumlevelstolessthan 10 ppm
• Covertheseedwithcoarsevermiculite.
Stage 2 – Stem and cotyledon emergence (7 to 10 days)• Soiltemperature62to65°F(17to18°C).• Reducemoisturelevelsonceradicle
emergence occurs Allow the soil to dry out slightly before watering for best germination and rooting
• KeepsoilpHto5.5to5.8andEClessthan 0 75 mmhos/cm
• Keepammoniumlevelstolessthan 10 ppm
• Beginfertilizingwith50to75ppmN from 14-0-14, 15-5-15 or a calcium/potassium nitrate feed once cotyledons are fully expanded
• Alternatefeedwithclearwater.• Irrigateearlyinthedaysofoliageisdry
by nightfall to prevent diseases
Stage 3 – Growth and development of true leaves (10 to 14 days)• Soiltemperature62to65°F(17to18°C).• Allowthesoiltodrythoroughlybetween
irrigations but avoid permanent wilting to promote root growth and control shoot growth
• MaintainsoilpHat5.5to5.8andEClessthan 1 0 mmhos/cm
• Increasefeedto100to150ppmN from 20 10 20 alternating with 14 0 14, 15-5-15 or other calcium/potassium nitrate fertilizer
• Fertilizeevery2to3irrigations.• Supplementwithmagnesium1to2times
during this stage, using magnesium sulfate or magnesium nitrate Do not mix magnesium sulfate with calcium nitrate as precipitate will form
Stage 4 – Plugs ready for transplanting or shipping (7 days)• Soiltemperature60to62°F(16to17°C).• Allowsoiltodrythoroughlybetween
irrigations • MaintainsoilpHat5.5to5.8andECless
than 0 75 mmhos/cm
• Fertilizewith14-0-14,15-5-15orcalcium/potassium nitrate feed at 100 to 150 ppm N as needed
GROWING ON TO FINISHTemperature• Night:58to60°F(14to15°C)• Day:60to65°F(15to18°C)
LightMaintain light levels as high as possible while maintaining moderate temperatures
MediaUse a well-drained, disease-free soilless medium with a medium initial nutrient charge and a pH of 5 5 to 6 2
Fertilization• Fertilizeeveryotherirrigationwith
15-0-15 or 15-5-15 alternating with 20-10-20 at 150 to 200 ppm nitrogen
• Maintainmediumelectrical conductivity around 1 0 mmhos/cm (using 1:2 extraction)
Controlling Height• Onceplantsarerootedtothesidesof
the containers, they can be allowed to wilt prior to irrigation to provide some height control
• Heightcanalsobecontrolledbywithholding fertilizer, especially phosphorous and ammonium-form nitrogen
• ChemicalPGRscannotbeusedon most vegetables and herbs
POST-PRODUCTION CAREOptimum Temperature• Night:62to65°F(17to18°C)• Day:65to70°F(18to21°C)• Celerypreferscooltemperatures;
temperatures below 70°F (21°C) are recommended during retail display
• Optimumconditionsmaybedifficultto maintain, especially if plants are displayed outside
LightCelery grows best in full sun; however partial shading may be beneficial during retail display
Common ProblemsInsects: Aphids, Whitefly, Fungus gnatsDiseases: Pythium, Rhizoctonia
COLLARDSBrassica oleracea Acephala group
Georgia
PLUG PRODUCTIONStage 1 – Time of radicle emergence (3 to 5 days)• Soil temperature 65 to 70°F (18 to 21°C) • Soil pH 5 5 to 5 8 and soluble salts (EC)
less than 0 75 mmhos/cm (2:1 extraction) • Collards are very sensitive to high salts,
particularly high ammonium, during germination
CAULIFLOWER continued

800 879-BALL ballseed.com 45
VEGEtabLE GROWERFacts
• Keep ammonium levels to less than 10 ppm
• Cover the seed with coarse vermiculite
Stage 2 – Stem and cotyledon emergence (4 to 7 days)• Soil temperature 62 to 65°F (17 to 18°C) • Reduce moisture levels once radicle
emergence occurs Allow the soil to dry out slightly before watering for best germination and rooting
• Keep soil pH to 5 5 to 5 8 and EC to less than 0 75 mmhos/cm
• Keep ammonium levels to less than 10 ppm
• Begin fertilizing with 50 to 75 ppm N from 14-0-14, 15-5-15 or a calcium/potassium nitrate feed once cotyledons are fully expanded
• Alternate feed with clear water • Irrigate early in the day so foliage is dry
by nightfall to prevent diseases
Stage 3 – Growth and development of true leaves (10 to 14 days)• Soil temperature 62 to 65°F (17 to 18°C) • Allow the soil to dry thoroughly between
irrigations but avoid permanent wilting to promote root growth and control shoot growth
• Maintain soil pH at 5 5 to 5 8 and EC less than 1 0 mmhos/cm
• Increase feed to 100 to 150 ppm N from 20-10-20 alternating with 14-0-14, 15-5-15 or other calcium/potassium nitrate fertilizer
• Fertilize every 2 to 3 irrigations • Supplement with magnesium 1 to 2 times
during this stage, using magnesium sulfate or magnesium nitrate Do not mix magnesium sulfate with calcium nitrate as precipitate will form
• Use DIF whenever possible, for the first 2 hours after sunrise, to control plant height
Stage 4 – Plugs ready for transplanting or shipping (7 days)• Soil temperature 60 to 62°F (16 to 17°C) • Allow soil to dry thoroughly between
irrigations • Maintain soil pH at 5 5 to 5 8 and EC less
than 0 75 mmhos/cm • Fertilize with 14-0-14, 15-5-15 or
calcium/potassium nitrate feed at 100 to 150 ppm N as needed
GROWING ON TO FINISH Temperature• Night: 50 to 60°F (10 to 15°C)• Day: 55 to 60°F (13 to 15°C)LightMaintain light levels as high as possible while maintaining moderate temperatures
MediaUse a well-drained, disease-free soilless medium with a medium initial nutrient charge and a pH of 5 5 to 6 2
Fertilization• Fertilize every other irrigation with
15-0-15 or 15-5-15 alternating with 20-10-20 at 150 to 200 ppm nitrogen
• Maintain medium electrical conductivity around 1 0 mmhos/cm (using 1:2 extraction)
Controlling Height• Once plants are rooted to the sides of
the containers, they can be allowed to wilt prior to irrigation to provide some height control
• Height can also be controlled by withholding fertilizer, especially phosphorous and ammonium-form nitrogen
• Collards are responsive to day/night temperature differential (DIF), and are shorter with a negative DIF
• Chemical PGRs can not be used on most vegetables and herbs
POST-PRODUCTION CAREOptimum Temperature• Night: 62 to 65°F (17 to 18°C)• Day: 65 to 70°F (18 to 21°C)• Collards prefer cool temperatures;
temperatures below 70°F (21°C) are recommended during retail display
• Optimum conditions may be difficult to maintain, especially if plants are displayed outside
LightCollards grow best in full sun; however partial shading may be beneficial during retail display
Common ProblemsInsects: Aphids, Cabbage looper, Whitefly, Stem borer, Fungus gnatsDiseases: Pythium, Rhizoctonia
CUCUMBER Cucumis sativus
BOOST Gold StandardBurpee Hybrid IIBurpless No. 26Bush Champion
A Burpee Home Gardens® Exclusive variety.
Homemade PicklesPickalot Hybrid
A Burpee Home Gardens® Exclusive variety.
Sweet Burpless HybridA Burpee Home Gardens® Exclusive variety.
DIRECT SOWSow seed directly into finish container
Time of radicle emergence (2 to 4 days)• Soil temperature 70 to 75°F (21 to 24°C) • Keep media very moist, near saturation • Seed are to be covered • Soil pH 5 8 to 6 2 and soluble salts
(EC) to less than 0 75 mmhos/cm (2:1 extraction)
• Avoid high salts and particularly high ammonium during germination
• Keep ammonium levels to less than 10 ppm
After stem and cotyledon emergence (7 days)• Soil temperature 65 to 70°F (18 to 21°C) • Reduce moisture levels Allow the soil
to dry out slightly before watering for best rooting
• Keep soil pH to 5 8 to 6 2 and EC to less than 0 75 mmhos/cm
• Begin fertilizing with 50 to 75 ppm N from 14-0-14 or 15-5-15 or a calcium/potassium nitrate feed once cotyledons are fully expanded
• Alternate feed with clear water • Irrigate early in the day so foliage is dry
by nightfall to prevent diseases
GROWING ON TO FINISHGrowth and development after the development of true leaves (3 to 5 weeks)
Temperature• Night: 60 to 65°F (16 to 18°C)• Day: 65 to 70°F (18 to 21°C)• Allow the soil to dry thoroughly between
irrigations but avoid permanent wilting to promote root growth and control shoot growth
LightMaintain light levels as high as possible while maintaining moderate temperatures
MediaUse a well-drained, disease-free soilless medium with a medium initial nutrient charge and a pH of 5 8 to 6 2
Fertilization• Increase feed to 100 to 150 ppm N from
20-10-20 alternating with 14-0-14 or 15-5-15 or other calcium/potassium nitrate fertilizer
• Fertilize every 2 to 3 irrigations • If using 15-0-15, supplement with
magnesium 1 to 2 times during this stage, using magnesium sulfate (16 oz /100 gal ) or magnesium nitrate Do not mix magnesium sulfate with calcium nitrate as precipitate will form
• Maintain soil pH at 5 8 to 6 2
Controlling Height• Use DIF whenever possible, especially
the first 2 hours after sunrise, to control plant height
• Height can also be controlled by withholding fertilizer, especially phosphorous and ammonium-form nitrogen
• Chemical PGRs can not be used on most vegetables and herbs
POST-PRODUCTION CAREOptimum Temperature• Night: 62 to 65°F (17 to 18°C)• Day: 65 to 70°F (18 to 21°C)• Optimum conditions may be difficult
to maintain, especially if plants are displayed outside
LightCucumbers grow best in full sun; however partial shading may be beneficial during retail display
Common ProblemsInsects: Whitefly, Spider mitesDiseases: Fungal diseases

800 879-BALL ballseed.com46
VEGEtabLE GROWERFacts
EGGPLANTSolanum melongena
Burpee HybridA Burpee Home Gardens® Exclusive variety.
Pot BlackPurple Blaze
A Burpee Home Gardens® Exclusive variety.
White Star HybridA Burpee Home Gardens® Exclusive variety.
PLUG PRODUCTIONStage 1 – Time of radicle emergence (3 to 6 days)• Soil temperature 70 to 75°F (21 to 24°C) • Keep media evenly moist but not
saturated • Cover the seed lightly with coarse
vermiculite • Soil pH 5 5 to 5 8 and soluble salts (EC)
less than 0 5 mmhos/cm (2:1 extraction) • Eggplant is very sensitive to high salts,
particularly high ammonium, during germination
• Keep ammonium levels to less than 10 ppm
Stage 2 – Stem and cotyledon emergence (7 to 10 days)• Soil temperature 70 to 75°F (21 to 24°C) • Reduce moisture levels once radicle
emergence occurs Allow the soil to dry out slightly before watering for best germination and rooting
• Keep soil pH to 5 5 to 5 8 and EC to less than 0 5 mmhos/cm
• Keep ammonium levels to less than 10 ppm
• Begin fertilizing with 50 to 75 ppm N from 14-0-14 or 15-5-15 or a calcium/potassium nitrate feed once cotyledons are fully expanded
• Alternate feed with clear water • Irrigate early in the day so foliage is dry
by nightfall to prevent diseases
Stage 3 – Growth and development of true leaves (10 to 14 days)• Soil temperature 65 to 70°F (18 to 21°C) • Allow the soil to dry thoroughly between
irrigations but avoid permanent wilting to promote root growth and control shoot growth
• Maintain soil pH at 5 5 to 5 8 and EC less than 0 75 mmhos/cm
• Increase feed to 100 to 150 ppm N from 20-10-20 alternating with 14-0-14, 15-5-15 or other calcium/potassium nitrate fertilizer
• Fertilize every 2 to 3 irrigations • If using 15-0-15, supplement with
magnesium 1 to 2 times during this stage, using magnesium sulfate (16 oz /100 gal ) or magnesium nitrate Do not mix magnesium sulfate with calcium nitrate as precipitate will form
• Use DIF whenever possible, for the first 2 hours after sunrise, to control plant height
Stage 4 – Plugs ready for transplanting or shipping (7 days)• Soil temperature 60 to 62°F (16 to 17°C) • Allow soil to dry thoroughly between
irrigations • Maintain soil pH at 5 5 to 5 8 and EC less
than 0 75 mmhos/cm • Fertilize with 14-0-14 or 15-5-15 or
calcium/potassium nitrate feed at 100 to 150 ppm N as needed
GROWING ON TO FINISHTemperature• Night: 55 to 65°F (13 to 18°C)• Day: 60 to 70 °F (15 to 21°C)
LightMaintain light levels as high as possible while maintaining moderate temperatures
MediaUse a well-drained, disease-free soilless medium with a medium initial nutrient charge and a pH of 5 5 to 6 2
Fertilization• Fertilize every other irrigation with
15-0-15 or 15-5-15 alternating with 20-10-20 at 150 to 200 ppm nitrogen
• Maintain medium electrical conductivity around 1 0 mmhos/cm (using 1:2 extraction)
Controlling Height• Once plants are rooted to the sides of
the containers, they can be allowed to wilt prior to irrigation to provide some height control
• Height can also be controlled by withholding fertilizer, especially phosphorous and ammonium-form nitrogen
• Eggplant is responsive to day/night temperature differential (DIF), and is shorter with a negative DIF
• AlthoughSumagicislabeledforuseonEggplant, we do not recommend its use until the grower has at least trialed it on a limited basis Application rates, timing and variety response may affect growth for the home gardener
POST-PRODUCTION CAREOptimum Temperature• Night: 55 to 65°F (13 to 18°C)• Day: 60 to 70°F (15 to 21°C)• Optimum conditions may be difficult
to maintain, especially if plants are displayed outside
LightEggplant prefers full sun; however partial shading may be beneficial during retail display
Common ProblemsInsects: Aphids, Thrips, WhiteflyDiseases: Botrytis, Pythium
FENNELFoeniculum vulgare
Orion
PLUG PRODUCTIONStage 1 – Time of radicle emergence (5 to 7 days)• Soiltemperature70to72°F(21to22°C).• SoilpH5.5to5.8andsolublesalts(EC)
less than 0 75 mmhos/cm (2:1 extraction) • Fennelisverysensitivetohighsalts,
particularly high ammonium, during germination
• Keepammoniumlevelstolessthan 10 ppm
• Covertheseedwithcoarsevermiculite.
Stage 2 – Stem and cotyledon emergence (7 to 10 days)• Soiltemperature62to65°F(17to18°C).• Reducemoisturelevelsonceradicle
emergence occurs Allow the soil to dry out slightly before watering for best germination and rooting
• KeepsoilpHto5.5to5.8andECtolessthan 0 75 mmhos/cm
• Keepammoniumlevelstolessthan 10 ppm
• Beginfertilizingwith50to75ppmN from 14-0-14, 15-5-15 or a calcium/potassium nitrate feed once cotyledons are fully expanded
• Alternatefeedwithclearwater.• Irrigateearlyinthedaysofoliageisdry
by nightfall to prevent diseases
Stage 3 – Growth and development of true leaves (10 to 14 days)• Soiltemperature62to65°F(17to18°C).• Allowthesoiltodrythoroughlybetween
irrigations but avoid permanent wilting to promote root growth and control shoot growth
• MaintainsoilatpH5.5to5.8andEClessthan 1 0 mmhos/cm
• Increasefeedto100to150ppmNfrom20-10-20 alternating with 14-0-14, 15-5-15 or other calcium/potassium nitrate fertilizer
• Fertilizeevery2to3irrigations.• Supplementwithmagnesium1to2times
during this stage, using magnesium sulfate or magnesium nitrate Do not mix magnesium sulfate with calcium nitrate as precipitate will form
• UseDIFwheneverpossible,especiallythe first 2 hours after sunrise, to control plant height
Stage 4 – Plugs ready for transplanting or shipping (7 days)• Soiltemperature55to60°F(13to15°C).• Allowsoiltodrythoroughlybetween
irrigations • MaintainsoilpHat5.5to5.8andECless
than 0 75 mmhos/cm • Fertilizewith14-0-14,15-5-15orcalcium/
potassium nitrate feed at 100 to 150 ppm N as needed

800 879-BALL ballseed.com 47
VEGEtabLE GROWERFacts
GROWING ON TO FINISHTemperature• Night:55to60°F(13to15°C)• Day:55to65°F(13to18°C)
LightMaintain light levels as high as possible while maintaining moderate temperatures
MediaUse a well-drained, disease-free soilless medium with a medium initial nutrient charge and a pH of 5 5 to 6 2
Fertilization• Fertilizeeveryotherirrigationwith
15-0-15 or 15-5-15 alternating with 20-10-20 at 150 to 200 ppm nitrogen
• Maintainmediumelectrical conductivity around 1 0 mmhos/cm (using 1:2 extraction)
Controlling Height• Onceplantsarerootedtothesidesof
the containers, they can be allowed to wilt prior to irrigation to provide some height control
• Heightcanalsobecontrolledbywithholding fertilizer, especially phosphorous and ammonium-form nitrogen
• Fennelisresponsivetoday/nighttemperature differential (DIF), and is shorter with a negative DIF
• ChemicalPGRscannotbeusedon most vegetables and herbs
POST-PRODUCTION CAREOptimum Temperature• Night:62to65°F(17to18°C)• Day:65to70°F(18to21°C)• Fennelpreferscooltemperatures;
temperatures below 70°F (21°C) are recommended during retail display
• Optimumconditionsmaybedifficultto maintain, especially if plants are displayed outside
LightFennel grows best in full sun; however partial shading may be beneficial during retail display
Common ProblemsInsects: Aphids, Whitefly, Fungus gnatsDiseases: Pythium, Rhizoctonia
KOHLRABIBrassica oleracea Gongylodes group
Quickstar
PLUG PRODUCTIONStage 1 – Time of radicle emergence (3 to 5 days)• Soiltemperature65to70°F(18to21°C).• SoilpH5.5to5.8andsolublesalts(EC)
less than 0 75 mmhos/cm (2:1 extraction) • Kohlrabiisverysensitivetohighsalts,
particularly high ammonium, during germination
• Keepammoniumlevelstolessthan 10 ppm
• Covertheseedwithcoarsevermiculite.
Stage 2 – Stem and cotyledon emergence (4 to 7 days)• Soiltemperature62to65°F(17to18°C).• Reducemoisturelevelsonceradicle
emergence occurs Allow the soil to dry out slightly before watering for best germination and rooting
• KeepsoilpHto5.5to5.8andECtolessthan 0 75 mmhos/cm
• Keepammoniumlevelstolessthan 10 ppm
• Beginfertilizingwith50to75ppmN from 14-0-14, 15-5-15 or a calcium/potassium nitrate feed once cotyledons are fully expanded
• Alternatefeedwithclearwater.• Irrigateearlyinthedaysofoliageisdry
by nightfall to prevent diseases
Stage 3 – Growth and development of true leaves (10 to 14 days)• Soiltemperature62to65°F(17to18°C).• Allowthesoiltodrythoroughlybetween
irrigations but avoid permanent wilting to promote root growth and control shoot growth
• MaintainsoilpHat5.5to5.8andEC less than 1 0 mmhos/cm
• Increasefeedto100to150ppmN from 20-10-20 alternating with 14-0-14, 15-5-15 or other calcium/potassium nitrate fertilizer
• Fertilizeevery2to3irrigations.• Supplementwithmagnesium1to2times
during this stage, using magnesium sulfate or magnesium nitrate Do not mix magnesium sulfate with calcium nitrate as precipitate will form
• UseDIFwheneverpossible,especiallythe first 2 hours after sunrise, to control plant height
Stage 4 – Plugs ready for transplanting or shipping (7 days)• Soiltemperature60to62°F(15to17°C).• Allowsoiltodrythoroughlybetween
irrigations • MaintainsoilpHat5.5to5.8andECless
than 0 75 mmhos/cm • Fertilizewith14-0-14,15-5-15orcalcium/
potassium nitrate feed at 100 to 150 ppm N as needed
GROWING ON TO FINISHTemperature• Night:50to60°F(10to15°C)• Day:55to60°F(13to15°C)
LightMaintain light levels as high as possible while maintaining moderate temperatures
MediaUse a well-drained, disease-free soilless medium with a medium initial nutrient charge and a pH of 5 5 to 6 2
Fertilization• Fertilizeeveryotherirrigationwith
15-0-15 or 15-5-15 alternating with 20-10-20 at 150 to 200 ppm nitrogen
• Maintainmediumelectrical conductivity around 1 0 mmhos/cm (using 1:2 extraction)
Controlling Height• Onceplantsarerootedtothesidesof
the containers, they can be allowed to wilt prior to irrigation to provide some height control
• Heightcanalsobecontrolledbywithholding fertilizer, especially phosphorous and ammonium-form nitrogen
• Kohlrabiisresponsivetoday/nighttemperature differential (DIF), and is shorter with a negative DIF
• ChemicalPGRscannotbeusedon most vegetables and herbs
POST-PRODUCTION CAREOptimum Temperature• Night:62to65°F(17to18°C)• Day:65to70°F(18to21°C)• Kohlrabipreferscooltemperatures;
temperatures below 70°F (21°C) are recommended during retail display
• Optimumconditionsmaybedifficultto maintain, especially if plants are displayed outside
LightKohlrabi grows best in full sun; however partial shading may be beneficial during retail display
Common ProblemsInsects: Aphids, Cabbage looper, Whitefly, Stem borer, Fungus gnatsDiseases: Pythium, Rhizoctonia, Fusarium
LETTUCE & GREENSLactuca sativa
Burpee BibbA Burpee Home Gardens® Exclusive variety.
Buttercrunch Little Caesar
A Burpee Home Gardens® Exclusive variety.
LEttUCE BLENDS Gourmet Blend
A Burpee Home Gardens® Exclusive variety.
Heatwave BlendA Burpee Home Gardens® Exclusive variety.
MULtI-SPECIES, MULtI-PELLEt MIXES Alfresco Mix City Garden Mix Global Gourmet Mix
SALAD MIX BOOST Healing HandsPLUG PRODUCTIONNote: Direct sowing seed into the finish container is an alternative
Stage 1 – Time of radicle emergence (3 to 5 days)• Soil temperature 65 to 70°F (18 to 21°C) • Keep media very moist, near saturation • Cover the seed very lightly with
vermiculite or no covering • Light at 100 to 400 foot-candles may be
beneficial for germination

800 879-BALL ballseed.com48
VEGEtabLE GROWERFacts
• Soil pH 5 5 to 5 8 and soluble salts (EC) less than 0 50 mmhos/cm (2:1 extraction)
• Lettuce is very sensitive to high salts, particularly high ammonium, during germination
• Keep ammonium levels to less than 10 ppm
Stage 2 – Stem and cotyledon emergence (5 to 7 days)• Soil temperature 65 to 70°F (18 to 21°C) • Reduce moisture levels once radicle
emergence occurs Allow the soil to dry out slightly before watering for best germination and rooting
• Keep soil pH to 5 5 to 5 8 and EC to less than 0 50 mmhos/cm
• Keep ammonium levels to less than 10 ppm
• Begin fertilizing with 50 to 75 ppm N from 14-0-14 or 15-5-15 or a calcium/potassium nitrate feed once cotyledons are fully expanded
• Alternate feed with clear water • Irrigate early in the day so foliage is dry
by nightfall to prevent diseases
Stage 3 – Growth and development of true leaves (7 days)• Soil temperature 62 to 65°F (17 to 18°C) • Allow the soil to dry thoroughly between
irrigations but avoid permanent wilting to promote root growth and control shoot growth
• Maintain soil pH at 5 5 to 5 8 and EC less than 0 75 mmhos/cm
• Increase feed to 100 to 150 ppm N from 20-10-20 alternating with 14-0-14, 15-5-15 or other calcium/potassium nitrate fertilizer
• Fertilize every 2 to 3 irrigations • If using 15-0-15, supplement with
magnesium 1 to 2 times during this stage, using magnesium sulfate (16 oz /100 gal ) or magnesium nitrate Do not mix magnesium sulfate with calcium nitrate as precipitate will form
• Use DIF whenever possible, for the first 2 hours after sunrise, to control plant height
• Growth regulators cannot be used on lettuce
Stage 4 – Plugs ready for transplanting or shipping (5 to 7 days)• Soil temperature 60 to 62°F (15 to 17°C) • Allow soil to dry thoroughly between
irrigations • Maintain soil pH at 5 5 to 5 8 and EC less
than 0 75 mmhos/cm • Fertilize with 14-0-14, 15-5-15 or calcium/
potassium nitrate feed at 100 to 150 ppm N as needed
GROWING ON TO FINISHTemperature• Night: 55 to 60°F (13 to 15°C)• Day: 55 to 65°F (13 to 18°C)
LightMaintain light levels as high as possible while maintaining moderate temperatures
MediaUse a well-drained, disease-free soilless medium with a medium initial nutrient charge and a pH of 5 5 to 6 2
Fertilization• Fertilize every other irrigation with
15-0-15 or 15-5-15 alternating with 20-10-20 at 150 to 200 ppm nitrogen
• Maintain medium electrical conductivity around 1 0 memos/cm (using 1:2 extraction)
Controlling Height• Once plants are rooted to the sides of
the containers, they can be allowed to wilt prior to irrigation to provide some height control
• Height can also be controlled by withholding fertilizer, especially phosphorous and ammonium-form nitrogen
• Lettuce is responsive to day/night temperature differential (DIF), and is shorter with a negative DIF
• Chemical PGRs can not be used on most vegetables and herbs
POST-PRODUCTION CAREOptimum Temperature• Night: 50 to 55°F (10 to 13°C)• Day: 55 to 58°F (13 to 14°C)• Optimum conditions may be difficult
to maintain, especially if plants are displayed outside
LightLettuce prefers full sun; however partial shading may be beneficial during retail display
Common ProblemsInsects: AphidsDiseases: Botrytis, Pythium, Rhizoctonia
MELON Cucumis melo
AmbrosiaDoralTwice As Nice
A Burpee Home Gardens® Exclusive variety.
DIRECT SOWSow seed directly into finish container
Time of radicle emergence (2 to 4 days)• Soil temperature 70 to 75°F (21 to 24°C) • Keep media very moist, near saturation • Seed are to be covered • Soil pH 5 8 to 6 2 and soluble salts (EC)
less than 0 75 mmhos/cm (2:1 extraction) • Avoid high salts and particularly high
ammonium during germination • Keep ammonium levels to less than
10 ppm
After stem and cotyledon emergence (7 days)• Soil temperature 65 to 70°F (18 to 21°C) • Reduce moisture levels Allow the soil
to dry out slightly before watering for best rooting
• Keep soil pH to 5 8 to 6 2 and EC to less than 0 75 mmhos/cm
• Begin fertilizing with 50 to 75 ppm N from 14-0-14, 15-5-15 or a calcium/potassium nitrate feed once cotyledons are fully expanded
• Alternate feed with clear water • Irrigate early in the day so foliage is dry
by nightfall to prevent diseases
GROWING ON TO FINISHGrowth and development after the development of true leaves (4 to 5 weeks)
Temperature• Night: 65 to 70°F (18 to 21°C)• Day: 68 to 75°F (20 to 24°C)• Allow the soil to dry thoroughly between
irrigations but avoid permanent wilting to promote root growth and control shoot growth
LightMaintain light levels as high as possible while maintaining moderate temperatures
MediaUse a well-drained, disease-free soilless medium with a medium initial nutrient charge and a pH of 5 8 to 6 2
Fertilization• Increase feed to 100 to 150 ppm N from
20-10-20 alternating with 14-0-14 or 15-5-15 or other calcium/potassium nitrate fertilizer
• Fertilize every 2 to 3 irrigations • If using 15-0-15, supplement with
magnesium 1 to 2 times during this stage, using magnesium sulfate (16 oz /100 gal ) or magnesium nitrate Do not mix magnesium sulfate with calcium nitrate as precipitate will form
• Maintain soil pH at 5 8 to 6 2
Controlling Height• Use DIF whenever possible, especially
the first 2 hours after sunrise, to control plant height
• Height can also be controlled by withholding fertilizer, especially phosphorous and ammonium-form nitrogen
• Chemical PGRs can not be used on most vegetables and herbs
POST-PRODUCTION CAREOptimum Temperature• Night: 65 to 70°F (18 to 21°C)• Day: 65 to 75°F (18 to 24°C)• Optimum conditions may be difficult
to maintain, especially if plants are displayed outside
LightMelon prefers full sun, however partial shade may be beneficial in retail areas
Common ProblemsInsects: Whitefly, Spider mitesDiseases: Fungal diseases
LETTUCE & GREENS continued

800 879-BALL ballseed.com 49
VEGEtabLE GROWERFacts
MUSTARDBrassica juncea
Florida Broadleaf
PLUG PRODUCTIONStage 1 – Time of radicle emergence (3 to 5 days)• Soil temperature 65 to 70°F (18 to 21°C) • Soil pH 5 5 to 5 8 and soluble salts (EC)
less than 0 75 mmhos/cm (2:1 extraction) • Mustard is very sensitive to high salts,
particularly high ammonium, during germination
• Keep ammonium levels to less than 10 ppm
• Cover the seed with coarse vermiculite
Stage 2 – Stem and cotyledon emergence (4 to 7 days)• Soil temperature 62 to 65°F (17 to 18°C) • Reduce moisture levels once radicle
emergence occurs Allow the soil to dry out slightly before watering for best germination and rooting
• Keep soil pH to 5 5 to 5 8 and EC to less than 0 75 mmhos/cm
• Keep ammonium levels to less than 10 ppm
• Begin fertilizing with 50 to 75 ppm N from 14-0-14, 15-5-15 or a calcium/potassium nitrate feed once cotyledons are fully expanded
• Alternate feed with clear water • Irrigate early in the day so foliage is dry
by nightfall to prevent diseases
Stage 3 – Growth and development of true leaves (10 to 14 days)• Soil temperature 62 to 65°F (17 to 18°C) • Allow the soil to dry thoroughly between
irrigations but avoid permanent wilting to promote root growth and control shoot growth
• Maintain soil pH at 5 5 to 5 8 and EC less than 1 0 mmhos/cm
• Increase feed to 100 to 150 ppm N from 20-10-20 alternating with 14-0-14, 15-5-15 or other calcium/potassium nitrate fertilizer
• Fertilize every 2 to 3 irrigations • Supplement with magnesium 1 to 2 times
during this stage, using magnesium sulfate or magnesium nitrate Do not mix magnesium sulfate with calcium nitrate as precipitate will form
• Use DIF whenever possible, for the first 2 hours after sunrise, to control plant height
Stage 4 – Plugs ready for transplanting or shipping (7 days)• Soil temperature 60 to 62°F (15 to 17°C) • Allow soil to dry thoroughly between
irrigations • Maintain soil pH at 5 5 to 5 8 and EC less
than 0 75 mmhos/cm • Fertilize with 14-0-14, 15-5-15 or calcium/
potassium nitrate feed at 100 to 150 ppm N as needed
GROWING ON TO FINISHTemperature• Night: 50 to 60°F (10 to 15°C)• Day: 55 to 60°F (13 to 15°C)
LightMaintain light levels as high as possible while maintaining moderate temperatures
MediaUse a well-drained, disease-free soilless medium with a medium initial nutrient charge and a pH of 5 5 to 6 2
Fertilization• Fertilize every other irrigation with
15-0-15 or 15-5-15 alternating with 20-10-20 at 150 to 200 ppm nitrogen
• Maintain medium electrical conductivity around 1 0 mmhos/cm (using 1:2 extraction)
Controlling Height• Once plants are rooted to the sides of
the containers, they can be allowed to wilt prior to irrigation to provide some height control
• Height can also be controlled by withholding fertilizer, especially phosphorous and ammonium-form nitrogen
• Mustard is responsive to day/night temperature differential (DIF), and is shorter with a negative DIF
• Chemical PGRs can not be used on most vegetables and herbs
POST-PRODUCTION CAREOptimum Temperature• Night: 62 to 65°F (17 to 18°C)• Day: 65 to 70°F (18 to 21°C)• Mustard prefers cool temperatures;
temperatures below 70°F (21°C) are recommended during retail display
• Optimum conditions may be difficult to maintain, especially if plants are displayed outside
LightMustard grows best in full sun; however partial shading may be beneficial during retail display
Common ProblemsInsects: Aphids, Cabbage looper, Whitefly, Stem borer, Fungus gnatsDiseases: Pythium, Rhizoctonia
OKRA Abelmoschus esculentus
Clemson Spineless
PLUG PRODUCTIONStage 1 – Time of radicle emergence (5 to 7 days)• Soil temperature 68 to 70°F (20 to 21°C) • Soil pH 5 5 to 5 8 and soluble salts (EC)
less than 0 75 mmhos/cm (2:1 extraction) • Okra is very sensitive to high salts,
particularly high ammonium, during germination
• Keep ammonium levels to less than 10 ppm
• Cover the seed lightly with coarse vermiculite
Stage 2 – Stem and cotyledon emergence (7 to 14 days)• Soil temperature 62 to 65°F (17 to 18°C) • Reduce moisture levels once radicle
emergence occurs Allow the soil to dry out slightly before watering for best germination and rooting
• Keep soil pH to 5 5 to 5 8 and EC to less than 0 75 mmhos/cm
• Keep ammonium levels to less than 10 ppm
• Begin fertilizing with 50 to 75 ppm N from 14-0-14, 15-5-15 or a calcium/potassium nitrate feed once cotyledons are fully expanded
• Alternate feed with clear water • Irrigate early in the day so foliage is dry
by nightfall to prevent diseases
Stage 3 – Growth and development of true leaves (10 to 14 days)• Soil temperature 62 to 65°F (17 to 18°C) • Allow the soil to dry thoroughly between
irrigations but avoid permanent wilting to promote root growth and control shoot growth
• Maintain soil pH at 5 5 to 5 8 and EC less than 1 0 mmhos/cm
• Increase feed to 100 to 150 ppm N from 20-10-20 alternating with 14-0-14, 15-5-15 or other calcium/potassium nitrate fertilizer
• Fertilize every 2 to 3 irrigations • Supplement with magnesium 1 to 2 times
during this stage, using magnesium sulfate or magnesium nitrate Do not mix magnesium sulfate with calcium nitrate as precipitate will form
• Use DIF whenever possible, for the first 2 hours after sunrise, to control plant height
Stage 4 – Plugs ready for transplanting or shipping (7 days)• Soil temperature 60 to 62°F (15 to 17°C) • Allow soil to dry thoroughly between
irrigations • Maintain soil pH at 5 5 to 5 8 and EC less
than 0 75 mmhos/cm • Fertilize with 14-0-14, 15-5-15 or calcium/
potassium nitrate feed at 100 to 150 ppm N as needed
GROWING ON TO FINISHTemperature• Night:60to65°F(15to18°C)• Day:65to75°F(18to24°C)
LightMaintain light levels as high as possible while maintaining moderate temperatures
MediaUse a well-drained, disease-free soilless medium with a medium initial nutrient charge and a pH of 5 5 to 6 2
Fertilization• Fertilize every other irrigation with
15-0-15 or 15-5-15 alternating with 20-10-20 at 150 to 200 ppm nitrogen
• Maintain medium electrical conductivity around 1 0 mmhos/cm (using 1:2 extraction)

800 879-BALL ballseed.com50
VEGEtabLE GROWERFacts
Controlling Height• Once plants are rooted to the sides of
the containers, they can be allowed to wilt prior to irrigation to provide some height control
• Height can also be controlled by withholding fertilizer, especially phosphorous and ammonium-form nitrogen
• Okra is responsive to day/night temperature differential (DIF), and is shorter with a negative DIF
• Chemical PGRs can not be used on most vegetables and herbs
POST-PRODUCTION CAREOptimum Temperature• Okra prefers temperatures of 68°F
(20°C) during retail display • Optimum conditions may be difficult
to maintain, especially if plants are displayed outside
LightOkra grows best in full sun; however partial shading may be beneficial during retail display
Common ProblemsInsects: Aphids, WhiteflyDiseases: Pythium, Rhizoctonia
ONION Allium cepa
Parade BunchingRed ZeppelinWhite Sweet SpanishYellow Sweet Spanish
DIRECT SOWSow seed directly into finish container
Time of radicle emergence (2 to 4 days)• Soil temperature 70 to 75°F (21 to 24°C) • Keep media very moist, near saturation • Seed are to be covered • Soil pH 5 8 to 6 2 and soluble salts
(EC) to less than 0 75 mmhos/cm (2:1 extraction)
• Avoid high salts and particularly high ammonium during germination
• Keep ammonium levels to less than 10 ppm
After stem and cotyledon emergence (7 days)• Soil temperature 65 to 70°F (18 to 21°C) • Reduce moisture levels Allow the soil
to dry out slightly before watering for best rooting
• Keep soil pH to 5 8 to 6 2 and EC to less than 0 75 mmhos/cm
• Begin fertilizing with 50 to 75 ppm N from 14-0-14, 15-5-15 or a calcium/potassium nitrate feed once cotyledons are fully expanded
• Alternate feed with clear water • Irrigate early in the day so foliage is dry
by nightfall to prevent diseases
GROWING ON TO FINISHGrowth and development after the development of true leaves (12 to 15 weeks)
Temperature• Night: 55 to 60°F (13 to 15°C)• Day: 65 to 70°F (18 to 21°C)• Allow the soil to dry thoroughly between
irrigations but avoid permanent wilting to promote root growth and control shoot growth
LightMaintain light levels as high as possible while maintaining moderate temperatures
MediaUse a well-drained, disease-free soilless medium with a medium initial nutrient charge and a pH of 5 8 to 6 2
Fertilization• Increase feed to 100 to 150 ppm N from
20-10-20 alternating with 14-0-14, 15-5-15 or other calcium/potassium nitrate fertilizer
• Fertilize every 2 to 3 irrigations • If using 15-0-15, supplement with
magnesium 1 to 2 times during this stage, using magnesium sulfate (16 oz /100 gal ) or magnesium nitrate Do not mix magnesium sulfate with calcium nitrate as precipitate will form
• Maintain soil pH at 5 8 to 6 2
Controlling Height• Use DIF whenever possible, especially
the first 2 hours after sunrise, to control plant height
• Height can also be controlled by withholding fertilizer, especially phosphorous and ammonium-form nitrogen
• Chemical PGRs can not be used on most vegetables and herbs
POST-PRODUCTION CAREOptimum Temperature• Night: 62 to 65°F (17 to 18°C)• Day: 65 to 70°F (18 to 21°C)• Optimum conditions may be difficult
to maintain, especially if plants are displayed outside
LightOnions grow best in full sun; however partial shading may be beneficial during retail display
Common ProblemsDiseases: Fungal diseases
PAK CHOIBrassica rapa Chinensis group
Toy Choy
PLUG PRODUCTIONStage 1 – Time of radicle emergence (3 to 5 days)• Soiltemperature65to70°F(18to21°C).• SoilpH5.5to5.8andsolublesalts(EC)
less than 0 75 mmhos/cm (2:1 extraction)
• PakChoiisverysensitivetohighsalts,particularly high ammonium, during germination
• Keepammoniumlevelstolessthan 10 ppm
• Covertheseedwithcoarsevermiculite.
Stage 2 – Stem and cotyledon emergence (4 to 7 days)• Soiltemperature62to65°F(17to18°C).• Reducemoisturelevelsonceradicle
emergence occurs Allow the soil to dry out slightly before watering for best germination and rooting
• KeepsoilpHto5.5to5.8andECtolessthan 0 75 mmhos/cm
• Keepammoniumlevelstolessthan 10 ppm
• Beginfertilizingwith50to75ppmN from 14-0-14, 15-5-15 or a calcium/potassium nitrate feed once cotyledons are fully expanded
• Alternatefeedwithclearwater.• Irrigateearlyinthedaysofoliageisdry
by nightfall to prevent diseases
Stage 3 – Growth and development of true leaves (4 to 7 days)• Soiltemperature62to65°F(17to18°C).• Allowthesoiltodrythoroughlybetween
irrigations but avoid permanent wilting to promote root growth and control shoot growth
• MaintainsoilpHat5.5to5.8andEClessthan 1 0 mmhos/cm
• Increasefeedto100to150ppmN from 20-10-20 alternating with 14-0-14, 15-5-15 or other calcium/potassium nitrate fertilizer
• Fertilizeevery2to3irrigations.• Supplementwithmagnesium1to2times
during this stage, using magnesium sulfate or magnesium nitrate Do not mix magnesium sulfate with calcium nitrate as precipitate will form
Stage 4 – Plugs ready for transplanting or shipping (7 days)• Soiltemperature55to60°F(13to15°C).• Allowsoiltodrythoroughlybetween
irrigations • MaintainsoilpHat5.5to5.8andECless
than 0 75 mmhos/cm • Fertilizewith14-0-14,15-5-15orcalcium/
potassium nitrate feed at 100 to 150 ppm N as needed
GROWING ON TO FINISHTemperature• Night:50to60°F(10to15°C)• Day:55to60°F(18to15°C)
LightMaintain light levels as high as possible while maintaining moderate temperatures
MediaUse a well-drained, disease-free soilless medium with a medium initial nutrient charge and a pH of 5 5 to 6 2
Fertilization• Fertilizeeveryotherirrigationwith
15-0-15 or 15-5-15 alternating with 20-10-20 at 150 to 200 ppm nitrogen
• Maintainmediumelectrical conductivity around 1 0 mmhos/cm (using 1:2 extraction)
OKRA continued

800 879-BALL ballseed.com 51
VEGEtabLE GROWERFacts
Controlling Height• Onceplantsarerootedtothesidesof
the containers, they can be allowed to wilt prior to irrigation to provide some height control
• Heightcanalsobecontrolledbywithholding fertilizer, especially phosphorous and ammonium-form nitrogen
• PakChoiisresponsivetoday/nighttemperature differential (DIF), and is shorter with a negative DIF
• ChemicalPGRscannotbeusedon most vegetables and herbs
POST-PRODUCTION CAREOptimum Temperature• Night:55to60°F(13to15°C)• Day:60to65°F(15to18°C)• PakChoipreferscooltemperatures;
temperatures below 70°F (21°C) are recommended during retail display
• Optimumconditionsmaybedifficultto maintain, especially if plants are displayed outside
LightPak Choi grows best in full sun; however partial shading may be beneficial during retail display
Common ProblemsInsects: Aphids, Cabbage looper, Whitefly, Stem borer, Fungus gnatsDiseases: Pythium, Rhizoctonia, Fusarium
PEAPisum sativum
RSVPeaA Burpee Home Gardens® Exclusive variety.
DIRECT SOW• Sowseeddirectlyintofinishcontainer.• Peasareacoolseasoncropandshould
be produced early in the season
Time of radicle emergence (4 to 6 days)• Soiltemperature50to60°F(10to15°C).• Keepmediaverymoist,nearsaturation.• Coverseed.• SoilpH5.8to6.2andsolublesalts(EC)
to less than 0 75 mmhos/cm (2:1 extraction)
• Avoidhighsaltsandparticularlyhighammonium during germination
• Keepammoniumlevelstolessthan 10 ppm
After stem and cotyledon emergence (7 to 10 days)• Soiltemperature50to60°F(10to15°C).• Reducemoisturelevels.Allowthesoil
to dry out slightly before watering for best rooting
• KeepsoilpHto5.8to6.2andECtolessthan 0 75 mmhos/cm
• Beginfertilizingwith50to75ppmNfrom 14-0-14 or 15-5-15 or a calcium/potassium nitrate feed once cotyledons are fully expanded
• Alternatefeedwithclearwater.
• Irrigateearlyinthedaysofoliageisdryby nightfall to prevent diseases
GROWING ON TO FINISHGrowth and development after the development of true leaves (2 to 3 weeks)
Temperature• Night:45to55°F(7to13°C)C)• Day:55to60°F(13to15°C)• Allowthesoiltodrythoroughlybetween
irrigations but avoid permanent wilting to promote root growth and control shoot growth
LightMaintain light levels as high as possible while maintaining moderate temperatures
MediaUse a well-drained, disease-free soilless medium with a medium initial nutrient charge and a pH of 5 8 to 6 2
Fertilization• Increasefeedto100ppmNfrom
20-10-20 alternating with 14-0-14 or 15-5-15 or other calcium/potassium nitrate fertilizer
• Fertilizeevery2to3irrigations.• Ifusing15-0-15,supplementwith
magnesium 1 to 2 times during this stage, using magnesium sulfate (16 oz /100 gal ) or magnesium nitrate Do not mix magnesium sulfate with calcium nitrate as precipitate will form
• MaintainsoilatpH5.8to6.2.
Controlling Height• Heightcanalsobecontrolledby
withholding fertilizer, especially phosphorous and ammonium-form nitrogen
• ChemicalPGRscannotbeusedon most vegetables and herbs
POST-PRODUCTION CAREOptimum Temperature• Night:50to55°F(10to13°C)• Day:55to60°F(13to15°C)• Optimumconditionsmaybedifficult
to maintain, especially if plants are displayed outside
LightPeas grow best in full sun; however partial shading may be beneficial during retail display
Common ProblemsInsects: Aphids, Whitefly, Spider mitesDiseases: Fungal diseases
PEPPERCapsicum annuum
Bananarama BaronBetter BelleBig BerthaBig Daddy Hybrid
A Burpee Home Gardens® Exclusive variety.
Big EarlyBOOST Sweet HeatBurning BushCajun Belle Costa Rican Sweet Hybrid
A Burpee Home Gardens® Exclusive variety.
Flavorburst HybridA Burpee Home Gardens® Exclusive variety.
Great Stuff HybridA Burpee Home Gardens® Exclusive variety.
Hot LemonA Burpee Home Gardens® Exclusive variety.
Hungarian Yellow WaxJalapeño Gigante
A Burpee Home Gardens® Exclusive variety.
Pinot NoirRistra Cayenne Hybrid
A Burpee Home Gardens® Exclusive variety.
Sweet Spot Hybrid X3RTabascoZavory
A Burpee Home Gardens® Exclusive variety.
PLUG PRODUCTIONStage 1 – Time of radicle emergence (5 to 7 days)• Soil temperature 75 to 78°F (24 to 26°C) • Keep media evenly moist but not
saturated • Cover the seed lightly with coarse
vermiculite • Light is not necessary for germination
until radicle emergence • Soil pH 5 5 to 5 8 and soluble salts (EC)
less than 0 5 mmhos/cm (2:1 extraction) • Peppers are very sensitive to high salts,
particularly high ammonium, during germination
• Keep ammonium levels to less than 10 ppm
Stage 2 – Stem and cotyledon emergence (7 to 10 days)• Soil temperature 70 to 75°F (21 to 24°C) • Reduce moisture levels once radicle
emergence occurs Allow the soil to dry out slightly before watering for best germination and rooting
• Increase light levels to 1,000 to 2,500 foot-candles
• Keep soil pH to 5 5 to 5 8 and EC to less than 0 5 mmhos/cm
• Keep ammonium levels to less than 10 ppm • Begin fertilizing with 50 to 75 ppm N
from 14-0-14, 15-5-15 or a calcium/potassium nitrate feed once cotyledons are fully expanded

800 879-BALL ballseed.com52
VEGEtabLE GROWERFacts
• Alternate feed with clear water • Irrigate early in the day so foliage is dry
by nightfall to prevent diseases
Stage 3 – Growth and development of true leaves (10 to 14 days)• Soil temperature 65 to 70°F (18 to 21°C) • Allow the soil to dry thoroughly between
irrigations but avoid permanent wilting to promote root growth and control shoot growth
• Maintain soil pH at 5 5 to 5 8 and EC less than 0 75 mmhos/cm
• Increase feed to 100 to 150 ppm N with 14-0-14, 15-5-15 or other calcium/potassium nitrate fertilizer
• Fertilize every 2 to 3 irrigations • If using 15-0-15, supplement with
magnesium 1 to 2 times during this stage, using magnesium sulfate (16 oz /100 gal ) or magnesium nitrate Do not mix magnesium sulfate with calcium nitrate as precipitate will form
• Use DIF whenever possible, for the first 2 hours after sunrise, to control plant height
Stage 4 – Plugs ready for transplanting or shipping (7 days)• Soil temperature 60 to 62°F (15 to 17°C) • Allow soil to dry thoroughly between
irrigations • Maintain soil pH at 5 5 to 5 8 and EC less
than 0 75 mmhos/cm • Fertilize with 14-0-14, 15-5-15 or calcium/
potassium nitrate feed at 100 to 150 ppm N as needed
GROWING ON TO FINISHTemperature• Night: 62 to 65°F (17 to 18°C)• Day: 65 to 70°F (18 to 21°C)• Peppers will be damaged by
temperatures below 45°F (7°C)
LightMaintain high light levels while maintaining moderate temperatures
MediaUse a well-drained, disease-free soilless medium with a medium initial nutrient charge and a pH of 5 5 to 6 3
Fertilization• Fertilize every third irrigation with 15-0-15
or 15-5-15 at 150 to 200 ppm nitrogen • Maintain medium electrical
conductivity around 1 0 mmhos/cm (using 1:2 extraction)
Controlling Height• Once plants are rooted to the sides of
the containers, they can be allowed to wilt prior to irrigation to provide some height control
• Height can also be controlled by withholding fertilizer, especially phosphorous and ammonium-form nitrogen
• Peppers are responsive to day/night temperature differential (DIF), and are shorter with a negative DIF
• AlthoughSumagicislabeledforuseonPeppers, we do not recommend its use until the grower has at least trialed it on a limited basis Application rates, timing and variety response may affect growth for the home gardener
POST-PRODUCTION CAREOptimum Temperature• Night: 55 to 65°F (13 to 18°C)• Day: 60 to 70°F (15 to 21°C)• Optimum conditions may be difficult
to maintain, especially if plants are displayed outside
LightPeppers prefer full sun; however partial shading may be beneficial during retail display
Common ProblemsInsects: Aphids, Thrips, WhiteflyDiseases: Botrytis
PUMPKINCucurbita maxima
CasperA Burpee Home Gardens® Exclusive variety.
Harvest MoonHowdenJack-Be-Little
DIRECT SOWSow seed directly into finish container
Time of radicle emergence (2 to 4 days)• Soil temperature 70 to 75°F (21 to 24°C) • Keep media very moist, near saturation • Seed are to be covered • Soil pH 5 8 to 6 2 and soluble salts (EC)
less than 0 75 mmhos/cm (2:1 extraction) • Avoid high salts and particularly high
ammonium during germination • Keep ammonium levels to less than
10 ppm
After stem and cotyledon emergence (7 days)• Soil temperature 65 to 70°F (18 to 21°C) • Reduce moisture levels Allow the soil
to dry out slightly before watering for best rooting
• Keep soil pH to 5 8 to 6 2 and EC to less than 0 75 mmhos/cm
• Begin fertilizing with 50 to 75 ppm N from 14-0-14, 15-5-15 or a calcium/potassium nitrate feed once cotyledons are fully expanded
• Alternate feed with clear water • Irrigate early in the day so foliage is
dry by nightfall to prevent diseases
GROWING ON TO FINISHGrowth and development after the development of true leaves (4 to 6 weeks)
Temperature• Night: 62 to 65°F (17 to 18°C)• Day: 66 to 70°F (19 to 21°C)
• Allow the soil to dry thoroughly between irrigations but avoid permanent wilting to promote root growth and control shoot growth
LightMaintain light levels as high as possible while maintaining moderate temperatures
MediaUse a well-drained, disease-free soilless medium with a medium initial nutrient charge and a pH of 5 8 to 6 2
Fertilization• Increase feed to 100 to 150 ppm N from
20-10-20 alternating with 14-0-14, 15-5-15 or other calcium/potassium nitrate fertilizer
• Fertilize every 2 to 3 irrigations • Ifusing15-0-15,supplementwith
magnesium 1 to 2 times during this stage, using magnesium sulfate (16 oz /100 gal ) or magnesium nitrate Do not mix magnesium sulfate with calcium nitrate as precipitate will form
• MaintainsoilpHat5.8to6.2.
Controlling Height• Use DIF whenever possible, especially
the first 2 hours after sunrise, to control plant height
• Height can also be controlled by withholding fertilizer, especially phosphorous and ammonium-form nitrogen
• Chemical PGRs can not be used on most vegetables and herbs
POST-PRODUCTION CAREOptimum Temperature• Night: 62 to 65°F (17 to 18°C)• Day: 65 to 70°F (18 to 21°C)• Optimum conditions may be difficult
to maintain, especially if plants are displayed outside
LightPumpkins prefer full sun, although partial shade may be beneficial in retail areas
Common ProblemsInsects: Whitefly, Spider mitesDiseases: Fungal diseases
SPINACH Spinica oleracea
Baby’s Leaf HybridA Burpee Home Gardens® Exclusive variety.
BloomsdalePLUG PRODUCTIONNote: Direct sowing seed into the finish container is an alternative
Stage 1 – Time of radicle emergence (3 to 5 days)• Soil temperature 65 to 70°F (18 to 21°C) • Keep media very moist, near saturation • Cover the seed • Soil pH 5 5 to 5 8 and soluble salts
(EC) less than 0 50 mmhos/cm (2:1 extraction)
PEPPER continued

800 879-BALL ballseed.com 53
VEGEtabLE GROWERFacts
• Spinach is very sensitive to high salts, particularly high ammonium, during germination
• Keep ammonium levels to less than 10 ppm
Stage 2 – Stem and cotyledon emergence (7 to 14 days)• Soil temperature 65 to 70°F (18 to 21°C) • Reduce moisture levels once radicle
emergence occurs Allow the soil to dry out slightly before watering for best germination and rooting
• Keep soil pH to 5 5 to 5 8 and EC to less than 0 50 mmhos/cm
• Keep ammonium levels to less than 10 ppm
• Begin fertilizing with 50 to 75 ppm N from 14-0-14, 15-5-15 or a calcium/potassium nitrate feed once cotyledons are fully expanded
• Alternate feed with clear water • Irrigate early in the day so foliage is dry
by nightfall to prevent diseases
Stage 3 – Growth and development of true leaves (7 to 14 days)• Soil temperature 62 to 65°F (17 to 18°C) • Allow the soil to dry thoroughly between
irrigations but avoid permanent wilting to promote root growth and control shoot growth
• Maintain soil pH at 5 5 to 5 8 and EC less than 0 75 mmhos/cm
• Increase feed to 100 to 150 ppm N from 20-10-20 alternating with 14-0-14, 15-5-15 or other calcium/potassium nitrate fertilizer
• Fertilize every 2 to 3 irrigations • If using 15-0-15, supplement with
magnesium 1 to 2 times during this stage, using magnesium sulfate (16 oz /100 gal ) or magnesium nitrate Do not mix magnesium sulfate with calcium nitrate as precipitate will form
• Use DIF whenever possible, for the first 2 hours after sunrise, to control plant height
• Chemical PGRs can not be used on vegetables and herbs
Stage 4 – Plugs ready for transplanting or shipping (7 days)• Soil temperature 60 to 62°F (15 to 17°C) • Allow soil to dry thoroughly between
irrigations • Maintain soil pH at 5 5 to 5 8 and EC less
than 0 75 mmhos/cm • Fertilize with 14-0-14, 15-5-15 or calcium/
potassium nitrate feed at 100 to 150 ppm N as needed
GROWING ON TO FINISHTemperature• Night: 55 to 60°F (13 to 15°C)• Day: 60 to 65°F (15 to 18°C)
LightMaintain light levels as high as possible while maintaining moderate temperatures
MediaUse a well-drained, disease-free soilless medium with a medium initial nutrient charge and a pH of 5 5 to 6 2
Fertilization• Fertilize every other irrigation with
15-0-15 alternating with 20-10-20 at 150 to 200 ppm nitrogen
• Maintain medium electrical conductivity around 1 0 memos/cm (using 1:2 extraction)
Controlling Height• Once plants are rooted to the sides of
the containers, they can be allowed to wilt prior to irrigation to provide some height control
• Height can also be controlled by withholding fertilizer, especially phosphorous and ammonium-form nitrogen
• Spinach is responsive to day/night temperature differential (DIF), and is shorter with a negative DIF
• Chemical PGRs can not be used on most vegetables and herbs
POST-PRODUCTION CAREOptimum Temperature• Night: 50 to 55°F (10 to 13°C)• Day: 55 to 58°F (13 to 14°C)• Optimum conditions may be difficult
to maintain, especially if plants are displayed outside
LightSpinach should be placed in partial shade during retail display
Common ProblemsInsects: AphidsDiseases: Botrytis, Pythium, Rhizoctonia
SQUASHCucurbita pepo (Summer squash)Cucurbita maxima (Winter squash)
Burpee Golden (Zucchini)A Burpee Home Gardens® Exclusive variety.
Burpee Hybrid (Zucchini)A Burpee Home Gardens® Exclusive variety.
Burpee’s Bush Table QueenA Burpee Home Gardens® Exclusive variety.
Burpee’s ButterbushA Burpee Home Gardens® Exclusive variety.
Limelight (Zucchini)LunarPic-N-Pic Hybrid
A Burpee Home Gardens® Exclusive variety.
DIRECT SOWSow seed directly into finish container
Time of radicle emergence (2 to 4 days)• Soil temperature 70 to 75°F (21 to 24°C) • Keep media very moist, near saturation • Seed are to be covered • Soil pH 5 8 to 6 2 and soluble salts (EC)
less than 0 75 mmhos/cm (2:1 extraction) • Avoid high salts and particularly high
ammonium during germination • Keep ammonium levels to less than
10 ppm
After stem and cotyledon emergence (7 days)• Soil temperature 65 to 70°F (18 to 21°C) • Reduce moisture levels Allow the soil
to dry out slightly before watering for best rooting
• Keep soil pH to 5 8 to 6 2 and EC to less than 0 75 mmhos/cm
• Begin fertilizing with 50 to 75 ppm N from 14-0-14, 15-5-15 or a calcium/potassium nitrate feed once cotyledons are fully expanded
• Alternate feed with clear water • Irrigate early in the day so foliage is dry
by nightfall to prevent diseases
GROWING ON TO FINISHGrowth and development after the development of true leaves (4 to 5 weeks)
Temperature• Night: 60 to 65°F (15 to 18°C)• Day: 68 to 75°F (20 to 24°C)• Allow the soil to dry thoroughly between
irrigations but avoid permanent wilting to promote root growth and control shoot growth
LightMaintain light levels as high as possible while maintaining moderate temperatures
MediaUse a well-drained, disease-free soilless medium with a medium initial nutrient charge and a pH of 5 8 to 6 2
Fertilization• Increase feed to 100 to 150 ppm N from
20-10-20 alternating with 14-0-14, 15-0-15, 15-5-15 or other calcium/potassium nitrate fertilizer
• Fertilize every 2 to 3 irrigations • If using 15-0-15, supplement with
magnesium 1 to 2 times during this stage, using magnesium sulfate (16 oz /100 gal ) or magnesium nitrate Do not mix magnesium sulfate with calcium nitrate as precipitate will form
• Maintain soil pH at 5 8 to 6 2
Controlling Height• Use DIF whenever possible, especially
the first 2 hours after sunrise, to control plant height
• Height can also be controlled by withholding fertilizer, especially phosphorous and ammonium-form nitrogen
• Chemical PGRs can not be used on most vegetables and herbs
POST-PRODUCTION CAREOptimum Temperature• Night: 62 to 65°F (17 to 18°C)• Day: 65 to 70°F (18 to 21°C)• Optimum conditions may be difficult
to maintain, especially if plants are displayed outside
LightSquash prefers full sun, although partial shade may be beneficial in retail areas
Common ProblemsInsects: Whitefly, Spider mitesDiseases: Fungal diseases

800 879-BALL ballseed.com54
VEGEtabLE GROWERFacts
STRAWBERRYFragaria x ananassa
Berri Basket® WhiteBerries Galore® Pink, Rose & White
PLUG PRODUCTIONStage 1 – Time of radicle emergence (5 to 7 days)• Soil temperature 70°F (21°C) • Keep media evenly moist but not
saturated • Cover the seed lightly with coarse
vermiculite • Light at 100 to 400 foot-candles may be
beneficial for germination • Soil pH 5 5 to 5 8 and soluble salts (EC)
less than 0 75 mmhos/cm (2:1 extraction) • Strawberries are very sensitive to high
salts, particularly high ammonium, during germination
• Keep ammonium levels to less than 10 ppm
Stage 2 – Stem and cotyledon emergence (16 to 21 days)• Soil temperature 70°F (21°C) • Reduce moisture levels once radicle
emergence occurs Allow the soil to dry out slightly before watering for best germination and rooting
• Gradually increase the light intensity to 500 to 1,500 foot-candles
• Keep soil pH to 5 5 to 5 8 and EC to less than 0 75 mmhos/cm
• Keep ammonium levels to less than 10 ppm
• Begin fertilizing with 50 to 75 ppm N from 14-0-14, 15-5-15 or a calcium/potassium nitrate feed once cotyledons are fully expanded
• Alternate feed with clear water • Irrigate early in the day so foliage is dry
by nightfall to prevent diseases
Stage 3 – Growth and development of true leaves (7 to 14 days)• Soil temperature 65 to 68°F (18 to 20°C) • Allow the soil to dry slightly between
irrigations but avoid permanent wilting to promote root growth and control shoot growth
• Gradually increase the light intensity to 1,500 to 2,500 foot-candles
• Maintain soil pH at 5 5 to 5 8 and EC less than 1 0 mmhos/cm
• Increase feed to 100 to 150 ppm N from 20-10-20 alternating with 14-0-14, 15-5-15 or other calcium/potassium nitrate fertilizer
• Fertilize every 2 to 3 irrigations • If using 15-0-15, supplement with
magnesium 1 to 2 times during this stage, using magnesium sulfate (16 oz /100 gal ) or magnesium nitrate Do not mix magnesium sulfate with calcium nitrate as precipitate will form
• Use DIF whenever possible, for the first 2 hours after sunrise, to control plant height
Stage 4 – Plugs ready for transplanting or shipping (7 days)• Soil temperature 60 to 62°F (15 to 17°C) • Allow soil to dry slightly between
irrigations • Maintain soil pH at 5 5 to 5 8 and EC less
than 0 75 mmhos/cm • Fertilize with 14-0-14, 15-5-15 or calcium/
potassium nitrate feed at 100 to 150 ppm N as needed
GROWING ON TO FINISHTemperature• Night: 60 to 62°F (15 to 17°C)• Day: 60 to 65°F (15 to 18°C)
LightMaintain high light levels while maintaining moderate temperatures
MediaUse a well-drained, disease-free soilless medium with a medium initial nutrient charge and a pH of 6 5 to 7 5
Watering• Keep the media moist but not soggy • Do not allow the media to dry out
Fertilization• Fertilize every other irrigation with
15-0-15 or 15-5-15 alternating with 20-10-20 at 150 to 200 ppm nitrogen
• Maintain medium electrical conductivity around 1 0 mmhos/cm (using 1:2 extraction)
Controlling Height• Once plants are rooted to the sides of
the containers, they can be allowed to wilt prior to irrigation to provide some height control
• Height can also be controlled by withholding fertilizer, especially phosphorous and ammonium-form nitrogen
• Strawberries are responsive to day/night temperature differential (DIF), and are shorter with a negative DIF
• Chemical PGRs can not be used on most fruit, vegetables and herbs
POST-PRODUCTION CAREOptimum Temperature• Night: 60 to 62°F (15 to 17°C)• Day: 60 to 65°F (15 to 18°C)• Optimum conditions may be difficult
to maintain, especially if plants are displayed outside
LightStrawberries perform best in full sun; however partial shading may be beneficial during retail display
Crop TimingBaskets with 3 to 4 plugs per baskets: 11 to 13 weeks
Common ProblemsInsects: Spider mitesDiseases: Leaf spots, Mildew
SWISS CHARDBeta vulgaris ssp Cicla
Bright Lights
PLUG PRODUCTIONStage 1 – Time of radicle emergence (4 to 8 days)• Soiltemperature68to72°F(20to22°C).• SoilpH5.5to5.8andsolublesalts(EC)
less than 0 75 mmhos/cm (2:1 extraction) • SwissChardisverysensitivetohigh
salts, particularly high ammonium, during germination
• Keepammoniumlevelstolessthan 10 ppm
• Covertheseedwithcoarsevermiculite.
Stage 2 – Stem and cotyledon emergence (4 to 7 days)• Soiltemperature62to65°F(17to18°C).• Reducemoisturelevelsonceradicle
emergence occurs Allow the soil to dry out slightly before watering for best germination and rooting
• KeepsoilpHto5.5to5.8andECtolessthan 0 75 mmhos/cm
• Keepammoniumlevelstolessthan 10 ppm
• Beginfertilizingwith50to75ppmN from 14-0-14, 15-5-15 or a calcium/potassium nitrate feed once cotyledons are fully expanded
• Alternatefeedwithclearwater.• Irrigateearlyinthedaysofoliageisdry
by nightfall to prevent diseases
Stage 3 – Growth and development of true leaves (10 to 14 days)• Soiltemperature62to65°F(17to18°C).• Allowthesoiltodrythoroughlybetween
irrigations but avoid permanent wilting to promote root growth and control shoot growth
• MaintainsoilatpH5.5to5.8andEC less than 1 0 mmhos/cm
• Increasefeedto100to150ppmN from 20-10-20 alternating with 14-0-14, 15-5-15 or other calcium/potassium nitrate fertilizer
• Fertilizeevery2to3irrigations.• Supplementwithmagnesium1to2times
during this stage, using magnesium sulfate or magnesium nitrate Do not mix magnesium sulfate with calcium nitrate as precipitate will form
Stage 4 – Plugs ready for transplanting or shipping (7 days)• Soiltemperature60to62°F(15to17°C).• Allowsoiltodrythoroughlybetween
irrigations • MaintainsoilpHat5.5to5.8andEC
less than 0 75 mmhos/cm • Fertilizewith14-0-14,15-5-15orcalcium/
potassium nitrate feed at 100 to 150 ppm N as needed

800 879-BALL ballseed.com 55
VEGEtabLE GROWERFacts
GROWING ON TO FINISHTemperature• Night:55to58°F(13to14°C)• Day:60to62°F(15to17°C)
LightMaintain light levels as high as possible while maintaining moderate temperatures
MediaUse a well-drained, disease-free soilless medium with a medium initial nutrient charge and a pH 5 5 to 6 2
Fertilization• Fertilizeeveryotherirrigationwith
15-0-15 or 15-5-15 alternating with 20-10-20 at 150 to 200 ppm nitrogen
• Maintainmediumelectrical conductivity around 1 0 mmhos/cm (using 1:2 extraction)
Controlling Height• Onceplantsarerootedtothesidesof
the containers, they can be allowed to wilt prior to irrigation to provide some height control
• Growthcanalsobecontrolledbywithholding fertilizer, especially phosphorous and ammonium-form nitrogen
• ChemicalPGRscannotbeusedon most vegetables and herbs
POST-PRODUCTION CAREOptimum Temperature• Night:55to65°F(13to18°C)• Day:65to70°F(18to21°C)• SwissChardpreferscooltemperatures;
temperatures below 70°F (21°C) are recommended during retail display
• Optimumconditionsmaybedifficultto maintain, especially if plants are displayed outside
LightSwiss Chard grows best in full sun; however partial shading may be beneficial during retail display
Common ProblemsInsects: Aphids, Whitefly, Fungus gnatsDiseases: Pythium, Rhizoctonia
TOMATO Lycopersicon escuelentum
Better BoyBig BeefBig Mama Hybrid
A Burpee Home Gardens® Exclusive variety.
Big PinkA Burpee Home Gardens® Exclusive variety.
Black Pearl HybridA Burpee Home Gardens® Exclusive variety.
Brandy Boy HybridA Burpee Home Gardens® Exclusive variety.
Brandywine Red BOOST Cherry PunchBOOST Power PopsBOOST Solar PowerBurpee’s Big Boy®
Bush Champion IIBush Early Girl IICelebrityChampion IICherokee Purple DeliciousEarly GirlFourth Of July
A Burpee Home Gardens® Exclusive variety.
Fresh Salsa HybridA Burpee Home Gardens® Exclusive variety.
Jet Star Lemon BoyNapa Grape Hybrid
A Burpee Home Gardens® Exclusive variety.
Old Time TastyOrange Wellington
A Burpee Home Gardens® Exclusive variety.
PhoenixPineappleRed Grape Steak Sandwich Hybrid
A Burpee Home Gardens® Exclusive variety.
SungoldSupersteak Hybrid
A Burpee Home Gardens® Exclusive variety.
SuperTasty HybridA Burpee Home Gardens® Exclusive variety.
Sweet 100Sweet Seedless Hybrid
A Burpee Home Gardens® Exclusive variety.
Tomatoberry GardenTumblerTye Dye
A Burpee Home Gardens® Exclusive variety.
Yellow Pear
PLUG PRODUCTIONStage 1 – Time of radicle emergence (2 to 3 days)• Soil temperature 70 to 75°F (21 to 24°C) • Keep media evenly moist but not
saturated • Cover the seed with coarse vermiculite • Light is not needed for germination until
radicle emergence • Soil pH 5 5 to 5 8 and soluble salts (EC)
less than 0 50 mmhos/cm (2:1 extraction)
• Tomatoes are very sensitive to high salts, particularly high ammonium, during germination
• Keep ammonium levels to less than 10 ppm
Stage 2 – Stem and cotyledon emergence (7 days)• Soil temperature 68 to 72°F (20 to 22°C) • Reduce moisture levels once radicle
emergence occurs Allow the soil to dry out slightly before watering for best germination and rooting
• Light levels can be increased to 1,000 to 1,500 foot-candles
• Keep soil pH to 5 5 to 5 8 and EC to less than 0 50 mmhos/cm
• Begin fertilizing with 50 to 75 ppm N from 14-0-14, 15-5-15 or a calcium/potassium nitrate feed once cotyledons are fully expanded
• Keep ammonium levels to less than 10 ppm
• Alternate feed with clear water • Irrigate early in the day so foliage is dry
by nightfall to prevent diseases
Stage 3 – Growth and development of true leaves (7 days)• Soil temperature 60 to 65°F (15 to 18°C) • Allow the soil to dry thoroughly between
irrigations but avoid permanent wilting to promote root growth and control shoot growth
• Increase light intensity to 1,000 to 2,500 foot-candles
• Maintain soil pH at 5 5 to 5 8 and EC less than 0 75 mmhos/cm
• Increase feed to 50 to 75 ppm N with 14-0-14, 15-5-15 or other calcium/potassium nitrate fertilizer
• Fertilize every 2 to 3 irrigations • If using 15-0-15, supplement with
magnesium 1 to 2 times during this stage, using magnesium sulfate (16 oz /100 gal ) or magnesium nitrate Do not mix magnesium sulfate with calcium nitrate as precipitate will form
• Use DIF whenever possible, especially the first 2 hours after sunrise, to control plant height
Stage 4 – Plugs ready for transplanting or shipping (7 days)• Soil temperature 60 to 62°F (15 to 17°C) • Allow soil to dry thoroughly between
irrigations • Maintain soil pH at 5 5 to 5 8 and EC
less than 0 75 mmhos/cm • Fertilize with 14-0-14, 15-5-15 or
calcium/potassium nitrate feed at 100 to 150 ppm N as needed

800 879-BALL ballseed.com56
VEGEtabLE GROWERFacts
GROWING ON TO FINISHTemperature• Night: 62 to 65°F (17 to 18°C)• Day: 65 to 70°F (18 to 21°C)
LightMaintain high light levels while maintaining moderate temperatures
Media
Use a well-drained, disease-free soilless medium with a medium initial nutrient charge and a pH of 5 5 to 6 2
Fertilization• Tomatoes respond to increased
fertilization with increased growth • Earliest garden yield comes from plants
which have not been stressed from insufficient nutrition
• Fertilize every third irrigation with 15-0-15 or 15-5-15 at 100 to 150 ppm nitrogen
• Maintain medium electrical conductivity around 1 0 mmhos/cm (using 1:2 extraction)
Controlling Height• Once plants are rooted to the sides of
the containers, they can be allowed to wilt prior to irrigation to provide some height control
• Height can also be controlled by withholding fertilizer, especially phosphorous and ammonium-form nitrogen
• Tomatoes are responsive to day/night temperature differential (DIF), and are shorter with a negative DIF
• AlthoughSumagicislabeledforuseonTomatoes, we do not recommend its use until the grower has at least trialed it on a limited basis Application rates, timing and variety response may affect growth for the home gardener
POST-PRODUCTION CARETemperature• Tomatoes will tolerate warm
temperatures, however temperatures below 70°F (21°C) are recommended during retail display
• Optimum conditions may be difficult to maintain, especially if plants are displayed outside
LightTomatoes grow best in full sun; however partial shading may be beneficial during retail display
Common ProblemsInsects: Aphids, Thrips, WhiteflyDiseases: Botrytis, TSWV (INSV), Pythium, Rhizoctonia
WATERMELONCitrullus lanatus
Crimson SweetSugar Baby
DIRECT SOWSow seed directly into finish container
Time of radicle emergence (2 to 4 days)• Soil temperature 75 to 80°F (24 to 27°C) • Keep media very moist, near saturation • Seed are to be covered • Soil pH 5 8 to 6 2 and soluble salts (EC)
less than 0 75 mmhos/cm (2:1 extraction) • Avoid high salts and particularly high
ammonium during germination • Keep ammonium levels to less than
10 ppm
After stem and cotyledon emergence (7 days)• Soil temperature 65 to 70°F (18 to 21°C) • Reduce moisture levels Allow the soil to
dry out slightly before watering for best rooting
• Keep soil pH to 5 8 to 6 2 and EC to less than 0 75 mmhos/cm
• Begin fertilizing with 50 to 75 ppm N from 14-0-14, 15-5-15 or a calcium/potassium nitrate feed once cotyledons are fully expanded
• Alternate feed with clear water • Irrigate early in the day so foliage is dry
by nightfall to prevent diseases
GROWING ON TO FINISHGrowth and development after the development of true leaves (4 to 5 weeks)
Temperature• Night: 65 to 70°F (18 to 21°C)• Day: 68 to 75°F (20 to 24°C)• Allow the soil to dry thoroughly between
irrigations but avoid permanent wilting to promote root growth and control shoot growth
Fertilization• Increase feed to 100 to 150 ppm N from
20-10-20 alternating with 14-0-14, 15-5-15 or other calcium/potassium nitrate fertilizer
• Fertilize every 2 to 3 irrigations • If using 15-0-15, supplement with
magnesium 1 to 2 times during this stage, using magnesium sulfate (16 oz /100 gal ) or magnesium nitrate Do not mix magnesium sulfate with calcium nitrate as precipitate will form
• Maintain soil pH at 5 8 to 6 2
Controlling Height• Use DIF whenever possible, especially
the first 2 hours after sunrise, to control plant height
• Height can also be controlled by withholding fertilizer, especially phosphorous and ammonium-form nitrogen
• Chemical PGRs can not be used on most fruits, vegetables and herbs
LightMaintain light levels as high as possible while maintaining moderate temperatures
MediaUse a well-drained, disease-free soilless medium with a medium initial nutrient charge and a pH of 5 8 to 6 2
POST-PRODUCTION CAREOptimum Temperature• Night: 65 to 70°F (18 to 21°C)• Day: 70 to 75°F (18 to 24°C)• Optimum conditions may be difficult
to maintain, especially if plants are displayed outside
LightWatermelon prefers full sun although partial shade may be beneficial in retail areas
Common ProblemsInsects: Whitefly, Spider mitesDiseases: Fungal diseases
TOMATO continued

800 879-BALL ballseed.com 57
HERb GROWERFacts
BASILOcimum basilicum
BoxwoodCardinalNufar Red RubinSiam QueenSweet Dani LemonSweet Italian Large LeafSweet Mammoth
PLUG PRODUCTIONNote: Direct sowing into the finish container is an alternative
Stage 1 – Time of radicle emergence (5 to 8 days)• Soil temperature 65 to 70°F (18 to 21°C) • Keep media very moist, near saturation • Seed should be covered • Soil pH 5 5 to 5 8 and soluble salts (EC)
less than 0 75 mmhos/cm (2:1 extraction) • Basil is very sensitive to high salts,
particularly high ammonium, during germination
• Keep ammonium levels to less than 10 ppm
Stage 2 – Stem and cotyledon emergence (7 days)• Soil temperature 65 to 70°F (18 to 21°C) • Reduce moisture levels once radicle
emergence occurs Allow the soil to dry out slightly before watering for best germination and rooting
• Keep soil pH at 5 5 to 5 8 and EC less than 0 75 mmhos/cm
• Keep ammonium levels to less than 10 ppm
• Begin fertilizing with 50 to 75 ppm N from 14-0-14, 15-5-15 or a calcium/potassium nitrate feed once cotyledons are fully expanded
• Alternate feed with clear water • Irrigate early in the day so foliage is dry
by nightfall to prevent diseases
Stage 3 – Growth and development of true leaves (7 to 10 days)• Soil temperature 62 to 65°F (17 to 18°C) • Allow the soil to dry thoroughly between
irrigations but avoid permanent wilting to promote root growth and control shoot growth
• Maintain soil pH at 5 5 to 5 8 and EC less than 1 0 mmhos/cm
• Increase feed to 100 to 150 ppm N from 20-10-20, alternating with 14-0-14, 15-5-15 or other calcium/potassium nitrate fertilizer
• Fertilize every 2 to 3 irrigations • If using 15-0-15, supplement with
magnesium 1 to 2 times during this stage, using magnesium sulfate (16 oz /100 gal ) or magnesium nitrate Do not mix magnesium sulfate with calcium nitrate as precipitate will form
• Use DIF whenever possible, for the first 2 hours after sunrise, to control plant height
CATNIPNepeta catariaHardy zones 3–9
PLUG PRODUCTIONStage 1 – Time of radicle emergence (2 to 3 days)• Soil temperature 70 to 75°F (21 to 24°C) • Keep media evenly moist but not
saturated • Cover the seed lightly with coarse
vermiculite • Light is not needed for germination
until radicle emergence • Soil pH 5 5 to 5 8 and soluble salts (EC)
less than 0 75 mmhos/cm (2:1 extraction) • Mint is very sensitive to high salts,
particularly high ammonium, during germination
• Keep ammonium levels to less than 10 ppm
Stage 2 – Stem and cotyledon emergence (3 to 5 days)• Soil temperature 70 to 75°F (21 to 24°C) • Reduce moisture levels once radicle
emergence occurs Allow the soil to dry out slightly before watering for best germination and rooting
• Keep soil pH at 5 5 to 5 8 and EC less than 0 75 mmhos/cm
• Keep ammonium levels to less than 10 ppm
• Begin fertilizing with 50 to 75 ppm N from 14-0-14, 15-5-15 or a calcium/potassium nitrate feed once cotyledons are fully expanded
• Alternate feed with clear water • Irrigate early in the day so foliage is dry
by nightfall to prevent diseases
Stage 3 – Growth and development of true leaves (5 to 7 days)• Soil temperature 65 to 70°F (18 to 21°C) • Allow the soil to dry thoroughly between
irrigations but avoid permanent wilting to promote root growth and control shoot growth
• Maintain soil pH at 5 5 to 5 8 and EC less than 1 0 mmhos/cm
• Increase feed to 100 to 150 ppm N from 20-10-20, alternating with 14-0-14, 15-5-15 or other calcium/potassium nitrate fertilizer
• Fertilize every 2 to 3 irrigations • If using 15-0-15, supplement with
magnesium 1 to 2 times during this stage, using magnesium sulfate (16 oz /100 gal ) or magnesium nitrate Do not mix magnesium sulfate with calcium nitrate as precipitate will form
• Use DIF whenever possible, for the first 2 hours after sunrise, to control plant height
Stage 4 - Plugs ready for transplanting or shipping (7 days)• Soil temperature 62 to 65°F (17 to 18°C) • Allow soil to dry thoroughly
between irrigations • Maintain soil pH at 5 5 to 5 8 and EC
less than 0 75 mmhos/cm • Fertilize with 14-0-14 or calcium/
potassium nitrate feed at 100 to 150 ppm N as needed
Stage 4 – Plugs ready for transplanting or shipping (7 days)• Soil temperature 62 to 65°F (17 to 18°C) • Allow soil to dry thoroughly between
irrigations • Maintain soil pH at 5 5 to 5 8 and EC
less than 0 75 mmhos/cm • Fertilize with 14-0-14, 15-5-15 or calcium/
potassium nitrate feed at 100 to 150 ppm N as needed
GROWING ON TO FINISHTemperature• Night: 60 to 65°F (15 to 18°C)• Day: 65 to 70°F (18 to 21°C)
LightMaintain light levels as high as possible while maintaining moderate temperatures
MediaUse a well-drained, disease-free soilless medium with a medium initial nutrient charge and a pH of 5 5 to 6 2
Fertilization• Fertilize every other irrigation with
15-0-15 alternating with 20-10-20 at 150 ppm nitrogen
• Maintain medium electrical conductivity around 1 0 mmhos/cm (using 1:2 extraction)
Controlling Height• Once plants are rooted to the sides of
the containers, they can be allowed to wilt prior to irrigation to provide some height control
• Height can also be controlled by withholding fertilizer, especially phosphorous and ammonium-form nitrogen
• Basil is responsive to day/night temperature differential (DIF), and is shorter with a negative DIF
• Chemical PGRs can not be used on most vegetables and herbs
POST-PRODUCTION CAREOptimum Temperature• Night: 62 to 65°F (17 to 18°C)• Day: 65 to 70°F (18 to 21°C)• Optimum conditions may be difficult
to maintain, especially if plants are displayed outside
LightBasil grows best in full sun; however partial shading may be beneficial during retail display
Common ProblemsInsects: White fly, AphidsDiseases: Fungal diseases

800 879-BALL ballseed.com58
HERb GROWERFacts
GROWING ON TO FINISHTemperature• Night: 55 to 60°F (13 to 15°C)• Day: 60 to 62°F (15 to 17°C)• Cooler temperatures will produce more
compact growth • Warm temperatures promote weak
growth and stretching
LightMaintain high light levels while maintaining moderate temperatures
MediaUse a well-drained, disease-free soilless medium with a medium initial nutrient charge and a pH of 5 5 to 6 2
Fertilization• Fertilize every other irrigation with
15-0-15 or 15-5-15 alternating with 20-10-20 at 150 to 200 ppm nitrogen
• Maintain medium electrical conductivity around 1 0 mmhos/cm (using 1:2 extraction)
Controlling Height• Once plants are rooted to the sides of
the containers, they can be allowed to wilt prior to irrigation to provide some height control
• Height can also be controlled by withholding fertilizer, especially phosphorous and ammonium-form nitrogen
• Catnip is responsive to day/night temperature differential (DIF), and is shorter with a negative DIF
• Chemical PGRs can not be used on most vegetables and herbs
POST-PRODUCTION CAREOptimum Temperature• Night: 50 to 55°F (10 to 13°C)• Day: 55 to 58°F (13 to 14°C)• Optimum conditions may be difficult
to maintain, especially if plants are displayed outside
LightCatnip grows best in full sun; however partial shading may be beneficial during retail display
Common ProblemsInsects: Aphids, Whitefly Diseases: Botrytis
CHIVES Garlic Allium tuberosum
Onion Allium schoenoprasumHardy zones 3–9
DIRECT SOWSow seed directly into finish container
Time of radicle emergence (2 to 5 days)• Soil temperature 70 to 75°F (21 to 24°C) • Keep media very moist, near saturation • Seed should be covered
• Soil pH 5 8 to 6 2 and soluble salts (EC) less than 0 75 mmhos/cm (2:1 extraction)
• Avoid high salts and particularly high ammonium during germination
• Keep ammonium levels to less than 10 ppm
After stem and cotyledon emergence (7 days)• Soil temperature 65 to 70°F (18 to 21°C) • Reduce moisture levels Allow the soil
to dry out slightly before watering for best rooting
• Keep soil pH at 5 8 to 6 2 and EC less than 0 75 mmhos/cm
• Begin fertilizing with 50 to 75 ppm N from 14-0-14, 15-5-15 or a calcium/potassium nitrate feed once cotyledons are fully expanded
• Alternate feed with clear water • Irrigate early in the day so foliage is dry
by nightfall to prevent diseases
GROWING ON TO FINISHGrowth and development after the development of true leaves (13 to 15 weeks)
Temperature• Night: 55 to 60°F (13 to 15°C)• Day: 65 to 70°F (18 to 21°C)• Allow the soil to dry thoroughly between
irrigations but avoid permanent wilting to promote root growth and control shoot growth
LightMaintain light levels as high as possible while maintaining moderate temperatures
MediaUse a well-drained, disease-free soilless medium with a medium initial nutrient charge and a pH of 5 8 to 6 2
Fertilization• Increase feed to 100 to 150 ppm N from
20-10-20, alternating with 14-0-14, 15-5-15 or other calcium/potassium nitrate fertilizer
• Fertilize every 2 to 3 irrigations • If using 15-0-15, supplement with
magnesium 1 to 2 times during this stage, using magnesium sulfate (16 oz /100 gal ) or magnesium nitrate Do not mix magnesium sulfate with calcium nitrate as precipitate will form
• Maintain soil pH at 5 8 to 6 2
Controlling Height• Use DIF whenever possible, especially
the first 2 hours after sunrise, to control plant height
• Height can also be controlled by withholding fertilizer, especially phosphorous and ammonium-form nitrogen
• Chemical PGRs can not be used on most vegetables and herbs
POST-PRODUCTION CAREOptimum Temperature• Night: 62 to 65°F (17 to 18°C)• Day: 65 to 70°F (18 to 21°C)• Optimum conditions may be difficult
to maintain, especially if plants are displayed outside
LightChives prefer full sun
Common ProblemsDiseases: Fungal diseases
CILANTRO Coriandrum sativum (Coriander)
Santo
PLUG PRODUCTIONNOTE: Direct sowing into the finish container is an alternative
Stage 1 – Time of radicle emergence (3 to 5 days)• Soil temperature 68 to 70°F (20 to 21°C) • Keep media very moist, near saturation • Cover the seed very lightly with
vermiculite or no covering • Light at 100 to 400 foot-candles may be
beneficial for germination • Soil pH 5 5 to 5 8 and soluble salts
(EC) less than 0 50 mmhos/cm (2:1 extraction)
• Cilantro is very sensitive to high salts, particularly high ammonium, during germination
• Keep ammonium levels to less than 10 ppm
Stage 2 – Stem and cotyledon emergence (7 to 10 days)• Soil temperature 65 to 70°F (18 to 21°C) • Reduce moisture levels once radicle
emergence occurs Allow the soil to dry out slightly before watering for best germination and rooting
• Keep soil pH at 5 5 to 5 8 and EC less than 0 50 mmhos/cm
• Keep ammonium levels to less than 10 ppm
• Begin fertilizing with 50 to 75 ppm N from 14-0-14, 15-5-15 or a calcium/potassium nitrate feed once cotyledons are fully expanded
• Alternate feed with clear water • Irrigate early in the day so foliage is dry
by nightfall to prevent diseases
Stage 3 – Growth and development of true leaves (7 days)• Soil temperature 62 to 65°F (17 to 18°C) • Allow the soil to dry thoroughly between
irrigations but avoid permanent wilting to promote root growth and control shoot growth
• Maintain soil pH at 5 5 to 5 8 and EC less than 0 75 mmhos/cm
• Increase feed to 100 to 150 ppm N from 20-10-20, alternating with 14-0-14, 15-5-15 or other calcium/potassium nitrate fertilizer
• Fertilize every 2 to 3 irrigations • If using 15-0-15, supplement with
magnesium 1 to 2 times during this stage, using magnesium sulfate (16 oz /100 gal ) or magnesium nitrate Do not mix magnesium sulfate with calcium nitrate as precipitate will form
• Use DIF whenever possible, for the first 2 hours after sunrise, to control plant height
CATNIP continued

800 879-BALL ballseed.com 59
HERb GROWERFacts
Stage 4 – Plugs ready for transplanting or shipping (5 to 7 days)• Soil temperature 60 to 62°F (16 to 17°C) • Allow soil to dry thoroughly
between irrigations • Maintain soil pH at 5 5 to 5 8 and EC
to less than 0 75 mmhos/cm • Fertilize with 14-0-14, 15-5-15 or calcium/
potassium nitrate feed at 100 to 150 ppm N as needed
GROWING ON TO FINISHTemperature• Night: 55 to 60°F (13 to 15°C)• Day: 55 to 65°F (13 to 18°C)
LightMaintain light levels as high as possible while maintaining moderate temperatures
MediaUse a well-drained, disease-free soilless medium with a medium initial nutrient charge and a pH of 5 5 to 6 2
Fertilization• Fertilize every other irrigation with
15-0-15 or 15-5-15 alternating with 20-10-20 at 150 to 200 ppm nitrogen
• Maintain medium electrical conductivity around 1 0 memos/cm (using 1:2 extraction)
Controlling Height• Once plants are rooted to the sides of the
containers, they can be allowed to wilt prior to irrigation to provide some height control
• Height can also be controlled by withholding fertilizer, especially phosphorous and ammonium-form nitrogen
• Cilantro is responsive to day/night temperature differential (DIF), and is shorter with a negative DIF
• Chemical PGRs can not be used on most vegetables and herbs
POST-PRODUCTION CAREOptimum Temperature• Night: 50 to 55°F (10 to 13°C)• Day: 55 to 58°F (13 to 14°C)• Optimum conditions may be difficult
to maintain, especially if plants are displayed outside
LightCilantro grows best in full sun; however partial shading may be beneficial during retail display
Common ProblemsInsects: AphidsDiseases: Botrytis, Pythium, Rhizoctonia
DILLAnethum graveolens
Dill Fernleaf
PLUG PRODUCTION Note: Direct sowing into the finish container is recommended
Stage 1 – Time of radicle emergence (4 to 7 days)• Soil temperature 68 to 72°F (20 to 22°C) • Keep media evenly moist but not
saturated • Do not cover or bury the seed • Light at 100 to 400 foot-candles may be
beneficial for germination • Soil pH 5 5 to 5 8 and soluble salts (EC)
less than 0 75 mmhos/cm (2:1 extraction) • Dill is very sensitive to high salts,
particularly high ammonium, during germination
• Keep ammonium levels to less than 10 ppm
Stage 2 – Stem and cotyledon emergence (5 to 8 days)• Soil temperature 68 to 72°F (20 to 22°C) • Reduce moisture levels once radicle
emergence occurs Allow the soil to dry out slightly before watering for best germination and rooting
• Gradually increase light levels to 500 to 1,000 foot-candles
• Keep soil pH at 5 5 to 5 8 and EC less than 0 75 mmhos/cm
• Keep ammonium levels to less than 10 ppm
• Begin fertilizing with 50 to 75 ppm N from 14-0-14, 15-5-15 or a calcium/potassium nitrate feed once cotyledons are fully expanded
• Alternate feed with clear water • Irrigate early in the day so foliage is dry
by nightfall to prevent diseases
Stage 3 – Growth and development of true leaves (14 to 21 days)• Soil temperature 65 to 68°F (18 to 20°C) • Allow the soil to dry thoroughly between
irrigations but avoid permanent wilting to promote root growth and control shoot growth
• Maintain soil pH at 5 5 to 5 8 and EC less than 1 0 mmhos/cm
• Increase feed to 100 to 150 ppm N from 20-10-20, alternating with 14-0-14 or other calcium/potassium nitrate fertilizer
• Gradually increase light intensity to 1,000 to 1,500 foot-candles
• Fertilize every 2 to 3 irrigations • If 15-0-15 is used, supplement with
magnesium 1 to 2 times during this stage, using magnesium sulfate (16 oz /100 gal ) or magnesium nitrate Do not mix magnesium sulfate with calcium nitrate as precipitate will form
• Use DIF whenever possible, for the first 2 hours after sunrise, to control plant height
• Chemical PGRs can not be used on vegetables and herbs
Stage 4 – Plugs ready for transplanting or shipping (7 days)• Soil temperature 62 to 65°F (17 to 18°C) • Allow soil to dry thoroughly between
irrigations • Gradually increase light intensity to
1,500 to 2,500 foot-candles • Maintain soil pH at 5 5 to 5 8 and EC
less than 0 75 mmhos/cm • Fertilize with 14-0-14 or calcium/
potassium nitrate feed at 100 to 150 ppm N as needed
• If not potted up once established in the cell pack, dill will flower within 10 weeks
GROWING ON TO FINISHTemperature• Night: 55 to 60°F (13 to 15°C)• Day: 60 to 65°F (15 to 18°C)
LightMaintain high light levels while maintaining moderate temperatures
MediaUse a well-drained, disease-free soilless medium with a medium initial nutrient charge and a pH of 5 5 to 6 2
Fertilization• Fertilize every other irrigation with
15-0-15 or 15-5-15 alternating with 20-10-20 at 150 to 200 ppm nitrogen
• Maintain medium electrical conductivity around 1 0 mmhos/cm (using 1:2 extraction)
Controlling Height• Once plants are rooted to the sides of
the containers, they can be allowed to wilt prior to irrigation to provide some height control
• Height can also be controlled by withholding fertilizer, especially phosphorous and ammonium-form nitrogen
• Dill is responsive to day/night temperature differential (DIF), and is shorter with a negative DIF
• Chemical PGRs can not be used on most vegetables and herbs
POST-PRODUCTION CARETemperature• Night: 55 to 60°F (13 to 15°C)• Day: 60 to 65°F (16 to 18°C)• Optimum conditions may be difficult
to maintain, especially if plants are displayed outside
• Using a negative DIF will help keep the plants short and of high quality
LightDill prefers full sun Partial shading may be beneficial during retail display
Common ProblemsInsects: AphidsDiseases: Fungal diseases

800 879-BALL ballseed.com60
HERb GROWERFacts
LAVENDER Lavandula angustifoliaHardy zones 5–8
Potpourri Dark Purple, Sky Blue & White
PLUG PRODUCTION Stage 1 – Time of radicle emergence (7 to 10 days)• Soil temperature 68 to 72°F (20 to 22°C) • Keep media evenly moist but not
saturated • Do not cover or bury the seed • Light at 100 to 400 foot-candles
is beneficial for germination • Soil pH 5 5 to 5 8 and soluble salts (EC)
less than 0 75 mmhos/cm (2:1 extraction) • Lavender is very sensitive to high salts,
particularly high ammonium, during germination
• Keep ammonium levels to less than 10 ppm
Stage 2 – Stem and cotyledon emergence (7 to 14 days)• Soil temperature 68 to 72°F (20 to 22°C) • Reduce moisture levels once radicle
emergence occurs Allow the soil to dry out slightly before watering for best germination and rooting
• Gradually increase light levels to 500 to 1,000 foot-candles
• Keep soil pH at 5 5 to 5 8 and EC less than 0 75 mmhos/cm
• Keep ammonium levels to less than 10 ppm
• Begin fertilizing with 50 to 75 ppm N from 14-0-14, 15-5-15 or a calcium/potassium nitrate feed once cotyledons are fully expanded
• Alternate feed with clear water • Irrigate early in the day so foliage is dry
by nightfall to prevent diseases
Stage 3 – Growth and development of true leaves (14 to 21 days)• Soil temperature 65 to 68°F (18 to 20°C) • Allow the soil to dry thoroughly between
irrigations but avoid permanent wilting to promote root growth and control shoot growth
• Maintain soil pH at 5 5 to 5 8 and EC less than 1 0 mmhos/cm
• Increase feed to 100 to 150 ppm N from 20-10-20, alternating with 14-0-14 or other calcium/potassium nitrate fertilizer
• Gradually increase light intensity to 1,000 to 1,500 foot-candles
• Fertilize every 2 to 3 irrigations • If 15-0-15 is used, supplement with
magnesium 1 to 2 times during this stage, using magnesium sulfate (16 oz /100 gal ) or magnesium nitrate Do not mix magnesium sulfate with calcium nitrate as precipitate will form
• Use DIF whenever possible, especially the first 2 hours after sunrise, to control plant height
• Chemical PGRs can not be used on vegetables and herbs
Stage 4 – Plugs ready for transplanting or shipping (7 days)• Soil temperature 62 to 65°F (17 to 18°C) • Allow soil to dry thoroughly between
irrigations • Gradually increase light intensity to
full intensity • Maintain soil pH at 5 5 to 5 8 and EC
less than 0 75 mmhos/cm • Fertilize with 14-0-14, 15-5-15 or
calcium/potassium nitrate feed at 100 to 150 ppm N as needed
GROWING ON TO FINISHTemperature• Night: 60 to 65°F (15 to 18°C)• Day: 65 to 70°F (18 to 21°C)
LightMaintain high light levels while maintaining moderate temperatures
MediaUse a well-drained, disease-free soilless medium with a medium initial nutrient charge and a pH of 5 5 to 6 2
Fertilization• Fertilize every other irrigation with
15-0-15 or 15-5-15 alternating with 20-10-20 at 150 to 200 ppm nitrogen
• Maintain medium electrical conductivity around 1 0 mmhos/cm (using 1:2 extraction)
Controlling Height• Once plants are rooted to the sides of
the containers, they can be allowed to wilt prior to irrigation to provide some height control
• Height can also be controlled by withholding fertilizer, especially phosphorous and ammonium-form nitrogen
• Lavender is responsive to day/night temperature differential (DIF), and is shorter with a negative DIF
• Chemical PGRs can not be used on most vegetables and herbs
POST-PRODUCTION CAREOptimum Temperature• Night: 55 to 60°F (13 to 15°C)• Day: 60 to 65°F (15 to 18°C)• Optimum conditions may be difficult
to maintain, especially if plants are displayed outside
LightLavender prefers full sun Partial shading may be beneficial during retail display
Common ProblemsInsects: AphidsDiseases: Fungal diseases
OREGANOOriganum vulgare (Common Oregano) Origanum herocieoticum (Greek Oregano)Hardy zones 5–9
OreganoGreek Oregano
PLUG PRODUCTION
Stage 1 – Time of radicle emergence (5 to 7 days)• Soil temperature 68 to 70°F (20 to 21°C) • Soil pH 5 5 to 5 8 and soluble salts (EC)
less than 0 75 mmhos/cm (2:1 extraction) • Oregano is very sensitive to high salts,
particularly high ammonium, during germination
• Keep ammonium levels to less than 10 ppm
• Cover the seed lightly with coarse vermiculite
Stage 2 – Stem and cotyledon emergence (7 to 14 days)• Soil temperature 62 to 65°F (17 to 18°C) • Reduce moisture levels once radicle
emergence occurs Allow the soil to dry out slightly before watering for best germination and rooting
• Keep soil pH at 5 5 to 5 8 and EC less than 0 75 mmhos/cm
• Keep ammonium levels to less than 10 ppm
• Begin fertilizing with 50 to 75 ppm N from 14-0-14, 15-5-15 or a calcium/potassium nitrate feed once cotyledons are fully expanded
• Alternate feed with clear water • Irrigate early in the day so foliage is dry
by nightfall to prevent diseases
Stage 3 – Growth and development of true leaves (10 to 14 days)• Soil temperature 62 to 65°F (17 to 18°C) • Allow the soil to dry thoroughly between
irrigations but avoid permanent wilting to promote root growth and control shoot growth
• Maintain soil pH at 5 5 to 5 8 and EC less than 1 0 mmhos/cm
• Increase feed to 100 to 150 ppm N from 20-10-20, alternating with 14-0-14, 15-5-15 or other calcium/potassium nitrate fertilizer
• Fertilize every 2 to 3 irrigations • Supplement with magnesium 1 to 2 times
during this stage, using magnesium sulfate (16 oz /100 gal ) or magnesium nitrate Do not mix magnesium sulfate with calcium nitrate as precipitate will form
• Use DIF whenever possible, for the first 2 hours after sunrise, to control plant height
Stage 4 – Plugs ready for transplanting or shipping (7 days)• Soil temperature 60 to 62°F (16 to 17°C) • Allow soil to dry thoroughly between
irrigations • Maintain soil pH at 5 5 to 5 8 and EC less
than 0 75 mmhos/cm • Fertilize with 14-0-14, 15-5-15 or calcium/
potassium nitrate feed at 100 to 150 ppm N as needed

800 879-BALL ballseed.com 61
HERb GROWERFacts
GROWING ON TO FINISHTemperature• Night: 50 to 55°F (10 to 13°C)• Day: 60 to 65°F (15 to 18°C)
LightMaintain light levels as high as possible while maintaining moderate temperatures
MediaUse a well-drained, disease-free soilless medium with a medium initial nutrient charge and a pH of 5 5 to 6 2
Fertilization• Fertilize every other irrigation with
15-0-15 or 15-5-15 alternating with 20-10-20 at 150 to 200 ppm nitrogen
• Maintain medium electrical conductivity around 1 0 mmhos/cm (using 1:2 extraction)
Controlling Height• Once plants are rooted to the sides of
the containers, they can be allowed to wilt prior to irrigation to provide some height control
• Height can also be controlled by withholding fertilizer, especially phosphorous and ammonium-form nitrogen
• Oregano is responsive to day/night temperature differential (DIF), and is shorter with a negative DIF
• Chemical PGRs can not be used on most vegetables and herbs
POST-PRODUCTION CAREOptimum Temperature• Night: 50 to 55°F (10 to 13°C)• Day: 60 to 65°F (15 to 18°C)• Oregano prefers cool temperatures
Optimum conditions may be difficult to maintain, especially if plants are displayed outside
LightOregano grows best in full sun; however partial shading may be beneficial during retail display
Common ProblemsInsects: Aphids, WhiteflyDiseases: Pythium, Rhizoctonia
PARSLEY Petroselinum crispum
Italian Dark SingleTriple Curled
PLUG PRODUCTIONNote: Direct sowing into the finish container is an alternative
Stage 1 – Time of radicle emergence (3 to 5 days)• Soil temperature 68 to 70°F (20 to 21°C) • Keep media very moist, near saturation • Cover the seed lightly with vermiculite or
do not cover • Light at 100 to 400 foot-candles may be
beneficial for germination • Soil pH 5 5 to 5 8 and soluble salts
(EC) less than 0 50 mmhos/cm (2:1 extraction)
• Parsley is very sensitive to high salts, particularly high ammonium, during germination
• Keep ammonium levels to less than 10 ppm
Stage 2 – Stem and cotyledon emergence (7 to 10 days)• Soil temperature 65 to 70°F (18 to 21°C) • Reduce moisture levels once radicle
emergence occurs Allow the soil to dry out slightly before watering for best germination and rooting
• Keep soil pH at 5 5 to 5 8 and EC less than 0 50 mmhos/cm
• Keep ammonium levels to less than 10 ppm
• Begin fertilizing with 50 to 75 ppm N from 14-0-14, 15-5-15 or a calcium/potassium nitrate feed once cotyledons are fully expanded
• Alternate feed with clear water • Irrigate early in the day so foliage is dry
by nightfall to prevent diseases
Stage 3 – Growth and development of true leaves (7 days)• Soil temperature 62 to 65°F (17 to 18°C) • Allow the soil to dry thoroughly between
irrigations but avoid permanent wilting to promote root growth and control shoot growth
• Maintain soil pH at 5 5 to 5 8 and EC less than 0 75 mmhos/cm
• Increase feed to 100 to 150 ppm N from 20-10-20, alternating with 14-0-14, 15-5-15 or other calcium/potassium nitrate fertilizer
• Fertilize every 2 to 3 irrigations • If using 15-0-15, supplement with
magnesium 1 to 2 times during this stage, using magnesium sulfate (16 oz /100 gal ) or magnesium nitrate Do not mix magnesium sulfate with calcium nitrate as precipitate will form
• Use DIF whenever possible, for the first 2 hours after sunrise, to control plant height
• Chemical PGRs can not be used on vegetables and herbs
Stage 4 – Plugs ready for transplanting or shipping (5 to 7 days)• Soil temperature 60 to 62°F (16 to 17°C) • Allow soil to dry thoroughly between
irrigations • Maintain soil pH at 5 5 to 5 8 and EC
less than 0 75 mmhos/cm • Fertilize with 14-0-14 or calcium/
potassium nitrate feed at 100 to 150 ppm N as needed
GROWING ON TO FINISHTemperature• Night: 60 to 65°F (15 to 18°C)• Day: 65 to 70°F (18 to 21°C)
LightMaintain light levels as high as possible while maintaining moderate temperatures
MediaUse a well-drained, disease-free soilless medium with a medium initial nutrient charge and a pH of 5 5 to 6 2
Fertilization• Fertilize every other irrigation with
15-0-15 alternating with 20-10-20 at 150 to 200 ppm nitrogen
• Maintain medium electrical conductivity around 1 0 memos/cm (using 1:2 extraction)
Controlling Height• Once plants are rooted to the sides of
the containers, they can be allowed to wilt prior to irrigation to provide some height control
• Height can also be controlled by withholding fertilizer, especially phosphorous and ammonium-form nitrogen
• Parsley is responsive to day/night temperature differential (DIF), and is shorter with a negative DIF
• Chemical PGRs can not be used on most vegetables and herbs
POST-PRODUCTION CAREOptimum Temperature• Night: 50 to 55°F (10 to 13°C)• Day: 55 to 58°F (13 to 14°C)• Optimum conditions may be difficult
to maintain, especially if plants are displayed outside
LightParsley grows best in full sun; however partial shading may be beneficial during retail display
Common ProblemsInsects: AphidsDiseases: Botrytis, Pythium, Rhizoctonia

800 879-BALL ballseed.com62
HERb GROWERFacts
PEPPERMINT & SPEARMINTMentha piperita (Peppermint)Mentha spicata (Spearmint)Hardy zones 5–9
PLUG PRODUCTIONStage 1 – Time of radicle emergence (2 to 3 days)• Soil temperature 70 to 75°F (21 to 24°C) • Keep media evenly moist but not
saturated • Cover the seed lightly with coarse
vermiculite • Light is not needed for germination
until radicle emergence • Soil pH 5 5 to 5 8 and soluble salts (EC)
less than 0 75 mmhos/cm (2:1 extraction) • Mints are very sensitive to high salts,
particularly high ammonium, during germination
• Keep ammonium levels to less than 10 ppm
Stage 2 – Stem and cotyledon emergence (3 to 5 days)• Soil temperature 70 to 75°F (21 to 24°C) • Reduce moisture levels once radicle
emergence occurs Allow the soil to dry out slightly before watering for best germination and rooting
• Keep soil pH at 5 5 to 5 8 and EC less than 0 75 mmhos/cm
• Keep ammonium levels to less than 10 ppm
• Begin fertilizing with 50 to 75 ppm N from 14-0-14, 15-5-15 or a calcium/potassium nitrate feed once cotyledons are fully expanded
• Alternate feed with clear water • Irrigate early in the day so foliage is dry
by nightfall to prevent diseases
Stage 3 – Growth and development of true leaves (5 to 7 days)• Soil temperature 65 to 70°F (18 to 21°C) • Allow the soil to dry thoroughly between
irrigations but avoid permanent wilting to promote root growth and control shoot growth
• Maintain soil pH at 5 5 to 5 8 and EC less than 1 0 mmhos/cm
• Increasefeedto100to150ppmNfrom20-10-20, alternating with 14-0-14, 15-5-15 or other calcium/potassium nitrate fertilizer
• Fertilizeevery2to3irrigations.• Ifusing15-0-15,supplementwith
magnesium 1 to 2 times during this stage, using magnesium sulfate (16 oz /100 gal ) or magnesium nitrate Do not mix magnesium sulfate with calcium nitrate as precipitate will form
• UseDIFwheneverpossible,forthe first 2 hours after sunrise, to control plant height
Stage 4 – Plugs ready for transplanting or shipping (7 days)• Soiltemperature62to65°F(17to18°C).• Allowsoiltodrythoroughly
between irrigations • MaintainsoilpHat5.5to5.8andECless
than 0 75 mmhos/cm • Fertilizewith14-0-14orcalcium/
potassium nitrate feed at 100 to 150 ppm N as needed
GROWING ON TO FINISHTemperature• Night:55to60°F(13to15°C)• Day:60to62°F(15to17°C)• Coolertemperatureswillproduce
more compact growth • Warmtemperaturespromoteweak
growth and stretching
LightMaintain high light levels while maintaining moderate temperatures
MediaUse a well-drained, disease-free soilless medium with a medium initial nutrient charge and a pH of 5 5 to 6 2
Fertilization• Fertilizeeveryotherirrigationwith
15-0-15 or 15-5-15 alternating with 20-10-20 at 150 to 200 ppm nitrogen
• Maintainmediumelectrical conductivity around 1 0 mmhos/cm (using 1:2 extraction)
Controlling Height• Onceplantsarerootedtothesidesof
the containers, they can be allowed to wilt prior to irrigation to provide some height control
• Heightcanalsobecontrolledbywithholding fertilizer, especially phosphorous and ammonium-form nitrogen
• Mintsareresponsivetoday/nighttemperature differential (DIF), and are shorter with a negative DIF
• ChemicalPGRscannotbeusedon most vegetables and herbs
POST-PRODUCTION CAREOptimum Temperature• Night:50to55°F(10to13°C)• Day:55to58°F(13to14°C)• Optimumconditionsmaybedifficult
to maintain, especially if plants are displayed outside
LightMints grow best in full sun; however partial shading may be beneficial during retail display
Common ProblemsInsects: Aphids, WhiteflyDiseases: Botrytis
ROSEMARYRosmarinus officinalisHardy zones 7–10
PLUG PRODUCTION Stage 1 – Time of radicle emergence (4 to 7 days)• Soiltemperature68to72°F(20to22°C).• Keepmediaevenlymoistbutnot
saturated • Donotcoverorburytheseed.• Lightat100to400foot-candlesmay
be beneficial for germination • SoilpH5.5to5.8andsolublesalts(EC)
less than 0 75 mmhos/cm (2:1 extraction) • Rosemaryisverysensitivetohighsalts,
particularly high ammonium, during germination
• Keepammoniumlevelstolessthan 10 ppm
Stage 2 – Stem and cotyledon emergence (5 to 8 days)• Soiltemperature68to72°F(20to22°C).• Reducemoisturelevelsonceradicle
emergence occurs Allow the soil to dry out slightly before watering for best germination and rooting
• Graduallyincreaselightlevelsto 500 to 1,000 foot-candles
• KeepsoilpHat5.5to5.8andEClessthan 0 75 mmhos/cm
• Keepammoniumlevelstolessthan 10 ppm
• Beginfertilizingwith50to75ppmN from 14-0-14, 15-5-15 or a calcium/potassium nitrate feed once cotyledons are fully expanded
• Alternatefeedwithclearwater.• Irrigateearlyinthedaysofoliageisdry
by nightfall to prevent diseases
Stage 3 – Growth and development of true leaves (14 to 21 days)• Soiltemperature65to68°F(18to20°C).• Allowthesoiltodrythoroughlybetween
irrigations but avoid permanent wilting to promote root growth and control shoot growth
• MaintainsoilpHat5.5to5.8andEClessthan 1 0 mmhos/cm
• Increasefeedto100to150ppmNfrom20-10-20, alternating with 14-0-14, 15-5-15 or other calcium/potassium nitrate fertilizer
• Graduallyincreaselightintensityto 1,000 to 1,500 foot-candles
• Fertilizeevery2to3irrigations.• If15-0-15isused,supplementwith
magnesium 1 to 2 times during this stage, using magnesium sulfate (16 oz /100 gal ) or magnesium nitrate Do not mix magnesium sulfate with calcium nitrate as precipitate will form
• UseDIFwheneverpossible,forthefirst2hours after sunrise, to control plant height
• ChemicalPGRscannotbeusedonvegetables and herbs

800 879-BALL ballseed.com 63
HERb GROWERFacts
Stage 4 – Plugs ready for transplanting or shipping (7 days)• Soiltemperature62to65°F(17to18°C).• Allowsoiltodrythoroughlybetween
irrigations • Graduallyincreaselightintensityto
1,500 to 2,500 foot-candles • MaintainsoilpHat5.5to5.8andECless
than 0 75 mmhos/cm • Fertilizewith14-0-14,15-5-15or
calcium/potassium nitrate feed at 100 to 150 ppm N as needed
• Ifnotpotteduponceestablishedinthecell pack, Rosemary will flower within 10 weeks
GROWING ON TO FINISHTemperature• Night:55to60°F(13to15°C)• Day:60to65°F(15to18°C)
LightMaintain high light levels while maintaining moderate temperatures
MediaUse a well-drained, disease-free soilless medium with a medium initial nutrient charge and a pH of 5 5 to 6 2
Fertilization• Fertilizeeveryotherirrigationwith
15-0-15 or 15-5-15 alternating with 20-10-20 at 150 to 200 ppm nitrogen
• Maintainmediumelectrical conductivity around 1 0 mmhos/cm (using 1:2 extraction)
Controlling Height• Onceplantsarerootedtothesidesof
the containers, they can be allowed to wilt prior to irrigation to provide some height control
• Heightcanalsobecontrolledbywithholding fertilizer, especially phosphorous and ammonium-form nitrogen
• Rosemaryisresponsivetoday/nighttemperature differential (DIF), and is shorter with a negative DIF
• ChemicalPGRscannotbeusedon most vegetables and herbs
POST-PRODUCTION CAREOptimum Temperature• Night:55to60°F(13to15°C)• Day:60to65°F(15to18°C)• Optimumconditionsmaybedifficult
to maintain, especially if plants are displayed outside
LightRosemary prefers full sun Partial shading may be beneficial during retail display
Common ProblemsInsects: AphidsDiseases: Pythium
SAGESalvia officinalisHardy zones 5–8
PLUG PRODUCTIONStage 1 – Time of radicle emergence (5 to 7 days)• Soiltemperature68to70°F(20to21°C).• SoilpH5.5to5.8andsolublesalts(EC)
less than 0 75 mmhos/cm (2:1 extraction) • Sageisverysensitivetohighsalts,
particularly high ammonium, during germination
• Keepammoniumlevelstolessthan 10 ppm
• Covertheseedlightlywith coarse vermiculite
Stage 2 – Stem and cotyledon emergence (7 to 14 days)• Soiltemperature62to65°F(17to18°C).• Reducemoisturelevelsonceradicle
emergence occurs Allow the soil to dry out slightly before watering for best germination and rooting
• KeepsoilpHat5.5to5.8andEClessthan 0 75 mmhos/cm
• Keepammoniumlevelstolessthan 10 ppm
• Beginfertilizingwith50to75ppmN from 14-0-14, 15-5-15 or a calcium/potassium nitrate feed once cotyledons are fully expanded
• Alternatefeedwithclearwater.• Irrigateearlyinthedaysofoliageisdry
by nightfall to prevent diseases
Stage 3 – Growth and development of true leaves (10 to 14 days)• Soiltemperature62to65°F(17to18°C).• Allowthesoiltodrythoroughlybetween
irrigations but avoid permanent wilting to promote root growth and control shoot growth
• MaintainsoilpHat5.5to5.8andEClessthan 1 0 mmhos/cm
• Increasefeedto100to150ppmNfrom20-10-20, alternating with 14-0-14 or other calcium/potassium nitrate fertilizer
• Fertilizeevery2to3irrigations.• Supplementwithmagnesium1to2times
during this stage, using magnesium sulfate (16 oz /100 gal ) or magnesium nitrate Do not mix magnesium sulfate with calcium nitrate as precipitate will form
• UseDIFwheneverpossible,forthe first 2 hours after sunrise, to control plant height
Stage 4 – Plugs ready for transplanting or shipping (7 days)• Soiltemperature60to62°F(15to17°C).• Allowsoiltodrythoroughlybetween
irrigations • MaintainsoilpHat5.5to5.8andECless
than 0 75 mmhos/cm • Fertilizewith14-0-14,15-5-15orcalcium/
potassium nitrate feed at 100 to 150 ppm N as needed
GROWING ON TO FINISHTemperature• Night:55to60°F(13to15°C)• Day:60to65°F(15to18°C)
LightMaintain light levels as high as possible while maintaining moderate temperatures
MediaUse a well-drained, disease-free soilless medium with a medium initial nutrient charge and a pH of 5 5 to 6 2
Fertilization• Fertilizeeveryotherirrigationwith
15-0-15 or 15-5-15 alternating with 20-10-20 at 150 to 200 ppm nitrogen
• Maintainmediumelectrical conductivity around 1 0 mmhos/cm (using 1:2 extraction)
Controlling Height• Onceplantsarerootedtothesidesof
the containers, they can be allowed to wilt prior to irrigation to provide some height control
• Heightcanalsobecontrolledbywithholding fertilizer, especially phosphorous and ammonium-form nitrogen
• Sageisresponsivetoday/nighttemperature differential (DIF), and is shorter with a negative DIF
• ChemicalPGRscannotbeusedon most vegetables and herbs
POST-PRODUCTION CAREOptimum Temperature• Sagepreferscooltemperatures;
temperatures below 70°F (21°C) are recommended during retail display
• Optimumconditionsmaybedifficultto maintain, especially if plants are displayed outside
LightSage grows best in full sun; however partial shading may be beneficial during retail display
Common ProblemsInsects: Aphids, WhiteflyDiseases: Pythium, Rhizoctonia
SPEARMINT See page 62.
STEVIA Stevia rebaudiana
Sweet Leaf
PLUG PRODUCTIONStage 1 – Time of radicle emergence (5 to 7 days)• Soiltemperature68to70°F(20to21°C).• SoilpH5.5to5.8andsolublesalts(EC)
less than 0 75 mmhos/cm (2:1 extraction)

800 879-BALL ballseed.com64
HERb GROWERFacts
STEVIA continued
• Steviaisverysensitivetohighsalts,particularly high ammonium, during germination
• Keepammoniumlevelstolessthan 10 ppm
• Covertheseedlightlywithcoarsevermiculite
Stage 2 – Stem and cotyledon emergence (7 to 10 days)• Soiltemperature62to65°F(17to18°C).• Reducemoisturelevelsonceradicle
emergence occurs Allow the soil to dry out slightly before watering for best germination and rooting
• KeepsoilpHat5.5to5.8andEClessthan 0 75 mmhos/cm
• Keepammoniumlevelstolessthan 10 ppm
• Beginfertilizingwith50to75ppmN from 14-0-14, 15-5-15 or a calcium/potassium nitrate feed once cotyledons are fully expanded
• Alternatefeedwithclearwater.• Irrigateearlyinthedaysofoliageisdry
by nightfall to prevent diseases
Stage 3 – Growth and development of true leaves (7 to 10 days)• Soiltemperature62to65°F(17to18°C).• Allowthesoiltodrythoroughlybetween
irrigations but avoid permanent wilting to promote root growth and control shoot growth
• MaintainsoilpHat5.5to5.8andEClessthan 1 0 mmhos/cm
• Increasefeedto100to150ppmNfrom20-10-20, alternating with 14-0-14, 15-5-15 or other calcium/potassium nitrate fertilizer
• Fertilizeevery2to3irrigations.• Supplementwithmagnesium1to2times
during this stage, using magnesium sulfate (16 oz /100 gal ) or magnesium nitrate Do not mix magnesium sulfate with calcium nitrate as precipitate will form
• UseDIFwheneverpossible,forthe first 2 hours after sunrise, to control plant height
Stage 4 – Plugs ready for transplanting or shipping (7 days)• Soiltemperature60to62°F(15to17°C).• Allowsoiltodrythoroughlybetween
irrigations • MaintainsoilpHat5.5to5.8andECless
than 0 75 mmhos/cm • Fertilizewith14-0-14,15-5-15orcalcium/
potassium nitrate feed at 100 to 150 ppm N as needed
GROWING ON TO FINISHTemperature• Night:60to65°F(15to18°C)• Day:65to75°F(18to24°C)
LightMaintain light levels as high as possible while maintaining moderate temperatures
MediaUse a well-drained, disease-free soilless medium with a medium initial nutrient charge and a pH of 5 5 to 6 2
Fertilization• Fertilizeeveryotherirrigationwith
15-0-15 or 15-5-15 alternating with 20-10-20 at 150 to 200 ppm nitrogen
• Maintainmediumelectrical conductivity around 1 0 mmhos/cm (using 1:2 extraction)
Controlling Height• Onceplantsarerootedtothesidesof
the containers, they can be allowed to wilt prior to irrigation to provide some height control
• Heightcanalsobecontrolledbywithholding fertilizer, especially phosphorous and ammonium-form nitrogen
• Steviaisresponsivetoday/nighttemperature differential (DIF), and is shorter with a negative DIF
• ChemicalPGRscannotbeusedon most vegetables and herbs
POST-PRODUCTION CAREOptimum Temperature• 68°F(20°C)isrecommendedduring
retail display • Optimumconditionsmaybedifficult
to maintain, especially if plants are displayed outside
LightStevia grows best in full sun; however partial shading may be beneficial during retail display
Common ProblemsInsects: Aphids, WhiteflyDiseases: Pythium, Rhizoctonia
SUMMER SAVORYSatureja hortensis
PLUG PRODUCTIONStage 1 – Time of radicle emergence (10 to 12 days)• Soiltemperature70to72°F(21to22°C).• SoilpH5.5to5.8andsolublesalts(EC)
less than 0 75 mmhos/cm (2:1 extraction) • SummerSavoryisverysensitivetohigh
salts, particularly high ammonium, during germination
• Keepammoniumlevelstolessthan 10 ppm
• Donotcovertheseed.
Stage 2 – Stem and cotyledon emergence (4 to 7 days)• Soiltemperature62to65°F(17to18°C).• Reducemoisturelevelsonceradicle
emergence occurs Allow the soil to dry out slightly before watering for best germination and rooting
• KeepsoilpHat5.5to5.8andECtolessthan 0 75 mmhos/cm
• Keepammoniumlevelstolessthan 10 ppm
• Beginfertilizingwith50to75ppmN from 14-0-14, 15-5-15 or a calcium/potassium nitrate feed once cotyledons are fully expanded
• Alternatefeedwithclearwater.• Irrigateearlyinthedaysofoliageisdry
by nightfall to prevent diseases
Stage 3 – Growth and development of true leaves (7 to 10 days)• Soiltemperature62to65°F(17to18°C).• Allowthesoiltodrythoroughlybetween
irrigations but avoid permanent wilting to promote root growth and control shoot growth
• MaintainsoilpHat5.5to5.8andEClessthan 1 0 mmhos/cm
• Increasefeedto100to150ppmN from 20-10-20 alternating with 14-0-14, 15-5-15 or other calcium/potassium nitrate fertilizer
• Fertilizeevery2to3irrigations.• Supplementwithmagnesium1to2times
during this stage, using magnesium sulfate or magnesium nitrate Do not mix magnesium sulfate with calcium nitrate as precipitate will form
• UseDIFwheneverpossible,especiallythe first 2 hours after sunrise, to control plant height
Stage 4 – Plugs ready for transplanting or shipping (7 days)• Soiltemperature60to62°F(15to17°C).• Allowsoiltodrythoroughlybetween
irrigations • MaintainsoilpHat5.5to5.8andECless
than 0 75 mmhos/cm • Fertilizewith14-0-14,15-5-15orcalcium/
potassium nitrate feed at 100 to 150 ppm N as needed
GROWING ON TO FINISHTemperature• Night:60to62°F(15to17°C)• Day:62to65°F(17to18°C)
LightMaintain light levels as high as possible while maintaining moderate temperatures
MediaUse a well-drained, disease-free soilless medium with a medium initial nutrient charge and a pH of 5 5 to 6 2
Fertilization• Fertilizeeveryotherirrigationwith
15-0-15 or 15-5-15 alternating with 20-10-20 at 150 to 200 ppm nitrogen
• Maintainmediumelectrical conductivity around 1 0 mmhos/cm (using 1:2 extraction)
Controlling Height• Onceplantsarerootedtothesidesof
the containers, they can be allowed to wilt prior to irrigation to provide some height control
• Heightcanalsobecontrolledbywithholding fertilizer, especially phosphorous and ammonium-form nitrogen
• SummerSavoryisresponsiveto day/night temperature differential (DIF), and is shorter with a negative DIF
• Plantscanstretchquickly.• ChemicalPGRscannotbeusedon
most vegetables and herbs

800 879-BALL ballseed.com 65
HERb GROWERFacts
POST-PRODUCTION CAREOptimum Temperature• Night:62to65°F(17to18°C)• Day:65to70°F(18to21°C)• SummerSavorypreferscool
temperatures; temperatures below 70°F (21°C) are recommended during retail display
• Optimumconditionsmaybedifficultto maintain, especially if plants are displayed outside
LightSummer Savory grows best in full sun; however partial shading may be beneficial during retail display
Common ProblemsInsects: Aphids, Whitefly, Fungus gnatsDiseases: Pythium, Rhizoctonia
SUMMER THYME Thymus vulgaris Hardy zones 4–8
PLUG PRODUCTIONStage 1 – Time of radicle emergence (4 to 8 days)• Soiltemperature68to70°F(20to21°C).• Keepmediaverymoist,nearsaturation.• Seedmaybecovered.• SoilpH5.5to5.8andsolublesalts(EC)
less than 0 75 mmhos/cm (2:1 extraction) • Thymeisverysensitivetohighsalts,
particularly high ammonium, during germination
• Keep ammonium levels to less than 10 ppm
Stage 2 – Stem and cotyledon emergence (7 days)• Soiltemperature65to70°F(18to21°C).• Reducemoisturelevelsonceradicle
emergence occurs Allow the soil to dry out slightly before watering for best germination and rooting
• KeepsoilpHat5.5to5.8andEClessthan 0 75 mmhos/cm
• Keepammoniumlevelstolessthan 10 ppm
• Beginfertilizingwith50to75ppmN from 14-0-14, 15-5-15 or a calcium/potassium nitrate feed once cotyledons are fully expanded
• Alternatefeedwithclearwater.• Irrigateearlyinthedaysofoliageisdry
by nightfall to prevent diseases
Stage 3 – Growth and development of true leaves (14 to 20 days)• Soiltemperature62to65°F(17to18°C).• Allowthesoiltodrythoroughlybetween
irrigations but avoid permanent wilting to promote root growth and control shoot growth
• MaintainsoilpHat5.5to5.8andEClessthan 1 0 mmhos/cm
• Increasefeedto100to150ppmNfrom20-10-20, alternating with 14-0-14, 15-5-15 or other calcium/potassium nitrate fertilizer
• Fertilizeevery2to3irrigations.
• Ifusing15-0-15,supplementwithmagnesium 1 to 2 times during this stage, using magnesium sulfate (16 oz /100 gal ) or magnesium nitrate Do not mix magnesium sulfate with calcium nitrate as precipitate will form
• UseDIFwheneverpossible,forthe first 2 hours after sunrise, to control plant height
Stage 4 – Plugs ready for transplanting or shipping (7 days)• Soiltemperature62to65°F(17to18°C).• Allowsoiltodrythoroughlybetween
irrigations • MaintainsoilpHat5.5to5.8andEC
less than 0 75 mmhos/cm • Fertilizewith14-0-14,15-5-15or
calcium/potassium nitrate feed at 100 to 150 ppm N as needed
GROWING ON TO FINISHTemperature• Night:55to60°F(13to15°C)• Day:65to70°F(19to21°C)
LightMaintain light levels as high as possible while maintaining moderate temperatures
MediaUse a well-drained, disease-free soilless medium with a medium initial nutrient charge and a pH of 5 5 to 6 2
Fertilization• Fertilizeeveryotherirrigationwith
15-0-15 or 15-5-15 alternating with 20-10-20 at 150 ppm nitrogen
• Maintainmediumelectrical conductivity around 1 0 mmhos/cm (using 1:2 extraction)
Controlling Height• Onceplantsarerootedtothesidesof
the containers, they can be allowed to wilt prior to irrigation to provide some height control
• Heightcanalsobecontrolledbywithholding fertilizer, especially phosphorous and ammonium-form nitrogen
• Thymeisresponsivetoday/nighttemperature differential (DIF), and is shorter with a negative DIF
• ChemicalPGRscannotbeusedon most vegetables and herbs
POST-PRODUCTION CAREOptimum Temperature• Night:62to65°F(17to18°C)• Day:65to70°F(18to21°C)• Optimumconditionsmaybedifficult
to maintain, especially if plants are displayed outside
LightThyme prefers full sun Partial shading may be beneficial during retail display
Common ProblemsInsects: Spider mites, AphidsDiseases: Fungal diseases
SWEET MARJORAMOriganum majorana
PLUG PRODUCTIONStage 1 – Time of radicle emergence (4 to 8 days)• Soiltemperature68to70°F(20to21°C).• Keepmediaverymoist,nearsaturation.• Seedmaybecoveredlightly.• SoilpH5.5to5.8andsolublesalts(EC)
less than 0 75 mmhos/cm (2:1 extraction) • SweetMarjoramisverysensitivetohigh
salts, particularly high ammonium, during germination
• Keepammoniumlevelstolessthan 10 ppm
Stage 2 – Stem and cotyledon emergence (7 days)• Soiltemperature65to70°F(18to21°C).• Reducemoisturelevelsonceradicle
emergence occurs Allow the soil to dry out slightly before watering for best germination and rooting
• KeepsoilpHat5.5to5.8andEClessthan 0 75 mmhos/cm
• Keepammoniumlevelstolessthan 10 ppm
• Beginfertilizingwith50to75ppmN from 14-0-14, 15-5-15 or a calcium/potassium nitrate feed once cotyledons are fully expanded
• Alternatefeedwithclearwater.• Irrigateearlyinthedaysofoliageisdry
by nightfall to prevent diseases
Stage 3 – Growth and development of true leaves (14 to 20 days)• Soiltemperature62to65°F(17to18°C).• Allowthesoiltodrythoroughlybetween
irrigations but avoid permanent wilting to promote root growth and control shoot growth
• MaintainsoilpHat5.5to5.8andEC less than 1 0 mmhos/cm
• Increasefeedto100to150ppmNfrom20-10-20, alternating with 14-0-14, 15-5-15 or other calcium/potassium nitrate fertilizer
• Fertilizeevery2to3irrigations.• Ifusing15-0-15,supplementwith
magnesium 1 to 2 times during this stage, using magnesium sulfate (16 oz /100 gal ) or magnesium nitrate Do not mix magnesium sulfate with calcium nitrate as precipitate will form
• UseDIFwheneverpossible,forthe first 2 hours after sunrise, to control plant height
Stage 4 – Plugs ready for transplanting or shipping (7 days)• Soiltemperature62to65°F(17to18°C).• Allowsoiltodrythoroughlybetween
irrigations • MaintainsoilpHat5.5to5.8andEC
less than 0 75 mmhos/cm • Fertilizewith14-0-14,15-5-15or
calcium/potassium nitrate feed at 100 to 150 ppm N as needed

800 879-BALL ballseed.com66
HERb GROWERFacts
GROWING ON TO FINISHTemperature• Night:55to60°F(13to15°C)• Day:65to70°F(18to21°C)
LightMaintain light levels as high as possible while maintaining moderate temperatures
MediaUse a well-drained, disease-free soilless medium with a medium initial nutrient charge and a pH of 5 5 to 6 2
Fertilization• Fertilizeeveryotherirrigationwith
15-0-15 or 15-5-15 alternating with 20-10-20 at 150 ppm nitrogen
• Maintainmediumelectrical conductivity around 1 0 mmhos/cm (using 1:2 extraction)
Controlling Height• Onceplantsarerootedtothesidesof
the containers, they can be allowed to wilt prior to irrigation to provide some height control
• Heightcanalsobecontrolledbywithholding fertilizer, especially phosphorous and ammonium-form nitrogen
• SweetMarjoramisresponsiveto day/night temperature differential (DIF), and is shorter with a negative DIF
• ChemicalPGRscannotbeusedon most vegetables and herbs
POST-PRODUCTION CAREOptimum Temperature• Night:62to65°F(17to18°C)• Day:65to70°F(18to21°C)• Optimumconditionsmaybedifficult
to maintain, especially if plants are displayed outside
LightSweet Marjoram prefers full sun Partial shading may be beneficial during retail display
Common ProblemsInsects: Spider mites, AphidsDiseases: Fungal diseases
SWEET MARJORAM continued

800 879-BALL ballseed.com 67
GROWERFacts NOtEs

800 879-BALL ballseed.com68
GROWERFacts NOtEs

Burpee Home Gardens® “to Go” Culture ChartsNote: This chart includes general culture guidelines Please refer to the
GrowerFacts on pages 39 to 66 for detailed growing information
Cucumber, Eggplant, Pepper & Tomato PlantersCucumber: BOOST Gold Standard, Bush ChampionEggplant: Burpee HybridPepper: Better Belle, BOOST Sweet Heat, Flavorburst Hybrid, Jalapeño GiganteTomato: BOOST Cherry Punch, BOOST Power Pops, BOOST Solar Power, Bush Champion II,
Bush Early Girl II, Celebrity, Fourth of July, Fresh Salsa Hybrid, Phoenix, Tumbler
Recommended for 12-in (30-cm) or larger patio pots NOTE: Tomatoes and cucumbers will benefit from some type of “cage” to contain the plants Fourth of July tomato is indeterminate and will also benefit from a “stake” to support its vertical growth
Sow to transplant (weeks)
Seeds per 200-plug tray 1
Number of plugs to transplant into a 4-4.5-in. (10-11-cm) pot
Growing on in 4-4.5-in. (10-11-cm) pots (weeks)
Number of 4-4.5-in. (10-11-cm) pots to plant in a 12-in. (30-cm) or larger container
Transplant to sale in a 12-in. (30-cm) or larger container (weeks)
Total crop time sow to sell (weeks)
Cucumber Direct sow to 4-4.5-in. (10-11-cm) pots
__ __ 3-5 3 1-3 4-8
Eggplant 2-3 1 1 7-9 3 2-3 11-15
Pepper 3-4 1-2 1 6-7 3-5 3-4 12-15
Tomato 2-3 1 1 6-8 3 2-3 10-141 A 200-plug tray is recommended to grow eggplant, peppers and tomatoes for the “To Go” program
Mixed Salad BowlsMulti-Species, Multi-Pellet Mixes: Alfresco Mix, City Garden Mix, Global Gourmet MixLettuce Blends: Gourmet Blend, Heatwave BlendSalad Mix: BOOST Healing Hands
Recommended for 10 to 12-in (25 to 30-cm) color bowls
Sow to transplant (weeks)
Seeds or pellets per 105/128-plug tray
Number of plugs to transplant into a 10-12-in. (25-30-cm) container 4
Transplant to sale in a 10-12-in. (25-30-cm) container
Total crop time sow to sell (weeks)
Multi-Species, Multi-Pellet Mixes 2-3 1-2 pellets 2 4-7 4-7 6-9
Lettuce Blends 2-3 3-4 seeds 3 4-7 4-7 6-9
2 These mixes are offered as a pellet containing several varieties of greens Only 1 to 2 pellets need to be sown per cell 3 These blends should be sown using 3 to 4 seeds per cell to produce a representative assortment of varieties Since 4 to 7 plugs are used in each color bowl, an excellent mix is produced 4 For best results, plant the plugs directly in the finish container to minimize checking the growth
Herb CombosGood Grillin’: Chives, parsley and rosemaryKitchen Favorites: Basil, dill, oregano and parsleyTuscan Trio: Basil, oregano and parsley
Recommended for color bowls or 10-in (25-cm) or larger patio pots
Sow to transplant (weeks)
Seeds per 200-plug tray 5
Number of plugs to transplant into a 4-4.5-in. (10-11-cm) pot
Growing on in 4-4.5-in. (10-11-cm) pots (weeks)
Number of 4-4.5-in. (10-11-cm) pots to plant in a 12-in. (30-cm) or larger container
Transplant to sale in a 10-12-in. (25-30-cm) or larger container (weeks)
Total crop time sow to sell (weeks)
Basil 5-6 1-2 Standard: 1 Boxwood: 3 3-4 Depending on
the size of the container, 4 to 7 4-5-in. (10-11-cm) pots make a saleable container.
1-3 9-13
Chives 5-6 7-8 6-7 3-4 1-3 9-13
Dill 3-4 2-3 5-6 3-4 1-3 7-11
Oregano 5-6 1-2 3-4 4-6 1-3 9-13
Parsley 5-6 2-3 3-4 3-4 1-3 9-13
Rosemary 9-10 1-2 1-2 4-6 1-3 14-19
5 A 200-plug tray is recommended to grow these herb varieties for the “To Go” program

Ball Horticultural Company800 879-BALLFax: 800 234-0370Order at ballseed.com
© 2011 Ball Horticultural Company BHC11508 Printed in the U.S. on 10% post-consumer recycled paper with soy-based inks.BURPEE HOME GARDENS and BURPEE BIG BOY are registered trademarks of W. Atlee Burpee Co. BALL is a registered trademark of Ball Horticultural Company.