vcc - agent supervisor desktop...
TRANSCRIPT

---------------------------------------------------------------------------- ------- ---------
Virtual Contact Center


8x8, Inc. Agent Console Guide
Version 8.0 Rev. 1.0 i
Copyright © 2013, 8x8, Inc. All rights reserved.
This document is provided for information purposes only and the contents hereof are subject to changewithout notice. This document is not warranted to be error-free, nor subject to any other warranties orconditions, whether expressed orally or implied in law, including implied warranties and conditions ofmerchantability or fitness for a particular purpose. We specifically disclaim any liability with respect to thisdocument and no contractual obligations are formed either directly or indirectly by this document. Thisdocument may not be reproduced or transmitted in any form or by anymeans, electronic or mechanical,for any purpose, without our prior written permission.
8x8® is a registered trademark of 8x8, Inc.
Microsoft® Internet Explorer is a trademark or a registered trademark of Microsoft Corporation in theUnited States and other countries.
All other trademarks, service marks, registered trademarks, or registered service marks are the property oftheir respective owner/s. All other brands and/or product names are the trademarks (or registeredtrademarks) and property of their respective owner/s.

8x8, Inc. Agent Console Guide
Version 8.0 Rev. 1.0 ii
PrefaceVirtual Contact Center from 8x8 is the fastest and easiest way to deploy a world class contact center.
Virtual Contact Center makes it easy to manage all of your customer interactions – phone, email and chat- through a single system. Our award-winning solution is 100% web-based and was developed by industry-leading designers to be extremely easy to use, thus speeding the adoption process for both agents andsupervisors. The Virtual Contact Center includes all of the functionality you need to provide an exceptionalcustomer experience: skills based routing, multi-media interaction management, IVR, CTI, case &contact management, call recording, real-time monitoring, desktop sharing, reporting, and much more.
This guide provides agents with the information necessary to use the Agent Console to manage customerinteractions.
Depending on your subscription, some components described in this guide may not be included in yourpurchased subscription.
8x8, IncSALES: 1.877.725.2621SUPPORT: [email protected]

8x8, Inc. Agent Console Guide
Version 8.0 Rev. 1.0 iii
Contents
Preface ii
Contents iii
Getting Started with the Agent Console 1How to Use this Document 1What You'll Need to Begin 1
Logging in and Setting Your Status 3Changing Agent Password 4Resetting your Agent Password 6Logging in with Reset Password 7
Logging out of theAgent Console 8
Overview of Agent Console User Interface 10
Checking Agent and Queue Status 13Ability to Search 13Ability to Filter 13Defining Favorites 14Tracking Recents 15Click to Chat or Call 15
Configuring Your Agent Profile 17Configuring Agent Account Settings 17
Summary of Agent Profile Settings 19
Changing Your TelephoneNumber 21Formatting Telephone Number Entries 23Changing Agent Console Telephone Number 23Making a Verification Phone Call 24Before you Begin 24
Configuring EmailOptions 25Configuring your External CRM 25External CRM Setup Summary 28
Personalizing your Agent Console 30Viewing Your QueueAssignments 30
Recording Agent Messages 32
Setting Your Status 35Busy with an Interaction 36Working Offline 37

8x8, Inc. Agent Console Guide
Version 8.0 Rev. 1.0 iv
Taking Breaks and Other Unavailable Statuses 37
Working with Codes 38Choosing Status Codes 38Choosing Transaction Codes 39Selecting Transaction Codes 41
Choosing Outbound PhoneCodes 42
Overview of Processing Interactions 45Overview of Interactions and Status 45ManagingMultiple Tasks 45
Processing Phone Interactions 46Overview of Phone Interactions 46Inbound PhoneCall Flow 46Overview of PhoneControls 47Accepting a Phone Interaction 49Recording Phone Interactions 51Playing Agent RecordedMessages 53Adding Notes During an Interaction 54
Choosing Transaction Codes 55Transferring a Phone Interaction to another Agent 56Transferring a Phone Interaction to another PhoneQueue 57Making Outbound PhoneCalls 59How the Agent Console Places Outbound Calls 59Keyboard Dialing Digit Tones 59Features 60Limitations 60Using Keyboard Digit Tone Dialing 60
Choosing Outbound Phone Codes 62Managing Your Status During Outbound Calls 62Ability to Set your Status 62Automatic Change of your Status 63
Processing Outbound Campaign Calls 64Rescheduling Campaign Calls 66Saving Do not Call Disposition 68
Transferring a Phone Interaction to an External Phone Number 68
Using Join Lines to Set Up a ConferenceCall 70Overview of Agent Console Conference Calls 70Adding an Agent to a Conference Call 70Adding an External Party to a Conference Call 71
Processing Voice Mail Interactions 74Overview of VoiceMail Interactions 74Accepting a VoiceMail Interaction 74
Processing Chat Interactions 76

8x8, Inc. Agent Console Guide
Version 8.0 Rev. 1.0 v
Overview of Chat Interactions 76Accepting a Chat Interaction 76Processing Chat Interactions 78Transferring a Customer Chat to a Different Queue 80Using Agent-to-Agent Chat 81Inserting FAQResponses into Chat Interactions 84
Processing Email Interactions 87Overview of Email Interactions 87Accepting an Email Interaction 87Processing Email Interactions 89Transferring an Email to a Different Queue 90Inserting FAQResponses into Emails 91Pulling Emails From aQueue 93Deleting Emails From a Queue 95
Managing Customers, Cases, and Tasks 96Customer 96Case 96Follow-up 96Task 97
Integrating with External CRM 97CRMLanding Page 97Customizing Lists of Customers and Cases 98
Searching for CRMData 99Searching for Customers 101Searching for Cases 103Searching for Tasks 105
Creating and Editing Customer Records 107Managing a Customer Record 109
Creating and Editing CaseRecords 110Managing a Case Record 112
Downloading CRM Attachments 113
Creating Follow-up Records 113Creating and Editing Tasks 115
Features 116Creating a Task 116Managing a Task 119Viewing a Task History 119Listing Tasks of a Customer 120
Deleting CRMData 121Before you begin 121
Understanding Rich Text Editor 123Summarizing the Menu Elements of Rich Text Editor 124Description - Inserting an Image 126

8x8, Inc. Agent Console Guide
Version 8.0 Rev. 1.0 vi
Description - Inserting a Hyperlink 128Description - Inserting a FAQ 131Description - Inserting a Signature 132Description - Spell Checking 133
Creating CRMReports 134Creating a CRM Customer Report 134Creating a CRM Case Report 137Creating a CRM Task Report 141
Posting and Viewing Notification Messages 144Sending a Notification Message 144Viewing Notification Messages 145
Using the Collaborate Feature 146Overview of a CollaborateDesktop Sharing Session 146Before Running Collaborate For The First Time 146Establishing a Collaborate Session 146
GLOSSARY 149
8x8, Inc. Agent Console Guide
Version 8.0 Rev. 1.0 1
Getting Started with the Agent ConsoleThe Virtual Contact Center Agent Console enables agents to use a graphical user interface (GUI) tomanage customer interactions.
If you are the primary contact center administrator, 8x8, Inc. will provide you with the information you willneed to access and configure your Virtual Contact Center.
If you are an agent, your contact center supervisor will provide you with the information you need toaccess your Agent Console account, as well as your contact center's policies and guidelines for using thataccount.
Using Agent Console, contact center agents can:
n process interactions of all media including phone, chat, email, and voicemail.
n process both inbound and outbound interactions.
n track the status of agents and queues.
n provide quick answers to customer questions using the FAQ knowledgebase.
n manage CRM data by integrating with local CRM or supported external CRMs.
n collaborate with a remote desktop for real time assistance or co-browsing capabilities.
How to Use this DocumentThe Agent Console user guide provides a comprehensive overview of the primary tasks performed usingthe Agent Console.
Your contact center supervisor will provide you with an overview of your duties as a customer agent,including the types of customer interactions you are responsible for.
When you log into your Agent Console account for the first time, use this document to learn how toconfigure your account. Your supervisor will help you configure your Agent Console account so that itconforms with your contact center's technical requirements and operational policies.
After configuring your Agent Console account, this document provides both overview and detailedinformation about processing interactions, managing your status, and working with customer, case, andfollow up records.
What You'll Need to BeginEach agent workstation requires the following:

8x8, Inc. Agent Console Guide
Version 8.0 Rev. 1.0 2
n An agent telephone that is available exclusively for handling Virtual Contact Center phoneinteractions during working hours
n A computer equipped with any of the following browsers:
o Internet Explorer 8,9, 10
o Chrome
o Firefox
For information about agent workstation technical requirements, see your contact center supervisor orrefer to the Technical Requirements document.
Note: Chrome and Firefox do not support CollapseWindow functionality in Agent Console.

8x8, Inc. Agent Console Guide
Version 8.0 Rev. 1.0 3
Logging in and Setting Your StatusYour contact center supervisor will provide you with the URL, username, and password required to log intoyour Agent Console account.
Note: Based on the configuration of your Virtual Contact Center, you may receive the login informationthrough a system generated email or from your Supervisor manually. The email includes User name,System Generated Password, and link to the Agent Console.
To log in to the Agent Console:
1. In your preferred browser, enter the URL for your Agent Console.
Figure 1: Agent Console: Login Screen
2. In the login page, enter your username and password. Click Login.
Note: Agent Console usernames and passwords are case-sensitive.
By default, the Agent Console launches in Break status.

8x8, Inc. Agent Console Guide
Version 8.0 Rev. 1.0 4
3. Select Available orWorking Offline status to initiate the session.
Your supervisor may also instruct you to update certain parts of your Agent Console user profile.
Changing Agent PasswordWhen you receive your account login credentials set by administrator, you can log in to Agent Consoleusing these credentials. You have the flexibility to change the password anytime by navigating to yourprofile.
To change the password:
1. Log into Agent Console
2. Navigate to Profile in the Agent Console from the Control Panel menu.

8x8, Inc. Agent Console Guide
Version 8.0 Rev. 1.0 5
Figure 2: Agent Profile
3. In the Security area, enter the old password.
4. Enter the new password.
Note: Hover over the tool tip to know the password length.
5. Retype the new password and clickSave.
Note: If your password fails to meet the password criteria set by the administrator, amessage indicates the failed criteria and prompts you to retype the password.
Your new password is activated from the next login session.

8x8, Inc. Agent Console Guide
Version 8.0 Rev. 1.0 6
Resetting your Agent PasswordIf you forget your password to log into Agent Console, you do not have to contact your supervisor oradministrator to reset the password. You can reset your password automatically by providing your Username and Tenant name. The new password is sent to the email address specified in your agent profile. Ifyou have set up a security question and answer in your profile, a link to the security question is emailed toyou. On answering the question correctly, you will receive the reset password in an email. This additionalstep proves that the person requesting to reset the password is the one assigned to the agent account.
To reset your forgotten password:
1. Click Forgot Password in the login screen.
Figure 3: Agent Console Login
A dialog box appears prompting for User name.
2. Enter user name exactly as you would for logging into the Agent Console (user name can be in oneof the two forms – agent_id@tenant_id or agent_id if tenant id is provided as a parameter in thelogin URL, please confirm with administrator) and clickContinue.

8x8, Inc. Agent Console Guide
Version 8.0 Rev. 1.0 7
Figure 4: Reset Password - Prompt for User Name and Tenant Name
A message indicates a new password is sent to your email address with the required information toproceed.
3. Open your email and click the link in the email. A dialog box opens prompting for an answer to yoursecurity question.
Figure 5: Reset Password - Security Question Prompt
Note: If you have not set up a security question and answer in your profile, you will receive a resetpassword in the email.
4. Enter your answer to the security question. If you answered the question right, a message indicates areset password is emailed to you.
5. Open your email to obtain the system generated reset password.
Logging in with Reset Password
You are allowed to use reset password to login to Agent Console only once. Upon logging into the AgentConsole with your reset password, you are prompted to change the password. If you fail to change thepassword, you will be automatically logged out.

8x8, Inc. Agent Console Guide
Version 8.0 Rev. 1.0 8
To login with the reset password:
1. Open your email to obtain the system generated reset password.
2. Log into Agent Console with the reset password. You are logged in successfully and prompted forchanging the password.
Figure 6: Logging with Reset Password
3. Enter a new password and clickChange to proceed with the login.
Logging out of the Agent ConsoleWhenever you are not scheduled to work, you must log out of the Agent Console. If you fail to log out, theAgent Console will incorrectly report your status.
To log out of the Agent Console:
1. In the Agent Console, clickWork Offline or Take Break.
Your statusmust be working offline or taking a break to display the LogOut button.

8x8, Inc. Agent Console Guide
Version 8.0 Rev. 1.0 9
2. Click Log Out.
Caution:Closing the Agent Consolebrowser does not log you out. To log out, you must click LogOut in the control panel.

8x8, Inc. Agent Console Guide
Version 8.0 Rev. 1.0 10
Overview of Agent Console User InterfaceThe Agent Console interface is broadly split into:
n Control Panel on the left hand side: The control panel provides controls to process interactions inyour contact center and to manage agent status. For a quick look at the control panel functionality,refer to the Agent Console Quick Start Guide.
n Display Panel on the right hand side: The display panel provides access to CRM data, profilesettings, and message recording settings.
illustrates the functional areas of the Agent Console.
Table 1describes the two Agent Console functional areas.

8x8, Inc. Agent Console Guide
Version 8.0 Rev. 1.0 11
Table 1: Summary of Agent Console Functional Areas
Functional Area Description
1: Control Panel Use the Agent Console Control panel to access thecontrols and status information you need to process aninteraction and work with Agent Console tools.
Maintain your agent status using status control buttons inthe Control Panel.
The Agent Console dynamically adjusts the Control paneltabs in response to the interaction type and task you areperforming. For information about specific Control panelfeatures, refer to the information for each Agent Consoleinteraction type. Each type of interaction is processedusing its corresponding Interaction Tab.
n Phone tab:The Phone tab allows an agent tomanage phone interactions. All call handling functionssuch asmaking calls, placing a caller on hold,conferencing and transferring calls are performedusing the Phone tab.
n Chat tab:The Chat tab is used to manage chatinteractions from customers or from other agents.
n Email tab: The Email tab is used to accept andrespond to emails.
n Status tab: The Status tab displays agents, andqueue information,such as number of calls waiting,calls in progress, and the status of logged in agents inyour group. For details refer to
n Notices tab: The Notice tab allows agents andsupervisors to post and receive informational notices.
The Control Panel menu offers action items:
n Profile to view or edit yourAgent Console accountsettings.
n My Recording to allow agents to record messages tobe played to customers.
n External CRM to initiate an integrated external CRM

8x8, Inc. Agent Console Guide
Version 8.0 Rev. 1.0 12
Functional Area Description
session.
n CRM to access cases, customers and tasks from thelocal CRM.
n FAQ to access frequently asked questions andanswers for repetitive use.
n Collaborate if your account includes the optionalCollaborate feature to remotely connect to a customercomputer with remote desktop control options and co-browsing capabilities.
n Help to navigate to Virtual Contact Center helpresources.
n Monitoring to display the Agent Supervisor ConsoleQueue and Agent management tool in separatebrowser window.
n Reporting to display the Agent Supervisor Consolereport selection and generation tool.
Collapse Window: The CollapseWindow button at thebottom of Control Panel hides or shows Display Panel.
Note: Chrome and Firefox do not supportCollapseWindow functionality in AgentConsole.
2: Display Panel The Display panel provides access to CRM data, profilesettings, andmessage recording settings. The Displaypanel opens with three default tabs and opens additionaltabs for eachmenu action.
n Customers to list your open case records bycustomer.
n Cases to list your open case records.
n Tasks to view the tasks assigned to you.

8x8, Inc. Agent Console Guide
Version 8.0 Rev. 1.0 13
Checking Agent and Queue StatusThe status tab in the Control Panel provides panel provides real time status about the number ofinteractions waiting to be served in a queue, longest waiting interaction in a queue, number of eligibleagents in busy state, and status of fellow agents. Supervisors can check the status of queues and agentsthey supervise, communicate with agents instantly through chat or call.
The Status tab organizes the status of queues and agents in separate tabs:
n Agents tab: View status of other agents belonging to your group.
n Queues tab: View status of queues you are a member of.
Ability to Search
Search and retrieve status about a specific queue or an agent instantly. Search is case insensitive.
Ability to Filter
Filter queue status information by queue type and queue member status. View status of queues:
n supervised by you
n you are a member of and you are enabled
n you are a member of but disabled
Note: If you are disabled to serve a queue, you can still view the status of this queue, but the queueappears grey in the directory.
n Queue type (Inbound Phone, Outbound Phone, Chat, Email, Voicemail)
Similarly, you can filter agents based on agent group affiliation and current status. Statusmay be one orall of the following:

8x8, Inc. Agent Console Guide
Version 8.0 Rev. 1.0 14
n Available
n Busy
n Post Processing
n Working Offline
n On Break
n On Email
n Logged out
Figure 7: Filter for Queue Search Figure 8: Filter for Agents Search
Defining Favorites
Bookmark agents you contact often and queues used often and track their status every time you log inwith just a click on the Favorites tab.
For example, you are one of the five managers in AcmeJets - Support agent group. You manage 7 teammembers out of the 50 members belonging to the group. You can mark these seven team members asyour favorites and monitor their status with just a click rather than sifting through the status of the wholeteam.

8x8, Inc. Agent Console Guide
Version 8.0 Rev. 1.0 15
Figure 9: Defining Favorites
Tracking Recents
Using theRecents tab,
n Track those agents with who you initiated a call or a chat session in the past. The Recents tab liststhose agents and displays their status. Your search results are locally stored.
Note: Does not qualify participation in a chat or a call.
n Track the status of queues you transferred the calls to in the past.
Click to Chat or Call
With just a single click, you can call or chat with an agent from the status tab. In the Status tab for agents,right click an agent in the panel for a context sensitive pop up menu with options to:
n Start a Chat: Initiate a chat with the agent
n Make a Call: Place a call to the agent

8x8, Inc. Agent Console Guide
Version 8.0 Rev. 1.0 16
n Monitor: Monitor the agent activity (Supervisor Only Privilege)

8x8, Inc. Agent Console Guide
Version 8.0 Rev. 1.0 17
Configuring Your Agent ProfileYour Supervisor will instruct you how to configure your Agent Profile to conform with company policies.
Configuring Agent Account SettingsBefore configuring the contact center's agent accounts, the contact center's management team shoulddefine a standard configuration for each type of agent that will work in the contact center.
The contact center administrator can then use those standard configuration values to guide the use of theAgent Console, My Profile page, to configure a given agent's account.
The information onMy Profile screen is organized under the following areas:
n General:Presents information on agent name, display name, tenant name, tenant label, productversion and revision.
n Personal: Lets you view or edit email address, phone number, and make verification call to thespecified number.
n Personalization:Allows you to personalize your Agent Console with notification sound alert, specifyDate Format, Default Signature, and Default email signature etc.
n External Setup: Lets you define your login credentials to access your integrated third party CRM.
n Security: Lets you change password to login. You can also select a security question and input ananswer which will be used in the event of resetting a forgotten password.
n Queue Assignment:Specifies inbound and outbound phone, chat, email and voicemail queues to

8x8, Inc. Agent Console Guide
Version 8.0 Rev. 1.0 18
which the agent is assigned.

8x8, Inc. Agent Console Guide
Version 8.0 Rev. 1.0 19
Summary of Agent Profile Settings
The following table summarizes profile settings in Agent Console.
Table 2: Summary of Agent Console, My Profile page settings
Agent Profile
Areas
Profile Setting Description
General Agent Name
Agent Id
Tenant Label
Tenant Name
Version - Package
Revision
n Displays agent name as entered by the VirtualContact Center administrator.
n agent Id used to login to Agent Console.
n Tenant Label that appears on top of theConfiguration Manager and Agent Consolewindows.
n Name of the tenant.
n Specifies the version of Virtual Contact Center.
n Represents the revision number of VirtualContact Center.
Personal Email Address
Phone Number
SIP Phone URI
Make Verification Call
n Type the email address for this account. When the
agent uses the CRM case management page,
Notification tab, to send an email, the agent can
choose this email address as the From address for
the message.
n Designated number to process interactions on the
Agent Console.
n specifies the SIP Phone URI of a VOIP phone. The
SIP URI resembles an e-mail address and is written
in the following format: SIP URI =sip:x@y:PortWhere x=Username and y=host
(domain or IP).
n Places a call to the specified phone number for
verification. On answering the verification call, you
can set up a voice mail greeting.
Personalization Notification Sound n Provides a choice of alert sounds to notify a new
interaction. You can play to check the notification

8x8, Inc. Agent Console Guide
Version 8.0 Rev. 1.0 20
Agent Profile
Areas
Profile Setting Description
Date Format
Default Signature
Default "From"
Email Signature
sound.
n Offers a choice of date formats to apply on all email
notifications sent to and from the tenant.
n Choose the default email signature used when
sending email messages from this account. When
the agent uses the CRM case management page,
Notification tab, to send an email, the default
signature appears as one of the choices in the
Signature list.
n Choose the default From address used when
sending email messages from this account. When
the agent uses the Internal CRM page, Notification
tab, to send an email, the default from address
appears as one of the choices in the From list.
n Type the email signature for this account. When the
agent uses the CRM case management page,
Notification tab, to send an email, the agent can
choose to insert this Signature in the message
External Setup External Username,External Password
If the Agent Console has been configured tointeroperate with a third-party CRM, in the ExternalUsername and External Password text entry areas, typethe login credentials this agent uses to access the third-party CRM.
Queues Assignment Inbound Phone
Outbound Phone
Chat access
VoiceMail
By default, the Queue Assignments area lists the agent'squeue memberships.
If the contact center administrator uses theConfiguration Manager to enable the Agent can changequeue assignments option for this agent, then the agentcan use the Queue Assignments area to disable aqueue's ability to offer the agent interactions.

8x8, Inc. Agent Console Guide
Version 8.0 Rev. 1.0 21
Agent Profile
Areas
Profile Setting Description
Security Old password
New Password
Retype Password
Security Question
Security Answer
n By default, the current password is listed for allthe three fields. If an agent wishes to change thepassword, he should enter the old password, andnew password, and confirm the new password.
n Hovering over the symbol indicates the passwordlength defined for the Agent Console.
n Selecting a Security Question and answer in theprofile is used to ensure the person requesting toreset the password is the one assigned with theagent account.
Changing Your Telephone NumberYour contact center supervisor has configured your Agent Console account to conform with your contactcenter's technical requirements and company policy.
Virtual Contact Center allows you to use a hard phone, or a cell phone, or a soft phone to process thecontact center interactions. Use of a hard phone requires the phone number while the use of a soft phonerequires the SIP URI. While setting up your account, your administrator specifies this information. Theadministrator also determines if you can change this information in your agent profile.
In theMy Profile tab, the Phone Number text entry area specifies the phone number you will use toprocess Virtual Contact Center phone interactions. The SIP URI identifies your soft phone.
Based on the configuration of your account, you may be able to edit your phone number and the SIP URI.If the administrator does not grant the privileges, you cannot change your phone number or the SIP URI.Do not change your Agent Console phone number unless directed to by your supervisor. If your supervisordirects you to change your number, possibly to respond to an emergency or to enable you to work in adifferent location, navigate to your agent profile, in the Personal text entry area, enter the phone numberand save the new settings .
You may use a traditional land line telephone, or an IP Phone, or a softphone. If you use a hardwaretelephone, enter the telephone number here. This could be your cell phone, or home phone, or deskphone offering the flexibility to function as an agent from virtually anywhere. If you use a soft phone,configure the soft phone, and enter the SIP Phone URI here.

8x8, Inc. Agent Console Guide
Version 8.0 Rev. 1.0 22
To change your Agent Console telephone number:
1. In the Agent Console, clickWork Offline.
The Agent Console makes you unavailable for new interactions.
2. In the Navigation bar, clickMy Profile.
The Agent Console displays the profile configuration page.
3. In theMy Profile configuration page, in the Phone Number text entry area, enter your telephonenumber or the SIP Phone URI.
Figure 10: Agent Console > My Profile
For information about valid telephone numbers, see Specifying Valid Telephone Number Entries,above.
4. Perform the procedure inMaking a Verification Phone Call, on page 24 to verify the operation of thenew phone number.
Note: If you do not have the permission to change your phone number or the SIP Phone URI, the twofields are disabled as shown below.

8x8, Inc. Agent Console Guide
Version 8.0 Rev. 1.0 23
Formatting Telephone Number Entries
In the Agent ConsoleMy Profile page, telephone numbers typed into the Phone Number text entryarea. Based on the dial plan implemented for your tenant, you may or may not need to prefix
n In the United States, must be of the form:
1 three-digit area code seven-digit phone number
n Outside the United States, must be of the form:
Country Code phone number
n May contain optional dashes, spaces, or parentheses
The following illustrates valid United States telephone number entries:
n 5102592675
n 15102592675
n 1-510-259-2675
n 1(510)259-2675
Changing Agent Console Telephone Number
Based on the permissions set by the Administrator, you can change a new telephone number or a SIPURI.
Perform the procedure in this section to change the number of your wired telephone. If you are using aVoIP phone, do not change your SIP Phone URI unless directed to by your contact center supervisor.
To change your Agent Console telephone number:
1. ClickWork Offline.
The Agent Console makes you unavailable for new interactions.
2. Navigate to Profile.
The Agent Console displays the profile configuration page.

8x8, Inc. Agent Console Guide
Version 8.0 Rev. 1.0 24
3. Enter your telephone number in the Phone Number text entry area.
For information about valid telephone numbers, See "Formatting Telephone Number Entries" onpage 23, above.
4. ClickMake verification call to verify if the phone works.
When the phone rings, answer the call to complete verification of your agent phone number.
5. If your Agent Console account permits direct agent access, and you want to change your personalvoice mail greeting, follow the recorded instructions.
6. Save changes to your phone settings.
Making a Verification Phone Call
Perform the procedure in this section to verify the connection between the Virtual Contact Center andyour wired or SIP VoIP agent telephone.
For information about specifying your agent telephone number or SIP URL, seeChanging Agent ConsoleTelephone Number, on page 23.
Before you Begin
Ask your supervisor if your account has been configured to permit direct agent access.
If your Agent Console account permits direct agent access, you can choose to change your personal voicemail greeting as part of verifying the operation of your agent telephone.
To verify the operation of your agent telephone:
1. In the Agent Console, clickWork Offline.
The Agent Console makes you unavailable for new interactions.
2. In the Navigation bar, clickMy Profile.

8x8, Inc. Agent Console Guide
Version 8.0 Rev. 1.0 25
The Agent Console displays the profile configuration page.
3. In theMy Profile configuration page, clickMake Verification Call.
After the Agent Console places a call to the phone number or SIP Phone URI, answer the call tocomplete verification of your agent phone number.
4. If your Agent Console account permits direct agent access, and you want to change your personalvoice mail greeting, follow the recorded instructions.
Hang up the phone to complete the verification of your agent telephone.
Configuring Email OptionsYour contact center supervisor has configured your Agent Profile to conform with your contact center'stechnical requirements and company policy.
For information about Agent Console email options, seeConfiguring Agent Account Settings, on page17.
Do not change your Agent Console email settings unless directed to by your supervisor.
Configuring your External CRMIf your contact center is integrated with an external CRM such as Salesforce.com or NetSuite, you canaccess your external CRM account from your Agent Console by saving the login credentials necessary toaccess the account.
Virtual Contact Center now provides out of the box integration with:
n Salesforce
n NetSuite
n Zendesk
n Microsoft Dynamics
n Zoho
To enable your agent account for external CRM Integration:
1. Login to Agent Console.
2. Navigate to Profile.
3. Scroll down to the External Setup area.
The External Setup provides three tabs.

8x8, Inc. Agent Console Guide
Version 8.0 Rev. 1.0 26
o Authentication Tab: Allows agents to save CRM login credentials
o Screen Properties Tab: Allows agents to define Screen Pop properties such as opening a newwindow for Screen Pop.
Note: This tab is enabled only if the tenant administrator grants access privileges.
o Window Properties Tab: Allows agents to define size and position of the Screen Pop window.
Note: This tab is enabled only if the tenant administrator grants access privileges.
4. Enter your CRM login ID, and password in the Authentication tab.
Note:Salesforce requires you to add the security token to your password to authenticate accessfrom a third party application. Obtain your security token from the original Salesforce communicationemail or your Salesforce administrator.
Figure 11: External CRM Authentication
5. Click the Screen Properties tab to view or change the settings.
Note: The agents' ability to define Screen Pop window properties is available for Salesforce,Zendesk and MS Dynamics integration only.

8x8, Inc. Agent Console Guide
Version 8.0 Rev. 1.0 27
Figure 12: External Setup > Screen Pop Properties
6. Click theWindow Properties tab to view or redefine the Screen Pop window properties.
Note: The agents' ability to define Screen Pop window properties is available for Salesforce,Zendesk and MS Dynamics integration.
Figure 13: External Setup > Screen Pop Window Properties
7. Save your settings to launch your external CRM from the Agent Console.
Your supervisor will provide you with the information you need to access and work with your contactcenter's third-party CRM product.

8x8, Inc. Agent Console Guide
Version 8.0 Rev. 1.0 28
External CRMSetup Summary
The following table summarizes External CRM set up options in the Agent Profile.
Table 3: Agent Profile > External Setup Options
Functional Area Description
Authentication Tab n External username: Enter the Username or login ID to log intoyour external CRM.
n External Password:Enter the password to login to your externalCRM.
Screen Properties Tab
Note:This tab enabled only ifthe tenant administratorgrants access.
n Open new window for Screen Pop-up
This option allows agents to view Screen Pop of interactions in astandalone pop up window instead of opening new tabs withintheAgent Console.
If an interaction is connected tomultiple records, a tab openslisting all matching records. You can click on a record to view therecord details.
If the option is disabled, launches the native CRMURLwithin theAgent Console. Along with this option, twomore options areavailable:
o Use single window only: This option displays theScreen Pop in a new window and refreshes thesamewindow to show new contact and call loginformation.
If disabled, launches new contact and call loginformation in new windows.
o Hide result listing for single search result: If aninteraction fetches multiple matching records, abrowser tab lists all matching records in a tabularformat. Clicking on a record shows the recorddetails.
If this option is enabled, an interaction fetching asingle matching record opens the record details in anew window and hides the result listing tab as

8x8, Inc. Agent Console Guide
Version 8.0 Rev. 1.0 29
Functional Area Description
shown below.
If this option is disabled, thematching single recordlists in a tab in addition to opening in a new window.
Window Properties Tab
Note: This tab is enabledonly if the tenant
Show toolbar:
n Selecting Yes displays the Internet Explorer toolbar at the top of thestand-alone popup window.
n Selecting No displays the windowwithout the Internet Explorertoolbar.

8x8, Inc. Agent Console Guide
Version 8.0 Rev. 1.0 30
Functional Area Description
administrator grants access Note: Show toolbar is not supported on IE9.
Size and Position:
n In the width and height text entry areas, enter the size of the screenpop window in pixels.
n In the top and left text entry areas, enter the screen position of thescreen pop's upper-left corner in pixels.
Personalizing your Agent ConsoleYou can personalize your Agent Console settings by choosing a notification option, setting a date formatfor your communications, and defining your signature setting for emails.
Figure 14: Agent Profile > Personalization
The notification serves as an interaction audio alert. You will hear this audio alert when an interaction isoffered to you. Select an option from the available choices.
You may personalize your emails by creating a custom signature and a date format. You can create asimple text based signature, or a custom signature using HTML tags. If needed, create multiplesignatures, and set up a default signature for all your emails. You can insert a signature with a single clickin your emails.
Viewing Your Queue AssignmentsYour contact center supervisor has assigned you to one or more queues. You can process interactionsfrom these queues.
In theMy Profile page, theQueue Assignments area lists your queue assignments grouped bymedia.

8x8, Inc. Agent Console Guide
Version 8.0 Rev. 1.0 31
If your Agent Console account permissions allow it, you may block interactions from a queue by opting outof queue assignments as directed by your contact center supervisor.
To opt out of a queue assignment:
1. Navigate to theQueue Assignments area in the Profile.
2. Select the desired media tab.
3. Clear a queue assignment in your profile.
Figure 15: Agent Profile > Queue Assignment
4. Save changes to your profile. Interactions from this queue will not be offered until enabled again.

8x8, Inc. Agent Console Guide
Version 8.0 Rev. 1.0 32
Recording Agent MessagesThe Agent Console allows you to record messages and play them during an inbound or outbound call tocallers. When you place an outbound call and reach voice-mail, you can choose to play a pre-recordedmessage and hang up. If you have direct agent access, you can record a personal voicemail greeting to beplayed to callers.
Prerequisite: To record a message from your phone, your phone must be entered in your profile.
To record a message:
1. Select My Recording option from the Control Panel menu. The Agent Console displays the VoicePre-Recordings panel.
Figure 16: Agent Console,Voice Pre-Recordings page
2. ClickNewRecording link.
3. Enter the following information:
n Name: to identify the voice message in theName entry area.
n Description: to state the purpose of the message in theDescription entry area.
n Text: Script of the message.

8x8, Inc. Agent Console Guide
Version 8.0 Rev. 1.0 33
Figure 17: New recording dialog
4. Check the Enabled box to play this message during a call.
5. ClickRecord a Message link. A dialog box appears indicating the following steps to record a voicemessage.
a. ClickCall Your Phone. Your phone rings. When you answer the call, you are prompted torecord your message after the beep.
b. Click Record and say your message.
c. ClickStop Recording to end the recording. The recorded message is played to you. If you arenot satisfied with the recording, you can re-record the message by clickingRecord or bypressing 1 on your phone key pad.
d. Hang up the phone and clickClose to close the pop-up dialog box.

8x8, Inc. Agent Console Guide
Version 8.0 Rev. 1.0 34
Figure 18: Voice Pre-Recordings - Dialog box
6. ClickSave.
Figure 19: List of voice recordings
Note: You can play the message and re-record if you wish to by clickingRe-record a Message inthe edit mode.

8x8, Inc. Agent Console Guide
Version 8.0 Rev. 1.0 35
Setting Your StatusVirtual Contact Center allows you to change your status by using status button in the Control Panel. Whenyou are logged in to the Agent Console, you are either available to accept new interactions or unavailable.
When your status isAvailable, you can use tools while waiting for a new interaction, but the AgentConsole is permitted to offer you a new interaction.
When your status isWorking Offline,you can be processing the current interaction, updating theCRM data for a previously received interaction, or taking a break. Regardless of why you areWorkingOffline, the Agent Console is not permitted to offer you a new interaction.
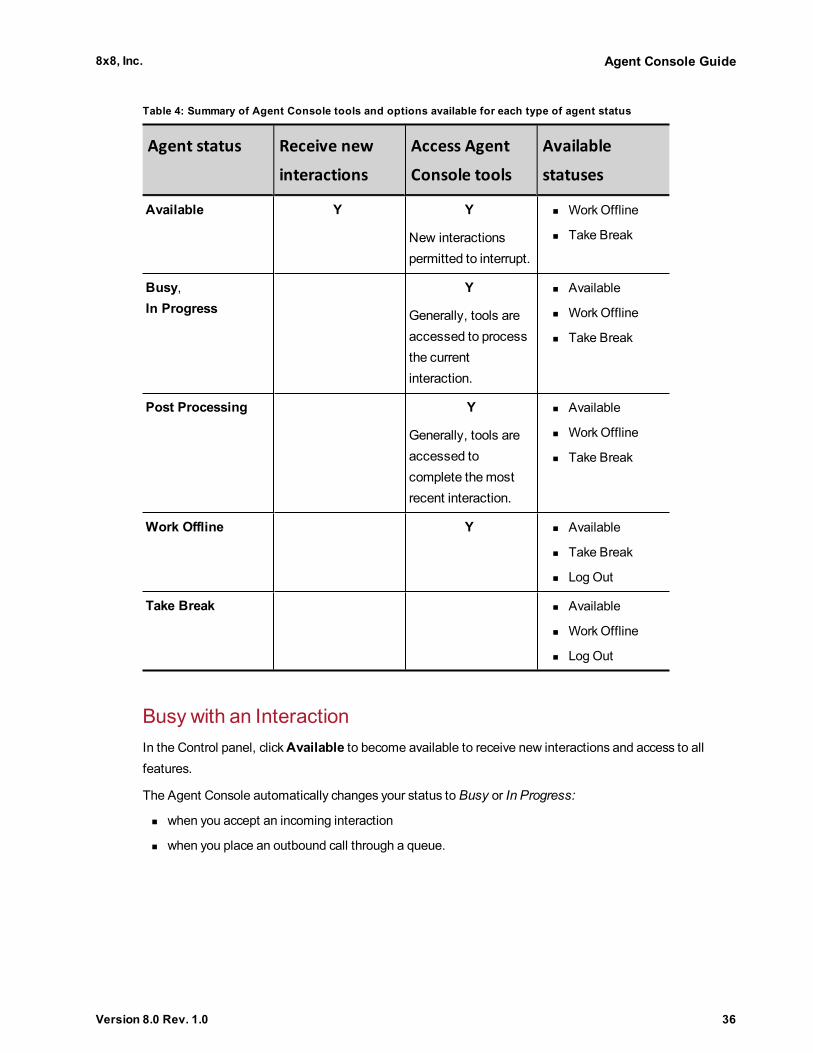
Table 4 lists the four statuses. For each of the four statuses, Table 4:
n Uses a Y to identify which features are available
n Lists the statuses you can choose while in a particular status
8x8, Inc. Agent Console Guide
Version 8.0 Rev. 1.0 36
Table 4: Summary of Agent Console tools and options available for each type of agent status
Agent status Receive new
interactions
Access Agent
Console tools
Available
statuses
Available Y Y
New interactionspermitted to interrupt.
n WorkOffline
n Take Break
Busy,In Progress
Y
Generally, tools areaccessed to processthe currentinteraction.
n Available
n WorkOffline
n Take Break
Post Processing Y
Generally, tools areaccessed tocomplete themostrecent interaction.
n Available
n WorkOffline
n Take Break
Work Offline Y n Available
n Take Break
n Log Out
Take Break n Available
n WorkOffline
n Log Out
Busy with an InteractionIn the Control panel, clickAvailable to become available to receive new interactions and access to allfeatures.
The Agent Console automatically changes your status to Busy or In Progress:
n when you accept an incoming interaction
n when you place an outbound call through a queue.

8x8, Inc. Agent Console Guide
Version 8.0 Rev. 1.0 37
When your Agent Console status is Busy or In Progress, you are unavailable to receive new interactions.The amount of time you are allotted to accept an offered interaction is specified by your contact centeradministrator when he or she configured the contact center.
When you complete an interaction, the Agent Console automatically changes your status to Post-Processing. When your status is Post Processing, you are unavailable to receive new interactions. Usethe post processing interval to perform any tasks required to finalize the interaction. The amount of timeyou are allotted to perform post processing is specified by your contact center administrator when he orshe configures the contact center.
When you are Busy or In Progress, the Agent Console enables you to access all Agent Console tools.
Caution: If you do not route an outbound call through a queue, your status remains unaffected. If you arein Available status while placing an outbound call, you are open for incoming interactions.
Working OfflineIn the Control panel, clickWork Offline to prevent the Agent Console from offering you new interactionsyet, but retain the ability to access all features.
Examples of tasks you may perform offline include:
n Extending the time available to complete the existing interaction
n Updating your CRM customer and case information
Taking Breaks andOther Unavailable StatusesIn the Control panel, click Take Break to become unavailable to receive new interactions and disableaccess to all features.

8x8, Inc. Agent Console Guide
Version 8.0 Rev. 1.0 38
Working with CodesYour contact center administrator may set up different types of code lists serving a unique purpose:
n Status Codes: to indicate the reason for your status change
n Outbound Phone Codes: to indicate the calling line ID of your outbound calls
n Transaction Codes: to state the purpose of each interaction and record the outcome of eachinteraction
You are presented with these code lists during an interaction if you are assigned to them.You may have toselect one or more custom codes as your status changes or as you process interactions.
Your supervisor will provide you with a list of your company's custom codes and explain when to choose aparticular code.
Choosing Status CodesIf your Virtual Contact Center includes the optional agent status codes feature, your contact centeradministrator has created status codes that identify reasons for a status change. When you select a statuschange button, the codes show up prompting you to select one.
For example, if you choose to change your status by clickingWorking Offline, the Agent Console displaysa list of reasons for working offline. Depending on your contact center's code definitions, the reasonsmayinclude AttendMeeting, Attend Training, or Finishing CaseWork. You must choose a status code beforeyou can complete the status-change operation.
The procedure in this section assumes your Agent Console includes the optional Status Codes feature.
Figure 20 shows the Control panel displaying status codes for working offline.

8x8, Inc. Agent Console Guide
Version 8.0 Rev. 1.0 39
Figure 20: Agent Console, selecting status code
To choose a status code:
1. In the Control panel, click a status change button.
For a list of statuses, see Setting Your Status, on page 35.
The Agent Console displays a list of status codes for the selected status.
2. Select a code from the list. Your status changes to the desired state.
The Agent Console applies the status. The status and associated status code appear in the contactcenter's historical reports.
Choosing Transaction CodesTransaction codes are mainly used to:

8x8, Inc. Agent Console Guide
Version 8.0 Rev. 1.0 40
n State the purpose of interactions.
n Indicate the outcome of inbound and outbound interactions.
For example, an ACME Sales representative processing a sales campaign for a new product, placesoutbound calls to prospect customers. He can record the result of each interaction with predefinedtransaction codes such as 'Successful Sale', 'Prospect Interested - Call back', 'Prospect not Interested -Donot call back', ‘Reached Voicemail’, and ‘Faulty Number’ etc. Further in the sales process, you can definetransaction codes to identify various stages of the sales process, and apply the codes to convey the statusand result of each interaction.
If your Virtual Contact Center includes the optional transaction codes feature, your contact centeradministrator creates transactions codes that identify call disposition.
Optional Vs. Required
Codes can be configured to be optional or required. If your contact center administrator configures a codelist asmandatory, as you process interactions, you are required to select transaction codes. You can endprocessing a call only after selecting the desired codes.
If your administrator configures a code list as optional, as you process interactions, you have the flexibilityto skip codes' selection.
Figure 21: Agent Console, selecting a transaction code

8x8, Inc. Agent Console Guide
Version 8.0 Rev. 1.0 41
You may select a transaction code to indicate the call disposition as shown above.
Selecting Transaction Codes
To select transaction codes during a call:
1. During an active call, clickOptions > Transaction Codes.
Note: The Options button or the Transaction Codes button indicates a mandatory code list if thecode list is mandatory.
Figure 22: Mandatory Transaction Codes Vs. Optional Transaction Codes
The code list assigned to the queue or the agent group shows.
2. Select the desired code/s and clickContinue. The code is assigned to the call.
Note: If you end the call without selecting a mandatory code, the call stagnates in the postprocessing mode. Clicking End Post Processing brings up the code list forcing a selection.
The Agent Console applies the code and enables you to begin processing the new interaction. Thetransaction code gets logged in the contact center's historical reports.
Using Keyboard Shortcuts
In a contact center environment, time taken by agents to process calls is critically important. During a call,agentsmay be required to browse multiple code lists and select desired code/s for each call. This processis time consuming. The keyboard shortcuts for codesminimize the time in selecting the codes by reducingthe number of clicks in the call flow. This feature is useful when the agent knows the code selection anddoes not have to go through the lists to make choices.
n The keyboard shortcut for Transaction codes is F2 t nn (where t = transaction code nn = codenumber).Within each code list, each code is numbered from 01 onwards. To select a second code in

8x8, Inc. Agent Console Guide
Version 8.0 Rev. 1.0 42
the list press F2 t 02
To select a transaction code using a keyboard shortcut:
During an interaction, type F2 t to bring up the Transaction Code list, and then select the desired code.
OR
Type F2 t nn to select a desired transaction code where nn stands for the transaction code number in thelist. The code saves.
Note: While selecting a code using the shortcut, always choose lower case d or t. Enter the number as01, not 1.
For a list of acceptable keyboard shortcut keys, refer to the table below:
Keyboard Shortcut for
Codes
Acceptable Format
F2 t 01 Yes
F2 T 01 No
F2 t 1 No
Choosing Outbound Phone CodesOutbound Phone Codes are used for tracking the purpose of a call or for setting a custom Calling Line IDbefore dialing out. For example, if your Contact Center provides services to multiple companies on thesame tenant but on different channels, you must ensure the correct caller ID is applied to each companyfor best call back experience to the customers. Your contact center administrator may define outboundphone codes to assign caller ID to outbound calls from your tenant. If you are assigned to an outboundphone code list, you are presented with the list when you dial out. You have to select a code to apply theright calling line ID.
Note: Assigning calling line ID is not supported by all telecommunication carriers.
Using the Outbound Codes functionality, an agent assigns a calling line Id to an outbound phone call fromthe predefined list before initiating the call.
Virtual Contact Center allows you to assign tenant channel numbers, special request numbers, oranonymous calling line ID to outbound calls by selecting an appropriate code.
To select Outbound Phone Codes:

8x8, Inc. Agent Console Guide
Version 8.0 Rev. 1.0 43
1. Dial a number to call, and clickDial in the Control Panel.
The outbound phone code list shows. You can select a code from the list.
Figure 23: Selecting an Outbound Phone Code
2. Select a code from the list and clickDial.
The calling line ID associated with the code applies to the call and the call dials out.
Using Keyboard Shortcuts
In a contact center environment, time taken by agents to process calls is critically important. During a call,agentsmay be required to browse multiple code lists and select desired code/s for each call. This processis time consuming. The keyboard shortcuts for codesminimize the time in selecting the codes by reducingthe number of clicks in the call flow. This feature is useful when the agent knows the code selection anddoes not have to go through the lists to make choices.
n The keyboard shortcut for Outbound Phone Codes is F2 d nn (where d = outbound phon code nn =code number).Within each code list, each code is numbered from 01 onwards. To select a secondcode in the list press F2 d 02
To select an Outbound Phone Code using a keyboard shortcut:
1. Dial a number to call, and clickDial in the Control Panel.
2. Type F2 d to bring up the Outbound Phone Code list, and then type the desired code number orselect the desired code.
OR
Type F2 d nn to select the desired outbound phone code from the code list where nn stands for thecode number.
The desired code is selected and the call dials out.

8x8, Inc. Agent Console Guide
Version 8.0 Rev. 1.0 44
Note: While selecting a code using the shortcut, always choose lower case d or t. Enter the number as 01,not 1.
For a list of acceptable keyboard shortcut keys, refer to the table below:
Keyboard Shortcut for
Codes
Acceptable Format
F2 d 01 Yes
F2 D 01 No
F2 d 1 No

8x8, Inc. Agent Console Guide
Version 8.0 Rev. 1.0 45
Overview of Processing InteractionsYour contact center supervisor will assign you to one or more queues.
The Virtual Contact Center supports four types of queues:
n Phone
n Voice Mail
n Chat
n Email
Each type of queue corresponds to a type of Agent Console interaction. Interactions are the customerrequests for information or assistance that you will use your Agent Console to process.
The Control Panel in the Agent Console features a separate interaction tab for each media type. Theadditional Status tab provides real time status on agents and queues.
Overview of Interactions and StatusWhen you accept a new interaction, the Agent Console sets your status to Busy (or an interaction-specificvariation of busy such asEmail in Progress). When your status is busy, the Agent Console does not offeryou new interactions.
After you complete an interaction, the Agent Console sets your status to Post Processing and starts apost-processing countdown timer. The post processing interval provides you with the time required toperform any post-interaction tasks, such as updating a customer or case record.
After the post-processing countdown timer reaches zero, the Agent Console sets your status to Available.When your status is Available, the Agent Console offers you new interactions.
If the post processing countdown timer reaches zero, and you need additional time to perform post-interactions tasks, clickWork Offline and block any new interactions.
ManagingMultiple TasksThe multi-tabbed interface in Agent Console gives flexibility to manage multiple multi-task. For example,If you are making some changes to your profile and do not want to block any interactions, you can keepyour statusAvailable. Accepting a new interaction triggers a screen pop in a separate tab withoutinterrupting the changes to your profile.

8x8, Inc. Agent Console Guide
Version 8.0 Rev. 1.0 46
Processing Phone InteractionsThe Agent Console phone controls enable you to perform the following operations:
n Accept inbound phone interactions
n Record phone interactions (if settings permit it)
n Transfer phone interactions to different agents, phone numbers, or phone queues
n Initiate outbound phone calls
n Set up a multi-party phone conference
Overview of Phone InteractionsMost contact center agents are assigned to one or more phone queues. Phone queues prioritize anddeliver phone interactions to agents whose status is Available, and who are assigned to an enabledqueue.
For information about opting in/out of queue assignments, see Viewing Your Queue Assignments, onpage 30
Inbound Phone Call FlowCalls flowing into Virtual Contact Center stay in a queue until an agent is available. When an agentchanges status to available, the longest waiting call in the queue is offered to the agent. Virtual ContactCenter searches the Local CRM database for existing records based on caller ID, or account number, orcase number or any arbitrary data passed during the interaction. Searching based on arbitrary datarequires customization of the CRM workflow and eIVR. If the caller is an existing customer, the relevantcustomer or case record is presented to the agent through screen pop. Screen pop of matching dataoccurs either before or after agent accepts an interaction based on the screen pop settings configured bycontact center administrator. The agent processes the call and selects transaction codes to indicate calldisposition. Selecting transaction codesmay be optional or mandatory based on the settings. On endingthe call, the agent gets post processing time for a final wrap up before the call terminates. If codes aremandatory, the call stays in post processing mode until codes are selected.
At the termination of the call, Virtual Contact Center may create an auto call log. If the administrator hasconfigured auto log, one of the following auto log events occurs:
n Screen pop auto log in viewmode
n Screen pop auto log in edit mode
n No screen pop

8x8, Inc. Agent Console Guide
Version 8.0 Rev. 1.0 47
Note: Auto log of interactions requires administrator configuration.
The sequence of events in an inbound call flowmay be represented as follows:
Figure 24: Inbound Call flow diagram
Overview of Phone ControlsThe Phone tab in the Control Panel provides all controls required to process both incoming and outgoingphone interactions. The availability of the controls dynamically adjusts to the configured privileges and theprocessing state of an interaction. For example, when an agent accepts an incoming call, controls such ashold, mute, end call get enabled. If an agent has the privileges to control call recording, then controls tostop and resume call recording are enabled during an active call.
The following table summarizes the various phone controls, purpose, and their availability.

8x8, Inc. Agent Console Guide
Version 8.0 Rev. 1.0 48
Phone Control
Button
Purpose
Dial Enters a destination phone number in the number field and click Dial to initiatean outbound call.
Mute Mutes self during an active call
Hold Places an active call on hold.
End Call Ends an active call after selectingmandatory transaction codes if any.
Transfer Lines Transfers calls from one phone line to another.
Join Lines Joins calls on the two telephone lines to set up a conference.
Stop recording stops recording an active call. (Availability is subject to privileges)
Resume recording resumes recording. (Availability is subject to privileges)
Always use the Agent Console phone controls to select phone lines or perform functions such asMute orHold, not the controls on your agent telephone.

8x8, Inc. Agent Console Guide
Version 8.0 Rev. 1.0 49
Figure 25: Phone Tab Controls
The Agent Console supports two phone lines: 1 and 2. When switching between two lines for purposes oftransferring a phone interaction or setting up a multi-party phone conference, the Agent Consoleautomatically places the line you are switching from on hold.
Accepting a Phone InteractionYou are ready to process new interactions when you change your status to Available. Interactions waitingto be served in the queue you are enabled to handle, are offered to you. For a pictorial representation ofthe sequence of events in an inbound call, See "Inbound Phone Call Flow" on page 46.
Figure 26 shows the Control panel tools you will use to accept a phone interaction.

8x8, Inc. Agent Console Guide
Version 8.0 Rev. 1.0 50
Figure 26: Agent Console, accepting a phone interaction
To accept an inbound phone interaction:
1. In the Control panel, change your status toAvailable.
The Agent Console offers new phone interactions only to available agents assigned to an enabledphone queue.
2. When your agent telephone rings, answer the call.
Your status changes to Busy.
If the Local CRM uses the caller's phone number to identify an existing customer, the Display Panelpops the customer's CRM record.
Note: Your contact center administrator determines the event that triggers a screen pop. Based onthe configuration, screen pop may occur before and/or after accepting an interaction, and/or aftercompleting an interaction.
3. Process the call.
4. If required, select transaction codes before ending the call.
5. Click End Call in the Control Panel to initiate the post-processing countdown timer.

8x8, Inc. Agent Console Guide
Version 8.0 Rev. 1.0 51
The Agent Console changes your status to Post Processing.
If the post-processing countdown interval reaches zero, the Agent Console automatically sets yourstatus to Available.
6. ClickEnd Post Processing to make your statusAvailable or clickWork Offline if you need moretime to complete any post processing tasks.
Recording Phone Interactions
Because recording a phone interaction uses some amount of your contact center's recording storagespace, always consult your contact center supervisor before using the Agent Console to record phoneinteractions. Your supervisor will provide you with specific situations that require the use of the AgentConsole recording feature to record a particular phone interaction.
In conformance with you supervisor's instructions, and if your contact center has enabled you to recordphone interactions, you may utilize the feature.
Based on the call recording permissions assigned to you, you:
n can start call recording
n can start and pause call recording
n may be denied permissions to control recording
Based on the call recording permission, the Control Panel presents appropriate options:
n Start Call Recording: If you have the permission to start call recording, when a call connects, theControl Panel shows the recording button. You can click the button to start recording the call anytime.

8x8, Inc. Agent Console Guide
Version 8.0 Rev. 1.0 52
Figure 27: Ability to Start Call Recording
n Start and Pause Call Recording: When a call connects, the Control Panel shows the Recordingbutton and a Pause button. Click the Recording button to start recording and click the Pause buttonto pause the recording.
Figure 28: Ability to Pause Recording
n No Recording Controls: If you do not have the recording permissions, the Control Panel does not

8x8, Inc. Agent Console Guide
Version 8.0 Rev. 1.0 53
show any recording control buttons during a call.
Figure 29: No Recording Controls
Playing Agent Recorded Messages
The Agent Console allows you to record up to ten messages and play them during an inbound oroutbound call. When you place an outbound call and reach voice-mail, you can choose to play a pre-recorded message such as a campaign message and hang up. The application plays the message andterminates the call. During an inbound call, you may choose to play a welcomemessage if you have directagent access.
To play a recorded message during a phone interaction:
1. When a call connects, ClickOptions > Play My Recording. Your list of pre-recorded messages isdisplayed.

8x8, Inc. Agent Console Guide
Version 8.0 Rev. 1.0 54
Figure 30: Agent Console,Voice Pre-Recordings page
2. Select the recording you wish to play and click play. Your recorded message plays to the caller.
Adding Notes During an Interaction
You have the capability to add notes regarding an interaction during inbound/outbound phone calls, orduring a chat conversation. This enables smooth transition of an interaction from one agent to another.For example, if you left a voice mail to a customer, you can leave a note to the next agent about thevoicemail who handles the next interaction with the same customer in future.
In Salesforce CRM, the notes gets saved in the call log of the activity history. The agent who handles thenext interaction with the same customer can refer to the call log and view the notes.
Note: This feature is applicable to Enhanced integration of Multichannel Connect for Salesforce.
The notes panel can be accessed by going toOptions menu in the control panel of the Agent Console
To access notes panel during a phone or chat interaction:
8x8, Inc. Agent Console Guide
Version 8.0 Rev. 1.0 55
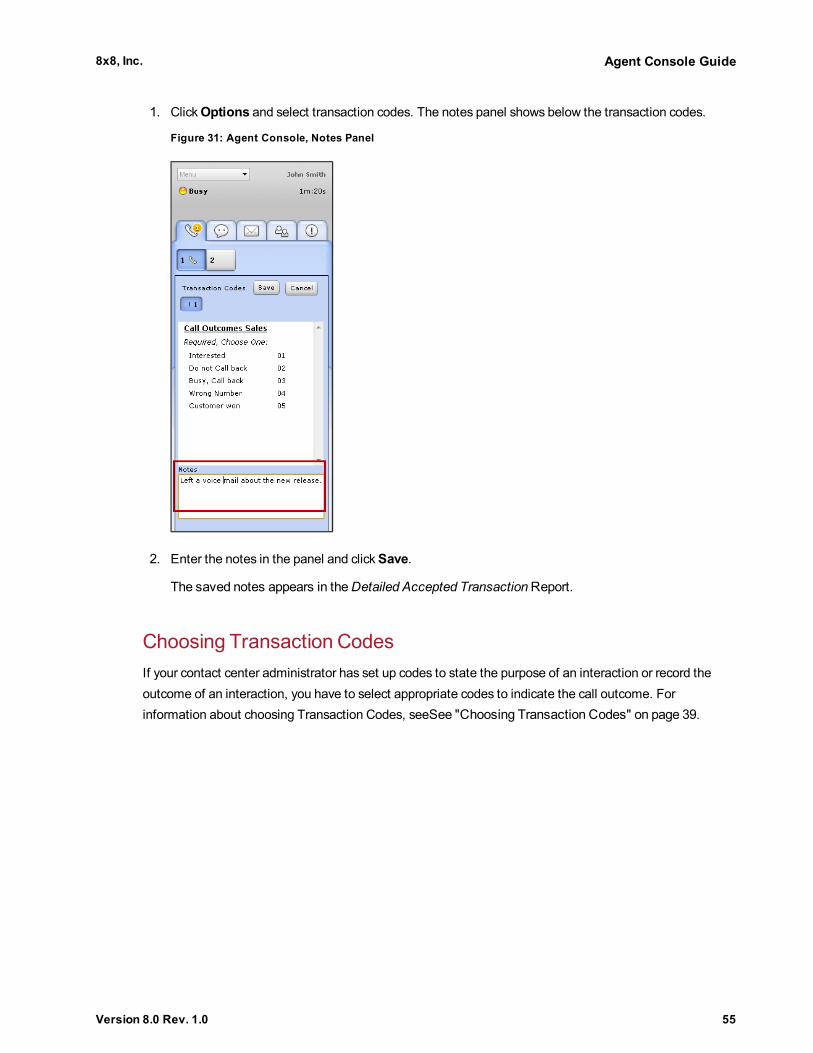
1. ClickOptions and select transaction codes. The notes panel shows below the transaction codes.
Figure 31: Agent Console, Notes Panel
2. Enter the notes in the panel and clickSave.
The saved notes appears in theDetailed Accepted TransactionReport.
Choosing Transaction CodesIf your contact center administrator has set up codes to state the purpose of an interaction or record theoutcome of an interaction, you have to select appropriate codes to indicate the call outcome. Forinformation about choosing Transaction Codes, seeSee "Choosing Transaction Codes" on page 39.
8x8, Inc. Agent Console Guide
Version 8.0 Rev. 1.0 56
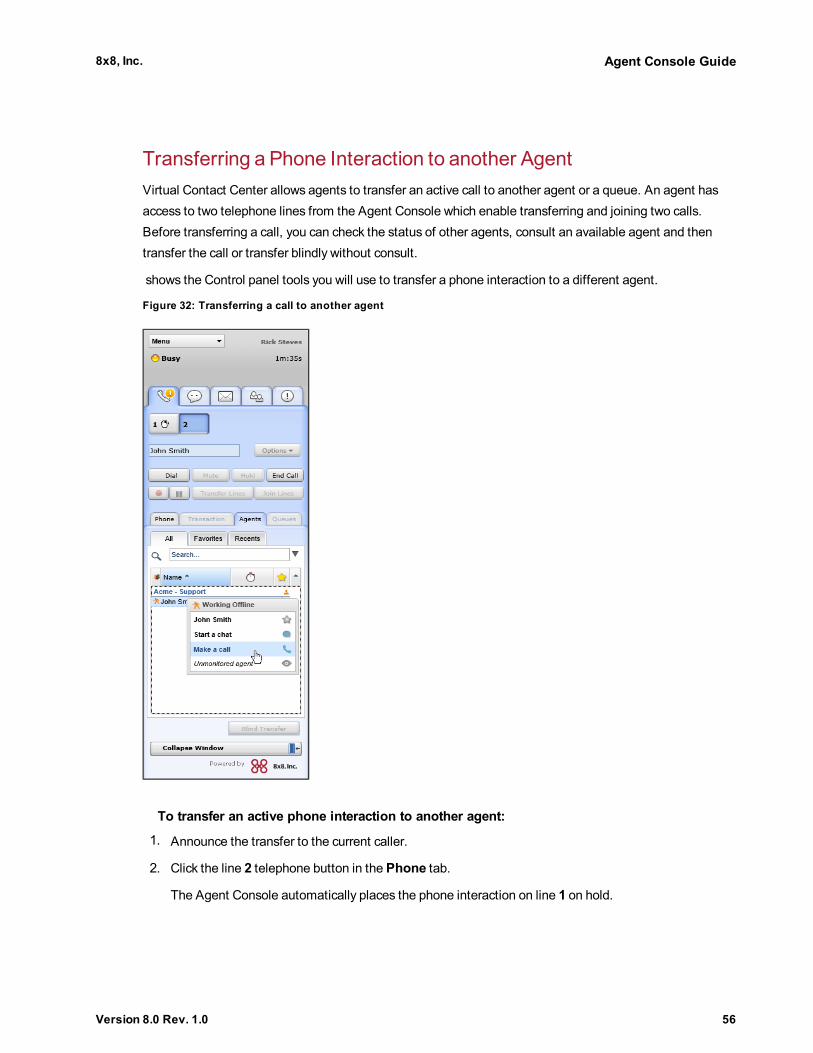
Transferring a Phone Interaction to another AgentVirtual Contact Center allows agents to transfer an active call to another agent or a queue. An agent hasaccess to two telephone lines from the Agent Console which enable transferring and joining two calls.Before transferring a call, you can check the status of other agents, consult an available agent and thentransfer the call or transfer blindly without consult.
shows the Control panel tools you will use to transfer a phone interaction to a different agent.
Figure 32: Transferring a call to another agent
To transfer an active phone interaction to another agent:
1. Announce the transfer to the current caller.
2. Click the line 2 telephone button in the Phone tab.
The Agent Console automatically places the phone interaction on line 1 on hold.

8x8, Inc. Agent Console Guide
Version 8.0 Rev. 1.0 57
3. Click theAgents tab.
The Agents tab lists agents currently logged in to the Agent Console with their current status. Youcan consult an available agent before transferring the call or transfer blindly. You can consult theagent by phone or via chat.
4. To consult the second agent before transferring the interaction:
a. Make sure you have switched to line 2.
b. Select an agent from the list and click to bring up the context menu.
c. Initiate a call or a chat with the agent by choosing Make a call or Start a chat.
After the agent answers the call, the Transfer Lines button gets enabled.
d. Inform the agent you're transferring a phone interaction to them, then click Transfer Lines tocomplete the transfer.
The Agent Console submits a new phone interaction to the selected agent, then changes your statusto Post Processing.
5. To transfer the interaction without first speaking to the second agent, select an agent, then clickBlind Transfer.
The Agent Console sends phone interaction to the selected agent, then changes your status to PostProcessing.
Note
n If the second agent does not answer the phone, and the agent has Virtual Contact Center voicemail, then the call is sent to the agent's voice mail.
n If the second agent does not answer the phone, and the agent does not have Virtual ContactCenter voice mail, then after the timeout period, the call is dropped.
For information about your contact center's timeout interval, contact your contact centeradministrator.
6. ClickEnd Post Processing to make your statusAvailable or clickWork Offline if you need moretime to complete any post processing tasks.
Transferring a Phone Interaction to another PhoneQueueVirtual Contact Center allows agents to transfer an active call to another agent or a queue. An agent hasaccess to two telephone lines from the Agent Console which enable transferring and joining two calls.Before transferring an active call to another queue, the agent handling the call should check the status ofthe destination queue and then transfer.
shows the Control panel tools you will use to transfer a phone interaction to a different queue.

8x8, Inc. Agent Console Guide
Version 8.0 Rev. 1.0 58
Figure 33: Transferring call to a queue
To transfer an active phone interaction to a different queue:
1. Announce to the current caller that you are going to transfer them to another department.
2. In the Phone tab, click theQueue tab.
The Agent Console does not place the phone interaction on line 1 on hold.
3. Choose a queue and click Transfer.
The Agent Console transfers the phone interaction to the selected queue, then changes your statusto Post Processing.
The transferred call stays in the queue until answered by an available agent in the queue.
8x8, Inc. Agent Console Guide
Version 8.0 Rev. 1.0 59
4. ClickEnd Post Processing to make your statusAvailable or clickWork Offline if you need moretime to complete any post processing tasks.
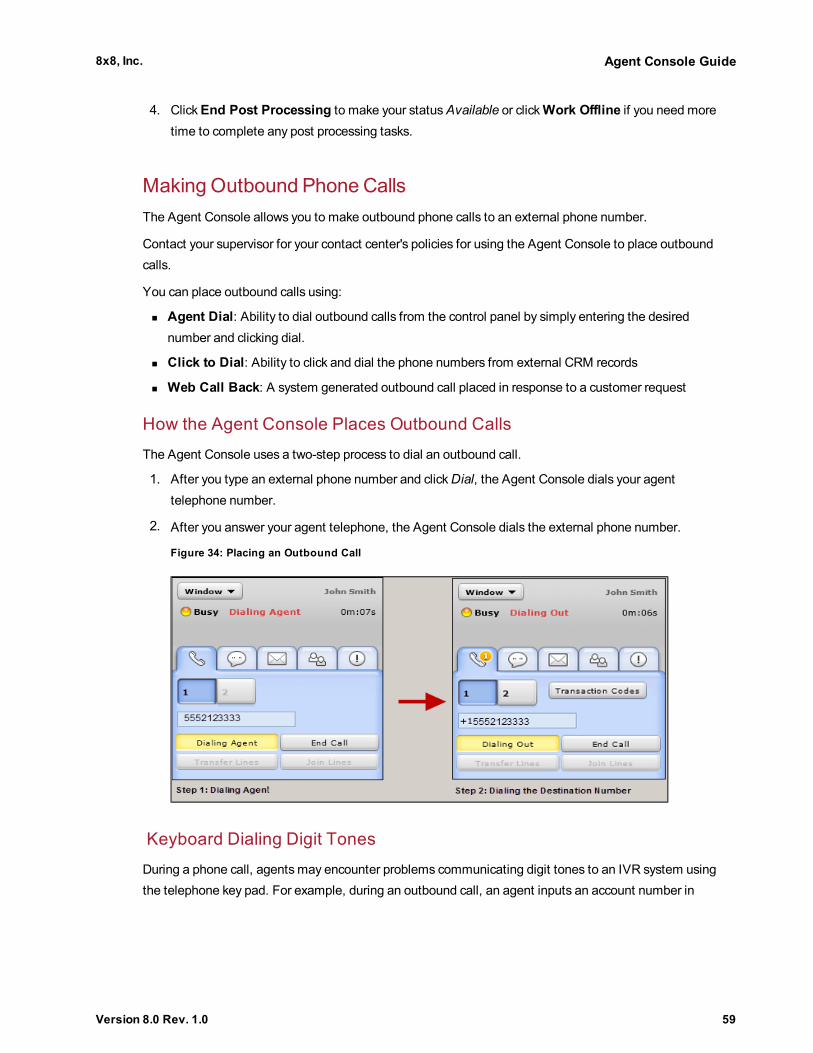
MakingOutbound Phone CallsThe Agent Console allows you to make outbound phone calls to an external phone number.
Contact your supervisor for your contact center's policies for using the Agent Console to place outboundcalls.
You can place outbound calls using:
n Agent Dial: Ability to dial outbound calls from the control panel by simply entering the desirednumber and clicking dial.
n Click to Dial: Ability to click and dial the phone numbers from external CRM records
n Web Call Back: A system generated outbound call placed in response to a customer request
How the Agent Console Places Outbound Calls
The Agent Console uses a two-step process to dial an outbound call.
1. After you type an external phone number and clickDial, the Agent Console dials your agenttelephone number.
2. After you answer your agent telephone, the Agent Console dials the external phone number.
Figure 34: Placing an Outbound Call
Keyboard Dialing Digit Tones
During a phone call, agentsmay encounter problems communicating digit tones to an IVR system usingthe telephone key pad. For example, during an outbound call, an agent inputs an account number in
8x8, Inc. Agent Console Guide
Version 8.0 Rev. 1.0 60
response to an IVR system prompt, the account number may be incorrectly conveyed due to digit audioleakage during transmission among diverse networks. Keyboard dialing provides an alternate mechanismto counteract this issue. It offers an alternate long tone method through an Virtual Contact Center DialPad interface to convey digit tones from an Agent Console to a touch tone IVR system across diversenetworks limiting the possibility of digit audio leakage.
Keyboard dialing allows an agent to generate two types of digit (DTMF) tones – Short tone, Long Tone.When the default short tone fails, an agent may select long tone using the Dial Pad interface tocommunicate the information correctly to the destination IVR system.
Features
Keyboard Dialing features the following behavior:
n Available during any active phone call session.
n Supports two types of Digit tones: Short tone, Long tone
n Preserves the digit tone setting per agent, per browser, and per workstation. If an agent logged outand logged back into the same workstation, previous setting of the digit tone is maintained until thenext manual change.
n Shares between two busy lines in a two-line call. The dial pad stays open when agent switchesbetween two busy phone lines.
n Generates digit tones for the active line only in the event of an agent handling two busy lines.
n Allows navigating voicemail IVR to access voice mails.
Limitations
Keyboard dialing has the following limitations:
• Not readily available when call is put on “Mute”.
• Not supported for Virtual Contact Center CTI Connect for Salesforce.
• Not supported for recording personal greetings during verification calls.
Using Keyboard Digit Tone Dialing
During an active call session, you can use keyboard or the Dial Pad for digit tone dialing. Dial Pad enablesyou to change digit tone duration. When an agent accepts a phone call, the Optionsmenu gets activatedin the control panel. The Options drop downmenu includes the Dial Pad feature.
To dial digit tones using keyboard:

8x8, Inc. Agent Console Guide
Version 8.0 Rev. 1.0 61
1. Place the cursor focus in the phone text box.
Figure 35: Placing focus in phone text box
2. Enter the numbers on the keyboard. You may hear the short tone transmission.
3. To change the digit tone duration, clickOptions and select Dial Pad from the drop downmenu.
OR pressCTRL+X to bring up the Dial Pad.
Figure 36: Accessing Dial Pad
4. Check the long digit tone (Uncheck for Short tone).

8x8, Inc. Agent Console Guide
Version 8.0 Rev. 1.0 62
Figure 37: Using Digit Tone
5. Input the digits or the characters using the keyboard or the Dial Pad.
Choosing Outbound Phone Codes
If your contact center administrator has set up codes to assign a calling line ID to outbound calls, you haveto select appropriate codes to apply the right calling line ID to your outbound calls. For details, seeChoosing Outbound Phone Codes, on page 42.
Managing Your Status During Outbound Calls
During outbound calls, you have the ability to set your status or your status may be updated automatically.
n Ability to set status: if your status is Available, you are open to incoming interactions during anoutbound call. You can change the status toWork Offline to prevent incoming interactions.
n Automatic Status Change: Based on the settings from your administrator, during an outbound call,your status changes to Busy automatically preventing any incoming interactions until you complete thecall. After processing the call, your status changes to Available.
Ability to Set your Status
If you do not route an outbound call through a queue, your current status is retained and you will beoffered new incoming interactions if you are Available. This is not desirable when you are on another call.To work around the situation, you can follow the steps below:
If you are on an outbound call, and the Agent Console offers you a new interaction:

8x8, Inc. Agent Console Guide
Version 8.0 Rev. 1.0 63
n ClickAccept Call to have the Agent Console place the existing call on hold, place the incomingphone interaction on line 2, connect your agent telephone to line 2, and change your status to Busy.
n ClickReject Call to have the Agent Console return the new interaction to the phone queue andchange your status toWorking Offline.
If you neither accept nor reject the new interaction, and the interaction acceptance interval reaches zero,the Agent Console returns the new interaction to the phone queue and changes your status toWorkingOffline.
Automatic Change of your Status
Changing your status to busy during an outbound call requires you to route the call through a queue. Thisis enabled through outbound phone codes where each code is associated with an outbound queue. Youmust be a member of the outbound phone queue as well as be assigned to the code list.
To change your status to busy during an outbound call:
1. Enter a phone number to call and clickDial.
You are prompted to select an Outbound Phone Code.
Figure 38: Agent Presented with Outbound Phone Codes
2. Select a code from the list and clickDial.
The call dials out and routes through the specified queue automatically changing your status to busy.

8x8, Inc. Agent Console Guide
Version 8.0 Rev. 1.0 64
Figure 39: Agent Status Changing to Busy
The call dials your phone and then the destination number.
Processing Outbound Campaign Calls
The Virtual Contact Center Dialer is an automated outbound phone based dialer that searches, andretrieves a target call list from campaigns defined by the Administrator. Campaigns are assigned tooutbound phone queues, while agents are assigned to these queues. As an agent, when you change yourstatus to Available, a campaign call is offered to you if you are a member of the queue a campaign isassigned to. The control panel on your Agent Console indicates an outbound call. The display panelpresents the contact record details for your preview. You can preview the contact record and decide tostart, reject or skip the call.
To process a campaign call:

8x8, Inc. Agent Console Guide
Version 8.0 Rev. 1.0 65
1. Change your status toAvailable in the control panel.
Figure 40: Agent Console, Campaign call offered
The phone tab blinks. The CRM panel presents the complete contact record for preview while thecontrol panel indicates an outbound call. After a quick preview of the contact record, you can decideto start, reject or skip the call.
Note: If you do not accept the call within the timeout period, your status changes toOnBreakautomatically.
2. ClickStart to initiate the call. Your phone rings.
a. Answer your phone. Destination number dials automatically if a default phone is selected.
b. In the absence of a default phone number, select a destination number to dial from the dropdown list of numbers .

8x8, Inc. Agent Console Guide
Version 8.0 Rev. 1.0 66
Figure 41: Agent ConsoleControl Panel
c. ClickOptions to see the processing options such as playing a pre-recorded message, recordingthe conversation, or selecting a transaction code.
d. Select a desired option and complete the call.
OR
3. ClickReject to reject the call. You status automatically changes toWork Offline. The call is routedback to the queue for next available agent.
OR
4. ClickSkip. This call skips and next call on the queue is offered.
The skipped record is marked completed.
Rescheduling Campaign Calls
If a campaign call fails to reach the called party, you can setup retrial calls or schedule a call backautomatically by selecting appropriate transaction codes that map to the following disposition actions:

8x8, Inc. Agent Console Guide
Version 8.0 Rev. 1.0 67
n Try Again: sets up retrial attempts for a call as specified by the administrator. The retrial call isplaced back in the queue and offered to any available agent at the specified time interval.
For example, if you fail to reach the called party during a campaign call, you can select a transactioncode such as Ring, No answer, or Reached third party, which map to “Try Again’ disposition actiontriggering retrial attempts for the call.
n Schedule Call back: allows scheduling a call back to a campaign customer, and pops up a reminderat the scheduled time to the same agent. The agent has to manually place a call.
For example, on reaching a destination number, if a customer suggests a time to call back, you canselect a code to schedule a call back based on the customer’s convenience.
Figure 42: Scheduling a Campaign Call back
If you select a transaction code that triggers schedule call back, you are prompted to schedule a timefor call back using the calendar. Specify a date and time to call back. A task is automatically createdfor the call. A reminder pops up a fewminutes before the specified scheduled call with the call log.Click the call log to view the details of the scheduled call. The agent has to manually place the call tocomplete the task, and dismiss the task in the Reminder window.

8x8, Inc. Agent Console Guide
Version 8.0 Rev. 1.0 68
Saving Do not Call Disposition
On reaching a contact during a campaign call, if the contact asks not be called back again, you can selectan appropriate transaction code to indicate the contact's choice. You can automatically save thisinformation in the contact record if:
n the code is mapped to Do not Call disposition action
n if the campaign defines a field to capture the transaction code .
The do not call disposition information is critical to filter the record from the campaign call list for recycling.
Figure 43: Selecting Do not Call Disposition
Transferring a Phone Interaction to an External Phone Number
Perform the procedure in this topic to forward a phone interaction to another telephone number.
The procedure in this topic assumes that you are processing a phone interaction.
Figure 44 shows the Control panel tools you will use to transfer a phone interaction to a different number.

8x8, Inc. Agent Console Guide
Version 8.0 Rev. 1.0 69
Figure 44: Agent Console. transferring to an external number
To transfer a phone interaction to an external number:
1. Announce to the current caller that you are going to transfer them to another telephone number.
2. In the Control panel, in the Phone tab, click the 2 telephone button.
The Agent Console automatically places the phone interaction on the 1 button on hold.
3. In the Phone tab, in the telephone text entry area type a telephone number then clickDial.
n In the U.S. type 1 before the area code.
n If the Agent Console prompts you to choose a Transaction Code, in the list of codes, choose acode, then clickSave. For information about choosing Transaction Codes, seeChoosingTransaction Codes, on page 39
The Agent Console dials the number, then changes theDial button toRinging (Figure 44).
4. To transfer the call after the second party has answered the phone, tell the second party you'retransferring a phone interaction to them, then click Transfer Lines to complete the transfer.
The Agent Console changes your status to Post Processing.
8x8, Inc. Agent Console Guide
Version 8.0 Rev. 1.0 70
5. To transfer the call before the second party answers the phone, click Transfer Lines.
The Agent Console forwards the call, then changes your status to Post Processing.
If the second party does not answer the call, and the second party does not have a voice mail box,the call eventually times out and is dropped.
6. ClickEnd Post Processing to make your statusAvailable or clickWork Offline if you need moretime to complete any post processing tasks.
Using Join Lines to Set Up a Conference CallYou can use the Agent Console Join Lines feature to create multi-party conference calls that include:
n Other agents who are online, and whose status is Available or Working Offline.
n External telephone numbers.
Overview of Agent Console Conference Calls
Use the Agent Console Join Lines feature to set up multi-party conference calls.
The Agent Console, uses line 1 to conduct a multi-party conference, and line 2 to connect each additionalparticipant. Each time you connect a new participant to the conference, the Agent Console automaticallyconnects both the new participant and you with the participants already connected to line 1; line 2becomes available to connect additional conference participants.
Setting up conference calls is a variation of using the Agent Console Transfer Line feature described in:
n Transferring a Phone Interaction to another Agent, on page 56
n Transferring a Phone Interaction to an External Phone Number, on page 68
The key difference between transferring a phone interaction and creating a multi-party conference is thatrather than clicking Transfer Line to hand a phone interaction off to a different agent or phone number,you click Join Lines to remain on the line as the coordinator of the multi-party conference.
Adding an Agent to a Conference Call
Perform the procedure in this topic to add another agent who is logged in to the Agent Console, andwhose status is either Available orWorking Offline , to a conference call.
shows the Control panel tools you will use to add an agent to a conference call.
To add an agent to a conference call:
1. Announce to the current caller that you are going to add them to the conference, then in the Controlpanel click line 2.
The Agent Console automatically places line 1 button on hold.

8x8, Inc. Agent Console Guide
Version 8.0 Rev. 1.0 71
2. Click theAgents tab.
In the Agents tab, the Agent Console lists the agents currently logged in to the Agent Console whosestatus is either Available (shown asWaiting in the list) orWorking Offline.
3. In the list of agents, select an agent, then clickDial.
The Agent Console submits a new phone interaction to the selected agent. After the phone has beenanswered, the sound of human or recorded voice enables the Join Lines feature.
4. If you receive the agent's voice mail, clickEnd Call to disconnect the call and return to line 1.
5. If the agent answers, tell the agent you're adding them to a conference, then click Join Lines.
The Agent Console connects the agent and you to any conference participants already on line 1.
6. ClickEnd Call to disconnect from the conference.
The Agent Console leaves the other parties connected to the conference call.
Adding an External Party to a Conference Call
Perform the procedure in this topic to add an external party to a multi-party conference call.
Figure 45 shows the Control panel tools you will use to add an external party to a conference call.

8x8, Inc. Agent Console Guide
Version 8.0 Rev. 1.0 72
Figure 45: Agent Console, line 2, add external party

8x8, Inc. Agent Console Guide
Version 8.0 Rev. 1.0 73
To add an external party to a conference call:
1. Announce to the current caller that you are going to add them to a multi-party conference call, thenIn the Control panel, in the Phone tab, click line 2.
The Agent Console automatically places line 1 on hold.
2. In line 2, in the number text entry area, type a telephone number then clickDial.
n In the U.S. type 1 before the area code.
n If the Agent Console prompts you to choose a Transaction Code, in the list of codes, choose acode, then clickSave. For information about choosing Transaction Codes, seeChoosingTransaction Codes, on page 39
The Agent Console dials the number. After the phone has been answered, the sound of human orrecorded voice enables the Join Lines feature.
3. If you receive the agent's voice mail, clickEnd Call to disconnect the call and return to line 1.
4. If a person answered the phone, tell them you're adding them to a conference call, then click JoinLines.
The Agent Console connects both the new participant and you to any callers already on line 1.
5. ClickEnd Call to disconnect from the conference.
The Agent Console leaves the other parties connected to the conference call.

8x8, Inc. Agent Console Guide
Version 8.0 Rev. 1.0 74
Processing Voice Mail InteractionsFor agents assigned to Voice Mail queues, the Agent Console Phone tab enables you to process VoiceMail interactions as a subset of Phone interactions.
Overview of VoiceMail InteractionsThe information in this section describes the default Voice Mail options.
The Agent Console uses the Control panel, Phone tab to offer an agent Voice Mail interactions. UnlikePhone interactions, Voice Mail interactions cannot be transferred or forwarded.
For information about the Agent Console phone tools, seeOverview of Phone Controls, on page 47
Accepting a VoiceMail InteractionPerform the following to accept a new a voice mail interaction.
The following procedure assumes that you are assigned to an enabled voice mail queue, and that yourstatus is available.
To accept a Voice Mail interaction:
1. In the Control panel (), clickAvailable.
The Agent Console offers a voice mail interaction only to an agent assigned to an enabled voice mailqueue, and whose agent status is available.
2. When your agent telephone rings, and the Agent Console flashes the Phone tab and displaysVoicemail Offered, answer your agent phone to accept the interaction.
The Agent Console:
n Plays a recorded message that notifies you that the new interaction is a Voice Mail interaction.
n Tells you to press 1 to send a copy of the voice mail message to your email address as aWAVfile attachment.
The only way you can save a voice mail message is to send a copy of the message to your emailaddress. When you disconnect your agent telephone from the Voice Mail interaction, the AgentConsole permanently deletes the voice mail message.
n Begins playing the voice mail message.
The Agent Console repeats the voice mail message until you hang up the phone or pressEndCall.

8x8, Inc. Agent Console Guide
Version 8.0 Rev. 1.0 75
3. After listening to the voice mail message, hang up your agent telephone or in the Control panel,Phone tab, clickEnd Call.
The Agent Console permanently deletes the voice mail message. If you did not press 1 to send acopy of the voice mail message to your email address, the message is permanently lost.
4. ClickEnd Post Processing to make your statusAvailable or clickWork Offline if you need morethan the allocated time to complete any post processing tasks.

8x8, Inc. Agent Console Guide
Version 8.0 Rev. 1.0 76
Processing Chat InteractionsThe Agent Console Chat controls enable you to perform the following operations:
n Accept inbound chat interactions
n Transfer a chat interaction to a different queue
n Use a secondary chat channel to ask another agent for help
n Insert preformatted answers from your contact center's Frequently Asked Questions (FAQs) into chatsessions
Overview of Chat InteractionsIn the Agent Console, chat interactions provide a means of responding in real-time to customer inquiries.
Depending on the configuration of your contact center, the contact center's chat access page can beconfigured to either allow or require a customer to supply an account number or other numericalinformation before beginning the chat interaction. When you accept the new chat session, the AgentConsole uses the information to automatically access customer or case records in the Internal CRM.
If the customer has not supplied any identifying information before beginning the chat, you can use thechat window to ask the customer for the information you need to create a new customer or case record.
Accepting a Chat InteractionIf you are working with the Internal CRM, and a new chat interaction arrives, you will lose your work unlessyou save it before accepting the new chat interaction. For this reason, take the time to understand thecomplete chat interaction workflow.
Figure 46 shows the Control panel tools you will use to accept an chat interaction.

8x8, Inc. Agent Console Guide
Version 8.0 Rev. 1.0 77
Figure 46: Agent Console, accepting a chat interaction
To accept a new chat interaction:
1. In the Control panel, clickAvailable.
The Agent Console offers new customer chat interactions only to agents assigned to an enabled chatqueue, and whose agent status is available.
You can use the agent-to-agent chat feature to contact other agents whose status isAvailable orWorking Offline. For information about agent-to-agent chat, seeUsing Agent-to-Agent Chat, onpage 81.
2. If you are working with the Internal CRM, and a new chat interaction arrives, in the CRM panelperform one of the following:
n ClickSave as Draft to save your work before accepting the new chat interaction.
n ClickSave to send the current follow-up.

8x8, Inc. Agent Console Guide
Version 8.0 Rev. 1.0 78
If you do not save your work before accepting a new chat interaction, the Agent Console permanentlydiscards the current contents of the unsaved Properties orNotification tabs. For information aboutthe Properties and Notification tabs, seeCreating Follow-up Records, on page 113.
3. After saving your work, in the Control panel click the chat tab, then perform one of the following:
n ClickAccept Chat to begin processing the chat interaction and change your status toChat inProgress.
n ClickReject Chat to return the chat to the queue and change your status toWorking Offline.
If you did not accept or reject the new interaction within the acceptance interval, the Agent Consolechanges your status toOnBreak.
If you accepted the new chat interaction, in the Control panel, the Agent Console displays theChattab.
If the customer supplied account or case information when initiating the chat, the Agent Consoleaccesses the appropriate record and displays the record in the CRM panel.
Processing Chat InteractionsIf you accept a new chat interaction, the Agent Console changes your status to Busy and starts the chatsession.
Figure 47 shows the tools you will use when processing a chat interaction.

8x8, Inc. Agent Console Guide
Version 8.0 Rev. 1.0 79
Figure 47: Agent Console, chat interaction processing
To process a chat interaction:
1. To accept a new chat interaction, perform the procedure in Accepting a Chat Interaction, on page76.
When you accept a new chat interaction, the Agent Console places the new interaction in the Controlpanel, Chat tab.
If your contact center prompted the customer for account or case information, the Agent Consoleuses the information to locate an existing customer or case record in the Internal CRM.
2. In the Your Message text entry area, type your chat message, then pressENTER or clickSend totransmit your messages to the customer.
TheChat Transcript displays both your and the customer's chat messages.

8x8, Inc. Agent Console Guide
Version 8.0 Rev. 1.0 80
Note: The chat screen notifies both the parties on chat when one is typing. For example, during achat session between an agent and a customer, when an agent types, the customer's screen notifiesthe agent is typing and vice versa.
3. If your contact center did not prompt the customer for account or case information, begin the chatsession by requesting that information from the customer.
4. To end the chat interaction, clickEnd Chat.
Transferring a Customer Chat to a Different QueuePerform the procedure in this topic to transfer a customer chat interaction to a different queue.
Figure 48 shows the Control panel tools you will use to transfer a chat interaction.
Figure 48: Agent Console, transfer customer chat to a different queue
To transfer a new chat interaction to a different queue:

8x8, Inc. Agent Console Guide
Version 8.0 Rev. 1.0 81
1. Perform the procedure in Accepting a Chat Interaction, on page 76 to accept the new customer chatinteraction.
Agent-to-agent chats cannot be transferred to a different queue.
2. In the Control panel, click theQueues tab.
The Agent Console lists the chat queues available to accept the transferred interaction.
3. In the list of chat queues, choose a queue then click Transfer.
The Agent Console transfers the interaction to the selected queue.
Using Agent-to-Agent ChatYou can chat with other agents logged into your contact center. You can send a chat request to an agenteven if the agent is busy processing an interaction. The Agents tab lists all logged in agents with thecurrent status. You can access Agents tab from Phone tab, or Chat tab, or Status tab.
To initiate a chat with another agent:
1. Log into the Agent Console.
2. Click the Chat Tab, or the Phone Tab, or the Status tab in the Control Panel.
3. Click the Agents tab from the selected main tab.

8x8, Inc. Agent Console Guide
Version 8.0 Rev. 1.0 82
Figure 49: Initiating agent to agent chat
4. Select and click the desired agent in the list to bring up the context menu.
The Request Chat button enables.
5. ClickStart a chat from the context menu orRequest Chat button.
A chat request is offered to the second agent.
Note: You can send a chat request to an agent who is in busy status as shown below.

8x8, Inc. Agent Console Guide
Version 8.0 Rev. 1.0 83
Figure 50: Agent sending a chat request to another agent is busy status
The second agent who is busy is offered the chat request on the second line. He/She can accept orreject the chat.

8x8, Inc. Agent Console Guide
Version 8.0 Rev. 1.0 84
Figure 51: Offering a Chat request
If the second agent accepts the chat request, the chat interaction is established on Chat Line 2.
6. In the Chat Transcript - Your Message area, enter your message and clickSend.
The message is sent.
Inserting FAQ Responses into Chat InteractionsIf your contact center maintains an FAQ knowledge base, you can extract relevant data from theknowledge base and insert these FAQ responses in a live chat session to assist customers. Using theseFAQ responsesminimizes agents' time in finding the right information and maintains consistent deliveryof information.
During a chat session, you can refer to the FAQs by shortcuts or by navigating to the FAQ knowledgebase. Referring to shortcuts requires prior definition of shortcuts while creating an FAQ.
To insert an FAQ response during a live chat session:
1. Select FAQ option from the Control Panel.
2. Search for the relevant information by keywords, or FAQ category.
3. After finding the relevant FAQ, clickSend in current chat link.

8x8, Inc. Agent Console Guide
Version 8.0 Rev. 1.0 85
Figure 52: Inserting FAQ in a live chat
The FAQ content is instantly communicated to the customer.
To insert an FAQ shortcut:
Inserting an FAQ by shortcut requires you to know the shortcuts beforehand. Each shortcut is linked to anFAQ item it is defined for. If you do not remember the shortcut, you can navigate to the FAQ Knowledgebase.
1. During a live chat, enter the FAQ shortcut that refers to the information customer is looking for in theShortcut entry window.
2. Click Insert FAQ.
A link to the FAQ inserts in the chat interaction window.
3. ClickSend to communicate this information to the customer participating in the chat.
Figure 53: Inserted FAQ in a chat

8x8, Inc. Agent Console Guide
Version 8.0 Rev. 1.0 86

8x8, Inc. Agent Console Guide
Version 8.0 Rev. 1.0 87
Processing Email InteractionsThe Agent Console Email controls enable you to perform the following operations:
n Accept inbound email interactions
n Reply immediately to an email interaction, or save an partial reply for later processing
n Transfer an email interaction to a different queue
n Insert preformatted answers to frequently asked questions into email replies
n If your agent account permissions enable it, pulling and optionally deleting unread email messagesfrom your email queues
Overview of Email InteractionsIn the Agent Console, email interactions provide a means of receiving and sending written customerinquiries and agent responses.
Using the Agent Console to process email interactions requires the use of the Internal CRM. If your AgentConsole has been configured to interoperate with a third-party CRM, the Internal CRM continues toprocess all email interactions received by the Agent Console.
When the Agent Console offers you a new email interaction, the CRM panel displays the displays theemail in the Internal CRM. If the message's From field, contains the email address of an existingcustomer, or the case number in the messagesSubject line matches information in the Internal CRM, theAgent Console displays that customer or case record.
For information about configuring your Agent Console profile's email settings, seeConfiguring EmailOptions, on page 25.
Accepting an Email InteractionIf you are working with the Internal CRM, and the Agent Console offers you a new interaction, you willlose any changes you entered unless you use Save as Draft to save any updates before accepting thenew interaction. For this reason, take the time to understand the complete email interaction workflow.
Figure 54 shows the Control panel tools you will use to accept an email interaction.

8x8, Inc. Agent Console Guide
Version 8.0 Rev. 1.0 88
Figure 54: Agent Console, accepting an email interaction
To accept a new email interaction:
1. In the Control panel, clickAvailable.
The Agent Console offers new email interactions only to agents enabled for the email queue, andwhose agent status is available.
When your status isAvailable, the Agent Console can offer you interactions from any type of contactcenter queue— Phone, Voice Mail, Chat, or Email — to which you are assigned.
2. If you are working with the Internal CRM, and the Agent Console offers you a new interaction, beforeaccepting the new interaction perform one of the following:
n ClickSave as Draft to save your work before accepting the new email interaction.
n ClickSave to send the email reply or save your follow-up notes.
If you do not save your work before accepting a new email interaction, the Agent Consolepermanently discards the current contents of the unsaved Properties orNotification tabs (Figure 54).
3. After saving or completing your work, perform one of the following:
n ClickAccept Email to begin processing the new email interaction.
The Agent Console changes your status to Email in Progress.

8x8, Inc. Agent Console Guide
Version 8.0 Rev. 1.0 89
n ClickReject Email to return the email to the queue.
The Agent Console changes your status toWorking Offline.
If you did not accept or reject the new interaction before the acceptance interval countdown timerreaches zero, the Agent Console changes your status toOnBreak.
If you accepted the new email interaction, the Agent Console changes your status to Email inProgress, displays the Internal CRM, and starts the email processing interval countdown timer.
4. If you accepted the new email interaction, in the Control panel, in the Email tab, in the list of emailinteractions double-click the new interaction.
In the CRM panel, the Agent Console displays the Internal CRM case management tools (Figure54). Use the case management tools to process the email interaction.
Processing Email InteractionsIf you accept a new email interaction, the Agent Console changes your status to Email in Progress,displays the Internal CRM, and starts the email processing interval.
Figure 55: Agent Console, email interaction processing
To process an email interaction:

8x8, Inc. Agent Console Guide
Version 8.0 Rev. 1.0 90
1. To accept a new email interaction, perform the procedure in Accepting an Email Interaction, onpage 87.
When you accept a new email interaction, the Agent Console places the new interaction in theControl panel, Email tab, Reply To list.
2. In the Control panel, in the Email tab, in theReply To list click the interaction to display the CRMCreate New Follow-up panel.
TheCreate New Follow-up panel contains two tabs:
n Use the Properties tab to choose case status, type, category, and related case options, and toannotate the follow-up.
n Use theNotification tab to reply to an email.
3. To save a draft of the interaction for completion at a later time, clickSave as Draft.
The Agent Console adds the follow-up to your list of Internal CRM follow-ups for the current case.
To view your drafts, inMy Cases chooseMy Drafts, then in the list of drafts select the draft youwant to view. For information about working with cases, seeCreating and Editing Case Records, onpage 110.
4. To reply to an email, in the case or follow-up window, in theNotification tab:
n Use the From, To, and Signature options to select the appropriate entries for the reply
n In theDescription text entry area, type the response to the email interaction.
n ClickSave to send the completed reply.
At the end of the email interaction processing interval, the Agent Console changes your status toAvailable. If you accept a new email interaction before clicking Save As Draft or Save to save the existingemail interaction, the Agent Console discards those changes.
Transferring an Email to a Different QueuePerform the procedure in this topic to transfer a new email interaction to a different queue.
Figure 56 shows the Control panel tools you will use to transfer an email to a different queue.

8x8, Inc. Agent Console Guide
Version 8.0 Rev. 1.0 91
Figure 56: Agent Console, transfer email to a different queue
To transfer a new email interaction to a different queue:
1. Perform the procedure in Accepting an Email Interaction, on page 87 to accept the new emailinteraction, but in the Email tab do not click the interaction to add it to the Internal CRM.
2. In the Control panel, click theQueues tab.
The Agent Console lists the email queues available to accept the transferred interaction.
3. In the list of email queues, choose a queue then click Transfer.
The Agent Console transfers the interaction to the selected queue.
Inserting FAQ Responses into EmailsIf your contact center maintains an FAQ knowledge base, you can extract relevant data from theknowledge base and insert these FAQ responses in an email response to customers. Using these FAQresponsesminimizes agents' time in finding the right information and maintains consistent delivery ofinformation.

8x8, Inc. Agent Console Guide
Version 8.0 Rev. 1.0 92
You can insert FAQs in an email by referring to shortcuts or by browsing and searching through the FAQknowledge base. Referring to shortcuts requires prior definition of shortcuts for an FAQ item.
To insert an FAQ response in an email using shortcuts:
1. Enter the shortcut for the desired FAQ.
2. Click Insert FAQ.
Full text of FAQ response inserts in the email body.
Figure 57: Inserting an FAQ response using shortcuts
To insert an FAQ by browsing through the knowledge base:

8x8, Inc. Agent Console Guide
Version 8.0 Rev. 1.0 93
1. ClickBrowse FAQ link.
2. Search and locate the desired FAQ.
3. Insert the content as a link or as full text by selecting the right option.
Links or full text content of the selected FAQ items insert in the email body.
Figure 58: Inserting an FAQ response in an email
Pulling Emails From aQueueIf your Agent Console account has been configured to permit it, you can use the Pull feature to list theunread emails in your assigned email queues. You can then select a queued email interaction forimmediate processing.
Figure 59 shows the tools you will use to pull emails from a queue.

8x8, Inc. Agent Console Guide
Version 8.0 Rev. 1.0 94
Figure 59: Agent Console, Control panel, Status tab
To pull email interactions from an email queue:
1. In the Agent Console, set your status toWorking Offline.
If your status is Available, the Agent Console may offer you a new interaction before you cancomplete pulling email interactions from an email queue.
2. In the Control panel, in the Status tab, in the list of queues clickPull or in theWait column click onthe number of email interactions waiting in that queue.
In the CRM panel, the Agent Console lists the selected queue's first 15 pending email interactions.
3. In the list of queued emails, in the Subject column, click an email interaction to begin processingthat interaction immediately.
For information about processing email interactions, see Processing Email Interactions, on page87.

8x8, Inc. Agent Console Guide
Version 8.0 Rev. 1.0 95
Deleting Emails From a Queue
If an Agent Console account has been configured to permit an agent to use the Pull feature to select aqueued email interaction for immediate processing, the agent can also use the feature to permanentlydelete one or more queued email interactions.
Deleting a pulled email interaction from an email queue:
n Permanently deletes the interaction from the queue
n Does not delete the customer record associated with the email from the Internal CRM
To permanently delete email interactions from an email queue:
1. Perform the process in see Pulling Emails From aQueue, on page 93 to display a list of queuedemail interactions.
2. In the list of queued emails, perform one of the following:
n To remove individual email interactions from the queue, select one or more email messages.
n To remove all the email interactions in the list, select the column heading checkbox.
Repeat the list-delete operation to remove additional email interactions.
3. ClickDelete.
The Agent Console displays a delete confirmation dialog. In the delete confirmation dialog, clickOKto permanently remove the selected email interactions from the queue.

8x8, Inc. Agent Console Guide
Version 8.0 Rev. 1.0 96
Managing Customers, Cases, and Tasks8x8 Virtual Contact Center provides customer and case management capabilities with its Local CRM.The Local CRM provides a model for managing your contact center's interactions with customers. TheLocal CRM stores your contact center's customer, case, and follow-up data.
Virtual Contact Center's phone, chat, and email scripting can use information about an incominginteraction, such as a phone number or a case number or an email ID, to locate and display a customer orcase record contained in the Local CRM.
As an agent, you can use the Local CRM to record and manage your customers, cases, and follow-upactivities.
To manage customer relationships, the Local CRM provides the following hierarchy of standard objects:
n Customer
n Case
n Follow-up
n Task
Customer
A customer object allows you to create customer instances with unique Account numbers. A customerrecord stores information such as name, address, phone numbers, and offers the capability to customizethe customer object with custom fields.
Case
A case object describes customer’s feedback, queries, or issues. You can create cases to systematicallytrack and solve customer’s issues. You can quickly create, update, and view cases. You may indicate thestatus of a case as open or closed. The standard definition of a case allows you add additional attributesto a case by stating the status, visibility, severity, priority.
For example, a support agent at AcmeJets creates a case when a customer calls in reporting schedulingissues with private jets. The support agent captures and records the customer reported issue by creating acase.
Follow-up
A case may have multiple follow-ups before it is resolved. Each communication regarding the case fromits creation until it is closed may be recorded as individual follow-up instances. This may include notes aswell as email communications regarding the case. The Follow-up object allows you to track how a case isresolved by creating multiple follow-up records .

8x8, Inc. Agent Console Guide
Version 8.0 Rev. 1.0 97
Task
A Task refers to a call, an email, a meeting, a chat or any other type of contact made with a customer. Atask organizes and helps you track all interactions associated with a customer. The task object serves tocreate, and manage all tasks you plan to perform or have performed, such asmaking calls or sendingmails. For example, you can create a task to schedule a phone call to a customer, and set a reminder. Areminder pops up a fewminutes before the scheduled call.
Integrating with External CRMThe Virtual Contact Center also supports integration with third-party CRMs, such as NetSuite andSalesforce.com. If your Agent Console integrates with an external CRM, your contact center supervisorwill provide you with the information you need to use the CRM to manage your customers, cases, andfollow-up activities.
CRM Landing PageWhen you log into Agent Console, the Display Panel launches separate tabs for:
n Cases: lists cases assigned to you, groups all related tasks such as creating a new case, editing, anddeleting cases, as well as reporting.
n Customers: lists customers assigned to you with centralized access to related tasks such as editinga customer record, adding a case, a follow up, or a task.
n Tasks: Lists tasks assigned to you with the ability to create new tasks, edit, or delete tasks.

8x8, Inc. Agent Console Guide
Version 8.0 Rev. 1.0 98
Customizing Lists of Customers and Cases
Selecting aCRM tab lists customers, and cases and tasks. You can filter the list as follows:
n Assigned To Me: customers whose open cases are assigned to you; open cases that areassigned to you. This is the default option.
n Assigned To My Group: customers whose cases are assigned to your group members; opencases that are assigned to your group.
n Created By Me: customer records created by you; cases created by you.
n My Draft Customers (customers) orMy Drafts (cases) : customer records created by you in draftstate; cases created by you in draft state.
ChooseMy Draft Customers andMy Drafts to access customer or case records that you saved asdraft.

8x8, Inc. Agent Console Guide
Version 8.0 Rev. 1.0 99
Figure 60: Filtering
Searching for CRMDataThe search feature in the Agent Console allows you to search for customers, cases, and task records inyour CRM based on specific criteria. You can perform a simple basic search on standard fields, or anadvanced search based on any CRM field defined in a record. For example, you can search for a customerby last name or email address in a simple search. You can look for records based on multiple criteria suchas a cases created in the last week in pending status. You can refine your search with a multitude ofsearch operators as described in the following table.

8x8, Inc. Agent Console Guide
Version 8.0 Rev. 1.0 100
Table 5: CRM Search Operators
Search Operator Description Example
= equals match the string exactly Last Name = Hansen
=i equals (ignore case) match the string exactly (case insensitive) Last Name = hansen
> greater than applicable to a numeric field. Search for avalue greater than a specified value.
Case Number > 1200
< less than applicable to a numeric field. Search for avalue less than a specified value.
Case Number < 1200
>= greater or equal applicable to a numeric field. Search for avalue greater than or equal to a specifiedvalue.
Case Number >= 1200
<= less of equal applicable to a numeric field. Search for avalue greater than or equal to a specifiedvalue.
Case Number <= 1200
* contains Search for a part of a word. Case Subject * Delayedorder
* i contains (ignore case) Search for a part of a word (case insens-itive)
Case Subject * delayed order
! not contains Search for a record which does not containa specified string.
Case Subject ! Sales Orders
!i not contains (ignore case) Search for a record which does not containa specified string. (case insensitive)
Case Subject !i sales orders
^ starts with Search for a record which starts with a spe-cified string.
Phone ^ 510
^i starts with (ignore case) Search for a record which starts with a spe-cified string. (case insensitive)
Phone ^i support
E empty Search for a record where the field value isempty
Do not Call E

8x8, Inc. Agent Console Guide
Version 8.0 Rev. 1.0 101
Search Operator Description Example
!E not empty Search for a record where the field value isnot empty
Phone !E
> after Search for a record with a date value aftera specified date.
Assign Date > 01/29/2012
< before Search for a record with a date valuebefore a specified date.
Assign Date < 01/29/2012
>= after (inclusive) Search for a record with a date value aftera specified date including the date.
Assign Date >= 01/29/2012
<= before (inclusive) Search for a record with a date value aftera specified date including the date.
Assign Date <= 01/29/2012
To perform a search:
1. Navigate to corresponding CRM object tab.
Figure 61: Searching for CRM data
2. ClickSearch link.
3. Select your search parameters in the simple search. For an advanced search, clickAdvanced link.ClickSearch for customer, case or task as desired.
Searching for Customers
By default, the Customers tab lists customers assigned to you. Additionally, you can access customerrecords:

8x8, Inc. Agent Console Guide
Version 8.0 Rev. 1.0 102
n Assigned to your group
n created by you
n customer records in draft state
n all customer records
Note: Ability to view, create, edit, and delete customer records are available to you if your administratorgrants privileges.
You can search and retrieve customer records using basic or advanced search.
n Basic Search: enables you to search for customers by last name AND/OR email address. ClickSearch to retrieve a list of all customers.
To perform a basic search for customers:
1. ClickCustomers tab.
2. Click the Search link.
The Agent Console displays the basic search tab.
Figure 62: Customer > Basic Search
3. ClickSearch to retrieve all customer records.
OR
Perform any or all of the following:
o Enter a customer Last Name.
o Enter a customer Email.
4. ClickSearch.
A list of customer recordsmatching the search criteria displays.
n Advanced Search: enables you to search for customers by any field defined in the customer record.You can create nested queries by using AND logical operator. Also, you can look for multiple values

8x8, Inc. Agent Console Guide
Version 8.0 Rev. 1.0 103
for a field of pick list data type.
Use the advanced customer search feature to search for a larger set of both default and customcustomer fields than are available in basic search. To perform an advanced search, clickAdvancelink from the simple search window.
Figure 63: Customer > Advanced Search
Searching for Cases
By default, the Cases tab lists customers assigned to you. Additionally, you can access cases records:
n Assigned to your group
n created by you
n case records in draft state
n all case records
Note: Ability to view, create, edit, and delete case records are available to you if your administrator grantsprivileges.
You can search and retrieve case records by performing basic or advanced search.
n Basic Search: enables you to search for cases :o by Case Number
o by Case Subject
o created by specific agents or customers
o assigned to specific agents or groups
To perform a basic case search:

8x8, Inc. Agent Console Guide
Version 8.0 Rev. 1.0 104
1. In the Navigation Panel, clickHome.
The CRM home page opens in the Display Panel.
2. In the case area toolbar, clickSearch.
The Agent Console displays the basic case search tab.
Figure 64: Case > Basic Search
3. Click Search to retrieve all cases.
OR
Perform any or all of the following:
o Enter a Case Number.
o Enter a Case Subject.
o Select an agent or customer who created a case.
o Select an agent, or group to retrieve cases assigned to them.
4. ClickSearch.
A list of case recordsmatching the search criteria displays.
1. ClickSearch toOR
Perform
o Enter a Case Number.
o Enter a Case Subject.
o Select an agent or customer who created a case.
o Select an agent, or group to retrieve cases assigned to them.
2. ClickSearch.
A list of case recordsmatching the search criteria displays.
n Advanced Search: enables you to search for cases by any field defined in a case record. Youcan create nested queries by using AND logical operator. Also, you can look for multiple values

8x8, Inc. Agent Console Guide
Version 8.0 Rev. 1.0 105
for a field of pick list data type.
Use the advanced case search feature to search for a larger set of both default and custom casefields than are available in basic search. To perform an advanced search, clickAdvance linkfrom the simple search window.
Figure 65: Case > Advanced Search
Searching for Tasks
You can search and retrieve task records by performing basic or advanced search.
n Basic Search: enables you to search for tasks: o by Task Number
o by Task Subject
o created by specific agents
o assigned to specific agents
To perform a basic search for tasks:
1. In the Navigation Panel, clickHome.
The CRM home page opens in the Display Panel.
2. In the Task area toolbar, clickSearch.
The Agent Console displays the basic case search tab.

8x8, Inc. Agent Console Guide
Version 8.0 Rev. 1.0 106
Figure 66: Task > Basic Search
3. ClickSearch to retrieve all tasks.
OR
Perform a search based on any or all of the following task fields using a suitable search operator:
o Enter a Task Number.
o Enter a Task Subject.
o Select an agent who created a task.
o Select an agent, or group to retrieve tasks assigned to them.
4. ClickSearch.
A list of task recordsmatching the search criteria displays.
n Advanced Search: enables you to search for tasks by any field defined in a task record. You cancreate nested queries by using AND logical operator. To perform an advanced search, clickAdvancelink from the simple search window.

8x8, Inc. Agent Console Guide
Version 8.0 Rev. 1.0 107
Figure 67: Task > Advanced Search
Creating and Editing Customer RecordsYou can create a new customer record at any time using the NewCustomer link in the Customers tabprovided your administrator has granted the privileges. During an interaction processing, Virtual ContactCenter searches the Local CRM for existing matching data. In the absence of matching customer records,agents are prompted to enter a new record through the screen pop.
This section describes the use of the default customer fields. Depending on how your contact centeradministrator has configured your Local CRM, the customer creation tool may display additional customerfields.
To create a customer record:
1. ClickNew Customer link in theCustomers tab.
The Agent Console displays theCreate New Customer page.

8x8, Inc. Agent Console Guide
Version 8.0 Rev. 1.0 108
Figure 68: Agent Console, Create New Customer page
2. In theCreate New Customer page, in the First Name and Last Name text entry areas, type thecustomer's first and last name.
You must specify the customer's first and last name before you can save the new customer record.
3. In the Email text entry area, type the customer's email address.
Each customer email addressmust be unique: To prevent a single customer email address fromreceiving multiple Support Center access credentials, the Agent Console uses the Internal CRM toverify the uniqueness of each customer email address.
The Agent Console uses the customer's email address to send the customer their optional SupportCenter access credentials.
4. To require that the customer specify an account number and password to access the contact center'sSupport Center, perform the following:

8x8, Inc. Agent Console Guide
Version 8.0 Rev. 1.0 109
a. Select Restrict customer's access to Support Center.
b. To specify the customer's Support Center password yourself, in the Password text entry areatype a password.
c. To have the Agent Console create the customer's Support Center password, select Generatepassword automatically.
When you save the new customer record, the Agent Console sends the customer's SupportCenter access credentials to the email address specified in the Email text entry area.
5. In the Primary Address and Secondary Address areas, specify the customer's addressinformation.
6. Perform one of the following
n To send all information contained in theDescription text entry area to the email recipientsspecified in the To, Cc, and Bcc areas, clickSave.
Before clicking Save, verify that the contents of theDescription text entry area contains onlyinformation that should be transmitted to all message recipients.
n To save a draft of an incomplete case record, clickSave as Draft.
To view saved drafts of customer records, see Filtering Lists of Customer or Cases, on page 1.
Managing a Customer Record
After you create and save a case record, you might want to edit the information many times during the lifecycle of a case.
To edit a customer record:
1. ClickCustomers tab. A list of your cases shows.
2. Select and open a customer record from the list by clicking on the customer name.
3. Click one of the actions items to view, edit, or delete the customer record.

8x8, Inc. Agent Console Guide
Version 8.0 Rev. 1.0 110
Creating and Editing Case RecordsWhen you process an interaction with an existing customer, you create or edit a case record of theinteraction either during or after the interaction. You can create, edit and save a case record, which theCRM pulls out during the next interaction with the same customer enabling you to process the caseefficiently. You create follow-up records to handle subsequent interactions with the customer regardingthe same case. At times, when a customer needs information, you may respond by emailing the caseinformation to them.
TheCases tab allows you to:
n Create a case record
n Edit an existing case record
n Create a follow-up record
n Send notification of case information
Best Practice: Edit an existing case record if you wish to re-word a case record or change the caseattributes such as Status, Priority, Severity etc. Create a follow-up record for each subsequent interactionof the same case.
The procedure in this section describes the use of the default customer fields. Depending on how yourcontact center administrator has configured your Local CRM, the customer creation tool may displayadditional customer fields.
While creating a case, you can notify it to the customer.
To create a case record:
1. ClickNew Case link in the Cases tab.
By default, the Agent Console displays theCreate New Case page.

8x8, Inc. Agent Console Guide
Version 8.0 Rev. 1.0 111
Figure 69: Agent Console, Create New Case tool, Properties tab
If your administrator enables HTML support for CRM, the CRM rich text editor shows. For moreinformation on using CRM rich text editor, refer toUnderstanding Rich Text Editor, on page 123.
2. In theCreate New Case page, choose case attributes and add comments to create a case record.
3. Optionally, clickNotify to send case notification to customer.
a. Select the From address from the drop downmenu if it fails to populate automatically.
b. Select the To address from the list of recipients if not populated automatically. Select Cc andBcc recipients if needed.
Note: Based on the configuration of your contact center, the To email addressesmay populateautomatically eliminating the need to manually enter the information. You will still need to addCc and Bcc addresses from the available list of recipients or manually.
c. In the Subject andDescription text entry areas, type the subject and message regarding thecase if you did not enter this information in the Properties tab.
Note: If HTML support is enabled, you can create content in the Description field using CRMrich text editor. For more information on using CRM rich text editor, refer toUnderstandingRich Text Editor, on page 123.
d. Select Signature for the email message.

8x8, Inc. Agent Console Guide
Version 8.0 Rev. 1.0 112
Note: You must set the right values for default from and default signature fields in your profileto automatically populate the From and Signature fields in theNotification tab.
4. Optionally, insert FAQs or attach files to the case record.
You can insert FAQ using shortcuts or by browsing through the FAQ Knowledge base. Shortcuts linkto the FAQs. For details, See "Inserting FAQResponses into Emails " on page 91
n To insert an FAQ shortcut, enter the shortcut and click Insert FAQ.
n ClickBrowse FAQ to browse through the FAQ knowledgebase and insert the desired FAQresponses either as full text or links.
n Attach files by browsing or by dragging files from the local file system.
5. Perform one of the following tasks:
n ClickSave as Draft to save a draft of an incomplete case record.
n ClickSave to save a completed case record. You can access and edit the case record later.
n ClickSend to mail the case record. If the To and From addresses populate automatically, themail is sent successfully creating a case record.
Note: Based on the configuration of your contact center, the To and From email addressesmaypopulate automatically eliminating the need to manually enter the information.
If your contact center configuration does not allow automatic populating, enter addressesmanually.
To view saved drafts of case records, see Filtering Lists of Case or Cases, on page 1.
Managing a Case Record
After you create and save a case record, you might want to edit the information many times during the lifecycle of a case.
To edit a case record:
1. ClickCases tab. A list of your cases shows.
2. Select and open a case from the list by clicking on the case number.
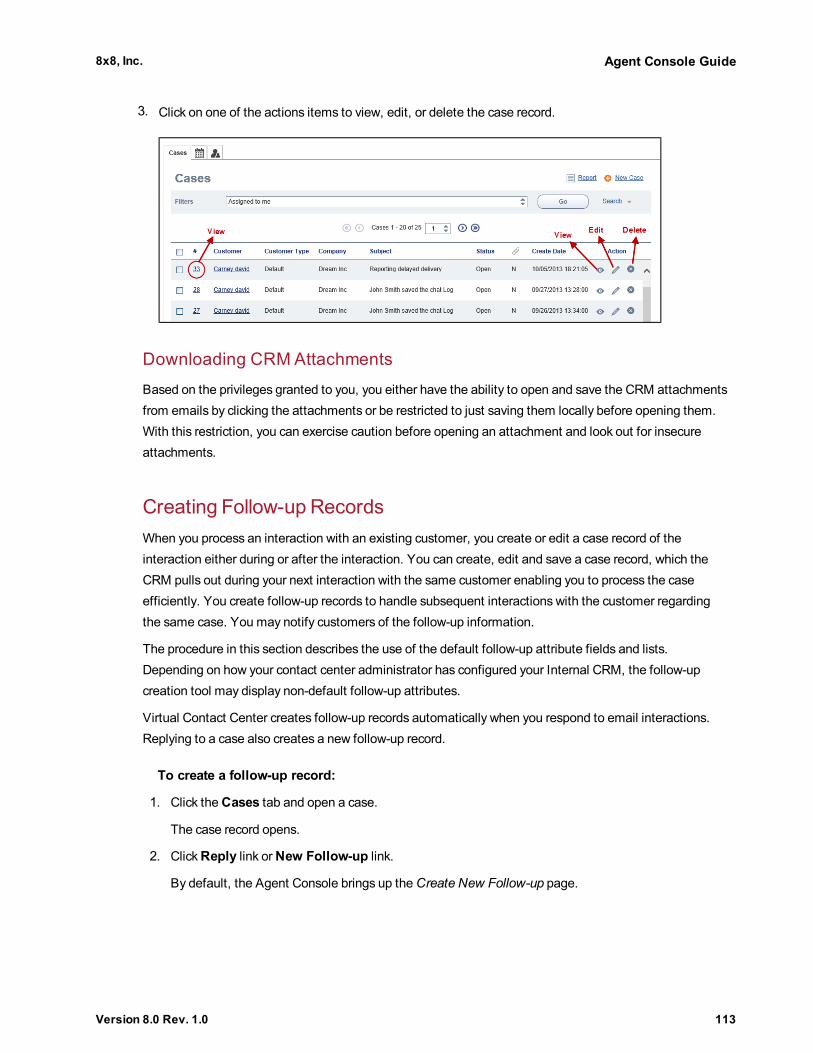
8x8, Inc. Agent Console Guide
Version 8.0 Rev. 1.0 113
3. Click on one of the actions items to view, edit, or delete the case record.
Downloading CRMAttachments
Based on the privileges granted to you, you either have the ability to open and save the CRM attachmentsfrom emails by clicking the attachments or be restricted to just saving them locally before opening them.With this restriction, you can exercise caution before opening an attachment and look out for insecureattachments.
Creating Follow-up RecordsWhen you process an interaction with an existing customer, you create or edit a case record of theinteraction either during or after the interaction. You can create, edit and save a case record, which theCRM pulls out during your next interaction with the same customer enabling you to process the caseefficiently. You create follow-up records to handle subsequent interactions with the customer regardingthe same case. You may notify customers of the follow-up information.
The procedure in this section describes the use of the default follow-up attribute fields and lists.Depending on how your contact center administrator has configured your Internal CRM, the follow-upcreation tool may display non-default follow-up attributes.
Virtual Contact Center creates follow-up records automatically when you respond to email interactions.Replying to a case also creates a new follow-up record.
To create a follow-up record:
1. Click theCases tab and open a case.
The case record opens.
2. ClickReply link orNew Follow-up link.
By default, the Agent Console brings up theCreate New Follow-up page.

8x8, Inc. Agent Console Guide
Version 8.0 Rev. 1.0 114
Figure 70: Agent Console, Create New Follow-up, Properties tab
If your administrator enables HTML support for Local CRM, the CRM rich text editor shows. Formore information on using CRM rich text editor, refer toUnderstanding Rich Text Editor, on page123.
If you are processing an email interaction, you can also use the Control panel, Email tab, to create afollow-up record. For information about creating a follow-up record while processing an emailinteraction, see Processing Email Interactions, on page 87.
3. In theCreate New Follow-up page, update follow-up attributes and add comments.
4. Optionally, select Reply orReply All to notify customers of the follow-up.
a. Select the From address from the drop downmenu if it fails to populate automatically.
b. Select the To address from the list of recipients if not populated automatically. Select Cc andBcc recipients if needed.
Note: Based on the configuration of your contact center, the To email addressesmay populateautomatically eliminating the need to manually enter the information. You will still need to addCc and Bcc addresses from the available list of recipients or manually.
c. In the Subject andDescription text entry areas, type the subject and message regarding the

8x8, Inc. Agent Console Guide
Version 8.0 Rev. 1.0 115
case if you did not enter this information in the Properties tab.
Note: If HTML support is enabled, you can create content in the Description field using CRMrich text editor. For more information on using CRM rich text editor, refer toUnderstandingRich Text Editor, on page 123.
d. Select Signature for the email message.
Note: You must set the right values for default from and default signature fields in your profileto automatically populate the From and Signature fields in theNotification tab.
5. Optionally, insert FAQs or attach files to the follow-up record.
You can insert FAQ using shortcuts or by browsing through the FAQ Knowledge base. Shortcuts linkto the FAQs. For details, See "Inserting FAQResponses into Emails " on page 91
n To insert an FAQ shortcut, enter the shortcut and click Insert FAQ.
n ClickBrowse FAQ to browse through the FAQ knowledge base and insert the desired FAQresponses either as full text or links.
n Attach files by browsing or by dragging files from the local file system.
6. Perform one of the following tasks:
n ClickSave as Draft to save a draft of an incomplete case record.
n ClickSave to save a completed case record. You can access and edit the case record later.
n ClickSend to mail the case record. If the To and From addresses populate automatically, themail is sent successfully creating a case record.
Note: Based on the configuration of your contact center, the To and From email addressesmaypopulate automatically eliminating the need to manually enter the information.
If your contact center configuration does not allow automatic populating, clicking Send takesyou to theNotification tab.
To view saved drafts of case records, see Filtering Lists of Case or Cases, on page 1.
Creating and Editing TasksA Task refers to a call, an email, a meeting, a chat or any other type of contact made with a customer. Atask organizes and helps you track all interactions associated with a customer. The task object serves tocreate, and manage all tasks you plan to perform or have performed, such asmaking calls or sendingmails. If your contact center is configured to generate auto logs for interactions,Virtual Contact Centerconverts these logs to task records and associates them to relevant cases and customers. For example, Acall log or a chat log generated on terminating an interaction is saved as a task.

8x8, Inc. Agent Console Guide
Version 8.0 Rev. 1.0 116
You can create independent tasks to schedule a phone call to a customer, and set a reminder. A reminderpops up a fewminutes before the scheduled call.
Features
n Task fields are customizable. You can add new fields, and edit existing fields.
n Interactions logs for phone and chat are saved as tasks.
n Tasks are automatically created for all campaign calls that are processed.
n Tasks are created for calls scheduled during a campaign.
n An agent creates, views, edits, and searches for tasks.
n An agent can view all tasks assigned to her, and also list all tasks pertaining to a customer.
Creating a Task
You can create a task two ways:
n Create an independent task: In the Tasks tab, you can create an independent task or associate it to acustomer.
n Create a task for a customer: In the Customers tab, open a customer record and create a new task.The task is automatically associated with the customer.
To create an independent task:
1. Click Tasks tab.
A list of your open tasks shows by default.
2. Click theNew Task link.

8x8, Inc. Agent Console Guide
Version 8.0 Rev. 1.0 117
Figure 71: Create New Task
Search and open a customer record, and clickCreate under the Task section.
3. Enter the details of a task. The task fields are customizable in your CRM. You may create customfields, or edit the existing fields.
a. Status: When you create a task, assign a status to indicate how the task progresses. Note: Picklist values are customizable.
b. Phone:Optionally, enter the phone number of the customer.
c. Media Type:Refers to the media of a task such as phone, email, chat, or voicemail.
d. Due Date:Select a date to complete the task using the calendar. This enables a reminder. Youcan check the reminder option to automatically generate a reminder.
e. Assigned To: By default, the task is assigned to the agent who creates it. To assign it toanother user, select a user from the drop down list. You can assign a task to a single user only.
f. Email: Optionally, enter the email address of the contact.
g. Call Type: inbound, outbound, and Direct Agent Access.
h. Subject: Enter a subject or short description of the task.
i. Description:A note describing the task.
j. Enable Reminder:Optionally, check the box to set a reminder on the task. This option isenabled only if you specify a due date.
4. Click theCustomers list link to associate it with an existing customer.
5. ClickSave.
You have created a task successfully. If you enabled a reminder, a reminder pops up at the specifiedtime interval before the scheduled call.

8x8, Inc. Agent Console Guide
Version 8.0 Rev. 1.0 118
Figure 72: Task Reminder Pop-up window
6. Click the Scheduled Call to view the task details and the associated customer record. The remindercontinues to pop until the task is completed, or dismissed.
To create a task for an existing customer:
1. Open a customer record and scroll down to the Tasks area.
2. Click theNew Task link.
Figure 73: Create a task for a customer

8x8, Inc. Agent Console Guide
Version 8.0 Rev. 1.0 119
3. Enter the desired attributes to the new task.
Note: The task is associated with the customer.
4. Save the task.
Managing a Task
To edit a task:
1. ClickCustomers tab. A list of your cases shows.
2. Select and open a customer record from the list by clicking on the customer name.
3. Click one of the actions items to view, edit, or delete the customer record.
Viewing a TaskHistory
You can view task record details including the changes a task has gone through since its creation.

8x8, Inc. Agent Console Guide
Version 8.0 Rev. 1.0 120
Listing Tasks of a Customer
You can list all tasks pertaining to a customer record.
To list all tasks:
1. Navigate to a customer record and click the triangle next to Tasks. in The tasks area expandsshowing all the tasks associated with the customer.

8x8, Inc. Agent Console Guide
Version 8.0 Rev. 1.0 121
Figure 74: Listing Tasks of a customer
A list of tasks associated with the customer record shows. Click on any record to view the taskdetails.
Deleting CRMDataYou can delete customer, case, and task records from the Local CRM if your contact center administratorhas granted permissions. If you do not have the privileges, you cannot delete data.
Before you begin
Before deleting CRM data, note that:
n Deleting a customer record permanently removes the customer information as well as all associatedcases, follow-ups, and attachments.
n Deleting a case record permanently removes the case information as well as all associated follow-upsand attachments.
n You cannot restore any portion of deleted CRM records.

8x8, Inc. Agent Console Guide
Version 8.0 Rev. 1.0 122
To delete CRM data:
1. Log in to Agent Console.
2. From the three CRM tabs (Customers, Cases, Tasks), select the object you wish to delete the datafrom. You can delete customers, or cases, or tasks based on your permissions.
Figure 75: Virtual Contact Center CRM Home Page
3. Click Delete action tool next to the CRM record to delete records individually. You are prompted toconfirm.
OR
4. Click Basic or Advanced Search to search and retrieve the data records you wish to delete.
Figure 76: Retrieving Specific CRM Data
5. From the list, select desired records and clickDelete Selected.

8x8, Inc. Agent Console Guide
Version 8.0 Rev. 1.0 123
A message indicates the number of records selected for deletion and warns all data associated withthe records will be deleted as well.
6. ClickOk to proceed.
7. To delete all records:
a. ClickDelete All.
You are prompted to enter your password to prevent accidental deletion.
b. At the prompt, enter your password to log in to Agent Console.
c. ClickDelete Now.
Understanding Rich Text EditorIf support for HTML Email is enabled, agents gain access to a rich text editor in the following pages of theAgent Console:
n CRM Create Case
n CRM Edit case (for non-read-only cases)
n CRM Create Follow-up
n CRM Notification of cases and follow-up records
The rich text editor is Unicode compatible and fully localized.

8x8, Inc. Agent Console Guide
Version 8.0 Rev. 1.0 124
Figure 77: CRM Rich Text Editor
The rich text editor on the Agent Console allows you to create, or edit cases and follow-up records with thefollowing features:
n Rich font Properties
n Insert Images
n Insert Hyperlinks
n Insert HTML formatted FAQ
n Insert HTML formatted Signature
n Easy to use Spell Checker
Summarizing the Menu Elements of Rich Text Editor
The rich text editor on the Virtual Contact Center CRM lets you create or edit cases, and follow-up recordswith varying indent options, font types, font sizes, font styles, paragraph styles, and lists. The followingtable lists the name and role of each menu element in the rich text editor:
Table 6: CRM Rich Text Editor, Menu Element Options
Element Name Role Values
Font Name Set the text font family Arial (Default)
Arial Black
Comic Sans MS
Courier New
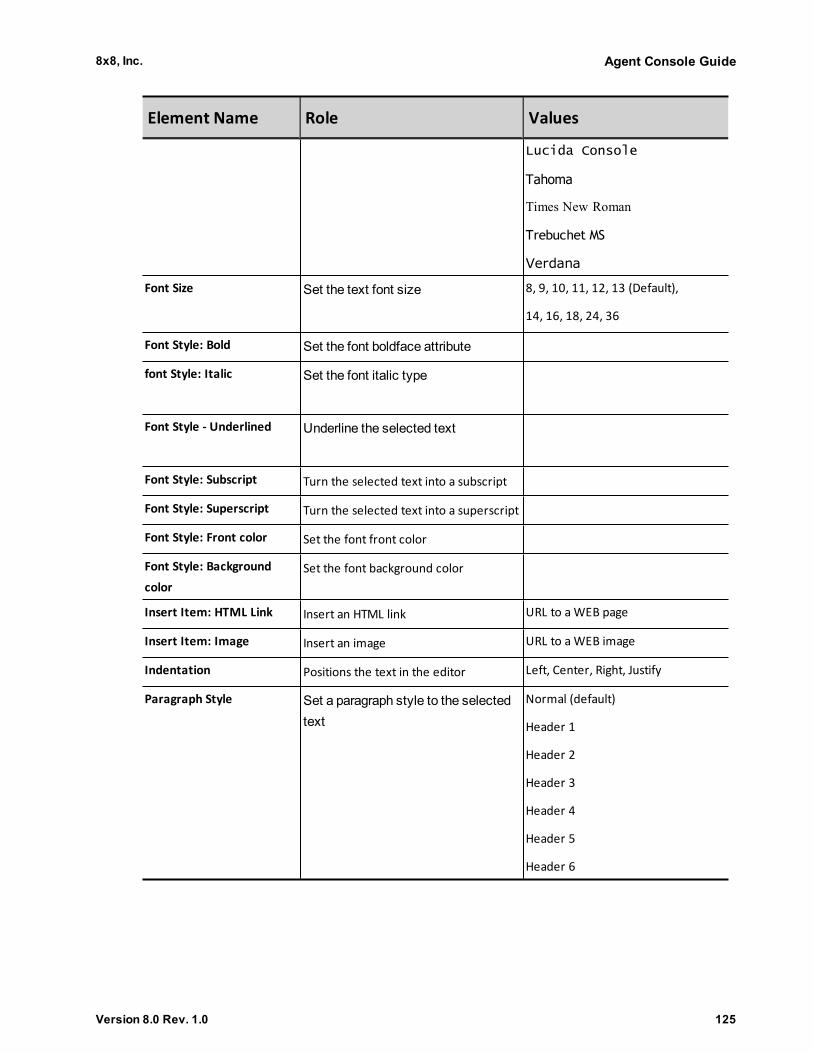
8x8, Inc. Agent Console Guide
Version 8.0 Rev. 1.0 125
Element Name Role Values
Lucida Console
Tahoma
Times New Roman
Trebuchet MS
Verdana
Font Size Set the text font size 8, 9, 10, 11, 12, 13 (Default),
14, 16, 18, 24, 36
Font Style: Bold Set the font boldface attribute
font Style: Italic Set the font italic type
Font Style - Underlined Underline the selected text
Font Style: Subscript Turn the selected text into a subscript
Font Style: Superscript Turn the selected text into a superscript
Font Style: Front color Set the font front color
Font Style: Backgroundcolor
Set the font background color
Insert Item: HTML Link Insert an HTML link URL to aWEB page
Insert Item: Image Insert an image URL to aWEB image
Indentation Positions the text in the editor Left, Center, Right, Justify
Paragraph Style Set a paragraph style to the selectedtext
Normal (default)
Header 1
Header 2
Header 3
Header 4
Header 5
Header 6

8x8, Inc. Agent Console Guide
Version 8.0 Rev. 1.0 126
Description - Inserting an Image
The CRM rich text editor enables you to insert images while creating cases and follow-up records. In theDescription field, you can choose to insert an image by placing the cursor in the desired location.
To insert an image:
1. In the CRM home, clickCreate a case or a follow-up. The properties tab opens.
Figure 78: CRM page, Create Follow-up, Properties tab
2. Enter the Subject andDescription.
3. In theDescription field, place the cursor where you want to insert an image.
4. Click from the menu. You may be prompted to allow scripted windows by your browser.

8x8, Inc. Agent Console Guide
Version 8.0 Rev. 1.0 127
Figure 79: Create follow-up, Insert Image
5. Click where instructed and then click Temporarily Allow ScriptedWindows option in the contextualmenu.
6. Click again. A dialog box opens prompting for a valid image URL.
Figure 80: Insert Image, URL prompt
7. Enter a valid URL and clickOK. The image at the specified URL gets inserted in the description.

8x8, Inc. Agent Console Guide
Version 8.0 Rev. 1.0 128
Figure 81: CRM page, Create Follow-up, Image inserted
Note: You can resize images in the editor by pulling on the image handlers.
Description - Inserting a Hyperlink
The CRM rich text editor enables you to insert hyperlinks while creating cases and follow-up records. IntheDescription field, you can choose to insert hyperlinks by selecting a text string and linking it to a validURL. When you click on the linked text, the browser opens the hyperlink.
To insert a hyperlink:

8x8, Inc. Agent Console Guide
Version 8.0 Rev. 1.0 129
1. In the CRM home, clickCreate a case or a follow-up. The properties tab opens.
Figure 82: CRM page, Create Follow-up, Properties tab
2. Enter the Subject andDescription.
3. In theDescription field, select text to be displayed as the hyperlink.
4. Click from the menu. You may be prompted to allow scripted windows by your browser.

8x8, Inc. Agent Console Guide
Version 8.0 Rev. 1.0 130
Figure 83: Create follow-up, Insert Hyperlink
5. Click where instructed and then click Temporarily Allow ScriptedWindows option in the contextualmenu.
6. Click again. A dialog box opens prompting for a valid image URL.
Figure 84: Insert Hyperlink, URL prompt
7. Enter a valid URL and clickOK. The link gets inserted in the Description. If you click on the linkedtext, a new browser opens the hyperlink.

8x8, Inc. Agent Console Guide
Version 8.0 Rev. 1.0 131
Figure 85: CRM page, Create Follow-up, Hyperlink inserted
Description - Inserting a FAQ
You can create HTML formatted FAQs to send to customers. If your contact center has prepared answersfor frequently asked questions (FAQs), and those answers include shortcut definitions, you can use thoseshortcuts to quickly insert the prepared answers into chat responses, email responses, and emailnotifications while creating cases and follow-up records.
To insert FAQ:
1. In the Notification tab, place the cursor in theDescription field where you wish to insert FAQ.
2. In the control panel, enter a shortcut FAQ and click Insert FAQ. The FAQ content gets inserted inthe response.

8x8, Inc. Agent Console Guide
Version 8.0 Rev. 1.0 132
Figure 86: Create Case, Notification tab, Insert FAQ
Description - Inserting a Signature
You can create elaborate HTML formatted signatures to be rendered in the email notifications sent tocustomers by creating a signature in your profile, saving it, and inserting in theDescription field ofnotification emails.
To create a signature:
1. ClickMy Profile in the navigation bar.
2. Create a signature using HTML tags and save in your profile.
To insert a signature:
1. In the Notification tab, place the cursor in theDescription field where you wish to insert signature.
2. Click Insert Signature. Your HTML formatted signature gets inserted in the email content.

8x8, Inc. Agent Console Guide
Version 8.0 Rev. 1.0 133
Figure 87: Create case, Notification tab, Inserted signature
Description - Spell Checking
The spell checker in the rich text editor scans and flags the words that may be spelled incorrectly. Thespell checker highlights all unknown words. You can replace the highlighted words with a suggestion orignore it.
Note: You do not have “Ignore” choice on the context menu. You should simply ignore the words by notclicking on them.
To spell check your content in Description field:
1. Click . The spell checking mode is turned on and turns off text editing or text formatting mode.
The spell checker highlights all unknown words with yellow color.
2. Click on a highlighted word to bring up a pop-up windowwith a list of suggested words.

8x8, Inc. Agent Console Guide
Version 8.0 Rev. 1.0 134
3. Replace it with a suggested word or ignore it.
4. When all the spell checking is done, Click to turn off the spell checking mode and return to the
normal editing mode.
Creating CRMReportsEach agent can use their Agent Console account to create and save CRM reports that summarize theircustomer and case activity.
CRM reports can be viewed in a browser window. If your computer hasMicrosoft Excel installed, you cangenerate a report as an Excel spreadsheet.
Creating a CRMCustomer Report
Virtual Contact Center provides you the ability to create custom reports to extract desired customer data.
To create a CRM Customer Report:
1. Go to Customers tab.
2. In the header area, clickReport.
The Agent Console displays theCustomer Reports page.

8x8, Inc. Agent Console Guide
Version 8.0 Rev. 1.0 135
Figure 88: Agent Console, Customer Reports page
In the Customer Reports page, theCustomer Reports list contains no choices.
3. In theCustomer Reports page, clickNew Report.
The Agent Console displays the first of threeReports Wizard pages.
Figure 89: Agent Console, Customer Report Wizard, Step 1
If your contact center administrator has added custom fields to your Local CRM, those custom fieldsappear in the list of fields.
4. In theCustomer Report Wizard, Step 1 of 3:

8x8, Inc. Agent Console Guide
Version 8.0 Rev. 1.0 136
a. In theReport Title text entry area, enter the name of this report.
b. In the Fields to Include area, select the fields included in this report.
c. ClickNext.
The Agent Console displays the next step in the wizard.
Figure 90: Agent Console, Customer Report Wizard, Step 2
5. In step 2, for each customer field you chose in step 1 of the Customer Report Wizard (Figure 89),create optional filtering statements.
a. For each of the report fields, chose a logical operator, then in the adjoining text entry area type(or if applicable, choose) a filter.
b. ClickNext.
The Agent Console displays the third of threeReports Wizard pages.

8x8, Inc. Agent Console Guide
Version 8.0 Rev. 1.0 137
Figure 91: Agent Console, Customer Report Wizard, Step 3
6. In the Step 3:
n Specify a company from the existing list of customer base by clicking the search link.
n Choose the primary and secondary report fields the Agent Console uses to order the datacontained in the customer report, then choose the two fields' sort order.
7. Produce and save the report. Perform one of the following:
n To save the report configuration without running the report, clickSave.
n To run the report without saving the report configuration, clickRun.
n To run the report and save the report configuration, clickSave and Run.
n If the agent computer hasMicrosoft Excel installed, to produce the report in the agentcomputer's Microsoft Excel program without saving the report configuration, clickRun in Excel.
After the Agent Console produces the report in Excel, in the Customer Report Wizard clickSaveto save the report configuration.
Creating a CRMCase Report
A CRM case report provides both customer and case information. The customer-related fields appear inCase, Follow-Up, and Attached fields and can be used to filter report data.

8x8, Inc. Agent Console Guide
Version 8.0 Rev. 1.0 138
Note: The Description field displays only the first 256 characters on reports.
Virtual Contact Center provides three reports by default. You cannot edit these reports.
n Internal Case Report:
n Supervisor Case Report:
n Management Case Report:
To run a default CRM Case Report:
1. Go to Cases tab.
2. In the header area, clickReport link.
The Agent Console displays theCase Reports page.
Figure 92: Agent Console, Case Reports page
The Case Reports list contains three default case reports:
n Internal Case Report
n Supervisor Case Report
n Management Case Report
3. To run one of the default reports, select a date range and clickRun next to the desired defaultreport. If you wish to create your own report, follow the steps below.
To create a new CRM Case Report:
1. In theCase Reports page, clickNew Report link.
The Agent Console walks you through the three step report wizard.

8x8, Inc. Agent Console Guide
Version 8.0 Rev. 1.0 139
Figure 93: Agent Console, Case Report Wizard, Step 1
If your contact center administrator has added custom fields to your Internal CRM, those customfields appear in the list of fields.
2. In theCase Report Wizard, Step 1 of 3:
a. In theReport Title text entry area, type the name of this report.
b. In the Fields to Include area, select the fields included in this report.
c. ClickNext.
The Agent Console displays the second of threeReports Wizard pages.

8x8, Inc. Agent Console Guide
Version 8.0 Rev. 1.0 140
Figure 94: Agent Console, Case Report Wizard, Step 2
3. In theCase Report Wizard, Step 2 of 3, for each customer and case field you chose in step 1 ofthe Case Report Wizard (Figure 93), create optional filtering statements.
a. For each of the report fields, choose a logical operator, then in the adjoining text entry area type(or if applicable, choose) a filter.
b. ClickNext.
The Agent Console displays the third of threeReports Wizard pages.
Figure 95: Agent Console, Case Report Wizard, Step 3
4. In the Step 3, choose the primary and secondary report fields the Agent Console uses to order the

8x8, Inc. Agent Console Guide
Version 8.0 Rev. 1.0 141
data contained in the case report, then choose the two fields' sort order.
5. Produce and save the report. Perform one of the following:
n To save the report configuration without running the report, clickSave.
n To run the report without saving the report configuration, clickRun.
n To run the report and save the report configuration, clickSave and Run.
n If the agent computer hasMicrosoft Excel installed, to produce the report in the agentcomputer's Microsoft Excel program without saving the report configuration, clickRun in Excel.
After the Agent Console produces the report in Excel, in the Case Report Wizard clickSave tosave the report configuration.
Creating a CRM Task Report
You can extract specific task information by generating customized task reports. Agent Console allowsyou to create a custom task report in just three simple steps using a wizard. The reporting wizard allowsyou to select the specific data you wish to report on. For example, you can generate a report to summarizethe tasks generated in a particular month.
To generate a report for tasks:
1. Log into the Agent Console and navigate to Tasks tab.
2. ClickReport link in the header area.
3. ClickNew Report link in the Tasks Reports page.
Figure 96: Generating Task Report
Note: To edit an existing report, select the report from the drop down list of Task Reports and clickEdit.
4. Enter a report title, specify a layout, and select the fields to include in the report.

8x8, Inc. Agent Console Guide
Version 8.0 Rev. 1.0 142
Figure 97: Generating Task Report - Step 1
5. Apply filters by specific fields to further customize your report data and clickNext.
Figure 98: Generating Task Report - Step 2

8x8, Inc. Agent Console Guide
Version 8.0 Rev. 1.0 143
6. Specify the order to sort data in the report.
Figure 99: Generating Task Report - Step 3
7. ClickSave and Run to generate the report.
Figure 100: Sample Task Report

8x8, Inc. Agent Console Guide
Version 8.0 Rev. 1.0 144
Posting and Viewing Notification MessagesAgents can use the Agent Console to send notification messages ("notices") to one or more agent groups.
All agents in the selected agent group receive the notice. Agents logged in to the Agent Console receivethe notice immediately. Agents who are not logged in receive the notice the next time they log in to theAgent Console.
Sending a NotificationMessagePerform the procedure in this section to send a notice to one or more agent groups.
Figure 101 shows the Control panel tools you will use to send a notice.
Figure 101: Agent Console, Post Notices tab
To send a notice:
1. In the Agent Console, select theNotices tab, then click the Post Notices tab.
The Agent Console displays the Post Notices tab.
2. In the Post Notices tab, in theGroup list, select a group or select All to send the notice to all agentgroups.

8x8, Inc. Agent Console Guide
Version 8.0 Rev. 1.0 145
You must select at least one agent group before you can send the notice.
3. In the Priority area (Figure 101), choose the priority level of the message or choose Pop-up.
If you choose Pop-up, the Agent Console displays the notice as a pop-up message that disables allrecipients tools until the agent selects the message box and clicksClose.
Viewing NotificationMessagesPerform the procedure in this message to view a notice.
Figure 102 shows the Control panel tools you will use to view a notice.
Figure 102: Agent Console, View Notices tab
To view a notice:
1. In the Agent Console, select theNotices tab, then clickView Notices.
The Agent Console displays the View Notices tab.
2. In the View Notices tab, in theNew Notices area, the Agent Console lists all your unread notices.
The Old Notices area retains your previously viewed notices until you log out of the Agent Console.

8x8, Inc. Agent Console Guide
Version 8.0 Rev. 1.0 146
Using the Collaborate FeatureIf your Agent Console account includes the Collaborate desktop sharing tool, you can use Collaborate toconnect to a customer's computer and directly control that computer for purposes of providing hands-onassistance.
When you use Collaborate to connect to a customer's computer, the customer sees every action youperform in real-time, and can disconnect their computer from the Collaborate session at any time.
Overview of a Collaborate Desktop Sharing SessionUsing the Collaborate feature to provide hands-on assistance to a customer consists of the following high-level tasks:
1. In the Agent Console, use the Collaborate page to generate a unique Collaborate session identifier.
2. Send the Collaborate session identifier and the URL of the Collaborate Web page to the customer,then help the customer connect to the Collaborate session.
3. In the Agent Console, use the Collaborate feature to connect to the customer's computer.
4. Use the Collaborate feature to provide hands-on assistance.
Before Running Collaborate For The First TimeIf your Agent Console includes access to the Collaborate feature, contact your contact center supervisorto verify that your computer and network configuration will permit the use of the Collaborate feature.
Establishing a Collaborate SessionPerform the procedure in this section to establish a Collaborate session.
To establish a Virtual Contact Center Collaborate session:
1. In the Agent Console, in the Navigation bar, clickCollaborate.
The Agent Console displays theCollaborate page.
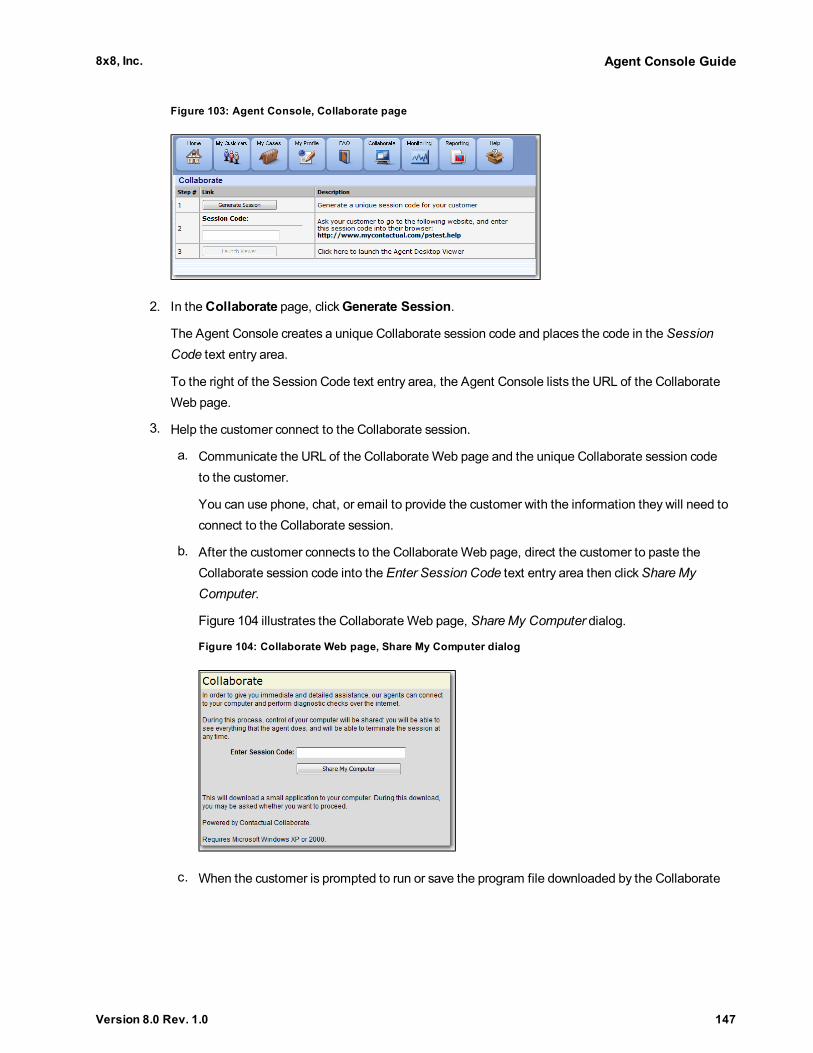
8x8, Inc. Agent Console Guide
Version 8.0 Rev. 1.0 147
Figure 103: Agent Console, Collaborate page
2. In theCollaborate page, clickGenerate Session.
The Agent Console creates a unique Collaborate session code and places the code in the SessionCode text entry area.
To the right of the Session Code text entry area, the Agent Console lists the URL of the CollaborateWeb page.
3. Help the customer connect to the Collaborate session.
a. Communicate the URL of the Collaborate Web page and the unique Collaborate session codeto the customer.
You can use phone, chat, or email to provide the customer with the information they will need toconnect to the Collaborate session.
b. After the customer connects to the Collaborate Web page, direct the customer to paste theCollaborate session code into the Enter Session Code text entry area then clickShareMyComputer.
Figure 104 illustrates the Collaborate Web page, ShareMy Computer dialog.
Figure 104: Collaborate Web page, Share My Computer dialog
c. When the customer is prompted to run or save the program file downloaded by the Collaborate

8x8, Inc. Agent Console Guide
Version 8.0 Rev. 1.0 148
feature, direct the customer to clickRun.
If the customer receives an additional warning that the program's publisher could not beverified, direct the customer to clickRun.
d. When the Collaborate session prompts the customer to accept or reject the Collaboratesession, direct the customer to clickYes.
e. Point out to the customer that the Collaborate session displays aDisconnect Now button thatthe customer can use to immediately end the Collaborate session.
4. In the Agent Console, in theCollaborate page, click Launch Viewer.
The Agent Console creates a new browser session, then connects that session to the customer'scomputer. You can now use the Collaborate session to directly control the customer computer forpurposes of providing hands-on assistance.
5. To end the Collaborate session, in the session window clickDisconnect.
You can also direct the customer to click their Collaborate session'sDisconnect Now button.

8x8, Inc. Agent Console Guide
Version 8.0 Rev. 1.0 149
GLOSSARY
A
AdministratorThe person who uses the Configuration Manager to configure the contact center's resources andbehaviors. An Administrator can be the Primary Administrator with unrestricted access to all theconfiguration objects or a Role Based Administrator with full or partical configuration rights.
AgentAgents use the Agent Console to view and manage customer interactions. Virtual Contact Centersupports Regular agents and Supervisor agents.
Agent ConsoleVirtual Contact Center's browser-based graphical user interface (GUI) used by Agents to managecustomer interactions.
Application Programming Interface (API)An application programming interface (API) defines the way an external program can requestservices from another program. See also, Virtual Contact Center Integrations.
Automatic Call Distribution (ACD)ACD uses the number called and programmable call distribution logic to route incoming telephonecalls to agents with the skills necessary to efficiently process the interaction.
Automatic Number Identification (ANI)ANI identifies the origination number of a call offered to an Agent.
B
Billing Telephone Number (BTN)For customers with multiple separate telephone numbers, the BTN consolidates those multiplenumbers under a single phone number for billing purposes.

8x8, Inc. Agent Console Guide
Version 8.0 Rev. 1.0 150
C
Call Treatment ChoiceRefers to choices within a schedule which allows a time based selection of treatment choices wheninteractions enter a Virtual Contact Center tenant.
Caller Name (CNAM)An enhanced Caller ID feature that displays both the number and name for an incoming voice call. Toprovide the value-added CNAM service, the carrier uses the originating caller's phone number tolocate the caller's name in the carriers' names database, then transmits both the number and name tothe CNAM-enabled customer.
Calling Line Identifier (CLI)The intended display number of the calling party. In some network configurations, the CLI containsthe calling party's Billing Telephone Number (BTN) or Charged Party Number (CPN) to be displayedinstead.
ChannelPhone, email, or Web chat interactions arrive at a tenant on a channel. Virtual Contact Center usesskills based routing rules to place interaction requests into the appropriate Queue.
CollaborateSee Desktop Sharing.
Computer Telephony Integration (CTI)CTI allows data associated with an incoming call or chat request to be presented to the respondingagent in real-time. Virtual Contact Center CTI typically presents this data as a "screen pop".
Configuration Manager (CM)The portion of the Virtual Contact Center application used by the contact center's administrator todefine and configure the resources and operational behaviors of the center's tenant.
CRM APIThe CRM API component of the Virtual Contact Center Integrations enables third-party processes toaccess the internal CRM data.

8x8, Inc. Agent Console Guide
Version 8.0 Rev. 1.0 151
Custom RoleAn administrator defined role with custom privileges is called a custom role. Any role other than thesystem defined Super User role is referred to as the custom role.
Customer Relationship Management (CRM)The Virtual Contact Center CRM stores the contact center's customer, case, and follow-up data.Numerous third-party CRM products also exist. Two examples of third-party CRM applications areSalesforce and NetSuite.
D
Desktop SharingIf authorized, an agent can use the Collaborate Desktop Sharing feature to view and control acustomer’s remote computer for purposes of providing assistance.
Direct Agent AccessIn an IVR script, direct agent access permits a caller to reach an agent directly rather than throughskills-based routing logic.
E
Email ScriptA set of instructions that determine and direct the treatment and routing of an incoming emailinteraction.
G
GroupA group is a collection of agents created for management or reporting purposes. Groups can befunctional (for example, Technical Support) or organizational (for example Supervisor Mary’s Team).Each agent can be assigned to only one group, and cannot view or access information about othergroups or group members.
I
Interactive Chat Response (ICR)Interactive Chat Response specifies the message sent in response to a new chat interaction.

8x8, Inc. Agent Console Guide
Version 8.0 Rev. 1.0 152
Interactive Voice Response (IVR)IVR enables touch tones to guide customer interaction with the contact center. For example, an IVRscript could direct a caller to Press 1 to be connected to Sales or Press 2 to be contacted to Support.
Intra Day SchedulerRefers to the functionality of the tenant that allows creating multiple recurring choices within a day.
IVR ScriptA set of instructions that prompts callers to choose options, then uses those choices to determine theoptimal routing of an incoming phone interaction. See also, Interactive Voice Response.
O
Outbound Phone CodesOutbound Phone codes offer a means to set a specific calling line identifier (caller ID) and optionaloutbound queue for outbound calls from your tenant. Outbound Phone Codes also may be used totrack the purpose of an outbound call.
P
Primary AdministratorAn adminstrator with unrestricted access to all the configuration objects in the ConfigurationManager.
Q
QueueA queue is an ordered collection of interactions waiting to be served by agents qualified to respond tothese interactions. In addition to enabling the call center administrator to customize how incominginteractions are prioritized and routed, queues also ensure that interactions are never lost ordiscarded.
R
Reporting APIThe Reporting API component of the Virtual Contact Center Integrations enables third-partyprocesses to access statistical reporting data, and status information.

8x8, Inc. Agent Console Guide
Version 8.0 Rev. 1.0 153
Responsible Organization (RespOrg)The entity that controls and maintains a phone number. Telephone carriers are the most commontype of RespOrg. 8x8's provisioning department processes the RespOrg orders required to direct yourcontact center's phone numbers to your Virtual Contact Center client
RoleA role defines a set of privileges to configure a Virtual Contact Center tenant. A role can be systemdefined or administrator defined.
Role Based AdministratorAn administrator who assumes a role with full or partial configuration rights to the Virtual ContactCenter.
Role Based ManagementRole Based Management is the functionality of Virtual Contact Center that allows a tenant todistribute the configuration management functionality among multiple roles.
S
Screen PopThe Screen Pop component of the Virtual Contact Center Integrations enables third-party CRMs todisplay information in the Agent Desktop. See also, Computer Telephony Integration.
Service Level Agreement (SLA)A commitment to process some number of interactions within a specific period of time. ServiceLevels are generally defined as X percent of interactions answered within Y secondsmeasured over Zminutes. In the Configuration Manager, use a queue's SLA tab to generate an alert wheneverinteraction processing levels fall below a specified commitment level.
SkillA qualification that associates a particular queue to an agent.
Skill LevelsFor each agent, Virtual Contact Center uses high, medium, and low skill level identifiers to prioritizethe distribution of interactions across the pool of available agents.

8x8, Inc. Agent Console Guide
Version 8.0 Rev. 1.0 154
Status CodesThe Status Codes feature enables agents to supply supplemental information about why theychanged their state. Status Codes provide enhanced workforce planning and management. Forexample, status codes could be created for different categories of breaks such as Break for Lunch,Break for Meeting, and so on.
Super UserThe system defined role with unrestricted access to configure all administrative areas of theConfiguration Manager. Primary Administrator inherits the Super User role automatically. Multipleadministrators can be assigned to the Super User role. Privileges to the Super User role cannot beedited or revoked.
SupervisorAn agent with the supplementary privileges required to create FAQ categories and answers, monitoragent interactions in progress, listen to recordings of previous interactions, and create reports for theagents groups they supervise.
Support CenterIn Configuration Manager, use the Support Center page to create customer-facing support Web pagefor your contact center, and specify the contact -- FAQs, desktop sharing, chat, email -- availablefrom that page.
T
TenantYour unique and secure contact center instance running on a 8x8 platform. You use the ConfigurationManager to create and configure all aspects of your contact center's resources and operationalbehaviors, including groups, incoming channels, queues, agents, routing scripts, skills, monitoring,recording, and reporting.
Transaction CodeThe Transaction Codes feature enables agents to supply supplemental information about the reasonfor or outcome of an interaction. Transaction codes provide enhanced metrics or enable the callingline ID on an outbound call to be modified. For example, transaction codes could be created fordifferent categories of sales activities such as Initial Contact, Prospect, Customer Satisfied, and soon.

8x8, Inc. Agent Console Guide
Version 8.0 Rev. 1.0 155
TriggersThe Triggers component of the Virtual Contact Center Integrations invokes a remote third-partyprocess whenever an agent creates, deletes, or edits internal CRM record.
V
Virtual Contact CenterA contact center that enables agents to be located in different geographical locations yet managed asif they were located in the same physical location.
Virtual Contact Center Integrations SuiteAn optional package containing the CRM API, Screen Pop, Triggers, and Reporting APIcomponents.
Voice over IP (VoIP)The use of the Internet Protocol (IP) to carry telephone calls.
W
WallboardThe 8x8Wallboard for Virtual Contact Center presents real time metrics of your contact centeroperations allowing supervisors to manage customer demand proactively.
Web Application Programming Interface (WAPI)Deprecated term for the optional 8x8 Integrations package.
Weekly ScheduleDefines recurring day-of-week/time-of-day treatment choices. These are typically normal businesshours. Schedules follow the defined weekly pattern unless superseded by date-specific SpecialEvents.