vacuum pressure switch part #rt080 - magnum heat
TRANSCRIPT
F:\AESBusinessSystems\AES Technical\Piece part instructions\RT080 Vaccum Pressure Switch.doc
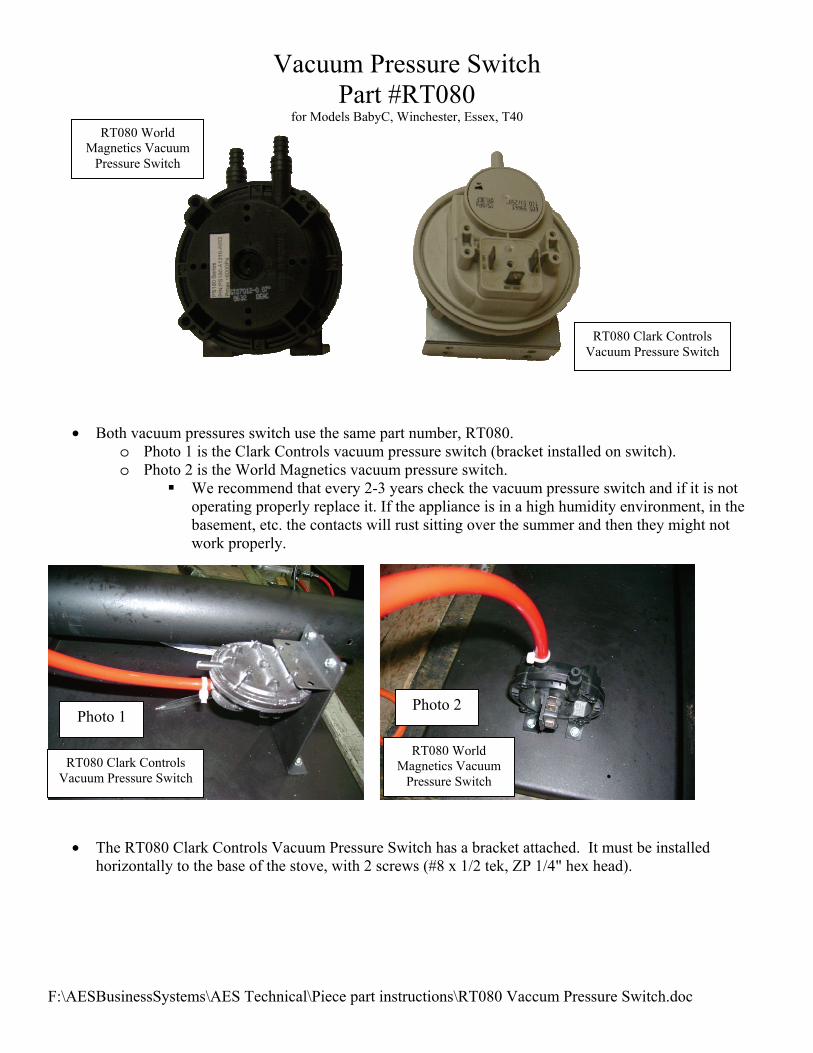
Vacuum Pressure Switch Part #RT080
for Models BabyC, Winchester, Essex, T40
• Both vacuum pressures switch use the same part number, RT080. o Photo 1 is the Clark Controls vacuum pressure switch (bracket installed on switch). o Photo 2 is the World Magnetics vacuum pressure switch.
We recommend that every 2-3 years check the vacuum pressure switch and if it is not operating properly replace it. If the appliance is in a high humidity environment, in the basement, etc. the contacts will rust sitting over the summer and then they might not work properly.
• The RT080 Clark Controls Vacuum Pressure Switch has a bracket attached. It must be installed horizontally to the base of the stove, with 2 screws (#8 x 1/2 tek, ZP 1/4" hex head).
Photo 1
RT080 Clark Controls Vacuum Pressure Switch
Photo 2
RT080 World Magnetics Vacuum
Pressure Switch
RT080 World Magnetics Vacuum
Pressure Switch
RT080 Clark Controls Vacuum Pressure Switch

F:\AESBusinessSystems\AES Technical\Piece part instructions\RT080 Vaccum Pressure Switch.doc
• The RT080 World Magnetics Vacuum Pressure Switch is installed vertically to the base of the stove, with 2 screws (#8 x 1/2 tek, ZP 1/4" hex head).
o When mounting this vacuum pressure switch verify it has been positioned correctly .03” from
the top approximately 1 to 1 ½ exposed threads should be shown above the Allen head screw. Add a small amount of thread loc to the Allen head screw after proper positioning.
SWITCH BYPASS mode – Gray wires connected to COM and N.C. terminals
• Make sure that the unit is unplugged from power. • Unplug the two gray wires going to the vacuum pressure switch. • Remove Vacuum hose from port. • Remove bad vacuum switch. • Mount new vacuum switch as identified above. • Place grey leads accordingly. • Place vacuum hose. • Plug unit in. • Start unit.
RT080 World Magnetics Vacuum
Pressure Switch
N.O. 3
N.C. 2
COM 1
RT080 Clark Controls Vacuum Pressure Switch
N.O. 3
N.C. 2
COM 1
Attach one grey wire to ‘Com 1’
and one grey wire to ‘NO 3’.
Attached hose to bottom connection
‘P2’.
Attach one grey wire to ‘Com 1’ and one grey wire to ‘NO 3’.
Attached hose to back connection ‘H’.