v2 gemini lock pro manual with pics warranty
TRANSCRIPT

Crafter’s Companion™ warrants the Gemini™ Lock Pro against defects in materials and workmanship under ordinary consumer use for one year (or longer depending on country specific regulations) from the date of original retail purchase. During this warranty period, if a defect arises in the Gemini™ Lock Pro, and you follow the instructions for returning the Gemini™ Lock Pro, we will at our option, to the extent permitted by law, either (i) repair the Gemini™ Lock Pro using either new or refurbished parts, (ii) replace it with a new or refurbished machine that is equivalent to the machine to be replaced, or (iii) refund to you all or part of the purchase price of the machine. All replaced parts and machines for which a refund is given shall become our property. This limited warranty applies only to hardware components that were not subject to accident, misuse, neglect, fire or other external causes, alterations, repair, or commercial use. For complete details of the Limited Warranty, visit www.crafterscom-panion.co.uk or www.crafterscompanion.com.
LIMITED WARRANTY


Important safety instructionsWhen you use an electrical appliance, basic safety precautions
should always be adhered to as follows: Read all instructions before using this machine.
DANGER To reduce the risk of electric shock:1. The machine should never be left unattended when plugged in. Always unplug this appliance from the electric outlet immediately after using and before cleaning it.2. Always unplug before re-lamping.3. Do not reach for a machine that has fallen into water. Unplug immediately.4. Do not place or store a machine where it can fall or be pulled into a tub or sink. Do not place in or drop into water or other liquid.WARNINGTo reduce the risk of burns, fire, electric shock, or injury to persons:1. Do not allow to be used as a toy. Close attention is necessary when this machine is used by or near children.2. Use this machine only for its intended use as described in this manual. Use only attachments recommended by the manufacturer as contained in this manual.3. Never operate this machine if it has a damaged cord or plug, if it is not working properly, if it has been dropped or damaged, or dropped in water. Return the appliance to the nearest authorised dealer or service centre for examination, repair, electrical or mechanical adjustment. 4. Never operate the machine with any air openings blocked. Keep ventilation openings of the machine and foot control free from the accumulation of lint, dust and loose cloth. 5. Never drop or insert any object into any opening.6. Do not use outdoors.7. Do not operate when aerosol (spray) products are being used or when oxygen is being administered.
outlet.9. Never operate on a soft surface such as a bed or couch when the air opening may be blocked.10. Do not unplug by pulling on cord. To unplug, grasp the plug, not the cord. 11. Keep fingers away from all moving parts. Special care is required around the machine needle.12. Always use the proper needle plate. The wrong plate can cause the needle to break.13. Do not use bent or blunt needles. Use needles recommended by the manufacturer only.14. Do not pull or push fabric while stitching. It may deflect the needle, causing it to break.
area, such as threading needle, changing needle, or changing presser foot, etc.16. Always unplug machine from the electric outlet when removing covers, lubricating, or when making any other user servicing adjustments mentioned in the instruction manual.
Please also observe the general safety notes on page 2.
KEEP THESE INSTRUCTIONS IN A SAFE PLACEThis machine is designed and manufactured for HOUSEHOLD use only. 1
15. Switch the machine o� (“O”) when making any adjustments in the needle
8. To disconnect, turn all controls to the o� (“O”) position, then remove the plug from

2
NOTES ON SAFETY1. The user must exercise adequate caution with regard to the up and down movement of the needle and constantly observe the sewing area while sewing.2. When leaving the machine unattended, during maintenance work or when replacing mechanical parts or accessories, always disconnect the machine from the mains by pulling out the mains plug.3. The machine comes with LED light, and the LED light only can be repaired by a mechanic.4. The tension of the drive belt may only be adjusted by a mechanic.5. Do not insert any objects in openings on the machine.6. Do not use the machine if: - There is visible damage - Its function is disturbed - It is wet, e
.g. with condensation which can
occur when a cold machine is brought into a warm room.7. Do not pull the mains plug out of the socket by its cord.8. If this appliance is used for a purpose other than that for which it is intended or if it is wrongly operated, we cannot accept any liability for any damage caused.9. To avoid risk of electric shock, do not open the machine. There are no parts inside the machine which the user can repair. This is solely the responsibility of our qualified
10. Be sure to use only original parts.11. This machine is designed for a mains supply with a nominal voltage of +/- 10% and a rated frequency of +/- 4%12. When using properly, the temperature of the outer components of a non-electrically controlled foot control can reach up to 85°C. Constant use at a low speed is therefore not permitted in order to avoid damage.
EnvironmentThe recommended environment is: Ambient temperature 10°C to 40°C, Humidity 20% to 80%.
This machine is suppressed and immune to interference; however, it should not be operated near electronic devices such as radios, TVs, PCs, broadcasting transmit-ters etc.
This machine is a high-quality electronic-mechanical appliance; it is a machine for supervised use in the home. It should be operated in such a way that it is not subjected to: dust, severe dampness, direct sunlight, static electric-ity, heat-producing objects, corrosive chemicals or liquids.
For ventilation purposes the machine must be free-standing, on a surface which is both firm and even.
Care of the machineAlways protect the machine against damage which may occur by knocking or dropping.
Cleaning To clean the housing use a dry, clean, soft and lint-free cloth. Any stubborn dirt can be removed with a soft cloth and alcohol or par
PLEASE NOTEDo not use any insecticides or chemical products such as benzine (petroleum) or fluid chemicals for cleaning the housing.
This appliance is not intended for use by persons with reduced physical,
sensory or mental capabilities, or lack of experience and knowledge, unless they have been given supervision or
instructions.
service sta�.

DANGER To reduce the risk of electric shock:1. The sewing machine should never be left unattended when plugged in. Always unplug this appliance from the electric outlet immediately after using and before cleaning it.2. Always unplug before re-lamping.3. Do not reach for a sewing machine that has fallen into water. Unplug immediately.4. Do not place or store a sewing machine where it can fall or be pulled into a tub or sink. Do not place in or drop into water or other liquid.WARNINGTo reduce the risk of burns, fire, electric shock, or injury to persons:1. Do not allow to be used as a toy. Close attention is necessary when this sewing machine is used by or near children.2. Use this sewing machine only for it intended use as described in this manual. Use only attachments recommended by the manufacturer as contained in this manual.3. Never operate this sewing machine if it has a damaged cord or plug, if it is not working properly, if it has been dropped or damaged, or dropped in water. Return the appliance to the nearest authorised dealer or service centre for examination, repair, electrical or mechanical adjustment. 4. Never operate the sewing machine with any air openings blocked. Keep ventilation openings of the sewing machine and foot control free from the accumulation of lint, dust and loose cloth. 5. Never drop or insert any object into any opening.6. Do not use outdoors.7. Do not operate when aerosol (spray) products are being used or when oxygen is being administered.8. To disconnect, turn all controls to o� (”o”) position, then remove the plug from outlet.9. Never operate on a soft surface such as a bed or couch when the air opening may be blocked.10. Do not unplug by pulling on cord. To unplug, grasp the plug, not the cord. 11. Keep fingers away from all moving parts. Special care is required around the sewing machine needle.12. Always use the proper needle plate. The wrong plate can cause the needle to break.13. Do not use bent or blunt needles. Use needles recommended by the manufacturer only.14. Do not pull or push fabric while stitching. It may deflect the needle, causing it to break.15. Switch the sewing machine o� (”o”) when making any adjustments in the needle area, such as threading needle, changing needle, threading bobbin, or changing presser foot, etc.16. Always unplug sewing machine from the electric outlet when removing covers, lubricating, or when making any other user servicing adjustments mentioned in the instruction manual. 17. Hold plug when rewinding into cord reel. Do not allow plug to whip when rewinding. Please also observe the general safety notes on page 2.
3
Parts
1. Thread tension dial/left needle2. Thread tension dial/right needle3. Carry handle4. Thread tension dial/upper looper5. Thread tension deal/lower looper6. Looper cover7. Sewing foot8. Needle plate9. Detachable work support10. Needle holder11. Lamp cover12. Thread chain cutter
13. Slide lever for stitch width stitch finger14. Movable upper knife15. Lower over-edge looper16. Fixed lower knife17. Seam width adjustment dial18. Upper over-edge looper
1 2 34
5
6
789
10
11
12
18
15
1617
13
14

20. Rear thread guides21. Telescopic thread guide22. Set screw for adjusting sewing foot pressure23. Thread spool pin24. Thread spool stand25. Spool26. Cone adapter27. Machine socket, foot control with main cord28. Main switch29. Handwheel
31. Stitch length adjustment dial
19. Thread guides with colour coding
33. Foot control34. Foot control plug for machine35. Regional mains plug
4
33
3435
20
31
30
29
2827
2625
24
23
19
21
22
30. Adjustable lever for di�erential feed
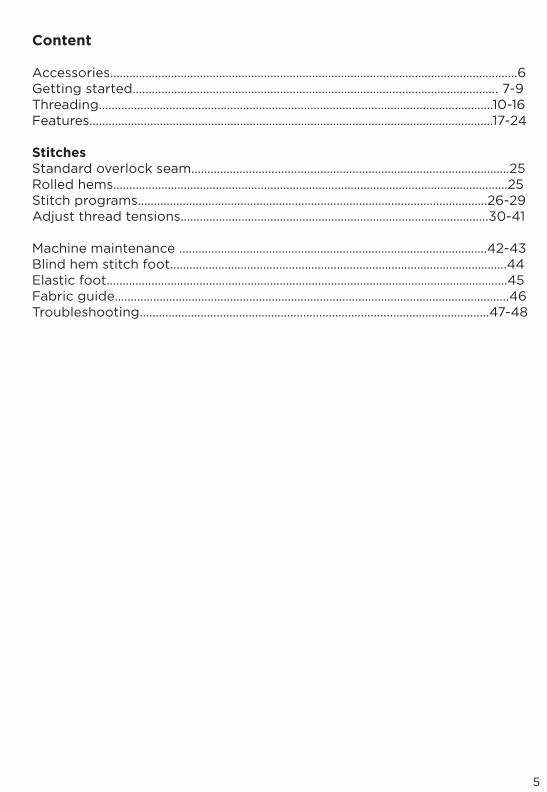
Content
Accessories……………………………………………………………………….....…………………………………..6Getting started………………………………………………………………………....……………………….. 7-9Threading……………………………………………………………………………………......…………………10-16Features………………………………………………………………………………………………………………17-24
StitchesStandard overlock seam………………………...............…………………………………………………25Rolled hems……………………………………………………...……………………………………………………25Stitch programs……………………………………………………………………....………………………26-29Adjust thread tensions…………………………………………………………….....………………….30-41
Machine maintenance …………………………………………………………..……………………….42-43Blind hem stitch foot…………………………………………………...………………………………………44Elastic foot………………………………………………………………....………………………………………….45Fabric guide…………………………………………………………………....……………………………………..46Troubleshooting……………………………………………………………….......…………………………47-48
5
6
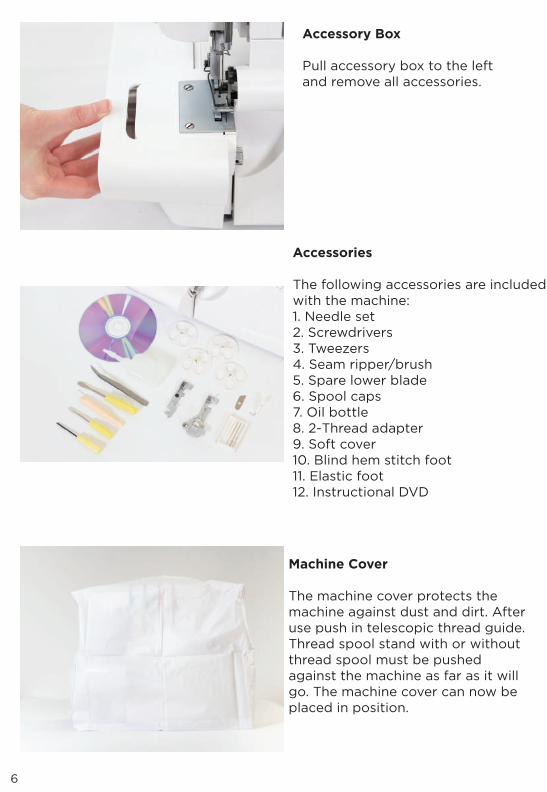
Accessory Box
Pull accessory box to the left and remove all accessories.
Accessories
The following accessories are included with the machine:1. Needle set2. Screwdrivers3. Tweezers4. Seam ripper/brush5. Spare lower blade6. Spool caps7. Oil bottle8. 2-Thread adapter9. Soft cover10. Blind hem stitch foot11. Elastic foot12. Instructional DVD
Machine Cover
The machine cover protects the machine against dust and dirt. After use push in telescopic thread guide. Thread spool stand with or without thread spool must be pushed against the machine as far as it will go. The machine cover can now be placed in position.

OPERATING INSTRUCTIONS
Connecting the foot control
Insert the plugs of the foot control into the machine socket and the power source respectively. Sewing speed is regulated by applying pressure to the foot control.
Mains switch
The sewing light lights up when mains switch is switched on.
The machine is now ready for opera-tion.
“O” = OFF“I” = ON
7

Looper cover
Slide looper cover as far as it will go to the right and swing it downwards. Individual threading paths are displayed in the colours on the inside of the machine, as well as the threading method of the overedge looper. In addition, the mounting procedure for the converter and the three most common stitch types are shown symbolically.
Telescopic thread guide
Extend telescopic thread guide upwards.
the two upper telescopes must be rotated slowly until their locking balls are heard to lock into place.
Thread unreeling disc
The thread unreeling disc included in the accessories is intended for use with smaller thread spools. Insert the thread unreeling disc into the thread spool and place them both on the cone adapter of the thread spool pin.
8
To ensure optimum thread take-o�,
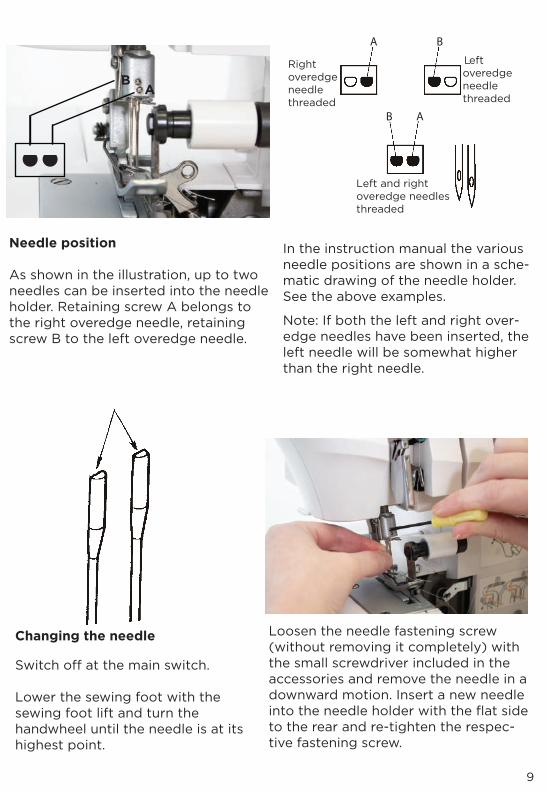
Needle position
As shown in the illustration, up to two needles can be inserted into the needle holder. Retaining screw A belongs to the right overedge needle, retaining screw B to the left overedge needle.
Changing the needle
Lower the sewing foot with the sewing foot lift and turn the handwheel until the needle is at its highest point.
Loosen the needle fastening screw (without removing it completely) with the small screwdriver included in the accessories and remove the needle in a downward motion. Insert a new needle into the needle holder with the flat side to the rear and re-tighten the respec-tive fastening screw.
BA
Rightoveredgeneedle threaded
Leftoveredgeneedlethreaded
Left and rightoveredge needlesthreaded
A B
B A
In the instruction manual the various needle positions are shown in a sche-matic drawing of the needle holder. See the above examples.
Note: If both the left and right over-edge needles have been inserted, the left needle will be somewhat higher than the right needle.
9

Threading
A colour-coded threading diagram for quick reference is to be found behind the looper cover, i.e. inside the machine.
Thread the individual threads as shown - following steps 1 to 4.
The colour markings are applicable as follows:
1. Upper overedge looper = pink2. Lever overedge looper = yellow3. Right needle = green4. Left needle = blue
Threading/guide wires
Place the thread spools on spool pins. Use cone adapters only with conical spools. Insert the threadsthrough the guide wires from the back to front according to the colour coding.
Lift carrying handle. Insert the threads beneath the handle and through rear guides by pulling down with both hands until the thread slips under the guide wire. Now pull the thread between the tension discs and press it down until it is lodged between the latter. Return the carrying handle to its closed position.
Thread ThreadLeftNeedle
RightNeedle
10
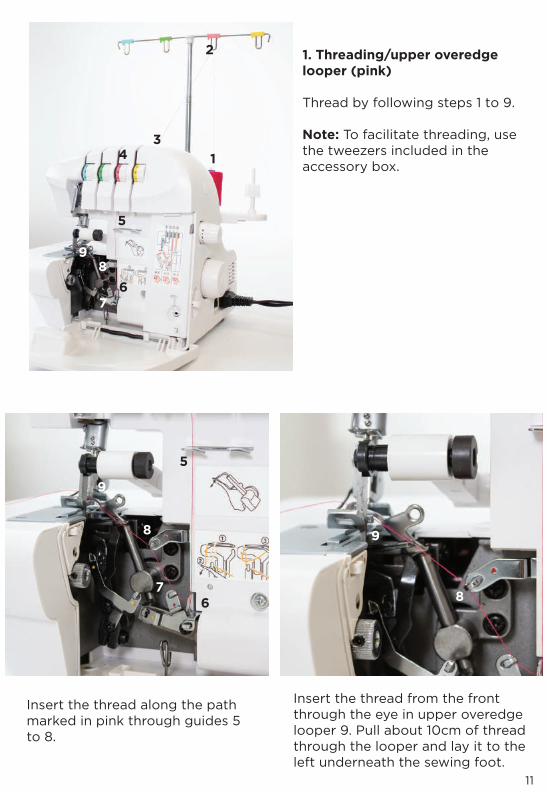
1. Threading/upper overedge looper (pink)
Thread by following steps 1 to 9.
Note: To facilitate threading, use the tweezers included in the accessory box. 1
2
34
5
67
89
Insert the thread along the path marked in pink through guides 5 to 8.
Insert the thread from the front through the eye in upper overedge looper 9. Pull about 10cm of thread through the looper and lay it to the left underneath the sewing foot.
5
67
9
8 9
8
11

2. Threading the lower overedge looper (yellow)
Turn the handwheel in the direction of the arrow until loweroveredge looper is positioned at the extreme right.
Insert the thread by following steps 1 to 10.
Note: To facilitate threading, use the tweezers included in the accessory box.
1
2
3
4
56789 10
12

Insert the thread along the path marked in yellow through guides 4 to 8.
The diagrams to be found behind the looper cover illustrate the princi-ples of threading.
Lay the thread from back to front over the right-hand side of the looper. Carefully pull the thread to the left and slightly down until it slips into notch B (threading point 9) of the looper.
Insert thread through the eye of lower overedge looper C (threading point 10). The thread must run along the groove in the looper.
Pull about 10cm or thread through the looper and lay it to the left underneath the sewing foot.
4
56
7
8
8
9 10
C
AB
13
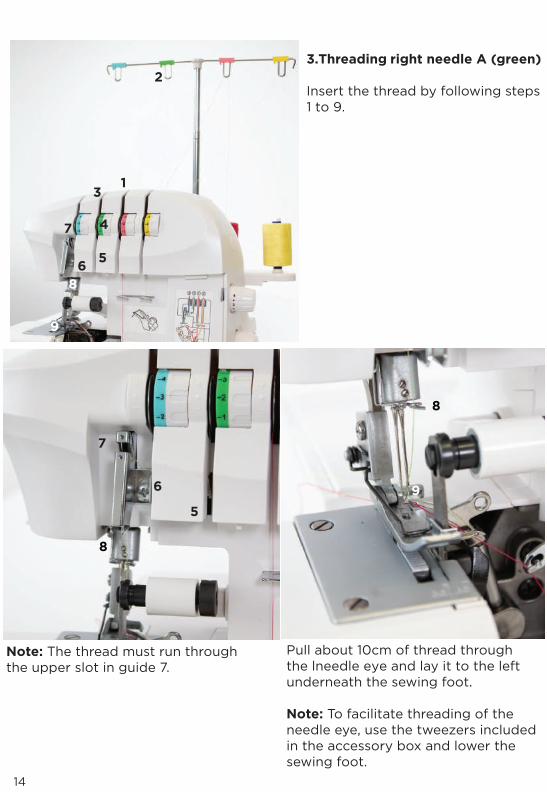
3.Threading right needle A (green)
Insert the thread by following steps 1 to 9.
Note: The thread must run through the upper slot in guide 7.
Pull about 10cm of thread through the lneedle eye and lay it to the left underneath the sewing foot.
Note: To facilitate threading of the needle eye, use the tweezers included in the accessory box and lower the sewing foot.
1
2
3
4
56
7
8
9
5
6
7
8
8
9
14
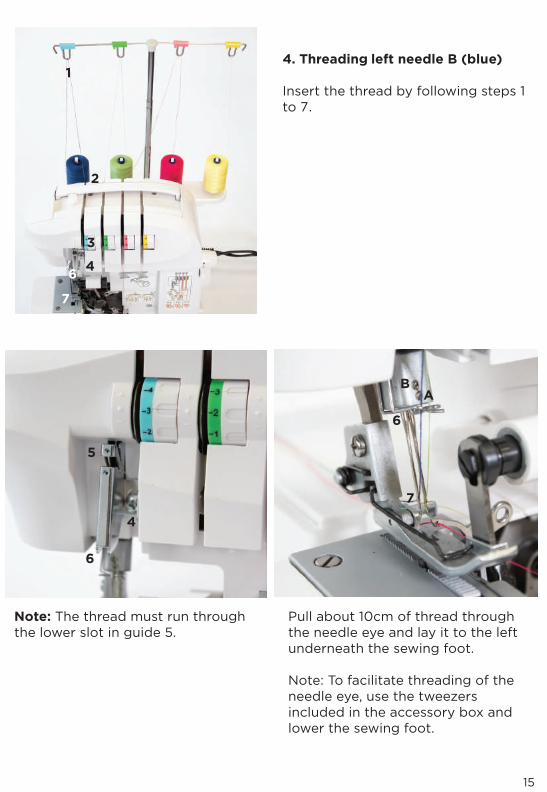
4. Threading left needle B (blue)
Insert the thread by following steps 1 to 7.
Note: The thread must run through the lower slot in guide 5.
Pull about 10cm of thread through the needle eye and lay it to the left underneath the sewing foot.
Note: To facilitate threading of the needle eye, use the tweezers included in the accessory box and lower the sewing foot.
1
2
3
46
7
5
4
6
BA
6
7
15
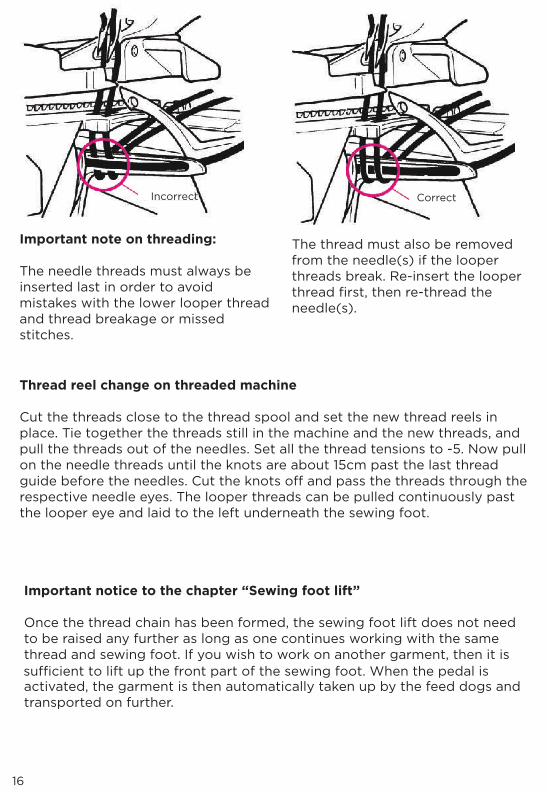
Important note on threading:
The needle threads must always be inserted last in order to avoid mistakes with the lower looper thread and thread breakage or missed stitches.
The thread must also be removed from the needle(s) if the looper threads break. Re-insert the looper thread first, then re-thread the needle(s).
Thread reel change on threaded machine
Cut the threads close to the thread spool and set the new thread reels in place. Tie together the threads still in the machine and the new threads, and pull the threads out of the needles. Set all the thread tensions to -5. Now pull on the needle threads until the knots are about 15cm past the last thread
respective needle eyes. The looper threads can be pulled continuously past the looper eye and laid to the left underneath the sewing foot.
Important notice to the chapter “Sewing foot lift”
Once the thread chain has been formed, the sewing foot lift does not need to be raised any further as long as one continues working with the same thread and sewing foot. If you wish to work on another garment, then it is
activated, the garment is then automatically taken up by the feed dogs and transported on further.
Incorrect Correct
16
guide before the needles. Cut the knots o� and pass the threads through the
su�cient to lift up the front part of the sewing foot. When the pedal is
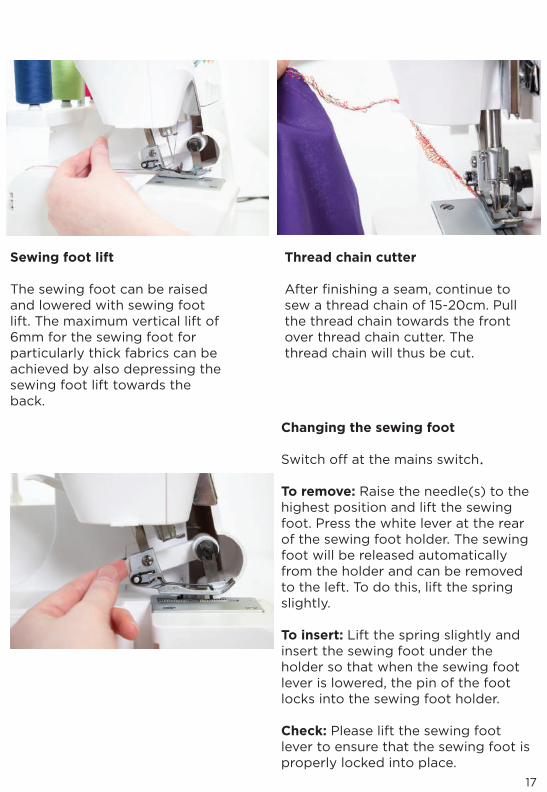
Sewing foot lift
The sewing foot can be raised and lowered with sewing foot lift. The maximum vertical lift of 6mm for the sewing foot for particularly thick fabrics can be achieved by also depressing the sewing foot lift towards the back.
Thread chain cutter
After finishing a seam, continue to sew a thread chain of 15-20cm. Pull the thread chain towards the front over thread chain cutter. The thread chain will thus be cut.
Changing the sewing foot
To remove: Raise the needle(s) to the highest position and lift the sewing foot. Press the white lever at the rear of the sewing foot holder. The sewing foot will be released automatically from the holder and can be removed to the left. To do this, lift the spring slightly.
To insert: Lift the spring slightly and insert the sewing foot under the holder so that when the sewing foot lever is lowered, the pin of the foot locks into the sewing foot holder.
Check: Please lift the sewing foot lever to ensure that the sewing foot is properly locked into place.
17
.

Disengaging the upper knife
Raise upper knife to its uppermost position by rotating the handwheel. Detach the lint box and open the looper cover. Now pull the holder of the movable upper knife fully towards the right.
Turn the head of the upper knife away from you until the upper knife locks into the horizontal position.
Engaging the upper knife
Slide the holder of the movable upper knife towards the right and turn the knife back until it locks into its work-ing position. Close the looper cover and reattach the lint box.
18

Mounting the converter
The converter must be mounted for all 2-thread seams and the 2-needle, 3-thread overedge closing seam. Detach the lint box and open the looper cover. Con-verter is located in the front of the machine housing. Pull it out.
Note: The 2-thread adapter is packed in accessory box
Rotate the handwheel until the upper overedge looper is positioned to the right of the movable upper knife.
Insert hub A of the converter into the aperture of the upper over-edge looper.
Rotate the converter towards the left and press the upper part slightly to the rear so that the tip of the converter locks into the eye of the looper.
The converter can be removed by following these direction in reverse order.
A
19
Switch o� at the mains switch.
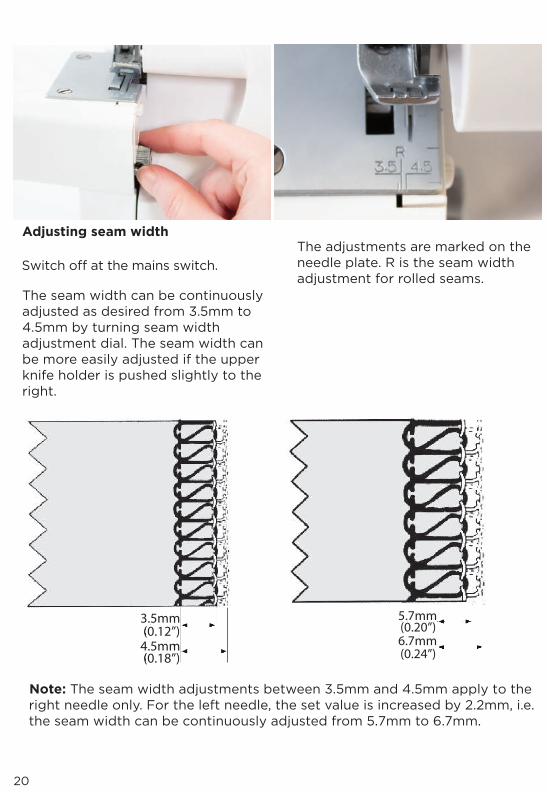
Adjusting seam width
The seam width can be continuously adjusted as desired from 3.5mm to 4.5mm by turning seam width adjustment dial. The seam width can be more easily adjusted if the upper knife holder is pushed slightly to the right.
The adjustments are marked on the needle plate. R is the seam width adjustment for rolled seams.
Note: The seam width adjustments between 3.5mm and 4.5mm apply to theright needle only. For the left needle, the set value is increased by 2.2mm, i.e.the seam width can be continuously adjusted from 5.7mm to 6.7mm.
3.5mm(0.12”)
4.5mm(0.18”)
5.7mm(0.20”)6.7mm(0.24”)
20
Switch o� at the mains switch.
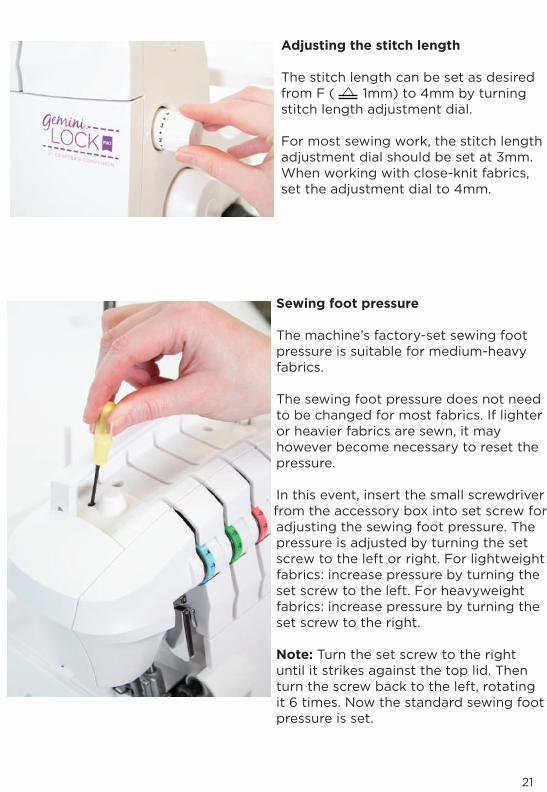
Adjusting the stitch length
The stitch length can be set as desired from F ( 1mm) to 4mm by turning stitch length adjustment dial.
For most sewing work, the stitch length adjustment dial should be set at 3mm. When working with close-knit fabrics, set the adjustment dial to 4mm.
Sewing foot pressure
The machine’s factory-set sewing foot pressure is suitable for medium-heavy fabrics.
The sewing foot pressure does not need to be changed for most fabrics. If lighter or heavier fabrics are sewn, it may however become necessary to reset the pressure.
In this event, insert the small screwdriver from the accessory box into set screw for adjusting the sewing foot pressure. The pressure is adjusted by turning the set screw to the left or right. For lightweight fabrics: increase pressure by turning the set screw to the left. For heavyweight fabrics: increase pressure by turning the set screw to the right.
Note: Turn the set screw to the right until it strikes against the top lid. Then turn the screw back to the left, rotating it 6 times. Now the standard sewing foot pressure is set.
21

feed dogs (A and B), arranged one behind the other, which move the fabric. Adjustment lever regulatesthe movement of the front feed dog (A), and thus the amount of fabric to be fed through. It can be adjusted within the range 0.7 and 2.0.
The standard adjustment is 1.0 by which the front feed dog (A) moves synchronously with the rear feed dog (B), i.e. the front and rear feed dogs both move the same amount of fabric.
-ential feed also depends on the stitch length selected and the type of fabric used.
is set to 0.7, the front feed dog moves half as fast as the rear feed dog, i.e. the front feed dogs feed through only half as much fabric as the rear feed dog.
As a result, the fabric is stretched.
This prevents the seam from becoming gathered when sewing very delicate
result is a smooth seam (A).
Fashionable touches can also be introduced in this way, such as the
B).
AB
22
Lorem ipsum
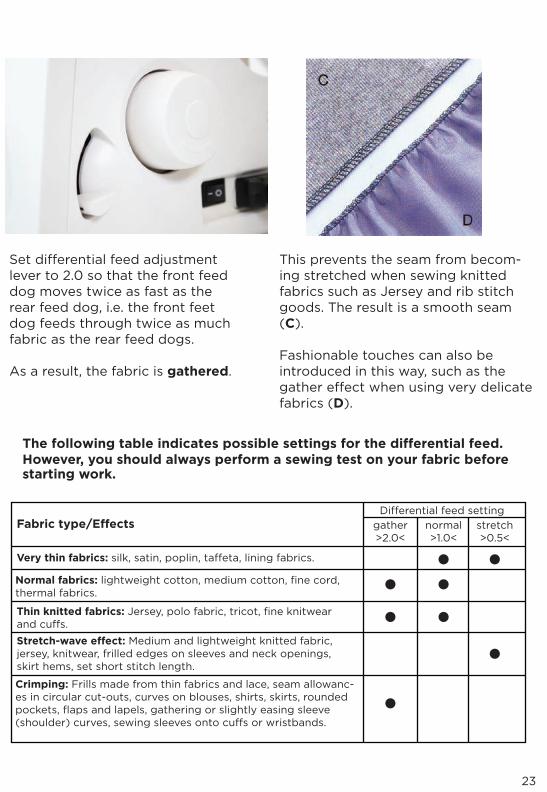
lever to 2.0 so that the front feed dog moves twice as fast as the rear feed dog, i.e. the front feet dog feeds through twice as much fabric as the rear feed dogs.
As a result, the fabric is gathered.
This prevents the seam from becom-ing stretched when sewing knitted fabrics such as Jersey and rib stitch goods. The result is a smooth seam (C).
Fashionable touches can also be introduced in this way, such as the
fabrics (D).
The following table indicates possible settings for the di�erential feed.However, you should always perform a sewing test on your fabric before starting work.
gather>2.0<
normal>1.0<
stretch>0.5<
Very thin fabrics:
Normal fabrics: lightweight cotton, medium cotton, fine cord, thermal fabrics.
Thin knitted fabrics: Jersey, polo fabric, tricot, fine knitwear
Medium and lightweight knitted fabric, jersey, knitwear, frilled edges on sleeves and neck openings, skirt hems, set short stitch length.
Crimping: Frills made from thin fabrics and lace, seam allowanc-es in circular cut-outs, curves on blouses, shirts, skirts, rounded pockets, flaps and lapels, gathering or slightly easing sleeve
23
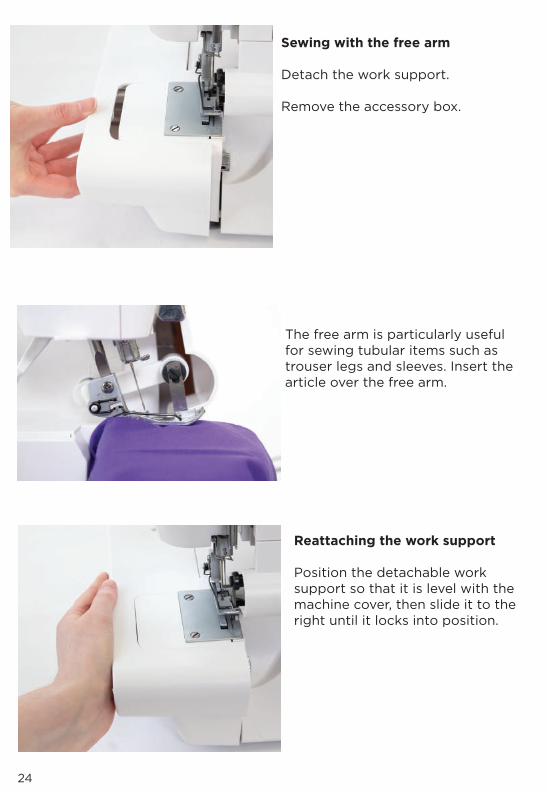
Sewing with the free arm
Detach the work support.
Remove the accessory box.
The free arm is particularly useful for sewing tubular items such as trouser legs and sleeves. Insert the article over the free arm.
Reattaching the work support
Position the detachable work support so that it is level with the machine cover, then slide it to the right until it locks into position.
24

Setting the slide lever for the stitch width stitch finger
For standard overlock seam:
Set the slide lever for stitch finger to position S.
Stitch finger A will be pushed forward. All standard overlock seams can be sewn with this adjustment.
For rolled hems
Set the slide lever for stitch finger to position R.
Stitch finger A will be pushed back-ward. All rolled hems can be sewn with this adjustment.
A
A
25

Program summary
Program Application Needle position
= left
= right
4-thread overedge seam Sewing together any material,especially elastic fabric, withsimultaneous serging.
3-thread overedge seam (wide)
3-thread-overedge seam (narrow)
3-thread serging seam (wide)
3-thread serging seam (narrow)
3-thread decorative seam(wide) FLATLOCK
3-thread decorative seam(narrow) FLATLOCK
3-thread rolled hem
Serging tightly-woven(easily frayed) fabrics.
Serging lightweight(easily-frayed) fabrics.
Serging tightly-woven(non-fraying) fabrics.
Serging lightweight(easily-frayed) fabrics.
Serging medium-heavy fabrics.Flatlock seams are for sewing together stretch fabrics and as decorative finished edges.
Serging medium-heavy fabrics.Flatlock seams are for sewing together stretch fabrics and as decorative finished edges.
Serging medium-heavy fabrics.Decorative finished edges.
26

Thread tensionThe settings are for medium-heavyfabrics and normal pollyester yarn.
Blue Green Pink Yellow
Stitchlength
Stitchwidth
Positionof sliderleverfor stitch finger
Converter
= without= with
- 2
N
N
N
N
N
N
- 4.5
- 4.5
- 1 - 1
- 1 N - 1 3 3.5 S
- 2 - 1 3 3.5 S
- 2
- 5
- 5
+ 3.5
+ 4
+ 2
+ 2
+ 2
- 1 3
3
3
3
3
3.5
3.5
3.5
3.5
3.5
S
S
S
S
S
F R R
27

Program summary
Program Application Needle position
= left
= right
Folded 3-thread rolled hem
2-thread overedge seam (wide)FLATLOCK
2-thread overedge seam (narrow)FLATLOCK
2-thread serging seam (wide)
2-thread serging seam (narrow)
2-thread rolled hem
Folded 2-thread rolled hem
2-needle, 3-thread overedge closing seam
Serging lightweight tomedium-heavy fabric. Decorative finished edges.
Serging together and simultaneous serging of lightweight, high-stretch fabric.
Serging medium-heavy fabrics.Flatlock seams for sewingtogether stretch fabrics.
Serging lightweight fabrics.Flatlock seams for sewingtogether stretch fabrics.
Serging lightweight fabrics.
Serging lightweight fabrics.
Serging lightweight fabrics.Decorative finished edges.
Serging very lightweight fabrics.Decorative finished edges.
28

Thread tensionThe settings are for medium-heavyfabrics and normal polyester yarn.
Blue Green Pink Yellow
Stitchlength
Stitchwidth
Positionof sliderleverfor stitch finger
Converter
= without= with
- 1 N + 3 F R R
- 4 + 2.5 3 3.5 S
- 4 + 2 3 3.5 S
N N 3 3.5 S
N N 3 3.5 S
- 4
- 1
- 1
- 2
-4 3 3.5- 2
+ 1 F
F
R R
R
S
R
29

Adjusting the thread tension
The following pages contain directions for setting thread tensions for all programs. Adjust the tension by turning the tensioning wheel until the dot marker is at the desired setting.
The setting for adjusting thread tension are recommendations. Fabric type, thread quality and needle gauge will influence seam results. For this reason it is always best to sew a test seam to check the interlocking of threads. It may be necessary to correct the thread tension settings.
Tip: When testing, it is a good idea to use thread colours corresponding to the individual dual thread tensions, i.e. thread the upper overedge looper with pink thread, the lower overedge looper with yellow thread etc.
Note: All further settings required for individual programs (needle position, stitch length, stitch width etc) are to be found in the program summary on page 26 to 29.
4-thread overedge seam
If all tensions are optimally set, the two looper threads will be interlocked at the very edge of the fabric.
Blue
-2 -1 N - 1
Green Pink Yellow
Face Side
Reverse Side
30
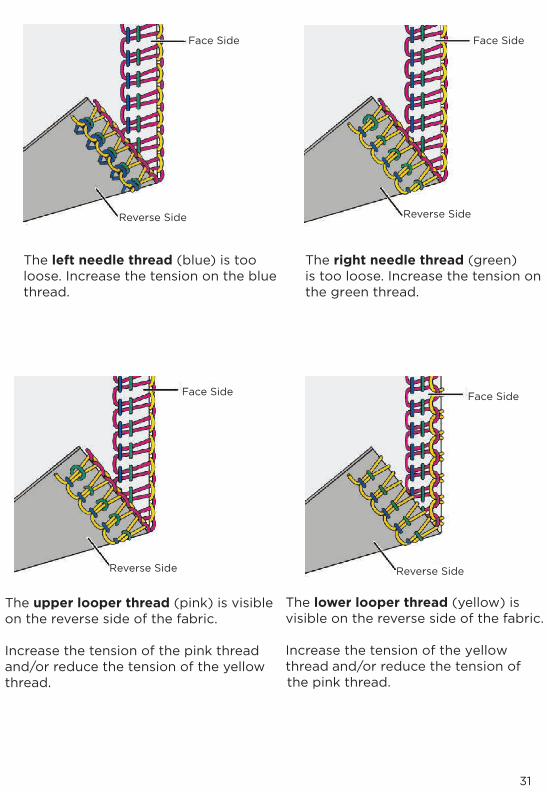
The left needle thread (blue) is tooloose. Increase the tension on the blue thread.
The right needle thread (green) is too loose. Increase the tension on the green thread.
The upper looper thread (pink) is visibleon the reverse side of the fabric.
Increase the tension of the pink thread and/or reduce the tension of the yellow thread.
The lower looper thread (yellow) is visible on the reverse side of the fabric.
Increase the tension of the yellow thread and/or reduce the tension of the pink thread.
Face Side
Reverse Side
Face Side
Reverse Side
Face Side
Reverse Side
Face Side
Reverse Side
31
The right needle thread (green) is too loose. Increase the tension on the blue thread.
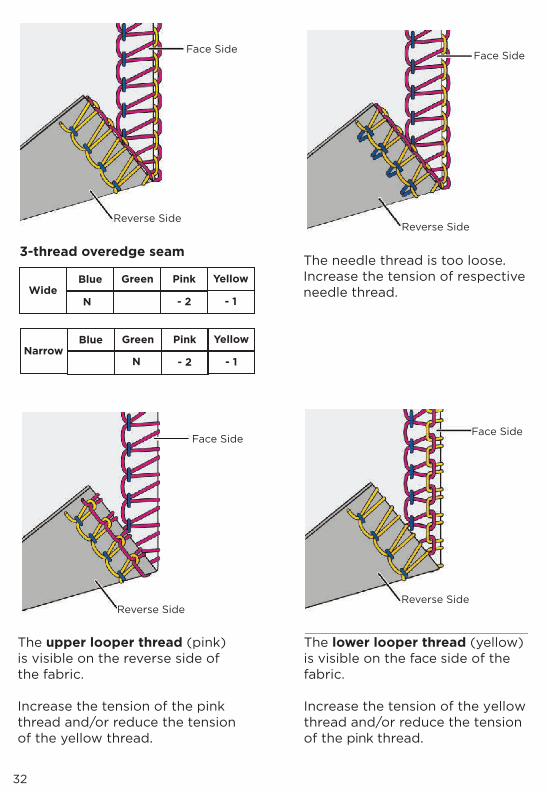
3-thread overedge seam The needle thread is too loose.Increase the tension of respective needle thread.
The upper looper thread (pink) is visible on the reverse side of the fabric.
Increase the tension of the pink thread and/or reduce the tension of the yellow thread.
The lower looper thread (yellow) is visible on the face side of the fabric.
Increase the tension of the yellow thread and/or reduce the tension of the pink thread.
BlueWide
N - 2 - 1
Green Pink Yellow
BlueNarrow
N - 2 - 1
Green Pink Yellow
Face Side
Reverse Side
Face Side
Reverse Side
Face Side
Reverse Side
Face Side
Reverse Side
32

3-thread serging seam The needle thread is too loose.Increase the tension of respective needle thread.
The upper looper thread (pink) is only partly looped around the edge of the fabric.
Reduce the tension of the pink thread and/or increase the tension of the yellow thread.
The lower looper thread (yellow) is visible on the face side of the fabric.
Increase the tension of the yellow thread and/or reduce the tension of the pink thread.
BlueWide
N - 5 + 3.5
Green Pink Yellow
BlueNarrow
N - 5 + 4
Green Pink Yellow
Face Side
Reverse Side
Face Side
Reverse Side
Face Side
Reverse Side
Face Side
Reverse Side
33

3-thread decorative seam sergingFLATLOCK
The needle thread is too tight.Reduce the tension of respective needle thread.
The upper looper thread (pink) is visible on the reverse side of the fabric.
Increase the tension of the pink thread.
The lower looper thread (yellow) is too loose.
Increase the tension of the yellow thread.
BlueWide
- 4.5
- 4.5
+ 2
Green Pink Yellow
BlueNarrow
+ 2
Green Pink Yellow
N
N
Face Side
Reverse Side
Face Side
Reverse Side
Face Side
Reverse Side
Face Side
Reverse Side
34

3-thread rolled hem The right needle thread (green) is too loose.
Increase the tension of the green thread.
The upper looper thread (pink) is visible on the reverse side of the fabric.
Increase the tension of the pink thread and/or reduce the tension of the yellow thread.
The lower looper thread (yellow) is visible on the face side of the fabric.
Increase the tension of the yellow thread and/or reduce the tension of the pink thread.
Blue
+ 2- 1 - 1
Green Pink Yellow
Face Side
Reverse Side
Face Side
Reverse Side
Face Side
Reverse Side
Face Side
Reverse Side
35
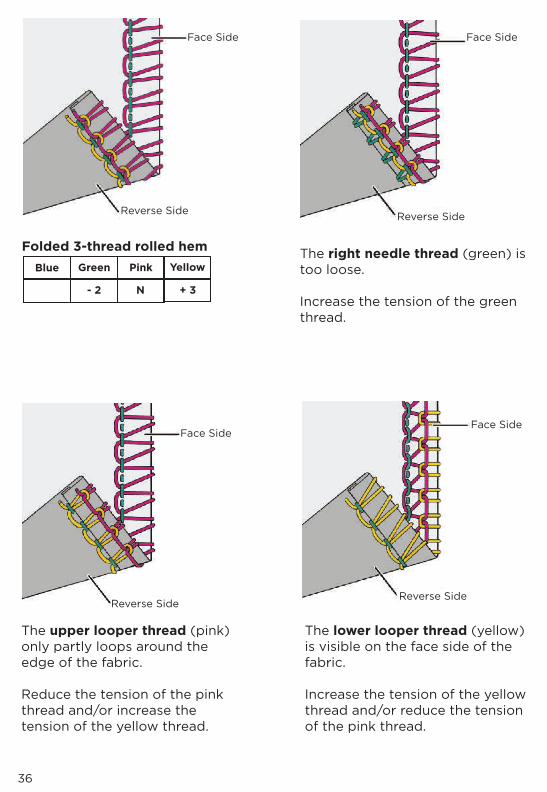
Folded 3-thread rolled hem The right needle thread (green) is too loose.
Increase the tension of the green thread.
The upper looper thread (pink) only partly loops around the edge of the fabric.
Reduce the tension of the pink thread and/or increase the tension of the yellow thread.
The lower looper thread (yellow) is visible on the face side of the fabric.
Increase the tension of the yellow thread and/or reduce the tension of the pink thread.
Blue
N- 2 + 3
Green Pink Yellow
Face Side
Reverse Side
Face Side
Reverse Side
Face Side
Reverse Side
Face Side
Reverse Side
36

2-thread over-edge seam, FLATLOCK
Note: Attach the converter (see page 19) for sewing 2-thread over-edge seams (FLATLOCK).
The needle thread is too loose or the lower looper thread (yellow) is too tight.
Increase the tension of the respective needle thread and/or reduce the tension of the yellow thread.
The lower looper thread (yellow) is visible on the reverse side of the fabric.
Increase the tension of the yellow thread and/or reduce the respective needle thread tension.
Reverse Side
Face Side
Face Side
Reverse Side
Face Side
Reverse Side
BlueWide
- 4
- 4
+ 2.5
Green Pink Yellow
BlueNarrow
+ 2
Green Pink Yellow
37

2-thread serging seam
Note: Attach the converter (see page 19) for sewing 2-thread over-edge seams (FLATLOCK).
The needle thread is too loose.
Increase the tension of the respective needle thread and/or reduce the tension of the yellow thread.
The lower looper thread (yellow) is too loose.
Increase the tension of the yellow thread.
Face Side
Reverse Side
Face Side
Reverse Side
Face Side
Reverse Side
BlueWide
N
N
N
Green Pink Yellow
BlueNarrow
N
Green Pink Yellow
38
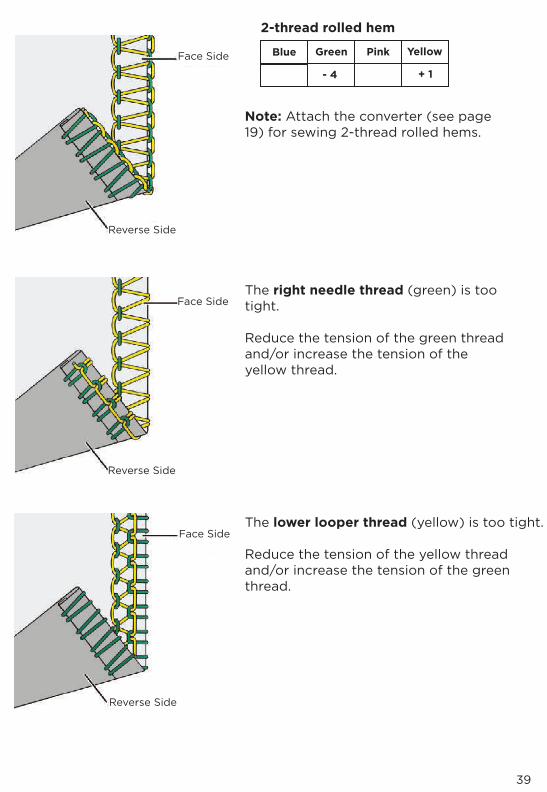
2-thread rolled hem
Note: Attach the converter (see page 19) for sewing 2-thread rolled hems.
The right needle thread (green) is too tight.
Reduce the tension of the green thread and/or increase the tension of the yellow thread.
The lower looper thread (yellow) is too tight.
Reduce the tension of the yellow thread and/or increase the tension of the green thread.
Face Side
Reverse Side
Face Side
Reverse Side
Face Side
Reverse Side
Blue
Green Pink Yellow
- 4 + 1
39
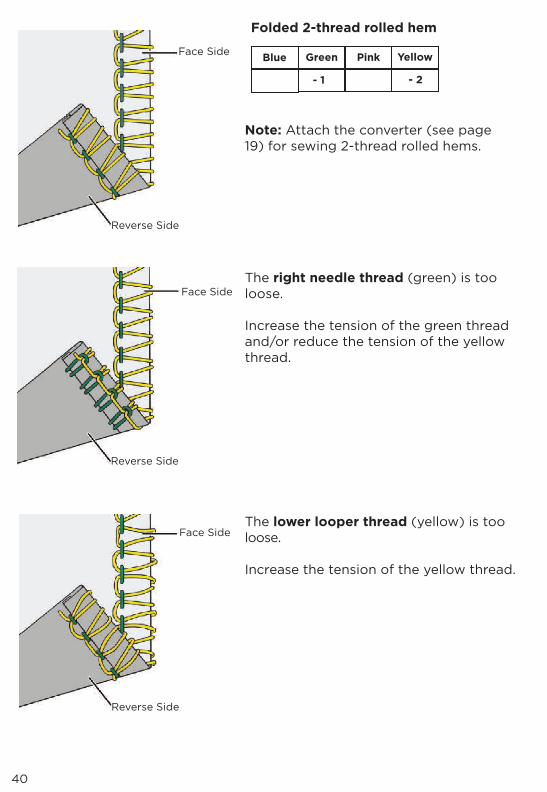
Folded 2-thread rolled hem
Note: Attach the converter (see page 19) for sewing 2-thread rolled hems.
The right needle thread (green) is too loose.
Increase the tension of the green thread and/or reduce the tension of the yellow thread.
The lower looper thread (yellow) is too loose.
Increase the tension of the yellow thread.
Face Side
Reverse Side
Face Side
Reverse Side
Face Side
Reverse Side
Blue
Green Pink Yellow
- 1 - 2
40
Folded 2-thread rolled hem

2-needle, 3-thread over-edge closing seam
The left needle thread (blue) is too loose.
Increase the tension of the blue thread.
Note: Attach the converter (see page 19) for sewing 2-needle, 3-thread over-edge closing seams.
The right needle thread (green) is too loose.
Increase the tension of the green thread.
The lower looper thread (yellow) is too tight.
Reduce the tension of the yellow thread.
Face Side
Reverse Side
Face Side
Reverse Side
Face Side
Reverse Side
Face Side
Reverse Side
Blue
Green Pink Yellow
- 2 - 1 - 4
41
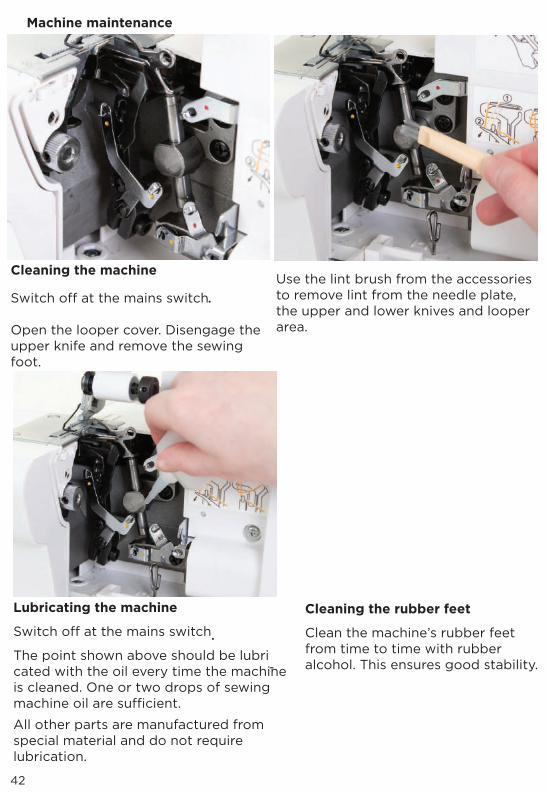
Cleaning the machine
Open the looper cover. Disengage the upper knife and remove the sewing foot.
Use the lint brush from the accessories to remove lint from the needle plate, the upper and lower knives and looper area.
Lubricating the machine
The point shown above should be lubri-cated with the oil every time the machine
is cleaned. One or two drops of sewing
All other parts are manufactured from special material and do not require lubrication.
Cleaning the rubber feet
Clean the machine’s rubber feet from time to time with rubber alcohol. This ensures good stability.
Machine maintenance
42
.
.

Changing the lower knife
Removal:
Open the looper cover. Disengage the upper knife and move the needle(s) to the uppermost posi-tion. Use the large screwdriver from the accessories to loosen lower knife retaining screw A. Remove the screw and the lower knife.
A
Insertion:
43
Switch o� at the mains switch.
Insert a new lower knife into the recess provided and tighten theretaining screw. Engage the upperknife and close the looper cover.

Blind hem stitch foot
The blind hem stitch foot is ideal for professional sewing of invisible seams on medium-heavy and thick fabrics. The seam is trimmed, serged and “blind” stitched in a single operation.
Setting the machine
Remove the left needle. Set your machine to 3-thread overedge seam (narrow) and select stitch length 4.
Working:
Raise the needle to its uppermost position and insert the blind hem stitch foot. Fold the seam inwards. Now fold the seam once again outwards so that the edge protrudes about 1cm. Position the seam under the sewing foot so that the folded seam part 3 lies beneath edge guide 2. Crease 4 must thereby run along the edge of guide 2.
Loosen set screw 1 and adjust edge guide 2 so that upon penetration only one thread of the upper fabric is caught by the needle. Sew a test seam.
44

Elastic foot
This sewing foot is used for sewing on elastic tape. In the same operation, the fabric is trimmed and serged, and also gathered by the elastic tape.
Setting the machine
Set your machine to 4-thread over-edge seam. The seam width is deter-mined by the width of the elastic tape.
Working:
Raise the needle to its uppermost position and insert the elastic tape sewing foot. Loosen screw 1 so that brake 3 at opening 2 is opened by about 2mm. Insert elastic tape 4 into opening 2 and pull it beneath the sewing foot so that it protrudes about 10cm behind the latter. Re-tighten screw 1. The more the screw is tightened, the greater the pressure brake 3 exerts on the elastic tape and thus the greater the
Sewing on a non-elastic tape prevents stretching of the seams (e.g. shoulder seams) in stretch fabrics.
Loosen screw 1 until the non-elastic tape can pass through opening 2 without hindrance.
45
ompanion™
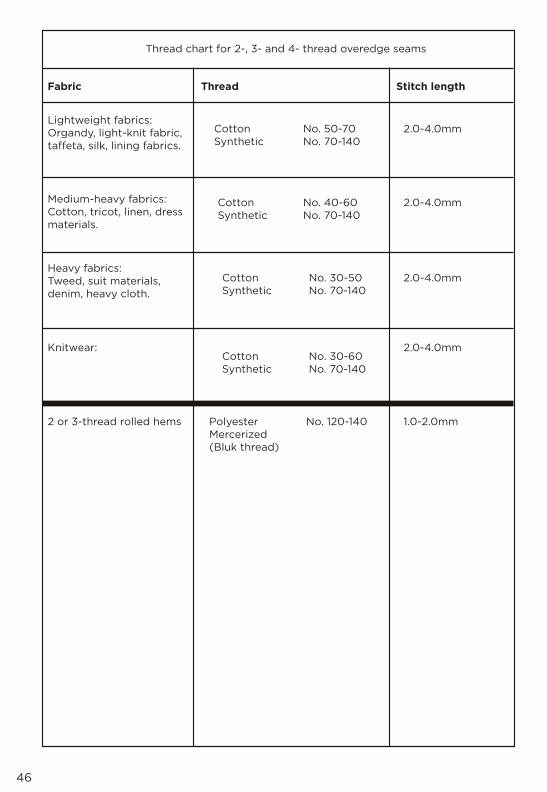
Thread chart for 2-, 3- and 4- thread overedge seams
Thread Stitch lengthFabric
Lightweight fabrics: Organdy, light-knit fabric,
Medium-heavy fabrics: Cotton, tricot, linen, dressmaterials.
Heavy fabrics:Tweed, suit materials, denim, heavy cloth.
Knitwear:
2 or 3-thread rolled hems
Cotton Synthetic
Cotton Synthetic
Cotton Synthetic
No. 40-60No. 70-140
No. 30-50No. 70-140
Cotton Synthetic
Polyester Mercerized (Bluk thread)
No. 30-60No. 70-140
No. 120-140
No. 50-70No. 70-140
2.0-4.0mm
2.0-4.0mm
2.0-4.0mm
2.0-4.0mm
1.0-2.0mm
46

Problem Cause Solution
The 3 or 4-threadoveredge seam hasan irregularappearance and the upper looperthread had not interlocked in the seam.
Incorrect stitchformation
Skipped Stitches
Thread breakage
Needle breakage Needle bent or pointdamaged
Needle not fully inserted
Material was pulled too firmly
Insert new needle(See page 9)
Insert needle correctly (see page 9)
Do not pull material during sewing
Thread correctly (see page 10-16)
Check whether threadcatches at reel stand etc
Correct tension(see page 30-41)
Insert needle correctly (see page 9)
Insert new needle(see page 9)
Insert needle correctly (see page 9)
Thread correctly (see page 10-16)
Reset thread tensions (see pages 30-41)
Converter must be detached
Incorrectly threaded
Thread has caught
Thread tension too tight
Needle not fully inserted
Incorrect needle used
Needle bent or point damaged
Needle not fully inserted
Incorrect needle used Incorrectly threaded
Incorrect setting of thread tensions
The converter is attached
Sewing problems and their solutions
must be made. Sewing problems of the kind described below may occur due to minoradjustment and operating errors. They can be easily corrected by following the instructions.
47
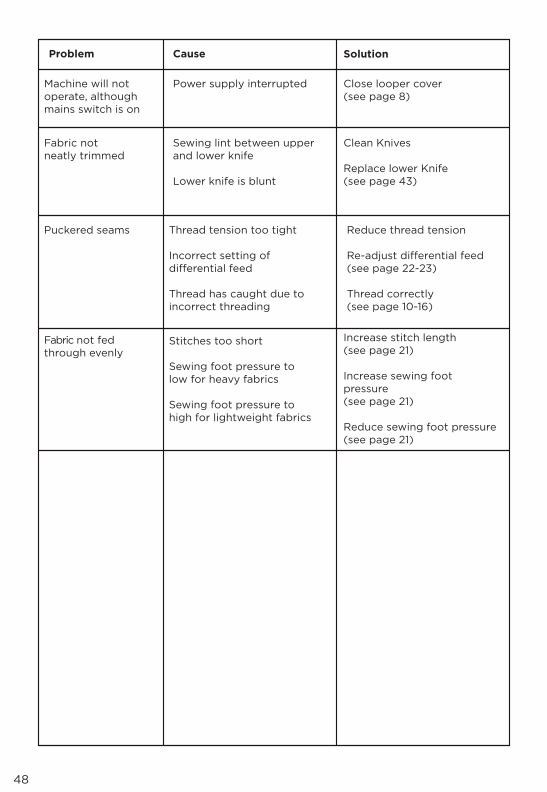
Problem Cause Solution
Machine will notoperate, althoughmains switch is on
Power supply interrupted Close looper cover(see page 8)
Clean Knives
Replace lower Knife(see page 43)
Reduce thread tension
(see page 22-23)
Thread correctly(see page 10-16)
Increase stitch length(see page 21)
Increase sewing footpressure(see page 21)
Reduce sewing foot pressure(see page 21)
Sewing lint between upperand lower knife
Lower knife is blunt
Thread tension too tight
Incorrect setting of
Thread has caught due to incorrect threading
Stitches too short
Sewing foot pressure to low for heavy fabrics
Sewing foot pressure tohigh for lightweight fabrics
Fabric notneatly trimmed
Puckered seams
Fabric not fedthrough evenly
48

In the UK Contact:Crafter’s Companion™ LtdHorndale Avenue, Aycli�e Business Park Newton Aycli�e, DL5 6DR UK
Tel: +44 (0)1388 663251www.crafterscompanion.co.uk
In the US Contact:Crafter’s Companion™ International 3599 Temescal Canyon RoadCorona, CA 92883 USA
Tel: 800-399-5035www.crafterscompanion.com
©Crafter’s Companion. All Rights Reserved.Gemini™ Lock Pro is not intended for use by children without adult supervision. Age 14+