v13 opd major-upgrade v12tov13 v02 - q-das
TRANSCRIPT

MAJOR UPGRADE VERSION 12 TO VERSION 13

QDas-656 v-0.2 2 2/29
CONTENTS
1 Basic information about the upgrading process ....................................................... 3
2 Steps to prepare the major upgrade ........................................................................... 8
2.1 Checking and adapting FireDAC database connections ................................................. 8
2.2 Planning database updates .......................................................................................... 10
2.2.1 How to check database structures ............................................................................ 11
2.2.2 How to update databases manually in case of a local installation ............................. 12
2.3 Preparing the installation directory for server provisioning ........................................... 12
3 Major Upgrade of a local installation ........................................................................ 13
4 Major Upgrade of server provisioning ...................................................................... 17
5 Major Upgrade of client provisioning ....................................................................... 21
6 Manual update of databases ..................................................................................... 21
6.1 Updating Microsoft Access databases manually .......................................................... 21
6.1.1 Error messages during a database upgrade ............................................................. 26
6.2 Updating SQL or Oracle databases manually ............................................................... 28

QDas-656 v-0.2 2 3/29
1 BASIC INFORMATION ABOUT THE UPGRADING PROCESS
Upgrading version 12 to version 13 requires a completely different approach compared to previous major release upgrades. Before the release of version 12, all major release have been installed in parallel and users had to upgrade databases as well as user-specific files and settings manually.
When you upgrade version 12 to version 13, this upgrade is automated. The databases and user-specific files and settings replaced by the defaults of version 13 depend on the installation type you selected in the installation of version 12 and on the database type you apply.
The installation and update of Q-DAS Statistical Software is standardised and documented. A standardised approach and documentation shall help our customers perform these tasks independently. However, you may still access our optional services regarding installation, update and consulting. Since Q-DAS software is highly flexible and may be applied in various environments, it might be reasonable to get some support. Our well-experienced experts are pleased to support in installing, updating and implementing Q-DAS applications. Please inform your Q-DAS contact person or send an email to mailto:[email protected].
Brief summary of special facts regarding the major upgrade from version 12 to version 13
• Installing the upgrade, the setup applies the “Master.INI“ and “License.INI“ of version 12 to identify the database connections. In case you changed database connections in the product INI files, you have to consider adapting them in the master INI file and licence INI file, too.
• User-specific settings like database connections or different paths are transferred from the product INI files of version 12 to the product INI files of version 13.
• Upgrading a local installation, you may only update databases whose FireDAC connection is indicated in the “[system]“ section of the master INI. Other databases such as additional data databases (measured values databases) can be upgraded manually later on. Depending on the database type and their application, you update the structure or content of these databases. Find a detailed description in the Manual update of database chapter.
• With the release of version 13, the program help is always provided in two languages and stored under ..\Help\ENG. The help files applied in version 12 are no longer in use.
QDas-656 v-0.2 2 4/29
• In case of a local installation or in case of server provisioning, version 13 is stored in the same directory as version 12. However, after installing version 13, the programs/apps of the control panel only list version 13 irrespective of whether you use a local installation or server provisioning.
Since the software applies the same directories and only one entry in the control panel for version 13 and version 12, uninstalling the software with the setup of both, version 12 or version 13, always deletes all files and applications of both versions!
Depending on whether you use the setup of version 12 or version 13 to uninstall software, you only deregister the licences of the setup version you started.
After completing the test phase successfully, you have to deregister version 12 to switch to version 13.
Apply the “V12- Q-DAS License“ application to deregister version 12.
The Q-DAS Tools launcher provides you with the “Q-DAS License“ application; use it to deregister licences of version 13.
• In case of client provisioning, the client of version 13 is installed in parallel to the client of version 12. The client of version 12 and of version 13 is thus available under programs/apps in the control panel.
• Each installation type keeps the start links of version 12 in the Windows start menu and adds the start links launching version 13. This fact makes a smooth transition to version 13 possible.
Even if you are provided with the start links of both versions, you must not use both versions permanently and simultaneously.
While updating the software, users are not allowed to adjust any new settings or configurations in version 13 since version 12 is not able to interpret them correctly. Only after version 13 has been rolled out and version 12 has been deregistered, you may adjust settings and configurations in version 13.
• In case of server provisioning, you may create different plants. A major upgrade only updates the “Default” plant. This plant also serves as a template for creating INI files of version 13.

QDas-656 v-0.2 2 5/29
Flow chart of a major upgrade for various database types in case of a local installation
Checking and, if required, adapting FireDAC database connections for the Master.INI and License.INI. While upgrading the software, the setup only considers the databases indicated in the Master.INI.
Check where the databases are and how they were updated before. Are they available locally or centrally? Have these databases always been updated for each version?
* central databases * “old“ databases Applying central or “old” databases, you need to update the databases after the installation manually.
* local databases Depending on the database type you may update the content or the content and the structure during a V13 installation.
Microsoft Access SQL or Oracle
Use the “Static DB“ tool prior to the installation to update the structure of the databases.
Activate the “DB update“ option during the installation to update the content of the databases.
Activate the “DB update“ option during the installation to update the structure and content of the databases.
Start major upgrade from version 12 to version 13. The “DB update” option is NOT enabled during the major update installation.
SQL or Oracle Use the “Static DB“ tool to update the structure of the databases and activate “DB update” to update the contents.
A manual update of databases is required after the major upgrade installation.
Microsoft Access Activate the “DB update“ option to update the structure and content of the databases.
After the test phase of version 13, you have to deregister the licence of version 12.

QDas-656 v-0.2 2 6/29
Flow chart of a major upgrade for various database types in case of server provisioning
Check FireDAC database connections and adapt them for the Master.INI and License.INI, if required. An update only considers the databases indicated in the Master.INI.
Share the server provisioning directory of version 12 and grant write access.
Install major upgrade from version 12 to version 13. The installation routine creates some additional
separate directories for version 13.
• These are the program files stored in the following directories ..\Share\BIN32\V_13 ..\Share\BIN64\V_13
• The client setup stored under ..\Share\ClientSetup\V_13
• Program data, i.e. INI files for applying version 13 immediately, are indicated by “V13” in the file name. The setup uses the INI files of version 12 as templates. ..\Share\Launcher – to start the version 13 Q-DAS Launcher ..\Share\INI\Default – for product INI files ..\Share\Plant\Default – new files required for the application of version 13, e.g. the “Others“ directory including the “V13_AddDataUsageSets.INI“ files
• While upgrading server provisioning, the setup does not update masks, reports or example data sets. They are stored as templates in the following directories and can also be used to create an additional plant. ..\Share\INI\_TEMPLATE_V13 ..\Share\Launcher\_TEMPLATE_V13 ..\Share\Plant\_TEMPLATE_V13
• Templates applied in any subsequent client distribution are stored under ..\Share\INI\Default\_ClientTemplate.
• The help files applied in version 12 are no longer in use. With the release of version 13, the program help is always provided in two languages and stored under ..\Help\ENG.
After the test phase of version 13, you have to deregister the licence of version 12.
A manual update of databases is required after the major upgrade. Please ensure that these databases are not in use during the update and that you created a back-up.
Microsoft Access Use the “DB update“ option to update the structure and the contents.
SQL or Oracle Use the “Static DB“ tool to update the structure and continue with the “DB update“ option to update the contents.

QDas-656 v-0.2 2 7/29
Overview of different installation types after a major upgrade from version 12 to version 13
Start links available for a local installation after upgrading version 12 to version 13
Start links available for server provisioning after upgrading version 12 to version 13
Start links available for client provisioning after upgrading version 12 to version 13
Local installation - entries under “Programs and Apps” in the control panel
Uninstalling the software deregisters the entire platform of both versions but only deletes the licences of the setup version you started.
Server provisioning - entries under “Programs and Apps” in the control panel
Uninstalling the software deregisters the entire platform of both versions but only deletes the licences of the setup version you started.
Client provisioning - entries under “Programs and Apps” in the control panel
Since there are two entries available, you are able to uninstall the single clients. After completing the upgrade to version 13, you may thus uninstall the client of version 12 and the associated start links.

QDas-656 v-0.2 2 8/29
2 STEPS TO PREPARE THE MAJOR UPGRADE
2.1 Checking and adapting FireDAC database connections
During the installation of the upgrade, the setup uses the ”MASTER.INI“ and ”License.INI“ files of version 12 to identify the database connections.
Check the FireDAC path and the indicated FireDAC connection “FDDBConnStr_Conf_xxx“ of your “License.ini“ including the respective product INI file. Both INI files are supposed to refer to the same FireDAC INI file and are to indicate the same FireDAC connection.
Changing the database connections in the product INI files of version 12, you have to adapt the “MASTER.INI“ file before starting the major upgrade. Compare the FireDAC path and all indicated FireDAC connections in the “[system]“ section of your INI file.

QDas-656 v-0.2 2 9/29
The following example shows a Master.ini created during the installation of version 12. For the application of qs-STAT, the user adapted the data database connection and the configuration database connection. Before starting the upgrade, you have to adapt the Master.ini based on the associated entries of the product.INI.

QDas-656 v-0.2 2 10/29
2.2 Planning database updates
For reasons of data security, you may only update databases automatically in case of a local installation while performing a major upgrade from version 12 to version 13. Server and client provisioning always requires a manual database update.
Other reasons for a manual database update are the application of additional databases and the application of a SQL or Oracle database. In order to update the contents of SQL or Oracle databases during a major upgrade installation, you have to adapt the structure of these databases in your database management system before starting the installation. The Manual update of database chapter describes how to perform a manual update.
An automated update considers all databases indicated in the “[system]” section of the Master.INI. Provided that you apply additional databases that are not indicated in the Master INI files at the time of the major upgrade installation, you have to update them manually.
Database update when you apply several Microsoft Access data databases
The reason why you apply several Access data databases to store measured values is often the requirement to keep the amount of data small. The capacity of Microsoft Access databases is limited.
We recommend you consider changing the installation type and apply Microsoft SQL databases instead. In case you need support in transferring the databases, please inform your Q-DAS contact person or send an email to [email protected].
Local installation connected to a central database
There are installation types rolling out local installations but connecting every single one of them to databases they apply in common, e.g. the configuration database or the data database (measured values database).
We strongly recommend you do not confirm a database update request when you update locally installed software products of version 12 accessing central databases. Otherwise, you will update the central databases every time you perform a local major upgrade installation.
When you apply central databases, we recommend you update the databases manually after you installed the major upgrade.
We do not recommend you use central Access databases. Please consider applying a different installation type instead, i.e. transferring the databases to Microsoft SQL. In case you need support in transferring the databases, please inform your Q-DAS contact person or send an email to [email protected].

QDas-656 v-0.2 2 11/29
2.2.1 How to check database structures
From version to version, some upgrades required the adjustment of internal database information. Especially when updating databases of previous Q-DAS applications or when updating databases several times, an automated database upgrade to version 13 might fail. This is often due to missing database keys.
In case you apply these types of databases, we recommend you have a look at the two most important database columns before you start the major upgrade. The “PK_QDAS_GRAPHICS“ column of the “QDAS_GRAPHICS“ table in the configuration database and the “PK_WERTEVAR“ column of the “WERTEVAR“ table in the data database need to be available as primary keys.
If the primary keys for the ”PK_QDAS_GRAPHICS“ and ”PK_WERTEWAR“ table columns are missing, some other primary keys will also be missing and a database update will fail.
Checking primary keys - example
The following example is based on a configuration database in the Microsoft Access format and a data database (measured values database) in the SQL format. Both databases are applied in version 12. Different database management systems are used to check the primary keys.
View in Microsoft Access showing the ”PK_QDAS_GRAPHICS“ primary key
View in Microsoft SQL Server Management showing the “PK_WERTEWAR“ primary key

QDas-656 v-0.2 2 12/29
2.2.2 How to update databases manually in case of a local installation
Even if the option to update databases automatically is available for a local installation, it is not always possible to update the structure during a major upgrade installation. A local installation requires a manual database update if
• you apply SQL or Oracle databases and you are not able to access the database management systems. Update the structure prior to the major upgrade installation. Installing the major upgrade only updates the contents.
• Microsoft Access databases being “very” outdated or having been updated several times The tool updating Access databases updates the structure and contents. Select the “Use existing databases” option in the major upgrade installation and start a manual database update subsequently.
The Manual update of database chapter describes how to perform a manual update.
2.3 Preparing the installation directory for server provisioning
Based on the new Q-DAS installation philosophy, the licences of version 13 and higher are always connected to the applied databases during the installation. The setup requires an available and shared directory. Up to version 12, server provisioning was always stored in the “C:\Q-DAS\Share“ in case of a standard installation. Since version 13, this directory needs to be shared with respective access rights to perform the major upgrade installation. More information are provided in the “Planning server provisioning” chapter of the “Server provisioning (concurrent network installation)” manual at https://www.q-das.com/en/service/support-hotline#faq579.
When you share a directory but do not grant required access rights, the installation setup is not able to copy the required files. The following error message appears.

QDas-656 v-0.2 2 13/29
3 MAJOR UPGRADE OF A LOCAL INSTALLATION
Before starting a major upgrade from version 12 to version 13 in case of a local installation, you first have to prepare the INI files and, if required, the databases. In addition, you require the licence file (*.LIC) of version 13 for the installation. We recommend you create a back-up of the existing system.
A local major upgrade installation includes less dialogue boxes than a new installation since it applies some basic settings of version 12.
After starting the installation by executing Setup_V13.exe, the text of the start dialogue box already indicates that the setup deals with a major upgrade.
A confirmation prompt opens since we recommend you create a backup of the existing system.
Select your licence file of version 13.

QDas-656 v-0.2 2 14/29
Depending on the database type and intended use, you may update the structure and contents of the databases during the major upgrade. Find more information in the Steps to prepare the major upgrade chapter.
Upgrading databases while installing a major upgrade, you have to decide how you want to deal with text databases.
There are three options available.
• Update text database Updates the contents of the current text database of version 12. In case the text database is a Microsoft Access database, the setup also updates the structure. We recommend this approach for users who added individual texts to the text database of version 12.
• Use NEW text databases Applies the new text database of version 13.
• Use existing text database Uses the text database of version 12 in version 13. In case you do not update the database manually after the installation, the Q-DAS applications of version 13 only display the missing texts of version 13 numerically (F-texts).
When you update the databases automatically, the setup shows the progress of the update. Any error messages occurring during the update generates a log file that is stored automatically in a temp directory. Find

QDas-656 v-0.2 2 15/29
more information about how to handle error messages occurring in a database update in the Fehler! Verweisquelle konnte nicht gefunden werden. chapter.
Take the last step and decide which products, options and languages you want to be available in the local V13 installation. A local installation makes each product, option and language only available once, you may thus only select one licence respectively.
Please consider that you cannot change the number of licences for the default language (“GER” in this case); this number is determined automatically. You may install additional languages (if available).
All products, options and languages are deactivated by default. Please select the products/options/languages you want to install and confirm your choice by clicking “OK“.
After installing the products, you register the respective licences online.

QDas-656 v-0.2 2 16/29
In case you are connected to the Internet during the installation and your Firewall does not block the registration, the online registration runs automatically. In case you are not connected to the Internet during the installation or there are not any licences available, you are required to register the software manually.
Without any valid registration, the full functional range of the software will only be available to you for 30 days. You have to register your software subsequently in this period; otherwise, you will only have access to a trial version.
In case of a subsequent registration, the Licence Manager loads and stores the re-registration file (*:LIC). More information on how to complete the product registration is available in the “offline registration - subsequent registration” chapter of the “Licence management” manual at https://www.q-das.com/en/service/support-hotline#faq579.
After you completed the installation successfully, the following message opens.
Click “Finish“ to close the setup.
QDas-656 v-0.2 2 17/29
4 MAJOR UPGRADE OF SERVER PROVISIONING
Before starting a major upgrade from version 12 to version 13 of your server provisioning, you first have to check and adapt, if required, the INI files. You have to update the databases manually after the installation. In addition, you require the licence file (*.LIC) of version 13 for the installation. We recommend you create a back-up of the existing system.
A major upgrade installation in case of server provisioning includes less dialogue boxes than a new installation since it applies some basic settings of version 12.
Based on the new Q-DAS installation philosophy, the licences of version 13 and higher are always connected to the applied databases during the installation. The setup requires an available and shared directory. Up to version 12, server provisioning was always stored in the “C:\Q-DAS\Share“ in case of a standard installation. Since version 13, this directory needs to be shared with respective access rights to perform the major upgrade installation. More information are provided in the “Planning server provisioning” chapter of the “Server provisioning (concurrent network installation)” manual at https://www.q-das.com/en/service/support-hotline#faq579.
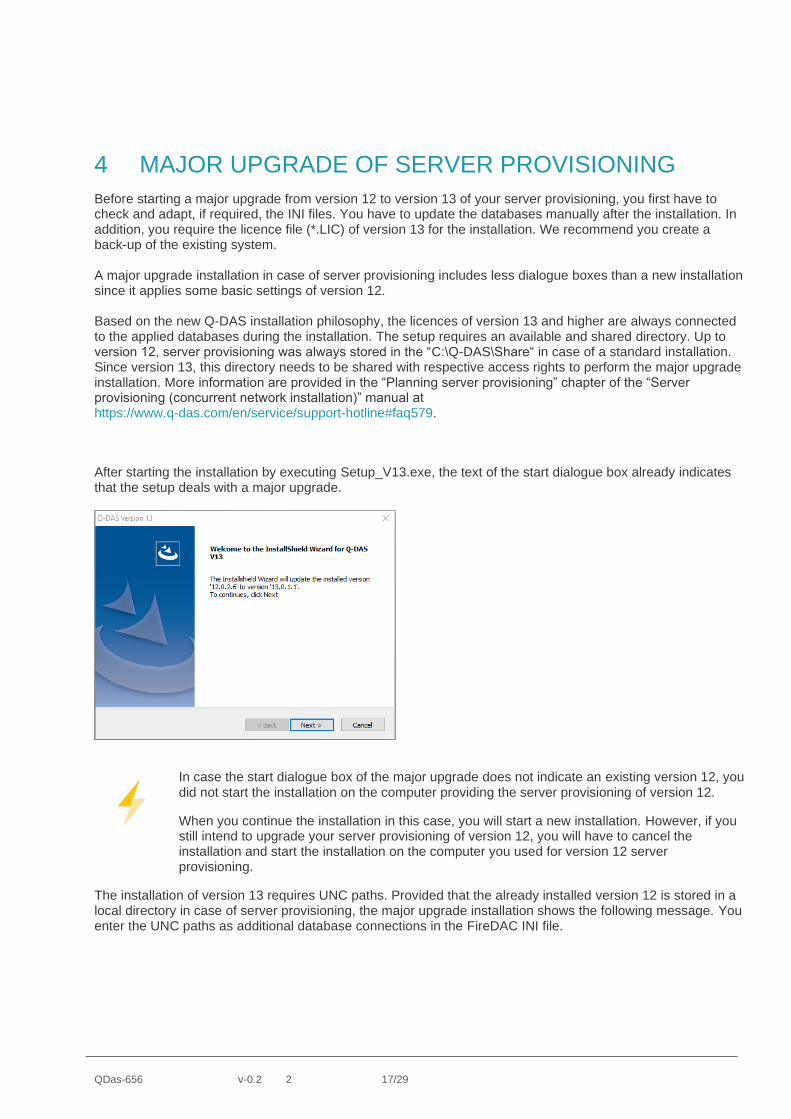
After starting the installation by executing Setup_V13.exe, the text of the start dialogue box already indicates that the setup deals with a major upgrade.
In case the start dialogue box of the major upgrade does not indicate an existing version 12, you did not start the installation on the computer providing the server provisioning of version 12.
When you continue the installation in this case, you will start a new installation. However, if you still intend to upgrade your server provisioning of version 12, you will have to cancel the installation and start the installation on the computer you used for version 12 server provisioning.
The installation of version 13 requires UNC paths. Provided that the already installed version 12 is stored in a local directory in case of server provisioning, the major upgrade installation shows the following message. You enter the UNC paths as additional database connections in the FireDAC INI file.

QDas-656 v-0.2 2 18/29
Select the target directory to install Q-DAS version 13. As described in the Steps to prepare the major upgrade chapter, the directory is available, shared and the users are granted respective access rights. The target directory the setup proposes is the local drive of the Windows server provided as an UNC path combined with “Q-DAS“ (\\<directory>\Q-DAS). In case you did not share the proposed directory, enter the path of the directory you shared.
A conformation prompt opens asking you whether you want to use this directory. Then you select the licence file of version 13.

QDas-656 v-0.2 2 19/29
A bar shows the progress of the installation.
The last step is to select the products, options and languages you want to install. In case of server provisioning, you may specify the number of licences.
Please consider that you cannot change the number of licences for the default language (“GER” in this case); this number is determined automatically. You may install additional languages (if available).
After installing the products, you register the respective licences online.

QDas-656 v-0.2 2 20/29
In case you are connected to the Internet during the installation and your Firewall does not block the registration, the online registration runs automatically. In case you are not connected to the Internet during the installation or there are not any licences available, you are required to register the software manually.
Without any valid registration, the full functional range of the software will only be available to you for 30 days. You have to register your software subsequently in this period; otherwise, you will only have access to a trial version.
In case of a subsequent registration, the Licence Manager loads and stores the re-registration file (*:LIC). More information on how to complete the product registration is available in the “offline registration - subsequent registration” chapter of the “Licence management” manual at https://www.q-das.com/en/service/support-hotline#faq579.
After you completed the installation successfully, the following message opens.
Click “Finish“ to close the setup.

QDas-656 v-0.2 2 21/29
5 MAJOR UPGRADE OF CLIENT PROVISIONING
The approach for a major upgrade of client provisioning is the same as for a new client installation. The client of version 13 is stored in parallel to the client of version 12. Find detailed information about client provisioning on our homepage at https://www.q-das.com/en/service/support-hotline#faq579.
6 MANUAL UPDATE OF DATABASES
Since version 13, the Q-DAS Tools Launcher provides the tools to update databases.
• Static DB to update the structure of SQL or Oracle databases.
• DB Update to update the structure and content of Microsoft Access databases.
6.1 Updating Microsoft Access databases manually
A manual update of Microsoft Access databases compares the databases of version 13 to the databases already in use. However, it is important that the name of the new databases include a “NEW“ and that they are stored in the respective database directory.
Each version 12 database you want to update requires a corresponding version 13 database including a “NEW“ in its name.
Preparing the database directory prior to the update
In case of a local installation, all Microsoft Access databases of version 13 including a “NEW“ in their name are available in the database directory after the major upgrade.
In case of server provisioning, all databases of version 13 are available under …\PLANT\_TEMPLATE_V13\Databases after the major upgrade.

QDas-656 v-0.2 2 22/29
The database update requires a copy of the databases to be updated. These copies have to include a “NEW“ in their file name and must be stored in the database directory.
After copying these databases, the databases of version 12 and version 13 are available in the same database directory.

QDas-656 v-0.2 2 23/29
Performing a database update
The “DB Update” tool is used to update the content and structure of Microsoft Access databases. After completing the major upgrade successfully, it is available in the Q-DAS Tools Launcher.
After starting the “DB Update” tool, you select the Master INI file. It includes the path to the applied FireDAC INI file containing the database connection to the Microsoft Access databases and the path to the new databases of version 13 under “Databases=“.
Check the boxes of the databases you want to update.
The “DB Update“ tool offers different database types serving various purposes.
• Config The QDAS_CONFIG.MDB configuration database includes all settings of the Q-DAS system.
• License (available since version 12) The QDAS_LIC.MDB licence database contains all licence information. It is not required to update this database when you upgrade your software from version 12 to version 13. The licence of version 13 is registered during the installation.
• Text The QDAS_TEXT.MDB text database contains all texts in all languages of the Q-DAS system. We recommend you update it since the missing texts in the Q-DAS applications of version 13 are only displayed numerically (F-texts).

QDas-656 v-0.2 2 24/29
• Data This option helps you update various measured values databases.
Depending on the data flow and the products you installed, you may select the respective data database (measured values database). There are always four data databases available.
Data database (measured values database)
Data-DB QDAS_DATA.MDB
Buffer database for local MCA/CMM Reporting
Local Rep-DB QDAS_CMM.MDB
Central database Central_Rep-DB QDAS_CENTRAL.MDB
Monitoring database Moni-DB DBQDAS_MONI.MDB
In case you apply additional data databases, you have to adapt the Master INI file accordingly and use the “DB Update” tool once again.
Click “Start” to start the update.

QDas-656 v-0.2 2 25/29
Steps the “DB Update” tool takes
The tool takes the following steps for each database you selected.
• It creates a back-up of the previous database, i.e. the current database of version 12, by adding “_SAV1“ to the database name. In case you already created back-ups, the back-ups are assigned to a consecutive number.
• As long as the update is running, the previous database is renamed to “*OLD.MDB“.
• The previous database is compressed.
• The previous database (*OLD.MDB) is updated. New tables or missing columns are added. Field definitions and field types are adapted.
The tool updates the content of the text/configuration databases.
• After the update was completed successfully, the previous database is renamed again and gets its original name back.
After the update was completed successfully, the following databases are available for each database type. QDAS%db%.MDB – the database of version 13 to be applied QDAS_%db%_SAV%no%.MDB – the original database of version 12 QDAS_%db%new.MDB – the database template

QDas-656 v-0.2 2 26/29
6.1.1 Error messages during a database upgrade
In case the update is cancelled because an error occurred, the database to be updated is renamed to QDAS%db%OLD.MDB.
The following databases thus exist for each database type after the update was not completed successfully. QDAS_%db%_SAV%no%.MDB – the original database of version 12 QDAS_%db%new.MDB – the database template of version 13 QDAS%db%OLD.MDB – the database causing the error
The respective error messages are listed in the log window and stored in a log file. The respective log file is stored automatically in the temp directory %TEMP%\Q-DAS_V13\TEMP.
Path to the log file
Log window
Error categorisation
There are basically two categories of errors occurring during a database update.
• Errors that cannot be processed at once due to a high number of instructions
• Errors caused by an inconsistent database structure

QDas-656 v-0.2 2 27/29
Too many instructions – error description and bug-fix
When you apply “older” databases, Microsoft Access might not be able to process the number of required updates. The log window indicates this error message as “Too many fields defined“.
In this case, the setup only follows some of the update instructions and stores the intermediate result in the QDAS%db%OLD.MDB database.
Bug-fix
• Create a back-up of QDAS%db%OLD.MDB.
• Rename the QDAS%db%OLD.MDB file to QDAS%db%.MDB (complying with the naming convention of the original database of version 12).
• Start the ”DB Update“ tool again.
Inconsistent database structure – error description and bug-fix
The upgrade to a new version might cause a lack of structural information or lead to deviating configurations during the database update. The log window shows the error message.
In case an error occurs, please contact the Q-DAS hotline team or send an email to [email protected].

QDas-656 v-0.2 2 28/29
6.2 Updating SQL or Oracle databases manually
The “Static DB“ tool to update the structure of SQL or Oracle databases after a major upgrade of server provisioning is available in the Q-DAS Tools Launcher.
Since it is important to update the structure of SQL or Oracle databases in case of a local installation prior to the major upgrade, we recommend you download the current “Static DB“ version from our homepage at https://www.q-das.com/en/service/software-downloads#tab1524.
Applying the “Static DB“ tool does not require any installation.
You adapt the content of the database by using the “DB Update“ tool. It is available in the Q-DAS Tools Launcher after you completed the major upgrade to version 13 successfully. You have to update the contents of text databases and configuration databases.
Find a detailed description of how to update the structure and the contents in the ”Updating existing databases on a Microsoft SQL Server“ manual https://www.q-das.com/en/service/support-hotline#faq579
QDas-656 v-0.2 2 29/29
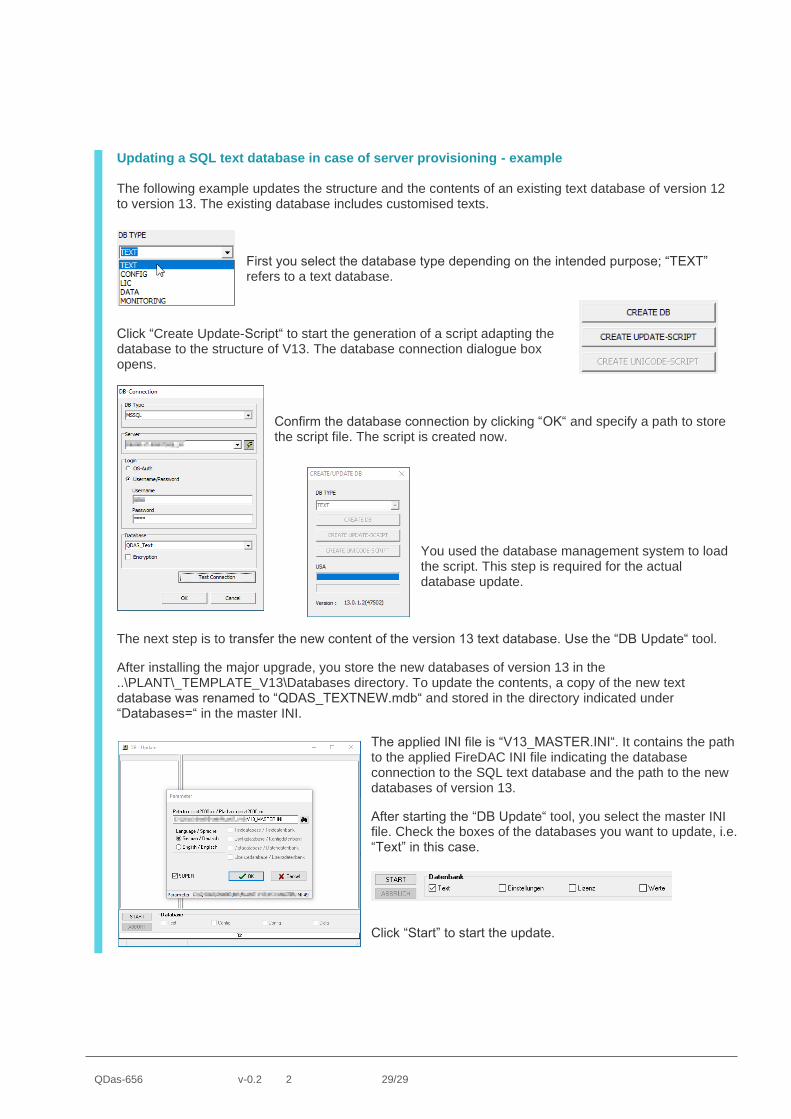
Updating a SQL text database in case of server provisioning - example
The following example updates the structure and the contents of an existing text database of version 12 to version 13. The existing database includes customised texts.
First you select the database type depending on the intended purpose; “TEXT” refers to a text database.
Click “Create Update-Script“ to start the generation of a script adapting the database to the structure of V13. The database connection dialogue box opens.
Confirm the database connection by clicking “OK“ and specify a path to store the script file. The script is created now.
You used the database management system to load the script. This step is required for the actual database update.
The next step is to transfer the new content of the version 13 text database. Use the “DB Update“ tool.
After installing the major upgrade, you store the new databases of version 13 in the ..\PLANT\_TEMPLATE_V13\Databases directory. To update the contents, a copy of the new text database was renamed to “QDAS_TEXTNEW.mdb“ and stored in the directory indicated under “Databases=“ in the master INI.
The applied INI file is “V13_MASTER.INI“. It contains the path to the applied FireDAC INI file indicating the database connection to the SQL text database and the path to the new databases of version 13.
After starting the “DB Update“ tool, you select the master INI file. Check the boxes of the databases you want to update, i.e. “Text” in this case.
Click “Start” to start the update.