v12 joomla documentmgr docman manual
DESCRIPTION
Joomla 3TRANSCRIPT

JOOMLA – DOCUMENT MANAGER (DOCMAN) MODULE TRAINING MANUAL

Content Management System Training – Document Manager (DocMan Module)
Page 2 of 15 Confidential - Not for Resale and Not for Distribution
Document Manager (DOCman Module)
Table of Contents
1 Overview .......................................................................................................................... 2
2 Create a Category ............................................................................................................. 4
3 Upload a File ..................................................................................................................... 6
4 Attach File to Front End Document ................................................................................... 8
5 Link a File to a Page (Article) ........................................................................................... 11
6 DOCman Configuration Settings ...................................................................................... 15
7 Credits and Contact Information ..................................................................................... 15
1 Overview Document Manager (DOCman) is a document management and download system to Joomla!. With this component you
can manage documents across multiple categories and subcategories and make them available for download on a
Joomla CMS powered web site.
Features
These are the main features of DocMan:
Infinite categories and subcategories. The documents can be organized across custom categories and
subcategories.
Custom groups support. Documents can be owned by a specific registered user, a groups of registered users, all
registered users or everybody.
Download counter and log. You can display a download counter per document and all the downloads can be
logged* (by user, IP, browser, date and hour).
Own search system. Documents can be searched by name and/or description.
Online editor. Plain text files can be edited online.
History and archiving system. All documents can use the history description and be archived to later retrieve.
Login to your CMS Admin area and then click on Components from the top main menu, and then select DOCman.
Menu Navigation: Components > DOCman

Content Management System Training – Document Manager (DocMan Module)
Page 3 of 15 Confidential - Not for Resale and Not for Distribution
Figure 1
The DOCman Control Panel page displays. The main sections used for uploading and linking documents using this
module includes: Files, Documents and Categories.
Figure 2

Content Management System Training – Document Manager (DocMan Module)
Page 4 of 15 Confidential - Not for Resale and Not for Distribution
The process for using DOCman is in four easy steps:
1. Create a Category to save documents in.
2. Upload a file into DOCMan.
3. Attach the file to the front end Documents component to prepare for publishing availability in your CMS.
4. Link the file to a page (article) that can be added to the front end of a web site.
2 Create a Category Menu Navigation: Components > DOCman > Categories
Document categories are used to organize documents within your CMS web site. Having them categorized helps you
with management and retrieval of your documents later when linking or unlinking them from your web site.
Click on Categories from the DOCman Control Panel or from the DOCman main menu. The Categories page displays and
lists all existing categories in the system.
Figure 3
The Category page displays the: Category Name, whether the category is Published, what security role has Access to
each category, the unique Category ID in the system, and the (number of) # Documents associated with each category.
To create a new Category, click on the Add button at the top right. The Add Category page displays.

Content Management System Training – Document Manager (DocMan Module)
Page 5 of 15 Confidential - Not for Resale and Not for Distribution
Figure 4
If you do not require adding a new category, skip to section 3 Upload a File in this manual.
Enter the following information for the new document category.
Category Title. The title of your document category. This can be the same or longer title than the category
name. This field is required.
Category Name. The name of your document category that is used to filter and search by within the system.
This can be the same or shorter name than the category title. This field is required.
Parent Item. If you have many documents to post to your web site, then you can use the Parent Item field to
create sub categories under Parent (main) categories. For example, if you hold an annual event each year such
as a walkathon, your Parent category can be ‘Walkathon’ and the sub categories can be the year ‘2010’, ‘2009’,
etc. All documents can be posted to the appropriate walkathon folder for a particular year to keep files
organized. If you don’t need sub categories added, then skip this field.
Image. An image can be added to the category to differentiate it from other categories. The list of images in the
dropdown are pulled from what is uploaded currently into the CMS Media Manager. If you require a new image
to be uploaded, refer to the Media Manager training manual. If you don’t need images added, then skip this
field.
Image Position. If you choose to associate an image with the category, you can position the image to the ‘right’
or ‘left’.
Ordering. You can order the list of categories within the CMS. New items default to the last position. The
ordering can be changed after this item is saved.
Access Level. This field allows you to set the Joomla security access level for viewing a category and all of its
associated documents.
Published. This field sets if the category is published or not for use within the CMS. If this is marked as ‘No’,
then the category and all associated documents will not be viewable by anyone on the front end web site.

Content Management System Training – Document Manager (DocMan Module)
Page 6 of 15 Confidential - Not for Resale and Not for Distribution
Description. The system allows you to enter a description for the category such as to help content managers
know what types of documents should be associated with this category. If you don’t need to add a description,
then you can skip this field.
Once you have filled out the page, click the Save button.
To later edit a category, place a check mark next to the Category Name and click the Edit icon or click the Category
Name link. The system will automatically update all of the documents that are associated with this category with the
new name for the category. If you try to delete a category that has documents in it, you will be prompted with a warning
stating that you are not able to delete the category until you reassociate the files with a different category.
3 Upload a File Menu Navigation: Components > DOCman > Files
The Files area of DOCman allows you to upload files to your CMS system.
Click on Files from the DOCman Control Panel or from the DOCman main menu. The Files page displays and lists all
existing files in the system.
Figure 5
The Files page displays the: Name of the file, Date and time stamp of when the file was uploaded to the system, file
Extension, the Mime Type, which identifies the format of the file and indicates which applications to read the file (such
as text/plain, image/jpeg , audio/mp3 , or video/quicktime, etc.), Size of the file, and the (number of) # Links the file has
in the CMS (how many pages the file is linked to).
Note: When uploading files to your CMS, it is recommended to have a file naming convention to help with
filtering and searching for files later in the system. For example, if you have annual reports that you post each

Content Management System Training – Document Manager (DocMan Module)
Page 7 of 15 Confidential - Not for Resale and Not for Distribution
year, name the file as ‘2010‐Annual‐Report’, ‘2009‐Annual‐Report’, etc. Additionally, it is recommended that file
names not contain spaces or underscores in them.
To upload a new File, click on the Upload button at the top right. The Add Category page displays.
Figure 6
Choose “Upload a file from your computer” upload method from the list and click the Next button. The Upload a file
from your hard disk page displays. Note: The other two options in the Choose the upload method are not discussed in
this manual.
Figure 7
Click on the Browse button and navigate to the image or file on your computer, and then click the Submit button.
Note: If you have multiple files you need to upload at one time, you may compress the files in a .zip file and then
select the zipped file when you browse to upload the files from your computer. Then, click the Batch Mode
check box so the system knows you are posting multiple files.
At this point you can keep uploading more files, or you can move on to section 4 Attach File to Front End Document in
this manual.

Content Management System Training – Document Manager (DocMan Module)
Page 8 of 15 Confidential - Not for Resale and Not for Distribution
4 Attach File to Front End Document Menu Navigation: Components > DOCman > Documents
The Documents area of DOCman allows you to create a formal title and description for your file, link the file to a
category, and set other properties to your uploaded files.
Click on Documents from the DOCman Control Panel or from the DOCman main menu. The Documents page displays
and lists all existing documents in the system.
Figure 8
The Documents page displays the: Name of the file, actual File name, Category each file is associated with, Date and
time stamp of when the file was uploaded to the system, authorized Viewers, if the file is Published or not, if the file is
Approved or not, Size of the file, and the number of Hits the file has received from visitors (how many times the file was
clicked on in the front end of the website).
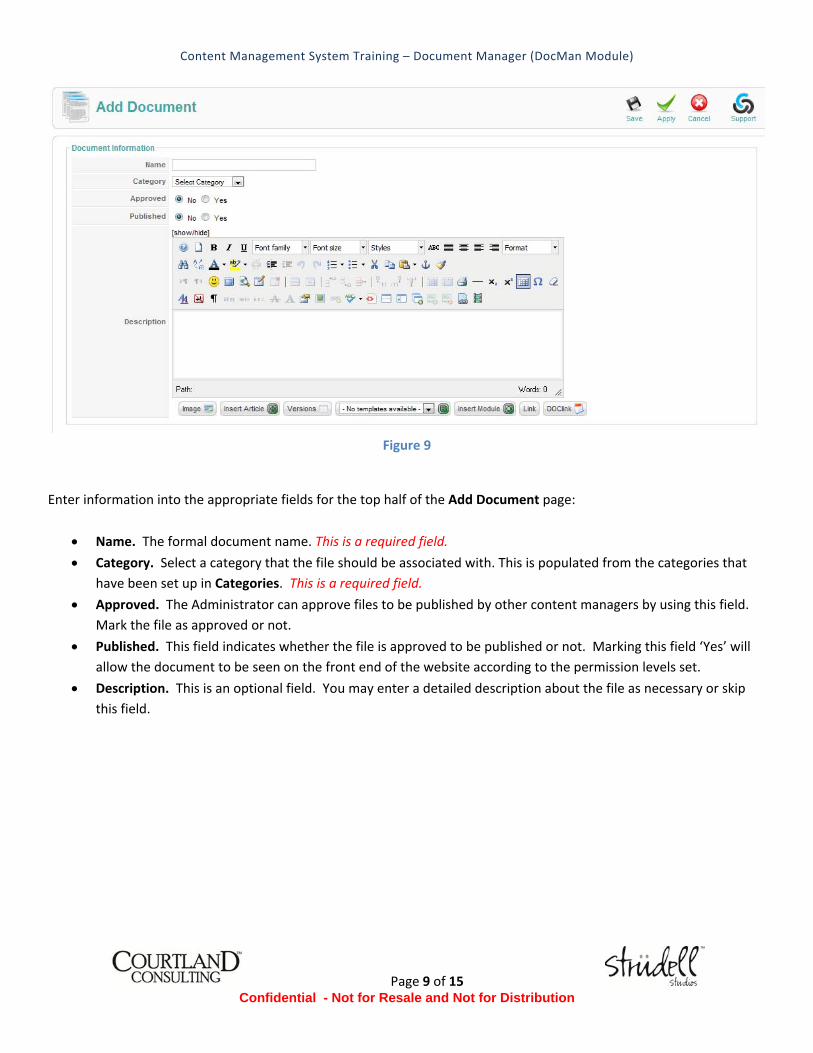
To add a new Document, click on the New button at the top right. The Add Document page displays.
Content Management System Training – Document Manager (DocMan Module)
Page 9 of 15 Confidential - Not for Resale and Not for Distribution
Figure 9
Enter information into the appropriate fields for the top half of the Add Document page:
Name. The formal document name. This is a required field.
Category. Select a category that the file should be associated with. This is populated from the categories that
have been set up in Categories. This is a required field.
Approved. The Administrator can approve files to be published by other content managers by using this field.
Mark the file as approved or not.
Published. This field indicates whether the file is approved to be published or not. Marking this field ‘Yes’ will
allow the document to be seen on the front end of the website according to the permission levels set.
Description. This is an optional field. You may enter a detailed description about the file as necessary or skip
this field.

Content Management System Training – Document Manager (DocMan Module)
Page 10 of 15 Confidential - Not for Resale and Not for Distribution
Figure 10
Enter information into the appropriate fields for the bottom half of the Add Document page:
DOCUMENT TAB
Thumbnail. An image thumbnail can be added to the document to differentiate it from other documents. The
list of images in the dropdown are pulled from what is uploaded currently into the CMS. If you require a new
image to be uploaded, refer to the Media Manager training manual. If you don’t need a thumbnail image
added, then skip this field.
File. Select the file from the drop down list that you are creating a document setting for. This is a required field.
Date. The date and time stamp of when the document settings were created for the file.
URL of Document. If the file is a remote file, stored on a different server, you will need to fill in the direct URL
for the file location.
Homepage. If the file is a remote file, stored on a different server, you can optionally include the homepage of
the web site that the file is located on.
Figure 11

Content Management System Training – Document Manager (DocMan Module)
Page 11 of 15 Confidential - Not for Resale and Not for Distribution
PERMISSIONS TAB
Viewers. This field allows you to set the viewer access to the document file. This can be a security group created
in DocMan, a Joomla group or an individual. The system default setting is ‘Everybody’.
Maintainer. This field allows you to set the maintenance access to the document file (those that can edit,
update, or delete). This can be a security group created in DocMan, a Joomla group or an individual. This
means that the chosen maintainer is the only entity allowed to make edits or change the document file settings.
The system default setting is ‘Editor’.
Created by. This field displays the login name of the person who the original creator was for the document file
and includes a date stamp of when created.
Last updated by. This field displays the login name of the person who was the last one to update the document
file settings.
LICENSE TAB
License Type. This is a dropdown of the Licenses that you have created. A license is an agreement for the use
and distribution of the documents that are created. Examples of licenses are the Gnu Public License and the
Creative Commons License. This is created under DocMan ‐> Licenses.
Display Agreement/License when viewing. Setting this to ‘Yes’ will cause the licensing information to be
displayed when reading the document.
DETAILS TAB
CRC Checksum. This is the Cyclical Redundancy Check to assure that the file that is downloaded is also the file
that has been uploaded. This will have to be created in a different application.
MD5 Checksum. This is an MD5 Hash of the file to assure that the file that is downloaded is also the file that was
originally updated. This will have to be created in a different application.
5 Link a File to a Page (Article) Menu Navigation: Content > Article Manager
The procedure in this section is the last step to using DOCman to publish files to your CMS web site. Now that your files
have been uploaded and properly categorized in your CMS system, you can easily link to any of your files from any page
(article) within the CMS.
Click on Content from main menu and select Article Manager. The Article Manager page displays and lists all existing
articles in the system.

Content Management System Training – Document Manager (DocMan Module)
Page 12 of 15 Confidential - Not for Resale and Not for Distribution
Figure 12
Select an article by clicking on the Title link that you would like to link a document file to. The Article Edit page displays.
Figure 13
Place your cursor where you would like the link to display within the JCE Editor box and then click the DOClink button at
the bottom of the editor box. The DOCman pop up window will display.

Content Management System Training – Document Manager (DocMan Module)
Page 13 of 15 Confidential - Not for Resale and Not for Distribution
Figure 14
All of the DOCman categories that are published in the system will display in the pop up window. You may click on the
Category drop down field or the Category link name to drill down into the category folder. The published documents
will display for that category similar to MS Windows Explorer.

Content Management System Training – Document Manager (DocMan Module)
Page 14 of 15 Confidential - Not for Resale and Not for Distribution
Figure 15
Click on the Document Name link to select the document to link to your article. Once you click on the file the URL and
Caption fields will auto‐populate the linking data from the system. If you would like to change the Caption description,
you may do so. The Caption is used to name your link in the article.
You may enable the linking features for filetype icon, file size and modification date by checking these check boxes.
Note: It is recommended that you publish document files consistently throughout your website (i.e., either use
or don’t use these linking features).
Click the Ok button and the DOCman pop window will save your selection and close the window. The document link
should display in the article where your cursor was. You may edit the link as necessary.
Note: There is a known bug within the DOCman component in the Internet Explorer browser. When the link is
added to the article, the link displays at the very top of the article content. This issue has been reported to the
CMS Joomla developers. When a fix is implemented, the Strudell Studios/Courtland Consulting support team
will contact you to upgrade. For now, the workaround is to copy and paste the link from the top of the page to
the appropriate area of the article.

Content Management System Training – Document Manager (DocMan Module)
Page 15 of 15 Confidential - Not for Resale and Not for Distribution
Click the Save button at the top of the Article page to save your link.
Important Note: With all content changes performed on your website, it is important to test your changes by going
to the specific page and testing links and formatting as soon as changes are implemented.
6 DOCman Configuration Settings Below is a list of DOCman module configuration settings which are important for Site Administrators to know.
Icon size display is 32x32 pixel. This setting can be changed under DocMan ‐> Configuration ‐> Fron‐end –
Themes.
Maximum filesize allowed when uploading is 10M. This setting can be increased up to the maximum set in the
php.ini file (currently set to 32 MB). This setting can be changed under DocMan ‐> Configuration ‐> Upload ‐>
General Settings.
File extensions allowed to upload: zip|rar|pdf|txt|gif|jpg|png|doc|docx|xls|xlsx|ppt|pptx. This setting can be
changed under DocMan ‐> Configuration ‐> Upload ‐> File Extensions. A pipe (|) will need to be between each
file extension added. Important: Do not set up executable file extensions such as .exe or .vbs as this will create a
security risk.
7 Credits and Contact Information This training manual has been developed and delivered by Strudell Studios, the Creative Division of Courtland
Consulting. Some of the content for this manual is based upon and/or taken verbatim from http://joomlatools.eu or
http://www.joomla.com © 2007‐2010, all rights reserved. For updates or questions regarding this manual, contact the
Strudell Studios / Courtland Consulting support team.
Strudell Studios Creative Division of Courtland Consulting 1500 Watertower Place, Ste 200 East Lansing, MI 48823 [email protected] www.strudellstudios.com (517) 908‐3950 direct (517) 371‐7810 main (517) 371‐7815 fax