utility guide adaptive server enterprise 15.7...
TRANSCRIPT

Utility Guide
Adaptive Server® Enterprise15.7 SP100

DOCUMENT ID: DC30191-01-1570100-01LAST REVISED: May 2013Copyright © 2013 by Sybase, Inc. All rights reserved.This publication pertains to Sybase software and to any subsequent release until otherwise indicated in new editions ortechnical notes. Information in this document is subject to change without notice. The software described herein is furnishedunder a license agreement, and it may be used or copied only in accordance with the terms of that agreement.Upgrades are provided only at regularly scheduled software release dates. No part of this publication may be reproduced,transmitted, or translated in any form or by any means, electronic, mechanical, manual, optical, or otherwise, without the priorwritten permission of Sybase, Inc.Sybase trademarks can be viewed at the Sybase trademarks page at http://www.sybase.com/detail?id=1011207. Sybase andthe marks listed are trademarks of Sybase, Inc. ® indicates registration in the United States of America.SAP and other SAP products and services mentioned herein as well as their respective logos are trademarks or registeredtrademarks of SAP AG in Germany and in several other countries all over the world.Java and all Java-based marks are trademarks or registered trademarks of Oracle and/or its affiliates in the U.S. and othercountries.Unicode and the Unicode Logo are registered trademarks of Unicode, Inc.IBM and Tivoli are registered trademarks of International Business Machines Corporation in the United States, othercountries, or both.All other company and product names mentioned may be trademarks of the respective companies with which they areassociated.Use, duplication, or disclosure by the government is subject to the restrictions set forth in subparagraph (c)(1)(ii) of DFARS52.227-7013 for the DOD and as set forth in FAR 52.227-19(a)-(d) for civilian agencies.Sybase, Inc., One Sybase Drive, Dublin, CA 94568.

Contents
CHAPTER 1: Utility Commands Reference ...................1Threaded Versions of Utilities ..............................................3Installation or Configuration Utilities ...................................4Utilities for Languages, Character Sets, and Sort Orders
.............................................................................................4Utilities to Start Servers ........................................................4Database Creation and Manipulation Utilities .....................5Utilities to Gather Information ..............................................5Tuning Utility ..........................................................................5Utility to Manage a Cluster ....................................................6backupserver .........................................................................6bcp ........................................................................................10
Usage for bcp ...............................................................23Copying Tables with Indexes or Triggers Using
bcp ...................................................................25Using bcp with Compressed Data .......................27
buildmaster ..........................................................................27certauth ................................................................................27
Usage for certauth ........................................................29Accomplish Certificate Management Tasks
Using Open Source Utility ...............................30Creating a Server Certificate File that Adaptive
Server Understands ........................................30certpk12 ................................................................................30certreq ..................................................................................33charset ..................................................................................35cobpre ...................................................................................36cpre .......................................................................................37dataserver ............................................................................37
Usage for dataserver ....................................................43
Utility Guide iii

Dependencies and Conditions of -b and -wOptions ............................................................44
Potential Issues of Using -f and -w OptionsTogether ..........................................................44
ddlgen ...................................................................................45Usage for ddlgen ..........................................................60
Hiding Passwords in ddlgen .................................62ddlgen for Encrypted Columns ............................62Encrypted Columns and Specifying the -XOD
Flag in ddlgen ..................................................63ddlgen Support for Key Copies ............................64EKC Encryption Key Copy Filter and ddlgen .......65Create Table DDL ................................................66
defncopy ...............................................................................66dscp ......................................................................................71dsedit ....................................................................................72extractjava ............................................................................73installjava .............................................................................76
Usage for installjava ......................................................78Cases When Adding New JARs Causes
Exceptions .......................................................78Updating JARs and Classes ................................79Locks ...................................................................79
isql .........................................................................................79Usage for isql ................................................................90
Interactive isql Commands ..................................92isql Session Commands ......................................93Prompt Labels and Double Wildcards in an isql
Session ............................................................94Command History in isql ......................................94
langinstall .............................................................................95optdiag ..................................................................................97
Usage for optdiag .......................................................101Byte Ordering and Binary optdiag Files .............102optdiag Input Mode ............................................102
Contents
iv Adaptive Server Enterprise

preupgrade .........................................................................102Usage for preupgrade .................................................106
The preupgrade -D Parameter ...........................106pwdcrypt .............................................................................107qrmutil .................................................................................108qptune .................................................................................112showserver .........................................................................118sqldbgr ................................................................................119
Usage for sqldbgr .......................................................121Error Messages in sqldbgr .................................123
sqlloc ..................................................................................124sqllocres .............................................................................125sqlsrvr .................................................................................126
Usage for sqlsrvr .........................................................130Starting Adaptive Server ....................................131startsrvr Dependencies and Conditions with -b
and -w ............................................................131sqlupgrade .........................................................................132sqlupgraderes ....................................................................133srvbuild ...............................................................................134
Usage for srvbuild .......................................................134Using LDAP with srvbuild in a 64-bit
Environment ..................................................135srvbuildres .........................................................................135startserver ..........................................................................137
Usage for startserver ..................................................138The runserver File .............................................138
sybcluster ...........................................................................139sybdiag ...............................................................................142
Usage for sybdiag .......................................................146Configuration Options for sybdiag ......................147
sybmigrate ..........................................................................148sybrestore ..........................................................................152sybtsmpasswd ...................................................................154updatease ...........................................................................155
Contents
Utility Guide v

xpserver ..............................................................................156
CHAPTER 2: Transferring Data to and from AdaptiveServer with bcp ........................................................159
Methods for Moving Data ..................................................159Import and Export Data with bcp ................................159
bcp Modes ..........................................................................160bcp Requirements .............................................................161
bcp Permissions .........................................................161Before You Transfer .....................................................162
Copy Data to Partitions Using bcp ...................................162Improve bcp Performance .................................................163
Fast, Fast-logged, and Slow bcp .................................163Slow bcp ............................................................165Fast bcp .............................................................165Fast-logged bcp .................................................166Copying Tables with Indexes ..............................166Space Requirements for Copying ......................167
Summary of Steps for Fast and Fast-logged bcp ........167Bulk Copying Data into Partitioned Tables ..................168
Copying Data Randomly into Partitions .............168Monitoring bcp Sessions with dbcc checktable
and sp_helpsegment .....................................169Reducing Logging by Increasing Page
Allocations .....................................................169Using Parallel Bulk Copy to Copy Data into a Specific
Partition ..................................................................170bcp in and Locks ................................................171Parallel Bulk Copy Methods ...............................172Parallel Bulk Copy Syntax ..................................172Using Parallel Bulk Copy on Round-robin
Partitioned Tables ..........................................173Parallel Bulk Copy and IDENTITY Columns ......173
Bulk Copying Encrypted Data ..........................................175
Contents
vi Adaptive Server Enterprise

bcp Options ........................................................................177Using the Default Formats ..........................................177
Native Format ....................................................177Character Format ...............................................178
Change Terminators from the Command Line ............178Change the Defaults in Interactive bcp ...........................178
Respond to bcp Prompts ............................................179File Storage Type ........................................................182Prefix Length ...............................................................184Field length .................................................................184Field and Row Terminators .........................................186
Choose Terminators ..........................................187Format Files .......................................................................188Examples of Copying Out Data Interactively ..................192Examples of Copying In Data Interactively .....................194bcp and Alternate Languages ..........................................197Support for Initialization Strings ......................................197bcp and Row-Level Access Rules ....................................197Copy In and Batch Files ....................................................198
Improve Recoverability ...............................................198Batches and Partitioned Tables ..................................199
Copy Out and Text and Image Data .................................199Specify a Network Packet Size .........................................199Copy In and Error Files .....................................................200Copy Out and Error Files ..................................................200Data Integrity for Defaults, Rules, and Triggers ..............201How bcp Differs from Other Utilities ................................201
CHAPTER 3: Building Servers Using dataserver .....203Building a New Master Device ..........................................203
Environments When Using dataserver .......................204Specifying Device and Logical Page Sizes When
Building a New Adaptive Server ............................. 205Starting an Existing Adaptive Server ..........................208
Contents
Utility Guide vii

Upgrading to a Server With Larger Page Sizes .......... 208Viewing the Current Server Limits ..............................208
CHAPTER 4: Viewing and Editing Server EntriesUsing dscp ...............................................................209
Starting dscp ......................................................................209Working with Server Entries .......................................211
Adding and Modifying Server Entries ................212Copy Server Entries ...........................................213List and View Contents of Server Entries ..........214Delete Server Entries ........................................215
Exiting dscp ................................................................215
CHAPTER 5: Viewing and Editing Server EntriesUsing dsedit .............................................................217
Add, View, and Edit Server Entries ..................................217Using dsedit in UNIX .........................................................218
Starting dsedit in UNIX ...............................................219Open an Editing Session in UNIX ...............................219Modify Server Entries in UNIX ....................................219
Adding a New Server Entry in UNIX ..................220Viewing or Modifying a Server Entry in UNIX ....220Add or Edit Network Transport Addresses .........220
Copying a Server Entry to Another Interfaces File inUNIX .......................................................................221
Copying Server Entries Within the Current Session ...221Copying Server Entries Between Sessions ................222
Using dsedit in Windows ..................................................222Starting dsedit in Windows .........................................223Open an Editing Session in Windows .........................223
Opening a Session in Windows .........................223Opening Additional Sessions in Windows .........224Switching Between Sessions in Windows .........224
Modify Server Entries in Windows ..............................224
Contents
viii Adaptive Server Enterprise

Adding a Server Entry .......................................224Modifying a Server Attribute ..............................224Renaming a Server Entry ..................................225Deleting a Server Entry .....................................225
Copying server entries within the current session inWindows .................................................................225
Copying server entries between sessions in Windows................................................................................225
Troubleshooting dsedit .....................................................226
CHAPTER 6: Using Interactive isql from theCommand Line .........................................................229
Starting isql ........................................................................229Stopping isql ......................................................................229Using Transact-SQL in isql ...............................................229
Formatting isql Output ................................................230Correcting isql Input ....................................................231set Options that Affect Output .....................................231
Changing the Command Terminator ................................232Performance Statistics Interaction with Command
Terminator Values .........................................................233Input and Output Files .......................................................234
UNIX command line redirection ..................................234
CHAPTER 7: Using Interactive SQL in GraphicsMode .........................................................................235
Starting Interactive SQL ....................................................235The Main Interactive SQL Window ...................................236
Plan Dialog Tab ...........................................................236The Interactive SQL Toolbar .............................................237Open Multiple Windows ....................................................238Keyboard Shortcuts ..........................................................238Display Data Using Interactive SQL .................................239Edit Table Values in Interactive SQL ................................239
Contents
Utility Guide ix

Copying Rows from the Interactive SQL Result Set . . .240Editing Rows from the Interactive SQL Result Set .....240Inserting Rows into the Database from the Interactive
SQL Result Set .......................................................241Deleting Rows from the Database Using Interactive
SQL ........................................................................241SQL Statements in Interactive SQL .................................242
Canceling an Interactive SQL Command ...................242Combining Multiple Statements ..................................243Looking Up Tables, Columns, and Procedures ...........243Recall Commands ......................................................244Logging Commands ....................................................245
Configure Interactive SQL ................................................245General Dialog Box .....................................................246Result Dialog Box .......................................................247Import/Export Dialog Box ............................................248Messages Dialog Tab .................................................248Editor Dialog Box ........................................................249Query Editor Dialog Box .............................................250
Processing Command Files ..............................................250Saving SQL Statements to a File ................................250Executing Command Files ..........................................250Saving, Loading, and Running Command Files .........251
The SQL Escape Syntax in Interactive SQL ....................252Interactive SQL Commands ..............................................253
CHAPTER 8: Interactive sybcluster CommandsReference .................................................................255
Commands Active Before Connecting to a Cluster .......255Commands Active After Connecting to a Cluster ..........256add backupserver ..............................................................257add instance .......................................................................258connect ...............................................................................259create backupserver ..........................................................260
Contents
x Adaptive Server Enterprise

create cluster .....................................................................261create xpserver ..................................................................263deploy plugin .....................................................................264diagnose cluster ................................................................265diagnose instance .............................................................267disconnect ..........................................................................268drop backupserver ............................................................268drop cluster ........................................................................269drop instance .....................................................................270drop xpserver .....................................................................271exit .......................................................................................271help .....................................................................................272localize ................................................................................272quit ......................................................................................273set backupserver ...............................................................274set cluster ...........................................................................275set instance ........................................................................276set xpserver port ...............................................................277show agents .......................................................................277show backupserver config ...............................................279show cluster ......................................................................280show instance ....................................................................283show membership mode ...................................................285show session .....................................................................285show xpserver ....................................................................287shutdown cluster ...............................................................287shutdown instance ............................................................288start cluster ........................................................................289start instance ....................................................................290upgrade server ...................................................................290use .......................................................................................292
CHAPTER 9: Migrating Data Using sybmigrate ........293What sybmigrate Does ......................................................293
Contents
Utility Guide xi

What sybmigrate Does Not Do .........................................295Before You Begin ...............................................................296
Permissions ................................................................296Changing Target Login Accounts .......................296
Platforms .....................................................................297Environment Settings ..................................................297Migrating Proxy Tables ................................................297
Migration process ..............................................................298Overview of the Migration Process .............................298Pre-migration Considerations .....................................298Configuration and Tuning for Higher Performance ......301
Configuration Considerations for AdaptiveServer ............................................................301
Possible Errors to Avoid ..............................................302Auto-select Dependent Objects for Migration .............303Migrating an Archive Database ...................................303
Upgrading an Adaptive Server with an ArchiveDatabase .......................................................303
Downgrading an Adaptive Server with anArchive Database ..........................................303
GUI mode ...................................................................304Setting up source databases for migration ........304Begin the migration ............................................307Validating the migration .....................................308Migration and Validation Progress .....................309
Resource File Mode ....................................................309Using sybmigrate with Encrypted Columns ...................315Post-migration Activities ..................................................316Migrate Databases in the Replication Server Domain ....316
Preparing for migration ...............................................317Postmigration Procedures ...........................................317
Restoring primary databases .............................318Restoring the RSSD ..........................................318Amending system tables when the logical page
size changes .................................................319
Contents
xii Adaptive Server Enterprise

Restoring Replicate Databases .........................320Logs ...................................................................320
Migrating Databases That Support Wide Data ...........322Limitations ..........................................................................323
Stopping High Availability ...........................................323Other Limitations .........................................................323
Troubleshooting and Error Messages .............................324
CHAPTER 10: Restoring a Database Usingsybrestore ................................................................329
Noninteractive Mode .........................................................329Interactive Mode ................................................................329Before You Begin ...............................................................330Using sybrestore ...............................................................330
Compatibility Geometry Check ...................................331sybrestore Syntax .......................................................331
Interactive Mode Syntax ....................................331Noninteractive Mode Syntax ..............................332
Restoring a Database in Noninteractive Mode ...............332Restoring a Database in Interactive Mode ......................333
Providing a Mapping Directory ....................................335Restoring a Database Using the Interactive Command
Line ........................................................................335Restoring a database ........................................335Restoring a database to a point in time .............337
Example of Restore to a Point-in-time ........................338
Index .........................................................................................341
Contents
Utility Guide xiii

Contents
xiv Adaptive Server Enterprise

CHAPTER 1 Utility Commands Reference
Reference pages for the Adaptive Server® utility program commands.
In UNIX, you enter a utility program command at the system prompt in a UNIX shell.
In Windows, if a utility:
• Has an icon in the Sybase® for Windows or Sybase for the Windows program group,double-click the icon to launch the utility program.
• Does not have an icon in the program group, enter the utility program command at theWindows command prompt to launch the utility program.
Place characters with special meaning to the shell (the command prompt in Windows), such asthe backslash (\), asterisk (*), slash (/), and spaces, in quotes. Precede some specialcharacters with the backslash (\) to “escape” them to prevent the shell (command prompt)from interpreting the special characters.
The utility programs available with Adaptive Server are:
Utility Description
backupserver An executable form of the Backup Server™ program.
bcp Copies rows in a database table to or from an operating system file in a user-speci-fied format.
buildmaster See dataserver.
certauth Converts a server-certificate request into a certificate authority-signed certificate.
certpk12 Exports or imports a PKCS#12 file.
certreq Creates a server certificate request and corresponding private key in two ways:
charset Loads the character sets and sort order files.
cobpre A precompiler for COBOL.
cpre A precompiler for C.
dataserver An executable form of the Adaptive Server program.
ddlgen Generates data definition language for server- and database-level objects in ASE.
Utility Guide 1

Utility Description
defncopy Copies definitions for specified views, rules, defaults, triggers, procedures, or re-ports from a database to an operating system file or from an operating system file toa database.
dscp Allows you to view and edit server entries in the interfaces file in command-linemode.
dsedit Allows you to view and edit server entries in the interfaces file using a graphicaluser interface.
extractjava Copies a retained JAR from an Adaptive Server to a client file.
installjava Installs a JAR from a client file into an Adaptive Server.
isql Interactive SQL parser to Adaptive Server.
langinstall Installs a new language on the Adaptive Server.
optdiag Displays optimizer statistics or loads updated statistics into system tables.
preupgrade Performs tests on an installation or database to determine its readiness for upgrade.
pwdcrypt Creates and prints an encrypted LDAP password in the libtcl.cfg file.
qrmutil (Cluster Edition only) allows you to back up, restore, and reconfigure the quorumdevice.
qptune Enables you to fix missing statistics and identify the best query plan, optimizationgoal, or other configuration settings, and apply them at the query or server level.
showserver Shows Adaptive Servers and Backup Servers that are currently running on the localmachine.
sqldbgr Debugs stored procedures and triggers.
sqlloc Installs and modifies languages, character sets, and sort order defaults for AdaptiveServer in GUI mode.
sqllocres Installs and modifies languages, character sets, and sort order defaults for AdaptiveServer in command-line mode.
sqlsrvr An executable form of the Adaptive Server program.
sqlupgrade Upgrades your currently installed release of Adaptive Server to the newest releasein GUI mode.
sqlupgraderes Upgrades your currently installed release of Adaptive Server to the newest releasein command-line mode.
CHAPTER 1: Utility Commands Reference
2 Adaptive Server Enterprise
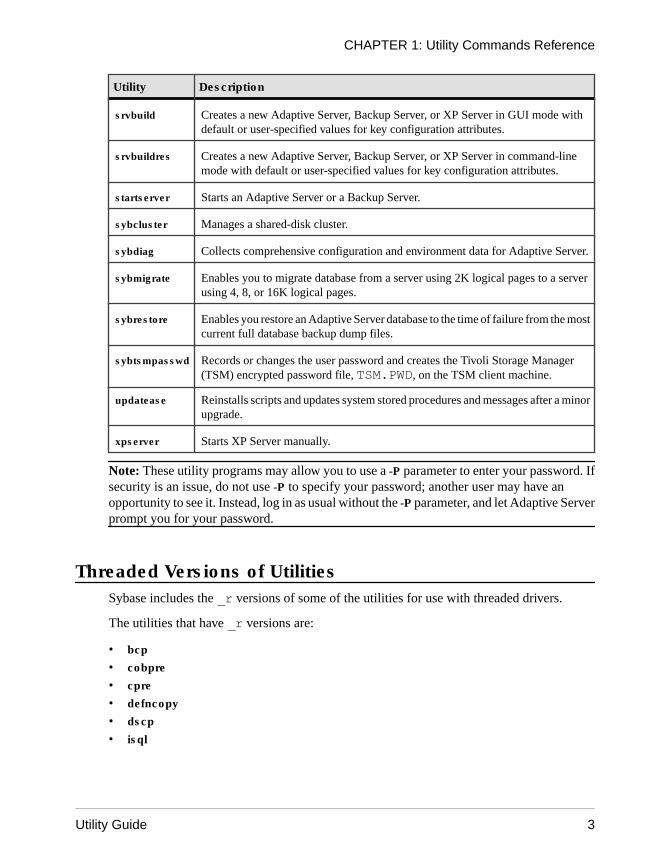
Utility Description
srvbuild Creates a new Adaptive Server, Backup Server, or XP Server in GUI mode withdefault or user-specified values for key configuration attributes.
srvbuildres Creates a new Adaptive Server, Backup Server, or XP Server in command-linemode with default or user-specified values for key configuration attributes.
startserver Starts an Adaptive Server or a Backup Server.
sybcluster Manages a shared-disk cluster.
sybdiag Collects comprehensive configuration and environment data for Adaptive Server.
sybmigrate Enables you to migrate database from a server using 2K logical pages to a serverusing 4, 8, or 16K logical pages.
sybrestore Enables you restore an Adaptive Server database to the time of failure from the mostcurrent full database backup dump files.
sybtsmpasswd Records or changes the user password and creates the Tivoli Storage Manager(TSM) encrypted password file, TSM.PWD, on the TSM client machine.
updatease Reinstalls scripts and updates system stored procedures and messages after a minorupgrade.
xpserver Starts XP Server manually.
Note: These utility programs may allow you to use a -P parameter to enter your password. Ifsecurity is an issue, do not use -P to specify your password; another user may have anopportunity to see it. Instead, log in as usual without the -P parameter, and let Adaptive Serverprompt you for your password.
Threaded Versions of UtilitiesSybase includes the _r versions of some of the utilities for use with threaded drivers.
The utilities that have _r versions are:
• bcp
• cobpre
• cpre
• defncopy
• dscp
• isql
CHAPTER 1: Utility Commands Reference
Utility Guide 3

Installation or Configuration UtilitiesAdaptive Server includes various utilities for installation and configuration.
Use these to install or configure databases:
• dataserver– allows you to build a new Adaptive Server.• dscp – allows you to view and edit server entries in the interfaces file from the command
line.• dsedit – allows you to view and edit server entries in the interfaces file using a GUI.
In Windows, allows you to create and modify network connection information in theinterfaces file.
• preupgrade – performs tests on an installation or database to determine its readiness forupgrade, and reports problems found.
• sqlupgrade – upgrades your currently installed release of Adaptive Server to the newestrelease.
• sqlupgraderes – upgrades your currently installed release of Adaptive Server to thenewest release using resource files in UNIX platforms.
• srvbuild – creates a new Adaptive Server, Backup Server, or XP Server with default oruser-specified values for key configuration attributes using a graphical user interface.
• srvbuildres – creates a new Adaptive Server, Backup Server, or XP Server, using resourcefiles to specify values for key configuration attributes in UNIX platforms.
Utilities for Languages, Character Sets, and Sort OrdersAdaptive Server includes various utilities to set languages, character sets and sort orders.
• charset – loads the character sets and sort order files in Windows.• langinstall – installs a new language on an Adaptive Server.• sqlloc – installs and modifies languages, character sets, and sort order defaults for
Adaptive Server.• sqllocres – installs and modifies languages, character sets, and sort order defaults for
Adaptive Server, using a resource file in UNIX platforms.
Utilities to Start ServersAdaptive Server includes various utilities to start servers manually.
• backupserver – starts the Backup Server executable. Use the startserver commandinstead of this utility to start Backup Server manually. In Windows, use the srvmgr utilityinstead to start Backup Server manually.
CHAPTER 1: Utility Commands Reference
4 Adaptive Server Enterprise

• dataserver – starts the Adaptive Server executable. Use the startserver command insteadof this utility to start Adaptive Server manually.
• sqlsrvr – starts the Adaptive Server executable in Windows . Use the services managerutility instead of this utility to start Adaptive Server manually.
• srvmgr – starts, pauses, and stops Adaptive Server, Backup Server, and Adaptive ServerMonitor™ as Windows services.
• startserver – starts an Adaptive Server and a Backup Server in UNIX platforms.
See also• startserver on page 137
Database Creation and Manipulation UtilitiesAdaptive Server includes various utilities to create and manipulate databases.
• bcp – copies a database table to or from an operating system file in a user-specified format.• ddlgen – generates data definition language for server- and database-level objects in ASE.• defncopy – copies definitions for specified views, rules, defaults, triggers, or procedures
from a database to an operating system file or from an operating system file to a database.• extractjava – copies a retained JAR and the classes it contains from an Adaptive Server to a
client file.• installjava – installs a JAR from a client file into an Adaptive Server database.• isql – interactive SQL parser to Adaptive Server.• optdiag – displays optimizer statistics or loads updated statistics into system table.
Utilities to Gather InformationAdaptive Server includes various utilities to gather information:
• showserver – shows the Adaptive Servers and Backup Servers that are currently runningon the local machine in UNIX platforms.
• sybdiag – collects comprehensive Adaptive Server configuration and environment data tohelp Sybase Technical Support diagnose server issues.
• wdllvers – provides information about the Sybase DLLs (dynamic link libraries) that areloaded into memory in Windows.
Tuning Utilityqptune enables you to fix missing statistics and identify the best query plan, optimizationgoal, or other configuration settings, and apply them at the query or server level.
CHAPTER 1: Utility Commands Reference
Utility Guide 5

Utility to Manage a Cluster(Cluster Edition only) Use the sybcluster utility to manage an Adaptive Server shared-diskcluster. sybcluster provides a set of interactive, command line options for creating andmanaging a cluster.
backupserverThe executable form of the Backup Server program.
The utility is located in:
• (UNIX) $SYBASE/$SYBASE_ASE/bin.
• (Windows) %SYBASE%\%SYBASE_ASE%\bin, as bcksrvr.exe.
Syntaxbackupserver [-C server_connections] [-S b_servername] [-I interfaces_file] [-e error_log_file] [-M sybmultbuf_binary] [-N network_connections] [-T trace_value] [-L Sybase_language_name] [-J Sybase_character_set_name] [-c tape_config_file] [-D n] [-A pathname] [-P active_service_threads] [-V level_number] [-p n] [-m max_shared_memory]
or:backupserver -v
Parameters
• -C server_connections – specifies the number of server connections for theBackup Server, which requires:
• Two connections for each dump session• One connection for each load session• One connection for volume change messages
CHAPTER 1: Utility Commands Reference
6 Adaptive Server Enterprise

Allow a maximum of three times the number of expected concurrent dump and loadsessions. The default value is 30 server connections.
• -S b_servername – specifies the name of the Backup Server to start. The default isSYB_BACKUP. This entry must specify the name of a Backup Server in the interfacesfile.
• -I interfaces_file – specifies the name and location of the interfaces file to searchwhen connecting to Backup Server. If -I is omitted, backupserver looks for a file namedinterfaces in the directory pointed to by your SYBASE environment variable.
• -v – prints the version number and copyright message of the backupserver software andthen exits.
• -e error_log_file – specifies the name and location of the Backup Server error logfile used to report Open Server internal errors, sybmultbuf errors, errors that halt theBackup Server, and errors for disconnected sessions. All other errors are sent to the notifydestination specified in the dump database, dump transaction, load database, and loadtransaction commands.
• -M sybmultbuf_binary – specifies the full path name of the sybmultbuf executable.Use this parameter only when starting Backup Server from a directory other than the bindirectory of the Sybase installation directory, or when using a diagnostic version ofsybmultbuf.
• -N network_connections – specifies the number of total network connections(DBPROCESSes) that the master Backup Server can originate. The default value is 25.
• -T trace_value – interprets trace_value as a bitmask (base-2 number). The 1 bits intrace_value correspond to Open Server Trace flags to turn on. If you specify more than one-T parameter on the command line, the final -T value overrides the values from earlier -Tparameters. The trace_value must be a positive integer.
• -L Sybase_language_name – specifies the default language for Backup Server. Ifnot specified, Backup Server uses the locale specified by the LC_ALL or LANGenvironment variables. If these variables are not set, Backup Server searches for the“default” entry in locales.dat.
Note: The -L parameter does not override the value set in the LANG environment variable.
• -J Sybase_character_set_name – specifies the default character set for BackupServer.
• -c tape_config_file – specifies the name and location of the tape configurationfile to search for tape device configuration information before doing a dump database or adump transaction. If you do not specify -c, the default path name for the tapeconfiguration file is $SYBASE/backup_tape.cfg.
• -D n – specifies the bitmap (base 10 number) of the diagnostic flags used within BackupServer.
• -A pathname – specifies the pathname to the directory of the Archive API dynamicallyloadable library.
CHAPTER 1: Utility Commands Reference
Utility Guide 7

• -P active_service_threads – allows you to increase the number of stripesduring multiple dump/load operations (with a maximum of 12,286 stripes per singleoperation).
• -V level_number – limits the messages that are printed to the Backup Server errorlog. The level_number variable determines the degree of error verbosity (-V) for BackupServer:
• -V4 – displays all -V0 messages except “Connection from Server” messages printedfor each connection event.
• -V3 – displays only completion messages from a normal dump or load command andthese types of messages:• Error messages from Backup Server and sybmultbuf
• Other sybmultbuf messages• Volume change messages• Open Server™ messages• Trace print messages• Informational messages from the System & Tape Auto Config modules
• -V2 – displays:
• All -V3 messages plus• File creation and file mount messages
• -V1 – displays:
• All -V2 messages plus• Phase messages
• -V0 (default) – displays all messages, including backup progress
This limitation does not involve the messages that are sent to the client or console asdetermined by the NOTIFY= parameter in a dump or load command.
This option also does not affect logging for these message types:
• Open Server messages• Trace printing messages from bs_traceprint
• sybmultbuf messages• -p n – specifies the TDS packet size in bytes that the local Backup Server requests from
the remote Backup Server during network dumps. The actual packet size used is limited tothe -p parameter value of the remote Backup Server. If you do not specify -p, the defaultis 2048 bytes. The packet size should be an integer greater than, or equal to 256.
• -m max_shared_memory – specifies the maximum amount of shared memory inmegabytes that Backup Server can use for all of its dump or load sessions.
Usage
• In Adaptive Server version 15.5 and later, both Adaptive Server and Backup Server canbypass the operating system buffer cache when you enable the directio parameter for the
CHAPTER 1: Utility Commands Reference
8 Adaptive Server Enterprise

device using disk init, disk reinit, or sp_deviceattr. Adaptive Server passes the deviceoptions to Backup Server, which enables Backup Server to access the database device withthe appropriate directio option.
• Backup Server versions 15.0.3 and earlier do not work with Adaptive Server 15.5 andlater.
• Start Backup Server with the startserver command rather than by directly executing thebackupserver program.• To change default values in UNIX, edit the RUN_servername file in your Sybase
installation directory. See the startserver reference page for details.• To change default values in Windows, use Server Config to change the command line
parameters of the Backup Server. See the Configuration Guide for details.• Make sure that the device driver options you include with the dump command are accurate.
Backupserver does not verify any device driver options you include during a dumpcommand. For example, if you include a option that forces Backupserver to rewind a tapebefore use, it will always rewind the tape to the beginning instead of reading the tape fromthe point of the dump.
• If you do not specify a Backup Server name with the -S parameter, and you have not set theenvironment variable DSLISTEN, backupserver uses the default Backup Server nameSYB_BACKUP in UNIX.(Windows) bcksrvr uses the default Backup Server name server_name_BS. The valueof the DSLISTEN environment variable overrides this default value, and the -S parameteroverrides both the default and the value specified in DSLISTEN.
• Whenever possible, the Backup Server and any Adaptive Servers that dump or loaddirectly through the Backup Server should share the same interfaces file (sql.ini inUNIX). The interfaces file that Backup Server uses must contain entries for:• Backup Server• Any other Backup Servers with which this Backup Server communicates
• Trace flags cause the Backup Server to print information regarding its operation while it isrunning, for debugging problems in the Backup Server.
• If Backup Server cannot find the locales and charsets directories specified by the -Land -J parameters, or if these parameters specify an incorrect language and character setcombination, Backup Server issues an error message and uses the default language andcharacter set. Backup Server does not support use of the Open Server-defined SRV_TRsymbols for -T.
• Backup Server cannot perform loads or dumps between servers that use different logicalpage sizes. For example, load a 4K logical page sized database dump into another serverusing a 4K logical page size. But Backup Server does not support dumping a 4K logicalpage sized database and loading it into a database that uses 16K logical page size.
See also Open Server Server-Library/C Reference Manual for more details on trace flags.
Permissions
Anyone with execute permission on the binary, and who has read/write access to all the files.
CHAPTER 1: Utility Commands Reference
Utility Guide 9

See also• startserver on page 137
bcpCopies a database table to or from an operating system file in a user-specified format.
bcp provides a convenient and high-speed method for transferring data between a databasetable or view and an operating system file. bcp can read or write files in a wide variety offormats. When copying in from a file, bcp inserts data into an existing database table; whencopying out to a file, bcp overwrites any previous contents of the file.
The utility is located in:
• (UNIX) $SYBASE/$SYBASE_OCS/bin.
• (Windows) %SYBASE%\%SYBASE_OCS%\bin, as bcp.exe.
Note: For parallel bcp, on:
• UNIX platforms – use bcp_r. The executable is in the same directory as the standard bcpcommand.
• Windows – use the standard bcp.exe utility.
Syntaxbcp [[database_name.]owner.]table_name [: partition_id | slice_number [partition partition_name] {in | out} [datafile] [-a display_charset] [-A packet_size] [-b batch_size] [-c] [-C] [-d discardfileprefix] [-e errfile] [-E] [-f formatfile] [-F firstrow] [-g id_start_value] [-i input_file] [-I interfaces_file] [-J client_character_set] [-K keytab_file] [-L lastrow] [-m maxerrors] [-MLabelName LabelValue] [-labeled] [-n] [-N] [-o output_file] [-P password] [-Q]
CHAPTER 1: Utility Commands Reference
10 Adaptive Server Enterprise

[-r row_terminator] [-R remote_server_principal] [-S server] [-t field_terminator] [-T text_or_image_size] [-U username] [-v] [-V [security_options]] [-W] [-x trusted.txt_file] [-X] [-y alternate_home_directory] [-Y ] [-z language] [-Z security_mechanism] [--colpasswd [[[db_name.[owner].]table_name.] column_name [password]]] [--keypasswd [[db_name.[owner].]key_name [password]]] [--hide-vcc] [--initstring "TSQL_command"] [--maxconn maximum_connections] [--show-fi] [--skiprows nSkipRows]
Parameters
• database_name – is optional if the table being copied is in your default database or inmaster. Otherwise, specify a database name.
• owner – is optional if you or the database owner owns the table being copied. If you do notspecify an owner, bcp looks first for a table of that name that you own, then looks for oneowned by the database owner. If another user owns the table, specify the owner name or thecommand fails.
• table_name – specifies the name of the database table to copy. The table name cannotbe a Transact-SQL™ reserved word.
• partition_id – specifies the partition number into which data is to be copied.Supported only for bcp in, partition_id is the equivalent of slice_number in AdaptiveServer 12.5.x.
• slice_number – specifies the number of the slice of the database table into which datais to be copied. Supported only for bcp in and only for round-robin partitioned tables inAdaptive Server 15.0 and later.
• partition partition_name – specifies the name of the partition in AdaptiveServer. For multiple partitions, use a comma-separated list of partition names.
• in | out – specifies the direction of the copy. in indicates a copy from a file into thedatabase table; out indicates a copy to a file from the database table or view.
Note: bcp raises an error and stops if the number of rows to be copied in or out exceeds2147483647.
• datafile – specifies the full path name of an operating system file. The path name canbe 1 to 255 characters long. For multiple files, use a comma-separated list of file names. If
CHAPTER 1: Utility Commands Reference
Utility Guide 11

you enter more than one data file and partition name, the number of files and partitionsmust be the same.
• -a display_charset – allows you to run bcp from a terminal where the character setdiffers from that of the machine on which bcp is running. Using -a in conjunction with -Jspecifies the character set translation file (.xlt file) required for the conversion. Use -awithout -J only if the client character set is the same as the default character set.
You see this error message if the character translation file named with the -a parameter ismissing, or you mistype the name:Error in attempting to determine the size of a pair oftranslation tables. : 'stat' utility failed.
• -A packet_size – specifies the network packet size to use for this bcp session. Forexample, set the packet size to 4096 bytes for the current bcp session, use:bcp pubs2..titles out table_out -A 4096
packet_size must be:
• Between the values of the default network packet size and maximumnetwork packet size configuration variables,
• A multiple of 512.
To improve the performance of large bulk-copy operations, use network packet sizes thatare larger than the default value.
• -b batchsize – specifies the number of rows per batch of data copied. By default, bcpin copies n rows in one batch, where n is equal to the batch size. Batch size applies onlywhen you are bulk copying in; it has no effect on bulk copying out. The smallest numberbcp accepts for batchsize is 1. The largest number bcp accepts for batchsize is2147483647L.
Note: Set the batch size to 1 for Adaptive Server to allocate one data page to one rowcopied in. This option applies only to fast bcp, and is useful only in locating corrupt rowsof data. Use -b1 with care—doing so causes a new page to be allocated for each row, andis an inefficient use of space.
• -c – performs the copy operation using the char datatype as the default. This option doesnot prompt for each field; it uses char as the default storage type, no prefixes, \t (tab) asthe default field terminator, and \n (newline) as the default row terminator.
• -C – supports bulk copy of encrypted columns if Adaptive Server supports encryptedcolumns. -C enables the ciphertext option before initiating the bulk copy operation.
• -d discardfileprefix – logs the rejected rows into a dedicated discard file. Thediscard file has the same format as the host file and is created by appending the input filename to the discard file prefix supplied. You can correct the rows in this file and use the fileto reload the corrected rows.
• You can use -d discardfileprefix with -e errorfile to help identify anddiagnose the problem rows logged in the discard file.
CHAPTER 1: Utility Commands Reference
12 Adaptive Server Enterprise

• Specifying the -d option applies only when bulk copying in; it is silently ignored whenused in bulk copying out.
• If there are no rejected rows, no discard file is created.• If you use multiple input files, one discard file is created for every input file that has an
erroneous row. If there are no rejected rows, no discard file is created.• If bcp reaches the maximum errors allowed and stops the operation, all the rows, from
the beginning of the batch until the failed row are logged.• -e errfile – specifies the full path name of an error file where bcp stores any rows that
it was unable to transfer from the file to the database. Error messages from bcp appear onyour terminal. bcp creates an error file only when you specify this parameter.
SAP® recommends that you use -e errorfile with -d discardfileprefix tohelp identify and diagnose the problem rows logged in the discard file.
• -E – explicitly specifies the value of a table’s IDENTITY column.
By default, when you bulk copy data into a table with an IDENTITY column, bcp assignseach row a temporary IDENTITY column value of 0. This is effective only when copyingdata into a table. bcp reads the value of the ID column from the data file, but does not send itto the server. Instead, as bcp inserts each row into the table, the server assigns the row aunique, sequential IDENTITY column value, beginning with the value 1. If you specifythe -E flag when copying data into a table, bcp reads the value from the data file and sendsit to the server, which inserts the value into the table. If the number of inserted rowsexceeds the maximum possible IDENTITY column value, Adaptive Server returns anerror.
By default, when you bulk copy data from a table with an IDENTITY column, bcpexcludes all information about the column from the output file. If you specify the -E flag,bcp copies the existing IDENTITY column values into the output file.
The -E parameter has no effect when you are bulk copying data out. Adaptive Servercopies the ID column to the data file, unless you use the -N parameter.
You cannot use the -E and -g flags together.
• -f formatfile – specifies the full path name of a file with stored responses from aprevious use of bcp on the same table. After you answer bcp’s format questions, it promptsyou to save your answers in a format file. Creation of the format file is optional. The defaultfile name is bcp.fmt. The interactive bcp program can refer to a format file when you arecopying data so that you do not have to duplicate your previous format responses. Use the-f parameter only if you previously created a format file that you now want to use for acopy in or copy out operation. If you do not specify this parameter, bcp interactivelyqueries you for format information.
• -F firstrow – specifies the number of the first row to copy (default is the first row). Ifyou use multiple files, this option applies to each file.
CHAPTER 1: Utility Commands Reference
Utility Guide 13
Do not use -F when performing heavy-duty, multiprocess copying, as doing so causes bcpto generally spend more effort to run, and does not provide you with a faster process.Instead, use -F for single-process, ad hoc copying.
Note: You cannot use -F with --skiprows.
• -g id_start_value – specifies the value of the IDENTITY column to use as astarting point for copying data in.
Note: You cannot use the -g and -E flags together.
• -i input_file – specifies the name of the input file. Standard input (stdin) is usedas the default.
• -I interfaces_file – specifies the name and location of the interfaces file to searchwhen connecting to Adaptive Server. If you do not specify -I, bcp looks for an interfacesfile (sql.ini in Windows) in the SYBASE release directory.
• -J client_charset – specifies the character set to use on the client. bcp uses a filterto convert input between client_charset and the Adaptive Server character set.
-J client_charset requests that Adaptive Server convert to and fromclient_charset, the character set used on the client.
-J with no argument disables character set conversion. No conversion takes place. Usethis if the client and server use the same character set.
Omitting -J sets the character set to a default for the platform, which may not necessarilybe the character set that the client is using. For more information about character sets andassociated flags, see the Adaptive Server Enterprise System Administration Guide.
• -K keytab_file – (Used only with Kerberos security) Specifies a Kerberos keytabfile that contains the security key for the user name specified with the -U option. To createa keytab, see your Kerberos documentation.
If you do not supply the -K option, the bcp user must be logged in to Kerberos with thesame user name as specified with the -U option.
• -L lastrow – specifies the number of the last row to copy from an input file (default isthe last row). If you use multiple files, this option applies to each file.
• -labeled – (secure Adaptive Server only) indicates that the data you are importingalready has labels in the first field of every record.
For exporting data, this option indicates that you want the sensitivity label of every row tobe copied out as the first field.
• -m maxerrors – specifies the maximum number of errors permitted before bcp abortsthe copy. bcp discards each row that it cannot insert (due to a data conversion error, or anattempt to insert a null value into a column that does not allow them), counting eachrejected row as one error. If you do not include this option, bcp uses a default value of10.
CHAPTER 1: Utility Commands Reference
14 Adaptive Server Enterprise

If you use multiple partitions, the same number of maxerrors is used for every file.• -M LabelName LabelValue – (secure Adaptive Server only) enables multilevel
users to set the session labels for the bulk copy. Values for LabelName are:
• curread (current reading level) – is the initial level of data that you can read duringthis session, curread must dominate curwrite.
• curwrite (current write level) – is the initial sensitivity level that is applied to anydata that you write during this session.
• maxread (maximum read level) – is the maximum level at which you can read data.This is the upper bound to which you as a multilevel user can set your curread duringthe session. maxread must dominate maxwrite.
• maxwrite (maximum write level) – is the maximum level at which you can writedata. This is the upper bound to which you as a multilevel user can set your curwriteduring a session. maxwrite must dominate minwrite and curwrite.
• minwrite (minimum write level) – is the minimum level at which you can write data.This is the lower bound to which you as a multilevel user can set curwrite during asession. minwrite must be dominated by maxwrite and curwrite.
LabelValue is the actual value of the label, expressed in the human-readable format usedon your system (for example, “Company Confidential Personnel”).
• -n – performs the copy operation using native (operating system) formats. Specifying the-n parameter means bcp does not prompt for each field. Files in native data format are nothuman-readable.
Warning! Do not use:
• bcp in native format for data recovery or salvage or to resolve an emergency situation.• bcp in native format to transport data between different hardware platforms, different
operating systems, or different major releases of Adaptive Server.• Field terminators (-t) or row terminators (-r) with bcp in native format.
Results are unpredictable and data may become corrupted.
Using bcp in native format can create flat files that cannot be reloaded into AdaptiveServer and it may be impossible to recover the data. If you cannot re-run bcp in characterformat (for example, a table was truncated or dropped, hardware damage occurred, adatabase was dropped, and so on) the data is unrecoverable.
• -N – skips the IDENTITY column. Use this option when copying data in if your host datafile does not include a placeholder for the IDENTITY column values, or when copyingdata out, if you do not want to include the IDENTITY column information in the hostfile.
You cannot use both -N and -E parameters when copying data in.
CHAPTER 1: Utility Commands Reference
Utility Guide 15

• -o output_file – specifies the name of the output file. Standard output (stdout) isused as the default.
• -P password – specifies an Adaptive Server password. If you do not specify -P, bcpprompts for a password. Omit the -P flag if your password is NULL.
• -Q – provides backward compatibility with bcp for copying operations involving nullablecolumns.
• -r row_terminator – specifies the row terminator.
Warning! Do not use -t or -r parameters with bcp in native format. Results areunpredictable and data may become corrupted.
When specifying terminators from the command line with the -t or -r parameter, youmust escape characters that have special significance to the UNIX operating system (or thecommand prompt shell for Windows). See the examples for bcp for more information.Either place a backslash in front of the special character or enclose it in quotes. This is notnecessary when bcp prompts you (interactive mode).
• -R remote_server_principal – specifies the principal name for the server. Bydefault, a server’s principal name matches the server’s network name (which is specifiedwith the -S option or the DSQUERY environment variable). Use the -R option when theserver’s principal name and network name are not the same.
• -S server – specifies the name of the Adaptive Server to connect to. If you specify -Swith no argument, bcp uses the server specified by the DSQUERY environment variable.
• -t field_terminator – specifies the default field terminator.• -T text_or_image_size – allows you to specify, in bytes, the maximum length of
text or image data that Adaptive Server sends. The default is 32K. If a text or animage field is larger than the value of -T or the default, bcp does not send the overflow.
• -U username – specifies an Adaptive Server login name. If you do not specify thisoption, bcp uses the current user’s operating system login name.
• -v – displays the version number of bcp and a copyright message and returns to theoperating system.
SDK binaries like bcp have the same names in both the 32-bit and 64-bit products.Installing Adaptive Server, the SDK, or Open Server 64-bit products with other Sybase32-bit products overwrites the 32-bit binaries. Starting with Adaptive Server 15.0.2 andSDK/Open Server 15.0 ESD #9, the 64-bit binaries have been replaced with 32-bit binarieson all 64-bit UNIX platforms. Since 32-bit binaries are included in the 64-bit EBF, the -voption of bcp is no longer a valid way to check the EBF number for 64-bit products.Instead, use the UNIX strings and grep commands to confirm the EBF numbers forAdaptive Server.
For example, to find the string containing the EBF number in the libsybct64.a library,enter:strings -a libsybct64.a | grep Sybase
This returns a string similar to:
CHAPTER 1: Utility Commands Reference
16 Adaptive Server Enterprise

Sybase Client-Library/15.5/P/DRV.15.5.0/SPARC/Solaris8/BUILD1550-001/64bit/OPT/Mon Aug 10 23:04:17 2009
To find the string containing the EBF number in the libsybsrv64.a library, enter:strings -a libsybsrv64.a | grep Sybase
This returns a string similar to:Sybase Server-Library/15.5/P/DRV.15.5.0/SPARC/Solaris8/BUILD1550-001/64bit/OPT/Mon Aug 10 23:06:27 2009
• -V security_options – specifies network-based user authentication. With thisoption, the user must log in to the network’s security system before running the utility.Users must supply their network user name with the -U option; any password suppliedwith the -P option is ignored.
To enable additional security services, follow -V with a security_options string of key-letter options:
• c – enables data confidentiality service.
• i – enables data integrity service.
• m – enables mutual authentication for connection establishment.
• o – enables data origin stamping service.
• r – enables data replay detection.
• q – enables out-of-sequence detection.
• -W – specifies that if the server to which bcp is attempting to connect supports neithernormal password encryption nor extended password encryption, plain text passwordretries are disabled.
If you use this option, the CS_SEC_NON_ENCRYPTION_RETRY connection propertyis set to CS_FALSE, and plain text (unencrypted) passwords are used, the connection isnot retried.
• -x trusted.txt_file – specifies an alternate trusted.txt file.
• -X – specifies that, in this connection to the server, the application initiates the login withclient-side password encryption. bcp (the client) specifies to the server that passwordencryption is desired. The server sends back an encryption key, which bcp uses to encryptyour password, and the server uses the key to authenticate your password when it arrives.
This option results in normal or extended password encryption, depending on connectionproperty settings at the server. If CS_SEC_ENCRYPTION is set to CS_TRUE, normalpassword encryption is used. If CS_SEC_EXTENDED_ENCRYPTION is set toCS_TRUE, extended password encryption is used. If both CS_SEC_ENCRYPTION andCS_SEC_EXTENDED_ENCRYPTION are set to CS_TRUE, extended passwordencryption is used as the first preference.
If bcp fails, the system creates a core file that contains your password. If you did not use theencryption option, the password appears in plain text in the file. If you used the encryptionoption, your password is not readable.
CHAPTER 1: Utility Commands Reference
Utility Guide 17

• -y alternate_home_directory – sets an alternate Sybase home directory.
• -Y – specifies that character-set conversion is disabled in the server, and is insteadperformed by bcp on the client side when using bcp out
Note: A client-side Unicode conversion is supported only for Adaptive Server 15.0 andlater.
During bcp out, all character-set conversion is done in the server.
• -z language – is the official name of an alternate language the server uses to displaybcp prompts and messages. Without the -z flag, bcp uses the server’s default language.
Add languages to an Adaptive Server during installation or afterwards, using either thelanginstall utility (langinst in Windows) or the sp_addlanguage system procedure.
If an incorrect or unrecognized language is named with the -z parameter, you see thiserror message:Unrecognized localization object. Using default value 'us_english'.Starting copy...=> warning.
• -Z security_mechanism – specifies the name of a security mechanism to use on theconnection.
Security mechanism names are defined in the $SYBASE/install/libtcl.cfgconfiguration file. The default mechanism is used if you do not supplysecurity_mechanism name.
• --colpasswd [[database_name[owner].]table_name.]column_name [password]]] – sets the passwordsfor encrypted columns by sending set encryption passwd password forcolumn column_name to Adaptive Server. This does not automatically applypasswords to other encrypted columns, even if the second column is encrypted with thesame key. Supply the password a second time to access the second column.
• --hide-vcc – instructs bcp not to copy virtual computed columns (VCC) either to orfrom a data file. When you use this option in bcp out, the data file contains no data forVCC. When you use it in bcp in, the data file may contain no data for a VCC.
If you use this option, Adaptive Server does not calculate or send virtual computed columndata.
• --initstring "Transact-SQL_command" – sends Transact-SQL commands toAdaptive Server before data is transferred.
Result sets issued by the initialization string are silently ignored, unless an error occurs. IfAdaptive Server returns an error, bcp stops before data is transferred, and displays an errormessage.
CHAPTER 1: Utility Commands Reference
18 Adaptive Server Enterprise

• --keypasswd [[database_name.[owner].]key_name [password]]]– sets passwords for all columns accessed by a key by sending set encryptionpasswd password for key key_name to Adaptive Server.
• --maxconn maximum_connections – is the maximum number of parallelconnections permitted for each bulk copy operation. You must use bcp_r, the threadedversion of the bcp utility, to copy multiple files in parallel. For example, the followingexample sets the maximum number of parallel connection permitted for each operation to2:bcp_r --maxconn 2
If you do not include this option, bcp uses the default value of 10.• --show-fi – instructs bcp to copy functional indexes, while using either bcp in or bcp
out. If you do not specify this option, Adaptive Server generates the value for thefunctional index.
• --skiprows nSkipRows – instructs bcp to skip a specified number of rows beforestarting to copy from an input file. The valid range for --skiprows is between 0 and theactual number of rows in the input file. If you provide an invalid value, you see an errormessage.
Note: You cannot use --skiprows with the -F option.
Examples
• Character datatype (-c) – The -c option copies data out of the publishers table incharacter format (using char for all fields). The -t field_terminator option endseach field with a comma, and the -r row_terminator option ends each line with aReturn. bcp prompts only for a password. The first backslash before the final “r” escapesthe second so that only one backslash prints.
In UNIX:bcp pubs2..publishers out pub_out -c -t , -r \\r
In Windows:bcp pubs2..publishers out pub_out -c -t , -r \r
• Encrypted columns (-C) – The -C parameter copies data out of the publishers table(with encrypted columns) in cipher-text format instead of plain text. Press Return to acceptthe defaults specified by the prompts. The same prompts appear when copying data intothe publishers table:
bcp pubs2..publishers out pub_out -CPassword:Enter the file storage type of field pub_id [char]:Enter prefix length of field pub_id [0]:Enter length of field pub_id [4]:Enter field terminator [none]:Enter the file storage type of field pub_name [char]:
CHAPTER 1: Utility Commands Reference
Utility Guide 19

Enter prefix length of field pub_name [1]:Enter length of field pub_name [40]:Enter field terminator [none]:Enter the file storage type of field city [char]:Enter prefix length of field city [1]:Enter length of field city [20]:Enter field terminator [none]:Enter the file storage type of field state [char]:Enter prefix length of field state [1]:Enter length of field state [2]:Enter field terminator [none]:
In UNIX, you are then asked:Do you want to save this format information in a file? [Y-n] yHost filename [bcp.fmt]: pub_formStarting copy...3 rows copied. Clock Time (ms.): total = 1 Avg = 0 (3000.00 rows per sec.)
• Copy out to a file – Copies data from the publishers table to a file named pub_out forlater reloading into Adaptive Server. Press Return to accept the defaults that the promptsspecify. The same prompts appear when copying data into the publishers table:
bcp pubs2..publishers out pub_outPasswordEnter the file storage type of field pub_id [char]:Enter prefix length of field pub_id [0]:Enter length of field pub_id [4]:Enter field terminator [none]:Enter the file storage type of field pub_name [char]:Enter prefix length of field pub_name [1]:Enter length of field pub_name [40]:Enter field terminator [none]:Enter the file storage type of field city [char]:Enter prefix length of field city [1]:Enter length of field city [20]:Enter field terminator [none]Enter the file storage type of field state [char]:Enter prefix length of field state [1]:Enter length of field state [2]:Enter field terminator [none]:
You are then asked:Do you want to save this format information in a file? [Y-n] Host filename [bcp.fmt]: pub_formStarting copy...3 rows copied. Clock time (ms.): total = 1 Avg = 0 (3000.00 rows per sec.)
• Copy in – Copies data back into Adaptive Server using the saved format file,pub_form:
CHAPTER 1: Utility Commands Reference
20 Adaptive Server Enterprise

bcp pubs2..publishers in pub_out -f pub_form• Client character set (-J) – Copies a data file created with the iso_1 character set into the
pubs2..publishers table. The -z flag displays bcp messages in French:
bcp pubs2..publishers in datafile -J iso_1 -z french• Partitions – Copies data out of partition p1 of table t1 to the mypart.dat file in the
current directory:bcp t1 partition p1 out mypart.dat
To copy in:bcp t1 partition p1 in mypart.dat
To copy files data.first, data.last and data.other into partitions p1, p2, andp3, respectively:
bcp t1 partition p1, p2, p3 in data.first, data.last, data.other
To copy partition p1, p2, and p3 to files a, b, and c respectively, into the \work2\datadirectory:bcp t1 partition p1, p2, p3 out \work2\data\1, \work2\data\b, \work2\data\c
• Setting limits (--initstring) – Limits this to the current session, disabling replication forthe bcp connection during the transfer of data from titles.txt data intopubs2..titles.
bcp pubs2..titles in titles.txt --initstring 'set replication off'
You need not explicitly reset the configuration option after bcp is finished. If AdaptiveServer returns an error, bcp stops the data transfer and displays an error message.
• Password (-P) – Sets the password to pwd1 for the encrypted column col1:
bcp mydb..mytable out myfile –U uuu –P ppp –-colpasswd db..tbl.col1 pwd1
• Password prompts – Sets a prompt to enter the password for encrypted column col1:
bcp mydb..mytable out myfile –U uuu –P ppp –-colpasswd db..tbl.col1Enter column db..tbl.col1’s password: ***?
• External file password – Reads the password for encrypted column col1 from anexternal OS file named “passwordfile”:
bcp mydb..mytable out myfile –U uuu –P ppp –-colpasswd db..tbl.col1 < passwordfile
• Encrypted key password – Sets password pwd1 for encryption key key1:bcp mydb..mytable in myfile –U uuu –p ppp –-keypasswd db..key1 pwd1
• Discard file (-d) – Creates the discard file reject_titlesfile.txt:
CHAPTER 1: Utility Commands Reference
Utility Guide 21

bcp pubs2..titles in titlesfile.txt -d reject_• Security (-V) – For MIT Kerberos, requests credential delegation and forwards the client
credentials to MY_GATEWAY:bcp -Vd -SMY_GATEWAY
• Skip rows (--skiprows) – bcp ignores the first two rows of the input file titles.txt,and starts to copy from the third row:bcp pubs2..titles in titles.txt -U username -P password --skiprows 2
• Alternate directories (-y) – Sets an alternate Sybase home directory:bcp tempdb..T1 out T1.out -y/work/NewSybase -Uuser1 -Psecret -SMYSERVER
• Text and image sizes (-T) – Specifies that Adaptive Server send 40K of text or imagedata using a packet size of 4096 bytes:bcp pubs2..publishers out -T 40960 -A 4096
• Maximum number of connections (--maxconn) – Sets 2 as the maximum number ofparallel connections permitted for each operation.bcp_r --maxconn 2
• Materialized computed columns – Copies out database db_1, which includes table t1with materialized computed column c1:
bcp db_1..t1 out db_1.dat -Usa -P -S big_db -I./interfaces -f ./bcp.fmt
The following then copies in the data file (db_1.dat) containing table t1 withmaterialized computed column c1:
bcp db_1..t1 in db_1.dat -Usa -P -S big_db -I./interfaces -f ./bcp.fmt
• Fast logging – Enables fast-logged bcp when you transfer the titles.txt data into thepubs2..titles table:
bcp pubs2..titles in titles.txt --initstring 'set logbulkcopy on'
Permissions
You must have an Adaptive Server account and the appropriate permissions on the databasetables or views, as well as the operating system files to use in the transfer to use bcp.
• To copy data into a table, you must have insert permission on the table.• To copy a table to an operating system file, you must have select permission on these
tables:• The table to copy• sysobjects• syscolumns
CHAPTER 1: Utility Commands Reference
22 Adaptive Server Enterprise

• sysindexes
Auditing
Values in event and extrainfo columns are:
Event
Audit op-tion
Command oraccess audi-ted
Information in extrainfo
4 bcp bcp in • Roles – Current active roles• Keywords or options – NULL• Previous value – NULL• Current value – NULL• Other information – NULL• Proxy information – Original login name, if set proxy
in effect
Tables used
sysaudits_01 – sysaudits_08
See also• Chapter 2, Transferring Data to and from Adaptive Server with bcp on page 159• Bulk Copying Encrypted Data on page 175
Usage for bcpThere are a number of considerations when using bcp.
• bcp_r is a threaded version of bcp.• You cannot use named pipes to copy files in or out.• Using --hide-vcc improves performance because Adaptive Server does not transfer and
calculate data from virtual computed columns.• Although you can use any Transact-SQL command with --initstring as an initialization
string for bcp, reset possible permanent changes to the server configuration after runningbcp. You can, for example, reset changes in a separate isql session.
• slice_number is included for backward compatibility with Adaptive Server 12.5.x andearlier, and can be used only with round-robin partitioned tables.
• Specify either partition_id or partition_name, but not both.• If you provide no partition name, bcp copies to the entire table.• You can specify multiple partitions and data files. Separate each partition name or data file
with commas.• bcp provides a convenient and high-speed method for transferring data between a database
table or view and an operating system file. bcp can read or write files in a wide variety of
CHAPTER 1: Utility Commands Reference
Utility Guide 23

formats. When copying in from a file, bcp inserts data into an existing database table;when copying out to a file, bcp overwrites any previous contents of the file.
• Upon completion, bcp informs you of the number of rows of data successfully copied, thetotal time the copy took, the average amount of time in milliseconds that it took to copy onerow, and the number of rows copied per second.
• bcp does not insert any row that contains an entry exceeding the character length of thecorresponding target table column. For example, bcp does not insert a row with a field of300 bytes into a table with a character-column length of 256 bytes. Instead, bcp reports aconversion error and skips the row. bcp does not insert truncated data into the table. Theconversion error is as follows:cs_convert: cslib user api layer: common libraryerror: The result is truncated because the conversion/operation resulted in overflow
To keep track of data that violates length requirements, run bcp with the -e log-file nameoption. bcp records the row and the column number of the rejected data, the error message,and the data in the log file you specify.To restrict the functionality of bcp to that of a previous version, set the CS_BEHAVIORproperty in the [bcp] section of the ocs.cfg file:
[bcp]CS_BEHAVIOR = CS_BEHAVIOR_100
If CS_BEHAVIOR is not set to CS_BEHAVIOR_100, you can use functionality for bcp11.1 and later.
• If bcp is invoked and no value is supplied for the -c, -f, or -n parameters, a bcp promptrequests the file storage type. The file storage type can be any valid Adaptive Serverdatatype. Storage types for the bigdatetime and bigtime Adaptive Server datatypesare specified as:
Storage Type Table Datatype
A bigdatetimeB bigtime
• You can specify these datatypes for a bcp format file using the bigdatetime orbigtime datatypes:
Storage Format Adaptive Server Datatype
SYBBIGDATETIME bigdatetimeSYBBIGTIME bigtime
• Use bcp to copy encrypted data in and out of the server.• bcp versions 15.7 and later allow you to copy data into tables that contain nonmaterialized
columns.
CHAPTER 1: Utility Commands Reference
24 Adaptive Server Enterprise

• Error message format is different than in versions of bcp earlier than 15.7. If you havescripts that perform routines based on the values of these messages you may need torewrite them, for example:The display message that indicates the number of rowstransferred has been changed. During a session, this version of bcp periodically reports a running total of rows transferred. This message replaces the "1000 rows transferred" message displayed by the previous bcp.
• When using bcp out:• If partition_name and datafile are both specified, then either datafile must specify a
single data file, or specify a one-to-one mapping between partition names and datafiles.
• If datafile is not specified, data from each partition is copied to a file named for thenamed partition with a .dat extension. For example, if the partition name is ptn1, thedata file is ptn1.dat.
• You may use initstring to run any Transact-SQL command, but you must reset anypermanent changes to the server initstring causes after bcp finishes. For instance, as in theexample for the password (-p) parameter, if the Adaptive Server account does not have theappropriate permissions, Adaptive Server returns an error message for the initializationstring. bcp displays the server error message and stops before any data is transferred.Result sets issued by the initialization string are silently ignored unless an error occurs.
• When using bcp in, if partition_name is specified, datafile must specify a correspondingnumber of data files
• If you see a message similar to the following, the character translation file specified withthe -q parameter is missing, or you mistyped the name:Error in attempting to load a view of translation tables.
See also:
• Open Client and Open Server Configuration Guide – the description for libtcl.cfgfor security mechanism names
• Performance and Tuning Guide – on how changing certain parameters can affect bcp forlarge batches
• Reference Manual: Commands – insert
• Reference Manual: Procedures – sp_audit, sp_dboption, sp_displayaudit
• System Administration Guide – character sets and associated flags
Copying Tables with Indexes or Triggers Using bcpbcp is optimized to load data into tables that do not have associated indexes or triggers. It loadsdata into tables without indexes or triggers at the fastest possible speed, with a minimum oflogging. Page allocations are logged, but row insertions are not.
When you copy data into a table that has one or more indexes or triggers, a slower version ofbcp is automatically used, which logs row inserts. This includes indexes that are implicitly
CHAPTER 1: Utility Commands Reference
Utility Guide 25

created using the unique integrity constraint of a create table command. However, bcp doesnot enforce the other integrity constraints defined for a table.
Since the fast version of bcp inserts data without logging it, the system administrator ordatabase owner must first set the sp_dboption procedure:
sp_dboption dbname, "select into/bulkcopy", true
If the option is not true and you try to copy data into a table that has no indexes or triggers,Adaptive Server generates an error message. You need not set this option to copy data out to afile or into a table that contains indexes or triggers.
Note: Because bcp logs inserts into a table that has indexes or triggers, the log can grow verylarge. You can truncate the log with dump transaction to truncate the log after the bulk copycompletes, and after you have backed up your database with dump database.
While the select into/bulkcopy option is on, you cannot dump the transaction log. Issuingdump transaction produces an error message instructing you to use dump database instead.
Warning! Ensure that you dump your database before you turn off the select into/bulkcopyflag. You cannot recover your data if you have inserted unlogged data into your database andyou then perform dump transaction before performing dump database.
Unlogged bcp runs slowly while a dump database is taking place.
Table 1. Comparing fast and slow bcp
select into/bulkcopy on select into/bulkcopy off
Fast bcp – no indexes or trig-gers on target table
Yes – dump transaction prohibi-ted
No – Adaptive Server forces slowbcp
Slow bcp – one or more in-dexes or triggers
Yes – dump transaction prohibi-ted
Yes – dump transaction OK
By default, the select into/bulkcopy option is off in newly created databases. To change thedefault, turn the option on in the model database.
Note: The performance penalty for copying data into a table that has indexes or triggers can besevere. If you are copying in a large number of rows, it may be faster to:
1. Use drop index (or alter table for indexes) and drop trigger to drop all the indexes andtriggers
2. Set the database option.3. Copy the data into the table.4. Re-create the indexes and triggers.5. Dump the database.
However, you must allocate extra disk space for the construction of indexes and triggers—about 2.2 times the amount of space needed for the data.
CHAPTER 1: Utility Commands Reference
26 Adaptive Server Enterprise

Using bcp with Compressed DataPages in a compressed table may have a combination of row-, page-, or uncompressed rows.Tables and partitions listed as not compressed may contain a mixture of rows in differentstates of compression because you may have created them when the table’s compression levelwas different.
• bcp out:• Decompresses compressed rows and returns them to the client, either in native or
character form.• Supports IDENTITY, encrypted columns, and so on.• Returns text data as uncompressed.
• bcp in compresses uncompressed data received from the client according to the table orpartition’s compression level.
Using bcp to copy data out and then bcp it back in to a table that is configured for compressionresults in compressed data, even if the data was originally uncompressed.
buildmasterAdaptive Server does not use the buildmaster binary to build the master device. Instead,Sybase has incorporated the buildmaster functionality in the dataserver binary.
SyntaxNone.
See also• Chapter 3, Building Servers Using dataserver on page 203
certauthConverts a server certificate request to a CA- (certificate authority) signed certificate.
The utility is located in:
• (UNIX) $SYBASE/$SYBASE_OCS/bin.
• (Windows) %SYBASE%\%SYBASE_OCS%\bin, as certarthr.exe.
Syntaxcertauth [-r] [-C caCert_file] [-Q request_filename] [-K caKey_filename]
CHAPTER 1: Utility Commands Reference
Utility Guide 27

[-N serial_number [-O SignedCert_filename] [-P caPassword] [-s start_time] [-T valid_time]
Orcertauth -v
Parameters
• -r – when specified, creates a self-signed root certificate for the test environment.
• -C caCert_file – specifies the name of the CA’s certificate request file when -r isspecified, or specifies the name of the CA’s root certificate.
• -Q request_filename – specifies the name of certificate request file.
• -K caKey_filename – specifies the name of the CA’s private key.
• -N serial_number – specifies the serial number in the signed certificate. If -N is notspecified, certauth generates a pseudo-random serial number.
The maximum length of the serial number in the -N option is 20 hexadecimal characters. Ifthe specified serial number is longer, certauth truncates the serial number to the maximumlength.
• -O SignedCert_filename – specifies the name to use for the output when creatinga signed certificate file. If -r is specified, SignedCert_filename is the self-signed rootcertificate. If -r option is not used, SignedCert_filename is the certificate signed by thecaCert_file.
• -P caPassword – specifies the CA’s password that is used to decrypt its private key.
• -s start_time – specifies the start of the valid time range, measured in days from thecurrent time. The default is the current time.
• -T valid_time – specifies the length of the valid time range for a signed certificate.The valid time range is in units of days.
• -v – prints the version number and copyright message of the certauth tool, then exits.
Examples
• Private keys – Converts the CA’s certificate request (ca_req.txt) to a certificate,using the private key (ca_pkey.txt). The private key is protected using password. Thisexample sets the valid time range to 365 days, self-signs the certificate, and outputs it as aroot certificate (trusted.txt):
certauth -r -C ca_req.txt -Q ca_req.txt -K ca_pkey.txt -P password -T 365 -O trusted.txt
The utility returns this message: -- Sybase Test Certificate Authority --Certificate Validity: startDate = Tue Sep 5 10:34:43 2000
CHAPTER 1: Utility Commands Reference
28 Adaptive Server Enterprise

endDate = Wed Sep 5 10:34:43 2001CA sign certificate SUCCEED (0)
Note: You need to create a trusted root certificate for the test CA only once, after whichyou can use it to sign many server certificates in your test environment.
• Time ranges – Converts a server certificate request (srv5_req.txt) to a certificate,and sets the valid time range to 180 days. It signs the certificate with a CA’s certificate andprivate key (trusted.txt and ca_pkey.txt), uses password protection, andoutputs the signed certificate as sybase_srv5.crtcertauth -C trusted.txt -Q srv5_req.txt -K ca_pkey.txt -P password -T 180 -O sybase_srv5.crt
The utility returns this message: -- Sybase Test Certificate Authority --Certificate Validity: startDate = Tue Sep 5 10:38:32 2000endDate = Sun Mar 4 09:38:32 2001CA sign certificate SUCCEED (0)
Note: If you do not set valid time, the default is 365 days.
This is a sample certificate. See the certauth Usage section for additional steps to take tocreate a server certificate that the server can use.-----BEGIN CERTIFICATE-----MIICSTCCAgUCAVAwCwYHKoZIzjgEAwUAMG8xCzAJBgNVBAYTAlVTMRMwEQYDVQQIEwpDYWxpZm9ybmlhMRMwEQYDVQQHEwpFbWVyeXZpbGxlMQ8wDQYDVQQKFAZTeWhc2UxDDAKBgNVBAsUA0RTVDEXMBUGA1UEAxQOc3liYXNlX3Rlc3RfY2EwHhcNMDAwODE4MTkxMzM0WhcNMDEwODE4MTkxMzM0WjBvMQswCQYDVQQGEwJVUzETMBEGAUECBMKQ2FsaWZvcm5pYTETMBEGA1UEBxMKRW1lcnl2aWxsZTEPMA0GA1UEChQGU3liYXNlMQwwCgYDVQQLFANEU1QxFzAVBgNVBAMUDnN5YmFzZV90ZXN0X2NhMIHwMIoBgcqhkjOOAQBMIGcAkEA+6xG7XCxiklxbP96nHBnQrTLTCjHlcy8QhIekwv9OlqGEMG9AjJLxj6VCkPOD75vqVMEkaPPjoIbXEJEe/aYXQIVAPyvY1+B9phC2e2YFcf7cReCcSNxAkBHt7rnOJZ1Dnd8iLQGt0wd1w4lo/Xx2OeZS4CJW0KVKkGId1hNGz8rGrQTspWcwTh2rNGbXxlNXhAV5g4OCgrYA0MAAkA70uNEl90Kmhdt3RISiceCMgOf1J8dgtWF15mcHeS8OmF9s/vqPAR5NkaVk7LJK6kk7QvXUBY+8LMOugpJf/TYMAsGByqGSM44BAMFAAMxADAuAhUAhM2Icn1pSavQtXFzXJUCoOmNLpkCFQDtE8RUGuo8ZdxnQtPu9uJDmoBiUQ==
-----END CERTIFICATE-----
Usage for certauthRunning certauth requires that you place the entry for $SYBASE/$SYBASE_OCS/lib3pbefore the entry for $SYBASE/$SYBASE_OCS/libp364 in the dynamic library searchpath.
CHAPTER 1: Utility Commands Reference
Utility Guide 29

Accomplish Certificate Management Tasks Using Open Source UtilityAdaptive Server includes the openssl open source utility in $SYBASE/$SYBASE_OCS/bin (%SYBASE%\%SYBASE_OCS%\bin in Windows).
Adaptive Server includes the openssl open source utility in $SYBASE/$SYBASE_OCS/bin (%SYBASE%\%SYBASE_OCS%\bin in Windows). Use openssl to accomplish allcertificate management tasks implemented by certreq, certauth and certpk12. Sybaseincludes this binary as a convenience, and is not responsible for any issues incurred using thebinary. See the OpenSSL Web site for details.
Creating a Server Certificate File that Adaptive Server UnderstandsTo create a server certificate file that Adaptive Server understands, append the certificaterequestor’s private key to the end of the signed certificate file.
Using example 2 above, you would cut and paste srv5_pkey.txt to the end of the signedcertificate file, sybase_srv5.crt.
To create a trusted roots file that the server can load upon start-up:
1. Rename trusted.txt to sybase_srv5.txt, where sybase_srv5.txt is thecommon name of the server.
2. Copy the sybase_srv5.txt file into the Adaptive Server installation directory; forexample, $SYBASE/$SYBASE_ASE/certificates.
The options -s and -T together specify the time range for the certificate.
Use the file, which is required for an SSL-based session, to start the SSL-enabled AdaptiveServer.
After the CA’s root certificate is created, use it to sign multiple server certificates.
certpk12Export or import a PKCS #12 file into a certificates file and a private key.
The utility is located in:
• (UNIX) $SYBASE/$SYBASE_OCS/bin.
• (Windows) %SYBASE%\%SYBASE_OCS%\bin, as certpk12.exe.
Syntaxcertpk12 {-O Pkcs12_file | -I Pkcs12_file} [-C Cert_file] [-K Key_file]
CHAPTER 1: Utility Commands Reference
30 Adaptive Server Enterprise

[-P key_password] [-E Pkcs12_password]
or:certpk12 -v
Parameters
• -C Cert_file – specifies the name of certificate file to be exported to a PKCS #12 fileif -O is on; or the name of certificate file to be imported from a PKCS #12 file if -I ison.
• -E Pkcs12_password – specifies the password used to protect the PKCS #12 file. If-O is on, the password is used to encrypt the PKCS #12 file to be exported; if -I is on, thepassword is used to decrypt the PKCS #12 file to be imported. The password is also called“transport password.”
• -I Pkcs12_file – specifies the name of a PKCS #12 file to be imported. The file cancontain a certificate plus a private key, a single certificate, or a single private key. Either -Ior -O needs to be on.
• -K Key_file – specifies the name of private key file to be exported to a PKCS #12 file if-O is on; or the name of private key file to be imported from a PKCS #12 file if -I is on.
• -O Pkcs12_file – specifies the name of a PKCS #12 file to be exported. The file cancontain a certificate plus a private key, a single certificate, or a single private key. Either -Oor -I needs to be on.
• -P Key_password – specifies the password which is used to protect the private keyspecified by -K. If -O is on, the password is required to export the private key to aPKCS #12 file; if -I is on, the password is required to output the private key to a text fileafter it is imported from a PKCS #12 file.
• -v – prints the version number and copyright message of the certpk12 tool and exits.
Examples
• Export certificate and private key file – Exports caRSA.crt, the certificate file andcaRSApkey.txt, the private key file, to a PKCS#12 file (caRSA.p12). password isthe password used to decrypt caRSApkey.txt. pk12password is the password used toencrypt the final caRSA.p12:
certpk12 -O caRSA.p12 -C caRSA.crt -K caRSApkey.txt -P password -E pk12password-- Sybase PKCS#12 Conversion Utility certpk12 Thu Nov 9 16:55:51 2000--
• Import file containing certificate and private key – Imports caRSA.p12, a PKCS #12file that contains a certificate and a private key. Output the embedded certificate to a textfile (caRSA_new.crt) and the embedded private key to a text file(caRSApkey_new.txt):
CHAPTER 1: Utility Commands Reference
Utility Guide 31

certpk12 -I caRSA.p12 -C caRSA_new.crt -K caRSApkey_new.txt -P new_password -E pk12password-- Sybase PKCS#12 Conversion Utility certpk12 Thu Nov 9 16:55:51 2000--
new_password is used to protect caRSApkey_new.txt, and pk12password is requiredto decrypt caRSA.p12 file.
Note: After you run examples 1 and 2, caRSA.crt and caRSA_new.crt are identical.caRSApkey.txt and caRSApkey_new.txt are different because they areencrypted randomly.
• Export certificate file – Exports the certificate file (caRSA.crt) to a PKCS#12 file(caRSAcert.p12). pkcs12password is used to encrypt caRSAcert.p12.
certpk12 -O caRSAcert.p12 -C caRSA.crt -E pk12password-- Sybase PKCS#12 Conversion Utility certpk12 Thu Nov 9 16:55:51 2000--
• Import file containing certificate – Imports a PKCS#12 file (caRSAcert.p12) thatcontains a certificate. Output the embedded certificate to a text file (caRSAcert.txt).
certpk12 -I caRSAcert.p12 -C caRSAcert.txt -E pk12password-- Sybase PKCS#12 Conversion Utility certpk12 Thu Nov 9 16:55:51 2000--
pk12password is required to decrypt caRSAcert.p12 file.
Note: After you run Examples 3 and 4, the caRSA.crt and caRSAcert.txt, areidentical.
Usage
• Adaptive Server includes the openssl open source utility in $SYBASE/$SYBASE_OCS/bin (%SYBASE%\%SYBASE_OCS%\bin in Windows). Use openssl to accomplish allcertificate management tasks implemented by certreq, certauth and certpk12. Sybaseincludes this binary as a convenience, and is not responsible for any issues incurred usingthe binary. See the OpenSSL Web site for details.
• certpk12 only supports triple-DES encrypted PKCS #12 file.• Running certpk12 requires that you place the entry for $SYBASE/$SYBASE_OCS/
lib3p before the entry for $SYBASE/$SYBASE_OCS/libp364 in the dynamiclibrary search path
• Append certificate requestor’s private key to the end of its signed certificate file.• Name the file servername.crt, where servername is the name of the server. Place it in
the certificates directory under $SYBASE/$SYBASE_ASE (%SYBASE%\%SYBASE_ASE% on Windows).
CHAPTER 1: Utility Commands Reference
32 Adaptive Server Enterprise

This file is needed to start the SSL-enabled Adaptive Server.
certreqCreates a server certificate request and corresponding private key. Use certreq in interactivemode, or provide all optional parameters on the command line.
The utility is located in:
• (UNIX) $SYBASE/$SYBASE_OCS/bin.
• (Windows) %SYBASE%\%SYBASE_OCS%\bin, as.certreq.exe
Syntaxcertreq [-F input_file] [-R request_filename] [-K PK_filename] [-P password]
Orcertreq -v
Parameters
• -F input_file – specifies the file name that contains attribute information to build acertificate request. If you do not specify an input_file name, the required informationmust be interactively entered by a user.
The input_file needs an entry for each of these:
req_certtype={Server,Client}req_keytype={RSA,DSA}req_keylength={for RSA: 512-4096; for DSA: 512,768,1024}req_country={string}req_state={string}req_locality={string}req_organization={string}req_orgunit={string}req_commonname={string}
Note: The common name must be the same as the server name.
See the Examples section for a sample file called input_file.
• -R request_filename – specifies the name for the certificate-request file.
• -K PK_filename – specifies the name for the private-key file.
• -P password – specifies the password used to protect the private key.
• -v – displays the version number and copyright message, then exits.
CHAPTER 1: Utility Commands Reference
Utility Guide 33

Examples
• Create request in interactive mode – This example does not use the -F input_fileparameter, and is therefore in interactive mode. To create a server certificate request(server_req.txt) and its private key (server_pkey.txt), enter:
certreqChoose certificate request type: S – Server certificate request C – Client certificate request (not supported) Q – QuitEnter your request [Q] : sChoose key type:
R – RSA key pair D – DSA/DHE key pair Q – Quit
Enter your request [Q] : rEnter key length (512, 768, 1024 for DSA; 512-2048 forRSA) : 512
Country: USState: californiaLocality: dublinOrganization: sybaseOrganizational Unit: dstCommon Name: server
The utility returns the message:Generating key pair (please wait) . . .
After the key pair is generated, the certreq utility prompts you for more information.Enter password for private key : password
Enter file path to save request: server_req.txt
Enter file path to save private key : server_pkey.txt• Build certificate noninteractively – The format, tag=value, is used for noninteractive
entry for a certificate request in this sample text file. Use the -F option for noninteractivemode, making sure to use valid values and following the format described above to ensurethat the certificate builds correctly.
certreq -F input_file
CHAPTER 1: Utility Commands Reference
34 Adaptive Server Enterprise

req_certtype=serverreq_keytype=RSAreq_keylength=512req_country=usreq_state=californiareq_locality=dublinreq_organization=sybasereq_orgunit=dstreq_commonname=server
After you create and save this file, enter on the command line, where path_and_file isthe location of the text file:certreq -F path_and_file -R server_req.txt -K server_pkey.txt -P password
This file creates a server certificate request, server_req.txt, and its private key,server_pkey.txt which is protected by password.
Edit the server certificate file with any standard ASCII text editor.
Usage
• Adaptive Server includes the openssl open source utility in $SYBASE/$SYBASE_OCS/bin (%SYBASE%\%SYBASE_OCS%\bin in Windows). Use openssl to accomplish allcertificate management tasks implemented by certreq, certauth and certpk12. Sybaseincludes this binary as a convenience, and is not responsible for any issues incurred usingthe binary. See the OpenSSL Web site for details.
• The input file uses the format of tag=value. tag is case-sensitive and should be the sameas described above.
• Running certreq requires that you place the entry for $SYBASE/$SYBASE_OCS/lib3p before the entry for $SYBASE/$SYBASE_OCS/libp364 in the dynamiclibrary search path
• The “=” is required. Valid value should start with a letter or digit, must be a single word,and there should not be any spaces within value.
• value is required for req_certtype, req_keytype, req_keylength and req_commonname.• The space or tab around <tag>, = and value is allowed. Blank lines are also allowed.
• Each comment line should start with #.
• The certificate request file is in PKCS #10 format and used as acceptable input for thecertauth tool to convert the request to a CA-signed certificate.
charset(UNIX only) Loads the character sets and sort order files in Adaptive Server.
The utility is located in $SYBASE/$SYBASE_ASE/bin.
CHAPTER 1: Utility Commands Reference
Utility Guide 35

Syntaxcharset [-Ppassword] [-Sserver] [-Iinterface] sort_order [ charset ]
Orcharset -v
Parameters
• -P password – specifies your password. If you do not specify -P, charset prompts foryour password.
• -S server – specifies the name of the server on which to change the character set andsort order.
• -I interface – specifies the network interface used by the server.
• sort_order – specifies the name of the sort order file Adaptive Server will use.
• charset – specifies the character set Adaptive Server will use.
• -v – displays the version number and copyright message for charset.
Usage
Before using charset, set your SYBASE environment variable to point to the current releasedirectory.
See also set command in Reference Manual: Commands.
Permissions
You must be a system administrator to use charset.
cobprePrecompiler for COBOL.
The utility is located in:
• (UNIX) $SYBASE/$SYBASE_OCS/bin.
• (Windows) %SYBASE%\%SYBASE_OCS%\bin.
SyntaxSee below.
CHAPTER 1: Utility Commands Reference
36 Adaptive Server Enterprise

Usage
For a full description of cobpre, see the Open Client and Open Server Programmer'sSupplement.
cprePrecompiler for C.
The utility is located in:
• (UNIX) $SYBASE/$SYBASE_OCS/bin.
• (Windows) %SYBASE%\%SYBASE_OCS%\bin.
SyntaxSee below.
Usage
For a full description of cpre, see the Open Client and Open Server Programmer'sSupplement.
dataserver(UNIX only) The executable form of the Adaptive Server program, located in $SYBASE/$SYBASE_ASE/bin.
Syntaxdataserver [-f] [-g] [-G] [-h] [-H] [-m] [-q] [-v] [-X] [-A system_role [-a path_to_CAPs_directive_file] [-b master_device_size [k | K | m | M | g | G | t | T] ] [-c config_file_for_server] [-d device_name] [-D default_db_size] [-e path_to_error_log] [-i interfaces_file_directory] [-K keytab_file] [-L config_file_name_for_connectivity] [-M shared_memory_repository_directory] [-N licinstant] [-n system_privileges [-p sa_login_name] [-r mirror_disk_name] [-s server_name] [-T trace_flag] [-u sa/sso_name] [-w master | model database]
CHAPTER 1: Utility Commands Reference
Utility Guide 37

[-y [password] ] [-z page_size [ k | K ] ] [-Z initial_master_db_size]
Syntax for the Cluster Edition:dataserver-u, --admin-name=sa/sso_name --buildquorum=[force] -a, --caps-file=filename -F, --cluster-input=filename --cluster-takeover -L, --conn-config-file=[filename] --create-cluster-id [=quorum]-D, --default-db-size=size_spec -e, --error-log=[filename] -G, --event-log-server=logserv_name -f, --forcebuild -H, --ha-server -h, --help=[{0|1|2|3}[,display_width]] --instance=instance_name -y, --key-password=[key_password] -K, --keytab-file=filename-N, --license-prop-file=filename -z, --logical-page-size=page_size -Z, --master-db-size=size_spec -d, --master-dev=master_device_name -b, --master-dev-size=[size_spec] --master_key_password [=password]-r, --master-mirror=filename -m, --masterrecover -g, --no-event-logging -n, --permission-login=system_privilege -Q, --quorum-dev=quorum_dev -q, --recover-quiesced -w, --rewrite-db=database_name-A, --role-logins=system_role-p, --sa-name={SSO_login_account | sso_role | sa_role} -k, --server-principal=s_principal -M, --shared-mem-dir=directory_name -X, --sybmon -T, --trace=trace_flag -v, --version
Ordataserver -v
Parameters
• -A system_role – when enable granular permissions is set to 0, and all users areunable to log into Adaptive Server, provides the server administrator with a login accountwith sso_role.
CHAPTER 1: Utility Commands Reference
38 Adaptive Server Enterprise

• -a path_to_CAPs_directive_file – specifies the path to the CAPs directivefile.
• -b master_device_size [ k | K | m | M | g | G | t | T ] –specifies the size of the master device or database you want to build. The server calculatesthe sizes, so you can use “K”, “M”, “G”, and “T” instead of exact byte numbers.
• -c config_file_for_server – specifies the full path name of an Adaptive Serverconfiguration file. Use this parameter to start Adaptive Server with the configurationvalues in the specified configuration file. If you specify a configuration file with thedataserver -c parameter, make sure all the parameters in this configuration file arecompatible before you boot the server. If some of the configuration parameters areincompatible, the server may not boot. To avoid this, do not specify a configuration filewhen you build the master device. The build phase uses all default settings when you donot specify a configuration file.For more information, see the System AdministrationGuide.
• -D default_db_size – declares how large the model database should be whencreating a new installation. This sets the size of the smallest permitted database. Syntax isidentical to the -b size parameter. -D is only valid when used in conjunction with -b.Default varies by server page size, because the smallest acceptable size is 1024 logicalpages: 2 Mb on a 2k page, 4 Mb on an 8k page, and so on. If the flag provides a size smallerthan the minimum, the server adjusts it up to the minimum.
• -d device_name – is the full path name of the device for the master database. Themaster database device must be writable by the user who starts Adaptive Server. If you donot use the -d parameter, the default master database device name is d_master.
• -e errorlogfile – is the full path name of the error log file for Adaptive Serversystem-level error messages.
• -f – forces initialization of a device or database. -f is valid only when used with -band/or -w. The server fails to boot if you use -f without either -b or -w. -f forces theserver in different ways, depending whether -w is present.
• -G logserv_name – specifies the name of the event log server.
• -g – turns off event-logging.
• -H – starts the high availability (HA) server, if you have the HA feature installed on yourAdaptive Server.
• -h – prints this help message, then exists.
• -i interfaces_file_directory – specifies the directory location of theinterfaces file to search when connecting Adaptive Server. If -I is omitted, dataserverlooks for a file named interfaces in the directory pointed to by your SYBASEenvironment variable.
• -K keytab_file – specifies the path to the keytab file used for authentication in DCE.
• -k, --server-principal=s_principal – specifies the server principal name.
• -L config_file_name_for_connectivity – specifies the name theconfiguration file for connectivity.
CHAPTER 1: Utility Commands Reference
Utility Guide 39

• -M sharedmem_directory – places shared memory files in the specified directoryinstead of in the default location, $SYBASE. If sharedmem_directory starts with “/”, thedirectory name is assumed to be absolute. Otherwise, the directory name is interpretedrelative to $SYBASE.
• --master_key_password [=password] – specifies the master key passwordwhen you provide the password on the command line or prompts for a master keypassword during Adaptive Server start-up. The password characters are not displayed, andthe password is not validated until later in the Adaptive Server startup sequence.
If you include the password on the command line, it is visible until the memory is read andused.
• -m – starts Adaptive Server in single-user mode.
• -N licinstant – specifies a nondefault directory location for the license cache file.The default location is $SYBASE/$SYBASE_ASE/sysam/server_name.properties.
• -n system_privileges – when enable granular permissions is set to 1, and all usersare unable to log into Adaptive Server, provides the server administrator with a loginaccount with change password privilege.
• -p sso_login_name – specifies the login name of a system security officer whenstarting Adaptive Server, for the purposes of getting a new password for that account.Adaptive Server generates a random password, displays it, encrypts it, and saves it inmaster..syslogins as that account’s new password.
Because Adaptive Server passwords are encrypted, you cannot recover forgottenpasswords. If all system security officers lose their passwords, the -p parameter generatesa new password for a system security officer account. Start Adaptive Server with -p,immediately log in to Adaptive Server with the new random password, and executesp_password to reset your password to a more secure one.
• -q – treats quiesced databases as “in recovery.”
• -r mastermirror – starts the mirror of the master device. Use this parameter to startAdaptive Server if the master device has been damaged.
• -s servername – specifies the name of the Adaptive Server to start.
If you do not specify an Adaptive Server name with the -s parameter, and you have not setthe DSLISTEN environment variable, dataserver uses the default Adaptive Server nameSYBASE. The value of the DSLISTEN environment variable overrides this default value,and the -s parameter overrides both the default and the DSLISTEN environment variable.
• -T trace_flag – specifies a trace flag number.
• -u sa/sso_name – specifies the system administrator or system security officer’sname you want to unlock.
• -v – prints the version number and copyright message for dataserver, then exits.
• -w [master | model] – specifies whether you want to write a master or modeldatabase.
CHAPTER 1: Utility Commands Reference
40 Adaptive Server Enterprise

When you use the -w parameter, dataserver uses the ascii-8 character set instead of theiso_1 character set. If you require the iso_8 character set for master, load a dump of themaster database or change the character set with sqlloc (sqlloc requires thesybsystemprocs database.)
• -X – starts this server as sybmon, not dataserver.
• -y [password] – allows you to assign a password for the encrypted private key, so thatthe server prompts the user for a password. This password should match the password youused to encrypt the private key when it was created. You cannot use this parameter whenyou are running the server in the background.
Note: Although you can set a password with -y, for security reasons Sybase stronglydiscourages you from doing so.
A private key is included with your server’s digital certificate. By default, the certificatefile located at /usr/local/sybase/certificates/<servername>.crt.
The location of the certificate file changes if you invoke the sp_ssladmin addcertcommand.
• -Z [initial_master_db_size] – declares how large the master databaseshould be when creating a new installation, setting the size of the smallest permitteddatabase. Syntax is identical to the -b size parameter. -D is only valid when used inconjunction with -b. Default varies by server page size, because the smallest acceptablesize is 3072 logical pages: 6MB on a 2K page, 12MB on an 8K page, and so on. If the flagprovides a size smaller than the minimum, the server adjusts it up to the minimum.
• -z page_size [ k | K ] – specifies the page size of the server. Use -b and -w touse this flag, and name an even power of two between 2K and 16K, or else the server doesnot boot.
Examples
• Create new installation – Creates a new installation with a 100MB master device and a4K page:dataserver -d my_master_device -z 4k -b 100.02M
The spaces between options and their following arguments are optional and acceptable.This example specifies “100.02M” for a 100MB master device because the server requires16K of overhead for its configuration area.
• Rewrite database – Rewrites a corrupt model database:
dataserver -d d_master -w model -s server_name• Rewrite database with device size – Rewrites a corrupt master database, specifying
device size:dataserver -d my_master_device -w master -z 4k
CHAPTER 1: Utility Commands Reference
Utility Guide 41

• Rewrite database with device and page sizes – Rewrites a corrupt master database,specifying device and page sizes, forcing the server to accept these values in preference towhat it may find in the config block:dataserver -d my_master_device -w master -z 4k -b 100.02M -f
• Rewrite database with nonmatching page size (generates error) – Rewrites a corruptmaster database, specifying a page size that does not match what the server finds in itsconfig block. This produces a failure:
dataserver -d my_master_device -w master -z 8k00:00000:00000:2001/01/19 12:01:26.94 server Theconfigured server page size does not match that specified on the command line. To use the configured size, omit the command line size; to use the command line size, specify 'force' (-f).
• Rewrite database with incorrect page size (generates error) – Rewrites a corruptmaster database, specifying an incorrect page size, even in a normal restart. Thisproduces a failure:
dataserver -d my_master_device -z4000dataserver: the 'z' flag may not be used without 'b' or 'w'. dataserver: server will ignore the 'z' flag. dataserver: the 'z' flag contained an invalid page size. dataserver: the page size must be an even power of two between 2048 and 16384 bytes, inclusive.
• Specify principal name – Specifies the “[email protected]” principal name:$SYBASE/$SYBASE_ASE/bin/dataserver -dmaster.dat -s secure_ase -k [email protected]
• Prompt for password – Prompts for a master key password:dataserver --master_key_passwd -dd_master -eerrorlog
• List with role – List account names with role sso_role:$SYBASE/$SYBASE_ASE/bin/dataserver -d master.dat -s server_name-A sso_role
(Cluster Edition) To list account names with role login for sso_role:$SYBASE/$SYBASE_ASE/bin/dataserver -d master.dat -s server_name--role-logins sso_role
• List with change password privilege – List account names with privilege changepassword:$SYBASE/$SYBASE_ASE/bin/dataserver -d master.dat
CHAPTER 1: Utility Commands Reference
42 Adaptive Server Enterprise

-s server_name-n "change password"
(Cluster Edition) To list account names with permission logins change password:$SYBASE/$SYBASE_ASE/bin/dataserver -d master.dat -s server_name--permission-logins "change password"
Permissions
Anyone with execute permission on the binary, and who has read/write access to all the files.
After you have finished running the Adaptive Server installation program, set the filepermissions on the dataserver executable to limit who can execute it.
See also• Dependencies and Conditions of -b and -w Options on page 44
• Potential Issues of Using -f and -w Options Together on page 44
• Chapter 3, Building Servers Using dataserver on page 203
• startserver on page 137
Usage for dataserverThere are additional considerations when using dataserver.
• dataserver allows you to create devices and databases that are up to 32Gb in size,depending on the limitation of your operating system. For more information on size limits,see the installation guide for your platform.
• Start Adaptive Server with the startserver command rather than by directly executing thedataserver program. If you need to change any of the default values, edit theRUN_servername file in your Sybase installation directory.
• Automatic login lockouts can cause a site to end up in a situation in which all accountscapable of unlocking logins (system administrators and system security officers) arelocked. If this occurs, use the dataserver utility with the -u parameter to check thespecified login for system administrator or system security officer authorization, unlockthe account, and reset the value of the current failed logins counter to zero.
See also:
• Reference Manual: Commands – disk mirror, disk remirror, disk unmirror
• Reference Manual: Procedures – sp_ssladmin, addcert
See also• startserver on page 137
CHAPTER 1: Utility Commands Reference
Utility Guide 43

Dependencies and Conditions of -b and -w OptionsThe effect of -b changes depending on whether -w is present.
• -b without -w creates a new master device as named by -d (the default is d_master) andwith the page size as specified by -z (the default is 2048). If the named device:• Already exists as an OS file – the attempt fails, and you see a message such as:
File already exists. You must remove the existing file before attempting to create a new one using the server's -b option.Unable to create master device.
• Names an existing raw partition – the attempt fails unless you include the-f flag. Thisreinitializes the raw partition as a server master device.
• -b with -w master tells dataserver to use the size specified in -z for the master devicewhen re-creating the master database. It implies nothing about creating a new device.
-w may or may not require additional flags if you use:
• -w model – the -z and -b flags are accepted but ignored.
• -w master for new installations – -z and -b are not required because the device sizeinformation is stored in the config_block.
• -w master to upgrade older installations:
• The server requires -b and/or -z if the config_block does not contain a valid entryfor the associated size(s). The command fails if it cannot get valid data for the page sizeor device size.
• Provide -b and/or -z when the config_block contains valid entries for the sizesthey represent. However if the sizes do not match what is in the config_block, add-f to force your new size preferences.
Potential Issues of Using -f and -w Options TogetherBe particularly careful when using the -f and -w options together.
When rewriting master database using the -w option, the server requires that theconfiguration block page size and device size are correct. If you do not provide them on thecommand line they must agree. The server refits the master device, and puts master and allother included databases back in their proper places.
When you use the -f option to force initialization, your page size and master device sizeoverride those in the configuration block. In addition, -f assigns all other unknown spaces—allocation blocks that are either unused or are corrupted—to the master database.
CHAPTER 1: Utility Commands Reference
44 Adaptive Server Enterprise

ddlgenA Java-based tool that generates definitions for server- and database-level objects in AdaptiveServer.
The command-line version of ddlgen is located in:
• (UNIX) $SYBASE/$SYBASE_ASE/bin.
• (Windows) %SYBASE%\%SYBASE_ASE%\bin.
Syntaxddlgen -Ulogin -Ppassword -S[[ssl:]server | host_name : port_number] [-I interfaces_file] [-Tobject_type] [-Nobject_name] [-Ddbname] [-Cproperty_name=property_value] [-Xextended_object_type] [-Ooutput_file] [-Eerror_file] [-Lprogress_log_file] [-Jclient_charset] [-LC -N logical_cluster_name -F[ % | SGM | GRP | USR | R | D | UDD | U | V | P | XP | I | RI | KC | TR | PC ]
Orddlgen -v
Parameters
• -U login – specifies a login name, and is case-sensitive.
• -P password – specifies your password.
If you do not include the -P parameter in your ddlgen statement, ddlgen prompts you tospecify a password.
• -S [[ssl:] server | host_name : port_number] – specifies the name ofthe Adaptive Server. ddlgen looks this name up in the interfaces file or LDAPconfiguration file. If you specify:
• [ssl:] – allows you to generate DDL for objects in SSL-enabled servers. Thisparameter is optional.
CHAPTER 1: Utility Commands Reference
Utility Guide 45

• -S[host_name:port_number] – ddlgen uses the host_name and port_numberprovided, and neither interfaces nor LDAP configuration files are read or parsed.
• -S[server] -I – ddlgen parses the interfaces file specified at the user location forthe server name (see the -I parameter description).
• -S[server] – without specifying an interfaces file, ddlgen does:
1. ddlgen first tries to read the LDAP configuration file from the standard location2. If the LDAP file does not exist, or exists but does not contain an Adaptive Server
entry, then the interfaces file is parsed at its standard location for the server name3. If the LDAP file exists, then ddlgen uses it to search the server name. The interfaces
file is not parsed, and the LDAP configuration file is parsed.
Note: You must use the -S option because ddlgen does not connect to a default server.
• -I – specifies the interfaces file name, and corresponds to $SYBASE/interfaces forUNIX, and %SYBASE%\ini\sql.ini for Windows. Use this optional parameter with-S.
• -Tobject_type – specifies the type of object you are creating. If you do not use -T,ddlgen generates DDL for the default database of login. The object types for -T are:
• C – cache
• D – default
• DB – database
• DBD – database device
• DPD – dump device
• EC – execution class
• EG – engine group
• EK – encrypted keys
• GRP – group
• I – index
• IT – instead of trigger for views
• KC – key constraints
• L – login
• LK – logical key
• P – stored procedure
• PN – partition name
• R – rule
• RI – referential integrity
• RO – role
• RS – remote server
• SGM – segment
CHAPTER 1: Utility Commands Reference
46 Adaptive Server Enterprise

• TR – trigger
• U – table
• UDD – user-defined datatype
• USR – user
• V – view
• WS – user-defined Web service
• WSC – Web service consumer
• XOD – local caches
• XOU – global caches
• XP – extended stored procedure
• -Nobject_name – specifies the fully qualified name of the object you are creating, suchas -Ndb_name.owner_name.table_name.object_name. The -N option:
• Is required if you specify any object_type other than DB (database) in the -Tparameter.
• Accepts wildcards with the use of %.
• Generates DDL for a trigger for a table, using the -Ndb_name.table_owner.table_name.trigger_name format.
To generate all triggers for a table, substitute trigger_name with % using the -Ndb_name.table_owner.table_name.% format.
• Generates DDL for an encrypted key with -Ndb_name.owner.key_name.
• Generates DDL for all items of a specific object type on your server.• Enforces strict order in which it parses the names in the -
Ndb_name.owner_name.table_name.object_name format. If you onlyprovide three arguments, ddlgen assumes they are owner_name, table_name, andobject_name, in that order. Alternatively, you can also use -Nowner_name.table_name -Ddb_name. ddlgen does not impose thisrestriction if object_name is an index (I).
• -Ddbname – specifies the name of the database for the object you specify in the -Noption. The default is the user’s default database.
You cannot use the -D parameter when generating DDL for all triggers of a table.
• -Cproperty_name=property_value – allows you to set connection properties.You can set multiple properties; separate them with commas, such as:-Cproperty_value1=property_value1,property_name2=property_value2
• -Xextended_object_type – differentiates:
• User tables (OU) from proxy tables (OD) when you specify a table as your object type(-TU)
• Temporary databases (OD) from normal databases (OU) or archive databases (OA)when you specify database as your object type (-TDB)
CHAPTER 1: Utility Commands Reference
Utility Guide 47

• SQLJ procedures (OD) from stored procedures (OU) when you specify procedure asyour object type (-TP).
If object_type (-T) is U (table) and -X is not specified, ddlgen generates DDL for bothuser tables and proxy tables. To generate DDL only for:
• user tables – use the OU extended object type with the -X option.
• proxy tables – use the OD extended object type with the -X option.
• in-memory databases, caches, and devices – use the OI extended object type withthe -X option.
• in-memory temporary databases – use the OIT extended object type with the -Xoption.
Note: ddlgen does not support schema generation for system tables.
Use extended_object_type DE (-XDE), with the database object type (-TDB) to generate adatabase and all of its objects in correct dependent order.
• -Ooutput_file – specifies an output file for the generated DDL. If you do not specify-O, the DDL you create appears in a console window.
• -Eerror_file – specifies a log file for recording errors. If you do not specify -E, thegenerated errors appear in a console window.
• -Lprogress_log_file – specifies a log file for recording the progress of ddlgen. Ifyou do not specify -L, the progress is not recorded.
• -Jclient_charset – specifies the character set to use on the client. -Jclient_charset requests that Adaptive Server convert to and from client_charset,the character set used on the client. A filter converts input between client_charset and theAdaptive Server character set.
Omitting -J sets the character set to a default for the platform. The default may notnecessarily be the character set that the client is using.
Note: For HP platforms – you must use -Jiso_1 to specify the correct character set.
• -LC – generate DDL for one or all logical clusters on a server.
• -F – filters out indexes, triggers, and constraints out of table and database definitions in theDDL of table- and database-level objects. The valid filters are:
• For tables – [ % | I | RI | KC | TR | PC ]• For databases – [ % | SGM | GRP | USR | R | D | UDD | U | V | P
| XP | I | RI | KC | TR]The filter options are:
• % – everything. Retrieves the schema-only definition of a database or table.
• SGM – segments
CHAPTER 1: Utility Commands Reference
48 Adaptive Server Enterprise

• GRP – groups
• USR – users
• R – rules
• D – defaults
• UDD – uer-defined datatypes
• U – user tables
• V – views
• P – stored procedures
• PC – partition condition
• XP – extended stored procedures
• I – indexes
• RI – referential integrity constraints
• KC – primary- and unique-key constraints
• TR – triggers
If you use an invalid filter parameter, ddlgen generates a warning, ignores that parameter,and continues with the rest of the valid parameters you specify.
If you specify % along with other filter parameters, ddlgen ignores all other filterableparameters, and only shows schema-only definitions. ddlgen then continues to evaluatethe dependencies within the subset of the applied as the filterable parameters for thedatabase.
• -v – displays the version and copyright message of ddlgen and returns to the operatingsystem.
Examples
• Archive database – To generate DDL for all archive databases, use the extended filteroption “OA.”ddlgen -Uroy -Proy123 -SHARBOR:1955 -TDB -N% -XOA
To generate DDL for a single archive database, use the syntax for normal databases. Thisexample creates DDL for the archive database adb1.
ddlgen -Uroy -Proy123 -SHARBOR:1955 -TDB -Nadb1• Caches – Generates DDL for a cache called default data cache on a machine
named HARBOR using port 1955:ddlgen -Uroy -Proy123 -SHARBOR:1955 -TC -N"default data cache"
To generate DDL for all caches:ddlgen -Ulogin -Ppassword -Sserver:port -TC -N%
• Connection properties –
Generates DDL for a database that uses an encrypted password for its connection:
CHAPTER 1: Utility Commands Reference
Utility Guide 49

ddlgen -Usa -Psybase -Sbjrhx64:7710 -Tdb -Nmodel -CENCRYPT_PASSWORD=true
• Databases – Generates DDL for a database called pubs2 on a machine named HARBORusing port 1955:ddlgen -Uroy -Proy123 -SHARBOR:1955 -TDB -Npubs2
If you do not specify a dbname, ddlgen generates DDL for the default database of login:ddlgen -Ulogin -Ppassword -Sserver:port
If you do not use the -T parameter, ddlgen generates DDL for a default-type database:
ddlgen -Ulogin -Ppassword -Sserver:port -Ndbname
To generate DDL for all databases:ddlgen -Ulogin -Ppassword -Sserver:port -TDB -N%
• Defaults – Generates DDL for a default called “phondflt” owned by jones in the pubs2database on a machine named HARBOR using port 1955:ddlgen -Uroy -Proy123 -SHARBOR:1955 -TD -Njones.phonedflt -Dpubs2
Alternatively, because ddlgen allows you to use a fully qualified name in the -N flag, omitthe -Ddbname and include the database name in the -N option:
ddlgen -Ulogin -Ppassword -Sserver:port -TD -Ndbname.owner.defaultname
To generate DDL for all defaults in a database owned by “owner”:ddlgen -Ulogin -Ppassword -Sserver:port -TD -Nowner.% -Ddbname
• Database devices – Generates DDL for a database device called master running on amachine named HARBOR using port 1955:ddlgen -Uroy -Proy123 -SHARBOR:1955 -TDBD -Nmaster
To generate DDL for all database devices:ddlgen -Ulogin -Ppassword -Sserver:port -TDBD -N%
• Dump devices – Generates DDL for a dump device called tapedump1 running on amachine named HARBOR using port 1955:ddlgen -Uroy -Proy123 -SHARBOR:1955 -TDPD -Ntapedump1
To generate DDL for all dump devices:ddlgen -Ulogin -Ppassword -Sserver:port -TDPD -N%
• Encrypted keys – Generates DDL for all encryption keys in the accounts database on amachine named “HARBOR” using port 1955:ddlgen -Uroy -Proy123 -SHARBOR:1955 -TEK -Naccounts.dbo.%
Alternatively, you use the -D option to specify the database name.
CHAPTER 1: Utility Commands Reference
50 Adaptive Server Enterprise

• Encrypted keys – Generate DDL for an encryption key “ssn_key” in a theSampleKeysDB database:
ddlgen -Usa -P -Sserver -TEK -NSampleKeysDB.dbo.ssn_key
Add -FEKC to avoid creating DDL for key copies when generating DDL for the “ssn_key”encryption key:ddlgen -Usa -P -Sserver -TEK -NSampleKeysDB.dbo.ssn_key -FEKC
• Encrypted passwords – Generates system encryption passwords along with DDLs forencryption keys when you include the extended option -XOD. The output generates thesp_encryption statement followed by DDL statements for all encrypted keys. Thisgenerates DDL for the login “george” on a machine named HARBOR using port 1955:ddlgen -Uroy -Proy123 -SHARBOR:1955 -TEK -Ngeorge -XOD
To generate DDL for all the encrypted keys in the authors database on a machine namedHARBOR using port 1955:ddlgen -Uroy -Proy123 -SHARBOR:1955 -TEK -Nauthors.dbo.%
• Engine groups – Generates DDL for an engine group called LASTONLINE running on amachine named HARBOR using port 1955:ddlgen -Uroy -Proy123 -SHARBOR:1955 -TEG -NLASTONLINE
To generate DDL for all engine groups:ddlgen -Ulogin -Ppassword -Sserver:port -TEG -N%
• Execution class – Generates DDL for an execution class called EC2 running on a machinenamed HARBOR using port 1955:ddlgen -Uroy -Proy123 -SHARBOR:1955 -TEC -NEC2
To generate DDL for all execution classes:ddlgen -Ulogin -Ppassword -Sserver:port -TEC -N%
• Extended object type
The example uses the following:create database tdb on default = '20M'
use tdb
create table test ( fid varchar(10) )
create view View_A as select * from test
create view View_B as select * from View_A CREATE FUNCTION Func_C(@ID VARCHAR(10)) RETURNS varchar(8000) AS BEGIN declare @ret varchar(8000)
CHAPTER 1: Utility Commands Reference
Utility Guide 51

select @ret = (select fid from View_B) return @ret
END go
create view View_D as select * from test where fid>dbo.Func_C('111') go
CREATE FUNCTION Func_no_depend(@ID VARCHAR(10)) RETURNS varchar(8000) AS BEGIN declare @ret varchar(8000) return @ret END go
Issuing ddlgen returns all objects of database tdb in correct dependent order:
ddlgen –S –U –P –TDB –Ntdb –XDE
1. Segment2. Group3. User4. Rules5. Defaults6. UDDs7. Encrypted Keys8. User Tables9. Proxy Tables10. Triggers11. Functions and Views
a. All functions without any dependencyb. All views without any dependencyc. All functions and all views with any dependency on any objects
12. Instead of trigger13. Stored Procedures14. Extended Stored Procedures15. PRS16. User Defined Web Services
• Extended stored procedures – Generates DDL for the xp_cmdshell extended storedprocedure in the pubs2 database, owned by Jones and running on a machine namedHARBOR using port 1955, by using the fully qualifieddbname.owner.extendedstoredprocedure format with the -N option:
CHAPTER 1: Utility Commands Reference
52 Adaptive Server Enterprise
ddlgen -Uroy -Proy123 -SHARBOR:1955 -TXP -Npubs2.jones.xp_cmdshell
Alternatively, use the -D option instead of using the fully qualified name:
ddlgen -Ulogin -Ppassword -Sserver:port -TXP -Nowner.extendedstoredprocedure -Ddbname
To generate DDL for all extended stored procedures:ddlgen -Ulogin -Ppassword -Sserver:port -TXP -Ndbname.owner.%
• Filters – Generates DDL for the authors table in the pubs2 database, filtering for allindexes (I), and referential integrity constraints (RI), primary and unique key constraints(KC), triggers (TR), and partition condition (PC) from the DDL of a table:
ddlgen -Uroy -Proy123 -TU -Nauthors -Dpubs2 -F%
Alternatively, specify each of the filters individually:ddlgen -Ulogin -Ppassword -TU -Ndbname.owner.table -FI,RI,KC,TR
This generates the definition of table_name while filtering out foreign keys and primary-unique keys:ddlgen -Ulogin -Ppassword -TU -Ntable_name -Ddbname -FRI,KC
Both of these generate foreign keys for a specified user in the entire database:ddlgen -Ulogin -Ppassword -TRI -N%.%.% -Ddbname
Or:ddlgen -Ulogin -Ppassword -TRI -Ndbname%.%.%
Both of these generate DDL for the primary and unique keys of all the tables in a databasethat begin with “PK”:ddlgen -Ulogin -Ppassword -TKC -Ndbname.%.%.PK%
Or:ddlgen -Ulogin -Ppassword -TKC -N%.%.PK% -Ddbname
This generates schema-only definition of a database:ddlgen -Ulogin -Ppassword -Sserver:port -TF -Ndbname -F%
Alternatively, specify each of the filters individually:ddlgen -Ulogin -Ppassword -Sserver:port -TDB -Ndbname -FSGM,GRP,USR,R,D,UDD,V,P,XP,I,RI,KC,TR
This generates the database DDL skipping the compiled object:ddlgen -Ulogin -Ppassword -Sserver:port -TDB -Ndbname -FTR,D,XP,V,R
This generates database definition without a table definition:
CHAPTER 1: Utility Commands Reference
Utility Guide 53

ddlgen -Ulogin -Ppassword -Sserver:port -TDB -Ndbname -FU
• Groups – Generates DDL for a group called “public” in the pubs2 database, running on amachine named HARBOR using port 1955, by using the fully qualifieddbname.groupname format in the -N option:
ddlgen -Uroy -Proy123 -SHARBOR:1955 -TGRP -Npubs2.public
Alternatively, use the -D option to specify the dbname:ddlgen -Ulogin -Ppassword -Sserver:port -TGRP -Ngroupname -Ddbname
To generate DDL for all groups:ddlgen -Ulogin -Ppassword -Sserver:port -TGRP -Ndbname.%
• In-memory database – Generates DDL for an in-memory database: ddlgen -Uroy -Proy123 -SHARBOR:1955 -TDB -Nimdb_1
Use the same syntax to generate DDL for an in-memory temporary database:ddlgen -Uroy -Proy123 -SHARBOR:1955 -TDB -Nimdb_temp1
• Indexes – Generates DDL for an index called au_lname for the table authors ownedby dbo, in the pubs2 database:
ddlgen -Uroy -Proy123 -SHARBOR:1955 -TI -Ndbo.authors.au_lname -Dpubs2
Alternatively, because ddlgen allows you to use a fully qualified name in the -N flag, omitthe -Ddbname and include the database name in the -N option:
ddlgen -Ulogin -Ppassword -Sserver:port -TI -Ndbname.owner.tablename.indexname
If you use a fully qualified name, you may omit the -D option.
To generate DDL for all indexes for a single table:ddlgen -Ulogin -Ppassword -Sserver:port -TI -Ndbname.owner.tablename.%
To generate DDL for all indexes of all tables in a database:ddlgen -Ulogin -Ppassword -Sserver:port -TI -Ndbname.%.%.%
For example, this generates DDL for all indexes for all tables in the pubs2 database:
ddlgen -Usa -P -SHARBOR:1955 -TI -Npubs2.%.%.%• Instead of triggers – Generates one view and its (instead of) trigger, and next view
and its (instead of) trigger:
ddlgen -S -U -P -TV -Ndbname.ownername.viewname
Generates triggers only for tables:ddlgen -S -U -P -TTR
Generates instead of triggers for views:
CHAPTER 1: Utility Commands Reference
54 Adaptive Server Enterprise

ddlgen -S -U -P -TIT• Keys – Both of these generate DDL for the primary and unique keys of all the tables in a
database that begin with “PK”:ddlgen -Usa -P -TKC -Ndbname.%.%.PK%
Or:ddlgen -Usa -P -TKC -N%.%.PK% -Ddbname
• Logical cluster – Generates DDL for “my_lcluster” on server “ase1”, enter:ddlgen -Usa -P -Sase1 -TLC -Nmy_lcluster
• Logical cluster – Generates DDL for all logical clusters on server “ase1”, enter:ddlgen -Usa -P -Sase1 -TLC -N%
• Logical keys – LK generates logical keys of table defined by sp_primarykey,sp_commonkey, sp_foreignkey statements. Since these keys do not have a name, thename of the object in this case would be the name of the table. This example generate aDDL for logical keys of table authors in database pubs2 running on a machine namedHARBOR using port 1955:ddlgen -Uroy -Proy123 -SHARBOR:1955 -TLK -Npubs2.dbo.authors
To generate DDL for all logical keys in database pub2 use:
ddlgen -Uroy -Proy123 -SHARBOR:1955 -TLK -Npubs2.%.%
To filter out logical keys definition from DDL of table authors use LK in -F argument,use:ddlgen -Uroy -Proy123 -SHARBOR:1955 -TLK -Npubs2.dbo.authors -FLK
• Logins – TL generates DDL for one or all logins. This example generates DDL for alllogins on a machine named HARBOR using port 1955:ddlgen -Uroy -Proy123 -SHARBOR:1955 -TL -N%
Note: The password in the DDL generated for all logins is “password”.
Alternatively, specify an individual login by using -Nusername instead of -N%:
ddlgen -Ulogin -Ppassword -Sserver:port -TL -Nusername
If server-wide password complexity options have been specified for the login or logins, allsp_addlogin and sp_loglogin DDL statements are generated first, followed by DDLstatements for the password options. This example generates DDL for the login “george”on a machine named HARBOR using port 1955:ddlgen -Uroy -Proy123 -SHARBOR:1955 -TL -Ngeorge
• Remote servers – Generates DDL for a remote server called ORANGE on a machinenamed HARBOR using port 1955:ddlgen -Uroy -Proy123 -SHARBOR:1955 -TRS -NORANGE
To generate DDL for all remote servers:
CHAPTER 1: Utility Commands Reference
Utility Guide 55

ddlgen -Ulogin -Ppassword -Sserver:port -TRS -N%• Roles – Generates DDL for the sa_role on a machine named HARBOR using port 1955:
ddlgen -Uroy -Proy123 -SHARBOR:1955 -TRO -Nsa_role
To generate DDL for all roles:
ddlgen -Ulogin -Ppassword -Sserver:port -TRO -N%
Note: The password in the DDL generated for all roles is “password”.
• Rules – Generates DDL for all rules associated with authors on a machine namedHARBOR using port 1955:ddlgen -Uroy -Proy123 -SHARBOR:1955 -TR -Nauthors.dbo.%
The % symbol tells ddlgen to create DDLs for all rules that exist on the server.
You can also give the fully qualified name of the rule:ddlgen -Ulogin -Ppassword -Sserver:port -TR -Ndbname.owner.rulename
Alternatively, also use the -D parameter:
ddlgen -Ulogin -Ppassword -Sserver:port -TR -Nowner.rulename -Ddbname
• Segments – Generates DDL using the fully qualified dbname.segmentname formatin the -N option for a segment called logsegment for the pubs2 database, on amachine named HARBOR using port 1955:ddlgen -Uroy -Proy123 -SHARBOR:1955 -TSGM -Npubs2.logsegment
Alternatively, specify the dbname using the -D option:
ddlgen -Ulogin -Ppassword -Sserver:port -TSGM -Nsegmentname -Ddbname
To generate DDL for all segments:ddlgen -Ulogin -Ppassword -Sserver:port -TSGM -Ndbname.%
• SQLJ functions – Generates DDL for a SQLJ function named region_of owned by dboin database master:
ddlgen -Uroy -Proy123 -SHARBOR:1955 -TF –Nmaster.dbo.region_of
Alternatively also use the -D parameter:
ddlgen -Ulogin -Ppassword -Sserver:port -TF –Ndbo.region_of –Dmaster
To generate DDL for all SQLJ functions in a database, use object type F:
ddlgen -Ulogin -Ppassword -Sserver:port -TF –Ndbname.owner.%• SQLJ procedures – A kind of stored procedure, you generate DDL for SQL procedures
along with DDL for stored procedures. This generates DDL for all stored procedures—including SQLJ procedures—owned by dbo in the master database:
CHAPTER 1: Utility Commands Reference
56 Adaptive Server Enterprise

ddlgen -Uroy -Proy123 -SHARBOR:1955 -TP –Nmaster.dbo.%
To generate DDL for all SQLJ procedures that are only owned by dbo in the masterdatabase, use this, where the extended type OD refers to SQLJ procedures:
ddlgen -Ulogin -Ppassword-Sserver:port -TP –Nmaster.dbo.% -XOD
To generate DDL for all procedures except SQLJ procedures owned by dbo in themaster database, use this, where the extended type OU refers to all stored proceduresexcept SQLJ procedures:ddlgen -Ulogin -Ppassword-Sserver:port -TP –Nmaster.dbo.% -XOU
• Stored procedures – Generates DDL for the sp_monitor stored procedure for the pubs2database on a machine named HARBOR using port 1955, using the fully qualifieddbname.owner.procedure_name format for the -N option:
ddlgen -Uroy -Proy123 -SHARBOR:1955 -TP -Npubs2.dbo.sp_monitor
Alternatively, specify the dbname using the -D option:
ddlgen -Ulogin -Ppassword -Sserver:port -TP -Nowner.procedurename -Ddbname
To generate DDL for all stored procedures:ddlgen -Ulogin -Ppassword -Sserver:port -TP -Ndbname.owner.%
• SSL-enabled servers – Generates DDL for objects in the pubs2 database for an SSL-enabled Adaptive Server running on a machine named HARBOR using port 1955:ddlgen -Uroy -Proy123 -Sssl:HARBOR:1955 -TDB -Npubs2
• Tables – Generates DDL for all user tables in the pubs2 database owned by “dbo” andrunning on a machine named HARBOR using port 1955:ddlgen -Uroy -Proy123 -SHARBOR:1955 -TU -Ndbo.% -Dpubs2
You can also use the -N parameter to give the fully qualified name of the table:
ddlgen -Ulogin -Ppassword -Sserver:port -TU -Ndbname.tableowner.tablename
Alternatively, also use the -D parameter to specify the database:
ddlgen -Ulogin -Ppassword -Sserver:port -TU -Ntableowner.tablename -Ddbname
To generate DDL for all proxy tables, which uses the value OD, use -XOD instead, where Xis the extended type, and OD denotes proxy tables:
ddlgen -Ulogin -Ppassword -Sserver:port -TU -Ntableowner.% -Ddbname -XOD
To generate DDL for all user tables, which uses the value OU, use -XOU instead, where X isthe extended type, and OU denotes user tables:
ddlgen -Ulogin -Ppassword -Sserver:port -TU -Ntableowner.% -Ddbname -XOU
To generate DDL for all tables, including user tables and proxy tables:
CHAPTER 1: Utility Commands Reference
Utility Guide 57

ddlgen -Ulogin -Ppassword -Sserver:port -TU -Ndbname.tableowner.%• Temporary databases – Generates DDL for all databases, including tempdb:
ddlgen -Ulogin -Ppassword -Sserver:port -TDB -N%
To generate DDL for all temporary databases, use the OD extended database type:
ddlgen -Ulogin -Ppassword -Sserver:port -TDB -XOD -N%
Although you can use the OD extended type in Adaptive Server versions 12.5.0.3 and later,versions earlier than 12.5.0.3 issue warning messages. Safely ignore this message; ddlgencontinues processing the command.To generate DDL for all databases except temporarydatabases, use the OU extended type:
ddlgen -Ulogin -Ppassword -Sserver:port -TDB -XOU -N%
This generates DDL for a temporary database named tempdb1:
ddlgen -Ulogin -Ppassword -Sserver:port -TDB -Ntempdb1
The output includes:
• A create temporary database statement:create temporary database tempdb1 on master = 4, asdas = 2go
• An sp_tempdb bind statement where the isql application is bound to tempdb1:
sp_tempdb 'bind','ap', 'isql', 'DB', 'tempdb1'go
Note: DDL for objects such as views, stored procedures, and tables is not generated alongwith DDL for a temporary database because these objects are temporary, and are re-created when the server restarts.
When you use the -F parameter to filter a table while generating DDL for a databaseobject, then indexes, referential integrity, key constraints and triggers automatically getfiltered, as they are a subset of the table object.
• Triggers – Generates DDL for the trigger checksum for the pubs2 database on amachine named HARBOR using port 1955, using the fully qualifieddbname.owner.trigger_name format for the -N option:
ddlgen -Uroy -Proy123 -SHARBOR:1955 -TTR -Npubs2.dbo.checksum
Alternatively, specify the database_name using the -D option:
ddlgen -Ulogin -Ppassword -Sserver:port -TTR -Nowner.triggername -Ddbname
You can also generate DDL for a trigger for a table, using:-Ndb_name.table_owner.table_name.trigger_name
To generate DDL for all triggers of a database:ddlgen -Ulogin -Ppassword -Sserver:port -TTR -Ndbname.owner.%
CHAPTER 1: Utility Commands Reference
58 Adaptive Server Enterprise
You can also use this format to generate DDL for all triggers of a table:-Ndb_name.table_owner.table_name.%
Note: You cannot use the -D parameter when generating DDL for all triggers of a table.
• User-defined datatypes – Generates DDL for the user-defined datatype “Identype” forthe pubs2 database on a machine named HARBOR using port 1955 using the fullyqualified dbname.userdefined_datatype format for the -N option:
ddlgen -Uroy -Proy123 -SHARBOR:1955 -TUDD -Npubs2.Identype
Alternatively, use the -D option to specify the dbname:
ddlgen -Ulogin -Ppassword -Sserver:port -TUDD -Nuserdefined_datatype -Ddbname
To generate DDL for all user-defined datatypes:ddlgen -Ulogin -Ppassword -Sserver:port -TUDD -Nbname.%
• Views – Generates DDL for a view named retail owned by Miller in the pubs2database running on a machine named HARBOR using port 1955, by using the fullyqualified dbname.owner.viewname format with the -N option:
ddlgen -Uroy -Proy123 -SHARBOR:1955 -TV -Npubs2.miller.retail
Alternatively, use the -D option instead of using the fully qualified name:
ddlgen -Ulogin -Ppassword -Sserver:port -TV -Nowner.viewname -Ddbname
To generate DDL for all views:ddlgen -Ulogin -Ppassword -Sserver:port -TV -Ndbname.owner.%
• User-defined Web services – Generates DDL for a named user-defined Web service,sp_who_service, in the pubs2 database running on a machine named HARBOR usingport 1995, by using a fully qualified dbname.username.webservice_nameformat with the -N and -T options:
ddlgen -Uroy -Proy123 -SHARBOR:1995 -TWS -Npubs2.dbo.sp_who_service
The syntax for generating DDL for a named user-defined Web service is:ddlgen -Ulogin -Ppassword -Shost_name:port -TWS -Ndbname.owner.webservice_name
To generate DDL for all user-defined Web services owned by all users in databasedbname:ddlgen -Ulogin -Ppassword -Shost_name:port -TWS -Ndbname.%.%
Note: An sp_webservices 'addalias' statement is only generated if the DDL is to begenerated for all user-defined web services or for a database.
CHAPTER 1: Utility Commands Reference
Utility Guide 59

• Users – Generates DDL for a user named Smith in the pubs2 database running on amachine named HARBOR using port 1955, by using a fully qualifieddbname.username format with the -N option:
ddlgen -Uroy -Proy123 -SHARBOR:1955 -TUSR -Npubs2.smith
Alternatively, use both the -N and -D options instead of using a fully qualified name in-N:
ddlgen -Ulogin -Ppassword -Shost_name:port -TUSR -Nusername -Ddbname
To generate DDL for all users:ddlgen -Ulogin -Ppassword -Sserver:port -TUSR -Ndbname.%
Permissions
Users must have either sa_role or sso_role to generate DDL for:
• Encryption keys• Logins• Roles
For all other objects, users do not need any specific permissions or roles to generate DDL.
See also• Hiding Passwords in ddlgen on page 62
Usage for ddlgenThere are additional considerations when using ddlgen.
• ddlgen does not identify existing sequences within views, stored procedures or triggers.For this reason, when generating DDL for a database, first run ddlgen on those views,stored procedures and triggers that are independent, before running ddlgen on those withdependencies. For example, if view B depends on view A, first run ddlgen on view A,before running it on view B.
• The default information for ddlgen is:
Op-tion
Parameter Required Default
-U username Yes None
-P password Yes None
-S host_name:port_number Yes None
CHAPTER 1: Utility Commands Reference
60 Adaptive Server Enterprise

Op-tion
Parameter Required Default
-T object_type
See the -T parameter description for a list of validobject types
No Database
-N object_name Yes, if ob-ject_type for-T is not DB
(database)
Default databasename of user-name, if -Tob-ject_type isdb or if -T is notspecified
-D database_name No Default databaseof username
-X extended_object_type
Options are:
• OU – for user tables, user databases (excludingtemporary databases), and stored procedures(excluding SQLJ procedures).
• OD – for proxy tables, temporary databases,and SQLJ procedures.
Use only when the object_type for -T is:
• U (user table)• P (procedure)• DB (database)
No None
-O output_file_name No Standard out
-E error_file_name No Standard out
-L log_file_name No None
-V version_number of ddlgen No None
• At the command line, invoke ddlgen using the ddlgen shell script file (ddlgen.batfor Windows), included in your Adaptive Server installation. The main class inDDLGen.jar is com.sybase.ddlgen.DDLGenerator.
• To start ddlgen in the Sybase Central plug-in for Adaptive Server:1. Right-click on the object for which you want to generate DDL.2. Select Generate DDL.
• In the output DDL of create table, bind statements are generated as independent DLLinstead of dependent DLL.
CHAPTER 1: Utility Commands Reference
Utility Guide 61

• The PN type allows you to generate DDL for tables with partition names. Use partitionnames and the optdiag utility to analyze optimizer behavior by creating empty partitionedtables with simulated metadata.To generate names for local index partitions, use:ddlgen - TU -XPN
To generate DDL for all user tables with partition names, use:ddlgen -TU -XPN,OUddlgen -TU -XOU,PN
Hiding Passwords in ddlgenWhen you issue the ddlgen utility in a UNIX command-line environment, other users on thatUNIX machine can see your ddlgen command—including its password—if they issue the psprocess management command, which shows the status of processes that are running on thatmachine.
The ddlgen -P password parameter option lets you to invoke ddlgen from a script so that thepassword is hidden from other users.
To achieve this, set the $PSWD environment variable to point to your Adaptive Server loginpassword, and include the string “ext” in the -P parameter. ext acts as a pseudo password,allowing you to supply the actual password in the next line. Set $PSWD at the command line ora Bourne shell script, but not from the C-shell.
1. Set the $PSWD environment variable:
setenv PSWD pass_word2. Run ddlgen:
ddlgen -Ulogin -Pext -Sserver:port -Ttype -Nname << END$PSWD END
If you prefer to keep your password in a file, replace $PSWD with 'cat filename', wherefilename is the location of your password file. For example:ddlgen -Ulogin -Pext -Sserver:port -Ttype -Nname << END'cat filename'END
ddlgen for Encrypted ColumnsYou can use the ddlgen utility with encrypted columns.
• The ddlgen utility supports pre-15.0.2 encryption. Pre-15.0.2 ddlgen support includesgenerating DDL for an encryption key in a database, and generating DDL to synchronizeencryption keys across servers.If you use ddlgen to generate DDL for encryption keys on Adaptive Server version 15.0.2or later, the DDL may cause errors on a pre-15.0.2 version Adaptive Server, specifically ifan encryption key is encrypted by a user specified-password or has key copies.
CHAPTER 1: Utility Commands Reference
62 Adaptive Server Enterprise

• The type EK, used for encryption key, generates the DDL to create an encryption key and togrant permissions on it. ddlgen generates encrypted column information and a grantdecrypt statement, along with the table definition.
• If you do not specify the -XOD option, and the key to be migrated has been created in thesource database using the with passwd clause, ddlgen generates a create encryption keycommand with password as its explicit password.This is similar to what ddlgen does forroles and login passwords.
• The -XOD generates the create encryption key that specifies the key’s encrypted value asrepresented in sysencryptkeys. Use the -XOD to synchronize encryption keys acrossservers for data movement.ddlgen -XOD generates DDL that includes a system encryption password (if it was set andDDL is generated for a key encrypted with a system encryption password) and DDL forkeys.
Encrypted Columns and Specifying the -XOD Flag in ddlgenThere are special considerations when using the ddlgen -XOD option with encrypted columns.
If you do not specify the -XOD flag in ddlgen, and you:• Did not specify a password when the encryption key was created – ddlgen generates DDL
with no password.• Specified a password when the encryption key was first created – ddlgen generates the
default password of ‘password’. This is similar to what ddlgen does for roles and loginpasswords, and its output looks similar to:--------------------------------------------------------------------- DDL for EncryptedKey 'ssn_key'-------------------------------------------------------------------print 'ssn_key'
--The DDL is generated with a default password – 'password' as--a password was specified when this key was created.
create encryption key SampleKeysDB.dbo.ssn_key for AESwith keylength 128 passwd 'password'init_vector random go
When you specify the-XOD flag in ddlgen, ddlgen generates DDL that includes a systemencryption password (if it has been set and DDL is generated for a key encrypted with a systemencryption password) and DDL for keys.
Use this syntax to generate a system encryption password:
ddlgen -Usa -P -Sserver -TEK -NsampleKeysdb.dbo.ek1 -XOD
The output would look like:-- System Encryption Password
CHAPTER 1: Utility Commands Reference
Utility Guide 63
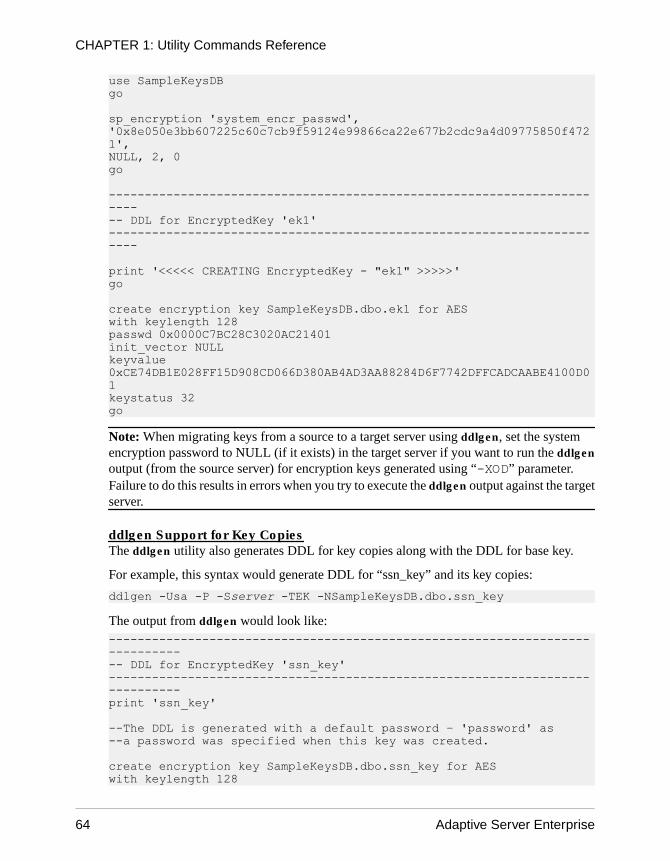
use SampleKeysDBgo
sp_encryption 'system_encr_passwd','0x8e050e3bb607225c60c7cb9f59124e99866ca22e677b2cdc9a4d09775850f4721',NULL, 2, 0go
------------------------------------------------------------------------- DDL for EncryptedKey 'ek1'-----------------------------------------------------------------------
print '<<<<< CREATING EncryptedKey - "ek1" >>>>>'go
create encryption key SampleKeysDB.dbo.ek1 for AESwith keylength 128 passwd 0x0000C7BC28C3020AC21401init_vector NULL keyvalue 0xCE74DB1E028FF15D908CD066D380AB4AD3AA88284D6F7742DFFCADCAABE4100D01 keystatus 32 go
Note: When migrating keys from a source to a target server using ddlgen, set the systemencryption password to NULL (if it exists) in the target server if you want to run the ddlgenoutput (from the source server) for encryption keys generated using “-XOD” parameter.Failure to do this results in errors when you try to execute the ddlgen output against the targetserver.
ddlgen Support for Key CopiesThe ddlgen utility also generates DDL for key copies along with the DDL for base key.
For example, this syntax would generate DDL for “ssn_key” and its key copies:
ddlgen -Usa -P -Sserver -TEK -NSampleKeysDB.dbo.ssn_key
The output from ddlgen would look like:------------------------------------------------------------------------------- DDL for EncryptedKey 'ssn_key'-----------------------------------------------------------------------------print 'ssn_key'
--The DDL is generated with a default password – 'password' as --a password was specified when this key was created.
create encryption key SampleKeysDB.dbo.ssn_key for AESwith keylength 128
CHAPTER 1: Utility Commands Reference
64 Adaptive Server Enterprise

passwd 'password'init_vector random go
print 'Key Copies for ssn_key'
-- Generating DDL for Key Copies for 'ssn_key'
alter encryption key 'ssn_key'with passwd 'password'add encryption with passwd 'passwd'for user 'dbo'.
If you include the -XOD flag, the DDL for key copy would look like:
alter encryption key SampleKeysDB.dbo.ssn_key add encryption with keyvalue0x84A7360AA0B28801D6D4CBF2F8219F634EE641E1082F221A2C58C9BBEC9F49B501 passwd 0x000062DF4B8DA5709E5E01 keystatus 257 for user 'user1' go
EKC Encryption Key Copy Filter and ddlgenThe ddlgen utility supports the EKC (encryption key copy) extended type for its -F filterargument, to suppress the generation of key copies for encryption keys.
This example uses -FEKC to avoid creating DDL for key copies when generating DDL for the“ssn_key” encryption key:
ddlgen -Usa -P -Sserver -TEK -NSampleKeysDB.dbo.ssn_key -FEKC
The output from ddlgen would look like:---------------------------------------------------------------------------- DDL for EncryptedKey 'ssn_key'--------------------------------------------------------------------------print 'ssn_key'
--The DDL is generated with a default password – 'password' as --a password was specified when this key was created.
create encryption key SampleKeysDB.dbo.ssn_key for AESwith keylength 128 passwd 'password'init_vector random go
CHAPTER 1: Utility Commands Reference
Utility Guide 65

Create Table DDLddlgen can generate decrypt_default statements (if set for an encrypted column) along withDDL of a table.
This example issues a ddlgen command on a table called employee which has an “ssn”column that is encrypted with encryption key “ssn_key,” and a decrypt default value that is setto “100”:
ddlgen -Usa -P -Sserver -TU -Nemployee
The DDL output would look like:create table employee ( ssn int not null encrypt with ssn_key decrypt_default 100 , last_name int not null , first_name int not null)lock allpages on 'default'go
defncopyCopies definitions for specified views, rules, defaults, triggers, or procedures from a databaseto an operating-system file or from an operating-system file to a database.
The utility is located in:
• (UNIX) $SYBASE/$SYBASE_OCS/bin.• (Windows) %SYBASE%\%SYBASE_OCS%\bin, as defncopy.exe.
Syntaxdefncopy [-X] [-a display_charset] [-I interfaces_file] [-J [client_charset]] [-K keytab_file] [-P password] [-R remote_server_principal] [-S [server_name]] [-U username] [-V security_options] [-Z security_mechanism] [-z language] { in file_name database_name | out file_name database_name [owner.]object_name [[owner.]object_name...] }
Or
CHAPTER 1: Utility Commands Reference
66 Adaptive Server Enterprise

defncopy -v
Parameters
• -a display_charset – runs defncopy from a terminal whose character set differsfrom that of the machine on which defncopy is running. Use -a in conjunction with -J tospecify the character set translation file (.xlt file) required for the conversion. Use -awithout -J only if the client character set is the same as the default character set.
Note: The ascii_7 character set is compatible with all character sets. If either the AdaptiveServer character set or the client character set is set to ascii_7, any 7-bit ASCII charactercan pass unaltered between client and server. Other characters produce conversion errors.See the System Administration Guide for more information on character set conversion.
• -I interfaces_file – specifies the name and location of the interfaces file to searchwhen connecting to Adaptive Server. If you do not specify -I, defncopy looks for a filenamed interfaces in the directory specified by the SYBASE environment variable inUNIX platforms, and sql.ini in the ini subdirectory for your Sybase release directoryin Windows.
• -J client_charset – specifies the character set to use on the client. A filter convertsinput between client_charset and the Adaptive Server character set.
-J client_charset requests that Adaptive Server convert to and fromclient_charset, the client’s character set.
-J with no argument sets character set conversion to NULL. No conversion takes place.Use this if the client and server are using the same character set.
Omitting -J sets the character set to a default for the platform. The default may not be thecharacter set that the client is using. For more information about character sets and theirassociated flags, see the System Administration Guide and configuration guide for yourplatform.
• -K keytab_file – specifies the path to the keytab file used for authentication in DCE.
• -P password – specifies your password. If you do not specify -P, defncopy promptsfor your password.
• -R remote_server_principal – specifies the principal name for the server. Bydefault, a server’s principal name matches the server’s network name (which is specifiedwith the -S parameter or the DSQUERY environment variable). Use the -R parameterwhen the server’s principal name and network name are not the same.
• -S server_name – specifies the name of the Adaptive Server to which to connect. Ifyou specify -S with no argument, defncopy looks for a server named SYBASE. If you donot specify -S, defncopy uses the server specified by your DSQUERY environmentvariable.
• -U username – specifies a login name. Login names are case sensitive. If you do notspecify username, defncopy uses the current user’s operating system login name.
CHAPTER 1: Utility Commands Reference
Utility Guide 67

• -v – displays the version and copyright message of defncopy and returns to the operatingsystem.
• -V security_options – specifies network-based user authentication. With thisoption, the user must log in to the network’s security system before running the utility. Inthis case, users must supply their network user name with the -U option; any passwordsupplied with the -P option is ignored.
-V can be followed by a security_options string of key-letter options to enable additionalsecurity services. These key letters are:
• c – Enable data confidentiality service
• i – Enable data integrity service
• m – Enable mutual authentication for connection establishment
• o – Enable data origin stamping service
• r – Enable data replay detection
• q – Enable out-of-sequence detection
• -X – initiates the login with client-side password encryption in this connection to theserver. defncopy (the client) specifies to the server that password encryption is desired.The server sends back an encryption key, which defncopy uses to encrypt your password,and the server uses to authenticate your password when it arrives.
If defncopy crashes, the system creates a core file which contains your password. If youdid not use the encryption option, the password appears in plain text in the file. If you usedthe encryption option, your password is not readable.
• -z language – is the official name of an alternate language that the server uses todisplay defncopy prompts and messages. Without the -z flag, defncopy uses the server’sdefault language.
Add languages to an Adaptive Server at installation, or afterwards with the utilitylanginstall (langinst in Windows) or the stored procedure sp_addlanguage.
• -Z security_mechanism – specifies the name of a security mechanism to use on theconnection.
Security mechanism names are defined in the $SYBASE/install/libtcl.cfgconfiguration file. If no security_mechanism name is supplied, the default mechanism isused. See the description of the libtcl.cfg file in the Open Client and Open ServerConfiguration Guide.
• database_name – specifies the name of the database to copy the definitions from or to.• file_name – specifies the name of the operating system file destination or source for the
definition copy. The copy out overwrites any existing file.• in | out – specifies the direction of definition copy.
• object_name – specifies names of database object for defncopy to copy out. Do not useobjectname when copying definitions in.
CHAPTER 1: Utility Commands Reference
68 Adaptive Server Enterprise

• owner – is optional if you or the database owner own the table being copied. If you do notspecify an owner, defncopy first looks for a table of that name that you own, and then looksfor one owned by the database owner. If another user owns the table, specify the ownername or the command fails.
Examples
• Files – Copies definitions from the file new_proc into the database stagedb on serverMERCURY. The connection with MERCURY is established with a user of name “sa” anda NULL password:defncopy -Usa -P -SMERCURY in new_proc stagedb
• Objects – Copies definitions for objects sp_calccomp and sp_vacation from theemployees database on the SYBASE server to the file dc.out. Messages and promptsdisplay in french. The user is prompted for a password:defncopy -S -z french out dc.out employees sp_calccomp sp_vacation
Usage
• Use this syntax for defncopy_r if you are using threaded drivers.• Use this syntax for defncopy you are using threaded drivers in the IBM platform.• Set the SYBASE environment variable to the location of the current version of Adaptive
Server before using defncopy.• Invoke the defncopy program directly from the operating system. defncopy provides a
noninteractive way to copy out definitions (create statements) for views, rules, defaults,triggers, or procedures from a database to an operating system file. Alternatively, it copiesin all the definitions from a specified file.
• The in filename or out filename and the database name are required and must bestated unambiguously. For copying out, use file names that reflect both the object’s nameand its owner.
• defncopy ends each definition that it copies out with the comment:/* ### DEFNCOPY: END OF DEFINITION */
Definitions created as text must end with this comment so that defncopy can copy them insuccessfully.
• Enclose values specified to defncopy in quotation marks, if they contain characters thatcould be significant to the shell.
Warning! Long comments of more than 100 characters that are placed before a createstatement may cause defncopy to fail.
• SDK binaries like defncopy use the same names in both 32-bit and 64-bit products.Installing Adaptive Server, the SDK, or Open Server 64-bit products with other Sybase32-bit products overwrites the 32-bit binaries. Starting with Adaptive Server 15.0.2 andSDK/Open Server 15.0 ESD #9, the 64-bit binaries are replaced with 32-bit binaries on all64-bit UNIX platforms. Since 32-bit binaries are included in the 64-bit EBF, the -v option
CHAPTER 1: Utility Commands Reference
Utility Guide 69

of defncopy is no longer a valid way to check the EBF number for 64-bit products. Instead,use the UNIX strings and grep commands to confirm the EBF numbers for both OpenClient and Open Server.For example, to find the string containing the EBF number in the libsybct64.a library,enter:strings -a libsybct64.a | grep SybaseThis returns a string similar to:Sybase Client-Library/15.5/P/DRV.15.5.0/SPARC/Solaris8/BUILD1550-001/64bit/OPT/Mon Aug 10 23:04:17 2009
To find the string containing the EBF number in the libsybsrv64.a library, enter:strings -a libsybsrv64.a | grep SybaseThis returns a string similar to:Sybase Server-Library/15.5/P/DRV.15.5.0/SPARC/Solaris8/BUILD1550-001/64bit/OPT/Mon Aug 10 23:06:27 2009
See also:
• Reference Manual: Commands – create, select
• Reference Manual: Procedures – sp_addlanguage, sp_checkreswords, sp_configure,sp_procqmode, sp_remap
Permissions
• You must have select permission on the sysobjects and syscomments tables tocopy out definitions; you do not need permission on the object itself.
• You may not have select permission on the text column of the syscomments table ifthe system security officer has reset the allow select on syscomments.text columnparameter with the system procedure sp_configure. This reset restricts select permissionto the object owner and the system administrator. This restriction is required in order to runAdaptive Server in the evaluated configuration , as described in the installation andconfiguration documentation for your platform. In this case, the object owner or a systemadministrator must execute defncopy to copy out definitions.
Note: If the text has been encrypted, it may be hidden from you even if you have all therequired permissions. See “Verifying and Encrypting Source Text” in the Transact-SQLUser’s Guide.
• You must have the appropriate create permission for the type of object you are copying in.Objects copied in belong to the copier. A system administrator copying in definitions onbehalf of a user must log in as that user to give the user proper access to the reconstructeddatabase objects.
Tables used
syscomments, sysobjects
CHAPTER 1: Utility Commands Reference
70 Adaptive Server Enterprise

See also• langinstall on page 95
dscp(UNIX only) A text-based utility that allows you to view and edit server entries in theinterfaces file from the command line in UNIX platforms.
The utility is located in $SYBASE/$SYBASE_OCS/bin.
Set the SYBASE environment variable to the location of the current version of AdaptiveServer before using dscp.
Syntaxdscp [-p]
or:dscp -v
To exit from dscp:quit
or:exit
Parameters
• -p – suppresses command-line prompts.
• -v – displays the version and copyright message of dscp and returns to the operatingsystem.
Examples
• Suppress command line prompt – Opens the default interfaces file for editing andsuppresses the command line prompt:dscp -p
Usage
You can perform various functions by entering commands at the dscp prompt:
• add servername – adds server entry servername in the current session. dscp promptsyou for information about servername. Press Return to accept the default value, which isshown in square brackets [ ]. Enter “#done” to exit add mode.
CHAPTER 1: Utility Commands Reference
Utility Guide 71

• addattr servername – adds an attribute to the server entry servername in the currentsession.
• close [sess] – closes a session identified by the sess number. If you do not specifysess, closes the current session.
• config – displays configuration information related to your Sybase environment.
• copy name1 to {name2 | sess | sess name2} – copies server entry name1in the current session to:• Server entry name2 in the current session,• Session sess, or• Server entry name2 in session sess.
• copyall to sess – copies all server entries in the current session to session sess.
• del servername – deletes server entry servername in the current session.
• delete-all – deletes all server entries in the current session.
• exit – exits dscp.
• help, ?, h – displays the online help.
• list [all] – lists the server entries for the current session. To list the names of theentries, use the list command. To list the attributes for each entry, use the list allcommand.
• mod servername – modifies server entry servername in the current session. dscpprompts you for information about servername. Press Return to accept the default value,which is shown in square brackets [ ]. Enter “#done” to exit modify mode.
• open [dsname] – opens a session for the specified directory service, where dsname isthe directory service name. If you do not specify a value for dsname, this command opens asession for the default directory service. To open a session, specify the value“InterfacesDriver” for dsname.
• quit – exits dscp.
• read servername – displays the contents of server entry servername.
• sess – lists all open sessions.
• [switch] sess – makes session number sess the current session.
See also• Chapter 4, Viewing and Editing Server Entries Using dscp on page 209• dsedit on page 72
dseditThe dsedit utility allows you to view and edit server entries in the interfaces file using a GUI.In Windows, dsedit creates and modifies network connection information in the interfacesfile.
The utility is located in:
CHAPTER 1: Utility Commands Reference
72 Adaptive Server Enterprise

• (UNIX) $SYBASE/$SYBASE_OCS/bin.
• (Windows) %SYBASE%\%SYBASE_OCS%\bin, as dsedit.exe.
Syntaxdsedit
or:dsedit -v
Parameters
• -v – displays the version and copyright message of dsedit.
Usage
• Set the SYBASE environment variable to the location of the current version of AdaptiveServer before using dsedit.
• Set the DISPLAY environment variable before invoking dsedit, unless you are only usingthe -v parameter to display the version number.
See also• Chapter 5, Viewing and Editing Server Entries Using dsedit on page 217
• dscp on page 71
extractjavaCopies a retained JAR and the classes it contains from an Adaptive Server into a client file.
The utility is located in:
• (UNIX) $SYBASE/$SYBASE_OCS/bin.
• (Windows) %SYBASE%\%SYBASE_OCS%\bin, as extrjava.exe.
Syntaxextractjava (extrjava in Windows) -j jar_name -f file_name [-a display_charset] [-D database_name] [-I interfaces_file] [-J client_charset] [-P password] [-S server_name] [-t timeout] [-U user_name]
CHAPTER 1: Utility Commands Reference
Utility Guide 73

[-v] [-z language]
or:extractjava -v
Parameters
• -a display_charset – allows you to use extractjava from a machine where thecharacter set differs that of the server. Use -a in conjunction with -J to specify thecharacter set translation file (.xlt file) required for the conversion. Use -a without -Jonly if the client character set is the same as the default character set.
• -D database_name – specifies the name of the database in which to install the JAR. Ifyou omit the -D flag, or if you specify the -D flag with no parameter, the user’s defaultdatabase is used.
• -f file_name – specifies the name of the client file that is the target of the transfer.
• -I interfaces_file – specifies the name and location of the interfaces file to searchwhen connecting to Adaptive Server. If you omit the -I flag and parameter, or if youspecify the -I flag with no parameter, the interfaces file in the directory designated byyour SYBASE environment variable is used.
• -j jar_name – specifies the name assigned to the retained JAR in the database that isthe source of the transfer.
• -J client_charset – specifies the character set to use on the client. extractjava usesa filter to convert input between client_charset and the Adaptive Server character set.
-J client_charset requests that Adaptive Server convert to and fromclient_charset, the character set used on the client.
-J with no argument disables character set conversion. Use this if the client and server usethe same character set.
Omitting -J sets the character set to a default for the platform, which may not necessarilybe the character set that the client is using. See the System Administration Guide for moreinformation about character sets and associated flags.
• -P password – specifies an Adaptive Server password. If you omit the -P flag andparameter, extractjava prompts for a password. If you specify the -P flag with nopassword, the null password is used.
• -S server_name – specifies the name of the server.
• -t timeout – specifies the number of seconds before a SQL command times out. If youdo not specify a timeout, the command runs indefinitely. This affects commands issuedfrom within extractjava, not the connection time. The default timeout for logging intoextractjava is 60 seconds.
CHAPTER 1: Utility Commands Reference
74 Adaptive Server Enterprise

• -U user_name – specifies an Adaptive Server login name. If you omit the -U flag andparameter, or if you specify the -U flag with no parameter, Adaptive Server uses thecurrent user’s operating system login name.
• -v – prints the version number and copyright message for extractjava and then exits.
• -z language – specifies the name of an alternate language for displaying extractjavaprompts and messages. Without the -z flag, extractjava uses the server’s defaultlanguage. Add languages to an Adaptive Server during installation or afterward, using thelanginstall utility or the sp_addlanguage stored procedure.
Examples
• Download classes – Downloads the classes associated with the employees JAR to theclient file newaddr.jar.
• On UNIX:extractjava -j employees -f '/home/usera/jars/addr.jar' -new
• On Windows:extrjava -j employees -f '\home\usera\jars\addr.jar' -new
Usage
• Set the SYBASE environment variable to the location of the current version of AdaptiveServer before you use extractjava.
• If the target client file already exists, extractjava overwrites its contents.• You can write parameter flags -f, -j, -S, -U, -P, -D, and -I with or without a space
between the flag letter and the following parameter.
• When you execute extractjava, an exclusive lock is placed on sysxtypes.
• Specifying -jar places an exclusive table lock on sysjars.
See also:
• Java in Adaptive Server Enterprise• Reference Manual: Commands – remove java
• Reference Manual: Procedures – sp_helpjava
Permissions
You need to be a system administrator or database owner to use extractjava.
Tables used
sysjars, sysxtypes
CHAPTER 1: Utility Commands Reference
Utility Guide 75

See also• installjava on page 76
• langinstall on page 95
installjavaInstalls a JAR from a client file into an Adaptive Server.
The utility is located in:
• (UNIX) $SYBASE/$SYBASE_OCS/bin.
• (Windows) %SYBASE%\%SYBASE_OCS%\bin as instjava.exe.
Syntaxinstalljava -f file_name [ -new | -update ] [ -a display_charset ] [ -D database_name ] [ -I interfaces_file ] [ -J client_charset ] [ -j jar_name ] [ -P password ] [ -S server_name ] [ -t timeout ] [ -U user_name ] [ -v] [ -z language ]
Orinstalljava -v
Parameters
• -a display_charset – allows you to use installjava from a machine where thecharacter set differs that of the server. Use -a in conjunction with -J to specify thecharacter set translation file (.xlt file) required for the conversion. Use -a without -Jonly if the client character set is the same as the default character set.
• -D database_name – is the name of the database in which to install the JAR. If youomit the -D flag, or if you specify the -D flag with no parameter, the user’s defaultdatabase is used.
• -f file_name – is the name of the source file containing the classes to be installed inthe database.
• -I interfaces_file – is the name and location of the interfaces file to search whenconnecting to Adaptive Server. If you omit the -I flag and parameter, or if you specify the
CHAPTER 1: Utility Commands Reference
76 Adaptive Server Enterprise

-I flag with no parameter, the interfaces file in the directory designated by your SYBASEenvironment variable is used.
• -J client_charset – specifies the character set to use on the client. installjava usesa filter to convert input between client_charset and the Adaptive Server character set.
-J client_charset requests that Adaptive Server convert to and fromclient_charset, the character set used on the client.
-J with no argument disables character set conversion. Use this if the client and server usethe same character set.
Omitting -J sets the character set to a default for the platform, which may not necessarilybe the character set that the client is using. See the System Administration Guide for moreinformation about character sets and associated flags.
• -j jar_name – is the name of the JAR containing the classes to be installed in thedatabase. Indicates that the JAR file should be saved in the database and associated withthe classes it contains.
• -new | -update – specifies whether the classes in the file already exist in thedatabase. If you specify:
• -new – you cannot install a class with the same name as an existing class
• -update – install a class with the same name as an existing class, and the newlyinstalled class replaces the existing class
• -P password – is an Adaptive Server password. If you omit the -P flag and parameter,installjava prompts for a password. If you specify the -P flag with no password, the nullpassword is used.
• -S server_name – is the name of the server.
• -t timeout – specifies the number of seconds before a SQL command times out. If youdo not specify a timeout, the command runs indefinitely. This affects commands issuedfrom within installjava, not the connection time. The default timeout for logging intoinstalljava is 60 seconds.
• -U user_name – is an Adaptive Server login name. If you omit the -U flag andparameter, or if you specify the -U flag with no parameter, Adaptive Server uses thecurrent user’s operating system login name.
• -v – prints the version number and copyright message for installjava and then exits.
• -z language – is the name of an alternate language for displaying installjava promptsand messages. Without the -z flag, installjava uses the server’s default language. Addlanguages to an Adaptive Server during installation or afterward, using the langinstallutility or the sp_addlanguage stored procedure.
Examples
• Install – Installs addr.jar and its classes, but does not retain the association betweenthe JAR and classes:
CHAPTER 1: Utility Commands Reference
Utility Guide 77

installjava -f '/home/usera/jars/addr.jar' -new
In Windows:instjava -f '\home\usera\jars\addr.jar' -new
• Reinstall – Reinstalls addr.jar and associates its classes with the employees JARname:installjava -f '/home/usera/jars/addr.jar' -update -j employees
In Windows:instjava -f '\home\usera\jars\addr.jar' -update -j employees
Permissions
You need to be a system administrator or database owner to use installjava.
Tables used
sysjars, sysxtypes
See also• extractjava on page 73
• langinstall on page 95
Usage for installjavaThere are additional considerations when using installjava.
• Set the SYBASE environment variable to the location of the current version of AdaptiveServer before you can use installjava.
• Any user can reference installed classes.• You can write the -f, -j, -S, -U, -P, -D, and -Iparameter flags with or without a space between
the flag letter and the following parameter.
See also:
• Java in Adaptive Server Enterprise• Reference Manual: Commands – remove java
• Reference Manual: Procedures – sp_helpjava
Cases When Adding New JARs Causes ExceptionsAn exception is raised under some conditions.
• You use -new with the -j jar_name option and a JAR of that name already exists in thedatabase.
• Any classes of the same name as those in the source JAR already exist in the database, anexception is raised.
CHAPTER 1: Utility Commands Reference
78 Adaptive Server Enterprise

Updating JARs and ClassesIf you alter a class used as a column datatype by reinstalling a modified version of the class,make sure that the modified class can read and use existing objects (rows) in tables using thatclass as a datatype. Otherwise, you may be unable to access those objects without reinstallingthe class.
If you use -update:
• With the -j jar_name option:• All classes in the database associated with the target JAR are deleted from the database
and the classes in the source JAR file installed in their place.• If a class in the source JAR file is already installed in the database but is not attached to
a JAR, the class in the source JAR is installed in the database and the unattached class isdeleted.
• Without the -j jar_name option:• Classes in the source JAR file replace unattached classes of the same name.• Classes in the source JAR that do not correspond to an installed class are installed as
unattached classes in the database.
If you install a new JAR with a replacement for an installed class that is referenced by a SQLJprocedure or function, make sure that the newly installed class has a valid signature for theSQLJ routine. If the signature is invalid, an exception is raised when the SQLJ routine isinvoked.
LocksUsing installjava causes some locks to occur.
• When you execute installjava, an exclusive lock is placed on sysxtypes.
• If -j jar_name is specified, an exclusive table lock is placed on sysjars.
isqlInteractive SQL parser to Adaptive Server.
The utility is located in:
• (UNIX) $SYBASE/$SYBASE_OCS/bin.
• (Windows) %SYBASE%\%SYBASE_OCS%\bin, as isql.exe.
Syntaxisql [-b] [-e] [-F] [-n] [-p] [-v] [-W] [-X] [-Y] [-Q] [-a display_charset] [-A packet_size] [-c cmdend] [-D database]
CHAPTER 1: Utility Commands Reference
Utility Guide 79

[-E editor] [-h header] [-H hostname] [-i inputfile] [-I interfaces_file] [-J client_charset] [-K keytab_file] [-l login_timeout] [-m errorlevel] [-M LabelName LabelValue] [-o outputfile] [-P password] [-R remote_server_principal] [-s col_separator] [-S server_name] [-t timeout] [-U username] [-v] [-V [security_options]] [-w column-width] [-x trusted.txt_file] [-y sybase_directory] [-z localename] [-Z security_mechanism] [--appname "application_name”] [--conceal [':?' | 'wildcard']] [--help] [--history [p]history_length [--history_file history_filename]] [--retserverror] [--URP remotepassword
Parameters
• -a display_charset – allows you to run isql from a terminal where the character setdiffers from that of the machine on which isql is running. Use -a with -J to specify thecharacter set translation file (.xlt file) required for the conversion. Use -a without -Jonly if the client character set is the same as the default character set.
Note: The ascii_7 character set is compatible with all character sets. If either the AdaptiveServer character set or the client character set is set to ascii_7, any 7-bit ASCII charactercan pass unaltered between client and server. Other characters produce conversion errors.For more information on character set conversion, see the System AdministrationGuide.
• -A packet_size – specifies the network packet size to use for this isql session. Forexample, to set the packet size to 4096 bytes for the isql session, use:isql -A 4096
To check your network packet size, use:select * from sysprocesses
The value appears under the network_pktsz heading.
CHAPTER 1: Utility Commands Reference
80 Adaptive Server Enterprise

packet_size must be between the values of the default network packet size and maximumnetwork packet size configuration variables, and must be a multiple of 512. The defaultvalue is 2048.
Use larger-than-default packet sizes to perform I/O-intensive operations, such as readtextor writetext operations. Setting or changing the Adaptive Server packet size does not affectremote procedure calls’ packet size.
• -b – disables the display of the table headers output.
• -c cmdend – changes the command terminator. By default, you terminate commandsand send them to the server by typing “go” on a line by itself. When you change thecommand terminator, do not use SQL reserved words or control characters.
• -D database – selects the database in which the isql session begins.
• -e – echoes input.
• -E editor – specifies an editor other than the default editor vi. To invoke the editor,enter its name as the first word of a line in isql.
• -F – enables the FIPS flagger. When you specify the -F parameter, the server returns amessage when it encounters a nonstandard SQL command. This option does not disableSQL extensions. Processing completes when you issue the non-ANSI SQL command.
• -h headers – specifies the number of rows to print between column headings. Thedefault prints headings only once for each set of query results.
• -H hostname – sets the client host name.
• -i inputfile – specifies the name of the operating system file to use for input to isql.The file must contain command terminators (the default is “go”).
• Specifying the parameter is equivalent to < inputfile:-i inputfile
• If you use -i and do not specify your password on the command line, isql prompts youfor it.
• If you use < inputfile and do not specify your password on the command line, specifyyour password as the first line of the input file.
• -I interfaces_file – specifies the name and location of the interfaces file to searchwhen connecting to Adaptive Server. If you do not specify -I, isql looks for a file namedinterfaces in the directory specified by your SYBASE environment variable.
• -J client_charset – specifies the character set to use on the client. The parameterrequests that Adaptive Server convert to and from client_charset, the character set used onthe client. A filter converts input between client_charset and the Adaptive Server characterset.
-J with no argument sets character set conversion to NULL. No conversion takes place.Use this if the client and server use the same character set.
Omitting -J sets the character set to a default for the platform. The default may notnecessarily be the character set that the client is using. For more information about
CHAPTER 1: Utility Commands Reference
Utility Guide 81

character sets and the associated flags, see Configuring Client/Server Character SetConversions, in the System Administration Guide, Volume One.
• -K keytab_file – specifies the path to the keytab file used for authentication in DCE.keytab_file specifies a DCE keytab that contains the security key for the user name youspecify in -U. Create keytab files using the DCE dcecp utility. See your DCEdocumentation.
If you do not specify -K, the isql user must be logged in to DCE with the same usernamespecified in -U.
• -l login_timeout – specifies the maximum timeout value allowed when connectingto Adaptive Server. The default is 60 seconds. This value affects only the time that isqlwaits for the server to respond to a login attempt. To specify a timeout period for commandprocessing, use the -ttimeout parameter.
• -m errorlevel – customizes error message appearance. For errors of the severitylevel specified or higher, only the message number, state, and error level appear; no errortext appears. For error levels lower than the specified level, nothing appears.
• -M LabelName LabelValue – (Secure SQL Server only) enables multilevel users toset the session labels for the this isql session. Valid values for LabelName are:
• curread (current read level) – is the initial level of data that you can read during thissession. curread must dominate curwrite.
• curwrite (current write level) – is the initial sensitivity level that is applied to anydata that you write during this session.
• maxread (maximum read level) – is the maximum level at which you can read data.This is the upper bound to which you as a multilevel user can set curread during thesession. maxread must dominate maxwrite.
• maxwrite (maximum write level) – is the maximum level at which you can writedata. This is the upper bound to which you as a multilevel user can set curwrite during asession. maxwrite must dominate minwrite and curwrite.
• minwrite (minimum write level) – is the minimum level at which you can write data.This is the lower bound to which you as a multilevel user can set curwrite during asession. minwrite must be dominated by maxwrite and curwrite.
LabelValue is the actual value of the label, expressed in the human-readable format usedon your system (for example, “Company Confidential Personnel”).
• -n – removes numbering and the prompt symbol (>) from the echoed input lines in theoutput file when used with -e.
• -o outputfile – specifies the name of an operating system file to store the outputfrom isql. Specifying the parameter as -o outputfile is similar to > outputfile
• -p – prints performance statistics.
• -P password – specifies your Adaptive Server password. If you do not specify the -Pflag, isql prompts for a password. If your password is NULL, use the-P flag without anypassword.
CHAPTER 1: Utility Commands Reference
82 Adaptive Server Enterprise

• -Q – provides clients with failover property. See Using Sybase Failover in a HighAvailability System.
• -R remote_server_principal – specifies the principal name for the server asdefined to the security mechanism. By default, a server’s principal name matches theserver’s network name (which is specified with the -S parameter or the DSQUERYenvironment variable). Use the -R parameter when the server’s principal name andnetwork name are not the same.
• -s colseparator – resets the column separator character, which is blank by default.To use characters that have special meaning to the operating system (for example, “|”, “;”,“&”, “<”, “>”), enclose them in quotes or precede them with a backslash.
The column separator appears at the beginning and the end of each column of each row.• -S server_name – specifies the name of the Adaptive Server to which to connect. isql
looks this name up in the interfaces file. If you specify -S without server_name, isql looksfor a server named SYBASE. If you do not specify -S, isql looks for the server specifiedby your DSQUERY environment variable.
• -t timeout – specifies the number of seconds before a SQL command times out. If youdo not specify a timeout, the command runs indefinitely. This affects commands issuedfrom within isql, not the connection time. The default timeout for logging into isql is 60seconds.
• -U username – specifies a login name. Login names are case-sensitive.
• -v – prints the version and copyright message of isql and then exits.
isql is available in both 32-bit and 64-bit versions. They both reside in the same directoryand are differentiated by their executable file names (isql and isql64). Enter isql-v or isql64 -v to see the detailed version string of the isql you are using.
• -V security_options – specifies network-based user authentication. With thisoption, the user must log in to the network’s security system before running the utility, andusers must supply the network user name with the -U option; any password supplied withthe -P option is ignored.
Follow -V with a security_options string of key-letter options to enable additional securityservices. These key letters are:
• c – enables data confidentiality service.
• d – enables credential delegation and forwards the client credentials to the gatewayapplication.
• i – enables data integrity service.
• m – enables mutual authentication for connection establishment.
• o – enables data origin stamping servic.e
• q – enables out-of-sequence detection
• r – enables data replay detection
• -W – disables both extended password and password encrypted negotiations.
CHAPTER 1: Utility Commands Reference
Utility Guide 83

• -w columnwidth – sets the screen width for output. The default is 80 characters. Whenan output line reaches its maximum screen width, it breaks into multiple lines.
• -x trusted.txt_file – specifies an alternate trusted.txt file.• -X – initiates the login connection to the server with client-side password encryption. isql
(the client) specifies to the server that password encryption is desired. The server sendsback an encryption key, which isql uses to encrypt your password, and the server uses thekey to authenticate your password when it arrives.
This option can result in normal or extended password encryption, depending onconnection property settings at the server. If CS_SEC_ENCRYPTION is set to CS_TRUE,normal password encryption is used. If CS_SEC_EXTENDED_ENCRYPTION is set toCS_TRUE, extended password encryption is used. If both CS_SEC_ENCRYPTION andCS_SEC_EXTENDED_ENCRYPTION are set to CS_TRUE, extended passwordencryption takes precedence.
If isql fails, the system creates a core file that contains your password. If you did not use theencryption option, the password appears in plain text in the file. If you used the encryptionoption, your password is not readable.
For details on encrypted passwords, see the user documentation for the Open ClientClient-Library.
• -y sybase_directory – sets an alternate Sybase home directory.• -Y – tells the Adaptive Server to use chained transactions.• -z locale_name – specifies the official name of an alternate language to display isql
prompts and messages. Without -z, isql uses the server’s default language. Addlanguages to an Adaptive Server during installation or afterward, using the langinstallutility (langinst in Windows) or the sp_addlanguage stored procedure.
• -Z security_mechanism – specifies the name of a security mechanism to use on theconnection.
Security mechanism names are defined in the libtcl.cfg configuration file located inthe ini subdirectory below the Sybase installation directory. If no security_mechanismname is supplied, the default mechanism is used. For more information on securitymechanism names, see the description of the libtcl.cfg file in the Open Client andOpen Server Configuration Guide.
• --appname "application_name" – allows you to change the default applicationname isql to the isql client application name. This simplifies:
• Testing of Adaptive Server cluster routing rules for incoming client connections basedon the client application name.
• Switching between alternative settings for isql in $SYBASE/$SYBASE_OCS/config/ocs.cfg, such as between debugging and normal sessions.
• Identification of the script that started a particular isql session from within AdaptiveServer.
application_name:
CHAPTER 1: Utility Commands Reference
84 Adaptive Server Enterprise

• Is the client application name. You can retrieve the client application name fromsysprocesses.program_name after connecting to your host server.
• Has a maximum length of 30 characters. You must enclose the entire application namein single quote or double quote characters if it contains any white spaces that do not usethe backslash escape character. You can set the application_name to an empty string.
Note: You can also set the client application name in ocs.cfg using the CS_APPNAMEproperty.
• --conceal [':?' | 'wildcard'] – hides your input during an isql session.The --conceal option is useful when entering sensitive information, such aspasswords.
wildcard, a 32-byte variable, specifies the character string that triggers isql to prompt youfor input during an isql session. For every wildcard that isql reads, isql displays a promptthat accepts your input but does not echo the input to the screen. The default wildcardis :?.
Note: --conceal is silently ignored in batch mode.
• --help – displays a brief description of syntax and usage for the isql utility consisting ofa list of available arguments.
• --history [p]history_length [--history_filehistory_filename] – Loads the contents of the command history log file, if it exists,when isql starts. By default, the command history feature is off. Use the --historycommand line option to activate it.
• p – indicates command history persistence; in-memory command history is saved todisk when isql shuts down. If you do not use the p option, the command history log isdeleted after its contents are loaded into memory.
• history_length – this parameter, which is required if you use --history, is thenumber of commands that isql can store in the command history log. The maximumvalue of history_length is 1024; if a larger value is specified, isql silently truncates it to1024.
• -history_file history_filename – indicates that isql must retrieve thecommand history log from history_filename. If p is specified, isql also useshistory_filename to store the current session’s command history. history_filename caninclude an absolute or a relative path to the log file. A relative path is based on thecurrent directory. If you do not indicate a path, the history log is saved in the currentdirectory. When --history_file is not specified, isql uses the default log file in$HOME/.sybase/isql/isqlCmdHistory.log.
• --retserverror – forces isql to terminate and return a failure code when itencounters a server error with a severity greater than 10. When isql encounters this type ofabnormal termination, it writes the label “Msg” together with the actual Adaptive Server
CHAPTER 1: Utility Commands Reference
Utility Guide 85

error number to stderr, and returns a value of 2 to the calling program. isql prints the fullserver error message to stdout.
• --URP remotepassword – enables setting the universal remote passwordremotepassword for clients accessing Adaptive Server.
Examples
• Query edit – Opens a text editor where you can edit the query. When you write and savethe file, you are returned to isql. The query appears; type “go” on a line by itself to executeit:isql -Ujoe -Pabracadabra1> select *2> from authors3> where city = "Oakland"4> vi
• Clearing and quitting – reset clears the query buffer, and quit returns you to the operatingsystem:isql -UalmaPassword:1> select *2> from authors3> where city = "Oakland"4> reset1> quit
• Column separators – Creates column separators using the “#” character in the output inthe pubs2 database for store ID 7896:
isql -Usa -P -s#1> use pubs22> go1> select * from sales where stor_id = "7896"#stor_id#ord_num #date ##-------#--------------------#--------------------------##7896 #124152 # Aug 14 1986 12:00AM##7896 #234518 # Feb 14 1991 12:00AM#
(2 rows affected)• Credentials – (MIT Kerberos) Requests credential delegation and forwards the client
credentials to MY_GATEWAY:isql -Vd -SMY_GATEWAY
• Passwords – Changes password without displaying the password entered. This exampleuses “old” and “new” as prompt labels:$ isql -Uguest -Pguest -Smyase --concealsp_password:? old,:?:? new
CHAPTER 1: Utility Commands Reference
86 Adaptive Server Enterprise

----------------oldnewConfirm newPassword correctly set.
(Return status 0)• Hide input – In this example of --conceal, the password is modified without
displaying the password entered. This example uses “old” and “new” as prompt labels:$ isql -Uguest -Pguest -Smyase --conceal1> sp_password2> :? old3> ,4> :?:? new5> go
oldnewConfirm newPassword correctly set.(return status = 0)
In this example of --conceal, the password is modified without displaying thepassword entered. This example uses the default wildcard as the prompt label:$ isql -Uguest -Pguest -Smyase --conceal1> sp_password2> :?3> ,4> :?:?5> go
:?:?Confirm :?Password correctly set.(return status = 0)
This example of --conceal uses a custom wildcard, and the prompt labels "role" and"password" to activate a role for the current user:$ isql -UmyAccount --conceal '*'Password:1> set role2> * role3> with passwd4> ** password5> on6> go
rolepasswordConfirm password1>
CHAPTER 1: Utility Commands Reference
Utility Guide 87

• Return server error – returns 2 to the calling shell, prints “Msg 207” to stderr, andexits, when it encountered a server error of severity 16:guest> isql -Uguest -Pguestpwd -SmyASE --retserverror 2> isql.stderr1> select no_column from sysobjects2> go
Msg 207, Level 16, State 4:Server 'myASE', Line 1:Invalid column name 'no_column'.
guest> echo $?2guest> cat isql.stderrMsg 207guest >
• Application name – Sets the application name to the name of the script that started the isqlsession:isql --appname $0
• History – Loads and saves the command history using the default log file:isql -Uguest -Ppassword -Smyase --history p1024
• Run isql with configuration file – This sample ocs.cfg file allows you to run isqlnormally or with network debug information. Because the configuration file is read andinterpreted after the command line parameters are read and interpreted, settingCS_APPNAME to isql sets the application name back to isql:;Sample ocs.cfg file [DEFAULT] ;place holder
[isql] ;place holder
[isql_dbg_net] CS_DEBUG = CS_DBG_NETWORK CS_APPNAME = "isql"
To run isql normally:isql -Uguest
To run isql with network debug information:isql -Uguest --appname isql_dbg_net
• Load and save command history – Loads and saves the command history using thedefault log file:isql -Uguest -Ppassword -Smyase --history p1024
• Delete log – Deletes myaseHistory.log after loading its contents to memory. Thesession’s command history is not stored.
CHAPTER 1: Utility Commands Reference
88 Adaptive Server Enterprise

isql -Uguest -Ppassword -Smyase --history 1024 --history_file myaseHistory.log
• All commands in command history – Lists all the commands stored in the commandhistory:isql -Uguest -Ppassword -Smyase --history p10241> h
[1] select @@version[2] select db_name()[3] select @@servername
1>• Most recent commands – Lists the two most recent commands issued:
isql -Uguest -Ppassword -Smyase --history p10241> h -2
[2] select db_name()[3] select @@servername
1>• Recall labeled command from history – Recalls the command labeled 1 from the
command history:isql -Uguest -Ppassword -Smyase --history p10241> ? 1
1> select @@version2>
• Recall last-issued command from history – Recalls the latest issued command from thecommand history:isql -Uguest -Ppassword -Smyase --history p10241> ? -1
1> select @@servername2>
• Set directory – Sets an alternate Sybase home directory using the -y option:
isql -y/work/NewSybase -Uuser1 -Psecret -SMYSERVER• Roles – Activates a role for the current user. This example uses a custom wildcard and the
prompt labels “role” and “password”:$ isql -UmyAccount --conceal '*'Password:set role* rolewith passwd** passwordongo
role
CHAPTER 1: Utility Commands Reference
Utility Guide 89

passwordConfirm password
• Application name – Sets the application name to “isql Session 01”:isql -UmyAccount -SmyServer --appname "isql Session 01"Password:1>select program_name from sysprocesses2>where spid=@@spid3>go
program_name-------------------isql Session 01
• Deleting history – Deletes myaseHistory.log after loading its contents to memory.The session’s command history is not stored:isql -Uguest -Ppassword -Smyase --history 1024 --history_file myaseHistory.log
See also• Interactive isql Commands on page 92• Command History in isql on page 94• Chapter 6, Using Interactive isql from the Command Line on page 229
Usage for isqlAdditional information for using isql.
• If you are using threaded drivers, use the isql syntax for isql_r.• If you are using threaded drivers in the IBM platform, use the standard syntax for isql.• Before using isql, set the SYBASE environment variable to the location of the current
version of Adaptive Server.• The 5701 (“changed database”) server message is no longer appears after logging in or
issuing a use database command.• Error message format differs from versions of isql earlier than 15.7. If you have scripts that
perform routines based on the values of these messages you may need to rewrite them.• When you include the -X parameter, the password-enabled connection proceeds according
to server capabilities:• If the server can handle both extended password and password encryption, extended
password encryption negotiations are used.• If the server can handle only password encryption, password encryption negotiations
are used.• If the server cannot handle password encryption or extended password encryption, the
first connection attempt fails and the client attempts to reconnect using a plain textpassword.
• Terminate a command by typing a line beginning with the default command terminator goor another command terminator, if the -c parameter is used. Follow the command
CHAPTER 1: Utility Commands Reference
90 Adaptive Server Enterprise

terminator with an integer to specify the number of times to run the command. Forexample, to execute this command 100 times, type:select x = 1go 100
The results appear once at the end of execution.• If you enter an option more than once on the command line, isql uses the last value. For
example, if you enter this command, “send”, the second value for -c, overrides “.”, thefirst value:isql -c"." -csend
This enables you to override any aliases you set up.• Execute operating system commands by starting a line with two exclamation points (!!)
followed by the command.• To clear the existing query buffer, type reset on a line by itself. isql discards any pending
input. Press Ctrl+c anywhere on a line to cancel the current query and return to the isqlprompt.
• Read in an operating system file containing a query for execution by isql:isql -U alma -Ppassword < input_file
The file must include a command terminator. The results appear on your terminal. Read inan operating system file containing a query and direct the results to another file:isql -U alma -Ppassword < input_file > output_file
• isql displays only six digits of float or real data after the decimal point, rounding offthe remainder.
• You can include comments in a Transact-SQL statement submitted to Adaptive Server byisql. Open a comment with “/*”. Close it with “*/”, as shown in this example:select au_lname, au_fname/*retrieve authors’ last and first names*/from authors, titles, titleauthorwhere authors.au_id = titleauthor.au_idand titles.title_id = titleauthor.title_id/*this is a three-way join that links authors**to the books they have written.*/
Do not comment out a go command at the beginning of a line. For example, use this tocomment out the go command:/***go*/
Do not use this:/*go*/
CHAPTER 1: Utility Commands Reference
Utility Guide 91

• isql defines the order of the date format as month, date, and year (mm dd yyyy hh:mmAM(or PM)), regardless of the locale environment. To change this default order, use theconvert function.
• In an isql session, the default prompt label is either the default wildcard :? or the value ofwildcard. Customize the prompt label by providing a one-word character string, with amaximum length of 80 characters after a wildcard. If you specify a prompt label that ismore than one word, the characters after the first word are ignored.
Note: In an isql session, isql recognizes :?, or the value of wildcard, as wildcards onlywhen these characters are placed at the beginning of an isql line.
See also:
• Reference Manual: Building Blocks – exact numeric datatypes, convert built-infunction
• Reference Manual: Commands – create schema, set
• Reference Manual: Procedures – xp_sendmail extended stored procedure,sp_addlanguage, sp_addlogin, sp_addremotelogin, sp_add_resource_limit,sp_bindexeclass, sp_configure, sp_defaultlanguage, sp_droplanguage,sp_helplanguage, sp_processmail, sp_remoteoption, sp_serveroption,sp_showcontrolinfo, sp_unbinexeclass, sp_volchanged
• System Administration Guide: Volume 1 – default network packet size and maximumnetwork packet sizeconfiguration parameters
Interactive isql CommandsTo use isql interactively, give the command isql (and any of the optional parameters) at youroperating system prompt.
The isql program accepts SQL commands and sends them to Adaptive Server. The results areformatted and printed on standard output. Exit isql with quit or exit.
When using isql interactively:
• Read an operating system file into the command buffer using::r filename
Do not include a command terminator in the file; enter the terminator interactively onceyou have finished editing.
• Read and display an operating system file into the command buffer using::R filename
• You can change the current database using:use databasename
The commands you execute from within interactive isql are:
CHAPTER 1: Utility Commands Reference
92 Adaptive Server Enterprise

Command Description
:r filename Reads an operating system file into the command buffer.
Do not include the command terminator in the file; once you have finishedediting, enter the terminator interactively on a line by itself.
:R filename Reads an operating system file into the command buffer then shows thecommand.
Do not include the command terminator in the file; once you have finishedediting, enter the terminator interactively on a line by itself.
use data-base_name
Changes the current database.
!! os_command Executes an operating system command. Place at the start of a line.
> file_name Redirects the output of the Transact-SQL command to file_name. Thisexample inserts the server version into file_name:
select @@versiongo > file_name
>> file_name Appends the output of the Transact-SQL command to file_name.This ex-ample appends the server version to file_name:
select @@versiongo >> file_name
| command Pipes the output of the Transact-SQL command to an external command.This example finds all instances of “sa” in the listing produced bysp_who:
sp_whogo | grep sa
vi (UNIX) or edit
(Windows)Calls the default editor.
reset Clears the query buffer.
quit or exit Exits isql.
isql Session CommandsAdditional commands to use within isql.
Command Description
> Redirects command output to a file. File is overwritten if it exists.
CHAPTER 1: Utility Commands Reference
Utility Guide 93

Command Description
> Redirects command output to a file. The output is appended to the file if the file alreadyexists.
| Pipes the output of a command to an external application.
reset Clears the query buffer.
quit or exit Exits from isql.
vi Calls the editor.
!! command Executes an operating system command.
:r filename Reads an operating system file.
:R filename Reads and displays an operating system file.
use dbname Changes the current database to dbname.
Prompt Labels and Double Wildcards in an isql SessionIn an isql session, the default prompt label is either the default wildcard :? or the value ofwildcard. You can customize the prompt label by providing a one-word character string with amaximum length of 80 characters, after a wildcard.
If you specify a prompt label that is more than one word, the characters after the first word areignored. Double wildcards such as :?:? specify that isql needs to prompt you twice for thesame input. The second prompt requests you to confirm your first input. If you use a doublewildcard, the second prompt label starts with Confirm.
Note: In an isql session, :? or the value of a custom wildcard is only recognized by isql assuch, when it is the first "word" of a line.
Command History in isqlThe command history feature is available in command mode.
Only commands that are issued interactively in isql are included in the command history.Examples of commands that are not included in the command history are those that areexecuted using the -i command line option or as part of a redirected input, such as:
isql -Uguest -Ppassword -Smyase --history p1024 --history_file myaseHistory.log <<EOFexec sp_x_y_zgoEOF
Command history contains the most recent commands issued in an isql session. Whenhistory_length is reached, isql drops the oldest command from the history and adds the newestcommand issued.
CHAPTER 1: Utility Commands Reference
94 Adaptive Server Enterprise

If you do not specify an alternate log file, and if the $HOME or %APPDATA% environmentvariable used by the default log file is not defined, an error message appears and the commandhistory log is not saved.
In an isql session, use the h [n] command to display the command history. A page candisplay up to 24 lines of commands. If the command history contains more than 24 lines, pressEnter to display the next set of commands or enter “a” to display all commands in one page.Enter “q” to return to isql.
n indicates the number of commands to appear. If n is:
• Positive – the commands that appear start from the oldest command in the history.• Negative – the n most recent commands appear.
Use the ? n | ?? command to recall and reissue a command from the command history.
When n is positive, isql looks for the command labeled with the number n and loads this to thecommand buffer. When n is negative, isql loads the nth most recent command issued.
?? – recalls the latest command issued and is equivalent to ? -1.
• When a command is recalled from history, the recalled command overwrites the commandin the command buffer.
• You can edit a recalled command before resubmitting the command to the server.
langinstallInstalls a new language in an Adaptive Server.
The utility is located in:
• (UNIX) $SYBASE/$SYBASE_ASE/bin.
• (Windows) %SYBASE%\%SYBASE_ASE%\bin, as langinst.exe.
Syntaxlanginstall [-I path] [-P password] [-R release_number] [-S server] [-U user] language character_set
Orlanginstall -v
CHAPTER 1: Utility Commands Reference
Utility Guide 95
Parameters
• -I path – specifies the name and location of the interfaces file (sql.ini file inWindows) that langinstall searches when connecting to Adaptive Server. If you do notspecify -I, langinstall uses the interfaces file in the directory specified by the SYBASEenvironment variable. If SYBASE is not set, langinstall looks for the default SYBASEdirectory.
• -P password – specifies the system administrator’s (“sa” account) password. If youomit -P, langinstall prompts for the “sa” account password.
• -R release_number – specifies the release number, in the format n.n.n, to use toupgrade messages in master..sysmessages. Use -R only in failure conditions, suchas if langinstall (langinst in Windows) fails, in case of user error, or when you think thatmessages in sysmessages are out of date.
The -R parameter forces langinstall to collect messages from a release previous to thecurrent one. langinstall compares the existing messages with the ones to be installed andreplaces any that have changed.
For example, if the current version is 15.0, and the previous version was 12.5, and youthink sysmessages may not be correct, include the messages from the earlier version inthe syslanguages.upgrade column (12.5 in this case) by specifying -R12.5.langinstall then installs all messages from Adaptive Server 12.5.
• -S server – specifies the name of the Adaptive Server to which to connect. If you donot specify -S, langinstall uses the server specified by your DSQUERY environmentvariable. If DSQUERY is not set, langinstall attempts to connect to a server namedSYBASE.
• -U user – specifies a login name. Login names are case sensitive.
• language – is the official name of the language to be installed. You must specify alanguage.
• character_set – is the name of Adaptive Server default character set, and indicatesthe directory name of the localization files for the language. The common.loc andserver.loc localization files for an official language reside in the character setdirectory $SYBASE/locales/language/character_set in UNIX platforms,or %SYBASE%\locales\language\character_set in Windows. You mustspecify a character set.
• -v – prints the version number and copyright message for langinstall and then exits.
Usage
The Adaptive Server installation program runs langinstall automatically for a new installationas well as for customers who are upgrading from an earlier version.
langinstall:
CHAPTER 1: Utility Commands Reference
96 Adaptive Server Enterprise

• Adds the specified language-specific information to master..syslanguages usingsp_addlanguage. If the language already exists, langinstall updates the appropriate rowin syslanguages.
• Adds to, updates, and deletes error messages as necessary from master..sysmessages.• Updates syslanguages.update, inserting the new release number.
• Validates the entries in the localization file sections that it uses. If anything is missing,langinstall prints an error message and does not add the language to syslanguages.
• Compares the version numbers of each localization file it uses, common.loc andserver.loc. If they are not the same, it prints a warning message.syslanguages.upgrade is always set according to the version number in server.loc.
See also:
• Reference Manual: Procedures – sp_addlanguage, sp_addlogin, sp_configure,sp_defaultlanguage, sp_droplanguage, sp_helplanguage
Permissions
Only a system administrator using the “sa” account can run langinstall.
Tables used
master.dbo.syslanguages, master.dbo.sysmessages
See also• defncopy on page 66• srvbuild on page 134
optdiagDisplays optimizer statistics or loads updated statistics into system tables.
The utility is located in:
• (UNIX) $SYBASE/$SYBASE_ASE/bin.
• (Windows) %SYBASE%\%SYBASE_ASE%\bin, as optidag.exe.
Syntaxoptdiag [binary] [simulate] statistics { -i input_file | database[.owner[.[table[.column] ] ] ] [-o output_file] } [-U user_name] [-P password] [-T trace_value] [-I interfaces_file] [-S server]
CHAPTER 1: Utility Commands Reference
Utility Guide 97

[-v] [-h] [-s] [-z language] [-J client_character_set] [-a display_charset]
Parameters
• binary – extracts statistics in human-readable form and in binary form. When used withan input file (-i input_file), loads binary statistics into system tables.
• simulate – specifies that optdiag display or load simulated statistics. See thePerformance and Tuning Guide.
• -i input_file – specifies the name of the operating system file to use for optdiaginput. Specifying an input file causes optdiag to update optimizer statistics for the table orcolumn by using the values in the specified file (also called “input mode”).
• database – is the name of the database whose statistics you want displayed. In inputmode, optdiag uses the database name as specified in the file, and does not accept adatabase name from the command line.
• owner – is the name of a table owner. In:
• Display mode – if you do not specify an owner, but do specify a table name, optdiagdisplays output for all of the owners of a table.
• Input mode – optdiag ignores the table owner specified on the command line and usesthe value in the input file.
• table – is the name of the table to survey for statistics. If the command:
• Does not include an owner name or a table name – optdiag displays statistics for alltables in the database.
• Includes an owner name, but no table name – optdiag displays all of the tables thatbelong to the specified owner.
In input mode, optdiag ignores the table name specified on the command line and uses thevalue from the input file.
• column – is the name of the colum to survey. If the command does not include a columnname, optdiag displays all statistics for a table.
In input mode, optdiag ignores the column name on the command line and uses the valuesfrom the input file.
• -o output_file – specifies the name of an operating system file to store the outputfrom optdiag. If a file with the same name already exists, optdiag overwrites that filewithout warning.
• -U user_name – specifies an Adaptive Server login name.
• -P password – specifies your Adaptive Server password. If you do not specify the -Pflag, optdiag prompts for a password.
CHAPTER 1: Utility Commands Reference
98 Adaptive Server Enterprise

• -T trace_value – sets trace flags for the optdiag session. The optdiag trace flags andtheir meanings are:
• 1 – do not stop with a warning if the optdiag version of Adaptive Server in use does notmatch the Adaptive Server version in the input file.
• 2 – display status message “Next table is table_name” when in input mode.• 4 – skip consistency checking for step numbers while loading histograms in input
mode.• 6 – display lines of input file during input mode. This flag has no effect in display
mode.• 7 – do not stop with a warning if the optdiag input file does not include sampling
percent information.• -I interfaces_file – specifies the name and location of the interfaces file to use
when connecting to Adaptive Server.
If you do not use -I and specify an interfaces file name, optdiag looks for the interfacesfile (interfaces in UNIX), in the directory specified by the SYBASE environmentvariable. In Windows, optdiag looks for a file named sql.ini in the ini subdirectory inthe Sybase installation directory (d:\sybase). Then, if SYBASE is not set, optdiaglooks for the file in the default $SYBASE directory (%SYBASE% in Windows).
• -S server – specifies the name of the Adaptive Server to which to connect. optdiaglooks for this name in the interfaces file (sql.ini in Windows).
If you use -S without specifying a server name, optdiag looks for a server namedSYBASE.
When you do not use -S, optdiag looks for the server that your DSQUERY environmentvariable specifies.
• -v – displays the version number of and a copyright message for optdiag and exits.
• -h – displays the optdiag syntax help.
• -s – includes system tables in optdiag output. By default, only user tables are included.
• -z language – is the official name of an alternate language that the server uses both fordate formats and to display optdiag prompts and messages. Without the -z flag, optdiaguses the server’s default language.
Add languages to Adaptive Server either during or after installation, After Adaptive Serverinstallation, use either the langinstall utility or the sp_addlanguage stored procedure toadd a language.
• -J client_charset – specifies the character set to use on the client. A filter convertsinput between client_charset and the Adaptive Server character set.
By using -J client_charset, you request that Adaptive Server convert data to andfrom client_charset, the client’s character set.
CHAPTER 1: Utility Commands Reference
Utility Guide 99

By using -J without a character set name, you specify character set conversion as NULL;no conversion takes place. Use this -J alone when the client and server are using the samecharacter set.
By omitting -J, you set the character set to the default set for the platform. A filterconverts input between the default set and the Adaptive Server character set. Keep in mindthat the default may not necessarily be the character set that the client is using.
For more information about character sets and their associated flags, see the SystemAdministration Guide.
• -a display_charset – runs optdiag from a terminal with a character set that differsfrom that of the machine on which optdiag is running. Use -a:
• In conjunction with -J to specify the character set translation (.xlt) file required forthe conversion.
• Without -J only if the client character set is the same as the default character set.
Note: The ascii_7 character set is compatible with all character sets. If either the AdaptiveServer character set or the client character set is set to ascii_7, any 7-bit ASCII charactercan pass unaltered between client and server. Any other characters produce conversionerrors. For more on character-set conversion, see the System Administration Guide.
On some Linux platforms, the LANG environment variable might be set by default to“en_US.UTF-8,” which can cause unnecessary LONGCHAR conversion between theclient and server. If your server and client have different charsets, SAP recommends thatyou bypass the conversion using one of these methods:
• unsetenv LANG
• setenv LANG C
• optdiag -J
• optdiag -Jiso-1 (if your server uses iso-1)
Examples
• User tables – Displays statistics for all user tables in the pubs2 database and places theoutput in the pubs2.opt file:
optdiag statistics pubs2 -Usa -Ppasswd -o pubs2.opt• Table – Displays statistics for the titles table:
optdiag statistics pubs2..titles -Usa -Ppasswd -o titles.opt
• Character set – Displays statistics using the roman8 character set and row labels and errormessages in French:optdiag statistics pubs2..titles -Usa -Ppasswd -o titles.opt -J roman8 -z french
CHAPTER 1: Utility Commands Reference
100 Adaptive Server Enterprise

• Binary statistics – Displays binary statistics for the price column in the titles table:
optdiag binary statistics pubs2..titles.price -Usa -Ppasswd -o price.opt
• Edited statistics – Loads edited statistics from the price.opt file:
optdiag statistics -i price.opt -Usa -Ppasswd
See also• ddlgen on page 45
Usage for optdiagTake these into consideration when using optidag.
• Set the SYBASE environment variable to the location of the current version of AdaptiveServer before using optdiag.
• By default, optdiag does not include the system tables when you display statistics for adatabase. To include the system tables in the output, use the -s flag.
• You cannot specify a particular partition on the optdiag command line; optdiag displaysstatistics for all partitions of a specified table.
• When you use binary mode, optdiag displays the human-readable values with commentmarks (#s) at the beginning of the lines, as shown in this example:Statistics for column: "price"Last update of column statistics: Jan 20 1998 7:16PMStatistics loaded from Optdiag. Range cell density: 0x3f8b9cfefece26bf# Range cell density: 0.0134830400000000 Total density: 0x3f8b9cfefece26bf# Total density: 0.0134830400000000 Range selectivity: default used (0.33)# Range selectivity: default used (0.33) In between selectivity: default used (0.25)# In between selectivity: default used (0.25)
• When you use optdiag with an input file to change statistics, it ignores all characters afterthe “#” in a line.
• Converting floating-point values may lead to rounding errors when you use files for input.When you are loading statistics on the same hardware platform, edit the statistics using thebinary values to provide greater precision.
• optdiag displays:• The statistic sampling percent last used, which indicates that statistics are gathered
with a user-specified sampling percent.• Statistics for each partition of a multi-partitioned table or index.• Global- and partition-level statistics for each column in a table with multiple partitions.
• Use ddlgen partition names and the optdiag utility to analyze optimizer behavior bycreating empty partitioned tables with simulated metadata.
See also:
CHAPTER 1: Utility Commands Reference
Utility Guide 101

• Performance and Tuning Guide – for details on optidag output, and changing statisticsusing optidag
• Reference Manual: Commands – create index, delete statistics, set, update statistics
• Reference Manual: Procedures – sp_addlogin, sp_configure, sp_defaultlanguage,sp_droplanguage, sp_flushstats, sp_helplanguage
Byte Ordering and Binary optdiag FilesDo not use the binary mode option to move statistics between Adaptive Servers on machinesthat use different byte ordering.
• On an incompatible architecture server, always comment out binary statistics and load thehuman-readable statistics.
• On a compatible architecture server, load either binary statistics or human-readablestatistics.
optdiag Input ModeWhen you use the -i input_file syntax, optdiag reads the file as named and updatesstatistics in sysstatistics.
optdiag input mode changes the allow update to system tables configuration parameter bysetting the parameter to 1 at the beginning of the session, and then to 0 at the end of thesession.
During histogram input, the process checks these rules and displays error messages for anyviolated rules:
• The step numbers must increase monotonically, unless the command includes the -T4trace flag.
• The column values for the steps must increase monotonically.• The weight for each cell must be between 0.0 and 1.0.• The total of weights for a column must be close to 1.0.• The first cell represents null values, and it must be present, even in columns that do not
allow null values. There must be only one cell to represent the null value.• Two adjacent cells must not both use the < (less than) operator.
preupgradePerforms tests on an installation or database to determine its readiness for upgrade, and reportsfound problems.
The utility is located in:
• (UNIX) $SYBASE/$SYBASE_ASE/upgrade.
• (Windows) %SYBASE%\%SYBASE_ASE%\upgrade, as preupgrd.exe.
CHAPTER 1: Utility Commands Reference
102 Adaptive Server Enterprise
Syntaxpreupgrade [-v] [-h] [-N] [-p [skip_sybprocs] [-D database_name] [-I interfaces_file] [-P password] [-S server_name] [-U user_name] [-X option[,option]...]
Parameters
• -D database_name – limits checking to the named database and a subset of possiblechecks. Use this parameter to check newly loaded databases before bringing them online.
• -h – prints help text and then exits.
• -I interfaces_file – specifies an interfaces file for the server. The default is$SYBASE/interfaces.
• -N – specifies preupgrade is to run in noninteractive mode. Thus, if preupgradedetermines that any database is too small, the utility exits immediately.
• -p [skip_sybprocs] – specifies whether you want to skip the parsing validity teston stored procedures.
During the upgrade process, stored procedures are automatically re-created internallyfrom the text source, requiring that they be parsed correctly. The valid options forpreupgrade -p are:
• -p – skips the parsing in all databases
• -p skip_procs – skips parsing in sybsystemprocs while parsing the otherdatabases
• Not using -p – parses text everywhere. This is the default.
• -P password – specifies the password for connecting to the server. SAP recommendsthat you do not use this option on the command line as the password is then visible to otherusers when they view displays of system information. Rather, wait until Adaptive Serverprompts for a password, and enter the information then.
• -S server_name – specifies the name of the server to which you want to connect. Thisserver must be listed in the interfaces file specified by the -I parameter. The default is$DSQUERY.
• -U user_name – specifies the user name to use when connecting to the server. Thedefault is “sa.” user_name must have “sa_role” privileges on the server being checked.
Note: If you use the -D option, which limits checking to a named database, and thatdatabase is offline, enter “sa” or accept the default as the user name.
• -v – prints version information and exits.
• -X option[, option...] – specifies a list of checks to be made. The default is allchecks, except when using the -D option, which uses only a subset of available checks. If
CHAPTER 1: Utility Commands Reference
Utility Guide 103

you specify the -X option more than once on the command line, preupgrade performsonly those checks in the last entered -X parameter.
When using the -X parameter with an options list, either:
• List options without a space between the comma and the next option, or• Surround the options list with quotes.
Valid check options are:
CheckOption
OptionUsed Withthe -DParame-ter
Description
all Performs all permitted checks. When used with the -D option, only checkssubset of options. Otherwise, all options are checked.
cache Checks the definition of default cache size. If the definition is DEFAULT, enterits current value in the configuration file as its actual value. This ensures that itssize does not change because the new server’s default value is different fromthe current server’s default value.
config Checks the server’s configuration parameters to see if they are consistent withnew requirements, and reports discrepancies.
Discrepancies can cause errors or warnings for certain parameters:
• Errors – occur when the current value of a parameter is outside the newserver’s range, or when its value is too low for upgrade.
• Warnings – occur when the current value of a parameter is between themaximum and minimum values, but less than the default value
da-ta_mods
Performs updates to system tables, including clearing certain system tablecolumns that are non-zero. Applies primarily to older Adaptive Servers, andwill make no changes to newer systems.
data-type
X Checks the systypes table to make sure that if existing datatypes use asystem-defined name, type, or user type, they match what the new serverexpects. Reports discrepancies and suggests remedies.
db_size Checks that certain system databases meet the minimum size requirements forinstallation.
free_space
X Checks for free space in the named database or in all databases. Makes sure thatthere is sufficient free data and log space to perform the necessary upgradesteps.
CHAPTER 1: Utility Commands Reference
104 Adaptive Server Enterprise

CheckOption
OptionUsed Withthe -DParame-ter
Description
ob-ject_id
X Checks that object IDs of user-defined objects are not reserved for systemobjects.
• Adaptive Server 15.0 and later reserves objects IDs 1 – 255.• Adaptive Server 12.5.x and earlier reserves object IDs 1 – 99.
Does not issue an error. If you receive a warning that a user object ID isreserved, contact Sybase Technical support for directions for changing the userobject ID after upgrade.
re-quired_dbs
Checks that required system databases exist. Some versions of Adaptive Serv-er may require specialized databases such as sybsystemdb.
sproc_text
X Checks for the existence of stored procedure text in the named database or in alldatabases. After upgrade, Adaptive Server must recompile stored proceduresfrom their source text. This check makes sure that all of the source text is bothavailable and valid.
srvclass
Checks for servers classed as “generic” in master.dbo.sysservers.This class is deprecated by Adaptive Server 12.0 and later.
statis-tics
Checks for duplicate rows in sysstatistics. Duplicate rows may occurwhen upgrading from Adaptive Server 12.0 to Adaptive Server 15.0 and laterdue to schema changes in the sysstatistics table.
Sybase may occasionally change valid options for the -X parameter; use the -hparameter to view the current set of valid options.
Examples
• Check options (-X) – Specifies checks for the default cache size, minimum database size,and duplicate rows in sysstatistics for the installation:
preupgrade –X cache,db_size,statistics• Check database (-D) – Checks a newly loaded, offline database for datatypes, free space,
object IDs, and stored procedure text:preupgrade –Dmy_db –Usa
• Noninteractive mode (-N) – Shows how the sqlupgrade utility uses preupgrade. Whenused in this way, preupgrade checks all databases, runs noninteractively, and exits with afailing status if any database is too small:
CHAPTER 1: Utility Commands Reference
Utility Guide 105

preupgrade –N
Permissions
The user login specified by the -U parameter must have system administrator privileges to runpreupgrade on the server specified by the -S parameter.
When using the -D parameter to check an offline database, preupgrade must log in as user“sa.” The “sa_role” privilege is insufficient.
See also• sqlupgrade on page 132
• sqlupgraderes on page 133
Usage for preupgradeThere are additional considerations when using preupgrade.
• When preupgrade finds no errors, it exits with status 0 (zero).• preupgrade is primarily used before upgrading an installation to ensure the procedure will
run smoothly. You can also run preupgrade after loading a database created by a previousversion of Adaptive Server to check for problems that might prevent that database fromupgrading while being brought online.
• sqlupgrade calls preupgrade as part of its normal procedure.
The preupgrade -D ParameterUse the -D parameter primarily to check newly loaded databases before bringing them online.
To do so, preupgrade must force access to offline databases, which requires that preupgradelog in as user “sa” The “sa_role” privilege alone is insufficient. The default is -Usa.When run as part of a normal upgrade, the -D parameter is optional, and you can choose asystem administrator login other than “sa.”
Unless the -D parameter is included, preupgrade checks all databases in the system, and runsonly on previous server versions.
sqlupgrade always runs the full set of preupgrade checks. Correct problems and runpreupgrade to ensure that the problems are indeed corrected before letting sqlupgrade repeatthe full preupgrade procedure.
If the -D parameter is included, preupgrade:
• Checks only the named database.• Can run be run against server of the same version number as the preupgrade utility.• Limits checking to a subset of possible checks. See -X parameter for a list of checks that
are valid when used in conjunction with this parameter.
CHAPTER 1: Utility Commands Reference
106 Adaptive Server Enterprise

When running preupgrade after an upgrade to check a newly loaded but offline database, usethe -D parameter and either specify the “sa” login or omit the -U parameter.
When you specify the -D option, or specify a partial list of options with the -X parameter,preupgrade performs the specified checks and, if there are no errors, displays a list of checksperformed in the exit message.
You may want to use the -D and the -X parameters as part of the normal upgrade ifpreupgrade reports warnings or errors for a particular database or area. Using theseparameters allows you to focus on problem areas without repeating unnecessary checks.
pwdcryptCreates and prints an encrypted LDAP password in the libtcl.cfg file.
The utility is located in:
• (UNIX) $SYBASE/$SYBASE_OCS/bin.
• (Windows) %SYBASE%\%SYBASE_OCS%\bin, as pwdcrypt.exe.
Before using pwdcrypt, set the SYBASE environment variable to the location of the currentversion of Adaptive Server.
Syntaxpwdcrypt
Examples
• Example of pwdcrypt – Enter pwdcrypt at the prompt to return a request to enter yourpassword twice, after which pwdcrypt returns the LDAP password:pwdcryptEnter password please: passwordEnter password again : passwordThe encrypted password: 0x01312a775ab9d5c71f99f05f7712d2cded288d0ae1ce79268d0e8669313d1bc4c706
Replace the last part of the LDAP URL in libtcl.cfg with this encrypted password:
ldap=libsybdldap.soldap://dolly:389/dc=sybase,dc=com????bindname=cn=Manager,dc=sybase,dc=com?0x01312a775ab9d5c71f99f05f7712d2cded288d0ae1ce79268d0e8669313d1bc4c706
An unencrypted password looks similar to:ldap=libsybdldap.soldap://dolly:389/dc=sybase,dc=com????
CHAPTER 1: Utility Commands Reference
Utility Guide 107

bindname=cn=Manager,dc=sybase,dc=com?secret
Permissions
Use file system permissions to prevent unauthorized access to this encrypted password in yourlibtcl.cfg file.
qrmutil(Cluster Edition only) qrmutil allows you to back up, restore, and reconfigure the quorumdevice.
The utility is located in $SYBASE/$SYBASE_ASE/bin.
Syntax
--additional-run-parameters=parameter_list--ase-config-extract=file_name--ase-config-info--ase-config-store=file_name--ase-config-version=version_number--buildquorum=[force]--cluster-take-over--config-file=file_name--diag={all | boot | toc | nodes | locks | config | cms}--display={boot | nodes | heartbeat | master | cluster | instance | config | state}--drop-cluster=[force]--drop-instance=instance_name--errorlog=file_name--extract-config=file_name-h, --help-F, --cluster-input=file_name--fence-capable=device_path--installation=installation_mode-s, --instance=instance_name--instance-node=node_name--interfaces-dir=path_to_interfaces_file--max-instances=number_of_instances--master-dev=master_device--membership-mode=membership_mode--primary-address=interconnect_address--primary-port=port_number--primary-protocol=protocol-Q, --quorum-dev=quorum_device--register-node=node_name--secondary-address=interconnect_address--secondary-port=port_number--secondary-protocol=protocol--traceflags=traceflag_list--unregister-node=node_name--verify-node=node_name-v, --version]
CHAPTER 1: Utility Commands Reference
108 Adaptive Server Enterprise

Parameters
• --additional-run-parameters=parameter_list – parameters thatUnified Agent uses to start the data server. Unlike other settings, dataserver does not readadditional run parameters. They are read by the unified agent and passed to the dataservercommand line. If you include the --instance parameter, the additional run parametersapply to the specified instance. Otherwise, the additional run parameters apply to allinstances in the cluster.
• --ase-config-extract=file_name – extracts the Adaptive Serverconfiguration file stored on the quorum device to the named file.
• --ase-config-info – displays information about the Adaptive Server configurationfile stored on the quorum device.
• --ase-config-store=file_name – stores the named file in the quorum device asthe Adaptive Server configuration file.
• --ase-config-version=[version_number] – displays or sets the version ofthe master Adaptive Server configuration file stored on the quorum device.
• --buildquorum[=force] – builds a new quorum device. Use =force to overwritean exiting file or an existing quorum device on a raw partition. You must include the --cluster-input parameter with --buildquorum.
• --config-file=config_file_name – if used with -instance, sets this pathto the Adaptive Server configuration file for the specified instance. If you do not include-instance, sets the path to the cluster-wide configuration file.
• --diag={all | boot | toc | nodes | locks | config | cms} – forinternal use only.
• --display={boot | nodes | heartbeat | master | cluster |instance | config | state} – displays the current state of cluster or instance:
• boot – displays start-up information for the cluster, including the version of thequorum device, any trace flags issued at start-up, the boot ID of the cluster, and anymessages displayed at start-up.
• nodes – displays the registered management nodes.
• heartbeat – displays heartbeat information for all nodes in the cluster.
• master – displays master device information.
• cluster – displays the cluster configuration.
• instance – displays the instance configuration. You must include --instance=instance_name with this parameter.
• config – displays configuration for the cluster and for all instances in the cluster.
• state – displays the current state for the cluster and for all instances in the cluster.
• --drop-cluster=[force] – drops a cluster and removes the quorum device. Use=force to force the drop if the quorum indicates the cluster is running.
Warning! --drop-cluster removes the cluster.
CHAPTER 1: Utility Commands Reference
Utility Guide 109

• --drop-instance=instance_name – do not use; Sybase internal use only.
Warning! Use the sybcluster utility to drop an instance from the cluster.
• --errorlog=log_file_name – full path to the error log for the specified instance.You must include the -instance-name parameter. Takes effect at next restart of theinstance.
• --extract-config=file_name – extracts the configuration area of the quorumdevice to the specified file.
• -h | --help – displays the full syntax of qrmutil.
• -F | cluster-input=file_name – loads the cluster configuration from thespecified cluster input file.
• --fence-capable=device_path – tests if specified device can be used for I/Ofencing. Returns either “Device is fence capable” or “Device is not fence capable”.
• --installation=installation_mode – changes the installation mode for thecluster. Values are:
• shared (default)
• private• -instance=instance_name – applies qrmutil parameters to a specified instance.
• --interfaces-dir=interfaces_path – the path to a directory that contains afile named interfaces. If this parameter is used with --instance, it sets the path to theinterfaces file for the specified instance. If --instance is not included, sets the path tothe cluster-wide interfaces file.
• --max-instances=number_of _instances – sets the maximum number ofinstances for the cluster configuration.
• --master-dev=master_device_name – changes the master device the clusteruses.
• --membership-mode=membership_mode – sets the membership mode. Valuesare:
• native (default)
• vcs• --primary-address=interconnect_address – changes the primary
interconnect address for a given instance.• --primary-port=port_number – changes the starting port number for the primary
interconnect for a given instance.• --primary-protocol=protocol – changes the protocol used for the primary
cluster interconnect.• -Q | --quorum-dev=quoum_path – specifies the full path to the quorum device.
• --register-node=node_name – registers a node for quorum management.
CHAPTER 1: Utility Commands Reference
110 Adaptive Server Enterprise

• --secondary-address=inteconnect_address – changes the secondaryinterconnect address for a given instance.
• --secondary-port=port_number – changes the starting port number for thesecondary interconnect for a given instance.
• --secondary-protocol=protocol – changes the protocol used for thesecondary cluster interconnect.
• --traceflags=trace_flag, trace_flag – changes the cluster-wide or theinstance-specific trace flags for start-up. If you do not include a list of trace flags, qrmutilclears the trace flags for the cluster instance.
• --unregister-node=node_name – unregisters a node from quorum management.
• --verify-node=node_name – indicates that the specified node is registered on thequorum device.
• -v | --version – displays the version information for the qrmutil utility.
Examples
• Change path – Changes the path to the error log to /sybase/opt/cluster/ASE-15_0/ase1.log:
qrmutil --quorum_dev=/dev/raw/raw101 --instance=ase1 --errorlog=/sybase/cluster/ASE-15_0/ASE-15_0/ase1.log
• Register node – Registers the node “blade5” for mycluster:qrmutil --quorum_dev=/dev/raw/raw101 --register-node=blade5
• Create quorum device – Creates a new quorum device for the cluster “mycluster”:qrmutil --quorum-dev=/dev/raw/raw101 --cluster-input=/sybase/cluster/ase1.inp -buildquorum
• Back up device – Backs up the quorum device to /sybase/cluster_bak/quorum.bak:
qrmutil --quorum-dev=/dev/raw/raw101 --extract-config=/sybase/cluster_bak/quorum.bak
• Restore device – Restores the quorum device from the backup created in /sybase/cluster_bak/quorum.bak:
qrmutil --quorum-dev=/dev/raw/raw101 --cluster-input=/sybase/cluster_bak/quorum.bak --buildquorum=force
• Display configuration – Displays the cluster configuration stored on the quorum device:qrmutil --quorum-dev=/dev/raw/raw101 --display=config
• Test – Tests whether the named device can be fenced:qrmutil --quorum-dev=/dev/raw/raw101 --fence-capable=/dev/raw/raw106
CHAPTER 1: Utility Commands Reference
Utility Guide 111

Usage
• qrmutil is primarily a diagnostic utility. SAP recommends that you use sybcluster to makeconfiguration changes to the cluster.
• You may pass as many as 20 commands to qrmutil. However, you can specify the --instance= parameter only once.
• If you specify --buildquorum, the quorum is built and qrmutil exits without runningany commands other than --cluster-input.
• qrmutil exits after it executes the --drop-cluster parameter.
• This is an example of using multiple commands:qrmutil --quorum-dev=/dev/raw/raw101 --display=cluster --register-node=blade1 --unregister-node=blade2 --verify-node=blade3
Permissions
To run qrmutil, you must be the same sybase user that started the instance, with executepriveledges on the qrmutil binary, have direct access to the quorum device, and at least readpermissions on the quorum file.
qptuneqptune is an Adaptive Server utility written in Java/XML. It enables users to fix missingstatistics and identify the best query plan, optimization goals, or other configuration settings,and apply them at the query or server level. This results in optimal performance of subsequentquery executions.
Syntaxqptune [-U username] [-P password] [-S hostname:port/database] [-A action] [-M mode] [-T appTime] [-i inputFile] [-o outputFile] [-f fileList(,)] [-c configFile] [-l limit] [-e evalField] [-d difference] [-m missingCount] [-n login] [-J charset>] [-N (noexec)] [-g (applyOptgoal)] [-v (verbose)]
CHAPTER 1: Utility Commands Reference
112 Adaptive Server Enterprise

[-s (sort)] [-h (help)]
Parameters
• -U username – specifies the database user name.
• -P password – specifies the database password.
• -S server – specifies the database server. The database server is denoted by host:port/database.
Note: Specify the -S option while using any qptune action.
• -A action – specifies the action to be taken. Valid actions are:
• start• collect – the default value
• collect_full• compare• fix• start_stats• collect_stats• fix_stats• undo_fix_stats
• -c configFile – specifies the configuration file. The default value isconfig.xml.
• -d difference – specifies the percentage and absolute value difference forperformance improvement to be considered outstanding using the format -d <diff%(,diff_abs)>. The default value is 5,5. If you specify percentage but not the absolutevalue, then absolute value defaults to 0.
• -e evalField – is the evaluation field used for performance comparison. The defaultvalue is elap.avg.
• -f fileList – compares a list of files to get the best plans; use commas to separatefilenames.
• -g – when used along with the fix action, applies the default goal. The default goal is thebest optgoal setting that most queries used as the best plan using QPTune’s fix action.This option only generates plans for queries that do not currently use the server’s defaultoptimization goal.
• -i inputFile – specifies the input file for the fix, fix_stats, andundo_fix_stats actions. You can also use -i to apply special rules to the specifiedqueries for start for custom modes.
• -J charset – specifies the character set used to connect to Adaptive Server. If you donot specify this option, the Adaptive Server uses the server’s default character set.
CHAPTER 1: Utility Commands Reference
Utility Guide 113

Note: If the installed JRE does not support the server’s default charset encoding, you seean error message during the login process. Use the -J option to specify a more genericcharacter set, such as -J utf8.
• -l limit – specifies a limit on the number of queries that should be analyzed andapplied with special rules.
• -M mode – specifies the optimization goal or custom mode for an application. The validoptions for mode are allrows_oltp, allrows_dss, allrows_mix. You may alsodefine custom modes, however _basic_ is a system-reserved custom mode. The defaultvalue is allrows_dss.
• -m missingCount – specifies the threshold value for missing statistics. The defaultvalue is 5.
• -N – used along with fix_stats and undo_fix_stats, -N generates a SQL scriptwith update statistics or delete statistics statements. The update or delete statements arenot executed through qptune. The statements are written into a SQL script that is specifiedby the -o option.
• -n login – specifies the user’s login whose query executions are collected andanalyzed.
• -o outputFile – specifies the output file. The default value is metrics.xml.
• -T appTime – specifies the application running time, in minutes. The default value is0.
• -v – specifies verbose mode. Do not use -v when collecting more than 1,000 queries, asQPTune can take a long time to export all the query information on the console. Instead,view the output XML file for query details.
Examples
• Fix stats – Fixes missing statistics, starts the utility with the start_stats action:
QPTune -A start_stats -S my_host:4816/my_database -vExecuting : QPTune -U sa -P [unshown] -S jdbc:sybase:Tds:my_host:4816/my_database -A start_stats -M allrows_dss -T 0 -i null -o metrics.xml -f null -c config.xml -l 5 -e elap_avg -d 5,5 -m 5 -n null -vYou are now connected to database: my_database[INFO] Config: sp_configure 'capture missing statistics', 1[INFO] Config: sp_configure 'system table', 1[INFO] Config: delete sysstatistics where formatid =110
• Retrieve missing information – Uses collect_stats to retrieve missing statisticsinformation from the sysstatistics table for statistics that exceed a specifiedthreshold for count of missing statistics:
QPTune -A collect_stats -m 1 -o missingstats.xml -v -S my_host:4816/my_database
CHAPTER 1: Utility Commands Reference
114 Adaptive Server Enterprise

Executing : QPTune -U sa -P [unshown] -S jdbc:sybase:Tds:my_host:4816/my_database -A collect_stats -M allrows_dss -T 0 -i null -o missingstats.xml -f null -c config.xml -l 5 -e elap_avg -d 5,5 -m 1 -n null -vYou are now connected to database: my_databaseNow collecting missing statistics information from sysstatistics on "Fri Sep 26 10:08:06 PDT 2008".<?xml version="1.0" encoding="UTF-8"?><server url="jdbc:sybase:Tds:my_host:4816/my_database"file="missingstats.xml"type="missing stats" datetime="Fri Sep 26 10:08:06 PDT 2008" > <missingStat id="1"> <id>1068527809</id> <stats>Y(y4,y2)</stats> <count>2</count> </missingStat> <missingStat id="2"> <id>1068527809</id> <stats>Y(y3)</stats> <count>1</count> </missingStat> <missingStat id="3"> <id>1068527809</id> <stats>Y(y2,y1)</stats> <count>1</count> </missingStat> <missingStat id="4"> <id>1068527809</id> <stats>Y(y1)</stats> <count>1</count> </missingStat></server>The missing statistics information is written into XML file: missingstats.xml[INFO] End config: sp_configure 'enable metrics capture', 0[INFO] End config: sp_configure 'abstract plan dump', 0[INFO] End config: sp_configure 'system table', 0[INFO] End config: sp_configure 'capture missing statistics', 0Program has restored the data source for metrics collection.----- QPTune finished executing. ------
• Update statistics – After collecting missing statistics information into an XML file calledmissingstats.xml, updates the statistics using the fix_stats action:
QPTune -A fix_stats -m 1 -i missingstats.xml -v -S my_host:4816/my_databaseExecuting : QPTune -U sa -P [unshown] -S jdbc:sybase:Tds:my_host:4816/my_database -A fix_stats -M allrows_dss -T 0 -i missingstats.xml -o metrics.xml -f null -c config.xml -l 5 -e elap_avg -d 5,5 -m 1 -n null -vYou are now connected to database: my_databaseFix statistics on "Fri Sep 26 10:14:59 PDT 2008"-----------------------------------------------------------Details of statements(s) fixed:-------------------------------
CHAPTER 1: Utility Commands Reference
Utility Guide 115

Fixed statistics:[Update] Y(y4,y2)[INFO] Fix Statement = update statistics Y(y4,y2)Fixed statistics:[Update] Y(y3)[INFO] Fix Statement = update statistics Y(y3)Fixed statistics:[Update] Y(y2,y1)[INFO] Fix Statement = update statistics Y(y2,y1)Fixed statistics:[Update] Y(y1)[INFO] Fix Statement = update statistics Y(y1)----- QPTune finished executing. ------
Generates a SQL script for updating statistics, without executing the actual updates, byusing the -N option to indicate “noexec”, and the -ooption to indicate the output scriptfile:QPTune -U sa -P -S my_host:5000/my_database -A fix_stats -m 5 -i missingstats.xml -N -o missingstats.sql
• Start QPTune – Starts QPTune to apply standard optimization goal settings to queries:QPTune -S host:port/database -A start [-M {allrows_oltp, allrows_dss, allrows_mix}]
Start QPTune to apply custom rules to specified queries:QPTune -S host:port/database -A start -M custom_1 -i input.xml -l 3 [-v]
• Collect metrics – Runs your application and collect metrics into an XML file nameda2.xml:
QPTune -S host:port/database -A collect -T 0 -o a2.xml -vProgram has configured the data source for metrics collection.Now collecting information from sysquerymetrics on "Tue Feb 19 22:16:04 PST 2008".<?xml version="1.0" encoding="UTF-8"?> <server url="jdbc:sybase:Tds:SHANGHI:5000" type="ASE" mode="custom_1" datetime="Tue Feb 19 22:16:04 PST 2008"><query id="1"><qtext> select count(T.title_id) from authors A, titleauthor T where A.au_id = T.au_id </qtext><elap_avg>300</elap_avg><bestmode> custom_1</bestmode></query></server>
• Compare XML files – Once metrics are collected, compares different XML files to get thebest query optimization goal or criteria for each of the queries:QPTune -A compare -f a1.xml,a2.xml -d 51,10 -o best.xml -S my_host:5000/my_database
This result shows a comparison between two XML metrics files: a1.xml has six queries,and a2.xml has seven queries. Comparisons can only be made between the queries thatare common to both files. There are three queries that ran faster in a2.xml:
CHAPTER 1: Utility Commands Reference
116 Adaptive Server Enterprise

Compare all the files: | a1.xml, a2.xml|Report generated on "Tue Aug 19 21:13:04 PST 2008"--------------------------------------------------------------------------File #1: [name= a1.xml : mode=allrows_mix]File #2: [name= a2.xml : mode=custom_1]Query count in File #1 : [mode=allrows_mix] 6Query count in File #2 : [mode=custom_1] 7==========================================================================Query count improved in File #2: [mode=allrows_mix] 3
Total performance improved [from 422 to 129]: 69 %
Following queries run better in File #2:[mode=allrows_mix]--------------------------------------------------------------------------Group 1: improved by no more than 25% [0 queries]Group 2: improved by 25% to 50% [1 queries]Query: select count(T.title_id) from authors A, titleauthors T where A.au_id = T.au_idAverage elapsed time (ms): File #1=100 File #2=50 Improvement=50.0% Outstanding=NoGroup 3: improved by 50% to 75% [0 queries]Group 4: improved by 75% to 100% [2 queries]Query: select count(*) from titlles T, titleauthors TA where T.title_id = TA.title_idAverage elapsed time (ms): File #1=34 File #2=7 Improvement=79.0% Outstanding=YesQuery: select au_lname, au_fname from authors where state in ("CA", "AZ") Average elapsed time (ms): File #1=9 File #2=0 Improvement=100.0% Outstanding=No
Usage
When you use QPTune to collect a very large number of queries, you may see a message suchas:Exception in thread "main" java.lang.OutOfMemoryError:Java heap space
If this occurs, increase the value of the maximum heap size of the Java Virtual Machine (JVM)by using sp_jreconfig to set the -Xmx arguments of the PCA_JVM_JAVA_OPTIONSdirective to a size larger than the default of 1024MB. See Chapter 2, “Managing the JavaEnvironment” in Java in Adaptive Server Enterprise for more information about -Xmx.
When you use QPTune to collect a large amount of queries, do not use the -v verbose option.
See also:
• Java in Adaptive Server Enterprise
CHAPTER 1: Utility Commands Reference
Utility Guide 117

• Migration Technology Guide• Reference Manual: Procedures – sp_jreconfig
Permissions
QPtune’s compare action may be run by any user. All other actions of QPTune may only berun by users with sa_role and sso_role.
showserver(UNIX only) Shows the Adaptive Servers and Backup Servers that are currently running onthe local machine, available only in UNIX platforms.
The utility is located in $SYBASE/$SYBASE_ASE/install.
Syntaxshowserver
Parameters
• None –
Examples
• Servers running – Shows the Adaptive Servers and Backup Servers that are currentlyrunning on the local machine:
showserverUSER PID %CPU %MEM SZ RSS TT STAT START TIME COMMANDuser114276 0.0 1.7 712 1000 ? S Apr 5514:05 dataserver-d greensrv.dat -sgreensrv -einstall/greensrv+_errorlog sybase 1071 0.0 1.4 408 820 ? S Mar 28895:38 /usr/local/sybase/bin/dataserver -d/dev/rsd1f -e/install/errorloguser128493 0.0 0.0 3692 0 ? IW Apr 1 0:10 backupserver -SSYB_BACKUP -e/install/backup.log -Iinterfaces -Mbin/sybmultbuf -Lus_english -Jiso_1
Usage
showserver displays process information about Adaptive Server or Backup Server. If noservers are running, only the header appears.
See also:
• Reference Manual: Building Blocks – host_name
• Reference Manual: Commands – startserver
CHAPTER 1: Utility Commands Reference
118 Adaptive Server Enterprise

See also• dataserver on page 37• startserver on page 137• langinstall on page 95
sqldbgrsqldbgr is a command line utility that debugs stored procedures and triggers.
The utility is located in:
• (UNIX) $SYBASE/$SYBASE_ASE/bin.
• (Windows) %SYBASE%\%SYBASE_ASE%\bin, as sqldbgr.exe.
As with many source-level debuggers, you can:
• Attach sqldbgr to a task• Set, enable, and disable breakpoints• Step through a task one line at a time• Step into and out of procedures• Detach sqldbgr from stored procedures or triggers once the debugging is complete.
Note: You do not have the ability to view sqldbgr version strings.
Syntaxsqldbgr -U username -P password -S host:port
Parameters
• -U username – specifies the user name. Insert a space between -U and username.
• -P password – specifies the user password. Insert a space between -P andpassword.
• -S host:port – specifies the machine name and the port number. Insert a spacebetween -S and host:port.
Examples
• Debug stored procedures and triggers – Shows sqldbgr debugging stored proceduresand triggers on host MERCURY:$SYBASE/$SYBASE_ASE/bin/sqldbgr -U sa -P -S MERCURY:16896(sqldbg) stop in sp_whoBreakpoint moved to line 20
CHAPTER 1: Utility Commands Reference
Utility Guide 119

(sqldbg) run sp_who(sp_who::20)if @@trancount = 0(sqldbg) next(sp_who::22) set chained off(sqldbg) contfid spid status loginame origname hostname blk_spid dbname cmd block_xloid0 2 sleeping NULL NULL 0 master NETWORK HANDLER 00 3 sleeping NULL NULL 0 master NETWORK HANDLER 00 4 sleeping NULL NULL 0 master DEADLOCK TUNE 00 5 sleeping NULL NULL 0 master MIRROR HANDLER 00 6 sleeping NULL NULL 0 master ASTC HANDLER 00 7 sleeping NULL NULL 0 master ASTC HANDLER 00 8 sleeping NULL NULL 0 master CHECKPOINT SLEEP 00 9 sleeping NULL NULL 0 master HOUSEKEEPER 00 10 running sa sa 0 master SELECT 00 11 sleeping sa sa(sqldbg) show breakpoints1 stop in sp_who(sqldbg)
• Debug a stored procedure running in another task – In this example, the systemadministrator first logs in to Adaptive Server using isql, then starts sqldbgr from thecommand line to debug a stored procedure that is running in another task:$SYBASE/$SYBASE_OCS/bin/isql -U sa -P 1> select @@spid2> go------121>
$SYBASE/$SYBASE_ASE/bin/sqldbgr -U sa -P -S MERCURY:16896(sqldbg) attach 13The spid is invalid(sqldbg) attach 12(sqldbg) show breakpoints(sqldbg) stop in sp_whoBreakpoint moved to line 20(sqldbg) /* at this point run the sp_who procedure from spid 12 */(sqldbg) where(sp_who::20::@loginname = <NULL>)(ADHOC::1::null)(sqldbg) next(sp_who::22) set chained off(sqldbg) next(sp_who::25)set transaction isolation level 1
CHAPTER 1: Utility Commands Reference
120 Adaptive Server Enterprise

(sqldbg) cont(sqldbg) /* at this point the sp_who result will show up in the isql screen */(sqldbg) detach 12(sqldbg)
Usage for sqldbgrAdditional usage instructions for sqldbgr.
• The sql command is executed in the context of debugged task, while the mysql commandis executed in the context of debugger task. Setting session-specific information, such asfor set quoted_identifier on through sql does not work.
• By default, the Sybase jConnect JDBC™ driver uses set quoted_identifier on. Since thesqldbgr utility is built using jConnect arguments that need quotes, use single quotesinstead of double quotes when entering options. For example, use sp_configure'allow update' instead of sp_configure "allow update".
• Before running sqldbgr, set either the SYBASE_JRE or JAVA_HOME environments tothe location containing the Java run environment.
• When you invoke sqldbgr at the command prompt, the utility starts and the promptchanges to a sqldbgr prompt:(sqldbgr)
Once you see the (sqldbgr) prompt, enter these sqldbgr commands to perform yourtasks:
sqldbgr commands and their descriptions are:
Command Description
attach spid Attaches a task to sqldbgr when you are already logged in to Adaptive Server.
Do not use attach spid to attach to a procedure that is not running.
sqldbgr cannot debug multiple tasks in the same session. If you try to attach theutility to multiple tasks, the first spid continues to be marked as attached. Sinceyou cannot attach to a spid that is already attached, use the detach command,and then attach to another spid.
run procname Debugs stored procedures and triggers without attaching sqldbgr to an existingtask.
If you attempt to use run procname while you are already debugging an existingtask with attach spid, run procname fails and you see:
Cannot run a procedure while debugging another task
CHAPTER 1: Utility Commands Reference
Utility Guide 121

Command Description
stop in procname[at line #]
Sets a breakpoint to stop the stored procedure or trigger being debugged at thebeginning of the specified procedure name.
stop in procname at line # sets a breakpoint to stop the stored procedure ortrigger being debugged at a designated line within the specified procedure.
If you enter an invalid line number, sqldbgr moves the breakpoint to the nextvalid line number, and displays:
Invalid line numberYou can also use this command to set multiple breakpoints.
show breakpoints Displays the breakpoint handle in the form of a unique number, as well as thebreakpoint statements given by the user during the sqldbgr session.
If you specify a breakpoint line number that does not contain a valid SQLstatement, Adaptive Server moves the breakpoint to the next valid line number.However, Adaptive Server does not change the command you entered. This iswhy show breakpoints can return a breakpoint handle and a breakpoint state-ment given during the sqldbgr session that can be different.
An asterisk (*) in the breakpoint line indicates that the breakpoint is set, butcurrently disabled.
use dbname Tells sqldbgr what database to use in order to debug that database’s storedprocedures or triggers.
show variables [at
level #]Dsplays all the variables and their values in the current SQL stored procedure ortrigger.
show variables at level #– displays the variables and their values in the currentSQL stored procedure or trigger at the specified level.
Note: sqldbgr does not support Java variables.
show where Displays the call stack of the stored procedures and triggers that exist in the taskbeing debugged.
step or next Instructs sqldbgr to move to the next statement in the current stored procedureor trigger.
step into Instructs sqldbgr to move into a procedure if the current statement is an executestatement. If the current statement is an update, delete, or insert statement, andif there are triggers in it, step into instructs sqldbgr to move into the update,delete, or insert triggers.
step out Instructs sqldbgr to move out of the current stored procedure or trigger, and tostop at the next line in the calling procedure.
CHAPTER 1: Utility Commands Reference
122 Adaptive Server Enterprise

Command Description
set @varname =VALUE
Sets the value of the indicated variable to the variable value declared in thecommand in the current stored procedure or trigger. The values for the variablesset using set @varname = VALUE are valid only for the current sessionsqldbgr.
cont[inue] Instructs sqldbgr to continue debugging, and to stop at the next breakpoint (ifany).
delete # Deletes the indicated breakpoint set in the current instance of sqldbgr.
enable # Enables the indicated breakpoints, while disable # does the opposite.
sql any_sql_state-ment
Executes ad hoc SQL statements. Use this command to select and analyze datafrom temp tables created by the task being debugged.
sql any_sql_statement returns a result set and any errors that occurred.
detach spid Detaches sqldbgr from the indicated spid, and releases the task being debug-ged.
It deletes the breakpoints that were set for the task being debugged during thecurrent sqldbgr session.
help [all] Display sqldbgr commands.
Error Messages in sqldbgrError messages for sqldgbr.
Message Displays When
Cannot allocate re-source in ASE
Adaptive Server does not have sufficient memory resources toexecute sqldbgr. Increase procedure cache size and restartsqldbgr.
Cannot create Debug-ger handle in ASE
Adaptive Server does not have sufficient memory resources tocreate a debugger handle. Increase procedure cache size andrestart sqldbgr.
The spid is invalid You attempt to attach sqldbgr to an invalid spid. Double check thespid and try again.
You cannot debug atask that is notowned by you
You are attempting to debug a task that you do not own. You mustlog in to the server as the owner of the task to be debugged.
Spid is already be-ing debugged
You execute attach spid and attempt to attach to a spid that isalready being debugged.
CHAPTER 1: Utility Commands Reference
Utility Guide 123

Message Displays When
Spid is not debuggedcurrently
You execute detach spid and attempt to detach from a spid that isnot attached to sqldbgr.
Invalid command You enter an invalid command.
Invalid procedurename
You enter an invalid procedure name in stop in procname.
Invalid line number You enter an invalid line number in stop in procname at line #.
Variable not found You enter an invalid variable in show @varname, show @varnameat level #, or set @varname = VALUE.
Illegal conversionattempted
You execute set @varname = VALUE and attempt to convert thevariable to an invalid value.
Conversion from textto datatype failed
set @varname = VALUE is unsuccessful.
Cannot run a proce-dure while debugginganother task
You use run procname while already debugging an existing taskwith attach spid.
sqlloc(UNIX only) Installs and modifies languages, character sets, and sort order defaults forAdaptive Server using a GUI.
The utility is located in $SYBASE/$SYBASE_ASE/bin.
Syntaxsqlloc [-S server] [-U user] [-P password] [-s sybase dir] [-I interfaces file] [-r resource file]
Orsqlloc -v
Parameters
• -I interfaces file – specifies the name and location of the interfaces file to searchwhen connecting to Adaptive Server.
CHAPTER 1: Utility Commands Reference
124 Adaptive Server Enterprise

• -P password – specifies the “sa” account password.
• -r resource file – executes the specified resource file.
• -S server – specifies the name of the Adaptive Server to which to connect.
• -U user – specifies a login name. Logins are case-sensitive.
• -s sybase dir – specifies the value to use for the SYBASE environment variable.
• -v – prints the version number and copyright message for sqlloc and then exits.
Usage
Set the:
• SYBASE environment variable to the location of the current version of Adaptive Serverbefore using sqlloc.
• DISPLAY environment variable before invoking sqlloc, unless you are only using the -vparameter to display the version number.
See also:
• Installation guide for your platform
Permissions
You must be a Sybase system administrator to use sqlloc.
See also• langinstall on page 95
• sqllocres on page 125
sqllocres(UNIX only) Installs and modifies languages, character sets, and sort order defaults forAdaptive Server, using a resource file.
The utility is located in $SYBASE/$SYBASE_OCS/bin.
Syntaxsqllocres [-S server] [-U user] [-P password] [-s sybase dir] [-I interfaces file] [-r resource file]
Or
CHAPTER 1: Utility Commands Reference
Utility Guide 125

sqllocres -v
Parameters
• -I interfaces file – specifies the name and location of the interfaces file to searchwhen connecting to Adaptive Server.
• -P password – specifies the “sa” account password.
• -r resource file – executes the specified resource file.
• -S server – specifies the name of the Adaptive Server to which to connect.
• -s sybase dir – specifies the value to use for the SYBASE environment variable.
• -U user – specifies a login name.
• -v – prints the version number and copyright message for sqllocres, then exits.
Usage
Set the SYBASE environment variable to the location of the current version of AdaptiveServer before using sqllocres.
See also:
• Installation guide for your platform
Permissions
You must be a Sybase system administrator to use the sqllocres utility.
See also• langinstall on page 95• sqlloc on page 124
sqlsrvr(Windows only) The executable form of the Adaptive Server program.
The utility is located in %SYBASE%\%SYBASE_ASE%\bin.
Syntaxsqlserver [-f] [-g] [-G] [-h] [-H] [-m] [-P] [-q] [-v] [-X] [-a path_to_CAPs_directive_file] [-b master_device_size] [k | K | m | M | g | G | t | T ] [-c config_file_for_server] [-d device_name] [-e path_to_error_log] [-i interfaces_file_directory] [-K keytab_file] [-L config_file_name_for_connectivity]
CHAPTER 1: Utility Commands Reference
126 Adaptive Server Enterprise

[--master_key_password [=password] [-M shared_memory_repository_directory] [-p sa_login_name] [-r mirror_disk_name] [-s server_name] [-T trace_flag] [-u sa/sso_name] [-w master | model database] [-y [password] ] [-z page_size [ k | K ] ]
Parameters
• -a path_to_CAPs_directive_file – specifies the path to the CAPs directivefile.
• -bmaster_device_size [k | K | m | M | g | G | t | T ] – specifiesthe size of the master device.
• -c config_file_for_server – specifies the full path name of an Adaptive Serverconfiguration file. Use this parameter to start Adaptive Server with the configurationvalues in the specified configuration file.If you specify a configuration file with the sqlsrvr-c parameter, make sure all the parameters in this configuration file are compatible beforeyou boot the server. If some of the configuration parameters are incompatible, the servermay not start. To avoid this, do not specify a configuration file when you build the masterdevice. The build phase uses all default settings when you do not specify a configurationfile.For more information, see the System Administration Guide: Volume 1.
• -ddevice_name – is the full path name of the device for the master database. Themaster database device must be writable by the user who starts Adaptive Server. Thedefault master database device name is d_master.
• -eerrorlogfile – is the full path name of the error log file for Adaptive Serversystem-level error messages.
• -f – forces initialization of a device or database. You must use both -b and -w to use -f.
• -G – specifies the name of the event log server.
• -g – turns off event-logging.
• -H – starts the high availability (HA) server, if you have the HA feature installed on yourAdaptive Server.
• -iinterfaces_file_directory – specifies the directory location of theinterfaces file to search when connecting Adaptive Server. If -i is omitted, sqlsrvr looksfor a file named interfaces in the directory pointed to by your SYBASE environmentvariable.
• -h – prints this help message, then exists.
• -Kkeytab_file – specifies the path to the keytab file used for authentication in DCE.
• -Lconfig_file_name_for_connectivity – specifies the name theconfiguration file for connectivity.
CHAPTER 1: Utility Commands Reference
Utility Guide 127

• -M sharedmem_directory – places shared memory files in the specified directoryinstead of in the default location, %SYBASE%. If sharedmem_directory starts with “\”, thedirectory name is assumed to be absolute. Otherwise, the directory name is interpretedrelative to %SYBASE%.
• -m – starts Adaptive Server in single-user mode.
• --master_key_password [=password] – specifies the master key passwordwhen you provide the password on the command line or prompts for a master keypassword during Adaptive Server startup. The password characters do not appear, and thepassword is not validated until later in the Adaptive Server startup sequence.
If you include the password on the command line, it is visible until the memory is read andused.
• -psso_login_name – specifies the login name of a system security officer whenstarting Adaptive Server, for the purposes of getting a new password for that account.Adaptive Server generates a random password, displays it, encrypts it, and saves it inmaster..syslogins as that account’s new password.
• -q – treats quiesced databases as “in recovery.”
• -rmastermirror – starts the mirror of the master device. Use this parameter to startAdaptive Server if the master device has been damaged.
• -sservername – specifies the name of the Adaptive Server to start. If -s is omitted, aserver named SYBASE is started.
• -Ttrace_flag –• -usa/sso_name – specifies the system administrator or system security officer’s name
you want to unlock.• -v – prints the version number and copyright message for sqlsrvr and then exits.
• -w master | model_database – specifies whether you want to write a master ormodel database.
• -X – starts this server as sybmon, not dataserver.
• -y [password] – allows you to assign a password for the encrypted private key, so thatthe server prompt the user for a password. This password should match the password youused to encrypt the private key when it was created. You cannot use this parameter whenyou are running the server in the background.
Note: Although you can a password with -y, for security reasons Sybase stronglydiscourages you from doing so.
A private key is included with your server’s digital certificate. By default, the certificatefile located:%SYBASE%\%SYBASE_ASE%\certificates\servername.crt
The location of the certificate file changes if you invoke the sp_ssladmin addcertcommand.
CHAPTER 1: Utility Commands Reference
128 Adaptive Server Enterprise

• -z page_size – specifies the page size of the server. Use -b and -w to use this flag,and name an even power of two between 2k and 16k, or else the server does not boot.
Examples
• Create new installation – Creates a new installation with a 100MB master device and a 4kpage:sqlsrvr -d d_master -z 4k -b 100.02M
The spaces between options and their following arguments are optional and acceptable.This example specifies “100.02M” for a 100MB master device because the server requires16KB of overhead for its configuration area.
• Rewrite a corrupt master – Rewrites a corrupt model database:
sqlsrvr -d d_master -w model
To rewrite a corrupt master database specifying device size:
sqlsrvr -d d_master -w master -z 4k
To rewrite a corrupt master database, specifying device and page sizes, forcing theserver to accept these values in preference to what it may find in the config block:sqlsrvr -d d_master -w master -z 4k -b 100.02M -f
To rewrite a corrupt master database, specifying a page size that does not match what theserver finds in its config block, which produces a failure:
sqlsrvr -d d_master -w master -z 8k00:00000:00000:2001/01/19 12:01:26.94 server Theconfigured server page size does not match that specified on the command line. To use the configured size, omit the command line size; to use the command line size, specify 'force' (-f).
To rewrite a corrupt master database, specifying an incorrect page size, even in a normalboot, which produces a failure:
sqlsrvr -d d_master -z4000sqlsrvr: the 'z' flag may not be used without 'b' or'w'. sqlsrvr: server will ignore the 'z' flag. sqlsrvr: the 'z' flag contained an invalid page size. sqlsrvr: the page size must be an even power of two between 2048 and 16384 bytes, inclusive.
Permissions
Anyone with execute permission on the binary, and who has read/write access to all the files.
Tables used
sysconfigures
CHAPTER 1: Utility Commands Reference
Utility Guide 129

See also• startserver on page 137
Usage for sqlsrvrUsage considerations for sqlsrvr.
• The sqlsrvr utility is referred to as dataserver in other Sybase documents.• Start Adaptive Server using the services manager utility rather than by executing the
sqlsrvr program directly. If you need to change any of the default parameters, edit theAdaptive Server Registry keys. See the configuration guide for your platform for details.
• Adaptive Server derives its running environment from values in the sysconfiguressystem table. Run sp_configure to see the configuration values; use sp_configure andreconfigure to change the configuration.
• Because Adaptive Server passwords are encrypted, you cannot recover forgottenpasswords. If all system security officers lose their passwords, the -p parameter generates anew password for a system security officer’s account. Start Adaptive Server with -p,immediately log in to Adaptive Server with the new random password, and executesp_password to reset your password to a more secure one.
• By default, Adaptive Server logs error messages in both the local error log file and the localWindows event log. You can disable Windows event logging by including the -g parameterand specifying a different event-logging machine with -G machine_name. Use standardWindows conventions when entering the machine_name. For example, to designate a PCnamed “LOGSITE”, substitute “\\LOGSITE” for the machine_name. See theconfiguration guide for your platform for details on logging error messages.
• After you have finished running the installer, set the file permissions on the sqlsrvrexecutable to limit who can execute it.
• If you do not specify an Adaptive Server name with the -s parameter, and you have not setthe DSLISTEN environment variable, sqlsrvr uses the default Adaptive Server nameSYBASE. The value of the DSLISTEN environment variable overrides this default value,and the -s parameter overrides both the default and the DSLISTEN environment variable.
• Automatic login lockouts can cause a site to end up in a situation in which all accountscapable of unlocking logins (system administrators and system security officers) arelocked. If this occurs, use the sqlsrvr utility with the -u parameter to check the specifiedlogin for system administrator or system security officer authorization, unlock theaccount, and reset the value of the current failed logins counter to zero.
• -f is only valid when used with -b and/or -w. The server fails to boot if you use -f withouteither -b or -w. -f forces the server in different ways, depending whether -w is present. See-b and -w below.
See also:
• Reference Manual: Commands – disk mirror, disk remirror, reconfigure
• Reference Manual: Procedures – sp_configure, sp_password
CHAPTER 1: Utility Commands Reference
130 Adaptive Server Enterprise

Starting Adaptive ServerThere are two methods to start Adaptive Server with a specified configuration file.Use either method to start Adaptive Server:
• Use Server Config to configure the server to have the -c parameter. In the ConfigureAdaptive Server window, select the Command Line option, and in the Command LineParameters window, enter:-Cconfiguration_file_pathname
For example, entering -chaze.cfg starts the server using the haze.cfg configurationfile.
• Start Adaptive Server from the command line and provide the -c parameter.
startsrvr Dependencies and Conditions with -b and -wThe effect of -b changes, depending on whether -w is present.
• -b without -w creates a new master device as named by -d (the default is d_master) andwith the page size as specified by -z (the default is 2048):• If the named device already exists as an OS file, the attempt fails, and you must remove
the existing file and try again.• If the named device names an existing raw partition, the attempt fails unless you
include the -f flag. This reinitializes the raw partition as a server master device.• -b with -w master tells dataserver to use the size specified in -z for the master device
when recreating the master database. It implies nothing about creating a new device.
-w may or may not require additional flags. If you use:
• -w model – the -z and -b flags are accepted but ignored.
• -w master for new installations – the -z and -b parameters are not required because thedevice size information is stored in the config_block.
• -wmaster to upgrade older installations:
• The server requires -b and/or -z if the config_block does not contain a valid entryfor the associated sizes. The command fails if it can't get valid data for the page size ordevice size.
• You may provide -b and/or -z when the config_block contains valid entries for thesizes they represent. However if the sizes do not match what is in theconfig_block, add -f to force your new size preferences.
• -f may appear without either -b or -z, because -f also instructs the server to acceptdamaged allocation pages as belonging to the master database. This is useful forrestoring badly corrupted databases. If you specify -w master -f, the server assigns tothe master database every allocation page on the named master device that does notbelong to some other database than master.
CHAPTER 1: Utility Commands Reference
Utility Guide 131

sqlupgrade(UNIX only) Upgrades your currently installed version of Adaptive Server to the newestrelease using a GUI.
The utility is located in $SYBASE/$SYBASE_ASE/bin.
Syntaxsqlupgrade [-s sybase dir] [-r resource file]
Orsqlupgrade -v
Parameters
• -r resource file – executes the specified resource file.
• -s sybase dir – specifies the value to use for the SYBASE environment variable.
• -v – prints the version number and copyright message for sqlupgrade and then exits.
Usage
Set the:
• SYBASE environment variable to the location of the current version of Adaptive Serverbefore using sqlupgrade.
• DISPLAY environment variable before invoking sqlupgrade, unless you are only usingthe -v parameter to display the version number.
See also:
• The installation guide for your platform
Permissions
You must be a Sybase system administrator to use sqlupgrade.
See also• preupgrade on page 102
• sqlupgraderes on page 133
CHAPTER 1: Utility Commands Reference
132 Adaptive Server Enterprise
sqlupgraderes(UNIX only) Upgrades your currently installed release of Adaptive Server to the newestrelease using resource files.
The utility is located in $SYBASE/$SYBASE_OCS/bin.
Syntaxsqlupgraderes [-s sybase dir] [-r resource file]
Orsqlupgraderes -v
Parameters
• -r resource_file – executes the specified resource file.
• -s sybase_dir – specifies the value to use for the SYBASE environment variable.
• -v – prints the version number and copyright message for sqlupgraderes and then exits.
Usage
Set the SYBASE environment variable to the location of the current version of AdaptiveServer before using sqlupgraderes.
See also:
• The installation guide for your platform• The configuration guide for your platform – "Configuring New Servers with srvbuild"• System Administration Guide – "Managing Adaptive Server Logins, Database Users, and
Client Connections"
Permissions
You must be a Sybase system administrator to use sqlupgraderes.
See also• sqlupgrade on page 132
CHAPTER 1: Utility Commands Reference
Utility Guide 133

srvbuild(UNIX only) Creates a new Adaptive Server, Backup Server, or XP Server with default oruser-specified values for key configuration attributes. Use srvbuild in either GUI or non-GUImode.
The utility is located in $SYBASE/$SYBASE_ASE/bin.
Syntaxsrvbuild [-s sybase_dir] [-I interfaces_file] [-r resource_file]
Orsrvbuild -v
Parameters
• -I interfaces_file – specifies the name and location of the interfaces file to searchwhen connecting to Adaptive Server.
• -s sybase_dir – specifies the value to use for the SYBASE environment variable.
• -r resource_file – executes the specified resource file.
• -v – prints the version number and copyright message for srvbuild and then exits.
Permissions
You must be a Sybase system administrator to use srvbuild.
See also• srvbuildres on page 135
Usage for srvbuildSet the SYBASE environment variable.
• To the location of the current version of Adaptive Server before using srvbuild.• Before invoking srvbuild, unless you are only using the -v parameter to display the version
number.
See also:
• The installation guide for your platform
CHAPTER 1: Utility Commands Reference
134 Adaptive Server Enterprise

Using LDAP with srvbuild in a 64-bit EnvironmentWhen you use srvbuild to build a new server using a Lightweight Directory Access Protocol(LDAP) service in a 64-bit environment, edit the LDAP server entry.
srvbuild is a 32-bit application and uses the LDAP server entry from the $SYBASE/$SYBASE_OCS/config/libtcl.cfg file. Adaptive Server is a 64-bit application anduses the LDAP server information from the $SYBASE/$SYBASE_OCS/config/libtcl64.cfg file.
Do not include any blank spaces after the LDAP server entry in the libtcl.cfg orlibtcl64.cfg files; these prevent srvbuild from connecting to the LDAP server.
srvbuildres(UNIX only) Creates, using resource files, a new Adaptive Server, Backup Server, or XPServer with default or user-specified values for key configuration attributes.
The utility is located in $SYBASE/$SYBASE_ASE/bin.
Syntaxsrvbuildres [-s sybase_dir] [-I interfaces_file] [-r resource_file]
Orsrvbuildres -v
Parameters
• -I interfaces_file – specifies the name and location of the interfaces file to searchwhen connecting to Adaptive Server.
• -r resource_file – executes the specified resource file.
• -s sybase_dir – specifies the value to use for the SYBASE environment variable.
• -v – prints the version number and copyright message for srvbuildres and then exits.
Usage
Set the SYBASE environment variable to the location of the current version of AdaptiveServer before using srvbuildres.
The $SYBASE/$SYBASE_ASE/init/sample_resource_files directory containsthese sample resource files:
CHAPTER 1: Utility Commands Reference
Utility Guide 135

• sqlloc.rs*• sqlupgrade.adaptive_server.rs*• sqlupgrade.backup_server.rs*• sqlupgrade.monitor_server.rs*• srvbuild.adaptive_server.rs*• srvbuild.backup_server.rs*• srvbuild.job_scheduler.rs*• srvbuild.monitor_server.rs*• srvbuild.text_server.rs*• srvbuild.xp_server.rs*The sample resource file from an Adaptive Server installation looks similar to:sybinit.release_directory: USE_DEFAULTsqlsrv.server_name: PUT_YOUR_SERVER_NAME_HEREsqlsrv.sa_login: sasqlsrv.sa_password: sqlsrv.default_language: USE_DEFAULTsqlsrv.language_install_list: USE_DEFAULTsqlsrv.language_remove_list: USE_DEFAULTsqlsrv.default_characterset: USE_DEFAULTsqlsrv.characterset_install_list: USE_DEFAULTsqlsrv.characterset_remove_list: USE_DEFAULTsqlsrv.sort_order: USE_DEFAULT# An example sqlloc resource file...# sybinit.release_directory: USE_DEFAULT# sqlsrv.server_name: PUT_YOUR_SERVER_NAME_HERE# sqlsrv.sa_login: sa# sqlsrv.sa_password: # sqlsrv.default_language: french# sqlsrv.language_install_list: spanish,german# sqlsrv.language_remove_list: USE_DEFAULT# sqlsrv.default_characterset: cp437# sqlsrv.characterset_install_list: mac,cp850# sqlsrv.characterset_remove_list: USE_DEFAULT# sqlsrv.sort_order: dictionary
See also:
• The installation guide for your platform
Permissions
You must be a Sybase system administrator to use srvbuildres.
See also• srvbuild on page 134
CHAPTER 1: Utility Commands Reference
136 Adaptive Server Enterprise

startserver(UNIX only) Starts an Adaptive Server or a Backup Server.
The utility is located in $SYBASE/$SYBASE_ASE/bin.
Syntaxstartserver [[-f runserverfile] [-m]] ...
Parameters
• -f runserverfile – specifies the relative path name of a runserver file, which is usedas a reference each time you start an Adaptive Server or Backup Server. By default, therunserver file is in the current directory and is named RUN_servername. If you start asecond Adaptive Server on the same machine, startserver creates a new runserver filenamed RUN_servername.
• -m – starts Adaptive Server in single-user mode, allowing only one system administratorto log in, and turns the allow updates to system tables configurationparameter on. Use this mode to restore the master database. The system administratorcan use thedbo use only parameter of sp_dboption for system administrationactivities that require more than one process, such as bulk copying or using the datadictionary. startserver normally starts up only one server per node.
The -m parameter creates an m_RUNSERVER file and overwrites any existingm_RUNSERVER file.
Examples
• Start Adaptive Server – Starts an Adaptive Server named SYBASE from the runserverfile named RUN_servername in the current directory:
startserver• Start Adaptive Server and Backup Server – Starts an Adaptive Server named
MYSERVER and a Backup Server named SYB_BACKUP:startserver -f RUN_MYSERVER -f RUN_SYB_BACKUP
• Start Backup Server – Starts only the Backup Server SYB_BACKUP:startserver -f RUN_SYB_BACKUP
See also• backupserver on page 6
• dataserver on page 37
CHAPTER 1: Utility Commands Reference
Utility Guide 137

Usage for startserverTake usage information into consideration when running startserver.
• startserver uses the information in the runserver file to start an Adaptive Server or BackupServer. The master device must be writable by the user who starts Adaptive Server.The startserver command creates the Adaptive Server error log file (named errorlog)in the directory where the server is started, and adds this information as part of the -eparameter in the Adaptive Server executable line in the runserver file. If a second AdaptiveServer is started on the same machine, a new error log named errorlog_servernameis created; this information is added to that server’s runserver file. The user must haveexecute permission on the specified runserver file.
• Start multiple servers by specifying more than one runserver file, as shown in example 2.Specify -m after each -f runserverfile.
• Adaptive Server derives its running environment from values in the config file. Runsp_configure or edit the config file to see or change configuration parameters.
• To ensure the integrity of your Adaptive Server, it is important that you apply appropriateoperating-system protections to the startserver executable and the runserver file.
See also:
• Reference Manual: Commands – disk mirror, disk remirror, disk unmirror
The runserver FileThe runserver file, which is created by srvbuild during installation, contains the dataservercommand to start Adaptive Server or the backupserver command to start Backup Server.
By default, the file is in the current directory and is named RUN_servername. Edit therunserver file to correct the options and parameters for the commands. This example showstwo sample runserver files.
Runserver file for server MYSERVER:#!/bin/sh## Adaptive Server Information:# name: /MYSERVER# master device: /remote/Masters/myserver_dat# master device size: 10752# errorlog: /remote/serverdev/install/errorlog# interfaces: /remote/serverdev/interfaces##/$SYBASE/$SYBASE_ASE/bin/dataserver -d/remote/Masters/myserver_dat \ -sMYSERVER -e/remote/serverdev/install/MYSERVER_errorlog \-i/remote/serverdev &
Runserver file for Backup Server SYB_BACKUP:#!/bin/sh#
CHAPTER 1: Utility Commands Reference
138 Adaptive Server Enterprise

# Backup Server Information:# name: SYB_BACKUP# errorlog: /remote/serverdev/install/backup.log# interfaces: /remote/serverdev/interfaces# location of multibuf: /remote/serverdev/bin/sybmultbuf# language: us_english# character set: iso_1# tape configuration file: /remote/serverdev/backup_tape.cfg##/remote/serverdev/bin/backupserver -SSYB_BACKUP \-e/remote/serverdev/install/backup.log \-I/remote/serverdev/interfaces \-M/remote/serverdev/bin/sybmultbuf -Lus_english -Jiso_1 \-c/remote/serverdev/backup_tape.cfg
sybclusterManages a Sybase shared-disk cluster. sybcluster lets you create, start, stop, and manage acluster or any instance in a cluster.
sybcluster is available only in a shared-disk cluster environment. For information about howto use sybcluster, see the Clusters Users Guide.
Syntaxsybcluster [ -C cluster_name ] [ -d discovery_list ] [ -F agent_connection ] [ -h ] [ -I instance_name ] [ -i input_file_path ] [ -L ] [ -m message_level ] [ -P [ password ]] [ -U user_name ] (the default value is “uafadmin”) [ -v ]
Parameters
• -C cluster_name – is the unique name of the Sybase shared-disk cluster to bemanaged. sybcluster looks up the name in the cluster directory or uses agent discoveryservices.
• -d discovery_list – specifies the discovery services to be used to discover ashared-disk cluster agent and the discovery order. The format is:"method[(method_specification][,...)"]]
For example:-d "udp(),jini(jinihost1;jinihost2)"
CHAPTER 1: Utility Commands Reference
Utility Guide 139

The supported discovery methods are:
• UDP() – performs a UDP broadcast and listens for a response from listening UnifiedAgents. UDP discovery does not cross subnet boundaries.
• JINI(JINI_spec) – specifies the JINI servers used to look up the locations ofnodes in the cluster. The specification form is: host-name[:port_num].
Indicate multiple JINI servers by placing a semicolon between each specification. Bydefault, sybcluster uses port number 4160 to attach to a JINI server.The JINI server must be running, and the management agents (UAF) must beregistered with the JINI server. The locations of the nodes, and status of the instancesare stored on the JINI server.
• LDAP(LDAP_spec) – specifies an LDAP server that will be used to look up thelocations of the nodes in the cluster. The specification form is:host_name[:port_num][?registry].
Indicate multiple LDAP servers by placing a semicolon between each specification.By default, sybcluster uses port number 389 to attach to an LDAP server and theLDAP directory at “cn=ua-registry,ou=ua,dc=sybase,dc=com”.
• -F agent_connection – specifies the agent to be used to access the cluster. Theformat is:host_name[:port_num] [, host_name[:port_num ]]
For example:-F "node1,node2,node3,node4:9999"
The default port number is 9999.• -h – displays sybcluster syntax and lists supported interactive commands.
• -I instance_name – specifies the instance to be accessed. If you do not specify the-I option when you execute sybcluster, you may need to specify it when entering certaininteractive commands. sybcluster uses this name to discover the remote host, and as adefault when executing interactive commands. If an interactive command affects multipleinstances, the instance identified by -I, if available, is used as the priority connection.
To override the instance specified by -I, execute the use command in interactive mode.
• -i – specifies an operating system file for input to sybcluster. This file containssybcluster commands, one command per line. The final command in the file should bequit.
• -L – creates a sybcluster.log file. sybcluster writes all messages to this fileirrespective of the message level set by the -m option.
• -m message_level – specifies which sybcluster and unified agent messages aredisplayed on the client console. Message levels are:
• 0 – off (no messages to log file or console)• 1 – fatal
CHAPTER 1: Utility Commands Reference
140 Adaptive Server Enterprise

• 2 – error• 3 – warning• 4 – information• 5 – debug
sybcluster displays all messages of the level you choose and all messages of greaterseverity (with lower numbers). That is, if you select message level 3, sybcluster displaysmessages of level 3, 2, and 1. The default level is 4.
• -P [password] – is the management agent password for the Sybase Common SecurityInfrastructure in the Unified Agent framework. The default user name after installation is“uafadmin” with no password. This is the Simple Login Module in the Agentconfiguration. The user and password can be configured to use several differentmechanisms for authentication and authorization, including using the running instanceand the operating system logins.
If you do not specify the -P option, sybcluster prompts for a password. For a blank or nullpassword, use the -P option without a value or enter a set of quotation marks withoutcontent.
You can encrypt the password using the Sybase passencrypt utility. See the Clusters UsersGuide.
• -U user_name – is the management agent login name. The default login afterinstallation is “uafadmin.” See the -P description.
• -v – displays the sybcluster version number and other information.
Examples
• Start using direct connect – Starts sybcluster using direct connect and port numbers:sybcluster -U uafadmin -P -C mycluster -F "blade1:9100,blade2:9292,blade3:9393"
To start sybcluster using direct connect and default port numbers:sybcluster -U uafadmin -P -C mycluster -F "blade1,blade2,blade3"
• Use discovery to start – You can also start sybcluster using discovery.sybcluster -U uafadmin -P -C mycluster -d "JINI(myjiniserver:4564)"
Usage
The recommended method for starting sybcluster and connecting to a cluster is:sybcluster -U login_name -P password -C cluster_name -F agent_spec
The -C cluster_name, -P password, -I instance_name, -Fagent_connection, and -d discovery_list parameters are default values that can
CHAPTER 1: Utility Commands Reference
Utility Guide 141

be changed using subsequent sybcluster interactive commands. If you do not specify thesevalues on the sybcluster command line, sybcluster prompts for them as they are required.
You can also start sybcluster and then use the interactive connect command to connect to thecluster. For example:sybcluster> connect to mycluster login uafadmin password " "agent "blade1,blade2,blade3"
See also• Chapter 8, Interactive sybcluster Commands Reference on page 255
sybdiagsybdiag is a Java-based tool that collects comprehensive Adaptive Server configuration andenvironment data. Technical Support uses this information to diagnose server issues, thusexpediting customer cases.
Note: Run sybdiag on the same machine as the monitored Adaptive Server.
Syntaxsybdiag -U username [-P password] -S [server_name | host:port] [-I interfaces_file] [-L log_file] [-N num_threads] [-O output_directory] [-R resource_file] [-T feature_list] [-h] [-m message_level] [-v]
Parameters
• -I interfaces_file – (optional) specifies the name of the interfaces file. If -I isspecified, sybdiag uses the interfaces_file specified and displays an error if that file is notfound. If -I is not specified, sybdiag first checks the LDAP server for the server entry, andif the entry is not found, sybdiag uses the default interfaces file in the directoryspecified by the SYBASE environment variable.
• -L log_file – (optional) specifies the name of the log file that sybdiag creates. Iflog_file is not an absolute path, the log file is created in the directory where sybdiag isexecuted.
CHAPTER 1: Utility Commands Reference
142 Adaptive Server Enterprise

Whether you specify this parameter or not, sybdiag creates a default log file calledsybdiag.log in the .zip output file.
• -N num_threads – (optional) specifies the maximum number of parallel threads thatsybdiag executes in parallel. The default value is 5. Do not change the default value unlessyou cannot execute parallel collections.
• -O output_directory – (optional) specifies the name of a local directory in whichto store sybdiag output. If not specified, sybdiag creates the output .zip file in thedirectory where the command was executed. The output file is named “sybdiag-<server name>-<datetime stamp>.zip”.
• -R resource_file – (optional) specifies the resource file that sybdiag uses on start-up. Use this option only at the direction of Sybase Technical Support.
• -P password – specifies your Adaptive Server password. If you do not specify the -Pflag, sybdiag prompts for a password. If your password is NULL, use the-P flag withoutany password.
• -S server_name | host:port – server_name specifies the name of the AdaptiveServer to which sybdiag connects. sybdiag looks for this name in the interfaces file or theLDAP directory.
If you specify -S with no argument, sybdiag looks for a server named SYBASE. If you donot specify -S, sybdiag looks for the server specified by your DSQUERY environmentvariable.
host:port specifies the machine name and the port number.• -T feature_list – (optional) specifies the type of diagnostic data that sybdiag
gathers, based on these feature_list values:
• osdata – operating system data.
• asecore – Adaptive Server configuration data.
• aseadd – Adaptive Server monitoring data.
• keyfile – information about Adaptive Server and operating system files.
All diagnostic data is collected if you do not specify -T..
• -U username – specifies a case-sensitive login name.
• -h – (optional) displays all help options.
• -m message_level – (optional) displays different levels of error messages dependingon the value of message_level:
• 0 – no messages.• 1 – fatal errors only.• 2 – all errors.• 3 – warnings and all errors.• 4 – informational messages, warnings, and all errors.• 5 – debug and informational messages, warnings, and all errors.
CHAPTER 1: Utility Commands Reference
Utility Guide 143

By default, the error message display level is set to 4.• -v – (optional) displays version information.
Examples
• Example 1 – Collects all Adaptive Server diagnostics from /work/ASEInstall/ASE-15_0/bin, and creates an output file called sybdiag-testserver-20110312024652.zip in the same directory:
sybdiag -Usa -P -Stestserver
Note: For readability, some lines have been omitted from this sample output.
Collecting data for "Adaptive Server Version" (ase_version) ...Completed data collection for "Adaptive Server Version" (ase_version).Collecting data for "Server License" (ase_license) ...Completed data collection for "Server License" (ase_license).Collecting data for "Adaptive Server Configuration" (ase_cfg) ...Completed data collection for "Adaptive Server Configuration" (ase_cfg).Collecting data for "Adaptive Server Non-default Configuration"(ase_nondefault_cfg) ...Completed data collection for "Adaptive Server Non-defaultConfiguration" (ase_nondefault_cfg)....Lines deleted...Collecting data for "Adaptive Server LDAP Configuration File" (ase_libtcl) ...Completed data collection for "Adaptive Server LDAP Configuration File"(ase_libtcl).Collecting data for "Adaptive Server LDAP Configuration File (64bit)"(ase_libtcl64) ...Completed data collection for "Adaptive Server LDAP Configuration File(64bit)" (ase_libtcl64).Collecting data for "Virtual Memory Statistics" (os_vmstat) ...Collecting data for "Adaptive Server General Performance Information"(ase_sysmon) ...Collecting data for "I/O Statistics" (os_iostat) ...Collecting data for "CPU Statistics" (os_mpstat) ...Completed data collection for "Virtual Memory Statistics" (os_vmstat).Completed data collection for "I/O Statistics" (os_iostat).Completed data collection for "CPU Statistics" (os_mpstat).Completed data collection for "Adaptive Server General PerformanceInformation" (ase_sysmon).Data collection statistics: 43 task(s) succeeded, 0 task(s) skipped, and0 task(s) failed.The collected data is stored as/work/ASEInstall/ASE-15_0/bin/sybdiag-
CHAPTER 1: Utility Commands Reference
144 Adaptive Server Enterprise

testserver-20110312024652.zipData collection completed.
• Example 2 – Collects basic Adaptive Server configuration data from /work/ASEInstall/ASE-15_0/bin, and creates an output file called sybdiag-smmdi_9966-20110502202909.zip in the same directory:
sybdiag -Usa -P -Ssmmdi:9966 -TasecoreCollecting data for "Adaptive Server Version" (ase_version) ...Completed data collection for "Adaptive Server Version" (ase_version).Collecting data for "Server License" (ase_license) ...Completed data collection for "Server License" (ase_license).Collecting data for "Adaptive Server Configuration" (ase_cfg) ...Completed data collection for "Adaptive Server Configuration" (ase_cfg).Collecting data for "Adaptive Server Non-default Configuration" (ase_nondefault_cfg) ...Completed data collection for "Adaptive Server Non-default Configuration"(ase_nondefault_cfg).Collecting data for "Remote Server Configuration" (ase_remote_server)...Completed data collection for "Remote Server Configuration" (ase_remote_server).Collecting data for "Adaptive Server Script Version" (ase_script_version) ...Completed data collection for "Adaptive Server Script Version" (ase_script_version).Collecting data for "Adaptive Server Configuration Monitor" (ase_mon_cfg) ...Completed data collection for "Adaptive Server Configuration Monitor" (ase_mon_cfg).Collecting data for "Adaptive Server Cache Configuration" (ase_cache_cfg) ...Completed data collection for "Adaptive Server Cache Configuration" (ase_cache_cfg).Collecting data for "Adaptive Server Pool Configuration" (ase_pool_cfg) ...Completed data collection for "Adaptive Server Pool Configuration" (ase_pool_cfg).Collecting data for "Adaptive Server Shared Memory Dump Configuration"(ase_shmdumpconfig) ...Completed data collection for "Adaptive Server Shared Memory DumpConfiguration" (ase_shmdumpconfig).Collecting data for "Adaptive Server Traceflags and Switches" (ase_switches) ...Completed data collection for "Adaptive Server Traceflags and Switches"(ase_switches).Data collection statistics: 11 task(s) succeeded, 0 task(s) skipped, and0 task(s) failed.The collected data is stored as /work/ASEInstall/ASE-15_0/bin/
CHAPTER 1: Utility Commands Reference
Utility Guide 145

sybdiagsmmdi_9966-20110502202909.zipData collection completed.
Permissions
• To gather all Adaptive Server data, you must have permission to access all datasourcesused by sybdiag. In a default Adaptive Server configuration, you must have sa_role andmon_role to collect Adaptive Server configuration and monitoring data. Use sp_roleto grant sa_role and mon_role to the sybdiag user:
sp_role "grant", sa_role, sybdiag_usergosp_role "grant", mon_role, sybdiag_usergo
You may need other permissions to access database objects if your system administratorhas changed the default access restrictions. If you have insufficient permission to accesscertain database objects, you see an error message that lists the database objects that youcannot access.
• To gather all environment data, you must have authorized access to operating system anddevice files.
Note: On Linux, you must have read permission to access operating system messagesin /var/log/messages.
• You must have read permissions on these files:• Adaptive Server error log• Adaptive Server configuration file• Environment scripts such as SYBASE.csh, SYBASE.sh or SYBASE.bat
• You must have write permissions on an output directory specified by the -O parameter.
Note: If you do not have the required permissions on a file, sybdiag displays an error messagedoes not process that file.
Usage for sybdiagsybdiag connects to an Adaptive Server and executes stored procedures such assp_configure, and queries to tables like monLicense. It collects operating system andplatform diagnostic information by executing commands such as ps, vmstat, and netstat.
The output of sybdiag is a compressed ZIP file containing HTML and data files that can beuncompressed and viewed in a Web browser. The information collected includes operatingsystem and environment data, Adaptive Server configuration and monitoring data, andAdaptive Server files and scripts.
sybdiag does not collect Adaptive Server or operating system data for logins, passwords, oruser lists, and does not collect information from application database tables.
CHAPTER 1: Utility Commands Reference
146 Adaptive Server Enterprise

Viewing sybdiag outputThe sybdiag output is in a compressed file in this format: sybdiag-servername-datetime_stamp.zip. To generate individual output files, uncompress the zip file.TheZIP file contains these HTML, data, and log files:
• sybdiag_start.html – an HTML file with links to diagnostic data files in the outputdirectory. To view sybdiag output, open this file in any Web browser.sybdiag displays information in these categories:• Operating system information, including process status, physical and virtual memory,
interprocess communication, disk usage, I/O, and network information.• Adaptive Server configuration data, including server version, platform and license
information, configuration values, remote server configuration data, and so on. For theCluster Edition, this also includes the cluster overview, cluster instances, and logicalcluster information.
• Adaptive Server monitoring data about processes, databases, devices, locks, and so on.For the Cluster Edition, this also includes cluster interprocess communication protocolinformation, cluster lock usage, and cluster quorum device dump information.
• Adaptive Server files such as errorlog, interfaces, configuration file, SySAMproperties file, and environment configuration scripts. For the Cluster Edition, a singlereport may contain information from many external files for several cluster instances.
• Diagnostic data files – collected Adaptive Server and environment information organizedunder different directories. These are the files that sybdiag_start.html accesses.
• Log file – by default, the ZIP file includes a log file called sybdiag.log that provides alog of the activities sybdiag performed.
Configuration Options for sybdiagTo generate certain reports, you must enable corresponding configuration options usingsp_configure, or edit the server configuration file.
If configuration options are set incorrectly, sybdiag skips the related reports.
Option Value sybdiag Reports
enable monitoring 1 Adaptive Server Wait Events
Adaptive Server Locks
Adaptive Server Deadlock His-tory
wait event timing 1 Adaptive Server Wait Events
deadlock pipe active 1 Adaptive Server Deadlock His-tory
CHAPTER 1: Utility Commands Reference
Utility Guide 147

Option Value sybdiag Reports
deadlock pipe max mes-sages
Nonzero value; must be large enoughto capture all relevant deadlock rows
Adaptive Server Deadlock His-tory
sybmigratesybmigrate allows you to convert an Adaptive Server from one page size to another page size,and to migrate between platforms.
The utility is located in:
• (UNIX platforms) $SYBASE/$SYBASE_ASE/bin/• (Windows) %SYBASE%\%SYBASE_ASE%\bin\sybmigrate.bat, as
sybmigrate.bat.
Warning! sybmigrate assumes that the source and target Adaptive Servers will not have anyactivity during the migration. If objects are created, modified, or deleted during the migrationprocess (setup, migrate, and validate), Sybase cannot guarantee migration integrity.
Syntaxsybmigrate [-v ] [-h ] [-f ] [-D 1 | 2 | 3 | 4 ] [-I interfaces_file ] [-J client_charset ] [-l log_file ] [-m setup | migrate | validate | report ] [-r input_resource_file ] [-rn status | space_est | repl | diff | password ] [-T trace_flags ] [-t output_template_resource_file ] [-Tase trace_flags ] [-z language ]
Parameters
• -D 1 | 2 | 3 | 4 – sets the debug level for sybmigrate. The default debug level is2.
• -f – overrides the locking session.
If sybmigrate exited a session inappropriately, use -f to override the source and targetdatabase binding that is created so that only one session of sybmigrate can run on a sourceand target database path.
• -h – prints the help information and syntax usage and exits.
• -I – identifies a specific interfaces file to find server names. If no interfaces filelocation is designated, sybmigrate uses:
CHAPTER 1: Utility Commands Reference
148 Adaptive Server Enterprise

• (UNIX) $SYBASE/interfaces• (Windows) %SYBASE%\ini\sql.ini
Note: You can override sybmigrate, and use the interfaces file by providing the -Iargument if the LDAP entry is defined in:
• (UNIX) $SYBASE/$SYBASE_OCS/config/libtcl.cfg• (Windows) %SYBASE%\%SYBASE_OCS%\ini\libtcl.cfg
• -J – specifies the character set to be used for the Adaptive Server connection.
• -l – indicates a user-defined log file where the output of the migration process is stored. If-l is not used, the logs are stored in $SYBASE/$SYBASE_ASE/init/logs or theworking directory.
• -m – designates the types of operations that are performed:
• setup – to set up the repository and migration working database, and to migrate theserver-wide data.
• migrate – to perform data and object migration.
• validate – to validate the migrated objects.
• report – to run any of the five reports. The reports can be run in the GUI and resourcefile mode. The available reports are:• status – the migrate object status report gives information about objects that
have been migrated. To run this report, issue:sybmigrate -r resource file -m report -rn status
• space_est – use the target database space estimation report to verify that youhave sufficient resources allocated to your target database. In the resource filemode, issue the following command to run the space_est report:
sybmigrate -r resource file -m report -rn space_est
• repl – use the replication report to check any explicitly replicated objects thathave been migrated, determine the type of replication system, and to produce SQLcommands for users to execute on the target Adaptive Server and the ReplicationServer. To run the repl report, issue:
sybmigrate -r resource file -m report -rn repl• diff – checks the objects between the source and target databases. Users can run
the report on individual objects, or the entire database, except for server anddatabase information or metadata. You can run the diff report at any time. You donot need to run a setup session to run the diff report. The source and targetdatabase name do not need to be the same when running the diff report.
The diff report provides the following information for the following objecttypes:
CHAPTER 1: Utility Commands Reference
Utility Guide 149

• Server information – compares the master database system catalogs row countbetween the source and target Adaptive Server. This task is similar to thevalidation session.
• Database information – compares the user database system catalogs row countbetween the source and target Adaptive Server. This task is similar to thevalidation session.
• DDL objects – the report displays whether the objects exist on the source or thetarget Adaptive Servers. If the objects exists in both databases, that object doesnot appear in the report.
• User table data – compares the row count of the user tables in the source andtarget Adaptive Server. If the table only exists in the source or target databases,the table does not appear in the report.
• password – creates a file for the changed passwords.
• -r – specifies that the resource file mode is to be used in the migration process. If the inputresource file is not specified by using the -r parameter, sybmigrate operates in GUImode.
If you use the -r parameter, then you also need to use the -m argument to specify the typeof operation to perform: setup, migrate, validate, or report. You can run theentire migration process in the resource file mode, or you can choose to run only parts of inthis fashion.
• -rn – indicates what type of report to generate. If -rn is not specified, all five reports arerun.
• -T – sets these command line trace flags:
• DUMP_SQL – specifies that every query issued by sybmigrate is output to the log file.
• NO_SORTED_DATA – overrides the default, which specifies that tables with clusteredindexes are copied to the target server in order, and the clustered index is recreatedusing the with_sorted_data option.
• LEAVE_PTBL_ON_ERROR – specifies that proxy tables are not deleted on failure.
• SKIP_CONFIG_CHECK – specifies that configuration compatibility checks are notto be performed.
• SKIP_PARTITION_CHECK – specifies that partition compatibility checks are not tobe performed.
• DUMP_DDL – specifies that DDL commands are to be output to the log file.
• DUMP_DEPEND_OBJECT – specifies that when theauto_select_dependent_objects option is used, sybmigrate outputs a listof objects added as dependents.
• ONE_WORK_THREAD – specifies that one work thread is to be used, overriding thecurrent setting for schema creation threads.
• ALLOW_DATA_AND_INDEX – overrides default behavior, in which indexes arecreated after all tables are created. Indexes are created as resources become available.
CHAPTER 1: Utility Commands Reference
150 Adaptive Server Enterprise

• -t – directs sybmigrate to generate an output template resource file, to be used forsubsequent migrations in the resource file mode.
-t requires that you start sybmigrate using the -r argument specifying the logininformation. This argument also requires -m to specify what type of resource file is to begenerated.
Note: You can use -t only in the resource file mode.
• -Tase – runs Adaptive Server trace flags (turned on using dbcc traceon) for all AdaptiveServer connections opened by sybmigrate. Specify the trace flags in a comma-separatedlist.
• -v – prints the version string and exits.
• -z – specifies the language to be used for the Adaptive Server connection.
Examples
• Example 1 – Runs the status report:
sybmigrate -r resource file -m report -rn status• Example 2 – Runs the space_est report in the resource file mode:
sybmigrate -r resource file -m report -rn space_est• Example 3 – Runs the repl report, issue:
sybmigrate -r resource file -m report -rn repl
Usage
• For security purposes, set file permissions at the highest level (preferably 600) for both thesybmigrate resource file and the file that contains the login and password information youare using for migrating logins from the source to the target server.
• Make sure the allow resource limits configuration parameter is set to 0 beforerunning sybmigrate.
• You cannot migrate server data if metadata already exists on the target Adaptive Server.• If sybmigrate exited a session inappropriately, use -f to override the source and target
database binding that is created so that only one session of sybmigrate can run on a sourceand target database path.
• If you use the -r parameter, then you also need to use the -m argument to specify the typeof operation to perform: setup, migrate, validate, or report. Run the entiremigration process in the resource file mode, or run only parts in this fashion.
• Use -t only in the resource file mode. -t requires that you start sybmigrate using the -rargument specifying the login information. This argument also requires -m to specifywhat type of resource file is to be generated.
• You may specify the size and location of a work database on your target server.
CHAPTER 1: Utility Commands Reference
Utility Guide 151

• SAP does not support Adaptive Server version 12.5.1. SAP recommends that you upgradefrom 12.5.1 to 12.5.4, then from 12.5.4 to 15.5 and later versions. To make the 12.5.1server visible to the 12.5.4 or later server, use:sp_addserver 'servername', local
Restart Adaptive Server to recognize the 12.5.1 server.• You can override sybmigrate, and use the interfaces file by providing the -I
argument if the LDAP entry is defined in:• UNIX – $SYBASE/$SYBASE_OCS/config/libtcl.cfg• Windows – %SYBASE%\%SYBASE_OCS%\ini\libtcl.cfg
• sybmigrate automatically migrates predicated privileges when:• ddlgen is called to generate the scheme definitions, including grants, denies, and
revokes• Data is migrated using CIS and proxy tables.
Permissions
You must be a Sybase system administrator or log in with the sa_role to use sybmigrate.
If you want any user other than the SA to use sybmigrate, set the cis rpc handlingconfiguration parameter to “1”.
See also• Chapter 9, Migrating Data Using sybmigrate on page 293
sybrestoresybrestore allows you to restore an Adaptive Server database to the time of failure from themost current full database backup dump files.
Syntaxsybrestore [-v ] [-h ] [-S server_name | host_name:port_number] [-t restore database to point in time] [-D database_name ] [-d dump_directory] [-I interfaces_file ] [-J character_set ] [-P password ] [-U username] [-z language ]
CHAPTER 1: Utility Commands Reference
152 Adaptive Server Enterprise

Parameters
• -h – prints the help information and syntax usage and exits.
• -D database_name – specifies the source database name.
• -d dump_directory – specifies the dump directory for dumping the last log.
• -I interfaces_file – identifies a specific interfaces file in which to look forserver names. If you do not specify this parameter, sybrestore uses:
• (UNIX) $SYBASE/interfaces• (Windows) %SYBASE%\ini\sql.ini
• -J character_set – specifies the character set to be used for the Adaptive Serverconnection.
• -P password – specifies your Adaptive Server password. If you do not specify the -Pparameter, sybrestore prompts for a password.
• -S server_name | host_name:port_number] – specifies the name of thesource Adaptive Server. sybrestore looks for this name in the interfaces file.
host_name:port_number specifies the machine name and the port number.• -t point_in_time – restores the specified database to a point in time.
• -U username – specifies a case-sensitive login name.
• -v – prints the version string and exits.
• -z language – specifies the language to be used for the Adaptive Server connection.
Examples
• command line mode – Invokes the command line interactive Restore Database menu.Use single-key entries to navigate through the menu options to specify options forrestoring a database:sybrestore -Usa -P -SlinuxDatasybrestore -Usa -P -SlinuxData<<<<<<<<<====Restore Database Menu ====>>>>>>>>s : Select Databaset : Target Serverr : Recreate Databasee : Use External Dumpc : Check Geometryd : Dump Directoryo : Online Databasep : Preview g : Go
To invoke the interactive command line Restore Database menu and execute the SQLstatements for restoring the database to a point in time: sybrestore -Usa -P -SaseServer1 -t
CHAPTER 1: Utility Commands Reference
Utility Guide 153

• Noninteractive mode – Invokes sybrestore in noninteractive mode using AdaptiveServer 15.7 ESD #2 and later. Executes the SQL statements for restoring the database andexits:sybrestore -Usa -P -SaseServer1 -Ddba_db
Usage
Verify settings before using sybrestore.
• Adaptive Server and Backup Server are running for both the target and source.• The master database is available.
• The log segment of the source database is available for dumping and then loading back themost recent transaction logs that have not been dumped.
• Either history files or external dump files are available.
Permissions
To use sybrestore, you must be logged in with the sa_role, or as the database owner.
See also• Chapter 10, Restoring a Database Using sybrestore on page 329
sybtsmpasswdRecords or changes the user password and creates the Tivoli Storage Manager (TSM)encrypted password file, TSM.PWD, on the TSM client machine. The location of the file is thedirectory specified by the PASSWORDDIR configuration parameter in the TSM configurationfile.
Note: sybtsmpasswd is supported when the IBM Tivoli Storage Manager is licensed at yoursite.
Syntaxsybtsmpasswd
Examples
• Example 1 – sybtsmpasswd prompts for password information.
sybtsmpasswdEnter your current password:Enter your new password:Enter your new password again:
CHAPTER 1: Utility Commands Reference
154 Adaptive Server Enterprise

Your new password has been accepted and updated.
Usage
Execute sybtsmpasswd when you record or change the user password. Make sure the sameuser name and password are present in the TSM.PWD file on the TSM client node.
Permissions
Only the operating system “root” user can execute sybtsmpasswd.
updateaseThe updatease utility reinstalls scripts and updates system stored procedures and messagesafter a minor upgrade.
The updatease executable file is located in:
• (UNIX) $SYBASE/SYBASE_ASE/bin/• (Windows) %SYBASE%\%SYBASE_ASE%\bin\
Syntax
updatease -Sserver_name -PASE_password
The syntax for Adaptive Server Cluster Edition:updatease -FSCC_connection -PSCC_password -Ccluster_name -iinstance -AASE_instance_password
Parameters
• -Sserver_name – (nonclustered Adaptive Server only) specifies the Adaptive Serveryou are updating.
• -PASE_password – (nonclustered Adaptive Server only) is the Adaptive Server "sa"password. If you do not specify this, updatease obtains the information from theSYBASE_ASE_SA_PWD environment variable or at the prompt.
• -FSCC_connection – (Adaptive Server Cluster Edition only) specifies the SybaseControl Center agent that you use to access the cluster. The value must be in the form"hostname:port_number".
• -PSCC_password – (Adaptive Server Cluster Edition only) specifies the SCC"uafadmin" password. If you do not specify this, updatease obtains the information fromthe UAFADMIN_PWD environment variable.
• -Ccluster_name – (Adaptive Server Cluster Edition only) specifies the name of theAdaptive Server cluster.
CHAPTER 1: Utility Commands Reference
Utility Guide 155

• -iinstance – (Adaptive Server Cluster Edition only) specifies the Adaptive Serverinstance you are updating.
• -AASE_instance_password – (Adaptive Server Cluster Edition only) specifies theAdaptive Server "sa" password.
Usage
When you perform a minor upgrade/update from Adaptive Server version 15.0 and higher,you need to update the system stored procedures and messages from the earlier version ofAdaptive Server, as well as reinstall the scripts in the following directory:
• (UNIX) $SYBASE/ASE-15_0/scripts/• (Windows) %SYBASE%\ASE-15_0\scripts\
Note: In a nonclustered Adaptive Server, when you perform the minor upgrade using theAdaptive Server installer, the installer runs updatease in the background; you need notperform any additional steps.
Permissions
You must be a Sybase system administrator, or log in with the sa_role to use updatease.
xpserverStarts XP Server manually.
Syntaxxpserver -S XP_Serverxpserver -SXP_Server [-Iinterfaces_file] [-ppriority] [-sstack_size] [-u] [-v] [-x]
Parameters
• -S XP_Server – specifies the name of the XP Server to start. The format of the XPserver name is SQLSERVERNAME_XP, where SQLSERVERNAME is the name of theAdaptive Server to which the XP Server is dedicated. For example, the XP Server for anAdaptive Server named SMOKE would be named SMOKE_XP. The XP Server namemust be in uppercase.
CHAPTER 1: Utility Commands Reference
156 Adaptive Server Enterprise

• -I interfaces_file – specifies the name and location of the directory containingthe interfaces file (sql.ini) that Adaptive Server searches when connecting to XPServer. If you do not specify -I, xpserver uses the ini subdirectory of the %SYBASE%release directory.
• -p priority – specifies the priority of the Open Server process. Values between 0(lowest) and 15 (highest) are valid. Overrides the esp execution priorityconfiguration parameter. The default is 8.
• -s stack_size – specifies (in bytes) the stack size of the process used to execute anextended stored procedure (ESP). Overrides the esp execution stacksizeconfiguration parameter if it is set. The default is 34816 bytes.
• -u – specifies that the functions be automatically unloaded from XP Server memory afterthe ESP request terminates. Overrides the esp unload dll configuration parameter ifit is set. The default is not to unload the function.
• -v – prints the version number and copyright message for XP Server and then exits.
• -x – specifies that the client security context be used to execute operating systemcommands using the system ESP, xp_cmdshell. Overrides the xp_cmdshell contextconfiguration parameter if it is set. The default is to use the security context of theoperating system account of the Adaptive Server session.
Usage
• When you run xpserver in root, xpserver automatically enables secure access on themachine as if you set the xp_cmdshell context configuration parameter to 1, therebypreventing users from accessing Adaptive Server unless they are also valid users on themachine.
• XP Server is normally started automatically by Adaptive Server. Use the manual commandto start XP Server only when instructed to do so in an “XP Server Failed to Start” errormessage.
• There can be only one XP Server per Adaptive Server. An Adaptive Server running ESPscommunicates with a single XP Server, and the ESPs execute synchronously.
• The -p parameter affects the priority used by the Open Server scheduler. If -p is set to ahigh number, the scheduler can run XP Server before running the other threads in its runqueue. If -p is set to a low number, the scheduler can run XP Server only when there are noother Open Server threads in its run queue. This parameter is unrelated to the applicationqueue priorities within Adaptive Server, which are set by sp_bindexeclass.See the discussion of multithread programming in the Open Server Server Library/CReference Manual.
• If automatic unloading of ESP functions is not set by the -u parameter or by the espunload dll configuration parameter, unload them at runtime using sp_freedll.
• Unlike Adaptive Server and Backup Server, XP Server does not have a runserver file.• When configuring an XP Server, the directory service entry name must end with “_XP” in
upper case, such as “abcdef_XP” or “ABCDEF_XP.”
CHAPTER 1: Utility Commands Reference
Utility Guide 157

See also:
• Reference Manual: Procedures – sp_configure, sp_freedll, xp_cmdshell extended storedprocedure
Permissions
No special permissions are required to run xpserver.
CHAPTER 1: Utility Commands Reference
158 Adaptive Server Enterprise

CHAPTER 2 Transferring Data to and fromAdaptive Server with bcp
This chapter discusses the bcp bulk copy utility, which provides a convenient, high-speedmethod for transferring data between a database table or view and an operating system file.
bcp can read or write files in a wide variety of formats. When copying in from a file, bcpinserts data into an existing database table; when copying out to a file, bcp overwrites anyprevious contents of the file.
Versions earlier than 15.0.3 did not allow you to run fast bcp on tables with nonclusteredindexes or triggers. Cluster Edition version 15.0.3 and later removes this restriction.
See also• bcp on page 10
Methods for Moving DataThere are two methods to move data to and from your Adaptive Server databases.
• bcp as a standalone program from the operating system.• Client-Library, which calls bulk-library routines. See the Open Client and Open Server
Common Libraries Reference Manual.
Import and Export Data with bcpTransact-SQL commands cannot transfer data in bulk. For this reason, use bcp for any largetransfers.
Uses for bcp include:
• Importing data that was previously associated with another program, such as the recordsfrom another database management system. This is the most common use for bcp.Before using bcp, create a file of the records you want to import. The general steps are:1. Put the data to transfer into an operating system file.2. Run bcp from the operating system command line.
• Moving tables between Adaptive Servers or between Adaptive Server and other datasources that can produce an operating-system file.
• Copying out data from a view.
Note: You cannot use bcp to copy in data to a view.
Utility Guide 159

• Transferring data for use with other programs, for example, with a spreadsheet program.The general steps to transfer data are:1. Use bcp to move the data from Adaptive Server into an operating-system file from
which the other program imports the data.2. When you finish using your data with the other program, copy it into an operating-
system file, then use bcp to copy it into Adaptive Server.
Adaptive Server can accept data in any character or binary format, as long as the data filedescribes either the length of the fields or the terminators, the characters that separatecolumns.
The structures in the tables involved in the transfer need not be identical, because whenbcp:
• Imports from a file, it appends data to an existing database table.• Exports to a file, it overwrites the previous contents of the file.
When the transfer is complete, bcp informs you of the:
• Number of rows of data successfully copied• Number of rows (if any) that it could not copy• Total time the copy took• Average amount of time, in milliseconds, that it took to copy one row• Number of rows copied per second.
If bcp runs successfully, you see a return status of 0. The return status generally reflects errorsfrom the operating system level and correspond to the ones listed in the errno.h file inthe /usr/include/sys/ directory.
See also• bcp on page 10
bcp Modesbcp in works in one of three modes.
• Slow bcp – logs each row insert that it makes, used for tables that have one or moreindexes.
• Fast bcp – logs only page allocations, copying data into tables without indexes or at thefastest speed possible. Use fast bcp on tables with nonclustered indexes.
• Fully logged fast bcp – provides a full log for each row. Allows you to use fast bcp onindexed and replicated tables.
CHAPTER 2: Transferring Data to and from Adaptive Server with bcp
160 Adaptive Server Enterprise

Although fast bcp might enhance performance, slow bcp gives you greater datarecoverability. Fully-logged fast bcp provides a combination of both.
To determine the bcp mode that is best for your copying task, consider:
• Size of the table into which you are copying data• Amount of data that you are copying in• Number of indexes on the table• Whether the table is replicated• Amount of spare database device space that you have for re-creating indexes
The modes bcp uses depending on index type:
Table Properties bcp Mode for bulk-copy on, With Logging
bcp Mode for bulk-copy on Without Log-ging
Clustered index Slow mode Slow mode
Replicated table with indexes or trig-gers, but no clustered index
Fast mode Slow mode
Nonclustered index and no triggers Fast mode Slow mode
Triggers, and no indexes Fast mode Fast mode
Nonclustered index with triggers Fast mode Fast mode
No indexes, no triggers, and no rep-lication
Fast mode Fast mode
bcp RequirementsBefore using bcp, provide it with basic data information and prepare both the data for transferand the command to access the data.
To transfer data successfully to and from Adaptive Server, supply:
• Name of the database and table or view• Name of the operating system file• Direction of the transfer (in or out)
You may also use bcp to modify the storage type, storage length, and terminator for eachcolumn.
bcp PermissionsYou need an Adaptive Server account and the appropriate permissions on the database tablesor views, as well as the operating system files to use in the transfer to use bcp.
To copy:
CHAPTER 2: Transferring Data to and from Adaptive Server with bcp
Utility Guide 161

• Data into a table – have insert and select permission on the table.• A table to an operating system file – have select permission on:
• The table to copy• sysobjects• syscolumns• sysindexes
Before You TransferPrepare the command and the data for transfer before using bcp in.
To use either fast or fast-logged bcp, set select into/bulkcopy/pllsort to true. For example, toturn on this option for the pubs2 database, enter:
sp_dboption pubs2, "select into/bulkcopy/pllsort", true
To use fast bcp, remove indexes on the target table.
In addition:
• If you are running Open Client version 11.1 or later and are using an external Sybaseconfiguration file, enable bcp by adding:[BCP]
• Set the $SYBASE environment variable to the location of the current version of AdaptiveServer before using bcp.
• To use a previous version of bcp, set the CS_BEHAVIOR property in the [bcp] section ofthe ocs.cfg file:
[bcp]CS_BEHAVIOR = CS_BEHAVIOR_100
If you do not set CS_BEHAVIOR to CS_BEHAVIOR_100, use functionality for bcp 11.1and later.
See also• bcp Modes on page 160
• Fast, Fast-logged, and Slow bcp on page 163
Copy Data to Partitions Using bcpUse bcp to copy data from a table to an operating system file. Specify a table name and one ormore partitions as the source.
You can copy data to a single file for all partitions, or a single file for each partition.
If you do not specify a destination file name, Adaptive Server creates file names based on thepartition names.
CHAPTER 2: Transferring Data to and from Adaptive Server with bcp
162 Adaptive Server Enterprise

These examples show how to copy of data from bigtable, which is partitioned three ways—ptn1, ptn2, and ptn3—to various operating system files:
• Copies the data in bigtable to file1:
bcp mydb..bigtable out file1• Copies the data from ptn1, ptn2, and ptn3 to file2:
bcp mydb..bigtable partition ptn1, ptn2, ptn3 out file2• Copies the data from ptn1 and ptn2 to data files ptn1.dat and ptn2.dat:
bcp mydb..bigtable partition ptn1, ptn2 out ptn1.dat,ptn2.dat
• Copies the data from ptn1 and ptn2 to ptn1.dat and ptn2.dat:
bcp mydb..bigtable partition ptn1, ptn2 out
See also• bcp on page 10
Improve bcp PerformanceThere are three ways to improve the performance of bcp.
Use:
• Fast-logged bcp
• Partitioned tables – several bcp sessions with a partitioned table can dramatically reducethe time required to copy the data. However, such performance improvements are morenoticeable in fast and fast-logged bcp than in slow bcp.
• bcp in parallel to increase performance dramatically – parallel bulk copy can providebalanced data distribution across partitions.
Note: bcp does not fire any trigger that exists on the target table.
See also• Using Parallel Bulk Copy to Copy Data into a Specific Partition on page 170
Fast, Fast-logged, and Slow bcpWhether to use fast, fast-logged, or slow bcp depends on your situation.
The existence of indexes on tables can affect transfer speed, depending on certain attributes.Unless you explicitly specify fast-logged bcp on tables with indexes, bcp automatically usesslow mode, which logs data inserts in the transaction log. These logged inserts can cause thetransaction log to become very large.
To control this data excess and ensure that the database is fully recoverable in the event of afailure, back up the log with dump transaction.
CHAPTER 2: Transferring Data to and from Adaptive Server with bcp
Utility Guide 163

By default, the select into/bulkcopy/pllsort option is false (disabled) in newly createddatabases. When this option is disabled, bcp automatically uses slow mode. Fast and fast-logged bcp both require that select into/bulkcopy/pllsort option is set to true. To change thedefault setting for future databases, turn this option on in the model database.
Note: You need not set the select into/bulkcopy/pllsort option to true to copy out data from, orto copy in data to a table that has indexes. Slow bcp always copies tables with indexes and logsall inserts.
The differences between fast, fast-logged, and slow bcp are:
• Fast bcp:
Lock Scheme Index Type select into Recovery
APL Non-unique nonclustered On No
DOL Non-unique nonclustered On No
DOL Non-unique clustered On No
• Fast-logged bcp (in Adaptive Server 15.7 ESD #2):
Lock Scheme Index Type select into Recovery
APL Non-unique nonclustered On Yes
DOL Non-unique nonclustered On Yes
DOL Non-unique clustered On Yes
• Slow bcp:
Lock Scheme Index Type select into/bulkcopy Recovery
APL Unique On/off Yes
DOL Unique On/off Yes
APL Non-unique Off Yes
DOL Non-unique Off Yes
While the select into/bulkcopy/pllsort option is on, you cannot dump the transaction log.Issuing dump transaction produces an error message instructing you to use dump databaseinstead.
Warning! Be certain that you dump your database before you turn off the select into/bulkcopy/pllsort flag. If you have inserted unlogged data into your database, and you thenperform a dump transaction before performing a dump database, you will not be able torecover your data.
Adaptive Server prohibits dump transaction after running fast bcp. Instead, use dumpdatabase. Because slow bcp is a minimally logged operation, Adaptive Server allows you to
CHAPTER 2: Transferring Data to and from Adaptive Server with bcp
164 Adaptive Server Enterprise

issue dump transaction after running slow bcp whether select into/bulkcopy/pllsort is set totrue or false in the database.
Slow bcpIn certain situations, use slow bcp.
Use slow bcp when:
• sp_dboption ‘select into/bulkcopy/pllsort’ is off.• sp_dboption ‘select into/bulkcopy/pllsort’ is on, but the table uses the allpages locking
scheme and has a clustered index.• sp_dboption ‘select into/bulkcopy/pllsort’ is on, but the table has a unique nonclustered
index.If the option ignore_dup_key option is enabled on the unique index, performing fast bcpcan put the table and index in an inconsistent state if rows with duplicate keys are inserted.To avoid the inconsistency, Adaptive Server performs slow bcp.
• If the table has nonclustered indexes or triggers, and the table is marked for replication orthe database is used as a warm standby.Because fast bcp does not log inserts, if Adaptive Server uses fast bcp, the rows bcp copiescannot be recovered on the replication site if there is a problem. Adaptive Server uses slowbcp in these situations to maintain compatibility with applications that were written to usethe old behavior.
Fast bcpAdaptive Server uses fast bcp in certain situations.
Adaptive Server uses fast bcp when (in all cases sp_dboption ‘select into/bulkcopy/pllsort’ isenabled and the table does not have a unique clustered index):
• You do not explicitly specify fast-logged bcp.• The table has a non-unique, nonclustered index. Adaptive Server logs the index updates
and the page allocations only. It does not log inserts into the table.• A table has triggers. However, bcp does not fire any triggers in the target table.• A table has datarows or datapage locking scheme with a unique clustered index.
If the table includes nonclustered indexes or triggers, but sp_dboption 'select into/bulkcopy/pllsort' is not enabled, Adaptive Server uses slow bcp.
Fast bcp runs more slowly while a dump database is taking place.
Fast bcp logs only the page allocations. For copying data in, bcp is fastest if your databasetable has no indexes.
If you use fast bcp to make data inserts, which fast bcp does not log, you cannot back up(dump) the transaction log to a device. The changes are not in the log, and a restore cannotrecover nonexistent backup data. The requested backup (dump transaction) produces an errormessage that instructs you to use dump database instead. This restriction remains in force
CHAPTER 2: Transferring Data to and from Adaptive Server with bcp
Utility Guide 165

until a dump database successfully completes. For more information about dump databaseand dump transaction, see the System Administration Guide, and the Reference Manual.
bcp optimization is performed by Adaptive Server and does not require that you use OpenClient version 15.0 or later.
Fast-logged bcpUse fast-logged bcp on any table the includes indexes and triggers (bcp does not fire anytriggers in the target table). Fast-logged bcp logs inserts to tables.
Use the set logbulkcopy {on | off } command to configure fast-logged bcp for the session. Youmay include the set logbulkcopy {on | off } with the --initstring 'Transact-SQL_command' parameter, which sends Transact-SQL commands to Adaptive Serverbefore transferring the data. For example, this enables logging when you transfer thetitles.txt data into the pubs2..titles table:
bcp pubs2..titles in titles.txt --initstring 'set logbulkcopy on'
Copying Tables with IndexesThe bcp utility is optimized to load data into tables that do not have indexes associated withthem.
bcp loads data into tables without indexes at the fastest possible speed. Fast-logged bcp logsany data changes to the table.
When you copy data into a table that has one or more indexes, depending on the index type andthe locking scheme, you can use fast bcp. This includes indexes that are implicitly createdusing the unique integrity constraint of a create table statement. However, bcp does notenforce the other integrity constraints defined for a table.
Note: The log can grow very large during slow bcp because bcp logs inserts into a table thathas indexes. After the bulk copy completes, back up your database with dump database, thentruncate the log with dump transaction after the bulk copy completes and after you havebacked up your database with dump database.
The performance penalty for copying data into a table that has indexes in place can be severe.If you are copying in a very large number of rows, it may be faster to drop all the indexesbeforehand with drop index (or alter table, for indexes created as a unique constraint); set thedatabase option; copy the data into the table; re-create the indexes; and then dump thedatabase. Remember to allocate disk space for the construction of indexes: about 2.2 times theamount of space needed for the data.
Locking Scheme and Fast bcpRegardless of the locking scheme, any table without indexes can utilize fast bcp.
For:
CHAPTER 2: Transferring Data to and from Adaptive Server with bcp
166 Adaptive Server Enterprise

• APL tables – the index must be nonunique and nonclustered to enable fast bcp.• DOL tables – the index need only be nonunique for fast bcp. It can be either clustered or
nonclustered.
To access fast bcp, set sp_dboption 'select into/bulkcopy/pllsort to true in the database.
SAP recommends that you enable dboption "trunc log on chkpt" before using bcp. Thisensures that the log will be truncated with each checkpoint.Adaptive Server issues acheckpoint with each batch completion. To implement more checkpoints, run bcp -b
batchsize.
Space Requirements for CopyingIf you are copying a very large number of rows, you must have 1.2 times the amount of spaceneeded for the data and enough space for the server to reconstruct a clustered index.
If space is
• Available – use drop index to drop all the indexes beforehand.• Not available – if you do not have enough space for the server to sort the data and build the
index or indexes, use slow bcp.
Summary of Steps for Fast and Fast-logged bcpThe various steps available for fast and fast-logged bcp can be performed by various users.
Table 2. Steps for copying in data using fast and fast-logged bcp
Step Who can do it
Use sp_dboption to set select into/bulkcopy/pllsort to true.
System administrator or database owner
Have enough space to re-create any indexes on thetable.
Drop the indexes on the table.
Table owner
Have insert permission on the table. Granted by the table owner
Perform the copy with bcp. Any user with insert permission
Re-create the indexes. Table owner
Reset sp_dboption, if required. System administrator or database owner
Use dump database to back up the newly inserteddata.
System administrator, operator, or databaseowner
Run stored procedures or queries to determinewhether any of the newly loaded data violates rules.
Table owner or stored procedure owner
CHAPTER 2: Transferring Data to and from Adaptive Server with bcp
Utility Guide 167

Bulk Copying Data into Partitioned TablesIn certain circumstances, you can improve bcp performance dramatically by executing severalbcp sessions with a partitioned table.
Partitioned tables improve insert performance by reducing lock contention and by distributingI/O over multiple devices. bcp performance with partitioned tables is improved primarilybecause of this distributed I/O.
When you execute a bcp session on a partitioned table, consider:
• A partitioned table improves performance when you are bulk copying in to the table.• The performance of slow bcp does not improve as much with partitioned tables. Instead,
drop all indexes and use fast or fast-logged bcp.• Network traffic can quickly become a bottleneck when multiple bcp sessions are being
executed. If possible, use a local connection to the Adaptive Server to avoid thisbottleneck.
When copying data into a partitioned table, you can:
• Copy the data randomly without regard to the partition to which data is copied. Forexample, to copy data from file1 to bigtable, enter:
bcp mydb..bigtable in file1
To copy data from file1, file2, and file3 to bigtable, enter:
bcp mydb..bigtable in file1, file2, file3• Copy the data into a specific partition For example, to copy data from file1 to ptn1,
file2 to ptn2, and file3 to ptn3, enter:
bcp mydb..bigtable partition ptn1, ptn2, ptn3 in file1, file2, file3
To copy data from file1 to the first partition of bigtable, enter:
bcp mydb..bigtable:1 in file1
If the table has a clustered index, bcp runs in slow mode and allows the index to control theplacement of rows.
See also• Chapter 1, Utility Commands Reference on page 1
Copying Data Randomly into PartitionsYou can copy data randomly into partitioned tables when using multiple bcp sessions.
1. Configure the table with as many partitions and physical devices as you require for yoursystem.
For more information, see the Performance and Tuning Guide.
CHAPTER 2: Transferring Data to and from Adaptive Server with bcp
168 Adaptive Server Enterprise

2. Make sure Adaptive Server is configured with enough locks to support multiple bcpsessions. For information on configuring locks, see the System Administration Guide.
3. Remove the indexes on the table and enable fast or fast-logged bcp.
Note: If you use slow bcp, performance may improve significantly after you remove theindexes.
4. Divide the bcp input file into as many files of equal size as the number of plannedsimultaneous bcp sessions.
You also can use the -F first_row and -L last_row options to specify the start and end of each“input file.”
5. Execute the bcp sessions with separate files in parallel on the local Adaptive Servermachine.
For example, on UNIX platforms, execute different sessions in different shell windows orstart individual bcp sessions in the background.
See also• Using Parallel Bulk Copy to Copy Data into a Specific Partition on page 170
• Fast, Fast-logged, and Slow bcp on page 163
Monitoring bcp Sessions with dbcc checktable and sp_helpsegmentIf you do not specify which partition the bcp sessions should use, Adaptive Server randomlyassigns the multiple bcp sessions to the table’s available partitions.
If this random assignment occurs, be sure to monitor the partitions to ensure that the processhas evenly distributed the inserts by using either of the following:
• dbcc checktable – to periodically to check the total page counts for each partition• sp_helpsegment or sp_helpartition – to perform a similar check, but without locking the
database objects
For more information about dbcc checktable, see the System Administration Guide. For moreinformation about sp_helpsegment and sp_helpartition, see the Reference Manual.
For more information about table partitions, see the Performance and Tuning Guide.
Reducing Logging by Increasing Page AllocationsIf you are using fast or fast-logged bcp, consider that each bcp in batch requires the pagemanager to allocate one or more extents. Each such allocation generates a single log record.
Use the number of pre-allocated extents configuration parameter to specify how manyextents Adaptive Server is to allocate through the page manager:
• Valid values for the number of pre-allocated extents configuration parameter are from 1to 32; the default value is 2.
CHAPTER 2: Transferring Data to and from Adaptive Server with bcp
Utility Guide 169

• The number of pre-allocated extents parameter is dynamic, not static. For this reason,you need not restart Adaptive Server after you change its value.
• An object may be allocated more pages than actually needed, so the value of number ofpre-allocated extents should be low if you are using bcp for small batches. If you are usingbcp for large batches, increase the value of number of pre-allocated extents to reduce theamount of overhead required to allocate pages and to reduce the number of log records.
Adaptive Server may allocate more pages than are actually needed, so keep the value smallwhen space is limited. These pages are deallocated at the end of the batch.
In Adaptive Server version 15.5 and later, the maximum values of preallocated extents hasbeen increased increased from 31 to 32.
Using a value of 32 for the number of pre-allocated extents parameter has a specialsignificance for configuration, and impacts the space allocations Adaptive Server performsinternally. If you set the number of preallocated extents to 32, Adaptive Server attempts toreserve an entire allocation unit of extents for utility operations that use a large-scaleallocation scheme of space reservation, such as bcp in and select into.
Using the maximum number of preallocated extents can greatly improve the performance ofthese utilities, particularly when you run them in parallel. Using a value of 32 greatly increasesthe likelihood that each engine running the utility can work independently on its ownallocation unit without interference from other engines.
For more information, see “Setting Configuration Parameters” in the System AdministrationGuide: Volume 1.
Using Parallel Bulk Copy to Copy Data into a Specific PartitionUse parallel bulk copy to copy data in parallel to a specific partition. Parallel bulk copysubstantially increases performance during bcp sessions because it can split large bulk copyjobs into multiple sessions and run the sessions concurrently.
To use parallel bulk copy:
• The destination table must be partitioned. Use:• sp_helpartition – to see the number of partitions on the table.• alter table ... partition – to partition the table, if the table is not already partitioned.
• The destination table should not contain indexes because:• If the table has a clustered index, this index determines the physical placement of the
data, causing the partition specification in the bcp command to be ignored.• If any indexes exist, bcp automatically uses its slow bulk copy instead of its fast bulk
copy mode.• If nonclustered indexes exist on the tables, parallel bulk copy is likely to lead to deadlocks
on index pages.• Each partition should reside on a separate physical disk for the best performance.
CHAPTER 2: Transferring Data to and from Adaptive Server with bcp
170 Adaptive Server Enterprise

• Before you copy data into your database, partition the table destined to contain the data.• Parallel bulk copy can copy in to a table from multiple operating system files.
• For all types of partitioned tables, use:bcp tablename partition partition_name in file_name
• For round-robin partitioned tables only, use:bcp tablename partition_number in file_name
Figure 1: Copying data into a round-robin partitioned table using parallel bulkcopy
See the Transact-SQL Users Guide for information about partitioning a table.
Note: When using parallel bulk copy to copy data out, you cannot specify a partition number.You can, however, specify a partition name.
bcp in and LocksWhen you copy in to a table using bcp—particularly when you copy in to a table using parallelbcp—the copy process acquires an exclusive lock.
• An exclusive intent lock on the table• An exclusive page lock on each data page or data row• An exclusive lock on index pages, if any indexes exist
If you are copying in very large tables—especially if you are using simultaneous copies into apartitioned table—this can involve a very large number of locks.
To avoid running out of locks, increase the number of locks.
• To estimate the number of locks needed, use:# of simultaneous batches * (rows_per_batch / (2016/row_length))
• To see the row length for a table, use:1> select maxlen2> from sysindexes3> where id = object_id("tablename") and (indid = 0 or indid = 1)
CHAPTER 2: Transferring Data to and from Adaptive Server with bcp
Utility Guide 171

See the System Administration Guide for more information about setting the number oflocks.
• Use the -b batchsize flag to copy smaller batches; the default batch size is 1000 rows. Thesmallest batch size bcp can process is 1; the largest is 2147483647L.
• Run fewer batches concurrently.
Parallel Bulk Copy MethodsThere are various methods to copy in data using parallel bulk copy.
• Start multiple bcp sessions in the background, and:• Specify the password at the command line.• Use native mode, character mode, or a format file.You can start bcp as many times as the table is partitioned.
• Create and use a format file:1. Start bcp in interactive mode.2. Answer the prompts.3. Create a format file that stores your responses.4. Put the process in the background when the copy begins.5. Issue the next bcp command, and specify the format file created with the first bcp
command.• Start bcp sessions in multiple windows.• Specify a partition to file mapping in a single bcp in command.
The client can execute independent bcp in sessions in parallel. The user can alternatelyspecify the --maxconn option to control the maximum number of parallel connections thatthe bcp client can open to the server.
Alternatively, specify the --maxconn option to control the maximum number of parallelconnections that the bcp client can open to the server. To ensure parallel execution on UNIXplatforms, use the bcp_r variant.
Parallel Bulk Copy SyntaxUse this syntax for parallel bulk copy, when using several simultaneous sessions.
bcp table_name[:partition_number | partrition_name] in file_name-Pmypassword
• table_name – is the name of the table into which you are copying the data.• partition_name – is the name of the partition into which you are copying.• file_name – is the host file that contains the data.• mypassword – is your password.
Alternatively, you can execute parallel bulk copy using a multithreaded version of bcp:
• (UNIX) Perform this using the bcp_r command:
CHAPTER 2: Transferring Data to and from Adaptive Server with bcp
172 Adaptive Server Enterprise

bcp_r database_name..table_name partition partition_number1 [, partition_number2 ...] in file_name1 [,file_name2 ....] -U[username] -P[password] -S[servername]
• (Windows) The standard bcp command is capable of paralled execution:bcp database_name..table_name partition partition_number1 [, partition_number2 ...] in file_name1 [,file_name2 ....] -U[username] -P[password] -S[servername]
Using Parallel Bulk Copy on Round-robin Partitioned TablesCopy sorted data in parallel into a specific partition.
• Specify the partition by appending a colon (:) plus the partition number to the table name.For example:publishers:10
Note: The partition you specify must exist before you issue the bcp command.
• Split the sorted data into separate files, or delineate the “files” by specifying the first row(-F first_row) and the last row (-L last_row) of the host file.
• Note the number of partitions in the table, as this number limits the number of parallel bulkcopy sessions that you can start.For example, if a table has four partitions, and you start five parallel bulk copy jobs, onlythe first four jobs can run in parallel; the fifth job does not start until one of the first fourjobs finish.
bcp copies each file or set of line numbers to a separate partition. For example, to use parallelbulk copy to copy in sorted data to mydb..bigtable from four files into four partitions,enter:bcp mydb..bigtable:1 in file1 -Pmypassword -c &bcp mydb..bigtable:2 in file2 -Pmypassword -c &bcp mydb..bigtable:3 in file3 -Pmypassword -c &bcp mydb..bigtable:4 in file4 -Pmypassword -c &
Parallel Bulk Copy and IDENTITY ColumnsWhen you use parallel bulk copy, IDENTITY columns can cause a bottleneck.
As bcp reads in the data, the utility both generates the values of the IDENTITY column andupdates the IDENTITY column’s maximum value for each row. This extra work mayadversely affect the performance improvement that you expected to receive from usingparallel bulk copy. To avoid this bottleneck, explicitly specify the IDENTITY starting pointfor each session.
Specifying the Starting Point from the Command LineUse -g id_start_value to specify an IDENTITY starting point for a session in thecommand line.
The -g parameter instructs Adaptive Server to generate a sequence of IDENTITY columnvalues for the bcp session without checking and updating the maximum value of the table’s
CHAPTER 2: Transferring Data to and from Adaptive Server with bcp
Utility Guide 173

IDENTITY column for each row. Instead of checking, Adaptive Server updates the maximumvalue at the end of each batch.
Warning! When specifying overlapping identity value ranges, be cautious aboutinadvertently creating duplicate identity values.
To specify a starting IDENTITY value, enter:bcp [-gid_start_value]
For example, to copy in four files, each of which has 100 rows, enter:bcp mydb..bigtable in file1 -g100bcp mydb..bigtable in file2 -g200bcp mydb..bigtable in file3 -g300bcp mydb..bigtable in file4 -g400
Using the -g parameter does not guarantee that the IDENTITY column values are unique. Toensure uniqueness:
• Know how many rows are in the input files and what the highest existing value is. Use thisinformation to set the starting values with the -g parameter and generate ranges that do notoverlap.In the example above, if any file contains more than 100 rows, the identity values overlapinto the next 100 rows of data, creating duplicate identity values.
• Verify that no one else is inserting data that can produce conflicting IDENTITY values.
Retaining Sort OrderIf you copy sorted data into the table without explicitly specifying the IDENTITY startingpoint, bcp might not generate the IDENTITY column values in sorted order.
Parallel bulk copy reads the information into all the partitions simultaneously and updates thevalues of the IDENTITY column as it reads in the data.
A bcp statement with no explicit starting point would produce IDENTITY column numberssimilar to those shown as follows:
The table has a maximum IDENTITY column number of 119, but the order is no longermeaningful.
To enforce unique IDENTITY column values in Adaptive Server, run bcp with either the -g or-E parameter.
CHAPTER 2: Transferring Data to and from Adaptive Server with bcp
174 Adaptive Server Enterprise

Specifying the Value of a Table’s IDENTITY ColumnBy default, when you bulk copy data into a table with an IDENTITY column, bcp assigns eachrow a temporary IDENTITY column value of 0.
This is effective only when copying data into a table. bcp reads the value of the ID columnfrom the data file, but does not send it to the server. Instead, as bcp inserts each row into thetable, the server assigns the row a unique, sequential, IDENTITY column value, beginningwith the value 1.
If you specify the -E flag when copying data into a table, bcp reads the value from the data fileand sends it to the server which inserts the value into the table. If the number of rows insertedexceeds the maximum possible IDENTITY column value, Adaptive Server returns an error.
The -E parameter has no effect when you are bulk copying data out. Adaptive Server copies theID column to the data file, unless you use the -N parameter.
You cannot use the -E and -g flags together.
Bulk Copying Encrypted Databcp transfers encrypted data in and out of databases in either plain text or cipher text form. Bydefault, bcp copies plain text data, data is automatically:• Encrypted by Adaptive Server before insertion when executing bcp in. Slow bcp is used.
The user must have insert and select permission on all columns.• Decrypted by Adaptive Server when executing bcp out. select permission is required on
all columns; in addition, decrypt permission is required on the encrypted columns.This example copies the customer table out as plain text data in native machine format:
bcp uksales.dbo.customer out uk_customers -n -Uroy -Proy123
If the data to be copied out as plain text is encrypted by a key that uses an explicit password,supply that password to bcp using the --c password or --colpasswd options.
For example, if the salary column in the employee table is encrypted by a key that isprotected by an explicit password, copy out only the salary data as plain text by providingbcp with the password, such as:
bcp hr.dbo.employee out -c -Upjones -PX15tgol --colpasswd hr.dbo.employee.salary '4mIneIsonly'
Alternatively, if you know the name of the key that encrypts the salary column, use:
bcp hr.dbo.employee out -c -Upjones -PX15tgol --keypasswd keydb.dbo.hr_key '4mIneIsonly'
bcp uses the password to issue a set encryption passwd command before selecting the data.Use the --keypasswd and --colpasswd options in a similar way on the bcp command linewhen copying the data back in.
CHAPTER 2: Transferring Data to and from Adaptive Server with bcp
Utility Guide 175

Use the -C option for bcp to copy the data as cipher text. When copying cipher text, you maycopy data out and in across different operating systems. If you are copying character data ascipher text, both platforms must support the same character set.
The -C option for bcp allows administrators to run bcp when they lack decrypt permission onthe data. When you use the -C option:
• Data is assumed to be in cipher text format during execution of bcp in, and Adaptive Serverperforms no encryption.Use the -C option only if the file being copied into Adaptive Server was created using the -Coption on bcp out. The cipher text must have been copied from a column with exactly thesame column attributes and encrypted by the same key as the column into which the data isbeing copied. Fast bcp is used. The user must have insert and select permission on thetable.
• bcp in -C bypasses the domain rule and check constraint for encrypted columns if eitherexist on an encrypted column because, in this situation, Adaptive Server uses fast bcp.Domain rules and check constraints do not affect bcp out -C.
• If an access rule exists on an encrypted column, using bcp out -C results in a 2929 error.Access rules do not affect bcp in -C.
• Data is copied out of Adaptive Server without decryption on bcp out. The cipher text datais in hexadecimal format. The user must have select permission on all columns. Forcopying cipher text, decrypt is not required on the encrypted columns.
• Encrypted char or varchar data retains the character set used by Adaptive Server at thetime of encryption. If the data is copied in cipher text format to another server, thecharacter set used on the target server must match that of the encrypted data copied fromthe source. The character set associated with the data on the source server when it wasencrypted is not stored with the encrypted data and is not known or converted on the targetserver.You can also perform bcp without the -C option to avoid the character set issue.You cannot use the -J option (for character set conversion) with the -C option.
This example copies the customer table:
bcp uksales.dbo.customer out uk_customers -C -c -Uroy -Proy123
The cc_card column is copied out as human-readable cipher text. Other columns are copiedin character format. User “roy” is not required to have decrypt permission on customercc_card.
When copying data as cipher text, ensure that the same keys are available in the database whenthe data is copied back in. If necessary, use the ddlgen utility to move keys from one databaseto another.
CHAPTER 2: Transferring Data to and from Adaptive Server with bcp
176 Adaptive Server Enterprise

bcp OptionsThe information in this section clarifies some of the more complex options of the bcp syntax.
See also• bcp on page 10
Using the Default Formatsbcp provides two command line options that create files with frequently used default formats.These options provide the easiest way to copy data in and out from Adaptive Server.
• The -n option uses “native” (operating system) formats.• The -c option uses “character” (char datatype) for all columns. This datatype supplies
tabs between fields on a row and a newline terminator, such as a carriage return, at the endof each row.
When you use the native or character options, bcp operates noninteractively and only asks youfor your Adaptive Server password.
Native FormatThe -n option creates files using native (operating system-specific) formats.
Native formats usually create a more compact operating system file. For example, thiscommand copies the publishers table to the file called pub_out, using native dataformat:bcp pubs2..publishers out pub_out -n
The contents of pub_out are:
0736^MNew Age Books^FBoston^BMA0877^PBinnet & Hardley^JWashington^BDC1389^TAlgodata Infosystems^HBerkeley^BCA
bcp prefixed each field, except the pub_id, which is a char(4) datatype, with an ASCIIcharacter equal to the data length in the field. For example, “New Age Books” is 13 characterslong, and ^M (Ctrl+m) is ASCII 13.
All the table data stored in pub_out is in the form of human-readable char or varchardata. In a table with numeric data, bcp writes the information to the file in the operatingsystem’s data representation format, which may not be human-readable.
bcp can copy data out to a file either as its native (database) datatype or as any datatype forwhich implicit conversion is supported for the datatype in question. bcp copies user-defineddatatypes as their base datatype or as any datatype for which implicit conversion is supported.For more information on datatype conversions, see dbconvert in the Open Client DB-Library/C Reference Manual or the Adaptive Server Enterprise Reference Manual.
CHAPTER 2: Transferring Data to and from Adaptive Server with bcp
Utility Guide 177
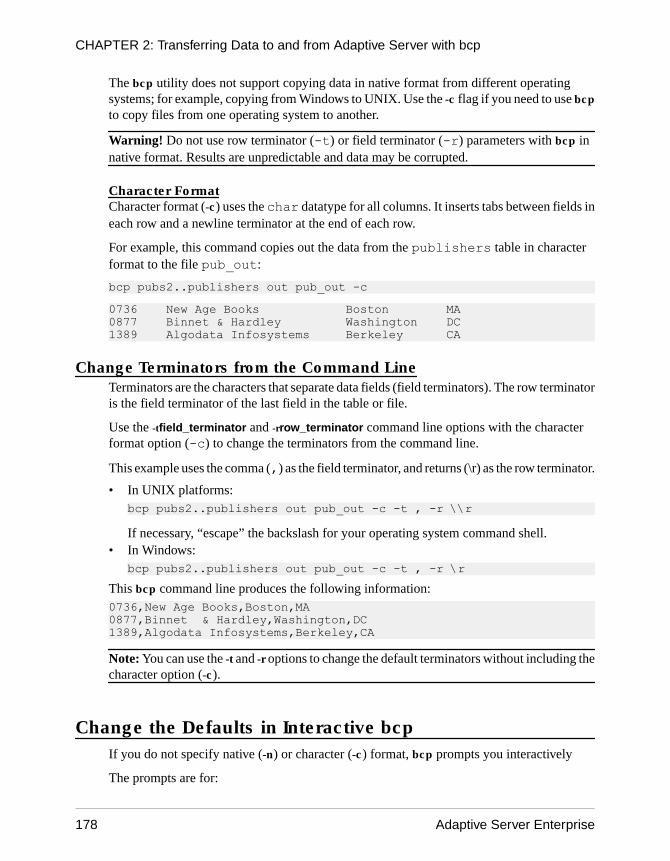
The bcp utility does not support copying data in native format from different operatingsystems; for example, copying from Windows to UNIX. Use the -c flag if you need to use bcpto copy files from one operating system to another.
Warning! Do not use row terminator (-t) or field terminator (-r) parameters with bcp innative format. Results are unpredictable and data may be corrupted.
Character FormatCharacter format (-c) uses the char datatype for all columns. It inserts tabs between fields ineach row and a newline terminator at the end of each row.
For example, this command copies out the data from the publishers table in characterformat to the file pub_out:
bcp pubs2..publishers out pub_out -c0736 New Age Books Boston MA0877 Binnet & Hardley Washington DC1389 Algodata Infosystems Berkeley CA
Change Terminators from the Command LineTerminators are the characters that separate data fields (field terminators). The row terminatoris the field terminator of the last field in the table or file.
Use the -tfield_terminator and -rrow_terminator command line options with the characterformat option (-c) to change the terminators from the command line.
This example uses the comma (,) as the field terminator, and returns (\r) as the row terminator.
• In UNIX platforms:bcp pubs2..publishers out pub_out -c -t , -r \\r
If necessary, “escape” the backslash for your operating system command shell.• In Windows:
bcp pubs2..publishers out pub_out -c -t , -r \rThis bcp command line produces the following information:0736,New Age Books,Boston,MA0877,Binnet & Hardley,Washington,DC1389,Algodata Infosystems,Berkeley,CA
Note: You can use the -t and -r options to change the default terminators without including thecharacter option (-c).
Change the Defaults in Interactive bcpIf you do not specify native (-n) or character (-c) format, bcp prompts you interactively
The prompts are for:
CHAPTER 2: Transferring Data to and from Adaptive Server with bcp
178 Adaptive Server Enterprise

• The file storage type• The prefix length• The terminator for each column of data to be copied• A field length for fields that are to be stored as char or binaryThe default values for these prompts produce the same results as using the native format, andprovide a simple means for copying data out of a database for reloading into Adaptive Serverlater.
If you are copying data to or from Adaptive Server for use with other programs, base youranswers to the prompts on the format required by the other software.
These four prompts provide an extremely flexible system that allows you either to read a filefrom other software or to create a file that requires little or no editing to conform to many otherdata formats.
Respond to bcp PromptsUnless you supplied bcp with the -P parameter, it prompts you for your password when youcopy data in or out using the -n (native format) or -c (character format) parameters.
If you do not supply either the -n, -c or -f formatfile parameter, bcp prompts you forinformation for each field in the table or view.
• Each prompt displays a default value, in brackets, which you can accept by pressingReturn. The prompts include:• The file storage type, which can be character or any valid Adaptive Server datatype
• The prefix length, which is an integer indicating the length in bytes of the followingdata
• The storage length of the data in the file for non-NULL fields• The field terminator, which can be any character string• (Windows) Scale and precision for numeric and decimal datatypesThe row terminator is the field terminator of the last field in the table, view, or file.
• The bracketed defaults represent reasonable values for the datatypes of the field inquestion. For the most efficient use of space when copying out to a file:• Use the default prompts• Copy all data in the datatypes defined by their table• Use prefixes as indicated• Do not use terminators• Accept the default lengthsThe bcp prompts, defaults, and the possible alternate user responses are:
CHAPTER 2: Transferring Data to and from Adaptive Server with bcp
Utility Guide 179

Table 3. Defaults and User Responses for bcp Prompts
Prompt Default Provided Possible User Response
File StorageType
Use database storage type for most fieldsexcept:• char for varchar• binary for varbinary
char to create or read a human-readable file; any Adaptive Serverdatatype where implicit conversion issupported.
PrefixLength
• 0 for fields defined with char data-type (not storage type) and all fixed-length datatypes
• 1 for most other datatypes• 2 for binary and varbinary
saved as char• 4 for text and image
0 if no prefix is desired; otherwise,defaults are recommended.
StorageLength
• For char and varchar, use de-fined length.
• For binary and varbinarysaved as char, use double the de-fined length.
• For all other datatypes, use maximumlength needed to avoid truncation ordata overflow.
Default values, or greater, are recom-mended.
Field or RowTerminator
None Up to 30 characters, or one of the fol-lowing:• \t – tab
• \n – newline
• \r – carriage return
• \0 – null terminator
• \ – backslash
• bcp can copy data out to a file either as its native (database) datatype, or as any datatype forwhich implicit conversion is supported. bcp copies user-defined datatypes as their basedatatype or as any datatype for which implicit conversion is supported. See dbconvert inthe Open Client DB-Library/C Reference Manual.
Note: Be careful when you copy data from different versions of Adaptive Server, becausenot all versions support the same datatypes.
• A prefix length is a 1-byte, 2-byte, or 4-byte integer that represents the length of each datavalue in bytes. It immediately precedes the data value in the host file.
• Be sure that fields defined in the database as char, nchar, and binary are alwayspadded with spaces (null bytes for binary) to the full length defined in the database.timestamp data is treated as binary(8).
CHAPTER 2: Transferring Data to and from Adaptive Server with bcp
180 Adaptive Server Enterprise

• If data in varchar and varbinary fields is longer than the length you specify for copyout, bcp silently truncates the data in the file at the specified length.
• A field terminator string can be up to 30 characters long. The most common terminatorsare a tab (entered as “\t” and used for all columns except the last one), and a newline(entered as “\n” and used for the last field in a row). Other terminators are: “\0” (the nullterminator), “\” (backslash), and “\r” (Return). When choosing a terminator, be sure thatits pattern does not appear in any of your character data. For example, if you use tabterminators with a string that contains a tab, bcp cannot identify which tab represents theend of the string. bcp always looks for the first possible terminator, in this case, it will findthe wrong one.
• When a terminator or prefix is present, it affects the actual length of data transferred. If thelength of an entry being copied out to a file is smaller than the storage length, it is followedimmediately by the terminator, or the prefix for the next field. The entry is not padded tothe full storage length (char, nchar, and binary data is returned from Adaptive Serveralready padded to the full length).
• When copying in from a file, data is transferred until either the number of bytes indicatedin the “Length” prompt has been copied, or the terminator is encountered. Once a numberof bytes equal to the specified length has been transferred, the rest of the data is flusheduntil the terminator is encountered. When no terminator is used, the table storage length isstrictly observed.
• These tables show the interaction of prefix lengths, terminators, and field length on theinformation in the file. “P” indicates the prefix in the stored table; “T” indicates theterminator; and dashes, “--”, show appended spaces. “...” indicates that the pattern repeatsfor each field. The field length is 8 for each column, and “string” represents the 6-characterfield each time.
Table 4. Adaptive Server char data
Prefix length 0 Prefix length 1, 2, or 4
No terminator string--string-- Pstring--Pstring--
Terminator string--Tstring--T Pstring--TPstring--T
Table 5. Other datatypes converted to char storage
Prefix length 0 Prefix length 1, 2 or 4
No terminator string--string-- PstringPstring
Terminator stringTstringT PstringTPstringT
• The file storage type and length of a column do not have to be the same as the type andlength of the column in the database table. However, if types and formats copied in areincompatible with the structure of the database table, the copy fails.
• File storage length generally indicates the maximum amount of data to be transferred forthe column, excluding terminators and prefixes.
CHAPTER 2: Transferring Data to and from Adaptive Server with bcp
Utility Guide 181

• When copying data into a table, bcp observes any defaults defined for columns and user-defined datatypes. However, bcp ignores rules to load data at the fastest possible speed.
• Because bcp considers any data column that can contain null values to be variable length,use either a length prefix or terminator to denote the length of each data row.
• Data written to a host file in its native format preserves all of its precision. datetime andfloat values preserve all of their precision even when they are converted to characterformat. Adaptive Server stores money values to a precision of one ten-thousandth of amonetary unit. However, when money values are converted to character format, theircharacter format values are recorded only to the nearest two places.
• Before copying data in character format from a file into a database table, check thedatatype entry rules in the Datatypes in Reference Manual: Building Blocks. Characterdata that is copied into the database with bcp must conform to those rules. Dates in theundelimited (yy)yymmdd format may result in overflow errors if the year is not specifiedfirst.
• When you send host data files to sites that use terminals different from your own, informthem of the datafile_charset that you used to create the files.
File Storage TypeThe file storage type prompt offers you choices about how to store the data in the file.
Copy data into a file as:
• Its database table type,• A character string, or• Any datatype for which implicit conversion is supported.
Note: bcp copies user-defined datatypes as their base types.
Table 6. File storage datatypes for bcp
Table Datatype Storage Type
char, varchar c[har]
text T[ext]
int i[nt]
smallint s[mallint]
tinyint t[inyint]
float f[loat]
money m[oney]
bit b[it]
CHAPTER 2: Transferring Data to and from Adaptive Server with bcp
182 Adaptive Server Enterprise

Table Datatype Storage Type
datetime d[atetime]
binary, varbinary, timestamp x
image I[mage]
smalldatetime D
real r
smallmoney M
numeric n
decimal e
The table shows the default storage type for each Adaptive Server datatype and theabbreviations that are acceptable to bcp.
• For the most compact storage, use the default value.• For character files, use char.• The date storage type is the Adaptive Server internal storage format of datetime, not
the host operating system format of the date.• timestamp data is treated as binary(8).
The brackets [ ] in the table indicate that you can use the initial character or the beginningcharacters of the word. For example, for “bit” use “b,” “bi,” or “bit.”
To display this list while using bcp interactively, type a question mark (?) in response to theprompt Enter the file storage type.
The values that appear in the prompts are the defaults. Your response determines how the datais stored in the output file; you need not indicate the column’s type in the database table.
bcp fails if you enter a type that is neither implicitly convertible or char. For example, youmay not be able to use smallint for int data (you may get overflow errors), but you canuse int for smallint.
When storing noncharacter datatypes as their database types, bcp writes the data to the file inAdaptive Server’s internal data representation format for the host operating system, ratherthan in human-readable form.
Before copying data that is in character format from a file into a database table, check thedatatype entry rules in the Reference Manual: Building Blocks. Character data copied into thedatabase with bcp must conform to those rules. If you do not specify the year first, dates in theundelimited (yy)yymmdd format may result in overflow errors.
When you send host data files to sites that use terminals different from your own, inform themof the datafile_charset that you used to create the files.
CHAPTER 2: Transferring Data to and from Adaptive Server with bcp
Utility Guide 183

Prefix LengthBy default, bcp precedes each field that has a variable storage length with a string of one ormore bytes indicating the length of the field, which enables the most compact file storage.
The default values in the prompts indicate the most efficient prefix length. For:
• Fixed-length fields – the prefix length should be 0.• Fields of 255 bytes or less – the default prefix length is 1.• text or image datatypes – the default prefix length is 4
• binary and varbinary datatypes being converted to char storage types – the defaultprefix length is 2, since each byte of table data requires 2 bytes of file storage.
• binary, varbinary, and image data – use even numbers for the prefix and length.This maintains consistency with Adaptive Server, which stores data as an even number ofhexadecimal digits.
• Any data column that permits null values – use a prefix length, other than 0, or a terminatorto denote the length of each row’s data. bcp considers such columns, including columnswith integer datatypes that might ordinarily be considered fixed-length columns, to be ofvariable length.
• Data with no prefix before its column – use a prefix length of 0.
A prefix length is a 1-, 2-, or 4-byte integer that represents the length of each data value inbytes, and it immediately precedes the data value in the host file.
Unless you supply a terminator, bcp pads each stored field with spaces to the full lengthspecified at the next prompt, “length.”
Because prefix lengths consist of native format integers, the resulting host file containsnonprintable characters, which could prevent you from printing the host file or fromtransmitting it through a communications program that cannot handle non-human-readablecharacters.
Field lengthIn almost all cases, use the bcp default value for the storage length while copying data out.
Note: The terms “length” and “storage length” in this discussion refer to the operating systemfile, not to Adaptive Server field lengths.
If you are creating:
• A file to reload into Adaptive Server – the default prefixes and length keep the storagespace needed to a minimum.
• A human-readable file – the default length prevents the truncation of data or the creation ofoverflow errors that cause bcp to fail.
CHAPTER 2: Transferring Data to and from Adaptive Server with bcp
184 Adaptive Server Enterprise

Be familiar with the data to transfer, since you can change the default length by supplyinganother value. If you are copying character data in from other software, examine the source filecarefully before choosing length values.
Note: If the storage type is noncharacter, bcp stores the data in the operating system’s nativedata representation and does not prompt for a length.
When bcp converts noncharacter data to character storage, it suggests a default field lengthlarge enough to store the data without truncating datetime data or causing an overflow ofnumeric data.
• The default lengths are the number of bytes needed to display the longest value for theAdaptive Server datatype.
Table 7. Default Field Lengths for Noncharacter to Character Datatypes
Datatype Default Size
int 12 bytes
smallint 6 bytes
tinyint 3 bytes
float 25 bytes
money 24 bytes
bit 1 byte
datetime 26 bytes
smalldatetime 26 bytes
real 25 bytes
smallmoney 24 bytes
• If you specify a field length that is too short for numeric data when copying data out, bcpprints an overflow message and does not copy the data.
• The default length for binary and varbinary fields is twice the length defined for thecolumn, since each byte of the field requires 2 bytes of file storage.
• If you accept the default storage length, the actual amount of storage space allocateddepends on whether you specify a prefix length and terminators. If you specify a prefixlength of:• 1, 2, or 4 – bcp uses a storage space of the actual length of the data, plus the length of the
prefix, plus any terminators.• 0 and no terminator – bcp allocates the maximum amount of space shown in the
prompt, which is the maximum space that may be needed for the datatype in question.bcp treats the field as if it were fixed length to determine where one field ends and thenext begins.
CHAPTER 2: Transferring Data to and from Adaptive Server with bcp
Utility Guide 185

For example, if the field is defined as varchar(30), bcp uses 30 bytes for eachvalue, even if some of the values are only 1 character long.
• Fields defined in the database as char, nchar, and binary, and those that do notpermit null values, are always padded with spaces (null bytes for binary) to the full lengthdefined in the database. timestamp data is treated as binary(8).
• If data in the varchar and varbinary fields is longer than the length specified forcopy out, bcp silently truncates the data in the file at the specified length.
• bcp does not know how large any one data value will be before copying all the data, so italways pads char datatypes to their full specified length.
• The file storage type and length of a column need not be the same as the type and length ofthe column in the database table. The coy fails if the types and formats copied in areincompatible with the structure of the database table.
• File storage length generally indicates the maximum amount of transferable data for thecolumn, excluding terminators and/or prefixes.
• When copying data into a table, bcp observes any defaults defined for columns and user-defined datatypes, but ignores rules in order to load data at the fastest possible speed.
• bcp considers any data column that can contain a null value to be variable length, so useeither a length prefix or a terminator to denote the length of each row of data.
• The file storage type and length of a column need not be the same as the type and length ofthe column in the database table. (If types and formats copied in are incompatible with thestructure of the database table, the copy fails.)
Field and Row TerminatorsUse a terminator to mark the end of a column or row, separating one from the next. The defaultis no terminator.
• Field terminators separate table columns.• A row terminator is a field terminator for the last field in the row of the table or file.
Terminators are very useful for dealing with character data because you can choose human-readable terminators. The bcp character option, which uses tabs between each column with anewline terminator at the end of each row, is an example of using terminators that enhance thereadability of a data file.
Supply your own terminators when you prepare data for use with other programs, and youwant to use bcp to prepare tabular data. The available terminators are:
• Tabs, indicated by \t• New lines, indicated by \n• Carriage returns, indicated by \r• Backslash, indicated by \• Null terminators (no visible terminator), indicated by \0• Any printable character, for example, *, A, t, |
CHAPTER 2: Transferring Data to and from Adaptive Server with bcp
186 Adaptive Server Enterprise

• Strings of up to 10 printable characters, including some or all of the terminators listedabove (for example, **\t**, end, !!!!!!!!!!, and \t--\n)
Note: Control characters (ASCII 0–25) cannot be printed.
Choose TerminatorsChoose terminators with patterns that do not appear in any of the data.
For example, using a tab terminator with a string of data that also contains a tab createsambiguity: which tab represents the end of the string? bcp always looks for the first possibleterminator, which in this case would be incorrect, since the first tab it would encounter wouldbe part of the data string.
Data in native format can also conflict with terminators. If the values of these integers are notstrictly limited in a column containing a 4-byte integer in native format, it is impossible tochoose a terminator that is guaranteed not to appear inside the data. Use bcp’s native formatoption for data in native format.
Note: “No terminator” differs from a “null terminator,” which is an invisible—but real—character.
• A field terminator string can be up to 30 characters long. The most common terminatorsare a tab (entered as \t and used for all columns except the last one), and a newline(entered as \n and used for the last field in a row). Other terminators are: \0 (the nullterminator), \ (backslash), and \r (Return). When choosing a terminator, its patterncannot appear in any of your character data, since bcp always looks for the first possibleterminator.For example, if you used tab terminators with a string that contained a tab, bcp cannotidentify which tab represents the end of the string. bcp always looks for the first possibleterminator, so, in this example it would find the wrong one.A terminator or prefix affects the actual length of data transferred:When a terminator or prefix is present, it affects the length of data transferred. If the lengthof an entry being copied out to a file is less than the storage length, it is immediatelyfollowed by the terminator or the prefix for the next field. The entry is not padded to the fullstorage length (char, nchar, and binary data is returned from Adaptive Serveralready padded to the full length).When bcp is copying in from a file, data is transferred until either the number of bytesindicated in the “Length” prompt has been copied or the terminator is encountered. Oncethe number of bytes equal to the specified length has been transferred, the rest of the data isflushed until the terminator is encountered. When no terminator is used, the table storagelength is strictly observed.
• Fields stored as char (except char, nchar, and binary fields) instead of theirdatabase datatypes take less file storage space with the default length and prefix or aterminator. bcp can use either a terminator or a prefix to determine the most efficient use of
CHAPTER 2: Transferring Data to and from Adaptive Server with bcp
Utility Guide 187

storage space. bcp suggests the maximum amount of storage space required for each fieldas the default. For char or varchar data, bcp accepts any length.
• The following two tables show the interaction of prefix lengths, terminators, and fieldlength on the information in the file. “P” indicates the prefix in the stored table; “T”indicates the terminator; and dashes, (--) show appended spaces. An ellipsis (…) indicatesthat the pattern repeats for each field. The field length is 8 bytes for each column; “string”represents the 6-character field each time.
Table 8. Adaptive Server char Data
Prefix length = 0 Prefix length–1, 2, or 4
No terminator string--string--... Pstring--Pstring--...
Terminator string--Tstring--T... Pstring--TPstring--T...
Table 9. Other Datatypes Converted to char Storage
Prefix length = 0 Prefix length–1, 2, or 4
No terminator string--string--... PstringPstring...
Terminator stringTstringT... PstringTPstringT...
Format FilesAfter gathering information about each field in the table, bcp asks if you want to save theinformation to a format file and prompts for the file name.
Using a format file created for the data to be copied with bcp allows you to copy data in or outnoninteractively without being prompted by bcp for information, since the format filesupplies the information that bcp needs. Use this newly created format file at any other time tocopy the data back into Adaptive Server or to copy data out from the table.
The figure illustrates the format of the bcp format files. It shows the publishers table fromthe pubs2 database, with all the host file columns in character format, with no prefix, andusing the default data length, a newline terminator at the end of the final column of a row, andtabs as terminators for all other columns.
CHAPTER 2: Transferring Data to and from Adaptive Server with bcp
188 Adaptive Server Enterprise

Figure 2: bcp format file
Using this format file example, the names of the various elements of a bcp format file are:
• The Tabular Data Stream (TDS) version is always the first line of the file. It specifies theversion of TDS that you are using, not the Adaptive Server version, and appears is a literalstring without quotation marks. In the figure, the version is 10.0.
• The second line of a bcp format file is the number of columns, which refers to the numberof records in the format file, not including lines 1 and 2. Each column in the host table hasone line.
• One line for each column follows the first and second lines in the database table. Each lineconsists of elements that are usually separated by tabs, except for the host file datatype andthe prefix length which are usually separated by a space. These elements are:
Elements Description
Host file column order The host file column order is the sequential number of the field in the hostdata file, which begins numbering at 1.
Host file datatype The host file datatype refers to the storage format of the field in the hostdata file, not the datatype of the database table column. See the next tablefor the list of host file datatypes and their storage formats.
Data written to a host file in its native format preserves all of its precision.datetime and float values preserve all of their precision, even whenthey are converted to character format. Adaptive Server stores moneyvalues to a precision of one ten-thousandth of a monetary unit. However,when money values are converted to character format, their characterformat values are recorded only to the nearest two places.
See System and User-Defined Datatypes in the Reference Manual: Build-ing Blocks for descriptions and appropriate uses of Adaptive Server da-tatypes.
CHAPTER 2: Transferring Data to and from Adaptive Server with bcp
Utility Guide 189

Elements Description
Prefix length Prefix length indicates the number of bytes in the field length prefix. Theprefix length is a 0-, 1-, 2-, or 4-byte unsigned integer value embedded inthe host data file that specifies the actual length of data contained in thefield. Some fields may have a length prefix while others do not.
The allowable prefix length values in bytes, and their ranges are:
• 0. Range: No prefix• 1. Range: 28-1; 0-255• 2. Range: 216-1; 0-65535• 4. Range: 232 -1; 0-4,294,967,295
Host file data length Host file data length refers to the maximum number of bytes to copy for thefield.
To decide how much data to copy in or out, bcp uses one of:
• The maximum field length• The prefix length, if any• The field terminator string, if any
If more than one method of field length specification is given, bcp choosesthe one that copies the least amount of data.
Terminator The terminator can be up to 30 bytes of characters enclosed in quotationmarks (" "). The terminator designates the end of data for the host data filefield.
Server column order The server column order represents the colid (column ID) of the sy-scolumns column into which the host data file column is to be loaded.Together with the host file column order, this element maps host data filefields to the database table columns.
Server column name The server column name is the name of the database table column intowhich this field is to be loaded.
Column precision The column precision is the precision of the database table column intowhich this field is to be loaded. This element is present only if the storageformat is numeric or decimal.
Column scale The column scale is the scale of the database table column into which thisfield is to be loaded. This element is present only if the storage format isnumeric or decimal.
Table 10. Host File Datatype Storage Formats
SYBCHAR char, chavarchar (ASCII), nchar,nvarchar
CHAPTER 2: Transferring Data to and from Adaptive Server with bcp
190 Adaptive Server Enterprise

SYBTEXT textSYBBINARY binary, timestamp, unichar, uni-
varchar, varbinarySYBIMAGE imageSYBINT1 tinyintSYBINT2 smallintSYBINT4 intSYBINT8 bigintSYBFLT8 floatSYBREAL realSYBBIT bitSYBNUMERIC numericSYBDECIMAL decimalSYBMONEY moneySYBMONEY4 smallmoneySYBDATETIME datetimeSYBDATETIME4 smalldatetimeSYBDATE dateSYBTIME timeSYBUINT8 unsigned bigintSYBUINT4 unsigned intSYBUINT2 unsigned smallintSYBUNITEXT unitextSYBFLT8 double
CHAPTER 2: Transferring Data to and from Adaptive Server with bcp
Utility Guide 191

Examples of Copying Out Data InteractivelyBy changing the default values of the prompts to bcp, you can prepare data for use with othersoftware.
To create a human-readable file, respond to the bcp prompts:
• File storage type, enter 0.
• Prefix length, enter 0.
• Field length, accept the default.• Terminator – the field terminator you enter depends on the software that you plan to use.
• Choose between delimited fields or fixed-length fields. Always use \n, the newlineterminator, to terminate the last field.For fixed-length fields, do not use a terminator. Each field has a fixed length, withspaces to pad the fields. Adjacent fields, where the data completely fills the first fieldseem to run together, since there are no field separators on each line of output. See theexample below.
• For comma-delimited output, use a comma (,) as the terminator for each field. Tocreate tabular output, use the tab character (\t).
Copy Out Data with Field Lengths
This example uses fixed-length fields to create output in the personal computer format calledSDF (system data format). This format can be easily read or produced by other software.bcp pubs2..sales out sal_out
The results as stored in the sal_out file are:
5023 AB-123-DEF-425-1Z3 Oct 31 1985 12:00AM5023 AB-872-DEF-732-2Z1 Nov 6 1985 12:00AM5023 AX-532-FED-452-2Z7 Dec 1 1990 12:00AM5023 BS-345-DSE-860-1F2 Dec 12 1986 12:00AM5023 GH-542-NAD-713-9F9 Mar 15 1987 12:00AM5023 NF-123-ADS-642-9G3 Jul 18 1987 12:00AM5023 XS-135-DER-432-8J2 Mar 21 1991 12:00AM5023 ZA-000-ASD-324-4D1 Jul 27 1988 12:00AM5023 ZD-123-DFG-752-9G8 Mar 21 1991 12:00AM5023 ZS-645-CAT-415-1B2 Mar 21 1991 12:00AM5023 ZZ-999-ZZZ-999-0A0 Mar 21 1991 12:00AM6380 234518 Sep 30 1987 12:00AM6380 342157 Dec 13 1985 12:00AM6380 356921 Feb 17 1991 12:00AM7066 BA27618 Oct 12 1985 12:00AM7066 BA52498 Oct 27 1987 12:00AM7066 BA71224 Aug 5 1988 12:00AM7067 NB-1.142 Jan 2 1987 12:00AM7067 NB-3.142 Jun 13 1990 12:00AM7131 Asoap132 Nov 16 1986 12:00AM7131 Asoap432 Dec 20 1990 12:00AM
CHAPTER 2: Transferring Data to and from Adaptive Server with bcp
192 Adaptive Server Enterprise

7131 Fsoap867 Sep 8 1987 12:00AM7896 124152 Aug 14 1986 12:00AM7896 234518 Feb 14 1991 12:00AM8042 12-F-9 Jul 13 1986 12:00AM8042 13-E-7 May 23 1989 12:00AM8042 13-J-9 Jan 13 1988 12:00AM8042 55-V-7 Mar 20 1991 12:00AM8042 91-A-7 Mar 20 1991 12:00AM8042 91-V-7 Mar 20 1991 12:00AM
The contents of the sal_fmt format file are:
10.031 SYBCHAR 04 "" 1 stor_id2 SYBCHAR 020 "" 2 ord_num3 SYBCHAR 026 "" 3 date
Comma-delimited, Newline-delimited with Format File
In this example, bcp copies data interactively from the publishers table to a file:
bcp pubs2..publishers out pub_out
The results as stored in the pub_out file are:
0736,New Age Books,Boston,MA0877,Binnet & Hardley,Washington,DC1389,Algodata Infosystems,Berkeley,CA
The contents of the pub_fmt format file are:
10.041 SYBCHAR 0 4 "," 1 pub_id2 SYBCHAR 0 40 "," 2 pub_name3 SYBCHAR 0 20 "," 3 city4 SYBCHAR 0 2 "\n" 4 state
This example creates:
• An output file with commas between all fields in a row and a newline terminator at the endof each row
• A format file (pub_fmt) that you can use later to copy the same or similar data back intoAdaptive Server
Tab-delimited with Format File
This example creates tab-delimited output from the table pubs2..publishers in thepub_out file:
bcp pubs2..publishers out pub_out
The results as stored in the pub_out file are:
0736 New Age Books Boston MA0877 Binnet & Hardley Washington DC1389 Algodata Infosystems Berkeley CA
CHAPTER 2: Transferring Data to and from Adaptive Server with bcp
Utility Guide 193

The contents of the pub_fmt format file are:
10.041 SYBCHAR 04 "\t" 1 pub_id2 SYBCHAR 040 "\t" 2 pub_name3 SYBCHAR 020 "\t" 3 city4 SYBCHAR 02 "\n" 4 state
See also• Format Files on page 188
Examples of Copying In Data InteractivelyTo copy in data successfully to a table from a file, know what the terminators in the file are orwhat the field lengths are and specify them when you use bcp.
The following examples show how to copy data in, either with fixed field lengths or withdelimiters, using bcp with or without a format file.
Copy In Data with Field Lengths
In this example, bcp copies data from the salesnew file into the pubs2..sales table.
In the salesnew file are three fields: the first is 4 characters long, the second is 20, and thethird is 26 characters long. Each row ends with a newline terminator (\n):
5023ZS-731-AAB-780-2B9 May 24 1993 12:00:00:000AM5023XC-362-CFB-387-3Z5 May 24 1993 12:00:00:000AM6380837206 May 24 1993 12:00:00:000AM6380838441 May 24 1993 12:00:00:000AM
Use the following command to copy in the data interactively from salesnew:
bcp pubs2..sales in salesnew
The system responds to the bcp command:Password:Enter the file storage type of field stor_id [char]:Enter prefix-length of field stor_id [0]:Enter length of field stor_id [4]:Enter field terminator [none]:Enter the file storage type of field ord_num [char]:Enter prefix-length of field ord_num [1]: 0Enter length of field ord_num [20]:Enter field terminator [none]:Enter the file storage type of field date [datetime]: charEnter prefix-length of field date [1]: 0Enter length of field date [26]:Enter field terminator [none]: \nDo you want to save this format information in a file? [Y/n] yHost filename [bcp.fmt]: salesin_fmtStarting copy...
CHAPTER 2: Transferring Data to and from Adaptive Server with bcp
194 Adaptive Server Enterprise

4 rows copied.Clock Time (ms.): total = 1 Avg = 0 (116000.00 rows per sec.)
When you log in to Adaptive Server and access sales, you see the following data fromsalesnew appended to the table:
select * from salesstor_id ord_num date------- -------------------- -------------------------5023 AB-123-DEF-425-1Z3 Oct 31 1985 12:00AM5023 AB-872-DEF-732-2Z1 Nov 6 1985 12:00AM
5023 AX-532-FED-452-2Z7 Dec 1 1990 12:00AM5023 BS-345-DSE-860-1F2 Dec 12 1986 12:00AM5023 GH-542-NAD-713-9F9 Mar 15 1987 12:00AM5023 NF-123-ADS-642-9G3 Jul 18 1987 12:00AM5023 XS-135-DER-432-8J2 Mar 21 1991 12:00AM5023 ZA-000-ASD-324-4D1 Jul 27 1988 12:00AM5023 ZD-123-DFG-752-9G8 Mar 21 1991 12:00AM5023 ZS-645-CAT-415-1B2 Mar 21 1991 12:00AM5023 ZZ-999-ZZZ-999-0A0 Mar 21 1991 12:00AM6380 234518 Sep 30 1987 12:00AM6380 342157 Dec 13 1985 12:00AM6380 356921 Feb 17 1991 12:00AM7066 BA27618 Oct 12 1985 12:00AM7066 BA52498 Oct 27 1987 12:00AM7066 BA71224 Aug 5 1988 12:00AM7067 NB-1.142 Jan 2 1987 12:00AM7067 NB-3.142 Jun 13 1990 12:00AM7131 Asoap132 Nov 16 1986 12:00AM7131 Asoap432 Dec 20 1990 12:00AM7131 Fsoap867 Sep 8 1987 12:00AM7896 124152 Aug 14 1986 12:00AM7896 234518 Feb 14 1991 12:00AM8042 12-F-9 Jul 13 1986 12:00AM8042 13-E-7 May 23 1989 12:00AM8042 13-J-9 Jan 13 1988 12:00AM8042 55-V-7 Mar 20 1991 12:00AM8042 91-A-7 Mar 20 1991 12:00AM8042 91-V-7 Mar 20 1991 12:00AM(34 rows affected)
Since there is a unique clustered index on the stor_id and ord_num columns of sales,the new rows were sorted in order.
A conflict or violation can affect the copy process:
• Had there been any violations of the unique index on the columns in the data being copiedfrom the file, bcp would have discarded the entire batch in which the violating row wasencountered.A batch size of 1 evaluates each row individually, but loads more slowly and creates aseparate data page for each row during a fast or fast-logged bcp session.
• If the types copied in are incompatible with the database types, the entire copy fails.
CHAPTER 2: Transferring Data to and from Adaptive Server with bcp
Utility Guide 195

Copy In Data with Delimiters
In this example, bcp copies data from the file newpubs into the tablepubs2..publishers. In the newpubs file, each field in a row ends with a tab character(\t) and each row ends with a newline terminator (\n):
1111 Stone Age Books Boston MA2222 Harley & Davidson Washington DC3333 Infodata Algosystems Berkeley CA
Since newpubs contains all character data, use the character command-line flag and specifythe terminators with command line options:
• In UNIX platforms:bcp pubs2..publishers in newpubs -c -t\\t -r\\n
• In Windows:bcp pubs2..publishers in newpubs -c -t\t -r\n
Copy In Data with a Format File
To copy data back into Adaptive Server using the saved pub_fmt format file, run:
bcp pubs2..publishers in pub_out -fpub_fmt
Use the pub_fmt file to copy any data with the same format into Adaptive Server. If you havea similar data file with different delimiters, change the delimiters in the format file.
Similarly, edit the format file to reflect any changes to the field lengths, as long as all fieldshave the same length. For example, the moresales file contains:
804213-L-9 Jan 21 1993 12:00AM804255-N-8 Mar 12 1993 12:00AM804291-T-4 Mar 23 1993 12:00AM804291-W-9 Mar 23 1993 12:00AM
Edit the sal_fmt format file to read:
10.031 SYBCHAR 0 4 "" 1 stor_id2 SYBCHAR 0 7 "" 2 ord_num3 SYBCHAR 0 21 "\n" 3 date
Then enter:
• For UNIX platforms:bcp pubs2..sales in moresales -fsal_fmt
• For Windows:bcp pubs2..sales in moresale -fsal_fmt
The system responds:Starting copy...4 rows copied.
CHAPTER 2: Transferring Data to and from Adaptive Server with bcp
196 Adaptive Server Enterprise

Clock Time (ms.): total = 1 Avg = 0 (116000.00 rows per sec.)
bcp and Alternate LanguagesAdaptive Server stores data using its default character set, which is configured duringinstallation. If your terminal does not support that default character set, it may send confusingcharacters to bcp when you respond to prompts either by typing or by using host file scripts.
Omitting all character-set options causes bcp to use the character set that was named as thedefault for the platform. This default can cause communications problems:
• The default is not necessarily the same character set that was configured for AdaptiveServer.
• The default may not necessarily be the character set that the client is using.
For more information about character sets and the associated flags, see Chapter 8,“Configuring Client/Server Character Set Conversions,” in the System AdministrationGuide.
Support for Initialization StringsThe bcp utility supports sending Transact-SQL commands, such as set replication off, toAdaptive Server before data is transferred.
Although you may use any Transact-SQL command as an initialization string for bcp, resetpossible permanent changes to the server configuration after running bcp. For example, resetchanges in a separate isql session.
bcp and Row-Level Access RulesIf Adaptive Server is enabled for row-level access, and you bulk-copy-out data, bcp copies outonly the rows of data to which you have access. To copy out the entire table, first drop theaccess rules, then bcp out. Reinstate the access rules after you are done, if applicable.
If you bulk-copy-in data to a table that has access rules enabled, Adaptive Server may issue“uniqueness violation” errors. For example, if you load data from a bcp data file that wasgenerated before the access rules were created on the table, and the bcp data file contains rowsthat were previously inserted into the table, you may receive this type of error.
If this happens, the table may look to the user like it does not include the rows that failed thebcp insert because of the uniqueness violation, but the user does not have access to the“missing” rows because of the access rules.
To copy in the entire table, drop the access rules, load the data, address any errors, thenreinstate the access rules.
CHAPTER 2: Transferring Data to and from Adaptive Server with bcp
Utility Guide 197

Copy In and Batch FilesBatching applies only to bulk copying in; it has no effect when copying out. By default,Adaptive Server copies all the rows in batches of 1000 lines. To specify a different batch size,use the command-line option (-b).
bcp copies each batch in a single transaction. If Adaptive Server rejects any row in the batch,the entire transaction is rolled back. By default, bcp copies all rows in a single batch; use the -bparameter to change the default batch size. Adaptive Server considers each batch a single bcpoperation, writes each batch to a separate data page, and continues to the next batch, regardlessof whether the previous transaction succeeded.
When data is being copied in, it can be rejected by either Adaptive Server or bcp.
• Adaptive Server treats each batch as a separate transaction. If the server rejects any row inthe batch, it rolls back the entire transaction.
• When bcp rejects a batch, it then continues to the next batch. Only fatal errors roll back thetransaction.
• Adaptive Server generates error messages on a batch-by-batch basis, instead of row-by-row, and rejects each batch in which it finds an error. Error messages appear on yourterminal and in the error file.
Improve RecoverabilityEnsure better recoverability with these actions.
• Break large input files into smaller units.For example, if you use bcp with a batch size of 100,000 rows to bulk copy in 300,000rows, and a fatal error occurs after row 200,000, bcp would have successfully copied in thefirst two batches—200,000 rows—to Adaptive Server. If you had not used batching, bcpwould not have been able to copy in any rows to Adaptive Server.
• Set the trunc log on chkpt to true (on).The log entry for the transaction is available for truncation after the batch completes. If youcopy into a database that has the trunc log on chkpt database option set on (true), the nextautomatic checkpoint removes the log entries for completed batches. This log cleaningbreaks up large bcp operations and keeps the log from filling.
• Set -b batch_size to 10.The batch size parameter set to 10 causes bcp to reject the batch of 10 rows, including thedefective row. The error log from this setting allows you to identify exactly which rowfailed.A batch size of 1 is the smallest that bcp processes.
Note: bcp creates 1 data page per batch, and setting b batch_size to 10 creates data pageswith 10 rows on each page. If you set -b batch_size to 1, the setting creates data
CHAPTER 2: Transferring Data to and from Adaptive Server with bcp
198 Adaptive Server Enterprise

pages with 1 row on each page. This setting causes the data to load slowly and takes upstorage space.
Batches and Partitioned TablesWhen you bulk copy data into a partitioned table without specifying a partition number,Adaptive Server randomly assigns each batch to an available partition. Copying rows in asingle batch places all those rows in a single partition, which can lead to load imbalance in thepartitioned table.
To help keep partitioned tables balanced, use a small batch size when bulk copying data orspecify the partition ID during the bcp session. For information about partitioning tables, seethe Performance and Tuning Guide.
Copy Out and Text and Image DataWhen you copy out text or image data, Adaptive Server, by default, copies only the first32K of data in a text or image field.
The -T text_or_image_size parameter allows you to specify a different value. For example, ifthe text field to copy out contains up to 40K of data, use the following command to copy outall 40K:
bcp pubs2..publishers out -T40960
Note: If a text or image field is larger than the given value or the default, bcp does not copyout the remaining data.
Specify a Network Packet SizeTo improve the performance of large bulk copy operations, you may want to use largernetwork packet sizes than the defaults. The -A size option specifies the network packet size touse for the bcp session that you are beginning.
The value of size must be:
• Between the values of the default network packet size and max network packet sizeconfiguration parameters, and
• A multiple of 512.
Note: The new packet size remains in effect for the current bcp session only.
For example, this command specifies that Adaptive Server send 40K of text or image datausing a packet size of 4096 bytes for the bcp session:bcp pubs2..authors out -A 4096 -T40960
CHAPTER 2: Transferring Data to and from Adaptive Server with bcp
Utility Guide 199

Copy In and Error FilesWhen you specify the -e error_file option with copy in, bcp stores the rows that it cannot copyin to Adaptive Server in the specified error file.
• The error file stores a line that:• Indicates which row failed and the error that occurred, and• Is an exact copy of the row in the host file.
• If the file name specified after -e already exists, bcp overwrites the existing file.
• If bcp does not encounter any errors, it does not create the file.
bcp in detects two types of errors:
• Data conversion errors• Errors in building the row – for example, attempts to insert a NULL into columns that do
not accept null values or to use invalid data formats, such as a 3-byte integer
The copy in process displays error messages on your monitor.
This example loads the newpubs file into the publishers database, storing any error rowsin the pub_err file:
bcp pubs2..publishers in newpubs -epub_err
When working with error files generated by copy in, note:
• bcp stores rows in an error file only when the bcp program itself detects the error.• bcp continues to copy rows until bcp encounters the maximum number of error rows, at
which point bcp stops the copy.• bcp sends rows to Adaptive Server in batches, so bcp cannot save copies of rows that are
rejected by Adaptive Server, for example, a duplicate row for a table that has a uniqueindex.
• Adaptive Server generates error messages on a batch-by-batch basis, instead of row-by-row, and rejects the entire batch if it finds an error.
• It is not considered an error for Adaptive Server to reject duplicate rows if eitherallow_dup_row or ignore_dup_key was set when a table’s index was created. The copyproceeds normally, but the duplicate rows are neither stored in the table nor in the bcp errorfile.
Copy Out and Error FilesDuring the copy out process, as with copy in, bcp overwrites any file of the same name anddoes not create an error file if no errors occurred.
There are two situations that cause rows to be logged in the error file during a copy out:
CHAPTER 2: Transferring Data to and from Adaptive Server with bcp
200 Adaptive Server Enterprise

• A data conversion error in one of the row’s columns• An I/O error in writing to the host file
When working with error files generated by copy out, note that:
• bcp logs rows in the error file in the default character format.• All data values print as characters with tabs between the columns and a newline terminator
at the end of each row.
Data Integrity for Defaults, Rules, and TriggersTo ensure integrity, bcp handles data to copy depending upon its element.
ElementType
Description
Defaultsand data-types
When copying data into a table, bcp observes any defaults defined for the columns anddatatypes. That is, if there is a null field in the data in a file, bcp loads the default valueinstead of the null value during the copy.
For example, here are two rows in a file to be loaded into authors:
409-56-7008,Bennet,David,415 658-9932,622 PineSt.,Berkeley,CA,USA,94705213-46-8915,Green,Marjorie,,309 63rd St.#411,Oakland,CA,USA,94618Commas separate the fields; a newline terminator separates the rows. There is no phonenumber for Marjorie Green. Because the phone column of the authors table has adefault of “unknown,” the rows in the loaded table look like this:
409-56-7008 Bennet David 415 658-9932 622 Pine St. Berkeley CA USA 94705213-46-8915 Green Marjorie unknown 309 63rd St. #411 Oakland CA USA 94618
Rules andtriggers
bcp, to enable its maximum speed for loading data, does not fire rules and triggers.
To find any rows that violate rules and triggers, copy the data into the table and runqueries or stored procedures that test the rule or trigger conditions.
How bcp Differs from Other UtilitiesThe bcp utility, which copies entire tables or portions of a single table, is distinct from theother utilities that move data from one place to another.
The following list names these other utilities and their commands, and describes how best touse them to move data.
CHAPTER 2: Transferring Data to and from Adaptive Server with bcp
Utility Guide 201

Commands Usage
dump database,load database,dump transaction,and load transac-tion
Use the SQL commands dump database, load database, dump transaction,and load transaction for backup purposes only. Unlike bcp, the dump com-mands create a physical image of the entire database.
Use load database or load transaction to read data backed up with dumpdatabase or dump transaction.
For information on using the SQL dump and load commands, see the SystemAdministration Guide and the Reference Manual.
insert, update, anddelete
Use the data modification commands insert, update, and delete, respectively,to add new rows to, change existing rows in, or remove rows from a table orview.
• Use the insert command with a select statement to move data betweentables.
• Use the select statement with an into clause to create a new table, basedon:• the columns named in the select statement,• the tables named in the from clause, and• data in the rows named in the where clause.For details on adding, changing, and deleting data, see insert, update, anddelete in the Reference Manual.
CHAPTER 2: Transferring Data to and from Adaptive Server with bcp
202 Adaptive Server Enterprise

CHAPTER 3 Building Servers Usingdataserver
dataserver is the executable form of the Adaptive Server program.
Adaptive Server does not use the buildmaster binary to build the master device. Instead,Sybase has incorporated the buildmaster functionality in the dataserver binary. This chapterdiscusses how to use dataserver to build your server.
Note: The dataserver binary in Windows is called sqlsrvr.exe. If you are using the Windowsplatform, substitute all reference to dataserver in this chapter with sqlsrvr.
The dataserver command allows you to create master devices and databases with logicalpages of size 2K, 4K, 8K, or 16K. Larger logical pages allow you to create larger rows, whichcan improve your performance because Adaptive Server accesses more data each time it readsa page. For example, a 16K page can hold eight times the amount of data as a 2K page, an 8Kpage holds four times as much data as a 2K page, and so on, for all the sizes for logical pages.
The logical page size is a server-wide setting; you cannot have databases with varying sizelogical pages within the same server. All tables are appropriately sized so that the row sizedoes not exceed the current page size of the server. That is, rows cannot span multiple pages.
See also• dataserver on page 37
• sqlsrvr on page 126
Building a New Master DeviceYou can create a new master device using the dataserver utility.
The master device is built using the build mode in dataserver. After the master device is built,the server shuts down. You must then manually start the server in the start mode. After thisyou can start, stop, and restart Adaptive Server whenever necessary without having to rebuildthe master device
Note: When you are building a master device you should allow an additional 8K for the configblock.
Adaptive Server uses:
Utility Guide 203

• Logical page size – these are the pages that the database objects are built with. A databasesand any of its related objects must use the same logical page size. Logical page sizes comein sizes of 2K, 4K, 8K, and 16K.
• Virtual page size – this is the physical page allocation at the disk level, and is always donein 2K pages. All disk I/O is done in multiples of virtual page size.
• Memory page size – the memory allocated and managed within Adaptive Server. Thememory page size is always in units of 2K pages.
To create a new master device with dataserver, use:
dataserver -ddevice_name. . . b [master_device_size [k|K|m|M|g|G] [-z logical_page_size [k|K]-h
where:
-d device_name – is the full path name of the device for the master database. The masterdatabase device must be writable by the user who starts Adaptive Server. The default masterdatabase device name is d_master.
-b – indicates that dataserver is in build mode and creating a new master device, and indicatesthe size of the master device. If you do not provide a unit specifier (k, m, g) for the size of thedevice, dataserver assumes a size in virtual pages. The size of a virtual page is always 2K. Forexample:
• -b 51204 – specifies a device of 51,204 virtual pages (100.0078125MB).
• -b 100M – specifies a device of 100MB
-z – specifies the logical page size, which is always 2K, 4K, 8K, or 16K. This parameter isoptional during the build phase and is ignored during the start mode. If you do not include the-z parameter during the build mode, the master device is built with 2K logical pages.
-h – prints the syntax for the dataserver command.
See also• dataserver on page 37
Environments When Using dataserverWhen you start an Adaptive Server with dataserver, Adaptive Server derives its runningenvironment from these places.
• The configuration file you specify in -c configuration_file
• The default configuration file, servername.cfg, if you did not specify the -c parameter• Default values if you did not specify either -c configuration_file or servername.cfg
See Chapter 17, “Setting Configuration Parameters,” in the System Administration Guide.
CHAPTER 3: Building Servers Using dataserver
204 Adaptive Server Enterprise

Specifying Device and Logical Page Sizes When Building a NewAdaptive Server
Create a new Adaptive Server, by issuing dataserver using the -b and -z options.
For example, to:
• Build a 100MB master device using the default logical page size (2K) and start the server:dataserver -d /var/sybase/masterdb.dat -b100M -sMASTER2K
• Build a 100MB master device with a logical page size of size 4K:dataserver -d /var/sybase/masterdb.dat -b100M -z4K -sMASTER4K
• Build a master device of 102,400 virtual pages of size 2K, create databases using a logicalpage size of 8K, and boot the server:dataserver -d /var/sybase/masterdb.dat -b102400 -z8K -sMASTER8K
If the total requested space (102,400 x 2K = 200 MB) is insufficient to build all the requiredsystem databases using the specified logical page size, then an error message is reported, andthe process fails.
Example
The following is a sample output of dataserver building a 200MB device with a 2K logicalpage size, called personnel2k:
dataserver -d /var/sybase/personnel2k.dat -b200M -z2k -sPERSONNEL2K
dataserver uses a default configuration file if you do not specify one:
00:00000:00000:2001/04/16 10:24:31.73 kernel Warning: Using default file'/var/sybase/PERSONNEL2K.cfg' since a configuration file was not specified. Specify a configuration file name in the RUNSERVER file to avoid this message.
To specify your own configuration file, use the dataserver -c parameter. See Chapter 11,“Setting Configuration Parameters” in the System Administration Guide for moreinformation.
Adaptive Server treats all installations as an upgrade, regardless of whether you have anexisting version of Adaptive Server or not. For this reason, you see the following output whenrunning dataserver:
00:00000:00001:2001/04/16 10:24:32.63 server Database 'master' appears tobe at an older revision than the present installation; SQL Server will assess it, and upgrade it as required.
00:00000:00001:2001/04/16 10:24:32.66 server Database 'master': beginning
CHAPTER 3: Building Servers Using dataserver
Utility Guide 205

upgrade step [ID 1]: Initialize disk and create empty allocation units on master device.
00:00000:00001:2001/04/16 10:24:34.74 server Database 'master': beginning upgrade step [ID 2]: Bootstrap basic system catalogs in database.
dataserver continues creating the master database, including all of its tables such assystypes, sysobjects and sysusages:
00:00000:00001:2001/04/16 10:24:35.21 server Database 'master': beginning upgrade step [ID 3]: creating index (table systypes, index ncsystypes)
00:00000:00001:2001/04/16 10:24:35.36 server Database 'master': beginningupgrade step [ID 4]: creating index (table sysobjects, index ncsysobjects)
00:00000:00001:2001/04/16 10:24:35.44 server Database 'master': beginning upgrade step [ID 20]: creating table (table sysusages)
[...]
When dataserver has created the master database, it creates the model database:
[...]
00:00000:00001:2001/04/16 10:24:43.14 server Database 'model' appears to be at an older revision than the present installation; SQL Server will assess it, and upgrade it as required.
00:00000:00001:2001/04/16 10:24:43.14 server Database 'model': beginning upgrade step [ID 1]: Initialize disk and create empty allocation units on master device.
00:00000:00001:2001/04/16 10:24:43.83 server Database 'model': beginning upgrade step [ID 2]: Bootstrap basic system catalogs in database.
00:00000:00001:2001/04/16 10:24:43.89 server Database 'model': beginning upgrade step [ID 3]: creating index (table systypes, index ncsystypes)
00:00000:00001:2001/04/16 10:24:43.91 server Database 'model': beginning upgrade step [ID 4]: creating index (table sysobjects, index ncsysobjects)
CHAPTER 3: Building Servers Using dataserver
206 Adaptive Server Enterprise

[...]
When dataserver has created the model database, it creates the tempdb andsybsystemdb databases:
[...]
00:00000:00001:2001/04/16 10:24:45.23 server CREATE DATABASE: allocating1024 logical pages (2.0 megabytes) on disk 'master'.
00:00000:00001:2001/04/16 10:24:46.79 server Database sybsystemdb successfully created.
[...]
dataserver is successful when the server changes the default sort order and shuts down:
[...]
00:00000:00001:2001/04/16 10:24:47.23 server Now loading SQL Server's newdefault sort order and character set
[...]00:00000:00001:2001/04/16 10:24:47.31 server Default Sort Ordersuccessfully changed.
00:00000:00001:2001/04/16 10:24:47.37 server SQL Server shutdown afterverifying System Indexes.
00:00000:00001:2001/04/16 10:24:47.37 kernel ueshutdown: exiting
Error Messages
If dataserver is unsuccessful, you cannot start the server on that master device, and you see thefollowing error message:
00:00000:00001:2001/04/16 19:02:39.53 kernel Use license file/var/sybase/SYSAM-1_0/licenses/license.dat.
00:00000:00001:2001/04/16 19:02:39.54 kernel The master device's configuration area appears to be corrupt. The server needs this data to boot, and so cannot continue. The server will shut down.
If you run dataserver with a user-specified configuration file that includes options that make itimpossible to allocate a shared segment and start up a server, dataserver fails with an errormessage, and you cannot boot the server on that master device:
00:00000:00001:2001/04/16 19:04:01.11 kernel Use license file/var/sybase/SYSAM-1_0/licenses/license.dat.
CHAPTER 3: Building Servers Using dataserver
Utility Guide 207

00:00000:00000:2001/02/09 19:04:01.25 kernel Using config area from primary master device.
00:00000:00001:2001/04/16 19:04:01.36 server The value of the 'max total_memory' parameter (33792) defined in the configuration file is not high enough to set the other parameter values specified in the configuration file. 'max total_memory' should be greater than the logical memory '34343'.
Starting an Existing Adaptive ServerTo start an existing Adaptive Server, issue dataserver without the -b and -z options:
dataserver -d /sybase/masterdb.dat
Upgrading to a Server With Larger Page SizesAdaptive Servers earlier than version 12.5 used 2K logical page sizes. You cannot change aninstallation’s page size by upgrading. That is, if your current Adaptive Server uses 2K logicalpages, you can upgrade only to an Adaptive Server that uses 2K logical pages.
However, you can migrate databases with 2K logical pages from earlier versions of AdaptiveServer.
See also• Chapter 9, Migrating Data Using sybmigrate on page 293
Viewing the Current Server LimitsTo display information about Adaptive Server’s limits:
• Run dbcc serverlimits, which includes the size of your server’s logical page size in itsoutput. For example, enter:dbcc serverlimits
• Search for the string “logical page size” in the error log.• Run select using the @@maxpagesize global variable, which displays the server’s logical
page size:select @@maxpage size----------- 8192
CHAPTER 3: Building Servers Using dataserver
208 Adaptive Server Enterprise

CHAPTER 4 Viewing and Editing ServerEntries Using dscp
dscp is a utility program that you use to view and edit server entries in the interfaces file.
Note: dscp is not available for Windows.
• To start dscp, enter:$SYBASE/$SYBASE_OCS/bin/dscp
The dscp prompt, >>, appears.
• To view the dscp help screen, enter one of the following commands:helph?
See also• dscp on page 71
Starting dscpIf you plan to add or modify entries, you must log in to the directory services, with thenecessary privileges, before you start dscp.
To start dscp, enter:
$SYBASE/$SYBASE_OCS/bin/dscpThe dscp prompt, >>, appears. The commands you can use are:
Command Description
open [DSNAME] Opens a session with the specified directory service or interfaces.
dscp – to open a session with interfaces, specify “InterfacesDriver” asDSNAME.
sess Lists all open sessions.
[switch] SESS Makes session number SESS the current session.
Utility Guide 209

Command Description
close [SESS] Closes a session identified by the SESS number. If you do not specify SESS,closes the current session.
list [all] Lists the server entries for the current session.
To list the names of the entries, use the list command. To list the attributes foreach entry, use the list all command.
read SERVER-NAME
Prints the contents of server entry SERVERNAME to the screen.
add SERVERNAME Adds server entry SERVERNAME in the current session.
dscp prompts you for information about SERVERNAME. Press Return toaccept the default value, which is shown in brackets [ ].
adtr SERVER-NAME
Adds an attribute to the server entry SERVERNAME in the current session.
mod SERVER-NAME
Modifies server entry SERVERNAME in the current session.
dscp prompts you for information about SERVERNAME. Press Return toaccept the default value, which is shown in brackets [ ].
del SERVERNAME Deletes server entry SERVERNAME in the current session.
delete-all Deletes all server entries in the current session.
copy NAME1 to{NAME2 | SESS |SESS NAME2}
Copies server entry NAME1 in the current session to:
• Server entry NAME2 in the current session
• Session SESS
• Server entry NAME2 in session SESS
copyall to SESS Copies all server entries in the current session to session SESS.
config Prints configuration information related to your Sybase environment to thescreen.
exit, quit Exits dscp.
help, ?, h Displays the help screen.
CHAPTER 4: Viewing and Editing Server Entries Using dscp
210 Adaptive Server Enterprise

Working with Server EntriesUse dscp to add or modify server entries.
Note: When you add or modify a server entry, dscp automatically creates or modifies bothmaster and query lines. The master line and the query line of an interfaces file entry containidentical information.
After you open a session, you can add or modify server entries associated with that session.
Each server entry is made up of a set of attributes. When you add or modify a server entry, dscpprompts you for information about each attribute.
Table 11. Server attributes
Attributes Type of value Default value and validvalues
Can be edited whenadding or modifying aserver entry
Adding Modifying
Server ObjectVersion
Integer 110 No No
Server Name Character string N/A N/A No
Server Service Character string SQL SERVER Yes No
Server Status Integer 4
Valid values are:
1. Active2. Stopped3. Failed4. Unknown
No No
TransportType
Character string tcp. Valid values are: decnet, spx,tcp, tli, spx, tli tcp
Note: Adaptive Server does notsupport the TLI interface inthreaded mode.
Yes Yes
Transport Ad-dress
Character string None. Valid values are characterstrings recognized by the speci-fied transport type
Yes Yes
CHAPTER 4: Viewing and Editing Server Entries Using dscp
Utility Guide 211

Attributes Type of value Default value and validvalues
Can be edited whenadding or modifying aserver entry
Adding Modifying
SecurityMechanism
Character string
Note: You canadd up to 20 se-curity mecha-nism strings foreach server entry
None
Valid values are character stringsassociated with object identifiersdefined in the user’s objec-tid.dat.
Yes Yes
Adding and Modifying Server EntriesAfter you open a session, you can add or modify server entries associated with that session.
Adding a Server EntryAfter you open a session, you can add server entries associated with that session.
1. Enter:
add servername
You are now in add mode. You can continue to add server entries, but you cannot executeany other dscp commands until you exit this mode. While in add mode, dscp prompts youfor information about servername.
2. Either:
• Enter a value for each attribute, or• Press Return to accept the default value, which is shown in brackets [ ]For example, dscp prompts for this information when you enter:
add myserverService: [SQL Server]Transport Type: [tcp] tcpTransport Address: victory 8001Security Mechanism []:
A server entry can have up to 20 transport type/address combinations associated with it.
3. When you are done adding a server enter, exit add mode:
#done
Modifying or Deleting a Server EntryAfter you open a session, you can modify or delete server entries associated with that session.
You cannot use dscp to modify the Version, Service, and Status entries in the interfacesfile.
CHAPTER 4: Viewing and Editing Server Entries Using dscp
212 Adaptive Server Enterprise

1. Enter:
mod servername
You are now in modify mode. You can continue to modify server entries, but you cannotexecute any other dscp commands until you exit this mode. In modify mode, dscpprompts you for information about servername.
2. Either:
• Enter a value for each attribute, or• Press Return to accept the default value, which is shown in brackets [ ]
For example, dscp prompts for the following information when you enter:mod myserver
Version: [1]Service: [SQL Server] Open ServerStatus: [4]Address:Transport Type: [tcp]Transport Address: [victory 1824] victory 1826Transport Type: [tcp]Transport Address: [victory 1828]Transport Type: []Security Mechanism []:
a) To delete an address:
#del3. When you are done modifying a server enter, exit modify mode:
#done
Copy Server Entriesdscp allows you to copy server entries within a session and between two sessions.
When you are copying a server entry, you can:
Options Descriptions
Create server entry to anew name in the currentsession
A server entry to a new name in the current session by entering:
copy name1 to name2For example, dscp creates a new entry, “my_server,” that is identical to“myserver” when you enter:
copy myserver to my_serverYou can then modify the new entry and leave the original intact.
CHAPTER 4: Viewing and Editing Server Entries Using dscp
Utility Guide 213

Options Descriptions
Copy a server entry with-out changing the name
Copy a server entry without changing the name. Enter:
copy name1 to sessFor example, dscp copies the “myserver” entry in the current session tosession 2 when you enter:
copy myserver to 2
Copy a server entry andrename it.
Enter:
copy name1 to sess name2For example, dscp copies the “myserver” entry in the current session tosession 2 and renames it “my_server” when you enter:
copy myserver to 2 my_server
Copy all entries in thecurrent session to a dif-ferent session.
Enter:
copyall sessFor example, dscp copies all entries in the current session to session 2when you enter:
copyall 2
List and View Contents of Server EntriesYou can list names and attributes associated with a session.
Option Description
List names of server entries Enter:
list
List the attributes of server entries Enter:
list all
CHAPTER 4: Viewing and Editing Server Entries Using dscp
214 Adaptive Server Enterprise

Option Description
View the contents of a server entry Enter:
read servernameFor example:
read myserverDIT base for object: interfacesDistinguish name: myserverServer Version: 1Server Name: myserverServer Service: SQL ServerServer Status: 4 (Unknown)Server Address:Transport Type: tcpTransport Addr: victory 1824Transport Type: tcpTransport Addr: victory 1828
Delete Server EntriesYou can delete one entry or all entries associated with a session.
Option Description
Delete entries associated with a session Enter:
del servernameFor example, dscp deletes the entry for “myserver” whenyou enter:
del myserver
Delete all entries associated with a session Enter:
delete-all
Exiting dscpEnter this command to exit dscp.To exit dscp, enter either of the following:
• exit• quit
CHAPTER 4: Viewing and Editing Server Entries Using dscp
Utility Guide 215

CHAPTER 4: Viewing and Editing Server Entries Using dscp
216 Adaptive Server Enterprise

CHAPTER 5 Viewing and Editing ServerEntries Using dsedit
dsedit is a graphical utility that lets you view and edit server entries in the interfaces file(sql.ini in Windows).
Note: (UNIX) If your system does not have X-Windows, use dscp to configure server entriesin the interfaces file.
See also• Chapter 4, Viewing and Editing Server Entries Using dscp on page 209
• dsedit on page 72
Add, View, and Edit Server EntriesOnce you are in an open session, you can add, modify, rename, and delete server entriesassociated with that session, as well as copy server entries within a session and betweensessions.
Each server entry is made up of a set of attributes.
Table 12. Server attributes
Attributename
Type ofvalue
Description De-faultvalue
Server Ver-sion
Integer Version level of the server object definition. Sybase pro-vides this attribute to identify future changes to the objectdefinition.
150
ServerName
Characterstring
Server name. N/A
Server Serv-ice
Characterstring
A description of the service provided by the server. Thisvalue can be any meaningful description.
Adap-tiveServer
Utility Guide 217

Attributename
Type ofvalue
Description De-faultvalue
Server Sta-tus
Integer The operating status of the server. Values are:
• Active• Stopped• Failed• Unknown
4
SecurityMechanism
Characterstring
Object identifier strings (OID) that specify the securitymechanisms supported by the server. This attribute is op-tional. If it is omitted, Open Server allows clients to connectwith any security mechanism for which Open Server has acorresponding security driver.
N/A
Server Ad-dress
Characterstring
One or more addresses for the server.
The format of the address varies by protocol, and someprotocols allow more than one format. The options are:
• TCP/IP – two formats:• computer name,port number• ip-address,portnumber
• Named Pipe – pipe name: “\pipe” is a required prefix toall pipe names. Server pipes can be only local.• Local – \pipe\sql\query• Remote – \\computer_name\pipe
\sql\query• IPX/SPX – three formats:
• server name• net number, node number, socket number• server name, socket number
• DECnet – four formats:• area number.node number,object name• area number.node number,object number• node name,object name• node name,object number
N/A
Using dsedit in UNIXThe dsedit utility allows you to view and edit server entries in the interfaces file using a GUI.
The server entries associated with the session appear in the Server box. Click a server entry toselect it.
CHAPTER 5: Viewing and Editing Server Entries Using dsedit
218 Adaptive Server Enterprise

Note: If your system does not have X-Windows, use dscp to configure server entries in theinterfaces file.
Starting dsedit in UNIXBefore starting dsedit, verify that you have write permission on the interfaces file.
Prerequisites
If you are running dsedit from a remote machine, verify that the DISPLAY environmentvariable is set so the dsedit screens display on your machine instead of on the remote machineby logging in to the remote machine and entering:setenv DISPLAY your_machine_name:0.0
TaskEnter:
$SYBASE/bin/dsedit
The Select a Directory Service window appears, letting you open editing sessions for theinterfaces file. The full path name of the default interfaces file is shown in the Interfaces File toEdit box, and the full path name of the configuration file is shown below it.
Open an Editing Session in UNIXYou can edit both the default interfaces file as well as other interfaces files to edit.
1. In dsedit, select Sybase Interfaces File.
2. To open:
• The default interfaces file for editing, click OK.• A file other than the default interfaces file, edit the displayed file name, then click
OK.
The Directory Service Session window appears.
Modify Server Entries in UNIXThe server entries associated with the session appear in the Server box. Click a server entry toselect it.
Click Close Session to apply your edits to the interfaces file. Clicking this button also closesthe interfaces session window.
See also• Open an Editing Session in Windows on page 223
CHAPTER 5: Viewing and Editing Server Entries Using dsedit
Utility Guide 219

Adding a New Server Entry in UNIXUse dsedit to add a server entry.
1. Click Add new server entry.
2. Specify the name and network addresses for a new server entry.
Viewing or Modifying a Server Entry in UNIXUse dsedit to modify a server entry.
1. Click Modify server entry.
2. Modify the attributes.
Add or Edit Network Transport AddressesYou can view, edit, or create the transport addresses at which a server accepts clientconnections in the Network Transport Editor window.
This window displays the name of the server entry for the address and allows you to configure:
• Transport type – specifies the protocol and interface for the address.• Address information – different address components are required depending on the
transport type.
TCP/IP AddressesThe address information for a TCP/IP entry consists of a host name (or IP address) and a portnumber (entered as a decimal number). For tli tcp-formatted interfaces entries, the host’s IPaddress and the port number are converted to the 16-byte hexadecimal representation requiredfor tli tcp-formatted interfaces entries.
Note: Adaptive Server does not support the TLI interface in threaded mode.
In interfaces entries, use tli tcp for:
• All pre-10.0 clients on platforms that use tli-formatted interfaces entries• Adaptive Server or Replication Server version 11.0.x or earlier on platforms that use tli-
formatted interfaces entries
Use tcp for other clients and servers.
To indicate a TCP/IP address, choose tcp or tli tcp from the Transport Type menu.
SPX/IPX AddressesSPX/IPX addresses allow Adaptive Server to listen for connections from client applicationsrunning on a Novell network.
To indicate an SPX/IPX address, choose tli spx or spx from the Transport Type menu.
CHAPTER 5: Viewing and Editing Server Entries Using dsedit
220 Adaptive Server Enterprise

AddressInformation
Description
Host address An eight digit hexadecimal value representing the IP address of the computer onwhich the server runs. Each component of the dot-separated decimal IP addressformat maps to one byte in the hex address format. For example, if your host’s IPaddress is 128.15.15.14, enter “800F0F0E” as the SPX/IPX host address value.
Port number The port number, expressed as a four-digit hexadecimal number.
Endpoint The path for the device file that points to the SPX device driver. Defaults to /dev/mspx on Solaris and /dev/nspx on any other platform. If necessary,
adjust the path so that it is correct for the machine on which the server runs. Thedefault path is based on the platform on which you are running dsedit.
Copying a Server Entry to Another Interfaces File in UNIXUse dsedit to copy a server entry into another interfaces file.
1. Select the entries to copy.
• Click once to copy a single entry.• Copy a range of consecutive entries by clicking the first entry in the range, then
pressing and holding Shift key, and clicking the last entry in the range.• Select multiple, nonconsecutive entries by pressing and holding down the Ctrl key
while you click each entry.
2. Click Copy server entry.
3. Select the Sybase interfaces file from the list.
4. Edit the file name, then click OK.
Copying Server Entries Within the Current SessionUse dsedit to copy server entries within the curent session.
1. Select one or more servers to copy. To select multiple entries, use the Shift key.
2. Click Copy from below the menu bar, or choose Edit > Copy.
3. Click Paste from below the menu bar, or choose Edit > Paste. dsedit appends the copiedserver entries with a version number of _n. To rename copied server entries, select ServerObject > Rename.
See also• Renaming a Server Entry on page 225
CHAPTER 5: Viewing and Editing Server Entries Using dsedit
Utility Guide 221

Copying Server Entries Between SessionsUse dsedit to copy server entries between sessions.
1. Open a session with the directory service or sql.ini file you want the entries copiedto.
To open a session, choose File > Open Directory Service.
2. Select one or more servers to copy. To select multiple entries, use the Shift key.
3. Click Copy from below the menu bar, or choose Edit > Copy.
To cut the server entries, click Cut below the menu bar, or choose Edit > Cut.
4. Activate the session where you want to paste the server entries.
5. Click Paste below the menu bar, or choose Edit > Paste.
You can rename the copied server entries using Server Object > Rename.
See also• Switching Between Sessions in Windows on page 224
• Opening Additional Sessions in Windows on page 224
• Renaming a Server Entry on page 225
Using dsedit in WindowsThe dsedit utility allows you to view and edit server entries in the interfaces file using a GUI.In Windows, dsedit creates and modifies network connection information in the interfacesfile.
The server entries associated with the session appear in the Server box. Click a server entry toselect it.
CHAPTER 5: Viewing and Editing Server Entries Using dsedit
222 Adaptive Server Enterprise

Starting dsedit in WindowsStart dsedit from the command prompt, the Windows Explorer, or the Sybase for Windowsprogram group.
Method Description
Commandprompt
Enter:
dseditSpecify these command-line arguments:
• -ddsname – specifies which directory service to connect to. dsname is thelocal name of the directory service, as listed in the libtcl.cfg file. If youdo not specify -ddsname, dsedit presents a list of directory service options inthe first dialog box.
• -lpath – specifies the path to the libtcl.cfg file, if other than SYB-ASE_home\INI. Use this only if you want to use a libtcl.cfg fileother than the one located in SYBASE_home\INI.
Windows Ex-plorer
Double-click DSEDIT.exe in the %SYBASE%\bin\ directory.
WindowsStart menu
Choose Start > Sybase for Windows > dsedit.
Open an Editing Session in WindowsThe Select Directory Service dialog box allows you to open a session with a directory service.
Open a session with:
• Any directory service that has a driver listed in the libtcl.cfg file
• The sql.ini file
Opening a Session in WindowsThere are two methods to open a session in Windows.Choose a method:
• Double-click the local name of the directory service you want to connect to, as listed in theDS Name box, or,
• Click the local name of the directory service you want to connect to, as listed in the DSName box, and click OK.
Note: dsedit uses the SYBASE environment variable to locate the libtcl.cfg file. Ifthe SYBASE environment variable is not set correctly, dsedit cannot locate thelibtcl.cfg file.
CHAPTER 5: Viewing and Editing Server Entries Using dsedit
Utility Guide 223

The session number and local name of the directory service appear in the header bar.
Opening Additional Sessions in Windowsdsedit allows you to have multiple sessions open at one time.
1. Select File > Open Directory Service .
2. Double-click the local name of the directory service to which to connect. Alternatively,select the directory service and click OK.
Opening multiple sessions allows you to copy entries between directory services.
Switching Between Sessions in WindowsIf you have multiple sessions open simultaeously, you must activate a session before you canwork in it.Perform either:
• Clicking in the session window• Choosing the session from the Windows menu
The dsedit title bar shows which session is active.
Modify Server Entries in WindowsThe server entries associated with the session appear in the Server box. Click a server entry toselect it.
Adding a Server EntryUse dsedit to add a server entry.
1. Choose Server Object > Add.
2. (Windows)Enter a server name, then click OK.
(UNIX) Specify the name and network addresses for a new server entry.
The server entry appears in the Server box. To specify an address for the server, you mustmodify the entry.
Modifying a Server AttributeUse dsedit to modify a server entry.
Modify any attribute of a server entry.
1. Select a server.
2. (Windows) Choose Server Object > Modify Attribute.
{UNIX) Click Modify server entry.
CHAPTER 5: Viewing and Editing Server Entries Using dsedit
224 Adaptive Server Enterprise

3. Select the attribute to modify. A dialog box appears that shows the current value of theattribute.
4. Enter or select the new attribute value, then click OK.
Renaming a Server EntryUse dsedit to rename a server entry.
1. Select a server.
2. Choose Server Object > Rename.
3. Enter a new server name, then click OK.
Deleting a Server EntryUse dsedit to delete a server entry.
1. Select a server.
2. Choose Server Object > Delete.
Copying server entries within the current session in WindowsUse dsedit to copy server entries within the current session.
1. Click one or more server entries in the Server box. Use the Shift key to select multipleentries.
2. Click Copy below the menu bar, or choose Edit > Copy.
3. Click Paste below the menu bar, or choose Edit > Paste. dsedit appends the copied serverentries with a version number of _n. You can rename the copied server entries using ServerObject > Rename.
See also• Renaming a Server Entry on page 225
Copying server entries between sessions in WindowsUse dsedit to copy server entries between sessions.
1. Open a session with the directory service or sql.ini file that you want the entries copiedto.
2. To open a session, choose File > Open Directory Service.
3. Click one or more server entries in the Server box of the session that you want the entriescopied from. Use the Shift key to select multiple entries.
4. To copy the server entries, click Copy below the menu bar, or choose Edit > Copy.
To cut the server entries, click Cut below the menu bar, or choose Edit > Cut.
CHAPTER 5: Viewing and Editing Server Entries Using dsedit
Utility Guide 225

5. Activate the session where you want to paste the server entries.
6. Click Paste below the menu bar, or choose Edit > Paste.
You can rename the copied server entries using the Rename command in the Server Objectmenu.
See also• Opening Additional Sessions in Windows on page 224
• Renaming a Server Entry on page 225
Troubleshooting dseditIdentify and correct common dsedit problems.
Problem Solution
The dsedit utility doesnot start
Check for the following:
• The SYBASE environment variable is not set or points to the wrongdirectory.
• (UNIX platforms) X-Windows is not configured correctly. If you arerunning dsedit on a remote host, make sure that X-Windows clients onthe remote host can connect to the X-Windows server on your ownmachine. See your X-Windows documentation for more troubleshoot-ing information. If X-Windows is not available, use dscp instead ofdsedit.
Error message: “Unableto open X display”
(UNIX platforms) dsedit might not work if the display machine is set up toreject X-Windows connections from remote hosts. If this is the problem,you see a message similar to the following:
Unable to open X display. Check the value of your$DISPLAY variable. If it is set correctly, use the'xhost +' command on the display machine to au-thorizeuse of the X display. If no X display is availa-ble, rundscp instead of dsedit.This error may be caused by either of the following situations:
• The value for the DISPLAY environment variable is not entered cor-rectly or is not set.Solution : Enter the DISPLAY environment variable correctly.
• You are not authorized to open windows on the machine to whichDISPLAY refers.Solution : Run the command ‘xhost +’ on the display machine.
CHAPTER 5: Viewing and Editing Server Entries Using dsedit
226 Adaptive Server Enterprise

Problem Solution
Cannot add, modify, ordelete server entries
Check for permissions problems with the interfaces file. To edit interfacesentries, you must have write permission on both the interfaces file and theSybase installation directory.
CHAPTER 5: Viewing and Editing Server Entries Using dsedit
Utility Guide 227

CHAPTER 5: Viewing and Editing Server Entries Using dsedit
228 Adaptive Server Enterprise

CHAPTER 6 Using Interactive isql from theCommand Line
isql is a command line interactive SQL parser to Adaptive Server.
If you are running Open Client version 11.1 or later and are using an external Sybaseconfiguration file, add the following in your configuration file to enable isql:[isql]
See also• isql on page 79
Starting isqlPerform these steps to start isql.
1. Enter this command at the operating-system prompt:
isql2. When the prompt appears, enter your password.
The password does not appear on the screen as you type. The isql prompt appears:1>
You can now issue Transact-SQL commands.
Stopping isqlTo stop isql, enter one of these commands on a line by itself.Enter:
quitexit
Using Transact-SQL in isqlisql sends Transact-SQL commands to Adaptive Server, formatting the results and printingthem to standard output.
There is no maximum size for an isql statement. For more information about using Transact-SQL, see the Transact-SQL User’s Guide.
Utility Guide 229

Note: To use Transact-SQL directly from the operating system with the isql utility program,you must have an account, or login, on Adaptive Server.
To execute a Transact-SQL command, type the default command terminator “go” on a newline.
For example:
isqlPassword:
1> use pubs22> go1> select *2> from authors3> where city = "Oakland"4> go
Formatting isql OutputThe width for isql output is adjusted according to the character-set expansion or the characterwidth, and displays a output column of the maximum possible bytes.
For example, for the UTF8 character set, each character may use at most 4 bytes, so the outputcolumn width is the character number multiplied by 4. However, the output column width cannot be larger than the column defined value, and the column width is calculated using thisformula:
Min(character_number X max_character_width, column_defined_width)
For example, if a column co11 is defined as varchar(10), then left(col1, 2)returns a width of eight, or four bytes per character. A value of left(col1,5) returns awidth or 10, and cannot be larger than the defined length, even though, according to theformula, 5 X 4 = 20).
The options that change the format of isql output are:
• -h headers – the number of rows to print between column headings. The default is 1.• -s colseparator – changes the column separator character. The default is single space.• -w columnwidth – changes the line width. The default is 80 characters.• -e – Includes each command issued to isql in the output• -n – Removes numbering and prompt symbols
In this example, the query’s results are placed in a file called output:
isql -Uuser_name -Ppassword -Sserver -e -n -o outputuse pubs2goselect *from authorswhere city = "Oakland"
CHAPTER 6: Using Interactive isql from the Command Line
230 Adaptive Server Enterprise

go quit
To view the contents of output, enter:
• (Windows) type output• (UNIX) cat output
select *from authorswhere city = "Oakland"au_id au_lname au_fname phone address city state country postalcode----------- ---------- -------- ------------- -------------------------------------------- ---- ----------- -----------213-46-8915 Green Marjorie 415 986-7020 309 63rd St. #411 Oakland CA USA 94618274-80-9391 Straight Dick 415 834-2919 5420 College Av. Oakland CA USA 94609724-08-9931 Stringer Dirk 415 843-2991 5420 Telegraph Av. Oakland CA USA 94609724-80-9391 MacFeather Stearns 415 354-7128 44 Upland Hts. Oakland CA USA 94612756-30-7391 Karsen Livia 415 534-9219 5720 McAuley St. Oakland CA USA 94609
Note: The output file does not include the command terminator.
Correcting isql InputYou can correct input when you make an error when typing a Transact-SQL command.
You can:
• Press Ctrl-c or type the word “reset” on a line by itself – this clears the query buffer andreturns the isql prompt.
• Type the name of your text editor on a line by itself – this opens a text file where you canedit the query. When you write and save the file, you are returned to isql and the correctedquery appears. Type “go” to execute it.
set Options that Affect OutputA number of set options affect Transact-SQL output.
Option Description
char_convert Turns character-set conversion off and on between Adaptive Server and a client;also starts a conversion between the server character set and a different clientcharacter set. The default is off.
CHAPTER 6: Using Interactive isql from the Command Line
Utility Guide 231

Option Description
fipsflagger Warns when any Transact-SQL extensions to entry-level SQL92 are used.Thisoption does not disable the SQL extensions. Processing completes when youissue the non-ANSI SQL command. The default is off.
flushmessage Sends messages as they are generated. The default is off.
language Sets the language for system messages. The default is us_english.
nocount Turns off report of number of rows affected. The default is off.
noexec Compiles each query but does not execute it; often used with showplan. Thedefault is off.
parseonly Checks the syntax of queries and returns error messages without compiling orexecuting the queries. The default is off.
showplan Generates a description of the processing plan for a query; does not print resultswhen used inside a stored procedure or trigger. The default is off.
statistics io, sta-
tistics time
Displays performance statistics after each execution. The default is off.
statistics sub-
querycache
Displays the number of cache hits, misses, and rows in the subquery cache foreach subquery. The default is off.
textsize Controls the number of bytes of text or image data returned. The default is
32K.
For more information, see set in the Reference Manual
Changing the Command TerminatorIf you include the command terminator argument (-c), you can choose your own terminatorsymbol; go is the default value for this option. Always enter the command terminator withoutblanks or tabs in front of it.
For example, to use a period as the command terminator, invoke isql:isql -c.
A sample isql session with this command terminator looks like:
1> select name from sysusers2> .name-----------sandykim
CHAPTER 6: Using Interactive isql from the Command Line
232 Adaptive Server Enterprise

leslie(3 rows affected)
Using the isql command terminator option with scripts requires advance planning:
• When Adaptive Server supplies scripts, such as installmaster, use “go”. Do not changethe command terminator for any session that uses these scripts.
• Your own scripts may already have “go” in them. Remember to update your scripts toinclude the terminator you plan to use.
Performance Statistics Interaction with CommandTerminator Values
isql provides a performance statistics option (-p).
For example, this syntax returns the following statistics:
isql -p1> select * from sysobjects2> goExecution Time (ms.): 1000 Clock Time (ms.): 10001 xact:
This means that a single transaction took 100 milliseconds. The clock time value reflects theentire transaction, which starts when Client-Library™ builds the query and ends when Client-Library returns the information from Adaptive Server.
You can gather performance statistics based on the execution of one or more transactions. Togather statistics on more than one transaction, specify a number after the command terminator.
For example, the following command instructs Adaptive Server to execute three select *transactions and report the performance statistics:
isql -p1> select * from sysobjects2> go 3Execution Time (ms.): 1000 Clock Time (ms.): 1000Execution Time (ms.): 1000 Clock Time (ms.): 2000Execution Time (ms.): 1000 Clock Time (ms.): 1000
Execution Time (ms.): 1000 Clock Time (ms.): 40003xact:
CHAPTER 6: Using Interactive isql from the Command Line
Utility Guide 233

Input and Output FilesYou can specify input and output files on the command line with the -i and -o options.
isql does not provide formatting options for the output. However, you can use the -n option toeliminate the isql prompts and other tools to reformat the output.
If you use the -e option, isql echoes the input to output. The resulting output file contains boththe queries and their results.
UNIX command line redirectionThe UNIX redirection symbols, “ <” and “>”, provide a similar mechanism to the -i and -ooptions.
For example:isql -Usa < input > output
You can direct isql to take input from the terminal, as shown in this example:isql -Usa -Ppassword -Sserver_name << EOF > output use pubs2goselect * from tablegoEOF
“<<EOF” instructs isql to take input from the terminal up to the string “EOF.” You can replace“EOF” with any character string. Similarly, the following example signals the end of inputwith Ctrl-d:isql -Usa << > output
CHAPTER 6: Using Interactive isql from the Command Line
234 Adaptive Server Enterprise

CHAPTER 7 Using Interactive SQL inGraphics Mode
Interactive SQL is the GUI-based isql utility, and allows you to execute SQL statements, buildscripts, and display database data to the server..
You can use Interactive SQL to:
• Browse the information in a database.• Test SQL statements that you plan to include in an application.• Load data into a database and carrying out administrative tasks.
In addition, Interactive SQL can run command files or script files. For example, you can buildrepeatable scripts to run against a database and then use Interactive SQL to execute thesescripts as batches.
Starting Interactive SQLThe menu item Open Interactive SQL opens a connection to a server. However, when youselect the menu item for a server, Interactive SQL opens a connection to the default databasefor that server. When you select a specific database from the Open Interactive SQL menu,Interactive SQL opens to the selected database.
How you start Interactive SQL from the command line depends on your operating system.
If you start Interactive SQL independently, the Connect dialog appears, which lets youconnect to a database just as you would in Sybase Central.
• (UNIX) You need not install Interactive SQL under $SYBASE, as $SYBASE does noteven need to exist for them to start. Instead, Interactive SQL is installed under $SYBROOT,an environment variable set by the installer. Go to $SYBROOT and enter:
dbisql
(Windows) Change to the %SYBROOT directory and enter:
dbisql.bat• In the Connection dialog, enter the information to connect to a database in the Connect
dialog box and click OK.
To open a new Interactive SQL window:
1. Choose Window > New Window. The Connect dialog appears.
2. In the Connect dialog, enter connection options, and click OK to connect.
Utility Guide 235

The connection information (including the database name, your user ID, and the databaseserver) appears on the title bar above the SQL Statements pane.
You can also connect to or disconnect from a database with the Connect and Disconnectcommands in the SQL menu, or by executing a connect or disconnect statement in theSQL Statements pane.
The Main Interactive SQL WindowThe Interactive SQL window includes four panes.
The window title displays the connection name. For Adaptive Server, the connection name iseither the server name (determined by the server’s interfaces file entry) or the host name andport number the user enters at the time of connection. The panes are:
Panes Description
SQL State-ment
Provides a place for you to type SQL statements.
Results Displays the results of commands that you execute. For example, if you use SQLstatements to search for specific data in the database, the Results tab in this panedisplays the columns and rows that match the search criteria. If the information exceedsthe size of the pane, scroll bars automatically appear. You can edit the result set on theResults tab.
Messages Displays messages from the database server.
Plan Displays the query optimizer’s execution plan for a SQL statement.
See also• Plan Dialog Tab on page 236
Plan Dialog TabThe Plan tab displays a GUI representation of an execution engine’s plan for the currentlyrunning SQL text, and helps you understand the performance and statistic characteristics ofthe currently running query.
Note: The Plan tab only appears if you connect to Adaptive Server version 15.0 and later.
The top half of the Plan tab shows the logical flow of the operators used in the plan in a tree-based, hierarchal structure, with each operator a separate node of the tree. The cost of eachoperator is based on the cost model used by the query processor. Each operator node in the treeis costed relative to other nodes, which makes it easier to identify operators based on theircosts.
CHAPTER 7: Using Interactive SQL in Graphics Mode
236 Adaptive Server Enterprise

Each node includes tooltip text (text that appears when you move your mouse over the node)that provides details about each operator, so you do not have to select the nodes to comparedetails between operators.
Plan TabInformation
Description
Details Shows the details of the operator statistics as:
• Node Statistics table – shown for all the operators, and includes statistics likerow count, logical I/O, and physical I/O.
• Subtree Statistics table – the aggregate sum of all the operators below, and areshown for the non-leaf operators, and include statistics on row count, logicalI/O, and physical I/O.
XML Shows the result set as XML output.
Text Shows the text version of the query plan (the same as the output of showplan).
Advanced Includes:
• Abstract query plan – shows the abstract query plan used by the query.
• Resource utilization – describes the resources used by the plan, includingnumber of threads and the auxiliary session descriptors (SDESs; every tablescan requires one session descriptor to track the scan).
• Cost – lists costs associated with the plan, including logical I/O, Physical I/O,and CPU usage.
• Optimizer Metrics – lists the query-plan statistics, including query run time,run time for the first plan, number of plans evaluated, number of plans thatwere valid, and amount of procedure cache used.
• Optimizer Statistics – lists the last time you ran update statistics on the table,any missing histogram steps, and the density of the steps.
The Interactive SQL ToolbarThe Interactive SQL toolbar appears at the top of the Interactive SQL window.
Use the buttons on this toolbar to:
• Recall the executed SQL statement immediately before your current position in the historylist.
• View a list of up to 50 previously executed SQL statements.• Recall the executed SQL statement immediately after your current position in the history
list.
CHAPTER 7: Using Interactive SQL in Graphics Mode
Utility Guide 237

• Execute the SQL statement that appears in the SQL Statements pane.• Interrupt the execution of the current SQL statement.
Open Multiple WindowsYou can open multiple Interactive SQL windows. Each window corresponds to a separateconnection.
You can connect simultaneously to two (or more) databases on different servers, or you canopen concurrent connections to a single database.
Keyboard ShortcutsInteractive SQL provides keyboard shortcuts.
Function Description
Alt-F4 Exits Interactive SQL.
Alt-LEFT AR-ROW
Displays the previous SQL statement in the history list.
Alt-RIGHTARROW
Displays the next SQL statement in the history list
Ctrl-C Copies the selected rows and column headings to the clipboard.
Ctrl-End Moves to the bottom of the current pane.
Ctrl-F6 Cycles through the open Interactive SQL windows.
Ctrl-H Displays the history of your executed SQL statements during the current session.
Ctrl-Home Moves to the top of the current pane.
Ctrl-N Clears the contents of the Interactive SQL window.
Ctrl-Q Displays the Query Editor, which helps you build SQL queries. When you havefinished building your query, click OK to export it back into the SQL Statementspane.
Ctrl-S Saves the contents of the SQL Statements pane.
Shift-F5 Refreshes the plan without executing the statement in the SQL Statements pane.This allows you to see the plan for a statement without altering table data.
Esc Clears the SQL Statements pane.
CHAPTER 7: Using Interactive SQL in Graphics Mode
238 Adaptive Server Enterprise

Function Description
F2 Allows you to edit the selected row in the result set. You can use the Tab key tomove from column to column within the row.
F5 Executes all text in the SQL Statements pane. You can also perform this operationby clicking the Execute SQL Statement button on the toolbar.
F7 Displays the Lookup Table Name dialog. In this dialog, you can find and select atable and then press Enter to insert the table name into the SQL Statements pane atthe cursor position. Or, with a table selected in the list, press F7 again to display thecolumns in that table. You can then select a column and press Enter to insert thecolumn name into the SQL Statements pane at the cursor position.
F8 Displays the Lookup Procedure Name dialog. In this dialog, you can find and selecta procedure, then press Enter to insert the procedure name into the SQL Statementspane at the cursor position.
F9 Executes the selected text in the SQL Statements pane. If no text is selected, all ofthe statements are executed.
Page Down Moves down in the current pane.
Page Up Moves up in the current pane.
Display Data Using Interactive SQLInteractive SQL allows you to browse the information in databases.
You can display database information using the select statement in Interactive SQL. Once youenter the statement, click the Execute SQL Statement button on the toolbar.
After you execute the statement, the result set appears in the Results pane. You can use thescroll bars to see areas of the table that are outside your current view of the pane.
For example, to list all the columns and rows of the authors table:
1. Start Interactive SQL and connect to the pubs2 database.2. Enter this in the SQL Statements pane:
select * from authors3. On the toolbar, click the Execute SQL Statement button
You can add, delete, and update rows within the result set.
Edit Table Values in Interactive SQLOnce you execute a query in Interactive SQL, you can edit the result set to modify thedatabase. You can also select rows from the result set and copy them for use in other
CHAPTER 7: Using Interactive SQL in Graphics Mode
Utility Guide 239

applications. Interactive SQL supports editing, inserting, and deleting rows. These actionshave the same result as executing update, insert, and delete statements.
Before you can copy, edit, insert, or delete rows, you must execute a query in Interactive SQLthat returns a result set on the Results tab in the Results pane. When you edit the result setdirectly, Interactive SQL creates and executes a SQL statement that makes your change to thedatabase table.
To edit a row or value in the result set, you must have the proper permissions on the table orcolumn you want to modify values from. For example, to delete a row, you must have deletepermission for the table the row belongs to.
Editing the result set may fail if you:
• Attempt to edit a row or column you do not have permission on.• Select columns from a table with a primary key, but do not select all of the primary key
columns.• Attempt to edit the result set of a join (for example, there is data from more than one table in
the result set).• Enter an invalid value (for example, a string in a numeric column or a NULL in a column
that does not allow NULLs).
When editing fails, an Interactive SQL error message appears explaining the error, and thedatabase table values remain unchanged.
Once you make changes to table values, you must enter a commit statement to make thechanges permanent. To undo your changes, you must execute a rollback statement.
Copying Rows from the Interactive SQL Result SetYou can copy rows directly from the result set in Interactive SQL and then paste them intoother applications. Copying rows also copies the column headings. Copied data is comma-delimited, which allows other applications, such as Microsoft Excel, to format the copied datacorrectly. By default, copied data is in ASCII format, and all strings are enclosed in singlequotes. You can select only consecutive rows in the result set.
1. Choose a method to select the rows you want to copy:
• Press and hold the Shift key while clicking the rows.• Press and hold the Shift key while using the Up or Down arrow.
2. Right-click the result set and select Copy. You can also copy the selected rows by pressingCtrl-C.
The selected rows, including their column headings, are copied to the clipboard. You canpaste them into other applications by selecting Edit > Paste or by pressing Ctrl-V.
Editing Rows from the Interactive SQL Result SetThe Edit command allows you to change individual values within a row. You can change anyor all of the values within existing rows in database tables. You must have update permission
CHAPTER 7: Using Interactive SQL in Graphics Mode
240 Adaptive Server Enterprise

on the columns being modified. When you edit the result set, you can make changes to thevalues in only one row at a time.
1. Select the row to edit and choose an edit method:
• Right-click the result set and choose Edit from the menu.• Press F2.
A blinking cursor appears in the first value in the row.
2. Press Tab to move the cursor from column to column across the row. You can also edit avalue by clicking the value in the selected row.
3. Enter the new value.
You cannot enter invalid datatypes into a column. For example, you cannot enter astring datatype into a column that is configured for the int datatype.
4. Execute a commit statement to make your changes to the table permanent.
Inserting Rows into the Database from the Interactive SQL Result SetThe Insert command adds a new blank row to the database table. Use the Tab key to movebetween columns in the result set to add values to the row. When you add values to the table,characters are stored in the same case as they are entered.
You must have insert permission on the table to add new rows. See insert in ReferenceManual: Commands.
1. Right-click the result set and choose Add from the menu.
A new blank row appears in the result set with a blinking cursor in the first value in therow.
Press Tab to move the cursor from column to column across the row. You can also insert avalue by clicking on the appropriate field in the selected row.
2. Enter the new value.
You cannot enter invalid datatypes into a column. For example, you cannot enter astring into a column that accepts the int datatype.
3. Execute a commit statement to make your changes to the table permanent.
Deleting Rows from the Database Using Interactive SQLThe Delete command removes the selected rows from a database table.
You must have delete permission on the table to delete rows.
1. Choose a method to select the rows you want to delete:
• Press and hold the Shift key while clicking the rows.• Press and hold the Shift key while using the Up or Down arrow.
CHAPTER 7: Using Interactive SQL in Graphics Mode
Utility Guide 241

Delete nonconsecutive rows individually.
2. Right-click the result set and choose Delete. You can also delete the selected rows bypressing the Delete key.
3. Execute a commit statement to make your changes to the table permanent.
SQL Statements in Interactive SQLYou can enter all SQL statements as commands in the top pane of the Interactive SQL window.When you are finished typing, execute the statement to run it.
Execute a SQL statement by either:
• Press the Execute SQL Statement button, or• Selecting F5.
To clear the SQL Statements pane:
• Choose Edit > Clear SQL, or• Press Escape.
If you are running a long-running query, Interactive SQL displays a splash screen thatdescribes some diagnostic tips.
Canceling an Interactive SQL CommandUse the Interrupt button on the Interactive SQL toolbar to cancel a command.
A Stop operation stops current processing and prompts for the next command. If a commandfile was being processed, you are prompted for an action to take (Stop Command File,Continue, or Exit Interactive SQL). You can control these actions with the Interactive SQLON_ERROR option.When an interruption is detected, one of three different errors is reported,depending on when the interruption is detected. If the interruption is detected:
• When Interactive SQL is processing the request (as opposed to the database server), thismessage appears, and Interactive SQL stops processing immediately and the currentdatabase transaction is not updated:ISQL command terminated by user
• By the database server while processing a data manipulation command (select, insert,delete, or update), this message appears, and the effects of the current command are leftunfinished but the rest of the transaction is left intact:Statement interrupted by user.
• While the database server is processing a data definition command (create object, dropobject, alter object, and so on.), this message appears:Terminated by user -- transaction rolled back
Since data definition commands all perform a commit automatically before the commandstarts, rollback simply cancels the current command.
CHAPTER 7: Using Interactive SQL in Graphics Mode
242 Adaptive Server Enterprise

This message also occurs when the database server is running in bulk operations modeexecuting a command that modifies the database (insert, update, and delete). In this case,rollback cancels not only the current command, but everything that has been done since thelast commit. In some cases, it may take a considerable amount of time for the databaseserver to perform the automatic rollback.
Combining Multiple StatementsInteractive SQL allows you to enter multiple statements at the same time. End each statementwith the Transact-SQL command, go.
Enter multiple statements in the SQL Statements pane separated by go:
update titlesset price = 21.95where pub_id = "1389"goupdate titlesset price = price + 2.05where pub_id = "0736"goupdate titlesset price = price+2.0where pub_id = "0877"go
You then execute all three statements by clicking Execute SQL Statement on the toolbar (orby pressing F9). After execution, the commands remain in the SQL Statements pane. To clearthis pane, press the Esc key.
You can roll back your changes by entering rollback and executing the statement.
Looking Up Tables, Columns, and ProceduresUse Tools > Lookup Table Name and Tools > Lookup Procedure Name to look up thenames of tables, columns, or procedures stored in the current database and insert them at yourcursor position.
PrerequisitesInstall jConnect for JDBC in order to use these Interactive SQL tools.
TaskEnter the first characters of a table, column, or procedure in the Lookup Table Name andLookup Procedure Name dialogs. This list narrows to display only those items that start withthe text you entered.
You can use the standard SQL wildcard character % to mean “match anything”. Clear thesearch area to display all items.
CHAPTER 7: Using Interactive SQL in Graphics Mode
Utility Guide 243

Looking Up Description
Table names 1. Choose Tools > Lookup Table Name.2. Select the table and click OK to insert the table name into the SQL
Statements pane.
Column names 1. Choose Tools > Lookup Table Name.2. Find and select the table containing the column.3. Click Show Columns.4. Select the column and click OK to insert the column name into the
SQL Statements pane.
Procedurenames
1. Choose Tools > Lookup Procedure Name.2. Find and select the procedure.3. Click OK to insert the procedure name into the SQL Statements
pane.
Recall CommandsWhen you execute a command, Interactive SQL automatically saves it in a history list that lastsfor the duration of your current session. Interactive SQL maintains a record of as many as 50 ofthe most recent commands.Choose one of these commands:
Recall CommandOptions
Description
View thecommands list
To view the entire list of commands in the Command Historydialog:• Press Ctrl-H, or• Select the book icon in the toolbar.
Recall a commandfrom a list
The most recent commands appear at the bottom of the list. Torecall a command, highlight it and click OK. It appears in the SQLStatements pane.
Recall a command To recall commands without the Command History dialog:• Use the arrows in the toolbar to scroll back and forward
through your commands, or• Press Alt-RIGHT ARROW and Alt-LEFT ARROW.
Save thecommands
Save commands in text files for use in a subsequent InteractiveSQL session.
CHAPTER 7: Using Interactive SQL in Graphics Mode
244 Adaptive Server Enterprise

Logging CommandsWith the Interactive SQL logging feature, you can record commands as you execute them.Interactive SQL continues to record until you stop the logging process, or until you end thecurrent session. The recorded commands are stored in a log file.Start or stop logging:
Command Description
Startlogging
You can use either:• The GUI option:
1. Choose SQL > Start Logging.2. In the Save dialog, specify a location and name for the log file.3. Click Save when finished
• Enter the command, where c:\file_name.sql is the path, name,and extension of the log file:start logging "c:\file_name.sql"
A log file must have the .sql extension. Include the single quotationmarks if the path contains embedded spaces.
Once you start logging, all commands that you try to execute are logged,including ones that do not execute properly.
Stoplogging
You can use either:• The GUI option by choosing SQL > Stop Logging.• Enter the command:
stop logging
.
Note: The commands start logging and stop logging are not Transact-SQL commands, andare not supported by Adaptive Server outside the Interactive SQL dialog box.
Configure Interactive SQLYou can configure Interactive SQL in the Options dialog, which provides settings forcommands, appearance, import/export features, and messages.
After you make your selections, choose OK or Make Permanent. Interactive SQL starts theconfiguration you select when you click Make Permanent..
Set each option by either using the GUI, or the set option statement.
To access the Options dialog, choose Tools > Options.
CHAPTER 7: Using Interactive SQL in Graphics Mode
Utility Guide 245

General Dialog BoxIn the General dialog box, select when to commit transactions, how Interactive SQL acts whenan error occurs, and whether to make a copy of scripts or commands into a log.
Components Description
Commit Lets you select when transactions are committed. You can commit transactions:
• Automatically after each statement is executed, or
• Only when you exit your Interactive SQL session
You can also commit manually by entering an explicit commit command when-ever appropriate. The default behavior is that transactions are committed whenyou exit Interactive SQL.
Command files Determines how Interactive SQL acts when an error occurs:
• Continue – Interactive SQL displays the error message in the Results panebut does not exit. Correct the problem, then reissue the command.
• Exit – Interactive SQL exits when an error occurs.
• Notify and Continue – Interactive SQL displays the error message in a dialogbox and describes the error but does not exit
• Notify and Exit – Interactive SQL displays the error message in a dialog box,describes the error, and exits.
• Notify and stop – Interactive SQL displays the error message and describesthe error.
• Prompt – the default setting. Interactive SQL displays a message box askingif you want to continue.
• Stop – Interactive SQL displays the error message in the Results pane. Cor-rect, then reissue the command.
Echo CommandFiles to Log
When you enable logging, this option causes SQL statements executed fromscript files (or command files) to be copied to the log along with the SQL state-ments entered interactively. If you disable this option, only SQL statementsentered interactively are copied to the log when you start logging.
Folders Determines in which directory the browser should start looking for files. Selecteither Last folder used or Current folder.
CHAPTER 7: Using Interactive SQL in Graphics Mode
246 Adaptive Server Enterprise

Result Dialog BoxThe Results dialog box has multiple components that let you configure how your results fromInteractive SQL appear.
Component Description
Display Null Values Lets you specify how you want nulls to appear in the table columns when youbrowse data. The default setting is (NULL).
Maximum Numberof Rows to Display
Lmits the number of rows that appear. The default setting is 500.
Truncation Length Limits the number of characters that appear in each column in the Results panein Interactive SQL. The default setting is 30.
Show Multiple Re-sult Sets
Enables or disables the display of multiple result sets. For example, you canuse this feature when you create a procedure containing multiple select state-ments. If you enable this option, you can see each result set on a separate tab inthe Results pane when you call the procedure.
If you are using the jConnect driver, choosing to display multiple result setsrequires Interactive SQL to wait for an entire result set to be retrieved beforeany rows appear. This may result in longer waits for large result sets. Thisoption is off by default.
Show Row Number Check if you want the row numbers displayed in the result set.
Automatically Re-fetch Result
Enables or disables the ability of Interactive SQL to automatically regeneratethe most recent result set after you execute an insert, update, or delete state-ment. For example, if you are updating a table with the Results tab in theResults pane displaying the rows about to be affected, this option causesInteractive SQL to automatically refresh the Results tab to reflect the executedchanges. This option is on by default.
Console Mode Select how you want the result sets displayed in the console; only the last resultsets, all result sets, or no result sets.
Font Select which font you want to use for the result set.
CHAPTER 7: Using Interactive SQL in Graphics Mode
Utility Guide 247
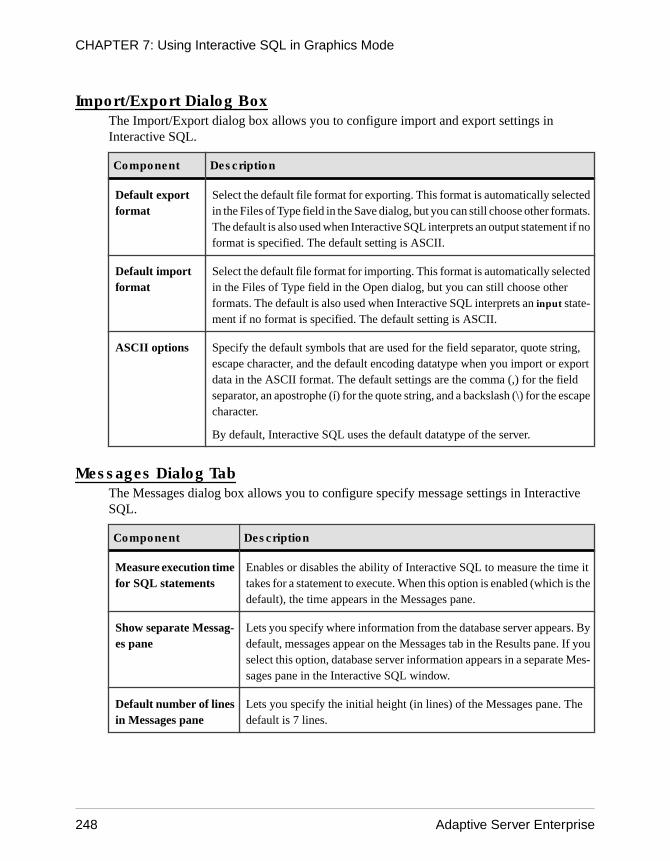
Import/Export Dialog BoxThe Import/Export dialog box allows you to configure import and export settings inInteractive SQL.
Component Description
Default exportformat
Select the default file format for exporting. This format is automatically selectedin the Files of Type field in the Save dialog, but you can still choose other formats.The default is also used when Interactive SQL interprets an output statement if noformat is specified. The default setting is ASCII.
Default importformat
Select the default file format for importing. This format is automatically selectedin the Files of Type field in the Open dialog, but you can still choose otherformats. The default is also used when Interactive SQL interprets an input state-ment if no format is specified. The default setting is ASCII.
ASCII options Specify the default symbols that are used for the field separator, quote string,escape character, and the default encoding datatype when you import or exportdata in the ASCII format. The default settings are the comma (,) for the fieldseparator, an apostrophe (í) for the quote string, and a backslash (\) for the escapecharacter.
By default, Interactive SQL uses the default datatype of the server.
Messages Dialog TabThe Messages dialog box allows you to configure specify message settings in InteractiveSQL.
Component Description
Measure execution timefor SQL statements
Enables or disables the ability of Interactive SQL to measure the time ittakes for a statement to execute. When this option is enabled (which is thedefault), the time appears in the Messages pane.
Show separate Messag-es pane
Lets you specify where information from the database server appears. Bydefault, messages appear on the Messages tab in the Results pane. If youselect this option, database server information appears in a separate Mes-sages pane in the Interactive SQL window.
Default number of linesin Messages pane
Lets you specify the initial height (in lines) of the Messages pane. Thedefault is 7 lines.
CHAPTER 7: Using Interactive SQL in Graphics Mode
248 Adaptive Server Enterprise

Editor Dialog BoxThe Editor dialog box allows you to configure edit settings in Interactive SQL.
Component Description
Editor Select your scrollbar style preference: vertical, horizontal, or both.
Tabs Determines how tabs are used in your SQL text:
• Tab size – enter the number of spaces you want each tab to comprise.
• Indent size – enter the number of spaces for each indent.
• Tab radio buttons – select Insert spaces to convert tabs to spaces when you indentSQL text. Select Keep tabs to retain tabs as spaces when you indent SQL text.
• Auto indent – Select:
• None – if you do not want to automatically indent SQL text
• Default – to use the default tab and indent settings
• Smart – if you want Interactive SQL to automatically indent SQL text. SelectIndent open brace to indent open braces or Indent closing brace to indent theclosing braces. Interactive SQL displays how these decisions affect the text inthe window below the buttons.
Format Determines the look of your SQL text:
• Text Highlighting – select the type of text you want to highlight from the list(keywords, comments, strings, and so on).
• Foreground – select the foreground color of the text.
• Background – select the color of the text’s background field.
Style • Font size – select the size font.
• Caret color – determines the color of the caret.
• Reset All – returns all styles to original selections.
Print Customizes your printed jobs:
• Header – enter the header text.
• Footer – enter the footer text.
• Font size – select the font size.
CHAPTER 7: Using Interactive SQL in Graphics Mode
Utility Guide 249

Query Editor Dialog BoxThe Query Editor dialog box allows you to configure the query editor settings in InteractiveSQL.
Component Description
Fully qualify table andcolumn names
Select this to have Interactive SQL prefix table names with the owner (forexample, dbo.authors) and prefix column names with the owner
and table names (for example, dbo.titles.price).
Quote names Select this to automatically put quotes around table and columns names toavoid conflicts with reserved words.
Get list of tables onstartup
Select this to automatically get a list of tables in the database when thequery editor is started.
Processing Command FilesThis section describes how to process files consisting of a set of commands.
Saving SQL Statements to a FileIn Interactive SQL, the output for each command remains in the Results pane until the nextcommand is executed. To keep a record of your data, you can save the output of each statementto a separate file.
If statement1 and statement2 are two select statements, then you can save them them tofile1 and file2, respectively:
Statement1; OUTPUT TO file1gostatement2; OUTPUT TO file2go
For example, this command saves the result of a query:select * from titlesgooutput to "C:\My Documents\Employees.txt"
Executing Command FilesThere are three ways to execute command files.
• Use the Interactive SQL read command to execute command files. this statement executesthe file temp.sql:read temp.SQL
CHAPTER 7: Using Interactive SQL in Graphics Mode
250 Adaptive Server Enterprise

• Load a command file into the SQL Statements pane and execute it directly from there.You load command files back into the SQL Statements pane by choosing File > Open.Enter transfer.sql when prompted for the file name.
The SQL Statements pane in Interactive SQL has a limit of 500 lines. For command fileslarger than this, use a generic editor capable of handling large files and use the readcommand to import it into Interactive SQL, which has no limit on the number of lines it canread.
• Supply a command file as a command-line argument for Interactive SQL.
Saving, Loading, and Running Command FilesSave the commands in the SQL Statements pane so they are available for future InteractiveSQL sessions.
The files in which you save them, called command files and commonly referred to as scripts,are text files containing SQL statements. You can use any editor to create command files, andinclude comment lines along with the SQL statements to be executed. When you begin a newsession, you can load the contents of a command file into the SQL Statements pane, or you canrun the contents immediately.
Action Description
Save the commandsfrom the SQL State-ments pane to a file
1. Choose File > Save.
2. In the Save dialog, specify a location, name, and format for the file. ClickSave when finished.
Load commands froma file into the SQLStatements pane
1. Choose File > Open.
2. In the Open dialog, find and select the file. Click Open when finished.
CHAPTER 7: Using Interactive SQL in Graphics Mode
Utility Guide 251

Action Description
Run a command fileimmediately
1. Choose File > Run Script.
2. The Run Script menu item is the equivalent of a read statement. Forexample, in the SQL Statements pane, you can also run a command fileby typing the following, where c:\filename.sql is the path,
name, and extension of the file. Single quotation marks (as shown) arerequired only if the path contains spaces:
READ "c:\filename.sql"3. In the Open dialog, find and select the file. Click Open when finished.
The Run Script menu item is the equivalent of a READ statement. Forexample, in the SQL Statements pane, you can also run a command file bytyping the following, where c:\filename.sql is the path, name, and extensionof the file. Single quotation marks (as shown) are required only if the pathcontains spaces:
READ 'c:\filename.sql'
The SQL Escape Syntax in Interactive SQLInteractive SQL supports JDBC escape syntax, which allows you to call stored proceduresfrom Interactive SQL regardless of the database management system you are using.
The general form for the escape syntax is:{{ keyword parameters }}
You must use double braces. This doubling is specific to Interactive SQL. There must not be aspace between successive braces: "{{" is acceptable, but "{ {" is not. As well, you cannot usenewline characters in the statement. You cannot use the escape syntax in stored proceduresbecause they are not executed by Interactive SQL.
You can use the escape syntax to access a library of functions implemented by the JDBCdriver, including number, string, time, date, and system functions.
For example, to obtain the name of the current user in a database management system-neutralway, type:select {{ fn user() }}
The functions that are available depend on the JDBC driver that you are using. The numericfunctions that are supported by jConnect are:
abs cos log10 sign
acos cot pi sin
CHAPTER 7: Using Interactive SQL in Graphics Mode
252 Adaptive Server Enterprise

asin degrees power sqrt
atan exp radians tan
atan2 floor rand
ceiling log round
The string functions that are supported by jConnect are:
ascii difference repeat space
char lcase right substring
concat length soundex ucase
The system functions that are supported by jConnect are:
database ifnull user convert
The datetime functions that are supported by jConnect are:
curdate dayofweek monthname timestampadd
curtime hour now timestampdiff
dayname minute quarter year
dayofmonth month second
A statement using the escape syntax should work in Adaptive Server Anywhere, AdaptiveServer Enterprise, Oracle, SQL Server, or another database management system that you areconnected to from Interactive SQL. For example, to obtain database properties with thesa_db_info procedure using SQL escape syntax, type this in the SQL Statements pane inInteractive SQL:((CANN sa_db_info(1)))
Interactive SQL CommandsInteractive SQL includes a set of commands that are entered in the top pane of the InteractiveSQL display. These commands are intended only for Interactive SQL and are not sent toAdaptive Server for execution.
The commands available for Interactive SQL are:
Command Description
clear Clears the Interactive SQL panes.
CHAPTER 7: Using Interactive SQL in Graphics Mode
Utility Guide 253

Command Description
configure Opens the Interactive SQL Options dialog.
connect Establishes a connection to a database.
disconnect Drops the current connection to a database.
exit Leaves Interactive SQL.
input Imports data into a database table from an external file or from the keyboard.
output Imports data into a database table from an external file or from the keyboard.
parameters Specifies parameters to an Interactive SQL command file.
read Reads Interactive SQL statements from a file.
set connection Changes the current database connection to another server.
set option Use this statement to change the values of Interactive SQL options.
start logging Use this statement to start logging executed SQL statements to a log file.
stop logging Use this statement to stop logging of SQL statements in the current session.
system Use this statement to launch an executable file from within Interactive SQL.
See “Using DBISQL Commands” in the Reference Manual: Commands.
CHAPTER 7: Using Interactive SQL in Graphics Mode
254 Adaptive Server Enterprise

CHAPTER 8 Interactive sybclusterCommands Reference
Some interactive commands are active before you connect to a cluster, while others are activeonly after you connect to a cluster.
The sybcluster command prompt includes the current cluster and the default instance whenthese values have been set.
Prompt When sybcluster is:
> Not connected to a cluster.
cluster_name> Connected to a cluster.
cluster_name instance_name> Connected to a cluster and a default instance has been set.
See also• sybcluster on page 139
Commands Active Before Connecting to a ClusterThese commands are active before you connect to a cluster, and are not available after youconnect to a cluster.
Command Description
connect Connects to an existing cluster.
create cluster Creates a new cluster.
deploy plugin Deploys the configuration information for a single instance of the cluster to theUnified Agent.
exit Exits sybcluster.
help Lists the currently available sybcluster interactive commands.
quit Exits sybcluster.
show agents Displays information about available UAF agents.
upgrade server Updates Adaptive Server to Adaptive Server Cluster Edition.
Utility Guide 255

Commands Active After Connecting to a ClusterThese commands are active only after you connect to a cluster:
Command Description
add backupserver Configures one or more new Backup Servers on nodes in the cluster notcurrently configured for Backup Server.
add instance Adds one new instance to the cluster.
create backupserver Create Backup Server.
create xpserver Creates an XP Server.
diagnose { cluster | in-
stance }
Performs a set of checks to ensure the cluster or instance is workingproperly.
disconnect Loses all connections to the current cluster and returns the cluster to theunconnected state.
drop backupserver Drops the Backup Server.
drop cluster Removes each instance from the cluster and deletes the cluster definitionfrom the cluster configuration file.
drop xpserver Drops the XP Server.
drop instance Removes an instance from the cluster.
exit Exits sybcluster.
help Lists the currently available sybcluster interactive commands.
localize Displays current values for default language, charset, and sort order.Allows you to change the default values and add or remove languages.
quit Exits sybcluster.
set backupserver Changes the listening port number for Backup Server on one or morenodes.
set cluster Sets properties for the cluster.
set instance Sets properties for the instance.
set xpserver Changes the listening port number for XP Server on one or more nodes.
show backupserver con-
fig
Displays the names of the nodes on which Backup Server is configuredand the associated listening port number.
CHAPTER 8: Interactive sybcluster Commands Reference
256 Adaptive Server Enterprise

Command Description
show cluster Displays configuration, log, and status values for the cluster.
show instance Displays information about an instance.
show membership mode Displays the cluster’s current membership mode, which specifies wheth-er or not the cluster supports Veritas Cluster Server integration.
show session Displays current agent and discovery information.
show xpserver config Displays the names of the instances and nodes on which XP Server isconfigured and the associated listening port number.
shutdown cluster Shuts down the cluster by executing a Transact-SQL shutdown com-mand for each instance in the cluster.
shutdown instance Shuts down the instance by executing a Transact-SQL shutdown com-mand.
start cluster Starts all instances in the cluster.
start instance Starts an instance in the cluster.
use Sets the default instance.
add backupserverConfigures Backup Server for nodes not already configured for Backup Server.
Syntaxadd backupserver
Examples
• Add Backup Server – Adds a Backup Server to “mycluster” on nodes “blade3” and“blade4.”add backupserverFinding nodes for which Backup Server is not configured...Do you want to configure Backup Server for node "blade3"? [Y]Please enter the Backup Server port number for node "blade3": 5001Do you want to configure Backup Server for node "blade4"? [Y]Please enter the Backup Server port number for node "blade4": 50011
Usage
You can configure Backup Server for one or more nodes in the cluster.
CHAPTER 8: Interactive sybcluster Commands Reference
Utility Guide 257

add backupserver lets you add additional nodes when configuring for single Backup Servers.You cannot use this command to add multiple Backup Servers.
add instanceAdds one new instance to the cluster.
You can add an instance interactively, with sybcluster prompting for necessary configurationinformation, or through an input file. add instance also creates a local system temporarydatabase for the new instance. add instance prompts vary depending on whetherconfiguration for the cluster is shared or private.
Syntaxadd instance instance_name [file “input_file”]
Parameters
• instance_name – is the name of the instance.• file “input_file” – specifies a file name that contains the configuration information for
adding an instance.
Usage
• add instance creates a local system temporary database for the new instance. Beforeexecuting add instance, make sure that a device with sufficient space for the local systemdatabase exists.
• The input file for add instance has the same format as the cluster input file. However, theadd instance input file may limit the instance definitions to the new instance in the nodesection.
• add instance may prompt for this information:• Instance name, if you did not enter an instance name in the command statement.• Node hosting the instance• Port number of the UAF agent on the node• Query port number• Primary and secondary address of the node• Primary and secondary port specification
• If you have configured single Backup Servers for the cluster, add instance asks whetherBackup Server is already configured for the new instance node. If no, add instance asks ifBackup Server should be configured. If yes, it prompts for the Backup Server port for thenode.If you have configured multiple Backup Servers for the cluster, add instance promptsfor:
CHAPTER 8: Interactive sybcluster Commands Reference
258 Adaptive Server Enterprise

• Name of the Backup Server• Backup Server log file path• Backup Server port for the new instanceadd instance also prompts for XP Server port number information for the new instance.
• If the installation mode is private, add instance prompts for additional information for thenew instance:• $SYBASE home directory.
• Environment shell script path.• Adaptive Server home directory.• Server configuration file path.• Interfaces file path, if LDAP is not configured.
connectConnects to an existing cluster.
Syntaxconnect [ to cluster_name ] [ login login_name] [ password [password]] [ agent “agent_spec [, agent_spec [,...]]” ] [ discovery “ discovery_spec [, discovery_spec [, ...]]" ]
Parameters
• cluster_name – is the name of the cluster to which you are connecting.• login login_name – is the management agent login for the Sybase Common Security
Infrastructure in the Unified Agent framework.
The default user name after installation is “uafadmin” with no password; this is the SimpleLogin Module in the Agent configuration. You can configure the user name and passwordto use several different mechanisms for authentication and authorization, includingoperating system logins.
• password password – is the management agent password for the Sybase CommonSecurity Infrastructure in the Unified Agent framework.
The default user name after installation is “uafadmin” with no password; this is the SimpleLogin Module in the Agent configuration. You can configure the user name and passwordto use several different mechanisms for authentication and authorization, includingoperating system logins.
• agent agent_spec – is the agent specification that identifies the nodes in the clusterrunning a Unified Agent, and the port number that sybcluster uses to connect to theUnified Agent.
CHAPTER 8: Interactive sybcluster Commands Reference
Utility Guide 259

The format is node_name:port_number[, node_name:port_number ][,...]. The defaultport number is 9999. This is the preferred method for connecting to a cluster.
• discovery discovery_spec – is the discovery method used to identify the agentsresponsible for the requested cluster.
The format is method[(method_specification)][, ( method_specification )[,...]]. See thedescription for sybcluster -d discovery_list for more information about discovery methods.
Examples
• Example 1 – Connects to “mycluster,” when “mycluster” is the default cluster specified inthe sybcluster command statement:connect
• Example 2 – Connects to “mycluster” using the agent specification and default portnumbers:connect to mycluster agent "blade1,blade2,blade3"
Usage
A direct connection is one in which the user identifies the cluster nodes and, optionally, theport numbers for the UAF agents. Sample agent specifications are:
• myhost – identifies the host node and assumes the default listening port of 9999.• myhost.mydomain.com – includes the host domain name.• myhost:9999 – identifies the host node and listening port number.
create backupserverCreates a Backup Server for the cluster, or, if the cluster is configured for multiple BackupServers, creates a Backup Server for each instance in the cluster.
Syntaxcreate backupserver
Examples
• Create Backup Server cluster – Creates the Backup Server “mycluster_BS” for“mycluster”:
create backupserverDo you want to create multiple Backup Servers? [Y] NEnter the Backup Server name: [mycluster_BS]Enter the Backup Server log file path: [$SYBASE/ASE-15_0/ install/mycluster_BS.log]Do you want to create a Backup Server for node "blade1"? [Y]
CHAPTER 8: Interactive sybcluster Commands Reference
260 Adaptive Server Enterprise

Enter the Backup Server port number for node "blade1":The Backup Server "mycluster_BS" was successfully defined.
• Create multiple Backup Servers – Creates multiple Backup Servers for “mycluster”running on “ase1” on “blade1” and “ase2” on “blade2”:
create backupserverDo you want to create multiple Backup Servers? [Y] YThe "dump/load" commands would be routed to appropriate Backup Server based on following policies:1. Dedicated - Each instance associated with exactly one Backup Server.2. Round Robin - Choose the Backup Server with least number of requests in round robin fashion starting from global cluster level counter.Enter the number corresponding to the policy to be used: [1] 1
Enter the Backup Server name for instance ase1: [ase1_BS]Enter Backup Server log file path: [/remote/var/sybase/install/ase1_BS_log]Enter the Backup Server port for node "blade1": 23001
Enter the Backup Server name for instance ase2: [ase2_BS]Enter Backup Server log file path: [/remote/var/sybase/install/ase2_BS_log]Enter the Backup Server port for node "blade2": 23002
Backup Servers successfully defined.
Usage
create backupserver prompts for the Backup Server listening port on each node. It copiesother necessary configuration information from the cluster configuration file. createbackupserver:
• Creates directory service entries for Backup Server on each node.• Creates the Backup Server configuration and log files, and the RUN_backup_server script.• Adds the Backup Server name to the cluster’s sysservers table.
• Enables Backup Server HA.
create clusterCreates an Adaptive Server shared-disk cluster.
Enter the necessary configuration information interactively, as responses to a series ofprompts, or use an input file.
Syntaxcreate cluster [cluster_name ] [ login login_name ]
CHAPTER 8: Interactive sybcluster Commands Reference
Utility Guide 261

[ password password ] [ agent “agent_spec[, agent_spec[, ...]]” ] [ discovery “ discovery_spec[, discovery_spec[, ...]]” ] [ file “input_file” ]
Parameters
• cluster_name – is the name of the cluster.• login login_name – is the management agent login for the Sybase Common Security
Infrastructure in the Unified Agent framework. The default user name after installation is“uafadmin” with no password; this is the simple login module in the agent configuration.You can configure the user name and password to use several different mechanisms forauthentication and authorization, including operating system logins.
• password password – is the management agent password for the Sybase CommonSecurity Infrastructure in the Unified Agent framework. The default user name afterinstallation is “uafadmin” with no password; this is the Simple Login Module in the Agentconfiguration. You can configure the user name and password to use several differentmechanisms for authentication and authorization, including operating system logins.
• agent agent_spec – is the agent specification that identifies the nodes in the clusterrunning a Unified Agent, and the port number that sybcluster uses to connect to theUnified Agent.
The format is node_name:port_number [, node_name:port_number ] [,...]. The defaultport number is “9999.”
• discovery discovery_spec – is the discovery method used to identify the agentsresponsible for the requested cluster.
The format is method[(method_specification)] [, (method_specification)[,...]]. See thedescription for sybcluster -d discovery_list.
• file “input_file” – is the operating system input file for creating the cluster.
Examples
• Create a cluster with sybcluter prompts – Creates a new cluster called “mycluster”;sybcluster prompts you for the information necessary to create the cluster:create cluster mycluster
• Create a cluster using a configuration file – Creates a new cluster called “mycluster1”using configuration information supplied in the mycluster1.xml file:create cluster mycluster1 file mycluster1.xml
Usage
When you create a cluster, sybcluster prompts for:
• Cluster name, if one has not been provided.
CHAPTER 8: Interactive sybcluster Commands Reference
262 Adaptive Server Enterprise

• Number of instances.• Installation mode for the cluster (private or shared).• Complete path to the master, quorum, PCI, systemdb, sybsysprocs, and temporary
database devices.• Path to the interfaces file, if LDAP is not configured and this is a shared install.• (Optional) Trace flags.• Complete path to the dataserver configuration file, if this is a shared install.• Primary and secondary interconnection protocols.• Instance host name, port number, private address, log file location, and start-up arguments.
If this is a private installation, sybcluster also prompts for the $SYBASE installationdirectory, Adaptive Server home directory, dataserver configuration file location, andinterfaces file location (if LDAP is not configured).
If sybcluster detects the Veritas Cluster Server (VCS) on the system, sybcluster asks if itshould check whether device is managed by VCS.
After you create and confirm the cluster, create cluster prompts for an I/O fencing check,which checks whether or not each device has I/O fencing capability (see the Installation Guidefor a description of I/O fencing).
create xpserverCreates an XP Server for each instance in the cluster.
Syntaxcreate xpserver
Examples
• Create an XP Server – Creates an XP Server for each instance in “mycluster”:create xpserverEnter the XP Server port number for instance "ase1":Enter the XP Server port number for instance "ase2":Enter the XP Server port number for instance "ase3":The XP Server was successfully defined for each instance.
Usage
create xpserver prompts for the XP Server listening port for each node in the cluster. Otherinformation necessary to create the XP Server is read from the cluster configuration file.
CHAPTER 8: Interactive sybcluster Commands Reference
Utility Guide 263

deploy pluginAdds the configuration information for a single instance of the cluster to the Unified Agent.
You can use deploy plugin to configure the Unified Agent to manage a cluster if you createdthe cluster without using the Adaptive Server plug-in or sybcluster utility, or if you need tore-create the Unified Agent configuration for a cluster. The configuration of a cluster instanceis performed by deploying a Unified Agent plug-in.
Syntaxdeploy plugin [ login login_name ] [ password password ] [ agent agent_spec ] [ discovery discovery_spec ]
Parameters
• login login_name – is the management agent login for the Sybase Common SecurityInfrastructure in the Unified Agent framework.
The default user name after installation is “uafadmin” with no password; this is the SimpleLogin Module in the Agent configuration. You can configure the user name and passwordto use several different mechanisms for authentication and authorization, includingoperating system logins.
• password password – is the management agent password for the Sybase CommonSecurity Infrastructure in the Unified Agent framework.
The default user name after installation is “uafadmin” with no password; this is the SimpleLogin Module in the Agent configuration. You can configure the user name and passwordto use several different mechanisms for authentication and authorization, includingoperating system logins.
• agent agent_spec – is the agent specification that identifies the nodes in the clusterrunning a Unified Agent, and the port number that sybcluster uses to connect to theUnified Agent.
The format is “node_name:port_number [, node_name:port_number] [,...]]”. Thedefault port number is “9999”.
• discovery discovery_spec – is the discovery method used to identify the agentsresponsible for the requested cluster.
The format is “method[(method_specification)] [, (method_specification)[,...]]”. See thedescription for sybcluster -d discovery_list for more information about discovery methods.
CHAPTER 8: Interactive sybcluster Commands Reference
264 Adaptive Server Enterprise

Examples
• Deploy plug-in using UAF agent – Deploys the plug-in using the UAF agent on host“system1501”:deploy plugin agent system1501
sybcluster prompts for the cluster name, cluster node number, installation mode, full pathto the quorum device, the environment shell script path, and the Adaptive Server homedirectory.
• Deploy plug-in using discovery – Deploys the plug-in using discovery to identify theagent:deploy plugin discovery udp
Usage
After you execute deploy plugin, sybcluster prompts you for:
• Path to the quorum device.• Path to the Sybase home directory.• Installation mode (private or shared) – the default is shared.• Location of your Sybase environment script – this must be a shell script that can be loaded
using the “.file_name” syntax, such as “sh” or “bash.” An example is SYBASE.sh.
• Location of your Adaptive Server software directory – the default is<sybase_home_directory>/ASE-15_0. When entering the location of theAdaptive Server software directory, include the full path. Do not use $SYBASE.
The dataserver login and password are configured using the login command, which updatesall Adaptive Server plug-ins managing the cluster.
diagnose clusterPerforms a set of checks to ensure that the cluster is working correctly.
Syntaxdiagnose cluster
Examples
• Example 1 – Checks that “mycluster” is working correctly:
diagnose clusterCluster name...................myclusterMaximum instances..............4Cluster node count.............1Instances defined..............4
CHAPTER 8: Interactive sybcluster Commands Reference
Utility Guide 265

Is cluster locked..............YesJDBC connection available......1 ase1 YesJDBC connection available......2 ase2 YesJDBC connection available......3 ase3 YesJDBC connection available......4 ase4 YesInstance Public Network........1 ase1 on blade1 (10.22.79.39) Reachable: YesInstance Public Network........2 ase2 on blade1 (10.22.79.39) Reachable: YesInstance Public Network........3 ase3 on blade1 (10.22.79.39) Reachable: YesInstance Public Network........4 ase4 on blade1 (10.22.79.39) Reachable: YesHas private Primary network.... NoHas private Secondary network.. NoNetwork ports required/instance 20Minimum port allowed........... 1025Maximum port allowed............65535
Current port strategy........... Public primary and secondary unique....The ports are sequenced primary followed by the next instance primary....When the primaries are are completed the secondary ports follow the samepattern.
Recommended port strategy....... Public primary and secondary unique....The ports are sequenced primary followed by the next instance primary....When the primaries are are completed the secondary ports follow the same pattern.
Usage
diagnose cluster checks that:
• A Unified Agent is running on each instance in the cluster.• The number of instances in the cluster does not exceed the value set for maximum number
of instances.• The quorum file exists.• All instances are defined in the interfaces file and that port numbers do not conflict.• The primary and secondary protocol specifications do not overlap.• Each of the $SYBASE directories are shared.
CHAPTER 8: Interactive sybcluster Commands Reference
266 Adaptive Server Enterprise

diagnose instancePerforms a set of checks to ensure that the instance is configured correctly.
Syntaxdiagnose instance [instance_name]
Parameters
• instance_name – is the name of an instance. sybcluster uses the default value if you do notspecify an instance name.
Examples
• Example 1 – Displays and verifies configuration information for “ase1” on “mycluster”:
diagnose instance ase1Cluster name ................. myclusterInstance id .................. 1Instance name ................ ase1Node name .................... blade1
Query port ................... 7101
JDBC connection available .... Yes
Instance Public Network ....... 1 ase1 on blade1 (10.33.108.139) Reachable:.....Yes
Minimum port allowed.......... 1025Maximum port allowed .......... 65535
Instance port range ........... 1 Primary ase1 17100 to 17115 (16) OkayInstance port range ........... 1 Secondary ase1 17165 to 17180 (16) Okay
Usage
Use diagnose cluster to ensure the cluster is configured correctly.
See also• diagnose cluster on page 265
CHAPTER 8: Interactive sybcluster Commands Reference
Utility Guide 267

disconnectCloses all connections to the current cluster and returns sybcluster to an unconnected state.
Syntaxdisconnect
Usage
Use connect to reconnect to an existing cluster.
See also• connect on page 259
drop backupserverDrops Backup Server from a node or from the cluster. If the cluster is configured for multipleBackup Servers, drops all Backup Servers.
Syntaxdrop backupserver
Examples
• Drop a single Backup Server –drop backupserverDo you want to drop the Backup Server from: 1. Selected nodes 2. ClusterEnter choice: 1Do you want to drop Backup Server from node "blade1"? [N] yDo you want to drop Backup Server from node "blade2"? [N] The Backup Server has been dropped from selected nodes.
• Drop the Backup Server from the cluster –drop backupserverDo you want to drop the Backup Server from: 1. Selected nodes 2. ClusterEnter choice: 2Are you sure you want to drop Backup Server mycluster_BS from
CHAPTER 8: Interactive sybcluster Commands Reference
268 Adaptive Server Enterprise

cluster mycluster? (Y or N): [N] yThe Backup Server has been dropped.
• Drop all multiple Backup Servers – Drops all of the multiple Backup Servers that wereconfigured for the cluster:
drop backupserverMultiple Backup Server are defined for the cluster. This command will drop all of them. Are you sure you want to continue? (Y/N): [N] yThe Backup Server has been dropped.
Usage
Use drop backupserver to drop a Backup Server from the cluster.
drop clusterRemoves each instance from a cluster and then removes the cluster definition from the clusterconfiguration file.
The drop cluster command also removes regular files associated with the cluster and thecluster agent plug-ins that manage the cluster. The cluster must be down to use dropcluster.
Syntaxdrop cluster
Examples
• Drop all instances – Drops all instances from the current cluster and deletes the cluster:drop cluster
Usage
• sybcluster prompts for confirmation before dropping the cluster.• Due to certain file-system locking, the UAF plug-ins may not be deleted after you use drop
cluster. Verify that the $SYBASE_UA/nodes/*/plugins/<cluster_name>directory has been deleted. If the directory still exists, delete it.
• drop cluster:• Removes cluster and instance entries from the interfaces file, configuration files, and
specified data devices.• Marks the quorum device as unused.• Shuts down and removes the cluster’s UAF agent plug-ins.
CHAPTER 8: Interactive sybcluster Commands Reference
Utility Guide 269

drop instanceRemoves an instance from the cluster configuration file and updates the Unified AgentFramework (UAF) and discovery services.
drop instance also notifies the cluster that an instance is to be dropped, and removes theinstance and interfaces file entries.
Syntaxdrop instance [instance_name]
Parameters
• instance_name – identifies an instance in a cluster. If an instance name is not specified,sybcluster uses the default specified in the sybcluster command line.
Examples
• Remove an instance – Removes the “ase3” instance from the current cluster:drop instance ase3
Usage
• Before you use drop instance:• Start at least one instance in the cluster other than the instance you plan to drop.• Shut down the instance you plan to drop.• Manually remove instance-specific information. drop instance automatically
removes the local system temporary database.• sybcluster prompts for confirmation before removing the instance.• You cannot drop the last instance in the cluster. You must use drop cluster.
drop instance:
• Removes references to the instance in the interfaces file, the instance entry in the quorumdevice, and notifies the cluster that the instance has been dropped.
• Removes entries for multiple and single Backup Servers if they were configured for theinstance you are dropping.
• Drops XP Server and single or multiple Backup Servers if they have been configured forthat instance.
See also• drop cluster on page 269
CHAPTER 8: Interactive sybcluster Commands Reference
270 Adaptive Server Enterprise

drop xpserverDrops the XP Server for each instance in the cluster.
Syntaxdrop xpserver
Examples
• Drop XP Server – Drops the XP Servers for “mycluster”:
drop xpserverAre you sure you want to drop the XP Servers from cluster mycluster"? {Y or N): [N] yThe XP Servers have been dropped for all instances.
Usage
Use drop xpserver to drop an XP Server from the cluster.
exitExits the sybcluster utility.
Syntaxexit
Usage
exit and quit both exit the sybcluster utility.
If some agents have been shut down while connected to sybcluster, Adaptive Server maydisplay error messages describing the connections. You can ignore these messages.
See also• quit on page 273
CHAPTER 8: Interactive sybcluster Commands Reference
Utility Guide 271

helpLists the currently available sybcluster interactive commands.
Syntaxhelp
Usage
The list of currently available interactive commands changes depending on whether or notsybcluster is connected to a cluster.
localizeDisplays the current values for default language, charset, and sort order. Allows modificationof default values, and addition or removal of languages.
Syntaxlocalize
Examples
• Display default localization avlues – Displays default localization values, and thenprompts for changes. The default language changes to Chinese, the default charset toeucgb, and the default sort order to bin_eucgb:
localizeCurrent default locale properties are:Default Language - portugueseDefault Charset - macDefault SortOrder - Binary ordering, for use with the Macintosh charcterset(mac).
Options for default Language are:1. spanish2. portuguese3. german4. us_english5. thai6. french7. japanese8. chinese9. korean10. polishEnter the number representing the language to be set as defaults:
CHAPTER 8: Interactive sybcluster Commands Reference
272 Adaptive Server Enterprise

[2] 8
Options for default charsets are:1. gb180302. eucgb3. uttf8Enter the number representing the charset to be set as default: [1] 2
Options for sort orders are:
1. Binary ordering, for the EUC GB2312-80 character set (eucgb).Enter the number representing the sort order to be set as default [1]
Do you want to install any language? [Y] nDo you want to remove any language? [N ]The cluster mycluster was successfully localized with default languagechinese, charset eucgb, sortorder bin_eucgb
Usage
• The current default localization value displays after each prompt. To accept the currentvalue, enter a carriage return instead of a number.
• The options for default languages include all languages present in $SYBASE_ASE. If theselected default language is not configured, use localize to configure it or remove it.
• To ensure that new values are consistent for all instances in the cluster, restart the clusterafter changing localization values.
quitExits the sybcluster utility.
Syntaxquit
Usage
exit and quit both exit the sybcluster utility.
See also• exit on page 271
CHAPTER 8: Interactive sybcluster Commands Reference
Utility Guide 273

set backupserverChanges the listening port number for Backup Server on specified nodes in a cluster.
Syntaxset backupserver
Examples
• Change the listening port number for Backup Server – Changes the listening portnumber for Backup Server on “blade1” of “mycluster”:
set backupserverBackup Server is configured on the following nodes: 1. blade1: 3001 2. blade2: 3002 3. blade3: 3003Do you want to change the Backup Server port on any node? {Y}Enter the number representing the node whose port you want to change: 1Enter the Backup Server port number for node "blade1":4001Backup Server was successfully modified as per new properties.
• Change the listening port number for one or more Backup Servers – When“mycluster” has been configured for multiple Backup Servers, changes the listening portnumber for one or more Backup Servers:
set backupserverMultiple Backup Servers are configured for the cluster. Their configuration is as follows:Backup Server Policy: Dedicated1. Backup Server name: ase1_BS Configured for blade1:23001 Log file location: /remote/sybase/ASE-15_0/install/ase1_BS.log2. Backup Server name: ase2_BS Configured for blade2:23002 Log file location: /remote/sybase/ASE-15_0/install/ase2_BS.log3. Backup Server name: ase3_BS Configured for blade3:23003 Log file location: /remote/sybase/ASE-15_0/install/ase3_BS.log
Do you want to edit any Backup Server (y/n)? [Y]Enter the number representing the Backup Server you want to edit: [1]Enter the new port for Backup Server "ase1_BS":24001Do you want to edit any more Backup Servers? [N]
Backup Server "ase1_BS" successfully updated.
CHAPTER 8: Interactive sybcluster Commands Reference
274 Adaptive Server Enterprise

Usage
When you set a new listening port number, Adaptive Server first checks to see if that portnumber is already in use.
set clusterChanges configuration values for the cluster.
The cluster must be down to execute all set cluster commands except set cluster login.
Syntaxset cluster { maxinst max_num_instances | traceflags trace_flag[, trace_flag[,...]] | { primary | secondary } protocol udp | login login_name [password password ] }
Parameters
• maxinst max_instances – specifies the maximum number of instances that can run in thecluster.
• traceflags trace_flag[, trace_flag[,...] – specifies trace flags to be set when the clusterstarts.
• login login_name [password password] – specifies a user name and password that theUnified Agent uses to log in to the cluster and perform shutdown and certain other tasks.
Note: You can only use set cluster login to change the login or password that the UnifiedAgent uses to log in to the cluster. To change the login or password sybcluster uses to login to the Unified Agent, use the Agent Management Console Sybase Central plug-in.
• { primary | secondary } protocol udp – sets the protocol for the private network for theprimary or secondary interface.
Examples
• Change the maximum number of instances – Changes the maximum number ofinstances to 4 for “mycluster”:set cluster maxinst 4
• Add a trace flag – Adds the trace flag 15506:set cluster traceflags 15506
• Change the password – Changes the password for the “sa” user name:set cluster login sa password abcde
CHAPTER 8: Interactive sybcluster Commands Reference
Utility Guide 275

Usage
To check that the cluster is down, enter show cluster status.
Permissions
The login for login login_name [password password] must have sa_role. By default, theUnified Agent uses the “sa” login with no password. To change this password, use set clusterlogin.
See also• set cluster on page 275
• show cluster on page 280
set instanceSets properties of the instance. The instance must be down.
Syntaxset instance instance_name {logpath path | startargs values | {primary | secondary} port port_range | {primary | secondary} address ip_address}
Parameters
• logpath logfile_path – specifies the path for the instance log file.• instance_name – specifies an instance.• startargs startup_args – specifies arguments for starting the instance.• { primary | secondary } address ip_address – specifies the primary or secondary IP
address for the instance.• { primary | secondary } port port_range – specifies the primary or secondary port range
for the instance. The format for port_range is start_num end_num.
Examples
• Change the port range – Changes the port range for the primary interface listening port:set instance primary port 7777
Usage
To check that the instance is down, enter show cluster status.
CHAPTER 8: Interactive sybcluster Commands Reference
276 Adaptive Server Enterprise

See also• show cluster on page 280
set xpserver portChanges the listening port number for XP Server on specified nodes of the cluster.
Syntaxset xpserver port
Examples
• Example 1 – Changes the listening port for the XP Server for instance “ase1” on “blade1”of “mycluster” without changing the listening ports for “ase2” and “ase3”:
set xpserver portEnter the XP Server port number for instance "ase1" [3002]: 4002Enter the XP Server port number for instance "ase2" [3002]: <CR>Enter the XP Server port number for instance "ase3" [3002]: <CR>
Usage
You can change the XP Server listening port number on one or more instances.
show agentsDisplays information about available UAF agents.
Syntaxshow agents [ login login_name ] [ password password ] [ agent “agent_spec[, agent_spec[,...]]” ] [ discovery “discovery_spec[, discovery_spec[,...]]” ]
Parameters
• login login_name – is the management agent login for the Sybase Common SecurityInfrastructure in the Unified Agent framework.
The default user name after installation is “uafadmin” with no password; this is the SimpleLogin Module in the Agent configuration. You can configure the user name and passwordto use several different mechanisms for authentication and authorization, includingoperating system logins.
CHAPTER 8: Interactive sybcluster Commands Reference
Utility Guide 277

• password password – is the management agent password for the Sybase CommonSecurity Infrastructure in the Unified Agent framework.
The default user name after installation is “uafadmin” with no password; this is the SimpleLogin Module in the Agent configuration. You can configure the user name and passwordto use several different mechanisms for authentication and authorization, includingoperating system logins.
• agent agent_spec – is the agent specification that identifies the nodes in the clusterrunning a Unified Agent, and the port number that sybcluster uses to connect to theUnified Agent.
The format is “node_name:port_number [, node_name:port_number ] [,...]]”. Thedefault port number is “9999.”
• discovery discovery_spec – is the discovery method used to identify the agentsresponsible for the requested cluster.
The format is “method[(method_specification)] [, ( method_specification ) [,...]]”. Seethe description for sybcluster -d discovery_list for more information about discoverymethods.
Examples
• Display UAF agent information –show agentsAgent Information: service:jmx:rmi:///jndi/rmi://blade1:9985/agent-----------------------------------------------------
Node Name: blade1Agent Port: 9985Agent Version: 2.5.0Agent Build: 977
OS Name: LinuxOS Version: 2.6.9-42.ELsmpOS Architecture: amd64
Agent Service Info:
Agent Service (Agent) Build: 977 Status: running BootstrapService (BootstrapService) Build: <unavailable> Status: running Configuration Service (ConfigService) Build: 977 Status: running Deployment Service (DeploymentService) Build: <unavailable> Status: running Environment Service (EnvironmentDiscoveryService) Build: 977 Status: running File Transfer Service (FileTransferService) Build: 977 Status: running Plugin Registration Service (PluginRegisterService) Build:
CHAPTER 8: Interactive sybcluster Commands Reference
278 Adaptive Server Enterprise

977 Status: running RMI Service (RMIService) Build: 977 Status: running Remote Shell Service (RemoteShellService) Build: 977 Status: running SecurityService (SecurityService) Build: 977 Status: running Self Discovery Service (SelfDiscoveryService) Build: 977 Status: running Service Registration Service (ServiceRegistrationService) Build: 977 Status: running Session Service (SessionService) Build: 977 Status: running Sybase Home Service (SybaseHomeService)Build: 14 Status: running
Agent Plugin Info:
ASE Cluster Agent Plugin (com.sybase.ase.cluster) Version: 15.1.0 Build: 85 Instance:1 Status: running Cluster Name: marion Env Shell: /job1/miso/betaR1/SYBASE.sh Shell Type: sh Sybase Home: /job1/miso/betaR1 ASE Home: /job1/miso/betaR1/ASE-15_0 ASE Version: Adaptive Server Enterprise/15.0.1/EBF 14721 ClusterEdition/B/x86_64/Enterprise Linux/asecluster3/2360/64-bit/FBO/Fri Jul 20 10:04:16 2007 ASE Login: sa Update Time: 60 seconds Last Update: 2007-09-28 22:09:02 -0700
Usage
show agents is active before you connect to a cluster.
show backupserver configDisplays the nodes on which Backup Server is configured, the associated listening portnumbers, and the Backup Server policy.
Syntaxshow backupserver config
Examples
• Display configuration information – Displays configuration information for“mycluster,” which has been configured for multiple Backup Servers.
show backupserver configMultiple Backup Servers are configured for cluster. Their
CHAPTER 8: Interactive sybcluster Commands Reference
Utility Guide 279

configuration isas follows:Backup Server policy: Dedicated1. Backup Server for ase1: ase1_BS Configured on (host:port) - blade1:230012. Backup Server for ase2: ase2_BS Configured on (host:port) - blade2:23002
3. Backup Server for ase3: ase3_BS Configured on (host:port) - blade3:23003
Usage
• Use the show backupserver config command to display Backup Server configurationinformation.
• If you are configuring multiple Backup Servers, show backupserver config includes theBackup Server policy.
show clusterDisplays configuration, log, and status information about the cluster.
Syntaxshow cluster config template log [errors] [minseverity severity_level] [startdate [date_string]] [enddate [date_string]] [last number_of_lines] status
Parameters
• status – displays status information for the cluster. Values are:
• Up
• Down
• Undefined
• Invalid
• Start
• Init
• Quiesce
• log – displays logs from all instances in the cluster.
CHAPTER 8: Interactive sybcluster Commands Reference
280 Adaptive Server Enterprise

• errors [ minseverity severity_level ] – display log file entries for errors. (Optional) Limitsdisplayed error entries to a severity level and above.
Note: Error severities_level is an attribute of Adaptive Server error messages, notsybcluster messages.
• startdate [date_string ] – display log file entries that occur on and after the date specified.The format for date_string is: mm:dd:yy.
If you do not specify a startdate or enddate date_string, the default is the current date(today).
• enddate [ date_string ] – display log file entries that occur on or before the date specified.• last num_lines – limits the number of lines displayed, counting backward from the last
line in the log files.• config – displays configuration information for the cluster:
• Maximum number of instances• Installation mode: shared or private• Primary and secondary protocols• Trace flags set• Location and name of the quorum device• LDAP information, if LDAP is configured• Location and name of the master device
• template – displays formatted configuration information for the cluster.
Examples
• Display current information – Displays current configuration and other informationabout the default cluster:
show cluster statusId Name Node State Heartbeat-----------------------------------------1 ase1 blade1 Up Yes2 ase2 blade2 Up Yes3 ase3 blade3 Down No
• Display configuration information for a cluster configured for shared installationmode – Displays configuration information—including LDAP, if it is configured—for thedefault cluster configured for shared installation mode:
show cluster config**Cluster configuration for "mycluster" ** Installation Mode shared Interfaces Path "/work2/sybase/ASE-15_0/" Trace Flags: 15556 Maximum Instances "4" Quorum "/dev/raw/raw101"
CHAPTER 8: Interactive sybcluster Commands Reference
Utility Guide 281

Master Device "/dev/raw/raw102" logfile ase1 /work2/sybase/ASE-15_0/install/ ase1.log run_parameters ase1 null logfile ase2 /work2/sybase/ASE-15_0/install/ ase2.log run_parameters ase2 null
Primary Interconnect "udp" Server[1]ase1 tigger.sybase.com 26016 26031 Server[2]ase2 christopher.sybase.com 26032 26047Secondary Interconnect "udp" Server[1]ase1 tigger.sybase.com 26081 26096 Server[2]ase2 christopher.sybase.com 26097 26112
• Display configuration information for a cluster configured for private installationmode – Displays configuration information for the default cluster configured for privateinstallation mode:
show cluster config**Cluster configuration for "localcluster" ** Installation Mode "private" Trace Flags: There are no trace flags Maximum Instances "4" Quorum "/dev/raw/raw101" Master Device "/dev/raw/raw102" logfile ase1 /remote/work2/sybase/ASE-15_0/install/ase1.log run_parameters ase1 null logfile ase2 /work2/sybase/ASE-15_0/install/ase2.log run_parameters ase2 null
Primary Interconnect "udp" Server[1]ase1 tigger.sybase.com 26016 26031 Server[2]ase2 christopher.sybase.com 26032 26047Secondary Interconnect "udp" Server[1]ase1 tigger.sybase.com 26081 26096 Server[2]ase2 christopher.sybase.com 26097 26112LDAP server blade1 2250
Usage
show cluster status displays the results of a show instance command on each instance in thecluster.
See also• show instance on page 283
CHAPTER 8: Interactive sybcluster Commands Reference
282 Adaptive Server Enterprise

show instanceDisplays information about an instance.
Syntaxshow instance [instance_name ] { config | status | log [ [ errors ] minseverity severity_level ] | [ startdate [ date_string ]] | [enddate [ date_string ]] | [ last num_lines ] ] }
Parameters
• instance_name – specifies a unique name for an instance in the cluster.• status – displays status information for the instance. Values are:
• Up
• Down
• Undefined
• Invalid
• Start
• Init
• Quiesce
• log – displays the instance log.• errors [ minseverity severity_level ] – displays log file entries for errors. (Optional)
Limits displayed error entries to a severity level and above.
Note: Error severities_level is an attribute of Adaptive Server error messages, notsybcluster messages.
• startdate [ date_string ] – displays log file entries that occur on and after the datespecified. The format for date_string is: mm:dd:yy.
If a startdate or enddate date_string is not specified, date_string defaults to the currentday.
• enddate [ date_string ] – displays log file entries that occur on or before the date specified.The format is: mm:dd:yy.
• last num_lines – Limits the number of lines displayed, counting backwards from the lastline in the log file.
CHAPTER 8: Interactive sybcluster Commands Reference
Utility Guide 283

Examples
• Display information about “ase1” –show instance ase1 statusId Name State------------------------1 ase1 Down
• Display configuration information for “ase1” –show instance ase1 configInstance: ase1 at blade6:25001
Private Primary Network Address: blade1 Port Range: 2541 - 2556 Sybase home: /sybase/sybase_sdc ASE home: /sybase/sybase_sdc/ASE-15_0 Config file: /sybase/sybase_sdc/ase1.cfg
Private Secondary Network Address: blade1 Port Range: 2557 - 2572
Log Path: /blade1/sybase/ ASE-15_0/install/mycluster_ase1.log
Usage
• show instance status displays one of seven different states for the named instance:• Down
• Init
• Invalid
• Quiesce
• Start
• Undefined
• Up
• show instance config includes this information when the installation mode is private:• The $SYBASE path• The ASE path• The server configuration file path
CHAPTER 8: Interactive sybcluster Commands Reference
284 Adaptive Server Enterprise

show membership modeDisplays the cluster’s current membership mode. Membership mode specifies whether or notVeritas Cluster Integration is supported on the current cluster.
Syntaxshow membership mode
Usage
Values for show membership mode are:
• vcs – VCS is supported for the current cluster.• native – VCS is not supported for the current cluster.
If the cluster is running in VCS membership mode, make sure you shut down or start upservers and the cluster using VCS shut-down and start-up mechanisms.
show sessionDisplays current discovery and agent information.
Syntaxshow session
Examples
• Display agent status information –show sessionSession information------------------
Sybase sybcluster Command Line Utility/15.0.1/CE GA 2/S/jdk1.4.2/sybclustermain/129/Mon Aug 13 09:59:51 PDT 2007Connected Cluster: myclusterDefault Cluster: Default Instance:
Agent Specifications: [1]: oddjob:7171
Discovery Specifications:
Agent Connections: 1
Connection[1] URL: rmi://oddjob:7171 Node
CHAPTER 8: Interactive sybcluster Commands Reference
Utility Guide 285

Name: oddjob1 Agent Port: 7171 Agent Version: 2.5.0 Agent Build: 980 OS Name: Linux OS Version: 2.6.9-42.ELsmp OS Architecture: amd64
Agent Service Info: Agent Service (Agent) Build:980 Status:running BootstrapService (BootstrapService) Build: <unavailable> Status: running Configuration Service (ConfigService) Build: 980 Status: running Deployment Service (DeploymentService) Build: 19 Status: running Environment Service(EnvironmentDiscoveryService) Build: 980 Status: running File Transfer Service (FileTransferService) Build: 980 Status: running Plugin Registration Service (PluginRegisterService) Build:980 Status: running RMI Service (RMIService) Build: 980 Status: running Remote Shell Service (RemoteShellService) Build: 980 Status: running Security Service (SecurityService) Build: 980 Status: running Self Discovery Service (SelfDiscoveryService) Build: 980 Status: running Service Registration Service (ServiceRegistrationService) Build: 980 Status: running Session Service (SessionService) Build: 980 Status: running
Sybase Home Service (SybaseHomeService) Build: 14 Status: running
Agent Plugin Info:
ASE Cluster Agent Plugin(com.sybase.ase.cluster) Version: 15.0.1 Build: 129 Instance: 1 Status: running Cluster Name: mycluster Env Shell: /oddjob1/work2/ sybase_sybclustermain_mycluster_vu/SYBASE.sh Shell Type: sh Sybase Home: /oddjob1/ work2/sybase_sybclustermain_mycluster_vu ASE Home: /oddjob1/work2/ sybase_sybclustermain_mycluster_vu/ASE-15_0 ASE Version: Adaptive Server Enterprise/ 15.0.1/EBF 14721 Cluster Edition/B/x86_64/ Enterprise Linux/asecluster3/2381/64-bit/
CHAPTER 8: Interactive sybcluster Commands Reference
286 Adaptive Server Enterprise

FBO/Mon Nov 12 07:44:23 2007 ASE Login: sa Update time: 300 seconds Last Update: 2007-11-13 15:27:39 -0800
Usage
Use the sybcluster show session command to view information about the current cluster.
show xpserverDisplays the XP Server name and listening port number, node name, and instance nameconfigured on each node.
Syntaxshow xpserver
Examples
• Display XP Server configuration information – Displays the XP Server name, listeningport number, node name, and instance name:
show xpserver config**XP Server configuration for the cluster**---------------------------------------------------XPServer Name Port Host Node---------------------------------------------------ase1_XP 4010 blade1 ase1ase2_XP 4011 blade2 ase2ase3_XP 4012 blade3 ase3
Usage
Use the sybcluster show xpserver command to view information about XP Server.
shutdown clusterShuts down the cluster by executing a Transact-SQL shutdown command for each instance inthe cluster’s instance list, in the order specified in the cluster configuration file.
Syntaxshutdown cluster [nowait]
CHAPTER 8: Interactive sybcluster Commands Reference
Utility Guide 287
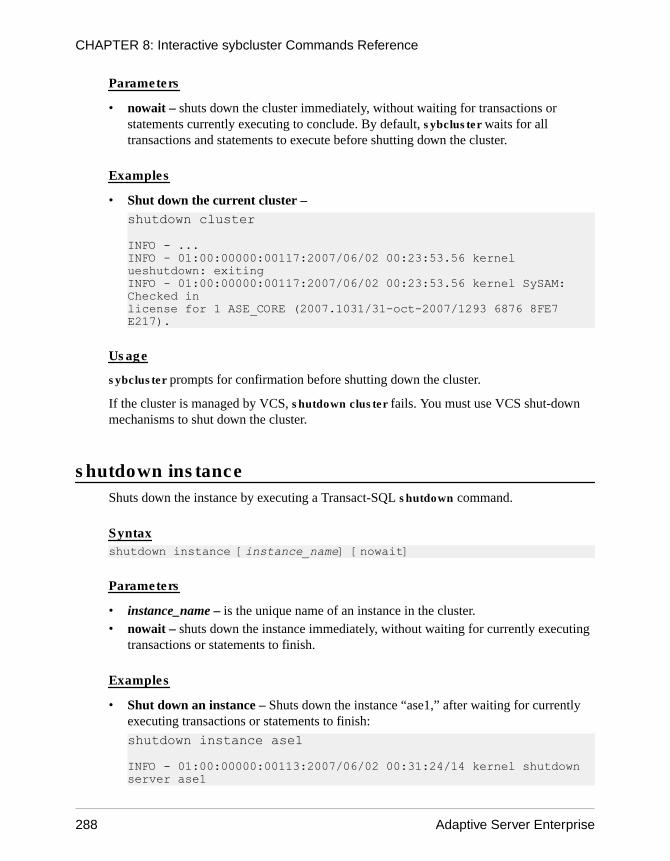
Parameters
• nowait – shuts down the cluster immediately, without waiting for transactions orstatements currently executing to conclude. By default, sybcluster waits for alltransactions and statements to execute before shutting down the cluster.
Examples
• Shut down the current cluster –shutdown cluster INFO - ...INFO - 01:00:00000:00117:2007/06/02 00:23:53.56 kernel ueshutdown: exitingINFO - 01:00:00000:00117:2007/06/02 00:23:53.56 kernel SySAM: Checked inlicense for 1 ASE_CORE (2007.1031/31-oct-2007/1293 6876 8FE7 E217).
Usage
sybcluster prompts for confirmation before shutting down the cluster.
If the cluster is managed by VCS, shutdown cluster fails. You must use VCS shut-downmechanisms to shut down the cluster.
shutdown instanceShuts down the instance by executing a Transact-SQL shutdown command.
Syntaxshutdown instance [instance_name] [nowait]
Parameters
• instance_name – is the unique name of an instance in the cluster.• nowait – shuts down the instance immediately, without waiting for currently executing
transactions or statements to finish.
Examples
• Shut down an instance – Shuts down the instance “ase1,” after waiting for currentlyexecuting transactions or statements to finish:
shutdown instance ase1INFO - 01:00:00000:00113:2007/06/02 00:31:24/14 kernel shutdown server ase1
CHAPTER 8: Interactive sybcluster Commands Reference
288 Adaptive Server Enterprise

INFO - 01:00:00000:00113:2007/06/02 00:31:24/14 Server SHUTDOWN by request.INFO - 01:00:00000:00113:2007/06/02 00:31:24/14 ASE is terminating this processINFO - 01:00:00000:00113:2007/06/02 00:31:24/14 shut down local cluster server.INFO - 01:00:00000:00113:2007/06/02 00:31:24/14 kernel coordinator to be shutdown, newcoo is 0.INFO - 01:00:00000:00113:2007/06/02 00:31:24/14 kernel Single server cluster.INFO - 01:00:00000:00113:2007/06/02 00:31:24/14 kernel cipcnode_down(): Node 1 down event.INFO - 01:00:00000:00113:2007/06/02 00:31:24/14 server ASE shutdown by request.INFO - 01:00:00000:00113:2007/06/02 00:31:24/14 kernel ueshutdown: exitingINFO - 01:00:00000:00113:2007/06/02 00:31:24/14 kernel SySAM: Checked in license for 1 ASE_CORE (2007.1031.31-oct-2007/1293 6876 8FE7 E 217).
Usage
• Shutting down the last instance in a cluster also shuts down the cluster.• sybcluster prompts for confirmation before shutting down the instance.• If the cluster is managed by VCS, shutdown instance fails. You must use VCS shut-down
mechanisms to shut down the instance.
start clusterStarts all instances in the cluster.
Syntaxstart cluster
Examples
• Start the current cluster –start cluster INFO - [cluster boot log]...
INFO - 02:00:00000:00002:2007/06/02 00:21:53.56 server 'ase1' (ID=1).INFO - 02:00:00000:00002:2007/06/02 00:21:53.56 server Master device size:80 megabytes, or 40960 virtual pages.
CHAPTER 8: Interactive sybcluster Commands Reference
Utility Guide 289

Usage
Connect to the cluster before starting it.
start instanceStarts an instance.
Syntaxstart instance [instance_name] [unlock]
Parameters
• instance_name – specifies a unique name for an instance in the cluster.
If you do not enter a cluster name, sybcluster uses the instance specified in the sybclustercommand line or specified with the use command.
• unlock – removes the lock from a cluster that was terminated unexpectedly. The clustermust be down before using unlock.
Warning! Do not use the unlock parameter unless you have verified that all instances inthe cluster are shut down.
Usage
The instance must be down to use start instance unlock.
upgrade serverUpgrades a nonclustered Adaptive Server to the Adaptive Server Cluster Edition, and creates acluster with a single instance.
You can perform the upgrade by answering prompts at the command line or via an input file.
See the Adaptive Server Cluster Edition installation guide for your platform for upgradeinformation.
Syntaxupgrade server server_name [ login login_name ] [ password password ] [ agent agent_spec ] [ discovery discovery_spec ] [ file input_file_name ] [ checkonly ]
CHAPTER 8: Interactive sybcluster Commands Reference
290 Adaptive Server Enterprise

Parameters
• server_name – is the name of the non-clustered Adaptive Server.• login login_name – is the management agent login for the Sybase Common Security
Infrastructure in the Unified Agent framework.
The default user name after installation is “uafadmin” with no password; this is the SimpleLogin Module in the Agent configuration. You can configure the user name and passwordto use several different mechanisms for authentication and authorization, includingoperating system logins.
• password password – is the management agent password for the Sybase CommonSecurity Infrastructure in the Unified Agent framework.
The default user name after installation is “uafadmin” with no password; this is the SimpleLogin Module in the Agent configuration. You can configure the user name and passwordto use several different mechanisms for authentication and authorization, includingoperating system logins.
• agent agent_spec – is the agent specification that identifies the node in the cluster runninga Unified Agent, and the port number that sybcluster uses to connect the Unified Agent.
When upgrading a non-clustered Adaptive Server, there is only one node. The format foragent_spec is “node_name:port_number”. The default port number is “9999.”
• discovery discovery_spec – is the discovery method used to identify the agentsresponsible for the requested cluster.
The format is “method[(method_specification)] ”. See the description for sybcluster -d
discovery_list for more information about discovery methods.• file file_name – is the input file containing values required for upgrading the server.• checkonly – performs a check run of the non-clustered Adaptive Server to determine its
readiness for upgrade.
Examples
• Upgrade “myserver” to the Cluster Edition –upgrade serverEnter the name of the cluster: new_clusterEnter the existing Sybase installation directory for server myserver:Enter the name of the subdirectory containing the ASE installation for server myserver:Enter the name of the subdirectory containing the OCS installation for server myserver:Enter the name of an sa login on server exit: [sa]Enter a password:Cluster new_cluster - Enter the maximum number of instances: [4]Verifying the supplied agent specifications... 1>tigger 9999 2.5.0 LinuxEnter the number representing the cluster node 1 [1]
CHAPTER 8: Interactive sybcluster Commands Reference
Utility Guide 291

Will this cluster be configured using private SYBASE installations? (Y/N)...
The information required to upgrade a server or create a cluster are the same.
Usage
upgrade server prompts for these values:
• The Sybase installation directory of the non-clustered Adaptive Server.• The release home directory of the non-clustered Adaptive Server.• The Open Client home directory of the non-clustered Adaptive Server.• The installation mode, private or shared.• If sybcluster detects a VCS subsystem, asks if you want to include VCS integration with
the cluster.• If you have not configured LDAP, the path to the interfaces file.• The name of the first instance in the cluster.• Other values as required to create a cluster.
The checkonly option does not perform any upgrade steps, but instead check the server’sreadiness for upgrade. Resolve the error conditions checkonly finds before performing theupgrade.
See also• create cluster on page 261
useSpecifies the default instance.
Syntaxuse instance_name
Usage
use overrides the instance name specified in the sybcluster command line.
CHAPTER 8: Interactive sybcluster Commands Reference
292 Adaptive Server Enterprise

CHAPTER 9 Migrating Data Using sybmigrate
sybmigrate is the migration tool used to migrate data from one server to another.
By default, sybmigrate migrates encrypted columns in ciphertext format. This avoids theoverhead of decrypting data at the source and encrypting at the target. In some cases,sybmigrate chooses the reencrypt method of migration, decrypting data at the source andencrypting at the target.
Note: When migrating from one Adaptive Server to another more recent version of AdaptiveServer, you must specify the size and location of a work database on the target server.
The sybmigrate utility:
• Aids users in changing the page sizes of their database applications.• Provides a manageable and smooth migration process.• Allows customers to take advantage of the variable page size feature for existing databases
with user data, thus realizing the full benefit of Adaptive Server versions 12.5 and later.
What sybmigrate DoesDuring the set-up portion of the migration process, sybmigrate migrates following server datato the target Adaptive Server:
• Remote servers• Logins• Login attributes• Server roles• Login roles• Role attributes• Users• Alternate users• Roles• Permissions• Remote logins• External login attributes• Timer• Resource limits• Replication attributes• Display level attributes
Utility Guide 293

• User messages in the master database
• Java classes in the master database
• JAR files in the master database
• Proxy objects
During the migration portion of the migration process, sybmigrate migrates followingdatabase-specific data to the target database:
• Defaults• User-defined datatypes• Rules• User tables• User table data• Views• Triggers• Indexes• Stored procedures• Extended stored procedures• Users• Logins• Roles• Remote servers
• Database data• Users• Alternate users• Roles• Role attributes• Permissions• User messages• Java classes• JAR files
• Defaults• Rules• User-defined types• Tables• Indexes• Referential constraints• Views• Stored procedures• Triggers
CHAPTER 9: Migrating Data Using sybmigrate
294 Adaptive Server Enterprise

What sybmigrate Does Not DoThe sybmigrate utility does not perform all tasks. Migrate these items manually.
• Migrate/downgrade databases from a higher version level. For example, you cannot usesybmigrate to downgrade Adaptive Server version 15.7 to an earlier version, such as 15.5.
• Table-level lock promotion attributes• User-defined thresholds• Abstract plan definitions maintained in sysqueryplans• All system databases except the model database
• Any required database options like cache binding, recovery order, and the associated logI/O size as specified by sp_logiosize
• Proxy databases• Engine groups• Engine bindings• Execution classes• Cache configurations• Auditing tables and auditing configuration• Server-wide row-lock promotion settings• Access rules
Note: Drop access rules before beginning data migration; they can prevent the DatabaseOwner from accessing all rows in a table, which prevents complete data migration.
• Compiled objects with hidden SQL text• User-defined segments• Constraints are migrated but when they are bound by name to user-defined message
numbers, the bindings must be re-created manually• Settings for objects such as ascinserts, indextrips, oamtrips, datatrips,
and sortbufsize created using dbcc tune
• Device definitions• SQLJ functions• Proxy tables for external files• Audit options and audit events• Server configuration• Database suspect threshold• Recovery orders
CHAPTER 9: Migrating Data Using sybmigrate
Utility Guide 295

Before You Beginsybmigrate requires JRE 1.4, jConnect™ for JDBC™ 6.0, ddlgen components, andComponent Integration Services in the source Adaptive Server.
sybmigrate is installed as part of the Adaptive Server software. For information about how toinstall Adaptive Server, see the installation guide for your platform.
Because sybmigrate requires a server-to-server connection, two Adaptive Servers must berunning. Make sure that you have the appropriate licenses.
Before you begin the migration process, create databases, devices, and segments on the targetAdaptive Server. Server and cache configurations must also be already installed on the targetAdaptive Server.
Use ddlgen to extract the corresponding scripts from the source Adaptive Server, and modifythem as needed before applying them to the target Adaptive Server.
See also• ddlgen on page 45
PermissionsThe System Administrator login is needed for the setup portion of the migration process. Forthe remainder of the process, the login must have “sa_role” and “sso_role” privileges to runsybmigrate.
Changing Target Login AccountsOnce you have migrated between different platforms, login passwords are not compatible.However, sybmigrate allows you to change the password on target Adaptive Server loginaccounts during the setup session of the migration process in either of two ways.
• Let sybmigrate generate a password on the target server. sybmigrate outputs a list ofpasswords used during migration after the process is complete.
• Supply a password file that contains user name and password pairs. sybmigrate sets thesepasswords on the target server. Thereafter, the System Administrator must runsp_password to create a new password for each login not included in the password file.
Note: After the migration process is complete, the System Administrator must changepasswords manually on the target Adaptive Server. The System Administrator must issuesp_password for new login and for each login not reset during the migration process.
In addition to the changing password options, sybmigrate also allows you to lock and unlocktarget Adaptive Server accounts. This option is provided so that the System Administrator canblock a user from logging into the target Adaptive Server during the migration process.
CHAPTER 9: Migrating Data Using sybmigrate
296 Adaptive Server Enterprise

Platformssybmigrate works on both UNIX and Windows platforms.
• For UNIX, the executable file is located in $SYBASE/$SYBASE_ASE/bin/sybmigrate.
• For Windows, the executable file is located in %SYBASE%\%SYBASE_ASE%\bin\sybmigrate.bat.
Environment SettingsThese environment variables must be set correctly. With the exception ofSYBMIGRATE_MEMORY, these environment variables are defined in the SYBASE.csh orSYBASE.sh files that are created during the installation process.
EnvironmentVariable
Description
SYBASE Defines the location of the Sybase release path.
SYBASE_ASE Defines the location of the Adaptive Server component directory.
SYBASE_JRE Defines the location of the Java runtime environment. This is generally set to$SYBASE/shared/jre-1_4 in the Adaptive Server release area.
This environment variable overrides JAVA_HOME. SYBASE_JRE defaultsto $SYBASE/shared/jre142 (UNIX) and %SYBASE%\Shared\Sun\jre142 (Windows).
SYBMI-GRATE_MEMORY
Specifies the amount of memory to be used when invoking the Java virtualmachine (JVM). This environment variable should be specified with a num-ber, which refers to the amount of memory in megabytes. If SYBMI-GRATE_MEMORY is not set, JVM uses the default memory setting of512MB.
Migrating Proxy Tablessybmigrate supports the migration of proxy tables. If you are planning to migrate proxytables, you should do the following before you begin migration.
• Make sure that the remote servers involved in proxy table defintions is present in the targetserver interface file.
• In order to verify the DDL execution time, the remote server has to be accessible when themigration is performed.
CHAPTER 9: Migrating Data Using sybmigrate
Utility Guide 297

Migration processThe goal of sybmigrate is to provide a means to migrate all objects and user data that exist onthe source Adaptive Server. However, when migration takes place, there is some server-widedata that needs to be migrated before any user data or user objects can be migrated toindividual databases.
The hierarchy of objects dictates the order in which objects are re-created. Generally, server-wide objects from the master database are created first. Independent objects like defaultlanguages and character are migrated to the target server before data from individualdatabases.
Overview of the Migration ProcessThe migration procedure consists of configuring the source and target Adaptive Servers,setting up the migration paths, migrating objects, and validating the migrated objects.
The setup session establishes the migration paths from the source database to the targetdatabase. The setup creates the repository database and the work databases, and registers theoption to migrate the server data. The setup session can only be executed by an “sa” login.
The migrate session is used to migrate objects and data from the source database to the targetdatabase.
The validate session validates the migrated objects. Validation ensures the integrity of dataand objects that have been successfully migrated from the source database to the targetdatabase.
sybmigrate does not migrate an archive database if an entire installation is being migrated.
sybmigrate migrates an archive database only if the archive database is specifically selectedfor migration. When you migrate an archive database to a target server, sybmigrateautomatically creates a traditional database—rather than an archive database—on the targetserver.
Pre-migration ConsiderationsYou must have the source Adaptive Server and the target Adaptive Server runningconcurrently when you migrate data from one to the other.
sybmigrate assumes that the target Adaptive Server has been installed and configured prior todata migration. Use srvbuild or syconfig to create a new Adaptive Server with the requiredlogical page size.
Keep the following items in mind prior to migration, when you are creating the target AdaptiveServer and configuring the source Adaptive Server:
CHAPTER 9: Migrating Data Using sybmigrate
298 Adaptive Server Enterprise

• sybmigrate requires allow resource limits to be set to 0.• If metadata already exists on the target server, you cannot migrate server data.• When you create a new Adaptive Server with a different logical page size into which you
want to migrate data, you must adequately adjust the size of the database on the targetAdaptive Server to accommodate the inbound data. If you are migrating data to anAdaptive Server with a larger logical page size, this is especially important.Use the space estimation report, space_est, to determine how much space is available onyour target database.
• To speed the migration process, you can run multiple sessions of sybmigrate within thesame server. However, running more than one session of sybmigrate on the same sourceand target database path is not allowed.
• You must manually create segments on the target database before migrating tables andindexes.
• The data transfer rate for sybmigrate is configured through CIS bulk insert array size. Thedefault configuration for CIS bulk insert array size is 50 rows. This means that as many as50 rows of data are buffered by CIS before being transferred to the target Adaptive Server.To increase throughput, increase the configuration of CIS bulk insert array size to a largervalue.However, increasing CIS bulk insert array size causes the source Adaptive Server to usememory from the operating system for local buffers. This can lead to excessiveconsumption of operating system memory.SAP recommends that if you do choose to increase the CIS bulk insert array size defaultvalue, you do so modestly. See the CIS documentation for more information.
• CIS bulk insert array size has no effect on data throughput if the table being transferred hasa text, image, or Java ADT column. When a table has a text, image, or JavaADT column in it, all data is migrated one row at a time, for the duration of the migration ofthat particular table. Also, no array buffering takes place.
• As the data migration is being done using CIS bulk transfer, the value for the configurationparameter CIS packet size on the source Adaptive Server can affect the speed of the datatransfer. The recommended value for CIS packet size on the source Adaptive Server is thelogical page size (2K, 4K, 8K, or 16K) of the target Adaptive Server.
• max packet size allowed on the target Adaptive Server should match the value of CISpacket size on the source Adaptive Server.For more information on max packet size allowed, see the System AdministrationGuide.
• To maximize the performance of sybmigrate, increase the additional network memoryconfiguration parameter on the target Adaptive Server to a value larger than the default.For more information on additional network memory, see the System AdministrationGuide.
• All the above considerations affect the max memory configuration parameter. Beforemigrating your data, make sure that max memory is set to a sufficiently large value.
• There are three types of data that are migrated: server data, database data, and user objects.To migrate metadata (the server and database data), the target Adaptive Server must be
CHAPTER 9: Migrating Data Using sybmigrate
Utility Guide 299
newly installed so that the migrated metadata does not conflict with any residual data fromprevious usage.If you are migrating only user objects, you can use a previously used Adaptive Server. Foruser data however, the target tables must be empty.
• Before migrating data, create the databases into which you want to migrate data on thetarget Adaptive Server. The databases should have the same name that they have on thesource Adaptive Server.
• To enable conversion of character sets that do not have an internal Adaptive Serverconversion routine, configure the target Adaptive Server with enable unicodeconversions set to 1.
• Determine the size of the named caches and buffer pools on the target Adaptive Server.sybmigrate does not migrate cache configurations. You can use the information that isgenerated by ddlgen and apply it to the target Adaptive Server, or you can choose toconfigure larger amounts of memory, in light of the larger page size being used.However, sybmigrate migrates cache bindings, therefore if the required cache is not in thetarget Adaptive Server, warnings are generated in the migration log.
• Before running sybmigrate, you must install the desired languages on the target AdaptiveServer. The default language should be the same on the source and the target AdaptiveServer.If there are user messages on the source Adaptive Server that are not installed on the targetAdaptive Server, sybmigrate aborts user message migration and reports an error.
• If you are migrating Java columns, you must enable Java on the source and target AdaptiveServer prior to migration. Enter:sp_configure 'enable java', 1
• To complete the migration, the source and target Adaptive Servers must have differentlocal server names. Set the local server name, and then restart the servers for the change totake effect.
• To migrate an Adaptive Server using single-byte character sets to an Adaptive Server usingmultibyte character sets (utf8):1. Use sybmigrate to migrate to a server using the same, single-byte character set.2. Change the character set to multibyte after migration is complete.sybcluster cannot migrate data directly from an Adaptive Server using single-bytecharacter sets to an Adaptive Server using multibyte character sets.
See also• sybmigrate on page 148
CHAPTER 9: Migrating Data Using sybmigrate
300 Adaptive Server Enterprise

Configuration and Tuning for Higher PerformanceDepending upon your server resources, you can configure sybmigrate and Adaptive Serverfor optimal performance.
Copy threads and create index threads are used to migrate tables and re-create indexes. Whenyou are configuring sybmigrate during setup mode, the values of COPY_THREADS andINDEX_THREADS can increase the speed at which sybmigrate copies and migrates data.
The number of copy threads controls the number of tables for which data migration is donesimultaneously. One copy thread is assigned to each table. When the thread has successfullycompleted one task, it moves on to another. Depending upon the size of your database and theresources for your Adaptive Server, you can increase the number of copy threads used duringthe migration process to improve performance.
Note: When you are migrating a large number of objects in parallel, check the value ofSYBMIGRATE_MEMORY to verify that there is sufficient memory allocated tosybmigrate.
Index threads control the number of threads used to re-create indexes on the target AdaptiveServer tables. One thread per table is used to re-create the indexes. Once the indexes have beenre-created on a table, the thread proceeds to the next successfully migrated table. Any threadswithout a task exits. The number of create index threads is expected to be substantially smallerthan the number of copy threads.
If you configure INDEX_THREADS to a large number, be sure that the target AdaptiveServer is also configured with a large number of sort buffers. The use of index threads takes upspace in the target database, so make sure that the target database is configured with adequatespace for the designated number of index threads. Also, you must configure the target databasewith extra space if you are going to be re-creating clustered indexes.
Configuration Considerations for Adaptive ServerThere are several configuration parameters on both the source and target Adaptive Server thataffect the performance of the migration process.
Configuration parameters that affect the source Adaptive Server:
Parameter Description
cis packet size Should be equal to max page size of the target Adaptive Server.
number of userconnections
Should be high enough to accommodate the migration of multiple tables simul-taneously according to the value of COPY_THREADS and IN-DEX_THREADS.
max parallel de-gree
Should be set to a value that is larger than the largest number of partitions in asingle table. Data migration is done in parallel, and if max parallel degree is notset to a value large enough to accommodate the partitioned tables, the tables donot migrate.
CHAPTER 9: Migrating Data Using sybmigrate
Utility Guide 301

Parameter Description
number of workerprocesses
Data migration for partitioned tables requires one worker thread per partition.Therefore, if t partitioned tables with p partitions each are migrating simultane-ously, configure a total of t multiplied by p worker threads on the source AdaptiveServer.
cis bulk insertbatch size
Controls the number of rows after which the data transfer transaction is com-mitted. The default value is 0. Using the default value is the safest way to ensuredata integrity while migrating data, but it can result in a large number of page androw locks on the source Adaptive Server. To reduce the number of locks, increasethis value. If you increase the value of cis bulk insert batch size, only a partialdata migration completes if an error occurs during the process. In this situation,manually truncate the target table and restart sybmigrate.
cis bulk insert ar-ray size
Controls the number of rows that are copied in bulk at one time. The default is 50rows per batch. For faster data migration, increase this value. If the table containstext or image columns, the data is transferred one row at a time, regardless ofthe value for cis bulk insert array size.
The following configuration parameters on the target Adaptive Server affect the performanceof sybmigrate:
Parameter Description
max network pack-et size
Should be set to a value that is at least equal to max page size.
number of userconnections
Should be set to accommodate the migration of multiple tables in parallel andpartitioned tables. For parallel data transfer for partitioned tables, worker pro-cesses are required on the source Adaptive Server, but user connections arerequired on the target Adaptive Server. If you are migrating partitioned tables,set the number of user connections on the target Adaptive Server to the samevalue as number of worker processes on the source Adaptive Server.
number of sortbuffers
The default value of 500 is sufficient during the migration process. You canincrease this value when sybmigrate rebuilds the indexes, especially if you aremigrating indexes on partitioned tables.
Possible Errors to AvoidBefore beginning the data migration process, sybmigrate checks for the following errorconditions. If any of these conditions are detected, the migration procedure is aborted.
• A target table with existing data – any attempt to migrate data to a table that alreadycontains data results in the failure of sybmigrate.
• A target table with existing indexes – the presence of indexes on a target table causessybmigrate to operate in slow bcp. Manually drop all indexes before you begin the datamigration.
CHAPTER 9: Migrating Data Using sybmigrate
302 Adaptive Server Enterprise

• Unmatching numbers of partitions on the source and target tables – if the number ofpartitions on the source and target table do not match, the attempt to migrate data fails.sybmigrate only migrates data; it does not redistribute it across partitions.
Auto-select Dependent Objects for Migrationsybmigrate selects dependent objects for migration when you use the auto-select feature.
The auto-select feature checks for the existence of dependent objects, and automaticallymigrates them to the target Adaptive Server. For a successful migration, SAP recommendsthat you use this feature.
Migrating an Archive Databasesybmigrate does not migrate an archive database if an entire installation is being migrated.
sybmigrate migrates an archive database only if the archive database is specifically selectedfor migration. When you migrate an archive database to a target server, sybmigrateautomatically creates a traditional database—rather than an archive database—on the targetserver.
Upgrading an Adaptive Server with an Archive DatabaseYou cannot upgrade an archive database. If you load a database dump from an older version ofAdaptive Server onto an archive database hosted on a newer version of Adaptive Server, thedatabase is not internally upgraded when you execute online database.
If you upgrade an Adaptive Server containing an archive database, all the databases except thearchive databases are upgraded. The archive database remains on the older version ofAdaptive Server.
SAP recommends you reload the archive database with a dump generated from an alreadyupgraded database.
For more information about upgrading Adaptive Server, see the installation guide for yourplatform.
Downgrading an Adaptive Server with an Archive DatabaseWhen you are downgrading to a version of Adaptive Server that does not support archivedatabases, be aware of the following:• If you must downgrade an Adaptive Server containing an archive database to a version of
Adaptive Server that does not support archive databases, SAP recommends you drop thearchive database before you downgrade.To eliminate the new sysaltusages table, drop the scratch database before youperform the downgrade procedure. sysaltuages does not cause any problems if thescratch database is not dropped.
• Backup Server versions 15.0 ESD #2 and later writes a format for compression (with
compression = compression_level) so that the dump can be loaded into an archivedatabase. Therefore, if you must load a compressed dump onto a version of Adaptive
CHAPTER 9: Migrating Data Using sybmigrate
Utility Guide 303

Server that does not support archive databases access, use the same version of BackupServer that created the compressed dump to load the compressed database dump. Anearlier version of Backup Server does not support the new format of the compresseddatabase dump.When you are downgrading without compression, you need not worry about BackupServer at all.
GUI modeYou can use either the GUI or the resource file mode for the migration process. You can alsoelect to run parts of the migration process in GUI mode, and parts of it in resource file mode.
When you run sybmigrate, there are three phases of the migration process that you mustfollow: setup, migrate, and validate.
Setting up source databases for migrationBefore migrating data, indicate your source and target Adaptive Servers and register the pathsbetween the source and target databases they contain.
To do this, start sybmigrate with the -m setup command line option, or by selecting “Setupsource databases for migration” when you are prompted in the Session Type window.
1. The Connect to ASE window allows you to designate the source and the target AdaptiveServers for your migration process.
• Choose from the drop-down menu in the Server fields. The menus provide a list ofAdaptive Servers that are located in the default interfaces file ($SYBASE/interfaces on UNIX or %SYBASE%\ini\sql.ini on Windows) or in theinterfaces file that you specify with the -I command line argument.
If you are not using the interfaces file, you cannot use the -I command lineargument; you must specify the source and the target Adaptive Servers in the host:portformat.
• During the setup phase, you must be logged in to the servers as a System Administrator.Enter “sa” into the Login field, enter your password, and select Connect.
Note: You can run only one session of sybmigrate at a time. Therefore, if there is anotheruser running sybmigrate on the same source and target Adaptive Servers, you see the errormessage “Setup session lock: Either previous setup exit abnormal or there is another setupsession running. Do you want to override?” You can override the session lock because it ispossible that the previous session may have crashed or quit prematurely.
Before proceeding with the setup and migration process, verify that there are no otherusers running sybmigrate. If there is more than one user running sybmigratesimultaneously, Sybase cannot guarantee data integrity.
2. The Session Type window prompts you to select the type of operation you want to perform.Choose from:
CHAPTER 9: Migrating Data Using sybmigrate
304 Adaptive Server Enterprise

• Setup source databases for migration• Migrate database objects and data• Validate the migrated objects and data• Reports – when you select Reports, a Reports type window displays. You can choose
from status, space_est, repl, diff, or password. When you select either the spaceestimation or the replication report, a Report Paths Window prompts you to select thedatabase paths on which to run the reports.The Password, Status, and Replications reports are disabled if the setup session has notbeen completed between the source and target Adaptive Servers.
If you started sybmigrate with the -m option specifying setup, migrate, validate, orreports you do not see this window.
3. Use the Setup wizard to prepare databases for migration. The Setup wizard displaysseveral windows:
• Choose Database windowThis window prompts you to select the source and target databases located within yoursource and target Adaptive Servers, so that sybmigrate knows where to put the datafrom the source Adaptive Server in the target Adaptive Server.
Note: The source and target databases must have identical names.
The Source Database drop-down list has a list of the databases in your source AdaptiveServer.The Target Database drop-down list has a list of the databases available in the targetAdaptive Server. sybmigrate requires that you create the databases in the targetAdaptive Server before beginning the migration process.The migration path is a selected source and target database pair.
• Configure DDL threadsChoose the number of threads to be used to create database objects on the target serverfor the specified migration path.
• Configure copy threadsChose the number of threads to be used to copy data from the source to the target for themigration path. Make sure you use sufficient numbers of threads for systems withmultiple engines.
• Configure index threadsChose the number of threads to be used to create indexes on the target server for thespecified migration path. Make sure you use sufficient numbers of threads for systemswith multiple engines.You control the number of threads used for parallel table transfer. When several tablesare transferred concurrently, each table requires a one-server-to-one-server CISconnection.Suppose the data migration is performed on unpartitioned tables (each table contains asingle partition). When you migrate such tables, a single server-to-server connection is
CHAPTER 9: Migrating Data Using sybmigrate
Utility Guide 305

established, which uses a single user connection on the source Adaptive Server and asingle user connection on the target Adaptive Server.If the data migration is performed on n-way partitioned tables, the data transfer isperformed in parallel with an n-way degree of parallelism. This requires n workerprocesses on the source server and 2n user connections on the target server.For example, suppose you have 10 n-way partitioned tables to migrate. You use fourthreads in sybmigrate, and configure the source Adaptive Server to have at least fourworker processes and eight user connections. You must configure the target AdaptiveServer to have at least eight user connections.
Note: The value you assign to each property in the setup session becomes the defaultvalue. You can temporarily override default values in the migrate or validate session. Limitthese values to the resources available to Adaptive Server.
• Configuring the work databasesybmigrate requires at least one work database during the migration process. TheDatabase size field provides a default value in megabytes. The default value is based onthe number of copy and create index threads specified in a previous window. Thedefault is the minimum value; you can increase but not decrease it.The Device field lets you indicate the device on which to create the work database.
Note: When migrating from a source Adaptive Server version 12.0 through 12.5.0,sybmigrate also requires a work database on the target server. The wizard prompts forthe same information for the target work database.
• Current pathsReview the migration paths you have selected. Right-click a migration path to displayedit and delete options.You can add paths by selecting Add Migration Path. To add paths later on, rerunsybmigate in Setup mode.
• Configure repositorysybmigrate creates a repository database on the source server to track the migration ofall migration paths. The default database size is a minimum; you can increase but notdecrease it.
• Migration of server-wide dataYou can choose whether or not to migrate information in system catalogs, such as logininformation. The options are:• Yes – server-wide data is migrated at the end of the Setup phase.• No – server-wide data is not migrated. You can return to this window and choose to
migrate data at any time—as long as database migration has not yet begun.• Undecided – allows you to return and choose another migration option later on.
However, you cannot begin the Migration phase until you have chosen Yes or No.Undecided is useful when you want to set up the migration process, but plan tomigrate data at a later date.
CHAPTER 9: Migrating Data Using sybmigrate
306 Adaptive Server Enterprise

If the target server already has been configured for logins or other server-wideinformation, sybmigrate defaults this option to No.The Options button provides advanced options for handling login accounts. Theoptions let you specify:• Whether or not to lock login accounts after migration• How to handle login passwords when migrating across platforms
• No change – use when migrating to the same platform (default)• Generate random passwords• Assign passwords from a list in a file
• SummaryDisplays a summary of options chosen. Click Finish to perform the chosen setup tasks.
4. The Setup Progress window displays the progress of the setup phase.
During this time, sybmigrate is creating the repository database, installing the databaseschema, creating a working database for each selected path, and migrating the server databased on your selection, in that order. If you are running sybmigrate in setup mode asubsequent time, it is creating new paths for data migration. If you do not want to createnew paths, there is no reason to run sybmigrate through the setup mode more than once.
You can to view the progress in the log by clicking Show Log. The completion of the setupprocess is indicated when the Current Task window displays DONE, and when the logshows SETUP_COMPLETE. Click Close to exit the log and the Setup Progress window.
5. You return to the Connect to ASE window. Select Quit to exit sybmigrate. To begin themigration phase of the data migration process, exit sybmigrate and restart it in the migratemode.
Begin the migrationAfter you have completed setup, you are ready to begin migrating.
Restart sybmigrate with the -m migrate command line option, or choose the migratedatabase objects and data option from the GUI window.
1. In the Connect to ASE window, select the source and target Adaptive Servers to which youwant to connect.
2. If you have not started sybmigrate with the -m migrate command line argument, selectthe session type in the Session Type window.
3. The Object Selection window allows you to choose what types of database data you wantto migrate.
In the Object Selection window, you can set the Copy thread, create index thread, and workthread parameters from the Setting menu bar.
In the Object Selection window, you can also request that sybmigrate Auto-SelectDependent Objects on your selected objects by right clicking the object tree node.
CHAPTER 9: Migrating Data Using sybmigrate
Utility Guide 307

When you expand the database data folder, there is a file for each path that you createdduring setup. Each file allows you to select the data you want to migrate for that particulardatabase. You can choose from the following:
• Database Data
Note: If you choose to migrate database data, you must migrate all of it. If you deselectparts of the database data, you see an error message asking you whether or not you wantto migrate database data.
If you do not migrate the server data during setup, the Database Data selection isdisabled.
• Defaults• Rules• User-defined Datatypes• Tables• Indexes• Referential Constraints• Views• Stored Procedures• Triggers
The Status field for these objects indicates whether or not the data has successfullymigrated. “Success” indicates that the data has already migrated. “Initial” means that themigration has not yet begun. If you find an error in the data that has been migrated, you canreset the Status field to Initial so that the data migrates again. The validation process actsonly on those objects that have been migrated successfully, so to begin the validationprocess without all of the data having successfully migrated, reset the Status field toSuccess. “Work in Progress” means that the object was selected for migration, but that themigration was not attempted because there was some error causing sybmigrate to exitabnormally.
You can see whether or not the server data has been selected to be migrated, but this is forinformational purposes only since the server data has already been migrated at this point inthe migration process.
When you have selected the data that you want to migrate, click Migrate.
Validating the migrationThe validation phase is the same as the migrate phase.The windows ask you to indicate the same information, but rather than selecting data formigration, you are selecting data for validation.
You can validate only those objects that have successfully been migrated.
CHAPTER 9: Migrating Data Using sybmigrate
308 Adaptive Server Enterprise

Migration and Validation Progresssybmigrate keeps you informed of the migration and validation progress on the Migration/validation screen. It shows migration progress, messages reported, and a summary count ofobjects pending, failed, and succeeded for each task type.
You can select Cancel at any time, which starts a graceful shutdown of the execution progress.
Resource File ModeMake these changes to the resource file mode:
• data_copy_thread, create_index_thread, and work_thread attributes are recognized inthe setup, migration, and validate sessions of sybmigrate. In the setup session, thesevalues are recorded in the repository database, and used as default values during themigrate and validate sessions. During the migrate and validate sessions, you can overridethe default values by specifying a new value.
• lock_account is a new login account management feature. lock_account tells sybmigrateto lock or unlock all accounts on the target Adaptive Server after copying the logininformation. Valid values are “Yes” and “No”, with “Yes” instructing sybmigrate to lockthe target Adaptive Server accounts. To activate lock_account, you must setmigrate_server_data to “Yes” in the setup session.If the lock_account attribute is not set, nothing is done to target login accounts.
• login_password_file has been added to support changing the passwords on the targetAdaptive Server. In the setup session, login_password_file takes the input password file orthe value “<generate>”. “<generate>” is a special key used to tell sybmigrate to generatethe passwords instead of reading them from the password file. If this attribute is not set inthe resource file during the setup session, there is no change to the target Adaptive Serverlogin passwords. To activate login_password_file, you must set migrate_server_data to“Yes” in the setup session.
• The password file must be in plain text. The content of this file consists of two columns: thelogin name column and the password string column. The separator between the columnsare tabs and or spaces. Any lines beginning with “#” are comments.
• auto_select_dependent_objects is a new value that is available during the migrate andvalidate sessions. This attribute tells sybmigrate to automatically select the dependentobjects for migration and validation. The valid values for this attribute are either “Yes” or“No”; “No” is the default.
• If source_ase, source_ase_login, source_ase_password, target_ase,target_ase_login, and target_ase_password attributes are not in the resource file,sybmigrate prompts the user for these attributes.
• In the database section of the resource file, if you do not specify any objects or SQL, allobjects and types are selected.For example, in the following resource file all object types (default, rule, table, and so on)are migrated from pubs2 and pubs3 databases:
[server}source_ase=tho:5002
CHAPTER 9: Migrating Data Using sybmigrate
Utility Guide 309

source_ase_login=sa source_ase_password=
target_ase=tho:6002 target_ase_login=sa target_ase_password=
[database]source_database_name=pubs2 target_database_name=pubs2
[database]source_database_name=pubs3 target_database_name=pubs3
Resource file mode is a non-interactive mode. The resource file contains all the informationrequired for migration. You can use the resource file mode if you do not have GUI support or ifyou need to run batch files.
If you do not specify any object type attributes to migrate in the resource file, sybmigratemigrates the entire database.
If you do not specify the source or target Adaptive Server login or password in the resourcefile, sybmigrate prompts the user for this information.
Following is the format for the resource file to run sybmigrate in noninteractive mode. Tocreate a resource file, type all the values into a file:
## This is a sample Migration Tool resource file.# This resource file will migrate objects in pubs2,# pubs3, and foo databases.#
####################################################### Server wide information######################################################[server]# "<host name>:<port number>" or just server name.source_ase=tho:5002source_ase_login=sasource_ase_password=
# "<host name>:<port number>" or just server name.target_ase=tho:6002target_ase_login=satarget_ase_password=
# Repository database setup attributes. This isrequired with "setup" mode.# Repository database size in MB.repository_database_size=7# Device used to create the "sybmigrate" database.repository_device=master
# Migrate server wide data - logins, roles, remote servers, etc...
CHAPTER 9: Migrating Data Using sybmigrate
310 Adaptive Server Enterprise

# valid only with "setup" mode, default is yesmigrate_server_data=yes
# Tell sybmigrate to lock or unlock all login accounts on the# target Adaptive Server. Valid values are "yes" and "no":# "yes" to lock and "no" to unlock. This is only valid if# "migrate_server_data" is set to "yes" and run in "setup" mode.# If this attribute is not specified, target Adaptive Server login# accounts are not change.lock_account=no
# Change target Adaptive Server login passwords. This is only valid# if "migrate_server_data" is set to "yes" and run in "setup" mode.# If this attribute is not specified, target Adaptive Server login# accounts are not change. # The valid values are "<generate>" and password file.# "<generate>" instructs sybmigrate to use random passwords.# Password file instructs sybmigrate to use the passwords from# this file.# The content of the password file consists of two columns: # the login name column and the password string column.# The separator between the columns are tabs and or spaces.login_password_file=<generate>
####################################################### Database information######################################################## Migrate the "pubs2" database objects#[database]# Specify the source target database to migrate.source_database_name=pubs2target_database_name=pubs2
# Migrate database data, valid only if "migrate_server_data"# was set to "yes" in "setup" mode. This is default to yes.migrate_database_data=yes
# Work database setup attributes. This is required with "setup" mode.# Work database size in MB.work_database_size=5# Device used to create the work database.work_database_device=master
# Number of threads use to do user table data copydata_copy_thread=5
# Number of thread use to create indexes.create_index_thread=1
# Number of thread use to do ddl migration/validation work_thread=10
# Automatically select the depedent objects for migration and
CHAPTER 9: Migrating Data Using sybmigrate
Utility Guide 311

# validation. Valid values are "yes" or "no".auto_select_dependent_objects=yes
### Migrate objects## These attributes specify the list of DDL object to# migrate or validate. User can directly specify the# list of DDL object or ask Migration tool to query the# list. Directly specifying the list has the higher # precedence. The SQL command will ignore if the list # is given.## Note:# * The SQL command for the "*_list_from_sql" attributes# must return column <object name> or columns <user # name> and <object name># * Index type must also specify the table name. For# example, "<table>.<index name>" for# "index_create_list" attribute or columns <table>, # <index name> for "index_create_list_from_sql"# attribute.# * Value "<ALL_OBJECTS>" can be used on any of the# attributes to specify all objects for the type.# * If none of these attributes are given, all objects# and data are migrated.#user_defined_type_create_list=iddbo.tid
default_create_list_from_sql=select user_name(uid), name from sysobjectswhere type = 'D'
rule_create_list=pub_idrule, title_idrule
table_create_list=publisherstitlesdbo.authorsdbo.titleauthordbo.royschedstoresdbo.salesdbo.salesdetaildbo.discountsdbo.au_pixblurbs
table_migrate_list=dbo.publishers titles dbo.authors dbo.titleauthordbo.royschedstores dbo.sales dbo.salesdetail dbo.discounts au_pixdbo.blurbs
CHAPTER 9: Migrating Data Using sybmigrate
312 Adaptive Server Enterprise

index_create_list=dbo.authors.auidind dbo.authors.aunmind publishers.pubind roysched.titleidind sales.salesind salesdetail.titleidind salesdetail.salesdetailind titleauthor.taind titleauthor.auidind titleauthor.titleidind titles.titleidind titles.titleind
trigger_create_list=deltitletotalsales_trig
store_procedure_create_list_from_sql=select name from sysobjects where type = 'P'
view_create_list_from_sql=<ALL_OBJECTS>
referential_constraint_create_list_from_sql=<ALL_OBJECTS>
logical_key_create_list_from_sql=<ALL_OBJECTS>
#####################################################
## Migrate the "pubs3" database objects#[database]source_database_name=pubs3target_database_name=pubs3
# Migrate database data - user, etc.migrate_database_data=yes
# These two attributes valid only with "setup" modework_database_size=5work_database_device=master
# Number of threads use to do user table data copydata_copy_thread=5
# Number of thread use to create indexes.create_index_thread=1
# Number of thread use to do ddl migration/validation work_thread=10
# Migrate objectsuser_defined_type_create_list=<ALL_OBJECTS>
CHAPTER 9: Migrating Data Using sybmigrate
Utility Guide 313

default_create_list=<ALL_OBJECTS>
rule_create_list=<ALL_OBJECTS>
table_create_list=dbo.authorspublishersdbo.titlesdbo.royschedstoresdbo.salesdbo.store_employeessalesdetaildbo.titleauthordbo.discountsblurbs
table_migrate_list_from_sql=<ALL_OBJECTS>
index_create_list=<ALL_OBJECTS>
trigger_create_list=<ALL_OBJECTS>
store_procedure_create_list=<ALL_OBJECTS>
view_create_list=<ALL_OBJECTS>
referential_constraint_create_list_from_sql=<ALL_OBJECTS>
logical_key_create_list_from_sql=<ALL_OBJECTS>
#####################################################
## Migrate all the "foo" database objects with default settings.#[database]source_database_name=footarget_database_name=foo
# Migrate database data - user, etc.migrate_database_data=yes
# These two attributes valid only with "setup" modework_database_size=5work_database_device=master
# Number of threads use to do user table data copydata_copy_thread=5
# Number of thread use to create indexes.create_index_thread=1
# Number of thread use to do ddl migration/validationwork_thread=10
CHAPTER 9: Migrating Data Using sybmigrate
314 Adaptive Server Enterprise

Using sybmigrate with Encrypted ColumnsFor databases with encrypted columns, sybmigrate migrates the following.
1. The system encryption password – if you specify not to migrate the system encryptionpassword, sybmigrate migrates the encrypted columns using the reencrypt methodinstead of migrating the ciphertext directly.
2. Encrypted columns in cipher text format by default – this avoids the overhead ofdecrypting data at the source and reencrypting it at the target. In some cases, however,sybmigrate chooses the reencrypt method of migration, which does decrypt data at thesource and reencrypts it at the target.
3. The encryption keys – you may select the keys to migrate. sybmigrate automaticallyselects keys in the current database used to encrypt columns in the same database. If youhave selected migration of the system encryption password, sybmigrate migrates theencryption keys using their actual values. The key values from the sysencryptkeyssystem table have been encrypted using the system encryption password and these are thevalues that are migrated. If you have not migrated the system encryption password,sybmigrate migrates the keys by name, to avoid migrating keys that will not decryptcorrectly at the target. Migrating the key by name causes the key at the target to be createdwith a different key value from the key at the source.
4. The data – by default, the data is transferred in its ciphertext form. Ciphertext data can bemigrated to a different operating system. Character data requires that the target server usesthe same character set as the source.
sybmigrate works on a database as a unit of work. If your database on the source server hasdata encrypted by a key in another database, migrate the key’s database first.
sybmigrate chooses to reencrypt migrated data when:
• Any keys in the current database are specifically not selected for migration, or alreadyexist in the target server. There is no guarantee that the keys at the target are identical to thekeys are the source, so the migrating data must be reencrypted.
• The system password was not selected for migration. When the system password at thetarget differs from that at the source, the keys cannot be migrated by value. In turn, the datacannot be migrated as ciphertext.
• The user uses the following flag:sybmigrate -T 'ALWAYS_REENCRYPT'
Reencrypting data can slow performance. A message to this effect is written to the migrationlog file when you perform migration with reencryption mode.
To migrate encrypted columns, you must have both sa_role and sso_role enabled.
CHAPTER 9: Migrating Data Using sybmigrate
Utility Guide 315

Post-migration ActivitiesThese are additional activities you perform after migration.
Activity Description
Migrate sche-ma objects,configurationinformation
sybmigrate supports the migration of only the objects listed elsewhere in thisdocument. Manually migrate other schema objects and configuration informationto ensure the target Adaptive Server is fully functional.
Statistics fromnon-index col-umns
Statistics for indexes are automatically re-created when you rebuild the indexes.However, sybmigrate does not re-create statistics from non-index columns. Anyuser-defined step values for index statistics are not retained during migration. Toobtain target-server-side statistics similar to the source-server-side statistics, useoptdiag to identify the tables with non-index columns that include statistics. Onceyou have determined which non-index columns include statistics, update the sta-tistics manually.
Messages Any message requiring user attention preceded by the word “attention” and loggedin the migration log.
Status report Run the object migrations status report to verify that all objects have been migra-ted.
Clean upsource and tar-get servers
When you no longer need to perform additional sessions (such as to validate or toreport), clean up the source and target Adaptive Servers. On the source AdaptiveServer and target Adaptive Servers:
• Drop the temporary working databases mtpdb$%.
• Drop the repository database sybmigratedb.
• Drop all remote servers mtrs$%.
Migrate Databases in the Replication Server DomainThe Replication Server domain includes one or more of these types of databases.
• Primary databases• Replicate databases• Replication Server System Databases (RSSDs)
Note: The RSSD stores Replication Server system tables; in addition, it can also be a primaryor a replicate database.
You can migrate any of these databases, but the process requires additional steps to ensuresuccess.
CHAPTER 9: Migrating Data Using sybmigrate
316 Adaptive Server Enterprise

Preparing for migrationMake sure that replication from or into each database is complete before initiating migration.
This means that:
• For a primary database – all changes have been applied to all subscribing databases• For a replicate database – all changes to which the database subscribes have been applied
Note: All transactions in the Replication Server inbound and outbound queues must beapplied. After migration, there is no way to restore data left in the Adaptive Server transactionlog.
1. Log in to the Replication Server and suspend log transfer. Enter:
suspend log transfer from server.database2. Log in to the Adaptive Server, and shut down the RepAgent. Enter:
use databasesp_stop_rep_agent database
3. Suspend all DSI connections to the replicate database. Log in to the Replication Server andenter:
suspend connection to server.database4. Put the Replication Server in hibernation mode. Enter:
sysadmin hibernate_on, replication_server
Before starting the migration process, sybmigrate records replication information in its log.The information needed to restore the replication information during the postmigration stepscan be retrieved from this log.
See also• Postmigration Procedures on page 317
Postmigration ProceduresAfter migration, restore the replication information in the database. These steps can begenerated by the repl report.
If the page size changes between the source and target, amend the system tables.
Replication Server identifies all connections by server_name.database_name. Aftermigration, you must change the name of the target server (the server you are migrating to) tothat of the source server (the server you are migrating from).
See also• Amending system tables when the logical page size changes on page 319
CHAPTER 9: Migrating Data Using sybmigrate
Utility Guide 317

Restoring primary databasesFollow this procedure for all primary databases, including the RSSD, if it is a primarydatabase.
If the page size changes during the migration, you must also alter the rs_lastcommit andrs_threads system tables.
1. If the original primary database had warm standby on, restore the standby status. Enter:
sp_reptostandby database_name, status
sybmigrate saves the standby status in the migration log of the source database.
2. Increase the generation ID by 1. Enter:
dbcc settrunc ("ltm", "gen_id", gen_id)
You can view the current generation ID in the migration log of the source database.
3. Reset the secondary truncation point:
dbcc settrunc ("ltm", "valid")4. Zero the Replication Server locator value for this database. Enter:
rs_zeroltm server, database_name5. If this database is an active connection in a warm standby configuration, rematerialize the
standby database by dumping the primary and loading the dumps into the standby. See theReplication Server documentation for instructions.
6. Start the RepAgent on the primary database. Enter:
sp_start_rep_agent database_name7. Log in to the Replication Server and restart log transfer:
resume log transfer from server.database
See also• Amending system tables when the logical page size changes on page 319
Restoring the RSSDFollow this procedure to restore the RSSD.
1. If the RSSD is a primary database, restore the primary databases.
If the page size changes, make sure you alter the rs_lastcommit and rs_threadssystem tables as instructed.
2. Turn off hibernation for the Repliction Server. Log in to Replication Server and enter:
sysadmin hiberate_off replication_server
See also• Restoring primary databases on page 318
CHAPTER 9: Migrating Data Using sybmigrate
318 Adaptive Server Enterprise

Amending system tables when the logical page size changesFollow this procedure for all databases in which the page size has changed.
If the logical page size changes during migration, you must alter the rs_lastcommit andrs_threads system tables to account for the change.
1. Alter the rs_lastcommit table. Enter:
declare @pad8_size integer declare @alter_cmd varchar(200)
select @pad8_size = (@@maxpagesize / 2) - (select sum(A.length) from syscolumns A, sysobjects B where A.id = B.id and B.name = 'rs_lastcommit') + (select A.length from syscolumns A, sysobjects B where A.id = B.id and B.name = 'rs_lastcommit' and A.name = 'pad8')
select @alter_cmd = "alter table rs_lastcommit " + "modify pad8 char(" + convert(varchar(100), @pad8_size) + ")" execute (@alter_cmd) go
2. Alter the rs_threads table. Enter:
declare @pad4_size integer declare @alter_cmd varchar(200)
select @pad4_size = (@@maxpagesize / 2) - (select sum(A.length) from syscolumns A, sysobjects B where A.id = B.id and B.name = 'rs_threads') + (select A.length from syscolumns A, sysobjects B where A.id = B.id and B.name = 'rs_threads' and A.name = 'pad4')
select @alter_cmd = "alter table rs_threads " + "modify pad4 char(" + convert(varchar(100), @pad4_size) + ")" execute (@alter_cmd) go
CHAPTER 9: Migrating Data Using sybmigrate
Utility Guide 319

Restoring Replicate DatabasesIf the page size does not change during migration, there are no postmigration steps necessaryfor replicate databases.
If the page size does change, amend the system tables. .
See also• Amending system tables when the logical page size changes on page 319
LogsIn the migration tool log, information about replicated objects is preceded by this banner:
=== Replication Information for Database 'pdb1' ===
This is a sample log file for a primary database named pdb1:
sp_repostandby 'pdb1' is NONE.
If the standby status for the database is not NONE, use the standby status as described in thepost-migration steps above.
sp_config_rep_agent 'pdb1'
sp_config_rep_agent requests the current RepAgent configuration. The migration toolautomatically restores RepAgent configuration, and you can use this log to verify theRepAgent configuration.
Parameter name Default Config Value Run valuepriority 5 5 5fade timeout 30 30 30scan timeout 15 15 15retry timeout 60 60 60rs username n/a rs1_user rs1_usertrace flags 0 8194 8194batch ltl true true truers servername n/a rs1 rs1send buffer size 2k 2k 2ktrace log file n/a n/a n/aconnect database n/a pdb1 pdb1connect dataserver n/a pds1 pds1can batch size 1000 1000 1000security mechanism n/a n/a n/amsg integrity false false falseunified login false false falseskip ltl errors false false falsemsg origin check false false falseshort ltl keywords false false falsemsg confidentiality false false falsedata limits filter mode stop stop stopmsg replay detection false false falsemutual authentication false false falsesend structured oqids false false falsesend warm standby xacts false false false
CHAPTER 9: Migrating Data Using sybmigrate
320 Adaptive Server Enterprise
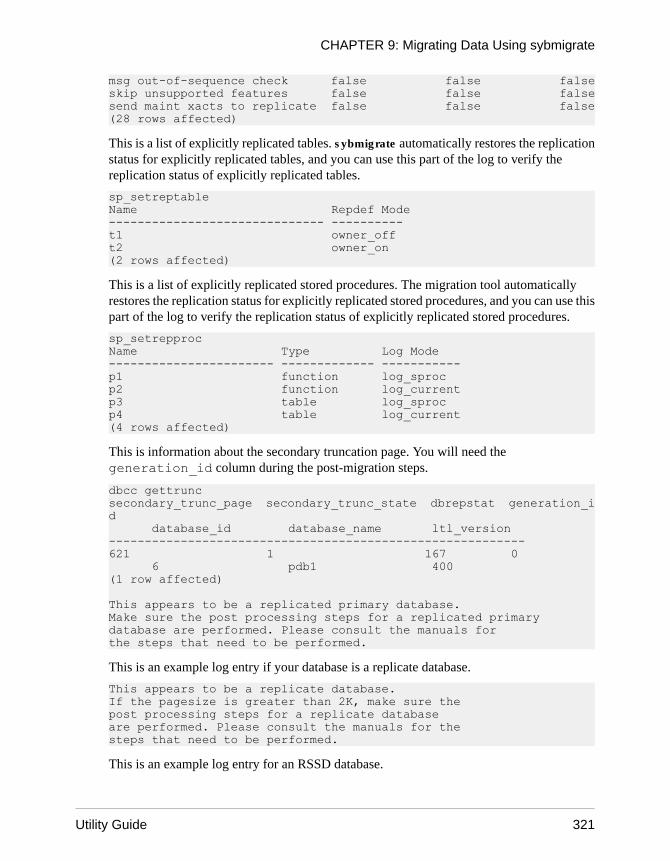
msg out-of-sequence check false false falseskip unsupported features false false falsesend maint xacts to replicate false false false(28 rows affected)
This is a list of explicitly replicated tables. sybmigrate automatically restores the replicationstatus for explicitly replicated tables, and you can use this part of the log to verify thereplication status of explicitly replicated tables.
sp_setreptableName Repdef Mode------------------------------ ----------t1 owner_offt2 owner_on(2 rows affected)
This is a list of explicitly replicated stored procedures. The migration tool automaticallyrestores the replication status for explicitly replicated stored procedures, and you can use thispart of the log to verify the replication status of explicitly replicated stored procedures.
sp_setrepprocName Type Log Mode----------------------- ------------- -----------p1 function log_sprocp2 function log_currentp3 table log_sprocp4 table log_current(4 rows affected)
This is information about the secondary truncation page. You will need thegeneration_id column during the post-migration steps.
dbcc gettrunc secondary_trunc_page secondary_trunc_state dbrepstat generation_id database_id database_name ltl_version----------------------------------------------------------621 1 167 0 6 pdb1 400(1 row affected)
This appears to be a replicated primary database. Make sure the post processing steps for a replicated primary database are performed. Please consult the manuals for the steps that need to be performed.
This is an example log entry if your database is a replicate database.
This appears to be a replicate database. If the pagesize is greater than 2K, make sure the post processing steps for a replicate database are performed. Please consult the manuals for the steps that need to be performed.
This is an example log entry for an RSSD database.
CHAPTER 9: Migrating Data Using sybmigrate
Utility Guide 321

This appears to be a replication system database Make sure the post processing steps for a replication system database are performed. Please consult the manuals for the steps that need to be performed
All three logs can be present for a database, since a database can list the three categories.
Migrating Databases That Support Wide DataAdaptive Server version 12.5 and later can generate data wider than what Replication Serverversion 12.1 and earlier can handle. If RepAgent passes wide data to Replication Server 12.1or earlier, Replication Server threads may shut down.
RepAgent communicates with Replication Server using Log Transfer Language (LTL). Whenthe RepAgent connects to Replication Server, it returns an LTL version.
Table 13. Replication Server and LTL versions
Replication Server version LTL version
12.1 and earlier < 400
12.5 and later >= 400
If Replication Server returns an LTL version less than 400, RepAgent uses the setting of thedata limits filter mode option to determine how to treat wide data.
You can set the data limits filter mode option using sp_config_rep_agent. Values for datalimits filter mode are:
• stop – RepAgent shuts down when it encounters data too wide for Replication Server toprocess (the default when the LTL version is less than 400).
• skip – RepAgent ignores data too wide for Replication Server to process, and logs aninformational message.
• truncate – RepAgent truncates wide data so that Replication Server can process it. If thetable or stored procedures has more than 250 columns or parameters, only the first 250columns or parameters are sent. If the column or parameter is wider than 255 bytes, onlythe first 255 bytes are sent.
• off – RepAgent sends wide data to the Replication Server; Replication Server threads mayshut down.
This table shows column and width limits for Replication Server 12.1 and earlier andReplication Server 12.5 and later:
Table 14. Replication Server column number and width limits
Property Replication Server 12.1and earlier
Replication Server 12.5and later
Column count 250 65535
CHAPTER 9: Migrating Data Using sybmigrate
322 Adaptive Server Enterprise

Property Replication Server 12.1and earlier
Replication Server 12.5and later
Column width 255 65535
LimitationsWhen migrating server data, sybmigrate requires that the target Adaptive Server catalogcontain only default data. Default data on Windows machines is different from UNIXmachines. This causes problems when migrating from UNIX to Windows machines.
To successfully migrate from a UNIX machine to a Windows machine, delete the XP Servername and the mon_user login on the target Windows machine.
Stopping High AvailabilityData migration is not supported while you are in high availability. You must stop highavailability before beginning database migration.
1. Decouple primary and secondary Adaptive Servers.
2. Migrate primary source Adaptive Server and secondary source Adaptive Server data to theprimary target Adaptive Server and secondary target Adaptive Server separately.
3. Configure the target Adaptive Server for high availability.
Warning! The primary and the secondary Adaptive Servers must be configured to thesame logical page size to run high availability.
Other LimitationsThese are additional limitations for migration.
• sybmigrate does not do any special processing for a DTM/XA environment. The status ofopen transactions and outstanding prepared transactions should be given consideration. Ifany special handling is required, you must do it manually.
• There is no reliable way for sybmigrate to determine the dependency of various objects.sybmigrate does not attempt to create an order in which objects are migrated based ontheir dependencies on other objects. Views can be dependent upon other views, and theywill not be re-created if the view on which they are dependent has not yet been migrated.The migration of stored procedures and triggers may not be successful if the data on whichthey depend has not yet been migrated. Cross-database dependencies mean that you needto coordinate the migration of related objects. If dependencies are within the selected set,sybmigrate takes care of those dependencies. However, if dependencies exist outside theselected set, you may need to run sybmigrate through migration more than one time. Forthis reason, you may need to perform some partial retries to successfully complete the datamigration.
CHAPTER 9: Migrating Data Using sybmigrate
Utility Guide 323

• Adaptive Server versions 12.5.3 and later allow you to specify the size and location of awork database on your target server. When migrating a database or server from a sourceserver with Adaptive Server Enterprise versions 12.0 and later but earlier than 12.5.0.1,you must specify the size and location of a work database on the target server.
• The name of the source and the target databases must be the same. SQL schema generatedby ddlgen may have objects that must be qualified with the source Adaptive Server name.
• sybmigrate does not support any kind of auditing for migration activities.• When renaming any of the compiled objects (procs, views, rules, defaults) the object name
in syscomments is not updated.
During the migration, the ddlgen query the object from syscomments with the oldname in the text. This old name in the text causes problems for sybmigrate during the DDLmigration.
Troubleshooting and Error MessagesThis section discusses common errors and how to address them, as well as different errormessages and their meaning.
Table 15. Migration-related errors and their descriptions
Issue Description
Objects fail to migrate Objects often fail to migrate on the first attempt. sybmigrate automaticallyretries all failed migration attempts. However, if you choose to migrate anobject that is dependent upon another object that is not migrated, themigration fails.
To prevent failed migration of objects, examine the dependencies of ob-jects that you select for migration. For example, you cannot migrate atrigger if the table on which the trigger is defined is not also migrated.Similarly, views can be created on other views or tables, and if these objectsare not migrated, the migration of the view fails.
Beginning database mi-gration
When you are in the setup phase of the migration process, you are asked todecide whether or not you want to migrate server data. You must selectfrom yes, no, or undecided.
“Undecided” provides you with the flexibility of setting up the migrationprocess, but being able to return to the process at a later date that is moreconvenient for migration. If you select Undecided, you cannot begin thedatabase migration until you indicate whether you want to migrate serverdata.
If you indicate that you do not want to migrate server data during setup, youcannot migrate database data during migration. You can override this lim-itation in GUI mode.
CHAPTER 9: Migrating Data Using sybmigrate
324 Adaptive Server Enterprise

Issue Description
“Connection refused”and “Unable to obtainconnection to the serv-er”
There are two possible reasons why you may encounter these error mes-sages.
• If either the source or the target Adaptive Server is not running, syb-migrate cannot establish a connection.
• The number of user connections configuration parameter must beconfigured to provide sufficient resources on both the source and targetAdaptive Servers.
Target server cannot bereached from sourceserver
The interfaces file is used to start the source Adaptive Server. Verify that ithas an entry that identifies the target Adaptive Server.
Verify that your login can access the target Adaptive Server from the sourceAdaptive Server.
If sybmigrate hangsduring migration
If sybmigrate hangs during the migration process, check the sybmi-grate log in $SYBASE/$SYBASE_ASE/init/logs for anyerrors or exceptions.
Also, check your Adaptive Server logs. If the Adaptive Server logs run outof space on the database, increase the database size, and install thesp_threasholdaction stored procedure to do dump tran when the log isfull.
Merging two databases To merge two databases on the source Adaptive Server into one databaseon the target Adaptive Server, use the following procedure.
• Set up and migrate the first database.• After migrating the first database, rename the target database so that it
has the same name as the second source database.• Set up and migrate the second database.
Note: You cannot migrate the database data for the second database be-cause the users, roles and other database data already exist on the targetdatabase. You can still migrate user data.
CHAPTER 9: Migrating Data Using sybmigrate
Utility Guide 325

Issue Description
Post-migration failurecleanup
If sybmigrate fails unexpectedly, rerun sybmigrate on the areas that failed.If it fails again with no more progress, clean up the source and targetAdaptive Servers, and begin migration again. There are actions that youmust perform on both the source and target Adaptive Server.
On the source Adaptive Server:
• Drop the temporary working databases mtpdb$%.
• Drop the repository database sybmigratedb.
• Drop all remote servers mtrs$%.
On the target Adaptive Server:
• If server data was migrated, rebuild the target Adaptive Server withsrvbuild or syconfig.
• Re-create the target databases.
Remigrating one data-base
To remigrate a specific database:
1. Start sybmigrate.2. In the Setup Paths window, during the setup session, right-click the
migration path you want to redo.3. Select Delete Migration Path on the pop-up menu.4. Clean up or remove the migrated data and objects on the target data-
base, or drop and re-create the target database.5. Restart sybmigrate and run it from setup mode.
Re-creating an individu-al object
To re-create an individual object:
1. In the target Adaptive Server, drop the object you want to re-create.2. Start sybmigrate in the migration session, and go to the Migrate Object
Selection window. Highlight the object you want to create and right-click.
3. From the pop-up menu, select Reset Object to Initial status.4. Complete the migration process.
Connection fail If you receive a connection fail error message even though the source andtarget Adaptive Servers are running, you may be using the wrong characterset. When you are using sybmigrate, you must use the default characterset. Run sybmigrate with the -J charset option, to change the character setyou are using.
CHAPTER 9: Migrating Data Using sybmigrate
326 Adaptive Server Enterprise

Issue Description
“Insufficient memory inJVM shared class”
If you see the following error in the server log, it indicates that you mustreconfigure the size of shared class heap configuration parameter to alarger value.
01:00000:00036:2002/01/28 14:17:05.63 server Java VMHost: Memory allocation request failed because of insufficient memory in Jvm Shared Class.
“There is not enoughmemory in the proce-dure cache”
If you see the error message there is not enough memoryin the procedure cache during the migration of indexes, usesp_configure procedure cache size to increase the procedure cache.
java.lang related error If you receive java.lang.NoClassDefFoundError:com/sybase/jdbcx/SybDriver when you are connecting to Adap-tive Server, check to make sure you have jConnect 6.0 installed in your$SYBASE directory ($SYBASE/jConnect-6_0).
CHAPTER 9: Migrating Data Using sybmigrate
Utility Guide 327

CHAPTER 9: Migrating Data Using sybmigrate
328 Adaptive Server Enterprise

CHAPTER 10 Restoring a Database Usingsybrestore
Use sybrestore, which supports Adaptive Server versions 15.7 ESD #2 and later, to restore anAdaptive Server database to the time of failure from the most current full database backupdump files.
In Adaptive Server versions 15.7 SP100 and later, sybrestore also supports restoring fromTivoli Support Manager and cumulative dumps, as well as applying database attributes viasp_dboption when a database is re-created and restored from the dump file.
sybrestore offers two modes—interactive and noninteractive—and is supported on bothWindows and UNIX platforms.
Noninteractive ModeProviding the database name invokes the utility in noninteractive mode, which restores adatabase using the most current dump history files.
To use noninteractive mode:
• Use Adaptive Server 15.7 ESD #2 and later.• The target and source servers must be the same server and the target database to be restored
must be the same database as the source.• You cannot use external dump files.• Specify the server name, a user name, and the database name. If you do not provide a
password, you are prompted to do so when you invoke sybrestore.• (Optional) Specify a dump directory and an interfaces file.
Interactive ModeIn interactive mode, you can specify:
• A different target server than the source server. If the target database you specify does notexist, a new database is automatically created.
• Whether the last transaction is dumped from the source server and loaded on to the targetserver. If your data device fails and the database is inaccessible, the dump transaction doesnot truncate the log.
• Whether to drop and re-create the database.
Utility Guide 329

• Whether to use the current dump history files or external dump files.• The location for the dump transaction.• Whether to bring the database online immediately after the restore.• A point in time, within the range of time during which the database is backed up in the
dump history files, from which to restore the database.• Reinitialize and re-create the database devices of an offline database for which the devices
are offline. Then restore the re-created database.
Before You BeginPerform these tasks before using sybrestore.
• You must be a user with sa_role privilege. To work on an offline database that has offline orinactivated devices, you must be a user with mon_role and sa_role.
• Make sure these environment variables are set correctly:• SYBASE -- the location of the current version of Adaptive Server.
• SYBASE_ASE -- the location of the Adaptive Server component directory.
• SYBASE_JRE6 and SYBASE_JRE7 -- the location of JRE 1.6 and JRE 1.7respectively.
• Adaptive Server and Backup Server must be running for both the target and source servers.• The master database must be available.
• The source database must be connected to the server in a recovered or unrecovered state.• The log segment of the source database must be available for dumping and then loading
back the last transaction logs that have not been dumped.• Dump history files or external dump files must be available.
sybrestore is installed as part of the Adaptive Server software. For information about how toinstall Adaptive Server, see the installation guide for your platform. The executable file islocated in:$SYBASE/ASE-15_0/bin/
Using sybrestoresybrestore performs checks in both interactive and noninteractive modes:
• A check is performed to determine the version of Adaptive Server. In version 15.7 ESD #2,enhancements called dump configurations were introduced in the dump and loadcommands. sybrestore supports dump configurations in version 15.7 ESD #2 and later. Ifyou are using Adaptive Server 15.7 ESD #1 or earlier, you must use external dump files
• Another check determines whether Backup Server is running. The session is terminated ifit is not.
CHAPTER 10: Restoring a Database Using sybrestore
330 Adaptive Server Enterprise

• The dumped database and target database are checked for geometry compatibility, whichverifies that the database dump can be loaded successfully into the target database.
• A final check determines whether dump history files exist for the database. If there is nosuch file, sybrestore prompts you to provide external dump files.
See also• Compatibility Geometry Check on page 331
Compatibility Geometry CheckA geometry compatibility check verifies whether a database dump can be loaded successfullyinto the target database.
The rules that verify this compatibility are:
• The size and the order of the data and log fragments must match. If two or moreconsecutive fragments are of the same type (data or log), the sizes for these consecutivefragments are combined together before a comparison is done between the dumpeddatabase and the target database.
• The size of all fragments before the last fragment for the target database must matchexactly with the size of the dumped database. The last fragment of the target database canbe bigger than the database that is dumped. There may be extra fragments in the targetdatabase after matching all fragments in the dumped database.
sybrestore SyntaxTo start sybrestore, you must provide a login and server name (or host name and portnumber). If you do not provide a password, you are prompted to enter one when you executethe command. If the connection to the server fails, an error message is raised.
By default, the $SYBASE/interfaces file is used. If you specify an interfaces file, thatfile is used instead of $SYBASE/interfaces.
See also• sybrestore on page 152
Interactive Mode SyntaxThe interactive mode syntax is:
sybrestore -S server_name | host_name:port_number -U username [-P password ] [-t [point in time of restore]] [-I interfaces_file ]
CHAPTER 10: Restoring a Database Using sybrestore
Utility Guide 331

Noninteractive Mode SyntaxProviding the database name invokes noninteractive mode. The noninteractive mode syntaxis:
sybrestore -S server_name | host_name:port_number -U username [-P password] -D database_name [-d dump_directory] [-I interfaces_file]
Restoring a Database in Noninteractive ModeIn Adaptive Server 15.7 ESD #2 and later, use sybrestore in noninteractive mode to restore adatabase to the time of failure from the most current dump history files.
In noninteractive mode, the dump history files must be available.
The current full database dump files are used, along with either: - A series of transaction logdumps, if dump transaction is used, or, - The most recent cumulative dump, if cumulativedump is used. Cumulative dump is supported only in Adaptive Server versions later than 15.7ESD #3
Start sybrestore with the user name, password, server name, and database name options. Forexample:
sybrestore -Usa -P -SaseServer1 -Ddba_db
You see the Restore Database wizard, which shows a preview of the SQL to be executed forrestoring the database, along with any progress or error messages.
Optionally, you can specify an interfaces file, and a directory for dumping the last transactionlog. If you specify a directory for dumping the last transaction log in the sybrestore command,it overrides the default location of the dump directory.
A geometry check, which verifies that the database dump can be loaded successfully into thetarget database is performed. If dump files do not exist or the geometry check fails, the sessionis terminated.
See also• Compatibility Geometry Check on page 331
CHAPTER 10: Restoring a Database Using sybrestore
332 Adaptive Server Enterprise

Restoring a Database in Interactive ModeThe interactive command line interface allows single-key entry, plus the Enter key to navigatethrough each menu. Use:
• Space – to move back to the previous menu.• q – to quit the session.• ? – to display help.
When the Restore Database wizard starts, which is based on the given parameters. Forexample, you see the menu shown below when you start sybrestore with the minimal optionsof user name, password, and server name:sybrestore -Usa -P -SaseServer1
<<<<<<====Restore Database Menu ====>>>>>>>
s : Select Databaset : Target Serverr : Recreate Databasee : Use External Dumpc : Check Geometryd : Dump Directoryo : Online Databasep : Previewg : Go
This example illustrates how the Restore Database menu is affected if you include the point-in-time parameter in the sybrestore command:sybrestore -Usa -P -SaseServer1 -t
<<<<<<====Restore Database Menu ====>>>>>>>
s : Select Databaset : Target Serverr : Recreate Databasei : Point-In-Timec : Check Geometryo : Online Databasep : Previewg : Go
Table 16. Restore Database menu
Menu Option Input Required
Select Database Select the database to be restored.
CHAPTER 10: Restoring a Database Using sybrestore
Utility Guide 333

Menu Option Input Required
Target Server Select the target server if it is not same as source server. Provide the target serverinformation:
• Server name or host name and port number.• User name.• Password.• A mapping directory that maps the mount point of the dump files in the
source server to the mount point of the dump files in the target server.• Specify whether the target database has the same name as the source data-
base.
Recreate Database When the input is yes, the database is dropped and re-created using specifieddevices and device sizes, and log devices and log sizes.
Use ExternalDump
Whether you want to restore the database from dump history files. When theinput is no, provide the external backup files to restore the database:
• The archive directory for the dump database file location and the dumpdatabase file name, including respective stripe names.
• The dump transaction log file location and multiple dump transaction logfile names, including respective stripes names.
Using the external dump option overrides using dump history files.
Geometry Check When the input is yes, you see the comparison between the data size and log sizeof the device fragments of the dumped database, and the corresponding data sizeand log size of the device fragments of the target database.
This option is provided when dump history files exist and external dump files arenot being used to restore the database.
Dump Directory When yes, you can change whether to dump the last transaction of the sourcedatabase, and change the dump directory for dumping the last transaction.
Online Database When yes, the database is brought online after restoring the database.
Point-In-Time Select the point in time to restore the database.
Preview Shows the SQL statements that will be executed.
Go Use “Go” to run all the menus options without having to select menus individ-ually. “Go” runs all menu options in sequence and then exits. If a menu item hasalready been executed, for example, if you have already selected a database, youare not prompted again to select a database.
CHAPTER 10: Restoring a Database Using sybrestore
334 Adaptive Server Enterprise
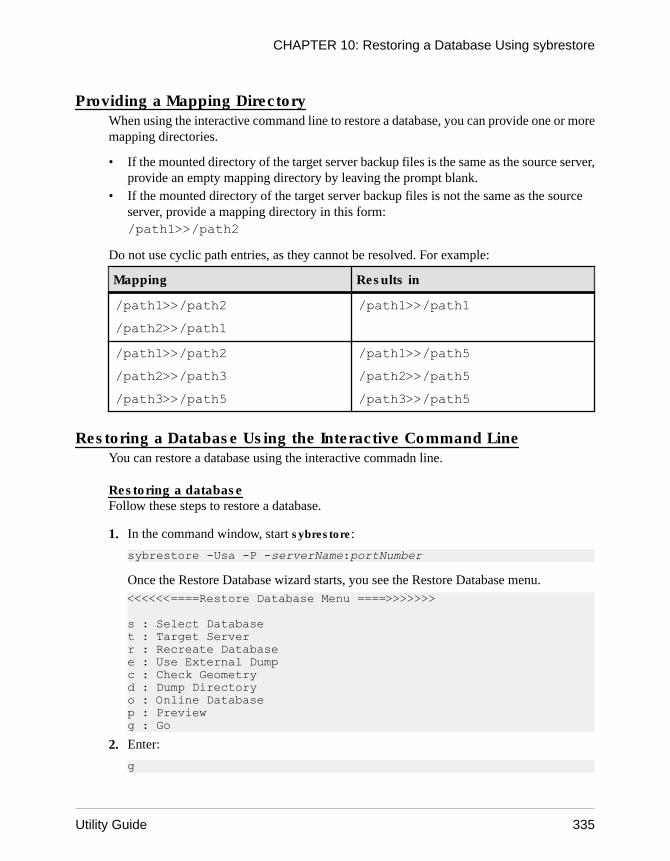
Providing a Mapping DirectoryWhen using the interactive command line to restore a database, you can provide one or moremapping directories.
• If the mounted directory of the target server backup files is the same as the source server,provide an empty mapping directory by leaving the prompt blank.
• If the mounted directory of the target server backup files is not the same as the sourceserver, provide a mapping directory in this form:/path1>>/path2
Do not use cyclic path entries, as they cannot be resolved. For example:
Mapping Results in
/path1>>/path2/path2>>/path1
/path1>>/path1
/path1>>/path2/path2>>/path3/path3>>/path5
/path1>>/path5/path2>>/path5/path3>>/path5
Restoring a Database Using the Interactive Command LineYou can restore a database using the interactive commadn line.
Restoring a databaseFollow these steps to restore a database.
1. In the command window, start sybrestore:
sybrestore -Usa -P -serverName:portNumber
Once the Restore Database wizard starts, you see the Restore Database menu.<<<<<<====Restore Database Menu ====>>>>>>>
s : Select Databaset : Target Serverr : Recreate Databasee : Use External Dumpc : Check Geometryd : Dump Directoryo : Online Databasep : Previewg : Go
2. Enter:
g
CHAPTER 10: Restoring a Database Using sybrestore
Utility Guide 335

You see a list of available source databases.
3. Select a database by entering the number associated with the database or the name of thedatabase.
4. Specify whether the target server to be restored is the same as the source server.
If the target server is not the same as the source server, you are prompted to specify a targetserver by providing the server name (or hostname:port number), login, and password. Youcan then provide a mapping directory.
5. Specify whether the name of the target database is the same as the source database:
• If the target database name is not the same as the source database name, select a targetdatabase.
• If the target database does not exist, a database is created, and you must specify devicesand devices sizes and log devices and log sizes.
• If the database is offline and its devices do not exist, you are prompted to reinitialize thedatabase devices.
6. Specify whether to drop and re-create the database.
When re-creating the database, you are prompted to specify devices and devices sizes, andlog devices and log sizes.
7. If you choose to restore the database from dump history files, specify whether to use thecurrent dump files or external dump files.
If you are using external backup files to restore the database:
• Specify the archive directory for the dump database file location and the dumpdatabase file name, including respective stripe names.
• Specify the dump transaction log file location and multiple dump transaction log filenames, including respective stripes names.
Note: Provide the transaction log files in the same time sequence as they were dumped.
If you have selected dump history files, a geometry check verifies that the database dumpcan be loaded successfully into the target database.
In Adaptive Server versions 15.7 ESD #2 and earlier, specify external dump files; nogeometry check is performed.
8. Specify whether to dump the last transaction of the source database, provided that:
• The status of the database is not "for load," or "offline."• The database passes the tran_dumpable_status check.
9. Use the archive directory as the location of the dump directory, or specify a differentlocation for dumping the transaction.
10. Specify whether to bring the database online after the restore.
You see a preview of the SQL statements to be executed for restoring the database.
CHAPTER 10: Restoring a Database Using sybrestore
336 Adaptive Server Enterprise

11. Specify whether to execute the SQL.
You see any progress or error messages.
See also• Providing a Mapping Directory on page 335
• Compatibility Geometry Check on page 331
Restoring a database to a point in timeFollow these steps to restore a database to a specific point in time.
1. In the command window, start sybrestore.
sybrestore -Usa -P -serverName -t
Once the Restore Database wizard starts, you see the Restore Database menu.<<<<<<====Restore Database Menu ====>>>>>>>
s : Select Databaset : Target Serverr : Recreate Databasei : Point-In-Timec : Check Geometryo : Online Databasep : Previewg : Go
2. Enter:
g
You see a list of available source databases.
3. Select a database by entering the number associated with the database or the name of thedatabase.
4. Specify whether the target server to be restored is the same as the source server.
If the target server is not the same as the source server, you are prompted to specify a targetserver by providing the server name (or hostname:port number), login, and password. Youcan then provide a mapping directory.
5. Specify whether the name of the target database is the same as the source database.
If the target database name is not the same as the source database name, select a targetdatabase.
If the target database does not exist, a database is created, and you must specify devices anddevices sizes and log devices and log sizes.
6. Specify whether to drop and re-create the database.
CHAPTER 10: Restoring a Database Using sybrestore
Utility Guide 337

When re-creating the database, you are prompted to specify devices and devices sizes, andlog devices and log sizes.
7. The dates and times of the dumped database are given.
First, specify the range of time from which to restore the database. You then see the low andhigh time ranges. Specify a point in time that falls within the available range.
8. A geometry check is performed. If dump files do not exist or the geometry check fails, thesession is terminated.
9. Specify whether to bring the database online after the restore.
You see a preview of the SQL to be executed for restoring the database.
10. Specify whether you want to execute the SQL.
You see any progress or error messages.
See also• Providing a Mapping Directory on page 335
• Compatibility Geometry Check on page 331
• Example of Restore to a Point-in-time on page 338
Example of Restore to a Point-in-timeThe following is an example of restoring a database to a point-in-time based on the dumpdatabase dates and times.
Table 17. Example of dump history
Date Dump time Type of dump
Aug 14 11:04 AM database dump
12:20 PM transaction dump
2:20 PM transaction dump
7:00 PM transaction dump
Aug 17 9:00 AM transaction dump
9:00 AM transaction dump
2:16 PM transaction dump
Aug 23 10:27 AM database dump
2:00 PM transaction dump
9:30 PM transaction dump
Sep 28 8:00 AM transaction dump
CHAPTER 10: Restoring a Database Using sybrestore
338 Adaptive Server Enterprise

Date Dump time Type of dump
9:00 AM transaction dump
12:14 PM transaction dump
sybrestore prompts you to select a range of time based on the database dump history.
For example, based on the information in the above table, you see:1 : [Aug 23 2012 10:27:45:206AM, Sep 28 2012 12:14:50:063PM]2 : [Aug 14 2012 11:04:58:330AM, Aug 17 2012 2:16:17:206PM]
You can select a time range by entering the list number. For example, enter 2 for the time range[Aug 14 2012 11:04:58:330AM, Aug 17 2012 2:16:17:206PM].
Next, enter a time that falls between Aug 14 2012 11:04:58:330AM and Aug 17 20122:16:17:206PM. For example, enter:Aug 16 2012 10:00 A.M
CHAPTER 10: Restoring a Database Using sybrestore
Utility Guide 339

CHAPTER 10: Restoring a Database Using sybrestore
340 Adaptive Server Enterprise

Index-bbatch_size parameter 198!! (exclamation points) operating system commands
prefix (isql) 79\\ (backslash) data field terminator in interactive bcp
186\\\0 (null) character terminator in interactive bcp
186\< (redirect in) in isql 234\> (redirect out) in isql 234
Aactions
restore 152Adaptive Server
configuration of, for migration 301executing (dataserver) 37executing (sqlsrvr) 126restoring using sybrestore 330rolling back processes 198starting an existing 208upgrading (sqlupgrade) 132upgrading with resource files (sqlupgraderes)
133add instance 258adding
network transport addresses in dsedit 221server entries in dscp 212server entries in dsedit 220, 224
additional network memory parameter 298allow_dup_row option to create index, and bcp
200application programs, copying data from 192archive database access
downgrading 303migrating 298, 303
ASCII format, bcp and 177ascii_7 character set
defncopy and 66
Bbacking up, compared to bulk copying 201backslash (\\›
terminator in interactive bcp 186
Backup ServerSee also backupserver utility command 6
backupserver utility commandcharacter set, default 6defined 6error log file 6error messages in 6full path names, specifying 6interfaces file 6interfaces file, name and location of 6language, default 6LC_ALL environment variable 6permissions required for 6server connections, number of 6server names, specifying 6starting servers and 6trace flags 6
bcpimproving performance 163
bcp utility command 175-bbatch_size parameter 198allow_dup_row option to create index 200ASCII format and 177batch operations in 198batch size settings 10binary format and 159character format 177character format files 177character format, default 178character formats accepted 159character set defaults 10configuration parameters 199copying data in 167, 169, 194copying data out 192, 199copying in batches of table rows 198copying into partitions 162data integrity 201data loss and dumping 163data storage size in 179data transfer, preparing for 162datatypes 184default values for data 201defaults for columns and datatypes 201defined 10described 159
Index
Utility Guide 341

dump database and 201error files 200errors in data conversion 200examples 10explained 159fast version and locking scheme 166fast version of 166fast version of, and data recoverability 165fast-logged version of 166field lengths 177field terminators 178, 179file storage types in 179format files 188how to move data 159IDENTITY columns and 173improving performance of operations 199improving recoverability when copying data in
198index creation 200indexes and triggers, dropping 167initialization strings 197insert and 201interactive mode 178, 187languages, using alternate 197load database and 201native file format and 177native format option and 177non-character to character datatype default
field lengths 184non-iso_1 data files and 197noninteractive 177other Adaptive Server utilities and 201page allocations, increasing for 169partitioned tables and 168, 175, 199password encryption in 10performance issues with 174permissions required for 182prefix length 179prompts and responses. See Interactive bcp
178prompts in 179requirements 161rolling back processes 198row terminators 178slow bcp 165slow version and deadlocks on index pages
168slow version of 166space needed for data 167
special characters, handling 10speed, and indexes and triggers 163speed, modes of 160steps and who can perform them 167storage types 184system data format (SDF) output in 192system differences, operating 177table defaults and copying data 201terminators used in 159transferring data between programs 159triggers not fired on target table 163unique IDENTITY column values and 174using with row-level access rules 197warning about data recovery 10
binary databcp and 159default in interactive bcp 184
buffer, query 231buildmaster utility command
See dataserverbulk copy process
See also bcp utility command 10bulk copy utility. See bcp utility command 159
Ccanceling commands in Interactive SQL 242carriage-return data field terminator (\\\\r) in
interactive bcp 186certauth utility command 29
defined 27permissions required for 27settings for 27
certpk12 utility commanddefined 30permissions required for 30settings for 30
certreq utility commanddefined 33permissions required for 33settings for 33
char datatype, and bcp 177character formats
bcp 159default in bcp 177, 178terminators for 186
character set utilities 4character sets
backupserver, default in 6bcp, defaults in 10
Index
342 Adaptive Server Enterprise

converting from non-character data 184installing and modifying (sqllocres) 125installing and modifying, in GUI (sqlloc) 124loading, with charset 35platform default 197
charset utility commanddefined 35permissions required for 35settings for 35
checkssybrestore utility command 330
CIS bulk insert array sizeconfiguration for migration 298, 301
CIS bulk insert batch size 301CIS packet size
configuration for migration 301for migration 298
closing a sessiondsedit 219
Cluster Edition utilities 6cobpre utility command 36collect action of qptune 112column precision in numeric or decimal storage
formats 188column scale in numeric or decimal storage formats
188columns
datatype sizes and 184default values and bcp 201fixed- and variable-length 184in Interactive SQL, looking up 243null 200separator character (isql) 230
comma-delimited output 192command files, using in Interactive SQL 251command terminator (isql) 229
statistics option interaction 233commands in Interactive SQL 253
recording 245commands used in sybcluster 255compare action of qptune 112component directory for migration 297configuration utilities 4connect 259copy rows using Interactive SQL 240copy threads on sybmigrate 301copying
server entries with dscp 213server entries with dsedit 221, 222, 225
copying data inbatch operations in 198improving recoverability after rolling back
198parallel bcp, requirements for 170, 174partitioned tables 168partitions, random use of 168steps, using fast version of bcp 167
copying data in with interactive bcpcompatibility of datatypes, and failure 194delimiters 194error files and 200field lengths 194
copying data out with interactive bcp 192delimiters 192fixed-length fields 192for other software 192text and image data 199
copying definitions 66copying server entries with dsedit 221cpre utility command 37create cluster 261create index command, bcp and duplicate rows
200creating
new servers (srvbuild) 134new servers using resource files (srvbuildres)
135custom start action of qptune 112
Ddata
changing with Adaptive Server commands201
conversion errors 200importing and exporting with bcp 159moving with Adaptive Server commands 201padding with spaces in interactive bcp 184parsing. See Field terminators 178permission required to copy into tables 10,
161recoverability 165, 166transferring from different programs using bcp
159data manipulation utilities 5data transfer, default formats with bcp 177data transfers
preparing for 162database creation utilities 5
Index
Utility Guide 343

database creation utilitybcp 10ddlgen 45defncopy 66extractjava 73installjava 76isql 79optdiag 97
database data, migration of 293database management systems, other 192database menu
sybrestore utility command 333database objects
copying using bcp 10databases, copying with bcp 201databases, restoring with sybrestore 335dataserver
description 203master device, creating 203specifying device and logical page sizes 205when to use 204
dataserver utility commanddefined 37passwords, generating new 37permissions required for 37
datatypesbcp file storage types for 178, 182bcp format files for 188bcp, used in 184copying and compatibility 194default values and bcp 201field lengths in interactive bcp 182, 187implicit conversions of 182non-character to character default field lengths
in bcp 184storage (SYB) 188
datatypes and bcpchar 177
ddlgen utility commanddefined 45permissions required for 45settings for 45
debugging utility 119default network packet size configuration parameter
199defaults
bcp data conversion 184bcp prompts 178, 187character sets in backupserver 6
character sets, in bcp 10copying into tables using data 201copying, with defncopy 66languages in backupserver 6prompts in interactive bcp 178, 187
definitionsbackupserver utility command 6bcp utility command 10certauth utility command 27certpk12 utility command 30certreq utility command 33charset utility command 35copying. See defncopy utility command 66dataserver utility command 37ddlgen utility command 45defncopy utility command 66dscp utility command 71dsedit utility command 72examples 66extractjava utility command 73installjava utility command 76isql utility command 79optdiag utility command 97preupgrade utility command 102pwdcrypt utility command 107qrmutil utility command 108showserver utility command 118sqldbgr utility command 119sqlloc utility command 124sqllocres utility command 125sqlsrvr utility command 126sqlupgrade utility command 132sqlupgraderes utility command 133srvbuild utility command 134srvbuildres utility command 135startserver utility command 137sybdiag utility command 142sybmigrate utility command 148sybrestore utility 152sybtsmpasswd utility command 154xpserver utility command 156
defncopy utility commandascii_7 character set and 66defined 66encrypted text 66failure due to long comments 66passwords and crashing 66Report Workbench, incompatibility with 66
delete rows using Interactive SQL 239
Index
344 Adaptive Server Enterprise

deletingserver entries (dscp) 215
deleting rows in Interactive SQL 241delimiters
copying data in with 194copying data out with 192
deploy plugin 264devices
specifying with dataserver 205diagnose cluster 265diagnose instance 267directory services
entries, adding 217entries, copying 221entries, copying to 222, 225entries, modifying 224entries, renaming 225opening to, with dsedit 223
disconnect 268DISPLAY environment variable
setting, in dsedit 219downgrading an archive database 303drop cluster 269drop instance 270dscp utility command
commands, table of 215defined 71, 209examples of 71exit command 215help 71permissions required for 71quit command 215server attributes 211, 212server entries, adding 212server entries, copying 213server entries, deleting 215server entries, listing 214server entries, modifying 212server entry contents, viewing 214starting 209
dsedit utility commandabout 217defined 72Directory Service Session screen 219DISPLAY environment variable and 219libtcl.cfg file 223network transport addresses, adding 221network transport addresses, editing 220opening with sql.ini 223
permissions required for 72, 219remote machines, running from 219Select a Directory Service screen 219server attributes 217server entries, adding 220, 224server entries, cannot add, modify, or delete
226server entries, copying 221, 222, 225server entries, copying within a session 225server entries, deleting 225server entries, modifying 220, 224server entries, renaming 225sessions, closing 219sessions, opening 219starting 219starting from command prompt 223SYBASE environmental variable and locating
libtcl.cfg 223troubleshooting 217, 226unable to open X display error message 226
DSLISTEN environment variablebackupserver and 6
dump database commandbcp and 201
dump transaction commandbcp and 201error message recommending use of dump
database 165
E
echo input (isql) 234editing
interfaces files 219interfaces files in GUI (dsedit) 72network transport addresses in dsedit 220
editing interfaces files in GUISee also dsedit utility command 72
editing rows using Interactive SQL 240editing using Interactive SQL 240enable Unicode conversions for migration 298encrypted hidden text 66environment variables
DSLISTEN (backupserver) 6LANG (backupserver) 6LC_ALL (backupserver) 6release path, for sybmigrate 297SYBASE_ASE 297SYBASE_JRE environment variable 297
Index
Utility Guide 345

error filesbcp and 200copying out and 200
error log filesfor backupserver 6
error messagesdsedit and X display 226dump database use over dump transaction 165in backupserver 6
error messages for migration 324errors
in data conversions 200operations, saving during copy in 200operations, saving during copy out 200
examplesbcp utility command 10defncopy utility command 66dscp utility command 71isql utility command 79showserver utility command 118startserver utility command 137
exclamation points (!!) operating system commandsprefix (isql) 79
executing a SQL statement in Interactive SQL 242executing Adaptive Server
See also dataserver utility command 37See also sqlsrvr utility command 126
exit 271exit command
in dscp 215in isql 229
exporting dataSee copying data out with interactive bcp
extractjava utility commanddefined 73permissions required for 73settings for 73
Ffailure cleanup, sybmigrate 326fast version of bcp 166
copying data in 167data recoverability and 165
fast version of bcp and locking scheme 166fast-logged version of bcp
data recoverability and 166field lengths
copy in 194in interactive bcp 184
prefix length, integer value in 188field terminators 178
bcp 179interactive bcp 186, 187
filesdefault formats with bcp 177error (bcp) 200native format 177null values 200
fixed-length fields 192format files in bcp 188
column numbers 188column precision 188column scale 188elements used in 188format used for 188host file column order 188host file data length 188host file datatype storage formats (SYB) 188number of records in 188prefix length, integer value in 188saving 188server column names 188server column orders 188TDS version number in 188terminators 188
formatting isql output 229full path names, specifying
in Backup Server 6
G
gathering information 5geometry check
sybrestore utility command 331GUI mode
for migration 304
H
help command (dscp) 71help in sybcluster 272hidden encrypted text 66high availability
migration with 323host file
isql and reading 234host files
column order 188
Index
346 Adaptive Server Enterprise

data length 188datatype storage formats (SYB) 188interactive bcp native format 184
how to move data 159
IIDENTITY columns
bcp and 174parallel bcp and 173, 174
ignore_dup_key option, create index, and bcp 200image datatype
interactive bcp and 184importing data. See Copying data in with interactive
bcp 194index re-creation for migration 316index threads for sybmigrate 301indexes
bcp, dropping before using 167slowing down bcp 163
information gathering urtilityshowserver 118sybdiag 142
information-gathering utilities 5initialization strings and bcp 197insert command
bulk copying, comparing 201insert rows using Interactive SQL 239inserting rows using Interactive SQL 241installation utilities 4installing
character sets (sqllocres) 125character sets, in GUI (sqlloc) 124languages (sqllocres) 125languages, in GUI (sqlloc) 124languages, new (langinstall) 95sort orders (sqllocres) 125sort orders, in GUI (sqlloc) 124
installjava utility commanddefined 76permissions required for 76settings for 76
interactive bcp 178, 187backslash terminator (\\› 186binary data, default 184carriage-return data field terminator (\\\\r) 186character format files, terminators for 186copying data for other software 178copying data in 194copying data out 192
defaults for prompts 178, 187field length 184field terminators 186, 187fields, prefix length of 182, 184file storage types 178, 182image datatype, default for 184implicit conversion of datatypes 182null or invisible character terminator (\\\0)
186null values and 184padding data with spaces 184row terminators 186, 187storage length 184tab data field terminator (\\\) 186terminator for new lines (\\\\n) 186terminators for tabular data preparation 186terminators, field and row 184, 187text data copying,default for 184
interactive command linesybrestore utility command 335
interactive isqlcommand line 229
interactive modesybrestore 329
Interactive SQL 235, 236canceling commands 242clearing a SQL statements pane 242columns, looking up 243combining multiple statements 243command files, using 251commands 253commands, logging 245configuring 245copy rows from a result set 240deleting rows 241displaying data 239editing rows from a result set 240editing, inserting, and deleting rows 239editor dialog box 249escape syntax 252executing a SQL statement 242executing command files 250general dialog box 246graphics mode 235import/export dialog box 248inserting rows from a result set 241keyboard shortcuts 238logging commands 245messages dialog tab 248
Index
Utility Guide 347

multiple windows 238Plan tab 236procedures, looking up 243query editor dialog box 250recall commands 244result dialog box 247saving statements to a file 250tables, looking up 243toolbar 237
Interactive SQL parserSee also 79
See also isql utility commandinterfaces files
backupserver and 6backupserver, specifying names and locations
of 6dscp, viewing and editing with 71dsedit, editing with 219dsedit, viewing and editing in GUI with 72dsedit, viewing and editing with 72opening for editing 219
iso_1 character set 197isql utility command 79
\< (redirect in) symbol 234\<\< symbol 79\> (redirect out) symbol 79, 234\| symbol 79column-separator character 230command terminator 229command terminator, changing 232command terminator, resetting 79correcting typing errors 231defined 79echo input 234examples of 79exit command 229host files, reading 234line numbers, removing 230, 234maximum statement size 229output file 230output, formatting 229queries, editing 231query buffer, resetting 231quit command in 229reset command in 231start command 229start command in 229statistics 233
statistics option with command terminator233
Transact-SQL, using with 229
J
Java columns for migration 298Java runtime environment migration 297
L
LANG environment variable in backupserver 6langinstall utility command
defined 95permissions required for 95
language utilities 4languages
alternate, with bcp 197for migration 298installing and modifying (sqllocres) 125installing and modifying, in GUI (sqlloc) 124installing new (langinstall) 95
LC_ALL environment variable in backupserver 6line numbers, removing in isql 230, 234load database command and bcp 201load transaction command
bcp and 201loading character sets
See also charset utility command 35locations of backupserver error log files 6logical page sizes
specifying with dataserver 205
M
managing clusters 6manual migration, what is not migrated 295mapping directory
sybrestore utility command 335master device
create with database 203max memory,for migration 298max network packet size configuration parameter
199max network packet size,configuration for
migration 301max packet size allowed, for sybmigrate 298max parallel degree, configuration for migration
301
Index
348 Adaptive Server Enterprise

merging databases, during migration 325migrate session, for sybmigrate 298migrating
servers (sybmigrate) 148migrating an archive database 298, 303missing statistics
fix_stats action 112start_stats action 112
modifyingcharacter sets (sqllocres) 125character sets, in GUI (sqlloc) 124languages (sqllocres) 125languages, in GUI (sqlloc) 124server entries (dscp) 212server entries with dsedit 220, 224sort orders (sqllocres) 125sort orders, in GUI (sqlloc) 124
moving data, methods for 159multiple statements in Interactive SQL 243multiple windows in Interactive SQL 238
Nnative file format
bcp and 177native format files 177network transport addresses
adding with dsedit 221dsedit, editing with 220
network transports 219new servers, creating
See also srvbuild utility command 134new servers, creating, using resource files
See also srvbuildres utility commandnew-line terminator (\\\\n)
in bcp 178in interactive bcp 186
non-printable characters, host file 184noncharacter datatypes, operating system format for
182noninteractive mode
sybrestore 329notes
ascii_7 character set compatibility 66batch size settings in bcp 10defncopy and Report Workbench 66hidden encrypted text 66null terminator versus no terminator 186slow version of bcp and deadlocks 168special characters, handling in bcp 10
system differences in bcp, operating 177triggers not fired by bcp in target table 163
null character terminator (\\\0) in interactive bcp186
null valuesinteractive bcp and 184
number (quantity of)server connections to backupserver 6
number of pre-allocated extents 169number of sort buffers for migration 301number of user connections for migration 301number of worker processes for migration 301numbers
line, removing from isql 230, 234numeric datatypes
bcp conversion to character storage 184column precision 188column scale 188operating system format for 177
O
object hierarchy for migrtion 298objects
failed migration of 324re-creating after migration 324
openingsessions in dsedit 219
operating system filesnative format 177permission required for copying tables into 10,
161operating systems
commands prefix (!!) (isql) 79non-character datatype formatting 182numeric datatype formatting 177
optdiag command, changes 97optdiag utility command 97
defined 97permissions required for 102
optimization goals, identifying best 5output formats, data
See copying data out with interactive bcp
P
packet size, networkbcp, specifying with 199
padding data and bcp 184
Index
Utility Guide 349

parallel bcpcopying to a specific partition 170, 173different methods of using 172, 174IDENTITY columns and 173, 174syntax 172
partitioned tables in bcp 175copying data into randomly 168copying data into, methods for 168page allocations, increasing 169
partitions, copying data to 162passwords
bcp encryption 10defncopy and 66new, generating 37
performancebcp issues and 174bulk copy and packet size 199
permissionsqptune 112
permissions required forbackupserver utility command 6bcp utility command 182certauth utility command 27certpk12 utility command 30certreq utility command 33charset utility command 35dataserver utility command 37ddlgen utility command 45dscp utility command 71dsedit utility command 72dsedit, required for 219extractjava utility command 73installjava utility command 76langinstall utility command 95operating system file, copying tables into 10,
161optdiag utility command 102preupgrade utility command 102pwdcrypt utility command 107qrmutil utility command 108sqldbgr utility command 119sqlloc utility command 124sqllocres utility command 125sqlsrvr utility command 126sqlupgrade utility command 132sqlupgraderes utility command 133srvbuild utility command 134srvbuildres utility command 135sybrestore utility command 330
sybtsmpasswd utility command 154tables, copying data into 10, 161xpserver utility command 156
Plan tab 236post-migration activities, for sybmigrate 316prefix field lengths in interactive bcp 182, 184prefix length 188prefix lengths in bcp 179preupgrade utility command
defined 102permissions required for 102settings for 102
primary database, restoring after migration 318procedures in Interactive SQL, looking up 243prompts
bcp. See Interactive bcp 178prompts in bcp utility command 179pwdcrypt utility command
defined 107permissions required for 107settings for 107
Qqptune
collect action 112compare action 112custom start action for tuning 112fix_stats action 112parameters 112simple start action for tuning applications or
queries 112start_stats action to fix missing statistics 112syntax 112
qptune actionscollect 112compare 112custom start 112fix_stats 112simple start 112start_stats to fix missing statistics 112
qrmutil utility commanddefined 108permissions required for 108settings for 108
query buffer, resetting 231query plans, identifying best 5quick reference
dscp commands 215quit 273
Index
350 Adaptive Server Enterprise

quit commandin dscp 215in isql 229
R
recall commands in Interactive SQL 244recording commands used in Interactive SQL 245redirect in symbol (\<) in isql 234redirect out symbol (\>) in isql 234release path, for sybmigrate 297remigrating a database 326remote machines 219remote machines, using dsedit utility on 219renaming server entries with dsedit 225replicate database
restoring after migration 320replicated databases
post-migration procedures 317Replication Server, migrating replicated data to
Adaptive Server 316, 317report Workbench, incompatibility with defncopy
66reports for sybmigrate 148required for
bcp utility command 161reset command (isql) 231resource file mode, for migration 309restoring a database
sybrestore utility command 335restoring databases in interactive mode
sybrestore utility command 333restoring databases in noninteractive mode
sybrestore utility command 332restoring to a point in time
sybrestore utility command 337roll-back processes 198row terminators
bcp, in 178interactive bcp, in 186, 187
row-level access rules and bcp 197rows in bcp, and erroneous table 200rows, table
bulk copying and failed 198length 171
rulesdefncopy, copying with 66tables, copying data into 201
Ssaving
errors during copy in operations 200errors during copy out operations 200format files in bcp 188
security Mechanism server attribute (dscp) 212Security Mechanism server attribute (dscp) 211select a Directory Service screen 219select into command, compared to bulk copying
201server attributes (dscp) 211server column
names 188orders 188
server connectionsbackupserver, number of 6
server data, migration of 293server entries
adding, with dsedit 224contents, viewing with dscp 214copying within a session, with dsedit 225copying, with dsedit 221, 222, 225deleting, with dseditdsedit 225dscp, listing with 214modifying, with dsedit 220, 224renaming, with dsedit 225server entries, adding 220
server Entry Editor window 219server Name server attribute (dscp) 212Server Name server attribute (dscp) 211server Object Version server attribute (dscp) 212Server Object Version server attribute (dscp) 211server Service server attribute (dscp) 212Server Service server attribute (dscp) 211server Status server attribute (dscp) 212Server Status server attribute (dscp) 211servers
backupserver, specifying names in 6backupserver, starting in 6migrating 148modes of speed when using bcp 160startserver utility command 137startserver, starting in 137sybdiag utility command 142sybmigrate utility command 148
set cluster 275set instance 276setup session, for sybmigrate 298sever attributes (dscp) 212
Index
Utility Guide 351

show agents 277show cluster 280show instance 283show servers 118
See also showserver utility command. 118show session 285showserver utility command 118
defined 118examples of 118
shutdown cluster 287shutdown instance 288simple start action of qptune 112size
data storage in bcp 179packet size 199text or image data 199
slow bcp 165slow version of bcp 166
deadlocks on index pages 168sort order utilities 4sort orders
installing and modifying (sqllocres) 125installing and modifying, in GUI (sqlloc) 124
space requirements and bcp 167special characters
bcp, handling in 10specifying full path names in Backup Server 6specifying server names in backupserver 6SPX/IPX addresses 220SPX/IPX addresses for interfaces entries 220SQL parser utility
See isql utility commandsql.ini file
dsedit sessions, opening with 223entries, adding 217entries, copying 221entries, copying to 222, 225entries, modifying 224entries, renaming 225
sqldbgr utility commanddefined 119permissions required for 119settings for 119
sqlloc utility commanddefined 124permissions required for 124
sqllocres utility commanddefined 125permissions required for 125
sqlsrvr utility commanddefined 126permissions required for 126
sqlupgrade utility commanddefined 132permissions required for 132
sqlupgraderes utility commanddefined 133permissions required for 133
srvbuild utility commanddefined 134permissions required for 134
srvbuildres utility commanddefined 135permissions required for 135
start cluster 289start command
in isql 229start instance 290starting
dscp utility 209dsedit utility command 219, 223servers (startserver) 137XP Server manually (xpserver) 156
starting Adaptive Server 208starting servers
utilities 4startserver utility command
backupserver and 6defined 137examples of 137runserver file examples 137
statisticsdisplaying (optdiag) 97isql 233loading updated (optdiag) 97
statistics, fixing missing 5storage types used in bcp 184stored procedures
copying with defncopy 66SYBASE environment variable 297SYBASE environment variable in dsedit 223SYBASE_ASE environment variable 297SYBASE_JRE environment variable 297sybcluster
commands active after connecting to a cluster256
commands active before connecting to a cluster255
Index
352 Adaptive Server Enterprise

interactive commands 255sybcluster commands
add backupserver 257add instance 258connect 259create backupserver 260create cluster 261create xpserver 263deploy plugin 264diagnose cluster 265diagnose instance 267disconnect 268drop backupserver 268drop cluster 269drop instance 270drop xpserver 271exit 271help 272localize 272quit 273set backupserver 274set cluster 275set instance 276set xpserver port 277show agents 277show backupserver config 279show cluster 280show instance 283show membership mode 285show session 285show xpserver 287shutdown cluster 287shutdown instance 288start cluster 289start instance 290upgrade server 290use 292
sybcluster utility 139sybdiag utility command
defined 142sybmigrate
additional network memory parameter 298changing target login accounts 296character set conversion 298CIS bulk insert array size 301CIS bulk insert array size configuration 298CIS bulk insert batch size configuration 301CIS packet size configuration 298, 301component directory 297
components for 296configuration and tuning 301copy threads 301dependencies for 296environment variables 297errors to avoid 302executable file 297GUI mode 304index re-creation 316index threads 301Java columns 298Java runtime environment 297languages 298max packet size allowed configuration 298max parallel degree configuration 301memory for the JVM 297merging two database 325migrate session 298, 307migrating Replication Server data 316, 317migration failure cleanup 326migration of database data 293migration of server data 293migration with high availability 323multiple sessions 298number of sort buffers configuration 301number of user connections configuration 301number of worker processes configuration
301object hierarchy 298objects fail to migrate 324permissions for 296platforms 297post-migration activities 316post-migration procedures for replicated
databases 317pre-migration considerations 298re-creating an object 324release path 297remigrating a database 326reports 148resource file mode 309restoring replicate databases 320restoring the primary database 318setup session 298, 304source Adaptive Server configuration 301starting 304sybmigrate log 320trouble shooting and error messages 324validate session 298, 308
Index
Utility Guide 353

sybmigrate ,max network packet size configuration301
sybmigrate utility commanddefined 148
SYBMIGRATE_MEMORY environment variablefor migration 297
sybmigrate,max memory configuration 298sybmigrate,what is not migrated 295sybmultbuf, using to start Backup Server 6sybrestore utility 152sybrestore utility command
checks 330database menu 333defined 152described 329example of point-in-time 338geometry check 331interactive command line 335interactive mode 329mapping directory 335noninteractive mode 329permissions required for 330restoring a database 335restoring databases in interactive mode 333restoring databases in noninteractive mode
332restoring to a point in time 337syntax 331
sybtsmpasswd utility commanddefined 154permissions required for 154settings for 154
symbols, field terminator (bcp) 186syntax
sybrestore utility command 331system data format (SDF) output in bcp 192
Ttab data field terminator (\\\) in interactive bcp 186table rows
copying in batches 198length 171
tablesbcp character set defaults 10bcp prompts in 179permission required for copying data into 10,
161permission required to copy into operating
system files 10, 161
tables in Interactive SQL, looking up 243tabular data, copying 187tabular output 192TCP/IP addresses for interfaces entries 220terminators (bcp)
changing 178defined 159field and row, and 184, 187other programs, using for 186
terminators in bcp 188text datatype
interactive bcp and 184threaded utilities 3trace flags and backupserver 6Transact-SQL
using with isql 229transferring data from programs using bcp 159transport Address server attribute (dscp) 212Transport Address server attribute (dscp) 211transport Type server attribute (dscp) 212Transport Type server attribute (dscp) 211triggers
bcp, dropping before using 167copying with defncopy 66slowing down bcp 163tables, copying data into 201
trouble shooting, for migration 324troubleshooting dsedit 226
Uunlogged transactions 165update rows using Interactive SQL 239updatease utility 155upgrade 155upgrading Adaptive Server
See also sqlupgrade utility command 132upgrading Adaptive Server using resource files
See also sqlupgraderes utility command 133utilities
bulk copy (bcp) 175utilities, other Adaptive Server, and bcp 201utility to start servers with
backupserver 6dataserver 37sqlsrvr 126startserver 137
utility typescharacter sets 4configuration 4
Index
354 Adaptive Server Enterprise
data manipulation 5database creation 5installation 4languages 4sort orders 4starting servers 4
Vvalidate session for sybmigrate 298viewing interfaces files in GUI
See also dsedit utility command 72views, copying, with defncopy 66
Wwarnings
bcp data loss 163
bcp in data recovery 10defncopy failure due to long comments 66failure due to long comments 66
X
XP Server, starting manuallySee also xpserver utility command 156
xpserver utility command 156defined 156permissions required for 156
Index
Utility Guide 355

Index
356 Adaptive Server Enterprise