utah national electronic disease surveillance...
TRANSCRIPT
1
UTAH National Electronic Disease Surveillance System (UT-NEDSS)
User’s Manual
Rev. 08/2013
2
Table of Contents
General Instructions – Accessing UT-NEDSS/TriSano ................................................................. 5
Create UT-NEDSS Login Account ............................................................................................. 5
Recover UT-NEDSS Login Information .................................................................................... 5
Quick Start for Entering a New Case .............................................................................................. 6
Create a New CMR ..................................................................................................................... 6
Create a New CMR from an Existing CMR ............................................................................... 7
Saving Work ............................................................................................................................... 8
Data Entry – Conventions ............................................................................................................... 8
General data entry information ................................................................................................... 8
Entering dates ............................................................................................................................. 8
Entering phone numbers ............................................................................................................. 9
Remove repeating fields ............................................................................................................. 9
Deleting a CMR .......................................................................................................................... 9
LHD information (reviewer, investigator, etc.) .......................................................................... 9
Brief note field ............................................................................................................................ 9
CMR Instructions, Tab by Tab ................................................................................................... 9
Demographic Tab ....................................................................................................................... 9
Name ....................................................................................................................................... 9
Address ................................................................................................................................. 10
Age ........................................................................................................................................ 10
Race and ethnicity data ......................................................................................................... 10
Clinical Tab ............................................................................................................................... 10
Change disease associated with CMR .................................................................................. 10
Treatments............................................................................................................................. 11
Navigating show and edit modes .......................................................................................... 11
Laboratory Tab ......................................................................................................................... 11
Contacts Tab ............................................................................................................................. 13
Promote a Contact to a Morbidity Event (CMR) .................................................................. 14
Encounters Tab ......................................................................................................................... 14
Epidemiological Tab ................................................................................................................. 15
Reporting Tab ........................................................................................................................... 17
Investigation Tab ...................................................................................................................... 18
Notes Tab .................................................................................................................................. 18
Adding New notes................................................................................................................. 18

3
Sorting/Viewing Notes.......................................................................................................... 18
Automatic Notes ................................................................................................................... 19
Administrative Tab ................................................................................................................... 19
“How To” Listing (Attachments, Search, Events, Print, Export, Tasks, Deleting Duplicates) ... 19
Search CMRs ............................................................................................................................ 19
Add Attachments ...................................................................................................................... 20
Deleting Duplicates .................................................................................................................. 20
EVENTS Listing ....................................................................................................................... 20
Sort EVENTS Listing ........................................................................................................... 21
Change View of EVENTS Listing ........................................................................................ 21
Contact Event vs. Morbidity Event ....................................................................................... 21
Using Bookmarks to Customize Your Views and Searches ..................................................... 21
Bookmarking a custom view of the EVENTS listing ........................................................... 22
Customize view by bookmarking a “SEARCH” .................................................................. 22
Print a CMR: ............................................................................................................................. 22
Print CMR from the patient record ....................................................................................... 22
Print CMR from the EVENTS listing ................................................................................... 22
Exporting CMRs to a Spreadsheet (csv file) ............................................................................ 23
Exporting a single CMR ....................................................................................................... 23
Exporting multiple CMR’s using SEARCH ......................................................................... 23
Exporting multiple CMRs from the EVENTS listing ........................................................... 23
Tasks ......................................................................................................................................... 23
Add a task ............................................................................................................................. 23
Viewing and editing tasks ..................................................................................................... 24
Entering Animal Rabies Cases...................................................................................................... 24
Routing CMR Events .................................................................................................................... 26
All Roles ................................................................................................................................... 25
Role-Specific routing instructions ............................................................................................ 26
LHD Surveillance Manager Role.......................................................................................... 26
LHD Investigator Role .......................................................................................................... 26
LHD Manager Role............................................................................................................... 26
UDOH Manager Role ........................................................................................................... 26
Routing to other jurisdictions ................................................................................................... 26
Routing "Out of State" cases for UDOH .................................................................................. 27
Routing a contact ...................................................................................................................... 27
Lead Jurisdiction vs. Investigating Jurisdiction ........................................................................ 28
4
Reopening an event ................................................................................................................... 28
Routing Scenario ....................................................................................................................... 28
Policy on reopening cases ......................................................................................................... 28
Technical Support for UT-NEDSS ............................................................................................... 29
Data loss .................................................................................................................................... 29
Error messages .......................................................................................................................... 29
Reporting problems with UT-NEDSS/TriSano ........................................................................ 29
Appendix A Role-Specific Routing .............................................................................................. 30
5
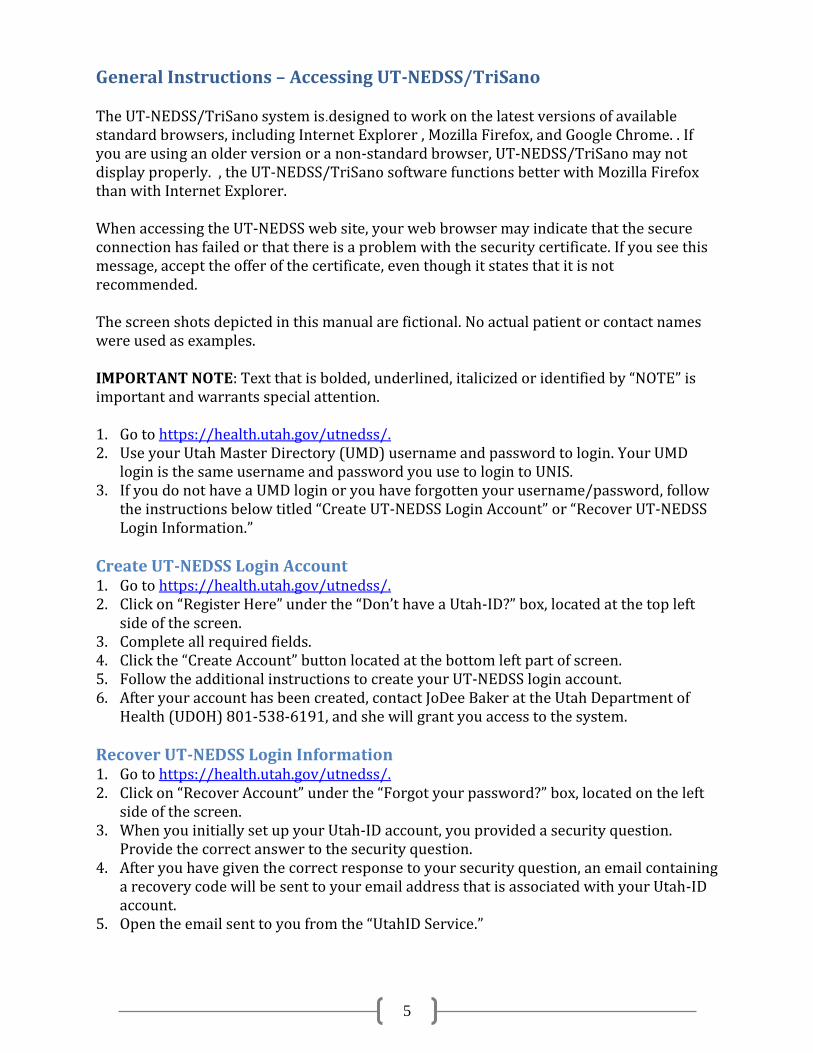
General Instructions – Accessing UT-NEDSS/TriSano The UT-NEDSS/TriSano system is.designed to work on the latest versions of available standard browsers, including Internet Explorer , Mozilla Firefox, and Google Chrome. . If you are using an older version or a non-standard browser, UT-NEDSS/TriSano may not display properly. , the UT-NEDSS/TriSano software functions better with Mozilla Firefox than with Internet Explorer. When accessing the UT-NEDSS web site, your web browser may indicate that the secure connection has failed or that there is a problem with the security certificate. If you see this message, accept the offer of the certificate, even though it states that it is not recommended. The screen shots depicted in this manual are fictional. No actual patient or contact names were used as examples. IMPORTANT NOTE: Text that is bolded, underlined, italicized or identified by “NOTE” is important and warrants special attention. 1. Go to https://health.utah.gov/utnedss/. 2. Use your Utah Master Directory (UMD) username and password to login. Your UMD
login is the same username and password you use to login to UNIS. 3. If you do not have a UMD login or you have forgotten your username/password, follow
the instructions below titled “Create UT-NEDSS Login Account” or “Recover UT-NEDSS Login Information.”
Create UT-NEDSS Login Account 1. Go to https://health.utah.gov/utnedss/. 2. Click on “Register Here” under the “Don’t have a Utah-ID?” box, located at the top left
side of the screen. 3. Complete all required fields. 4. Click the “Create Account” button located at the bottom left part of screen. 5. Follow the additional instructions to create your UT-NEDSS login account. 6. After your account has been created, contact JoDee Baker at the Utah Department of
Health (UDOH) 801-538-6191, and she will grant you access to the system.
Recover UT-NEDSS Login Information 1. Go to https://health.utah.gov/utnedss/. 2. Click on “Recover Account” under the “Forgot your password?” box, located on the left
side of the screen. 3. When you initially set up your Utah-ID account, you provided a security question.
Provide the correct answer to the security question. 4. After you have given the correct response to your security question, an email containing
a recovery code will be sent to your email address that is associated with your Utah-ID account.
5. Open the email sent to you from the “UtahID Service.”
6
6. Click on the “Continue Recovery Link” provided in the “UtahID Service” email. This will automatically open up a web browser.
7. Enter the “Recovery Code” provided in the email. 8. Enter a new Utah-ID password. 9. Login into UT-NEDSS using your new password.
To access this User’s Manual online, visit http://health.utah.gov/nedss. The UT-NEDSS support documents are located in the “UT-NEDSS User’s Resources” section.
Quick Start for Entering a New Case Create a New CMR NOTE: ALWAYS check to determine if a record has already been started before entering any new data. Failure to complete to do so will create duplicate records in the database. There is no need to fill out all the data fields before you create the CMR. Creating the CMR will generate additional questions for each disease. The most expedient process is to put in limited information (name and disease), and save the CMR. Once you have done this, you may add the rest of the information. Go to: https://health.utah.gov/utnedss/. Click on “NEW CMR” function in the menu tab bar at the top of the screen. (CMR =
Confidential Morbidity Report) A new screen will appear with a reminder that states, “Before creating a new morbidity
event, please search for the person in question.” Enter the name and/or birth date of the case you entering. You may encounter one of the following scenarios:
The event you are trying to create already exists (patient and disease have already been entered). In this case, you can either do nothing or edit the existing event. To view a record, click on the patient name; then click on “Show” under “CMR Actions.” To edit an existing case, click “Edit.”
o Selecting “Edit” will open up the event in Edit mode. This allows you to change and edit event information.
o Selecting “Show” will open up the event in Show mode. You cannot edit from Show mode.
The person in question is already in the system for a different disease or event. In this case, you can start a new CMR with the person's information by clicking on the link, “Create and edit CMR using this person,” listed in the column, “Entity Actions.” This will create a new CMR for the patient. This will create a new event for the patient and transfer demographic information already in the system.
The person in question is not in the system. If the person you were looking for was not listed in the search results, click on the link that appears above the search results, “Start a CMR with the criteria you searched on.”
Once you have established a CMR – In the “Demographic” tab, complete the fields, “Last Name” and “date first
reported to public health1”, if they are not already populated.
7
o The date first reported to public health (DFRPH) entered in UT-NEDSS is the earliest date that disease notification was received by a public health authority in Utah.
o Notification may include a positive lab result received by email, fax, or ELR; or telephone reporting from a laboratory or clinician.
o The Event created date will be used to populate the DFRPH for previously entered cases when the date of first notification is not available.
o The DFRPH will be automatically populated when results are received via ELR.
o The DFRPH for a promoted contact's CMR is the earliest date that notification of disease occurring in the promoted contact was received by public health.
Move to the “Clinical” tab. In the “Clinical” tab, select the disease from the drop-down menu in the
“Disease” field. Make certain that the disease you have selected is correct. After you select the disease and click on the “Save & Continue” button or the “Save & Exit” button, questions that are specific to that disease are loaded onto the electronic form. If you need to change the disease name, see “Changing Event Disease.”
After entering the disease name and selecting “Save & Continue” or “Save & Exit,” you may proceed to enter data in the CMR tab-by-tab. As you enter data, the “Save & Continue” button saves what you have entered, while keeping you in “Edit” mode and keeping your place in the investigation form. You must be in “Edit” mode to edit the event.
Click on “Route case,” located at the top right side of the screen under “Jurisdictions.” See further instructions under “Routing.”
Create a New CMR from an Existing CMR This function can either be used to create a new event for a patient that is completely
unrelated to the existing CMR or that is closely related to the existing CMR. To create a new CMR from an existing CMR, locate the CMR and open it in the “Show”
mode. Click on the “Create a new event from this one” function. This brings up a box that
allows you to create a “Shallow” copy of the existing CMR or a “Deep” copy of the existing CMR.
Shallow Copy creates a new CMR for the patient that is completely unrelated to the existing CMR.
Only demographic information is copied to the new CMR. Deep Copy creates a new CMR for the patient that is related to the existing CMR.
Allows you to copy demographic information as well as any of the following: o Clinical information without disease o Labs and lab results o Reporting information o Disease forms and answers o Notes
1Official policy approved by the UT-NEDSS Core Team, 1/2012.

8
Saving Work Pressing the “enter” key to save your work will move you to the “Show” mode from the
“Edit” mode. It is not advised to use the “enter” key to save your work. Rather, use the “Save & Continue” or “Save & Exit” button to save work. It is recommended and a good practice to save information after completing each tab and before moving to the next tab.
NOTE: Depending on the disease you select, additional questions will appear under the different tabs of the CMR. The additional questions are disease-specific and will only appear on the CMR once the disease has been selected and you clicked the “Save & Continue” or “Save & Exit” button. The “Save & Exit” button saves your work and takes you to the “Show” mode. You must be in “Show” mode to route an event. Fields shaded in light orange are required fields and must be completed before saving the CMR. You will receive an error message if you try to save the CMR, but have not completed the required fields. For example, if you fail to enter the date first reported to public health in the Demographic or Reporting tabs, you will receive an error message, “There were problems with the following field: Date first reported to public health can’t be blank.” You must correct any errors before proceeding to save the CMR.
Data Entry – Conventions General Data Entry Information All data entered into UT-NEDSS should be entered using Proper Case, i.e., John Doe not
john doe or JOHN DOE. Fields shaded in light orange are required fields. If a field is shaded in light yellow it means that if that field is filled out, other fields
within that tab must be completed before you can “Save & Continue.” Move from field to field, or tab to tab using the “tab” key. It’s advised you do not press the “Enter” key during data entry; this acts as “Save and
Exit” and will take you into “Show” mode. If you need to enter two items from a drop down list, use the Ctrl key and click with the
mouse to add each item.
Entering Dates Calendar icon – The calendar icon is there to assist you with dates. You do not have to
use it. You can input the dates manually. To enter dates, you may use mm/dd/yy or mm/dd/yyyy or mm-dd-yy or mm-dd-yyyy
or Month dd, yyyy. You CANNOT enter dates without // or --. For example, if you type March 3, 2003 as
03032003, you will receive an error message when you attempt to save the record, alerting you that the date entered “is not a valid date.”
The dates available / important to the case may vary by disease; for every case, please enter ALL available date information.
9
Entering Phone Numbers You do not have to put the hyphen in the phone number. For example, rather than
type 555-1212, type 5551212 and the program will automatically add the hyphen.
Remove Repeating Fields If you inadvertently add a repeating field (for example, “Add a new lab result to this lab”
is a repeating field), and you need to remove it, check the “Remove” checkbox and click “Save and Continue.”
Deleting a CMR When deleting a CMR you are actually doing what is considered a “soft delete”. This
means that the CMR is “grayed out” in the EVENTS listing, and appears with a strike-through in the SEARCH listing. Deleted records will not be exported to CDC or to the IBIS Query Module.
To delete a CMR follow the steps below. A CMR can be deleted from either the “Show” or
“Edit” mode or from the EVENTS listing: To delete a CMR from “Show” or “Edit” mode, view the CMR and click on the
“Delete” function listed in red text directly above the CMR tabs. To delete a CMR from the EVENTS listing, click on EVENTS, find the CMR you
would like to delete and click on the “Delete” function shown directly under case’s name.
You are still able to view data from a deleted CMR by clicking on the CMR in “Show” or “Edit” mode.
NOTE: Do not delete a CMR just because it is determined not to be a case. For a CMR that is determined to be not a case, select “not a case” from the drop-down menu under LHD case status or UDOH case status in the Administrative tab and route it as you would any other completed CMR. Both deleted cases and cases marked as “not a case” should be routed on to the UDOH. This will clear the case from your list.
LHD Information (reviewer, investigator, etc.) This is automatically entered into the program. You do not need to manually enter any
of this information. Brief note field
From the CMR listing, under the status column, there is a “Brief note” field. Any note entered into the “Brief note” field will only be saved after clicking on the “Action required” directly below the Brief note field.
CMR Instructions, Tab by Tab
Demographic Tab
Name Enter the person’s last name, first name and middle name, if available.
10
The “Last name” field is required. Fields shaded in light orange are required and must be completed before saving the CMR.
The “A.K.A.” field will appear on disease-specific events associated with Sexually Transmitted Diseases (STDs).
Address Enter the person’s residential address.
Street number & Street name – disregard street number field and enter the entire street address in the Street name field.
NOTE: If the address provided is a P.O. Box, enter the P.O. Box in the “Street Name” field.
Age You do not need to calculate age. When you enter the birth date, the program will
calculate the age for you automatically. You will not see the calculation until you click either the “Save & Continue” or “Save & Exit” button at the top right side of the screen.
When entering dates, you may use the following formats: 1) mm/dd/yy or mm/dd/yyyy; 2) mm-dd-yy or mm-dd-yyyy, or 3) you may spell out the date (January 1, 2009). However, you CANNOT enter dates without // or --. For example, if you type March 3, 2003 as 03032003, the system will not recognize that as a valid date. You will receive an error message stating, “Date of birth is not a valid date.”
You may also use the calendar icon ( ) to enter the date. Once you click on “Save & Continue,” the date will automatically be reformatted
to appear in the following format - January 01, 2009.
Race and ethnicity data The ethnicity field has been intentionally placed before the race field. Studies have
shown that reporting will be more accurate and more complete when ethnicity is asked before race.
The race drop-down box looks odd because it is always open. This is designed so that you can select more than one race. Use the Ctrl key and mouse click to add a second race.
Clinical Tab NOTE: Depending on the disease you select, additional questions will appear under the different tabs of the CMR. The additional questions are disease-specific and will only appear on the CMR once the disease has been selected and you have clicked the “Save & Continue” or “Save & Exit” button.
Change disease associated with CMR If you need to change the disease name associated with an event, you can do that by
going to the “Clinical” tab and selecting the new disease. Click “Save & Continue.” Next, go to the “Investigation” tab, and click on “Add/Remove forms for this event.” If you would like to remove the disease form associated with the previous disease for
the case event, you can do so by clicking the “REMOVE FROM EVENT” check box, located at the right of the screen, and then clicking on the “Remove Forms” button located on the left side of the screen. Warning: If you remove a form from the disease event, you will lose any data associated with the form.
11
NOTE: You do not have to remove the previous disease form. You can have more than one disease form linked to an event. But, by having more than one disease form linked to an event, you will have two sets of disease-specific questions that appear in the different tabs. To add the new disease form, scroll through the list. Click the “ADD TO EVENT” check
box for the disease form you would like to add. Click the “Add Forms” button located at the bottom of the list of disease forms on the left side of the screen.
You should now see the disease forms linked to the case event at the top. Click either the “Show” or “Edit” mode, located in red text at the top right of page, to
return to the tabs section of the CMR. Complete the new disease-specific questions under each tab.
Treatments Enter any additional treatment data in the text box located under the treatment field.
Navigating show and edit modes If you are in “Edit” mode, “Show” will be displayed in the upper left corner of the screen. If you are in “Show” mode, “Edit” will be displayed in the upper left corner of the screen.
Laboratory Tab Lab field – Enter the name of the lab where the test was run, i.e., ARUP or Unified State
Laboratories: Public Health. If the laboratory you are entering is already in the system, it will appear as you
type. When you see the laboratory name, scroll down and select it. Test type field – Select the test type from the options. If the test type you are looking
for is not in the list of options, click on “More choices” and a more comprehensive list of test types will become available.
Organism field – Select the organism from the options. If the organism is not listed, click on “More choices” and a more comprehensive list of organism types will become available.
Test result field – Select the test results from the options. The actual test result indicated on the laboratory results that come from the laboratory may not exactly match the items listed in the drop-down listing. Select the most appropriate or best-fitting item from the drop-down listing.
Result value field – Enter the quantitative or numeric results in this field. Use the “Units” field to enter the units used to measure the result. If the lab result is for a serological test, the lab result may show a number such as 1.2 or 5 ug/ml. Use the Result value field to enter in the 1.2 and use the Unit field to enter in the ug/ml.
Units field – The Units field is used for entering the units of measurement for the Result value (see above).
Reference range field – If the lab result has a range, such as a positive or negative range, you can enter the range shown on the lab result in this field.
Test status field – Select the Test status option from the drop-down list. Specimen source field – Select the Specimen source from the drop-down list to
indicate the type of specimen used for the lab test.
12
Collection date field – Enter the collection date of the specimen by using the calendar icon or entering it manually (mm/dd/yyyy).
Lab test date field – Enter the date the lab test was conducted by using the calendar icon or entering it manually (mm/dd/yyyy).
Specimen sent to state lab? field – Select the appropriate option from the drop-down list to indicate whether the specimen was sent to the Unified State Laboratory: Public Health.
Comment field – Enter any comments regarding the lab test and/or results. Add a new lab result to this lab function – This function is used to add an additional
lab result to a laboratory with a result previously listed. Click “Add a new lab result to this lab” and a new lab result section will appear.
Add a new lab function – This function is used to add a new reporting laboratory to the CMR in the Laboratory tab. This function is different from the “Add a new lab result to this lab.”
Remove lab (with results) check box function – The “Remove” function is used to remove an unneeded lab test or incorrectly entered lab test. The “Remove” check box is located to the right of the Lab field and will only appear after the laboratory information has been saved by clicking “Save & Continue” or “Save & Exit.”
To remove the lab (with results), click the “Remove lab (with results)” check box. A green check mark (√) will appear in the box. Click the “Save & Continue” or “Save & Exit” button.
Remove check box – The “Remove” check box is located directly below the left side of the Comment box of the lab result. It is used to remove any unwanted lab results. Only the lab result located directly above the “Remove” check box will be removed.
To remove the lab result, click the “Remove” check box. A green check mark (√) will appear in the box. Click the “Save & Continue” or “Save & Exit” button.
Encounter-specific Labs section – This section is located at the bottom of the Laboratory tab and will show laboratory information only if previously entered in the Laboratory section of the Encounters tab.
NOTE: Test information should be entered in the first two fields, while test results should be entered in the second two fields. SPECIAL NOTES REGARDING HEPATITIS RESULTS: Hepatitis A total antibody results will not be routinely entered into UT-NEDSS or routed
to local health departments for investigation. This policy is based on the finding that very few, if any, cases of acute hepatitis A are identified as a result of investigating hepatitis A, total antibody results. The total antibody test is useful as a screening test, but not as a diagnostic test. Hepatitis A, IgM results are needed in order to classify as a confirmed case.2
UDOH will no longer add new lab results to chronic Hepatitis B or C events with a CONFIRMED state status. Note, this will only affect labs being attached/appended to EXISTING UT-NEDSS cases, and applies only to labs NOT received via ELR.3
2Policy approved by Local Health Officers and UDOH BOE Director 3/2011. 3Policy approved by Local Health Officers 11/2010.
13
Discontinuing this practice will reduce the number of tasks received by investigators.
For existing Hepatitis C cases over 30 years of age, additional labs will be attached to the CMR, but not entered into the laboratory section.
Exceptions: All Hepatitis B labs will be continue to be faxed and/or added to UT-
NEDSS for women of childbearing age, regardless of state case status. By request, Utah County will continue to receive all chronic Hepatitis B and C
labs via fax. Contacts Tab Entering the contact information is a multi-step process. To enter the contacts, follow
the steps below: The “Search” option can be used to search for existing people in the system to
identify them as contacts to a case. If the person does not exist in the system, enter the person’s name manually as a contact.
In “Edit” mode, enter the name (last and first), disposition, contact type, and phone information for all contacts. Use the “Add a contact” function to add additional contacts.
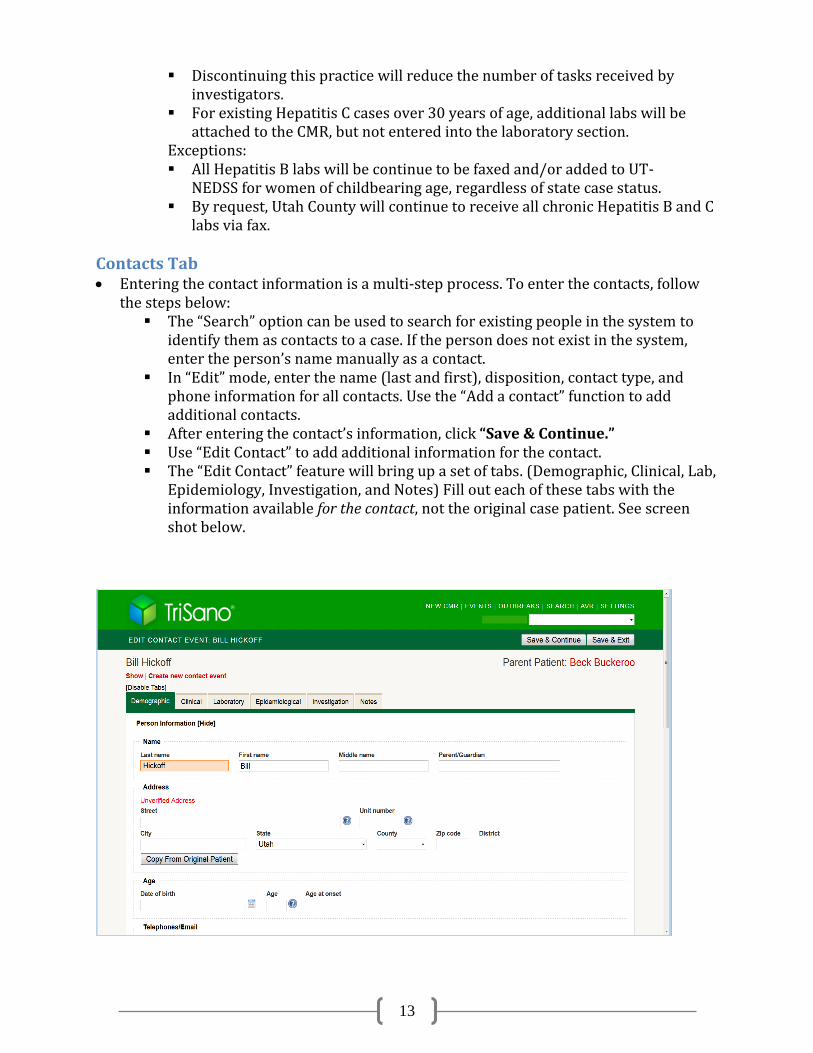
After entering the contact’s information, click “Save & Continue.” Use “Edit Contact” to add additional information for the contact. The “Edit Contact” feature will bring up a set of tabs. (Demographic, Clinical, Lab,
Epidemiology, Investigation, and Notes) Fill out each of these tabs with the information available for the contact, not the original case patient. See screen shot below.

14
Use the “Copy From Original Patient” function if the contact is a household
contact and has the same street address. This function will automatically populate the street address information.
NOTE: The name of the contact is shown in the upper left corner of the screen. The name of the original case or “Parent Patient” is shown in the upper right corner of the page in red. To go back to the CMR tabs for the original patient, click on the “Parent Patient” link. The tabs for a contact are similar to the tabs for the original case patient and are completed in a similar manner.
Promote a contact to a morbidity event (CMR) If a contact becomes an actual disease case, it is possible to promote a contact event to a
morbidity event. To do this, find the contact event you would like to promote to a morbidity event in the EVENTS listing and click on the contact’s name to view the contact in “Show” mode.
In “Show” mode, you will see a “Promote to CMR” function located in the top left portion of the screen in red text.
Click on “Promote to CMR.” A pop up box, “Are you sure?” will appear. Click yes to create a CMR or morbidity event for this contact.
NOTE: Once promoted to a morbidity event, the event will no longer be a “contact event,” but will still be linked to the original CMR for whom the case was a contact. In the “Contacts” tab of the promoted morbidity event, a section called “Parent CMR” is created that shows to whom the promoted morbidity event is a contact. The link is also maintained in the “Parent CMR” under the “Contacts” tab in a section titled “CMR Contacts.”
Encounters Tab This tab is primarily used for local health department (LHD) investigators conducting
case management. The “Encounters Tab” allows the investigator to track when and where a case has had
encounters with public health (such as a clinic visit, telephone conversation, treatment, etc.).
Investigator field – This field will automatically populate with the investigators name that is completing the CMR. If you need to change the name of the investigator, click on the down arrow and scroll through the list to select.
Encounter date field – Enter the date of encounter. Location field – Use the drop-down list to select the location of where the public
health encounter occurred. Description field – This is a free text field that allows the investigator to give a
more detailed description of the encounter event. More than one encounter event can be added to the CMR. To add additional encounters,
click “Add an encounter.” Click “Save & Continue.” Once an encounter event has been saved, three new features will appear to the right of
the Encounter event. (“Remove” check box, Show Encounter” and “Edit encounter
15
event”) These three features allow the encounter event to be deleted, viewed and edited.
To add information to the Encounter event, click “Edit Encounter” to bring up the following tabs:
Encounter tab – This displays the original information entered into the encounter event (investigator, date, location, description).
Clinical tab – This allows you to enter in any treatment information. Any clinical information entered here will also show up in the main Clinical tab under “Treatments.”
Laboratory tab – This allows you to enter any laboratory information. Any laboratory information entered here will also show up in the main Laboratory tab under “Encounter-specific Labs.”
Investigation tab – This allows you to attach forms to the encounter. o LHDs can create and use their own specific forms for this section. However,
only UT-NEDSS users with “administration” rights can create a form. If your LHD does not have an individual with the rights to create a form, contact the Bureau of Epidemiology at the UDOH for assistance.
Notes tab – This allows you to add any additional notes to the encounter. Encounter Notes section – This section automatically creates a time stamp and person
stamp of when and by whom the encounter was created. Epidemiological Tab This tab contains fields that gather epidemiological information. There are three
sections in this tab: Contact Oriented, Place Exposures and Other. Additional fields in this tab will appear depending on responses provided in certain fields or based on the disease.
Contact Oriented section – o In this section, there are seven items to complete. Five of the fields are drop-
down menus: Food handler, Healthcare worker, Group living, Day care association and Attends school. There are three possible responses: Yes, No, and Unknown. When answering “Yes” to some of the questions, additional questions will appear. The other two items in this section are the “Occupation” field (a free text field) and a set of check boxes.
Place Exposures section – o In this section, there are set of options in the check box and other questions
below for place exposures. There are three possible choices: Yes, No and Unknown. When answering “Yes” to some of the questions, additional questions will appear.
o Search for an existing place field – Use this field to search for an existing place that may already exist in the system. To do this, type the name of the place in the “Search for an existing place” field, i.e., McDonalds.
o If the place already exists in the system, it will appear. Select the correct place from the list of items that appeared. Click the “Save & Continue button. This will automatically populate the name and address of the place. The “Date of exposure” will still need to be entered.
o If the place does not exist in the system, enter it manually.
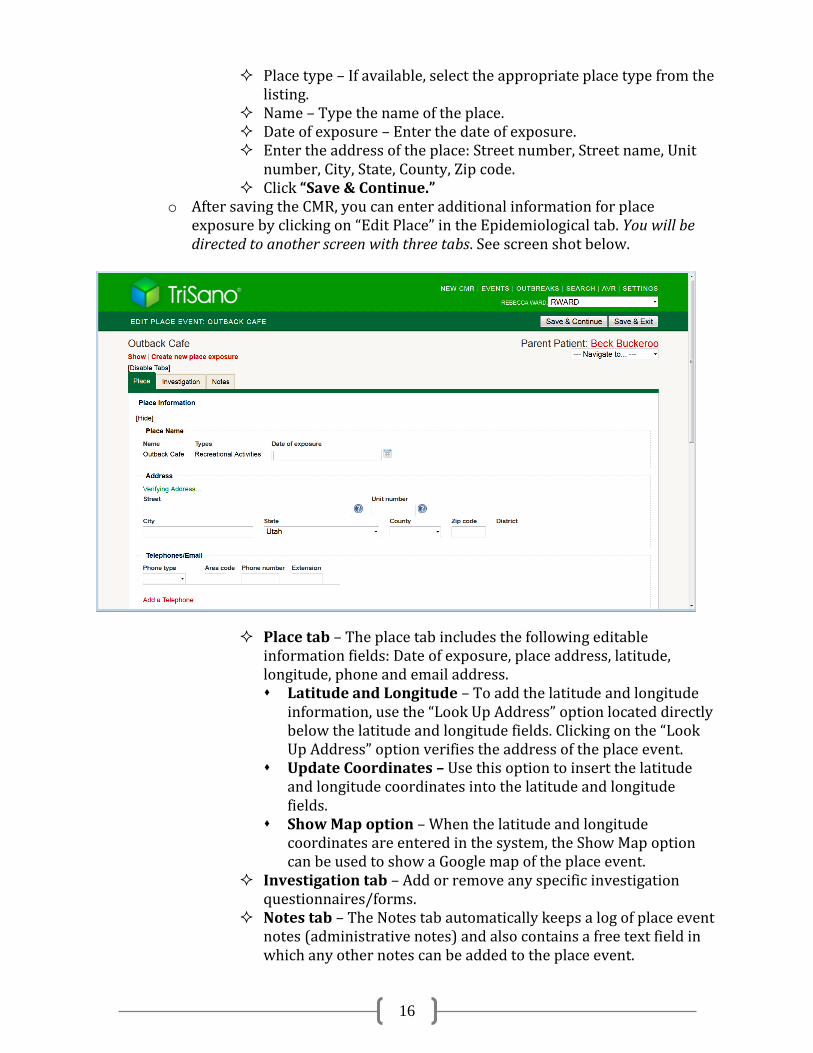
16
Place type – If available, select the appropriate place type from the listing.
Name – Type the name of the place. Date of exposure – Enter the date of exposure. Enter the address of the place: Street number, Street name, Unit
number, City, State, County, Zip code. Click “Save & Continue.”
o After saving the CMR, you can enter additional information for place exposure by clicking on “Edit Place” in the Epidemiological tab. You will be directed to another screen with three tabs. See screen shot below.
Place tab – The place tab includes the following editable information fields: Date of exposure, place address, latitude, longitude, phone and email address. Latitude and Longitude – To add the latitude and longitude
information, use the “Look Up Address” option located directly below the latitude and longitude fields. Clicking on the “Look Up Address” option verifies the address of the place event.
Update Coordinates – Use this option to insert the latitude and longitude coordinates into the latitude and longitude fields.
Show Map option – When the latitude and longitude coordinates are entered in the system, the Show Map option can be used to show a Google map of the place event.
Investigation tab – Add or remove any specific investigation questionnaires/forms.
Notes tab – The Notes tab automatically keeps a log of place event notes (administrative notes) and also contains a free text field in which any other notes can be added to the place event.

17
Add a place exposure – To add an additional place exposure, click on the “Add a place exposure” option and follow the steps above.
Show Map of Places – Once the latitude and longitude coordinates are entered in each place event, the Show Map of Places option can be used to display a Google map of all place events for the CMR.
Other section – The “Other” section is used to input other data regarding the place event. o Imported from – Select where the case was likely to have gotten ill from the
drop-down list. If the case became infected within the state, select “Utah” from the drop-down menu.
o Risk factors – Type in a brief explanation of other risks that may be associated with the case’s illness.
o Risk factors notes – Included more detailed notes about each risk factor entered.
o Other data 1 and Other data 2 fields – The other data 1 and 2 fields are located at the bottom of the epidemiological tab and can be used to help a LHD further categorize an event.
Reporting Tab This tab is used for gathering information about the reporting agency. There are three
sections in this tab: Reporting Agency information, Reporter information, and Reported Dates information.
Reporting Agency section – o Search for a reporting agency – Enter the name of the agency that first
reported the disease case to public health. Reporting agencies may include: laboratory, doctor office, LHD, UDOH, etc.
If the reporting agency has been entered into the system previously, the agency’s name will appear as you begin typing it in. There is no need to use the “Add a new reporting agency” option if the reporting agency is already in the system. Doing so will create duplicate information in the system.
If the reporting agency’s name does not appear, click on “Add a new reporting agency” function and complete the fields. Reporting agency – Enter in the name of the reporting agency. Agency Type – To select agency type, click on the box next to
the appropriate option in the list. Reporter section –
o Reporter last name – If available, enter the last name of the person that first reported the case to public health. Type “Unknown” if not known and you have a first name. This is a required field and cannot be left blank.
o Reporter fist name – If available, enter the first name of the person that first reported the case to public health.
o Area code – If available, enter the 3-digit area code of the phone number of the person that first reported the case to public health.
o Phone number – If available, enter the phone number of the person that first reported the case to public health.
18
o Extension – If applicable, enter the phone number extension of the person that first reported the case to public health.
Reported Dates section – o Results reported to clinician date – Enter the date when results of the case
were reported to the clinician. This can be done manually or by using the calendar icon to select the date.
o Date first reported to public health – Do not leave this field blank. Enter the date when results of the case were first reported to public health. The date may be entered manually or by using the calendar icon to select the date.
Investigation Tab When you click on the Investigation tab in “Edit” view, you may see the following
information: “No investigation forms are configured for this event and/or disease.” This is normal. Your CMR was still entered correctly.
You may add or remove forms for the event in the “Investigation” tab. For many of the infectious diseases, there will be no data fields shown in the
“Investigation” tab. If this is the case for the CMR you are entering, proceed to the next tab to continue filling out the CMR. However, if additional tabs and data fields do appear when you click on the “Investigation” tab, complete these fields. o The fields may be check boxes, radio buttons, date fields, data fields, etc.
Please complete as many of the questions as possible in the “Investigation” tab.
Notes Tab
Adding new notes In “Edit” mode, open the “Notes” tab.
Enter your notes into the “New notes” text box. If the note is an “administrative note,” click the “Is admin” box. If you do not click
the “Is admin” box, the note, by default, will be categorized as a clinical note. When you have completed the notes, click on “Save & Continue.”
o This places your note in the “Earlier notes” section, and it automatically stamps your note with your name, date and time the note was created.
NOTE: A note that has been saved is permanent and cannot be deleted. However, you can strike through the note to indicate that it is no longer valid.
o To strike through the note, click the “Strike Through” box located to the left of the note.
o To add another note, type in the text box, and click on “Save & Continue” to save the new note.
Sorting and viewing notes You can sort notes by three different views: All, Administrative, and Clinical.
19
NOTE: Tasks are automatically saved in the Notes tab.
Automatic notes After any edits have been made to a previously saved CMR, you will notice a section
titled, “Edited event,” in the “Notes” tab. This feature shows the name of the person who made the edit, date, and time any edits or changes were made to the CMR. This section is automatically updated and will show once the CMR has been saved.
Administrative Tab This tab includes the following information for the CMR: Record number, MMWR year,
MMWR week and Date record created. The Case/Outbreak section includes:
LHD case status – (for LHD use only) Select from the drop-down menu. State case status – (for UDOH use only) Select from the drop-down menu. Outbreak associated – Select from the drop-down menu whether or not the
case is associated with a known outbreak. Outbreak name –Enter the outbreak name assigned to the outbreak.
NOTE: Contact the disease-specific epidemiologist at the UDOH for assistance in assigning an outbreak name. This will ensure that outbreak naming convention remains consistent. Auditing/Investigation –
This field is important for Public Health Emergency Preparedness (PHEP) grant metrics and must be completed in a consistent manner. o LHD Investigation/intervention started – Enter the date of the first attempt
to contact the case or physician to begin the investigation. Do not include a call made solely to verify demographic information.
The following fields are defined and used as determined by each LHD: o Date closed o Investigation Outcome o Event name o Acuity
The following fields are automatically populated by the system, based on actions performed for the CMR: o Event Status o Date investigation started o Date investigation completed o Date review completed by state
“How To” Listing (Attachments, Search, Events, Print, Export, Tasks) Search CMRs To conduct a search, use the “SEARCH” function located in the green bar at the top right
of the screen. The search page provides three initial search criteria options: Full-text name, Starts-
with first name, and Starts-with last name.
20
You have the option to “hide” or “show” other search criteria, which include demographic, clinical, and event criteria.
If your search does not return the results you were looking for, click the “Start over” button to clear the previous search results and select a new set of criteria to conduct the new search.
You can clear a previous search by clicking on the “SEARCH” function at the top of the screen.
Patient View (Multiple Events per person) – Clicking on the person’s name in the search results will lead to a “patient view”
listing all events in the system associated with that person. The “patient view” can also be accessed via “PEOPLE” search in the top menu
bar. Deleting Duplicates If a duplicate CMR is received by an LHD (reporting the same disease event, for the
same person, as a previously received CMR), the LHD should: Enter “Duplicate - see CMR # [original CMR number]” in the Notes tab. Set LHD Status to “Discarded.” Delete the CMR. Route the CMR to “Utah State” jurisdiction, adding access for LHD.
In addition, if an LHD experiences an increase in duplicate cases received, the LHD should report this to [email protected] to assist in ongoing efforts to minimize duplication.
Add Attachments UT-NEDSS allows the user to attach a file to the CMR. The following attachment
categories are provided as part of a drop-down menu: correspondence, lab result, letter and x-ray.
To attach a file to a CMR, open the CMR. Click the “Add Attachment” function in red text, located below the patients’ name. Use the “File” field to locate and attach the desired file. Use the “Category” field to select an appropriate category for attaching the file. Click the “Create” button to attach the file to the CMR. NOTE: There is a size limit of 10 mb on attached files. If you get an error message, it may be that the file you are attempting to attach is too large. The attached file now appears under the “Existing Attachments.” To open an attached file, locate it in the “Existing Attachments” section or under the
Notes tab. To delete an attached file, click on “Delete” for the attachment you want to delete.
EVENTS listing This link allows you to view a listing of all of the CMR’s that you have the rights to see.
The “Change View” tab allows you to sort the CMR’s.
21
Sort EVENTS listing CMR’s can be sorted in the EVENTS listing. Click on the EVENTS link on the dashboard
in the upper right portion of the screen and select one of the following options: Click on Patient Name to sort alphabetically by name. Click on Disease to sort alphabetically by disease. Click on Jurisdiction to sort alphabetically by jurisdiction. Click on Status to sort by investigation status. Click on Event Date to sort by date.
NOTE: Clicking twice on any of the sortable options will put them in reverse order. (i.e., Patient Name, Disease and Jurisdiction will be listed from Z-A, Event date will list the older events first. The Default order is most recent Event Date.)
Change view of EVENTS listing To customize your view of the CMR’s in the EVENTS listing, use the “Change View”
option. Click on the EVENTS listing on the dashboard in the upper right portion of the
screen. Click on the “Change View” option.
o This will open a “Change View” box with the following lists: “Event Investigation Status,” “Queues,” “Investigators,” and “Diseases.”
You can select which “Event Investigation Statuses,” “Queues,” “Investigators,” and “Diseases” will appear in your custom EVENTS listing by selecting the items you want to appear from each list.
To select multiple items, click while holding down the “Ctrl” key on your keyboard.
Items per page listed – You can select to view 25, 50, 75, or 100 cases from the drop-down box.
Click the “Change View” button. The EVENTS listing will now display only the CMR’s that you have selected in the
“Change View” box.
NOTE: If you want the system to remember your view each time you login, click the “Set as default view” box located in the lower left corner of the “Change View” box. To save multiple “views,” you must bookmark in your web browser each view setting after you click Change View. See the “Using Bookmarks to Customize Your Views and Searches” section.
Contact event vs. morbidity event In the “EVENTS” listing, you will notice that cases are categorized as either a Contact
Event or Morbidity Event. A Contact Event is a case in which the patient is a contact to another event. A Morbidity Event is the actual case.
Using Bookmarks to Customize Your Views and Searches Currently UT-NEDSS limits you to only one custom view at a time using the “Change
View” option in the EVENTS listing. You may find it convenient to have more than one custom view of the EVENTS listing or may even want to save previously searched criteria when using “SEARCH.” Below are steps for bookmarking custom views using
22
the “Change View” option in the EVENTS listing and for bookmarking search criteria using “SEARCH.”
Bookmarking a custom view of the EVENTS listing Select all the elements you want in your view. See steps in the previous section titled
“Change View of EVENTS Listing.” Click the red “Change View” option at the top of the screen. Use your web browser’s bookmark option to bookmark the page.
Give the new bookmark a name that will reflect your custom view settings. To access the bookmarked view again, go to your web browser’s bookmark listing and
open the appropriate bookmark. Any new cases entered in the system will automatically be updated when accessing the
saved bookmark. Repeat this process for setting up additional default/custom EVENTS listing views.
Customize view by bookmarking a “SEARCH” Click on “SEARCH” located in the top right corner of your screen. Select the criteria/fields you would like to search and enter the information into the
data fields. Click “Submit Query” to conduct the search. Using your web browser’s bookmark option, bookmark the results of your search.
Give the bookmark a name that reflects your search. To access the bookmarked search again, go to your web browser’s bookmark listing and
open the appropriate bookmark. Any new cases entered in to the system will automatically be updated when accessing
the saved bookmark. Repeat this process for setting up additional custom searches. Print a CMR You can print a CMR from the patient record or EVENTS listing.
Print CMR from the patient record In “Show” or “Edit” mode of the CMR, click on “Print” shown in red text at the top left of
the screen below the patient’s name. A “Print” options box will appear. Select which sections or tabs of the CMR you would
like to print. To print the entire CMR, select “All.” Click the Print button. This will bring up a printable version of the CMR. Proceed to print by selecting the print option from the file menu at the top of the web
browser.
Print CMR from the EVENTS listing While viewing the EVENTS listing, click on the “Print” option. Follow the steps above for printing. NOTE: The name and record number will appear at the top of each printed page of the CMR.
23
Exporting CMRs to a Spreadsheet (CSV file) You can choose to export a single CMR to a spreadsheet or all CMRs in the EVENTS
listing or in a SEARCH listing.
Exporting a single CMR You can export a single CMR either from the “Show” or “Edit” mode of the CMR. In
“Show” or “Edit” mode, click on the “Export to CSV” option in red text at the top of the screen below the patient’s name.
This brings up an “Export” box in which you can select additional items that may be included in your export:
Contacts Lab Results Treatments Place Exposures Additional Options
o You can choose to have the short column names included in the export instead of showing the entire column name, i.e., “patient_address_state.” The short column names option will show only “State.”
o You can also choose whether to have your results exported as “Code” or as “Description,” i.e., Code for male/female would be a 1 or 2, where Description would show the word “male” or “female.”
Once you have selected what you would like to include in your export, click on the “Export” button.
A pop-up window appears that shows the CMR will be exported to an Excel file by default. Click “OK” and the CMR will be exported to an Excel CSV file.
Exporting multiple CMR’s using SEARCH You can export multiple CMRs after conducting a search. This is preferred to
exporting multiple CMRs from the EVENTS listing. After conducting a search, click on the “Export All to CSV” option in red text. Customize your export as described above and click “Export.”
Exporting multiple CMRs from the EVENTS listing From the EVENTS listing, go to the top right of the screen and click on the “Export All to
CSV” option in red text. Customize your export as described above and click “Export.” EXPORT NOTE: You can only export a maximum of 500 CMRs at one time. For exports requiring more than 500 CMR’s, submit a request to [email protected] or the export can be split into two or more different categories (i.e., by gender, by reported date, etc.) so that the total number of CMR’s to be exported at one time will be less than 500 records.
Tasks
Add a task This feature can be used as an individual case management tool in which an
investigator can assign himself/herself a task that needs to be completed on a case investigation. However, this feature can also be used within a local jurisdiction to assign
24
tasks to another investigator within the same jurisdiction in such situations where one investigator has agreed to cover for another investigator.
To add a task associated with a CMR, click on the “Add Task” function within the CMR. The “Add Task” option allows you to add tasks that are associated with an event. Tasks
can be assigned a priority level and can be set up as repeating tasks. The fields in the Task function includes:
Name field – a free text field in which you name the task. Description field – a free text field to provide a more detailed description of the
task. Category field – a drop down menu used to categorize the task into one of the
following: Appointment, Call Back, or Treatment. Priority field – a drop down menu to assign a priority to the task (Low, Medium,
or High). Due date field – allows you select a completion date or due date for the task. Repeat field – a drop down menu that allows you to assign a task as a repeat
task that must be completed on a daily, weekly, monthly, or yearly basis. Until field – this field is associated directly with the “Repeat” field. Use the
calendar to select a future date to specify the length of time the task will continue to be a repeating task.
User field – a drop down menu in which you select the Investigator/UT-NEDSS user the task will be assigned to. In most cases, this will be you.
Create button – use this button to create the task.
Viewing and editing tasks To view any pending tasks that may be assigned to you, click on the “TriSano” logo located in the upper left part of the screen. The tasks list will also appear first thing as a user logs into the UT-NEDSS system. The “Change filter” option is located below the Tasks heading. This function allows you
to filter your tasks for the following: Show tasks for the last ___ days Show tasks for the next ___ days By disease By user By jurisdiction By task status By any combination of the above options.
NOTE: Leaving a field blank will show all tasks assigned to you in that section. Tasks may default to 0 days. If this occurs, no tasks will appear. To apply filters, click “Update.” From the Event Tasks list, you can edit the disease event or edit the task by clicking on
the “Edit event” or “Edit task” functions indicated in red text. Any previously entered tasks associated with a CMR will appear in “Existing Tasks.”
Existing tasks can be sorted by any of the following: Due Date, Name, Description, Category, Priority, Assigned To, and Status fields.
25
NOTE: Task filter settings will remain selected until manually updated, even after logging out and logging back in.
Entering Animal Rabies Cases UDOH will create CMR and route to LHD. The fields that will be completed by UDOH
should include the following:
Demographic Tab o Date First Reported to Public Health o Last name: Animal Type (i.e., Bat, Dog, etc.) o First name: Animal Species (i.e., Silver hair, Mexican Free-tail, etc.) o County o Human exposure o Name of individual who submitted animal to Animal Control o Name of owner of animal (if different than submitter)
Clinical Tab o Disease: Rabies, animal
Laboratory Tab o Test Type: Antigen by FRA o Organism: Rabies Virus o Test Result: Positive/Reactive o Result Value: leave blank o Units: leave blank o Reference Range: leave blank o Test Status: Final o Interpretation: Positive or Negative o Specimen Source: Brain tissue o Collection Date o Lab Test Date
o Specimen sent to USLPH: Yes Contact Tab – If your jurisdiction tracks exposure information, you can use
the Contact tab, Notes section, or the “Rabies Exposure Event” (coming soon!) o Name: Bite Victim name o Click “Save and Continue.” o Click “edit contact event” to enter contact info (i.e., PEP information, etc.)
Epidemiological Tab o Imported From
Administrative Tab o State Case Status: Confirmed
NOTE: After you have entered anything you would like to add into the Notes or Contact section, please enter the local case status and route back to state.
26
Routing CMR Events
All Roles To route a case to a Local Health Department, locate the “Route to Local Health
Departments” link at the top of screen in red text. Click on “Route to Local Health Departments.” A box, “Route to Local Health Department” will appear. From the drop-down menu,
located next to “Investigating Jurisdiction,” select the Local Health Department that will be investigating this case.
It is not necessary to check anything under the “Also grant access to” field. However, if you would like to grant access to another public jurisdiction to have the ability to view the case, you can do so by clicking in the appropriate box.
Click the “Route Event” button within the “Route to Local Health Departments” box. A user’s ability to route a case depends on their assigned roles in the system. A case can
be routed to a certain queue (determined by each LHD) and/or an investigator. Not all individuals will be able to conduct each routing step described in the following scenarios. Refer to Appendix A for more information on routing roles.
Role-Specific Routing Instructions Please note, you must be assigned the appropriate roles to perform the actions
described in this section.
NOTE: When trying to route a CMR, you may receive the message, “Insufficient privileges to transition this event.” This message means that the user logged into the system does not have the right to route the CMR. LHD surveillance manager role Under “STATUS” at the top right side of the CMR, click on “Accept” to accept the case for
your LHD. A status of “Accepted by Local Health Dept” will appear. Here, you can choose to assign the case to a queue (these are specific to each county), to an individual, or both. Use the drop-down lists to select the appropriate queue or individual. The case will be sent to the assigned investigator(s) that are set up to receive cases in certain queues.
LHD investigator role Click “Accept” to accept a case for investigation. After completing the investigation, click on “Complete.” This will send the case to your LHD Manager for local approval.
LHD manager role Review a case investigation for completeness. Ensure that the appropriate “LHD Case Status” in the “Administrative” tab has been
selected. If the investigation is complete, click on “Approve” to send the case to the UDOH. If the investigation is not complete, click on “Reopen” to send the case back to the
investigator.
27
UDOH manager role Review all case investigations for completeness in either the “Edit” or “Show” mode. If the investigation is complete, click on “Approve” to approve the case at UDOH. Ensure the appropriate “UDOH Case Status” field under the “Administrative” tab has
been selected. If the investigation is not complete, click on “Reopen” to send the case back to the LHD
Manager, and use the “Notes” tab to document the reason for reopening the case. Routing to Other Jurisdictions If you receive a case that belongs to another jurisdiction, do not reject the case; route it
directly to the correct jurisdiction. All roles (data entry, investigator, manager, etc.) have privileges that allow them to do this.
Only in situations where you do not know the correct jurisdiction for a case should you route it to “Utah State.”
For out-of-state cases, route the case to the “Out of State” option and the UDOH will conduct the appropriate routing.
NOTE: If you would like to retain the rights to view any case that you route to another jurisdiction, select your LHD in the “Also grant access to:” check box. At any point during the routing process, you may grant access to another jurisdiction to view the case.
Routing “Out of State” Cases (for UDOH) Click on "Route to Local Health Department." Select "Out of State" as the Investigating Jurisdiction and click on “Route Event.” Click on "Approve" multiple times to route the case all the way through to "Approved by
State." You will be assigned all of the roles required to allow you to complete this process.
Routing a Contact It is possible to route a contact of a case to another jurisdiction. For example, assume
you are investigating a disease case in your jurisdiction, but a contact for the disease case lives in another jurisdiction. Route that contact to the jurisdiction in which the contact resides.
Locate the contact from either the original case patient in the Contacts tab, or search for the contact by name.
Route the contact as you would route any other case event by clicking on the “Route to Local Health Depts” function, located in red text in the JURISDICTION column.
NOTE: The major difference with routing a “Contact” Event, is that there is no “State” approval required. The final step in contact routing is “Approved by Local Health Dept.”

28
Lead Jurisdiction vs. Investigating Jurisdiction The lead jurisdiction is the jurisdiction in which a case patient resides. An investigating
jurisdiction, in most circumstances, will be the same as the lead jurisdiction. However, if a case patient is hospitalized in one jurisdiction, and resides in another jurisdiction, the jurisdiction in which the case patient is hospitalized may assist with the investigation.
The lead jurisdiction may grant access to the investigating jurisdiction to assist with the investigation.
Reopening an Event An LHD or State Manager may reopen an event after it has been marked as complete or
approved at the local level. Follow the steps below to reopen an event:
Under the status column, click on the button labeled “Reopen.” This allows you to pull the event back a step in the approval process.
Once you have made the necessary updates/changes to the event, click on the “Approve” button to move it through the approval/routing process.
Routing Scenario
Policy on Reopening Cases State program staff will reopen cases if the minimum required information to complete
a communicable disease investigation is missing. The minimum required information is determined by UDOH based on CDC case definition and includes data required for assignment of case status, disease-specific information listed in disease plans and forms required for CDC reporting, cluster/outbreak investigation, or MMWR week assignment.
If an investigation is not complete, State program staff will click on “Reopen” to send the case back to the LHD manager and use the “Notes” tab to document the reason for reopening the case. If the information requested is unavailable, this may be specified by the LHD in the Notes section. If the LHD investigator requires assistance to obtain the needed information, the LHD investigator should contact the State program staff for assistance or to obtain the information with State resources.
Amendment: For purposes of data reconciliation, data may be provided by alternate methods at the request of the Local Health Department.4
4Policy approved by Local Health Officers 8/2010 with an amendment approved 6/2011.
LHD or UDOH Data Entry Tech
LHD Surveillance
Manager
LHD Investigator
LHD Manager
UDOH Manager
29
Technical Support for UT-NEDSS
Data Loss UT-NEDSS will automatically log you out of the system if the system is open and idle for
more than two hours. Any unsaved data will be lost when this happens. All UT-NEDSS sessions will automatically close after 10 hours, regardless of activity.
Any unsaved data will be lost when the system automatically closes.
Error Messages An error message may appear after clicking “Save & Continue” or “Save & Exit” if a
required field was left blank. If you did not save information after completing each tab, error messages related to a previous tab may appear.
Reporting Problems with UT-NEDSS/TriSano Please send a detailed email describing the error/problem to: [email protected]. Include as much of the following information as possible:
CMR # (Most important) Screen shot of the error Browser you were using (Firefox, Explorer, etc.) Version of TriSano you were using (Community/Enterprise; Production/Test) Steps that produced the error - what you were doing when the error occurred Mode (Edit or Show) you were in when the error occurred Field data that was entered, if you were entering data when the error occurred; what
value you were entering Error message you received Date and time or approximate time frame the error occurred Describe what priority this error should be assigned (Is there a workaround, or is this
problem preventing you from working at all?) Indicate if you aware of others experiencing this same error
30
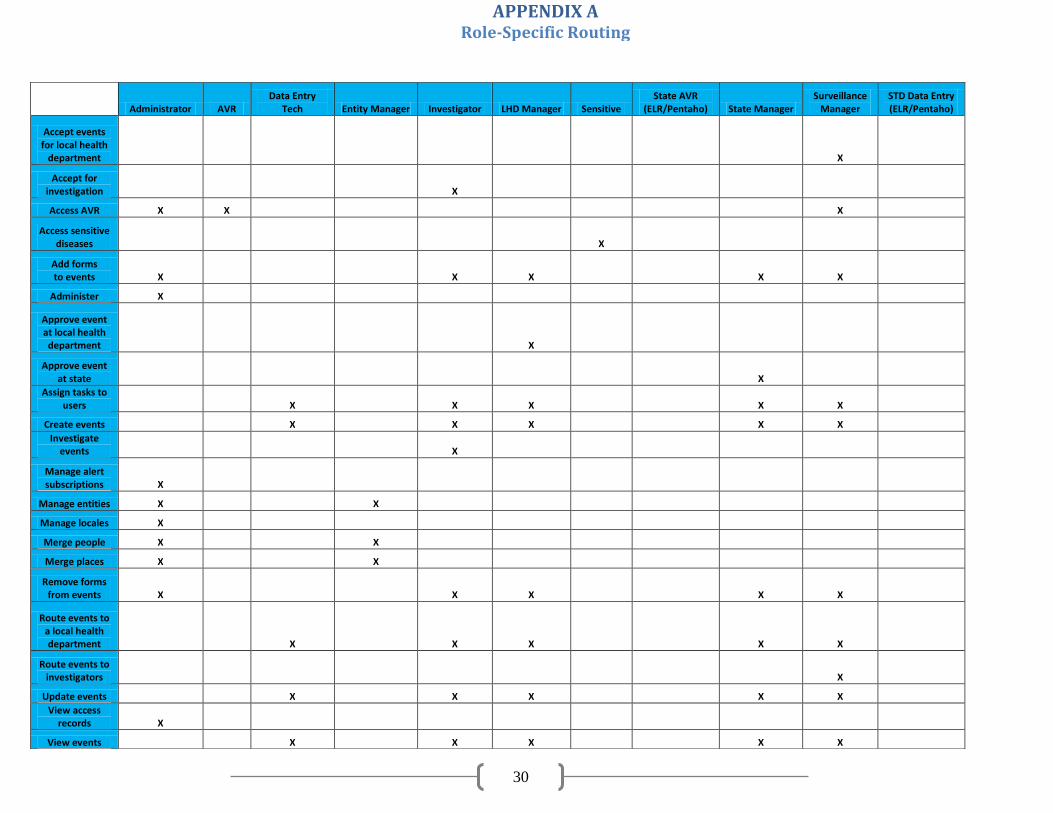
Administrator AVR Data Entry
Tech Entity Manager Investigator LHD Manager Sensitive State AVR
(ELR/Pentaho) State Manager Surveillance
Manager STD Data Entry (ELR/Pentaho)
Accept events for local health
department X
Accept for investigation X
Access AVR X X X
Access sensitive diseases X
Add forms to events X X X X X
Administer X
Approve event at local health department X
Approve event at state X
Assign tasks to users X X X X X
Create events X X X X X
Investigate events X
Manage alert subscriptions X
Manage entities X X
Manage locales X
Merge people X X
Merge places X X
Remove forms from events X X X X X
Route events to a local health department X X X X X
Route events to investigators X
Update events X X X X X
View access records X
View events X X X X X
APPENDIX A Role-Specific Routing