using xiv in openstack environments - ibm redbooks redpaper front cover using xiv in openstack...
TRANSCRIPT
ibm.com/redbooks Redpaper
Front cover
Using XIV in OpenStack Environments
Bertrand DufrasneRoger Eriksson
Wenzel KalabzaLisa Martinez
Introducing OpenStack with XIV in a brief overview
Deploying OpenStack with IBM Cloud Manager
Integrating XIV with OpenStack

International Technical Support Organization
Using XIV in OpenStack Environments
February 2015
REDP-4971-01

© Copyright International Business Machines Corporation 2015. All rights reserved.Note to U.S. Government Users Restricted Rights -- Use, duplication or disclosure restricted by GSA ADP ScheduleContract with IBM Corp.
Second Edition (February 2015)
This edition applies to the IBM XIV Storage System, with XIV Storage System software Version 11.5, with IBM Cloud Manager and the OpenStack Icehouse release.
Note: Before using this information and the product it supports, read the information in “Notices” on page v.
Contents
Notices . . . . . . . . . . . . . . . . . . . . . . . . . . . . . . . . . . . . . . . . . . . . . . . . . . . . . . . . . . . . . . . . . .vTrademarks . . . . . . . . . . . . . . . . . . . . . . . . . . . . . . . . . . . . . . . . . . . . . . . . . . . . . . . . . . . . . . vi
Preface . . . . . . . . . . . . . . . . . . . . . . . . . . . . . . . . . . . . . . . . . . . . . . . . . . . . . . . . . . . . . . . . . viiAuthors. . . . . . . . . . . . . . . . . . . . . . . . . . . . . . . . . . . . . . . . . . . . . . . . . . . . . . . . . . . . . . . . . . viiNow you can become a published author, too! . . . . . . . . . . . . . . . . . . . . . . . . . . . . . . . . . . viiiComments welcome. . . . . . . . . . . . . . . . . . . . . . . . . . . . . . . . . . . . . . . . . . . . . . . . . . . . . . . viiiStay connected to IBM Redbooks . . . . . . . . . . . . . . . . . . . . . . . . . . . . . . . . . . . . . . . . . . . . . ix
Summary of changes . . . . . . . . . . . . . . . . . . . . . . . . . . . . . . . . . . . . . . . . . . . . . . . . . . . . . . xiFebruary 2015, Second Edition . . . . . . . . . . . . . . . . . . . . . . . . . . . . . . . . . . . . . . . . . . . . . . . xi
Chapter 1. OpenStack and IBM Cloud Manager overview. . . . . . . . . . . . . . . . . . . . . . . . 11.1 OpenStack overview . . . . . . . . . . . . . . . . . . . . . . . . . . . . . . . . . . . . . . . . . . . . . . . . . . . . 2
1.1.1 Concept. . . . . . . . . . . . . . . . . . . . . . . . . . . . . . . . . . . . . . . . . . . . . . . . . . . . . . . . . . 51.1.2 Terminology . . . . . . . . . . . . . . . . . . . . . . . . . . . . . . . . . . . . . . . . . . . . . . . . . . . . . . 5
1.2 OpenStack architecture and components . . . . . . . . . . . . . . . . . . . . . . . . . . . . . . . . . . . . 61.2.1 What is OpenStack . . . . . . . . . . . . . . . . . . . . . . . . . . . . . . . . . . . . . . . . . . . . . . . . . 61.2.2 OpenStack components . . . . . . . . . . . . . . . . . . . . . . . . . . . . . . . . . . . . . . . . . . . . . 7
1.3 OpenStack and XIV multi-tenancy . . . . . . . . . . . . . . . . . . . . . . . . . . . . . . . . . . . . . . . . . 81.3.1 XIV multi-tenancy and domains . . . . . . . . . . . . . . . . . . . . . . . . . . . . . . . . . . . . . . . 81.3.2 OpenStack with XIV multi-tenancy . . . . . . . . . . . . . . . . . . . . . . . . . . . . . . . . . . . . . 9
1.4 IBM Cloud Manager with OpenStack . . . . . . . . . . . . . . . . . . . . . . . . . . . . . . . . . . . . . . 101.4.1 What is IBM Cloud Manager . . . . . . . . . . . . . . . . . . . . . . . . . . . . . . . . . . . . . . . . . 10
Chapter 2. OpenStack environment. . . . . . . . . . . . . . . . . . . . . . . . . . . . . . . . . . . . . . . . . 132.1 Introduction . . . . . . . . . . . . . . . . . . . . . . . . . . . . . . . . . . . . . . . . . . . . . . . . . . . . . . . . . . 142.2 OpenStack installation . . . . . . . . . . . . . . . . . . . . . . . . . . . . . . . . . . . . . . . . . . . . . . . . . 14
2.2.1 OpenStack system requirements . . . . . . . . . . . . . . . . . . . . . . . . . . . . . . . . . . . . . 152.2.2 Installing OpenStack . . . . . . . . . . . . . . . . . . . . . . . . . . . . . . . . . . . . . . . . . . . . . . . 192.2.3 Creating users, roles, and projects . . . . . . . . . . . . . . . . . . . . . . . . . . . . . . . . . . . . 20
Chapter 3. Integrating the XIV in the OpenStack environment . . . . . . . . . . . . . . . . . . . 233.1 Integrating the XIV in the OpenStack environment . . . . . . . . . . . . . . . . . . . . . . . . . . . . 24
3.1.1 Preparing the XIV for OpenStack . . . . . . . . . . . . . . . . . . . . . . . . . . . . . . . . . . . . . 253.1.2 Installing the XIV Host Attachment Kit . . . . . . . . . . . . . . . . . . . . . . . . . . . . . . . . . 263.1.3 Installing IBM Storage Driver for OpenStack . . . . . . . . . . . . . . . . . . . . . . . . . . . . 27
Chapter 4. IBM Cloud Manager with OpenStack . . . . . . . . . . . . . . . . . . . . . . . . . . . . . . 314.1 IBM Cloud Manager with OpenStack . . . . . . . . . . . . . . . . . . . . . . . . . . . . . . . . . . . . . . 32
4.1.1 Overview . . . . . . . . . . . . . . . . . . . . . . . . . . . . . . . . . . . . . . . . . . . . . . . . . . . . . . . . 324.1.2 Installing IBM Cloud Manager with OpenStack. . . . . . . . . . . . . . . . . . . . . . . . . . . 32
4.2 Using IBM Cloud Manager with OpenStack . . . . . . . . . . . . . . . . . . . . . . . . . . . . . . . . . 514.2.1 Configuring IBM Cloud Manager to manage a cloud . . . . . . . . . . . . . . . . . . . . . . 524.2.2 Importing an image . . . . . . . . . . . . . . . . . . . . . . . . . . . . . . . . . . . . . . . . . . . . . . . . 534.2.3 Deploying an instance (virtual machine) . . . . . . . . . . . . . . . . . . . . . . . . . . . . . . . . 554.2.4 Creating and attaching a volume to an instance. . . . . . . . . . . . . . . . . . . . . . . . . . 59
Related publications . . . . . . . . . . . . . . . . . . . . . . . . . . . . . . . . . . . . . . . . . . . . . . . . . . . . . 65IBM Redbooks . . . . . . . . . . . . . . . . . . . . . . . . . . . . . . . . . . . . . . . . . . . . . . . . . . . . . . . . . . . 65
© Copyright IBM Corp. 2015. All rights reserved. iii

Other publications . . . . . . . . . . . . . . . . . . . . . . . . . . . . . . . . . . . . . . . . . . . . . . . . . . . . . . . . 65Online resources . . . . . . . . . . . . . . . . . . . . . . . . . . . . . . . . . . . . . . . . . . . . . . . . . . . . . . . . . 65Help from IBM . . . . . . . . . . . . . . . . . . . . . . . . . . . . . . . . . . . . . . . . . . . . . . . . . . . . . . . . . . . 66
iv Using XIV in OpenStack Environments

Notices
This information was developed for products and services offered in the U.S.A.
IBM may not offer the products, services, or features discussed in this document in other countries. Consult your local IBM representative for information on the products and services currently available in your area. Any reference to an IBM product, program, or service is not intended to state or imply that only that IBM product, program, or service may be used. Any functionally equivalent product, program, or service that does not infringe any IBM intellectual property right may be used instead. However, it is the user's responsibility to evaluate and verify the operation of any non-IBM product, program, or service.
IBM may have patents or pending patent applications covering subject matter described in this document. The furnishing of this document does not grant you any license to these patents. You can send license inquiries, in writing, to: IBM Director of Licensing, IBM Corporation, North Castle Drive, Armonk, NY 10504-1785 U.S.A.
The following paragraph does not apply to the United Kingdom or any other country where such provisions are inconsistent with local law: INTERNATIONAL BUSINESS MACHINES CORPORATION PROVIDES THIS PUBLICATION "AS IS" WITHOUT WARRANTY OF ANY KIND, EITHER EXPRESS OR IMPLIED, INCLUDING, BUT NOT LIMITED TO, THE IMPLIED WARRANTIES OF NON-INFRINGEMENT, MERCHANTABILITY OR FITNESS FOR A PARTICULAR PURPOSE. Some states do not allow disclaimer of express or implied warranties in certain transactions, therefore, this statement may not apply to you.
This information could include technical inaccuracies or typographical errors. Changes are periodically made to the information herein; these changes will be incorporated in new editions of the publication. IBM may make improvements and/or changes in the product(s) and/or the program(s) described in this publication at any time without notice.
Any references in this information to non-IBM websites are provided for convenience only and do not in any manner serve as an endorsement of those websites. The materials at those websites are not part of the materials for this IBM product and use of those websites is at your own risk.
IBM may use or distribute any of the information you supply in any way it believes appropriate without incurring any obligation to you.
Any performance data contained herein was determined in a controlled environment. Therefore, the results obtained in other operating environments may vary significantly. Some measurements may have been made on development-level systems and there is no guarantee that these measurements will be the same on generally available systems. Furthermore, some measurements may have been estimated through extrapolation. Actual results may vary. Users of this document should verify the applicable data for their specific environment.
Information concerning non-IBM products was obtained from the suppliers of those products, their published announcements or other publicly available sources. IBM has not tested those products and cannot confirm the accuracy of performance, compatibility or any other claims related to non-IBM products. Questions on the capabilities of non-IBM products should be addressed to the suppliers of those products.
This information contains examples of data and reports used in daily business operations. To illustrate them as completely as possible, the examples include the names of individuals, companies, brands, and products. All of these names are fictitious and any similarity to the names and addresses used by an actual business enterprise is entirely coincidental.
COPYRIGHT LICENSE:
This information contains sample application programs in source language, which illustrate programming techniques on various operating platforms. You may copy, modify, and distribute these sample programs in any form without payment to IBM, for the purposes of developing, using, marketing or distributing application programs conforming to the application programming interface for the operating platform for which the sample programs are written. These examples have not been thoroughly tested under all conditions. IBM, therefore, cannot guarantee or imply reliability, serviceability, or function of these programs.
© Copyright IBM Corp. 2015. All rights reserved. v
Trademarks
IBM, the IBM logo, and ibm.com are trademarks or registered trademarks of International Business Machines Corporation in the United States, other countries, or both. These and other IBM trademarked terms are marked on their first occurrence in this information with the appropriate symbol (® or ™), indicating US registered or common law trademarks owned by IBM at the time this information was published. Such trademarks may also be registered or common law trademarks in other countries. A current list of IBM trademarks is available on the Web at http://www.ibm.com/legal/copytrade.shtml
The following terms are trademarks of the International Business Machines Corporation in the United States, other countries, or both:
developerWorks®DS6000™DS8000®IBM®IBM SmartCloud®
PowerVM®Redbooks®Redpaper™Redbooks (logo) ®System p®
System Storage®System z®XIV®z/VM®
The following terms are trademarks of other companies:
Intel, Intel logo, Intel Inside logo, and Intel Centrino logo are trademarks or registered trademarks of Intel Corporation or its subsidiaries in the United States and other countries.
Linux is a trademark of Linus Torvalds in the United States, other countries, or both.
Microsoft, Windows, and the Windows logo are trademarks of Microsoft Corporation in the United States, other countries, or both.
Other company, product, or service names may be trademarks or service marks of others.
vi Using XIV in OpenStack Environments

Preface
This IBM® Redpaper™ publication provides a brief overview of OpenStack and IBM Cloud Manager with OpenStack. It focuses on the use of OpenStack with the IBM XIV® Storage System Gen3. The illustration scenario in the paper uses the OpenStack Icehouse release, which is installed on RedHat Linux servers, and the IBM Storage Driver for OpenStack.
This paper is intended for clients and cloud administrators who look forward to integrating IBM XIV Storage Systems in OpenStack and using IBM Cloud Manager with OpenStack environments. The paper provides guidance in setting up an environment by using XIV as the back-end storage in an OpenStack cloud environment. This paper is not an official support document.
Authors
This paper was produced by a team of specialists from around the world working at the International Technical Support Organization, San Jose Center.
Bertrand Dufrasne is an IBM Certified Consulting I/T Specialist and Project Leader for IBM System Storage® disk products at the International Technical Support Organization (ITSO), San Jose Center. He has worked at IBM in various I/T areas. He has authored many IBM Redbooks® publications, and has also developed and taught technical workshops. Before joining the ITSO, he worked for IBM Global Services as an Application Architect. He holds a Master’s degree in Electrical Engineering.
Roger Eriksson is an STG Lab Services Consultant, based in Stockholm, Sweden, who works for the European Storage Competence Center in Mainz, Germany. He is a Senior Accredited IBM Product Service Professional. Roger has over 20 years of experience working on IBM servers and storage, including Enterprise and Midrange disk, network-attached storage (NAS), storage area networks (SAN), IBM System x, IBM System p®, and IBM BladeCenter. He has consulted, created proofs of concept, and provided education, mainly with the XIV product line, since December 2008. He has worked with both clients and various IBM teams worldwide. He holds a Technical College Graduation in Mechanical Engineering.
Wenzel Kalabza is a Certified XIV Product Field Engineer (PFE) based in the storage competence center in Mainz, Germany. Wenzel joined IBM in 1998 as Customer Quality Engineer for IBM disk drive failure and performance analysis. He joined the Back Office for the high-end storage system (Enterprise Storage System (ESS)) in June 2002. In 2005, Wenzel started a PFE role for the IBM Disk Storage DS6000™. In June 2008, he became a PFE for the XIV storage product. Wenzel holds a degree in Electrical Engineering and Power Economy, and several storage-related certifications.
Lisa Martinez has worked in the North America Storage Specialty Team (formerly ATS) as a Storage Consultant since January 2012. Her focus is pre-sales support for IBM DS8000® and XIV. And, she is the Lead Instructor for XIV client-based workshops. Her prior experience includes roles as a Storage Architect in the Specialty Services Area in GTS, a temporary assignment as a Global Support Manager for Cardinal Health and Test Architect in disk storage focusing on system-level test for XIV for three years, and Copy Services for DS8000. Lisa holds degrees in Computer Science from New Mexico Highlands University and Electrical Engineering from the University of New Mexico. She has been employed with IBM for 17 years.
© Copyright IBM Corp. 2015. All rights reserved. vii
Special thanks to Harald Seipp for his help and support in installing IBM Cloud Manager.
Thanks to the following people for their contributions to this project:
Diane Benjuya, Ramy Buechler, Rami Elron, Theodore Gregg, Rony Shapiro, Yossi Siles, Oded Kellner, George Thomas, Carlo Saba, Stephen Solewin, and Mary J. ConnellIBM
Thanks also to the authors of the previous editions:
Desire Brival, Thomas Peralto, and Markus OschekaIBM
Now you can become a published author, too!
Here’s an opportunity to spotlight your skills, grow your career, and become a published author—all at the same time! Join an ITSO residency project and help write a book in your area of expertise, while honing your experience using leading-edge technologies. Your efforts will help to increase product acceptance and customer satisfaction, as you expand your network of technical contacts and relationships. Residencies run from two to six weeks in length, and you can participate either in person or as a remote resident working from your home base.
Find out more about the residency program, browse the residency index, and apply online at:
ibm.com/redbooks/residencies.html
Comments welcome
Your comments are important to us!
We want our papers to be as helpful as possible. Send us your comments about this paper or other IBM Redbooks publications in one of the following ways:
� Use the online Contact us review Redbooks form found at:
ibm.com/redbooks
� Send your comments in an email to:
� Mail your comments to:
IBM Corporation, International Technical Support OrganizationDept. HYTD Mail Station P0992455 South RoadPoughkeepsie, NY 12601-5400
viii Using XIV in OpenStack Environments
Stay connected to IBM Redbooks
� Find us on Facebook:
http://www.facebook.com/IBMRedbooks
� Follow us on Twitter:
http://twitter.com/ibmredbooks
� Look for us on LinkedIn:
http://www.linkedin.com/groups?home=&gid=2130806
� Explore new Redbooks publications, residencies, and workshops with the IBM Redbooks weekly newsletter:
https://www.redbooks.ibm.com/Redbooks.nsf/subscribe?OpenForm
� Stay current on recent Redbooks publications with RSS Feeds:
http://www.redbooks.ibm.com/rss.html
Preface ix

x Using XIV in OpenStack Environments
Summary of changes
This section describes the technical changes made in this edition of the paper and in previous editions. This edition might also include minor corrections and editorial changes that are not identified.
Summary of Changesfor Using XIV in OpenStack Environmentsas created or updated on February 27, 2015.
February 2015, Second Edition
This revision reflects the addition, deletion, or modification of new and changed information described below.
New information� Deploying the XIV Storage System and OpenStack with IBM Cloud Manager
© Copyright IBM Corp. 2015. All rights reserved. xi

xii Using XIV in OpenStack Environments

Chapter 1. OpenStack and IBM Cloud Manager overview
This chapter provides a brief overview of the following topics:
� OpenStack components and terminology� OpenStack and the IBM XIV Storage System multi-tenancy� IBM Cloud Manager with OpenStack: Definition and functions
1
© Copyright IBM Corp. 2015. All rights reserved. 1
1.1 OpenStack overview
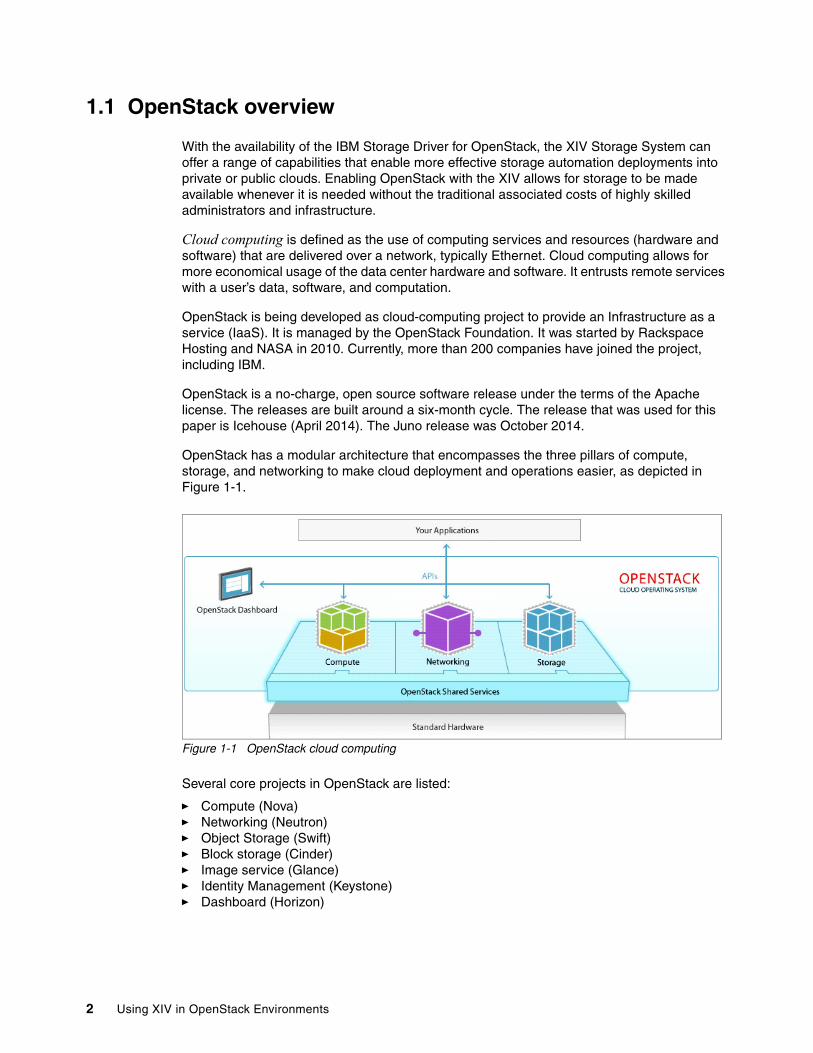
With the availability of the IBM Storage Driver for OpenStack, the XIV Storage System can offer a range of capabilities that enable more effective storage automation deployments into private or public clouds. Enabling OpenStack with the XIV allows for storage to be made available whenever it is needed without the traditional associated costs of highly skilled administrators and infrastructure.
Cloud computing is defined as the use of computing services and resources (hardware and software) that are delivered over a network, typically Ethernet. Cloud computing allows for more economical usage of the data center hardware and software. It entrusts remote services with a user’s data, software, and computation.
OpenStack is being developed as cloud-computing project to provide an Infrastructure as a service (IaaS). It is managed by the OpenStack Foundation. It was started by Rackspace Hosting and NASA in 2010. Currently, more than 200 companies have joined the project, including IBM.
OpenStack is a no-charge, open source software release under the terms of the Apache license. The releases are built around a six-month cycle. The release that was used for this paper is Icehouse (April 2014). The Juno release was October 2014.
OpenStack has a modular architecture that encompasses the three pillars of compute, storage, and networking to make cloud deployment and operations easier, as depicted in Figure 1-1.
Figure 1-1 OpenStack cloud computing
Several core projects in OpenStack are listed:
� Compute (Nova)� Networking (Neutron)� Object Storage (Swift)� Block storage (Cinder)� Image service (Glance)� Identity Management (Keystone)� Dashboard (Horizon)
2 Using XIV in OpenStack Environments
OpenStack Compute (Nova) is a cloud-computing fabric controller (the main part of an IaaS system). It is written in Python and uses many external libraries, such as Eventlet (for concurrent programming), Kombu (for Advanced Message Queuing Protocol communication), and SQLAlchemy (for database access).
IBM with the OpenStack community is on a mission to provide scalable, elastic cloud computing for both public and private clouds, large and small. The cloud must be simple to implement and massively scalable.
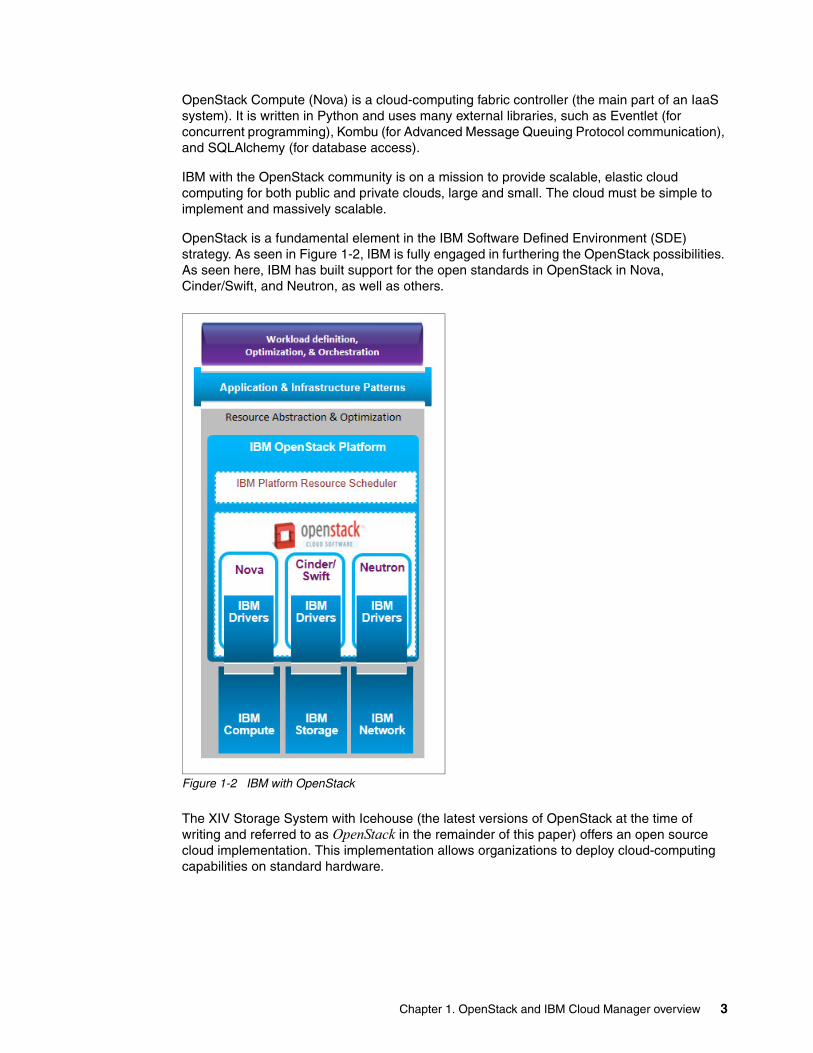
OpenStack is a fundamental element in the IBM Software Defined Environment (SDE) strategy. As seen in Figure 1-2, IBM is fully engaged in furthering the OpenStack possibilities. As seen here, IBM has built support for the open standards in OpenStack in Nova, Cinder/Swift, and Neutron, as well as others.
Figure 1-2 IBM with OpenStack
The XIV Storage System with Icehouse (the latest versions of OpenStack at the time of writing and referred to as OpenStack in the remainder of this paper) offers an open source cloud implementation. This implementation allows organizations to deploy cloud-computing capabilities on standard hardware.
Chapter 1. OpenStack and IBM Cloud Manager overview 3

OpenStack Storage has support for both object (Swift) and block (Cinder) storage capabilities:
� Object storage, via the Swift node, is a distributed storage system for data, such as virtual machine images, photographs, videos, and similar objects or files.
� Block storage, via the Cinder node, is more traditional type storage that attaches to block devices. The volumes for block storage are integrated into the OpenStack Compute and the Dashboard so that users can manager their own storage needs.
There are several OpenStack releases. For the latest information, see the following website:
http://www.openstack.org/software/
The Icehouse release of OpenStack included updates to block storage by adding back-end migrations with tiered storage environments. This capability allows for performance management in heterogeneous environments.
Because the focus of this paper is around block storage and the Cinder node, Figure 1-3 illustrates the flow of the Cinder node, which, for the XIV and the DS8000 (DS8K), uses the IBM Storage Driver for OpenStack. This driver is available through the following link:
http://www.ibm.com/support/fixcentral/swg/selectFixes?parent=Enterprise%2BStorage%2BServers&product=ibm/Storage_Disk/XIV+Storage+System+%282810,+2812%29&release=All&platform=All&function=all
Figure 1-3 IBM Storage OpenStack flow
OpenStack also provides a Dashboard for administrators and users to manage the cloud with a graphical user interface (GUI). In addition, IBM offers IBM Cloud Manager with OpenStack, which integrates all of the OpenStack Dashboard features into simple-to-use cloud management software that includes IBM enhancements, such as the Chef deployment feature for rapid installation and configuration of a cloud environment, a self-service portal for workload provisioning, virtual image management, and monitoring. For more information about IBM Cloud Manager with OpenStack, see the following website:
https://www-01.ibm.com/support/knowledgecenter/SST55W_4.1.0/liaca/liaca_kc_welcome.html
Important: Illustrations of commands in this paper are based on the OpenStack Icehouse release. This paper focuses on block storage with the XIV by using the Cinder driver.
4 Using XIV in OpenStack Environments
1.1.1 Concept
The OpenStack cloud connects to the XIV over an iSCSI or Fibre Channel connection. Remote cloud users can issue requests for storage resources from the OpenStack cloud. These requests are transparently handled by the IBM Storage Driver. The IBM Storage Driver communicates with the XIV Storage System and controls the storage volumes on it.
1.1.2 Terminology
OpenStack introduced a specific terminology to describe its features and functions, including these important terms:
User Any person, user, or administrator who wants to use cloud services or administer tenants.
Role User, administrator, or system service within a tenant
Tenant/Project OpenStack supports the concept of multi-tenancy as an organizational structure. By this approach, resources are managed within a tenant or project and can share services. A tenant/project offers the ability to correlate usage tracking, auditing, authorization, and so on.
Service OpenStack and Linux services have some similarities. A Linux service, which is also called a daemon, is a program that runs in the background and listens to a port to respond to service requests. An OpenStack service is a group of Linux services that work together. For example, nova-compute and nova-scheduler are two of the Linux services that implement the Compute service.
Hypervisor Software that allows multiple virtual images to share a single physical machine. OpenStack Compute requires a hypervisor, and Compute controls the hypervisors through an application programming interface (API) server. The process for selecting a hypervisor usually prioritizes and decides based on budget and resource constraints and the inevitable list of supported features and required technical specifications. Most development uses the kernel-based virtual machine (KVM) and Xen based hypervisors. For a detailed list of features and support across the hypervisors, see this website:
http://wiki.openstack.org/HypervisorSupportMatrix
The types of virtualization standards that can be used with Compute include KVM, Quick Emulator (QEMU), VMware ESX/ESXi 4.1 update 1, and Xen.
Code names Every OpenStack service has a code name, as described in “OpenStack components” on page 7. These code names are reflected in the names of configuration files and command-line utility programs. For example, the Keystone Identity service has a configuration file that is called keystone.conf.
Image Images are disk images that are templates for virtual machine (VM) file systems. The image service, Glance, is responsible for the storage and management of images within OpenStack.
Service: In this document, we use the term “service” to refer both to Linux and OpenStack services.
Chapter 1. OpenStack and IBM Cloud Manager overview 5

Instance Instances are the actual VMs that run on physical compute nodes. Nova, the compute service, manages the instances. More than one instance can be started from the same image. The instance is run from a copy of the base image. Snapshots of a running instance can be taken, which create a new image based on this running version and can be deployed as a new instance.
1.2 OpenStack architecture and components
The OpenStack architecture and its components are described in this section. Figure 1-4 shows a simple view of how the environment works. This view is a diagram illustrating how the deployment interacts with the controller and compute nodes. Projects or tenants are deployed by using the Compute environment.
Figure 1-4 OpenStack Compute environment
1.2.1 What is OpenStack
OpenStack is a global collaboration of developers and cloud-computing technologists that seek to produce a ubiquitous Infrastructure as a Service (IaaS) open source cloud-computing platform for public and private clouds. OpenStack consists of many interrelated projects that control resources for compute, storage, and networking. OpenStack is managed by the OpenStack Foundation, a non-profit organization that oversees both development of the project and building a community around the project.
OpenStack allows users to deploy VMs, attach storage to the VMs, create projects for private and public clouds, create and manage users for private and public clouds, and other tasks for managing a cloud environment. It provides a graphical Dashboard, as well as a command-line interface (CLI) for the management.
Compute Compute Compute…
Controller
6 Using XIV in OpenStack Environments
1.2.2 OpenStack components
OpenStack has several components:
� Nova (Compute) provides VMs or instances. Nova interacts with several OpenStack services, such as Keystone, Horizon, or Glance. The API process can upload and query Glance while nova-compute downloads images for use in launching images. Nova is the most complex and distributed component of OpenStack. Many processes are involved to handle user API requests and launch VMs.
The following list is a summary of Nova processes:
– The nova-api handles user compute API calls, synchronizes activities, and enforces policy.
– The nova-compute process is a daemon that launches and ends VM instances by using the hypervisor’s APIs.
– The nova-network manages the network by setting up bridges or changes to iptables rules.
– nova-schedule, which is implemented with RabbitMQ or Qpid, determines where instances run based on requests that are in the message queue.
– The SQL database stores items for the cloud. The items can be an instance, available network, a project, or another type.
– The nova-consoleauth offers a proxy to access the VMs to users.
� Horizon (Dashboard) provides a modular web-based user interface for all the OpenStack services. With this web GUI, you can perform most operations on your cloud. You can create volumes, launch an instance, assign IP addresses, and set access controls.
� Keystone (Identity) provides authentication and authorization for all the OpenStack services. It also provides a service catalog of services within a particular OpenStack cloud.
� Cinder (Block Storage) provides persistent block storage to guest VMs. This project came out of code that was originally in Nova (the nova-volume service). The IBM Storage Driver for OpenStack, which is fully supported by Cinder, provides “block storage as a service” via iSCSI to VMs. Cinder virtualizes pools of block storage devices and provides users with a self-service API to request and consume storage resources without needing to know where the storage physically resides. Cinder replaces the nova-volume, which was part of the Nova component, starting with the Folsom release.
For more details about Cinder and the IBM Storage Driver for OpenStack, see this web page:
http://wiki.openstack.org/Cinder
� Swift (Object Store) provides object storage and allows users to store or retrieve files in a blob mode. It is built for scale-out networks and it is ideal for storing unstructured data that can group without bounds.
� Glance (Image) provides a catalog and repository for disk operating system images for VMs that are mostly used in OpenStack Compute. It has several components:
– Glance-api accepts Image API calls for discovery, retrieval, and store images.
– Glance-registry stores, processes, and retrieves metadata about images (size, type, and so on).
– A database stores the image metadata.
– A data repository stores the image files.
Chapter 1. OpenStack and IBM Cloud Manager overview 7

� Neutron (Network) provides “network connectivity as a service” between interface devices that are managed by other OpenStack services (most likely Nova). The service works by allowing users to create their own networks and then attach interfaces to them.
� Ceilometer (Telemetry) provides a mechanism to collect and configure the necessary data to monitor services and the infrastructure in the OpenStack environment. It can also collect custom usage data with additional plug-ins.
� Heat (Orchestration) provides a template for creating most OpenStack resource types (instances, floating IP addresses, volumes, security, groups, and users). This service enables cloud deployments to integrate with the Orchestration module directly or through custom plug-ins.
� Trove (Database) provides a scalable cloud provisioning function for relational and non-relational database engines. This function enables users to use the database features without dealing with the administrative tasks. It also provides resource isolation and automates tasks, such as deployment, configuration, patching, backups, restores, and monitoring.
In addition to these core projects, there are a number of “incubation” projects that are being considered for future inclusion in the OpenStack core. Information about the future enhancements to OpenStack is available at the following web page:
http://www.openstack.org/software/roadmap/
1.3 OpenStack and XIV multi-tenancy
With the release of Version 11.5 software, the XIV introduced support for multi-tenancy. Multi-tenancy enables cloud providers to divide and isolate the XIV resources into logical domains, which can then be used by tenants without any knowledge of the rest of the system resources. From the storage administrator’s view, it is a simple and quick delegation of resources and user permissions. It enables the management of multiple tenants securely and simply in the same XIV.
1.3.1 XIV multi-tenancy and domains
The XIV uses the concept of domains for multi-tenancy. A domain represents a subset of resources that include users, pools, volumes, hosts and clusters, snapshots, snapshot groups, and mirroring. Some of these resources can be shared among multiple domains, such as users and hosts/clusters. Other features that are enabled in the XIV multi-tenancy feature include allowing the main storage administrator (known as the global administrator) to set up a quality of service (QoS) for domains and pools independently (as well as hosts, which were already available before the 11.5 release).
Figure 1-5 on page 9 is a simple illustration of how multi-tenancy can be set up with an XIV Storage System. Illustrated in this example are three domains (A, B, and C) and the resources that are associated with those domains. This example also shows how hosts (or servers) can be isolated to pools in a domain or how hosts (or servers) can see pools for more than one domain. The same is true for users that are associated with domains.
For more information about the XIV multi-tenancy, see the XIV Storage System Architecture and Implementation, SG24-7659.
8 Using XIV in OpenStack Environments
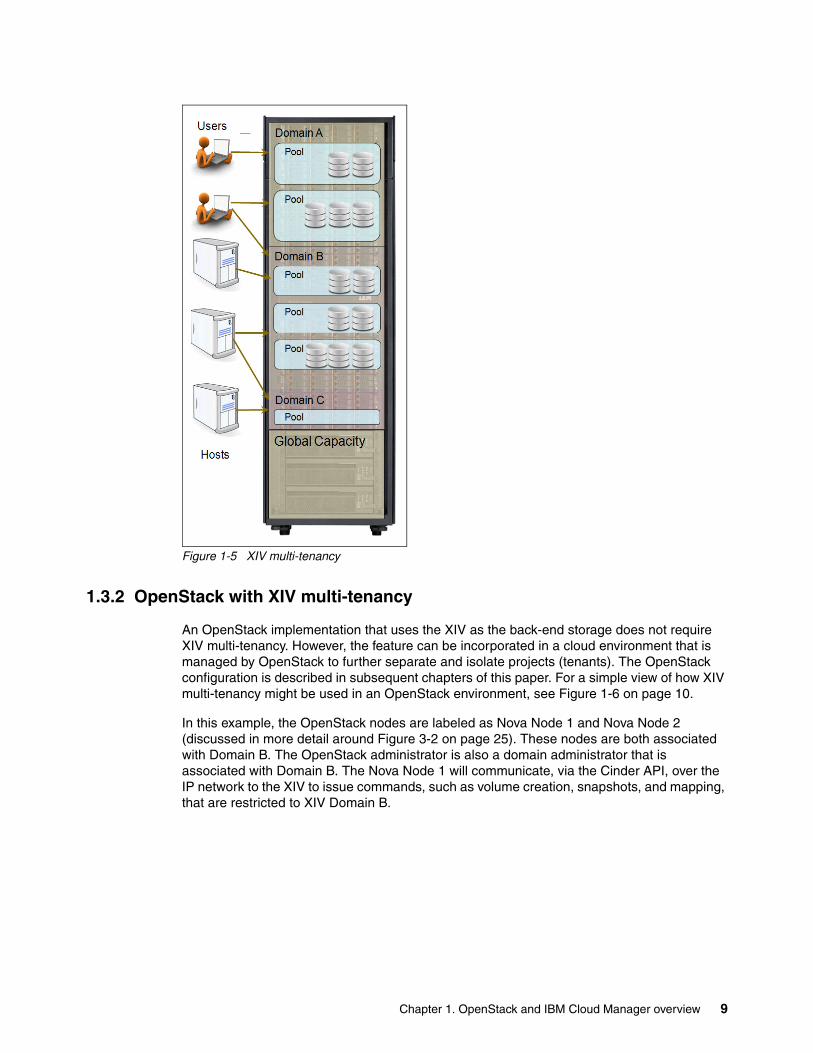
Figure 1-5 XIV multi-tenancy
1.3.2 OpenStack with XIV multi-tenancy
An OpenStack implementation that uses the XIV as the back-end storage does not require XIV multi-tenancy. However, the feature can be incorporated in a cloud environment that is managed by OpenStack to further separate and isolate projects (tenants). The OpenStack configuration is described in subsequent chapters of this paper. For a simple view of how XIV multi-tenancy might be used in an OpenStack environment, see Figure 1-6 on page 10.
In this example, the OpenStack nodes are labeled as Nova Node 1 and Nova Node 2 (discussed in more detail around Figure 3-2 on page 25). These nodes are both associated with Domain B. The OpenStack administrator is also a domain administrator that is associated with Domain B. The Nova Node 1 will communicate, via the Cinder API, over the IP network to the XIV to issue commands, such as volume creation, snapshots, and mapping, that are restricted to XIV Domain B.
Chapter 1. OpenStack and IBM Cloud Manager overview 9

Figure 1-6 XIV multi-tenancy in an OpenStack environment
1.4 IBM Cloud Manager with OpenStack
IBM Cloud Manager with OpenStack provides unique additional components to OpenStack, which include supporting an enterprise database (db2) as an alternative to MYSQL, and additional targets, including IBM PowerVM®, IBM z/VM®, and HyperV. IBM Cloud Manager is designed to simplify the deployment and management of cloud environments. It also hides the underlying infrastructure from the user and shifts the focus to the services that are delivered by the cloud.
1.4.1 What is IBM Cloud Manager
IBM Cloud Manager is a cloud management solution that is designed to be easy to deploy and simple to use. It features a self-service portal for balanced provisioning of VMs (instances), as well as virtualized image management.
IBM Cloud Manager includes support for deploying, resizing, and capturing the cloud environment. Reporting is available for billing and metering of the individual users in a public cloud, as well as the projects (tenants) of a private cloud. It includes author approval policies that require the cloud administrator to approve (or deny) requests to private and public cloud projects.
Nova Node 2
Nova Node 1 with Cinder Driver
OpenStack/Domain Admin
IP
10 Using XIV in OpenStack Environments
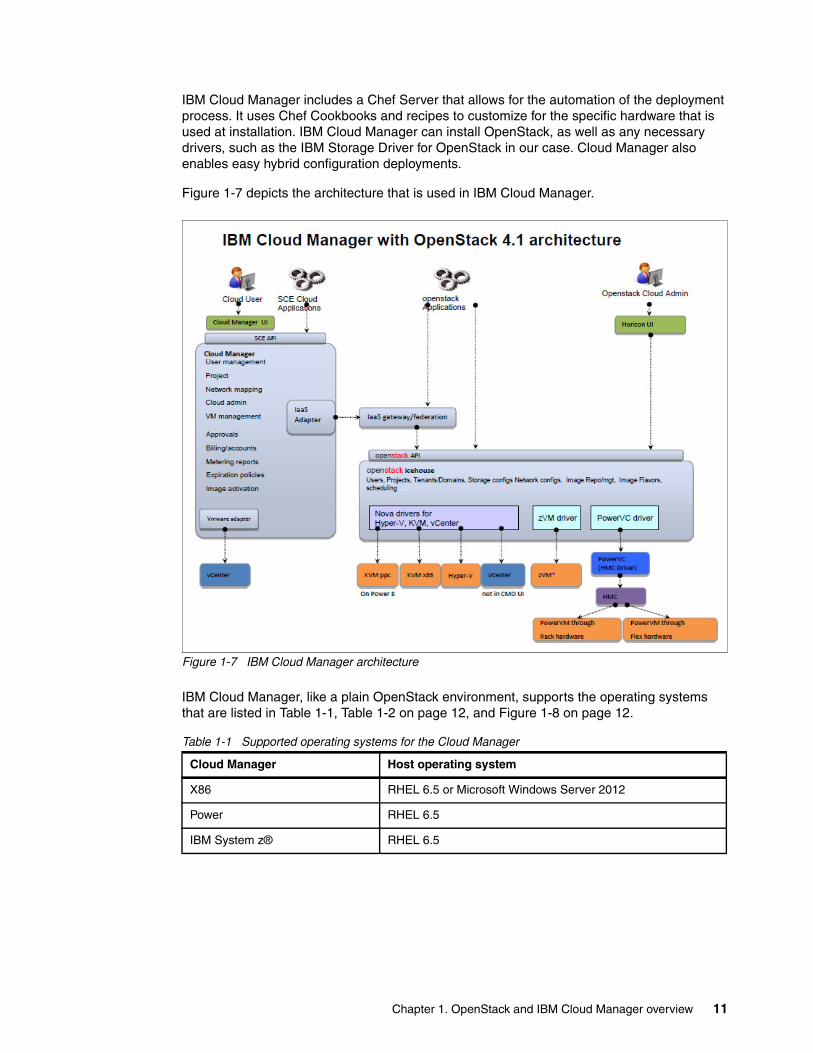
IBM Cloud Manager includes a Chef Server that allows for the automation of the deployment process. It uses Chef Cookbooks and recipes to customize for the specific hardware that is used at installation. IBM Cloud Manager can install OpenStack, as well as any necessary drivers, such as the IBM Storage Driver for OpenStack in our case. Cloud Manager also enables easy hybrid configuration deployments.
Figure 1-7 depicts the architecture that is used in IBM Cloud Manager.
Figure 1-7 IBM Cloud Manager architecture
IBM Cloud Manager, like a plain OpenStack environment, supports the operating systems that are listed in Table 1-1, Table 1-2 on page 12, and Figure 1-8 on page 12.
Table 1-1 Supported operating systems for the Cloud Manager
Cloud Manager Host operating system
X86 RHEL 6.5 or Microsoft Windows Server 2012
Power RHEL 6.5
IBM System z® RHEL 6.5
Chapter 1. OpenStack and IBM Cloud Manager overview 11
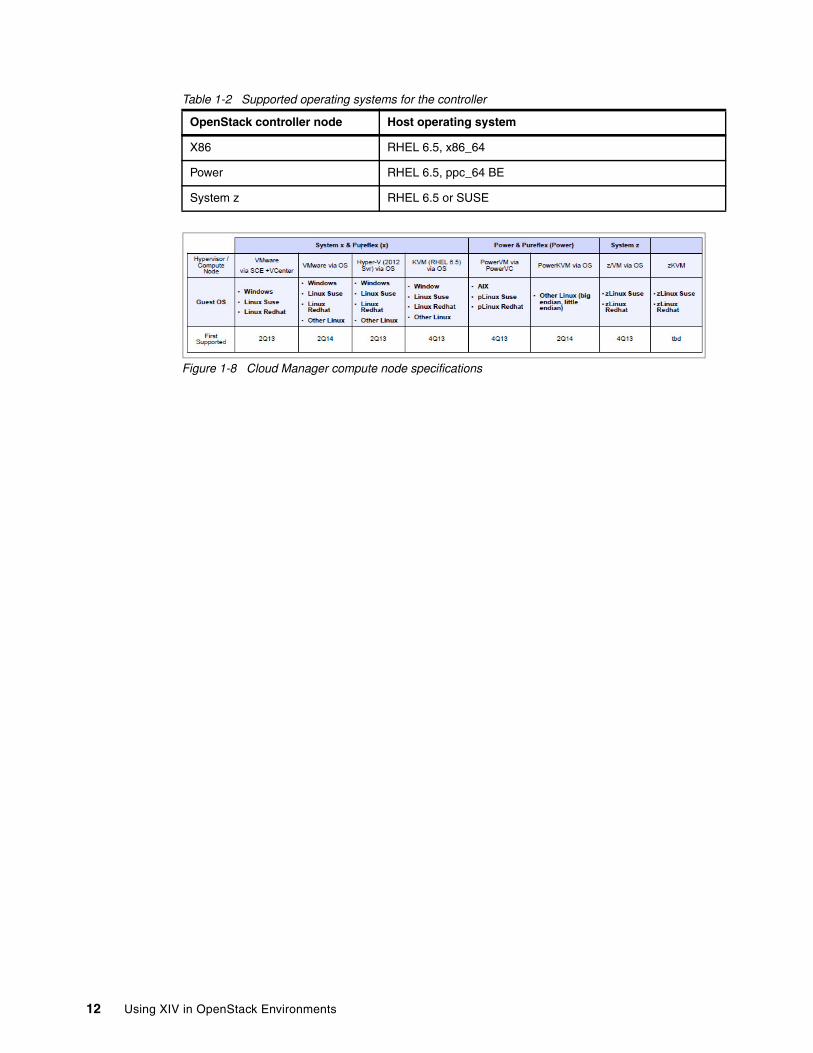
Table 1-2 Supported operating systems for the controller
Figure 1-8 Cloud Manager compute node specifications
OpenStack controller node Host operating system
X86 RHEL 6.5, x86_64
Power RHEL 6.5, ppc_64 BE
System z RHEL 6.5 or SUSE
12 Using XIV in OpenStack Environments
Chapter 2. OpenStack environment
This chapter reviews some of the required steps to install the OpenStack environment. Our scenario is a simple installation with a single compute node and a single storage node.
2
© Copyright IBM Corp. 2015. All rights reserved. 13
2.1 Introduction
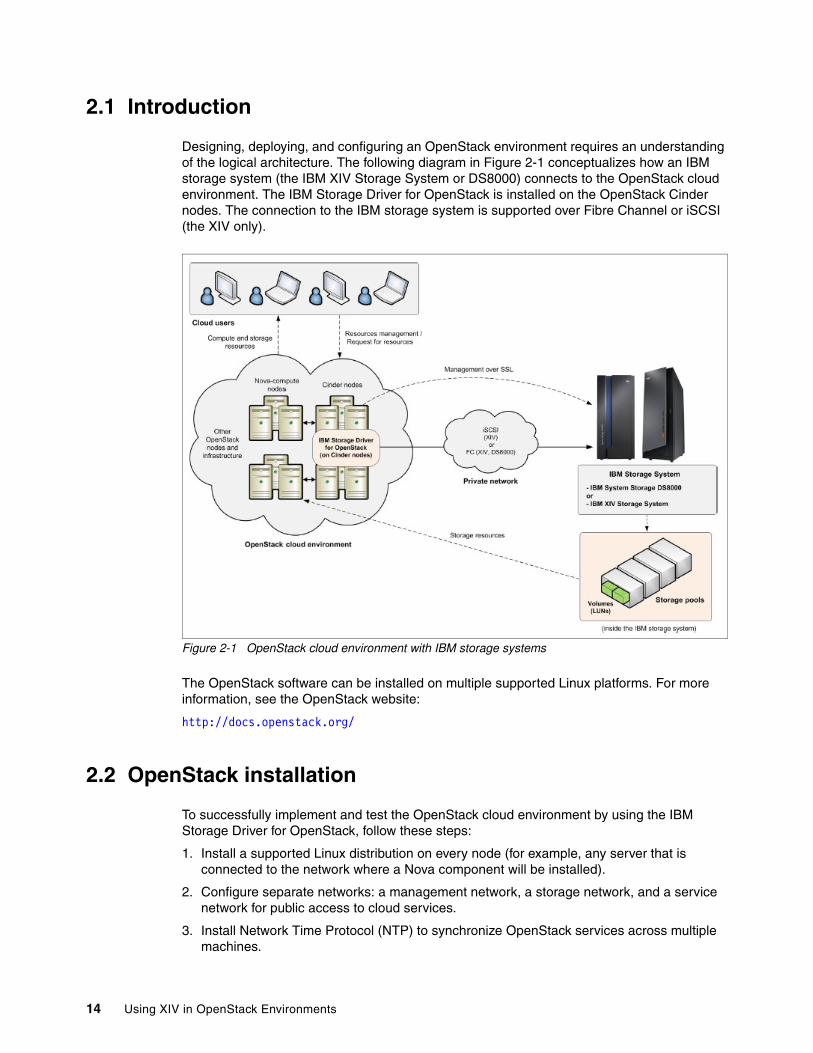
Designing, deploying, and configuring an OpenStack environment requires an understanding of the logical architecture. The following diagram in Figure 2-1 conceptualizes how an IBM storage system (the IBM XIV Storage System or DS8000) connects to the OpenStack cloud environment. The IBM Storage Driver for OpenStack is installed on the OpenStack Cinder nodes. The connection to the IBM storage system is supported over Fibre Channel or iSCSI (the XIV only).
Figure 2-1 OpenStack cloud environment with IBM storage systems
The OpenStack software can be installed on multiple supported Linux platforms. For more information, see the OpenStack website:
http://docs.openstack.org/
2.2 OpenStack installation
To successfully implement and test the OpenStack cloud environment by using the IBM Storage Driver for OpenStack, follow these steps:
1. Install a supported Linux distribution on every node (for example, any server that is connected to the network where a Nova component will be installed).
2. Configure separate networks: a management network, a storage network, and a service network for public access to cloud services.
3. Install Network Time Protocol (NTP) to synchronize OpenStack services across multiple machines.
14 Using XIV in OpenStack Environments
4. Configure security as necessary for the cloud environment (for example, passwords, policies, and encryption).
5. Install and configure a supported database to store credentials and centralized items.
6. Install and configure the identity service on the controller node.
7. Install and configure the OpenStack clients.
8. Configure the image service.
9. Configure the compute service.
10.Add and configure the OpenStack components: Network, Dashboard, Block Storage, and Object Storage.
11.Create a storage pool for the OpenStack on the XIV Storage System.
12.Install IBM Storage Driver for OpenStack.
13.Install and configure the supported hypervisors.
14.Build and import the operating system images.
In the environment that we used for our examples in this document, the OpenStack infrastructure is set up with two servers that are hosted by RedHat 6.5. The following key components were installed and configured:
� Controller node� Image node� Block storage node (Cinder, which is installed with the compute node)� Compute node� IBM Storage Driver for OpenStack� IBM XIV Storage System Gen3
2.2.1 OpenStack system requirements
Before you deploy the supported infrastructure, verify that you have the appropriate hardware. Ensure that you have the servers, SAN, and IP switches that are required to set the environment. See Table 2-1 on page 17.
For the latest information, see the release notes at this website:
http://pic.dhe.ibm.com/infocenter/strhosts/ic/topic/com.ibm.help.strghosts.doc/nova_pdfs.html
Important: The storage pool must be created before you install the storage driver for OpenStack.
Note: The IBM Storage Driver is installed on the node that contains Cinder or Cinder with Compute.
Installation and configuration: Detailed installation and configuration steps for all required components (Linux, network, or storage area network (SAN) configuration, and so on) are beyond the scope of this paper.
Chapter 2. OpenStack environment 15
Hardware specificationsThere are several ways to implement the Nova OpenStack infrastructure. Consider single-node and multiple-node configurations:
� Single node: This configuration cannot deliver the performance that most cloud environments require. A virtualized environment can be enough to deploy this configuration.
� Multiple nodes: In this environment, Nova components can be distributed across several systems. Use this setup for a typical production environment.
In either case, the recommended hardware for the controller and compute nodes is the same as though these nodes were intended to run on standard hardware. The minimum deployment recommendations are listed in Table 2-1 on page 17. Verify this information with the latest recommendations, which are listed in the OpenStack website:
http://docs.openstack.org/grizzly/openstack-compute/install/yum/content/compute-system-requirements.html
Also, OpenStack does not require significant resources to create a functional environment. At a minimum, the following resources can support multiple minimal instances:
� Controller node: One processor, 2 GB memory, and 5 GB storage� Network node: One processor, 512 MB memory, and 5 GB storage� Compute node: One processor, 2 GB memory, and 10 GB storage
You can create this minimal environment with virtual machines (VMs) and then use this environment to become familiar with the OpenStack environment, as well, for testing purposes.
Important: Remember that this hardware reference is for a simple environment and the number of VMs (or instances) that can be deployed will depend on the hardware configuration.
16 Using XIV in OpenStack Environments
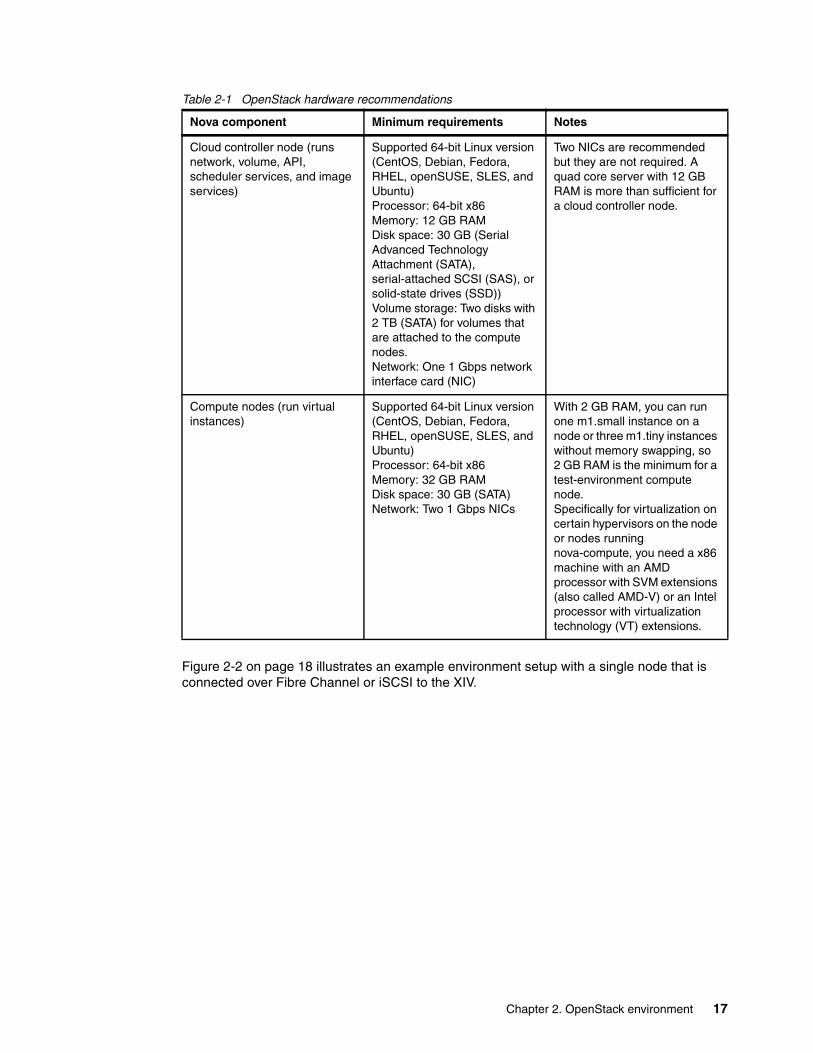
Table 2-1 OpenStack hardware recommendations
Figure 2-2 on page 18 illustrates an example environment setup with a single node that is connected over Fibre Channel or iSCSI to the XIV.
Nova component Minimum requirements Notes
Cloud controller node (runs network, volume, API, scheduler services, and image services)
Supported 64-bit Linux version (CentOS, Debian, Fedora, RHEL, openSUSE, SLES, and Ubuntu)Processor: 64-bit x86Memory: 12 GB RAMDisk space: 30 GB (Serial Advanced Technology Attachment (SATA), serial-attached SCSI (SAS), or solid-state drives (SSD))Volume storage: Two disks with 2 TB (SATA) for volumes that are attached to the compute nodes.Network: One 1 Gbps network interface card (NIC)
Two NICs are recommended but they are not required. A quad core server with 12 GB RAM is more than sufficient for a cloud controller node.
Compute nodes (run virtual instances)
Supported 64-bit Linux version (CentOS, Debian, Fedora, RHEL, openSUSE, SLES, and Ubuntu)Processor: 64-bit x86Memory: 32 GB RAMDisk space: 30 GB (SATA)Network: Two 1 Gbps NICs
With 2 GB RAM, you can run one m1.small instance on a node or three m1.tiny instances without memory swapping, so2 GB RAM is the minimum for a test-environment compute node. Specifically for virtualization on certain hypervisors on the node or nodes running nova-compute, you need a x86 machine with an AMD processor with SVM extensions (also called AMD-V) or an Intel processor with virtualization technology (VT) extensions.
Chapter 2. OpenStack environment 17
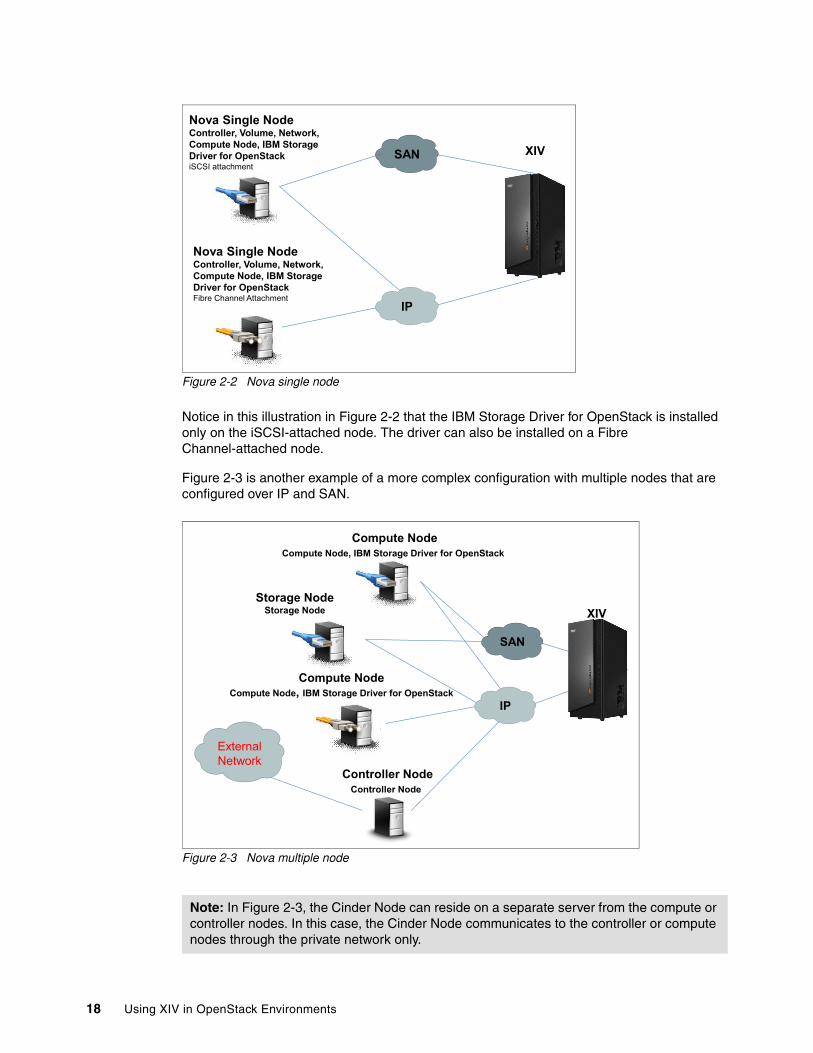
Figure 2-2 Nova single node
Notice in this illustration in Figure 2-2 that the IBM Storage Driver for OpenStack is installed only on the iSCSI-attached node. The driver can also be installed on a Fibre Channel-attached node.
Figure 2-3 is another example of a more complex configuration with multiple nodes that are configured over IP and SAN.
Figure 2-3 Nova multiple node
Note: In Figure 2-3, the Cinder Node can reside on a separate server from the compute or controller nodes. In this case, the Cinder Node communicates to the controller or compute nodes through the private network only.
SAN
IP
Nova Single Node Controller, Volume, Network, Compute Node, IBM Storage Driver for OpenStack iSCSI attachment
Nova Single Node Controller, Volume, Network, Compute Node, IBM Storage Driver for OpenStack Fibre Channel Attachment
XIV
Controller Node Controller Node
Compute Node Compute Node, IBM Storage Driver for OpenStack
Storage Node Storage Node
Compute Node Compute Node, IBM Storage Driver for OpenStack
XIV
External Network
IP
SAN
18 Using XIV in OpenStack Environments
2.2.2 Installing OpenStack
The OpenStack installation is documented thoroughly on the OpenStack website. In this section, we provide a summary list of the tasks to complete for a block storage device, such as the XIV. The installation is based on the Icehouse release.
1. Install the Linux 64-bit version that you selected. We recommend that this installation is a minimal installation. VMs can be used for test environments but they are not recommended for the full OpenStack production environment.
2. Configure the network interfaces:
– Disable the automated network management tools.
– OpenStack Networking (Neutron) requires one controller node, one network node, and at least one compute node.
3. Configure NTP
We advise that you configure additional nodes in the deployment for time synchronization to the controller node.
4. Configure the database that is required to store information.
5. Install and configure the OpenStack packages.
6. Install and configure the Messaging service.
7. Install and configure the Identity service.
8. Install and configure the OpenStack clients.
9. Install and configure the Image service.
10.Install and configure the Compute services.
11.Install the Dashboard (Horizon).
12.Add the Block Storage service (Cinder).
13.Add the Orchestration service.
14.Add the Telemetry service.
15.Add the Database service.
For the full set of installation instructions, see the OpenStack documentation website:
http://docs.openstack.org/
Now, you can configure and launch an instance. An instance exists on a node. Volumes are created through OpenStack (either through the command line or the Dashboard) and they are associated with an instance. The volumes can then be used by the instance similarly to an external drive.
Important: These requirements are provided as-is and are based on code that was available at the time of writing this paper. For the latest information, see the IBM Storage Driver for OpenStack release notes at this web page:
http://pic.dhe.ibm.com/infocenter/strhosts/ic/topic/com.ibm.help.strghosts.doc/nova_pdfs.html
Chapter 2. OpenStack environment 19
2.2.3 Creating users, roles, and projects
After OpenStack is installed, the next step is to configure users, roles, and projects (or tenants). You can configure users, roles, and projects (or tenants) before you attach any back-end storage, such as the XIV, as well as prepare operating system disk images to use with the VMs (or instances).
Creating a user
Users with associated roles can be created with OpenStack (and must be created to manage the environment before any configuration). The following link provides the instructions for creating users in OpenStack:
http://docs.openstack.org/user-guide-admin/content/dashboard_manage_projects_users.html#dashboard_create_user
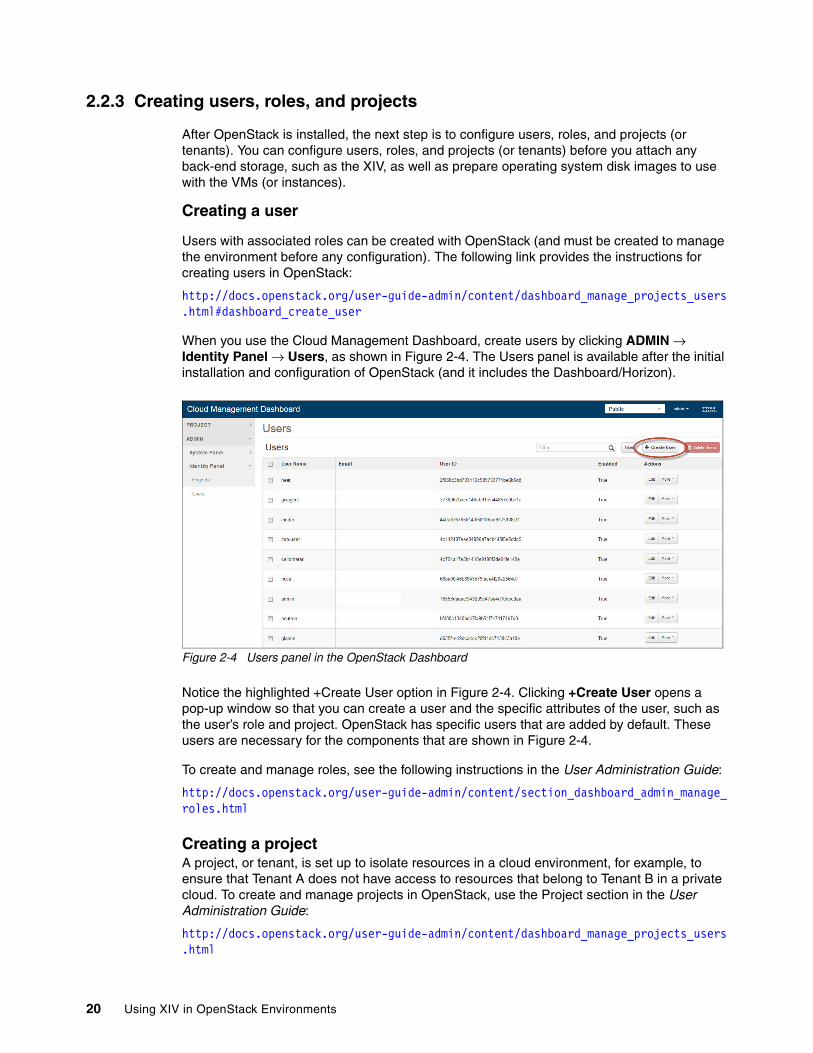
When you use the Cloud Management Dashboard, create users by clicking ADMIN → Identity Panel → Users, as shown in Figure 2-4. The Users panel is available after the initial installation and configuration of OpenStack (and it includes the Dashboard/Horizon).
Figure 2-4 Users panel in the OpenStack Dashboard
Notice the highlighted +Create User option in Figure 2-4. Clicking +Create User opens a pop-up window so that you can create a user and the specific attributes of the user, such as the user’s role and project. OpenStack has specific users that are added by default. These users are necessary for the components that are shown in Figure 2-4.
To create and manage roles, see the following instructions in the User Administration Guide:
http://docs.openstack.org/user-guide-admin/content/section_dashboard_admin_manage_roles.html
Creating a projectA project, or tenant, is set up to isolate resources in a cloud environment, for example, to ensure that Tenant A does not have access to resources that belong to Tenant B in a private cloud. To create and manage projects in OpenStack, use the Project section in the User Administration Guide:
http://docs.openstack.org/user-guide-admin/content/dashboard_manage_projects_users.html
20 Using XIV in OpenStack Environments
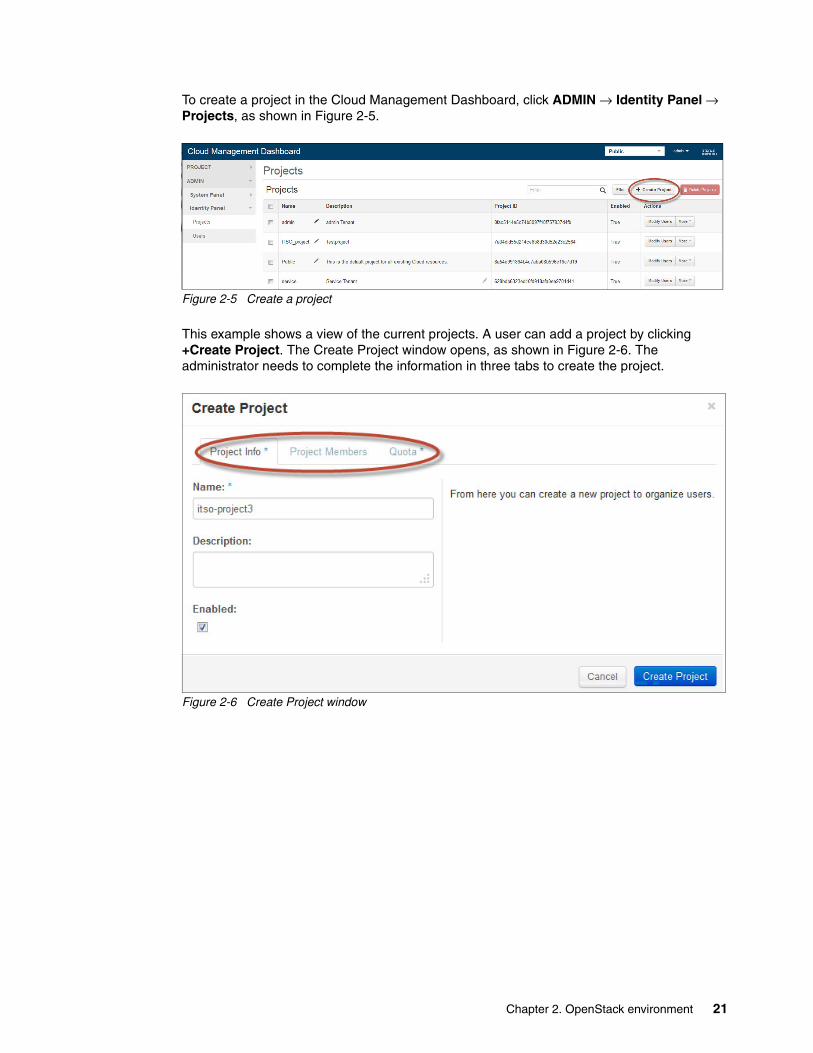
To create a project in the Cloud Management Dashboard, click ADMIN → Identity Panel → Projects, as shown in Figure 2-5.
Figure 2-5 Create a project
This example shows a view of the current projects. A user can add a project by clicking +Create Project. The Create Project window opens, as shown in Figure 2-6. The administrator needs to complete the information in three tabs to create the project.
Figure 2-6 Create Project window
Chapter 2. OpenStack environment 21

22 Using XIV in OpenStack Environments
Chapter 3. Integrating the XIV in the OpenStack environment
This chapter highlights the steps to integrate the IBM XIV Storage System into a new OpenStack environment.
3
© Copyright IBM Corp. 2015. All rights reserved. 23
3.1 Integrating the XIV in the OpenStack environment
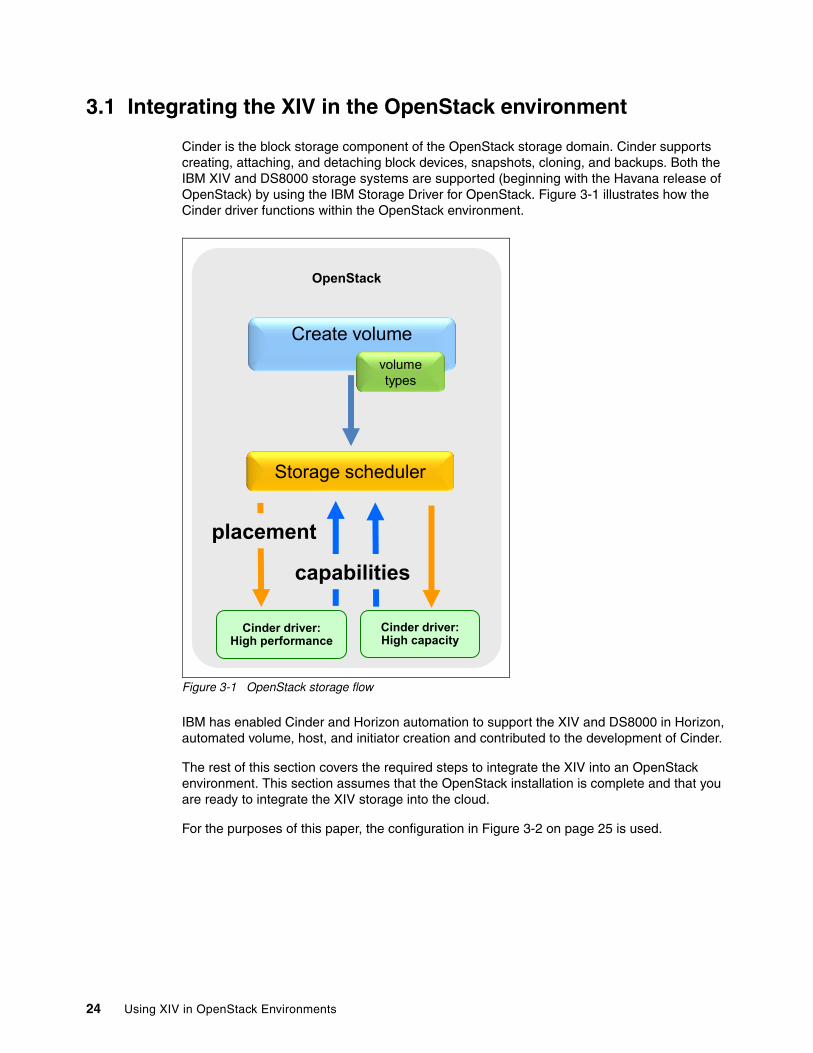
Cinder is the block storage component of the OpenStack storage domain. Cinder supports creating, attaching, and detaching block devices, snapshots, cloning, and backups. Both the IBM XIV and DS8000 storage systems are supported (beginning with the Havana release of OpenStack) by using the IBM Storage Driver for OpenStack. Figure 3-1 illustrates how the Cinder driver functions within the OpenStack environment.
Figure 3-1 OpenStack storage flow
IBM has enabled Cinder and Horizon automation to support the XIV and DS8000 in Horizon, automated volume, host, and initiator creation and contributed to the development of Cinder.
The rest of this section covers the required steps to integrate the XIV into an OpenStack environment. This section assumes that the OpenStack installation is complete and that you are ready to integrate the XIV storage into the cloud.
For the purposes of this paper, the configuration in Figure 3-2 on page 25 is used.
OpenStack
Storage scheduler
capabilities
placement
Create volume volume
types
Cinder driver: High capacity
Cinder driver: High performance
24 Using XIV in OpenStack Environments

Figure 3-2 OpenStack test configuration
The back-end storage consists of two XIV Gen3 Storage Systems that connect to the two servers over Fibre Channel for access to the storage. Additionally, the server that is labeled Nova Node 1, which contains the controller, Horizon, and Cinder nodes, as well as the IBM Storage Driver for OpenStack, is able to communicate with the XIV systems over the Internet Protocol (IP) network to issue commands through the application programming interface (API) interface. The server that is labeled Nova Node 2 is a compute node. Both of these nodes/servers make up the initial OpenStack environment.
3.1.1 Preparing the XIV for OpenStack
The IBM Storage Driver for OpenStack requires you to predefine at least one storage pool on the XIV before the installation. The specific pool is required when you run the installation script. For this paper, we defined a pool on the XIV with 5 TB and named it ITSO_CM_PFE2_P1 on the XIV system that is named XIV_PFE2_1340010, as shown in Example 3-1.
Example 3-1 XIV storage pool
XIV_PFE2_1340010>>pool_list pool=ITSO_CM_PFE2_P1Name Size (GB) Soft Vols (GB) Snap Size (GB) Soft Empty (GB) Hard Size (GB) ITSO_CM_PFE2_P1 5007 0 516 5007 5007
SAN
Nova Node 2 Compute Node Fibre Channel Attachment
Nova Node 1 Controller, Horizon, Cinder, Network, Compute Node, IBM Storage Driver for OpenStack Fibre Channel Attachment
XIV Gen3
IP
Tip: OpenStack requires at least 1 TB of pool capacity. Configure the pool on the XIV with adequate capacity for your environment. Pools can be resized later; however, resizing pools later requires reconfiguration in OpenStack.
Chapter 3. Integrating the XIV in the OpenStack environment 25

The next step is to define the hosts (or nodes) to attach to the XIV. In our case, we configured two compute nodes in a cluster to enable moving resources or virtual machines (VMs) between the compute nodes. Figure 3-3 shows the definition of the cluster that is used for this paper.
Figure 3-3 Cluster definition for OpenStack
After the hosts or clusters are defined, the zoning is performed on the switch. (You can perform the zoning before you define the cluster, as well.) Figure 3-4 shows the ports from both nodes in the cluster logging in to the XIV.
Figure 3-4 Hosts zoned and logging in to the XIV
3.1.2 Installing the XIV Host Attachment Kit
The next step is to install the XIV Host Attachment Kit (HAK) on the servers because these nodes connect the back-end storage to the OpenStack environment. The installation of the HAK is the same for any Linux host. Follow the installation procedures for the latest HAK, which are at this website:
http://pic.dhe.ibm.com/infocenter/strhosts/ic/index.jsp?topic=%2Fcom.ibm.help.strghosts.doc%2Fhak-homepage.html
After the HAK is installed successfully, it is a good idea to validate connectivity to the back-end storage. You can attach the XIV volumes to use as additional disk space to help with the disk capacity on the servers. If you attach the XIV volumes to use as additional disk space, run the HAK xiv_devlist command to show the attached volumes, as shown in Example 3-2 on page 27.
26 Using XIV in OpenStack Environments
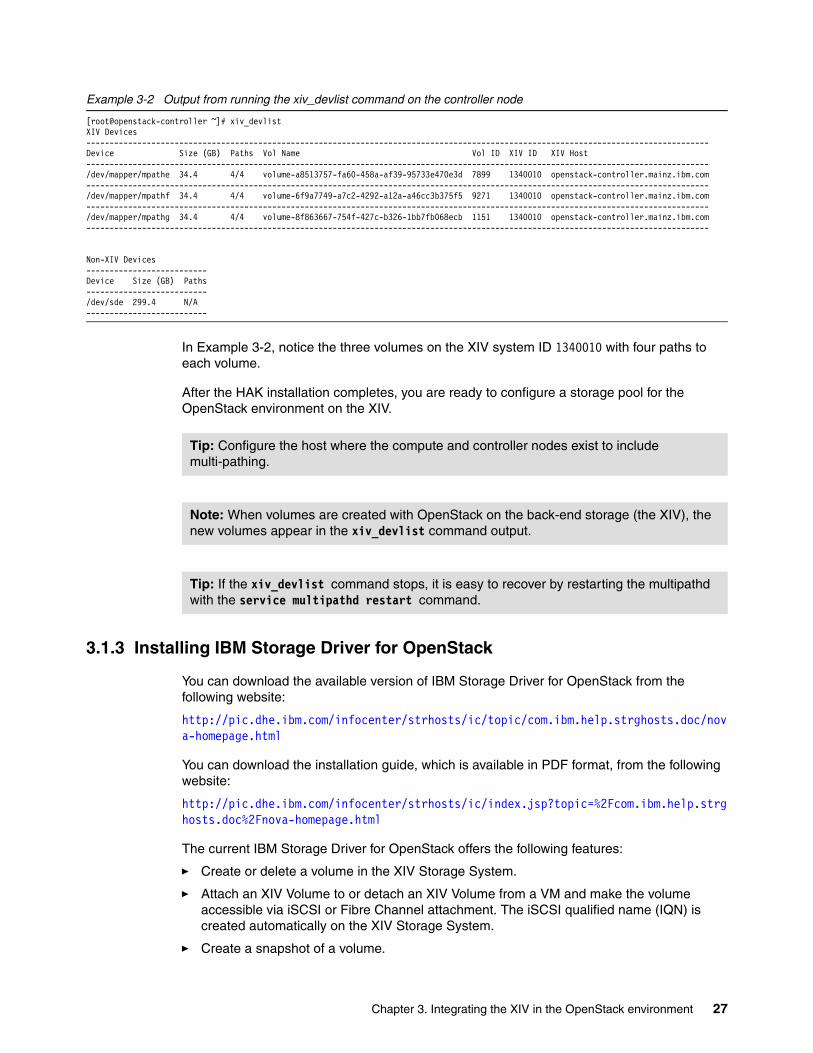
Example 3-2 Output from running the xiv_devlist command on the controller node
[root@openstack-controller ~]# xiv_devlistXIV Devices --------------------------------------------------------------------------------------------------------------------------------------Device Size (GB) Paths Vol Name Vol ID XIV ID XIV Host --------------------------------------------------------------------------------------------------------------------------------------/dev/mapper/mpathe 34.4 4/4 volume-a8513757-fa60-458a-af39-95733e470e3d 7899 1340010 openstack-controller.mainz.ibm.com--------------------------------------------------------------------------------------------------------------------------------------/dev/mapper/mpathf 34.4 4/4 volume-6f9a7749-a7c2-4292-a12a-a46cc3b375f5 9271 1340010 openstack-controller.mainz.ibm.com--------------------------------------------------------------------------------------------------------------------------------------/dev/mapper/mpathg 34.4 4/4 volume-8f863667-754f-427c-b326-1bb7fb068ecb 1151 1340010 openstack-controller.mainz.ibm.com--------------------------------------------------------------------------------------------------------------------------------------
Non-XIV Devices--------------------------Device Size (GB) Paths--------------------------/dev/sde 299.4 N/A --------------------------
In Example 3-2, notice the three volumes on the XIV system ID 1340010 with four paths to each volume.
After the HAK installation completes, you are ready to configure a storage pool for the OpenStack environment on the XIV.
3.1.3 Installing IBM Storage Driver for OpenStack
You can download the available version of IBM Storage Driver for OpenStack from the following website:
http://pic.dhe.ibm.com/infocenter/strhosts/ic/topic/com.ibm.help.strghosts.doc/nova-homepage.html
You can download the installation guide, which is available in PDF format, from the following website:
http://pic.dhe.ibm.com/infocenter/strhosts/ic/index.jsp?topic=%2Fcom.ibm.help.strghosts.doc%2Fnova-homepage.html
The current IBM Storage Driver for OpenStack offers the following features:
� Create or delete a volume in the XIV Storage System.
� Attach an XIV Volume to or detach an XIV Volume from a VM and make the volume accessible via iSCSI or Fibre Channel attachment. The iSCSI qualified name (IQN) is created automatically on the XIV Storage System.
� Create a snapshot of a volume.
Tip: Configure the host where the compute and controller nodes exist to include multi-pathing.
Note: When volumes are created with OpenStack on the back-end storage (the XIV), the new volumes appear in the xiv_devlist command output.
Tip: If the xiv_devlist command stops, it is easy to recover by restarting the multipathd with the service multipathd restart command.
Chapter 3. Integrating the XIV in the OpenStack environment 27
To install the IBM Storage Driver for OpenStack, create a pool on the XIV Storage System for the node. In our example, we created a pool that is named ITSO_CM_PFE2_P1.
For the driver installation, you need the XIV IP address, admin name, and password. To install the IBM Storage Driver for OpenStack, see the driver installation guide:
http://pic.dhe.ibm.com/infocenter/strhosts/ic/index.jsp?topic=%2Fcom.ibm.help.strghosts.doc%2Fnova-homepage.html
Verify that the IBM Storage Driver for OpenStack is installed correctly by checking the cinder.conf file, as shown in Example 3-3. In the storage area network (SAN) parameters, you must set the volume_driver to cinder.volume.drivers.xiv_ds8k.XIVDS8KDriver and the xiv_ds8k_proxy must be set to xiv_ds8k_openstack.xiv_nova_proxy.XIVNovaProxy.
Example 3-3 The XIV cinder.conf stanza for IBM Storage Driver
# cat /etc/nova/cinder.conf [IBM-XIV_9.155.50.90_ITSO_CM_PFE2_P1_fibre_channel]xiv_ds8k_connection_type = fibre_channelsan_clustername = ITSO_CM_PFE2_P1san_password = YWRtaW5hZG1pbg==volume_backend_name = IBM-XIV_9.155.50.90_ITSO_CM_PFE2_P1_fibre_channelsan_login = your login IDvolume_driver = cinder.volume.drivers.xiv_ds8k.XIVDS8KDriverxiv_ds8k_proxy = xiv_ds8k_openstack.xiv_nova_proxy.XIVNovaProxysan_ip = your IPxiv_chap = disabled
Example 3-4 shows the installation process for the test environment that was used for this paper. We used Version 1.3.1.1-b261 to install the driver for an XIV system. The storage pool to use with the OpenStack environment was previously created and defined for OpenStack during the installation with this script (ITSO_CM_XIV02_P1). Notice that you can install more than one back-end storage device (for this driver, it is an XIV or the DS8000) with this installation script. Also, the driver is installed from the OpenStack controller node.
Example 3-4 Installing the IBM Storage Driver for OpenStack
[root@openstack-controller IBM_Storage_Driver_for_OpenStack_1.3.1.1-b261_rhel6.x]# ./install.sh Welcome to the IBM Storage Driver for OpenStack (v1.3.1.1-b261) installation.Press [ENTER] to proceed.
Enter the storage array type.x/xiv for XIV or d/ds8k for DS8000: [Default: x ]: xEnter the IBM XIV Storage System IP address or hostname: 9.155.50.90Enter the username and password for accessing the IBM XIV Storage System:Username: [Default: admin ]: itsoPassword:
Please specify the required connection type:f/fc/fibre for Fibre Channel or i/iscsi for iSCSI: [Default: i ]: fEnter the name of the XIV storage pool to be used: ITSO_CM_PFE2_P1Would you like to add another IBM storage system? [Default: No ]: yesTo cancel adding another back end, press [CTRL+C].Enter the storage array type.x/xiv for XIV or d/ds8k for DS8000: [Default: x ]: Enter the IBM XIV Storage System IP address or hostname: 9.155.116.61
28 Using XIV in OpenStack Environments
Enter the username and password for accessing the IBM XIV Storage System:Username: [Default: admin ]: itsoPassword:
Please specify the required connection type:f/fc/fibre for Fibre Channel or i/iscsi for iSCSI: [Default: i ]: fEnter the name of the XIV storage pool to be used: ITSO_CM_XIV02_P1Would you like to add another IBM storage system? [Default: No ]: Verifying installation...Installation verified successfully.Installing IBM Storage Driver for OpenStack Python eggs...Stopping OpenStack Volume service...Configuring OpenStack with IBM XIV|DS8000 Storage System information...Starting OpenStack Volume service...Installation of the IBM Storage Driver for OpenStack (v1.3.1.1-b261) is complete.Press [ENTER] to exit.
Chapter 3. Integrating the XIV in the OpenStack environment 29

30 Using XIV in OpenStack Environments

Chapter 4. IBM Cloud Manager with OpenStack
This chapter describes the following topics:
� Installing IBM Cloud Manager with OpenStack
� Integrating the IBM XIV Storage System as block storage into IBM Cloud Manager with OpenStack
� Using IBM Cloud Manager with OpenStack
4
© Copyright IBM Corp. 2015. All rights reserved. 31
4.1 IBM Cloud Manager with OpenStack
IBM Cloud Manager with OpenStack, formerly IBM SmartCloud® Entry, is a self-service portal for simplified cloud management.
4.1.1 Overview
With IBM Cloud Manager with OpenStack, you can work with virtual machines (VMs). Self-service capabilities simplify the process of executing many common public or private cloud operations:
� Provisioning and de-provisioning instances (VMs)� Cloning instances� Taking snapshots of instances� Starting and stopping instances� Resizing existing instances� Attaching storage area network (SAN) storage to instances
The new version of IBM Cloud Manager offers the following functions:
� Added support for z/VM and PowerKVM virtualization hypervisors through OpenStack technologies.
� Chef deployment server. IBM Cloud Manager with OpenStack Chef Server provides greater flexibility and control over how you deploy OpenStack in your cloud.
� You can now manage storage volumes for individual VMs with IBM Cloud Manager with the OpenStack self-service portal. You can create, delete, edit, and attach or detach storage volumes for a corresponding instance.
� An administrator can lock a user account to prevent access to IBM Cloud Manager with the OpenStack self-service portal.
� Cloud environment management is available from a z/VM system.
� You can deploy the z/VM appliance to manage your cloud environment from a z/VM system. For more information, see z/VM prerequisites at this website:
http://www.ibm.com/support/knowledgecenter/SST55W_4.2.0/liaca/liacazvm_prerequisites.html
4.1.2 Installing IBM Cloud Manager with OpenStack
A broad range of documentation is available about the installation of IBM Cloud Manager. A quick installation guide helps you to set up a test or evaluation environment rapidly. Also, detailed documents are provided, in which specific sections, such as security or the installation of various supported host operating systems, are described in detail. The documentation and other useful information are available on the IBM developerWorks® website:
https://www.ibm.com/developerworks/community/wikis/home?lang=en#!/wiki/W21ed5ba0f4a9_46f4_9626_24cbbb86fbb9/page/Documentation
The quick installation guide is also at the IBM developerWorks website under the IBM Cloud Manager with OpenStack documentation:
http://ibm.co/1AaiQta
32 Using XIV in OpenStack Environments
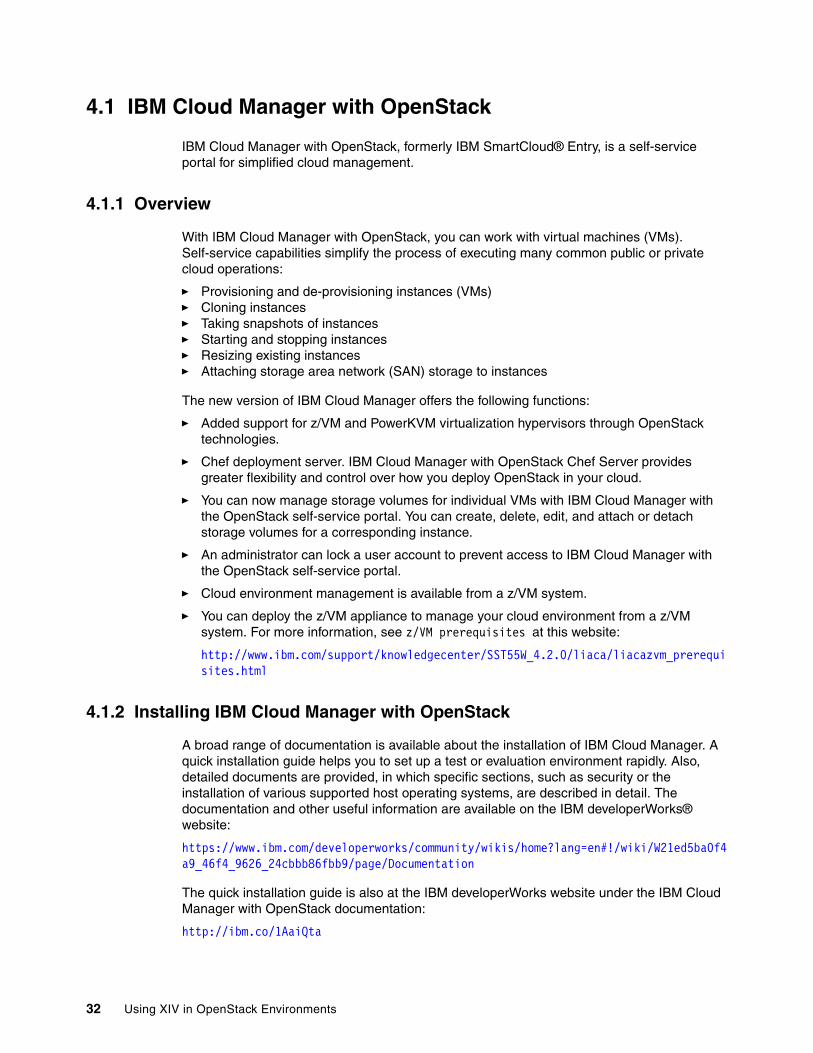
You can download the installation packages and fix packs from the IBM Fix Central product gateway, as shown in Figure 4-1. See Figure 4-1.
Figure 4-1 IBM Cloud Manager with OpenStack installation files from Fix Central
The following prerequisites are necessary for the IBM Cloud Manager with OpenStack installation:
� Hardware requirements for the deployment server, as listed in Table 4-1.
Also, the deployment server can be based on a virtual system. In our setup, we used a physical server.
Table 4-1 IBM Cloud Manager with OpenStack deployment server requirements
Component Minimum hardware requirements
Recommended minimum hardware production requirements
IBM Cloud Manager with OpenStack deployment server
� Four CPUs� Free disk space: 4 GB for
/opt/ibm/cmwo � Free disk space: 4.5 GB of
temporary space while installing
� Chef Server: 5.0 GB of free disk space in /opt; 5.0 GB of free disk space in /var.
� 4 GB physical memory
� Eight CPUs� 25 GB free disk space� 8 GB physical memory
Chapter 4. IBM Cloud Manager with OpenStack 33
� We installed RHEL 6.5 64-bit x86 (same as for OpenStack nodes) with the minimum installation, as used in our setup without the graphical user interface (GUI). (We performed a command-line installation.)
� We downloaded the IBM Cloud Manager with OpenStack installation packages, including the latest service packs and documentation.
Each node/system must have at least two network adapters: one network adapter for the date and the other network adapter for the management network.
� A fully qualified domain name (FQDN) is required. (The FQDN name.domain format is required.) In our setup, we modified the /etc/hosts files of each node with the FQDN information because we did not use a dedicated Domain Name Server (DNS). For a productive environment, a DNS is the preferred solution. Example 4-1 illustrates our setup.
Example 4-1 FQDNs in the /etc/hosts files are the same for all OpenStack hosts
[root@deployment-server ~]# cat /etc/hosts127.0.0.1 localhost.localdomain localhost9.155.51.40 deployment-server.mainz.ibm.com deployment-server9.155.51.210 openstack-controller.mainz.ibm.com openstack-controller9.155.51.97 openstack-compute.mainz.ibm.com openstack-compute[root@deployment-server ~]#
� The deployment server and the nodes that are planned for deployment must all use the same root password.
� Another prerequisite is a properly configured RHEL YUM repository. Because we had no internet connection, we used the following steps to create this repository:
a. Create a directory for the RHEL installation image.
b. Copy the image into that location.
c. Mount the RHEL 6.5 DVD installation image on each OpenStack server locally (controller and compute node).
d. Modify the /etc/fstab to add that image location as the yum repository by using the yum-config-manager, as shown in Example 4-2.
Example 4-2 RHEL installation image mounted as the repository
[root@openstack-controller ~]# mount./var/rhel65dvd/RHEL6.5-20131111.0-Server-x86_64-DVD1.iso on /var/rhel65dvd/mnt type iso9660 (rw,loop=/dev/loop0).[root@openstack-controller ~]# cat /etc/fstab./var/rhel65dvd/RHEL6.5-20131111.0-Server-x86_64-DVD1.iso /var/rhel65dvd/mnt iso9660 loop 0 0.[root@openstack-controller ~]# ls -ls /var/rhel65dvd/insgesamt 3763216 8 dr-xr-xr-x. 12 root root 8192 11. Nov 2013 mnt 4 drwxr-xr-x. 2 root root 4096 26. Sep 18:14 repodata
Tip: In our restricted lab environment, neither of the two network ports provided an Internet connection. However, Internet access is useful for OS updates. Therefore, we advise you to procure additional network ports for each node/server.
34 Using XIV in OpenStack Environments
3763204 -rw-r--r--. 1 root root 3853516800 26. Sep 17:59 RHEL6.5-20131111.0-Server-x86_64-DVD1.iso[root@openstack-controller ~]# yum-config-manager --add-repo=/var/rhel65dvd/mnt
For more information, see the IBM Cloud Manager documentation.
After you complete the prerequisites, you can start the installation of the deployment server. Follow these steps for an RHEL 64-bit x86 v6.5 OS-based installation:
1. Create an installation directory with sufficient capacity for the installation and service pack files, as shown in Example 4-3. Untar (tar -xvf file) the compressed packages and change (chmode +x file) the permissions so that the installation files are executable. In Example 4-3, the cmwo (Cloud Manager with OpenStack) file is already untarred and executable; however, the service packs are not.
Example 4-3 The cmwo installation package location
[root@deployment-server INSTALLER_LAUNCH_DIR]# pwd/root/INSTALLER_LAUNCH_DIR[root@deployment-server INSTALLER_LAUNCH_DIR]# llinsgesamt 6378424-rwxr-xr-x. 1 root root 692877531 25. Sep 07:59 cmwo410_xlinux_install.bin-rw-r--r--. 1 root root 1009412262 25. Sep 08:00 cmwo410_xlinux_install_pkg_01.tar.gz-rw-r--r--. 1 root root 818247595 25. Sep 08:00 cmwo410_xlinux_install_pkg_02.tar.gz-rw-r--r--. 1 root root 1073679808 25. Sep 08:01 cmwo410_xlinux_install_pkg_03.tar.gz
2. Start the cmwo installation, as shown in Example 4-4.
Example 4-4 The cmwo installation
[root@deployment-server INSTALLER_LAUNCH_DIR]# echo LICENSE_ACCEPTED=true > ./installer.rsp[root@deployment-server INSTALLER_LAUNCH_DIR]# cat installer.rsp LICENSE_ACCEPTED=true[root@deployment-server INSTALLER_LAUNCH_DIR]# ./cmwo410_xlinux_install.bin –f ./installer.rsp
If the installation does not succeed, review the installation log for problem determination. The installation log file location is indicated in Example 4-5.
Example 4-5 Installation log file
[root@deployment-server INSTALLER_LAUNCH_DIR]# ls -l /opt/ibm/cmwo/_installation/Logs/-rw-r-----. 1 root root 306506 26. Sep 06:50 IBM_Cloud_Manager_with_OpenStack_Install_09_26_2014_06_45_13.log
3. Download the latest fix packs. At the time of this installation, Service Pack 3 for cmwo 4.1 was the current service pack. To place the latest fix pack on the server, create a dedicated directory for the fix pack file, such as /cmwo_fp3, copy the latest fix pack file into that directory, and unpack the fix pack file. See Example 4-6 on page 36.
Chapter 4. IBM Cloud Manager with OpenStack 35
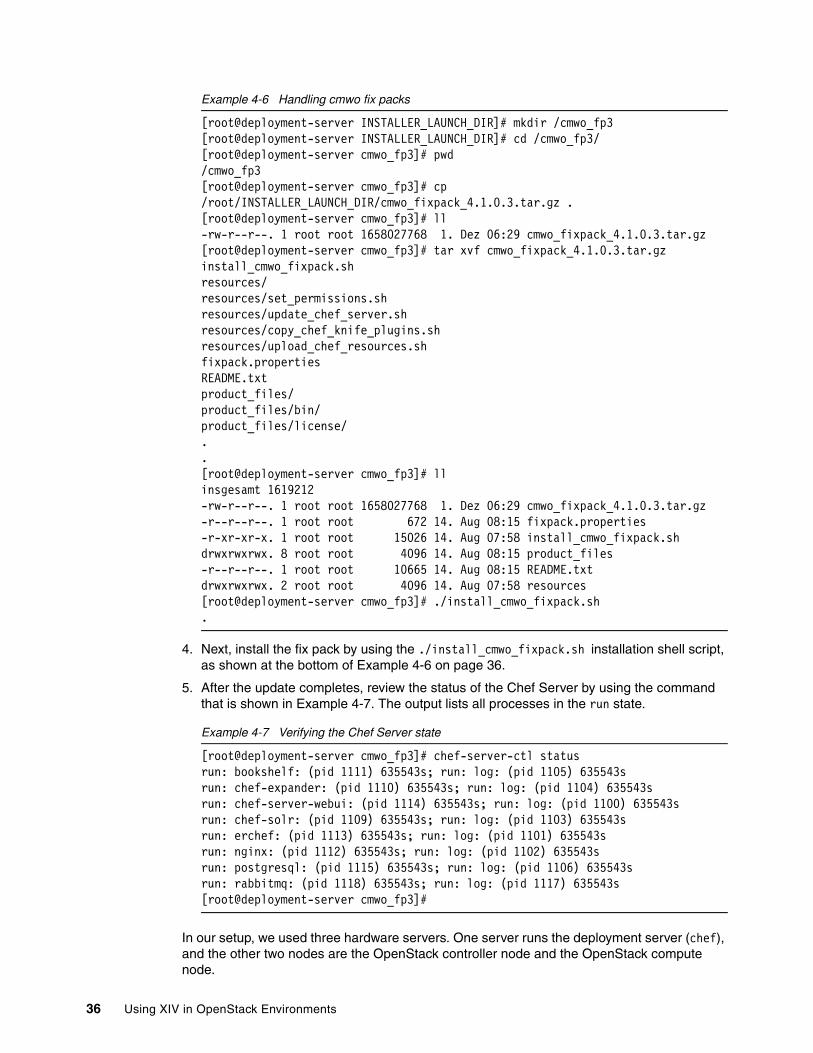
Example 4-6 Handling cmwo fix packs
[root@deployment-server INSTALLER_LAUNCH_DIR]# mkdir /cmwo_fp3[root@deployment-server INSTALLER_LAUNCH_DIR]# cd /cmwo_fp3/[root@deployment-server cmwo_fp3]# pwd/cmwo_fp3[root@deployment-server cmwo_fp3]# cp /root/INSTALLER_LAUNCH_DIR/cmwo_fixpack_4.1.0.3.tar.gz .[root@deployment-server cmwo_fp3]# ll-rw-r--r--. 1 root root 1658027768 1. Dez 06:29 cmwo_fixpack_4.1.0.3.tar.gz[root@deployment-server cmwo_fp3]# tar xvf cmwo_fixpack_4.1.0.3.tar.gz install_cmwo_fixpack.shresources/resources/set_permissions.shresources/update_chef_server.shresources/copy_chef_knife_plugins.shresources/upload_chef_resources.shfixpack.propertiesREADME.txtproduct_files/product_files/bin/product_files/license/..[root@deployment-server cmwo_fp3]# llinsgesamt 1619212-rw-r--r--. 1 root root 1658027768 1. Dez 06:29 cmwo_fixpack_4.1.0.3.tar.gz-r--r--r--. 1 root root 672 14. Aug 08:15 fixpack.properties-r-xr-xr-x. 1 root root 15026 14. Aug 07:58 install_cmwo_fixpack.shdrwxrwxrwx. 8 root root 4096 14. Aug 08:15 product_files-r--r--r--. 1 root root 10665 14. Aug 08:15 README.txtdrwxrwxrwx. 2 root root 4096 14. Aug 07:58 resources[root@deployment-server cmwo_fp3]# ./install_cmwo_fixpack.sh.
4. Next, install the fix pack by using the ./install_cmwo_fixpack.sh installation shell script, as shown at the bottom of Example 4-6 on page 36.
5. After the update completes, review the status of the Chef Server by using the command that is shown in Example 4-7. The output lists all processes in the run state.
Example 4-7 Verifying the Chef Server state
[root@deployment-server cmwo_fp3]# chef-server-ctl statusrun: bookshelf: (pid 1111) 635543s; run: log: (pid 1105) 635543srun: chef-expander: (pid 1110) 635543s; run: log: (pid 1104) 635543srun: chef-server-webui: (pid 1114) 635543s; run: log: (pid 1100) 635543srun: chef-solr: (pid 1109) 635543s; run: log: (pid 1103) 635543srun: erchef: (pid 1113) 635543s; run: log: (pid 1101) 635543srun: nginx: (pid 1112) 635543s; run: log: (pid 1102) 635543srun: postgresql: (pid 1115) 635543s; run: log: (pid 1106) 635543srun: rabbitmq: (pid 1118) 635543s; run: log: (pid 1117) 635543s[root@deployment-server cmwo_fp3]#
In our setup, we used three hardware servers. One server runs the deployment server (chef), and the other two nodes are the OpenStack controller node and the OpenStack compute node.
36 Using XIV in OpenStack Environments
Now, we show the steps to prepare for the deployment of those two OpenStack nodes in our setup:
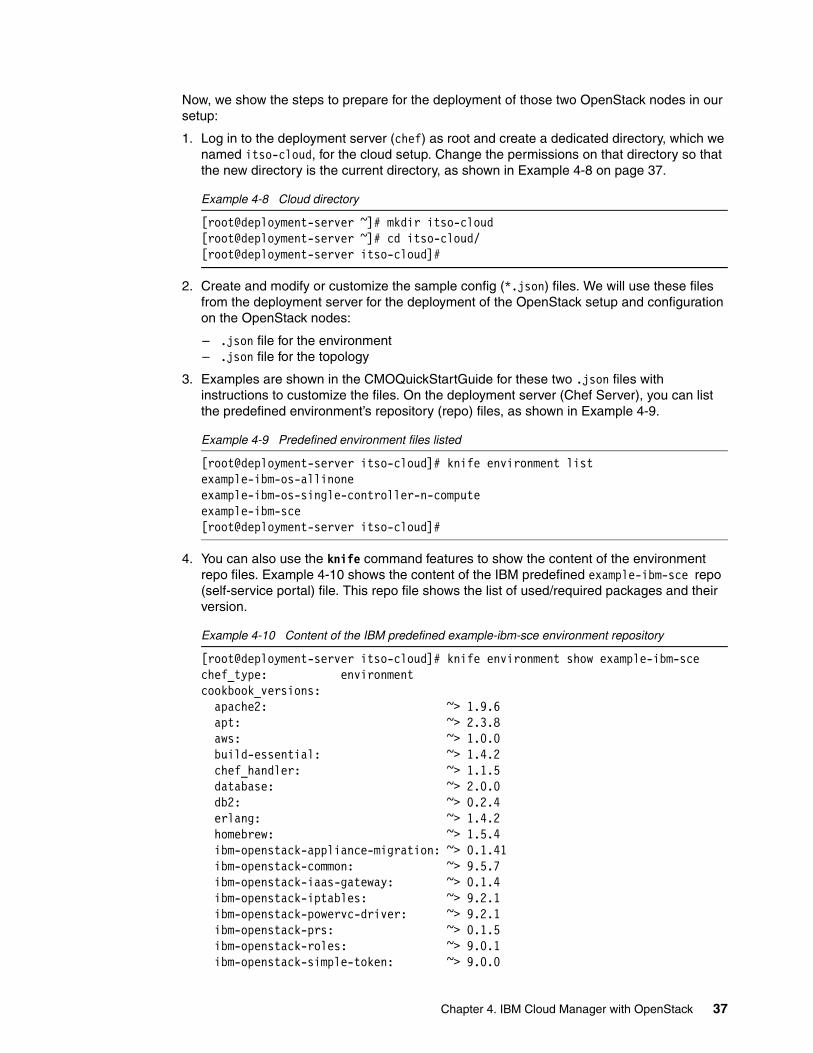
1. Log in to the deployment server (chef) as root and create a dedicated directory, which we named itso-cloud, for the cloud setup. Change the permissions on that directory so that the new directory is the current directory, as shown in Example 4-8 on page 37.
Example 4-8 Cloud directory
[root@deployment-server ~]# mkdir itso-cloud[root@deployment-server ~]# cd itso-cloud/[root@deployment-server itso-cloud]#
2. Create and modify or customize the sample config (*.json) files. We will use these files from the deployment server for the deployment of the OpenStack setup and configuration on the OpenStack nodes:
– .json file for the environment – .json file for the topology
3. Examples are shown in the CMOQuickStartGuide for these two .json files with instructions to customize the files. On the deployment server (Chef Server), you can list the predefined environment’s repository (repo) files, as shown in Example 4-9.
Example 4-9 Predefined environment files listed
[root@deployment-server itso-cloud]# knife environment listexample-ibm-os-allinoneexample-ibm-os-single-controller-n-computeexample-ibm-sce[root@deployment-server itso-cloud]#
4. You can also use the knife command features to show the content of the environment repo files. Example 4-10 shows the content of the IBM predefined example-ibm-sce repo (self-service portal) file. This repo file shows the list of used/required packages and their version.
Example 4-10 Content of the IBM predefined example-ibm-sce environment repository
[root@deployment-server itso-cloud]# knife environment show example-ibm-scechef_type: environmentcookbook_versions: apache2: ~> 1.9.6 apt: ~> 2.3.8 aws: ~> 1.0.0 build-essential: ~> 1.4.2 chef_handler: ~> 1.1.5 database: ~> 2.0.0 db2: ~> 0.2.4 erlang: ~> 1.4.2 homebrew: ~> 1.5.4 ibm-openstack-appliance-migration: ~> 0.1.41 ibm-openstack-common: ~> 9.5.7 ibm-openstack-iaas-gateway: ~> 0.1.4 ibm-openstack-iptables: ~> 9.2.1 ibm-openstack-powervc-driver: ~> 9.2.1 ibm-openstack-prs: ~> 0.1.5 ibm-openstack-roles: ~> 9.0.1 ibm-openstack-simple-token: ~> 9.0.0
Chapter 4. IBM Cloud Manager with OpenStack 37
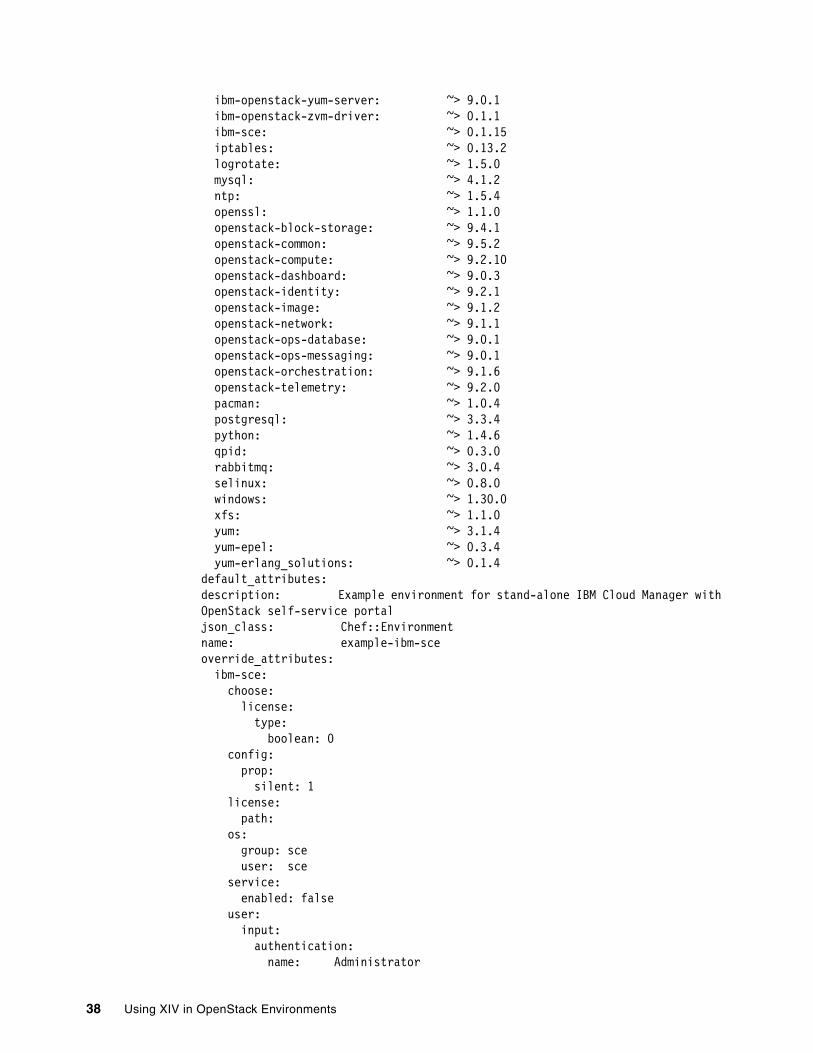
ibm-openstack-yum-server: ~> 9.0.1 ibm-openstack-zvm-driver: ~> 0.1.1 ibm-sce: ~> 0.1.15 iptables: ~> 0.13.2 logrotate: ~> 1.5.0 mysql: ~> 4.1.2 ntp: ~> 1.5.4 openssl: ~> 1.1.0 openstack-block-storage: ~> 9.4.1 openstack-common: ~> 9.5.2 openstack-compute: ~> 9.2.10 openstack-dashboard: ~> 9.0.3 openstack-identity: ~> 9.2.1 openstack-image: ~> 9.1.2 openstack-network: ~> 9.1.1 openstack-ops-database: ~> 9.0.1 openstack-ops-messaging: ~> 9.0.1 openstack-orchestration: ~> 9.1.6 openstack-telemetry: ~> 9.2.0 pacman: ~> 1.0.4 postgresql: ~> 3.3.4 python: ~> 1.4.6 qpid: ~> 0.3.0 rabbitmq: ~> 3.0.4 selinux: ~> 0.8.0 windows: ~> 1.30.0 xfs: ~> 1.1.0 yum: ~> 3.1.4 yum-epel: ~> 0.3.4 yum-erlang_solutions: ~> 0.1.4default_attributes:description: Example environment for stand-alone IBM Cloud Manager with OpenStack self-service portaljson_class: Chef::Environmentname: example-ibm-sceoverride_attributes: ibm-sce: choose: license: type: boolean: 0 config: prop: silent: 1 license: path: os: group: sce user: sce service: enabled: false user: input: authentication: name: Administrator
38 Using XIV in OpenStack Environments
username: admin install: folder: /opt/ibm prop: folder: /var/opt/ibm shortcuts: /root openstack: developer_mode: false release: icehouse secret: db_passwords_data_bag: db_passwords key_path: /etc/chef/encrypted_data_bag_secret secrets_data_bag: secrets service_passwords_data_bag: service_passwords user_passwords_data_bag: user_passwords[root@deployment-server itso-cloud]#
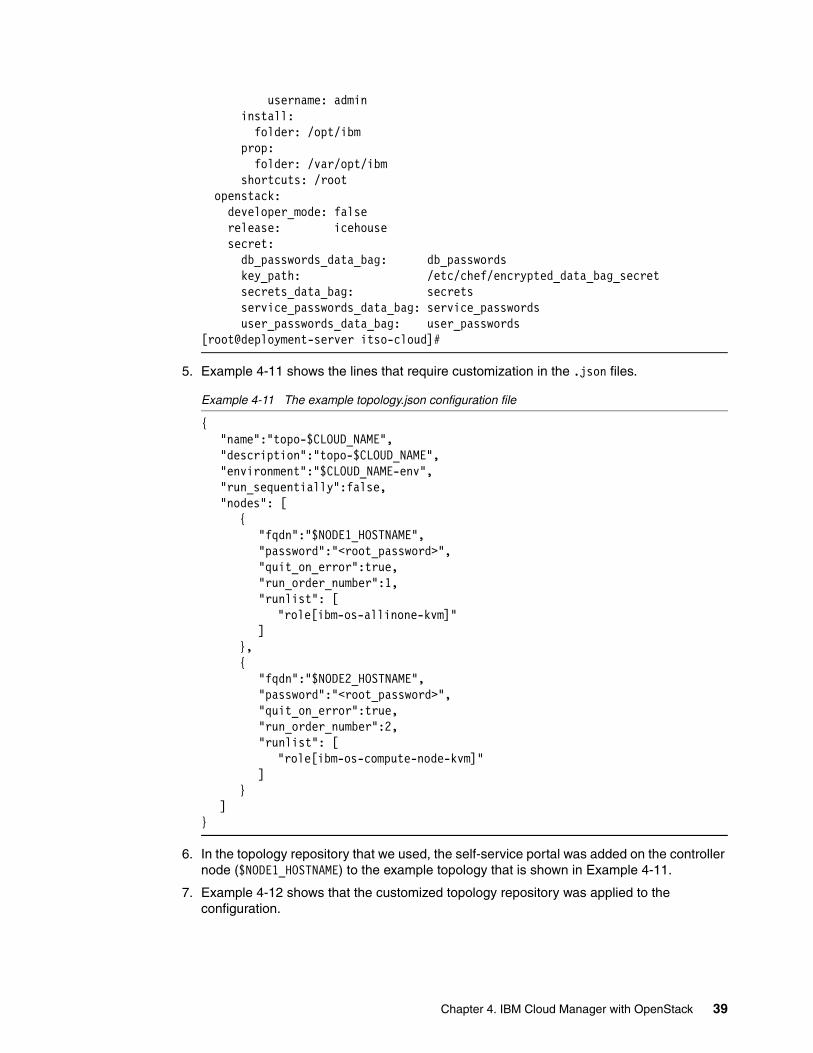
5. Example 4-11 shows the lines that require customization in the .json files.
Example 4-11 The example topology.json configuration file
{"name":"topo-$CLOUD_NAME","description":"topo-$CLOUD_NAME","environment":"$CLOUD_NAME-env","run_sequentially":false,"nodes": [
{"fqdn":"$NODE1_HOSTNAME","password":"<root_password>","quit_on_error":true,"run_order_number":1,"runlist": [
"role[ibm-os-allinone-kvm]"]
},{
"fqdn":"$NODE2_HOSTNAME","password":"<root_password>","quit_on_error":true,"run_order_number":2,"runlist": [
"role[ibm-os-compute-node-kvm]"]
}]
}
6. In the topology repository that we used, the self-service portal was added on the controller node ($NODE1_HOSTNAME) to the example topology that is shown in Example 4-11.
7. Example 4-12 shows that the customized topology repository was applied to the configuration.
Chapter 4. IBM Cloud Manager with OpenStack 39
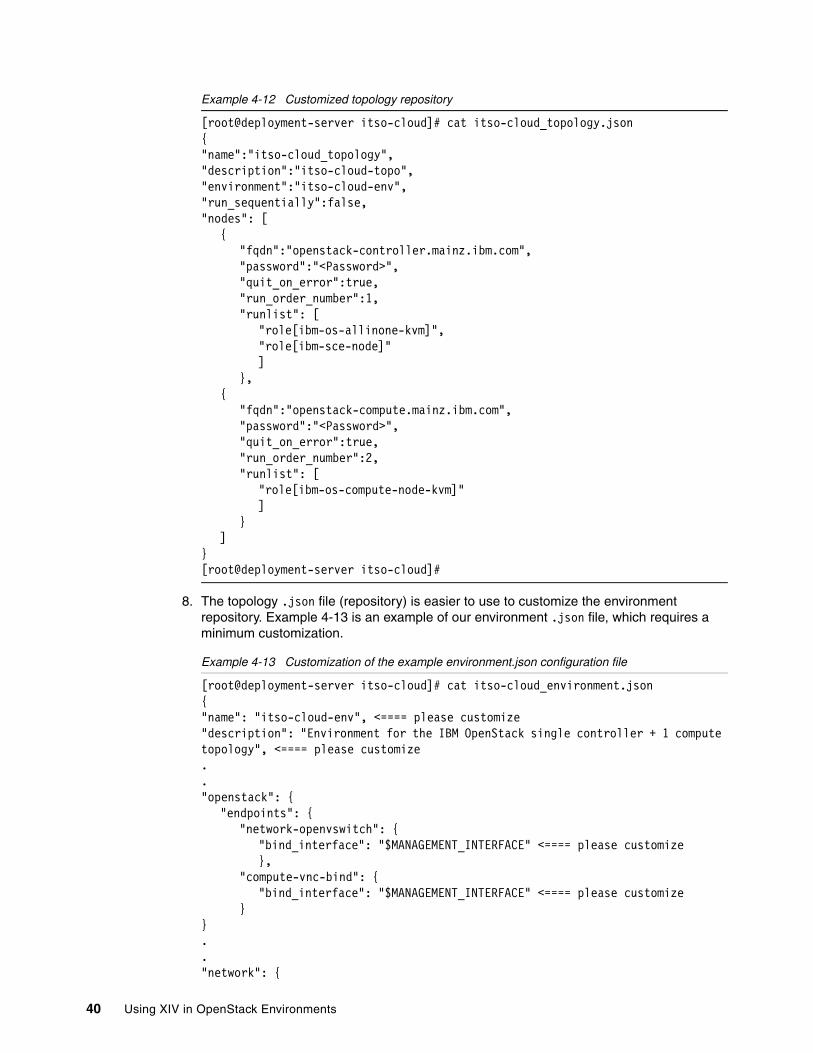
Example 4-12 Customized topology repository
[root@deployment-server itso-cloud]# cat itso-cloud_topology.json{"name":"itso-cloud_topology","description":"itso-cloud-topo","environment":"itso-cloud-env","run_sequentially":false,"nodes": [
{"fqdn":"openstack-controller.mainz.ibm.com","password":"<Password>","quit_on_error":true,"run_order_number":1,"runlist": [
"role[ibm-os-allinone-kvm]","role[ibm-sce-node]"]
},{
"fqdn":"openstack-compute.mainz.ibm.com","password":"<Password>","quit_on_error":true,"run_order_number":2,"runlist": [
"role[ibm-os-compute-node-kvm]"]
}]
}[root@deployment-server itso-cloud]#
8. The topology .json file (repository) is easier to use to customize the environment repository. Example 4-13 is an example of our environment .json file, which requires a minimum customization.
Example 4-13 Customization of the example environment.json configuration file
[root@deployment-server itso-cloud]# cat itso-cloud_environment.json{"name": "itso-cloud-env", <==== please customize"description": "Environment for the IBM OpenStack single controller + 1 compute topology", <==== please customize.."openstack": {
"endpoints": {"network-openvswitch": {
"bind_interface": "$MANAGEMENT_INTERFACE" <==== please customize},
"compute-vnc-bind": {"bind_interface": "$MANAGEMENT_INTERFACE" <==== please customize
}}.."network": {
40 Using XIV in OpenStack Environments
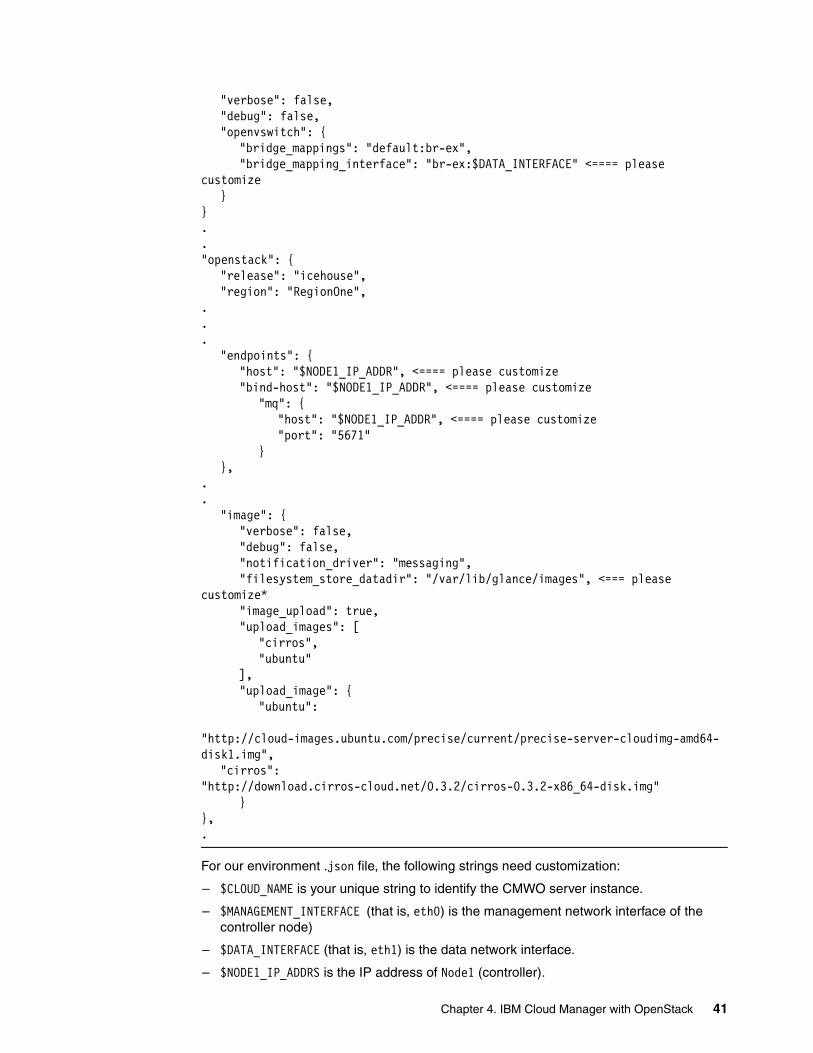
"verbose": false,"debug": false,"openvswitch": {
"bridge_mappings": "default:br-ex","bridge_mapping_interface": "br-ex:$DATA_INTERFACE" <==== please
customize}
}.."openstack": {
"release": "icehouse","region": "RegionOne",
.
.
."endpoints": {
"host": "$NODE1_IP_ADDR", <==== please customize"bind-host": "$NODE1_IP_ADDR", <==== please customize
"mq": {"host": "$NODE1_IP_ADDR", <==== please customize"port": "5671"
}},
.
."image": {
"verbose": false,"debug": false,"notification_driver": "messaging","filesystem_store_datadir": "/var/lib/glance/images", <=== please
customize*"image_upload": true,"upload_images": [
"cirros","ubuntu"
],"upload_image": {
"ubuntu":
"http://cloud-images.ubuntu.com/precise/current/precise-server-cloudimg-amd64-disk1.img",
"cirros": "http://download.cirros-cloud.net/0.3.2/cirros-0.3.2-x86_64-disk.img"
}},.
For our environment .json file, the following strings need customization:
– $CLOUD_NAME is your unique string to identify the CMWO server instance.
– $MANAGEMENT_INTERFACE (that is, eth0) is the management network interface of the controller node)
– $DATA_INTERFACE (that is, eth1) is the data network interface.
– $NODE1_IP_ADDRS is the IP address of Node1 (controller).
Chapter 4. IBM Cloud Manager with OpenStack 41
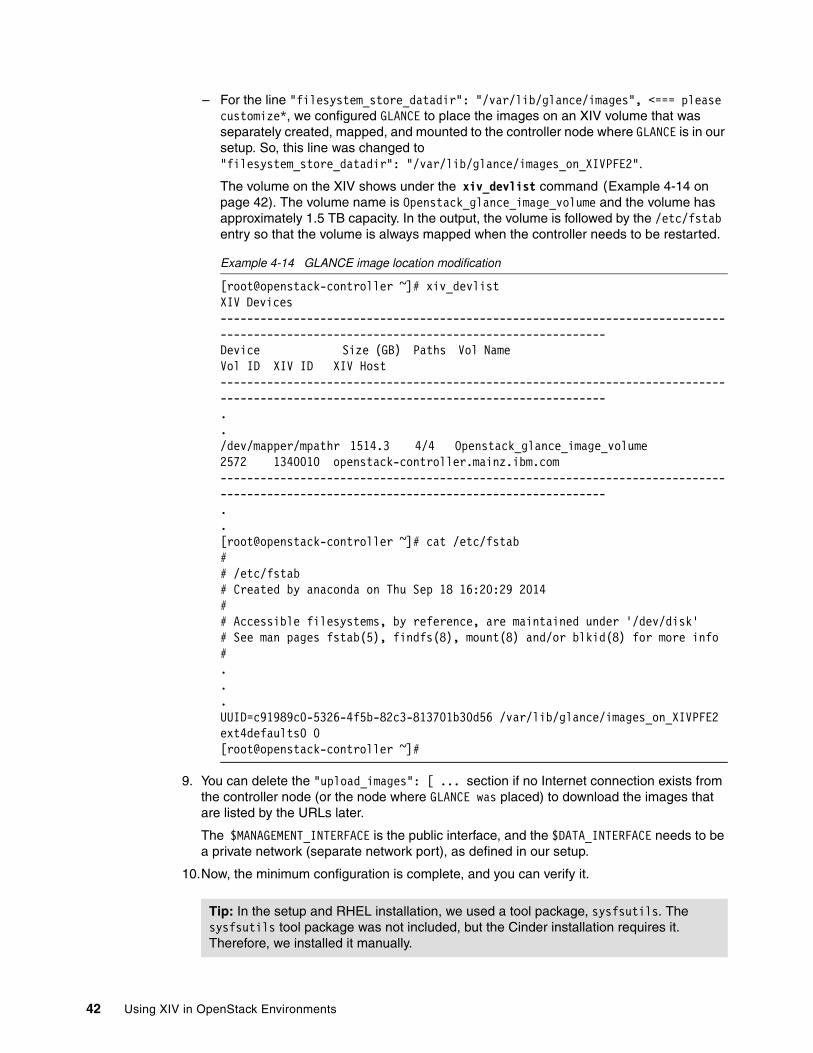
– For the line "filesystem_store_datadir": "/var/lib/glance/images", <=== please customize*, we configured GLANCE to place the images on an XIV volume that was separately created, mapped, and mounted to the controller node where GLANCE is in our setup. So, this line was changed to "filesystem_store_datadir": "/var/lib/glance/images_on_XIVPFE2".
The volume on the XIV shows under the xiv_devlist command (Example 4-14 on page 42). The volume name is Openstack_glance_image_volume and the volume has approximately 1.5 TB capacity. In the output, the volume is followed by the /etc/fstab entry so that the volume is always mapped when the controller needs to be restarted.
Example 4-14 GLANCE image location modification
[root@openstack-controller ~]# xiv_devlistXIV Devices --------------------------------------------------------------------------------------------------------------------------------------Device Size (GB) Paths Vol Name Vol ID XIV ID XIV Host --------------------------------------------------------------------------------------------------------------------------------------../dev/mapper/mpathr 1514.3 4/4 Openstack_glance_image_volume 2572 1340010 openstack-controller.mainz.ibm.com--------------------------------------------------------------------------------------------------------------------------------------..[root@openstack-controller ~]# cat /etc/fstab## /etc/fstab# Created by anaconda on Thu Sep 18 16:20:29 2014## Accessible filesystems, by reference, are maintained under '/dev/disk'# See man pages fstab(5), findfs(8), mount(8) and/or blkid(8) for more info#...UUID=c91989c0-5326-4f5b-82c3-813701b30d56 /var/lib/glance/images_on_XIVPFE2ext4defaults0 0[root@openstack-controller ~]#
9. You can delete the "upload_images": [ ... section if no Internet connection exists from the controller node (or the node where GLANCE was placed) to download the images that are listed by the URLs later.
The $MANAGEMENT_INTERFACE is the public interface, and the $DATA_INTERFACE needs to be a private network (separate network port), as defined in our setup.
10.Now, the minimum configuration is complete, and you can verify it.
Tip: In the setup and RHEL installation, we used a tool package, sysfsutils. The sysfsutils tool package was not included, but the Cinder installation requires it. Therefore, we installed it manually.
42 Using XIV in OpenStack Environments

Example 4-15 illustrates how to install the sysfsutils tool and verify the installation based on RHEL 6.5.
Example 4-15 Installing and verifying the sysfsutils tool package on RHEL 6.5
[root@openstack-controller ~]# yum install sysfsutilsLoaded plugins: product-id, security, subscription-managerdvd 2.9 kB 00:00 ... ibmos-arch 2.9 kB 00:00 ibmos-noarch 2.9 kB 00:00 Setting up Install ProcessResolving Dependencies--> Running transaction check---> Package sysfsutils.x86_64 0:2.1.0-7.el6 will be installed--> Processing Dependency: libsysfs.so.2()(64bit) for package: sysfsutils-2.1.0-7.el6.x86_64--> Running transaction check---> Package libsysfs.x86_64 0:2.1.0-7.el6 will be installed--> Finished Dependency Resolution
Dependencies Resolved==================================================================================Package Arch Version Repository Size==================================================================================Installing:sysfsutils x86_64 2.1.0-7.el6 dvd 38 kInstalling for dependencies:libsysfs x86_64 2.1.0-7.el6 dvd 44 k
Transaction Summary==================================================================================Install 2 Package(s)
Total download size: 82 kInstalled size: 256 kIs this ok [y/N]: yDownloading Packages:----------------------------------------------------------------------------------Total 3.7 MB/s | 82 kB 00:00 Running rpm_check_debugRunning Transaction TestTransaction Test SucceededRunning TransactionWarning: RPMDB altered outside of yum.Installing : libsysfs-2.1.0-7.el6.x86_64 1/2 Installing : sysfsutils-2.1.0-7.el6.x86_64 2/2 Verifying : sysfsutils-2.1.0-7.el6.x86_64 1/2 Verifying : libsysfs-2.1.0-7.el6.x86_64 2/2
Installed: sysfsutils.x86_64 0:2.1.0-7.el6
Dependency Installed:
Chapter 4. IBM Cloud Manager with OpenStack 43

libsysfs.x86_64 0:2.1.0-7.el6
Complete![root@openstack-controller ~]# yum list sysfsutilsLoaded plugins: product-id, security, subscription-managerInstalled Packagessysfsutils.x86_64 2.1.0-7.el6 @dvd[root@openstack-controller ~]#
Now, the customized environment is added to the configuration, and the customized topology definitions (the itso-cloud_environment.json and itso-cloud_topology.json files) are deployed.
First, the environment .json file is applied and then verified by listing the available environment .json files, as shown in Example 4-16 (if the customized environment was successfully added).
Example 4-16 Applying and listing the environment .json files
[root@deployment-server ~]#knife environment from file itso-cloud_environment.json..[root@deployment-server ~]# knife environment list_defaultexample-ibm-os-allinoneexample-ibm-os-single-controller-n-computeexample-ibm-sceitso-cloud_environment <=== customized environment[root@deployment-server ~]#
11.Use the knife command to deploy the customized topology, as shown in Example 4-17. The deployment steps are applied first to the controller node and then to the compute node. This step takes several minutes. Ensure that this step completes for both (all) nodes by verifying the lines that confirm the successful completion. You can also verify the deployment to the nodes by using the knife node list command.
Example 4-17 Deployment of customized topology .json and verification that all nodes are added
[root@deployment-server ~]# knife os manage deploy topology itso-cloud_topology.jsonopenstack-controller.mainz.ibm.com ...openstack-controller.mainz.ibm.com ...openstack-controller.mainz.ibm.com .....All nodes for environment itso-cloud-env bootstrapped.Deploying bootstrapped nodes with run_order_number '2'...All bootstrapped nodes with run_order_number '2' deployed.
Results for deploy of topology 'itso-cloud_topology' Results for nodes with run_order_number '1'Deploy of node at openstack-controller.mainz.ibm.com was successful.Results for nodes with run_order_number '2'Deploy of node at openstack-compute.mainz.ibm.com was successful.Deploy of topology 'itso-cloud_topology.json' completed in 292 seconds.[root@deployment-server itso-cloud]#
44 Using XIV in OpenStack Environments
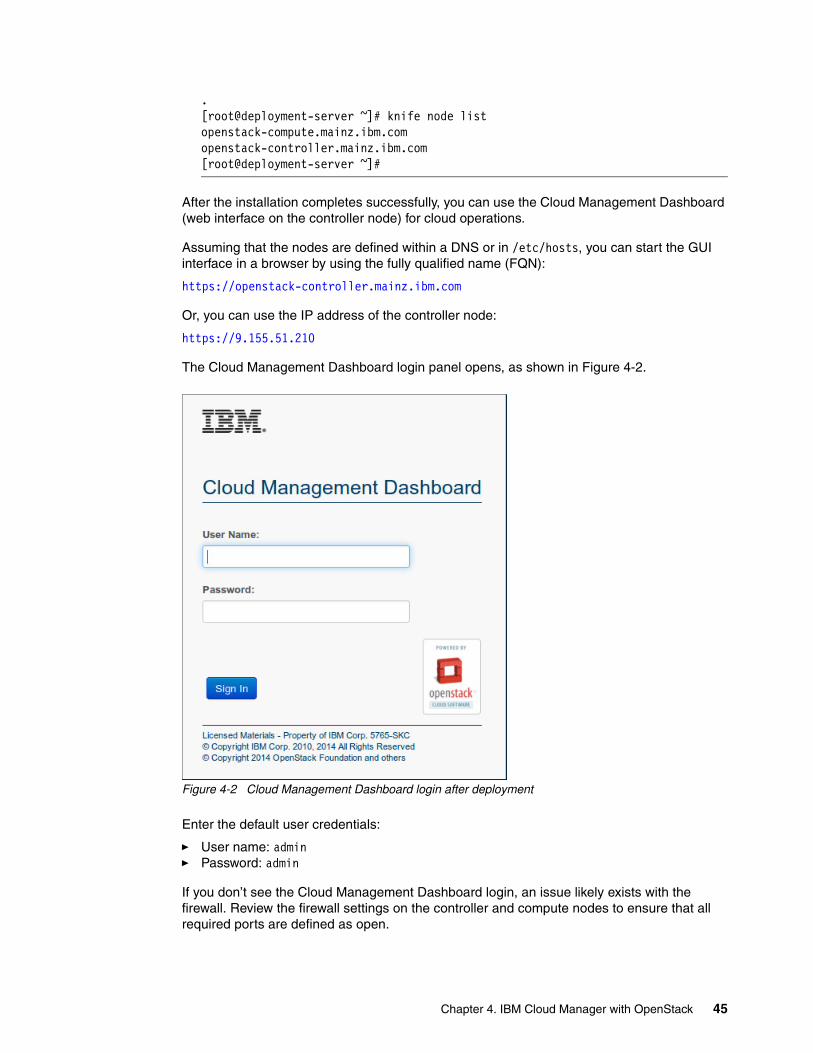
.[root@deployment-server ~]# knife node listopenstack-compute.mainz.ibm.comopenstack-controller.mainz.ibm.com[root@deployment-server ~]#
After the installation completes successfully, you can use the Cloud Management Dashboard (web interface on the controller node) for cloud operations.
Assuming that the nodes are defined within a DNS or in /etc/hosts, you can start the GUI interface in a browser by using the fully qualified name (FQN):
https://openstack-controller.mainz.ibm.com
Or, you can use the IP address of the controller node:
https://9.155.51.210
The Cloud Management Dashboard login panel opens, as shown in Figure 4-2.
Figure 4-2 Cloud Management Dashboard login after deployment
Enter the default user credentials:
� User name: admin� Password: admin
If you don’t see the Cloud Management Dashboard login, an issue likely exists with the firewall. Review the firewall settings on the controller and compute nodes to ensure that all required ports are defined as open.
Chapter 4. IBM Cloud Manager with OpenStack 45
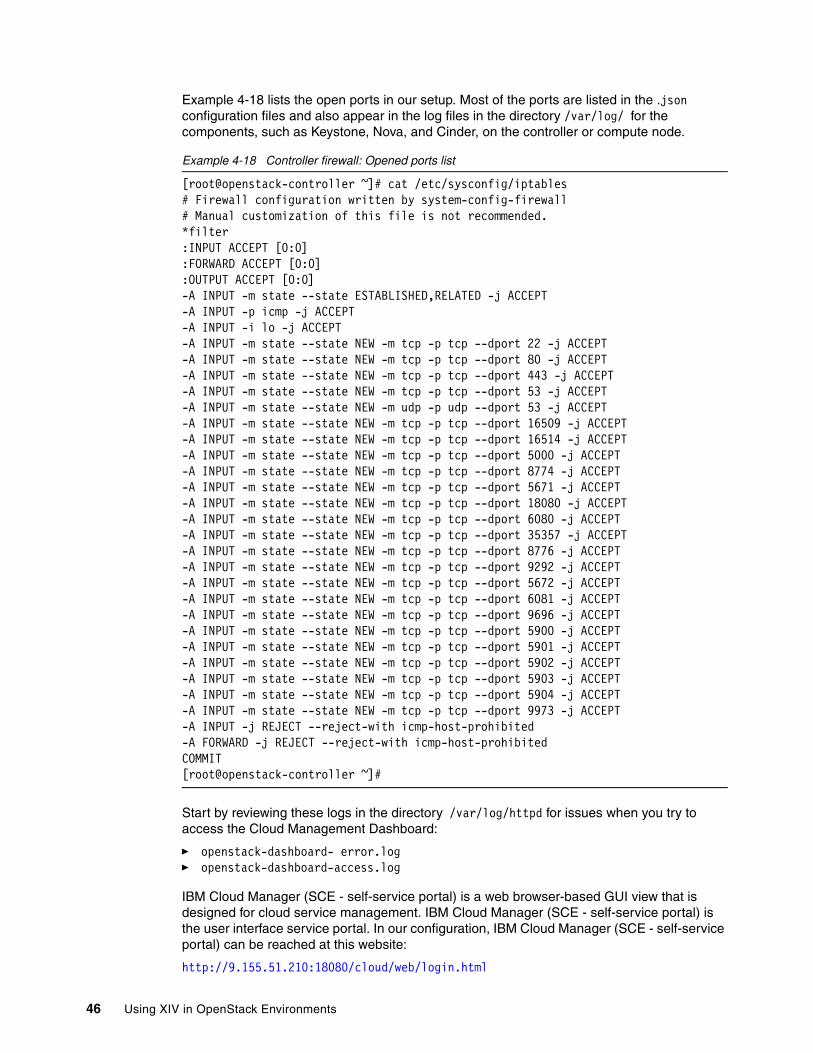
Example 4-18 lists the open ports in our setup. Most of the ports are listed in the .json configuration files and also appear in the log files in the directory /var/log/ for the components, such as Keystone, Nova, and Cinder, on the controller or compute node.
Example 4-18 Controller firewall: Opened ports list
[root@openstack-controller ~]# cat /etc/sysconfig/iptables# Firewall configuration written by system-config-firewall# Manual customization of this file is not recommended.*filter:INPUT ACCEPT [0:0]:FORWARD ACCEPT [0:0]:OUTPUT ACCEPT [0:0]-A INPUT -m state --state ESTABLISHED,RELATED -j ACCEPT-A INPUT -p icmp -j ACCEPT-A INPUT -i lo -j ACCEPT-A INPUT -m state --state NEW -m tcp -p tcp --dport 22 -j ACCEPT-A INPUT -m state --state NEW -m tcp -p tcp --dport 80 -j ACCEPT-A INPUT -m state --state NEW -m tcp -p tcp --dport 443 -j ACCEPT-A INPUT -m state --state NEW -m tcp -p tcp --dport 53 -j ACCEPT-A INPUT -m state --state NEW -m udp -p udp --dport 53 -j ACCEPT-A INPUT -m state --state NEW -m tcp -p tcp --dport 16509 -j ACCEPT-A INPUT -m state --state NEW -m tcp -p tcp --dport 16514 -j ACCEPT-A INPUT -m state --state NEW -m tcp -p tcp --dport 5000 -j ACCEPT-A INPUT -m state --state NEW -m tcp -p tcp --dport 8774 -j ACCEPT-A INPUT -m state --state NEW -m tcp -p tcp --dport 5671 -j ACCEPT-A INPUT -m state --state NEW -m tcp -p tcp --dport 18080 -j ACCEPT-A INPUT -m state --state NEW -m tcp -p tcp --dport 6080 -j ACCEPT-A INPUT -m state --state NEW -m tcp -p tcp --dport 35357 -j ACCEPT-A INPUT -m state --state NEW -m tcp -p tcp --dport 8776 -j ACCEPT-A INPUT -m state --state NEW -m tcp -p tcp --dport 9292 -j ACCEPT-A INPUT -m state --state NEW -m tcp -p tcp --dport 5672 -j ACCEPT-A INPUT -m state --state NEW -m tcp -p tcp --dport 6081 -j ACCEPT-A INPUT -m state --state NEW -m tcp -p tcp --dport 9696 -j ACCEPT-A INPUT -m state --state NEW -m tcp -p tcp --dport 5900 -j ACCEPT-A INPUT -m state --state NEW -m tcp -p tcp --dport 5901 -j ACCEPT-A INPUT -m state --state NEW -m tcp -p tcp --dport 5902 -j ACCEPT-A INPUT -m state --state NEW -m tcp -p tcp --dport 5903 -j ACCEPT-A INPUT -m state --state NEW -m tcp -p tcp --dport 5904 -j ACCEPT-A INPUT -m state --state NEW -m tcp -p tcp --dport 9973 -j ACCEPT-A INPUT -j REJECT --reject-with icmp-host-prohibited-A FORWARD -j REJECT --reject-with icmp-host-prohibitedCOMMIT[root@openstack-controller ~]#
Start by reviewing these logs in the directory /var/log/httpd for issues when you try to access the Cloud Management Dashboard:
� openstack-dashboard- error.log � openstack-dashboard-access.log
IBM Cloud Manager (SCE - self-service portal) is a web browser-based GUI view that is designed for cloud service management. IBM Cloud Manager (SCE - self-service portal) is the user interface service portal. In our configuration, IBM Cloud Manager (SCE - self-service portal) can be reached at this website:
http://9.155.51.210:18080/cloud/web/login.html
46 Using XIV in OpenStack Environments
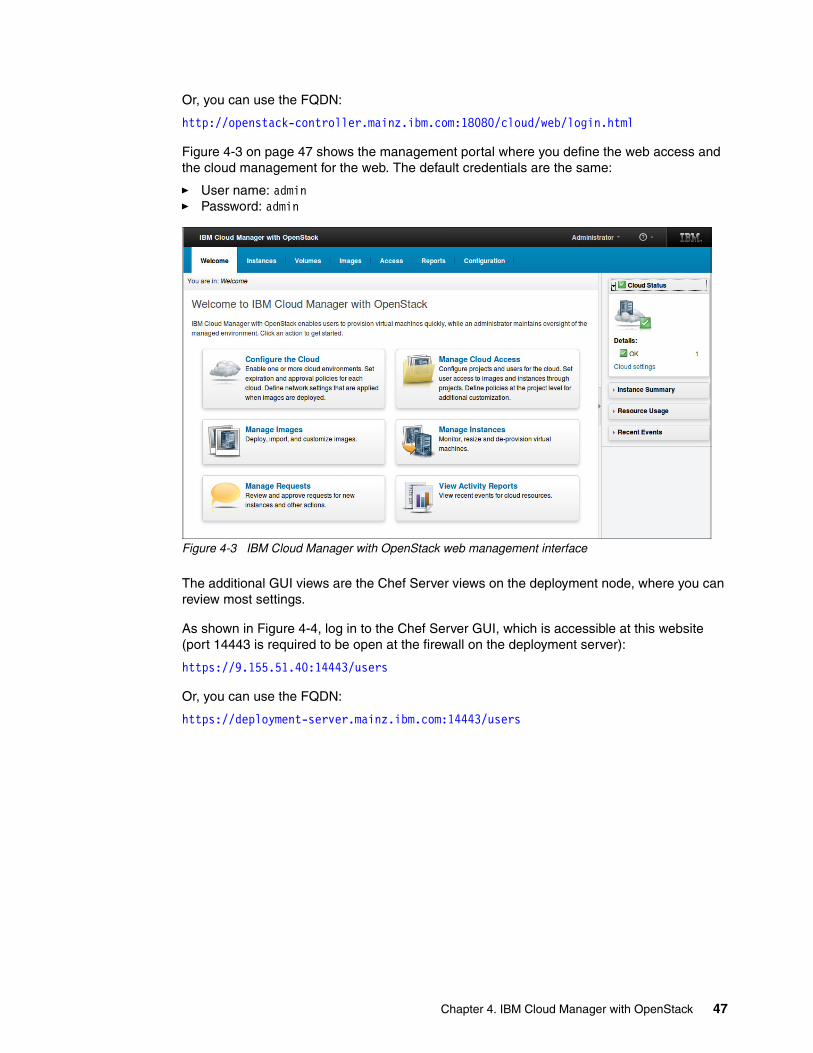
Or, you can use the FQDN:
http://openstack-controller.mainz.ibm.com:18080/cloud/web/login.html
Figure 4-3 on page 47 shows the management portal where you define the web access and the cloud management for the web. The default credentials are the same:
� User name: admin� Password: admin
Figure 4-3 IBM Cloud Manager with OpenStack web management interface
The additional GUI views are the Chef Server views on the deployment node, where you can review most settings.
As shown in Figure 4-4, log in to the Chef Server GUI, which is accessible at this website (port 14443 is required to be open at the firewall on the deployment server):
https://9.155.51.40:14443/users
Or, you can use the FQDN:
https://deployment-server.mainz.ibm.com:14443/users
Chapter 4. IBM Cloud Manager with OpenStack 47

Figure 4-4 Chef Server login panel for further review and changes by using the GUI
The default credentials show on the left. The user name is admin and the password is p@sswOrd1. After the successful login, the entry panel that is shown in Figure 4-5 displays. Ensure that you select the environment that you want to review.
Figure 4-5 Chef Server Users entry panel
As shown in Figure 4-6, you can use the Chef Server Node List to review and edit the configuration of the available nodes in the cloud setup.
48 Using XIV in OpenStack Environments
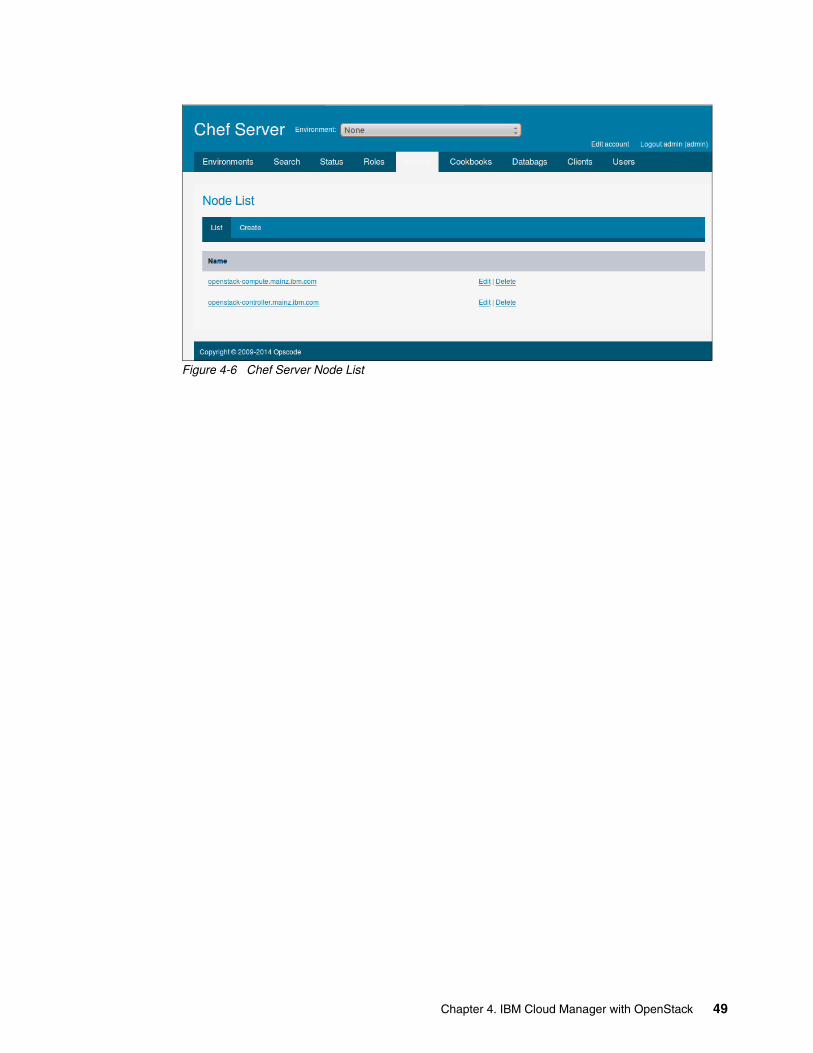
Figure 4-6 Chef Server Node List
Chapter 4. IBM Cloud Manager with OpenStack 49

Figure 4-7 show the editable node configuration.
Figure 4-7 Chef Server view of the controller node
50 Using XIV in OpenStack Environments
IBM Cloud Manager with OpenStack can be installed on multiple operating system platforms. For the scenario in this paper, we used a 64-bit RedHat Linux operating environment (RHEL 6.5 64-bit x86).
To install IBM Cloud Manager with OpenStack on the deployment server, follow the steps that are outlined in the Cloud Manager with OpenStack Administration Guide, which is available at this website:
https://www.ibm.com/developerworks/community/wikis/home?lang=en#!/wiki/W21ed5ba0f4a9_46f4_9626_24cbbb86fbb9/page/Documentation
After the Cloud Manager with OpenStack is installed with the latest fix pack, you can configure the cookbook for XIV storage. Follow these steps:
1. Run from the deployment server. The Chef Server manages the installations).
2. Configure multiple back ends in cinder.conf by following the instructions at this website:
https://www-01.ibm.com/support/knowledgecenter/SST55W_4.1.0/liaca/liaca_configuring_multiple_block_storage_backends.html
3. Upload the xiv_ds8k_cookbook and follow the instructions in this knowledge base to install the Cinder driver for xiv_ds8k:
https://www-01.ibm.com/support/knowledgecenter/SST55W_4.1.0/liaca/liaca_configuring_xiv_storage_cookbook.html
The openstack driver version file is hardcoded in the script, and it must be modified, if necessary. For our installation, we need to modify the installation script to look for the new driver version. The installation script is hardcoded for IBM_Storage_Driver_for_OpenStack_1.3.1-b211_rhel6.x.tar.gz. We need IBM_Storage_Driver_for_OpenStack_1.3.1.1-b261_rhel6.x.tar.gz to link to the correct file.
Example 4-19 Restart Cinder services to see storage in the Cloud Manager
[root@openstack-controller cinder]# service openstack-cinder-api --full-restartStopping openstack-cinder-api: [ OK ]Starting openstack-cinder-api: [ OK ][root@openstack-controller cinder]# service openstack-cinder-volume --full-restartStopping openstack-cinder-volume: [ OK ]Starting openstack-cinder-volume: [ OK ]
4.2 Using IBM Cloud Manager with OpenStack
After you complete the installation of IBM Cloud Manager, you must configure the cloud that IBM Cloud Manager will manage. IBM Cloud Manager can manage multiple clouds of different kinds, such as VMware and OpenStack, but also z/VM and PowerKVM are supported through OpenStack technologies.
This section describes how to configure IBM Cloud Manager and how to deploy virtual machine instances, and then how to attach external XIV storage to the created virtual machine instance with IBM Cloud Manager.
Tip: After you change the script, perform a full restart of the cinder-volume and cinder-api services on the compute node (see Example 4-19).
Chapter 4. IBM Cloud Manager with OpenStack 51
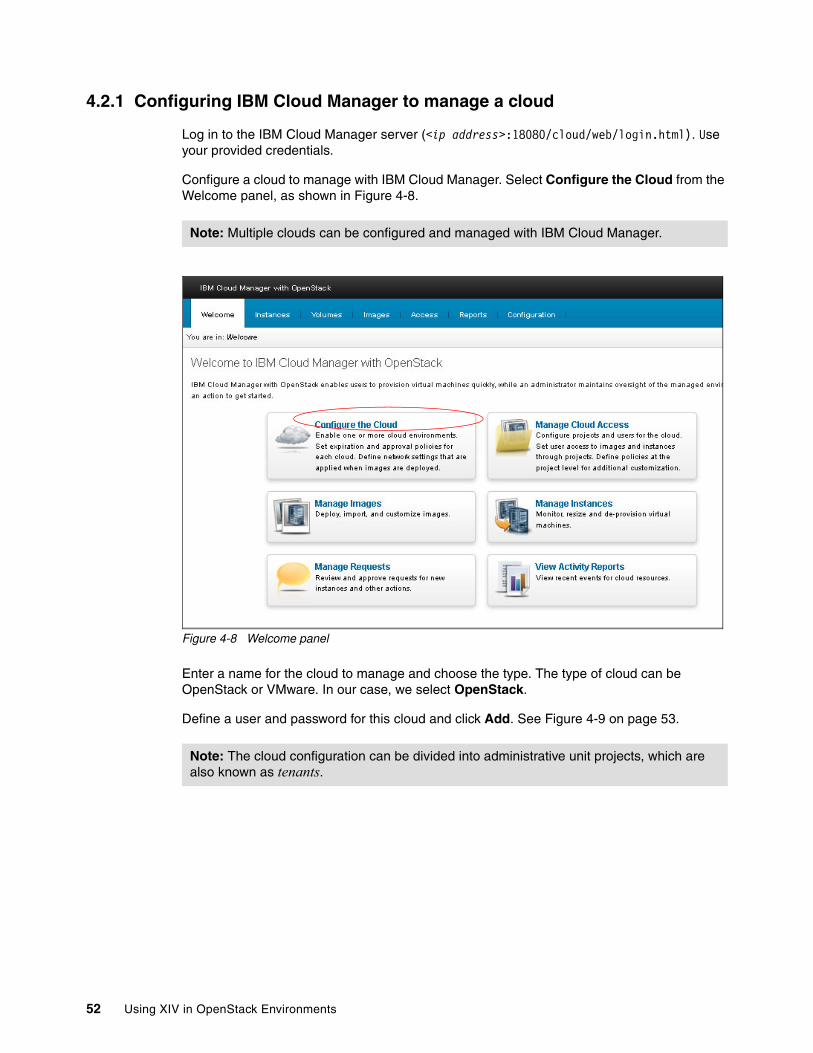
4.2.1 Configuring IBM Cloud Manager to manage a cloud
Log in to the IBM Cloud Manager server (<ip address>:18080/cloud/web/login.html). Use your provided credentials.
Configure a cloud to manage with IBM Cloud Manager. Select Configure the Cloud from the Welcome panel, as shown in Figure 4-8.
Figure 4-8 Welcome panel
Enter a name for the cloud to manage and choose the type. The type of cloud can be OpenStack or VMware. In our case, we select OpenStack.
Define a user and password for this cloud and click Add. See Figure 4-9 on page 53.
Note: Multiple clouds can be configured and managed with IBM Cloud Manager.
Note: The cloud configuration can be divided into administrative unit projects, which are also known as tenants.
52 Using XIV in OpenStack Environments
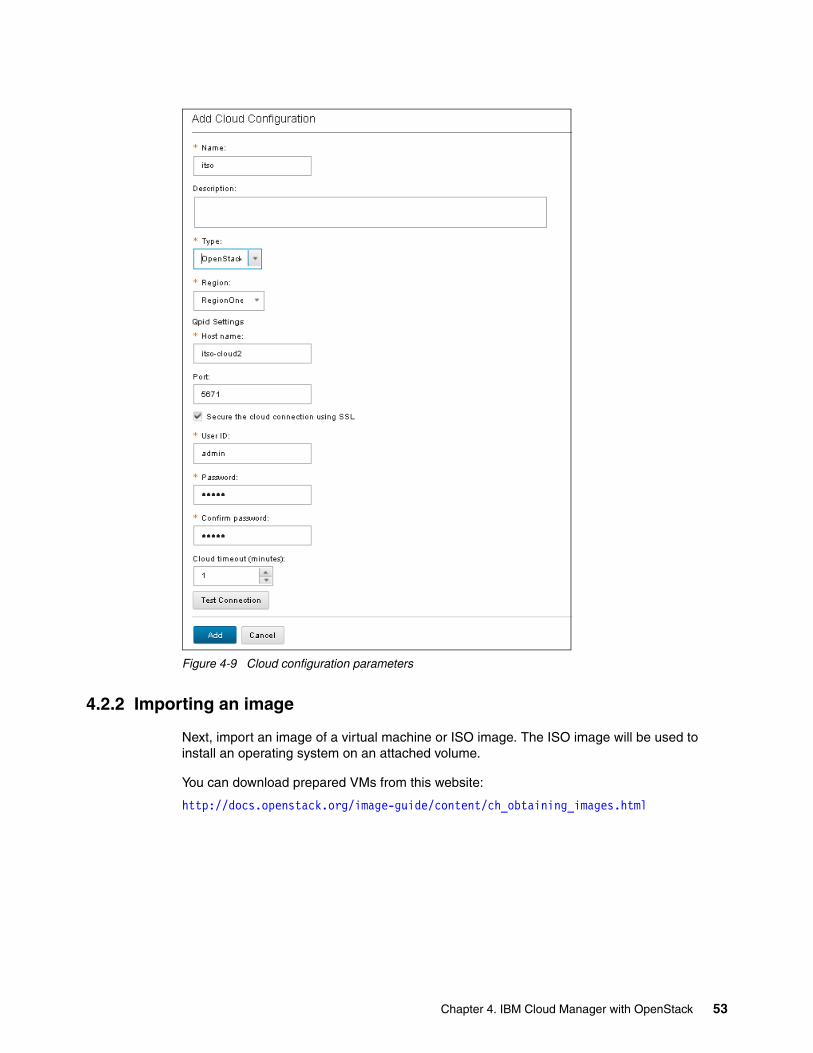
Figure 4-9 Cloud configuration parameters
4.2.2 Importing an image
Next, import an image of a virtual machine or ISO image. The ISO image will be used to install an operating system on an attached volume.
You can download prepared VMs from this website:
http://docs.openstack.org/image-guide/content/ch_obtaining_images.html
Chapter 4. IBM Cloud Manager with OpenStack 53
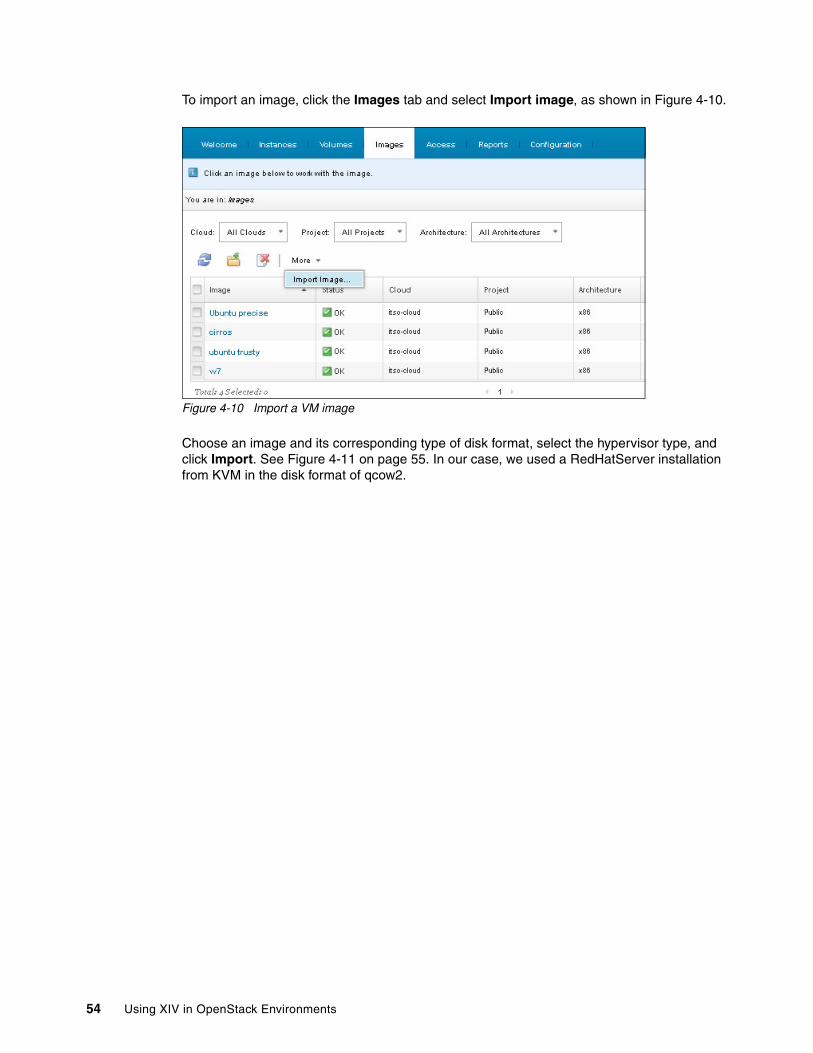
To import an image, click the Images tab and select Import image, as shown in Figure 4-10.
Figure 4-10 Import a VM image
Choose an image and its corresponding type of disk format, select the hypervisor type, and click Import. See Figure 4-11 on page 55. In our case, we used a RedHatServer installation from KVM in the disk format of qcow2.
54 Using XIV in OpenStack Environments
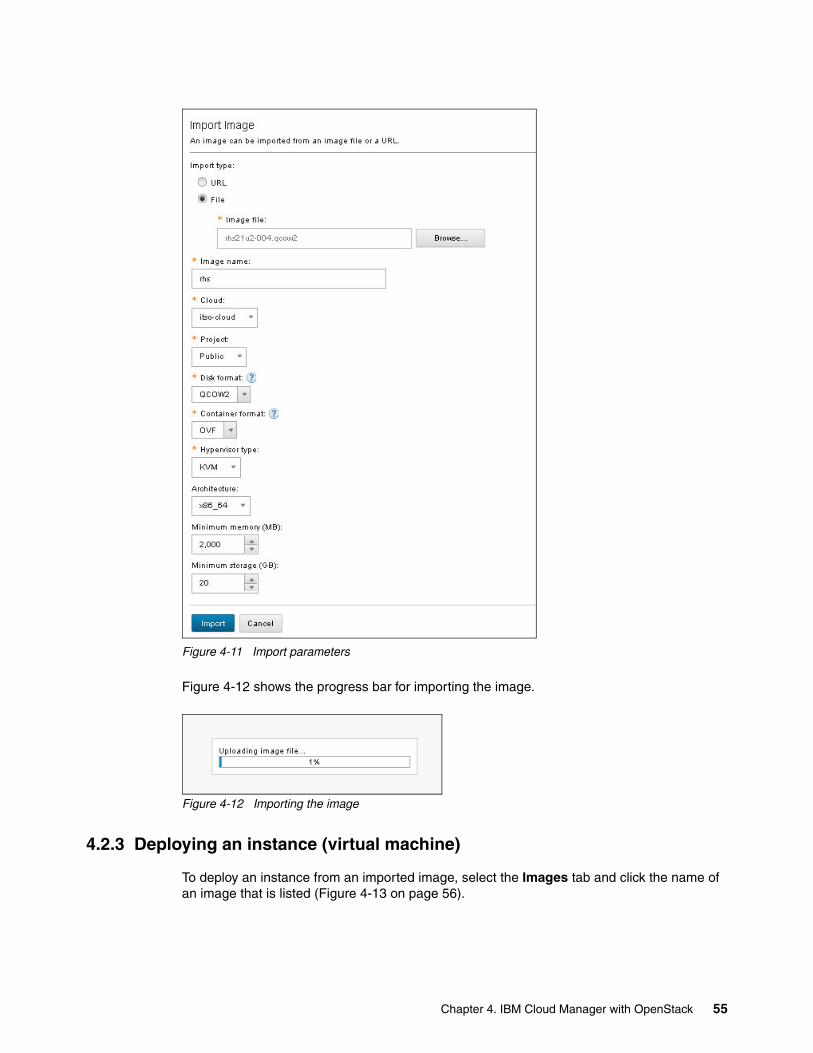
Figure 4-11 Import parameters
Figure 4-12 shows the progress bar for importing the image.
Figure 4-12 Importing the image
4.2.3 Deploying an instance (virtual machine)
To deploy an instance from an imported image, select the Images tab and click the name of an image that is listed (Figure 4-13 on page 56).
Chapter 4. IBM Cloud Manager with OpenStack 55

Figure 4-13 Imported images
The Deploy image window shows the characteristics of the image to be used. Click Deploy, as shown in Figure 4-14 on page 57, to see the second Deploy window.
56 Using XIV in OpenStack Environments
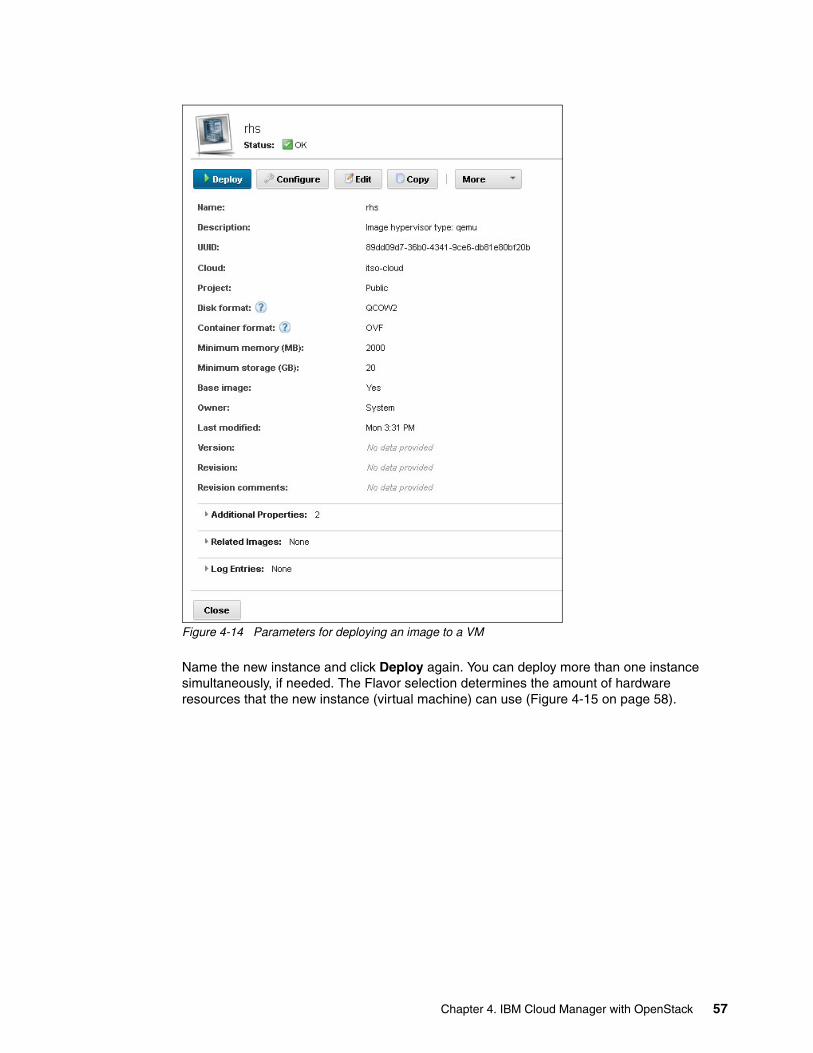
Figure 4-14 Parameters for deploying an image to a VM
Name the new instance and click Deploy again. You can deploy more than one instance simultaneously, if needed. The Flavor selection determines the amount of hardware resources that the new instance (virtual machine) can use (Figure 4-15 on page 58).
Chapter 4. IBM Cloud Manager with OpenStack 57
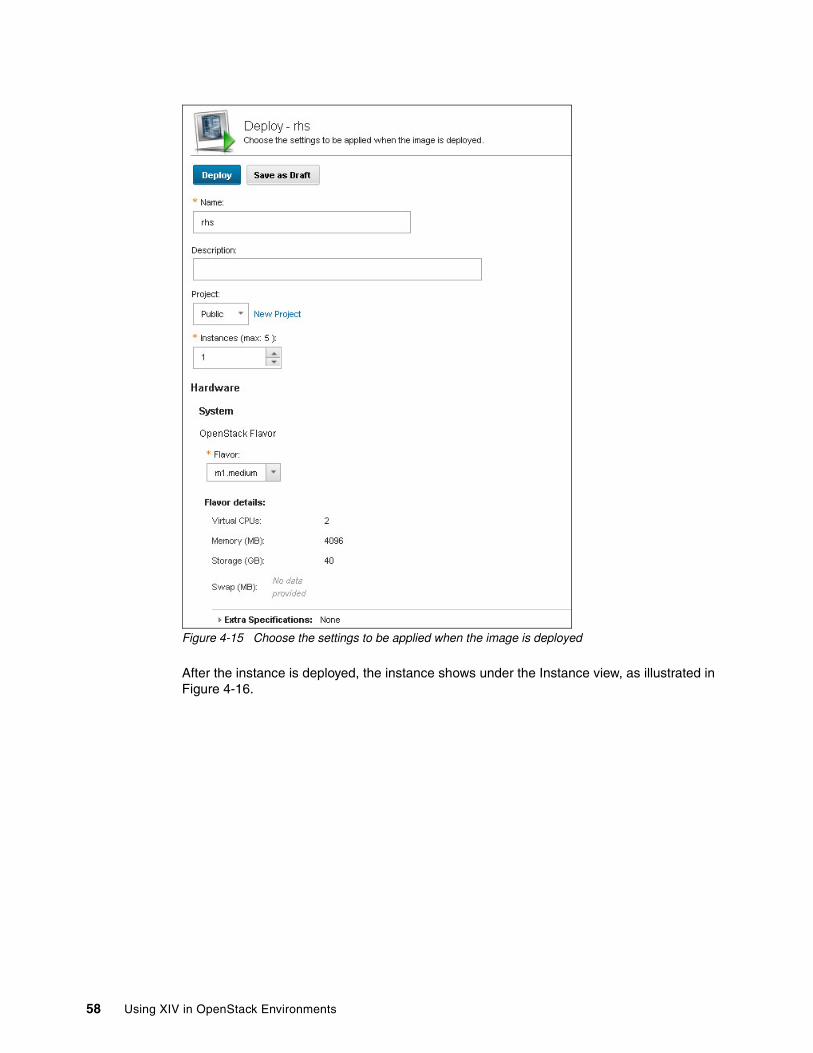
Figure 4-15 Choose the settings to be applied when the image is deployed
After the instance is deployed, the instance shows under the Instance view, as illustrated in Figure 4-16.
58 Using XIV in OpenStack Environments

Figure 4-16 Instance view
4.2.4 Creating and attaching a volume to an instance
To create a volume from IBM Cloud Manager, you need to enable a supported storage system for Cinder on the Cinder node and define it in OpenStack Manager (see 3.1.1, “Preparing the XIV for OpenStack” on page 25).
To create a volume, click Volumes. Click the Create volume icon, as highlighted in Figure 4-17.
Figure 4-17 Volumes view
The New Volume panel shows. Enter a logical name for the volume. Select the cloud configuration. If you use projects (tenants), select the project (Figure 4-18).
Chapter 4. IBM Cloud Manager with OpenStack 59
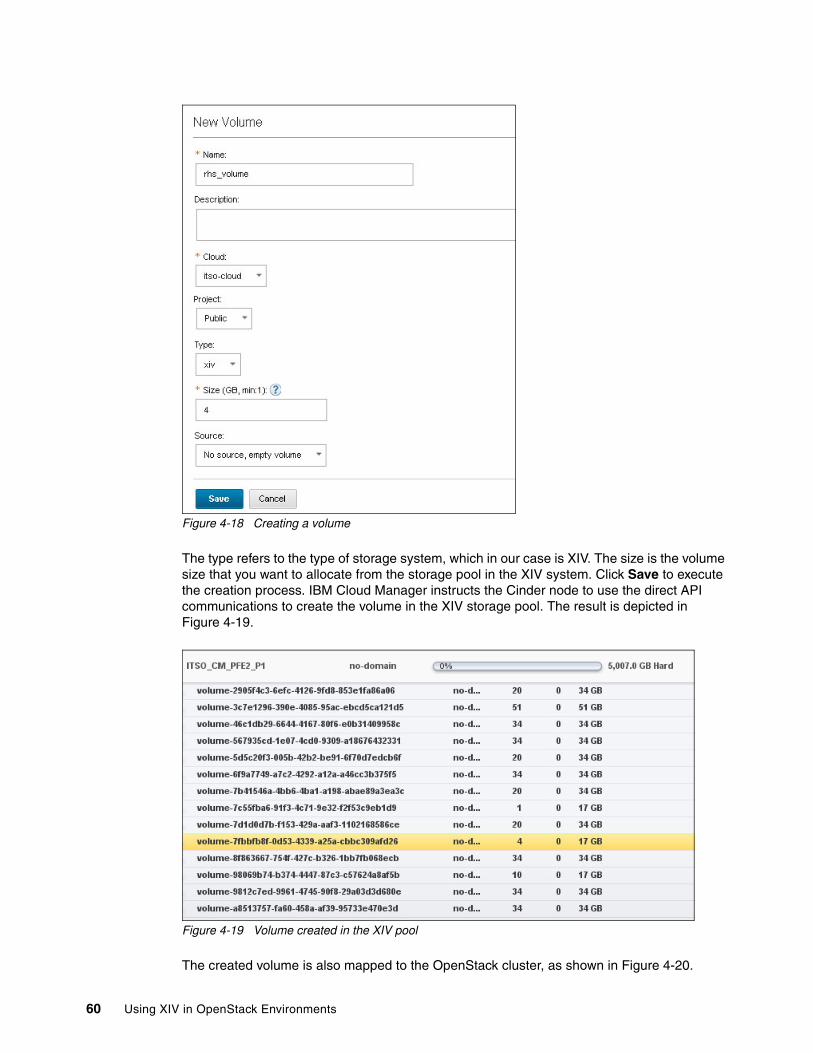
Figure 4-18 Creating a volume
The type refers to the type of storage system, which in our case is XIV. The size is the volume size that you want to allocate from the storage pool in the XIV system. Click Save to execute the creation process. IBM Cloud Manager instructs the Cinder node to use the direct API communications to create the volume in the XIV storage pool. The result is depicted in Figure 4-19.
Figure 4-19 Volume created in the XIV pool
The created volume is also mapped to the OpenStack cluster, as shown in Figure 4-20.
60 Using XIV in OpenStack Environments

Figure 4-20 Mapped volume in the XIV GUI
The new volume shows in the list of volumes. Select Attach to attach it to an instance, as illustrated in Figure 4-21 on page 61.
Figure 4-21 Attaching the volume to an instance
Select the instance to which the volume must be attached. Type the mount point for the volume, which in our case is /dev/vdc (Figure 4-22).
Chapter 4. IBM Cloud Manager with OpenStack 61
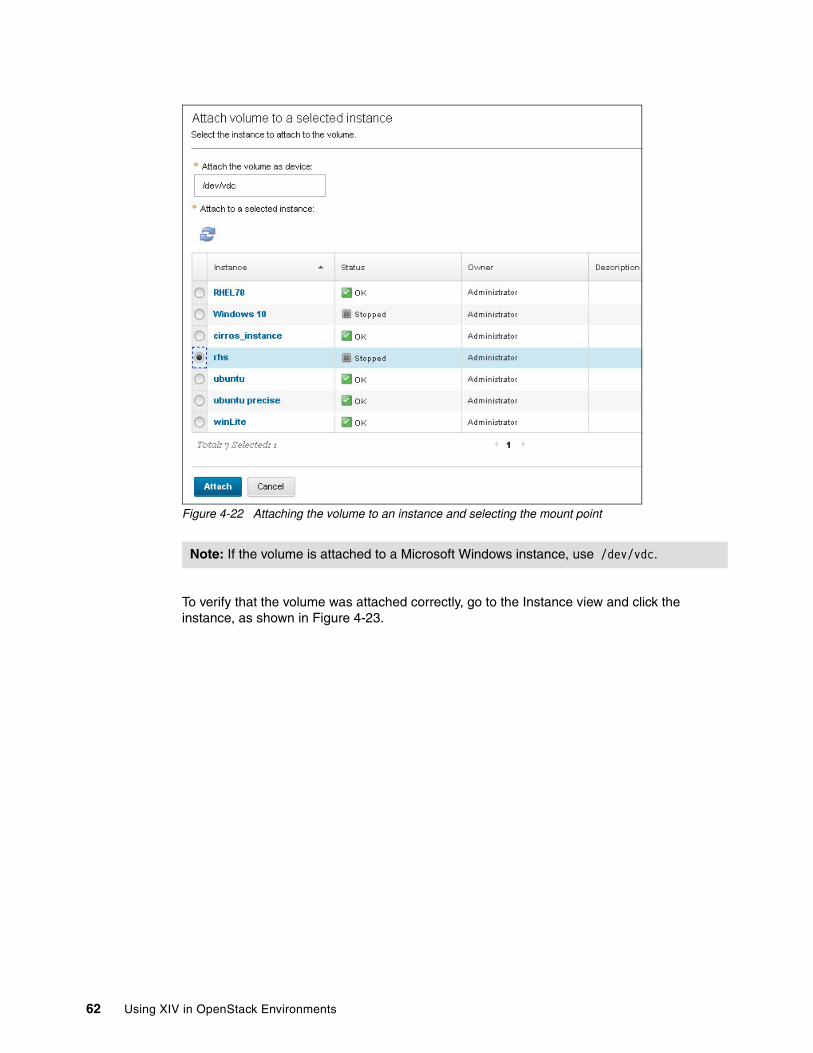
Figure 4-22 Attaching the volume to an instance and selecting the mount point
To verify that the volume was attached correctly, go to the Instance view and click the instance, as shown in Figure 4-23.
Note: If the volume is attached to a Microsoft Windows instance, use /dev/vdc.
62 Using XIV in OpenStack Environments
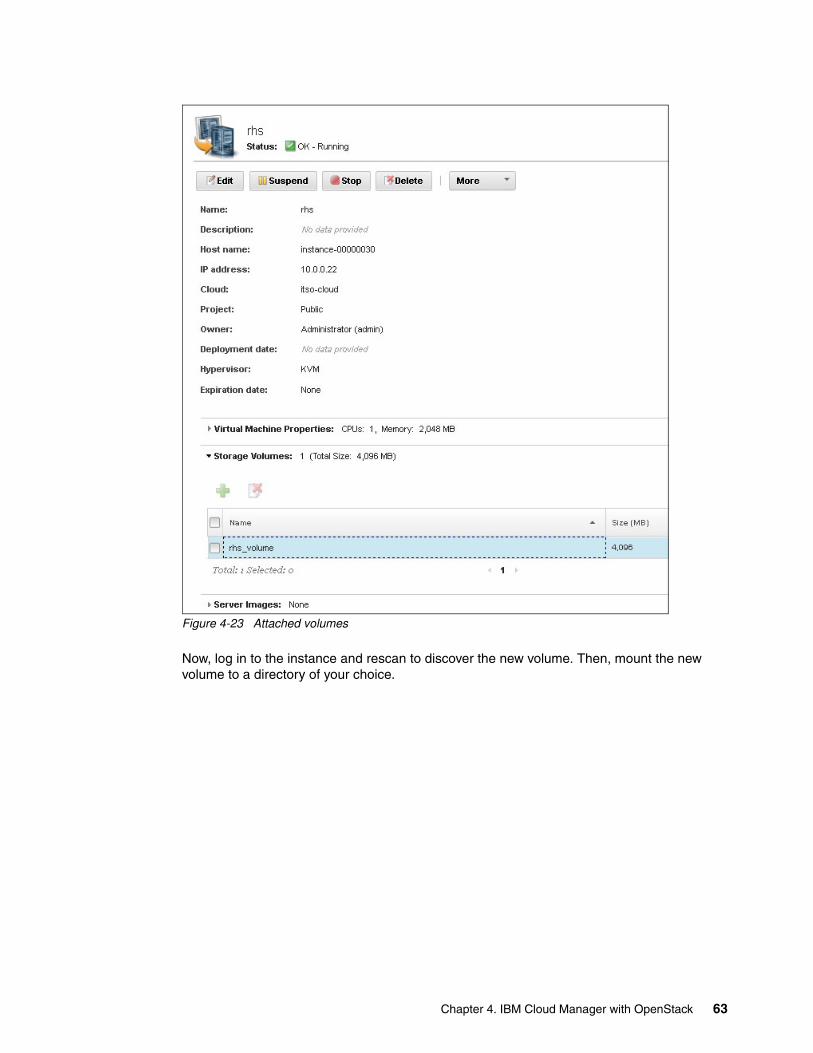
Figure 4-23 Attached volumes
Now, log in to the instance and rescan to discover the new volume. Then, mount the new volume to a directory of your choice.
Chapter 4. IBM Cloud Manager with OpenStack 63

64 Using XIV in OpenStack Environments
Related publications
The publications listed in this section are considered particularly suitable for a more detailed discussion of the topics covered in this paper.
IBM Redbooks
The following IBM Redbooks publications provide additional information about the topic in this document. Note that some publications referenced in this list might be available in softcopy only.
� IBM XIV Storage System Architecture and Implementation, SG24-7659� IBM XIV Storage System Business Continuity Functions, SG24-7759� IBM XIV Storage System Multi-site Mirroring, REDP-5129 � XIV Storage System: Host Attachment and Interoperability, SG24-7904� XIV Storage System SSD Caching Implementation, REDP-4842� XIV Storage System in VMware Environments, REDP-4965� IBM Hyper-Scale for the XIV Storage System, REDP-5053� RESTful API Support in XIV, REDP-5064
You can search for, view, download, or order these documents and other Redbooks, Redpapers, Web Docs, draft and additional materials, at the following website:
ibm.com/redbooks
Other publications
These publications are also relevant as further information sources:
� IBM XIV Remote Support Proxy Installation and User’s Guide, GA32-0795� IBM XIV Storage System Application Programming Interface, GC27-3916� IBM XIV Storage System Planning Guide, GC27-3913� IBM XIV Storage System: Product Overview, GC27-3912� IBM XIV Storage System User Manual, GC27-3914� IBM XIV Storage System Management Tools Version 4.0 User Guide, SC27-4230-00� IBM XIV Storage System XCLI Utility User Manual, GC27-3915
Online resources
These websites are also relevant as further information sources:
� IBM XIV Storage System Information Center:
http://www.publib.boulder.ibm.com/infocenter/ibmxiv/r2/index.jsp
� IBM XIV Storage System website:
http://www.ibm.com/systems/storage/disk/xiv/index.html
� IBM System Storage Interoperability Center (SSIC):
http://www.ibm.com/systems/support/storage/config/ssic/index.jsp
© Copyright IBM Corp. 2015. All rights reserved. 65
� Storage Networking Industry Association (SNIA) website:
http://www.snia.org/
� IBM Director software download matrix page:
http://www.ibm.com/systems/management/director/downloads.html
� IBM Systems Director documentation:
http://www.ibm.com/systems/management/director/
Help from IBM
IBM Support and downloads
ibm.com/support
IBM Global Services
ibm.com/services
66 Using XIV in OpenStack Environments

®
REDP-4971-01
INTERNATIONAL TECHNICALSUPPORTORGANIZATION
BUILDING TECHNICAL INFORMATION BASED ON PRACTICAL EXPERIENCE
IBM Redbooks are developed by the IBM International Technical Support Organization. Experts from IBM, Customers and Partners from around the world create timely technical information based on realistic scenarios. Specific recommendations are provided to help you implement IT solutions more effectively in your environment.
For more information:ibm.com/redbooks
Redpaper™
Using XIV in OpenStack Environments
Introducing OpenStack with XIV in a brief overview
Deploying OpenStack with IBM Cloud Manager
Integrating XIV with OpenStack
This IBM Redpaper publication provides a brief overview of OpenStack and IBM Cloud Manager with OpenStack. It focuses on the use of OpenStack with the IBM XIV Storage System Gen3. The illustration scenario in the paper uses the OpenStack Icehouse release, which is installed on RedHat Linux servers, and the IBM Storage Driver for OpenStack.
This paper is intended for clients and cloud administrators who look forward to integrating IBM XIV Storage Systems in OpenStack and using IBM Cloud Manager with OpenStack environments. The paper provides guidance in setting up an environment by using XIV as the back-end storage in an OpenStack cloud environment. This paper is not an official support document.
Back cover