using - united states military academy. ... 5 select the unsaved notebook file from the taskbar to...
TRANSCRIPT

!ÄÖÁÎÃÅÄ #ÌÁÓÓÒÏÏÍ 4ÅÃÈÎÏÌÏÇÙ Using ÔÈÅ 3ÍÁÒÔ "ÏÁÒÄ
An excerpt from Smart Technology's getting started manual explaining the basics of the SmartBoard and how to use it.

Quick Reference
Hardware Basics for Front Projection SMART Board Interactive WhiteboardsThe SMART Board™ interactive whiteboard is touch sensitive and operates as part of a system that includes a computer and a projector.
It may help you to think of your interactive whiteboard the same way you think of your mouse or keyboard – it is an input device that enables you to control applications on your computer. Setup instructions depend on the model of SMART Board interactive whiteboard. Specific instructions on how to setup your SMART Board can be found at www.smarttech.com/support/product/index.asp.
The SMART Pen TrayThe SMART Pen Tray consists of four color-coded slots for pens and one slot for the eraser. Each slot has an optical sensor to identify when the pens and eraser have been picked up. You can write with the pen or with your finger, as long as the pen slot is empty. The technology in the pen tray is smart enough to know which tool was removed from its slot most recently. If you remove the eraser from its slot while you are still holding a pen, the pen tray will assume you want to erase. The lights above the tool slots indicate which tool was removed last.
TIP: If someone accidentally takes a pen or the eraser home, simply cover the optical sensor with a pen lid or a sticky note to continue using your interactive whiteboard until the tool is returned.
• The computer sends an image of an application to the projector.
• The projector casts the image onto the interactive whiteboard.
• The interactive whiteboard acts as both the monitor and input device, allowing you to control any application by touching the screen.

The Pen-Tray ButtonsThe pen tray has at least two pen-tray buttons. One button is used to launch the On-Screen Keyboard. The second button is used to make your next touch on the interactive whiteboard a right-click. Some interactive whiteboards have a third button; this button is used to quickly access the Help Center.
The PensThe SMART Board interactive whiteboard comes with four Whisper-tip™ pens (black, red, green and blue) and one eraser. Although you do not need to use the pens to write on you interactive whiteboard, the pens do make writing more intuitive. Pick up a pen from the pen tray and write on the SMART Board. To erase your digital ink, remove the eraser from the pen tray and move it in a smooth motion over your notes. Your notes will disappear.
TIP: To clear a large area of digital ink, draw a circle around the area you want to erase with the eraser and tap once inside that area. All handwritten notes inside that circle will disappear.
The Ready LightThe Ready Light indicates the status of your interactive whiteboard. Depending on the model of the SMART Board interactive whiteboard you are using, the Ready Light is located either on the right side of the pen tray or the lower-right of the frame bezel.
If the Ready Light is a solid green, your system is functioning properly. If the Ready Light is flashing or is a color other than green for an extended period of time, you should check the User’s Guide that came with your SMART Board interactive whiteboard for guidance on troubleshooting.
NOTE: After you turn on your computer, the Ready Light will be red while the SMART Board interactive whiteboard and the computer are establishing communication.
Pen tray buttons
Pen tray buttons
Ready Light on lower-right of frame bezel
Ready Light on right side of pen tray
© 2008 SMART Technologies ULC. All rights reserved. SMART Board, Whisper-tip and the SMART logo are trademarks of SMART Technologies Inc. All other third-party productand company names may be tradmarks of their respective owners. Printed in Canada 03/2008.

Quick Reference
SMART Board Interactive Whiteboard BasicsThis Quick Reference Guide provides an overview of the information you need to begin using a SMART Board™ interactive whiteboard. Before you begin, make sure the appropriate SMART Board software has been loaded on your computer. For more information, refer to your SMART Board User’s Guide.
Starting the SMART Board Interactive Whiteboard 1 Ensure the interactive whiteboard and projector are connected to the computer.
2 Turn on the projector, then the computer. The interactive whiteboard draws power from the computer and will be activated automatically. The Ready Light, indicating the status of your interactive whiteboard, will be red while the SMART Board and the computer are establishing communication.
NOTE: Depending on the model of the SMART Board interactive whiteboard you are using, the Ready Light is either located on the right side of the SMART Pen Tray or the lower-right of the frame bezel.
3 Log on, if required, using the computer keyboard. When the Ready Light on the pen tray turns green, the computer and the interactive whiteboard have established communication. The SMART Board is now touch sensitive, and you can open any application available on the connected computer.
Orienting the SMART Board Interactive WhiteboardYou should orient your interactive whiteboard when setting it up, or if either the projector or interactive whiteboard has been moved since you last used it.
1 Press and hold the Keyboard and the Right Mouse button simultaneously until the Orientation screen appears.
2 Begin the orientation process at the upper left corner of the Orientation screen. Press your finger or pen firmly on the center of each cross in the order indicated by the white, diamond-shaped graphic.
Ready Light on lower-right of frame bezel
Ready Light on right side of pen tray
Pen tray buttons
Pen tray buttons
Orientation screen

Your Finger Is Your MouseA press on a SMART Board interactive whiteboard is the same as a left-click with a mouse. To open an application such as an Internet browser, double-press the application icon with your finger.
Writing and Erasing NotesTo write over your desktop image or application, pick up a pen from the pen tray and write on the interactive whiteboard. To write in a different color, pick up a different-colored pen. The color recognition comes from the optical sensors in the pen-tray slots and not from the pens themselves.
Pick up the eraser from the pen tray and move it in a smooth motion over your notes to erase them.
NOTE: The interactive whiteboard only recognizes the last tool removed from the pen tray. For example, if you already have a pen in your hand when you pick up the eraser, the interactive whiteboard will assume you want to erase, regardless of whether you touch the board with a pen or an eraser. To avoid confusion, return each tool to its proper slot when you have finished using it.
Saving Your NotesYou can easily save the notes you have written on your interactive whiteboard for future reference.
1 Pick up a pen from the pen tray. The Digital Ink Layer border will appear on your screen. To save what you write on the board when this layer is in place, press the Capture writing button in the top right hand corner of the border. An image of the screen including your writing will be saved in a new Notebook file..
NOTE: If the Digital Ink Layer border does not appear when you pick up a pen, you may be working in an Ink Aware application (e.g., Microsoft Word). If the application is Ink Aware, buttons will be available in the application’s own toolbar for capturing writing.
2 If you wish to capture a specific area of your screen, press the SMART Board™ icon located in the Windows Notification Area at the bottom right of your screen, and choose Other SMART Tools > Screen Capture Toolbar... from the menu to launch the Screen Capture toolbar
3 To save a selected area of your notes, press the Area Capture button on the Screen Capture toolbar. Press the interactive whiteboard and, without releasing pressure, drag the selection box using your finger to outline the area you want to capture.
NOTE: The Screen Capture button in Ink Aware applications will capture an image of your entire screen.
4 Notebook™ software will open automatically, and your capture will be saved to a new Notebook page.
5 Select the unsaved Notebook file from the taskbar to view your captured image in Notebook software. Select File > Save to save your notes for future reference.
Close Digital Ink Layer
Capture writing
Clear writing
Digital Ink Layer border
Area Capture button
© 2006 SMART Technologies Inc. All rights reserved. SMART Board, Notebook and the SMART logo are trademarks of SMART Technologies Inc. All other third-party productand company names may be tradmarks of their respective owners. Printed in Canada 03/2006.

Quick Reference
Notebook SoftwareNotebook software acts as an electronic notebook that can be used to edit, save and distribute information written on a SMART Board interactive whiteboard. Open Notebook software by pressing Start > Programs > SMART Board Software > SMART Notebook.
Additional training material on how to use Notebook software is available at www.smarttech.com/trainingcenter.

Hands-On Practice: Getting Started Basic FunctionalityYour school or company has just moved one of your SMART Board interactive whiteboards into a new room because you were unable to access the Internet from the old location. You will be the first person to use the interactive whiteboard in the new environment and will be showing everyone how to use the interactive whiteboard and the Internet together.
You have learned through experience that whenever a piece of technology gets moved, it’s a good idea to test it before you deliver a lesson or presentation. The computer, SMART Board interactive whiteboard and projector appear to be working properly when you turn everything on. However, when you double-press the Internet browser icon on your desktop, your cursor appears a few inches away from your finger press.
Orienting your SMART Board interactive whiteboardYou remember that when the projector or interactive whiteboard moves location, you should orient the SMART Board. This will tell the computer where the image of the desktop is being displayed on the surface of the interactive whiteboard.
1 To orient the interactive whiteboard, press and hold the Keyboard button and the Right Mouse
button simultaneously until the Orientation screen appears
2 Begin the orientation process at the upper left corner of the Orientation screen. Press your finger or pen firmly on the center of each cross in the order indicated by the white, diamond-shaped graphic.
NOTE: The point is registered when you remove your finger, not when you first touch the Orientation screen.
Pen-tray buttons
Pen-tray buttons
Orientation screen
SMART Technologies ULC eLearning
1

functionalityIt’s a good idea to test the basic functionality of your interactive whiteboard to ensure all the applications you will be using to deliver your lesson or presentation are working properly.
1 Using your finger, double-press on the Internet browser icon (e.g., Internet Explorer) to launch the Internet
2 Press the On-Screen Keyboard button on the SMART Pen Tray
3 Press once inside your Internet browser’s address bar to select the website address
4 Using the On-Screen Keyboard, type www.google.com
NOTE: The On-Screen Keyboard is a single point of contact; touch-typing or keystroke combinations are not possible
5 Press the Go button beside your Internet browser’s address bar
SMART Technologies ULC eLearning
2

6 You know you will be writing notes directly over the Google™ Web page during your lesson or presentation to highlight key points
Pick up a pen from the pen tray. You will notice the transparency layer appears, shown by a visible border around the desktop as a visual cue. The border indicates you can write on the desktop, and it remains in place until all pens and the eraser have been returned to the pen tray and you touch the SMART board
7 Using a pen, circle the browser’s Back button
8 Return the pen to the pen tray and touch the interactive whiteboard once to clear the circle around the browser’s Back button. Press the Click here to restore writing icon at the bottom right of the screen to bring the circle back.
You have now confirmed that you can clear your notes by touching the interactive whiteboard, then restore your notes by pressing the Clear here to restore writing icon.
To ensure you will be able to capture and save important information for a future lesson or presentation, launch the Screen Capture toolbar by pressing the SMART Board™ icon located in the Windows Notification Area at the bottom right of your screen, and choosing Other SMART tools... > Screen Capture toolbar... from the menu.
9 Press the Area Capture button.
Transparency layer border appears
Area Capture button
SMART Technologies ULC eLearning
3

10 Press the interactive whiteboard and, without releasing pressure, drag the selection box using your finger to outline the circle around your browser’s Back button. Release your press to capture the image to Notebook software.
NOTE: Notebook software will open automatically, and your notes and background will be saved to a new Notebook page.
11 Touch the screen once to clear the circle from your browser’s Back button
12 Select the unsaved Notebook file from the taskbar to view your captured image in Notebook software. Select File > Save to save your notes for future reference.
SMART Technologies ULC eLearning
4

Hands-On Practice
Using Microsoft PowerPoint Software on a SMART
Board Interactive WhiteboardWhen you use Microsoft® PowerPoint® software in conjunction with a SMART Board™ interactive whiteboard, presentations become more collaborative and relevant to your audience. As a presenter, you can record audience feedback, make notes, add diagrams and save your work directly into your PowerPoint file or into Notebook™ software.Before You StartBefore you begin your presentation, ensure your computer is turned on and the SMART Board interactive whiteboard is connected and oriented. The SMART Board icon should be visible in the Windows Notification Area at the bottom right of your screen, indicating that your SMART Board software is running.
If the SMART Board icon is not visible, select Start > Programs > SMART Board Software > SMART Board Tools. The SMART Board icon will appear in the Windows Notification Area.
This Hands-On Practice assumes you have a basic understanding of the Microsoft Windows® operating system. You may find it useful to think of how you normally work with a computer as you go through the lesson. When working at your computer, for example, you use left-, right- or double-clicks, depending on the function you want to perform. Use the SMART Board interactive whiteboard in the same way. If you get confused, simply think about what you would do at your computer, and then replicate these actions on the interactive whiteboard.
For more information on how to get started with your interactive whiteboard, refer to the Quick Reference Guides available at www.smarttech.com/trainingcenter/windows/trainingmaterials.asp.
Slide Show ToolbarThe Slide Show toolbar automatically appears when you are viewing your PowerPoint presentation as a slide show with your interactive whiteboard.
Press to go to the previous slide in your presentation.
Press to open the Command Menu.
Press to go to the next slide in your presentation.
Windows Notification Area
Slide Show Toolbar

Hands-On Practice
Preparation
Assume your supervisor has requested a brief presentation on the topic of productivity in the office. The preliminary work on your presentation requires you to incorporate feedback and suggestions from your colleagues. The final presentation will be presented to your supervisor.A sample PowerPoint file is available at www.smarttech.com/media/trainingcenter/samplepresentation.ppt for this lesson. If this file opens in your Web browser, save it to your desktop and then reopen it.
Alternatively, open an existing PowerPoint presentation saved on your computer. The steps in this Hands-On Practice will still be applicable to you when using your own PowerPoint presentation with an interactive whiteboard.
Presenting on an Interactive Whiteboard 1 Select View > Slide Show to begin your presentation. The Slide Show toolbar automatically appears
so you can navigate between slides.
2 Press the Next Slide button on the Slide Show toolbar to move forward one slide; then press the Previous Slide button to move back one slide.
TIP: You can go to the next slide of a PowerPoint presentation by pressing twice on the interactive whiteboard, making the second press to the right of the first. To go to the previous slide, make the second press to the left of the first.
3 Advance the slide show by pressing twice on the interactive whiteboard, remembering to make the second press to the right of the first.
Press twice; a second press to the right will move to the next slide.
Press twice; a second press to the left will move to the previous slide.

Hands-On Practice
4 For emphasis, you want to draw your audience’s attention to the items listed on your PowerPoint slide.Pick up a pen from the SMART Pen Tray and place a check mark beside each point as you discuss it with your colleagues.
5 After the discussion, you decide to remove the check marks. Return the pen to the pen tray and touch the interactive whiteboard once with your finger to clear your notes.
6 Use the Slide Show toolbar, or press twice on the interactive whiteboard to advance to the next slide.
7 Your colleagues take interest in the statistics you referenced on your PowerPoint slide and ask you to send them the source material. Record their request as a note to remind yourself to get back to them later. Pick up a pen from the pen tray and write send source material.
8 Return the pen to the pen tray.

Hands-On Practice
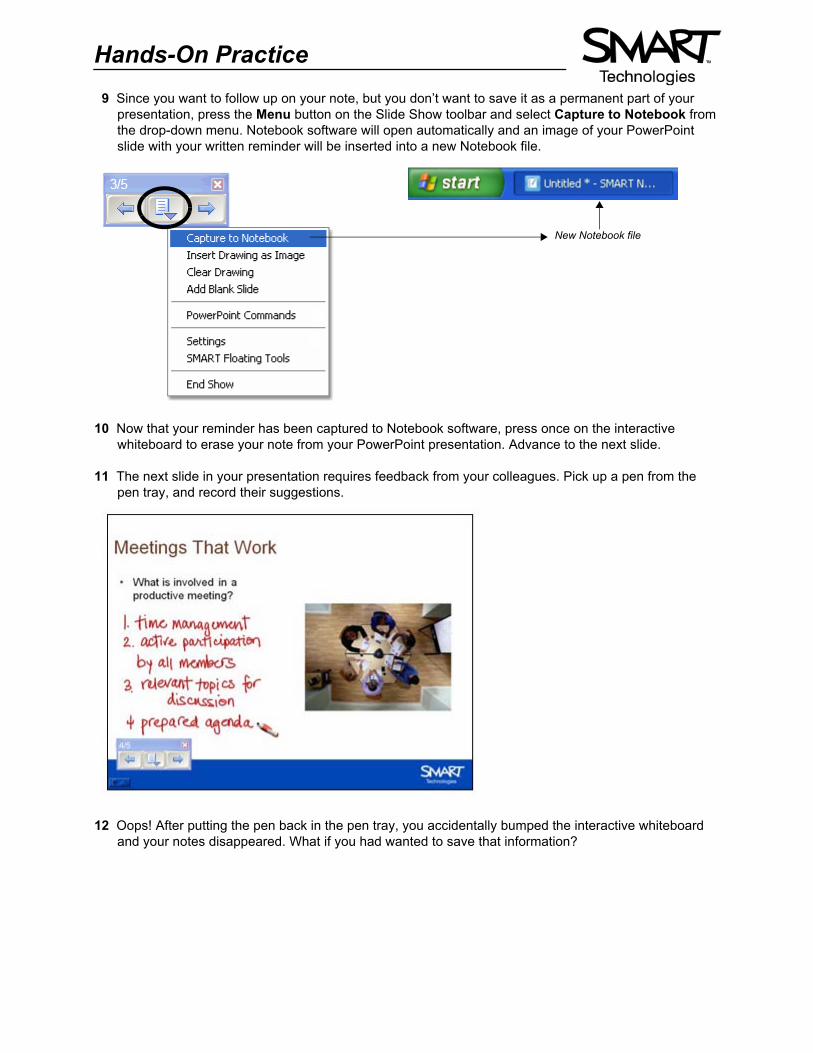
9 Since you want to follow up on your note, but you don’t want to save it as a permanent part of yourpresentation, press the Menu button on the Slide Show toolbar and select Capture to Notebook from the drop-down menu. Notebook software will open automatically and an image of your PowerPoint slide with your written reminder will be inserted into a new Notebook file.
10 Now that your reminder has been captured to Notebook software, press once on the interactive whiteboard to erase your note from your PowerPoint presentation. Advance to the next slide.
11 The next slide in your presentation requires feedback from your colleagues. Pick up a pen from the pen tray, and record their suggestions.
12 Oops! After putting the pen back in the pen tray, you accidentally bumped the interactive whiteboard and your notes disappeared. What if you had wanted to save that information?
New Notebook file

Hands-On Practice
Before you pick up the pen again, press the Click here to restore writing icon that appears in the bottom right corner of the screen. Your notes will reappear on the slide.
TIP: If the Click here to restore writing icon disappears from the interactive whiteboard, don’t worry. Click the Menu button on the Slide Show toolbar and select Restore Drawing.
13 You are ready to end your presentation. Press the Menu button on the Slide Show toolbar and select End Show from the drop-down menu. Select Yes in the SMART Aware message box to add your notes to your PowerPoint presentation.
14 Select File > Save to save your notes into your original presentation, or select File > Save As to save to a new PowerPoint file. Close your presentation.
15 Now select the unsaved Notebook file created earlier in the lesson. Select File > Save to save your notes for future reference.
Congratulations! You have finished the Using Microsoft PowerPoint Software on a SMART Board Interactive Whiteboard Hands-On Practice.
© 2006 SMART Technologies Inc. All rights reserved. SMART Board, Notebook and the SMART logo are trademarks of SMART Technologies Inc. Allother third-party product and company names may be tradmarks of their respective owners. Printed in Canada 01/2006.
Hands-On Practice
9 Since you want to follow up on your note, but you don’t want to save it as a permanent part of yourpresentation, press the Menu button on the Slide Show toolbar and select Capture to Notebook from the drop-down menu. Notebook software will open automatically and an image of your PowerPoint slide with your written reminder will be inserted into a new Notebook file.
10 Now that your reminder has been captured to Notebook software, press once on the interactive whiteboard to erase your note from your PowerPoint presentation. Advance to the next slide.
11 The next slide in your presentation requires feedback from your colleagues. Pick up a pen from the pen tray, and record their suggestions.
12 Oops! After putting the pen back in the pen tray, you accidentally bumped the interactive whiteboard and your notes disappeared. What if you had wanted to save that information?
New Notebook file

Hands-On Practice
Before you pick up the pen again, press the Click here to restore writing icon that appears in the bottom right corner of the screen. Your notes will reappear on the slide.
TIP: If the Click here to restore writing icon disappears from the interactive whiteboard, don’t worry. Click the Menu button on the Slide Show toolbar and select Restore Drawing.
13 You are ready to end your presentation. Press the Menu button on the Slide Show toolbar and select End Show from the drop-down menu. Select Yes in the SMART Aware message box to add your notes to your PowerPoint presentation.
14 Select File > Save to save your notes into your original presentation, or select File > Save As to save to a new PowerPoint file. Close your presentation.
15 Now select the unsaved Notebook file created earlier in the lesson. Select File > Save to save your notes for future reference.
Congratulations! You have finished the Using Microsoft PowerPoint Software on a SMART Board Interactive Whiteboard Hands-On Practice.
© 2008 SMART Technologies ULC. All rights reserved. SMART Board, Notebook and the SMART logo are trademarks of SMART Technologies Inc. Allother third-party product and company names may be tradmarks of their respective owners. Printed in Canada 03/2008.

Hands-On Practice
Ink Aware and Microsoft Word in the Classroom
Before You StartBefore you begin your class, ensure that your computer is turned on and the SMART Board™ interactive whiteboard is connected and oriented. For more information on how to get started with your interactive whiteboard, refer to the Quick Reference Guides available at www.smarttech.com/trainingcenter/windows/trainingmaterials.asp.
This Hands-On Practice assumes you have a basic understanding of the Microsoft® Windows® operating system. You may find it useful to think of how you normally work with a computer as you go through the lesson. When working at your computer, for example, you use left-, right- or double-clicks, depending on the function you want to perform. Use the SMART Board interactive whiteboard in the same way. If you get confused, simply think about what you would do at your computer, and then replicate these actions on the interactive whiteboard.
What Is Ink Aware?Ink Aware integrates SMART Board software with many types of applications, including Microsoft Word, Excel® or PowerPoint®. When you use an application that is ink aware, whatever you write or draw on your interactive whiteboard becomes embedded in the file, rather than an external note created over the file.
SMART Aware ToolbarWhen using Microsoft Word with your interactive whiteboard, you will notice three new buttons appear; they may be integrated with the current Word toolbar or separated as a floating toolbar.
If you do not see either of these toolbars, select View > Toolbars > SMART Aware Toolbar in Microsoft Word.
PreparationCreate a short, two-question quiz. In a real-world example you would open a quiz prepared in advance.
1 Open a blank document in Microsoft Word.
Press to insert your drawings or writing as an image directly into your document
Press to convert your writing as typed text directly into your document. Your text will appear at the cursor point and in the color the words were written in.
Press to save a screen capture in Notebook™ software
Integrated with Word toolbar Separated as floating toolbar

Hands-On Practice
2 Type a mathematical equation using your computer’s keyboard – for example 13 x 7 =. Press theEnter key several times to give your students space to show their work.
3 Type Complete the following sentence with either “who” or “whom”. Press the Enter key twice, then type Now is the time for all good men to come to the aid of.
Using Ink Aware in the ClassroomYour class has just completed the quiz you created in Microsoft Word. Now you would like to review the answers as a group.
1 Show your class how to best display their work when answering the multiplication equation. Use a pen from the SMART Pen Tray to demonstrate how to arrive at the correct answer on the interactive whiteboard. Put the pen back in the pen tray and press the Insert as Image button to add the answer to your Word file.
2 Move to the next quiz question. Discuss with your class when to use the word who versus whom in the sentence.
3 Touch the interactive whiteboard to place the cursor at the end of the sentence.

Hands-On Practice
4 Use a pen from the pen tray to write the correct answer on the interactive whiteboard.5 Press the Insert as Text button to convert the correct answer to text. The text will appear at the cursor point and in the same color as the digital ink it was written in.
6 Save your document in Microsoft Word. Now you can e-mail or print copies and distribute the answers to your students.
Congratulations! You have completed the Ink Aware and Microsoft Word in the Classroom Hands-On Practice.
© 2006 SMART Technologies Inc. All rights reserved. SMART Board, Notebook and the SMART logo are trademarks of SMART Technologies Inc. Allother third-party product and company names may be tradmarks of their respective owners. Printed in Canada 01/2006.

Hands-On Practice
Ink Aware and Microsoft Excel in the Office
Before You StartBefore you begin your meeting, ensure that your computer is turned on and the SMART Board™ interactive whiteboard is connected and oriented. For more information on how to get started with your interactive whiteboard, refer to the Quick Reference Guides available at www.smarttech.com/trainingcenter/windows/trainingmaterials.asp.
This Hands-On Practice assumes you have a basic understanding of the Microsoft® Windows® operating system. You may find it useful to think of how you normally work with a computer as you go through the lesson. When working at your computer, for example, you use left-, right- or double-clicks, depending on the function you want to perform. Use the SMART Board interactive whiteboard in the same way. If you get confused, simply think about what you would do at your computer, and then replicate these actions on the interactive whiteboard.
What Is Ink Aware?Ink Aware integrates SMART Board software with many types of applications, including Microsoft Word, Excel® or PowerPoint®. When you use an application that is ink aware, whatever you write or draw on your interactive whiteboard becomes embedded in the file, rather than an external note created over the file.
SMART Aware ToolbarWhen using Microsoft Excel with your interactive whiteboard, you will notice three new buttons appear; they may be integrated with the current Excel toolbar or separated as a floating toolbar.
If you do not see either of these toolbars, select View > Toolbars > SMART Aware Toolbar in Microsoft Excel.
Press to insert your drawings or writing as an image directly into your spreadsheet
Press to convert your writing as typed text directly into your spreadsheet. Your text will appear at the cursor point and in the color the words were written in.
Press to save a screen capture in Notebook™ software
Integrated with Excel toolbar Separated as floating toolbar

Hands-On Practice
Preparation 1 Open a blank spreadsheet in Microsoft Excel.
2 Type Hotel in cell A2 on your computer’s keyboard.
3 Type Flight in cell A3.
4 Type 1000 in cell B3.
Using Ink Aware in the OfficeAssume you and your colleagues are attending a conference in the near future. As a group, you prepared a travel request outlining the anticipated expenses. This request will be presented to the accounting department for approval.
1 One group member states the hotel will cost $150 per night. Press the cell in the spreadsheet to highlight where the cost will be placed. Pick up a pen from the SMART Pen Tray and write 150 on the interactive whiteboard.
2 Another group member declares the corporate rate for the hotel is only $115 per night. Put the pen back in the pen tray and press once on the interactive board to remove 150; then, press the cell in the spreadsheet to highlight where the new cost will be placed. Now, write 115.

Hands-On Practice
3 Press the Insert as Text button to add the hotel rate into the highlighted cell. Your text is inserted intothe spreadsheet and will appear in the same color as the digital ink it was written in.
4 Finally, your team lead suggests that you get a minimum of three price quotes for flight. Circle the flight cost in cell B3 and write Get Quote. Press the Insert as Image button to insert your note as an image into your spreadsheet.
5 Save your spreadsheet as a Microsoft Excel file. Now you can update the travel request with your group’s notes and e-mail it to the accounting department for approval.
Congratulations! You have completed the Ink Aware and Microsoft Excel in the Office Hands-On Practice.
© 2006 SMART Technologies Inc. All rights reserved. SMART Board, Notebook and the SMART logo are trademarks of SMART Technologies Inc. Allother third-party product and company names may be tradmarks of their respective owners. Printed in Canada 01/2006.