using the beowulf cluster lab - boise state...
TRANSCRIPT

Using the Beowulf Cluster LabAmit Jain
Department of Computer Science
Boise State University
September 2, 2010
This material is based upon work supported by the National Science Foundation under grant No. 0321233,
Development of Tools to Enable the Port of Software to a Beowulf Cluster. Any opinions, findings, and
conclusions, or recommendations expressed in this material are those of the authors and do not necessarily
reflect the views of the National Science Foundation.
Contents
1 Cluster Configuration 3
2 Setup 3
3 Working on the Cluster 4
3.1 Accessing the cluster from a remote system . . . . . . . . . . . . . . . . . . . . . . . 4
3.2 Useful cluster commands . . . . . . . . . . . . . . . . . . . . . . . . . . . . . . . . . . 4
3.2.1 Cluster Monitoring . . . . . . . . . . . . . . . . . . . . . . . . . . . . . . . . . 4
3.2.2 Parallel Shell . . . . . . . . . . . . . . . . . . . . . . . . . . . . . . . . . . . . 5
4 Using Swarm to run multiple sequential programs 6
5 Compiling Parallel Programs on the Cluster 7
5.1 Compiling MPI programs on the cluster . . . . . . . . . . . . . . . . . . . . . . . . . 7
5.2 Compiling PVM programs on the cluster . . . . . . . . . . . . . . . . . . . . . . . . . 7
6 Running parallel programs interactively 8
6.1 Acquiring nodes from the PBS system . . . . . . . . . . . . . . . . . . . . . . . . . . 8
6.2 Running PVM programs . . . . . . . . . . . . . . . . . . . . . . . . . . . . . . . . . . 10
6.2.1 Using the PVM console . . . . . . . . . . . . . . . . . . . . . . . . . . . . . . 10
6.2.2 Using the XPVM GUI . . . . . . . . . . . . . . . . . . . . . . . . . . . . . . . 13
6.2.3 Using the pvmrun application . . . . . . . . . . . . . . . . . . . . . . . . . . . 17
6.3 Running MPI programs . . . . . . . . . . . . . . . . . . . . . . . . . . . . . . . . . . 19
7 Running parallel programs in batch mode 20
7.1 Getting ready to run PBS batch jobs . . . . . . . . . . . . . . . . . . . . . . . . . . . 20

7.2 Preparing a PBS batch job script . . . . . . . . . . . . . . . . . . . . . . . . . . . . . 21
7.3 Submitting a PBS batch job script . . . . . . . . . . . . . . . . . . . . . . . . . . . . 23
8 Debugging PVM programs 24
8.1 Using print statements . . . . . . . . . . . . . . . . . . . . . . . . . . . . . . . . . . . 24
8.2 Using a debugger . . . . . . . . . . . . . . . . . . . . . . . . . . . . . . . . . . . . . . 25
9 How to Setup and use MPICH2 on your Linux PC or notebook 25
9.1 How to download and install MPICH2 . . . . . . . . . . . . . . . . . . . . . . . . . . 25
9.2 Using MPICH2 on your computer . . . . . . . . . . . . . . . . . . . . . . . . . . . . . 26
10 How to setup and use PVM on your Linux PC or laptop 27
10.1 Installing PVM . . . . . . . . . . . . . . . . . . . . . . . . . . . . . . . . . . . . . . . 27
10.2 Setting up the Environment . . . . . . . . . . . . . . . . . . . . . . . . . . . . . . . . 27
10.3 Running PVM programs . . . . . . . . . . . . . . . . . . . . . . . . . . . . . . . . . . 28
11 Documentation 28
12 Dealing with obscure errors 29
2

1 Cluster Configuration
The Beowulf Cluster Lab in MEC305 has one master node, named node00, and 62 compute nodes,named node01, . . ., node62, which are connected with a private Gigabit Ethernet switch.
The machine beowulf.boisestate.edu is the master node and the only one that is on the publicInternet. The master node beowulf.boisestate.edu is connected to the private switch with thename node00. The figure below shows the layout of the Beowulf Cluster Lab.
Linux Channel Bonding
. . . . . . . . .
To Internet
1000 MBits/sec link
Gigabit Switch Gigabit SwitchGigabit Switch
(dual 2.4 GHz Xeons, 4GB RAM, RAID disk drives)
dual 2.4 GHz Xeons, 1GB RAM, 80GB ATA100 drive
Node00
node01 node20 node21 node40 node41 node60
beowulf
1000 MBits/sec tocampus backbone
32000 MBits/sec linkEach Compute Node:
Gigabit Switch: Cisco 24−port Gigabit ctacking cluster switch
node00192.168.1.1
192.168.1.120 192.168.1.121 192.168.1.140 192.168.1.141 192.168.1.160192.168.1.101
Beowulf Cluster Architecture
To use the cluster you must login to beowulf.boisestate.edu. Your home directory resides on themaster node, which is the file server for the cluster. Thus you have the same home directory on allmachines in the cluster.
2 Setup
Your home directory is shared among all nodes of the cluster. The master node acts as a networkfile server for the home directories.
When you log in to the master node, your account is already setup to use MPICH2 as the defaultMPI implementation.
When you log in to the master node, you will find a directory named pvm3 in your home directory.This directory is setup (when you login for the first time) for PVM to work correctly. This directorycontains a sub-directory bin, which contains a sub-directory named LINUXI386, where LINUXI386
3

is the architecture of the system as used by the PVM system. Your PVM executables normallyreside in the ~/pvm3/bin/LINUXI386 directory, which is already set to be in your PATH.
3 Working on the Cluster
3.1 Accessing the cluster from a remote system
The following are some common commands for accessing the master node of the cluster from aremote site.
• ssh beowulf.boisestate.edu starts a secure remote login session on the master node of thecluster.
• ssh beowulf.boisestate.edu <command> runs the command remotely on the cluster andredirects the output to your terminal.
• scp lets you copy files to remote machines.
Note that the letter s stands for secure. All these commands encrypt your data on the network toprotect against eavesdroppers. These commands replace the insecure equivalents (rlogin, rsh,
rcp) that have been used commonly for accessing remote machines. Note that rsh commandswork internally on the cluster (to support some software that needs it) but it is operating behinda firewall on a private network.
The command scp also has an option -r that lets you copy directories. In addition, you can specifya directory to copy to on the remote machine. Remember that the pathnames are relative to yourhome directory on the remote machine. For example to copy recursively a directory named prog1
on your local system to the master node beowulf.boisestate.edu under the directory cs430 ortt cs530 in your home directory, use the following command:
scp -r prog1 beowulf.boisestate.edu:cs430/prog1
3.2 Useful cluster commands
3.2.1 Cluster Monitoring
The following is a set of useful cluster commands that are available on the cluster lab. They canbe run from the master node in the cluster.
• cchk Check the machines on the cluster by pinging the machines. Quick way to check ifany machines are down.
• cdate Check the current time and date on each node of the cluster. The master node is aNTP time server (and also a client to another trusted source of accurate time). All the othernodes in the cluster are NTP time service clients of the master node.
4

• cmips Check the total computing power of the cluster. The computing power is reportedin MIPS (using the bogoMIPS value reported by the kernel).
• cfree Reports memory usage across the cluster.
• cdisks Reports /tmp scratch disk space usage across the cluster.
• ctemp Reports CPU temperatures across the cluster. May not be available on all clusters.
3.2.2 Parallel Shell
The cluster comes with a simple parallel shell named pdsh. The pdsh shell is handy for runningcommands across the cluster. See the man page, which describes the capabilities of pdsh in detail.One of the useful features is the capability of specifying all or a subset of the cluster. For example:
pdsh -a <command> targets the <command> to all nodes of the cluster, including the master.
pdsh -a -x node00 <command> targets the <command> to all nodes of the cluster except the mas-ter.
pdsh -w node[01-08] <command> targets the <command> to the 8 nodes of the cluster namednode01, node02, . . ., node08.
Another utility that is useful for formatting the output of pdsh is dshbak. Here we will show somehandy uses of pdsh.
• Show the current date and time on all nodes of the cluster.pdsh -a date
• Show the current load and system uptime for all nodes of the cluster.pdsh -a uptime
• Show all processes with the substring mpd in their name on the cluster.pdsh -a ps augx | grep mpd
• Cleanup MPI files and sockets fom all nodes in the system. This can be handy in removingleftover files from a earlier program or system crash.
pdsh -a mpdcleanup
• Remove all instances of pvm temporary files from the cluster. This can be handy in removingleftover files from a earlier program or system crash.pdsh -a /bin/rm -f /tmp/pvm*
• The utility dshbak formats the output from pdsh by consolidating the output from each node.The option -c shows identical output from different nodes just once.
pdsh -a ls -l /etc/ntp | dshbak -c
Here is a sample output:
5
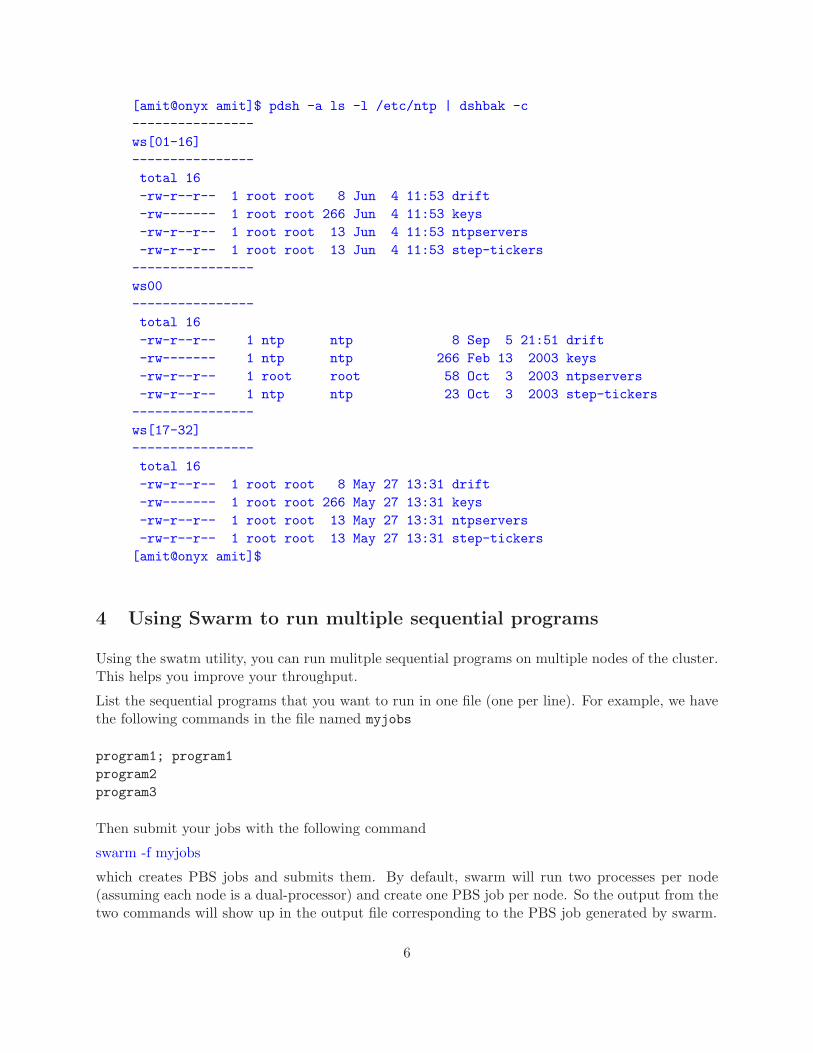
[amit@onyx amit]$ pdsh -a ls -l /etc/ntp | dshbak -c
----------------
ws[01-16]
----------------
total 16
-rw-r--r-- 1 root root 8 Jun 4 11:53 drift
-rw------- 1 root root 266 Jun 4 11:53 keys
-rw-r--r-- 1 root root 13 Jun 4 11:53 ntpservers
-rw-r--r-- 1 root root 13 Jun 4 11:53 step-tickers
----------------
ws00
----------------
total 16
-rw-r--r-- 1 ntp ntp 8 Sep 5 21:51 drift
-rw------- 1 ntp ntp 266 Feb 13 2003 keys
-rw-r--r-- 1 root root 58 Oct 3 2003 ntpservers
-rw-r--r-- 1 ntp ntp 23 Oct 3 2003 step-tickers
----------------
ws[17-32]
----------------
total 16
-rw-r--r-- 1 root root 8 May 27 13:31 drift
-rw------- 1 root root 266 May 27 13:31 keys
-rw-r--r-- 1 root root 13 May 27 13:31 ntpservers
-rw-r--r-- 1 root root 13 May 27 13:31 step-tickers
[amit@onyx amit]$
4 Using Swarm to run multiple sequential programs
Using the swatm utility, you can run mulitple sequential programs on multiple nodes of the cluster.This helps you improve your throughput.
List the sequential programs that you want to run in one file (one per line). For example, we havethe following commands in the file named myjobs
program1; program1
program2
program3
Then submit your jobs with the following command
swarm -f myjobs
which creates PBS jobs and submits them. By default, swarm will run two processes per node(assuming each node is a dual-processor) and create one PBS job per node. So the output from thetwo commands will show up in the output file corresponding to the PBS job generated by swarm.
6

If you like to get email when your jobs are done, then use:
swarm -f myjobs -m e
You may want to set up a .forward file on beowulf so that the email notification from PBS getsrouted to your favorite mail address.
If your program is I/O or memory intensive, then you may want to tell swarm to only run oneprocess per node. This can be done as follows:
swarm -f myjobs -n 1 -m e
Check the status of your jobs with the following command.
qstat -a
To kill a job, use
qdel ¡job#¿.beowulf
To kill all your jobs, use
qdelall
You should use the above command with caution! For more information about swarm, see the manpage:
man swarm
5 Compiling Parallel Programs on the Cluster
5.1 Compiling MPI programs on the cluster
First setup the appropriate MPI system for your account. The default is MPICH2, which shouldbe fine for most users. Compiling MPI programs is pretty simple: just use mpicc instead of theusual C compiler.
Here is a sample Makefile.
http://cs.boisestate.edu/˜amit/teaching/430/lab/Makefile.mpich2.sample
5.2 Compiling PVM programs on the cluster
The PVM package comes with a portable wrapper script for make called aimk, which takescare of setting all the right option for a given architecture. The program aimk assumes thatthe Makefile is named Makefile.aimk. A sample Makefile.aimk can be downloaded here:http://cs.boisestate.edu/˜amit/teaching/430/lab/Makefile.aimk.sample
Edit the file Makefile.aimk to include a rule for your program and compile using the aimk com-mand. Assuming that your rule in the Makefile.aimk is called myprog, you would use the followingcommand.
aimk myprog
The executable will be placed in the directory ~/pvm3/bin/LINUXI386.
7

6 Running parallel programs interactively
To run a parallel program interactively on the cluster requires two steps.
• Acquire desired number of compute nodes via the Portable Batch System that controls com-pute node allocation to users.
• Run the PVM or MPI parallel program.
– Running a PVM program. There are three possibilities:
∗ pvm: A command line console that can be used to start up the PVM system andrun parallel programs. It has built-in help. Useful for low-bandwidth remote accessto the cluster.
∗ xpvm: A graphical user interface that can be used to start/stop the PVM system, runparallel programs, visualize the execution in various ways, debug parallel programsand more. Excellent for developers.
∗ pvmrun: A self contained utility that starts the PVM system, runs the parallelprogram and then cleanly stops the PVM system.
– Running a MPICH MPI program. Use the mpiexec command after starting the MPICHdaemons.
6.1 Acquiring nodes from the PBS system
The cluster uses the Portable Batch Scheduling system to manage the resources effectively. Torun a parallel program, the user needs to request nodes from the PBS system. The master nodeis a shared resource and is always allocated to the user. The compute nodes are allocated in anexclusive mode. Currently there is a time limit of 24 hours for the use of compute nodes at a time.
To check the status of the nodes in the PBS system, there are two choices:
• qstat -n gives a list of all jobs running on the cluster along with the nodes allocated to thejobs.
• xpbsmon is a GUI that shows the state of the nodes in the PBS system.
To request n nodes, use the command pbsget on the master node. Here is a sample session.
[amit@onyx ~]$ pbsget -4
#####################################################################
Allocate cluster nodes via PBS for running interactive parallel jobs.
#####################################################################
Trying for 4 nodes
8

**********************************************************************
Scheduling an interactive cluster session with PBS.
Please end session by typing in exit.
Use qstat -n to see nodes allocated by PBS.
You may now run MPI, pvm, xpvm or pvmrun. They will automatically use
only the nodes allocated by PBS.
If you are using pvm or xpvm, then please always halt the pvm
system before exiting the PBS cluster session.
If you are using MPI, then please always halt the MPI daemons
system before exiting the PBS cluster session using mpdallexit command.
For running LAM MPI programs use the following command:
mpirun i-np <#copies> [options] <program> [<prog args>]
For running MPICH2 MPI programs use the following command:
mpiexec -n <#copies> [options] <program> [<prog args>]
For running PVM programs use the following command:
Usage: pvmrun -np <#copies> <executable> <args>,...
**********************************************************************
qsub: waiting for job 3613.onyx.boisestate.edu to start
qsub: job 3613.onyx.boisestate.edu ready
[amit@onyx PBS ~]:qstat -n
onyx.boisestate.edu:
Req’d Req’d
Elap
Job ID Username Queue Jobname SessID NDS TSK Memory Time S
Time
--------------- -------- -------- ---------- ------ --- --- ------ ----- -
-----
3613.onyx.boise amit interact STDIN 17742 5 -- -- 00:30 R
--
node00/0+node20/0+node19/0+node18/0+node17/0
[amit@onyx PBS ~]:echo $PBS_NODEFILE
/var/spool/pbs/aux/3613.onyx.boisestate.edu
[amit@onyx PBS ~]:cat $PBS_NODEFILE
node00
node20
node19
node18
node17
[amit@onyx PBS ~]:exit
9

logout
qsub: job 3613.onyx.boisestate.edu completed
[amit@onyx ~]$
The command pbsget attempts to allocate the requested number of nodes from the PBS system. Ifit succeeds, it starts a new shell with the prompt modified to have PBS in the prompt. Note thatthe environment variable PBS NODEFILE contains the name of a file that contains the list of nodesallocated by PBS to the user. Now the user can run either PVM or MPI parallel programs. Whenthe user is done they would type exit to end the interactive PBS session.
If the required number of nodes are not available, then pbsget will wait. A user can cancel therequest by typing in Ctrl-c and try again later. Remember to use qstat -n to check the statusof the nodes.
6.2 Running PVM programs
6.2.1 Using the PVM console
To run a PVM program the PVM daemon must be running. To start the daemon, startup thePVM console with the following command.
pvm
This invokes the PVM control program. The pvm console program is set to automatically add thenodes allocated to you by PBS. You can check what machines are in the PVM system with theconf command.
[amit@onyx amit]$ pbsget -4
#####################################################################
Allocate cluster nodes via PBS for running interactive parallel jobs.
#####################################################################
Trying for 4 nodes
...
qsub: waiting for job 806.onyx.boisestate.edu to start
qsub: job 806.onyx.boisestate.edu ready
[amit@onyx PBS ~]:pvm
pvm: Using list of machines from PBS.
pvm> conf
5 hosts, 1 data format
HOST DTID ARCH SPEED DSIG
ws00 40000 LINUXI386 1000 0x00408841
ws04 80000 LINUXI386 1000 0x00408841
ws03 c0000 LINUXI386 1000 0x00408841
ws02 100000 LINUXI386 1000 0x00408841
10

ws01 140000 LINUXI386 1000 0x00408841
pvm>
In the above example, we allocated 4 nodes using the PBS system. Note that the PVM consoleprogram adds the four compute nodes plus the master node to the PVM system. PBS alwaysallocates the master node since that is a shared resource. Normally you would not run yourprograms on the master nodes but use it for monitoring purposes.
If you have already started the daemon, then the pvm console program would inform you. Thesimplest thing to do is to halt the already running daemon and start a fresh one, as shown below:
[amit@onyx PBS ~]:pvm
pvm: Using list of machines from PBS.
pvmd already running.
pvm> halt
Terminated
[amit@onyx PBS ~]:pvm
pvm: Using list of machines from PBS.
pvm>
You can type help in the pvm console program to get a list of all commands. You can run yourapplication using the spawn command from the PVM console. Here is the help on the spawncommand.
pvm> help spawn
spawn Spawn task
Syntax: spawn [ options ] file [ arg ... ]
Options: -(count) number of tasks, default is 1
-(host) spawn on host, default is any
-(host):(wd) spawn on host, in directory ’wd’
--host=(IP) spawn on host with given IP addr
--host=(IP):(wd) spawn on IP, in directory ’wd’
-(ARCH) spawn on hosts of ARCH
-(ARCH):(wd) spawn on hosts of ARCH, in ’wd’
-:(wd) spawn in working directory ’wd’
-? enable debugging
-> redirect job output to console
->(file) redirect output of job to file
->>(file) append output of job to file
-@ trace job, output to terminal
-@(file) trace job, output to file
pvm>
The following figure continues the example by running a parallel program using the spawn com-mand. The program is a SPMD style program. Thus we need to spawn a number of copies together.The output from the various nodes is captured together with the -> option to the spawn command.Note that each output is tagged with the task id of the task creating that output.
pvm> spawn -4 -> spmd_sum 10000
11

[1]
4 successful
t80001
tc0001
t100001
t140001
pvm> [1:tc0001] EOF
[1:t80001] I got 2500 from 0
[1:t80001] I got 2500 from 1
[1:t80001] I got 2500 from 3
[1:t80001] I got 2500 from 2
[1:t80001] The total is 10000
[1:t80001] EOF
[1:t140001] EOF
[1:t100001] EOF
[1] finished
pvm>
There is no limitation in PVM as to the number of tasks versus the number of nodes. So we couldhave invoked 12 tasks in the above example even though we acquired only 4 compute nodes. Bydefault the PVM system distributes the tasks on the available nodes in a round robin fashion.
Finally you must remember to halt the PVM system and exit out of the PBS shell to release allresources.
pvm>
pvm> halt
Terminated
[amit@onyx PBS ~]:exit
logout
qsub: job 806.onyx.boisestate.edu completed
[amit@onyx amit]$
Note that MPMD (or master/slave) style programs can be invoked directly from the PBS shell ifyou have started the pvm daemon before. For example:
[amit@onyx amit]$ pbsget -4
#####################################################################
Allocate cluster nodes via PBS for running interactive parallel jobs.
#####################################################################
Trying for 4 nodes
...
qsub: waiting for job 807.onyx.boisestate.edu to start
qsub: job 807.onyx.boisestate.edu ready
[amit@onyx PBS ~]:pvm
pvm: Using list of machines from PBS.
pvm> quit
12

Console: exit handler called
pvmd still running.
[amit@onyx PBS ~]:psum 10000 4
Starting 4 copies of spsum
I got 2500 from 2
I got 2500 from 0
I got 2500 from 1
I got 2500 from 3
The total is 10000
[amit@onyx PBS ~]:exit
logout
qsub: job 807.onyx.boisestate.edu completed
[amit@onyx amit]$
The above technique does not work for SPMD programs. It also will not show you the outputfrom other nodes (unless you capture it using library calls in PVM). Finally, note that it is possibleto embed the start up of PVM daemon and adding of nodes inside a program, making PVMtransparent.
For more information on the pvm console program, see the man page for it.
6.2.2 Using the XPVM GUI
The xpvm graphical user interface to PVM is a nice visualization tool for developing, testing anddebugging PVM programs. The xpvm program has built in help and is intuitive and simple to use.Similar to the PVM console program, pvm, the xpvm program starts up the PVM system with thelist of nodes allocated by the PBS system. Then the user can use it to run parallel programs,visualize the execution, look at the output from all nodes, debug multiple nodes simultaneously,check utilization of the cluster during execution of the parallel program, check message queuelength during execution and other features. A powerful feature of xpvm is its ability to graphicallyplayback the sequence of events during an execution. This allows the user to investigate the behaviorof a parallel program without having to spend a lot of time rerunning the parallel program. Thefollowing figure shows a screenshot of xpvm in action.
13
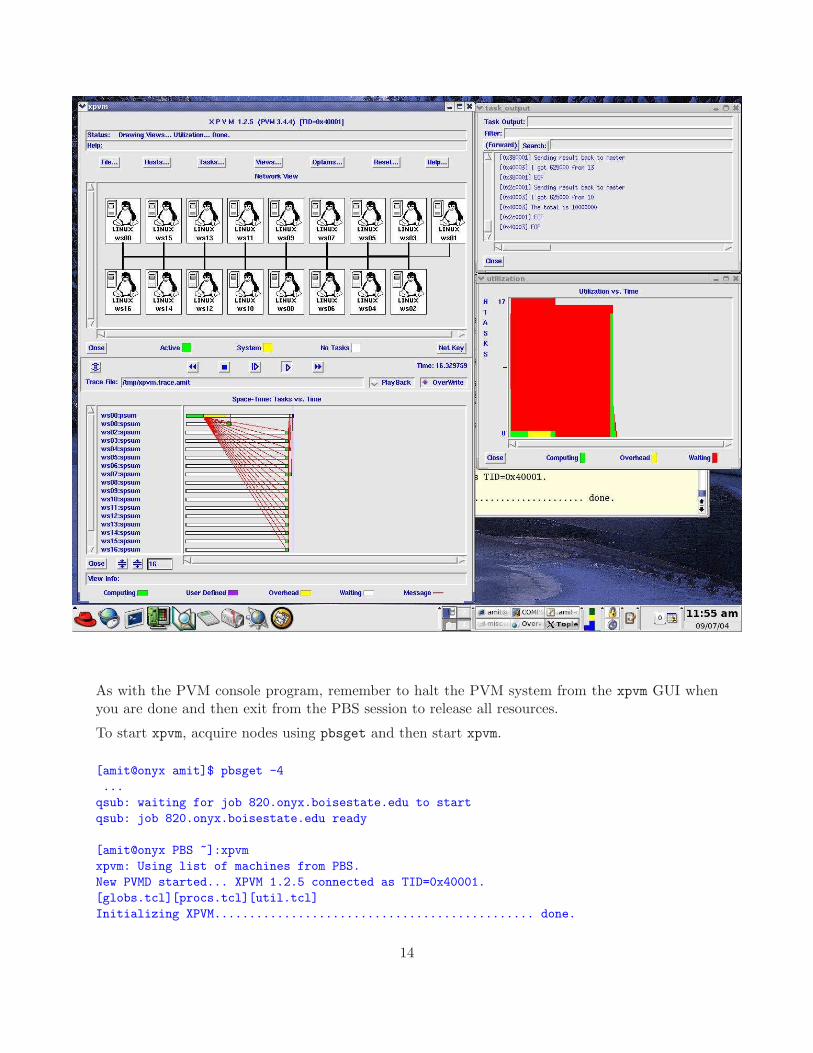
As with the PVM console program, remember to halt the PVM system from the xpvm GUI whenyou are done and then exit from the PBS session to release all resources.
To start xpvm, acquire nodes using pbsget and then start xpvm.
[amit@onyx amit]$ pbsget -4
...
qsub: waiting for job 820.onyx.boisestate.edu to start
qsub: job 820.onyx.boisestate.edu ready
[amit@onyx PBS ~]:xpvm
xpvm: Using list of machines from PBS.
New PVMD started... XPVM 1.2.5 connected as TID=0x40001.
[globs.tcl][procs.tcl][util.tcl]
Initializing XPVM.............................................. done.
14

%
The xpvm will start up in a new window. Initially it will ask you want to overwrite the trace file.You can answer “Yes” here. The main xpvm window will have two panels: Network View and Space
Time View.
Running a PVM program. Go to Tasks... menu, then click on Spawn option to get the spawnwindow. In the Command: field you can type in the name of your program along with the commandline arguments. Next select the PvmHostCompl button. Then select the Host button. A new fieldlabeled Host will show up. Type the internal name of the master node, node00, here. The purposeof the last two steps to ensure that the PVM processes are not scheduled on the master node. Nexttype in the number of SPMD tasks you want to spawn in the NTasks field. Finally click on theStart button to start the parallel program.
15
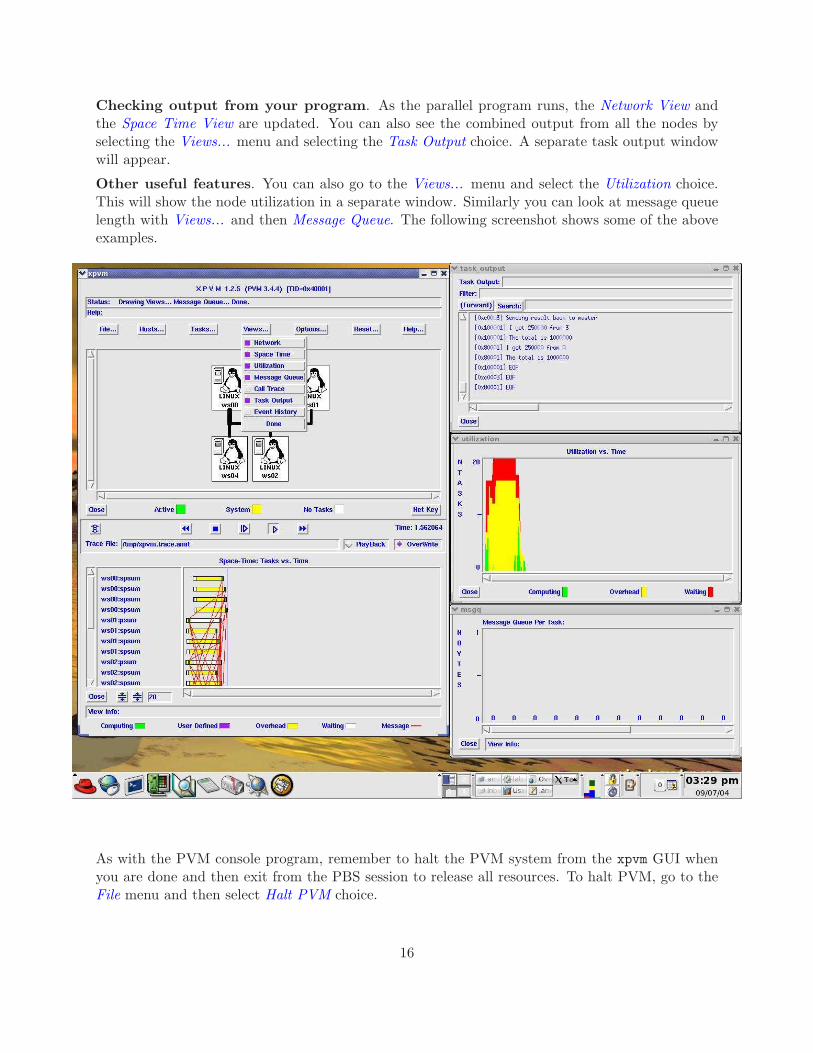
Checking output from your program. As the parallel program runs, the Network View andthe Space Time View are updated. You can also see the combined output from all the nodes byselecting the Views... menu and selecting the Task Output choice. A separate task output windowwill appear.
Other useful features. You can also go to the Views... menu and select the Utilization choice.This will show the node utilization in a separate window. Similarly you can look at message queuelength with Views... and then Message Queue. The following screenshot shows some of the aboveexamples.
As with the PVM console program, remember to halt the PVM system from the xpvm GUI whenyou are done and then exit from the PBS session to release all resources. To halt PVM, go to theFile menu and then select Halt PVM choice.
16

6.2.3 Using the pvmrun application
With PVM you need to create the PVM system with either the pvm console or the xpvm application.Once the PVM system is operational, then you run your program. This is undesirable for severalreasons. For example, if you forget to start the PVM system, your applications fails. If you left thePVM system running, then you will connect to what is already running. In order to avoid theseproblems, we have created an application named pvmrun. Running pvmrun with the help optionshows its usage.
[amit@onyx amit]$ pvmrun -h
pvmrun: $Id: pvmrun.c,v 1.8 2004/09/02 00:00:28 amit Exp $
Usage: pvmrun -np <#tasks> <executable> <args>,...
************************************************************************
For a pvm master/slave program: pvmrun -np 1 <executable>
<args>,...
For a pvm n-way spmd program: pvmrun -np n <executable> <args>,...
The list of machines to use for PVM is determined as follows:
if PBS_NODEFILE is set, then use the file specified by PBS
else: exit and ask user to run after getting nodes
using pbsget.
[amit@onyx amit]:
The pvmrun program starts the pvm system for you, runs your application (either master/slaveMPMD style or SPMD style) and then cleanly shuts down the PVM system. If the PVM system isalready running, it shuts it down and restarts it with the list of nodes supplied by the PBS system.You must use pvmrun in your PBS batch jobs.
The following shows the usage of pvmrun to run a parallel program. Note that we show the programbeing run twice. The second time we have redirected the standard error output from pvmrun to afile so only the output from the application shows up.
[amit@onyx parallel_sum]$ pbsget -4
#####################################################################
Allocate cluster nodes via PBS for running interactive parallel jobs.
#####################################################################
Trying for 4 nodes
...
qsub: waiting for job 850.onyx.boisestate.edu to start
qsub: job 850.onyx.boisestate.edu ready
[amit@onyx PBS ~/cs430/lab/PVM/parallel_sum]:pvmrun -np 4 spmd_sum 10000
pvmrun: Using host file: /var/spool/pbs/aux/850.onyx.boisestate.edu
pvmrun: Probing for pre-existing PVM.
***********************************************************
libpvm [pid10012] /tmp/pvmd.999: No such file or directory
libpvm [pid10012] /tmp/pvmd.999: No such file or directory
libpvm [pid10012] /tmp/pvmd.999: No such file or directory
libpvm [pid10012]: pvm_mytid(): Can’t contact local daemon
17

***********************************************************
pvmrun: PVM not running. Ignore error messages above from pvm_mytid().
pvmrun: Succeeded in starting new PVM daemon!
Selected nodes from file: /var/spool/pbs/aux/850.onyx.boisestate.edu
*************************************************
ws00
ws04
ws03
ws02
ws01
*************************************************
pvmrun: Succeeded in adding 5 hosts.
pvmrun: Parallel Virtual Machine configuration
-----------------------------------------------
ws00
ws04
ws03
ws02
ws01
-----------------------------------------------
[tc0001] BEGIN
[t100001] BEGIN
[t140001] BEGIN
[t80001] BEGIN
[t80001] I got 2500 from 0
[t80001] I got 2500 from 1
[t80001] I got 2500 from 2
[t80001] I got 2500 from 3
[t80001] The total is 10000
[t100001] EOF
[tc0001] EOF
Received PvmTaskExit notification from task id 100001
Received PvmTaskExit notification from task id c0001
[t140001] EOF
[t80001] EOF
Received PvmTaskExit notification from task id 140001
Received PvmTaskExit notification from task id 80001
pvmrun: 4 tasks finished!
pvmrun: Halting PVM.
pvmrun: End of PVM application.
[amit@onyx PBS ~/cs430/lab/PVM/parallel_sum]:pvmrun -np 4 spmd_sum 10000 2>
errorlog
[tc0001] BEGIN
[t140001] BEGIN
[t100001] BEGIN
[t80001] BEGIN
[tc0001] EOF
18

[t140001] EOF
[t80001] I got 2500 from 0
[t80001] I got 2500 from 1
[t80001] I got 2500 from 3
[t80001] I got 2500 from 2
[t80001] The total is 10000
[t100001] EOF
[t80001] EOF
[amit@onyx PBS ~/cs430/lab/PVM/parallel_sum]:exit
logout
qsub: job 850.onyx.boisestate.edu completed
[amit@onyx parallel_sum]$
6.3 Running MPI programs
• Create MPI config file. Create the file ˜/.mpd.conf and enter one line that contains a secret codeword. The commands to do this are shown below. Remember to put your own secret word in yourfile.
touch ~/.mpd.conf
echo "MPD_secretword=abracadabara" > ~/.mpd.conf
chmod 600 ~/.mpd.conf
• Setting up MPICH2. Add the command mpich2setup at the end of your ~/.bashrc file and sourceit with the command source ~/.bashrc (or log in again).
• Running a MPI program
– Log in to the head node onyx. Acquire nodes from the scheduler: pbsget -4
– Start up the MPI daemons on all nodes using the command: mpdboot
– Next run your mpi program with the mpiexec command.
mpiexec -n 4 hello world
– Stop all MPI daemons.
mpdallexit
– Exit and release all allocated nodes with the command: exit
Here is a sample session.
[amit@onyx hello-world]$ pbsget -4
#####################################################################
Allocate cluster nodes via PBS for running interactive parallel jobs.
#####################################################################
Trying for 4 nodes
**********************************************************************
19

Scheduling an interactive cluster session with PBS.
Please end session by typing in exit.
Use qstat -n to see nodes allocated by PBS.
or use xpbsmon to graphically see nodes allocated by PBS.
You may now run MPI, pvm, xpvm or pvmrun. They will automatically use
only the nodes allocated by PBS.
If you are using pvm or xpvm, then please always halt the pvm
system before exiting the PBS cluster session.
If you are using MPI, then please always halt the MPI daemons
system before exiting the PBS cluster session using mpdallexit command.
For running LAM MPI programs use the following command:
mpirun i-np <#copies> [options] <program> [<prog args>]
For running MPICH2 MPI programs use the following command:
mpiexec -n <#copies> [options] <program> [<prog args>]
For running PVM programs use the following command:
Usage: pvmrun -np <#copies> <executable> <args>,...
**********************************************************************
qsub: waiting for job 3614.onyx.boisestate.edu to start
qsub: job 3614.onyx.boisestate.edu ready
[amit@onyx PBS ~/cs430/lab/MPI/hello-world]:mpdboot
Starting 5 mpds
[amit@onyx PBS ~/cs430/lab/MPI/hello-world]:mpiexec -n 4 spmd_hello_world
Hello! I am 0 of 4 running on node17.
Hello! I am 1 of 4 running on node18.
Hello! I am 3 of 4 running on node20.
Hello! I am 2 of 4 running on node19.
[amit@onyx PBS ~/cs430/lab/MPI/hello-world]:mpdallexit
[amit@onyx PBS ~/cs430/lab/MPI/hello-world]:exit
logout
qsub: job 3614.onyx.boisestate.edu completed
[amit@onyx hello-world]$
7 Running parallel programs in batch mode
7.1 Getting ready to run PBS batch jobs
To be able to run PBS jobs, you must check your .bash profile and .bashrc files carefully. Anycommand that manipulates the terminal must be put in a conditional statement of the followingform.
if test "$PBS_ENVIRONMENT" = "PBS_INTERACTIVE" -o -z "$PBS_ENVIRONMENT"
20

then
# set up the prompt to the hostname
#
PS1="[\u@\h \W]":
fi
The reason is that there is no terminal when you are running in batch mode. If you try to manipulatethe terminal in batch mode, your login will fail and your batch job will not run. The environmentvariable PBS ENVIRONMENT is set by PBS to be either PBS INTERACTIVE or PBS BATCH. When youare not running under PBS, then the variable is unset.
7.2 Preparing a PBS batch job script
Any parallel program that takes more than a few minutes should normally be run as a PBSbatch job. In order to run it as a PBS batch job, you will need to prepare a PBS batch script(which is just a shell script with some additional features). Here is a sample PBS batch job(~/amit/cs430/lab/PVM/tools/psort.pbs):
#!/bin/sh
#PBS -l nodes=1:master+16:node
# This is a PBS job submission script. It asks for the master node
# and 16 nodes in the PBS cluster to run the PVM application on.
#
# IMPORTANT NOTE: Be sure to modify the "cd" command below to switch
# to the directory in which you are currently working!
#
#------------------------------------------------------------------------
cd /home/faculty/amit/cs430/lab/PVM/tools
pvmrun -np 16 psort 20000000 16
The line starting with #PBS is a PBS directive. There are many PBS directives but the one wewill use is mainly the one that lists the nodes that we need to run our program. The following listshows some common options that can be used in the PBS directives:
PBS option Description
-N jobname name the job jobname-l cput=N request N seconds of CPU time; N can also be in hh:mm:ss form-l mem=N[KMG][BW] request N kilo—mega—gigabytes—words of memory-l nodes=N:ppn=M request N nodes with M processors per node-m e mail the user when the job completes-m a mail the user if the job aborts-a 1800 Start job after 6pm-o outfile redirect standard output to outfile-e errfile redirect standard error to errfile-j oe combine standard output and standard error
For a full list, see the man page for pbs resources on the cluster.
21

Here is another sample PBS batch job. Here the psum program is assumed to spawn processes tothe 16 nodes.
#!/bin/sh
#PBS -l nodes=1:master+16:node
# This is a PBS job submission script. It runs a master/slave PVM program
# Note that even though we are specifying only one process to pvmrun, we
# need to reserve the appropriate number of nodes to match what the parallel
# program requires.
#
# IMPORTANT NOTE: Be sure to modify the "cd" command below to switch
# to the directory in which you are currently working!
#
#------------------------------------------------------------------------
cd /home/faculty/amit/cs430/lab/PVM/parallel_sum
pvmrun -np 1 psum 10000 16
Here is a sample PBS batch script for a MPICH2 program.
#!/bin/sh
#PBS -l nodes=1:master+4:node
#------------------------------------------------------------------------
# setup for MPICH2
MPICH2_HOME=/usr/local/mpich2
export PATH=$MPICH2_HOME/bin:$PATH
export MANPATH=$MPICH2_HOME/man:$MANPATH
unset MPI_HOST
#------------------------------------------------------------------------
cd /home/amit/MPI/hello_world
mpdboot
mpiexec -n 4 spmd_hello_world
mpdallexit
Here is a sample PBS batch script for a LAM MPI program.
#!/bin/sh
#PBS -l nodes=1:master+4:node
# reset paths to point to LAM MPI
PATH=/usr/bin/:$PATH
MANPATH=/usr/share/man:/usr/man:$MANPATH
export PATH MANPATH
hash -r
cd /home/amit/MPI/hello_world
lamboot
mpiexec -n 4 spmd_hello_world
lamhalt -v
22

7.3 Submitting a PBS batch job script
The command qsub can be used to submit a PBS job. Please see the man page for qsub for avariety of options that can be used with it. Continuing with the example script psort.pbs fromthe previous subsection, we can submit it for execution as follows.
cd ~amit/cs430/lab/PVM/tools/
qsub psort.pbs
The status of a job can be checked with the qstat command. Using qstat -n also shows the nodesthat were allocated to your job.
[amit@onyx tools]:qsub psort.pbs qstat
[amit@onyx tools]:qstat
116.onyx.boisestate.edu
Job id Name User Time Use S Queue
---------------- ---------------- ---------------- -------- - -----
116.onyx psort.pbs amit 0 Q default
[amit@onyx tools]:qstat -n
onyx.boisestate.edu:
Req’d Req’d Elap
Job ID Username Queue Jobname SessID NDS TSK Memory Time S Time
--------------- -------- -------- ---------- ------ --- --- ------ ----- - -----
116.onyx.boises amit default psort.pbs -- 17 -- -- 00:30 R --
ws00/0+ws16/0+ws15/0+ws14/0+ws13/0+ws12/0+ws11/0+ws10/0+ws09/0+ws08/0+ws07/0
+ws06/0+ws05/0+ws04/0+ws03/0+ws02/0+ws01/0
[amit@onyx tools]:
You can delete jobs with the qdel command.
The standard output and standard error streams are redirected into the files psort.pbs.oxxx andpsort.pbs.exxx, where xxx is the job number assigned by PBS.
In case of an error in running the job after it has been accepted in the queue, PBS sends an emailto the user.
The following shows another example of submitting a job. This time we are specifying that the jobshould start anytime after the time specified in the qsub command, that we should be emailed atthe start and end of the job, and the jobs is to be named test1.
[amit@onyx parallel_sum]$ qsub -m be -a 0400 -N test1 psum.pbs
853.onyx.boisestate.edu
[amit@onyx parallel_sum]$ qstat -n
onyx.boisestate.edu:
Req’d Req’d Elap
Job ID Username Queue Jobname SessID NDS TSK Memory Time S Time
--------------- -------- -------- ---------- ------ --- --- ------ ----- - -----
853.onyx.boises amit default test1 -- 17 -- -- 00:30 W --
--
[amit@onyx parallel_sum]$ date
23

Thu Sep 9 03:57:33 MDT 2004
[amit@onyx parallel_sum]$
[amit@onyx parallel_sum]$ date
Thu Sep 9 04:00:23 MDT 2004
[amit@onyx parallel_sum]$ qstat -n
[amit@onyx parallel_sum]$ls -l test1.*853
-rw------- 1 amit faculty 2047 Sep 9 04:00 test1.e853
-rw------- 1 amit faculty 1850 Sep 9 04:00 test1.o853
----------------------Mail message-----------------------------------
Date: Thu, 9 Sep 2004 04:00:00 -0600
From: adm <[email protected]>
Subject: PBS JOB 853.onyx.boisestate.edu
PBS Job Id: 853.onyx.boisestate.edu
Job Name: test1
Begun execution
----------------------Mail message-----------------------------------
Date: Thu, 9 Sep 2004 04:00:02 -0600
From: adm <[email protected]>
Subject: PBS JOB 853.onyx.boisestate.edu
PBS Job Id: 853.onyx.boisestate.edu
Job Name: test1
Execution terminated
Exit_status=0
resources_used.cput=00:00:00
resources_used.mem=312kb
resources_used.vmem=1440kb
resources_used.walltime=00:00:02
---------------------------------------------------------------------
8 Debugging PVM programs
8.1 Using print statements
Any print statements in the process running on the local machine will who up on the console.However prints from processes running on remote machines will not show up on your console. Tobe able to see the output from all processes, you have three options.
• pvm control program: Run the application from the pvm control program using the spawn
command. Giving the appropriate options will redirect all output from all processes in yourapplication to the console. See the following example, which starts a master process thatfurther spawns 3 worker processes.
24

pvm> spawn -1 -> psum 100 3
spawn -1 -> psum 100 3
[1]
1 successful
t40002
pvm> [1:t40002] Starting 3 copies of spsum
[1:t40003] Sending result back to master
[1:t40004] Sending result back to master
[1:t40002] I got 33 from 0
[1:t40002] I got 33 from 1
[1:t40003] EOF
[1:t40005] Sending result back to master
[1:t40002] I got 33 from 2
[1:t40002] The total is 99
[1:t40002] EOF
[1:t40004] EOF
[1:t40005] EOF
[1] finished
pvm>
• XPVM: If you are running the PVM application under XPVM, then the output from allprocesses can be seen by going to the menu option Views --> Task Output, which showsthe output from the processes in a separate window.
• PVM daemon log: The PVM daemon maintains a log in the file /tmp/pvml.xxx, wherexxx is your numerical user id (find out your user id with the command id). This log filecontains the output from all the remote processes.
8.2 Using a debugger
Using the debugger is recommended when running a small number of processes. If you supplythe PvmTaskDebug flag in the function pvm spawn(...), it will attempt to start each task in aseparate window under the control of a debugger. The same effect can be achieved by clicking onthe PvmTaskDebug button in the Spawn subwindow in xpvm. Under LINUX the default debuggeris gdb. The default debugger can be changed by setting the PVM DEBUGGER environment variable.
9 How to Setup and use MPICH2 on your Linux PC or notebook
9.1 How to download and install MPICH2
• Download the tarball of the software from http://www-unix.mcs.anl.gov/mpi/mpich2/. Un-pack it somewhere, say in /usr/local/src with the command:
cd /usr/local/src
tar xzvf mpich2-xyz.tar.gz
25

• Assuming that you have Sun Java installed in /usr/local/java, I recommend the followingsteps tp build MPICH2.
mkdir /usr/local/src/mpich2
./configure --prefix=/usr/local/mpich2 --enable-mpe --enable-cxx \
--enable-romio --with-java-home=/usr/local/java/jre 2>&1 | tee configure.log
make 2>&1 | tee make.log
make install 2>&1 | tee install.log
• For more details on installation, please read the instructions in the README file in theMPICH2 source.
• Add /usr/local/mpich2/share/man in the /etc/man.config file to enable viewing manpages in KDE Konqueror.
9.2 Using MPICH2 on your computer
• Create MPI config file. Create the file ˜/.mpd.conf and enter one line that contains asecret code word. The commands to do this are shown below. Remember to put your ownsecret word in your file.
touch ~/.mpd.conf
echo "MPD_secretword=abracadabara" > ~/.mpd.conf
chmod 600 ~/.mpd.conf
• Setting up MPICH2. Assume that you installed MPICH2 in the folder/usr/local/mpich2 on your computer. Then add the following at the end of your ~/.bashrcfile and source it with the command source ~/.bashrc (or log in again).
#----------------------------------------------------------------------
# MPICH2 setup
export PATH=/usr/local/mpich2/bin:$PATH
export MANPATH=/usr/local/mpich2/man:$MANPATH
#----------------------------------------------------------------------
• Running a MPI program
– Start up the MPI daemon with the command: mpdboot &
– Next run your mpi program with the mpiexec command.
mpiexec -n 4 hello world
– Stop the MPI daemon with the command: mpdallexit
26

10 How to setup and use PVM on your Linux PC or laptop
10.1 Installing PVM
Most recent Red Hat Linux distributions (Red Hat 9, Red Hat Enterprise, Fedora Core 1, FedoraCore 2 etc) already have PVM in their installation. To check if you have the PVM software alreadyinstalled, use the following command:
rpm -qa | grep pvm
If the PVM software is not installed, then find them on the install CDs. Each Red Hat install CDtypically has a directory named RedHat/RPMS/ that has all the RPM packages. Mount the CD thathas the pvm rpm packages, change directory to the right directory on the CD and then issue thefollowing commands as superuser:
rpm -ivh pvm*
Or if you are using the GUI, you can just double click on the pvm RPMs to install the packages.
We have created custom packages of the PVM software for these distributions that have some en-hancements. We recommend that you replace the stock packages with the ones available on our web-site. See the information on local PVM packages here: http://cs.boisestate.edu/˜amit/teaching/430/CS430.html#sec11
10.2 Setting up the Environment
• Become superuser and add the following lines at the end of the /etc/bashrc file in yoursystem. The following lines set up the environment for PVM for all users on the system.
#-------------------------------------------------------
#
# PVM (Parallel Virtual Machine) Setup.
#
PVM_ARCH=LINUXI386
export PVM_ARCH
PVM_ROOT=/usr/share/pvm3
export PVM_ROOT
MANPATH=$MANPATH:$PVM_ROOT/man
export MANPATH
PVM_DPATH=$PVM_ROOT/lib/pvmd
export PVM_DPATH
PATH=$PATH:$PVM_ROOT/lib:$HOME/pvm3/bin/$PVM_ARCH:
export PATH
XPVM_ROOT=/usr/share/pvm3/xpvm
export XPVM_ROOT
PVM_TMP=/tmp
export PVM_TMP
#-------------------------------------------------------
Note that the following setup assumes that the PVM software is installed in the directory/usr/share/pvm3, which is true on beowulf.boisestate.edu. If you want to setup PVMon another system, find out where PVM is installed and adjust the directories as needed.
27

Now you can either login again for these settings to take effect or source the /etc/bashrc
file for the setting to take effect immediately as shown below.
source /etc/bashrc
Test out your settings by typing the which pvm command. It should show the path to thepvm control program.
[amit@kohinoor amit]:which pvm
/usr/bin/pvm
[amit@kohinoor amit]:
• You will also need to create some directories as follows.
mkdir ~/pvm3
mkdir ~/pvm3/bin
mkdir ~/pvm3/bin/LINUXI386
10.3 Running PVM programs
Running PVM programs on your PC or laptop is the same as on the cluster except you would notbe using the PBS system. You can use pvm console or xpvm directly. Note that all the processes inyour parallel program will run on your machine so you will not see any speedup (unless you havemore than one CPU!). However this is an excellent way to develop and test your code. You canoften resolve 90% to 95% of problems by running and testing on a single machine.
11 Documentation
Here are some sources of documentation:
• There are man pages for all MPI and PVM calls. For example, to read the man page forMPI Send(), type:
man MPI Send
In the KDE desktop, you can use Alt+F2 to get a command window, where you can typeman:MPI Send to get the man page in hypertext.
• The entire PVM book is available for download from the class home page (under the Handoutssection). Checkout the PVM website for lots of info.
http://www.csm.ornl.gov/pvm/
• The MPI reference book is also available online at
http://www.netlib.org/utk/papers/mpi-book/mpi-book.html
28

12 Dealing with obscure errors
1. If you see the following errors, then the pvm daemon is not running. You need to start thepvm daemon using the pvm or xpvm control program.
[amit@kohinoor lab]: psum 100 2
Starting 2 copies of spsum
libpvm [pid12121] /tmp/pvmd.221: No such file or directory
libpvm [pid12121] /tmp/pvmd.221: No such file or directory
libpvm [pid12121] /tmp/pvmd.221: No such file or directory
libpvm [pid12121]: pvm_mytid(): Can’t contact local daemon
libpvm [pid12121] /tmp/pvmd.221: No such file or directory
libpvm [pid12121] /tmp/pvmd.221: No such file or directory
libpvm [pid12121] /tmp/pvmd.221: No such file or directory
libpvm [pid12121]: pvm_spawn(): Can’t contact local daemon
Trouble spawning slaves. Aborting. Error codes are:
TID -140
TID -130
TID -120
TID -110
TID -100
TID -90
TID -80
TID -70
TID -60
TID -50
TID -40
TID -30
TID -20
TID -117
TID 00
TID 10
libpvm [pid12121] /tmp/pvmd.221: No such file or directory
[amit@kohinoor lab]:
2. If you see the following error message(s):
[amit@onyx PBS ~]:xpvm
xpvm: Using list of machines from PBS.
libpvm [pid21054] mksocs() connect: Connection refused
libpvm [pid21054] socket address tried: /tmp/pvmtmp020154.0
Connecting to PVMD already running... libpvm [pid21054] mksocs() connect: Connection refused
libpvm [pid21054] socket address tried: /tmp/pvmtmp020154.0
libpvm [pid21054] mksocs() connect: Connection refused
libpvm [pid21054] socket address tried: /tmp/pvmtmp020154.0
libpvm [pid21054] mksocs() connect: Connection refused
libpvm [pid21054] socket address tried: /tmp/pvmtmp020154.0
libpvm [pid21054]: pvm_mytid(): Can’t contact local daemon
libpvm [pid21054]: Error Joining PVM: Can’t contact local daemon
29

This means that even though the PVM system thinks that the pvmd is running, the daemonis not responding. This may happen because the system was rebooted (without a propershutdown) since you last started the pvmd daemon or at some point you unceremoniouslykilled the pvm programs and daemon.
Check if your pvmd is still running using the following command.
pdsh -a ps -ax | grep pvmd
Kill all instances of the pvmd using he following command:
pdsh -a killall -9 pvmd
Then go to the /tmp directory and look for the files whose name starts with pvm. Remove allsuch files that are owned by you. You can simply use:
pdsh -a rm -f /tmp/pvm*
Ignore warnings about failed deletes on other user’s pvm files. Now you should be able restartthe PVM daemon. You can use the command pvmclean to help you with this cleanup.
30