using powerpoint to create a virtual field trip
TRANSCRIPT
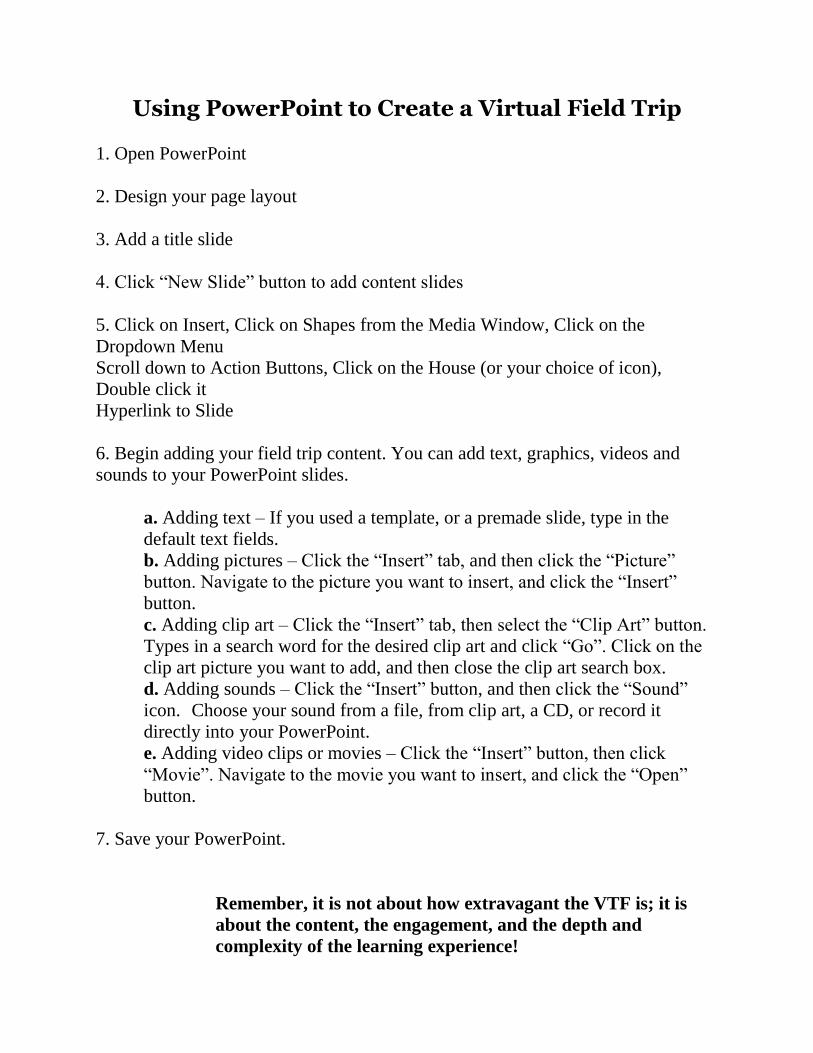
Using PowerPoint to Create a Virtual Field Trip
1. Open PowerPoint
2. Design your page layout
3. Add a title slide
4. Click “New Slide” button to add content slides
5. Click on Insert, Click on Shapes from the Media Window, Click on the
Dropdown Menu
Scroll down to Action Buttons, Click on the House (or your choice of icon),
Double click it
Hyperlink to Slide
6. Begin adding your field trip content. You can add text, graphics, videos and
sounds to your PowerPoint slides.
a. Adding text – If you used a template, or a premade slide, type in the
default text fields.
b. Adding pictures – Click the “Insert” tab, and then click the “Picture”
button. Navigate to the picture you want to insert, and click the “Insert”
button.
c. Adding clip art – Click the “Insert” tab, then select the “Clip Art” button.
Types in a search word for the desired clip art and click “Go”. Click on the
clip art picture you want to add, and then close the clip art search box.
d. Adding sounds – Click the “Insert” button, and then click the “Sound”
icon. Choose your sound from a file, from clip art, a CD, or record it
directly into your PowerPoint.
e. Adding video clips or movies – Click the “Insert” button, then click
“Movie”. Navigate to the movie you want to insert, and click the “Open”
button.
7. Save your PowerPoint.
Remember, it is not about how extravagant the VTF is; it is
about the content, the engagement, and the depth and
complexity of the learning experience!
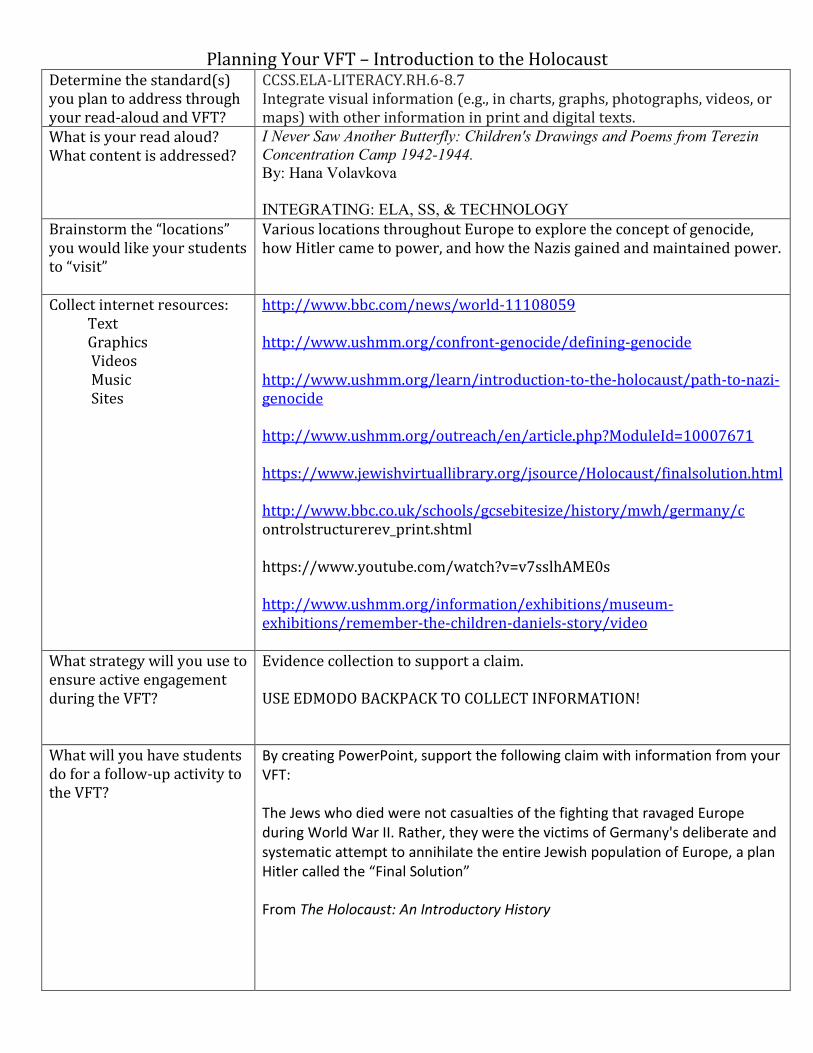
Planning Your VFT – Introduction to the Holocaust Determine the standard(s) you plan to address through your read-aloud and VFT?
CCSS.ELA-LITERACY.RH.6-8.7 Integrate visual information (e.g., in charts, graphs, photographs, videos, or maps) with other information in print and digital texts.
What is your read aloud? What content is addressed?
I Never Saw Another Butterfly: Children's Drawings and Poems from Terezin
Concentration Camp 1942-1944. By: Hana Volavkova
INTEGRATING: ELA, SS, & TECHNOLOGY Brainstorm the “locations” you would like your students to “visit”
Various locations throughout Europe to explore the concept of genocide, how Hitler came to power, and how the Nazis gained and maintained power.
Collect internet resources: Text Graphics Videos Music Sites
http://www.bbc.com/news/world-11108059 http://www.ushmm.org/confront-genocide/defining-genocide http://www.ushmm.org/learn/introduction-to-the-holocaust/path-to-nazi-genocide http://www.ushmm.org/outreach/en/article.php?ModuleId=10007671 https://www.jewishvirtuallibrary.org/jsource/Holocaust/finalsolution.html http://www.bbc.co.uk/schools/gcsebitesize/history/mwh/germany/c ontrolstructurerev_print.shtml https://www.youtube.com/watch?v=v7sslhAME0s http://www.ushmm.org/information/exhibitions/museum-exhibitions/remember-the-children-daniels-story/video
What strategy will you use to ensure active engagement during the VFT?
Evidence collection to support a claim. USE EDMODO BACKPACK TO COLLECT INFORMATION!
What will you have students do for a follow-up activity to the VFT?
By creating PowerPoint, support the following claim with information from your VFT:
The Jews who died were not casualties of the fighting that ravaged Europe during World War II. Rather, they were the victims of Germany's deliberate and systematic attempt to annihilate the entire Jewish population of Europe, a plan Hitler called the “Final Solution”
From The Holocaust: An Introductory History
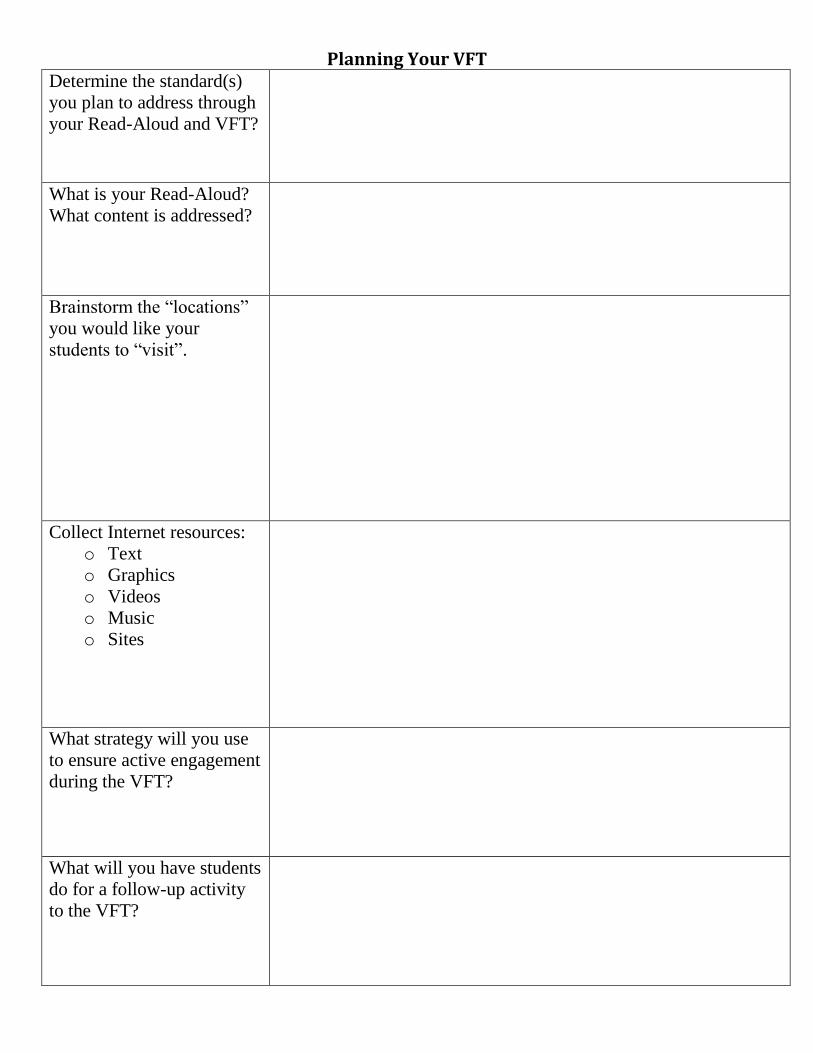
Planning Your VFT Determine the standard(s)
you plan to address through
your Read-Aloud and VFT?
What is your Read-Aloud?
What content is addressed?
Brainstorm the “locations”
you would like your
students to “visit”.
Collect Internet resources:
o Text
o Graphics
o Videos
o Music
o Sites
What strategy will you use
to ensure active engagement
during the VFT?
What will you have students
do for a follow-up activity
to the VFT?

Planning Your VFT

Planning Your VFT – Introduction to the Holocaust