using oracle big data preparation cloud service · using oracle big data preparation cloud service...
TRANSCRIPT

Oracle® CloudUsing Oracle Big Data Preparation Cloud Service
Release 16.4.5
E63106-15
December 2016
This guide describes how to repair, enrich, blend, and publishlarge data files in Oracle Big Data Preparation Cloud Service.

Oracle Cloud Using Oracle Big Data Preparation Cloud Service, Release 16.4.5
E63106-15
Copyright © 2015, 2017, Oracle and/or its affiliates. All rights reserved.
Primary Authors: Mark Moussa, Salome Clement
This software and related documentation are provided under a license agreement containing restrictions onuse and disclosure and are protected by intellectual property laws. Except as expressly permitted in yourlicense agreement or allowed by law, you may not use, copy, reproduce, translate, broadcast, modify, license,transmit, distribute, exhibit, perform, publish, or display any part, in any form, or by any means. Reverseengineering, disassembly, or decompilation of this software, unless required by law for interoperability, isprohibited.
The information contained herein is subject to change without notice and is not warranted to be error-free. Ifyou find any errors, please report them to us in writing.
If this is software or related documentation that is delivered to the U.S. Government or anyone licensing it onbehalf of the U.S. Government, then the following notice is applicable:
U.S. GOVERNMENT END USERS: Oracle programs, including any operating system, integrated software,any programs installed on the hardware, and/or documentation, delivered to U.S. Government end users are"commercial computer software" pursuant to the applicable Federal Acquisition Regulation and agency-specific supplemental regulations. As such, use, duplication, disclosure, modification, and adaptation of theprograms, including any operating system, integrated software, any programs installed on the hardware,and/or documentation, shall be subject to license terms and license restrictions applicable to the programs.No other rights are granted to the U.S. Government.
This software or hardware is developed for general use in a variety of information management applications.It is not developed or intended for use in any inherently dangerous applications, including applications thatmay create a risk of personal injury. If you use this software or hardware in dangerous applications, then youshall be responsible to take all appropriate fail-safe, backup, redundancy, and other measures to ensure itssafe use. Oracle Corporation and its affiliates disclaim any liability for any damages caused by use of thissoftware or hardware in dangerous applications.
Oracle and Java are registered trademarks of Oracle and/or its affiliates. Other names may be trademarks oftheir respective owners.
Intel and Intel Xeon are trademarks or registered trademarks of Intel Corporation. All SPARC trademarks areused under license and are trademarks or registered trademarks of SPARC International, Inc. AMD, Opteron,the AMD logo, and the AMD Opteron logo are trademarks or registered trademarks of Advanced MicroDevices. UNIX is a registered trademark of The Open Group.
This software or hardware and documentation may provide access to or information about content, products,and services from third parties. Oracle Corporation and its affiliates are not responsible for and expresslydisclaim all warranties of any kind with respect to third-party content, products, and services unlessotherwise set forth in an applicable agreement between you and Oracle. Oracle Corporation and its affiliateswill not be responsible for any loss, costs, or damages incurred due to your access to or use of third-partycontent, products, or services, except as set forth in an applicable agreement between you and Oracle.

Contents
Preface ............................................................................................................................................................... vii
Audience ...................................................................................................................................................... vii
Documentation Accessibility .................................................................................................................... vii
Related Resources ....................................................................................................................................... vii
Conventions................................................................................................................................................ viii
1 Getting Started with Oracle Big Data Preparation Cloud Service
About Oracle Big Data Preparation Cloud Service.............................................................................. 1-1
About Oracle Big Data Preparation Cloud Service Features.............................................................. 1-2
About the Components of Oracle Big Data Preparation Cloud Service........................................... 1-2
How to Begin with Oracle Big Data Preparation Cloud Service Subscriptions .............................. 1-3
Accessing Oracle Big Data Preparation Cloud Service ....................................................................... 1-3
About Oracle Big Data Preparation Cloud Service Roles and User Accounts ................................ 1-4
Understanding Information on the Home Page................................................................................... 1-4
2 Defining and Using Data Sources and Targets
Task Overview for Defining and Using Data Sources and Targets .................................................. 2-2
Creating Data Sources and Targets ........................................................................................................ 2-2
Adding an Existing Oracle Storage Cloud Service Instance as a Source or Target ................ 2-2
Adding an Existing Oracle Business Intelligence Cloud Service Instance as a Target .......... 2-3
Adding an Existing Oracle Data Visualization Cloud Service Instance as a Target .............. 2-4
Adding an Existing Oracle Database Cloud Service Instance as a Target ............................... 2-5
Adding a Local Hadoop Distributed File System as a Source or Target.................................. 2-6
Editing Data Sources and Targets .......................................................................................................... 2-7
Editing Source or Target Settings for Oracle Storage Cloud Service........................................ 2-7
Editing Target Settings for Oracle Business Intelligence Cloud Service .................................. 2-8
Editing Target Settings for Oracle Data Visualization Cloud Service ...................................... 2-9
Editing Target Settings for Oracle Database Cloud Service..................................................... 2-10
Editing Source or Target Settings for a Local Hadoop Distributed File System................... 2-11
Uploading Your Data ............................................................................................................................. 2-12
Downloading Results from Your Oracle Storage Cloud Service Directories................................. 2-12
Understanding the Supported File Types ........................................................................................... 2-13
iii

3 Working with the Catalog
Task Overview for Working with the Catalog ..................................................................................... 3-1
Creating Transforms................................................................................................................................. 3-2
Editing Transforms................................................................................................................................... 3-4
Renaming Transforms and Data Sources .............................................................................................. 3-4
Deleting Transforms and Data Sources ................................................................................................. 3-5
4 Creating a Transform Script
Understanding Transforms ..................................................................................................................... 4-1
Working with the Metadata View.......................................................................................................... 4-1
Working with the Sample Data View .................................................................................................... 4-2
Task Overview for Viewing Profile Metrics ......................................................................................... 4-3
Viewing the Data Set Level Metrics ....................................................................................................... 4-3
Viewing Metrics for a Specific Column................................................................................................. 4-4
Viewing Duplicates for a Specific Column ........................................................................................... 4-5
About Supported Data Languages......................................................................................................... 4-6
5 Authoring the Transform Script
Task Overview for Authoring the Transform Script ........................................................................... 5-1
Changing the Column Order .................................................................................................................. 5-2
Changing the Column Name .................................................................................................................. 5-2
Merging Columns..................................................................................................................................... 5-3
Filtering Transform Script Actions......................................................................................................... 5-3
Viewing and Applying Recommendations........................................................................................... 5-4
Viewing and Fixing Alerts....................................................................................................................... 5-4
Handling Sensitive Information ............................................................................................................. 5-5
Unifying Classified Data Values............................................................................................................. 5-5
Using Regular Expressions...................................................................................................................... 5-6
Extracting Data Using Regular Expressions................................................................................. 5-7
Replacing Data Using Regular Expressions ................................................................................. 5-8
Finding Duplicates in Your Data.......................................................................................................... 5-10
Checking for Null Data .......................................................................................................................... 5-10
Enriching Data Sets................................................................................................................................. 5-11
Understanding Recognized Patterns and Data Enrichments........................................................... 5-12
6 Adding Custom Reference Knowledge
Task Overview for Working with Custom Reference Knowledge.................................................... 6-1
Adding Custom Reference Knowledge Files........................................................................................ 6-2
Editing Custom Reference Knowledge Properties and Content ....................................................... 6-3
Deleting Custom Reference Knowledge Files ...................................................................................... 6-4
iv

7 Blending Data
Blending Multiple Data Files .................................................................................................................. 7-1
Setting Conditions in Your Blending Configuration........................................................................... 7-2
Selecting Columns in Your Blending Configuration........................................................................... 7-5
8 Publishing Data Results and Scheduling Policies
Publishing Transforms............................................................................................................................. 8-1
Understanding a Publishing Log ........................................................................................................... 8-2
Publishing Results to Oracle Business Intelligence Cloud Service.................................................... 8-3
Understanding Policies and Scheduling ............................................................................................... 8-3
Finding and Editing Policies ................................................................................................................... 8-4
Creating Policies ....................................................................................................................................... 8-4
Deleting Policies........................................................................................................................................ 8-5
9 Monitoring Jobs
Viewing Jobs.............................................................................................................................................. 9-1
Viewing Details for a Specific Job .......................................................................................................... 9-2
Understanding the Job Information....................................................................................................... 9-2
A Using Similarity Discovery
About Similarity Discovery..................................................................................................................... A-1
Web Service Call Syntax .......................................................................................................................... A-1
Using the Similarity Discovery Web Service ........................................................................................ A-1
Understanding the Similarity Discovery Prediction Results ............................................................. A-2
v

vi

Preface
Topics:
• Audience
• Documentation Accessibility
• Related Resources
• Conventions
AudienceUsing Oracle Big Data Preparation Cloud Service is intended for data analysts who wantto perform data repair, data enrichment, and publish data sets to Oracle Cloud, andfor administrators who want to perform these functions or monitor activities by anyuser on their cluster from a desktop or mobile device browser.
Documentation AccessibilityFor information about Oracle's commitment to accessibility, visit the OracleAccessibility Program website at http://www.oracle.com/pls/topic/lookup?ctx=acc&id=docacc.
Access to Oracle Support
Oracle customers that have purchased support have access to electronic supportthrough My Oracle Support. For information, visit http://www.oracle.com/pls/topic/lookup?ctx=acc&id=info or visit http://www.oracle.com/pls/topic/lookup?ctx=acc&id=trs if you are hearing impaired.
Related ResourcesFor more information, see these Oracle resources:
• About Oracle Cloud in Getting Started with Oracle Cloud.
• What's New for Oracle Big Data Preparation Cloud Service.
• Known Issues for Big Data Preparation Cloud Service.
• Accessing Oracle Storage Cloud Service in Using Oracle Storage Cloud Service.
• Getting Started with Visual Analyzer in Using Oracle Business Intelligence CloudService.
vii

• Oracle Cloud
http://cloud.oracle.com
ConventionsThe following text conventions are used in this document:
Convention Meaning
boldface Boldface type indicates graphical user interface elements associatedwith an action, or terms defined in text or the glossary.
italic Italic type indicates book titles, emphasis, or placeholder variables forwhich you supply particular values.
monospace Monospace type indicates commands within a paragraph, URLs, codein examples, text that appears on the screen, or text that you enter.
viii
1Getting Started with Oracle Big Data
Preparation Cloud Service
Topics:
• About Oracle Big Data Preparation Cloud Service
• About Oracle Big Data Preparation Cloud Service Features
• About the Components of Oracle Big Data Preparation Cloud Service
• How to Begin with Oracle Big Data Preparation Cloud Service Subscriptions
• Accessing Oracle Big Data Preparation Cloud Service
• About Oracle Big Data Preparation Cloud Service Roles and User Accounts
• Understanding Information on the Home Page
About Oracle Big Data Preparation Cloud ServiceOracle Big Data Preparation Cloud Service is a comprehensive and secure solutionthat lets you automate and streamline data ingestion and enrichment in the cloud. Itsimplifies and shortens the process of data importing, cleansing, semantic indexing,blending, and publishing, while avoiding time-consuming manual intervention.
Video
The service interface provides an intuitive way for you to prepare unstructured, semi-structured, and structured data publishing in the cloud and for downstreamprocessing. Create transform scripts quickly in a collaborative machine-userexperience because the process of ingesting varied data sets is automated and efficient.You can also call scripts as an object using a REST API.
Oracle Big Data Preparation Cloud Service includes a Knowledge Graph. TheKnowledge Graph is a knowledge base repository used by the service’s semanticdiscovery engines to decipher and enrich your data, as well as to make suggestions toyour data. The Knowledge Graph includes reference data as lists of identifiedinformation and language models, patterns, and statistical criteria.
Oracle Big Data Preparation Cloud Service is built natively in Hadoop and Spark as aPlatform as a Service (PaaS) product for iterative machine learning in a clusteredcompute environment. The data enrichment capabilities of the service are based onYAGO3 derived real-world knowledge, reliable semantic technology, and enhancedwith customer-specific reference data.
Getting Started with Oracle Big Data Preparation Cloud Service 1-1

About Oracle Big Data Preparation Cloud Service FeaturesOracle Big Data Preparation Cloud Service provides a rich variety of features that letyou save time and money.
Listed below are some of the key features:
• Data ingestion
• Cleansing
• Statistical profiling
• Semantic indexing
• Metadata enrichment
• Cross-source enrichment
• Blending
• Custom reference knowledge importing
Profile metrics and visualizations are important features of Oracle Big DataPreparation Cloud Service. When a data set is ingested, you have visual access to theprofile results and summary of each column that was profiled, and the results ofduplicate entity analysis completed on your entire data set.
Visualize governance tasks on the service Home page with easily understood runtimemetrics, data health reports, and alerts. Keep track of your transforms and ensure thatfiles are processed correctly. See the entire data pipeline, from ingestion to enrichmentand publishing, including automated execution and discovery of sensitive data.
Oracle Big Data Preparation Cloud Service also lets you to publish your enriched databy scheduling and executing a service, where you can specify the target of your choiceand the frequency or schedule on which your data set is exported.
About the Components of Oracle Big Data Preparation Cloud ServiceOracle Big Data Preparation Cloud Service is a part of the platform service offerings inOracle Public Cloud Services.
Oracle Big Data Preparation Cloud Service consists of the following components:
• Home: The default landing page where you can monitor transform activity andview a variety of statistics. These statistics include the number of sources in yourservice instance, total data rows processed, transforms run, and the number ofjobs succeeded or running, all in time slices of 30 days, 7 days, or 24 hours. Createa source or a transform, or upload data from the Quickstart panel. Access othertypes of documentation from the Resources bar.
For more information on metrics for your transforms, see UnderstandingInformation on the Home Page.
For more information on creating a source, see Creating Data Sources.
For more information on creating a transform, see Creating Transforms.
For more information on uploading data, see Uploading Your Data.
About Oracle Big Data Preparation Cloud Service Features
1-2 Oracle Cloud Using Oracle Big Data Preparation Cloud Service

• Jobs: A searchable portal where you can view, sort, and filter jobs running onyour service instance. For more information on the Jobs page, see ViewingCompleted Pending and Running Jobs.
• Catalog: A portal where you can view a searchable list of sources and profilesnapshots for data sets that you’re processing in the system. You can also create oredit transform services or data sources, and upload or download data sets fromthis page. For more information on the Catalog, see Task Overview for Workingwith the Catalog.
• Transform Authoring: A portal where you can author a transform script to repairor enrich your data set. Access the main authoring page when you create a newtransform or edit an existing transform.
For more information on transform script authoring, see Task Overview forAuthoring the Transform Script.
• Knowledge: A searchable portal for adding and managing custom referenceknowledge files on your service instance’s processing engine. For moreinformation on custom reference knowledge, see Adding Custom ReferenceKnowledge.
• Policies: A searchable portal for creating and editing policies. Use policies to runtransforms automatically against specific data files or directories at a set scheduleor cadence, and define a target where data sources are published. For moreinformation on policies, see Understanding Policies and Scheduling.
How to Begin with Oracle Big Data Preparation Cloud ServiceSubscriptions
Here’s how to get started with Oracle Big Data Preparation Cloud Service trials andpaid subscriptions:
1. Purchase a subscription.
• For a trial, see Subscribing to an Oracle Cloud Service Trial in Getting Startedwith Oracle Cloud.
• For subscriptions, see Buying a Metered Subscription to an Oracle CloudService or Buying a Non-Metered Subscription to an Oracle Cloud Service inGetting Started with Oracle Cloud. If you’ve subscribed to an entitlement tocreate instances of an Oracle Cloud service, then create service instances basedon your business needs.
2. Learn about Oracle Big Data Preparation Cloud Service users and roles. See AboutOracle Big Data Preparation Cloud Service Users.
3. Create accounts for your users and assign them appropriate privileges and roles.See Adding Users and Assigning Roles in Getting Started with Oracle Cloud.
Accessing Oracle Big Data Preparation Cloud ServiceYou can access Oracle Big Data Preparation Cloud Service through the mails youreceived after subscribing, or through a service web console.
To access Oracle Big Data Preparation Cloud Service:
1. Log in to Oracle Cloud.
How to Begin with Oracle Big Data Preparation Cloud Service Subscriptions
Getting Started with Oracle Big Data Preparation Cloud Service 1-3
2. From the Platform tab, select Big Data Preparation.
Alternatively, go to the service URL provided by email or by your administrator.
When you first access Oracle Big Data Preparation Cloud Service, Oracle Clouddisplays the Home page.
About Oracle Big Data Preparation Cloud Service Roles and UserAccounts
There are various roles to which a user can be assigned to access, administer, and useOracle Big Data Preparation Cloud Service.
Oracle Big Data Preparation Cloud Service users comprise several distinct roles:
• Data analyst: Let’s you create sources, transforms, upload and download datafiles, perform data repair and edit metadata, create policies, and publish to OracleCloud.
• Administrator: Let’s you perform all of the preceding functions and edit anyobject created by a user on your cluster.
• Entitlement Administrator or Service Entitlement Administrator: Creates ordeletes service instances if you've subscribed to an entitlement to create instancesof Oracle Big Data Preparation Cloud Service.
You can’t assign credentials or edit user information within Oracle Big DataPreparation Cloud Service. To define users and access rights, see Oracle Cloud UserRoles and Privileges in Getting Started with Oracle Cloud.
Understanding Information on the Home PageThe Oracle Big Data Preparation Cloud Service Home page is an interactive portal foryou to monitor all transform activity in the service.
The Home page consists of several graphs with various real-time metrics from serviceexecutions including the following:
• Total jobs
• Sources on your cluster
• Number of rows processed
• Percentage of successfully processed rows
• Total transforms for the data sets that you process in the service
Filter your data results by time slices of 30 days, 7 days, or 24 hours.
About Oracle Big Data Preparation Cloud Service Roles and User Accounts
1-4 Oracle Cloud Using Oracle Big Data Preparation Cloud Service

The Quickstart panel provides a convenient launching point to create a source ortransform, or to upload a data file from your local environment after you’ve defined asource.
The Activity Stream is a set of notifications that displays the current status of an actionthat you take on the service cluster, such as creating a transform or running a policy.
The Resources bar provides several documentation resources for Oracle Big DataPreparation Cloud Service.
Understanding Information on the Home Page
Getting Started with Oracle Big Data Preparation Cloud Service 1-5

Understanding Information on the Home Page
1-6 Using Oracle Big Data Preparation Cloud Service
2Defining and Using Data Sources and
Targets
Add new data sources to your Catalog. These data sources can store the data sets thatyou want to prepare and enhance, or the results of processing those data sets. You canalso upload files containing your data to a target, or download the resulting data setsafter running a transform from a source to your local environment.
Topics:
• Task Overview for Defining and Using Data Sources and Targets
• Creating Data Sources and Targets
– Adding an Existing Oracle Storage Cloud Service Instance as a Source orTarget
– Adding an Existing Oracle Business Intelligence Cloud Service Instance as aTarget
– Adding an Existing Oracle Data Visualization Cloud Service Instance as aTarget
– Adding an Existing Oracle Database Cloud Service Instance as a Target
– Adding a Hadoop Distributed File System as a Source or Target
• Editing Data Sources and Targets
– Editing Source or Target Settings for Oracle Storage Cloud Service
– Editing Target Settings for Oracle Business Intelligence Cloud Service
– Editing Target Settings for Oracle Data Visualization Cloud Service
– Editing Target Settings for Oracle Database Cloud Service
– Editing Source or Target Settings for a Hadoop Distributed File System
• Uploading Your Data
• Downloading Results from Your Oracle Storage Cloud Service Directories
• Understanding the Supported File Types
Defining and Using Data Sources and Targets 2-1

Task Overview for Defining and Using Data Sources and TargetsData sources let you store sample data sets and complete raw data sets. Use targets topublish the resulting data sets from running a transform, and upload and downloaddata from the data sources that you define in the Catalog.
Task Description More Information
Create a source or target. Add new data sources to yourCatalog. Use these sources to storethe sample files that you use tocreate transforms, the real data setsthat you want to prepare andenhance, or the results of running atransform on a data set.
Create data sources or targets usingOracle Storage Cloud Service,Oracle Business Intelligence CloudService, Oracle Data VisualizationCloud Service, Oracle DatabaseCloud Service, or a HadoopDistributed File System.
Adding an Existing Oracle StorageCloud Service Instance as a Sourceor Target
Adding an Existing Oracle BusinessIntelligence Cloud Service Instanceas a Target
Adding an Existing Oracle DataVisualization Cloud ServiceInstance as a Target
Adding an Existing Oracle DatabaseCloud Service Instance as a Target
Adding a Hadoop Distributed FileSystem as a Source or Target
Edit a source or target. Edit the connection settings for adata source or target that you’vealready added to the Catalog.
Editing Data Sources and Targets
Upload data. Upload data sets to any of theOracle Storage Cloud Service datasources that you defined in yourCatalog.
Uploading Your Data
Download data. Download files from any of theOracle Storage Cloud Service datasources that you defined in yourCatalog.
Downloading Results from YourOracle Storage Cloud ServiceDirectories
Creating Data Sources and TargetsAdd data sources to the Catalog. Use these data sources to store raw data source filesthat you want to prepare and enhance, or the results of running a transform on a dataset.
You can create the following data sources and targets:
Adding an Existing Oracle Storage Cloud Service Instance as a Source or TargetCreate a data source that uses files stored in an existing Oracle Storage Cloud Serviceinstance. Use this storage server as the source of the data that you want to repair andenrich, or use it as the target where you store the repaired and enriched data.
Video
To add an existing Oracle Storage Cloud Service instance as a source or target:
1. On the Home or Catalog page, click Create Source.
The Create Source page appears.
Task Overview for Defining and Using Data Sources and Targets
2-2 Oracle Cloud Using Oracle Big Data Preparation Cloud Service

2. In the Name field, enter a name to identify the source.
The name must not contain spaces. If you enter a space, then the applicationchanges it to an underscore.
3. From the Type drop-down list, select Oracle Cloud Storage .
4. Provide your credentials to access your Oracle Storage Cloud Service instance.
This information appears in the email that you receive when you activate yourOracle Storage Cloud Service account.
a. In the Service URL field, enter the URL.
This URL is the Service REST Endpoint that appears in the Overview tab of yourOracle Cloud My Account page.
b. In the Username field, enter the user name.
This is the user name specified in the email that you receive when you createyour account.
c. In the Password field, enter the password.
This is the password specified in the email that you receive when you createyour account.
5. Optionally, click Test to verify that you entered the correct data, and that theconnection to the service works.
A confirmation message appears.
6. Click Save.
The Catalog page appears.
The Catalog now shows the source that you created. Obtain the data that you want toprepare and enrich from this source, and use the same location as a target to publishyour processed data.
Adding an Existing Oracle Business Intelligence Cloud Service Instance as a TargetPublish a repaired or enriched data file to an existing Oracle Business IntelligenceCloud Service instance.
To add an existing Oracle Business Intelligence Cloud Service instance as a target:
1. On the Home or Catalog page, click Create Source.
The Create Source page appears.
2. In the Name field, enter a name to identify the source.
The name must not contain spaces. If you enter a space, then the applicationchanges it to an underscore.
3. From the Type drop-down list, select Oracle BICS .
4. Provide your credentials to access your Oracle Business Intelligence Cloud Serviceinstance.
Creating Data Sources and Targets
Defining and Using Data Sources and Targets 2-3

This information appears in the email that you receive when you activate yourOracle Business Intelligence Cloud Service account.
a. In the Service URL field, enter the URL .
This URL is the Service REST Endpoint for the DataSync API of your OracleBusiness Intelligence Cloud Service instance. Most often, this REST Endpoint isthe URL for your Oracle Business Intelligence Cloud Service instance withoutany values after the .com extension.
For example, if your Oracle Business Intelligence Cloud Service instance is athttp://service-domain.analytics.us2.oraclecloud.com:443, thenthe corresponding DataSync API REST Endpoint for your service is http://service-domain.analytics.us2.oraclecloud.com.
b. In the Username field, enter the user name.
This is the user name specified in the email that you receive when you createyour account.
c. In the Password field, enter the password.
This is the password specified in the email that you receive when you createyour account.
d. In the Domain field, enter the domain name.
This is the domain name specified in the email that you receive when you createyour account.
5. Optionally, click Test to verify that you entered the correct data, and that theconnection to the service works.
A confirmation message appears.
6. Click Save.
The Catalog page appears.
The Catalog now shows the target that you created. Use this target to publish yourenhanced or repaired data sets and analyze them using the tools available in OracleBusiness Intelligence Cloud Service.
When you publish your data, Oracle Big Data Preparation Cloud Service creates atable in the repository of your Oracle Business Intelligence Cloud Service instance.From this table, you must create fact tables and dimension tables containing columnsthat store the data of your data model. You can then use Visual Analyzer to create andanalyze your data.
To learn more about publishing to Oracle Business Intelligence Cloud Service, see Publishing Results to Oracle Business Intelligence Cloud Service.
Adding an Existing Oracle Data Visualization Cloud Service Instance as a TargetCreate a data source using an existing Oracle Data Visualization Cloud Serviceinstance. Use this service instance as the target where you publish the repaired andenriched data.
To add an existing Oracle Data Visualization Cloud Service instance as a target:
Creating Data Sources and Targets
2-4 Oracle Cloud Using Oracle Big Data Preparation Cloud Service

1. On the Home or Catalog page, click Create Source.
The Create Source page appears.
2. In the Name field, enter a name to identify the source.
The name must not contain spaces. If you enter a space, then the applicationchanges it to an underscore.
3. From the Type drop-down list, select Oracle DVCS .
4. Provide your credentials to access your Oracle Data Visualization Cloud Serviceinstance.
This information appears in the email that you receive when you activate yourOracle Data Visualization Cloud Service account.
a. In the Service URL field, enter the URL.
This URL is the Service REST Endpoint that appears in the Overview tab of yourOracle Cloud My Account page.
b. In the Username field, enter the user name.
This is the user name specified in the email that you receive when you createyour account.
c. In the Password field, enter the password.
This is the password specified in the email that you receive when you createyour account.
d. In the Domain field, enter the domain name.
This is the domain name specified in the email that you receive when you createyour account.
5. Optionally, click Test to verify that you entered the correct data, and that theconnection to the service works.
A confirmation message appears.
6. Click Save.
The Catalog page appears.
The Catalog now shows the source you created. You can use the data source as atarget to publish your processed data. Use this target to analyze data using the toolsavailable in Oracle Data Visualization Cloud Service.
To learn more about publishing to Oracle Data Visualization Cloud Service, see Adding Your Own Data in Using Oracle Data Visualization Cloud Service.
Adding an Existing Oracle Database Cloud Service Instance as a TargetCreate a data source using an existing Oracle Database Cloud Service instance. Usethis service instance as the target where you publish repaired and enriched data.
To add an existing Oracle Database Cloud Service instance as a target:
Creating Data Sources and Targets
Defining and Using Data Sources and Targets 2-5

1. On the Home or Catalog page, click Create Source.
The Create Source page appears.
2. In the Name field, enter a name to identify the source.
The name must not contain spaces. If you enter a space, then the applicationchanges it to an underscore.
3. From the Type drop-down list, select Oracle DBCS .
4. Provide your credentials to access your Oracle Database Cloud Service instance.
This information appears in the email that you receive when you activate yourOracle Database Cloud Service account.
a. In the JDBC Connection field, enter the JDBC database connection value.
This connection is the value that appears in the Overview tab of your OracleCloud My Account page. The JDBC connection is in the formjdbc:oracle:thin:@<IP address>:<port>/PDB1.<service name>.
b. In the Username field, enter the user name.
This is the user name specified in the email that you receive when you createyour account.
c. In the Password field, enter the password.
This is the password specified in the email that you receive when you createyour account.
d. In the Driver field, confirm that a driver is provided to access your databaseinstance.
5. Optionally, click Test to verify that you entered the correct data, and that theconnection to the service works.
A confirmation message appears.
6. Click Save.
The Catalog page appears.
The Catalog now shows the data source that you created. Use this target to publishyour enhanced or repaired data sets and analyze them in Oracle Database CloudService.
Adding a Local Hadoop Distributed File System as a Source or TargetCreate a data source that uses files stored in a Local Hadoop Distributed File System.Use this storage server as the source of the data that you want to prepare and enhance,or use it as the target where you publish the prepared and enriched data.
To add a local Hadoop Distributed File System as a source or target:
1. On the Home or Catalog page, click Create Source.
The Create Source page appears.
Creating Data Sources and Targets
2-6 Oracle Cloud Using Oracle Big Data Preparation Cloud Service

2. In the Name field., enter a name to identify the source.
The name must not contain spaces. If you enter a space, then the applicationchanges it to an underscore.
3. From the Type drop-down list, select BDP HDFS.
4. Provide the information to access your Hadoop Distributed File System:
a. In the Service URL field, enter the URL of the Hadoop server.
This URL starts with hdfs://, then it specifies the name of the server, andends with the port. For example, hdfs://hadoopserver:8020.
b. In the Username field, enter the user name.
This is the user name specified in the email that you receive when you createyour account.
c. In the Password field, enter the password.
This is the password specified in the email that you receive when you createyour account.
5. Optionally, click Test to verify that you entered the correct data, and that theconnection to the service works.
A confirmation message appears.
6. Click Save.
The Catalog page appears.
The Catalog now shows the source that you created. Obtain the data that you want toprepare and enrich from this source, and use the same location as a target to publishyour processed data.
Editing Data Sources and TargetsEdit the connection settings of data sources that are listed in the Catalog. Use thesedata sources to store raw source data files or the data sets that you’ve prepared andenriched after running a transform.
Edit settings of the following data sources:
Editing Source or Target Settings for Oracle Storage Cloud ServiceEdit properties of existing Oracle Storage Cloud Service data sources and targets listedin the Catalog. Use this storage server as the source of the data that you want to repairand enrich, or use it as the target where you store the repaired and enriched data.
To edit an existing Oracle Storage Cloud Service source or target:
1. On the Catalog page, locate the Oracle Storage Cloud Service source or targetwhose properties you want to edit.
2. Click the More Actions icon. A menu with the available actions for thatelement of the Catalog appears.
Editing Data Sources and Targets
Defining and Using Data Sources and Targets 2-7

3. Select Edit.
The Edit Source page appears.
4. Edit the source properties of the Oracle Storage Cloud Service instance that youwant to change:
• In the Name field, enter a new name to identify the source. The name must notcontain spaces. If you enter a space, then the application changes it to anunderscore.
• In the Service URL field, enter a new URL. This URL is the Service RESTEndpoint that appears in the Overview tab of your Oracle Cloud My Accountpage.
• In the Username field, enter a new user name. This is the user name specifiedin the email that you receive when you create your account.
• In the Password field, enter a new password. This is the password specified inthe email that you receive when you create your account.
5. Optionally, click Test to verify that you entered the correct data, and that theconnection to the service works.
A confirmation message appears.
6. Click Save.
The Catalog page appears.
The Catalog now shows the edited source that you created. Obtain the data that youwant to prepare and enrich from this source, and use the same location as a target topublish your processed data.
Editing Target Settings for Oracle Business Intelligence Cloud ServiceEdit properties of existing Oracle Business Intelligence Cloud Service targets listed inthe Catalog. Use a Oracle Business Intelligence Cloud Service target to publishrepaired and enriched data.
To edit an existing Oracle Business Intelligence Cloud Service target:
1. On the Catalog page, locate the Oracle Business Intelligence Cloud Service targetwhose properties you want to edit.
2. Click the More Actions icon. A menu with the available actions for thatelement of the Catalog appears.
3. Select Edit.
The Edit Source page appears.
4. Edit the source properties of the Oracle Business Intelligence Cloud Serviceinstance that you want to change:
• In the Name field, enter a new name to identify the source. The name must notcontain spaces. If you enter a space, then the application changes it to anunderscore.
Editing Data Sources and Targets
2-8 Oracle Cloud Using Oracle Big Data Preparation Cloud Service

• In the Service URL field, enter a new URL. This URL is the Service RESTEndpoint that appears in the Overview tab of your Oracle Cloud My Accountpage.
• In the Username field, enter a new user name. This is the user name specifiedin the email that you receive when you create your account.
• In the Password field, enter a new password. This is the password specified inthe email that you receive when you create your account.
• In the Domain field, enter the domain name. This is the domain namespecified in the email that you receive when you create your account.
5. Optionally, click Test to verify that you entered the correct data, and that theconnection to the service works.
A confirmation message appears.
6. Click Save.
The Catalog page appears.
The Catalog now shows the edited target that you created. Use this Oracle BusinessIntelligence Cloud Service instance as a target to publish your processed data.
Editing Target Settings for Oracle Data Visualization Cloud ServiceEdit properties of existing Oracle Data Visualization Cloud Service data sources listedin the Catalog. Use this instance as the target where you store the repaired andenriched data.
To edit an existing Oracle Data Visualization Cloud Service target:
1. On the Catalog page, locate the Oracle Data Visualization Cloud Service targetwhose properties you want to edit.
2. Click the More Actions icon. A menu with the available actions for thatelement of the Catalog appears.
3. Select Edit.
The Edit Source page appears.
4. Edit the source properties of the Oracle Data Visualization Cloud Service instancethat you want to change:
• In the Name field, enter a new name to identify the source. The name must notcontain spaces. If you enter a space, then the application changes it to anunderscore.
• In the Service URL field, enter a new URL. This URL is the Service RESTEndpoint that appears in the Overview tab of your Oracle Cloud My Accountpage.
• In the Username field, enter a new user name. This is the user name specifiedin the email that you receive when you create your account.
• In the Password field, enter a new password. This is the password specified inthe email that you receive when you create your account.
Editing Data Sources and Targets
Defining and Using Data Sources and Targets 2-9

• In the Domain field, enter the domain name. This is the domain namespecified in the email that you receive when you create your account.
5. Optionally, click Test to verify that you entered the correct data, and that theconnection to the service works.
A confirmation message appears.
6. Click Save.
The Catalog page appears.
The Catalog now shows the edited source that you created. Use this target to publishyour processed data.
Editing Target Settings for Oracle Database Cloud ServiceEdit properties of existing Oracle Database Cloud Service data source targets listed inthe Catalog. Use this database instance as the target where you publish the repairedand enriched data.
To edit an existing Oracle Database Cloud Service target:
1. On the Catalog page, locate the Oracle Database Cloud Service target whoseproperties you want to edit.
2. Click the More Actions icon. A menu with the available actions for thatelement of the Catalog appears.
3. Select Edit.
The Edit Source page appears.
4. Edit the source properties of the Oracle Database Cloud Service instance that youwant to change:
• In the Name field, enter a new name to identify the source. The name must notcontain spaces. If you enter a space, then the application changes it to anunderscore.
• In the JDBC Connection field, enter a new connection. This connection is thevalue that appears in the Overview tab of your Oracle Cloud My Accountpage. The JDBC connection is in the form jdbc:oracle:thin:@<IPaddress>:<port>/PDB1.<service name>.
• In the Username field, enter a new user name. This is the user name specifiedin the email that you receive when you create your account.
• In the Password field, enter a new password. This is the password specified inthe email that you receive when you create your account.
• In the Driver field, confirm that a driver is provided to access your databaseinstance.
5. Optionally, click Test to verify that you entered the correct data, and that theconnection to the service works.
A confirmation message appears.
Editing Data Sources and Targets
2-10 Oracle Cloud Using Oracle Big Data Preparation Cloud Service

6. Click Save.
The Catalog page appears.
The Catalog now shows the edited data source that you created. Use this data sourceas a target to publish your processed data.
Editing Source or Target Settings for a Local Hadoop Distributed File SystemEdit properties of the local Hadoop Distributed File System that’s listed as a datasource in the Catalog. Use this storage server as the source of the data that you want torepair and enrich, or use it as the target where you store the repaired and enricheddata.
To edit a local Hadoop Distributed File System source or target:
1. On the Catalog page, locate the Hadoop Distributed File System source or targetwhose properties you want to edit.
2. Click the More Actions icon. A menu with the available actions for thatelement of the Catalog appears.
3. Select Edit.
The Edit Source page appears.
4. Edit the source properties of the Hadoop Distributed File System you want tochange:
• In the Name field, enter a new name to identify the source. The name must notcontain spaces. If you enter a space, then the application changes it to anunderscore.
• In the Service URL field, enter a new URL. This URL starts with hdfs://,then it specifies the name of the server, and ends with the port. For example,hdfs://hadoopserver:8020
• In the Username field, enter a new user name. This is the user name specifiedin the email that you receive when you create your account.
• In the Password field, enter a new password. This is the password specified inthe email that you receive when you create your account.
5. Optionally, click Test to verify that you entered the correct data, and that theconnection to the service works.
A confirmation message appears.
6. Click Save.
The Catalog page appears.
The Catalog now shows the edited source that you created. Obtain the data that youwant to prepare and enrich from this source, and use the same location as a target topublish your processed data.
Editing Data Sources and Targets
Defining and Using Data Sources and Targets 2-11

Uploading Your DataUpload the files that you use to create your transforms to any Oracle Storage CloudService or Hadoop distributed file system. You can upload excel files or commaseparated values (CSV) files.
Video
To upload your data:
1. On the Home page, click Upload Data, or from the Catalog page, click Upload.
The Upload page appears.
2. Click the Select button located next to the Source field.
The Select dialog box appears.
3. From the Source drop-down list, click the source where you want to upload thedata.
A list of directories for the selected source appears in the Select Directory field.
4. In the Select Directory field, go to the directory where you want your local datafile to be uploaded, select the directory, and then click OK.
5. Click the Browse button located next to the File field to select the file that you wantto upload. A file browser appears.
6. In your local file system, go to the file(s) that you want to upload, select the file(s),and then click Open. The file browser closes and the File field displays the selectedfile(s).
7. Click Upload.
A confirmation message appears when your data file is uploaded. The selected fileis uploaded to the selected source.
8. Click OK.
You can now use this file as a basis to create new transforms.
If you want to upload another file, then click Upload again. When you finishuploading your files, go back to the Catalog page.
Downloading Results from Your Oracle Storage Cloud Service DirectoriesDownload the data set that results from running a transform. When you run atransform, the resulting enriched data is stored in the source that you specify. You canlater download the file that contains these results from the source where it was stored.
To download results from your Oracle Storage Cloud Service directories:
1. On the Catalog page, click Download Data.
The Download page appears.
2. Click the Select button located next to the Source field.
The Select dialog box appears.
Uploading Your Data
2-12 Oracle Cloud Using Oracle Big Data Preparation Cloud Service

3. From the Source drop-down list, select the source from which you want todownload the data.
A list of directories for the selected source appears in the Select File field.
4. In the Select File field, go to the directory that contains your results, select yourdata file(s), and then click OK.
The Select dialog box closes and the Source field displays the selected file(s).
5. Click Download.
The download process starts.
The selected file is downloaded to your browser download directory.
Understanding the Supported File TypesProvide your data using different file types. Additionally, you can compress your filesusing different file compression formats.
Supported File Types
Use any of these types of files.
Description Extensions
Text files: log files, delimited files, clickstream, anderror logs
TXT
Microsoft Office Excel files XLS
XLSX
Comma-delimited files CSV
Tab-delimited files TSV
Simple and complex JavaScript Object Notation files JSON
XML files XML
Rich Text Format files RTF
Adobe PDF files PDF
Microsoft Office Word files DOC
DOCX
EssBase log files LOG
Splunk log files LOG
SAP poly-structured files SAP
Supported Compression Formats
Use any of the following formats to compress the files that contain your data.
Understanding the Supported File Types
Defining and Using Data Sources and Targets 2-13

Description Extensions
Zip compression file ZIP
Bzip compression file Bz2
Gzip compression file GZ
TAR archive file TAR
Compressed TAR file TAR.GZ
TGZ
TAR.BZ2
TBZ2
Unsupported File Types
The following file types and compression formats aren’t supported. If you select filesof this type, then an error message appears.
Description Extensions
Microsoft Office Powerpoint PPTX
PPTS
PPSX
Executable files EXE
Image files JPG
JPEG
BMP
GIF
TIF
Media files MP3
MP4
MOV
Shell scripts SH
Compression formats 7Z
JAR
Understanding the Supported File Types
2-14 Oracle Cloud Using Oracle Big Data Preparation Cloud Service

3Working with the Catalog
The Catalog stores the data sources and transforms that you define. From the Catalog,you define new data sources and transforms, and manage them. You can search theCatalog, filter the Catalog list to display just transforms or just sources, and sort theCatalog contents by data or name.
Topics:
• Task Overview for Working with the Catalog
• Creating Transforms
• Editing Transforms
• Renaming Transforms and Data Sources
• Deleting Transforms and Data Sources
Task Overview for Working with the CatalogThe Catalog is a repository that lets you manage the sources and transforms. Create,edit, rename, and publish new sources and transforms. You can also filter and sort thelist of transforms, or run a search to find a specific transform.
Task Description More Information
Create Create new transforms and data sources,and manage them from the Catalog.
Creating Transforms
Creating Data Sources and Targets
Edit Edit the script of existing transforms andthe connection settings for data sources andtargets.
Editing Transforms
Editing Data Sources and Targets
Rename Change the name of existing transformsand data sources.
Renaming Transform and Data Sources
Publish Publish existing transforms. Publishing Transforms
Delete Delete transforms and data sources that youdon’t need anymore.
Deleting Transforms or Data Sources
The following figure shows the Catalog page:
Working with the Catalog 3-1

Creating TransformsCreate transforms to prepare and enrich data. You create a transform based on sampledata, and after editing and publishing it, you can apply the transform to an entire dataset in a cluster.
Video
To create a transform:
1. On the Home or Catalog page, click Create Transform.
The Create Transform page appears.
2. In the Name field, enter a name to identify the transform. Use only alpha-numericand underscore characters to name your transform. Other special characters are notallowed.
3. In the Description field, describe the use of this transform.
4. In the Source field, click Select.
To run a search in the Search field, enter part of the name or the complete name ofthe source.
The Select dialog box appears.
5. From the Source drop-down list, click the source where your sample or raw datafile is located.
A list of directories for the selected source appears in the Select File dialog.
6. In the Select File dialog, go to the directory where your sample or raw data file islocated, select the file, and then click OK. Alternatively, you can just select thedirectory, and all the files in that directory will be processed as part of thetransform.
For more information on supported file types, see Understanding the SupportedFile Types.
You can also select a directory. If you select a directory instead of a specific file, youwill receive a warning, but all the files in that directory will be processed.
Creating Transforms
3-2 Oracle Cloud Using Oracle Big Data Preparation Cloud Service

7. Optionally, select any of the following:
• Smart Sample: Allow the processing engine to use a sampling algorithm onthe selected file instead of loading and processing the entire set of rows in thesource. This shortens the time for data preparation.
Note: Smart samples are loaded only for files that contain less than onemillion rows. Otherwise, the entire data file is automatically loaded in yourHadoop cluster.
• Contains Headers: This option is selected by default. If your selected sourcedoesn’t contain headers, then deselect this option.
8. Click Submit.
You return to the Catalog page where your new transform is listed and it beginsprocessing.
On the right side of the Catalog page, the Activity Stream provides a status on thedata ingestion and profiling for your new transform.
When the transform is successfully processed, the status changes in the Catalog list.
Creating Transforms
Working with the Catalog 3-3

9. To open the transform and view its contents, click the name of the transform or
select Edit from the More Actions menu.
The main authoring page appears. The transform is created using patterns that thesystem automatically recognizes. The system also displays recommendations to fixand enrich the data. For more information, see Understanding Recognized Patternsand Data Enrichments.
10. Edit the transform script.
For more information on editing the transform script, see Task Overview forAuthoring the Transform Script.
11. Click Done.
The changes that you made to the transform are saved.
The created transform is now part of the Catalog. Use it to prepare and enrich data.
Publish your transform and apply it to other sources. For more information, see Publishing Transforms.
Schedule your transform to run periodically on one or more sources. For moreinformation, see Understanding Policies and Scheduling.
Editing TransformsOpen transforms from the Catalog page and edit the script that defines the repair andenrichment actions that are included in the data transform.
If you want to rename a transform, then see Renaming Transforms and Data Sources.
To edit a transform:
1. On the Catalog page, locate the transform that you want to edit.
To search for a specific transform, in the Search field, enter a string. A searchapplies only to the names of transforms in the Catalog.
2. Click the More Actions icon.
A menu with the available actions for the transform appears.
3. Select Edit.
The main authoring page appears. For more information on authoring thetransform script, see Task Overview for Authoring the Transform Script.
Renaming Transforms and Data SourcesChange the name that identifies a transform or a data source.
To rename a transform or a data source:
Editing Transforms
3-4 Oracle Cloud Using Oracle Big Data Preparation Cloud Service

1. On the Catalog page, locate the source or the transform that you want to rename.
To search for a specific transform or data source, in the Search field, enter a string.A search applies only to the names of transforms or data sources in the Catalog.
2. Click the More Actions icon.
A menu with the available actions for that element of the Catalog appears.
3. Select Rename.
The Rename dialog box appears.
4. Enter a new name for the selected transform or data source.
The new name must be different from the previous name.
5. Click Apply.
The selected transform or data source now appears with a different name in theCatalog. The references to the renamed transform or data source are automaticallyupdated.
Deleting Transforms and Data SourcesDelete existing transforms and data sources that you no longer use.
To delete a transform or a data source:
1. On the Catalog page, locate the source or the transform that you want to delete.
To search for a specific transform or data source, in the Search field, enter a string.A search applies only to the names of transforms or data sources and not to usernames or dates.
2. Click the More Actions icon.
A menu with the available actions for that element of the Catalog appears.
3. Select Delete.
A confirmation message appears. If there are policies using the transform, thenthose policies are also deleted. If the data source that you want to delete is in use,then the dialog box lists the transforms using it. If you chose to continue, then thelisted transforms are also deleted.
4. Click OK.
The selected transform or data source is deleted, and doesn’t appear in the Cataloganymore.
Deleting Transforms and Data Sources
Working with the Catalog 3-5

Deleting Transforms and Data Sources
3-6 Using Oracle Big Data Preparation Cloud Service

4Creating a Transform Script
Transforms contain the actions to prepare and enrich your data. You create atransform based on a data source that contains sample data. Once the transform isdefined, you can publish it and apply it to larger sets of data.
Topics:
• Understanding Transforms
• Working with the Metadata View
• Working with the Sample Data View
• Task Overview for Viewing Profile Metrics
• Viewing the Data Set Level Metrics
• Viewing Metrics for a Specific Column
• Viewing Duplicates for a Specific Column
• About Supported Data Languages
Understanding TransformsTransforms let you define a script to prepare and enrich your data.
To create a transform, you must provide a data source file. You can provide a samplefile, or use the complete data source and select the smart sampling option. Oracle BigData Preparation Cloud Service creates a basic transform based on this file. You canthen edit the transform script to unify values, hide (obfuscate) sensitive information,detect and delete rows containing null values, blend your data with additional datafiles, and enrich the existing data using the Oracle Big Data Preparation Cloud Serviceknowledge service or imported custom reference knowledge files. For moreinformation on creating transforms, see Creating Transforms.
After you publish your transform, use it to prepare and enrich other data sourcesgenerally larger than the file that you used to create it.
The file that you use to create the transform must be representative of the data thatyou expect to find in the larger data sources that you want to process.
Working with the Metadata ViewThe Metadata view shows the column name, the detected data type, and a set ofsample values.
To work with the Metadata view:
1. Edit an existing transform or create a new one.
Creating a Transform Script 4-1

2. In the main authoring page, click the Metadata View icon
from the toolbar at the top of the page.
The Metadata view is the default view.
3. From this view you can edit the transform script.
For more information on editing the transform script, see Task Overview forAuthoring the Transform Script.
The following figure shows the Metadata view mode for the main authoring page:
Working with the Sample Data ViewThe Sample Data view displays a table with the sample data that you used to createthe transform. The header row shows the name of the columns and the rows show thedata.
To work with the Sample Data view:
1. Edit an existing transform or create a new one.
2. On the main authoring page, click the Sample Data (Spreadsheet) View icon
from the toolbar at the top of the page.
3. From this view, edit the transform script.
For more information on editing the transform script, see Task Overview forAuthoring the Transform Script.
The following figure shows the Sample Data view mode for the main authoring page:
Working with the Sample Data View
4-2 Oracle Cloud Using Oracle Big Data Preparation Cloud Service

Task Overview for Viewing Profile MetricsView the profile results from the transform that you’re creating or editing in the right-side Profile pane. These metrics let you analyze the effect of the transform on yourdata. Based on this effect, decide which actions to add to the transform script.
Task Description More Information
View data set level metrics. View the statistics for the wholedata set. These show you how thetransform affects all your data.
Viewing the Data Set Level Metrics
View metrics for a specific column. View the statistics for a specificcolumn in your data set. Theseshow you how the transform affectsthe data in this column.
Viewing Metrics for a SpecificColumn
Viewing duplicated results. View the statistics for duplicatedvalues in your data set. Duplicatesare displayed by the selectedcolumn.
Viewing Duplicates for a SpecificColumn
Viewing the Data Set Level MetricsView the profile results for the whole data set. This information helps you tounderstand the nature of your data and decide which actions to include in yourtransform script.
To view the data set level metrics:
1. Edit the transform for which you want to view the data set level metrics.
2. On the main authoring page, click the Profile icon
on the right side of the page to expand the Profile pane.
Task Overview for Viewing Profile Metrics
Creating a Transform Script 4-3

The first page in the Profile drawer displays the data set level metrics.
Viewing Metrics for a Specific ColumnView the profile result for a specific transform column. This information helps you tounderstand the nature of your data and decide which actions to include in yourtransform script.
To view metrics for a specific column:
1. Edit the transform for which you want to view the data set level metrics.
2. On the main authoring page, select the Metadata view.
3. Click the Profile icon
on the right side of the page to expand the Profile pane.
4. Select a row from the data that’s displayed in the Metadata view.
In the Profile pane on the Column Profile page, you can see metrics displayed forthe selected transform column.
Viewing Metrics for a Specific Column
4-4 Oracle Cloud Using Oracle Big Data Preparation Cloud Service

Viewing Duplicates for a Specific ColumnView the results of a duplicate analysis for a specific column. This information helpsyou to understand the nature of your data and decide which actions to include in yourtransform script.
To view duplicate analysis:
1. Edit the transform for which you want to view a duplicate analysis for a specificcolumn.
2. On the main authoring page, click the Profile icon
on the right side of the page to expand the Profile pane.
In the Profile pane on the Duplicate Analysis page, you can see metrics displayedfor the selected transform column.
Viewing Duplicates for a Specific Column
Creating a Transform Script 4-5

About Supported Data LanguagesOracle Big Data Preparation Cloud Service supports several languages for the processof data ingestion and publishing.
Proper display, ingestion, processing, and publishing of data files are supported inEnglish and the following nine languages:
• Simplified Chinese
• Traditional Chinese
• French
• German
• Italian
• Japanese
• Korean
• Brazilian Portuguese
• Spanish
About Supported Data Languages
4-6 Oracle Cloud Using Oracle Big Data Preparation Cloud Service

5Authoring the Transform Script
After you create a transform, you can edit the transform script to add new actions toprepare and enrich data, and to manage the columns of your data set.
Topics:
• Task Overview for Authoring the Transform Script
• Changing the Column Order
• Changing the Column Name
• Merging Columns
• Filtering Transform Script Actions
• Viewing and Applying Recommendations
• Viewing and Fixing Alerts
• Handling Sensitive Information
• Unifying Classified Data Values
• Using Regular Expressions
• Finding Duplicates in Your Data
• Checking for Null Data
• Enriching Data Sets
• Understanding Recognized Patterns and Data Enrichments
Task Overview for Authoring the Transform ScriptThe transform script contains the actions to apply to your data. When you create atransform, the application automatically creates a basic transform script. Edit thisscript and add actions to prepare and enrich your data.
Task Description More Information
Work with different views. View the columns of your data setwith their data type and samplevalues, or view the complete dataset with all the values.
Working with the Metadata View
Working with the Sample DataView
Authoring the Transform Script 5-1
Task Description More Information
Edit the data set structure. Edit the names of the columns inthe data set, change their order, ordelete columns.
Changing the Column Order
Changing the Column Name
Merging Columns
View and apply alerts andrecommendations.
Improve, repair, and enhance yourdata using the suggestions in thealerts and recommendations.
Viewing and ApplyingRecommendations
Viewing and Fixing Alerts
Prepare data. Improve your data by concealing(obfuscating) sensitive data,normalizing values, findingduplicates, or eliminating rows withnull values.
Handling Sensitive Information
Unifying Classified Data Values
Using Regular Expressions
Finding Duplicates in Your Data
Checking for Null Data
Enrich data sets. Add information to your data basedon the existing information.
Enriching Data Sets
Changing the Column OrderConfigure your transform to change the order of the columns when you run it on asource. The resulting source uses the new column order.
To change the column order:
1. On the main authoring page, identify the transform column that contains thesensitive information.
2. Drag the column to the new location and drop it there.
The transform script now contains an action to move the selected column. The datatable displays the columns with the new order.
Changing the Column NameChange the name of a transform column. When you create the transform, the columnsare automatically renamed. In some cases, it isn’t possible to find a name for thecolumn. In other cases, you might have a better name than the one suggested. Whennecessary, rename the column manually.
To change the column name:
1. On the main authoring page, identify the transform column whose name you wantto change.
2. In the Column cell, click the More Actions icon.
A drop-down list appears.
3. Select Rename.
The Rename dialog box appears.
4. Enter a new name for this column.
Changing the Column Order
5-2 Oracle Cloud Using Oracle Big Data Preparation Cloud Service

5. Click Apply.
The transform script now contains an action to rename the selected column. The datatable shows the new name for this column.
To quickly rename a column, click the column name, enter the new name, and pressEnter or Tab to apply changes.
Merging ColumnsMerge multiple columns in your transform, use a delimiter in your merge, assign anew name to the resulting column, and add a prefix or suffix to the contents of thecolumn.
To merge columns:
1. On the main authoring page, click the Merge Columns icon.
The Column Merge dialog appears.
2. From the Available Columns list, select the columns that you want to merge.
You must select at least two columns to perform a merge.
Select multiple columns by pressing the Ctrl key as you select the columns.
3. Click the Push Selected icon.
To use all the available columns, click the Push All icon.
The selected columns appear in the Selected Columns list.
4. In the Merge Column Name field, enter a name for the new column that containsyour merged data. This field is required.
5. In the Merge Delimiter field, assign a delimiter to place between data values inyour merged data. The default delimiter is <SPACE>. This field is required.
6. Optionally, assign a prefix or suffix for your merged data by entering it in thePrefix or Suffix fields.
7. Click Apply.
The transform displays a new merge column with the name that you assigned to it andthe contents from the available columns that you selected for the merge.
Filtering Transform Script ActionsFilter the actions in your transform script by column.
To filter the actions that are displayed in the Transform Script pane:
1. In the Metadata view of the main authoring page, select a column.
By default, when you open a transform, the All icon is selected.
Merging Columns
Authoring the Transform Script 5-3

2. Click the By Column icon .
Only the transform script actions that are performed on the selected column aredisplayed in the Transform Script pane.
3. Optionally, select another column to re-filter the actions listed in the transformscript.
If a transform does not contain any actions on a selected column, No data isdisplayed in the Transform Script pane.
Viewing and Applying RecommendationsWhen you create a transform, Oracle Big Data Preparation Cloud Service suggests alist of recommendations to repair or enrich your data. Select the recommendations thatyou want to include in your transform script.
To view and apply recommendations:
1. On the main authoring page, click the Recommendations icon.
If there are any recommendations, then the button displays the number ofrecommendations that are available.
A drop-down list of the available recommendations appears.
2. Select a row from the drop-down list.
The Recommendations panel on the bottom left corner shows therecommendations for the transform column that you selected. The data tableselection changes to the column that you selected.
3. Select a recommendation from the Recommendations panel, and click the Accept
icon next to the recommendation to apply it.
The recommended change is applied to the transform script and the list ofrecommendations is updated.
4. Repeat this procedure until you’re satisfied with the transform.
Viewing and Fixing AlertsAlerts let you quickly identify and fix those columns in the transform that may causeproblems when using the data. The most typical issues are related to the sensitivity ofcertain data.
To view and fix columns with alerts:
1. On the main authoring page, locate a row that’s labeled with an Alert icon
.
2. To fix the alert, select and apply a recommendation from the Recommendationspanel.
Viewing and Applying Recommendations
5-4 Oracle Cloud Using Oracle Big Data Preparation Cloud Service

For more information on how to apply recommendations, see Viewing andApplying Recommendations.
A check mark appears in the status column on the data table indicating thatyou’ve modified that row of data.
3. Click Done.
Handling Sensitive InformationYour data sets might contain sensitive information that you want to handle carefully.Credit card numbers, social security numbers, and other personal details likebirthdates in data files are considered sensitive information. You can partially orcompletely obfuscate such values so that you can process it without placing anypersonal or identifying information at risk. An alert icon is displayed next to columnsthat the system identifies as sensitive information.
Always look at the alerts and recommendations before obfuscating data manually. Therecommendations pane offers different options, including partial obfuscation and theremoval of sensitive data records. For more information on alerts, see Viewing andFixing Alerts. For more information on recommendations, see Viewing and ApplyingRecommendations.
To handle sensitive information:
1. On the main authoring page, identify the transform column that contains sensitiveinformation.
2. In the Column cell, click the More Actions icon.
A drop-down list appears.
3. Select Obfuscate.
The transform script now contains an action to obfuscate the selected sensitivecolumn. When you run the transform on a data set, the data for the selected column isobfuscated.
Unifying Classified Data ValuesClassified values may sometimes contain different values for the same category. Forexample, a data set may contain a variety of designations for male or female gender.You can standardize these values across a data set. You can also use this feature tosearch and replace null values in your data.
To unify classified data values:
1. On the main authoring page, identify the transform column that contains classifieddata values that you want to repair.
2. In the Column cell, click the More Actions icon.
A drop-down list appears.
3. Select Search and Replace.
The Search and Replace dialog box appears.
Handling Sensitive Information
Authoring the Transform Script 5-5

4. Click the Load Samples link.
The dialog box displays the current classified values in your data set.
Note: With the Load Samples feature, you can load up to 100 most frequentlyused sample values.
Note: The Load CSV feature allows you to upload files in comma- or tab-delimited format. This file must have two columns: one identifying the valuesin the data set and the other column identifying the replacement text.
5. Enter the values that unify your data in the Replace By list.
The figure that follows shows an example of a table replacement to unify thegender column values.
6. Click Add to add more rows and values to the Find Value and Replace Bycolumns.
7. Click Apply.
Replacement actions are added to the transform script. The data table now shows thereplaced values.
Using Regular ExpressionsA regular expression is a special text string that describes a search pattern.
You can use regular expressions in Oracle Big Data Preparation Cloud Service for twopurposes.
• Search and Extract Data
Using Regular Expressions
5-6 Oracle Cloud Using Oracle Big Data Preparation Cloud Service

• Search and Replace Data
Extracting Data Using Regular ExpressionsUse regular expressions to match a specific text pattern in your column data andextract it to a new column.
To extract data using regular expressions:
1. On the main authoring page, identify the transform column that contains the datayou want to extract to a new column.
2. In the Column cell, click the More Actions icon.
A drop-down list appears.
3. Select Extract with Expression.
The Extract with Expression dialog box appears. The Sample Value field is auto-populated with a value from the selected column.
4. In the Column Name field, enter a name for the new column that will contain theextracted data.
5. In the Regex Field, enter the regular expression to identify the text you want toextract.
The example in the following screenshot searches for the string that starts with the@ symbol in the data and matches any number of characters after that.
6. Confirm that the Regex Result field displays the expected output and click Apply.
The following screenshot shows the extracted text for the regex example used inthe previous step.
Using Regular Expressions
Authoring the Transform Script 5-7

The sample data is updated and the text identified by the regular expression isextracted into a new column.
Replacing Data Using Regular ExpressionsUse regular expressions to match a specific text pattern in your column data andremove or replace it with a different text string.
To replace data using regular expressions:
1. On the main authoring page, identify the transform column that contains the datayou want to replace.
2. In the Column cell, click the More Actions icon.
A drop-down list appears.
3. Select Expression Search and Replace.
The Expression Search and Replace dialog box appears. The Sample Value field isauto-populated with a value from the selected column.
4. In the Regex Search field, enter the regular expression you want to use to identifythe text to be replaced.
The following screenshot shows an example of a regular expression string \d* thatis used to search for any number of digits.
Using Regular Expressions
5-8 Oracle Cloud Using Oracle Big Data Preparation Cloud Service

5. In the Regex Search field, enter the regex expression you want to use to replace thetext you identified.
In the example used for the following screenshot, the Regex Replace field is leftempty in order to replace the identified text with null. In order words, theidentified text will be removed from the column.
6. Confirm that the Regex Result field displays the expected output and click Apply.
The sample data is updated and the text identified by the regular expression isreplaced.
Using Regular Expressions
Authoring the Transform Script 5-9
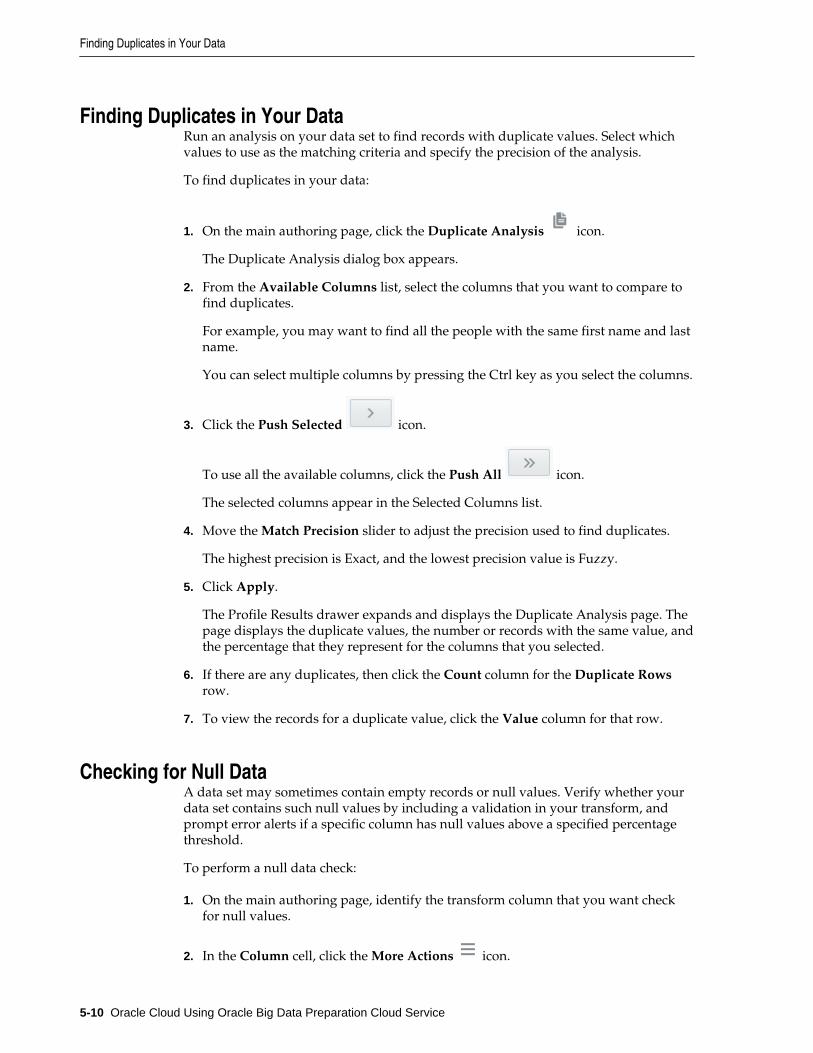
Finding Duplicates in Your DataRun an analysis on your data set to find records with duplicate values. Select whichvalues to use as the matching criteria and specify the precision of the analysis.
To find duplicates in your data:
1. On the main authoring page, click the Duplicate Analysis icon.
The Duplicate Analysis dialog box appears.
2. From the Available Columns list, select the columns that you want to compare tofind duplicates.
For example, you may want to find all the people with the same first name and lastname.
You can select multiple columns by pressing the Ctrl key as you select the columns.
3. Click the Push Selected icon.
To use all the available columns, click the Push All icon.
The selected columns appear in the Selected Columns list.
4. Move the Match Precision slider to adjust the precision used to find duplicates.
The highest precision is Exact, and the lowest precision value is Fuzzy.
5. Click Apply.
The Profile Results drawer expands and displays the Duplicate Analysis page. Thepage displays the duplicate values, the number or records with the same value, andthe percentage that they represent for the columns that you selected.
6. If there are any duplicates, then click the Count column for the Duplicate Rowsrow.
7. To view the records for a duplicate value, click the Value column for that row.
Checking for Null DataA data set may sometimes contain empty records or null values. Verify whether yourdata set contains such null values by including a validation in your transform, andprompt error alerts if a specific column has null values above a specified percentagethreshold.
To perform a null data check:
1. On the main authoring page, identify the transform column that you want checkfor null values.
2. In the Column cell, click the More Actions icon.
Finding Duplicates in Your Data
5-10 Oracle Cloud Using Oracle Big Data Preparation Cloud Service
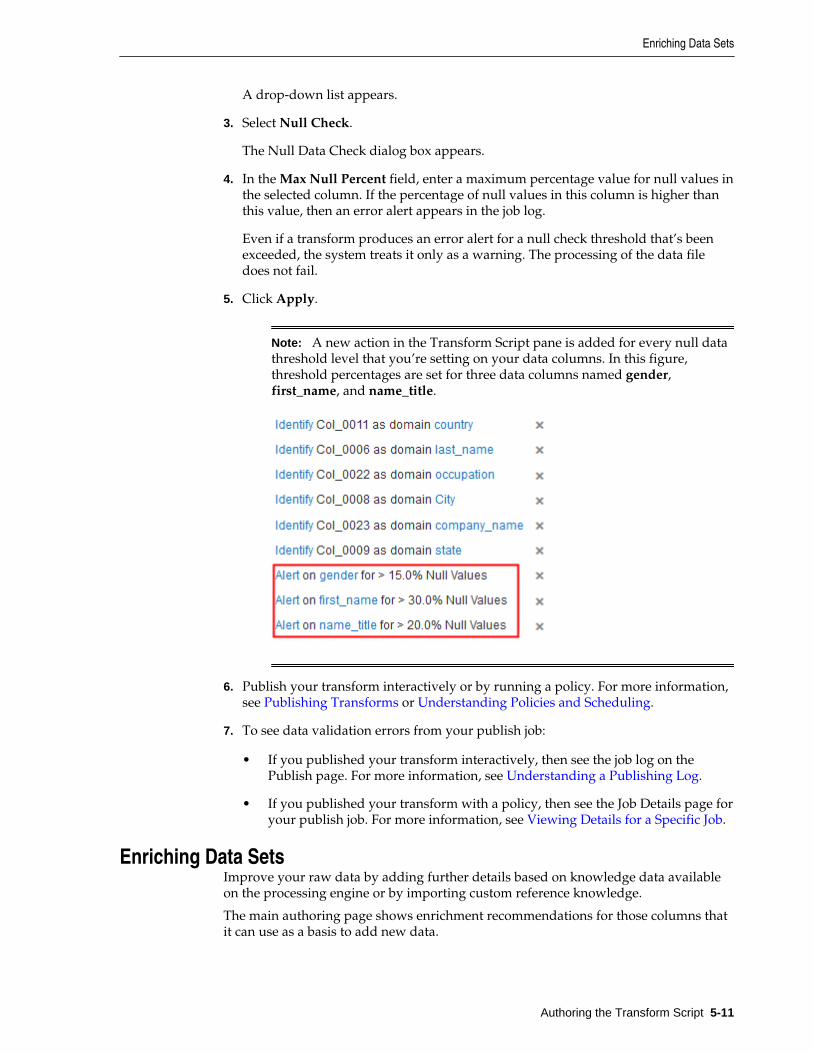
A drop-down list appears.
3. Select Null Check.
The Null Data Check dialog box appears.
4. In the Max Null Percent field, enter a maximum percentage value for null values inthe selected column. If the percentage of null values in this column is higher thanthis value, then an error alert appears in the job log.
Even if a transform produces an error alert for a null check threshold that’s beenexceeded, the system treats it only as a warning. The processing of the data filedoes not fail.
5. Click Apply.
Note: A new action in the Transform Script pane is added for every null datathreshold level that you’re setting on your data columns. In this figure,threshold percentages are set for three data columns named gender,first_name, and name_title.
6. Publish your transform interactively or by running a policy. For more information,see Publishing Transforms or Understanding Policies and Scheduling.
7. To see data validation errors from your publish job:
• If you published your transform interactively, then see the job log on thePublish page. For more information, see Understanding a Publishing Log.
• If you published your transform with a policy, then see the Job Details page foryour publish job. For more information, see Viewing Details for a Specific Job.
Enriching Data SetsImprove your raw data by adding further details based on knowledge data availableon the processing engine or by importing custom reference knowledge.
The main authoring page shows enrichment recommendations for those columns thatit can use as a basis to add new data.
Enriching Data Sets
Authoring the Transform Script 5-11

For example, in the case of cities, the transform can add elevation in meters, time zone,latitude, or longitude to your data set using state as a secondary key. There are manyother types of enrichments available to add to your data set. For a list of the availabledata enrichments, see Understanding Recognized Patterns and Data Enrichments.
For more information on how to view and apply recommendations, see Viewing andApplying Recommendations. To add custom reference knowledge to your serviceinstance’s processing engine, see Task Overview for Working with Custom ReferenceKnowledge.
Understanding Recognized Patterns and Data EnrichmentsWhen you create a transform, Oracle Big Data Preparation Cloud Serviceautomatically recognizes some patterns in the data. It also suggests enrichments thatyou can add based on the existing data.
Recognized Patterns
This list shows the patterns that are recognized when you create a transform. For moreinformation on creating transforms, see Creating Transforms.
• Identifiers
• Codes
• Yes/no Flags
• Dates
• Quantities
• Free form text
• Social security numbers
• Credit Card Numbers
• Country codes
• Locale/Language Codes
• Email Addresses
• IP Addresses
• URLs
• US Phone Numbers
• US State Codes
• US Zip Codes
• Gender Codes
Data Enrichments
This list shows the data enrichments that are suggested when you create a transform.For information on how to apply data enrichments, see Enriching Data Sets.
• Country
Understanding Recognized Patterns and Data Enrichments
5-12 Oracle Cloud Using Oracle Big Data Preparation Cloud Service

• Province or State
• Jurisdiction (county)
• Population
• Elevation (in meters)
• Time Zone
• Longitude
• Latitude
• ISO Country Codes
• FIPS
• Country Name
• Capital
• Continent
• Population
• Spoken Languages
• Phone Country Code
• Postal Code Format
• Postal Code Regex
• Currency Name and Abbreviation
• TLD
• Surface
• GeoName ID
Geographical Enrichments
This list shows additional data enrichments based on geographical location that aresuggested when you create a transform:
• abandoned_airfield
• abandoned_camp
• abandoned_canal
• abandoned_factory
• abandoned_farm
• abandoned_mine
• abandoned_mission
• abandoned_oil_well
Understanding Recognized Patterns and Data Enrichments
Authoring the Transform Script 5-13

• abandoned_police_post
• abandoned_populated_place
• abandoned_prison
• abandoned_railroad
• abandoned_railroad_station
• abandoned_railroad_stop
• abandoned_watercourse
• abandoned_well
• administrative_division
• administrative_facility
• agricultural_colony
• agricultural_facility
• agricultural_reserve
• agricultural_school
• airbase
• airfield
• airport
• amphitheater
• amusement_park
• anabranch
• anchorage
• ancient_road
• ancient_wall
• apron
• aquaculture_facility
• aqueduct
• arch
• archaeological_prehistoric_site
• arctic_land
• area
• arrugado
• artificial_island
Understanding Recognized Patterns and Data Enrichments
5-14 Oracle Cloud Using Oracle Big Data Preparation Cloud Service

• artillery_range
• asphalt_lake
• astronomical_station
• asylum
• athletic_field
• atolls
• atomic_center
• automatic_teller_machine
• badlands
• baling_station
• bank
• banks
• bar
• barracks
• basin
• battlefield
• bay
• bays
• beach
• beach_ridge
• beaches
• beacon
• bench
• bights
• blowholes
• blowouts
• boatyard
• body_of_water
• bogs
• border_post
• borderland
• boulder_field
Understanding Recognized Patterns and Data Enrichments
Authoring the Transform Script 5-15

• boundary_marker
• breakwater
• brewery
• bridge
• buffer_zone
• buildings
• burial_caves
• bus_station
• bus_stop
• bushes
• business_center
• buttes
• cairn
• caldera
• camps
• canal
• canal_bend
• canal_tunnel
• canalized_stream
• cannery
• canyon
• canyons
• cape
• capital_of_a_political_entity
• caravan_route
• casino
• castle
• cattle_dipping_tank
• causeway
• caves
• cemetery
• channel
Understanding Recognized Patterns and Data Enrichments
5-16 Oracle Cloud Using Oracle Big Data Preparation Cloud Service

• chrome_mines
• church
• cirque
• cirques
• city
• clearing
• clefts
• cliffs
• clinic
• coal_mines
• coalfield
• coast
• coast_guard_station
• coconut_grove
• college
• common
• communication_center
• community_center
• concession_area
• cones
• confluence
• continent
• continental_rise
• convent
• copper_mines
• copper_works
• coral_reefs
• cordillera
• corrals
• corridor
• country_house
• courthouse
Understanding Recognized Patterns and Data Enrichments
Authoring the Transform Script 5-17

• coves
• crater_lake
• crater_lakes
• craters
• cuestas
• cultivated_area
• current
• customs_house
• customs_post
• cutoff
• dairy
• dam
• deep
• delta
• dependent_political_entity
• depressions
• desert
• destroyed_populated_place
• dike
• diplomatic_facility
• dispensary
• distributary_ies
• ditch
• ditch_mouths
• divide
• docking_basin
• docks
• dockyard
• drainage_basin
• drainage_canal
• drainage_ditch
• dry_dock
Understanding Recognized Patterns and Data Enrichments
5-18 Oracle Cloud Using Oracle Big Data Preparation Cloud Service

• dry_stream_bed
• dunes
• economic_region
• escarpment
• escarpment_or_scarp
• estates
• estuary
• experiment_station
• facility
• facility_center
• factory
• fan
• fans
• farm
• farm_village
• farms
• farmstead
• ferry
• fields
• fifth_order_administrative_division
• first_order_administrative_division
• fishing_area
• fishponds
• fissure
• fjord
• flat
• ford
• forest_reserve
• forest_station
• forests
• former_sugar_mill
• fort
Understanding Recognized Patterns and Data Enrichments
Authoring the Transform Script 5-19

• fossilized_forest
• foundry
• fourth_order_administrative_division
• fracture_zone
• free_trade_zone
• freely_associated_state
• fuel_depot
• furrow
• gap
• gardens
• gas_oil_separator_plant
• gasfield
• gate
• geographical_spot
• geological_formation
• geyser
• ghat
• glaciers
• gold_mines
• golf_course
• gorges
• grassland
• grave
• gravel_area
• grazing_area
• guest_house
• gulf
• gully
• halting_place
• hammocks
• hanging_valley
• harbors
Understanding Recognized Patterns and Data Enrichments
5-20 Oracle Cloud Using Oracle Big Data Preparation Cloud Service

• headland
• headwaters
• heath
• heliport
• hermitage
• hill
• hills
• historical_administrative_division
• historical_capital_of_a_political_entity
• historical_first_order_administrative_division
• historical_fourth_order_administrative_division
• historical_political_entity
• historical_populated_place
• historical_region
• historical_second_order_administrative_division
• historical_site
• historical_third_order_administrative_division
• hole
• homestead
• hospital
• hot_springs
• hotel
• houses
• housing_development
• hunting_reserve
• hut
• huts
• hydroelectric_power_station
• icecap
• icecap_depression
• icecap_dome
• icecap_ridge
Understanding Recognized Patterns and Data Enrichments
Authoring the Transform Script 5-21

• independent_political_entity
• industrial_area
• inlet
• inspection_station
• interdune_troughs
• interfluve
• intermittent_lake
• intermittent_lakes
• intermittent_oxbow_lake
• intermittent_pond
• intermittent_ponds
• intermittent_pool
• intermittent_reservoir
• intermittent_salt_lake
• intermittent_salt_ponds
• intermittent_stream
• intermittent_wetland
• iron_mines
• irrigated_fields
• irrigation_canal
• irrigation_ditch
• irrigation_system
• island
• islands
• islet
• israeli_settlement
• isthmus
• jetty
• karst_area
• knoll
• knolls
• labor_camp
Understanding Recognized Patterns and Data Enrichments
5-22 Oracle Cloud Using Oracle Big Data Preparation Cloud Service

• lagoon
• lagoons
• lake
• lake_beds
• lake_channels
• lake_region
• lakes
• land_tied_island
• landfill
• landing
• language_school
• lava_area
• leased_area
• ledge
• leper_colony
• leprosarium
• levee
• library
• lighthouse
• limekiln
• local_government_office
• locality
• locks
• logging_camp
• lost_river
• mall
• maneuver_area
• mangrove_island
• mangrove_swamp
• marina
• marine_channel
• maritime_school
Understanding Recognized Patterns and Data Enrichments
Authoring the Transform Script 5-23

• market
• marshes
• meadow
• meander_neck
• medical_center
• mesa
• mesas
• meteorological_station
• metro_station
• military_base
• military_installation
• military_school
• mills
• mines
• mining_area
• mining_camp
• mission
• moat
• mole
• monastery
• monument
• moors
• moraine
• mosque
• mound
• mounds
• mountain
• mountains
• mud_flats
• munitions_plant
• museum
• narrows
Understanding Recognized Patterns and Data Enrichments
5-24 Oracle Cloud Using Oracle Big Data Preparation Cloud Service

• nature_reserve
• naval_base
• navigation_canals
• navigation_channel
• novitiate
• nunatak
• nunataks
• nursery_ies
• oasis_es
• observation_point
• observatory
• ocean
• office_building
• oil_camp
• oil_palm_plantation
• oil_pipeline
• oil_pipeline_junction
• oil_pipeline_terminal
• oil_pumping_station
• oil_refinery
• oil_well
• oilfield
• olive_grove
• olive_oil_mill
• opera_house
• orchards
• ore_treatment_plant
• overfalls
• oxbow_lake
• pagoda
• palace
• palm_grove
Understanding Recognized Patterns and Data Enrichments
Authoring the Transform Script 5-25

• palm_tree_reserve
• pan
• pans
• parish
• park
• park_gate
• park_headquarters
• park_or_area
• parking_lot
• pass
• patrol_post
• peak
• peaks
• peat_cutting_area
• peninsula
• petroleum_basin
• phosphate_works
• pier
• pine_grove
• pinnacle
• plain
• plains
• plateau
• point
• points
• polder
• police_post
• political_entity
• political_region
• pond
• ponds
• pools
Understanding Recognized Patterns and Data Enrichments
5-26 Oracle Cloud Using Oracle Big Data Preparation Cloud Service

• populated_locality
• populated_place
• populated_places
• port
• portage
• post_office
• power_station
• prison
• promenade
• promontory_ies
• province
• pyramid
• pyramids
• quarry_ies
• quay
• quicksand
• racetrack
• radio_observatory
• radio_station
• railroad
• railroad_junction
• railroad_siding
• railroad_signal
• railroad_station
• railroad_stop
• railroad_tunnel
• railroad_yard
• ranches
• rapids
• ravines
• reach
• reef
Understanding Recognized Patterns and Data Enrichments
Authoring the Transform Script 5-27

• reefs
• reformatory
• refugee_camp
• region
• religious_center
• religious_populated_place
• religious_site
• research_institute
• reservation
• reserve
• reservoirs
• resort
• restaurant
• resthouse
• retreat
• ridge
• ridges
• rise
• road
• road
• road_bend
• road_cut
• road_junction
• road_tunnel
• roadstead
• rock
• rock_desert
• rockfall
• rocks
• rookery
• rubber_plantation
• ruined_bridge
Understanding Recognized Patterns and Data Enrichments
5-28 Oracle Cloud Using Oracle Big Data Preparation Cloud Service
• ruined_dam
• ruins
• sabkhas
• saddle
• salt_area
• salt_evaporation_ponds
• salt_lake
• salt_lakes
• salt_marsh
• salt_mines
• salt_pond
• salt_ponds
• sanatorium
• sand_area
• sandy_desert
• satellite_station
• sawmill
• school
• scientific_research_base
• scrubland
• sea
• seachannel
• seachannels
• seamount
• seamounts
• seaplane_landing_area
• seat_of_a_first_order_administrative_division
• seat_of_a_fourth_order_administrative_division
• seat_of_a_second_order_administrative_division
• seat_of_a_third_order_administrative_division
• seat_of_government_of_a_political_entity
• second_order_administrative_division
Understanding Recognized Patterns and Data Enrichments
Authoring the Transform Script 5-29

• section_of_bank
• section_of_canal
• section_of_estate
• section_of_harbor
• section_of_independent_political_entity
• section_of_intermittent_stream
• section_of_island
• section_of_lagoon
• section_of_lake
• section_of_peninsula
• section_of_plain
• section_of_plateau
• section_of_populated_place
• section_of_reef
• section_of_stream
• section_of_valley
• section_of_wadi
• section_of_waterfalls
• semi_independent_political_entity
• sewage_treatment_plant
• sheepfold
• shelf
• shelf_edge
• shelf_valley
• shoal
• shoals
• shore
• shrine
• sill
• sinkhole
• slide
• slope
Understanding Recognized Patterns and Data Enrichments
5-30 Oracle Cloud Using Oracle Big Data Preparation Cloud Service
• slopes
• sluice
• snowfield
• sound
• spa
• space_center
• spillway
• spit
• springs
• spur
• spurs
• square
• stable
• stadium
• state_exam_prep_center
• steps
• stock_route
• stony_desert
• store
• storehouse
• strait
• stream
• stream_bank
• stream_bend
• stream_mouths
• streams
• street
• sub_surface_dam
• sugar_mill
• sugar_plantation
• sugar_refinery
• sulphur_springs
Understanding Recognized Patterns and Data Enrichments
Authoring the Transform Script 5-31

• swamp
• tablemount_or_guyot
• tablemounts_or_guyots
• talus_slope
• tank_farm
• tea_plantation
• technical_school
• temp_work_office
• temples
• terrace
• territory
• theater
• third_order_administrative_division
• tidal_creeks
• tidal_flats
• tombs
• tongue
• tower
• traffic_circle
• trail
• transit_terminal
• trees
• trench
• triangulation_station
• tribal_area
• trough
• tundra
• tunnel
• underground_irrigation_canals
• underground_lake
• undersea_formation
• united_states_government_establishment
Understanding Recognized Patterns and Data Enrichments
5-32 Oracle Cloud Using Oracle Big Data Preparation Cloud Service

• university
• university_prep_school
• upland
• valley
• valleys
• veterinary_facility
• vineyard
• vineyards
• volcano
• wadi
• wadi_bend
• wadi_junction
• wadi_mouth
• wadies
• wall
• water_mill
• water_pumping_station
• water_tank
• watercourse
• waterfalls
• waterholes
• waterworks
• weirs
• well
• wells
• wetland
• whaling_station
• wharf_ves
• whirlpool
• wildlife_reserve
• windmill
• woodland
Understanding Recognized Patterns and Data Enrichments
Authoring the Transform Script 5-33

• wreck
• zone
• zoo
Understanding Recognized Patterns and Data Enrichments
5-34 Oracle Cloud Using Oracle Big Data Preparation Cloud Service

6Adding Custom Reference Knowledge
Oracle Big Data Preparation Cloud Service leverages a large amount of publiclyaccessible reference knowledge that’s provisioned with your subscription. Forexample, the processing engine uses a wide range of geographical information toenrich your data. In addition to taking advantage of generic and geographicallycentered classifications of data, you can use your own enterprise-specific referencedata to supplement the service’s knowledge service with enrichments that are tailoredto your needs. Custom reference knowledge files are accessible by provisioned usersfor your service environment only and aren’t accessible by anyone else.
Topics:
• Task Overview for Working with Custom Reference Knowledge
• Adding Custom Reference Knowledge Files
• Editing Custom Reference Knowledge Properties
• Deleting Custom Reference Knowledge Files
Task Overview for Working with Custom Reference KnowledgeThe Knowledge page is a portal where you can manage custom reference knowledgefiles. Add your own custom reference knowledge files to your service cluster. Theclassifications in these files supplement the knowledge service that’s provided byOracle Big Data Preparation Cloud Service. Create, edit, rename, and delete newknowledge reference files. You can also filter and sort the list of knowledge referencefiles, or run a search to find a specific file.
Task Description More Information
Create Create new custom reference knowledgesources and manage them from theKnowledge page.
Adding Custom Reference Knowledge Files
Edit Edit the properties of existing customreference knowledge files.
Editing Custom Reference KnowledgeProperties
Delete Delete custom reference knowledge filesthat you don’t need anymore.
Deleting Custom Reference KnowledgeFiles
The following figure shows the Knowledge page:
Adding Custom Reference Knowledge 6-1
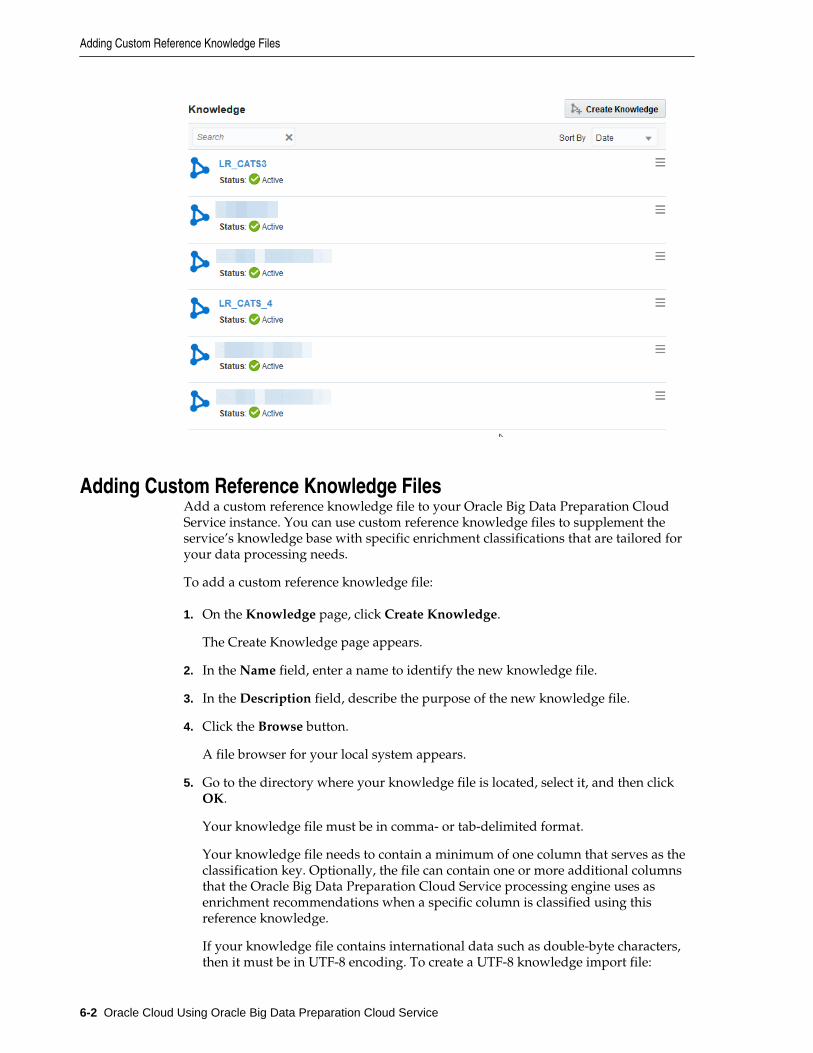
Adding Custom Reference Knowledge FilesAdd a custom reference knowledge file to your Oracle Big Data Preparation CloudService instance. You can use custom reference knowledge files to supplement theservice’s knowledge base with specific enrichment classifications that are tailored foryour data processing needs.
To add a custom reference knowledge file:
1. On the Knowledge page, click Create Knowledge.
The Create Knowledge page appears.
2. In the Name field, enter a name to identify the new knowledge file.
3. In the Description field, describe the purpose of the new knowledge file.
4. Click the Browse button.
A file browser for your local system appears.
5. Go to the directory where your knowledge file is located, select it, and then clickOK.
Your knowledge file must be in comma- or tab-delimited format.
Your knowledge file needs to contain a minimum of one column that serves as theclassification key. Optionally, the file can contain one or more additional columnsthat the Oracle Big Data Preparation Cloud Service processing engine uses asenrichment recommendations when a specific column is classified using thisreference knowledge.
If your knowledge file contains international data such as double-byte characters,then it must be in UTF-8 encoding. To create a UTF-8 knowledge import file:
Adding Custom Reference Knowledge Files
6-2 Oracle Cloud Using Oracle Big Data Preparation Cloud Service

a. In an application such as Microsoft Excel, save your data file as Unicode text.
b. In a file editing utility such as Notepad, open the Unicode-encoded file and saveit as UTF-8. You must save your file in UTF-8 encoding to preserve characters inyour data throughout the ingestion and repair process.
6. In the Curation Level field, set the value for the new knowledge file’s curationlevel.
By default, curation levels are set to 10 for uploaded custom reference knowledgefiles. A value of 10 assigns priority to your custom reference knowledge oversimilar classifications from the Oracle Big Data Preparation Cloud Serviceprocessing engine.
You use curation levels to break ties between data classifications when default andcustom reference knowledge domains contain overlapping information. Forexample, ties may occur between default reference knowledge and customreference knowledge for City classifications. The higher the curation level youassign, the higher priority that you give to a specific knowledge domain. Therefore,if you want to give preference to a particular custom knowledge reference file overthe default knowledge service domains, then raise value of its curation level.
7. Optionally, select Activate for Use if you want your new knowledge file to beavailable immediately to process data.
8. Click Submit.
Your custom reference knowledge file appears on the Knowledge page and the serviceengine can begin enriching data with it.
Editing Custom Reference Knowledge Properties and ContentEdit the properties or view and replace the content of a custom reference knowledgefile that’s already available on your Oracle Big Data Preparation Cloud Serviceinstance. Use custom reference knowledge files to supplement the service’s knowledgebase with specific enrichment classifications that are tailored for your data processingneeds.
To edit the properties of a reference knowledge file:
1. Go to the Knowledge page.
2. In the Search field, enter the partial or full name of a knowledge file. You can alsofind a knowledge file by scrolling through the list displayed on the page.
3. Click the More Actions icon. A menu with the available actions for thereference knowledge file appears.
4. Select Edit.
The Edit Knowledge page appears.
5. Edit any of the properties of this custom reference knowledge file:
• Name: Enter a name to identify the knowledge file.
• Description: Describe the purpose of the knowledge file.
Editing Custom Reference Knowledge Properties and Content
Adding Custom Reference Knowledge 6-3

• Curation Level: Set a value for the knowledge file. Treat the value as aweighted priority for your knowledge file. The higher the value, the higher thepriority that is given to that particular set of custom reference knowledge.
• Activate for Use: Specify if you want the knowledge file to be availableimmediately to process data.
6. Examine the contents of the custom reference knowledge in the Edit Knowledgepage’s viewing pane.
You can’t edit the contents of the knowledge file in this interface.
7. Optionally, if you want to replace or update your custom reference knowledgewith another data file, then click the Upload New link and select another file fromyour local storage.
Click Revert to deprecate the currently implemented knowledge file and revert tothe previous selection.
8. Click Save.
Your custom reference knowledge file appears on the Knowledge page.
Deleting Custom Reference Knowledge FilesDelete a custom reference knowledge file that’s available on your Oracle Big DataPreparation Cloud Service instance.
To delete a custom reference knowledge file:
1. Go to the Knowledge page.
2. In the Search field, enter the partial or full name of a knowledge file. You can alsofind a knowledge file by scrolling through the list displayed on the page.
3. Click the More Actions icon. A menu with the available actions for thereference knowledge file appears.
4. Select Delete, then click OK to confirm.
Your custom reference knowledge file is no longer displayed on the Knowledge page,and isn’t available for any data processing.
Deleting Custom Reference Knowledge Files
6-4 Oracle Cloud Using Oracle Big Data Preparation Cloud Service

7Blending Data
Blend multiple data files in a transform by selecting the conditions for a data blend,the columns to include, and the column can be used as a blend key.
Topics:
• Blending Multiple Data Files
• Setting Conditions in Your Blending Configuration
• Setting Columns in Your Blending Configuration
Blending Multiple Data FilesBlend multiple data files in a single transform.
You must have an existing transform to perform a blend. If you haven’t created atransform yet, then see Creating Transforms.
To blend data files:
1. On the Catalog page, locate the transform that you want to edit.
2. Click the More Actions icon.
A menu with the available actions for the transform appears.
3. Select Edit.
The main authoring page appears.
4. Click Add File to add another data file to this transform.
You’ll blend this file in subsequent steps with the existing data of this transform.
5. In the Source field, click Select.
The Select dialog box appears.
6. From the Source drop-down list, click the source where your sample or raw datafile is located.
A list of directories for the selected source appears in the Select File field.
7. In the Select File field, go to the directory where your sample or raw data file islocated, select it, and then click OK.
8. Optionally, select any of the following:
Blending Data 7-1

• Smart Sample: Allow the processing engine to use a sampling algorithm onthe selected file instead of loading and processing the entire set of rows in thesource. This shortens the time for data preparation.
• Contains Headers: Select this option if the selected source contains a headerrow.
9. Click OK.
The additional data file is listed in a drop-down list in the top banner.
The processing engine begins to ingest, prepare, and profile your second data file.Note that an asterisk appears on the blending drop-down list next to the second fileindicating that it isn’t yet available, and a green banner notifies you that the secondfile is still being processed. When the service engine completes the ingestion andpreparation of your second file, the asterisk on the blending drop-down listdisappears, a blue banner notifies you that the blend is complete, and you can thengo to the newly added file to prepare it for blending.
10. Click Blend.
The Blending Configuration dialog box appears.
11. Set your blending configuration parameters.
• For more information on blending conditions, see Setting Conditions in YourBlending Configuration.
• For more information on column selection, see Selecting Columns in YourBlending Configuration.
12. Click Submit.
The main authoring page displays the blended data sample in your transform.
You can’t blend any additional files with your results before completing the initialblend of two files. After your initial blend is complete, repeat the steps of thisprocedure to add another file to your blended data results.
When a blend is completed, a third link is added to the blending drop-down menu inthe main authoring page. This new blend has its own set of profile results, and you canperform additional transforms on the resulting blended file.
Note that if you add another file to this blend, then your current blend configuration islost and the service engine begins processing a new blend.
Setting Conditions in Your Blending ConfigurationSet conditions for a data blend by specifying which columns are blend keys manuallyor accepting system-generated recommendations, and viewing the confidence scoresfor them.
To set the conditions for a data blend:
Setting Conditions in Your Blending Configuration
7-2 Oracle Cloud Using Oracle Big Data Preparation Cloud Service

1. In the Blending Configuration dialog box, select the Conditions tab if necessary.When the Blending Configuration dialog box loads, the Conditions tab is selectedby default.
2. Select the columns to be the blend keys for your data blend:
• For each of the data files that you blend, select a column from the drop-down
list that becomes the primary key. Click the Add or Remove icons toadd or remove keys.
• Optionally, in the Blending Key Recommendations section, click the Accept
icon next to the blending keys you that want to use in your data blend.These automated blending key recommendations are provided by therelationship discovery engine.
• Click the Show Details icon to see the confidence score for the automatedblending key recommendations that are provided by the relationshipdiscovery engine, and then click Close.
Setting Conditions in Your Blending Configuration
Blending Data 7-3

The confidence score consists of a multifaceted statistical analysis on allcolumns of each data set. The goal is to produce a few pairs of columns that aregood candidates to be blend keys. Each of the following criteria is scoredbetween 0 and 20 based on the likeliness that the pair is a good pair to be ablend key:
– Name: The score is based on the similarity of the names of the two columnheaders.
– Histogram: For columns containing numerical data, the score represents astatistical comparison of how similar the numerical values are between thetwo columns.
– Type: This score represents a comparison of the data type and the extentof information that can be obtained from the data type in two columns. Forexample, a column that contains names of cities is meaningfully differentthan one that contains dates, decimal numbers, or addresses.
– Pattern: This score represents a comparison of the character value patternsof two columns. For example, two columns may contain strings, but acolumn of email addresses that contain @ characters has a consistentlydifferent character pattern than a column that contains first names.
– F1 Uniqueness: This score measures the uniqueness of values that are inthe left column. For example, a column with gender values of F or M is lessunique in comparison to a column that contains individual social securitynumbers.
– F2 Uniqueness: This score measures the uniqueness of values that are inthe right-hand column.
3. Select an output option:
Setting Conditions in Your Blending Configuration
7-4 Oracle Cloud Using Oracle Big Data Preparation Cloud Service

• Rows matching both datasets: The processing engine returns only rows thatcontain a match to the blend keys.
• Left join: The processing engine returns all rows from the F1 (left) data set inaddition to all rows from the F2 (right) data set that match the blend keys.
• Right join: The processing engine returns all rows from the F2 (right) data setin addition to all rows from the F1 (left) data set that match the blend keys.
4. Click Submit.
Your blend configuration is saved and the blend of two data files begins in theservice cluster.
Note that an asterisk appears on the blending drop-down list and a green bannernotifies you that the blend has started. When the process engine completes theblend, the asterisk on the blending drop-down list disappears, a blue bannernotifies you that the blend is complete, and you can then go to the resultingblended file.
Selecting Columns in Your Blending ConfigurationSelect the columns to be used in a data blend.
To select columns in a blending configuration:
1. In the Blending Configuration dialog box, select the Column Selection tab.
2. Select the check boxes next to the columns of each data file that you’ve added toyour blend.
Note that you can’t deselect columns that you use as blend keys.
3. Click Submit.
Your blend configuration is saved and the blend of two data files begins in theservice cluster.
Note that an asterisk appears on the blending drop-down list and a green bannernotifies you that the blend has started. When the relationship discovery enginecompletes the blend, the asterisk on the blending drop-down list disappears, a bluebanner notifies you that the blend is complete, and you can then go to the resultingblended file.
Selecting Columns in Your Blending Configuration
Blending Data 7-5

Selecting Columns in Your Blending Configuration
7-6 Using Oracle Big Data Preparation Cloud Service

8Publishing Data Results and Scheduling
Policies
Publish repaired and enriched data sets interactively from the Catalog, or search,create, edit, and schedule policies to run transforms against your data sets on thePolicies page.
Topics:
To publish from the Catalog, see:
• Publishing Transforms
• Understanding a Publishing Log
• Publishing Results to Oracle Business Intelligence Cloud Service
To publish using policies, see:
• Understanding Policies and Scheduling
• Finding and Editing Policies
• Creating Policies
• Deleting Policies
Publishing TransformsPublish already defined transforms from the Catalog.
To publish a transform:
1. On the Catalog page, locate the transform that you want to publish.
2. Click the More Actions icon.
A menu with the available actions for that element of the Catalog appears. Notethat the publish action is available only for transforms.
3. Select Publish.
The Publish Transform page appears.
4. Click the Select button located next to the Source field.
The Select dialog box appears.
5. From the Source drop-down list, click the data source for your file. A list ofdirectories for the selected source appears in the Select File field.
Publishing Data Results and Scheduling Policies 8-1

6. In the Select File field, go to the directory where your file is located, select that file,and then click OK.
You can also select a directory. If you select a directory instead of a specific file, youwill receive a warning, but all the files in that directory will be processed.
The selected source and file appear in the Source field on the Publish Transformpage.
7. Click the Select button located next to the Target field.
The Select dialog box appears.
8. From the Source drop-down list, click the target where your repaired and enricheddata set will be published. A list of directories for the selected source appears in theSelect Directory field.
9. In the Select Directory field, go to the directory where your published data set willbe stored, select that directory, and then click OK.
The selected target appears in the Target field on the Publish Transform page.
10. Click Publish.
For interactive publishing from the Catalog page, you have only one schedulingoption. For the Execute property, Once is the only option available. To customizedata processing and publishing, see Understanding Policies and Scheduling.
The Publish page appears. The publishing process might take a few minutes. Formore information on the Publish page, see Understanding a Publishing Log.
Understanding a Publishing LogWhen you publish a transform interactively, a log is generated with status updates foryour job.
On the Job Details page, the status details for your publishing log is generated. Thedata source and transform that you selected are listed, along with an automaticallygenerated publish job ID, your login user name, time and date stamps, and a start,then succeed or fail status for each of the following steps of the publishing taskperformed by the processing engine:
• Ingest: Imports and processes a smart sample from your data file.
• Prepare: Identifies categories and types of data from a smart sample.
Understanding a Publishing Log
8-2 Oracle Cloud Using Oracle Big Data Preparation Cloud Service

• Copymerge: Copies your entire data file to the computing cluster for your serviceinstance.
• Transform: Edits your data based on your transform script.
• Publish: Places your repaired and enriched data file in your designateddestination folder.
For more information on job details, see Understanding the Job Information.
Publishing Results to Oracle Business Intelligence Cloud ServicePublish the data set that results from running a transform in Oracle BusinessIntelligence Cloud Service.
You can publish a data set to Oracle Business Intelligence Cloud Service bothinteractively and by setting a policy:
• To publish interactively, see Publishing Transforms. In the Target drop-down list,ensure that you select an Oracle Business Intelligence Cloud Service target thatyou’ve previously created. Note that the Schedule setting is automatically set toOnce.
• To publish using a policy, see Creating Policies. In the Publish drop-down list,ensure that you select an Oracle Business Intelligence Cloud Service target thatyou’ve previously created.
When you run a transform and publish your data set, the repaired or enrichedcontents are added to your Oracle Business Intelligence Cloud Service repository as atable. The name assigned to this table is identical to the name that you assigned toyour transform and is listed on the Catalog page of your Oracle Big Data PreparationCloud Service instance. From this table, you must create fact tables and dimensiontables and then use them to create visualizations. For more information on tables, see Components of Data Models in Preparing Data in Oracle Business Intelligence CloudService.
If you edit your transform and republish your data set to Oracle Business IntelligenceCloud Service, then from the Model Actions menu, select Refresh Model. The datadisplay in your Oracle Business Intelligence Cloud Service instance is refreshed withthe updated contents from your repaired or enriched data set.
For more information on working with your data in Oracle Business IntelligenceCloud Service, see Adding Your Own Data in Using Oracle Business Intelligence CloudService.
Understanding Policies and SchedulingOracle Big Data Preparation Cloud Service policies let you schedule transform servicesto run against specific data files or directories at regular intervals.
Create, edit, run, and delete policies from the Policies page. The policies lists can besearched. Aside from the policy name, you can change all of the properties of a policy.
Run policies on a set schedule, such as on a weekly or monthly basis. You can alsomonitor and automatically schedule a transform when a particular event occurs, suchas when new files are uploaded to a particular directory.
For each policy, specify the transform that you want to run, the Hadoop DistributedFile System or Oracle Storage Cloud Service source where your data file is uploaded,and the target where the repaired or enriched data file will be published. Use either
Publishing Results to Oracle Business Intelligence Cloud Service
Publishing Data Results and Scheduling Policies 8-3

your Oracle Storage Cloud Service or Oracle Business Intelligence Cloud Serviceinstance as a target.
For more information on working with policies, see Creating Policies.
Finding and Editing PoliciesFind and edit the properties of policies that run transforms against your data sets onthe Policies page.
To find and edit a policy:
1. Go to the Policies page.
2. Locate the policy that you want to edit: In the Search field, enter the partial or fullname of a policy. You can also find a policy by scrolling through the list of policiesdisplayed on the page.
3. Click the More Actions icon. A menu with the available actions for a policyappears.
4. Select Edit.
The Edit Policy page appears.
5. Follow the steps in Creating Policies to edit the properties for this policy, and clickOK.
The policy is displayed on the Policies page with updated properties.
Creating PoliciesCreate policies to run transforms against your data sets on the Policies page.
To create a policy:
1. Go to the Policies page.
2. Click Create Policy.
The Create Policy dialog appears.
3. In the Name field, enter an alphanumeric title for your policy. This is a requiredfield.
4. In the Description field, describe the purpose of this policy.
5. In the Email Notification drop-down list, select from one of the following choices:
• None: You won’t receive any email notifications.
• Start and End: You’ll receive two emails, one notifying you when thescheduled policy has started and the other when it has ended.
• Verbose: You’ll receive an email notifying you when each engine in thetransform process has started and completed its task. This is a samplenotification:
BDP Notification at Jun 26 00:04:11 UTC 2015
Job Name: LR0625TESTEMAILNOTIFICATIONS1 Job Id: 3496
Finding and Editing Policies
8-4 Oracle Cloud Using Oracle Big Data Preparation Cloud Service
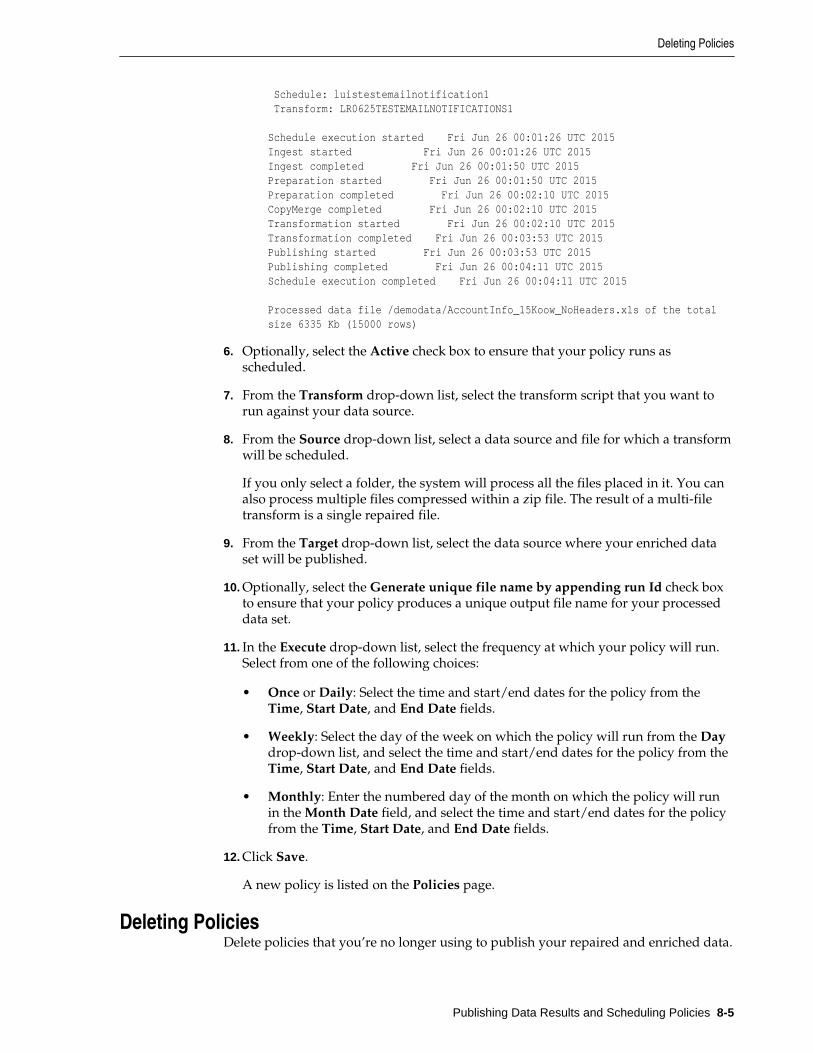
Schedule: luistestemailnotification1 Transform: LR0625TESTEMAILNOTIFICATIONS1
Schedule execution started Fri Jun 26 00:01:26 UTC 2015Ingest started Fri Jun 26 00:01:26 UTC 2015Ingest completed Fri Jun 26 00:01:50 UTC 2015Preparation started Fri Jun 26 00:01:50 UTC 2015Preparation completed Fri Jun 26 00:02:10 UTC 2015CopyMerge completed Fri Jun 26 00:02:10 UTC 2015Transformation started Fri Jun 26 00:02:10 UTC 2015Transformation completed Fri Jun 26 00:03:53 UTC 2015Publishing started Fri Jun 26 00:03:53 UTC 2015Publishing completed Fri Jun 26 00:04:11 UTC 2015Schedule execution completed Fri Jun 26 00:04:11 UTC 2015
Processed data file /demodata/AccountInfo_15Koow_NoHeaders.xls of the total size 6335 Kb (15000 rows)
6. Optionally, select the Active check box to ensure that your policy runs asscheduled.
7. From the Transform drop-down list, select the transform script that you want torun against your data source.
8. From the Source drop-down list, select a data source and file for which a transformwill be scheduled.
If you only select a folder, the system will process all the files placed in it. You canalso process multiple files compressed within a zip file. The result of a multi-filetransform is a single repaired file.
9. From the Target drop-down list, select the data source where your enriched dataset will be published.
10. Optionally, select the Generate unique file name by appending run Id check boxto ensure that your policy produces a unique output file name for your processeddata set.
11. In the Execute drop-down list, select the frequency at which your policy will run.Select from one of the following choices:
• Once or Daily: Select the time and start/end dates for the policy from theTime, Start Date, and End Date fields.
• Weekly: Select the day of the week on which the policy will run from the Daydrop-down list, and select the time and start/end dates for the policy from theTime, Start Date, and End Date fields.
• Monthly: Enter the numbered day of the month on which the policy will runin the Month Date field, and select the time and start/end dates for the policyfrom the Time, Start Date, and End Date fields.
12. Click Save.
A new policy is listed on the Policies page.
Deleting PoliciesDelete policies that you’re no longer using to publish your repaired and enriched data.
Deleting Policies
Publishing Data Results and Scheduling Policies 8-5

To delete a policy:
1. Go to the Policies page.
2. Locate the policy that you want to delete: In the Search field, enter the partial orfull name of a policy. You can also find a policy by scrolling through the list ofpolicies displayed on the page.
3. Click the More Actions icon. A menu with the available actions for a policyappears.
4. Select Delete, then click OK to confirm.
Your policy is no longer displayed on the Policies page, and it no longer runs againstany data files stored in your data sources.
Deleting Policies
8-6 Oracle Cloud Using Oracle Big Data Preparation Cloud Service

9Monitoring Jobs
Monitor data transform activity on the Jobs page and see detailed job information forrunning or completed jobs.
Topics:
• Viewing Jobs
• Viewing Details for a Specific Job
• Understanding the Job Information
Viewing JobsView and sort publish jobs on the Policies page.
To view a list of successful, running, pending, and failed jobs:
1. Go to the Jobs page.
The list of successful, running, pending, and failed jobs appears on the Jobs page.
The following information is listed for each job:
• Job Id: The default identification number assigned by the service to yourtransform.
• Name: The alphanumeric designation that you assigned to your transform.
• Status: The status of the job.
– Succeeded: The transform was executed.
– Running: The transform is under way.
– Pending: The transform hasn’t started yet. A transform is listed as“pending” if it’s scheduled to execute at a future date or time.
– Failed: The transform failed to run or run completely.
• Start Time: The date and time for when the transform was executed.
• End Time: The date and time for when the transform was stopped.
• User: The name of the user who executed the policy.
• Rows: The total number of rows transformed in the job.
• Transforms: The total number of data entities transformed in the job.
Monitoring Jobs 9-1

• Errors: The total number of errors in the job.
2. Change the view of the job lists in the following ways:
• To search for a specific job, in the Search field, enter a job identificationnumber (ID) or job name.
• To filter job lists by a specific time slice, from the top banner, select 30 days, 7days, or 24 hours.
• To filter jobs with a specific category, from the Show drop-down list, selectSucceeded, Running, Pending, or Failed.
• To sort job lists, from the Sort By drop-down list, select Date or Name.
• If your job doesn’t appear right away, at the top of the Jobs page, click the
Refresh icon .
Viewing Details for a Specific JobView details for a specific job on the Job Details page.
To view the details for a specific job:
1. On the Jobs page, click the row for a specific job.
The job details page appears.
To learn more about job details, see Understanding the Job Information.
Understanding the Job InformationThe Job Details page for a specific job lists useful metrics, including the size of the dataresults, when it was published, and who scheduled the job.
Viewing Details for a Specific Job
9-2 Oracle Cloud Using Oracle Big Data Preparation Cloud Service

Detail Description
Job Id The default identification number assignedby the service to your transform.
Name The alphanumeric designation you assignedto your transform.
Status The status of the job. A job status is Succeeded,Running, Pending, or Failed.
Start Time The date and time for when the transformwas executed.
End Time The date and time for when the transformwas completed.
User The name of the user who executed thepolicy.
Schedule The schedule category of a job. A jobschedule is either Interactive or Scheduled.
Transform The name that you assigned to the transformjob.
Source The source file that’s being transformed.
Target The target file where the transformed data setwill be stored.
Size The size of the transformed data set.
Rows The total number of rows transformed in thejob.
Transforms The total number of data entities transformedin the job.
Errors The total number of errors in the job.
For more information on logs, see Understanding a Publishing Log.
Understanding the Job Information
Monitoring Jobs 9-3

Understanding the Job Information
9-4 Using Oracle Big Data Preparation Cloud Service

AUsing Similarity Discovery
Use similarity discovery to compare the profiles of two datasets and identify if thedatasets are similar.
Topics:
• About Similarity Discovery
• Web Service Call Syntax
• Using the Similarity Discovery Web Service
• Understanding the Similarity Discovery Prediction Results
About Similarity DiscoveryThe similarity discovery feature is a web service that allows you to compare twotransform files and predict the similarity between the two datasets. This comparison isdone on the profile metadata of the two transform files and not the actual huge data.
You can use this feature to identify if a transform file is similar to another transformfile. This prediction approach reduces the time and resources required to compare theactual big datasets. Other uses of this feature include:
• Identifying potentially duplicate datasets
• Analyzing drifts in the new dataset while compared to the previous datasets fromthe same data source
• Identifying similar columns for blending into useful datasets
The prediction results are displayed in JSON format in the web page itself. You canuse a browser plugin like JSONView to automatically display the JSON results in areadable format.
Web Service Call SyntaxYou access the similarity discovery web service using the web browser URL.
The URL for the web service call requires the following structure:
http:// <service name : port> /appui/ws/profilesimilarity?dataserviceleft=dataOne&dataserviceright=dataTwo
where dataOne and dataTwo are the transform file names.
Using the Similarity Discovery Web ServiceThe similarity discovery web service allows you to compare the profile data of twotransform files to predict how the two files are similar.
Using Similarity Discovery A-1

To use the similarity discovery web service:
1. Login to the service.
2. Note the service URL. Create your web service call URL by replacing text in theURL after /appui/ with ws/profilesimilarity?dataserviceleft=dataOne&dataserviceright=dataTwo ; where dataOneand dataTwo are the names of the two transform files you want to compare.
3. Enter the URL in the browser address bar.
The results of the similarity prediction are displayed.
Note: Use a browser plugin like JSONView to view the JSON results in areadable format.
Understanding the Similarity Discovery Prediction ResultsThe similarity discovery results predict the overall similarity of the two files and alsothe similarities at the column level.
The similarity discovery engine predicts similarity by finding the best match for acolumn in one profile to a column in the other profile. This pairing is done based onsimilarities of the column type and column data from the profile metadata. Thecolumns might pair up in order, out-of-order, or not at all. Each pair’s similarity ispredicted on a scale of 1 to 100.
The results of the similarity discovery web service are displayed in a JSON format.First the overall similarities are listed followed by the detailed pairing similarities. Youcan use only the overall similarity predictions for your analytical purposes or drilldown all the way into the individual predicted overlapping column pairs.
The JSON parameters are:
• leftId: name of the first datafile used in similarity discovery
• rightId: name of the second datafile used in similarity discovery
• similarity: the overall similarity prediction score ranging from 0 to 100. Ahigher score indicates more similarity between the two files. The overall similarityscore is based on the following three similarities: column data, column order, andcolumn types. These three similarities are individually listed next in the JSONoutput.
• similarityColumnData: the similarity prediction score for the data overlapbetween the predicted columns pairs in the two profiles
• similarityColumnOrder: the similarity prediction score for the predictedcolumns pairs order in the two profiles
• similarityColumnTypes: the similarity prediction score for the similarity oftwo profiles’ column type regardless of the column order
• weightSimilarityColumnData: a weighing number ranging from 0.0 to 1.0used to calculate the overall similarity score
• weightSimilarityColumnOrder: a weighing number ranging from 0.0 to 1.0used to calculate the overall similarity score
Understanding the Similarity Discovery Prediction Results
A-2 Oracle Cloud Using Oracle Big Data Preparation Cloud Service

• columnRelationships: gives detailed information for the columns that arepredicted to be similar. For each mapping pair, the column number of the similarcolumns is listed with a prediction score. Additionally, pairs are scored for theirhistogram match, header similarity, example value intersection, and charactersequence intersection.
• leftOrphanIds: lists columns in the first datafile that are predicted to not mapto any columns in the second datafile.
• rightOrphanIds: lists columns in the second datafile that are predicted to notmap to any columns in the first datafile.
Below are the similarity discovery prediction results for two files that are very similar.The screenshot shows the overall similarity predictions and the detailed predictionsfor one mapping column. Note that the first column from file 1 maps to the firstcolumn in file 2.
Understanding the Similarity Discovery Prediction Results
Using Similarity Discovery A-3

Understanding the Similarity Discovery Prediction Results
A-4 Oracle Cloud Using Oracle Big Data Preparation Cloud Service

Below are the similarity discovery prediction results for two files that are not sosimilar. The screenshot shows the overall similarity predictions and the detailedpredictions for one mapping column. Note that the predictions indicate that the 11thcolumn from file 1 maps to the 7th column in file 2.
Understanding the Similarity Discovery Prediction Results
Using Similarity Discovery A-5

Understanding the Similarity Discovery Prediction Results
A-6 Oracle Cloud Using Oracle Big Data Preparation Cloud Service