using flat files
TRANSCRIPT

TIBCO Foresight® EDISIM®
Using Flat Files
Version 6.20.0
May 2021
Copyright © 1991-2021. TIBCO Software Inc. All Rights Reserved.

Using Flat Files Contents
Contents
Introduction 1
Intended Audience ........................................................................................................... 1
TIBCO Foresight Products that work with Flat Files ............................................................ 1
Overview ........................................................................................................................ 2
Demos ............................................................................................................................ 2
Tutorial 3
Creating a Delimited Flat File Guideline with EDISIM ......................................................... 4
Starting the Guideline ................................................................................................ 4
Setting Guideline Properties ........................................................................................ 5
Creating the HEAD Record ........................................................................................ 6
Creating the TRLR Record ......................................................................................... 8
Assembling other Records .......................................................................................... 9
Adding Records to the Layout ................................................................................... 11
Setting Requirements ............................................................................................... 11
Setting Repeat Counts .............................................................................................. 12
Specifying Values ..................................................................................................... 12
Validating Data with the Flat File Guideline ...................................................................... 13
Importing 14
Creating a Guideline from a COBOL Copybook ................................................................ 14
Copybook File Format ............................................................................................. 14
Importing the Copybook .......................................................................................... 15
Creating a Guideline from a CSV Layout ........................................................................... 17
CSV File Format ..................................................................................................... 17
CSV File Checklist ................................................................................................... 19
Importing the CSV File ............................................................................................ 20
Validating Flat Files 21
Validating Flat Files with EDISIM Validator...................................................................... 21
Validating Flat Files with HIPAA Validator Desktop .......................................................... 21
Validating Flat Files with Instream ................................................................................... 22
Creating an HTML Report of a Flat File Validation ............................................................ 22
Splitting Flat Files with Document Splitter ........................................................................ 22
Guideline Properties 23
Guidelines with Fixed Record Lengths .............................................................................. 24
Enveloping .................................................................................................................... 25
TIBCO Documentation and Support Services 26
Using Flat Files Contents
How to Access TIBCO Documentation ................................................................................................ 26
Product-Specific Documentation ............................................................................................................ 26
How to Contact TIBCO Support ........................................................................................................... 27
How to Join TIBCO Community ........................................................................................................... 27
Legal and Third-Party Notices 28

Using Flat Files Page 1 Introduction
Introduction
Intended Audience
This document is intended for users who wish to define flat file formats and validate flat files against
these formats. The flat files can be delimited or fixed-length.
You will need a basic knowledge of the TIBCO Foresight programs that you will use with the flat
files. These may include:
TIBCO Foresight® EDISIM® - Standards Editor and Validator components
TIBCO Foresight® HIPAA Validator® Desktop
TIBCO Foresight® Instream®
TIBCO Foresight Products that work with Flat Files
EDISIM® 6.7 or later
(Standards Editor,
Validator, Document
Builder modules)
Required Import, create, edit flat
file guidelines
Validate flat file data
Create paper, HTML, or
RTF documentation.
See TIB_fsp_edisim_<n.n>_fseditor.pdf,
TIB_fsp_edisim_<n.n>_fsdocbld.pdf
in EDISIM’s Documentation directory
HIPAA Validator®
Desktop 6.0 and later
Optional Validate flat file data See
TIB_fsp_edisim_<n.n>_fsvalidator.pdf in
Desktop’s Doc directory
Instream® 5.9 and later Optional Validation, Docsplitter,
partner automation,
ValidationHighlighter,
See TIB_fsp-
instream_<n.n>_usersguide.pdf, TIB_fsp-
instream _<n.n>_docsplitter.pdf, and
TIB_fsp-instream _<n.n>_tpa.pdf in
Instream®’s Doc directory
TIBCO Foresight®
Translator
Optional Translate between EDI
and flat
See TIB_translator_<n.n>_usersguide.pdf
in Translator’s Doc directory

Using Flat Files Page 2 Introduction
Overview
You can:
Create a flat file guideline in EDISIM Standards Editor, including adding business rules.
Describe the guideline in paper, HTML, or RTF format with EDISIM Document Builder.
Validate flat file data against the guideline with EDISIM Validator or HIPAA Validator Desktop
and optionally edit the data from Validator’s bottom pane.
Validate flat file data against the guideline with Instream and optionally use partner automation.
Use Validation Highlighter to create a human-friendly validation report.
Split good from bad data with Instream’s Docsplitter.
Translate between EDI and flat file.
Since flat files are not based on standards the way EDI is, you will notice some differences in how it
is implemented in TIBCO Foresight products:
You must have EDISIM to use flat files. It lets you create a TIBCO Foresight “guideline” (STD
file) from the flat file structure.
In EDISIM, flat file code lists are stored in code values or application value lists.
APF files are honored by flat file validations.
You can validate flat files with Instream, but you cannot use Response Generator or
DataSwapper.
Demos
Program Data file Guideline Validate with …
EDISIM In EDISIM®’s Samples directory:
FF_Delim_1VetCustomer.txt or Oneill.txt
VETDELIM
EDISIM Validator
HIPAA
Validator
Desktop
In HIPAA Validator Desktop’s DemoData
directory:
FF_Delim_1VetCustomer.txt or Oneill.txt
VETDELIM HIPAA Validator Desktop
Instream In Instream’s DemoData directory:
FF_Delim_1VetCustomer.txt
FF_Delim_Customers.txt
FF_FL_1VetCustomer.txt
FF_Delim_2Vetcustomer.txt
VETDELIM
In Instream’s Scripts directory:
V_DS_FFdelim_vet
V_FFdelim_CBTPA
ValidationHighlighter_FF_FL
ValidationHighlighter_FF_Delim

Using Flat Files Page 3 Tutorial
Tutorial
This tutorial will walk you through the most basic steps in creating a delimited file guideline and
validating flat file data with it. The file format we will create is:
Corresponding data might look like this:
HEAD|01|20070110|1412$
NAME|RITA|O'NEILL$
ADDR|115 CENTRAL AVE.||HILLSDALE#MN#12345$
PETS|SKYLER|DOG|YELLOW|2001$
PETS|JENNY|PARAKEET|BLUE$
PETS|CELESTE|CAT|BLACK WHITE|2002$
TRLR|01$

Using Flat Files Page 4 Tutorial
Creating a Delimited Flat File Guideline with EDISIM
Steps include:
1. Starting the Guideline .................... page 4
2. Setting Guideline Properties ......... page 5
3. Creating the TRLR Record ........... page 8
4. Setting Guideline Properties ......... page 5
5. Assembling other Records ............ page 9
6. Adding Records to the Layout ..... page 11
7. Setting Requirements ..................... page 11
8. Setting Repeat Counts ................... page 12
9. Specifying Values ............................ page 12
Starting the Guideline
1. Open EDISIM Standards Editor.
2. Choose File | New | Empty Guidelines.
3. For data that will have delimited fields, choose +UDELIM:
4. Click Open.
5. Click Save and use this Name and Description:
Save.

Using Flat Files Page 5 Tutorial
Setting Guideline Properties
1. Choose File | Properties | User-Defined Standard.
2. Type these delimiters:
Record $
Field |
Sub-Field #
3. Click OK and then save.

Using Flat Files Page 6 Tutorial
Creating the HEAD Record
Header and trailer records are optional but our particular file format has them.
Creating the Fields in the HEAD Record
We will now create the fields in the first record in the file. In this guideline, we are labeling it HEAD:
1. Open Dictionary Objects and click Fields:
Dictionary objects are pieces that can be assembled to create file layouts.
2. Choose Edit | Create new item | Dictionary Field.
3. Fill out the following information about the FNUM field and then click OK. The field ID can be
up to 128 alphanumeric characters and underscores. Do not use spaces or other special
characters in the ID.

Using Flat Files Page 7 Tutorial
4. Click on Fields again, and create DATE and then TIME:
5. Save.
Assembling the HEAD Record
We now assemble the HEAD record itself:
1. Under Dictionary Objects, click Records:
2. Choose Edit | Create new item | Dictionary Record.
Using Flat Files Page 8 Tutorial
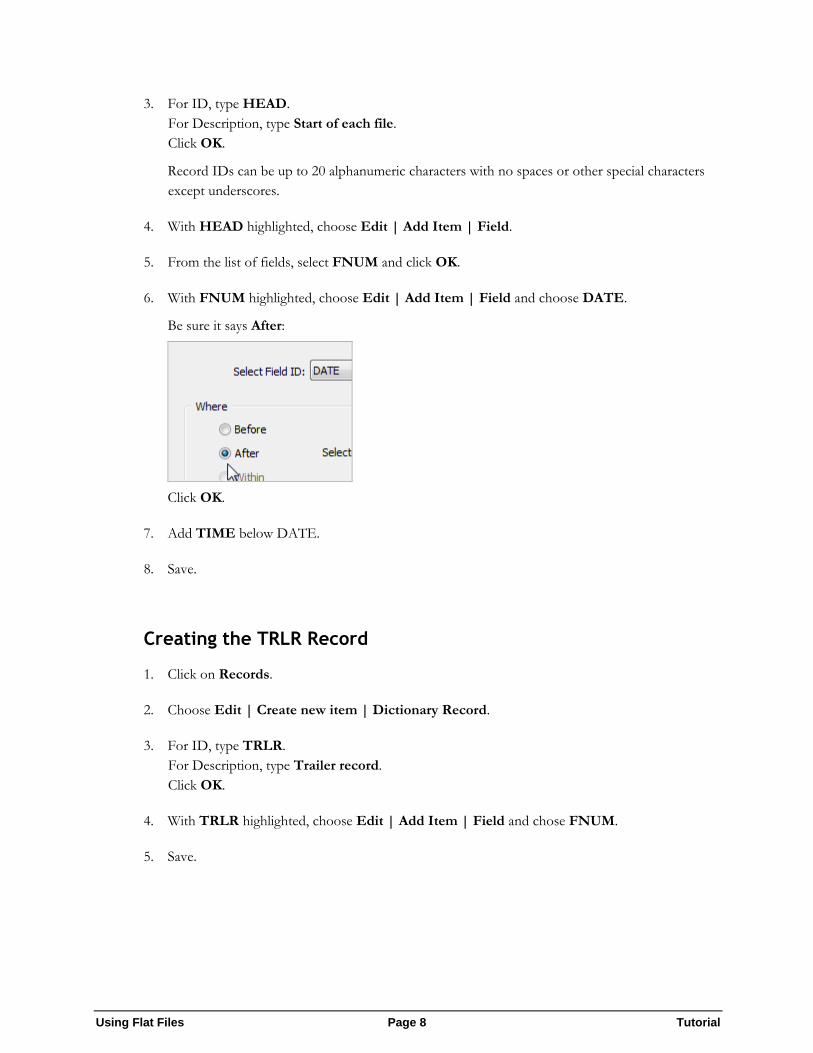
3. For ID, type HEAD.
For Description, type Start of each file.
Click OK.
Record IDs can be up to 20 alphanumeric characters with no spaces or other special characters
except underscores.
4. With HEAD highlighted, choose Edit | Add Item | Field.
5. From the list of fields, select FNUM and click OK.
6. With FNUM highlighted, choose Edit | Add Item | Field and choose DATE.
Be sure it says After:
Click OK.
7. Add TIME below DATE.
8. Save.
Creating the TRLR Record
1. Click on Records.
2. Choose Edit | Create new item | Dictionary Record.
3. For ID, type TRLR.
For Description, type Trailer record.
Click OK.
4. With TRLR highlighted, choose Edit | Add Item | Field and chose FNUM.
5. Save.

Using Flat Files Page 9 Tutorial
Assembling other Records
We will now create fields needed for the other records, and then assemble them into records.
1 For each field in the table below, click on Fields under Dictionary Objects and choose Edit |
Create new item | Dictionary Field.
2. Fill out the information for these fields:
ID Description Type Min Max
FNAM First name AN 1 100
LNAM Last name AN 2 100
ADDS Street address AN 5 100
CITY City name AN 2 100
STAT State - 2 character AN 2 2
ZIPC 5 or 9-character ZIP, no hyphen N 5 9
SPEC Pet Species AN 2 20
COLR Color AN 3 20
BYER Birth year in YYYY format N 4 4
3. Highlight Complex Fields:
We are going to assemble the CZIP complex field, which includes CITY, STAT, and ZIPC. This
is a typical example of a complex field, which is a set of fields that always appear in the same
order.
4. Choose Edit | Create new item | Dictionary Complex Field, fill out this information, and
click OK:

Using Flat Files Page 10 Tutorial
5. With CZIP highlighted, choose Edit | Add item | Field and choose CITY. Click OK:.
6. With CITY highlighted, choose Edit | Add item | Field and choose STAT and be sure After
is selected. Click OK.
7. Add ZIPC below STAT.
8. Assemble the NAME record:
Highlight Records.
Choose Edit | Create new item | Dictionary Record and fill out the information about the
NAME record:
Use Edit | Add item | Field to add FNAM and then LNAM:
9. Create the ADDR record and add the ADDS field twice (to accommodate 2-line street
addresses).
Then use Edit | Add item | Add Complex Field and choose CZIP.
10. Create the PETS record with these fields.
11. Save.

Using Flat Files Page 11 Tutorial
Adding Records to the Layout
The layout is the set of records, in order, that define the flat file structure. In a flat file guideline, it
includes all records including any header and trailer records.
1. Close Dictionary Objects and Click on LAYOUT:
2. Choose Edit | Add item | Record and choose HEAD.
3. Add the rest of the records in this order:
Setting Requirements
1. Click on the NAME record and make it required:

Using Flat Files Page 12 Tutorial
2. Make these records and fields required.
Both fields in the NAME record
SPEC field in the PETS record.
Setting Repeat Counts
To specify that the PETS record can appear multiple times:
1. Click the PETS record.
2. In the Repeat Count field in the bottom pane, type >1.
3. Be sure that View | Show Unused is selected:
Specifying Values
You can use code values or application values with flat file guidelines. Here, we specify a list of pet
species.
1. Open the PETS record.
2. Right-click on SPEC and choose Application Values.
3. Fill out the top like this:

Using Flat Files Page 13 Tutorial
4. In the bottom Value line, type DOG and press Enter .
Type BIRD and press Enter .
Also add CAT and REPTILE.
5. Click Attach and then Save.
Validating Data with the Flat File Guideline
Now we can check a file to see if it conforms to the file definition in our new guideline VETDELIM.
Note If you would like to use a TIBCO Foresight-supplied VETDELIM guideline rather than the
one you created, use Standards Editor to import VETDELIM.sef from EDISIM’s Samples directory.
1. Start EDISIM’s Validator by clicking the icon on the toolbar:
2. Choose File | Open and open Oneill.txt in EDISIM’s Samples directory.
3. Choose our new guideline VETDELIM:
4. Click OK.
5. Click on each blue segment in the top pane and notice the corresponding data segment in the
bottom pane.
The street address is too long, and the second PETS segment had an invalid value of
PARAKEET.

Using Flat Files Page 14 Importing
Importing
Creating a Guideline from a COBOL Copybook
Requires EDISIM 6.6 or later.
Copybook File Format
EDISIM will support most COBOL keywords except :
VALUE OF system-name IS <data-name literal>
DATA RECORDS ARE data-name …
LINAGE IS remainder of clause
RECORDING MODE IS mode
CODE-SET IS alphabet-name
LABEL RECORD IS data-name
RENAMES <data-name> <remainder of clause>
ASCENDING/DESCENDING KEY IS name INDEXED BY name
USAGE IS <INDEX POINTER COMP-1 COMP-2 DISPLAY-1>
OCCURS VARYING
These OCCURS clauses will just import the upper limit as the repeat count, since we currently
support only a maximum repeat count:
OCCURS n TO n TIMES
OCCURS integer-1 TO integer-2 TIMES DEPENDING ON remainder of clause

Using Flat Files Page 15 Importing
Importing the Copybook
NOTE: When importing a COBOL copybook, Standards Editor automatically translates 'soft
hyphen' characters (hex AD) into regular hyphen characters (hex 2D).
To import a COBOL copybook into Standards Editor for use as a delimited or fixed-length-field
guideline:
1. Open Standards Editor.
2. Choose File | Import | Import COBOL Copybook and open.
3. Select the copybook.
There is a sample Address.cob in EDISIM’s Samples directory.
Additional Checkbox Options:
“Start reading in column”:
This option allows you to specify a record start position. COBOL copybooks sometimes
have an internal identifier or counter at the start and/or end of each line. This option
allows you exclude those areas from the import. For example, your copybook has a record
ID in the first six positions of each copybook record. You might check this box and specify
that the import start with column 7. Default is column 1.

Using Flat Files Page 16 Importing
“Limit Input Record Size to next…”:
This option allows you to limit record size to a certain number of characters. Default is 72
characters.
4. Have a look at the guideline:
5. Choose File | Properties | User-Defined Standard and fill out the information as described
in Guideline Properties on page 23.

Using Flat Files Page 17 Importing
Creating a Guideline from a CSV Layout
Requires EDISIM 6.6 or later
CSV File Format
For an example, please see Test1.csv in EDISIM’s Samples directory:
Notice the headers in the top row. The first row must contain the exact field names shown in
Test1.csv.
Each line in the CSV file can contain these columns (case insensitive and in any order).
Lev The Lev column shows the level, or hierarchy, of items. Number from the outer level as 0 to
the most inner level, which will be a field containing data.
Example (levels are shown in red):
0
0
1
2 2
1 2 2
1
2 3
4 4
3 4 4
3 3
2
1

Using Flat Files Page 18 Importing
Level 99 is a code value for the field immediately above. These 99 rows are code values A,
B, and C for ITEMTYPE:
ID The ID of the item; maximum 20 characters for a record and 128 characters for fields; no
spaces or other special characters except underscores.
Name The Description of the item:
Desc The Purpose of the item.
Usage The Usage of the item. Possible values are:
M (mandatory)
O (optional)
N (not used)
They appear in the U/A column
Repeat How many times this item can repeat in the current location.
Type Data type for fields. See DataTypes.pdf in EDISIM’s Documentation directory. Only fields
that actually contain data should have a type. Do not use Type for records or complex fields.
MinLen Minimum length for data in this field.
Only fields containing data have MinLengths. Do not use them with records or complex
fields.

Using Flat Files Page 19 Importing
MaxLen Maximum length for data in this field.
Only fields containing data have MaxLengths. Do not use them with records or complex
fields.
If each field has a MinLen and MaxLen that is the same, the guideline will be assumed to be
for fixed-length data.
If one or more has a different MinLen from its MaxLen, then the guideline will be assumed to
be delimited.
Note1 Contents of a level 1 note.
Note2 Contents of a level 2 note.
You can have columns for any level of note up to Note99.
CSV File Checklist
Remove commas, line feeds, double quotes, and single quotes from values. If you are editing the
CSV file with a spreadsheet program, edit the CSV with a text editor just before importing, and
check for single quotes that have been inserted.
Make all cells text if you are using a spreadsheet to create the CSV file. Otherwise, leading zeros
may disappear.
Be sure values in the Usage column match those in EDISIM (M, O, and N).
Be sure the values in the Type column match EDISIM types (see DataTypes.pdf in EDISIM’s
Documentation directory).
Do not include the segment tag as a field.
IDs are 6 characters or less.
Add levels in column 1.
Be sure that records do not have lengths or types.
Be sure the last record has a newline at the end.

Using Flat Files Page 20 Importing
Importing the CSV File
To import a comma-delimited file into Standards Editor for use as a delimited or fixed-length-field
guideline:
1. Open Standards Editor.
2. Choose File | Import | Import CSV Layout and open.
3. Select the CSV file and import it.
There is a sample Test1.csv in EDISIM’s Samples directory.
4. Choose File | Properties | User-Defined Standard and fill out the information as described
in Guideline Properties on page 23.
5. Be sure that the record tags are not repeated as the first field in the records.

Using Flat Files Page 21 Validating Flat Files
Validating Flat Files
Validating Flat Files with EDISIM Validator
After defining and saving the flat file layout as illustrated in the tutorial on page 3, you can start
validating flat files with EDISIM Validator to see if they conform to the guideline.
Validating a flat file is exactly like validating an EDI file:
1. Start EDISIM Validator by:
Clicking on the toolbar from within Standards Editor, or by …
Choosing Start | Programs | Foresight | EDISIM | Validator.
2. Use File | Open to open the data file that you want to validate.
3. Select the flat file guideline to be used for validation.
4. Dismiss the Analysis Completed box and view the results as usual.
For information about how to edit the data in the bottom pane, or for other details, see
TIB_fsp_edisim_<n.n>_fsvalidator.pdf in EDISIM’s Documentation.
Validating Flat Files with HIPAA Validator Desktop
After defining and saving the flat file layout as illustrated in the tutorial on page 3, you can start
validating flat files with HIPAA Validator Desktop to see if they conform to the guideline.
Validating a flat file is exactly like validating an EDI file, once you have copied the guideline to
HIPAA Validator Desktop:
1. Copy the flat file guideline’s .STD file from EDISIM’s User Files\Public Guidelines directory
to HIPAA Validator Desktop’s Database directory.

Using Flat Files Page 22 Validating Flat Files
2. Start HIPAA Validator Desktop with one of these:
Click on the toolbar from within Standards Editor, or by …
Choose Start | Programs | Foresight | HIPAA Validator Desktop| Validator.
3. Use File | Open to open the data file that you want to validate.
4. Select the flat file guideline to be used for validation.
5. Dismiss the Analysis Completed box and view the results as usual.
For other details, see TIB_fsp_edisim_<n.n>_fsvalidator.pdf in HIPAA Validator Desktop’s Doc
directory.
Validating Flat Files with Instream
After defining and saving the flat file layout as illustrated in the tutorial on page 3, you can start
validating flat files with Instream to see if they conform to the guideline.
To validate with Instream:
1. Copy the flat file guideline’s .STD file from EDISIM’s User Files\Public Guidelines directory
to Instream’s Database directory.
2. Validate as usual with Instream, using the -g parameter to identify the flat file guideline.
See scripts that start with V_FF or V_DS_FF Instream’s Scripts directory for examples.
3. Open the detail results file and view the results as usual.
You can also use trading partner automation to select guideline and profile. See TIB_fsp-instream
_<n.n>_tpa.pdf.
Creating an HTML Report of a Flat File Validation
You can create an HTML report from your flat file validation. Please see
ValidationHighlighter.pdf.
Splitting Flat Files with Document Splitter
You can split flat file data into separate good and bad files as described in TIB_fsp-
instream_<n.n>_docsplitter.pdf.

Using Flat Files Page 23 Guideline Properties
Guideline Properties
Choose File | Properties | User-Defined Standard to set guideline properties.

Using Flat Files Page 24 Guideline Properties
Guidelines with Fixed Record Lengths
Flat Files with Record ID
Choose File | Properties | User-Defined Standard:
1. For Record Size,
If ALL records are the same size, type the length of the records.
If records have varying length, leave Record Size set to 0. In this case, records can be separated
by any character defined in Record Separator. This is true for delimited and fixed-length field
data.
2. For Record Key Size,
If the data is delimited, leave the Record Key size at 0.
If the data is fixed-length, type the length of the record key field.
3. For Record Key Start,
If the data is delimited, this is ignored. The key must be in the first position in each record.
If the data is fixed-length, type the position where the record key starts.
4. Record Delimiter, Field Delimiter, and Sub-Field Delimiter
If the data is delimited, enter this information. For hex values, type a lower case x followed by
two hexadecimal characters. Example: x0A for newline.
If the data is fixed-length, skip the Field Delimiter and Sub-Field Delimiter. If the record
delimiter is other than a newline, enter it.

Using Flat Files Page 25 Guideline Properties
Flat Files without Record ID
These are files with no record tags and fixed-length fields, like this file:
All records must have the same format. In Standards Editor, there is only one record defined in the
guideline and it must be enclosed in a loop.
Under File | Properties | User-Defined Standard, Record Key Size is 0 and other fields are blank
except perhaps Record Delimiter. You do not need anything under Enveloping.
For an example:
Copy FF_FL_NoTag_OneRec.std from EDISIM’s Samples directory to EDISIM’s User
Files\Public Guidelines directory. You can then open it in Standards Editor.
For example data to go with this guideline, see FF_FL_OneRecordType_NoTag.txt in
EDISIM’s Samples directory.
Enveloping
If your data has a header and trailer record, you can enter it in the layout as you do any other record.
You can then skip the Enveloping sections under File | Properties |User-Defined Standard.
Using Flat Files Page 26
TIBCO Documentation and Support Services
How to Access TIBCO Documentation
Documentation for TIBCO products is available on the TIBCO Product Documentation website, mainly in HTML and PDF formats.
The TIBCO Product Documentation website is updated frequently and is more current than any other documentation included with the product. To access the latest documentation, visit https://docs.tibco.com.
Product-Specific Documentation
Documentation for TIBCO® Foresight® EDISIM® is available on the TIBCO Foresight® EDISIM® Documentation page.
The following documents for this product can be found on the TIBCO Documentation site:
● TIBCO Foresight® EDISIM® Release Notes
● TIBCO Foresight® EDISIM® Data Types
● TIBCO Foresight® EDISIM® Documentation and Demo Data Index
● TIBCO Foresight® EDISIM® Supported File Formats
● TIBCO Foresight® EDISIM® Installation Guide
● TIBCO Foresight® EDISIM® Introduction to EDISIM®
● TIBCO Foresight® EDISIM® DocStarter: Creating a Guideline from EDI Data
● TIBCO Foresight® EDISIM® Guideline Merge
● TIBCO Foresight® EDISIM® Document Builder User’s Guide
● TIBCO Foresight® EDISIM® Error Message Numbers, Editing, and Management
● TIBCO Foresight® EDISIM® Validator User’s Guide
● TIBCO Foresight® EDISIM® Using Flat Files
● TIBCO Foresight® EDISIM® Library User’s Guide
● TIBCO Foresight® EDISIM® Validation Profile Files (APF)
● TIBCO Foresight® EDISIM® Using XML
● TIBCO Foresight® EDISIM® Comparator User’s Guide
● TIBCO Foresight® EDISIM® Analyzer User’s Guide
● TIBCO Foresight® EDISIM® Standards and Guidelines Reference Manual
● TIBCO Foresight® EDISIM® Test Data Generator User’s Guide
● TIBCO Foresight® EDISIM® Self-Paced Tutorial: Introduction to EDISIM® (X12 Standards)
● TIBCO Foresight® EDISIM® Self-Paced Tutorial: Introduction to EDISIM® EDIFACT D99A
Orders

Using Flat Files Page 27
● TIBCO Foresight® EDISIM® Standards Editor User’s Guide
● TIBCO Foresight® EDISIM® Business Rules
How to Contact TIBCO Support
You can contact TIBCO Support in the following ways:
● For an overview of TIBCO Support, visit http://www.tibco.com/services/support.
● For accessing the Support Knowledge Base and getting personalized content aboutproducts you are interested in, visit the TIBCO Support portal athttps://support.tibco.com.
● For creating a Support case, you must have a valid maintenance or support contractwith TIBCO. You also need a user name and password to log in tohttps://support.tibco.com. If you do not have a user name, you can request one byclicking Register on the website.
How to Join TIBCO Community
● TIBCO Community is the official channel for TIBCO customers, partners, and employee
subject matter experts to share and access their collective experience. TIBCO Community
offers access to Q&A forums, product wikis, and best practices. It also offers access to
extensions, adapters, solution accelerators, and tools that extend and enable customers to
gain full value from TIBCO products. In addition, users can submit and vote on feature
requests from within the TIBCO Ideas Portal. For a free registration, go to
https://community.tibco.com
Using Flat Files Page 28
Legal and Third-Party Notices
SOME TIBCO SOFTWARE EMBEDS OR BUNDLES OTHER TIBCO SOFTWARE. USE OF SUCH EMBEDDED OR BUNDLED TIBCO SOFTWARE IS SOLELY TO ENABLE THE FUNCTIONALITY (OR PROVIDE LIMITED ADD-ON FUNCTIONALITY) OF THE LICENSED TIBCO SOFTWARE. THE EMBEDDED OR BUNDLED SOFTWARE IS NOT LICENSED TO BE USED OR ACCESSED BY ANY OTHER TIBCO SOFTWARE OR FOR ANY OTHER PURPOSE.
USE OF TIBCO SOFTWARE AND THIS DOCUMENT IS SUBJECT TO THE TERMS AND CONDITIONS OF A LICENSE AGREEMENT FOUND IN EITHER A SEPARATELY EXECUTED SOFTWARE LICENSE AGREEMENT, OR, IF THERE IS NO SUCH SEPARATE AGREEMENT, THE CLICKWRAP END USER LICENSE AGREEMENT WHICH IS DISPLAYED DURING DOWNLOAD OR INSTALLATION OF THE SOFTWARE (AND WHICH IS DUPLICATED IN THE LICENSE FILE) OR IF THERE IS NO SUCH SOFTWARE LICENSE AGREEMENT OR CLICKWRAP END USER LICENSE AGREEMENT, THE LICENSE(S) LOCATED IN THE “LICENSE” FILE(S) OF THE SOFTWARE. USE OF THIS DOCUMENT IS SUBJECT TO THOSE TERMS AND CONDITIONS, AND YOUR USE HEREOF SHALL CONSTITUTE ACCEPTANCE OF AND AN AGREEMENT TO BE BOUND BY THE SAME.
This document is subject to U.S. and international copyright laws and treaties. No part of this document may be reproduced in any form without the written authorization of TIBCO Software Inc.
TIBCO, the TIBCO logo, the TIBCO O logo, and EDISIM are either registered trademarks or trademarks of TIBCO Software Inc. in the United States and/or other countries.
Java and all Java based trademarks and logos are trademarks or registered trademarks of Oracle and/or its affiliates.
All other product and company names and marks mentioned in this document are the property of their respective owners and are mentioned for identification purposes only.
This software may be available on multiple operating systems. However, not all operating system platforms for a specific software version are released at the same time. See the readme.txt file for the availability of this software version on a specific operating system platform.
THIS DOCUMENT IS PROVIDED “AS IS” WITHOUT WARRANTY OF ANY KIND, EITHER EXPRESS OR IMPLIED, INCLUDING, BUT NOT LIMITED TO, THE IMPLIED WARRANTIES OF MERCHANTABILITY, FITNESS FOR A PARTICULAR PURPOSE, OR NON-INFRINGEMENT.
THIS DOCUMENT COULD INCLUDE TECHNICAL INACCURACIES OR TYPOGRAPHICAL ERRORS. CHANGES ARE PERIODICALLY ADDED TO THE INFORMATION HEREIN; THESE CHANGES WILL BE INCORPORATED IN NEW EDITIONS OF THIS DOCUMENT. TIBCO SOFTWARE INC. MAY MAKE IMPROVEMENTS AND/OR CHANGES IN THE PRODUCT(S) AND/OR THE PROGRAM(S) DESCRIBED IN THIS DOCUMENT AT ANY TIME.
THE CONTENTS OF THIS DOCUMENT MAY BE MODIFIED AND/OR QUALIFIED, DIRECTLY OR INDIRECTLY, BY OTHER DOCUMENTATION WHICH ACCOMPANIES THIS SOFTWARE, INCLUDING BUT NOT LIMITED TO ANY RELEASE NOTES AND "READ ME" FILES.
This and other products of TIBCO Software Inc. may be covered by registered patents. Please refer to TIBCO's Virtual Patent Marking document (https://www.tibco.com/patents) for details.
Copyright © 1991-2021. TIBCO Software Inc. All Rights Reserved.