using extron streaming content manager: a help file iis verson 7.0 or higher (microsoft windows...
TRANSCRIPT
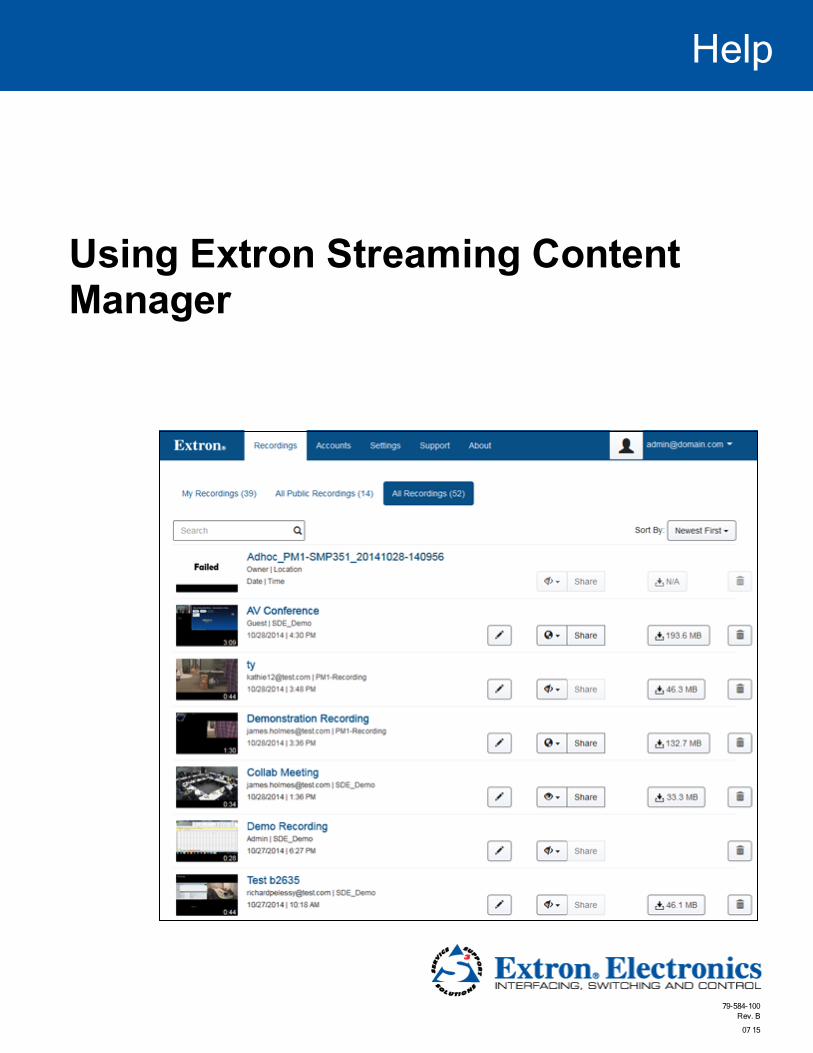
Help
Using Extron Streaming Content Manager
79-584-100Rev. B
07 15
2Using Streaming Content Manager (SCM) Software • Contents
Prerequisites 7System and Web Browser Requirements 7
System Installation Requirements 7Web Browser Requirements 8
About Streaming Content Manager 9About Streaming Content Manager 9
General Product Overview 9What SCM Does 9Signal Flow Within Streaming Content Manager 10
User Roles 12Comparing User Types Based on Origin (Local or AD Accounts) 15System Design and Planning 16
How to Estimate Storage Requirements for Recordings 16Understanding Time Zone Settings 20
Definitions 20What Time System is Used Where in SCM 20Where Time Zones Are Set Within SCM 20
How to Find Information About SCM 21
Quick Start Guide for Administrators 23Step 1: Set Up Servers and Network Services. 23Step 2: Set Up Recording Devices. 24Step 3: Install the SCM Software. 24Step 4: Configure the Streaming Content Manager. 27Step 5: Add Users 27
Installing Streaming Content Manager 28Installing Streaming Content Manager: Prerequisites and Preparation 28
Installation Prerequisites 28Obtaining the Software 29Server Account Permissions: What is Needed for Installation 29Recommendations Regarding Security Certificates 29
Contents
3Using Streaming Content Manager (SCM) Software • Contents
How to Install SCM 30Server Account Permissions and SCM Installation 31
Requirements if Credentials Are Provided During Installation 31Requirements if Credentials Are Not Provided During Installation 32SCM Application Pool Database Access For a System Using Windows Authentication 32
Adding HTTPS Binding 32Generating a Self-signed Certificate on IIS 33Setting up HTTPS Binding to the IIS 33Setting up HTTPS Binding for the Website 34
Installation Instructions 36How to Install SCM 36
Changing Accounts and Permissions After Installation 51Upgrading Streaming Content Manager 52
Prerequisites for SCM Upgrades 52Pre-upgrade Recommendations 52Procedure for Upgrading SCM 53
Uninstalling Streaming Content Manager 66Procedure for Uninstalling SCM 66
Database Setup and Administration 73Setting Up, Resetting, and Migrating the Database 73
Database Setup 73Resetting the Database 80Migrating the Database 80
Getting Started 81Opening Streaming Content Manager 81Logging In and Logging Out 82Overview of the SCM Software Interface 84
How the SCM Web Pages Are Organized 84
System Configuration and Management Overview 87System Configuration and Management Overview 87Setting Up Recording Package Settings 88Setting Up LDAP/AD Connections 92Setting General System Settings 96
Setting the Time Zone 96Setting the System URL 96
Configuring E-mail Notification Settings 98Configuring and Enabling E-mail Notification 98Disabling E-mail Notification 99
Changing Recording Storage Locations 101
4Using Streaming Content Manager (SCM) Software • Contents
Factors to Consider Before Moving Recordings 101Procedure 101
Migrating the SCM Web Service to a New Server 103Logging 104
About the System Logs 104Viewing Log Files 104Modifying Logging Levels 105Modifying the Configuration File 106
Managing User Accounts 108Managing User Accounts 108
Understanding User Account Roles and Types 108Creating and Managing Accounts 108Best Practices Recommendations 109
Adding Users 110Adding a User Locally (Creating a Local SCM User Account) 110Adding Users From an LDAP/AD System 114
Viewing, Locating, and Accessing User Accounts 117Locating a User Account: How to Work With the Accounts List 118Accessing a User Profile (Detail View) Page 118
Deleting a User Account 119Editing My Profile 120Editing a User Profile 125Editing the System Administrator Profile 128Resetting or Changing Your Password 132
Guidelines for Passwords 132Resetting a Forgotten Password 133Changing an Existing Password 134
Managing Recordings 137Managing Recordings: an Overview 137Locating and Accessing Recordings 138
About The Recordings Pages 138List View Pages and Their Corresponding Tabs: What Content Appears on Which Page 138Detail View Pages 140Player Pages 141Locating Recordings in a List 143
Elements of Recording Entries 144Elements of a Recording Entry in a List View 144Elements of a Recording Entry in a Detail View 146
Recording Privacy Settings 148Privacy Settings Defined 148
5Using Streaming Content Manager (SCM) Software • Contents
Default Privacy Setting 149Privacy Settings and Unauthenticated Users 149
Downloading a Recording Package 150Why Download a Recording? 150What Is In The Recording Package? 150How to Download a Recording 150
Sharing a Recording 152Editing Recording Details 154Playing a Recording 158
Accessing a Player Page 159Player Page Features and How to Use Them 159Using Keyboard Controls 165
Deleting a Recording 166How to Delete a Recording 166How to Recover an Accidentally Deleted Recording 167
Working With the Extron Media Player 168About the Extron Media Player (EMP) 168
How Streaming Content Manager Uses the EMP 168Which EMP Features Can Be Customized Within SCM 168
Configuring the EMP Player 169
Troubleshooting 170SCM System Access 170SCM User Interface 173Installation or Upgrade 174Recordings 174E-mail 185Database 185Account Validation 188System and Hardware 189
General Reference Information 190Supported Database Types, E-mail Server Systems, Browsers, and File Types 190
System Installation Requirements 190Network Drives for Recording Ingest and Storage 191Browsers 191File Types 192
Resources For Accessibility 193Choosing a Browser 193Tips for Browser Configuration and Use 193
Licensed Software 195
6Using Streaming Content Manager (SCM) Software • Contents
Glossary 199
About Extron Media Player 200About Extron Media Player (EMP) 200
How Streaming Content Manager Uses the EMP 200Customization 201
How to Find Information About EMP 201Configuring the EMP Player Within Streaming Content Manager 202
Using Extron Media Player 204Playing a Recording 204Overview of the Extron Media Player Interface 205
How the Extron Media Player is Organized 205EMP Features 206
Using Keyboard Shortcuts 210
Troubleshooting for EMP 211Working with Mozilla® Firefox® 211
General Reference Information for EMP 212Supported Browsers and File Types 212
Browsers 212File Types 213
Licensed Software for EMP 213

Prerequisites
System and Web Browser Requirements
System Installation Requirements
In order to install and set up Streaming Content Manager you need the following items:Hardware l Server hardware to support a Web server and database installation l Display: 1024 x 768 screen resolution or higher
Framework l Microsoft® .Net® framework version 4.5 or higher
Web ServerMicrosoft IIS extensible Web server: l IIS verson 7.0 or higher (Microsoft Windows Server® 2008 R2) l IIS version 8.5 or higher (Windows Windows Server 2012)
NOTE: HTTPS binding for IIS services and for the SCM website is required prior to installation (see Adding HTTPS Binding). In this process you create or obtain an SSL certificate, tie it and HTTPS protocol to the IIS services for SCM, then create a binding association between HTTPS and the SCM website. This sets Streaming Content Manager to use secure protocol and to open using HTTPS. By default, when SCM is installed, it creates a self-signed SSL certificate and sets up the HTTPS binding within IIS (for instructions on how to accomplish this manually, particularly if using an SSL certificate from a certification authority [CA], see Adding HTTPS Binding).
E-mail Server l Microsoft Exchange Server that supports Microsoft Exchange Web Services
Database l Microsoft SQL Server® 2008 or later, full or Express editions
Managed Directory System (optional)To use a Microsoft Active Directory® (AD) system for adding and validating users, you will also need: l An Active Directory server running Active Directory (AD)
Storage space requirements for the recording storage server depend on a variety of factors (see Network Drives for Recording Ingest and Storage).
Using Streaming Content Manager (SCM) Software • Prerequisites 7
8Using Streaming Content Manager (SCM) Software • Prerequisites
Web Browser Requirements
In order to open and use Streaming Content Manager, use one of the supported Web browsers (and versions) listed below. l Google® Chrome™ version 35 or higher l Mozilla® Firefox® version 28 or higher l Microsoft® Internet Explorer® version 9 or higher (for Windows® operating systems)
NOTE: If you are using Internet Explorer, compatibility mode must be turned off (see Turning Off Internet Explorer Compatibility Mode for details).
l Apple® Safari® version 6 or higher (for Mac® OS X® operating systems)
Browser preferences l Chrome is the preferred browser for sighted users. l Firefox is the preferred browser for screen reader users. SCM has been tested to work
with Firefox and the NVDA (NonVisual Desktop Access) screen reader, which is available at http://www.nvaccess.org/.
NOTE: SCM is accessible to users with screen readers and those who use keyboard controls for navigation. The interface is accessible, and supports commonly available screen readers.
Turning Off Internet Explorer Compatibility Mode
The Streaming Content Manager does not support compatibility mode in Microsoft Internet Explorer.
To check compatibility view settings:
1. From the Tools menu of the browser, select Compatibility View Settings. The Compatibility View Settings dialog box opens.
2. Be sure that the Display all websites in Compatibility View check box is cleared and that the DNS name or IP address of the SCM is not in the list of websites that have been added to Compatibility view.
About Streaming Content Manager
About Streaming Content Manager
General Product Overview
Extron Streaming Content Manager (SCM) is a software management tool for processing, packaging, and delivering enhanced packages of recording files produced by the Extron SMP 351 Streaming Media Processor and other recording devices. SCM processes and transfers recording packages to a network storage directory and provides a way to manage access to the recordings.
NOTE: SCM is accessible to users with screen readers and those who use keyboard controls for navigation. The interface is accessible, and supports commonly available screen readers.
What SCM Does
Preparing and Managing Recordings
Streaming Content Manager checks the designated network server location for new recordings on an ongoing basis. When SCM detects new recordings on the server, SCM integrates the basic SMP recording package (.m4v recording files, recording metadata, and time-synchronized thumbnails) with an advanced set of playback controls into a package with Extron Media Player (EMP). EMP operates from almost any PC or personal device using a variety of browser applications. SCM then transfers recording packages to a managed network storage directory. From the network storage location, SCM automatically distributes recording packages to event presenters and viewers via a secure web page interface.Within SCM, administrators define the recording ingest and storage directories and determine whether or not unauthenticated users (those who do not have accounts within SCM) will be able to access public and unlisted recordings.The SCM web portal provides users and administrators with access for managing AV recordings, identifying the total number of recordings, and monitoring recent activity. Recording data include: l The quantity of recordings by each user l The date, time, and title or file name of each recording l The privacy setting (private, public, or unlisted) of the recording
Using Streaming Content Manager (SCM) Software • About Streaming Content Manager 9

10Using Streaming Content Manager (SCM) Software • About Streaming Content Manager
l The source device location name l File package size.
Recordings can be sorted based on recording title or file name, date and time, and recording source device location name. Recordings can be deleted or downloaded, and links to recordings can be shared with others who have access to the SCM system.
Managing Users and Access to AV Recordings
With data from standard LDAP/AD network services or from a locally defined set of users and passwords, SCM identifies, authenticates, and manages user access to recording packages. Recordings that cannot be authenticated by SCM are saved to a guest account that is controlled by the SCM administrator. See User Roles and Comparing User Types Based on Origin (Local or AD Accounts) for a more detailed discussion about types of user accounts.The SCM web portal provides administrators with the ability to add and delete users and includes tools to manage and update user profiles.Within SCM, administrators define the users and access rights for AV recordings. Users can be added and access can be managed using standard network directory services (LDAP/Active Directory [AD]). SCM, or an AD system via SCM, authenticates users and provides them access to download or share their recording packages.Administrators can access summary data about users such as the date and time of last log-in, the date and time of the last uploaded recording, and the total number of recordings made by that user, broken out by privacy status (private, public, and unlisted).
Signal Flow Within Streaming Content Manager
1. Recordings (and their thumbnail and chapter marker images, timing data, and metadata) are created by a recording device such as an SMP 351.
2. Recordings are automatically uploaded from the SMP into a designated server folder. This folder is the "ingest location" for the SCM system.
3. SCM monitors ("watches") the ingest location to determine if new recordings have appeared there and to determine when each recording has finished uploading to the server.
4. When the recording is uploaded, SCM transfers ("ingests") the raw recording package, moving it into its own server, checking the metadata, verifying that the components (including video, thumbnails, chapter markers, metadata, and timing data) are included.
5. SCM packages the recording with the EMP player files along with instructions on how to synchronize the recording and its associated files. It then transfers (distributes) the complete recording package to the SCM storage directory.
6. Once the recording package is stored in the storage directory, the raw recording is deleted from the ingest location. It may still be available stored in the recording device (SMP) for a brief period until the device determines that memory is needed for storing new recordings, at which time the recording is deleted or overwritten.
7. The recording package appears in the All Recordings list (viewable by administrators) within SCM, and its privacy level is set to "private" by default. If the owner of the recording has an account in SCM, and if e-mail connection is configured and enabled for SCM, the recording owner receives an e-mail notifying them that the recording is available in SCM in their My Recordings list.

11Using Streaming Content Manager (SCM) Software • About Streaming Content Manager
8. The user logs in to SCM, and SCM or an Active Directory system validates their credentials. SCM opens to the My Recordings page, where the user can download, delete, or edit information about their recordings and can view or download public recordings.

12Using Streaming Content Manager (SCM) Software • About Streaming Content Manager
User RolesStreaming Content Manager includes two built-in types of user accounts that cannot be deleted and supports four different user account roles, as described below. In addition to the roles defined for SCM accounts, unauthenticated users may have limited access to the system (by visiting the SCM site or by receiving a link to a recording by e-mail) if the system is configured to allow access. Unauthenticated users are any users who do not have an account in the SCM system.
Role
Action System Admin- istrator
Admin- istrator
User Guest Unauthen- ticated
User
Account management
Account is created by: SCM System administrator
or other administrator
System administrator
or other administrator
SCM —
Account may be local X X X X —
Account may originate from an Active Directory (AD) system
X X —
Account may be deleted X X —
May log into their account X X X
May add or delete another user
X X —
May reset a local user's password
X X —
May reset their own password
X X(if not added
via AD)
X(if not added
via AD)
—
System settings
May configure recording package ingest settings
X X —
May configure general system settings
X X —
May configure e-mail notification settings
X X —
May add, delete, or edit AD settings or profiles
X X —
May view system logs X X —
Recordings
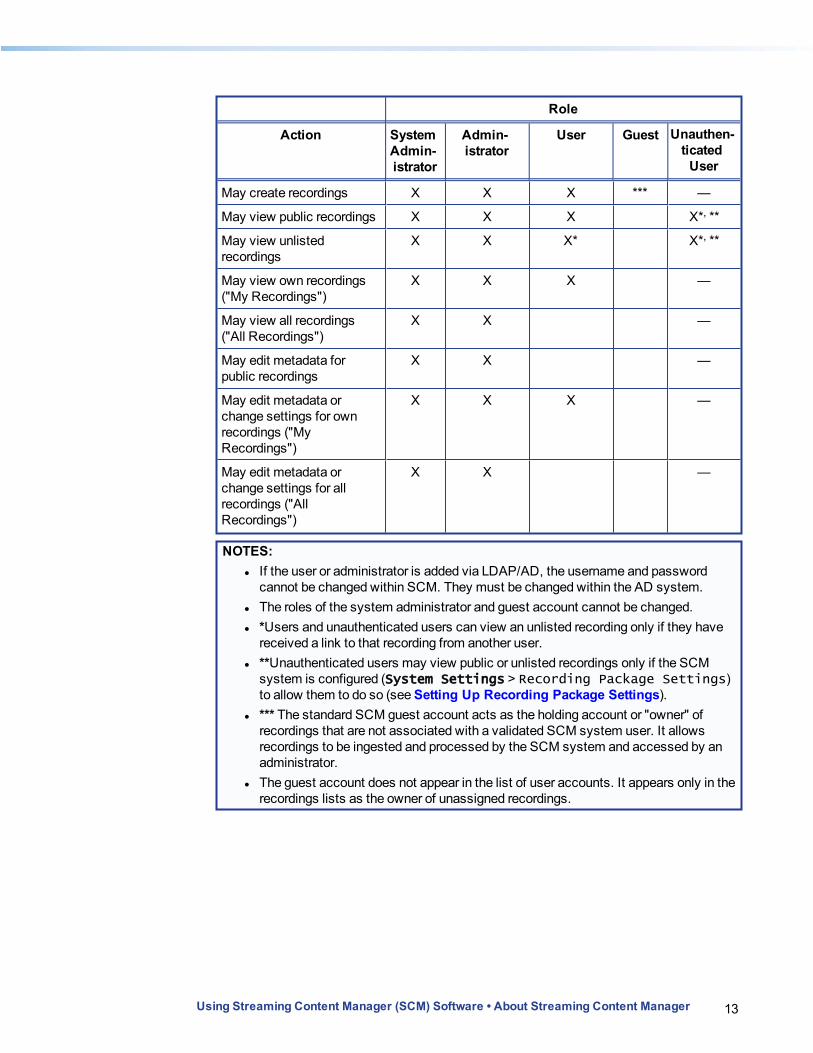
13Using Streaming Content Manager (SCM) Software • About Streaming Content Manager
Role
Action System Admin- istrator
Admin- istrator
User Guest Unauthen- ticated
User
May create recordings X X X *** —
May view public recordings X X X X*, **
May view unlisted recordings
X X X* X*, **
May view own recordings ("My Recordings")
X X X —
May view all recordings ("All Recordings")
X X —
May edit metadata for public recordings
X X —
May edit metadata or change settings for own recordings ("My Recordings")
X X X —
May edit metadata or change settings for all recordings ("All Recordings")
X X —
NOTES: l If the user or administrator is added via LDAP/AD, the username and password
cannot be changed within SCM. They must be changed within the AD system. l The roles of the system administrator and guest account cannot be changed. l *Users and unauthenticated users can view an unlisted recording only if they have
received a link to that recording from another user. l **Unauthenticated users may view public or unlisted recordings only if the SCM
system is configured (System Settings > Recording Package Settings) to allow them to do so (see Setting Up Recording Package Settings).
l *** The standard SCM guest account acts as the holding account or "owner" of recordings that are not associated with a validated SCM system user. It allows recordings to be ingested and processed by the SCM system and accessed by an administrator.
l The guest account does not appear in the list of user accounts. It appears only in the recordings lists as the owner of unassigned recordings.
14Using Streaming Content Manager (SCM) Software • About Streaming Content Manager
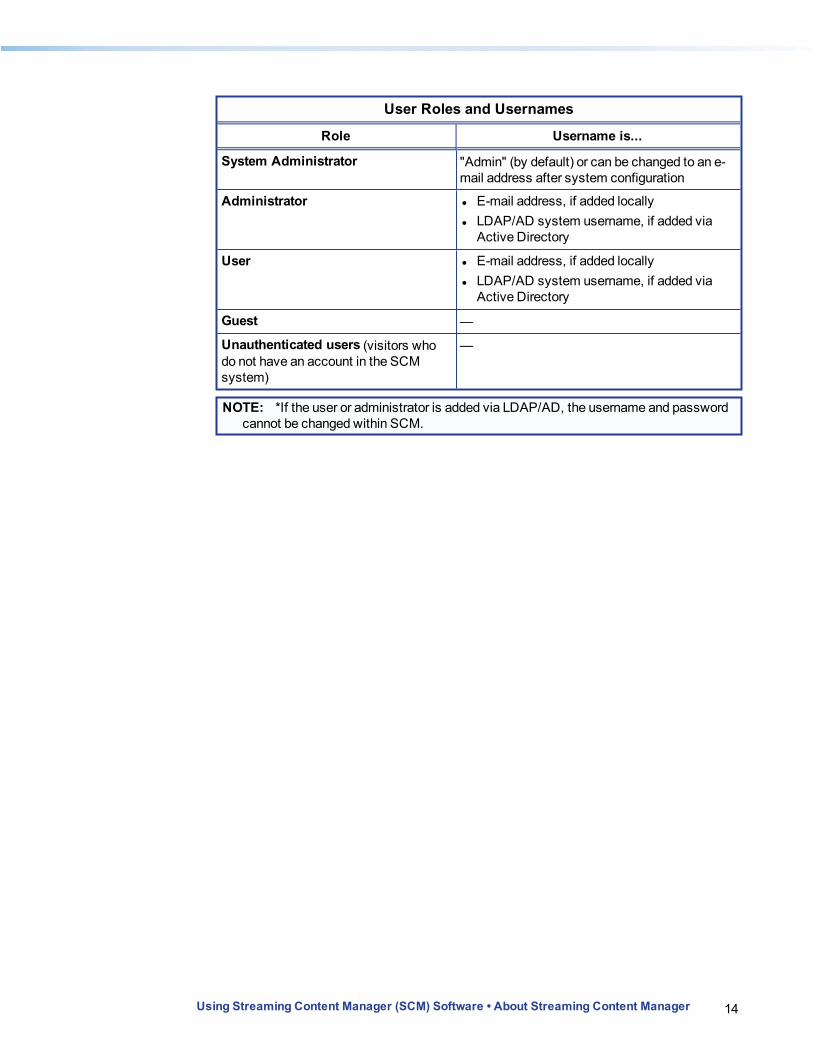
User Roles and Usernames
Role Username is...
System Administrator "Admin" (by default) or can be changed to an e-mail address after system configuration
Administrator l E-mail address, if added locally l LDAP/AD system username, if added via
Active Directory
User l E-mail address, if added locally l LDAP/AD system username, if added via
Active Directory
Guest —
Unauthenticated users (visitors who do not have an account in the SCM system)
—
NOTE: *If the user or administrator is added via LDAP/AD, the username and password cannot be changed within SCM.
15Using Streaming Content Manager (SCM) Software • About Streaming Content Manager
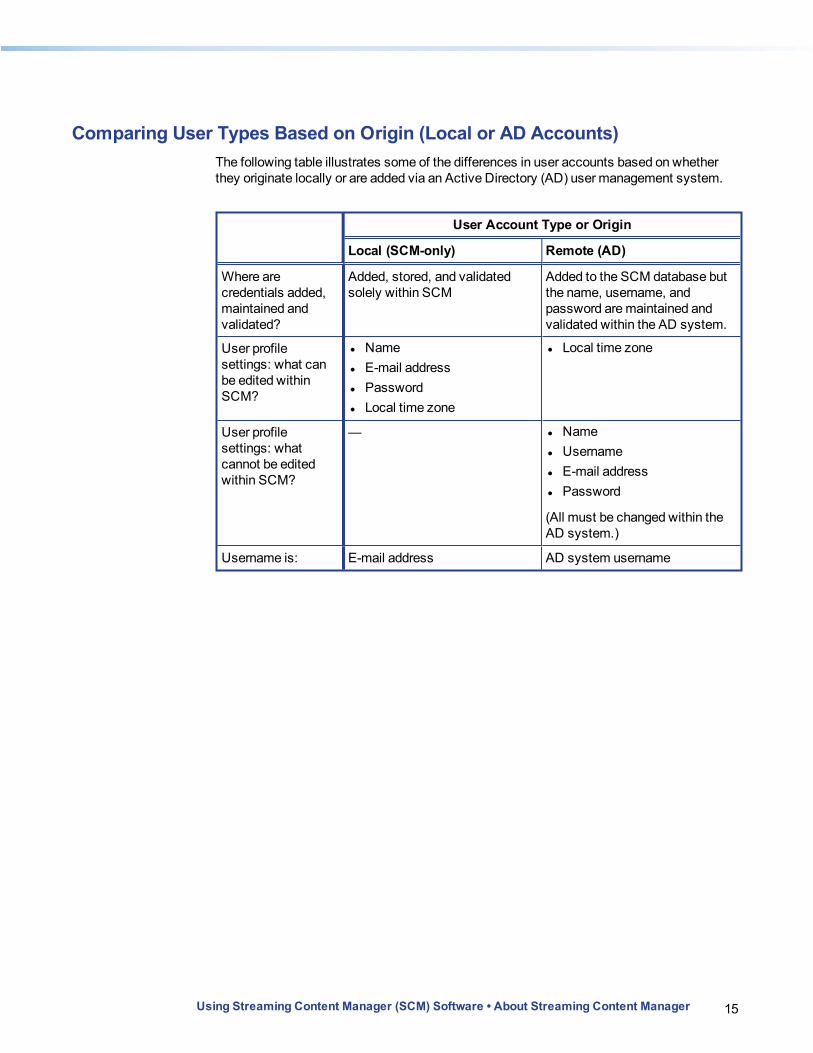
Comparing User Types Based on Origin (Local or AD Accounts)The following table illustrates some of the differences in user accounts based on whether they originate locally or are added via an Active Directory (AD) user management system.
User Account Type or Origin
Local (SCM-only) Remote (AD)
Where are credentials added, maintained and validated?
Added, stored, and validated solely within SCM
Added to the SCM database but the name, username, and password are maintained and validated within the AD system.
User profile settings: what can be edited within SCM?
l Name l E-mail address l Password l Local time zone
l Local time zone
User profile settings: what cannot be edited within SCM?
— l Name l Username l E-mail address l Password
(All must be changed within the AD system.)
Username is: E-mail address AD system username
16Using Streaming Content Manager (SCM) Software • About Streaming Content Manager
System Design and Planning This section discusses elements to consider when planning for SCM installation and
maintenance. It covers the following topics: l Factors to consider l How to estimate recording storage requirements
Factors to consider include the following: l Will users be managed locally (entirely within SCM), or remotely (outside SCM, via an
Active Directory [AD] system)? SCM can include both locally-managed and AD-managed users. Adding and managing users from an AD system requires credentials for and a connection to an AD system (see Setting Up LDAP/AD Connections and Adding Users).
l All recordings must be on the same server. l For optimal speed in systems using video streaming, it is best to use separate servers
(separate hard drives and processors) for each of the following: l Recording ingest l SCM server installation and database storage l Recording storage
l Microsoft® SQL Server is recommended and preferable for regular, full-scale deployments. SQL Express can be used for demonstration installations and for small scale installations. However, SQL Express has limitations on database size (4 GB or 10 GB, depending on the SQL Express edition), it supports only a single physical CPU, can use only 1 GB of available RAM, and does not include the SQL Server Agent service.How much storage space is needed for recordings and for the database (see How to Estimate Storage Requirements for Recordings, below)? The required amount of storage space depends on the following factors: l The encoding settings of the recording devices. The higher the resolution and the
greater the motion content, the more space is needed per hour of recording. The settings for variable bit rates, compression, and the level of motion content all affect the recording size.
l How many hours per day recordings are made per room. l How many rooms in the facility will be used for recording. l The frequency with which recordings will be removed (deleted) from the server. The
longer recordings are retained, the more space will be needed. l Will unauthenticated users (people who do not have a user account within SCM) need
access to recordings? If so, SCM must be configured to allow access to those users (see Setting Up Recording Package Settings).
How to Estimate Storage Requirements for Recordings
There are several data points that you need in order to estimate the amount of storage space to allocate: l The amount of storage required for each hour of recording l The number of recording hours per week l The number of weeks that you intend to retain the content (content retention time)

17Using Streaming Content Manager (SCM) Software • About Streaming Content Manager
These points are covered in this section, as is the storage space calculation.
Step 1: Estimating Storage per Recording Hour
You need to know the video and audio bitrates configured in your Extron SMP 351 recorders. For these examples, assume each recording is 60 minutes long. If your recordings are longer or shorter, then in later stages of calculations use the portion of the hour (for example, 1.25 = a 75 minute recording, 0.83 = a 50 minute recording). The calculation also assumes the bitrates remain constant during the recording; if you are using VBR (variable bitrate, which is the default) then the actual bitrates are often slightly lower than this estimate.
To estimate storage per recording hour:
1. Identify the SMP 351 video bitrate and audio bitrate, which are in kbps (kilobits per second). See the SMP 351 User Guide or the Encoder Presets embedded web page in the SMP for details.
2. Insert those bitrates into the following equation:[(video bitrate + audio bitrate) *3600 seconds per hour] / 8 = x kBph (kilobytes per hour)
3. Use the kBph value to calculate MBph and GBph: l (x kBph / 1024) = y MBph (megabytes per hour) l (x kBph / 1048576) = z GBph (gigabytes per hour)
ExampleUsing the default “720p High” encoder preset, with l Video bitrate = 5000 kbps l Audio bitrate = 192 kbps
For a 1-hour recording (3600 seconds), l ([5000 + 192] * 3600) / 8 = 2336400 kBph l 2336400 kBph / 1024 = 2281.64 MBph l 2336400 kBph / 1048576 = 2.23 GBph
For the default encoder presets of an SMP 351, the following are the estimated storage requirements for each hour of recording:
Estimated Storage Requirements
Encoder Preset Video Bitrate (kbps)
Audio Bitrate (kbps)
MB per hour GB per hour
1080p High 8000 320 3656.25 3.57
1080p Low 6000 128 2692.97 2.63
720p High 5000 192 2281.64 2.23
720p Low 3000 128 1374.61 1.34
480p High 2500 128 1154.88 1.13
480p Low 1500 80 694.34 0.68
VGA High 3500 128 1594.34 1.56
VGA Low 2500 128 1154.88 1.13
18Using Streaming Content Manager (SCM) Software • About Streaming Content Manager
Estimated Storage Requirements
Encoder Preset Video Bitrate (kbps)
Audio Bitrate (kbps)
MB per hour GB per hour
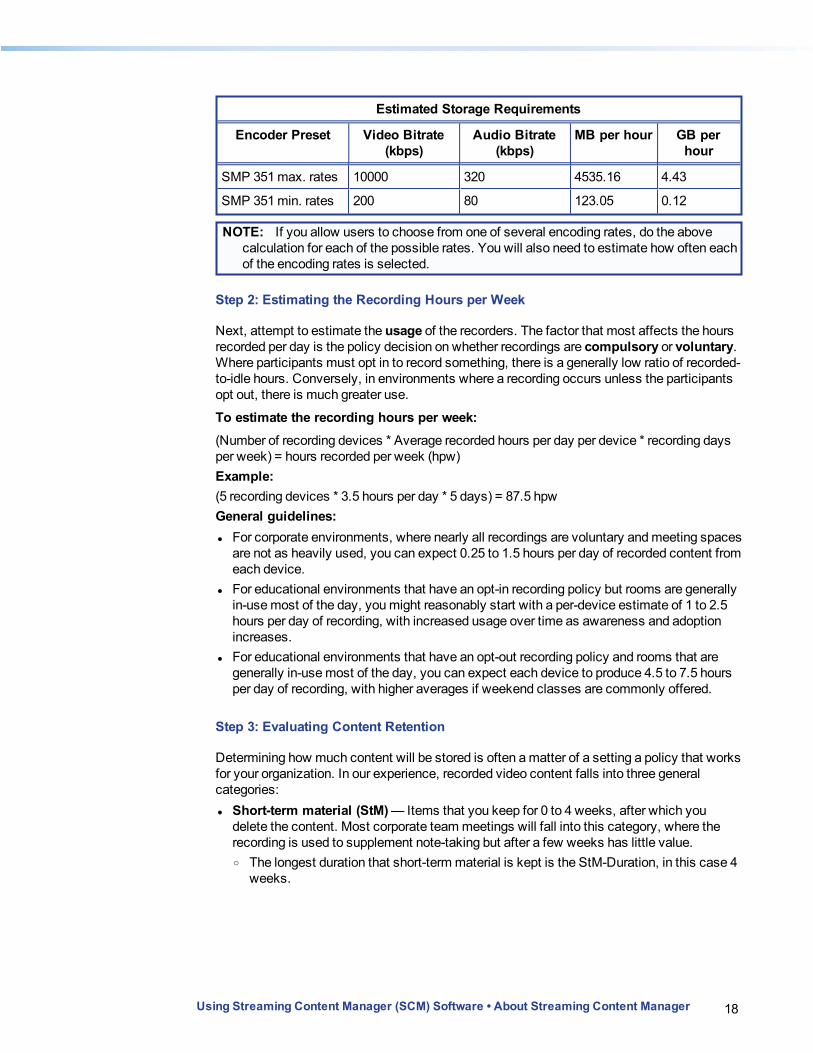
SMP 351 max. rates 10000 320 4535.16 4.43
SMP 351 min. rates 200 80 123.05 0.12
NOTE: If you allow users to choose from one of several encoding rates, do the above calculation for each of the possible rates. You will also need to estimate how often each of the encoding rates is selected.
Step 2: Estimating the Recording Hours per Week
Next, attempt to estimate the usage of the recorders. The factor that most affects the hours recorded per day is the policy decision on whether recordings are compulsory or voluntary. Where participants must opt in to record something, there is a generally low ratio of recorded-to-idle hours. Conversely, in environments where a recording occurs unless the participants opt out, there is much greater use.
To estimate the recording hours per week:(Number of recording devices * Average recorded hours per day per device * recording days per week) = hours recorded per week (hpw)Example:(5 recording devices * 3.5 hours per day * 5 days) = 87.5 hpwGeneral guidelines: l For corporate environments, where nearly all recordings are voluntary and meeting spaces
are not as heavily used, you can expect 0.25 to 1.5 hours per day of recorded content from each device.
l For educational environments that have an opt-in recording policy but rooms are generally in-use most of the day, you might reasonably start with a per-device estimate of 1 to 2.5 hours per day of recording, with increased usage over time as awareness and adoption increases.
l For educational environments that have an opt-out recording policy and rooms that are generally in-use most of the day, you can expect each device to produce 4.5 to 7.5 hours per day of recording, with higher averages if weekend classes are commonly offered.
Step 3: Evaluating Content Retention
Determining how much content will be stored is often a matter of a setting a policy that works for your organization. In our experience, recorded video content falls into three general categories: l Short-term material (StM) — Items that you keep for 0 to 4 weeks, after which you
delete the content. Most corporate team meetings will fall into this category, where the recording is used to supplement note-taking but after a few weeks has little value. o The longest duration that short-term material is kept is the StM-Duration, in this case 4
weeks.

19Using Streaming Content Manager (SCM) Software • About Streaming Content Manager
l Semi-durable material (SDM) — These are recordings that you have available for 4 to 26 weeks, then either delete or move to offline or archived storage. Examples include product marketing and promotional material. Most educational classroom recordings fall into this category, where content is generally deleted after completion of the term. o The longest duration that semi-durable material is kept is the SDM-Duration, in this
case 26 weeks. l Permanent material (PM) — These are recordings that you keep longer than 26 weeks
and move to offline or archived storage only as capacity demands. This may be corporate training material and recordings of special events. o Set the PM-Duration to the longest time of your estimate, in this case 52 weeks.
For most corporate usage, a good starting ratio is: l StM Ratio = 60% l SDM Ratio = 35% l PM Ratio = 5%
For most educational environments, the ratio is: l StM Ratio = 25% l SDM Ratio = 65% l PM Ratio = 10%
We recommend that you do your initial estimation for one year and re-evaluate your assumptions against actual usage semi-annually.
Step 4: Calculating the Total Storage Requirement
You now have the data: l MBph = The amount of storage required for each hour of recording, from step 1 l hpw = The number of recording hours per week, from step 2 l The number of weeks that you intend to retain each type of content
The calculations are as follows:Short-term storage (StS) = 2 * (hpw * StM-Ratio) * StM-Duration (weeks) * MBphSemi-durable storage (SDS) = 2 * (hpw * SDM-Ratio) * SDM-Duration (weeks) * MBphPermanent storage (PS) =2 * (hpw * PM-Ratio) * PM-Duration (weeks) * MBphTOTAL STORAGE = StS + SDS + PS Example:Assuming a typical corporate retention policy, with 87.5 recorded hours per week, and standardizing on the 720p Low recording profile (1374.61 MBph):StS = 2 * (35 * 60%) * 4 * 1374.61 = 577,336 MB = 936 GBSDS = 2 * (35 * 35%) * 26 * 1374.61 = 2,189,065 MB = 3,548 GBPS = 2 * (35 * 5%) * 52 * 1374.61 = 625,447 MB = 1,014 GBTOTAL STORAGE FOR ONE YEAR = 3,391,849 MB = 5,498 GB
20Using Streaming Content Manager (SCM) Software • About Streaming Content Manager
Understanding Time Zone SettingsStreaming Content Manager saves and displays time using different time zones depending on the context. It is important to understand time zone settings and how they are used by the SCM system or server, what is displayed to each user, and what is logged.
Definitions
UTC time is coordinated universal time, a standard time reference. This is more precise than but is similar to GMT (Greenwich Mean Time). Greenwich, England, is used to define the starting point (midnight at hour 00:00) of the "universal day". UTC does not vary with the seasons. Time zones around the world are defined with reference to an offset in hours from UTC.Local time is region-specific and may or may not include a seasonal offset such as daylight saving time.
What Time System is Used Where in SCM
l Within the SCM web pages and in e-mails, the local time zone is displayed to each user. However, recordings are logged in SCM in both local time and UTC to aid in troubleshooting.
l On the Accounts pages, an administrator sees all user login and recording times displayed in the local time zone of the administrator.
l The time of each recording is displayed to the owner in each individual user's local time. For example, if a recording is made by one user at 10:15 am Central Time in the United States and another user logs in using Pacific Time, the second user sees the recording time listed as 8:15 am.
l Error e-mails are time stamped using the local time of the user (owner, e-mail recipient). l System logs register UTC and the local time of the SCM system (usually the same as the
local time of the server).
Where Time Zones Are Set Within SCM
l Initial setup sets the default SCM system time to Pacific Time (UTC - 08:00 hours). The same is true for the system administrator account. Both the SCM system time and the local time setting for the system administrator account can be changed after installation. o SCM system time can be changed in the General System Settings section of the
Settings page (see Setting General System Settings). o The local time zone for the system administrator account can be changed by the
system administrator only via the My Profile page (see Editing the System Administrator Profile).
21Using Streaming Content Manager (SCM) Software • About Streaming Content Manager
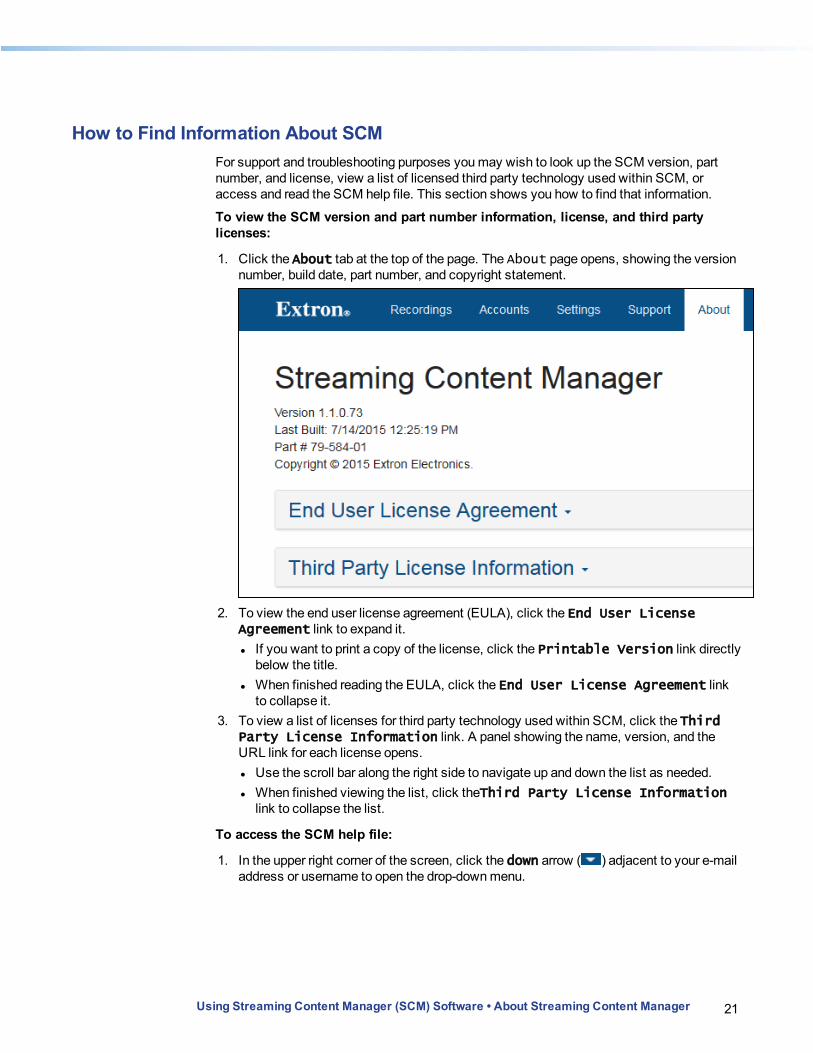
How to Find Information About SCMFor support and troubleshooting purposes you may wish to look up the SCM version, part number, and license, view a list of licensed third party technology used within SCM, or access and read the SCM help file. This section shows you how to find that information.
To view the SCM version and part number information, license, and third party licenses:
1. Click the About tab at the top of the page. The About page opens, showing the version number, build date, part number, and copyright statement.
2. To view the end user license agreement (EULA), click the End User License Agreement link to expand it. l If you want to print a copy of the license, click the Printable Version link directly
below the title. l When finished reading the EULA, click the End User License Agreement link
to collapse it. 3. To view a list of licenses for third party technology used within SCM, click the Third
Party License Information link. A panel showing the name, version, and the URL link for each license opens. l Use the scroll bar along the right side to navigate up and down the list as needed. l When finished viewing the list, click theThird Party License Information
link to collapse the list.
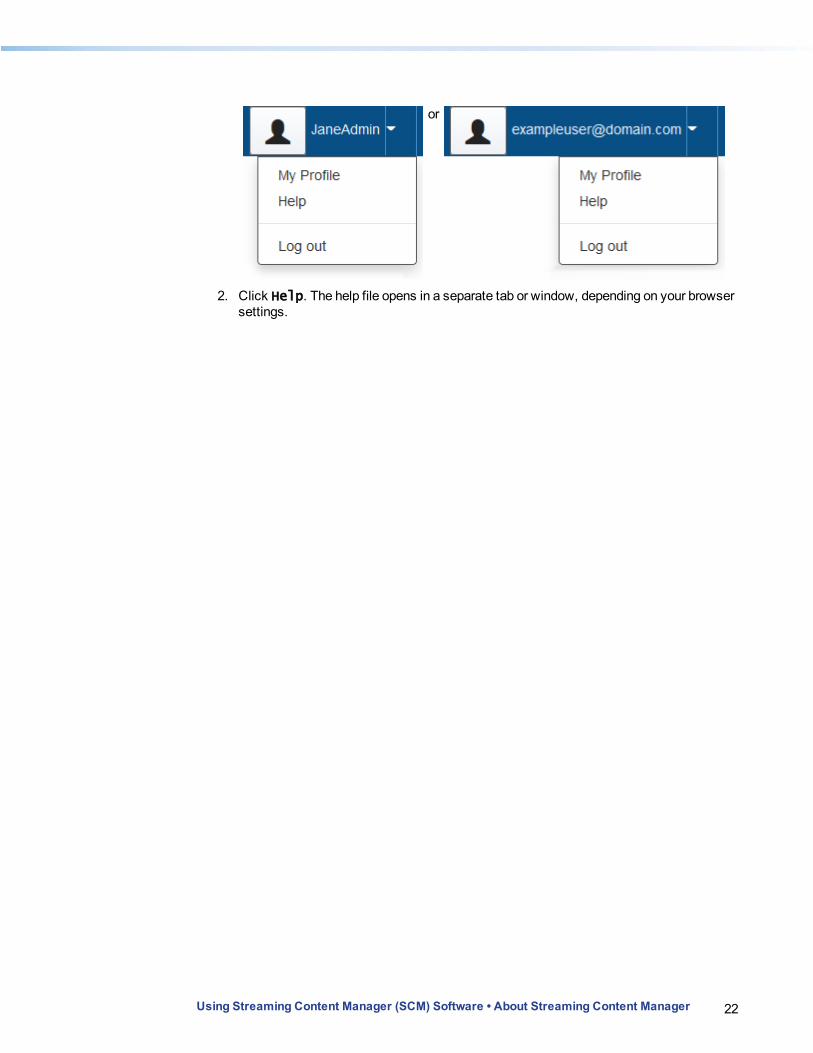
To access the SCM help file:
1. In the upper right corner of the screen, click the down arrow ( ) adjacent to your e-mail address or username to open the drop-down menu.
22Using Streaming Content Manager (SCM) Software • About Streaming Content Manager
or
2. Click Help. The help file opens in a separate tab or window, depending on your browser settings.
Quick Start Guide for Administrators
Below are the fundamental steps to configure Streaming Content Manager (SCM). See the other sections of this help file for more information about the individual features and settings available in the SCM web pages.
Step 1: Set Up Servers and Network Services.
1. Install and configure database software and services on a network server. The database must be set for Windows® authentication, SQL Server® authentication, or mixed mode.You will need the following information for SCM setup: l The server name, IP address, or connection path of the database installation l Permission settings for SCM to access the database (the user ID and password for the
SCM account) l The name of the SCM database l A decision on whether or not to use Windows authentication
2. If users will be drawn from a managed directory (Active Directory [AD]) system, establish the directory system and set up a username and password for SCM to use to access the system. You will need the following information for LDAP/AD connection setup: l AD system host name l Connection string l Port number l SCM username and password for accessing the directory l User schema settings (if the system uses custom values rather than standard defaults)
3. Create a recording ingest network server location to which recordings will be uploaded. Ensure that the SCM system will have read, write, and delete access to that location. SCM must be allowed to copy files from it. This server folder can be part of a Matterhorn scheduling system. Make a note of the server path so you can use it as the ingest location during SCM recording package setup.
4. Create a recording package storage server location where output recording packages will be stored after ingest and processing. SCM must have read, write, and delete access to this location, as well.
Using Streaming Content Manager (SCM) Software • Quick Start Guide for Administrators 23
24Using Streaming Content Manager (SCM) Software • Quick Start Guide for Administrators
5. Optional: Set up an e-mail server and services and create an account (with username and password) for the SCM system. For SCM configuration you will need: l The full path of the e-mail server l The e-mail username of the SCM system l The password for the SCM system e-mail account
Step 2: Set Up Recording Devices.
1. Make hardware connections (connect source devices to inputs, connect display devices to outputs, make network connections).
2. Configure default recording file names. Using the front panel menu, commands, or the embedded web pages for the devices, select the options the recording device will use for naming its files. Use the same file name structure for every recorder that will be part of the system. Note the chosen file name parameters: you will need the file naming information to use as ingest filter criteria during SCM recording ingest location setup.
3. Configure default recording upload locations. Designate the network storage folder location to which each recorder will upload its files when recording is completed. All recording devices must use the same server location. The path for this server folder will be needed during SCM
4. Set up the ingest location for recording packages. The recorders and the SCM FileWatcher and Distribution Web services must have read/write access to this network location.
Step 3: Install the SCM Software.
Full instructions for SCM installation are available in Installing Streaming Content Manager. The following procedure is simply an overview of the process.
1. Download the software from the Extron website to the server where SCM will be installed.
2. Open and run the installer. The installer checks the server to ensure that various components (IIS; .Net framework v4.5, ASP.Net, Windows Server with SQL Server Native Client, SQL Server management objects, and CLR types) are installed and it displays the results of the check . If any components are missing, you must install them on the server before proceeding with the installation: a. Download and install the missing item. b. In the SCM installer window, click the Back button. c. Click the Next button to restart the component check and then proceed to
installation. 3. Read and accept the end user license agreement. The installer program displays the
default installation path. 4. Optional: if you want to change the path to a different location, click Change. In the
Choose Folder dialog box, navigate to and select the desired location, and click Ok.
25Using Streaming Content Manager (SCM) Software • Quick Start Guide for Administrators
5. Click Next to start the server component installation. When the server installation is complete, a new window opens asking whether you want to install SQL Express to use for the SCM database.
6. Click Yes to have the SCM installer program install SQL Express and use that server for SCM installation. Or... Click No to use an existing instance of SQL Server 2008 R2 or higher for the SCM installation.
TIP: Extron recommends using Microsoft® SQL Server 2008 R2 or higher for regular, full-scale deployments. SQL Express can be used for demonstration installations and for small scale installations. However, SQL Express has limitations on database size (4 GB or 10 GB, depending on the SQL Express edition), it supports only a single physical CPU, can use only 1 GB of available RAM, and does not include the SQL Server Agent service.
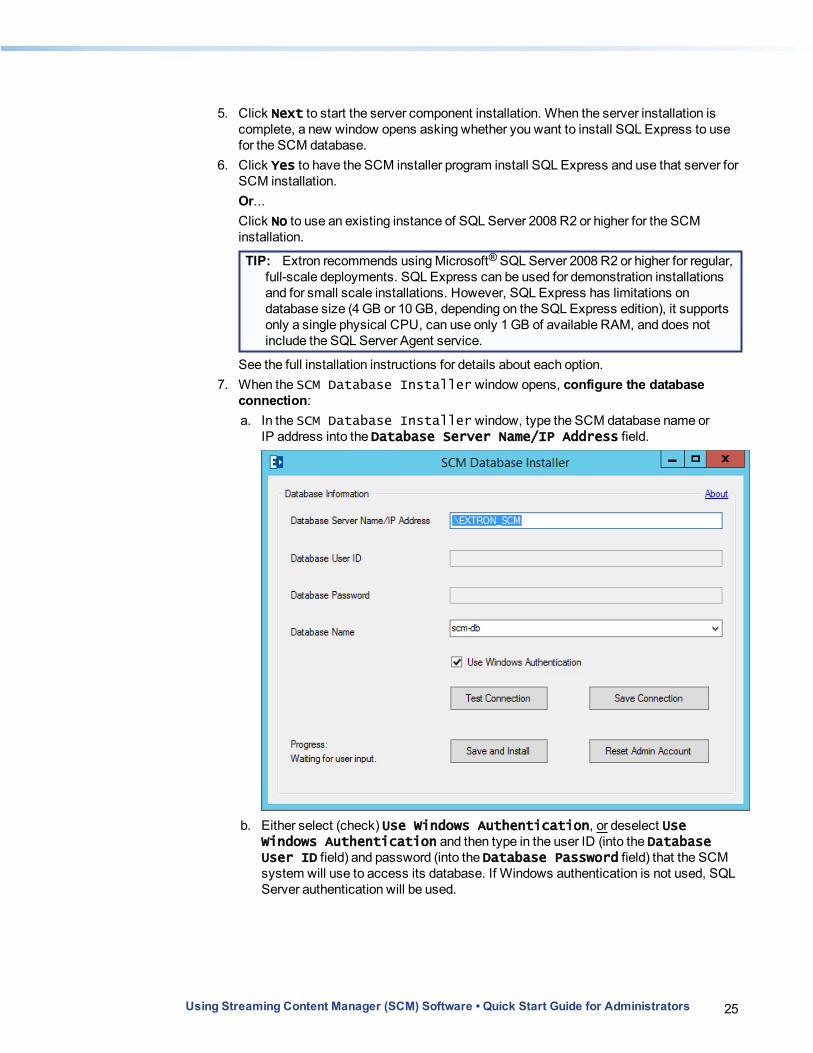
See the full installation instructions for details about each option. 7. When the SCM Database Installer window opens, configure the database
connection: a. In the SCM Database Installer window, type the SCM database name or
IP address into the Database Server Name/IP Address field.
b. Either select (check) Use Windows Authentication, or deselect Use Windows Authentication and then type in the user ID (into the Database User ID field) and password (into the Database Password field) that the SCM system will use to access its database. If Windows authentication is not used, SQL Server authentication will be used.
26Using Streaming Content Manager (SCM) Software • Quick Start Guide for Administrators
c. In the Database Name drop-down list, select an existing database, or select the option to create a new database and then create one.
NOTE: If you create a new database, you must have database creator privileges on that server. The default new database name is "SCM" or "scm-db". The name can be changed manually (using other tools) after installation, before opening and configuring the SCM.
d. Click the Test Connection button to test the settings and ensure that a database connection can be made. If the connection is successful, a check mark appears to the right of the Test Connection button. If it is not successful, an error message appears.
e. If necessary, correct the settings and retest the connection. Repeat as needed until the database connection can be made successfully.
f. Click the Save Connection button to save the settings. If the connection is successful, a check mark appears to the right of the Save Connection button. If it is not successful, an error message appears.
g. Once the settings have been tested successfully and saved, click Save and Install to begin database installation. The installer displays a success message when database installation is successfully completed.
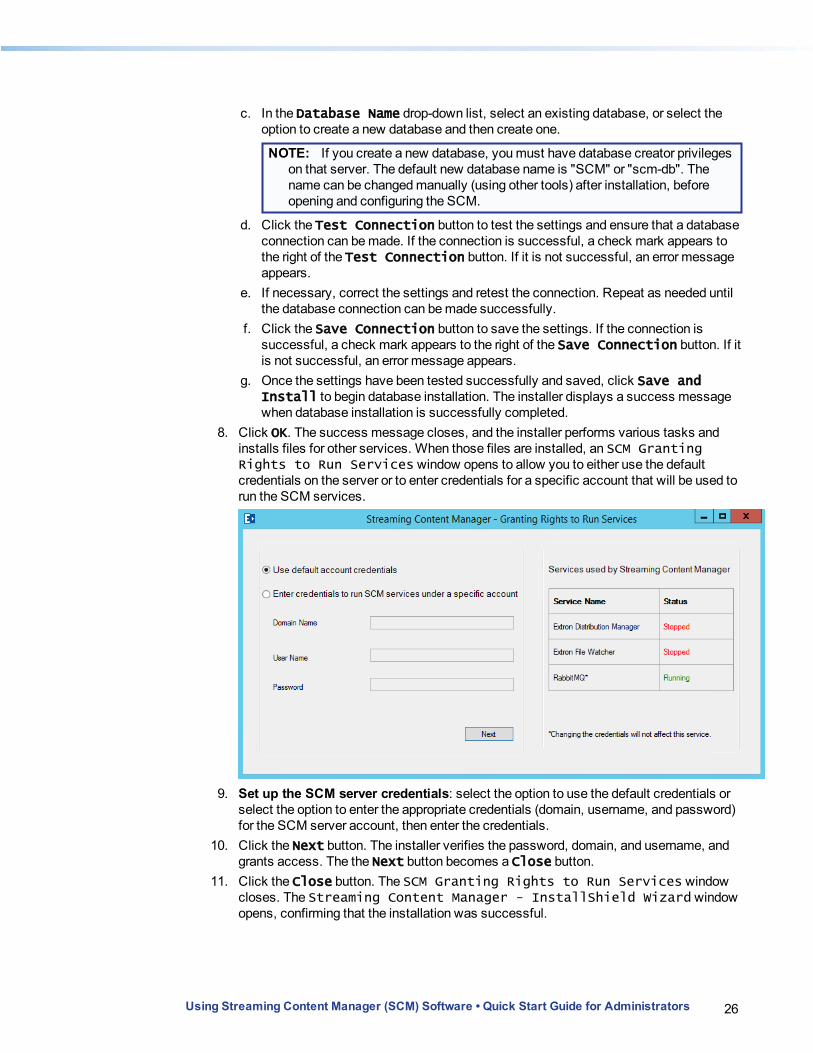
8. Click OK. The success message closes, and the installer performs various tasks and installs files for other services. When those files are installed, an SCM Granting Rights to Run Services window opens to allow you to either use the default credentials on the server or to enter credentials for a specific account that will be used to run the SCM services.
9. Set up the SCM server credentials: select the option to use the default credentials or select the option to enter the appropriate credentials (domain, username, and password) for the SCM server account, then enter the credentials.
10. Click the Next button. The installer verifies the password, domain, and username, and grants access. The the Next button becomes a Close button.
11. Click the Close button. The SCM Granting Rights to Run Services window closes. The Streaming Content Manager - InstallShield Wizard window opens, confirming that the installation was successful.
27Using Streaming Content Manager (SCM) Software • Quick Start Guide for Administrators
12. If desired, select Check here if you want to add a shortcut to the desktop.
13. Click Finish. The installation wizard closes. SCM has been installed and is now ready for configuration. SCM opens in your default web browser.
Step 4: Configure the Streaming Content Manager.
1. Open a web browser, enter the IP address or URL of Streaming Content Manager into the address field, and connect to SCM.
2. At the Log In page, enter admin for the user name and extron1111@ for the password, then click Log In. The system configuration page opens. You are now logged in as the system administrator.
NOTE: It is recommended that you change the password for the system administrator account at this time to allow better system security (see Editing the System Administrator Profile for details). If the password must be reset to the factory default later, run the installer application (see Step 3: Install the SCM Software. above). Skip the software installation, and in the SCM Database Installer dialog box, click the Reset Admin Account button to reset the system administrator account (delete any e-mail address for the account and reset to factory user name and password).
3. Configure the recording package settings (see Setting Up Recording Package Settings) and click Apply.
4. If users will be added from an Active Directory (AD) system, configure the LDAP/AD server settings, timeout periods, and user schema settings (see Setting Up LDAP/AD Connections) and click Apply.
5. Select the default time zone to be used by the SCM system and to be used as the default zone for new users (see Setting General System Settings).
6. Set the application URL for SCM and click Apply (see Setting General System Settings).
7. Set up and test e-mail notification server connections (see Configuring E-mail Notification Settings) and click Apply.
Step 5: Add Users
1. Log in to Streaming Content Manager as the system administrator (see step 4, number 1 above).
2. Navigate to the Accounts page. 3. Click Create Account. 4. Choose whether to add users locally (purely within the SCM system) or to draw users
from a managed directory (LDAP/AD). 5. Proceed to create or add user accounts (see Adding Users).
Installing Streaming Content Manager
Installing Streaming Content Manager: Prerequisites and PreparationExtron provides an installer program that steps through first installing the SCM software onto a server and then creating the SCM database within an existing database installation. Configuration of SCM features such as recording package settings, Active Directory connection settings, default time zone, system URL, and e-mail server settings, is performed after installation, from within SCM. The installer program can also be used to upgrade the SCM software (see Upgrading Streaming Content Manager) or to uninstall the software and its database tables (see Uninstalling Streaming Content Manager).In preparation for installation, it is helpful to read the following topics: Server Account Permissions and SCM Installation and Adding HTTPS Binding. For step-by-step instructions on using the installer application to install the SCM program and its database, see Installation Instructions.
NOTE: The installer program also includes features that allow you to update the database or reset the system administrator credentials (username, e-mail address, and password). Those features are covered elsewhere in this help file.
Installation Prerequisites
In order to install and set up Streaming Content Manager you need the following items:Hardware l Server hardware to support a Web server and database installation l Display: 1024 x 768 screen resolution or higher
Framework l Microsoft® .Net® framework version 4.5 or higher
Web ServerMicrosoft IIS extensible Web server: l IIS verson 7.0 or higher (Microsoft Windows Server® 2008 R2) l IIS version 8.5 or higher (Windows Windows Server 2012)
Using Streaming Content Manager (SCM) Software • Installing Streaming Content Manager 28
29Using Streaming Content Manager (SCM) Software • Installing Streaming Content Manager
NOTE: HTTPS binding for IIS services and for the SCM website is required prior to installation (see Adding HTTPS Binding). In this process you create or obtain an SSL certificate, tie it and HTTPS protocol to the IIS services for SCM, then create a binding association between HTTPS and the SCM website. This sets Streaming Content Manager to use secure protocol and to open using HTTPS. By default, when SCM is installed, it creates a self-signed SSL certificate and sets up the HTTPS binding within IIS (for instructions on how to accomplish this manually, particularly if using an SSL certificate from a certification authority [CA], see Adding HTTPS Binding).
E-mail Server l Microsoft Exchange Server that supports Microsoft Exchange Web Services
Database l Microsoft SQL Server® 2008 or later, full or Express editions
Managed Directory System (optional)To use a Microsoft Active Directory® (AD) system for adding and validating users, you will also need: l An Active Directory server running Active Directory (AD)
Obtaining the Software
The Streaming Content Manger software can be downloaded from the Extron Download page (www.extron.com/download/index.aspx) or via the Downloads tab within the Streaming Content Manager product page (http://www.extron.com/product/product.aspx?id=scm&s=5). Locate the software package and follow the on-screen directions to download the installer. You need to have an Extron Insider account and log in with your account username and password in order to download the file. Note the name and location to which the file is downloaded.
Server Account Permissions: What is Needed for Installation
During installation of SCM you will be prompted to enter the domain name, username, and password that will be used for the SCM server installation. If this information is not entered during installation, it can be manually changed outside the installation program (using other tools such as Microsoft IIS Manager) after installation. See Server Account Permissions and SCM Installation for details about what permissions and access must be set up depending on whether or not credentials are entered during installation and on whether Windows® Authentication is used for the database setup.
Recommendations Regarding Security Certificates
The SCM software makes use of secure HTTP (HTTPS) to ensure secure communications with SCM. HTTPS uses SSL certificates to enable users to confirm the identity of a Web server, and also as part of the encryption mechanism used to secure communications with websites.
About self-signed and CA security certificates
By default, when SCM is installed, it creates a self-signed SSL certificate and sets up the HTTPS binding within IIS (for instructions on how to accomplish this manually, see Adding
30Using Streaming Content Manager (SCM) Software • Installing Streaming Content Manager
HTTPS Binding). Such a self-signed certificate originates from SCM and not from a generally trusted source. Because the self-signed certificate originates from SCM and not from a generally trusted source, it does not enable users to confirm the identity of the SCM without additional configuration for each client of the SCM. Modern Web browsers are sensitive to the dual use of SSL certificates and may warn or block the user (prevent login) when the user accesses SCM from a client where such additional configuration has not been done. Using a certificate issued by a generally trusted certification authority (CA) is often preferable to using a self-signed certificate, but the process for obtaining a certificate issued by a generally trusted certification authority is outside the scope of this document.
For further reading
For further information about CA security certificates, how to configure them from within IIS, and how to import them, you may want to start by reading the material at the following sites: l "Configure Web Server Security (IIS 7)" — https://technet.microsoft.com/en-
us/library/cc731278(v=ws.10).aspx — This serves as a starting point, describing various IIS 7 security features and providing links to topics on what to configure within IIS 7 and how.
l "What Are CA Certificates?" — https://technet.microsoft.com/en-us/library/cc778623(v=ws.10).aspx
l "Configuring Server Certificates in IIS 7" — https://technet.microsoft.com/en-us/library/cc732230(v=ws.10).aspx — This page includes links to instructions on how to configure, create, view, import, export, and remove server certificates.
l "Import a Certificate" — https://technet.microsoft.com/en-us/library/cc754489.aspx — This covers how to perform additional configuration for a client so that a self-signed certificate will be registered as from a trusted source.
How to Install SCM
Set up HTTPS binding manually prior to installation if using a CA security certificate (see Adding HTTPS Binding) or allow the installer program to automatically generate a self-signed certificate and set up HTTPS binding automatically during installation. To proceed with installation, see Installation Instructions for step-by-step directions.
31Using Streaming Content Manager (SCM) Software • Installing Streaming Content Manager
Server Account Permissions and SCM InstallationServer access permissions and related requirements for SCM installation differ based on whether or not credentials are entered during the installation process. This section details those requirements and also discusses the main steps to ensure that the SCM application pool can access the SCM database.
Requirements if Credentials Are Provided During Installation
If the domain name, username (for a named user of the domain or on an local machine), and password are entered during installation: l The named account will be assigned as the identity for the SCM application pool in IIS. l The named account will be assigned as the service identity for the FileWatcher and
DistributionManager Windows services. l The named account must have read, write, and delete access to the recording package
ingest location. This is the server location that is checked by the file watcher service (Extron FileWatcher) for arrival of new recordings and from which recordings are transferred (ingested) into the SCM system. If the location is a network path, the administrator must grant two types of permissions to the account used by the SCM services: folder share permissions and local folder security (NTFS) permissions. l To grant folder share permissions, right-click on the folder in Windows Explorer,
select Properties, select the Sharing tab, then click the Share button. In the File Sharing dialog box, select the account name, set its permission level to Read/Write, and click Share. Click Done, then click Close to exit the Properties dialog box.
l To grant local folder security permissions, right-click on the folder in Windows Explorer, select Properties, select the Security tab, then click the Edit button. In the Permissions dialog box, select the account name, enable the Allow Full control check box, and click OK. Click OK to exit the Properties dialog box.
l The named account must have read, write, and delete access to the recording package storage location so the SCM distribution manager service (Extron DistributionManager) can transfer recording from the ingest location to the storage location and then permit recordings to be edited and deleted. If the location is a network path, the administrator must grant two types of permissions to the account used by the SCM services: folder share permissions and local folder security (NTFS) permissions. l To grant folder share permissions, right-click on the folder in Windows Explorer,
select Properties, select the Sharing tab, then click the Share button. In the File Sharing dialog box, select the account name, set its permission level to Read/Write, and click Share. Click Done, then click Close to exit the Properties dialog box.
l To grant local folder security permissions, right-click on the folder in Windows Explorer, select Properties, select the Security tab, then click the Edit button. In the Permissions dialog box, select the account name, enable the Allow Full control check box, and click OK. Click OK to exit the Properties dialog box.
l The named account must have full control permissions on the SCM installation folder. This is set automatically by the SCM installer.
32Using Streaming Content Manager (SCM) Software • Installing Streaming Content Manager
Requirements if Credentials Are Not Provided During Installation
If the credentials for a named account are not entered during Installation (if Use default account credentials is selected during the Granting Rights part of the installation process): l The DefaultAppPool will be assigned as the identity for the SCM application pool in IIS.
The DefaultAppPool Identity will default to ApplicationPoolIdentity which corresponds to the IIS_IUSRS named account on the system.
l The IIS_IUSRS user must have read access to storage location. Note that IIS_IUSRS is, by default, a member of the Users group, which has read permission on most folders on the local machine.
l The built-in LOCAL_SERVICE account will be assigned as the service identity for the FileWatcher and DistributionManager Windows services. The LOCAL_SERVICE account must have read, write, and delete access to the recording package ingest location and the storage location.
NOTE: Network paths are not recommended.
SCM Application Pool Database Access For a System Using Windows Authentication
For database installation using Windows Authentication, the identity used by the SCM Application Pool (either the named account specified above or IIS_IUSRS if default account credentials were selected) must have access to the database created by the installation.
To set up the application pool to access the database:
1. Create a login for the identity used by the SCM application pool on the database being used.
2. Assign required privileges on the database for the newly-created login (see Database in the Troubleshooting topic for more information).
The identity used by the SCM Windows services must also have access to the database created by the installation. If credentials were not provided during installation (if Use default account credentialswas selected), then set up the LOCAL_SERVICE account to access the database using the same steps described above.
Adding HTTPS BindingOnce you set up an Internet Information Services (IIS) extensible web server, the IIS by default uses port 80 and is set for binding to HTTP. Multiple bindings can be added to IIS, HTTPS, and other protocols and services. Binding the server to HTTPS allows secure protocols to be used with Streaming Content Manager.By default, the SCM installer program automatically generates a self-signed certificate and sets up HTTPS binding during installation. If you want to use a certification authority (CA) security certificate instead of the default self-signed certificate, follow the directions in this topic for manually setting up HTTPS binding.
33Using Streaming Content Manager (SCM) Software • Installing Streaming Content Manager
To add HTTPS binding manually, you must:
1. Create a certificate for SSL (see Generating a Self-signed Certificate on IIS) or buy a certificate from a service provider such as VeriSign, Inc. Before doing so, it is a good idea to read Recommendations Regarding Security Certificates.
2. Set up HTTPS binding for IIS (see Setting up HTTPS Binding to the IIS). 3. Set up HTTPS binding for the website (see Setting up HTTPS Binding for the
Website).
The instructions in this section include details on how to accomplish the binding using a self-signed security certificate.
Generating a Self-signed Certificate on IIS
To generate a self-signed security certificate:
1. Open Internet Information Services (IIS) Manager: l If you are using Windows Server 2012 or Windows Server 2012 R2:
On the taskbar, click Server Manager> Tools > Internet Information Services (IIS) Manager.
l If you are using Windows Server 2008 R2: On the taskbar, click Start > Administrative Tools> Internet Information Services (IIS) Manager.
2. In the Connections panel, select the root option named with the SCM system name. The center panel of the window becomes the server home page and displays options.
3. From the IIS section of the screen (if grouped by area) or the Security section of the screen (if grouped by category), double-click Server Certificate. The center panel becomes a Server Certificates panel.
4. In the Actions panel on the right of the screen, click Create Self-Signed Certificate. A Create Self-Signed Certificate dialog box opens.
5. Type a "friendly" name for the certificate into the field. 6. Click OK. The dialog box closes and the name of the new certificate appears in the
Server Certificates panel.
Setting up HTTPS Binding to the IIS
Once you have created a self-signed security certificate or added an SSL certificate from a service provider to the server, set up HTTPS binding for IIS.
To add HTTPS binding to IIS:
1. Open IIS Manager (see step 1 in Generating a Self-signed Certificate on IIS above). 2. In the Connections panel, expand the server name, expand Sites, and then click
Default Web Site. 3. In the Actions panel on the right of the screen, click Bindings... (within the Edit
Site section). A dialog box opens.

34Using Streaming Content Manager (SCM) Software • Installing Streaming Content Manager
4. In the Site Bindings dialog box click Add. Another dialog box opens.
5. In the Add Site Binding dialog box, add the binding information. l From the Type drop-down list select HTTPS. l In the IP address drop-down list select All Unassigned. l In the Port field, type the default port, 433. l From the SSL certificate drop-down list, select the name of the self-signed
certificate created using the procedure above (see Generating a Self-signed Certificate on IIS) or the certificate obtained through the security service provider.
6. Click OK. The Add Site Binding dialog box closes. The certificate is installed and HTTPS binding is added to the IIS system.
7. Click Close to close the Site Bindings dialog box.
Setting up HTTPS Binding for the Website
Once HTTPS binding has been set up for IIS, you can add HTTPS binding to the SCM website.
To add HTTPS binding to the SCM website:
1. Open IIS Manager (see step 1 in Generating a Self-signed Certificate on IIS above). 2. In the Connections panel, expand the server name, expand Sites, expand Default
Web Site, and click on the name of the SCM website within that. The center panel of the window displays options.

35Using Streaming Content Manager (SCM) Software • Installing Streaming Content Manager
3. In the center panel double-click SSL Settings in the IIS section (if grouped by area) or the Security section (if grouped by category). The center panel changes to show SSL settings.
4. Select (check) the Require SSL check box. 5. For client certificates select the radio button for the desired option. 6. In the Actions panel on the right of the screen, click Apply. The SSL settings are
saved for the SCM website, which now will use HTTPS protocol.
36Using Streaming Content Manager (SCM) Software • Installing Streaming Content Manager
Installation InstructionsThis topic includes step-by-step instructions on using the installer application to install the SCM program and its database. In preparation for installation, it is helpful to read the following topics: Installing Streaming Content Manager: Prerequisites and Preparation, Server Account Permissions and SCM Installation, and Adding HTTPS Binding.
NOTE: The installer program also includes features that allow you to update the database or reset the system administrator credentials (username, e-mail address, and password). Those features are covered elsewhere in this help file.
How to Install SCM
TIP: Restart the server before and after any installation, upgrade, or uninstallation.
If you will use a certification authority (CA) security certificate, you should perform manual HTTPS binding first (see Adding HTTPS Binding), then proceed with installation. If you want to use the default self-signed certificate and let the installer bind the site for you, proceed directly to installation.
37Using Streaming Content Manager (SCM) Software • Installing Streaming Content Manager
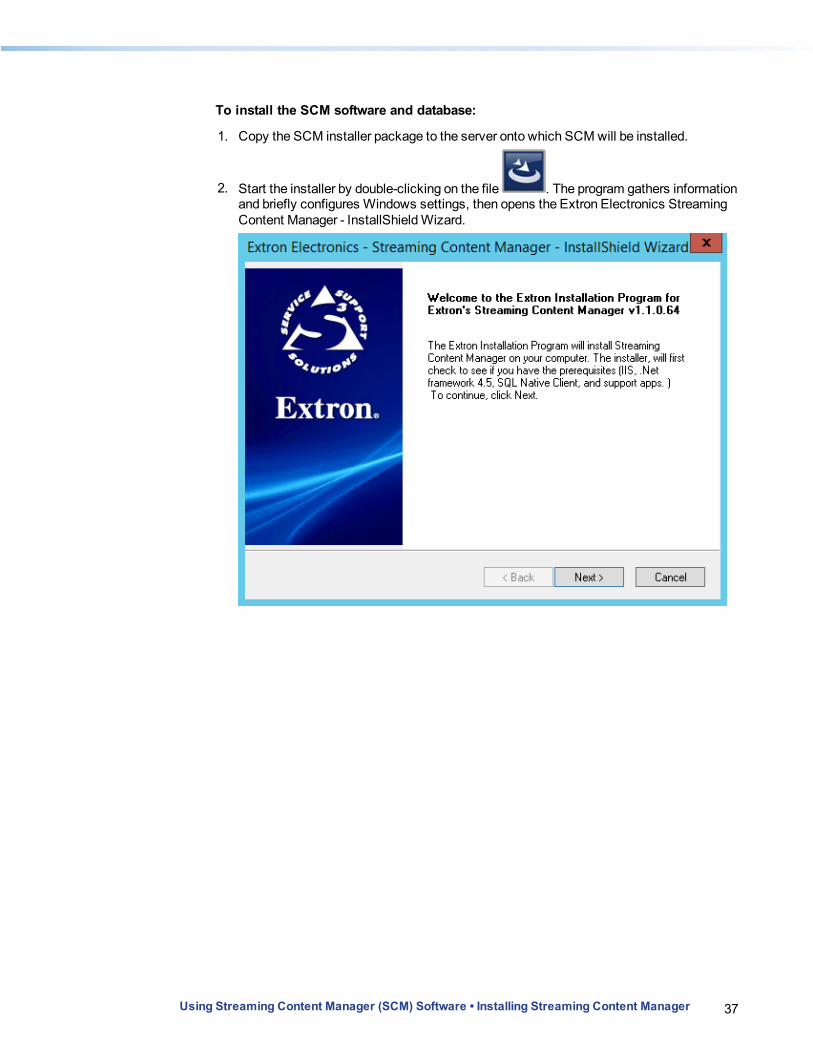
To install the SCM software and database:
1. Copy the SCM installer package to the server onto which SCM will be installed.
2. Start the installer by double-clicking on the file . The program gathers information and briefly configures Windows settings, then opens the Extron Electronics Streaming Content Manager - InstallShield Wizard.
38Using Streaming Content Manager (SCM) Software • Installing Streaming Content Manager
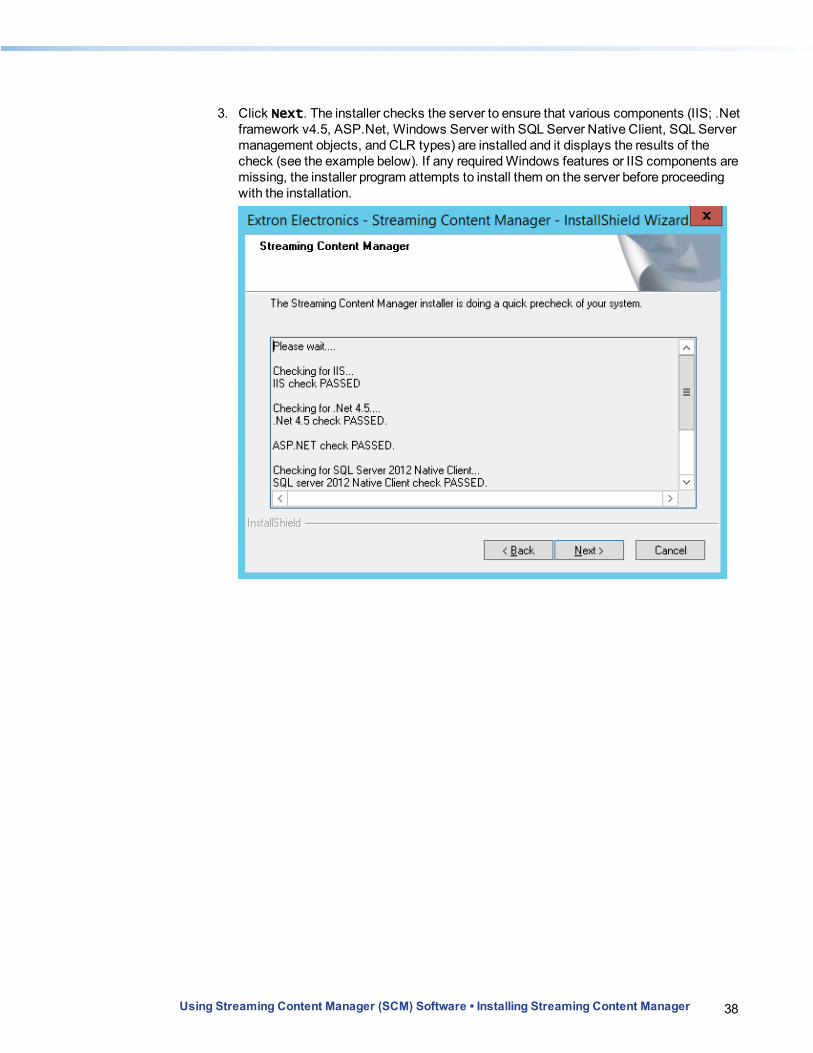
3. Click Next. The installer checks the server to ensure that various components (IIS; .Net framework v4.5, ASP.Net, Windows Server with SQL Server Native Client, SQL Server management objects, and CLR types) are installed and it displays the results of the check (see the example below). If any required Windows features or IIS components are missing, the installer program attempts to install them on the server before proceeding with the installation.

39Using Streaming Content Manager (SCM) Software • Installing Streaming Content Manager
4. If all the required components are installed, click Next. The license agreement is displayed in the window.
5. Read the license agreement. 6. If you want to save and print a copy of the agreement for your records, click the Print
button. The text of the agreement is sent to your default printer for printing.

40Using Streaming Content Manager (SCM) Software • Installing Streaming Content Manager
7. In the installation wizard window, select I accept the terms of the license agreement and click Next. The installer displays the default installation path.
8. Optional: if you want to change the path to a different location, click Change. In the Choose Folder dialog box, navigate to and select the desired location, and click Ok.
41Using Streaming Content Manager (SCM) Software • Installing Streaming Content Manager
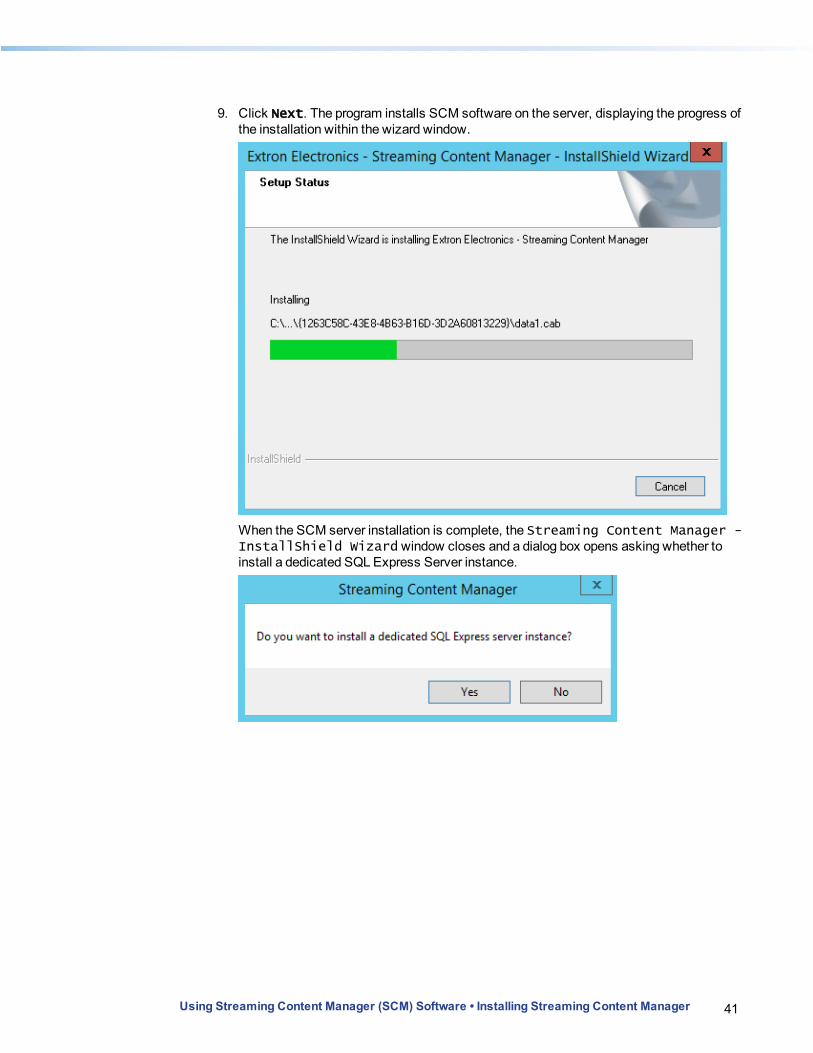
9. Click Next. The program installs SCM software on the server, displaying the progress of the installation within the wizard window.
When the SCM server installation is complete, the Streaming Content Manager - InstallShield Wizard window closes and a dialog box opens asking whether to install a dedicated SQL Express Server instance.
42Using Streaming Content Manager (SCM) Software • Installing Streaming Content Manager
10. Click Yes to have the SCM installer program install SQL Express and use that server for SCM installation. Or...Click No to use an existing instance of SQL Server 2008 R2 or higher for the SCM installation.
TIP: Extron recommends using Microsoft® SQL Server 2008 R2 or higher for regular, full-scale deployments. SQL Express can be used for demonstration installations and for small scale installations. However, SQL Express has limitations on database size (4 GB or 10 GB, depending on the SQL Express edition), it supports only a single physical CPU, can use only 1 GB of available RAM, and does not include the SQL Server Agent service.
l If you select Yes so you can have the installation program install SQL Express, the program extracts the appropriate files and proceeds to install a SQL Express instance. o If SQL Express server has already been installed and is detected, SCM opens a
dialog box stating that a SQL Express server instance with the same name exists and, therefore, SQL Express cannot be installed. Click OK to close the dialog box and skip the installation. Proceed to step 11.
o If any problems are encountered during installation (such as the need for a server restart), a SQL Server 2012 Setup window opens, showing which operations failed and which passed, so you can resolve any issues.
o If no problems are encountered, the SQL Express installation completes. Proceed to step 11.
l If you select No so you can use a full SQL Server database, proceed to step 11.The SCM Database Installer window opens.

43Using Streaming Content Manager (SCM) Software • Installing Streaming Content Manager
11. In the SCM Database Installer window, type the SCM database name or IP address into the Database Server Name/IP Address field.
12. For SQL Express installations installed by the SCM installer, select (check) Use Windows Authentication. You cannot deselect that option or enter database user ID or password credentials.For SQL Server installations and SQL Express installations not installed by SCM, either select (check) Use Windows Authentication, or deselect Use Windows Authentication and then type in the user ID (into the Database User ID field) and password (into the Database Password field) that the SCM system will use to access its database.
44Using Streaming Content Manager (SCM) Software • Installing Streaming Content Manager
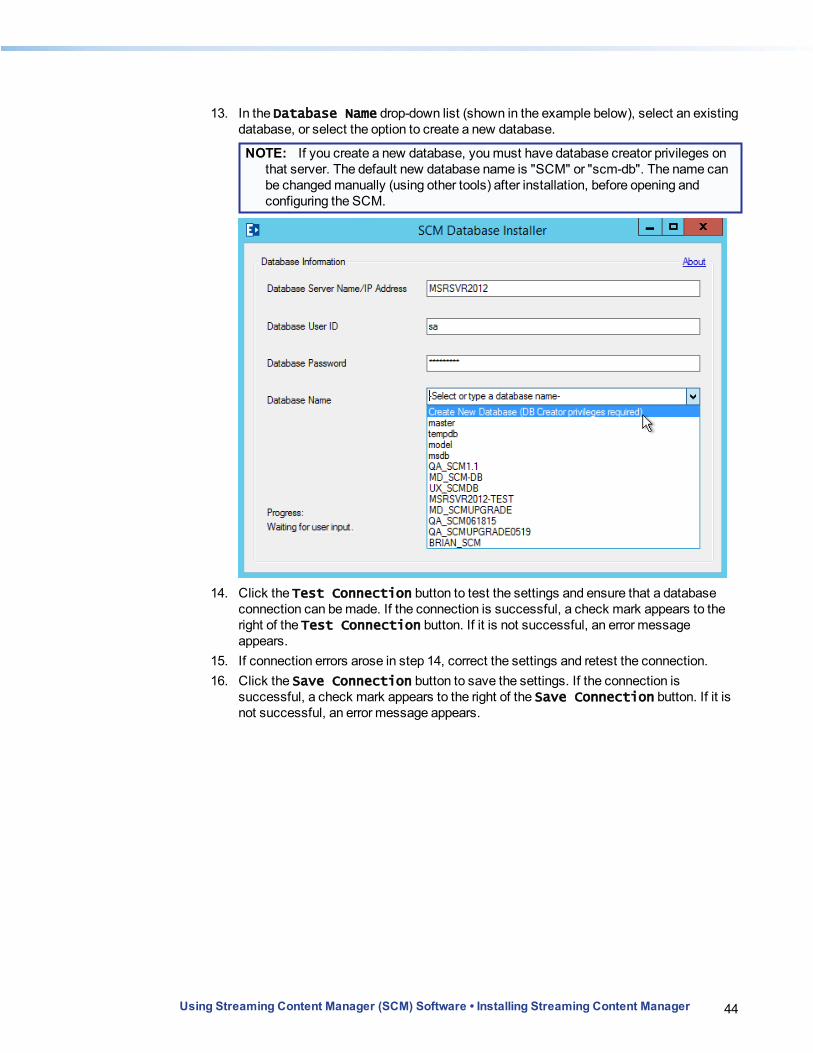
13. In the Database Name drop-down list (shown in the example below), select an existing database, or select the option to create a new database.
NOTE: If you create a new database, you must have database creator privileges on that server. The default new database name is "SCM" or "scm-db". The name can be changed manually (using other tools) after installation, before opening and configuring the SCM.
14. Click the Test Connection button to test the settings and ensure that a database connection can be made. If the connection is successful, a check mark appears to the right of the Test Connection button. If it is not successful, an error message appears.
15. If connection errors arose in step 14, correct the settings and retest the connection. 16. Click the Save Connection button to save the settings. If the connection is
successful, a check mark appears to the right of the Save Connection button. If it is not successful, an error message appears.

45Using Streaming Content Manager (SCM) Software • Installing Streaming Content Manager
17. Once the settings have been tested successfully and saved, click Save and Install to begin database installation.
46Using Streaming Content Manager (SCM) Software • Installing Streaming Content Manager
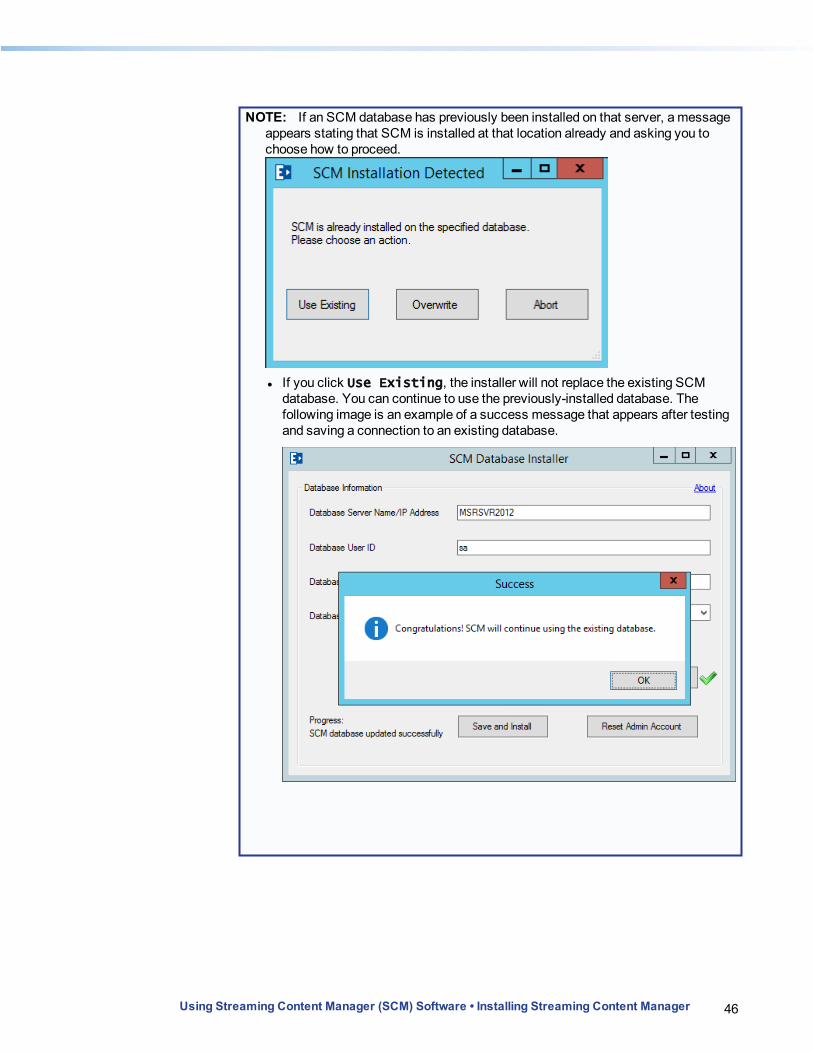
NOTE: If an SCM database has previously been installed on that server, a message appears stating that SCM is installed at that location already and asking you to choose how to proceed.
l If you click Use Existing, the installer will not replace the existing SCM database. You can continue to use the previously-installed database. The following image is an example of a success message that appears after testing and saving a connection to an existing database.

47Using Streaming Content Manager (SCM) Software • Installing Streaming Content Manager
l If you click Overwrite, the existing database will be erased and replaced by a new SCM database installation. A message similar to the following example appears asking you to confirm that you wish to overwrite the database. Click Yes to close that message and to overwrite the data and database.
The reinstallation progress is indicated by the text in the lower left corner of the window.
l If you click Abort, the database installer closes without changing the existing database or installing a new one.

48Using Streaming Content Manager (SCM) Software • Installing Streaming Content Manager
The installer displays a success message when database installation is successfully completed.
18. Click OK. The success message closes, and the installer performs various tasks and installs files for other services. When those files are installed, an SCM Granting Rights to Run Services window opens to allow you to either use the default credentials on the server or to enter credentials for a specific account that will be used to run the SCM services.
49Using Streaming Content Manager (SCM) Software • Installing Streaming Content Manager
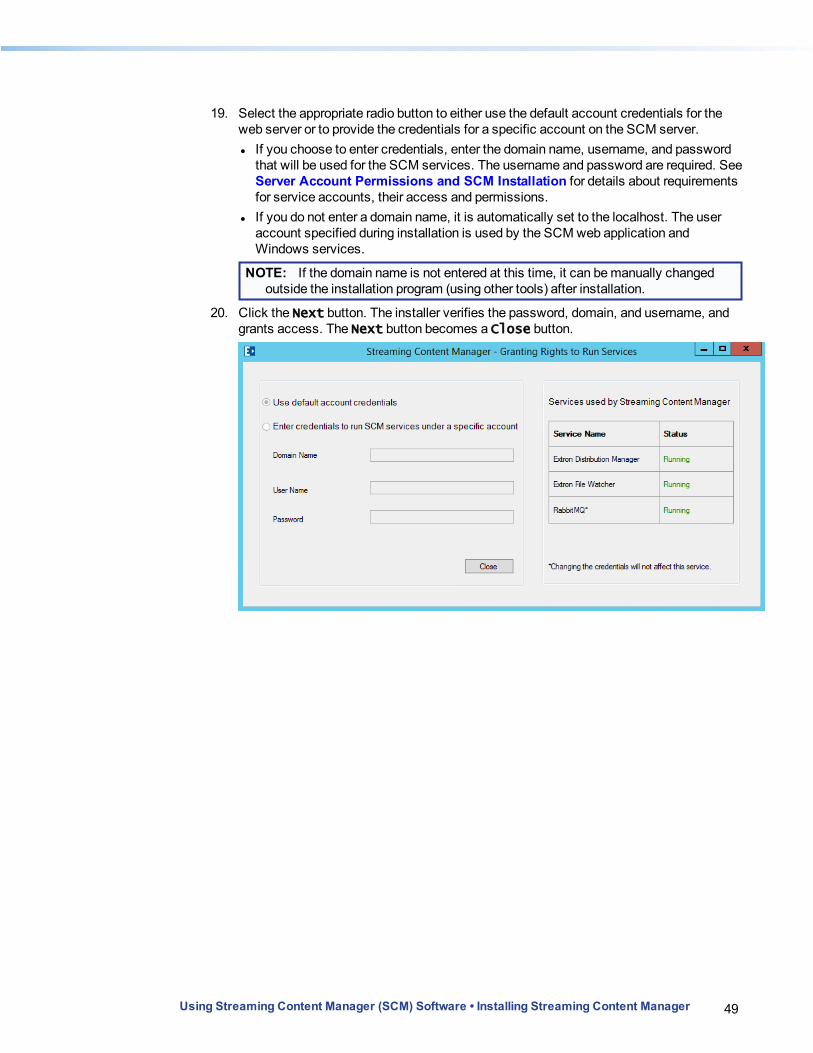
19. Select the appropriate radio button to either use the default account credentials for the web server or to provide the credentials for a specific account on the SCM server. l If you choose to enter credentials, enter the domain name, username, and password
that will be used for the SCM services. The username and password are required. See Server Account Permissions and SCM Installation for details about requirements for service accounts, their access and permissions.
l If you do not enter a domain name, it is automatically set to the localhost. The user account specified during installation is used by the SCM web application and Windows services.
NOTE: If the domain name is not entered at this time, it can be manually changed outside the installation program (using other tools) after installation.
20. Click the Next button. The installer verifies the password, domain, and username, and grants access. The Next button becomes a Close button.

50Using Streaming Content Manager (SCM) Software • Installing Streaming Content Manager
21. Click the Close button. The SCM Granting Rights to Run Services window closes. The Streaming Content Manager - InstallShield Wizard window opens, confirming that the installation was successful.
22. If desired, select Check here if you want to add a shortcut to the desktop.
23. Click Finish. The installation wizard closes. SCM has been installed and is now ready for configuration. SCM opens in your default web browser.
24. Log in (see Logging In and Logging Out) using the system administrator credentials (see Step 4: Configure the Streaming Content Manager.) and configure the system (see System Configuration and Management Overview).

51Using Streaming Content Manager (SCM) Software • Installing Streaming Content Manager
Changing Accounts and Permissions After InstallationThe default account or another account specified during installation may not have the permissions settings necessary for all of the SCM Web and Windows services to run correctly (see Server Account Permissions and SCM Installation for details). If the need arises, you can change the account used to run the SCM services. The Permissions utility within the SCM installer program provides a simple way to accomplish that.
To access the Permissions utility and change the account:
1. From the server on which SCM is installed, open the Windows Command Prompt. 2. Change the directory to the bin folder within or underneath the path on the drive where
SCM is installed. in most cases that folder is C:\inetpub\wwwroot\SCM\bin.Example command: cd C:\inetpub\wwwroot\SCM\bin
3. Enter the following command, replacing the path to SCM if necessary:Extron.Installer.Permissions.exe -I C:\inetpub\wwwroot\SCM
The installer Permissions utility opens.
4. Select the Enter credentials to run SCM services under a specific account radio button.
5. Enter the new domain name (optional), username, and password that will be used for the SCM Web and Windows services. The username and password are required.
6. Click the Next button. The installer verifies the password, domain, and username, and grants access. The installer program then closes.
52Using Streaming Content Manager (SCM) Software • Installing Streaming Content Manager
Upgrading Streaming Content ManagerWhen updated versions of Streaming Content Manager become available you may want to upgrade your system to the latest version. This section covers what to consider and do prior to installation and details the upgrade process.
NOTE: The installer program detects whether or not SCM is already installed and, if it is, what version is installed. SCM allows upgrades from a lower to a higher version and also replacement or repair of the version that is currently installed. Downgrades to older versions are prevented, however.
Prerequisites for SCM Upgrades
All the prerequisites for SCM installation (system hardware, database, server, memory, and account permissions requirements) also apply to upgrading the software (see Prerequisites). In addition, to have the installer program automatically back up the server files and the database, the accounts used by SCM must have permission to back up files.
Pre-upgrade Recommendations
Prior to upgrading the SCM software, the following tasks are strongly recommended: l Back up the SCM database. The database backup is helpful so that if anything goes
awry during the database upgrade you can restore the system to its previous configuration and with its previous records. The installation and upgrade utility program can back up the database for you, but you can perform the backup on your own prior to installation at a convenient time and to store the backup database files to a location of your choosing. Use SQL Management Studio to back up the SCM database to a location of your choice.
l Notify users (content owners and viewers) that the SCM services will be unavailable during the upgrade. Services are stopped during the upgrade process.
l Ensure that you have enough free space on the SCM server to accommodate twice the size of the SCM system installation (excluding recordings) to allow room for backups of the system and settings.

53Using Streaming Content Manager (SCM) Software • Installing Streaming Content Manager
Procedure for Upgrading SCM
To upgrade SCM:
1. Copy the new SCM installer package to the server onto which SCM will be installed.
2. Start the installer by double-clicking on the file . The program detects the existing installation, gathers information about it, then opens the Extron Electronics Streaming Content Manager - InstallShield Wizard Installation Maintenance window.
3. Select the Update radio button.
54Using Streaming Content Manager (SCM) Software • Installing Streaming Content Manager
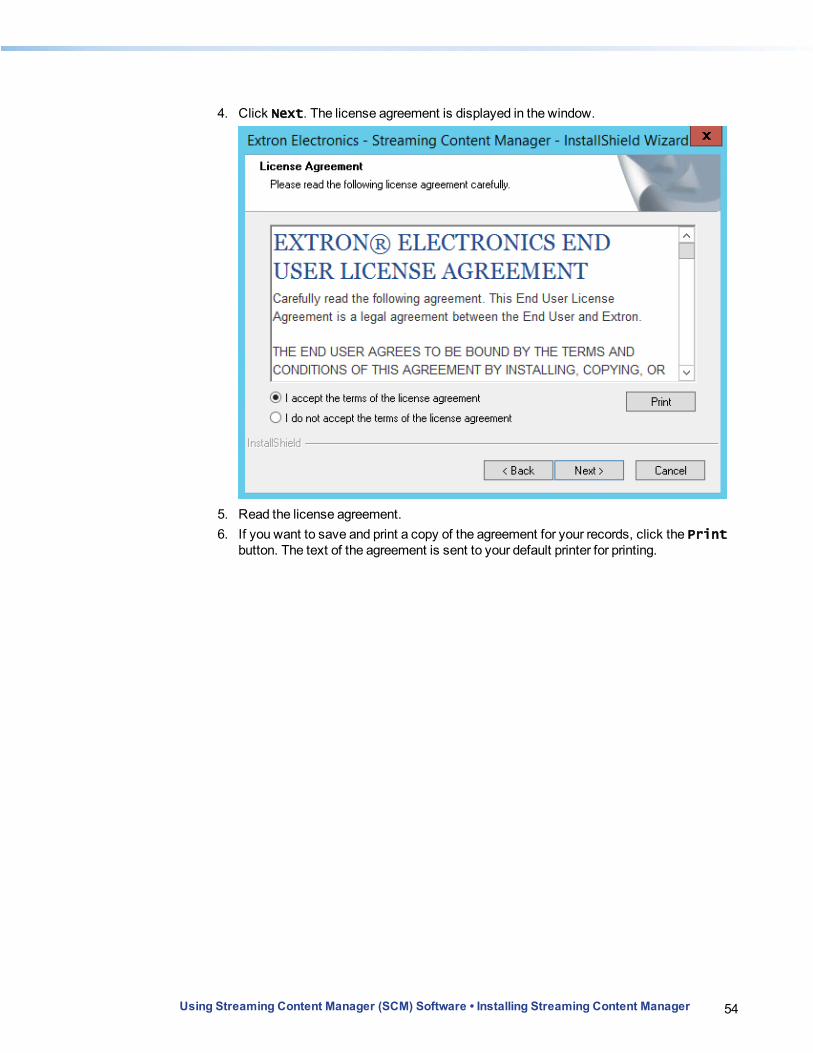
4. Click Next. The license agreement is displayed in the window.
5. Read the license agreement. 6. If you want to save and print a copy of the agreement for your records, click the Print
button. The text of the agreement is sent to your default printer for printing.
55Using Streaming Content Manager (SCM) Software • Installing Streaming Content Manager
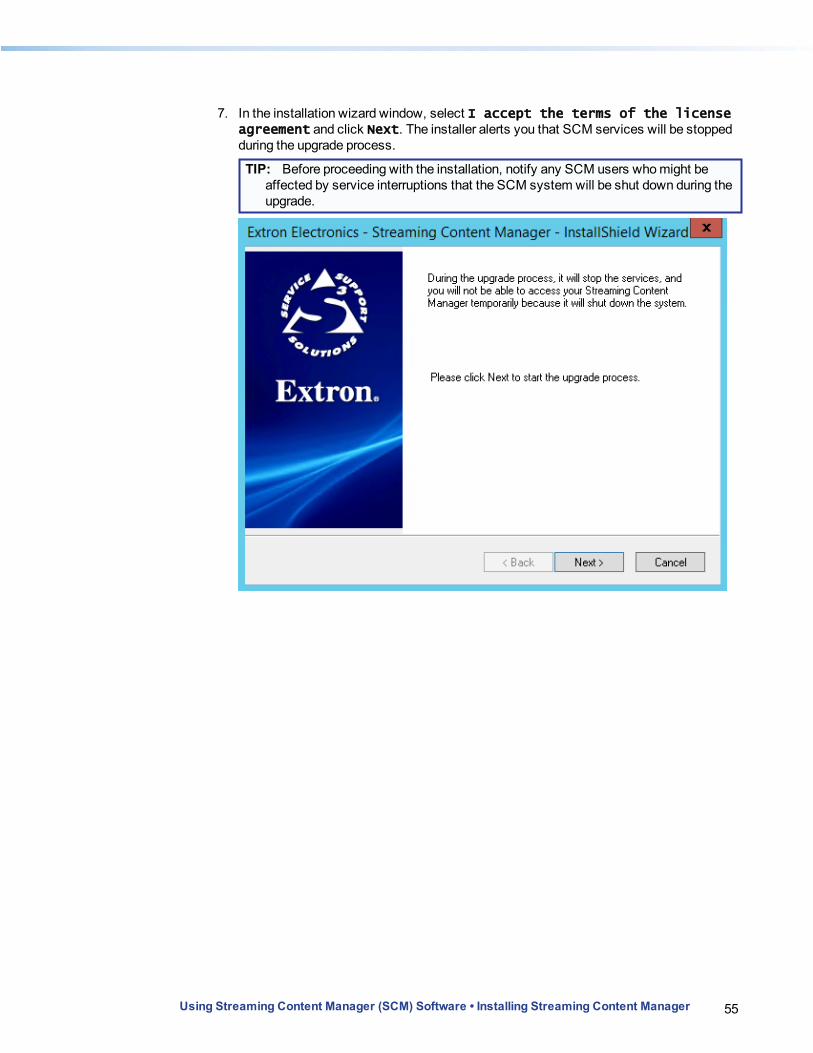
7. In the installation wizard window, select I accept the terms of the license agreement and click Next. The installer alerts you that SCM services will be stopped during the upgrade process.
TIP: Before proceeding with the installation, notify any SCM users who might be affected by service interruptions that the SCM system will be shut down during the upgrade.
56Using Streaming Content Manager (SCM) Software • Installing Streaming Content Manager
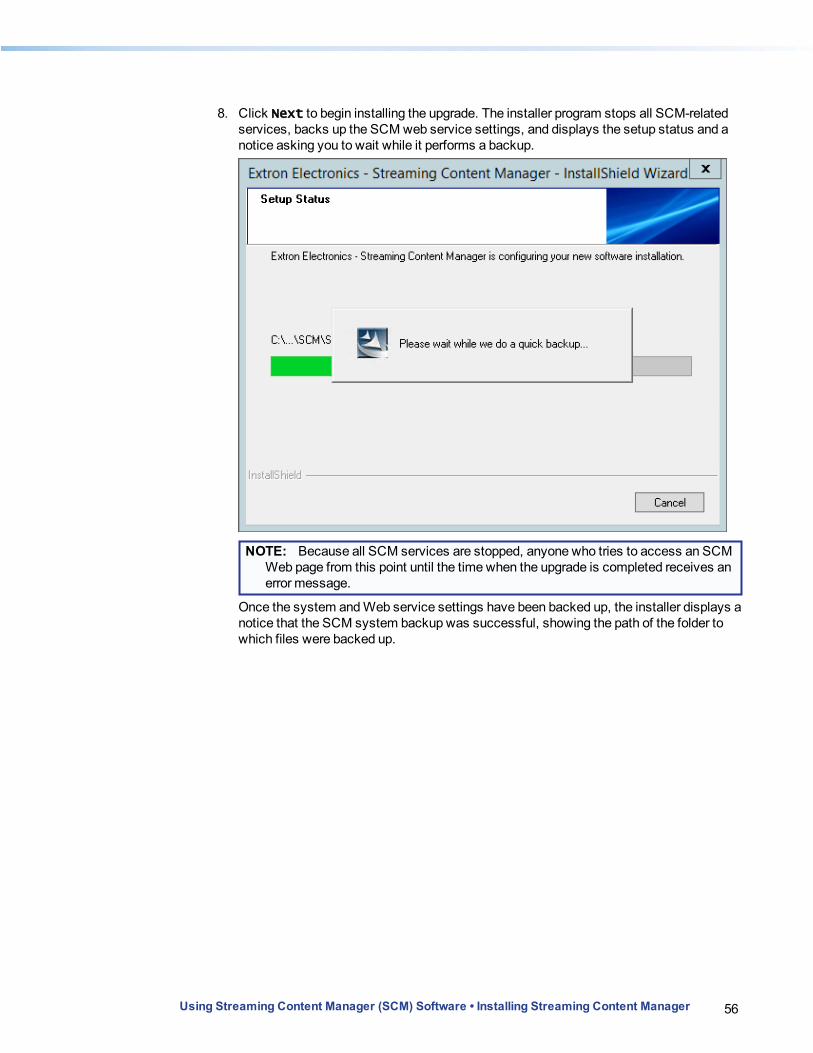
8. Click Next to begin installing the upgrade. The installer program stops all SCM-related services, backs up the SCM web service settings, and displays the setup status and a notice asking you to wait while it performs a backup.
NOTE: Because all SCM services are stopped, anyone who tries to access an SCM Web page from this point until the time when the upgrade is completed receives an error message.
Once the system and Web service settings have been backed up, the installer displays a notice that the SCM system backup was successful, showing the path of the folder to which files were backed up.
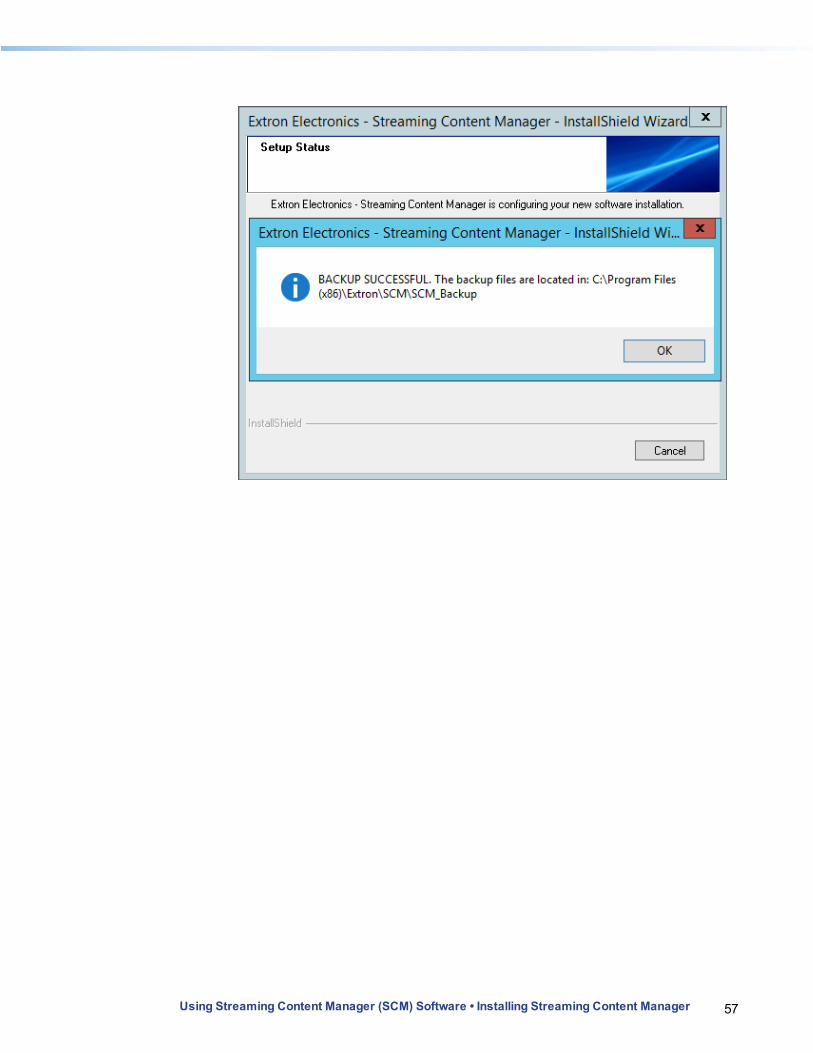
57Using Streaming Content Manager (SCM) Software • Installing Streaming Content Manager
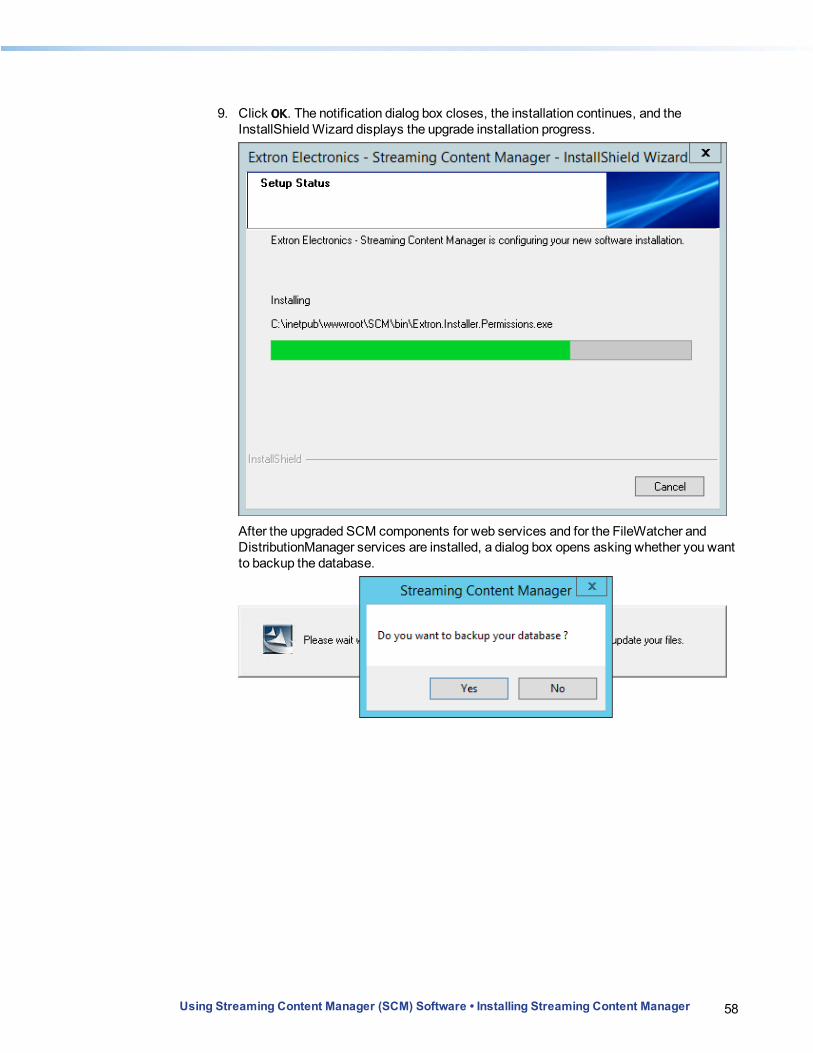
58Using Streaming Content Manager (SCM) Software • Installing Streaming Content Manager
9. Click OK. The notification dialog box closes, the installation continues, and the InstallShield Wizard displays the upgrade installation progress.
After the upgraded SCM components for web services and for the FileWatcher and DistributionManager services are installed, a dialog box opens asking whether you want to backup the database.
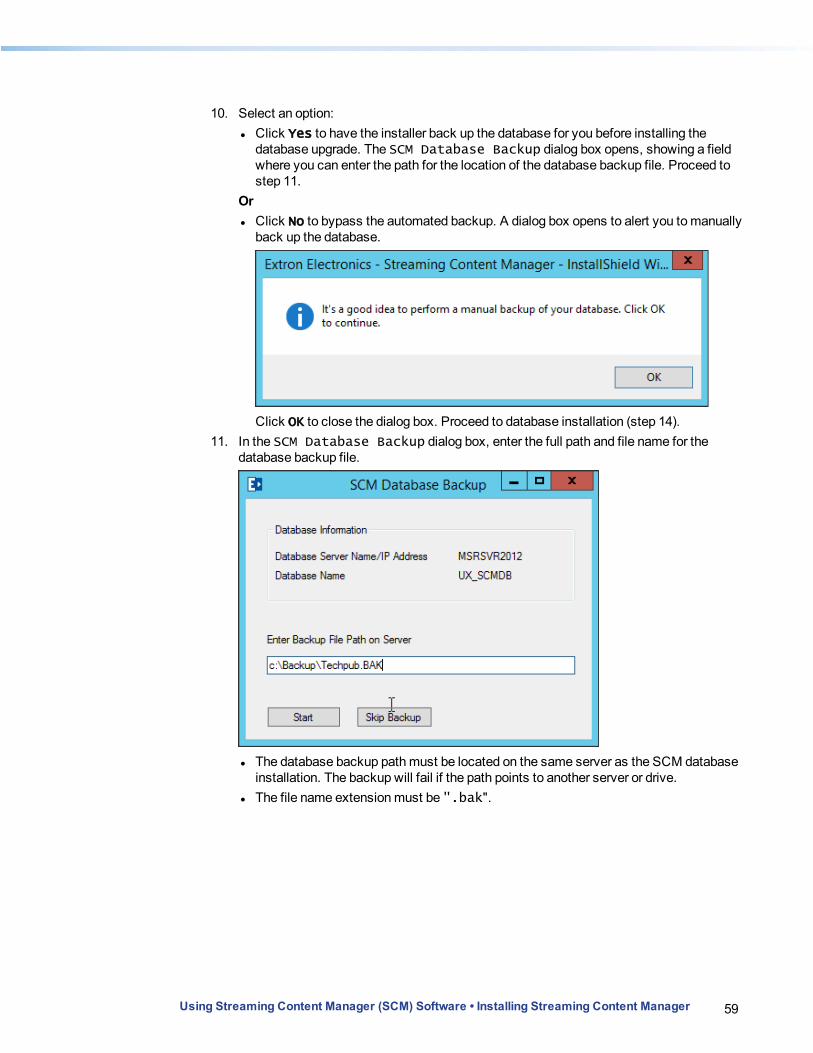
59Using Streaming Content Manager (SCM) Software • Installing Streaming Content Manager
10. Select an option: l Click Yes to have the installer back up the database for you before installing the
database upgrade. The SCM Database Backup dialog box opens, showing a field where you can enter the path for the location of the database backup file. Proceed to step 11.
Or l Click No to bypass the automated backup. A dialog box opens to alert you to manually
back up the database.
Click OK to close the dialog box. Proceed to database installation (step 14). 11. In the SCM Database Backup dialog box, enter the full path and file name for the
database backup file.
l The database backup path must be located on the same server as the SCM database installation. The backup will fail if the path points to another server or drive.
l The file name extension must be ".bak".
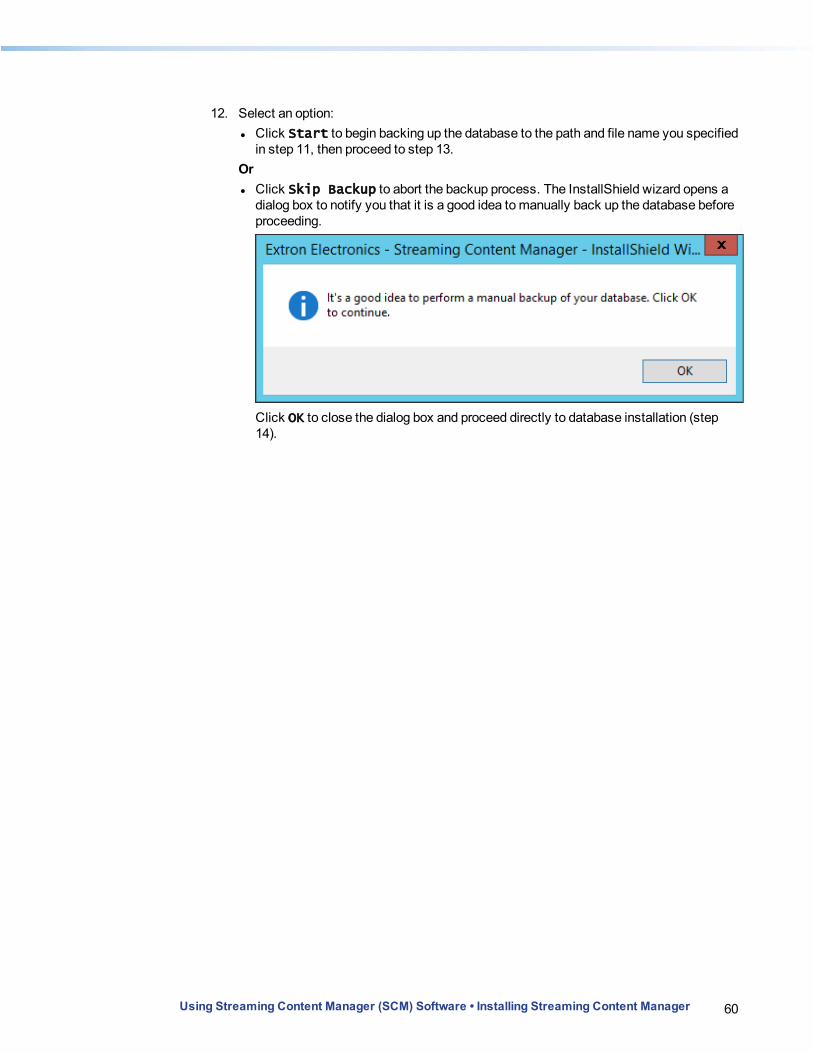
60Using Streaming Content Manager (SCM) Software • Installing Streaming Content Manager
12. Select an option: l Click Start to begin backing up the database to the path and file name you specified
in step 11, then proceed to step 13.Or l Click Skip Backup to abort the backup process. The InstallShield wizard opens a
dialog box to notify you that it is a good idea to manually back up the database before proceeding.
Click OK to close the dialog box and proceed directly to database installation (step 14).
61Using Streaming Content Manager (SCM) Software • Installing Streaming Content Manager
13. If you clicked Start in step 12, the SCM database backup process begins. l If you entered an invalid file name (such as XYZ.doc instead of XYZ.bak) in the
path, or if you did not enter a file name, the Enter Backup File Path on Server field is cleared and an alert icon appears next to the field. i. If an alert dialog box opens to describe the error, make note of the type of error and
click OK to close the error dialog box. ii. In the SCM Database Backup dialog box, enter the full path, including a file
name with a correct (.bak) extension. iii. Click Start. The backup process validates the path and file type and restarts the
backup. The program backs up the database and displays the backup status. When the backup is completed, a dialog box opens stating that the database backup was successfully created at the path you specified.
iv. Click OK to close the dialog box. The installer program begins to upgrade the database.

62Using Streaming Content Manager (SCM) Software • Installing Streaming Content Manager
l If the backup fails, the program displays a failure message that indicates the nature of the failure. A backup can fail if the specified path does not exist or is not on the same server as the database, if the file name is invalid, or if the connection to the database or the server fails.
i. Close the SCM Database Backup Failed dialog box. The InstallShield wizard opens a dialog box to notify you that it is a good idea to manually back up the database before proceeding.
ii. Click OK to close the dialog box. The installer program begins to upgrade the database.
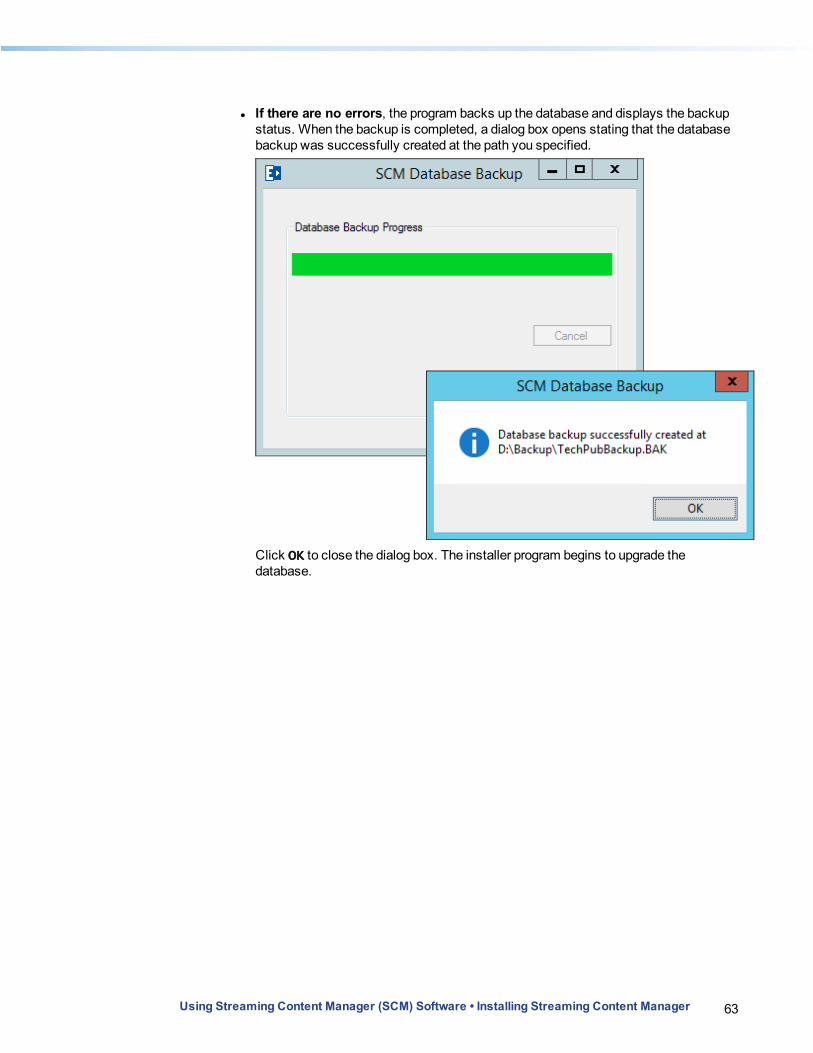
63Using Streaming Content Manager (SCM) Software • Installing Streaming Content Manager
l If there are no errors, the program backs up the database and displays the backup status. When the backup is completed, a dialog box opens stating that the database backup was successfully created at the path you specified.
Click OK to close the dialog box. The installer program begins to upgrade the database.
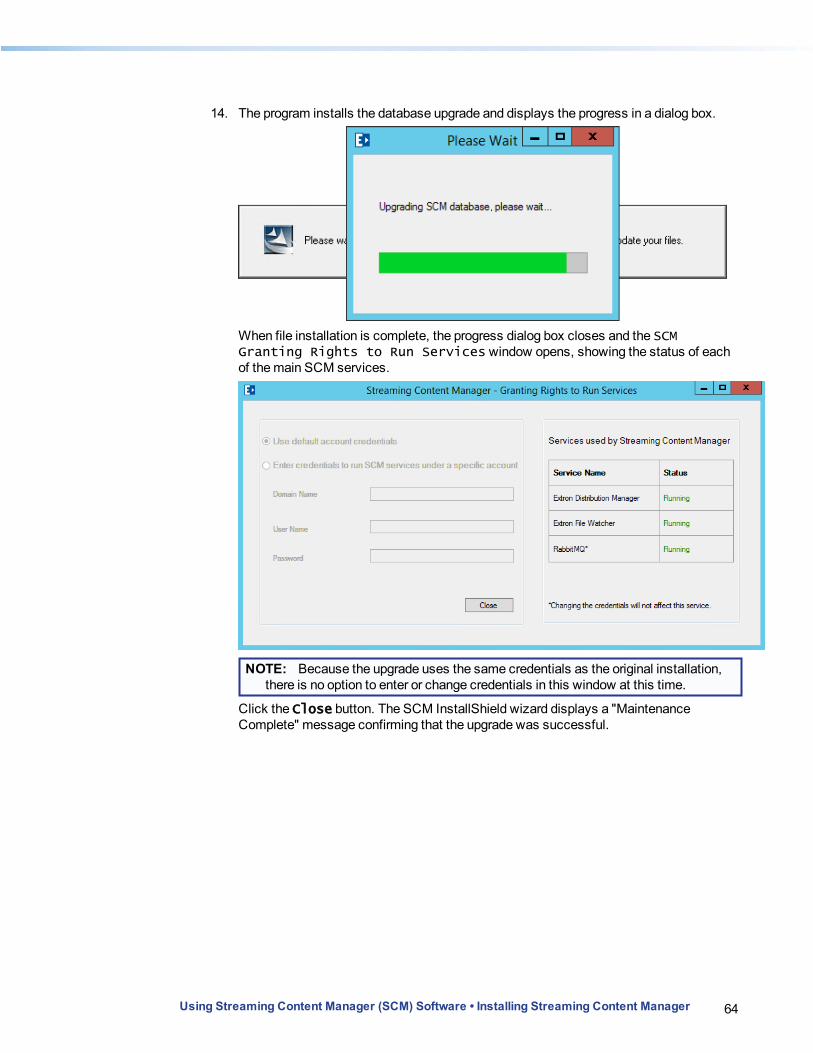
64Using Streaming Content Manager (SCM) Software • Installing Streaming Content Manager
14. The program installs the database upgrade and displays the progress in a dialog box.
When file installation is complete, the progress dialog box closes and the SCM Granting Rights to Run Services window opens, showing the status of each of the main SCM services.
NOTE: Because the upgrade uses the same credentials as the original installation, there is no option to enter or change credentials in this window at this time.
Click the Close button. The SCM InstallShield wizard displays a "Maintenance Complete" message confirming that the upgrade was successful.
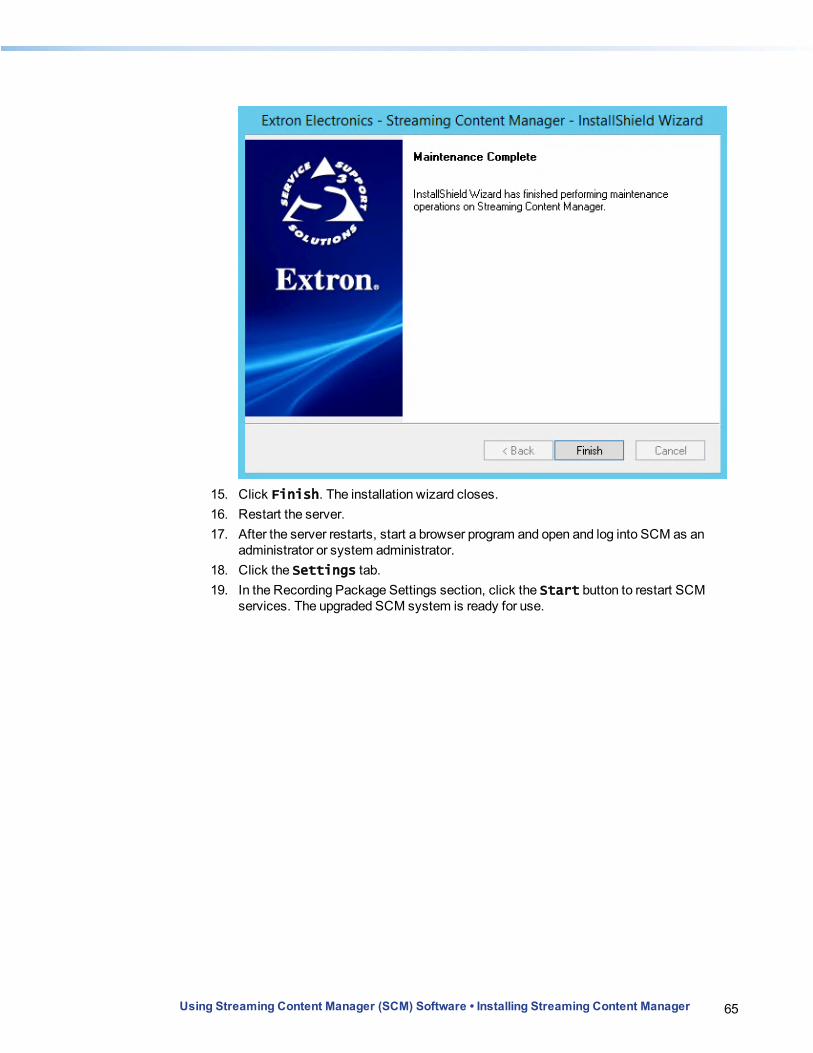
65Using Streaming Content Manager (SCM) Software • Installing Streaming Content Manager
15. Click Finish. The installation wizard closes. 16. Restart the server. 17. After the server restarts, start a browser program and open and log into SCM as an
administrator or system administrator. 18. Click the Settings tab. 19. In the Recording Package Settings section, click the Start button to restart SCM
services. The upgraded SCM system is ready for use.
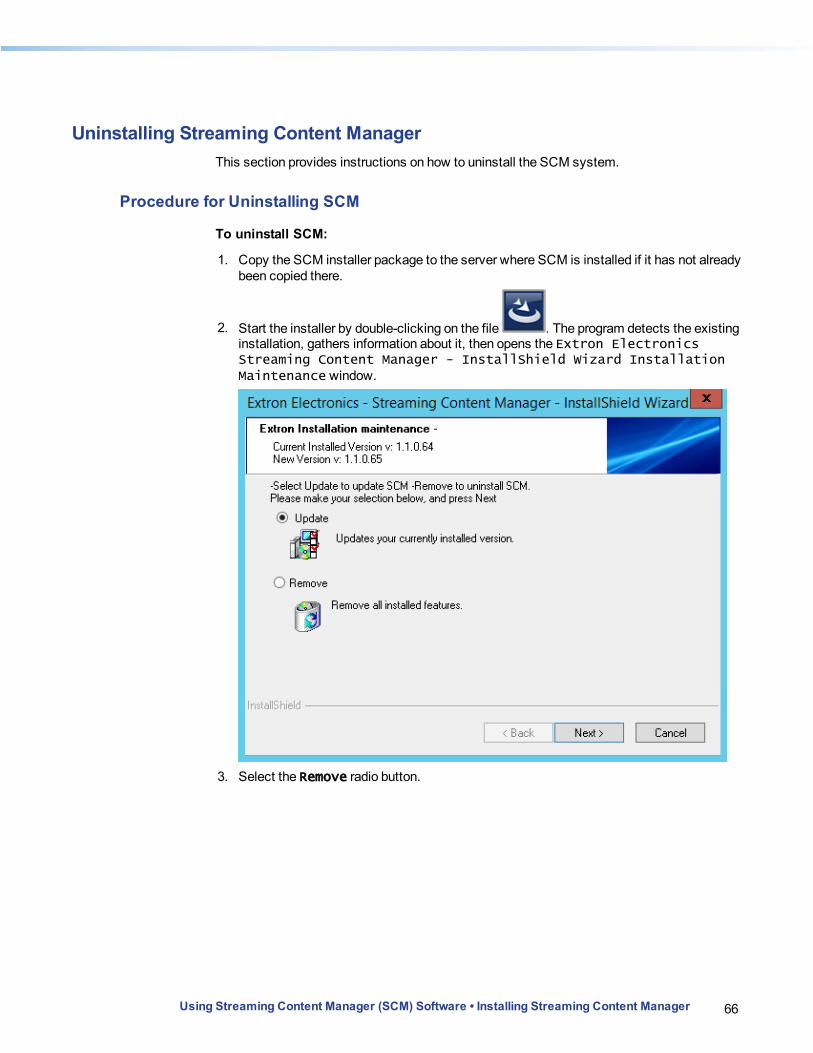
66Using Streaming Content Manager (SCM) Software • Installing Streaming Content Manager
Uninstalling Streaming Content ManagerThis section provides instructions on how to uninstall the SCM system.
Procedure for Uninstalling SCM
To uninstall SCM:
1. Copy the SCM installer package to the server where SCM is installed if it has not already been copied there.
2. Start the installer by double-clicking on the file . The program detects the existing installation, gathers information about it, then opens the Extron Electronics Streaming Content Manager - InstallShield Wizard Installation Maintenance window.
3. Select the Remove radio button.
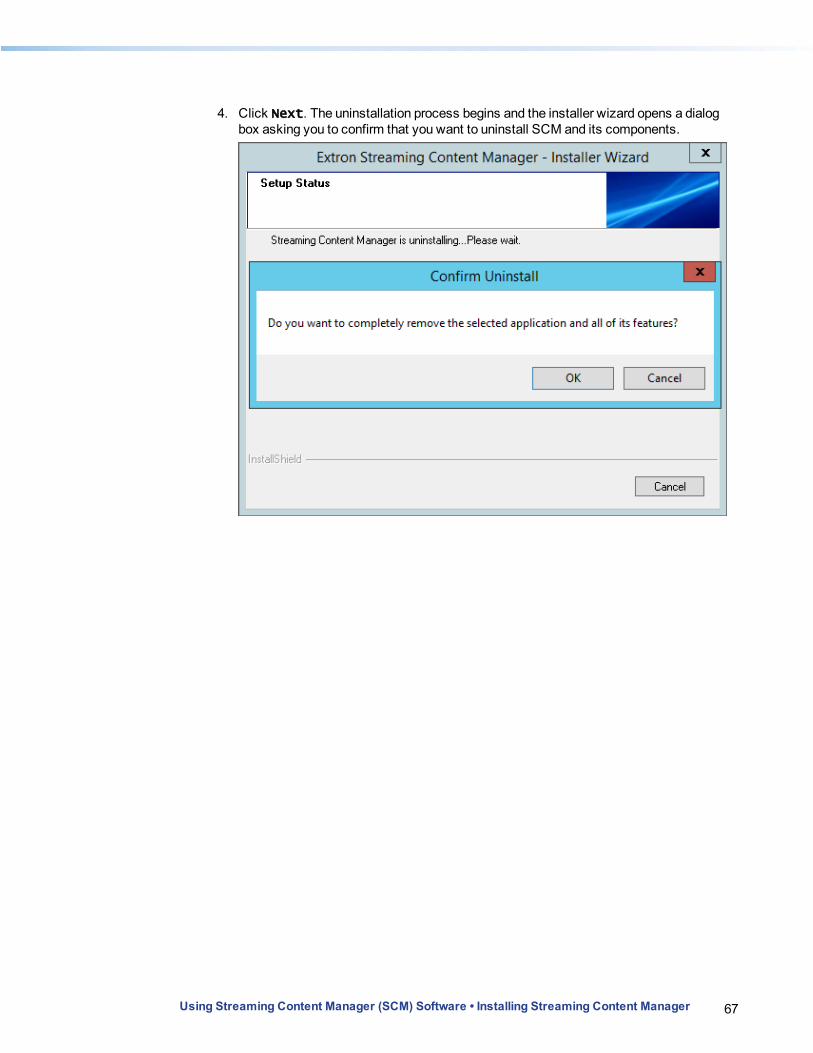
67Using Streaming Content Manager (SCM) Software • Installing Streaming Content Manager
4. Click Next. The uninstallation process begins and the installer wizard opens a dialog box asking you to confirm that you want to uninstall SCM and its components.
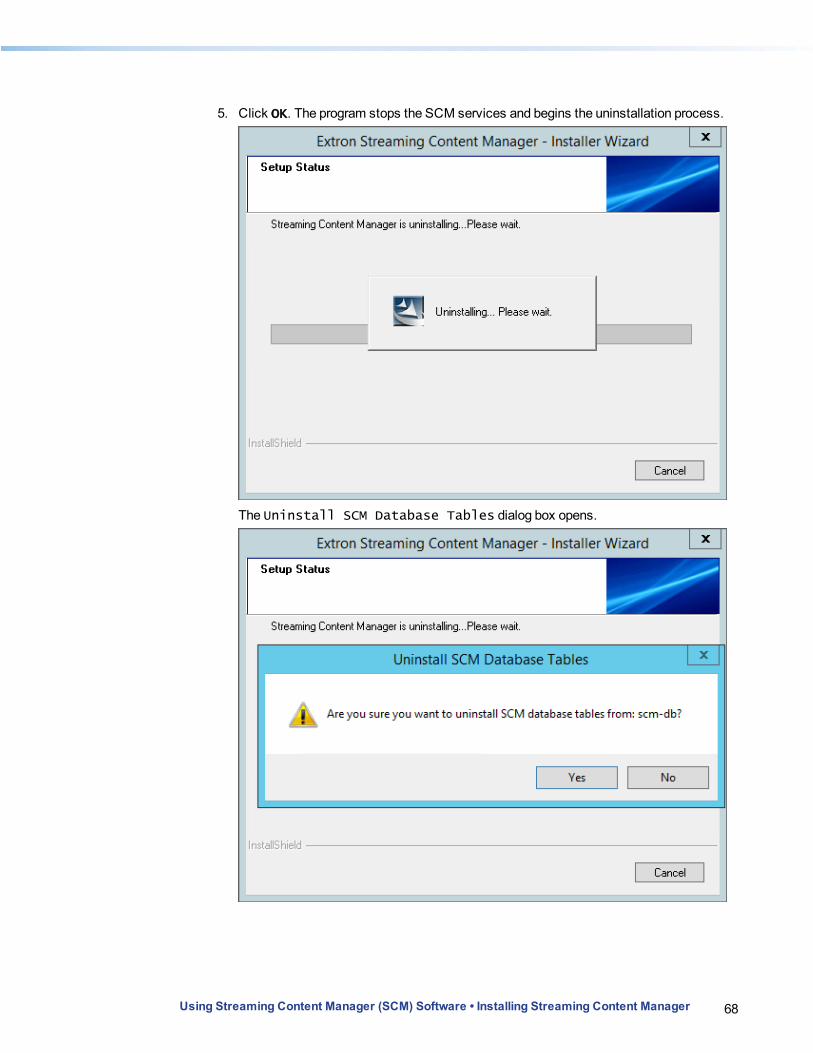
68Using Streaming Content Manager (SCM) Software • Installing Streaming Content Manager
5. Click OK. The program stops the SCM services and begins the uninstallation process.
The Uninstall SCM Database Tables dialog box opens.

69Using Streaming Content Manager (SCM) Software • Installing Streaming Content Manager
6. Click Yes to remove the SCM database tables from the server. The installer wizard displays a notice that it is uninstalling, then opens a dialog box that asks whether you want to uninstall the RabbitMQ supporting application.

70Using Streaming Content Manager (SCM) Software • Installing Streaming Content Manager
7. Click Yes to uninstall RabbitMQ. OrClick No to let RabbitMQ remain installed, if programs and services other than SCM also use RabbitMQ. If you clicked Yes, the installer wizard removes the RabbitMQ program. Whether you clicked Yes or No, a dialog box opens asking whether you want to uninstall Erlang OTP, which is another supporting application.
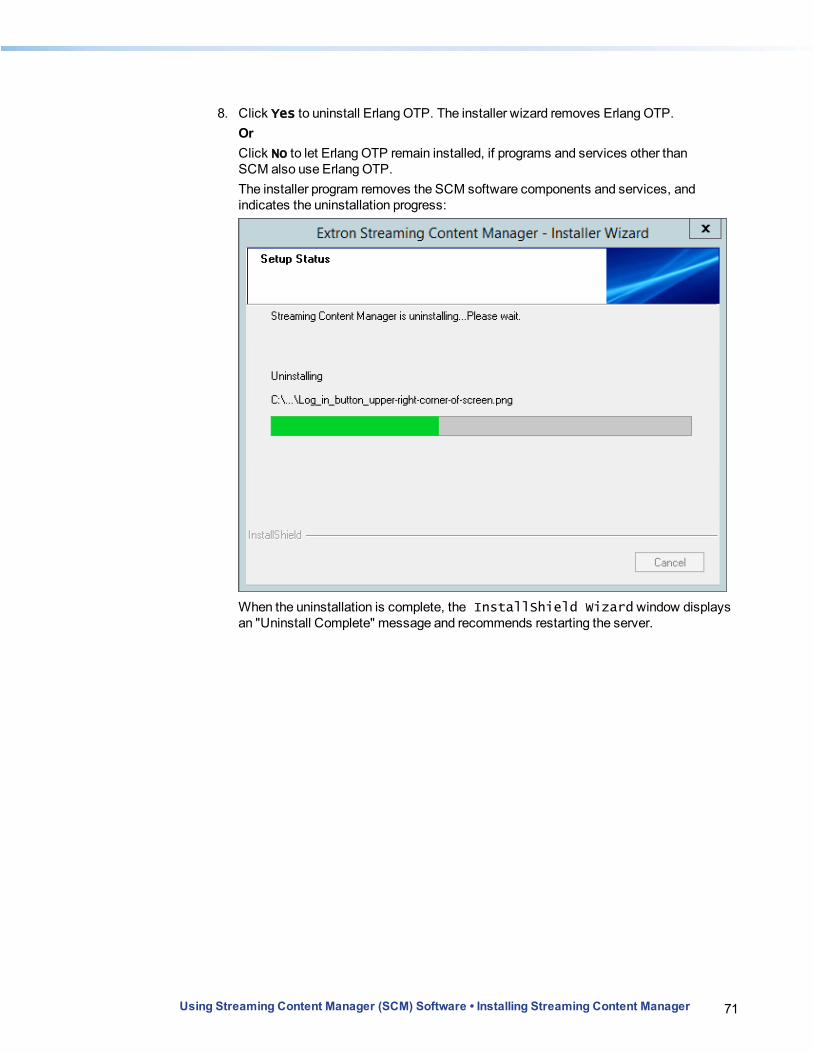
71Using Streaming Content Manager (SCM) Software • Installing Streaming Content Manager
8. Click Yes to uninstall Erlang OTP. The installer wizard removes Erlang OTP. OrClick No to let Erlang OTP remain installed, if programs and services other than SCM also use Erlang OTP. The installer program removes the SCM software components and services, and indicates the uninstallation progress:
When the uninstallation is complete, the InstallShield Wizard window displays an "Uninstall Complete" message and recommends restarting the server.

72Using Streaming Content Manager (SCM) Software • Installing Streaming Content Manager
9. Restart the server. You have successfully uninstalled SCM.
Database Setup and Administration
Setting Up, Resetting, and Migrating the Database
Database Setup
Initial database setup for the Streaming Content Manager is performed during the installation process, within the installation wizard program. You will need the following information during installation: l The server name, IP address, or connection path of the database installation l Permission settings for SCM to access the database (the user ID and password for the SCM
account) l The name of the SCM database
To configure the database:
1. Open and run the SCM installation program. The installer checks to ensure that a Microsoft IIS extensible web server, ASP.net, and Microsoft .Net version 4.5 or higher are installed on the system. If any component is not installed: a. Download and install the missing item. b. In the SCM installer window, click the Back button. c. Click the Next button to restart the component check and then proceed to installation.
2. Read and accept the end user license agreement. 3. Set up the SCM server connection. When server setup is complete and the connection has
been made, a new window opens for database configuration.
Using Streaming Content Manager (SCM) Software • Database Setup and Administration 73

74Using Streaming Content Manager (SCM) Software • Database Setup and Administration
4. Enter the database settings into the fields in the SCM Database Installer window. You will need the following information to do this: l database server name or IP address l database user ID l database password l database name to use for the SCM installation
5. If desired, select (check) Use Windows Authentication to use Windows Authentication on the database entries. If this check box is not selected, SQL server authentication will be used.
6. Click Test Connection to test the database connection based on the information entered in step 5, or click Save Connection to save the information first and then test the connection.
7. If necessary, correct errors and click Save Connection, then click Test Connection. Repeat as needed until the database connection can be made successfully.

75Using Streaming Content Manager (SCM) Software • Database Setup and Administration
8. Once the settings have been tested successfully and saved, click Save and Install to begin database installation.
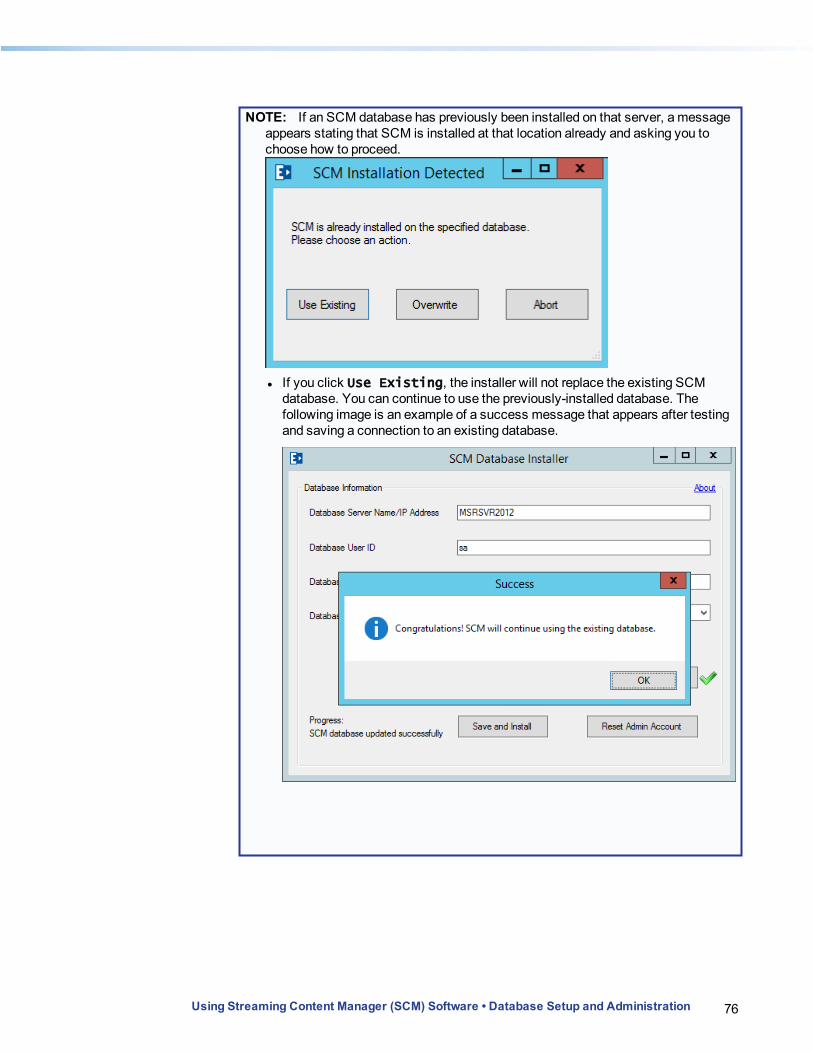
76Using Streaming Content Manager (SCM) Software • Database Setup and Administration
NOTE: If an SCM database has previously been installed on that server, a message appears stating that SCM is installed at that location already and asking you to choose how to proceed.
l If you click Use Existing, the installer will not replace the existing SCM database. You can continue to use the previously-installed database. The following image is an example of a success message that appears after testing and saving a connection to an existing database.
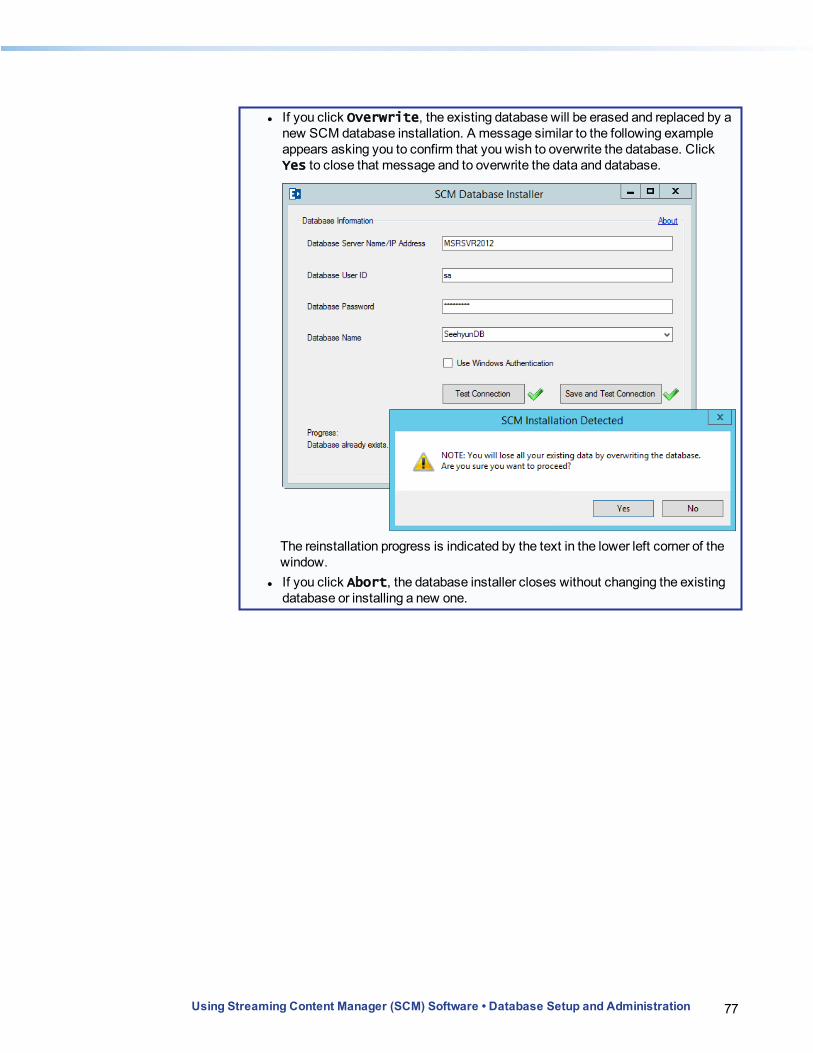
77Using Streaming Content Manager (SCM) Software • Database Setup and Administration
l If you click Overwrite, the existing database will be erased and replaced by a new SCM database installation. A message similar to the following example appears asking you to confirm that you wish to overwrite the database. Click Yes to close that message and to overwrite the data and database.
The reinstallation progress is indicated by the text in the lower left corner of the window.
l If you click Abort, the database installer closes without changing the existing database or installing a new one.
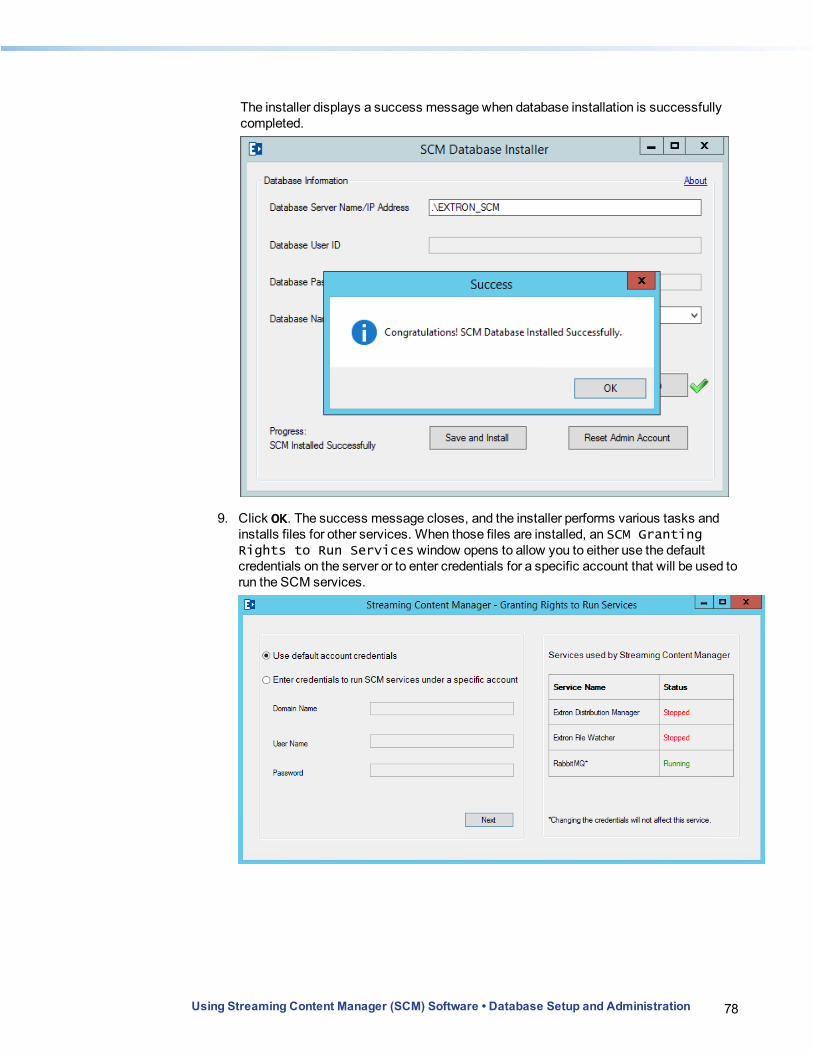
78Using Streaming Content Manager (SCM) Software • Database Setup and Administration
The installer displays a success message when database installation is successfully completed.
9. Click OK. The success message closes, and the installer performs various tasks and installs files for other services. When those files are installed, an SCM Granting Rights to Run Services window opens to allow you to either use the default credentials on the server or to enter credentials for a specific account that will be used to run the SCM services.
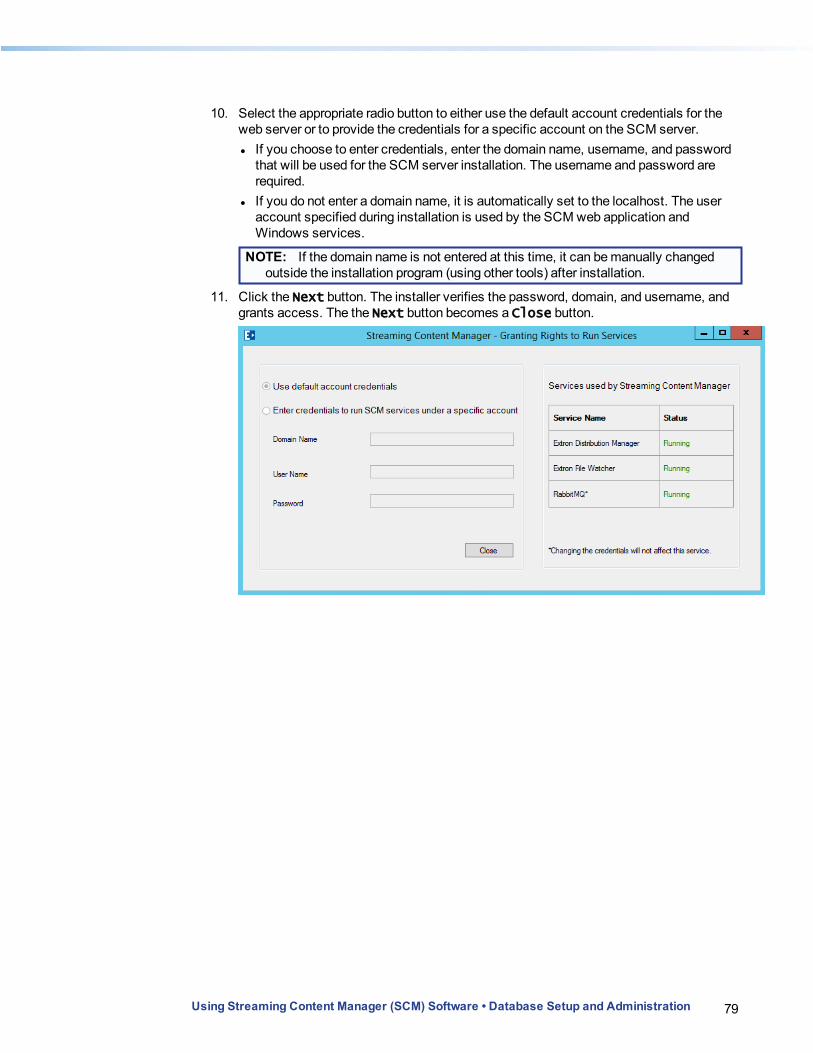
79Using Streaming Content Manager (SCM) Software • Database Setup and Administration
10. Select the appropriate radio button to either use the default account credentials for the web server or to provide the credentials for a specific account on the SCM server. l If you choose to enter credentials, enter the domain name, username, and password
that will be used for the SCM server installation. The username and password are required.
l If you do not enter a domain name, it is automatically set to the localhost. The user account specified during installation is used by the SCM web application and Windows services.
NOTE: If the domain name is not entered at this time, it can be manually changed outside the installation program (using other tools) after installation.
11. Click the Next button. The installer verifies the password, domain, and username, and grants access. The the Next button becomes a Close button.
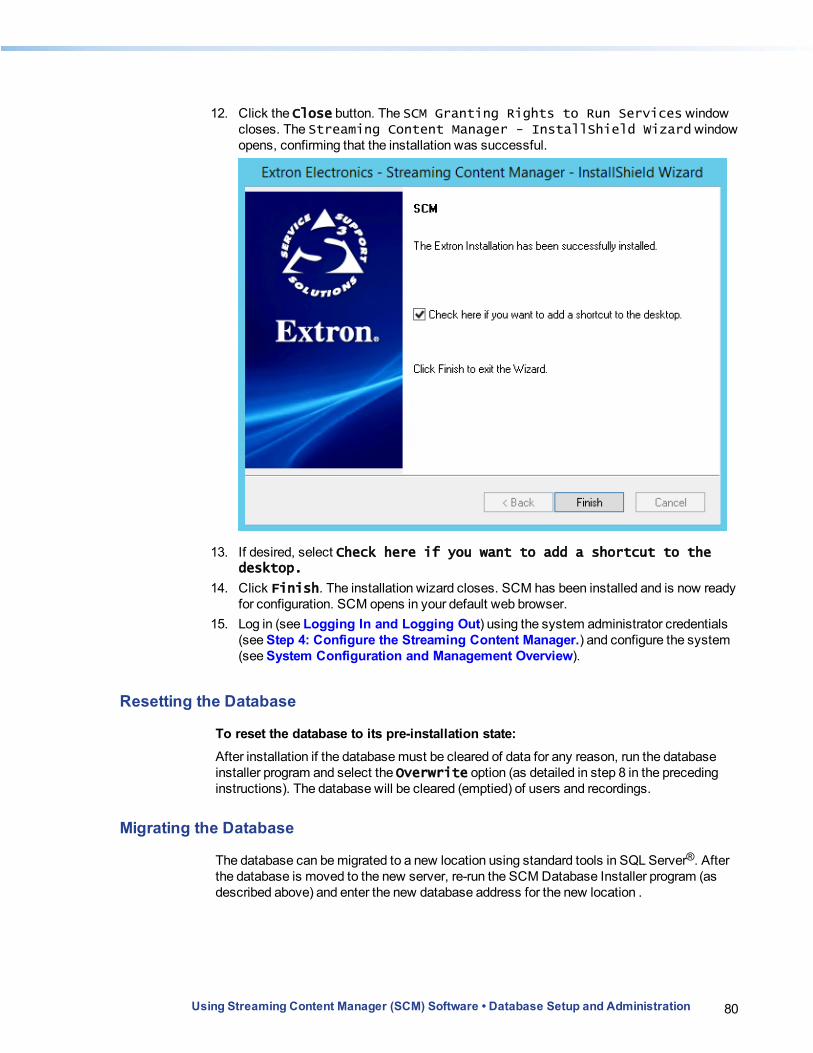
80Using Streaming Content Manager (SCM) Software • Database Setup and Administration
12. Click the Close button. The SCM Granting Rights to Run Services window closes. The Streaming Content Manager - InstallShield Wizard window opens, confirming that the installation was successful.
13. If desired, select Check here if you want to add a shortcut to the desktop.
14. Click Finish. The installation wizard closes. SCM has been installed and is now ready for configuration. SCM opens in your default web browser.
15. Log in (see Logging In and Logging Out) using the system administrator credentials (see Step 4: Configure the Streaming Content Manager.) and configure the system (see System Configuration and Management Overview).
Resetting the Database
To reset the database to its pre-installation state:After installation if the database must be cleared of data for any reason, run the database installer program and select the Overwrite option (as detailed in step 8 in the preceding instructions). The database will be cleared (emptied) of users and recordings.
Migrating the Database
The database can be migrated to a new location using standard tools in SQL Server®. After the database is moved to the new server, re-run the SCM Database Installer program (as described above) and enter the new database address for the new location .
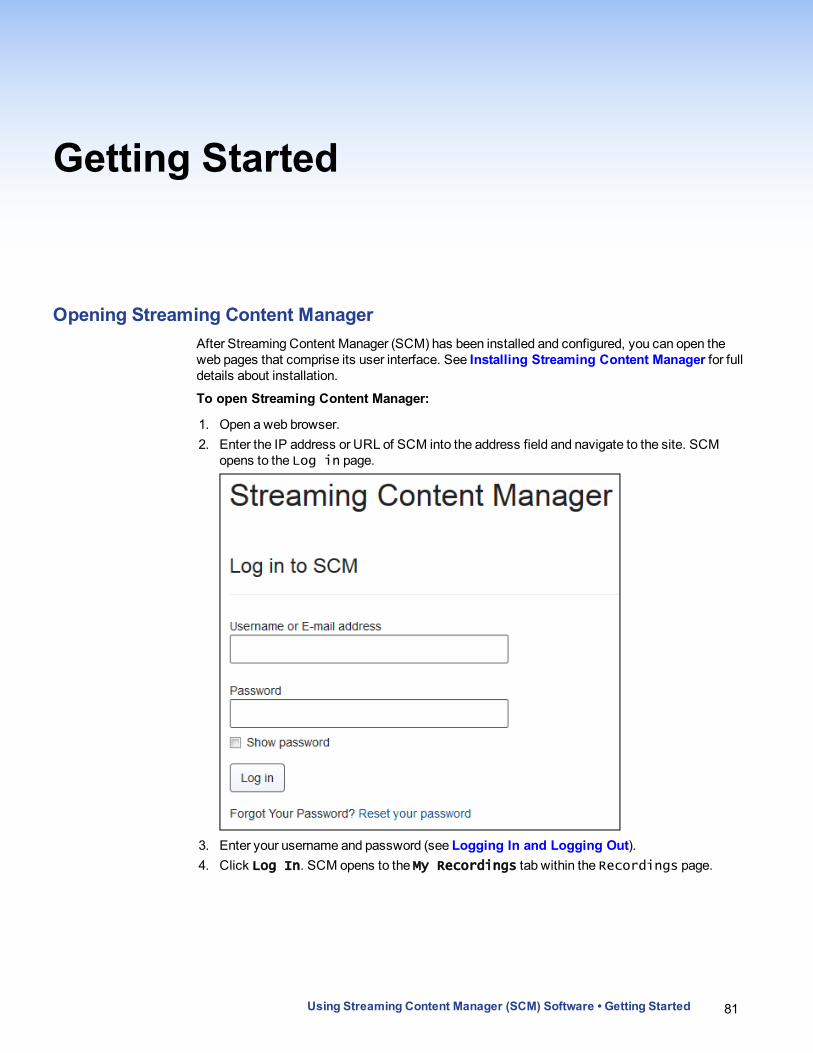
Getting Started
Opening Streaming Content ManagerAfter Streaming Content Manager (SCM) has been installed and configured, you can open the web pages that comprise its user interface. See Installing Streaming Content Manager for full details about installation.
To open Streaming Content Manager:
1. Open a web browser. 2. Enter the IP address or URL of SCM into the address field and navigate to the site. SCM
opens to the Log in page.
3. Enter your username and password (see Logging In and Logging Out). 4. Click Log In. SCM opens to the My Recordings tab within the Recordings page.
Using Streaming Content Manager (SCM) Software • Getting Started 81

82Using Streaming Content Manager (SCM) Software • Getting Started
Logging In and Logging OutIn order to use the Streaming Content Manager, unless you are an unregistered guest with permission to access public recordings, you must log in to SCM. Also, before you can change roles (from administrator to user or user to administrator) or change user accounts (from your personal account to the system administrator account, for example), you must log out of SCM.
To log in:
NOTES: l If you are a new user added to SCM with a local account, you will receive an e-mail
with a link to the Log in page and instructions to set or change your password. Passwords must be at least 10 characters in length and may not start with a space character.
l If you are a new user added to SCM from an Active Directory® (AD) system, will receive an e-mail with a link to the Log in page, but you cannot change your credentials (username and password) in SCM. Your credentials are maintained in the AD system. Contact an IT system administrator for information on changing credentials.
1. Open a web browser. 2. Enter the IP address or URL of the Streaming Content Manager into the address field and
navigate to the SCM page. The Log in page opens.
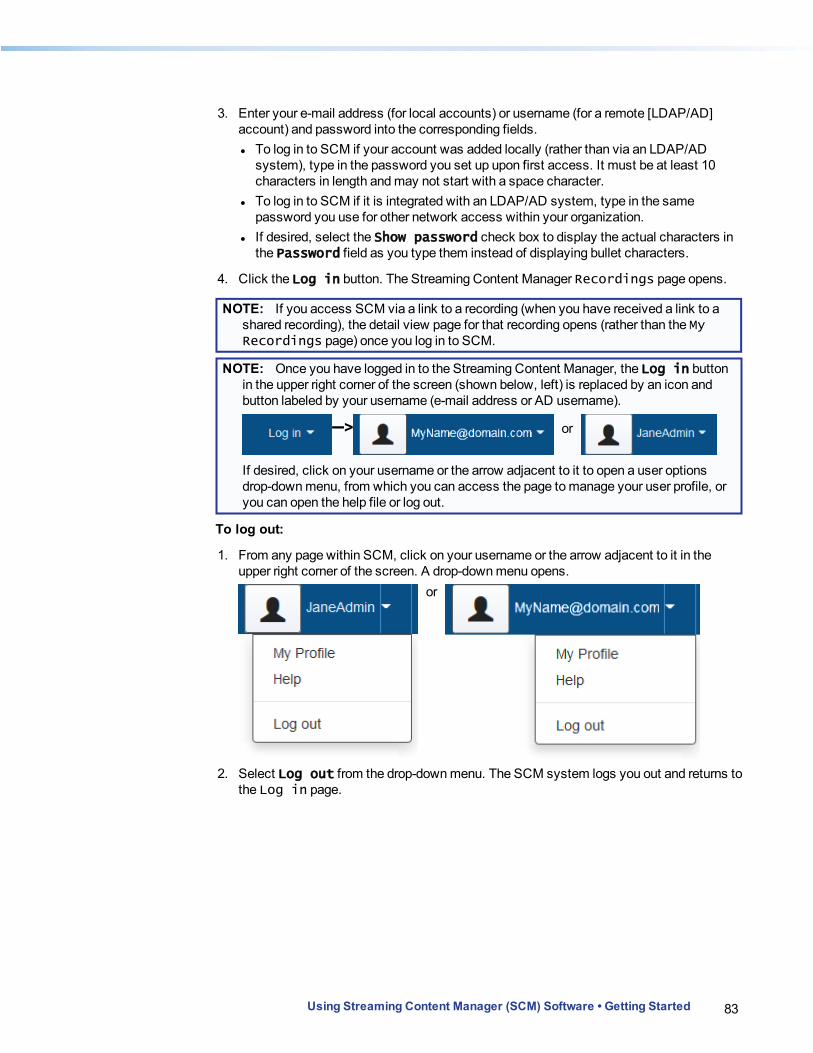
83Using Streaming Content Manager (SCM) Software • Getting Started
3. Enter your e-mail address (for local accounts) or username (for a remote [LDAP/AD] account) and password into the corresponding fields. l To log in to SCM if your account was added locally (rather than via an LDAP/AD
system), type in the password you set up upon first access. It must be at least 10 characters in length and may not start with a space character.
l To log in to SCM if it is integrated with an LDAP/AD system, type in the same password you use for other network access within your organization.
l If desired, select the Show password check box to display the actual characters in the Password field as you type them instead of displaying bullet characters.
4. Click the Log in button. The Streaming Content Manager Recordings page opens.
NOTE: If you access SCM via a link to a recording (when you have received a link to a shared recording), the detail view page for that recording opens (rather than the My Recordings page) once you log in to SCM.
NOTE: Once you have logged in to the Streaming Content Manager, the Log in button in the upper right corner of the screen (shown below, left) is replaced by an icon and button labeled by your username (e-mail address or AD username).
–> or
If desired, click on your username or the arrow adjacent to it to open a user options drop-down menu, from which you can access the page to manage your user profile, or you can open the help file or log out.
To log out:
1. From any page within SCM, click on your username or the arrow adjacent to it in the upper right corner of the screen. A drop-down menu opens.
or
2. Select Log out from the drop-down menu. The SCM system logs you out and returns to the Log in page.
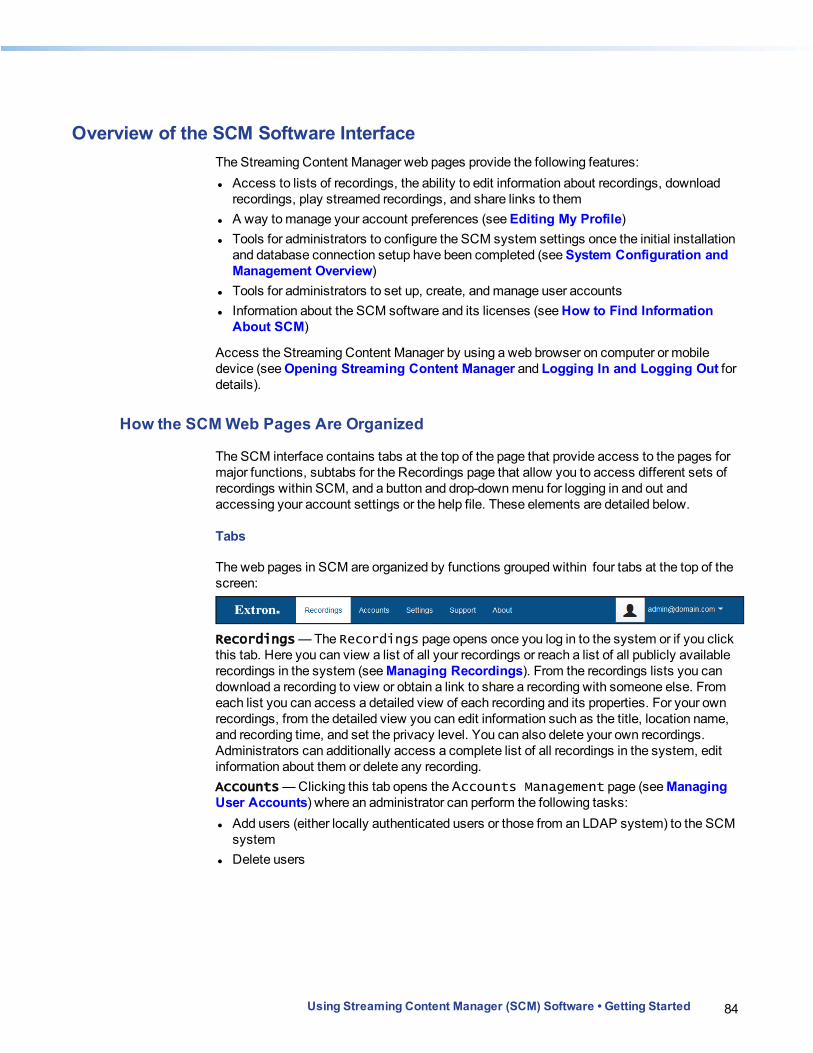
84Using Streaming Content Manager (SCM) Software • Getting Started
Overview of the SCM Software InterfaceThe Streaming Content Manager web pages provide the following features: l Access to lists of recordings, the ability to edit information about recordings, download
recordings, play streamed recordings, and share links to them l A way to manage your account preferences (see Editing My Profile) l Tools for administrators to configure the SCM system settings once the initial installation
and database connection setup have been completed (see System Configuration and Management Overview)
l Tools for administrators to set up, create, and manage user accounts l Information about the SCM software and its licenses (see How to Find Information
About SCM)
Access the Streaming Content Manager by using a web browser on computer or mobile device (see Opening Streaming Content Manager and Logging In and Logging Out for details).
How the SCM Web Pages Are Organized
The SCM interface contains tabs at the top of the page that provide access to the pages for major functions, subtabs for the Recordings page that allow you to access different sets of recordings within SCM, and a button and drop-down menu for logging in and out and accessing your account settings or the help file. These elements are detailed below.
Tabs
The web pages in SCM are organized by functions grouped within four tabs at the top of the screen:
Recordings — The Recordings page opens once you log in to the system or if you click this tab. Here you can view a list of all your recordings or reach a list of all publicly available recordings in the system (see Managing Recordings). From the recordings lists you can download a recording to view or obtain a link to share a recording with someone else. From each list you can access a detailed view of each recording and its properties. For your own recordings, from the detailed view you can edit information such as the title, location name, and recording time, and set the privacy level. You can also delete your own recordings. Administrators can additionally access a complete list of all recordings in the system, edit information about them or delete any recording.Accounts — Clicking this tab opens the Accounts Management page (see Managing User Accounts) where an administrator can perform the following tasks: l Add users (either locally authenticated users or those from an LDAP system) to the SCM
system l Delete users
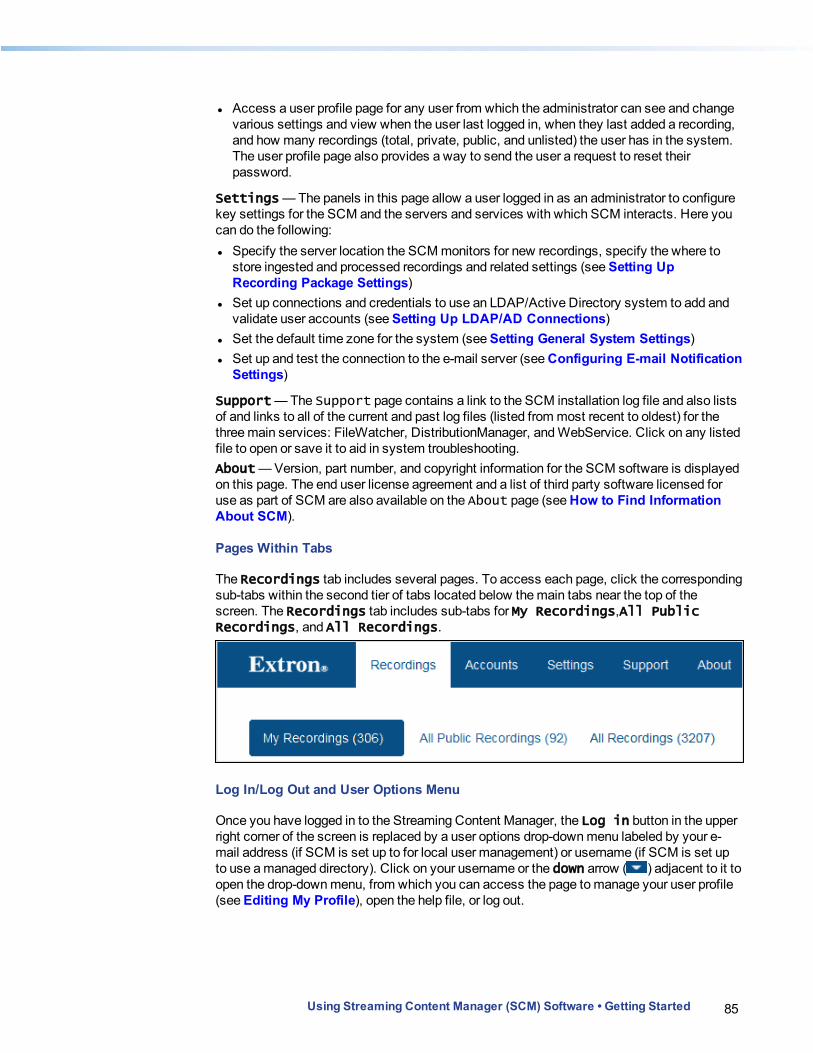
85Using Streaming Content Manager (SCM) Software • Getting Started
l Access a user profile page for any user from which the administrator can see and change various settings and view when the user last logged in, when they last added a recording, and how many recordings (total, private, public, and unlisted) the user has in the system. The user profile page also provides a way to send the user a request to reset their password.
Settings — The panels in this page allow a user logged in as an administrator to configure key settings for the SCM and the servers and services with which SCM interacts. Here you can do the following: l Specify the server location the SCM monitors for new recordings, specify the where to
store ingested and processed recordings and related settings (see Setting Up Recording Package Settings)
l Set up connections and credentials to use an LDAP/Active Directory system to add and validate user accounts (see Setting Up LDAP/AD Connections)
l Set the default time zone for the system (see Setting General System Settings) l Set up and test the connection to the e-mail server (see Configuring E-mail Notification
Settings)
Support — The Support page contains a link to the SCM installation log file and also lists of and links to all of the current and past log files (listed from most recent to oldest) for the three main services: FileWatcher, DistributionManager, and WebService. Click on any listed file to open or save it to aid in system troubleshooting.About — Version, part number, and copyright information for the SCM software is displayed on this page. The end user license agreement and a list of third party software licensed for use as part of SCM are also available on the About page (see How to Find Information About SCM).
Pages Within Tabs
The Recordings tab includes several pages. To access each page, click the corresponding sub-tabs within the second tier of tabs located below the main tabs near the top of the screen. The Recordings tab includes sub-tabs for My Recordings,All Public Recordings, and All Recordings.
Log In/Log Out and User Options Menu
Once you have logged in to the Streaming Content Manager, the Log in button in the upper right corner of the screen is replaced by a user options drop-down menu labeled by your e-mail address (if SCM is set up to for local user management) or username (if SCM is set up to use a managed directory). Click on your username or the down arrow ( ) adjacent to it to open the drop-down menu, from which you can access the page to manage your user profile (see Editing My Profile), open the help file, or log out.

86Using Streaming Content Manager (SCM) Software • Getting Started
—> or

System Configuration and Management Overview
System Configuration and Management OverviewOnce Streaming Content Manager is installed you must configure the following items related to system operation: l Recording package settings — These make it possible for SCM to locate, process, and
store recordings. l LDAP/AD connections — Setting these up allows for optional integration with a Microsoft®
Active Directory® (AD) system for user account setup and validation. l General system settings — These include setting the specific time zone and the Uniform
Resource Locator (URL) for the SCM system l E-mail notification and connection settings — These settings establish connection to a
Microsoft Exchange Web server and allow e-mail notification to be enabled. If those are set up and if SCM has a valid e-mail account, SCM can send e-mail notices to users.
After the SCM system has been up and running for some time, you may need to address maintenance or system expansion needs. Procedures are available within the following topics: l Changing Recording Storage Locations l Migrating the SCM Web Service to a New Server l Migrating the Database
Using Streaming Content Manager (SCM) Software • System Configuration and Management Overview 87

88Using Streaming Content Manager (SCM) Software • System Configuration and Management Overview
Setting Up Recording Package SettingsRecording package settings must be configured in order for Streaming Content Manager to locate, process, and store recordings. Administrators and the system administrator can configure these settings.
To configure recording package settings:
1. Log in to SCM as an administrator or system administrator. 2. Navigate to the Settings page by clicking the Settings tab at the top of the screen.
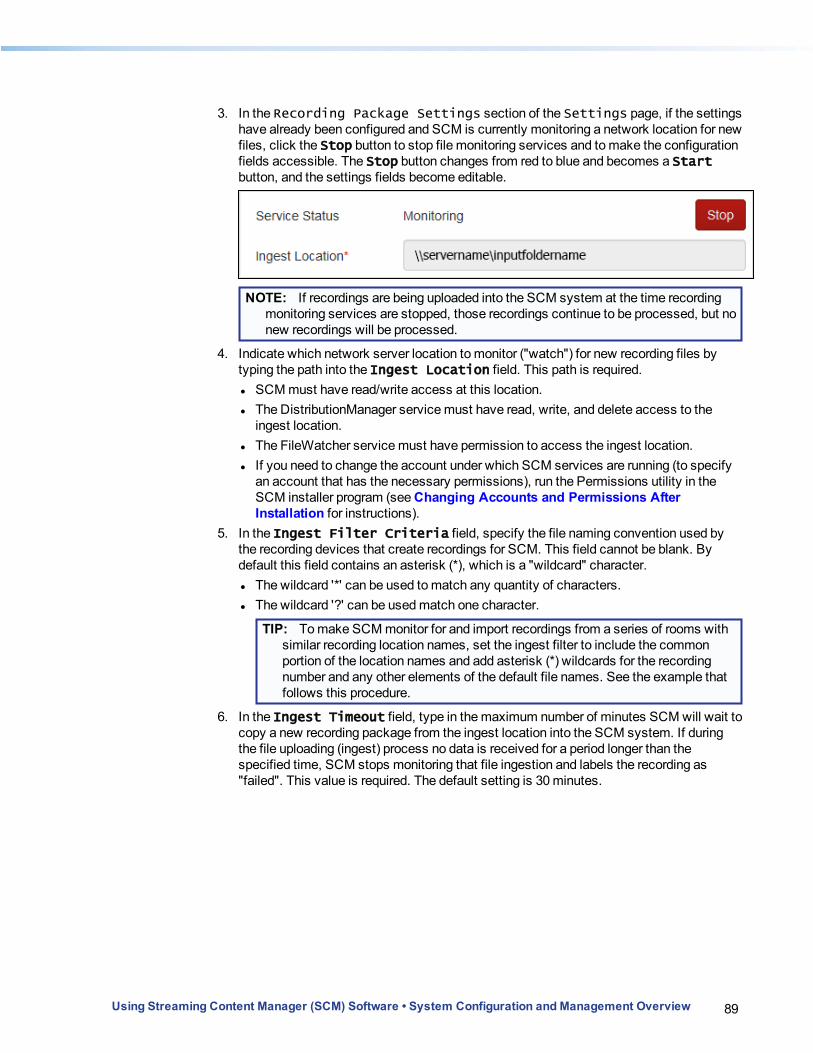
89Using Streaming Content Manager (SCM) Software • System Configuration and Management Overview
3. In the Recording Package Settings section of the Settings page, if the settings have already been configured and SCM is currently monitoring a network location for new files, click the Stop button to stop file monitoring services and to make the configuration fields accessible. The Stop button changes from red to blue and becomes a Start button, and the settings fields become editable.
NOTE: If recordings are being uploaded into the SCM system at the time recording monitoring services are stopped, those recordings continue to be processed, but no new recordings will be processed.
4. Indicate which network server location to monitor ("watch") for new recording files by typing the path into the Ingest Location field. This path is required. l SCM must have read/write access at this location. l The DistributionManager service must have read, write, and delete access to the
ingest location. l The FileWatcher service must have permission to access the ingest location. l If you need to change the account under which SCM services are running (to specify
an account that has the necessary permissions), run the Permissions utility in the SCM installer program (see Changing Accounts and Permissions After Installation for instructions).
5. In the Ingest Filter Criteria field, specify the file naming convention used by the recording devices that create recordings for SCM. This field cannot be blank. By default this field contains an asterisk (*), which is a "wildcard" character. l The wildcard '*' can be used to match any quantity of characters. l The wildcard '?' can be used match one character.
TIP: To make SCM monitor for and import recordings from a series of rooms with similar recording location names, set the ingest filter to include the common portion of the location names and add asterisk (*) wildcards for the recording number and any other elements of the default file names. See the example that follows this procedure.
6. In the Ingest Timeout field, type in the maximum number of minutes SCM will wait to copy a new recording package from the ingest location into the SCM system. If during the file uploading (ingest) process no data is received for a period longer than the specified time, SCM stops monitoring that file ingestion and labels the recording as "failed". This value is required. The default setting is 30 minutes.

90Using Streaming Content Manager (SCM) Software • System Configuration and Management Overview
7. Specify the path of the root server folder where SCM will store processed recording packages by typing the path into the Storage Location field. This is a required field. Recordings that have been uploaded from the monitored ingest location, processed, and packaged with the EMP player will be stored here within subfolders for each recording. l SCM must have read/write access to this path. l The Distribution Manager service must have read, write, and delete access to the
storage location. l If you need to change the account under which SCM services are running (to specify
an account that has the necessary permissions), run the Permissions utility in the SCM installer program (see Changing Accounts and Permissions After Installation for instructions).
8. To allow people who do not have an account within SCM to access the list of all public recordings and to see detailed views of unlisted recordings, check the Allow unauthenticated users to view Public/Unlisted recordings check box. If that option is selected, a user without an SCM account can view and download recordings that are set for the public privacy level. She or he can also view and download any recording set as "unlisted" if a user with an SCM account has shared a link to that recording with them.
9. Click the Apply button. SCM attempts to verify that the SCM services have the correct access permissions on the ingest and storage locations. SCM displays error messages if any permissions or server paths need to be corrected.
10. Make corrections to server location paths (see steps 4 and 7) or to permissions (see Server Account Permissions and SCM Installation), if needed, then click the Apply button.
11. When you are ready for SCM to start monitoring the ingest location for new recordings, click the Start button.
Example: Setting Default Recording Names and Ingest Filter CriteriaIn this example, the installation includes both meeting rooms and classrooms, but SCM will be used to manage recordings from classrooms only.
1. At each recording device set the unit or system location name MeetingRoomN or ClassroomN, as appropriate.
2. At each recording device set the default location name as part of the default file names. In an Extron SMP 351 the default file name setting may be similar to Event Course Name_System Location_UTC Time_Stream#Recording, as shown here:
3. In SCM navigate to the Settings page. 4. In SCM in the Recording Package Settings section, if the settings have already
been configured and SCM is currently monitoring a network location for new files, click the Stop button to stop file monitoring services and to make the configuration fields accessible.
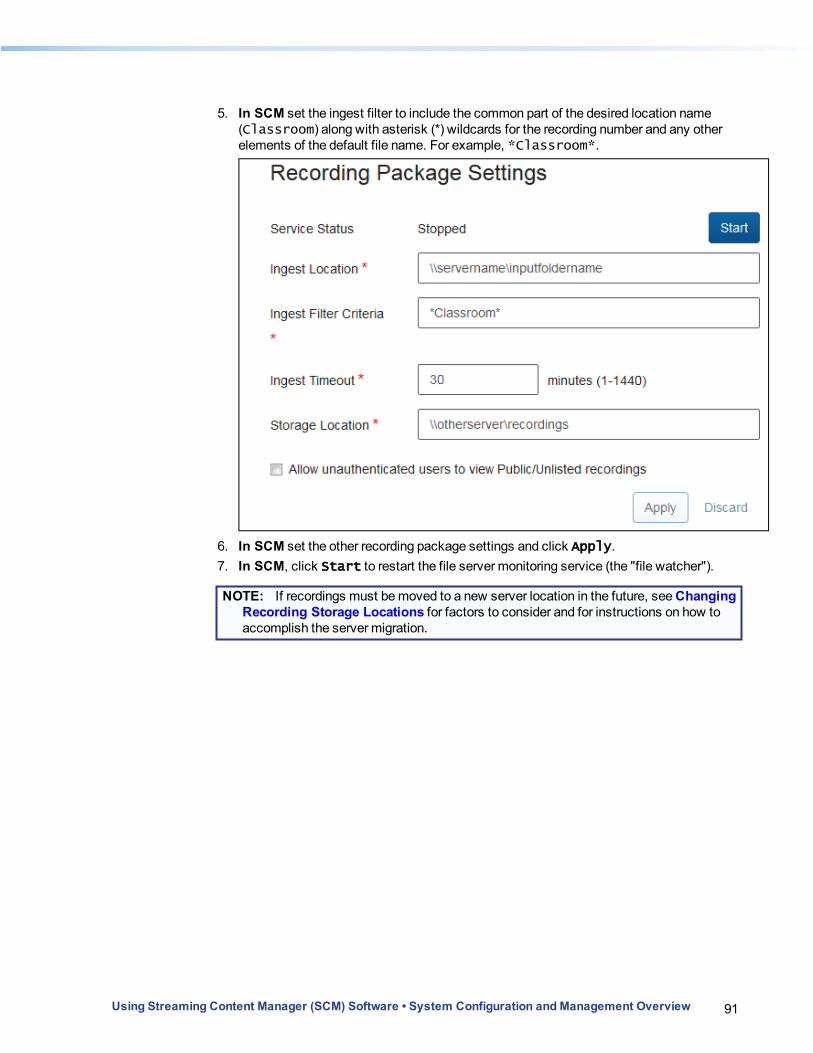
91Using Streaming Content Manager (SCM) Software • System Configuration and Management Overview
5. In SCM set the ingest filter to include the common part of the desired location name (Classroom) along with asterisk (*) wildcards for the recording number and any other elements of the default file name. For example, *Classroom*.
6. In SCM set the other recording package settings and click Apply. 7. In SCM, click Start to restart the file server monitoring service (the "file watcher").
NOTE: If recordings must be moved to a new server location in the future, see Changing Recording Storage Locations for factors to consider and for instructions on how to accomplish the server migration.
92Using Streaming Content Manager (SCM) Software • System Configuration and Management Overview
Setting Up LDAP/AD ConnectionsUsers can be imported from and then validated/authenticated by a managed directory rather than solely within SCM. SCM supports Lightweight Directory Access Protocol (LDAP) and can be integrated with Microsoft® Active Directory® (AD) systems, if configured to do so. Once SCM is installed, an administrator or system administrator can configure an AD connection and enable or disable connection to it from within the Settings page of SCM.If an Active Directory connection is configured and enabled within SCM, usernames and passwords are easily imported from the AD system into SCM. When users drawn from an AD system log in to SCM, their credentials are validated by the AD system, maintaining consistency with other applications used within the same organization. User accounts drawn from an AD system are validated with the AD system: l When a query is sent to the AD system when users are being added to SCM. l When a user logs into SCM.
This on-demand validation allows for a lower network and AD system traffic.
To configure LDAP/AD:
1. Log in to SCM as an administrator or system administrator. 2. Navigate to the Settings page by clicking the Settings tab.

93Using Streaming Content Manager (SCM) Software • System Configuration and Management Overview
3. Scroll down to the LDAP/AD Settings section, which is divided into two parts: Server Settings and User Schema Settings.
The read-only Service Type field indicates ActiveDirectory. The label in the read-only Connection Name field at the top of the section displays the alias name for the connection.
NOTE: The connection name is displayed in user profiles in the read-only Created From field. It is used to indicate the managed directory source for the user account.
4. To use Secure Socket Layer (SSL) protocol, select (check) the Use SSL check box. This option allows encrypted communication between client and server for greater security during user authentication. Contact your IT department to install an SSL certificate.
NOTE: If SSL is selected, the default port number in the Port field changes from 389 (or any custom number) to 636 and the connection uses LDAPS rather than LDAP. Also, if SSL is selected and is then deselected, the port number changes to 389, even if a custom port number were previously entered.
94Using Streaming Content Manager (SCM) Software • System Configuration and Management Overview
5. Type the AD system host name in the Hostname field. Either a host name or an IP address is acceptable in this field. The host name is required for configuration.
6. Type the base domain name into the Base DN field. This should be in the form of DN=xxxxxxx,OU=yyyyyyy.
7. If your directory system uses a port number for its connection that is different from the standard ports used for LDAP (389) or LDAPS (636), type the number into the Port field. The port number is required.
8. If desired, enter the username that SCM will use to access the directory system into the Username field.
9. If desired, enter the corresponding password for accessing the directory system into the Password field. SCM displays dots or asterisks in this field rather than the actual characters that you type.
NOTE: If the username is edited or changed, the Password field is cleared, and you will need to enter the appropriate password.
10. Type the query timeout period (in seconds) into the Query Timeout field. The timeout period is the maximum amount of time to wait when performing search queries to find users in the AD database. The query timeout period is a required setting, and it is five seconds by default.
11. Select how many user entries to return per search query by typing a number into the Results Per Search field. This will be the default quantity of user records shown in search results on the Accounts page when you add users from an AD system. This value is a required setting.

95Using Streaming Content Manager (SCM) Software • System Configuration and Management Overview
12. If desired, customize the user schema settings. The schema settings specify the fields in Active Directory from which SCM user fields will be imported.Most installations can use the default strings shown below. If your system uses custom values rather than standard defaults, type the appropriate strings into the corresponding fields.
13. If the server and user schema settings are correct, click Apply to save the settings. Otherwise you can click Discard to clear the changes you made.
14. To allow SCM to use the LDAP/AD connection, select the Enable this Connection check box at the top of the LDAP/AD Settings section and click Apply again. l When the connection is enabled, user accounts can be added to SCM from an AD
system or created locally, and users who have been added from the AD system can log in and access SCM.
l When the connection is not enabled, user accounts cannot be added from an AD system and users who have been added from an AD system cannot log in to SCM.

96Using Streaming Content Manager (SCM) Software • System Configuration and Management Overview
Setting General System SettingsIn the General Settings section of the Settings page, Streaming Content Manager can be configured to use a specific time zone, and the Uniform Resource Locator (URL) can be specified for the SCM system. This is the URL to which users will be directed in order to access the system.
Setting the Time Zone
To set the time zone for the SCM system:
1. Log in to SCM as an administrator or system administrator. 2. Navigate to the Settings page by clicking the Settings tab at the top of the screen. 3. Scroll down to the General Settings section.
4. Select the desired time zone for SCM to use from the Default Time Zone drop-down list. By default the SCM system uses time zone of the server on which it is installed. The time zone is a required setting.
5. Click the Apply button to save the time zone selection, or click Discard to continue using the default server time zone or whichever zone was previously selected.
Setting the System URL
The application URL for the SCM system is required for generating and sending e-mails that contain links to recordings pages within the SCM system. In most cases, the application URL is the base URL used to access SCM.
To define the URL for the SCM system:
1. Log in to SCM as an administrator or system administrator. 2. Navigate to the Settings page by clicking the Settings tab at the top of the screen.
97Using Streaming Content Manager (SCM) Software • System Configuration and Management Overview
3. Either: l Click Detect. SCM uses the base URL of the current page within SCM and
populates the Application URL field with this value.or
l Type the desired URL into the Application URL field. This is useful when SCM users will access the system through a different URL than is used for the current page.
4. Click the Apply button to save the URL setting, or click Discard to clear the URL from the field.
NOTE: The default URL is https://<IP address>/SCM.
98Using Streaming Content Manager (SCM) Software • System Configuration and Management Overview
Configuring E-mail Notification SettingsIf an e-mail connection is configured, the Streaming Content Manager has a valid e-mail account, and if e-mail notification is enabled, SCM can send e-mail notices to users. SCM sends e-mails to do the following things: l Notify a user that an account has been set up for them in SCM and provide the SCM
system URL so they can access the Log in page l Notify a local user to set or reset a password l Notify any user when one of their recordings has been added to the SCM system
SCM supports Microsoft® Exchange for e-mail. SCM must be configured to communicate with the Exchange server using Microsoft Exchange Web Services.
Configuring and Enabling E-mail Notification
To configure the e-mail server connection the SCM system and enable it:
1. Log in to SCM as an administrator or system administrator. 2. Navigate to the Settings page by clicking the Settings tab at the top of the screen. 3. Scroll down to the Notification Settings section.
4. Type the path for the Exchange Web Services service into the E-mail Server field. In most cases this address is in the form https://<server>.<domain>.com/ews/exchange.asmx. If you do not know the full path of the EWS server, contact your IT administrator for details.
5. Type the username of the account that SCM will use to access the e-mail system into the Username field. The account must have a valid mailbox in Exchange.
6. Type the password for the e-mail account that SCM will use into the Password field. The account must have a valid mailbox in Exchange.
99Using Streaming Content Manager (SCM) Software • System Configuration and Management Overview
7. Test the server settings entered in the previous steps by doing the following: a. Click Send Test E-mail. A dialog box pops up.
a. Type the e-mail address of someone to whom to send a test e-mail into the Enter Test E-mail Address field.
b. Click Send. The dialog box closes. SCM then uses the server path, username, and password entered in steps 4 through 6 to attempt to send an e-mail to the recipient specified in step 7b. If the server credentials are incorrect, an error message may be displayed near the Send Test E-mail button.
c. Contact the test e-mail recipient to determine whether they received the e-mail successfully.
8. If the test e-mail recipient received the sample e-mail, proceed to step 9. If not, enter correct information for the server path, username, or password and retry the test before proceeding.
9. Select (check) the Enable E-mail Notification check box. 10. Click the Apply button to save the e-mail settings, or click Discard to clear the fields
or, if applicable, to continue using a previously configured connection.
Disabling E-mail Notification
If the e-mail server requires maintenance or if SCM system e-mail notifications need to be stopped for any reason, the e-mail notification service can be disabled.
100Using Streaming Content Manager (SCM) Software • System Configuration and Management Overview
To disable e-mail notification from the SCM system:
1. Log in to SCM as an administrator or system administrator. 2. Navigate to the Settings page by clicking the Settings tab at the top of the screen. 3. Scroll down to the Notification Settings section. 4. Deselect (uncheck) the Enable E-mail Notification check box. 5. Click the Apply button to save the settings.
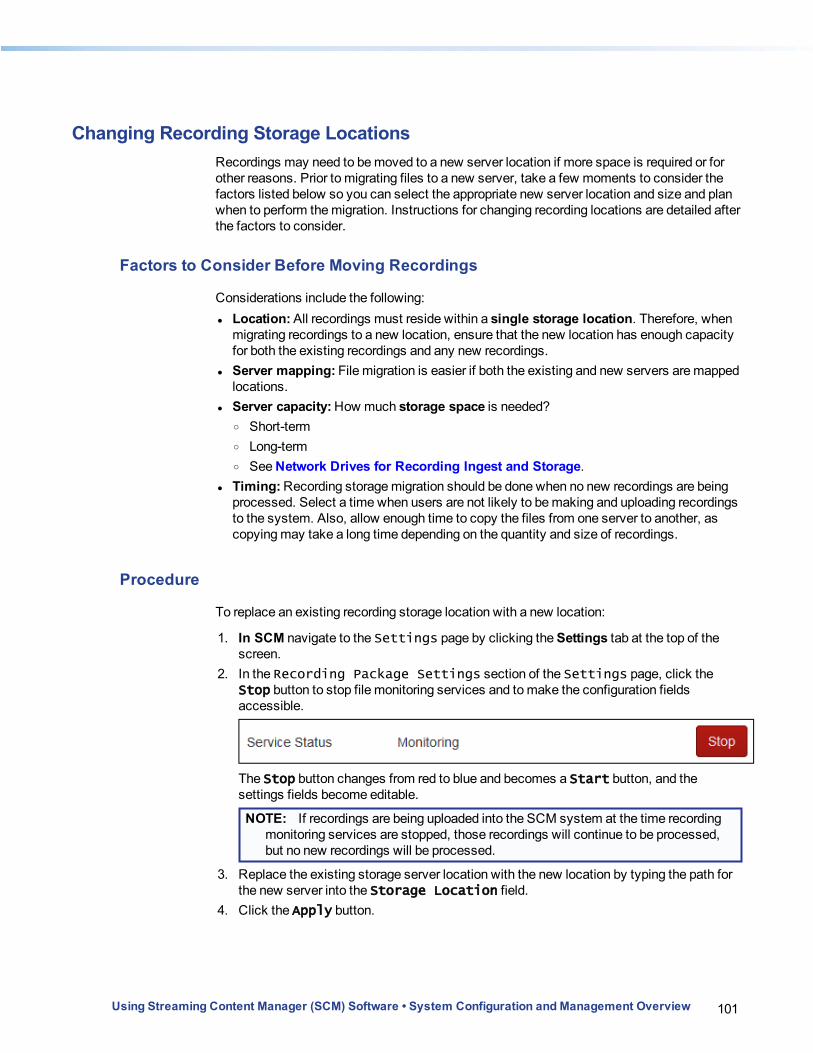
101Using Streaming Content Manager (SCM) Software • System Configuration and Management Overview
Changing Recording Storage LocationsRecordings may need to be moved to a new server location if more space is required or for other reasons. Prior to migrating files to a new server, take a few moments to consider the factors listed below so you can select the appropriate new server location and size and plan when to perform the migration. Instructions for changing recording locations are detailed after the factors to consider.
Factors to Consider Before Moving Recordings
Considerations include the following: l Location: All recordings must reside within a single storage location. Therefore, when
migrating recordings to a new location, ensure that the new location has enough capacity for both the existing recordings and any new recordings.
l Server mapping: File migration is easier if both the existing and new servers are mapped locations.
l Server capacity: How much storage space is needed? o Short-term o Long-term o See Network Drives for Recording Ingest and Storage.
l Timing: Recording storage migration should be done when no new recordings are being processed. Select a time when users are not likely to be making and uploading recordings to the system. Also, allow enough time to copy the files from one server to another, as copying may take a long time depending on the quantity and size of recordings.
Procedure
To replace an existing recording storage location with a new location:
1. In SCM navigate to the Settings page by clicking the Settings tab at the top of the screen.
2. In the Recording Package Settings section of the Settings page, click the Stop button to stop file monitoring services and to make the configuration fields accessible.
The Stop button changes from red to blue and becomes a Start button, and the settings fields become editable.
NOTE: If recordings are being uploaded into the SCM system at the time recording monitoring services are stopped, those recordings will continue to be processed, but no new recordings will be processed.
3. Replace the existing storage server location with the new location by typing the path for the new server into the Storage Location field.
4. Click the Apply button.
102Using Streaming Content Manager (SCM) Software • System Configuration and Management Overview
5. In Windows Explorer or another file management utility, copy the contents of the existing storage location to the new storage location.
NOTE: Recording packages are very large files. It may take a long time to copy them from the old location to the new one depending on the number and length of recordings within SCM.
6. When copying is complete, in SCM in the Recording Package Settings section of the Settings page, click the Start button to restart the file monitoring service.
7. In SCM click the Recordings tab at the top of the screen to open the Recordings page.
8. Verify that recordings appear in the recordings list and verify that you can download recordings and navigate to recording detail view pages.

103Using Streaming Content Manager (SCM) Software • System Configuration and Management Overview
Migrating the SCM Web Service to a New ServerWhen the need arises, the Streaming Content Manager web service can be moved to a new server.
To migrate the web service to a new server:
1. Run the SCM Installer program on (from) the new server location. Follow the instructions in Installing Streaming Content Manager and be sure to specify the path to the existing database.
2. Open SCM from the new location. 3. On the SCM Settings page in the Recording Package Settings section, update
the ingest location and storage location, especially if the locations are set to folders on the local system.
4. On the Settings page, enter the necessary passwords in the LDAP/AD Settings section and in the Notification Settings section. These values need to be set each time you install SCM on a new server because the values are encrypted by the web service prior to being saved in the database, and that encryption is specific to the host machine. The values do not need to be changed, they simply need to be re-entered and then the changes applied.
5. On the Settings page in the General Settings section, you may need to update the application URL. This update is required only if the URL used to access the SCM page has changed.
104Using Streaming Content Manager (SCM) Software • System Configuration and Management Overview
Logging
About the System Logs
SCM uses system logs to aid in troubleshooting, debugging, and auditing the system. By default, SCM is configured to log only error, audit, and informational messages. If desired, an administrator can enable additional debugging messages to provide more information about SCM operations.SCM generates three log files, located within the installation path of the web service (typically C:\inetpub\wwwroot\SCM\Log). Each file stores log messages pertaining to one of the SCM core services. l WebService_Log.txt — Contains log messages from the web service, which serves
the web page. l FileWatcher_Log.txt — Contains log messages from the file watcher Windows
service, which monitors the ingest location and generates a notification when new recordings have been created.
l DistributionManager_Log.txt — Contains log messages from the distribution manager Windows service, which ingests and packages the recording and copies them to the storage location.
l Installation_Log.txt — Contains log messages from the database installer tool, which is the part of the SCM installation package. The tool is used to establish and test the connection to a database server and to install the SCM database.
The most recent version of each log file is named as specified above. Older log files are named with a date extension, such as WebService_Log.txt.2015-06-18. If the log file for a particular day reaches a certain size limit, additional log files are automatically created and named with a sequential number appended to the basic file name (such as WebService_Log.txt.2015-06-18.1 and WebService_Log.txt.2015-06-18.2).
Viewing Log Files
To view the log files from a web browser:
1. While logged in to SCM as an administrator or system administrator, click the Support tab. The Support page opens, displaying lists of the available log files:

105Using Streaming Content Manager (SCM) Software • System Configuration and Management Overview
2. Click on the name of any listed log file to select and download it. Follow any on-screen prompts.
3. Open the file with any text editor program.
To view the log files on the local drive of the SCM web server using a file explorer program:Navigate to C:\inetpub\wwwroot\SCM\Log. There you can select and open the appropriate log file.
Modifying Logging Levels
Instructions for modifying the logging levels for each of these services are as detailed below.
To modify logging levels for the web service (WebService_Log.txt):
1. Stop the application pool for the web service in IIS. 2. Edit the configuration file C:\inetpub\wwwroot\SCM\Web.config, according to
the instructions below. 3. Restart the application pool for the web service.
To modify logging levels for the file watcher Windows service (FileWatcher_Log.txt):
1. Stop the Windows service from the Services application of your server. The service is named "Extron File Watcher.”
2. Edit the configuration file C:\inetpub\wwwroot\SCM\WindowsServices\FileWatcher\Extron.MR.FileWatcherWindowsService.exe.config, according to the instructions below.
3. Restart the Windows service.
106Using Streaming Content Manager (SCM) Software • System Configuration and Management Overview
To modify logging levels for the distribution manager Windows service (DistributionManager_Log.txt):
1. Stop the Windows service from the Services application of your server. The service is named “Extron Distribution Manager.”
2. Edit the configuration file C:\inetpub\wwwroot\SCM\WindowsServices\DistributionManager\Extron.MR.DistributionManagerWindowsService.exe.config, according to the instructions below.
3. Restart the Windows service.
Modifying the Configuration File
The configuration file for each service may be modified in order to change the amount of logging information that is generated in the corresponding log file for each service. Each configuration file contains the following section:
<log4net debug="true">
<!--
Set the logging level.
NOTE: Other configuration options such as the path to the log file are specified in code.
-->
<root>
<level value="INFO" />
</root>
</log4net>
1. Set the “level value” parameter to your desired level (within <level value="______" />). Valid values are: l FATAL
l ERROR
l AUDIT
l INFO
l DEBUG
l ALL
Note that when a level is selected, all logging statements at that level or above are generated. For example, if the level is set to FATAL then only fatal messages are logged. If the value is set to ERROR then both error and fatal messages are logged. If the level is set to ALL, then everything is logged.By default, SCM is installed with the level set to INFO for all services. To enable additional logging statements for the purpose of debugging the system, it is recommended to set the level to DEBUG.
107Using Streaming Content Manager (SCM) Software • System Configuration and Management Overview
NOTES: l Setting the logging level to DEBUG dramaticdally increases the amount of data
logging. Only change to this level of logging if you are working with Extron support staff to resolve an issue.
l Setting the level to ALL results in the identical behavior as setting it to DEBUG.
2. Save the configuration file. 3. Restart the affected service.
Managing User Accounts
Managing User AccountsWithin Streaming Content Manager administrators and the system administrator define the user accounts and the roles of users. After an AD connection is set up (see Setting Up LDAP/AD Connections), users can be added and access to SCM can be managed using standard network directory services ( Microsoft Active Directory® (AD) ), or users and passwords can be locally defined within SCM.Once user accounts are established, SCM (for local accounts), or an AD system via SCM (for accounts drawn externally from an AD system), authenticates users and provides them access to download or share their recording packages.Administrators and the system administrator can access summary data about users such as the date and time of last login, the date and time of the last uploaded recording, and the total number of recordings made by that user, broken out by privacy status (private, public, and unlisted). They can also manage and update user profiles.Recordings that cannot be authenticated by SCM are saved to a local guest account that is controlled by the SCM administrators.There are several aspects to managing user accounts in Streaming Content Manager.
Understanding User Account Roles and Types
To understand the different user roles (system administrator, administrator, user, guest) within SCM, what they can do, and who can change them, see User Roles.To compare characteristics of user account types based on origin (local or AD), see Comparing User Types Based on Origin (Local or AD Accounts).
Creating and Managing Accounts
Adding, viewing, editing, and deleting user accounts
l To add users, see Adding Users. l To view a list of user accounts,see Viewing, Locating, and Accessing User Accounts. l To delete a user, see Deleting a User Account.
Using Streaming Content Manager (SCM) Software • Managing User Accounts 108

109Using Streaming Content Manager (SCM) Software • Managing User Accounts
l To edit and update a user profile (name, e-mail, role, local time zone, and other settings), see one of the following topics: o Editing My Profile o Editing a User Profile o Editing the System Administrator Profile
l To have a local user change their password, go to their User Profile page, click the Reset Password button, and send a link to the user (see Editing a User Profile).
Best Practices Recommendations
Determining what to do with an existing user's recordings before replacing or deleting their account
If a user account must be changed from a local SCM account to one drawn from an Active Directory system or vice versa), the existing account must be deleted before the AD (or local) version of the account can be established. Also, accounts of any origin may need to be deleted when a user leaves the organization.If a user account is deleted, all the recordings "owned" by that account are also deleted. If any recordings should be saved for later use (transferred to a replacement account for the user, archived, or made available to other users in the organization), you must do one of the following before deleting the account: l Reassign them to another user account. l Download them one at a time from within the SCM interface and save them to another
location. l Manually copy the recording files outside SCM (at the server level).
110Using Streaming Content Manager (SCM) Software • Managing User Accounts
Adding UsersAdministrators and the system administrator define user accounts and the roles of users. Once an Microsoft Active Directory® (AD) connection is set up (see Setting Up LDAP/AD Connections), users can be added and access to Streaming Content Manager can be managed using standard network directory services (AD ), or users and passwords can be locally defined within SCM. Generally, if a company or organization has an existing AD system in place, it is preferable to add users from AD. With an LDAP/AD system, usernames, e-mail addresses, and permissions already reside in a database and can be quickly added to SCM and because it allows consistent login and user management consistency across many applications. l When a user is added to SCM, their account origin (local or LDAP/AD) is saved in their
record. l If a user account has been added to SCM already, that user cannot be added again even if
the origin (LDAP/AD or local entry) is different. For example, if a user was added locally, the same user (or any user with the same e-mail address) cannot be added from an LDAP/AD system. The existing account is retained. To change the account from local to AD or vice versa, the existing account must be deleted* and then the replacement account must be added.
NOTE: *If the user has recordings stored in SCM that must be saved, an administrator or system administrator must first temporarily reassign any recordings from that user to another account or ask the user to download the recording packages before their original account is deleted. Recordings associated with an account are deleted when the account is deleted.
l An e-mail address is required for all accounts in the system except the system administrator (which can add an e-mail address, if desired) and the guest account (which can never have an e-mail address).
The following procedures describe how to add users to the SCM system.
Adding a User Locally (Creating a Local SCM User Account)
Users can be added to SCM as local accounts that are created and validated entirely within SCM only.

111Using Streaming Content Manager (SCM) Software • Managing User Accounts
To add a local user account:
1. Once logged in to SCM as an administrator or system administrator, click on the Accounts tab at the top of the window. The Accounts page opens.
2. Click on the Create Account button in the upper portion of the screen. The account creation panel opens. If an LDAP/AD connection is active, it opens with the Add from LDAP button selected. Otherwise it opens with the Add Locally button selected. If needed, click the Add Locally button.
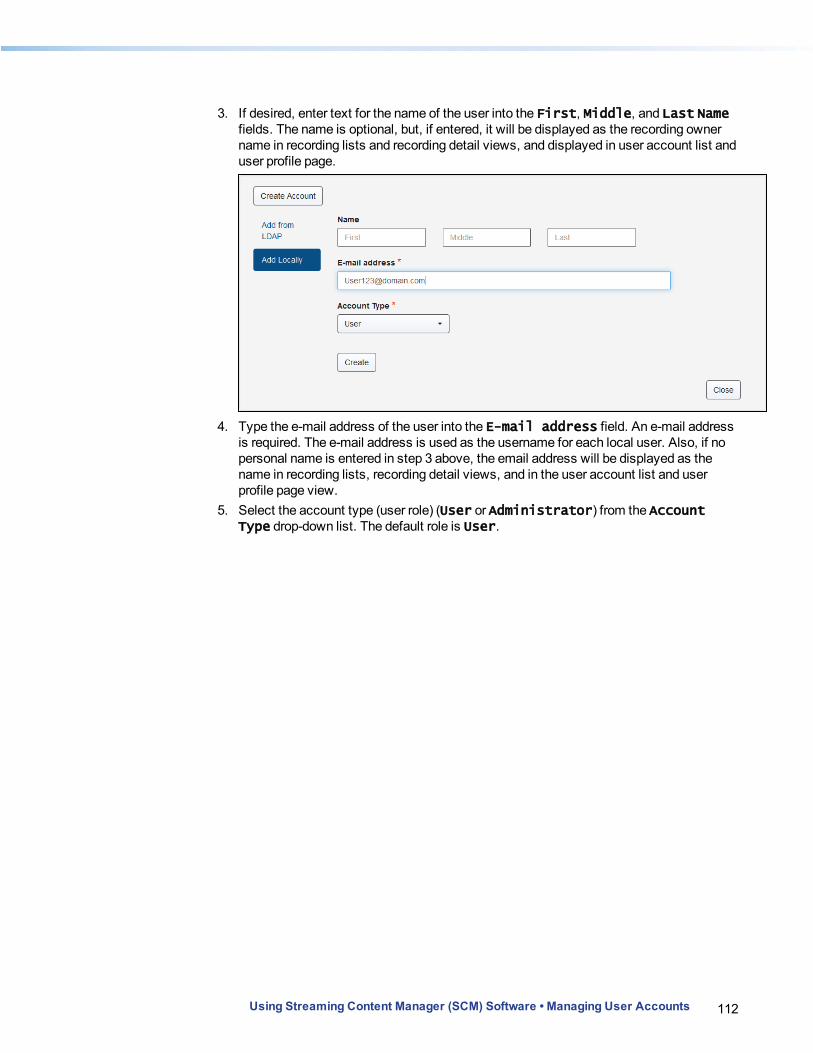
112Using Streaming Content Manager (SCM) Software • Managing User Accounts
3. If desired, enter text for the name of the user into the First, Middle, and Last Name fields. The name is optional, but, if entered, it will be displayed as the recording owner name in recording lists and recording detail views, and displayed in user account list and user profile page.
4. Type the e-mail address of the user into the E-mail address field. An e-mail address is required. The e-mail address is used as the username for each local user. Also, if no personal name is entered in step 3 above, the email address will be displayed as the name in recording lists, recording detail views, and in the user account list and user profile page view.
5. Select the account type (user role) (User or Administrator) from the Account Type drop-down list. The default role is User.
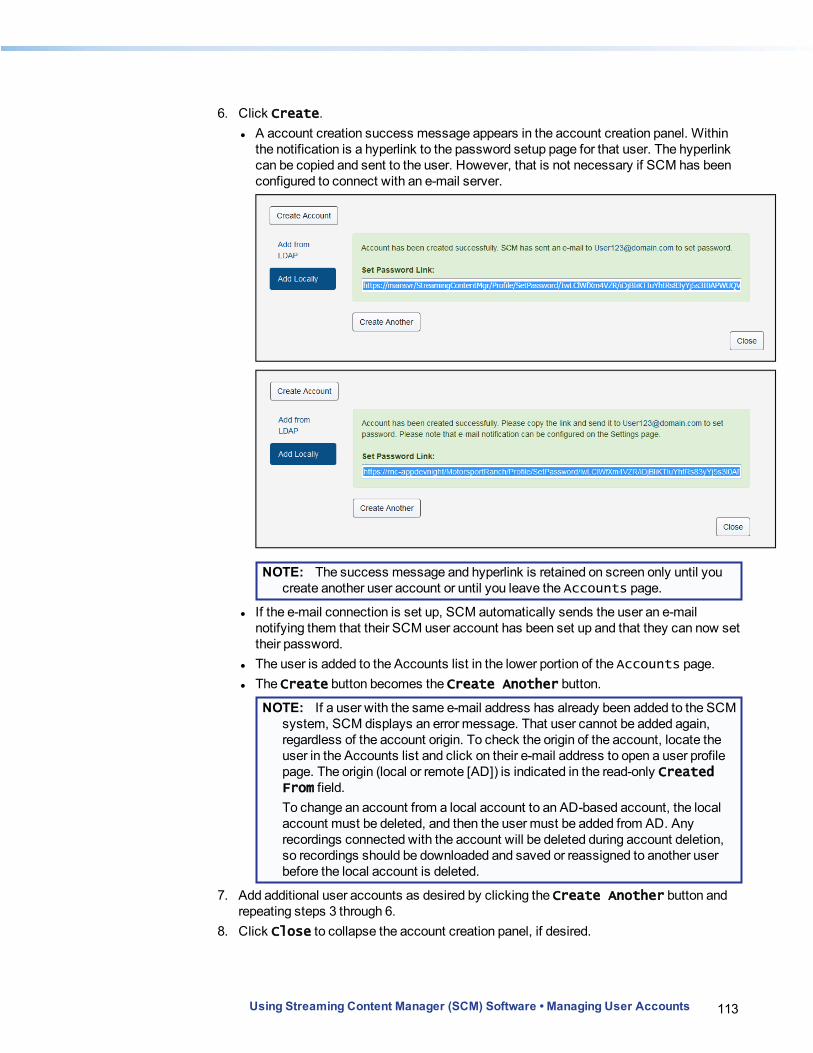
113Using Streaming Content Manager (SCM) Software • Managing User Accounts
6. Click Create. l A account creation success message appears in the account creation panel. Within
the notification is a hyperlink to the password setup page for that user. The hyperlink can be copied and sent to the user. However, that is not necessary if SCM has been configured to connect with an e-mail server.
NOTE: The success message and hyperlink is retained on screen only until you create another user account or until you leave the Accounts page.
l If the e-mail connection is set up, SCM automatically sends the user an e-mail notifying them that their SCM user account has been set up and that they can now set their password.
l The user is added to the Accounts list in the lower portion of the Accounts page. l The Create button becomes the Create Another button.
NOTE: If a user with the same e-mail address has already been added to the SCM system, SCM displays an error message. That user cannot be added again, regardless of the account origin. To check the origin of the account, locate the user in the Accounts list and click on their e-mail address to open a user profile page. The origin (local or remote [AD]) is indicated in the read-only Created From field.To change an account from a local account to an AD-based account, the local account must be deleted, and then the user must be added from AD. Any recordings connected with the account will be deleted during account deletion, so recordings should be downloaded and saved or reassigned to another user before the local account is deleted.
7. Add additional user accounts as desired by clicking the Create Another button and repeating steps 3 through 6.
8. Click Close to collapse the account creation panel, if desired.
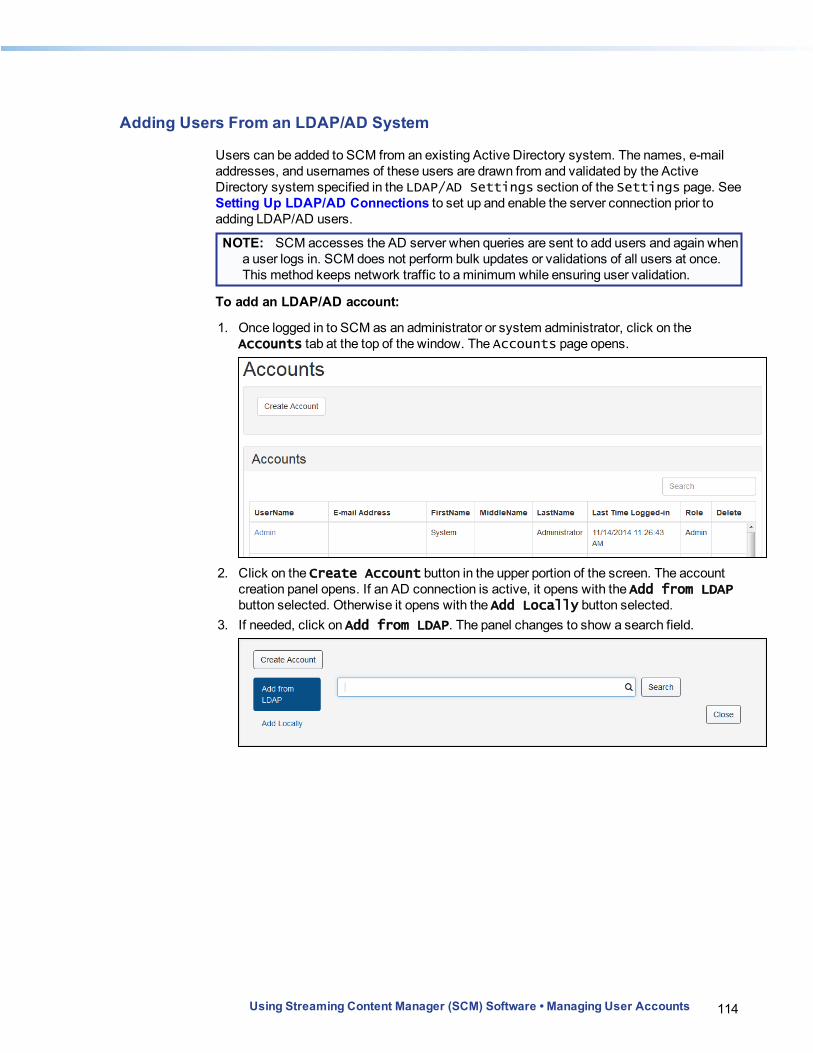
114Using Streaming Content Manager (SCM) Software • Managing User Accounts
Adding Users From an LDAP/AD System
Users can be added to SCM from an existing Active Directory system. The names, e-mail addresses, and usernames of these users are drawn from and validated by the Active Directory system specified in the LDAP/AD Settings section of the Settings page. See Setting Up LDAP/AD Connections to set up and enable the server connection prior to adding LDAP/AD users.
NOTE: SCM accesses the AD server when queries are sent to add users and again when a user logs in. SCM does not perform bulk updates or validations of all users at once. This method keeps network traffic to a minimum while ensuring user validation.
To add an LDAP/AD account:
1. Once logged in to SCM as an administrator or system administrator, click on the Accounts tab at the top of the window. The Accounts page opens.
2. Click on the Create Account button in the upper portion of the screen. The account creation panel opens. If an AD connection is active, it opens with the Add from LDAP button selected. Otherwise it opens with the Add Locally button selected.
3. If needed, click on Add from LDAP. The panel changes to show a search field.

115Using Streaming Content Manager (SCM) Software • Managing User Accounts
4. Search for a user in the AD system by typing text such as a username, name, or e-mail address into the search field and click Search. Results of the search appear in the list directly below the search field. The quantity of results shown in the list is limited by the LDAP/AD Results per Search setting (see Setting Up LDAP/AD Connections).
5. Locate the user in the search results list and click the Add As button to right of their e-mail address. The button changes to a drop-down list.
NOTE: If a user with the same e-mail address has already been added to the SCM system, the user appears in the search results list with a check mark in place of the Add As button. That user cannot be added again, regardless of the account origin. To determine the origin of the account, locate the user in the Accounts list and click on their e-mail address to open a user profile page. The origin (local or remote [AD]) is indicated in the read-only Created From field.To change an account from a local account to an AD-based account, the local account must be deleted, and then the user must be added from AD. Any recordings connected with the account will be deleted during account deletion, so recordings should be downloaded and saved or reassigned to another user before the local account is deleted.
6. Select User or Administrator, as appropriate, from the drop-down list to add that user to SCM with the corresponding role (user or administrator).
l Successful addition of the user to SCM is indicated by a check mark ( ) in place of the Add As button.

116Using Streaming Content Manager (SCM) Software • Managing User Accounts
l The user is added to the Accounts list in the lower portion of the Accounts page. l If the e-mail server connection is set up, SCM automatically sends the user an e-mail
notifying them that their SCM user account has been set up. They will not be given an option to change passwords because the AD system (not SCM) maintains and validates all passwords.
7. Add other users from the displayed search results (repeat steps 5 and 6) or start a new search and add users as desired from the new results (repeat steps 4 through 6).
8. Click Close to collapse the account creation panel, if desired.
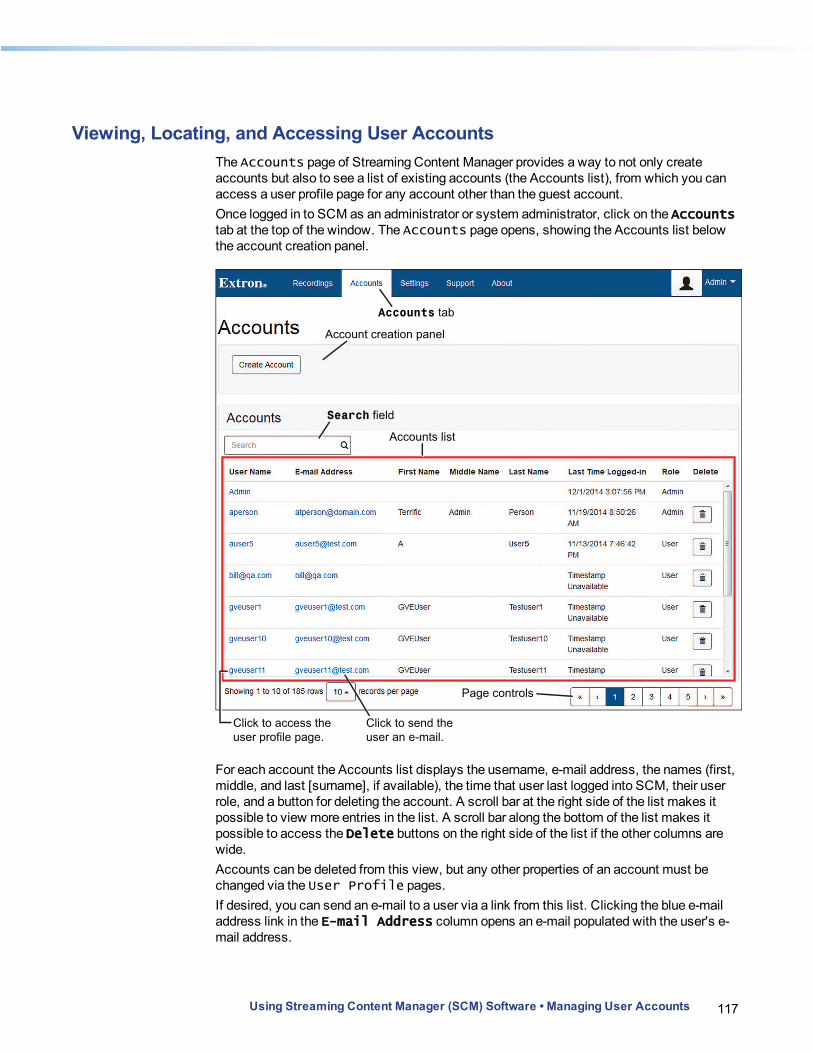
117Using Streaming Content Manager (SCM) Software • Managing User Accounts
Viewing, Locating, and Accessing User AccountsThe Accounts page of Streaming Content Manager provides a way to not only create accounts but also to see a list of existing accounts (the Accounts list), from which you can access a user profile page for any account other than the guest account. Once logged in to SCM as an administrator or system administrator, click on the Accounts tab at the top of the window. The Accounts page opens, showing the Accounts list below the account creation panel.
Accounts tab
Search field
Account creation panel
Accounts list
Page controls
Click to access the
user profile page.
Click to send the
user an e-mail.
For each account the Accounts list displays the username, e-mail address, the names (first, middle, and last [surname], if available), the time that user last logged into SCM, their user role, and a button for deleting the account. A scroll bar at the right side of the list makes it possible to view more entries in the list. A scroll bar along the bottom of the list makes it possible to access the Delete buttons on the right side of the list if the other columns are wide.Accounts can be deleted from this view, but any other properties of an account must be changed via the User Profile pages.If desired, you can send an e-mail to a user via a link from this list. Clicking the blue e-mail address link in the E-mail Address column opens an e-mail populated with the user's e-mail address.
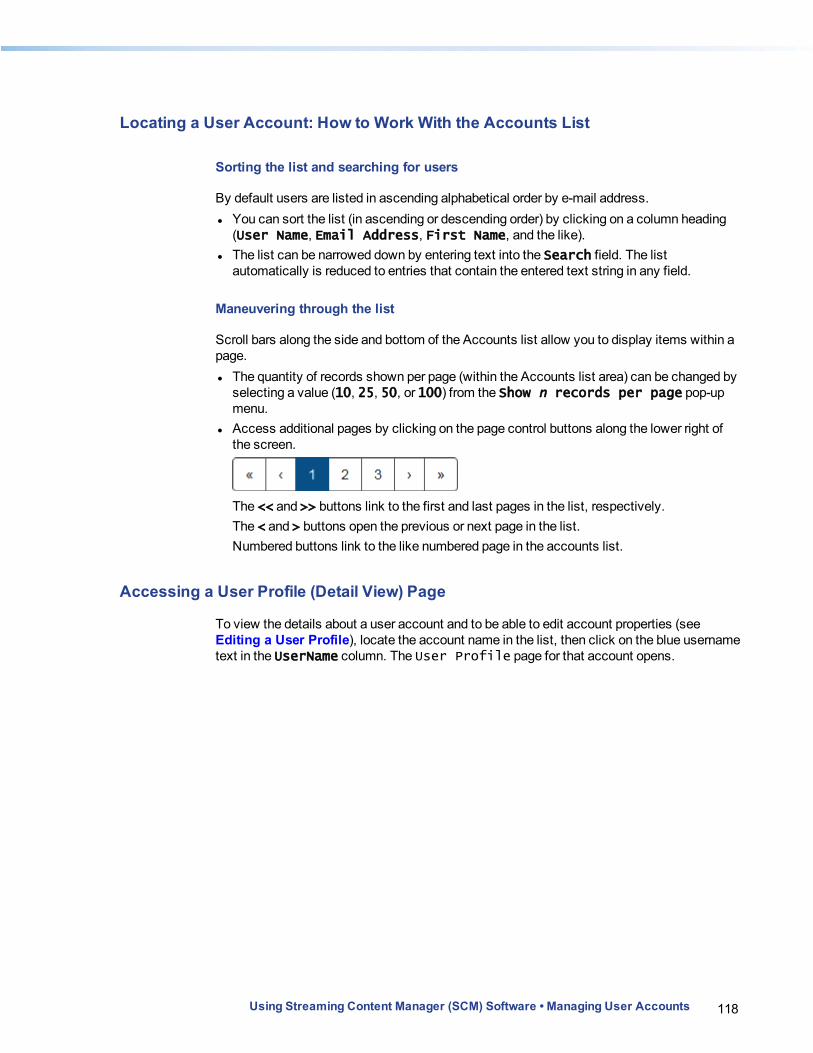
118Using Streaming Content Manager (SCM) Software • Managing User Accounts
Locating a User Account: How to Work With the Accounts List
Sorting the list and searching for users
By default users are listed in ascending alphabetical order by e-mail address. l You can sort the list (in ascending or descending order) by clicking on a column heading
(User Name, Email Address, First Name, and the like). l The list can be narrowed down by entering text into the Search field. The list
automatically is reduced to entries that contain the entered text string in any field.
Maneuvering through the list
Scroll bars along the side and bottom of the Accounts list allow you to display items within a page. l The quantity of records shown per page (within the Accounts list area) can be changed by
selecting a value (10, 25, 50, or 100) from the Show n records per page pop-up menu.
l Access additional pages by clicking on the page control buttons along the lower right of the screen.
The << and >> buttons link to the first and last pages in the list, respectively.The < and > buttons open the previous or next page in the list.Numbered buttons link to the like numbered page in the accounts list.
Accessing a User Profile (Detail View) Page
To view the details about a user account and to be able to edit account properties (see Editing a User Profile), locate the account name in the list, then click on the blue username text in the UserName column. The User Profile page for that account opens.
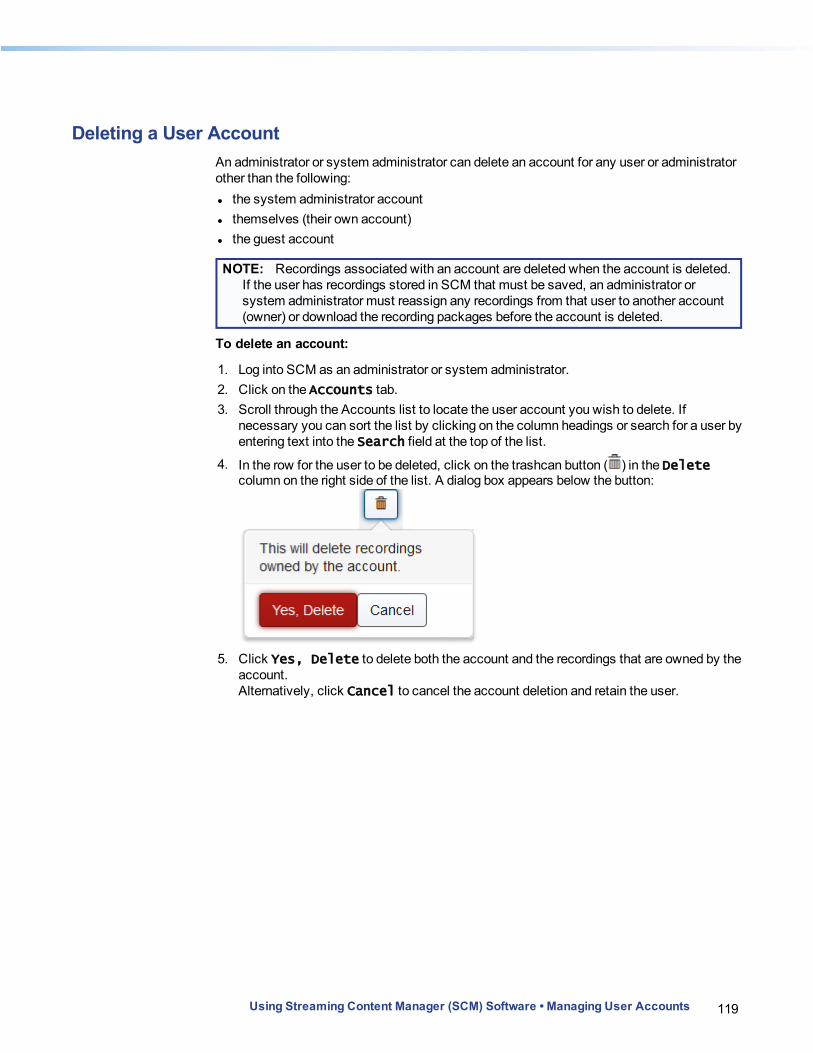
119Using Streaming Content Manager (SCM) Software • Managing User Accounts
Deleting a User AccountAn administrator or system administrator can delete an account for any user or administrator other than the following: l the system administrator account l themselves (their own account) l the guest account
NOTE: Recordings associated with an account are deleted when the account is deleted. If the user has recordings stored in SCM that must be saved, an administrator or system administrator must reassign any recordings from that user to another account (owner) or download the recording packages before the account is deleted.
To delete an account:
1. Log into SCM as an administrator or system administrator. 2. Click on the Accounts tab. 3. Scroll through the Accounts list to locate the user account you wish to delete. If
necessary you can sort the list by clicking on the column headings or search for a user by entering text into the Search field at the top of the list.
4. In the row for the user to be deleted, click on the trashcan button ( ) in the Delete column on the right side of the list. A dialog box appears below the button:
5. Click Yes, Delete to delete both the account and the recordings that are owned by the account.Alternatively, click Cancel to cancel the account deletion and retain the user.
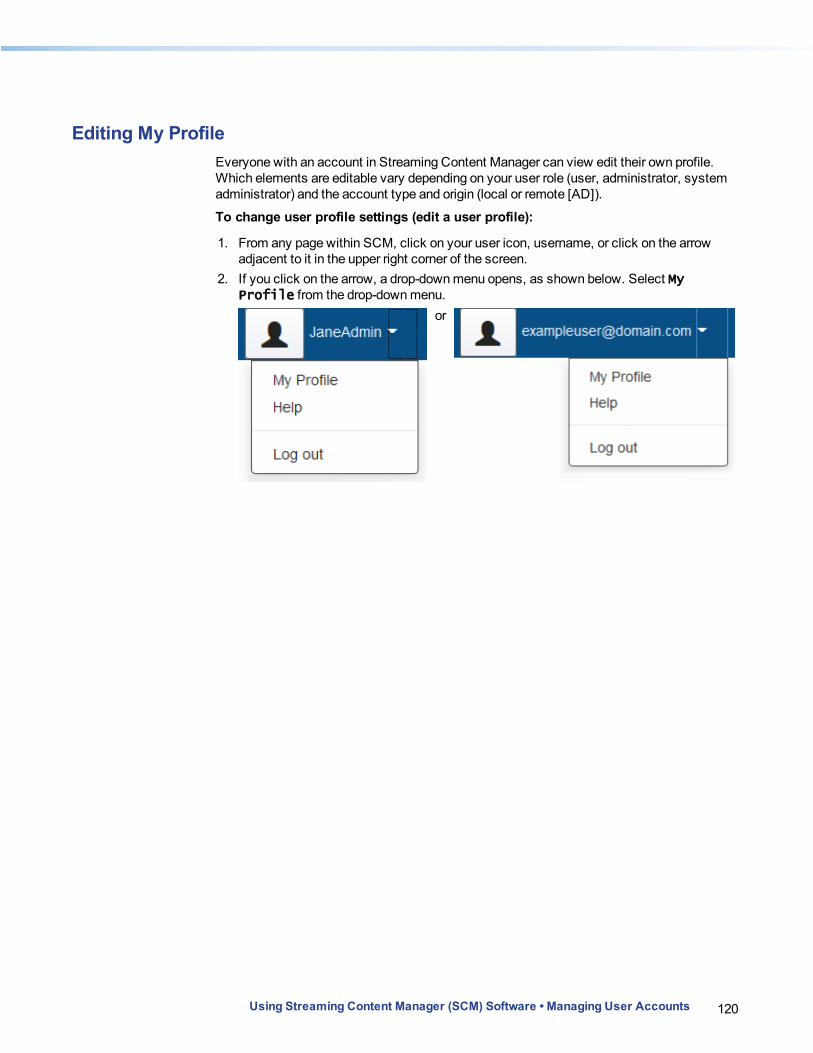
120Using Streaming Content Manager (SCM) Software • Managing User Accounts
Editing My ProfileEveryone with an account in Streaming Content Manager can view edit their own profile. Which elements are editable vary depending on your user role (user, administrator, system administrator) and the account type and origin (local or remote [AD]).
To change user profile settings (edit a user profile):
1. From any page within SCM, click on your user icon, username, or click on the arrow adjacent to it in the upper right corner of the screen.
2. If you click on the arrow, a drop-down menu opens, as shown below. Select My Profile from the drop-down menu.
or
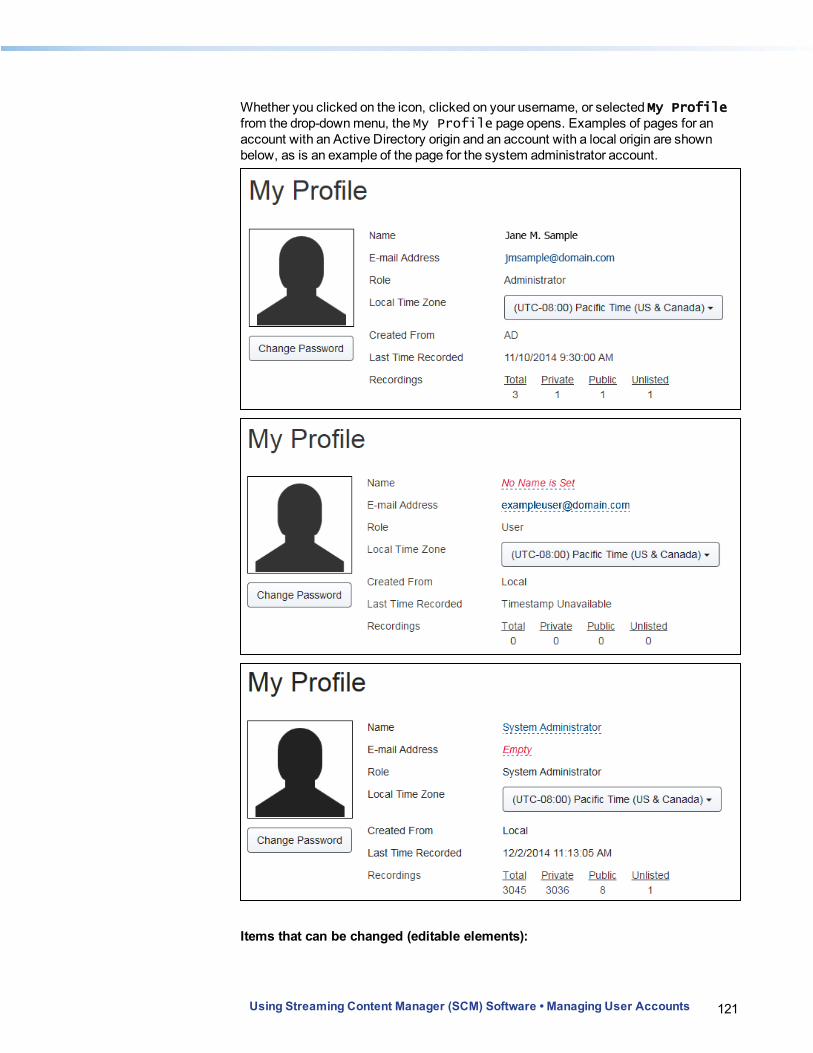
121Using Streaming Content Manager (SCM) Software • Managing User Accounts
Whether you clicked on the icon, clicked on your username, or selected My Profile from the drop-down menu, the My Profile page opens. Examples of pages for an account with an Active Directory origin and an account with a local origin are shown below, as is an example of the page for the system administrator account.
Items that can be changed (editable elements):
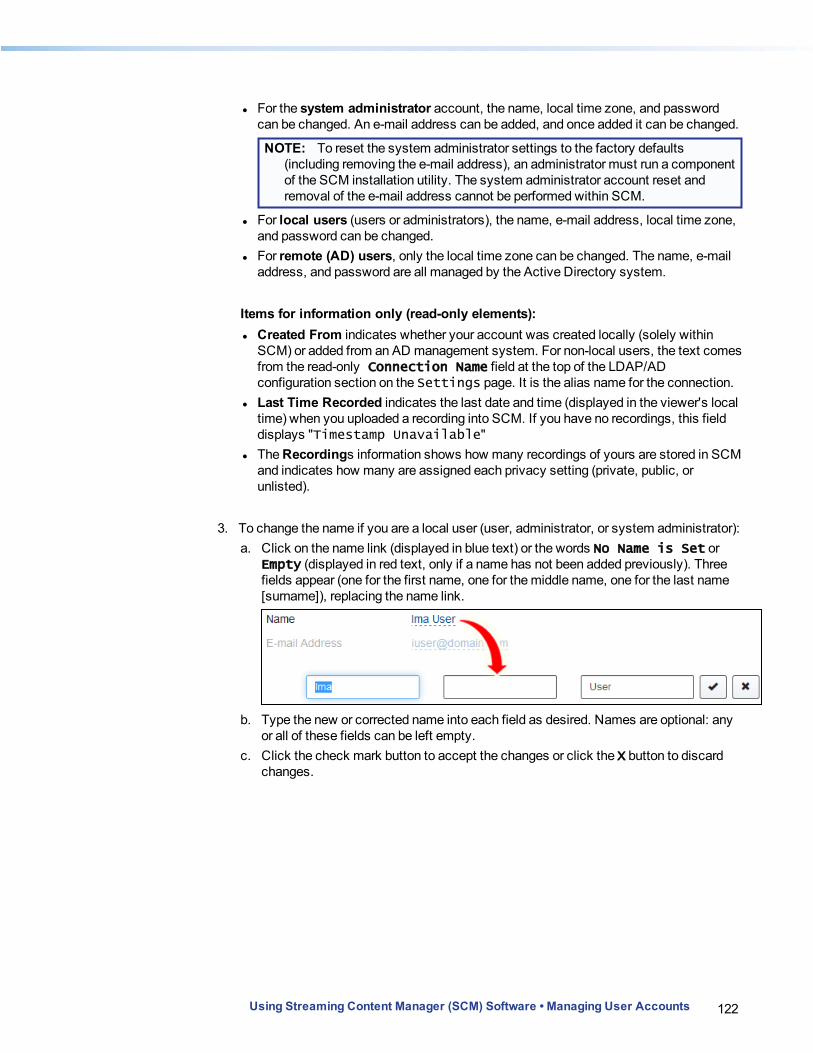
122Using Streaming Content Manager (SCM) Software • Managing User Accounts
l For the system administrator account, the name, local time zone, and password can be changed. An e-mail address can be added, and once added it can be changed.
NOTE: To reset the system administrator settings to the factory defaults (including removing the e-mail address), an administrator must run a component of the SCM installation utility. The system administrator account reset and removal of the e-mail address cannot be performed within SCM.
l For local users (users or administrators), the name, e-mail address, local time zone, and password can be changed.
l For remote (AD) users, only the local time zone can be changed. The name, e-mail address, and password are all managed by the Active Directory system.
Items for information only (read-only elements): l Created From indicates whether your account was created locally (solely within
SCM) or added from an AD management system. For non-local users, the text comes from the read-only Connection Name field at the top of the LDAP/AD configuration section on the Settings page. It is the alias name for the connection.
l Last Time Recorded indicates the last date and time (displayed in the viewer's local time) when you uploaded a recording into SCM. If you have no recordings, this field displays "Timestamp Unavailable"
l The Recordings information shows how many recordings of yours are stored in SCM and indicates how many are assigned each privacy setting (private, public, or unlisted).
3. To change the name if you are a local user (user, administrator, or system administrator): a. Click on the name link (displayed in blue text) or the words No Name is Set or
Empty (displayed in red text, only if a name has not been added previously). Three fields appear (one for the first name, one for the middle name, one for the last name [surname]), replacing the name link.
b. Type the new or corrected name into each field as desired. Names are optional: any or all of these fields can be left empty.
c. Click the check mark button to accept the changes or click the X button to discard changes.
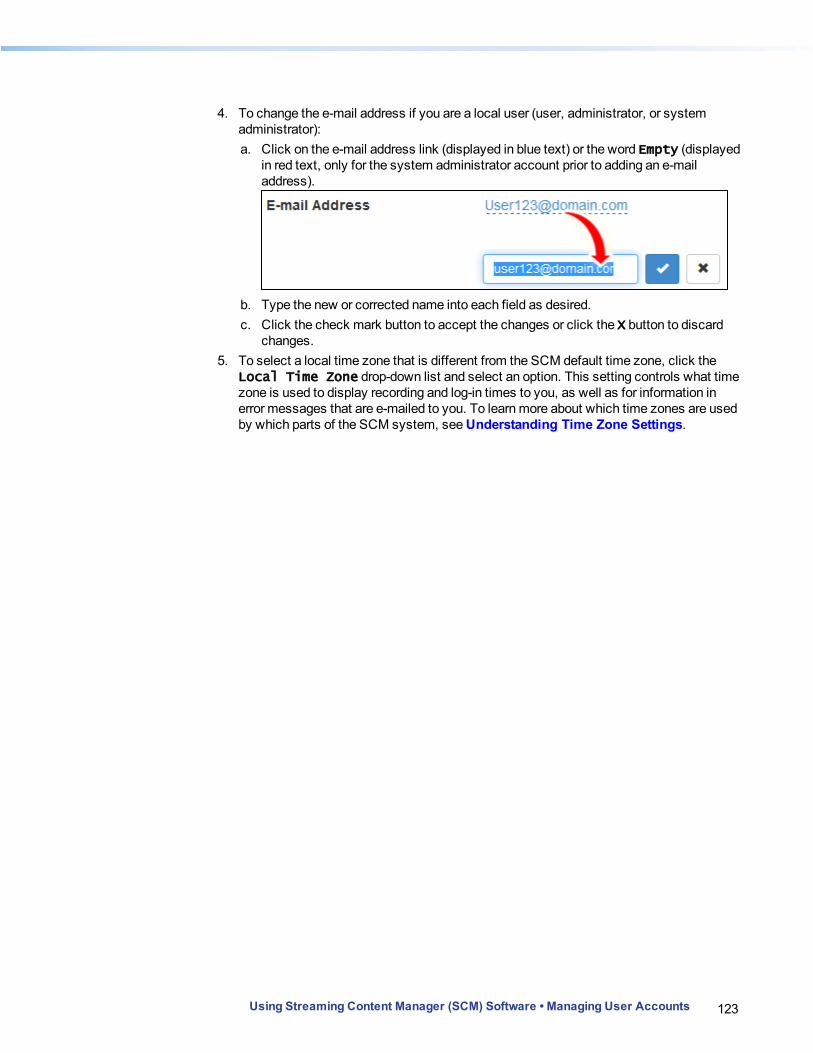
123Using Streaming Content Manager (SCM) Software • Managing User Accounts
4. To change the e-mail address if you are a local user (user, administrator, or system administrator): a. Click on the e-mail address link (displayed in blue text) or the word Empty (displayed
in red text, only for the system administrator account prior to adding an e-mail address).
b. Type the new or corrected name into each field as desired. c. Click the check mark button to accept the changes or click the X button to discard
changes. 5. To select a local time zone that is different from the SCM default time zone, click the
Local Time Zone drop-down list and select an option. This setting controls what time zone is used to display recording and log-in times to you, as well as for information in error messages that are e-mailed to you. To learn more about which time zones are used by which parts of the SCM system, see Understanding Time Zone Settings.

124Using Streaming Content Manager (SCM) Software • Managing User Accounts
6. To change the password if you are a local user or administrator: a. Click the Change Password button below the user icon. A panel opens with fields
where you can reset your password.
b. Type your current password into the Current Password field. c. Type your new password into the Enter New Password and Confirm Your
Password fields. For the minimum number of characters and details about acceptable characters, see Guidelines for Passwords.
d. Click Save to save the new password or click Cancel to discard changes and keep your old password.
125Using Streaming Content Manager (SCM) Software • Managing User Accounts
Editing a User ProfileAn administrator or system administrator can edit the profile and settings for any user within SCM. Which elements are editable vary depending on user role (user, administrator, system administrator) and the account type or origin (local or remote [AD]).
To change user profile settings (edit a user profile):
1. Once logged in to SCM as an administrator or system administrator, click on the Accounts tab at the top of the window. The Accounts page opens.
2. In the Accounts list locate the user profile to be edited. l By default users are listed in ascending alphabetical order by e-mail address. You can
sort the list (in ascending or descending order) by clicking on a column heading (User Name, E-mail Address, First Name, and the like).
l The list can be narrowed down by entering text into the Search field.
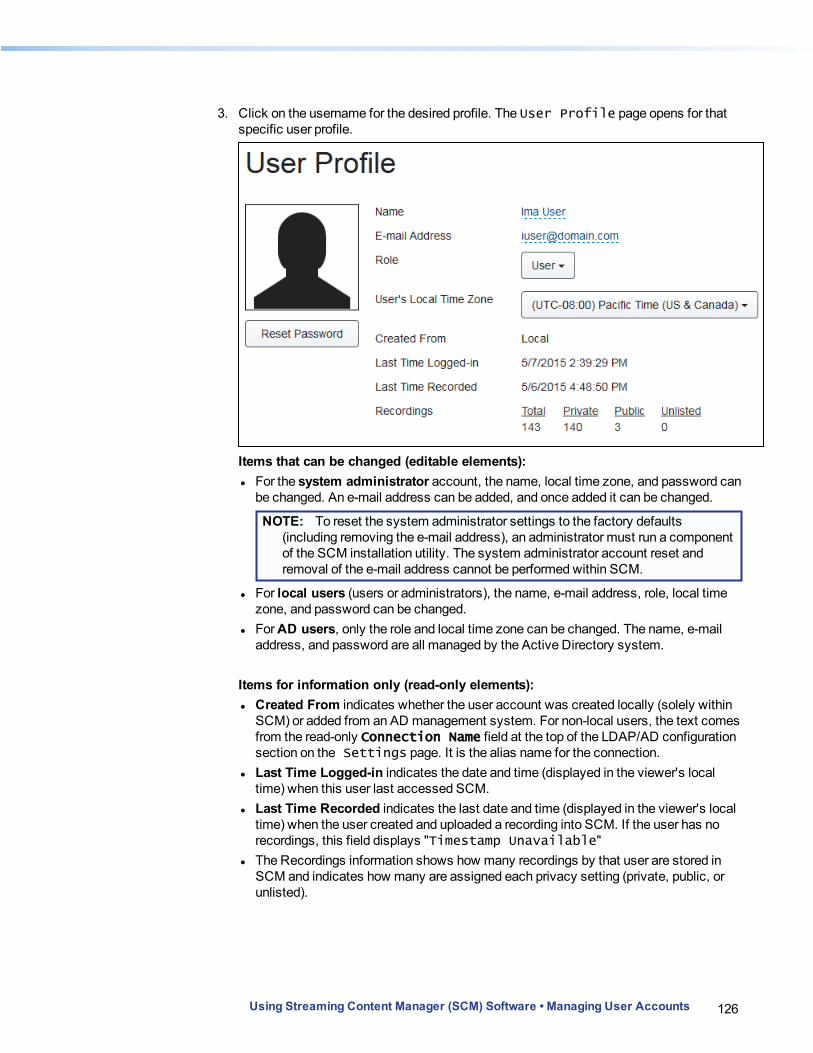
126Using Streaming Content Manager (SCM) Software • Managing User Accounts
3. Click on the username for the desired profile. The User Profile page opens for that specific user profile.
Items that can be changed (editable elements): l For the system administrator account, the name, local time zone, and password can
be changed. An e-mail address can be added, and once added it can be changed.
NOTE: To reset the system administrator settings to the factory defaults (including removing the e-mail address), an administrator must run a component of the SCM installation utility. The system administrator account reset and removal of the e-mail address cannot be performed within SCM.
l For local users (users or administrators), the name, e-mail address, role, local time zone, and password can be changed.
l For AD users, only the role and local time zone can be changed. The name, e-mail address, and password are all managed by the Active Directory system.
Items for information only (read-only elements): l Created From indicates whether the user account was created locally (solely within
SCM) or added from an AD management system. For non-local users, the text comes from the read-only Connection Name field at the top of the LDAP/AD configuration section on the Settings page. It is the alias name for the connection.
l Last Time Logged-in indicates the date and time (displayed in the viewer's local time) when this user last accessed SCM.
l Last Time Recorded indicates the last date and time (displayed in the viewer's local time) when the user created and uploaded a recording into SCM. If the user has no recordings, this field displays "Timestamp Unavailable"
l The Recordings information shows how many recordings by that user are stored in SCM and indicates how many are assigned each privacy setting (private, public, or unlisted).

127Using Streaming Content Manager (SCM) Software • Managing User Accounts
4. To change the name for a local user (user, administrator, or system administrator): a. Click on the name link (displayed in blue text) or the word Empty (displayed in red
text, only if a name has not been added previously). Three fields appear (one for the first name, one for the middle name, one for the last name [surname]), replacing the name link.
b. Type the new or corrected name into each field as desired. c. Click the check mark button to accept the changes or click the X button to discard
changes. 5. To change the e-mail address for a local user (user, administrator, or system
administrator): a. Click on the e-mail address link (displayed in blue text) or the word Empty (displayed
in red text, only for the system administrator account prior to adding an e-mail address).
b. Type the new or corrected name into each field as desired.
c. Click the check mark button ( ) to accept the changes or click the X button to discard changes.
6. To change the role from user to administrator or from administrator to user, click on the Role drop-down list and select the desired role.
7. To select a different local time zone, click the User's Local Time Zone drop-down list and select an option. This setting controls what time zone is used to display recording and log-in times to that user, as well as for information in error messages that are e-mailed to the user. To learn more about which time zones are used by which parts of the SCM system, see Understanding Time Zone Settings.
128Using Streaming Content Manager (SCM) Software • Managing User Accounts
8. To change the password for a local user or administrator: a. Click the Reset Password button below the user icon. A panel opens that
provides the URL link to a page where the user can reset their password.
b. You can copy and send the link to the user manually or click the Send Link to user button to allow SCM to send the link to the user if SCM has already been configured for e-mail notifications (see Configuring E-mail Notification Settings). Alternatively, to cancel sending the user a link to reset their password, click Cancel.
NOTE: If the user receives the e-mail, clicks on the link, opens the password reset page, and completes and submits the form, the password is reset. However, if the user logs in to SCM using their old password before accessing the password reset page, then the link for resetting the password expires, no new password is set, and the old password continues to be valid.
Editing the System Administrator ProfileAn administrator or the system administrator can change the name of the system administrator account, add an e-mail address to the account (which becomes the username), edit the e-mail address once it has been added, or change the local time zone setting.
NOTE: The only way to remove an e-mail address from this account once it has been added is to exit SCM and use the SCM installer utility to reset the system administrator account to factory default settings.
Only the system administrator can change the system administrator password, though an administrator can send a link to the system administrator so they can change the password.
To edit the system administrator profile if you are the system administrator:See Editing My Profile or follow the instructions below but realize that you will reach your My Profile page instead of a User Profile page. Also, the system administrator can
129Using Streaming Content Manager (SCM) Software • Managing User Accounts
change the system administrator password directly within the My Profile page instead of sending and accessing a reset password e-mail message.
To edit the system administrator profile if you are an administrator:
1. Once logged in to SCM as an administrator or system administrator, click on the Accounts tab at the top of the window. The Accounts page opens.
2. In the accounts list locate the system administrator profile. The list can be sorted (by clicking on the column headings) or searched to make it easier to find the account. By default, the username is "Admin", the first name is "System", and the last name is "Administrator".
3. Click on the username (Admin, by default) for the system administrator. The profile page (titled "User Profile" if logged in as administrator or titled "My Profile" if logged in as the system administrator) opens.
4. To edit the name of the system administrator account: a. Click on the name link (System Administrator, by default, displayed in blue
text). Three fields appear (one for the first name, one for the middle name, one for the last name [surname]), replacing the name link.
b. Type the new or corrected name into each field as desired.
c. Click the check mark button ( ) to accept the changes or click the X button to discard changes.
130Using Streaming Content Manager (SCM) Software • Managing User Accounts
5. To add or change the e-mail address: a. Click on the word Empty (displayed in red text, prior to adding an e-mail address) or
on the e-mail address link (displayed in blue text, if an e-mail address was added previously).
b. Type the new or corrected name into each field as desired. c. Click the check mark button to accept the changes or click the X button to discard
changes.
NOTES: l Be aware that adding or changing the e-mail address of the system
administrator account automatically changes the login credentials (specifically the username) of the system administrator from the default ("admin") or the previous e-mail address to the new e-mail address.
l Once an e-mail address is added for the system administrator account, the only way to remove it is to use the SCM installation program to reset the system administrator account to the factory defaults (clear the e-mail address and reset name to admin and password to extron1111@).
6. To select a different local time zone, click the User's Local Time Zone drop-down list and select an option. This setting controls what time zone is used to display recording and log-in times to the system administrator, as well as for information in error messages that are e-mailed to that account. To learn more about which time zones are used by which parts of the SCM system, see Understanding Time Zone Settings.
131Using Streaming Content Manager (SCM) Software • Managing User Accounts
7. To change the password: a. Click the Reset Password button below the user icon. A panel opens that
provides the URL link to a page where the system administrator can reset their password.
b. You can copy and send the link to the system administrator account e-mail manually. Or click the Send Link to user button to allow SCM to send the link if SCM has already been configured for e-mail notifications (see Configuring E-mail Notification Settings) and an e-mail address has already been configured and saved for the system administrator account. Alternatively, to cancel sending the system administrator a link to reset their password, click Cancel.
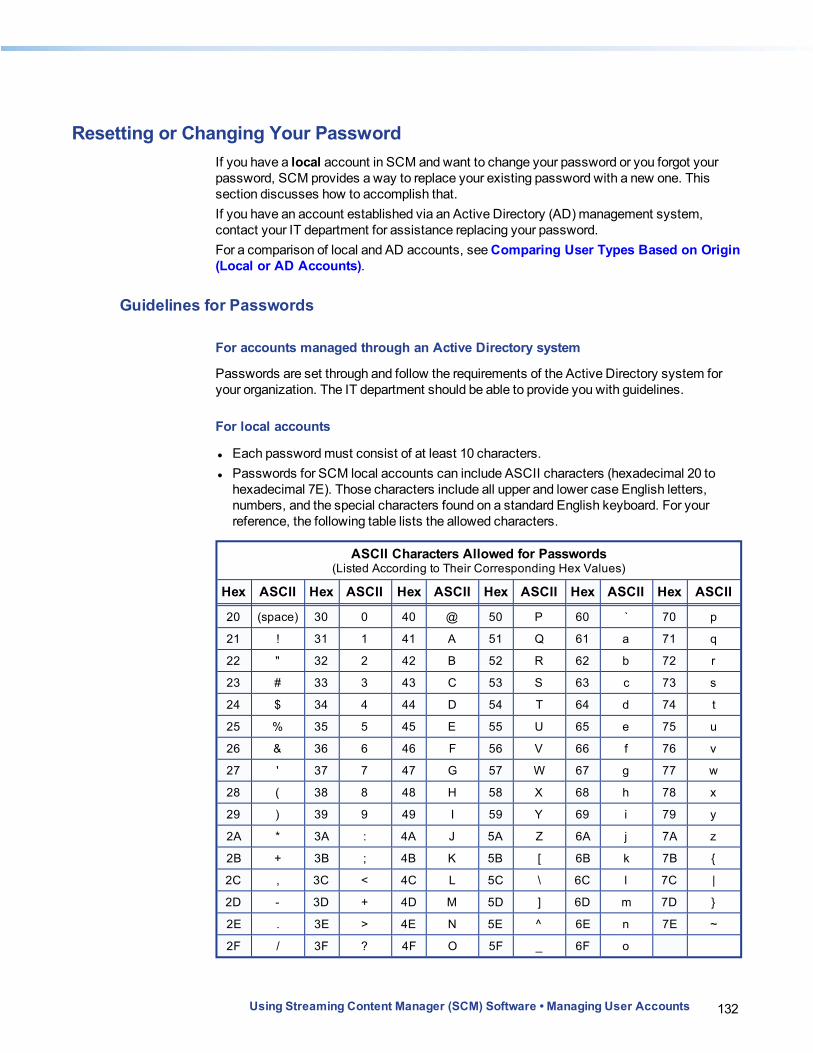
132Using Streaming Content Manager (SCM) Software • Managing User Accounts
Resetting or Changing Your PasswordIf you have a local account in SCM and want to change your password or you forgot your password, SCM provides a way to replace your existing password with a new one. This section discusses how to accomplish that.If you have an account established via an Active Directory (AD) management system, contact your IT department for assistance replacing your password.For a comparison of local and AD accounts, see Comparing User Types Based on Origin (Local or AD Accounts).
Guidelines for Passwords
For accounts managed through an Active Directory system
Passwords are set through and follow the requirements of the Active Directory system for your organization. The IT department should be able to provide you with guidelines.
For local accounts
l Each password must consist of at least 10 characters. l Passwords for SCM local accounts can include ASCII characters (hexadecimal 20 to
hexadecimal 7E). Those characters include all upper and lower case English letters, numbers, and the special characters found on a standard English keyboard. For your reference, the following table lists the allowed characters.
ASCII Characters Allowed for Passwords(Listed According to Their Corresponding Hex Values)
Hex ASCII Hex ASCII Hex ASCII Hex ASCII Hex ASCII Hex ASCII
20 (space) 30 0 40 @ 50 P 60 ` 70 p
21 ! 31 1 41 A 51 Q 61 a 71 q
22 " 32 2 42 B 52 R 62 b 72 r
23 # 33 3 43 C 53 S 63 c 73 s
24 $ 34 4 44 D 54 T 64 d 74 t
25 % 35 5 45 E 55 U 65 e 75 u
26 & 36 6 46 F 56 V 66 f 76 v
27 ' 37 7 47 G 57 W 67 g 77 w
28 ( 38 8 48 H 58 X 68 h 78 x
29 ) 39 9 49 I 59 Y 69 i 79 y
2A * 3A : 4A J 5A Z 6A j 7A z
2B + 3B ; 4B K 5B [ 6B k 7B {
2C , 3C < 4C L 5C \ 6C l 7C |
2D - 3D + 4D M 5D ] 6D m 7D }
2E . 3E > 4E N 5E ^ 6E n 7E ~
2F / 3F ? 4F O 5F _ 6F o
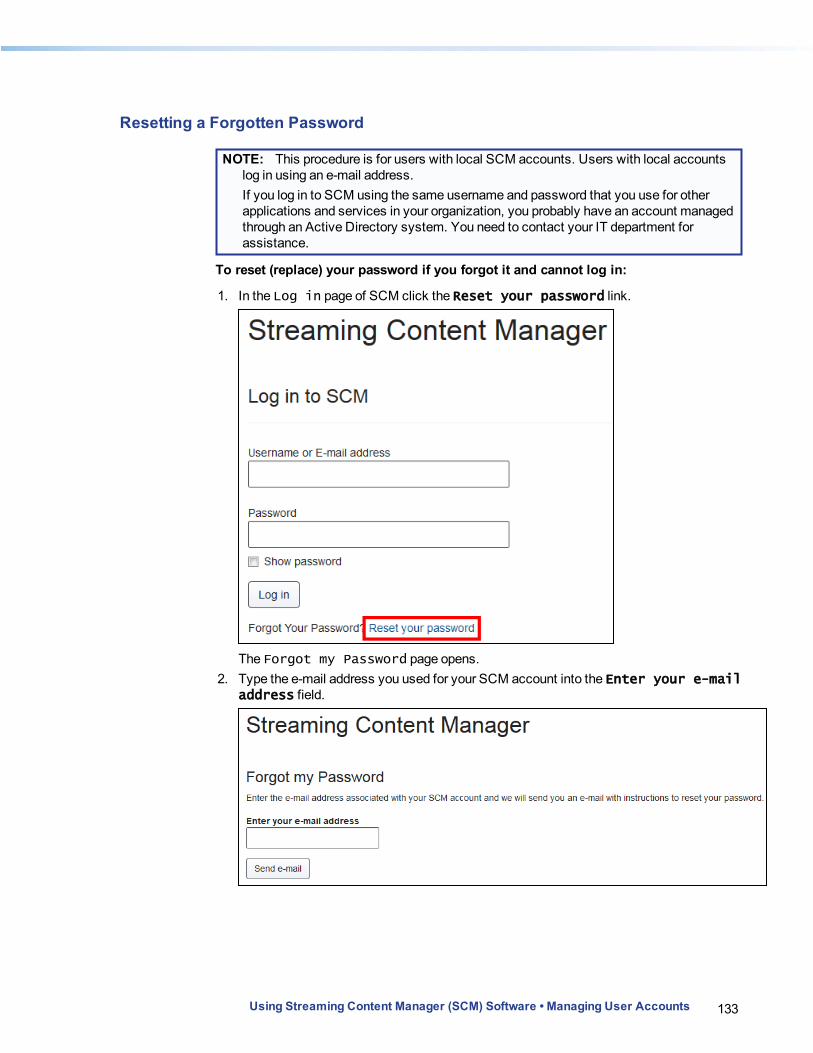
133Using Streaming Content Manager (SCM) Software • Managing User Accounts
Resetting a Forgotten Password
NOTE: This procedure is for users with local SCM accounts. Users with local accounts log in using an e-mail address.If you log in to SCM using the same username and password that you use for other applications and services in your organization, you probably have an account managed through an Active Directory system. You need to contact your IT department for assistance.
To reset (replace) your password if you forgot it and cannot log in:
1. In the Log in page of SCM click the Reset your password link.
The Forgot my Password page opens. 2. Type the e-mail address you used for your SCM account into the Enter your e-mail
address field.
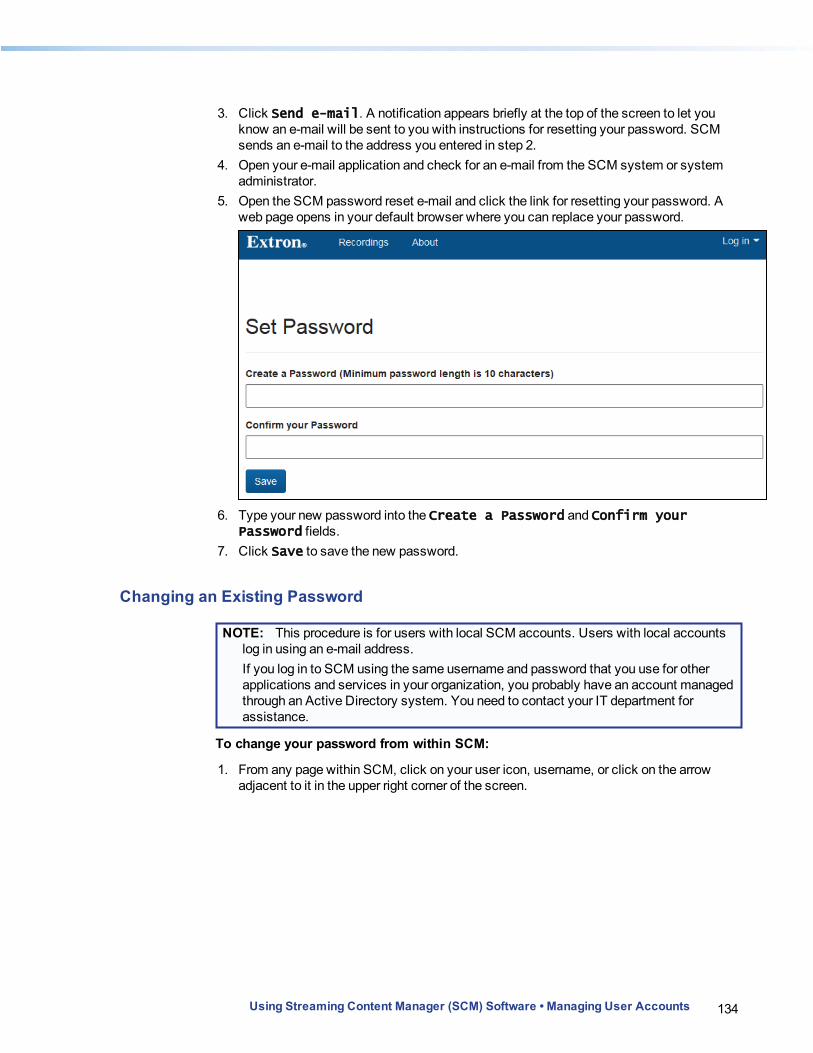
134Using Streaming Content Manager (SCM) Software • Managing User Accounts
3. Click Send e-mail. A notification appears briefly at the top of the screen to let you know an e-mail will be sent to you with instructions for resetting your password. SCM sends an e-mail to the address you entered in step 2.
4. Open your e-mail application and check for an e-mail from the SCM system or system administrator.
5. Open the SCM password reset e-mail and click the link for resetting your password. A web page opens in your default browser where you can replace your password.
6. Type your new password into the Create a Password and Confirm your Password fields.
7. Click Save to save the new password.
Changing an Existing Password
NOTE: This procedure is for users with local SCM accounts. Users with local accounts log in using an e-mail address.If you log in to SCM using the same username and password that you use for other applications and services in your organization, you probably have an account managed through an Active Directory system. You need to contact your IT department for assistance.
To change your password from within SCM:
1. From any page within SCM, click on your user icon, username, or click on the arrow adjacent to it in the upper right corner of the screen.

135Using Streaming Content Manager (SCM) Software • Managing User Accounts
2. If you click on the arrow, a drop-down menu opens, as shown below. Select My Profile from the drop-down menu.
Whether you clicked on the icon, clicked on your username, or selected My Profile from the drop-down menu, the My Profile page opens. An example is shown below.

136Using Streaming Content Manager (SCM) Software • Managing User Accounts
3. Click the Change Password button below the user icon. A panel opens with fields where you can change your password.
4. Type your current password into the Current Password field. 5. Type your new password into the Enter New Password and Confirm Your
Password fields. 6. Click Save to save the new password or click Cancel to discard changes and keep
your old password.
Managing Recordings
Managing Recordings: an OverviewOnce Streaming Content Manager (SCM) has uploaded, processed, packaged, and stored recordings, it provides access to the recordings. You can view, download, and edit settings of your own recordings and view and download public recordings and unlisted recordings for which you have received an access invitation. Additionally, administrators and the system administrator can view and edit settings of all recordings in the system. Content owners or administrators can be set each recording to allow it to be downloaded, played as streaming video, or both.If SCM is configured to use e-mail, for each recording that is ingested into SCM with an identifiable owner, SCM sends the recording owner an e-mail to notify them that the recording is now available in the system.This section on managing recordings covers the following topics: l Locating and Accessing Recordings l Elements of Recording Entries: an explanation, including what time zone is shown, where
elements come from (such as recording naming, location name) l Recording Privacy Settings l Downloading a Recording Package l Sharing a Recording l Editing Recording Details l Playing a Recording l Deleting a Recording
NOTE: If you access SCM via a link to a recording (when you have received a link to a shared recording), the player view page for that recording opens (rather than the My Recordings page) once you log in to SCM.
Using Streaming Content Manager (SCM) Software • Managing Recordings 137

138Using Streaming Content Manager (SCM) Software • Managing Recordings
Locating and Accessing Recordings
About The Recordings Pages
To access the recordings pages, log in to Streaming Content Manager (SCM), or from any other page click the Recordings tab at the top of the screen. The My Recordings page opens.The Recordings tab includes several pages. Each page features a different list view of recordings in the SCM system. To access each page, click the corresponding sub-tabs within the second tier of tabs located below the main tabs near the top of the screen. The Recordings tab includes sub-tabs for My Recordings,All Public Recordings, and All Recordings.
From within any list view page you can click on the thumbnail view of a recording or click on its title to open the player page for that particular recording.
List View Pages and Their Corresponding Tabs: What Content Appears on Which Page
l My Recordings — The My Recordings page lists only your recordings (recordings that list you as the owner). All of your recordings are listed here, regardless of privacy setting (private, ; unlisted, ; public, ) . This page includes buttons ( ) that allow you to
delete your recordings, if desired, and buttons ( ) that let you access a detail view page to edit information and settings for a recording.

139Using Streaming Content Manager (SCM) Software • Managing Recordings
l All Public Recordings — The All Public Recordings page lists recordings made by every SCM account holder as long as each recording has been set to the Public ( ) privacy setting. No recordings can be deleted from this page. An example of an All Public Recordings list is shown below.
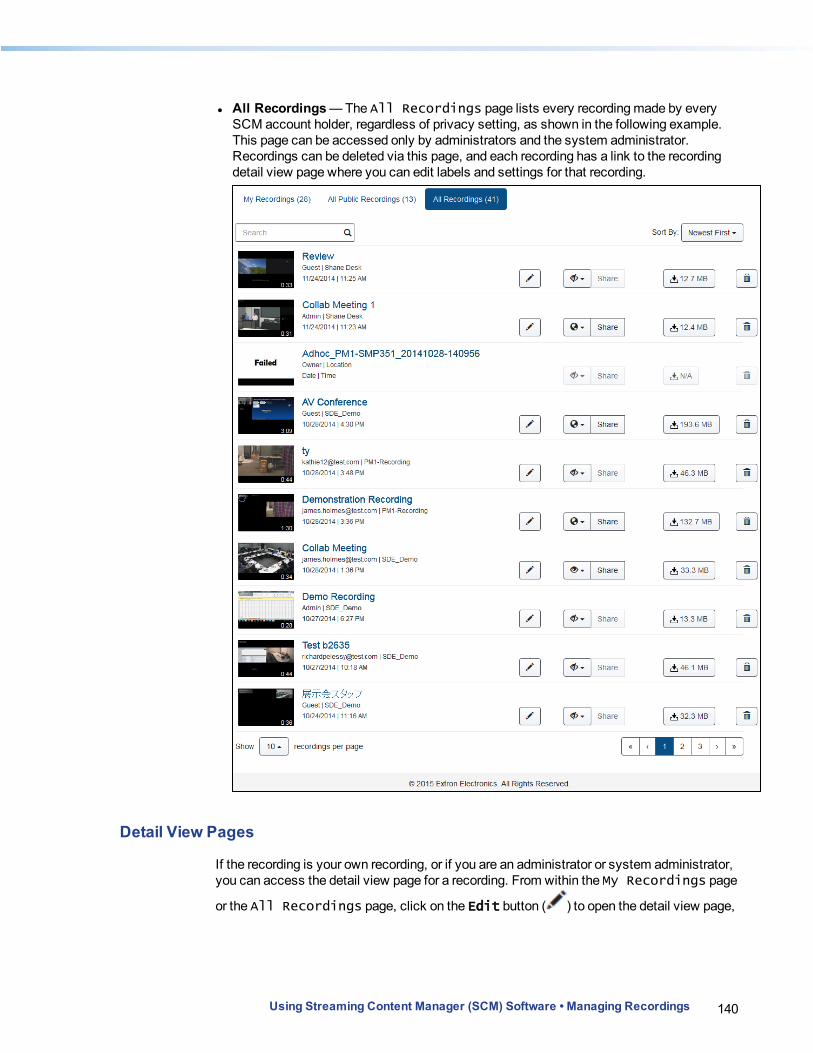
140Using Streaming Content Manager (SCM) Software • Managing Recordings
l All Recordings — The All Recordings page lists every recording made by every SCM account holder, regardless of privacy setting, as shown in the following example. This page can be accessed only by administrators and the system administrator. Recordings can be deleted via this page, and each recording has a link to the recording detail view page where you can edit labels and settings for that recording.
Detail View Pages
If the recording is your own recording, or if you are an administrator or system administrator, you can access the detail view page for a recording. From within the My Recordings page
or the All Recordings page, click on the Edit button ( ) to open the detail view page,
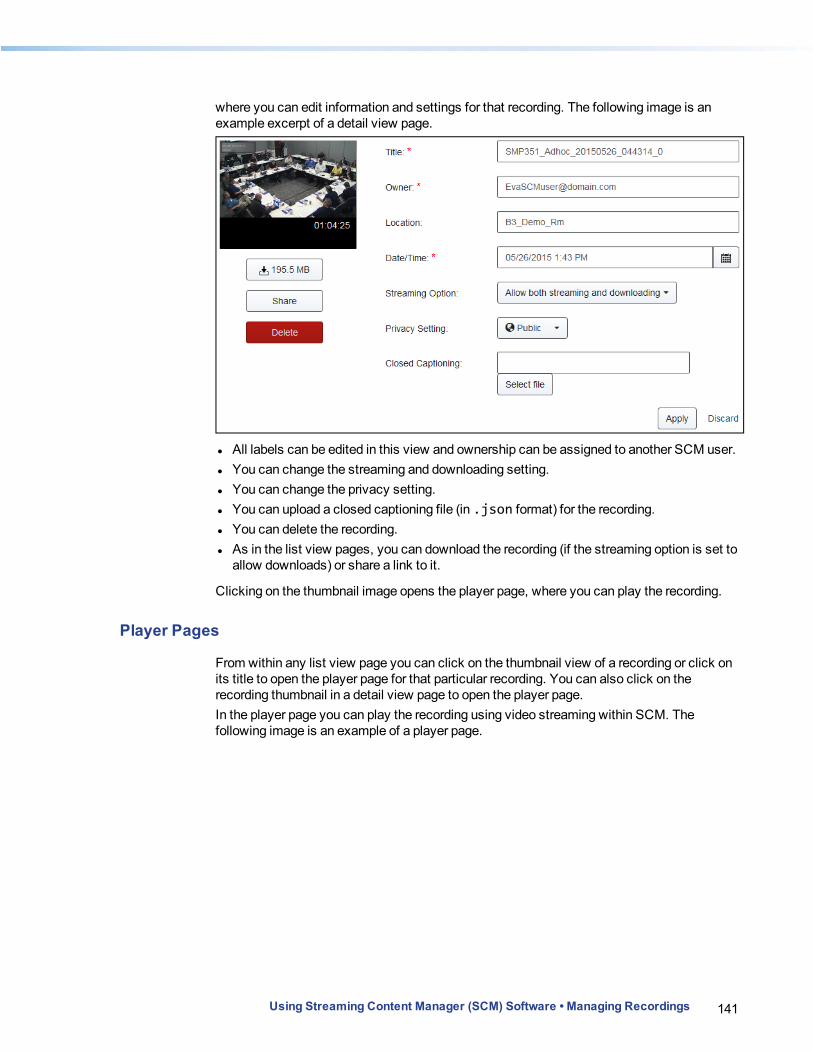
141Using Streaming Content Manager (SCM) Software • Managing Recordings
where you can edit information and settings for that recording. The following image is an example excerpt of a detail view page.
l All labels can be edited in this view and ownership can be assigned to another SCM user. l You can change the streaming and downloading setting. l You can change the privacy setting. l You can upload a closed captioning file (in .json format) for the recording. l You can delete the recording. l As in the list view pages, you can download the recording (if the streaming option is set to
allow downloads) or share a link to it.
Clicking on the thumbnail image opens the player page, where you can play the recording.
Player Pages
From within any list view page you can click on the thumbnail view of a recording or click on its title to open the player page for that particular recording. You can also click on the recording thumbnail in a detail view page to open the player page. In the player page you can play the recording using video streaming within SCM. The following image is an example of a player page.
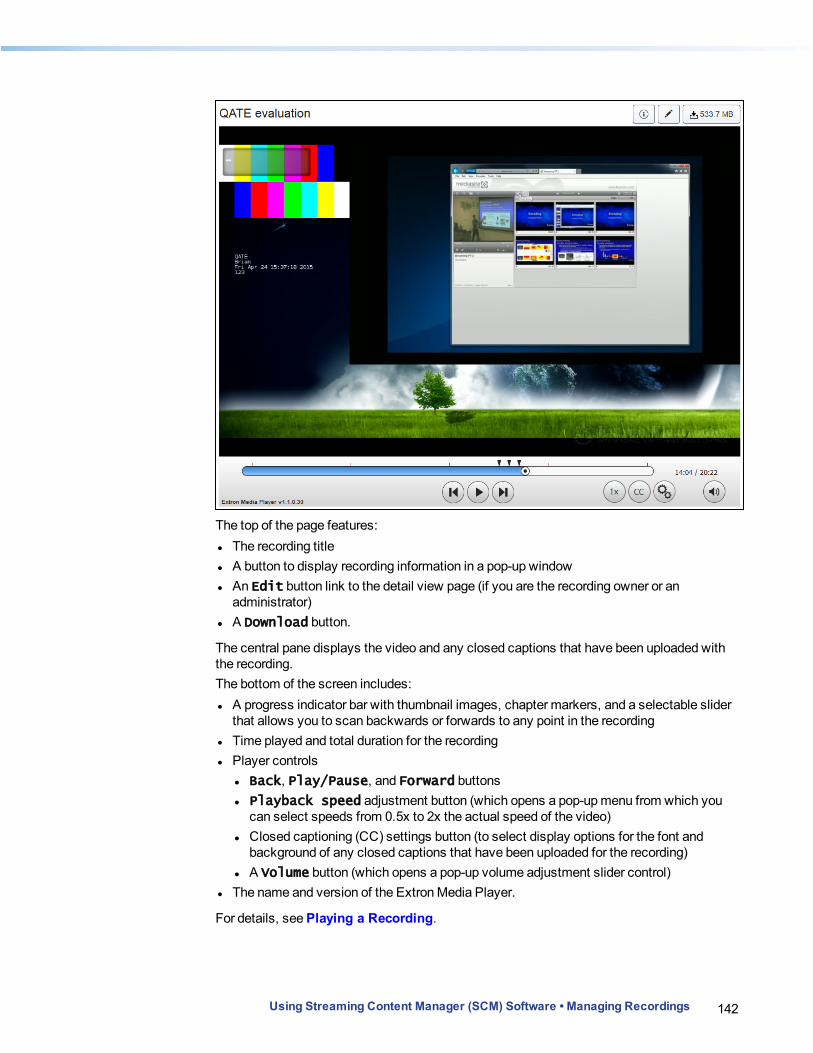
142Using Streaming Content Manager (SCM) Software • Managing Recordings
The top of the page features: l The recording title l A button to display recording information in a pop-up window l An Edit button link to the detail view page (if you are the recording owner or an
administrator) l A Download button.
The central pane displays the video and any closed captions that have been uploaded with the recording. The bottom of the screen includes: l A progress indicator bar with thumbnail images, chapter markers, and a selectable slider
that allows you to scan backwards or forwards to any point in the recording l Time played and total duration for the recording l Player controls
l Back, Play/Pause, and Forward buttons l Playback speed adjustment button (which opens a pop-up menu from which you
can select speeds from 0.5x to 2x the actual speed of the video) l Closed captioning (CC) settings button (to select display options for the font and
background of any closed captions that have been uploaded for the recording) l A Volume button (which opens a pop-up volume adjustment slider control)
l The name and version of the Extron Media Player.
For details, see Playing a Recording.
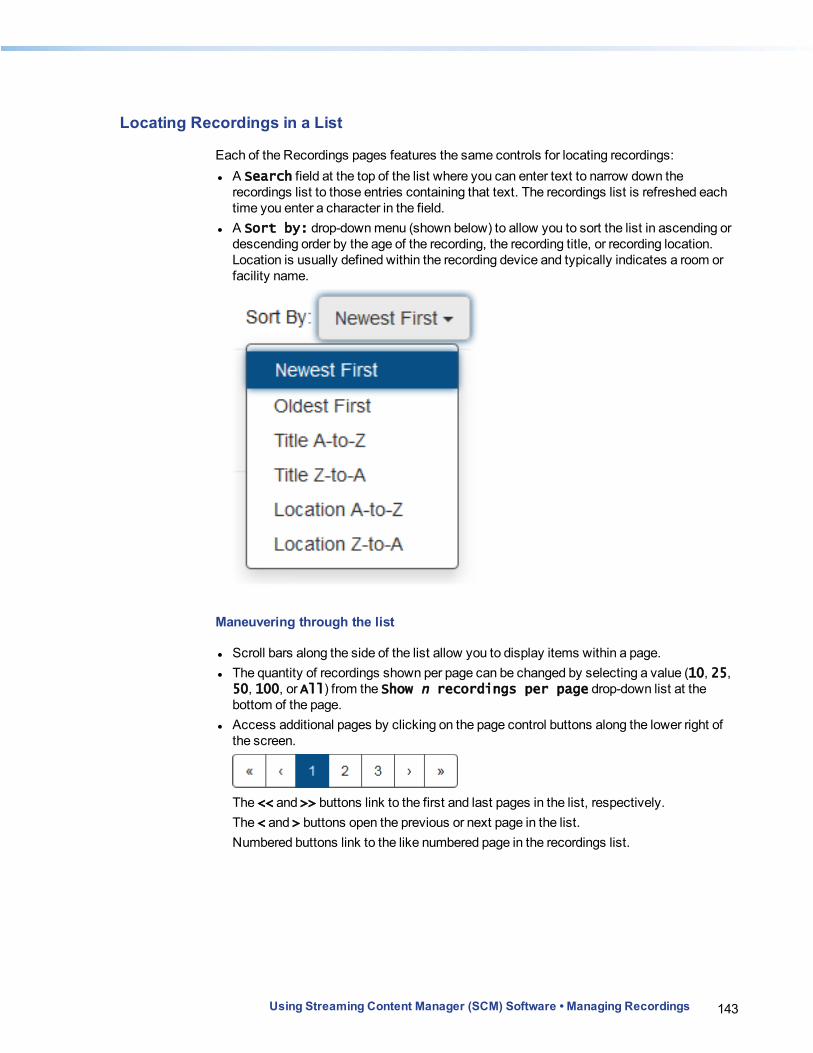
143Using Streaming Content Manager (SCM) Software • Managing Recordings
Locating Recordings in a List
Each of the Recordings pages features the same controls for locating recordings: l A Search field at the top of the list where you can enter text to narrow down the
recordings list to those entries containing that text. The recordings list is refreshed each time you enter a character in the field.
l A Sort by: drop-down menu (shown below) to allow you to sort the list in ascending or descending order by the age of the recording, the recording title, or recording location. Location is usually defined within the recording device and typically indicates a room or facility name.
Maneuvering through the list
l Scroll bars along the side of the list allow you to display items within a page. l The quantity of recordings shown per page can be changed by selecting a value (10, 25,
50, 100, or All) from the Show n recordings per page drop-down list at the bottom of the page.
l Access additional pages by clicking on the page control buttons along the lower right of the screen.
The << and >> buttons link to the first and last pages in the list, respectively.The < and > buttons open the previous or next page in the list.Numbered buttons link to the like numbered page in the recordings list.
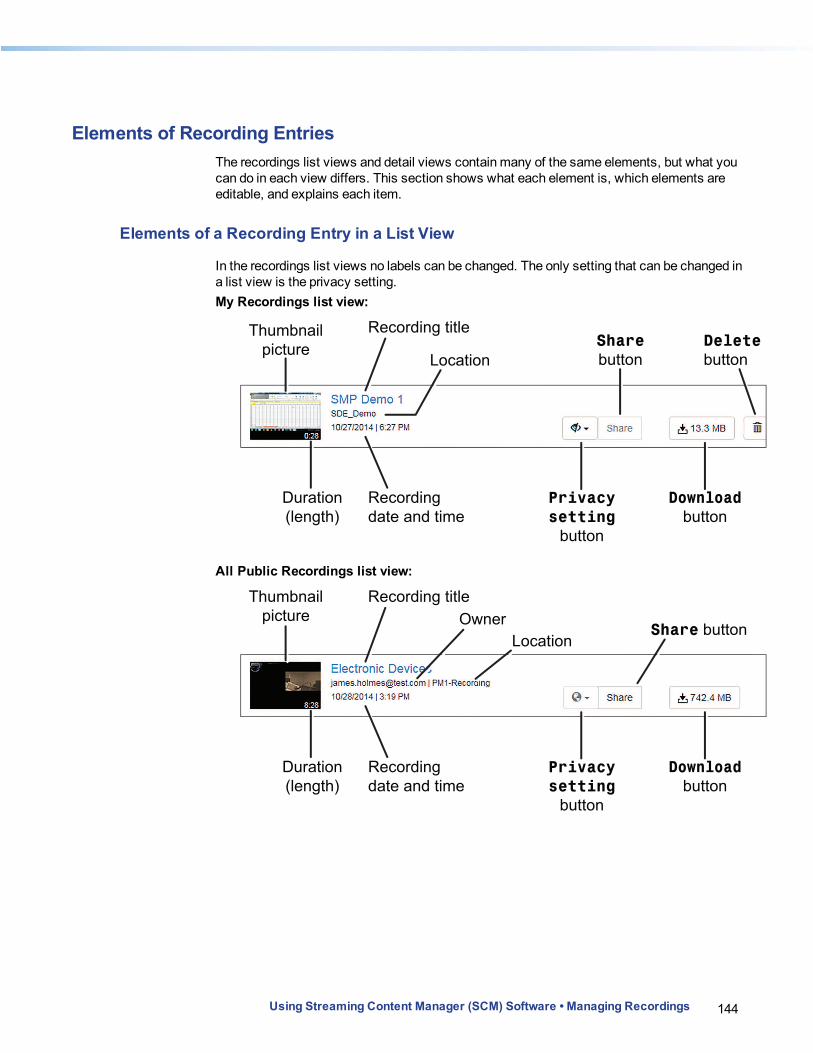
144Using Streaming Content Manager (SCM) Software • Managing Recordings
Elements of Recording EntriesThe recordings list views and detail views contain many of the same elements, but what you can do in each view differs. This section shows what each element is, which elements are editable, and explains each item.
Elements of a Recording Entry in a List View
In the recordings list views no labels can be changed. The only setting that can be changed in a list view is the privacy setting.My Recordings list view:
Thumbnail
pictureDelete
button
Download
button
Share
button
Privacy
setting
button
Recording title
Location
Recording
date and time
Duration
(length)
All Public Recordings list view:
Thumbnail
picture
Download
button
Share button
Privacy
setting
button
Recording title
Location
Recording
date and time
Duration
(length)
Owner
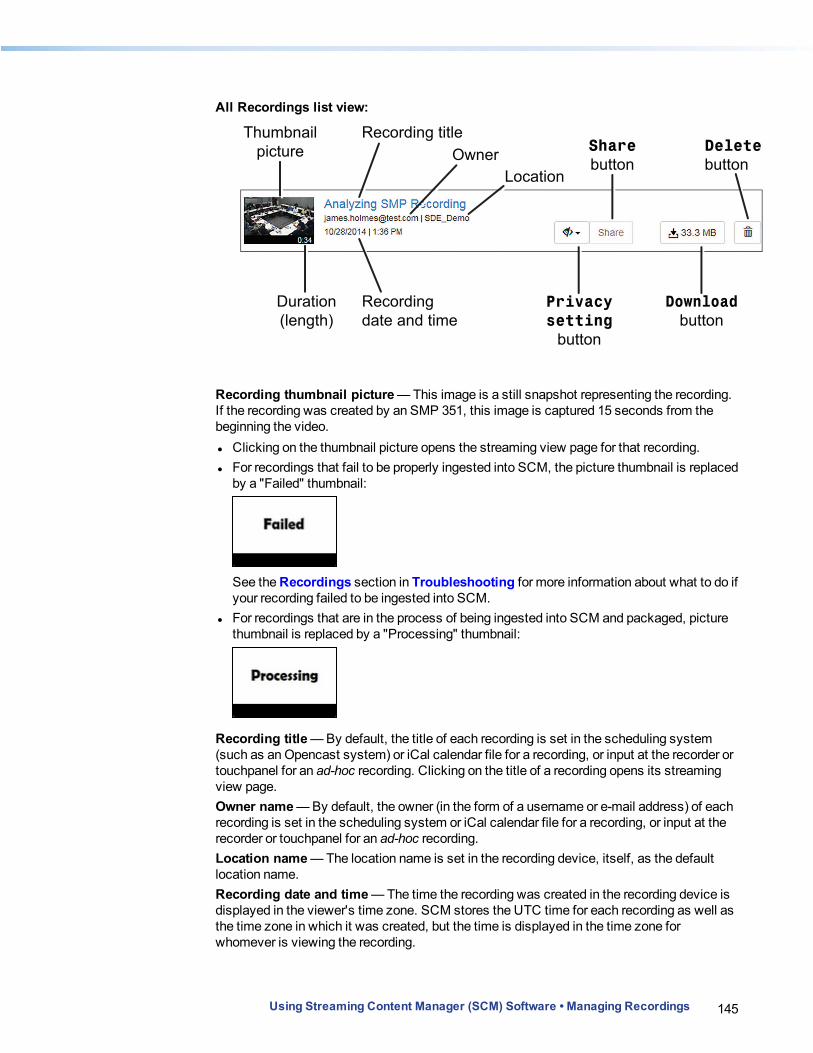
145Using Streaming Content Manager (SCM) Software • Managing Recordings
All Recordings list view:
Thumbnail
picture
Download
button
Share
button
Privacy
setting
button
Recording title
Location
Recording
date and time
Duration
(length)
Owner Delete
button
Recording thumbnail picture — This image is a still snapshot representing the recording. If the recording was created by an SMP 351, this image is captured 15 seconds from the beginning the video. l Clicking on the thumbnail picture opens the streaming view page for that recording. l For recordings that fail to be properly ingested into SCM, the picture thumbnail is replaced
by a "Failed" thumbnail:
See the Recordings section in Troubleshooting for more information about what to do if your recording failed to be ingested into SCM.
l For recordings that are in the process of being ingested into SCM and packaged, picture thumbnail is replaced by a "Processing" thumbnail:
Recording title — By default, the title of each recording is set in the scheduling system (such as an Opencast system) or iCal calendar file for a recording, or input at the recorder or touchpanel for an ad-hoc recording. Clicking on the title of a recording opens its streaming view page.Owner name — By default, the owner (in the form of a username or e-mail address) of each recording is set in the scheduling system or iCal calendar file for a recording, or input at the recorder or touchpanel for an ad-hoc recording.Location name — The location name is set in the recording device, itself, as the default location name.Recording date and time — The time the recording was created in the recording device is displayed in the viewer's time zone. SCM stores the UTC time for each recording as well as the time zone in which it was created, but the time is displayed in the time zone for whomever is viewing the recording.

146Using Streaming Content Manager (SCM) Software • Managing Recordings
Edit button — This button appears only for the recording owner or for administrators and only in the My Recordings page and the All Recordings page. Clicking this button opens the detail view page for the corresponding recording. The detail view page is where labels and settings can be edited for the recording.
Privacy setting — A button indicates the privacy setting (private, ; unlisted, ; public, ). More information on privacy settings is available in Recording Privacy Settings.Share button — For recordings with a public or unlisted privacy setting, clicking this button opens a pop-up window containing a URL link that you can copy and paste into an e-mail or text message to share the video with another user.
Download button ( ) — Click this button to download a zipped file of the recording package to your computer. The button indicates the size of the recording package.
Delete button ( ) — This button appears on the My Recordings page and on the All Recordings page but not on the All Public Recordings page. It allows you to delete the corresponding recording.
Elements of a Recording Entry in a Detail View
Detail view pages are accessible only to the recording owner and to administrators, not to guests or to other viewers. Detail view pages contain all the same elements found in the recordings list views described above, but with the following differences: l The thumbnail image is larger. l There is no Edit button. l You can edit the labels for title, owner, location, and date and time (see Editing
Recording Details). l You can change streaming and privacy settings. l You can select and upload a closed caption file (in .json format) for the recording.
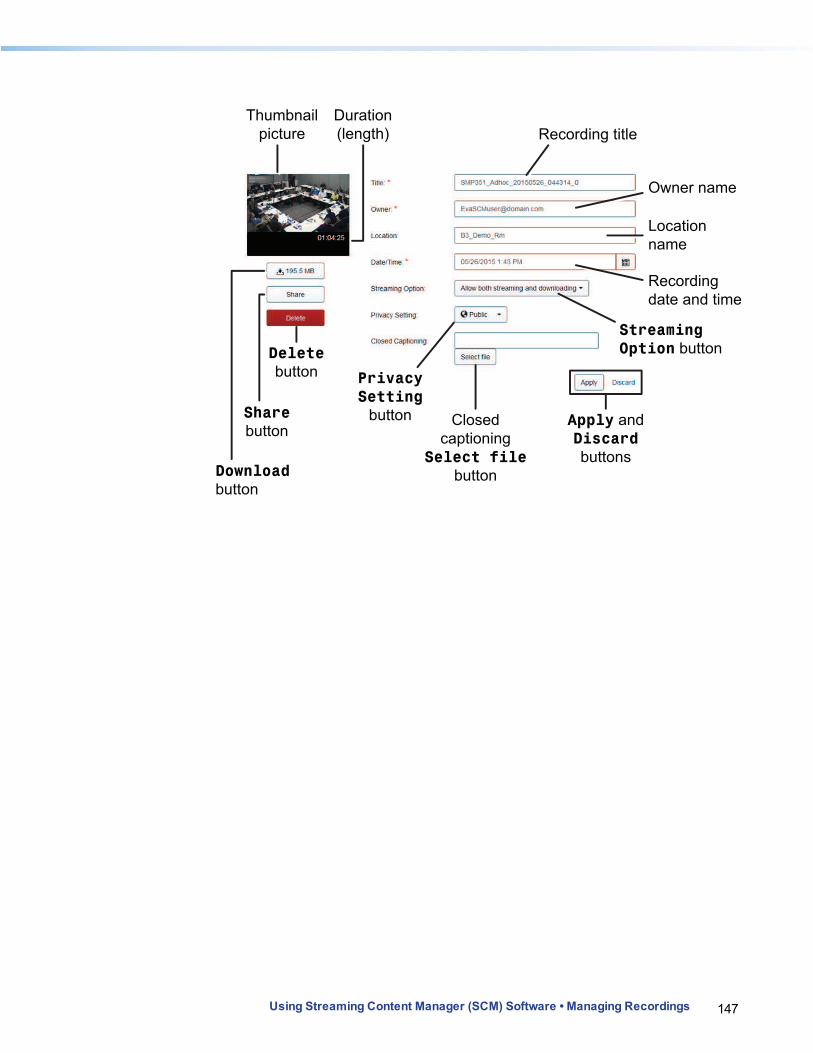
147Using Streaming Content Manager (SCM) Software • Managing Recordings
Recording title
Recording
date and time
Duration
(length)
Owner name
Location
name
Thumbnail
picture
Delete
button
Download
button
Share
button
Privacy
Setting
button Closed
captioning
Select file
button
Streaming
Option button
Apply and
Discard
buttons
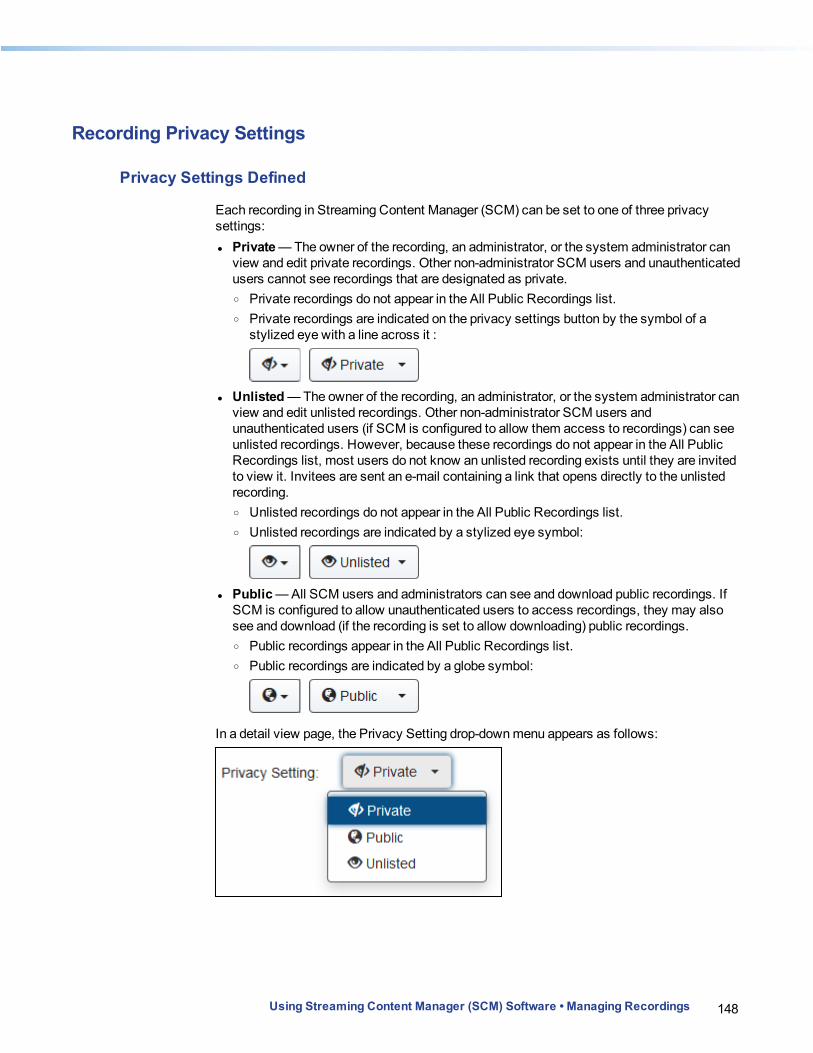
148Using Streaming Content Manager (SCM) Software • Managing Recordings
Recording Privacy Settings
Privacy Settings Defined
Each recording in Streaming Content Manager (SCM) can be set to one of three privacy settings: l Private — The owner of the recording, an administrator, or the system administrator can
view and edit private recordings. Other non-administrator SCM users and unauthenticated users cannot see recordings that are designated as private. o Private recordings do not appear in the All Public Recordings list. o Private recordings are indicated on the privacy settings button by the symbol of a
stylized eye with a line across it :
l Unlisted — The owner of the recording, an administrator, or the system administrator can
view and edit unlisted recordings. Other non-administrator SCM users and unauthenticated users (if SCM is configured to allow them access to recordings) can see unlisted recordings. However, because these recordings do not appear in the All Public Recordings list, most users do not know an unlisted recording exists until they are invited to view it. Invitees are sent an e-mail containing a link that opens directly to the unlisted recording. o Unlisted recordings do not appear in the All Public Recordings list. o Unlisted recordings are indicated by a stylized eye symbol:
l Public — All SCM users and administrators can see and download public recordings. If
SCM is configured to allow unauthenticated users to access recordings, they may also see and download (if the recording is set to allow downloading) public recordings. o Public recordings appear in the All Public Recordings list. o Public recordings are indicated by a globe symbol:
In a detail view page, the Privacy Setting drop-down menu appears as follows:
149Using Streaming Content Manager (SCM) Software • Managing Recordings
Default Privacy Setting
By default, all recordings are set to Private when they are ingested into SCM. Users can change this setting for any of their own recordings, and administrators can change the setting for any recording in the SCM system.
Privacy Settings and Unauthenticated Users
If SCM is set up to allow unauthenticated users to view recordings in SCM (see Setting Up Recording Package Settings), then people who do not have an account in SCM can view any recordings designated as public, and they can view unlisted recordings if they are sent an invitation to do so. The e-mailed invitation contains a link directly to the player view page for that recording.
150Using Streaming Content Manager (SCM) Software • Managing Recordings
Downloading a Recording Package
Why Download a Recording?
You may want to download a recording for a variety of reasons including the following: l To watch the recording at a later time or on another device. — To watch or review a
meeting, presentation, or lecture during your commute or at another time when you do not have access to the internet or the SCM system, download the recording package and copy it to your laptop computer.
l To save an archive copy locally. l To share the recording with someone who does not have an account in SCM if
SCM is not configured to allow unauthenticated users to access recordings.
What Is In The Recording Package?
When you download a recording from SCM, you are downloading the Extron Media Player (EMP) as well as the recording. The EMP package contains more than just an MP4 video file. When you download a recording it includes a folder of compressed (zipped) files that must be "unzipped" before playing the recording.The package includes: l An HTML file (Play_Video.html) — Open this file to play the recording. l A VideoPlayer folder containing the following files and elements:
o The .mp4 file for the video, itself o Thumbnail images for the video as captured by the recording device o Any chapter markers (images and timing information to sync with the video) created
during recording o The EMP o The themes, graphics, and style sheets used by the EMP o Metadata for the recording (including but not limited to the recording title,
owner/creator, location, recording date and time) o Timing synchronization information for the video, thumbnails, and chapter markers
How to Download a Recording
To download a recording package:
1. From any recordings list (such as My Recordings or All Public Recordings) or from a recording detail view page, click on the download button (see the example below) for the desired recording.
A dialog box may open in which you can select whether to open the zipped file (and choose a program with which to do that) or save the file.

151Using Streaming Content Manager (SCM) Software • Managing Recordings
2. If applicable, choose to save the file to your computer and click OK. The zipped file of the recordings package downloads to your computer.
3. Locate the file in the Downloads folder of your computer and extract or unzip it to a location of your choice. The recording can be played from that location (by opening the Play_Video.html file and using the EMP player controls within the browser window that opens).
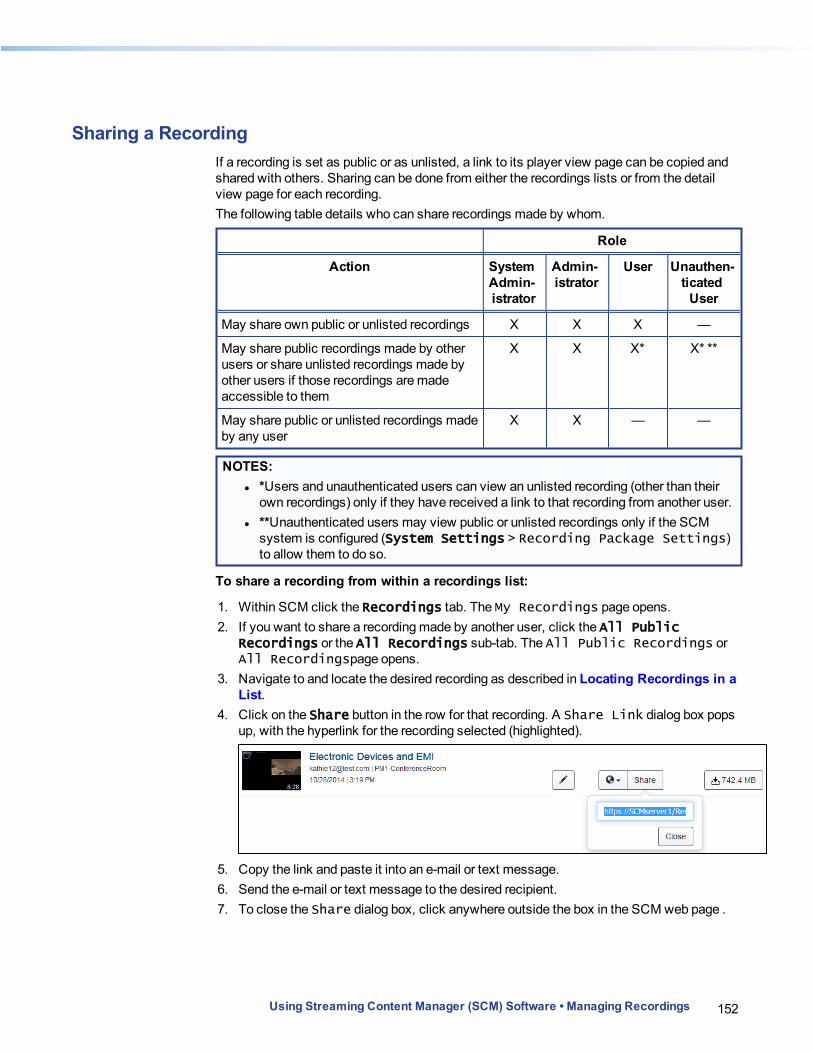
152Using Streaming Content Manager (SCM) Software • Managing Recordings
Sharing a RecordingIf a recording is set as public or as unlisted, a link to its player view page can be copied and shared with others. Sharing can be done from either the recordings lists or from the detail view page for each recording.The following table details who can share recordings made by whom.
Role
Action System Admin- istrator
Admin- istrator
User Unauthen- ticated
User
May share own public or unlisted recordings X X X —
May share public recordings made by other users or share unlisted recordings made by other users if those recordings are made accessible to them
X X X* X* **
May share public or unlisted recordings made by any user
X X — —
NOTES: l *Users and unauthenticated users can view an unlisted recording (other than their
own recordings) only if they have received a link to that recording from another user. l **Unauthenticated users may view public or unlisted recordings only if the SCM
system is configured (System Settings > Recording Package Settings) to allow them to do so.
To share a recording from within a recordings list:
1. Within SCM click the Recordings tab. The My Recordings page opens. 2. If you want to share a recording made by another user, click the All Public
Recordings or the All Recordings sub-tab. The All Public Recordings or All Recordingspage opens.
3. Navigate to and locate the desired recording as described in Locating Recordings in a List.
4. Click on the Share button in the row for that recording. A Share Link dialog box pops up, with the hyperlink for the recording selected (highlighted).
5. Copy the link and paste it into an e-mail or text message. 6. Send the e-mail or text message to the desired recipient. 7. To close the Share dialog box, click anywhere outside the box in the SCM web page .

153Using Streaming Content Manager (SCM) Software • Managing Recordings
To share a recording from a recording detail view page:
1. Perform steps 1 through 3 in the above instructions for sharing a recording from a list. 2. Click on the Edit button for the desired recording. The detail view page for that recording
opens. 3. Click on the Share button. A Share dialog box pops up, with the hyperlink for the
recording selected (highlighted).
4. Copy the link and paste it into an e-mail or text message. 5. Send the e-mail or text message to the desired recipient. 6. To close the Share dialog box, click anywhere outside the box in the SCM web page .
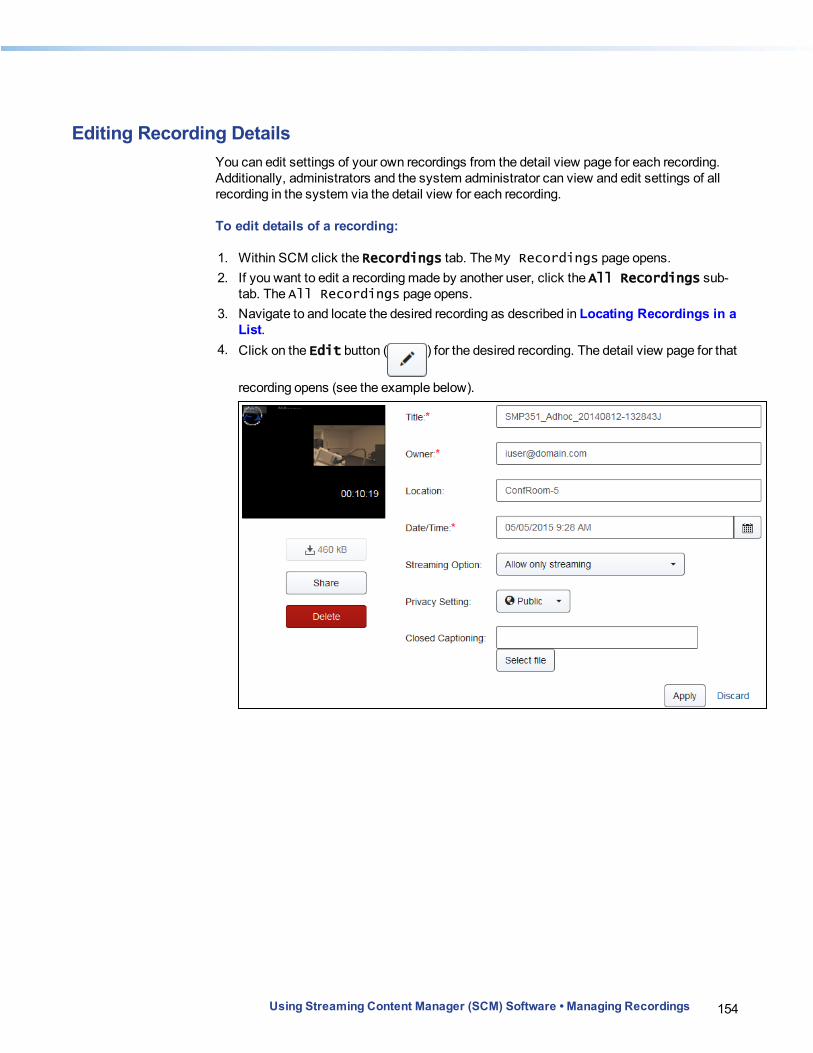
154Using Streaming Content Manager (SCM) Software • Managing Recordings
Editing Recording DetailsYou can edit settings of your own recordings from the detail view page for each recording. Additionally, administrators and the system administrator can view and edit settings of all recording in the system via the detail view for each recording.
To edit details of a recording:
1. Within SCM click the Recordings tab. The My Recordings page opens. 2. If you want to edit a recording made by another user, click the All Recordings sub-
tab. The All Recordings page opens. 3. Navigate to and locate the desired recording as described in Locating Recordings in a
List. 4. Click on the Edit button ( ) for the desired recording. The detail view page for that
recording opens (see the example below).

155Using Streaming Content Manager (SCM) Software • Managing Recordings
5. Edit labels and settings shown to the right of the thumbnail picture. l For labels, click in the field (Title, Owner, Location, or Date/Time) that you
want to edit and use standard keyboard controls to edit or replace text in the field as needed.
NOTES: l Required fields (Title, Owner, and Date/Time) are indicated by an
asterisk after the name of the field. Those fields cannot be left blank. l The owner name must be the name of a user who is part of the SCM system.
Names entered here are verified within the SCM accounts list. As you type in characters, the SCM system opens a list of suggested user names below the Owner field. Click on a name in that list to select it.
l When you change the owner name, the ownership of the recording changes once the new owner name is saved. If this is your recording and you change this text to the user name of someone else, the recording will no longer appear in your My Recordings list. You will not be able to edit properties of the recording once it is reassigned to another user, unless you are an administrator. See Tips on editing specific fields later in this topic for more details on the Owner field.
For the Date/Time field you can also click on the calendar icon on the right side of the field to open a date/time tool (shown below) where you can click on a date in the calendar or click the clock icon at the bottom of the tool to shown and use the time selector.
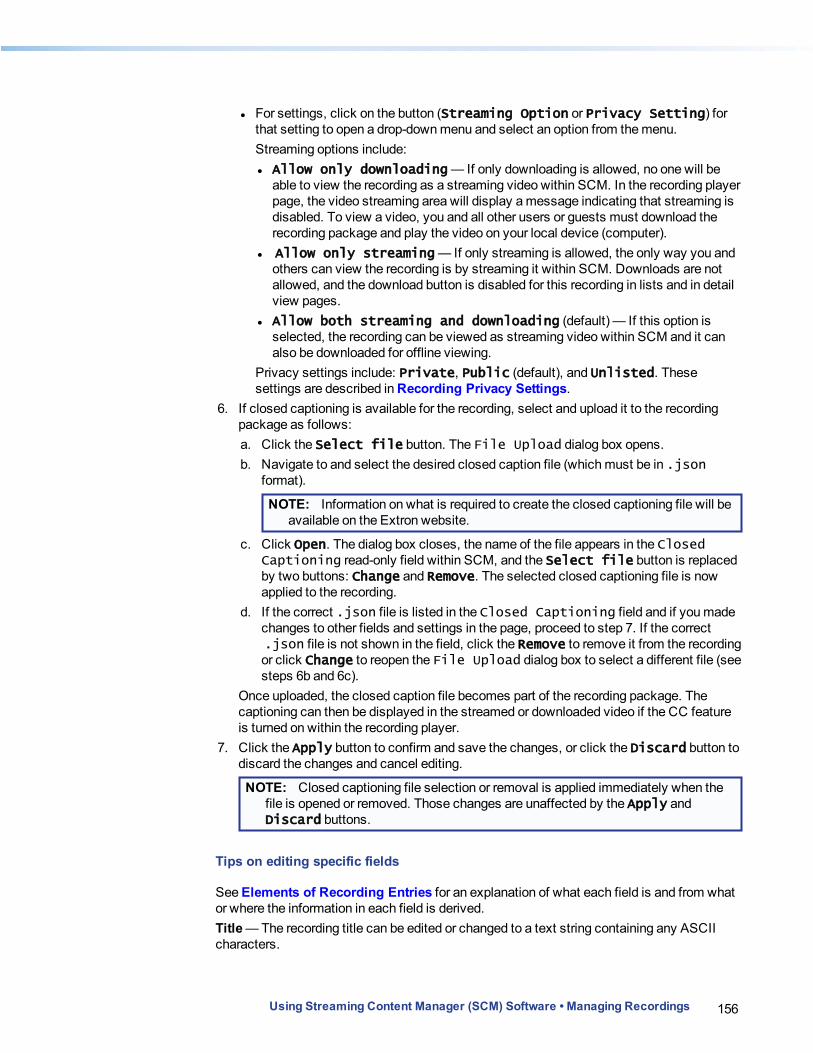
156Using Streaming Content Manager (SCM) Software • Managing Recordings
l For settings, click on the button (Streaming Option or Privacy Setting) for that setting to open a drop-down menu and select an option from the menu.Streaming options include: l Allow only downloading — If only downloading is allowed, no one will be
able to view the recording as a streaming video within SCM. In the recording player page, the video streaming area will display a message indicating that streaming is disabled. To view a video, you and all other users or guests must download the recording package and play the video on your local device (computer).
l Allow only streaming — If only streaming is allowed, the only way you and others can view the recording is by streaming it within SCM. Downloads are not allowed, and the download button is disabled for this recording in lists and in detail view pages.
l Allow both streaming and downloading (default) — If this option is selected, the recording can be viewed as streaming video within SCM and it can also be downloaded for offline viewing.
Privacy settings include: Private, Public (default), and Unlisted. These settings are described in Recording Privacy Settings.
6. If closed captioning is available for the recording, select and upload it to the recording package as follows: a. Click the Select file button. The File Upload dialog box opens. b. Navigate to and select the desired closed caption file (which must be in .json
format).
NOTE: Information on what is required to create the closed captioning file will be available on the Extron website.
c. Click Open. The dialog box closes, the name of the file appears in the Closed Captioning read-only field within SCM, and the Select file button is replaced by two buttons: Change and Remove. The selected closed captioning file is now applied to the recording.
d. If the correct .json file is listed in the Closed Captioning field and if you made changes to other fields and settings in the page, proceed to step 7. If the correct .json file is not shown in the field, click the Remove to remove it from the recording or click Change to reopen the File Upload dialog box to select a different file (see steps 6b and 6c).
Once uploaded, the closed caption file becomes part of the recording package. The captioning can then be displayed in the streamed or downloaded video if the CC feature is turned on within the recording player.
7. Click the Apply button to confirm and save the changes, or click the Discard button to discard the changes and cancel editing.
NOTE: Closed captioning file selection or removal is applied immediately when the file is opened or removed. Those changes are unaffected by the Apply and Discard buttons.
Tips on editing specific fields
See Elements of Recording Entries for an explanation of what each field is and from what or where the information in each field is derived.Title — The recording title can be edited or changed to a text string containing any ASCII characters.

157Using Streaming Content Manager (SCM) Software • Managing Recordings
Owner — You can change the owner in order to reassign a recording to someone else. l Once the owner of a recording is changed, that recording appears in the My Recordings
list for that user and is removed from the My Recordings list of the previous owner. l As you enter a new e-mail address or username, a pop-up list opens below the field
displaying any matching or partially matching e-mail address or username that already exists within the SCM accounts list. Click on the desired entry to select it.
NOTES: l The owner name must be the name of a user who is part of the SCM system.
Names entered here are verified within the SCM accounts list. l When you change the owner name, the ownership of the recording changes once
the new owner name is saved. If this is your recording and you change this text to the user name of someone else, the recording will no longer appear in your My Recordings list. You will not be able to edit properties of the recording once it is reassigned to another user, unless you are an administrator.
Location — The location name is set in the recording device, itself, as the default location name. This can be changed to correct the name or to provide a more descriptive location name.
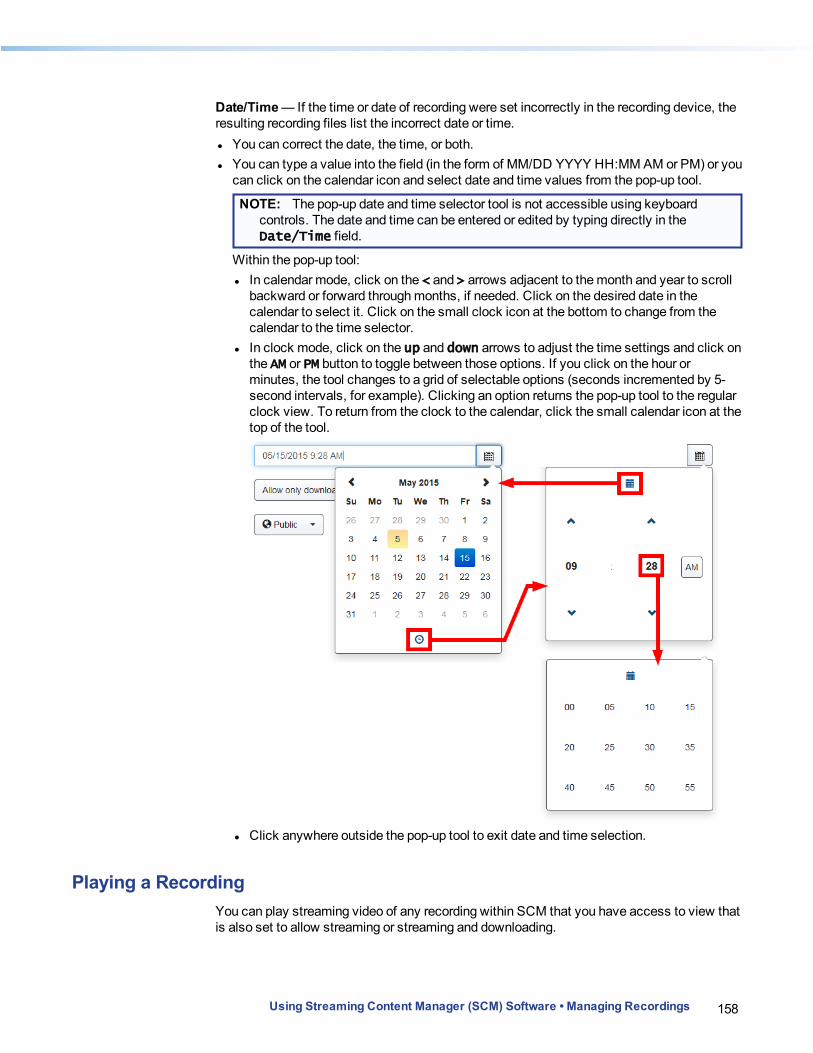
158Using Streaming Content Manager (SCM) Software • Managing Recordings
Date/Time — If the time or date of recording were set incorrectly in the recording device, the resulting recording files list the incorrect date or time. l You can correct the date, the time, or both. l You can type a value into the field (in the form of MM/DD YYYY HH:MM AM or PM) or you
can click on the calendar icon and select date and time values from the pop-up tool.
NOTE: The pop-up date and time selector tool is not accessible using keyboard controls. The date and time can be entered or edited by typing directly in the Date/Time field.
Within the pop-up tool: l In calendar mode, click on the < and > arrows adjacent to the month and year to scroll
backward or forward through months, if needed. Click on the desired date in the calendar to select it. Click on the small clock icon at the bottom to change from the calendar to the time selector.
l In clock mode, click on the up and down arrows to adjust the time settings and click on the AM or PM button to toggle between those options. If you click on the hour or minutes, the tool changes to a grid of selectable options (seconds incremented by 5-second intervals, for example). Clicking an option returns the pop-up tool to the regular clock view. To return from the clock to the calendar, click the small calendar icon at the top of the tool.
l Click anywhere outside the pop-up tool to exit date and time selection.
Playing a RecordingYou can play streaming video of any recording within SCM that you have access to view that is also set to allow streaming or streaming and downloading.
159Using Streaming Content Manager (SCM) Software • Managing Recordings
To play a recording in SCM:
1. Locate the desired recording in a recordings list (see Locating Recordings in a List). 2. Open the player page for the desired recording (see Accessing a Player Page). 3. Use the player controls at the bottom of the page (see Playing a Recording) to change
playback settings as desired and click the Play/Pause button to start and stop playing the video stream. Alternatively, you can use keyboard controls to control video playback and audio volume (see Using Keyboard Controls).
To download a recording from SCM and play it offline using EMP:
1. Locate the desired recording in a recording list (see Locating Recordings in a List).
2. If the recording is set to allow downloading, click the Download button ( ) for that recording.
3. If offered the choice between opening the package or saving it, select Save. The recording package downloads to your computer or other device in the form of a .zip file.
4. Locate the downloaded file and extract (unzip) the package to a folder of your choice.
NOTE: This step is important because you cannot play the recording without unzipping the files first. The player cannot read a zipped video file.
5. Open the folder for that recording and open the Play_Video.html file. The Extron Media Player (EMP) opens within a browser and loads the recording. The page looks very similar to the Player page within SCM (see Player Page Features and How to Use Them, below), with a few exceptions. It does not have any SCM tab controls at the top of the page, just a header displaying the logo (either the default Extron logo or the logo of your organization) on the left, the recording title, and an Information button. There are no Edit or Download buttons within the stand-alone EMP player window.
6. Use the player controls at the bottom of the window (see Playing a Recording) to change playback settings as desired and click the Play/Pause button to start and stop playing the video stream. Alternatively, you can use keyboard controls to control video playback and audio volume (see Using Keyboard Controls).
Accessing a Player Page
To open a player page: l From within any list view page (such as the My Recordings list or All Public Recordings
list), click on the thumbnail image of a recording or click on its title to open the player page for that particular recording.
l From a detail view page, click on the recording thumbnail image to open the player page.
Player Page Features and How to Use Them
How the SCM Player page is organized
The Player page is organized into three main zones:
1. The header at the top of the window 2. The recording playback area in the center of the window 3. The playback controls and indicators region along the bottom of the window
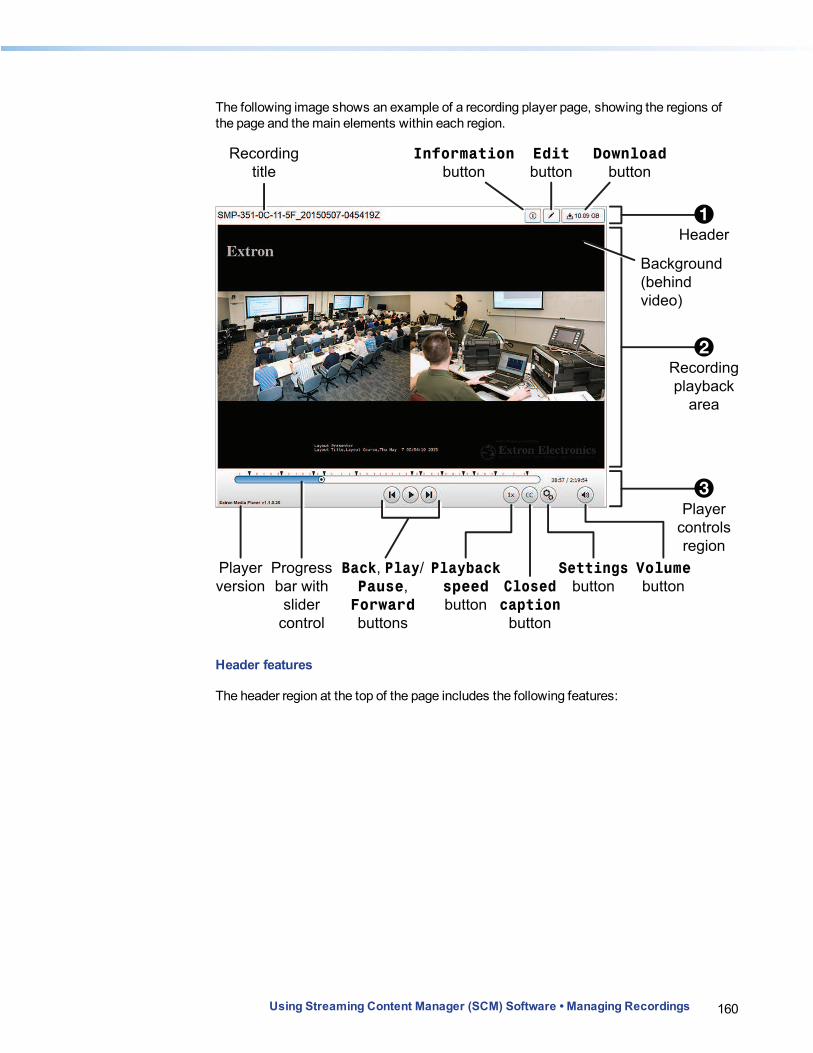
160Using Streaming Content Manager (SCM) Software • Managing Recordings
The following image shows an example of a recording player page, showing the regions of the page and the main elements within each region.
Recording
title
Progress
bar with
slider
control
Player
version
Header
Information
button
Edit
button
Download
button
Player
controls
region
Recording
playback
area
Background
(behind
video)
Back, Play/
Pause,
Forward
buttons
Playback
speed
button
Settings
buttonClosed
caption
button
Volume
button
1
2
3
Header features
The header region at the top of the page includes the following features:
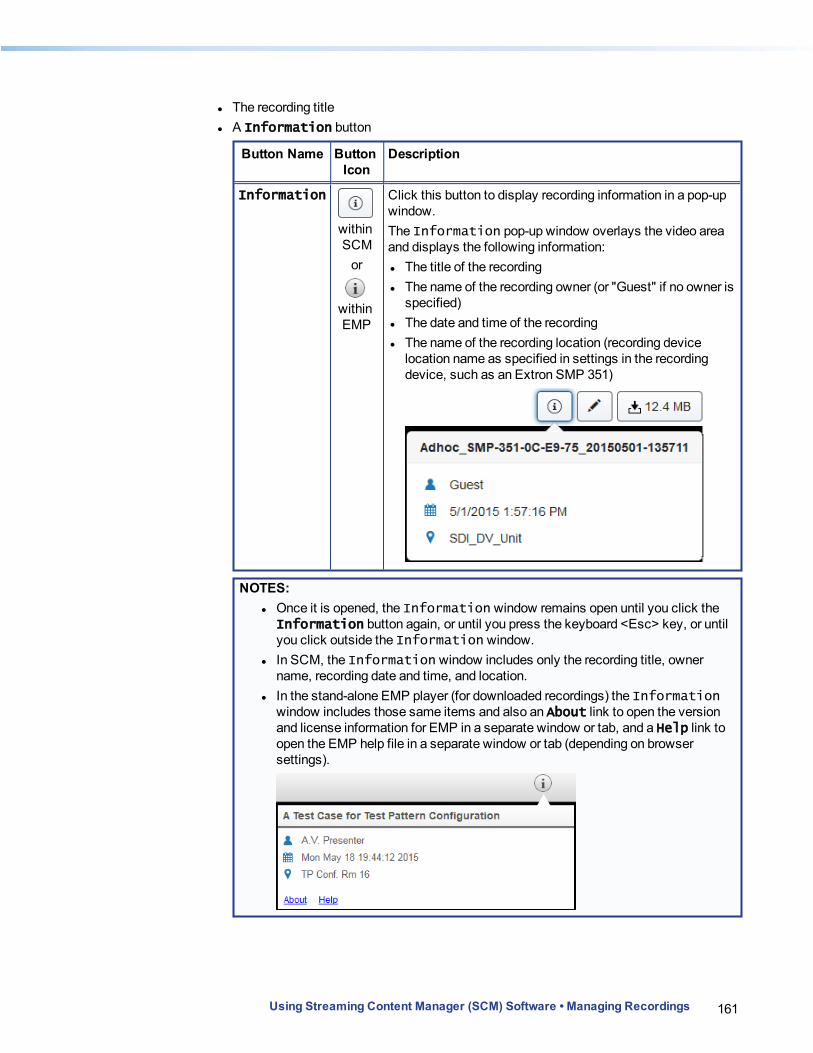
161Using Streaming Content Manager (SCM) Software • Managing Recordings
l The recording title l A Information button
Button Name Button Icon
Description
Information
within SCM
or
within EMP
Click this button to display recording information in a pop-up window.The Information pop-up window overlays the video area and displays the following information: l The title of the recording l The name of the recording owner (or "Guest" if no owner is
specified) l The date and time of the recording l The name of the recording location (recording device
location name as specified in settings in the recording device, such as an Extron SMP 351)
NOTES: l Once it is opened, the Information window remains open until you click the
Information button again, or until you press the keyboard <Esc> key, or until you click outside the Information window.
l In SCM, the Information window includes only the recording title, owner name, recording date and time, and location.
l In the stand-alone EMP player (for downloaded recordings) the Information window includes those same items and also an About link to open the version and license information for EMP in a separate window or tab, and a Help link to open the EMP help file in a separate window or tab (depending on browser settings).

162Using Streaming Content Manager (SCM) Software • Managing Recordings
l An Edit button (if you are the recording owner or an administrator)
Button Name
Button Icon
Description
Edit This button provides a link to the SCM detail view page for the recording owner or an administrator.
l A Download button ( ) (if downloading is enabled for the recording).
Recording playback area features
The recording playback area (center pane) displays the following: l The recorded video l A plain background, if the video does not completely fill the area l Closed captions, if they have been uploaded in the form of a .json file with the recording.
If closed captioning is turned on, captions are displayed in the bottom center of the video viewing area, overlaid over the video.
l An "Extron Electronics" watermark in the lower right corner.
Playback controls region features
The playback control and settings region at the bottom of the page includes: l A progress indicator bar with thumbnail images, chapter marker indicators, and a
selectable slider that allows you to navigate backwards or forwards to any point in the recording n The standard thumbnail images are miniature images of the picture at a given point in
the video. They are located at points indicated by short red lines above the progress bar and appear when you hover your mouse or other pointing device over the lines or the progress bar at those points. Thumbnails are automatically generated and saved by the recording device. An SMP 351 creates the first thumbnail 15 seconds into the recording and then every five minutes during recording.
n Chapter markers, indicated by downward pointing arrows ( ) are manually entered by the presenter of the recording when they push a button on the recording device (the Mark button on an SMP 351). They are often used to indicate a change of topic. Chapter markers also include a small thumbnail image which appears if you hover a mouse or other pointing device over the marker or progress bar.
l Time played and total duration for the recording

163Using Streaming Content Manager (SCM) Software • Managing Recordings
l Player controls n Back, Play/Pause, and Forward buttons
Button Name
Button Icon
Description
Back Click Back to move video playback to the previous chapter marker or to move to the beginning of the recording (if no chapter markers exist or if there are no chapter markers earlier than the current part of the recording).
Play or Pause
Click Play to play or resume playback of the recording. While the recording is playing, the button becomes a Pause button. Click Pause to pause playback. While recording is paused, the button becomes a Play button.
Forward Click Forward to advance the recording to the location of the next chapter marker. If the recording has no chapter markers or there are no chapter markers after the currently selected part of the recording, then clicking the Forward button button moves the video playback to the end of the recording.
n Playback speed button
Button Name
Button Icon
Description
Playback speed
Selecting this button opens a pop-up menu from which you can select playback speeds from 0.5x to 2x the actual speed of the video.
n CC (Closed captioning) button
Button Name
Button Icon
Description
CC This button appears only if a closed caption file has been uploaded for the recording. Click the CC button to toggle display of closed captioning text on or off.
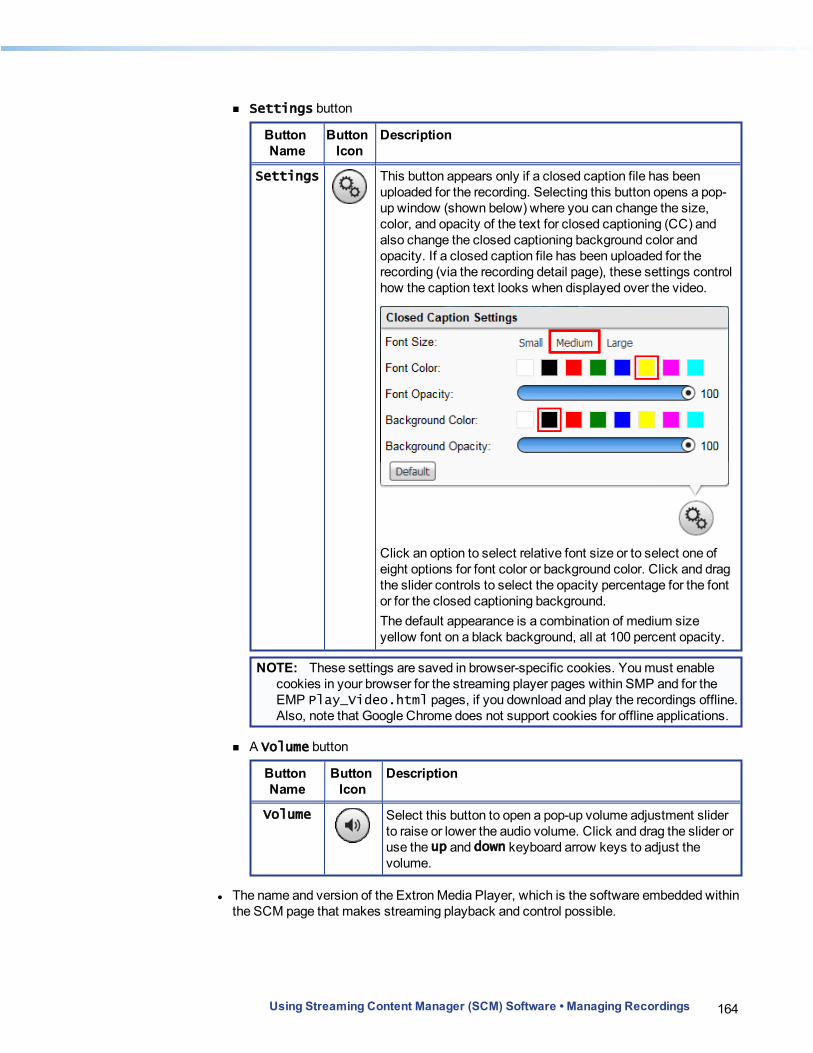
164Using Streaming Content Manager (SCM) Software • Managing Recordings
n Settings button
Button Name
Button Icon
Description
Settings This button appears only if a closed caption file has been uploaded for the recording. Selecting this button opens a pop-up window (shown below) where you can change the size, color, and opacity of the text for closed captioning (CC) and also change the closed captioning background color and opacity. If a closed caption file has been uploaded for the recording (via the recording detail page), these settings control how the caption text looks when displayed over the video.
Click an option to select relative font size or to select one of eight options for font color or background color. Click and drag the slider controls to select the opacity percentage for the font or for the closed captioning background.The default appearance is a combination of medium size yellow font on a black background, all at 100 percent opacity.
NOTE: These settings are saved in browser-specific cookies. You must enable cookies in your browser for the streaming player pages within SMP and for the EMP Play_Video.html pages, if you download and play the recordings offline. Also, note that Google Chrome does not support cookies for offline applications.
n A Volume button
Button Name
Button Icon
Description
Volume Select this button to open a pop-up volume adjustment slider to raise or lower the audio volume. Click and drag the slider or use the up and down keyboard arrow keys to adjust the volume.
l The name and version of the Extron Media Player, which is the software embedded within the SCM page that makes streaming playback and control possible.

165Using Streaming Content Manager (SCM) Software • Managing Recordings
Using Keyboard Controls
The Player page supports basic keyboard controls (such as using the <Tab> key to move from one element to another or pressing <Esc> to exit a menu or pop-up window). In addition, you can control media playback through by using combinations of keyboard keystrokes. The keyboard shortcuts (available at all times within the SCM Player page or when playing downloaded recordings using Extron Media Player) are detailed in the following table.
NOTE: You may need to press the <F6> key to refresh the page and be able to access the URL field of the browser.
Control Category
Keyboard Shortcut Command or Control
Recording playback and display
<Space bar> Play or pause the presentation.
<Shift+period> Skip to the next thumbnail (not chapter marker).
<Shift+comma> Skip to the previous thumbnail (not chapter marker).
<Shift+N> Skip to the next chapter marker.
<Shift+P> Skip to the previous chapter marker.
<Shift+C> Toggle the closed caption overlay on or off.
<Shift+1>, <Shift+2>, <Shift+3>, and so forth
Toggle on or off the associated video window (video-1, video-2, video-3, and so forth).
<Shift+left arrow> Decrease playback speed.
<Shift+right arrow> Increase playback speed.
Audio adjustment
<Up arrow> Increase program audio volume.
<Down arrow> Decrease program audio volume.
<Shift+M> Mute or unmute program audio.
Additional controls
<Shift+I> Open the Information menu.
NOTE: The <Up arrow> and <Down arrow> keys adjust the audio volume from anywhere in the playback page except when the control focus is within either of the following two pop-up elements. l Within the Playback speed pop-up control, use the <Up arrow> and <Down
arrow> keys to select the playback speed. l Within the Settings pop-up window, use the <Up arrow> and <Down arrow> keys
to increase and decrease font and background opacity.
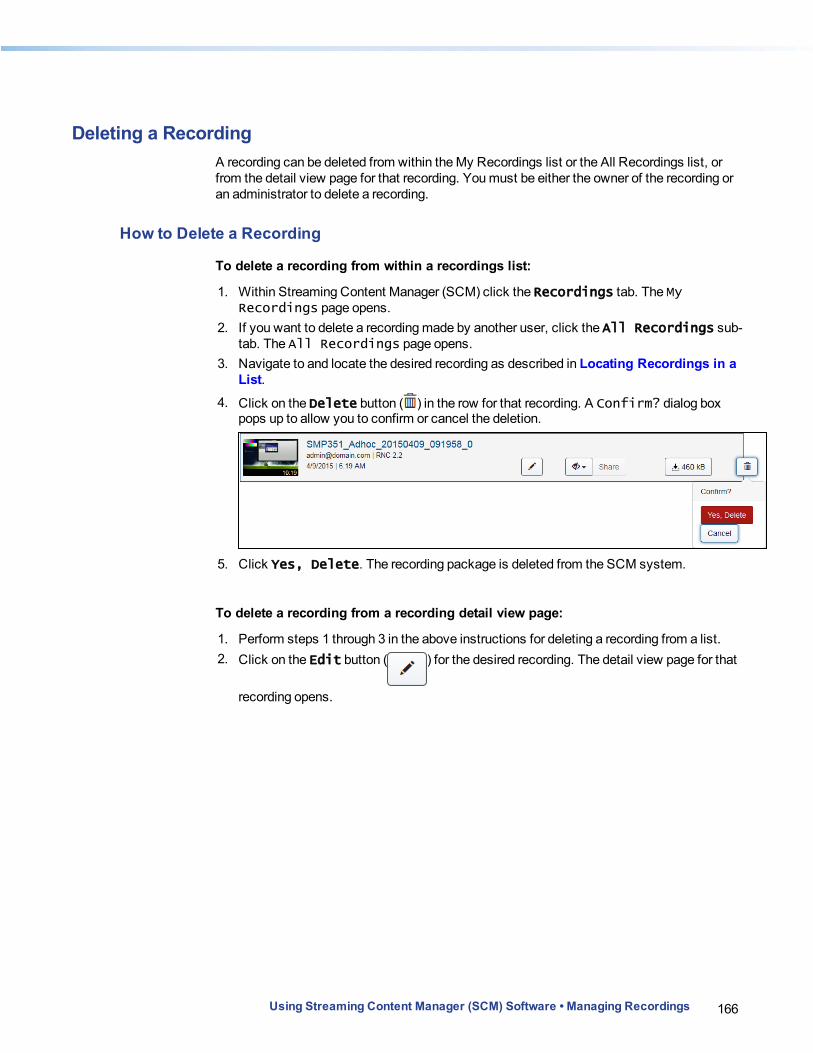
166Using Streaming Content Manager (SCM) Software • Managing Recordings
Deleting a RecordingA recording can be deleted from within the My Recordings list or the All Recordings list, or from the detail view page for that recording. You must be either the owner of the recording or an administrator to delete a recording.
How to Delete a Recording
To delete a recording from within a recordings list:
1. Within Streaming Content Manager (SCM) click the Recordings tab. The My Recordings page opens.
2. If you want to delete a recording made by another user, click the All Recordings sub-tab. The All Recordings page opens.
3. Navigate to and locate the desired recording as described in Locating Recordings in a List.
4. Click on the Delete button ( ) in the row for that recording. A Confirm? dialog box pops up to allow you to confirm or cancel the deletion.
5. Click Yes, Delete. The recording package is deleted from the SCM system.
To delete a recording from a recording detail view page:
1. Perform steps 1 through 3 in the above instructions for deleting a recording from a list. 2. Click on the Edit button ( ) for the desired recording. The detail view page for that
recording opens.
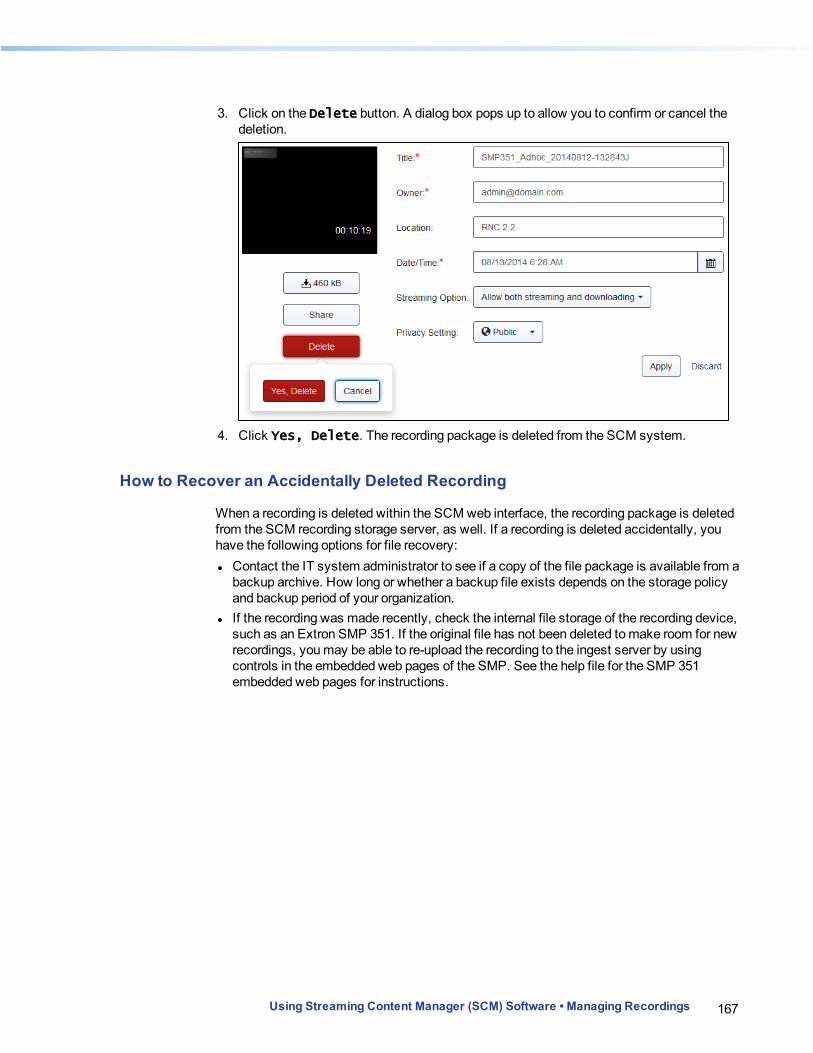
167Using Streaming Content Manager (SCM) Software • Managing Recordings
3. Click on the Delete button. A dialog box pops up to allow you to confirm or cancel the deletion.
4. Click Yes, Delete. The recording package is deleted from the SCM system.
How to Recover an Accidentally Deleted Recording
When a recording is deleted within the SCM web interface, the recording package is deleted from the SCM recording storage server, as well. If a recording is deleted accidentally, you have the following options for file recovery: l Contact the IT system administrator to see if a copy of the file package is available from a
backup archive. How long or whether a backup file exists depends on the storage policy and backup period of your organization.
l If the recording was made recently, check the internal file storage of the recording device, such as an Extron SMP 351. If the original file has not been deleted to make room for new recordings, you may be able to re-upload the recording to the ingest server by using controls in the embedded web pages of the SMP. See the help file for the SMP 351 embedded web pages for instructions.
Working With the Extron Media Player
About the Extron Media Player (EMP)The Extron Media Player (EMP) is a browser-based media player for recordings that are produced by the Extron Streaming Media Processor (SMP) (for information on the SMP, visit www.extron.com). EMP provides an enhanced playback experience, incorporating metadata, time-synchronized thumbnail images, and advanced playback controls into the user interface. The data and controls provide the user with greater ability to efficiently navigate and play back the recorded material. EMP requires no software installation and can be operated from virtually any PC using a variety of browser applications.
How Streaming Content Manager Uses the EMP
l Some elements of EMP, such as logo graphics files, are selected within the Streaming Content Manager system before the EMP player is packaged with recordings.
l During file ingestion and processing, Streaming Content Manager packages the recording and its thumbnails, chapter markers, logo file, and metadata with the EMP player. If a closed captioning .json file is available, it can be uploaded from within SCM and packaged with the recording.
l When a user downloads a recording to play using the stand-alone EMP player, everything needed to play and navigate through the recording is in the package.
l When someone plays a recording from within an SCM recording player page, EMP streams the recording from the SCM server. During online playback, the viewer has access to many of the controls available in the stand-alone EMP program, though does not have the ability to edit information about the recordings through that interface.
Which EMP Features Can Be Customized Within SCM
Which features can be customized within SCM
For recordings that are packaged by SCM, SCM administrators can customize the logo that appears in EMP. For instructions see Configuring the EMP Player. Also, closed captioning files in .json format can be uploaded in SCM and packaged with the recording.
NOTE: Information on what is required to create a closed captioning file will be available on the Extron website.
Using Streaming Content Manager (SCM) Software • Working With the Extron Media Player 168

169Using Streaming Content Manager (SCM) Software • Working With the Extron Media Player
Which features can be customized within the EMP player
Closed captioning font color, size, and opacity and background color and opacity can be selected using controls within the EMP player.
Configuring the EMP PlayerThe SCM system administrator or other SCM administrators can customize (change) the logo image that appears in EMP. This can be accomplished by: l Replacing the logo file directly from the SCM server folder.
NOTES: l Files for these images must be in PNG format. l Within EMP the logo height is restricted to 80 pixels and the width is scaled
according to the native aspect ratio of the file.
To replace a logo file via the SCM server:
1. Log in to the SCM server as an administrator with read/write privileges. 2. Using a file manager program, navigate to and open
\\<servername>\wwwroot\SCM\Windows Services\Distribution Manager\Resources\VideoPlayer\images\customer_images where servername is the name and root path of the server where SCM is installed.
3. Copy the PNG file for the logo into that server location.
NOTE: The file for the logo must be named "company_logo.png" (without quotation marks).
SCM and EMP automatically recognize the new file and will use the new file in recording packages created after they have been uploaded.
Troubleshooting
This section details various situations you may encounter when working with Streaming Content Manager and suggests possible causes and solutions. Issues are grouped by subject as follows: l SCM system access issues l SCM user interface issues l Installation or upgrade issues l Recordings issues l E-mail issues l Database issues l Account validation issues l Assorted system and hardware issues
Log files can aid in troubleshooting. To view the log files from a web browser: click the Support tab. The Support page opens, displaying links to all the available log files, which you can download and open in a text editing program. To view the log files on the local drive of the SCM Web server using a file explorer program, navigate to C:\inetpub\wwwroot\SCM\Log.
SCM System Access
Problem Cause Solution
The SCM web pages do not load. Instead the browser displays a "Page not found 404" error message.
IIS may not have been set for HTTPS binding. HTTPS binding is required for SCM.
Follow the instructions in Adding HTTPS Binding.
Using Streaming Content Manager (SCM) Software • Troubleshooting 170
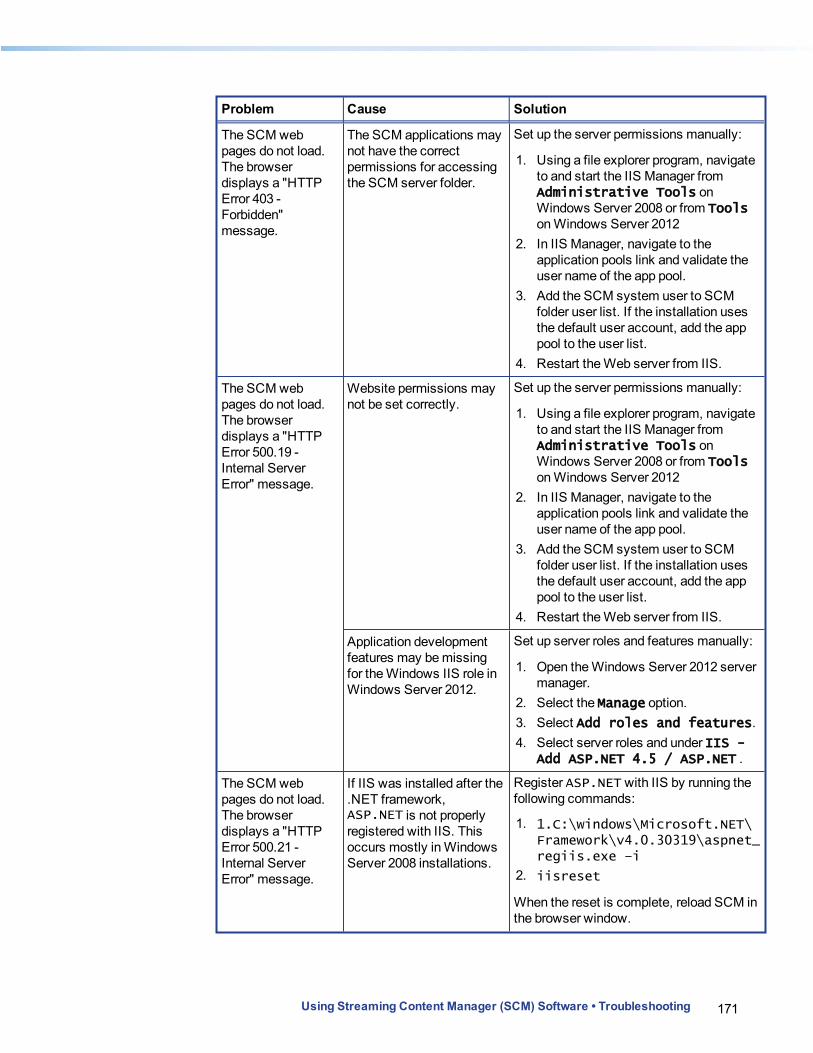
171Using Streaming Content Manager (SCM) Software • Troubleshooting
Problem Cause Solution
The SCM web pages do not load. The browser displays a "HTTP Error 403 - Forbidden" message.
The SCM applications may not have the correct permissions for accessing the SCM server folder.
Set up the server permissions manually:
1. Using a file explorer program, navigate to and start the IIS Manager from Administrative Tools on Windows Server 2008 or from Tools on Windows Server 2012
2. In IIS Manager, navigate to the application pools link and validate the user name of the app pool.
3. Add the SCM system user to SCM folder user list. If the installation uses the default user account, add the app pool to the user list.
4. Restart the Web server from IIS.
The SCM web pages do not load. The browser displays a "HTTP Error 500.19 - Internal Server Error" message.
Website permissions may not be set correctly.
Set up the server permissions manually:
1. Using a file explorer program, navigate to and start the IIS Manager from Administrative Tools on Windows Server 2008 or from Tools on Windows Server 2012
2. In IIS Manager, navigate to the application pools link and validate the user name of the app pool.
3. Add the SCM system user to SCM folder user list. If the installation uses the default user account, add the app pool to the user list.
4. Restart the Web server from IIS.
Application development features may be missing for the Windows IIS role in Windows Server 2012.
Set up server roles and features manually:
1. Open the Windows Server 2012 server manager.
2. Select the Manage option. 3. Select Add roles and features. 4. Select server roles and under IIS -
Add ASP.NET 4.5 / ASP.NET .
The SCM web pages do not load. The browser displays a "HTTP Error 500.21 - Internal Server Error" message.
If IIS was installed after the .NET framework, ASP.NET is not properly registered with IIS. This occurs mostly in Windows Server 2008 installations.
Register ASP.NET with IIS by running the following commands:
1. 1.C:\windows\Microsoft.NET\Framework\v4.0.30319\aspnet_regiis.exe –i
2. iisreset
When the reset is complete, reload SCM in the browser window.

172Using Streaming Content Manager (SCM) Software • Troubleshooting
Problem Cause Solution
I cannot log in. I forgot my password. l If you have a local SCM account, reset your password (see Resetting or Changing Your Password).
l If you have an account with access managed by an Active Directory (AD) system, contact your IT system administrator for assistance with your password.
For a comparison of local and AD accounts, see Comparing User Types Based on Origin (Local or AD Accounts).
The system fails to authenticate your credentials.
l If you have a local SCM account, ask an SCM administrator to create a link for you to reset your password.
l If you have an account with access managed by an Active Directory (AD) system, AD connection may be temporarily disabled. An SCM administrator can enable the AD Connection (see Setting Up LDAP/AD Connections).
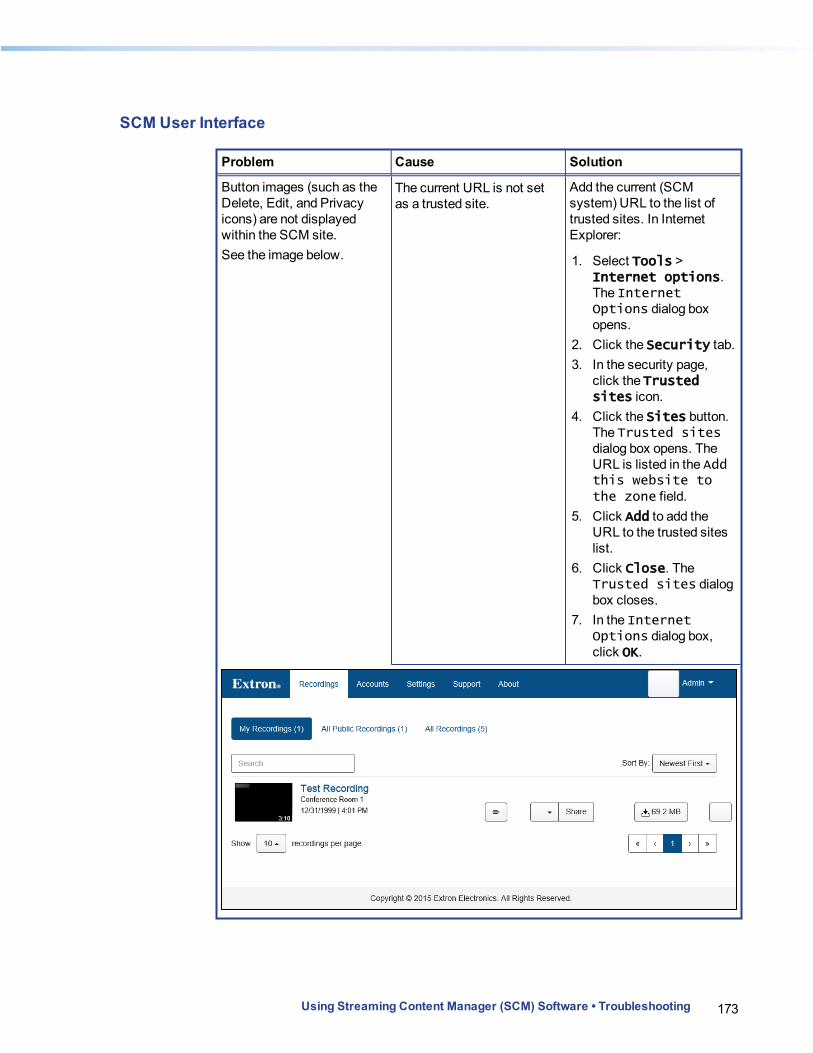
173Using Streaming Content Manager (SCM) Software • Troubleshooting
SCM User Interface
Problem Cause Solution
Button images (such as the Delete, Edit, and Privacy icons) are not displayed within the SCM site. See the image below.
The current URL is not set as a trusted site.
Add the current (SCM system) URL to the list of trusted sites. In Internet Explorer:
1. Select Tools > Internet options. The Internet Options dialog box opens.
2. Click the Security tab. 3. In the security page,
click the Trusted sites icon.
4. Click the Sites button. The Trusted sites dialog box opens. The URL is listed in the Add this website to the zone field.
5. Click Add to add the URL to the trusted sites list.
6. Click Close. The Trusted sites dialog box closes.
7. In the Internet Options dialog box, click OK.
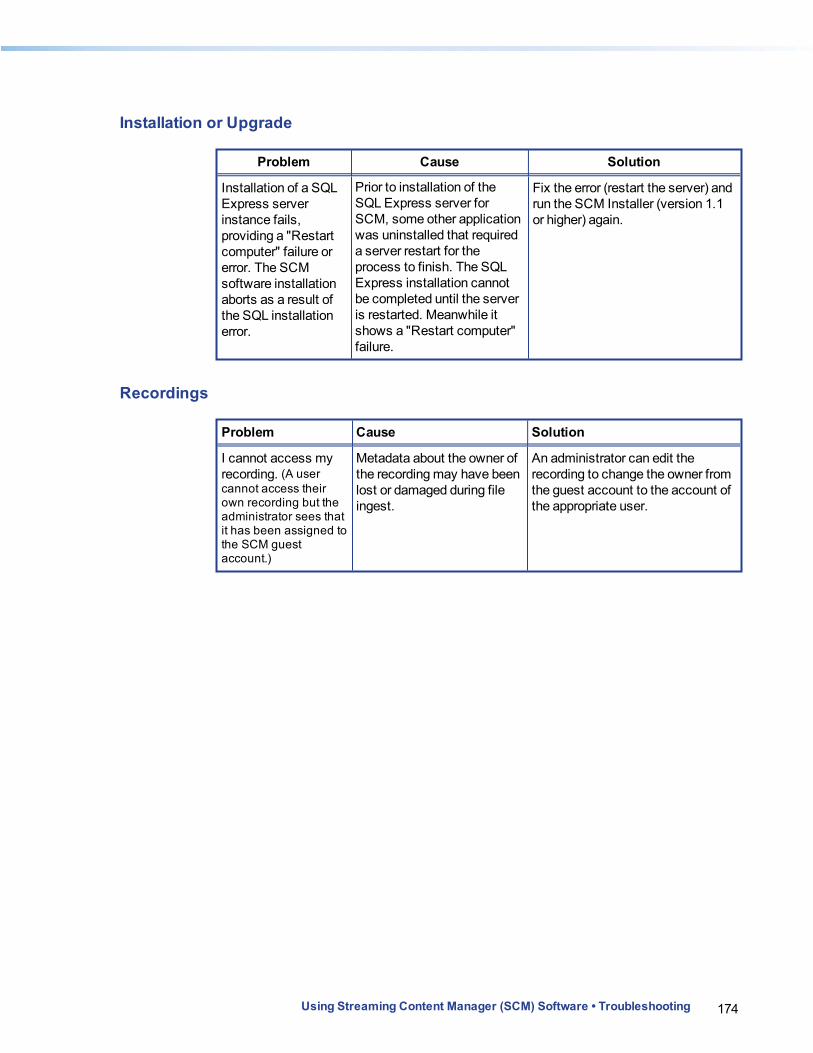
174Using Streaming Content Manager (SCM) Software • Troubleshooting
Installation or Upgrade
Problem Cause Solution
Installation of a SQL Express server instance fails, providing a "Restart computer" failure or error. The SCM software installation aborts as a result of the SQL installation error.
Prior to installation of the SQL Express server for SCM, some other application was uninstalled that required a server restart for the process to finish. The SQL Express installation cannot be completed until the server is restarted. Meanwhile it shows a "Restart computer" failure.
Fix the error (restart the server) and run the SCM Installer (version 1.1 or higher) again.
Recordings
Problem Cause Solution
I cannot access my recording. (A user cannot access their own recording but the administrator sees that it has been assigned to the SCM guest account.)
Metadata about the owner of the recording may have been lost or damaged during file ingest.
An administrator can edit the recording to change the owner from the guest account to the account of the appropriate user.
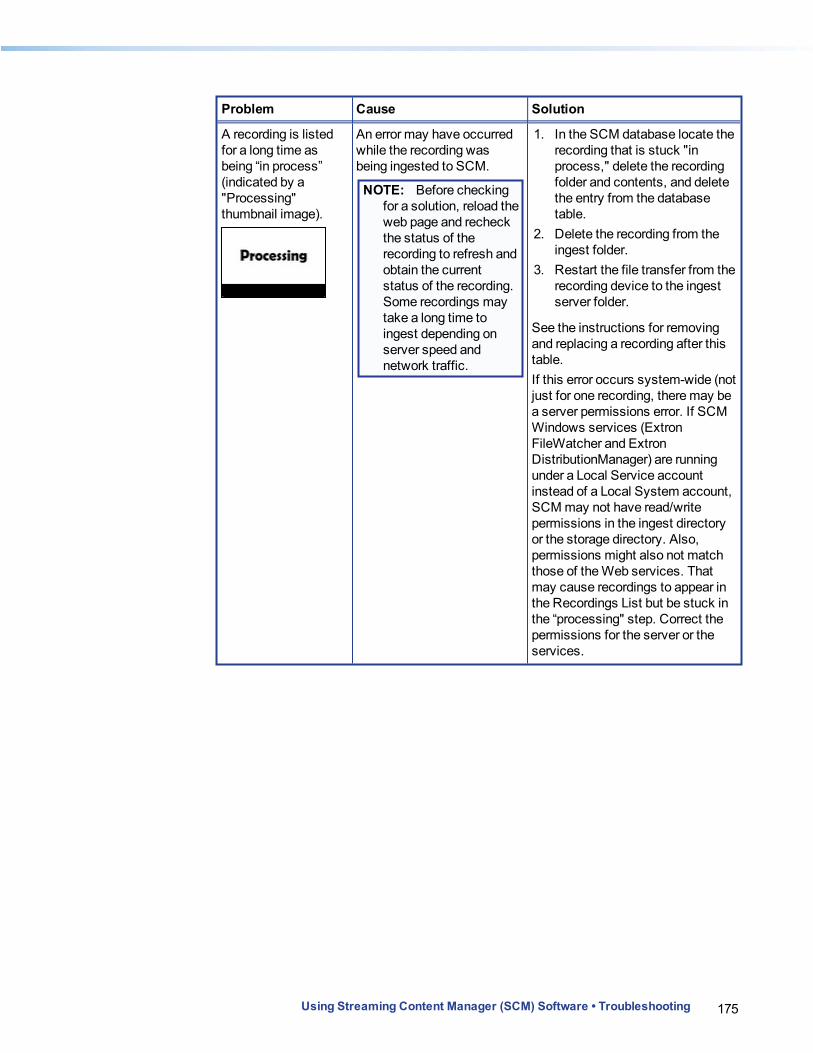
175Using Streaming Content Manager (SCM) Software • Troubleshooting
Problem Cause Solution
A recording is listed for a long time as being “in process” (indicated by a "Processing" thumbnail image).
An error may have occurred while the recording was being ingested to SCM.
NOTE: Before checking for a solution, reload the web page and recheck the status of the recording to refresh and obtain the current status of the recording. Some recordings may take a long time to ingest depending on server speed and network traffic.
1. In the SCM database locate the recording that is stuck "in process," delete the recording folder and contents, and delete the entry from the database table.
2. Delete the recording from the ingest folder.
3. Restart the file transfer from the recording device to the ingest server folder.
See the instructions for removing and replacing a recording after this table.If this error occurs system-wide (not just for one recording, there may be a server permissions error. If SCM Windows services (Extron FileWatcher and Extron DistributionManager) are running under a Local Service account instead of a Local System account, SCM may not have read/write permissions in the ingest directory or the storage directory. Also, permissions might also not match those of the Web services. That may cause recordings to appear in the Recordings List but be stuck in the “processing" step. Correct the permissions for the server or the services.
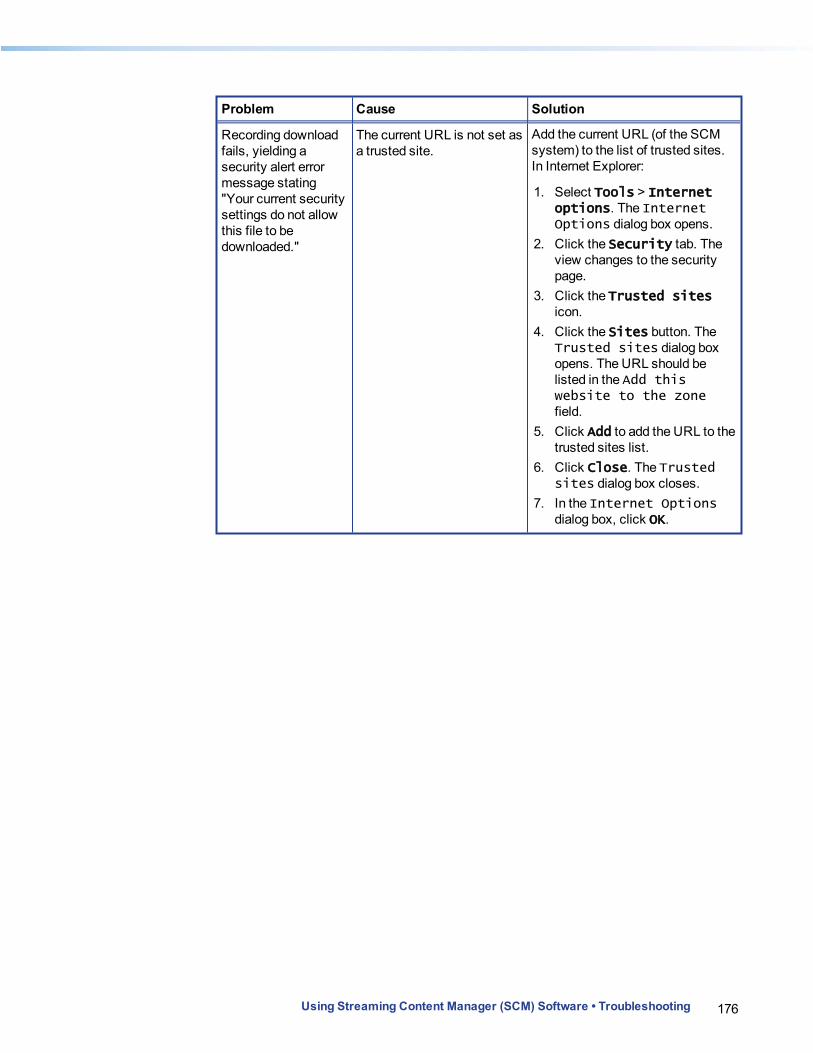
176Using Streaming Content Manager (SCM) Software • Troubleshooting
Problem Cause Solution
Recording download fails, yielding a security alert error message stating "Your current security settings do not allow this file to be downloaded."
The current URL is not set as a trusted site.
Add the current URL (of the SCM system) to the list of trusted sites. In Internet Explorer:
1. Select Tools > Internet options. The Internet Options dialog box opens.
2. Click the Security tab. The view changes to the security page.
3. Click the Trusted sites icon.
4. Click the Sites button. The Trusted sites dialog box opens. The URL should be listed in the Add this website to the zone field.
5. Click Add to add the URL to the trusted sites list.
6. Click Close. The Trusted sites dialog box closes.
7. In the Internet Options dialog box, click OK.
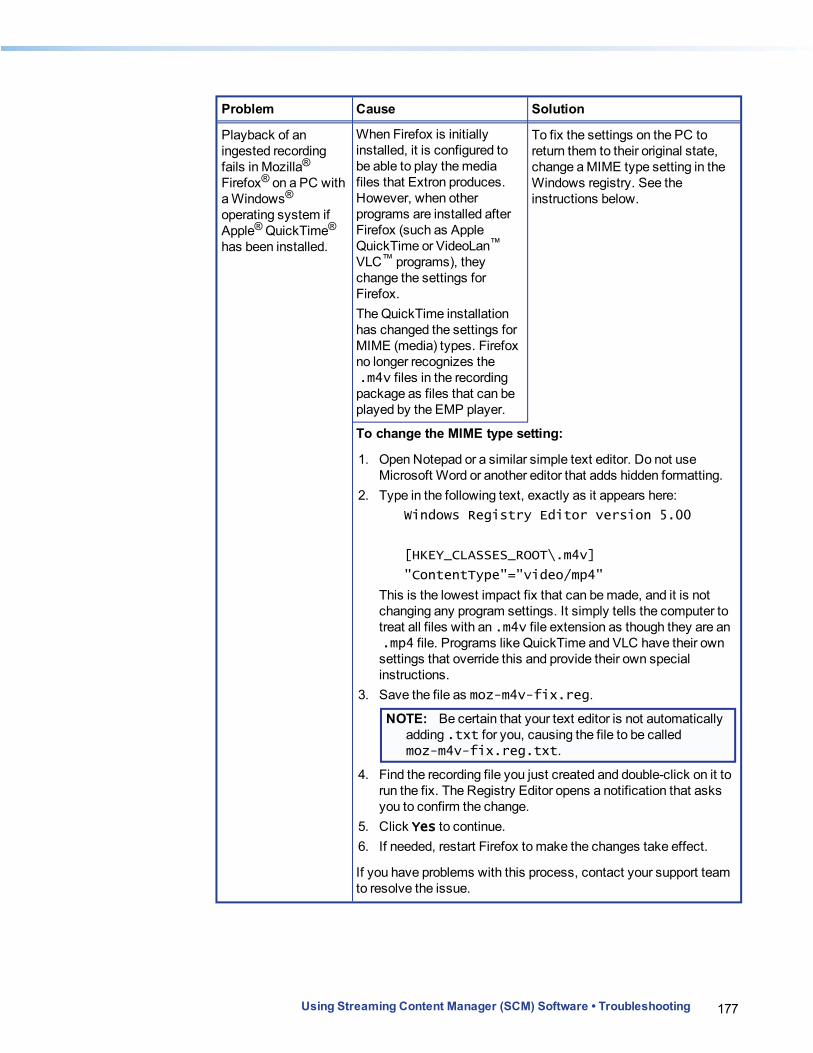
177Using Streaming Content Manager (SCM) Software • Troubleshooting
Problem Cause Solution
Playback of an ingested recording fails in Mozilla® Firefox® on a PC with a Windows® operating system if Apple® QuickTime® has been installed.
When Firefox is initially installed, it is configured to be able to play the media files that Extron produces. However, when other programs are installed after Firefox (such as Apple QuickTime or VideoLan™ VLC™ programs), they change the settings for Firefox.The QuickTime installation has changed the settings for MIME (media) types. Firefox no longer recognizes the .m4v files in the recording package as files that can be played by the EMP player.
To fix the settings on the PC to return them to their original state, change a MIME type setting in the Windows registry. See the instructions below.
To change the MIME type setting:
1. Open Notepad or a similar simple text editor. Do not use Microsoft Word or another editor that adds hidden formatting.
2. Type in the following text, exactly as it appears here: Windows Registry Editor version 5.00
[HKEY_CLASSES_ROOT\.m4v]
"ContentType"="video/mp4"
This is the lowest impact fix that can be made, and it is not changing any program settings. It simply tells the computer to treat all files with an .m4v file extension as though they are an .mp4 file. Programs like QuickTime and VLC have their own settings that override this and provide their own special instructions.
3. Save the file as moz-m4v-fix.reg.
NOTE: Be certain that your text editor is not automatically adding .txt for you, causing the file to be called moz-m4v-fix.reg.txt.
4. Find the recording file you just created and double-click on it to run the fix. The Registry Editor opens a notification that asks you to confirm the change.
5. Click Yes to continue. 6. If needed, restart Firefox to make the changes take effect.
If you have problems with this process, contact your support team to resolve the issue.

178Using Streaming Content Manager (SCM) Software • Troubleshooting
Problem Cause Solution
Recording playback fails when using Internet Explorer or Firefox browswers from within Windows Server® 2012 or Windows Server 2008. This occurs after a new installation or upgrade.
The Windows Desktop Experience feature is not enabled.
Enable the Desktop Experience feature as follows:
1. On to the server where SCM is installed, start Windows Server Manager.
2. In Dashboard view in the screen center, select 2 Add Roles and Features. The Add Roles and Features Wizard window opens.
3. Click Server Selection in the menu in the left panel.
4. Select the Select a server from the server pool radio button.
5. Select the appropriate server from the Server Pool list.
6. Click Features in the menu in the left panel. The wizard displays a list of available features.
7. In the Features list navigate to and expand User Interfaces and Infrastructure and select (enable) Desktop Experience.
8. If the wizard prompts you to install additional features or services, follow the on-screen instructions to add those.
9. Click Next. The wizard displays a confirmation page.
10. Select Restart the destination server automatically if required.
11. Click Install. The wizard installs the selected components and then restarts the server.
The following Web page provides the procedure and screenshots for Windows Server 2012: 20112.how-to-enable-windows-8-features-in-windows-server-2012.aspx
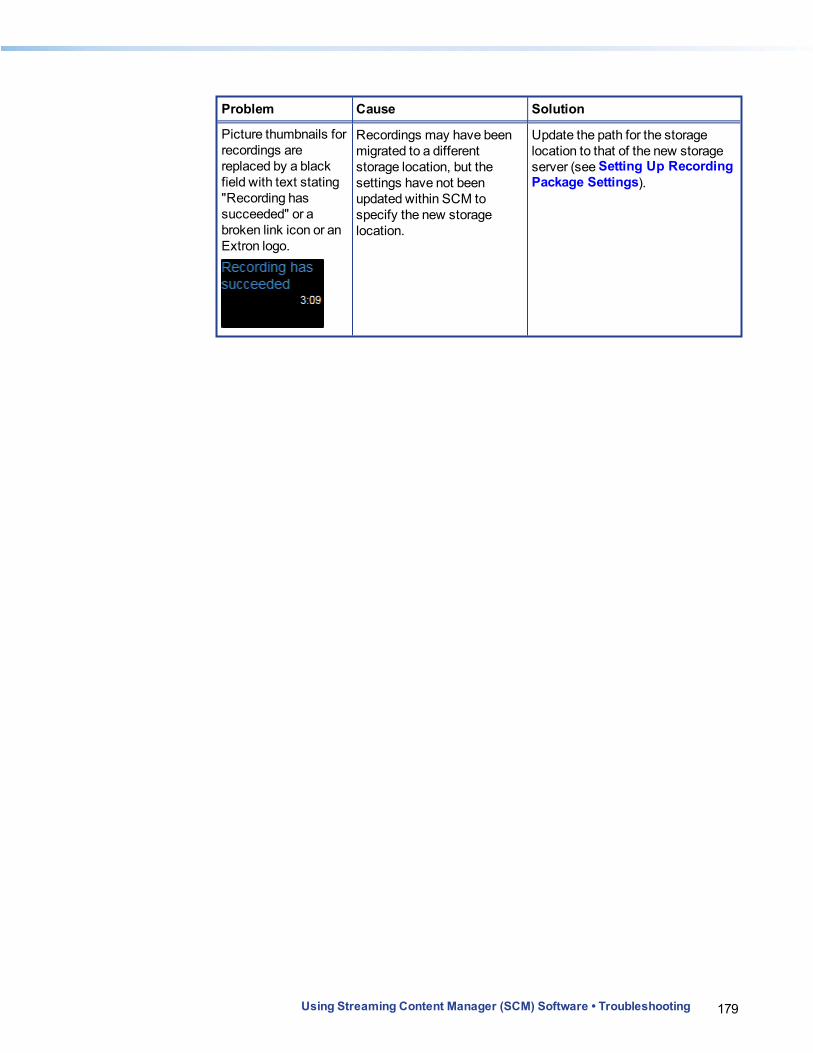
179Using Streaming Content Manager (SCM) Software • Troubleshooting
Problem Cause Solution
Picture thumbnails for recordings are replaced by a black field with text stating "Recording has succeeded" or a broken link icon or an Extron logo.
Recordings may have been migrated to a different storage location, but the settings have not been updated within SCM to specify the new storage location.
Update the path for the storage location to that of the new storage server (see Setting Up Recording Package Settings).
180Using Streaming Content Manager (SCM) Software • Troubleshooting
Problem Cause Solution
Recording ingest failed.
The file watcher (file monitoring) service may have stopped after a server restart or server maintenance.
1. Ensure that the recording ingest server is operational.
2. Ensure that the path of the ingest server is correct in the SCM recording package settings Ingest Location field.
3. Restart the file monitoring service by first stopping the service using the red Stop button (if necessary) and then starting the service by clicking the green Start button at the top of the Recording Package Settings section in the Settings page.
See Setting Up Recording Package Settings for details.
File monitoring criteria for recording package name may not match the file name structure used by the recording devices.
l In the SCM recording package settings, change the ingest filter criteria to just an asterisk (*).Or
l Check the default recording file name settings for each recorder and ensure that the filter criteria in SCM will allow files with that naming structure to be ingested.
See the details on ingest filter criteria and also the example within Setting Up Recording Package Settings.
Network delays caused a timeout.
Address the network performance issues.You may also need to consider increasing the recording package ingest timeout period.
181Using Streaming Content Manager (SCM) Software • Troubleshooting
Problem Cause Solution
Server and service permissions may not be set up to allow read/write permissions for all required directories and services.
If SCM Windows services (Extron FileWatcher and Extron DistributionManager) are running under a Local Service account instead of a Local System account, SCM may not have read/write permissions in the ingest directory or the storage directory. Also, permissions might also not match those of the Web services. That may cause recordings to appear in the Recordings List but be stuck in the “processing" step. Correct the permissions for the server or the services. For details on permissions, see Server Account Permissions and SCM Installation. For instructions on how to add or change the ingest and storage locations, see Setting Up Recording Package Settings.
The server has run out of space. All SCM services are running but recording ingestion stops, and SCM does not display any errors. Adding more space does not start the upload process automatically.
Add more space to the ingest or storage server, then restart services manually. Services must be in sync to bring the SCM system back to normal operation. To restart services:
1. Stop the service from the SCM Settings page by clicking the Stop button in the Recording Package Settings section. The Stop button becomes a Start button.
2. Restart the Extron FileWatcher Windows service and Extron DistributionManager Windows service from the Windows Services tool.
3. Within SCM, start the services by clicking the Start button in the Settings page.
182Using Streaming Content Manager (SCM) Software • Troubleshooting
Problem Cause Solution
Unauthenticated users cannot view public recordings.
Unauthenticated users do not have access to SCM. This is the default setting in SCM.
1. In the SCM recording package settings on the Settings page, click Stop to stop monitoring services.
2. Select (check, enable) the Allow unauthenticated users to view Public/Unlisted recordings check box.
3. Click Apply. 4. Click Start to restart
monitoring.
Recording thumbnail links to the detail view page are broken or the recording cannot be downloaded.
The recording storage location was changed but the content was not physically copied to the new storage location.
Copy the files to the new recording storage server.
The recordings were moved to a new storage location (and removed from the original server), but the old storage location is still specified in SCM.
1. In the SCM recording package settings, click Stop to stop monitoring services.
2. Replace the old server path in the Storage Location field with the new server path.
3. Click Apply. 4. Click Start to restart
monitoring.
See Setting Up Recording Package Settings for details.

183Using Streaming Content Manager (SCM) Software • Troubleshooting
Problem Cause Solution
Recordings uploaded to the ingest location are not ingested immediately and may remain there for a while (minutes or hours). As a result, users do not receive e-mail notifications of recordings added to SCM because the recordings have not been added to the system yet. Recording ingest resumes after someone accesses the SCM web pages.
The SCM web service is in idle mode because web services have timed out. The timeout period for the SCM application pool in IIS is too short. File watcher services (and, therefore, file ingest functions) are suspended until SCM web pages are accessed and web services resume.
Access the SCM web pages. File ingestion will restart automatically.or...Set the idle timeout period on the web services application pool to zero (to prevent idling) and change other settings as follows:
1. Using a file explorer program, navigate to and start the Internet Information Services (IIS) Manager from Administrative Tools on Windows Server 2008 or from Tools on Windows Server 2012
2. In IIS Manager, in the Connections panel, select Application Pools. The Applications Pools pane opens.
3. Right-click on the SCM app pool and select Advanced Settings from the pop-up menu. The Advanced Settings dialog box opens.
4. In the Process Model section, locate the Idle Time-out (minutes) setting and change the value to 0.
5. Click OK. The Advanced Settings dialog box closes.
A recording named test_dir appears on the ingest server but is not ingested.
SCM is configured to ignore this particular recording folder name, which is used by the EMP for testing purposes.
Choose a different recording name.
Removing and Replacing a Recording That Does Not Complete Ingestion
If a recording is listed indefinitely as being "in process" and that status does not change after the recordings list has been reloaded within the SCM web page, you must manually remove it from SCM and retransfer the file to the ingest server.
To remove a recording that is stuck in the "in process" state:
1. Using SQL Server® Management Studio, open a connection to the database server and select the SCM database. For a typical installation, it is named “scm-db.”
2. Open the Recordings table for editing.
184Using Streaming Content Manager (SCM) Software • Troubleshooting
3. Locate the recording that did not advance beyond the in-process state. There are several ways to do this: l View the entries in the RecordingStatus column. A value between 0 and 4 indicates
that the recording is in process. l The title of the recording as displayed in the SCM web page is equal to either the value
in the Title column in the database, the child folder of the RecordingPath field in the database, or both.
l Look in the UploadStartDate column, which indicates the date/time stamp of when the recording ingest began.
l Open the system log for the SCM FileWatcher (see Logging for more details). Identify the start of ingest for the recording in question, and note the RecordingId for the recording that did not finish being ingested. This unique value can then be used to locate the recording within the database.
4. Once the recording has been identified within the Recordings database table, note the value of the RecordingPath column. This is the path in the ingest location to which the recording was written by the SMP 351 presentation recorder or other recording device. Delete this folder and all of its contents using Windows Explorer.
5. For the recording in question, note the value in the PackagePath column. This is the path in the storage location to which the packaged recording will be written. Browse to this location using Windows Explorer and delete the recording package if it exists.
6. Delete the recording entry, itself, from various database tables (ClosedCaptions, PackageFiles, RecordingChapters, RecordingThumbnails, RecordingsManifest) and then from the Recordings database table. Alternatively, you can set the value in the RecordingStatus column to the failed state (value = 5), and then delete the recording from within the SCM Web pages.
7. Restart the ingest process by re-transfering the recording from the SMP (or other recording device).To manually start uploading an event recording from an SMP 351 to the specified network server (ingest location: a. In the SMP 351 embedded web pages, click on the Scheduled Events tab to
open the calendar. b. Click on the event to be re-uploaded. The Event Details dialog box opens. c. Click Retransfer. The status changes first to Admin Requested Reupload, then to
Uploading to Server. d. If the process fails, the status is displayed as Upload Retries Failed. Click
Retransfer again to retry uploading the files. Once the recording package has been uploaded to the server, the status changes to Upload to Server Complete.
e. At any time after clicking Retransfer you can click Close to close the dialog box. If you do not click Close, the dialog box remains open indefinitely.
8. If the above steps fail, it may be necessary to repeat the entire process of removing the recording, then restart the FileWatcher and DistributionManager services. Note that any other recordings that are in process will be lost when the services are restarted.

185Using Streaming Content Manager (SCM) Software • Troubleshooting
Problem Cause Solution
E-mails are not being sent.
E-mail connection settings may not be properly configured or the e-mail connection may be disabled.
1. Ensure that the SCM e-mail notification settings are properly configured with the correct Exchange server path and the username and password of the SCM e-mail account on that server (see Configuring E-mail Notification Settings).
2. Ensure that the Enable E-mail Notification check box is selected (checked).
3. Send a test e-mail to verify that the connection is working correctly.
4. Click Apply.
The system administrator is not receiving e-mail.
E-mail connection settings may not be properly configured or the e-mail connection may be disabled.
See above.
The system administrator account does not yet have an email address.
Edit the system administrator account to add an e-mail address (see Editing the System Administrator Profile).
Database
Problem Cause Solution
After installation an administrator wishes to clear all data from the database.
Run the database installer program and select the Overwrite option (as detailed in step 8 in Database Setup and Administration). The database will be cleared (emptied) of users, recordings, and SCM system settings.
186Using Streaming Content Manager (SCM) Software • Troubleshooting
Problem Cause Solution
While connecting to a database using an account that is not the system administrator account, one of the following errors occurs: l Connection Failed!
Be sure that you have the correct credentials and SQL server name.
l Error while opening connection to SQL server: Login failed for user ‘<username>’.
SQL Login does not have required permissions to create a new database.
See the instructions for setting SQL log-in permissions immediately after this table.
To set the required SQL log-in permissions for the database:
1. Open Microsoft SQL Server Management Studio. 2. Connect to the SCM database server (as specified in the Database Server
Name/IP Address field of the SCM Database Installer) using an account with administrator privileges, such as the system administrator account.
3. Expand the Security > Logins folder 4. Locate the login of the account that is failing. 5. Right-click on the login and select Properties. 6. Select the Server Roles page from the Select a page panel.
187Using Streaming Content Manager (SCM) Software • Troubleshooting
7. Verify that the following roles are selected: dbcreator and public.
8. From the Select a page panel, select the User Mapping page. 9. Select the database used by SCM (as specified in the Database Name field of the
SCM Database Installer).

188Using Streaming Content Manager (SCM) Software • Troubleshooting
10. In the“Database role membership for: <database name> area, verify that the following roles are selected: db_owner and public.
11. Click OK.
Account Validation
Problem Cause Solution
When adding user accounts I cannot access Add from LDAP because it is disabled.
The LDAP/AD connection is disabled.
In the LDAP/AD settings select (check) the Enable this Connection check box (see Setting Up LDAP/AD Connections).
189Using Streaming Content Manager (SCM) Software • Troubleshooting
System and Hardware
Problem Cause Solution
SCM stopped working
Lack of server space can cause SCM to stop working. When the system hard disk is full, the application stops working and doesn’t throw an error.
1. Check the storage space and move the installation to a new server if needed. Update settings in SCM for server paths as appropriate in the SCM system settings.
2. Verify that the RabbitMQ service is running, as it can stop if the application crashes.
General Reference Information
Supported Database Types, E-mail Server Systems, Browsers, and File Types
System Installation Requirements
In order to install and set up Streaming Content Manager you need the following items:Hardware l Server hardware to support a Web server and database installation l Display: 1024 x 768 screen resolution or higher
Framework l Microsoft® .Net® framework version 4.5 or higher
Web ServerMicrosoft IIS extensible Web server: l IIS verson 7.0 or higher (Microsoft Windows Server® 2008 R2) l IIS version 8.5 or higher (Windows Windows Server 2012)
NOTE: HTTPS binding for IIS services and for the SCM website is required prior to installation (see Adding HTTPS Binding). In this process you create or obtain an SSL certificate, tie it and HTTPS protocol to the IIS services for SCM, then create a binding association between HTTPS and the SCM website. This sets Streaming Content Manager to use secure protocol and to open using HTTPS. By default, when SCM is installed, it creates a self-signed SSL certificate and sets up the HTTPS binding within IIS (for instructions on how to accomplish this manually, particularly if using an SSL certificate from a certification authority [CA], see Adding HTTPS Binding).
E-mail Server l Microsoft Exchange Server that supports Microsoft Exchange Web Services
Database l Microsoft SQL Server® 2008 or later, full or Express editions
Managed Directory System (optional)To use a Microsoft Active Directory® (AD) system for adding and validating users, you will also need:
Using Streaming Content Manager (SCM) Software • General Reference Information 190

191Using Streaming Content Manager (SCM) Software • General Reference Information
l An Active Directory server running Active Directory (AD)
Network Drives for Recording Ingest and Storage
How much storage space will be needed depends on the following factors: l The encoding settings of the recording devices. The higher the resolution and the greater
the motion content, the more space is needed per hour of recording. The settings for variable bit rates, compression, and the level of motion content all affect the recording size.
l How many hours per day recordings are made per room. l How many rooms in the facility will be used for recording. l The frequency with which recordings will be removed (deleted) from the server. The longer
recordings are retained, the more space will be needed.
Minimum required space
For reference, using the default archive encoding settings for an Extron SMP 351 yields recordings of approximately 2.1 GB per hour.See How to Estimate Storage Requirements for Recordings in the System Design and Planning section for a full explanation of how to estimate how much space will be needed.
Browsers
In order to open and use Streaming Content Manager, use one of the supported Web browsers (and versions) listed below. l Google® Chrome™ version 35 or higher l Mozilla® Firefox® version 28 or higher l Microsoft® Internet Explorer® version 9 or higher (for Windows® operating systems)
NOTE: If you are using Internet Explorer, compatibility mode must be turned off (see Turning Off Internet Explorer Compatibility Mode for details).
l Apple® Safari® version 6 or higher (for Mac® OS X® operating systems)
Browser preferences l Chrome is the preferred browser for sighted users. l Firefox is the preferred browser for screen reader users. SCM has been tested to work
with Firefox and the NVDA (NonVisual Desktop Access) screen reader, which is available at http://www.nvaccess.org/.
See Turning Off Internet Explorer Compatibility Mode in the Prerequisites section before using Internet Explorer.
NOTE: SCM is accessible to users with screen readers and those who use keyboard controls for navigation. The interface is accessible, and supports commonly available screen readers.

192Using Streaming Content Manager (SCM) Software • General Reference Information
File Types
l Recordings are .mp4 (.m4v) files. l Thumbnails are stored as .jpg files. l Graphics for the EMP player logo and background are .png files. l Closed captioning files must be .json files.
193Using Streaming Content Manager (SCM) Software • General Reference Information
Resources For AccessibilityMany people use screen reader programs to describe the elements and text on a screen. Even more people use keyboard controls (instead of a mouse or other pointing device) to navigate through, select, and interact with elements within software and on Web pages. The choice of a Web browser and adjustments to settings within browsers can make using screen readers and keyboard controls much easier. This section provides some recommendations that can help make SCM more accessible.
Choosing a Browser
l Chrome is the preferred browser for sighted users. l Firefox is the preferred browser for screen reader users. SCM has been tested to work
with Firefox and the NVDA (NonVisual Desktop Access) screen reader, which is available for free at http://www.nvaccess.org/.
For a list of system requirements and of browsers and file types supported by SCM, see General Reference Information.
Tips for Browser Configuration and Use
Mozilla Firefox
Some settings can be applied globally to facilitate keyboard use and prevent page redirection and reloading.
1. Open Firefox. 2. Click the Menu button (in the upper right corner of the currently open tab). 3. Click the Options button. The preferences window opens showing the General tab or
button and General settings page. 4. Click the Advanced tab or button. The Advanced settings page opens. 5. If it is not already selected, click the General tab within the Advanced settings page. 6. Check (enable) or uncheck (disable) any of the following accessibility options as desired:
l Always use the cursor keys to navigate within pages — When this option is enabled, Firefox displays a movable cursor in web pages, allowing you to select text with the keyboard. This mode is known as "caret browsing." You can toggle this mode by pressing <F7>.
l Search for text when I start typing — When this option is enabled, Firefox finds within the current Web page what you type as you type it. While you are finding typed text in the page, the Find Toolbar automatically displays at the bottom of the window to show information about what you found.
l Warn me when websites try to redirect or reload the page — When this option is enabled, Firefox prevents websites from redirecting you to another page or automatically reloading.
Additional tips for using Firefox (such as how to use page zoom controls, change font settings, browse with caret browsing, and more) are available at http://www.accessfirefox.org/Firefox_Accessibility_Features.php and at
194Using Streaming Content Manager (SCM) Software • General Reference Information
https://support.mozilla.org/en-US/kb/accessibility-features-firefox-make-firefox-and-we.
Google Chrome
Google provides information and instructions on how to change settings within Chrome and on how to use the accessibility features of Chrome. A few websites that may be helpful include the following: l The low-vision accessibility support page at
https://sites.google.com/a/chromium.org/dev/user-experience/low-vision-support. l The keyboard access accessibility support page at
https://sites.google.com/a/chromium.org/dev/user-experience/keyboard-access, which details several keyboard shortcuts and how to use them.
l The assistive technology accessibility support page at https://sites.google.com/a/chromium.org/dev/user-experience/assistive-technology-support. This page includes links to websites for five popular assistive technology or screen reader programs that have been tested to work with Chrome and two that do not work with Chrome.
Microsoft Internet Explorer
According to Microsoft, some Internet Explorer features can cause screen readers to give confusing or incorrect information. The Microsoft website (http://windows.microsoft.com/en-US/internet-explorer/ie-accessibilty-options?ocid=IE10_ignore_fonts#ie=ie-10-win-7) provides the following instructions on how to make Internet Explorer work better with screen readers.
To configure Internet Explorer version 10 to work with a screen reader or voice recognition software:
1. Open Internet Explorer. 2. Click the Tools button, and then tap or click Internet options. 3. Click the Advanced tab. 4. Make one or more of the following changes:
l Set the cursor to determine where to read or magnify. Under Accessibility, select the Move system caret with focus/selection changes check box.
l Display text in place of pictures. Under Accessibility, select the Always expand Alt text for images check box. Under Multimedia, clear the Show pictures check box.
l Stop page transitions from causing problems with your screen reader or voice recognition software. Under Browsing, clear the Use smooth scrolling check box. Under Multimedia, clear the Show pictures and Play animations in webpages check boxes.
l Help prevent webpage sounds from interfering with your screen reader. Under Multimedia, clear the Play sounds in webpages check box.
5. Click OK.
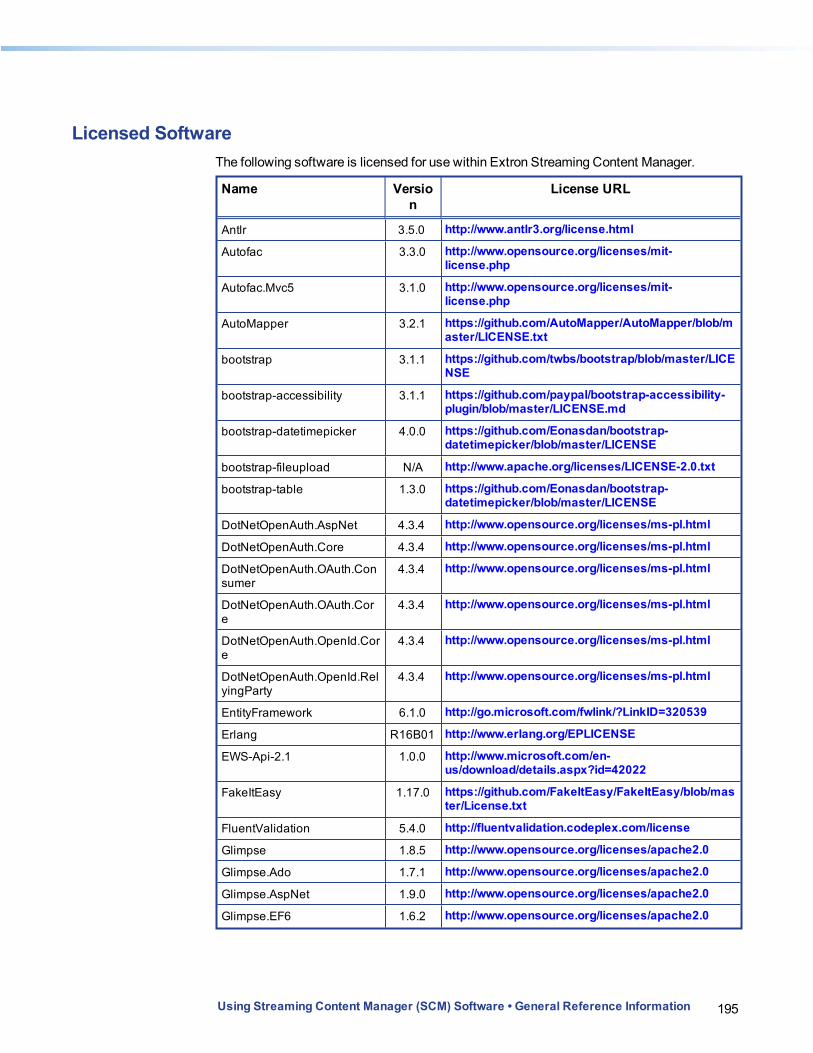
195Using Streaming Content Manager (SCM) Software • General Reference Information
Licensed SoftwareThe following software is licensed for use within Extron Streaming Content Manager.
Name Version
License URL
Antlr 3.5.0 http://www.antlr3.org/license.html
Autofac 3.3.0 http://www.opensource.org/licenses/mit-license.php
Autofac.Mvc5 3.1.0 http://www.opensource.org/licenses/mit-license.php
AutoMapper 3.2.1 https://github.com/AutoMapper/AutoMapper/blob/master/LICENSE.txt
bootstrap 3.1.1 https://github.com/twbs/bootstrap/blob/master/LICENSE
bootstrap-accessibility 3.1.1 https://github.com/paypal/bootstrap-accessibility-plugin/blob/master/LICENSE.md
bootstrap-datetimepicker 4.0.0 https://github.com/Eonasdan/bootstrap-datetimepicker/blob/master/LICENSE
bootstrap-fileupload N/A http://www.apache.org/licenses/LICENSE-2.0.txt
bootstrap-table 1.3.0 https://github.com/Eonasdan/bootstrap-datetimepicker/blob/master/LICENSE
DotNetOpenAuth.AspNet 4.3.4 http://www.opensource.org/licenses/ms-pl.html
DotNetOpenAuth.Core 4.3.4 http://www.opensource.org/licenses/ms-pl.html
DotNetOpenAuth.OAuth.Consumer
4.3.4 http://www.opensource.org/licenses/ms-pl.html
DotNetOpenAuth.OAuth.Core
4.3.4 http://www.opensource.org/licenses/ms-pl.html
DotNetOpenAuth.OpenId.Core
4.3.4 http://www.opensource.org/licenses/ms-pl.html
DotNetOpenAuth.OpenId.RelyingParty
4.3.4 http://www.opensource.org/licenses/ms-pl.html
EntityFramework 6.1.0 http://go.microsoft.com/fwlink/?LinkID=320539
Erlang R16B01 http://www.erlang.org/EPLICENSE
EWS-Api-2.1 1.0.0 http://www.microsoft.com/en-us/download/details.aspx?id=42022
FakeItEasy 1.17.0 https://github.com/FakeItEasy/FakeItEasy/blob/master/License.txt
FluentValidation 5.4.0 http://fluentvalidation.codeplex.com/license
Glimpse 1.8.5 http://www.opensource.org/licenses/apache2.0
Glimpse.Ado 1.7.1 http://www.opensource.org/licenses/apache2.0
Glimpse.AspNet 1.9.0 http://www.opensource.org/licenses/apache2.0
Glimpse.EF6 1.6.2 http://www.opensource.org/licenses/apache2.0
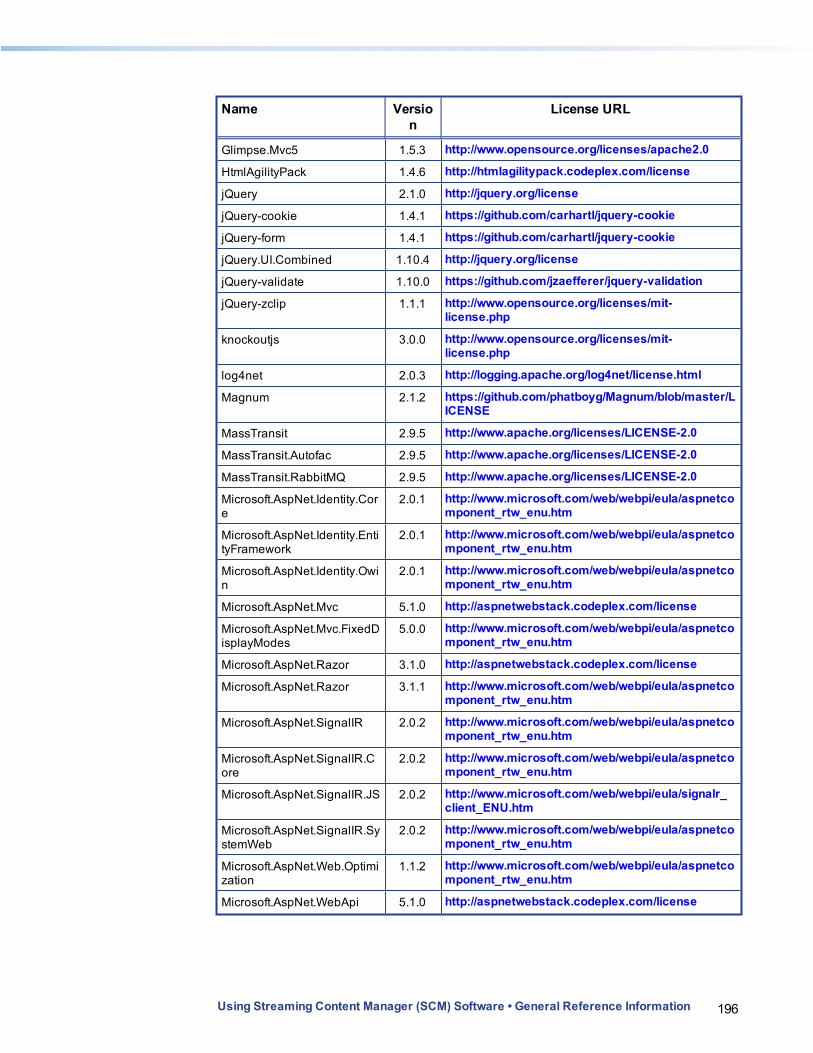
196Using Streaming Content Manager (SCM) Software • General Reference Information
Name Version
License URL
Glimpse.Mvc5 1.5.3 http://www.opensource.org/licenses/apache2.0
HtmlAgilityPack 1.4.6 http://htmlagilitypack.codeplex.com/license
jQuery 2.1.0 http://jquery.org/license
jQuery-cookie 1.4.1 https://github.com/carhartl/jquery-cookie
jQuery-form 1.4.1 https://github.com/carhartl/jquery-cookie
jQuery.UI.Combined 1.10.4 http://jquery.org/license
jQuery-validate 1.10.0 https://github.com/jzaefferer/jquery-validation
jQuery-zclip 1.1.1 http://www.opensource.org/licenses/mit-license.php
knockoutjs 3.0.0 http://www.opensource.org/licenses/mit-license.php
log4net 2.0.3 http://logging.apache.org/log4net/license.html
Magnum 2.1.2 https://github.com/phatboyg/Magnum/blob/master/LICENSE
MassTransit 2.9.5 http://www.apache.org/licenses/LICENSE-2.0
MassTransit.Autofac 2.9.5 http://www.apache.org/licenses/LICENSE-2.0
MassTransit.RabbitMQ 2.9.5 http://www.apache.org/licenses/LICENSE-2.0
Microsoft.AspNet.Identity.Core
2.0.1 http://www.microsoft.com/web/webpi/eula/aspnetcomponent_rtw_enu.htm
Microsoft.AspNet.Identity.EntityFramework
2.0.1 http://www.microsoft.com/web/webpi/eula/aspnetcomponent_rtw_enu.htm
Microsoft.AspNet.Identity.Owin
2.0.1 http://www.microsoft.com/web/webpi/eula/aspnetcomponent_rtw_enu.htm
Microsoft.AspNet.Mvc 5.1.0 http://aspnetwebstack.codeplex.com/license
Microsoft.AspNet.Mvc.FixedDisplayModes
5.0.0 http://www.microsoft.com/web/webpi/eula/aspnetcomponent_rtw_enu.htm
Microsoft.AspNet.Razor 3.1.0 http://aspnetwebstack.codeplex.com/license
Microsoft.AspNet.Razor 3.1.1 http://www.microsoft.com/web/webpi/eula/aspnetcomponent_rtw_enu.htm
Microsoft.AspNet.SignalIR 2.0.2 http://www.microsoft.com/web/webpi/eula/aspnetcomponent_rtw_enu.htm
Microsoft.AspNet.SignalIR.Core
2.0.2 http://www.microsoft.com/web/webpi/eula/aspnetcomponent_rtw_enu.htm
Microsoft.AspNet.SignalIR.JS 2.0.2 http://www.microsoft.com/web/webpi/eula/signalr_client_ENU.htm
Microsoft.AspNet.SignalIR.SystemWeb
2.0.2 http://www.microsoft.com/web/webpi/eula/aspnetcomponent_rtw_enu.htm
Microsoft.AspNet.Web.Optimization
1.1.2 http://www.microsoft.com/web/webpi/eula/aspnetcomponent_rtw_enu.htm
Microsoft.AspNet.WebApi 5.1.0 http://aspnetwebstack.codeplex.com/license

197Using Streaming Content Manager (SCM) Software • General Reference Information
Name Version
License URL
Microsoft.AspNet.WebApi.Client
5.1.0 http://aspnetwebstack.codeplex.com/license
Microsoft.AspNet.WebApi.Core
5.1.0 http://aspnetwebstack.codeplex.com/license
Microsoft.AspNet.WebApi.OData
5.1.0 http://aspnetwebstack.codeplex.com/license
Microsoft.AspNet.WebApi.WebHost
5.1.0 http://aspnetwebstack.codeplex.com/license
Microsoft.AspNet.WebApi.WebPages
3.1.0 http://aspnetwebstack.codeplex.com/license
Microsoft.AspNet.WebApi.WebPages
3.1.1 http://www.microsoft.com/web/webpi/eula/aspnetcomponent_rtw_ENU.htm
Microsoft.AspNet.WebApi.WebPages.Data
3.1.0 http://aspnetwebstack.codeplex.com/license
Microsoft.AspNet.WebApi.WebPages.OAuth
3.1.0 http://aspnetwebstack.codeplex.com/license
Microsoft.AspNet.WebApi.WebPages.WebData
3.1.0 http://aspnetwebstack.codeplex.com/license
Microsoft.Bcl 1.1.6 http://go.microsoft.com/fwlink/?LinkId=329770
Microsoft.Bcl.Build 1.0.13 http://go.microsoft.com/fwlink/?LinkId=329770
Microsoft.Data.Edm 5.6.0 http://go.microsoft.com/?linkid=9809688
Microsoft.Data.OData 5.6.0 http://go.microsoft.com/?linkid=9809688
Microsoft.jQuery.Unobtrusive.Ajax
3.1.0 http://aspnetwebstack.codeplex.com/license
Microsoft.jQuery.Unobtrusive.Validation
3.1.0 http://aspnetwebstack.codeplex.com/license
Microsoft.Net.Http 2.2.18 http://go.microsoft.com/fwlink/?LinkId=329770
Microsoft.Owin 2.0.2 http://www.microsoft.com/web/webpi/eula/aspnetcomponent_rtw_enu.htm
Microsoft.Owin 2.1.0 http://www.microsoft.com/web/webpi/eula/aspnetcomponent_rtw_enu.htm
Microsoft.Owin.Host.SystemWeb
2.0.2 http://www.microsoft.com/web/webpi/eula/aspnetcomponent_rtw_enu.htm
Microsoft.Owin.Security 2.0.2 http://www.microsoft.com/web/webpi/eula/aspnetcomponent_rtw_enu.htm
Microsoft.Owin.Security 2.1.0 http://www.microsoft.com/web/webpi/eula/aspnetcomponent_rtw_enu.htm
Microsoft.Owin.Security.Cookies
2.1.0 http://www.microsoft.com/web/webpi/eula/aspnetcomponent_rtw_enu.htm
Microsoft.Owin.Security.OAuth
2.1.0 http://www.microsoft.com/web/webpi/eula/aspnetcomponent_rtw_enu.htm
Microsoft.Web.Infrastructure 1.0.0 http://go.microsoft.com/fwlink/?LinkID=214339
Modernizr 2.7.1 http://www.modernizr.com/license/
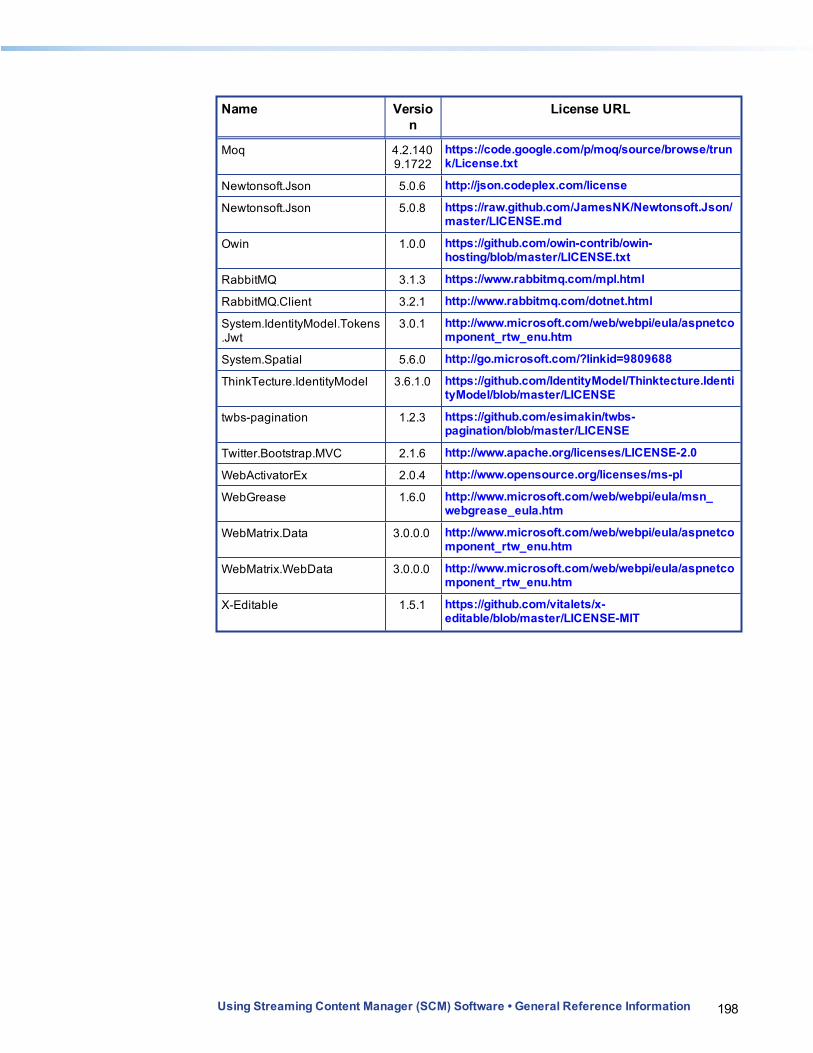
198Using Streaming Content Manager (SCM) Software • General Reference Information
Name Version
License URL
Moq 4.2.1409.1722
https://code.google.com/p/moq/source/browse/trunk/License.txt
Newtonsoft.Json 5.0.6 http://json.codeplex.com/license
Newtonsoft.Json 5.0.8 https://raw.github.com/JamesNK/Newtonsoft.Json/master/LICENSE.md
Owin 1.0.0 https://github.com/owin-contrib/owin-hosting/blob/master/LICENSE.txt
RabbitMQ 3.1.3 https://www.rabbitmq.com/mpl.html
RabbitMQ.Client 3.2.1 http://www.rabbitmq.com/dotnet.html
System.IdentityModel.Tokens.Jwt
3.0.1 http://www.microsoft.com/web/webpi/eula/aspnetcomponent_rtw_enu.htm
System.Spatial 5.6.0 http://go.microsoft.com/?linkid=9809688
ThinkTecture.IdentityModel 3.6.1.0 https://github.com/IdentityModel/Thinktecture.IdentityModel/blob/master/LICENSE
twbs-pagination 1.2.3 https://github.com/esimakin/twbs-pagination/blob/master/LICENSE
Twitter.Bootstrap.MVC 2.1.6 http://www.apache.org/licenses/LICENSE-2.0
WebActivatorEx 2.0.4 http://www.opensource.org/licenses/ms-pl
WebGrease 1.6.0 http://www.microsoft.com/web/webpi/eula/msn_webgrease_eula.htm
WebMatrix.Data 3.0.0.0 http://www.microsoft.com/web/webpi/eula/aspnetcomponent_rtw_enu.htm
WebMatrix.WebData 3.0.0.0 http://www.microsoft.com/web/webpi/eula/aspnetcomponent_rtw_enu.htm
X-Editable 1.5.1 https://github.com/vitalets/x-editable/blob/master/LICENSE-MIT
Glossary
Active Directory® (AD) Microsoft® Active Directory® (AD) is a directory service for WIndows-based networks that includes a hierarchical database along with services and processes that make use of LDAP protocol. Domain controllers running AD authenticate users and control user access to network services.
DNS Domain Name System (DNS): a database system that translates domain names (such as www.extron.com) into IP addresses.
Event ID Event ID is the database identification number of a scheduled recording event. The number may appear in the event details within the Scheduled Events page of an Extron SMP 351 streaming media recording processor, for example.
Host name This is a unique name by which a device is known on a network. It identifies a particular host in electronic communication.
LDAP Lightweight Directory Access Protocol (LDAP) is an open source, standard application protocol for accessing and maintaining distributed directory information services over IP. It is a vendor-independent protocol that makes it possible to provide controlled access to a database of records, such as a structured list of users and their passwords. It allows for each user to use the same username and password for a variety of network services available throughout an organization. By default, LDAP uses network port 389.
LDAPS Lightweight Directory Access Protocol over Secure Sockets Layer (SSL). This is a variation of LDAP that uses encrypted communication between the client and server. By default, LDAPS uses network port 636.
SSL Secure Sockets Layer (SSL) is a protocol used by web servers and web browsers that creates a uniquely encrypted channel for private communications over the public Internet.
Variable bit rate (VBR) This scheme adjusts the output bit rate around the specified target bit rate depending on image complexity. More bandwidth is used when the video frame is more complex and less bandwidth is used when the video frame is simple. Recordings containing more complexity and more motion content require more storage space than simpler recordings with more static content.
Using Streaming Content Manager (SCM) Software • Glossary 199

About Extron Media Player
About Extron Media Player (EMP)The Extron Media Player (EMP) is a browser-based media player for recordings that are produced by the Extron Streaming Media Processor (SMP) (for information on the SMP, visit www.extron.com). EMP provides an enhanced playback experience, incorporating metadata, time-synchronized thumbnail images, and advanced playback controls into the user interface. The data and controls provide the user with greater ability to efficiently navigate and play back the recorded material. EMP requires no software installation and can be operated from virtually any PC using a variety of browser applications.
NOTE: EMP is accessible to users with screen readers and those who use keyboard controls for navigation. The interface is accessible, and supports commonly available screen readers. For a list of EMP-specific keyboard controls, see Using Keyboard Shortcuts.
Extron Streaming Content Manager (SCM) is server-based software that processes the recording files from an SMP, packages them with the EMP player, and readies the recordings either for viewing via online streaming or for downloading to a device for later playback. For more information, visit the SCM product page on www.extron.com or see About Streaming Content Manager within this help file.
How Streaming Content Manager Uses the EMP
l Some elements of EMP, such as logo graphics files, are selected within the Streaming Content Manager system before the EMP player is packaged with recordings.
l During file ingestion and processing, Streaming Content Manager packages the recording and its thumbnails, chapter markers, logo file, and metadata with the EMP player. If a closed captioning .json file is available, it can be uploaded from within SCM and packaged with the recording.
l When a user downloads a recording to play using the stand-alone EMP player, everything needed to play and navigate through the recording is in the package.
l When a user plays a recording from within an SCM recording player page, EMP streams the recording from the SCM server. During online playback, the viewer has access to many of the controls available in the stand-alone EMP program, though does not have the ability to edit information about the recordings through that interface.
Using Streaming Content Manager (SCM) Software • About Extron Media Player 200

201Using Streaming Content Manager (SCM) Software • About Extron Media Player
Customization
Which features can be customized within SCM
For recordings that are packaged by SCM, SCM administrators can customize the logo that appears in EMP. For instructions see Configuring the EMP Player Within Streaming Content Manager. Also, closed captioning files in .json format can be uploaded in SCM and packaged with the recording.
NOTE: Information on what is required to create a closed captioning file will be available on the Extron website.
Which features can be customized within the EMP player
Closed captioning font color, size, and opacity and background color and opacity can be selected using controls within the EMP player.
How to Find Information About EMPFor support and troubleshooting purposes you may wish to look up information about the Extron Media Player. This section provides instructions on how to find the following: l EMP version, part number, and license l A list of licensed third party technology used within EMP l The EMP help file.
To view the EMP version number only:The software version number is listed in the lower left corner of the EMP page.
To view the EMP version and part number information, license, and third party licenses:
1. Click the Information button in the upper right corner of the EMP screen. The
Information pop-up window opens, overlaying the video window. It displays the following information:
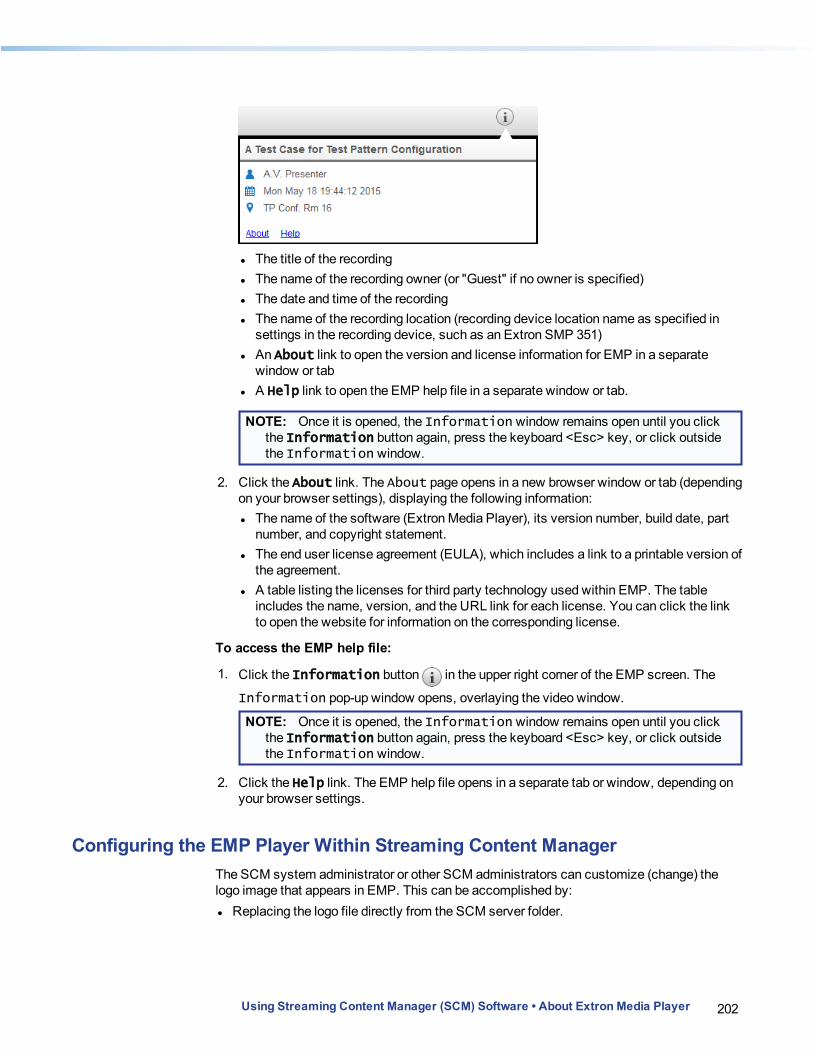
202Using Streaming Content Manager (SCM) Software • About Extron Media Player
l The title of the recording l The name of the recording owner (or "Guest" if no owner is specified) l The date and time of the recording l The name of the recording location (recording device location name as specified in
settings in the recording device, such as an Extron SMP 351) l An About link to open the version and license information for EMP in a separate
window or tab l A Help link to open the EMP help file in a separate window or tab.
NOTE: Once it is opened, the Information window remains open until you click the Information button again, press the keyboard <Esc> key, or click outside the Information window.
2. Click the About link. The About page opens in a new browser window or tab (depending on your browser settings), displaying the following information: l The name of the software (Extron Media Player), its version number, build date, part
number, and copyright statement. l The end user license agreement (EULA), which includes a link to a printable version of
the agreement. l A table listing the licenses for third party technology used within EMP. The table
includes the name, version, and the URL link for each license. You can click the link to open the website for information on the corresponding license.
To access the EMP help file:
1. Click the Information button in the upper right corner of the EMP screen. The
Information pop-up window opens, overlaying the video window.
NOTE: Once it is opened, the Information window remains open until you click the Information button again, press the keyboard <Esc> key, or click outside the Information window.
2. Click the Help link. The EMP help file opens in a separate tab or window, depending on your browser settings.
Configuring the EMP Player Within Streaming Content ManagerThe SCM system administrator or other SCM administrators can customize (change) the logo image that appears in EMP. This can be accomplished by: l Replacing the logo file directly from the SCM server folder.
203Using Streaming Content Manager (SCM) Software • About Extron Media Player
NOTES: l Files for these images must be in PNG format. l Within EMP the logo height is restricted to 80 pixels and the width is scaled
according to the native aspect ratio of the file.
To replace a logo file via the SCM server:
1. Log in to the SCM server as an administrator with read/write privileges. 2. Using a file manager program, navigate to and open
\\<servername>\wwwroot\SCM\Windows Services\Distribution Manager\Resources\VideoPlayer\images\customer_images where servername is the name and root path of the server where SCM is installed.
3. Copy the PNG file for the logo into that server location.
NOTE: The file for the logo must be named "company_logo.png" (without quotation marks).
SCM and EMP automatically recognize the new file and will use the new file in recording packages created after they have been uploaded.
Using Extron Media Player
Playing a RecordingTo play a recording offline (not streamed within Streaming Content Manager [SCM]), you must first download it from the SCM system and extract (unzip) the files. If you stream a recording from the SCM server, you can skip the downloading instructions.
To play a recording by streaming it in SCM:
NOTE: The recording must be set to allow streaming in SCM.
1. Locate the desired recording in a recordings list (see Locating Recordings in a List). 2. Open the player page for the desired recording (see Using Extron Media Player). 3. Use the player controls at the bottom of the window (see Using Extron Media Player) to
change playback settings as desired and click the Play/Pause button to start and stop playing the video stream. Alternatively, you can use keyboard controls to control video playback and audio volume (see Using Extron Media Player).
To download a recording from SCM and play it offline using EMP:
NOTE: The recording must be set to allow downloading in SCM.
1. In SCM, locate the desired recording in a recording list.
2. If the recording is set to allow downloading, click the Download button ( ) for that recording.
3. Select Save if offered the choice to Open or to Save the package. The recording package downloads to your computer or other device in the form of a .zip file. This is typically saved to the default download location used by your browser.
4. Locate the downloaded file and extract (unzip) the package to a folder of your choice.
NOTE: This step is important because you cannot play the recording without unzipping the files first. The player cannot read a zipped video file.
5. Open the folder for that recording and open the Play_Video.html file by double-clicking the file or right-clicking on the file and selecting Open from the pop-up menu. The Extron Media Player (EMP) opens within a browser and loads the recording.
6. Use the player controls at the bottom of the window (see Overview of the Extron Media Player Interface) to change playback settings as desired and click the Play/Pause button to start and stop playing the video stream. Alternatively, you can use keyboard controls to control video playback and audio volume (see Using Keyboard Shortcuts).
Using Streaming Content Manager (SCM) Software • Using Extron Media Player 204

205Using Streaming Content Manager (SCM) Software • Using Extron Media Player
Overview of the Extron Media Player Interface
How the Extron Media Player is Organized
The Extron Media Player is organized into three main zones:
1. The header at the top of the window 2. The recording playback area in the center of the window 3. The playback controls and indicators region along the bottom of the window
The following image shows an example of an EMP window, showing the regions and the main elements within each region.
Recording
title
Progress
bar with
slider
control
Player
version
Header
Logo
Information
button
Player
controls
Recording
playback
area
Information
pop-up
window
Closed
captioning
Background
(behind video)
Back, Play/
Pause,
Forward
buttons
Playback
speed
button
Settings
button
Volume
buttonClosed
caption
button
1
2
3

206Using Streaming Content Manager (SCM) Software • Using Extron Media Player
EMP Features
Header features
The header region at the top of the window includes the following features (from left to right): l A logo or other graphic — By default this is the Extron logo, but it can be replaced by
something else using controls within Extron Streaming Content Manager server software (see Configuring the EMP Player Within Streaming Content Manager).
l The recording title l The Information button — When this is clicked or tapped, the Information pop-
up window opens, overlaying the video area. It displays the following information:
n The title of the recording n The name of the recording owner (or "Guest" if no owner is specified) n The date and time of the recording n The name of the recording location (recording device location name as specified in
settings in the recording device, such as an Extron SMP 351) n An About link to open the version and license information for EMP in a separate
window or tab (depending on your browser settings) n A Help link to open the EMP help file in a separate window or tab (depending on
browser settings).NOTE: Once it is opened, the Information window remains open until you click the
Information button again, press the keyboard <Esc> key, or click outside the Information window.
Recording playback area features
The recording playback area (center pane) displays the following: l The recorded video l A plain background, if the video does not completely fill the recording area l Closed captions, if they have been uploaded in the form of a .json file with the recording.
If closed captioning is turned on, captions are displayed in the bottom center of the video viewing area, overlaying the video.
l An "Extron Electronics" watermark in the lower right corner.

207Using Streaming Content Manager (SCM) Software • Using Extron Media Player
Playback controls region features
The playback control and settings region at the bottom of the window includes:
Chapter
marker
image
Chapter
marker
Progress
bar
Playback
slider
control
EMP
version
Closed
captioning
Back,
Play/
Pause,
Forward
buttons
Playback
speed
button
Settings
button
Volume
button
Closed
caption
button
Thumbnail
indicator
Extron
watermark
Time played/
total length
Background
l A progress indicator bar with thumbnail images, chapter marker indicators, and a selectable slider that allows you to navigate backwards or forwards to any point in the recording n The standard thumbnail images are miniature images of the picture at a given point in
the video. They are located at points indicated by short red lines above the progress bar and appear when you hover your mouse or other pointing device over the lines or the progress bar at those points. Thumbnails are automatically generated and saved by the recording device. An SMP 351 creates the first thumbnail 15 seconds into the recording and then every five minutes during recording.
n Chapter markers, indicated by downward pointing arrows ( ) are manually entered by the presenter of the recording when they push a button on the recording device (the Mark button on an SMP 351). They are often used to indicate a change of topic. Chapter markers also include a small thumbnail image which appears if you hover a mouse or other pointing device over the marker or progress bar.
l Time played and total duration for the recording
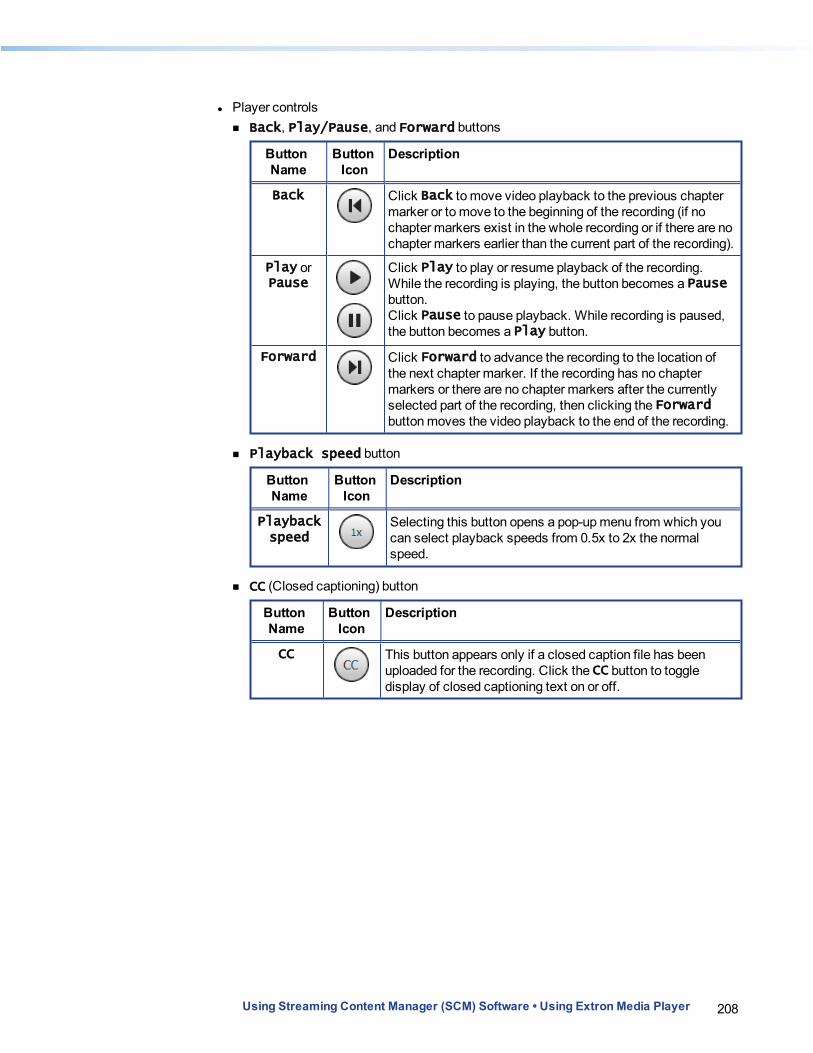
208Using Streaming Content Manager (SCM) Software • Using Extron Media Player
l Player controls n Back, Play/Pause, and Forward buttons
Button Name
Button Icon
Description
Back Click Back to move video playback to the previous chapter marker or to move to the beginning of the recording (if no chapter markers exist in the whole recording or if there are no chapter markers earlier than the current part of the recording).
Play or Pause
Click Play to play or resume playback of the recording. While the recording is playing, the button becomes a Pause button. Click Pause to pause playback. While recording is paused, the button becomes a Play button.
Forward Click Forward to advance the recording to the location of the next chapter marker. If the recording has no chapter markers or there are no chapter markers after the currently selected part of the recording, then clicking the Forward button moves the video playback to the end of the recording.
n Playback speed button
Button Name
Button Icon
Description
Playbackspeed
Selecting this button opens a pop-up menu from which you can select playback speeds from 0.5x to 2x the normal speed.
n CC (Closed captioning) button
Button Name
Button Icon
Description
CC This button appears only if a closed caption file has been uploaded for the recording. Click the CC button to toggle display of closed captioning text on or off.
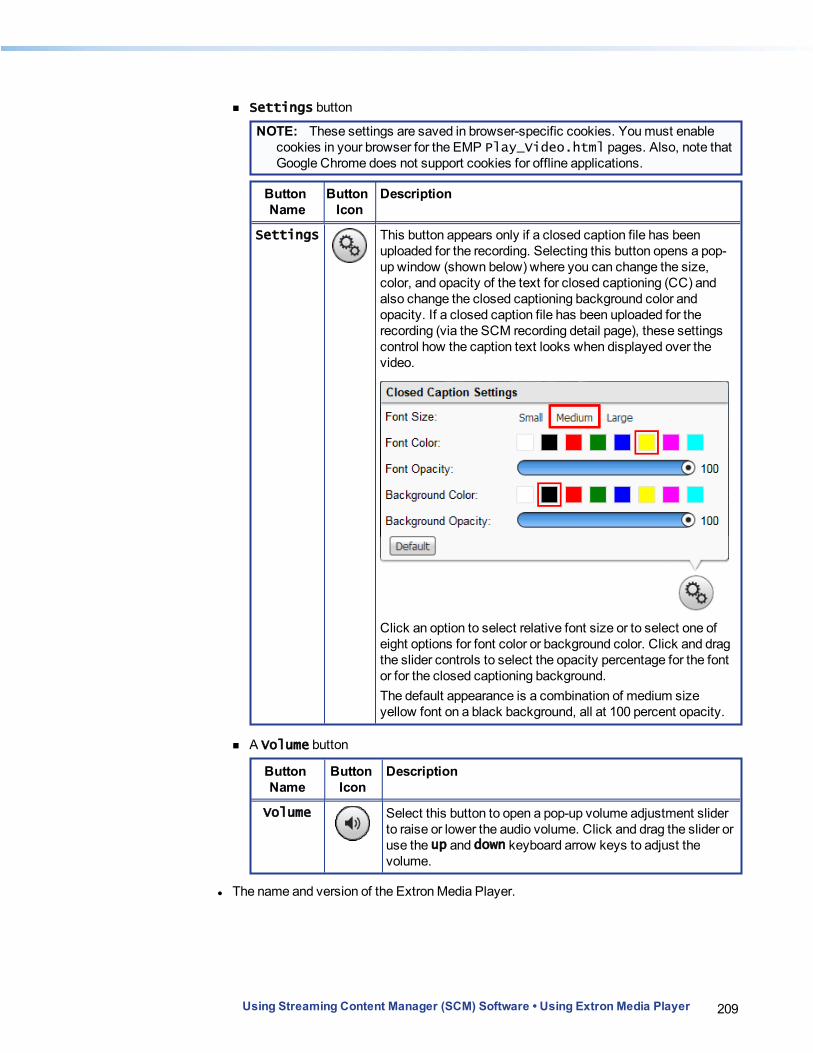
209Using Streaming Content Manager (SCM) Software • Using Extron Media Player
n Settings button
NOTE: These settings are saved in browser-specific cookies. You must enable cookies in your browser for the EMP Play_Video.html pages. Also, note that Google Chrome does not support cookies for offline applications.
Button Name
Button Icon
Description
Settings This button appears only if a closed caption file has been uploaded for the recording. Selecting this button opens a pop-up window (shown below) where you can change the size, color, and opacity of the text for closed captioning (CC) and also change the closed captioning background color and opacity. If a closed caption file has been uploaded for the recording (via the SCM recording detail page), these settings control how the caption text looks when displayed over the video.
Click an option to select relative font size or to select one of eight options for font color or background color. Click and drag the slider controls to select the opacity percentage for the font or for the closed captioning background.The default appearance is a combination of medium size yellow font on a black background, all at 100 percent opacity.
n A Volume button
Button Name
Button Icon
Description
Volume Select this button to open a pop-up volume adjustment slider to raise or lower the audio volume. Click and drag the slider or use the up and down keyboard arrow keys to adjust the volume.
l The name and version of the Extron Media Player.

210Using Streaming Content Manager (SCM) Software • Using Extron Media Player
Using Keyboard ShortcutsExtron Media Player supports basic keyboard controls (such as using the <Tab> key to move from one element to another or pressing <Esc> to exit a menu or pop-up window). In addition, you can control media playback through EMP by using combinations of keyboard keystrokes. The keyboard shortcuts available within EMP are detailed in the following table.
NOTE: You may need to press the <F6> key to refresh the page and be able to access the URL field of the browser.
Control Category
Keyboard Shortcut Command or Control
Recording playback and display
<Space bar> Play or pause the presentation.
<Shift+period> Skip to the next thumbnail (not chapter marker).
<Shift+comma> Skip to the previous thumbnail (not chapter marker).
<Shift+N> Skip to the next chapter marker.
<Shift+P> Skip to the previous chapter marker.
<Shift+C> Toggle the closed caption overlay on or off.
<Shift+1>, <Shift+2>, <Shift+3>, and so forth
Toggle on or off the associated video window (video-1, video-2, video-3, and so forth).
<Shift+left arrow> Decrease playback speed.
<Shift+right arrow> Increase playback speed.
Audio adjustment
<Up arrow> Increase program audio volume.
<Down arrow> Decrease program audio volume.
<Shift+M> Mute or unmute program audio.
Additional controls
<Shift+I> Open the Information menu.
NOTE: The <Up arrow> and <Down arrow> keys adjust the audio volume from anywhere in the playback window except when the control focus is within either of the following two pop-up elements. l Within the Playback speed pop-up control, use the <Up arrow> and <Down
arrow> keys to select the playback speed. l Within the Settings pop-up window, use the <Up arrow> and <Down arrow> keys
to increase and decrease font and background opacity.
Troubleshooting for EMP
Working with Mozilla® Firefox®
When Firefox is initially installed, it is configured to be able to play the media files that Extron produces. However, when other programs (such as Apple® Quicktime® or VideoLan VLC) are installed after Firefox, they change the settings within Firefox.To return the settings to their original state and make it possible to play the video files within Firefox, you must change a MIME type setting in the Windows registry. This method does not change any program settings. It tells the computer to treat all files with a “.m4v” file extension as though they are “.mp4” files. Programs like Quicktime and VLC have their own settings that override this and provide their own special instructions.
To change the MIME type:
1. Open Notepad or a similar simple text editor. Do not use Microsoft Word® or another editor that will add hidden formatting.
2. Type in the following text, exactly as it appears here:Windows Registry Editor Version 5.00
[HKEY_CLASSES_ROOT\.m4v]
"Content Type"="video/mp4"
3. Save the file as moz-m4v-fix.reg.
NOTE: Verify that your text editor does not automatically add “.txt” to the file name, causing the file to be called “moz-m4v-fix.reg.txt”.
4. Find the file you just created, and double-click it to run the fix. The Registry Editor opens a dialog box asking you to confirm the change.
5. Click Yes to continue. 6. Restart Firefox, if needed, to make the changes take effect.
Using Streaming Content Manager (SCM) Software • Troubleshooting for EMP 211
General Reference Information for EMP
Supported Browsers and File Types
Browsers
In order to use Extron Media Player, use one of the supported web browsers (and versions) listed below. l Google® Chrome™ version 35 or higher l Mozilla® Firefox® version 28 or higher l Microsoft® Internet Explorer® version 9 or higher (for Windows® operating systems)
NOTE: If you are using Internet Explorer, compatibility mode must be turned off (see Turning Off Internet Explorer Compatibility Mode, below, for details).
l Apple® Safari® version 6 or higher (for Mac® OS X® operating systems)
NOTE: The EMP interface is accessible to users with commonly available screen readers and those who use keyboard controls for navigation. See Using Keyboard Shortcuts for a table of keyboard controls that are specific to the Extron Media Player.
Turning Off Internet Explorer Compatibility Mode
The Extron Media Player is not supported while Microsoft Internet Explorer is in compatibility mode.
To check compatibility view settings:
1. From the Tools menu of the browser, select Compatibility View Settings. The Compatibility View Settings dialog box opens.
2. Be sure that the Display all websites in Compatibility View check box is cleared and that the DNS name or IP address of any recording is not in the list of websites that have been added to Compatibility view.
Using Streaming Content Manager (SCM) Software • General Reference Information for EMP 212

213Using Streaming Content Manager (SCM) Software • General Reference Information for EMP
File Types
l Recordings are .mp4 (.m4v) files. l Thumbnails are stored as .jpg files. l Graphics for the EMP player logo and background are .png files. l Closed captioning files must be .json files.
Licensed Software for EMPThe following software is licensed for use within Extron Media Player.
Name Version License URL
Ext JS 4.1 http://www.sencha.com/legal/sencha-sdk-software-license-agreement
Video.js 4.1.0 http://www.apache.org/licenses/LICENSE-2.0
Video.js-thumbnail 4.1.0 http://www.apache.org/licenses/LICENSE-2.0
Video.js-watermark 4.1.0 http://www.apache.org/licenses/LICENSE-2.0

Extron Headquarters+1.800.633.9876 (Inside USA/Canada Only)
Extron USA - West Extron USA - East+1.714.491.1500 +1.919.850.1000
+1.714.491.1517 FAX +1.919.850.1001 FAX
Extron Europe+800.3987.6673
(Inside Europe Only)
+31.33.453.4040
+31.33.453.4050 FAX
Extron Asia+65.6383.4400
+65.6383.4664 FAX
Extron Japan+81.3.3511.7655
+81.3.3511.7656 FAX
Extron China+86.21.3760.1568
+86.21.3760.1566 FAX
Extron Middle East+971.4.299.1800
+971.4.299.1880 FAX
Extron Korea+82.2.3444.1571
+82.2.3444.1575 FAX
Extron India1800.3070.3777
(Inside India Only)
+91.80.3055.3777
+91.80.3055.3737 FAX
©2015 Extron Electronics. All rights reserved. www.extron.com