using dreamweaver cc - o'neil · using dreamweaver cc more page editing © steve o’neil 2017...
TRANSCRIPT
Using Dreamweaver CC More Page Editing
© Steve O’Neil 2017 Page 1 of 16 http://www.oneil.com.au/pc/
Using Dreamweaver CC
5 – More Page Editing By now, you should have a functional template, with one simple page based on that template.
For the remaining pages, we’ll create each page based on the template and then save each one,
replacing the blank ones that are already there. On each page, we will look at different elements
that may be used in a page.
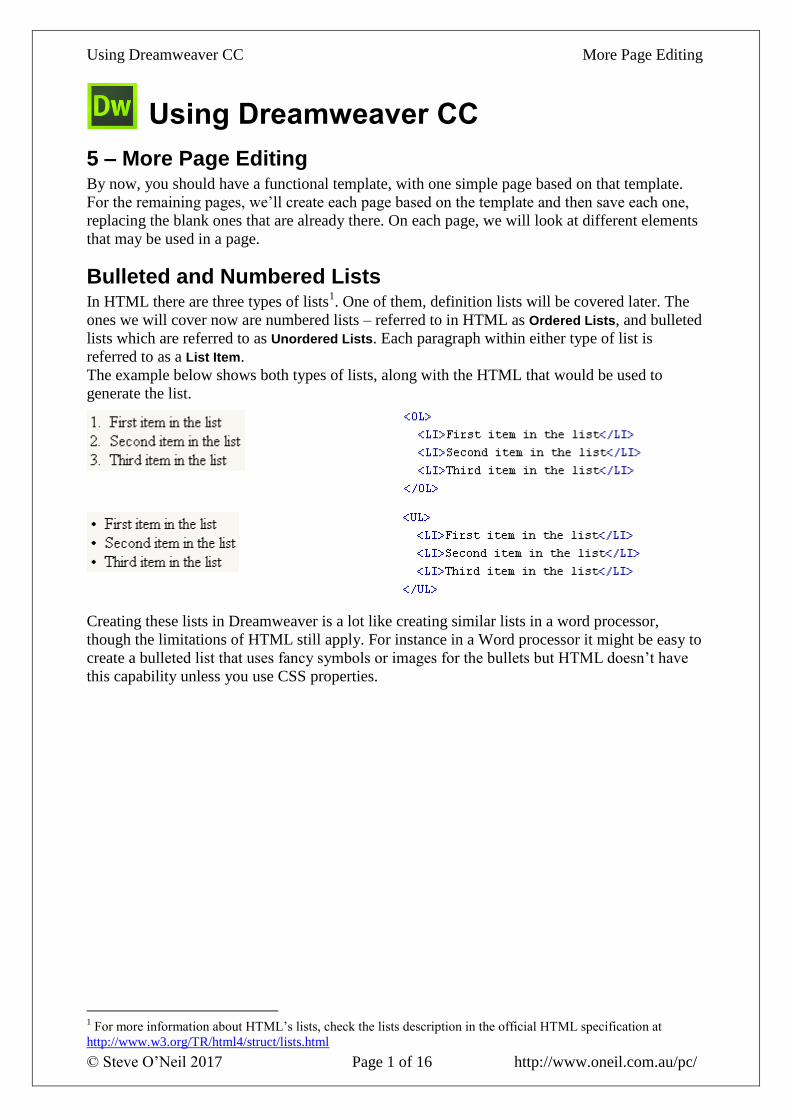
Bulleted and Numbered Lists In HTML there are three types of lists
1. One of them, definition lists will be covered later. The
ones we will cover now are numbered lists – referred to in HTML as Ordered Lists, and bulleted
lists which are referred to as Unordered Lists. Each paragraph within either type of list is
referred to as a List Item.
The example below shows both types of lists, along with the HTML that would be used to
generate the list.
Creating these lists in Dreamweaver is a lot like creating similar lists in a word processor,
though the limitations of HTML still apply. For instance in a Word processor it might be easy to
create a bulleted list that uses fancy symbols or images for the bullets but HTML doesn’t have
this capability unless you use CSS properties.
1 For more information about HTML’s lists, check the lists description in the official HTML specification at
http://www.w3.org/TR/html4/struct/lists.html
Using Dreamweaver CC More Page Editing
© Steve O’Neil 2017 Page 2 of 16 http://www.oneil.com.au/pc/
Exercise 1 – Creating a List
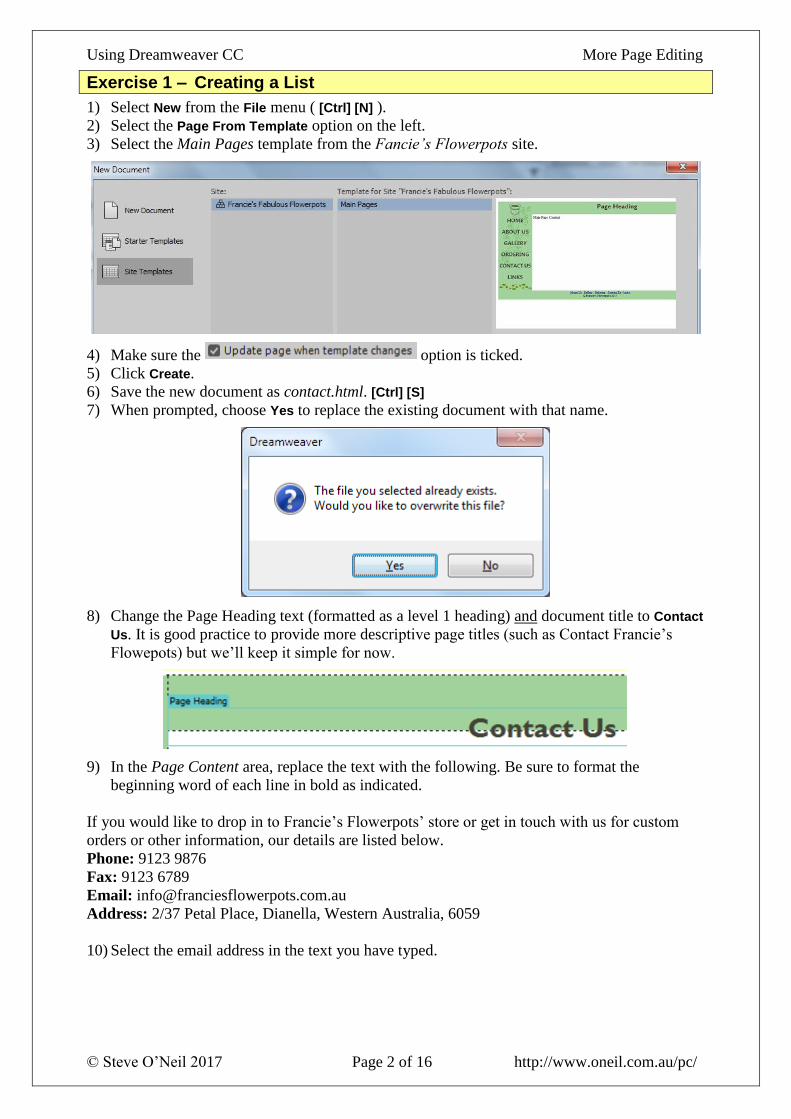
1) Select New from the File menu ( [Ctrl] [N] ).
2) Select the Page From Template option on the left.
3) Select the Main Pages template from the Fancie’s Flowerpots site.
4) Make sure the option is ticked.
5) Click Create.
6) Save the new document as contact.html. [Ctrl] [S]
7) When prompted, choose Yes to replace the existing document with that name.
8) Change the Page Heading text (formatted as a level 1 heading) and document title to Contact
Us. It is good practice to provide more descriptive page titles (such as Contact Francie’s
Flowepots) but we’ll keep it simple for now.
9) In the Page Content area, replace the text with the following. Be sure to format the
beginning word of each line in bold as indicated.
If you would like to drop in to Francie’s Flowerpots’ store or get in touch with us for custom
orders or other information, our details are listed below.
Phone: 9123 9876
Fax: 9123 6789
Email: [email protected]
Address: 2/37 Petal Place, Dianella, Western Australia, 6059
10) Select the email address in the text you have typed.
Using Dreamweaver CC More Page Editing
© Steve O’Neil 2017 Page 3 of 16 http://www.oneil.com.au/pc/
11) In the Link property of the properties panel, type the email address (or copy and paste it if
you prefer). Before the email address, type mailto: (including the colon).
Note If you want a hyperlink to link to an email address, it must include the mailto: part. This will mean that if a user clicks on it, the web browser will tell their email program to create a new email addressed to the email address in the link.
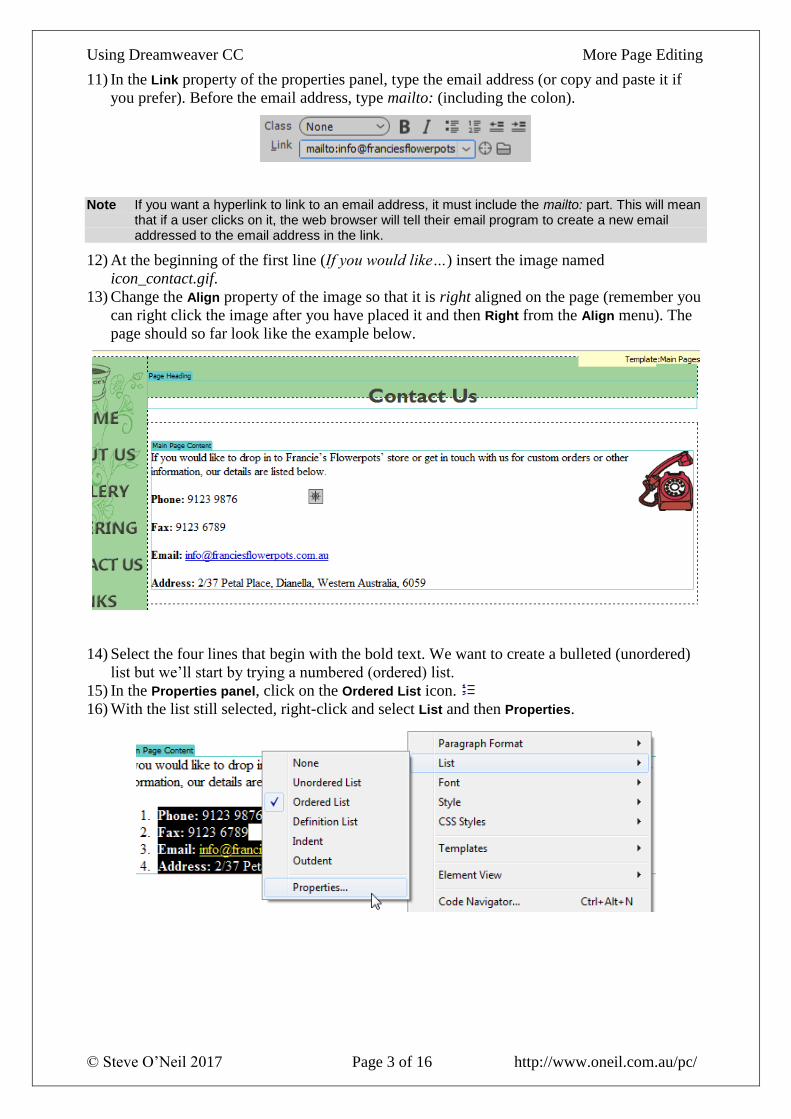
12) At the beginning of the first line (If you would like…) insert the image named
icon_contact.gif.
13) Change the Align property of the image so that it is right aligned on the page (remember you
can right click the image after you have placed it and then Right from the Align menu). The
page should so far look like the example below.
14) Select the four lines that begin with the bold text. We want to create a bulleted (unordered)
list but we’ll start by trying a numbered (ordered) list.
15) In the Properties panel, click on the Ordered List icon.
16) With the list still selected, right-click and select List and then Properties.
Using Dreamweaver CC More Page Editing
© Steve O’Neil 2017 Page 4 of 16 http://www.oneil.com.au/pc/
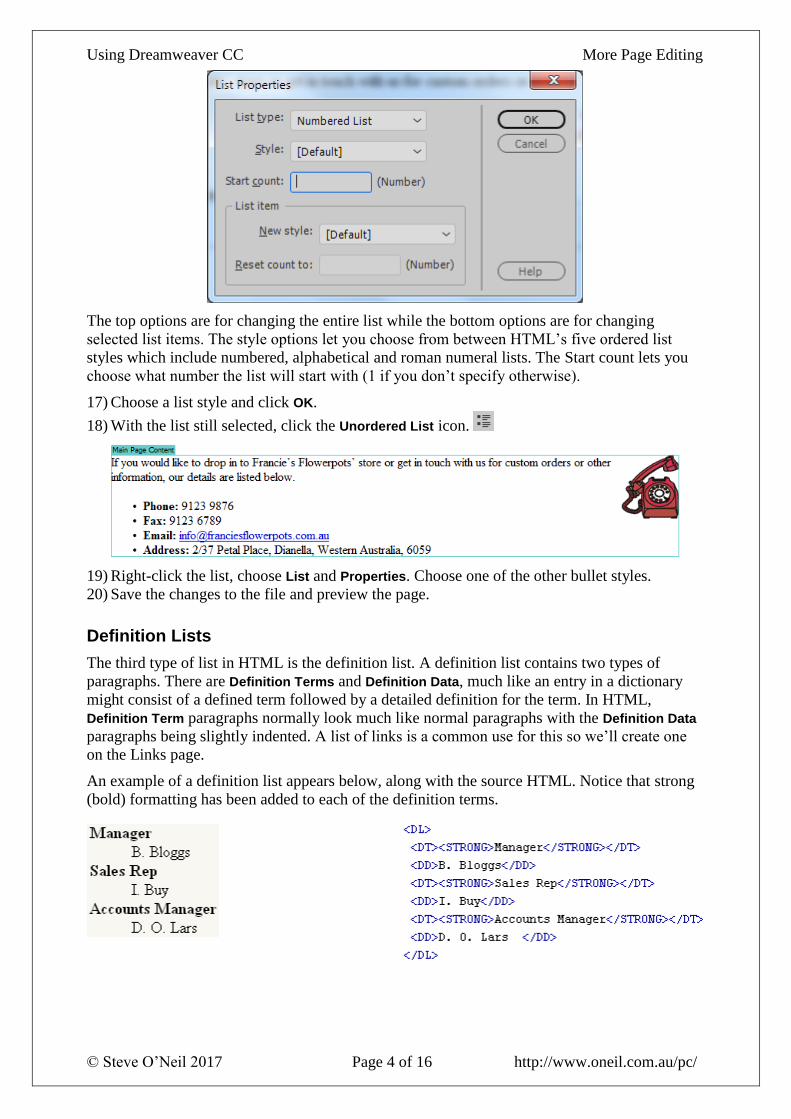
The top options are for changing the entire list while the bottom options are for changing
selected list items. The style options let you choose from between HTML’s five ordered list
styles which include numbered, alphabetical and roman numeral lists. The Start count lets you
choose what number the list will start with (1 if you don’t specify otherwise).
17) Choose a list style and click OK.
18) With the list still selected, click the Unordered List icon.
19) Right-click the list, choose List and Properties. Choose one of the other bullet styles.
20) Save the changes to the file and preview the page.
Definition Lists
The third type of list in HTML is the definition list. A definition list contains two types of
paragraphs. There are Definition Terms and Definition Data, much like an entry in a dictionary
might consist of a defined term followed by a detailed definition for the term. In HTML,
Definition Term paragraphs normally look much like normal paragraphs with the Definition Data
paragraphs being slightly indented. A list of links is a common use for this so we’ll create one
on the Links page.
An example of a definition list appears below, along with the source HTML. Notice that strong
(bold) formatting has been added to each of the definition terms.
Using Dreamweaver CC More Page Editing
© Steve O’Neil 2017 Page 5 of 16 http://www.oneil.com.au/pc/
Exercise 2 – Creating a Definition List
1) Create a new page based on the same template we used in the last exercise.
2) Save the new page as links.html, replacing the existing page with that name.
3) Change the Page Heading text (formatted as heading 1) and Document Title to Links.
4) Delete the text in the Page Content area.
5) From the Insert menu, select Format, List and then Definition List (You can also right-click
and select the option from the shortcut menu).
6) Type Learn to Pot and press [Enter].
The first line (a definition Term line) is followed by a Definition Data line which will be
indented.
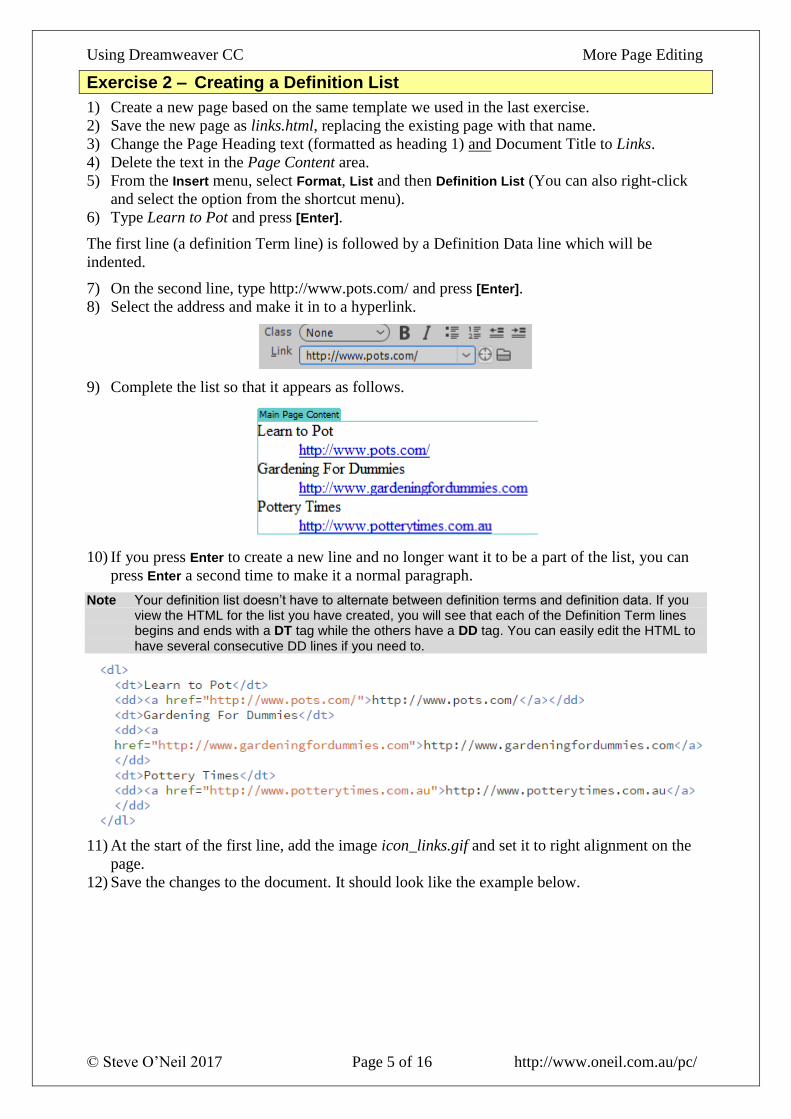
7) On the second line, type http://www.pots.com/ and press [Enter].
8) Select the address and make it in to a hyperlink.
9) Complete the list so that it appears as follows.
10) If you press Enter to create a new line and no longer want it to be a part of the list, you can
press Enter a second time to make it a normal paragraph.
Note Your definition list doesn’t have to alternate between definition terms and definition data. If you view the HTML for the list you have created, you will see that each of the Definition Term lines begins and ends with a DT tag while the others have a DD tag. You can easily edit the HTML to have several consecutive DD lines if you need to.
11) At the start of the first line, add the image icon_links.gif and set it to right alignment on the
page.
12) Save the changes to the document. It should look like the example below.

Using Dreamweaver CC More Page Editing
© Steve O’Neil 2017 Page 6 of 16 http://www.oneil.com.au/pc/
Exercise 3 – Creating a List Using a Table
Sometimes the best way to create the kind of listing you want is by having the items listed in a
table. We’ll use a table to create a listing of pots on the products page.
1) Create a new page based on the same template we used in the last exercise.
2) Save the new page as gallery.html, replacing the existing page with that name.
3) Change the Page Heading text (formatted as a level 1 heading) and Document Title to
Gallery.
4) Delete the text in the Page Content area.
5) Type the following text and press Enter at the end of the line.
A selection of our products can be seen below. Remember that we have many more
types of pots available. For a full listing of our pots, or to request a custom made
pot, see our Contact Us page.
6) Create a hyperlink so that the words Contact Us link to the file contact.html.
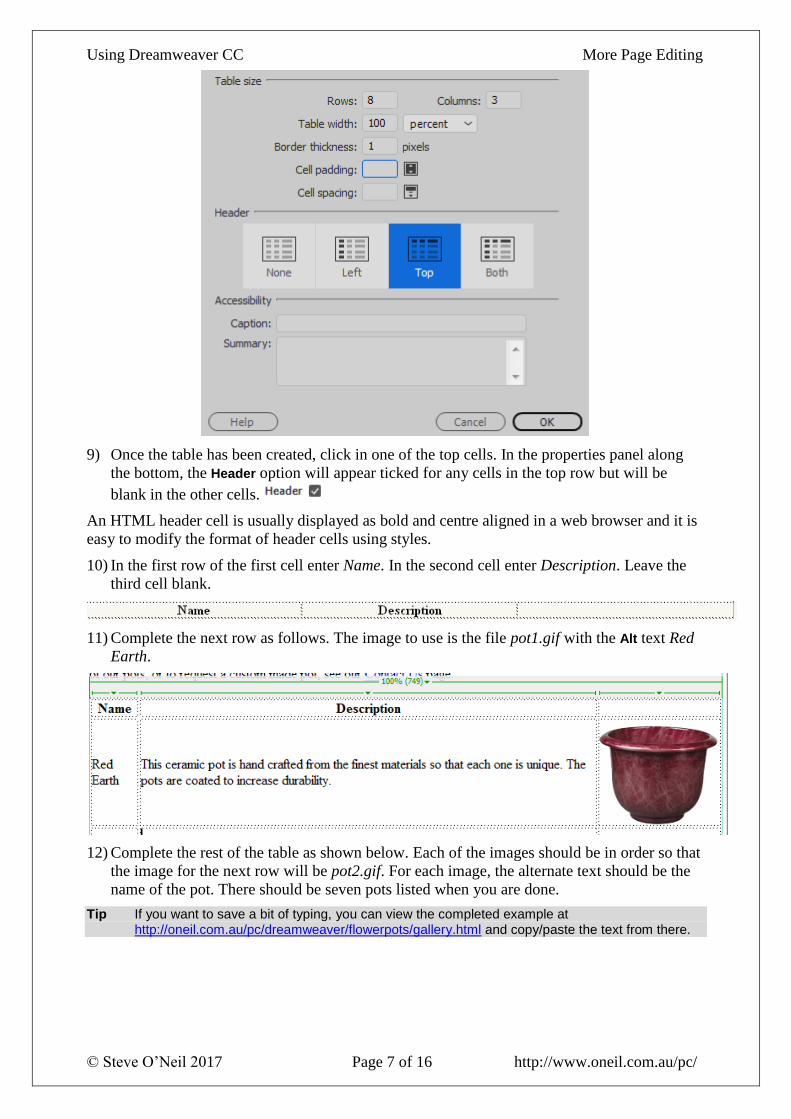
7) On a new line after the text, insert a table that is 8 rows high, 3 columns wide and 100%
width. You can press [Ctrl] [Alt] [T] or select Table from the Insert menu.
8) Choose the Header Top option as you are creating the table.
Using Dreamweaver CC More Page Editing
© Steve O’Neil 2017 Page 7 of 16 http://www.oneil.com.au/pc/
9) Once the table has been created, click in one of the top cells. In the properties panel along
the bottom, the Header option will appear ticked for any cells in the top row but will be
blank in the other cells.
An HTML header cell is usually displayed as bold and centre aligned in a web browser and it is
easy to modify the format of header cells using styles.
10) In the first row of the first cell enter Name. In the second cell enter Description. Leave the
third cell blank.
11) Complete the next row as follows. The image to use is the file pot1.gif with the Alt text Red
Earth.
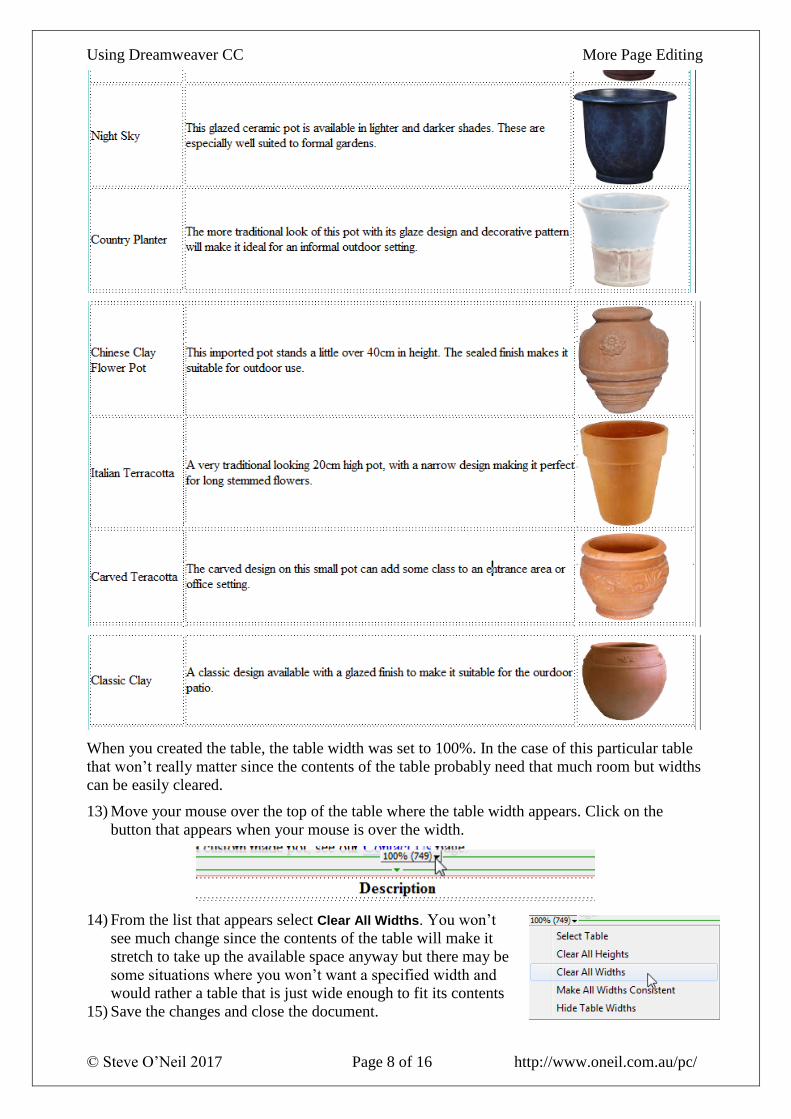
12) Complete the rest of the table as shown below. Each of the images should be in order so that
the image for the next row will be pot2.gif. For each image, the alternate text should be the
name of the pot. There should be seven pots listed when you are done.
Tip If you want to save a bit of typing, you can view the completed example at http://oneil.com.au/pc/dreamweaver/flowerpots/gallery.html and copy/paste the text from there.
Using Dreamweaver CC More Page Editing
© Steve O’Neil 2017 Page 8 of 16 http://www.oneil.com.au/pc/
When you created the table, the table width was set to 100%. In the case of this particular table
that won’t really matter since the contents of the table probably need that much room but widths
can be easily cleared.
13) Move your mouse over the top of the table where the table width appears. Click on the
button that appears when your mouse is over the width.
14) From the list that appears select Clear All Widths. You won’t
see much change since the contents of the table will make it
stretch to take up the available space anyway but there may be
some situations where you won’t want a specified width and
would rather a table that is just wide enough to fit its contents
15) Save the changes and close the document.
Using Dreamweaver CC More Page Editing
© Steve O’Neil 2017 Page 9 of 16 http://www.oneil.com.au/pc/
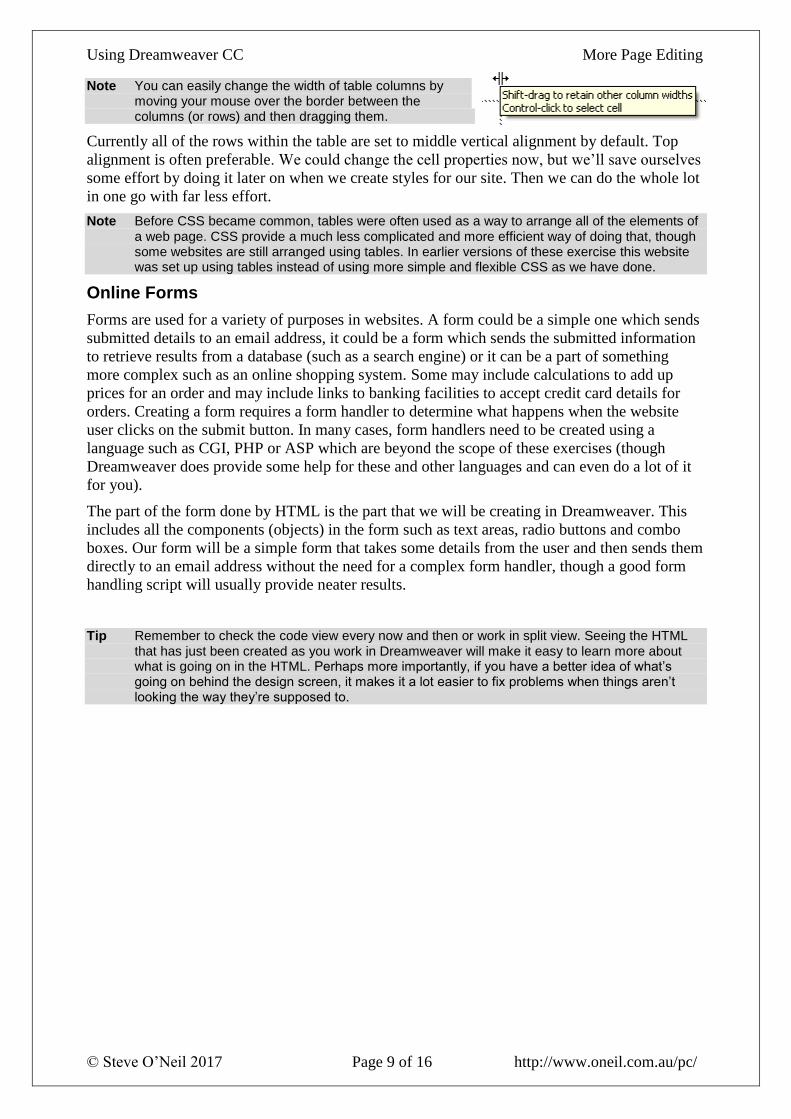
Note You can easily change the width of table columns by moving your mouse over the border between the columns (or rows) and then dragging them.
Currently all of the rows within the table are set to middle vertical alignment by default. Top
alignment is often preferable. We could change the cell properties now, but we’ll save ourselves
some effort by doing it later on when we create styles for our site. Then we can do the whole lot
in one go with far less effort.
Note Before CSS became common, tables were often used as a way to arrange all of the elements of a web page. CSS provide a much less complicated and more efficient way of doing that, though some websites are still arranged using tables. In earlier versions of these exercise this website was set up using tables instead of using more simple and flexible CSS as we have done.
Online Forms
Forms are used for a variety of purposes in websites. A form could be a simple one which sends
submitted details to an email address, it could be a form which sends the submitted information
to retrieve results from a database (such as a search engine) or it can be a part of something
more complex such as an online shopping system. Some may include calculations to add up
prices for an order and may include links to banking facilities to accept credit card details for
orders. Creating a form requires a form handler to determine what happens when the website
user clicks on the submit button. In many cases, form handlers need to be created using a
language such as CGI, PHP or ASP which are beyond the scope of these exercises (though
Dreamweaver does provide some help for these and other languages and can even do a lot of it
for you).
The part of the form done by HTML is the part that we will be creating in Dreamweaver. This
includes all the components (objects) in the form such as text areas, radio buttons and combo
boxes. Our form will be a simple form that takes some details from the user and then sends them
directly to an email address without the need for a complex form handler, though a good form
handling script will usually provide neater results.
Tip Remember to check the code view every now and then or work in split view. Seeing the HTML that has just been created as you work in Dreamweaver will make it easy to learn more about what is going on in the HTML. Perhaps more importantly, if you have a better idea of what’s going on behind the design screen, it makes it a lot easier to fix problems when things aren’t looking the way they’re supposed to.
Using Dreamweaver CC More Page Editing
© Steve O’Neil 2017 Page 10 of 16 http://www.oneil.com.au/pc/
Exercise 4 – Creating the Form
1) Create a new page based on the same template we used in the last exercise.
2) Save the new page as ordering.html, replacing the existing page with that name.
3) Change the heading text (formatted as level 1 heading) and page title to Ordering.
4) Delete the text in the Page Content area.
5) Enter the following text.
To place an order for any of our products or to request our latest catalogue, complete
the form below.
6) Press [Enter] to create a new blank line.
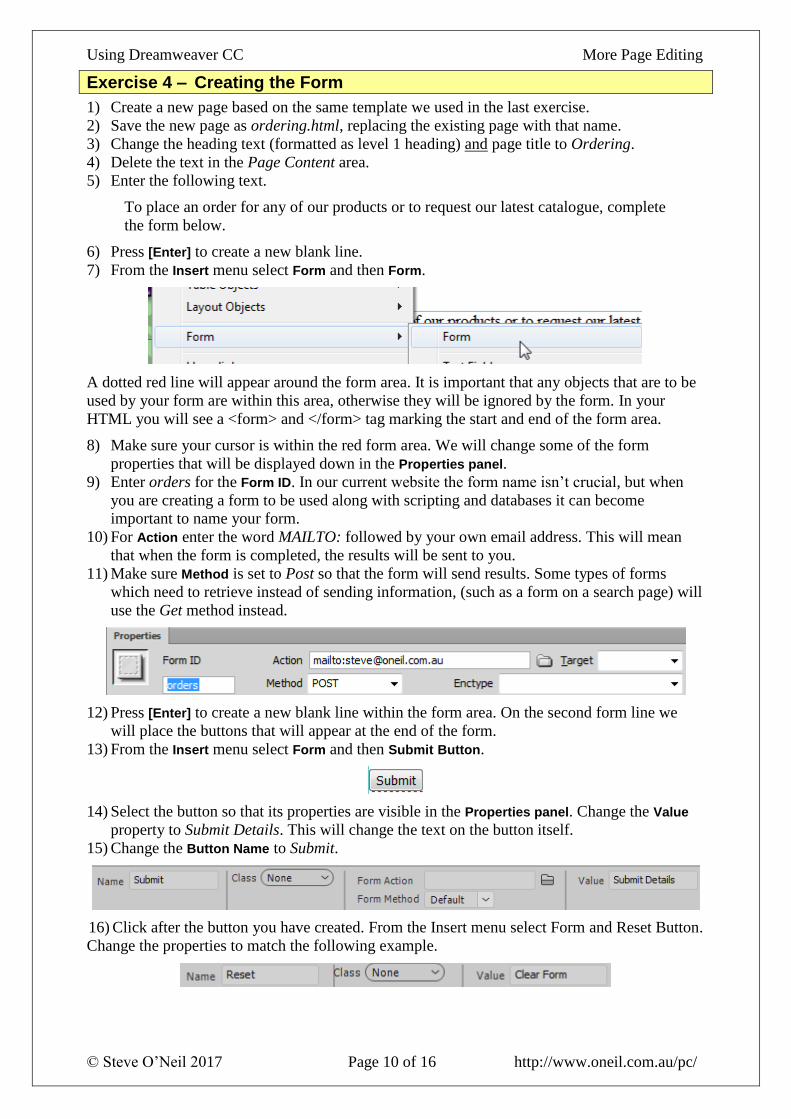
7) From the Insert menu select Form and then Form.
A dotted red line will appear around the form area. It is important that any objects that are to be
used by your form are within this area, otherwise they will be ignored by the form. In your
HTML you will see a <form> and </form> tag marking the start and end of the form area.
8) Make sure your cursor is within the red form area. We will change some of the form
properties that will be displayed down in the Properties panel.
9) Enter orders for the Form ID. In our current website the form name isn’t crucial, but when
you are creating a form to be used along with scripting and databases it can become
important to name your form.
10) For Action enter the word MAILTO: followed by your own email address. This will mean
that when the form is completed, the results will be sent to you.
11) Make sure Method is set to Post so that the form will send results. Some types of forms
which need to retrieve instead of sending information, (such as a form on a search page) will
use the Get method instead.
12) Press [Enter] to create a new blank line within the form area. On the second form line we
will place the buttons that will appear at the end of the form.
13) From the Insert menu select Form and then Submit Button.
14) Select the button so that its properties are visible in the Properties panel. Change the Value
property to Submit Details. This will change the text on the button itself.
15) Change the Button Name to Submit.
16) Click after the button you have created. From the Insert menu select Form and Reset Button.
Change the properties to match the following example.
Using Dreamweaver CC More Page Editing
© Steve O’Neil 2017 Page 11 of 16 http://www.oneil.com.au/pc/
Earlier we’ve created style rules in an external CSS file. We can also use inline styles to format
a specific part of the document. We’ll centre align this line by adding an inline style that will
only apply to this paragraph.
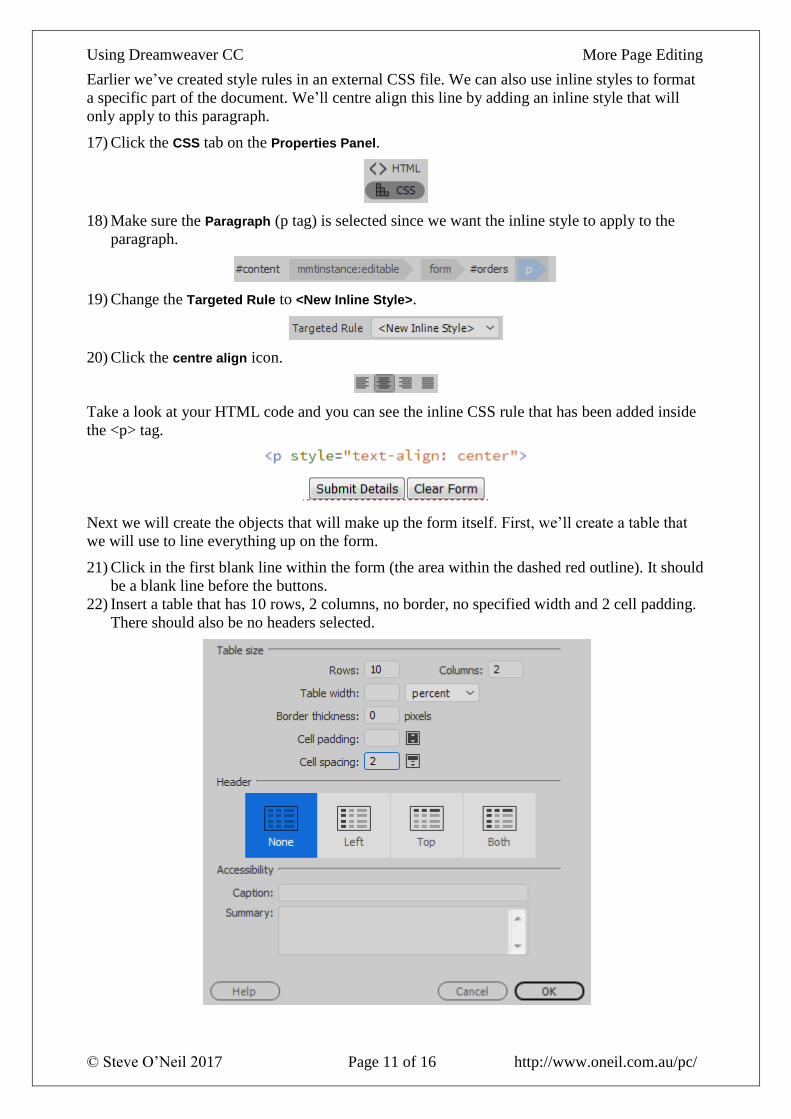
17) Click the CSS tab on the Properties Panel.
18) Make sure the Paragraph (p tag) is selected since we want the inline style to apply to the
paragraph.
19) Change the Targeted Rule to <New Inline Style>.
20) Click the centre align icon.
Take a look at your HTML code and you can see the inline CSS rule that has been added inside
the <p> tag.
Next we will create the objects that will make up the form itself. First, we’ll create a table that
we will use to line everything up on the form.
21) Click in the first blank line within the form (the area within the dashed red outline). It should
be a blank line before the buttons.
22) Insert a table that has 10 rows, 2 columns, no border, no specified width and 2 cell padding.
There should also be no headers selected.
Using Dreamweaver CC More Page Editing
© Steve O’Neil 2017 Page 12 of 16 http://www.oneil.com.au/pc/
Since we haven’t specified a width, the table will look a little squashed until we’ve put
something in it.
23) Click in the first cell of the table and type Name: (including the colon: ).
24) Click in the second cell of the first row (or press the [Tab] key to move to it).
25) From the Insert menu select Form and then Text.
26) Dreamweaver may add a text label (Text Field) to the left of the text box. Delete it if it does.
27) Make sure the text field you just inserted is selected so you can change the properties.
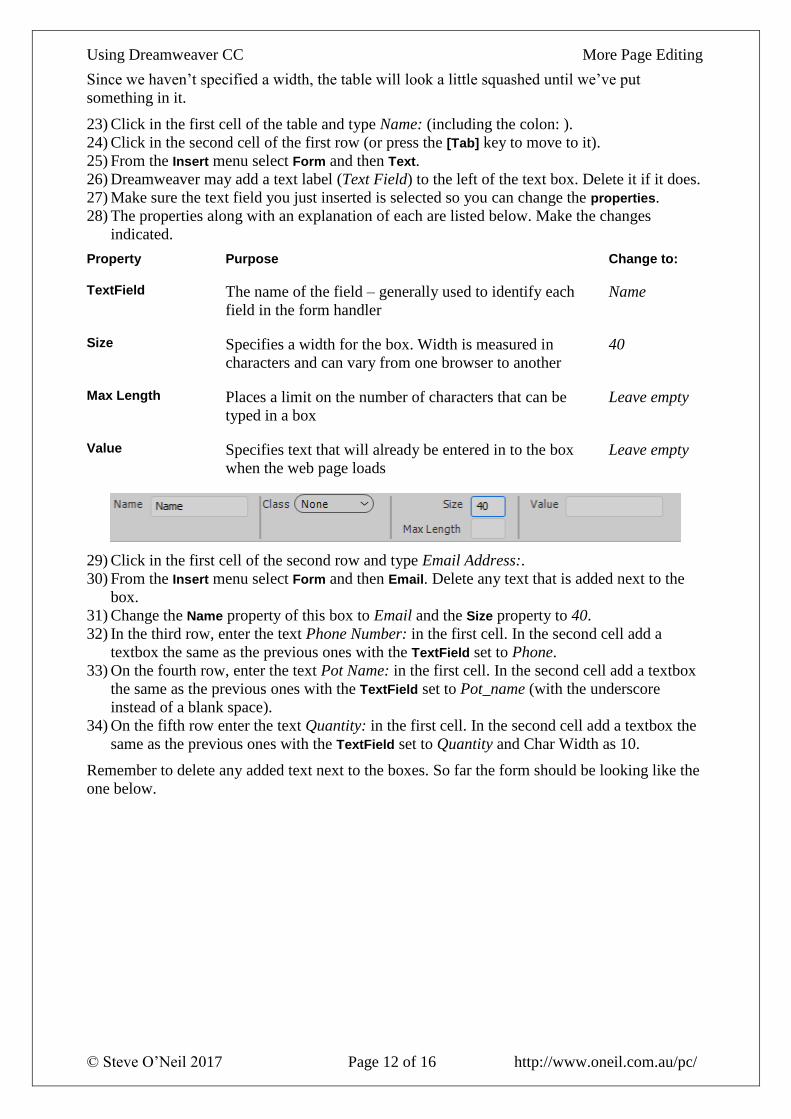
28) The properties along with an explanation of each are listed below. Make the changes
indicated.
Property Purpose Change to:
TextField The name of the field – generally used to identify each
field in the form handler
Name
Size Specifies a width for the box. Width is measured in
characters and can vary from one browser to another
40
Max Length Places a limit on the number of characters that can be
typed in a box
Leave empty
Value Specifies text that will already be entered in to the box
when the web page loads
Leave empty
29) Click in the first cell of the second row and type Email Address:.
30) From the Insert menu select Form and then Email. Delete any text that is added next to the
box.
31) Change the Name property of this box to Email and the Size property to 40.
32) In the third row, enter the text Phone Number: in the first cell. In the second cell add a
textbox the same as the previous ones with the TextField set to Phone.
33) On the fourth row, enter the text Pot Name: in the first cell. In the second cell add a textbox
the same as the previous ones with the TextField set to Pot_name (with the underscore
instead of a blank space).
34) On the fifth row enter the text Quantity: in the first cell. In the second cell add a textbox the
same as the previous ones with the TextField set to Quantity and Char Width as 10.
Remember to delete any added text next to the boxes. So far the form should be looking like the
one below.

Using Dreamweaver CC More Page Editing
© Steve O’Neil 2017 Page 13 of 16 http://www.oneil.com.au/pc/
Time to try out some of the other types of form objects, starting with a combo box.
35) In the first cell of the sixth row type Location:.
36) In the next cell select Insert, then select Form and Select. Change the name property to
Location.
37) In the Properties panel, click on the List Values button.
Here we can create the choices that will appear in the list. The Item Label will specify the text
that will appear for each choice in the list. The Value specifies what will be submitted with the
form when each option is selected. If no value is specified then the value will be the same as the
Item Label.
38) Click in the Item Label section and enter ACT, and in the Value section enter Australian
Capital Territory.
39) Click the + button to add another item. Add additional items as shown on the next page. You
can use the buttons to change their order if you need to.
ACT Australian Capital Territory
NSW New South Wales
NT Northern Territory
QLD Queensland
SA South Australia
TAS Tasmania
Using Dreamweaver CC More Page Editing
© Steve O’Neil 2017 Page 14 of 16 http://www.oneil.com.au/pc/
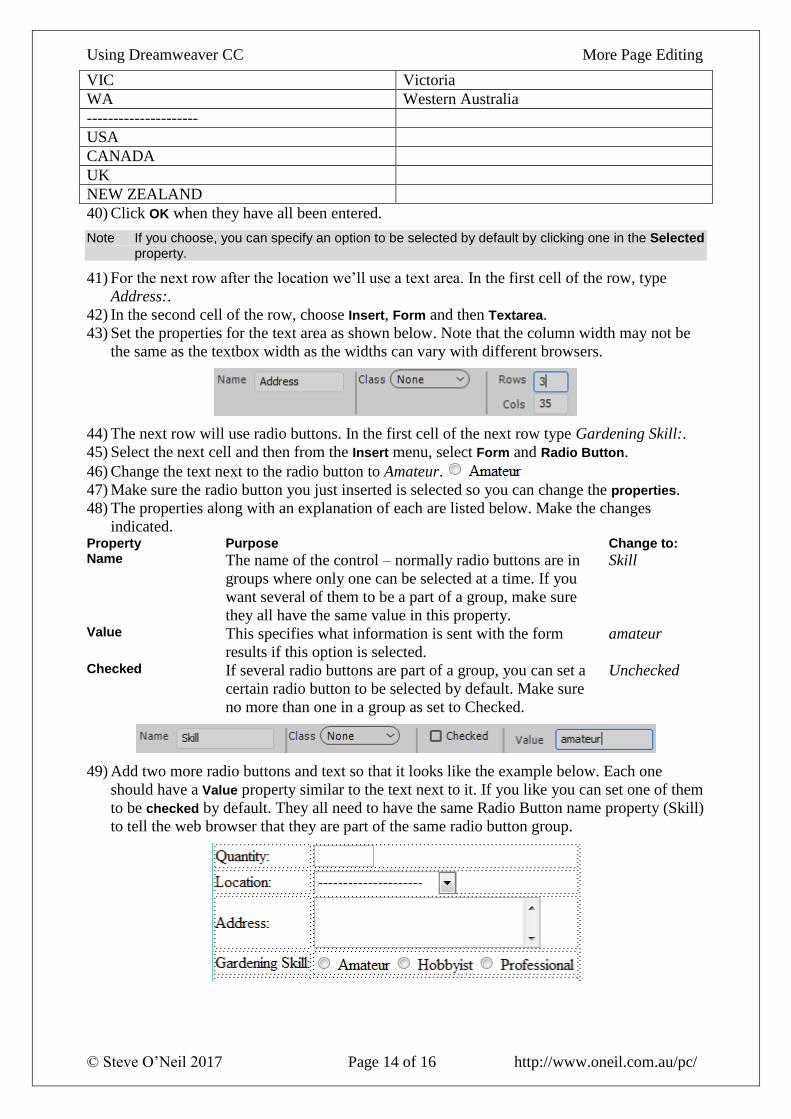
VIC Victoria
WA Western Australia
---------------------
USA
CANADA
UK
NEW ZEALAND
40) Click OK when they have all been entered.
Note If you choose, you can specify an option to be selected by default by clicking one in the Selected property.
41) For the next row after the location we’ll use a text area. In the first cell of the row, type
Address:.
42) In the second cell of the row, choose Insert, Form and then Textarea.
43) Set the properties for the text area as shown below. Note that the column width may not be
the same as the textbox width as the widths can vary with different browsers.
44) The next row will use radio buttons. In the first cell of the next row type Gardening Skill:.
45) Select the next cell and then from the Insert menu, select Form and Radio Button.
46) Change the text next to the radio button to Amateur.
47) Make sure the radio button you just inserted is selected so you can change the properties.
48) The properties along with an explanation of each are listed below. Make the changes
indicated. Property Purpose Change to: Name The name of the control – normally radio buttons are in
groups where only one can be selected at a time. If you
want several of them to be a part of a group, make sure
they all have the same value in this property.
Skill
Value This specifies what information is sent with the form
results if this option is selected.
amateur
Checked If several radio buttons are part of a group, you can set a
certain radio button to be selected by default. Make sure
no more than one in a group as set to Checked.
Unchecked
49) Add two more radio buttons and text so that it looks like the example below. Each one
should have a Value property similar to the text next to it. If you like you can set one of them
to be checked by default. They all need to have the same Radio Button name property (Skill)
to tell the web browser that they are part of the same radio button group.

Using Dreamweaver CC More Page Editing
© Steve O’Neil 2017 Page 15 of 16 http://www.oneil.com.au/pc/
50) For the next row, we’ll merge both cells so that they become one cell. Select both cells in the
row.
51) In the Properties panel, click on the Merge cells icon. This will cause the first cell to have
the colspan="2" attribute added to its table data (td) tag while the second cell, which is no
longer needed will be removed. Check the Code View ( [Ctrl] [`] ) to see the changes.
52) In the merged cell, enter the text – Would you like to – followed by a blank space.
53) From the Insert menu select Form and Checkbox.
54) Complete the properties as follows.
55) Add some more text and another Checkbox so that it appears like the following example.
Make sure the second checkbox has catalogue for the Name and Value properties.
56) For the last row, put the text Comments: in the first cell and another text area called
Comments in the second cell. Make it the same size as the previous text area (You can copy
the previous text area and simply change the TextField property).
The completed form should look like the following example
57) Preview the page in your browser to see how the form looks. Try filling in the form and
testing both the reset and submit buttons.
58) Try the links in the navigation bar to see how the other pages look.
Since this page is quite long, you may end up with a gap between your navigation and your
footer. You could give the container a background colour (#a2d39c) if you’d prefer that gap to
be filled.

Using Dreamweaver CC More Page Editing
© Steve O’Neil 2017 Page 16 of 16 http://www.oneil.com.au/pc/
Note Since our form action is an email address it will open your email program to send an email which is not the best solution and may not work in some email programs. If you have an account with an internet service provider they may include a mailto script for their customer’s websites which would be good to use in the form’s action setting. Your school or workplace might also have something similar available. Alternatively, if you search the web, you will be able to find a wide range of form mailto scripts, though many of them require some knowledge of web servers to use. If you are going through these exercises in a class, ask your teacher if there is one available for your use.