usersguide nocover ae-00 - mechanical engineeringstarr/research/wam_usersguide_ae-00.pdf · up the...
TRANSCRIPT

WAM Arm User’s Guide
Document: D1001 Version: AE.00
TM

WAM™Arm – User’s Guide [email protected] www.barrett.com
© 2006 Barrett Technology®, Inc. Document: D1001, Version: AE.00 Page 2 of 33
1 Table of Contents 1 Table of Contents............................................................................................................................................ 2 2 Getting Started ................................................................................................................................................ 3
2.1 Unpacking.................................................................................................................................................................................................... 3 2.2 System Setup............................................................................................................................................................................................... 4 2.3 System Startup ............................................................................................................................................................................................ 8
3 Hardware ......................................................................................................................................................... 9 3.1 WAM Arm................................................................................................................................................................................................... 9 3.2 WAM Wrist (optional) ............................................................................................................................................................................ 12
4 PC & Control Software ................................................................................................................................. 13 4.1 PC Specifications...................................................................................................................................................................................... 13 4.2 File system layout..................................................................................................................................................................................... 13 4.3 The configuration file (wam.conf)......................................................................................................................................................... 13 4.4 Operating modes....................................................................................................................................................................................... 13 4.5 Handling safety faults .............................................................................................................................................................................. 14 4.6 Additional information ............................................................................................................................................................................ 14 4.7 Troubleshooting........................................................................................................................................................................................ 16
5 Appendix A – Kinematics, Transmission Ratios, and Joint Ranges............................................................. 17 5.1 4-DOF and 7-DOF Kinematics & Joint Ranges.................................................................................................................................. 17 5.2 4-DOF + Gimbals Kinematics................................................................................................................................................................ 25 5.3 Motor-Joint Transformations.................................................................................................................................................................. 27
6 Appendix B - CAN Communication Spec .................................................................................................... 29 7 Appendix C - BarrettHand ............................................................................................................................ 34
Barrett Technology, Inc. 625 Mount Auburn Street Cambridge, MA 02138
U.S.A
US+617-252-9000 [email protected]

WAM™Arm – User’s Guide [email protected] www.barrett.com
© 2006 Barrett Technology®, Inc. Document: D1001, Version: AE.00 Page 3 of 33
2 Getting Started This section is meant to help you develop a familiarity with the WAM™Arm system. Use this Getting Started section as a supplement to the Quick Start Guide, included separately.
2.1 Unpacking Figure 1 below illustrates everything that is shipped with a standard 4 degree-of- freedom WAM™Arm (keyboard not shown). Please ensure that all components are accounted for. In addition to the components shipped, you will need a computer monitor to connect to the supplied PC.
Figure 1: WAM Arm components
WAM™Arm
Network cable DC power cord
Converter for AC mode with line cord Pendants Maintenance Kit
User’s Manual, software
PC, Ethernet cord and line cord
Modular outer link
WAM™Arm – User’s Guide [email protected] www.barrett.com
© 2006 Barrett Technology®, Inc. Document: D1001, Version: AE.00 Page 4 of 33
Details WAM Arm – Four degree-of- freedom robotic arm WAM PC – Shuttle PC including CAN card, used
to communicate with the WAM AC mode converter – For optional AC power, this
connects the WAM to 50-60 Hz, 100-240V outlet power
Control Pendant – Used to activate and deactivate the WAM, show the safety status of the system, and has an emergency stop button
Display Pendant – Like the Control pendant, this displays the safety status of the components and has an emergency stop button, but cannot activate the WAM Arm
WAM DC power cable (blue) – Connects the WAM to DC power, or to the AC converter for AC power
Network cable (purple) – for use in communication between the PC and the WAM
Ethernet cable (for PC) – Standard Ethernet cable, for use in connecting PC to a local network
Computer AC line cord (6’) – Standard AC line cord, shorter and thinner of the two line cords
AC converter line cord (10’) – Standard heavy-gauge AC line cord, longer and thicker of the two line cords
Maintenance kit – kit containing replacement parts, maintenance tools, clamps for recabling, and mounting hardware for the WAM
Documentation – Includes this manual, a cable maintenance manual, a quick-start guide, and a 1-year warranty
WAM Wrist (not shown, optional) – replaces the Outer Link on the WAM, adds three additional powered degrees-of-freedom
Passive Gimbals (not shown, optional) – replaces the Outer Link on the WAM, adds three additional unpowered degrees-of-freedom
2.2 System Setup This section describes in detail the steps required to connect the components of the WAM system, power up the system, and perform some routine system checks. Unless explicitly noted, all setup instructions referencing the optional WAM Wrist can be ignored if the user is setting up only the 4-DOF WAM.
Power Source
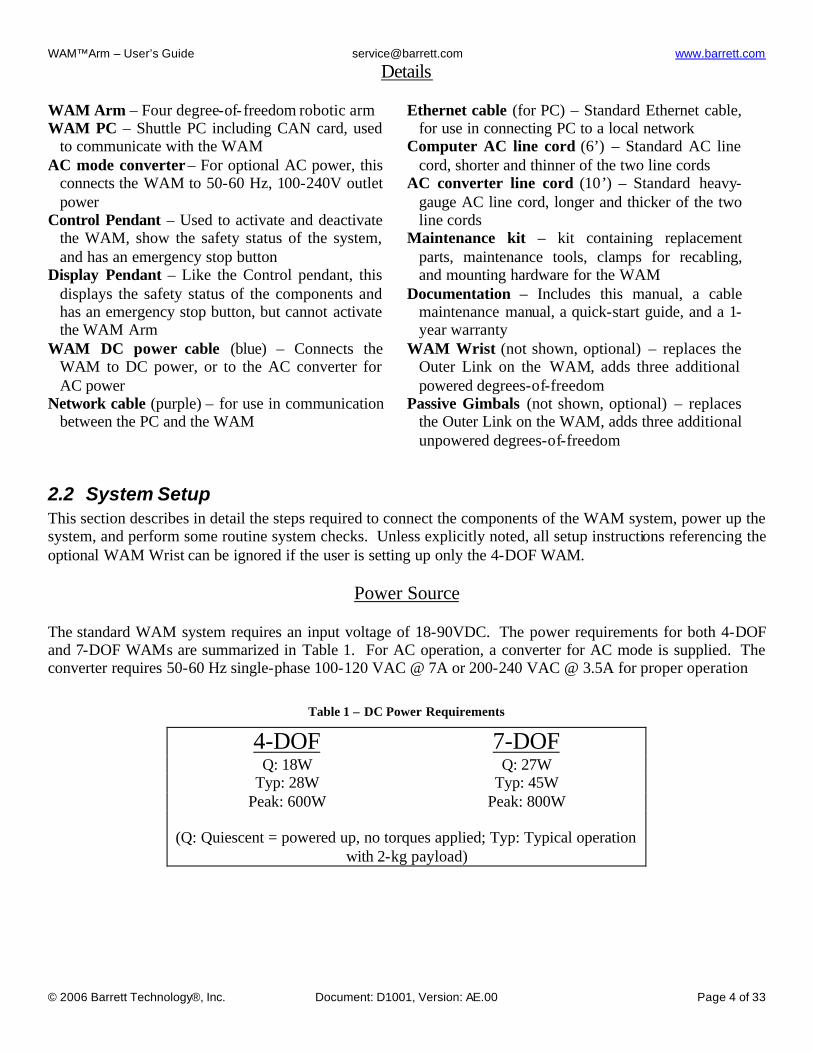
The standard WAM system requires an input voltage of 18-90VDC. The power requirements for both 4-DOF and 7-DOF WAMs are summarized in Table 1. For AC operation, a converter for AC mode is supplied. The converter requires 50-60 Hz single-phase 100-120 VAC @ 7A or 200-240 VAC @ 3.5A for proper operation
Table 1 – DC Power Requirements
4-DOF 7-DOF Q: 18W Q: 27W
Typ: 28W Typ: 45W Peak: 600W Peak: 800W
(Q: Quiescent = powered up, no torques applied; Typ: Typical operation
with 2-kg payload)

WAM™Arm – User’s Guide [email protected] www.barrett.com
© 2006 Barrett Technology®, Inc. Document: D1001, Version: AE.00 Page 5 of 33
Mounting Requirements The mounting-surface for the WAM should be designed to handle the large reaction forces generated at the base of the arm during high-acceleration operation. The WAM can be fastened to the prepared mounting-surface via the four bolt holes in the base plate. Use four M10 or 3/8” screws. The holes are located on the base of the WAM according to Figure 2 and Figure 3. The plate thickness is 8mm.
General Safety Proper precautions should be taken when selecting the location and setup of your WAM system. DO NOT set up the system such that any part of the robot’s workspace (resembling a sphere with a ~1m radius, Figure 4, below) reaches into a pedestrian pathway in the lab space. The WAM is an unusually quiet mechanism thereby providing very little intrinsic warning of its enabled state (i.e. little or no servo or transmission noise). Shown below is a model of the WAM + tool workspace.
Figure 3 – Screw-hole locations
Figure 2 – Mounting-Hole Locations
Figure 4 - WAM Workspace
WAM™Arm – User’s Guide [email protected] www.barrett.com
© 2006 Barrett Technology®, Inc. Document: D1001, Version: AE.00 Page 6 of 33
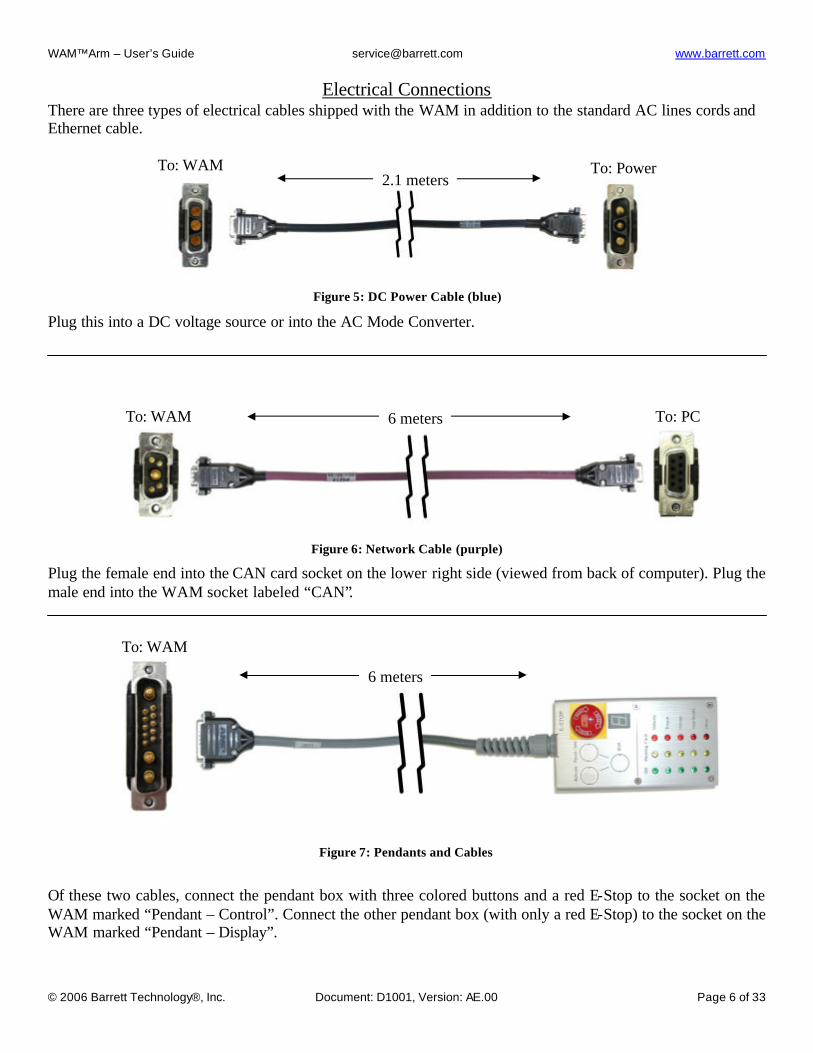
Electrical Connections
There are three types of electrical cables shipped with the WAM in addition to the standard AC lines cords and Ethernet cable.
Figure 5: DC Power Cable (blue)
Plug this into a DC voltage source or into the AC Mode Converter.
Figure 6: Network Cable (purple)
Plug the female end into the CAN card socket on the lower right side (viewed from back of computer). Plug the male end into the WAM socket labeled “CAN”.
Figure 7: Pendants and Cables
Of these two cables, connect the pendant box with three colored buttons and a red E-Stop to the socket on the WAM marked “Pendant – Control”. Connect the other pendant box (with only a red E-Stop) to the socket on the WAM marked “Pendant – Display”.
To: WAM 2.1 meters
To: Power
6 meters To: PC To: WAM
6 meters
To: WAM

WAM™Arm – User’s Guide [email protected] www.barrett.com
© 2006 Barrett Technology®, Inc. Document: D1001, Version: AE.00 Page 7 of 33
Installing the PC
Physical Installation: Install the PC shipped with the WAM as you would any other. You will need to add a monitor while performing initial setup of the PC. Afterwards, you may use the PC for development or remove the monitor and use remote terminal software (such as ssh) to operate the PC remotely. Software installation: The PC comes with the WAM software loaded. You will need to edit /etc/network/interfaces to set an IP address that is compatible with your network. We do not recommend using DHCP, as we have found that periodic address renegotiation interferes with the real-time operation of the WAM. The Barrett Technology software library uses syslogd to log all error messages to a file. It is highly recommended to make sure that syslogd is running. Error messages may be found in the /var/log/syslog text file.
Connecting the WAM Wrist (optional)
Figure 10 shows that the outer link can be removed to accommodate the WAM Wrist (if the 7-DOF WAM is purchased). To avoid damaging the WAM electronics, please make sure the WAM is powered off before detaching or attaching any outer link. The WAM Wrist is connected after removing the outer link by aligning the metal shells of the integrated D-sub connectors at its base with the mating connector’s shells on the end of the WAM’s “elbow” and threading the quick-connect ring onto the wrist base. No special wrenches, fasteners, or tools are required, however, it may be necessary to shake the outer link (or Wrist) back and forth while tightening or loosening the ring. This ring should only be hand-tightened. It is normal for there to be a small number of threads left when fully tightened. This single operation also makes all electrical connections to the WAM Wrist. Figure 9 shows the electrical connector at the end of the WAM.
Figure 10 - Separating the Outer Link Figure 9 – Wrist Connector
Figure 8 - Shuttle PC
WAM™Arm – User’s Guide [email protected] www.barrett.com
© 2006 Barrett Technology®, Inc. Document: D1001, Version: AE.00 Page 8 of 33
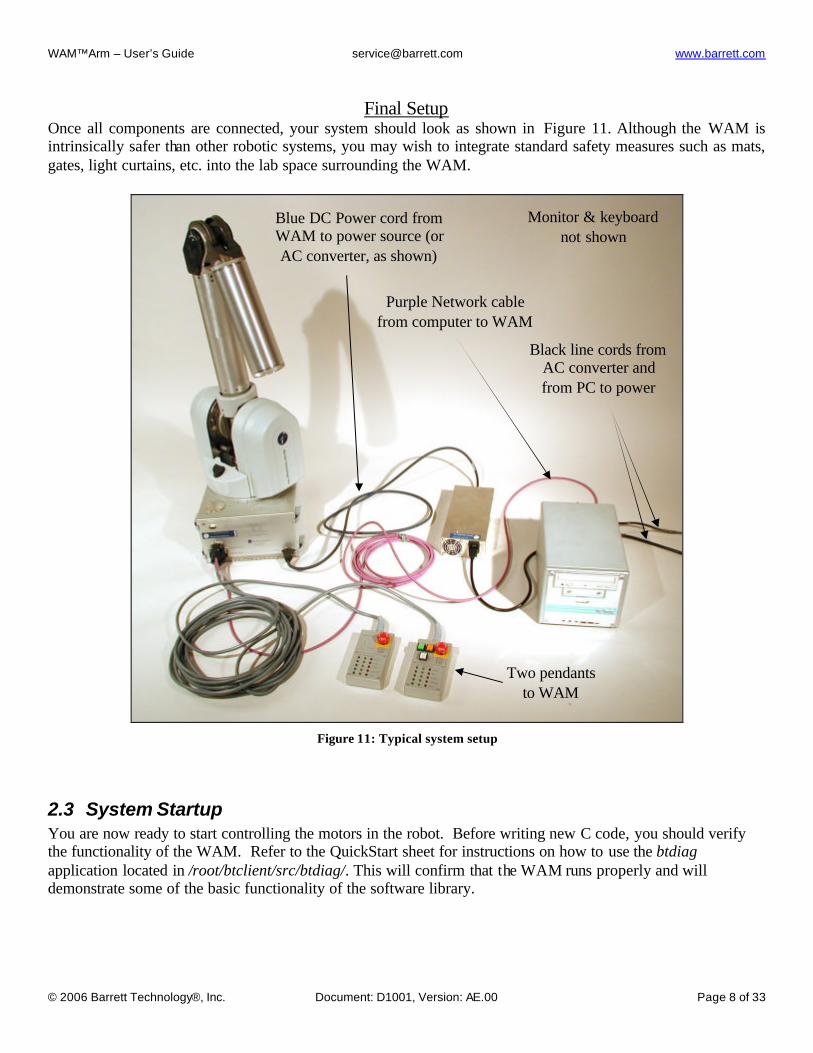
Final Setup Once all components are connected, your system should look as shown in Figure 11. Although the WAM is intrinsically safer than other robotic systems, you may wish to integrate standard safety measures such as mats, gates, light curtains, etc. into the lab space surrounding the WAM.
Figure 11: Typical system setup
2.3 System Startup You are now ready to start controlling the motors in the robot. Before writing new C code, you should verify the functionality of the WAM. Refer to the QuickStart sheet for instructions on how to use the btdiag application located in /root/btclient/src/btdiag/. This will confirm that the WAM runs properly and will demonstrate some of the basic functionality of the software library.
Blue DC Power cord from WAM to power source (or AC converter, as shown)
Purple Network cable from computer to WAM
Black line cords from AC converter and from PC to power
Two pendants to WAM
Monitor & keyboard not shown

WAM™Arm – User’s Guide [email protected] www.barrett.com
© 2006 Barrett Technology®, Inc. Document: D1001, Version: AE.00 Page 9 of 33
3 Hardware
3.1 WAM Arm Overview
The WAM Arm is a 4-degree-of- freedom (4-DOF) manipulator with human-like kinematics. With its aluminum frame and advanced cable-drive systems, including a patented cabled differential, the WAM is lightweight with no backlash, extremely low friction, and stiff transmissions. All of these characteristics contribute to its high-bandwidth performance. The WAM Arm is the ideal platform for implementing Whole Arm Manipulation (WAM), advanced force control techniques, and high precision trajectory control.
Safety System: Pendants The WAM Arm system comes standard with two safety pendants, a control pendant and a display pendant. Both pendants show the present safety status of the WAM Arm, with status lights for the velocity, torque, voltage, and heartbeats of the robot. There is also a 7-segment LED single-character display which shows additional information related to any existing errors. Each pendant has a large mushroom-type emergency stop button, which can be reset (popped up) by rotating the button face clockwise. The control pendant has three additional buttons: Shift, Idle, and Activate. The WAM Arm has three safety states: E-STOP, IDLE, and ACTIVATED: E-STOP means there is no motor bus voltage, in fact the motor bus power and ground lines are tied together, resulting in a “resistive braking” effect on the joints of the WAM Arm. The motor controllers are off line and do not keep track of their motor positions in this state. E-STOP is achieved by pressing the E-STOP button on either pendant. IDLE means there is voltage applied to the motor bus and the motor controllers are on line and keeping track of their motor positions, but they are commanded to tie their motor phase leads together (also resulting in a braking effect), and they will ignore any command torque sent to them. To put the WAM Arm into the IDLE state (which will also reset any existing faults), press and hold the Shift button on the control pendant, then press the Reset/Idle button (yellow) and release both buttons. The yellow Idle button will light up, indicating that the WAM Arm is now in the IDLE state. Make sure both E-STOP buttons are reset (popped up) before attempting to change modes. ACTIVATED means the motor controllers are actively applying any commanded torque they receive from the control PC. To put the WAM into the ACTIVATED state, press and hold the Shift button on the control pendant, then press the Activate button (green) and release both buttons. This state may only be reached when all of the status lights are showing OK (green). All warnings or faults must be cleared before activating the WAM. The green Activate button will light up, indicating that the WAM Arm is now in the ACTIVATED state. Before the WAM Arm’s joint positions are initialized by the PC control software, the velocity status lights indicate the state of the 4-DOF’s angular joint speed. By default, there is a yellow LED warning when any joint exceeds 0.5 radians/sec and a red LED fault when any joint exceeds 2 radians/sec. The joint number responsible for the warning/fault is indicated by the single-character display on each pendant. After the WAM Arm’s joint positions are initialized, the safety system begins calculating and monitoring the 4-DOF elbow and endpoint velocities in Cartesian space instead of monitoring individual joint velocities. By default, there is a warning
Figure 12 – Pendants

WAM™Arm – User’s Guide [email protected] www.barrett.com
© 2006 Barrett Technology®, Inc. Document: D1001, Version: AE.00 Page 10 of 33
when either the elbow (single-character “E”) or arm endpoint (single-character “A”) exceeds 0.5 m/s and a fault when either one exceeds 2 m/s. These defaults are modifiable in software. The torque status lights indicate the state of the torque commands being received by the WAM Arm from the PC control software. If the PC sends non-zero torques while the WAM is in the IDLE state (the yellow Reset/Idle button is lit), the safety system will display a torque warning- prohibiting the WAM Arm from being activated. If the WAM Arm is in the ACTIVATED state (the green Activate button is lit) and the PC sends torques which exceed the default torque warning or fault levels, the torque warning or fault light will be lit- and the offending motor number will be shown in the single-character display. The voltage status lights indicate the state of the WAM Arm’s motor bus voltage. When the system is first powered up, the bus is off (there is no motor power), and the safety system registers a voltage fault. This fault is cleared by pressing Shift-Idle on the control pendant. Placing the WAM Arm into the IDLE state applies a DC voltage (18-90V, depending on input voltage) on the motor bus and clears the fault. If the voltage approaches the limits, the voltage warning light is lit. If the voltage exceeds the limits, the voltage fault light is lit. The heartbeat status lights indicate the state of the communication between the PC and each motor controller in the WAM Arm. If the WAM is in the IDLE state and no control loop is active between the PC and robot, the pendants will display a heartbeat warning. If the WAM is in the ACTIVATED state and any controller or the PC fails to issue any communication for longer than 16ms, a heartbeat fault is registered. The “Other” status lights presently only indicate whether an E-STOP has occurred. If this is the case, the fault light will be lit and the single-character display will show “E”.
Error occurs in stateE-STOP IDLE ACTIVE
Velocity exceeds VL1 No action Warn WarnVelocity exceeds VL2 No action Fault, E-STOP Fault, IDLE, Wait 1/4sTorque exceeds TL1 Warn for non-zero Warn for non-zero WarnTorque exceeds TL2 Fault Fault Fault, IDLEHeartbeat missing Warn Warn Fault, E-STOPVoltage lower than VOLTL1 No action Warn WarnVoltage lower than VOLTL2 Fault Fault Fault, IDLEVoltage higher than VOLTH1 No action Warn, Bleed voltage Warn, Bleed voltageVoltage higher than VOLTH2 No action Fault, E-STOP Fault, E-STOPE-Stop pressed Fault, E-STOP Fault, E-STOP Fault, E-STOPNOTE: Warnings are cleared automatically, critical faults are cleared through a RESET
Request occurs in stateE-STOP IDLE ACTIVE
E-STOP E-STOP E-STOP E-STOP
RESET / IDLEClear faults, power up bus, enumerate, IDLE
Clear faults IDLE
ACTIVATE No Action If no warnings or faults, ACTIVE
No ActionRE
QU
ES
TE
RR
OR
Table 2: Pendant lights & errors

WAM™Arm – User’s Guide [email protected] www.barrett.com
© 2006 Barrett Technology®, Inc. Document: D1001, Version: AE.00 Page 11 of 33
AC Converter The AC power converter should be used when hooking-up the WAM Arm to normal 100-120 or 200-240 VAC power. For mobile applications or applications that require alternate DC power sources, the AC power converter is not used.
Covers There may be occasions to remove one or more of the covers for maintenance or upgrades. Typical reasons for cover removal include: cable replacement or tensioning, firmware upgrades, and access to baseplate mounting holes. The base cover is removed by opening all four latches. If necessary, the hinged back door may be swung down by removing the single M6 flat head screw in the upper left of the back door. To reinstall the base cover, first make sure the hinged back door is in place and the screw is secure. Wrap the cover in place, swing the lower two latch hooks away from the backplate, and place the upper two latch hooks in the grooves on each side of the backplate. Hold the upper latches, one in each hand, and align the cover such that there is an equal gap between the cover edges and the edge of the hinged door. With equal pressure, slowly close the two upper latches. They should snap into place. Repeat with the upper two latches. The plastic side covers or shoulder covers snap into place. To remove, wrap hands around the sides about halfway down and lightly pull the sides apart. Pull the cover out and up to remove. To reinstall, pull the sides out slightly and feed the sides through the gaps formed by the Joint 2 stop covers and the large vertical aluminum plates. To access the motor controller for Joint 1, the silver-colored disc on top of the upper base plate must be removed. Use a flat-head screwdriver with a sharp tip and gently pry the cover off. To reinstall, ensure that all electrical wires are away from the sides of the hole in the upper plate, align the silver-colored disc, and snap into place.
Figure 13 - AC Power Converter
WAM™Arm – User’s Guide [email protected] www.barrett.com
© 2006 Barrett Technology®, Inc. Document: D1001, Version: AE.00 Page 12 of 33
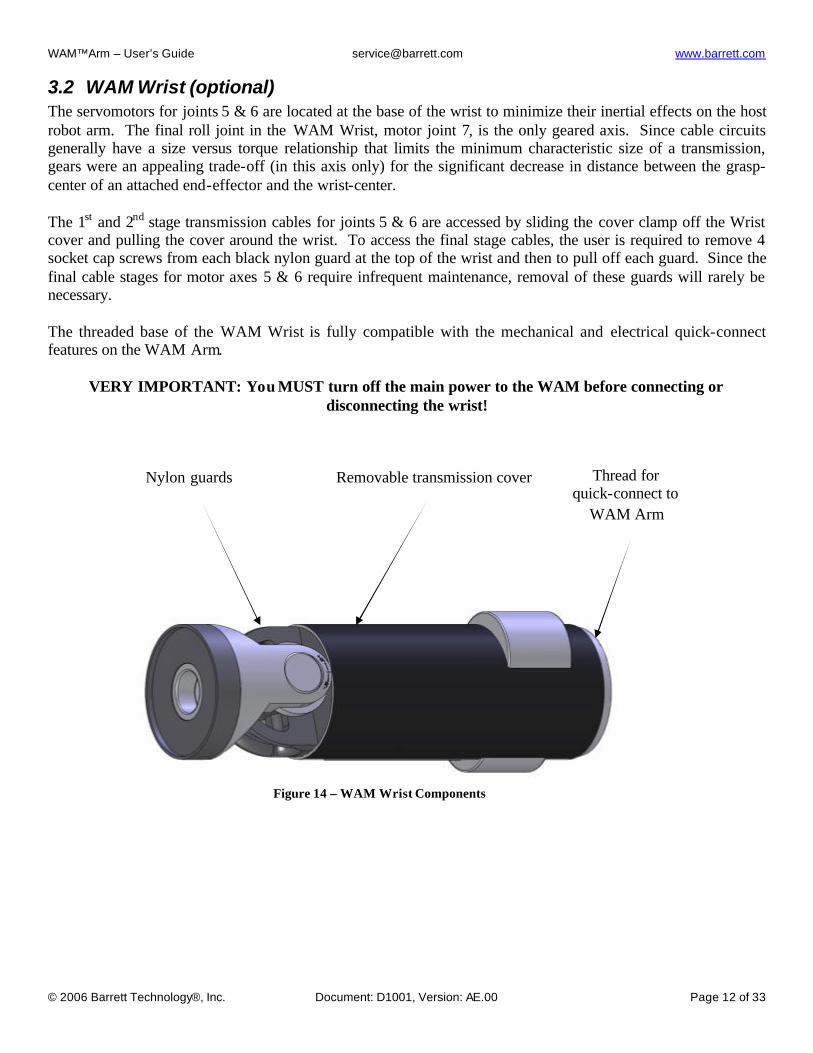
3.2 WAM Wrist (optional) The servomotors for joints 5 & 6 are located at the base of the wrist to minimize their inertial effects on the host robot arm. The final roll joint in the WAM Wrist, motor joint 7, is the only geared axis. Since cable circuits generally have a size versus torque relationship that limits the minimum characteristic size of a transmission, gears were an appealing trade-off (in this axis only) for the significant decrease in distance between the grasp-center of an attached end-effector and the wrist-center. The 1st and 2nd stage transmission cables for joints 5 & 6 are accessed by sliding the cover clamp off the Wrist cover and pulling the cover around the wrist. To access the final stage cables, the user is required to remove 4 socket cap screws from each black nylon guard at the top of the wrist and then to pull off each guard. Since the final cable stages for motor axes 5 & 6 require infrequent maintenance, removal of these guards will rarely be necessary. The threaded base of the WAM Wrist is fully compatible with the mechanical and electrical quick-connect features on the WAM Arm.
VERY IMPORTANT: You MUST turn off the main power to the WAM before connecting or disconnecting the wrist!
Figure 14 – WAM Wrist Components
Thread for quick-connect to
WAM Arm
Nylon guards Removable transmission cover

WAM™Arm – User’s Guide [email protected] www.barrett.com
© 2006 Barrett Technology®, Inc. Document: D1001, Version: AE.00 Page 13 of 33
4 PC & Control Software
4.1 PC Specifications Mainboard: Shuttle SK43G or Via EPIA M10k Processor Type: AMD Duron Applebred x86 @ ~1.8GHz or 1GHz C3 Nehemiah Memory: 128MB (16MB of that is used as a video framebuffer). Hard drive: 80GB, but only a fraction of that is partitioned and formatted Optical: Standard ATAPI CD-ROM Kernel: Linux 2.6 and the Real-Time Application Interface (RTAI) patches Distro: Zenwalk (slackware-based) PCI: One slot, used by CAN network card
4.2 File system layout The Barrett Technology robot control client software (btclient) is divided into multiple parts:
examples/ - example source code for robot control software development doc/ - source code documentation, Doxygen (HTML/RTF) lib/ - location of library binaries include/ - common include directory for libraries src/btsystem/ - software library with general robot routines src/btwam/ - software library with WAM-specific routines src/btutil/ - utility for enumerating the motor controllers, restoring defaults, updating firmware src/btdiag/ - a robot diagnostic application (and example program)
If you edit the btsystem or btwam libraries, the procedure to recompile is: make lib; make install
4.3 The configuration file (wam.conf) The configuration file (wam.conf) is read by the OpenWAM() function to set up the operating parameters for the WAM. This file must be located in the same directory as your executable application and may be a symbolic link to a configuration file that describes your particular WAM parameters. If you add or remove the wrist, or change any link or tool masses, you will need to edit your active configuration file. You should take a look at the contents of this file to familiarize yourself with its contents. It contains the default home position, the Denavit-Hartenberg parameters, and the inertial parameters, and many other useful numbers.
4.4 Operating modes The WAM has a number of operating modes: IDLE/POSITION (press 'p' to toggle) In IDLE mode, the WAM does not try to maintain its present position. In position mode, it will try to maintain its position using a PID controller. JOINT/CARTESIAN (press <tab> to toggle) In JOINT mode, the WAM will report joint angles (in radians) and control joint torques (in Nm). In CARTESIAN mode, it will report the end-effector position in world coordinates and control tool forces (in Newtons). In both cases, the Move command executes a trapezoidal velocity profile and generates a stream of torque commands based on position error. GRAVITY-COMPENSATION (press 'g', enter a scaling value)

WAM™Arm – User’s Guide [email protected] www.barrett.com
© 2006 Barrett Technology®, Inc. Document: D1001, Version: AE.00 Page 14 of 33
If you set the gravity scaling value set to 1.0 and have appropriate mass parameters defined in "wam.conf", then the WAM will apply the necessary joint torques to "float" in normal Earth gravity. The normal operation of the Move command is to remember the initial IDLE/POSITION mode when the move was commanded and restore the WAM to that mode when the move completes. It is advisable to activate POSITION mode (press 'p') and Gravity-Comp (press 'g', type '1 <Enter>') before issuing a Move command.
4.5 Handling safety faults If the safety system registers a fault during WAM operation, you will need to clear the fault before continuing to use the WAM. The most common safety faults (over velocity, over torque) leave the WAM safety system in the IDLE state (yellow button is lit). To reset the fault from this state (when using the btdiag example application):
1) Stop any running Teach & Play playback (press ‘/’) 2) Set the position controller to IDLE mode (press ‘p’ to toggle mode) 3) Turn off gravity compensation (press ‘g’) 4) Reset the safety fault (press <Shift+Reset/Idle> on the control pendant) 5) Re-activate the WAM (press <Shift+Activate> on the control pendant) 6) Turn on gravity compensation (press ‘g’)
If the safety system encountered a critical fault that resulted in an E-STOP of the WAM (no pendant buttons are lit), then you should follow these steps to recover from the fault:
1) Exit the application (press ‘x’) 2) Reset the safety fault (press <Shift+Reset/Idle> on the control pendant) 3) Grab the WAM and move it back to the home position (the joint positions are lost after an E-STOP) 4) Re-launch the control program and follow the on-screen instructions
4.6 Additional information The world coordinate frame is right-handed and its origin is in the center of the shoulder with X pointing toward the front (rounded) part of the WAM, and Z pointing up (see frame docs in this manual). Move command arguments for JOINT mode must be entered in units of radians. In CARTESIAN mode, the units are meters from the world frame origin. All arguments should be specified and comma-separated: 4 arguments for a 4-DOF JOINT Move, 7 args for a 7-DOF JOINT Move, 3 args for any CARTESIAN Move. We do not yet have Cartesian angular control built into the WAM library. The default home position (specified in wam.conf) is J2 folded about 2 rad back against its large rubber stop, and J4 folded in against the inner link (+pi rad). It looks like the WAM is trying to touch its shoulder. In the examples, the PC closes a 500Hz position/torque control loop with the WAM over the CAN bus. The PC asks the motor controllers for their present positions, converts the received encoder counts into joint angles, calculates the desired joint torques, converts these into motor torque commands, then sends out the calculated torques to the motors. All force or position control is calculated on the PC and converted to motor torques as a final step- the WAM itself is entirely motor torque controlled. For a source code example of this process, see the WAMControlThread() function in src/btwam/btwam.c. Please note that (as of Nov 2005) the CAN card driver used under LinuxRTAI is not realtime. If interrupts occur while the CAN driver is processing data, the WAM may jitter slightly. Common sources of interrupts are DHCP renegotia tion, and XWindows GUI processing. To minimize the chance of jitter, please use only static IP addressing, and run the PC in terminal mode- or log in via SSH.

WAM™Arm – User’s Guide [email protected] www.barrett.com
© 2006 Barrett Technology®, Inc. Document: D1001, Version: AE.00 Page 15 of 33
When the WAM is first powered on, the motor controllers use hall effect sensors and six-step commutation for control until an initial hall transition occurs. Then they switch to using the incremental encoders for smoother commutation until the encoder index pulse is observed (once per motor revolution). Then they begin a factory-calibrated commutation loop for precise torque control. A good example of setting the velocity is in the btdiag program /btclient/src/btdiag/btdiag.c. You can call setSafetyLimits(rad/s, endpoint m/s, elbow m/s) with floating point values from 0.0 to 6.9. getProperty(bus, node, property, &reply) bus = 0 (no other value has been tested) node = [1,31] inclusive (0x400 is not valid) property = [0..108] inclusive, use the enumerations in btcan.h &reply = pointer to a long integer If you want to get the properties of several pucks at one time, you will have to write your own routine using an array for the replies along with canSendMsg() and canReadMsg() - see the getPositions() function in src/btsystem/btcan_esd.c as an example. Otherwise, you can use getProperty to get a single property of a single puck at a time. The setProperty() function, in contrast, DOES allow nodeIDs OR group messageIDs to be used interchangeably. So setProperty(0,0x400,STAT,FALSE,STATUS_READY) is okay. However, if the 4th parameter is set to TRUE (verify=TRUE), then it is effectively calling getProperty() with the 0x400, which is illegal. NOTE: Calling getProperty() with 0x400 will prompt at least 4 responses (one from each puck), but getProperty() will only read the first one, leaving 3 in the queue to be read by some later call to getProperty() (or canReadMsg()). I strongly recommend rebooting the system to clear out these messages- otherwise they could cause a LOT of confusion even if you start to do things correctly. Alternatively, you could call canReadMessage() with a non-blocking read until no messages are found - see getBusStatus() for an example.

WAM™Arm – User’s Guide [email protected] www.barrett.com
© 2006 Barrett Technology®, Inc. Document: D1001, Version: AE.00 Page 16 of 33
4.7 Troubleshooting
1) The most obvious thing to check is that the two E-Stop buttons are reset (up). 2) If you are using your own power supply, try using the power supply supplied with the WAM. 3) Check the CAN connection from the pucks at the safety board. It is not a locking connector and sometimes it gets loose from the safety board (located near the base motor side of the safety board). 4) Check the little white cylindrical fuse (4A/250V) in the fuse holder on the safety board (under the grey plastic cover). Mfg P/N: Littelfuse 0216004.H- 5) Check for wires coming loose in their connectors, crimps may be suspect

WAM™Arm – User’s Guide [email protected] www.barrett.com
© 2006 Barrett Technology®, Inc. Document: D1001, Version: AE.00 Page 17 of 33
5 Appendix A – Kinematics, Transmission Ratios, and Joint Ranges
5.1 4-DOF and 7-DOF Kinematics & Joint Ranges A good introduction to coordinate frames, transformations and kinematics is beyond the scope of this document. There are several good introductory robotics books available. We recommend Spong,M.;Vidyasagar, M. Robot Dynamics and Control ; 1989 John Wiley & Sons. We use the Denavit-Hartenberg (D-H) method to establish the coordinate frames; particularly the variant used in Spong.
Figure 15: WAM 4-DOF dimensions and D-H frames
Figure 15 shows the 4-DOF WAM system in the zero position. A positive joint motion is based on the right hand rule for each axis. Figure 17 thru Figure 20 on the following pages show explicitly each of the four joint kinematic parameters and joint limits.

WAM™Arm – User’s Guide [email protected] www.barrett.com
© 2006 Barrett Technology®, Inc. Document: D1001, Version: AE.00 Page 18 of 33
Figure 16: WAM 7-DOF dimensions and D-H frames
Figure 16 shows the entire 7-DOF WAM system in the zero position. A positive joint motion is based on the right hand rule for each axis. The seven figures on the following pages show explicitly each of the seven joint kinematic parameters and joint limits.
WAM™Arm – User’s Guide [email protected] www.barrett.com
© 2006 Barrett Technology®, Inc. Document: D1001, Version: AE.00 Page 19 of 33
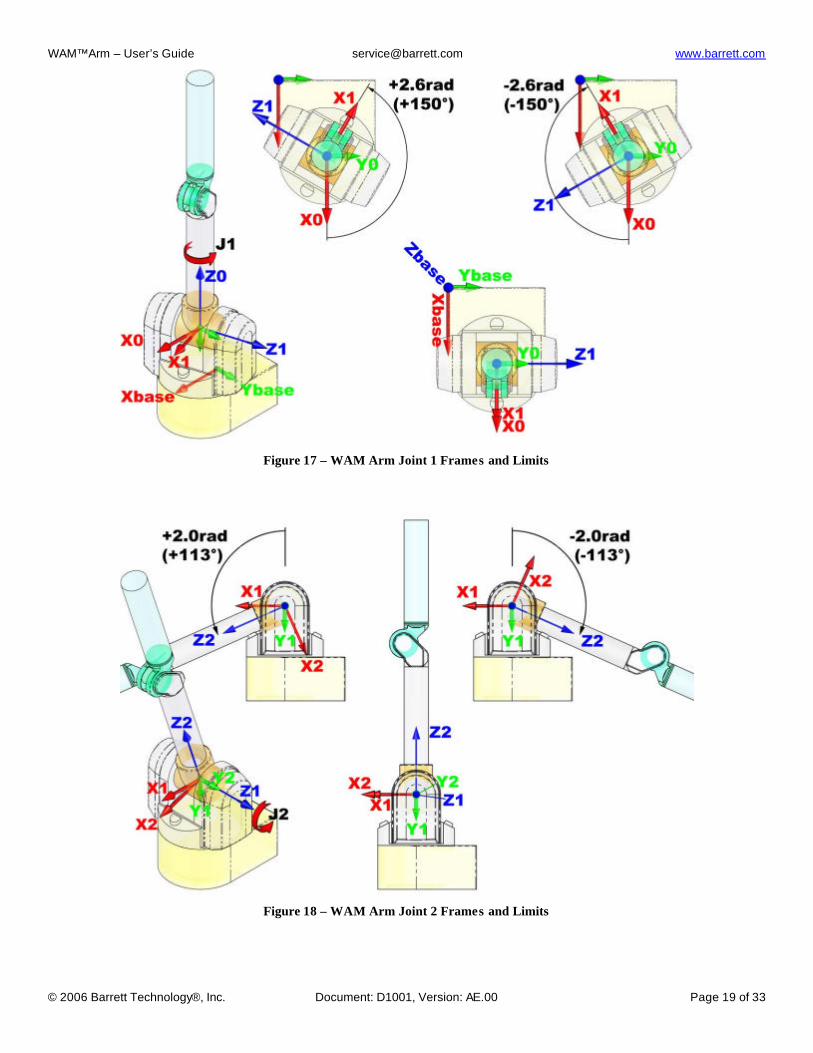
Figure 17 – WAM Arm Joint 1 Frames and Limits
Figure 18 – WAM Arm Joint 2 Frames and Limits

WAM™Arm – User’s Guide [email protected] www.barrett.com
© 2006 Barrett Technology®, Inc. Document: D1001, Version: AE.00 Page 20 of 33
Figure 19 – WAM Arm Joint 3 Frames and Limits
Figure 20 - WAM Arm Joint 4 Frames and Limits

WAM™Arm – User’s Guide [email protected] www.barrett.com
© 2006 Barrett Technology®, Inc. Document: D1001, Version: AE.00 Page 21 of 33
Figure 21 - WAM Arm Joint 5 Frames and Limits
Figure 22 – WAM Arm Joint 6 Frames and Limits
WAM™Arm – User’s Guide [email protected] www.barrett.com
© 2006 Barrett Technology®, Inc. Document: D1001, Version: AE.00 Page 22 of 33
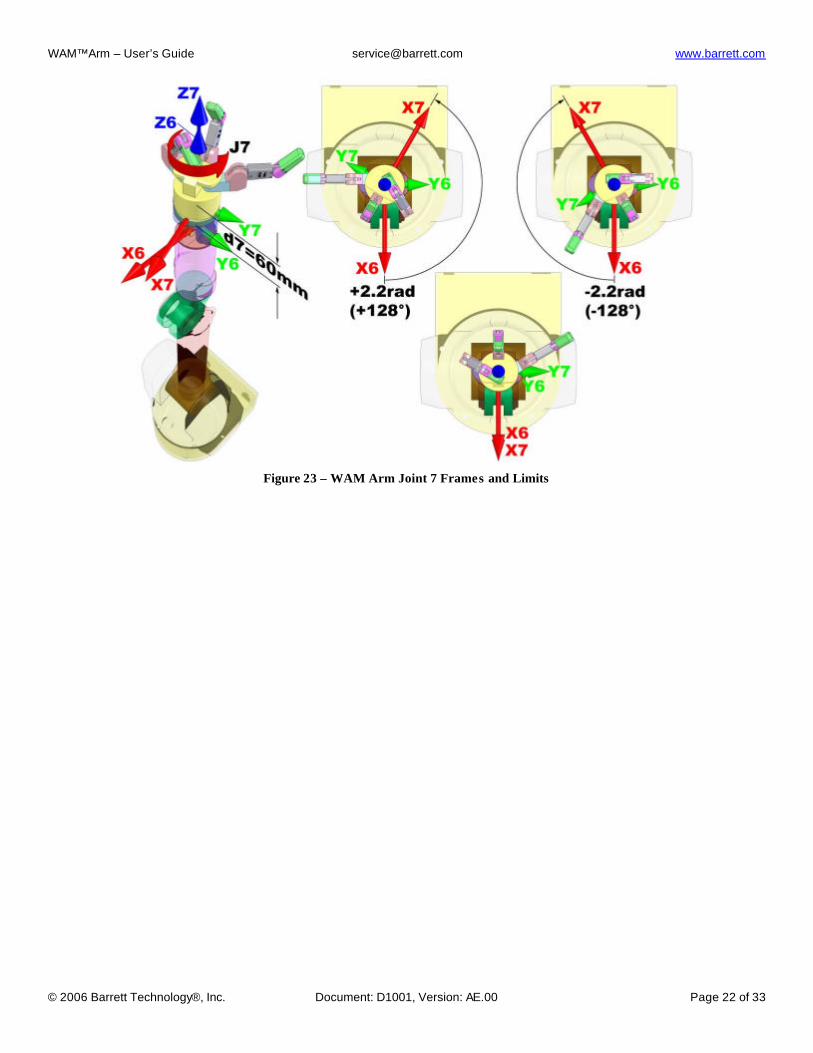
Figure 23 – WAM Arm Joint 7 Frames and Limits
WAM™Arm – User’s Guide [email protected] www.barrett.com
© 2006 Barrett Technology®, Inc. Document: D1001, Version: AE.00 Page 23 of 33
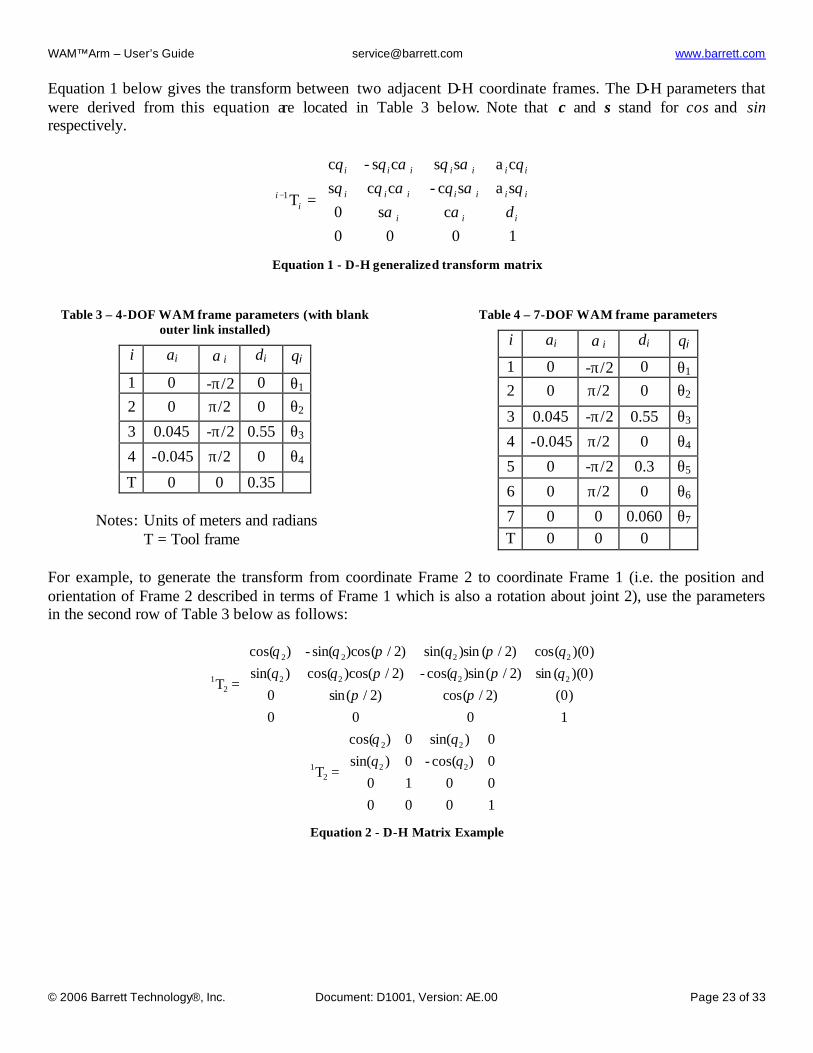
Equation 1 below gives the transform between two adjacent D-H coordinate frames. The D-H parameters that were derived from this equation are located in Table 3 below. Note that c and s stand for cos and sin respectively.
=Τ−
1000cs0
sasc-ccscasscs-c
1
iii
iiiiiii
iiiiiii
ii
dααθαθαθθθαθαθθ
Equation 1 - D-H generalized transform matrix
Table 3 – 4-DOF WAM frame parameters (with blank outer link installed)
i ai αi di θi
1 0 -π/2 0 θ1 2 0 π/2 0 θ2
3 0.045 -π/2 0.55 θ3
4 -0.045 π/2 0 θ4
T 0 0 0.35
Notes: Units of meters and radians T = Tool frame
Table 4 – 7-DOF WAM frame parameters
i ai αi di θi
1 0 -π/2 0 θ1 2 0 π/2 0 θ2
3 0.045 -π/2 0.55 θ3
4 -0.045 π/2 0 θ4
5 0 -π/2 0.3 θ5
6 0 π/2 0 θ6
7 0 0 0.060 θ7 T 0 0 0
For example, to generate the transform from coordinate Frame 2 to coordinate Frame 1 (i.e. the position and orientation of Frame 2 described in terms of Frame 1 which is also a rotation about joint 2), use the parameters in the second row of Table 3 below as follows:
=Τ
1000)0()2/(cos)2/(sin0
)0)((sin)2/()sincos(-)2/()coscos()sin()0)((cos)2/()sinsin()2/()cossin(-)cos(
2222
2222
21
ππθπθπθθθπθπθθ
=Τ
100000100)cos(-0)sin(0)sin(0)cos(
22
22
21 θθ
θθ
Equation 2 - D-H Matrix Example

WAM™Arm – User’s Guide [email protected] www.barrett.com
© 2006 Barrett Technology®, Inc. Document: D1001, Version: AE.00 Page 24 of 33
Each of the joints has a mechanical stop that limits the motion. Refer to Table 5 below for a complete listing of the joint limits for each axis.
Table 5 – Joint Limits
Joint Positive Joint Limit Rad (deg)
Negative Joint Limit Rad (deg)
1 2.6 (150) -2.6 (-150) 2 2.0 (113) -2.0 (-113) 3 2.8 (157) -2.8 (-157) 4 3.1 (180) -0.9 (-50) 5 1.3 (75) -4.8 (-275) 6 1.6 (90) -1.6 (-90) 7 2.2 (128) -2.2 (-128)
Forward Kinematics for the 4-DOF WAM The forward kinematics of the 4-DOF WAM system is used to determine the end tip location and orientation. These transformations are generated using the parameters in Table 3 on page 23 and the matrix in Equation 1 on page 23.
=Τ
1000
4
zzzz
yyyy
xxxx
Tool pwvupwvupwvu
Equation 3: Tool frame matrix
You define the ToolΤ4 frame for your specific end-effector. The forward kinematics are determined for any frame on the robot by mulitplying all of the transforms up to and including the final frame. To determine the tool end tip location and orientation use the following equation:
ToolTool ΤΤΤΤΤ=Τ 44
33
22
11
00
Equation 4: Tool end tip position and orientation equation for the 4-DOF WAM
Forward Kinematics for the 7-DOF WAM As with the previous example, you define the ToolΤ7 frame for your specific end-effector. The forward kinematics are determined for any frame on the robot by mulitplying all of the transforms up to and including the final frame. To determine the end tip location and orientation use the following equation:
ToolTool ΤΤΤΤΤΤΤΤ=Τ 77
66
55
44
33
22
11
00
Equation 5: Tool end tip position and orientation equation for the 7-DOF WAM
WAM™Arm – User’s Guide [email protected] www.barrett.com
© 2006 Barrett Technology®, Inc. Document: D1001, Version: AE.00 Page 25 of 33
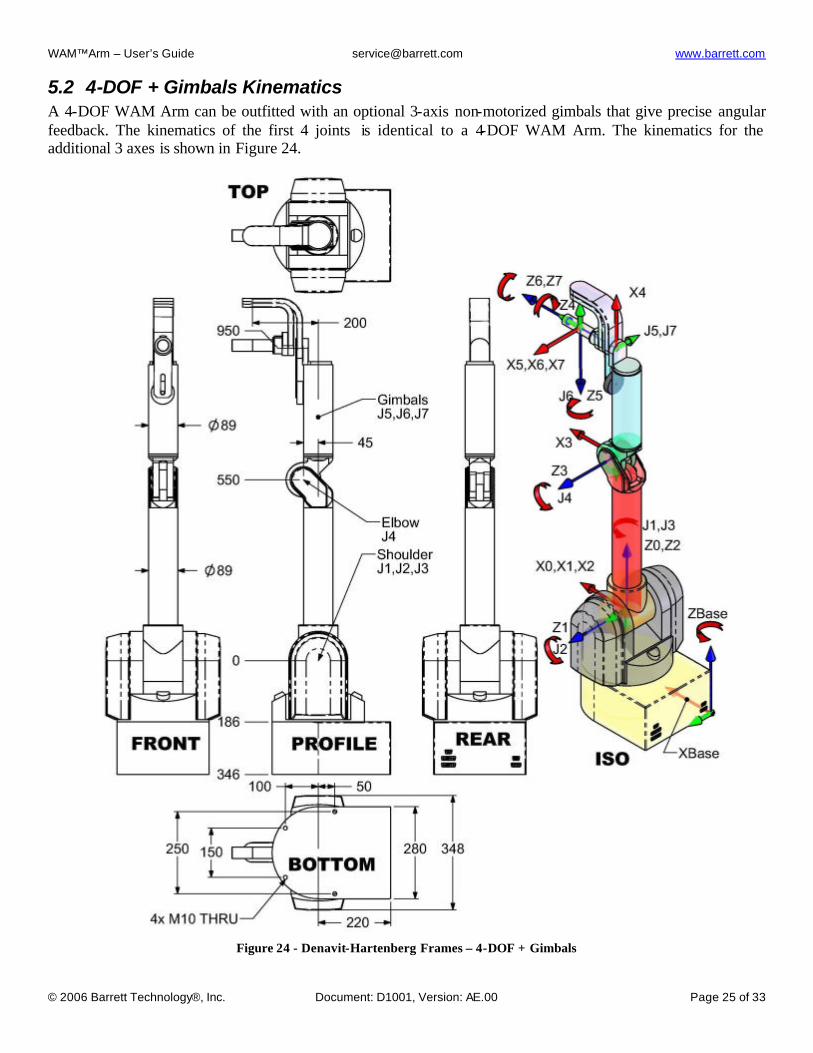
5.2 4-DOF + Gimbals Kinematics A 4-DOF WAM Arm can be outfitted with an optional 3-axis non-motorized gimbals that give precise angular feedback. The kinematics of the first 4 joints is identical to a 4-DOF WAM Arm. The kinematics for the additional 3 axes is shown in Figure 24.
Figure 24 - Denavit-Hartenberg Frames – 4-DOF + Gimbals

WAM™Arm – User’s Guide [email protected] www.barrett.com
© 2006 Barrett Technology®, Inc. Document: D1001, Version: AE.00 Page 26 of 33
Figure 24 shows the WAM Gimbals in the zero position. A positive joint motion is based on the right hand rule for each axis. The D-H parameters that were derived from Figure 24 are located in Table 6 below.
Table 6 – 4-DOF WAM + Gimbals DH Parameters
i ai αi di θi
1 0 -π/2 0 θ1 2 0 π/2 0 θ2
3 0.045 -π/2 0.55 θ3
4 0.4 -π/2 0 θ4
5 0 π/2 0 θ5-π/2
6 0 -π/2 0.1547 θ6-π/2
7 0 0 0 θ7

WAM™Arm – User’s Guide [email protected] www.barrett.com
© 2006 Barrett Technology®, Inc. Document: D1001, Version: AE.00 Page 27 of 33
5.3 Motor-Joint Transformations
Motor-to-Joint Position Transformations The following transformations show the change in joint positions as a function of motor positions. The input transmission ratios and the differential transmission ratios are calculated from known pulley, pinion, and cable diameters.
Table 7 - Arm Transmission Ratios
Parameter Value
1N 42.0
2N 28.25
3N 28.25
3n 1.68
4N 18.0
5N 10.27
6N 10.27
7N 14.93
6n 1
−−
−
−
=
4
3
2
1
4
2
3
2
3
22
1
4
3
2
1
1000
022
0
02
12
10
0001
θθθθ
θθθθ
MMMM
N
Nn
Nn
NN
N
JJJJ
Equation 6 - WAM Motor-to-Joint position transformations
−
−=
7
6
5
7
5
6
5
6
55
7
6
5
100
022
02
12
1
θθθ
θθθ
MMM
N
Nn
Nn
NN
JJJ
Equation 7 - Wrist Motor-to-Joint position transformations

WAM™Arm – User’s Guide [email protected] www.barrett.com
© 2006 Barrett Technology®, Inc. Document: D1001, Version: AE.00 Page 28 of 33
The motor position can also be derived from joint space by taking the inverse of the multiplying matrix. For convenience, they are as follows:
−−
−−
=
4
3
2
1
4
3
22
3
22
1
4
3
2
1
000
00
00
000
θθθθ
θθθθ
JJJJ
NnN
N
nN
N
N
MMMM
Equation 8: Arm Joint-to-Motor position transformations
−
−
=
7
6
5
7
6
55
6
55
7
6
5
00
0
0
θθθ
θθθ
JJJ
NnN
N
nN
N
MMM
Equation 9: Wrist Joint-to-Motor position transformation
Motor-to-Joint Torque Transformations Similar to the position transformations the following equations determine the joint torque from the motor torque:
−−−
−
=
4
3
2
1
4
3
2
3
2
22
1
4
3
2
1
000
00
00000
ττττ
ττττ
MMMM
NnN
nN
NNN
JJJJ
Equation 10: Arm Motor -to-Joint torque transformation
−
−=
7
6
5
7
6
5
6
5
55
7
6
5
00
0
0
τττ
τττ
MMM
NnN
nN
NN
JJJ
Equation 11: Wrist Motor -to-Joint transformations
The following equations determine motor torque from the joint torque:
−−
−
−
=
4
3
2
1
4
2
3
2
2
3
2
1
4
3
2
1
1000
022
10
022
10
0001
ττττ
ττττ
JJJJ
N
Nn
N
Nn
N
N
MMMM
Equation 12: Arm Joint-to-Motor torque transformations
−
−
=
7
6
5
7
5
6
5
5
6
5
7
6
5
100
022
1
022
1
τττ
τττ
JJJ
N
Nn
N
Nn
N
MMM
Equation 13 - Wrist Joint-to-Motor torque transformations

WAM™Arm – User’s Guide [email protected] www.barrett.com
© 2006 Barrett Technology®, Inc. Document: D1001, Version: AE.00 Page 29 of 33
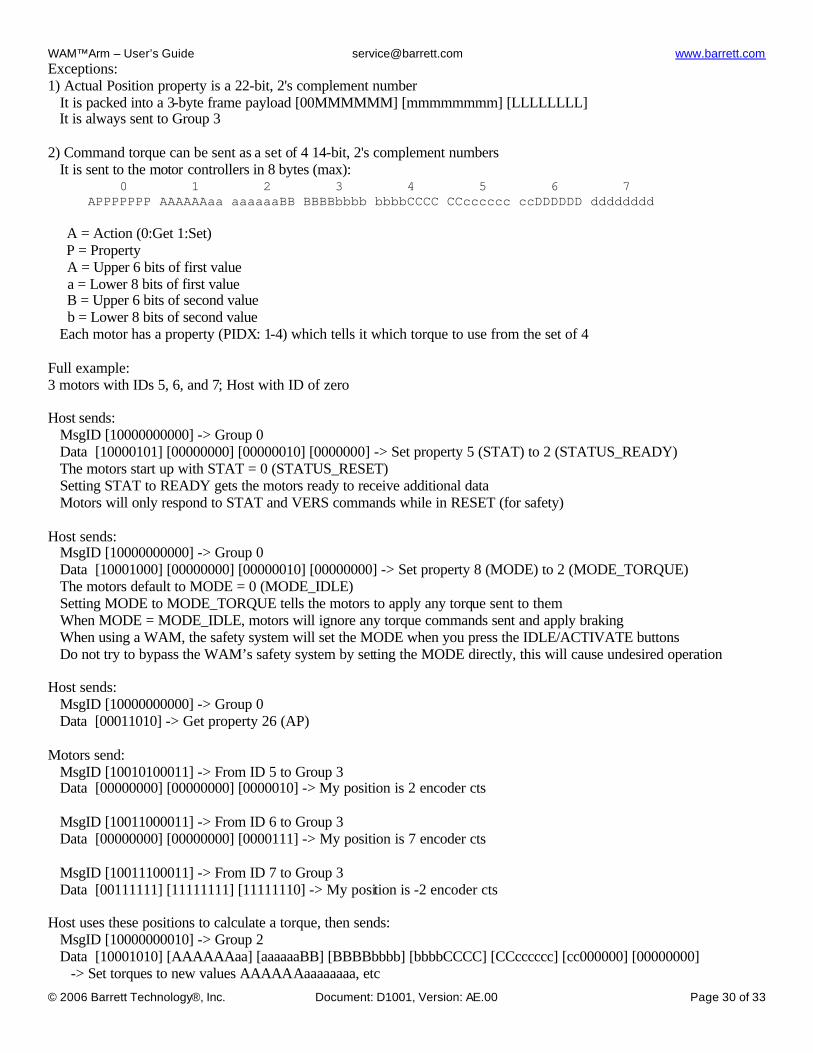
6 Appendix B - CAN Communication Spec 1Mbaud CANbus 8 time quanta per bit 75% sampling point Sync jump width = 1 time quanta (TQ) 11-bit MsgID (standard CAN) Proprietary protocol, not DeviceNet or CANopen Recommended reading: Controller Area Network by Konrad Etschberger MsgID spec: [GFFFFFTTTTT] (11 bits, binary) G: Group, 0 = Directed message, 1 = Group broadcast F: From ID, Host = 00000, Motor N = N T: To ID or group Examples MsgIDs: 00000000011 => Directed message from host to motor 3 (3 = 00011, binary) 10001100100 => Group broadcast from motor 3 to group 4 Motor IDs and Groups: Each motor in the robot has a unique communication ID Each motor listens and processes messages bound for its ID There are 32 possible groups (0..31, 00000..11111) Each motor may be assigned to be a part of any 3 groups (GRPA, GRPB, GRPC) Each motor also listens and processes messages bound for any of those 3 groups Motors 1-4 belong to groups 0, 1, and 4 by default Motors 3-7 belong to groups 0, 2, and 5 by default Host belongs to groups 3 and 6 by default Summary of default groups: 0 = All actuators 1 = Lower arm torques (motors 1-4) 2 = Upper arm torques (motors 5-7) 3 = Position feedback 4 = Lower arm property 5 = Upper arm property 6 = Property feedback CAN frame data payload: CAN specifies a maximum of 8 bytes/frame payload – our typical payload consists of 4-6 bytes: [APPPPPPP] [00000000] [LLLLLLLL] [mmmmmmmm] [MMMMMMMM] [HHHHHHHH] A: Action, 0 = Get property, 1 = Set property P: Property (128 possible values, 0..127, 0000000..1111111) 0: Second byte (almost) always set to zero, see exceptions below L: Low byte of data value m: mid-low byte of data value M: Mid-high byte of data value H: High byte of data value If sending a single 16-bit integer value, only LLLLLLLL and mmmmmmmm are used (for a total of 4 payload bytes) The CAN frame data length code (DLC) is set to the number of bytes being transmitted Properties: Each motor controller has several properties, see property list below Most of these properties may be read and written via "Get property" and "Set property" messages
WAM™Arm – User’s Guide [email protected] www.barrett.com
© 2006 Barrett Technology®, Inc. Document: D1001, Version: AE.00 Page 30 of 33
Exceptions: 1) Actual Position property is a 22-bit, 2's complement number It is packed into a 3-byte frame payload [00MMMMMM] [mmmmmmmm] [LLLLLLLL] It is always sent to Group 3 2) Command torque can be sent as a set of 4 14-bit, 2's complement numbers It is sent to the motor controllers in 8 bytes (max): 0 1 2 3 4 5 6 7 APPPPPPP AAAAAAaa aaaaaaBB BBBBbbbb bbbbCCCC CCcccccc ccDDDDDD dddddddd A = Action (0:Get 1:Set) P = Property A = Upper 6 bits of first value a = Lower 8 bits of first value B = Upper 6 bits of second value b = Lower 8 bits of second value Each motor has a property (PIDX: 1-4) which tells it which torque to use from the set of 4 Full example: 3 motors with IDs 5, 6, and 7; Host with ID of zero Host sends: MsgID [10000000000] -> Group 0 Data [10000101] [00000000] [00000010] [0000000] -> Set property 5 (STAT) to 2 (STATUS_READY) The motors start up with STAT = 0 (STATUS_RESET) Setting STAT to READY gets the motors ready to receive additional data Motors will only respond to STAT and VERS commands while in RESET (for safety) Host sends: MsgID [10000000000] -> Group 0 Data [10001000] [00000000] [00000010] [00000000] -> Set property 8 (MODE) to 2 (MODE_TORQUE) The motors default to MODE = 0 (MODE_IDLE) Setting MODE to MODE_TORQUE tells the motors to apply any torque sent to them When MODE = MODE_IDLE, motors will ignore any torque commands sent and apply braking When using a WAM, the safety system will set the MODE when you press the IDLE/ACTIVATE buttons Do not try to bypass the WAM’s safety system by setting the MODE directly, this will cause undesired operation Host sends: MsgID [10000000000] -> Group 0 Data [00011010] -> Get property 26 (AP) Motors send: MsgID [10010100011] -> From ID 5 to Group 3 Data [00000000] [00000000] [0000010] -> My position is 2 encoder cts MsgID [10011000011] -> From ID 6 to Group 3 Data [00000000] [00000000] [0000111] -> My position is 7 encoder cts MsgID [10011100011] -> From ID 7 to Group 3 Data [00111111] [11111111] [11111110] -> My position is -2 encoder cts Host uses these positions to calculate a torque, then sends: MsgID [10000000010] -> Group 2 Data [10001010] [AAAAAAaa] [aaaaaaBB] [BBBBbbbb] [bbbbCCCC] [CCcccccc] [cc000000] [00000000] -> Set torques to new values AAAAAAaaaaaaaa, etc

WAM™Arm – User’s Guide [email protected] www.barrett.com
© 2006 Barrett Technology®, Inc. Document: D1001, Version: AE.00 Page 31 of 33
Motor Controller Parameters ANA0, ANA1- if you solder analog sensors to the puck, read them here (0-3V only). AP - Actual motor position in encoder counts DIG0, DIG1- if you solder wires to these contacts on the puck, you can read/write them here (0-3.3V only). IPNM - you can store the puck torque unit to Nm conversion here (set at factory) LOAD - Load a parameter from non-volatile memory into active puck memory via the CAN bus, setProperty(0,4,LOAD,FALSE,MT) (for example) MECH - how many encoder counts away from the index pulse you are MOFST - how far is it from the index pulse to the start of an electrical cycle (calibrated) MT - torque limit (puck units) SAVE - after setting a non-volatile property, save it to non-volatile puck memory with setProperty(0,4,SAVE,FALSE,MT) (for example) STAT - 0 = RESET, 1 = Unused, 2 = READY TEMP - read the puck temperature THERM - read the motor thermistor temperature TORQ - Set the puck torque VBUS - Read the present bus voltage on a puck (volts) VERS - Get the firmware version (or the monitor version, if the puck is in reset) Safety System Parameters TL1 - Set the safety system's motor torque warning level (puck torque units) TL2 - Set the safety system's motor torque fault level VL1 - Set the safety system's motor velocity warning limit (before the WAM is homed/zeroed) or cartesian velocity limit (after zeroing) VL2 - Set the safety system's motor velocity fault limit (before the WAM is homed/zeroed) or cartesian velocity limit (after zeroing) VOLTH1 - Set the safety system's high voltage warning limit (begin bleeding off bus voltage through a resistor) VOLTH2 - Set the safety system's high voltage fault limit (disconnect the bus and clamp it) VOLTL1 - Set the safety system's low voltage warning limit (no action, warning light only) VOLTL2 - Set the safety system's low voltage fault limit (disconnect the bus and clamp it) ZERO - After sending the pucks their known initial position, set the safety system's ZERO parameter to 1 so it can start calculating Cartesian velocities. Additional Information on parameters Setting STAT=0 forces a reset, which will actually leave the motors free-spinning (no torque, no braking). MOFST is the distance in encoder counts between the index pulse of the encoder and the start of an electrical cycle for that motor (a point where the magnets are aligned with a single phase coil). It is calibrated here, so you shouldn't need to worry about it unless you replace an encoder wheel some day. MECH tells you how many encoder counts away from the index pulse you are. Unless you want to try writing your own cogging or torque ripple cancellation code, these parameters are not important. Knowing the orientation of the rotor magnets inside the stator is really only important for the low-level commutation and any types of perturbation cancellation you may wish to implement. ZERO is only meaningful in the SAFETY_MODULE. Use the DefineWAMpos() function in src/btwam/btwam.c to set the initial positions. This is called automatically during the normal OpenWAM() call anyway.

WAM™Arm – User’s Guide [email protected] www.barrett.com
© 2006 Barrett Technology®, Inc. Document: D1001, Version: AE.00 Page 32 of 33
TL1 and TL2 are specified in puck units of torque, as is TORQ. IPNM is never actually used in the pucks themselves. It is simply a non-volatile place to store the conversion constant so that the controlling PC can read it upon startup and use it to convert between puck units and SI units of torque for the end user. VL1,VL2 - after zeroing, the WAM switches to limiting the Cartesian velocity instead of each motor’s velocity. You can't specify two sets of values. You could try changing them dynamically, if you wish. TEMP and THERM should not go above 70C, VBUS should be between 25 and 90V for safe operation. MT: OpenWAM() calls InitializeSystem() which sets MT to 4731 for each puck. A value of 1024 corresponds to 1.01A of current in the motor windings. Let's say MT = 750, TL1 = 2500, TL2 = 4000. You send a TORQ of 2800. The safety system is okay with this, it just shows the warning light on the pendant. The puck notices that abs(2800) exceeds 750, so it sets its own torque output to 750 * sign(2800). Also note: for sanity's sake, the WAM library saturates packed torques at 14-bits. That's -8192..+8191. SAFETY_MODULE: The safety module is puck ID 10. It is a 5th puck in your 4DOF WAM located in the base of the unit (not attached to a motor). Its job is to listen to the CANbus traffic and shut the WAM down in the event of an over-torque, over-velocity, voltage problem, or heartbeat error (missing communication from any puck or the PC). It also controls the pendant lights and switches. The safety module is what you need to configure with VOLTL/H/1/2, TL1/2, VL1/2, and ZERO (these values are irrelevant in the motor pucks). To set the initial positions of the pucks, please see the DefineWAMpos() function, as you must also set IFAULT (Ignore Fault) at that time to prevent the giant instantaneous position change from causing an over-velocity fault in the safety module. If IFAULT > 0, IFAULT is decremented each time a fault is observed by the safety system. If IFAULT > 0, the fault is ignored. VL1,VL2,TL1 and TL2 - are SAFETY_MODULE properties. They apply to the whole arm on a global basis. For example, if the torque of ANY motor exceeds TL2, the safety system will force the arm into IDLE mode (all phase leads tied together). There are 40960 encoder ticks per motor revolution for each motor (even the wrist motors- though they have different IPNMs). You can set AP in a puck (to anything you want) only when the puck's MODE = 0. Just be careful to set IFAULT in the safety module before you do this (like previously described), else you will likely get a velocity fault. Sometimes, when you exit a WAM control program, the torque warning light will stay on. That just means that the last torque that the safety system saw go by was beyond the warning level for the present state ( > 0 for E-STOP or IDLE, or > TL1 for ACTIVATED). As long as you send one or more zero-torque commands to the pucks, the warning light should extinguish. If you press Shift-Activate, you must request encoder values in a constant loop until you press Shift-Idle again. Else, the safety system will register a heartbeat error and shut down the WAM. The pucks will apply the last received torque until a new torque is sent, or the MODE changes to MODE_IDLE.

WAM™Arm – User’s Guide [email protected] www.barrett.com
© 2006 Barrett Technology®, Inc. Document: D1001, Version: AE.00 Page 33 of 33
Here is the CANbus timing: 75uS to ask for position. 75uS per puck to respond with the positions 125uS to send a packed torque to the lower 4DOF 125uS to send a packed torque to the wrist ...plus control-side processing time on PC For the 7DOF, it is: 75+(7*75)+(2*125)+PC = 850uS + PC For the 4DOF, it is: 75+(4*75)+125+PC = 500uS + PC These numbers are limited by the 1 Mbps CANbus. Each message has a 47-bit frame (47uS), plus payload data (3 bytes, 24uS typ). CAN transceivers are not rated above 1 Mbps due to slew rate limitations.

WAM™Arm – User’s Guide [email protected] www.barrett.com
© 2006 Barrett Technology®, Inc. Document: D1001, Version: AE.00 Page 34 of 33
7 Appendix C - BarrettHand The BarrettHand can be readily integrated into the WAM system. There are two methods by which Hand control can be integrated with Arm control. The first method allows the user to control the Hand from a separate window while the Arm is running. The second method is integration of hand commands with Arm commands within the same program. Both methods require the following setup procedure.
Setup: • Turn power to entire system OFF • Plug in hand connector that extends from the modular outer link or Wrist into base of Hand • Align holes on Hand Base Ring with holes on connector strain relief plate • Align pins on Tool Plate with holes on Hand Base Ring • Attach Hand to modular outer link or Wrist by turning Tool Plate Attachment Ring clockwise • The pins must engage completely for Hand to be securely attached to Wrist • Plug ‘End Effector’ extension cable from base of Arm to rear of Hand Power Supply Box • Plug power cord into Power Supply Box • Attach a standard serial cable from COM port to rear of Hand Power Supply Box
The hand is attached and ready for operation. Read the BarrettHand User Manual before proceeding with Hand operation.
Before operating both Hand and Arm together the Hand should be tested on the end of the Arm. Place Arm in a configuration that allows the Hand to move through its full range of motion. Follow the procedures in the BarrettHand User Manual for testing Hand operation. If Hand operation is successful, the system is ready for use. To operate the Hand separately from the Arm:
• Turn Hand Power Supply Box ON • Open a serial terminal application (such as TeraTerm, HyperTerminal, minicom) and connect to the
COM port of the BarrettHand at 9600 baud, No parity, 8 bits, One stop bit, No flow control • Put Arm in a configuration that allows for full joint motion of the Hand • Initialize Hand (Type “HI”). The Hand is now ready for operation while executing Arm programs • Execute desired Arm program • While Arm program is running, switch to the serial terminal window • Type Hand commands (see the Grasper Control Language section of the BarrettHand manual)
To operate Hand and Arm from the same program: Integration of the Hand and the Arm in the same program requires opening and initializing the serial port from within your WAM control application, then sending the desired Grasper Control Language (GCL) commands from the application. See the directory of example code for details about how this is implemented.