user´s manual - suzohapp · what is slot machine analyzer? operation ... • collecting traces...
TRANSCRIPT
1
User´s Manual
www.slotmachineanalyzer.com
2
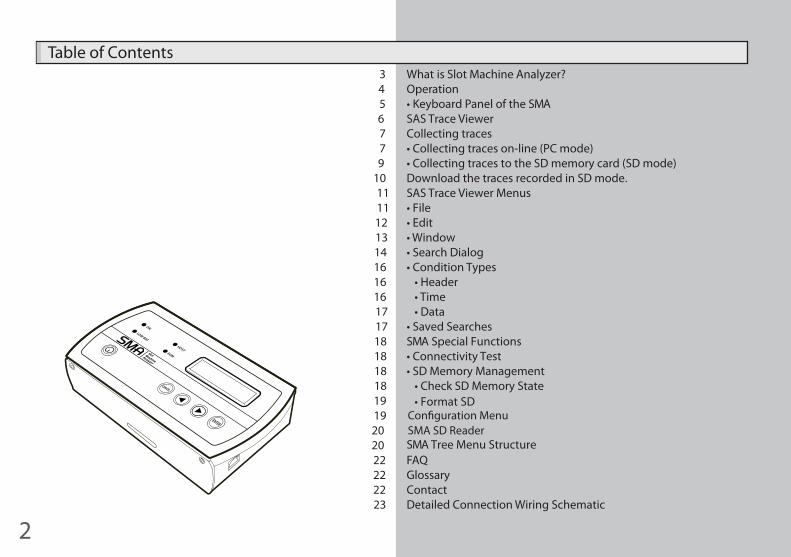
Table of ContentsWhat is Slot Machine Analyzer? Operation • Keyboard Panel of the SMASAS Trace ViewerCollecting traces • Collecting traces on-line (PC mode) • Collecting traces to the SD memory card (SD mode)Download the traces recorded in SD mode. SAS Trace Viewer Menus • File • Edit • Window • Search Dialog • Condition Types • Header • Time • Data • Saved Searches SMA Special Functions• Connectivity Test • SD Memory Management • Check SD Memory State • Format SD
SMA Tree Menu StructureFAQ GlossaryContactDetailed Connection Wiring Schematic
3456779
1011111213141616161717181818181919202022222223
SMA SD ReaderCon�guration Menu
3
Note: The SD memory format is propietary and it can’t be read
access the traces stored in the SD card, is inserting the card in the SMA unit and connecting this unit to the PC or to use the Trace
Viewer tool or SD Export Tool to read it.
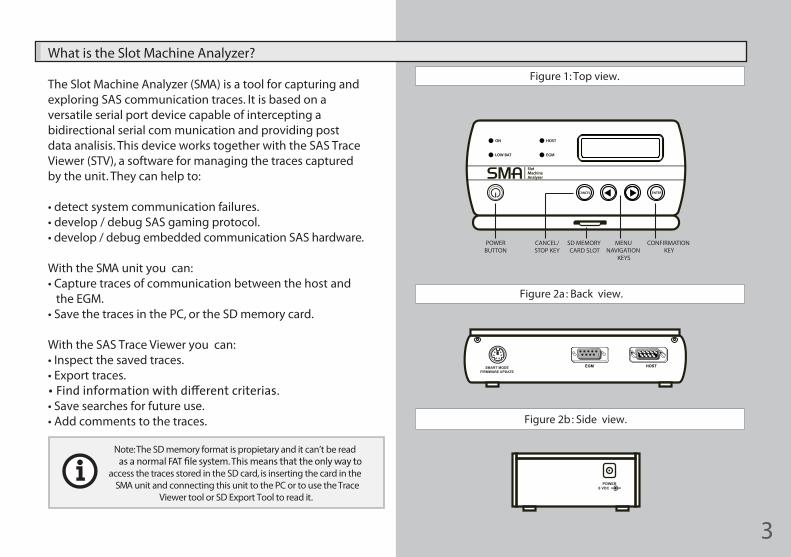
What is the Slot Machine Analyzer?
The Slot Machine Analyzer (SMA) is a tool for capturing and exploring SAS communication traces. It is based on a versatile serial port device capable of intercepting a bidirectional serial com munication and providing postdata analisis. This device works together with the SAS Trace Viewer (STV), a software for managing the traces captured by the unit. They can help to:
• detect system communication failures.• develop / debug SAS gaming protocol.• develop / debug embedded communication SAS hardware.
With the SMA unit you can:• Capture traces of communication between the host and the EGM.• Save the traces in the PC, or the SD memory card.
With the SAS Trace Viewer you can:• Inspect the saved traces. • Export traces.
• Save searches for future use.• Add comments to the traces.
ON
LOW BAT EGM
HOST
CANCEL ENTER
POWERBUTTON
CANCEL/STOP KEY
SD MEMORY CARD SLOT
MENU NAVIGATION
KEYS
CONFIRMATION KEY
Figure 1: Top view.
Figure 2a: Back view.
Figure 2b: Side view.
POWER6 VDC

4
Figure 3: SMA unit connections.
The SMA intercepts the SAS communication between the EGM and Host. Usually the original installed serial cable is connected between SMA and the Host.
Operation
This manual describes the SMA unit operation and its companion software Sas Trace Viewer (STV). To start working with the SMAMachine) through the provided serial cable, as shown in
supply (110v/220v). If there is no external power supply connected, the SM A will try to run from internal batteries (4 AA batteries) or from USB connection.
ON
LOW BAT EGM
HOST
CANCEL ENTERPOWERBUTTON
5
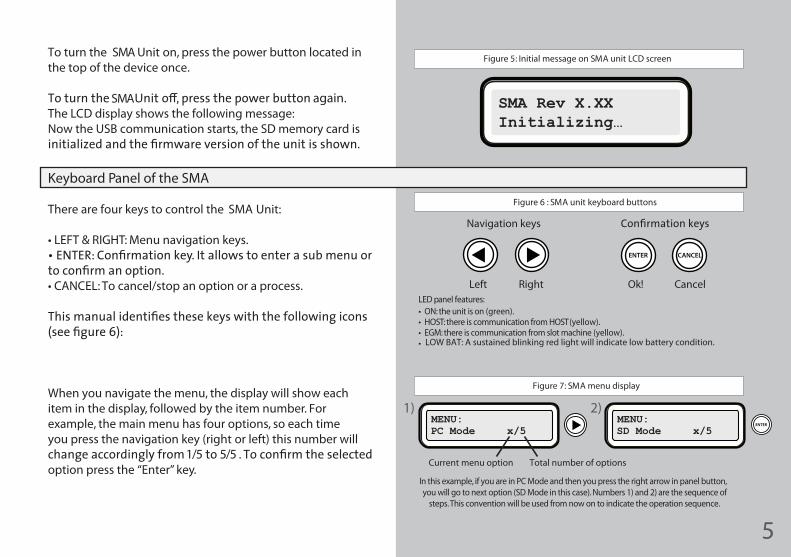
To turn the SMA Unit on, press the power button located in the top of the device once.
The LCD display shows the following message:Now the USB communication starts, the SD memory card is
Keyboard Panel of the SMA
There are four keys to control the SMA Unit:
• LEFT & RIGHT: Menu navigation keys.
• CANCEL: To cancel/stop an option or a process.
When you navigate the menu, the display will show each item in the display, followed by the item number. For example, the main menu has four options, so each time you press the navigation key (right or left) this number will
option press the “Enter” key.
Figure 6 : SMA unit keyboard buttons
Figure 7: SMA menu display
In this example, if you are in PC Mode and then you press the right arrow in panel button, you will go to next option (SD Mode in this case). Numbers 1) and 2) are the sequence of
steps. This convention will be used from now on to indicate the operation sequence.
LED panel features: • ON: the unit is on (green).• HOST: there is communication from HOST(yellow).• EGM: there is communication from slot machine (yellow).•
SMA Rev X.XXInitializing…
MENU: PC Mode x/5
MENU: SD Mode x/5
Navigation keys
Left
Current menu option Total number of options
Ok!Right Cancel
Figure 5: Initial message on SMA unit LCD screen
1) 2)
again.
LOW BAT: A sustained blinking red light will indicate low battery condition.
1/5 5/5
6
File Edit Window
OpenSaveSD ImportRead from SMATXT ExportQuit
RawText
Copy Copy
Saved SearchesTrace Porperties
Tile HorizontallyTile
Vertically
CascadeClose
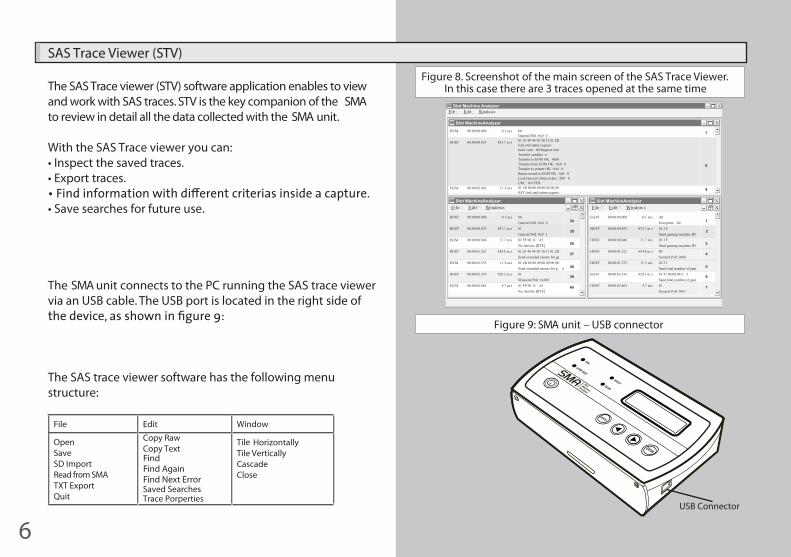
Figure 9: SMA unit – USB connector
Figure 8. Screenshot of the main screen of the SAS Trace Viewer.In this case there are 3 traces opened at the same time
Slot Machine AnalyzerFile Edit Windows
X
File Edit WindowsXX
HOST
HOST
EGM
HOST
EGM
HOST
EGM
00:00:00.000
00:00:00.833
00:00:00.846
00:00:01.521
00:00:01.533
00:00:02.376
00:00:02.863
0.1 m s
833.7 m s
11.7 m s
654.8 m s
11.5 m s
829.3 m s
5.7 m s
80General Poll: 0x0 081General Poll: 0x0 101 FF 00 1C A5No Activity [RTE]01 1F 49 44 30 30 31 01 2D Send extended meters for ga 01 1B 00 00 00 00 00 00 00Send extended meters for g a81SGeneral Poll: 0x010 01 FF 00 1C A5No Activity [RTE]
File Edit WindowsXX
EGM
HOST
HOST
HOST
HOST
EGM
HOST
00:00:00.000
00:00:00.833
00:00:00.846
00:00:01.521
00:00:01.533
00:00:02.376
00:00:02.863
0.1 m s
833.7 m s
11.7 m s
654.8 m s
11.5 m s
829.3 m s
5.7 m s
A0Exception: A026 1 FSend gaming machine ID26 1 FSend gaming machine ID80General Poll: 0x0001 5 1Send total number of gam01 51 00 00 84 C 5Send total number of gam81General Poll: 0x01
1
2
3
4
5
6
7
34
35
36
37
38
39
40
X
EGM
HOST
EGM
00:00:00.000
00:00:00.833
00:00:02.863
0.1 m s
833.7 m s
11.5 m s
80General Poll: 0x0 001 1F 49 44 30 30 31 01 2Dlock and status requesttrack code : 00 Request lockTransfer conditio nTransfer to EGM OK : 0x00 Transfer from EGM OK : 0x0 0Transfer to printer OK : 0x0 0Bonus award to EGM OK : 0x0 0Lock timeout (10ms ticks) : 200 0CRC : 0x1FFB01 1B 00 00 00 00 00 00 00AFT lock and status request
7
8
9
SAS Trace Viewer (STV)
The SAS Trace viewer (STV) software application enables to view and work with SAS traces. STV is the key companion of the SMA to review in detail all the data collected with the SMA unit.
With the SAS Trace viewer you can:• Inspect the saved traces.• Export traces.
• Save searches for future use.
The SMA unit connects to the PC running the SAS trace viewer via an USB cable. The USB port is located in the right side of
The SAS trace viewer software has the following menu structure:
USB Connector
Slot MachineAnalyzer
Slot MachineAnalyzer Slot MachineAnalyzer
FindFind Again Find Next Error

7
PC Mode New Trace 1/2
Mode: PCStop?
MENU: PC Mode 1/4
Mode: PCRunning.
Mode: PC Running.
New Trace Start
Mode: PCStopped.
1
1
3
3
2
2
4
Importing from SMA.
4285 samples read.
S top
Collecting traces
The SMA unit allows you to collect traces in two ways:
• On-line, PC mode : it collects the traces directly to the PC. The STV software must be running on the PC. The SMA will pick up live SAS data between host system and the slot machine, and will dump it in real time to the PC. Note: the data will be transferred in real time to the PC but it
• To the SD memory card, SD mode : it collects the traces to the SD memory card. There is no need for a PC connection, so you can use the SMA unit alone.
Collecting traces on-line (PC mode)
To start collecting traces in this mode, the PC must be running the STV software.From the File menu, go to the Read from SMA option to start the data capture from the SMA .
In the SMA unit, navigate to the “PC mode”, “New trace” menu option. To start, select “New Trace” from the menu and press “Enter”.
To stop the capture, press “Cancel” and then “Enter”,

8
A dialog window will display the amount of samples captured. This dialog has a button to stop the capture process. When you press the Stop button you will see the captured data in the main window.
Figure 10 shows the main screen of this tool, with the traces captured:
The captured traces are called SAS protocol messages and for each one, the following data is shown:
• the source (HOST, EGM): host polls are shown in green, EGM responses are shown in yellow, and corrupted polls/responses are shown in red• its timestamp • the time elapsed since the previous message reception • the raw message dump (in hexadecimal) and the message description• the message sequence number
If the message is bigger than 2 bytes, it can be expanded by double clicking on it (Figure 11). If you double click on it again, it will return to the collapsed form. Also, if the amount of bytes exceed the windows width, you will see a tooltip with all the message’s bytes.
File Edit WindowsXX
EGM
HOST
EGM
HOST
EGM
HOST
EGM
HOST
EGM
HOST
EGM
1
2
3
4
5
6
7
8
9
10
11
00:00:00.000
00:00:00.833
00:00:00.846
00:00:01.521
00:00:01.533
00:00:02.376
00:00:02.863
00:00:03.050
00:00:03.061
00:00:03.723
00:00:03.735
0.1 m s
833.7 m s
11.7 m s
654.8 m s
11.5 m s
829.3 m s
5.7 m s
653.0 m s
8.6 m s
652.8 m s
7.0 m s
06Exception: 0 601 1CSend meter s01 1C 00 00 00 02 00 00 00 00 00 14 08 00 00 00 00 00 00 00 00 02 00 00 00 Send meter s01 1BSend handpay information 01 1B 00 00 00 00 00 00 00 00 00 00 00 00 00 00 00 00 00 00 00 00 00 6B 2DSend handpay informatio n01 1FSend gaming machine ID and informatio n01 1F 49 44 30 30 31 01 2D 00 00 00 30 30 30 30 31 30 39 34 31 32 36 70Send gaming machine ID and informatio n01 B5 00 44 AFSend extended game N informatio n01 B5 00 00 00 00 45 00 00 00 00 00 00 00 00 00 3B 91Send extended game N informatio n01 A0 00 00 6C 13Send enabled features01 A0 00 00 D2 4C 03 00 00 00 83 C1
File Edit WindowsXX
EGM
HOST
EGM
HOST
EGM
HOST
00:00:00.000
00:00:00.833
00:00:00.846
00:00:01.521
00:00:01.533
00:00:02.376
0.1 m s
833.7 m s
11.7 m s
654.8 m s
11.5 m s
829.3 m s
06Exception: 0 601 1CSend meter s01 1C 00 00 00 02 00 00 00 00 00 14 08 00 00 00 00 00 00 00 00 02 00 00 00 Send meter sTotal coin in = 00000002Total coin out = 00000000Total drop = 00140800Total jackpot = 00000000Games played = 00000002Games won = 00000000Slot door open count = 00000000Power reset count = 00000001CRC = 0x40D01 1BSend handpay information 01 1B 00 00 00 00 00 00 00 00 00 00 00 00 00 00 00 00 00 00 00 00 00 6B 2DSend handpay informatio n01 1FSend gaming machine ID and informatio n
1
2
3
4
5
6
Figure 10 - Main Screen showing the collected trace
Figure 11 - Expanded message after row double click
Slot MachineAnalyzer
Slot MachineAnalyzer

9
Collecting traces to the SD memory card (SD mode)
This mode is useful for capturing traces at a casino facility in an unattended mode . This mode does not require any PC connection.After the SMA unit initializes, follow these steps to start capturing traces in SD mode.
To stop the capture, press “Cancel” and then “Enter”, as
To download the traces from the memory card to the computer, you can use the SAS Trace Viewer provided. Another option is to use the SMA unit as a SD memory reader. This can be useful for small traces or if you don’t have a memory card reader available at that moment.
MENU:SD Mode 1/2
MENU:PC Mode 1/5
New TraceStart Tr 2
SD ModeNew Trace
Mode: SDTr: 2 running.
1
3
5
2
4
Mode: SDStop?
Mode: SDTr: 2 running.
Mode: SDStopped...
1
3
2
Note: Never remove the SD memory card from the SMA unit while the traces are being captured. This could
cause the loss of all the data stored in the SD memory.

10
PC ModeNew Trace 1/2
Trace DownloadNum: 0
Trace DownloadStop?
Trace DownloadFinished
MENU:PC Mode 1/5
PC ModeTrc Downl. 2/2
Trace DownloadFinished
Tr 0Trace Downloading
Trace DownloadStopped
1
3
1
5
3
2
2
2
6
Follow the instructions in the “SD Import” section of this manual to process the downloaded traces with
the SAS Trace Viewer software.
Download the traces recorded in SD mode
Follow these steps after the initialization, in order to download a trace from the SD memory card using the SMA unit:
Note that the default trace is number zero. If there is more than one trace stored, you can search for them with the
The next screen will show the estimated download time for each trace, in the format hours:minutes:seconds. When it
If you want to interrupt this process press the “Cancel”
11
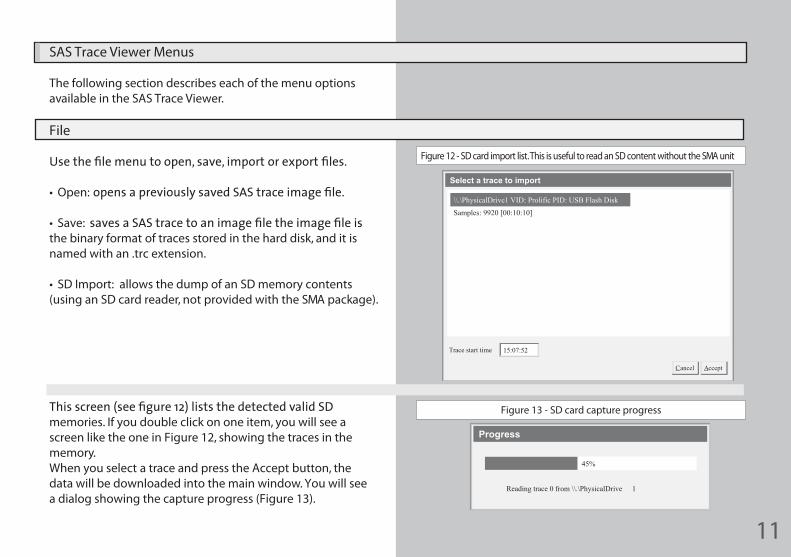
Progress
Reading trace 0 from \\.\PhysicalDrive 1
45%
Select a trace to import
\\.\PhysicalDrive1 VID: Prolific PID: USB Flash Disk
Samples: 9920 [00:10:10]
Trace start time
Cancel Accept
15:07:52
Figure 12 - SD card import list. This is useful to read an SD content without the SMA unit
Figure 13 - SD card capture progress
SAS Trace Viewer Menus
The following section describes each of the menu options available in the SAS Trace Viewer.
File
• Open:
• Save:the binary format of traces stored in the hard disk, and it is named with an .trc extension.
• SD Import: allows the dump of an SD memory contents (using an SD card reader, not provided with the SMA package).
memories. If you double click on one item, you will see a screen like the one in Figure 12, showing the traces in the memory. When you select a trace and press the Accept button, the data will be downloaded into the main window. You will see a dialog showing the capture progress (Figure 13).

12
:Read from SMA this option starts the data capture from the SMA, the dialog will display the amount of samples captured. You can stop the capture process by pressing the Stop button. Then you will see the captured data in the main window.
TXT Export: exports the current trace in a human readable text format. The format is the same as the collapsed form of the packets.
Quit: this option will exit the application.
Edit
The Edit menu option enables you to manipulate the information associated with the traces:
• Copy Raw: copies the selected message as a sequence of hexadecimal digits into the clipboard. You can expand your selection using CTRL or SHIFT keys.• Copy Text: copies the selected message in a human readable text format into the clipboard. The format is the same as the one you will see if you expand the packet. You can expand your selection using CTRL or SHIFT keys.• Search:section for more information).• Search again: searches for the next matching message using
• Saved Searches: opens a dialog in order to create, edit or delete searches (see Manage Searches section for more information).
Read from SMA.
4285 samples read.
S top
Figure 14 – SD card import

13
• Trace Porperties: opens a dialog showing information of the trace (Packet count and samples count), allowing you to edit the trace description and start time. See Figure 15 and review the second column in that window.
It is very important to set the trace start time property rightbecause then you may use it to review the saved traces, in
hardware version does not include a real time clock. So the
Its purpose is to match a potential instant of failure to the collected trace. When the trace lasts for more than 72 hours,
Window
Use this menu option to arrange the windows showing the
• Tile Horizontally: displays all opened traces by stretching them to the full width of the window, and stacked on top of one another.
• Tile Vertically: displays all opened traces by stretching them to the full height of window and placed in a row.
• Cascade: displays all opened traces by making them smaller than the window and partially overlapping them.
• Close: it closes the active trace window.
Description: Trace captured or TestLocation.
Trace start time :
Packet Count :
Samples Count :
Cancel Accept
12:07:25
138 1
30619
Trace Properties
Figure 15 – Trace properties window
SMA

14
Search Dialog
This option allows you to make searches within a trace. This feature is useful to find out patterns, polls, or exceptions in long traces.
When you select search (from the Edit menu or by pressing CTRL-E), you will see a dialog like the one in Figure 16. This dialog will show the last search you made.Every search has a name used to identify it later on Manage Searches menu option.
It also has 4 buttons: Save, Clear, Cancel and OK.
• Save: saves the current search to be used later (see Search Organizer section).• Clear: empties the search by removing all conditions in it.• Cancel: cancels the search.• OK: performs the search.
A search is made by one or more conditions. These conditions can be combined using AND or OR logical operations. If no condition was added to the search, you will see an Add button (like the one in Figure 16) and a Remove button (enabled if you have a condition selected on the list).
The Add button adds a condition to the search. The Remove button will remove it from the search.If there are conditions in the search you will see three buttons, OR, AND and Remove (see Figure 17).
Header Time Data
Channel :
Cancel AcceptSave Clear
Add Remove
Search
Name: Unnamed search .
Any Command 00 Bus y
Header Time Data
Channel :
Cancel AcceptSave Clear
ANDOR Remove
Search
Name: Unnamed search .
Any Command 00 Busy
Channel: Any Command: 00 Busy
Figure 16 – Search dialog window
Figure 17 – Search dialog window
OK
OK

15
The OR button chains the condition to the search using the OR logical operation. The AND button chains the condition to the search using the AND logical operation. The Remove button removes the selected condition from the list.The logical operations precedence is from top to bottom. The example in Figure 18 is processed in the following way:
(“Channel: Any Command: 00 – Busy” OR “Channel: Any Command: 06 – Enable bill acceptor”) AND “Time: > 100.00 ms.” ) AND “Time: < 600.00 ms.” )
Use Case example: �nding all the tickets inserted in the EGM
To explain how to build a search, consider the following scenario: you are having sporadic problems when a ticket is inserted into de EGM. You should start capturing a trace, and then perform the problematic action (in this example, insert a ticket) until the problem occurs. Stop the trace capture and open the “Find” dialog (CTRL+F). Whenever a ticket is inserted, the EGM issues the “Ticket Inserted” exception (0x67), so this is what we will look for. Select “EGM” from the Source combo box, select “Exception” from the contiguous
Click the “Add” button. The search should look like this:
exception 67, and pressing “F3” will cycle between all the occurrences of the exception.
Header Time Data
Time :
Cancel AcceptSave Clear
ANDOR Remove
Search
Name: Unnamed search .
< 600
Channel: Any Command: 00 Bus yOR Channel: Any Command: 06 - Enable bill acceptorAND Time: > 100.00 ms.AND Time: < 600.00 ms.
Header Time Data
Source
Cancel AcceptSave Clear
ANDOR Remove
Search
Name: Unnamed search .
EGM Exception 67- Ticket has been inserted
Figure 18 – Search dialog window example
Figure 19 – Search dialog window with the “Insert Ticket” example
OK
OK
Source: EGM Exception: 67- Ticket has been inserted

16
Header Time Data
Channel :
ANDOR Remove
Any Command 00 Bus y
AnyHostEGM
Header Time Data
Channel :
ANDOR Remove
Any Command 00 Bus y
CommandExceptio n
Header Time Data
ANDOR Remove
Time : < 0.00
Header Time Data
Channel :
ANDOR Remove
Any Command 00 Bus y
Figure 20 – Condition types: Header
Figure 21 – Condition types: Header
Figure 22 - Condition types: Header
Figure 23 - Condition types: Time
Condition Types
Header
This condition checks the message header in order to determine if the message satisfies the condition.
The condition has 3 selectable items: 1. Channel• Host, only messages coming from the Host are listed• EGM , only messages coming from the EGM are listed• Any, any message coming from the EGM or Host are listed
2. Command/Exception:• Command, only messages that are polls or responses are listed. • Exception, only messages coming from the EGM and which are, in turn, exceptions are listed.
3. Command/Exception code and description:This option will show you a list of available commands/responses or exceptions; only messages that match the code are listed.
Time
This condition checks the time elapsed from the previous message in order to determine if a message satisfies the condition.In this condition you can select the comparison operator (<, <=, =, =>, >), and the time magnitude.

17
Header Time Data
Data :
ANDOR Remove
ASCII
Select a trace to import
ID001
Test search 1 (Data Search [D2 4C 03] [C1 C1 C1] [01 B5 0D]Test search 2 (Any Command 0x1f )Test search 3Test search 4 (EGM Exception 0x1F)
Cancel AcceptEditNew Remove
Figure 24 - Condition types: Data
Figure 25 - Condition types: Data
Data
This condition checks if the message has custom data entered by the user in ASCII or hexadecimal mode, in order to determine if the message satisfies the condition.
Note: this type of condition checks the data entered in the Data field in the entire message, so this data will match values present in one or more message fields.
Saved Searches
This dialog allows you to manage saved searches.This dialog has five buttons at the bottom.
• New: creates a new search (see Find Dialog section for more information).
• Edit: allows you to edit the selected search (see Find Dialog section for more information).
• Remove: removes the selected search.
• Cancel: closes the dialog.
• Accept: if there is a selected search, it performs the search in the active trace.
OK

18
MENU: Memory Card 3/5
MENU: PC Mode 1/4
Total: 120 MbUsed: 20 MB
Memory Info 1/2 1/3
1
3
2
4
SMA Special functions
SD Memory management
The following functions allow to work with the SD memory card plugged into the SMA unit.
Check SD memory state
To check the capacity of the SD memory card follow these steps:
To quit press the “Cancel” key.
19
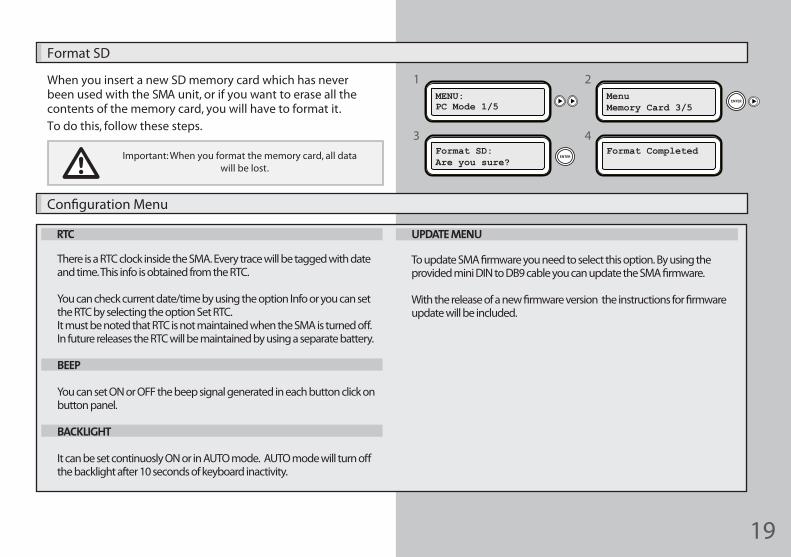
Important: When you format the memory card, all data will be lost.
MenuMemory Card 3/5
MENU:PC Mode 1/5
Format CompletedFormat SD:Are you sure?
1
3
2
4
Format SD
When you insert a new SD memory card which has never been used with the SMA unit, or if you want to erase all the contents of the memory card, you will have to format it. To do this, follow these steps.
There is a RTC clock inside the SMA. Every trace will be tagged with date and time. This info is obtained from the RTC.
You can check current date/time by using the option Info or you can set the RTC by selecting the option Set RTC.
In future releases the RTC will be maintained by using a separate battery.
BEEP
You can set ON or OFF the beep signal generated in each button click on button panel.
BACKLIGHT
the backlight after 10 seconds of keyboard inactivity.
update will be included.
RTC UPDATE MENU
20
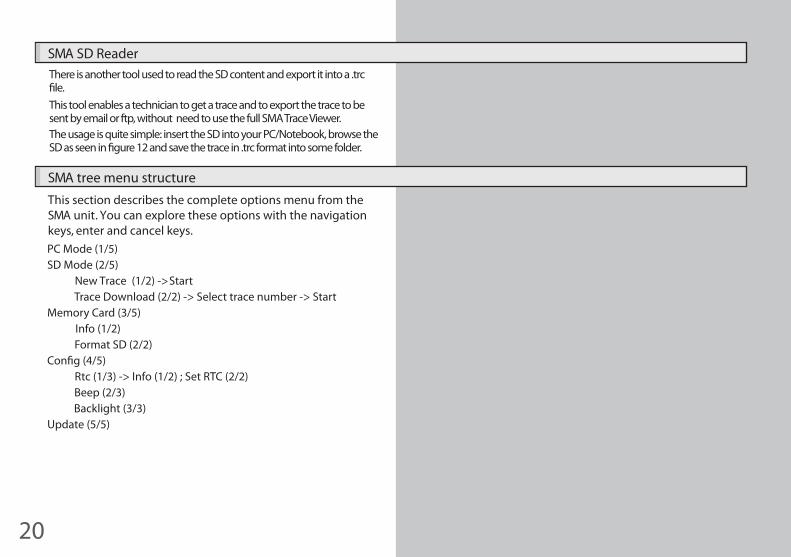
SMA tree menu structure
SMA SD Reader
This section describes the complete options menu from the SMA unit. You can explore these options with the navigation keys, enter and cancel keys.PC Mode (1/5)SD Mode (2/5)
New Trace (1/2) -> StartTrace Download (2/2) -> Select trace number -> Start
Memory Card (3/5)Info (1/2)Format SD (2/2)
Rtc (1/3) -> Info (1/2) ; Set RTC (2/2)Beep (2/3)Backlight (3/3)
Update (5/5)
There is another tool used to read the SD content and export it into a .trc
This tool enables a technician to get a trace and to export the trace to be sent by email or ftp, without need to use the full SMA Trace Viewer.The usage is quite simple: insert the SD into your PC/Notebook, browse the

21
SMA Error Messages Meaning
SD not present This error appears if the SD memory card is not inserted in the unit, and you attempt to read or write the memory. If you turn the unit on with an SD memory card inserted and this message appears, try to remove and insert the memory card back. If this error persists, replace the SD memory card, as it might be corrupted.
SD needs format This error appears if the SD memory card has not been formated with the SMA unit. If you format the memory card with the SMA unit and this message continues to appear, then it might be corrupted.
USB not ready This error appears when you want to download a trace in PC mode and the connexion between the PC and the SMA unit is lost. The cause of this could be a defective usb cable or not properly connected PC and SMA units.
The traces will be lost if there is a power outage while traces are written into SD.Also traces can be lost if the traces are not properly closed with the cancel / enter button sequence.In spite of this, SMA includes an auto recover function. When a trace is not properly closed SMA will try to �x it in the next SD access and leave the SD in a non corrupted state.

22
Yes. This number depends on SD memory card capacity, and it is also limited to 255 traces.
It is no limited. It depends only on the SD memory capacity (on stand alone mode).
It is 512 bytes, on a SD memory card.
No, this model does not allow to do that.
Up to 32 Gb. SMA is optimized for SD larger than 4Gb.
No, it is not possible.
AnswersQuestions
FAQ
Is there a limit on the number of traces on stand alone mode?
Which is the maximun size for a single trace?
Which is the minium size for a single trace (on stand alone mode)?
Is it possible to change the baud rate on the SMA Unit?
What kind of SD is accepted?
Is its possible to recover a trace after formating the SDmemory card (using the SMA Unit)?
Glossary
• EGM : Electronic Gaming Machine.• SLOT: a synonymous of EGM. • SMIB: Slot Machine Interface Board.
Contact

23
Detailed connection wiring schematic
EGM FEMALEPines Description
2 TX
3 RX
4 GND
HOST MALEPines Description
2 RX
3 TX
4 GND

24
www.slotmachineanalyzer.com