user’s manual for the dd1149 requisition and invoice
TRANSCRIPT
USER’S MANUAL FOR THE
DD1149 REQUISITION AND INVOICE/SHIPPING
DOCUMENT
Version 1.1 Produced by IB Logistics, LLC
August 2015

1 PURPOSE AND FUNCTION:
1.1 The DD1149 system allows users to submit DD1149 invoice data for visibility in
CMOS. The system also allows users to print a DD1149 PDF form. It keeps track of all
submissions, allowing for users to re- use data as well as re-print past DD1149 invoices.
1.2 The goal of the site is to provide users with a common interface to quickly communicate
transportation data required to successfully ship cargo globally
2 ACCESSING THE WEB SITE:
2.1 The DD1149 Web Site is located at url: https://trackerlite.wpafb.af.mil/dd1149/ It is a
“.mil” access site that requires the use of a Common Access Card (CAC) to reach.
The first screen the user will see is the main page. If the user has not yet registered an
account, they will see Figure 2.1. If the user has already registered he/she will see Figure
2.2
Figure 2-1

Figure 2-2
2.2 New users will have to create an account that is linked to their Common Access Card
(CAC). This only occurs once. This information is covered in Section 3.
2.3 Existing users are shown the system menu. My Account menu is covered in Section 4.
Forms menu is covered in Section 5. Help menu is covered in Section 6.
3 REGISTRATION:
3.1 All new users are required to register an account which is linked to their Common
Access Card (CAC). Upon successful registration, user can then access the site via CAC-
login only. Upon reaching the main screen, new users must click the “Create an Account”
button shown in figure 2-1 once clicked, users will be show the screen in figure 3-1.
Figure 3-1
3.2 Every field is required during registration with the exception of the Address (Line 2) and
Transportation Office Email Address. Most of the fields are self-explanatory.
DoDAACs are validated against the Master DoDAAC table. If the system cannot find your
MARINES

DoDAAC, it is not currently active.
3.3 Once your information has been entered hit the “Register Account” button to create your
account. Any errors will be listed at this time by the system. Errors will be displayed on
the screen as shown in Figure 3-2
Figure 3-2
4 MY ACCOUNT: This section will cover the “My Account” menu item of the DD11449.
4.1 User Detail
4.1.1 This section allows users to update their user account. All fields are editable and
are used when submitted a DD1149. It is selected by clicking the “User Detail” sub-
menu item under the “My Account” menu item as seen in Figure 4-1.
Figure 4-1
4.1.2 Once selected, the user is presented with the User Account Management page as
seen in Figure 4-2.

Figure 4-2
4.1.3 Every field is required during user management with the exception of the
Address (Line 2) and Transportation Office Email Address.
4.1.4 DoDAACs are validated against the Master DoDAAC table. If the system
cannot find your DoDAAC, it is not currently active.
4.1.5 Once your information has been entered hit the “Update Account” button to
create your account. Any errors will be listed at this time by the system. Errors will be
displayed on the screen.
4.2 Funds Management
4.2.1 This section allows users to update their user funding information. All fields are
editable and are used when submitting a DD1149. It is selected by clicking the “Funds
Management” sub-menu item under the “My Account” menu item as seen in Figure 4-
3
Figure 4-3
4.2.2 Once selected, the user is presented with the Funds Management page as seen in
Figure 4-4.
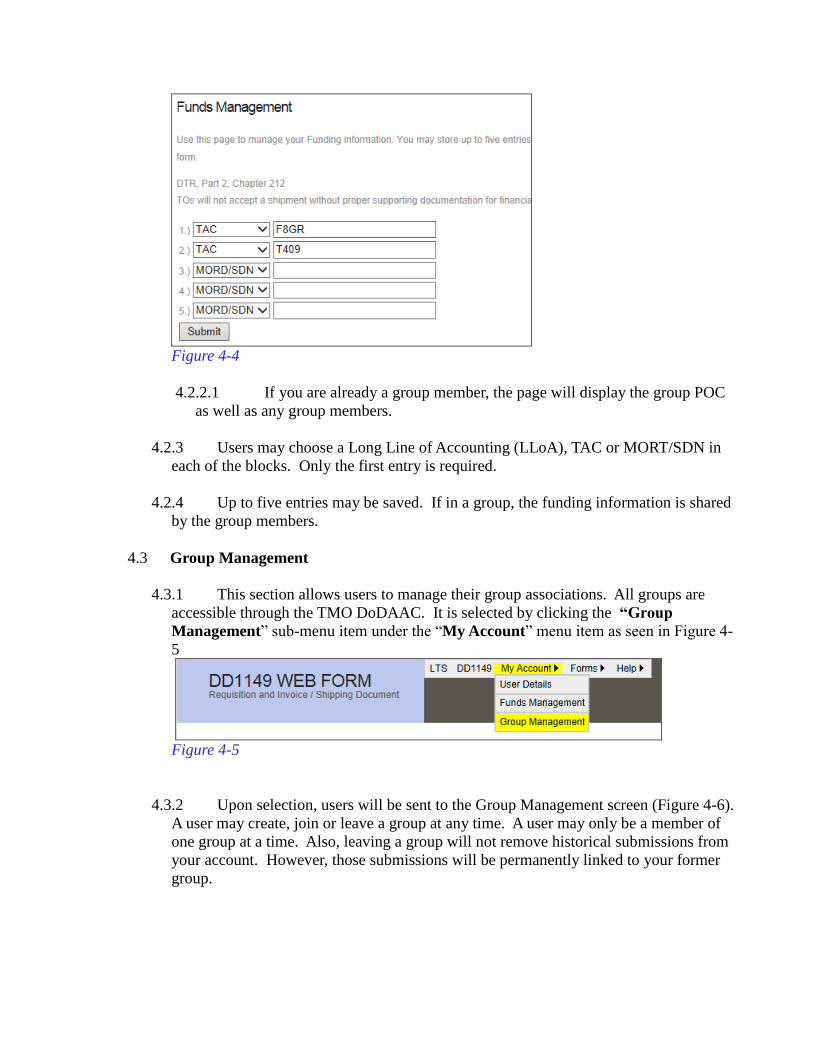
Figure 4-4
4.2.2.1 If you are already a group member, the page will display the group POC
as well as any group members.
4.2.3 Users may choose a Long Line of Accounting (LLoA), TAC or MORT/SDN in
each of the blocks. Only the first entry is required.
4.2.4 Up to five entries may be saved. If in a group, the funding information is shared
by the group members.
4.3 Group Management
4.3.1 This section allows users to manage their group associations. All groups are
accessible through the TMO DoDAAC. It is selected by clicking the “Group
Management” sub-menu item under the “My Account” menu item as seen in Figure 4-
5
Figure 4-5
4.3.2 Upon selection, users will be sent to the Group Management screen (Figure 4-6).
A user may create, join or leave a group at any time. A user may only be a member of
one group at a time. Also, leaving a group will not remove historical submissions from
your account. However, those submissions will be permanently linked to your former
group.
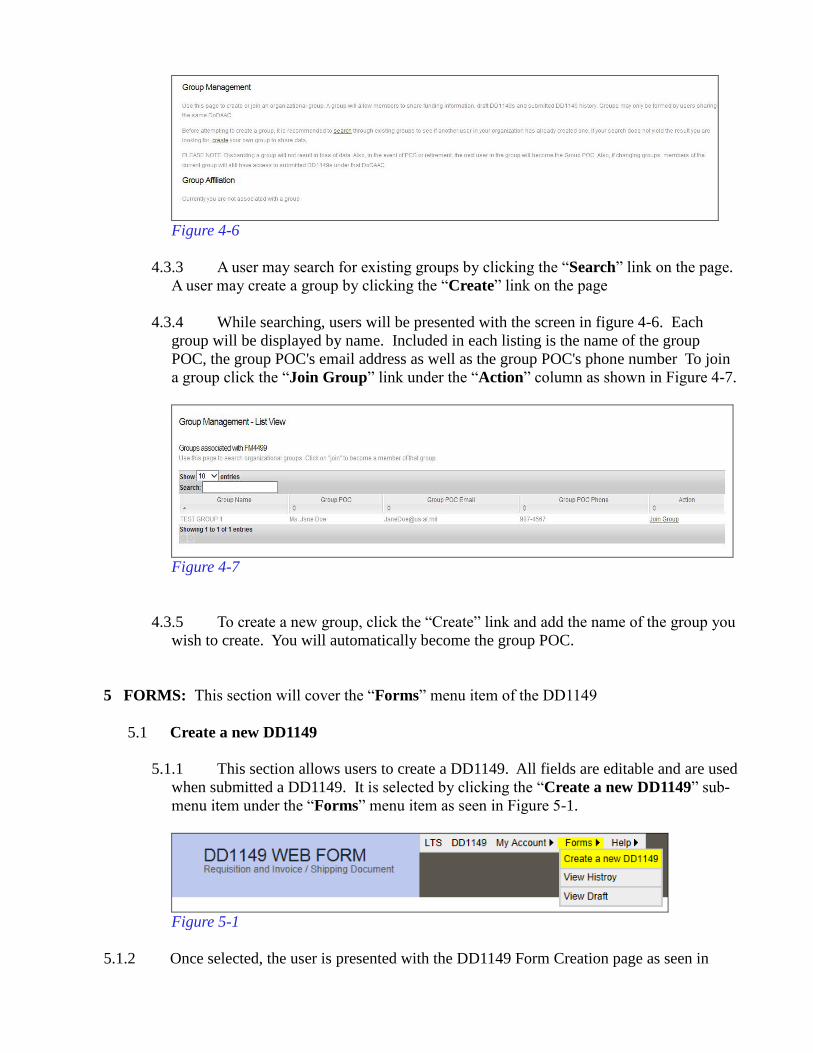
Figure 4-6
4.3.3 A user may search for existing groups by clicking the “Search” link on the page.
A user may create a group by clicking the “Create” link on the page
4.3.4 While searching, users will be presented with the screen in figure 4-6. Each
group will be displayed by name. Included in each listing is the name of the group
POC, the group POC's email address as well as the group POC's phone number To join
a group click the “Join Group” link under the “Action” column as shown in Figure 4-7.
Figure 4-7
4.3.5 To create a new group, click the “Create” link and add the name of the group you
wish to create. You will automatically become the group POC.
5 FORMS: This section will cover the “Forms” menu item of the DD1149
5.1 Create a new DD1149
5.1.1 This section allows users to create a DD1149. All fields are editable and are used
when submitted a DD1149. It is selected by clicking the “Create a new DD1149” sub-
menu item under the “Forms” menu item as seen in Figure 5-1.
Figure 5-1
5.1.2 Once selected, the user is presented with the DD1149 Form Creation page as seen in

Figure 5-2.
Figure 5-2
5.1.3 Data Entry: Project Code, Organization and base (under Mark For) and Unit
Price (for each item) are the only fields on the form that are not required.
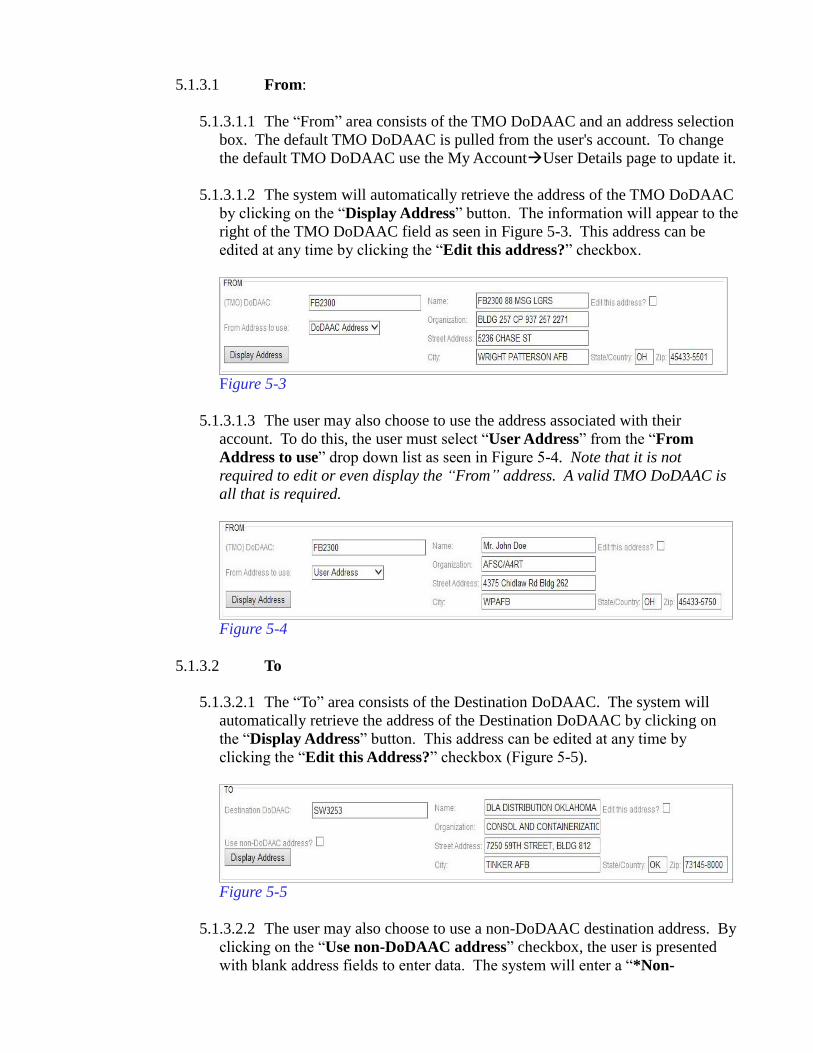
5.1.3.1 From:
5.1.3.1.1 The “From” area consists of the TMO DoDAAC and an address selection
box. The default TMO DoDAAC is pulled from the user's account. To change
the default TMO DoDAAC use the My AccountUser Details page to update it.
5.1.3.1.2 The system will automatically retrieve the address of the TMO DoDAAC
by clicking on the “Display Address” button. The information will appear to the
right of the TMO DoDAAC field as seen in Figure 5-3. This address can be
edited at any time by clicking the “Edit this address?” checkbox.
Figure 5-3
5.1.3.1.3 The user may also choose to use the address associated with their
account. To do this, the user must select “User Address” from the “From
Address to use” drop down list as seen in Figure 5-4. Note that it is not
required to edit or even display the “From” address. A valid TMO DoDAAC is
all that is required.
Figure 5-4
5.1.3.2 To
5.1.3.2.1 The “To” area consists of the Destination DoDAAC. The system will
automatically retrieve the address of the Destination DoDAAC by clicking on
the “Display Address” button. This address can be edited at any time by
clicking the “Edit this Address?” checkbox (Figure 5-5).
Figure 5-5
5.1.3.2.2 The user may also choose to use a non-DoDAAC destination address. By
clicking on the “Use non-DoDAAC address” checkbox, the user is presented
with blank address fields to enter data. The system will enter a “*Non-
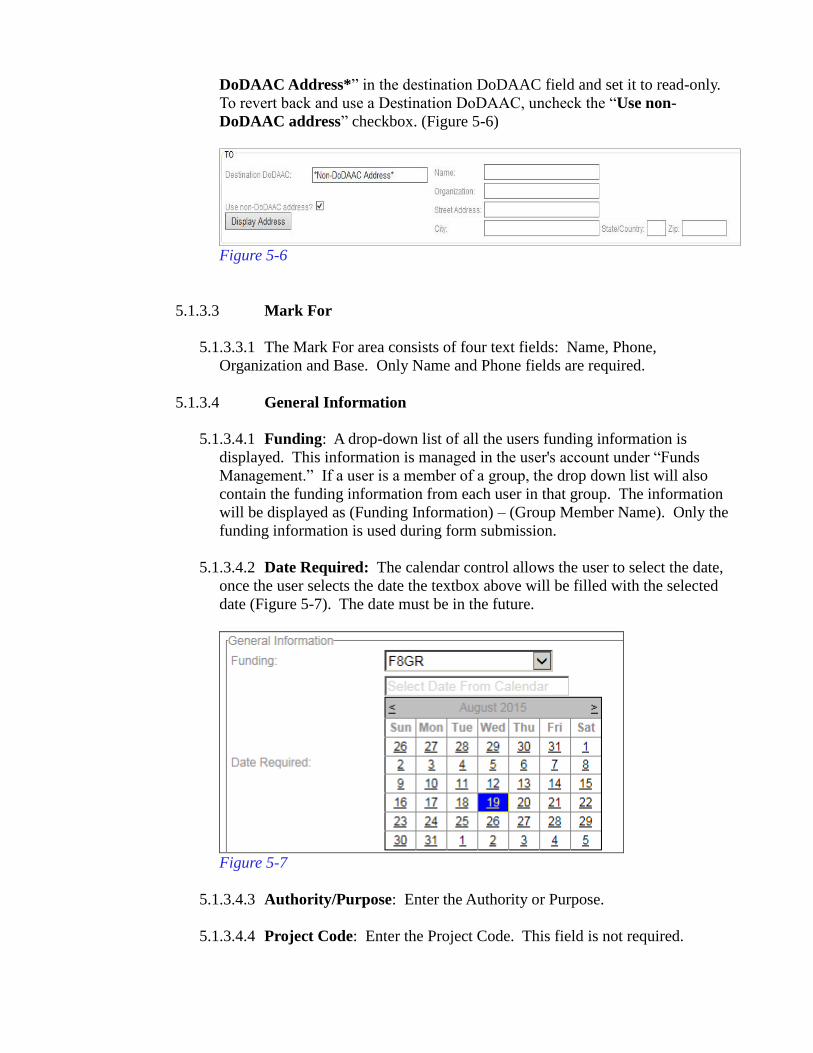
DoDAAC Address*” in the destination DoDAAC field and set it to read-only.
To revert back and use a Destination DoDAAC, uncheck the “Use non-
DoDAAC address” checkbox. (Figure 5-6)
Figure 5-6
5.1.3.3 Mark For
5.1.3.3.1 The Mark For area consists of four text fields: Name, Phone,
Organization and Base. Only Name and Phone fields are required.
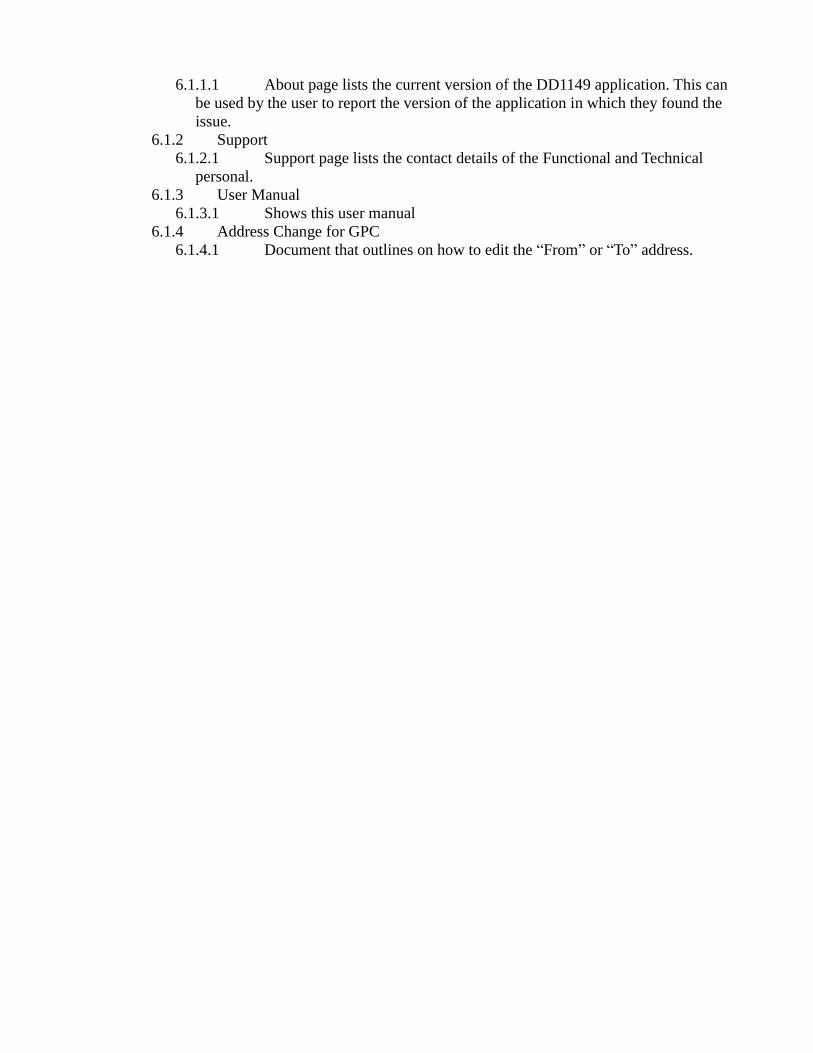
5.1.3.4 General Information
5.1.3.4.1 Funding: A drop-down list of all the users funding information is
displayed. This information is managed in the user's account under “Funds
Management.” If a user is a member of a group, the drop down list will also
contain the funding information from each user in that group. The information
will be displayed as (Funding Information) – (Group Member Name). Only the
funding information is used during form submission.
5.1.3.4.2 Date Required: The calendar control allows the user to select the date,
once the user selects the date the textbox above will be filled with the selected
date (Figure 5-7). The date must be in the future.
Figure 5-7
5.1.3.4.3 Authority/Purpose: Enter the Authority or Purpose.
5.1.3.4.4 Project Code: Enter the Project Code. This field is not required.

5.1.3.4.5 TCN: By default, the system will auto-generate a TCN for the
submission. The user may enter a TCN by selecting “Manual Entry” on the
radio box next to the TCN. To revert back to auto-generation, select “Web-
Generated” on the radio box next to the TCN.
5.1.3.4.6 HAZMAT, Sensitive and Classified: Each one of these checkboxes is
used to add information to the submission. Selection of any of these will place
verbiage on the completed form. If selecting either Sensitive or Classified, a
drop down box will appear, allowing the user to select the appropriate code.
5.1.3.5 Items
5.1.3.5.1 Number of Items: Adjust the number of items displayed on the page. If
the type of shipment in container information section is set to
box/container/pallet/skid/skit then the range of items can be from 1 to 99. On
the other hand if the items are to be shipped separately then range of items can
be from 1 to 23.
5.1.3.5.2 Nomenclature: Item nomenclature.
5.1.3.5.3 NSN/Part Number: Allows users to enter Part Number, NSN or NNSN.
When selecting Part Number, any alpha-numeric combination may be entered.
When selecting NSN, a 13 character NSN is required. When selecting NNSN,
“NNSN” is automatically entered and the field is set to read-only.
5.1.3.5.4 Unit of Issue: Item Unit of Issue
5.1.3.5.5 DEMIL Code: Item DEMIL Code
5.1.3.5.6 Quantity: Number of pieces of the item.
5.1.3.5.7 Unit Price: Price of the individual item.
5.1.3.5.8 Type Container: Item Type Container
5.1.3.5.9 Dimension and Weight (only for items shipped individually)
5.1.3.5.9.1 Length, Width, Height: The user can specify the dimension (in
inches) of the shipment container in which the item can be shipped.
5.1.3.5.9.2 Weight: The user can also specify the weight of the item in
pounds (lb.).
5.1.4 Container Information:
5.1.4.1 Type of Shipment: The user can specify on whether to ship the items in
one box or individually. If the items were to ship individually then the user can
specify the dimensions as well as weight of all the items.
5.1.4.1.1 Items are contained in one box/container/pallet/skid/skit: When items

are contained in one box/container/pallet/skid/skit the user will be optionally
asked for the dimensional and weight information (Figure 5-8)
Figure 5-8
5.1.5 Data Validation: All fields have validation for security purposes as well as data
integrity.
5.2 View History
5.2.1 This section allows users to view submission history. It is selected by clicking
the “View History” sub-menu item under the “Forms” menu item as seen in Figure 5-9.
Figure 5-9
5.2.2 Users are shown each submission, in summary. TCN, Submit Date, CMOS Date
and Action are displayed (Figure 5-10).
Figure 5-10
5.2.2.1 CMOS Date: Represents a time stamp of when DLA Transaction
Services has received the associated DD1149 data. It is not a receipt of entry into
CMOS as we do not yet have the capability to receive validation from CMOS.
5.2.2.2 Action:
5.2.2.2.1 View/Save PDF: Generates a PDF form for the submitted DD1149. The

form generation may take a few seconds after the first submission and display
the screen in Figure 5-11.
Figure 5-11
5.2.2.2.2 Re-Use: By selecting this, users are sent to the DD1149 creation form
pre-filled with the data from the selected submission. TCN is removed in the
new page.
5.2.3 Users can sort by any of the displayed fields by clicking on the column header.
Users can select the number of entries shown per page by using the drop down box for
“Show x entries.” Users can search by any fields by entering search criteria into the
“Search” text box.
5.2.4 If users are members of a group, a separate table is displayed below, showing
submission history for the group. The only difference is the inclusion of the submitter's
name in the columns.
5.3 View Draft
5.3.1 This section allows users to view their draft. It is selected by clicking the “View
Draft” sub-menu item under the “Forms” menu item as seen in Figure 5-X.
5.3.2 Once selected, users are sent to the DD1149 creation form with data pre-filled
from their saved draft. If users do not have a draft, they are sent to a blank DD1149
creation form.
6 Help: This section will cover the “Help” menu item of the DD1149
6.1 This section allows users to view the About page, Support page, User Manual, and
Address Change for GPC document of the DD1149 system.
6.1.1 About
6.1.1.1 About page lists the current version of the DD1149 application. This can
be used by the user to report the version of the application in which they found the
issue.
6.1.2 Support
6.1.2.1 Support page lists the contact details of the Functional and Technical
personal.
6.1.3 User Manual
6.1.3.1 Shows this user manual
6.1.4 Address Change for GPC
6.1.4.1 Document that outlines on how to edit the “From” or “To” address.
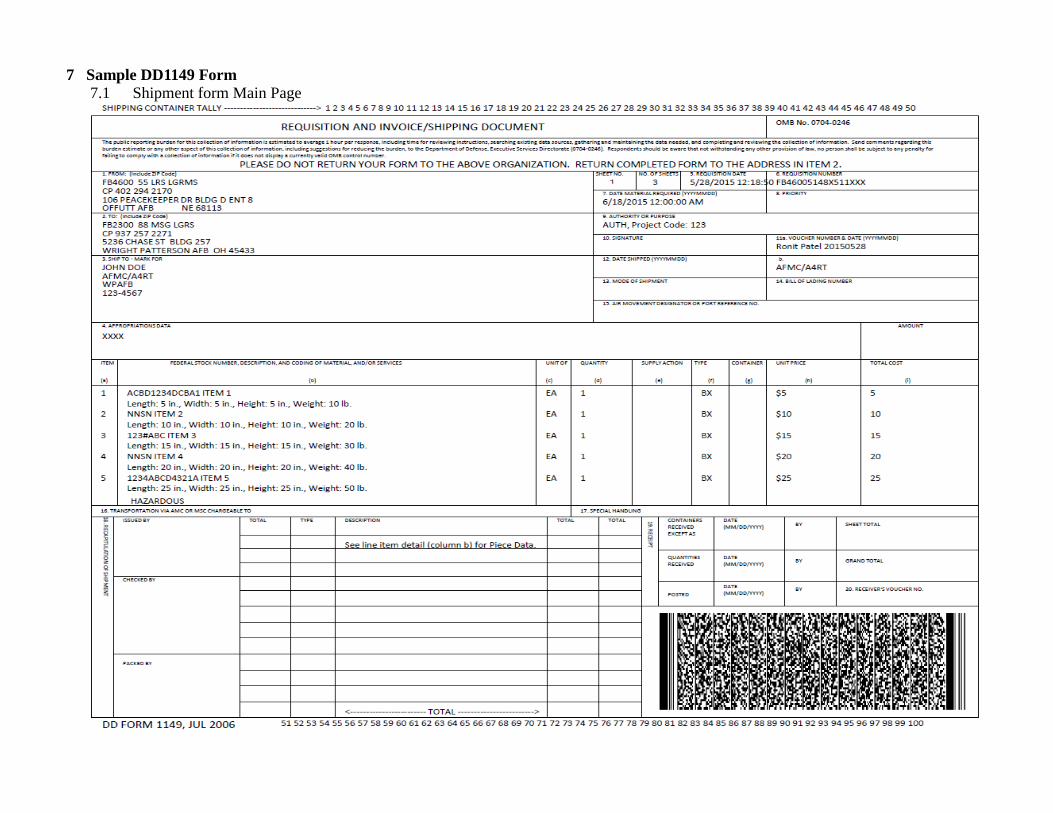
7 Sample DD1149 Form 7.1 Shipment form Main Page
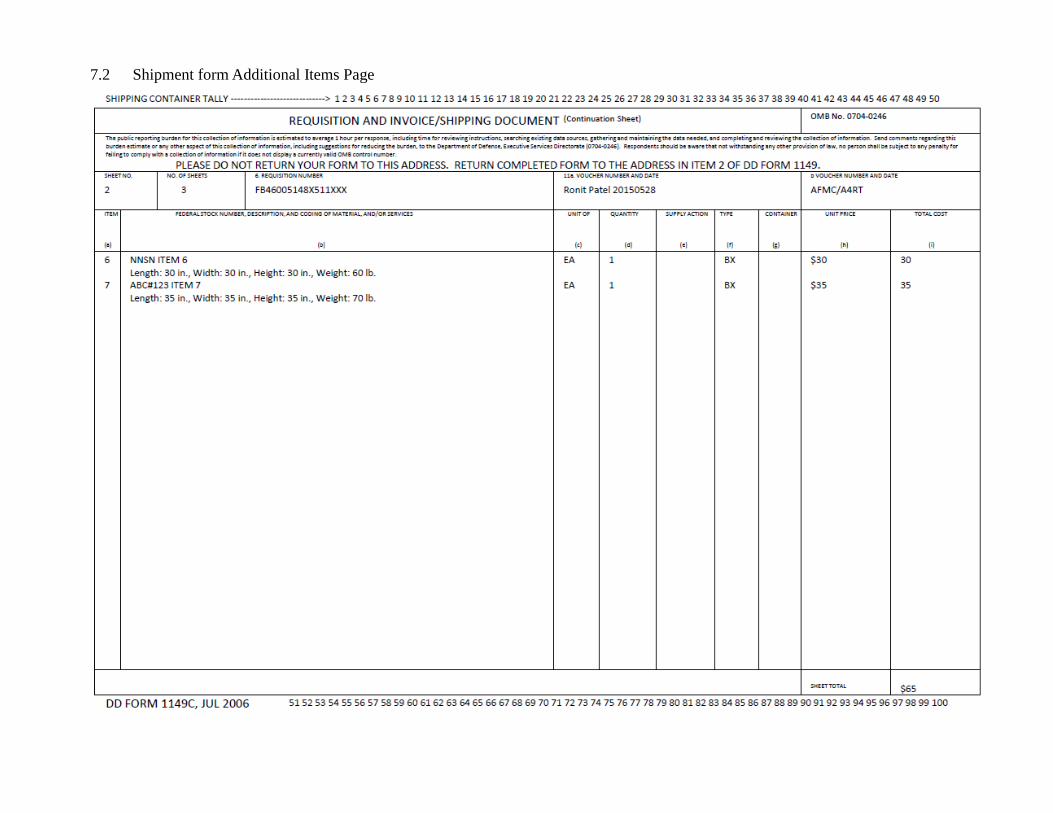
7.2 Shipment form Additional Items Page

7.3 Shipment form Remarks Page