user's guide - surecolor p800 - epson america... using the control panel the touch screen 1...
TRANSCRIPT
Epson® SureColor® P800 User's Guide

ContentsSureColor P800 User's Guide..................................................................................................................... 9Product Basics .......................................................................................................................................... 10
Using the Control Panel ..................................................................................................................... 10Control Panel Buttons and Lights .................................................................................................. 10The Touch Screen ......................................................................................................................... 11
Status Icons .............................................................................................................................. 12Adjusting Control Panel Position ................................................................................................... 13Changing Touch Screen Language............................................................................................... 13Adjusting the Screen Brightness.................................................................................................... 14
Product Parts Locations ..................................................................................................................... 15Product Parts - Front ..................................................................................................................... 16Product Parts - Back...................................................................................................................... 17
The Power Off and Sleep Timers ....................................................................................................... 18Changing the Power Off Timer Setting from the Control Panel...................................................... 18Changing the Sleep Timer Setting from the Control Panel ............................................................ 19Changing the Power Off Timer Setting - Windows......................................................................... 19Changing the Power Off Timer Setting - OS X............................................................................... 20
Epson Connect Solutions for Smartphones, Tablets, and More ......................................................... 21Using the Epson iPrint Mobile App ................................................................................................ 22Using Epson Remote Print ........................................................................................................... 22
Using AirPrint .................................................................................................................................... 23Using Google Cloud Print ................................................................................................................... 23
Setting Up Google Cloud Print on a Chromebook ......................................................................... 24Wi-Fi or Wired Networking........................................................................................................................ 26
Wi-Fi Infrastructure Mode Setup......................................................................................................... 26Selecting Wireless Network Settings from the Control Panel ........................................................ 27
Wi-Fi Direct Mode Setup .................................................................................................................... 29Enabling Wi-Fi Direct Mode........................................................................................................... 30
Wi-Fi Protected Setup (WPS)............................................................................................................. 33Using WPS to Connect to a Network ............................................................................................. 33
3
Printing a Network Status Sheet......................................................................................................... 34Changing or Updating Network Connections ..................................................................................... 35
Accessing the Web Config Utility ................................................................................................... 35Changing a USB Connection to a Wi-Fi Connection...................................................................... 35Changing a Wi-Fi Connection to a Wired Network Connection...................................................... 36Connecting to a New Wi-Fi Router ................................................................................................ 36Disabling Wi-Fi Features ............................................................................................................... 37
Loading Media ........................................................................................................................................... 38Loading Paper in the Sheet Feeder.................................................................................................... 38Loading Fine Art Media ...................................................................................................................... 42Loading Posterboard and Thick Media............................................................................................... 46Loading Roll Paper (Optional) ............................................................................................................ 50
Attaching the Roll Paper Unit......................................................................................................... 50Removing and Installing the Roll Media Adapter - 2-inch Core...................................................... 52Removing and Installing the Roll Media Adapter - 3-inch Core...................................................... 53Loading Roll Paper on the Spindle ................................................................................................ 53Loading Roll Paper in the Product ................................................................................................. 55Cutting and Removing Roll Paper ................................................................................................. 59
Cut Sheet Media Loading Capacity .................................................................................................... 61Available Epson Papers ..................................................................................................................... 63Borderless Paper Type Compatibility ................................................................................................. 71Paper or Media Type Settings - Product Software.............................................................................. 72Selecting the Paper Settings for Each Source - Control Panel ........................................................... 73
Paper or Media Type Settings - Control Panel............................................................................... 74Selecting the Default Paper Setup Display and Error Notice Settings ................................................ 75
Printing from a Computer ......................................................................................................................... 78Printing with Windows ........................................................................................................................ 78
Selecting Basic Print Settings - Windows ...................................................................................... 78Paper Configuration Options - Windows ................................................................................... 81Advanced B&W Photo Options - Windows................................................................................ 82Print Quality Options - Windows ............................................................................................... 83Color Management Options - Windows .................................................................................... 83Advanced Color Controls - Windows ........................................................................................ 85
4
Paper Source Options - Windows ............................................................................................. 85Using Layout Manager - Windows Only .................................................................................... 87
Selecting Print Layout Options - Windows..................................................................................... 93Reduce/Enlarge Options - Windows ......................................................................................... 94Multi-Page Printing Options - Windows..................................................................................... 94Double-sided Printing Options - Windows................................................................................. 95
Selecting Additional Settings - Windows ....................................................................................... 95Printing Your Document or Photo - Windows................................................................................. 97
Checking Print Status - Windows.............................................................................................. 99Saving, Sharing, and Customizing the Printer Settings ................................................................. 99
Saving and Sharing Print Settings - Windows......................................................................... 100Saving and Sharing Media Settings - Windows....................................................................... 101Editing Print Setting Displays - Windows ................................................................................ 102
Selecting Default Print Settings - Windows.................................................................................. 104Changing the Language of the Printer Software Screens............................................................ 106Changing Automatic Update Options .......................................................................................... 107
Printing with OS X ............................................................................................................................ 108Selecting Basic Print Settings - OS X .......................................................................................... 108
Advanced Color Settings - OS X............................................................................................. 113Output Resolution Settings - OS X.......................................................................................... 116Print Options - OS X................................................................................................................ 116
Selecting Roll Paper Settings - OS X........................................................................................... 117Selecting Paper Configuration Settings - OS X............................................................................ 119
Advanced Media Control Options - OS X................................................................................ 119Selecting Print Layout Options - OS X......................................................................................... 120Managing Color - OS X................................................................................................................ 121
Color Matching Options - OS X............................................................................................... 121Sizing Printed Images - OS X ...................................................................................................... 122Selecting Printing Preferences - OS X......................................................................................... 122
Printing Preferences - OS X.................................................................................................... 123Printing Your Document or Photo - OS X..................................................................................... 124
Checking Print Status - OS X.................................................................................................. 124
5
Replacing Ink Cartridges ........................................................................................................................ 126Check Cartridge Status .................................................................................................................... 126
Checking Cartridge Status on the LCD Screen............................................................................ 126Checking Cartridge Status with Windows.................................................................................... 127Checking Cartridge Status with OS X .......................................................................................... 129
Purchase Epson Ink Cartridges........................................................................................................ 130Ink Cartridge and Maintenance Box Part Numbers...................................................................... 130
Removing and Installing Ink Cartridges............................................................................................ 131Replacing the Maintenance Cartridge .............................................................................................. 135Switch Black Ink Type ...................................................................................................................... 138
Black Ink Type Media List ............................................................................................................ 138Switching the Black Ink Type....................................................................................................... 139
Adjusting Print Quality............................................................................................................................ 140Print Head Maintenance................................................................................................................... 140
Print Head Nozzle Check............................................................................................................. 140Checking the Nozzles Using the Product Control Panel ......................................................... 140Checking the Nozzles Using a Computer Utility ...................................................................... 142
Print Head Cleaning .................................................................................................................... 144Cleaning the Print Head Using the Product Control Panel ...................................................... 144Cleaning the Print Head Using a Computer Utility................................................................... 146
Print Head Alignment ....................................................................................................................... 148Aligning the Print Head Using the Product Control Panel ............................................................ 149Aligning the Print Head Using a Computer Utility......................................................................... 150
Cleaning the Paper Guide ................................................................................................................ 152Cleaning and Transporting Your Product ............................................................................................. 154
Cleaning Your Product ..................................................................................................................... 154Transporting Your Product ............................................................................................................... 155
Solving Problems .................................................................................................................................... 158Checking for Software Updates........................................................................................................ 158Product Status Messages ................................................................................................................ 159Running a Product Check ................................................................................................................ 160Resetting Control Panel Defaults ..................................................................................................... 162Solving Setup Problems................................................................................................................... 162
6
Noise After Ink Installation ........................................................................................................... 163Software Installation Problems .................................................................................................... 163
Solving Network Problems ............................................................................................................... 164Product Cannot Connect to a Wireless Router or Access Point .................................................. 164Network Software Cannot Find Product on a Network................................................................. 165Product Does Not Appear in OS X Printer Window...................................................................... 166Cannot Print Over a Network....................................................................................................... 167
Solving Paper Problems................................................................................................................... 168Paper Feeding Problems............................................................................................................. 168Paper Jam Problems in the Sheet Feeder ................................................................................... 170Paper Jam Problems in the Front Manual Feed Tray .................................................................. 171Paper Jam Problems - Thick Media............................................................................................. 173Paper Jam Problems - Roll Paper ............................................................................................... 174Paper Ejection Problems ............................................................................................................. 176
Solving Problems Printing from a Computer..................................................................................... 176Nothing Prints .............................................................................................................................. 177Product Icon Does Not Appear in Windows Taskbar ................................................................... 178Error After Cartridge Replacement .............................................................................................. 178Printing is Slow ............................................................................................................................ 178
Solving Page Layout and Content Problems.................................................................................... 179Inverted Image............................................................................................................................. 180Too Many Copies Print ................................................................................................................ 180Blank Pages Print ........................................................................................................................ 181Incorrect Margins on Printout....................................................................................................... 181Border Appears on Borderless Prints .......................................................................................... 182Incorrect Characters Print............................................................................................................ 182Incorrect Image Size or Position.................................................................................................. 183Slanted Printout ........................................................................................................................... 183
Solving Print Quality Problems......................................................................................................... 184White or Dark Lines in Printout .................................................................................................... 184Blurry or Smeared Printout .......................................................................................................... 185Faint Printout or Printout Has Gaps ............................................................................................. 186Grainy Printout............................................................................................................................. 187
7
Incorrect Colors ........................................................................................................................... 188Uninstall Your Product Software....................................................................................................... 189
Uninstalling Printing Software - Windows .................................................................................... 189Uninstalling Product Software - OS X .......................................................................................... 190
Where to Get Help............................................................................................................................ 191Technical Specifications ........................................................................................................................ 192
Windows System Requirements ...................................................................................................... 192OS X System Requirements............................................................................................................. 192Paper Specifications ........................................................................................................................ 193Printable Area Specifications ........................................................................................................... 194Ink Cartridge Specifications.............................................................................................................. 198Dimension Specifications ................................................................................................................. 199Electrical Specifications ................................................................................................................... 200Environmental Specifications ........................................................................................................... 201Interface Specifications .................................................................................................................... 201Network Interface Specifications ...................................................................................................... 201Safety and Approvals Specifications ................................................................................................ 202
Notices ..................................................................................................................................................... 203Important Safety Instructions............................................................................................................ 203
General Printer Safety Instructions.............................................................................................. 203Ink Cartridge Safety Instructions.................................................................................................. 205LCD Screen Safety Instructions................................................................................................... 206Wireless Connection Safety Instructions ..................................................................................... 206
FCC Compliance Statement............................................................................................................. 206Trademarks...................................................................................................................................... 207Copyright Notice............................................................................................................................... 208
A Note Concerning Responsible Use of Copyrighted Materials................................................... 208Default Delay Times for Power Management for Epson Products ............................................... 208Copyright Attribution.................................................................................................................... 209
8
SureColor P800 User's GuideWelcome to the SureColor P800 User's Guide.For a printable PDF copy of this guide, click here.
9
Product BasicsSee these sections to learn about the basic features of your product.Using the Control PanelProduct Parts LocationsThe Power Off and Sleep TimersEpson Connect Solutions for Smartphones, Tablets, and MoreUsing AirPrintUsing Google Cloud Print
Using the Control PanelSee these sections to learn about the control panel and select control panel settings.Control Panel Buttons and LightsThe Touch ScreenAdjusting Control Panel PositionChanging Touch Screen LanguageAdjusting the Screen BrightnessParent topic: Product Basics
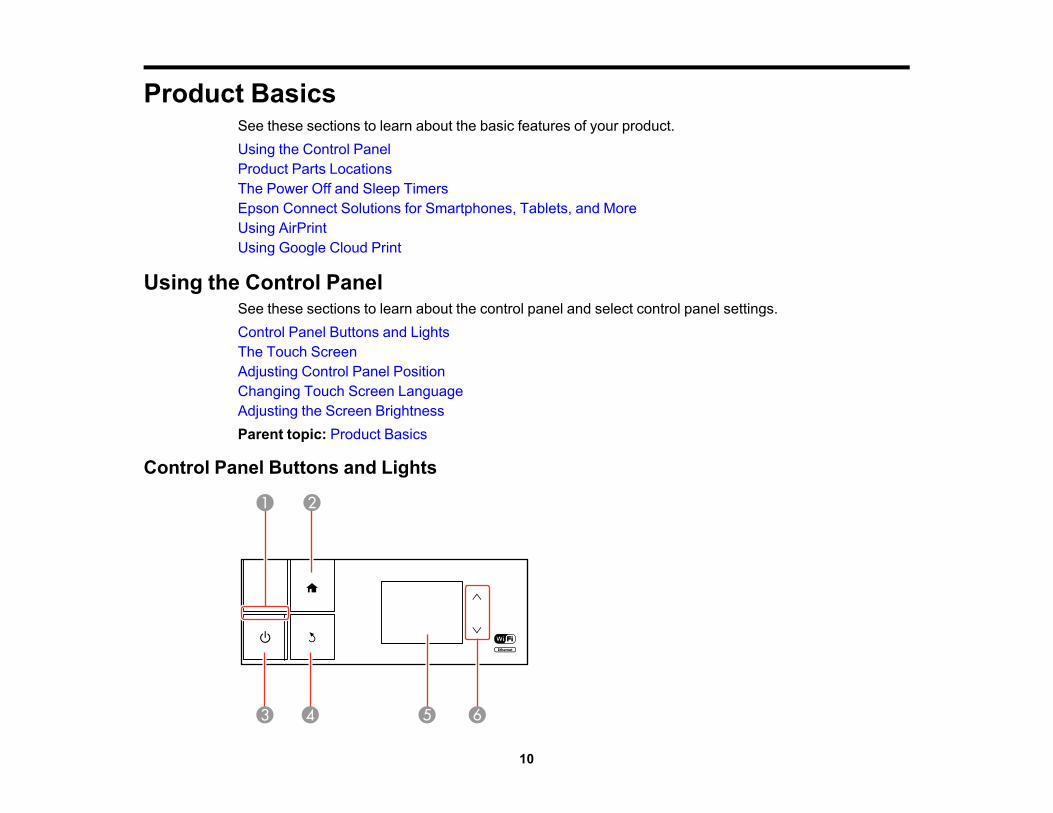
Control Panel Buttons and Lights
10
1 The power light2 The home button3 The power button4 The back button5 The touch screen6 The up and down arrow buttons
Parent topic: Using the Control Panel
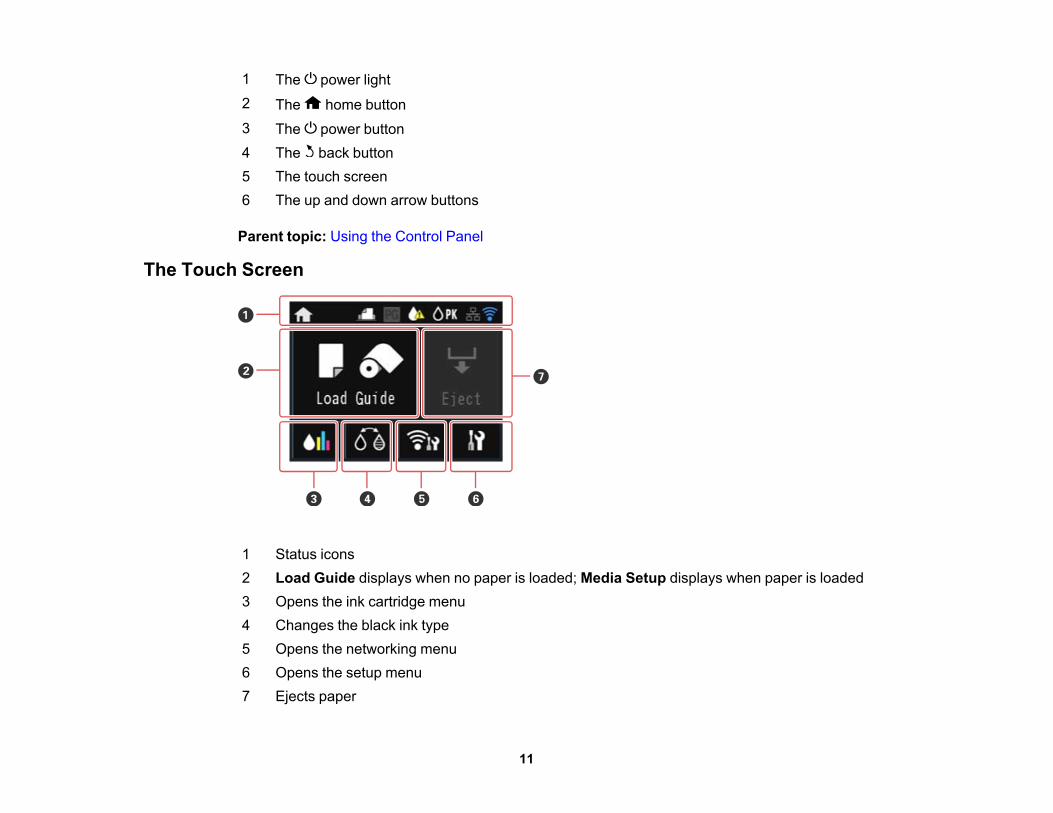
The Touch Screen
1 Status icons2 Load Guide displays when no paper is loaded; Media Setup displays when paper is loaded3 Opens the ink cartridge menu4 Changes the black ink type5 Opens the networking menu6 Opens the setup menu7 Ejects paper
11
Status IconsParent topic: Using the Control Panel
Status IconsStatus icons may be displayed on the touch screen depending on the product's status.
Icons DescriptionPhoto Black ink is selected.
Matte Black ink is selected.
Ink is low.
Displays the status of the Ethernet connection.
Wired or wireless network connection has been established.
Wi-Fi connection has been established. The number of lit bars indicates theconnection's signal strength.
Ad hoc connection has been established.
Wi-Fi Direct mode connection has been established.
Simple AP mode connection has been established.
12
Icons DescriptionAuto Sheet Feeder setting is selected (displays in Load Guide).
Fine Art Media setting is selected (displays in Load Guide).
Poster Board setting is selected (displays in Load Guide).
Roll Paper setting is selected (displays in Load Guide).
Thick Paper setting is set to On.
Parent topic: The Touch Screen
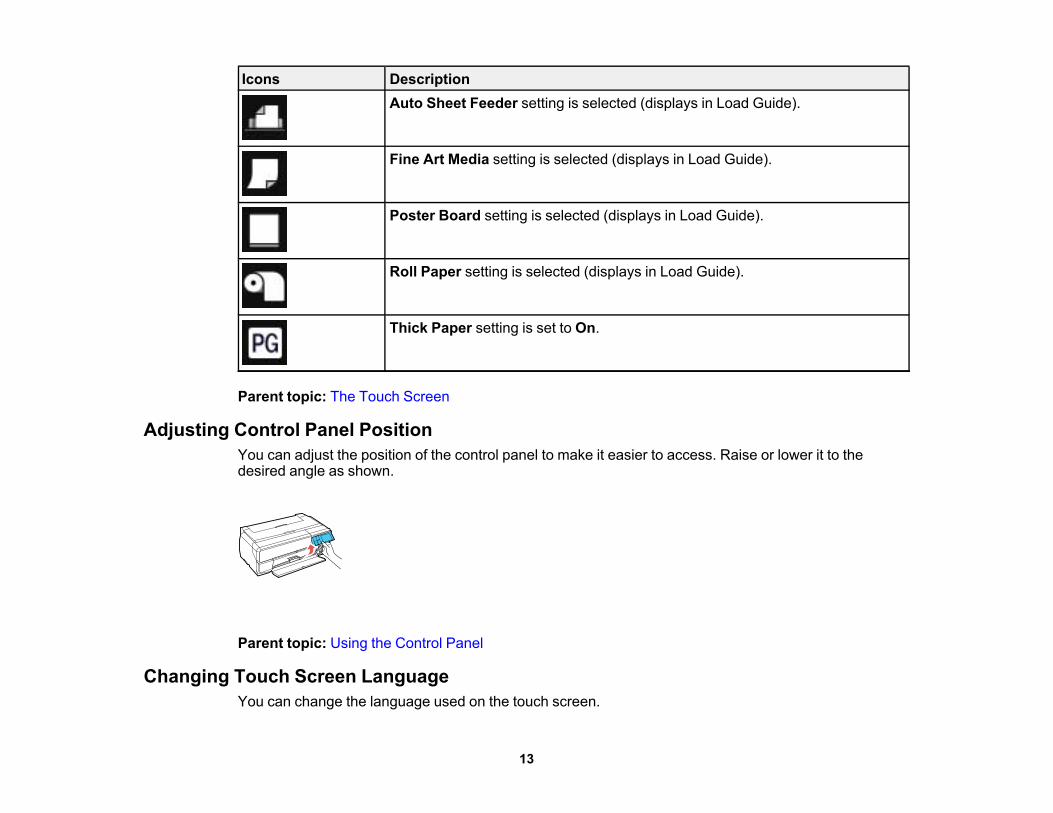
Adjusting Control Panel PositionYou can adjust the position of the control panel to make it easier to access. Raise or lower it to thedesired angle as shown.
Parent topic: Using the Control Panel
Changing Touch Screen LanguageYou can change the language used on the touch screen.
13
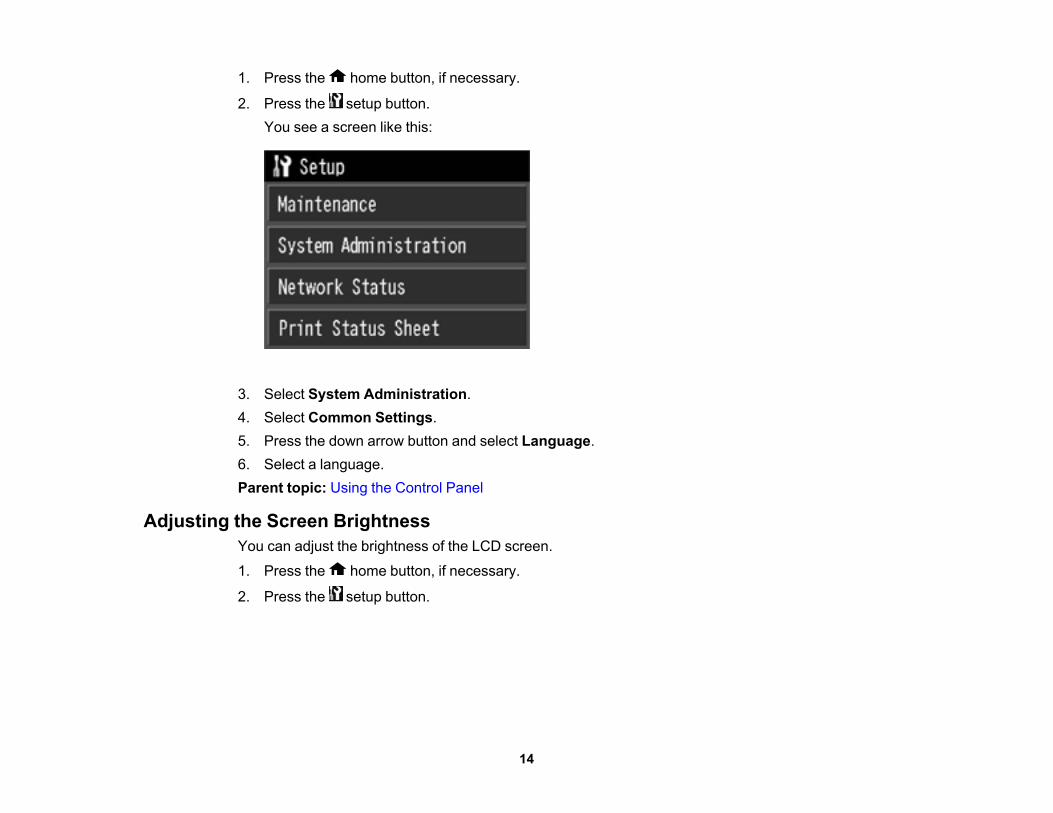
1. Press the home button, if necessary.
2. Press the setup button.You see a screen like this:
3. Select System Administration.4. Select Common Settings.5. Press the down arrow button and select Language.6. Select a language.Parent topic: Using the Control Panel
Adjusting the Screen BrightnessYou can adjust the brightness of the LCD screen.
1. Press the home button, if necessary.
2. Press the setup button.
14

You see a screen like this:
3. Select System Administration.4. Select Common Settings.5. Select LCD Brightness.6. Tap the left or right arrows to adjust the screen brightness.7. Select OK to exit.Parent topic: Using the Control Panel
Product Parts LocationsSee these sections to identify the parts on your product.Product Parts - FrontProduct Parts - BackParent topic: Product Basics
15
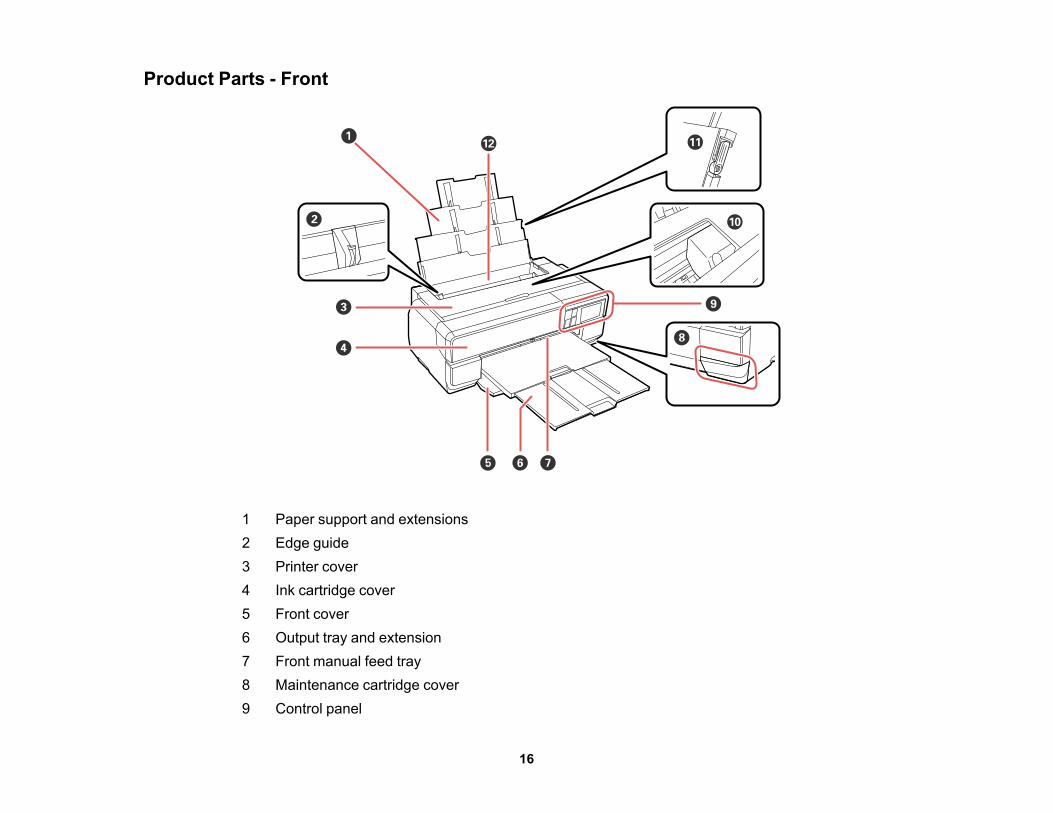
Product Parts - Front
1 Paper support and extensions2 Edge guide3 Printer cover4 Ink cartridge cover5 Front cover6 Output tray and extension7 Front manual feed tray8 Maintenance cartridge cover9 Control panel
16
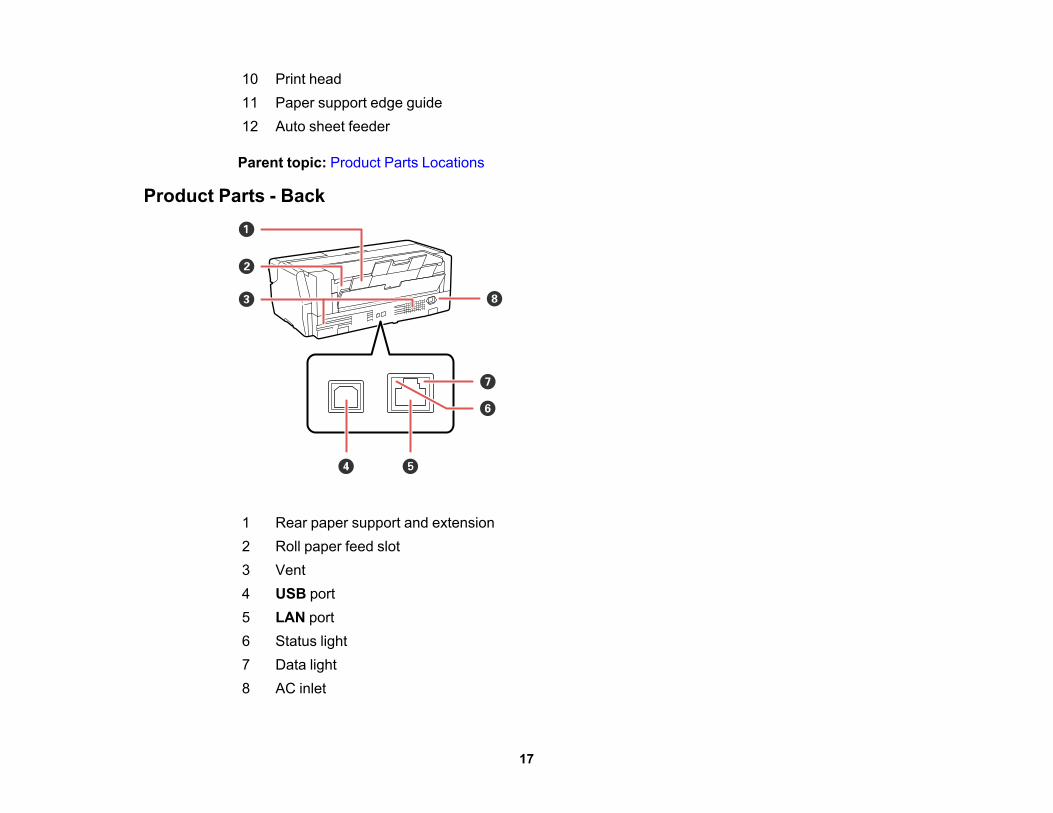
10 Print head11 Paper support edge guide12 Auto sheet feeder
Parent topic: Product Parts Locations
Product Parts - Back
1 Rear paper support and extension2 Roll paper feed slot3 Vent4 USB port5 LAN port6 Status light7 Data light8 AC inlet
17
Parent topic: Product Parts Locations
The Power Off and Sleep TimersThe product enters sleep mode or turns off automatically if it is not used for a period of time. You canadjust the time period before power management, but increasing the time reduces the product's energyefficiency.Changing the Power Off Timer Setting from the Control PanelChanging the Sleep Timer Setting from the Control PanelChanging the Power Off Timer Setting - WindowsChanging the Power Off Timer Setting - OS XParent topic: Product Basics
Changing the Power Off Timer Setting from the Control PanelYou can use the product's control panel to change the time period before the printer turns offautomatically.
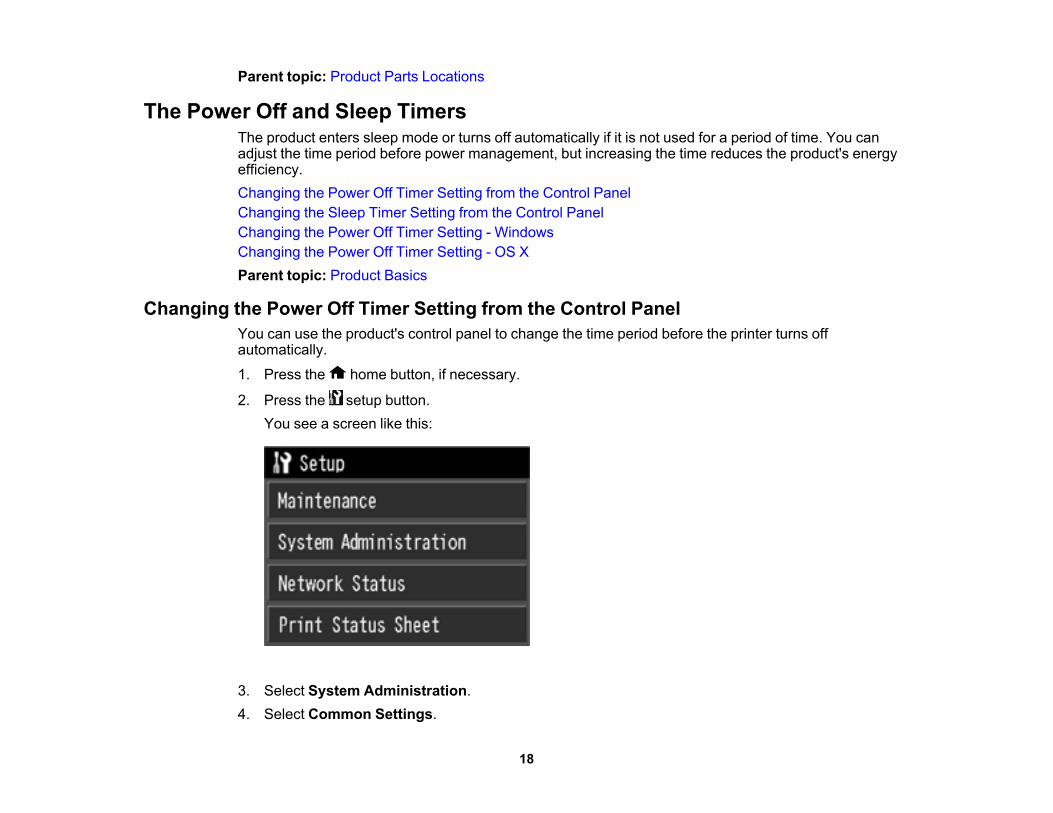
1. Press the home button, if necessary.
2. Press the setup button.You see a screen like this:
3. Select System Administration.4. Select Common Settings.
18
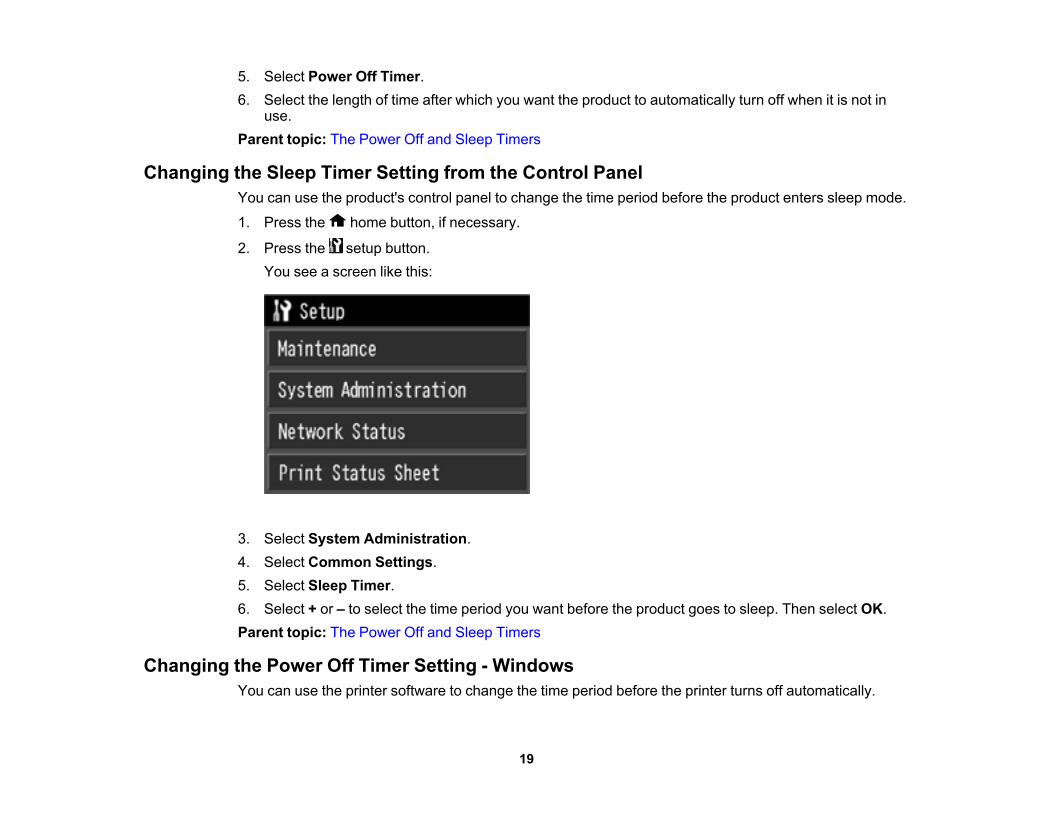
5. Select Power Off Timer.6. Select the length of time after which you want the product to automatically turn off when it is not in
use.Parent topic: The Power Off and Sleep Timers
Changing the Sleep Timer Setting from the Control PanelYou can use the product's control panel to change the time period before the product enters sleep mode.
1. Press the home button, if necessary.
2. Press the setup button.You see a screen like this:
3. Select System Administration.4. Select Common Settings.5. Select Sleep Timer.6. Select + or – to select the time period you want before the product goes to sleep. Then select OK.Parent topic: The Power Off and Sleep Timers
Changing the Power Off Timer Setting - WindowsYou can use the printer software to change the time period before the printer turns off automatically.
19

1. Access the Windows Desktop, right-click the product icon in the Windows taskbar, and selectPrinter Settings.
2. Click the Utility tab and select Printer and Option Information.You see this window:
3. In the drop-down menu, select the length of time after which you want the product to automaticallyturn off when it is not in use.
4. Click Send.5. When you see the time you selected listed as the Current Printer Setting, click OK.Parent topic: The Power Off and Sleep Timers
Changing the Power Off Timer Setting - OS XYou can use the printer software to change the time period before the printer turns off automatically.1. In the Apple menu or the Dock, select System Preferences. Select Print & Fax, Print & Scan, or
Printers & Scanners, select your product, and select Options & Supplies. Select Utility and selectOpen Printer Utility.
2. Select Printer Settings.
20

You see this window:
3. Select the length of time after which you want the product to automatically turn off when it is not inuse as the Power Off Timer setting.
4. Click Apply.5. Close the Printer Settings window.Parent topic: The Power Off and Sleep Timers
Epson Connect Solutions for Smartphones, Tablets, and MoreYou can print documents, photos, and web pages from your home or office. You can use yoursmartphone, tablet, or computer. Epson offers these solutions to print from anywhere: Epson iPrintMobile App and Epson Remote Print.Using the Epson iPrint Mobile AppUsing Epson Remote PrintParent topic: Product BasicsRelated topicsWi-Fi or Wired Networking
21
Using the Epson iPrint Mobile AppUse this free Apple and Android app to print to nearby Epson networked products. The Epson iPrintMobile App lets you print PDFs, Microsoft Office documents, photos, and web pages over a wirelessnetwork.1. Set up your product on a network. See the link below.2. Visit epson.com/connect to learn more about Epson iPrint and check the compatibility of your mobile
device.3. Download Epson iPrint from the Apple App Store or Google Play.4. Connect your mobile device to the same wireless network that your product is using.5. Print from your mobile device to your Epson product.Parent topic: Epson Connect Solutions for Smartphones, Tablets, and MoreRelated topicsWi-Fi or Wired Networking
Using Epson Remote PrintWith Epson Remote Print software on your Windows computer or laptop, you can print to an EpsonEmail-enabled product anywhere in the world.1. Set up your product for network printing. See the link below.2. Visit epson.com/connect to learn more about Remote Print and how to download the software.3. Download and install the Remote Print software.4. Obtain the email address and optional access key of the Epson product you want to use for printing,
and enter this address during Remote Print setup.5. Select the print command in your application and choose the Remote Print driver for your Epson
product.Parent topic: Epson Connect Solutions for Smartphones, Tablets, and MoreRelated topicsWi-Fi or Wired Networking
22
Using AirPrintAirPrint enables instant wireless printing from iPhone, iPad, and iPod touch with the latest version ofiOS, and Mac with the latest version of OS X.
Note: If you disabled paper configuration messages on your product control panel, you cannot useAirPrint. See the link below to enable the messages, if necessary.
1. Load paper in your product.2. Set up your product for wireless printing. See the link below.3. Connect your Apple device to the same wireless network that your product is using.4. Print from your device to your product.
Note: For details, see the AirPrint page on the Apple website.
Parent topic: Product BasicsRelated topicsWi-Fi or Wired NetworkingLoading Media
Using Google Cloud PrintWith a Google Account, you can print from your Apple or Android device to your Epson product. You canalso print from Chromebooks and the Google Chrome browser without drivers or cables.Set up your Epson product for network printing. See the link below.
Note: Make sure your Epson printer and computer are connected to the same network before startingthe Google Cloud Print setup.
1. Connect your device to the same network that your Epson product is using.2. Print a network status sheet.
23
3. Locate your product's IP address on the network status sheet.4. Enter the IP address into the address bar of a web browser.5. Select the Google Cloud Print Services option.
Note: If you don't see the Google Cloud Print Services option, turn your product off and back on. Ifthe option still doesn't appear, select the Firmware Update option and follow the on-screeninstructions to update your product.
6. Click Register.7. Select the checkbox to agree to the Usage Advisory and click Next.8. Click OK to launch the sign-in page.
A separate browser window opens.9. Enter your Google Account username and password and click Sign in, or, if you don't have an
account, click Sign up for a new Google Account and follow the on-screen instructions.10. Click Finish printer registration to complete setup and print a test page.
Your product is now linked to your Google Account and can be accessed from any Chromebook,computer, Apple or Android device with Internet access. Visit Epson Support for more information onusing Google Cloud Print, or the Google Cloud Print website for a list of supported apps.
Setting Up Google Cloud Print on a ChromebookParent topic: Product BasicsRelated topicsWi-Fi or Wired Networking
Setting Up Google Cloud Print on a ChromebookWith a Google Account, you can print from a Chromebook without drivers or cables.Set up your Epson product for network printing. See the link below.
Note: Make sure your Epson product is connected to your wireless network before starting the GoogleCloud Print setup.
1. Turn on your Chromebook and connect it to the same wireless network as your product.
Note: See your Chromebook's documentation for details on connecting to a network.
24
2. Do one of the following:• Click Add to Cloud Print in the notification that appears in the corner of your Chromebook
screen.
Note: If you do not see a notification, check to see if a number appears in the status area at thelower-right corner of the screen. Click this number to open the notifications menu, then click Addto Cloud Print.
• Open a web browser and enter chrome://devices in the address bar. Skip to step 4.3. Click Add Device.4. Click the Register button that appears next to your product.5. Click Register on the confirmation screen. Your product's LCD screen displays a confirmation
message.6. Select OK or press the OK button on your product to confirm the Google Cloud Print connection and
print a test page.Your product is now linked to your Google Account and can be accessed from any Chromebook,iPhone, or Android phone with Internet access. For more information on using Google Cloud Print,visit Epson Support.
Parent topic: Using Google Cloud Print
25
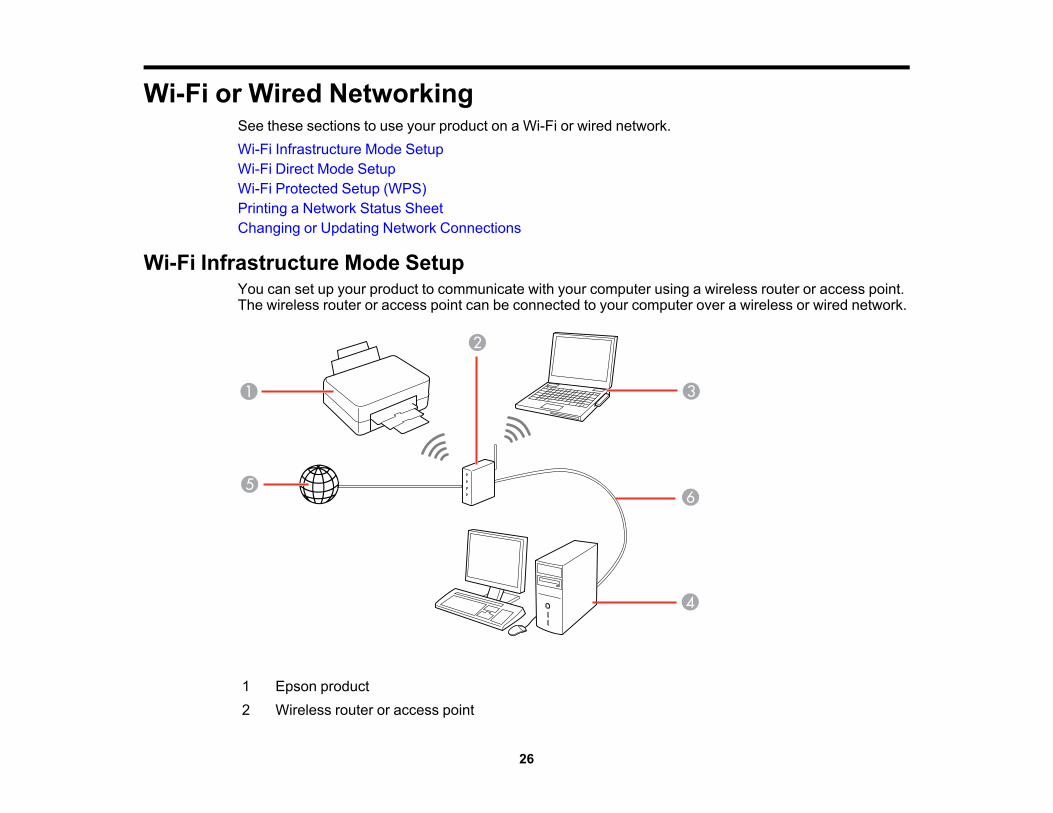
Wi-Fi or Wired NetworkingSee these sections to use your product on a Wi-Fi or wired network.Wi-Fi Infrastructure Mode SetupWi-Fi Direct Mode SetupWi-Fi Protected Setup (WPS)Printing a Network Status SheetChanging or Updating Network Connections
Wi-Fi Infrastructure Mode SetupYou can set up your product to communicate with your computer using a wireless router or access point.The wireless router or access point can be connected to your computer over a wireless or wired network.
1 Epson product2 Wireless router or access point
26

3 Computer with a wireless interface4 Computer5 Internet6 Ethernet cable (used only for wired connection to the wireless router or access point)
Selecting Wireless Network Settings from the Control PanelParent topic: Wi-Fi or Wired Networking
Selecting Wireless Network Settings from the Control PanelYou can select or change wireless network settings using your product control panel.To install your product on a wireless network, follow the instructions on the Start Here sheet and installthe necessary software. The installer program guides you through network setup.
Note: Breakdown or repair of this product may cause loss of network data and settings. Epson is notresponsible for backing up or recovering data and settings during or after the warranty period. Werecommend that you make your own backup or print out your network data and settings.
1. Press the home button, if necessary.
2. Press the network status icon.3. Select Wi-Fi Setup.
You see a screen like this:
27
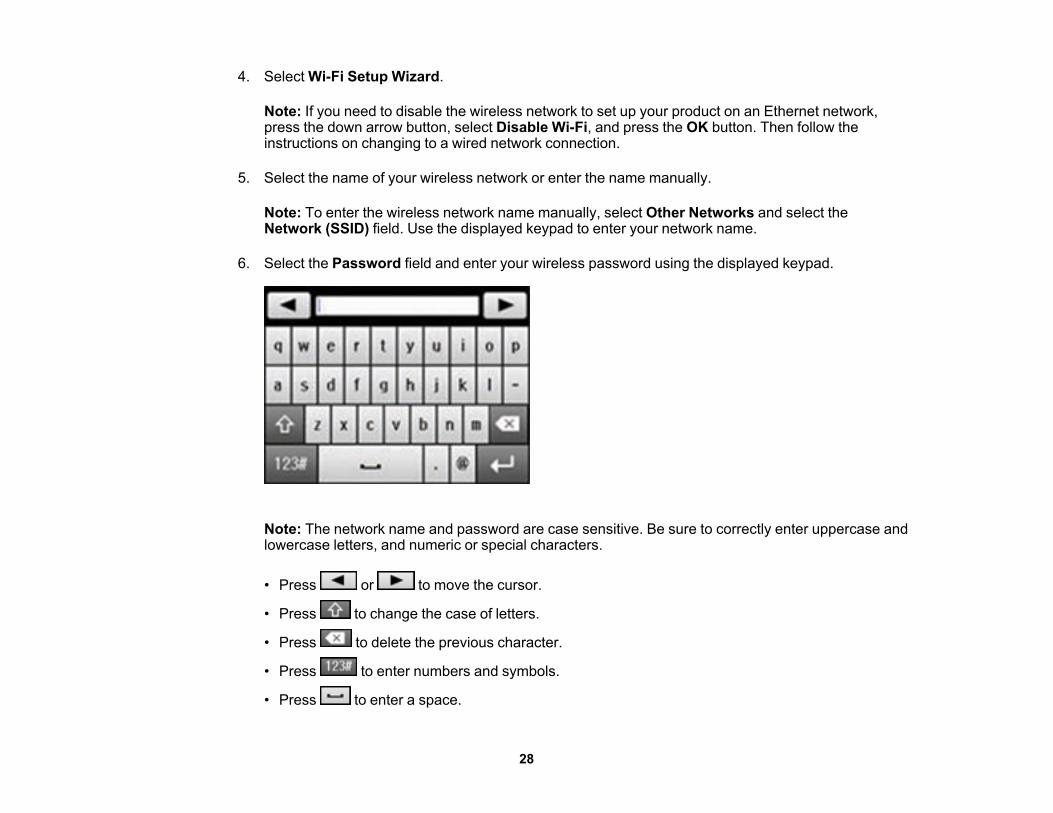
4. Select Wi-Fi Setup Wizard.
Note: If you need to disable the wireless network to set up your product on an Ethernet network,press the down arrow button, select Disable Wi-Fi, and press the OK button. Then follow theinstructions on changing to a wired network connection.
5. Select the name of your wireless network or enter the name manually.
Note: To enter the wireless network name manually, select Other Networks and select theNetwork (SSID) field. Use the displayed keypad to enter your network name.
6. Select the Password field and enter your wireless password using the displayed keypad.
Note: The network name and password are case sensitive. Be sure to correctly enter uppercase andlowercase letters, and numeric or special characters.
• Press or to move the cursor.
• Press to change the case of letters.
• Press to delete the previous character.
• Press to enter numbers and symbols.
• Press to enter a space.
28
7. Press when you finish entering your password and select Proceed.8. Confirm the displayed network settings and select OK to save them.
Note: If you need to change a setting, press the back button.
9. If you want to print a network setup report, select Print. (Otherwise, select Done.)
10. Press the home button to exit.Your product should now be connected to the network.
Note: If the WiFi connection symbol does not appear lit on the touch screen, you may have selectedthe wrong network name or entered the password incorrectly. Repeat these steps to try again.
Parent topic: Wi-Fi Infrastructure Mode SetupRelated tasksChanging a Wi-Fi Connection to a Wired Network Connection
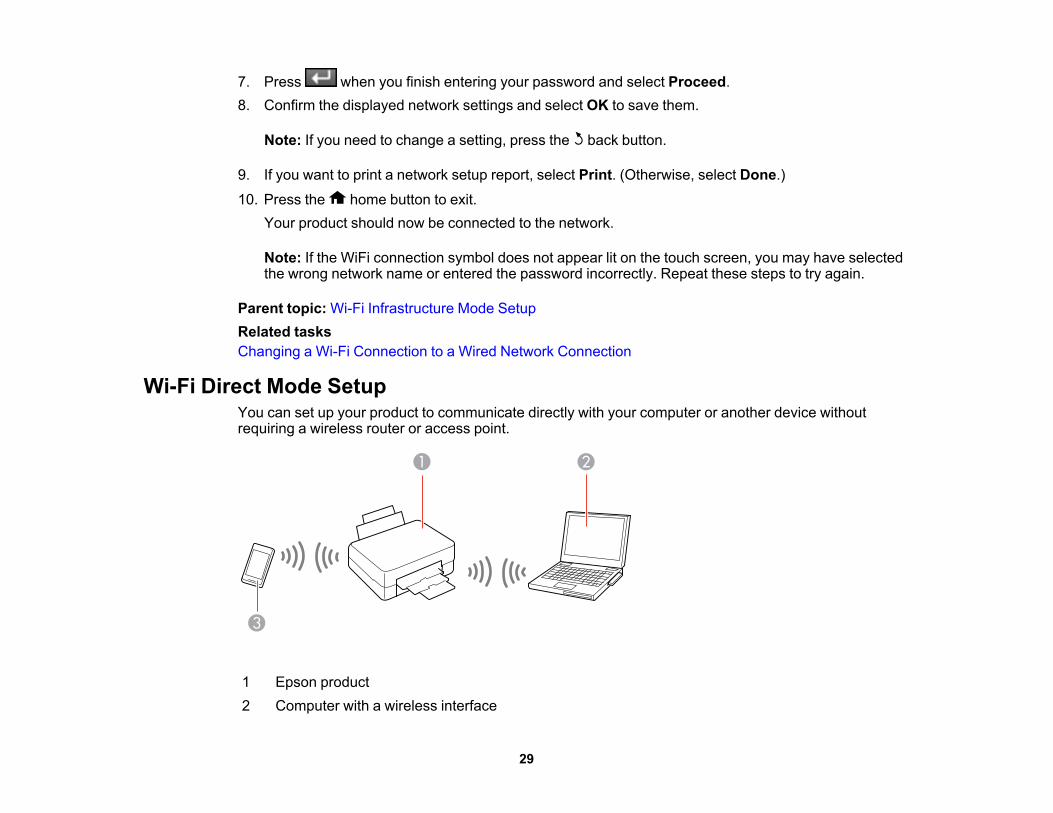
Wi-Fi Direct Mode SetupYou can set up your product to communicate directly with your computer or another device withoutrequiring a wireless router or access point.
1 Epson product2 Computer with a wireless interface
29
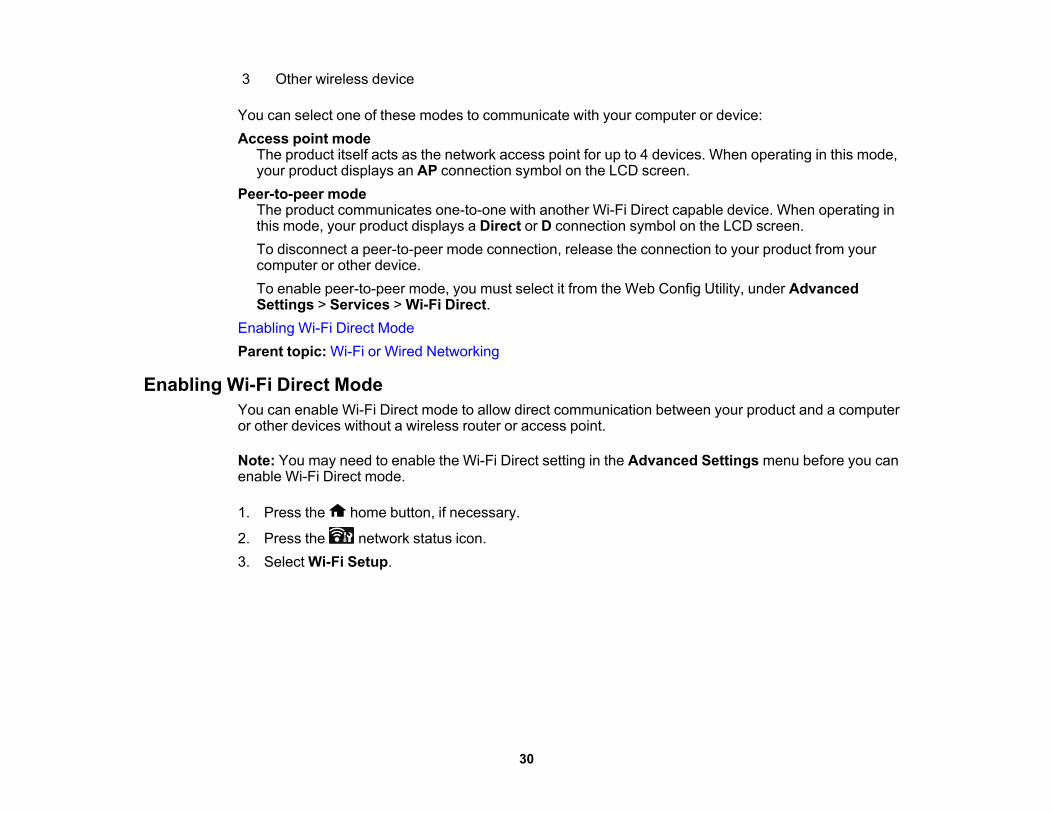
3 Other wireless device
You can select one of these modes to communicate with your computer or device:Access point mode
The product itself acts as the network access point for up to 4 devices. When operating in this mode,your product displays an AP connection symbol on the LCD screen.
Peer-to-peer modeThe product communicates one-to-one with another Wi-Fi Direct capable device. When operating inthis mode, your product displays a Direct or D connection symbol on the LCD screen.To disconnect a peer-to-peer mode connection, release the connection to your product from yourcomputer or other device.To enable peer-to-peer mode, you must select it from the Web Config Utility, under AdvancedSettings > Services > Wi-Fi Direct.
Enabling Wi-Fi Direct ModeParent topic: Wi-Fi or Wired Networking
Enabling Wi-Fi Direct ModeYou can enable Wi-Fi Direct mode to allow direct communication between your product and a computeror other devices without a wireless router or access point.
Note: You may need to enable the Wi-Fi Direct setting in the Advanced Settings menu before you canenable Wi-Fi Direct mode.
1. Press the home button, if necessary.
2. Press the network status icon.3. Select Wi-Fi Setup.
30
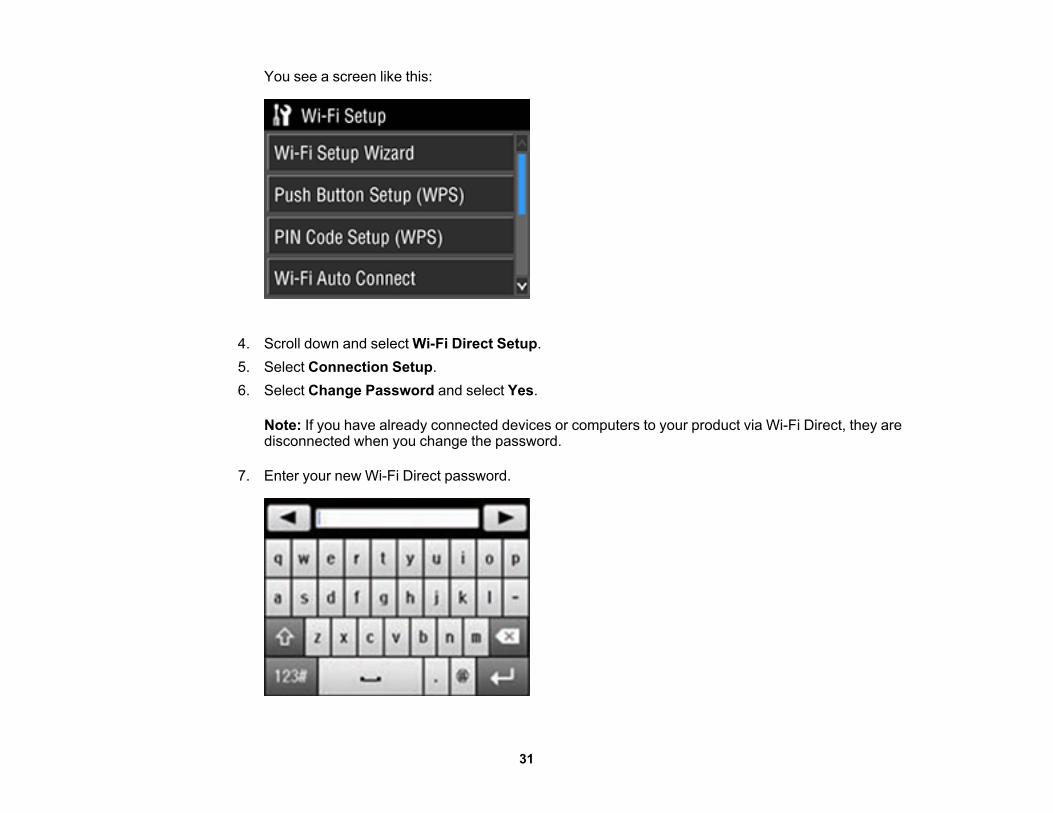
You see a screen like this:
4. Scroll down and select Wi-Fi Direct Setup.5. Select Connection Setup.6. Select Change Password and select Yes.
Note: If you have already connected devices or computers to your product via Wi-Fi Direct, they aredisconnected when you change the password.
7. Enter your new Wi-Fi Direct password.
31
Note: Your password must be at least 8 and no more than 22 characters long.
• Press or to move the cursor.
• Press to change the case of letters.
• Press to delete the previous character.
• Press to enter numbers and symbols.
• Press to enter a space.
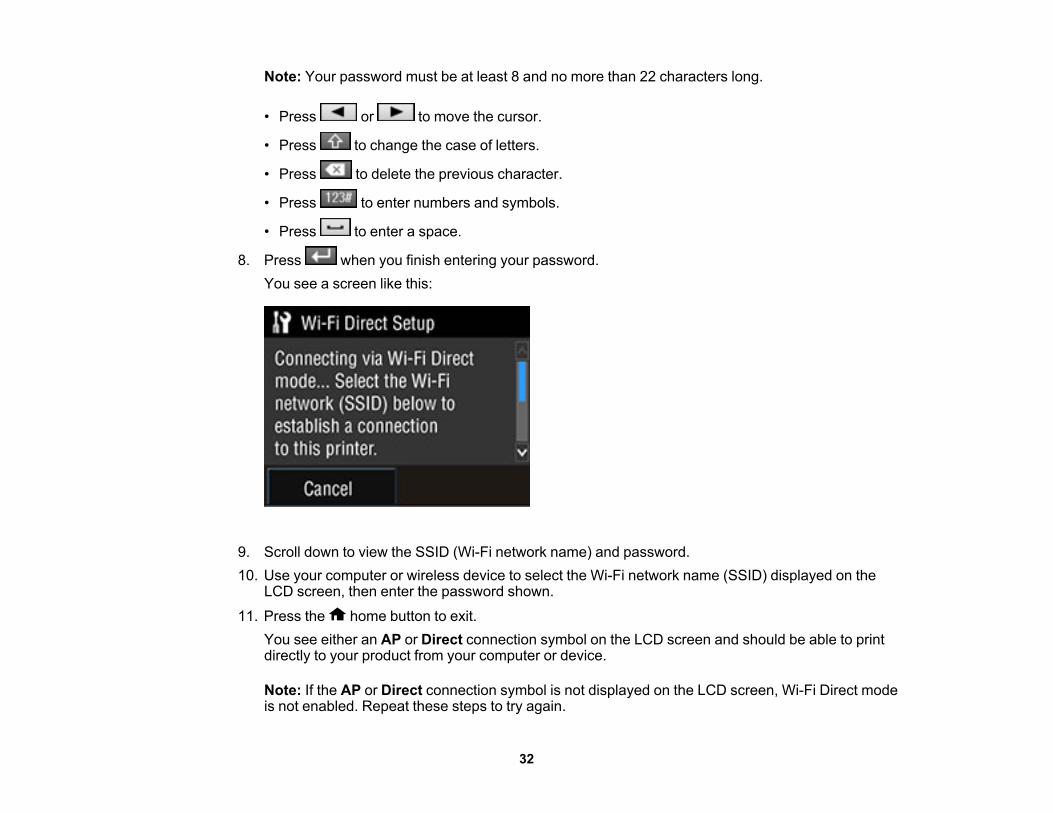
8. Press when you finish entering your password.You see a screen like this:
9. Scroll down to view the SSID (Wi-Fi network name) and password.10. Use your computer or wireless device to select the Wi-Fi network name (SSID) displayed on the
LCD screen, then enter the password shown.
11. Press the home button to exit.You see either an AP or Direct connection symbol on the LCD screen and should be able to printdirectly to your product from your computer or device.
Note: If the AP or Direct connection symbol is not displayed on the LCD screen, Wi-Fi Direct modeis not enabled. Repeat these steps to try again.
32
Parent topic: Wi-Fi Direct Mode Setup
Wi-Fi Protected Setup (WPS)If your network uses a WPS-enabled wireless router or access point, you can quickly connect yourproduct to the network using Wi-Fi Protected Setup (WPS).
Note: To check if your router is WPS-enabled, look for a button labeled WPS on your router or accesspoint. If there is no hardware button, there may be a virtual WPS button in the software for the device.Check your network product documentation for details.
Using WPS to Connect to a NetworkParent topic: Wi-Fi or Wired Networking
Using WPS to Connect to a NetworkIf you have a WPS-enabled wireless router or access point, you can use Wi-Fi Protected Setup (WPS) toconnect your product to the network.
1. Press the home button, if necessary.
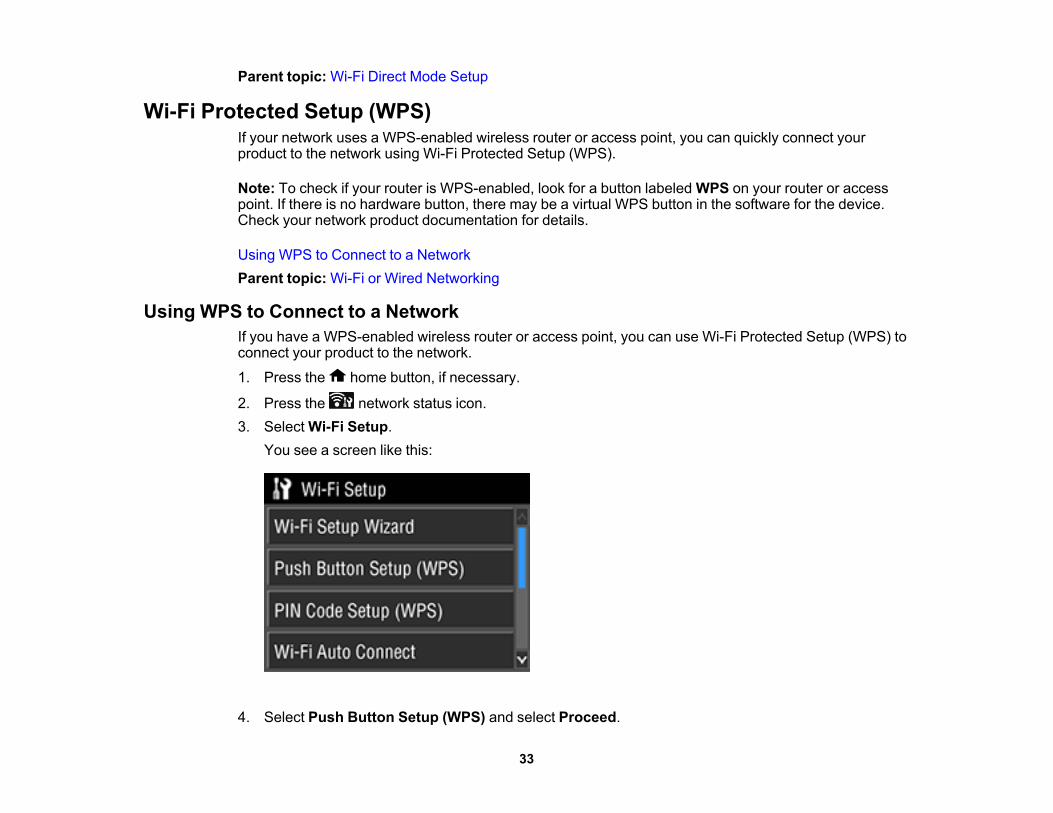
2. Press the network status icon.3. Select Wi-Fi Setup.
You see a screen like this:
4. Select Push Button Setup (WPS) and select Proceed.
33
5. Follow the instructions on the LCD screen to complete WPS setup.
6. Press the home button to exit.Your product should now be connected to the network.
Parent topic: Wi-Fi Protected Setup (WPS)
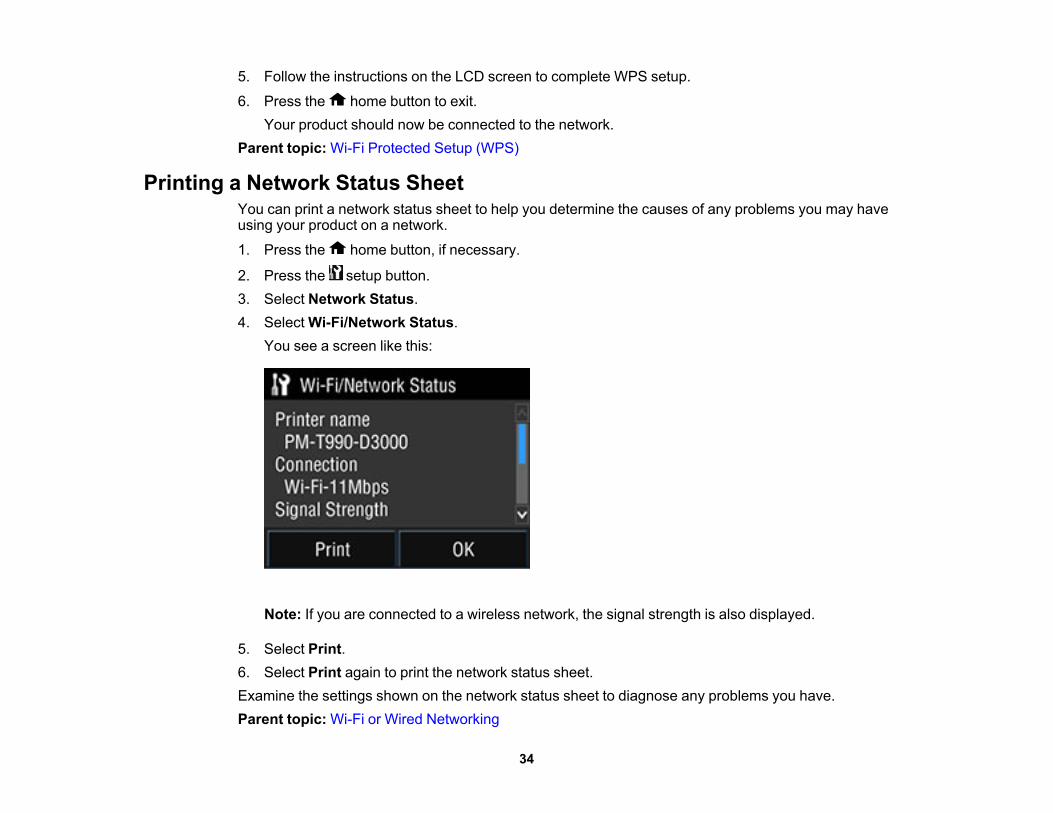
Printing a Network Status SheetYou can print a network status sheet to help you determine the causes of any problems you may haveusing your product on a network.
1. Press the home button, if necessary.
2. Press the setup button.3. Select Network Status.4. Select Wi-Fi/Network Status.
You see a screen like this:
Note: If you are connected to a wireless network, the signal strength is also displayed.
5. Select Print.6. Select Print again to print the network status sheet.Examine the settings shown on the network status sheet to diagnose any problems you have.Parent topic: Wi-Fi or Wired Networking
34
Changing or Updating Network ConnectionsSee these sections to change or update how your product connects to a network.Accessing the Web Config UtilityChanging a USB Connection to a Wi-Fi ConnectionChanging a Wi-Fi Connection to a Wired Network ConnectionConnecting to a New Wi-Fi RouterDisabling Wi-Fi FeaturesParent topic: Wi-Fi or Wired Networking
Accessing the Web Config UtilityYou can select your product's network settings and confirm its operating status using a web browser.You do this by accessing your product's built-in Web Config utility from a computer or other device that isconnected to the same network as your product.1. Print a network status sheet.2. Locate the IP Address for your product that is listed on the network status sheet.3. On a computer or other device connected to the same network as your product, open a web
browser.4. Enter your product's IP address into the address bar.
You see the available Web Config utility options.Parent topic: Changing or Updating Network ConnectionsRelated tasksPrinting a Network Status Sheet
Changing a USB Connection to a Wi-Fi ConnectionIf you have already connected your product to your computer using a USB connection, you can changeto a Wi-Fi connection.1. Disconnect the USB cable from your product.2. Uninstall your product software.3. Download and install your product software from the Epson website using the instructions on the
Start Here sheet.Parent topic: Changing or Updating Network Connections
35
Changing a Wi-Fi Connection to a Wired Network ConnectionIf you have already connected your product to your computer wirelessly, you can change to a wirednetwork connection if necessary.1. Disable your product's Wi-Fi features.2. Connect one end of an Ethernet network cable to the product's LAN port.3. Connect the other end to any available LAN port on your router or access point.4. Uninstall your product software.5. Download and install your product software from the Epson website.6. Follow the on-screen instructions to install the software.7. When you see the Select Your Connection screen, select Wired network connection.8. If you see a Select Setup Option screen, select Set up printer for the first time.9. Continue following the rest of the on-screen instructions.Parent topic: Changing or Updating Network ConnectionsRelated conceptsUninstall Your Product SoftwareRelated tasksDisabling Wi-Fi Features
Connecting to a New Wi-Fi RouterIf you change the wireless router you have been using on your network, you need to update yourproduct's Wi-Fi connection to the new router.
Note: If you switch to a 5 GHz wireless router, set the router to operate in dual band (2.4 GHz and 5GHz) mode. See your router documentation for instructions.
1. Do one of the following:• Windows: Uninstall your product software.• OS X: Go to the next step.
2. Download and install your product software from the Epson website using the instructions on theStart Here sheet.
Parent topic: Changing or Updating Network Connections
36
Related tasksUninstalling Printing Software - Windows
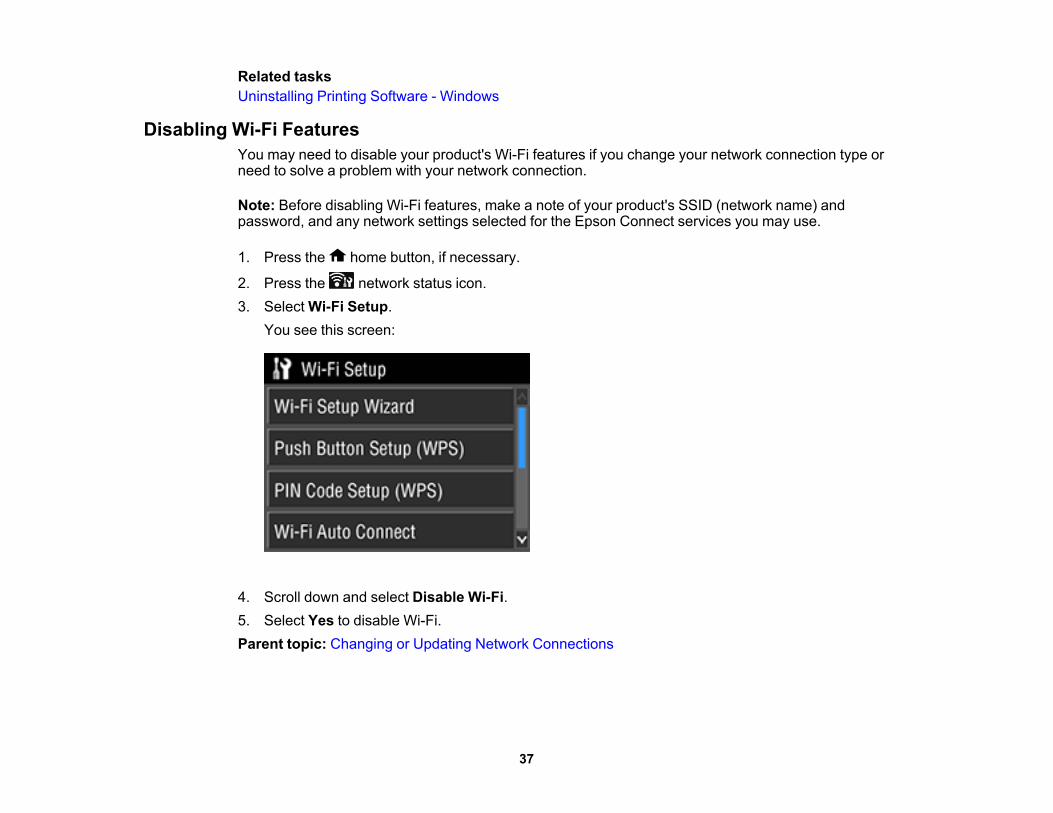
Disabling Wi-Fi FeaturesYou may need to disable your product's Wi-Fi features if you change your network connection type orneed to solve a problem with your network connection.
Note: Before disabling Wi-Fi features, make a note of your product's SSID (network name) andpassword, and any network settings selected for the Epson Connect services you may use.
1. Press the home button, if necessary.
2. Press the network status icon.3. Select Wi-Fi Setup.
You see this screen:
4. Scroll down and select Disable Wi-Fi.5. Select Yes to disable Wi-Fi.Parent topic: Changing or Updating Network Connections
37
Loading MediaBefore you print, load media for the type of printing you will do.
Note: Loading media automatically displays the setup screen for media type and size. To turn thisdisplay off, press the setup button, select System Administration > Printer Settings > PaperSource Settings > Paper Setup Display > Off.
Loading Paper in the Sheet FeederLoading Fine Art MediaLoading Posterboard and Thick MediaLoading Roll Paper (Optional)Cut Sheet Media Loading CapacityAvailable Epson PapersBorderless Paper Type CompatibilityPaper or Media Type Settings - Product SoftwareSelecting the Paper Settings for Each Source - Control PanelSelecting the Default Paper Setup Display and Error Notice Settings
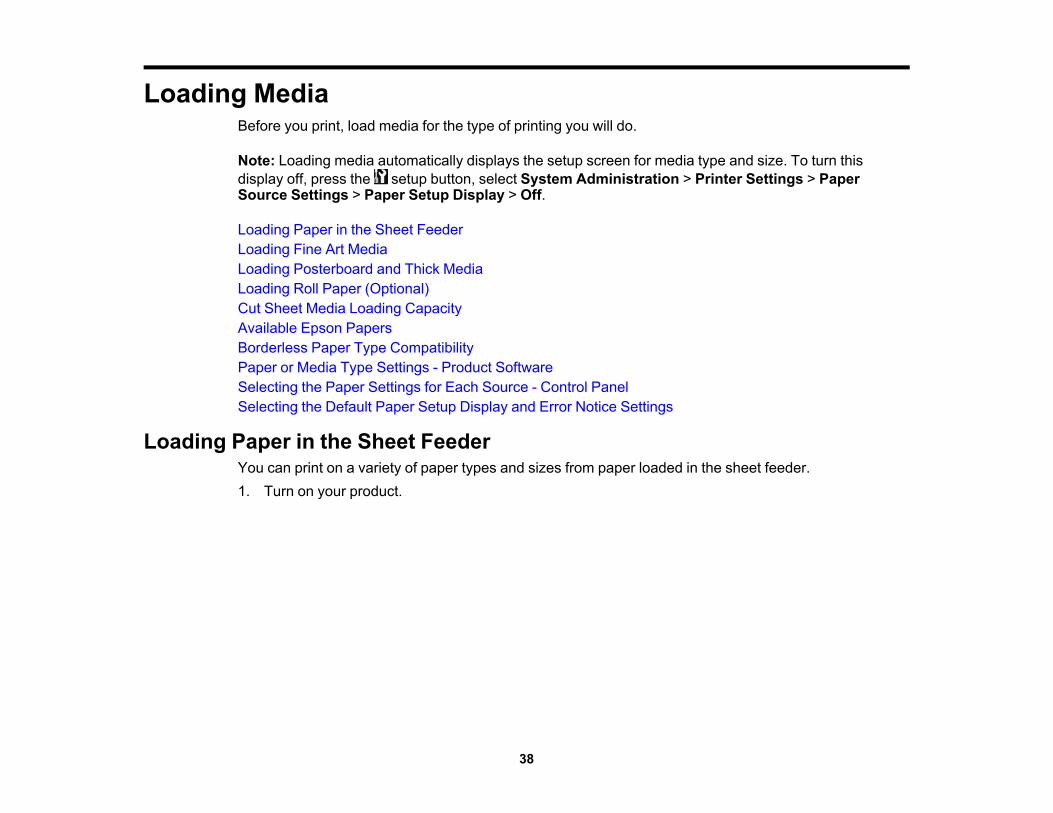
Loading Paper in the Sheet FeederYou can print on a variety of paper types and sizes from paper loaded in the sheet feeder.1. Turn on your product.
38
2. Open the paper support and pull up the extensions.
3. Press the front cover to open it.
39
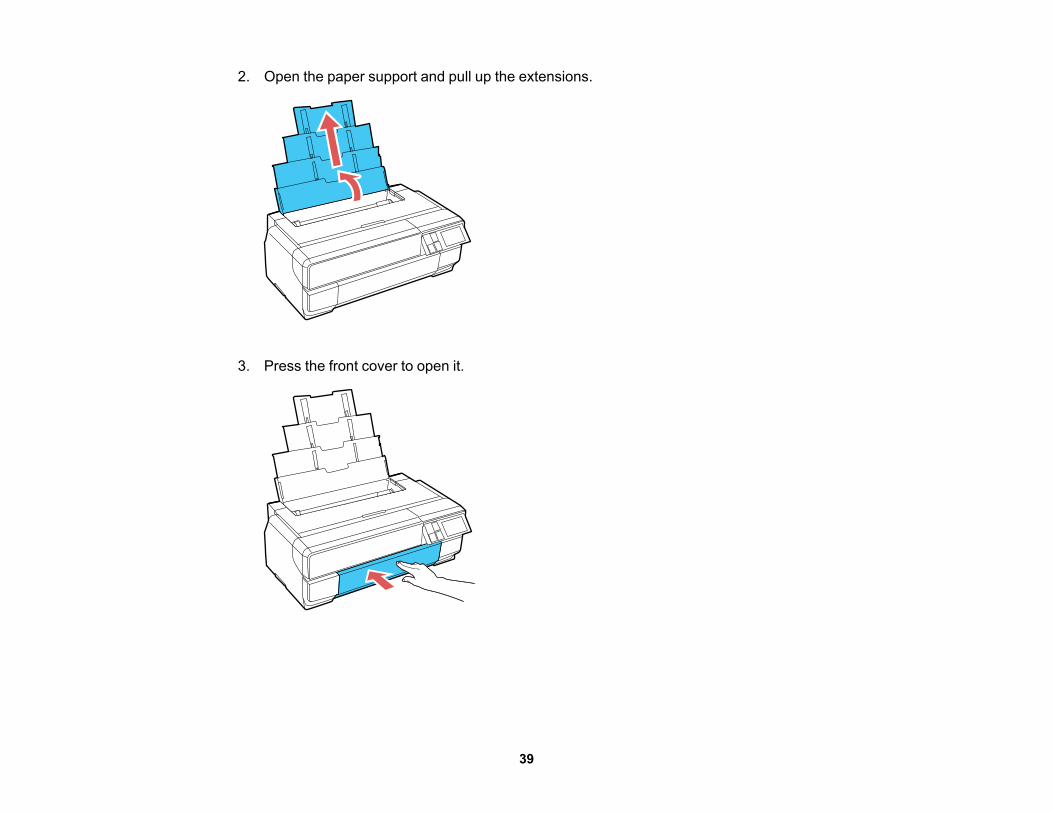
4. Fully extend the output tray.
5. Insert paper, glossy or printable side up, short edge first, against the right side and beneath the tab.
40
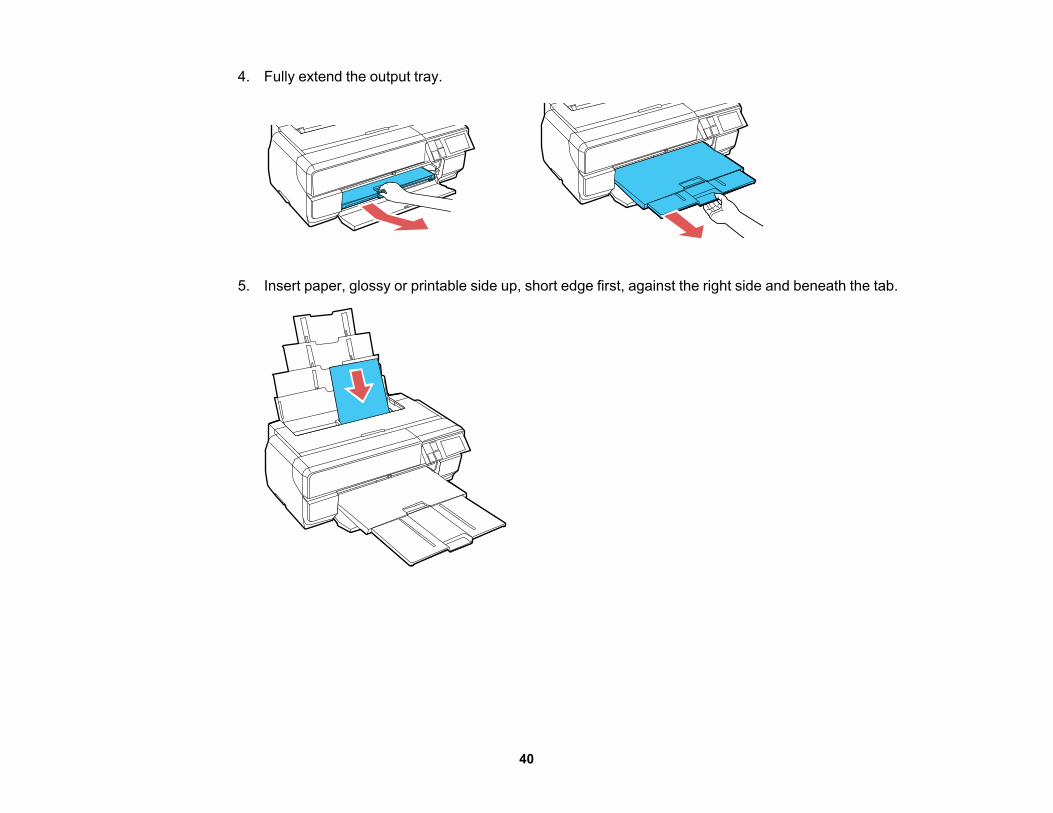
6. Press the button on the edge guide and slide it against the paper (but not too tightly).
7. When prompted by the product's LCD screen, select the size and type of the paper you loaded andselect OK.Always follow these paper loading guidelines:• Load only the recommended number of sheets.• Load paper short edge first, no matter which way your document faces.• Load the printable side faceup.• Load letterhead or pre-printed paper top edge first.• Do not load paper above the arrow mark inside the edge guide.• Check the paper package for any additional loading instructions.• If larger paper does not feed correctly, flip down the paper support edge guide as shown.
41

Parent topic: Loading MediaRelated referencesCut Sheet Media Loading CapacityRelated tasksLoading Fine Art MediaLoading Posterboard and Thick MediaSelecting the Paper Settings for Each Source - Control PanelSelecting the Default Paper Setup Display and Error Notice Settings
Loading Fine Art MediaUse the front manual feed tray and the rear paper support to load fine art media.
Note: You can load fine art media with a thickness of 0.012 to 0.028 inch (0.3 to 0.7 mm).
1. Turn on your product.2. Remove any paper from the sheet feeder and close the paper support.3. Remove any roll paper and the roll paper unit, if necessary.4. Open the rear paper support.
5. Pull out the rear paper support extensions.
42
6. Press the front cover to open it.
7. Press the center of the manual feed tray and release it to extend the tray.
43
8. Insert a single sheet of fine art paper into the manual feed tray. Insert it short edge first with theprintable side up.
9. Feed the paper up to the line on the tray. Make sure the paper is flush against the right side, thenpull the paper back gently to align it against the edge of the manual feed tray.
10. Select Load on the touch screen. The paper loads into your product.
Note: If you return to the home screen, select Load Guide and follow the instructions on the touchscreen.
44
11. When you see a message on the screen, close the manual feed tray by pushing it in until it latches.
12. Fully extend the output tray.
13. If necessary, select the Paper Size and Paper Type, then select OK.14. To eject paper, select Eject on the main menu and select Yes to confirm.
Caution: Do not extend the manual feed tray during printing or you may damage your product.
Always follow these paper loading guidelines:• Load only one sheet at a time.• Load fine art media short edge first, no matter which way your document faces.• Load the printable side faceup.
45
• Check the paper package for any additional loading instructions.Parent topic: Loading MediaRelated referencesCut Sheet Media Loading CapacityRelated tasksLoading Paper in the Sheet FeederLoading Posterboard and Thick MediaSelecting the Paper Settings for Each Source - Control PanelSelecting the Default Paper Setup Display and Error Notice Settings
Loading Posterboard and Thick MediaUse the front manual feed tray to load media with a thickness of 0.047 to 0.059 inch (1.2 to 1.5 mm).
Note: Be sure to leave at least 17 inches (43 cm) of space behind your product for the media to feedthrough.
1. Turn on your product.2. Remove any paper from the sheet feeder and close the paper support.3. Remove any roll paper and the roll paper unit, if necessary.4. Close the rear paper support.
46
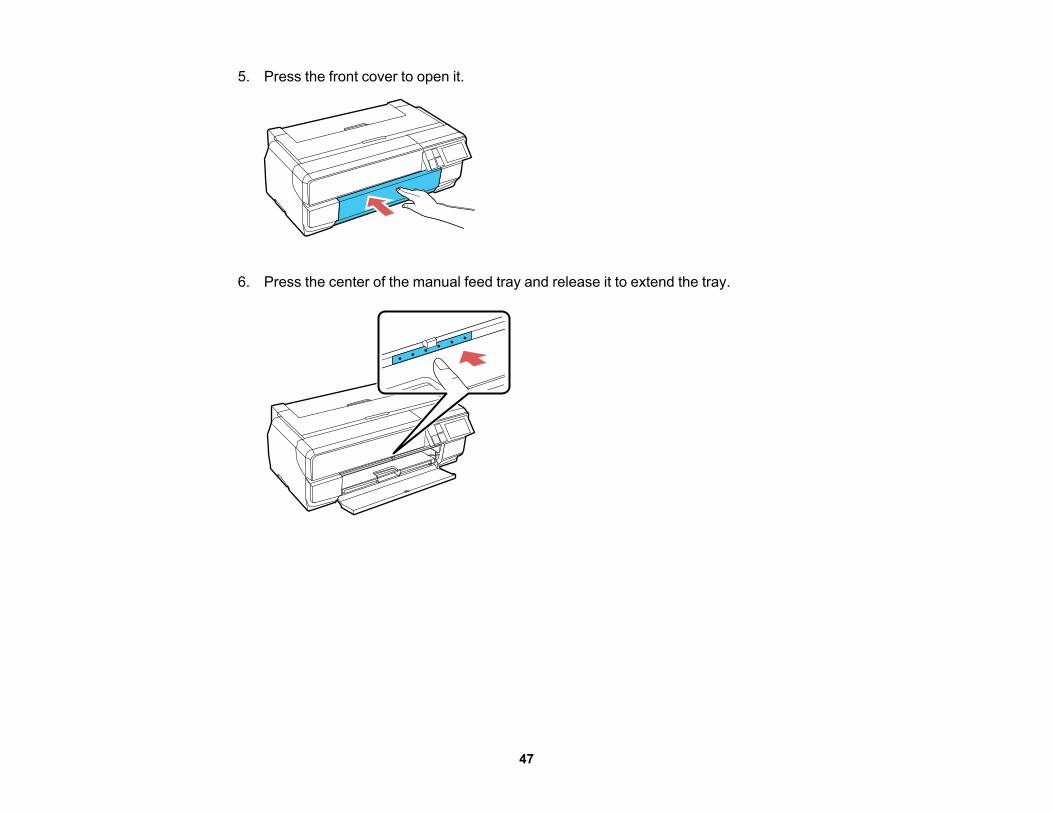
5. Press the front cover to open it.
6. Press the center of the manual feed tray and release it to extend the tray.
47
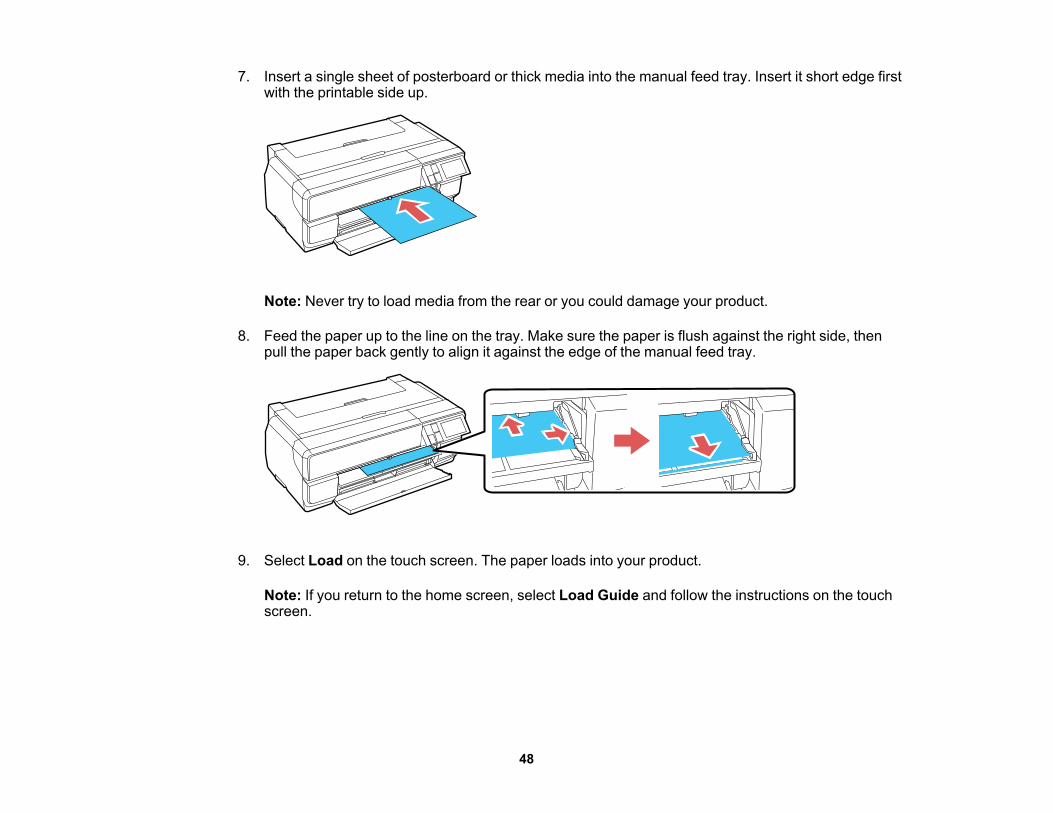
7. Insert a single sheet of posterboard or thick media into the manual feed tray. Insert it short edge firstwith the printable side up.
Note: Never try to load media from the rear or you could damage your product.
8. Feed the paper up to the line on the tray. Make sure the paper is flush against the right side, thenpull the paper back gently to align it against the edge of the manual feed tray.
9. Select Load on the touch screen. The paper loads into your product.
Note: If you return to the home screen, select Load Guide and follow the instructions on the touchscreen.
48
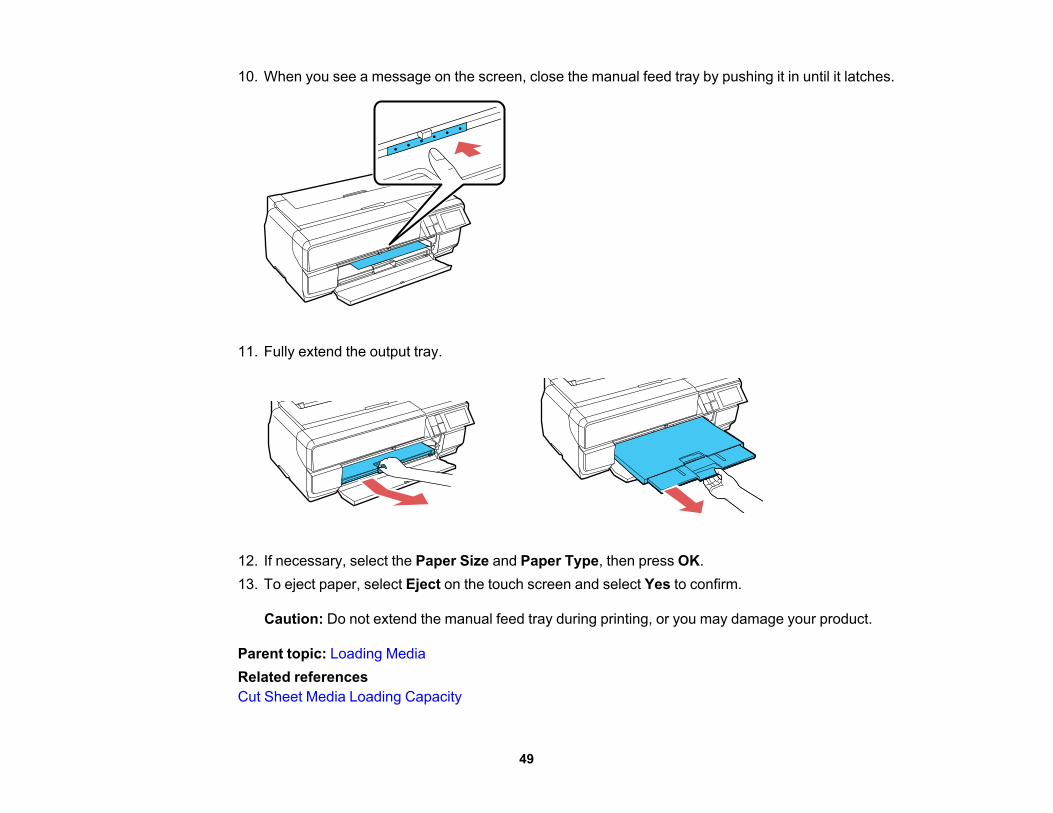
10. When you see a message on the screen, close the manual feed tray by pushing it in until it latches.
11. Fully extend the output tray.
12. If necessary, select the Paper Size and Paper Type, then press OK.13. To eject paper, select Eject on the touch screen and select Yes to confirm.
Caution: Do not extend the manual feed tray during printing, or you may damage your product.
Parent topic: Loading MediaRelated referencesCut Sheet Media Loading Capacity
49
Related tasksLoading Paper in the Sheet FeederLoading Fine Art MediaSelecting the Paper Settings for Each Source - Control PanelSelecting the Default Paper Setup Display and Error Notice Settings
Loading Roll Paper (Optional)You can load 13-inch to 17-inch (330 mm to 432 mm) wide roll paper for printing large or panoramicimages, or multiple photos (with or without borders) using the optional roll paper unit.
Note: It’s a good idea to check the ink status and replace cartridges, if necessary, before printing a largeprint job. If you need to replace a cartridge while printing, you can do so but you might notice a colordifference in your printout depending on drying conditions and the time it takes to install the new inkcartridge.
Attaching the Roll Paper UnitRemoving and Installing the Roll Media Adapter - 2-inch CoreRemoving and Installing the Roll Media Adapter - 3-inch CoreLoading Roll Paper on the SpindleLoading Roll Paper in the ProductCutting and Removing Roll PaperParent topic: Loading MediaRelated conceptsCheck Cartridge StatusRelated referencesBorderless Paper Type CompatibilityRelated tasksRemoving and Installing Ink Cartridges
Attaching the Roll Paper UnitAttach the roll paper unit to the back of your product to load roll paper.1. Turn on your product.2. Remove any paper from the sheet feeder and close the paper support.
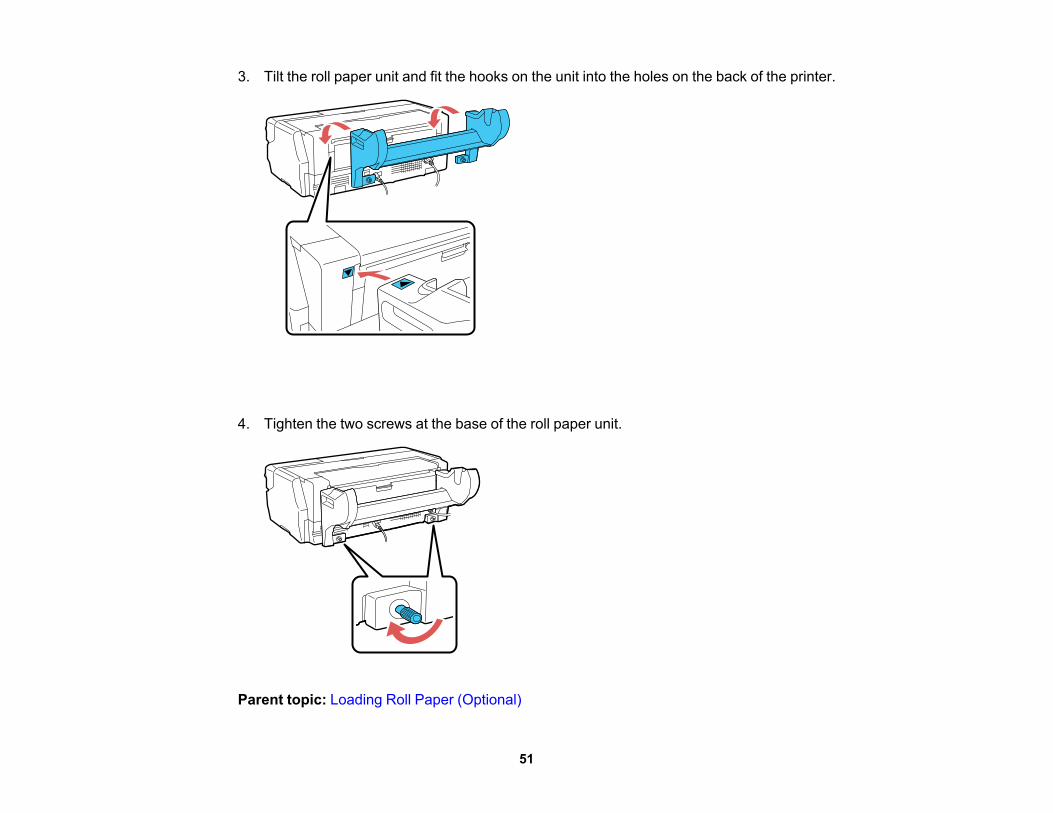
50
3. Tilt the roll paper unit and fit the hooks on the unit into the holes on the back of the printer.
4. Tighten the two screws at the base of the roll paper unit.
Parent topic: Loading Roll Paper (Optional)
51
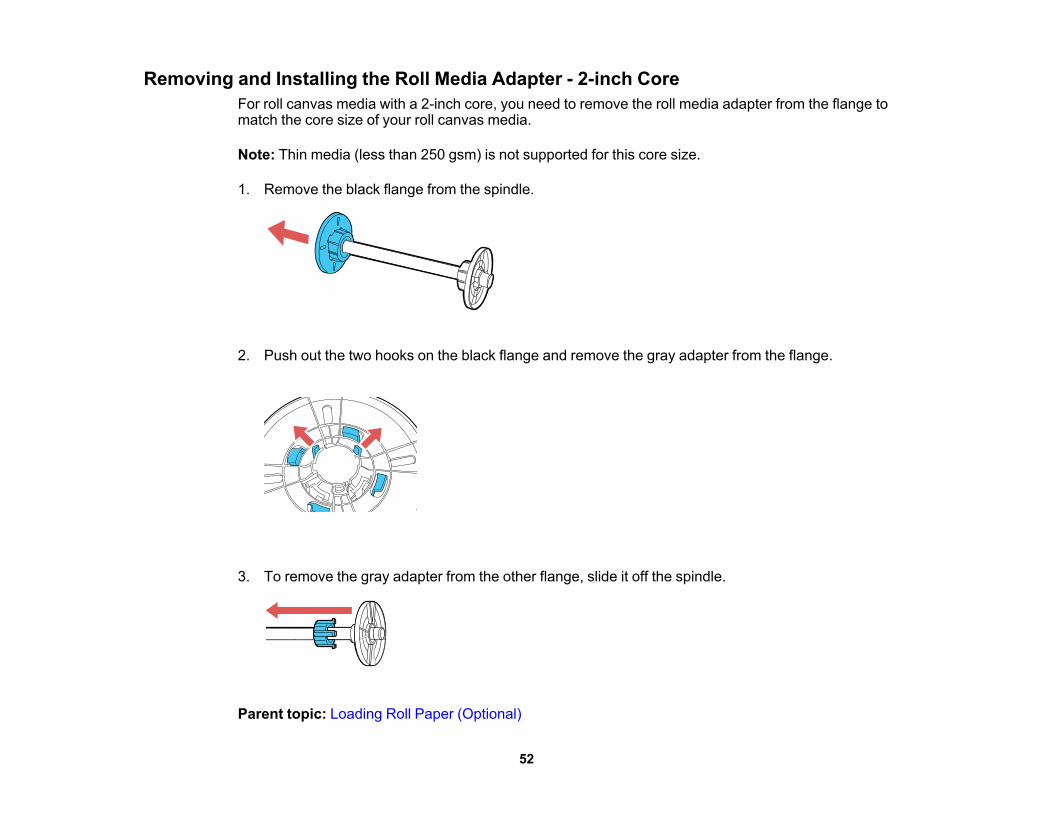
Removing and Installing the Roll Media Adapter - 2-inch CoreFor roll canvas media with a 2-inch core, you need to remove the roll media adapter from the flange tomatch the core size of your roll canvas media.
Note: Thin media (less than 250 gsm) is not supported for this core size.
1. Remove the black flange from the spindle.
2. Push out the two hooks on the black flange and remove the gray adapter from the flange.
3. To remove the gray adapter from the other flange, slide it off the spindle.
Parent topic: Loading Roll Paper (Optional)
52
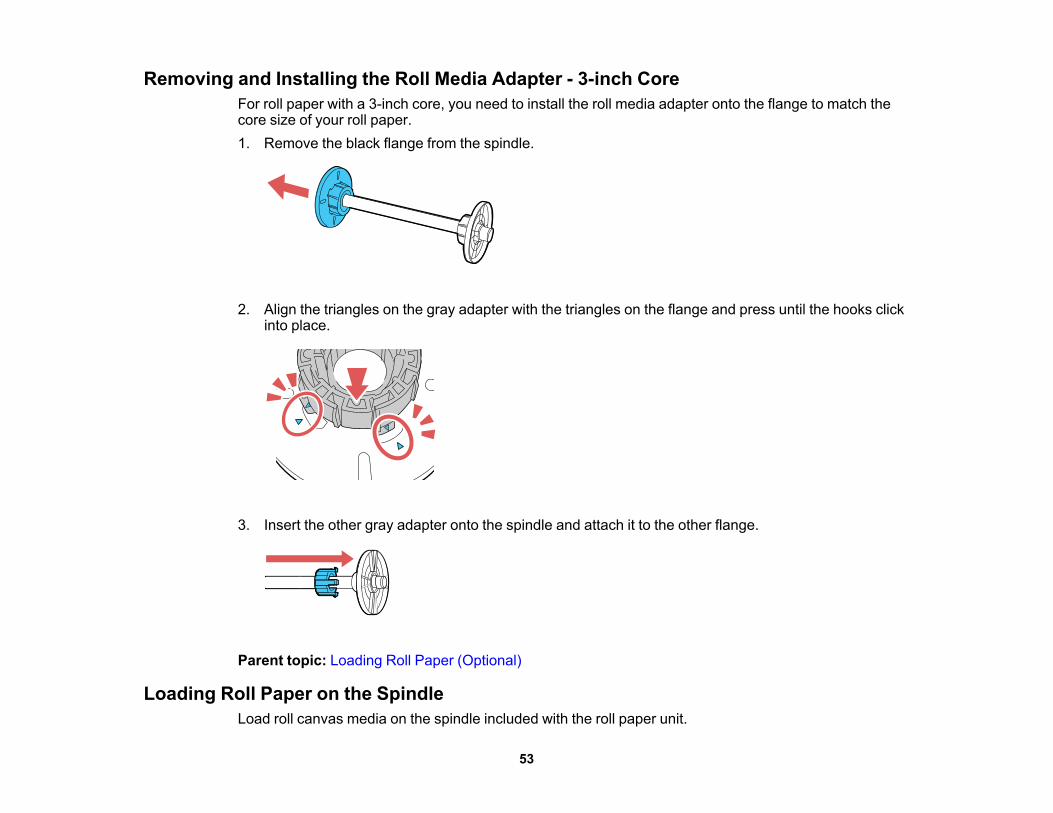
Removing and Installing the Roll Media Adapter - 3-inch CoreFor roll paper with a 3-inch core, you need to install the roll media adapter onto the flange to match thecore size of your roll paper.1. Remove the black flange from the spindle.
2. Align the triangles on the gray adapter with the triangles on the flange and press until the hooks clickinto place.
3. Insert the other gray adapter onto the spindle and attach it to the other flange.
Parent topic: Loading Roll Paper (Optional)
Loading Roll Paper on the SpindleLoad roll canvas media on the spindle included with the roll paper unit.
53
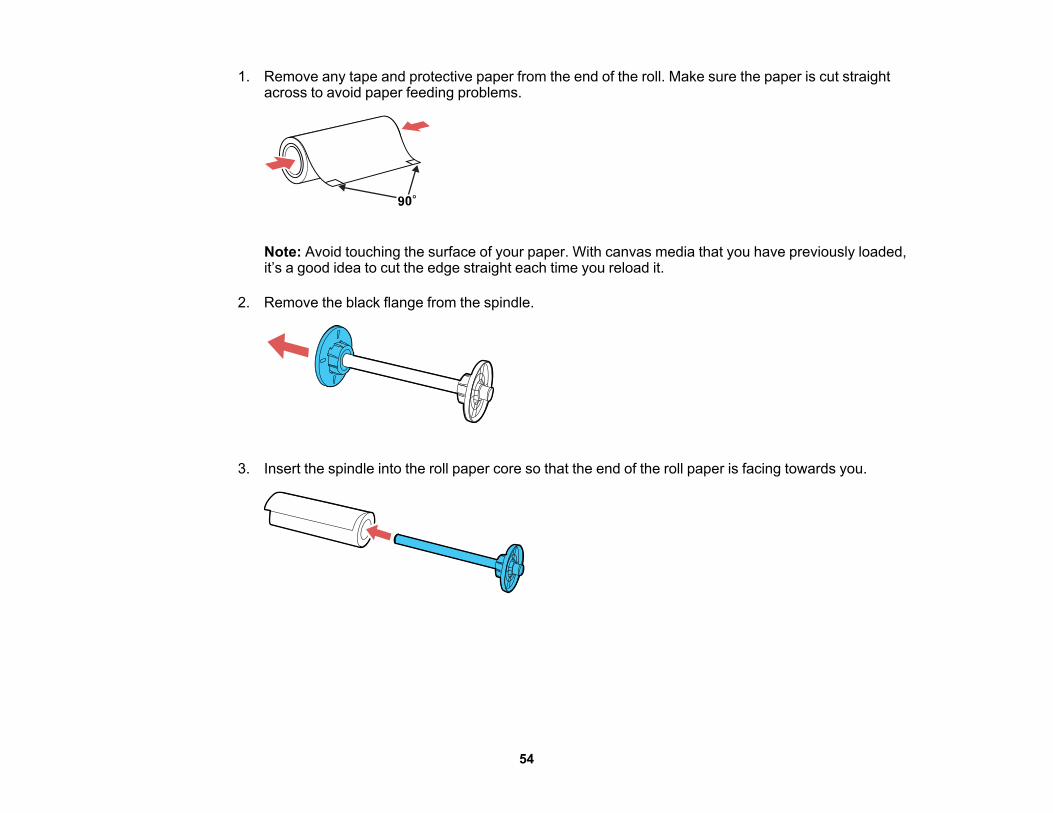
1. Remove any tape and protective paper from the end of the roll. Make sure the paper is cut straightacross to avoid paper feeding problems.
Note: Avoid touching the surface of your paper. With canvas media that you have previously loaded,it’s a good idea to cut the edge straight each time you reload it.
2. Remove the black flange from the spindle.
3. Insert the spindle into the roll paper core so that the end of the roll paper is facing towards you.
54
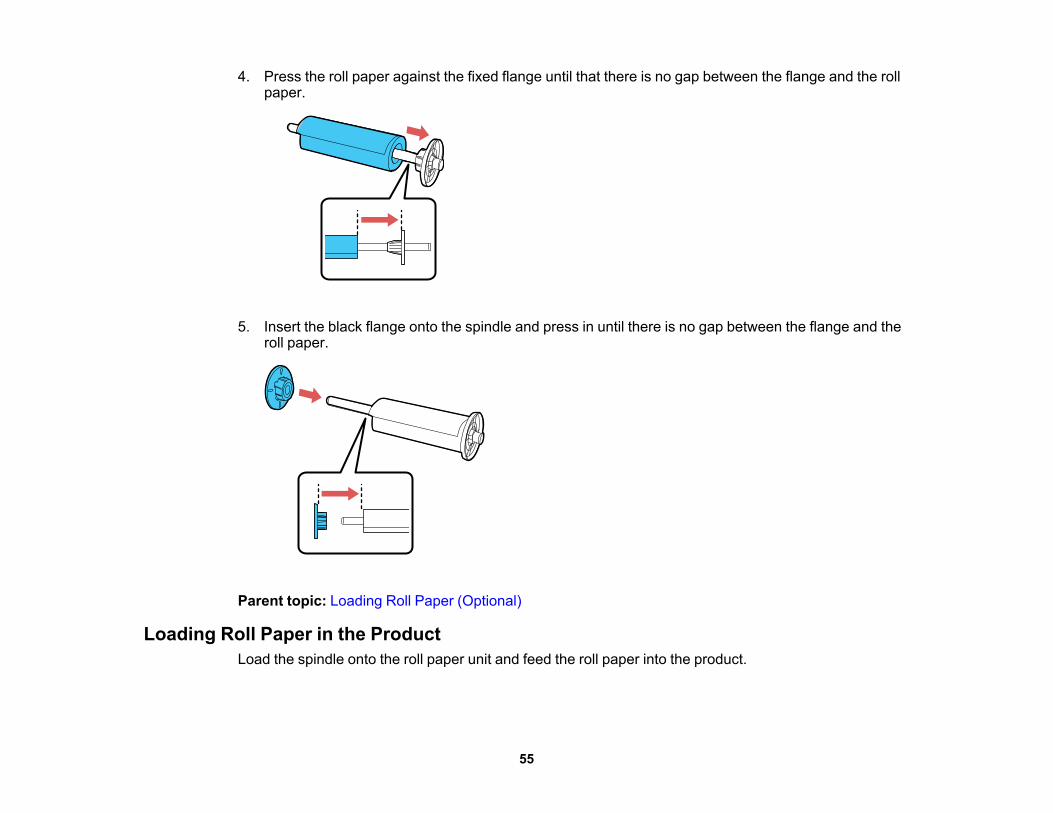
4. Press the roll paper against the fixed flange until that there is no gap between the flange and the rollpaper.
5. Insert the black flange onto the spindle and press in until there is no gap between the flange and theroll paper.
Parent topic: Loading Roll Paper (Optional)
Loading Roll Paper in the ProductLoad the spindle onto the roll paper unit and feed the roll paper into the product.
55
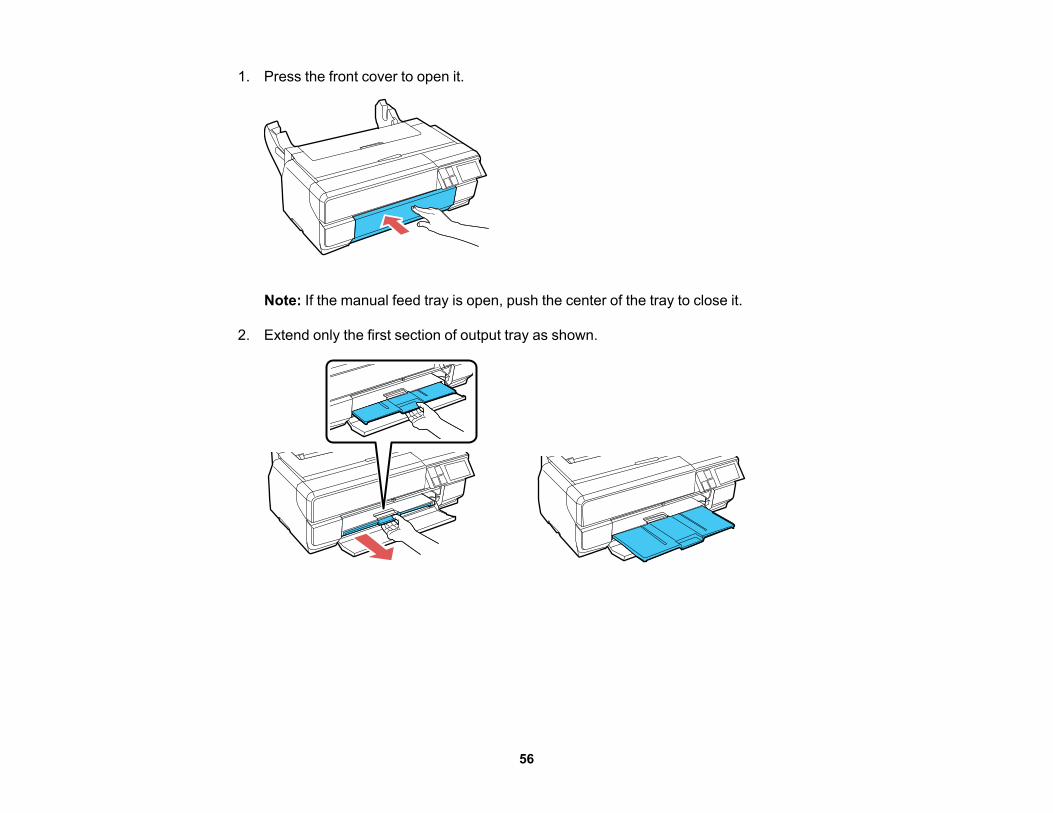
1. Press the front cover to open it.
Note: If the manual feed tray is open, push the center of the tray to close it.
2. Extend only the first section of output tray as shown.
56
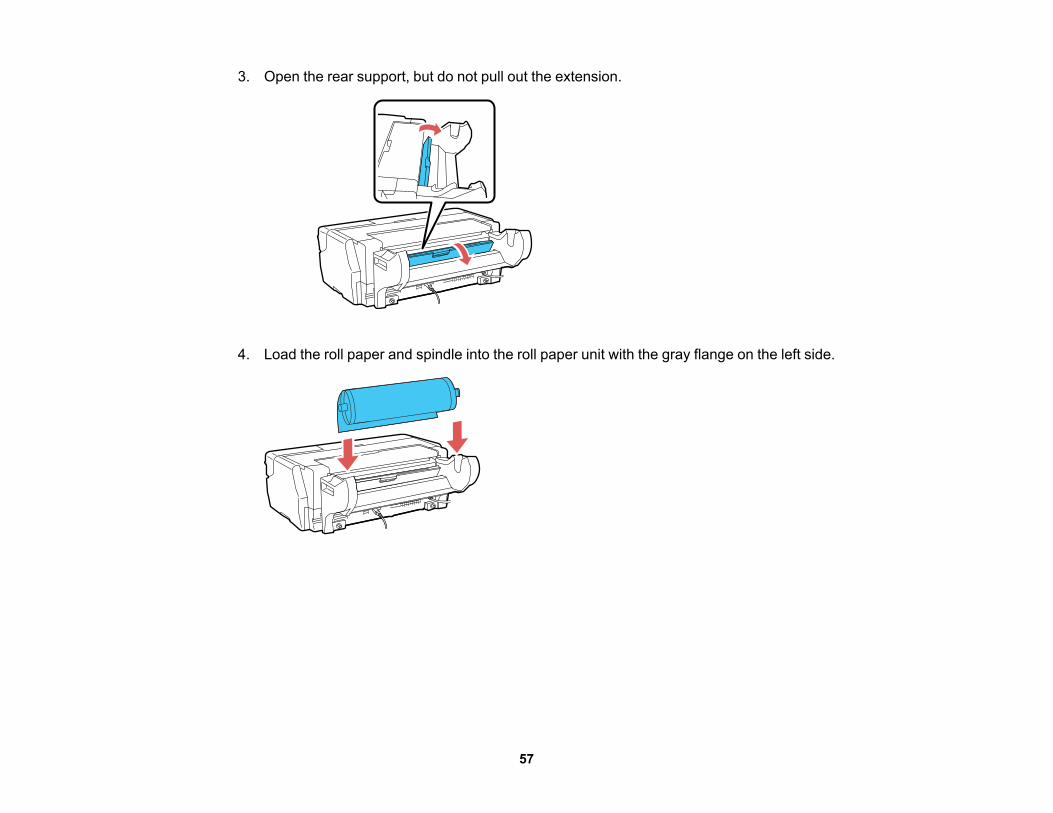
3. Open the rear support, but do not pull out the extension.
4. Load the roll paper and spindle into the roll paper unit with the gray flange on the left side.
57
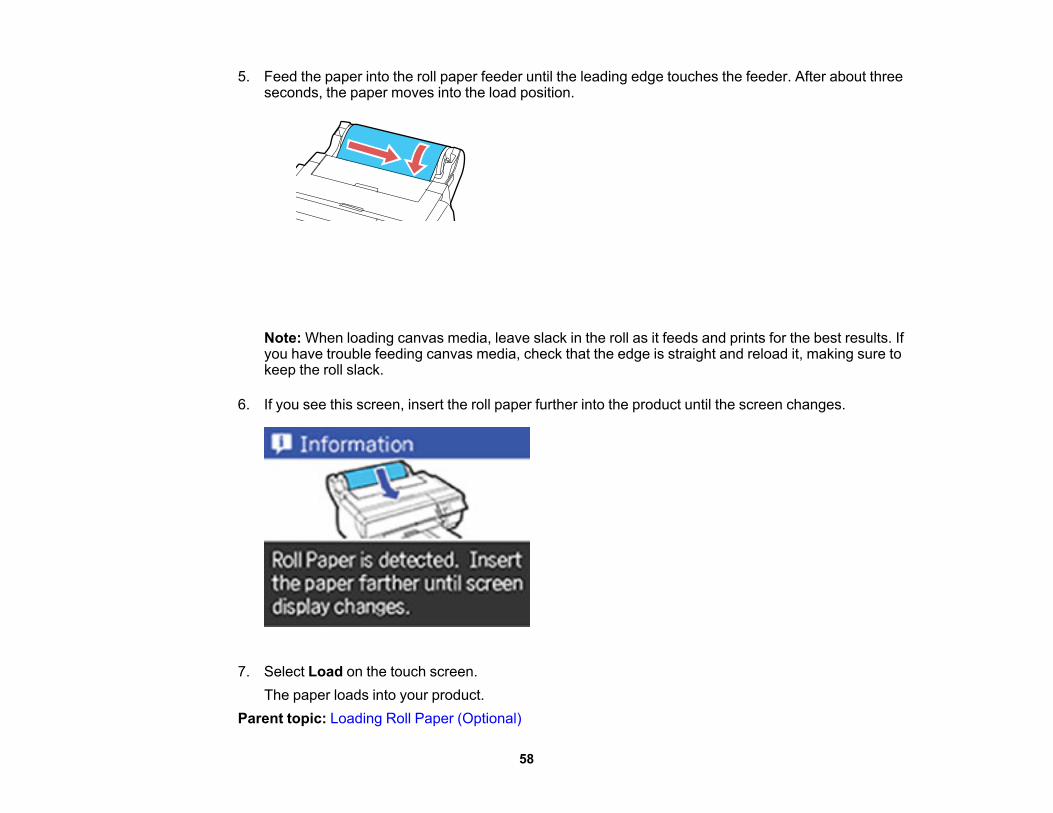
5. Feed the paper into the roll paper feeder until the leading edge touches the feeder. After about threeseconds, the paper moves into the load position.
Note: When loading canvas media, leave slack in the roll as it feeds and prints for the best results. Ifyou have trouble feeding canvas media, check that the edge is straight and reload it, making sure tokeep the roll slack.
6. If you see this screen, insert the roll paper further into the product until the screen changes.
7. Select Load on the touch screen.The paper loads into your product.
Parent topic: Loading Roll Paper (Optional)
58
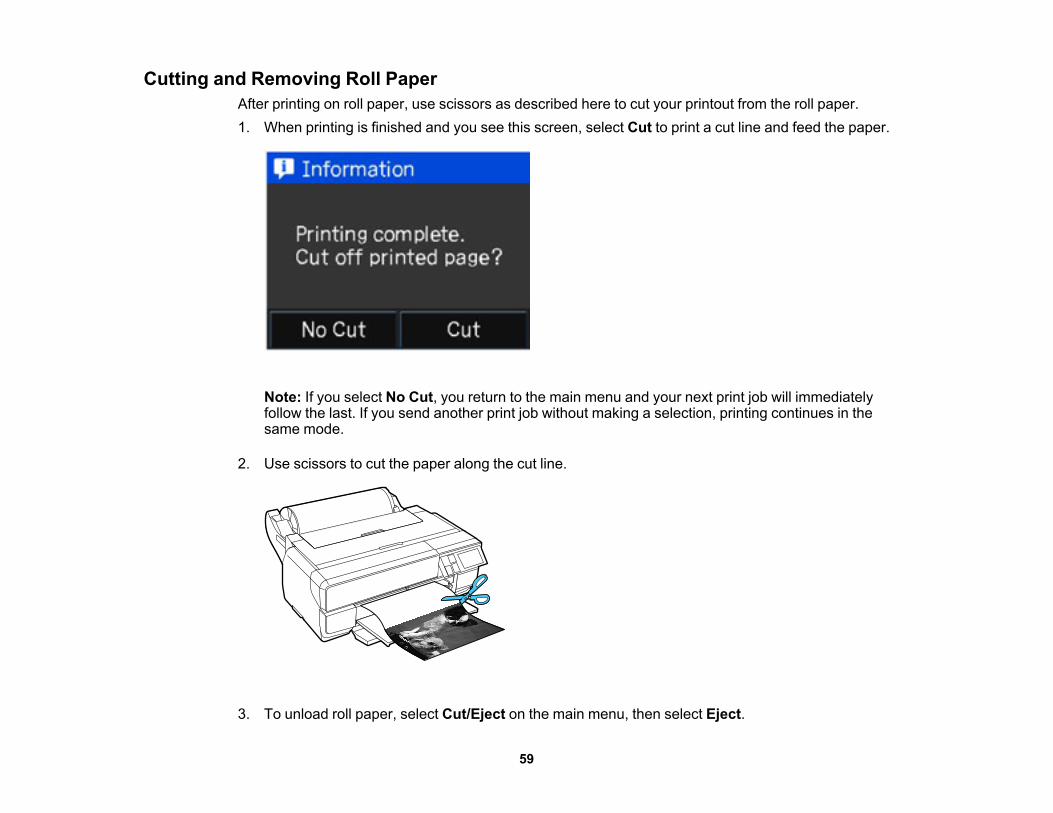
Cutting and Removing Roll PaperAfter printing on roll paper, use scissors as described here to cut your printout from the roll paper.1. When printing is finished and you see this screen, select Cut to print a cut line and feed the paper.
Note: If you select No Cut, you return to the main menu and your next print job will immediatelyfollow the last. If you send another print job without making a selection, printing continues in thesame mode.
2. Use scissors to cut the paper along the cut line.
3. To unload roll paper, select Cut/Eject on the main menu, then select Eject.
59
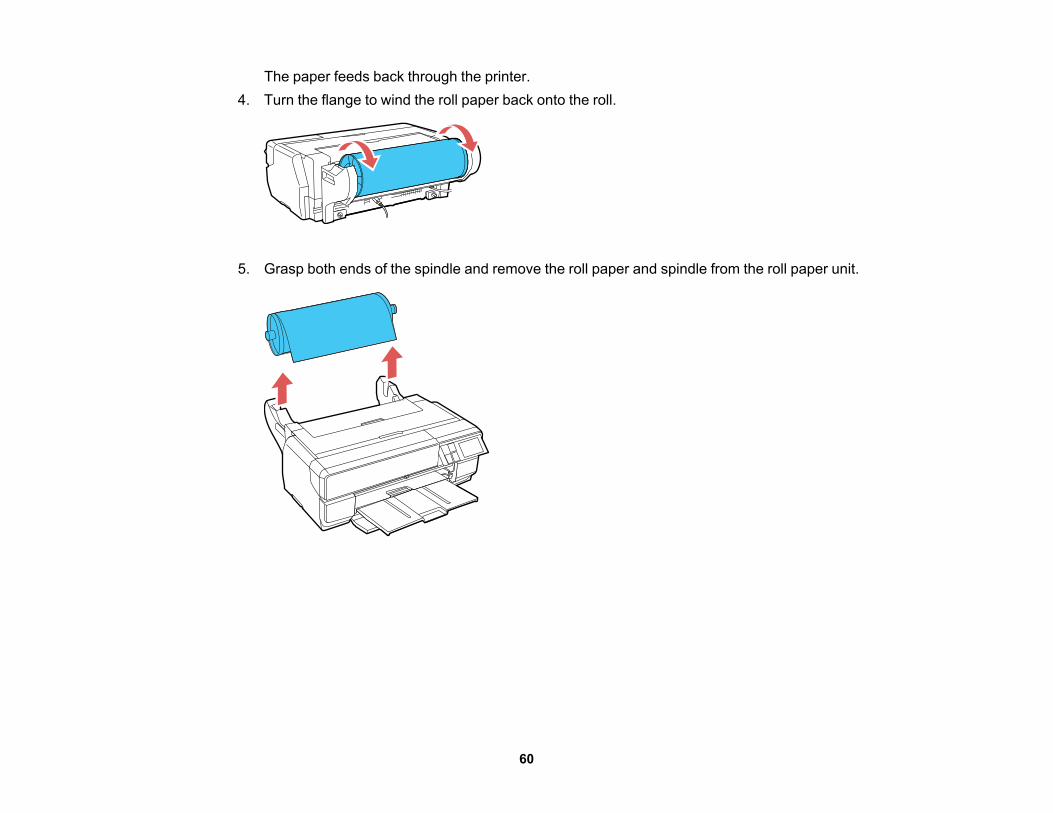
The paper feeds back through the printer.4. Turn the flange to wind the roll paper back onto the roll.
5. Grasp both ends of the spindle and remove the roll paper and spindle from the roll paper unit.
60
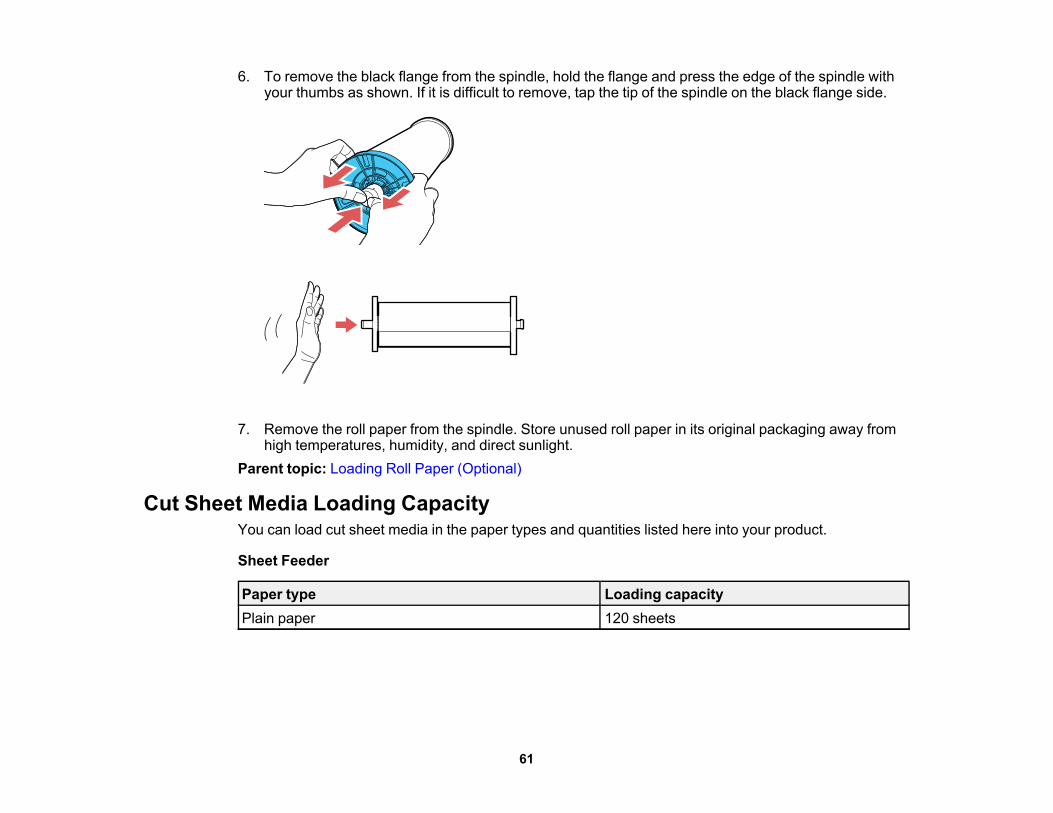
6. To remove the black flange from the spindle, hold the flange and press the edge of the spindle withyour thumbs as shown. If it is difficult to remove, tap the tip of the spindle on the black flange side.
7. Remove the roll paper from the spindle. Store unused roll paper in its original packaging away fromhigh temperatures, humidity, and direct sunlight.
Parent topic: Loading Roll Paper (Optional)
Cut Sheet Media Loading CapacityYou can load cut sheet media in the paper types and quantities listed here into your product.
Sheet Feeder
Paper type Loading capacityPlain paper 120 sheets
61
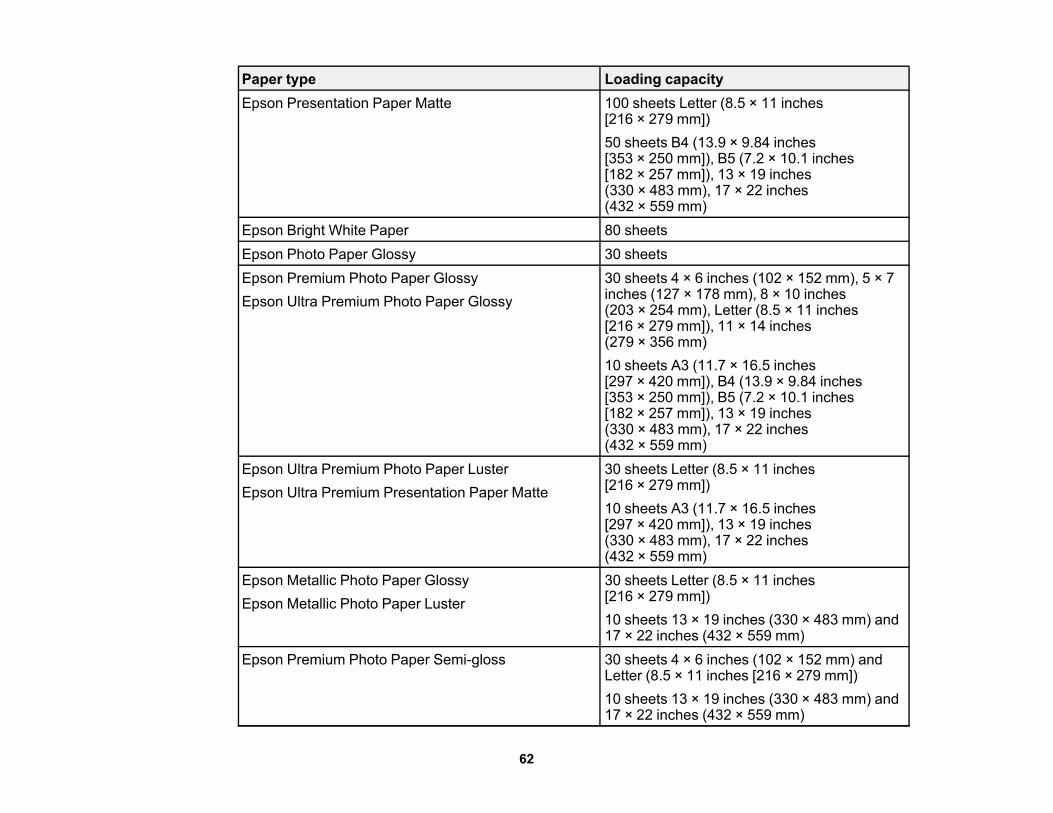
Paper type Loading capacityEpson Presentation Paper Matte 100 sheets Letter (8.5 × 11 inches
[216 × 279 mm])50 sheets B4 (13.9 × 9.84 inches[353 × 250 mm]), B5 (7.2 × 10.1 inches[182 × 257 mm]), 13 × 19 inches(330 × 483 mm), 17 × 22 inches(432 × 559 mm)
Epson Bright White Paper 80 sheetsEpson Photo Paper Glossy 30 sheetsEpson Premium Photo Paper Glossy 30 sheets 4 × 6 inches (102 × 152 mm), 5 × 7
inches (127 × 178 mm), 8 × 10 inchesEpson Ultra Premium Photo Paper Glossy (203 × 254 mm), Letter (8.5 × 11 inches[216 × 279 mm]), 11 × 14 inches(279 × 356 mm)10 sheets A3 (11.7 × 16.5 inches[297 × 420 mm]), B4 (13.9 × 9.84 inches[353 × 250 mm]), B5 (7.2 × 10.1 inches[182 × 257 mm]), 13 × 19 inches(330 × 483 mm), 17 × 22 inches(432 × 559 mm)
Epson Ultra Premium Photo Paper Luster 30 sheets Letter (8.5 × 11 inches[216 × 279 mm])Epson Ultra Premium Presentation Paper Matte10 sheets A3 (11.7 × 16.5 inches[297 × 420 mm]), 13 × 19 inches(330 × 483 mm), 17 × 22 inches(432 × 559 mm)
Epson Metallic Photo Paper Glossy 30 sheets Letter (8.5 × 11 inches[216 × 279 mm])Epson Metallic Photo Paper Luster10 sheets 13 × 19 inches (330 × 483 mm) and17 × 22 inches (432 × 559 mm)
Epson Premium Photo Paper Semi-gloss 30 sheets 4 × 6 inches (102 × 152 mm) andLetter (8.5 × 11 inches [216 × 279 mm])10 sheets 13 × 19 inches (330 × 483 mm) and17 × 22 inches (432 × 559 mm)
62
Paper type Loading capacityEpson Premium Presentation Paper Matte 30 sheets 8 × 10 inches (203 × 254 mm) and
Letter (8.5 × 11 inches [216 × 279 mm])Epson Premium Presentation Paper Matte Double-sided 10 sheets 11 × 14 inches (279 × 356 mm), A3
(11.7 × 16.5 inches [297 × 420 mm]), 13 × 19inches (330 × 483 mm), 17 × 22 inches(432 × 559 mm)
Epson Photo Quality Self-adhesive Sheets 1 sheet
Manual Feed TrayYou can load one sheet of posterboard or other thick media 0.047 to 0.059 inch (1.2 to 1.5 mm) thick inthe front manual feed tray. You can also load one sheet of the following types of media:• Epson Velvet Fine Art Paper• Epson UltraSmooth Fine Art Paper• Epson Watercolor Paper Radiant White• Epson Exhibition Fiber Paper• Epson Exhibition Watercolor Paper Textured• Epson Hot Press Bright• Epson Hot Press Natural• Epson Cold Press Bright• Epson Cold Press NaturalParent topic: Loading Media
Available Epson PapersYou can purchase genuine Epson ink and paper at epson.com/ink3 (U.S. sales) or epson.ca (Canadiansales). You can also purchase supplies from an Epson authorized reseller. To find the nearest one, call800-GO-EPSON (800-463-7766).
Note: Paper/media availability varies by country.
63
Paper Type Size Part number Sheet countEpson Bright White Paper Letter (8.5 × 11 inches S041586 500
[216 × 279 mm])Epson Cold Press Bright Letter (8.5 × 11 inches S041111 100
[216 × 279 mm])Letter (8.5 × 11 inches S042307 25[216 × 279 mm])13 × 19 inches S042310 25(330 × 483 mm)17 × 22 inches S042311 25(432 × 559 mm)
Epson Cold Press Natural Letter (8.5 × 11 inches S042297 25[216 × 279 mm])13 × 19 inches S042300 25(330 × 483 mm)17 × 22 inches S042301 25(432 × 559 mm)
Epson Velvet Fine Art Paper Letter (8.5 × 11 inches S041636 20[216 × 279 mm])13 × 19 inches S041637 20(330 × 483 mm)17 × 22 inches S042097 25(432 × 559 mm)
Epson Exhibition Fiber Paper Letter (8.5 × 11 inches S045033 25[216 × 279 mm])13 × 19 inches S045037 25(330 × 483 mm)17 × 22 inches S045039 25(432 × 559 mm)
64
Paper Type Size Part number Sheet countEpson Hot Press Bright Letter (8.5 × 11 inches S042327 25
[216 × 279 mm])13 × 19 inches S042330 25(330 × 483 mm)17 × 22 inches S042331 25(432 × 559 mm)
Epson Hot Press Natural Letter (8.5 × 11 inches S042317 25[216 × 279 mm])13 × 19 inches S042320 25(330 × 483 mm)17 × 22 inches S042321 25(432 × 559 mm)
Epson Exhibition Watercolor Paper Letter (8.5 × 11 inches S045486 25Textured [216 × 279 mm])
13 × 19 inches S045487 20(330 × 483 mm)17 × 22 inches S045488 25(432 × 559 mm)
Epson Brochure & Flyer Paper Letter (8.5 × 11 inches S042384 150Matte Double-sided [216 × 279 mm])Epson (Consumer) Sample Media Various sizes SMP603 VariousPack quantitiesEpson Photo Quality Self-adhesive A4 (8.3 × 11.7 inches S041106 10Sheets [210 × 297 mm])Photo Quality Ink Jet Cards A6 (4.1 × 5.8 inches S041054 50
[105 × 148 mm])Epson Ultra Premium Photo Paper Letter (8.5 × 11 inches S042175 20Glossy [216 × 279 mm])
8 × 10 inches (203 × 254 mm) S041946 20
65
Paper Type Size Part number Sheet countEpson Premium Luster Photo 8.3 inches (211 mm) × 32 feet S041408 1 rollPaper (260) (9.8 m)
13 inches (330 mm) × 32 feet S041409 1 roll(9.8 m)10 inches (254 mm) × 100 feet S042077 1 roll(30.5 m)
Epson Metallic Photo Paper Letter (8.5 × 11 inches S045589 25Glossy [216 × 279 mm])
13 × 19 inches S045590 25(330 × 483 mm)17 × 22 inches S045591 25(432 × 559 mm)
Epson Metallic Photo Paper Luster Letter (8.5 × 11 inches S045516 25[216 × 279 mm])13 × 19 inches S045517 25(330 × 483 mm)17 × 22 inches S045598 25(432 × 559 mm)
Epson Photo Paper Glossy Letter (8.5 × 11 inches S041649 50[216 × 279 mm])11 × 17 inches S041156 20(279 × 432 mm)13 × 19 inches S041143 20(330 × 483 mm)Letter (8.5 × 11 inches S041271 100[216 × 279 mm])
66
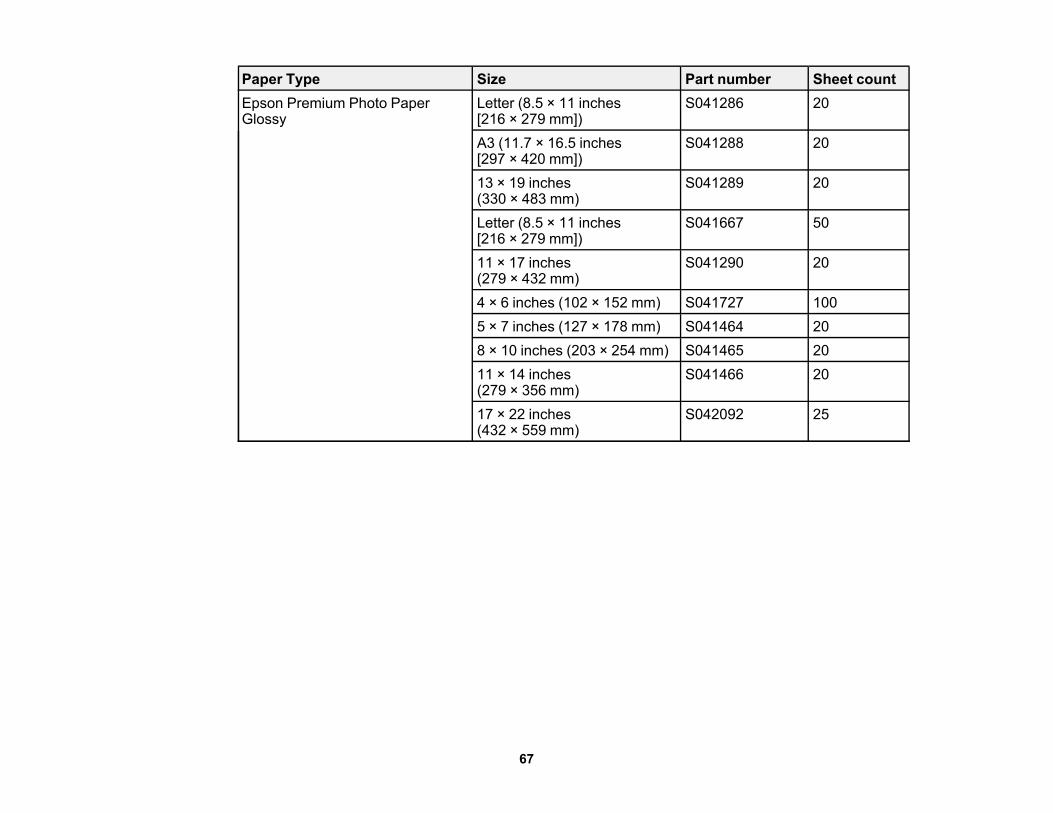
Paper Type Size Part number Sheet countEpson Premium Photo Paper Letter (8.5 × 11 inches S041286 20Glossy [216 × 279 mm])
A3 (11.7 × 16.5 inches S041288 20[297 × 420 mm])13 × 19 inches S041289 20(330 × 483 mm)Letter (8.5 × 11 inches S041667 50[216 × 279 mm])11 × 17 inches S041290 20(279 × 432 mm)4 × 6 inches (102 × 152 mm) S041727 1005 × 7 inches (127 × 178 mm) S041464 208 × 10 inches (203 × 254 mm) S041465 2011 × 14 inches S041466 20(279 × 356 mm)17 × 22 inches S042092 25(432 × 559 mm)
67
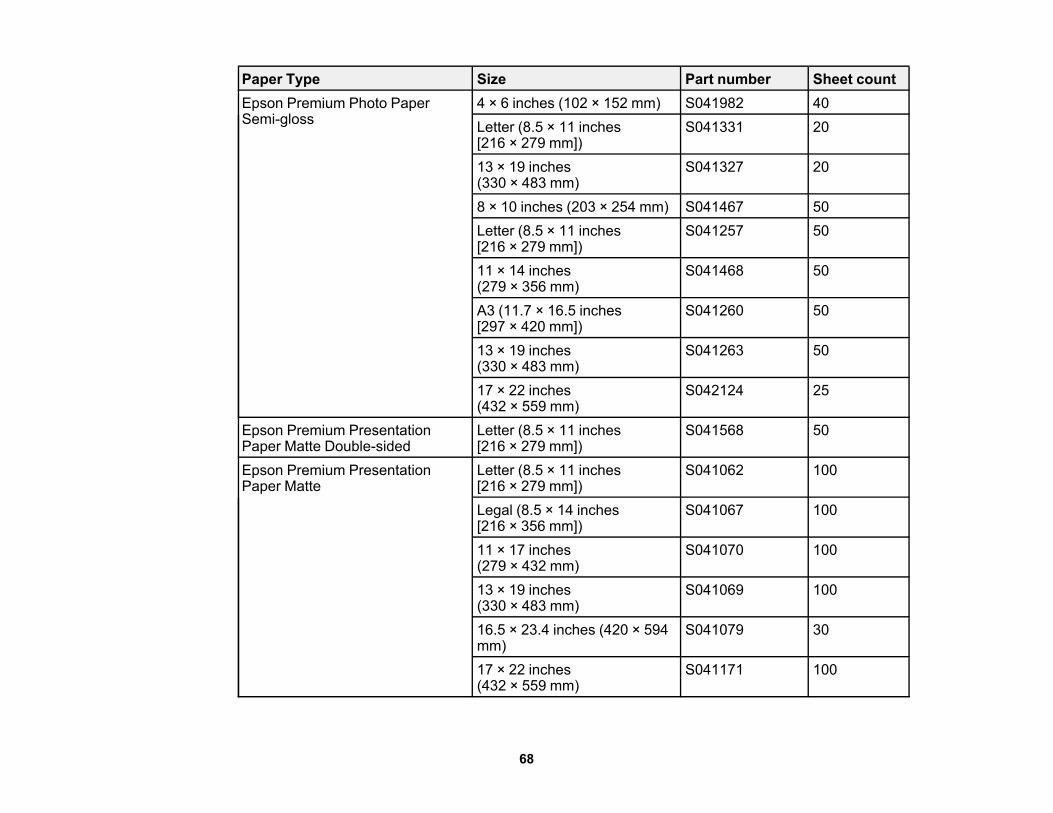
Paper Type Size Part number Sheet countEpson Premium Photo Paper 4 × 6 inches (102 × 152 mm) S041982 40Semi-gloss Letter (8.5 × 11 inches S041331 20
[216 × 279 mm])13 × 19 inches S041327 20(330 × 483 mm)8 × 10 inches (203 × 254 mm) S041467 50Letter (8.5 × 11 inches S041257 50[216 × 279 mm])11 × 14 inches S041468 50(279 × 356 mm)A3 (11.7 × 16.5 inches S041260 50[297 × 420 mm])13 × 19 inches S041263 50(330 × 483 mm)17 × 22 inches S042124 25(432 × 559 mm)
Epson Premium Presentation Letter (8.5 × 11 inches S041568 50Paper Matte Double-sided [216 × 279 mm])Epson Premium Presentation Letter (8.5 × 11 inches S041062 100Paper Matte [216 × 279 mm])
Legal (8.5 × 14 inches S041067 100[216 × 356 mm])11 × 17 inches S041070 100(279 × 432 mm)13 × 19 inches S041069 100(330 × 483 mm)16.5 × 23.4 inches (420 × 594 S041079 30mm)17 × 22 inches S041171 100(432 × 559 mm)
68
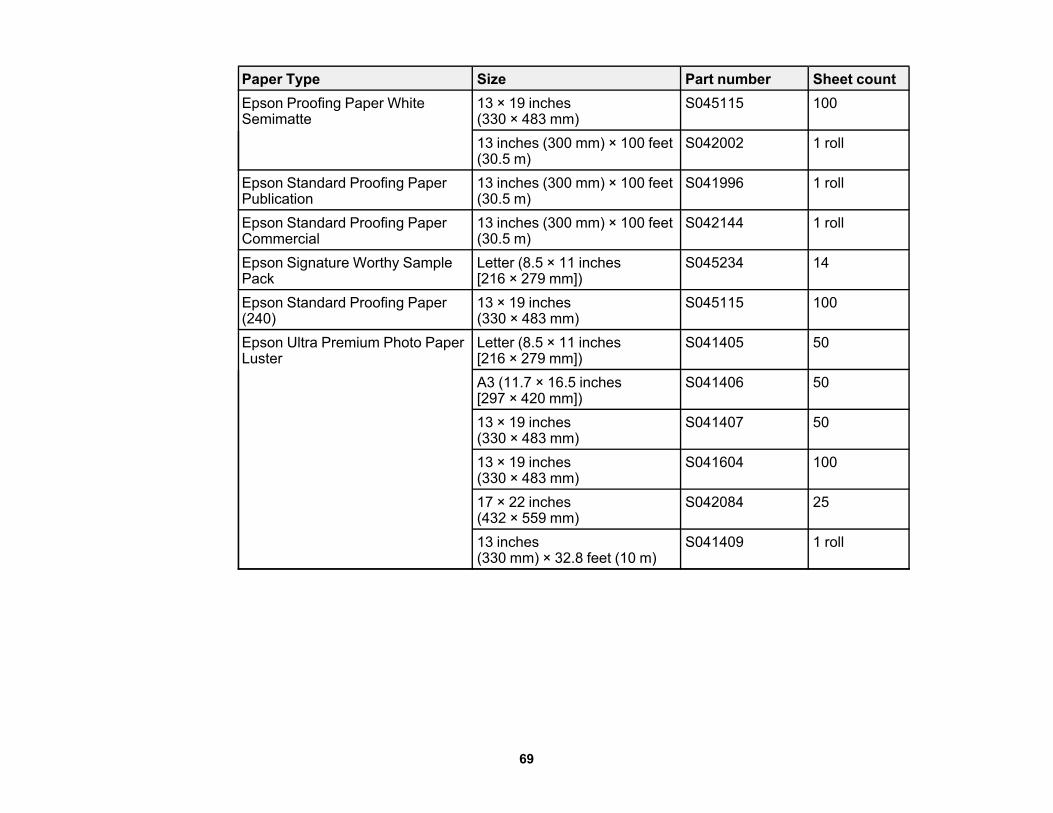
Paper Type Size Part number Sheet countEpson Proofing Paper White 13 × 19 inches S045115 100Semimatte (330 × 483 mm)
13 inches (300 mm) × 100 feet S042002 1 roll(30.5 m)
Epson Standard Proofing Paper 13 inches (300 mm) × 100 feet S041996 1 rollPublication (30.5 m)Epson Standard Proofing Paper 13 inches (300 mm) × 100 feet S042144 1 rollCommercial (30.5 m)Epson Signature Worthy Sample Letter (8.5 × 11 inches S045234 14Pack [216 × 279 mm])Epson Standard Proofing Paper 13 × 19 inches S045115 100(240) (330 × 483 mm)Epson Ultra Premium Photo Paper Letter (8.5 × 11 inches S041405 50Luster [216 × 279 mm])
A3 (11.7 × 16.5 inches S041406 50[297 × 420 mm])13 × 19 inches S041407 50(330 × 483 mm)13 × 19 inches S041604 100(330 × 483 mm)17 × 22 inches S042084 25(432 × 559 mm)13 inches S041409 1 roll(330 mm) × 32.8 feet (10 m)
69
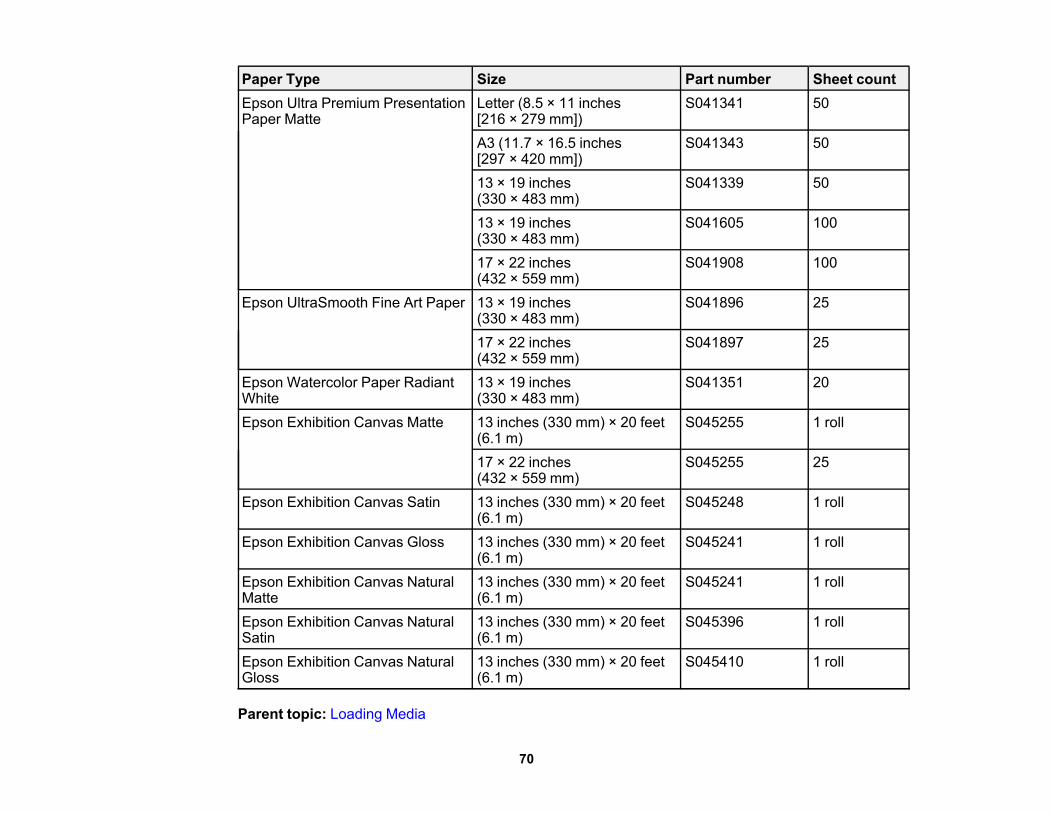
Paper Type Size Part number Sheet countEpson Ultra Premium Presentation Letter (8.5 × 11 inches S041341 50Paper Matte [216 × 279 mm])
A3 (11.7 × 16.5 inches S041343 50[297 × 420 mm])13 × 19 inches S041339 50(330 × 483 mm)13 × 19 inches S041605 100(330 × 483 mm)17 × 22 inches S041908 100(432 × 559 mm)
Epson UltraSmooth Fine Art Paper 13 × 19 inches S041896 25(330 × 483 mm)17 × 22 inches S041897 25(432 × 559 mm)
Epson Watercolor Paper Radiant 13 × 19 inches S041351 20White (330 × 483 mm)Epson Exhibition Canvas Matte 13 inches (330 mm) × 20 feet S045255 1 roll
(6.1 m)17 × 22 inches S045255 25(432 × 559 mm)
Epson Exhibition Canvas Satin 13 inches (330 mm) × 20 feet S045248 1 roll(6.1 m)
Epson Exhibition Canvas Gloss 13 inches (330 mm) × 20 feet S045241 1 roll(6.1 m)
Epson Exhibition Canvas Natural 13 inches (330 mm) × 20 feet S045241 1 rollMatte (6.1 m)Epson Exhibition Canvas Natural 13 inches (330 mm) × 20 feet S045396 1 rollSatin (6.1 m)Epson Exhibition Canvas Natural 13 inches (330 mm) × 20 feet S045410 1 rollGloss (6.1 m)
Parent topic: Loading Media
70
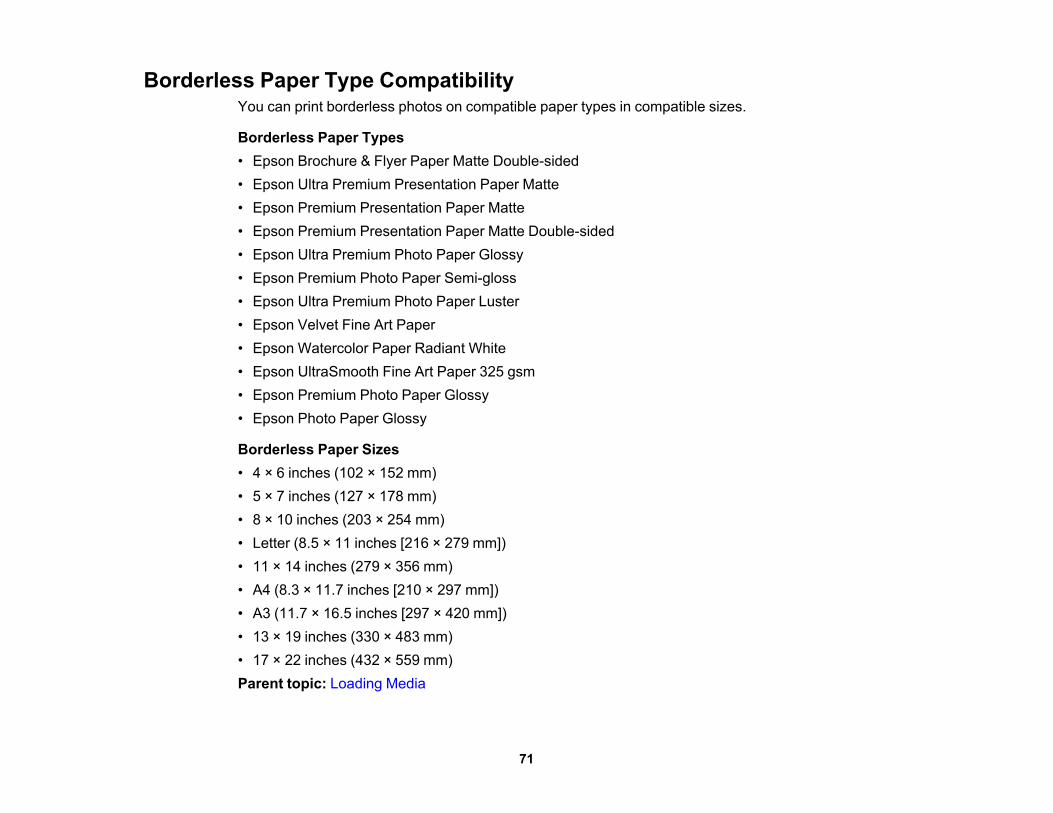
Borderless Paper Type CompatibilityYou can print borderless photos on compatible paper types in compatible sizes.
Borderless Paper Types• Epson Brochure & Flyer Paper Matte Double-sided• Epson Ultra Premium Presentation Paper Matte• Epson Premium Presentation Paper Matte• Epson Premium Presentation Paper Matte Double-sided• Epson Ultra Premium Photo Paper Glossy• Epson Premium Photo Paper Semi-gloss• Epson Ultra Premium Photo Paper Luster• Epson Velvet Fine Art Paper• Epson Watercolor Paper Radiant White• Epson UltraSmooth Fine Art Paper 325 gsm• Epson Premium Photo Paper Glossy• Epson Photo Paper Glossy
Borderless Paper Sizes• 4 × 6 inches (102 × 152 mm)• 5 × 7 inches (127 × 178 mm)• 8 × 10 inches (203 × 254 mm)• Letter (8.5 × 11 inches [216 × 279 mm])• 11 × 14 inches (279 × 356 mm)• A4 (8.3 × 11.7 inches [210 × 297 mm])• A3 (11.7 × 16.5 inches [297 × 420 mm])• 13 × 19 inches (330 × 483 mm)• 17 × 22 inches (432 × 559 mm)Parent topic: Loading Media
71
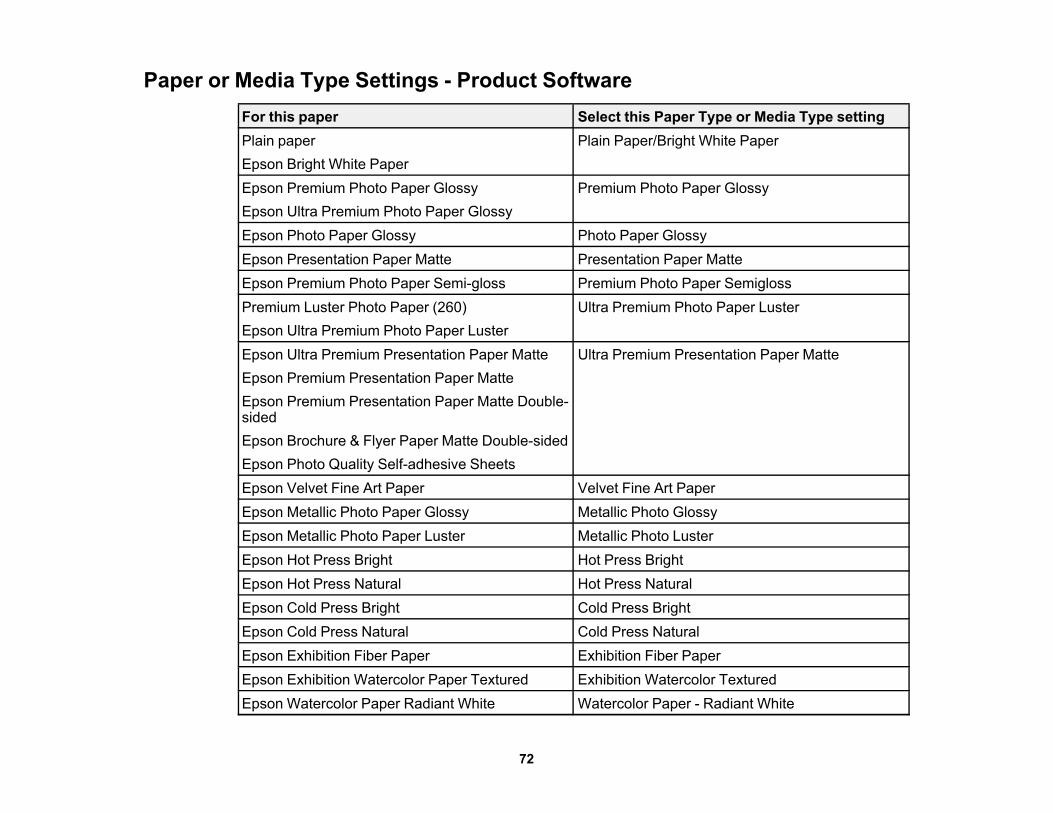
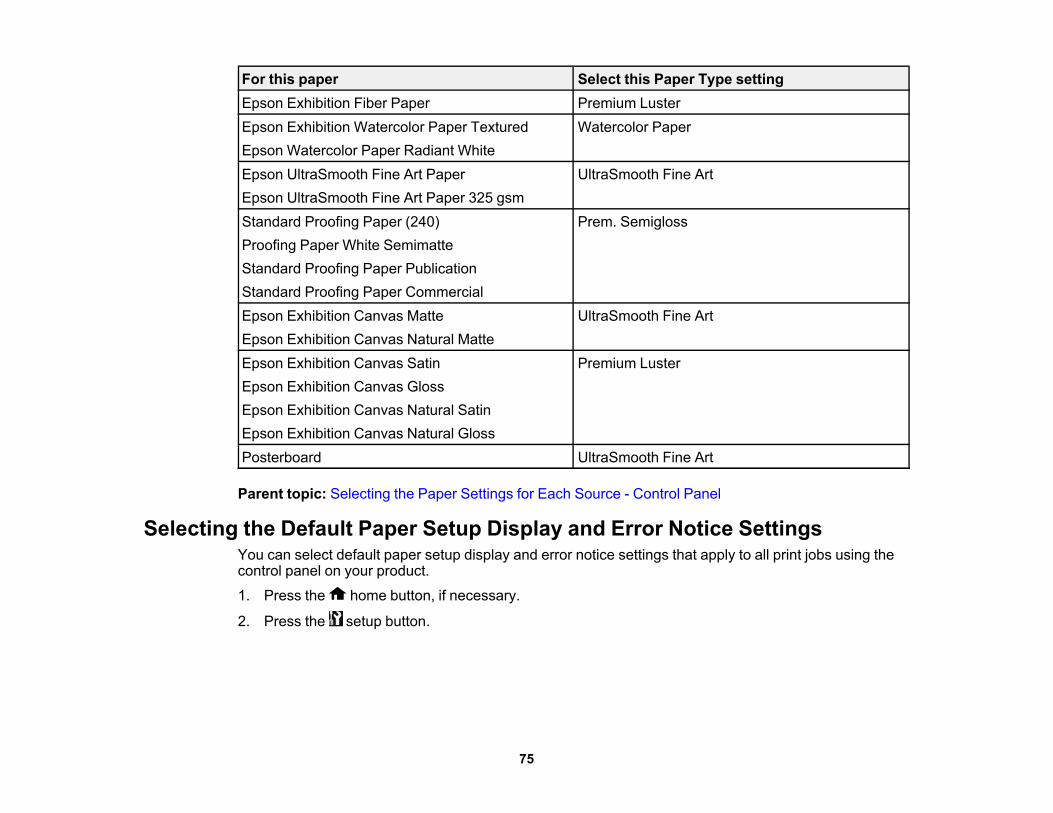
Paper or Media Type Settings - Product SoftwareFor this paper Select this Paper Type or Media Type settingPlain paper Plain Paper/Bright White PaperEpson Bright White PaperEpson Premium Photo Paper Glossy Premium Photo Paper GlossyEpson Ultra Premium Photo Paper GlossyEpson Photo Paper Glossy Photo Paper GlossyEpson Presentation Paper Matte Presentation Paper MatteEpson Premium Photo Paper Semi-gloss Premium Photo Paper SemiglossPremium Luster Photo Paper (260) Ultra Premium Photo Paper LusterEpson Ultra Premium Photo Paper LusterEpson Ultra Premium Presentation Paper Matte Ultra Premium Presentation Paper MatteEpson Premium Presentation Paper MatteEpson Premium Presentation Paper Matte Double-sidedEpson Brochure & Flyer Paper Matte Double-sidedEpson Photo Quality Self-adhesive SheetsEpson Velvet Fine Art Paper Velvet Fine Art PaperEpson Metallic Photo Paper Glossy Metallic Photo GlossyEpson Metallic Photo Paper Luster Metallic Photo LusterEpson Hot Press Bright Hot Press BrightEpson Hot Press Natural Hot Press NaturalEpson Cold Press Bright Cold Press BrightEpson Cold Press Natural Cold Press NaturalEpson Exhibition Fiber Paper Exhibition Fiber PaperEpson Exhibition Watercolor Paper Textured Exhibition Watercolor TexturedEpson Watercolor Paper Radiant White Watercolor Paper - Radiant White
72
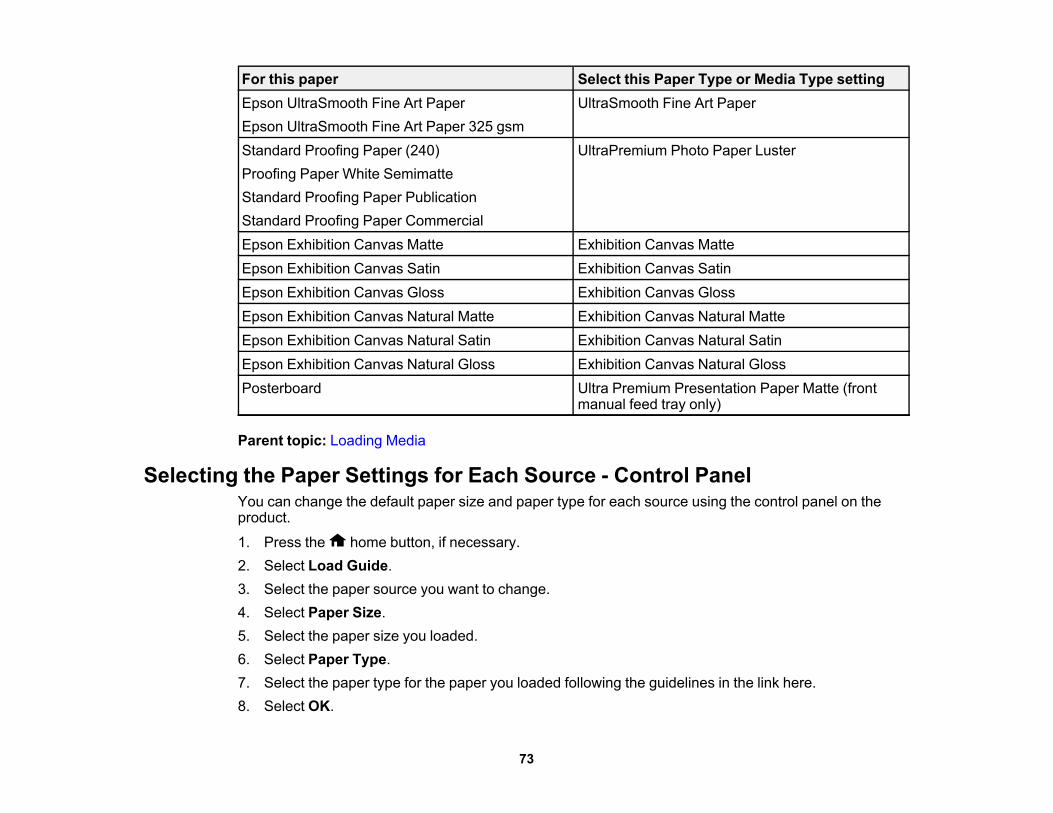
For this paper Select this Paper Type or Media Type settingEpson UltraSmooth Fine Art Paper UltraSmooth Fine Art PaperEpson UltraSmooth Fine Art Paper 325 gsmStandard Proofing Paper (240) UltraPremium Photo Paper LusterProofing Paper White SemimatteStandard Proofing Paper PublicationStandard Proofing Paper CommercialEpson Exhibition Canvas Matte Exhibition Canvas MatteEpson Exhibition Canvas Satin Exhibition Canvas SatinEpson Exhibition Canvas Gloss Exhibition Canvas GlossEpson Exhibition Canvas Natural Matte Exhibition Canvas Natural MatteEpson Exhibition Canvas Natural Satin Exhibition Canvas Natural SatinEpson Exhibition Canvas Natural Gloss Exhibition Canvas Natural GlossPosterboard Ultra Premium Presentation Paper Matte (front
manual feed tray only)
Parent topic: Loading Media
Selecting the Paper Settings for Each Source - Control PanelYou can change the default paper size and paper type for each source using the control panel on theproduct.
1. Press the home button, if necessary.2. Select Load Guide.3. Select the paper source you want to change.4. Select Paper Size.5. Select the paper size you loaded.6. Select Paper Type.7. Select the paper type for the paper you loaded following the guidelines in the link here.8. Select OK.
73
9. Repeat these steps to select another paper source to change.Paper or Media Type Settings - Control PanelParent topic: Loading Media
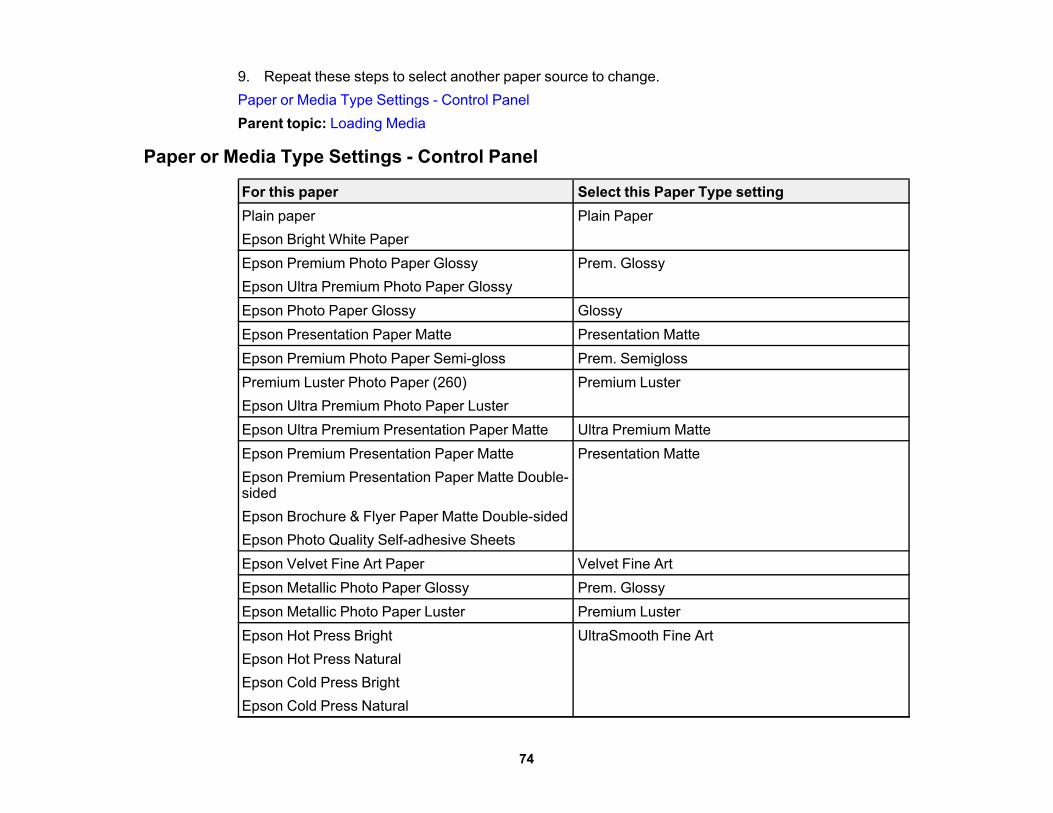
Paper or Media Type Settings - Control Panel
For this paper Select this Paper Type settingPlain paper Plain PaperEpson Bright White PaperEpson Premium Photo Paper Glossy Prem. GlossyEpson Ultra Premium Photo Paper GlossyEpson Photo Paper Glossy GlossyEpson Presentation Paper Matte Presentation MatteEpson Premium Photo Paper Semi-gloss Prem. SemiglossPremium Luster Photo Paper (260) Premium LusterEpson Ultra Premium Photo Paper LusterEpson Ultra Premium Presentation Paper Matte Ultra Premium MatteEpson Premium Presentation Paper Matte Presentation MatteEpson Premium Presentation Paper Matte Double-sidedEpson Brochure & Flyer Paper Matte Double-sidedEpson Photo Quality Self-adhesive SheetsEpson Velvet Fine Art Paper Velvet Fine ArtEpson Metallic Photo Paper Glossy Prem. GlossyEpson Metallic Photo Paper Luster Premium LusterEpson Hot Press Bright UltraSmooth Fine ArtEpson Hot Press NaturalEpson Cold Press BrightEpson Cold Press Natural
74
For this paper Select this Paper Type settingEpson Exhibition Fiber Paper Premium LusterEpson Exhibition Watercolor Paper Textured Watercolor PaperEpson Watercolor Paper Radiant WhiteEpson UltraSmooth Fine Art Paper UltraSmooth Fine ArtEpson UltraSmooth Fine Art Paper 325 gsmStandard Proofing Paper (240) Prem. SemiglossProofing Paper White SemimatteStandard Proofing Paper PublicationStandard Proofing Paper CommercialEpson Exhibition Canvas Matte UltraSmooth Fine ArtEpson Exhibition Canvas Natural MatteEpson Exhibition Canvas Satin Premium LusterEpson Exhibition Canvas GlossEpson Exhibition Canvas Natural SatinEpson Exhibition Canvas Natural GlossPosterboard UltraSmooth Fine Art
Parent topic: Selecting the Paper Settings for Each Source - Control Panel
Selecting the Default Paper Setup Display and Error Notice SettingsYou can select default paper setup display and error notice settings that apply to all print jobs using thecontrol panel on your product.
1. Press the home button, if necessary.
2. Press the setup button.
75
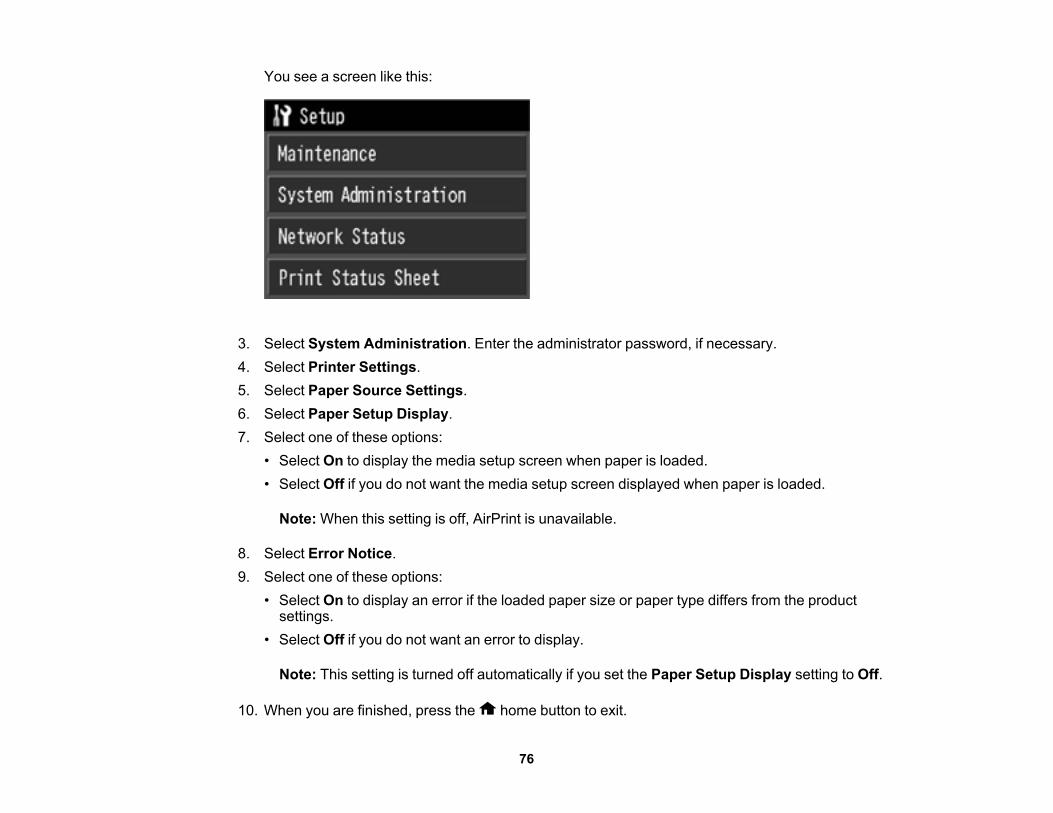
You see a screen like this:
3. Select System Administration. Enter the administrator password, if necessary.4. Select Printer Settings.5. Select Paper Source Settings.6. Select Paper Setup Display.7. Select one of these options:
• Select On to display the media setup screen when paper is loaded.• Select Off if you do not want the media setup screen displayed when paper is loaded.
Note: When this setting is off, AirPrint is unavailable.
8. Select Error Notice.9. Select one of these options:
• Select On to display an error if the loaded paper size or paper type differs from the productsettings.
• Select Off if you do not want an error to display.
Note: This setting is turned off automatically if you set the Paper Setup Display setting to Off.
10. When you are finished, press the home button to exit.
76

Parent topic: Loading Media
77
Printing from a ComputerBefore printing from your computer, make sure you have set up your product and installed its softwareas described on the Start Here sheet.
Note: If you have an Internet connection, it is a good idea to check for updates to your product softwareon Epson's support website. If you see a Software Update screen, select Enable automatic checkingand click OK. The update scans your system to see if you have the latest product software. Follow theon-screen instructions.
Printing with WindowsPrinting with OS X
Printing with WindowsYou can print with your product using any Windows application, as described in these sections.Selecting Basic Print Settings - WindowsSelecting Print Layout Options - WindowsSelecting Additional Settings - WindowsPrinting Your Document or Photo - WindowsSaving, Sharing, and Customizing the Printer SettingsSelecting Default Print Settings - WindowsChanging the Language of the Printer Software ScreensChanging Automatic Update OptionsParent topic: Printing from a Computer
Selecting Basic Print Settings - WindowsSelect the basic settings for the photo or document you want to print.1. Open a photo or document for printing.2. Select the print command in your application.
Note: You may need to select a print icon on your screen, the Print option in the File menu, oranother command. See your application's help utility for details.
78
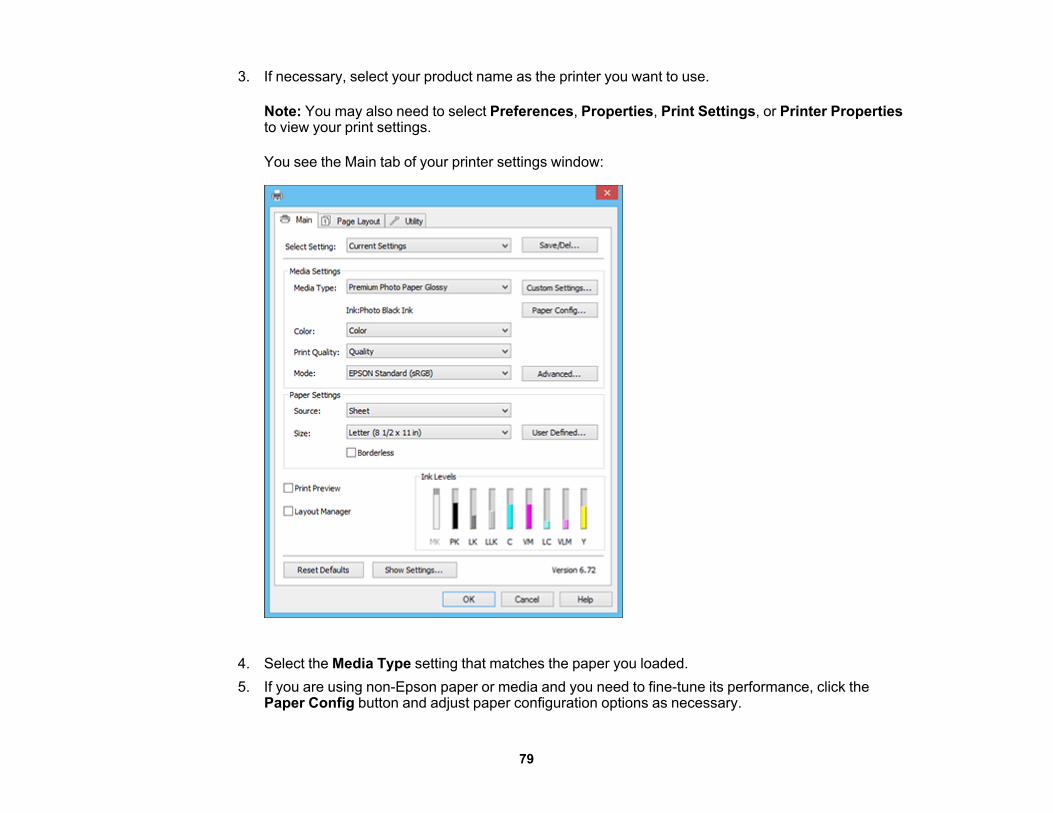
3. If necessary, select your product name as the printer you want to use.
Note: You may also need to select Preferences, Properties, Print Settings, or Printer Propertiesto view your print settings.
You see the Main tab of your printer settings window:
4. Select the Media Type setting that matches the paper you loaded.5. If you are using non-Epson paper or media and you need to fine-tune its performance, click the
Paper Config button and adjust paper configuration options as necessary.
79
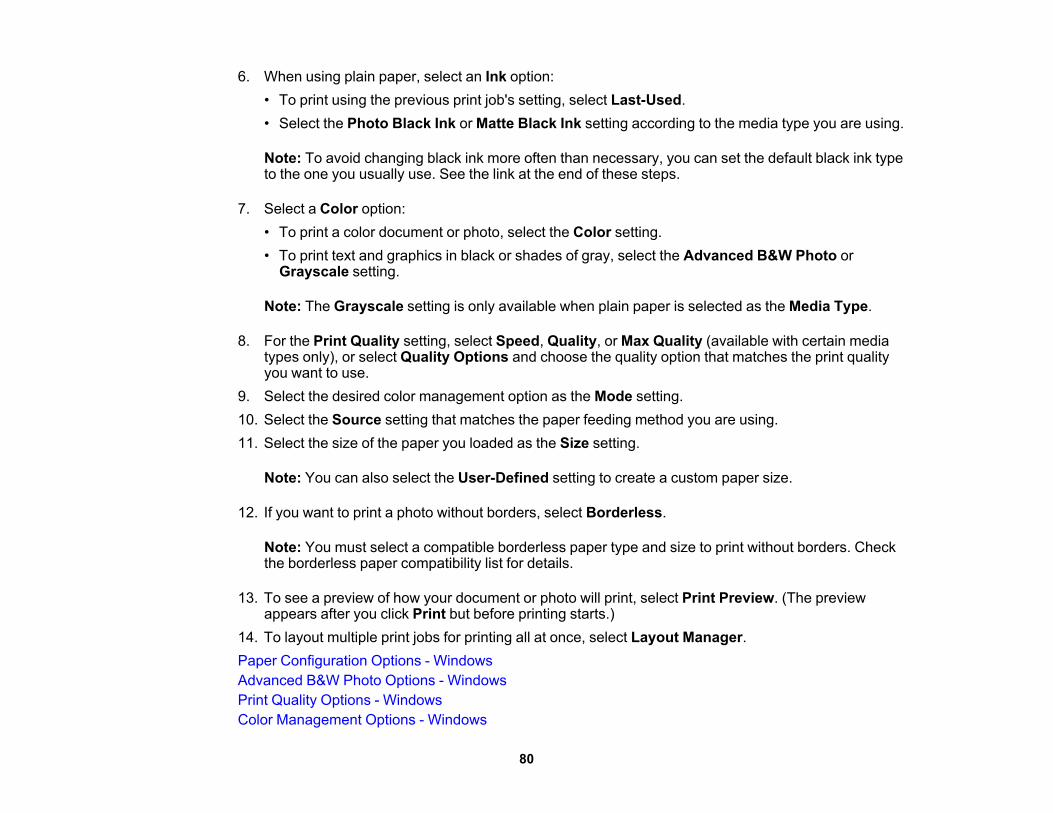
6. When using plain paper, select an Ink option:• To print using the previous print job's setting, select Last-Used.• Select the Photo Black Ink or Matte Black Ink setting according to the media type you are using.
Note: To avoid changing black ink more often than necessary, you can set the default black ink typeto the one you usually use. See the link at the end of these steps.
7. Select a Color option:• To print a color document or photo, select the Color setting.• To print text and graphics in black or shades of gray, select the Advanced B&W Photo or
Grayscale setting.
Note: The Grayscale setting is only available when plain paper is selected as the Media Type.
8. For the Print Quality setting, select Speed, Quality, or Max Quality (available with certain mediatypes only), or select Quality Options and choose the quality option that matches the print qualityyou want to use.
9. Select the desired color management option as the Mode setting.10. Select the Source setting that matches the paper feeding method you are using.11. Select the size of the paper you loaded as the Size setting.
Note: You can also select the User-Defined setting to create a custom paper size.
12. If you want to print a photo without borders, select Borderless.
Note: You must select a compatible borderless paper type and size to print without borders. Checkthe borderless paper compatibility list for details.
13. To see a preview of how your document or photo will print, select Print Preview. (The previewappears after you click Print but before printing starts.)
14. To layout multiple print jobs for printing all at once, select Layout Manager.Paper Configuration Options - WindowsAdvanced B&W Photo Options - WindowsPrint Quality Options - WindowsColor Management Options - Windows
80
Advanced Color Controls - WindowsPaper Source Options - WindowsUsing Layout Manager - Windows OnlyParent topic: Printing with WindowsRelated tasksPrinting Your Document or Photo - Windows
Paper Configuration Options - WindowsSelect any of the available Paper Configuration options to fine-tune the quality of your print.
Color DensityAdjusts the ink saturation level.
81
Drying Time per Print Head PassPauses print head movement for up to 5 seconds after each pass to allow ink to dry. This lets youprint with non-Epson media and avoid smearing the ink.
Paper Feed AdjustmentModifies the speed of the paper feeding to compensate for banding in the direction of the print head.
Paper ThicknessLets you select the thickness of your paper or media.
Platen GapAdjusts the distance from the paper to the print head. (Use a wider setting if you are seeing edgemarks or scuffs on your prints.)
Parent topic: Selecting Basic Print Settings - WindowsAdvanced B&W Photo Options - Windows
If you select Advanced B&W Photo as the Color option, you can easily produce neutral and tonedblack-and-white prints. Whether your photo is color or grayscale, you can use this screening and colormanagement technology to create stunning black-and-white prints. You can select any of the availableoptions.Color Toning
Adds tone (hue) to your black-and-white output. The default is Neutral, which provides a neutral tonalscale print. You can also choose other popular presets such as Cool, Warm, and Sepia. Note thatthe presets affect the target found in the tone color circle.
ToneChanges the entire tonal scale of your black-and-white output. While Darker is the default setting, youmay see better results if you choose Dark. The tone color circle adjusts the hue of your black-and-white print. Click on any portion of the color wheel or enter corresponding values to customize thetone (hue) to add to your print. The closer you select to the edge of the wheel, the more color you add.
BrightnessAdjusts the overall lightness and darkness of your image.
ContrastAdjusts the difference between the light and dark areas of your image.
Shadow TonalityControls tonality only in the shadow areas of your image.
Highlight TonalityControls tonality only in the highlight areas of your image.
82
Max Optical DensityAdjusts the overall density or focus of the print. Create a soft focus print by lowering the densitysetting.
Highlight Point ShiftHelps reduce gloss differential on glossy media by adding density to the highlights of your image.
Parent topic: Selecting Basic Print Settings - WindowsPrint Quality Options - Windows
You can use the Speed/Quality slider to set the desired quality level, and select any of the availableQuality options to fine-tune the quality of your print. Some settings may be unavailable, depending on thepaper type and border setting you have chosen.High Speed
Speeds up printing but may reduce print quality.Edge Smoothing
Smooths jagged edges in low-resolution images such as screen captures or images from the Web.Finest Detail
Sharpens edges on vector-based data including text, graphics, and line art. (This setting does notaffect photographs.)
Parent topic: Selecting Basic Print Settings - WindowsColor Management Options - Windows
You can adjust the Mode setting to fine-tune the colors in your printout, or turn off color management inyour printer software.EPSON Standard (sRGB)
Increases the contrast in images. Click the Advanced button to use advanced color controls.Adobe RGB
Matches image colors to the Adobe RGB color standard. Use this setting if your source file wascaptured in Adobe RGB. Click the Advanced button to use advanced color controls.
PhotoEnhanceLets you choose from various Scene Correction settings to automatically analyze your photos.
Note: PhotoEnhance uses a sophisticated face recognition technology to optimize photos that includefaces. For this to work, both eyes and the nose must be visible in the subject's face. If your photoincludes a face with an intentional color cast, such as a statue, you may want to turn offPhotoEnhance to retain the special color effects.
83
ICMAutomatically adjusts colors based on the printer’s ICC profile and the selected Media Type setting,using the Image Color Matching system. Click the Advanced button to choose the input profile andother settings.
Note: In most cases, you get better results by applying color management in your application, ratherthan in the printer driver.
Off (No Color Adjustment)Turns off color management in your printer software so you can manage color using only yourapplication software.
Note: An ICC profile is required if color management is turned off.
Parent topic: Selecting Basic Print Settings - Windows
84
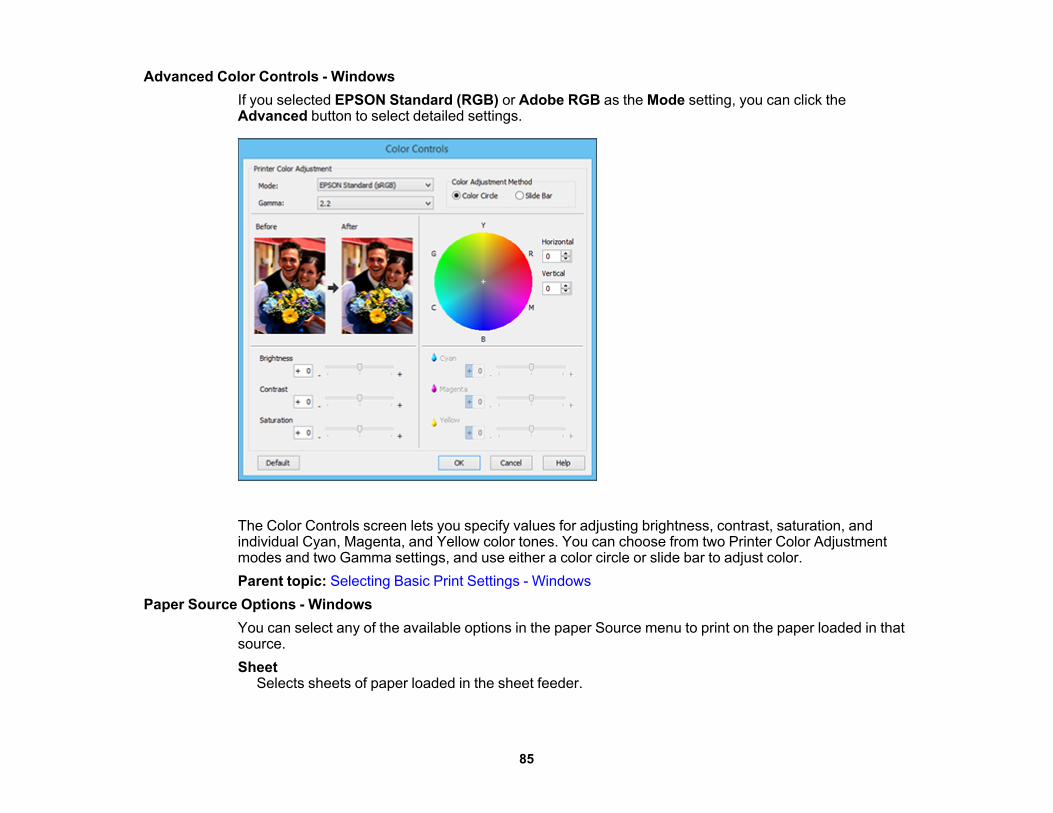
Advanced Color Controls - WindowsIf you selected EPSON Standard (RGB) or Adobe RGB as the Mode setting, you can click theAdvanced button to select detailed settings.
The Color Controls screen lets you specify values for adjusting brightness, contrast, saturation, andindividual Cyan, Magenta, and Yellow color tones. You can choose from two Printer Color Adjustmentmodes and two Gamma settings, and use either a color circle or slide bar to adjust color.Parent topic: Selecting Basic Print Settings - Windows
Paper Source Options - WindowsYou can select any of the available options in the paper Source menu to print on the paper loaded in thatsource.Sheet
Selects sheets of paper loaded in the sheet feeder.
85
Roll PaperSelects roll paper loaded in the optional roll paper unit for photos or panoramics up to 27 inches (68.6cm) long. Click Roll Paper Option and select Print Page Frame to print a cutting guideline aroundeach photo.
Roll Paper (Banner)Selects roll paper loaded in the optional roll paper unit for photos or banners over 27 inches (68.6 cm)long.
Front - Fine ArtSelects fine art paper loaded in the front manual feed tray.
Front - Poster BoardSelects poster board or other thick media loaded in the front manual feed tray.
Parent topic: Selecting Basic Print Settings - Windows
86
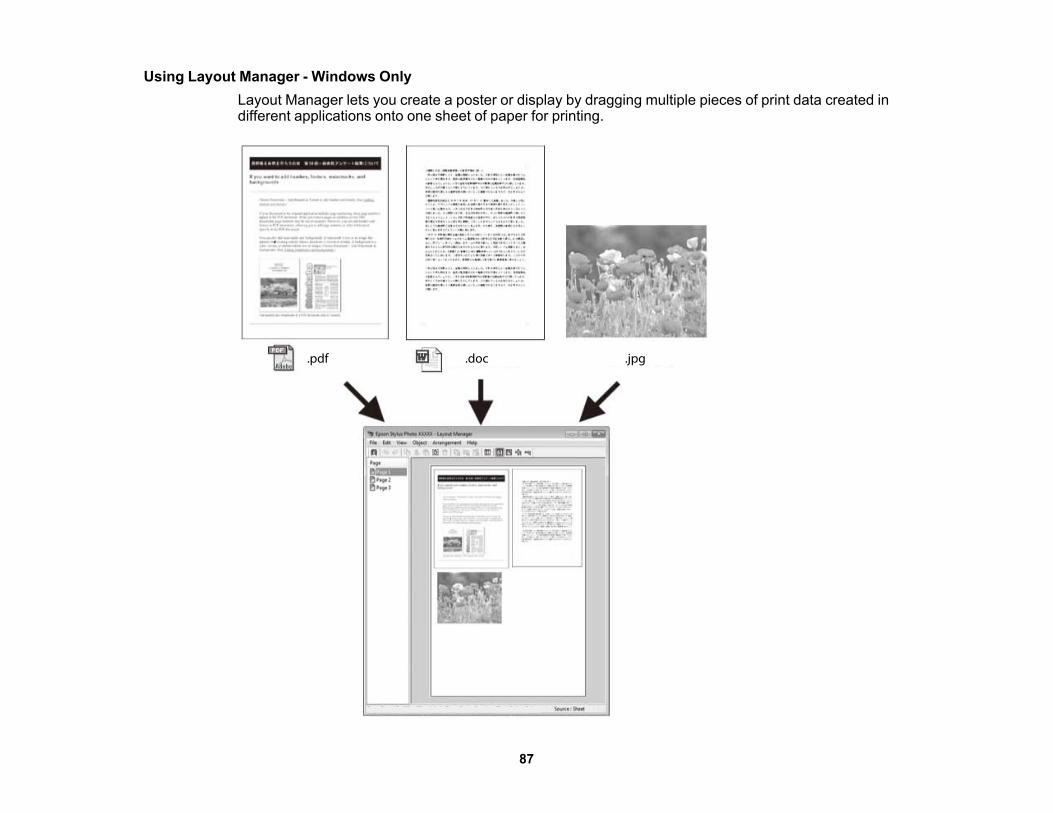
Using Layout Manager - Windows OnlyLayout Manager lets you create a poster or display by dragging multiple pieces of print data created indifferent applications onto one sheet of paper for printing.
87
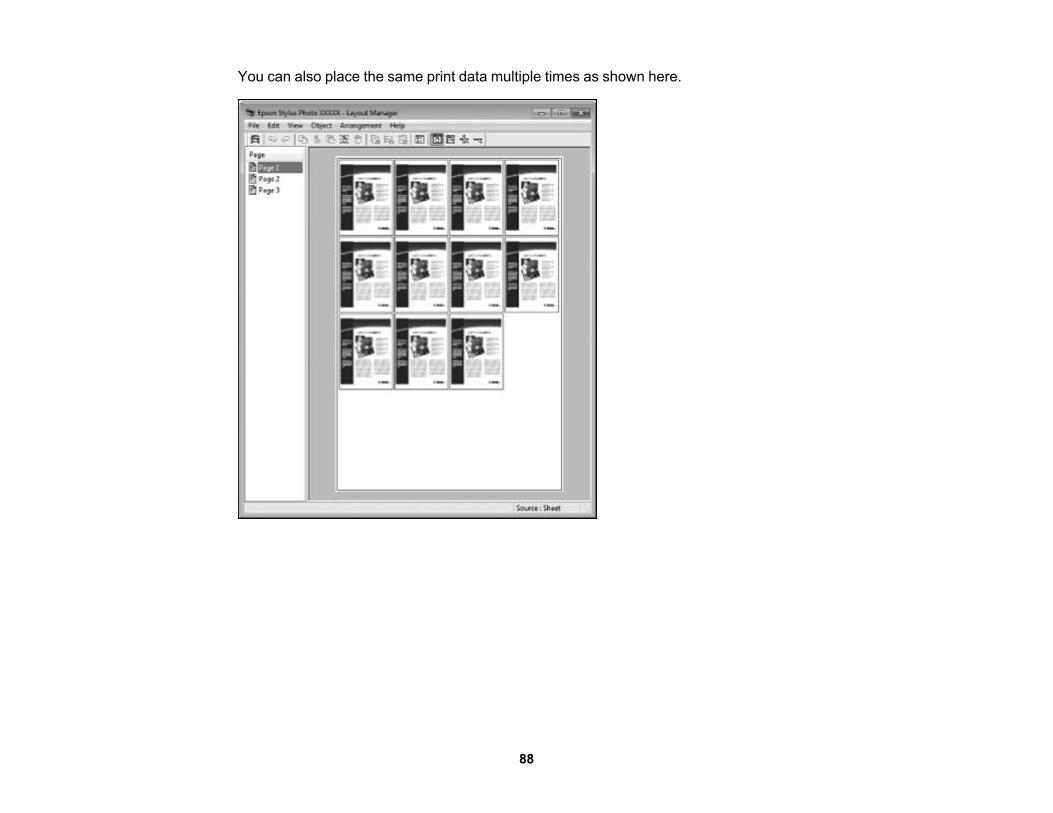
You can also place the same print data multiple times as shown here.
88
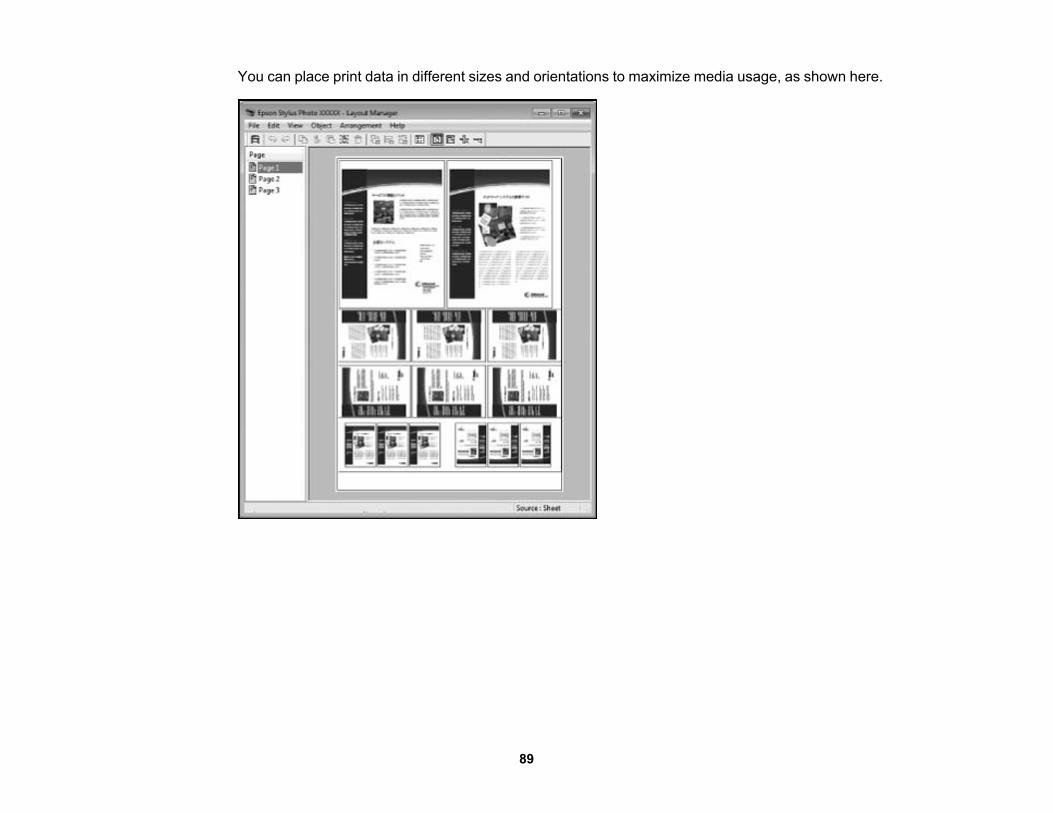
You can place print data in different sizes and orientations to maximize media usage, as shown here.
89
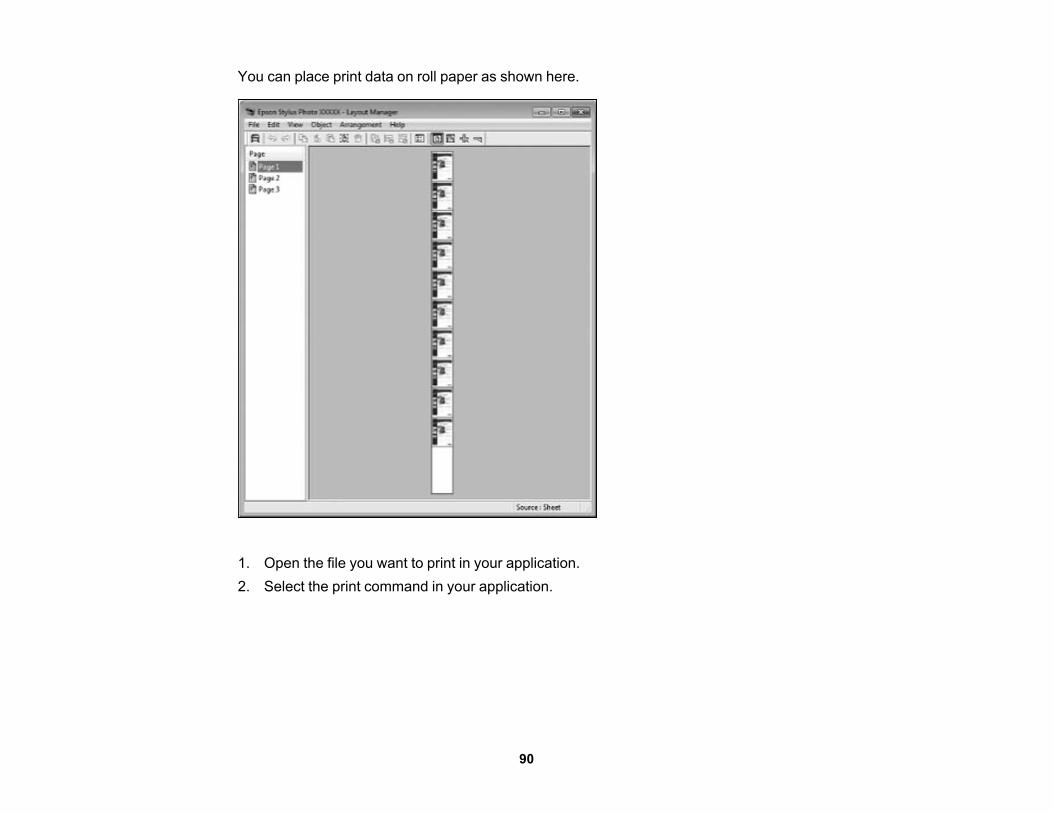
You can place print data on roll paper as shown here.
1. Open the file you want to print in your application.2. Select the print command in your application.
90
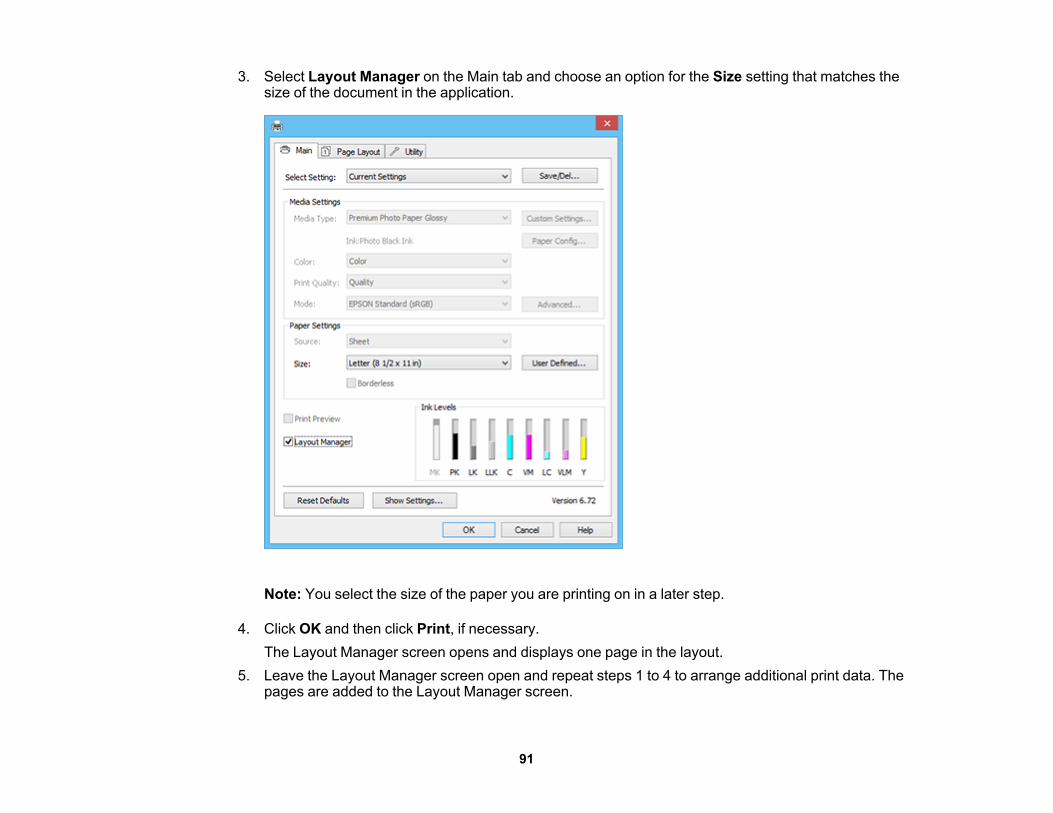
3. Select Layout Manager on the Main tab and choose an option for the Size setting that matches thesize of the document in the application.
Note: You select the size of the paper you are printing on in a later step.
4. Click OK and then click Print, if necessary.The Layout Manager screen opens and displays one page in the layout.
5. Leave the Layout Manager screen open and repeat steps 1 to 4 to arrange additional print data. Thepages are added to the Layout Manager screen.
91
6. Do the following to arrange objects on the Layout Manager screen:• Drag pages to move and resize them.• Use the tool buttons and the Object menu to align and rotate pages.• Resize and replace whole pages in the Preference or Arrangement Settings screens.
Note: See the Layout Manager screen help for more details.
7. Click File > Properties, then select your print settings on the Main tab.8. Click the File menu on the Layout Manager screen and click Print.
Note: To save the current job to a file, click the File menu on the Layout Manager screen, save thefile, and close the Layout Manager screen. To open the saved file later for editing or reprinting, right-click the printer icon in the Windows taskbar, select Layout Manager, and open the file.
Parent topic: Selecting Basic Print Settings - Windows
92
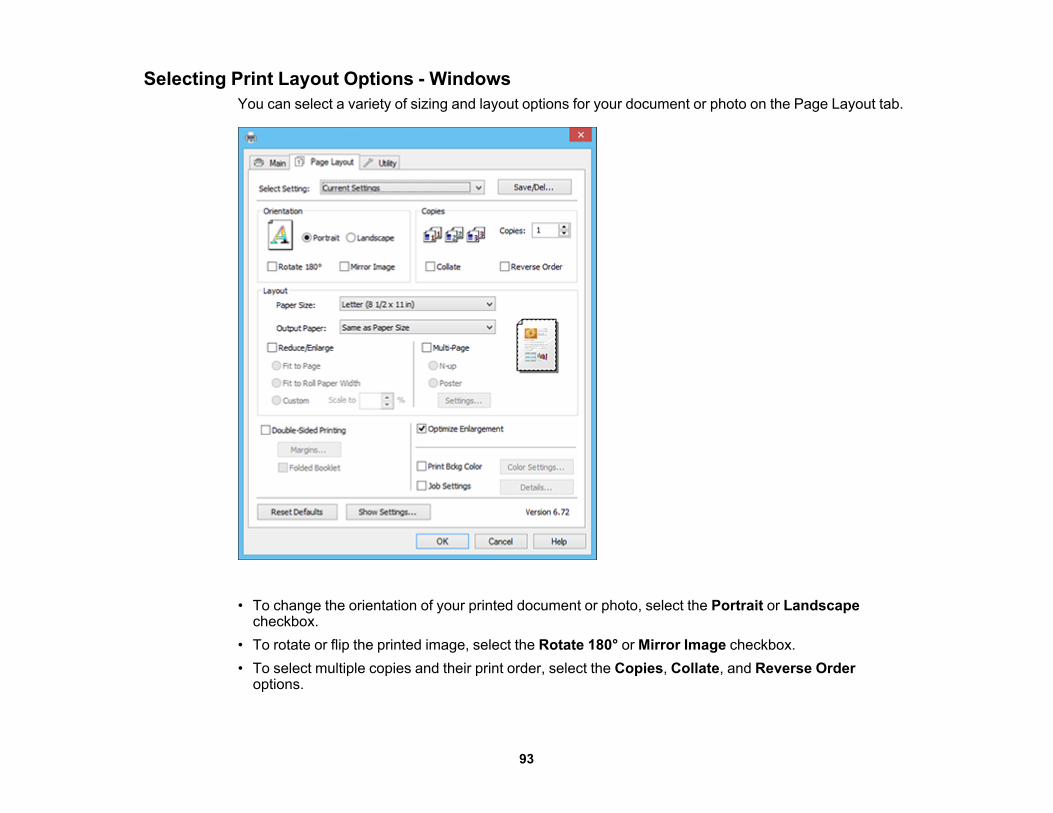
Selecting Print Layout Options - WindowsYou can select a variety of sizing and layout options for your document or photo on the Page Layout tab.
• To change the orientation of your printed document or photo, select the Portrait or Landscapecheckbox.
• To rotate or flip the printed image, select the Rotate 180° or Mirror Image checkbox.• To select multiple copies and their print order, select the Copies, Collate, and Reverse Order
options.
93
• To change the size of your printed document or photo, select the Reduce/Enlarge checkbox andselect sizing options.
• To print multiple pages on one sheet of paper, or print one image on multiple sheets of paper, selectthe Multi-Page checkbox and select the options you want.
• To print on both sides of your paper, select the Double-Sided Printing options.
Note: Your product software prompts you to reinsert your paper when it is time to print on the reverseside.
• To enlarge your image beyond the limits of your application program, select Optimize Enlargement.
Note: The driver can increase the image size up to 650% and decrease the output resolution to staywithin the pixel limitations. Depending on the resolution of the original image and the print size, youmay see reduced print quality.
• To print a color background on the page, select Print Bckg Color and click Color Settings to selectthe color you want to use.
• To print the time, date, and other information about your print job at the top or bottom of the page,select Job Settings and click Details to select the settings you want to use.
Reduce/Enlarge Options - WindowsMulti-Page Printing Options - WindowsDouble-sided Printing Options - WindowsParent topic: Printing with Windows
Reduce/Enlarge Options - WindowsYou can select any of the Reduce/Enlarge options to size your printed image.Fit to Page
Sizes your printed image to fit on the paper you loaded and selected as the Output Paper setting.Fit to Roll Paper Width
Sizes your printed image to fit the width of the roll paper you loaded.Custom
Sizes your printed image by the percentage you select as the Scale to setting.Parent topic: Selecting Print Layout Options - Windows
Multi-Page Printing Options - WindowsYou can select these Multi-Page options to set up your multi-page print job.
94
N-upPrints 2 (2-up) or 4 (4-up) pages on one sheet of paper.
PosterPrints one image on multiple sheets of paper to create a large poster with or without borders. Click theSettings button to select the layout and guideline options.
Parent topic: Selecting Print Layout Options - WindowsDouble-sided Printing Options - Windows
You can select any of the double-sided options to set up your double-sided print job.Margins
Click Margins to customize the margins used during double-sided printing.Binding Edge Options
Select a setting that orients double-sided print binding in the desired direction.Binding Margin Options
Select options that define a wider margin to allow for binding.Folded Booklet Option
Select a binding option to use when creating a folded booklet.Parent topic: Selecting Print Layout Options - Windows
Selecting Additional Settings - WindowsYou can run maintenance utilities and select additional settings that apply to all the print jobs you send toyour product.1. Access the Windows Desktop and right-click the product icon in the Windows taskbar.2. Select Printer Settings.3. Click the Utility tab.
95

You see a window like this:
4. Select any of the following options, as necessary:• Nozzle Check to print a nozzle check pattern to check whether the print head nozzles are
clogged.• Head Cleaning to clean the print head if you notice banding or gaps in your printouts.• Print Head Alignment to align the print head if printouts appear grainy or out of focus.• Epson Status Monitor 3 to check the printer's status.
96
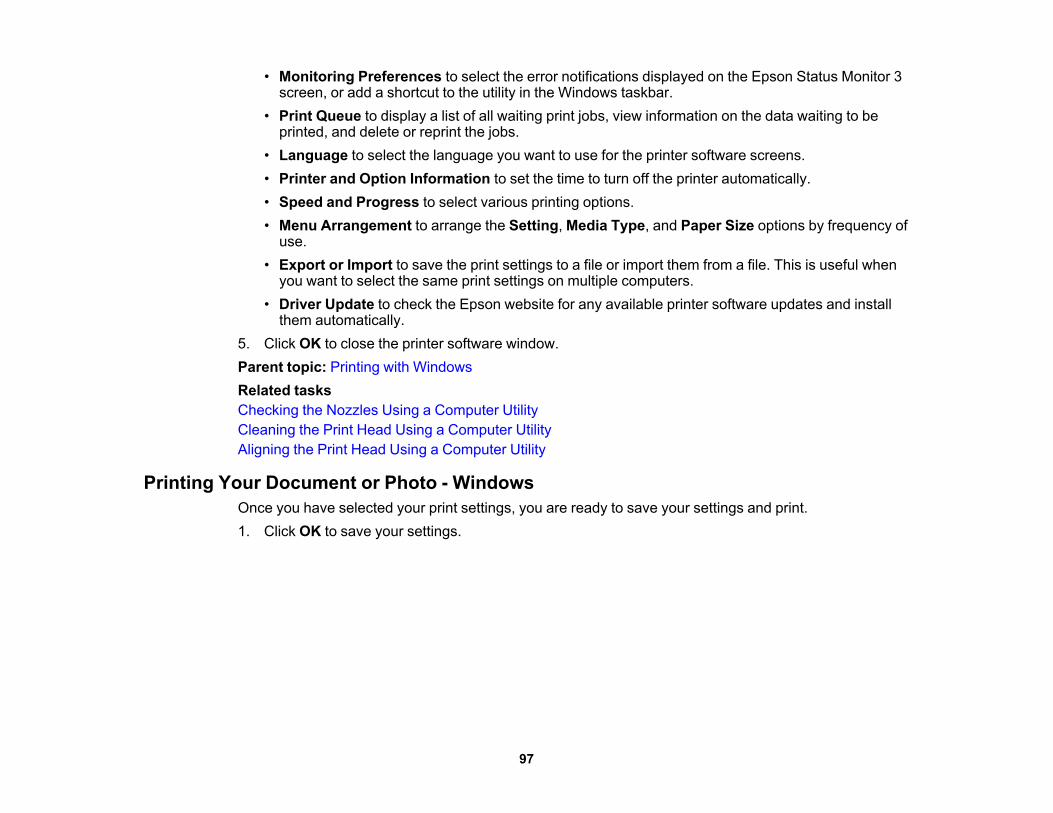
• Monitoring Preferences to select the error notifications displayed on the Epson Status Monitor 3screen, or add a shortcut to the utility in the Windows taskbar.
• Print Queue to display a list of all waiting print jobs, view information on the data waiting to beprinted, and delete or reprint the jobs.
• Language to select the language you want to use for the printer software screens.• Printer and Option Information to set the time to turn off the printer automatically.• Speed and Progress to select various printing options.• Menu Arrangement to arrange the Setting, Media Type, and Paper Size options by frequency of
use.• Export or Import to save the print settings to a file or import them from a file. This is useful when
you want to select the same print settings on multiple computers.• Driver Update to check the Epson website for any available printer software updates and install
them automatically.5. Click OK to close the printer software window.Parent topic: Printing with WindowsRelated tasksChecking the Nozzles Using a Computer UtilityCleaning the Print Head Using a Computer UtilityAligning the Print Head Using a Computer Utility
Printing Your Document or Photo - WindowsOnce you have selected your print settings, you are ready to save your settings and print.1. Click OK to save your settings.
97
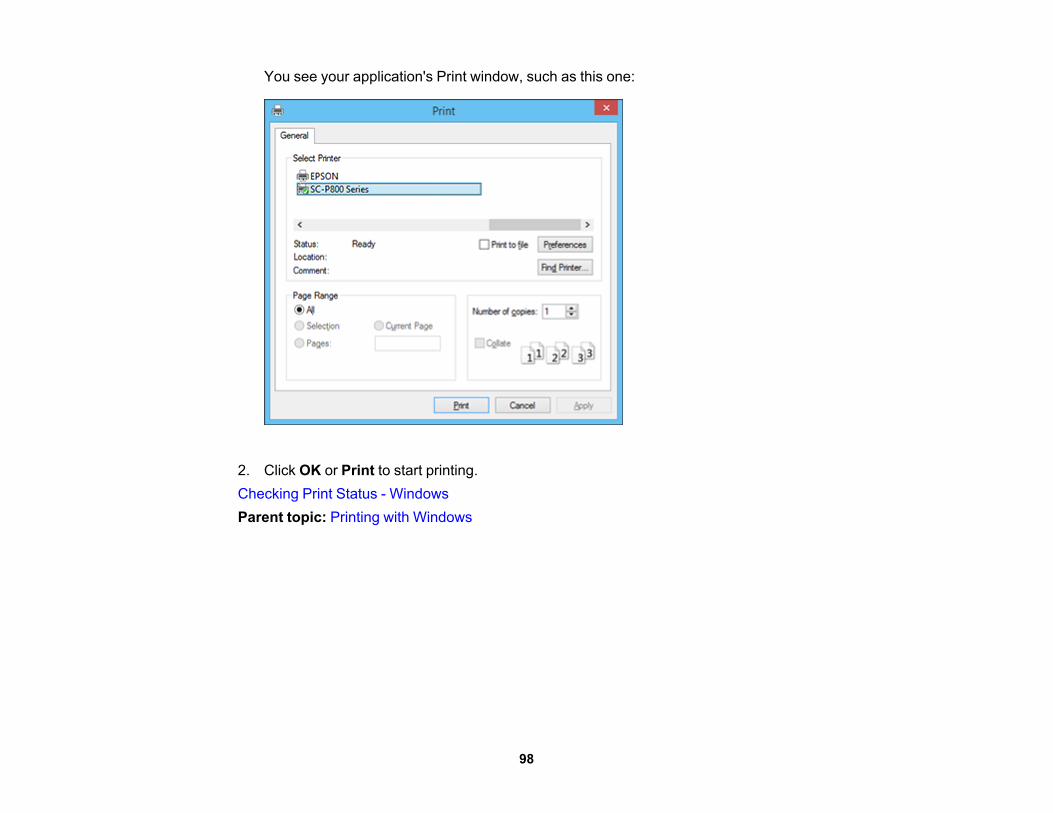
You see your application's Print window, such as this one:
2. Click OK or Print to start printing.Checking Print Status - WindowsParent topic: Printing with Windows
98
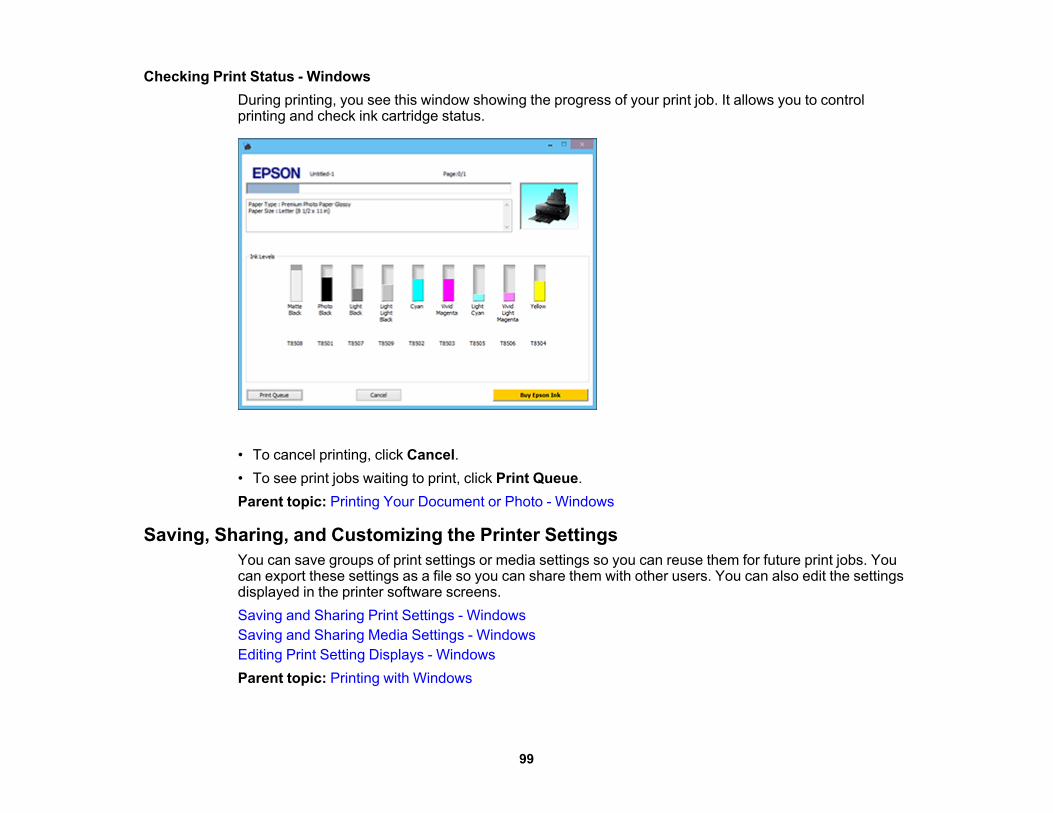
Checking Print Status - WindowsDuring printing, you see this window showing the progress of your print job. It allows you to controlprinting and check ink cartridge status.
• To cancel printing, click Cancel.• To see print jobs waiting to print, click Print Queue.Parent topic: Printing Your Document or Photo - Windows
Saving, Sharing, and Customizing the Printer SettingsYou can save groups of print settings or media settings so you can reuse them for future print jobs. Youcan export these settings as a file so you can share them with other users. You can also edit the settingsdisplayed in the printer software screens.Saving and Sharing Print Settings - WindowsSaving and Sharing Media Settings - WindowsEditing Print Setting Displays - WindowsParent topic: Printing with Windows
99
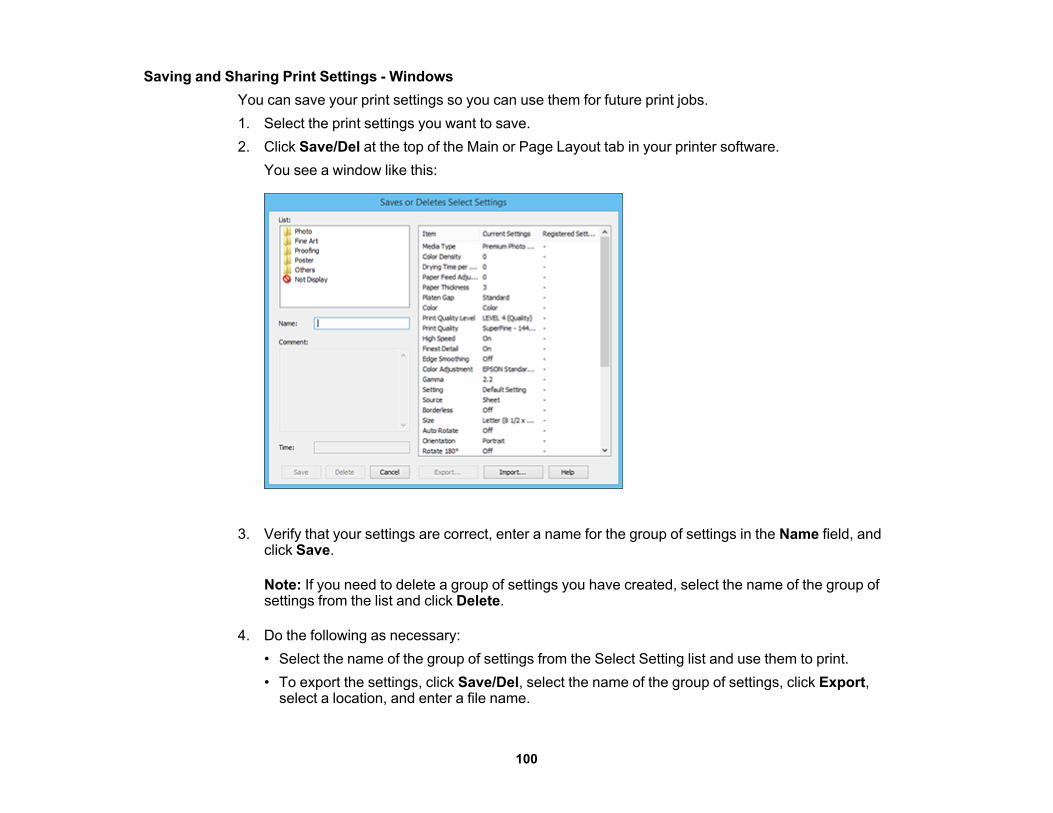
Saving and Sharing Print Settings - WindowsYou can save your print settings so you can use them for future print jobs.1. Select the print settings you want to save.2. Click Save/Del at the top of the Main or Page Layout tab in your printer software.
You see a window like this:
3. Verify that your settings are correct, enter a name for the group of settings in the Name field, andclick Save.
Note: If you need to delete a group of settings you have created, select the name of the group ofsettings from the list and click Delete.
4. Do the following as necessary:• Select the name of the group of settings from the Select Setting list and use them to print.• To export the settings, click Save/Del, select the name of the group of settings, click Export,
select a location, and enter a file name.
100
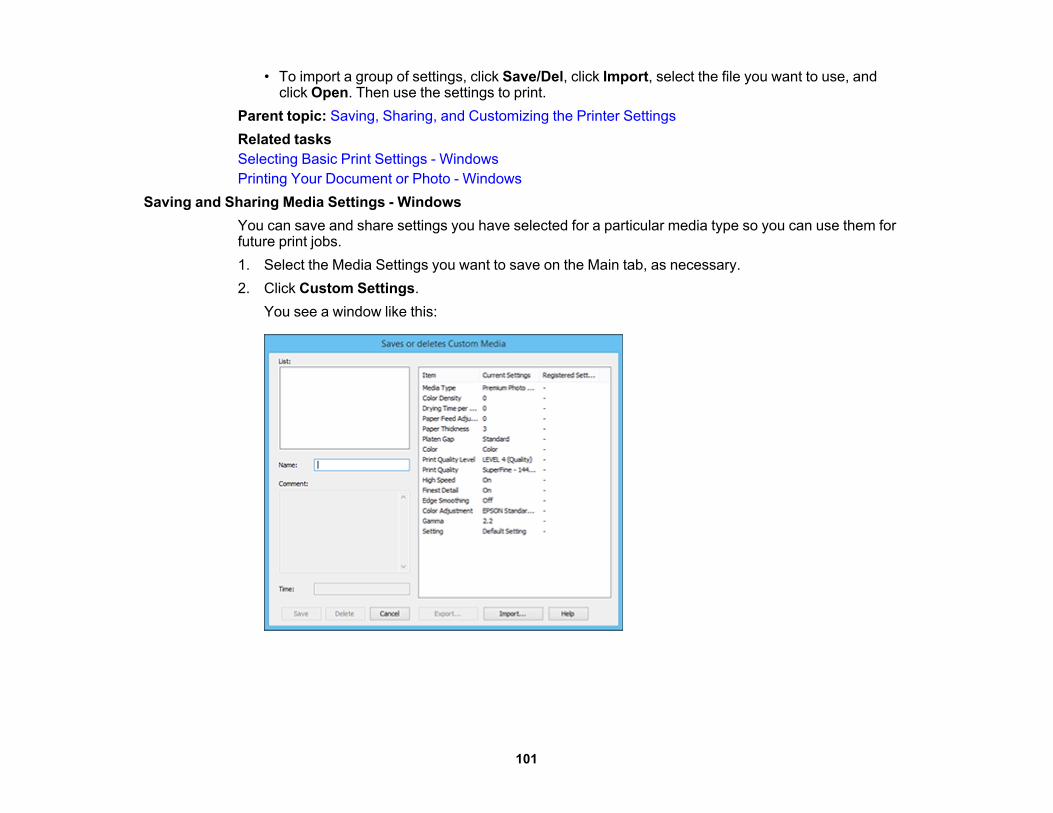
• To import a group of settings, click Save/Del, click Import, select the file you want to use, andclick Open. Then use the settings to print.
Parent topic: Saving, Sharing, and Customizing the Printer SettingsRelated tasksSelecting Basic Print Settings - WindowsPrinting Your Document or Photo - Windows
Saving and Sharing Media Settings - WindowsYou can save and share settings you have selected for a particular media type so you can use them forfuture print jobs.1. Select the Media Settings you want to save on the Main tab, as necessary.2. Click Custom Settings.
You see a window like this:
101
3. Verify that your settings are correct, enter a name for the media settings in the Name field, and clickSave.
Note: If you need to delete a group of settings you have created, select the name of the settingsfrom the list and click Delete.
4. Do the following as necessary:• Select the name of a media setting as the Media Type setting and use it to print.• To export the settings, click Custom Settings, select the name of the media settings, click
Export, select a location, and enter a file name.• To import settings, click Custom Settings, select the name of the media settings, click Import,
select the file you want to use, and click Open. Then use these settings to print.Parent topic: Saving, Sharing, and Customizing the Printer SettingsRelated tasksSelecting Basic Print Settings - WindowsPrinting Your Document or Photo - Windows
Editing Print Setting Displays - WindowsYou can arrange the displayed print settings so you can easily select the settings you use most often.1. Click the Utility tab in the printer software.2. Select Menu Arrangement.
102
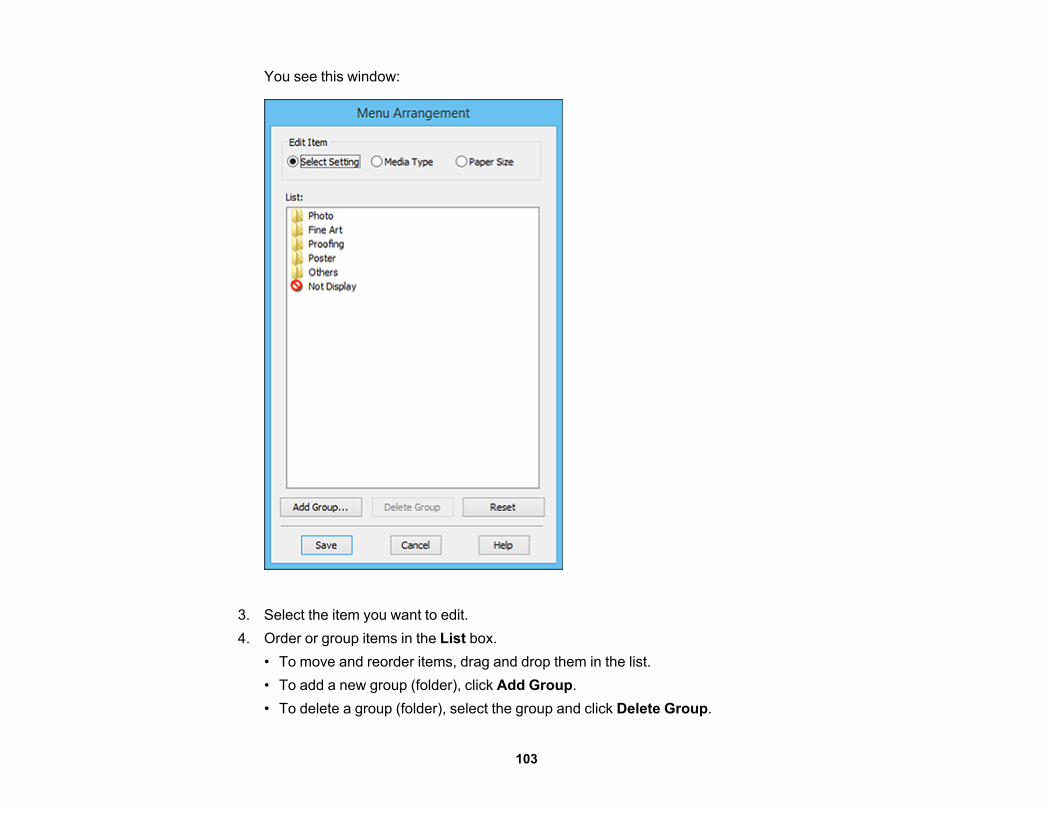
You see this window:
3. Select the item you want to edit.4. Order or group items in the List box.
• To move and reorder items, drag and drop them in the list.• To add a new group (folder), click Add Group.• To delete a group (folder), select the group and click Delete Group.
103
• To hide a group, drag and drop it to Not Display.
Note: If you delete a group, the group folder is deleted but the items within the folder remain.
5. Click Save.Parent topic: Saving, Sharing, and Customizing the Printer Settings
Selecting Default Print Settings - WindowsWhen you change your print settings in a program, the changes apply only while you are printing in thatprogram session. If you want to change the print settings you use in all your Windows programs, you canselect new default print settings.1. Access the Windows Desktop and right-click the product icon in the Windows taskbar.2. Select Printer Settings.
104
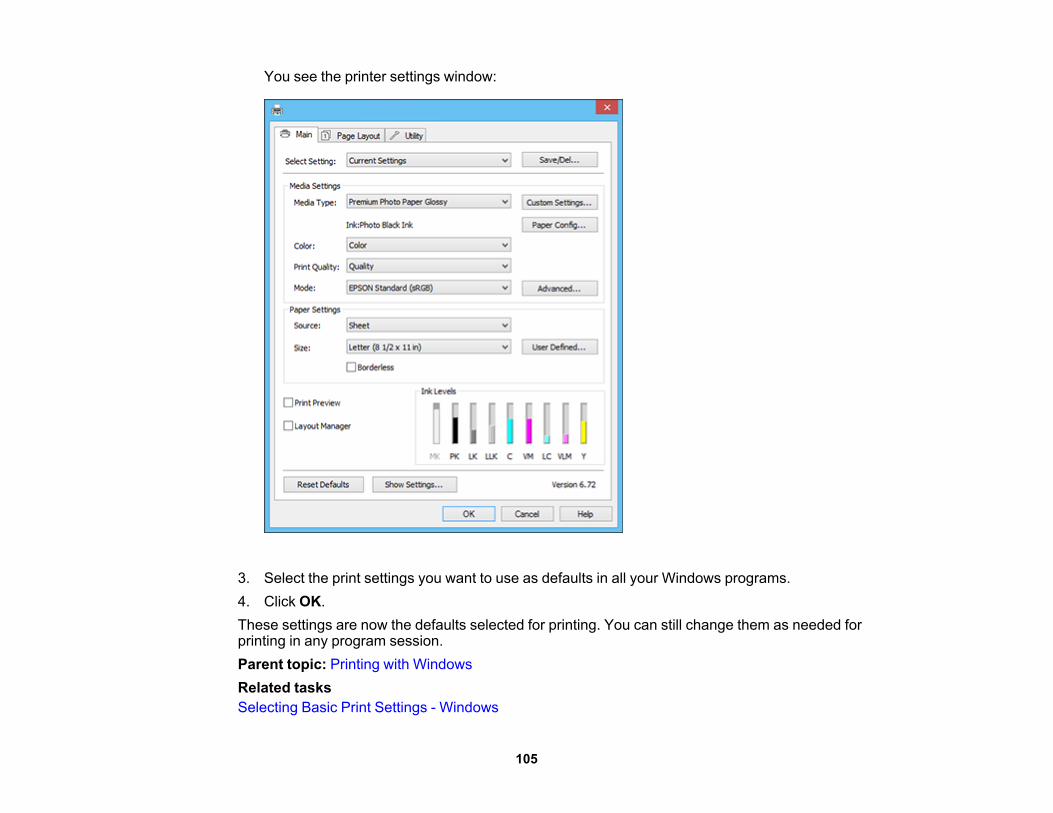
You see the printer settings window:
3. Select the print settings you want to use as defaults in all your Windows programs.4. Click OK.These settings are now the defaults selected for printing. You can still change them as needed forprinting in any program session.Parent topic: Printing with WindowsRelated tasksSelecting Basic Print Settings - Windows
105
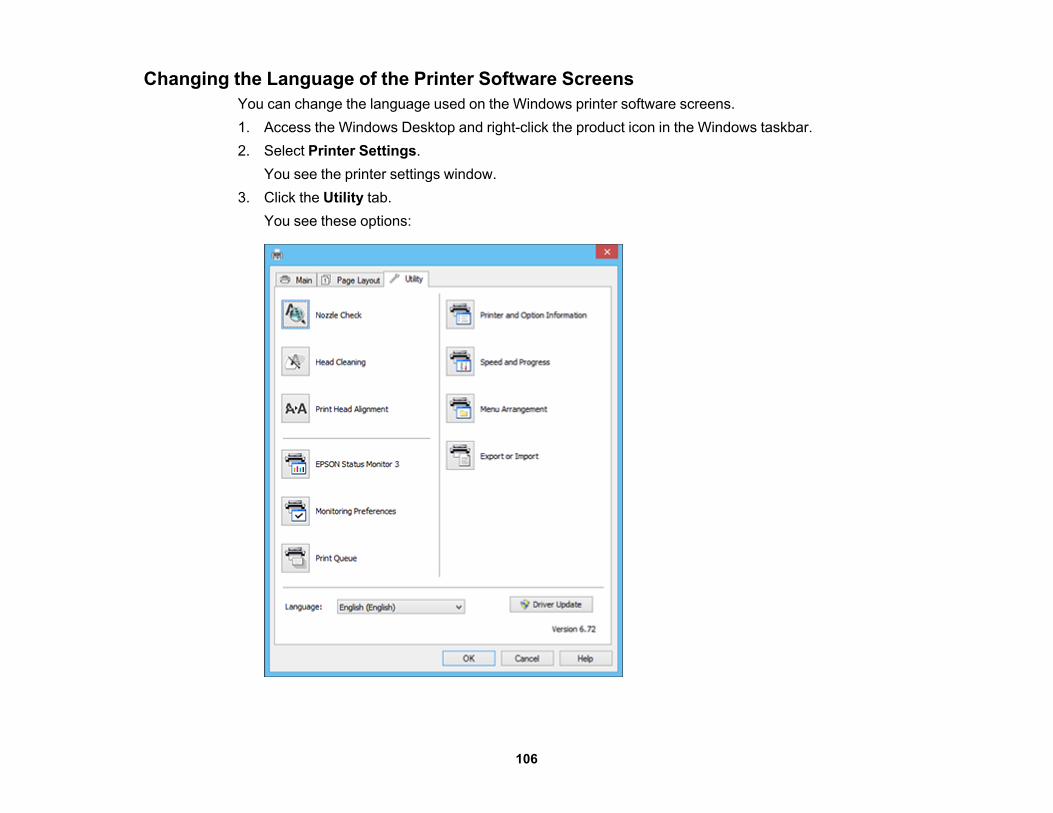
Changing the Language of the Printer Software ScreensYou can change the language used on the Windows printer software screens.1. Access the Windows Desktop and right-click the product icon in the Windows taskbar.2. Select Printer Settings.
You see the printer settings window.3. Click the Utility tab.
You see these options:
106

4. Select the language you want to use as the Language setting.5. Click OK to close the printer software window.The printer software screens appear in the language you selected the next time you access them.Parent topic: Printing with Windows
Changing Automatic Update OptionsYour printer software for Windows automatically checks for updates to the product software. You canchange how often the software checks for updates or disable this feature.1. Access the Windows Desktop and right-click the product icon in the Windows taskbar.2. Select Software Update Settings.
You see this window:
3. Do one of the following:• To change how often the software checks for updates, select a setting in the Check every menu.• To disable the automatic update feature, select the Never option.
4. Click OK to exit.
Note: If you choose to disable the automatic update feature, you can check for updates manually.
Parent topic: Printing with Windows
107
Related tasksChecking for Software Updates
Printing with OS XYou can print with your product using any OS X printing program, as described in these sections.
Note: If you have an Internet connection, it is a good idea to check for updates to your product softwareon Epson's support website.
Selecting Basic Print Settings - OS XSelecting Roll Paper Settings - OS XSelecting Paper Configuration Settings - OS XSelecting Print Layout Options - OS XManaging Color - OS XSizing Printed Images - OS XSelecting Printing Preferences - OS XPrinting Your Document or Photo - OS XParent topic: Printing from a Computer
Selecting Basic Print Settings - OS XSelect the basic settings for the photo or document you want to print.1. Open a photo or document for printing.2. Select the print command in your application.
Note: You may need to select a print icon on your screen, the Print option in the File menu, oranother command. See your application's help utility for details.
108
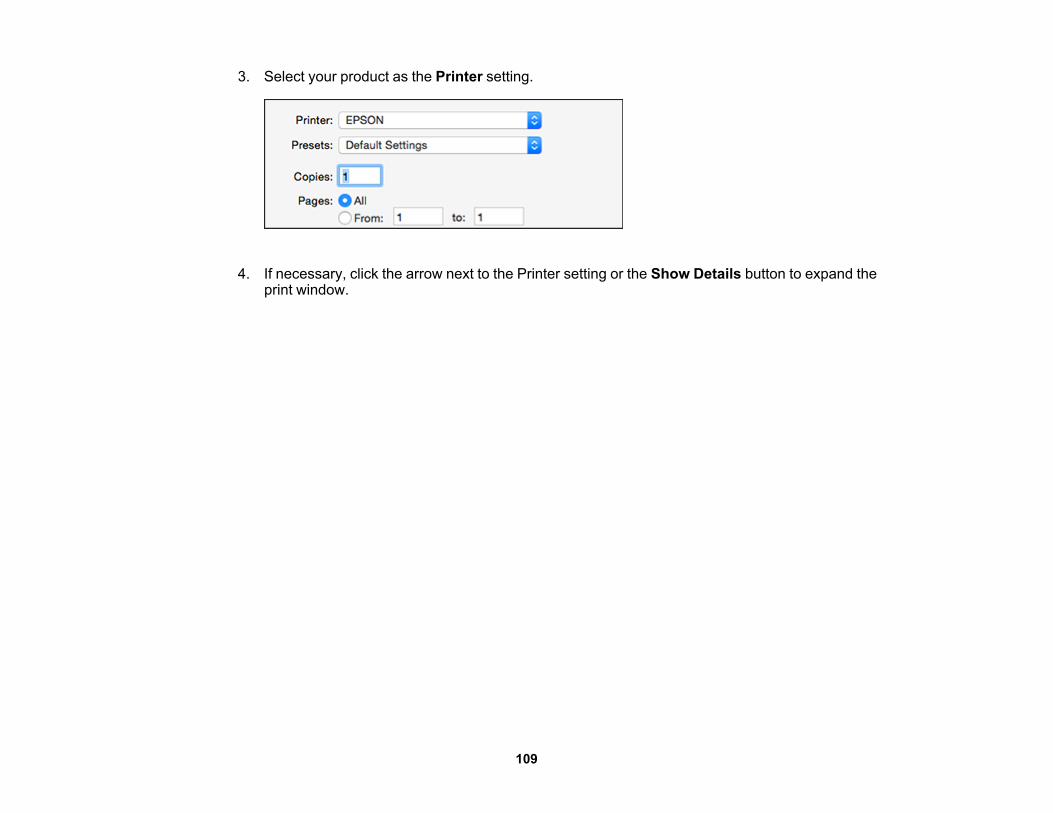
3. Select your product as the Printer setting.
4. If necessary, click the arrow next to the Printer setting or the Show Details button to expand theprint window.
109
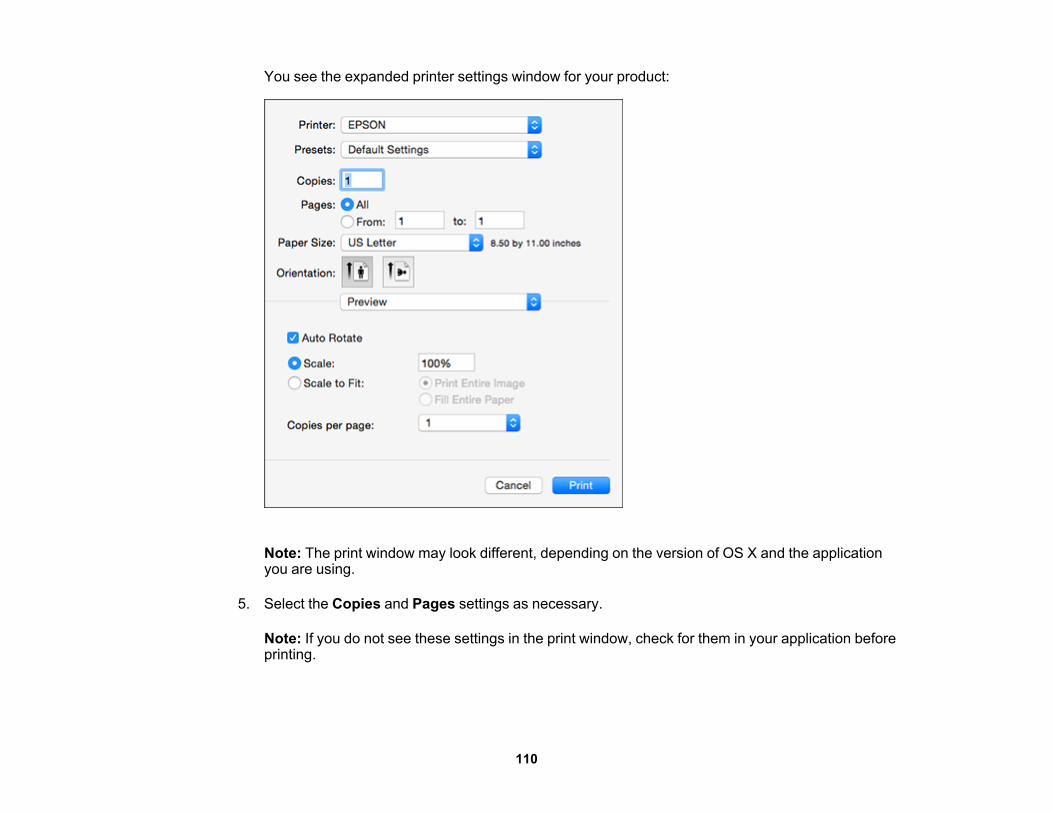
You see the expanded printer settings window for your product:
Note: The print window may look different, depending on the version of OS X and the applicationyou are using.
5. Select the Copies and Pages settings as necessary.
Note: If you do not see these settings in the print window, check for them in your application beforeprinting.
110
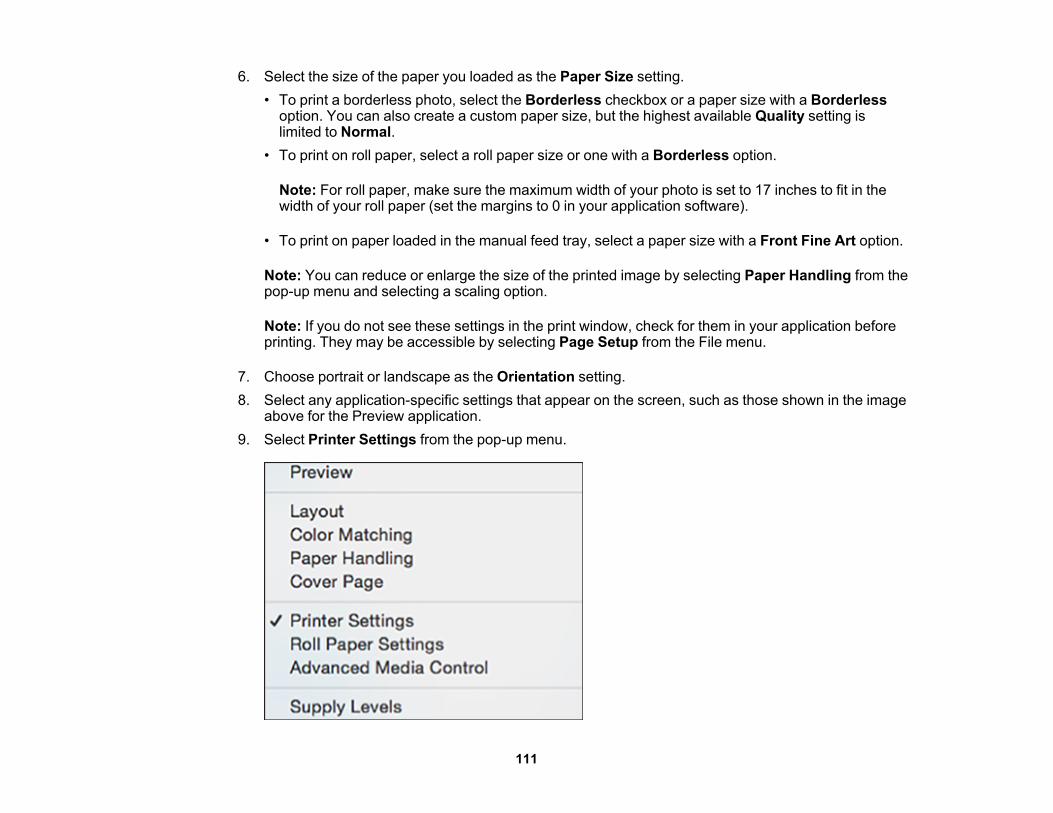
6. Select the size of the paper you loaded as the Paper Size setting.• To print a borderless photo, select the Borderless checkbox or a paper size with a Borderless
option. You can also create a custom paper size, but the highest available Quality setting islimited to Normal.
• To print on roll paper, select a roll paper size or one with a Borderless option.
Note: For roll paper, make sure the maximum width of your photo is set to 17 inches to fit in thewidth of your roll paper (set the margins to 0 in your application software).
• To print on paper loaded in the manual feed tray, select a paper size with a Front Fine Art option.
Note: You can reduce or enlarge the size of the printed image by selecting Paper Handling from thepop-up menu and selecting a scaling option.
Note: If you do not see these settings in the print window, check for them in your application beforeprinting. They may be accessible by selecting Page Setup from the File menu.
7. Choose portrait or landscape as the Orientation setting.8. Select any application-specific settings that appear on the screen, such as those shown in the image
above for the Preview application.9. Select Printer Settings from the pop-up menu.
111
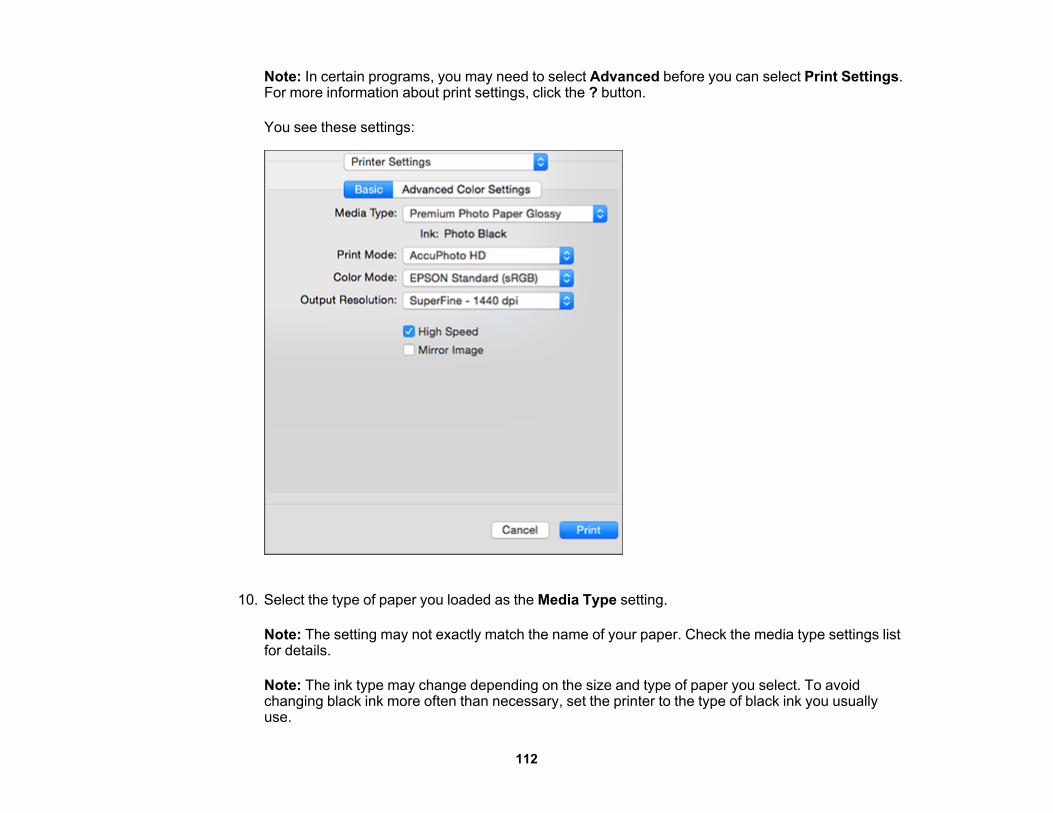
Note: In certain programs, you may need to select Advanced before you can select Print Settings.For more information about print settings, click the ? button.
You see these settings:
10. Select the type of paper you loaded as the Media Type setting.
Note: The setting may not exactly match the name of your paper. Check the media type settings listfor details.
Note: The ink type may change depending on the size and type of paper you select. To avoidchanging black ink more often than necessary, set the printer to the type of black ink you usuallyuse.
112
11. Select one of the following as the Print Mode setting:• Select AccuPhoto HD for any type of photographic printing.• Select Advanced B&W Photo to print black-and-white photos on certain types of photo paper.
See the list of Advanced B&W Photo options for details. If your paper type does not support thisoption, print black-and- white photos using the AccuPhoto HD setting.
• Select Black/Grayscale when using plain paper.12. Click Color Mode and select Manual Settings.13. Select one of the following as the Color Mode setting:
• EPSON Standard (sRGB): Increases the contrast in images. Click the Advanced Color Settingstab to use advanced color controls.
• Adobe RGB: Matches image colors to the Adobe RGB color standard. Use this setting if yoursource file was captured in Adobe RGB. Click the Advanced Color Settings tab to use advancedcolor controls.
• Off (No Color Adjustment): Turns off color management in your printer software so you canmanage color using only your application software.
Note: If desired, you can instead use ColorSync to manage colors. In most cases, you get betterresults by applying color management in your application, rather than in the printer driver.
14. Select the Output Resolution setting you want to use.15. Select any of the available print options.Advanced Color Settings - OS XOutput Resolution Settings - OS XPrint Options - OS XParent topic: Printing with OS XRelated tasksSelecting Roll Paper Settings - OS XSelecting Roll Paper Settings - OS X
Advanced Color Settings - OS XWhen you click the Advanced Color Settings tab, you see one of the screens below depending on thePrint Mode you selected.• AccuPhoto HD
113
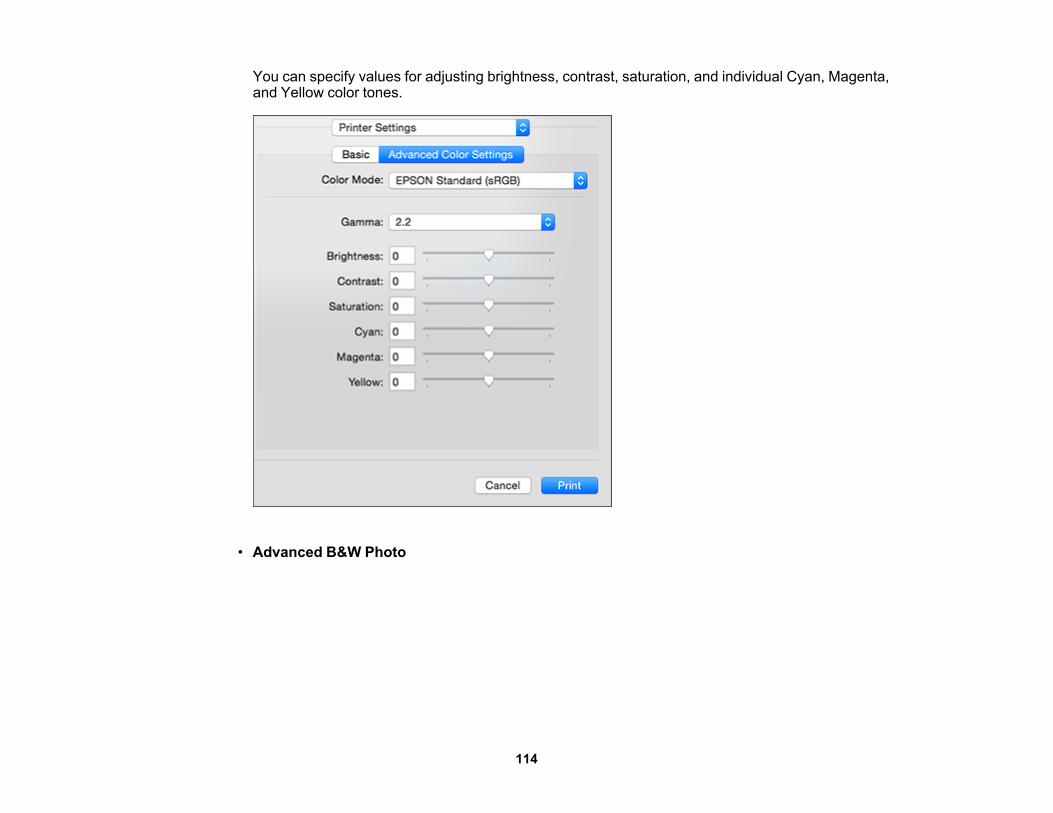
You can specify values for adjusting brightness, contrast, saturation, and individual Cyan, Magenta,and Yellow color tones.
• Advanced B&W Photo
114
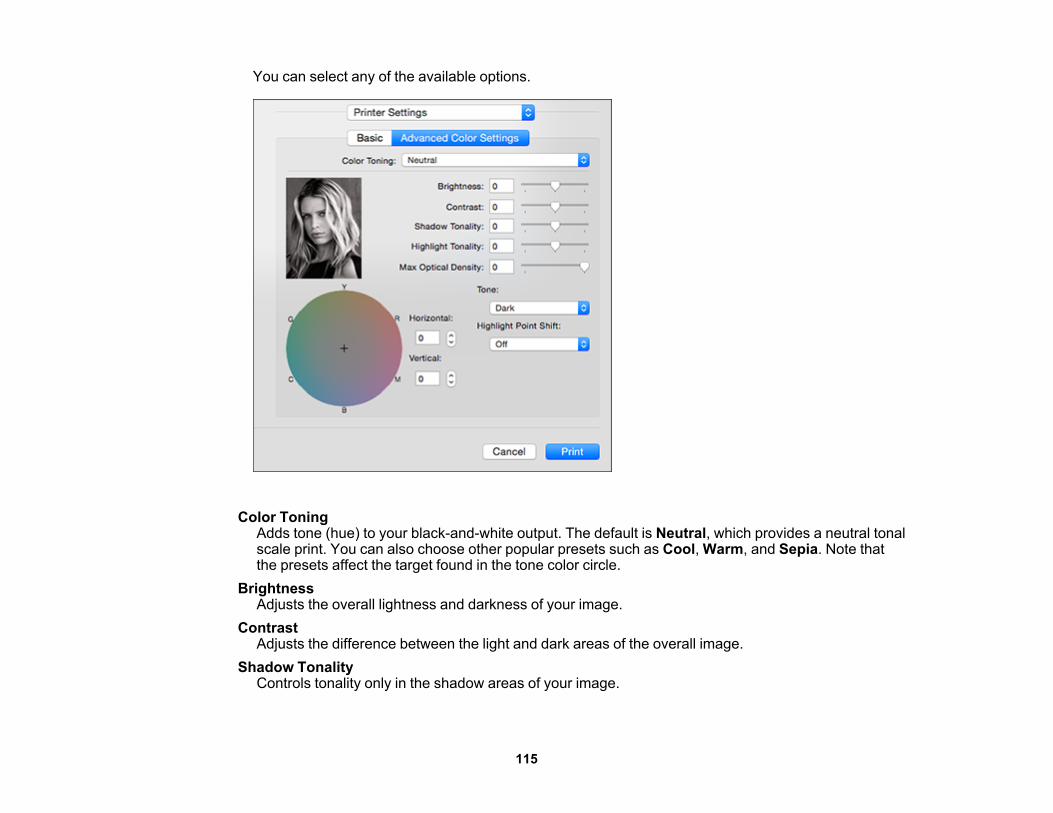
You can select any of the available options.
Color ToningAdds tone (hue) to your black-and-white output. The default is Neutral, which provides a neutral tonalscale print. You can also choose other popular presets such as Cool, Warm, and Sepia. Note thatthe presets affect the target found in the tone color circle.
BrightnessAdjusts the overall lightness and darkness of your image.
ContrastAdjusts the difference between the light and dark areas of the overall image.
Shadow TonalityControls tonality only in the shadow areas of your image.
115
Highlight TonalityControls tonality only in the highlight areas of your image.
Max Optical DensityAdjusts the overall density or focus of the print. Create a soft focus print by lowering the densitysetting.
ToneChanges the entire tonal scale of your black-and-white output. While Darker is the default setting, youmay see better results if you choose Dark. The tone color circle adjusts the hue of your black-and-white print. Click on any portion of the color wheel or enter corresponding values to customize thetone (hue) to add to your print. The closer you select to the edge of the wheel, the more color you add.
Highlight Point ShiftHelps reduce gloss differential on glossy media by adding density to the highlights of your image.
Parent topic: Selecting Basic Print Settings - OS XOutput Resolution Settings - OS X
You can select any of the Output Resolution settings to fine-tune the quality of your print. Somesettings may be unavailable, depending on the paper type and border setting you have chosen.Draft
For draft printing on photo paper.Fine - 360 dpi
For everyday text and image printing.Fine - 720 dpi
For everyday text and image printing.Super Fine - 1440 dpi
For photos and graphics with good print quality and speed.SuperPhoto - 2880 dpi
For the best print quality but the slowest print speed.Parent topic: Selecting Basic Print Settings - OS X
Print Options - OS XYou can select any of the print options to customize your print. Some options may be unavailable,depending on other settings you have chosen.High Speed
Speeds up printing but may reduce print quality.
116
Mirror ImageFlips the printed image left to right.
Parent topic: Selecting Basic Print Settings - OS X
Selecting Roll Paper Settings - OS XTo print on roll paper, you select the roll paper size and roll paper options from the Printer Settingsmenu.1. Select Manage Custom Sizes as the Paper Size setting.2. Click +, double-click Untitled, and enter a name for your roll paper size.3. For borderless printing, enter one of the following as the Width setting:
• 12.95 for 13-inch (330 mm) wide roll paper• 16 for 16-inch (406 mm) wide roll paper• 16.5 for 16.5-inch (419 mm) wide roll paper• 17 for 17-inch (432 mm) wide roll paper
Note: Make sure your image fits within the width of your roll paper.
4. Enter the length of your roll paper image as the Height setting (up to 44 inches [1118 mm]).5. Set the margin setting to 0.6. Click OK.7. Select your new custom roll paper size as the Paper Size setting.8. Select Roll Paper Settings.
117
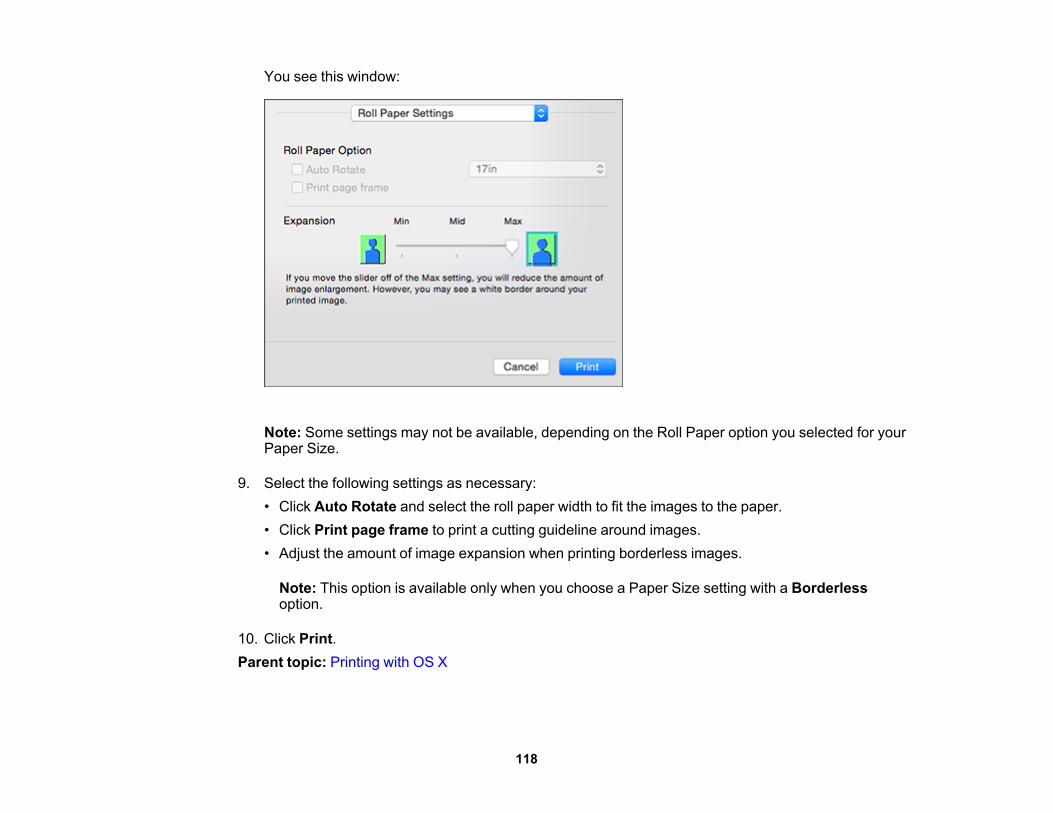
You see this window:
Note: Some settings may not be available, depending on the Roll Paper option you selected for yourPaper Size.
9. Select the following settings as necessary:• Click Auto Rotate and select the roll paper width to fit the images to the paper.• Click Print page frame to print a cutting guideline around images.• Adjust the amount of image expansion when printing borderless images.
Note: This option is available only when you choose a Paper Size setting with a Borderlessoption.
10. Click Print.Parent topic: Printing with OS X
118
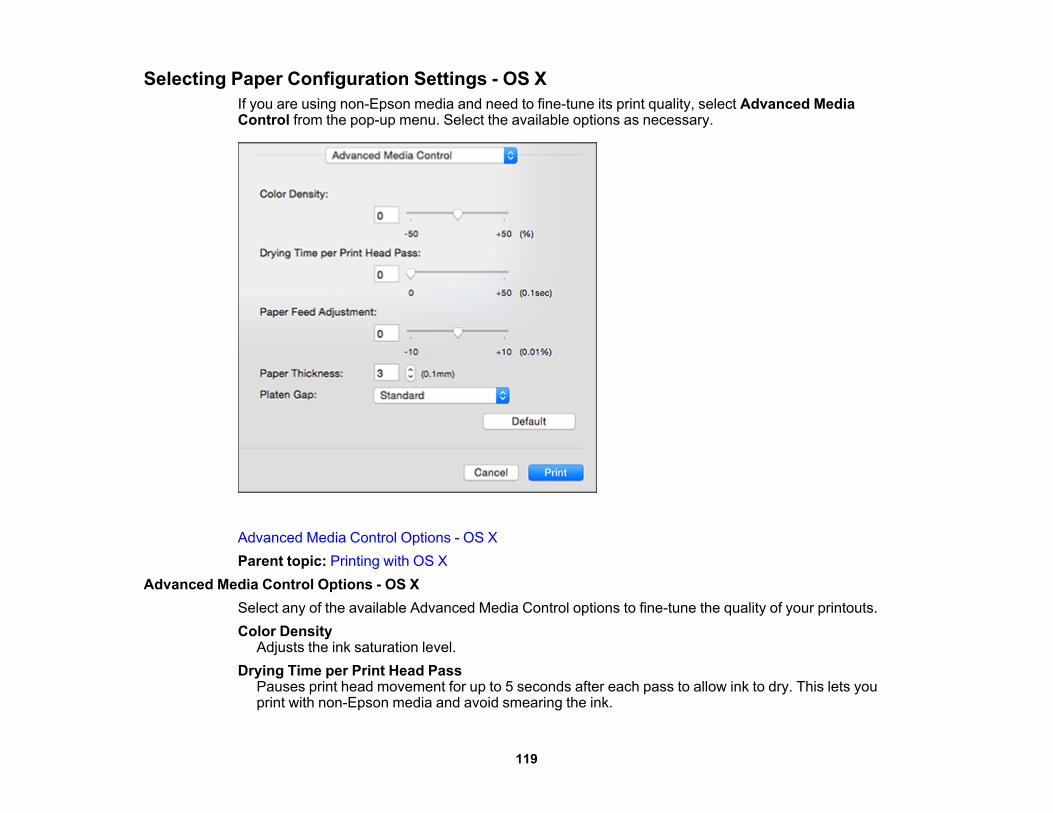
Selecting Paper Configuration Settings - OS XIf you are using non-Epson media and need to fine-tune its print quality, select Advanced MediaControl from the pop-up menu. Select the available options as necessary.
Advanced Media Control Options - OS XParent topic: Printing with OS X
Advanced Media Control Options - OS XSelect any of the available Advanced Media Control options to fine-tune the quality of your printouts.Color Density
Adjusts the ink saturation level.Drying Time per Print Head Pass
Pauses print head movement for up to 5 seconds after each pass to allow ink to dry. This lets youprint with non-Epson media and avoid smearing the ink.
119
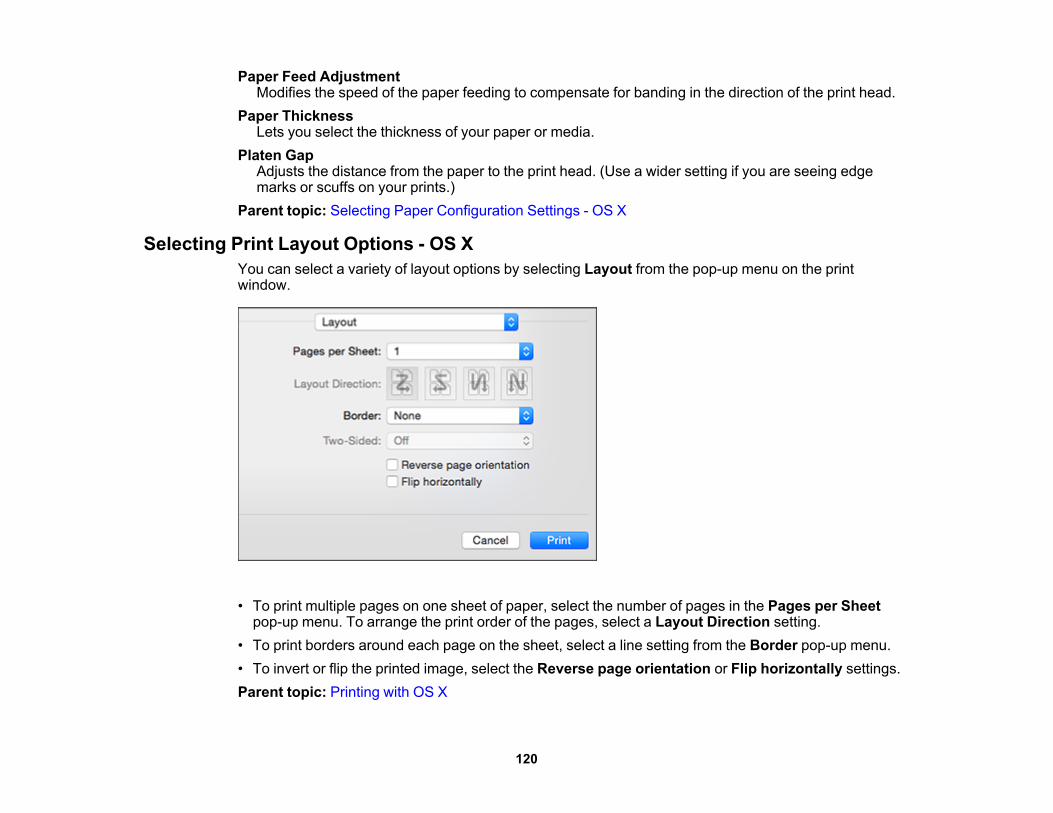
Paper Feed AdjustmentModifies the speed of the paper feeding to compensate for banding in the direction of the print head.
Paper ThicknessLets you select the thickness of your paper or media.
Platen GapAdjusts the distance from the paper to the print head. (Use a wider setting if you are seeing edgemarks or scuffs on your prints.)
Parent topic: Selecting Paper Configuration Settings - OS X
Selecting Print Layout Options - OS XYou can select a variety of layout options by selecting Layout from the pop-up menu on the printwindow.
• To print multiple pages on one sheet of paper, select the number of pages in the Pages per Sheetpop-up menu. To arrange the print order of the pages, select a Layout Direction setting.
• To print borders around each page on the sheet, select a line setting from the Border pop-up menu.• To invert or flip the printed image, select the Reverse page orientation or Flip horizontally settings.Parent topic: Printing with OS X
120
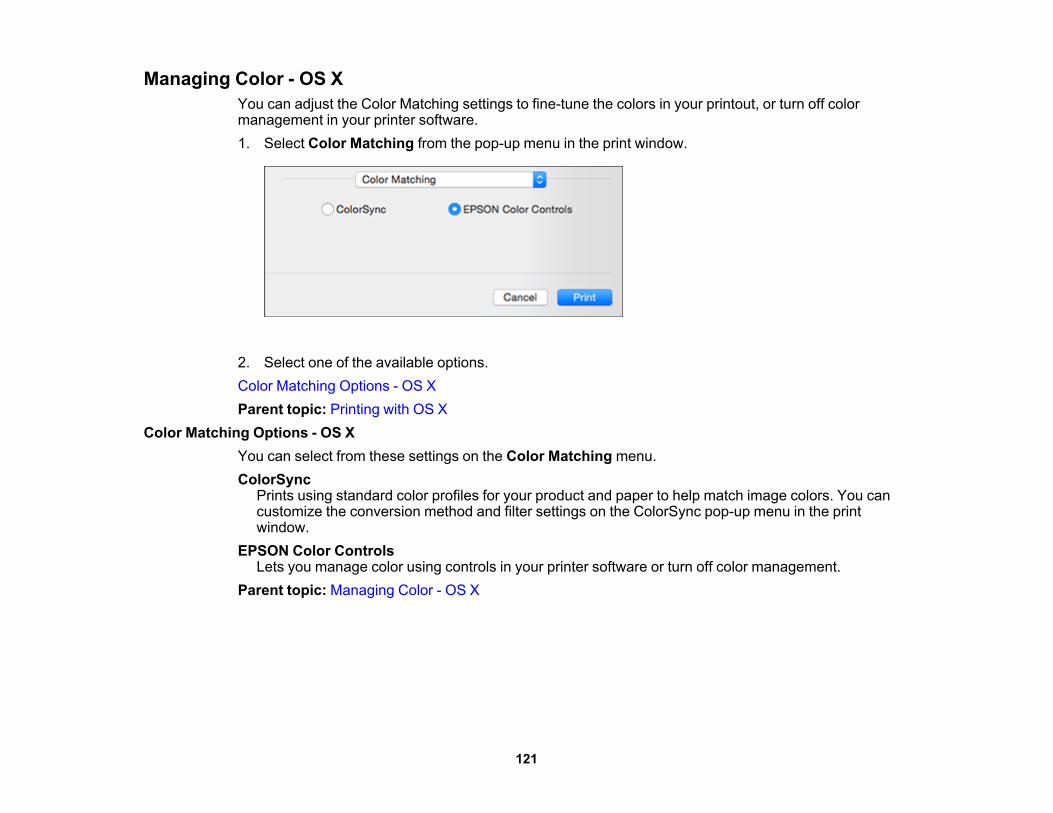
Managing Color - OS XYou can adjust the Color Matching settings to fine-tune the colors in your printout, or turn off colormanagement in your printer software.1. Select Color Matching from the pop-up menu in the print window.
2. Select one of the available options.Color Matching Options - OS XParent topic: Printing with OS X
Color Matching Options - OS XYou can select from these settings on the Color Matching menu.ColorSync
Prints using standard color profiles for your product and paper to help match image colors. You cancustomize the conversion method and filter settings on the ColorSync pop-up menu in the printwindow.
EPSON Color ControlsLets you manage color using controls in your printer software or turn off color management.
Parent topic: Managing Color - OS X
121
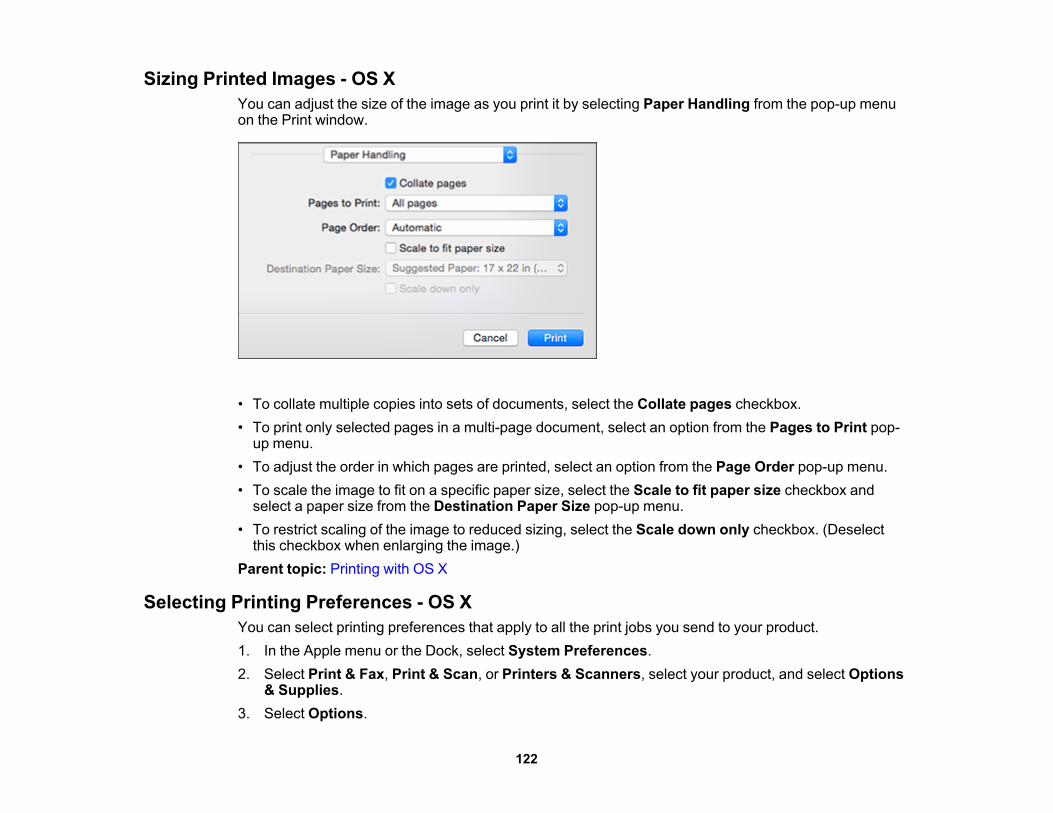
Sizing Printed Images - OS XYou can adjust the size of the image as you print it by selecting Paper Handling from the pop-up menuon the Print window.
• To collate multiple copies into sets of documents, select the Collate pages checkbox.• To print only selected pages in a multi-page document, select an option from the Pages to Print pop-
up menu.• To adjust the order in which pages are printed, select an option from the Page Order pop-up menu.• To scale the image to fit on a specific paper size, select the Scale to fit paper size checkbox and
select a paper size from the Destination Paper Size pop-up menu.• To restrict scaling of the image to reduced sizing, select the Scale down only checkbox. (Deselect
this checkbox when enlarging the image.)Parent topic: Printing with OS X
Selecting Printing Preferences - OS XYou can select printing preferences that apply to all the print jobs you send to your product.1. In the Apple menu or the Dock, select System Preferences.2. Select Print & Fax, Print & Scan, or Printers & Scanners, select your product, and select Options
& Supplies.3. Select Options.
122
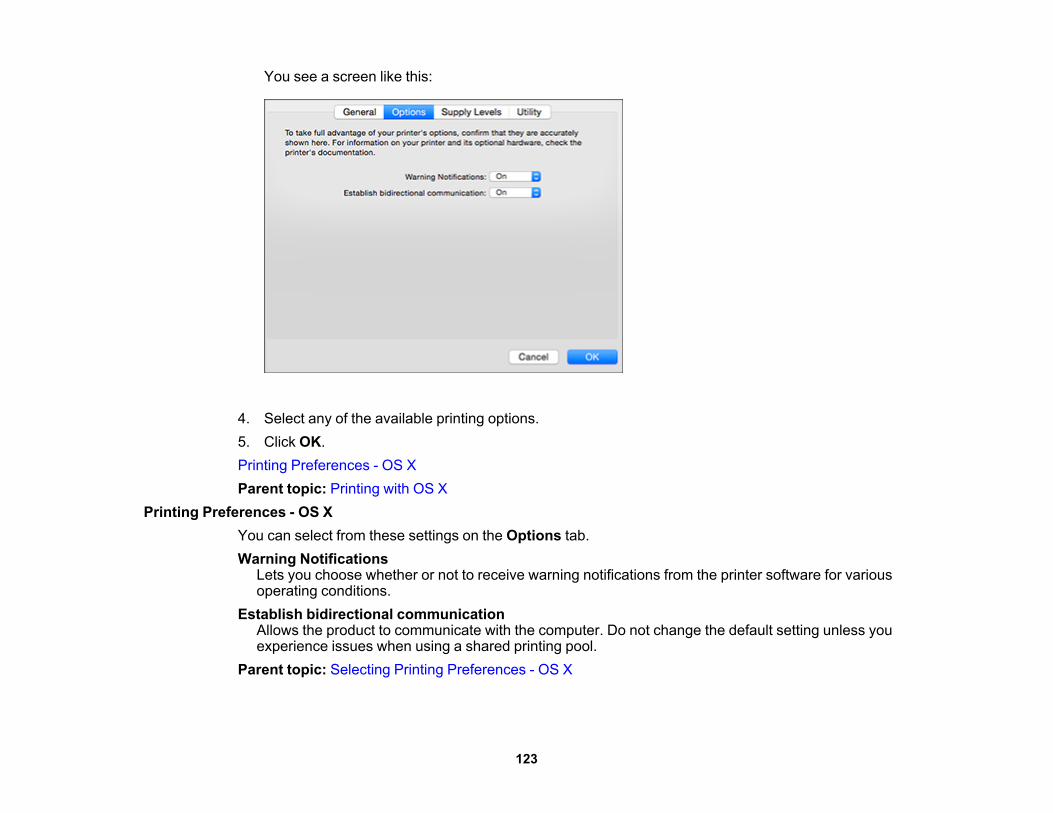
You see a screen like this:
4. Select any of the available printing options.5. Click OK.Printing Preferences - OS XParent topic: Printing with OS X
Printing Preferences - OS XYou can select from these settings on the Options tab.Warning Notifications
Lets you choose whether or not to receive warning notifications from the printer software for variousoperating conditions.
Establish bidirectional communicationAllows the product to communicate with the computer. Do not change the default setting unless youexperience issues when using a shared printing pool.
Parent topic: Selecting Printing Preferences - OS X
123
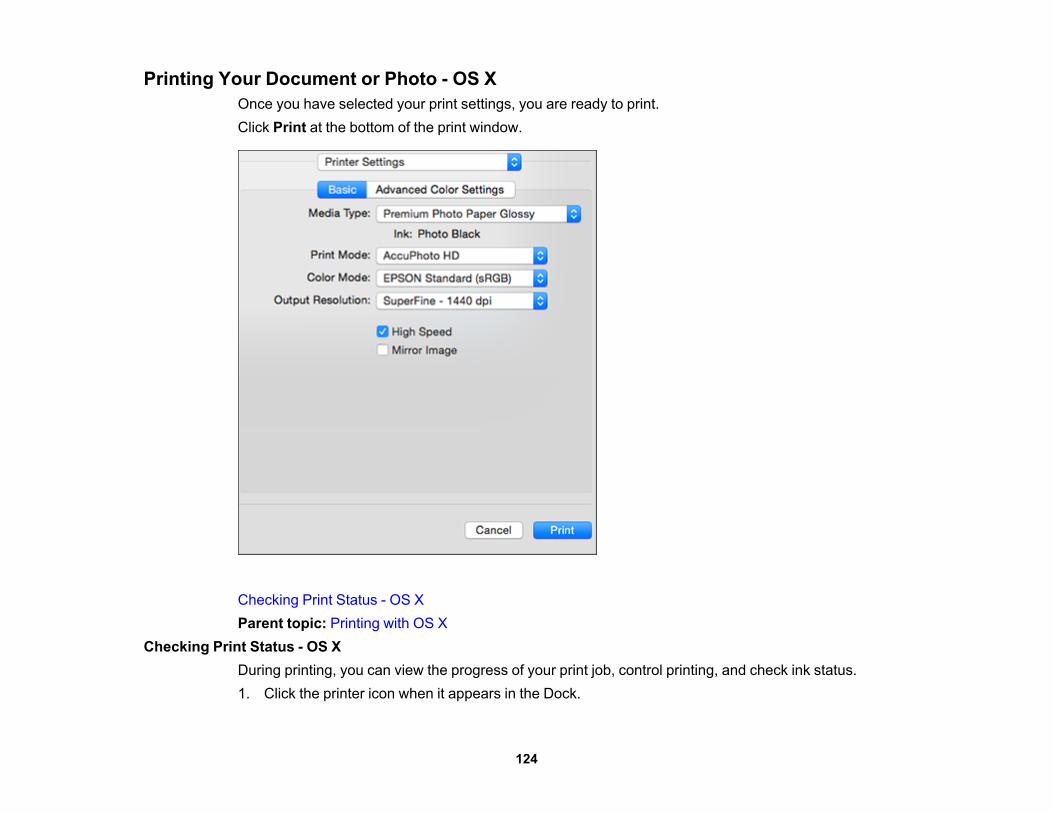
Printing Your Document or Photo - OS XOnce you have selected your print settings, you are ready to print.Click Print at the bottom of the print window.
Checking Print Status - OS XParent topic: Printing with OS X
Checking Print Status - OS XDuring printing, you can view the progress of your print job, control printing, and check ink status.1. Click the printer icon when it appears in the Dock.
124
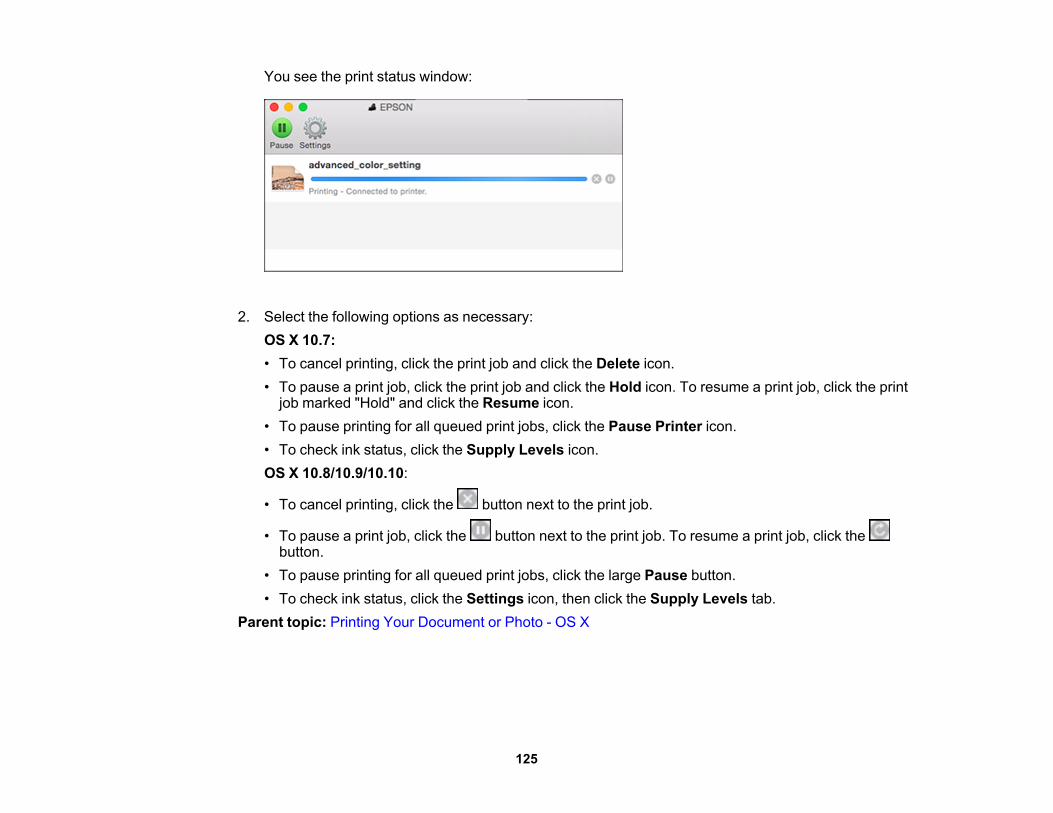
You see the print status window:
2. Select the following options as necessary:OS X 10.7:• To cancel printing, click the print job and click the Delete icon.• To pause a print job, click the print job and click the Hold icon. To resume a print job, click the print
job marked "Hold" and click the Resume icon.• To pause printing for all queued print jobs, click the Pause Printer icon.• To check ink status, click the Supply Levels icon.OS X 10.8/10.9/10.10:
• To cancel printing, click the button next to the print job.
• To pause a print job, click the button next to the print job. To resume a print job, click thebutton.
• To pause printing for all queued print jobs, click the large Pause button.• To check ink status, click the Settings icon, then click the Supply Levels tab.
Parent topic: Printing Your Document or Photo - OS X
125
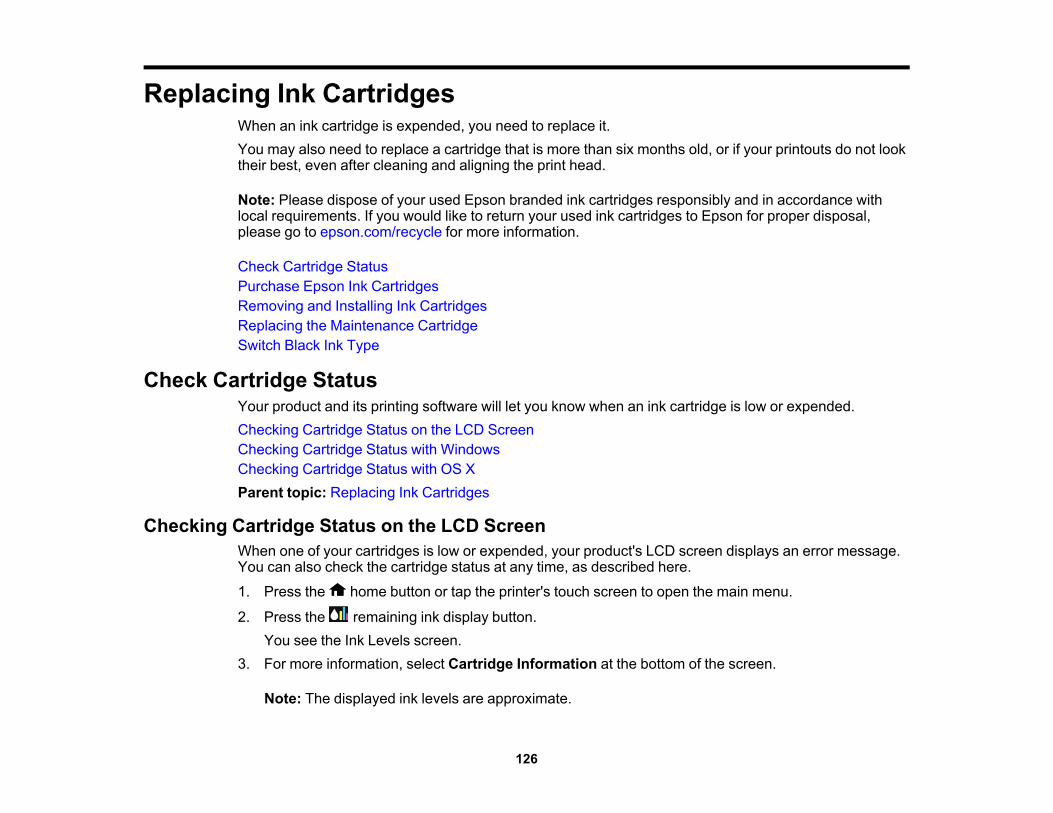
Replacing Ink CartridgesWhen an ink cartridge is expended, you need to replace it.You may also need to replace a cartridge that is more than six months old, or if your printouts do not looktheir best, even after cleaning and aligning the print head.
Note: Please dispose of your used Epson branded ink cartridges responsibly and in accordance withlocal requirements. If you would like to return your used ink cartridges to Epson for proper disposal,please go to epson.com/recycle for more information.
Check Cartridge StatusPurchase Epson Ink CartridgesRemoving and Installing Ink CartridgesReplacing the Maintenance CartridgeSwitch Black Ink Type
Check Cartridge StatusYour product and its printing software will let you know when an ink cartridge is low or expended.Checking Cartridge Status on the LCD ScreenChecking Cartridge Status with WindowsChecking Cartridge Status with OS XParent topic: Replacing Ink Cartridges
Checking Cartridge Status on the LCD ScreenWhen one of your cartridges is low or expended, your product's LCD screen displays an error message.You can also check the cartridge status at any time, as described here.
1. Press the home button or tap the printer's touch screen to open the main menu.
2. Press the remaining ink display button.You see the Ink Levels screen.
3. For more information, select Cartridge Information at the bottom of the screen.
Note: The displayed ink levels are approximate.
126
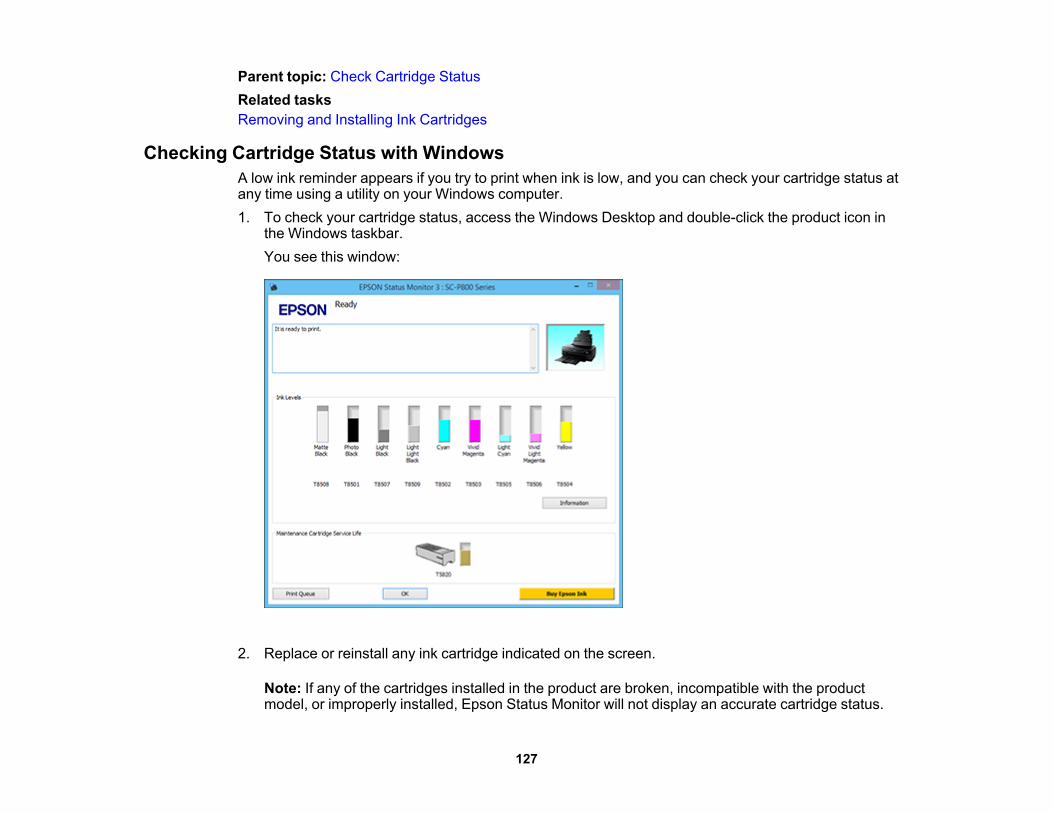
Parent topic: Check Cartridge StatusRelated tasksRemoving and Installing Ink Cartridges
Checking Cartridge Status with WindowsA low ink reminder appears if you try to print when ink is low, and you can check your cartridge status atany time using a utility on your Windows computer.1. To check your cartridge status, access the Windows Desktop and double-click the product icon in
the Windows taskbar.You see this window:
2. Replace or reinstall any ink cartridge indicated on the screen.
Note: If any of the cartridges installed in the product are broken, incompatible with the productmodel, or improperly installed, Epson Status Monitor will not display an accurate cartridge status.
127
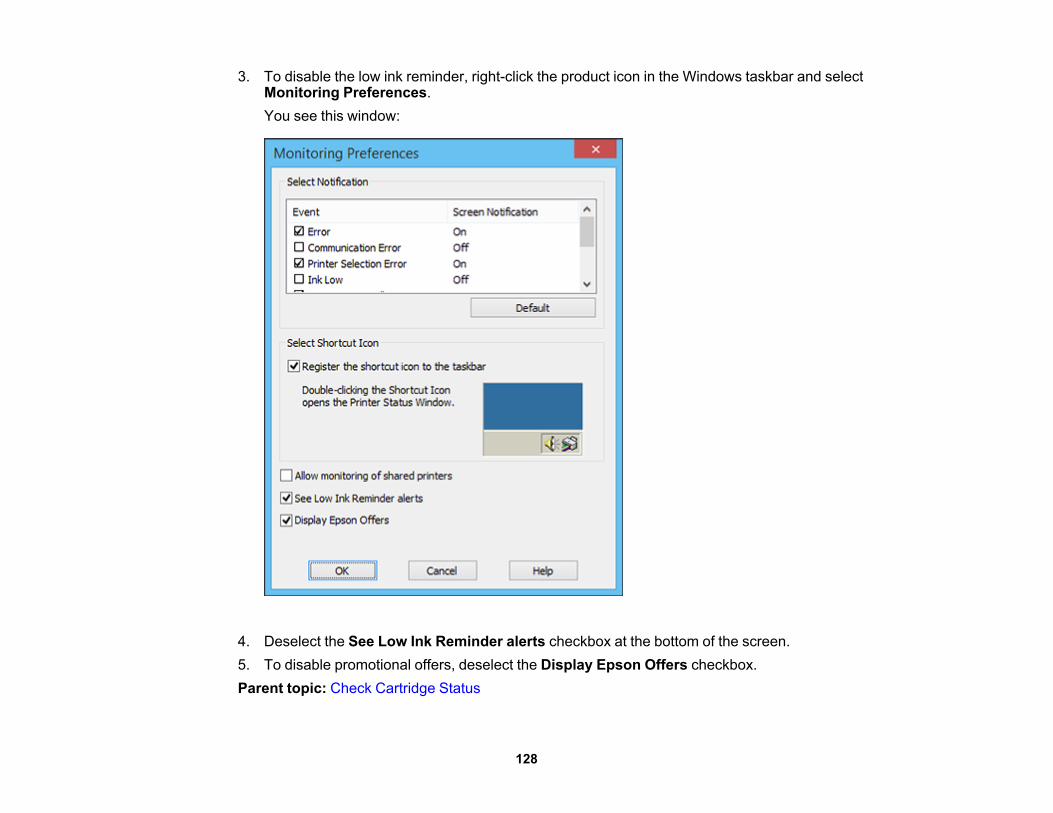
3. To disable the low ink reminder, right-click the product icon in the Windows taskbar and selectMonitoring Preferences.You see this window:
4. Deselect the See Low Ink Reminder alerts checkbox at the bottom of the screen.5. To disable promotional offers, deselect the Display Epson Offers checkbox.Parent topic: Check Cartridge Status
128
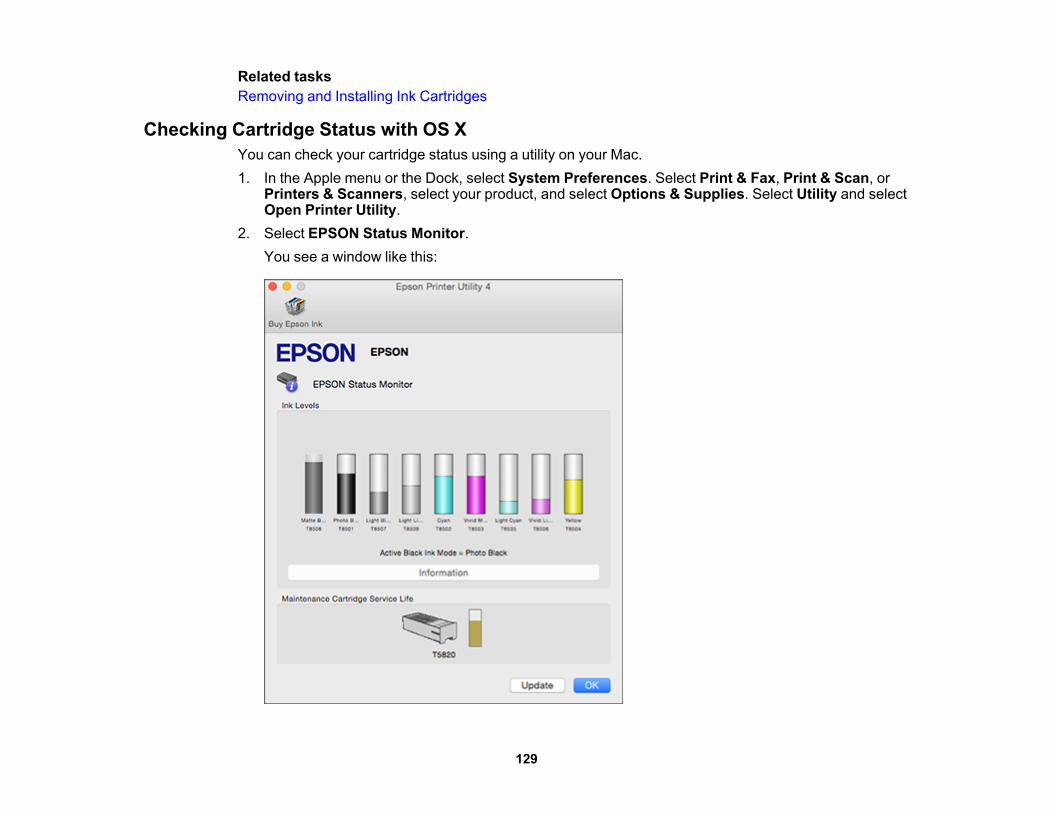
Related tasksRemoving and Installing Ink Cartridges
Checking Cartridge Status with OS XYou can check your cartridge status using a utility on your Mac.1. In the Apple menu or the Dock, select System Preferences. Select Print & Fax, Print & Scan, or
Printers & Scanners, select your product, and select Options & Supplies. Select Utility and selectOpen Printer Utility.
2. Select EPSON Status Monitor.You see a window like this:
129
3. Do the following as necessary:• To update the ink cartridge status, click Update.• Replace or reinstall any ink cartridge indicated on the screen.
Note: If any of the cartridges installed in the product is broken, incompatible with the product model,or improperly installed, Epson Status Monitor will not display an accurate cartridge status.
Parent topic: Check Cartridge StatusRelated tasksRemoving and Installing Ink Cartridges
Purchase Epson Ink CartridgesYou can purchase genuine Epson ink and paper at epson.com/ink3 (U.S. sales) or epson.ca (Canadiansales). You can also purchase supplies from an Epson authorized reseller. To find the nearest one, call800-GO-EPSON (800-463-7766).
Note: We recommend that you use genuine Epson cartridges and do not refill them. The use of otherproducts may affect your print quality and could result in printer damage.The cartridges included with the printer are designed for printer setup and not for resale. After some inkis used for charging, the rest is available for printing. Yields vary considerably based on images printed,print settings, paper type, frequency of use, and temperature. For print quality, a variable amount of inkremains in the cartridge after the "replace cartridge" indicator comes on.
Ink Cartridge and Maintenance Box Part NumbersParent topic: Replacing Ink Cartridges
Ink Cartridge and Maintenance Box Part NumbersUse these part numbers when you order or purchase a new maintenance box or ink cartridges.
Note: For best printing results, use up a cartridge within 6 months of opening the package.
Ink color Part numberPhoto Black T8501Cyan T8502
130

Ink color Part numberVivid Magenta T8503Yellow T8504Light Cyan T8505Vivid Light Magenta T8506Light Black T8507Matte Black T8508Light Light Black T8509
Maintenance box part number: T582000Parent topic: Purchase Epson Ink Cartridges
Removing and Installing Ink CartridgesMake sure you have your replacement cartridges handy before you begin. You must install newcartridges immediately after removing the old ones.
Caution: Leave your old cartridges in the printer until you are ready to replace them to prevent the printhead nozzles from drying out. Do not open ink cartridge packages until you are ready to install the ink.Cartridges are vacuum packed to maintain reliability.
1. Turn on your product.
2. Press the home button or tap the printer's touch screen to open the main menu.
3. Press the remaining ink display button.You see the Ink Levels screen.
4. Select Open ink cover.
131
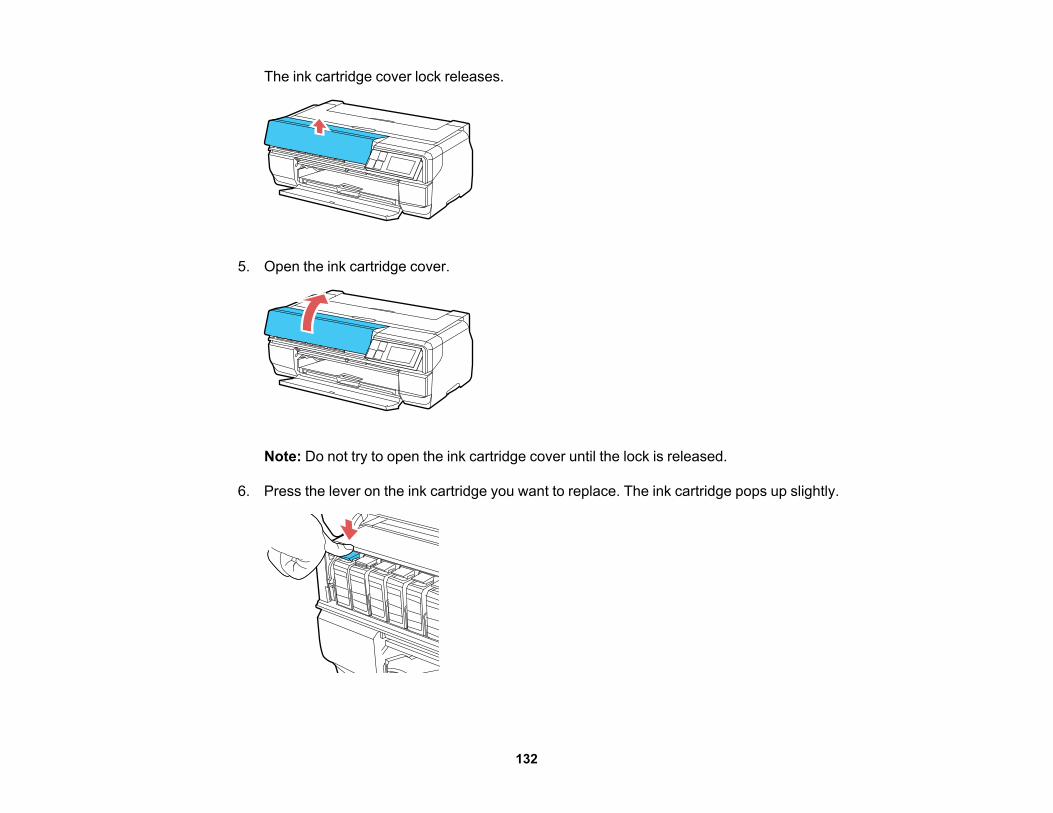
The ink cartridge cover lock releases.
5. Open the ink cartridge cover.
Note: Do not try to open the ink cartridge cover until the lock is released.
6. Press the lever on the ink cartridge you want to replace. The ink cartridge pops up slightly.
132
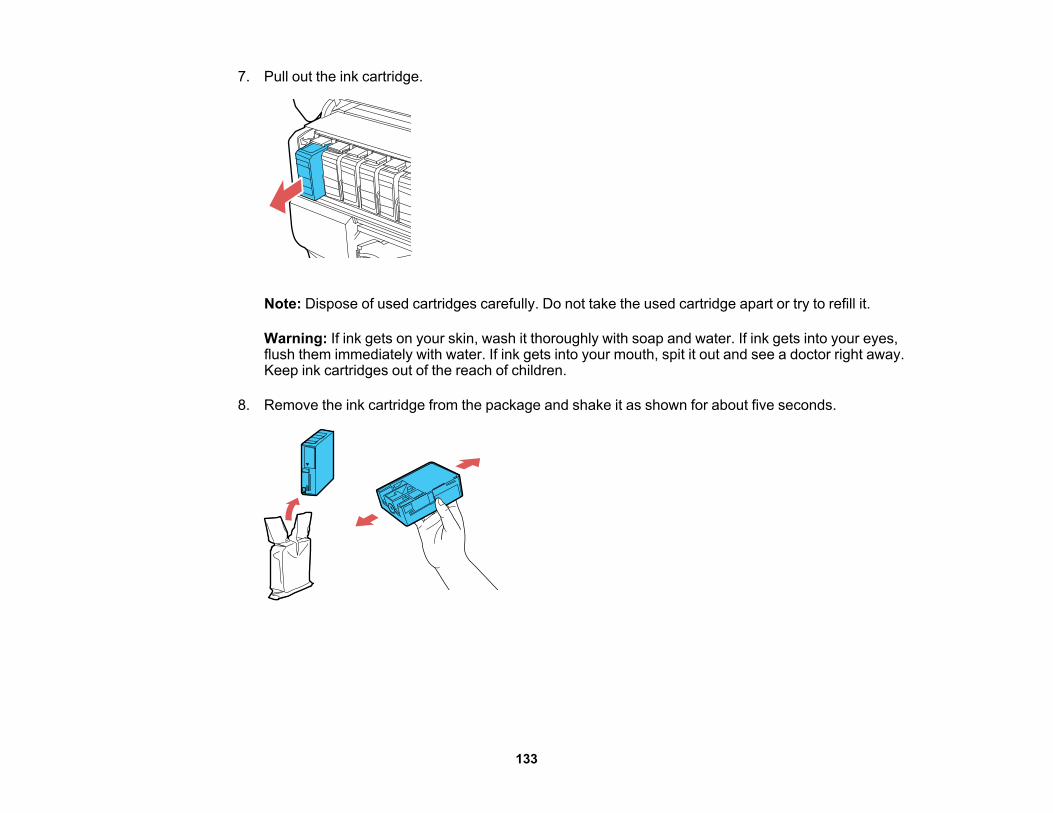
7. Pull out the ink cartridge.
Note: Dispose of used cartridges carefully. Do not take the used cartridge apart or try to refill it.
Warning: If ink gets on your skin, wash it thoroughly with soap and water. If ink gets into your eyes,flush them immediately with water. If ink gets into your mouth, spit it out and see a doctor right away.Keep ink cartridges out of the reach of children.
8. Remove the ink cartridge from the package and shake it as shown for about five seconds.
133
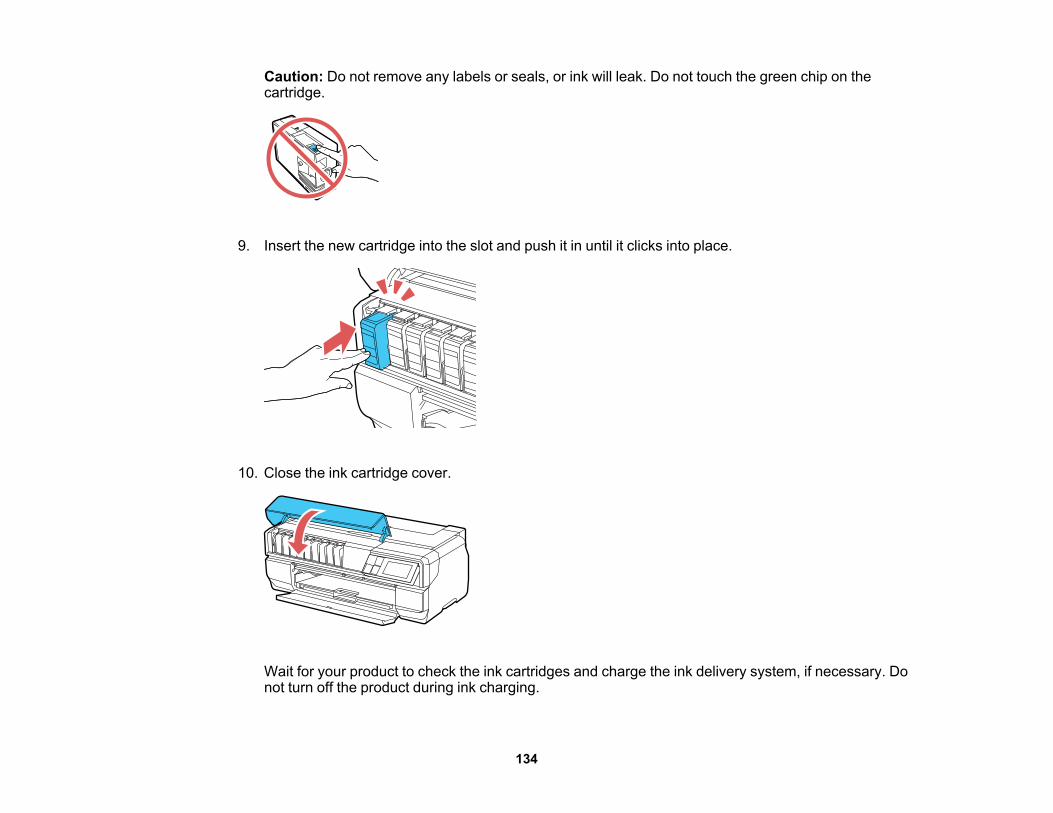
Caution: Do not remove any labels or seals, or ink will leak. Do not touch the green chip on thecartridge.
9. Insert the new cartridge into the slot and push it in until it clicks into place.
10. Close the ink cartridge cover.
Wait for your product to check the ink cartridges and charge the ink delivery system, if necessary. Donot turn off the product during ink charging.
134
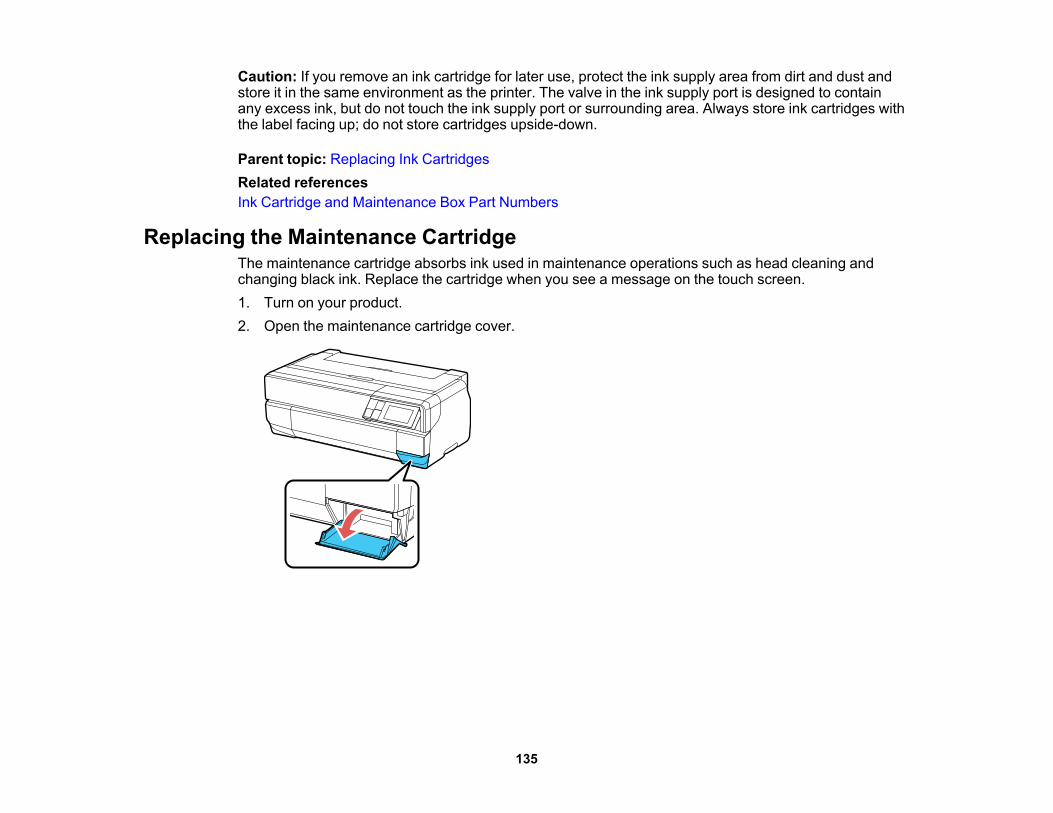
Caution: If you remove an ink cartridge for later use, protect the ink supply area from dirt and dust andstore it in the same environment as the printer. The valve in the ink supply port is designed to containany excess ink, but do not touch the ink supply port or surrounding area. Always store ink cartridges withthe label facing up; do not store cartridges upside-down.
Parent topic: Replacing Ink CartridgesRelated referencesInk Cartridge and Maintenance Box Part Numbers
Replacing the Maintenance CartridgeThe maintenance cartridge absorbs ink used in maintenance operations such as head cleaning andchanging black ink. Replace the cartridge when you see a message on the touch screen.1. Turn on your product.2. Open the maintenance cartridge cover.
135
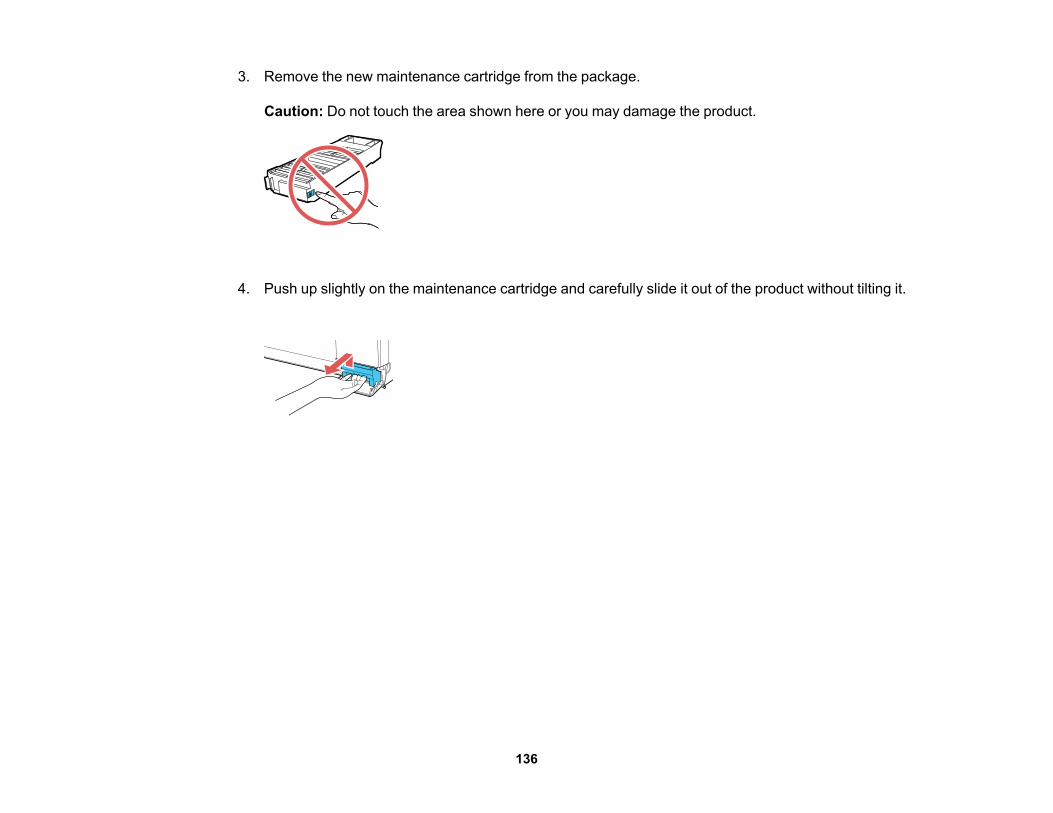
3. Remove the new maintenance cartridge from the package.
Caution: Do not touch the area shown here or you may damage the product.
4. Push up slightly on the maintenance cartridge and carefully slide it out of the product without tilting it.
136
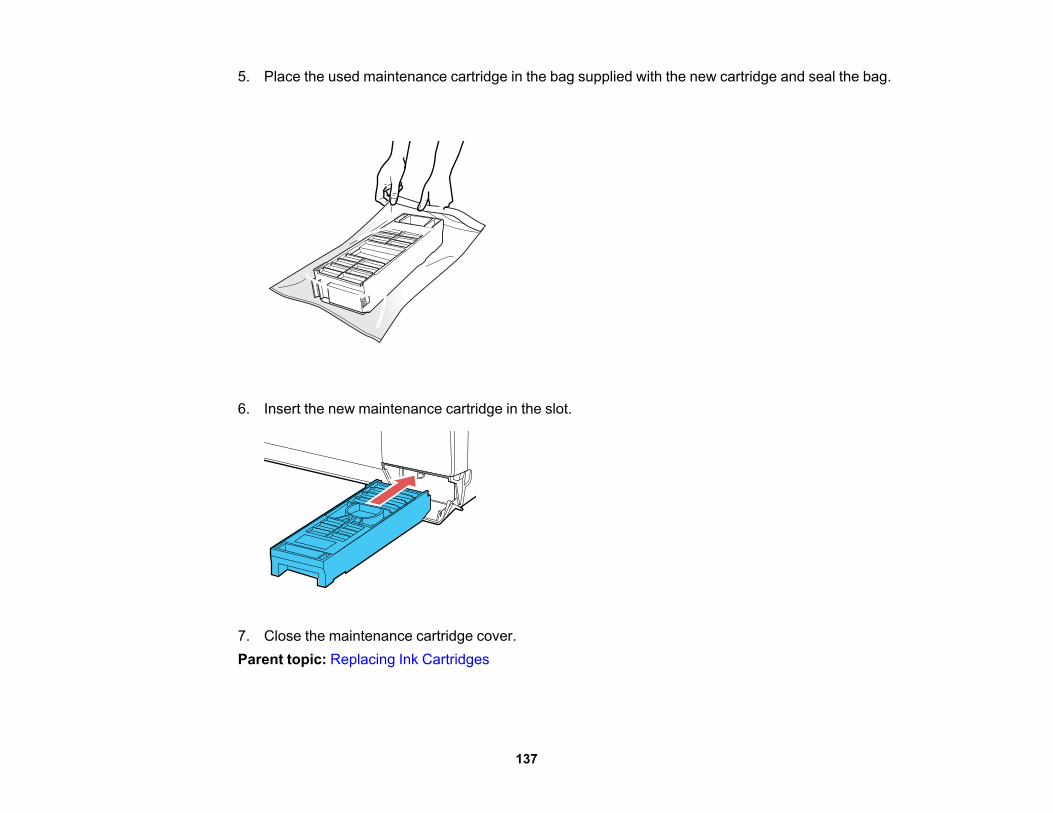
5. Place the used maintenance cartridge in the bag supplied with the new cartridge and seal the bag.
6. Insert the new maintenance cartridge in the slot.
7. Close the maintenance cartridge cover.Parent topic: Replacing Ink Cartridges
137
Switch Black Ink TypeYour product comes with Matte Black and Photo Black ink cartridges. Although both cartridges must beinstalled for your product to work, it can print using only one type of black ink at a time.Your product switches the black ink type automatically, depending on the type of media you load.Because this process consumes some ink, so you should avoid switching black ink more often thannecessary and select a default black ink type for the type of media you print on most often.
Note: To disable automatic black ink switching, press the setup button and select SystemAdministration > Printer Settings > BK Ink Auto Change > Off.
Black Ink Type Media ListSwitching the Black Ink TypeParent topic: Replacing Ink Cartridges
Black Ink Type Media ListTo conserve ink, select the default black ink type that matches the type of media you usually print on.
Matte Black Ink Media Types• Epson Presentation Paper Matte• Epson Premium Presentation Paper Matte• Epson Premium Presentation Paper Matte Double-sided• Epson Ultra Premium Presentation Paper Matte• Epson Velvet Fine Art Paper• Epson Exhibition Watercolor Paper Textured• Epson Watercolor Paper Radiant White• Epson UltraSmooth Fine Art Paper 325 gsm• Epson Exhibition Canvas Matte• Epson Exhibition Canvas Natural Matte• Epson Photo Quality Self-adhesive Sheets• Epson Hot Press Bright• Epson Hot Press Natural
138
• Epson Cold Press Bright• Epson Cold Press Natural
Photo Black Ink Media Types• Epson Photo Paper Glossy• Epson Premium Photo Paper Glossy• Epson Ultra Premium Photo Paper Glossy• Epson Premium Photo Paper Semi-gloss• Epson Ultra Premium Photo Paper Luster• Epson Exhibition Canvas Gloss• Epson Exhibition Canvas Satin• Epson Exhibition Canvas Natural Satin• Epson Exhibition Canvas Natural Gloss• Epson Exhibition Fiber Paper• Epson Metallic Photo Paper Glossy• Epson Metallic Photo Paper LusterParent topic: Switch Black Ink Type
Switching the Black Ink TypeSwitching the black ink type takes several minutes and consumes some ink. Check the black ink typemedia list to select the correct ink type for the media you loaded.
1. Press the home button.
2. Press the black ink change button.3. Select Proceed and select one of these types of black ink to switch to:
• Photo Black to Matte Black; switching takes about 1.5 minutes• Matte Black to Photo Black; switching takes about 3.5 minutes
Parent topic: Switch Black Ink TypeRelated referencesBlack Ink Type Media List
139

Adjusting Print QualityIf your print quality declines, you may need to run a utility to clean or align the print head.If running these utilities does not solve the problem, you may need to replace the ink cartridges.Print Head MaintenancePrint Head AlignmentCleaning the Paper Guide
Print Head MaintenanceIf your printouts become too light, or you see dark or light bands across them, you may need to clean theprint head nozzles. Cleaning uses ink, so clean the nozzles only if print quality declines.You can check for clogged nozzles before you clean them so you don’t clean them unnecessarily.
Note: You cannot clean the print head if an ink cartridge is expended, and may not be able to clean itwhen a cartridge is low. You must replace the cartridge first.
Print Head Nozzle CheckPrint Head CleaningParent topic: Adjusting Print Quality
Print Head Nozzle CheckYou can print a nozzle check pattern to check for clogged nozzles.Checking the Nozzles Using the Product Control PanelChecking the Nozzles Using a Computer UtilityParent topic: Print Head MaintenanceRelated tasksRemoving and Installing Ink Cartridges
Checking the Nozzles Using the Product Control PanelYou can check the print head nozzles using the control panel on your product.
1. Press the home button, if necessary.
2. Press the setup button.
140
You see this screen:
3. Select Maintenance.4. Select Print Head Nozzle Check.5. Load a few sheets of plain paper in the sheet feeder.6. Select Print.
The nozzle pattern prints.7. Check the printed pattern to see if there are gaps in the lines.
Print head is clean
Print head needs cleaning
141
8. Do one of the following:• If there are no gaps, select Done.• If there are gaps or the pattern is faint, select Clean the Print Head and continue.
9. Follow the instructions on the screen to clean the print head, check the nozzles, and repeat theprocess as necessary.
If you don’t see any improvement after cleaning the print head up to 4 times, wait at least 6 hours. Thentry cleaning the print head again. If quality still does not improve, one of the ink cartridges may be old ordamaged and needs to be replaced.Parent topic: Print Head Nozzle CheckRelated conceptsPrint Head CleaningRelated tasksLoading Paper in the Sheet Feeder
Checking the Nozzles Using a Computer UtilityYou can check the print head nozzles using a utility on your Windows or Mac computer.1. Load a few sheets of plain paper in the sheet feeder.2. Do one of the following:
• Windows: Access the Windows Desktop and right-click the product icon in the Windows taskbar.• OS X: In the Apple menu or the Dock, select System Preferences. Select Print & Fax, Print &
Scan, or Printers & Scanners, select your product, and select Options & Supplies. SelectUtility and select Open Printer Utility.
3. Select Nozzle Check.
142
You see a window like this:
4. Click Print.5. Check the printed pattern to see if there are gaps in the lines.
Print head is clean
Print head needs cleaning
143
6. If there are no gaps, click Finish.If there are gaps or the pattern is faint, clean the print head.
If you don’t see any improvement after cleaning the print head up to 4 times, wait at least 6 hours. Thentry cleaning the print head again. If quality still does not improve, one of the ink cartridges may be old ordamaged and needs to be replaced.Parent topic: Print Head Nozzle CheckRelated conceptsPrint Head CleaningRelated tasksLoading Paper in the Sheet Feeder
Print Head CleaningIf print quality has declined and the nozzle check pattern indicates clogged nozzles, you can clean theprint head.
Note: You cannot clean the print head if an ink cartridge is expended, and may not be able to clean itwhen a cartridge is low. You must replace the cartridge first.
Cleaning the Print Head Using the Product Control PanelCleaning the Print Head Using a Computer UtilityParent topic: Print Head Maintenance
Cleaning the Print Head Using the Product Control PanelYou can clean the print head using the control panel on your product.
1. Press the home button, if necessary.
2. Press the setup button.
144
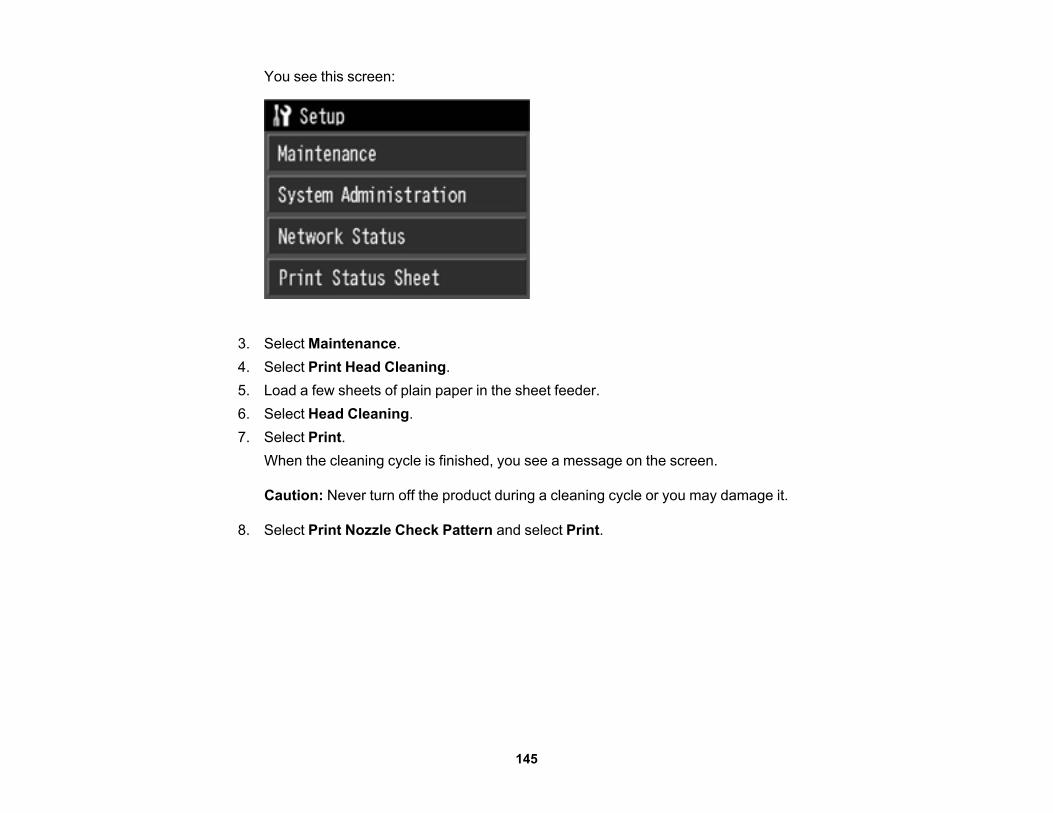
You see this screen:
3. Select Maintenance.4. Select Print Head Cleaning.5. Load a few sheets of plain paper in the sheet feeder.6. Select Head Cleaning.7. Select Print.
When the cleaning cycle is finished, you see a message on the screen.
Caution: Never turn off the product during a cleaning cycle or you may damage it.
8. Select Print Nozzle Check Pattern and select Print.
145
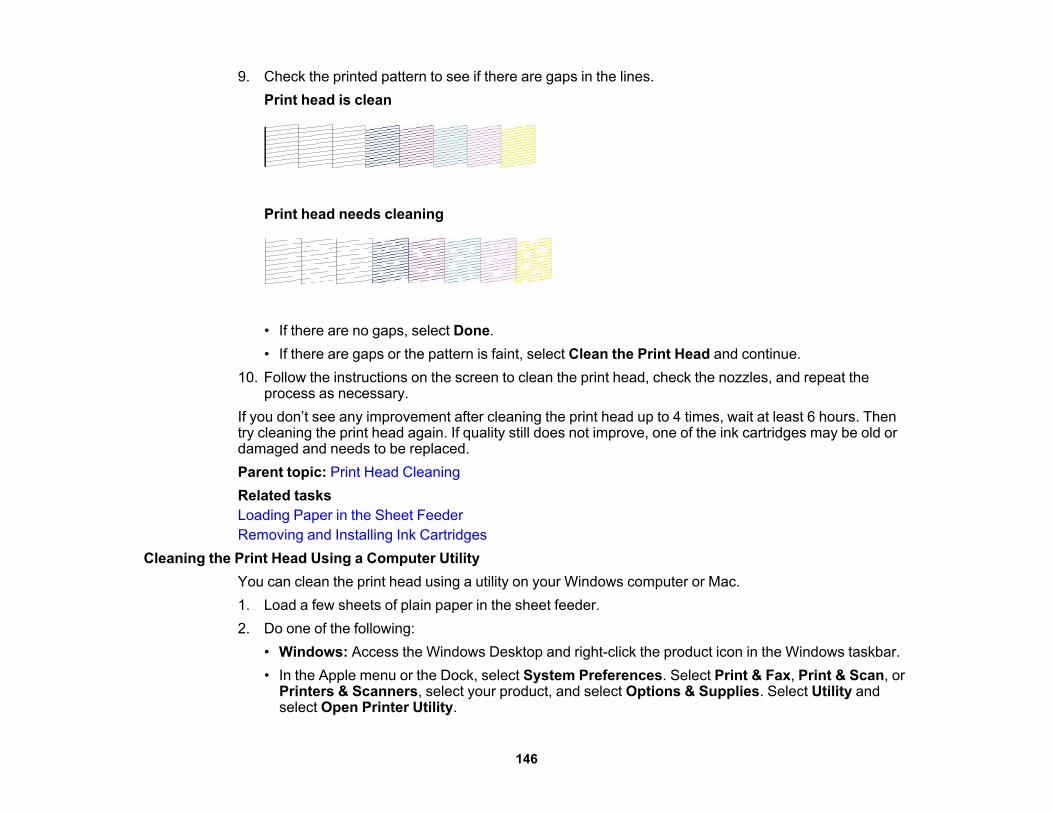
9. Check the printed pattern to see if there are gaps in the lines.Print head is clean
Print head needs cleaning
• If there are no gaps, select Done.• If there are gaps or the pattern is faint, select Clean the Print Head and continue.
10. Follow the instructions on the screen to clean the print head, check the nozzles, and repeat theprocess as necessary.
If you don’t see any improvement after cleaning the print head up to 4 times, wait at least 6 hours. Thentry cleaning the print head again. If quality still does not improve, one of the ink cartridges may be old ordamaged and needs to be replaced.Parent topic: Print Head CleaningRelated tasksLoading Paper in the Sheet FeederRemoving and Installing Ink Cartridges
Cleaning the Print Head Using a Computer UtilityYou can clean the print head using a utility on your Windows computer or Mac.1. Load a few sheets of plain paper in the sheet feeder.2. Do one of the following:
• Windows: Access the Windows Desktop and right-click the product icon in the Windows taskbar.• In the Apple menu or the Dock, select System Preferences. Select Print & Fax, Print & Scan, or
Printers & Scanners, select your product, and select Options & Supplies. Select Utility andselect Open Printer Utility.
146
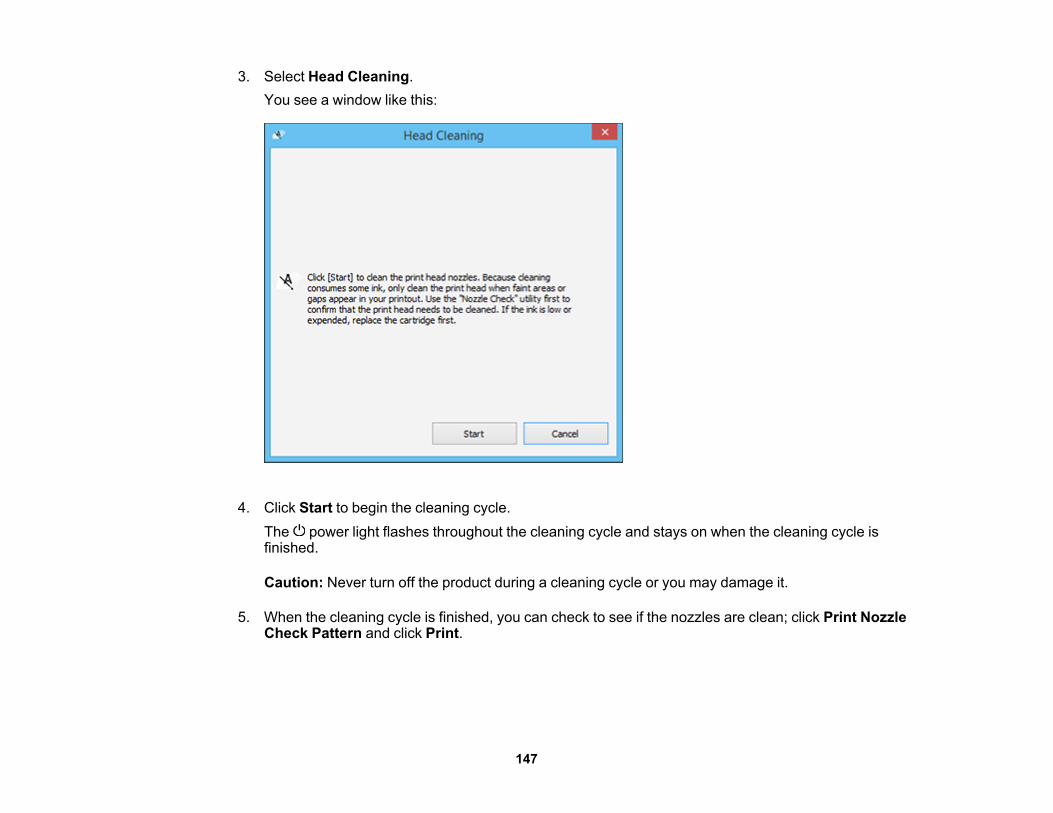
3. Select Head Cleaning.You see a window like this:
4. Click Start to begin the cleaning cycle.The power light flashes throughout the cleaning cycle and stays on when the cleaning cycle isfinished.
Caution: Never turn off the product during a cleaning cycle or you may damage it.
5. When the cleaning cycle is finished, you can check to see if the nozzles are clean; click Print NozzleCheck Pattern and click Print.
147
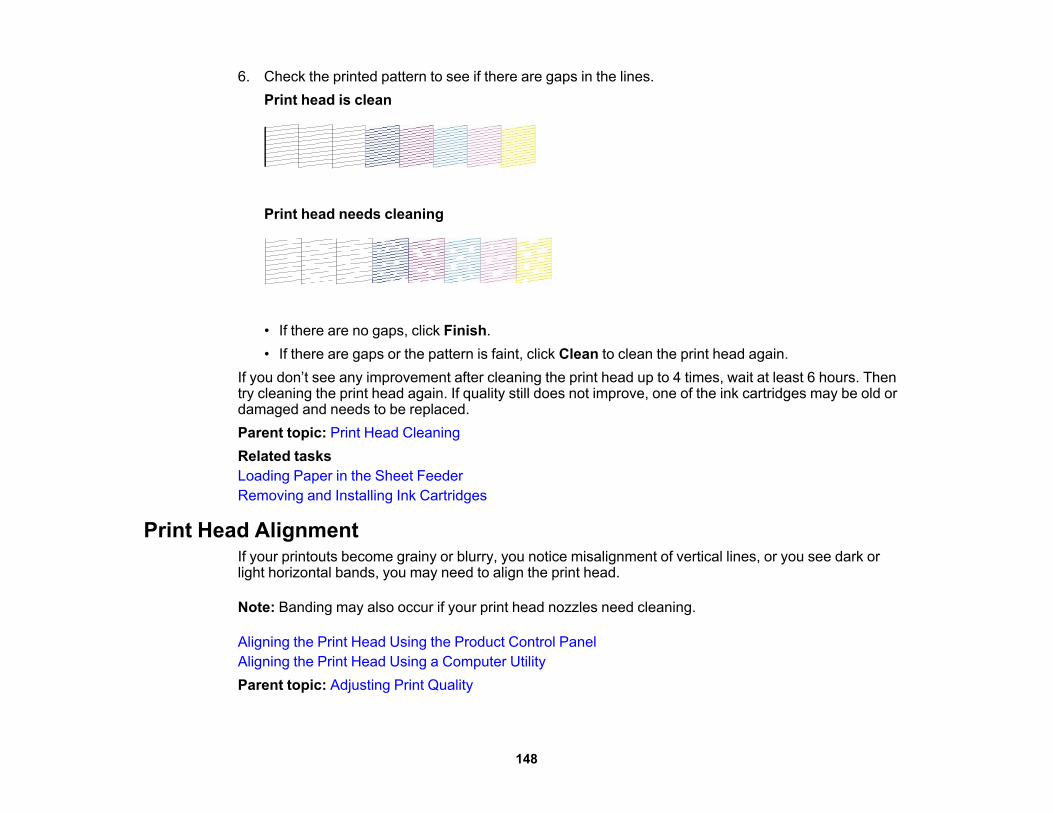
6. Check the printed pattern to see if there are gaps in the lines.Print head is clean
Print head needs cleaning
• If there are no gaps, click Finish.• If there are gaps or the pattern is faint, click Clean to clean the print head again.
If you don’t see any improvement after cleaning the print head up to 4 times, wait at least 6 hours. Thentry cleaning the print head again. If quality still does not improve, one of the ink cartridges may be old ordamaged and needs to be replaced.Parent topic: Print Head CleaningRelated tasksLoading Paper in the Sheet FeederRemoving and Installing Ink Cartridges
Print Head AlignmentIf your printouts become grainy or blurry, you notice misalignment of vertical lines, or you see dark orlight horizontal bands, you may need to align the print head.
Note: Banding may also occur if your print head nozzles need cleaning.
Aligning the Print Head Using the Product Control PanelAligning the Print Head Using a Computer UtilityParent topic: Adjusting Print Quality
148
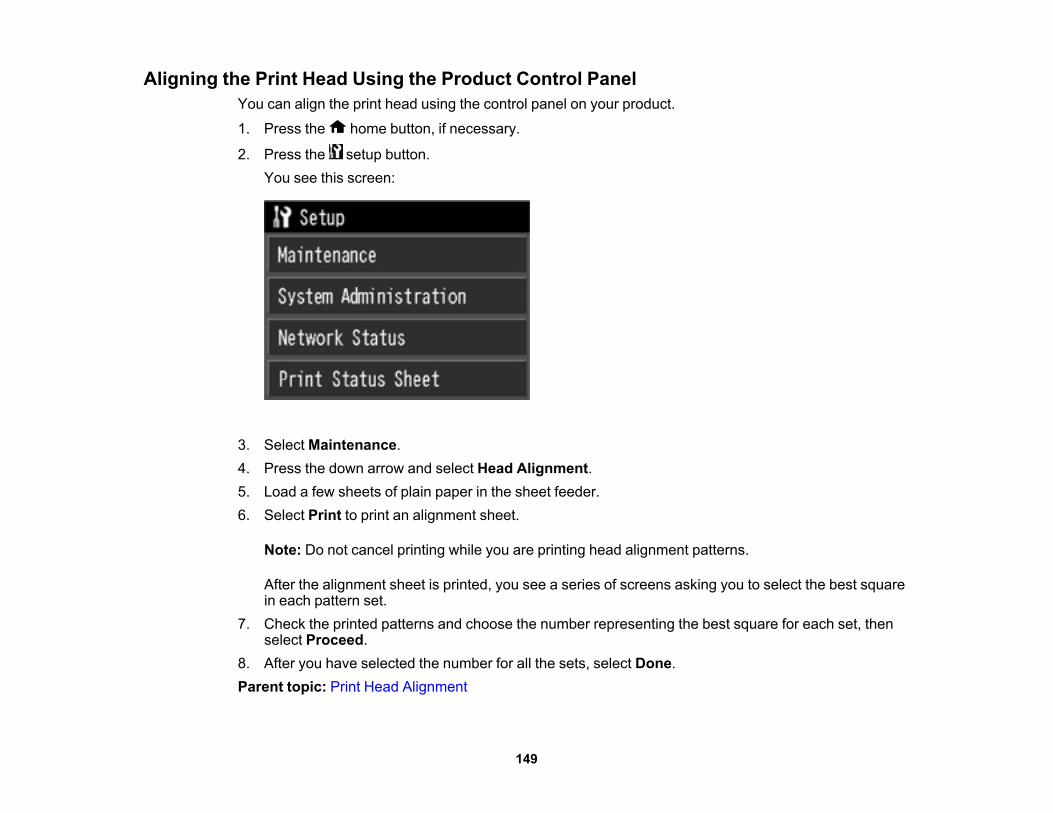
Aligning the Print Head Using the Product Control PanelYou can align the print head using the control panel on your product.
1. Press the home button, if necessary.
2. Press the setup button.You see this screen:
3. Select Maintenance.4. Press the down arrow and select Head Alignment.5. Load a few sheets of plain paper in the sheet feeder.6. Select Print to print an alignment sheet.
Note: Do not cancel printing while you are printing head alignment patterns.
After the alignment sheet is printed, you see a series of screens asking you to select the best squarein each pattern set.
7. Check the printed patterns and choose the number representing the best square for each set, thenselect Proceed.
8. After you have selected the number for all the sets, select Done.Parent topic: Print Head Alignment
149
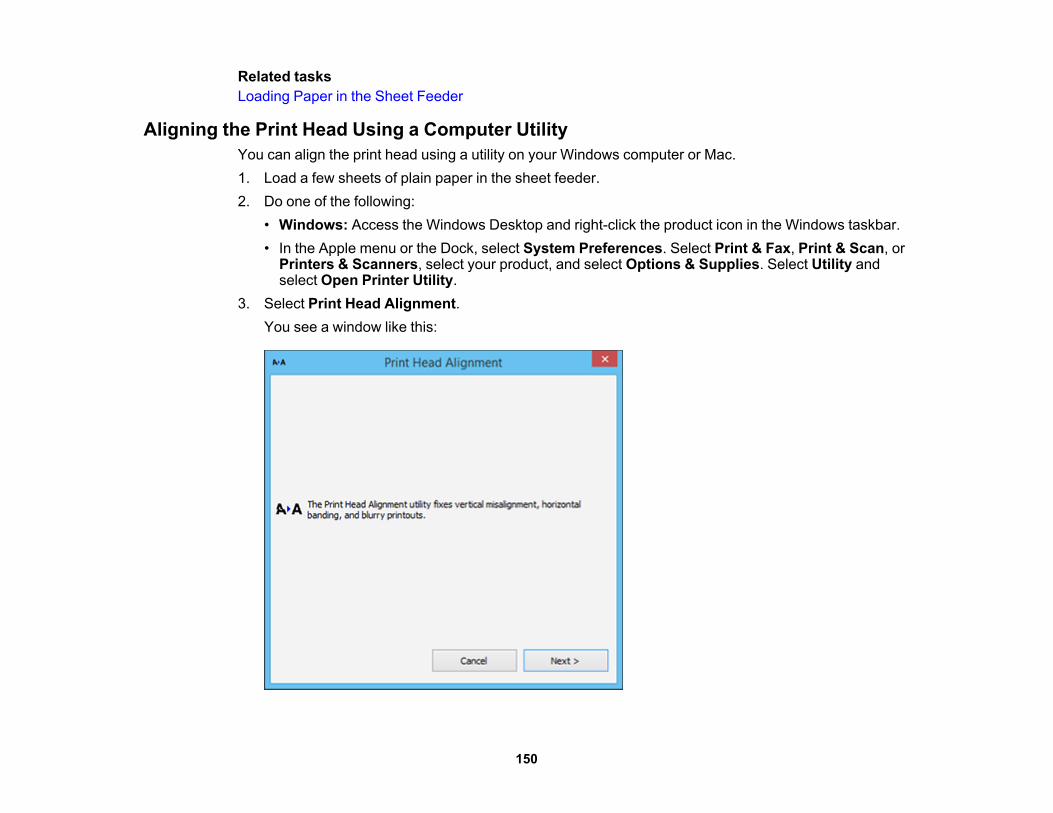
Related tasksLoading Paper in the Sheet Feeder
Aligning the Print Head Using a Computer UtilityYou can align the print head using a utility on your Windows computer or Mac.1. Load a few sheets of plain paper in the sheet feeder.2. Do one of the following:
• Windows: Access the Windows Desktop and right-click the product icon in the Windows taskbar.• In the Apple menu or the Dock, select System Preferences. Select Print & Fax, Print & Scan, or
Printers & Scanners, select your product, and select Options & Supplies. Select Utility andselect Open Printer Utility.
3. Select Print Head Alignment.You see a window like this:
150
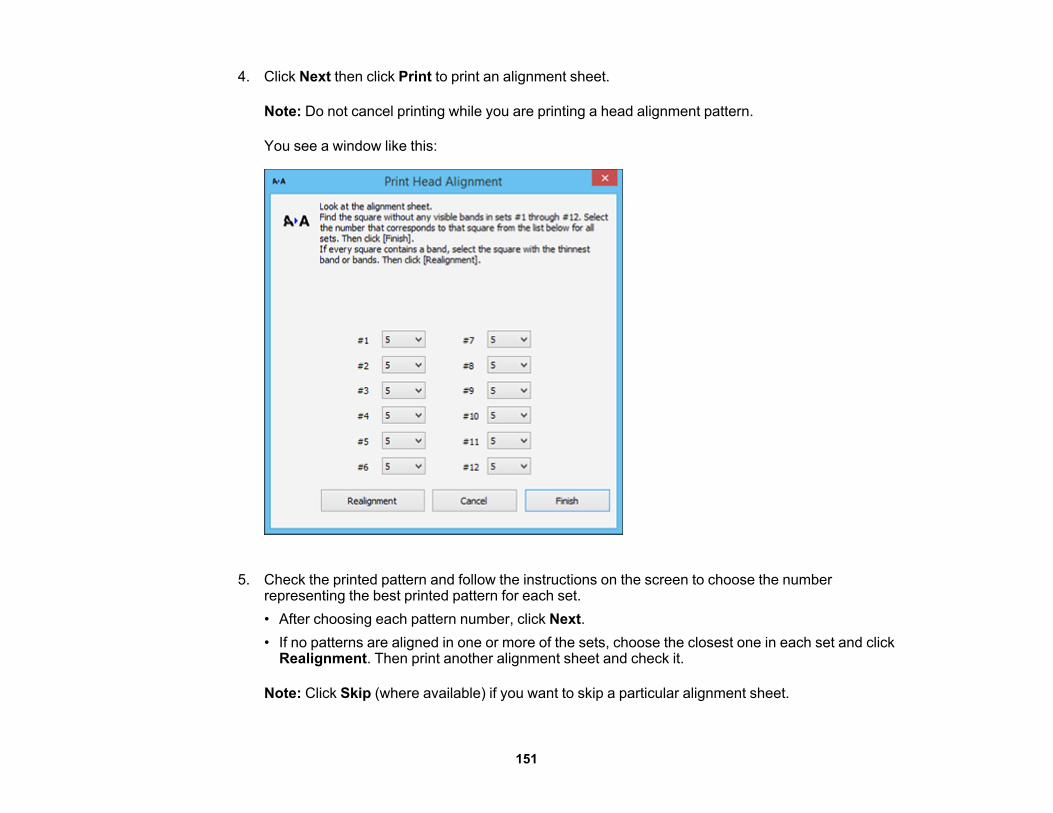
4. Click Next then click Print to print an alignment sheet.
Note: Do not cancel printing while you are printing a head alignment pattern.
You see a window like this:
5. Check the printed pattern and follow the instructions on the screen to choose the numberrepresenting the best printed pattern for each set.• After choosing each pattern number, click Next.• If no patterns are aligned in one or more of the sets, choose the closest one in each set and click
Realignment. Then print another alignment sheet and check it.
Note: Click Skip (where available) if you want to skip a particular alignment sheet.
151
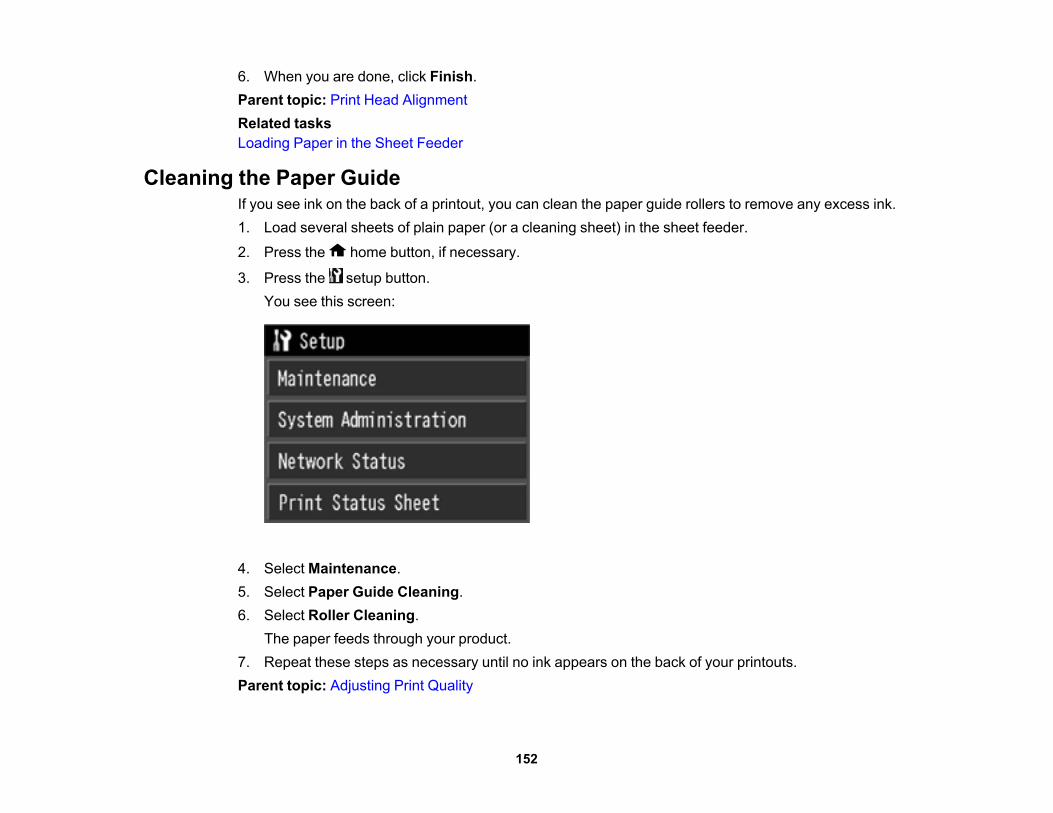
6. When you are done, click Finish.Parent topic: Print Head AlignmentRelated tasksLoading Paper in the Sheet Feeder
Cleaning the Paper GuideIf you see ink on the back of a printout, you can clean the paper guide rollers to remove any excess ink.1. Load several sheets of plain paper (or a cleaning sheet) in the sheet feeder.
2. Press the home button, if necessary.
3. Press the setup button.You see this screen:
4. Select Maintenance.5. Select Paper Guide Cleaning.6. Select Roller Cleaning.
The paper feeds through your product.7. Repeat these steps as necessary until no ink appears on the back of your printouts.Parent topic: Adjusting Print Quality
152

Related tasksLoading Paper in the Sheet Feeder
153
Cleaning and Transporting Your ProductSee these sections if you need to clean or transport your product.Cleaning Your ProductTransporting Your Product
Cleaning Your ProductTo keep your product working at its best, you should clean it several times a year.
Caution: Do not use a hard brush, benzene, alcohol, or paint thinner to clean the product or you maydamage it. Do not place anything on top of the cover or use the cover as a writing surface, or it could getpermanently scratched. Do not use oil or other lubricants inside the product or let water get inside.
1. Turn off the product.2. Unplug the power cable.3. Disconnect any connected cables.4. Remove all the paper and the roll paper unit from the product.5. Clean the paper support and manual feed tray using a soft brush or a dry microfiber cloth.6. Close the paper support, manual feed tray, output tray, and any covers.7. Clean the outer case with a soft cloth dampened with a mild detergent.8. Plug the power cable back in and turn on the product.9. Load several sheets of plain paper (or a cleaning sheet) in the sheet feeder and clean the paper
guide.Close the rear paper support and output tray when you are not using the product to help keep it clean.Parent topic: Cleaning and Transporting Your ProductRelated tasksLoading Paper in the Sheet FeederCleaning the Paper Guide
154
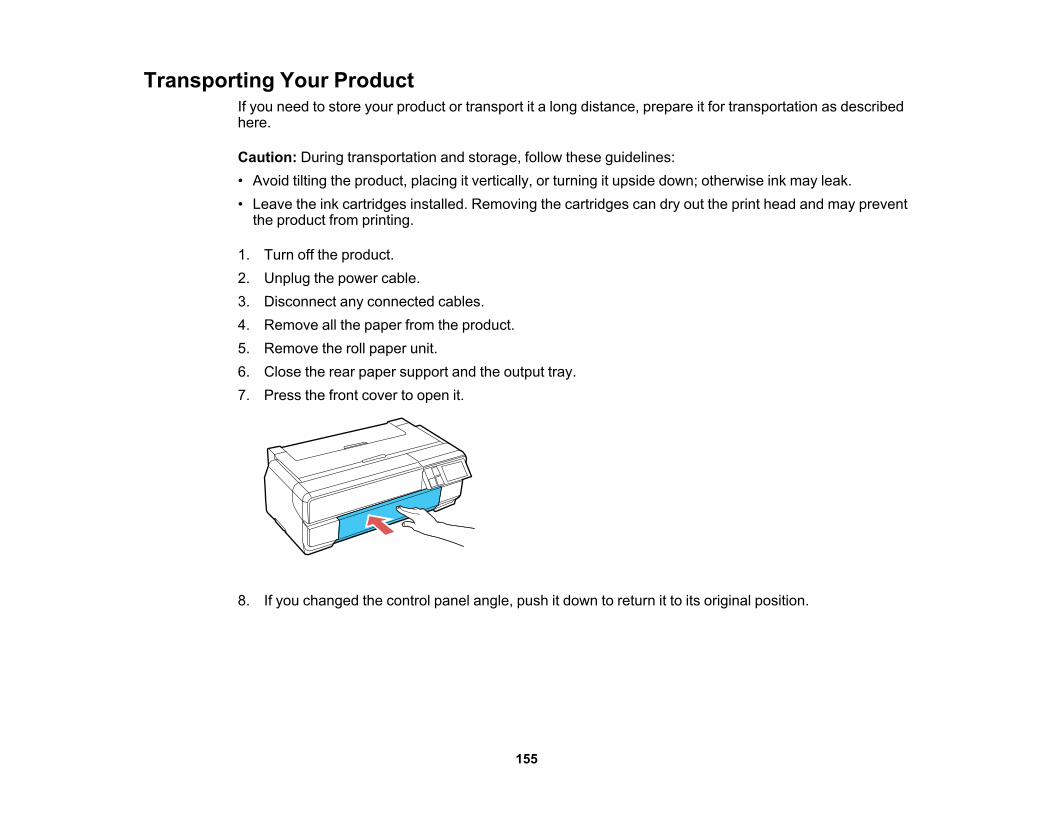
Transporting Your ProductIf you need to store your product or transport it a long distance, prepare it for transportation as describedhere.
Caution: During transportation and storage, follow these guidelines:• Avoid tilting the product, placing it vertically, or turning it upside down; otherwise ink may leak.• Leave the ink cartridges installed. Removing the cartridges can dry out the print head and may prevent
the product from printing.
1. Turn off the product.2. Unplug the power cable.3. Disconnect any connected cables.4. Remove all the paper from the product.5. Remove the roll paper unit.6. Close the rear paper support and the output tray.7. Press the front cover to open it.
8. If you changed the control panel angle, push it down to return it to its original position.
155
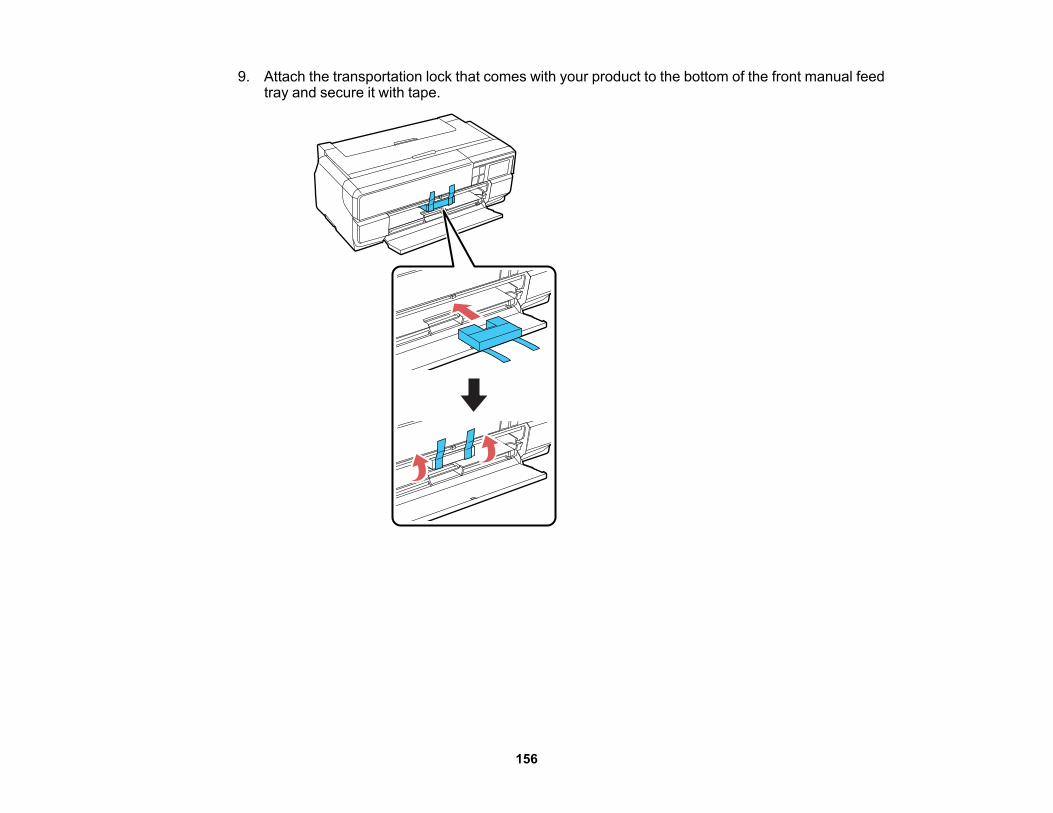
9. Attach the transportation lock that comes with your product to the bottom of the front manual feedtray and secure it with tape.
156
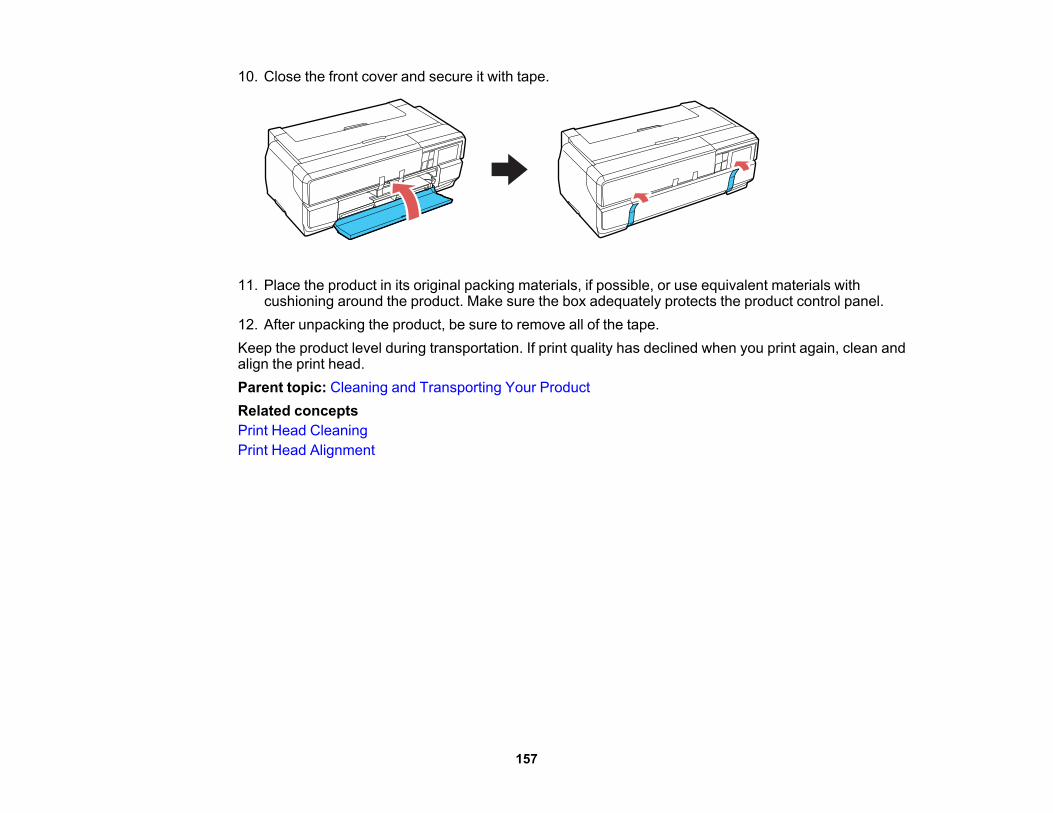
10. Close the front cover and secure it with tape.
11. Place the product in its original packing materials, if possible, or use equivalent materials withcushioning around the product. Make sure the box adequately protects the product control panel.
12. After unpacking the product, be sure to remove all of the tape.Keep the product level during transportation. If print quality has declined when you print again, clean andalign the print head.Parent topic: Cleaning and Transporting Your ProductRelated conceptsPrint Head CleaningPrint Head Alignment
157
Solving ProblemsCheck these sections for solutions to problems you may have using your product.Checking for Software UpdatesProduct Status MessagesRunning a Product CheckResetting Control Panel DefaultsSolving Setup ProblemsSolving Network ProblemsSolving Paper ProblemsSolving Problems Printing from a ComputerSolving Page Layout and Content ProblemsSolving Print Quality ProblemsUninstall Your Product SoftwareWhere to Get Help
Checking for Software UpdatesPeriodically, it's a good idea to check Epson's support website for free updates to your product software.Visit the driver download site at (U.S. downloads or Canadian downloads).• Windows: Your printer software automatically checks for updates. You can also manually update the
software by:• Accessing the Windows Desktop, right-clicking the product icon in the Windows taskbar, then
clicking Software Update.• Clicking on the Utility tab in the printer settings window and selecting Driver UpdateYou can also update the software by selecting EPSON Software Updater in the EPSON or EPSONSoftware program group, accessible by the Start button, or on the Start or Apps screens, dependingon your version of Windows.
• OS X: You can manually update the software by opening the Applications > Epson Software folderand selecting EPSON Software Updater.
Parent topic: Solving ProblemsRelated tasksChanging Automatic Update Options
158

Product Status MessagesYou can often diagnose problems with your product by checking the messages on its LCD screen.
Note: If the LCD screen is dark, press the screen to wake the product from sleep mode.
LCD screen message Condition/solutionCheck if paper is jammed. See Paper may be jammed in the product. If paper is jammed in themanual for how to clear jammed product, follow the instructions in this guide to remove thepaper. jammed paper from the indicated area.Printer Error. Turn power off and A serious error has occurred. Turn the product off and then backthen on again. For details, see your on again. If the error continues, check for a paper jam. If there isdocumentation. no paper jam, contact Epson for support.Non-supported size paper for The paper size specified in the printer driver does not supportborderless printing is loaded. See borderless printing. See the media tables in this guide formanual for details on supported information on sizes that support borderless printing.paper.Print head protective material is not Packaging materials may be inside the printer. Follow theremoved. See manual for details. instructions on the Start Here poster to remove all of the
packaging materials and tape.Periodic replacement part is nearing A replacement part is nearing the end of its service life. You canthe end of its service life. Please continue printing, but the part should be replaced as soon ascontact Epson support soon. possible to maintain optimum printing quality. Contact Epson to
request replacement.Combination of IP address and There is a problem with the network configuration of yoursubnet mask is invalid. See your product.documentation.Some functions may not be When Paper Setup Display is set to Off, the Error Noticeavailable. For details, see your setting automatically defaults to Off and AirPrint is not available.documentation. Set the Paper Setup Display setting to On to use AirPrint.
Note: The ink pads in the printer collect, distribute, and contain the ink that is not used on printed pages.During the life of your product it may reach a condition where either satisfactory print quality cannot bemaintained or the ink pads have reached the end of their usable life. The Epson Status Monitor, yourLCD, or lights on the control panel will advise you when these parts need replacing. If this happensduring the standard warranty of the product, the exchange of the product or replacement of the pads is
159
covered under the standard warranty. If the product is out of warranty, the pads can be replaced by anyEpson authorized service provider. The waste ink pads are not a user-replaceable part.
Parent topic: Solving ProblemsRelated referencesPaper Jam Problems in the Sheet FeederPaper Jam Problems in the Front Manual Feed TrayPaper Jam Problems - Thick MediaPaper Jam Problems - Roll PaperWhere to Get HelpBorderless Paper Type CompatibilityRelated tasksSelecting the Default Paper Setup Display and Error Notice SettingsRelated topicsWi-Fi or Wired Networking
Running a Product CheckRunning a product check helps you determine if your product is operating properly.1. Disconnect any interface cables connected to your product.2. Make sure plain paper is loaded in the sheet feeder.
3. Press the home button, if necessary.
4. Press the setup button.
160
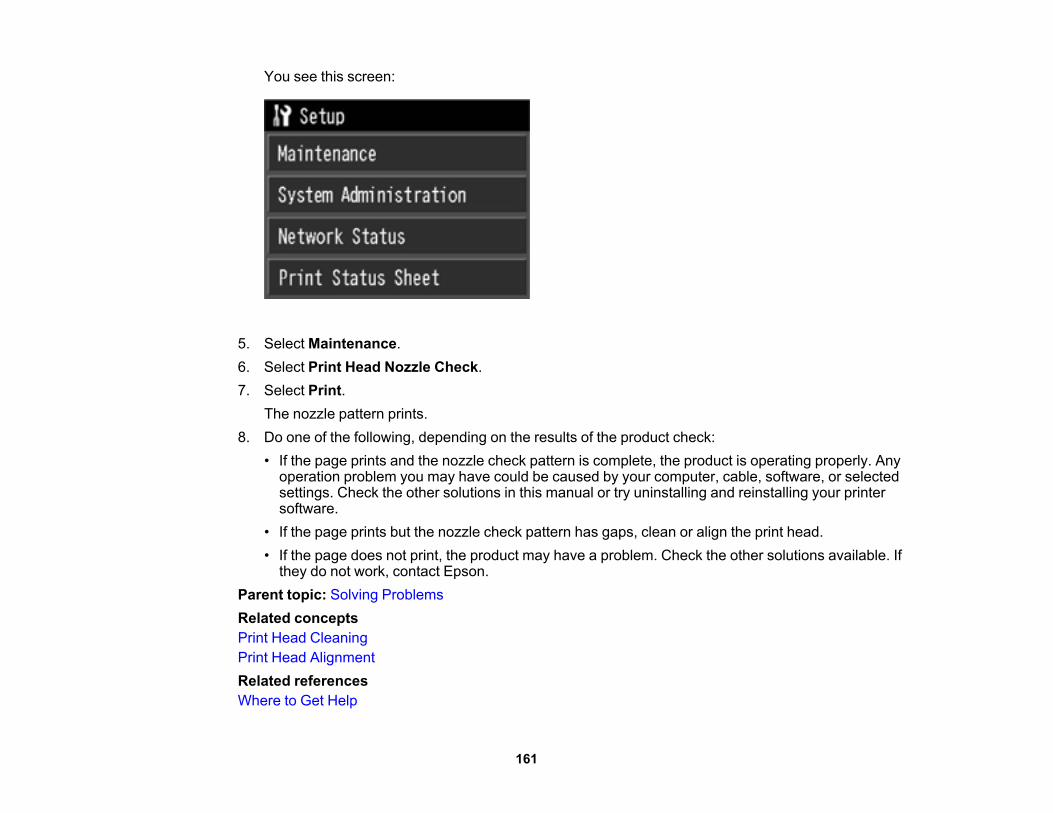
You see this screen:
5. Select Maintenance.6. Select Print Head Nozzle Check.7. Select Print.
The nozzle pattern prints.8. Do one of the following, depending on the results of the product check:
• If the page prints and the nozzle check pattern is complete, the product is operating properly. Anyoperation problem you may have could be caused by your computer, cable, software, or selectedsettings. Check the other solutions in this manual or try uninstalling and reinstalling your printersoftware.
• If the page prints but the nozzle check pattern has gaps, clean or align the print head.• If the page does not print, the product may have a problem. Check the other solutions available. If
they do not work, contact Epson.Parent topic: Solving ProblemsRelated conceptsPrint Head CleaningPrint Head AlignmentRelated referencesWhere to Get Help
161
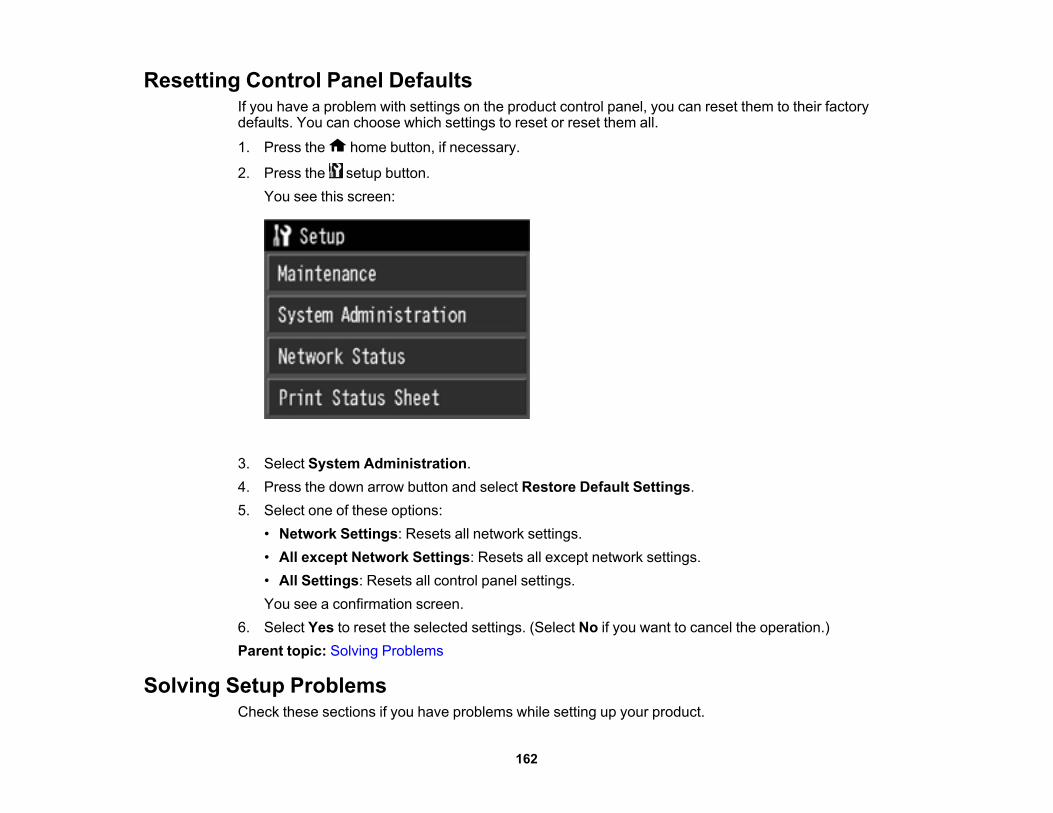
Resetting Control Panel DefaultsIf you have a problem with settings on the product control panel, you can reset them to their factorydefaults. You can choose which settings to reset or reset them all.
1. Press the home button, if necessary.
2. Press the setup button.You see this screen:
3. Select System Administration.4. Press the down arrow button and select Restore Default Settings.5. Select one of these options:
• Network Settings: Resets all network settings.• All except Network Settings: Resets all except network settings.• All Settings: Resets all control panel settings.You see a confirmation screen.
6. Select Yes to reset the selected settings. (Select No if you want to cancel the operation.)Parent topic: Solving Problems
Solving Setup ProblemsCheck these sections if you have problems while setting up your product.
162
Noise After Ink InstallationSoftware Installation ProblemsParent topic: Solving Problems
Noise After Ink InstallationIf you hear noises from your product after installing ink, check the following:• The first time you install ink cartridges, the product must charge its print head. Wait until charging
finishes before you turn off the product, or it may charge improperly and use excess ink the next timeyou turn it on. Your product is finished charging the print head when the power light stops flashing.
• If the product's print head stops moving or making noise, and the charging process has not finishedafter approximately 5 minutes, turn off your product. Turn it back on and check to see if charging is stillin progress. If it is still in progress, contact Epson for help.
• Turn off the product, then make sure the ink cartridges are inserted completely and the ink cartridgecover is closed completely. Also make sure no packing material remains in the product. Wait amoment, then turn the product back on to clear the error.
Parent topic: Solving Setup Problems
Software Installation ProblemsIf you have problems while installing your product software, try these solutions:• Make sure your product is turned on and any necessary cables are securely connected at both ends. If
you still have problems installing software, disconnect the cable and carefully follow the instructions onthe Start Here sheet. Also make sure your system meets the requirements for your operating system.
• Close any other programs, including screen savers and virus protection software, and install yourproduct software again.
• In Windows, make sure your product is selected as the default printer and the correct port is shown inthe printer properties.
• If you see any error message or your software does not install correctly in Windows, you may not havesoftware installation privileges. Contact your System Administrator.
• If you are printing over a network, make sure your product is set up properly on the network.Parent topic: Solving Setup ProblemsRelated conceptsUninstall Your Product Software
163
Related referencesWindows System RequirementsOS X System Requirements
Solving Network ProblemsCheck these solutions if you have problems setting up or using your product on a network.
Note: Breakdown or repair of this product may cause loss of network data and settings. Epson is notresponsible for backing up or recovering data and settings during or after the warranty period. Werecommend that you make your own backup or print out your network data and settings.
Product Cannot Connect to a Wireless Router or Access PointNetwork Software Cannot Find Product on a NetworkProduct Does Not Appear in OS X Printer WindowCannot Print Over a NetworkParent topic: Solving Problems
Product Cannot Connect to a Wireless Router or Access PointIf your product has trouble finding or connecting to a wireless router or access point, try these solutions:• If you are connecting the product via Wi-Fi Protected Setup (WPS) and the Wi-Fi icon on your
product's LCD screen is not lit or does not appear, make sure you select one of the WPS options fromthe product control panel within 2 minutes of pressing the WPS button on your router.
• Make sure to place your product within contact range of your 2.4 GHz router or access point. Avoidplacing your product near a microwave oven, 2.4 GHz cordless phone, or large metal object, such as afiling cabinet.
Note: If you are using a 5 GHz wireless router, set the router to operate in dual band (2.4 GHz and 5GHz) mode. See your router documentation for instructions.
• Verify that your router or access point is operating correctly by connecting to it from your computer oranother device.
• You may need to disable the firewall and any anti-virus software on your wireless router or accesspoint.
• Check to see if access restrictions, such as MAC address filtering, are set on the router or accesspoint. If access restrictions are set, add your product's MAC address to your router's address list. To
164
obtain your product's MAC address, print a network status sheet. Then follow the instructions in yourrouter or access point documentation to add the address to the list.
• If your router or access point does not broadcast its network name (SSID), follow the instructions thatcame with your product to enter your wireless network name manually.
• If your router or access point has security enabled, determine the kind of security it is using and anyrequired password or passphrase for connection. Then make sure to enter the exact WEP key or WPApassphrase correctly.
• Check if your computer is restricting the available wireless channels. If so, verify that your wirelessaccess point is using one of the usable channels and change to a usable channel, if necessary.
• If you are using a Wi-Fi Direct connection that suddenly disconnects, the Wi-Fi direct password onyour device may have been changed. If necessary, delete the existing DIRECT-xxxxxxxx connectionsettings from your device and enter a new password. See your device documentation for instructions.
• If you connected your product to a Windows computer using Wi-Fi Direct and it automatically selectedAccess Point Mode, you may have trouble accessing a low-priority Internet connection. Check thenetwork connection or adapter settings in the Windows Control Panel and set the Internet metricsetting to 100 for your version of the Internet Protocol.
Parent topic: Solving Network ProblemsRelated topicsWi-Fi or Wired Networking
Network Software Cannot Find Product on a NetworkIf EpsonNet Setup cannot find your product on a network, try these solutions:• Make sure your product is turned on and connected to your network. Verify connection using your
product control panel.• Check if your network name (SSID) contains non-ASCII characters. Your product cannot display non-
ASCII characters.• Make sure your product is not connected to a guest network.• If necessary, reinstall your product software and try running EpsonNet Setup again:
1. Reset your product's network settings to their factory defaults.2. Windows only: uninstall your product software.3. Initialize your router following the instructions in your router documentation.
165
Note: If you are reading these instructions online, you will lose your Internet connection when youinitialize your router, so note the next step before initializing it.
4. Download your product software from the Epson website using the instructions on the Start Heresheet.
• If you have replaced your router, reinstall your product software to connect to the new router.
Note: If you are using a 5 GHz wireless router, set the router to operate in dual band (2.4 GHz and5 GHz) mode. See your router documentation for instructions.
Parent topic: Solving Network ProblemsRelated conceptsUninstall Your Product SoftwareRelated topicsWi-Fi or Wired Networking
Product Does Not Appear in OS X Printer WindowIf your product does not appear in the OS X printer window, try these solutions:• Turn your product off, wait 30 seconds, then turn it back on again.• If you are connecting the product wirelessly via EpsonNet Setup and a WiFi symbol is not displayed on
the product's LCD screen, make sure your product software was installed correctly. If necessary,reinstall your software.
• Make sure you installed your product software correctly for your network. See the Start Here sheet forinstructions.
• If your Mac includes both wired and wireless network services, make sure the network to which youconnected your product is at the top of the Set Service Order list. Check your Mac documentation forinstructions.
Note: If you are using a 5 GHz wireless router, set the router to operate in dual band (2.4 GHz and 5GHz) mode. See your router documentation for instructions.
Parent topic: Solving Network ProblemsRelated conceptsUninstall Your Product Software
166
Related topicsWi-Fi or Wired Networking
Cannot Print Over a NetworkIf you cannot print over a network, try these solutions:• Make sure that your product is turned on.• Make sure you install your product's network software as described in your product documentation.• Print a network status sheet and verify that the network settings are correct. If the network status is
Disconnected, check any cable connections and turn your product off and then on again.• If you are using TCP/IP, make sure the product's IP address is set correctly for your network. If your
network does not assign IP addresses using DHCP, set the IP address manually.• Make sure your computer and product are both using the same wireless network.• If network printing is slow, print a network status sheet and check the signal strength. If it is poor, place
your product closer to your router or access point. Avoid placing your product near a microwave oven,2.4 GHz cordless phone, or large metal object, such as a filing cabinet.
Note: If you are using a 5 GHz wireless router, set the router to operate in dual band (2.4 GHz and 5GHz) mode. See your router documentation for instructions.
• Check to see if your wireless router or access point has an enabled Privacy Separator function that ispreventing printing from a device over the network. See your router or access point documentation forinstructions on disabling the Privacy Separator function.
• If you are connecting the product via Wi-Fi Protected Setup (WPS) and the Wi-Fi icon does not appearon your product's LCD screen, make sure you select one of the WPS options from the product controlpanel within 2 minutes of pressing the WPS button on your router.
• Check your wired LAN router or access point to see if the LED for the port to which your product isconnected is on or flashing. If the link LED is off, try the following:• Make sure the Ethernet cable is securely connected to your product and to your router, access
point, switch, or hub.• Try connecting your product to a different port or a different router, access point, switch, or hub.• Try connecting with a different Ethernet cable.• Try printing to your product from another computer on the network.
167
Note: If you are using a 5 GHz wireless router, set the router to operate in dual band (2.4 GHz and 5GHz) mode. See your router documentation for instructions.
• If you are connecting the product via EpsonNet Setup and the Wi-Fi icon does not appear on the LCD,make sure your product software was installed correctly. If necessary, reinstall your software.
Parent topic: Solving Network ProblemsRelated conceptsUninstall Your Product SoftwareRelated topicsWi-Fi or Wired Networking
Solving Paper ProblemsCheck these sections if you have problems using paper with your product.Paper Feeding ProblemsPaper Jam Problems in the Sheet FeederPaper Jam Problems in the Front Manual Feed TrayPaper Jam Problems - Thick MediaPaper Jam Problems - Roll PaperPaper Ejection ProblemsParent topic: Solving Problems
Paper Feeding ProblemsIf you have problems feeding paper, try these solutions:• If paper does not feed into the sheet feeder, remove the paper and fan the edges to separate the
sheets. Reload paper against the right side and slide the edge guide against it. Do not load too manysheets in the sheet feeder at once and make sure the product cover is closed.
• When using the sheet feeder, do not load paper above the arrow mark on the left edge guide. Loadonly one sheet of compatible paper when using the front manual feed tray.
• Load only one sheet of media in the front manual feed tray. For posterboard, make sure there isenough space behind the product for the media to feed through.
• If multiple pages feed at once, remove the paper, fan the edges to separate the sheets, and reload it.• If you can not insert paper easily into the front manual feed tray, make sure the paper is perfectly flat
and not curled.
168

• If you are printing on roll paper or with the sheet feeder, make sure the manual feed tray is notextended. Extend it only to load fine art paper or posterboard. Once the media is fed into the productand you see a message on the LCD screen, close the manual feed tray.
• If paper loaded using the front manual feed tray does not feed, make sure you installed the papercorrectly and guided it all the way into the product.
• Do not load more than the recommended number of sheets.• Make sure paper is loaded in the correct orientation. Load cut sheets in the sheet feeder vertically.• Make sure your paper meets the specifications for your product.• If paper dust builds up on the rollers, they may lose traction and become unable to feed paper
properly. Clean the paper guide.• If roll paper does not feed, cut the end straight across and uncurl it by rolling it backward, if necessary.
Then reload the paper.• If thick media does not feed, make sure you are loading it straight into the product, not at an angle.• Make sure the transportation lock is removed from the front manual feed tray.• If paper jams when you print on both sides of the paper, try loading fewer sheets.• For best results, follow these guidelines:
• Use new, smooth, high-quality paper that is not damp, curled, creased, old, too thin, or too thick.• Load paper printable side up.• Follow any special loading instructions that came with the paper.
Parent topic: Solving Paper ProblemsRelated referencesPaper Jam Problems in the Sheet FeederPaper Jam Problems in the Front Manual Feed TrayPaper Jam Problems - Thick MediaPaper Jam Problems - Roll PaperPaper SpecificationsRelated topicsLoading Media
169
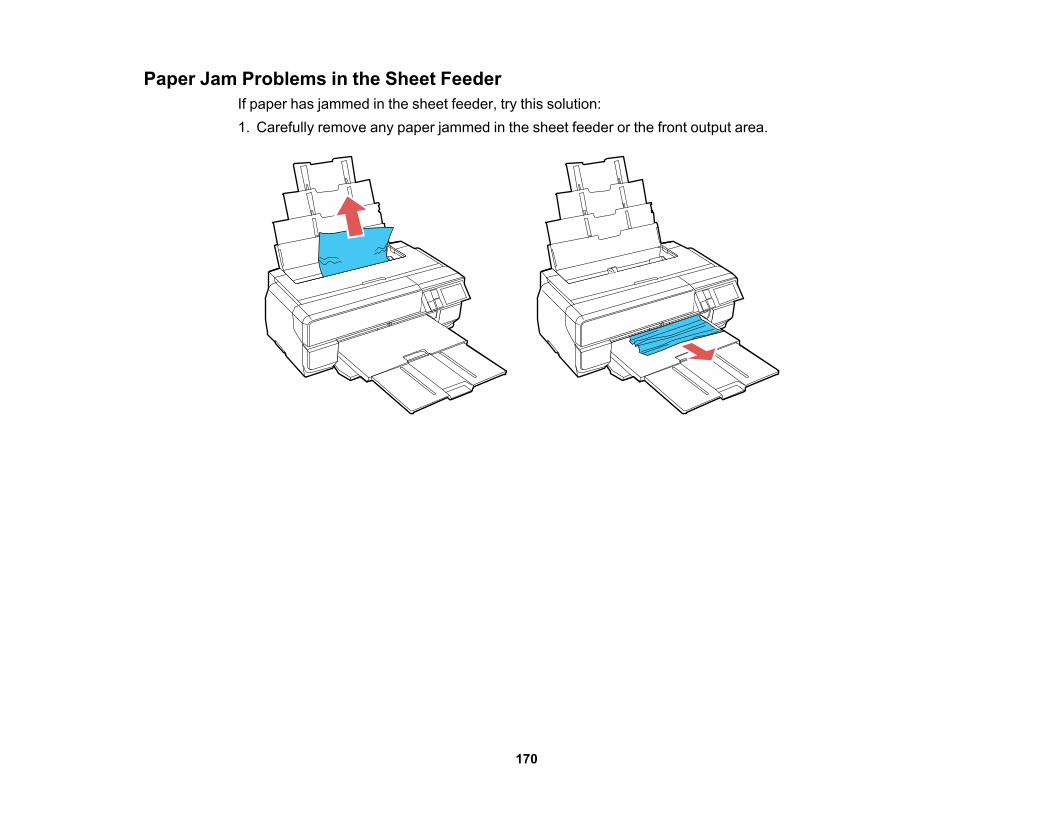
Paper Jam Problems in the Sheet FeederIf paper has jammed in the sheet feeder, try this solution:1. Carefully remove any paper jammed in the sheet feeder or the front output area.
170
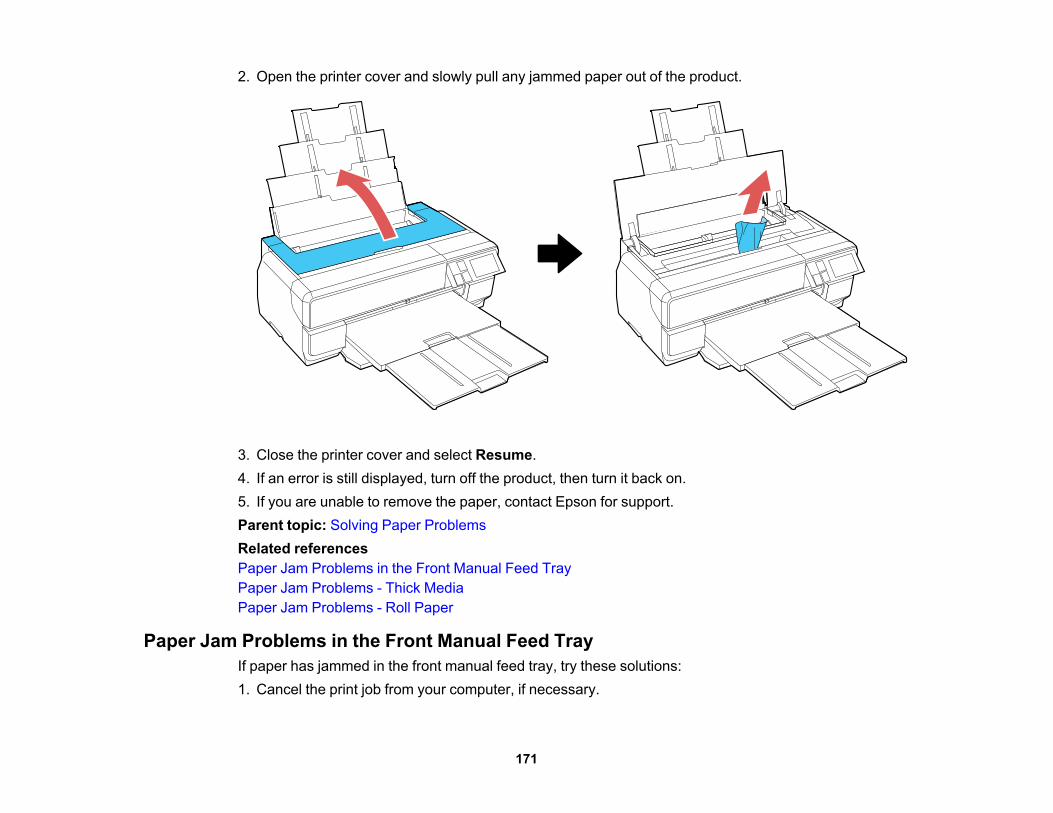
2. Open the printer cover and slowly pull any jammed paper out of the product.
3. Close the printer cover and select Resume.4. If an error is still displayed, turn off the product, then turn it back on.5. If you are unable to remove the paper, contact Epson for support.Parent topic: Solving Paper ProblemsRelated referencesPaper Jam Problems in the Front Manual Feed TrayPaper Jam Problems - Thick MediaPaper Jam Problems - Roll Paper
Paper Jam Problems in the Front Manual Feed TrayIf paper has jammed in the front manual feed tray, try these solutions:1. Cancel the print job from your computer, if necessary.
171
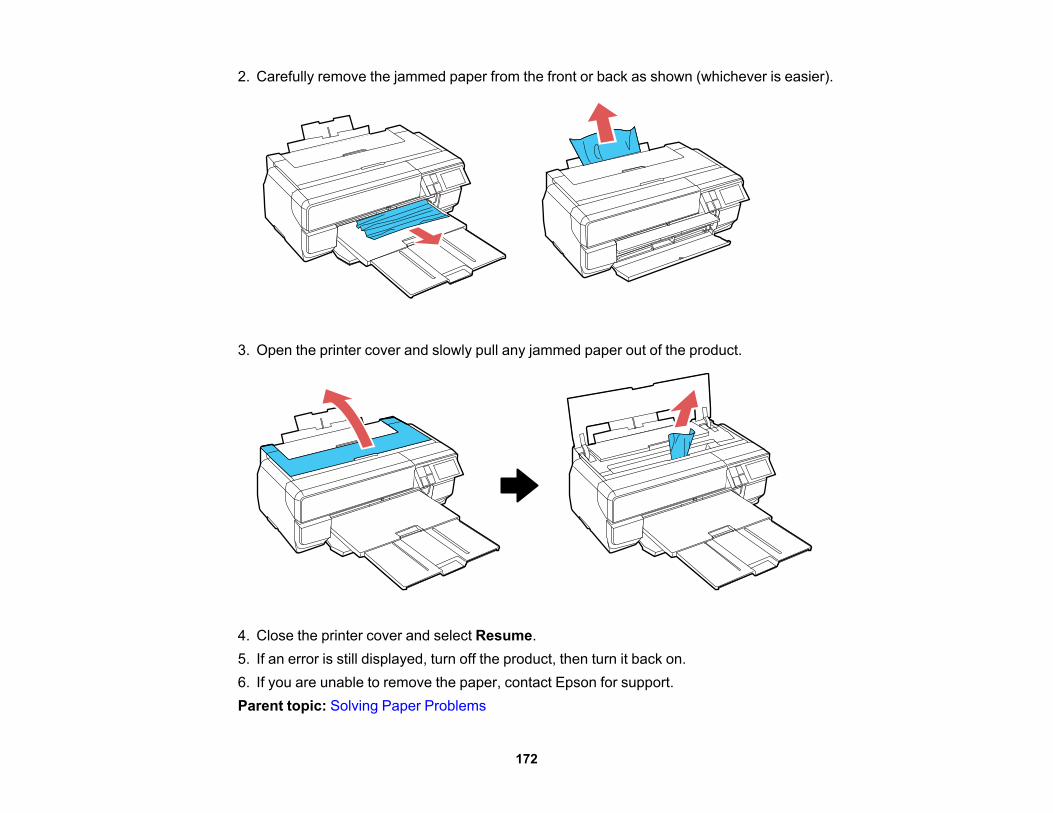
2. Carefully remove the jammed paper from the front or back as shown (whichever is easier).
3. Open the printer cover and slowly pull any jammed paper out of the product.
4. Close the printer cover and select Resume.5. If an error is still displayed, turn off the product, then turn it back on.6. If you are unable to remove the paper, contact Epson for support.Parent topic: Solving Paper Problems
172
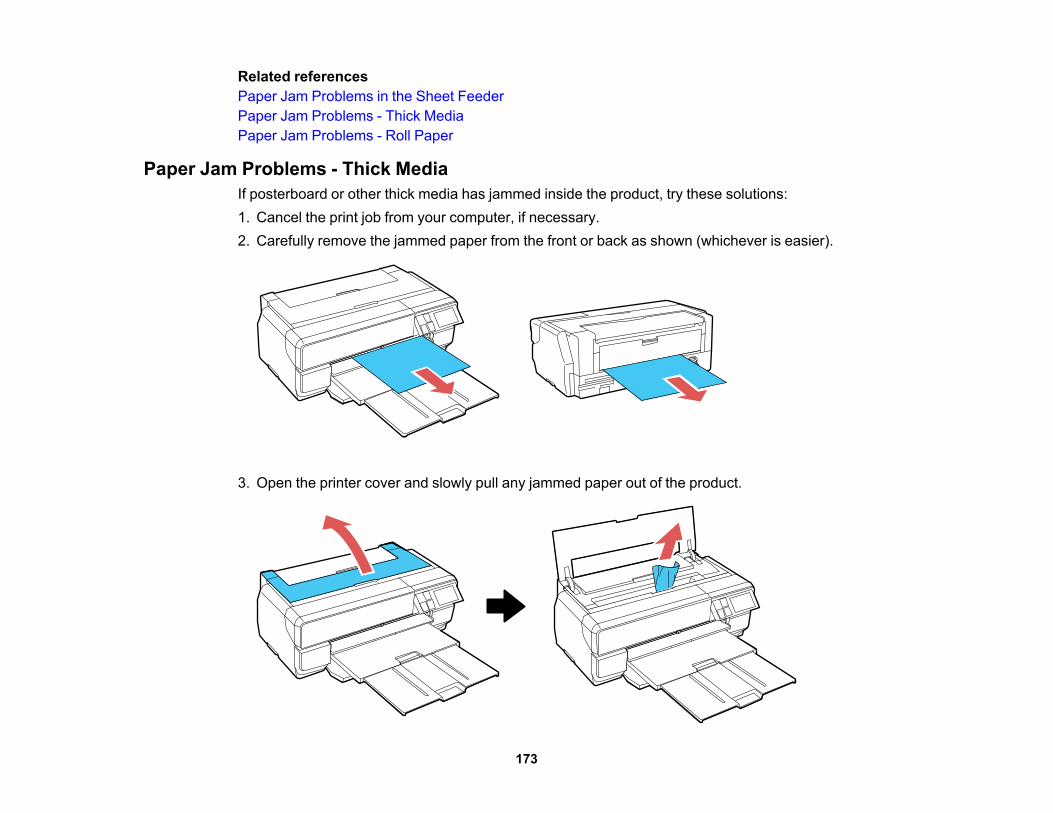
Related referencesPaper Jam Problems in the Sheet FeederPaper Jam Problems - Thick MediaPaper Jam Problems - Roll Paper
Paper Jam Problems - Thick MediaIf posterboard or other thick media has jammed inside the product, try these solutions:1. Cancel the print job from your computer, if necessary.2. Carefully remove the jammed paper from the front or back as shown (whichever is easier).
3. Open the printer cover and slowly pull any jammed paper out of the product.
173
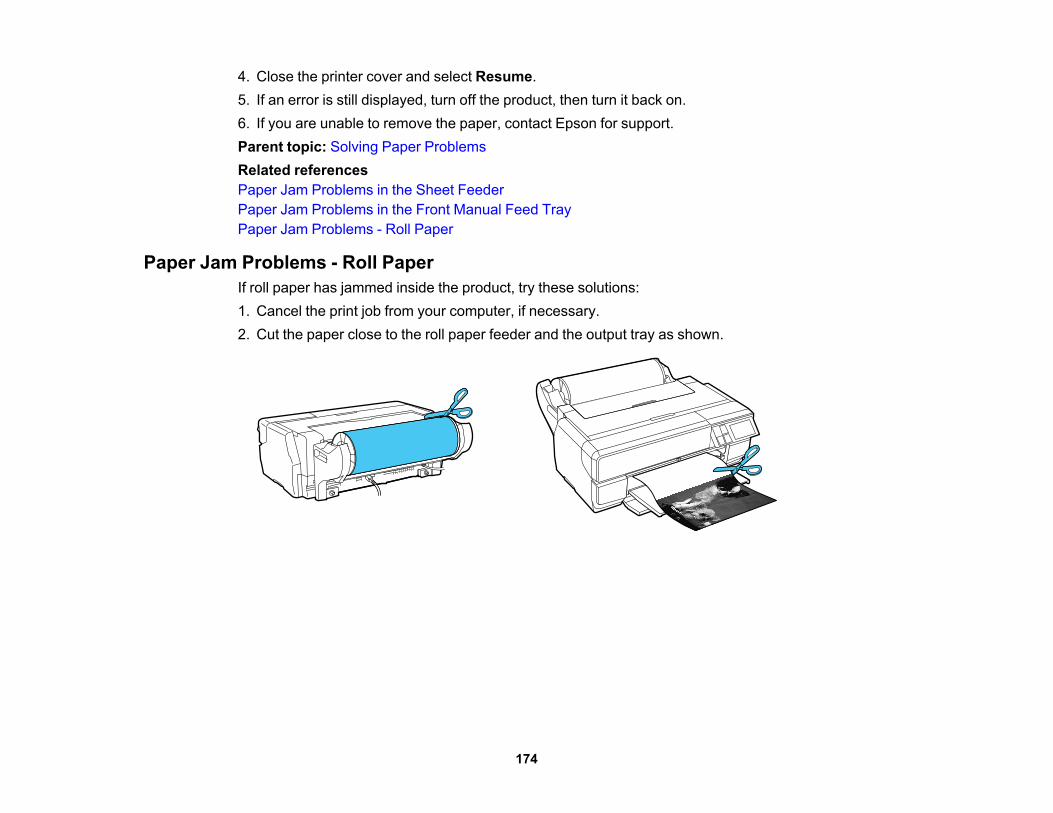
4. Close the printer cover and select Resume.5. If an error is still displayed, turn off the product, then turn it back on.6. If you are unable to remove the paper, contact Epson for support.Parent topic: Solving Paper ProblemsRelated referencesPaper Jam Problems in the Sheet FeederPaper Jam Problems in the Front Manual Feed TrayPaper Jam Problems - Roll Paper
Paper Jam Problems - Roll PaperIf roll paper has jammed inside the product, try these solutions:1. Cancel the print job from your computer, if necessary.2. Cut the paper close to the roll paper feeder and the output tray as shown.
174
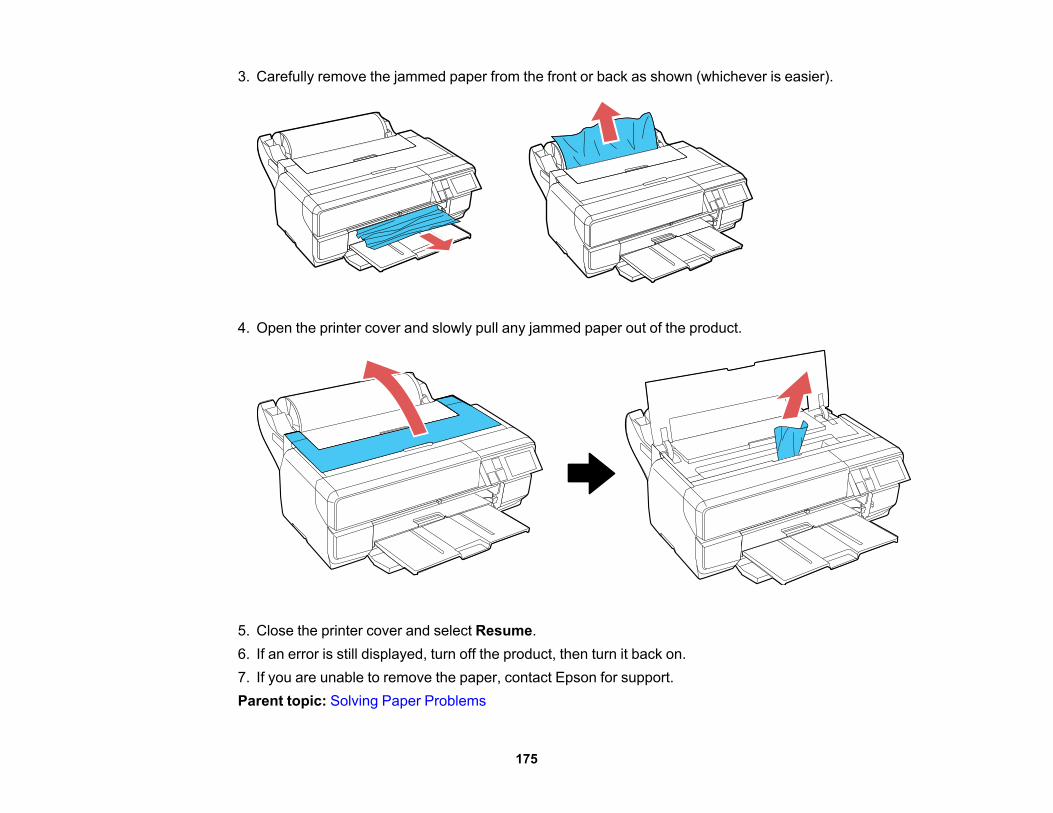
3. Carefully remove the jammed paper from the front or back as shown (whichever is easier).
4. Open the printer cover and slowly pull any jammed paper out of the product.
5. Close the printer cover and select Resume.6. If an error is still displayed, turn off the product, then turn it back on.7. If you are unable to remove the paper, contact Epson for support.Parent topic: Solving Paper Problems
175
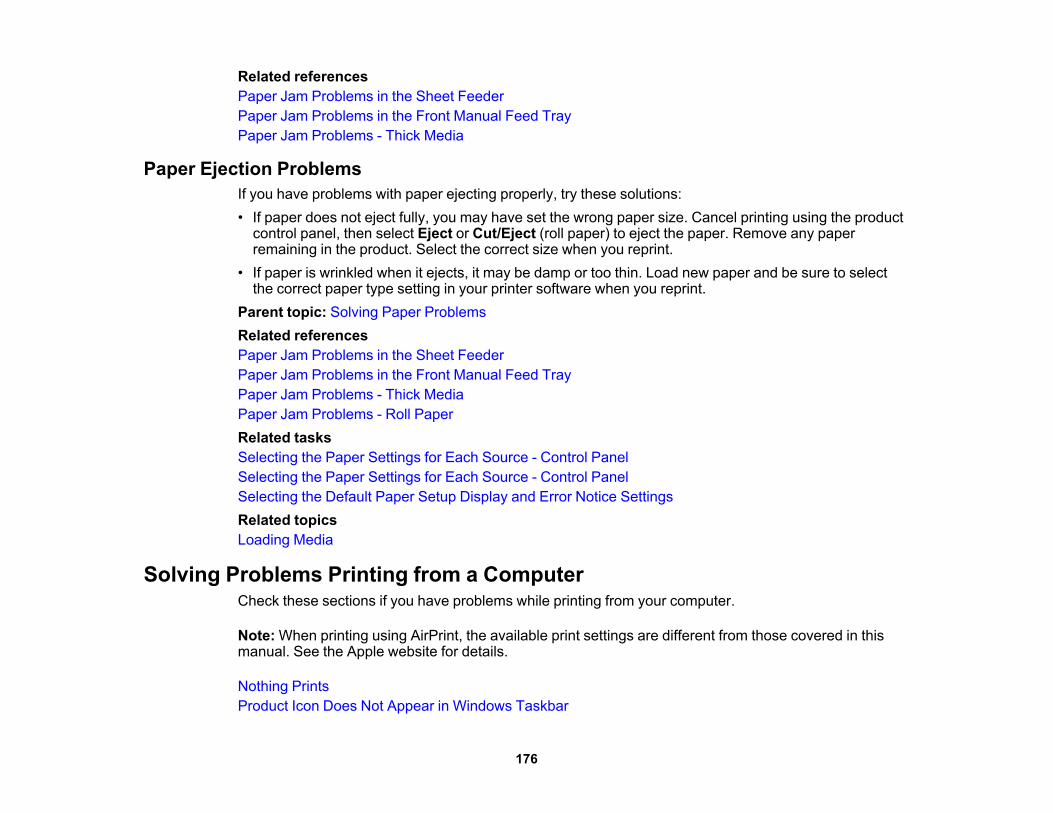
Related referencesPaper Jam Problems in the Sheet FeederPaper Jam Problems in the Front Manual Feed TrayPaper Jam Problems - Thick Media
Paper Ejection ProblemsIf you have problems with paper ejecting properly, try these solutions:• If paper does not eject fully, you may have set the wrong paper size. Cancel printing using the product
control panel, then select Eject or Cut/Eject (roll paper) to eject the paper. Remove any paperremaining in the product. Select the correct size when you reprint.
• If paper is wrinkled when it ejects, it may be damp or too thin. Load new paper and be sure to selectthe correct paper type setting in your printer software when you reprint.
Parent topic: Solving Paper ProblemsRelated referencesPaper Jam Problems in the Sheet FeederPaper Jam Problems in the Front Manual Feed TrayPaper Jam Problems - Thick MediaPaper Jam Problems - Roll PaperRelated tasksSelecting the Paper Settings for Each Source - Control PanelSelecting the Paper Settings for Each Source - Control PanelSelecting the Default Paper Setup Display and Error Notice SettingsRelated topicsLoading Media
Solving Problems Printing from a ComputerCheck these sections if you have problems while printing from your computer.
Note: When printing using AirPrint, the available print settings are different from those covered in thismanual. See the Apple website for details.
Nothing PrintsProduct Icon Does Not Appear in Windows Taskbar
176
Error After Cartridge ReplacementPrinting is SlowParent topic: Solving Problems
Nothing PrintsIf you have sent a print job and nothing prints, try these solutions:• Make sure your product is turned on.• Make sure any interface cables are connected securely at both ends.• Make sure the interface specifications match the specifications for the printer and the computer.• If you connected your product to a USB hub, make sure it is a first-tier hub. If it still does not print,
connect your product directly to your computer instead of the hub.• Run a product check to see if a test page prints. If the test page prints, check to see if your product
software is installed correctly.• In Windows, make sure your product is selected as the default printer.• In Windows, make sure the printer port setting matches the printer connection port.• In Windows, clear any stalled print jobs from the Windows Spooler:
• Windows 8.x: Navigate to the Apps screen and select Control Panel > Hardware and Sound >Devices and Printers. Right-click your product name, select See what's printing, and select yourproduct name again if necessary. Right-click the stalled print job, click Cancel, and click Yes.
• Windows 7: Click and select Devices and Printers. Right-click your product name, select Seewhat's printing, and select your product name again, if necessary. Right-click the stalled print job,click Cancel, and click Yes.
• In OS X, make sure the printer is added to the printer list.Parent topic: Solving Problems Printing from a ComputerRelated tasksRunning a Product Check
177

Product Icon Does Not Appear in Windows TaskbarIf you do not see your product icon in the Windows taskbar, first try restarting your computer. If that doesnot work, try this solution:1. Do one of the following:
• Windows 8.x: Navigate to the Apps screen and select Control Panel > Hardware and Sound >Devices and Printers.
• Windows 7: Click and select Devices and Printers.2. Right-click your product name, select Printing Preferences, and select your product name again if
necessary.3. Click the Utility tab.4. Click the Monitoring Preferences button.5. Click the checkbox for the option that adds the shortcut icon to the taskbar.6. Click OK to close the open program windows.Parent topic: Solving Problems Printing from a Computer
Error After Cartridge ReplacementIf you see an error message after you replace an ink cartridge, follow these steps:1. Remove and reinsert the replaced ink cartridge, making sure to push it all the way into its slot.2. Complete the ink cartridge installation steps.Parent topic: Solving Problems Printing from a ComputerRelated tasksRemoving and Installing Ink Cartridges
Printing is SlowIf printing becomes slow, try these solutions:• Make sure your system meets the requirements for your operating system. If you are printing a high-
resolution image, you may need more than the minimum requirements. If necessary, increase yoursystem's memory.
• If you are using Windows 7, close the Devices and Printers window before you print.• If you are using OS X, make sure you download and install the Epson printer driver.
178
• Clear space on your hard drive or run a defragmentation utility to free up existing space.• Close any programs you are not using when you print.• If your product is connected to a USB hub, connect it directly to your computer instead.• If printing becomes slower after printing continuously for a long time, the product may have
automatically slowed down to protect the print mechanism from overheating or becoming damaged.Let the product rest with the power on for 30 minutes, then try printing again.
For the fastest printing, select the following settings in your product software:• Make sure the paper type setting matches the type of paper you loaded.• Turn on any high speed settings in your product software.• Select a lower print quality setting.• Windows: Click the Maintenance or Utility tab, select Extended Settings or Speed and Progress,
and select the following settings:• High Speed Copies• Always Spool RAW Datatype• Page Rendering Mode• Print as Bitmap
Parent topic: Solving Problems Printing from a ComputerRelated referencesPaper or Media Type Settings - Product SoftwarePaper or Media Type Settings - Control PanelWindows System RequirementsOS X System RequirementsRelated tasksSelecting Basic Print Settings - WindowsSelecting Additional Settings - WindowsSelecting Basic Print Settings - OS X
Solving Page Layout and Content ProblemsCheck these sections if you have problems with the layout or content of your printed pages.
179

Note: When printing using AirPrint, the available print settings are different from those covered in thismanual. See the Apple website for details.
Inverted ImageToo Many Copies PrintBlank Pages PrintIncorrect Margins on PrintoutBorder Appears on Borderless PrintsIncorrect Characters PrintIncorrect Image Size or PositionSlanted PrintoutParent topic: Solving Problems
Inverted ImageIf your printed image is inverted unexpectedly, try these solutions:• Turn off any mirror or inversion settings in your printing application.• Turn off the Mirror Image, Flip horizontally, or Reverse page orientation settings in your printer
software. (This option has different names, depending on your operating system version.)
Note: Leave these options turned on when you print on Epson Iron-on Cool Peel Transfer paper, ifavailable for your product.
Parent topic: Solving Page Layout and Content ProblemsRelated tasksSelecting Print Layout Options - WindowsSelecting Additional Settings - WindowsSelecting Basic Print Settings - OS X
Too Many Copies PrintMake sure that the Copies setting in your printing program or printer software is not set for multiplecopies.Parent topic: Solving Page Layout and Content ProblemsRelated tasksSelecting Print Layout Options - Windows
180
Selecting Additional Settings - WindowsSelecting Basic Print Settings - OS X
Blank Pages PrintIf blank pages print unexpectedly, try these solutions:• Make sure you selected the correct paper size settings in your printing program and printer software.• If a blank page exists in a document you are printing and you want to skip printing it, select the Skip
Blank Page setting in your printer software, if available.• Run a print head nozzle check to see if any of the nozzles are clogged. Then clean the print head, if
necessary.• Make sure your product is selected as the printer in your printing program.Parent topic: Solving Page Layout and Content ProblemsRelated conceptsPrint Head Nozzle CheckPrint Head CleaningRelated tasksSelecting Basic Print Settings - WindowsSelecting Additional Settings - WindowsSelecting Basic Print Settings - OS XSelecting Printing Preferences - OS X
Incorrect Margins on PrintoutIf your printed page has incorrect margins, try these solutions:• Make sure you selected the correct paper size settings in your printing program and printer software.• Make sure you selected the correct margins for your paper size in your printing program.• Make sure your paper is positioned correctly for feeding into the printer.You can use the preview option in your printer software to check your margins before you print.Parent topic: Solving Page Layout and Content ProblemsRelated tasksSelecting Basic Print Settings - WindowsSelecting Basic Print Settings - OS X
181
Related topicsLoading Media
Border Appears on Borderless PrintsIf you see a border on borderless prints, try these solutions:• Make sure you are printing on a compatible borderless paper type and size.
Note: For custom paper sizes, make sure you select a supported borderless page width.
• Windows: Make sure you selected the Borderless setting in your printer software.• OS X: Make sure you selected the Borderless checkbox or a paper size with a Borderless option in
your printer software.• Adjust the Expansion setting to adjust the amount of image expansion on the edges of borderless
prints.• Make sure the image size and the paper size are set correctly; if the image is small, the enlargement
may not be enough to cover the paper.Parent topic: Solving Page Layout and Content ProblemsRelated referencesBorderless Paper Type CompatibilityRelated tasksSelecting Basic Print Settings - WindowsSelecting Basic Print Settings - OS X
Incorrect Characters PrintIf incorrect characters appear in your prints, try these solutions before reprinting:• Make sure any cables are securely connected at both ends.• In Windows, delete all jobs from the Windows Spooler. Click Print Queue on the Utility tab in the
printer settings window, and cancel any stalled print jobs.• If your product is connected to a USB hub, connect it directly to your computer instead.• If incorrect characters still appear in your prints, try connecting your product using a different cable.Parent topic: Solving Page Layout and Content Problems
182
Incorrect Image Size or PositionIf your printed image is the wrong size or in the wrong position, try these solutions:• Make sure you selected the correct paper size and layout settings in your printing program and printer
software.• Make sure you selected the correct paper size on the control panel.• Make sure your paper is positioned correctly for feeding into the printer.You can use the preview option in your printer software to check your margins before you print.Parent topic: Solving Page Layout and Content ProblemsRelated tasksSelecting Basic Print Settings - WindowsSelecting Additional Settings - WindowsSelecting Basic Print Settings - OS XSelecting Printing Preferences - OS XRelated topicsLoading Media
Slanted PrintoutIf your printouts are slanted, try these solutions:• Slide the edge guide against the edge of the paper.• Make sure the paper support edge guide is flipped down.• Select a higher print quality setting in your printer software.• Turn off any high speed settings in your product software.• Align the print head.• Make sure the product is not printing while tilted or at an angle.Parent topic: Solving Page Layout and Content ProblemsRelated conceptsPrint Head AlignmentRelated tasksSelecting Basic Print Settings - WindowsSelecting Basic Print Settings - OS X
183

Related topicsLoading Media
Solving Print Quality ProblemsCheck these sections if your printouts have problems with print quality, but your image looks fine on yourcomputer screen.
Note: When printing using AirPrint, the available print settings are different from those covered in thismanual. See the Apple website for details.
White or Dark Lines in PrintoutBlurry or Smeared PrintoutFaint Printout or Printout Has GapsGrainy PrintoutIncorrect ColorsParent topic: Solving Problems
White or Dark Lines in PrintoutIf you notice white or dark lines in your prints (also called banding), try these solutions before you reprint:• Run a nozzle check to see if any of the print head nozzles are clogged. Then clean the print head, if
necessary.• Make sure the paper type setting matches the type of paper you loaded.• Make sure you loaded the printable side of the paper correctly for your product.• Turn off any high speed settings in your product software.• Align the print head.• You may need to replace the ink cartridges.Parent topic: Solving Print Quality ProblemsRelated conceptsPrint Head Nozzle CheckPrint Head CleaningPrint Head Alignment
184
Related referencesPaper or Media Type Settings - Product SoftwarePaper or Media Type Settings - Control PanelRelated tasksSelecting Print Layout Options - WindowsSelecting Additional Settings - WindowsSelecting Basic Print Settings - OS XRemoving and Installing Ink CartridgesRelated topicsLoading Media
Blurry or Smeared PrintoutIf your printouts are blurry or smeared, try these solutions:• Make sure your paper is not damp, curled, old, or loaded incorrectly in your product.• Use a support sheet with special paper, or load special paper one sheet at a time.• Make sure your paper meets the specifications for your product.• Use Epson papers to ensure proper saturation and absorption of genuine Epson inks.• Make sure the paper type setting in your product software matches the type of paper you loaded.• Make sure you loaded the printable side of the paper correctly for your product.• If you are printing on thick paper or poster board, make sure you select the appropriate settings.• Remove each sheet from the output tray as it is printed.• Avoid handling printouts on glossy paper right after printing to allow the ink to set.• Turn off any high speed settings in your product software.• If you print on both sides of a sheet of paper, smudges may appear on the reverse side of heavily
saturated or dark images. If one side of a sheet will contain a lighter image or text, print that side first.Adjust the Print Density and/or Increased Ink Drying Time settings.
• Run a nozzle check to see if any of the print head nozzles are clogged. Then clean the print head, ifnecessary.
• Align the print head.• Clean the paper path.
185
Note: Your product will not operate properly while tilted at an angle. Place it on a flat, stable surface thatextends beyond the base of the product in all directions.
Parent topic: Solving Print Quality ProblemsRelated conceptsPrint Head CleaningPrint Head AlignmentRelated referencesDouble-sided Printing Options - WindowsAvailable Epson PapersPaper SpecificationsRelated tasksSelecting Basic Print Settings - WindowsSelecting Print Layout Options - WindowsSelecting Additional Settings - WindowsSelecting Basic Print Settings - OS XSelecting Printing Preferences - OS XCleaning the Paper GuideRelated topicsLoading Media
Faint Printout or Printout Has GapsIf your printouts are faint or have gaps, try these solutions:• Run a nozzle check to see if any of the print head nozzles are clogged. Then clean the print head, if
necessary.• The ink cartridges may be old or low on ink, and you may need to replace them.• Make sure the paper type setting matches the type of paper you loaded.• Make sure your paper is not damp, curled, old, or loaded incorrectly in your product.• Align the print head.• Clean the paper path.Parent topic: Solving Print Quality Problems
186
Related conceptsPrint Head Nozzle CheckPrint Head CleaningPrint Head AlignmentRelated referencesPaper or Media Type Settings - Product SoftwarePaper or Media Type Settings - Control PanelRelated tasksSelecting Basic Print Settings - WindowsSelecting Basic Print Settings - OS XCleaning the Paper GuideRemoving and Installing Ink CartridgesRelated topicsLoading Media
Grainy PrintoutIf your printouts are grainy, try these solutions:• Make sure you loaded the printable side of the paper correctly for your product.• Select a higher print quality setting and turn off any high speed settings in your product software.• Run a nozzle check to see if any of the print head nozzles are clogged. Then clean the print head, if
necessary.• Align the print head.• You may need to increase the image resolution or print a smaller size; see your software
documentation.
Note: Images from the Internet may be low resolution and not result in a high quality printout.
• If you enlarged the image in an image-editing program, you need to increase the resolution setting toretain a high image quality. Increase the resolution by the same amount you increased the image size.For example, if the resolution is 300 dpi (dots per inch) and you will double the image size later,change the resolution setting to 600 dpi.
187
Note: Higher resolution settings result in larger file sizes, which take longer to process and print.Consider the limitations of your computer system when selecting a resolution, and select the lowestpossible resolution that produces acceptable quality to keep file sizes manageable.
Parent topic: Solving Print Quality ProblemsRelated conceptsPrint Head Nozzle CheckPrint Head CleaningPrint Head AlignmentRelated tasksSelecting Basic Print Settings - WindowsSelecting Basic Print Settings - OS XSelecting Print Layout Options - WindowsSelecting Additional Settings - WindowsCleaning the Paper GuideRelated topicsLoading Media
Incorrect ColorsIf your printouts have incorrect colors, try these solutions:• Make sure the Advanced B&W Photo, Black/Grayscale or Grayscale setting is not selected in your
printer software.• Run a nozzle check to see if any of the print head nozzles are clogged. Then clean the print head, if
necessary.• The ink cartridges may be old or low on ink, and you may need to replace them.• Your printed colors can never exactly match your on-screen colors. However, you can use a color
management system to get as close as possible. Try using the color management options in yourprinter software.
• Try turning off the PhotoEnhance setting in Windows.• Try adjusting the Gamma setting.• For best results, use genuine Epson ink and paper.Parent topic: Solving Print Quality Problems
188
Related conceptsPrint Head Nozzle CheckPrint Head CleaningRelated referencesAvailable Epson PapersRelated tasksSelecting Basic Print Settings - WindowsSelecting Basic Print Settings - OS XSelecting Print Layout Options - WindowsSelecting Additional Settings - WindowsManaging Color - OS X
Uninstall Your Product SoftwareIf you have a problem that requires you to uninstall and re-install your software, follow the instructions foryour operating system.Uninstalling Printing Software - WindowsUninstalling Product Software - OS XParent topic: Solving Problems
Uninstalling Printing Software - WindowsYou can uninstall and then re-install your printer software to solve certain problems.1. Turn off the product.2. Disconnect any interface cables.3. Do one of the following:
• Windows 8.x: Navigate to the Apps screen and select Control Panel > Programs > Programsand Features. Select the uninstall option for your Epson product, then select Uninstall/Change.
Note: If you see a User Account Control window, click Yes or Continue.
In the next window, select your product, if necessary, and click OK. Then follow any on-screeninstructions.
189
• Windows (other versions): Click or Start, and select All Programs or Programs. SelectEpson, select your product, then click EPSON Printer Software Uninstall.
Note: If you see a User Account Control window, click Yes or Continue.
In the next window, select your product, if necessary, and click OK. Then follow any on-screeninstructions.
4. Restart your computer, then re-install your software.
Note: If you find that re-installing your product software does not solve a problem, contact Epson.
Parent topic: Uninstall Your Product Software
Uninstalling Product Software - OS XIn most cases, you do not need to uninstall your product software before re-installing it. However, youcan download the Uninstaller utility from the Epson support website to uninstall your product software asdescribed here.
Note: If you find that re-installing your product software does not solve a problem, contact Epson.
1. To download the Uninstaller utility, visit the Epson download site (U.S. downloads or Canadiandownloads).
2. Follow the instructions on the screen to install the Uninstaller utility.3. Quit all applications currently running on your Mac.4. Double-click the Uninstaller icon.5. Select the checkbox for each software program you want to uninstall.6. Click Uninstall.7. Follow the on-screen instructions to uninstall the software.8. To reinstall your product software, see the Start Here sheet for instructions.
Note: If you uninstall the printer driver and your product name remains in the Print & Fax, Print & Scan,or Printers & Scanners window, select your product name and click the – (remove) icon to remove it.
Parent topic: Uninstall Your Product Software
190
Where to Get HelpIf you need to contact Epson for technical support services, use the following support options.
Internet SupportVisit Epson's support website at epson.com/support (U.S.) or epson.ca/support (Canada) for solutions tocommon problems. You can download drivers and documentation, get FAQs and troubleshootingadvice, or e-mail Epson with your questions.
Speak to a Support RepresentativeBefore you call Epson for support, please have the following information ready:• Product name• Product serial number (located on a label on the product)• Proof of purchase (such as a store receipt) and date of purchase• Computer configuration• Description of the problemThen call:• U.S.: (562) 276-7272, 6 AM to 8 PM, Pacific Time, Monday through Friday, and 7 AM to 4 PM, Pacific
Time, Saturday• Canada: (905) 709-2567, 6 AM to 8 PM, Pacific Time, Monday through Friday, and 7 AM to 4 PM,
Pacific Time, SaturdayDays and hours of support are subject to change without notice. Toll or long distance charges mayapply.
Purchase Supplies and AccessoriesYou can purchase genuine Epson ink and paper at epson.com/ink3 (U.S. sales) or epson.ca (Canadiansales). You can also purchase supplies from an Epson authorized reseller. To find the nearest one, call800-GO-EPSON (800-463-7766).Parent topic: Solving Problems
191
Technical SpecificationsThese sections list the technical specifications for your product.
Note: Epson offers a recycling program for end of life products. Please go to this site for information onhow to return your products for proper disposal.
Windows System RequirementsOS X System RequirementsPaper SpecificationsPrintable Area SpecificationsInk Cartridge SpecificationsDimension SpecificationsElectrical SpecificationsEnvironmental SpecificationsInterface SpecificationsNetwork Interface SpecificationsSafety and Approvals Specifications
Windows System RequirementsTo use your product and its software, your computer should use one of these Microsoft operatingsystems:• Windows 8.x• Windows 7
Note: Visit Epson's support website at epson.com/support (U.S.) or epson.ca/support (Canada) for thelatest in compatibility and drivers for your product.
Parent topic: Technical Specifications
OS X System RequirementsTo use your product and its software, your Mac should use one of these operating systems:• OS X 10.10.x
192
• OS X 10.9.x• OS X 10.8.x• OS X 10.7.x
Note: Visit Epson's support website at epson.com/support (U.S.) or epson.ca/support (Canada) for thelatest in compatibility and drivers for your product.
Parent topic: Technical Specifications
Paper SpecificationsNote: Since the quality of any particular brand or type of paper may be changed by the manufacturer atany time, Epson cannot guarantee the quality of any non-Epson brand or type of paper. Always test asample of paper stock before purchasing large quantities or printing large jobs.
Cut sheets - plain paper
Capacity Paper stack up to 0.47 inch (12 mm) thick of these paper sizes:A4 (8.3 × 11.7 inches [210 × 297 mm])B5 (7.2 × 10.1 inches [182 × 257 mm])A5 (5.8 × 8.2 inches [148 × 210 mm])A6 (4.1 × 5.8 inches [105 × 148 mm])Letter (8.5 × 11 inches [216 × 279 mm])Stack up to 0.20 inch (5 mm) thick on these paper sizes:A3 (11.7 × 16.5 inches [297 × 420 mm])B4 (13.9 × 9.84 inches [353 × 250 mm])Non-standard sizes between 3.5 inches (89 mm) and 17 inches(432 mm) wide, and between 5 inches (127 mm) and 129 inches(3276.7 mm) long
Thickness 0.003 to 0.004 inch (0.08 to 0.11 mm)Weight 17 lb (64 g/m2) to 20 lb (90 g/m2)
193
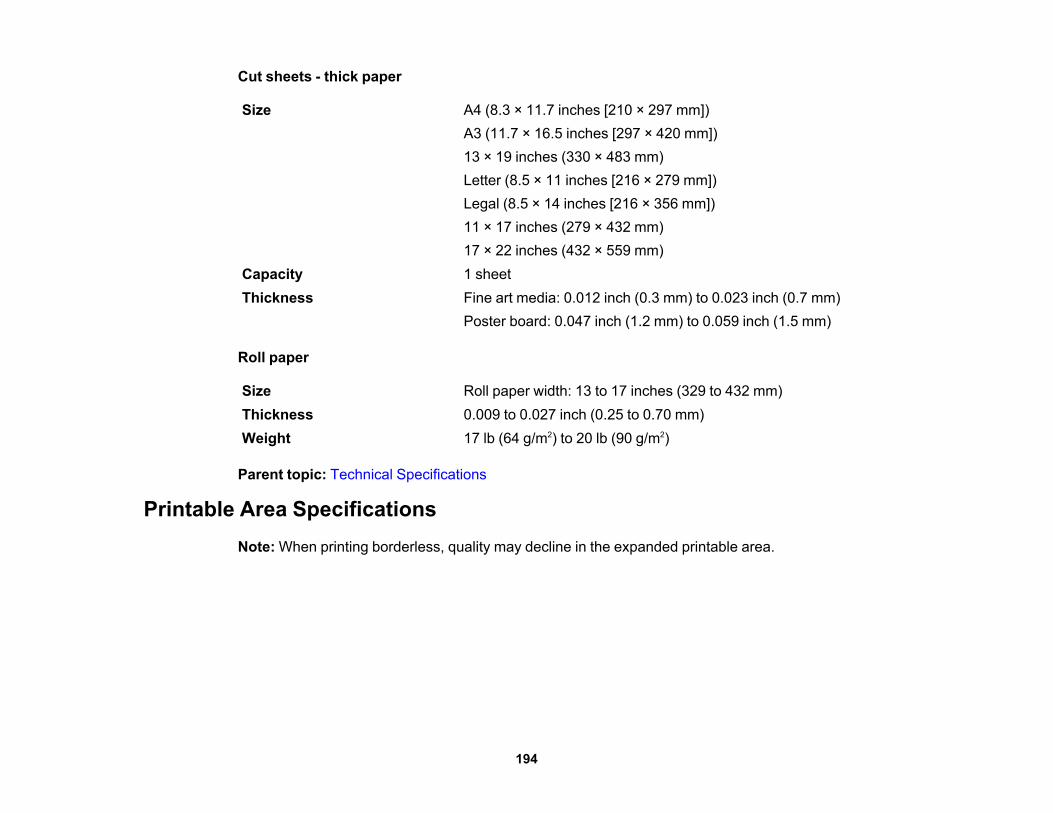
Cut sheets - thick paper
Size A4 (8.3 × 11.7 inches [210 × 297 mm])A3 (11.7 × 16.5 inches [297 × 420 mm])13 × 19 inches (330 × 483 mm)Letter (8.5 × 11 inches [216 × 279 mm])Legal (8.5 × 14 inches [216 × 356 mm])11 × 17 inches (279 × 432 mm)17 × 22 inches (432 × 559 mm)
Capacity 1 sheetThickness Fine art media: 0.012 inch (0.3 mm) to 0.023 inch (0.7 mm)
Poster board: 0.047 inch (1.2 mm) to 0.059 inch (1.5 mm)
Roll paper
Size Roll paper width: 13 to 17 inches (329 to 432 mm)Thickness 0.009 to 0.027 inch (0.25 to 0.70 mm)Weight 17 lb (64 g/m2) to 20 lb (90 g/m2)
Parent topic: Technical Specifications
Printable Area SpecificationsNote: When printing borderless, quality may decline in the expanded printable area.
194
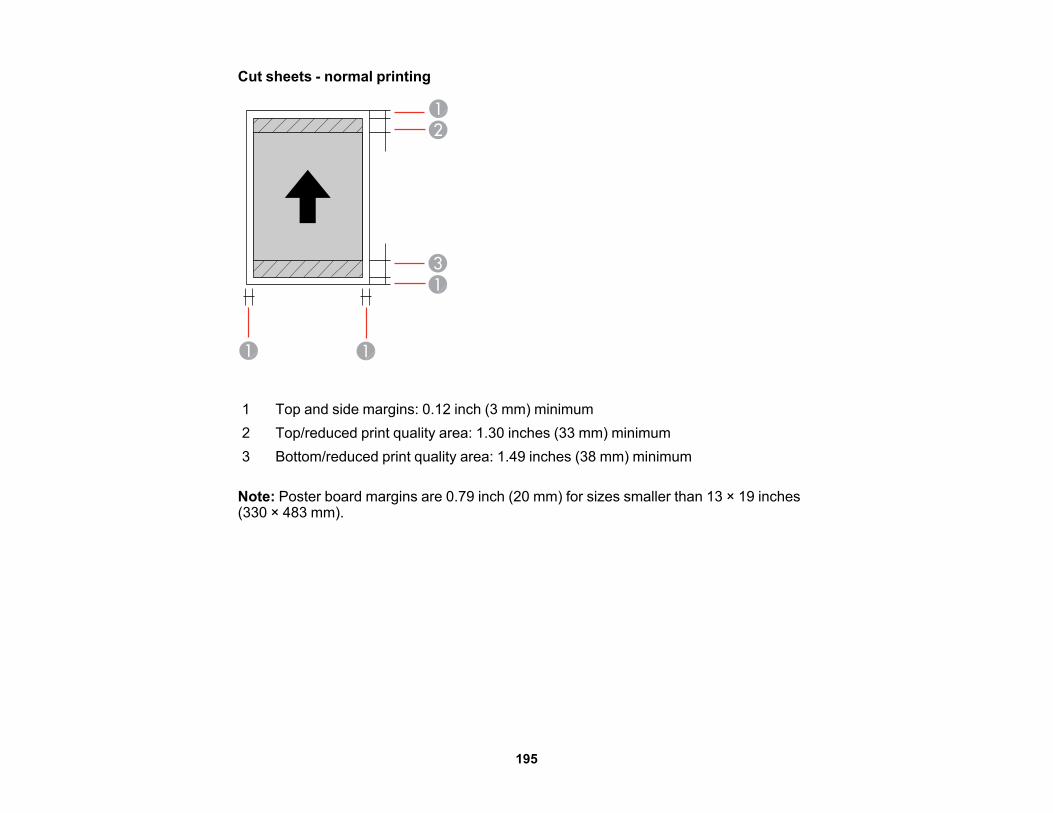
Cut sheets - normal printing
1 Top and side margins: 0.12 inch (3 mm) minimum2 Top/reduced print quality area: 1.30 inches (33 mm) minimum3 Bottom/reduced print quality area: 1.49 inches (38 mm) minimum
Note: Poster board margins are 0.79 inch (20 mm) for sizes smaller than 13 × 19 inches(330 × 483 mm).
195
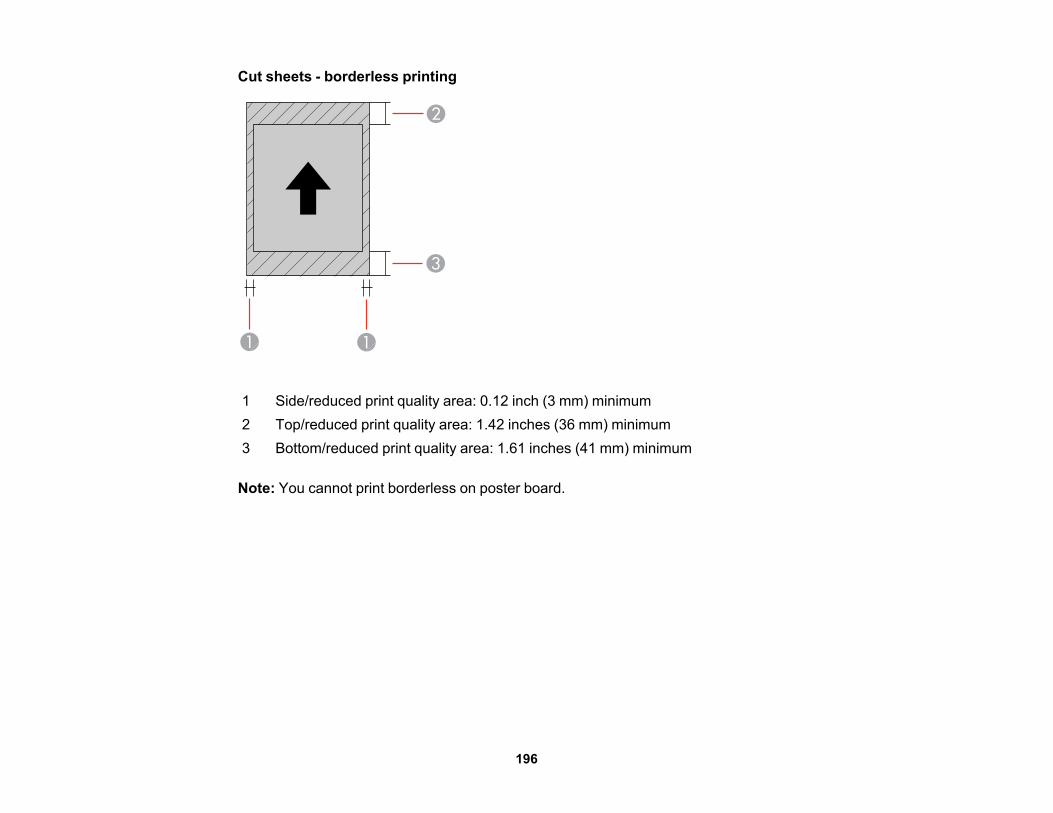
Cut sheets - borderless printing
1 Side/reduced print quality area: 0.12 inch (3 mm) minimum2 Top/reduced print quality area: 1.42 inches (36 mm) minimum3 Bottom/reduced print quality area: 1.61 inches (41 mm) minimum
Note: You cannot print borderless on poster board.
196
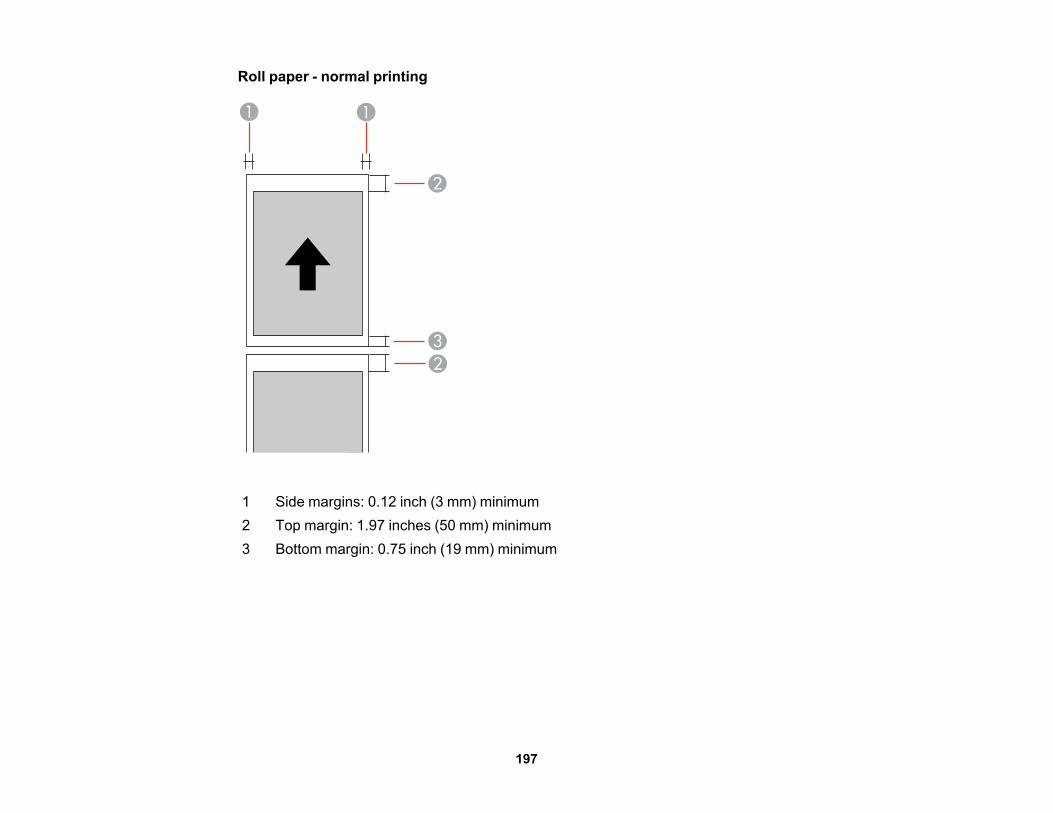
Roll paper - normal printing
1 Side margins: 0.12 inch (3 mm) minimum2 Top margin: 1.97 inches (50 mm) minimum3 Bottom margin: 0.75 inch (19 mm) minimum
197
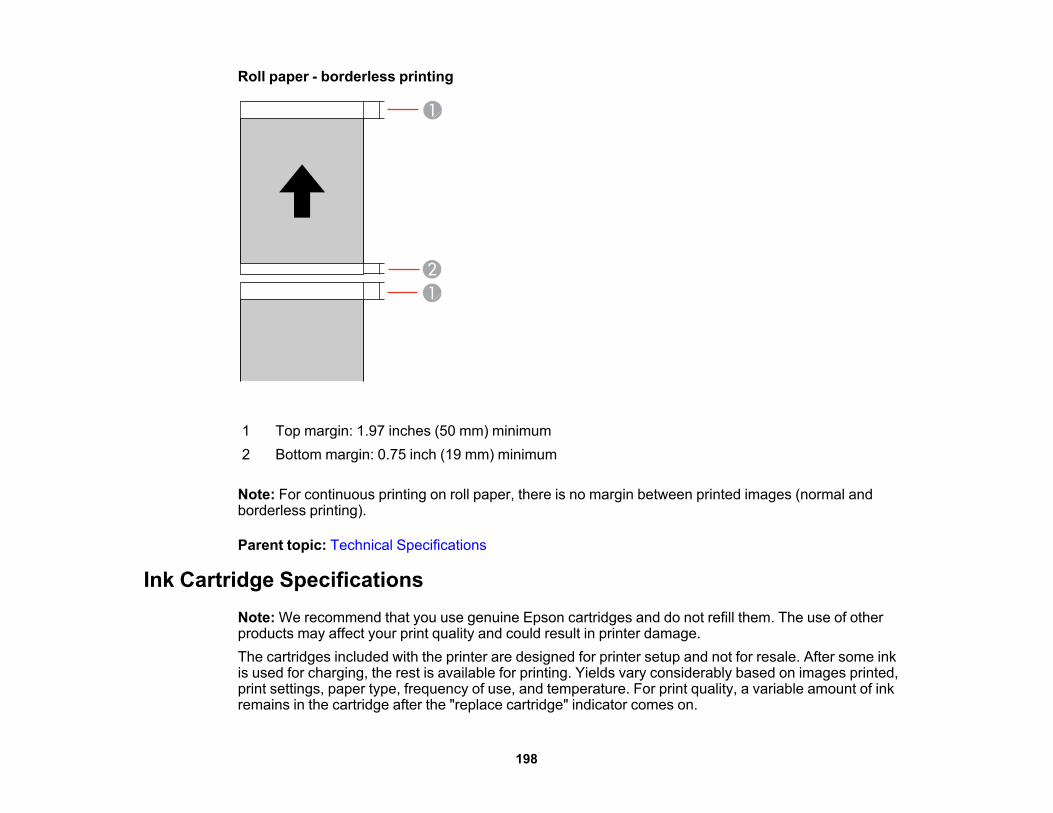
Roll paper - borderless printing
1 Top margin: 1.97 inches (50 mm) minimum2 Bottom margin: 0.75 inch (19 mm) minimum
Note: For continuous printing on roll paper, there is no margin between printed images (normal andborderless printing).
Parent topic: Technical Specifications
Ink Cartridge SpecificationsNote: We recommend that you use genuine Epson cartridges and do not refill them. The use of otherproducts may affect your print quality and could result in printer damage.The cartridges included with the printer are designed for printer setup and not for resale. After some inkis used for charging, the rest is available for printing. Yields vary considerably based on images printed,print settings, paper type, frequency of use, and temperature. For print quality, a variable amount of inkremains in the cartridge after the "replace cartridge" indicator comes on.
198
Color Black cartridge: Photo Black, Matte Black, Light Black, and LightLight Black inksColor cartridge: Yellow, Cyan, Light Cyan, Vivid Magenta, and VividLight Magenta inks
Cartridge life Opened package: 6 monthsUnopened package: do not use if the date on the package hasexpired
Temperature Storage: –4 to 104 °F (–20 to 40 °C)Within a month at 104 °F (40 °C)Ink freezes at 5 °F (–15 °C); if left for a long timeInk thaws and is usable after 3 hours at 77 °F (25 °C) with nocondensation
Note: For best printing results, use up a cartridge within 6 months of opening the package.
Parent topic: Technical SpecificationsRelated referencesInk Cartridge and Maintenance Box Part Numbers
Dimension SpecificationsHeight Stored: 9.8 inches (250 mm)
Printing: 21.6 inches (550 mm)Width Stored: 26.9 inches (684 mm)
Printing: 26.9 inches (684 mm)Depth Stored: 14.8 inches (376 mm)
Printing: 37.9 inches (963 mm)Weight 42.9 lb (19.5 kg)(without ink cartridges)
Parent topic: Technical Specifications
199
Electrical SpecificationsPower supply rating 100 to 120 V
220 to 240 VInput voltage range 100 to 120 V model: 90 to 132 V
220 to 240 V model: 198 to 264 VRated frequency range 50/60 HzInput frequency range 49.5/60.5 HzRated current 100 to 120 V model: 0.6 A
220 to 240 V model: 0.3 APower consumption Printing: Approximately 21 W (ISO/IEC24712)(100 to 120 V model) Ready mode: Approximately 5.8 W
Sleep mode: Approximately 1.8 WPower off mode: Approximately 0.13 W
Power consumption Printing: Approximately 21 W (ISO/IEC24712)(200 to 240 V model) Ready mode: Approximately 5.8 W
Sleep mode: Approximately 1.8 WPower off mode: Approximately 0.5 W
Parent topic: Technical Specifications
200
Environmental SpecificationsTemperature Operating:
50 to 95 °F (10 to 35 °C)Storage before unpacking:–4 to 140 °F (–20 to 60 °C)Within 120 hours at 140 °F (60 °C); within a month at 104 °F (40 °C)Storage after unpacking:–4 to 104 °F (–20 to 40 °C)Within a month at 104 °F (40 °C)
Humidity Operating: 20 to 80% RH(without condensation) Storage: 5 to 85% RH
Parent topic: Technical Specifications
Interface SpecificationsOne High-Speed USB port for connection to computerParent topic: Technical Specifications
Network Interface SpecificationsWi-Fi
Standard IEEE 802.11 b/g/nSecurity WPA-PSK (TKIP/AES); complies with WPA2
WEP (64/128 bit)Frequency band 2.4 GHzCommunication mode Infrastructure mode
Ad hoc mode (IEEE 802.11 n not supported in this mode)Wi-Fi Direct
201
EthernetEthernet 100BASE-TX/10 Base T standardParent topic: Technical Specifications
Safety and Approvals SpecificationsUnited States Safety: UL60950-1
EMC: FCC part 15 Subpart B class BCanada Safety: CAN/CSA C22.2 No. 60950-1
EMC: CAN/CSA-CEI/IEC CISPR 22 Class B [CAN ICES-3(B)/NMB-3(B)]
This equipment contains the following wireless module:• Manufacturer: Askey Computer Corporation.• Type: WLU6117-D69 (RoHS)This product conforms to Part 15 of FCC Rules and RSS-210 of the IC Rules. Epson cannot acceptresponsibility for any failure to satisfy the protection requirements resulting from a non-recommendedmodification of the product. Operation is subject to the following two conditions: (1) this device may notcause harmful interference, and (2) this device must accept any interference received, includinginterference that may cause undesired operation of the device.To prevent radio interference to the licensed service, this device is intended to be operated indoors andaway from windows to provide maximum shielding. Equipment (or its transmit antenna) that is installedoutdoors is subject to licensing.Parent topic: Technical Specifications
202
NoticesCheck these sections for important notices about your product.
Note: Epson offers a recycling program for end of life products. Please go to this site for information onhow to return your products for proper disposal.
Important Safety InstructionsFCC Compliance StatementTrademarksCopyright Notice
Important Safety InstructionsBefore using your Epson product, read and follow these safety instructions.General Printer Safety InstructionsInk Cartridge Safety InstructionsLCD Screen Safety InstructionsWireless Connection Safety InstructionsParent topic: Notices
General Printer Safety Instructions• Be sure to follow all warnings and instructions marked on the printer.• Use only the type of power source indicated on the printer's label.• Use only the power cord that comes with the printer. Use of another cord may cause fires or shock. Do
not use the cord with any other equipment.• Place the printer near a wall outlet where the plug can be easily unplugged.• Avoid plugging the printer into an outlet on the same circuit as a photo copier or air control system that
regularly switches on and off, or on an outlet controlled by a wall switch or timer.• Do not let the power cord become damaged or frayed.• If you use an extension cord with the printer, make sure the total ampere rating of the devices plugged
into the extension cord does not exceed the cord's ampere rating. Also, make sure the total ampererating of all devices plugged into the wall outlet does not exceed the wall outlet's ampere rating.
203
• Always turn off the printer using the power button, and wait until the power light stops flashing beforeunplugging the printer or cutting off power to the electrical outlet.
• Place the printer on a flat, stable surface that extends beyond its base in all directions. It will notoperate properly if it is tilted or at an angle.
• When printing on posterboard, leave at least 17 inches (430 mm) of space in back of the printer.• Leave enough space in front of the printer for the paper to be fully ejected.• Avoid locations that are subject to rapid changes in heat or humidity, shocks or vibrations, or dust.• Do not place the printer near a radiator or heating vent or in direct sunlight.• Leave enough room around the printer for sufficient ventilation. Do not block or cover openings in the
case or insert objects through the slots.• Keep the printer away from potential sources of electromagnetic interference, such as loudspeakers or
the base units of cordless telephones.• When connecting the printer to a computer or other device with a cable, ensure the correct orientation
of the connectors. Each connector has only one correct orientation. Inserting a connector in the wrongorientation may damage both devices connected by the cable.
• Do not touch the flat white cable inside the printer.• Do not move the print head by hand; this may damage the printer.• Do not spill liquid on the printer.• Do not use aerosol products that contain flammable gases inside or around the printer. Doing so may
cause fire.• Except as specifically explained in your documentation, do not attempt to service the printer yourself.• Unplug the printer and refer servicing to qualified service personnel under the following conditions: if
the power cord or plug is damaged; if liquid has entered the product; if the product has been droppedor the case damaged; if the product does not operate normally or exhibits a distinct change inperformance. Adjust only those controls that are covered by the operating instructions.
• If damage occurs to the plug, replace the cord set or consult a qualified electrician. If there are fuses inthe plug, make sure you replace them with fuses of the correct size and rating.
• Leave the ink cartridges installed. Removing the cartridges can dehydrate the print head and mayprevent the printer from printing.
• Before transporting the printer, make sure that the print head is in the home (far right) position and theink cartridges are in place.
204
• When storing or transporting the printer, do not tilt it, stand it on its side, or turn it upside down;otherwise ink may leak from the cartridges.
Parent topic: Important Safety Instructions
Ink Cartridge Safety Instructions• Keep ink cartridges out of the reach of children and do not drink the ink.• Be careful when you handle used ink cartridges; there may be ink remaining around the ink supply
port. If ink gets on your skin, wash it off with soap and water. If it gets in your eyes, flush themimmediately with water.
• Do not put your hand inside the product or touch any cartridges during printing.• Install a new ink cartridge immediately after removing an expended one. Leaving cartridges
uninstalled can dry out the print head and may prevent the product from printing.• Do not remove or tear the label on the cartridge; this can cause leakage.• Do not remove the transparent seal from the bottom of the cartridge. This may cause the cartridge to
become unusable.• Do not break the hooks on the side of the cartridge when removing it from the packaging.• Do not touch the green IC chip on the side of the cartridge. This may prevent normal operation.• Do not shake cartridges after opening their packages; this can cause them to leak.• If you remove an ink cartridge for later use, protect the ink supply area from dirt and dust and store it in
the same environment as the product. Note that there is a valve in the ink supply port, making coversor plugs unnecessary, but care is needed to prevent the ink from staining items that the cartridgetouches. Do not touch the ink cartridge ink supply port or surrounding area.
• Use an ink cartridge before the date printed on its package.• Do not dismantle an ink cartridge. This could damage the print head.• Store ink cartridges in a cool, dark place.• Make sure to install all ink cartridges. The printer only works when all ink cartridges are properly
installed.• After bringing an ink cartridge inside from a cold storage site, allow it to warm up at room temperature
for at least three hours before using it.• Store ink cartridges with their labels facing upward. Do not store cartridges upside down.Parent topic: Important Safety Instructions
205
LCD Screen Safety Instructions• Use only a dry, soft cloth to clean the LCD screen. Do not use liquid or chemical cleansers.• If the LCD screen is damaged, contact Epson. If the liquid crystal solution gets on your hands, wash
them thoroughly with soap and water. If the liquid crystal solution gets into your eyes, flush themimmediately with water. If discomfort or vision problems remain after a thorough flushing, see a doctorimmediately.
• Do not press too hard on the LCD screen.• Do not use a pointy or sharp object, such as a pen or your fingernail, to operate the LCD screen.Parent topic: Important Safety Instructions
Wireless Connection Safety InstructionsRadio waves from this product may adversely affect the operation of medical equipment or automaticallycontrolled devices, such as pacemakers, automatic doors or fire alarms. When using this product nearsuch devices or inside a medical facility, follow the directions from authorized staff members at thefacility, and follow all posted warnings and directions on the device to avoid causing an accident.Parent topic: Important Safety Instructions
FCC Compliance StatementFor United States UsersThis equipment has been tested and found to comply with the limits for a Class B digital device, pursuantto Part 15 of the FCC Rules. These limits are designed to provide reasonable protection against harmfulinterference in a residential installation. This equipment generates, uses, and can radiate radiofrequency energy and, if not installed and used in accordance with the instructions, may cause harmfulinterference to radio or television reception. However, there is no guarantee that interference will notoccur in a particular installation. If this equipment does cause interference to radio and televisionreception, which can be determined by turning the equipment off and on, the user is encouraged to try tocorrect the interference by one or more of the following measures:• Reorient or relocate the receiving antenna.• Increase the separation between the equipment and receiver.• Connect the equipment into an outlet on a circuit different from that to which the receiver is connected.• Consult the dealer or an experienced radio/TV technician for help.
206
WARNINGThe connection of a non-shielded equipment interface cable to this equipment will invalidate the FCCCertification or Declaration of this device and may cause interference levels which exceed the limitsestablished by the FCC for this equipment. It is the responsibility of the user to obtain and use a shieldedequipment interface cable with this device. If this equipment has more than one interface connector, donot leave cables connected to unused interfaces. Changes or modifications not expressly approved bythe manufacturer could void the user’s authority to operate the equipment.
For Canadian UsersCAN ICES-3(B)/NMB-3(B)Parent topic: Notices
TrademarksEPSON®, Epson UltraChrome®, Signature Worthy® and SureColor®are registered trademarks, EPSONExceed Your Vision is a registered logomark, and Epson ConnectTM is a trademark of Seiko EpsonCorporation.UltraSmooth® is a registered trademark, Designed for ExcellenceTM is a trademark, and Epson StoreSM isa service mark of Epson America, Inc.Epson iPrintTM and Remote PrintTM are trademarks of Seiko Epson Corporation.Apple, iPad, iPhone, iPod touch, Mac, and OS X are trademarks of Apple Inc., registered in the U.S. andother countries. AirPrint and the AirPrint logo are trademarks of Apple Inc.Google® is a registered trademark and AndroidTM, ChromebookTM, GmailTM, Google ChromeTM, GoogleCloud PrintTM, Google DriveTM, PicasaTM and YouTubeTM are trademarks of Google Inc.Wi-Fi Direct® is a registered trademark of Wi-Fi Alliance®.General Notice: Other product names used herein are for identification purposes only and may betrademarks of their respective owners. Epson disclaims any and all rights in those marks.
Parent topic: Notices
207
Copyright NoticeAll rights reserved. No part of this publication may be reproduced, stored in a retrieval system, ortransmitted in any form or by any means, electronic, mechanical, photocopying, recording, or otherwise,without the prior written permission of Seiko Epson Corporation. The information contained herein isdesigned only for use with this Epson product. Epson is not responsible for any use of this information asapplied to other products.Neither Seiko Epson Corporation nor its affiliates shall be liable to the purchaser of this product or thirdparties for damages, losses, costs, or expenses incurred by purchaser or third parties as a result of:accident, misuse, or abuse of this product or unauthorized modifications, repairs, or alterations to thisproduct, or (excluding the U.S.) failure to strictly comply with Seiko Epson Corporation's operating andmaintenance instructions.Seiko Epson Corporation shall not be liable for any damages or problems arising from the use of anyoptions or any consumable products other than those designated as Original Epson Products or EpsonApproved Products by Seiko Epson Corporation.Seiko Epson Corporation shall not be held liable for any damage resulting from electromagneticinterference that occurs from the use of any interface cables other than those designated as Epsonapproved Products by Seiko Epson Corporation.This information is subject to change without notice.A Note Concerning Responsible Use of Copyrighted MaterialsDefault Delay Times for Power Management for Epson ProductsCopyright AttributionParent topic: Notices
A Note Concerning Responsible Use of Copyrighted MaterialsEpson encourages each user to be responsible and respectful of the copyright laws when using anyEpson product. While some countries' laws permit limited copying or reuse of copyrighted material incertain circumstances, those circumstances may not be as broad as some people assume. Contact yourlegal advisor for any questions regarding copyright law.Parent topic: Copyright Notice
Default Delay Times for Power Management for Epson ProductsThis product will enter sleep mode after a period of nonuse. This is to ensure that the product meetsEnergy Star standards of energy efficiency. More energy savings can be achieved by setting the time tosleep to a shorter interval.
208
Parent topic: Copyright Notice
Copyright Attribution© 2015 Epson America, Inc.6/15CPD-43251Parent topic: Copyright Notice
209