user’s guide - husqvarna...
TRANSCRIPT
K E E P I N G T H E W O R L D S E W I N G
User’s Guide

This household sewing machine is designed to comply with IEC/EN 60335-2-28 and UL1594
IMPORTANT SAFETY INSTRUCTIONSWhen using an electrical appliance, basic safety precautions should always be followed, including the following:
Read all instructions before using this household sewing machine.
DANGER - To reduce the risk of electric shock:• A sewing machine should never be left unattended when plugged in. Always unplug
this sewing machine from the electric outlet immediately after using and before cleaning.
• Always unplug before relamping. Replace bulb with same type rated 5 Watt.
WARNING - To reduce the risk of burns, fi re, electric shock, or injury to persons:• Do not allow to be used as a toy. Close attention is necessary when this sewing
machine is used by or near children or infi rm persons.
• Use this sewing machine only for its intended use as described in this manual. Use only attachments recommended by the manufacturer as contained in this manual.
• Never operate this sewing machine if it has a damaged cord or plug, if it is not working properly, if it has been dropped or damaged, or dropped into water. Return the sewing machine to the nearest authorised dealer or service center for examination, repair, electrical or mechanical adjustment.
• Never operate the sewing machine with any air openings blocked. Keep ventilation openings of the sewing machine and foot controller free from the accumulation of lint, dust, and loose cloth.
• Keep fi ngers away from all moving parts. Special care is required around the Sewing machine needle.
• Always use the proper needle plate. The wrong plate can cause the needle to break.
• Do not use bent needles.
• Do not pull or push fabric while stitching. It may defl ect the needle causing it to break.
• Switch the sewing machine off (“0”) when making any adjustment in the needle area, such as threading needle, changing needle, threading bobbin, or changing presser foot, etc.
• Always unplug the sewing machine from the electrical outlet when removing covers, lubricating, or when making any other user servicing adjustments mentioned in the instruction manual.
• Never drop or insert any object into any opening.
• Do not use outdoors.
• Do not operate where aerosol (spray) products are being used or where oxygen is being administrated.
• To disconnect, turn all controls to the off (“0”) position, then remove plug from outlet.
• Do not unplug by pulling on cord. To unplug, grasp the plug, not the cord.
• Hold plug when rewinding into cord reel. Do not allow plug to whip when rewinding.
SAVE THESE INSTRUCTIONS
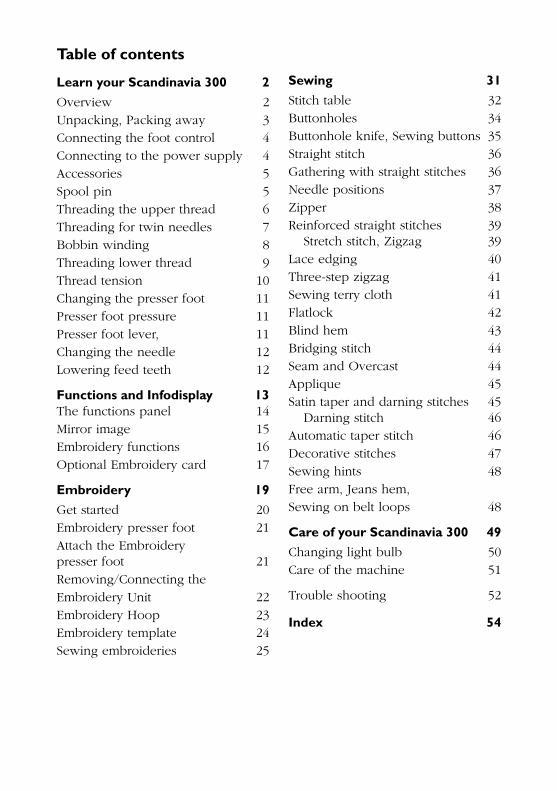
Table of contents
Learn your Scandinavia 300 2
Overview 2Unpacking, Packing away 3Connecting the foot control 4Connecting to the power supply 4 Accessories 5Spool pin 5Threading the upper thread 6Threading for twin needles 7Bobbin winding 8Threading lower thread 9Thread tension 10Changing the presser foot 11Presser foot pressure 11Presser foot lever, 11Changing the needle 12Lowering feed teeth 12
Functions and Infodisplay 13The functions panel 14Mirror image 15Embroidery functions 16Optional Embroidery card 17
Embroidery 19
Get started 20Embroidery presser foot 21Attach the Embroiderypresser foot 21Removing/Connecting theEmbroidery Unit 22Embroidery Hoop 23Embroidery template 24Sewing embroideries 25
Sewing 31
Stitch table 32 Buttonholes 34Buttonhole knife, Sewing buttons 35Straight stitch 36Gathering with straight stitches 36Needle positions 37Zipper 38Reinforced straight stitches 39
Stretch stitch, Zigzag 39Lace edging 40Three-step zigzag 41Sewing terry cloth 41Flatlock 42Blind hem 43Bridging stitch 44Seam and Overcast 44Applique 45Satin taper and darning stitches 45
Darning stitch 46Automatic taper stitch 46Decorative stitches 47Sewing hints 48Free arm, Jeans hem,Sewing on belt loops 48
Care of your Scandinavia 300 49
Changing light bulb 50Care of the machine 51
Trouble shooting 52
Index 54

2
17
16
15
14
13
12
18 20
21
22
23
24
25
26
27
28
29
30
1
2
3
4
56
7
8
9
10
11
19
34
33
32
31
Learn your Scandinavia 300
Overview
1. Lid 2. Thread take-up lever 3. Presser foot pressure dial 4. Thread guide 5. Buttonhole sensor socket 6. Light 7. Needle bar 8. Presser foot 9. Free arm 10. Bobbin cover11. Base plate12. Drop feed dial13. Needle plate14. Presser bar 15. Needle clamp screw16. Thread tension discs17. Thread tension indicator18. Thread guide for bobbin winding 19. Spool pin20. Spool holders21. Recess for additional spool pin 22. Thread cutter for bobbin winding23. Handwheel
24. Bobbin spindle, Bobbin stop25. Infodisplay26. Numeral buttons Stitch selection27. Function buttons28. Function buttons Embroidery29. Embroidery card slot30. Main power switch,
Connection to power supply31. Stitch panel32. Presser foot lever33. Thread cutter34. Embroidery unit socket

3
36
37
38
35
Learn your Scandinavia 300
Embroidery Unit
35. Embroidery arm 36. Embroidery Hoop attachment37. Embroidery unit socket38. Release button
Unpacking1. Place the machine on the table or
cabinet, remove the packaging.2. Remove the side parts of the
packing ma te ri al and the foot control.
3. The machine is delivered with a soft plastic cover, an accessory bag, a main cord and a foot control cord. There is also a test kit for embroidery and a bag containing embroidery accessories (see page 17).
4. Wipe the machine, particularly around the needle and needle plate to remove any soil before sewing.
Packing away after sewing1. Unplug the cords from the wall
socket and the machine. Wind the cords around your hand and place the foot control cord in the foot control storage space. Place the foot control as illustrated. Lower the presser foot. Remove the embroidery card.
2. Slide the cover over the machine. Place the main cord in the pocket of the cover. There is also space provided for the ope ra ting manual, the embroidery accessories and the other accessories.

4
213
Learn your Scandinavia 300
Connecting the foot controlAmong the accessories you will fi nd the foot control cord and the main cord.
1. Place the foot control on its narrow side. Fit the plug into the socket inside the foot control compartment.
2. Push it fi rmly to make sure it is properly connected. This ope ra tion is only necessary the very fi rst time you are going to use the machine.
3. To correctly guide foot control cord, place it into the slot, see picture.
Note: Before plugging in, check to ensure that the foot control is of type "FR4".
Connecting to the power supply1. Connect the foot control cord to
the fi rst socket on the lower right side of the machine.
2. Connect the main cord to the back socket on the lower right side of the machine.
3. When you press the power switch, both the machine and the light are turned on.
For the USA and CanadaHusqvarna Viking Scandinavia 300 has a polarized plug (one blade wider than the other). To reduce the risk of electric shock, this plug is intended to fi t in a polarized outlet only one way. If the plug does not fi t fully in the outlet, reverse the plug. If it still does not fi t, contact a qualifi ed electrician to install the proper outlet. Do not modify the plug in any way.
5
a b dc
d
c
Learn your Scandinavia 300
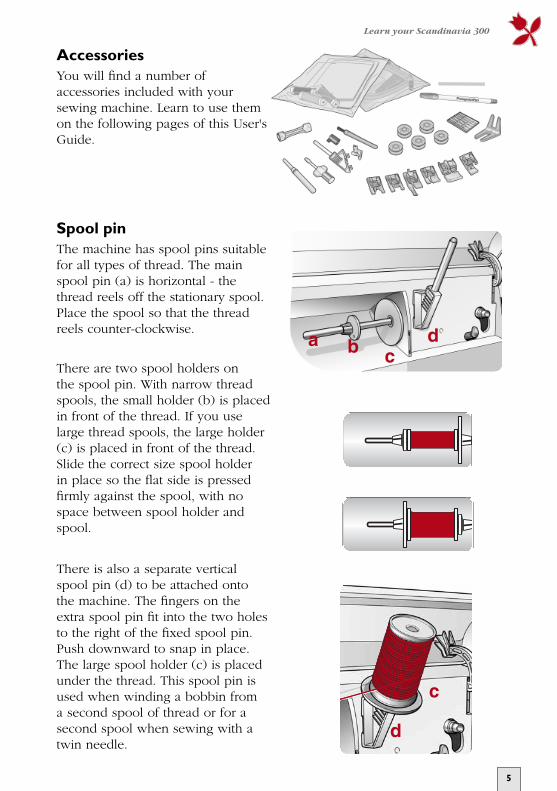
AccessoriesYou will fi nd a number of accessories included with your sewing machine. Learn to use them on the following pages of this User's Guide.
Spool pinThe machine has spool pins suitable for all types of thread. The main spool pin (a) is horizontal - the thread reels off the stationary spool. Place the spool so that the thread reels counter-clockwise.
There are two spool holders on the spool pin. With narrow thread spools, the small holder (b) is placed in front of the thread. If you use large thread spools, the large holder (c) is placed in front of the thread. Slide the correct size spool holder in place so the fl at side is pressed fi rmly against the spool, with no space between spool holder and spool.
There is also a separate vertical spool pin (d) to be attached onto the machine. The fi ngers on the extra spool pin fi t into the two holes to the right of the fi xed spool pin. Push downward to snap in place. The large spool holder (c) is placed under the thread. This spool pin is used when winding a bobbin from a second spool of thread or for a second spool when sewing with a twin needle.
6
ab
1
3
24
5
6
7
Learn your Scandinavia 300
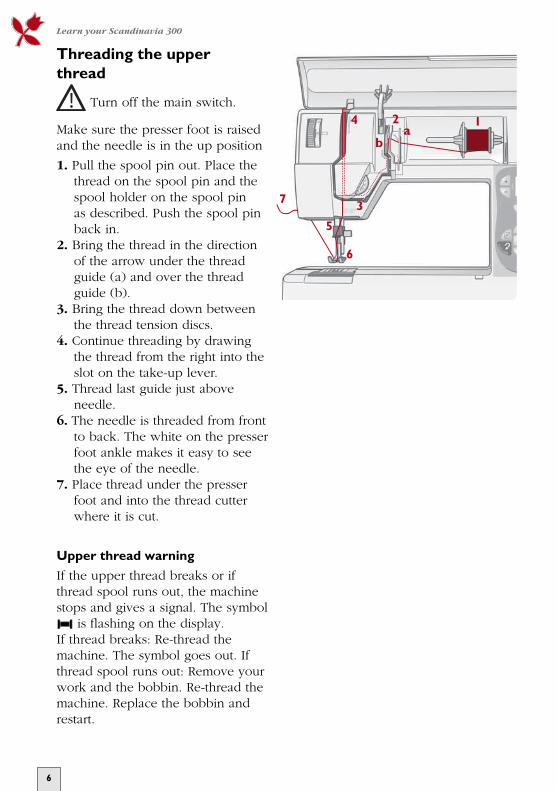
Threading the upper thread
Turn off the main switch.
Make sure the presser foot is raised and the needle is in the up po si tion
1. Pull the spool pin out. Place the thread on the spool pin and the spool holder on the spool pin as described. Push the spool pin back in.
2. Bring the thread in the direction of the arrow under the thread guide (a) and over the thread guide (b).
3. Bring the thread down between the thread tension discs.
4. Continue threading by drawing the thread from the right into the slot on the take-up lever.
5. Thread last guide just above needle.
6. The needle is threaded from front to back. The white on the presser foot ankle makes it easy to see the eye of the needle.
7. Place thread under the presser foot and into the thread cutter where it is cut.
Upper thread warning
If the upper thread breaks or if thread spool runs out, the machine stops and gives a signal. The symbol
is fl ashing on the display. If thread breaks: Re-thread the machine. The symbol goes out. If thread spool runs out: Remove your work and the bobbin. Re-thread the machine. Replace the bobbin and restart.

7
Learn your Scandinavia 300
Threading for twin needle
Turn off the main switch.
Make sure the presser foot is raised and the needle is in the up po si tion
1. Insert a twin needle (optional accessory).
2. Wind a bobbin with the thread you are going to use as the second upper thread.
3. Thread the machine as described and check to ensure that the thread lies between the inner thread tension discs, outside the lowest thread guide. Thread left needle.
4. Attach the extra spool pin onto the machine. Place a spool holder under the thread.
5. Place the bobbin with the second thread on the spool pin.
6. Thread the machine as before but this thread should lie between the outer thread tension discs, outside the lowest thread guide. Thread right needle.

8
c
d
ab
c
Learn your Scandinavia 300
Bobbin winding from the needle
Make sure that the presser foot is up and the needle is in the highest po si tion.
Note! Do not use a plastic presser foot when bobbin winding.
1. Place your empty bobbin with the small mark outwards on the bobbin spindle on the front of the machine.
2. Pull the thread from the needle under the presser foot and to the right over the thread guide (c).
3. Start from above and wind a few turns of thread around the bob bin. Cut off the thread on the thread cutter(d).
4. Bring the bobbin spindle down. Press the foot control. When the
Bobbin winding - vertical spool pin1. Place an empty bobbin with
the mark outwards on the bobbin spindle on the front of the machine.
2. Place the large spool holder under the thread on the spool pin.
3. Bring the thread under the thread guide (a) and over thread guide (b),then around thread guide (c) as illustrated.
4. From above wind a few turns of thread aro und the bobbin and into the cutter.
bobbin winding is fi nished, the bobbin will stop automatically. Remove the bobbin, cut off the thread and bring the bobbin spindle up.
Note! We do not recommend winding specialty threads such as clear nylon or other stretchy threads through the needle. Instead see "Bob bin winding - vertical spool pin" below.
5. Bring the bobbin spindle down. Press the foot control. When the bobbin winding is fi nished, the bobbin will stop automatically. Remove the bob bin, cut off the thread and bring the bobbin spindle up.
9
12
10 15
a
2
b
c
1
3 4
Learn your Scandinavia 300
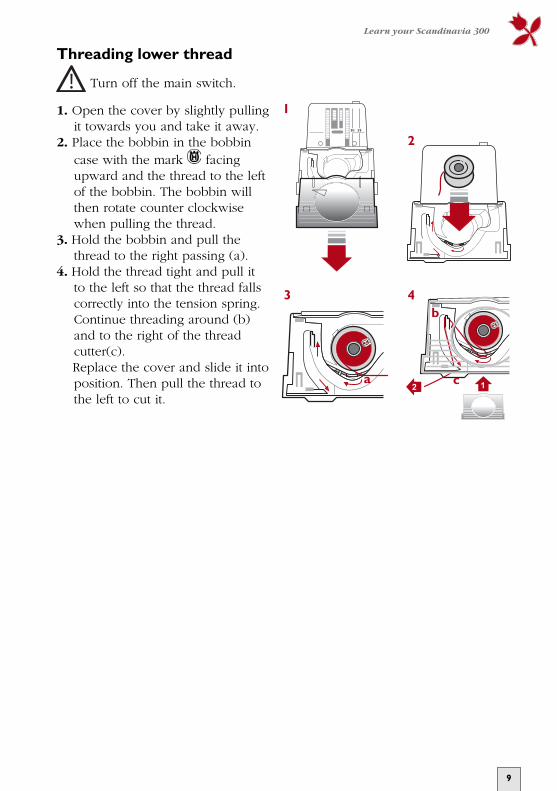
Threading lower thread
Turn off the main switch.
1. Open the cover by slightly pulling it towards you and take it away.
2. Place the bobbin in the bobbin case with the mark facing upward and the thread to the left of the bobbin. The bobbin will then rotate counter clockwise when pulling the thread.
3. Hold the bobbin and pull the thread to the right passing (a).
4. Hold the thread tight and pull it to the left so that the thread falls correctly into the tension spring. Continue threading around (b) and to the right of the thread cutter(c).
Replace the cover and slide it into position. Then pull the thread to the left to cut it.

10
2
1
3
Learn your Scandinavia 300
Thread tensionThe thread tension is adjusted automatically when you select a stitch or an embroidery. This is shown by the thread tension indicator being reset. Do not turn this dial manually
You can adjust the thread tension by pressing the buttons, see page 14. Using the button
(-) you decrease the tension and using the button (+) you increase the tension. The adjustment affects all stitches and will remain until the machine is turned off or until changed manualy.
Normal thread tension is 4.
When selecting buttonholes and decorative stitches the thread ten sion is reduced.
Correct and incorrect thread tensionTo understand the correct thread tension, sew a few sample stitches at different settings.
Adjust tension only with the function buttons (see page 14). Do not turn dial.
1. Begin with a tension that is too loose, i.e. set at "1". The lower thread will lie straight and the upper thread will be drawn down on the underside.
2. If you set the tension at the highest number, the opposite will occur, and the seam may pucker.
3. When thread tension is correctly set the threads interlock in the middle of both layers of material
When topstitching with a heavy thread in thick fabric, increase the tension to 7-9.
When the machine is turned on, the tension is set to normal automatically.
or, in the case of decorative stitches, on the underside.
Note! Make a few tests on a scrap piece of the ma te ri al you are going to sew and check the tension.
11
1 2
a
b
Learn your Scandinavia 300
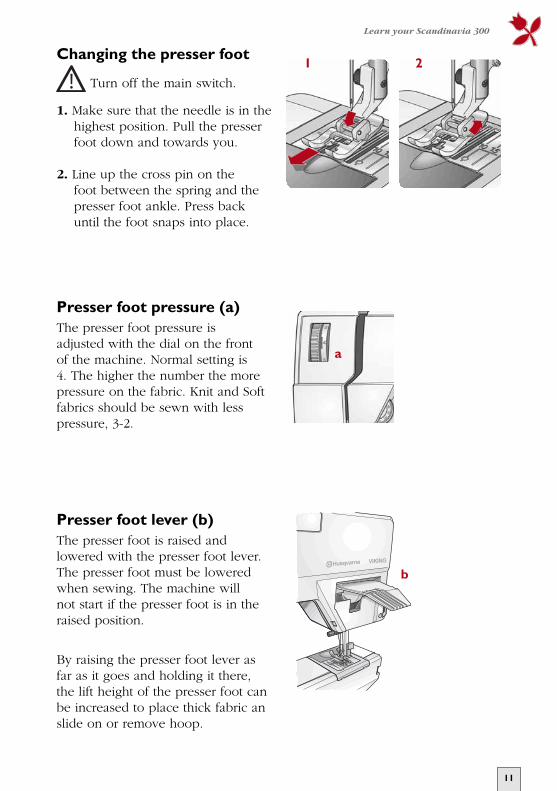
Changing the presser foot
Turn off the main switch.
1. Make sure that the needle is in the highest position. Pull the presser foot down and towards you.
2. Line up the cross pin on the foot between the spring and the presser foot ankle. Press back until the foot snaps into place.
Presser foot pressure (a)The presser foot pressure is adjusted with the dial on the front of the machine. Normal setting is 4. The higher the number the more pressure on the fabric. Knit and Soft fabrics should be sewn with less pressure, 3-2.
Presser foot lever (b)The presser foot is raised and lowered with the presser foot lever. The presser foot must be lowered when sewing. The machine will not start if the presser foot is in the raised position.
By raising the pres ser foot lever as far as it goes and holding it there, the lift height of the presser foot can be increased to place thick fabric an slide on or remove hoop.
12
Learn your Scandinavia 300
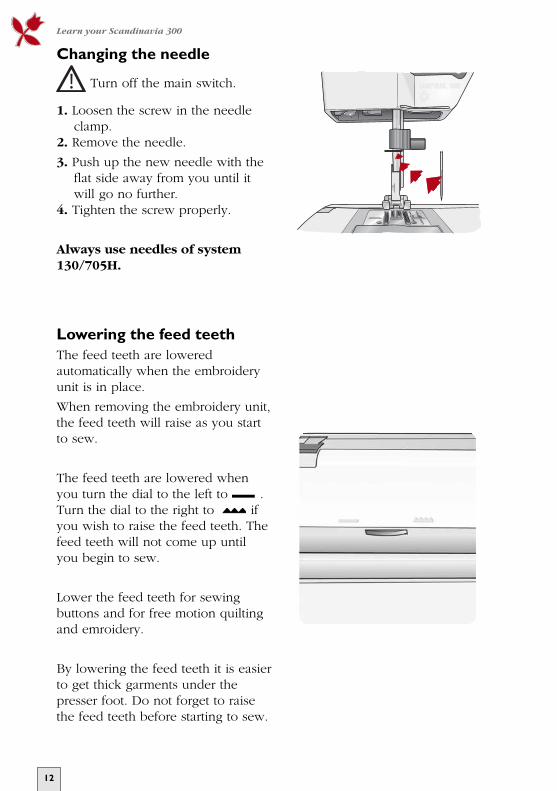
Changing the needle
Turn off the main switch.
1. Loosen the screw in the needle clamp.
2. Rem ove the needle.
3. Push up the new needle with the fl at side away from you until it will go no further.
4. Tighten the screw properly.
Always use needles of system 130/705H.
Lowering the feed teethThe feed teeth are lowered automatically when the embroidery unit is in place.
When removing the embroidery unit, the feed teeth will raise as you start to sew.
The feed teeth are lowered when you turn the dial to the left to .Turn the dial to the right to if you wish to raise the feed teeth. The feed teeth will not come up until you begin to sew.
Lower the feed teeth for sewing buttons and for free motion quilting and emroidery.
By lowering the feed teeth it is easier to get thick garments under the presser foot. Do not forget to raise the feed teeth before starting to sew.
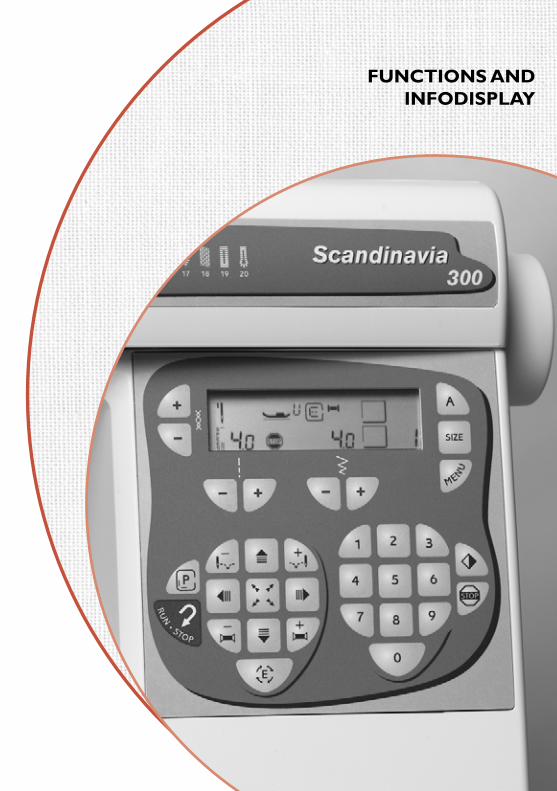
FUNCTIONS AND INFODISPLAY
14
2
6
9
7
8
2 54 7 9
910
5
8
1 6 113
Functions and InfoDisplay
1. Thread tension - adjustment
Use these buttons to adjust the thread tension manually. The adjustment affects all stitches and will remain until
the machine is turned off or until reset manually.
2. Stitch length
When you select a stitch, the machine will automatically set the best
stitch length which will be indicated by numbers on the Infodisplay. You can change the stitch length by pressing either the (+) or (-) button. Certain stitches have a limited stitch length.
When sewing embroideries the length can be set between 2 and 6 to change size of embroidery.
Functions and Infodisplay
3. Needle stop recommendation
This symbol shows the normal stop position of the needle, up. You regulate the needle
stop po si tion with the foot control. To raise or lower the needle after stopping, lightly tap the foot control.
When sewing embroideries only the up position can be used.
4. Sewing speed
This symbol shows the sewing speed for the actual stitch/embroidery.
All stitches in the machine have a pre-set maximum speed at which they can be sewn. When you select a stitch the machine automatically sets the correct max i mum speed.
15
Functions and InfoDisplay
For Embroidery sewing without thread color change stops, see page 27.
8. Mirror image
You can mirror a stitch by
using the button , mirror image side to side. The symbol will be dis play ed.
9. Stitch/Embroidery selection
The machine has one row of stitches shown on the front of the lid. To select a stitch or an embroidery, touch the numeral buttons - for example 1, 2 to select stitch or embroidery number 12.
10. Recommended presser foot
The letter shows which presser foot is correct for the stitch you have selected. The corresponding letter is found on the presser foot.
11. Embroidery
Refer to pages 19-30
11. Sewing - Optional - Sensor buttonhole foot
When you plug the optional Sensor Buttonhole Foot into the socket on the machine near the light, and placwe the white fi eld of the measurement wheel against the white mark, the symbol will be show brightly on the dis play.
Optional Accessories - Letters
As an optional accessory an embroidery card containing three different font styles are available. These buttons are
used with this embroidery card. Read more about these buttons on page 17.
5. Stitch width
When you select a stitch, the machine automatically sets the best stitch width
which is displayed with numbers on the Infodisplay. You can change the stitch width by pressing the (+) or (-) button. The width can be adjusted between 0 and 6 mm.
When sewing embroideries the width can be set between 2 and 6, to change size of embroidery.
6. Reverse
Your machine sews back-wards when this button is pres sed. The machine sews
for ward when the button is released. The longest stitch length when reverse feeding is 3 mm.
For permanent reverse, press the button twice in quick succession before starting to sew. An arrow
to the top left on the display indicates reverse sewing. To sew forward again, press the button once more.
The reverse button is also used when star ting and stopping embroidery. (The foot control
can also be used).
7. STOP
The STOP button is used to fi nish a stitch. i.e. the machine
fastens the thread and stops automatically when the stitch has been completed. The sym bol on the display indicates that STOP is selected. STOP is cancelled when you press the button again or select a new stitch.
(See ”Satin taper...”, page 45.)

16
Functions and InfoDisplay
Functions / Embroidery
Positioning
These buttons allow you to move the embroidery in four directions.
Rotation
Touch this button once and your embroidery will rotate
a quarter of a turn.
Stitch advance
These buttons allow you to step stitch by stitch
forward (+) or backward (-) within your embroidery.
Color advance
Many of the embroideries have color changes.
These buttons allow you to step for ward (+) or backward (-) to the beginning of each thread color change.
Check size
This button allow you to step from one corner to an other
within your embroidery to check the fi nished size of your design.
When your embroidery is fi nished, touch this button. The embroidery arm returns to
parking position. The embroidery unit can now be remo ved. Read more about embroidery sewing on page 19-30.
17
Functions and InfoDisplay
Optional Embroidery Cards The buttons to the right of the Infodisplay - A, SIZE and MENU can only be activated with Embroidery Card No 21 which is sold separately. This card contains three alphabet styles- Palace Script, Clarendon and Kalligraphia. An Embroidery Booklet showing all the alphabet styles, sizes and menus is included with the card.
This button is used to select the alphabet style:
1 Palace Script2 Clarendon3 Kalligraphia
This button selects the size of the letters - 1 30 mm, 2 12 mm.
This button selects between 1 upper case letters - ABC...., 2 lower case letters - abc...
or 3 numbers - 123... and special characters.
There are also Optional Embroidery Cards with more than one menu available.
EmbroideryThe Embroidery accessory bag contains embroidery hoop, embroidery booklet, embroidery template, template pencil, embroidery card, a pair of scissors, thread and a test kit.
Stitch
18
Functions and InfoDisplay
Some fabrics have excess dye which can cause discoloration on other fabric but also on your sewing machine. This discoloring may be very diffi cult or impossible to remove.
Fleece and denim fabric in especially red and blue often contain a lot of excess dye.
If you suspect that your fabric/ready-to-wear garment contains a lot of excess dye, always pre-wash it before sewing/embroidering to avoid the discoloring.
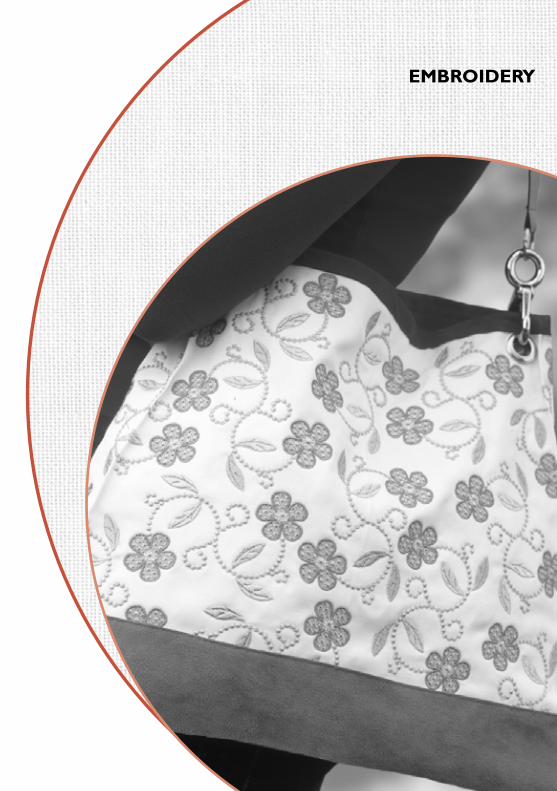
EMBROIDERY

20
Embroidery
Get started1. Insert the embroidery card
(Scandinavia 300 Sampler) into the slot on the right side of the machine. To remove the card, pull it straight out.
2. Turn the machine on. If the presser foot is in lower po si tion the symbol is fl ashing on the Infodisplay. When raising the presser foot, the machine calibrates. If the needle is in its down position it will automatically go to up po si tion. The embroidery unit will take the ready position.
3. When you have fi nished your
embroidery, touch . The arm returns to park po si tion. Turn off the machine.
Scandinavia 300 Sampler - Embroidery BookletThe embroideries are pictured in actual size in the Embroidery Booklet. Each embroidery is placed in a square where the center of each side is marked and a cross marks the center point of the design.
You will also see how each embroidery is placed related to the center point of your sewing space.
The row of thread spools next to the embroideries shows the number of thread color changes, suggested colors, and the order of changes.

21
BA
Embroidery
ThreadThread the needle with 40 wt rayon embroidery thread. When reducing the size of the embroidery we recommend a fi ner thread, 60 wt. When enlarging, we recommend a thicker thread, 30 wt.
Place the net over the thread spool, especially when using Rayon thread. Use a very fi ne thread as bobbin thread. There is a special embroidery bobbin thread available.
Embroidery presser foot UEmbroidery: The lever on the arm of the presser foot should be downward (A). The mark U on the
lever corresponds to the symbol on the display.
Quilting or embroidering thick fabrics: Turn the lever upward (B) to allow more clearence between the foot and the fabric.
22
Embroidery
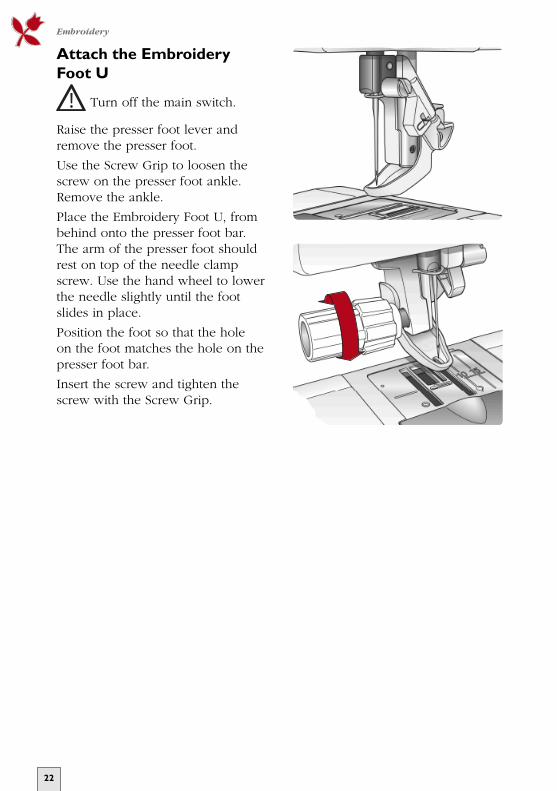
Attach the Embroidery Foot U
Turn off the main switch.
Raise the presser foot lever and remove the presser foot.
Use the Screw Grip to loosen the screw on the presser foot ankle. Remove the ankle.
Place the Embroidery Foot U, from behind onto the presser foot bar. The arm of the presser foot should rest on top of the needle clamp screw. Use the hand wheel to lower the needle slightly until the foot slides in place.
Position the foot so that the hole on the foot matches the hole on the presser foot bar.
Insert the screw and tighten the screw with the Screw Grip.

23
A
Embroidery
Connecting the Embroidery unit
Turn off the main switch.
Slide the arm of the embroidery unit to the right of the needle and the presser bar and push the unit to the right until it plugs into the socket (A).
Turn on the machine to calibrate.
The embroidery unit is now ready. The feed teeth are lowered automatically.
Removing the Embroidery unit
Touch to move embroidery arm to park position.
Turn off the main switch.
Make sure the machine is turned off while removing the embroidery unit. Press the release button at the center of the left side on the underside of the unit and slide it off.
Remove the embroidery card.
24
Embroidery
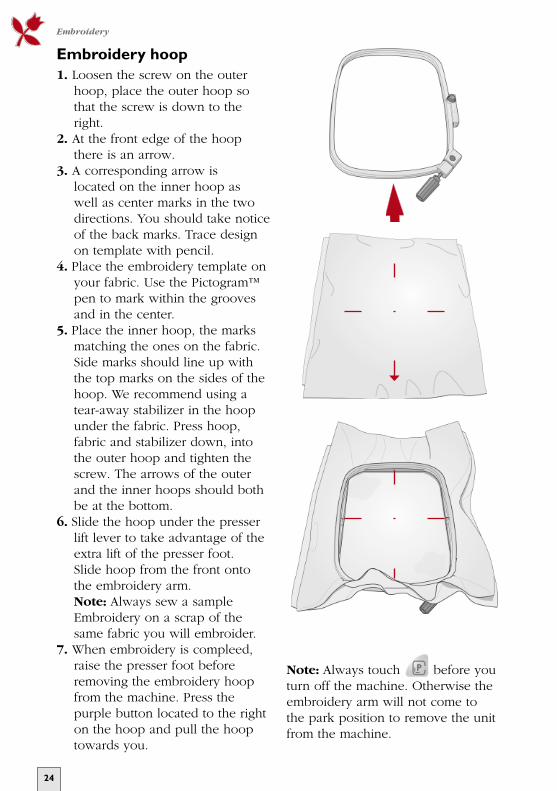
Embroidery hoop1. Loosen the screw on the outer
hoop, place the outer hoop so that the screw is down to the right.
2. At the front edge of the hoop there is an arrow.
3. A corresponding arrow is located on the inner hoop as well as center marks in the two directions. You should take notice of the back marks. Trace design on template with pencil.
4. Place the embroidery template on your fabric. Use the Pictogram™ pen to mark within the grooves and in the center.
5. Place the inner hoop, the marks matching the ones on the fabric. Side marks should line up with the top marks on the sides of the hoop. We recommend using a tear-away stabilizer in the hoop under the fabric. Press hoop, fabric and stabilizer down, into the outer hoop and tighten the screw. The arrows of the outer and the inner hoops should both be at the bottom.
6. Slide the hoop under the presser lift lever to take advantage of the extra lift of the presser foot.Slide hoop from the front onto the embroidery arm.Note: Always sew a sample Embroidery on a scrap of the same fabric you will embroider.
7. When embroidery is compleed, raise the presser foot before removing the embroidery hoop from the machine. Press the purple button located to the right on the hoop and pull the hoop towards you.
Note: Always touch before you turn off the machine. Otherwise the embroidery arm will not come to the park position to remove the unit from the machine.

25
Embroidery
Using the Embroidery templateWhen you wish to sew the embroidery at a specifi c place on your fabric or garment, you can take advantage of the embroidery template to mark where the embroidery is to be sewn. In the Embroidery Booklet you will fi nd all the embroideries pictured in actual size.
1. Place the template with the arrow pointing downward and matching the other marks. Draw the outer lines of your selected embroidery on the template using the template pencil. The markings can later be removed with an eraser.
2. Place the template on your fabric where you wish to sew the embroidery.
3. Draw marks on the fabric in the four grooves and in the center with your Pictogram™ pen.
4. Place the embroidery hoop matching the arrow pointing downward to the arrow mark on the fabric. Insert the fabric into the hoop, see ”Embroidery hoop”, page 24.
Make fi nal adjustments using the
positioning buttons until the needle will start at the center.
26
Embroidery
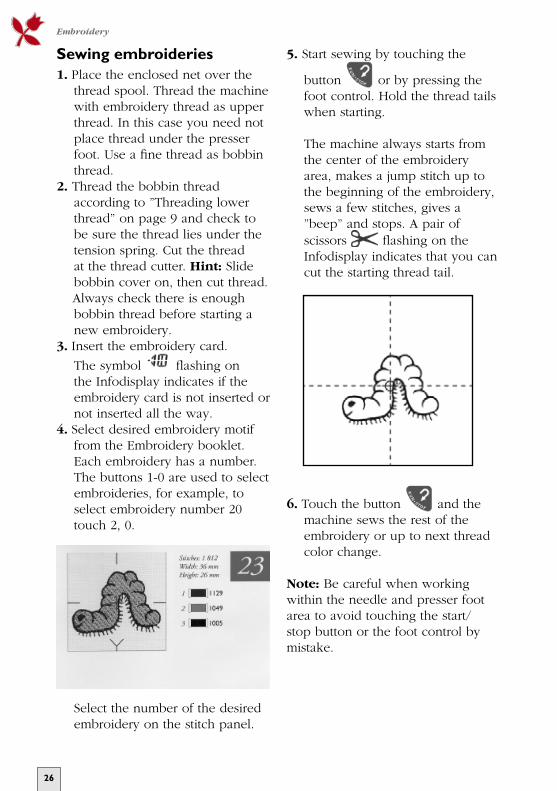
Sewing embroideries1. Place the enclosed net over the
thread spool. Thread the machine with embroidery thread as upper thread. In this case you need not place thread under the presser foot. Use a fi ne thread as bobbin thread.
2. Thread the bobbin thread according to ”Threading lower thread” on page 9 and check to be sure the thread lies under the tension spring. Cut the thread at the thread cutter. Hint: Slide bobbin cover on, then cut thread.
Always check there is enough bobbin thread before starting a new embroidery.
3. Insert the embroidery card.
The sym bol fl ashing on the Infodisplay indicates if the embroidery card is not inserted or not inserted all the way.
4. Select desired embroidery motif from the Embroidery booklet. Each embroidery has a number. The buttons 1-0 are used to select embroideries, for example, to select embroidery number 20 touch 2, 0.
Select the number of the desired embroidery on the stitch panel.
5. Start sewing by touching the
button or by pressing the foot control. Hold the thread tails when star ting.
The machine always starts from the center of the embroidery area, makes a jump stitch up to the beginning of the embroidery, sews a few stitches, gives a ”beep” and stops. A pair of scissors fl ashing on the Infodisplay indicates that you can cut the starting thread tail.
6. Touch the button and the machine sews the rest of the embroidery or up to next thread color change.
Note: Be careful when working within the needle and presser foot area to avoid touching the start/stop button or the foot control by mistake.
27
Embroidery
7. The machine stops automatically when it is time to change thread color. The Infodisplay indicates which thread color change you have reached by a fl ashing number next to the thread spool
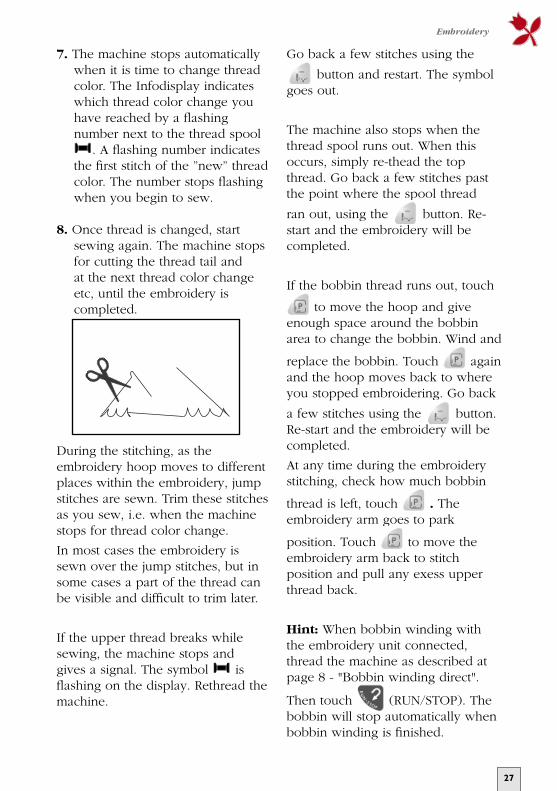
. A fl ashing number indicates the fi rst stitch of the ”new” thread color. The number stops fl ashing when you begin to sew.
8. Once thread is changed, start sewing again. The machine stops for cutting the thread tail and at the next thread color change etc, until the embroidery is completed.
During the stitching, as the embroidery hoop moves to dif fe rent places within the embroidery, jump stitches are sewn. Trim these stitches as you sew, i.e. when the machine stops for thread color change.
In most cases the embroidery is sewn over the jump stitches, but in some cases a part of the thread can be visible and diffi cult to trim later.
If the upper thread breaks while sewing, the machine stops and gives a signal. The symbol is fl ashing on the display. Rethread the machine.
Go back a few stitches using the
button and restart. The symbol goes out.
The machine also stops when the thread spool runs out. When this occurs, simply re-thead the top thread. Go back a few stitches past the point where the spool thread
ran out, using the button. Re-start and the embroidery will be completed.
If the bobbin thread runs out, touch
to move the hoop and give enough space around the bobbin area to change the bobbin. Wind and
replace the bobbin. Touch again and the hoop moves back to where you stopped embroidering. Go back
a few stitches using the button. Re-start and the embroidery will be completed.
At any time during the embroidery stitching, check how much bobbin
thread is left, touch . The embroidery arm goes to park
position. Touch to move the embroidery arm back to stitch position and pull any exess upper thread back.
Hint: When bobbin winding with the embroidery unit connected, thread the machine as described at page 8 - "Bobbin winding direct".
Then touch (RUN/STOP). The bobbin will stop automatically when bobbin winding is fi nished.

28
Embroidery
Function buttons - embroidery
The check size button allows you to step from one corner to another within your embroidery,
so that you will know the size of the embroidery and where on your facric it will be placed.
All embroideries begin from the center. The sewing space within the embroidery hoop is 100 mm x 100 mm (approx. 4" x 4").
These positioning buttons allow you to move the embroidery in four directions. The limit in each direction
is indicated by a "beep" and the
symbol fl ashing on the display.
Touch this button once and your embroidery will rotate a quarter of a turn.
Touch the button twice and your embroidery will be sewn upside-down.
Watch the Infodisplay to see how the
symbol has been rotated after each touch on the button.
29
Embroidery
These buttons allow you to step stitch by stitch through your
embroidery, e.g. if thread has tun out or broken, you can step back a few stitches.
Most of the embroi-deries include several colors. These buttons
allow you to step forward (+) or backward (-) to the beginning of each thread color change. On the Infodisplay the number next to the thread spool will fl ash to indicate the start of each thread color change.
One color embroidery
Touch STOP and all stops for thread color change will be cancelled. The machine sews the entire embroidery without stopping.
Embroideries using several menus (optional)
If you have an embroidery card including 2 or 3 menus you can change menu by touching the MENU button.
Change to desired menu, then enter the embroidery number.

30
Embroidery
Mirror image embroideriesYou can mirror image the embroi-
dery side to side . The sym bol is shown on the display.
Enlarging and reducing embroideriesYou can make the embroidery designs larger and smaller with the stitch length and stitch width buttons between 2 and 6 maximum. The size changes are individually limited for each embroidery design.
When enlarging or reducing the embroidery we recommend changing the thread thickness for the best result, see "Thread", page 21.
A ”beep” indicates when a limit is reached. You can change stitch width and stitch length indepen-dently.
Change the size before moving from the center position. If the embroidery is moved fi rst the size change may be limited by the design reaching the edge of the 100 x 100 mm area.
After fi nishing the embroidery
1. Remove the embroidery hoop by pressing the purple button to the right on the hoop. Pull the hoop toward you.
2. Touch and the embroidery arm returns to park position. Remove the embroidery unit from the machine by pushing the release button on the center left underside, after turning the machine off (see page 23).
SEWING

32
Sewing
Utility sewing / Stitch selection
When you turn on the machine without having the embroidery unit connected, it always selects straight
stitch and the number 1 as well as is dis play ed.
The machine has one row of stitches shown on the front of the lid.
To select a stitch or an embroidery, touch the numeral buttons - for example to select stitch/embroidery number 12 - touch 1, 2.
To the very right on the Infodisplay the number of the selected stitch is displayed.

33
Sewing
Stitch table
01 Straight stitchFor all kind of sewing in woven fabrics, 25 different needle positions
02 Reinforced straight stitchFor seams which are subject to considerable strain, i.e. to reinforce and topstitch sportswear and work clothes. 25 needle positions.
03 Stretch stitchFor seams in tricot and stretch fabrics
04 ZigzagFor lace edging and sewing on braids
05 Three-step zigzagFor overcasting, mending, sewing on patches and elastics
06 Seam and overcast stitchSeam and overcast in one step along the edge or trim later. For light stretch and non-stretch fabrics.
07 Overlock Seam and overcast in one step along the edge or trim later. For medium and heavy stretch fabrics
08 FlatlockDecorative hems and overlapped seams, belts and bands
09 Blind hemInvisible hems in stretch or woven medium and heavy fabrics
10 Bridging stitchFor joining two pieces of fabric with fi nished edges and for elastic shirring
11 Hand look Appliqué stitch Hand look appliqué stitching
12 Feather stitchDecorative stitching and for quilting
13 HemstitchFor hemstitching, use a wing needle (optional)
14 Satin stitchFor appliqués, sewing on laces and bands
15 Decorative edgingFor decorative edges. Sew 15 mm from the edge and trim close to the stitching.
16 Decorative stitchFor decorating clothes, tablecloths and curtains
17 Tapered satin stitchAutomatic tapering for sewing monograms and other decorations
18 Darning stitchDarn and mend work clothes, jeans, tablecloths and linen towels
19 Bartack ButtonholeSuitable for medium and heavy fabrics
20 Keyhole buttonholeFor tailored garments suitable for wool.

34
Sewing
ButtonholesYou can select different buttonhole styles.
Buttonhole the bartack buttonhole, used for medium and heavy fabrics.
Buttonhole keyhole buttonhole for tailored garments.
When sewing stretch fabrics, use a fusible stabilizer or a cord.
The buttonhole foot has guide lines to determine buttonhole length. Place the button on the presser foot against the needle and you will be able to see which mark on the foot corresponds to the button. You will sew until the fi rst buttonhole column reaches this mark.
There is a small fi nger at the back of the presser foot. For a corded buttonhole, loop your cord around the fi nger as illustrated.
For better visibility the machine sews buttonholes away from you.
NOTE: Always stitch a sample buttonhole on scraps of the garment fabric to check size before sewing buttonholes on the garment.
NOTE: Purchase the optional sensor buttonhole foot to sew 1-step buttonhole
1. Select a buttonhole.
2. Snap on the presser foot C. 3. Mark the buttonhole location on
your fabric.
4. Place the material in the machine and begin at the bottom of the buttonhole.
5. Sew the fi rst column of the buttonhole to the required length, use the markings.
6. Touch the reverse
button .7. Continue to sew the
buttonhole until the other column is the same length as the
fi rst, touch the button again.
8. The machine will bartack the other end, make a few tie off stitches in the fi rst column of the buttonhole and then stop.

35
Sewing
Buttonhole knife/Seam ripperThe knife is used to cut buttonholes. It is also useful for removing stitches sewn in error.
Sewing buttons1. Mark the button placement on the
fabric.
2. Select zigzag .3. Lower the feed teeth with the
dial. See page 12.4. Snap off the presser foot.
5. Place the fabric under the presser foot ankle.
6. Place the button on marking and lower the pres ser bar so that the presser foot ankle is between the holes of the button (see picture).
7. Hold the thread ends to one side. Turn the handwheel and check to be sure that the needle goes into the left hole of the button.
Button with a thread shankUse the clearance plate for this purpose. Use the thin end when sewing buttons on light fabrics, the thick end for heavier fabrics.
Place the plate between the button and the fabric. Lower the presser bar and sew on the button.
Pull the threads between the button and the fabric.
Wind the threads a few times around the thread shank and tie the ends.
8. Touch the mirror image button
to check that the needle also goes into the right hole.
9. Sew as many stitches as you consider necessary.
10. Touch STOP. The machine will then tie off in one of the holes and stop.
11.Touch STOP to cancel it. Move to the next pair of holes or the next button.
If you have a button with a dif fe rent hole spacing, you can adjust this by pressing one of the stitch width buttons (+) or (-).
36
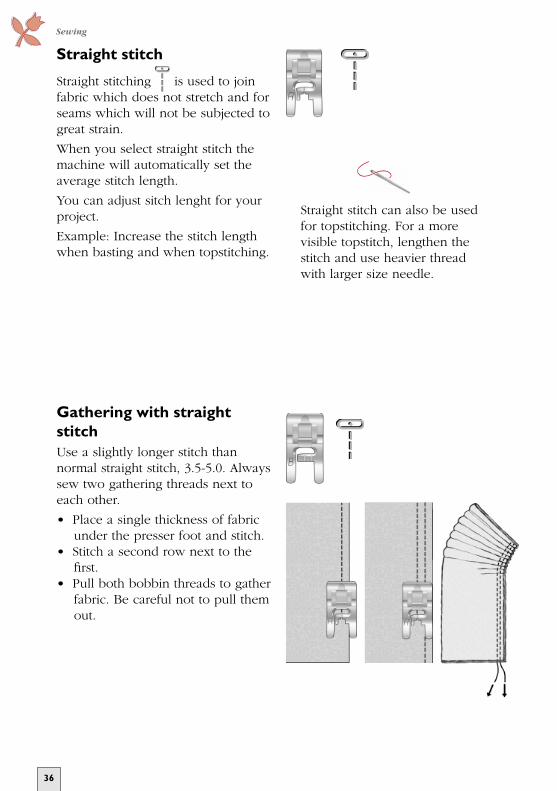
Straight stitch
Straight stitching is used to join fabric which does not stretch and for seams which will not be subjected to great strain.
When you select straight stitch the machine will automatically set the average stitch length.
You can adjust sitch lenght for your project.
Example: Increase the stitch length when basting and when topstitching.
Gathering with straight stitchUse a slightly longer stitch than normal straight stitch, 3.5-5.0. Always sew two gathering threads next to each other.
• Place a single thickness of fabric under the presser foot and stitch.
• Stitch a second row next to the fi rst.
• Pull both bobbin threads to gather fabric. Be careful not to pull them out.
Straight stitch can also be used for topstitching. For a more visible topstitch, lengthen the stitch and use heavier thread with larger size needle.
Sewing
37
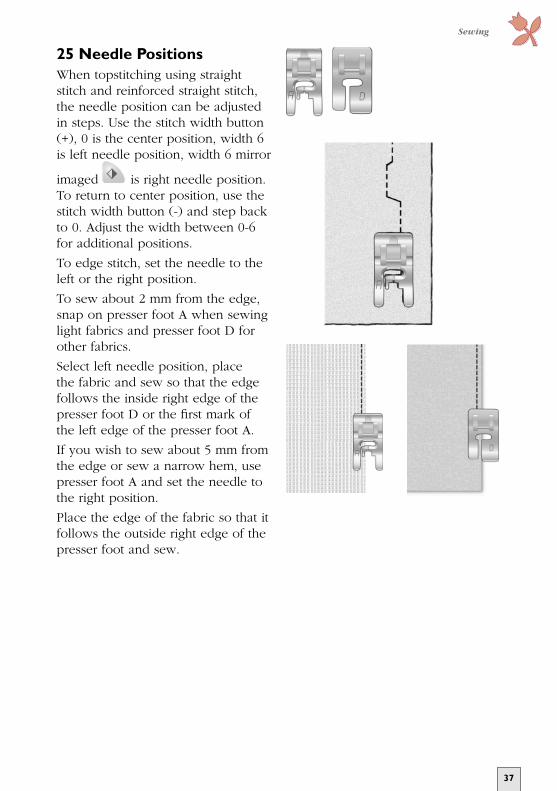
Sewing
25 Needle PositionsWhen topstitching using straight stitch and reinforced straight stitch, the needle position can be adjusted in steps. Use the stitch width button (+), 0 is the center position, width 6 is left needle position, width 6 mirror
imaged is right needle position. To return to center po si tion, use the stitch width button (-) and step back to 0. Adjust the width between 0-6 for additional positions.
To edge stitch, set the needle to the left or the right position.
To sew about 2 mm from the edge, snap on presser foot A when sewing light fabrics and presser foot D for other fabrics.
Select left needle position, place the fabric and sew so that the edge follows the inside right edge of the presser foot D or the fi rst mark of the left edge of the presser foot A.
If you wish to sew about 5 mm from the edge or sew a narrow hem, use pres ser foot A and set the needle to the right position.
Place the edge of the fabric so that it follows the outside right edge of the pres ser foot and sew.
38
1
2
3
4
Sewing
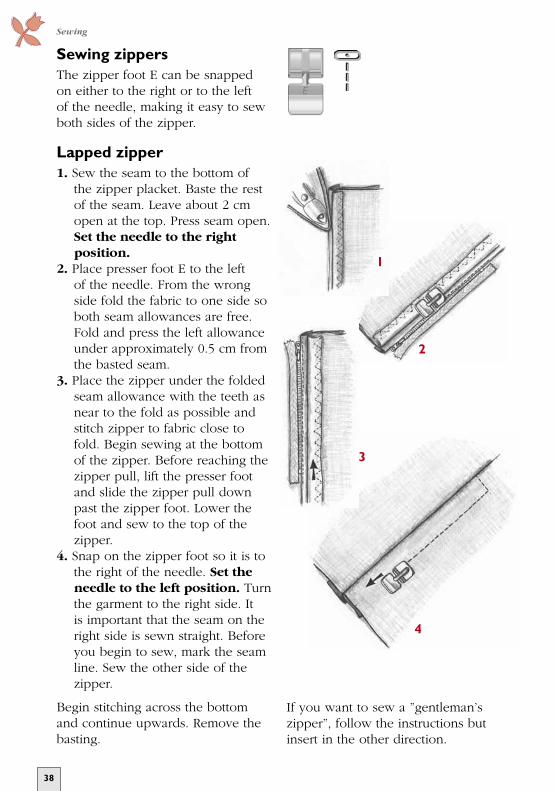
Sewing zippersThe zipper foot E can be snapped on either to the right or to the left of the needle, making it easy to sew both sides of the zipper.
Lapped zipper1. Sew the seam to the bottom of
the zipper placket. Baste the rest of the seam. Leave about 2 cm open at the top. Press seam open. Set the needle to the right po si tion.
2. Place presser foot E to the left of the needle. From the wrong side fold the fabric to one side so both seam allowances are free. Fold and press the left allowance under approximately 0.5 cm from the basted seam.
3. Place the zipper under the folded seam allowance with the teeth as near to the fold as possible and stitch zipper to fabric close to fold. Begin sewing at the bot tom of the zipper. Before reaching the zipper pull, lift the presser foot and slide the zipper pull down past the zipper foot. Lower the foot and sew to the top of the zipper.
4. Snap on the zipper foot so it is to the right of the needle. Set the needle to the left po si tion. Turn the garment to the right side. It is important that the seam on the right side is sewn straight. Before you begin to sew, mark the seam line. Sew the other side of the zipper.
Begin stitching across the bottom and continue upwards. Remove the basting.
If you want to sew a ”gentleman’s zipper”, follow the instructions but insert in the other direction.

39
Sewing
Reinforced straight stitch
The reinforced straight stitch is stronger than ordinary straight stitch, due to the fact that it is a triple and elastic stitch.
The reinforced straight stitch can be used for heavy stretch fabrics, for crotch seams which are subject to considerable strain and for topstitching in heavy fabrics.
Stretch stitch
The stretch stitch makes a pliable, stretchy seam that is suitable for sewing together pieces of light stretch fabric.
The stretch stitch is ideal for topstitching in light stretch fabrics.
Zigzag
The zigzag is utilized for sewing on lace, bound edging and appliqués.
When you select the zigzag the machine will automatically set stitch length 2 and width 3.
You can change this setting by pressing either the (+) or (-) button on the width and/or length.
Experiment until you reach the best setting for your project.

40
1
2
3
Sewing
Lace edging1. Place wrong side of lace to right
side of fabric matching edges. Sew along inner edge of lace with
zigzag, stitch length 1.5, stitch width 1.5.
2. Press seam allowance towards
fabric. Sew with satin stitch ,stitch width 2.0, on the right side over the zigzag seam.
3. Cut off the seam allowance up to the stitching on the wrong side.
41
Sewing
Three-step zigzag
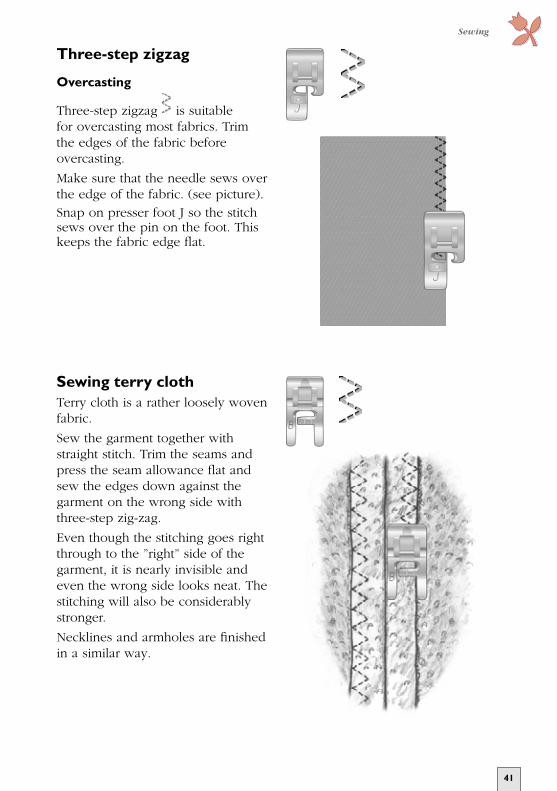
Overcasting
Three-step zigzag is suitable for over cas ting most fabrics. Trim the edges of the fabric before over cas ting.
Make sure that the needle sews over the edge of the fabric. (see picture).
Snap on presser foot J so the stitch sews over the pin on the foot. This keeps the fabric edge fl at.
Sewing terry clothTerry cloth is a rather loosely woven fabric.
Sew the garment together with straight stitch. Trim the seams and press the seam allowance fl at and sew the edges down against the garment on the wrong side with three-step zig-zag.
Even though the stitching goes right through to the ”right” side of the garment, it is nearly invisible and even the wrong side looks neat. The stitching will also be considerably stronger.
Necklines and armholes are fi nished in a similar way.
42
Sewing
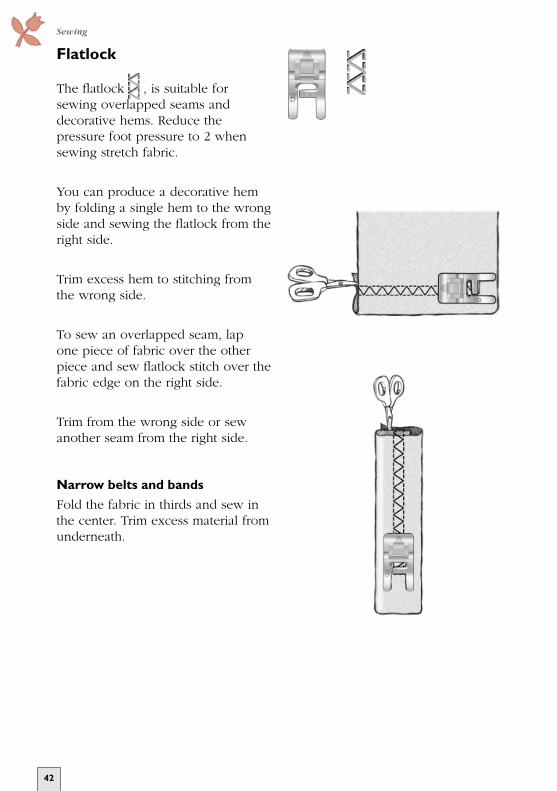
Flatlock
The fl at lock , is suitable for sewing overlapped seams and decorative hems. Reduce the pressure foot pressure to 2 when sewing stretch fabric.
You can produce a decorative hem by folding a sing le hem to the wrong side and sewing the fl atlock from the right side.
Trim excess hem to stitching from the wrong side.
To sew an overlapped seam, lap one piece of fabric over the other piece and sew fl atlock stitch over the fabric edge on the right side.
Trim from the wrong side or sew another seam from the right side.
Narrow belts and bands
Fold the fabric in thirds and sew in the center. Trim excess material from underneath.
43
Sewing
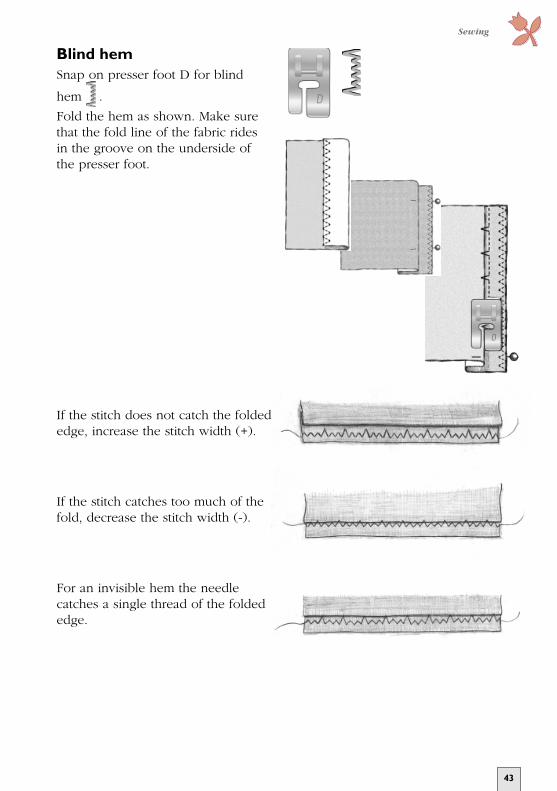
Blind hemSnap on presser foot D for blind
hem .
Fold the hem as shown. Make sure that the fold line of the fabric rides in the groove on the underside of the presser foot.
If the stitch does not catch the folded edge, increase the stitch width (+).
If the stitch catches too much of the fold, decrease the stitch width (-).
For an invisible hem the needle catches a single thread of the folded edge.

44
Sewing
Bridging stitch
The bridging stitch is suitable for joining two pieces of fabric with fi nished edges.
Leather and vinyl are joined by butting the edges close to each other using the bridging stitch. Also use to join lace and ribbon.
Elastic shirring
The bridging stitch is also used for gathered elastic shirring. Snap on the buttonhole foot C.
On the wrong side of your fabric draw lines to sew the stitched rows straight.
Place the shirring elastic (elastic thread) around the fi nger of the presser foot C.
Seam and overcastSome stitches can be used for seaming and over cas ting on the edge where a 5 mm (1/4") seam is allowed. Place the fabric so that the inside right ”toe” of the presser foot follows the edge of the fabric.
Overlock is chiefl y used for sewing medium and heavy stretch fabric. Snap on presser foot B.
Seam and overcast stitch, may be used to sew light and me di um non-stretch fabric and light stretch fabric. Snap on presser foot J.
Presser foot J is also used to over- lock and overcast many dif fe rent fabrics with the exception of heavy, fi rm fabrics. The pin on the presser
Sew from the wrong side over both lengths of the elastic following marked lines. Gather the shirring by pulling the elastic threads.
foot should follow the edge of the fabric and will prevent the fabric from pucke ring. Stitch width 5-6 mm. When using stitch width 4.5 or lower, use presser foot A.

45
a
b
1
2
3
AppliquéSnap on presser foot B.
1 Draw a mirror image of your design on the paper side of the fusible web.
2 Iron the fusible web so that it sticks to the wrong side of the appliqué material.
3 Cut out the appliqué. Remove the paper layer from the fusible web. Fuse the appliqué to the back gro und material. Place stabilizer under background fabric.
a Sew the hand look appliqué
stitch number 11 , around the appliqué.
b The satin stitch number 14 , stitch width 2 mm sews beautiful appliqués. Fuse or pin applique in place and satin stitch around the outside edges.
Darning and taper satin stitchesThe stitches 17-18 can not be combined but are set individually and automatically. There are stitch memories where the number of stitches, length or width changes are stored.
1. Sew until the stitch has reached the desired length.
2. Touch the button. The machine completes the stitch.
3. When you have the result you wish, touch STOP.
4. The stitch will now repeat in succession and the machine will
Sewing
stop automatically when the stitch is completed.
If you wish to sew another stitch and then return to your stitch, you only select this stitch and touch STOP.
The repeated stitch is retained even if you turn off the machine.
Read more on page 46.

46
Sewing
Darning stitch
is a perfect stitch for men ding and darning. Use presser foot A.
1. Sew the fi rst row of stitches as long as you need to cover your tear or worn spot.
2. Touch the reverse button and the machine continues sewing the remaining stitches at the same length and fastens the thread.
3. When the fi rst stitch is fi nished, touch STOP to put into memory. Move the fabric so that the needle is right over the last stitch. Repeat as many times as needed to cover the hole. See "Satin taper and darning stitches" page 45.
Automatic taper stitch The tapered satin stitch , is a ta pe red satin stitch which makes it suitable for sewing monograms and other embellishments. Use presser foot B.
1. Trace the monogram on the fabric and sew over the lines.
2. Select .3. Sew until the desired length is
reached.
4. Touch the reverse button to taper the end. See "Satin taper and darning stitches" page 45.
5. Touch STOP if you wish to repeat the same stitch with retained length.
47
Sewing
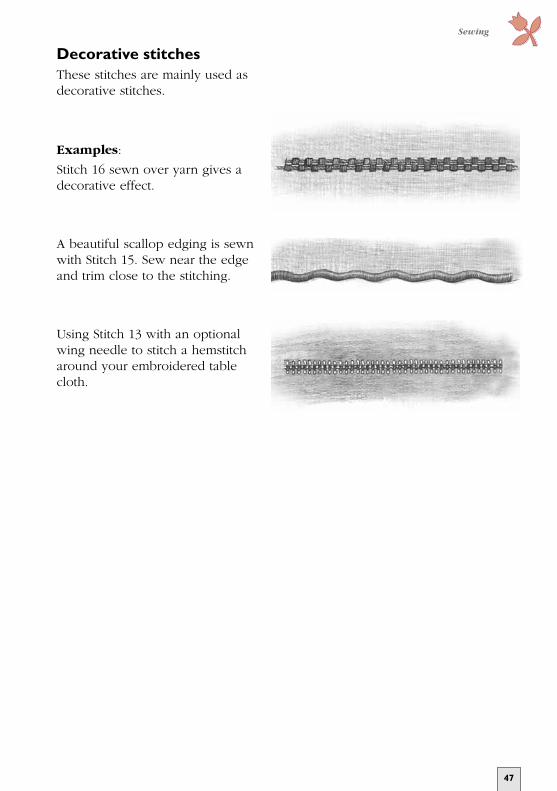
Decorative stitchesThese stitches are mainly used as decorative stitches.
Examples:
Stitch 16 sewn over yarn gives a decorative effect.
A beautiful scallop edging is sewn with Stitch 15. Sew near the edge and trim close to the stitching.
Using Stitch 13 with an optional wing needle to stitch a hemstitch around your embroidered table cloth.
48
Sewing
Sewing hints
Free arm
To facilitate sewing trouser legs and sleeve hems use the free arm.
The free arm also allows you to darn socks (the darning foot is an optional accessory).
Jeans hem
When sewing over seams in extra heavy fabric or a blue jeans hem, the foot can tip as the machine climbs over the seam. The needle can hit the tipped foot and break. In this case, use the clearance plate to balance the height of the hem as you sew.
Place the clearance plate behind the foot as you approach the hem and in front of the foot as you sew over the hem thickness. Remove the clearance plate before sewing in to it.
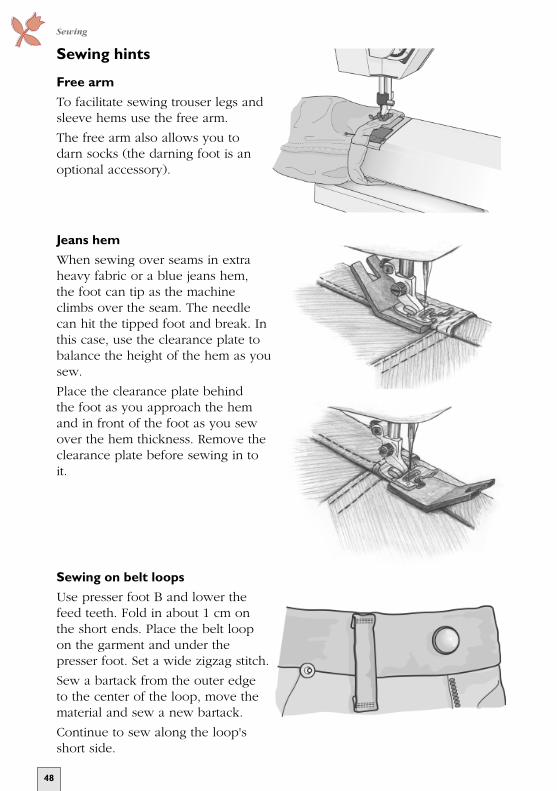
Sewing on belt loops
Use presser foot B and lower the feed teeth. Fold in about 1 cm on the short ends. Place the belt loop on the garment and under the presser foot. Set a wide zigzag stitch.
Sew a bartack from the outer edge to the center of the loop, move the material and sew a new bartack.
Continue to sew along the loop's short side.

CARE OF YOUR SCANDINAVIA 300

50
Care of your Scandinavia 300
Changing the light bulbOnly use light bulbs of a type as indicated on the front of the machine (12V, 5W). They are available at your authorized Husqvarna Viking dealer.
Turn off the main switch.
1 Place the light bulb remover withthe deep hole, marked OUT, around the bulb.
Do not turn the bulb, just pull it out to remove it.
2 When inserting a new light bulb place the remover with the shallow hole, marked IN, around the new bulb. Insert the new bulb by pushing it up.

51
1
2
10 15
Care of your Scandinavia 300
Care of the MachineTo keep your sewing machine operating well, clean it often. No lubrication (oiling) is needed.
Turn off the main switch.
Cleaning
Wipe the exterior surfaces of your Scandinavia 300 with a soft cloth to remove any dust or lint built up.
Clean the Bobbin Area
Remove the presser foot and slide off the bobbin cover. Lower the feed teeth. Place the stitch plate opener on the brush, and then in the recess at the rear of the stitch plate. Turn toward you to pop off the stitch plate. Clean the feed teeth with the brush.
Cleaning Under the Bobbin Area
When lint builds up, the area under the bobbin case must be cleaned.
Remove the bobbin case holder (1) covering the front part of the bobbin case (2). Remove the bobbin case by lifting it up. Clean with the brush.
Replace the bobbin case and the bobbin case holder.
Replacing the Stitch Plate
With feed teeth down, place the stitch plate about 5 mm in front of the rear edge and push it back. Slide on the bobbin cover. Raise the feed teeth.
52
Care of your Scandinavia 300
Trouble shooting
Always start by checking the needle
Always start with a new needle as soon as you discover that a stitch is not what you expected. Test sew on a scrap of the fabric you are sewing. Check that you have chosen the correct needle and see that it is correctly inserted. See page 12.
Unattractive stitches
The thread tension is not correct. See page 10. Make sure that the thread is not catching. Certain thread spools are unsuitable for spooling from the horizontal spool pin. Try instead with the vertical spool pin.
The machine may be incorrectly threaded. Be sure to place spool holders correctly.
The correct threading is shown on page 6.
Wrong bobbin thread. It should be of the same thickness as the upper thread except for embroidery.
The needle breaks
The needle can strike against stitch plate and break. Change the needle. See page 12.
The upper thread breaks
Check the thread spool to see that it has not caught in any way.
The needle eye may have sharp edges which cut the thread. If so, change the needle. See page 12.
The upper thread is incorrectly threaded. See page 6.
The upper thread may have too much tension. Refer to page 10.
The hole in the stitch plate may be chipped and have sharp edges. We recommend that you replace it.
The bobbin thread breaks
The bobbin thread may be incorrectly threaded. See page 9.
The stitch plate hole is damaged. See "Upper thread breaks".
Irregular thread tension
This may be due to poor quality thread. When sewing with cotton thread, increase the thread tension. See page 10.
Irregular bobbin winding
The machine is not correctly threaded for bobbin winding. See page 8.
The fabric puckers
The upper thread tension is too tight. See page 10 for correct thread tension.
Use the correct presser foot as recommended by the Infodisplay.
The machine does not feed the fabric
The stitch length is too short. Increase stitch length.
The feed teeth may be lowered. Raise them by turning the dial to
. See page 12.
The feed teeth are full of dust and dirt. Clean with the brush. See page 51.
53
Care of your Scandinavia 300
The stitch is too loose - fabric layers not held together
The thread tension is far too loose. Page 10 shows how to adjust the thread tension.
Incorrect stitch
If the machine does not sew the stitch indicated by the Infodisplay, it is possible that the electronics have been disturbed in some way, per-haps by a short power cut or electri-cal disturbance. Shut off the main switch, wait a few seconds and try again. If the fault remains, contact your dealer.
Machine runs sluggishly
Dirt or lint has built up under the stitch plate. Loosen the plate and brush clean between the feed teeth and in the bottom area. See page 51.
Main motor does not work
The electronic overload protector may have switched off. Shut off the main switch, wait about a minute. Then turn the machine back on.
Balance setting for buttonhole
Balance can only be set if a button-hole is selected. Press the buttons
and until the letters BAL are indicated to the left on the Infodis play. Instead of the stitch length indication, a balance indication is now shown. When you wish to increase the density of the right column, press stitch length button (-). When you wish to decrease the density, press stitch length button (+).
The balance can be set between -5 to +5. The balance indication on the Infodisplay will change in steps with each touch. When you select an other stitch, the display goes back to show the sitch length indication. The machine always retains the last balance setting that has been made.
The sewing and embroidery machine screen does not respond to touch
The socket on the back of the machine where the embroidery unit is connected can be sensitive to static electricity when the embroidery unit is not connected. If the sewing machine screen does not respond to touch, turn the machine off and back on again. If this persists, contact your authorized Husqvarna Viking retailer.
Expert assistance
Have your machine "tuned up" regularly by your dealer. If you have followed the preceding points and still do not get satisfactory results, you should contact the dealership where you bought the machine. When the machine is being checked, it is a great help if it can be test sewn under as similar conditions as possible as when you used it.
Remember to take a sewing sample along with you, preferably of the fabric and with the thread you intend to use. A sewing sample will often give much better information than words.
Non-original parts and accessories
The warranty does not cover any defect or damage caused by use of non-original accessories or parts.

54
Index
IndexAccessories 5
Appliqué 45
Baste 36
Belt loops 48
Blind hem 43
Bobbin, placing in machine 9
Bobbin winding 8
Bridging stitch 45
Button sewing 35
Buttonholes 34
Care of machine 49
Cleaning 49
Clear thread 8
Connecting the machine 4
Color advance 16, 27
Darning 45-46
Decorative stitches 47
Edging 47
Elastic shirring 44
Embroidery 19-28
Embroidery booklet 20
Embroidery, get started 20
Embroidery hoop 23
Embroidery presser foot 21
Embroidery size 14-16, 28
Embroidery template 24
Embroidery thread 21
Embroidery unit 3, 22
Extra spool pin 5
Embroidery Selection 15, 25
Feed teeth, lowering 12
Flatlock 42
Free arm 48
Functions, Embroidery 14-16, 27
Gathering 36
Hand look applique 45
Hems 42-43
Hemstitch 47
Hoop 23
Infodisplay 14-15
Lace edging 40
Lapped zipper 38
Letters (optional) 15, 17
Light bulb, changing 50
Lowering feed teeth 12
Mending 45-46
Menu (optional) 15, 17
Mirror image 15, 28
Needle, changing 12
Needle positions 37
Nylon thread 8

55
Index
Optional Accessories 15, 17, 34
Overcasting 41
Overlock 44
Overview 2-3
Packing the machine 3
Positioning, embroidery 16, 27
Presser foot, changing 11
Presser foot, recommended 15
Presser foot lever 11
Presser foot pressure 11
Reinforced straight stitch 39
Reverse 15
Rotation 16, 27
Satin stitch 40, 45
Satin taper 45, 46
Seam and overcast stitch 44
Sensor foot buttonhole 15, 34
(optional)
Setting up the machine 3-4
Sewing hints 48
Shirring 44
Spool Holders 5
Spool pin 5
Stitch Advance 16, 27
Stitch Length 14
Stitch plate 49
Stitch selection 15, 32
Stitch table 32-33
Stitch Width 15
Stop 15, 34, 45-46
Straight Stitch 36, 37
Stretch stitch 39
Tapered satin stitch 45, 46
Tension 10, 14
Terry cloth 41
Template 25
Thread, tension 10, 14
Thread, upper warning 6
Threading, bobbin 9
Threading twin needle 7
Threading, upper 6
Three-step zigzag 41
Topstitching 36
Transparent thread 8
Trouble shooting 52-53
Twin needle, threading 7
Unpacking the machine 3-4
Vertical spool pin 5
Warning, thread 6
Zigzag 39-40
Zippers 38


We reserve the right to change the machine equipment and the ass ort ment of accessories without prior notice, or make modifi cations to the performance or design.
Such modifi cations, however, will always be to the benefi t of the user and the product.
Please note that on disposal, this product must be safely recycled in accordance with relevant National legislation relating to electrical/electronic products. If in doubt please contact your retailer for guidance

VSM Group AB • SE-561 84 Huskvarna, Swedenwww.husqvarnav ik ing .com 41
2 87
01
- 26
E •
InH
ous
e •
© 2
004
VS
M G
roup
AB
• A
ll ri
ghts
res
erve
d •
Pri
nted
in S
wed
en o
n en
viro
nmen
tally
-fri
endl
y pa
per