users and roles (bc-ccm-usr) - wordpress.com and roles (bc-ccm-usr) sap ag 2 ... and os/400® are...
TRANSCRIPT
Users and Roles (BC-CCM-USR)
HE
LP
.BC
CC
MU
SR
R e l e a s e 4 . 6 C

Users and Roles (BC-CCM-USR) SAP AG
2 April 2001
Copyright
© Copyright 2001 SAP AG. All rights reserved.
No part of this publication may be reproduced or transmitted in any form or for any purposewithout the express permission of SAP AG. The information contained herein may be changedwithout prior notice.
Some software products marketed by SAP AG and its distributors contain proprietary softwarecomponents of other software vendors.
Microsoft®, WINDOWS®, NT®, EXCEL®, Word®, PowerPoint® and SQL Server® are registeredtrademarks ofMicrosoft Corporation.
IBM®, DB2®, OS/2®, DB2/6000®, Parallel Sysplex®, MVS/ESA®, RS/6000®, AIX®, S/390®,AS/400®, OS/390®, and OS/400® are registered trademarks of IBM Corporation.
ORACLE® is a registered trademark of ORACLE Corporation.
INFORMIX®-OnLine for SAP and Informix® Dynamic ServerTM
are registered trademarks ofInformix Software Incorporated.
UNIX®, X/Open®, OSF/1®, and Motif® are registered trademarks of the Open Group.
HTML, DHTML, XML, XHTML are trademarks or registered trademarks of W3C®, World WideWeb Consortium,Massachusetts Institute of Technology.
JAVA® is a registered trademark of Sun Microsystems, Inc.
JAVASCRIPT® is a registered trademark of Sun Microsystems, Inc., used under license fortechnology invented and implemented by Netscape.
SAP, SAP Logo, R/2, RIVA, R/3, ABAP, SAP ArchiveLink, SAP Business Workflow, WebFlow,SAP EarlyWatch, BAPI, SAPPHIRE, Management Cockpit, mySAP.com Logo and mySAP.comare trademarks or registered trademarks of SAP AG in Germany and in several other countriesall over the world. All other products mentioned are trademarks or registered trademarks of theirrespective companies.

SAP AG Users and Roles (BC-CCM-USR)
April 2001 3
Icons
Icon Meaning
Caution
Example
Note
Recommendation
Syntax

Users and Roles (BC-CCM-USR) SAP AG
4 April 2001
Contents
Users and Roles (BC-CCM-USR)................................................................................6Changes for Release 4.6....................................................................................................... 6Creating and Maintaining User Master Records.................................................................. 10Maintaining Logon Data ..................................................................................................... 12Assign Roles...................................................................................................................... 15Assigning Profiles.............................................................................................................. 15Assign User Groups........................................................................................................... 16Personalization................................................................................................................... 17User Maintenance Functions.............................................................................................. 17Mass Changes.................................................................................................................... 20Logon and Password Security in the SAP System ............................................................. 21Setting Password Controls................................................................................................. 23Limiting Logon Attempts and Setting up Clients................................................................ 24Logging Off Inactive Users................................................................................................. 24Maintaining User Defaults and Options.............................................................................. 25Comparing User Master Records........................................................................................ 27The Effect of Changes on User Master Records................................................................. 28Create and Maintain Internet Users..................................................................................... 28Assign Standard Roles....................................................................................................... 30Role Maintenance ............................................................................................................... 36Change and Assign Roles.................................................................................................. 37Create Roles....................................................................................................................... 38
Editing Predefined Authorizations ..................................................................................... 44SAP Authorization Concept Modules ............................................................................ 47
Authorization Check Scenario................................................................................. 52Symbols and Status Text in Authorization Maintenance................................................. 53Copying Authorizations From Templates....................................................................... 55
Generating Authorization Profiles ...................................................................................... 56Regenerate the Authorization Profile Following Changes ............................................... 57Mass Generation of Profiles ......................................................................................... 59
Assign Users ................................................................................................................... 60Personalization ................................................................................................................ 62
Create Composite Roles..................................................................................................... 62Derive Roles....................................................................................................................... 63Compare Roles................................................................................................................... 64Transport/Distribute Roles.................................................................................................. 66
Upload/Download Roles ................................................................................................... 67Role Maintenance: Example ............................................................................................... 67Role Maintenance: Tips and Tricks..................................................................................... 73Using the Infosystem.......................................................................................................... 74Reducing the Scope of Authorization Checks.................................................................... 75Preparatory Steps............................................................................................................... 76

SAP AG Users and Roles (BC-CCM-USR)
April 2001 5
Globally Deactivating Authorization Checks....................................................................... 77Reducing Authorization Checks in Transactions................................................................ 77Editing Templates for General Authorizations.................................................................... 79Comparing Check Indicators/Field Values After Upgrade .................................................. 80Transporting Authorization Components........................................................................... 80Analyzing Authorization Checks......................................................................................... 83Analyzing Authorizations using the System Trace ............................................................. 83Authorization Checks in Your Own Developments............................................................. 84Creating Authorization Fields............................................................................................. 85Assigning an Authorization Object to an Object Class....................................................... 85Creating/Maintaining Authorizations/Profiles Manually...................................................... 86Line-oriented Authorizations.............................................................................................. 86Administration Tasks.......................................................................................................... 87Maintaining Authorization Profiles..................................................................................... 87
Simple and Composite Profiles ......................................................................................... 88Defining Profiles and Authorizations .................................................................................. 88Alternative Authorizations ................................................................................................. 89Choosing Authorization Objects........................................................................................ 89Maintaining Composite Profiles ......................................................................................... 90Activate profiles ............................................................................................................... 90Naming Convention for Predefined Profiles........................................................................ 90
Maintaining Authorizations................................................................................................. 91Creating and Maintaining Authorizations............................................................................ 91Entering Values ............................................................................................................... 91Activating Authorizations .................................................................................................. 93Naming Convention for SAP Authorizations ....................................................................... 93
Central User Administration ............................................................................................... 94Setting Up Central User Administration.............................................................................. 94
Setting-up CUA for Systems with different Releases .......................................................... 98Setup field distribution parameters ...................................................................................100Migration of Existing Users into the Central System .........................................................102Central User Distribution ...................................................................................................103Distribution Logs...............................................................................................................104Global User Manager.........................................................................................................105Preparatory Steps..............................................................................................................109Global User Manager authorizations..................................................................................111Global User Manager Functions........................................................................................111First Installation Procedure ...............................................................................................113Organizing User and Authorization Maintenance ..............................................................115
Managing users and roles ...............................................................................................116Distributed Administration................................................................................................116Setting up Administrators.................................................................................................117
Protecting Special Users...................................................................................................118Securing User SAP* Against Misuse................................................................................119Protecting User DDIC Against Unauthorized Access.........................................................120
Security in System Groups................................................................................................121Upgrade Procedure ...........................................................................................................123

Users and Roles (BC-CCM-USR) SAP AG
Users and Roles (BC-CCM-USR)
6 April 2001
Users and Roles (BC-CCM-USR)
PurposeUsers must be setup and roles assigned to user master records before you can use the SAPSystem.
A user can only log on to the system if he or she has a user master record with a password. Auser menu and authorizations are also assigned to the user master record via one or more roles.
Roles are collections of activities which allow a user to use one or more business scenarios of anorganization. The transactions, reports and web-based applications in the roles are accessed viauser menus. User menus should only contain the typical functions in the daily work of a particularuser.
The integrity of business data is also ensured by the assignment of roles. Authorization profilesare generated which restrict the activities of users in the SAP System, depending on the activitiesin the roles.
IntegrationThe mySAP.com Workplace offers users a role-based portal to perform his or her tasks via a webbrowser. This is documented in SAPNet under the alias Workplace. The following notes refer tothe R/3 user administration and role maintenance.
Data is also protected in the SAP System by the following mechanisms as well as theassignment of authorizations described in the following sections:
• Secure Network Communication (SNC)
• Secure data formats (Secure Store and Forward (SSF))
• Internet security
• System passwords
• Database access
• Transport system
• Individual directory structures for the SAP System and so on
See the R/3 Security Guide. It is in SAPNet under http://sapnet.sap.com/securityguide.
Changes for Release 4.6The following areas were extended:
• Role Maintenance
− Flexible user menus
− Composite roles
− Distribution of roles
− Read roles from other systems

SAP AG Users and Roles (BC-CCM-USR)
Changes for Release 4.6
April 2001 7
− Link a role to Knowledge Warehouse documentation
− Comparison of roles
• User administration
− Central User Administration
Global User Manager
Simplified ALE system environment setup for central user administration
− User groups
− Mass changes in user administration
− Alias names for users
− Reference user
The term Activity group has been replaced by Role in Release 4.6C.
Role MaintenanceThe current Release contains more than 1200 single roles from all application areas. You canuse the roles as they are delivered by SAP or you can copy and change them and assign them tousers.
The delivered roles include:
Basis: Authorization data administratorBasis: Authorization profile administratorBasis: User administratorBasis: System administratorBasis: Batch administratorBasis: Database administratorBasis: Customizing project memberBasis: ABAP developerBasis: Uncritical basis authorizations for all users
See Assign standard roles [Page 30].
Flexible user menus
In role maintenance (transaction PFCG), the administrator can construct the user menu for a roleby adding transactions, reports, and Internet/intranet links to the menu. The structure andterminology for the functions contained can be specified as needed.
You can specify transactions to add to the user menus or choose transactions from the SAPmenu. The company menu is no longer available as of Release 4.6A.
Along with the user menus, you can display a complete view of all functions delivered by SAPusing the SAP menu. This complete view is only displayed if no user menus have been defined.
See Create roles [Page 38].

Users and Roles (BC-CCM-USR) SAP AG
Changes for Release 4.6
8 April 2001
Composite roles
It is often necessary to define a work center using more than just a role and the menu structure,authorization data and user assignment information it contains. To simplify maintenance andimprove the reusability of the information, a work center can also be modularized into severalroles and then combined into one composite role.
Users assigned to a composite role are automatically assigned to the roles included in thecomposite activity group.
You can edit the complete menu structure that is the sum of the individual roles included in thecomposite role.
See Composite roles [Page 62].
Distribution of Roles in Target SystemYou can distribute roles into target systems from Release 4.6C provided that the target systemalso has Release 4.6C.
See Create roles [Page 38].
Read roles from other systemsYou can copy component system roles to the work center server by RFC. You can also readroles from earlier releases (down to Release 3.1H) into the work center, if you have theappropriate plug-in.
Link a role to Knowledge Warehouse documentation
You can link a role to a document in the Knowledge Warehouse with Utilities → Info object →Assign in the role maintenance Change roles screen.
Comparison of rolesYou can compare and adjust role menus across systems from Release 4.6C with the transactionROLE_CMP.
See Compare roles [Page 64].
New authorization functionality: Mass generation of derived rolesYou can derive roles from existing roles in the role maintenance. The role menu is copied into thederived roles. You can perform a mass generation of the derived roles in the authorizationmaintenance of the original role to copy the authorization data as well.
The organization level data is only copied the first time the authorization data is adjusted for thederived role. If organization level data is maintained in the derived role, it is not overwritten bysubsequent adjustments.
See Derive roles [Page 63].
User administration
Central User AdministrationAn SAP system group consists of several R/3 Systems with several clients. The same users arefrequently created and assigned to roles in each client. The central user administration performsthese tasks in a central system and distributes the data to the systems in the system group.

SAP AG Users and Roles (BC-CCM-USR)
Changes for Release 4.6
April 2001 9
Global User Manager
From Release 4.6A the system administrator can get an overview of the users, existing usergroups, the systems in the system group and the roles, in the Global User Manager, based onthe central user administration. The system administrator can make changes in the overviewusing drag and drop. These changes take affect after being distributed to the dependentsystems.
Previously, user data had to be maintained in every client in every system. With the introductionof central user administration, this can all be maintained in a central system. User groups can beused to reduce the administration overhead required for maintaining user data, as authorizationdata then only has to be maintained once for each user group.
See Global User Manager [Page 105].
Simplified ALE system environment setupFrom Release 4.6C, simple system landscapes can be setup with transaction SCUA.
See Setting up Central User Administration [Page 94].
Cross-system role assignment in workplaceIf the Workplace server is the origin for the central user administration, the single roles and theirprofiles are automatically assigned to the component system user when you assign a compositerole to a user. The composite role menu is called on the Workplace Server. Authorization checksare made in the component systems.
User groupsPreviously, user groups were used to distribute user administration among severaladministrators. As of Release 4.6A, the User group category can be used to improve thedistribution of users thus increasing the speed of user administration.
See User groups [Page 16].
Mass changes in user administrationMost changes which can be made for one user in the user management can also be made for aset of users.
Logon data, constants, parameters, roles and profiles can be changed for a set of users.
You select users in the user administration Infosystem. Users can be selected, for example,according to address data or authorization data.
See Mass changes [Page 20].
Alias names for usersYou can assign an alias to a user when you create it. This gives you 40 characters for usernames which can be longer and more meaningful. The user can be identified by either the (12-character) user name or the (40-character) alias. The alias also identifies a dialog user in theinternet.
See Create and maintain internet user [Page 28].

Users and Roles (BC-CCM-USR) SAP AG
Creating and Maintaining User Master Records
10 April 2001
Reference user
A reference user can be assigned to each user when assigning roles. Reference users are anauthorization enhancement. They are used to give internet users identical authorizations.
See Create and maintain internet user [Page 28].
Creating and Maintaining User Master Records
UseThe existence of a user master record is a prerequisite for logging on to the SAP System. Theuser master record determines which role is assigned to the user, i.e. which activities are in theuser menu and which authorizations the user has.
IntegrationUser master records are client-specific. You therefore need to maintain individual user masterrecords for each client in your SAP System. If you use the Central User Administration, youshould create and maintain the users in the central system. See Central User Administration[Page 94].
PrerequisitesYou need authorizations to create or maintain user master records:
• Authorization to create and/or maintain user master records and to assign a user group(object S_USER_GRP).
• Authorization for the authorization profiles you want to assign to users (objectS_USER_PRO).
• Authorization to create and maintain authorizations (object S_USER_AUTH).
• Authorization to protect roles. You can use this authorization object to determine which rolesmay be processed and which activities (Create, Display, Change and so on) are available forthe role(s) (object S_USER_AGR).
• Authorization for transactions that you may assign to the role and for which you can assignauthorization at the start of the transaction in the Profile Generator (object S_USER_TCD).
• Authorization to restrict the values which a system administrator can insert or change in arole in the Profile generator (S_USER_VAL)
See Organizing User and Authorization Maintenance [Page 115].
FeaturesFunctions for maintaining user master records are in the menu path: Tools → Administration →User Maintenance → User.
The system administrator can use the User maintenance functions [Page 17].
The system administrator or the user can Maintain user values and options [Page 25].
See:

SAP AG Users and Roles (BC-CCM-USR)
Creating and Maintaining User Master Records
April 2001 11
Compare user master records [Page 27]
The Effect of User Master Record changes [Page 28]
ActivitiesTo create and maintain user master records:
1. Choose Tools → Administration → User maintenance → Users. You go to the Usermaintenance: Initial screen.
2. Enter an existing user name and choose or enter a new user name and choose .
You can assign an alias to a user when you create it. This gives you 40 characters foruser names which can be longer and more meaningful. The user can be identified byeither the (12-character) user name or the (40-character) alias.
To create a user with aliases, enter them in the Logon data tab.
The alias is also used for internet transactions. When users logon in the internet via theInternet Transaction Server [Ext.], they use the source system user name. The alias andpassword must be entered for identification in internet transactions (e.g. for orderingarticles). If the user has forgotten his or her alias, he or she can create a new account. Anew user and alias are created in the SAP System. The 12-character user name isgenerated using a specified algorithm.
The Alias field in the initial user maintenance screen is mainly for finding internet userswhose internal technical user name is not known.
3. Enter user personnel data in the Address tab. The Last name field must be filled.
There is a set of tabs for user data categories: Address, Logon data, Constants, Parameters,Roles, Profiles, Groups and Personalization.
If you are using the SNC interface or central user administration, the system displaysthe additional corresponding tab.
The Constants and Parameters tabs contain optional fields.
Users can change this data and their address information by choosing System → User profile →Own data (see Maintaining User Defaults and Options [Page 25]).
The tabs Address, Logon data, Roles and Profiles contain fields that you must fill in.
The application toolbar contains the following pushbuttons:
Measurement data You can enter measurement data. See the SAP System MeasurementGuide - Individual Installation brochure. This describes the measurementprogram enabling you to determine the total number of R/3 users and HRmaster records that have been set up.

Users and Roles (BC-CCM-USR) SAP AG
Maintaining Logon Data
12 April 2001
References You can assign business object types to a user in a table. An object typeis a description of data (objects) used in the system, created at definitiontime in the Business Object Builder [Ext.]. Object types include:
• Documents (invoices, purchase requisition, applications, etc.)
• Master data (customer, material, vendor, etc.)
• Transaction data (order, quotation, etc.)
An object is any kind of set of information which can be addresseduniquely with an identifying key.
The possible entries help for the Object type field lists all object types.
See also:
Maintaining Logon Data [Page 12]
Assigning roles [Page 15]
Assigning Profiles [Page 15]
Assigning user groups [Page 16]
Personalization [Page 17]
Maintaining Logon DataIn the Logon data tab you must enter an initial password for the new user in the Initial passwordfield. All other entries on this screen are optional.
Further information is available by choosing F1.
You can maintain the following fields:

SAP AG Users and Roles (BC-CCM-USR)
Maintaining Logon Data
April 2001 13
Initial password You are required to enter the password twice to eliminate the possibilityof typing errors.
Passwords:
- are not case-sensitive (the R/3 System does notdifferentiate between upper- and lowercase letters)
- must be at least three characters long. have a maximumlength of eight characters
- may contain any characters which can be input from thekeyboard. This includes digits, spaces and punctuationmarks
- cannot begin with a question mark or exclamation mark
- may not contain spaces within the minimum length. This isnormally the first three characters
- may not begin with three identical characters
- may not be PASS or SAP*
- may not be used if its use has been forbidden
- may not start with a sequence of three characters whichappears in the user name
When the user logs on for the first time, he or she mustenter a new password. When a user changes his or herpassword, the new password must be different to each ofthat user’s last five passwords.
See Logon and password protection in the SAP System [Page 21].
User group Enter the name of the user group to which this user is to belong.
If you want to distribute the user maintenance tasks amongst severaluser administrators, you must assign the user to a group. Only theadministrator with authorization for that group may then change themaster record.
A user master record which is not assigned to a group can be changedby any user administrator.

Users and Roles (BC-CCM-USR) SAP AG
Maintaining Logon Data
14 April 2001
user type The system proposes Dialog for normal dialog users. The following usertypes exist:
Dialog user: individual, interactional system access
• obsolete/initial password check
• passwords can be changed
• repeat dialog logon check
use: individual (internet) user
Service user: anonymous, interactional user, repeated system access
• no obsolete/initial password check
• only the user administrator can change passwords
• multiple logon allowed
use: anonymous system access (e.g. ITS scenarios: product catalogdisplay)
System user: system-dependent and system-internal procedures, notinteraction-capable
• no obsolete/initial password check
• only the user administrator can change passwords
• multiple logon allowed
use: background processing, ALE, Workflow, TMS, etc.
Reference user: authorization enhancement
• logon not possible
• authorization enhancement tool
use: internet users with identical authorizations
You can specify a reference user for additional authorizations for eachuser in the Roles tab.
The application controls the assignment of reference users. Thereference user name can be assigned in variables. Variables begin with"$". Variables are assigned to reference users in the transactionSU_REFUSERVARIABLE.
Valid from...Valid to... These optional fields allow you to specify a start and end date for theuser master record. Leave them blank if you do not want to set a limit.

SAP AG Users and Roles (BC-CCM-USR)
Assign Roles
April 2001 15
Account Number For each user or user group, assign an account name or number ofyour choice. The user appears in the RZ accounting system(ACCOUNTING EXIT) under this number.
A recommended account number would be the user’s cost center orcompany code, for example.
You should always enter an account name or number in the SAPaccounting system. The user will otherwise be assigned to a generalcategory without account number.
Assign RolesIn the Roles tab the possible entries help displays a list of the existing roles from which you canselect one. You can assign a role to as many users as you like.
You can create a link with the user master record for a specified validity period by clicking on therelevant field in the Valid from or Valid to column and then using the calendar to choose a newdate.
You can delete a line by selecting it and then choosing Delete.
Note that you can use the separator to move the column separators so that you can read textsthat are not completely visible.
Assigning ProfilesYou assign authorization profiles to a user in the Profiles tab.
You can assign a large number of authorization profiles to a user (about 150).
Profiles give users authorizations.
You should maintain your profiles in the role maintenance transaction PFCG unless you have toedit profiles that were created manually.
You can manually maintain profiles by choosing Tools → Administration → Manual maintenance→ Edit profiles manually (see Creating and Maintaining Authorizations and Profiles Manually[Page 86]). You can also enter composite profiles (a combination of several profiles) in the usermaster records when manually maintaining profiles.
If you choose automatic maintenance, the Profile Generator generates an authorization profile onthe basis of an role.
You can go to role maintenance and profile generation from the user maintenance withEnvironment → Maintain roles. See Role maintenance [Page 36].
You assign roles to a user in the Roles tab. This simultaneously assigns the associatedauthorization profiles to the user. See Assigning roles [Page 15] and Comparing profiles withroles in the user master record.

Users and Roles (BC-CCM-USR) SAP AG
Assign User Groups
16 April 2001
Never insert profiles generated in the role maintenance directly into the user masterrecord. The profiles are automatically transferred to your user master record after auser comparison in the Profile Generator.
The SAP System contains predefined profiles:
• SAP_ALL: assign the profile SAP_ALL to users who are to have all R/3 authorizationsincluding superuser authorization.
• SAP_NEW: assign this profile to users who are to have access to all not yet protectedcomponents.
The SAP_NEW profile grants unrestricted access to all existing functions for whichadditional authorization checks have been introduced. Users can therefore continue towork uninterrupted with functions which are subject to new authorization checks. Thisensures upward compatibility.
For this reason you should assign SAP_NEW to all user master records. You can thendecide which users are to have which authorizations and delete the SAP_NEW profile.
If you have skipped releases or upgrades, when you execute this operation you needto take into account all authorizations which have come into the system in themeantime. SAP_NEW is a composite profile which contains a simple profileS_NEW_<Release> with new authorizations for functional Releases.
• You must add the new authorizations to manually generated profiles
• Following a Release or upgrade you need to regenerate all authorization profiles which havebeen generated using the Profile Generator. Choose Environment → Installation/Upgrade inthe role maintenance (transaction SU25).
Assign User GroupsUser groups have been used to distribute user maintenance between administrators, but userscan now be assigned to one or more user groups. The category User group can now be the basisfor better assignment of user data and speed up central user administration.
You can go to the user group maintenance from the user maintenance via Environment → Usergroups. You can display, create, change and delete user groups.
When you create or change a user, you can assign it to one or more groups in the last tabGroups.
See Global User Manager [Page 105] for further information about using user groups.

SAP AG Users and Roles (BC-CCM-USR)
Personalization
April 2001 17
Personalization
UseYou can set certain system person or role defaults in this tab. Tasks in a role can have person orrole default values.
IntegrationYou can call the Personalization tab in the role or user maintenance.
ActivitiesTo assign personalization data to the user or role:
1. Choose the Personalization tab.
2. Choose to display the application components on the left-hand side of the screen.
3. Choose a component whose personalization data is to be maintained. The personalizationobjects for the component are output on the right-hand side.
4. Double-click on a personalization object. A default value entry dialog box appears.
User Maintenance FunctionsUser maintenance (Tools → Administration → User maintenance → Users ) includes thefollowing functions:
Function: Description:
- Create Enter a user name and choose Create. See Create and maintainuser master records [Page 10].
- Change Enter an existing user name and choose Change. See Createand maintain user master records [Page 10].

Users and Roles (BC-CCM-USR) SAP AG
User Maintenance Functions
18 April 2001
- Display Enter a user name and choose Display. The maintenancedescription contains information about the contents of the tabdisplayed.
- Copy Choose Copy. Enter the name of a reference user and the newuser name.You can specify whether you want to copy only some of the userdata or all of it. On the following screen you can edit the newuser master record as required.
You can also rename user master records if you simply want toreplace one record with an identical one of a different name.
- Lock/Unlock Enter an existing user name and choose Lock/Unlock to grant ordeny a user access to a system. Locking or unlocking a usermaster record takes effect the next time a user attempts to logon. Users who are logged on at the time that changes are madeare not affected.
The system automatically locks users if twelve successiveunsuccessful attempts are made to log on. The lock is recordedin the system log, along with the terminal ID of the machinewhere the logon attempt took place.
You can set the number of permissible unsuccessful logonattempts in a system profile parameter. See Limiting LogonAttempts and Predefining Clients [Page 24] for further details.
This automatic lock is released by the system at midnight. Youcan also remove the lock manually before this time. Locks thatyou specifically set yourself apply indefinitely until you releasethem.
Change password Enter the user name and choose Change password.
This new password must fulfill the standard conditions regardingpermissible passwords. See Maintain logon data [Page 12] orchoose F1.
The new password is effective immediately. If users forget theirpassword, they can use the new one as soon as it has been set.
Users may change their passwords no more than once a day.System administrators, on the other hand, may change userpasswords as often as necessary.
Edit → Address Choose a component (telephone number, fax number, and soon) and make changes as needed.
Environment → Masschanges
Most changes which can be made for one user in the usermanagement can also be made for a set of users. See Masschanges [Page 20].

SAP AG Users and Roles (BC-CCM-USR)
User Maintenance Functions
April 2001 19
Environment → Archive andread
Displaying Change Documents
Choose Info → Infosystem and Change documents in theoverview displayed to call a list of changes to user masterrecords, authorization profiles and authorizations. The systemlogs the following changes:
• Direct authorization changes for a user (that is, changes tothe profile list in the user master record).
Indirect changes are changes to profiles andauthorizations contained in the user master record.These changes cannot be seen in the display. You can,however, see them in the change documents for profilesand authorizations.
• Changes to user passwords, user type, user group, validityperiod and account number
For each change made, the log shows the deleted value in theDeleted entries line. The changed or new value is displayed inthe Added entries line.
Archiving Change Documents
User master records and authorizations are stored in the USR*tables. You can reduce the amount of space that these take upin the database by using the archiving function. Changedocuments are stored in USH* tables. The archiving functiondeletes change documents that are no longer required from theUSR* tables.
You can archive the following change documents relating touser master records and authorizations from the USH* tables:
• Changes to authorizations (archiving object US_AUTH)
• Changes to authorization profiles (archiving objectUS_PROF)
• Changes to the authorizations assigned to a user (archivingobject US_USER)
• Changes to a user’s password or to defaults stored in theuser master record (archiving object US_PASS)
The functions for maintaining users and authorizations provideaccess to the archiving system. In the user maintenance initialscreen, choose Environment → Archive and read. In profile andauthorization maintenance, choose Utilities → Archive and read.You then have two options, either Archive auth. docs or Readauth. docs. These options refer to whether you want to archiveor read change documents pertaining to users, profiles orauthorizations.
See Archiving user and authorization changes [Ext.].
Environment → User groups Users can be assigned to one or more user groups. See Usergroups [Page 16].

Users and Roles (BC-CCM-USR) SAP AG
Mass Changes
20 April 2001
Environment →Organizational assignment.
Location of user in HR-ORG.
Environment → Maintaincompany address
You can maintain the company address using an additionaltransaction and assign it in user maintenance using theappropriate pushbuttons.
Mass ChangesMost changes which can be made for one user in the user management can also be made for aset of users.
Logon data, constants, parameters, roles and profiles can be changed for a set of users.
You can make changes to a set of users with Environment → Mass changes (transaction SU10)in the user maintenance.
If you use the Central User Administration, i.e. you make the mass changes from the centralsystem, profiles and roles are displayed system-dependently. See Distributing users [Page 103].
The mass user data change functions apply to the users displayed in the initial screen unless youmake a selection.
You must choose Change in the Address, Logon data and Constants tabs for eachchange. This ensures that your change, e.g. deleting the contents of a field, is madefor all fields.
Select users You select users in the user administration Infosystem.
1. Select either by Address or by Authorization data.
2. Select some or all users and choose Copy.
Create users 1. Enter names in the User column.
2. Choose .
Maintain the user data as in the user maintenance (SU01). See Create andmaintain user master records [Ext.].
You cannot assign individual passwords because you createseveral users at the same time. They are generatedautomatically and displayed in the mass changes log.
Change users 1. Choose .
2. Change the user data. You can decide whether parameters, roles,profiles and groups are added to or removed from the user masterrecords.
Delete users Choose .

SAP AG Users and Roles (BC-CCM-USR)
Logon and Password Security in the SAP System
April 2001 21
Lock/unlock users Choose or .
The users are only locked or unlocked if it is allowed in thecurrent system. If the system is in the Central UserAdministration, only the central system may be able to lock andunlock. See Defining Fields to be Transferred [Page 100].
Mass changes logAfter each mass change you are asked in a dialog box whether you want a log. The log showswho made which changes in which system at what time.
The log contains several message levels which you can expand with a pushbutton. If a messagehas a long text, you can display it with a pushbutton next to the message.
You can make certain settings for the log display under Settings and the Color legend explainsthe colors used in the display.
You can print the log or save it in a PC file.
Logon and Password Security in the SAP SystemThis section provides a general overview of logon and password security in the SAP System.
The Initial PasswordWhen you create a user, you are required to enter a password for the user. The password mustmeet all of the internal requirements set by the SAP System as well as any Customizing changesthat you have made. For more information, see Setting Password Controls [Page 23].
When a new user logs on for the first time, he or she must specify a new password beforeproceeding.
Password RequirementsThe following table shows password requirements and whether they are fixed by the system orwhether you can customize them.
Password Requirement Type
Minimum length: 3 characters Can be defined by the customer. Minimumlength can be increased
Expiration Can be defined by the customer. Numberof days after which a password must bechanged can be set. Rule: password mustnot be changed
Password may not be set to a valuethat is contained in a "lock-out list"
Can be defined by the customer. Rule: onlythe passwords PASS and SAP* areexcluded from the application.
First character may not be ! or ? Fixed in SAP System

Users and Roles (BC-CCM-USR) SAP AG
Logon and Password Security in the SAP System
22 April 2001
First three characters may not appearin the same sequence in the user ID
Fixed in SAP System
First three characters may not be identical Fixed in SAP System
Space character not allowed within firstthree characters
Fixed in SAP System
Password may not be PASS or SAP* Fixed in SAP System
Any character which may be typed on thekeyboard is allowed in a password. Password isnot case-sensitive. Nodistinction is made between upper and lowercaseletters
Fixed in SAP System
A user can change his or her passwordno more than once a day. Restriction doesnot apply to user administrators
Fixed in SAP System
Password may not be changed to any of a user’slast five passwords
Fixed in SAP System
For help in setting the customizable password requirements, see Define password rules
Logging OnTo access the R/3 System and its data, a user must log on to the system. A user must enter bothuser ID and password; it is not possible to have an empty password.
Before the user is admitted to the system, the system checks whether either of two conditionsapplies:
• The user has been locked.
If this is the case, the user is not permitted to log on. As user administrator, you can locka user to prevent logons. You can find further details in Locking and Unlocking UserMaster Records [Ext.].
• The user’s current password is not longer valid. If so, the user must enter a new passwordbefore proceeding.
You can specify how long passwords remain valid in the system profile. By default, thereis no limit on the validity of passwords.
A user cannot change a password more than once a day. The system requires both the user’scurrent password and two matching entries of the new password.
If the user ID and password are correct, then the system displays the date and time of the user’slast logon. With the date and time, the user can check that no suspicious logon activity hasoccurred, such as a logon in the middle of the night. The logon date and time cannot be changedin a standard production R/3 System. The system does not record the logoff date and time.
Logon ErrorsIf a user has not entered a valid user ID, the system allows the logon attempt to continue until theuser enters a valid user ID. User IDs, and passwords as well, are not case-sensitive. A user canenter his or her user ID in lowercase, uppercase, or a combination of both.

SAP AG Users and Roles (BC-CCM-USR)
Setting Password Controls
April 2001 23
If a user enters an incorrect password, then the system allows the user two retries beforeterminating the logon attempt. Should the user continue to enter an incorrect password insubsequent logon attempts, then the system automatically locks the user against further logonattempts. The default maximum number of consecutive incorrect password entries is set to 12.For more information, see Setting Password Controls [Page 23].
A user that was locked because of too many incorrect passwords is automatically unlocked atmidnight of the day the lock was set. A user administrator can unlock the user at any time.
Setting Password ControlsYou can set controls on user passwords in two ways:
• With system profile parameters, you can specify a minimum length for passwords. You canalso specify how frequently users must choose new passwords.
• With a reserved-password table, you can specify passwords that users may not choose.Generic specifications are possible.
Setting Password Length and ValidityUse the following system profile parameters to specify the minimum length of a password and thefrequency with which users must change their password.
• login/min_password_lng: minimum password length.
Default value: Three characters. You can set it to any value between 3 and 8.
• login/password_expiration_time: number of days after which a password expires
To allow users to keep their passwords without limit, leave the value set to the default 0.
Specifying Impermissible PasswordsYou can prevent users from choosing passwords that you do not want to allow. To prohibit theuse of a password, enter it in table USR40. You can maintain table USR40 with TransactionSM30.
In USR40, you can specify impermissible passwords generically if you want. There are twowildcard characters:
• ? stands for a single character
• * stands for a sequence of any combination characters of any length.
123* in table USR40 prohibits any password that begins with the sequence “123.”
*123* prohibits any password that contains the sequence “123.”
AB? prohibits all passwords that begin with “AB” and have one additional character:“ABA”, “ABB”, “ABC” and so on.

Users and Roles (BC-CCM-USR) SAP AG
Limiting Logon Attempts and Setting up Clients
24 April 2001
Limiting Logon Attempts and Setting up ClientsYou can use the following system profile parameters to limit the permitted number of failed logonattempts and to set the default client.
• login/fails_to_session_end: This parameter specifies the number of times that a user canenter an incorrect password before the system ends the logon attempt.
Default value 3. You can set it to any value between 1 and 99 inclusive.
• login/fails_to_user_lock : This parameter specifies the number of times that a user can enteran incorrect password before the system locks the user against further logon attempts.
Default value 12. You can set it to any value between 1 and 99 inclusive.
• login/system_client: Specifies the default client. This client is automatically entered in thesystem logon screen. Users can type in a different client.
Maintain the system profile parameters under Tools → CCMS → Configuration → Profilemaintenance.
To make the parameters globally effective in an SAP System, set them in the default systemprofile DEFAULT.PFL. However, to make them instance-specific, you must set them in theprofiles of each application server in your SAP System.
Logging Off Inactive UsersYou can set up your SAP System to automatically log off inactive users after a specified period oftime. This improves system security by assuring that SAP sessions at unattended terminals donot stay active indefinitely.
By default, automatic logoff is not activated in the SAP System. Users remain logged on nomatter how long they may be inactive. You activate automatic logoff by setting the system profileparameter rdisp/gui_auto_logout to the number of seconds of inactivity you want to permit. Enteras a value for this parameter the number of seconds of inactivity that must elapse before a useris automatically logged off.
Once you have activated this function, inactive users are logged off once the idle-time limit hasbeen exceeded. The system does not save data before logging off the user. Unsaved data will belost. The system also does not display a logoff confirmation prompt.
ProcedureTo activate automatic logoff, proceed as follows:
1. Call the system profile maintenance functions with Administration → CCMS →Configuration → Profile maintenance (transaction RZ10).
2. Define or maintain parameter rdisp/gui_auto_logout. Enter as a value for this parameter thenumber of seconds of inactivity that must elapse before a user is automatically logged off.

SAP AG Users and Roles (BC-CCM-USR)
Maintaining User Defaults and Options
April 2001 25
To activate automatic logoff throughout the system, set the parameter in the defaultprofile (DEFAULT.PFL) . However, if you want to activate automatic logoff only for aspecific SAP application, set the parameter in the profile for that particular instance.
Remember that many users are not "active" for extended periods of time. Such usersmay include:
• Programmers or other users of SAP editors, who regularly work for long periodsof time only using the frontend software.
• Users who only occasionally enter data but who should not be logged off.Example: Production employees who only enter data in the SAP System when,for example, materials are delivered.
You should either set a high value for parameter rdisp/gui_auto_logout, or deactivateautomatic logoff on the servers on which such users are active. This protects theseusers from loss of data or the inconvenience of having to log on again.
You can activate automatic logoff selectively by server by setting the parameter onlyin the profiles for the relevant instance. You can also define logon groups andthereby specify which users should not be automatically logged off. For moreinformation about logon groups, see the R/3 Library Computing Center ManagementSystem.
To deactivate automatic logoff, delete the parameter from your profile(s) or set it to the value 0.
Maintaining User Defaults and OptionsBoth system administrators and individual users can maintain user data.
The system administrator can maintain all data (see Creating and Maintaining User MasterRecords [Page 10]).
Users can maintain the following user data: Constants, Addresses and Parameters.
The following sections summarize the user options which you can define.
Maintaining Own User DataUsers can maintain their own data by choosing System → User profile → Own data.
Choose F1 to display field help. F4 displays the input values that are available.
DefaultsYou can set the following defaults:
• Start menu
You can specify the name of an area menu from the possible entries help in this field.The SAP Menu then only contains the components of this area menu.

Users and Roles (BC-CCM-USR) SAP AG
Maintaining User Defaults and Options
26 April 2001
A user needs the credit management transactions for his or her daily work. If thestart menu in his or her user data is FRMN, the SAP Menu only contains the creditmanagement transactions.
The systemwide initial menu can be specified in the transaction SSM2.
• Logon language
The default system language at logon. The user can however choose another languageon the logon screen
• Printer
• Spool control
• Personal time zone (different from the company time zone in Address, crucial with RFC)
• Date format
• The format for decimals
• CATT check indicators
Information about these default values is available if you choose F1.
User AddressThe user address data fields are self-explanatory.
Only the system administrator can maintain company addresses.
A time zone is assigned to each company address. User-specific time zones can overlapcompany time zones (see Defaults above).
Parameters
User parameters supply defaults to R/3 fields. If a field is indicated, the system automatically fillsin the default value. Depending on the field definition, the entry can also be replaced with a valueentered by the user.
The two input fields on the parameter maintenance screen are described briefly below. Furtherinformation is available by choosing F1.
• Parameter: Enter the parameter ID for which you want to define a default value. You candisplay all of the parameter IDs defined in the system by choosing F4.
• Value: Enter the default value for the parameter.

SAP AG Users and Roles (BC-CCM-USR)
Comparing User Master Records
April 2001 27
Comparing User Master RecordsYou can set a time limit on the assignment of roles to user master records. As a result some datawill become invalid on a particular day, whilst other data becomes valid.
You cannot set time limits for authorization profiles and their entry in user masterrecords.
To ensure that only authorization profiles which are valid are contained in the user master recordeach day, you must execute a daily profile comparison.
So that changes in the user master record are effective, you should execute the comparisonbefore the user logs on.
There are two ways to execute the comparison.
1. As a background job before the start of each day.
If report PFCG_TIME_DEPENDENCY is run every night, the authorization profiles in theuser master will be current each morning (assuming that the job has run correctly). Thebest procedure is to schedule this as a periodic background job.
Report PFCG_TIME_DEPENDENCY must also have run after each import of roles fromother systems.
2. Using Transaction PFUD, Compare User Master
As an administrator, it is recommended that you use this transaction regularly to checkthat no errors have occurred in the background job. Any such errors can then becorrected manually.
To ensure that the authorization profiles in the user master records are always current,you should always execute a complete comparison of all roles (by choosing Completecomparison).
Following the comparison the system displays a log which includes any errors thatoccurred (background processing log for background report).
You have the following options in Transaction PFUD:
• Schedule or check job for the full comparison
Here you can start report PFCG_TIME_DEPENDENCY by specifying the time when thejob is to start. The overview displays the status of jobs that have already beenscheduled.
• Manual profile selection
Before comparing the user master record, you can select the profiles that are to becompared. The system displays an overview of the user master records to which profileshave been added, or from which profiles have been removed, during the comparison. Ifyou deselect the relevant checkbox, you can exclude the profiles that should not beincluded in the user master record comparison. You start the comparison by choosingUser master comp.

Users and Roles (BC-CCM-USR) SAP AG
The Effect of Changes on User Master Records
28 April 2001
To compare the user master records belonging to selected users, first position the cursoron a user name and then choose Select user. You execute the comparison by choosingUser master comp.
The status display for the user master comparison is only set to green once thecomparison is executed.
• Complete comparison
With a complete comparison, all invalid authorization profiles are removed from the usermaster record and all new authorization profiles are inserted in the user master record.
The options Add new profiles, Delete expired authorization profiles and Output error messagesare related to the actions described above.
You can also specify whether or not HR Organizational Management should be included in thecomparison (Reconcile with HR Organizational Management).
The Effect of Changes on User Master RecordsChanges to user master records take effect when the user next logs on. If a user is logged on atthe time when the system administrator implements the changes, these will only take effect whenthe user logs on to their next session.
You can also change a user’s authorizations by changing and then reactivating profiles andauthorizations within the user master record. Changes to reactivated authorizations haveimmediate effect. Changes to profiles, on the other hand, only take effect at the user’s nextlogon.
Create and Maintain Internet Users
UseSome internet application components (IAC) require an individual SAP user name and password,most do not. However even these IACs may require identification. A user can e.g. navigateanonymously in a product catalog; but must identify him or herself as a customer to place anorder.
There are two procedures for creating an internet user, depending on which internet applicationcomponent is used.
The following section describes how a normal SAP System dialog user can be active in theinternet and the features which the SAP System user administration provides in this respect. It

SAP AG Users and Roles (BC-CCM-USR)
Create and Maintain Internet Users
April 2001 29
then describes how you create and maintain internet users for the IACs which require anadditional accounts for the internet.
Create an (internet) user in user maintenance (SU01)
4. Choose Tools → Administration → User maintenance → Users. You go to the Usermaintenance: Initial screen.
5. Enter the user name and then choose .
You can assign an alias to a user when you create it. The user can be identified by eitherthe (12-character) user name or the (40-character) alias.
When users logon in the internet via the ITS service, they use the source system username. You can navigate in the internet with this user. If e.g. articles were ordered, theuser must enter his or her alias and password for identification. The alias is used foridentification in internet applications.
If the user has forgotten his or her alias, he or she can create a new account. A new userand alias are created in the SAP System. A 12-character user name is generated using aspecified algorithm.
The Alias field in the initial user maintenance screen is mainly for finding internet userswhose internal technical user name is not known.
To assign an alias to a user, enter it in the Logon data tab.
See Create and maintain user master records [Page 10] for the further procedure tocreate a user.
6. Assign a reference user to the user you want to use as internet user. Reference users extendauthorizations and are used to give internet users identical authorizations. You can createone or more reference users, depending on the authorizations your staff are to have.
Reference users are assigned to a user master record in the Roles tab.
The authorizations of a reference user can be assigned to the user in the internettransaction program when the user is identified in the internet. The reference user can beassigned in a variable. The variable name should begin with "$". Variables are assignedto reference users in the transaction SU_REFUSER_VARIABLE. Different variables canbe assigned to a particular reference user for a group of users.
If no reference user is found for a variable in the transactionSU_REFUSER_VARIABLE, the variable is used as the user name.
Create an Internet User with the Maintain Internet User Function (SU05).
This transaction creates users and manages user data (e.g. passwords) in a table. Internet usersare identified by:
• user name and
• user type

Users and Roles (BC-CCM-USR) SAP AG
Assign Standard Roles
30 April 2001
The user type depends on the IACs which the user wants to run.
Internet user information is a client-specific user master record enhancement. When the internetuser identifies him or herself to IACs later, these values are checked against the information inthe table BAPIUSW01. Access is refused to unauthorized users.
1. Choose Tools → Αdministration → User maintenance → Internet users .
You go to the Maintain internet users screen.
2. Enter the user name and type. Choose one of the following functions:
- Create The system returns the initial password for the internet user. Note thepassword if you want to pass it on to the user. Otherwise choose Changepassword to give the user a new password.
Assign the created name and password to users.
- Change Enter a new user name or change the validity period.
- Delete Internet user is deleted after confirmation.
- Lock/Unlock A user is also locked after twelve failed attempts to logon.
Change password Enter the new password twice.
Initialize A new password is generated.
Assign Standard Roles
UseThe SAP standard contains more than 1200 predefined single roles from all application areas.
If you assign a predefined role to a user, he or she is automatically given the user menu requiredfor his or her daily work and the authorizations required for it, when he or she logs on to the SAPSystem.
He or she can also define his or her personal Favorites from the functions assigned to him or her.The user calls transactions, programs or internet/intranet applications from the Favorites or thejob structure tree.
Before you start to create your own roles for your staff, check whether the roles delivered by SAPcan be used for the job descriptions in your company.
PrerequisitesGet an overview of the roles delivered by SAP. The program RSUSR070 outputs descriptions ofthe existing example jobs. To run the program, choose Tools → Administration → Usermaintenance → Infosystem → Roles → Roles by complex selection criteria → by role name, orthe transaction S_BCE_68001418.

SAP AG Users and Roles (BC-CCM-USR)
Assign Standard Roles
April 2001 31
If you choose Role description, the description text of the predefined role is displayed as well asits name.
The list displayed lists the roles delivered in the SAP Standard.
Predefined roles are delivered as templates with the prefix 'SAP_'.

Users and Roles (BC-CCM-USR) SAP AG
Assign Standard Roles
32 April 2001
ProcedureTo assign user roles unchanged:
the SAP System SAP Easy Access initial transaction contains additional functions foradministrators. You need authorization for the following authorization objects to be able to usethese functions:
Authorization object: Value:
S_USER_TCODE PFCG
S_USER_PRO *
S_USER_AUT *
S_USER_GRP *
You also need the following authorizations if the authorization profiles of the delivered roles arealso to be generated automatically:
Authorization object: Value:
S_USER_AGR *
S_USER_TCD *
S_USER_VAL *

SAP AG Users and Roles (BC-CCM-USR)
Assign Standard Roles
April 2001 33
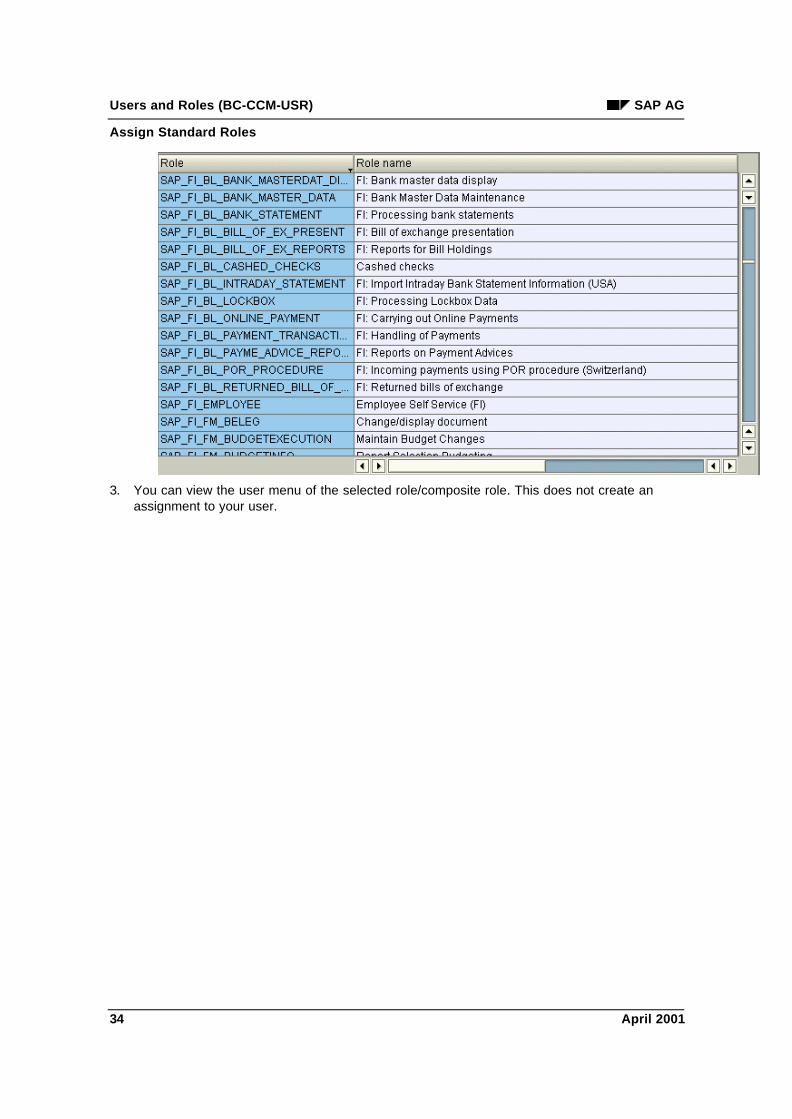
1. Choose Other menu in the initial transaction SAP Easy Access.
The delivered roles are output.
2. Choose a role/composite role by double-click.
Users and Roles (BC-CCM-USR) SAP AG
Assign Standard Roles
34 April 2001
3. You can view the user menu of the selected role/composite role. This does not create anassignment to your user.

SAP AG Users and Roles (BC-CCM-USR)
Assign Standard Roles
April 2001 35
4. Choose Assign user to assign the currently displayed role directly to one or more users.
5. Enter the name of the user which you want to assign. User selection displays a multipleselection list of the current users in the system.
The users must already exist in the system before you can assign them. See Createand maintain user master records [Page 10].
6. Choose Copy user.
7. Confirm that the role profile is to be generated and the user master adjusted. Theauthorization profile is generated and put in the user master of the selected user in additionto the user menu of the selected role(s).
If you do not confirm the prompt, only the user menu is assigned to the selected users.The authorization profile is not generated and entered in the user master.

Users and Roles (BC-CCM-USR) SAP AG
Role Maintenance
36 April 2001
The authorization data of all delivered roles are maintained. All customer-dependentfields, such as company code and plant, but also authorization groups and some otherauthorization fields, have the value '*‘. In many authorization fields, '*‘ means the entirepossible range of values. This allows usable authorization profiles to be pre-generated.
ResultThe users to whom you have assigned the role can logon to the system. The user menu appearswith the functions which the user needs for his or her work and for which he or she has thenecessary authorizations.
Role Maintenance
PurposeYou must maintain roles when the roles in the standard delivery need to be adjusted or you needto create new roles.
ImplementationThe SAP Standard contains a large number of roles. Check whether you can use a user roledelivered in the standard before you define roles yourself.
Choose Tools → Administration → User maintenance → Infosystem → Roles → Roles bycomplex selection criteria in the SAP menu in the SAP Easy Access initial menu for an overviewof the delivered roles.
You can also display a list of the delivered roles in the possible entries help for the Role field inthe role maintenance (Tools → Administration → User maintenance → Roles).
You can copy and modify existing roles.
If you do not find a suitable role, write a job description before you maintain the role. See Initialinstallation procedure [Page 113].
All maintenance tasks can be executed centrally by a single "superuser". Alternatively, you candistribute these tasks amongst more than one user to ensure greater system security. Furtherdetails are contained in the section Organizing User and Authorization Maintenance [Page 115].

SAP AG Users and Roles (BC-CCM-USR)
Change and Assign Roles
April 2001 37
FeaturesThe system administrator chooses transactions, menu paths (in the SAP menu) or area menus,in the role maintenance (transaction PFCG). The selected functions correspond to the activitiesof a user or a group of users.
The tree which a system administrator creates here for a user group corresponds to the usermenu which appears when the user to whom this role is assigned logs on to the SAP System.
The Profile generator automatically provides the required authorizations for the selectedfunctions. Some of them have default values. Traffic lights show you which values need to bemaintained.
Generate an authorization profile and assign the role to the users. The user menu appears whena user logs on to the SAP System.
In the role maintenance you can:
Change and assign roles [Page 37]
Create roles [Page 38]
Create composite roles [Page 62]
Derive roles [Page 63]
Compare roles [Page 64]
Transport/assign roles [Page 66]
See also:
Assign standard roles [Page 30]
Change and Assign Roles
UseThe roles in the standard delivery correspond to the working environment of certain users. Theymust be adjusted as required.
ProcedureTo copy, adjust and assign roles to one or more users:
1. Choose the pushbutton Create role or the transaction PFCG in the initial transaction SAPEasy Access.
2. Enter a name in the Role field or choose one from the possible entry help.
Predefined roles are delivered as templates with the prefix 'SAP_'.
3. Copy the workplace example with Copy role and choose a name in customer namespace.
4. Choose Change (the new name is in the Role field).

Users and Roles (BC-CCM-USR) SAP AG
Create Roles
38 April 2001
5. Choose the Menu tab to change the user menu. You can reduce, extend or restructure it.See Create roles [Page 38].
6. Choose the Change authorization data pushbutton in the Authorizations tab.
7. Maintain the authorization field values as required. To adjust the authorizations for the menuchanges, choose the Profile generation expert mode pushbutton in the Authorizations taband then Read old version and adjust to new data. The following overview shows you whichauthorizations you must maintain. See Adjust default authorizations [Page 44].
8. Generate the role profile.
9. Assign users in the User tab and compare users if necessary.
The users must already exist in the system before you can assign them. See Create andmaintain user master records [Page 10].
ResultThe users to whom you have assigned the role can logon to the system. The user menu with thetransactions, programs and internet links which the user needs for his or her work, and for whichhe or she has been assigned the necessary authorizations, appears.
Create Roles
UseUser-specific menus can be displayed for users after they have logged on to the SAP System byusing either pre-defined roles or roles you created.
The role also contains the authorizations users need to access the transactions, reports, web-based applications and so on, contained in the menu.
You can assign a role to an unlimited number of users.
PrerequisitesCheck the suitability of the roles delivered by SAP before you create your own roles. You can usethe user role examples just as they are delivered with the SAP System. If you want to modifythem, all you need to do is copy the SAP template.
See Assign standard roles [Page 30] and Change and assign roles [Page 37].
ProcedureThe creation of a single role is described below. To create a composite role, see Createcomposite role [Page 62].
To create a single role:

SAP AG Users and Roles (BC-CCM-USR)
Create Roles
April 2001 39
2. Choose the pushbutton Create role or the transaction PFCG in the initial transaction SAPEasy Access. You go to the role maintenance.
2. Specify a name for the role.
The roles delivered by SAP have the prefix 'SAP_'. Do not use the SAP namespace foryour user roles.
SAP does not distinguish between the names of simple and composite roles. You shouldadopt your own naming convention to distinguish between simple and composite roles.
3. Choose Basic maintenance (in the Profile, Other objects menu).
4. Choose Create.
5. Enter a meaningful role description text. You can describe the activities in the role in detail.
You may use an existing role as a reference. See Derive roles [Page 63].
6. Assign transactions, programs and/or web addresses to the role in the Menu tab. The usermenu which you create here is called automatically when the user to whom this role isassigned logs on to the SAP System. You can create the authorizations for the transactionsin the role menu structure in the authorizations tab.
If you want to call the transactions in a role in another system, enter the RFCdestination of the other system in the Target system field.
You should only use RFC destinations which were created using the Trusted Systemconcept (Trusted System: Relationships between R/3 Systems [Ext.]) to guaranteethat the same user is used in the target system. This is only necessary if you want tonavigate via the Easy Access Menu in the SAPgui.
If you use the Workplace Web Browser, you can use any destination containing alogical system with the same name.

Users and Roles (BC-CCM-USR) SAP AG
Create Roles
40 April 2001
If the Target system field is empty, the transactions are called in the system in whichthe user is logged on.
You can also specify a variable which refers to an RFC destination. Variables areassigned to the RFC destinations in the transaction SM30_SSM_RFC.
To distribute the role into a particular target system, specify the target system (itsRelease must be 4.6C) and choose Distribute. This function is most useful when youuse the Workplace.
You can create the user menu:
• from the SAP menu

SAP AG Users and Roles (BC-CCM-USR)
Create Roles
April 2001 41
You can copy complete menu branches from the SAP menu by clicking on the crossin front of it in the user menu. Expand the menu branch if you want to put lower-levelnodes or individual transactions/programs in the user menu.
• from a role
this function copies a defined role menu structure in the same system into the currentrole. You can also copy the menu structure of a role delivered by SAP. Click on themenu branches and copy them.
• from an area menu
You can copy area menus (SAP Standard and your own) into a role menu. Choosean area menu from the list of menus and copy the transactions you want.

Users and Roles (BC-CCM-USR) SAP AG
Create Roles
42 April 2001
• Import from file
See Upload/Download roles [Page 67].
• Transaction
You can put a transaction code in the user menu directly.
• Program
This function puts programs, transaction variants or queries in the user menu. Theyneed not be given a transaction code.
ABAP Report
Choose a report and a variant. You can skip the selection screen.

SAP AG Users and Roles (BC-CCM-USR)
Create Roles
April 2001 43
You can generate a transaction code automatically and copy the report descriptionby setting checkboxes.
SAP Query
Enter a user group and query name. If the query has a variant, you can specify it.You can also specify a global query. See Query work areas [Ext.].
Transactions with variants
The system administrator can create transaction variants in the SAP SystemPersonalization [Ext.]. Transaction variants adjust complex SAP System transactionsto customer business processes, by e.g. hiding superfluous information and addingother information such as pushbuttons, text or graphics. You can put a transactionvariant call in a user menu by entering the transaction code and variant which youcreated in the transaction SHD0.
BW report
Include a Business Information Warehouse report. Enter the report ID.
ReportWriter, Search, Report
These function put other application-specific report types in the user menu.
• Others
Enter other objects:
Web address or file
Enter internet/intranet links with a descriptive text and the web address. You canenter a file name if the browser can call an application.
Drag and relate component
Enter the component name.
Knowledge Warehouse link
Use the Document field possible entries help. Choose the information object type.You go to a selection screen in which you can search for the object in the KnowledgeWarehouse.
There are other pushbuttons for editing the user menu. Choose a menu entry with thecursor before you call one of the following functions.

Users and Roles (BC-CCM-USR) SAP AG
Editing Predefined Authorizations
44 April 2001
Function: Meaning
Create folder Group transactions, programs, etc. in a folder
Change node text Change a menu entry text
Move down Move a menu entry down one place
Move up Move a menu entry up one place
Delete nodes Delete a menu entryAny subnodes are also deleted.
Delete all nodes Delete the complete role menu
Translate node Translate a menu entry
Documentation Display the documentation of transactions, programs, etc.
Find doc. Find programs
You can restructure the menu by Drag & Drop.
The Menu tab status is red if no menu nodes are assigned. If at least one menu nodeis assigned, the status is green.
You can assign Implementation Guide (IMG) projects or project views to a role underUtilities → Customizing auth. Do this to generate IMG activity authorization andassign users. The authorization to perform all activities in the assigned IMGprojects/project views is generated in profile generation. You make the assignmentsin a dialog box. Choose Information to display more information on using this option.
7. Save your entries.
ResultYou have created a role.
The next section Edit predefined authorizations [Page 44] describes how to display and editpredefined authorizations.
See also:
Using composite roles [Page 62]
Editing Predefined AuthorizationsSuppose you have created a role based on a selection of menu functions.
You can generate authorizations for this role automatically. Most of the fields for theseauthorizations are filled with SAP–assigned default values. However, you can add missingvalues, change default values and also add additional authorizations from SAP templates orprofiles.

SAP AG Users and Roles (BC-CCM-USR)
Editing Predefined Authorizations
April 2001 45
Generating Authorizations
To create authorizations for a role, choose Authorizations in the role maintenance.
The Authorizations tab displays creation and change information as well as information on theauthorization profile (including the profile name, profile text and status).
There are open as well as default authorizations for the transactions you assign to the role. Youcan change this authorization data by choosing Change authorization data in Authorizations.Finally, you can use the Profile Generator to create an authorization profile based on this data.The authorization profile generated in this way is added to the authorization profiles of the usersin the role after the user master records are compared.
If you choose Expert mode for profile generation, you can choose the option with which you wantto maintain the authorization values. This option is automatically set correctly in normal mode.
The Authorizations tab index displays whether or not the corresponding authorization profile iscurrent. The profile is not current if the display is red or yellow. The profile status text displayedon the tab explains the status of the profile in more detail. This helps you determine why theprofile is not current.
Choose Change authorization data and then proceed as follows:
1. You can maintain organizational levels by choosing Org. levels.
Organization levels can be plants, company codes and business areas, for example. Foreach field that displays an organizational level, you determine the global values for theseroles.

Users and Roles (BC-CCM-USR) SAP AG
Editing Predefined Authorizations
46 April 2001
Save your entries.
The system only displays the dialog box if the selected authorization data containsorganizational levels.
2. Check or change the default authorizations in the hierarchy view displayed. See SAPauthorization concept modules [Page 47] and Authorization maintenance symbols and statustexts [Page 53].

SAP AG Users and Roles (BC-CCM-USR)
SAP Authorization Concept Modules
April 2001 47
SAP Authorization Concept ModulesThe SAP authorization concept modules are color-coded in the hierarchy display.
The basic SAP authorization concept terms are displayed below, before you specify theauthorization field values. The colors of the SAP authorization concept modules are the standardcolors in the following hierarchy display.

Users and Roles (BC-CCM-USR) SAP AG
SAP Authorization Concept Modules
48 April 2001
Explanation of terms:
Object class Object classes have an orange background in the hierarchy display.
Authorization objects are divided into classes for comprehensibility. Anobject class corresponds e.g. to an application (Financial accounting,etc.)
The SAP authorization concept object classes are under Tools →Administration → User maintenance → Authorizations .

SAP AG Users and Roles (BC-CCM-USR)
SAP Authorization Concept Modules
April 2001 49
Authorization objects Authorization objects have a green background in the hierarchy display.
You may need several authorizations to perform an operation in theSAP System. The resulting contexts can be complex. The SAPauthorization concept, based on authorization objects, has beenrealized to provide an understandable and simple procedure. Severalsystem elements which are to be protected form an authorizationobject.
An authorization object allows complex tests of an Authorization formultiple conditions. Authorizations allow users to execute actions withinthe system. An authorization object groups up to ten fields that relatedby AND.
For an authorization check to be successful, all field values of theauthorization object must be maintained in the user master.
You get the authorization object documentation by double-click on anauthorization object. The documentation describes how you maintainthe authorization values.

Users and Roles (BC-CCM-USR) SAP AG
SAP Authorization Concept Modules
50 April 2001
Authorizations Authorizations have a yellow background in the hierarchy display.Authorization fields are light blue and their values are white.
An authorization enables you to perform a particular activity in the SAPSystem, based on a set of authorization object field values.
The programmer of a function decides whether, where and howauthorizations are to be checked. The program determines whether theuser is authorized to perform an activity by comparing the specifiedauthorization object field values in the program with the authorizationvalues in the user master record.
T_9092029701 is an authorization for the authorizationobject F_KNA1_BUK with the following values:
* for company code and
01,02 activity
Use of an authorization: Specifies permissible authorization objectfield values.
Contents: One or more values for each field.
Authorizations allow you to specify any number of values or valueranges for a field. You can also allow all values, or allow an empty fieldas a permissible value.
Changes: All users with this authorization in their authorization profileare affected.
You can maintain authorizations manually with reference to theauthorization object documentation or by double-click on a value field inthe following dialog box:

SAP AG Users and Roles (BC-CCM-USR)
SAP Authorization Concept Modules
April 2001 51
Profile User authorizations are not usually assigned directly to user masterrecords, but grouped together in authorization profiles.
Authorizations can be collected in authorization profiles to reduce themaintenance effort which would be required to enter individualauthorizations in the user master record. Access authorization changesaffect all users with the profile in their master record.
You can create profiles manually, but you should use the Profilegenerator.
Use : Specifies authorizations in user master records
Contents: Specific access rights, identified by an object name and acorresponding authorization name.
Changes only take effect when the user next logs on. Users who arelogged on when the change takes place are not affected in their currentsession.
In the example, T_58000097 is an authorization profile containingcompany code authorizations.
User Master Record These enable the user to log onto the SAP System and allow access tothe functions and objects in it within the limits of the specifiedauthorization profiles.
Changes only take effect when the user next logs on. Users who arelogged on when the change takes place are not affected in their currentsession.
In the example a user whose user master record contains the profileT_58000097 can perform the activities in the profile authorizations.
When a transaction is called, a system program makes various checks to ensure that the userhas the appropriate authorization.
Is the transaction code valid? (table TSTC check).
Is the transaction locked by the system administrator? (table TSTC check).
Is the user authorized to call the transaction?
The authorization object S_TCODE (call transaction) contains the field TCD (transaction code).The user must have an authorization with a value for the selected transaction code.
Does the transaction code have an authorization object? If so, a check is made that the user hasauthorization for this authorization object.
If one of this checks fails, the transaction is not called and the system sends a message.
If the transaction is called, it calls an ABAP program which makes further authorization checkswith the AUTHORITY-CHECK command. The programmer specifies an authorization object andthe required values for each authorization field.
AUTHORITY-CHECK checks whether a user has appropriate authorization. To do this, itsearches in the specified authorization profile in the user master record to see whether the userhas authorization for the authorization object specified in the command.
If the authorization is found and it contains the correct values, the check is successful.

Users and Roles (BC-CCM-USR) SAP AG
Authorization Check Scenario
52 April 2001
Authorization check scenario [Page 52] contains an example of the use of the AUTHORITY-CHECK command.
Authorization Check ScenarioA programmer wants to make an authorization check before bookings for business customerscan be changed.
To do this, the programmer should create an authorization fields [Page 85] (ACTVT andCUSTTYPE) and assign for each field defined the value to be checked (02, B). Authorizationfields are created under Tools → ABAP Workbench → Development → Other tools →Authorization objects → Fields (transaction SU20).
Programmers should also create an authorization object [Ext.] (here S_TRVL_BKS) and assignthe authorization object to an object class [Page 85].
Authorization fields are created under Tools → ABAP Workbench → Development → Other tools→ Authorization objects → Objects (transaction SU21). Authorization objects can also be createdin the Object Navigator (transaction SE80).
You program the authorization check using the ABAP statement AUTHORITY-CHECK.
AUTHORITY-CHECK OBJECT 'S_TRVL_BKS' ID 'ACTVT' FIELD '02' ID 'CUSTTYPE' FIELD 'B'.IF SY-SUBRC <> 0.
MESSAGE E...ENDIF.
The AUTHORITY-CHECK checks whether a user has the appropriate authorization to execute aparticular activity.
When this happens, the system checks the authorization profiles in the user’s master record forthe appropriate authorization object (S_TRVL_BKS). If the authorization is found and it containsthe correct values, the check is successful.
The system administrator has defined the following authorizations for the authorization objectS_TRVL_BKS:
• S_TRVL_CUS1 with the following values:
* for customer type (CUSTTYPE field) and
02 for activity (field: ACTVT).
Users with this authorization may change bookings for all customers.
• S_TRVL_CUS2 with the following values:
B for customer type (CUSTTYPE) and
03 for activity (ACTVT).
Users with this authorization may display all business customer bookings.
When assigning profiles, the system administrator gave different authorizations to different users.
SAP AG Users and Roles (BC-CCM-USR)
Symbols and Status Text in Authorization Maintenance
April 2001 53
User Miller has been assigned a profile containing both of these authorizations (S_TRVL_CUS1and S_TRVL_CUS2). Miller can therefore change bookings for business customers.
User Meyers on the other hand, is only authorized to display the records (S_TRVL_CUS2) andtherefore cannot change bookings.
Symbols and Status Text in Authorization MaintenanceYou can edit the display elements using icons in the hierarchy level and in the toolbar.
The current status of the organizational units and authorizations is shown in the status (header)line and at the various levels of the tree structure with red, yellow and green traffic lights.
Authorization fields are maintained
Authorization fields not completely maintained
Organizational levels are not maintained. Choose Org. levels to maintain theorganizational levels.
Specify a global value for this role for each field representing an organizational level. If,for example, the organizational level PLANTS appears in several authorizations, youonly need to maintain the plant values once on the Organizational levels screen.
You can display a list of all existing organizational levels using Transaction SUPO.
You should also check the values of the authorization fields marked with a greentraffic light.
Choose Open, Modified or Maintained to display open, changed or modified authorizations,respectively.
The status line shows the status of the authorization profile: Unchanged, Saved, Changed orGenerated.
Authorization field value maintenance functions:
Click on the maintenance symbol to maintain an authorization field value. You can alsodouble-click on an authorization field value or click on an empty field.
Maintain the values in the dialog box.
* You can setup general authorization by clicking on the asterisk in front of an authorizationfield name, or choosing a pushbutton in the input window.
The following icons are also displayed where appropriate:

Users and Roles (BC-CCM-USR) SAP AG
Symbols and Status Text in Authorization Maintenance
54 April 2001
Deactivate an authorization or authorization object.Inactive authorizations are ignored when profiles aregenerated.
Reactivate inactive authorizations.
You can display other symbols with Utilities → Settings:
Display transactions which use this object.
Summary of authorizations. You can summarize identical authorization field contents ofan authorization object by choosing Utilities → Summarize auths.
Copy authorizations.
Delete field contents.
You can also show the technical names of the authorization objects and activate security checks,under Settings.
The authorization status text displays their maintenance status. The status of a field,authorization, object, object class or the role is indicated as follows:
Standard All field values in the subordinate levels of the hierarchy are unchanged from theSAP defaults.
Maintained In the subordinate levels of the hierarchy there is at least one field that wasdelivered empty by SAP and which you have later filled with a value.
SAP AG Users and Roles (BC-CCM-USR)
Copying Authorizations From Templates
April 2001 55
Changed: You have changed the SAP default value of at least one field in the subordinatelevels of the hierarchy. The status also changes to Changed if you change anorganizational level which was previously set globally (unless you make thechange in the Maintain organizational levels dialog box.
Manual: You have entered at least one authorization, template or profile in the hierarchy
below with the function
Old: The comparison found that all field values in the subordinate levels of thehierarchy are still current and that no new authorizations have been added.
New The comparison found that at least one new authorization has been added to thesubordinate levels of the hierarchy. If you now choose New, all new authorizationsin the subordinate levels are expanded.
Adding Authorizations
The standard toolbar contains two pushbuttons to insert authorizations:
Enter single authorizations. Select via object classes. Click on the symbol to copy authorizations. Choose the pushbutton Insert selected.
Manual entry of authorization objects. Enter the technical names of theauthorization objects which are to be put in the role. You can use possibleentries help.
When you enter authorizations with Edit → Enter authorization, you can also:
– Add full authorization (add all authorizations for an authorization object)
– Add authorizations from a profile
– Copying Authorizations From SAP Templates [Page 55]
Copying Authorizations From Templates
UseYou can copy general authorizations into a role in the form of templates. So you can assigngeneral authorizations to users.
You can also create your own templates in the transaction SU24.
PrerequisitesIn order to edit models in Transaction SU24 you need the User Master Maintenance and UserGroup (S_USER_GRP) authorizations, with value * in the CLASS and ACTVT fields.
ProcedureYou can assign general authorizations to users in one of two ways:

Users and Roles (BC-CCM-USR) SAP AG
Generating Authorization Profiles
56 April 2001
1. Create a role which only contains general authorizations (such as printing). Then assign thisrole to all users. This is the best thing to do if all users are to be allowed to print from anyprinter, for example.
2. Use a template to import the required objects into the role and then maintain missing fieldcontents. This is the best thing to do if each user assigned to a role may use only oneparticular printer, for example.
In the authorization data maintenance, choose Edit → Insert authorizations → Fromtemplate. Choose the SAP_PRINT template. Authorization data is now included in theauthorization profile, but you still need to fill in missing details such as which printers areto be used.
If you want to create your own templates, choose Edit templates in Transaction SU24.You can then either create your own templates or make copies of SAP templates andchange these. Unlike changes to defaults, changes to templates are not passed on whenyou compare roles.
The names of SAP templates begin with S. If you create any templates yourself, theyshould not begin with S.
Generating Authorization Profiles
UseAuthorization profiles must be generated before they can be assigned to users. An authorizationis generated for each authorization level in the browser view, and an authorization profile for thewhole role as represented in the browser view.
PrerequisitesBefore generating an authorization profile, the system checks that you are authorized for theobject Maintain User Masters: Authorization Profile (S_USER_PRO).
If the changed profile is already assigned to some users:
You should only generate profiles after the users of the role you want to edit have logged off thesystem. If the users are logged on, they must logon again after generation to have the currentauthorizations.
ProcedureWhen you have maintained all fields and organizational levels, generate the authorizations or theprofile of this role, by choosing or Authorizations → Generate.
The following dialog box appears:

SAP AG Users and Roles (BC-CCM-USR)
Regenerate the Authorization Profile Following Changes
April 2001 57
You can change the profile name and text.
When you generate an authorization profile the technical names of the authorizationsare automatically reorganized.
You can display the technical names by choosing Utilities → Technical names on.They comprise the activity profile name and a number in the range 00 - 99:T_<role>nn, for example T_5002995604
To avoid problems with number assignment, you should reorganize the numbers nnfrom time to time. Choose Utilities → Reorganize. This restarts the numberassignment starting at 00.
You can display an overview of the existing authorization profiles for this role by choosingAuthorizations → Profile overview.
The overview contains profile names and their maintenance status (not generated, maintenanceversion, active version).
ResultWhenever you assign the role to a user, you can also assign the generated authorization profileto that user (see Assigning Profiles [Page 15]).
The system then displays the current status of the authorization profile: generated.
See also:
Regenerating Authorization Profiles Following Changes [Page 57]
Check roles for existing profiles [Page 59]
Regenerate the Authorization Profile Following ChangesWhen you change a role, you must regenerate the authorization profile. In this case, the tabindex Authorizations is marked in red or yellow. The status text displayed on the tab explains thestatus of the profile in more detail.
If a red symbol appears on the tab index, you must compare and adjust the profile. The menuhas changed since the profile was last generated. If the display is yellow, the profile has beenchanged and saved since it was generated. This means that the generated profile is no longercurrent.
Users and Roles (BC-CCM-USR) SAP AG
Regenerate the Authorization Profile Following Changes
58 April 2001
On the maintenance screen Change role: Authorizations, you can make the necessary changedand regenerate the profile.
If you select Expert mode for profile generation under the Authorization tab, you can choose theoption with which you want to maintain the authorization values (this option is automatically set innormal mode).
In expert mode, you can:
• Delete and recreate profile and authorizations
All authorizations are recreated. Values which had previously been maintained, changedor entered manually are lost. Only the maintained values for organizational levels remain.
• Edit old status
You can edit the authorization profile you previously maintained using the saved values.It is not worth doing this if the assignment of transactions to roles has changed.
• Read old status and compare with new data
The Profile Generator compares the old data to the current data in the role. It is worthdoing this if the role menu has changed. Unchanged data is marked as Old, new data asNew.
Note the following when you execute the comparison:
– The maintained organizational levels remain. If new levels are added, they need tobe maintained. Superfluous organizational levels are deleted.
– If authorizations in an authorization object have changed, a manual comparison isnecessary: you must decide whether you want to retain the old modified data, or usethe current version. Delete or maintain the authorizations you no longer require.
– Maintained authorizations are filled automatically, as far as possible, with the valuesyou have maintained .
The transactions in the role determine the following activities in an authorization:Create, Change, Display Authorization group [Ext.] 0001 (maintained by you).
This is the old, maintained status. You change the role to have the following actions:Change, Display and Delete. The value 0001 is then copied for the authorizationgroup activities Change and Display as these were already maintained. Insert is nolonger displayed on the screen. You still need to maintain the authorization group forthe Delete activity, since this was not maintained in the old status.
– Wherever the New attribute appears, you need to check whether the newauthorizations make sense. If necessary, you can compare them manually with theold values.
– Manually entered authorizations are not deleted.
– The values for authorization object T_CODE are always filled automatically with thecurrent transactions from the role, but receive the attribute Old.
Choose one of the three options. The system displays a browser view.
The status line contains the authorization profile status: unchanged, saved, changed orgenerated.

SAP AG Users and Roles (BC-CCM-USR)
Mass Generation of Profiles
April 2001 59
Mass Generation of Profiles
UseThe mass profile generation transaction tells you which roles already have authorization profiles.
You can generate roles en masse or generate the missing role authorization profiles in thebackground.
You can limit the choice of roles.
PrerequisitesYou will need the following authorizations to use Transaction SUPC:
• User master maintenance: Authorization Profile (S_USER_PRO)
• User master maintenance: Authorizations (S_USER_AUT)
• Authorization system: Check for roles (S_USER_AGR)
Procedure1. Choose Environment → Mass Generation in the role maintenance (transaction SUPC).
2. Specify selection criteria.

Users and Roles (BC-CCM-USR) SAP AG
Assign Users
60 April 2001
If you do not want to generate all profiles automatically (last checkbox), you can further restrictthe role selection in the next screen.
Assign Users
UseYou have created a menu for the new role and setup the authorizations. You must finally assignthe roles to users.
ProcedureYou have created a menu for the new role and setup the authorizations. You must finally assignthe roles to users. Proceed as follows:
1. Choose the User tab.
The status display in the tab tells you whether the roles have already been assigned tousers. If the display is red, no users are assigned. Green means that at least one user isassigned. Yellow means that users are assigned but the user master comparison is notup-to-date.

SAP AG Users and Roles (BC-CCM-USR)
Assign Users
April 2001 61
The status of composite roles only refers to user assignment.
2. Enter the user name in the list.
Enter the user name either directly or from the possible entries help. You can make amultiple selection with the Select pushbutton, e.g. all users in a user group.
You can specify a validity period for the assignment in the other columns. When youassign users to the role, the default start date is the current date and the default end dateis the 31.12.9999. You can change these default values.
3. Make a user comparison if necessary.
The generated profile is not entered in the user master record until the users have beencompared. Changes to the users assigned to the roles and the generation of anauthorization profile also require a comparison.
There are various ways of comparing users:
• Choose User comparison in the User tab. The users are compared for the role you created.The status displayed for this key specifies whether a new comparison must be made.
• Choose Utilities → Settings and Automatic comparison at save. When you save the role, auser comparison is performed automatically.
• Wait until the user comparison is made with the program PFCG_TIME_DEPENDENCY.
You should schedule PFCG_TIME_DEPENDENCY periodically (preferably daily) asa background job. This ensures that user authorizations are regularly updated. Theprogram performs a complete user master comparison for all roles. Theauthorizations are updated in the user master records. The authorization profiles ofuser assignments which have become invalid are removed from the user masterrecord. The authorization profiles of valid user assignments to the role are entered.
Users who are assigned to a composite role are displayed on a gray background inthe roles in the composite role. The entries cannot be changed. They should only bechanged in the composite role.
If you perform a user master comparison for the composite role, it performs a usermaster comparison for all roles in the composite role.

Users and Roles (BC-CCM-USR) SAP AG
Personalization
62 April 2001
Personalization
UseYou can set certain system person or role defaults in this tab. Tasks in a role can have person orrole default values.
IntegrationYou can call the Personalization tab in the role or user maintenance.
ActivitiesTo assign personalization data to the user or role:
5. Choose the Personalization tab.
6. Choose to display the application components on the left-hand side of the screen.
7. Choose a component whose personalization data is to be maintained. The personalizationobjects for the component are output on the right-hand side.
8. Double-click on a personalization object. A default value entry dialog box appears.
Create Composite Roles
UseComposite roles can simplify the user administration.
They consist of roles. Users who are assigned to a composite role are automatically put in itsroles when you compare. Composite roles do not themselves contain authorization data.
Composite roles are useful for example if some of your staff need authorization for several roles.You can create a composite role and assign the users to it instead of putting each user in eachrole.

SAP AG Users and Roles (BC-CCM-USR)
Derive Roles
April 2001 63
ProcedureTo create a composite role:
1. Enter a name in the Role field in the role maintenance (transaction PFCG).
The SAP System does not distinguish between the names of simple and compositeroles. You should adopt your own naming convention to distinguish between simpleand composite roles.
2. Choose Create collective role.
3. You can define the composite role in the following screen.
4. Save your entries.
5. Enter the roles in the composite role in the Roles tab. You can display all the simple roles inthe system with the possible entries help.
Composite roles cannot contain composite roles.
6. You can restructure the role menus which you read in with Read menu, in the Menu tab. SeeCreate roles [Page 38].This does not affect the menus of the roles.
The key in the Menu tab contains composite role menu notes.
7. Either enter the names of the users individually in the User tab (manually or from the possibleentries help) or choose Selection. You can define selection criteria (e.g. all users in a usergroup)
If you select a username and choose Display, detailed user information is displayed.
Choose Compare users. The user data is updated after the comparison.
Users which are assigned to a composite role are displayed on a gray background in itsroles (not changeable). The user assignment should only be changed in the compositerole.
You can display an overview of the roles in composite roles with Role hierarchy incomposite roles in the role maintenance initial screen. You can select a role in thehierarchy display for editing by double-click.
Derive Roles
UseThere are two possible reasons for deriving a role from an existing role:
• The role menus are identical but the authorizations for the menu actions are different in thederived role.

Users and Roles (BC-CCM-USR) SAP AG
Compare Roles
64 April 2001
• The menu and authorizations of the derived role are identical, but the organizational levelsare different in the derived role.
PrerequisitesRoles derived from another cannot have any additional menu entries.
ProcedureTo create a reference to another role:
1. Create a role.
2. Enter a role description text.
3. Enter the name of the role from which all transactions including the menu structure are to becopied in the Derive from role field in the Description tab.
When you save, you have created a role whose menu is derived from another role.
To copy the authorizations to the derived role:
1. Change the role from which the authorizations are to be derived, in the role maintenance.Choose the Authorizations tab and the Change authorization data pushbutton.
2. Choose the menu entry Authorizations → Adjust derived → Generate derived roles.
The authorization data is copied to the derived roles.
The organization level data is only copied the first time the authorization data isadjusted for the derived role. If organization level data is maintained in the derivedrole, it is not overwritten by subsequent adjustments.
You need complete authorization for the authorization object S_USER_VAL and changeauthorization for the derived roles to adjust the authorization data of derived roles.
To delete the inheritance relationship between two roles, choose the Delete inheritancerelationship pushbutton in the Description tab.
You can display an overview of the inheritance of roles by choosing Role → Where-used list. Youcan go to another role by double-click.
You cannot derive functions from the delivered user roles in your own roles.
Compare Roles
UseYou can compare and adjust roles between:
• two roles in a system

SAP AG Users and Roles (BC-CCM-USR)
Compare Roles
April 2001 65
• two roles in different systems
• a role and its template
• a newly-delivered role and its previous customer version
PrerequisitesTo compare two roles in different systems, their RFC destinations must be maintained.
ProcedureRole comparison example:
1. Choose Environment → Role comparison tool in role maintenance, or the transactionROLE_CMP.
2. Enter the name of the role to be compared in the Role input field. Enter the comparison role.
3. Choose Compare.

Users and Roles (BC-CCM-USR) SAP AG
Transport/Distribute Roles
66 April 2001
Two entries in the menu of roles to be compared are output in red. This means that twoentries have been added in comparison with the role Role_Compare_2. You can selectand delete these entries.
The entry Business Add-Ins in the role Role_Compare_2 is displayed in blue. This entryis missing in the role to be adjusted and can be copied to the appropriate place in therole to be adjusted by Drag & Drop.
4. Save your entries. You have created maintenance version.
You can discard the comparison in the initial screen of the transaction with Role →Delete maintenance vers.
5. Choose Activate to create an active version of the compared role.
Transport/Distribute Roles
Transport Roles
You use Transaction PFCG to transport an role. Enter the role and choose Transport. Thesystem displays a dialog box that queries whether the user assignment should also betransported. Next, enter a transport request. The role is entered in a Customizing request. UseTransaction SE10 to display this.
The authorization profiles are transported along with the roles. Unlike in previous releases, theprofiles no longer have to be regenerated in the target system using Transaction SUPC.However, you must compare the user master records for all roles that are imported into the targetsystem.
If the user assignments are also transported, they will replace the entire user assignment of rolesin the target system. If you want to lock a system against importing user assignments of roles,you can specify this in the Customizing table PRGN_CUST. You maintain this using TransactionSM30. Add the line USER_REL_IMPORT and the value NO.
You should only transport user assignments to roles if you are not using central useradministration.
After the import into the target system, you must compare the user master records for all rolesinvolved. You can do this in two ways:
• Start report PFCG_TIME_DEPENDENCY
• In Transaction PFCG, choose Goto → Mass compare. Enter the role in the Role field.Choose Complete compare and start the report.
You can also prevent authorization profiles from being transported with the roles using aCustomizing entry. In the transport source system, make an entry in table PRGN_CUST calledPROFILE_TRANSPORT with the value NO. In this case, you must regenerate the profiles in thetarget system using Transaction SUPC.

SAP AG Users and Roles (BC-CCM-USR)
Upload/Download Roles
April 2001 67
Distribute Roles
You can distribute roles in the Menu tab in the role maintenance if the target system has Release4.6C.
Upload/Download RolesTo upload or download a role, choose Role → Upload or Role → Download in the rolemaintenance.
Role upload loads all role data, including authorization data from a file into the SAP System. Therole user assignment and the generated role profile are not loaded. The authorization profile mustbe regenerated after the upload.
You can save several roles on the PC with Environment → Bulk download in the rolemaintenance initial screen.
To avoid inconsistencies, all roles from which a role is derived are also downloaded. When youdownload composite roles, all the roles which they contain are also downloaded.
Role Maintenance: Example
PrerequisitesYou are using the SD and MM applications but not HR or HR-ORG.
You are not using warehouse management within materials management.
Your company has five plants and you want to create material master data for them. A separateemployee is responsible for each plant, who must not be able to change the data for other plants.
In order to understand this scenario and to be able to adapt it for your own purposes,you will need a basic knowledge of the SAP authorization concept, authorizationobjects, authorizations and authorization profiles.
The following assumes that none of the predefined user roles satisfies yourrequirements.
Procedure
Preparation
Activate the Profile Generator and permit authorization checks to be suppressed
The system parameter auth/no_check_in_some_cases must be set to the value 'Y'. Thisis the case for new installations.
Check the setting in your system using report RSPARAM.

Users and Roles (BC-CCM-USR) SAP AG
Role Maintenance: Example
68 April 2001
Copy SAP default settings for check indicators and authorization field values
Copy the SAP default check indicator settings for the authorization objects in transactions andthe authorization field values for the Profile Generator using Transaction SU25.
You can then edit the default check indicators using Transaction SU24.
For more information, see Preparatory Steps [Page 76].
Creating and Maintaining an Authorization Profile for a UserCreate a user-specific menu with appropriate authorizations.
The user needs to be able to:
• Maintain material master data for plant 0001 in company code 0001, all salesorganizations and distribution channels
• Display material master data for all plants and company codes.
The user needs a range of authorizations to be able to do this. These are grouped together in anauthorization profile.
To create an authorization profile for a user, do the following:
1. Create a role and generate an authorization profile
2. Assign the role to a user
3. Change the role (optional)
4. Change the check indicator defaults (optional)
5. Copy the general authorizations from SAP defaults (optional)
6. Regenerate the Authorization Profile Following Changes
7. Check the authorization profile
These steps are described in detail below.
1. Create a role and generate an authorization profile
You use roles to define the functions (transactions) for which a user receivesauthorizations.
1. On the User maintenance: Initial screen (Transaction SU01), choose Environment →Maintain role.
2. Create a role. Enter MATST_0001 as the identification code and choose Create.
3. On the following screen, enter an appropriate description.
4. Choose the Menu tab and SAP Menu.
5. Expand the Logistics, Materials management and Material master levels.
6. Flag the checkbox next to Material. If you expand this branch further, the transactionwhich you have selected is displayed: including Create/Display/Change material.
7. Confirm your selection. The system now compiles the authorization data using thetransactions you have selected.
8. Under the Authorizations tab, choose Change authorization data.
SAP AG Users and Roles (BC-CCM-USR)
Role Maintenance: Example
April 2001 69
9. In the next dialog box, you are required to maintain the organizational levels.Organizational levels are fields in the authorization system, determined by SAP, thatrelate to the enterprise structure. These fields occur in many authorizations. You onlyneed to maintain them once. This is done in the Maintain organizational levels dialogbox.
Corresponding to our scenario, you would need to enter the following values (eachtime in the From field):
– Company code: 0001
– Warehouse number / complex (no entry since there is no warehouse management.
– Sales organization: * (all)
– Distribution channel: * (all)
– Plant: 0001
Choose Enter.
10. The authorization data is displayed hierarchically in the following screen: the role atthe highest level, the object classes of the authorization objects for this role below.
Expand a few levels of the hierarchy. By choosing Color legend, you can display anexplanation of the colors used in the authorization component hierarchy.
At the lowest level for example are the authorization field values: most fields havedefault values, either from SAP, or your organizational level values.
The traffic lights indicate whether there are fields whose values you have not yetmaintained.
Red - You have not maintained the organizational levels.
Yellow: - You have not assigned values to fields (not organizational levels).
11. Expand the levels with red traffic lights: this includes an authorization for the objectMaterial master record: Warehouse number. Since you are not using warehousemanagement in your company, no employee needs authorization to maintain thisdata.
12. Deactivate this authorization by choosing the relevant icon.The authorization is flagged as Inactive. When you generate authorization profileslater, this authorization will not be copied into the profile.
There are now no more red traffic lights, since no active authorizations withunmaintained organizational levels remain.
13. There are, however, a lot of yellow traffic lights. For each of these you need to supplyvalues in the authorization fields by choosing Maintain.
You can display help as follows:
By double-clicking the text of an authorization object
By double-clicking the text of an authorization field
14. Assign full authorization
To assign full authorization (*), click on the star symbol next to an authorization field.
You can assign full authorization for all unmaintained (empty, open) fields in anorganizational level by clicking on the traffic light. Once you have confirmed the

Users and Roles (BC-CCM-USR) SAP AG
Role Maintenance: Example
70 April 2001
operation, full authorization (*) is assigned for all empty fields in the subordinatelevels of the hierarchy. Note how the traffic light reacts.
You can display detailed information on the individual icons by choosing Colorlegend.
15. When you have finished maintaining the data, save your changes. Here you can alsochange the default name for the authorization profile to be generated.
16. Generate the authorization profile by choosing Generate. To do this, you need theappropriate authorization. An active authorization profile is generated from theauthorization data.
2. Assign roles and authorization profiles to a user
Assign role MATST_0001 to users by entering names in the lists displayed under theUsers tab. These users have the proper authorizations to execute the role transactions.See the online documentation for more information on assigning users in Users.
The generated profile is not entered in the user master record until the user masterrecords have been compared. To do this, choose Compare users.
You can also assign a role to a user in the user maintenance transaction (SU01) inRoles. For more information, see Assigning roles [Page 15].
Log onto the system again with the user name that you have entered. The usershould now have all of the authorizations necessary to maintain material masters inplant 0001 / company code 0001. It should also be possible to display data for allplants. This does not yet work.
3. Change the role (optional)
You change a role as follows:
1. In the initial screen of role maintenance, enter the name of the role you want tochange and choose Change.
2. By choosing Menu and Menu selection, you can also activate the menu functionsStock overview, Close period, Allow posting to a previous period. Save your entries.
3. Under the Authorizations tab, choose Authorization data to access authorizationmaintenance. Two new organizational levels have now appeared in the dialog box:Purchasing group and Purchasing organization. Maintain these (enter * for example)and choose Continue.
Some new authorizations have been added to the group because new functions havebeen added. These are marked as New. Some of these will already contain values,others will need to be maintained manually (yellow traffic light). The warehousemanagement authorization is still inactive. New authorizations (for the period closingprogram, for example) may already be filled if they only affect organizational levels thatalready contain values.
If you also want to assign authorization to display data for all plants, proceed as follows:
1. Expand the authorization for the Material Master: Plant object. Choose Copy to copythe authorization.
SAP AG Users and Roles (BC-CCM-USR)
Role Maintenance: Example
April 2001 71
2. Maintain the activities in the authorization you have copied. Delete all authorizationsexcept Display.
3. Maintain the Plant field by choosing the field maintenance symbol. Choose Fullauthorization.Notice that the authorization status has changed to Changed. This means that youhave changed activities and / or organizational levels that no longer correspond tothe default authorizations for the selected functions.
Note that when you change an organizational level by choosing Org. Levels, thisaffects all fields in the organizational level. Exception fields whose status havechanged.
If, on the other hand, you maintain an organizational level by choosing the maintainfield icon, the changes only apply to the field. The field then has the status Changed.
4. Generate the authorization profile.
4. Change the check indicator defaults (optional)
You will have noticed that you need to maintain the warehouse management data inorder to set the red and yellow traffic lights to green. You can avoid this by changing thetransaction defaults.
1. To do this, call Transaction SU24.
2. Choose Edit check indicators in all transactions and enter M_MATE_LGN as theobject. Choose Execute.
3. On the next screen, the system displays all the transactions which check thisauthorization object. You can assign the Check Indicators [Ext.] globally for theobject. In this case it is a good idea to check this object in all transactions, but not tocopy the defaults into the Profile Generator.
Select all transactions, set the check indicator in the top line to P and choose Save.All transactions are set to P. Save the data.
4. Return to maintaining role MATST_0001. In Authorizations, choose Changeauthorization data. You can see from the overview that all data for theM_MATE_LGN authorization object has disappeared.
5. You can also change the check indicator for each individual transaction. Forexample, from the initial screen of Transaction SU24, enter Transaction MMPVClose Periods. If you do not want the default value 51 Initialize for objectM_MATE_PER Material master: Allow backposting to be copied into the role, changethe proposal for transaction MMPV by maintaining the field values. You canreactivate the SAP defaults at any time, restoring the default values delivered whenyou installed the system.
It is sensible to change the defaults whenever several roles are affected, whether theyalready exist (and must as such then be compared) or you will create in the future.
5. Copy the general authorizations from SAP defaults (optional)
Notice that the generated profile does not give users general authorizations such asthose required for printing. It does not make sense to copy general authorizations toeach transaction with the check indicator CM.

Users and Roles (BC-CCM-USR) SAP AG
Role Maintenance: Example
72 April 2001
Instead, you can do either of the following:
1. Create a role which only contains general authorizations (such as printing). Thenassign this role to all users. This is the best thing to do if all users are to be allowedto print from any printer, for example.
Then compare the user master records.
2. Use a template to import the required objects into the role and then maintain missingfield contents. This is the best thing to do if each user assigned to a role may useonly one particular printer, for example.
In the authorization data maintenance, choose Edit → Insert authorizations → Fromtemplate. Choose the SAP_PRINT template. The system inserts authorization data,which you must then complete yourself (printers to be used, and so on).
If you want to create your own templates, choose Edit templates in TransactionSU24. You need the authorization User master maintenance: User groups,S_USER_GRP. You can create your own templates or you can copy the SAPtemplates and edit them. Unlike changes to defaults, changes to templates are notpassed on when you compare roles. Your own templates must not begin with S.
6. Regenerate the Authorization Profile Following Changes
Regenerate the authorization profile so that your changes take effect in the system.
7. Check the authorization profile
Test your generated authorization profile
If any authorizations are missing or superfluous, you have two options:
1. Change the role: change activities, create authorizations manually, deactivateauthorizations
2. Change the defaults using Transaction SU24 as described above and compare theroles.
If an authorization check fails during a transaction, you can see which authorization ismissing by choosing System → Utilities → Display auth. check (Transaction SU53).
Test this example until you are happy with the result and the user can perform exactlythe correct action in the plant/company code 0001. Change the organizational level toplant 0002 and company code 0002 and generate the authorization profile. You can thenassign this role to the users who are to execute material master maintenance for plant0002.
Installing a new moduleSuppose you later want to install warehouse management. You need to undo all the changes youhave made that affect authorization object M_MATE_LGN.
You should then check whether the functions in your role are still correct. Is the menu selectionstill current, for example? Always compare your authorization data.
SAP AG Users and Roles (BC-CCM-USR)
Role Maintenance: Tips and Tricks
April 2001 73
Role Maintenance: Tips and Tricks
Limiting Activities by Time
Even if you are not using HR-Org. you can still take advantage of the option to assign roles tousers for a limited period of time. This is useful, for example for your end of year procedure,where inventory activities should only be permitted for a limited time.
Choose Tools → Administration → User maintenance → Roles.
Under the tab User, you can set the assignment validity period.
To put a time–delimited assignment of an activity group to a user master record intoeffect, you must first execute a comparison.
The authorization profile is only entered or deleted in the user master recordautomatically if you have scheduled the background report to run periodically.
Job scheduling is also important for ensuring role consistency after an import.
SAP recommends that you schedule background programPFCG_TIME_DEPENDENCY for these cases.
User assignmentNever insert generated profiles directly into the user master record (Transaction SU01). Assignthe role to the user in the Roles tab in transaction SU01 or choose the User tab in rolemaintenance (PFCG) and enter the user to whom you want to assign the role or profile.
If you then compare the user master records, the system inserts the generated profile in the usermaster record.
Do not assign any authorizations for modules you have not yet installedIf you intend to gradually add modules to your system, it is important you do not assign anyauthorizations for those modules you have not yet installed. This ensures that you cannotaccidentally change data in your production system you may need at a later stage.
Leave the corresponding authorizations or organizational levels open. Do not set the CheckIndicator [Ext.] in Transaction SU24 to No check.
Initial authorization assignmentYou want to create a user in the test system who can do “almost anything”: typically, such userscannot create a user master record or change authorization profiles.
The fastest way to set up this user is as follows:
1. Create a role.
2. In Authorizations, choose Change authorization data and then Edit → Insert → Fullauthorization.
3. Expand the Basis administration object class.This contains the authorization objects generally regarded as critical.

Users and Roles (BC-CCM-USR) SAP AG
Using the Infosystem
74 April 2001
4. Deactivate all authorizations which begin with User master maintenance and any otherswhich you regard as critical. You need the authorization User master maintenance: Usergroups (S_USER_GRP) with the value * in the fields CLASS and ACTVT for transactionSU24.
5. Generate the profile and assign the authorizations to a user under User.
6. You assign the role you have just created to users entering them in Role.
Using the InfosystemGo to the info system from the SAP menu in SAP Easy Access with Tools → Administration →User maintenance → Infosystem or with Info → Infosystem in the user maintenance.
You can specify selection criteria for one or more of the following objects in the menu:

SAP AG Users and Roles (BC-CCM-USR)
Reducing the Scope of Authorization Checks
April 2001 75
Reducing the Scope of Authorization ChecksWhen SAP transactions are executed, a large number of Authorization Objects [Ext.] are oftenchecked, since the transaction calls other work areas in the background. In order for thesechecks to be executed successfully, the user in question must have the appropriateauthorizations. This results in some users having more authorizations than they strictly need. Italso leads to an increased maintenance workload.
For an authorization check to be executed, it must be included in the source code of atransaction and must not be explicitly exempt from the check.
You can suppress authorization checks without changing the program code, as check indicatorscontrol authorization checks.
You also use check indicators to control which objects appear in the Profile Generator [Page 36]and which field values are displayed there for editing before the authorization profiles aregenerated automatically.
SAP supplies defaults for check indicator and authorization field values, which you should copy.You can then edit these copied defaults. You should only do this once you have defined yourcompany's authorization concept.
You can reduce authorization checks within a transaction or exclude an authorization objectglobally from the check.
For more information, see:
Preparatory Steps [Page 76]
Globally Deactivating Authorization Checks [Page 77]
Reducing Authorization Checks in Transactions [Page 77]
Editing Templates for General Authorizations [Page 79]
Comparing Check Indicators and Field Values After a Release Upgrade [Page 80]
Authorization objects from the Basis (S_*) and Human Resource Managementapplications (P_*, PLOG) cannot be excluded from authorization checks. The fieldvalues for these objects are always checked.
You cannot exclude authorization objects used in parameter transactions from acheck directly, only using the corresponding target transaction.

Users and Roles (BC-CCM-USR) SAP AG
Preparatory Steps
76 April 2001
Preparatory StepsWhen you activate the Profile Generator, you permit specified authorization checks to bedeactivated. The Profile Generator is active in the standard system (the system profile parameterauth/no_check_in_some_cases is set).
This setting has the following effect:
• When a transaction is called, the system always checks to see whether the authorizationchecks contained within it are to be suppressed.
• The authorization Profile Generator is activated. The system displays Authorizations on theinitial screen for Transaction PFCG (Role Maintenance).
Perform the following steps in the Implementation Guide (IMG):
1. Copy SAP default settings for check indicators and authorization field values
Using Transaction SU25 (step 1), copy the default values delivered by SAP. This is howyou import the SAP check indicator default values for the authorization objects within atransaction, and the authorization field values for the Profile Generator into the customertables (tables USOBX_C and USOBT_C). You can edit these in Transaction SU24.
You can change both configurations to meet your requirements.
To import an upgrade, follow steps 2a to 2d.
It may take a few minutes to copy the SAP defaults into the customer tables.
See the documentation in Transaction SU25.
2. Schedule Background Job for Time Limits
You can set a time limit on the assignment of users to roles. To ensure that thesechanges are reflected in the user master record, you need to schedule a background jobto make the relevant adjustments daily.
See Comparing user master record profiles with roles [Page 27].
To maintain the default check indicator settings, use Transaction SU24 (see the following topics).To do this you need the User Master Maintenance: User Groups (S_USER_GRP) authorization,with the value ‘*’ in the CLASS and ACTVT fields.
You can edit the default authorizations for the Profile Generator on the initial screen of the ProfileGenerator (see Elements in the Browser View [Ext.]).

SAP AG Users and Roles (BC-CCM-USR)
Globally Deactivating Authorization Checks
April 2001 77
Globally Deactivating Authorization ChecksYou can globally deactivate authorization checks with Transaction AUTH_SWITCH_OBJECTS.The system does not execute any authorization checks for deactivated authorization objects.
You deactivate authorization objects in the tree display by selecting the checkbox to the left ofthe object. The deactivated authorization objects are then displayed in red. The authorizationchecks are not ignored in the system until you save your settings.
You cannot globally deactivate authorization objects that begin with "S_" (Basis) or"P_" (HR) in Transaction AUTH_SWITCH_OBJECTS.
Globally deactivating authorization checks considerably reduces authorization maintenance. Thesystem does not insert any authorization data in the Profile Generator for deactivatedauthorization objects. With Release upgrades, transactions whose authorization data is to bepostprocessed are not displayed for postprocessing if the corresponding authorization object isglobally deactivated.
If you activate authorization objects that were previously deactivated, note that you may have topostprocess the authorization data for many roles.
If you reactivate authorization objects, these objects are not contained in any roles. In this case,call Transaction PCFG and choose Read old status and compare with the new data in the tabAuthorizations in expert mode to generate profiles. Maintain any authorization values that aremissing and then regenerate the profile.
You can transport the settings in Transaction AUTH_SWITCH_OBJECTS. During the transport,for reasons of security the system transports the inactive (saved) version of the deactivatedauthorization objects. You activate the deactivated authorization objects by choosingAuthorization objects → Activate data.
To save or activate deactivated authorization objects, you require authorization forobject S_USER_OBJ. For reasons of security, you should assign authorizations forsaving and activating the deactivated authorization objects for various users. Itmakes sense to deactivate the authorization checks only if at least two people agreeon this.
The option to globally deactivate authorization checks is controlled by systemparameter auth/object_disabling_active. This parameter is set by default.
Reducing Authorization Checks in TransactionsYou can display the authorization objects associated with each transaction. You can also excludeany of these authorization objects individually from the authorization check. You should have athorough knowledge of this application and its context before you start.
Proceed as follows:

Users and Roles (BC-CCM-USR) SAP AG
Reducing Authorization Checks in Transactions
78 April 2001
1. From the initial screen of Transaction SU24, choose Maintain check indicators for transactioncodes.
2. Enter either a single transaction code (for example, SE01) or an interval for a range of codes(for example, SE10 to SE38).
The system displays either a single transaction or a list of transactions. See the notebelow regarding parameter transactions. If you are dealing with a parameter transaction,the target transaction appears in the right hand column under Tcode (original).
3. Select the required transaction and then choose the appropriate pushbutton.
The system displays a list of the authorization objects involved along with their CheckIndicators [Ext.].
Using the pushbuttons, you can display field values for individual objects as well as theSAP-default values for check indicators. SAP-default values you have changed aredisplayed in color.
Choose the Info Auth. obj. pushbutton to display a help text for the object that is currentlymarked.
4. Set the check indicator to N to stop the check. See the note below regarding parametertransactions.
5. Save your settings.
The default values and the check indicator of an authorization object are importantfor the Profile Generator. These values are only displayed for changing in the ProfileGenerator if you have set the check indicator to CM (check / maintain).
If you have set authorization checks for your own transactions, you need to enter theauthorization objects which you have used into Transaction SU24 manually and alsomaintain the check indicators.
Authorization objects used in parameter transactions cannot be excluded from acheck directly, only using the authorization objects in the corresponding targettransaction.
If you want to set the check indicator of parameter Transaction XYZP to N, you need to changethe check indicator for the target Transaction XYZE. You can find the name of this transaction inthe right-hand column of the transaction overview in Transaction SU24. If you double–click thetransaction code, the system goes directly to check indicator maintenance.
If the authorization object for parameter Transaction XYZP is set to C (check) but under thetarget transaction it is set to CM (check/maintain), the field values which have been maintainedfor XYZE will be proposed in the Profile Generator. If the authorization object is also set to CM inXYZP, the field values maintained for XYZP will be proposed in the Profile Generator, and theentries for XYZE will be overridden.
When using Transaction SU24 for parameter transactions you can only maintain and/or overwritethe field values of the target transaction.

SAP AG Users and Roles (BC-CCM-USR)
Editing Templates for General Authorizations
April 2001 79
Editing Templates for General AuthorizationsIt does not makes sense to include general authorizations (printing, archiving and so on) in everytransaction.
You can adopt authorization objects from templates created by SAP when you maintain roles(transaction PFCG).
You can then maintain these templates from the initial screen of Transaction SU24. Choose Edittemplates.
The system then displays a list of the SAP templates. These cannot be changed directly.
You can, however, copy these and use them as a pattern for your own settings, or you cancreate completely new templates. You need the authorization User master maintenance: Usergroups (S_USER_GRP).
The names of SAP templates begin with S. If you create any templates yourself, they should notbegin with S. SAP_ALL contains all authorizations.
Ensure that changes to templates are not passed on when you compare roles.
If you want to transport your template you must specify a development class when you create it(not $TMP, local objects). You can find details on this in the BC - Change and TransportOrganizer documentation in Maintaining Development Classes [Ext.].
You want to create a Basis user who can do “almost anything”: such users cantypically not create user master records or change authorization profiles.
Proceed as follows:
– Create a role by choosing User maintenance → Roles
– Do not enter any transactions, choose Authorizations and then Changeauthorization data.
– Do not copy any templates, but choose Edit → Add authorization. → Fullauthorization.
– Expand the Basis administration object class.Here you find the authorizations which are generally regarded as critical.
– Deactivate all authorizations which begin with user master maintenance andany others which you regard as critical.
– Using the Profile Generator, generate a new profile and save it under a newname (refer to Naming Convention for Pre-Defined Profiles [Page 90]
If you choose User Maintenance → Users, you can assign the role you have justcreated to the user. See Assigning roles [Page 15].
Users and Roles (BC-CCM-USR) SAP AG
Comparing Check Indicators/Field Values After Upgrade
80 April 2001
Comparing Check Indicators/Field Values After UpgradeAfter a Release upgrade you can compare the default check indicators and the field values of theprevious and new Releases. To do this, call Transaction SU25 (steps 2a to 2d).
If you have made changes to check indicators or field values in Transaction SU24, you cancompare these with the new SAP default values. The previous and new settings are displayed ina list. You can decide whether you want to use each new setting or retain the previous one.
In the next step, the system displays a list of roles affected by changes to the authorization data.Edit and regenerate their authorization profiles.
To save time if you utilize a large number of roles, you can skip editing and assignthe profile SAP_NEW to the users manually. The profile SAP_NEW is delivered withevery new Release and contains the authorizations for all new checks in existingtransactions. Remove any subprofiles from the profile SAP_NEW that are notrelevant to your users. You can tailor the authorization profiles the next time theyneed to be changed (for example, when the role menu changes).
Step 2d display a list all roles containing any transactions that have been replaced by one ormore other transactions.
In the last section, you can adjust authorization checks. This includes changing check indicators(Transaction SU24) and globally switching off authorization objects.
You can create roles from manually created authorization profiles in step 6. You must then adjustand check them.
Transporting Authorization ComponentsThere are two different processes for transporting authorization components, roles and usermaster records, depending on the type of transport:
• Transports between clients (within an SAP System)
• Transports between R/3 Systems
The procedures for both kinds of transport are detailed below.
Transport Between ClientsUser master records and authorization components are client-dependent. You need to maintainseparate user master records and authorization components for each client in your R/3 System.
SAP AG Users and Roles (BC-CCM-USR)
Transporting Authorization Components
April 2001 81
In the target client, choose Tools → Administration → System administration, Administration→ Client admin. → Client copy → Local copy (Transaction SCCL). Here you can transport usermaster records and authorization profiles from other clients. To do this, enter the profileSAP_USER or choose from the possible entries.
Schedule the transport for background processing during the night. This ensures thatdata remains consistent.
Transport Between SAP SystemsYou can copy authorization components, roles and user master records from one SAP System toanother. The method of transport depends on the component that you want to transport.
Transport RolesYou use Transaction PFCG to transport an role. Enter the role and choose Transport. Thesystem displays a dialog box that queries whether the user assignment and the personalizationdata should also be transported. Next, enter a transport request. The role is entered in aCustomizing request. Use Transaction SE10 to display this.
The authorization profiles are transported along with the roles. Unlike in previous releases, theprofiles no longer have to be regenerated in the target system using Transaction SUPC.However, you must compare the user master records for all roles that are imported into the targetsystem.
If the user assignments are also transported, they will replace the entire user assignment of rolesin the target system. If you want to lock a system against importing user assignments of roles,you can specify this in the Customizing table PRGN_CUST. You maintain this using TransactionSM30. Add the line USER_REL_IMPORT and the value NO.
You should only transport user assignments to roles if you are not using central useradministration.
After the import into the target system, you must compare the user master records for all rolesinvolved. You can do this in two ways:
• Start report PFCG_TIME_DEPENDENCY
• In Transaction PFCG, choose Goto → Mass compare. Enter the role in the Role field.Choose Complete compare and start the report.
You can also prevent authorization profiles from being transported with the roles using aCustomizing entry. In the transport source system, make an entry in table PRGN_CUST calledPROFILE_TRANSPORT with the value NO. In this case, you must regenerate the profiles in thetarget system using Transaction SUPC.
Transport Manually-Created ProfileTo transport selected profiles, proceed as follows:
1. Choose Tools → Administration → User maintenance → Manual maintenance → Editprofiles manually. Create a profile list and then choose Profile → Transport.
2. Select the profiles you want to transport in the list displayed. You can also select all profiles.

Users and Roles (BC-CCM-USR) SAP AG
Transporting Authorization Components
82 April 2001
3. Enter the transport request number for each profile or profile group in the dialog box.
4. The system asks whether you want to transport just the profile, or the authorizations itcontains as well. You can either transport the profile by itself, or include all of its componentsin the transport request.
The system also transports the documentation for the profiles and authorizations.
5. When you have finished your selection, you can execute your transport request using theWorkbench Organizer.
Transport Manually-Created AuthorizationsThe procedure for transporting authorizations is the same. First start the authorizationmaintenance function. Do this by choosing User maintenance → Authorization. Choose an objectclass and then Authorization → Transport.
Transporting Authorization Objects and Authorization ObjectClassesWhenever you create or change authorization object classes, the system displays a dialog box inwhich you can enter a change request. Release this request for the desired target system.
Transporting User Master RecordsYou copy user master records using either the tools described above or via central useradministration.
Transporting Check Indicators and Field ValuesYou can use Transaction SU25 (Step 3) to transport all check indicators and field values.
Note that the transport overwrites all existing check indicators and field values in thetarget system.
You can use Transaction SU24 to maintain individual check indicators. You can use theWorkbench Organizer to record your changes. By executing the corresponding transport request,you distribute your check indicators to other systems.
Transporting TemplatesAll SAP templates are automatically identical in all systems following an upgrade. You cannotchange SAP templates.
The Workbench Organizer records changes to your own templates. Transport the request. Theobjects in the transport request have the following syntax:
R3TR SUSV <Template Name>
The system transports the template name (in all languages) as well as the maintained data.
Transporting Globally Deactivated Authorization ChecksFor information on transporting globally deactivated authorization checks, see GloballyDeactivating Authorization Checks

SAP AG Users and Roles (BC-CCM-USR)
Analyzing Authorization Checks
April 2001 83
Analyzing Authorization ChecksShould you not find any documentation for an authorization, the system offers two ways to findout which authorizations are required:
• System trace
You can use the system trace to record authorization checks in your own sessions and inother users' sessions. The trace records each authorization object that is tested, alongwith the object’s fields and the values tested.
For more information, see Tracing Authorizations with the System Trace [Page 83].
• Authorization error analysis
By entering Transaction SU53 in the command field, you can analyze an access-deniederror in your system that just occurred.
You can use Transaction SU53 from any of your sessions, not just the one in which theerror occurred. You cannot analyze an authorization error in another user’s logonsession from your own session.
Example: Upon selecting a function, the system responds with the message "You are notauthorized for this function." If you enter SU53 or /nSU53 in the command field, the systemdisplays the authorization object that was just tested and the authorizations, if any, thatyou possess for that object.
To deactivate this function, set the system profile parameterauth/check_value_write_on to 0.
Analyzing Authorizations using the System TraceTo start tracing authorizations, proceed as follows:
1. Choose Tools → Administration, Monitor → Traces → System trace.
2. Choose the trace component Authorization check and then Trace on. The system thenautomatically writes the trace to disk.
3. To restrict the system trace to your own sessions, choose Edit → Filter → General. In thedialog box displayed, enter your user ID in the field Trace for user only.
4. After you have completed your analysis, choose Trace off.
5. To display the results of the analysis, choose Goto → Files/Analysis or choose thepushbutton File list. Position the cursor on the file that you want to analyze and chooseAnalyze file.
Users and Roles (BC-CCM-USR) SAP AG
Authorization Checks in Your Own Developments
84 April 2001
You will see authorization tests entries in the format <Authorizationobject>:<Field>=<Value tested>.
You can display a formatted view of an authorization check by double–clicking an entry.(You may need to scroll down in the display to reach the formatted view of the entry.)
If no authorization entries exist or the system displays the message Authorization entriesskipped, check that you have set the trace switches correctly. If the switches are correct,then choose Trace file → Analyze file and ensure that Trace for authorization checks isselected.
Authorization Checks in Your Own DevelopmentsEach time a transaction is started, the system automatically checks for authorization objectS_TCODE. This check is also executed for any transactions that you created yourself.
If you use the Profile Generator [Page 36] to generate your authorization profiles automatically,the authorizations for the authorization object S_TCODE are contained in the profiles.
Furthermore, you can add your own authorization checks to protect critical points in your ABAPprograms.
The authorization check is not executed when the transaction is called indirectly, thatis, from another transaction. Authorizations are not checked, for example, if atransaction calls another with the CALL TRANSACTION statement.
You should make sure that any security-critical transactions you call are alwayssubject to authority checks.
Adding Authorization Checks to ProgramsIn order to maintain authorization objects and fields, you need access to the authorization objectAuthorizations (S_USER_AUT).
To add authorization checks to programs, you need to do the following:
1. Create an Authorization Field [Page 85]
2. Create an Authorization Object [Page 85]
3. Assign an Authorization Object to an Object Class [Page 85]
4. Program authority checks
Use the ABAP AUTHORITY-CHECK statement. Specify alphabetic values in uppercaseletters: ABC. Test values from user master records are converted to uppercase beforebeing passed to AUTHORITY-CHECK.
See the ABAP programming documentation for more information.

SAP AG Users and Roles (BC-CCM-USR)
Creating Authorization Fields
April 2001 85
Creating Authorization Fields
In authorization objects, authorization fields represent the values to be tested duringauthorization checks.
To create authorization fields, choose Tools → ABAP Workbench → Development → OtherTools → Authorization Objects → Fields.
To create an authorization field, proceed as follows:
1. Choose Create authorization field.
2. On the next screen, enter the name of the field. Field names must be unique and must beginwith the letter Y or Z.
3. Assign a data element from the ABAP Dictionary to the field.
4. If desired, enter a check table for the possible entries. For more information about checktables, see Connection to the Check Table [Ext.]. The connection provides possible fieldvalues. Values ranges can also be defined using the domain with which a field is associated.
For more information about AUTHORITY-CHECK, see the keyword documentation of the ABAPEditor.
You can often use the fields defined by SAP in your own authorization objects. If youcreate a new authorization object, you do not need to define your own fields. Forexample, you can use the SAP field ACTVT in your own authorization objects torepresent a wide variety of actions in the system.
Assigning an Authorization Object to an Object ClassEach authorization object must be assigned to an object class when it is created.
Choose Tools → ABAP Workbench → Development → Other tools → Authorization objects →Objects. You can also create authorization objects in the Object Navigator (SE80).
Creating / Choosing Object ClassesThe system displays a list of existing object classes.
Object classes are organized according to the components of the system.
Before you can create a new object, you must define the object class for the component in whichyou are working. The objects are not overwritten when you install new releases.

Users and Roles (BC-CCM-USR) SAP AG
Creating/Maintaining Authorizations/Profiles Manually
86 April 2001
You can also define your own object classes. If you do so, select class names that begin with Yor Z to avoid conflicts with SAP names.
Creating an ObjectEnter a unique object name and the fields that belong to the object. Object names must beginwith the letter Y or Z in accordance with the naming convention for customer-specific objects.
You can enter up to ten authorization fields in an object definition. You must also enter adescription of the object and create documentation for it.
Ensure that the object definition matches the AUTHORITY-CHECK calls that refer to the object.
Do not change or delete authorization objects defined by SAP. This disables SAPprograms that use the objects.
You can regenerate the profile SAP_ALL after creating an authorization object.
For further information, see the documentation in the transaction.
Creating/Maintaining Authorizations/Profiles ManuallyThis section describes how to create and maintain authorizations manually.
You can generate authorizations and profiles on the basis of selected transactions.See Role maintenance [Page 36].
Administration Tasks [Page 87]
Maintaining Authorization Profiles [Page 87]
Maintaining Authorizations [Page 91]
Adding Authorization Checks To Your Own Developments [Page 84]
Analyzing Authorization Checks [Page 83]
Line-oriented Authorizations
UseYou can restrict access to tables by business organizational units using the line-orientedauthorizations introduced in Release 4.6C. You could previously only use the authorizationobjects S_TABU_DIS and S_TABU_CLI to allow or prevent access to complete tables.

SAP AG Users and Roles (BC-CCM-USR)
Administration Tasks
April 2001 87
The introduction of organizational criteria allows you to restrict user access to parts of a table.The authorization object S_TABU_LIN has been introduced for this purpose.
One possible use for line-oriented authorizations would be that a user can only display andchange the contents of a particular work area, e.g. a country or plant, in a table.
See the IMG documentation under Basis → System administration → Users and authorizations→ Line-oriented authorizations.
Administration TasksIf you want to create and maintain authorizations in the SAP System, you should create andactivate two types of authorization components.
• These components are authorizations to allow specific system authorizations.
Maintain authorizations under Tools → Administration → User maintenance → Manualmaintenance → Edit authorizations manually.
• Authorization profiles, to enter authorizations in user master records.
Maintain authorization profiles under Tools → Administration → User maintenance →Manual maintenance → Edit profiles manually.
The SAP System includes predefined authorizations and profiles. These can often be given toyour users without modification, which greatly reduces the effort required to maintainauthorizations and profiles.
You can also decide how to organize maintaining user master records and authorizations. Youcan have a single superuser conduct all user and authorization maintenance, or dividemaintenance among decentralized administrators. You can have a single superuser conduct alluser and authorization maintenance, or divide maintenance among decentralized administrators.See Organizing User and Authorization Maintenance [Page 115].
Maintaining Authorization ProfilesThis section describes how you manually create, maintain, activate, and delete AuthorizationProfiles [Ext.].
Note that it is faster and easier to create profiles using the Profile Generator.
You access profile maintenance by choosing Tools → Administration → User administration→Manual maintenance → Edit authorization profile manually. .

Users and Roles (BC-CCM-USR) SAP AG
Simple and Composite Profiles
88 April 2001
Simple and Composite Profiles [Page 88]
Defining Profiles and Authorizations [Page 88]
Alternative Authorizations [Page 89]
Choosing Authorization Objects [Page 89]
Maintaining Composite Profiles [Page 90]
Activating Profiles [Page 90]
Naming Convention for Predefined Profiles [Page 90]
Simple and Composite ProfilesYou can manually create two types of profiles:
• Simple (or single-level) profiles contain authorizations. Each authorization is identified by thename of an authorization object and the name of the authorization created for the object.
• Composite profiles contain other profiles. A composite profile assigns all of the simple orcomposite profiles it contains to a user.
Defining Profiles and AuthorizationsYou can maintain both profiles and authorizations from the profile maintenance functions.
Use the default profiles provided by SAP as templates for your own profiles:
1. Use the SAP naming convention to select default profiles for the application with which youare working.
Example: Searching for profiles with F_* selects profiles for the Financial Accountingapplication.
From Release 4.5A, SAP recommends you use the Profile Generator to createprofiles and copy predefined user roles. Only use the profiles predefined by SAP ifthe documentation explicitly informs you to do so.
SAP does not guarantee that standard authorizations delivered with the R/3 Systemwill remain the same in future releases or updates. You should therefore make your

SAP AG Users and Roles (BC-CCM-USR)
Alternative Authorizations
April 2001 89
own copies of predefined profiles. Otherwise, you must check your authorizationsafter installing a release or update.
2. Copy the profile that most closely matches the profile you need.
Use a systematic naming convention. You can change the SAP naming convention, forexample.
SAP recommends substituting a different character for the underscore found in thesecond position in SAP profile names. That way, the profile name makes the source ofthe profile immediately clear.
Example: To create your own profile for customer accounts clerks, you could copy thedefault profile F_CUSTOMERS to F: CUSTOMERS. Changing only the second charactermakes the new profile name unique, but you can easily tell where the profile came from.
3. Maintain the profile and the authorizations it contains.
Delete the authorizations that you do not require by deleting the corresponding lines fromthe profile.
If you need to change an authorization, then you should first create a copy of it. Deletethe original authorization from your profile and insert your copy in its place. You can thenedit the authorization by double-clicking on it. Do not edit the original authorization, asyour changes may be overwritten when you update your system with a new Release.
You can create new authorizations. Choose Simple auth. When you select an objectclass and an object, existing authorizations are displayed.
4. Activate all the authorizations that you have changed.
5. When you have finished editing authorizations, activate the profile. It is then ready for use.
Alternative AuthorizationsIf you want to assign a user alternative authorizations, you can enter a single authorization objectin a profile as often as you like. Enter a different authorization each time the object occurs.
The system tests the alternative authorizations using OR logic. If any of the authorizationspermits the user's action, the user passes the authorization test. The system uses the firstauthorization that meets all of the requirements of the access test.
Choosing Authorization ObjectsYou can choose the objects of a particular work area or component by copying the predefinedprofile and modifying it. However you can also use authorization object classes and theinformation system to find the authorization objects that are used in a particular component of theR/3 System.

Users and Roles (BC-CCM-USR) SAP AG
Maintaining Composite Profiles
90 April 2001
Maintaining Composite ProfilesTo create or maintain a composite profile, choose User maintenance → Manual Maintenance → Edit profile manually.
Then proceed as follows:
1. Generate a work area (profile list) by choosing Generate work area, or entering the name ofthe composite profile you want to create or maintain.The system displays a list of profiles. This list is empty when you create a composite profile.
2. Choose Create, Change, Delete or Copy.If you choose Create, you should then choose the profile type Composite profile in the dialogbox.
3. From the list of profiles, choose the name of the single or composite profile to be included inthe composite profile using Add profile. To do this, use the pushbutton, Add profile.You can add a virtually unlimited number of profiles to a composite profile.When creating composite profiles, you can enter profiles that have not yet been created oractivated. However, you must create and activate the missing profile(s) before you canactivate the composite profile.
Activate profilesNew or modified profiles must be activated before they can be assigned to users or becomeeffective in the system.
Activation copies the maintenance version of a profile to the active version. If the activated profilealready exists in a user master record, the changes to it become effective as each affected userlogs onto the system. Changes are not effective for users who are already logged on when theprofile is activated.
To activate a profile, choose Profile → Activate on the Profile List screen. If an active version ofthe profile exists, you will see the active and maintenance versions of the profile so that you canverify the changes.
Naming Convention for Predefined ProfilesFrom Release 4.5A, SAP recommends you use the Profile Generator to create profiles and copypredefined user roles. Only use the profiles predefined by SAP if the documentation explicitlyinforms you to do so.
SAP does not guarantee that standard authorizations delivered with the R/3 System will remainthe same in future releases or updates. You should therefore make your own copies ofpredefined profiles. Otherwise, you must check your authorizations after installing a release orupdate.

SAP AG Users and Roles (BC-CCM-USR)
Maintaining Authorizations
April 2001 91
Naming Your Own Profiles
To avoid conflicts between profiles that you define and those supplied by SAP, you should notuse any name that has an _ (underscore) character in the second position. Substitute theunderscore in the second position for a different character of your choice.
Maintaining AuthorizationsThis topic describes how you create, edit, activate and delete authorizations. You accessauthorization maintenance by choosing Tools → Administration → User Maintenance → ManualMaintenance → Edit Authorizations Manually. You can also maintain authorizations from theprofile maintenance screen.
Creating and Maintaining Authorizations [Page 91]
Entering Values [Page 91]
Activating Authorizations [Page 93]
Naming Conventions for SAP Authorizations [Page 93]
Creating and Maintaining AuthorizationsTo create or maintain an authorization, proceed as follows:
• Select an authorization object according to class and description.
• Add a new authorization, or choose one from the authorizations that already exist.
A new authorization name should be unique only among the authorizations for the sameauthorization object.
Generated authorizations (type •) cannot be maintained manually.
Entering ValuesDefine or change single values and / or value ranges for each field in the object. A user who hasthese values is authorized to execute the corresponding actions.
The system automatically displays the fields for which you must define values. A description ofeach field is included in the display so that you can easily identify its functions.

Users and Roles (BC-CCM-USR) SAP AG
Entering Values
92 April 2001
You can display the documentation or possible entries for a field by positioning the cursor on thefield and choosing Maintain values or Field documentation. When you maintain values a dialogbox appears. Choose the possible entries help (F4) for an overview of the values you can enterhere.
Rules for Entering Values• Enter single values in From fields only. Do not enter any values in the accompanying To field.
• Enter value ranges using the formats below.
Formats for Entering Values in an Authorization
From To Authorization
1 3 Values 1, 2, and 3
S_USER* Any character format beginning with "S_USER"
AB C* All values beginning with AB, AC,... or B or C
0 9* Any numeric value
• To exclude a value from a range, specify multiple ranges that do not include the value. Forexample, the ranges below allow access to all values except those that begin with the string"S_U", for S_USER_ (user maintenance) authorizations.
Excluding Values From a Range of Values
From To Authorization
A S_T* Values beginning with A through S_T
S_V Z* Values beginning with S_V through Z
• To authorize a user to leave a field blank, Enter ' ' (a space enclosed in single quotationmarks, or ' or simply ' in shorter fields).
• For many fields, you can display the values that may be entered by choosing Possibleentries.
Cross-system value ranges: If you have a heterogeneous R/3 environment, youshould specify value ranges for numbers and letters separately. Example: A to Z and0 to 9.
You need to define separate ranges as the values are sorted according to thecharacter set used. To include all numbers and letters in a range, for example, youwould need different range definitions in ASCII and EBCDIC systems:
• ASCII: the value range 0 to Z* includes all numbers and letters, as well as some otherprintable characters
• EBCDIC: the value range A to 9* includes all numbers and letters.
SAP AG Users and Roles (BC-CCM-USR)
Activating Authorizations
April 2001 93
Example
The object displayed below controls actions users belonging to a user group may execute:
Sample Authorization
Object Fields Values
User groups User master maintenance: User group S*
Administrator action 03 (display)
The sample authorization for object User groups would allow a user to display any user masterrecord belonging to a group whose name begins with S.
Activating AuthorizationsYou must activate new or modified authorizations to make them effective in the system.Activation copies the maintenance version of an authorization to the active version.
An activated authorization becomes effective immediately in all active profiles in which it exists.The authorization is effective even for users who are logged on when the activation takes place.
To activate an authorization, choose Authorization → Activate.
If an active version of the authorization exists, you will see the active and maintenance versionsso that you can verify the changes that you are about to put into effect. You can cancel anactivation if the changes are not correct.
Naming Convention for SAP AuthorizationsThe R/3 System is supplied with a set of predefined authorizations. You can display thepredefined authorizations by using the user and authorization information system.
For predefined authorizations, you can also use the naming convention described in PredefinedProfiles: Naming Convention [Page 90].
In any case, SAP recommends that you do not create profiles and authorizationsmanually. Use the Profile Generator instead.

Users and Roles (BC-CCM-USR) SAP AG
Central User Administration
94 April 2001
Central User AdministrationAn SAP system group consists of several SAP Systems with several clients. The same users arefrequently created and maintained in each client.
Using central user administration, you can maintain these users centrally in one system. Theinformation is then automatically distributed to the dependent systems.
For more information, see:
Setting Up Central User Administration [Page 94]
Setup distribution field distribution parameters [Page 100]
Migration of existing users into the central system [Page 102]
Central user distribution [Page 103]
Distribution Logs [Page 104]
Global User Manager [Page 105]
Setting Up Central User AdministrationAn ALE environment is necessary to distribute the data. It can exchange data and keep itconsistent. An ALE system group is used by the central user administration to distribute userdata between a central system and systems linked by ALE.
Central user administration data is exchanged asynchronously between the application systemsin an ALE environment. This ensures that it still reaches the target system even if it wasunreachable when the data was sent.
One system in the central user administration ALE environment is defined as the central system.The links to the subsidiary systems emanate from the central system. The subsidiary systemsare not linked to each other.
Perform the following steps to setup the central user administration:
Create system usersCreate a system user. A user account is required for the internal communication between thesystems in an ALE group. It is only used internally for this communication and not in dialog. Thisuser must be created in all systems in the ALE environment with the same user name andpassword. Assign the type System and appropriate authorizations (e.g. SAP_ALL) to the user.
See Create and maintain user master records [Page 10].
Name logical systems1. Call the transaction SALE.
2. Choose Prepare sender and target systems -> Create logical systems -> Name logicalsystem.
3. To put new logical systems in the list, choose New entries.
As the logical system table is cross-client, settings made here apply to all clients in anR/3 System. If the ALE environment only comprises the logical systems of an R/3

SAP AG Users and Roles (BC-CCM-USR)
Setting Up Central User Administration
April 2001 95
System, you only need to define the logical systems once. For several R/3 Systems, youmust setup all logical systems in each instance completely.
4. Enter the short name under by which the system is to be known in the ALE group, in upper-case letters under Log.system. Enter a meaningful text name for the logical systems underName.
We recommend a combination of system name and client number for the shortname. For example BIZCLNT008 was chosen for the system BIZ and client 008.
Note that you must also enter any logical systems which are not in the current R/3System. All logical systems must be defined in each R/3 System in the ALEenvironment.
5. Choose Save when you have entered all logical systems.
Naming the logical systems does not assign these logical system names to existing clients inyour R/3 Systems.
Assign logical systems to clients1. Assign logical systems to clients in the transaction SALE under Prepare sender and target
systems -> Create logical systems -> Assign logical system to a client. Mark the client towhich you want to assign a logical system and choose Detail. The system displays the detailscreen. In the field Logical System, enter the name of the logical system you want to assignto the client. Then save your settings. This is case-sensitive.
2. Assign all central user administration logical systems to a client.
Define target systems for RFC callsDefine the RFC destinations for the logical systems under Prepare sender and target systems ->Configure systems in network . The remote function call is controlled by the RFC destinationparameters.
An RFC destination is always created from the client to which you are logged on. Todefine an RFC link from client 008 to client 322, you must be logged on to client 008.Central user administration RFC links must always be two-way. To define the RFClink completely, you must also logon to client 322 and define client 008 as RFCdestination.
1. Enter the RFC destination name. The name of the RFC destination should match the nameof the corresponding logical system (e.g:B20CLNT323). This is case-sensitive.
2. Specify link type 3 for links to another R/3 System.
3. Enter the target client number under Client and the system user created at the beginning forinternal system communication in the ALE environment, under User and Password. Saveyour entries.
The top of the screen changes when you save. You can specify whether you want touse load-sharing. This is recommended but not obligatory. Choose Load-sharing →

Users and Roles (BC-CCM-USR) SAP AG
Setting Up Central User Administration
96 April 2001
Yes and enter the message server under Target machine and the message serversystem number under System number.
Use the transaction RZ03 in the target system to get the target system messageserver name. Several servers are usually listed. The message server is the onewhich offers the service M. The message server name is the part of the server namebefore the first underline. The two-digit number at the end of the server name is thesystem number.
Create distribution modelWhen you have created the ALE environment, create the distribution model. The distributionmodel describes the ALE message flow between logical systems.
1. Logon to the system which is to be the central system, and call the transaction SCUA.
2. Create a distribution model. Enter a name and choose Create. Enter the target system in thenext screen.
3. Save your entries.
The following actions are performed automatically when you save:
• The message flow is defined for each recipient system by specifying sender and recipientsystems and the Business objects USER (create user from models in other systems) orUSERCOMPANY (maintain company address) and the method CLONE.
• The partner profiles are generated for the subsidiary systems and the central system.
• The distribution model is sent to the subsidiary systems.
Several partner profile generation logs appear. Check whether the partner profiles were createdsuccessfully.
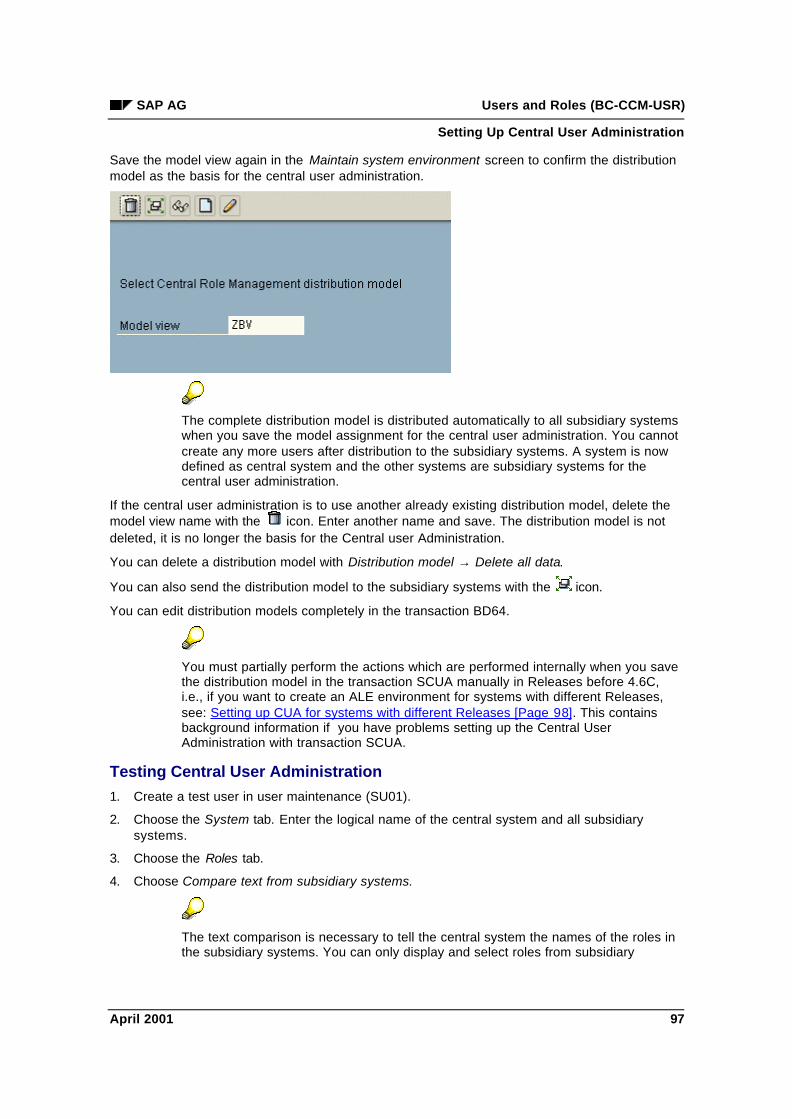
SAP AG Users and Roles (BC-CCM-USR)
Setting Up Central User Administration
April 2001 97
Save the model view again in the Maintain system environment screen to confirm the distributionmodel as the basis for the central user administration.
The complete distribution model is distributed automatically to all subsidiary systemswhen you save the model assignment for the central user administration. You cannotcreate any more users after distribution to the subsidiary systems. A system is nowdefined as central system and the other systems are subsidiary systems for thecentral user administration.
If the central user administration is to use another already existing distribution model, delete themodel view name with the icon. Enter another name and save. The distribution model is notdeleted, it is no longer the basis for the Central user Administration.
You can delete a distribution model with Distribution model → Delete all data.
You can also send the distribution model to the subsidiary systems with the icon.
You can edit distribution models completely in the transaction BD64.
You must partially perform the actions which are performed internally when you savethe distribution model in the transaction SCUA manually in Releases before 4.6C,i.e., if you want to create an ALE environment for systems with different Releases,see: Setting up CUA for systems with different Releases [Page 98]. This containsbackground information if you have problems setting up the Central UserAdministration with transaction SCUA.
Testing Central User Administration1. Create a test user in user maintenance (SU01).
2. Choose the System tab. Enter the logical name of the central system and all subsidiarysystems.
3. Choose the Roles tab.
4. Choose Compare text from subsidiary systems.
The text comparison is necessary to tell the central system the names of the roles inthe subsidiary systems. You can only display and select roles from subsidiary

Users and Roles (BC-CCM-USR) SAP AG
Setting-up CUA for Systems with different Releases
98 April 2001
systems in the central system from the possible entries help after this step. Youcannot assign roles from subsidiary systems manually without a text comparison.
5. Assign a role to the test user in each logical system in the system group. (Enter all logicalsystems in the System column and the role to be assigned to the test user in the Rolecolumn. One role per system is sufficient for testing).
6. The distribution procedure runs automatically when you save. The user is created with itsroles in all defined systems.
7. You can check the result in the transaction SCUL.
See also:
For information on configuring the system landscape, see documentation ALE-Introduction [Ext.]and ALE integration technology [Ext.].
Setting-up CUA for Systems with different ReleasesAs setting up the distribution model in the simplified form with transaction SCUA is only suitablefor Release 4.6C systems, the complete Central User Administration setup procedure isdescribed below.
Perform the following activities:
• Create system users
• Name logical systems
• Assign logical systems to clients
• Define target systems for RFC calls
See Setting up Central User Administration [Page 94].
Proceed as follows:
1. Define the system environment in the SAP Reference IMG under Basis → Distribution (ALE)→ Model and implement Business processes → Maintain Distribution Model (TransactionBD64).
The distribution model is used to specify which applications communicate with eachother in your distributed systems. The distribution model contains all of your company’scross–system message flow information. The distribution model consists of severalmodel views. In each model view, you can define related message flows. Each modelview is maintained in a central system and distributed from there to the other systems.
For each model view, you can specify a descriptive short text, the validity period of themessage flows in the view, as well as the view maintenance system. When a model viewis created, the system in which the view is created is automatically specified as themaintenance system. If possible, designate one system as the central maintenancesystem for all model views. The names of the model views must be unique in the entiredistributed environment within your company.
Do the following:
• Choose Create Model view and enter a name and a short description.

SAP AG Users and Roles (BC-CCM-USR)
Setting-up CUA for Systems with different Releases
April 2001 99
• Create a BAPI for the object User and the method Clone (Create user with reference fromother systems). Use F4 help for possible objects and methods. Also specify which system isthe sending system and which is the target system.
• Create a second BAPI for the object UserCompany and the method Clone. This method isused for company address distribution.
5. Distribute the system landscape by choosing Edit → Model view → Distribute. The systemdisplays a dialog box in which the systems relevant for you are already selected. Normally,you can just confirm the selections.
6. In Transaction BD64, generate the partner profiles for all dependent systems (choose Goto→ Partner profile ### Generate).
For information about partner profiles, see the IMG documentation (Cross-Application Components → Distribution (ALE) → Communication)
7. Generate the partner profiles in all dependent systems for the central system.
8. Define the system landscape for central user administration in the Reference IMG underBasis → Distribution (ALE) → Configure predefined ALE Business Processes → Cross-application Business Processes → Central User Administration→ Select Model View forCentral User Administration (transaction SCUA). Use the F4 help (possible entries) to choosethe distribution model you require and then choose Save. When you save the distributionlandscape, the information is automatically distributed to the dependent systems.
The Central user Administration is only completely available in from Release 4.6A.Some functions are restricted in previous Releases.
After installing Central User Administration, you must check another system setting with thetransaction WE20 as follows, if you use the Workplace Server:
1. Go to transaction WE20.
2. Display the subnodes of Partner type LS in the tree structure.

Users and Roles (BC-CCM-USR) SAP AG
Setup field distribution parameters
100 April 2001
3. Choose a system in the tree structure.
4. Double-click on the entry USERCLONE in the table Export parameter.
5. Change the entry basis type to USERCLONE01 in the IDOC type group.
6. Save your changes.
7. Do the same for the other R/3 components in the Workplace.
Setup field distribution parametersWith a central user administration system, certain fields must be maintained centrally. It may beuseful to maintain additional fields locally. If you maintain fields locally, you can decide whetherthese fields should be automatically redistributed.
The transaction SCUM under Basis → Distribution (ALE) → Model and implement businessprocesses → Configure predefined ALE business processes → Cross-application businessprocesses → Create central user administration → Setup field distribution parameters displays alist of fields whose distribution parameters you can set. Select a distribution model in the initialscreen and save it. You go to the following screen.
By choosing Next page, you can display any additional fields.
Choose additional tab indexes so that you can also maintain the parameters of the other groups.To save your settings, choose Save. The settings are then automatically distributed to thedependent systems.
When setting up central user administration, you should try and set the individualfield options you choose in this transaction only once. You should not frequentlychange the field maintenance flags.

SAP AG Users and Roles (BC-CCM-USR)
Setup field distribution parameters
April 2001 101
Under the individual tabs, you can choose from among the following options (some options maynot make sense for all tabs):
Global Data can only be maintained in the central system and is completelydistributed.
Proposal A default value is maintained in the central system. This value is distributedwhen a user is created and is then maintained locally.
Redistribution Data is maintained both centrally and locally. Each time data is changedlocally, this change is redistributed to the central system and from theredistributed to the other dependent systems.
Local Data can only be maintained in the dependent system. Data changes arenot distributed to other systems.
Everywhere Data is maintained both centrally and locally. However, data changes arenot redistributed to other systems.
The last tab Lock contains the following options for locking a user: you can specify that the usercan only be locked/unlocked either locally or globally. For local/global unlocking, you can alsochoose the option Everywhere. You can also specify where a user can be unlocked following anincorrect logon.
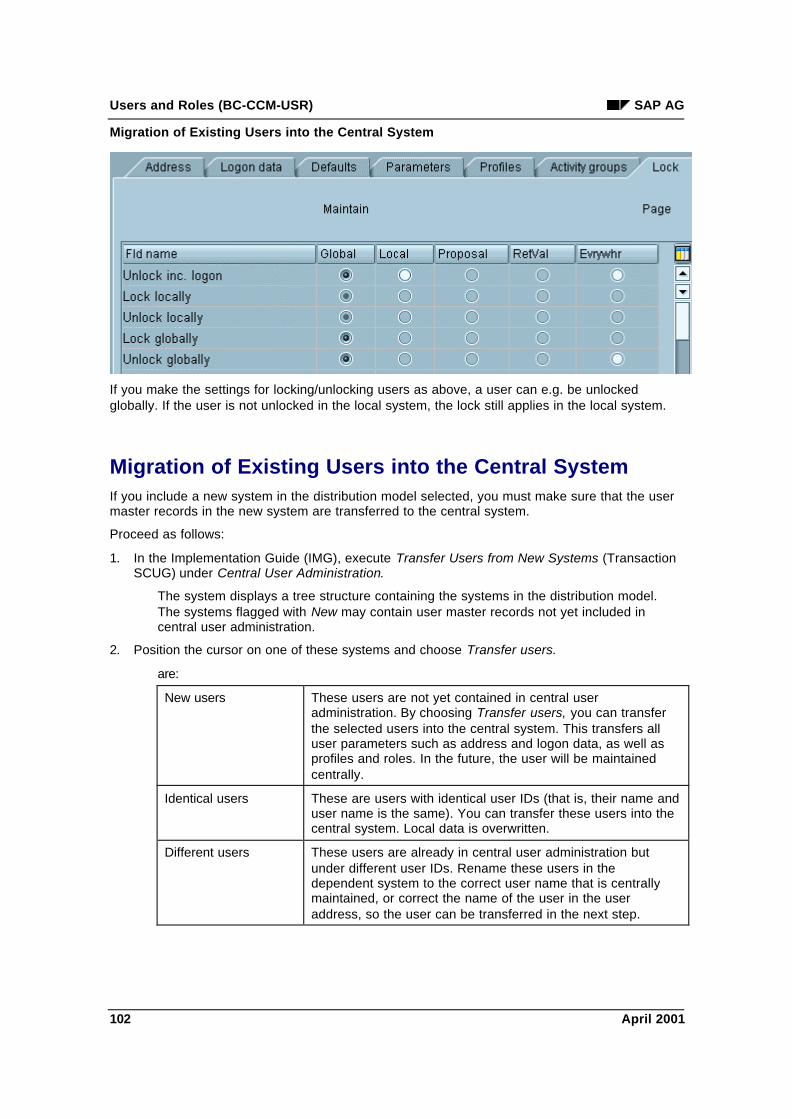
Users and Roles (BC-CCM-USR) SAP AG
Migration of Existing Users into the Central System
102 April 2001
If you make the settings for locking/unlocking users as above, a user can e.g. be unlockedglobally. If the user is not unlocked in the local system, the lock still applies in the local system.
Migration of Existing Users into the Central SystemIf you include a new system in the distribution model selected, you must make sure that the usermaster records in the new system are transferred to the central system.
Proceed as follows:
1. In the Implementation Guide (IMG), execute Transfer Users from New Systems (TransactionSCUG) under Central User Administration.
The system displays a tree structure containing the systems in the distribution model.The systems flagged with New may contain user master records not yet included incentral user administration.
2. Position the cursor on one of these systems and choose Transfer users.
are:
New users These users are not yet contained in central useradministration. By choosing Transfer users, you can transferthe selected users into the central system. This transfers alluser parameters such as address and logon data, as well asprofiles and roles. In the future, the user will be maintainedcentrally.
Identical users These are users with identical user IDs (that is, their name anduser name is the same). You can transfer these users into thecentral system. Local data is overwritten.
Different users These users are already in central user administration butunder different user IDs. Rename these users in thedependent system to the correct user name that is centrallymaintained, or correct the name of the user in the useraddress, so the user can be transferred in the next step.

SAP AG Users and Roles (BC-CCM-USR)
Central User Distribution
April 2001 103
Already central users These users are already in the central user administrationunder the same name. This user is already maintainedcentrally.
Central User DistributionYou maintain users within central user administration using the user maintenance transaction(Transaction SU01). If central user administration is activated, you maintain users in thetransaction differently:
• Whether fields are ready for input or not depends on the distribution attributes that wereassigned to the field in Transaction SCUM. See Setup field distribution parameters [Page100].
Only the fields that may be maintained in the system are ready for input.
In the central system, you can only change a field that is to be maintained globally.This field is not ready for input in the dependent systems.
• In the central system, the user maintenance transaction also displays the tab Systems. Hereyou enter the systems to which users are to be distributed. Use the possible entries help. Thesystems selected in the distribution model are displayed. Each time you save, the systemdistributes the user data to these listed systems.
• The Roles and Profiles tabs each contain an additional column, specifying the system forwhich the user is assigned the role or profile.
By choosing Compare text from dependent systems in the Roles and Profiles tabs, youcan update the texts for roles and profiles that were changed in the dependent systems,for example. The texts in the dependent systems are stored temporarily so that they areavailable in the central system. Since the comparison requires some time, it is executedasynchronously. The current texts may not be immediately available.
You can only assign profiles to users for the systems in which they are distributed. If youenter a new system when you assign profiles to users, the system displays a warningthat the user was assigned a new system. The entry is automatically transferred into thetab Systems. After this, the user master record is also distributed in the new system.
All user master records are created in the user master records. Users can then only log onto thecentral system if the central system itself is entered in Systems tab of the corresponding usermaster record.

Users and Roles (BC-CCM-USR) SAP AG
Distribution Logs
104 April 2001
You can display global user data from a dependent system in the Infosystem [Page74].
Additional NotesAs well as the authorizations already mentioned, you also need another authorization in thecentral system for object S_USER_SYS. You can only assign new systems to a new user withthis authorization.
If you make any incorrect entries when you maintain roles and profiles, you can only see this inthe log (Transaction SCUL).
When a user is deleted in the central system, the system entry for the user is retained until thedeletion is confirmed. If an error occurs, the deletion can be repeated by withdrawing the systems(in the subsidiary system).
In the dependent systems, the RFC user is output as the last person to make changes. Choosean appropriate name when you set up the RFC user.
Distribution LogsTo display the distribution logs, choose Environment → Distribution log (transaction SCUL) in theuser maintenance (transaction SU01).
The system displays a selection of pushbuttons you can use to display the logs. The pushbuttontexts form the evaluation criteria for the logs displayed.
For example, if you choose Systems, the system displays the status of the users, sorted bysubsystem. You display the users in the subsystem by expanding the tree. The color of a nodecorresponds to the worst error within a node.
To display the color legend, choose Utilities → Color legend.
If you display the incorrect user master records, the system displays a short text that explains thecause of the error. If this short text is insufficient, you can display a long text by clicking on thefield User.
By choosing Transport, you can execute the transport again at this level and trigger datadistribution.
The system also offers you a summary of errors, warnings, successful and unconfirmeddistributions. The system logs unconfirmed distributions, for example, if the data could not bedistributed due to an incorrect RFC connection.

SAP AG Users and Roles (BC-CCM-USR)
Global User Manager
April 2001 105
Global User ManagerThe Global User Manager is an additional tool with which you can considerably simplify thecentral user administration. Use of the Global User Manager is not obligatory. You can still makeassignments at individual user level with the existing user and role maintenance transactions.
The Global User Manager gives you various grouping possibilities at user and system level formaintaining user and system assignments in a system group in the central system, in addition tothe previous individual user view.
The Global User Manager contains these maintenance possibilities because the user masterrecord data hardly changes once the user has been created. System assignments andauthorizations change more frequently.
Do not distribute the user data in the Global User Manager until you have completelymodeled the data for all users. Everything which is not defined in the Global UserManager is deleted in the target systems.
You cannot assign an authorization profile to users or user groups directly in theGlobal User Manager. The authorizations are assigned in roles. If you want to createa role automatically from an existing authorization profile, call the transaction SU25and choose item 6: Copy data from existing profiles .
An advantage of the Global User Manager is that you do not need to consider the full complexityof the system environment when modeling authorizations. You consider only one part of thewhole in each work step, two of the axes of an assignment triangle.
Source Target
User/user group System/System type
System/System type Role/Composite role
Role/Composite role User/user group

Users and Roles (BC-CCM-USR) SAP AG
Global User Manager
106 April 2001
To model a complete assignment to be distributed into the target systems, you mustcreate a closed assignment triangle as shown in the graphic. The Global UserManager reduces the complexity of this procedure so that you only need to make thetwo other assignments from each corner. When you have done so from all corners,the assignment is complete.
The Global User Manager ScreenThe Global User Manager only runs in the central system of the central user administration.
Call the transaction SUUM to display the Global User Manager.
All users and user groups in the system group are displayed at the left-hand side of the screen.The systems and system types are displayed in the middle, and the roles and composite roles inthe system group on the right.
Choose Extras → Compare systems in the Global User Manager to display the rolesand composite roles of the subsidiary systems. You can alternatively chooseCompare texts in subsidiary systems in the Roles tab in the user maintenance

SAP AG Users and Roles (BC-CCM-USR)
Global User Manager
April 2001 107
transaction SU01. The data may not be immediately available because it isdistributed asynchronously.
Using the Global User ManagerIf you want to use the Global User Manager, the procedure depends on whether your systemenvironment already contained users before the installation of the central user administration. Ifusers already exist, you should migrate the current user master records into the Global UserManager, so that previously existing assignments are not deleted the first time you distribute userdata with the Global User Manager.
System environment with existing users
To use the Global User Manager in a system environment with existing productive users:
1. Choose Extras → Migration → Users to get the current user master records of all systems inthe Global User Manager.
2. Choose Extras → Migration → Roles to automatically assign the roles to the systems inwhich they exist, in the Global User Manager.
The data is compared with the current system status at individual user level in theGlobal User Manager after the migrations. To ensure that you do not lose anyexisting data, do not start to model user groups and system types until the migrationsare finished.
Role names must be unique in the system environment. The system environmentbehaves like a single system, and a role can only exist once in this system. If a rolewith the same name exists in several systems in the system group, it appearsseveral times in the Global User Manager role list.
You can make assignments at both individual user level and user group level in the Global UserManager. This can have unwanted effects after a user migration. Example: You have migrated alldevelopers in your system in the Global User Manager as described above. You have thendefined a user group for all developers containing the same authorizations which they hadpreviously as individual users. When you assign all developers to the user group, theauthorizations are assigned twice. So if you remove a developer from the user group, he or shestill has the individual authorizations and can continue to develop. You should remove theindividual user assignments after a migration as soon as you assign the users to their usergroups. Use individual user assignments to give a user additional authorizations which differ fromthe standard authorizations of the user group.
System environment without (existing) users
If there are no active users in your system environment, you do not need to migrate the existinguser master records. You can start to create new users in transaction SU01 and model theauthorizations in the system environment in the Global User Manager. Each user must only becreated once in the central system and can then be assigned to other systems in the Global UserManager. The Global User Manager creates the users in these systems and assigns roles tothem.
Proceed as follows:
1. Create a user in the transaction SU01.

Users and Roles (BC-CCM-USR) SAP AG
Global User Manager
108 April 2001
Only assign something in the System and Role tabs when it is only for this individualuser. Define other authorization for user groups in the Global User Manager.
2. Enter a user group for the current user in the Groups tab, if one has already been created inthe Global User Manager. You will not need to make this assignment again in the GlobalUser Manager.
All data that you enter in SU01 is also in the Global User Manager. Conversely, allassignments made and distributed in the Global User Manager are also in SU01.
Definition on system types and user groupsProceed as follows:
1. Create a system type/user group by choosing the appropriate pushbutton.
2. Assign systems or users to the system type/user group respectively by Drag & Drop.
A system can only be assigned to one system type. A user can belong to severaluser groups.
Modeling in the Global User ManagerTo specify the systems and roles for a user group:
1. Mark the user group and choose Display assignments.
The current system/system type and role assignments of the selected user group aredisplayed. No systems or roles should be assigned to the user group yet.
2. To assign systems or system types to the user group, Drag & Drop a system or a systemtype to the entries under Assignments to user groups. Assign roles or composite roles to theuser group similarly.
To restrict the number of entries displayed in a list (users, roles, etc.), choose the selection iconnext to an entry and restrict the value range.
You have now defined two of the three sides of the above assignment triangle. This examplefocuses on the user group and we have so far assigned systems and roles. The axis whichconnects system and role is still missing. If you migrated the roles, this assignment is madeautomatically and the triangle is complete. If not, you must define it for each role.
You can display and change assignments from any corner of the triangle. When you display theassignments to a role you can edit the systems and user groups for this role. When you displaythe assignments to a system type you can define the users and roles for the systems of thissystem type.
Distributing data with the Global User Manager
Display and check your distribution data in a list before distributing it. Proceed as follows:
1. Choose Display distribution data.
2. Check whether the data for selected users is correctly flagged for distribution.

SAP AG Users and Roles (BC-CCM-USR)
Preparatory Steps
April 2001 109
Only delete the user data when you have checked a sample of it in the list display.
You can distribute data from the Global User Manager immediately manually, orschedule a regular background job.
3. To distribute data immediately, choose Distribute immediately.
The data is distributed immediately. It can take a few minutes until the data reaches the targetsystem because it is distributed asynchronously
Immediate distribution can damage the performance of your system. To avoid this, schedule aperiodic background job to distribute the data, e.g. at night.
The data is distributed according to the modeling in the Global User Manager in the SU01 of thecentral system and from there to the subsidiary systems. Only the users are created and theroles assigned in the subsidiary systems. Other data is not distributed, it is retained in the centralsystem. There is no log in the transaction SCUL.
Only changes since the last distribution are distributed. This minimizes the amount of data to bedistributed.
To distribute data in a periodic background job, choose Extras → Schedule distribution.
1. Enter a meaningful name for the background job under Job name.
2. Choose a job class to specify processing priority.
3. Choose the central system of the central user administration under Target server.
4. Choose to schedule the ABAP program RSUSR500.
5. Choose to specify when the job is to run.
6. Choose Save.
See also:
Preparatory Steps [Page 109]
Global User Manager authorizations [Page 111]
Global User Manager functions [Page 111]
Preparatory StepsYou must perform some preparatory measures before you can manage the users centrally in theGlobal User Manager. They depend on whether you are installing the authorization concept forthe first time or you already used the central user administration before the upgrade.
It is assumed that you have a central and several subsidiary systems. The roles are createdlocally in the subsidiary systems.
A subsidiary system is intended for the application MM, another for SD. Differentroles are created locally in each system in Customizing.

Users and Roles (BC-CCM-USR) SAP AG
Preparatory Steps
110 April 2001
When you migrate the roles into the central system the System - Role assignment is copied intothe Global User Manager. The roles must be assigned to user groups to which users areassigned, in the Global User Manager. The Role -System assignment determines which systemsthe user can access.
The following cases can be distinguished:
Your system has been upgraded. The central user administration was not used in the previousRelease.
• Setup the central user administration by connecting the systems for which users are to bemanaged centrally. See Installing Central user administration [Page 94].
• Copy the users from the systems into the central system (Copy users from new systems[Page 102])
• Create the system administrator for the Global User Manager. See Global User Managerauthorizations [Page 111].
• Call the Global User Manager and choose Extras → Migration → Roles or Extras →Migration → Users.
Your system has been upgraded. The central user administration was used in the previousRelease.
• Create a system administrator for the Global User Manager. See Global User Managerauthorizations [Page 111].
• Call the Global User Manager and choose Extras → Migration → Users or Roles. Themigration copies the current assignments into the Global User Manager. You can then modelthe user data based on the existing links between roles, users and systems. See Extras →Migration in Global User Manager functions [Page 111]
The SAP System has been installed for the first time.
• Install the Central user management. See Installing Central user administration [Page 94].
• Create all users who are to be active in the individual systems in the system group, in thecentral system. When you create the users, specify the user groups to which they are to beassigned. You can then assign the systems for all groups in the Global User Manager.
• Create the roles in the systems in which they are used (possibly with Customizing functions).
• Create a system administrator for the Global User Manager. See Global User Managerauthorizations [Page 111].
• Call the Global User Manager and choose Extras → Migration → Roles. The data can onlybe modeled after migration.
Users are only migrated if the systems were also assigned in the user maintenancewhen the users were created. This is not recommended because the users areassigned to the systems directly and not via the groups.

SAP AG Users and Roles (BC-CCM-USR)
Global User Manager authorizations
April 2001 111
Global User Manager authorizationsYou can set up the authorizations for the Global User Manager using the authorization objectsS_USER_GRP, S_USER_SYS and S_USER_AGR. For security reasons, we recommend settingup two system administrators for the Global User Manager. One of the system administratorsmodels the user data. The second system administrator checks the model (4 eyes principle) andperforms the distribution. This administrator also requires the authorizations for usermaintenance (SU01). See Organizing user and authorization maintenance [Page 115].
The following authorizations are available for use in the Global User Manager:
Actions Object Activity S_USER_GRP S_USER_SYS S_USR_AGR
Create, display,and deleteassignments
UserUsergroupSystemSystemtypeRole
Model (68),Display (03)
User group of the userUser group
SystemSystem type
Role
User in usergroup
Assign (78) User group of the userUser group
Change systemtype
Assign (78) SystemSystem type
Create usergroup
Create(01)
User group
Migration Migrate (90) *Logon:not possible tospecifyindividualsystems
There is no authorization check for creating system types.
As the migration is only executed the first time the Global User Managers is used,the authorization for migration should be later revoked. This prevents the migrationfrom accidentally being executed later leading to inconsistent data.
When the user data distribution is triggered, the system only distributes data for which the systemadministrator who triggered the distribution has authorizations. The system does not reportwhether the distribution was incomplete. It is not possible to compare or distribute only some ofthe data.
Global User Manager FunctionsThe Global User Manager has the following functions:
- Display assignments The assignments are output when you double-click on an objectin user administration.

Users and Roles (BC-CCM-USR) SAP AG
Global User Manager Functions
112 April 2001
- Delete You can delete the assignments to user groups and systemtypes with the Delete pushbutton.
- Change validity period A validity period is assigned to each role in the standard. Youcan change it with the Change period pushbutton.
- HR-ORG in user group This function puts organizational units from organizationmanagement (HROrg) into groups. You do not need to nameusers explicitly. This function prompts you to specify whichorganizational units you want to include, in dialog boxes.
- Display distribution data A tabular list of the user data (SU01) is output.
The distribution into the subsidiary systems is basedon the assignments and objects in the distributiondata table.
- Distribute immediately When you trigger distribution, the user data in the dependentsystems is compared according to your model. This function canonly be executed by a system administrator with the appropriateauthorizations (Authorizations for the Global User Manager[Page 111]).
Only data that has changed since the last distribution istransferred to the dependent systems. If large changes weremade, the distribution may increase system load considerably. Inthis case, you should consider whether the distribution shouldrun at night as a background job.
- Schedule distribution If you schedule RSUSR500 to run as a background job, all usersin all dependent systems are compared according to the definedmodel.
After you call the function, the initial screen for defining abackground job appears. Enter data as required. In the Serverfield, enter the server of the central system. Enter the start timefor the job on the next screen. The job step is the calling of theABAP program RSUSR500.
System comparison Using Extras → System comparison, the names of the roles inthe individual dependent system are temporarily stored in thecentral system. You can then assign them to users or systemsthere. The system comparison generates a current status(changes may have been made to roles in the dependentsystems). Since the comparison requires some time, it isexecuted asynchronously. The current data may not beimmediately available after the function is executed.

SAP AG Users and Roles (BC-CCM-USR)
First Installation Procedure
April 2001 113
Migration Using Extras → Migration → Users, the existing user data istransferred to the Global User Manager. The migration onlymakes assignments to individual users. To model the data afterthe migration, assign the users to one or more groups using dragand drop and make sure that the group has the samerelationships as the individual users. You can then delete theindividual user assignments. This is how you move step by stepfrom maintenance of individual users to modeling.
Another possibility would be to create the completemodel and define all the groups. This means you donot have to delete the individual assignments. In thiscase, the first distribution should only be made onceyou are sure that all users have been included. Ifyou decide to use this procedure, do not migrate.
Using Extras → Migration → Roles, you ensure that all roles inthe individual systems are assigned to these systems. To ensurethe migration is as complete as possible, execute a systemcomparison prior to the migration. Execute the migration whenyou start using the Global User Manager and model the userdata based on the migration.
- Create user groups Create a user group by choosing the Create icon next to the listof user groups and entering the required data.
- Create system types Create a system type by choosing the Create icon. Enter data asrequired.
First Installation ProcedureTo create authorizations for your SAP System:
Procedure Optional
1. Get an overview of the various tasks of your staff.
If your company uses various applications, you must liaise with the variousdepartments to decide which workplaces to define in each department, andwhich authorizations the staff is to be given. Each workplace should bedefined (in writing). The authorization managers need to know whichemployees can access which data, call which transactions and programs, etc.
2. Install the Central User Administration. (This step is optional and depends on howmany clients and system users must be maintained. You should use the CentralUser Administration if more than one system with several users is used).
See Installing Central User Administration [Page 94].
X

Users and Roles (BC-CCM-USR) SAP AG
First Installation Procedure
114 April 2001
3. Organize the management tasks.
Install the system administrator for authorization maintenance.
See Organizing User and Authorization Maintenance [Page 115]. See alsoSecurity in system networks [Page 121].
4. Reduce the extent of authorization checks if possible, before using the profilegenerator.
If the profile generator is active, an authorization check is only executed it isin the source code of a transaction and is not explicitly excluded from thecheck.
SAP supplies proposals for check indicator and authorization field values,which you must copy. You can then edit these copied defaults.
Copy the SAP check indicator and field values in step 1 in the transactionSU25.
Then change the check indicator if necessary. You also use check indicatorsto control which objects are not to be checked, which appear in the ProfileGenerator and which field values are displayed there for editing before theauthorization profiles are generated automatically.
You can also globally deactivate authorization objects in the transaction SU25(item 5).
See Reduce extent of authorization checks [Page 75].
X
5. Create roles in the development system (of the child systems).
See Create roles [Page 38].
6. Define test user and assign roles to them according to their job descriptions. Testthe defined jobs in the quality assurance system with the help of the departmentsconcerned (in the child systems). Make any corrections which may be necessaryduring the test.
See Create and maintain user master records [Page 10].
7. Create the users in the production or central system and assign them their roles.If you use the central user management, compare the systems or migrate first inthe Global User Manager.
See Create and maintain user master records [Page 10] or Global UserManager functions [Page 111].

SAP AG Users and Roles (BC-CCM-USR)
Organizing User and Authorization Maintenance
April 2001 115
8. Update the validity of the profiles in the user master record.
This is only necessary if you make indirect assignments of users to roles inOrganization management (HR-Org) or time-dependent assignments of rolesto users.
You cannot restrict the validity of authorization profiles in a user masterrecord by time.
But you can assign roles to a user master record for a time period.
You must periodically compare these profiles with the corresponding roles inthe user master record to ensure that they are up-to-date. Use the programPFCG_TIME_DEPENDENCY.
You should check regularly as administrator whether background job errorshave occurred in the job log of the program PFCG_TIME_DEPENDENCY.
Resolve such errors manually.
9. Assign table maintenance authorizations
You can specify which table types can be maintained by which employees.
Choose Edit → Assign Authorizations → Manual entry and enter the object"S_TABU_DIS" in the Profile generator authorization maintenance(transaction PFCG, Authorization tab, "Change authorization data").
The selected object is inserted in the authorization maintenance hierarchydisplay with its authorizations and fields (activity and authorization group).
Each table or view can be assigned to an authorization group.
SAP delivers authorization groups and assignments of tables/views to groups.
You can also assign row-orientes authorizations for tables. See Row-orientedauthorizations [Page 86].
10. Define not-allowed passwords.
You can prevent users from choosing passwords that you do not want toallow. To prohibit the use of a password, enter it in table USR40.
See Specifying Impermissible Passwords [Ext.].
X
See Security in system networks [Page 121].
Organizing User and Authorization MaintenanceThis section describes how you organize user and authorization maintenance in your R/3System.
Managing users and roles [Page 116]
Distributed Administration [Page 116]
Create administrator [Page 117]

Users and Roles (BC-CCM-USR) SAP AG
Managing users and roles
116 April 2001
Managing users and rolesThe authorization system allows you great flexibility in organizing and authorizing themaintenance of user master records and roles:
• If your organization is small and centralized, you can have all maintenance of user masterrecords and authorization components executed by a single superuser.
For more information on setting up superusers, see Protecting Special Users [Page 118].
• If you want to maximize system security and accommodate decentralized systemadministration, you can divide up maintenance among user and authorization administratorswho have limited authorizations.
As you can precisely restrict authorizations for user and authorization maintenance, theadministrators do not have to be privileged users. You can assign user and authorizationmaintenance to ordinary users.
This topic explains how to:
• how to authorize users to maintain user master records, profiles and authorizations.
• how to increase security by setting up separate administrators for maintaining user masterrecords and roles.
Distributed AdministrationIf you are using the Profile Generator, you can automatically generate authorization profilesbased on selectable R/3 transactions. You can also generate these type of profiles foradministrators using templates.
For reasons of system security, you should divide up system administration tasks betweendifferent administrators as described below.
The superuser sets up user master records, profiles and authorizations for administrators in oneor more areas.
An area may be a department, a cost center or any other organizational unit.
Within an area, administration tasks are divided among the following three administrators:
• User administrator
User administrators have authorizations to do the following:
– Create and change users (Transaction SU01)
– Assign user roles
– Assign profiles beginning with T to users
– Display authorizations and profiles
– Call user information system (Tools → Administration → User maintenance →Infosystem)
They are not authorized to:

SAP AG Users and Roles (BC-CCM-USR)
Setting up Administrators
April 2001 117
– Change role data
– Change or generate profiles
• Authorization administrator
Authorization data administrators have authorizations to do the following:
– Create and change roles (PFCG)
– Change the transaction selection and authorization data in roles
– Call user information system
They are not authorized to:
– Change users
– Generate profiles
• Authorization profile administrator
Authorization profile administrators have authorizations to do the following:
– Display roles and their data
– Generate authorizations and authorization profiles beginning with T based onexisting roles.
– Compare user master (transaction SUPC)
– Call user information system
They are not authorized to:
– Change users
– Change role data
– Generate authorization profiles containing authorization objects beginning withS_USER.
For information about assigning administration tasks to the various users see Setting UpAdministrators [Page 117].
You can use authorization objects S_USER_AGR, S_USER_TCD and S_USER_VAL to furtherdifferentiate the roles of the administrators.
Setting up AdministratorsYou should proceed as follows:
1. Create an role for each administrator.
2. Do not choose any transactions, choose Change authorization data in the Authorizations tab.The system displays a dialog box asking you to choose a template.
3. Choose one of the following templates:

Users and Roles (BC-CCM-USR) SAP AG
Protecting Special Users
118 April 2001
Template: Administrator:
SAP_ADM_PR Authorization profile administrator
SAP_ADM_AU Authorization administrator
SAP_ADM_US User administrator
4. Generate an authorization profile for each.
Use a profile name which DOES NOT begin with T.
5. Assign the roles to the appropriate users.
Using user administration, you can restrict the authorization to particular user groups.
Using profile administration, you can exclude further authorization objects, for example, for HRdata. If you want your generated authorization profiles to begin with a letter other than T, youshould inform your profile administrator.
How the Three Administrators Work Together
The authorization data administrator creates a role, chooses transactions and maintainsauthorization data. In the Profile Generator, authorization data administrators merely save thedata since they are not authorized to generate the profile, and accepts the default profile nameT_....
The Authorization profile administrator calls the transaction SUPC and chooses All roles. Heor she then restricts the selection, for example by entering the ID of the role to be processed. Onthe following screen, the administrator selects Display profile to check the data. If the data iscorrect, the administrator generates the authorization profile.
Finally, the user administrator assigns the role to a user (using User maintenance). Theauthorization profile is added to the user master record.
No authorization profile beginning with T may contain critical (S_USER* objects)authorization objects.
Protecting Special UsersClients 000, 001 and 066 are created when your SAP System is installed. Two special users aredefined in clients 000 and 001. Since these users have standard names and standardpasswords, you must secure them against unauthorized use by outsiders who know of theirexistence.
Note that no special user is created in client 066.
The two special users in the SAP System are as follows:
• The SAP System superuser, SAP*
SAP* is the only user in the SAP System that does not require a user master record, butthat is instead defined in the system code itself. SAP* has by default the passwordPASS, as well as unlimited system access authorizations.

SAP AG Users and Roles (BC-CCM-USR)
Securing User SAP* Against Misuse
April 2001 119
When you install your SAP System, a user master record is defined for SAP* with theinitial password 06071992 in Clients 000 and 001. The presence of a SAP* user masterrecord deactivates the special properties of SAP*. It has only the password and theauthorizations that are specified for it in the user master record.
To secure SAP* against misuse, you should at least change its password from thestandard PASS. For security reasons, SAP recommends that you deactivate SAP* anddefine your own superuser.
• The maintenance user for the ABAP Dictionary and software logistics, user DDIC.
The user master record for user DDIC is automatically created in clients 000 and 001when you install your SAP System. The default password for this user is 19920706. Thesystem code allows user DDIC special privileges for certain operations. For example,DDIC is the only user that is allowed to log on to the SAP System during an upgrade.
To secure DDIC against unauthorized use, you must change the initial password for theuser in clients 000 and 001 in your R/3 System.
• The user EarlyWatch is delivered in client 066 and is protected using the passwordSUPPORT. The EarlyWatch experts from SAP use this user. It should not be deleted.Change the password. This user should only be used for EarlyWatch functions (monitoringand performance).
See:
Securing User SAP* Against Misuse [Page 119]
Protecting user DDIC against unauthorized access [Page 120]
Securing User SAP* Against MisuseThe SAP System has a default superuser, SAP*, in the clients 000 and 001. A user masterrecord is defined for SAP* when the system is installed. However, SAP* is programmed in thesystem and does not require a user master record.
If you delete the SAP* user master record and log on again as SAP* with initial password PASS,then SAP* has the following attributes:
• The user is not subject to authorization checks and therefore has all authorizations.
• The user has the password "PASS", which cannot be changed.
If you want to deactivate the special properties of SAP*, set the system profileparameter login/no_automatic_user_sapstar to a value greater than zero. If theparameter is set, then SAP* has no special default properties. If there is no SAP*user master record, then SAP* cannot be used to log on.
You should set the parameter in the global system profile, DEFAULT.PFL, so that itis effective in all instances of an SAP System. You should ensure that there is a usermaster record for SAP* even if you set the parameter. Otherwise, resetting theparameter to the value 0 would once again allow you to log on with SAP*, thepassword ”PASS” and unrestricted system authorizations.
See Profile maintenance [Ext.] for system profile parameter details.

Users and Roles (BC-CCM-USR) SAP AG
Protecting User DDIC Against Unauthorized Access
120 April 2001
If a user master record exists for SAP*, it behaves like a normal user. It is subject to authorizationchecks and its password can be changed.
Deactivating User SAP*As SAP* is a known superuser, SAP recommends that you deactivate it and replace it with yourown superuser. In the SAP* user master record, you should proceed as follows:
• Create a user master record for SAP* in all new clients and in client 066.
• Assign a new password to SAP* in clients 000 and 001.
• Delete all profiles from the SAP* profile list so that it has no authorizations.
• Ensure that SAP* is assigned to the user group SUPER to prevent accidental deletion ormodification of the user master record.
The SUPER user group has a special status in the predefined user profiles. (They are describedlater in this topic.)
The users that are assigned to group SUPER can be maintained or deleted only by the newsuperuser that you define, provided that:
• you use the predefined profiles, and
• you follow SAP's other user and authorization maintenance recommendations.
Defining a New SuperuserTo define a superuser to replace SAP*, you need only give a user the SAP_ALL profile.SAP_ALL contains all R/3 authorizations, including new authorizations released in theSAP_NEW profile.
SAP_NEW assures upward compatibility of authorizations. The profile ensures that users are notinconvenienced when a release or update includes new authorization checks for functions thatwere previously unprotected.
Protecting User DDIC Against Unauthorized AccessUser DDIC is a user with special privileges in installation, software logistics, and the ABAPDictionary. The user master record is created in clients 000 and 001 when you install your R/3System.
You should secure the DDIC user against misuse by changing DDIC’s initial password 19920706in clients 000 and 001.
User DDIC is required for certain installation and setup tasks in the system, so you should notdelete it.

SAP AG Users and Roles (BC-CCM-USR)
Security in System Groups
April 2001 121
Security in System GroupsThe development system
When the development system is first installed the R/3 users are mainly the project teammembers, including developers and system administrators. Most users of a newly-installed SAPSystem initially have the authorization profile SAP_ALL, which allows them to perform all R/3tasks, in their user master record. As the R/3 project progresses it is necessary to restrict useraccess. Development system users usually have greater access rights as quality assurance orproduction system users.
Authorization administrators should make themselves acquainted with the SAP authorizationconcept in this phase. First define the role or profile <company>_ALL based on SAP_ALL withoutsuperuser authorization, as follows:
1. Create a role with Tools → Administration → User maintenance → Roles.
2. Do not enter any transactions, choose Authorizations and then Change authorization data.
3. Do not copy any templates, choose Edit → Add authorization. → Full authorization.
4. Expand the Basis administration object class.Here you find the authorizations which are generally regarded as critical.
5. Deactivate all authorizations which begin with User master maintenance or have S_USER_*in the object name, and any others which you regard as critical.
6. Generate a new profile with the Profile Generator and save it under a new name (seePredefined profile: Naming convention [Page 90]).
You can assign the role you have just created to the user in user maintenance. See Assigningroles [Page 15].
This control ensures the integrity and stability of the system.
The Basis authorization objects are documented in the transaction AUTH_OBJECTS_DISPLAY.The authorization objects in the object class Basis - Administration are called S_USER_*.Position the cursor on an authorization object and choose Information.
For further information about Basis System and SAP work area authorizations, seeTools → AcceleratedSAP → Customizing → Edit project and the SAP ReferenceIMG pushbutton. Search for the entries User or Authorization to call the authorizationsections.
The following standard roles [Page 30] are delivered:
Basis: Authorization data administratorBasis: Authorization profile administratorBasis: User administratorBasis: System administratorBasis: Batch administratorBasis: Database administratorBasis: Customizing project memberBasis: ABAP developerBasis: Uncritical basis authorizations for all users

Users and Roles (BC-CCM-USR) SAP AG
Security in System Groups
122 April 2001
The authorization administrator creates profiles and authorizations for end users in thedevelopment system. These authorizations and profiles are transported to the final test in thequality assurance system before being put in the production system. The user master records areusually created in the production system shortly before it goes live. The roles are assigned to theend users in the production system together with the transported authorization data, as required.
The authorization administrator must know which clients are to be created in the customersystems. Roles are not automatically copied when new clients are created. As users, roles,authorization profiles and authorizations are client-specific, the client copy administrator mustalso know which user master records are to be copied.
If the SAP standard changes and user developments are made, you must clarify:
• Which development classes are to be created?
• Which authorization groups are to be created for programs?
• When are development requests transported?
• Into which clients are they transported?
etc.
SAP Standard changes (BC) [Ext.] contains information about how to proceed with newdevelopments and changes to the SAP Standard.
New customer program code should be assigned to an authorization group in theABAP Editor (SE38) Program attributes screen. Use the authorization object ABAPDevelopment Workbench (S_DEVELOP) to assign an authorization group forprograms to users.
The quality assurance system
The authorization administrator can start to transport the roles from the development system intothe quality assurance system when it has been setup.
For example a member of the FI project team can check the following in the accounts payableaccounting with a model user ID:
• whether the user has access to the transactions in the roles assigned to him or her
• whether these transactions correspond to the role defined by the company for the accountspayable accounting
• whether the model user ID has unallowed access authorization for certain transactions
The end users can logon in a test environment and simulate production processing to test theuser authorizations.
A training client is usually created in the quality assurance system because it contains the newestconfiguration. Larger installations have a separate training system. In both cases theauthorization administrator should contact the project team members responsible for training tofamiliarize him or herself with the creation of user IDs and roles.
The production system
When the roles and authorization profiles have been completely tested in the quality assurancesystem and approved by the end users or project team, the roles can be transported into theproduction system. The user IDs can then be created. A form is distributed to all departments.
SAP AG Users and Roles (BC-CCM-USR)
Upgrade Procedure
April 2001 123
When all the information required for the creation of user IDs has been entered, it is signed by allrelevant persons.
You should never make changes to a production R/3 System. You should therefore not assignfollowing authorizations to users in a production system:
• Authorizations for the ABAP Development Workbench (authorization objects ABAPDevelopment Workbench (S_DEVELOP) and Transport Organizer (S_TRANSPRT))
• SAP System operating system command execution authorizations (transaction SM52)(System Authorizations (S_ADMI_FCD) value UNIX).
• Authorizations to deactivate authorization checks (transaction AUTH_SWITCH_OBJECTS)with the authorization object S_USER_OBJ.
Upgrade ProcedureYou should perform the following activities in an upgrade from a Release before 4.6A to Release4.6A or later:
1. Migrate report trees
The report tree data structure has changed. Existing report trees must be adjusted to thechanged data structures if they are to continue to be used. The migration is performed bythe transaction RTTREE_MIGRATION. You only need to run the transaction in theclients which contain the production versions of the report trees. Transaction codes areassigned to all reports in a tree during the migration. This allows you to put reports in theuser menu in the role maintenance. You can define a company-specific transaction codeprefix in the SAP Reference IMG under Basis → System administration → Report treemigration namespace.
2. Reconcile the default check indicator and field values in the previous and new releases intransaction SU25 (steps 2a - 2d).
If you have made changes to check indicators or field values in Transaction SU24, youcan compare these with the new SAP default values. The previous and new settings aredisplayed in a list. You can decide whether you want to use each new setting or retainthe previous one.
In the next step, the system displays a list of roles affected by changes to theauthorization data. Edit and regenerate their authorization profiles.
To save time if you utilize a large number of roles, you can skip editing and assignthe profile SAP_NEW to the users manually. The profile SAP_NEW is delivered withevery new Release and contains the authorizations for all new checks in existingtransactions.
Step 2d display a list all roles containing any transactions that have been replaced byone or more other transactions.

Users and Roles (BC-CCM-USR) SAP AG
Upgrade Procedure
124 April 2001
In the last section, you can adjust authorization checks. This includes changing checkindicators (Transaction SU24) and globally switching off authorization objects.
3. Activate the Profile Generator
This step is not necessary in new installations or when upgrading from Release 4.5Bor 4.6A to 4.6B, as the parameter is already set.
Make the following setting in the system profile maintenance:
auth/no_check_in_some_cases=Y
This parameter setting has the following effect:
• When a transaction is called, the system checks to see whether its authorization checks areto be suppressed.
• The authorization profile generator is activated in the role maintenance basic data screen(the Authorizations tab appears).
Help → Application help in transaction RZ10 contains system profile parametermaintenance information.
4. Install the Central User Administration and perform the user administration with the GlobalUser Manager if several systems must be managed. See Central user administration [Page94].