user ’s manual v3 - cn-cctv.com dome 216t user manual.pdfir high speed dome camera user ’s...
TRANSCRIPT

IR HIGH SPEED DOME CAMERAUSER’S MANUAL V3.0

1
TableTableTableTable ofofofof ContentsContentsContentsContents
Precautions………………………………………………………………....2
Features……………………………………………………………………….3
Technical Data……………………………………………………………..9
Installation Guide…………………………………………………………10
Dome Settings…………………………………………………………..…18
Operation Instructions…………………………………………………22

2
1111 PrecautionPrecautionPrecautionPrecaution
1. Please read this manual carefully before the installations and operations.
2. Transportation SecurityNo heavy stress, violent vibration or water splash are allowed duringtransportation, storage. The unit should be transported in separatedpacking. In shipments of distributor and delivery of maintenance, anydamages caused by integral packing are not covered by warranty.
3. InstallationAvoid heavy stress and violent vibration during installation. Don’t touch thedome cover directly by hand. When connecting the power source, pleasefollow all electric safety standards and only use the power supplydesignated for this device. Keep the video and control signal in a decentdistance from high voltage devices and cable. Don’t apply power to domebefore finishing the installation.
4. Internal EnvironmentKeep metal and inflammable material away from dome body to avoid fireshort circuit and damage. Please prevent all liquids material from enteringthe dome. If this occurs, please shut down the power and pull out theplug-in. Then please inform the technical personnel immediately.
5. Electrical SafetyThe video image would be interfered when the dome is installed nearTelevision, radio transmitter, voltage changer and audio amplifier.
6. Camera ProtectionAvoid shooting very bright objects directly into the camera’s CCD (suchAs the sun or light fittings) and avoid fixating the camera lens on bright

3
static object for long time, as it will cause Irreparable damage to thecamera’s CCD.
7. Cleaning MethodPlease don’t use abrasive and violent detergent to clean the dome. Pleasechoose dry fabric and neutral detergent. And please use lens paper to cleanthe lens.
8. Internal removing, assembly, repair and operations should be onlyperformed by qualified service personnel.
9. Please use our production under the following environmental standards:
Environmental Temperature -35~60 oC
Environmental Humidity <95%
Barometric Pressure 86~106KPa
Power Supply DC12V/4A
2222 FeaturesFeaturesFeaturesFeatures2.12.12.12.1MainMainMainMain FeaturesFeaturesFeaturesFeatures• Stepless speed changes, auto zoom/speed matching• Pan 0.01~360o/S, Tilt 0.01o~120o/S, Preset: 400o/S (high speed IR speed dome)• Pan 0.5o~20o, Tilt 0.5o~20o, Preset: 20o/s (for Vari-speed IR dome)• Auto object track with zoom in/out and motion detection (Auto Track Model)• Timing actions for 7 days of programmable schedule• Built-in Semi-conductor heater & digital temperature sensor• PWM cooling fan vari-speed temperature control• Reserved network interface and space for network module• Pan Tilt accuracy +/- 0.1o, 220preset positions• 8 cruising tracks, each cruising track has 32 presets

4
• 4 pattern tours,10 Mins memory, 500 programmable instructions• Multi-Protocol through RS485 or coaxial cable.• 8 auto scan with use-defined left and right boundaries and settable scan speed• 8 Privacy Zones with defined English camera title• Auto Compatible PELCO_P, PELCO_D compatible• Guard Location: the dome will rotate back to preset position after a period ofvacant time• Alarm triggering: the alarm can trigger preset, auto scan, cruising and pattern
tours functions• Soft Address Function: the use can set up the dome address without uninstall
the dome
2.2.2.2.2222 IntegratedIntegratedIntegratedIntegrated SuperSuperSuperSuper SpeedSpeedSpeedSpeed PTZPTZPTZPTZ RotatorRotatorRotatorRotator
• Delicate stepping motor, stable, sensitive and accurate• 360° Pan and 90° Tilt range (auto-flip) without blind area• Stepless speed change, auto zoom/speed matching• Near / far IR Light auto matches camera zoom in/out
2.2.2.2.3333 Built-inBuilt-inBuilt-inBuilt-in HighHighHighHigh DefinitionDefinitionDefinitionDefinition Day/NightDay/NightDay/NightDay/Night CameraCameraCameraCamera
• Auto iris, auto back light compensation• Auto/manual white balance• Auto/manual brightness control• Auto/manual focus• Multiple compatible camera brands including Sony, Samsung, LG, CNB, Sanyoetc.
2.2.2.2.4444 All-weatherAll-weatherAll-weatherAll-weather OutdoorOutdoorOutdoorOutdoor DesignDesignDesignDesign
• 6 Inch High die-cast alloy aluminum construction
• High Precision Mould with high heat conductivity
• Fully enclosed isolation design for heat sink

5
• Nanometer Dustproof, waterproof and fog-proof lens
• IP66 Waterproof
• 3000V lightning and surge current protection
2.52.52.52.5 FunctionFunctionFunctionFunction InstructionsInstructionsInstructionsInstructions• Focus / PTZ Speed Auto MatchThe pan/tilt rotation speed could be automatically adjusted according to thefocus in/out, which makes it much more practical for manual target tracking.(Only for the auto tracking IR speed dome)
• Auto FlipWhen the camera tilts downward and goes just beyond the vertical position, thecamera will rotate 180 degrees.
• Preset Position Set up and Call UpIn the Preset function the dome stores the current pan/tilt angle, zoom andother position parameters in its memory. When necessary the dome recallsthese parameters and adjusts the camera to a particular position. The user canstore, recall and clear the presets easily and promptly by using the keyboardcontroller. The dome can store up to 220 presets.
• Auto ScanUsers can set up the left and right boundaries by control keyboard. Then speeddome can scan between this boundary. It supports up to 8 groups of scanningpaths.
• Cruising TrackThe preset position can be programmed to be recalled in a set of sequences. Thissequence can be set to let the camera scan from one position to the next in acycle at a set speed. This feature is called the “auto cruise”. The cruise sequenceand dwell time of each preset can be set. It supports up to 8 cruising tracks, eachcruising track with 32 presets.

6
• Pattern TourDome can memorize 600s running path or 500 programmable instructions.When start pattern tour, speed dome will move automatically accordingrecorded action path. It supports 4 groups of pattern tours.
• Guard LocationThe dome will automatically return to preset position if there is no operation in aperiod of vacant time.
• Default ActionWhen you start up the dome camera or do not send commands over a long time,the dome camera will return to its default functions which include the homeplace, auto pan, auto cruise and pattern.
• Dome Address SetupThe dome supports up to 256 addresses and the dome will only response to theinstructions given to its own address. Please check the dip switch on the bottomof the dome for address setup.
• Manual Object TrackingThe use can move the joystick up, down, left or right to track the appearingobject in the screen and use the joystick to zoom in and out with auto focus.
• Privacy Mask ProtectionSet black mask areas to protect the privacy zones. The black privacy locationscan be set, and support up to 8 mask zones.
• Timing Running FunctionUsers can set speed dome operation task at total 8 timing areas during 7 days.
• Coordinates and Directions DisplayUser can define the dome’s direction of due north, which will help to showup the exact moving directions on screen. And zone title is supported to

7
display when the dome moves to the specified zone.
• Auto TrackingThe dome will automatically fix and track the moving object according to theuser’s setup via OSD.
• Motion DetectionThe dome will detect the changes in the defined video zone and trigger alarm.It supports to 8 video Locations, each with 4 detection zones.
• PTZ and Lens Control
1) Zoom ControlUsers can control zoom by keyboard to get near or far images.
2) Focus ControlThe default setting is auto focus. The camera will auto focus based on the centerof the video display to get the clear image. In some special occasions, the usercould do the manual focus to get the desired image effect.
3) Auto Iris ControlAuto Iris is aiming to detect the environmental lights condition and adjust the iristo get the stabilized brightness of the image.
4) Auto Back Light CompensationIn the highly bright background, auto back light compensation is aiming tocompensate the brightness of the dark object and adjust the backgroundbrightness to get a clear image.
5) Auto/Manual White BalanceAuto/Manual WB adjust depending on the environment light changes.
6) Day and Night Switch (Only for Day/Nigh Camera)Speed dome camera can auto switch according to the environmental

8
illumination changes.
7) OSD Setup (Only for camera with menu)Call upon preset No.95 to enter into OSD menu setup interface. Press “Focus”to choose menu items and press “Iris” to set menu contents.

9
3333 TechnicalTechnicalTechnicalTechnical SpecificationsSpecificationsSpecificationsSpecifications
Power Supply DC12V+10% 50W
Night IR Distance 120/150/180meters
Manual Speed Pan 0.01o~180o, Tilt 0.01o~100o (high speed) /Pan:0.5o~35o/S, Tilt:0.5o~35o/S (Vair-speed)
Preset Speed 360 o/S (high speed) / 35o/S (Vari-speed)
Pan Angle 360o continuous pan rotation
Tilt Angle 90o(Auto Flip)
Presets Positions 220
Preset Accuracy +/-0.1o
Auto Scan 8 auto scan tracks, user-defined left and right boundaries and scan speed
Auto Cruising 8 cruising tracks, each cruising tracks has 32 preset positions,user-defined dwell time
Pattern Tour 4 groups, each one with 10 Mins memory, 500 programmable instructions
Guard Location The dome will rotate back to preset position after a period of vacant time.
IR LED On Mode Manual/Auto/Timing
DataCommunication
RS-485
Protocols Auto Compatible PELCO_P, PELCO_D
Camera Module Auto Compatible SONY,LG,Samsung,CNB,HITACH,etc.
Baud Rate 2400/4800/9600bps
Operating Humidity 0~90%
Operating Temp -35o~ +60oC

10
4444 InstallationInstallationInstallationInstallation GuideGuideGuideGuide
4.14.14.14.1 PreparationsPreparationsPreparationsPreparations
1)1)1)1) BasicBasicBasicBasic RequirementsRequirementsRequirementsRequirements
AllAllAllAll thethethethe electricelectricelectricelectric workworkworkwork mustmustmustmust bebebebe finishedfinishedfinishedfinished underunderunderunder thethethethe latestlatestlatestlatest electricelectricelectricelectric &&&& firefirefirefire preventionpreventionpreventionpreventionlawlawlawlaw andandandand rulesrulesrulesrules (and(and(and(and anyanyanyany relatedrelatedrelatedrelated lawlawlawlaw andandandand rules).rules).rules).rules). PleasePleasePleasePlease checkcheckcheckcheck accordingaccordingaccordingaccording totototo thethethethepackingpackingpackingpacking listlistlistlist ifififif everyeveryeveryevery accessoryaccessoryaccessoryaccessory isisisis included.included.included.included. AndAndAndAnd alsoalsoalsoalso makemakemakemake suresuresuresure thethethethe installationinstallationinstallationinstallation isisisisoperatedoperatedoperatedoperated asasasas required.required.required.required. PleasePleasePleasePlease contactcontactcontactcontact usususus forforforfor anyanyanyany helphelphelphelp duringduringduringduring thethethethe installation.installation.installation.installation.
2)2)2)2) InstallationInstallationInstallationInstallation SpaceSpaceSpaceSpace andandandand DensityDensityDensityDensity CheckupCheckupCheckupCheckupPleasePleasePleasePlease makemakemakemake suresuresuresure thethethethe spacespacespacespace isisisis bigbigbigbig enoughenoughenoughenough totototo installinstallinstallinstall ourourourour dome.dome.dome.dome. AndAndAndAnd alsoalsoalsoalso ensureensureensureensurethethethethe densitydensitydensitydensity ofofofof thethethethe ceilingceilingceilingceilingssss orororor wallswallswallswalls totototo holdholdholdhold totaltotaltotaltotal weightweightweightweight ofofofof thethethethe domedomedomedome andandandand itsitsitsitsaccessories.accessories.accessories.accessories.
3) Cables Preparation
Please choose the proper cable according to the transmission distance. The min
requirement of coaxial BNC cable is listed as follows for reference:
4) Setup Dip Switch for Dome Address*Please turn to Part 5 for details.
Models Max Distance(Feet\Meter)
RG59/U 750ft(229m)
RG6//U 1,000ft(305m)
RG11/U 1,500ft(457m)

11
4.24.24.24.2 InstallationInstallationInstallationInstallationMethodMethodMethodMethod
The IR speed dome could be installed in wall-mount and pedant-mount

12
4.3 Installation DimensionsWall Mount

13
Pendant Mount
4.4 Installation Procedures
*Notice: The wall and ceiling must be thick enough to install the expansionbolts and can bear 4 times the weight of the dome camera itself.
Wall-mount Installation Procedures:

14
1) Take out the bracket from the package (as shown), mark the installation holepositions on the wall referencing to the bottom of bracket.
2) Drill the hole and install 4 pieces of M8 expansion bolt into the hole.
3) Take out the IR speed dome and put the cables through the bracket.Use M5 screws to fix the bracket and dome body.

15
4) Use 4 pieces of M8 screw nuts with washer to fix the bracket on the wall.
Pendant-mount Installation Procedures:
1) Take out the bracket from the package (as shown), mark the installation holepositions on the ceiling referencing to the bottom of bracket.

16
2) Drill the hole and install 4 pieces of M8 expansion bolt into the hole.
3) Take out the IR speed dome and put the cables through the sockets on thebottom of the pendant bracket. Use M5 screws to fix the bracket and dome body.

17
4) Use screw nuts with washer to fix the bracket on the wall.
Notice: Pendant-bracket is not designed for outdoor installation. If speciallyrequired, please do make sure the waterproof installation of the dome.

18
DomeDomeDomeDome SettingSettingSettingSettingBefore the dome is installed, please finish the setup of the communicationprotocol, baud rate and dome address. Set the DIP switch inside the dome body.The relative DIP switch site and connecting wires are diagramed below forreference.

19
SW1— Dip switch for the dome addressSW2— Dip switch for the dome protocol
1) Protocol Setup
Our IR speed dome supports three protocols including Pelco P, Pelco D and HS.All of them supports baud rate of 9600bps、4800bps、2400bps.
Set the No.1~4 dip switch for the protocol configuration.
Protocol SW2-1 SW2-2 SW2-3 SW2-4HS OFF OFF OFF OFF
PELCO P ON OFF OFF OFF

20
PELCO D OFF ON OFF OFFReserve
d… … … …
2) Baud Rate Setup
Set the No.5~6 dip switch for the baud rate configuration.
3) Dome Address Setup
PELCO-P & PELCO-D ProtocolAdd
SW-1 SW1-2 SW1-3 SW1-4 SW1-5 SW1-6 SW1-7 SW1-8
1 1 0 0 0 0 0 0 02 0 1 0 0 0 0 0 03 1 1 0 0 0 0 0 04 0 0 1 0 0 0 0 05 1 0 1 0 0 0 0 06 0 1 1 0 0 0 0 07 1 1 1 0 0 0 0 08 0 0 0 1 0 0 0 09 1 0 0 1 0 0 0 0
Baud Rate SW2-5 SW2-6
9600 OFF OFF
4800 ON OFF
2400 OFF ON
Reserved … …

21
10 0 1 0 1 0 0 0 011 1 1 0 1 0 0 0 012 0 0 1 1 0 0 0 013 1 0 1 1 0 0 0 014 0 1 1 1 0 0 0 015 1 1 1 1 0 0 0 016 0 0 0 0 1 0 0 017 1 0 0 0 1 0 0 018 0 1 0 0 1 0 0 019 1 1 0 0 1 0 0 020 0 0 1 0 1 0 0 021 1 0 1 0 1 0 0 022 0 1 1 0 1 0 0 023 1 1 1 0 1 0 0 024 0 0 0 1 1 0 0 025 1 0 0 1 1 0 0 026 0 1 0 1 1 0 0 027 1 1 0 1 1 0 0 028 0 0 1 1 1 0 0 029 1 0 1 1 1 0 0 030 0 1 1 1 1 0 0 031 1 1 1 1 1 0 0 032 0 0 0 0 0 1 0 0… … … … … … … … …253 1 0 1 1 1 1 1 1254 0 1 1 1 1 1 1 1
4) Cable Definition

22
BNC Connector: Video Coaxial CablePower Connector: DC12VRed: RS485AYellow: RS485B
OperationOperationOperationOperation InstructionsInstructionsInstructionsInstructions
1) Main Functions Fast Call UpOur IR Speed dome supports 220 preset positions. You can activate some specialfunctions by calling upon code number 65-99.
SerialNo. Command Fast Call Up Note
1 Start Auto Scan Call 99 Default to start auto scan ofgroup No.1
2 Start Auto Cruise Call 98 Default to start auto cruise ofgroup No.1
3 Start Pattern Tour Call 97 Default to start pattern tour ofgroup No.1
4 Start Auto Scan ofGroup No. Call 80+ Call pp+ Call 99
pp means:Group No.1-85 Start Auto Cruise of
Group No. Call 80+ Call pp+ Call 98
6 Start Pattern Tour ofGroup No. Call 80+ Call pp+ Call 97 pp means:Group No.1-4
7 Stop Auto Mode/End upSetting Call 96
8 Open OSD Menu Set 95(or Call 95)9 Remote Reset Call 9410 Recover Factory Default Call 82
2) System Self-TestingThe dome will do self-testing after power up, and system status will show“Normal” if system Is running normally. If error happens, testing result will beshown in “○” or “X”. “○” means normal and “X” means error. Please check the

23
according meaning as follows:
3) OSD Menu Operations
Call Preset 95 to enter the main OSD menu (or call preset No.1 twotimes continuously within two seconds)
Control the joystick to move the cursor around the menu
Press
“Iris
Open” to enter the menu for selections
Move the joystick up and down to select the item
Press “Iris Open” to confirm the selection
Press “Iris Close” to cancel the selection
*Note: If your controller does not have a joystick, use the up or down key.
4) OSD Menu Functions
Serial No. 1 2 3 4 5 6Meaning Dip Switch Temperature Sensor Storage Pan Tilt Camera

24

25
LANGUAGE
The language for the on-screen menus isSelectable.
To change the display language:
Press Iris Open to enter selection.All on-screen menus are changed to theselected language.
SYSTEM INFORMATION
The user can check the dome system information as required.

26
The system information includes: Dome ID, dome address, baud rate, protocol, temperature, voltage,alarm info, dome title, version, date, time, and temperature scale.
Use the following steps to display theSystem Information screens:1. Use the joystick to position the cursor along the SYSTEM INFORMATION.2. Press Iris Open. The SYSTEM INFORMATION screen opens.3. Mover the joystick up and town to select the item.
4. Press Iris Open to enter the setup of each item.
DISPLAY SETUPDisplay setup allows the user to define the way to display thedome titles on the monitor.
The displayed titles are listed as follows:

27
DOME TITLE Indicate domePRESET Indicate the dwell time for preset title
MOTION Indicate the dwell time for auto function titles(auto scan/auto cruise/pattern tour)
ZONES Indicate the dwell time for zone titlesDATE/TIME Display the current date and time
PAN/TILT Time to display PTZ info and zoom infoALARM Time to display alarm in/out infoIR LED INFO Time to display IR LED infoPROMPT Display prompt info
Two options for the Dome Title and Date/Time: OFF and ONOther setup selections include:
OFF Title will not be displayed when activated.ON Title will be continuously displayed when activated.2 SEC Title will be displayed for 2 seconds after activation.5 SEC Title will be displayed for 5 seconds after activation.10 SEC Title will be displayed for 5 seconds after activation.
Move the cursor by joystick to the one you need to set, and press IrisOpen to enter the item. Move the joystick select the status and press IrisOpen to confirm.
Titles can be placed anywhere on the monitor. This feature allows youto customize the window of your monitor screen. To set a title position:
1. Use the joystick to position the cursor in the DISPLAY POSITION2. Press Iris Open.3. Use the joystick to move the title up, down, left, or right.4. Press Iris Open.5. Repeat steps 1 through 4 to position other titles6. Position the cursor at BACK or EXIT. Press Iris Open to save settingsand exit menu.
IR LEDThe user can open and close the IR LED manually and set up the IR LEDwork mode under this OSD mean. (Under normal operation mode, theuser can press IRIS OPEN and IRIS CLOSE to adjust the IR LED power):1) CONTROL MODE:AUTO: IR LED will be opened or closed automatically according to thelight conditions.

28
TIMING: LED will be adjusted according to Open and Close Time.OPEN: IR LED forcedly openCLOSE: IR LED forcedly closeCAMERA: IR LED status (Open/Close) will be synchronized with Camera day and night switching2) SENSITIVIRY:Here the user can manually set the sensitivity from 1-5. The smaller the number is, the lower light ofthe environment will be when the IR LED on.3) IR LED POWER: Here the use can choose the power mode covering: NORMAL, MATCH and USER.NORMAL: Near IR LED will be turned on when wide angle. and Far IR LED will be turned on when
small angle.MATCH: The Near and Far IR LED will be turned on and offautomatically to match the zoom in and out.USER: The user can manually adjust the Near and Far IR LED.4) AUTO CONTROL: When it is on, the IR LED will turn its power
consumption to the standby status which will effectivelyextend the service life of IR LEDs. And under this mode, whenobjects appear in the screen, the IR LED will turn its powerconsumption back to the normal status.
5) STANDBY POWER: When the AUTO CONTROL is on, the usercan set up the standby power here.
6) STANDBY DELAY: Set up how long if there is not moving object,the IR LED will turn into standby status.
7) SENSITIVITY: When the AUTO CONTROL is on, the user can setup the sensitivity to detect the moving objects.
8) ENHANCED MODE: Under normal status, press IRIS OPEN toenhance the IR LED power, when it is turned to maximum,press IRIS OPEN continuously for 2 seconds to enter theenhanced mode. And the whole brightness of the image willbe improved. Move the cursor to EHNANCED MODE andpress IRIS to enter and select between” STATIC” and“DYNAMIC”
9) START/STOP TIME: Set up time for IR LED to open and closeunder “TIMING” of control mode.
IDLE
IDLE setting means if there is no command for the dome for aperiod of time, the dome will run the actions as defined.
1) TIME: Move the cursor to “TIME” and press IRIS OPEN toenter, and move the joystick up and dome to select among 30sec, 1 min, 5 min, 10 min and 30 min. And press IRIS OPEN toconfirm.

29
2) ACTION: Move the cursor to “ACTION” and press IRIS OPEN to enter. Move the joystick to selectthe actions including” NONE, PRESET, SCAN, SEQUENCE, PATTERN. Press IRIS OPEN to confirm.
3) ALARMThe dome system has 2alarm inputs and 1 alarm output.(optional function). When an alarm is received, an input signalto the dome triggers the user defined action (such as presets,patterns, etc.), and at meantime the alarm output signals isactivated.
ALARM NO.: Move the cursor to the ALARM NO. Press IRISOPEN to enter and move the joystick up and down to select thealarm input no. (Channel 1 and Channel 2)
INPUT STATE:Set the alarm contact status. There aretwo input states, OPEN and CLOSE.
OPEN normally openCLOSE normally close
ALARMMODEOFF Alarm function is deactivated.ON Alarm function is activated.AUTO AUTO Alarm function will be activated anddeactivated between START TIME and STOP TIME.
ACTION: Set the alarm action:
NONE (default) No action.PRESET Dome goes to preset. (Default as Preset 1)SCAN Dome starts auto scan (Default as Auto Scan 1)SEQ Dome runs auto cruise (Default as Auto Cruise 1)PATTERN Dome runs pattern (Default as Pattern 1)
ALARM OUT: Set the auxiliary to activate:OFF Not alarm output will be activated.OUT1 An alarm action will close AUX 1 output..OUT2 An alarm action will activate AUX2 output.
RESET TIME: Set up time for the alarm output (such as analarm buzzed) when is triggered by the detector. .

30
START /STOP TIME: Set up the time to start alarm and stop alarm ONLY under the AUTO mode underALARMMODE.
PRIVACY MASK
Privacy mask allows the user to mask the privacy areas withblack frame. The user can set up 8 privacy masks at most.
MASK NO.: Move the cursor here and press IRIS OPEN to enterthe setup of Mask Number of the privacy zone,
ENABLE: To enable or disable this privacy mask function.
SET: Move the cursor here and press IRIS OPEN to enter themode of setting the privacy mask. Move the joystick(Left/Right/Up/Down) on the screen to set up the privacy zoneand press IRIS OPEN to confirm.
DELETE: Move the cursor here and press IRIS OPEN to deletethe current No. of privacy mask zone.

31
CLOCK
The dome can display the data and time. And the user couldenter this CLOCK menu to set up the DATE and TIME.
DATE: Move the cursor here and press IRIS OPEN to enter.Move the joystick left and right to choose the date positionand move it up and dome to adjust the figures. Press IRISOPEN to confirm.
TIME: Move the cursor here and press IRIS OPEN to enter.Move the joystick left and right to choose the time positionand move it up and dome to adjust the figures. Press IRISOPEN to confirm.
SAVE/CANCEL: Move the cursor to “SAVE” and press IRISOPEN to save the settings. Move the cursor to “DELETE” andpress IRIS OPEN to cancel the settings.

32
PASSWORD
The dome features password protection function to preventunanthorized changes to the dome settings. If the PASSWORD
function is enabled, theoperator can not accessany dome setting withoutentering a validpassword.
EDIT PASSWORD: Movethe cursor here and pressIRIS OPEN to enter. Pleaseunder the old passwordbefore set up the newpassword. The initialpassword is “111111”
ENABLE: Move the cursorhere and press IRIS OPENto enter. Move thejoystick to select between“ON” and “OFF” . Theuser need to enter thepassword when openingthe OSD under the statusof “ENABLE: ON”.
DOME TITLE
The user can set up thedome title to define eachcamera. Dome title

33
support up to 12 characters.
Move the cursor according the left steps and select INPUT. Press IRIS OPEN to enter.
1) Move the joystick left and right to position “←”, and press IRIS OPEN to delete the characterat“←”. Press IRIS CLOSE to exit the edit mode.
4) Move the cursor to “<CAP>” and press IRIS OPEN to enter.Move the joystick up and down to select the input method(such as English Cap, English, Chinese, Figures, and Symbols)
5) Mover the cursor to next line of <CAP> and press IRIS OPEN toenter the mode of character input. The selected character willbe shown in high brightness. Move the joystickup/down/left/right to choose the needed characters. Press IRISOPEN to move the selected character to the INPUT positionat“←”.
6) After finishing the character inputs, move the cursor to “OK”and press IRIS OPEN to confirm.
7) Also user can move the cursor to “CANCEL” to cancel thecharacter input settings.
SOFT ADDRESS SET
The use can set up the SOFT ADDRESS, SOFT PROTOCOL andSOFT BAUD RATE under this menu here to activate the softaddress function. And then the defined dome address by dipswitch will be disabled.
1) Move the cursor to INPUT (under DOME ID) and press IRISOPEN to enter the mode of setting dome ID, Move the joystickto position the cursor beside :0 1 2 3 4 5 6 7 8 9” and pressIRIS OPEN to enter. And move the joystick again to selectnumbers of dome ID and press IRIS OPEN to confirm. Thenumber selected will be input on the upper line.
2) Move the cursor to INPUT (the bottom menu) and press IRIS

34
OPEN to enter the mode of setting soft address, Move the joystick to position the cursorbeside :0 1 2 3 4 5 6 7 8 9” and press IRIS OPEN to enter. And move the joystick again to selectnumbers of dome soft address and press IRIS OPEN to confirm. The number selected will beinput on the upper line.
3) Enable or disable the soft address function. Press IRIS CLOSE to exit last step. Move the cursor toto “SOFTADDRESS:ON/OFF”. Press iris open to enter. Move the joystick up or down to select ONof OFF. Press IRIS OPEN to confirm.
4) Press OK to save and confirm all the settings and press CANCEL to exit all the settings.
AUX
The user can set up the auxiliary output to trigger other devicesfrom an alarm or a controller.
Move the cursor to AUX and press IRIS OPEN to enter to select“ON” or “OFF” to enable or disable this function.

35
SOFT LIMIT
The user can set up the soft limit to define the left and rightboundaries for the pan movement.
SOFT LIMIT: Move the cursor here and press IRIS OPEN to enter.Move the joystick to select ““““ONONONON”””” orororor ““““OFFOFFOFFOFF”””” totototo enableenableenableenable orororor disabledisabledisabledisablethisthisthisthis function.function.function.function.
LEFT LIMIT: Move the cursor here and press IRIS OPEN to enter.Now the user can mover the joystick to control the PANmovement of the dome to a defined position for the left limit.Press IRIS OPEN to confirm.
RIGHT LIMIT: Move the cursor here and press IRIS OPEN toenter. Now the user can mover the joystick to control the PANmovement of the dome to a defined position for the right limit.Press IRIS OPEN to confirm.
LIMIT DELETE: Move the cursor here and press IRIS OPEN todelete all the settings.
DOME SPEED

36
To make a selection of the dome speed, the user can enter thismenu to set up.
Move the cursor to DOME SPEED and press IRIS OPEN to enter.Move the joystick to select the dome speed when doing the panmovement.
Move the cursor to BACK/EXIT and press IRIS OPEN to run thecommand of BACK or EXIT.
POWER ON ACTION
The user can define thedome action when poweron,
Move the cursor to POWERON ACTION and press IRISOPEN to enter the mode ofsetup.
NONE (default) Noaction.PRESET Dome goes topreset. (Default as Preset1)SCAN Dome startsauto scan (Default as AutoScan 1)SEQ Dome runsauto cruise (Default asAuto Cruise 1)PATTERN Dome runspattern (Default as Pattern1)

37
CAMERA
The dome can automatically recognize the main cameramodules in the market. For the cameras it can not recognize,the user can set up here.
CAMERA: Move the cursor here and press IRIS OPEN to enterthe setup mode. Move the joystick up and down to select thecamera types. Press IRIS OPEN to confirm.
BAUDRATE: Move the cursor here and press IRIS OPEN to enterthe setup mode. Move the joystick up and down to select thebaud rate. Press IRIS OPEN to confirm.
PARITY: Move the cursor here and press IRIS OPEN to enter thesetup mode. Move the joystick up and down to select the paritymode. Press IRIS OPEN to confirm.

38
COMMUNICATION TEST
The dome can do self diagnosis for the communicationsbetween keyboard and speed dome. The test needs to matchwith our software VK200.
If the self testing is successfully finished via the software, thesystem will show up the testing results as left diagram.

39
OTHERS
The user can set up TEMP MODE, INTERNAL FAN, PRESETFREEZE, STOP TIME. MENU OFF TIME and NORTH ZERO hereunder the menu of “OTHERS”
TEMP MODE: To set up the control mode of dome fans andheaters. It includes three modes of AUTO, FAN HIGH SPEED andFAN LOW SPEED.
PRESET FREEZE: This feature freezes the scene on the monitorwhen going to a preset. This allows smooth switching from onepreset scene to another.
AUTO FLIP: When the camera tilts downward and goes justbeyond the vertical position, the camera will rotate 180 degrees.The user can press IRIS OPEN to enter and choose to turn on/offthis function.
STOP TIME: To set up the time that dome will stops afterreceiving the last command. Options include 5/15/30/60 Sec.
MENU OFF TIME: To set up the time that OSD menu be offwhen no operations. Options include 1/2/5/10 min.
NORTH ZERO: To set up the due north of the dome (pan 0º)Move the cursor here and press IRIS OPEN to enter. Move thejoystick to control the dome to pan 0º and press IRIS OPEN toconfirm.
CAMERA

40
The user can make adjustment for the cameras under thismenu.
FOCUS MODE: AUTO FOCUS allows the camera lens toremain in focus during zooming in, zooming out and pan/tiltmovement. Move the cursor here and press IRIS OPEN toenter. Setup the mode: AUTO” or “OFF” and press IRIS OPENto confirm. When auto focus is off, the user needs to domanual focus.
DIGITAL ZOOM: Move the cursor here and press IRIS OPEN toenter. Setup the function to be “ON” or “OFF”.
BACKLIGHT: Move the cursor here and press IRIS OPEN toenter. Setup the function to be “ON” or “OFF”.
PICTURE FLIP: To set up the Tilt flip for the dome. Move thecursor here and press IRIS OPEN to enter. Setup the functionto be “ON” or “OFF”.
FREEZE: If turn on this function, the screen image will befrozen until it is turned off. Move the cursor here and pressIRIS OPEN to enter. Setup the function to be “ON” or “OFF”.
ZOOM SPEED: To set up the zoom speed of Low, Normal andhigh when doing the zoom in and out. Move the cursor hereand press IRIS OPEN to enter. Move the joystick to chooseand press IRIS OPEN to confirm
DAY NIGHT: To set up the day and night mode of AUTO,CLOUR and B/W. Move the cursor here and press IRIS OPENto enter. Move the joystick to choose and press IRIS OPEN toconfirm
CAMERA ADVANCED

41
The use can set up more detailed parameters of camera hereunder the menu of CAMERA ADVANCED.
WB: To set up the white balance of the camera. Optionsinclude AUTO, MANUAL. INDOOR and OUTDOOR. The use canselect different mode according the different locations.
RED GAIN: Only can be adjusted whet WB set as manual.
BLUE GAIN: Only can be adjusted whet WB set as manual.
BIRGHT: To set up the brightness of the image. Move thecursor here and press IRIS OPEN to enter. Move the joystick toadjust and press IRIS OPEN to confirm
EXPOSURE: To set up the exposure mode of the camera.Options include AUTO, MANUAL, SHUTTER PRIORITY, IRISPRIORITY and BRIGHT PRIORITY. The use can select differentmode according the different locations.
WIDE DYNAMIC: Wide dynamic range (WDR) balances thebrightest and darkest sections of a scene to produce a picturethat is perfectly balanced in light and clarity. Availablesettings are OFF.LOW.MID and HIGH. The default setting isOFF.
PRESET
The dome supports 220 presets. Please check the followingsteps to set up a preset.
1) PRESET NO.: Move the cursor here and press IRIS OPEN to

42
enter the setup of Preset Number. Move the joystick to select a preset number (1-64 and 100-255)and press IRIS OPEN to confirm.
2) TITLE: Move the cursor here and press IRIS OPEN to enter the setup of Preset Title. Check thedetailed above in DOME TITLE settings.
3) <SET>: Move the cursor here and press IRIS OPEN to enter. Move the dome to a defined positionas preset point and press IRIS OPEN to save the preset position.
4) CALL: Move the cursor here and press IRIS OPEN to call up the current preset.
5) DELETE: Move the cursor here and press IRIS OPEN todelete the current preset.
6) SPEED: Move the cursor here and press IRIS OPEN to set upthe preset call up speed of LOW, MID and HIGH.
AUTO SCAN
The dome supports 8 groups of auto scan. Please check thefollowing steps to set up a scan.
1) SCAN NO.: Move the cursor here and press IRIS OPEN toenter the setup of SCAN Number. Move the joystick toselect a preset number (1-8) and press IRIS OPEN toconfirm.
2) TITLE: Move the cursor here and press IRIS OPEN to enterthe setup of SCAN Title. Check the detailed above in DOMETITLE settings.
3) <LEFT LIMIT>: Move the cursor here and press IRIS OPENto enter. Move the dome to a defined position as left limitand press IRIS OPEN to save this left boundary.
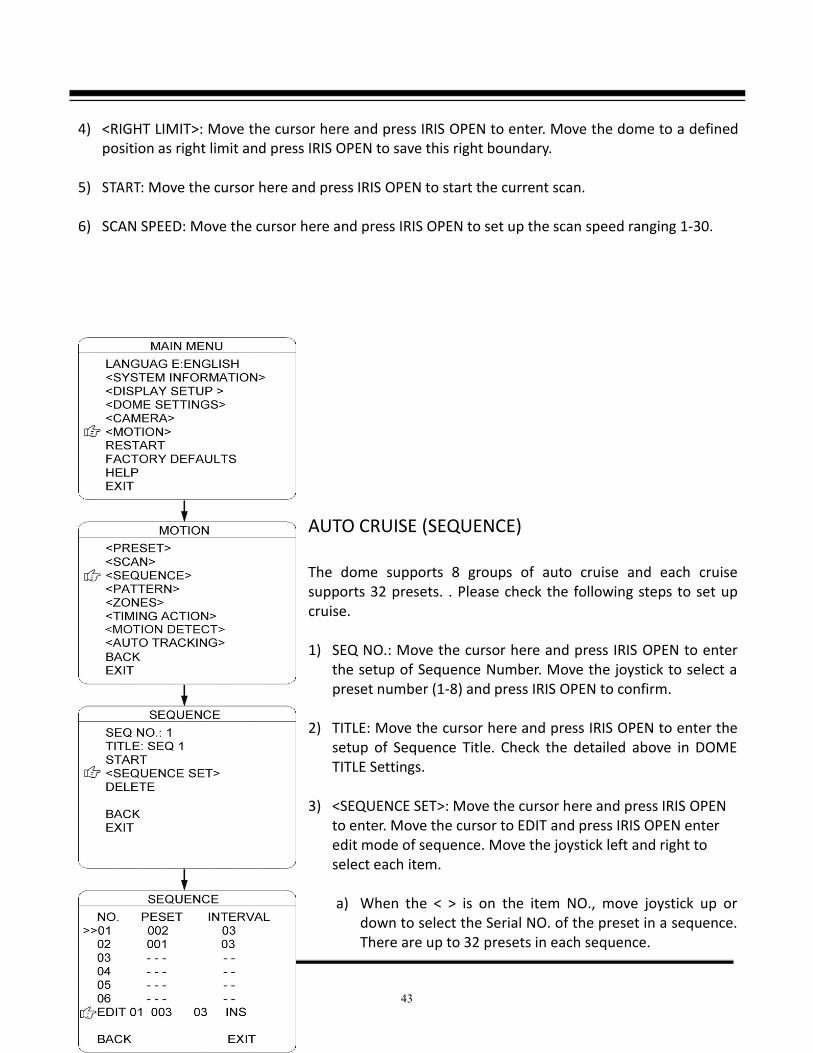
43
4) <RIGHT LIMIT>: Move the cursor here and press IRIS OPEN to enter. Move the dome to a definedposition as right limit and press IRIS OPEN to save this right boundary.
5) START: Move the cursor here and press IRIS OPEN to start the current scan.
6) SCAN SPEED: Move the cursor here and press IRIS OPEN to set up the scan speed ranging 1-30.
AUTO CRUISE (SEQUENCE)
The dome supports 8 groups of auto cruise and each cruisesupports 32 presets. . Please check the following steps to set upcruise.
1) SEQ NO.: Move the cursor here and press IRIS OPEN to enterthe setup of Sequence Number. Move the joystick to select apreset number (1-8) and press IRIS OPEN to confirm.
2) TITLE: Move the cursor here and press IRIS OPEN to enter thesetup of Sequence Title. Check the detailed above in DOMETITLE Settings.
3) <SEQUENCE SET>: Move the cursor here and press IRIS OPENto enter. Move the cursor to EDIT and press IRIS OPEN enteredit mode of sequence. Move the joystick left and right toselect each item.
a) When the < > is on the item NO., move joystick up ordown to select the Serial NO. of the preset in a sequence.There are up to 32 presets in each sequence.

44
b) When the < > is on the item PRESET, move the joystick up or down to select the preset NO.that the user wants to add in the sequence.
c) When the < > is on the INTERVAL, move the joystick up or down to select the interval timebetween each preset.
d) When the < > is on the last item, move the joystick up or down to select edition mode as “INS(insert)”, “ok” and “delete”.
Press IRIS OPEN when selecting INS to insert the settings into the position of current SerialNo.
Press IRIS OPEN when selecting OK to override the settings ofCurrent Serial No.
Press IRIS OPEN when selecting delete to delete thesettings
of the Current Serial No.Press IRIS OPEN to save all the setting and press IRIS
CLOSEto exit.
4) DELETE/START: Move the cursor here and press IRIS OPENto delete/start the current sequence.
PATTERN TOUR
The dome supports 4 pattern tours and each pattern cover atmost 10 Minutes of 500 commands. Please check the followingsteps to set up a pattern.
1) PATTERN NO.: Move the cursor here and press IRIS OPENto enter the setup of Pattern Number. Move the joystick toselect a pattern number (14) and press IRIS OPEN toconfirm.
2) TITLE: Move the cursor here and press IRIS OPEN to enterthe setup of Pattern Title. Check the detailed above inDOME TITLE settings.
3) <SET>: Move the cursor here and press IRIS OPEN to enter.Move the dome up/down/left right, make the zoom in/outand press IRIS OPEN to save the pattern tour.
4) START: Move the cursor here and press IRIS OPEN to startthe current pattern tour.
45
5) DELETE: Move the cursor here and press IRIS OPEN to delete the current pattern tour.
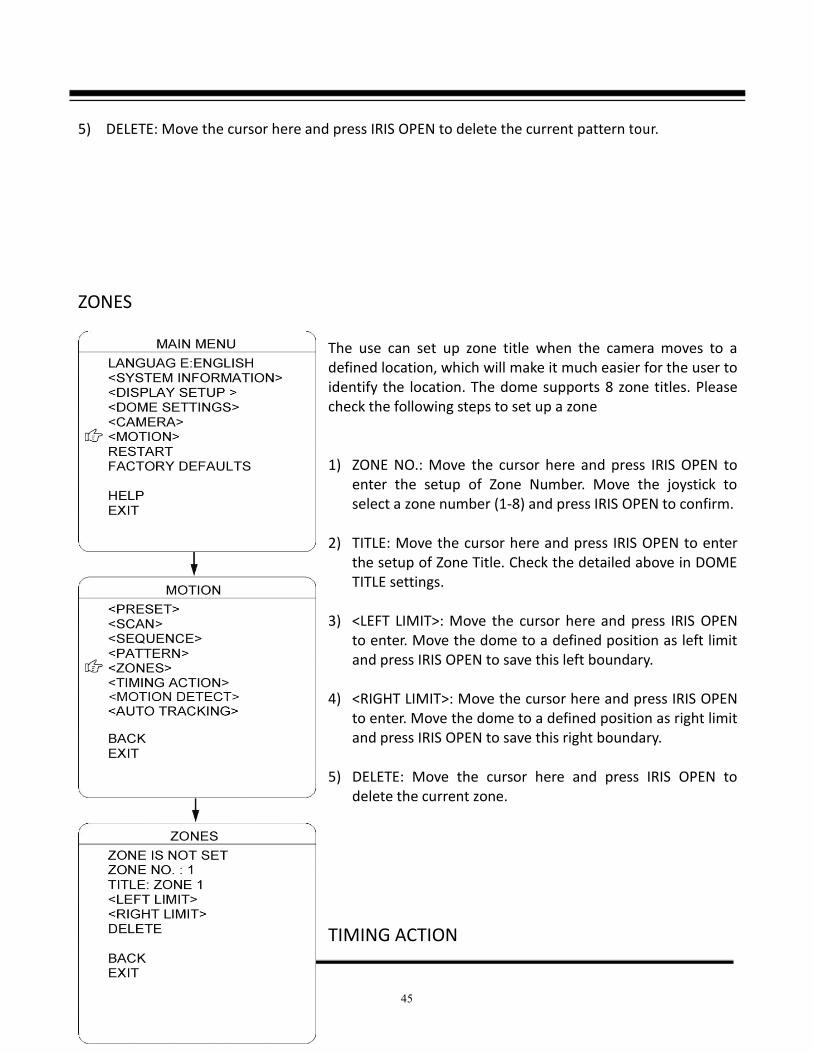
ZONES
The use can set up zone title when the camera moves to adefined location, which will make it much easier for the user toidentify the location. The dome supports 8 zone titles. Pleasecheck the following steps to set up a zone
1) ZONE NO.: Move the cursor here and press IRIS OPEN toenter the setup of Zone Number. Move the joystick toselect a zone number (1-8) and press IRIS OPEN to confirm.
2) TITLE: Move the cursor here and press IRIS OPEN to enterthe setup of Zone Title. Check the detailed above in DOMETITLE settings.
3) <LEFT LIMIT>: Move the cursor here and press IRIS OPENto enter. Move the dome to a defined position as left limitand press IRIS OPEN to save this left boundary.
4) <RIGHT LIMIT>: Move the cursor here and press IRIS OPENto enter. Move the dome to a defined position as right limitand press IRIS OPEN to save this right boundary.
5) DELETE: Move the cursor here and press IRIS OPEN todelete the current zone.
TIMING ACTION

46
TIMING ACTION allows the user to set up the actions of thedome in 7 days (each day with 8 timing segments). Whenfishing the setup, the dome will do the actions according tothe setup motion during the defined time segment.
NO.: Here shows the day within a week. Move the cursor hereand press IRIS OPEN to enter. Move joystick up or down toselect the Serial No. (1-8) for the timing action. Press IRISOPEN to confirm.
START: To set up the start time for the defined motion withinthis time segment. Press IRIS OPEN to confirm.
STOP: To set up the stop time for the defined motion withinthis time segment. Press IRIS OPEN to confirm.
MOTION: To setup the motion that will be operated in thistime segment. The motion includes: NONE. PRESET 1-8, SCAN1-4, SEQUENCE 1-4 and PATTERN 1-4.
ON/OFF: Move the cursor here and press IRIS OPEN to enter toenable or disable this function. Press IRIS OPEN to confirm.
COPY: The user could set up each 8 segment of 7 daysseparately or can copy the finished setting for one day to thecurrent day. Move the cursor there and press IRIS OPEN tocopy the settings.
BACK: Press IRIS OPEN to save and be back to last menu.
NOTE: It is not allowed to set up the same time segmentduring one day. And the time segment can not exceed 00:00.During the timing action segment, the defined action will bestopped if the user moves the dome. If there is operationduring the defined time segment, the action will re-activatedas long as it is in the defined timing action segment.
MOTION DETECT

47
The user can set up 8 motion detection scenes (each scene with 4detecting areas) under this menu. The alarm output will be triggeredwhen moving objects enter these detecting areas
SCENE NO.: Move the cursor here and press IRIS OPEN to enter thesetup of Scene Number. Move the joystick to select a preset number(1-8) and press IRIS OPEN to confirm.
<EDIT SCENE>: Move the cursor here and press IRIS OPEN to enter.Move the dome to a user-defined detecting scene. Press IRIS OPENto confirm.
<EDIT AREA>: Move the cursor here and press IRIS OPEN to enter themenu of AREA EDIT.
a) AREA NO.: Move the cursor here and press IRIS OPEN toenter the setup of AREA Number. Move the joystick to selecta preset number (1-4) and press IRIS OPEN to confirm.
b) <AREA EDIT>: Move the cursor here and press IRIS OPEN toenter the setup of AREA EDIT. The screen will display framewith Serial No. The user can move the frame to the top leftconner of the wanted detecting area and press IRIS OPEN toconfirm. Then move the joystick to adjust the size of thedetecting area and press IRIS OPEN to confirm
c) DELETE: Move the cursor here and press IRIS OPEN to deletethe current detecting area.
d) SENSITIVITY: Move the cursor here and press IRIS OPEN toenter. Select among LOW. MID and HIGH and press IRISOPEN to confirm the sensitivity.
e) DELETE SCENE: Move the cursor here and press IRIS OPEN todelete the current scene.
f) AUX ACTIVATE: The dome can activate the alarm aux outputwhen detecting the moving object. Press IRIS OPEN to enterand select between “ON” and “OFF” to activate ordeactivate this function.
g) CANCEL (SEC): Here means when the alarm aux output isactivated by the detecting function, for how long it will lastbefore the aux output will be closed. The time ranging 1-60Sec.
h) START: Move the cursor here and press IRIS OPEN to startthe function of motion detection.
AUTO TRACKING

48
Under the auto tracking mode, the dome will auto track themoving objects entering the scene. When the object is movingout of the scene, the dome will return to a preset position asdefined after the defined time.
SENSITIVITY: The user can set up the auto tracking sensitivityunder this menu. When set as LOW, the dome will do autotracking when obvious object entering the screen. When set asHIGH, the dome will do auto tracking when small object movinginto the screen. Move the cursor there and press the IRIS OPENto enter. The options include: LOW, MID and HIGH.
TARGET: To set up the size of the tracking object. The optionsinclude Large. MID and SMALL.
AUX: If set “ON” here, the object auto tracking will activate alarmaux output at the same time. Press IRIS OPEN to enter to select“ON” or “OFF”
ZOOM MATCH: Under the auto tracking model, if turn on thefunction of ZOOM MATCH, the dome will do zooming in and outduring auto tracking to keep the right proportion between theobject and background. Move the cursor there and press the IRISOPEN to enter. And move the joystick to select the optical zoom.
ENABLE: MoveMoveMoveMove thethethethe cursorcursorcursorcursor herehereherehere andandandand presspresspresspress IRISIRISIRISIRIS OPENOPENOPENOPEN totototo enterenterenterenter totototoselectselectselectselect ““““ONONONON”””” orororor ““““OFFOFFOFFOFF”””” totototo enableenableenableenable orororor disabledisabledisabledisable thisthisthisthis function.function.function.function.
TRACKINGTRACKINGTRACKINGTRACKING SCENESCENESCENESCENE SET:SET:SET:SET: HereHereHereHere thethethethe useruseruseruser cancancancan setsetsetset upupupup thethethethe scenescenescenescene thatthatthatthatthethethethe domedomedomedome willwillwillwill getgetgetget backbackbackback totototo whenwhenwhenwhen finishingfinishingfinishingfinishing thethethethe actionactionactionaction ofofofof autoautoautoautotracking.tracking.tracking.tracking. MoveMoveMoveMove thethethethe cursorcursorcursorcursor herehereherehere andandandand presspresspresspress IRISIRISIRISIRIS OPENOPENOPENOPEN totototo enter.enter.enter.enter.MoveMoveMoveMove thethethethe domedomedomedome totototo thethethethe wantedwantedwantedwanted scenescenescenescene andandandand presspresspresspress IRISIRISIRISIRIS OPENOPENOPENOPEN totototoconfirm.confirm.confirm.confirm.
DELETE:DELETE:DELETE:DELETE:Move the cursor here and press IRIS OPEN to delete thereturn scene.
RETURN DELAY: To set up the time that dome will waiting toreturn to this scene.
RESTART

49
The dome allows the user to reset its settings remotely underthis menu.
Move the cursor here and press IRIS OPEN to enter.Select “OK” or “CANCEL” to continue the reset or cancel thereset.
FACTORY DEFAULTS

50
FACTORY DEFAULTS will allow the user to recover all thesetting to factory default setting.
Move the cursor here and press IRIS OPEN to enter.Select “OK” or “CANCEL” to continue the reset or cancel thereset.