user manual program version 1.0 · trumpet eimrt calculator is designed to generate a number of...
TRANSCRIPT
R
USER MANUAL
PROGRAM VERSION 1.0.1
DOC #80464-01
STANDARD IMAGING, INC.7601 Murphy DriveMiddleton, WI 53562-2532
TEL 800.261.4446TEL 608.831.0025FAX 608.831.2202
Dec / 2004 ©2004 Standard Imaging, Inc.
REF 92730-92731
WWW. .COM

2 3
CAUTION:Due to the increased impact and constraints of lateral scat-ter when using small or custom field sizes, specific percent depth dose measurements must be completed for each small or custom field.
CAUTION:Federal law in the U.S.A., and Canadian law, restricts the sale distribution, or use of this product to, by, or on the order of a licensed medical practitioner. This product should be used under the guidance of a medical physicist.
General Precautions
WARNING:Be certain to have the patient chart containing the dose prescription available and verify the physician order before proceeding.
WARNING:To help ensure proper application and validation, the output solutions of Trumpet eIMRT Calculator should be used as inputs into a treatment planning system.
WARNING:Trumpet eIMRT Calculator is intended for use in target regions where the peak dose is relatively flat. It should not be used for target regions significantly beyond the es-tablished depth of peak dose. The steeply declining dose gradient beyond peak dose will contribute to the difference between the calculated dose and the measured dose.
WARNING:Trumpet eIMRT Calculator requires the input of data with proper units of measure to function correctly. The first depth dose point, the second depth dose point, and the range fields all require inputs in millimeters (mm). The dose field at the first depth dose point and the dose field at the second depth dose point all require inputs in Gray (Gy).
CAUTION:The PDD data files to be used with Trumpet eIMRT Calcu-lator must sequence from 0 mm in the A1 cell to the final measurement point in exact mm increments. If the PDD data does not have a % in each mm increment, the user must extrapolate between measured points to fill in the missing percent values. No millimeter can be skipped. Cells can not be left blank; Trumpet eIMRT Calculator does not interpolate for cells left blank.
CAUTION:To minimize the potential for computer issues, do not run Trumpet eIMRT Calculator concurrently with other software programs.
CAUTION:Trumpet eIMRT Calculator is intended to be used on a personal computer with the required specifications. Use on other operating systems or with less than required speci-fications may hinder proper operation.
CAUTION: To provide the user with multiple solutions, Trumpet eIMRT Calculator is designed to be used with bolus with at least 1 electron energy. It will not provide solutions where no bolus is desired for both energies.
Warnings and Cautions alert users to dangerous conditions that can occur if instructions in the manual are not obeyed. Warnings are conditions that can cause injury to the operator, while Cautions can cause damage to the equipment.
!
!
!
!
!
!
!
!
!
!

2 3
R
Table of Contents
7601 MURPHY DRIVEMIDDLETON, WI 53562-2532 USAWWW.STANDARDIMAGING.COM
Background
Trumpet eIMRT Calculator is a tool that utilizes existing electron beam data to model new, composite electron beam dose distributions that better meet the medical goals of delivering conformal homogeneous dose distributions while reducing the dose to surrounding normal tissue and critical structures.
Trumpet eIMRT Calculator product concept and mathematical equations are licensed from the University of Wisconsin-Madison by Standard Imag-ing. The basis for Trumpet eIMRT Calculator is based on a paper recently submitted for publication to the International Journal of Radiation Oncology, Biology and Physics. This paper is entitled “Inverse Planning Tool Offers Improved Conformal Dosing of Superficial Sites via Combined Energy and Intensity Modulation of Megavoltage Electron Beams” and is written by John R.Gentry, M.S. Richard Steeves, M.D., and Ph.D., Bhudatt A. Paliwal, Ph.D. of the Department of Human Oncology, Comprehensive Cancer Care Center, University of Wisconsin-Madison, Madison, WI.
The authors report that use of single energy megavoltage electron beams often poses a clinical challenge when the target volume is anterior to other radiosensitive structures and has variable depth. Ensuring that skin, as well as the deepest extent of the planning target volume (PTV), receives the desired dose entails prescribing to a point beyond the depth of peak dose. The inherent dose inhomogeneities result in heightened potential for tissue fibrosis, scarring and possible soft tissue necrosis. Selection of a higher energy in order to improve dose homogeneity results in increased dose to structures beyond the PTV, as well as enlargement of the volume receiving the heightened dose. The authors ultimately propose use of a powerful script that presents possible solutions on the central axis for composite electron beam creation using both intensity and energy modulation. The script eliminates the need to create tens or hundreds of trials on a powerful treatment planning system in order to optimize the dose distribution, and its use saves time and improves results for patients.
Indications for Use
Trumpet eIMRT Calculator is a simple, stand-alone software program provided on a CD-ROM for use on an appropriately configured personal computer. It is intended to assist the oncologist or medical physicist in creating an optimum electron treatment plan based on the treatment objec-tive for the patient.
Using previously established mathematical equations, Trumpet eIMRT Calculator suggests several potential electron beam treatment energy solutions, within user selected parameters, by combining several discrete energies typically available on the linear accelerator(s). It uses previously user gathered or generated depth dose data sets for each electron energy available (4, 6, 9, 12, 15, 16, 18, 20 or 22 MeV) on the user’s specific linear accelerator(s) as its primary input. Other inputs involve the identification of the facility, specific linear accelerator(s) and bolus used.
The output of Trumpet eIMRT Calculator is a hardcopy printout of the sug-gested electron beam treatment energies, in both numeric and graphical formats. The site, linear accelerator and bolus information are also provided on this printout. Trumpet eIMRT Calculator does not, however, electronically store any patient identification data or information.
Specific electron beam parameters are selected from the solution options provided by Trumpet eIMRT Calculator for non-direct (manual) input into the user’s radiation treatment planning system. The treatment planning system then creates a treatment plan based on the treatment objective for the patient, which is reviewed by the attending oncologist for acceptability prior to implementation with a linear accelerator.
2 General Precautions3 Table of Contents3 Background3 Indications for Use4 Overview4 Operation Overview4 Installation5 First Step: Preparation of PDD Data7 Selecting and Importing PDD Data10 Interface Description10 Calculating Composite Beam Solutions - Accelerator Tab11 Calculating Composite Beam Solutions - Plan Tab13 Saving and Opening Workspaces14 Calculating Composite Beam Solutions - Results Page15 Editing an APD File16 Working with Multiple Open APD Files16 Frequently Asked Questions17 Customer Responsibility17 Warranty18 Software License Agreement
PAGE

4 5
Operation Overview
Overview Installation
The use of megavoltage electron beams often poses a clinical challenge when the planning target volume (PTV) is anterior to other radiosensitive structures and has variable depth. The electron beam energies on a linear accelerator have depth dose characteristics, which makes each suitable for dose prescription over a limited range of depths.
Trumpet eIMRT Calculator, employing energy and intensity modulation, has been developed to permit the creation of patient-specific dose distribu-tions with user-defined positions of peak dose and range. Benefits include increased dose homogeneity within the target volume, greater control over the dose to the skin and reduced dose to points beyond the dose prescrip-tion point.
Using Trumpet eIMRT Calculator, the operator specifies the dose to the skin and to a second depth within the patient. The program then searches for combinations of intensity modifications and energy modulations to achieve the dose at the skin and at the second point. The number of solutions re-turned by the first pass of Trumpet eIMRT Calculator is further reduced by the operator’s specification of appropriate ranges that will be allowed. Then, application of dose homogeneity requirements further reduces the number of treatment solutions. The most optimal solutions are then available for the user to review. The user can view the composite solution beams alone or choose to also view the two standard beams for comparison. All calcula-tions are done on the central axis. Outputs of Trumpet eIMRT Calculator are then manually entered into a standard treatment planning program for creation of a treatment plan.
Installation of Trumpet eIMRT Calculator is accomplished by using the installation wizard included on the program CD-ROM.
The required Trumpet eIMRT serial number is affixed to the program instal-lation disc. Since the installation program will prompt for this serial number during installation, it is advised write this value down prior to placing the disc into the CD-ROM drive.
If autorun is enabled in the operating system, the installation wizard will start automatically upon inserting the Trumpet eIMRT program disc in the CD-ROM drive.
If autorun is disabled, browse to the program disc in Windows® Explorer and double-click setup.exe to start the installation program. Read through the software license agreement and if you agree to the enclosed terms, click next to proceed with the installation. A Trumpet eIMRT Calculator program icon is placed within the Start Menu under the Standard Imag-ing program group. If prompted, restart your computer to begin using the Trumpet eIMRT Calculator.
To uninstall Trumpet eIMRT, go to Add/Remove Programs under the Win-dows Control Panel, find eIMRT on the list, click Change/Remove and follow the on-screen instructions.
Choice of Electron Beam EnergiesTrumpet eIMRT Calculator is designed to generate a number of composite beam dose distributions (solutions) created from two separate electron beam energies. The user selects the two electron energies from which to calculate solutions. From these solutions the user can choose the one that offers the most conformal dose distribution in the patient. In general, the electron beam energies should be chosen such that:
1. The depth of the most distal edge of the target volume lies between the depths of peak dose for the two energies, and...
2. The highest energy chosen minimizes the dose beyond the most distal edge of the planning target volume (PTV).
Dose Constraints
1. Specifying the First Dose Constraint Position Trumpet eIMRT Calculator works by specifying positions at which
the dose distribution must have certain values. Typically, one begins by specifying the dose at the skin. This depth is usually zero (0) mm so, zero (0) is entered as the depth to use as the first dose constraint point. Trumpet eIMRT Calculator requires depth to be given in mm (millimeters).
2. Specify the Dose at the First Dose Constraint Point Enter the dose prescribed by the physician at the first dose con-
straint position. Trumpet eIMRT Calculator program requires the dose be entered in Gy (Gray). One Gy may be used to provide a convenient multiplier for the dose in Gy to be entered into the treatment planning program. The unit in Gy is rounded to two decimal points so a selection of 1.00 Gy will include solutions within 0.995 to 1.004 Gy.
3. Position of the Second Dose Point Specify the depth of the most distal edge of the target volume in
mm.
4. Specify the Dose at the Second Dose Constraint Point Specify the dose in Gy at the second point (deepest) within the
patient to which the prescribed dose must be delivered. To de-liver a uniform dose over the PTV, the dose at the second point is typically equal to the first dose.
5. Range Specify the Range in mm.
System Requirements
Operating SystemProcessorMemoryHard DriveScreen ResolutionCD-ROM DriveOther
Product Standards:
Microsoft® Windows® 2000 / Windows® XPIntel® or AMD® 500 MHz or greater256 MB (512 MB recommended)50 MB or greater1024 x 768 or higher recommended2X speed or greaterSpreadsheet editing application
Designed to meet IEC 60601-1-4
Windows is a registered trademark of Microsoft Corporation.
4 5
6. Range Dose in Percent Select a % (percent). At the specified range value, the dose at
the range point can be no more than this % of the dose at the First Dose Constraint Point. All beams which have a value below this % of the dose at the First Dose Constraint Point can be considered as possible solutions.
7. Dose Homogeneity Specify the dose homogeneity as a %. Any composite beam
solutions which have doses above this % of the dose at the First Dose Constraint Point Dose will be excluded from the solution sets. For example, if the First Dose Constraint Point is 1.00 Gy and the Dose Homogeneity is 5%, no composite beams which have a dose above 1.05 Gy will be considered as a solution. All composite beams below 1.05 Gy will be considered as a solu-tion.
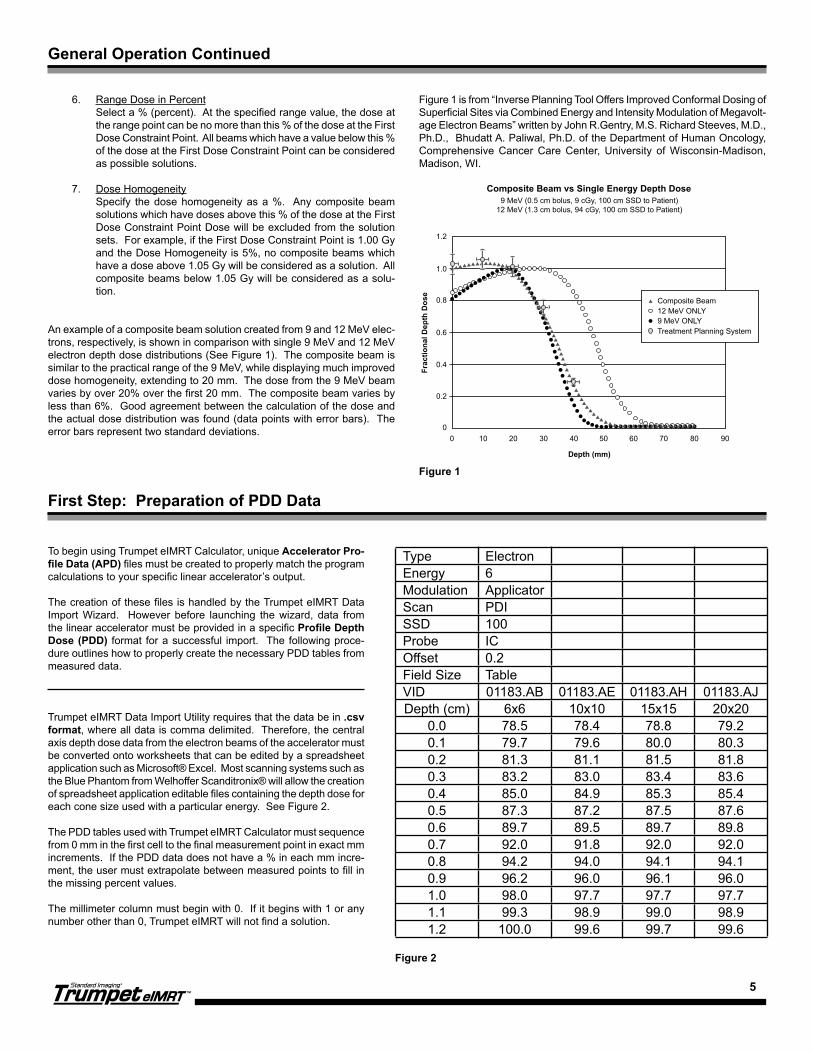
An example of a composite beam solution created from 9 and 12 MeV elec-trons, respectively, is shown in comparison with single 9 MeV and 12 MeV electron depth dose distributions (See Figure 1). The composite beam is similar to the practical range of the 9 MeV, while displaying much improved dose homogeneity, extending to 20 mm. The dose from the 9 MeV beam varies by over 20% over the first 20 mm. The composite beam varies by less than 6%. Good agreement between the calculation of the dose and the actual dose distribution was found (data points with error bars). The error bars represent two standard deviations.
General Operation Continued
Figure 1 is from “Inverse Planning Tool Offers Improved Conformal Dosing of Superficial Sites via Combined Energy and Intensity Modulation of Megavolt-age Electron Beams” written by John R.Gentry, M.S. Richard Steeves, M.D., Ph.D., Bhudatt A. Paliwal, Ph.D. of the Department of Human Oncology, Comprehensive Cancer Care Center, University of Wisconsin-Madison, Madison, WI.
Composite Beam12 MeV ONLY9 MeV ONLYTreatment Planning System
Composite Beam vs Single Energy Depth Dose9 MeV (0.5 cm bolus, 9 cGy, 100 cm SSD to Patient)
12 MeV (1.3 cm bolus, 94 cGy, 100 cm SSD to Patient)
1.2
1.0
0.8
0.6
0.4
0.2
00 10 20 30
Depth (mm)
40 50 60 70 80 90
Frac
tiona
l Dep
th D
ose
Figure 1
First Step: Preparation of PDD Data
To begin using Trumpet eIMRT Calculator, unique Accelerator Pro-file Data (APD) files must be created to properly match the program calculations to your specific linear accelerator’s output.
The creation of these files is handled by the Trumpet eIMRT Data Import Wizard. However before launching the wizard, data from the linear accelerator must be provided in a specific Profile Depth Dose (PDD) format for a successful import. The following proce-dure outlines how to properly create the necessary PDD tables from measured data.
Trumpet eIMRT Data Import Utility requires that the data be in .csv format, where all data is comma delimited. Therefore, the central axis depth dose data from the electron beams of the accelerator must be converted onto worksheets that can be edited by a spreadsheet application such as Microsoft® Excel. Most scanning systems such as the Blue Phantom from Welhoffer Scanditronix® will allow the creation of spreadsheet application editable files containing the depth dose for each cone size used with a particular energy. See Figure 2.
The PDD tables used with Trumpet eIMRT Calculator must sequence from 0 mm in the first cell to the final measurement point in exact mm increments. If the PDD data does not have a % in each mm incre-ment, the user must extrapolate between measured points to fill in the missing percent values.
The millimeter column must begin with 0. If it begins with 1 or any number other than 0, Trumpet eIMRT will not find a solution.
Type ElectronEnergy 6Modulation ApplicatorScan PDISSD 100Probe ICOffset 0.2Field Size TableVID 01183.AB 01183.AE 01183.AH 01183.AJDepth (cm) 6x6 10x10 15x15 20x20
0.0 78.5 78.4 78.8 79.20.1 79.7 79.6 80.0 80.30.2 81.3 81.1 81.5 81.80.3 83.2 83.0 83.4 83.60.4 85.0 84.9 85.3 85.40.5 87.3 87.2 87.5 87.60.6 89.7 89.5 89.7 89.80.7 92.0 91.8 92.0 92.00.8 94.2 94.0 94.1 94.10.9 96.2 96.0 96.1 96.01.0 98.0 97.7 97.7 97.71.1 99.3 98.9 99.0 98.91.2 100.0 99.6 99.7 99.6
Figure 2
6 7
Preparation of PDD Data Continued
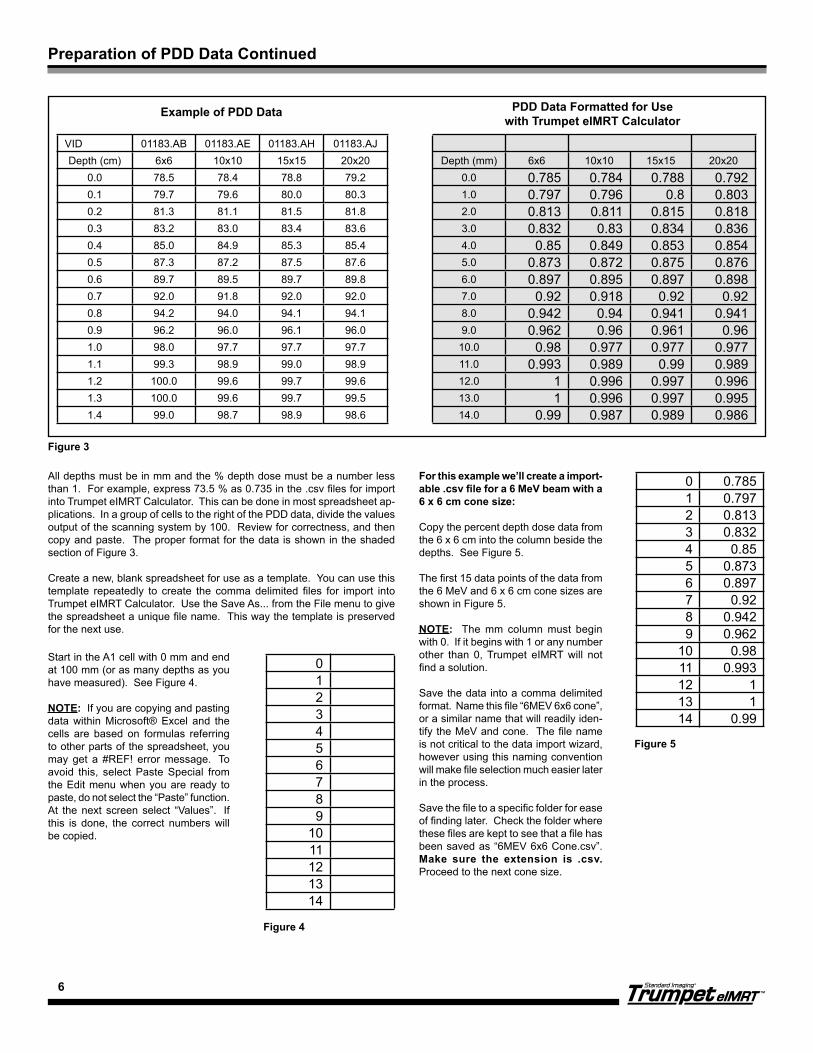
VID 01183.AB 01183.AE 01183.AH 01183.AJ Depth (cm) 6x6 10x10 15x15 20x20 Depth (mm) 6x6 10x10 15x15 20x20
0.0 78.5 78.4 78.8 79.2 0.0 0.785 0.784 0.788 0.7920.1 79.7 79.6 80.0 80.3 1.0 0.797 0.796 0.8 0.8030.2 81.3 81.1 81.5 81.8 2.0 0.813 0.811 0.815 0.8180.3 83.2 83.0 83.4 83.6 3.0 0.832 0.83 0.834 0.8360.4 85.0 84.9 85.3 85.4 4.0 0.85 0.849 0.853 0.8540.5 87.3 87.2 87.5 87.6 5.0 0.873 0.872 0.875 0.8760.6 89.7 89.5 89.7 89.8 6.0 0.897 0.895 0.897 0.8980.7 92.0 91.8 92.0 92.0 7.0 0.92 0.918 0.92 0.920.8 94.2 94.0 94.1 94.1 8.0 0.942 0.94 0.941 0.9410.9 96.2 96.0 96.1 96.0 9.0 0.962 0.96 0.961 0.961.0 98.0 97.7 97.7 97.7 10.0 0.98 0.977 0.977 0.9771.1 99.3 98.9 99.0 98.9 11.0 0.993 0.989 0.99 0.9891.2 100.0 99.6 99.7 99.6 12.0 1 0.996 0.997 0.9961.3 100.0 99.6 99.7 99.5 13.0 1 0.996 0.997 0.9951.4 99.0 98.7 98.9 98.6 14.0 0.99 0.987 0.989 0.986
Figure 3
Example of PDD Data PDD Data Formatted for Usewith Trumpet eIMRT Calculator
0123456789
1011121314
Figure 4
All depths must be in mm and the % depth dose must be a number less than 1. For example, express 73.5 % as 0.735 in the .csv files for import into Trumpet eIMRT Calculator. This can be done in most spreadsheet ap-plications. In a group of cells to the right of the PDD data, divide the values output of the scanning system by 100. Review for correctness, and then copy and paste. The proper format for the data is shown in the shaded section of Figure 3.
Create a new, blank spreadsheet for use as a template. You can use this template repeatedly to create the comma delimited files for import into Trumpet eIMRT Calculator. Use the Save As... from the File menu to give the spreadsheet a unique file name. This way the template is preserved for the next use.
Start in the A1 cell with 0 mm and end at 100 mm (or as many depths as you have measured). See Figure 4.
NOTE: If you are copying and pasting data within Microsoft® Excel and the cells are based on formulas referring to other parts of the spreadsheet, you may get a #REF! error message. To avoid this, select Paste Special from the Edit menu when you are ready to paste, do not select the “Paste” function. At the next screen select “Values”. If this is done, the correct numbers will be copied.
0 0.7851 0.7972 0.8133 0.8324 0.855 0.8736 0.8977 0.928 0.9429 0.962
10 0.9811 0.99312 113 114 0.99
Figure 5
For this example we’ll create a import-able .csv file for a 6 MeV beam with a 6 x 6 cm cone size:
Copy the percent depth dose data from the 6 x 6 cm into the column beside the depths. See Figure 5.
The first 15 data points of the data from the 6 MeV and 6 x 6 cm cone sizes are shown in Figure 5.
NOTE: The mm column must begin with 0. If it begins with 1 or any number other than 0, Trumpet eIMRT will not find a solution.
Save the data into a comma delimited format. Name this file “6MEV 6x6 cone”, or a similar name that will readily iden-tify the MeV and cone. The file name is not critical to the data import wizard, however using this naming convention will make file selection much easier later in the process.
Save the file to a specific folder for ease of finding later. Check the folder where these files are kept to see that a file has been saved as “6MEV 6x6 Cone.csv”. Make sure the extension is .csv. Proceed to the next cone size.
6 7
Preparation of PDD Data Continued
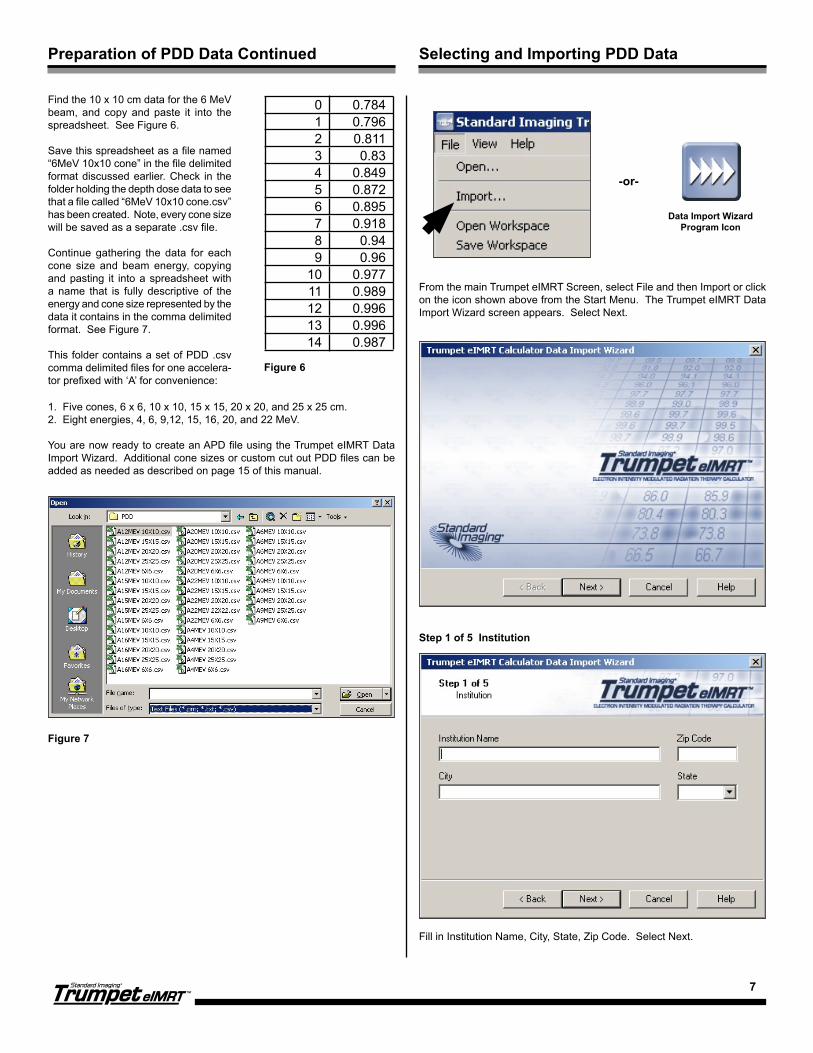
0 0.7841 0.7962 0.8113 0.834 0.8495 0.8726 0.8957 0.9188 0.949 0.96
10 0.97711 0.98912 0.99613 0.99614 0.987
Figure 6
Selecting and Importing PDD Data
Find the 10 x 10 cm data for the 6 MeV beam, and copy and paste it into the spreadsheet. See Figure 6.
Save this spreadsheet as a file named “6MeV 10x10 cone” in the file delimited format discussed earlier. Check in the folder holding the depth dose data to see that a file called “6MeV 10x10 cone.csv” has been created. Note, every cone size will be saved as a separate .csv file.
Continue gathering the data for each cone size and beam energy, copying and pasting it into a spreadsheet with a name that is fully descriptive of the energy and cone size represented by the data it contains in the comma delimited format. See Figure 7.
This folder contains a set of PDD .csv comma delimited files for one accelera-tor prefixed with ‘A’ for convenience:
1. Five cones, 6 x 6, 10 x 10, 15 x 15, 20 x 20, and 25 x 25 cm.2. Eight energies, 4, 6, 9,12, 15, 16, 20, and 22 MeV.
You are now ready to create an APD file using the Trumpet eIMRT Data Import Wizard. Additional cone sizes or custom cut out PDD files can be added as needed as described on page 15 of this manual.
Figure 7
From the main Trumpet eIMRT Screen, select File and then Import or click on the icon shown above from the Start Menu. The Trumpet eIMRT Data Import Wizard screen appears. Select Next.
Step 1 of 5 Institution
Fill in Institution Name, City, State, Zip Code. Select Next.
-or-
Data Import WizardProgram Icon

8 9
Selection and Importing PDD Data Continued
Step 2 of 5 AcceleratorFill in Accelerator Make, Accelerator Model, Accelerator Serial Number.Select Next.
Step 3 of 5 Percent Depth Dose Data Files Part 1The % Depth Dose Data File Screen Appears. Select Add.
Step 3 of 5 Percent Depth Dose Data Files Part 2A directory list appears. Select the folder where the PDD data is stored. Select a PDD dose file to open.
Step 3 of 5 Percent Depth Dose Data Files Part 3Review the % Depth Dose Data Properties to confirm they are correct.
Select the cone size associated with this data set.Select the electron energy associated with this data.Select the Default Output Factor.Select OK to continue.
If the cone size or the MeV needed is not available from the pull down menu, enter a new value manually. The next time the pull down menu is selected, the new cone size or MeV will be available.
8 9
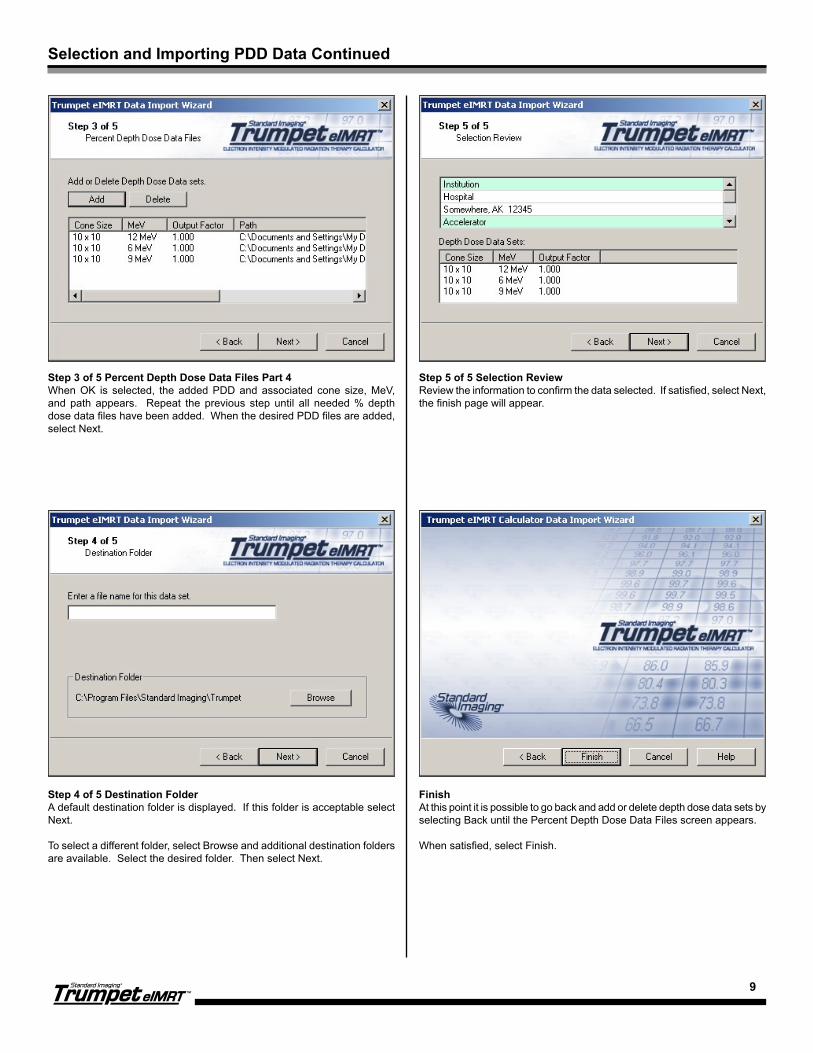
Selection and Importing PDD Data Continued
Step 3 of 5 Percent Depth Dose Data Files Part 4When OK is selected, the added PDD and associated cone size, MeV, and path appears. Repeat the previous step until all needed % depth dose data files have been added. When the desired PDD files are added, select Next.
Step 4 of 5 Destination FolderA default destination folder is displayed. If this folder is acceptable select Next.
To select a different folder, select Browse and additional destination folders are available. Select the desired folder. Then select Next.
Step 5 of 5 Selection ReviewReview the information to confirm the data selected. If satisfied, select Next, the finish page will appear.
FinishAt this point it is possible to go back and add or delete depth dose data sets by selecting Back until the Percent Depth Dose Data Files screen appears.
When satisfied, select Finish.
10 11
Interface Description
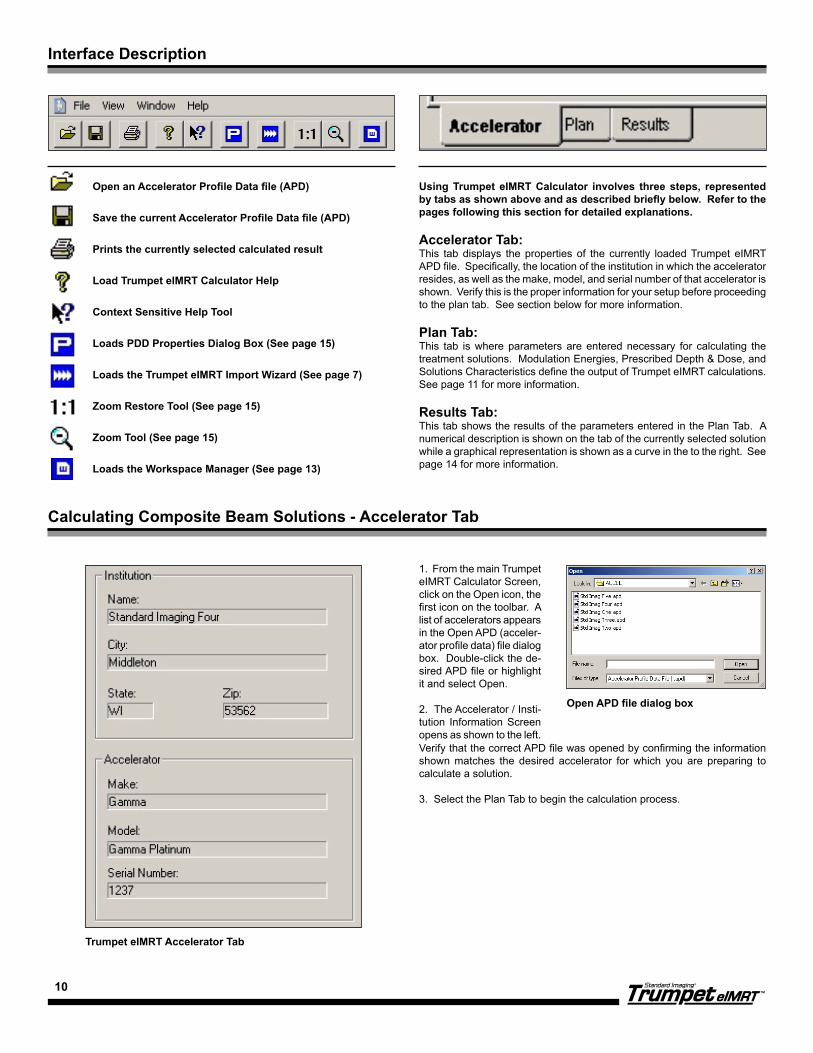
1. From the main Trumpet eIMRT Calculator Screen, click on the Open icon, the first icon on the toolbar. A list of accelerators appears in the Open APD (acceler-ator profile data) file dialog box. Double-click the de-sired APD file or highlight it and select Open.
2. The Accelerator / Insti-tution Information Screen opens as shown to the left.
Calculating Composite Beam Solutions - Accelerator Tab
Open an Accelerator Profile Data file (APD)
Save the current Accelerator Profile Data file (APD)
Prints the currently selected calculated result
Load Trumpet eIMRT Calculator Help
Context Sensitive Help Tool
Loads PDD Properties Dialog Box (See page 15)
Loads the Trumpet eIMRT Import Wizard (See page 7)
Zoom Restore Tool (See page 15)
Zoom Tool (See page 15)
Loads the Workspace Manager (See page 13)
Using Trumpet eIMRT Calculator involves three steps, represented by tabs as shown above and as described briefly below. Refer to the pages following this section for detailed explanations.
Accelerator Tab:This tab displays the properties of the currently loaded Trumpet eIMRT APD file. Specifically, the location of the institution in which the accelerator resides, as well as the make, model, and serial number of that accelerator is shown. Verify this is the proper information for your setup before proceeding to the plan tab. See section below for more information.
Plan Tab:This tab is where parameters are entered necessary for calculating the treatment solutions. Modulation Energies, Prescribed Depth & Dose, and Solutions Characteristics define the output of Trumpet eIMRT calculations. See page 11 for more information.
Results Tab:This tab shows the results of the parameters entered in the Plan Tab. A numerical description is shown on the tab of the currently selected solution while a graphical representation is shown as a curve in the to the right. See page 14 for more information.
Verify that the correct APD file was opened by confirming the information shown matches the desired accelerator for which you are preparing to calculate a solution.
3. Select the Plan Tab to begin the calculation process.
Open APD file dialog box
Trumpet eIMRT Accelerator Tab

10 11
Calculating Composite Beam Solutions - Plan Tab
The parameters entered on the Plan Tab define the solutions generated by Trumpet eIMRT Calculator. The following is a detailed description of each of the three main categories required for completing for a successful calculation.
1 - Modulation Energies
Cone SizeThis field displays the cone sizes available for the specific accelerator being used. The cone sizes available were chosen in the section Preparation of PDD Data. An example set of cones and associated PDD values is shown in Figure 7.
Trumpet eIMRT Plan Tab
MeV-1 and MeV-2At these fields the operator selects the two electron energies to be mixed; it does not matter the order in which these are selected. When MeV 1 and MeV 2 are selected, the PDD curve relating to each MeV is shown in the solutions graph. This feature can be turned on or off with the check box labeled Reference Curves.
1
2
3 Output FactorThere are default Output Factors for standard cone sizes. If the operator chooses to use a different Output Factor, this can be entered here. Existing default Output Factors can also be deleted. When the operator exits the program, they will be asked if changes to this accelerator set up parameters should be saved. If the operator selects yes, the new Output Factor will be saved and will be available in the future from the drop down menu.
Cutout FactorThe default Cutout Factor is one. If a different Cutout Factor is to be used, it is entered here. The entered Cutout Factor is only applicable to this specific calculation. When a new Cutout Factor is used, this Cutout Factor is not saved by the program. For every new calculation, the default Cutout Factor is always presented as one.
2 - Prescribed Depth & Dose
1st Dose PointThis is the first point on the patient where the operator needs to prescribe a dose. For most typical cases, this will be at the skin, so 0 mm is usually entered here. After the operator becomes familiar with the program, they may occasionally select a point other than 0 mm for some special cases. Initially, 0 mm is suggested as a beginning value to use.
DoseThe Dose entered at the 1st Dose Point is the dose in Gy that is required at the 1st Dose Point, typically the skin surface. For new operators , it is sug-gested that the dose is normalized to 1 Gy. When solutions are presented on the Results Page, they will be represented as a percent of 1 Gy for the two energies being mixed, i.e. 40% of 6 MeV and 60% of 9 MeV. A percent for the two energies allows easy input into the treatment planning programs.
2nd Dose PointThis is the second point on the patient where the operator needs to pre-scribe a dose. For most typical cases, the goal is to have a uniform dose through the central axis for a specific distance. Therefore the 2nd Dose
12 13
Point is the depth in the patient where the dose is required to be the same as it is at the 1st Dose Point. For example, if this specific case requires a uniform dose from the skin to 10 mm into the patient, 10 mm is entered as the 2nd Dose Point.
DoseThe Dose entered at the 2nd Dose Point is the dose in Gy that is required at the 2nd Dose Point. Because a uniform dose is usually required, this dose is usually the same as that entered for 1st Dose Point. For new operators, it is suggested that the dose is normalized to 1 Gy.
Monitor Unit Definitions
Trumpet eIMRT uses the following definitions:
1 MU = 1 Gy1 mu = 1 cGy
Example:
If the treatment delivery value indicates 0.196, deliver 19.6 cGy or 0.196 Gy.
3 - Solution Characteristics
Range (mm)The range in millimeters is the depth within the patient where the operator would like the dose entered at the 1st Dose Point to drop off to a certain percent of the dose at the 1st Dose point. For example, the operator may specify this point to be 40 mm. Then at 40 mm the dose must be no more than a certain percent, i.e. 5% or 10% of the dose entered at the 1st Dose Point. The percent will be determined in the next field. For a more detailed explanation of Range, please consult a medical physicist.
Range Dose in PercentThis percent field value entered by the operator related to the Range entered at the previous filed. At the Range depth entered, the composite dose may be no more than this percent of the 1st Dose Point. For example, if 40 mm is entered as the range, and 5% is entered as the Range Dose in Percent, then at 40 mm from the 1st Dose Point, the composite dose must be 5% or less than the Dose at the 1st Dose Point. No solutions having a dose at 40 mm which are above 5% of the 1st Dose Point are presented for review on the Results Page. All solutions which are 5% or less will be displayed on the Results Page.
Homogeneity in PercentThis percent value entered by the operator is related to the Dose at the 1st Dose Point. The value entered in this field indicates the composite dose solutions, with dose values above the dose at the 1st Dose Point, which will be displayed on the Results page. For example, if the Dose at the 1st Dose Point is 1 Gy, and the Homogeneity Percent is 5%, then the only solutions displayed on the Results Page will be those less than or equal to 1.05 Gy at the 1st Dose Point. For example, if the Dose at the 1st Dose Point is 1 Gy, and the Homogeneity Percent is 10%, then the only solutions displayed on the Results Page will be those that have a dose less than or equal to 1.10 Gy at the 1st Dose Point.
Managing the Number of Composite Solutions Available for Review
The Range, Range Dose in Percent, and Homogeneity in Percent are all interconnected, and define (constrain) the composite beam solutions that are displayed on the Results Page.
Calculating Composite Beam Solutions - Plan Tab Continued
Too Many SolutionsIf values entered on the Plan Page result in too many solutions (some entries will present hundreds of solutions) the values in these fields can be changed to give fewer and better solutions for review.
Examples:
Reducing the Range from 50 mm to 30 mm will eliminate solutions that have a dose which extends past 30 mm. This may be better for the patient in a specific case, as it will reduce dose beyond the planning target volume.
Reducing the Range Dose in Percent from 5% to 2% will eliminate solu-tions which are above 2% of the 1st Dose Point at the specified range. If the Range is 40 mm, changing the Range Dose in Percent for 5% to 2% will eliminate those solutions that have a dose at 40 mm which are above 2% of the 1st Dose Point at 40 mm. This again, will reduce the dose beyond the planning target volume.
Reducing the Homogeneity in Percent from 5% to 2% will eliminate solutions that are displayed on the Results Page to only those that have a dose less than or equal to 1.02 of the Dose prescribed at the 1st Dose Point. This should result in solutions which have a flatter, more uniform dose through the planning target volume, therefore delivering a more uniform dose to the patient.
In general, decreasing the values of the Range, Range Dose in Percent, and Homogeneity in Percent fields will reduce the number of solutions presented on the Results Page.
No SolutionsIn general, increasing the values of the Range, Range Dose in Percent, and Homogeneity in Percent fields will increase the number of solutions presented on the Results Page. This changes can be done alone or simul-taneously. If the operator wants to maintain the two selected MeV energies, and the prescribed Dose Points and Doses, the parameters to change are the Range, Range Dose in Percent, and Homogeneity in Percent.
Changing the two MeV energies selected may provide other solutions. If a Range of 30 mm is selected, and the two MeV energies are 6 MeV and 9 MeV, the peak dose of these two energies may occur before the 30 mm point. The peak dose of 6 MeV may be 12 mm and the peak dose of 9 MeV may be 20 mm. Therefore Trumpet eIMRT Calculator may not be able to create a composite dose that extends to 30 mm. Another possible combination of MeV energies is 9 MeV with a peak dose of 20 mm and 12 MeV with a peak dose of 32 mm. This combination may enable Trumpet eIMRT Calculator to create solutions when the Range is 30 mm, just within the 32 mm peak dose point of the 12 MeV energy.
Changing the 2nd Dose Point may provide solutions. If the 2nd Dose Point is 8 mm and no solutions are found, there may be solutions available at the 10 mm or 12 mm point. Then increasing the 2nd Dose Point to 15 mm would find solutions that are available from the 9 mm to the 15 mm point, and display them on the Results Page.
Analysis of a Typical Case and Resulting Solution
A patient requires an electron breast boost treatment. A 10 cm by 10 cm field will be used. The planning target volume begins 3 mm past the skin surface. The treatment is prescribed to begin at the skin surface. The planning target volume extends to a depth of 12 mm. The most desirable electron beam to use would be one that delivers a uniform dose from the skin surface to a depth of 12 mm. The lung field starts at a depth of 50 mm, therefore the plan requires the electron field to drop as close to 0 as possible before it reaches the 50 mm depth.
12 13
Plan Tab Continued
Referring to the Plan Page, these parameters may be selected to enter into the fields.
Cone Size – The cone size selected for the treatment is 10 x 10 cm, so this option must be selected here.
MeV-1 and MeV-2 – A uniform dose is required from 0 mm to 12 mm. To achieve this, one needs to select MeV energies which have peak depth doses close to these depth, and one of which is past the 12 mm depth. The 6 MeV energy has a peak depth at 12 mm and the 9 MeV energy has a peak depth at 20 mm. These two energies are good selections to use for this case. MeV-1 is 6 MeV and MeV-2 is 9 MeV.
Output factors and Cutout Factors – These values are dictated by charac-teristics of the beams chosen.
1st Dose Point – This is 0 mm, skin surface. The Dose at the 1st Dose Point is 1 Gy.
2nd Dose Point – This is 12 mm, the extent of the planning target volume. The Dose at the 2nd Dose Point is 1 Gy.
Range – In this case the dose should drop off to close to 0 before the lung field begins at the 50 mm depth. To achieve this, it is reasonable to enter 30 mm for the Range. If no solutions are found, the range value can be increased, i.e. to 40 mm, and recalculated.
Range Dose Percent – Enter 10 percent to indicate that solutions must be no more than 0.1 Gy at the 30 mm depth.
Homogeneity Percent – Enter 5 percent to indicate that solutions must be less than 1.05 Gy at any place on the central dose axis.
When these values were selected for the fields, a good solution was found.
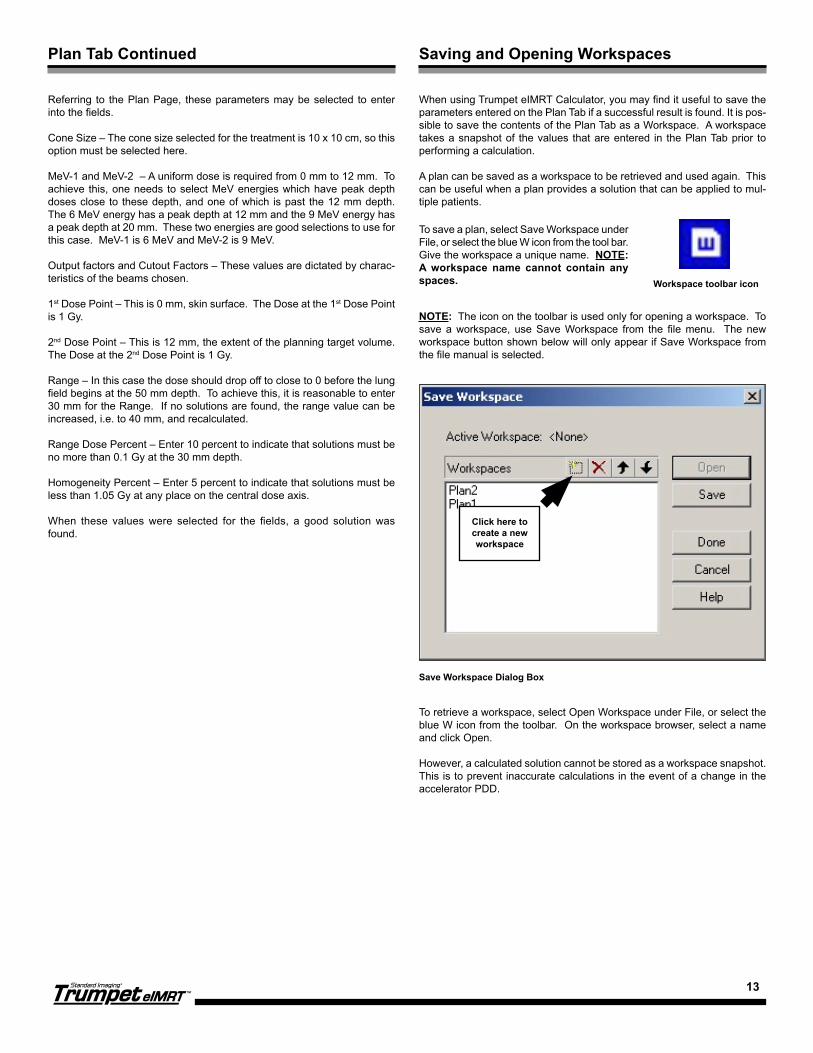
When using Trumpet eIMRT Calculator, you may find it useful to save the parameters entered on the Plan Tab if a successful result is found. It is pos-sible to save the contents of the Plan Tab as a Workspace. A workspace takes a snapshot of the values that are entered in the Plan Tab prior to performing a calculation.
A plan can be saved as a workspace to be retrieved and used again. This can be useful when a plan provides a solution that can be applied to mul-tiple patients.
Saving and Opening Workspaces
To save a plan, select Save Workspace under File, or select the blue W icon from the tool bar. Give the workspace a unique name. NOTE: A workspace name cannot contain any spaces.
NOTE: The icon on the toolbar is used only for opening a workspace. To save a workspace, use Save Workspace from the file menu. The new workspace button shown below will only appear if Save Workspace from the file manual is selected.
Workspace toolbar icon
Save Workspace Dialog Box
Click here to create a new workspace
To retrieve a workspace, select Open Workspace under File, or select the blue W icon from the toolbar. On the workspace browser, select a name and click Open.
However, a calculated solution cannot be stored as a workspace snapshot. This is to prevent inaccurate calculations in the event of a change in the accelerator PDD.
14 15
Calculating Composite Beam Solutions - Results Page
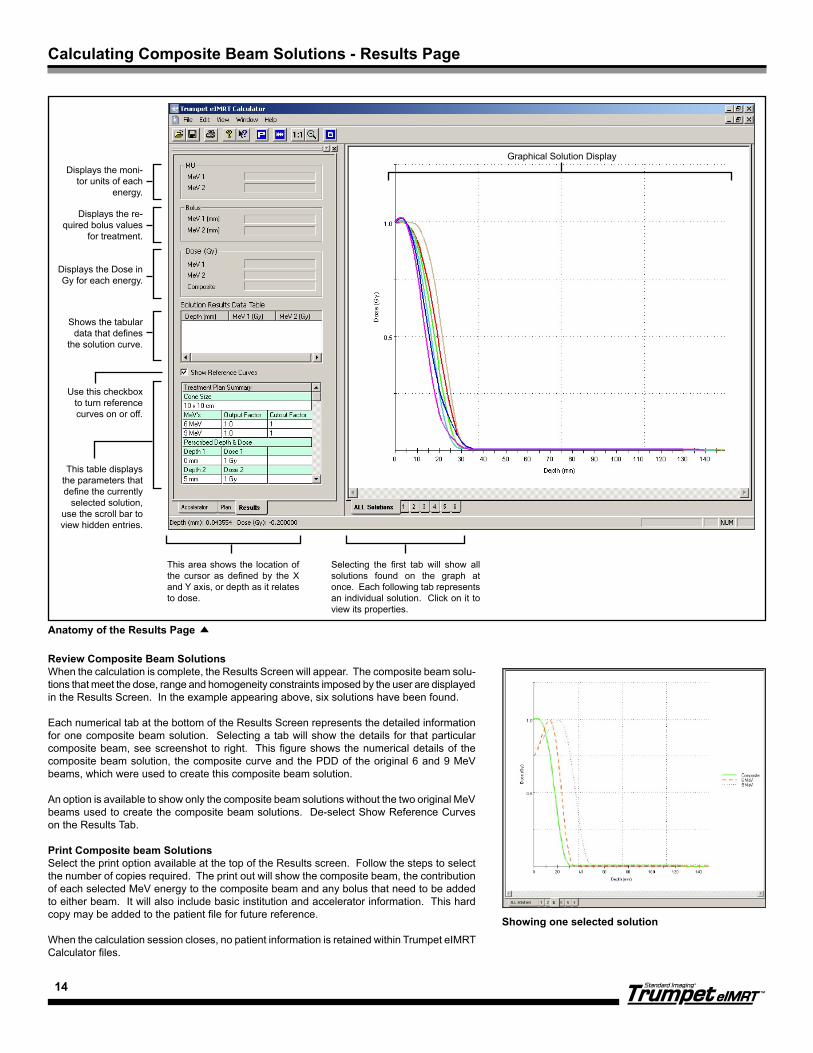
Anatomy of the Results Page
Review Composite Beam SolutionsWhen the calculation is complete, the Results Screen will appear. The composite beam solu-tions that meet the dose, range and homogeneity constraints imposed by the user are displayed in the Results Screen. In the example appearing above, six solutions have been found.
Each numerical tab at the bottom of the Results Screen represents the detailed information for one composite beam solution. Selecting a tab will show the details for that particular composite beam, see screenshot to right. This figure shows the numerical details of the composite beam solution, the composite curve and the PDD of the original 6 and 9 MeV beams, which were used to create this composite beam solution.
An option is available to show only the composite beam solutions without the two original MeV beams used to create the composite beam solutions. De-select Show Reference Curves on the Results Tab.
Print Composite beam SolutionsSelect the print option available at the top of the Results screen. Follow the steps to select the number of copies required. The print out will show the composite beam, the contribution of each selected MeV energy to the composite beam and any bolus that need to be added to either beam. It will also include basic institution and accelerator information. This hard copy may be added to the patient file for future reference.
When the calculation session closes, no patient information is retained within Trumpet eIMRT Calculator files.
This area shows the location of the cursor as defined by the X and Y axis, or depth as it relates to dose.
Selecting the first tab will show all solutions found on the graph at once. Each following tab represents an individual solution. Click on it to view its properties.
This table displays the parameters that define the currently
selected solution, use the scroll bar to view hidden entries.
Use this checkbox to turn reference curves on or off.
Shows the tabular data that defines
the solution curve.
Displays the Dose in Gy for each energy.
Displays the re-quired bolus values
for treatment.
Displays the moni-tor units of each
energy.
Showing one selected solution
Graphical Solution Display
14 15
Editing an APD File
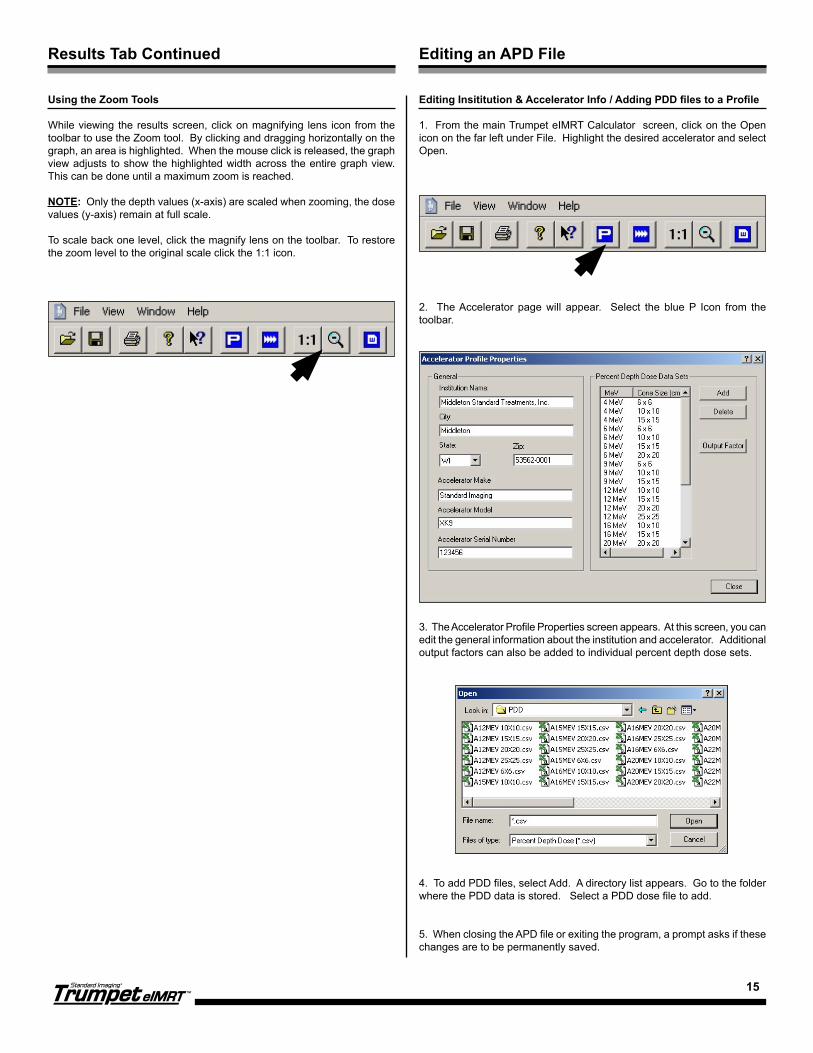
Editing Insititution & Accelerator Info / Adding PDD files to a Profile
1. From the main Trumpet eIMRT Calculator screen, click on the Open icon on the far left under File. Highlight the desired accelerator and select Open.
2. The Accelerator page will appear. Select the blue P Icon from the toolbar.
3. The Accelerator Profile Properties screen appears. At this screen, you can edit the general information about the institution and accelerator. Additional output factors can also be added to individual percent depth dose sets.
4. To add PDD files, select Add. A directory list appears. Go to the folder where the PDD data is stored. Select a PDD dose file to add.
5. When closing the APD file or exiting the program, a prompt asks if these changes are to be permanently saved.
Results Tab Continued
Using the Zoom Tools
While viewing the results screen, click on magnifying lens icon from the toolbar to use the Zoom tool. By clicking and dragging horizontally on the graph, an area is highlighted. When the mouse click is released, the graph view adjusts to show the highlighted width across the entire graph view. This can be done until a maximum zoom is reached.
NOTE: Only the depth values (x-axis) are scaled when zooming, the dose values (y-axis) remain at full scale.
To scale back one level, click the magnify lens on the toolbar. To restore the zoom level to the original scale click the 1:1 icon.
16 17
Frequently Asked Questions
Working with Multiple Open APD Files
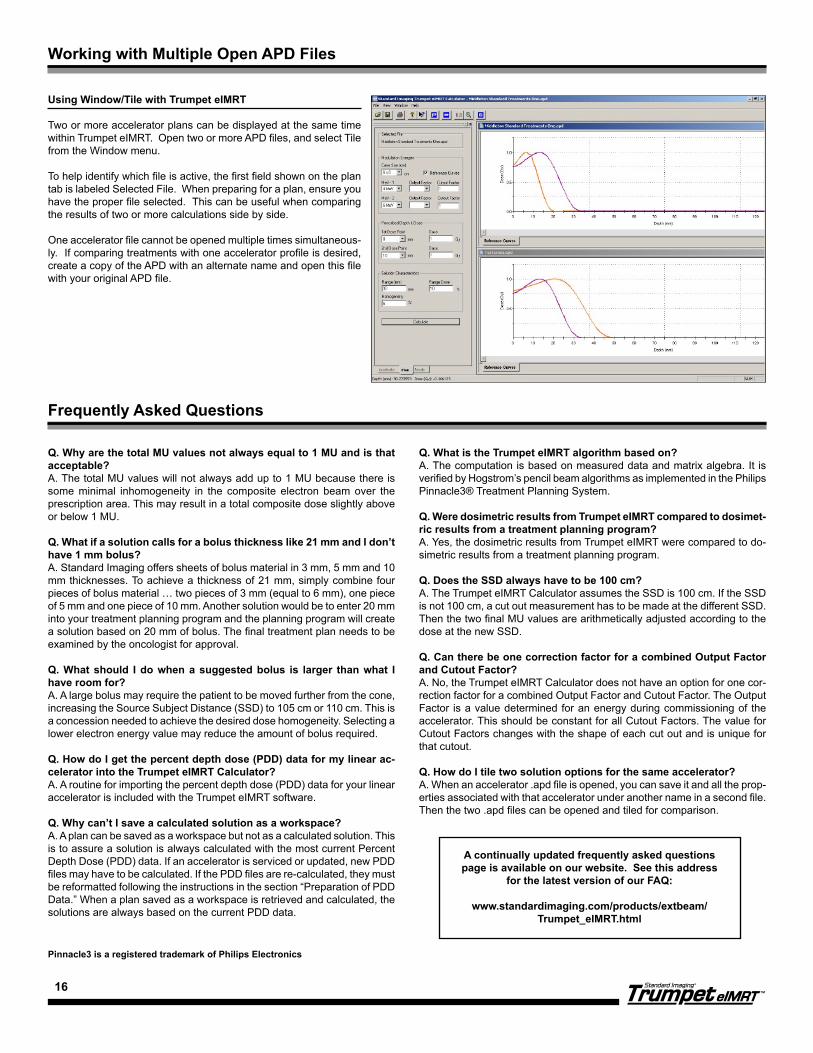
Using Window/Tile with Trumpet eIMRT
Two or more accelerator plans can be displayed at the same time within Trumpet eIMRT. Open two or more APD files, and select Tile from the Window menu.
To help identify which file is active, the first field shown on the plan tab is labeled Selected File. When preparing for a plan, ensure you have the proper file selected. This can be useful when comparing the results of two or more calculations side by side.
One accelerator file cannot be opened multiple times simultaneous-ly. If comparing treatments with one accelerator profile is desired, create a copy of the APD with an alternate name and open this file with your original APD file.
Q. Why are the total MU values not always equal to 1 MU and is that acceptable?A. The total MU values will not always add up to 1 MU because there is some minimal inhomogeneity in the composite electron beam over the prescription area. This may result in a total composite dose slightly above or below 1 MU.
Q. What if a solution calls for a bolus thickness like 21 mm and I don’t have 1 mm bolus?A. Standard Imaging offers sheets of bolus material in 3 mm, 5 mm and 10 mm thicknesses. To achieve a thickness of 21 mm, simply combine four pieces of bolus material … two pieces of 3 mm (equal to 6 mm), one piece of 5 mm and one piece of 10 mm. Another solution would be to enter 20 mm into your treatment planning program and the planning program will create a solution based on 20 mm of bolus. The final treatment plan needs to be examined by the oncologist for approval.
Q. What should I do when a suggested bolus is larger than what I have room for?A. A large bolus may require the patient to be moved further from the cone, increasing the Source Subject Distance (SSD) to 105 cm or 110 cm. This is a concession needed to achieve the desired dose homogeneity. Selecting a lower electron energy value may reduce the amount of bolus required.
Q. How do I get the percent depth dose (PDD) data for my linear ac-celerator into the Trumpet eIMRT Calculator?A. A routine for importing the percent depth dose (PDD) data for your linear accelerator is included with the Trumpet eIMRT software.
Q. Why can’t I save a calculated solution as a workspace?A. A plan can be saved as a workspace but not as a calculated solution. This is to assure a solution is always calculated with the most current Percent Depth Dose (PDD) data. If an accelerator is serviced or updated, new PDD files may have to be calculated. If the PDD files are re-calculated, they must be reformatted following the instructions in the section “Preparation of PDD Data.” When a plan saved as a workspace is retrieved and calculated, the solutions are always based on the current PDD data.
Q. What is the Trumpet eIMRT algorithm based on?A. The computation is based on measured data and matrix algebra. It is verified by Hogstrom’s pencil beam algorithms as implemented in the Philips Pinnacle3® Treatment Planning System.
Q. Were dosimetric results from Trumpet eIMRT compared to dosimet-ric results from a treatment planning program?A. Yes, the dosimetric results from Trumpet eIMRT were compared to do-simetric results from a treatment planning program.
Q. Does the SSD always have to be 100 cm?A. The Trumpet eIMRT Calculator assumes the SSD is 100 cm. If the SSD is not 100 cm, a cut out measurement has to be made at the different SSD. Then the two final MU values are arithmetically adjusted according to the dose at the new SSD.
Q. Can there be one correction factor for a combined Output Factor and Cutout Factor?A. No, the Trumpet eIMRT Calculator does not have an option for one cor-rection factor for a combined Output Factor and Cutout Factor. The Output Factor is a value determined for an energy during commissioning of the accelerator. This should be constant for all Cutout Factors. The value for Cutout Factors changes with the shape of each cut out and is unique for that cutout.
Q. How do I tile two solution options for the same accelerator?A. When an accelerator .apd file is opened, you can save it and all the prop-erties associated with that accelerator under another name in a second file. Then the two .apd files can be opened and tiled for comparison.
Pinnacle3 is a registered trademark of Philips Electronics
A continually updated frequently asked questions page is available on our website. See this address
for the latest version of our FAQ:
www.standardimaging.com/products/extbeam/Trumpet_eIMRT.html
16 17
Customer Responsibility Warranty
This product and its components will perform properly and reliably only when operated and maintained in accordance with the instructions contained in this manual and accompanying labels. A defective device should not be used. Parts which may be broken or missing or are clearly worn, distorted or contaminated should be replaced immediately with genuine replacement parts manufactured by or made available from Standard Imaging, Inc.
CAUTION: Federal law in the U.S.A. and Canadian law restrict the sale, distribution, or use of this product to, by, or on the order of a licensed medical practitioner. The use of this product should be restricted to the supervision of a qualified medical physicist. Measurement of high activity radioactive sources is potentially hazardous and should be performed by qualified personnel.
Should repair or replacement of this product become necessary after the warranty period, the customer should seek advice from Standard Imaging Inc. prior to such repair or replacement. If this product is in need of repair, it should not be used until all repairs have been made and the product is functioning properly and ready for use. After repair, the product may need to be calibrated. The owner of this product has sole responsibility for any malfunction resulting from abuse, improper use or maintenance, or repair by anyone other than Standard Imaging, Inc.
The information in this manual is subject to change without notice. No part of this manual may be copied or reproduced in any form or by any means without prior written consent of Standard Imaging, Inc.
!
Standard Imaging, Inc. sells this product under the warranty herein set forth. The warranty is extended only to the buyer purchasing the product directly from Standard Imaging, Inc. or as a new prod-uct from an authorized dealer or distributor of Standard Imaging, Inc.For a period provided in the table below from the date of original delivery to the purchaser or a distributor, this Standard Imaging, Inc. product provided in the table is warranted against functional defects in design, materials and workmanship, provided it is properly operated under conditions of normal use, and that repairs and replacements are made in accordance herewith. The foregoing warranty shall not apply if the product has been altered, disassembled or repaired other than by Standard Imaging, Inc. or if the product has been subject to abuse, misuse, negligence or accident.
Product Warranty PeriodStandard Imaging Ionization Chambers 2 yearsStandard Imaging Well Chambers 2 yearsStandard Imaging Electrometers 2 yearsStandard Imaging Software Products 1 yearAll Other Standard Imaging Products 1 yearStandard Imaging Custom Product 90 daysConsumables 90 daysServiced Product 90 days
Resale Products As defined by the OriginalEquipment Manufacturer
ADCL Product Calibration(Standard Imaging uses the UW-ADCL for recalibrations required under warranty)
0 - 90 days = 100% of ADCL Calibration Costs91 - 182 days = 75% of ADCL Calibration Costs
183 – 365 days = 50% of ADCL Calibration Costs366 – 639 days = 25% of ADCL Calibration Costs
(days from date of shipment to customer)
Standard Imaging’s sole and exclusive obligation and the purchaser’s sole and exclusive remedy under the above warranties are, at Standard Imaging’s option, limited to repairing, replacing free of charge or revising labeling and manual content on, a product: (1) which contains a defect covered by the above warranties; (2) which are reported to Standard Imaging, Inc. not later than seven (7) days after the expiration date of the warranty period in the table; (3) which are returned to Standard Imaging, Inc. promptly after discov-ery of the defect; and (4) which are found to be defective upon examination by Standard Imaging, Inc. Transportation related charges, (including, but not limited to shipping, customs, tariffs, taxes, and brokerage fees) to Standard Imaging are the buyer’s responsibility. This warranty extends to every part of the product except consumables (fuses, batteries, or glass breakage). Standard Imaging, Inc. shall not be otherwise liable for any damages, including but not limited to, incidental damages, consequential damages, or special damages. Repaired or replaced products are warranted for the balance of the original warranty period, or at least 90 days.This warranty is in lieu of all other warranties, expressed or implied, whether statutory or otherwise, including any implied warranty of fit-ness for a particular purpose. In no event shall Standard Imaging, Inc. be liable for any incidental or consequential damages resulting from the use, misuse or abuse of the product or caused by any defect, failure or malfunction of the product, whether a claim of such dam-ages is based upon the warranty, contract, negligence, or otherwise.This warranty represents the current standard warranty of Standard Imag-ing, Inc. Please refer to the labeling or instruction manual of your Standard Imaging, Inc. product or the Standard Imaging, Inc. web page for any war-ranty conditions unique to the product.

18
Software License Agreement
Contains licensed program materials of Standard Imaging, Inc.Copyright © Standard Imaging, Inc., Middleton, Wisconsin, USA
This software is protected by U.S. copyright laws, international treaties, FDA regulations, and other intellectual property laws and treaties.
This is a software license agreement to use the software product or products (“the product”) enclosed in this package and described in the applicable purchase order or other ordering document. Standard Imaging, Inc., a Wisconsin corporation (Standard Imaging) hereby grants to the purchaser of the product (“Licensee”) the right to use the product, together with its documentation and other related materials, only in connection the com-puters or computer network system located at the site of use (“the site”) previously designated as such by Licensee and only if in strict compliance with the terms and conditions set forth below. Any purchase and installa-tion or use of the product shall constitute acceptance of and agreement by Licensee to be bound by the terms and conditions hereof. Licensee also agrees that the agreement terms and conditions will prevail in the event of any conflict between the agreement applicable purchase order or other ordering document.
All rights not specifically granted to licensee under this software license agreement are reserved by Standard Imaging. The Standard Imaging documented Warranty and Customer Responsibility statements shall be considered to be part of this agreement. The term of this agreement and the licenses granted hereunder will continue in perpetuity, unless sooner terminated by Standard Imaging.
Licensee may:a. Use the product only on a single computer or single network system at the site of use; andb. Make backup copies of the product only for back-up, recovery and ar-chival purposes.
Licensee may not and shall not:a. Make copies of the product, except as otherwise permitted herein;b. Rent, lease, sub-lease or otherwise permit any third party to use the product;c. Redistribute any portion of the product, its software programs, documenta-tion, or other related materials;d. Other than as set forth in section 1.b. above, copy the product, any of its software programs, documentation or other related materials, without the express written permission of Standard Imaging;e. Remove or obscure copyright and/or trademark notices appearing on the product;f. Reverse engineer the product in order to derive or appropriate for any reason or purpose the source code or any other trade secret or other pro-prietary information; org. Transfer the software program of the product to another site or to a third party purchaser without the express written permission of Standard Imaging and agreement to all the terms and conditions of the then current software license agreement utilized by Standard Imaging by the authorized representative of the new site or such third party.
The Licensee shall be solely responsible for the installation of the product and any updates provided by Standard Imaging. Standard Imaging shall provide telephone technical support for the product for a period of (1) one year from the date of shipment. Any updates, upgrades and new releases to the product within the period of (1) year from date of shipment will be provided at no additional costs. After the expiration of the period of (1) year from the date of shipment, Standard Imaging will provide technical support, and updates, upgrades and new releases for an additional fee.
Standard Imaging shall not be liable for any amount in excess of the product costs actually paid by the Licensee giving rise to any claims hereunder. In no event shall Standard Imaging be liable, whether in contract, tort or otherwise for any indirect, incidental or consequential damages arising out of the subject matter of this agreement.
In the event of breach by Licensee of any of the terms and conditions of this software license agreement, Standard Imaging shall be entitled to enforce all legal rights and remedies conferred upon it by State of Wisconsin, federal, and/or international law. Standard Imaging and Licensee acknowledge that because breach by Licensee of any of the terms or conditions of this agreement will likely cause irreparable harm to Standard Imaging, injunc-tive relief would be an appropriate remedy for Standard Imaging resulting from any such breach by Licensee. In the event that action, suit, or legal proceedings are initiated or brought to enforce any or all of the provisions of this agreement, the prevailing party shall be entitled to such attorney’s fees, costs, and disbursements as are deemed reasonable and proper by a court of law or an arbitrator. In the event of an appeal of an initial decision of a court or of an arbitrator, the prevailing party shall be entitled to such attorney’s fees, costs, and disbursements as are deemed reasonable and proper by such appellate court.
Notwithstanding the foregoing, in the event of any breach by Licensee of the terms and conditions of this agreement, Standard Imaging may, upon reasonable advance written notice to Licensee (which in no event shall be less than thirty days), terminate this license. Upon such termination by Standard Imaging, Licensee shall furnish Standard Imaging with a sworn affidavit stating that all of the product, including, without limitation, its soft-ware program(s), documentation and other related material and any copies thereof, have been returned by certified mail, return receipt requested to Standard Imaging or destroyed by Licensee.
This agreement shall be deemed executed in the State of Wisconsin and shall be interpreted and construed in accordance with the laws of the State of Wisconsin. If any provision of this agreement is judicially declared to be invalid, unenforceable, or void by a court of competent jurisdiction, such decision shall not have the effect of invalidating or voiding the remainder of this agreement and the part or parts of this agreement so held to be invalid, unenforceable, or void shall be deemed to be deleted from this agreement and the remainder of this agreement shall have the same force and effect as if such part or parts had never been included.