user manual matrix-12 v -...
TRANSCRIPT
ARTURIA – Matrix-12 V – USER MANUAL 1
USER MANUAL

ARTURIA – Matrix-12 V – USER MANUAL 2
Direction
Frédéric Brun Kevin Molcard
Development
Pierre-Lin Laneyrie (project manager)
Toby Carpenter (lead)
Stefano D'Angelo
Baptiste Aubry
Corentin Comte
Baptiste Le Goff
Valentin Lepetit
Samuel Limier
Germain Marzin
Mathieu Nocenti
Pierre Pfister
Benjamin Renard
Vincent Travaglini
Design
Glen Darcey
Shaun Ellwood
Morgan Perrier
Sebastien Rochard
Sound Design
Jean-Baptiste Arthus
Jean Michel Blanchet
Glen Darcey
Richard Devine
Ed Ten Eyck
Boele Gerkes
Frank Greiner
Victor Morello
Erik Norlander
Greg Savage
Paul Schilling
Stephane Schott
Nori Ubukata
Manual
Antoine Back
Tomoya Fukuchi
Jason Valax
Special Thanks
Paul Beaudoin
Bill Cameron « electrowizard »
Chuck Capsis
Richard Courtel
Dwight Davies
Ben Eggehorn
David Farmer
Jeff Haler
David Harman
Koshdukai
Terrence Mardsen
Ken Flux Pierce
Daniel Saban
Chad Wagner
© ARTURIA S.A. – 1999-2016 – All rights reserved.
11 Chemin de la Dhuy
38240 Meylan
FRANCE
http://www.arturia.com

ARTURIA – Matrix-12 V – USER MANUAL 3
Table of Contents
1 INTRODUCTION ................................................................................................................. 7
1.1 Oberheim: an overview ........................................................................................................................ 7
1.1.1 Prelude .............................................................................................................................................. 7
1.1.2 Lord of the Ring Modulators ............................................................................................................. 7
1.1.3 Technological innovations ............................................................................................................... 8
1.1.3.1 Polyphony ................................................................................................................................................................. 8
1.1.3.2 Sequencers ............................................................................................................................................................... 9
1.1.3.3 Presets ...................................................................................................................................................................... 10
1.1.3.4 Drum machines ...................................................................................................................................................... 10
1.1.3.5 MIDI .......................................................................................................................................................................... 11
1.2 The Oberheim synth family: a genealogy ....................................................................................... 11
1.2.1 SEM: the little synth that could ....................................................................................................... 11
1.2.2 The polysynths: rapid growth.......................................................................................................... 13
1.2.3 Crowning achievement: the Matrix 12 .......................................................................................... 13
1.2.4 Where the sound is found… ........................................................................................................... 14
1.3 All good things come to an end…for a while ................................................................................ 14
1.4 Arturia’s secret ingredient: TAE® ........................................................................................................ 15
1.4.1 Aliasing-free oscillators ................................................................................................................... 15
1.4.2 A better reproduction of analog oscillator waveforms................................................................. 16
1.4.3 Direct Filter Circuit Modeling .......................................................................................................... 17
2 ACTIVATION AND FIRST START ...................................................................................... 19
2.1 Register and Activate .......................................................................................................................... 19
2.2 Initial setup ............................................................................................................................................. 19
2.2.1 Audio and MIDI settings: Windows ................................................................................................. 19
2.2.2 Audio and MIDI settings: Mac OS X ............................................................................................... 22
2.2.3 Using Matrix-12 V in plug-in mode .................................................................................................. 22
3 USER INTERFACE .............................................................................................................. 23
3.1 The virtual keyboard ............................................................................................................................ 23
3.2 Toolbar .................................................................................................................................................... 23
3.2.1 Save Preset ..................................................................................................................................... 23
3.2.2 Save Preset As… ............................................................................................................................. 24
3.2.3 Import preset .................................................................................................................................. 24
3.2.4 Export preset ................................................................................................................................... 25
3.2.5 Resize window options ................................................................................................................... 25
3.2.6 Audio settings ................................................................................................................................. 26
3.2.7 Preset browser overview ................................................................................................................ 26
3.2.8 MIDI Learn assignment ................................................................................................................... 27
3.2.8.1 Assigning / unassigning controls .......................................................................................................................... 28
3.2.8.2 Min / Max value sliders .......................................................................................................................................... 29
3.2.8.3 Relative control option.......................................................................................................................................... 29
3.2.8.4 Reserved MIDI CC numbers ................................................................................................................................. 29

ARTURIA – Matrix-12 V – USER MANUAL 4
3.2.9 MIDI controller configuration.......................................................................................................... 30
3.2.10 The lower toolbar ............................................................................................................................ 30
3.3 The Preset Browser ................................................................................................................................ 31
3.3.1 Searching presets ........................................................................................................................... 31
3.3.2 Using tags as a filter ........................................................................................................................ 32
3.3.3 The Preset Info section .................................................................................................................... 33
3.3.4 Preset selection: other methods..................................................................................................... 34
3.3.4.1 Selecting a preset by its Type .............................................................................................................................. 35
3.3.5 Playlists ............................................................................................................................................ 35
3.3.5.1 Add a playlist .......................................................................................................................................................... 35
3.3.5.2 Add a preset ........................................................................................................................................................... 36
3.3.5.3 Re-order the presets .............................................................................................................................................. 36
3.3.5.4 Remove a preset ................................................................................................................................................... 36
3.3.5.5 Delete a playlist ...................................................................................................................................................... 36
3.4 Overview of the main window components .................................................................................. 37
3.4.1 Page bar ......................................................................................................................................... 37
3.4.2 Parameter window ......................................................................................................................... 38
3.4.2.1 The Main page ....................................................................................................................................................... 38
3.4.2.2 The Voices page .................................................................................................................................................... 38
3.4.3 Nameplate ..................................................................................................................................... 39
3.4.4 Bottom panel .................................................................................................................................. 39
3.5 The tool bar: Managing presets ........................................................................................................ 40
4 SINGLE MODE .................................................................................................................. 41
4.1 Front Panel Functions ........................................................................................................................... 41
4.1.1 Overview of the parameter organization ...................................................................................... 41
4.1.1.1 Parameter groups .................................................................................................................................................. 41
4.1.1.2 Tabs .......................................................................................................................................................................... 42
4.1.1.3 Parameters with and without mods .................................................................................................................... 43
4.1.2 The nameplate ............................................................................................................................... 43
4.1.3 The bottom panel ........................................................................................................................... 43
4.1.3.1 Virtual keyboard..................................................................................................................................................... 43
4.1.3.2 FX .............................................................................................................................................................................. 44
4.1.3.3 Mod .......................................................................................................................................................................... 44
4.1.3.4 Page 2...................................................................................................................................................................... 44
4.2 Parameter groups ................................................................................................................................ 45
4.2.1 VCOs ............................................................................................................................................... 45
4.2.1.1 VCO Frequency (Freq) .......................................................................................................................................... 46
4.2.1.2 VCO Detune ........................................................................................................................................................... 46
4.2.1.3 VCO Pulse Width (PW) .......................................................................................................................................... 46
4.2.1.4 VCO waveform ...................................................................................................................................................... 46
4.2.1.5 VCO Volume .......................................................................................................................................................... 47
4.2.1.6 Sync (VCO 2 only) .................................................................................................................................................. 47
4.2.1.7 VCO Page 2 ............................................................................................................................................................ 47
4.2.2 FM ................................................................................................................................................... 47

ARTURIA – Matrix-12 V – USER MANUAL 5
4.2.2.1 Filter FM .................................................................................................................................................................... 49
4.2.3 Filter ................................................................................................................................................. 50
4.2.3.1 Filter Frequency (Freq) .......................................................................................................................................... 50
4.2.3.2 Filter Resonance (Res) ........................................................................................................................................... 50
4.2.3.3 Filter Mode .............................................................................................................................................................. 50
4.2.3.4 Filter Page 2 ............................................................................................................................................................ 51
4.2.3.5 VCAs ........................................................................................................................................................................ 52
4.2.4 Lag .................................................................................................................................................. 52
4.2.5 Ramps ............................................................................................................................................. 53
4.2.6 Envelopes (Env) .............................................................................................................................. 54
4.2.7 Tracking Generators (Track) ........................................................................................................... 54
4.2.8 LFOs ................................................................................................................................................. 55
4.3 The Effects .............................................................................................................................................. 56
4.3.1 Delay ............................................................................................................................................... 57
4.3.2 Dual-stage Phaser .......................................................................................................................... 58
4.3.3 Analog Delay .................................................................................................................................. 59
4.3.4 Flanger ............................................................................................................................................ 59
4.3.5 Analog Chorus ................................................................................................................................ 60
4.3.6 Reverb............................................................................................................................................. 61
4.4 The Modulation Page .......................................................................................................................... 61
4.4.1 The MOD list .................................................................................................................................... 62
4.4.1.1 Resetting part of a mod ........................................................................................................................................ 63
4.4.1.2 Clearing a mod ...................................................................................................................................................... 64
4.4.1.3 Quantizing a mod .................................................................................................................................................. 64
4.5 Page 2 .................................................................................................................................................... 65
4.6 Single mode: the Voices page .......................................................................................................... 65
4.6.1 First of all: What’s a Voice? ............................................................................................................ 65
4.6.2 The Voice page .............................................................................................................................. 66
4.6.3 Voices ............................................................................................................................................. 67
4.6.4 Zones ............................................................................................................................................... 68
4.6.5 Vibrato (VIB).................................................................................................................................... 69
5 MULTI MODE .................................................................................................................... 72
5.1 How to switch modes .......................................................................................................................... 72
5.2 Single mode vs. Multi mode ............................................................................................................... 72
5.3 Multi mode: the Voices page ............................................................................................................ 73
5.3.1 Voices ............................................................................................................................................. 74
5.3.2 Groups ............................................................................................................................................ 75
5.3.3 Selecting a single............................................................................................................................ 77
5.3.4 Zones ............................................................................................................................................... 78
5.3.5 VIB ................................................................................................................................................... 78
5.3.6 Saving a Voice into a Single Preset................................................................................................ 79
5.3.7 Saving a Multi ................................................................................................................................. 80
5.4 Import / Export ...................................................................................................................................... 80

ARTURIA – Matrix-12 V – USER MANUAL 6
5.5 Multi Mode: the Main page ............................................................................................................... 80
6 END USER LICENSE AGREEMENT .................................................................................. 82

ARTURIA – Matrix-12 V – USER MANUAL 7
1 INTRODUCTION
Arturia would like to thank you for purchasing our synthesizer model: the Matrix-12
V. We are confident it will prove to be an extremely valuable addition to your music
production studio. If you’ve purchased our products before, you know we pride
ourselves in faithfully recreating the sound and feel of the original instruments, down
to the smallest detail. Matrix-12 V is no exception to this rule.
And if this is the first of our products you have owned, you are in for a treat! The
synthesizer upon which this model is based was the absolute pinnacle of analog
synthesizer technology at the time, light-years ahead of the competition.
1.1 Oberheim: an overview
1.1.1 Prelude
The 21st century is experiencing a Renaissance in the area of analog synthesizers,
with many companies offering models of all colors, shapes and sizes. From towering
modular synthesizers dripping with patch cords to Arturia’s affordable and
innovative MiniBrute series, fans of analog synthesis haven’t had it so good for
decades.
Back in the early ‘70s, however, there were really only two main synthesizer
manufacturers with any notoriety: Bob Moog and his eponym company and ARP.
These two companies rode a crest of technological and musical innovations for
nearly a decade, with a rivalry akin to that of the Beatles and the Rolling Stones:
some liked one, some liked the other, and the serious collectors owned both. And
it seemed the more these companies ‘divided the pie’ of market share, the larger
the pie became.
Then about 1975, riding in like something out of an American Western film, came a
wave of white-faced synthesizers by the name of Oberheim. In addition to their
unique appearance, they offered a different set of features and a fresh sound that
ranged from creamy to brash. Bands around the world began appearing onstage
and in the studio with these instruments, and many a memorable song and solo
were built around them.
But we’re getting ahead of ourselves. A lot of brainstorming and hard work had to
happen before musicians were able to get their hands on a polyphonic Oberheim
synthesizer like the Matrix 12. Here’s a bit of the background.
1.1.2 Lord of the Ring Modulators
The mid-1960s were a time when all musical boundaries began to be challenged.
Unusual applications for electronic circuitry were at the heart of that, as artists
looked for That Sound, the one that would set them apart from the crowd.

ARTURIA – Matrix-12 V – USER MANUAL 8
It was then Tom Oberheim first made a name for himself through his version of an
electronic device called a ring modulator. These somewhat simple circuits had
been used in radio receivers for a long time, but when applied to a signal in the
audio range the results were often other-worldly.
Case in point: if you have watched enough of the popular BBC show Doctor Who,
you probably know about his nemeses, the Daleks. Their ominous, alien drill-
sergeant voices owe much to the ring modulator (“Exterminate! Exterminate!”).
And many of the bell-like tones you’ve heard from analog synths through the years
also came from ring modulators. So these devices are still in use!
Initially Tom made a couple of these for some musician friends, one of whom was
in a psychedelic band called The United States of America. Word got around, one
thing led to another, and the next thing he knew he was being contacted by the
Chicago Musical Instruments Company (CMI).
CMI wanted Tom to develop a ring modulator, which he did (the Maestro RM-1A).
Good for them, and even better for us: this odd little box led directly to the
formation of Oberheim Electronics.
The Maestro RM-1A, circa 1969
The RM-1A was followed by the Maestro PS-1, a phase shifter which also became
very popular. And for the next five years or so a steady stream of interesting and
useful products were designed for CMI by Tom Oberheim.
1.1.3 Technological innovations
Our main focus in these sections will be the synthesizer products Mr. Oberheim
brought to life. However, some of his other contributions to the music world are
noteworthy:
1.1.3.1 Polyphony
Sometimes it’s good to be reminded: Back in the “old days” it wasn’t possible to
play a chord on a synthesizer keyboard. You could only play one note at a time.

ARTURIA – Matrix-12 V – USER MANUAL 9
But after becoming the official Los Angeles dealer for ARP synthesizers, Tom set out
to change this. His early discoveries with the ARP 2500 and later modifications of
the 2600 allowed duophonic performance on these synths (i.e., two notes could
be played at once).
After this a “voice race” began, with two, then four, then five or six, and eventually
eight voices becoming the standard for commercially available analog
synthesizers. But the roots of this modern reality trace back to the early days of
Oberheim Electronics.
1.1.3.2 Sequencers
About 1975 Oberheim introduced the DS-2a, a monophonic sequencer with a 144-
note memory. (Well, it seemed like a lot at the time!) The beauty of this device was
that it allowed users to enter notes from a keyboard, in real or step time, as
opposed to dialing them in with a knob. Memory was shared by up to three
sequences, which could be played back individually or chained and played back
one after the other.
Unfortunately, there was no way to preserve the sequences for later use; all
memory would be lost when the unit was powered down.
The Oberheim DS-2a, circa 1975
Another limitation with the DS-2a is that it would “hijack” the synth to which it was
attached, rendering it unplayable by the user during playback. But this limitation
led Oberheim to develop his Synthesizer Expansion Module, the beloved Oberheim
SEM.
And again, the DS-2a paved the way for sequencers with more memory and
polyphonic capabilities, including the Oberheim DSX and products from other
manufacturers.

ARTURIA – Matrix-12 V – USER MANUAL 10
1.1.3.3 Presets
A famous, perhaps apocryphal story about a well-known multi-keyboardist puts the
early days of analog synthesizers in perspective: it is said that whenever he came
up with a sound he really liked on one of his Minimoogs, he would leave the controls
on that synthesizer exactly as they were and go buy another Minimoog.
True or not, it is true that back in the day, people had to write down the values for
every knob and switch if they wanted to recreate a sound later (and didn’t want
to buy another synth). Here again Oberheim led the pack in the development of
the Programmer (1976), a device that could store and recall any one of 16 presets,
each containing the parameters for up to eight SEMs at a time. And the SEMs didn’t
have to have identical settings, either, so each preset could contain wildly different
sounds from SEM voice to SEM voice.
But the parameter controls on the Programmer also allowed the user to program
all eight SEMs at the same time so they would sound like a single instrument if
desired. Cassette backup was possible too, which allowed for the creation of a
potentially infinite patch library.
The Oberheim Programmer, circa 1976
1.1.3.4 Drum machines
Oberheim introduced the DMX (1981) and DX (1983), which became the
foundation for scores of hit records in the ‘80s and beyond. They weren’t the first
sample-based drum machines, but soon they added a new twist: The Oberheim
Prommer (1986) effectively turned the DMX and DX into samplers, in all their 8-bit
glory. All the user had to do was open the drum machine and swap a chip (an
EPROM), being careful to avoid static electricity and not to bend or break any pins!

ARTURIA – Matrix-12 V – USER MANUAL 11
The Oberheim DMX and DX drum machines
So the Linn LM-1 may have arrived first, but the features, the Prommer and the price
point quickly established Oberheim drum machines as a significant presence in the
music industry.
1.1.3.5 MIDI
Yep. MIDI. Tom Oberheim helped drive the development of the Musical Instrument
Digital Interface protocol, a.k.a. MIDI, in three ways.
First, he brought the concept to life by implementing a digital communication bus
for his own products (the Parallel Buss). This enabled devices such as the OB-8, the
DMX and the DSX to become a synchronized, musically useful sequencing system.
The home project studio was born!
Second, when two other manufacturers took notice of Oberheim’s system,
discussions began regarding a universal protocol that could be adopted by all
manufacturers.
Third, and possibly most importantly, those three companies pitched this new idea
to other major instrument manufacturers and convinced them it was a
commercially viable concept. The course of the music world was forever changed
through the efforts of Tom Oberheim and his colleagues.
1.2 The Oberheim synth family: a genealogy
Few product lines are as diverse as this one, even when only considering the
synthesizers. From a small, single-voice expansion module to the behemoth Matrix
12, within the space of ten years this company covered a lot of ground.
But it all started with an innovative little box called the SEM.
1.2.1 SEM: the little synth that could
While selling ARP synthesizers, Oberheim began to design a device to help solve a
small problem created by his DS-2a sequencer: the performer had to surrender
control of the synthesizer to the sequencer while it was doing its thing. Few could

ARTURIA – Matrix-12 V – USER MANUAL 12
afford a second modular synth, not to mention the added bulk and complexity of
carrying around two systems.
So Tom realized that a small, self-contained module could provide a cost-effective
solution, complete with oscillators, filter and input/output connections. This unit
could be connected to the sequencer while the user played the main synth. And
so the Oberheim Synthesizer Expansion Module, better known as the SEM, came
into being.
He enlisted the help of Scott Wedge and Dave Rossum, engineers who were
pioneers in their own right as founders of E-mu Systems. Together they unveiled the
SEM at the Audio Engineering Society Convention in Los Angeles in May, 1974.
The SEM was also a great way to expand the sound of a Minimoog or an ARP
Odyssey by using their Control Voltage (CV) and Gate connectors to trigger the
SEM.
Pictured below is Arturia’s SEM V, our reverently rendered DSP model of the SEM:
The center panel of Arturia’s SEM V modeling software
Patch cables had been replaced by internal connections, giving the unit a clean
and simple appearance. But on close inspection you will see there is a lot of power
behind that pretty face.
Among other things, people began to take notice of the SEM because of its
innovative filter section. It had lowpass, highpass and bandpass filters like the Big
Boys, but there was something new: a continuously variable filter control with
lowpass on one side, highpass on the other, and a notch filter at the 12:00 setting.
This became known as a “multi-mode filter”, and it truly set the Oberheim sound
apart from the competition.
The SEM proved to be sort of a “Cinderella synth”: too beautiful to stay in the
background for long. And so the humble expansion module took center stage, as
Oberheim Electronics combined an increasing number of SEMs with a keyboard in
a single, portable package.

ARTURIA – Matrix-12 V – USER MANUAL 13
1.2.2 The polysynths: rapid growth
Synth followed synth in quick succession, each standing on the other’s shoulders:
the two-voice TVS-1 (1975), the four-voice FVS-1 (also 1975), and the Eight-voice
(1977), which are pictured below (note the inclusion of the Programmer on the
left side of the two larger models):
The TVS-1 The FVS-1
The last of the Great White Synths: the Oberheim 8-voice
Not pictured are the increasingly popular OB-1 (1978), OB-X (1979), OB-Xa (1980),
OB-8 (1983), and Xpander (1984). Each is legendary and worthy of a section of its
own!
Finally, Oberheim introduced their flagship, the Matrix 12, in 1985.
1.2.3 Crowning achievement: the Matrix 12
Though based on the same voice architecture as its predecessor, the Matrix 12 was
definitely more than just two Xpanders soldered together. In addition to the 5-
octave keyboard and two modulation levers, some important new features were
added while a few significant hardware features were not included. But at an
original retail price of almost $5,000, no doubt some shortcuts were necessary to
keep this marvelous synth within the reach of more musicians.
So on the downside, the Matrix 12 lost the individual CV/gate and output jacks per
voice (the latter being available as an upgrade). But on the plus side, the Matrix 12
gained some extra MIDI functionality and a per-voice detune parameter in the
Multi Voice setup section, which you will be very glad to know we included in
Matrix-12 V.

ARTURIA – Matrix-12 V – USER MANUAL 14
The Oberheim Matrix 12
To maintain basic patch compatibility with the Xpander, each of the Matrix 12’s
dual-oscillator voices boasted the same 15-mode voltage controlled filter (VCF),
five envelopes and five low-frequency oscillators (LFOs) as well as a Lag processor
(for portamento, etc.), three tracking generators and four ramp generators (i.e.,
modulation delays), which added up to a lot of programming options. On top of
that, the Matrix Modulation section allowed almost any imaginable sort of control
over the final sound, from small refinements to radical routings that could
completely disfigure the sound if desired: mods could be modulating the sources
of other mods, etc.
And as usual with Arturia, our Matrix-12 V offers you all of the original features and
many, many more.
1.2.4 Where the sound is found…
The list of albums made using the various Oberheim synthesizers could fill an
encyclopedia. They have certainly filled the airwaves over the years:
Styx – The Grand Illusion
Rush – Moving Pictures
The Police – Synchronicity
Prince – 1999
Queen – The Game
Jean Michel Jarre – Magnetic Fields
Bruce Hornsby & The Range – The Way It Is
Madonna – Madonna
Tangerine Dream – Exit
Van Halen – 1984
This is only a small percentage of the songs, styles and artists fueled and driven by
Oberheim products. They have clearly proven themselves as great creative tools,
to say the least.
1.3 All good things come to an end…for a while
It’s a sad truth that no matter how excellent a company’s products are, they
sometimes find it hard to stay afloat. Alas, this was true of Oberheim Electronics as
well, which changed hands a number of times beginning in 1985. Tom stayed on

ARTURIA – Matrix-12 V – USER MANUAL 15
board for a couple of years and then struck out on his own, founding another
company called Marion Systems.
Then in 2009 he announced he would be revising and reissuing some of his most
famous early synthesizers, starting with the SEM. He followed that in 2014 with the
Two Voice Pro.
Look for these products and more at tomoberheim.com.
1.4 Arturia’s secret ingredient: TAE®
TAE® (True Analog Emulation) is Arturia's outstanding technology dedicated to the
digital reproduction of the analog circuits used in vintage synthesizers.
TAE®’s software algorithms result in spot-on emulation of analog hardware. This is
why Matrix-12 V offers an unparalleled quality of sound, as do all of Arturia’s virtual
synthesizers.
TAE® combines three major advances in the domain of synthesis:
1.4.1 Aliasing-free oscillators
Standard digital synthesizers produce aliasing in high frequencies, especially when
using Pulse Width Modulation (PWM) or Frequency Modulation (FM).
TAE® enables the generation of oscillators which are completely free of aliasing in
all contexts (PWM, FM…), and at no extra CPU cost.
Linear frequency spectrum of a current well-known software synthesizer
Aliasing

ARTURIA – Matrix-12 V – USER MANUAL 16
Linear frequency spectrum of an oscillator modeled with TAE®
1.4.2 A better reproduction of analog oscillator waveforms
The waveforms produced by the oscillators in analog synthesizers are affected by
the presence of a capacitor in the circuits. The discharge of a capacitor results in
a slight ‘bend’ in the original waveform (most notably for sawtooth, triangular and
square waveforms). TAE® reproduces the result of this capacitor discharge in
software.
Below is the analysis of a waveform from one of the five original instruments Arturia’s
software emulates, followed by one made by TAE®. They are both equally
deformed by the low-pass and high-pass filtering.
Temporal representation of the “sawtooth” waveform of a hardware synthesizer

ARTURIA – Matrix-12 V – USER MANUAL 17
Temporal representation of a “sawtooth” waveform reproduced by TAE®
What’s more, the hardware analog oscillators were unstable. In fact, their
waveforms vary slightly from one period to another. If we add to this the fact that
the starting point for each period (in Trigger mode) can vary with the temperature
and other environmental conditions, we see why vintage synthesizers have such a
typical sound.
TAE® reproduces the instability of oscillators, resulting in a fatter and “bigger” sound.
1.4.3 Direct Filter Circuit Modeling
Due to advances in computer processing power, TAE® can now employ direct filter
modeling techniques to achieve unprecedented accuracy in the emulation of a
hardware synthesizer’s filter. By modeling the operation of the individual hardware
components of the filter circuit, the warm nuances synonymous with analog sounds
are recreated.
The following graph shows a single example of direct circuit modeling in action.
The peaks represent the generation of harmonics at multiples of the resonant
frequency when a particular filter is in self oscillation mode. These harmonics are
characteristic of hardware synthesizer filters and are due to the non-linear behavior
inherent to their analog circuitry. Anomalies such as these add to the richness and
warmth of the sound produced by the filter.
But you’ll notice there are two lines on the graph: Those are the superimposed
frequency domain plots for both one of Arturia's virtual instruments and the
hardware filter being emulated. They are practically indistinguishable, both on the
graph and to the human ear. The direct recreation of this analog circuitry causes
the same characteristics of the sound to be present, thus giving the user a truly
analog sound.

ARTURIA – Matrix-12 V – USER MANUAL 18
Comparison of harmonics generated by the filter circuits in self-oscillation
of TAE® and a hardware synthesizer
So here’s the bottom line: when you bring together a bunch of music lovers who
also have a deep understanding of the characteristics of electronic circuits, you
wind up with Arturia. And Arturia now offers you our most impressive software model
yet, the Matrix-12 V.
We take great satisfaction in knowing this great synthesizer will help you explore
previously unknown musical territory.

ARTURIA – Matrix-12 V – USER MANUAL 19
2 ACTIVATION AND FIRST START
2.1 Register and Activate
Matrix-12 V works on computers equipped with Windows 7 or later and Mac OS X
10.8 or later. You can use the stand-alone version or use Matrix-12 V as an Audio
Units, AAX, VST2 or VST3 instrument.
Once Matrix-12 V has been installed, the next step is to register the software.
The registration process will require you to enter the serial number and the unlock
code you received with the product.
In order to proceed, go to this web page and follow the instructions:
http://www.arturia.com/register
Note: If you don’t have an Arturia account yet, you will need to create one. The
process is quick, but it does require that you can access your email address during
the registration process.
Once you have acquired an Arturia account you will be able to register the product.
2.2 Initial setup
2.2.1 Audio and MIDI settings: Windows
At the top left of the Matrix-12 V application is a pull-down menu. It contains various
setup options. Initially you will need to go to the menu and choose the Audio Settings
option to get sound and MIDI flowing in and out.

ARTURIA – Matrix-12 V – USER MANUAL 20
Matrix-12 V main menu
You will then see the Audio MIDI settings window. This works in the same way on both
Windows and Mac OS X, although the names of the devices available to you will
depend on the hardware you are using.

ARTURIA – Matrix-12 V – USER MANUAL 21
Audio and MIDI settings window
Starting from the top you have the following options:
Device lets you choose which audio driver you want to use to route sound out
of the instrument. This might be your computer’s own driver like Windows
Audio, or an ASIO driver. The name of your hardware interface may appear
in this field.
Output Channels lets you select which of the available outputs will be used to
route audio out. If you only have two outputs, only two will appear as options.
If you have more than two you can select a specific pair of outputs.
The Buffer Size menu lets you select the size of the audio buffer your computer
uses to calculate sound. A smaller buffer means lower latency between
pressing a key and hearing the note. A larger buffer means a lower CPU load
as the computer has more time to think, but can result in a small latency. Find
the optimum buffer size for your system. A fast, modern computer should easily
be able to operate at 256 or 128 sample buffer size without creating pops or
clicks in the sound. If you are getting clicks, try raising the buffer a little. The
latency is displayed on the right hand side of this menu.
The Sample Rate menu lets you set the sample rate at which audio is sent out
of the instrument. The options here will depend on the capability of your audio
interface hardware though even most computers’ own hardware can
operate at up to 48kHz which is perfectly fine. Higher sample rates use more
CPU power so unless you have a good reason to go up to 96kHz, then 44.1k
or 48k is usually fine. The Show Control Panel button will jump to the system
control panel for whatever audio device is selected.

ARTURIA – Matrix-12 V – USER MANUAL 22
Play Test Tone helps you to troubleshoot audio issues by confirming whether
sound can be heard through the correct device.
Your connected MIDI devices will appear in the MIDI Devices area. Click the
check box to accept MIDI from the device you want to use to trigger the
instrument. In standalone mode, Matrix-12 V listens for all MIDI channels so
there’s no need to specify a channel. You can specify more than one MIDI
device at once.
2.2.2 Audio and MIDI settings: Mac OS X
The process is very similar to initial setup for Windows and the menu is accessed in
the same way. The difference is that OS X uses CoreAudio to handle audio routing
and the audio device selection is made in the second dropdown menu. Apart from
that, the options work the same way as described in the Windows section.
2.2.3 Using Matrix-12 V in plug-in mode
Matrix-12 V comes in VST, AU and AAX plug-in formats for use in all major DAW
software such as Cubase, Logic, Pro Tools and so on. You can load it as a plug-in
instrument and its interface and settings work the same way as in standalone mode,
with a couple of differences.
You can automate numerous parameters using your DAW’s automation
system.
You can use more than one instance of Matrix-12 V in a DAW project. In
standalone mode you can only use one at once.
You can route Matrix-12 V’s audio outputs more creatively inside your DAW
using the DAW’s own audio routing system.
ARTURIA – Matrix-12 V – USER MANUAL 23
3 USER INTERFACE
In this chapter we will give an overview of the features available to you with Matrix-
12 V. As with every Arturia product, we have gone to great lengths to make the use
of this software instrument as simple and as much fun as possible, while also striving
to make sure you never run out of new things to do with it as your knowledge
expands. After reading this chapter you should be ready to delve as deeply into the
workings of Matrix-12 V as you would like.
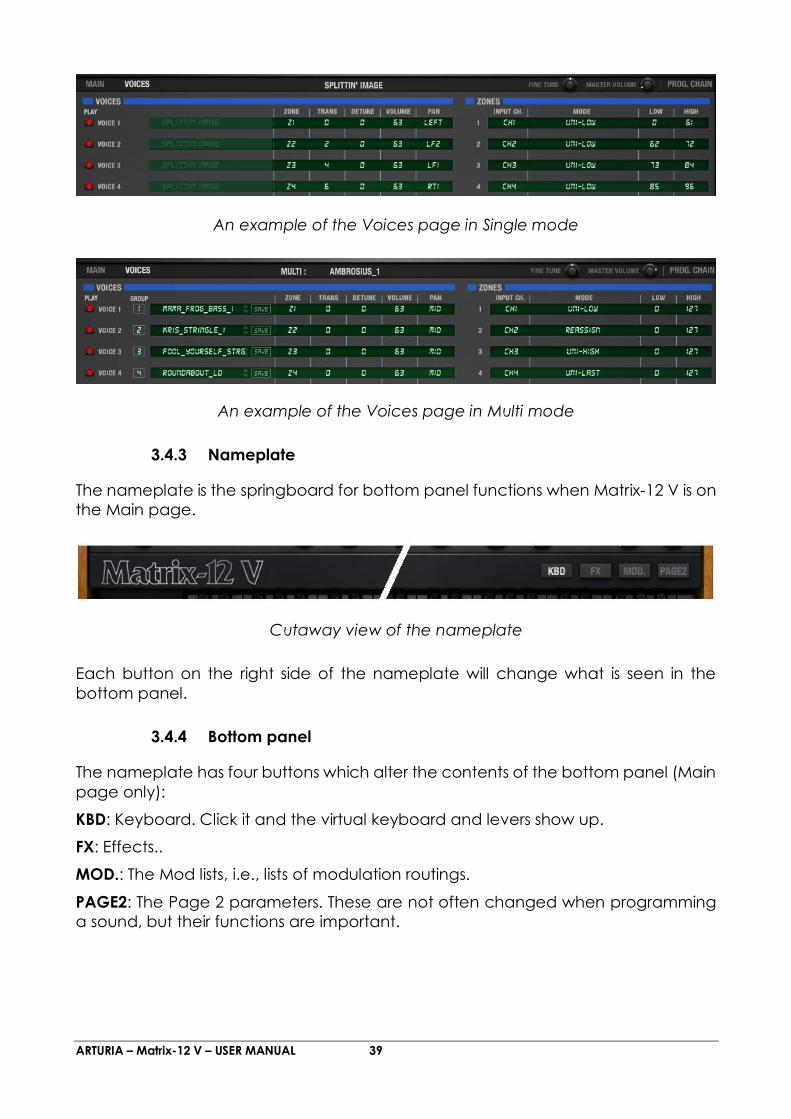
3.1 The virtual keyboard
The virtual keyboard lets you play a sound without connecting an external MIDI
device; just click a key to hear the active Voice. Drag the cursor across the keys to
hear a glissando.
The Matrix-12 V virtual keyboard and Levers
Note also the Levers to the left of the virtual keys. Lever 1 is available as a modulation
source, while spring-loaded Lever 2 is usually dedicated to pitch bend purposes.
Either can be routed to other destinations on the Modulation Page, though.
3.2 Toolbar
The toolbar that runs along the top edge of the instrument both in standalone and
plug-in mode provides access to many useful features. Let’s look at them in detail.
The first seven of these options can be found by clicking on the Matrix-12 V section
at the very top left hand corner of the instrument window.
3.2.1 Save Preset
The first option lets you save a preset. If you select this, you are presented with a
window where you can enter information about the preset. In addition to naming it
you can enter the author name, select a bank and type and select some tags that
describe the sound. This information can be read by the preset browser and is useful
for searching the preset banks later. You can also enter freeform text comments in
the Comments field, which is handy for providing a more detailed description.

ARTURIA – Matrix-12 V – USER MANUAL 24
The Save Preset window
3.2.2 Save Preset As…
This works in the same way as the Save command, but lets you save a copy of the
preset instead of saving over the original. It’s useful for creating variations on
patches but still keeping individual copies of each one.
3.2.3 Import preset
This command lets you import a preset file, which can be either a single preset or an
entire bank of presets. Both types are stored in the .matrix format.
After selecting this option, the default path to these files will appear in the window,
but you can navigate to whichever folder you are using.

ARTURIA – Matrix-12 V – USER MANUAL 25
3.2.4 Export preset
You can export and share a single preset using this command. The default path to
these files will appear in the window, but you can create a folder at another location
if you like.
3.2.5 Resize window options
The Matrix-12 V window can be resized from 60% to 200% of its original size without
any visual artifacts. On a smaller screen such as a laptop you might want to reduce
the interface size so it doesn’t dominate the display. On a larger screen or a second
monitor you can increase the size to get a better view of the controls. The controls
work the same at any zoom level but the smaller ones can be harder to see at the
smaller magnification values.

ARTURIA – Matrix-12 V – USER MANUAL 26
The Resize Window menu
3.2.6 Audio settings
Here you manage the way the instrument transmits sound and receives MIDI. See
section 2.2 of the manual for full details on this.
3.2.7 Preset browser overview
The Preset browser is invoked by clicking the toolbar button that has four vertical
lines. See section 3.3 of the manual for full details on this. The Filter, name field and
left / right arrows in the toolbar all assist with preset selection.

ARTURIA – Matrix-12 V – USER MANUAL 27
The Preset Browser
3.2.8 MIDI Learn assignment
The MIDI plug icon at the far right side of the toolbar places the instrument into MIDI
learn mode. Parameters that can be assigned to MIDI controls will be shown in
purple, and the idea is that you map physical buttons, knobs, faders or pedals from
hardware MIDI controllers to specific destinations inside the instrument. A typical
example might be to map a real expression pedal to the virtual volume pedal, or
buttons on a controller to the effect switches so you can change the sound from
your hardware keyboard.

ARTURIA – Matrix-12 V – USER MANUAL 28
MIDI Learn mode
3.2.8.1 Assigning / unassigning controls
If you click on a purple area you’ll put that control into learning mode. Move a
physical knob or fader and the target goes red, indicating that a link has been
made between the hardware control and the software parameter. There’s a popup
window that displays which two things are being linked and a button to unassign
the two from each other.
Filter cutoff frequency selected and assigned

ARTURIA – Matrix-12 V – USER MANUAL 29
3.2.8.2 Min / Max value sliders
There are also minimum and maximum value sliders that you can use to restrict the
parameter change range to something other than 0%-100%. For example, you might
want the filter cut-off be controllable via hardware from 30% to 90%. If you made
this setting (Min set to 0.30 and Max set to 0.90) your physical knob would be unable
to alter the volume lower than 30% or higher than 90%, no matter how far you turned
it. This is very useful for making sure you can’t accidentally make the sound too quiet
or too loud when performing.
In the case of switches which only have two positions (on or off), those would
normally be assigned to buttons on your controller. But it is possible to toggle those
with a fader or other control if you like.
3.2.8.3 Relative control option
The final option in this window is a button labelled “Is Relative”. It is optimized for use
with a specific type of control: one which sends only a few values to indicate the
direction and speed at which a knob is turning, as opposed to sending a full range
of values in a linear fashion (0-127, for example).
To be specific, a “relative” knob will send values 61-63 when turned in a negative
direction and values 65-67 when turned in a positive direction. The turn speed
determines the parameter response. Refer to the documentation of your hardware
controller to see if it has this capability. If so, be sure to switch this parameter on
when setting up its MIDI assignments.
When configured this way, movements of the physical control (usually a knob) will
change the software parameter by starting at its current setting, rather than being
an “absolute” control and snapping it to some other value as soon as you start to
move it.
This can be a great feature when controlling things like volume, filter, or effect
controls, since you won’t usually want them to jump massively out of their current
setting as soon as you start to modify them.
3.2.8.4 Reserved MIDI CC numbers
Certain MIDI Continuous Controller (MIDI CC) numbers are reserved and cannot be
reassigned to other controls. These are:
PitchBend
AfterTouch
Ctrl Mod Wheel (CC #1)
Ctrl Sustain On/Off (CC #64)
Ctrl Expression (CC #11)
Ctrl All Notes Off (CC #123)

ARTURIA – Matrix-12 V – USER MANUAL 30
All other MIDI CC numbers may be used to control any assignable parameter in
Matrix-12 V.
3.2.9 MIDI controller configuration
There’s a small arrow at the far right hand side of the toolbar that deals with MIDI
controller configurations. This allows you to manage the different sets of MIDI maps
you may have set up for controlling the instrument’s parameters from MIDI
hardware. You can copy the current MIDI assignment setup or delete it, import a
configuration file or export the currently active one. This is a quick way to set up
different hardware MIDI keyboards or controllers with Matrix-12 V without having to
build all the assignments from scratch each time you swap hardware.
3.2.10 The lower toolbar
At the left hand side of the lower toolbar you will see a readout showing the value
or state of whatever control you are modifying. It will also display the current value
of a parameter without editing it: just hover the cursor over the related control and
the value will appear as pictured below.
The Panic button can be pressed to reset all MIDI signals in the event of stuck notes
or other issues. The Panic button is also MIDI-assignable.

ARTURIA – Matrix-12 V – USER MANUAL 31
The CPU meter is used to monitor how much of your computer’s CPU is being used
by the instrument.
3.3 The Preset Browser
The preset browser is how you search, load and manage sounds in Matrix-12 V. It
has a couple of different views but they all access the same banks of presets.
To access the search view, click on the browser button (the icon looks a bit like books
on a library shelf).
The Preset Browser button
3.3.1 Searching presets
The Search screen has a number of sections. By clicking on the Search field at the
top left you can quickly enter any search term to filter the preset list by patch name.
The Results column is updated to show the results of your search. Press the X button
in the search field to clear the search.

ARTURIA – Matrix-12 V – USER MANUAL 32
3.3.2 Using tags as a filter
You can also search using different tags. Clicking on a Type field shows only presets
that match that tag. The tag fields can be shown or hidden by using the small down
arrow buttons in their title fields. Results columns can be sorted by clicking the same
arrow button in their own section.
You can use multiple search fields to perform narrower searches. So by entering a
text search and also specifying type, bank and characteristics options you could
see only the presets that match those exact criteria. Deselect any tag in any area
to remove that criteria and widen the search without having to go back and start
again. Using “Ctrl + click” (Windows) or “Cmd + click” (Mac) will allow you to select
multiple elements in the same area.
The second Results column can be switched to show Type, Sound Designer, Favorite
or Bank tags depending on how you like to search. Click on its options menu button
just next to its sort arrow.

ARTURIA – Matrix-12 V – USER MANUAL 33
3.3.3 The Preset Info section
The Info column on the right of the search field shows you information about any
preset. The information for User presets may be changed here: Name, Type,
Favorite, etc.
However, if you want to alter the information for a Factory preset you must first use
the Save As command to re-save it as a User preset. After this the Info section will
gain Edit and Delete buttons at the bottom of the window.
Click Edit and then make the desired changes, either by typing in one of the fields
or by using a pull-down menu to change the Bank or Type. You can even add new
Characteristics by clicking the + sign at the end of that list. Click Save when you are
done.

ARTURIA – Matrix-12 V – USER MANUAL 34
3.3.4 Preset selection: other methods
The pull-down menu to the right of the Search menu provides a different way to
select presets. The first option in this menu is called Filter, and it will display the presets
that fit the search terms you used in the Search field. So if you searched for “Love”
in the main search area, the results of that search will appear here.
Similarly, if you previously selected a Type in the Search field you would see the
results of that search in this area instead.
Filter results may differ based on Search criteria
Selecting the All Types option in the pull-down menu will bypass the Search criteria
and show the entire list of presets.
The Categories below the line also ignore the Search criteria and display the presets
based on their Type.

ARTURIA – Matrix-12 V – USER MANUAL 35
3.3.4.1 Selecting a preset by its Type
Clicking on the name field in the center of the toolbar will show you a list of all
available presets. The list will also take into account any selections you have made
in the Search field. So if you have pre-selected a Characteristic such as “Funky” this
shortcut menu will only show you presets that match that tag.
The left and right arrows in the toolbar cycle up and down through the preset list:
either the full list, or the filtered list that resulted from the use of one or more search
terms.
3.3.5 Playlists
In the lower left corner of the Preset Browser window is a feature titled Playlists. This is
used to collect presets into different groups for different purposes, such as a set list
for a particular performance or a batch of presets related to a particular studio
project.
3.3.5.1 Add a playlist
To create a playlist, click the plus sign at the bottom:
ARTURIA – Matrix-12 V – USER MANUAL 36
Give the playlist a name and it will appear in the Playlists menu. You can rename
the playlist at any time; just click the pencil icon at the end of its row.
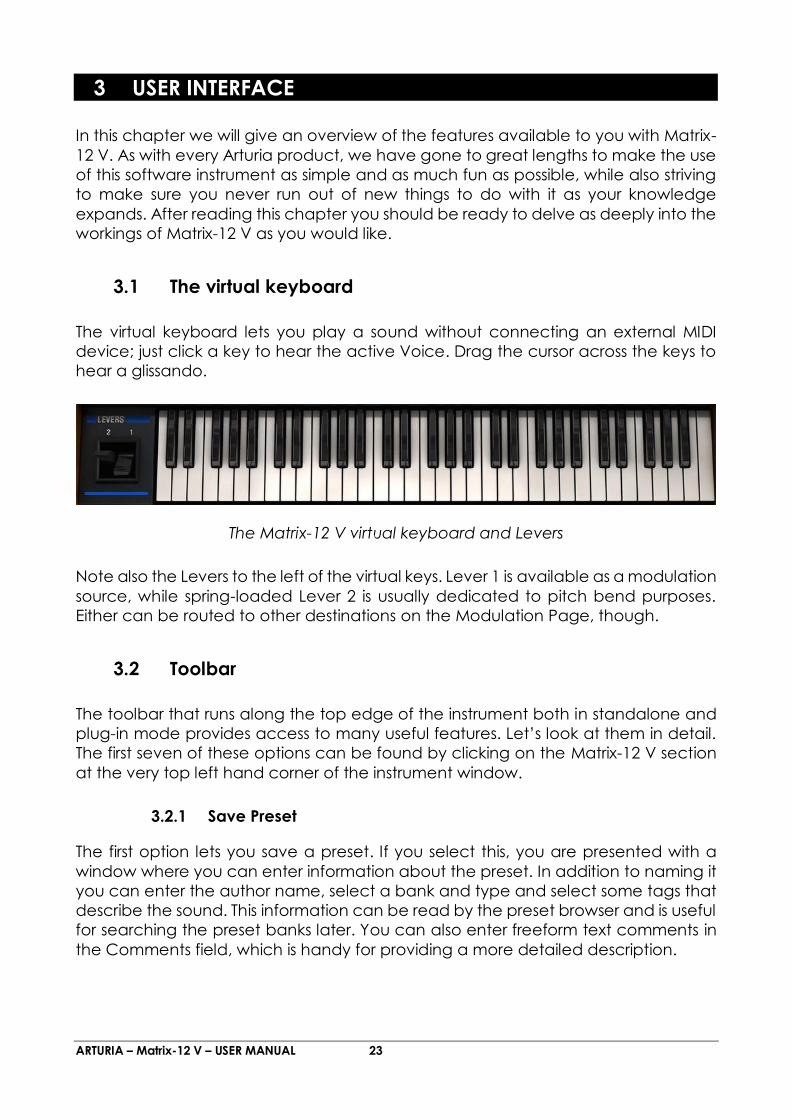
3.3.5.2 Add a preset
You can use all of the options in the Search window to locate the presets you want
to have in your playlist. Once you have found the right preset, click and drag it onto
the playlist name.
Click and drag from the Search Results list onto one of the playlists
To view the contents of a playlist, click on the playlist name.
3.3.5.3 Re-order the presets
Presets may be reorganized within a playlist. For example, to move a preset from slot
2 to slot 4, drag and drop the preset to the desired location.
This will move the preset into the new location.
3.3.5.4 Remove a preset
To delete a preset from a playlist, click the x at the end of the preset row.
Click the X to remove a preset from a playlist
3.3.5.5 Delete a playlist
To delete a playlist, click the x directly to the right of the playlist name.
Click the X to delete a playlist.

ARTURIA – Matrix-12 V – USER MANUAL 37
3.4 Overview of the main window components
Matrix-12 V has many features and several modes of operation. But it is helpful to
know that each mode has things in common with the others. So let’s take a look at
the broad picture first.
3.4.1 Page bar
Beneath the tool bar is another strip called the Page bar. The Main, Voices and
Program Chain pages are accessed through their respective labels. Note that two
of these pages (Main and Voices) have slightly different capabilities depending on
the mode of the selected preset.
The page bar will look a bit different in each mode, too, but these are the basic
items you will always see.
Also constant to this region are the Master Volume and Fine Tune knobs, which are
global controls affecting all Voices and modes equally.
An example of the Page bar in Single mode

ARTURIA – Matrix-12 V – USER MANUAL 38
An example of the Page bar in Multi mode
And of course the name of the current preset is always in the middle of the Page
bar. If you see an asterisk after the name it means the preset has been edited. In this
case, be sure to save your changes before selecting a new preset.
3.4.2 Parameter window
The center section in each mode is called the Parameter window. It has a very
different appearance depending on the page and mode you have selected:
3.4.2.1 The Main page
Chances are high that you’ll spend a majority of your Matrix-12 V time on the Main
page, both in Single and Multi modes. The other pages are very useful and have lots
of great features, but the Main page is at the center of it all:
The parameter window of the Main page
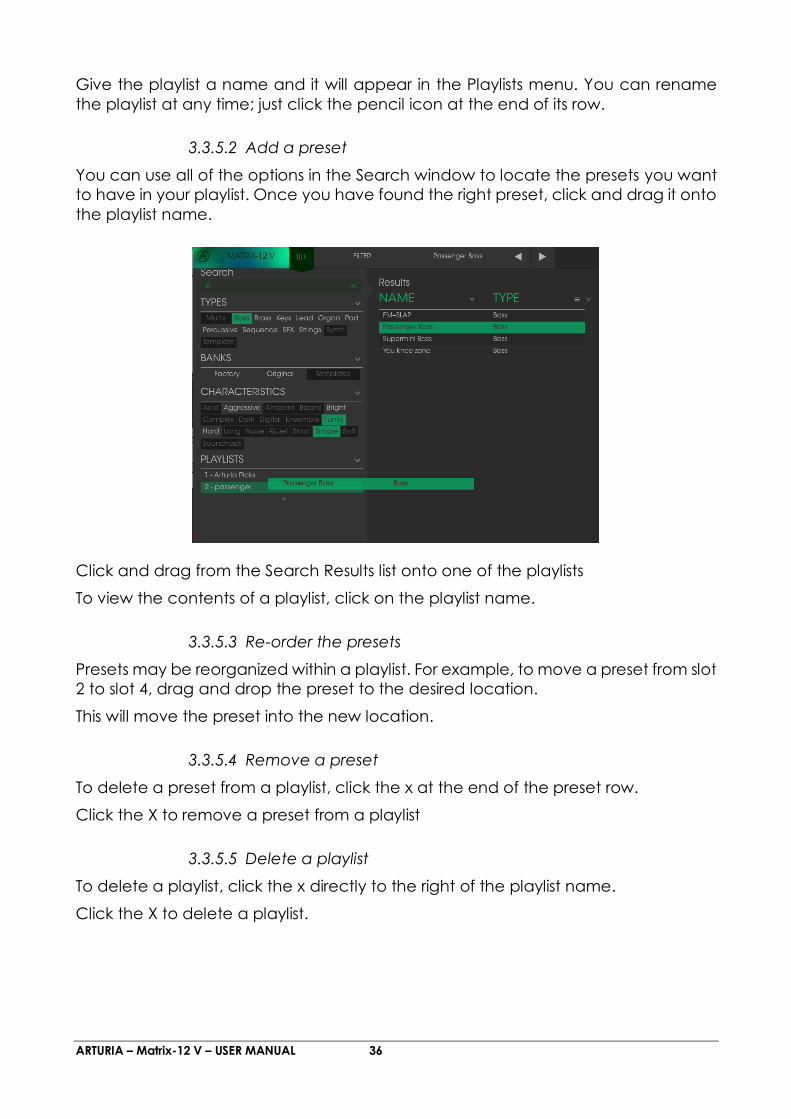
3.4.2.2 The Voices page
As with the Main page, the Voices page exists in both Single and Multi modes. But
what it does in each mode is quite different.
In Single mode its parameters affect what happens with a single Voice. But in Multi
mode its parameters can be applied to up to twelve Voices at once, each with its
own settings.
ARTURIA – Matrix-12 V – USER MANUAL 39
An example of the Voices page in Single mode
An example of the Voices page in Multi mode
3.4.3 Nameplate
The nameplate is the springboard for bottom panel functions when Matrix-12 V is on
the Main page.
Cutaway view of the nameplate
Each button on the right side of the nameplate will change what is seen in the
bottom panel.
3.4.4 Bottom panel
The nameplate has four buttons which alter the contents of the bottom panel (Main
page only):
KBD: Keyboard. Click it and the virtual keyboard and levers show up.
FX: Effects..
MOD.: The Mod lists, i.e., lists of modulation routings.
PAGE2: The Page 2 parameters. These are not often changed when programming
a sound, but their functions are important.

ARTURIA – Matrix-12 V – USER MANUAL 40
3.5 The tool bar: Managing presets
Presets can remember the settings for any Single or Multi you create with Matrix-12
V. When saving a preset you have the opportunity to designate the “bank” and
“type” to which it belongs, so make as many banks as you need and fill each one
with as many types and presets as you like. The “type” designation can help you
categorize your presets into groups such as “Leads”, “Pads”, etc. There’s no limit on
the number of presets within a type, so use these features in the way that works for
you.
Matrix-12 V ships with several banks of factory presets, each containing a number of
types and presets. These cannot be overwritten, but they are great starting points
for creating new presets. Then you can use the SAVE AS feature to save the changes
as your own presets.

ARTURIA – Matrix-12 V – USER MANUAL 41
4 SINGLE MODE
Single mode is where it all begins, and it's really important to understand the
available features. So now we’re going to take a look at each parameter group
and how they interact with one another.
4.1 Front Panel Functions
At first glance Matrix-12 V seems deceptively simple compared to modular
synthesizers. There are no patch cables, for one thing.
However, beneath the straightforward front panel over 1,000 parameters are
available for sculpting the sound and behavior of this marvelous instrument.
4.1.1 Overview of the parameter organization
When you first move to a new city its buildings, streets, lights and signs present
themselves all at once, which can seem bewildering. But eventually the sights will
become organized in your mind, often with the aid of a map.
And at first, Matrix-12 V may resemble an aerial view of a small city at night:
But the following sections should help you familiarize yourself quickly with the layout
of Matrix-12 V.
4.1.1.1 Parameter groups
Built into the layout of the Parameter window is a “top down” user interface that
starts with parameter groups, which are delineated by thick blue lines such as those
for VCO 1 and FILTER, shown below:

ARTURIA – Matrix-12 V – USER MANUAL 42
The VCO1 and Filter parameter groups
In the pictures above the Frequency, Detune, Pulse Width, waveform and Volume
parameters are all part of the VCO1 parameter group. Likewise, the Filter frequency,
Resonance, Mode, and both VCA settings are part of the Filter parameter group.
Here’s a list of all the parameter groups in Single mode:
Name Parameters
VCO 1 Freq, detune, PW, waveform, volume
VCO 2 Sync, freq, detune, PW, waveform,
volume
FM Amplitude, destination
Filter Freq, res, mode, VCA 1 level, VCA 2
level
Lag Input, rate, mode switches
Ramps Rate control (x4)
Env Delay, attack, decay, sus, rel, amp (x5)
Track Input, track point levels 1-5 (x3)
LFO Speed, wave, input, retrig, amp (x5)
Many of those parameter groups have additional “members” that are available
when you press the Page 2 button.
4.1.1.2 Tabs
The next level of organization are the tabs inside certain parameter groups. For
example, you can only see one envelope, tracking generator, and LFO at a time,
but the tabs beneath the blue bars alert you to the fact that there are more than
one of these parameter groups available.
Case in point: look at the parameter group ENV, where there are 5 tabs labeled
ENV1, ENV2, etc. This means there are 5 envelopes available for programming a
Voice.

ARTURIA – Matrix-12 V – USER MANUAL 43
The Envelope parameter group: Tab 2 is selected; the other tabs are circled
A quick glance around the Matrix-12 V parameter window will show that tabs are
also available for the LFOs (5 per Voice) and the Tracking generators (3 per Voice).
There is no shortage of programming options here!
4.1.1.3 Parameters with and without mods
The foundations of each parameter group are the parameters themselves. But you’ll
notice some parameters have buttons containing their names and some do not.
The ones with buttons are available for further tweaking in the Modulation Page.
And while the ones without those buttons can’t be modulated, they can of course
be edited right where they are by turning one of the knobs or toggling a switch,
depending on the parameter.
One more thing: There are some lesser-used but very important parameters
available on a sort of “sub-page”, too. These are found by pressing the Page 2
button on the right side of the nameplate:
4.1.2 The nameplate
As mentioned previously, the function of the nameplate is to allow easy access to
the four different aspects of the bottom panel. All four figure heavily into what a
Voice can do, so the buttons to select them are conveniently located.
4.1.3 The bottom panel
Selecting the various buttons in the nameplate reveals different features of the Main
page. These buttons are not available on the other pages; only the virtual keyboard
will be seen there.
4.1.3.1 Virtual keyboard
The virtual keyboard lets you play a sound without connecting an external MIDI
device; just click a key to hear the active Voice. Drag the cursor across the keys to
hear a glissando.

ARTURIA – Matrix-12 V – USER MANUAL 44
The Matrix-12 V virtual keyboard and Levers
Note also the Levers to the left of the virtual keys. Lever 1 is available as a modulation
source, while spring-loaded Lever 2 is usually dedicated to pitch bend purposes.
Either can be routed to other destinations on the Modulation Page, though.
4.1.3.2 FX
When the FX button is pressed the bottom panel will reveal the two FX modules
associated with the current preset, if any.
If none are present, it’s a simple thing to add them.
Keep in mind that these are master effects: only two are available at one time in
any of the modes. This means that all the Voices in a Multi will share two FX modules,
not twenty-four!
4.1.3.3 Mod
This is the very heart of the power of Matrix-12 V. Here you can route any one of 27
sources to any one of 47 destinations, and do it 40 times over. The refinements and
spur-of-the-moment decisions the Modulation Page puts at your disposal are listed
here in the bottom panel, almost spreadsheet-style, when the Mod button is clicked.
As powerful as this section is, it is quite easy to use.
4.1.3.4 Page 2
The Page 2 button reveals a second page of Voice parameters. These actually play
a support role to their respective parameter groups (VCO1, Filter, etc.).

ARTURIA – Matrix-12 V – USER MANUAL 45
There are tabs here too, meaning the envelope modes can be set differently for
each of the five envelopes in the Voice, for example.
4.2 Parameter groups
Let's start by focusing on one of Matrix-12 V's parameter groups and get a feel for
how Single mode works.
Note: For the examples in the rest of chapter 4 we will assume you have already
selected a Voice in Single mode, not from the Main page in Multi mode.
4.2.1 VCOs
“VCO” stands for “Voltage Controlled Oscillator”, the most basic building block of
sound in an analog synthesizer. The quickest way to make a large change in the
tone of a Voice is through its waveforms. In this section we’ll cover some of the
simpler ways to do that.
In the upper left-hand area of the Parameter window is a blue bar labeled VCO 1.
All of the parameters under that bar are part of the VCO 1 parameter group.
You can see from the picture below that the parameters are almost identical for
VCOs 1 and 2, so we'll describe them all in this section.
The VCO 1 & 2 parameter groups
The Page 2 VCO parameters are exactly the same for both oscillators:

ARTURIA – Matrix-12 V – USER MANUAL 46
The Page 2 parameters for VCO 1 & 2
We’ll cover these at the same time as the other VCO parameters. Here’s what they
do:
4.2.1.1 VCO Frequency (Freq)
The fundamental pitch of the oscillator is set here, with a range of 0-63 semitones
(chromatic steps). Click the button just below the value and the VCO frequency
parameter will come into focus on the Modulation Page. Any one of 27 mod sources
can then modulate the oscillator frequency, a lot or a little, in a positive or negative
direction.
4.2.1.2 VCO Detune
This is literally a fine tune control, able to gently nudge the oscillator frequency flat
or sharp in smaller increments. Its range is -31 to +31, and it is capable of even more
precision by holding the control key while adjusting the value.
4.2.1.3 VCO Pulse Width (PW)
This control affects only the Pulse wave form, changing it from “thin” to full and then
to a sort of “inverted thin” in a range from 0 to 63, with 32 as the midpoint. The value
of 32 is a full square wave, with a 50% duty cycle and the requisite “hollow” sound
caused by the presence of only the odd-numbered harmonics.
Note again the presence of a Mod button, meaning the pulse width can be
modulated by a source such as an LFO. This is a great way to bring a sound “alive”
by causing its harmonic content to shift constantly. (As long as we’re giving out
programming tips, you may want to use an additional, static mod such as the
keyboard to tame the PW modulation in the lower frequency ranges. Or not.)
4.2.1.4 VCO waveform
There are three choices here for each VCO (pulse, saw, triangle) and a fourth for
VCO 2 (noise). Here’s a brief description of each:
Pulse: A square wave. See the previous section 4.2.1.3 for its description.
Saw i.e., Sawtooth: When unfiltered it is sort of brash or buzzy, and great for leads
that cut through.
Tri a.k.a. Triangle: It’s a simple, pure waveform akin to a sine wave.
Noise (VCO 2 only): Random frequencies all at once; great for wind effects,
electronic drums, etc.

ARTURIA – Matrix-12 V – USER MANUAL 47
4.2.1.5 VCO Volume
This governs the output level of the oscillator. And it’s equipped with a Mod button
so the VCO can fade in and out as desired. This effect can cause a subtle tremolo
or an intermittent chorusing, for example, depending on how the two VCOs are
interacting. It can also cause subtle or radical timbral shifts if VCO 2 is also synced
to the frequency of VCO 1. More about that in the next section.
4.2.1.6 Sync (VCO 2 only)
Sync stands for "synchronize", and when this button is pressed the relationship of the
two VCOs changes drastically. Rather than being completely independent, the
Sync button slaves the waveform(s) of VCO 2 to VCO 1 and forces them to output
a single, complex waveform.
Lower the frequency of VCO 1 to zero and experiment with changing the frequency
of VCO 2, either manually or by means of a mod routing (envelopes can be loads
of fun here). The resultant timbral shifts are unlike anything else a synthesizer can
produce, ranging from a controlled scream or an aggressive, biting tone to a subtle
shimmer, depending on the mod source and amount.
4.2.1.7 VCO Page 2
There are other, less “glamorous” parameters available for the VCO parameter
groups. To access these, press the Page 2 button in the nameplate. The bottom
panel will show the Page 2 parameters for six different parameter groups, two of
which are identical (VCO 1 and 2). We’ll cover only those parameters in this section;
the rest will be covered with their own parameter groups.
Keyboard: This decides whether the VCO frequency will change when different keys
are played.
Lag: When enabled, the VCO frequency will respond to the settings of the Lag
generator. This is what enables “glide”, or portamento. It can be cool to have one
VCO “scoop” while the other is static, so try enabling Lag for one and disabling it for
the other.
Pitch bend: If you want the VCO frequency to ignore lever 1, disable this switch.
Vibrato: Same thing: if you want a VCO to ignore lever 2, switch off this parameter.
These seem like simple parameters, being only on/off switches. But as you can see,
their settings can have a huge impact on the overall sound and behavior of a Voice.
4.2.2 FM
FM is an abbreviation for “Frequency Modulation.” Did you know analog synthesizers
were doing this form of synthesis long before those famous Yamaha synths? The
concepts are very similar: the FM parameters in Matrix-12 V can put VCO 1 and VCO
2 into a carrier/modulator relationship, or do a similar thing to VCO 2 and the Filter.
The FM parameter group contains the following parameters:

ARTURIA – Matrix-12 V – USER MANUAL 48
Amp: The amount of the FM effect being sent to VCO 1 or the Filter
FM Dest: Selects the destination for the FM effect: VCO 1 or the Filter
This is where things become a bit more complicated to describe. But it will help to
take another look at the Parameter window, specifically the thin blue lines
connecting VCO 1 and VCO 2 to the FM parameter group.
We’re going to take a close look at what is meant by Oscillator FM.
In the picture below the red arrow traces one of the paths for the output of VCO 2,
thanks to a hardwired connection it has to the FM input. To hear this effect most
clearly, set the VCO 2 VOL parameter to zero:
VCO 2 being fed into the FM input
As you trace the blue line past the red arrow and through the FM AMP box, note the
connection from FM DEST to OSC 1 in the second blue box. This establishes the
connection to VCO 1 courtesy of the FM DEST switch, which we’ll describe later.
There’s a problem, though: the input Amp amount is set to 0. So you won’t hear an
effect on the sound unless one of its active mod routings is pushing the FM input level
in a positive direction.

ARTURIA – Matrix-12 V – USER MANUAL 49
Here’s a larger picture that traces the path of the FM signal to VCO 1 after raising
the Amp amount:
FM output being fed into VCO 1
That, ladies and gentlemen, is how Oscillator FM works. The frequency of VCO 2
affects the VCO 1 waveform in ways that are impossible with normal additive
synthesis or even Oscillator sync. And using a mod routing to change the VCO 2
frequency with an envelope, for example, will cause the harmonic content of VCO
1 to change over time in ways an analog filter would not be able to produce, either.
4.2.2.1 Filter FM
A similar path exists between the FM output and the Filter section. Simply press the
FM DEST toggle button at the bottom of the FM parameter group and the blue line
will point downward, making the connection to VCF. You can trace the connection
to the Filter section by following those little blue lines in the Parameter window, as
we did with the connection to VCO 1.

ARTURIA – Matrix-12 V – USER MANUAL 50
In a nutshell, Filter FM in Matrix-12 V uses the VCO 2 Triangle waveform to turn the
filter into an oscillator. This effect is best heard with a high Filter Resonance value,
and you may want to try different filter types and filter frequencies to get a feel for
what is happening. You may enjoy hearing the direct output of VCO 2 at the same
time, but for now leave it set to zero. There’s a particular “grunge” caused by Filter
FM that you’ll want to hear clearly.
And of course, your friendly neighbourhood Modulation Page stands ready to
control the VCO 2 frequency in any number of ways.
4.2.3 Filter
This parameter group contains one of the most distinctive features of the Matrix-12
V sound. Rather than merely offering the requisite Low Pass / High Pass / Band Pass
filters in 2- or 4-pole options, it offers some very unusual filter types as well. There are
15 filter modes in total!
As sound-sculpting tools, the filter parameters rival the oscillators for flexibility. Take a
look at the parameters:
4.2.3.1 Filter Frequency (Freq)
This is probably the first knob anyone tries on any synth: “How do the filters sound”.
The amount and type of change you hear depends on a number of factors, but rest
assured the Matrix-12 V filters provide just about anything you could want from an
analog filter.
Turning the knob changes the location of the corner point(s) of the filter, revealing
and/or hiding frequencies in the audio range depending on the selected filter
model.
4.2.3.2 Filter Resonance (Res)
To emphasize the corner point(s) at which the audio signal is being filtered, raise the
resonance level. The higher it goes the more obvious a filter sweep becomes, to the
point of “whistling” as certain frequencies are emphasized by the more powerful
filter modes. Self-oscillation is possible when the resonance is at maximum, so be
careful not to destroy any audio components (like your ears!).
4.2.3.3 Filter Mode
Sometimes it helps to have a visualization of something that affects the audio realm.
The following graphic actually opens up as a window inside Matrix-12 V when you
click in the Filter Mode value field. It shows all 15 of the Matrix-12 V filter modes:

ARTURIA – Matrix-12 V – USER MANUAL 51
The Matrix-12 V Filter mode selection window, with Band Pass 4P selected
The graphic helps illustrate the concept that a 2-pole filter is “steeper” than a 1-pole
filter of the same type, and a 3-pole filter is steeper than a 2-pole filter, and so on.
The 4-pole LP filter, labeled “Low Pass 4P”, rolls off the audio frequencies more
quickly than the Low Pass 1P, for example. A High Pass filter scoops out the audio
starting at the bottom, and the 3-pole HP filter has the strongest impact that way.
But sometimes that isn’t what you want, so we’ve given you two “kinder, gentler”
HP filters in the 1-pole and 2-pole versions.
The other options affect the output signal in various ways, so be sure to try them all.
And once you’ve become familiar with the different filter modes you’ll probably be
able to select one without referring to the built-in graphic. In that case, simply turn
the filter mode knob to dial up the one you want.
Click the Close button to exit without making a change, or select one of the
graphics and the window will close itself.
4.2.3.4 Filter Page 2
As with the VCOs, there are other parameters available for the Filter parameter
group. To access these, press the Page 2 button in the nameplate. The bottom panel
will show the Page 2 parameters for six different parameter groups, including those
related to the Filter. We’ll cover only those parameters in this section; the rest will be
covered with their respective parameter groups.
Keyboard: Tells the Filter frequency to “track” the keyboard, raising the corner point
for higher notes and lowering it for lower notes.
Lag: When this is enabled the Filter frequency will be affected by the settings of the
Lag generator. Note: when the Lag section’s Legato setting is off you may hear the
filter sweep in a jagged, “stair step” manner. But if that sounds interesting, try it!
Pitch bend: If you want Lever 1 to sweep the Filter frequency, enable this switch.
Vibrato: Likewise, switch on this parameter to allow Lever 2 to sweep the Filter
frequency.

ARTURIA – Matrix-12 V – USER MANUAL 52
Though these are basic on/off controls, you can see that their settings can have a
significant impact on the overall sound and responsiveness of a Voice.
4.2.3.5 VCAs
As with the VCOs, VCA 1 and VCA 2 are basically identical so we’ll cover them both
in this section. The main difference between them is that they are “wired” in series;
in other words, VCA 1 comes first in the signal path and VCA 2 comes last.
The VCAs are the final stage in getting the signal out of Matrix-12 V and into the
world, a journey that began with the VCOs, traveled through the VCF, and now
needs to be allowed to pass through these two parameters.
Assuming no mods are active, if both VCAs are set to zero then no sound will be
heard. But simply raising their levels isn’t always a good idea: when the output is
wide open and not being shaped in some way, it means any note that has been
played will come on and stay on.
So the thing to do when starting out is to set VCA 1 to a value higher than 0 (63 is
max) and use at least one mod routing to control the VCA 2 level. This job is usually
handled by an envelope being triggered by the keyboard, which is the most
predictable way of controlling how quickly the sound begins and how long it sticks
around.
So why are there two VCAs? Wouldn’t it be simpler just to control one?
Simpler, yes, but also much less flexible. For example, velocity, aftertouch, a tracking
generator and/or a couple of LFOs can be routed to VCA 1 for certain types of level
control while still leaving the envelope controlling the overarching output
characteristics of VCA 2.
In fact, between the two VCAs a combined total of 12 mod routings can be set up
for the final output stage (6 per VCA). With the VCAs serving as the gatekeepers for
the output of a Voice, that much control can be a good thing.
4.2.4 Lag
Simply put, a lag generator affects the rate of change between two data points. In
synthesis terms this is often thought of in relationship to pitch, as in “this is what
controls the speed and type of the glide between two notes” (i.e., the “portamento
speed” or “glide time”).
But the output of the Matrix-12 V lag generator can be applied to any number of
targets, not just pitch, and use a source such as an LFO or a Lever, not just the
keyboard. Generally the mod routes are handled through the Modulation Page, but
the Page 2 button reveals hardwired routings for the VCOs, the Filter, and the LFOs.

ARTURIA – Matrix-12 V – USER MANUAL 53
These are the Lag parameters:
Input: Select the source with the knob or click the value field and select one that
way
Rate: Sets the rate of the Lag effect. The mod button allows a source to vary the Lag
rate.
= Time: Only functions when Linear response is selected. It works like this: “Equal time”
is selected with keyboard as the input. When middle C is played and then the C one
octave up is played, let’s say the time it takes the pitch to reach the upper C is 1
second. If you then played two notes 5 octaves apart, the glide time from one to
the other would also be 1 second, even though the distance is bigger.
Linear: Choose the lag curve here: when this is lit, the response is Linear; when unlit,
the response follows an Exponential curve.
Legato: Legato provides a smooth, gradual response. When deselected, the result
is a “stepped” response. In terms of pitch, the result would be a chromatic scale
between two notes, not a “pitch bend.”
Again, you are free to insert the Lag generator between any mod source and any
mod destination.
4.2.5 Ramps
What a ramp generator does is provide a simple mod source that can be routed
positively or negatively to affect a mod destination, such as VCO Frequency or the
rate of an LFO. The source rises from 0 to maximum in a linear fashion, then remains
at its maximal value.
There are four independent Ramp sources, each with its own rate control and Page
2 settings. You can specify whether the Ramp will rise only once after it is triggered
by the keyboard and then wait for another trigger, or be triggered repeatedly by
an LFO.
Suggested experiment: Try routing these to the rate or amplitude of an LFO with the
LFO routed to the VCOs. This is tons of fun, and at one extreme can provide a
beautiful, subtle shift in vibrato; the other extreme will set new standards for aural
insanity.
You’ll only see the Rate parameter for each Ramp until you click the Page 2 button.
Use the Tabs to select between Ramps 1-4 on Page 2:
Trigger: Selects single or multiple trigger response
LFO Trigger: Allows a Ramp to be triggered by a specific LFO. When clicked it reveals
the other parameters.
Gated: Instructs the Ramp to be triggered by an LFO only when a key is being
pressed.
LFO select: Offers a choice of Ramp triggers: LFO 1-5 or VIB.
The VIB parameters are found on the Voices Page.
ARTURIA – Matrix-12 V – USER MANUAL 54
4.2.6 Envelopes (Env)
If it weren’t for envelopes it would be very difficult to achieve any subtlety when
programming; every sound would simply turn on and off. (There’s a way to do that,
too, when needed: that’s what a Gate does.)
Every sound in the universe has an envelope. Some are more complex than others,
but most have at least four of the five stages offered by each of the five Matrix-12 V
envelopes:
Delay: Specifies the time that will elapse before the envelope begins
Attack: Controls the rapidity of the onset of the envelope once it starts: instant, lazy,
slow, etc.
Decay: Once the envelope reaches its peak, this tells it how quickly to fall to the
Sustain level
Sustain: The envelope will remain at this plateau until the note is released
Amp: The overall depth of the envelope
The Page 2 button provides some very important parameters which define the basic
characteristics of each envelope:
Reset: Reset will cause the envelope to start again each time a new trigger event
occurs
Freerun: Forces the envelope through all of its stages when triggered, regardless of
whether the source gate has closed (for example, even after the key has been
released)
DADR: Further simplifies the envelope by removing the Sustain stage
Trigger: Selects single or multiple trigger response
LFO Trigger: Allows an Env to be triggered by a specific LFO. When clicked it reveals
the other parameters.
Gated: Instructs the Env to be triggered by an LFO only when a key is being pressed.
In this case once the Release stage begins the LFO input will cease, which is a cool
option.
LFO select: Offers a choice of Env triggers: LFO 1-5 or VIB.
Remember: the Tabs allow you to make a selection between Envelopes 1-5, and
the mod buttons will bring their parameters into focus in the Modulation Page for
the creation of mod routes.
4.2.7 Tracking Generators (Track)
There are three Track parameter groups per Voice, and what they do is similar to
what the Lag processors can do: process an incoming signal and reshape it
according to the Track settings.

ARTURIA – Matrix-12 V – USER MANUAL 55
One way to visualize their function is to think of them like an FX insert: when
configured correctly they will exist between the source and destination of a mod
routing. Let’s say you have set up a simple mod route with LFO 1 as the source and
VCO 1 Frequency as the destination. Now instead of this direct connection, choose
LFO 1 as the Track 1 input and change the mod source from LFO 1 to Track 1. Now
the LFO will pass through the Tracking generator on its way to VCO 1 Frequency.
The Track points are evenly spaced, so in the case of an LFO, Point 1 affects the
initial stage of the LFO; Point 2 affects the value at ¼ of the way through the LFO
cycle; Point 3 affects the value at the halfway point; and so on until Point 5, which
affects the final stage of the LFO cycle. Then the process begins again. You can
shape some interesting peaks and valleys in the modulation routing, even with a
simple triangle wave as the Track input source.
The input can be any one of the 27 modulation sources, and the Point values are
from 0-63. Negative modulation directions are achieved through the Modulation
Page.
4.2.8 LFOs
“LFO” is the easy way to say “Low Frequency Oscillator.” Matrix-12 V has five of them
available per Voice, which can make for some very interesting modulation routings.
Each LFO has seven waveform choices that range from rounded (Triangle) to
potentially abrupt (Square, Saw Up/Down) to nearly unpredictable (Random, Noise,
Sample).
Let’s look at the waveforms before we talk about the other parameters in the LFO
group.
Triangle: On a graph this would look like a ripple on the surface of a pond after
tossing in a pebble, with a smooth rise and a smooth fall.
Square: More like the teeth of the gears within a clock: sudden rise, sudden fall, with
a steady state between transitions.
Saw up: Gradual, linear transition from zero to maximum with a sudden return to
zero.
Saw down: Gradual, linear transition from maximum to zero with a sudden return to
maximum.
Random: Capable of selecting any value within its range at regular intervals.
Noise: Completely arbitrary data points presented nearly simultaneously at
unpredictable intervals. “Rate” does not apply to the Noise selection, but Amp
controls the level.
Sample: Short for “Sample & Hold”. This option reveals the Input parameter, where
you can choose any one of the 27 mod sources. When selected, the LFO looks to
the input source for its next value at regular intervals. It’s more predictable than
Random but still can be pretty crazy.

ARTURIA – Matrix-12 V – USER MANUAL 56
Let’s go through all of the other LFO group parameters now:
Speed: Controls the rate of the LFO waveform, except for Noise.
Input: Only available when LFO Wave is set to Sample, with 27 source options.
Retrig: Allows you to specify the starting point of the LFO for the first five waveforms.
A setting of 0 means the LFO will start from the beginning of its cycle, while values of
1 or higher will cause the LFO to be triggered from somewhere in the middle of its
cycle.
Amp: Determines the overall LFO output that will be sent to the target.
Press the Page 2 button for the final two parameters in the LFO group:
Lag: The LFO Lag parameter can be used to round off the edges of the LFO
waveform. This will be most noticeable when using a Square wave LFO and least
noticeable when using the Triangle waveform. It is actually not related to the Lag
processor and has a predetermined impact. If a greater Lag effect is desired, the
LFO can be routed through the Lag processor directly and then routed to the VCO
through the Modulation Page.
Retrig Mode: Selects single or multiple trigger response. “Off” provides the LFO with
a “freerun” setting.
Remember to use the Tabs to select LFOs 1-5, and the the mod buttons will bring
their parameters into focus in the Modulation Page so you can create one or more
mod routes.
4.3 The Effects
To add one of the effects to a Matrix-12 V sound in Main mode, click the FX button
in the nameplate:
The bottom panel will reveal two drop-down menus, either of which will show you
the available Effects choices when you click the words “SELECT EFFECT”:
Make a selection and its FX module will appear in the bottom panel, either on the
left half or the right, depending on which one you chose.

ARTURIA – Matrix-12 V – USER MANUAL 57
We’ll take each of the Effect menu choices one at a time, starting from the top.
The first one is labeled None. Selecting this option will close the current FX module
and the Effect menu, removing that FX device from the signal path.
But None isn’t the option to use when you want to hear the sound without the FX
unit temporarily. You’ll notice every FX device also has a bypass button in its upper-
left hand corner, which is the quickest way to remove the FX module from the mix.
There is also a Wet/Dry slider which controls the percentage of the original signal
that passes through to the output. Moving this all the way to Dry will remove that
effect from the output.
One more thing: All FX parameters are MIDI-assignable, which means they “learn”
the controllers on your external USB MIDI device.
What follows is a description of each available FX device.
4.3.1 Delay
Sync: Locks the delay to the current tempo of the DAW and/or the rate of the
Phaser. (These are the only two FX modules with a Sync button.)
Link: Makes the delay mono, after which the top row of Time and Feedback controls
are used to adjust the effect
Time: A clockwise turn increases the delay time; a turn in the opposite direction
shortens it
Feedback: Adjusts the Feedback amount. Larger values cause the delay to be
heard longer
Pingpong: Hard-pans the effected signals so they “bounce” from left to right
Damping: Higher settings will roll off the high-frequency content of the delayed
signal more quickly
Wet/Dry: Sets the ratio between the original (dry) and modified (wet) signals
This digital delay repeats the input signal and creates an “echo”, giving it more
space and depth. The Time knob offers a range of settings from 4.5 milliseconds to
1 full second.

ARTURIA – Matrix-12 V – USER MANUAL 58
4.3.2 Dual-stage Phaser
The following parameters are available independently for both Stage 1 and Stage
2:
Rate: Sets the speed of the phaser
Depth: Sets the depth of the phaser activity
Feedback: Controls the amount of phaser resonance
Shape: Sine vs. noise
Stages 1 and 2 share these parameters:
Sync: Locks both stages to the current tempo of the DAW and/or the rate of the
delay. (These are the only two FX modules with a Sync button.)
Mode: “Single” means Stage 1 is on the left side and Stage 2 is on the right. With
“Dual” both stages process both sides; the Phaser output is mono.
Mix: Alters wet/dry mix
The phase shifter was one of the most popular effects used with electric instruments
in the 1970s. It works by splitting the incoming signal, changing the phase of one
side, and recombining it with the unaffected signal. This creates a notch-comb filter
which can be swept through the frequency spectrum, causing the signature
“whooshing” sound of the phase shifter.
The sweep is caused when the phase of the affected half is modulated by an
oscillator, with the frequency determined by the Rate control. The Depth knob sets
the amplitude for the action of the filtering, while Feedback amplifies certain
harmonics.
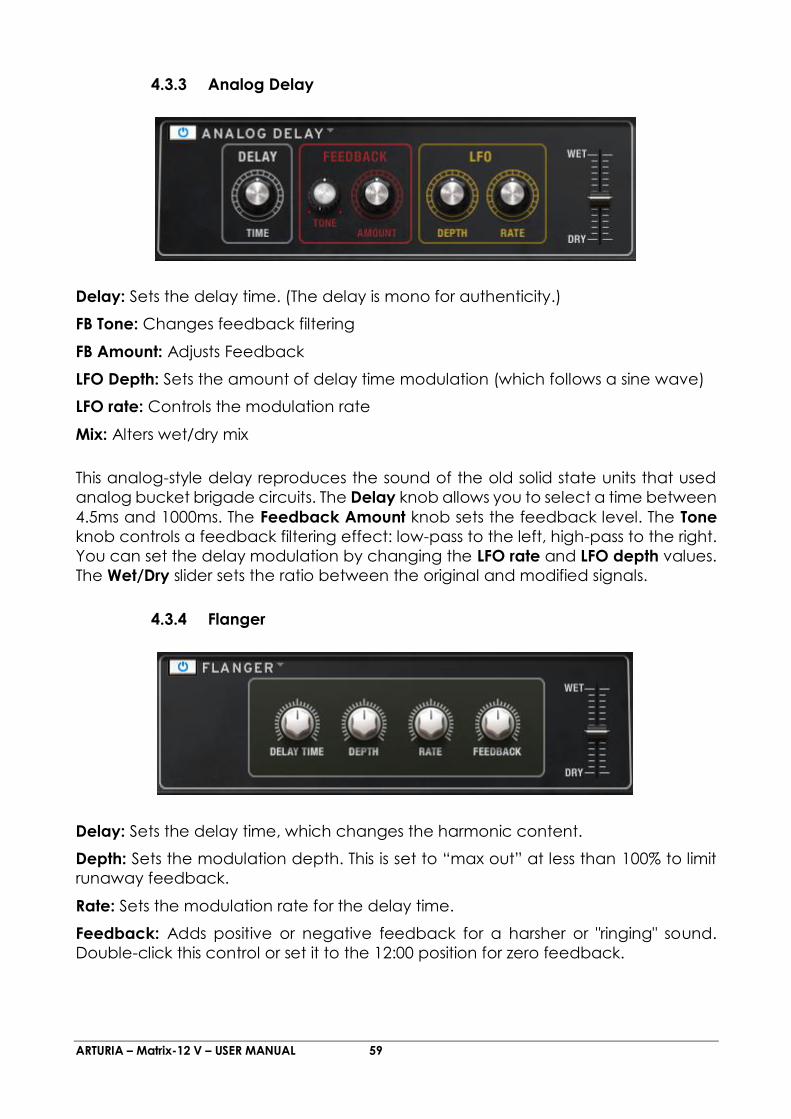
ARTURIA – Matrix-12 V – USER MANUAL 59
4.3.3 Analog Delay
Delay: Sets the delay time. (The delay is mono for authenticity.)
FB Tone: Changes feedback filtering
FB Amount: Adjusts Feedback
LFO Depth: Sets the amount of delay time modulation (which follows a sine wave)
LFO rate: Controls the modulation rate
Mix: Alters wet/dry mix
This analog-style delay reproduces the sound of the old solid state units that used
analog bucket brigade circuits. The Delay knob allows you to select a time between
4.5ms and 1000ms. The Feedback Amount knob sets the feedback level. The Tone
knob controls a feedback filtering effect: low-pass to the left, high-pass to the right.
You can set the delay modulation by changing the LFO rate and LFO depth values.
The Wet/Dry slider sets the ratio between the original and modified signals.
4.3.4 Flanger
Delay: Sets the delay time, which changes the harmonic content.
Depth: Sets the modulation depth. This is set to “max out” at less than 100% to limit
runaway feedback.
Rate: Sets the modulation rate for the delay time.
Feedback: Adds positive or negative feedback for a harsher or "ringing" sound.
Double-click this control or set it to the 12:00 position for zero feedback.
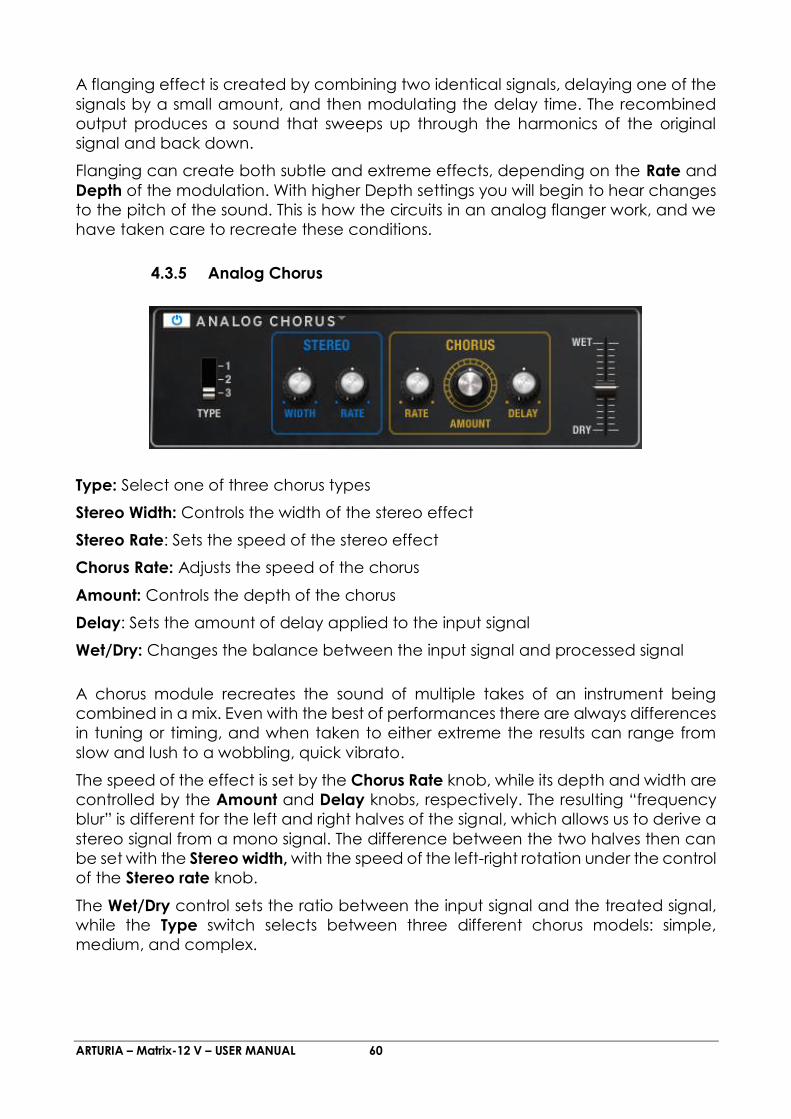
ARTURIA – Matrix-12 V – USER MANUAL 60
A flanging effect is created by combining two identical signals, delaying one of the
signals by a small amount, and then modulating the delay time. The recombined
output produces a sound that sweeps up through the harmonics of the original
signal and back down.
Flanging can create both subtle and extreme effects, depending on the Rate and
Depth of the modulation. With higher Depth settings you will begin to hear changes
to the pitch of the sound. This is how the circuits in an analog flanger work, and we
have taken care to recreate these conditions.
4.3.5 Analog Chorus
Type: Select one of three chorus types
Stereo Width: Controls the width of the stereo effect
Stereo Rate: Sets the speed of the stereo effect
Chorus Rate: Adjusts the speed of the chorus
Amount: Controls the depth of the chorus
Delay: Sets the amount of delay applied to the input signal
Wet/Dry: Changes the balance between the input signal and processed signal
A chorus module recreates the sound of multiple takes of an instrument being
combined in a mix. Even with the best of performances there are always differences
in tuning or timing, and when taken to either extreme the results can range from
slow and lush to a wobbling, quick vibrato.
The speed of the effect is set by the Chorus Rate knob, while its depth and width are
controlled by the Amount and Delay knobs, respectively. The resulting “frequency
blur” is different for the left and right halves of the signal, which allows us to derive a
stereo signal from a mono signal. The difference between the two halves then can
be set with the Stereo width, with the speed of the left-right rotation under the control
of the Stereo rate knob.
The Wet/Dry control sets the ratio between the input signal and the treated signal,
while the Type switch selects between three different chorus models: simple,
medium, and complex.

ARTURIA – Matrix-12 V – USER MANUAL 61
4.3.6 Reverb
Gain: Sets the input level of the signal going into the Reverb
HF Damping: Rolls off high frequencies gradually in the reverb
Brightness: Controls the high frequency content of the input signal
Diffusion: Masks or reveals individual reflections within the reverb
Decay Time: Determines the length of time the reverb takes to fade out
Feedback: Adjusts the number of reiterations of the reverb effect that occur after
the pre-delay time
Pre-Delay: Controls the onset of the initial burst of reverb by delaying it for up to 2
seconds
Wet/Dry: Allows you to decide the balance between the input signal (dry) and the
effect (wet).
In summary, we think you’ll find that these six FX modules provide some extremely
useful effects for building great analog synth sounds. Have fun!
4.4 The Modulation Page
You’ll notice many items in the Parameter window have buttons containing their
names. These are found just beneath the parameter value.
When one of these buttons is clicked its name will appear in the top line of the
Modulation Page, and any existing modulation routes and amounts will be
automatically displayed in the next two lines:

ARTURIA – Matrix-12 V – USER MANUAL 62
In the above picture the VCO 1 Frequency mod button has been selected, bringing
that parameter into focus in the Modulation Page. We can see that both LFO 1 and
Tracking Generator 1 are selected as modulation sources, although the mod level
for the Track 1 mod is set to 0 so it is having no impact on VCO 1.
These assignments and values can be altered or removed, and more can be added
if mod routings are available. In the example above there are four unused mod
routes.
As for the “buttonless” parameters, the ones that can’t be used as modulation
destinations can still be edited by their respective controls, and also can be
controlled by incoming MIDI data.
4.4.1 The MOD list
Another way to view the modulation routings is to press the MOD button in the
nameplate. This will change the bottom panel to display the Mod list:
Modulation routings 1-20
Note that there are two tabs on the far right side of the Mod list: 1-20 and 21-40. This
means you have 40 modulation routings available for each Single mode preset, and
also means that you will probably never run out of them.

ARTURIA – Matrix-12 V – USER MANUAL 63
Modulation routings 21-40
The controls are arranged in groups of three: Source, Amount and Destination. There
are a lot of Sources and Destinations, so when you click one of them a window will
open to show you the options:
The Mod Source list The Mod Destination list
Some sources like Envelope have more than one option. So do some destinations,
such as VCO 1. For these you need to be more specific about which source or
destination to use, so you’ll have to click a second item, like ENV1 or VCO1 FREQ.
Once the selection is made the Mod list will close.
After making your selections, use the associated SRC knob at the bottom of the
Modulation Page to dial in the modulation level. Or if the Mod page is open on the
bottom panel, you can use the appropriate AMT knob to set the value instead.
4.4.1.1 Resetting part of a mod
When you’re inside one of the lists pictured above you can clear the selection
you’ve made by clicking the RESET button. This will remove that selection from the
mod routing and close the list. The name of the item you cleared will be replaced
by three dashes in the display.

ARTURIA – Matrix-12 V – USER MANUAL 64
To reset the modulation amount, not the source or destination, double-click one of
the following:
the value field on the Modulation Page
the related AMT knob in the bottom panel’s Mod field (pictured in the next
section)
the SRC knob immediately below the value on the Modulation Page.
4.4.1.2 Clearing a mod
If you decide you want to remove the entire modulation route (source, destination
and amount), there’s a very quick way to do that:
Find the mod in the bottom panel’s Mod display
Click the CLEAR button on the right side of that mod, as pictured below.
The bottom panel Clear button
The SRC and DEST names will be replaced by three dashes, and the AMT value will
return to 0 (12:00).
4.4.1.3 Quantizing a mod
The Quantize feature can be used to force an otherwise smooth modulation
transition to happen in steps. Imagine: a sweeping LFO, an envelope, a Lever or any
other mod source can be made to move in discreet increments rather than “gliding”
through the values.
Here’s a cool example: When a mod to the VCO frequency or the filter cutoff is
quantized, the modulation output can be heard in semi-tones. You may find an
immediate use for that application by setting up a sort of “mini-sequence” that will
transpose itself when you play the keys. This is interactivity at its best, and one gift
among many from us to you.
To quantize a mod, select the Modulation Page and then toggle the button with the
letter 'Q' next to the clear button.

ARTURIA – Matrix-12 V – USER MANUAL 65
4.5 Page 2
The Page 2 nameplate button reveals important settings such as VCO keyboard
tracking, LFO trigger modes and pitch bend/vibrato assignments for the levers, to
name a few features.
Most of what Page 2 offers are on/off parameters, with buttons that light when
activated. When a parameter is “on” its name will be underlined in the display; if it
is not underlined the parameter is “off”.
The Page 2 window in the bottom panel
As with the Parameter window, blue bars identify parameter groups and tabs are
used to access parameter sets such as LFO 1-5 and Ramp 1-4. None of the Page 2
parameters are available as destinations in the Modulation Page, so they do not
have additional buttons beneath their names.
All Page 2 parameters are MIDI-assignable.
Page 2 will remain in the bottom panel until one of the other nameplate buttons is
selected (KBD, FX, or MOD), or until one of the other pages is selected (Voices or
Program Chain).
4.6 Single mode: the Voices page
4.6.1 First of all: What’s a Voice?
There are two uses of the word “voice” related to Matrix-12 V. To keep them straight,
we capitalize one (“Voice”) and don’t capitalize the other (“voice”). Here’s a
definition of each:
voice: A unit of polyphony; i.e., the number of notes that can be played
simultaneously.
Example: “The Xpander is a six-voice synthesizer.”
Voice: The collection of synthesizer parameters that make up a preset in Single
mode, not counting the FX settings.
Example: “This Multi was constructed by layering two Voices.”

ARTURIA – Matrix-12 V – USER MANUAL 66
4.6.2 The Voice page
The Voices page has fewer features in Single mode than it does in Multi mode, which
is to be expected since you can only work with one Voice at a time. But it still is
capable of enhancing that Voice quite a bit! Options include independent panning
and transposition for each of the 12 voices, the ability to have two mono voices
stacked on the right side of the keyboard with the other 10 voices layered and
detuned on the left side, etc.
Plus, the Voices page houses the VIB parameter group. So there are a lot of features
to discuss here.
So now let’s take a look at the Parameter groups on the Voices page and see what
they can do in Single mode.
The first step is to select a preset that’s a Single, not a Multi. If you’re not sure, then
click the word “Voices” to access the Voices page. You should see a page that
looks like this:
A portion of the Voices page in Single mode
…with the name of the Single preset in the Page bar and also “greened out” in the
display column to the left.
But if what you see looks like this instead:
An example of the Voices page in Multi mode
…then Matrix-12 V is in Multi mode, not Single mode. Select one of the Single presets
from the Factory banks so what we’re describing and what you’re seeing are the
same thing.
When you’re ready, see the next section. We’ll start with the parameter group
labeled “Voices” and work our way across the screen.

ARTURIA – Matrix-12 V – USER MANUAL 67
4.6.3 Voices
The Voices parameter group in Single mode
Note: unless otherwise indicated, click and drag to edit a parameter value; double-
click to reset.
Play: Normally on (red) by default, these turn green when a particular voice has
been triggered. You can also click them to disable a voice so it will not play.
Zone: This field is used to assign a voice to one of the six Zones, where its note range,
keyboard mode, and other settings can be defined. You can also select one of the
16 MIDI channels for a voice and bypass the Zone parameters.
Transpose: Allows you to change the pitch of a voice in chromatic increments within
a range of + 2/-3 octaves. You could use this for semi-random octave jumps, for
example.
Detune: With this you could put some voices slightly flat and others slightly sharp, or
make them way out of tune. The range is -31 to +31, and in combination with the
Transpose parameter you could set the pitch of a voice to pretty much whatever
you want.
Volume: This parameter sets different output levels for the voices, which could be
handy when layering transposed voices so you can get the balance just right.
Pan: Choose one of seven stereo positions per voice to give the Voice a bit of
motion. This could be extra cool with percussion or a sound effect. Click the field
and a window will open to display the options.
The per-voice pan positions

ARTURIA – Matrix-12 V – USER MANUAL 68
4.6.4 Zones
The Zones parameter group in Single mode
The first thing to notice are the Zone numbers in the left-most column (1-6), indicating
which Zone will be edited by the parameters to the right. The per-voice Zone
assignments themselves are handled in the Voices parameter group over to the left.
Here’s what’s possible with the Zone parameter group:
Input Ch.: Assign the Zone to MIDI Channel 1-16 or Omni.
Mode: Determines how voices will be triggered. The first three modes are polyphonic
(Rotate, Reassign, Reset), and the last three are monophonic (Uni-Low, Uni-High, Uni-
Last).
Click the field and a window will open with the choices. A check mark indicates
the current mode:
Note assignment modes
Below is a description of how each mode behaves:
Rotate: Each new note will play the voices assigned to that Zone one after the other,
and then they’ll loop (1-2-3, 1-2-3, etc.).

ARTURIA – Matrix-12 V – USER MANUAL 69
Reassign: Checks each new note to see if any voice in that Zone is already playing
it. If so, the note will be retriggered using the same voice. If not, it’ll grab the next
higher voice if it’s available.
Reset: Plays the voices assigned to the Zone in numerical order, always starting with
the first voice. If consecutive staccato notes are played it’ll use the first voice each
time; if two legato notes are played it will use the first voice, then the second, and
so on. But when either of those notes ends it’ll start over with the lowest-numbered
available voice.
Uni-Low: The voice(s) will be triggered by the lowest note played in the Zone. If the
note is held and a higher note is played, the voice(s) will stay on the current note; if
a lower note is played, the voice(s) will change to that note. Also known as “low
note priority”.
Uni-High: The voice(s) will be triggered by the highest note played in the Zone. If the
note is held and a lower note is played, the voice(s) will stay on the current note; if
a higher note is played, the voice(s) will change to that note. Also known as “high
note priority”.
Uni-Last: A combination of high and low note priority: The voice(s) will be triggered
by the last note played in the Zone, whether it is above or below the previous note.
V. steal: Voice stealing helps maximize the voice allocation within a Zone. For
example, if five voices have been assigned to a Zone and all five notes are playing,
what happens if a sixth note is played?
Ordinarily, nothing: the sixth note is ignored. But with V. steal enabled, the first note
that was played is “stolen” and made available to the sixth note. So on the plus side,
V. steal means every note played within the Zone will be heard. However, the
downside is that if the Voice has a long release time, then after a note is released it
is at risk of being cut off abruptly if a new note arrives.
Low: Click and drag the value to set the lower MIDI note range for the Zone.
High: Click and drag the value to set the higher MIDI note range for the Zone.
4.6.5 Vibrato (VIB)
The VIB section provides a modulation source that is sort of like having an “LFO #6”.
However, it doesn’t have as many options available as LFOs 1-5.
Here are the LFO features that are missing from VIB:
One less waveform: Sample & Hold is not available
No Retrig setting: the VIB waveform always starts from the beginning when
triggered
Single trigger only: no Multiple trigger setting or “freerun” capability
No Mod buttons: VIB parameters are not available as destinations on the
Modulation Page.
Now let’s focus on the positive! Here’s what the VIB section does provide:

ARTURIA – Matrix-12 V – USER MANUAL 70
Speed: A rate control with a range of 0 to 63; click and drag to edit the value. A
simple mod routing Is provided.
Source: Modulate VIB speed from one of two sources: Mod Wheel or Pedal. Click
the field to reveal the choices:
Mod sources for VIB rate
Mod Amt: The amount of control the Source will have on the VIB speed. Click and
drag to edit the value. The modulation can be positive or negative, with a range +/-
63.
Wave: Six options: Triangle, Up/Down Saw, Square, Random and Noise (no Sample
& Hold). Click the field to reveal the choices:
VIB waveform options
Lag: Click the button to use the Lag generator as an additional mod for the VIB
effect.
Amp: The overall output of the VIB section. A simple mod is provided
Source: Modulate VIB output from one of two sources: Mod Wheel or Pedal
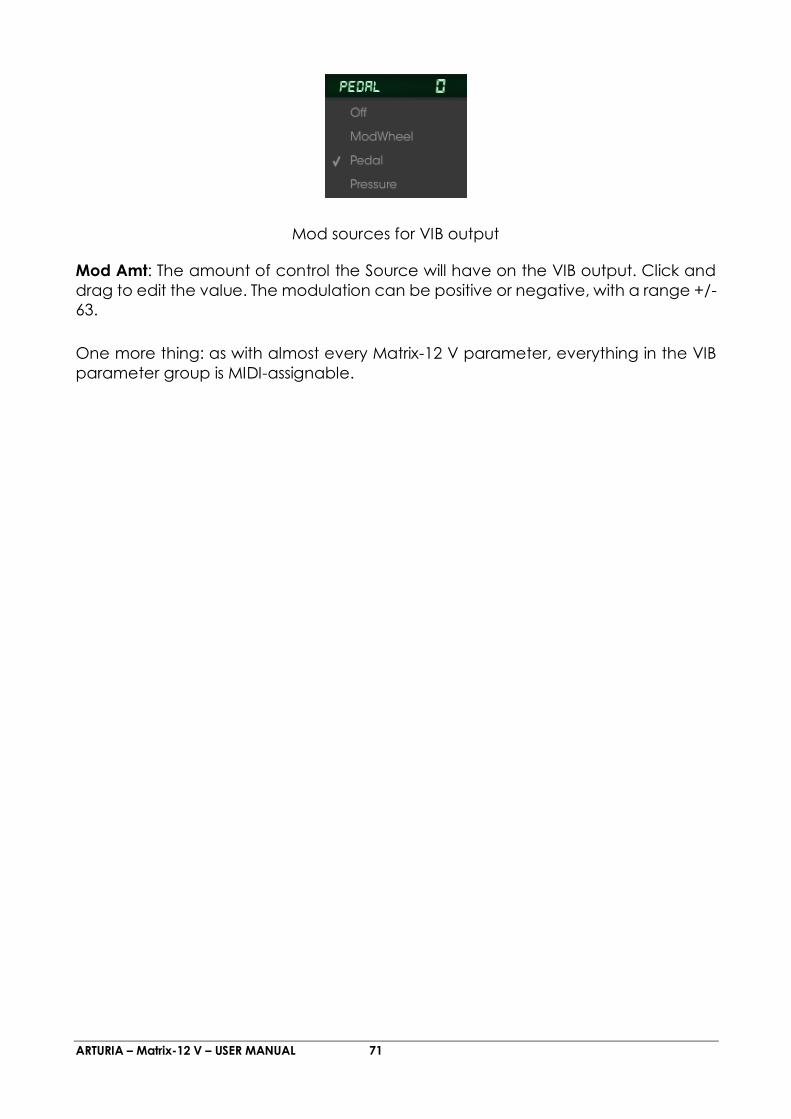
ARTURIA – Matrix-12 V – USER MANUAL 71
Mod sources for VIB output
Mod Amt: The amount of control the Source will have on the VIB output. Click and
drag to edit the value. The modulation can be positive or negative, with a range +/-
63.
One more thing: as with almost every Matrix-12 V parameter, everything in the VIB
parameter group is MIDI-assignable.

ARTURIA – Matrix-12 V – USER MANUAL 72
5 MULTI MODE
So you want to play synth bass with your left hand and some funky riffs with the
other? How about multi-timbral sequences, or layering two Voices to create
The Pad To End All Pads?
Whatever your musical requirements may be, Multi mode is the place to go
when your plans call for Matrix-12 V to have two or more Single mode presets
active at the same time.
5.1 How to switch modes
There are two main modes in Matrix-12 V: Single and Multi. However, what you
see in the Page bar are the words “Main” and “Voices”, so those aren’t what
you use to switch between the modes.
Here’s why: even though the Main page and the Voices page look pretty
much the same in each mode, they actually do different things depending on
the mode of the selected preset.
However, to enter Single or Multi mode you must select a preset that is known
to be one or the other type. And once you are in Multi mode, for example,
selecting a Single mode preset will take you back to Single mode.
5.2 Single mode vs. Multi mode
Visually Single mode and Multi mode seem very similar, but functionally they
are quite different. The focus of Single mode is the Main page, where
practically every synthesizer parameter known to man resides, for the express
purpose of creating a Voice. The Voice can stand on its own or become the
basis around which a Multi is constructed.
The focus of Multi mode, on the other hand, is the Voices page. As the plural
of “Voice”, the name “Voices” implies that Multi mode enables you to access
more than one “Voice” at a time.
The potentially confusing part is that there is a Main page in Multi mode and a
Voices page in Single mode. The advantages to this system, though, is that
there are certain parameters on both pages that are useful in either mode,
whether you’re dealing with a Single preset or a Multi.
But how do you tell which mode Matrix-12 V is in without loading a new preset
that you know is one or the other?
Here’s the fastest way we’ve found: If you’re on the Main page, click Voices in
the Page bar and look at the name field for the voices. If the voice names are
“greened out” and they’re all the same, Matrix-12 V is in Single mode.

ARTURIA – Matrix-12 V – USER MANUAL 73
The Voices page in Single mode
In Multi mode the Voices page has several more options, so it should be easy
to tell in that case.
But eventually you’ll know at a glance that Matrix-12 V is in Multi mode even
when you’re on the Main page. The only difference is in the Page bar:
The Main page view of the Page bar in Multi mode
Note the word “MULTI” and the name of a Multi in the middle of the Page bar,
plus the term “G1” and the name of a Single preset surrounded by blue arrows.
We’ll describe those things later, but those factors indicate that Matrix-12 V is
in Multi mode.
But in Single mode the Page bar only has the name of a Single preset in the
middle, like so:
The Main page view of the Page bar in Single mode
All other parameters on the Main page are the same in either mode, so it is
always possible to switch to the Main page and edit the parameters of a
Voice.
And since the focus of Multi mode is the Voices page, that’s where we’ll begin.
5.3 Multi mode: the Voices page
When you load a Multi preset it will default to the Voices page. The Zones and
VIB sections are identical to the ones you see on the Voices page in Single
mode; the only noticeable difference on the Voices page in Multi mode are
on the left side of the window:

ARTURIA – Matrix-12 V – USER MANUAL 74
An example of the Voices page in Multi mode
Notice the Group column and the green “Save” button, neither of which are
there in Single mode. All of the other features are the same in each mode,
except for the ability to select a new Single preset for each Voice: Multi mode
has this and Single mode does not. We’ll go over those features carefully in this
section of the manual.
The Voices page is divided into three parameter groups (Voices, Zones, VIB),
with each section offset by a thick blue line. Let’s focus on each parameter
group one at a time.
5.3.1 Voices
In Multi mode each of the Voices in Matrix-12 V can be assigned its own Single
preset. But it doesn’t stop there: each Voice can be transposed, detuned, and
panned independently, and then placed into a Group and Zone which may
or may not contain any of the other Voices.
Most of the features in the following screen shot are already familiar:
The Voices parameter group in Multi mode

ARTURIA – Matrix-12 V – USER MANUAL 75
The focus here will be mainly on the features that are unique to Multi mode.
Follow the links to the sections where these are covered in greater detail.
Note: unless otherwise indicated, click and drag to edit a parameter value;
double-click to reset.
Play: The buttons enable/disable Voices and indicate Voice activity.
Group: Only available in Multi mode, this function links multiple Voices for
quicker edits.
Voice name: Show the names of the Single mode Presets used for the Voice(s).
Select arrows: These will move up and down through the presets within the
current type selected for the Voice.
Save: Provides a quick way to save an edited Voice.
Zone: Used to assign a Voice to one of the six Zones, where its note range,
keyboard mode, and other settings can be defined. Or select one of the 16
MIDI channels and bypass the Zone parameters.
Trans: Allows you to change the pitch of a Voice in chromatic increments
within a range of + 2/-3 octaves.
Detune: Tune a Voice flat or sharp. The range is -31 to +31, and can be used in
combination with the Transpose parameter.
Volume: Use this to adjust the output levels for each Voice.
Pan: Each Voice can be placed at one of seven positions in the stereo field.
Click the field and a window will open to display the options.
The Voice pan positions
5.3.2 Groups
A group is a combination of Voices that simplifies the process of assigning a
new Single preset to multiple Voices that share that preset. For example, if
Voices 1 through 4 are assigned to the same group and you select a Brass
preset for Voice 1, then Voices 2, 3, and 4 will also change to the Brass preset,

ARTURIA – Matrix-12 V – USER MANUAL 76
They retain their individual Transposition and other settings, but they move
together when a new preset is selected.
The default Multi has all 12 Voices assigned to the same group, so it is necessary
to reassign them. To do this, click on the Group field next to the Voice you want
to change:
The Group menu in Multi mode
There’s only one group available so far, so click “Create New group” at the
bottom of the list. After this there will be two groups available and you can
assign any one of the Voices to either group.
As soon as one of the Voices has been assigned to group 2 it is possible to
select a different Single mode preset for it without affecting the first Voice. In
the picture below this has been done, and Voices 1 and 2 are now
independent.
However, Voice 3 is still assigned to group 1. You can assign it to group 2 if you
like by following the same process.
Selecting a different group for Voice 3
Using this same technique repeatedly it is possible to set up several groups and
use them to combine Voices into a single polyphonic synth. Let’s take another
look at this graphic from the previous section and analyze what’s happening:

ARTURIA – Matrix-12 V – USER MANUAL 77
The Voices parameter group in Multi mode
Voices 1 and 2 are in group 1, so they share the same Single mode
preset. But Voice 1 is an octave lower than Voice 2 and slightly quieter.
They’ve been assigned to Zone 1 also.
Voices 3-7 (5 Voices) are in group 2 and sharing one Single mode preset.
But each Voice is slightly detuned from the others and panned to a
different location in the stereo field. All five Voices are assigned to Zone
2.
Voices 8-12 (5 Voices) are in group 3, sharing a Single mode preset. But
in addition to different Transpose, Detune, Volume and Pan settings they
are also assigned to MIDI channel 3 (not a Zone), so they will respond to
incoming MIDI data on that channel without being additionally
constrained by the settings of a Zone.
You can create up to 12 groups inside the Multi, so there are lots of other
possibilities, too.
5.3.3 Selecting a single
If you’d like to select a new Single mode preset for a Voice inside the Multi, all
you have to do is click inside the name field for that Voice.

ARTURIA – Matrix-12 V – USER MANUAL 78
Selecting a new preset for a Voice
After that it’s very similar to selecting one from the tool bar: just navigate to the
bank and type you want and make a selection from the presets inside that
type.
You can also use the small vertical arrows next to the Voice name to select a
new preset inside the current bank and type.
5.3.4 Zones
The Zones parameter group allows you to specify MIDI channel response, MIDI
note range, monophonic and polyphonic keyboard modes, and enable voice
stealing. These settings will be in effect for any Voices that have been assigned
to a given Zone.
5.3.5 VIB
The VIB section is identical to the one in Single mode. It provides a modulation
source very similar to LFOs 1-5, although it doesn’t have as many options
available.
Saving an edited Multi
As soon as you change one of the Multi parameters, an asterisk will appear
next to the name of the Multi. This is to remind you to save the Multi before
selecting another one, or else you will lose the edits you have made.
The process is basically the same as that described previously “Saving an
edited preset”: click either the single-disc icon to overwrite the original file, or
click the double-disc icon to keep the original preset the way it was and save
a renamed copy of your latest edits.
If you started with a Factory preset then the “Save Preset As…” window will
open automatically no matter which icon you click.
After the window opens the first thing you might want to do is select a new
bank or type for the preset. There’s a drop-down menu in each field for this
purpose:

ARTURIA – Matrix-12 V – USER MANUAL 79
Drop-down menus to select a new bank or type for the preset
Or if you would like to create a new bank or type, just highlight the appropriate
field and type in a new name.
Rename the preset and click OK to complete the process.
5.3.6 Saving a Voice into a Single Preset
If at some point while programming a Multi you went over to the Main page
and made a few tweaks to one of the Voices, an asterisk will appear next to
its name on the Voices page. This means you can extract the single assigned
on a voice to save it into a single preset.
Just click the small green “SAVE” button next to the Voice name…
…and the Save window you’ve seen in Single mode will appear:
Saving an edited Single mode preset from within a Multi
Once you’ve selected the Bank and Type and given the preset a new name
(if desired), click OK and the preset will be saved. The new preset will show up
in the Voice name field and the asterisk will disappear.

ARTURIA – Matrix-12 V – USER MANUAL 80
After this, be sure to save the Multi itself!
5.3.7 Saving a Multi
The Multi is embedding all the informations of the voices into itself. It means
that modifying a single preset affected to a voice will not impact the multi.
Just open the Save As dialog as usual to define your preset.
Save the edited Single Preset also!
Click the OK button and your work will be preserved.
5.4 Import / Export
The process of exporting and importing banks or presets is fairly straightforward:
click the appropriate button and then either 1) navigate to the folder where
the items are, or 2) create a folder where they will be.
5.5 Multi Mode: the Main page
The Main page in Multi mode is almost identical to the Main page in Single
mode, with only two exceptions. Both exceptions are found in the Page bar,
not in the Parameter groups.
The differences are in the very middle of the Page bar:

ARTURIA – Matrix-12 V – USER MANUAL 81
The center of the Page bar on the Main page in Multi mode
Difference #1: The word “MULTI” is followed by the name of the current Multi
preset.
Difference #2: The name of the Voice being edited is between a pair of blue
“Previous/Next” arrows. The “G1” stands for “Group 1”, the group to which the
Voice has been assigned (see section 5.2.2 for information about this).
The cool thing is that those blue arrows will switch the selection from Group 1
to Group 2, etc., which calls up the Voice that has been assigned to that
Group. Then the preset can be edited immediately from the Main page, and
you didn’t have to go back to the Voices page to select the Voice you want
to edit. Definitely a time-saver there.
For the full description of each Main page parameter, see chapter 4.

ARTURIA – Matrix-12 V – USER MANUAL 82
6 END USER LICENSE AGREEMENT
1. General
1.1 In consideration of payment of the Licensee fee, which is a portion of the
price you paid, Arturia, as Licensor, grants to you (hereinafter termed
“Licensee”) a nonexclusive right for the use of software including related
media, documentation (for example program descriptions, manuals) and
other documents and materials manufactured by Arturia SA ("Product(s)").
All intellectual property rights in the software belong to Arturia SA (hereinafter:
“Arturia”).
1.2 The following editions of the Product are available: “Demo”, “Standard”,
“EDU” and “NFR”. Whilst each edition equips the User with the same software,
the editions vary as regards both the scope of functions activated in the
Product, and the rights of use granted under this EULA.
1.3 By installing the software on your computer you agree to these terms and
conditions. If you do not approve these terms and conditions, you must not
install this software.
1.4 If you do not approve these terms and conditions, please return the
complete Product (including all written matter, packaging and similar
material) to the dealer from whom it was originally bought within 14 (fourteen)
days after the day of purchase. For purchases from the Arturia Online Store,
please contact Arturia on the internet website:
www.arturia.com/support/askforhelp/purchase.
1.5 Arturia reserves all rights not expressly granted in the EULA.
2. Right of use
2.1 The Product is protected by copyright. The Licensee may not lease, loan or
sub-license the software. The Licensee is not authorized to modify the software.
2.2 Owning any product provided to the Licensee as “Standard” version grants the
Licensee a non-exclusive right to use the Product in perpetuity including
commercial purposes. The Licensee can activate the Product on up to five
computers, as long as only one installation is used at any given time. The
Licensee must register the Product to Arturia to get access to client support,
and to activate his Product. (An internet connection is required to register and
activate the Product, either on the computer on which the Product is installed,
either on another device able to exchange files with the computer on which
the Product is installed). Owning a license of the Products entitles the Licensee
to get access to the future updates of this Product.
2.3 Any Products provided to you as "NFR" (Not For Resale) version grants the
Licensee a non-exclusive right to use the Product for a limited period of time.
The Product shall only be used for demonstration, testing and evaluation
purposes. NFR Products must not be used for commercial purposes, and must

ARTURIA – Matrix-12 V – USER MANUAL 83
not be resold or transferred. The Licensee can activate the Product on up to
five computers, as long as only one installation is used at any given time. The
Licensee must register the Product to Arturia to get access to client support,
and to activate his Product. (An internet connection is required to register and
activate the Product, either on the computer on which the Product is installed,
either on another device able to exchange files with the computer on which
the Product is installed). NFR Products are exempt from update, upgrade or
crossgrade offers, and cannot be purchased with or exchanged for vouchers
or coupons. Furthermore, as an owner of a NFR Product, you are not entitled
to any vouchers that ship with the standard version of the Product.
2.4 Any Products labelled or otherwise provided to you as an “Educational”
version grants the Licensee a non-exclusive right to use the Product in
perpetuity. The Product shall only be used by students or those working in
educational institutions. This definition includes students, faculty, staff and
administration attending and / or working at an educational institutional
facility: private / public schools, colleges, universities and similar. These
Products must not be used for commercial purposes, and must not be resold
or transferred. The Licensee can activate the Product on up to five computers,
as long as only one installation is used at any given time. The Licensee must
register the Product to Arturia to get access to client support, and to activate
his Product. (An internet connection is required to register and activate the
Product, either on the computer on which the Product is installed, either on
another device able to exchange files with the computer on which the
Product is installed). These Products are exempt from upgrade or crossgrade
offers, and cannot be purchased with or exchanged for vouchers or coupons.
Furthermore, as an owner of an educational Product, you are not entitled to
any vouchers that ship with the standard version of the Product.
2.5 Any Products labelled or otherwise provided to you as a “Demo” version
grants the Licensee a right to use the Product only for demonstration and
evaluation purposes. These Products must not be used for commercial
purposes, and must not be resold or transferred. These Products are exempt
from upgrade or crossgrade offers, and cannot be exchanged for vouchers or
coupons.
3. No Unbundling
Bundles (product bundles are an association of software and hardware or
software-only products) can only be resold / transferred as a whole. The
individual components of a bundle must not be resold / transferred separately.
4. Resell
4.1 Renting or lending the licensed Software to a third party is expressly
forbidden. Apart from that and if not provided otherwise within this EULA.
4.2 Except if otherwise stated within this EULA, Licensee may resell the software
to a third party or transfer the software permanently free of charge, provided

ARTURIA – Matrix-12 V – USER MANUAL 84
the third party agrees in writing with this EULA and Licensee ceases all use of
the software, completely removes all installed copies of the software from his
computers and – if the software was not purchased via download – deletes or
transfers the original media delivered with the software to the third party. In
addition, Licensee is required to de-register the purchased software with
Arturia (more information available on www.arturia.com).
5. In case a sound library is part of the purchased Product the following shall
apply in addition to the EULA
The provided samples, instruments and presets can be used for commercial or
non-commercial music and audio Productions without the prior permission
from Arturia under the terms of this Agreement. The usage of this Product (in
particular samples, instruments and presets) for the creation of a sound library
or as a sound library for any kind of synthesizer, virtual instrument, sample library,
sample-based Product or other musical instrument is strictly prohibited.
Individual samples, sound sets or audio loops may not be distributed
(commercially or otherwise) standalone. Furthermore these samples, sound
sets or audio may not be repackaged in whole or in part as audio samples,
sound libraries or sound effects.
6. Data Protection
Arturia attaches great importance to compliance with legislation on data
protection. The User data collected are used exclusively for performing its
contractual obligations. No data is passed on to third parties. Further
information can be obtained from our Privacy Policy at
www.arturia.com/privacy.
7. Limited Warranty
Arturia warrants that the physical media on which the software is provided is
free from defects in materials and workmanship under normal use for a period
of thirty (30) days from the date of purchase. The Licensee’s invoice shall be
evidence of the date of purchase. Any implied warranties on the software are
limited to thirty (30) days from the date of purchase. Some states do not allow
limitations on duration of an implied warranty, so the above limitation may not
apply to the Licensee in this case. All programs and accompanying materials
are provided “as is”.
8. No Liability for Consequential Damages
Neither Arturia nor anyone else involved in the creation, production, or delivery
of this Product shall be liable for any direct, indirect, consequential, or
incidental damages arising out of the use of, or inability to use this Product
(including without limitation, damages for loss of business profits, business
interruption, loss of business information and the like) even if Arturia was

ARTURIA – Matrix-12 V – USER MANUAL 85
previously advised of the possibility of such damages. Some states do not allow
limitations on the length of an implied warranty or the exclusion or limitation of
incidental or consequential damages, so the above limitation or exclusions
may not apply to the Licensee in this case. This warranty gives the Licensee
specific legal rights, and the Licensee may also have other rights which vary
from state to state.