user manual - | icar ori... · information about this user manual ... taken from the milking robot...
TRANSCRIPT

User Manual
Ori-Collector
with LELY Robot A3, A3 Next and A4
Using 90 vials
Version 1.09
Nov 2013

User Guide Ori-Collector / Lely version 1.09 Page 2
Date Version Motif
1/10/2012 1.0 Initial Release 11/02/2013 1.07 Version with maintenance 19/09/2013 1.08 Version with new maintenance 20/11/2013 1.09 Version last renumbering
Historial Version

User Guide Ori-Collector / Lely version 1.09 Page 3
1. INTRODUCTION ........................................................................................................................................ 4
1.1. INFORMATION ABOUT THIS USER MANUAL ......................................................................................................... 4 1.2. MANUFACTURER’S ADDRESS........................................................................................................................... 4 1.3. SALES AND AFTER-SALES SERVICE .................................................................................................................... 4
2. SAFETY ...................................................................................................................................................... 4
2.1. THE USER’S RESPONSIBILITY ........................................................................................................................... 4 2.2. SAFETY SYMBOL ........................................................................................................................................... 5 2.3. SAFETY INSTRUCTIONS ................................................................................................................................... 5
3. DESCRIPTION OF THE ORI-COLLECTOR ...................................................................................................... 5
3.1. FUNCTIONS OF THE ORI-COLLECTOR ................................................................................................................ 5 3.2. DESCRIPTION OF COMPONENTS ....................................................................................................................... 5 3.3. FUNCTIONING .............................................................................................................................................. 6 3.4. SPECIFICATIONS ........................................................................................................................................... 8 3.5. PLATE ........................................................................................................................................................ 8
4. INSTRUCTIONS OF USE OF THE ORI-COLLECTOR .............................................................................. 9
4.1. ASSEMBLY OF THE ORI-COLLECTOR .................................................................................................................. 9 4.1.1. Preparation of the samples ............................................................................................................. 9 4.1.2. Unlocking the filling system .......................................................................................................... 10 4.1.3. Positioning in place of the Ori-Collector ........................................................................................ 12 4.1.4. Levelling......................................................................................................................................... 12
4.2. CONFIGURATION OF THE ORI-COLLECTOR ON THE ROBOT ................................................................................... 12 4.3. CONNECTION OF THE ORI-COLLECTOR ............................................................................................................ 16
4.3.1. Pneumatic connection ................................................................................................................... 16 4.3.2. Milk hose connection ..................................................................................................................... 17
4.3.2.1 Pausing the milk connection by clicking Stop ............................................................................................ 17 4.3.2.2 Waiting for the milking to finish ................................................................................................................ 17 4.3.2.3 Activating sampling ................................................................................................................................... 18 4.3.2.4 Opening the sampling valve ...................................................................................................................... 18 4.3.2.5 Connecting the Ori-Collector ..................................................................................................................... 19 4.3.2.6 Connecting the outlet bend of the terminal unit....................................................................................... 19 4.3.2.7 Connecting the Ori-Collector ..................................................................................................................... 19
4.4. PROGRAMMING THE SAMPLING .................................................................................................................... 21 4.4.1. Programming with the X-Link Robot console ................................................................................ 21 4.4.2. Activation of sampling with T4C .................................................................................................... 22
4.5. RECOVERY OF THE MILKING .......................................................................................................................... 24 4.6. RELOADING THE ORI-COLLECTOR .................................................................................................................. 24 4.7. STOPPING THE SAMPLING ............................................................................................................................. 29 4.8. EXPORTING ROBOT DATA ............................................................................................................................. 32 4.9. DATA PROCESSING WITH THE DATA COLLECTED ................................................................................................ 33 4.10. EDITING THE LIST OF SAMPLINGS ............................................................................................................... 36
5. CLEANING AND MAINTENANCE .......................................................................................................... 37
5.1. WASHING AFTER INSPECTION ........................................................................................................................ 37 5.2. CLEANING OF THE FILLING SYSTEM AND HOSE .................................................................................................. 39 5.3. CLEANING THE BOX AND CROWN .................................................................................................................. 39 5.4. REMOVING THE SILICONE HOSE FROM THE FILLING SYSTEM ................................................................................. 40 5.5. REMOVING THE STEEL PLATE ......................................................................................................................... 44 5.6. CARE AND MAINTENANCE ............................................................................................................................ 47 5.7. MALFUNCTION OF THE ORI-COLLECTOR .......................................................................................................... 47
6. LIST OF PARTS ......................................................................................................................................... 48
Contents

User Guide Ori-Collector / Lely version 1.09 Page 4
1. INTRODUCTION 1.1. Information about this user manual
The manufacturer reserves the right to modify the manufacturing of the Ori-Collector in the case of improvement. All reproductions, translations or copies require the manufacturer’s consent. This manual shall always be within reach of the Ori-Collector’s user.
1.2. Manufacturer’s address
Sayca sl c/Rumania, 5 nave d-15 –Polígono Industrial Inbisa Alcalá I 28802 - Alcalá de Henares – MADRID (Spain) Tel.: (0034) 645811182
1.3. Sales and After-sales Service
Sales and After-sales service is provided by: Comatel Maison du lait 42 rue de Chateaudun 75009 Paris
2. SAFETY 2.1. The User’s Responsibility
The design and realization of the Ori-Collector took into account the risk of danger in accordance with the appropriate standards, we guarantee complete security. This security can only be achieved by the user in accordance with the safety instructions. It is the responsibility of the user to ensure that the following measures are implemented:
All persons who use the Ori-Collector must have read the manual.
Users of the Ori-Collector shall always have access to the manual.
Safety instructions shall always be adhered to.
The product can only be used within the environment described.
Safety devices should be checked regularly.
Maintenance shall only be carried out by qualified personnel.
Safety symbols, labels and stickers on the Ori-Collector should be replaced
if lost or illegible.
Untrained personnel cannot use the Ori-Collector. Prior training should
always be provided.
User Guide Ori-Collector / Lely version 1.09 Page 5
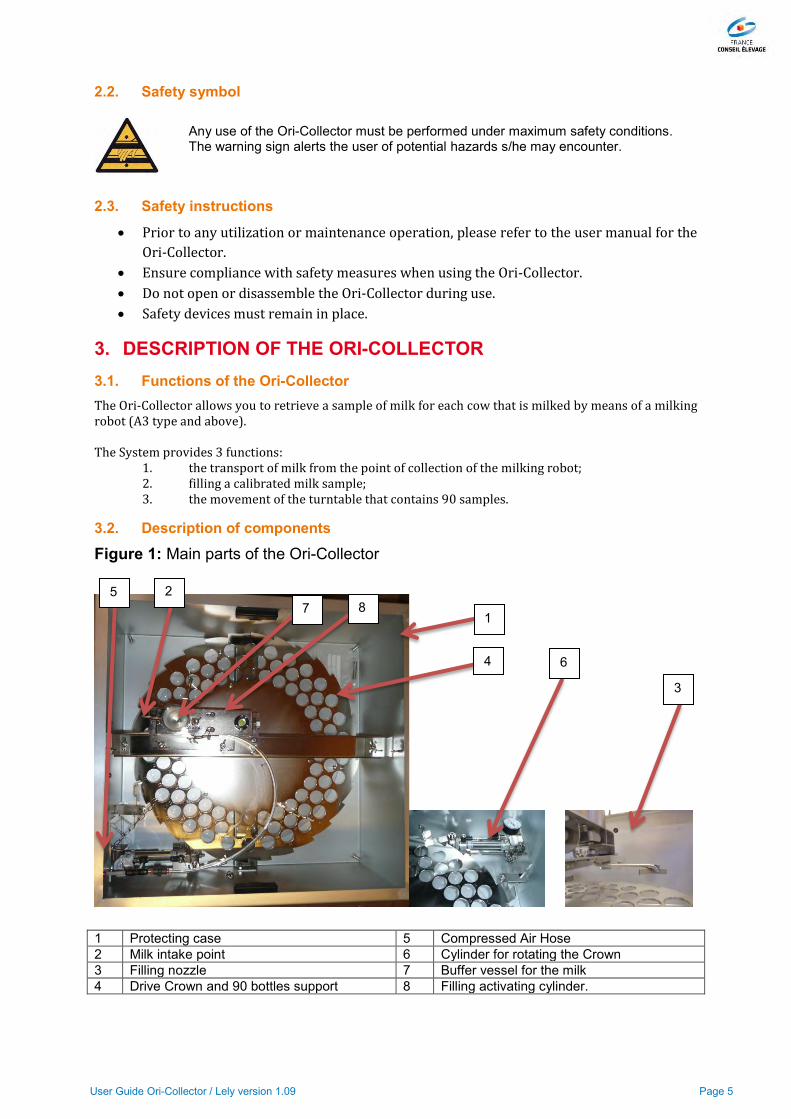
2.2. Safety symbol Any use of the Ori-Collector must be performed under maximum safety conditions. The warning sign alerts the user of potential hazards s/he may encounter.
2.3. Safety instructions
Prior to any utilization or maintenance operation, please refer to the user manual for the
Ori-Collector.
Ensure compliance with safety measures when using the Ori-Collector.
Do not open or disassemble the Ori-Collector during use.
Safety devices must remain in place.
3. DESCRIPTION OF THE ORI-COLLECTOR 3.1. Functions of the Ori-Collector The Ori-Collector allows you to retrieve a sample of milk for each cow that is milked by means of a milking robot (A3 type and above). The System provides 3 functions:
1. the transport of milk from the point of collection of the milking robot; 2. filling a calibrated milk sample; 3. the movement of the turntable that contains 90 samples.
3.2. Description of components
Figure 1: Main parts of the Ori-Collector
1 Protecting case 5 Compressed Air Hose 2 Milk intake point 6 Cylinder for rotating the Crown 3 Filling nozzle 7 Buffer vessel for the milk 4 Drive Crown and 90 bottles support 8 Filling activating cylinder.
1
2
3
5
4
7
6
8

User Guide Ori-Collector / Lely version 1.09 Page 6
The Ori-Collector sampler is a rotating system in which the set of samples is in motion, in order to maintain the filling system fixed. Its main parts are presented in Figure 1. The system (1) is easily transportable, and must be supplied with compressed air (5). It consists of a double crown (4), the upper part in stainless steel, the bottles, and the lower part in PVC which serves as a support. The upper part is crenellated, allowing it to move by means of a pneumatic cylinder (6). Milk (2) taken from the milking robot is sent to a calibrated buffer tank (7), the cylinder (8) is activated to carry out the filling of the bottle via the filling nozzle (3).
3.3. Functioning The system works in 5 stages:
1 Waiting for the sample 2 Transport of milk 3 Sample calibration 4 Filling the bottles 5 Moving the samples
The system uses the robot controls by compressed air, and transports the milk by gravity into the sampler.

User Guide Ori-Collector / Lely version 1.09 Page 7
User Guide Ori-Collector / Lely version 1.09 Page 8
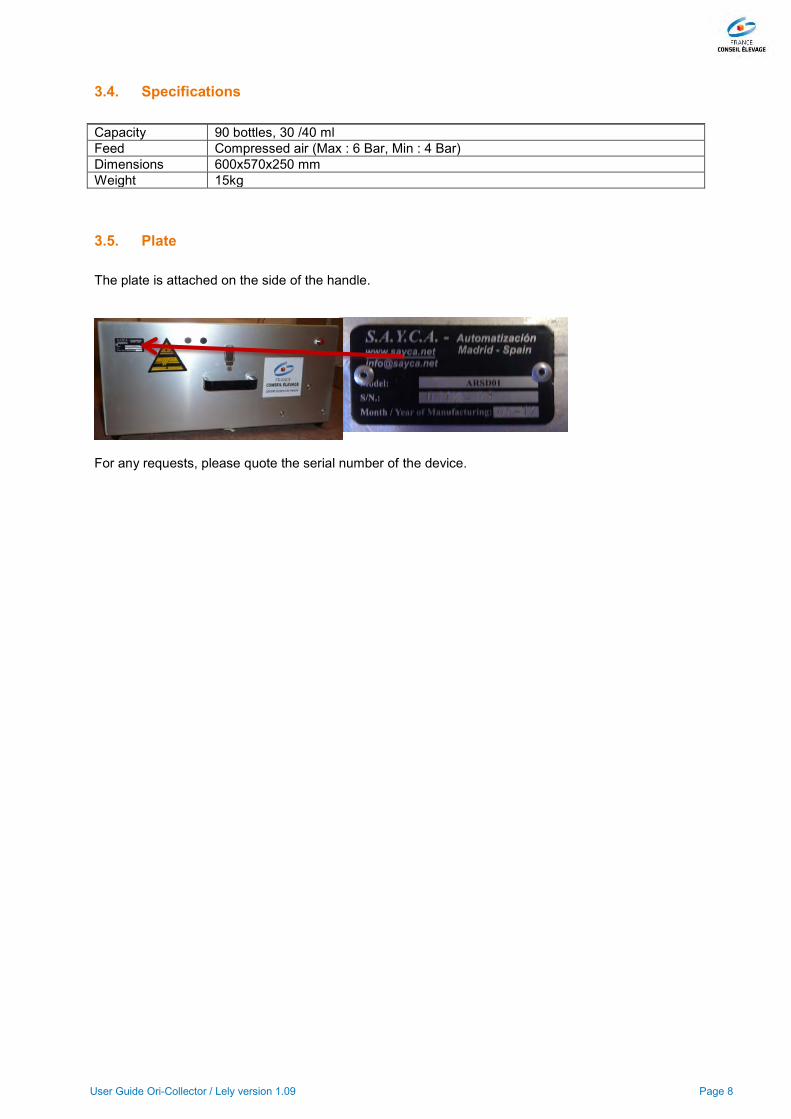
3.4. Specifications Capacity 90 bottles, 30 /40 ml Feed Compressed air (Max : 6 Bar, Min : 4 Bar) Dimensions 600x570x250 mm Weight 15kg
3.5. Plate The plate is attached on the side of the handle.
For any requests, please quote the serial number of the device.

User Guide Ori-Collector / Lely version 1.09 Page 9
4. INSTRUCTIONS OF USE OF THE ORI-COLLECTOR
4.1. Assembly of the Ori-Collector
4.1.1. Preparation of the samples
The system is circular: Outer ring de 1 à 30 Middle ring de 31 à 60 Inner ring de 61 à 90
Load the bottles before connecting the robot
Outer ring Extérieur
Middle Ring intermédiaire
Inner ring Intérieur
Starting position N°1

User Guide Ori-Collector / Lely version 1.09 Page 10
Diagram showing the loading of the bottles
The crown is engraved with the corresponding sample numbers.
It is important to number the bottles before filling the crown.
4.1.2. Unlocking the filling system
Important: Place the filling hose on sample 1

User Guide Ori-Collector / Lely version 1.09 Page 11
The system has a locking system for the filling of the bottles
In order to avoid soliciting the silicone hose during the stages of transport and storage, a pin has been designed to bedraggle the system. Once the pin is removed, place it in the hole provided for this purpose
Please insert this pin in the hole when disassembling the Ori-Collector
Silicone hose
Pin
Pull the pin upwards to activate the cylinder for the filling of the bottles
Pin in the Ori-Collector operating position

User Guide Ori-Collector / Lely version 1.09 Page 12
4.1.3. Positioning in place of the Ori-Collector
It is recommended that the Ori-Collector is positioned next to the Robot, as close as possible.
After handling the Ori-Collector, please make sure that the protecting cover is put in place.
4.1.4. Levelling
Levelling is achieved by means of adjustable feet which are controlled through the level indicator
4.2. Configuration of the Ori-Collector on the robot
The sampling parameters are changed on the X-Link robot console.

User Guide Ori-Collector / Lely version 1.09 Page 13
Please follow these steps:
Click on Settings (‘Réglages’ in English)
Click on ‘Réglages’ (‘Settings’ in English) at the top of the page.
Click on ‘Procédure de traite’ (‘Milking procedure’ in English)

User Guide Ori-Collector / Lely version 1.09 Page 14
The following screen appears
Define the sampling number
Click on ‘échantillonnage de lait’ (‘Milk sampling’ in English)
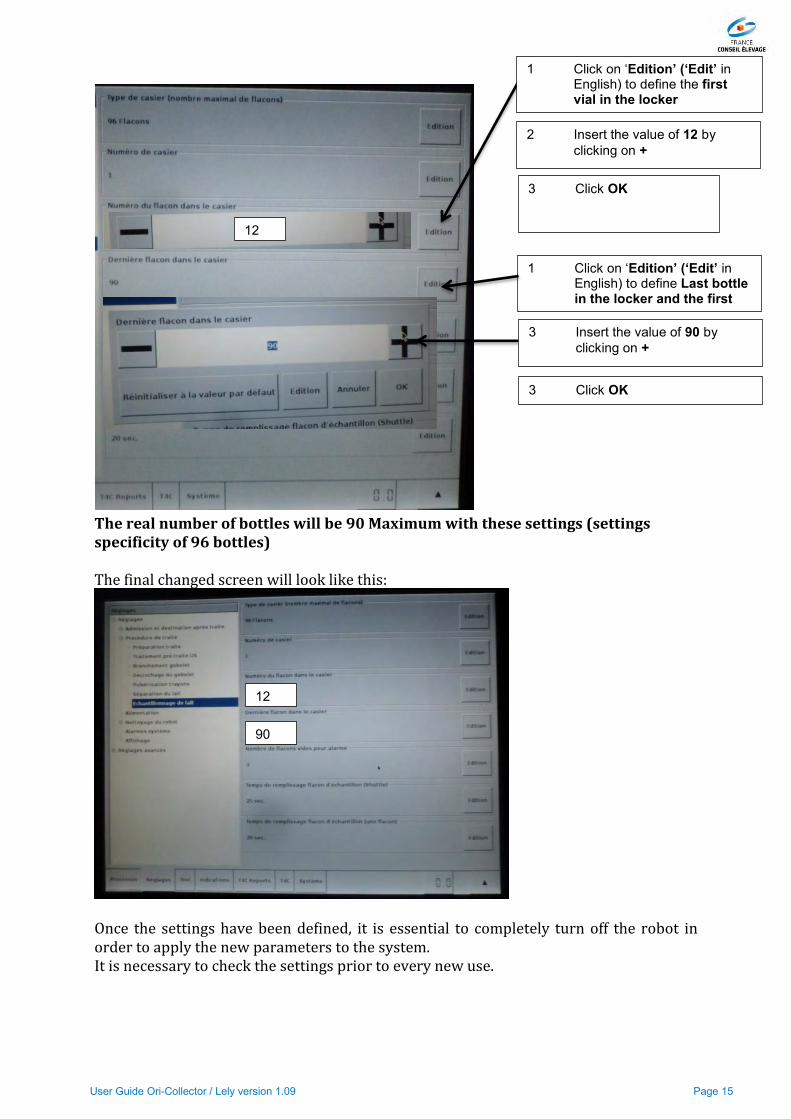
1 Click on ‘Edition’ (‘Edit’ in English) to define the number of samples on the sampler.
Select 96 Flacons (default) (’96 Bottles (dafault) in English)
Cliquer sur OK pour valider
2 Cliquer sur Edition Pour définir le dernier flacon dans l’échantillonneur
2 Select ‘96 Flacons’ (default) (’96 Bottles
(default)’ in English).
3 Click OK
User Guide Ori-Collector / Lely version 1.09 Page 15
The real number of bottles will be 90 Maximum with these settings (settings specificity of 96 bottles) The final changed screen will look like this:
Once the settings have been defined, it is essential to completely turn off the robot in order to apply the new parameters to the system. It is necessary to check the settings prior to every new use.
3 Click OK
1 Click on ‘Edition’ (‘Edit’ in English) to define Last bottle in the locker and the first vial
3 Insert the value of 90 by clicking on +
1 Click on ‘Edition’ (‘Edit’ in English) to define the first vial in the locker
2 Insert the value of 12 by clicking on +
3 Click OK
12
12
90
90

User Guide Ori-Collector / Lely version 1.09 Page 16
4.3. Connection of the Ori-Collector
4.3.1. Pneumatic connection
Please connect the compressed air feeding hose to the Ori-Collector
Connect it to the Ori-Collector and to the robot
Connection on the Ori-Collector
Connection on the Robot
Pneumatic connection

User Guide Ori-Collector / Lely version 1.09 Page 17
4.3.2. Milk hose connection
To accomplish this operation, please activate the opening of the milk grip of the robot on the robot screen.
4.3.2.1 Pausing the milk connection by clicking Stop
4.3.2.2 Waiting for the milking to finish

User Guide Ori-Collector / Lely version 1.09 Page 18
4.3.2.3 Activating sampling
4.3.2.4 Opening the sampling valve

User Guide Ori-Collector / Lely version 1.09 Page 19
4.3.2.5 Connecting the Ori-Collector
4.3.2.6 Connecting the outlet bend of the terminal unit
4.3.2.7 Connecting the Ori-Collector
Place the milk hose into the valve.
Connect the steel end piece to the outlet bend and to the milk hose
Place the milk hose in the hole that is protected by a rubber ring
User Guide Ori-Collector / Lely version 1.09 Page 20
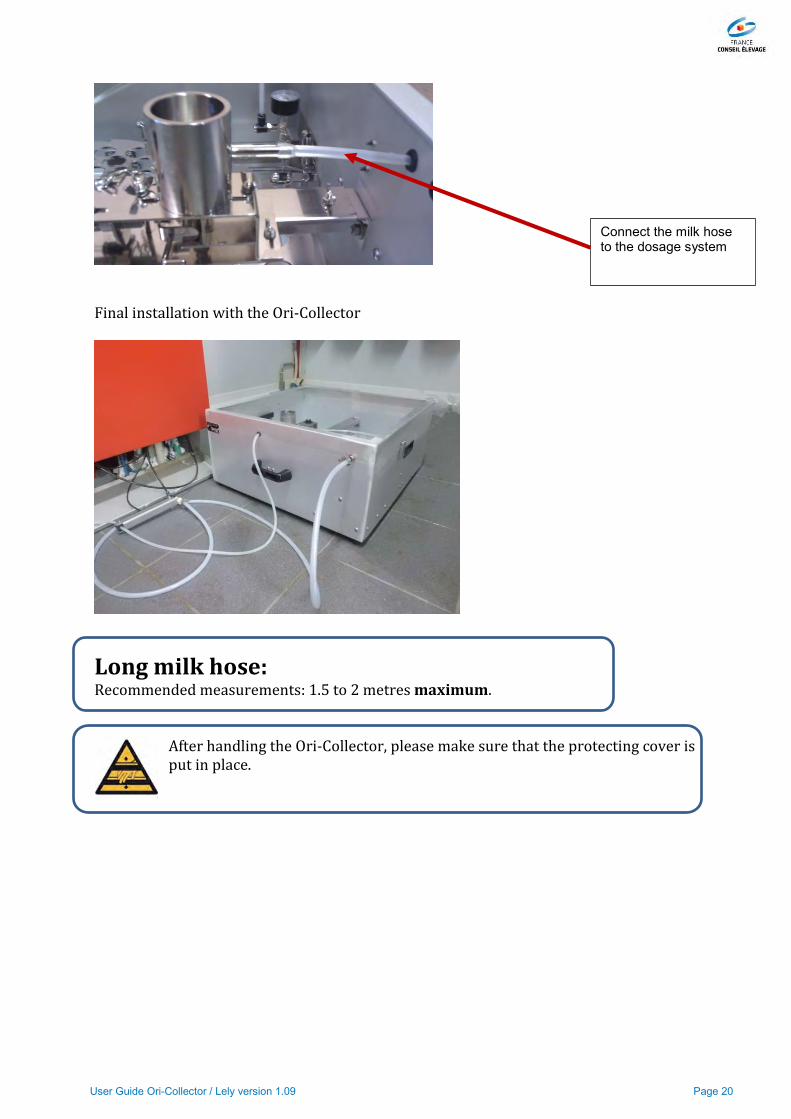
Final installation with the Ori-Collector
Long milk hose: Recommended measurements: 1.5 to 2 metres maximum.
After handling the Ori-Collector, please make sure that the protecting cover is put in place.
Connect the milk hose to the dosage system
User Guide Ori-Collector / Lely version 1.09 Page 21
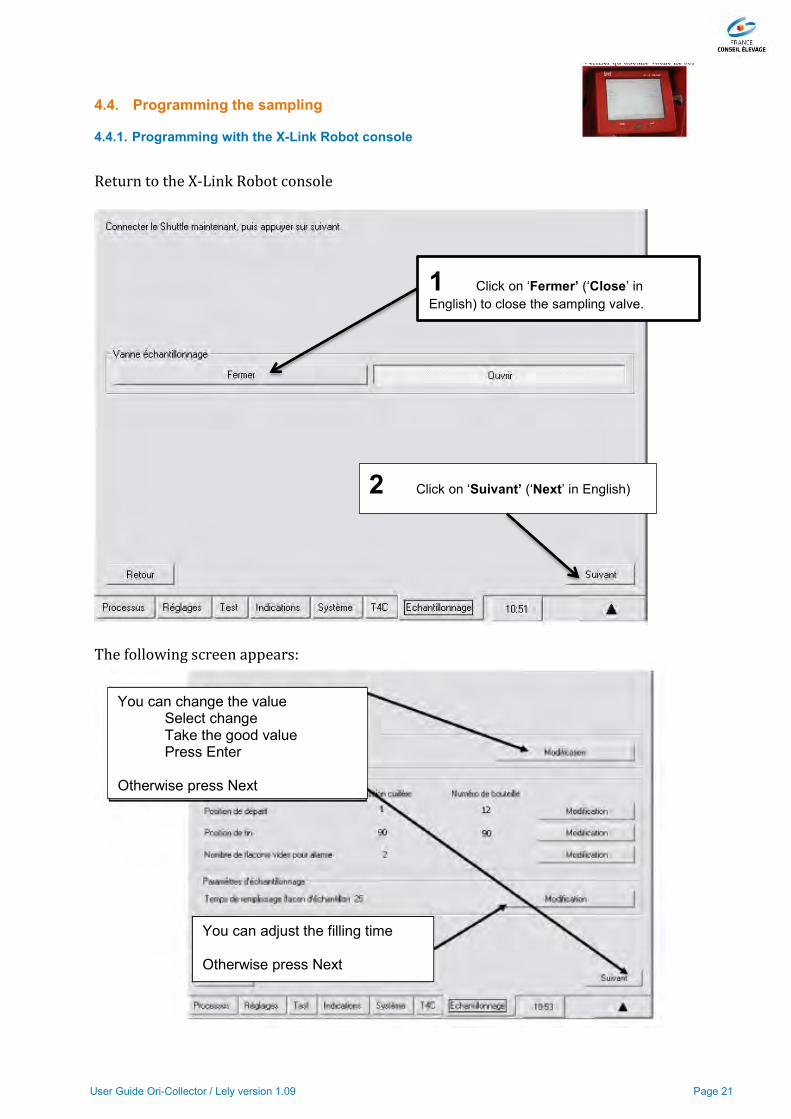
4.4. Programming the sampling
4.4.1. Programming with the X-Link Robot console
Return to the X-Link Robot console
The following screen appears:
1 Click on ‘Fermer’ (‘Close’ in English) to close the sampling valve.
2 Click on ‘Suivant’ (‘Next’ in English)
You can change the value Select change
Take the good value Press Enter
Otherwise press Next
You can adjust the filling time Otherwise press Next

User Guide Ori-Collector / Lely version 1.09 Page 22
To make the numbering of the baskets easier, we propose the following method:
Please indicate the robot number on the sampler by means of a paper placed on the plastic cover. Please note the numbering is very important.
The following screen appears:
4.4.2. Activation of sampling with T4C
On the farming PC, open the application T4C 3.0. Click on the tabs following this order: - Data entry (1) - Settings (2)
Laboratoire Laboratoire LaboratoireRobot Panier Ordre Panier Robot Panier Ordre Panier Robot Panier Ordre Panier
1 1 1 1 1 1
2 2 4 2 5 2
3 3 7 3 9 3
2 4 2 4
Laboratoire 5 5 6 5
Robot Panier Ordre Panier 8 6 10 6
1 1 3 7 3 7
3 2 6 8 7 8
5 3 9 9 11 9
2 4 4 10
4 5 8 11
6 6 12 12
4
1 Robot
2 Robot
3 Robot 4 Robot
1
1
1 1
2
2 2
3 3

User Guide Ori-Collector / Lely version 1.09 Page 23
- Milking (3) - General (4) Click on the line « herd » within the column « Sampling method » (5) and select the sampling settings (6)
The Ori-Collector must be in place and the activation must be performed on the X-link before moving to the next stage! In order to activate the sampling on T4C 3.0: - Click on « Post –milking » (1) - Next, click on the column « Sampling (yes/no) » of the line « Herd » (2) - Select the settings and register (3)
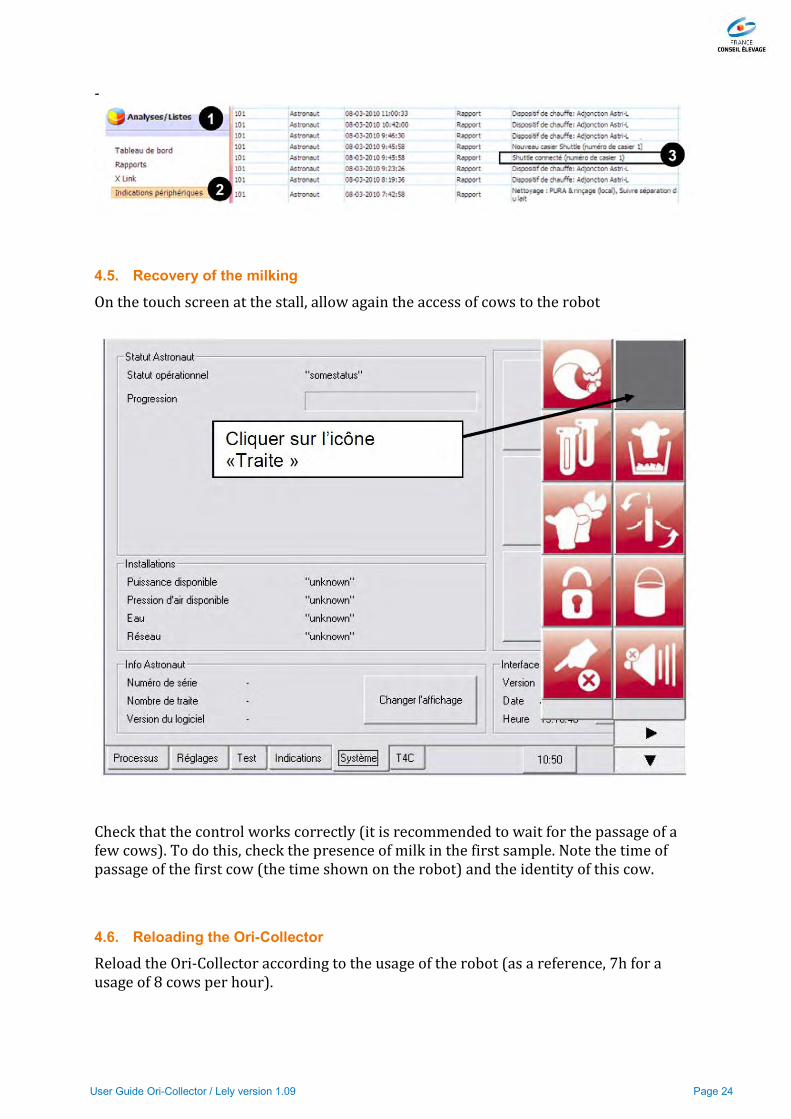
If the sampling process is correct, the message « Shuttle connected » will appear in the peripheral indications of T4C 3.0. To confirm this, go to: - Analysis/Lists (1) - Peripheral indications (2) - Check that the indication is present (3)
User Guide Ori-Collector / Lely version 1.09 Page 24
-
4.5. Recovery of the milking
On the touch screen at the stall, allow again the access of cows to the robot
Check that the control works correctly (it is recommended to wait for the passage of a few cows). To do this, check the presence of milk in the first sample. Note the time of passage of the first cow (the time shown on the robot) and the identity of this cow.
4.6. Reloading the Ori-Collector
Reload the Ori-Collector according to the usage of the robot (as a reference, 7h for a usage of 8 cows per hour).

User Guide Ori-Collector / Lely version 1.09 Page 25
Once the first 80 samples have been taken (at an average passage rate of 6 to 8 cows per hour):
- Stop the operation of the robot by blocking the access doors for the cows on the X-link, as explained in section 3.2.1 - Wait until the milk reception unit (jar) is empty and the cow is released. - Remove all the bottles from the Ori-Collector, loading them in the CL basket. Caution, please follow the order of the bottles from position 1. Please remove all the bottles from the outer ring first, then remove those from the middle ring, and then finish with the inner ring. See the diagram below for the sequence of bottle collection.
1 Note the time and sample number corresponding to the last milked cow of locker 1. 2 Note the time and number of the first cow of locker 2.
Next, perform the following operations:

User Guide Ori-Collector / Lely version 1.09 Page 26
The following screen appears

User Guide Ori-Collector / Lely version 1.09 Page 27
After handling the Ori-Collector, please make sure that the protecting cover is put in place. Reminder about recommended numbering:
The following screen appears:
To provide the start and end positions of the spoon, follow these operations:
Laboratoire Laboratoire LaboratoireRobot Panier Ordre Panier Robot Panier Ordre Panier Robot Panier Ordre Panier
1 1 1 1 1 1
2 2 4 2 5 2
3 3 7 3 9 3
2 4 2 4
Laboratoire 5 5 6 5
Robot Panier Ordre Panier 8 6 10 6
1 1 3 7 3 7
3 2 6 8 7 8
5 3 9 9 11 9
2 4 4 10
4 5 8 11
6 6 12 12
4
1 Robot
2 Robot
3 Robot 4 Robot
1
1
1 1
2
2 2
3 3

User Guide Ori-Collector / Lely version 1.09 Page 28
Next, proceed with the following operations: - return the sampling cone to the position 1 on the rack - press the « milking » button to unblock the door and allow cows’ access again.
For the basket that has been loaded: - Put the caps back on the bottles and mix the milk with the preservative.

User Guide Ori-Collector / Lely version 1.09 Page 29
- Check that the number of samplings matches the number of cows milked. Only the empty bottles remaining after the last sample taken are discarded. The rest (both empty and full ones) are sent to the laboratory.
4.7. Stopping the sampling
To stop the sampling process, please follow these operations:
The following screen appears:
Next, disconnect all the different hoses.

User Guide Ori-Collector / Lely version 1.09 Page 30
Before pressing ‘Close’, both the milk hose and the compressed air hose may be disconnected from the robot.
Cliquer sur Ouvrir pour enlever le tuyau à lait de la vanne du robot. 2 3
1
Disconnect the stainless steel nozzle and reconnect the plastic obturator.
Remove the milk hose from the robot valve.
User Guide Ori-Collector / Lely version 1.09 Page 31
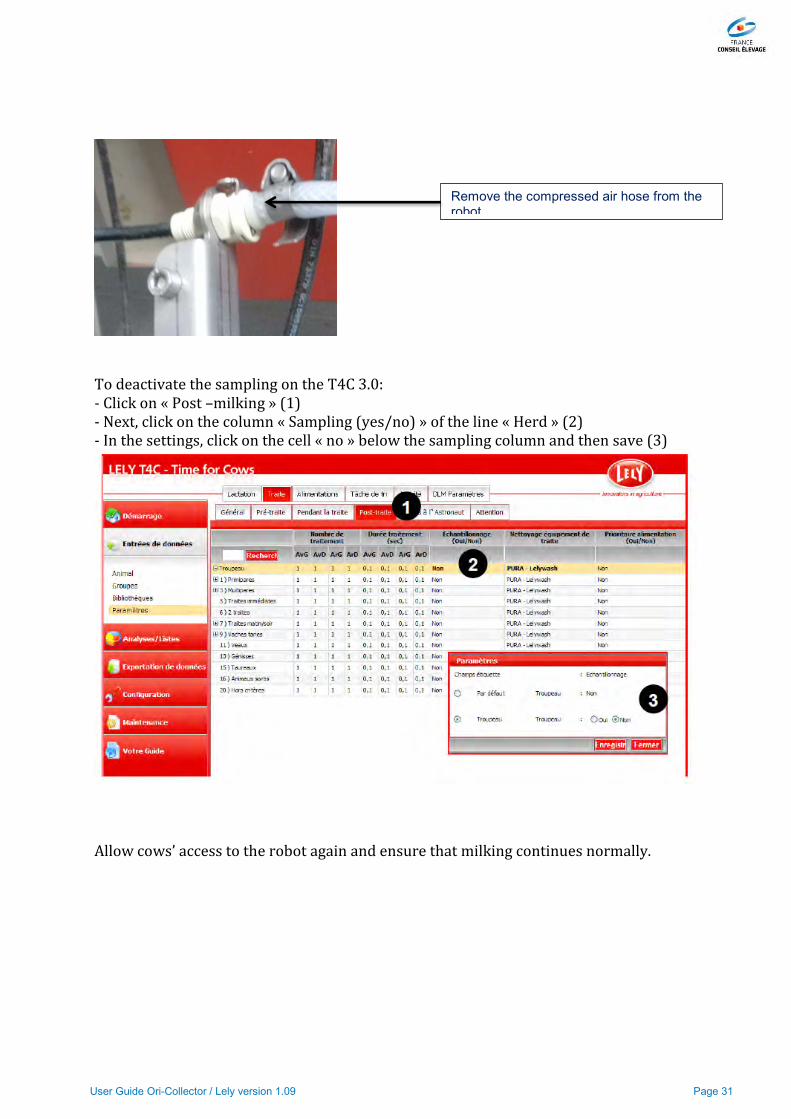
To deactivate the sampling on the T4C 3.0: - Click on « Post –milking » (1) - Next, click on the column « Sampling (yes/no) » of the line « Herd » (2) - In the settings, click on the cell « no » below the sampling column and then save (3)
Allow cows’ access to the robot again and ensure that milking continues normally.
Remove the compressed air hose from the robot

User Guide Ori-Collector / Lely version 1.09 Page 32
4.8. Exporting robot data
Follow stages in the order below: - Click on « Export data » (1) - Next, click on « export sampling » (2) - and « France dairy inspection » (3)
Next, go to: - « Analysis/lists » (1) - « Export sampling» (2) - Indicate the number of milking days you want to retrieve (3) - « Export » (4) - Save (5)

User Guide Ori-Collector / Lely version 1.09 Page 33
Finally: - Select the location where you want to save the document - In type, select « Text Document » - Insert a name with the format XXX.dat or XXX.txt Verification of compliance of the data file « edi-mlp » After the first data retrieval, the dairy inspector must make sure the information contained in the file (number of livestock) is complete and in the correct format, see CPL MO 307 format type 2. If necessary, s/he may request the installation technician to make the necessary changes. Description of a file of type 2:
4.9. Data Processing with the data collected
After using the Ori-Collector, it is necessary to use the parameters of 96 bottles, these settings interfere with the numbering on the EDI-mlp file. The numbering is not reliable after sampling 12. It is necessary to number the samplings in the following manner: From 12 to 1, in 12 to 1( 12= 1, 11= 2, 10=3, 9=4…..) From 36 to 25, in 25 to 36 ( 36= 25, 35= 26, 34=25, 33=27…..) From 60 to 49, in 49 to 60 ( 60=49, 59=50, 58=51, 57=52….) From 84 to 73, in 73 to 84 ( 84= 73, 83=74, 82=75, 81= 76…) Refer to the following file to better understand how this works. The Original Robot software, from version 9.85 onwards, allows for the numbering of the bottles. For this purpose, the name extension must be changed to .ori.

User Guide Ori-Collector / Lely version 1.09 Page 34
Example of renumbering table:
In Example: edi-mlp.dat In this example, you can see the right date /hour chronology for this control. You need a tools to renumber every Vial number or use a table to put the right number of the vial.
Cow
NumberName Date Hour
Milk
Production
Vial
Number
Milking
StatusN° Rack
Vial
RenumberingVN880022 41 Balzane 20121025 152551 81 12 0 2 1
VN880022 31 Belle 20121025 153143 109 11 0 2 2
VN880022 3 Treille 20121025 153751 127 10 0 2 3
VN880022 71 Dinette 20121025 154623 105 9 0 2 4
VN880022 15 Venelle 20121025 155245 94 8 0 2 5
VN880022 4 Tarentelle 20121025 155842 98 7 0 2 6
VN880022 43 Coccinelle 20121025 160408 94 6 0 2 7
VN880022 53 Emplette 20121025 161536 78 5 0 2 8
VN880022 37 Brève 20121025 163148 86 4 0 2 9
VN880022 91 Egine 20121025 164214 83 3 0 2 10
VN880022 38 Egérie 20121025 170601 112 2 0 2 11
VN880022 5 Ultime 20121025 171623 72 1 0 2 12
VN880022 73 Décence 20121025 172403 73 13 0 2
VN880022 35 Blague 20121025 173023 130 14 0 2
VN880022 26 Brume 20121025 173537 59 15 0 2
VN880022 80 Dépêche 20121025 174910 82 16 0 2
VN880022 89 EPEE 20121025 175829 94 17 0 2
VN880022 46 Capucine 20121025 180659 67 18 0 2
VN880022 57 Déesse 20121025 181145 117 19 0 2
VN880022 66 Digue 20121025 181823 50 20 0 2
VN880022 79 Devote 20121025 182311 81 21 0 2
VN880022 33 Brique 20121025 182735 66 22 0 2
VN880022 13 Vacance 20121025 183333 102 23 0 2
VN880022 20 Azalée 20121025 184050 123 24 0 2
VN880022 19 Amande 20121025 184701 79 36 0 2 25
VN880022 72 Devinette 20121025 190135 73 35 0 2 26
VN880022 59 Datcha 20121025 190930 144 34 0 2 27
VN880022 36 Epice 20121025 192246 79 33 0 2 28
VN880022 83 Endive 20121025 192854 71 32 0 2 29
VN880022 87 Elegie 20121025 194755 105 31 0 2 30
VN880022 88 Ebonite 20121025 205522 103 30 0 2 31
VN880022 76 Diane 20121025 211406 90 29 0 2 32
VN880022 82 Elite 20121025 215718 97 28 0 2 33
VN880022 92 Epitaphe 20121025 230750 93 27 0 2 34
VN880022 43 Coccinelle 20121025 232852 101 26 0 2 35
VN880022 53 Emplette 20121025 235359 77 25 0 2 36

User Guide Ori-Collector / Lely version 1.09 Page 35
Cow
NumberName Date Hour
Milk
Production
Vial
Number
Milking
StatusN° Rack
Vial
RenumberingVN880022 69 Digitale 20121026 402 71 37 0 2
VN880022 37 Brève 20121026 5228 90 38 0 2
VN880022 50 Canaille 20121026 10309 106 39 0 2
VN880022 60 Dalhia 20121026 10851 84 40 0 2
VN880022 36 Epice 20121026 12121 78 41 0 2
VN880022 57 Déesse 20121026 13427 119 42 0 2
VN880022 56 Cactée 20121026 14025 97 43 0 2
VN880022 89 EPEE 20121026 20147 98 44 0 2
VN880022 59 Datcha 20121026 20852 138 45 0 2
VN880022 79 Devote 20121026 21702 91 46 0 2
VN880022 87 Elegie 20121026 40102 109 47 0 2
VN880022 28 Brise 20121026 42037 94 48 0 2
VN880022 86 Enclume 20121026 51012 144 60 0 2 49
VN880022 35 Blague 20121026 55035 184 59 0 2 50
VN880022 88 Ebonite 20121026 62011 131 58 0 2 51
VN880022 5 Ultime 20121026 65555 104 57 0 2 52
VN880022 3 Treille 20121026 70547 99 56 0 2 53
VN880022 71 Dinette 20121026 71602 153 55 0 2 54
VN880022 4 Tarentelle 20121026 72330 172 54 0 2 55
VN880022 38 Egérie 20121026 81914 185 53 0 2 56
VN880022 2 Alizée 20121026 83135 94 52 0 2 57
VN880022 15 Venelle 20121026 102502 118 51 0 2 58
VN880022 56 Cactée 20121026 103043 118 50 0 2 59
VN880022 67 Daphnée 20121026 103708 93 49 0 2 60
VN880022 60 Dalhia 20121026 104254 137 61 0 2
VN880022 11 encre 20121026 105156 95 62 0 2
VN880022 59 Datcha 20121026 110019 157 63 0 2
VN880022 79 Devote 20121026 110652 97 64 0 2
VN880022 40 Biscotte 20121026 111554 188 65 0 2
VN880022 20 Azalée 20121026 112643 230 66 0 2
VN880022 12 Venue 20121026 113253 161 67 0 2
VN880022 7 Vague 20121026 114331 225 68 0 2
VN880022 55 Caféine 20121026 115152 129 69 0 2
VN880022 89 EPEE 20121026 120345 119 70 0 2
VN880022 45 Caille 20121026 120817 89 71 0 2
VN880022 87 Elegie 20121026 121418 113 72 0 2
VN880022 13 Vacance 20121026 122038 107 84 0 2 73
VN880022 78 Dolcevita 20121026 122551 95 83 0 2 74
VN880022 1 Ellebore 20121026 124137 115 82 0 2 75
VN880022 47 Coquette 20121026 132831 116 81 0 2 76
VN880022 52 Candi 20121026 133905 100 80 0 2 77
VN880022 92 Epitaphe 20121026 142505 110 79 0 2 78
VN880022 64 Docile 20121026 143432 122 78 0 2 79
VN880022 54 Clématite 20121026 144927 52 77 0 2 80
VN880022 18 Amazone 20121026 145755 53 76 0 2 81
VN880022 81 Electre 20121026 150446 77 75 0 2 82
VN880022 40 Biscotte 20121026 151922 140 74 0 2 83
VN880022 65 Dune 20121026 152614 138 73 0 2 84
VN880022 91 Egine 20121026 154214 83 85 0 2
VN880022 71 Dinette 20121026 154623 105 86 0 2
VN880022 15 Venelle 20121026 155245 94 87 0 2
VN880022 4 Tarentelle 20121026 155842 98 88 0 2
VN880022 43 Coccinelle 20121026 160408 94 89 0 2
VN880022 53 Emplette 20121026 161536 78 90 0 2

User Guide Ori-Collector / Lely version 1.09 Page 36
4.10. Editing the list of samplings
To perform this operation, go to: - « Analysis/Lists » (1) - « Reports » (2) - Select « Milking - -Milk sampling » (3)

User Guide Ori-Collector / Lely version 1.09 Page 37
5. CLEANING AND MAINTENANCE
5.1. Washing after inspection
Before the cleaning process is started, please put the pin of the bottle filling system back in place.
Once the pin has been inserted in Transport/Off mode, the filling system may be disassembled to proceed with its cleaning. Removal of the Compressed Air Hose
Put your finger underneath to pull the drawer.
Insert the pin in the hole provided for this purpose.
Pin in Off or transport position

User Guide Ori-Collector / Lely version 1.09 Page 38
Disassemble the filling system
Press on the flange of the compressed air connection
Pull the back connection compressed air tube
Dismantle the 3 winged nuts

User Guide Ori-Collector / Lely version 1.09 Page 39
The box of the Ori-Collector can be cleaned with water by avoiding:
- filling it with water completely - spraying the drive cylinder (shorter life) - using a suppressor for cleaning ( a simple damp cloth will suffice)
It is necessary to drain the remaining water through the evacuation holes provided for this purpose. It is not necessary to spray the drive cylinder.
5.2. Cleaning of the filling system and Hose
The support can be removed in order to be cleaned directly over a sink.
Use the syringe to inject hot water with a little acid in the silicone hoses and in the stainless steel tank. Caution: Because a chemical product is being used, it is imperative that personal protective equipment is worn.
5.3. Cleaning the Box and Crown
The crown may be washed with water. Do not use pressure, THIS COULD DAMANGE THE CYLINDERS

User Guide Ori-Collector / Lely version 1.09 Page 40
5.4. Removing the silicone Hose from the filling system
In order to replace the silicone hoses, please follow these steps: Dismantle the stainless steel tank
Gently pull the stainless steel tank up to disconnect it from the rest of the device.
Once the tank has been extracted, the silicone hose may be changed if it is damaged.
Please remove the silicone hose and replace it on the tank filler (without silicone grease)
Loose the 2 winged nuts

User Guide Ori-Collector / Lely version 1.09 Page 41
Size of the silicone Hose: (4/6, 4 mm inside, and 6 mm outside)
Before connecting the tank with the silicone hose, it is imperative to lubricate it with food grease.
Lubricate the hose
Food grease

User Guide Ori-Collector / Lely version 1.09 Page 42
Connect it in the following manner:
To enable the introduction of the silicone tube into the stainless steel nozzle, it is necessary to turn the stainless steel filling hose.
Checking the silicone hose connection is correct
Gently turn the stainless steel tube clockwise.
Put the tank milk input in the correct direction
Bring the silicone hose closer to the stainless steel nozzle
Push the tank into the fastening screws

User Guide Ori-Collector / Lely version 1.09 Page 43
Put the device back on its mounting rail.
Make sure that the hose is tightly placed on both sides
Put the winged thumbscrews back in place
Put the winged thumbscrews back in place
User Guide Ori-Collector / Lely version 1.09 Page 44
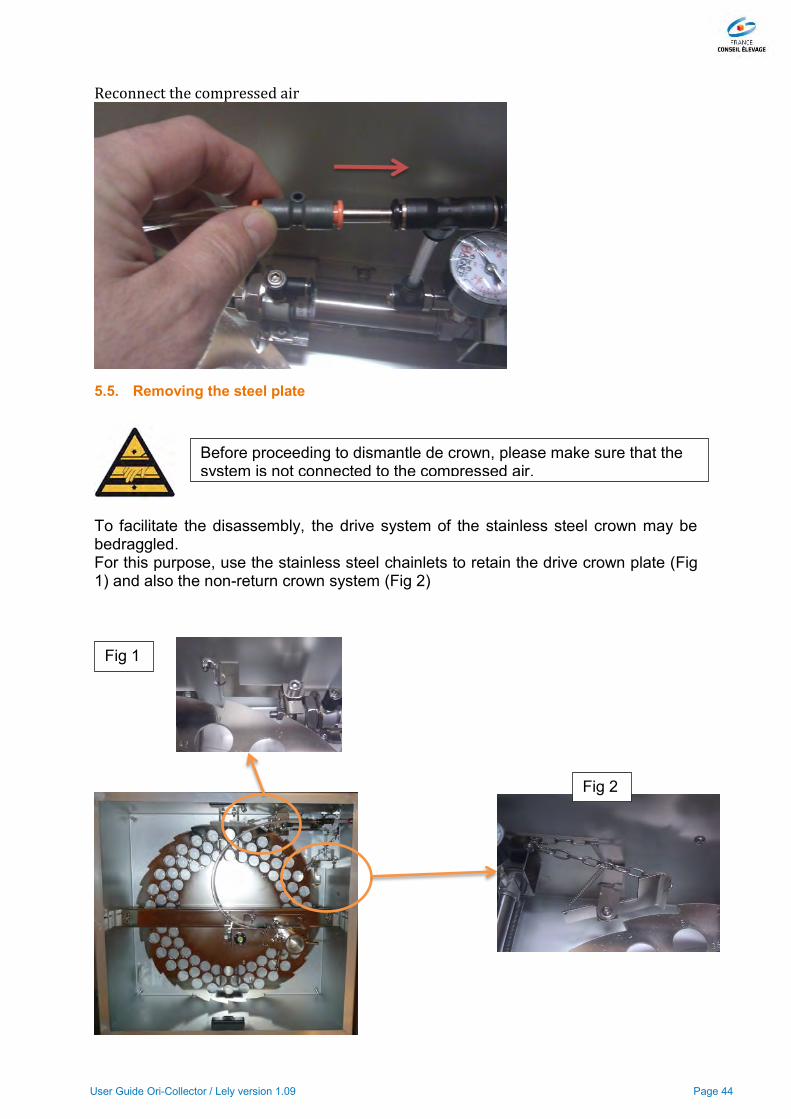
Reconnect the compressed air
5.5. Removing the steel plate
To facilitate the disassembly, the drive system of the stainless steel crown may be bedraggled. For this purpose, use the stainless steel chainlets to retain the drive crown plate (Fig 1) and also the non-return crown system (Fig 2)
Before proceeding to dismantle de crown, please make sure that the system is not connected to the compressed air.
Fig 1
Fig 2

User Guide Ori-Collector / Lely version 1.09 Page 45
To remove the crown, it is necessary to tilt it to one side.
Care is required when handling the crown, since there is a risk of injury and also damage of the system in case of heavy impact.
Unscrew the outer nuts
User Guide Ori-Collector / Lely version 1.09 Page 46
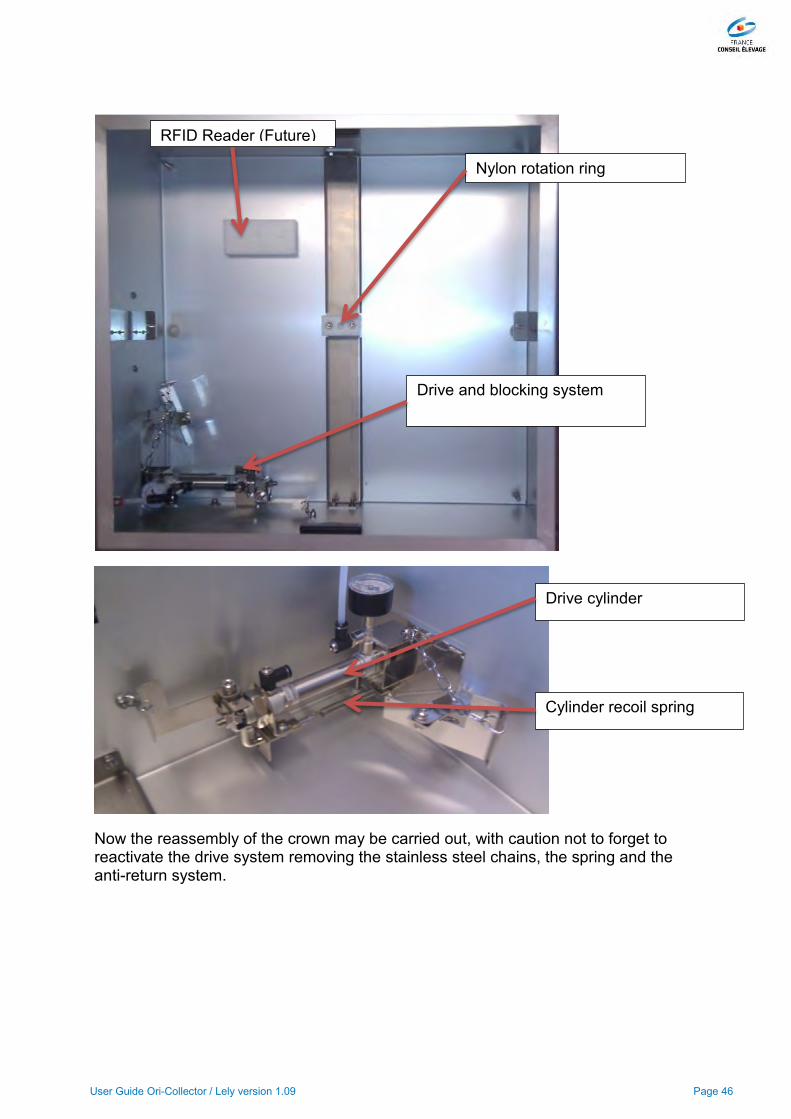
Now the reassembly of the crown may be carried out, with caution not to forget to reactivate the drive system removing the stainless steel chains, the spring and the anti-return system.
Nylon rotation ring
RFID Reader (Future)
Drive and blocking system
Drive cylinder
Cylinder recoil spring

User Guide Ori-Collector / Lely version 1.09 Page 47
5.6. Care and Maintenance The system should be checked every 6 months to ensure good performance. Regular Maintenance: Monthly: Check the silicone hose of the filling system, and replace if necessary (it is recommended to change it every 2 months as a preventive measure and after using the device). Yearly: Replace:
- The recoil spring of the drive cylinder - The recoil spring of the Anti-return system.
The system does not need any lubrication (it works on dry cylinders) The cylinders must be inspected, it is necessary to change them if their performance is altered.
5.7. Malfunction of the Ori-Collector Operational hazards that may occur when using the Ori-Collector
Problems encountered Causes
The system does not sample cows Check if the sampling sequence has been activated on the robot
Check the compressed air connection
Check the milking hose on the side of the robot
The system does not work, but the bottle is filled Check the release system of the drive cylinder
Check the anti-return release system
The system moves 2 notches Check the robot settings ( 96 Bottles)
The bottles are not filled enough Check the filling times on the robot console
User Guide Ori-Collector / Lely version 1.09 Page 48
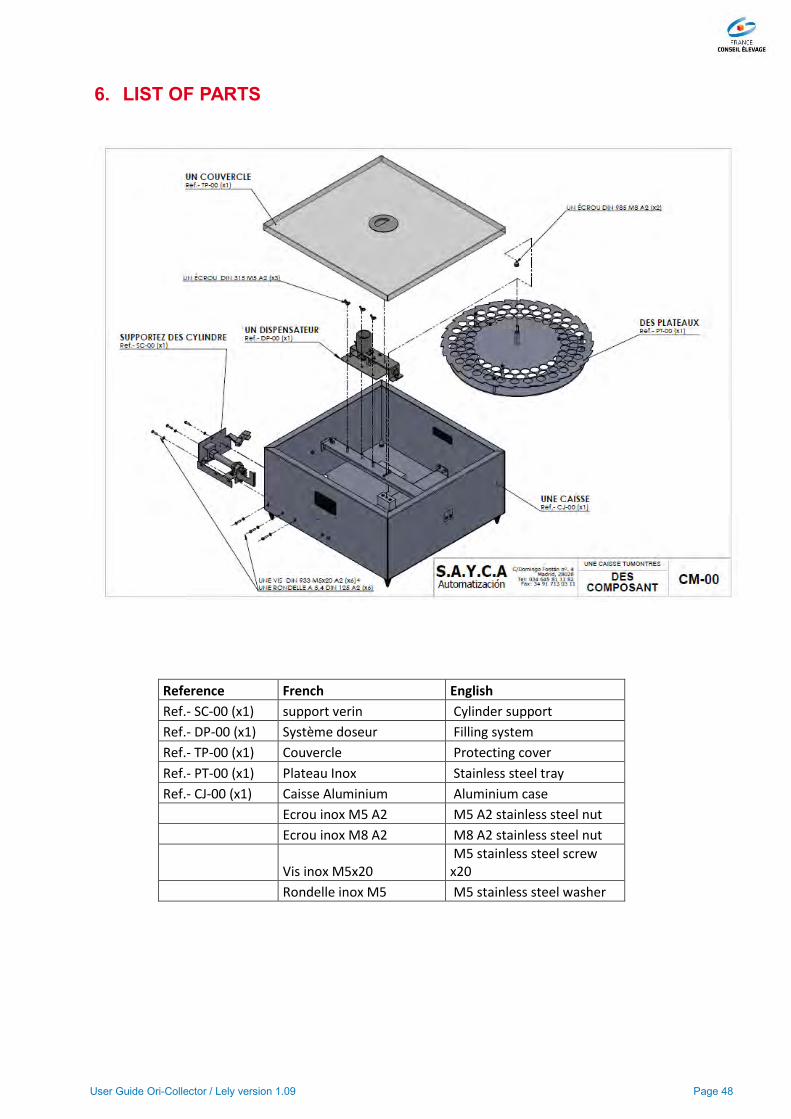
6. LIST OF PARTS
Reference French English
Ref.- SC-00 (x1) support verin Cylinder support
Ref.- DP-00 (x1) Système doseur Filling system
Ref.- TP-00 (x1) Couvercle Protecting cover
Ref.- PT-00 (x1) Plateau Inox Stainless steel tray
Ref.- CJ-00 (x1) Caisse Aluminium Aluminium case
Ecrou inox M5 A2 M5 A2 stainless steel nut
Ecrou inox M8 A2 M8 A2 stainless steel nut
Vis inox M5x20 M5 stainless steel screw x20
Rondelle inox M5 M5 stainless steel washer
User Guide Ori-Collector / Lely version 1.09 Page 49
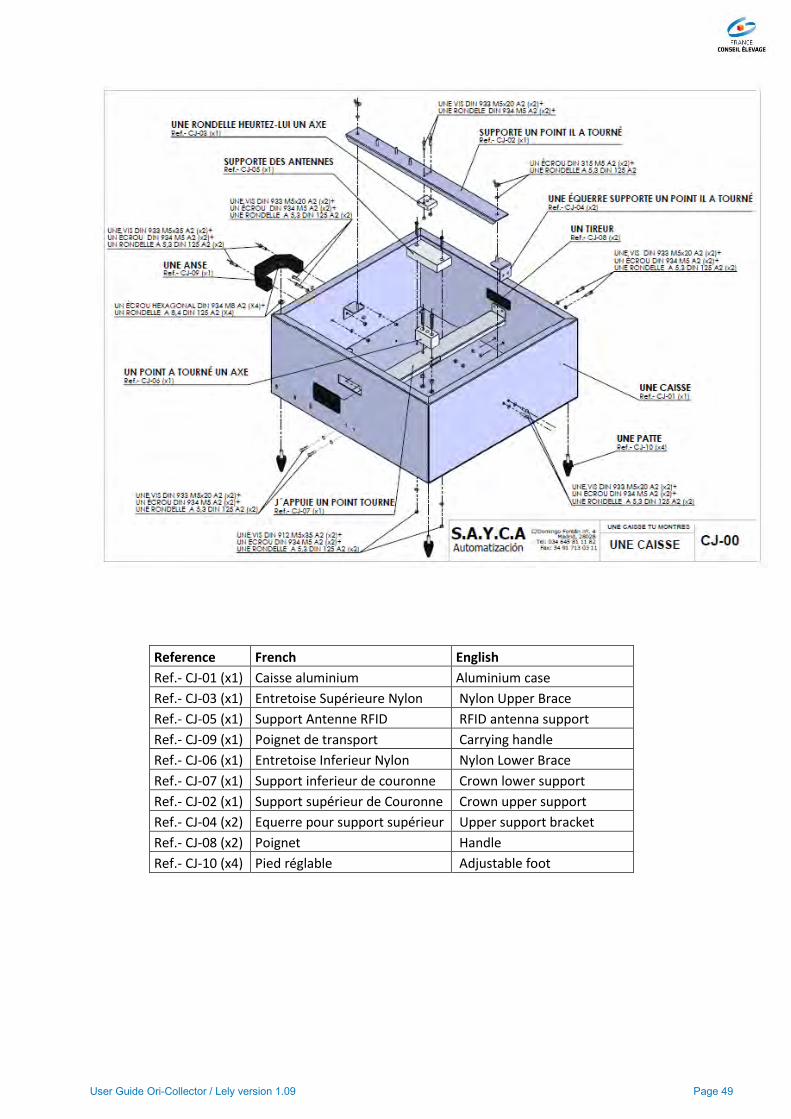
Reference French English
Ref.- CJ-01 (x1) Caisse aluminium Aluminium case
Ref.- CJ-03 (x1) Entretoise Supérieure Nylon Nylon Upper Brace
Ref.- CJ-05 (x1) Support Antenne RFID RFID antenna support
Ref.- CJ-09 (x1) Poignet de transport Carrying handle
Ref.- CJ-06 (x1) Entretoise Inferieur Nylon Nylon Lower Brace
Ref.- CJ-07 (x1) Support inferieur de couronne Crown lower support
Ref.- CJ-02 (x1) Support supérieur de Couronne Crown upper support
Ref.- CJ-04 (x2) Equerre pour support supérieur Upper support bracket
Ref.- CJ-08 (x2) Poignet Handle
Ref.- CJ-10 (x4) Pied réglable Adjustable foot

User Guide Ori-Collector / Lely version 1.09 Page 50
Reference French English
Ref.- DP-04 (x1) Embout de vérin Cylinder tip
Ref.- DP-06 (x1) Tuyau inox de remplissage Stainless steel filling hose
Ref.- DP-05 (x1) Plaque inferieur Lower plate
Ref.- DP-01 (x1) Réservoir Inox Stainless steel tank
Ref.- DP-07 (x1) Goupille inox Stainless steel pin
Ref.- DP-02 (x1) Plaque supérieure du système doseur Filling system upper plate
Ref.- DP-08 (x1) Vérin de vidange lait Milk emptying cylinder
Ref.- DP-03 (x1) Chape avant de vérin Clevis in front of the cylinder

User Guide Ori-Collector / Lely version 1.09 Page 51
Reference French English
Ref.- PT-01 (x1) Couronne Inox pour 90 flacons Stainless steel crown for 90 bottles
Ref.- PT-02 (x1) Support Plexiglas Plexiglas support
Ref.- PT-03 (x6) Entretoise inox Stainless steel brace

User Guide Ori-Collector / Lely version 1.09 Page 52
Reference French English
Ref.- SC-01 (x1) Support pour vérin d'entrainement Drive cylinder support
Ref.- SC-02 (x1) Plaque antiretour Anti-return plate
Ref.- SC-03 (x1) Chape avant de vérin Cylinder front clevis
Ref.- SC-04 (x1) Plaque de Blocage ressort Spring blocking plate
Ref.- SC-05 (x1) Embout de vérin Cylinder tip
Ref.- SC-06 (x1) Vérin d'entrainement Drive cylinder
Ref.- SC-07 (x1) Ressort de chape avant Front clevis spring
Ref.- SC-08 (x1) Ressort pour antiretour Anti-return spring

User Guide Ori-Collector / Lely version 1.09 Page 53
Reference French English
Ref.- TP-01 (x1) Couvercle Plexiglas Plexiglas Protective cover
Ref.- TP-02 (x1) Poignet Inox Stainless steel handle

User Guide Ori-Collector / Lely version 1.09 Page 54
FRANCE CONSEIL ELEVAGE (French Farming Council)
Maison du Lait 42 rue de Châteaudun
75009 Paris T. 01 53 94 65 00 – F. 01 53 94 65 20 – [email protected]
www.france-conseil-elevage.fr