user manual historic harpsichords - ruckers 1628temporubato.com/downloads/ruckers 1628...
TRANSCRIPT

User Manual!Historic Harpsichords - Ruckers 1628!
! !!Version 1.0!!!
!
!!TABLE OF CONTENTS! !
!!!!!!!© 2014 Rolf Wöhrmann - All rights reserved! !Apple, the Apple logo, iPad are trademarks of Apple Inc., registered in the U.S. and other countries. iPhone is a trademark of Apple Inc. All other trademarks are property of their respective owners.
1. Introduction! 2! 2. Keyboard! 3! 3. Stops! 5! 4. Tuning! 6! 5. MIDI! 7! 6. Advanced Settings! 8! 7. Connectivity! 8

!1. Introduction! !!The app implements a virtual recreation of one of the most famous and valuable historic harpsichords: The double-manual Andreas Ruckers (The Elder) from 1628. !!The instruments of the Ruckers family represent the well-known and sought-after sound of Flemish harpsichords while ranking among the best harpsichords ever built. Their full and precious sound set out to influence the harpsichord designs in Spain, France, England and Germany. For more information about the Ruckers family please check http://en.wikipedia.org/wiki/Ruckers. For more information about harpsichords in general check also the excellent overview http://en.wikipedia.org/wiki/Harpsichord.!!The instrument which comes from the collection of Andreas Beurmann has been meticulously recorded and sampled by Realsamples.!!The app is compatible will all iOS devices running a 64-bit hardware architecture, i.e. iPad Air, iPad mini retina and later, as well as iPhone 5S and later. You need about 800 MB free space on the device.! !The instrument can be played from a wide range of various sources. We have implemented all standards in iOS currently available for instrument control:!!• On-screen keyboard!• External keyboards connected via hardware MIDI interfaces!• Computer connected via MIDI over WIFI!• Other apps on same device via virtual Core MIDI!• Other apps on same device via Apple’s Inter-App Audio!!The on-screen keyboard will be described in section 2. The MIDI options will be described in section 5. And Inter-App Audio will be described in section 7.!!You can play the instrument via the device’s speaker, but it is recommended to use headphones or to connect an external sound system to the iPad to fully enjoy the high audio quality of the instrument. You could connect to an external amplifier via the headphone output or via an USB audio interface using Apple’s!Camera Connection Kit.!!The overall volume from the instrument is controlled via the on-screen volume slider as well as the device volume setting. For the on-screen volume slider, tap on the volume button and move the slider horizontally. For hiding the slide tap on the volume label again.!!

2. Keyboard! !!The two on-screen keyboards represent both manuals of the original instruments. At the right side there are some controls to configure the keyboards:!
!Size!!Tap the “size” button to active a horizontal slider for setting the key widths. Tap the “size” label again for hiding the slider.!!Aligned / Free!!Tap the “Aligned / Free” button to toggle between both states. In aligned mode both manuals are always aligned such that keys vertically on same position play same pitches. In free mode you can position each manual independently when sliding keyboards.!!Locked / Sliding!!Tap the “Locked / Sliding” button to toggle between both states. In locked mode the keyboards are fixed and cannot be horizontally scrolled. In sliding mode you scroll keyboards by holding and dragging a key horizontally.!!!!!

Coupling!!When “Coupled” is activated in the stop settings, then playing a key on the lower manual will activate the corresponding key on the upper manual which is a feature of the original instrument.!!On the harpsichord the key velocity (in the true sense of speed) does not control the loudness of the note. This is left for the piano-forte which hasn't been invented at the time harpsichords were built. However, the key velocity has other much more subtle effects on the sound. One of these the app is recreating: When playing multiple string choirs like having both 8 and 4 foot on the lower, or any "coupling" combination, then the instruments are "intoned" in a way that the choirs are not playing in the same moment but with a certain delay between them. The amount of the delay is influenced by the velocity of the key strokes which is modelled by the app as well. !!!!

3. Stops!!!The Ruckers fro 1628 is a double manual instrument with 3 sets of strings called choirs or stops. The upper manual is fixed to an 8 foot (= normal octave) choir and the lower one has a choice of two choirs: another 8 foot (with a different timbre) and a 4 foot (sounding one octave higher). The lower 8 foot can be put in "lute" mode which sounds a bit like a pizzicato on a string instrument. Both manuals can be "coupled" in the sense, that when playing the lower manual, the upper keys are playing as well such you can get almost all combinations of the 3 string choirs.!!The stops of the lower manual can be activated and de-activated with the respective buttons on the main page. Also coupling can be controlled from here. Please see previous section for more about coupling.!!There is a distinct noise for note ends which could be unusual compared to modern instruments. It is due to the mechanical principle of the instrument and part of the faithful recreation of the instrument.!!The app remembers the current stop settings when re-starting.!
!

4. Tuning! !! ! !At the times of the Ruckers harpsichord equal tuning wasn't common as it is today. Instead a wide range of different tuning systems were in use each with different consequences for the tonalities, scales and harmonies one could can play with a specific tuning. The various tunings have been mostly named after their inventors and can be selected in the tuning page. The idea of many tuning systems is to make thirds and fifths better (i.e. more pure) sounding as it is today with equal tuning. The trade-off is that the better the thirds are, the more restricted you will get in the keys/tonalities you can choose from. !!For setting the tuning tap on the “Tuning” button which leads to the tuning page. For returning to the main page with the stops controls, tap on “Tuning” again.!Select a tuning from the scrolling list. You can also set the “root” note of the tuning. For example if you select the “meantone” tuning you can set the root to D which then builds the meantone scale related to D as the base note.!
!In addition you can set the frequency for the A4 key by tapping on the arrow buttons for in- and de-crease in cent steps. By tap and hold you can set the values quickly. You can apply a range above and below a semi-tone from standard 440 Hz for A4.!!Please keep in mind, that the A4 frequency is always kept even when changing tunings or temperaments. This of course results that other notes like middle C change in frequency when changing tunings regardless of the root key setting.!!All tuning settings are stored persistently and will be applied even after re-starting the app.
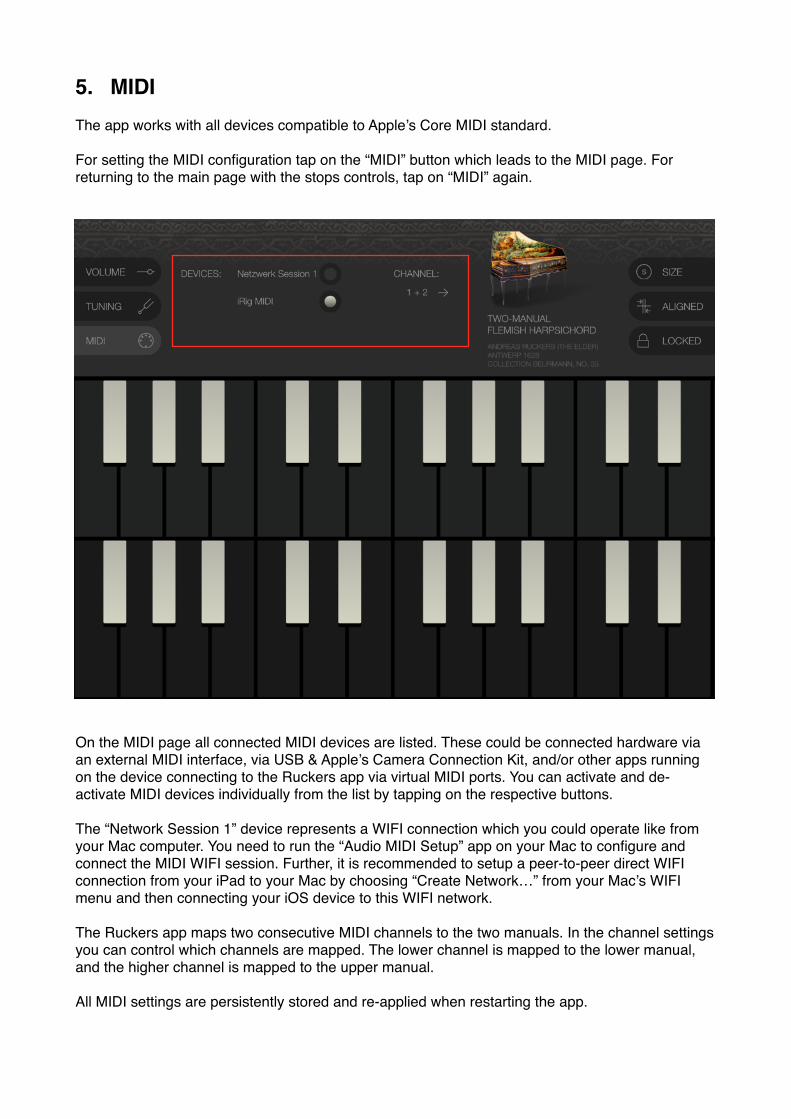
5. MIDI! !!The app works with all devices compatible to Apple’s Core MIDI standard.!!For setting the MIDI configuration tap on the “MIDI” button which leads to the MIDI page. For returning to the main page with the stops controls, tap on “MIDI” again.!
!On the MIDI page all connected MIDI devices are listed. These could be connected hardware via an external MIDI interface, via USB & Apple’s Camera Connection Kit, and/or other apps running on the device connecting to the Ruckers app via virtual MIDI ports. You can activate and de-activate MIDI devices individually from the list by tapping on the respective buttons.!!The “Network Session 1” device represents a WIFI connection which you could operate like from your Mac computer. You need to run the “Audio MIDI Setup” app on your Mac to configure and connect the MIDI WIFI session. Further, it is recommended to setup a peer-to-peer direct WIFI connection from your iPad to your Mac by choosing “Create Network…” from your Mac’s WIFI menu and then connecting your iOS device to this WIFI network.!!The Ruckers app maps two consecutive MIDI channels to the two manuals. In the channel settings you can control which channels are mapped. The lower channel is mapped to the lower manual, and the higher channel is mapped to the upper manual.!!All MIDI settings are persistently stored and re-applied when restarting the app.!!

6. Advanced Settings! !! ! !In the standard iOS “Settings” app you can configures a few more advanced settings for the app. Please reach the home screen of your iOS app and search for the Settings app. Then select “Ruckers 1628” from the left side to reach the specific app settings.!!Background Audio!!It is a good idea to have the app running even when it is not the app in foreground. By this you are still able to control the app via MIDI and have it produce sound. By this you could for example display a score on the screen and at the same time play the instrument from an external keyboard. You can activate and de-activate this feature with the respective check-box.!! !Preferred Audio Buffer Size! !!The buffer size of the audio engine determines the latency of the app i.e. how fast it reacts to key strokes. It is preferable to have the buffer size as low as possible, but if the app starts to produce “crackles” or “clicks” and “pops” the buffer size is too low. Normally the app itself knows best to set the appropriate buffer size which is triggered by setting the buffer size to “automatic.”!!Please keep in mind that this size is just “preferred” by the app. Eventually iOS determines the real buffer size from a set of various aspects and circumstances which are outside of control of the app.!!MIDI Channel!!In addition to the MIDI screen in the app itself you can set the MIDI channels also here.!!Send Crash Diagnostics! !!By activating to send crash diagnostics you help to improve the app. We can then monitor and analyse when the app crashes in order to fix problems and release them in free updates. We do not collect any personal information.!!!7. Connectivity! !! ! !In addition to connectivity via MIDI the app implements Apple’s Inter-App Audio standard and also implements AudioBus.!!Inter-App Audio!!The app can be used as an “Instrument” or “Generator” node from Inter-App Audio hosts like Steinberg’s Cubasis or Garage Band. If used as an “Instrument” note information will be received from the host app. Please make sure that the channel info matches the setting the Ruckers app.!!AudioBus!!With AudioBus you can send the audio output of the Ruckers app into other apps like for applying reverb or recording audio. Please see http://audiob.us for more info.!! !!!