user manual - exetel
TRANSCRIPT

EXETEL PTY LTD
User Manual eXeSMS ‐ Version 2.0
This is the user manual documentation for the eXeSMS version 2.0 and contains the procedures that should be followed when installing and executing the application.

2
TABLE OF CONTENTS
1 Introduction 3
1.1 What is the eXeSMS application? …………………………………………………………………..... 3 1.2 Configuring the software …………………………………………………………………………………. 3
2 Execution of the software 6
2.1 Logging in to the system …………………………………………………………………………………. 6 2.2 Configuring the user profile ……………………………………………………………………………. 7
3 Message sending Service 10
3.1 Single SMS Sending …………………………………………………………………………………………. 11 3.2 Bulk SMS Sending ……………………………………………………………………………………………. 11 3.3 Group SMS Sending ………………………………………………………………………………………… 13 3.4 Image SMS Sending ………………………………………………………………………………………… 15
4 Virtual Inbox Functionality 17
5 Address Book Functionality 19
5.1 Inserting a new contact ……………………….………………………………………………………….. 20 5.2 Editing a new contact ……………………………………………………………………………………… 21 5.3 Deleting a contact …………………………………………………………………………………………… 22 5.4 Inserting a group …………………………………………………………………………….……………….. 23 5.5 Editing a group ……………………………………………………………………….……………………….. 24 5.6 Deleting a group ……………………………………………………………………………………………… 24 5.7 Adding a contact to a group ……………………………………………………………………………. 24
6 Message History Functionality 26
7 Scheduling Messages Functionality 27
7.1 Schedule Management ……………………………………………………………………………………. 28 7.2 View sent schedule Massages …………………………………………………………………………. 28
8 System Setting and Configuration 29
8.1 User configuration …………………………………………………………………………………………... 29 8.2 Virtual Inbox …………………………………………………………………………………………………… 29 8.3 Deletion of data ……………………………………………………………………………………………… 29

3
1. INTRODUCTION
1.1 What is the eXeSMS application?
The eXeSMS application is a stand‐alone application which can be used to access and utilize the SMS
services provided by Exetel. The software is a standalone application that acts as an interface and
transport layer for the Exetel "SMS via DSL" Application Programming Interface (API). Basically the
software can be used to send messages to recipients via the Exetel SMS gateway.
Exetel pty Ltd introduced the first version of such an application when it introduced the eXeSMS version
1.5 and it was a huge success since it was an easy and inexpensive way for users to send SMS. The
success of the initial application triggered the development of the latest version of the eXeSMS
application.
Although, the initial version was successful, it had a few drawbacks and tribulations as in all other
software. The new version has taken into consideration all these problems and the users’ views about
the previous release and aims to provide an effective solution to cater all these needs. It also has a few
more embedded functionalities which will enhance the usability and novelty of the software.
1.2 Configuring the software
The application has been developed using java hence portable across many platforms. However, two
versions have been created for the Windows platform and for all other platforms preferably “Ubuntu”
OS. Although each version works in both platforms, it is advisable to select the version which matches
the operating system the user is using to enhance the look and feel of the software.
The Windows Version
The Windows Version requires:
Java Runtime Environment 1.6 (JRE 1.6) – Could be downloaded at the Sun Microsystems website
freely and is mandatory to run any java application including the eXeSMS version 2.0. It is important
to note that the application requires JRE 1.6 or a newer version.

4
Installation Procedure of Java Runtime Environment in Windows Platform
After downloading the JRE Environment, run the Setup Application and Click “Begin Download” to
start the installation.
The installer "unpacks" the files needed to continue. A dialog box tracks this process, which takes
less than a minute.
After briefly displaying a logo splash screen, the installer presents the license agreement.
After reading the agreement, click the I accept the terms in the license agreement button to accept,
and click Next to continue.
Next, the installer will present the Setup Type screen, and choose “Typical” option and press “Next”.
Installation will commence and a status bar will show the user the installation progress. Please wait
until the installation process completes.
A few brief dialogs confirm the last steps of the installation process, and a concluding message
appears with the confirmation.
Then download the eXeSMS software (Version 2.0) from the Exetel website and the software can be
executed by double clicking on .jar file. This like the ordinary .exe file will start execution of the
application.
Version for other platforms
Like the Windows version, this version also requires the Java Runtime Environment (JRE) to be
installed on the computer you are using and make sure that it is JRE 1.6 or a newer version. This
again can be downloaded from the Sun Microsystems website and the appropriate JRE for the
operating system you are using should be downloaded.
In order to execute the software after downloading the application folder from the Exetel
website, Use the terminal command java ‐jar eXeSMS.jar (watch the case) from the directory
you expanded the zip in.
Make sure that the JDK/JRE installed is Sun JDK/JRE for better look and feel and not Open
JDK/JRE. If the latter is used, due to the difference in font sizes the GUI will not look that
pleasing to the user and all options offered to the user will not be accessible.

5
Installation Procedure of the Java Runtime Environment in operating systems other than Windows
Identify the operating system being used and download the relevant file from the main java website. For
example, if you are running a 64‐bit Linux OS, download the 64 Bit JRE.
Open the terminal and traverse to the directory where the downloaded JRE setup is.
Change the mode using:
sudo chmod 755 /<folder path>/jre-6u13-linux-i586.bin
Run the file
sudo ./ jre‐6u13‐linux‐i586.bin
Setting the installed JRE as the Default
sudo update‐alternatives ‐‐install "/usr/bin/java" "java" "/<folder path>/jre1.6.0_13/bin/java" 1
sudo update‐alternatives ‐‐set java /<folder path>/jre1.6.0_13/bin/java
The software when executed for the first time will take a few minutes to configure itself on your
operating system. Please be patient during these first few minutes.
Furthermore, only one instance of the application should be run at any one time.
6
2. EXECUTION OF THE SOFTWARE
2.1 Logging into the system
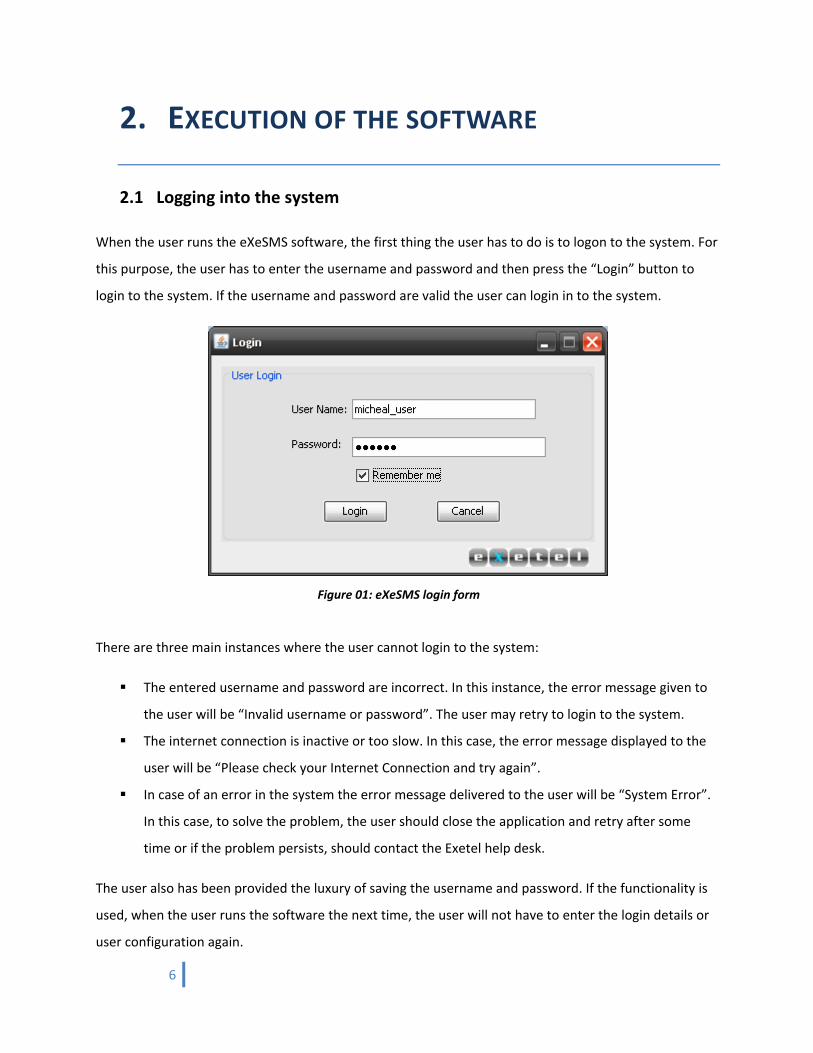
When the user runs the eXeSMS software, the first thing the user has to do is to logon to the system. For
this purpose, the user has to enter the username and password and then press the “Login” button to
login to the system. If the username and password are valid the user can login in to the system.
There are three main instances where the user cannot login to the system:
The entered username and password are incorrect. In this instance, the error message given to
the user will be “Invalid username or password”. The user may retry to login to the system.
The internet connection is inactive or too slow. In this case, the error message displayed to the
user will be “Please check your Internet Connection and try again”.
In case of an error in the system the error message delivered to the user will be “System Error”.
In this case, to solve the problem, the user should close the application and retry after some
time or if the problem persists, should contact the Exetel help desk.
The user also has been provided the luxury of saving the username and password. If the functionality is
used, when the user runs the software the next time, the user will not have to enter the login details or
user configuration again.
Figure 01: eXeSMS login form
7
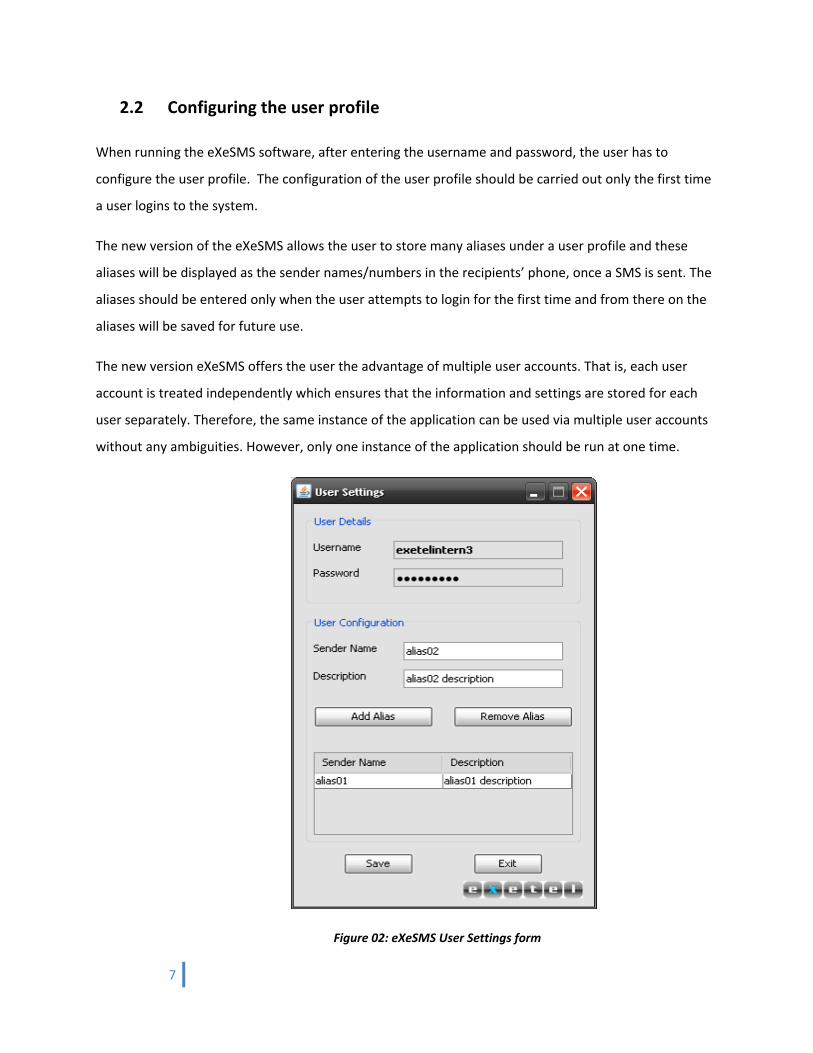
2.2 Configuring the user profile
When running the eXeSMS software, after entering the username and password, the user has to
configure the user profile. The configuration of the user profile should be carried out only the first time
a user logins to the system.
The new version of the eXeSMS allows the user to store many aliases under a user profile and these
aliases will be displayed as the sender names/numbers in the recipients’ phone, once a SMS is sent. The
aliases should be entered only when the user attempts to login for the first time and from there on the
aliases will be saved for future use.
The new version eXeSMS offers the user the advantage of multiple user accounts. That is, each user
account is treated independently which ensures that the information and settings are stored for each
user separately. Therefore, the same instance of the application can be used via multiple user accounts
without any ambiguities. However, only one instance of the application should be run at one time.
Figure 02: eXeSMS User Settings form
8
Steps to follow when configuring the profile
The user should enter a sender name and a sender description (optional) and then press on the
“Add Alias” button. The added new alias will be displayed to the user via the table below the
buttons.
The user has been given the option of adding several aliases and these aliases can be used when
sending a message via the software.
With “Remove alias” button the user can remove an already added alias. For this purpose, the
user should first select the alias required to be removed by clicking the specific alias in the
display table and press the button to remove the alias.
After adding the aliases, to proceed to the software, the user can press the “Save” button which
will save the changes made to the user configuration.
It is important to note that the user cannot enter any special characters (e.g.: white spaces, %, $ …)
when entering the sender/alias name. The maximum numbers of characters that could be entered for
the sender name fields and sender description fields are 10 and 50 respectively.
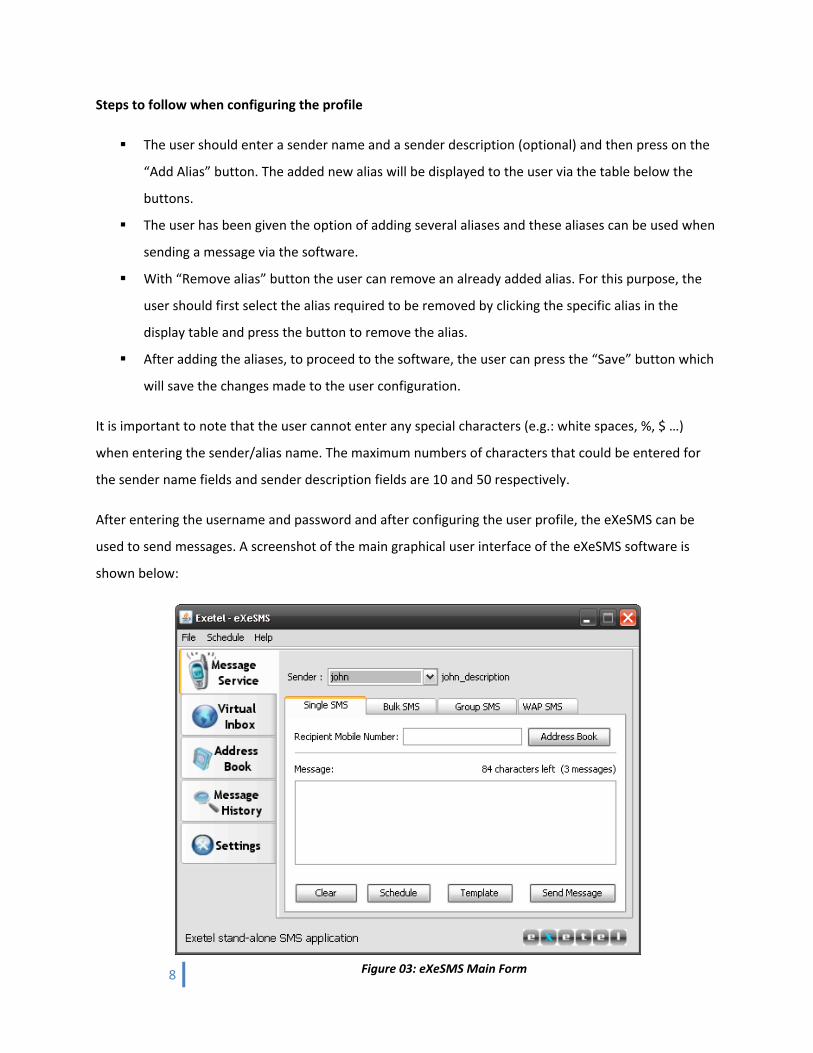
After entering the username and password and after configuring the user profile, the eXeSMS can be
used to send messages. A screenshot of the main graphical user interface of the eXeSMS software is
shown below:
Figure 03: eXeSMS Main Form
9
The main graphical user interface of the system provides a very user friendly and appealing interface for
the user to use the SMS services provided by Exetel.
Description of the main form of eXeSMS
On the top menu of eXeSMS, access is provided the functionalities of:
Exporting the address book (either to .xml format or .csv format)
Importing the address book (either from .xml format or .csv format)
Checking the remaining credit in the account.
On the left‐hand side of the main form is a column of tabs which can be used to access the main
functionalities of eXeSMS.
When the “Message Service” tab is pressed the user will be provided access to the main
SMS services.
In the same way, the other tabs will provide the users access to the respective
functionalities.
The main form also consists of a status bar which is used to display important information to the
user such as a confirmation messages when a message is sent or after a new entry has been
added to the address book.
The exeSMS provides several main functionalities to the user and they are namely:
• Message Sending Service
• Virtual Box (SMS Receiving functionality)
• Address Book functionality
• Message History
• System settings
• Scheduling messages functionality
• Exporting/Importing Address Book
This documentation will aim to cover each of these functions in detail and how the users can use these
functionalities with ease.
10
3. MESSAGE SENDING SERVICE
When considering the message service functionality the user can send four main types of messages and
they are namely
Single SMS
Bulk SMS
Group SMS
Image (WAP) SMS
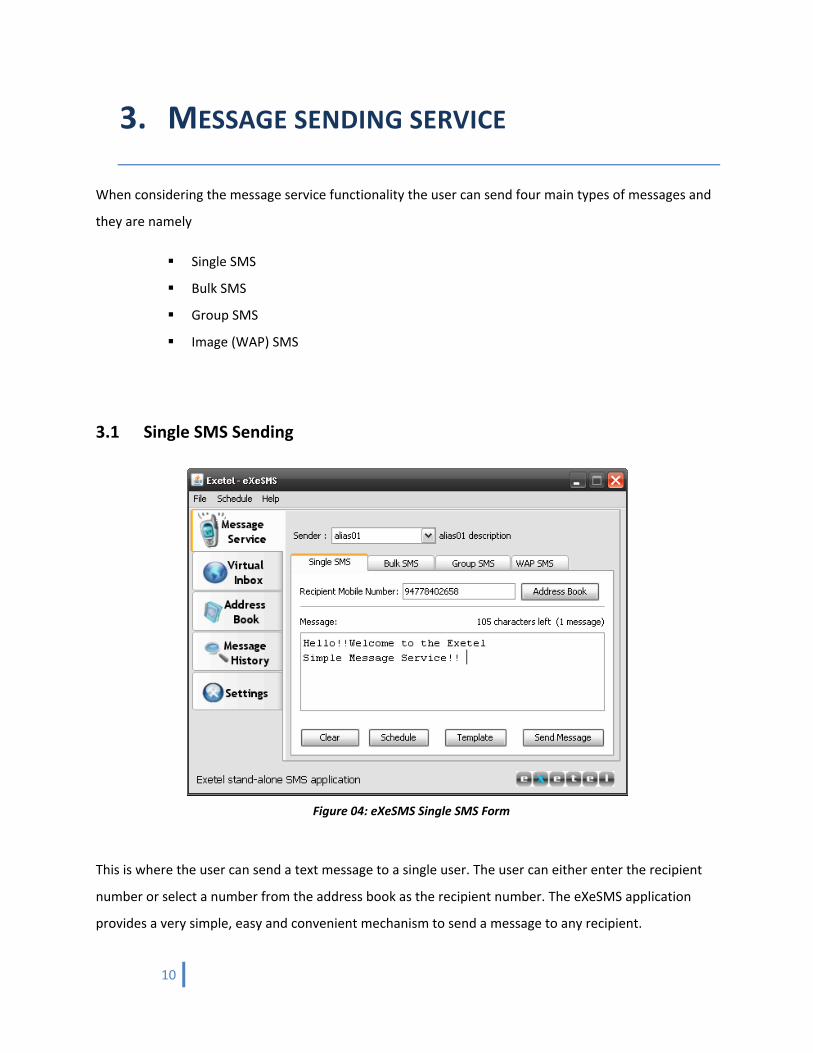
3.1 Single SMS Sending
This is where the user can send a text message to a single user. The user can either enter the recipient
number or select a number from the address book as the recipient number. The eXeSMS application
provides a very simple, easy and convenient mechanism to send a message to any recipient.
Figure 04: eXeSMS Single SMS Form

11
Steps to follow when sending a “Single” SMS
The user should type the text message to be sent on the text area provided. The message can
have a maximum of 612 characters. If the message has characters more than 160 the message
will be sent as multiple messages and merged at the destination handset. The breakdown of the
message will be as follows:
1 Message = 0 ‐ 160 characters
2 Messages = 161 ‐ 306 characters
3 Messages = 307 ‐ 459 characters
4 Messages = 460 ‐ 612 characters
The user can select details of a specific contact by pressing the “Address Book” button which will
display all the contacts already entered in the address book. The user can left‐click on the
contact required and press “Add selected contact” in order to select the particular contact.
The user can confirm sending of the message by pressing the “Send Message” and the message
will be successfully delivered to the recipient number. Furthermore, the user can also refresh
the message text area by pressing the “Clear” button which will apparently clear the text typed
already.
An important feature embedded to the latest version of eXeSMS is the template functionality.
The user can use this functionality to insert a template already saved than typing the message
from scratch.
Furthermore, functionality is provided for the user to schedule the sending of a message which enable
to set the date and time at which the user wants to send the message (Refer section 7 for further
details about scheduling).
3.2 Bulk SMS sending
As the name implies, the bulk SMS sending functionality allows the user to send messages to multiple
recipients at one given time. This saves time and saves the user of the tedious task of sending the same
message over and over again.

12
Steps to follow when sending a “Bulk” SMS
The user should type the text message to be sent on the text area provided. The message can
have a maximum of 612 characters. If the message has characters more than 160 the message
will be sent as multiple messages and merged at the destination handset. The breakdown of the
message will be as follows:
1 Message = 0 ‐ 160 characters
2 Messages = 161 ‐ 306 characters
3 Messages = 307 ‐ 459 characters
4 Messages = 460 ‐ 612 characters
By clicking the button “Address Book” the contact details already existing in the address book
will be displayed. The user could select the contacts desired and press the button “Add Selected
Contact” to add the numbers to the set of recipient numbers. The “Address Book” form
displayed is as follows:
The user could select multiple rows by either
Pressing the “ctrl” button on the keyboard and left‐ clicking the mouse on the desired rows
By left‐clicking the mouse and dragging the mouse‐cursor over the desired rows.
Figure 05: eXeSMS Address Book Form

13
An important feature embedded to the latest version of eXeSMS is the template functionality.
The user can use this functionality to insert a template already saved than typing the message
from scratch.
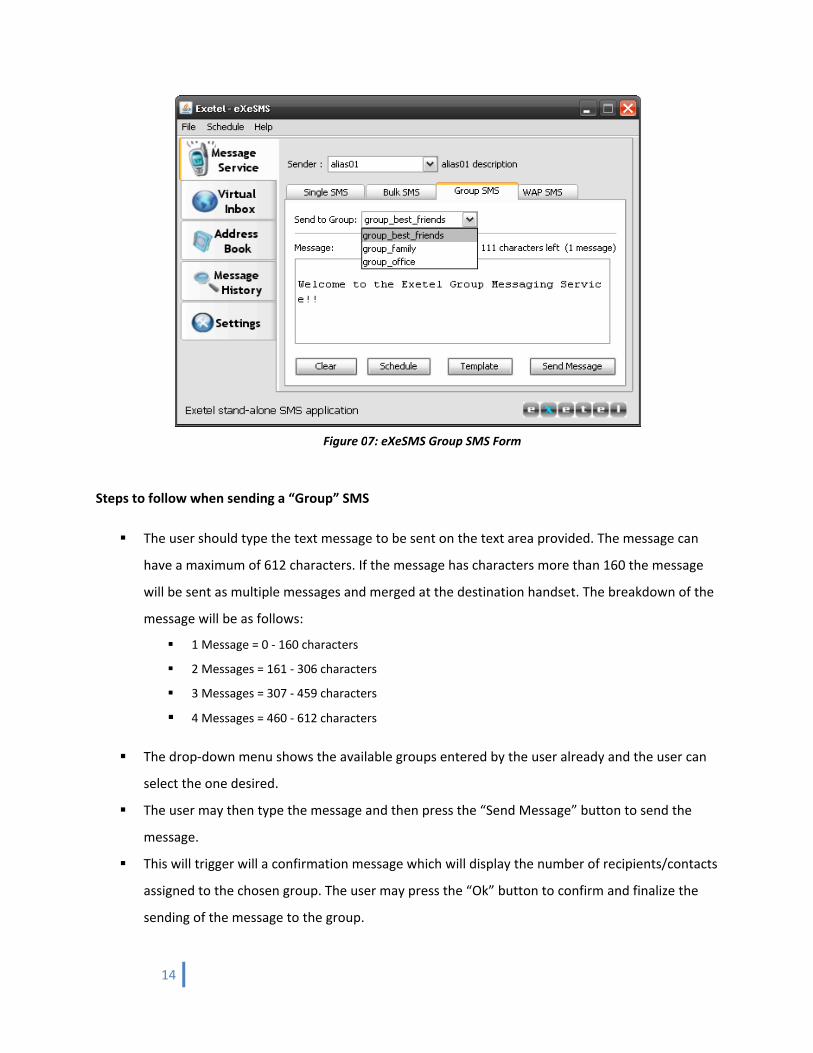
3.3 Group SMS sending
Another feature offered by the eXeSMS software is the Group SMS sending functionality. This is where a
simple text message could be send to multiple recipients within groups. For this purpose, first the user
should create groups and assign contacts for the groups. Then the user will be able to send messages to
the desired groups.
Figure 06: eXeSMS Bulk SMS Form
14
Steps to follow when sending a “Group” SMS
The user should type the text message to be sent on the text area provided. The message can
have a maximum of 612 characters. If the message has characters more than 160 the message
will be sent as multiple messages and merged at the destination handset. The breakdown of the
message will be as follows:
1 Message = 0 ‐ 160 characters
2 Messages = 161 ‐ 306 characters
3 Messages = 307 ‐ 459 characters
4 Messages = 460 ‐ 612 characters
The drop‐down menu shows the available groups entered by the user already and the user can
select the one desired.
The user may then type the message and then press the “Send Message” button to send the
message.
This will trigger will a confirmation message which will display the number of recipients/contacts
assigned to the chosen group. The user may press the “Ok” button to confirm and finalize the
sending of the message to the group.
Figure 07: eXeSMS Group SMS Form
15
However, it is important to ensure that the group has at least one contact assigned to it
otherwise an error message stating so will be displayed to the user.
An important feature embedded to the latest version of eXeSMS is the template functionality.
The user can use this functionality to insert a template already saved than typing the message
from scratch.
This works exactly according to the group SMS sending mechanism in an ordinary mobile phone but
offers greater usability and convenience when using this simple but yet effective functionality.
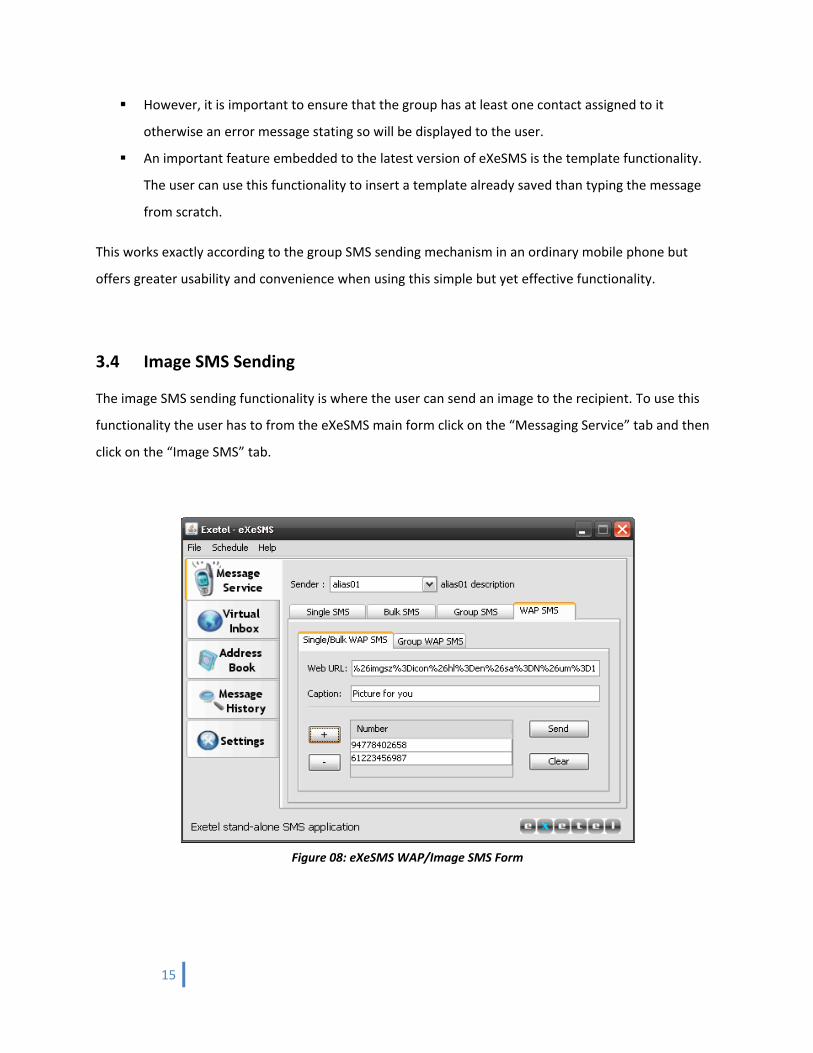
3.4 Image SMS Sending
The image SMS sending functionality is where the user can send an image to the recipient. To use this
functionality the user has to from the eXeSMS main form click on the “Messaging Service” tab and then
click on the “Image SMS” tab.
Figure 08: eXeSMS WAP/Image SMS Form
16
The user may select one of the two options:
Single/Bulk Image SMS: Sending of image messages to a single recipient or multiple recipients
or multiple recipients. Sending is carried out in the same way as carrying out the sending of a
Bulk SMS.
Group Image SMS: Sending of image messages to recipients saved under a specific group name.
Steps to follow when sending a “Image” SMS
The user should paste the URL of the image to be sent in the space allocated for the “Web URL”.
The user should enter a desired caption as well. This will be displayed at the recipient handset as
the description of the message.
For “Single/Bulk WAP SMS” the user should add the recipients in the same manner as adding the
recipients for the Bulk SMS. For the “Group WAP SMS” the desired group should be selected.
The user may press the “Send” button to send the WAP SMS.
It is important to note that this facility cannot be used to send pictures on the user’s local computer and
can only be used for pictures in the internet. Hence only a Web URL can be used. If a local computer
path address, the recipient will not be able to retrieve the message. In any case, the message will be
sent to the recipient’s mobile phone as a service message.
17
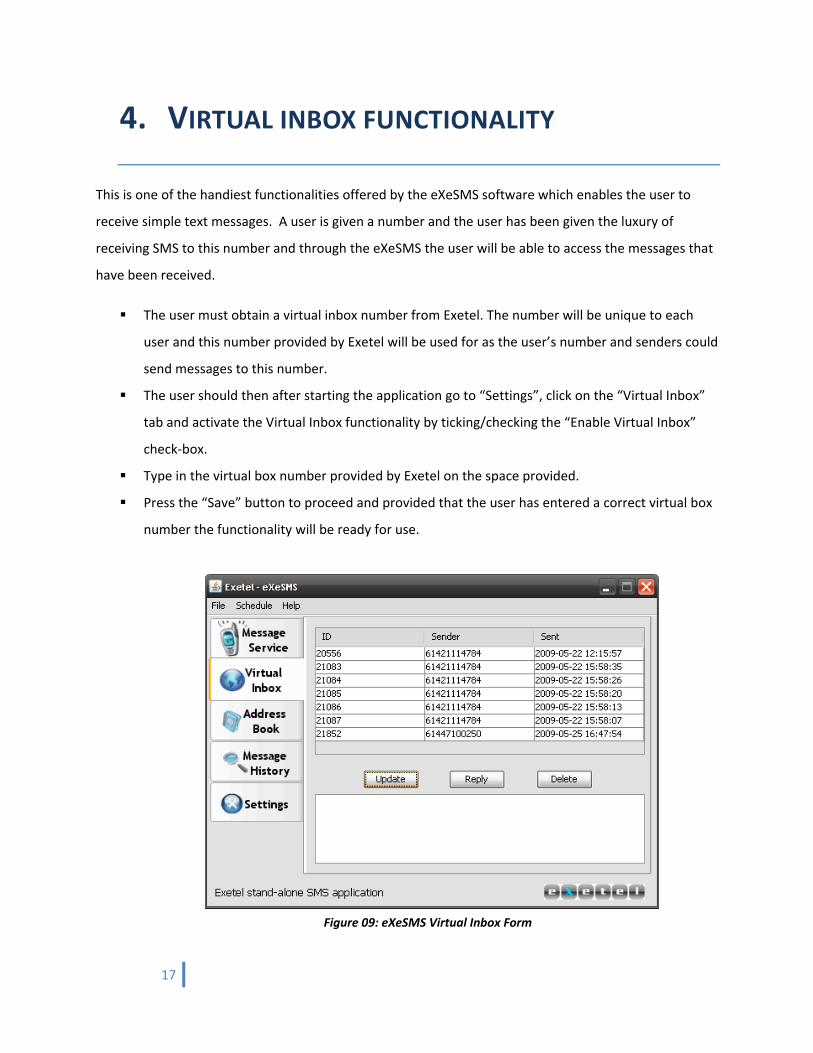
4. VIRTUAL INBOX FUNCTIONALITY
This is one of the handiest functionalities offered by the eXeSMS software which enables the user to
receive simple text messages. A user is given a number and the user has been given the luxury of
receiving SMS to this number and through the eXeSMS the user will be able to access the messages that
have been received.
The user must obtain a virtual inbox number from Exetel. The number will be unique to each
user and this number provided by Exetel will be used for as the user’s number and senders could
send messages to this number.
The user should then after starting the application go to “Settings”, click on the “Virtual Inbox”
tab and activate the Virtual Inbox functionality by ticking/checking the “Enable Virtual Inbox”
check‐box.
Type in the virtual box number provided by Exetel on the space provided.
Press the “Save” button to proceed and provided that the user has entered a correct virtual box
number the functionality will be ready for use.
Figure 09: eXeSMS Virtual Inbox Form

18
Steps to follow when using the Virtual Inbox functionality
To use the virtual inbox functionality, click on the “Virtual Inbox” tab from the eXeSMS “Messaging
Service” form.
The user can then press on the “Update” button to receive any of the messages received for the
Virtual Inbox number and the messages will be displayed on the space provided.
To delete a specific message the user can click on the message to be deleted and press on the
“Delete” button.
Furthermore, the user can reply to the sender of a message by selecting the message and
pressing the “Reply” button. This will display another form which will contain two text areas,
one which displays the message received and the other to write the message to be delivered as
the reply.
After filling the details on the displayed form, the user may press on the “Send” button to reply
to the message received.
The user can now receive any messages via the virtual box inbox functionality.
Error Messages
If the user enters an incorrect virtual inbox number not provided by Exetel, an error message
will be displayed to the user when trying to “Update” and receive any messages. To solve this problem,
re‐enter a valid virtual number and re‐configure the functionality.

19
5. ADDRESS BOOK FUNCTIONALITY
An important and indispensable feature of the eXeSMS software is the address book functionality which
can be used to store contact information and retrieve them effectively and conveniently when the need
arises.
To view, add, edit or delete any information in the address book the user should click on the “Address
Book” tab from the eXeSMS main page. The available contacts in the address book will be displayed to
the user and also the available groups of the user will be displayed on to the user.
In this new release of the eXeSMS software, the user has the ability to enter a contact to the address
book and each contact (or contact name) can have several contact numbers. Each contact number can
be assigned to a group as well, which can be utilized when using the Group SMS functionality.
Figure 10: eXeSMS Address Book Form

20
5.1 Inserting a new contact
After clicking the “Address Book” tab from the main form of eXeSMS the user may click on “Add new
Contact” button to insert a new contact to the address book. This will display the “Insert new contact”
form and the user should enter the information prerequisite for entering a new entry to the address
book.
Steps to follow when using the Address Book functionality
The first name of the contact is mandatory and should be provided in the space provided. A last
name could also be entered in the space provided which will be later useful when identifying the
contact. It is important to note that several identical names could be entered hence it is
advisable to use the last name field for distinguishing between the contacts.
Figure 11: eXeSMS Add New Contact Form

21
The next step is to fill out the number details. Each contact can have several numbers. To add a
number, fill out the number in the space provided. Furthermore, a contact category/type could
be selected for each number. The default type will be “Home”.
After filling out the number the user could then select a group. The groups available will be
displayed on to the user in the drop down menu. Also an empty selection is available which
means that the number is not assigned to any group.
Furthermore, the user can right click on this “group” drop‐down menu to add a new group. A
new form will be displayed when the user does this and the group name and description should
be entered to enter the new group. Then the contact number could be assigned to the new
group.
After entering the number information, the user can press the “Add Number” to add the new
number to the contact. The user can repeat the process several times to add multiple numbers
to the contact. By selecting an already added number and pressing the “Delete Number” button
a number already entered could be deleted.
After entering the number information, the next step would be to submit and save the contact
information. To do this, the user has to press on the “Add Contact” button. This will save the
changes to the address book.
5.2 Editing a new contact
The user also has the luxury of editing or updating information in the address book. To edit a contact a
sequence of steps should be carried out and they are as follows:
First the user should select the contact entry to be updated. For this purpose, the user should
first click on the “Address Book” tab from the main form and then select the desired entry from
the details displayed.
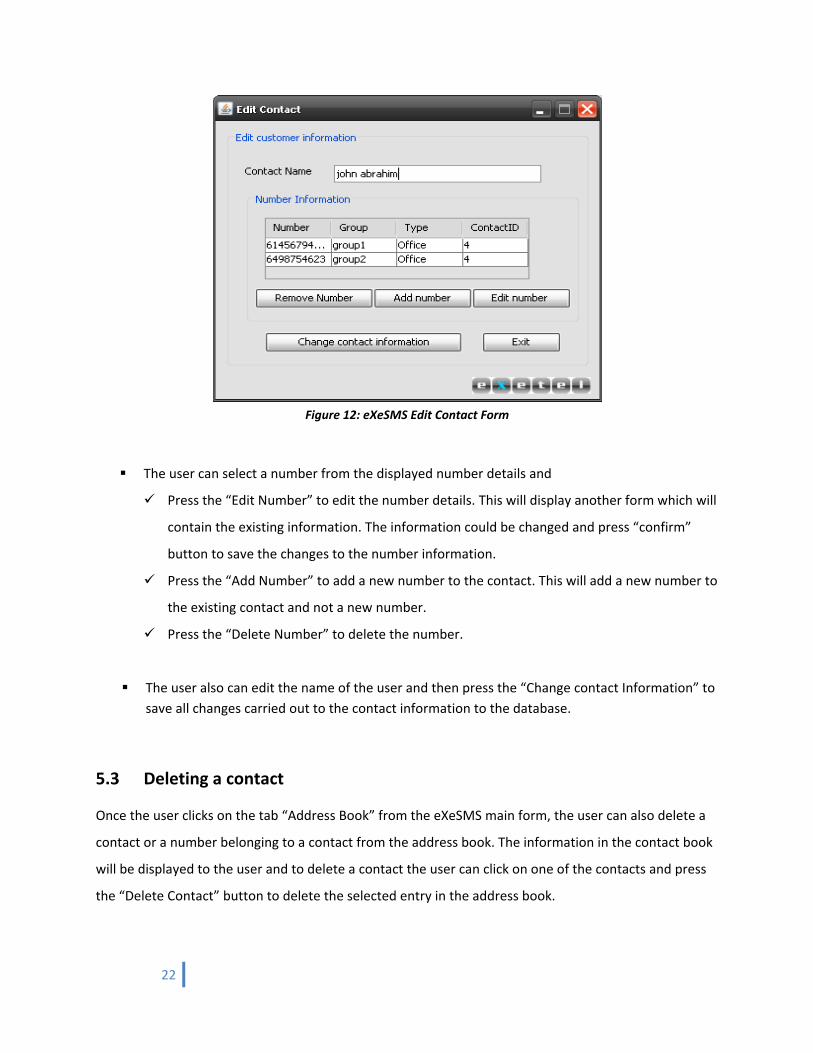
After selecting the desired entry the user can press the “Edit Contact” to proceed
editing/updating of the contact information. This will display the edit contact form to the user
through which the contact could be edited.
The “Edit Contact” form will show the contact name and also the number details of the contact
in a tabular manner.
22
The user can select a number from the displayed number details and
Press the “Edit Number” to edit the number details. This will display another form which will
contain the existing information. The information could be changed and press “confirm”
button to save the changes to the number information.
Press the “Add Number” to add a new number to the contact. This will add a new number to
the existing contact and not a new number.
Press the “Delete Number” to delete the number.
The user also can edit the name of the user and then press the “Change contact Information” to save all changes carried out to the contact information to the database.
5.3 Deleting a contact
Once the user clicks on the tab “Address Book” from the eXeSMS main form, the user can also delete a
contact or a number belonging to a contact from the address book. The information in the contact book
will be displayed to the user and to delete a contact the user can click on one of the contacts and press
the “Delete Contact” button to delete the selected entry in the address book.
Figure 12: eXeSMS Edit Contact Form
23
This will prompt the user to select one of the two options:
Delete the full contact
Delete only selected number
A contact may have several numbers belonging to it. If the first option is selected the full contacts
including all the numbers under it will be deleted. Whereas, the latter option will only delete the
number selected and the other numbers belonging to the contact will remain. This feature has been
added since a contact may contain several numbers and each number could be altered, deleted or even
a new number could be inserted for a given contact.
After selecting the desired option the request will be carried out and a message will be delivered to the
user to inform that the requested deletion has been carried out.
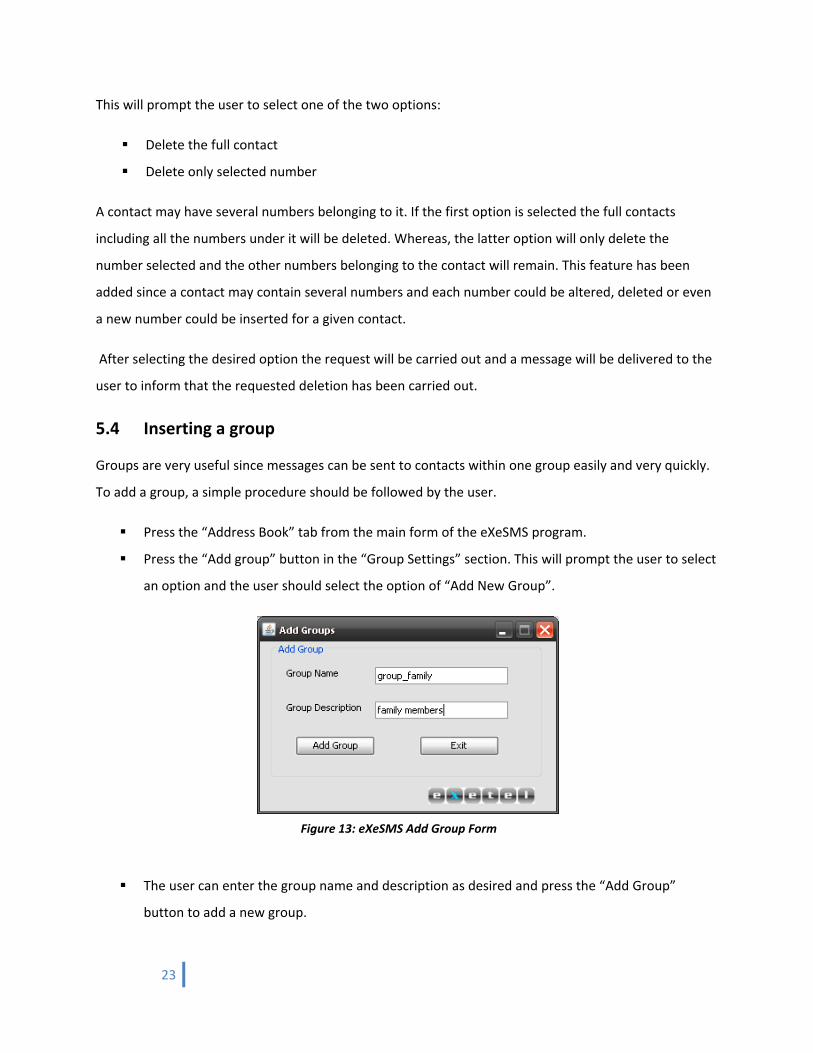
5.4 Inserting a group
Groups are very useful since messages can be sent to contacts within one group easily and very quickly.
To add a group, a simple procedure should be followed by the user.
Press the “Address Book” tab from the main form of the eXeSMS program.
Press the “Add group” button in the “Group Settings” section. This will prompt the user to select
an option and the user should select the option of “Add New Group”.
The user can enter the group name and description as desired and press the “Add Group”
button to add a new group.
Figure 13: eXeSMS Add Group Form
24
A group also could be added during the insertion of a contact by right clicking the “group” drop‐
down menu in the “Insert New Contact” form. Therefore, when inserting a new contact a new
group also could be inserted.
5.5 Editing a group
To edit the group information, from the Address Book form select an available group by clicking on the
desired group from the displayed groups. After selection of the desired group, the current group details
will be displayed to the user, and the user may change the information and press the “Save” button to
update the eXeSMS database.
5.6 Deleting a group
To delete a group, from the Address Book form, select an available group by clicking on the desired
group from the displayed groups and then press on the “Delete group” button. This will delete the
selected group and a message confirming the deletion will be displayed to the user.
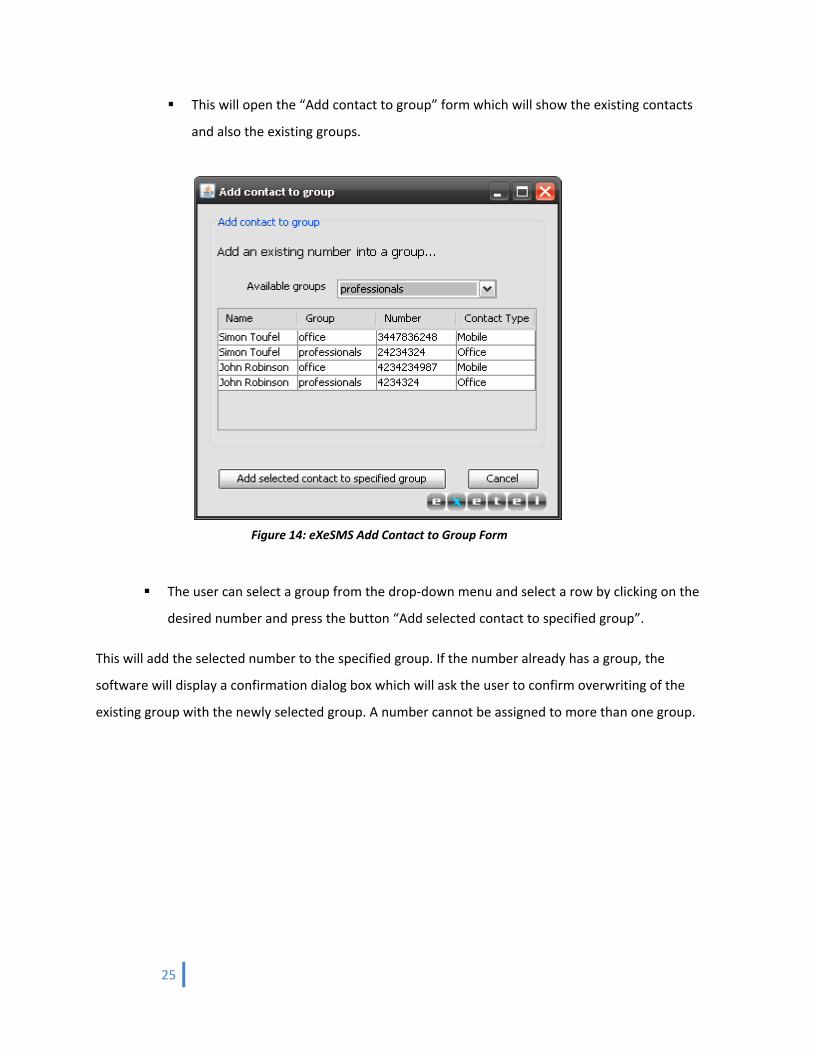
5.7 Adding a contact to a group
Another important requirement when considering the address book is the ability to add a contact to a
group. This can be done in two instances:
Insertion of a new contact: When inserting a new contact, a group could be selected for each
number. Each number can only be assigned to one group.
Add an existing number to an existing group:
Press the “Address Book” tab from the main form of eXeSMS.
Press the “Add group” button in the “Group Settings” section. This will prompt the user
to select an option and the user should select the option of “Add Contact to Group”.
25
This will open the “Add contact to group” form which will show the existing contacts
and also the existing groups.
The user can select a group from the drop‐down menu and select a row by clicking on the
desired number and press the button “Add selected contact to specified group”.
This will add the selected number to the specified group. If the number already has a group, the
software will display a confirmation dialog box which will ask the user to confirm overwriting of the
existing group with the newly selected group. A number cannot be assigned to more than one group.
Figure 14: eXeSMS Add Contact to Group Form
26
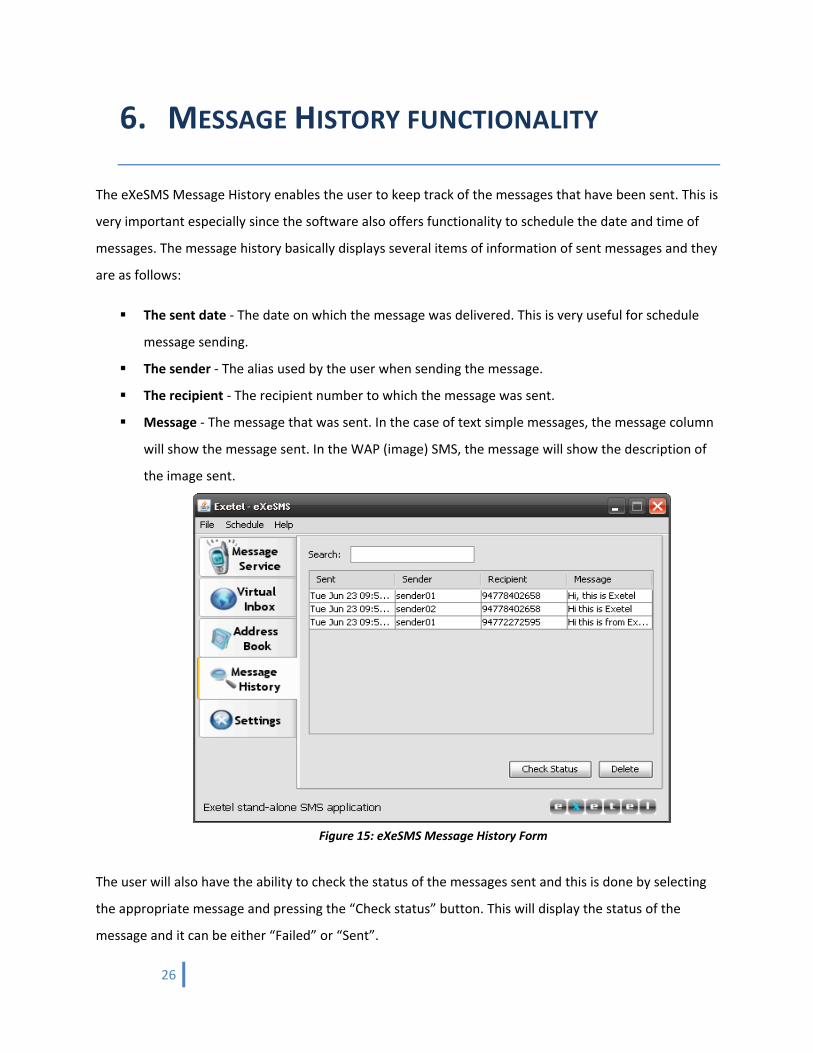
6. MESSAGE HISTORY FUNCTIONALITY
The eXeSMS Message History enables the user to keep track of the messages that have been sent. This is
very important especially since the software also offers functionality to schedule the date and time of
messages. The message history basically displays several items of information of sent messages and they
are as follows:
The sent date ‐ The date on which the message was delivered. This is very useful for schedule
message sending.
The sender ‐ The alias used by the user when sending the message.
The recipient ‐ The recipient number to which the message was sent.
Message ‐ The message that was sent. In the case of text simple messages, the message column
will show the message sent. In the WAP (image) SMS, the message will show the description of
the image sent.
The user will also have the ability to check the status of the messages sent and this is done by selecting
the appropriate message and pressing the “Check status” button. This will display the status of the
message and it can be either “Failed” or “Sent”.
Figure 15: eXeSMS Message History Form

27
7. SCHEDULING MESSAGES FUNCTIONALITY
The scheduling messages functionality as the name implies, is used to schedule messages by the user.
The user could use this functionality when sending Single SMS, Bulk SMS and Group SMS. When the
user schedules a message immediately the message will be scheduled by the software through the
Exetel server and the scheduling functionality will be handled by the Exetel server. Therefore the user
need not have the software running for a scheduled message to be delivered.
Steps to follow when using the Scheduling messages functionality
When sending a single, bulk or group SMS, the user can press on the “Schedule message” button
to schedule the message. Make sure that the message and the recipient number(s) are entered
before attempting to schedule a message. When the user presses the “Schedule Message” form
will be displayed.
The time and date could be entered on the given spaces and the user has to press the “Save”
button in order to schedule the message.
It is important to note that the messages that are delivered will not be entered in the “Message
History”. Instead two options have been given to the user :
o Schedule Management
o View sent scheduled messages
Figure 16: eXeSMS Schedule Time Picker

28
7.1 Schedule Management
The user can use this feature by pressing “Schedule” on the main menu bar and selecting “Schedule
Options” and then selecting “Scheduling Management”. This will display the schedule management form
as shown below:
The user can press on the “Pending Messages” button to view the messages that have been
scheduled and are yet to be sent. When the user clicks or selects a scheduled message, the text
of the message will be displayed in the space at the bottom of the form.
The user can press the “Reschedule” button to reschedule an already scheduled message or
“Delete Message” to cancel the sending of a scheduled message.
7.2 View sent scheduled messages
This works exactly like the “Message History” for other types of messages and the user will be able to
get the information of the messages that have been sent through scheduling. The user can use this
feature by pressing “Schedule” on the main menu bar and selecting “Schedule Options” and then
selecting “Scheduling Management”. This will display the Sender, Recipient, Message Body, Scheduled
Time and the Sent Time of the send scheduled messages.
Figure 17: eXeSMS Schedule Management Form
29
8. SYSTEM SETTINGS AND CONFIGURATION
The user can view and change the setting of the eXeSMS software by clicking on the “Settings” tab from
the main page of the software. Settings include three main types of information and namely they are as
follows:
8.1 User configuration
The user can view the user configuration by clicking on the “User Configuration” from the “Settings”
form. This will display the username used and of course the password in asterisks (*). Furthermore, the
aliases will also be displayed and aliases could also be added or existing ones deleted by pressing on the
“+” and “‐” buttons respectively.
8.2 Virtual Inbox
This is where the user can configure the virtual inbox settings. Refer Section 4 of this documentation for
further details.
8.3 Deletion of data
Under this section, the user can delete the details in the profile. The user has three options:
Deletion of message history: The message history of the user will completely deleted from
database permanently.
Deletion of address book: This will delete the contents of the address book permanently.
Delete All Details: This will delete all the details of the user profile and this includes address
book details, group details, message history and the complete user profile. It is important to
note that the software will exit when all details are deleted and the user should login for further
use.