user manual - dtr hood-type...
TRANSCRIPT

STALGAST Radom sp. z o.o. ul. Staniewicka 5 03-310 Warsaw
tel.: 22 517 15 75 fax: 55 517 15 77 www.stalgast.com email: [email protected]
USER MANUAL - DTR
HOOD-TYPE DISHWASER
2 STALGAST Radom sp. z o.o. ul. Staniewicka 5 03-310 Warsaw tel.: 22 517 15 75 fax.: 22 517 15 77 www.stalgast.com email: [email protected]
1. SAFETY MANUAL…………………………………………………….............................
2. PURPOSE OF THE DEVICE……………………………………………….……............
3. TECHNICAL DATA……………………………………………………………………....
4. DESIGN FEATURES OF THE DEVICE……………………………….........................
5. INSTALLATION………………………………………………………….…………….....
6. OHS RULES……………………………………………………….……………………......
7. OPERATION……………………………………………….……………...........................
8. MAINTENANCE………………………………………….……………………………....
9. PACKING, LOADING AND TRANSPORT……………………………….…….........
10. LIST OF SPARE PARTS……………………………………………………....................
11. ELECTRICAL DIAGRAM……………………………………………………………......
12. DISPOSAL OF WASTE EQUIPMENT………………………………………………...
13. WARRANTY.................................................................................................................
14. DECLARATION OF CONFORMITY.........................................................................
3
4
4
5
5
7
8
10
11
12
13
13
13 14

3 STALGAST Radom sp. z o.o. ul. Staniewicka 5 03-310 Warsaw tel.: 22 517 15 75 fax.: 22 517 15 77 www.stalgast.com email: [email protected]
Thank you for buying our product. Please read this manual before first use.
Copying this manual without permission is prohibited. NOTE: Keep the manual in a safe and accessible place for staff.
Photos and drawings are for illustration only and may differ from your purchase.
The manufacturer reserves the right to change technical parameters without notice. NOTE!!! With a long break in operation (night breaks, Christmas breaks, etc.), disconnect the device from the power supply.
1. SAFETY MANUAL
• NOTE! Do not connect if the device was damaged in transit! • Incorrect operation and improper use may result in serious damage or injury. • The device can be used only for its designed purpose. • The manufacturer does not accept any liability for damage caused by incorrect operation and improper
use. • During use, protect the appliance and the power cord against contact with water or other liquids.
Failure to follow these instructions can result in life-threatening situations.
• Never open the unit's casing on your own. • Do not insert objects into the openings in the unit. • Do not touch the power plug with wet hands. • Check the plug and power cord regularly. In case of damage to the plug or the power cord, it must be
repaired by a specialized repair company. • When the device is dropped or is damaged in any other way, it should be checked and repaired as
necessary by a specialized repair company before continuing to use it. • Never repair the appliance yourself - this may cause life-threatening situations. • Alterations and repairs by persons not trained professionally are forbidden. • Protect the cord from sharp or hot objects, and keep away from open flame. If you want to disconnect
the unit from the mains, always hold and pull the plug, never pull the power cord. • Secure the power cord so that no one accidentally pulls it from the outlet or stumbles over it. • If the power cord is damaged, it should be replaced. A non-detachable power cord can be
replaced in a specialized repair shop or by a qualified professional. • Control the functioning of the appliance when in use. • Do not allow the use of the appliance by minors, physically or mentally disabled persons, handicapped
persons, as well as those lacking appropriate experience and knowledge regarding the proper use of the appliance. Such persons can only operate it under the supervision of a person responsible for safety.
• If the appliance is not currently in use or is undergoing cleaning, always unplug it from the power source by pulling the plug from the socket.
• NOTE: If the power cord is plugged into a power outlet, the appliance still remains live. • Turn the appliance off before pulling the plug from the outlet.
2. PURPOSE OF THE DEVICE The dishwasher is designed exclusively for professional use and should be operated by trained personnel. The device is used for washing and steaming of utensils (plates, bowls, cups, cutlery, trays, etc.) and other similar items used in catering and related branches, in compliance with international regulations and standards for safety in electrical and mechanical appliances (CEI-EN-IEC 60335-2-58/61770) and electromagnetic compatibility (CEI-IEC-EN 55014-1/-2, 61000-3;4, 50366).

4 STALGAST Radom sp. z o.o. ul. Staniewicka 5 03-310 Warsaw tel.: 22 517 15 75 fax.: 22 517 15 77 www.stalgast.com email: [email protected]
3. TECHNICAL DATA
Model 803020 Dimensions (WxDxH) 690x794x1500mm Supply voltage 400V/3+N Frequency 50 Hz Maximum power consumption 6800 W Water supply pressure 200-600 kPa Water supply temperature 10-55 °C Water hardness in the water supply system 5-6 dH Water consumption 2.5 l/cycle Boiler capacity 6.5 l Maximum water level in the chamber 140 mm Tank capacity 21 l Standard cycle duration 120 sec./180sec. Noise level 65 dB(A) Protection IP24 Net weight 86.5 kg Type of power cable H05RN-F Washing water temperature 60-65°C (140-149°F) Rinse temperature 82-90°C(181-194°F)
The dishwasher has an automatic steam function (integral part of the washing cycle).
1 – Body 2 – Hood 3 – Adjustable feet 4 – Basket guide 5 – Control panel 6 – Supply: electricity and water

5 STALGAST Radom sp. z o.o. ul. Staniewicka 5 03-310 Warsaw tel.: 22 517 15 75 fax.: 22 517 15 77 www.stalgast.com email: [email protected]
4. DESIGN FEATURES OF THE DEVICE
Figure 1. Control panel
On/Off
Wash cycle
Selecting the washing program:
2 – program 120sec. 3 – program 180sec.
Indicator light for chamber (upper)
and boiler (bottom) heaters
Figure 2. Description of the control panel functions
5. INSTALLATION
I. Connecting the appliance to a power source Connecting the appliance to the mains can only be carried out by the technical service personnel in accordance with applicable law. The electrical parameters of the appliance are included in the table in section 3. It is forbidden to make one electrical safeguard for two appliances. It is necessary to install a main circuit breaker and an earth fault breaker. Both switches must be installed in an easily accessible location in such a way as to guarantee disconnecting the appliance from power supply in accordance with the category II.

6 STALGAST Radom sp. z o.o. ul. Staniewicka 5 03-310 Warsaw tel.: 22 517 15 75 fax.: 22 517 15 77 www.stalgast.com email: [email protected]
The appliance is fully disconnected from the power supply only when the main switch is set to OFF. The appliance must be connected via the terminal placed in the rear, lower part of the appliance. Protective earth (PE) is marked in yellow-green, neutral (N) in blue, and phase conductors (L1, L2, L3) in black, gray, and brown, respectively.
II. Connecting the appliance to the water mains Water hoses and the power cord are protruding from the rear. The water supply hose must be connected to a 3/4" outlet. The connection should be closed only with the use of a brand new hose. In order to observe safety, water pressure should be between 2-4 bar. Should the pressure be higher, a pressure reducer should be installed. The main valve should be installed above the hose feeding water into the appliance. The main valve should be installed in an easily accessible place; therefore, it should not be installed behind the appliance. The appliance is equipped with a drain pipe, which should be installed at floor level with the use of a vent.
Before starting the appliance, make sure that the supply and drain hoses are not bent, blocked or otherwise damaged during installation.
III. Setting the appliance The appliance must be delivered to the installation site, unpacked, and its condition should be checked. In case of damage to the appliance or any of its components, the shipping company must be notified immediately. Connections to the devices must conform to the standards in force at the installation site. The manufacturer is not liable for any injury or damage to the product resulting from failure to comply with the standards in force at the installation site. Before installing the appliance, make sure that the moisture-sensitive components are properly protected against wetting, e.g.: during the washing of the appliance. The appliance should be set at a desired location and then the protective packaging should be removed. The appliance should be leveled using a spirit level and the four adjustable feet, thus ensuring stable operation. Any other way of leveling the appliance should be approved by the manufacturer. The packaging materials should be kept away from children and pets, as they can cause an accident. All materials used to pack the product are environmentally friendly and can be safely stored in a suitable place. Recyclable components are marked as follows:
• PE – polyethylene: external packaging components, manual jacket, fastening components; • PP – polypropylene: grips; • Wooden and cardboard components must be left in places intended for this purpose in accordance
with applicable law. It is forbidden to store the appliance and its components directly in the environment.
IV. First start-up
Before starting the appliance, check the correct operation of the electronic safety system. The above steps and the first start-up may only be done by technical service personnel, who will also conduct a short training in the operation of the appliance Each appliance is equipped with an adjustable rinse aid dispenser. In contrast, the adjustable washing liquid dispenser is only supplied with some models. A container for the washing liquid and rinse aid must be put in place and then connected to suction tubes: the transparent one to the washing liquid, and the blue one to the rinse aid. To adjust, use the adjustment screws shown in (Fig. 3 and 4). It is recommended that adjustments be made by the staff of the company providing the rinse aid and washing liquid. Before connecting the suction tubes, weights should be attached (to keep the tube at the bottom of the container) and filters should be installed (Fig. 5).
Figure 3 Figure 4 Figure 5
7 STALGAST Radom sp. z o.o. ul. Staniewicka 5 03-310 Warsaw tel.: 22 517 15 75 fax.: 22 517 15 77 www.stalgast.com email: [email protected]
In the case where the two liquid dispensers have not been installed before installing the device, it can later be done only by qualified technical personnel (technical service). Alternatively, an external washing liquid dispenser can be connected through an electrical connection via a 2x0.5mm H07 RN-F cable. The cable must be connected through the passage indicated in the technical data diagram, in accordance with the electrical parameters of the appliance and with the laws and regulations in force. Dispenser parameters: 230V/50Hz, 15W. The washing liquid dispenser is connected to the dishwasher through a transparent tube.
6. OHS RULES
In order to prevent burns and electrical shock, observe the following safety rules. To do this: • train staff in the use of the appliance in accordance with the information contained in this manual; • train staff in basic principles of using electrical equipment, safety at work and first aid in case of an
emergency; • before starting any maintenance work, disconnect the appliance from the power supply, • prohibit the use of the appliance, if any heating and/or control element has been damaged; • do not wash under running water. • only allow qualified technical personnel (technical service) to repair and/or inspect the appliance.
The manufacturer is not liable for any injury or damage to the product resulting from failure to comply with the recommendations contained in the manual, improper use of the appliance, use of spare parts and attempts to repair the appliance without professional service.
The appliance must be connected to ground in accordance with the rules and standards in force at the place of installation.
The appliance is compliant with the standards introduced by the EU Directive 2002/96/EC. Suitable storage of the appliance is part of environmental pollution prevention.
Do not add solvents to the dishwasher, such as e.g. alcohol, turpentine, as they could cause an explosion. Also avoid placing dishes with left-over food inside the dishwasher.
The dishwasher and its components should not be used as a ladder or support for other appliances or objects.
Do not sit on or lean against the components of the dishwasher, as this could cause an accident.
The water remaining on the dishes after completion of the cycle is not suitable for drinking.
The device cannot be independently operated by minors and persons with reduced intellectual, physical and sensory capacity, who are not able to fully apply the principles contained in this manual. Operating the appliance by said persons can only take place under supervision.
The power cord should be non-detachable and should be a flexible cable with oil-resistant coating not lighter than conventional cables with a polychloroprene shell - code designation 60745 IEC 57.
7. OPERATION
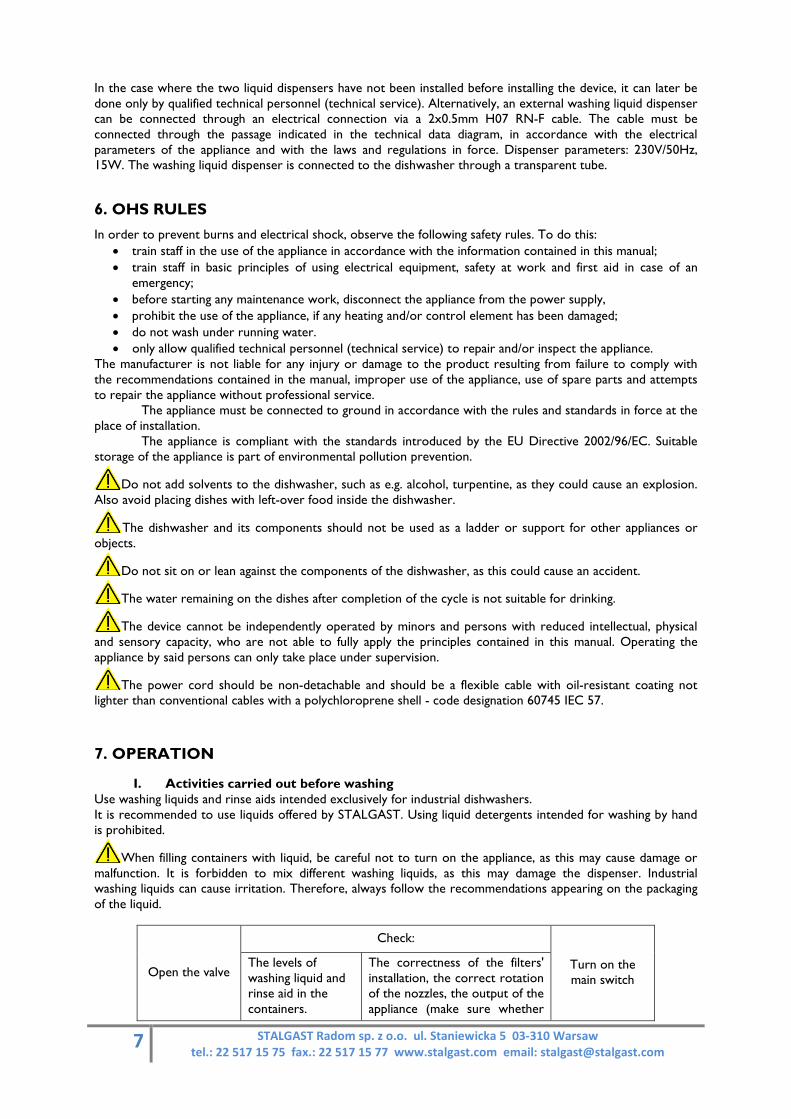
I. Activities carried out before washing Use washing liquids and rinse aids intended exclusively for industrial dishwashers. It is recommended to use liquids offered by STALGAST. Using liquid detergents intended for washing by hand is prohibited.
When filling containers with liquid, be careful not to turn on the appliance, as this may cause damage or malfunction. It is forbidden to mix different washing liquids, as this may damage the dispenser. Industrial washing liquids can cause irritation. Therefore, always follow the recommendations appearing on the packaging of the liquid.
Open the valve
Check:
Turn on the main switch
The levels of washing liquid and rinse aid in the containers.
The correctness of the filters' installation, the correct rotation of the nozzles, the output of the appliance (make sure whether

8 STALGAST Radom sp. z o.o. ul. Staniewicka 5 03-310 Warsaw tel.: 22 517 15 75 fax.: 22 517 15 77 www.stalgast.com email: [email protected]
there are any foreign objects inside the appliance which could prevent proper operation).
II. Loading the dishwasher 7.2.1. Plates
The basket can hold 12 deep plates or 18 flat plates. Remove food residue from the surface of the plates. Before washing, leave plates with dried cheese, eggs, etc. in cold water to soak.
Figure 6 Figure 7
7.2.2. Glass Remove residue from glasses, shot glasses, etc. and put them in the basket bottoms up.
7.2.3. Cutlery It is recommended that you use a cutlery basket. It is recommended to place cutlery with handles facing down, paying attention to knives and forks (risk of injury).
III. Starting the appliance Activate the switch placed on the wall and press the On/Off (Fig. 9). Then open the hood of the dishwasher, put the overflow plug in place (Fig. 8), put the basket into the chamber and select the program. After closing the hood, the appliance will start filling its tank and the boiler with water - the boiler pilot light will illuminate (Fig. 11). Once the water in the boiler is heated up, the dishwasher chamber starts heating up the water - a pilot light of the heater compartment light will illuminate (Fig. 11). The washing cycle will start automatically - the indicator light will illuminate (Fig. 10). If you open the door during the wash cycle, the program stops automatically. After closing the door, the program continues the wash cycle. After completing the program, the wash cycle indicator light turns off (Figure 10). Remove the basket from the chamber of the appliance. Note! Each operation that involves closing the hood starts a new dishwashing cycle.
Figure 8 Figure 9 Figure 10 Figure 11 Figure 12
IV. Emptying the tank at the end of the day 7.4.1. Emptying the tank in models equipped with a drain pump
Switch off the appliance by pressing the On/Off switch (Fig. 9), then open the hood of the appliance, remove the overflow plug (fig. 8) and close the hood. The drainage process begins automatically and continues until the tank is completely emptied of water. In order to activate the appliance place the overflow plug back in its place,
Overflow / drain plug
Chamber heating lamp
Boiler heating lamp

9 STALGAST Radom sp. z o.o. ul. Staniewicka 5 03-310 Warsaw tel.: 22 517 15 75 fax.: 22 517 15 77 www.stalgast.com email: [email protected]
close the hood of the appliance, and then press the power button. However, if the appliance is not already in use, turn off the main switch.
7.4.2. Emptying the tank in models not equipped with a drain pump Switch off the appliance by pressing the On/Off switch (Fig. 9), then open the hood of the appliance, remove the overflow plug (fig. 8) and wait until the water leaks from the tank completely. Place the overflow plug back in its place, close the hood of the appliance..
Always empty the tank of water before turning the appliance off. In the event of ending work with the appliance, after performing the above, it is mandatory to switch off the device by pressing the switch and then turning off the main switch and close the water tap.
PROBLEM CAUSE SOLUTION
The indicator lamp of the appliance is not lit No power supply Check the connection between the appliance and the power
supply
The washing program does not start The device is not yet ready for operation Wait until the water heater pilot light illuminates.
Improper washing
Blocked nozzles Dismantle and clean the nozzles
Too low level of the washing liquid and/or improper washing liquid
Check whether the liquid is intended for use with this appliance and check the liquid level in the container
Incorrect setting of plates and glasses Rearrange plates and glass correctly (section 6.1)
Low washing temperature Check the temperature on the display. If it is lower than 50°C, please contact your service technician
Improper flushing Blocked nozzles
Clean the nozzles, and check the correct operation of water softener (if installed)
Limescale on the boiler
Stains on the glass and cutlery
Too low rinse aid level and/or wrong rinse aid Check whether the fluid is intended for use
with this appliance and check the liquid level in the container. If the problem persists, contact the service technician Hard water (above 12°dF or contains a lot of
dissolved salt)
The water remains in the tank despite attempts to
empty it
Drain pipe is incorrectly installed or is partially blocked
Make sure that the drain pipe and drain hole are not blocked, and check that the drain hole is not too high
8. MAINTENANCE
Before starting any maintenance work, disconnect the appliance from the power supply. Daily maintenance involves removing objects from the chamber and washing them with a cloth dampened in water with a dish detergent and then wiping them off with a dry cloth. Washing under running water as well as using a pressure washer for this purpose is prohibited.
In the case of intense use, we recommend that you clean the filters every 30-40 wash cycles in order to ensure the proper functioning of the appliance To do this, partially drain the tank of water.
Remove the filters, making sure no fatty deposits and leftover food falls into the openings under the filters. Clean the filters of food residue and sediment and then rinse thoroughly. Do not use sharp tools or sharp edges to clean the filters. Make sure to also remove limescale, as this prevents the build-up of a layer on the surface of the filter.
The surfaces of the filters should be cleaned thoroughly with a damp cloth and neutral (non-aggressive) detergents with no chlorine content and agents that do not cause corrosion and mechanical damage to stainless steel surfaces. In order to prevent the formation of corrosion spots on the stainless steel, avoid using harsh detergents containing chlorine and agents that cause corrosion or mechanical damage to the stainless steel surfaces. For cleaning floors and immediate surroundings, only use detergents that do not cause damage to stainless steel.

10 STALGAST Radom sp. z o.o. ul. Staniewicka 5 03-310 Warsaw tel.: 22 517 15 75 fax.: 22 517 15 77 www.stalgast.com email: [email protected]
Once a month you should: • make sure the power cord is not damaged; • make sure that all components of the appliance are working properly, • clean the wash arms and nozzles (figure 13) (lower and upper 1 and 2) by removing the screws (3 and
4).
Figure 13
• Clean the outside of the appliance using a washing liquid for stainless steel and a damp cloth and then thoroughly rinse and wipe dry.
Service the appliance at least once a year to verify its correct operation, determine the degree of wear, detect possible failures of components and parts. If you detect any damage, it should be removed by qualified technical personnel (technical services). Technical service should pay particular attention to:
• the condition of heating elements, • the condition of electrical installation, • the condition of heating elements' safeguards, • wear and tear of the appliance,
Any damage or failure resulting from the user's non-compliance with this manual as well as failure to comply with existing legislation and standards will not be considered manufacturer's liability.
Downtime in operation
When not expecting to use the appliance for an extended period of time, it is necessary to empty containers for the washing liquid and rinse aid in order to prevent crystallization and, consequently, damage to the pump. Accordingly, suction tubes should be removed from both containers and placed in a bowl filled with clear water; carry out several wash cycles and then drain the tank of water. Finally, turn off the main switch and close the water tap. Suction tubes must be connected back to the containers only when the appliance goes back into use (the clear tube goes into the washing liquid container, and the blue one into the rinse aid container). It is forbidden to leave the appliance on and the water valve open for an extended period of downtime. 9. PACKING, LOADING AND TRANSPORT
The dishwasher is packed in accordance with applicable standards. Loading for transport, unloading and transit should be done using appropriate cranes mechanisms, trucks. Should be transported in covered means of transport. During transport, the dishwasher should be secured to prevent its sliding, protected against strong shocks and other mechanical damage.
2
1
3
4

11 STALGAST Radom sp. z o.o. ul. Staniewicka 5 03-310 Warsaw tel.: 22 517 15 75 fax.: 22 517 15 77 www.stalgast.com email: [email protected]
10. LIST OF SPARE PARTS
No. Part name Index 803020 1 Boiler 6000W_set M72136 1 2 Power cord 400V M70124 1 3 2-channel solenoid valve M72009 1 4 Limit switch M72211 1 5 Switch magnet M72212 1 6 Power switch M72028 1 7 Program switch M72028 1 8 Power indicator light M72096 1 9 Washing cycle indicator light M72097 1 10 Indicator light for boiler, chamber and work time M72098 3 11 Drain pump M72090 0 12 Dishwasher pump 0.75kW M72196 1 13 Peristaltic detergent pump M72087 1 14 Pressure switch M72054 1 15 Pressure switch siphon M72206 1 16 Seal for the pressure switch siphon M72026 1 17 Chamber heater 3000 W M72168 1 18 Contactor M70145 2 19 Electronics board M72092 1 20 Suppressor filter 400V M72083 1 21 6-level connection block M72037 1 22 3-level connection block M72038 1 23 Cable gland M70150 1 24 Pressure switch nut M72019 1 25 Safety thermostat 95ºC M72205 1 26 Chamber thermostat 55ºC M72067 1 27 Boiler thermostat 86ºC M72065 1 28 Drain plug M72207 1 29 Drain sieve M72186 1 30 Drain seal press M72187 1 31 Drain seal M72189 1 32 Drain body M72179 1 33 Rubber connector for the water pump and drain body M72177 1 34 Rubber connector for the water pump and the pipe feeding wash arms M72139 1 35 Rubber connector for lower wash arm body and the pipe feeding wash arms M72148 1 36 Feed pipe for wash arms M72139 1 37 Rubber connector for top bracket and the pipe feeding wash arms M72192 1 38 Top wash arm axis M72122 1 39 Top wash arm bracket M72137 1 40 Seal for the top wash arm bracket M72143 2 37 Body for the top wash arm bracket M72165 1 38 Body for lower wash arms M72058 1 39 Bushing for lower wash arms M72040 1 40 Lower wash arm axis M72157 1 41 Distance between wash arms M72043 2 42 Rinse arm M72024 2 43 Wash arm M72023 2 44 Arm fixing nut M72020 2 45 Non-return water valve M72079 1 46 Weight with filter M72047 1 47 Spring lifting the hood M72149 2 48 Hood slide PWB0090 4 49 Slide support for the hood bracket M72135 2 50 Hood bumper M90512 4 51 Foot M30102 4 52 Water hose M72176 1 53 Dishwasher drain hose M72208 1 54 Dishwasher basket guide M72170 1 55 Control panel label M72203 1 56 Rinse aid pump M72008 1 57 Water tee-joint - rinse aid pump M72056 1

12 STALGAST Radom sp. z o.o. ul. Staniewicka 5 03-310 Warsaw tel.: 22 517 15 75 fax.: 22 517 15 77 www.stalgast.com email: [email protected]
11. ELECTRICAL DIAGRAM
11. DISPOSAL OF WASTE EQUIPMENT
Once you have finished using the equipment, or upon purchasing a new Stalgast product, you can give away the old appliance. Send in your product to us and a specialized company will utilize it in accordance with the Law on Waste Electrical and Electronic Equipment (Dz. U. 2005 No. 180, item 1495)

13 STALGAST Radom sp. z o.o. ul. Staniewicka 5 03-310 Warsaw tel.: 22 517 15 75 fax.: 22 517 15 77 www.stalgast.com email: [email protected]
12. DECLARATION OF CONFORMITY

14 STALGAST Radom sp. z o.o. ul. Staniewicka 5 03-310 Warsaw tel.: 22 517 15 75 fax.: 22 517 15 77 www.stalgast.com email: [email protected]
stalgast DECLARATION OF CONFORMITY STALGAST Radom sp. z o.o. Staniewicka 5 03-310 Warsaw
Product: Hood-type dishwasher
Model: 803020
Meets the requirements described in: Directives:
2006/95/WE - LVD Low Voltage Devices 2004/108/WE - EMC Electromagnetic Compatibility 2002/96/WE - Disposal of waste equipment 2011/65/EU - RoHs restricting the use of certain hazardous substances in
electrical and electronic equipment Standards: EN 10088-1:2005 Corrosion resistant steel. Corrosion resistant steel grades. Low Voltage Devices (LVD) PN-EN 60335-1:2012 Electrical appliances for household and similar purposes -
Safety - Part 1: General requirements (orig.) PN-EN 60335-2-58:2010 Electrical appliances for household and similar purposes -
Safety - Part 2-58: Particular requirements for electric dishwashers for catering.
PN-EN 62233:2008/AC:2008 Methods for measuring electromagnetic fields of electrical appliances for household and similar purposes.
Electromagnetic Compatibility (EMC)
PN-EN 61000-3-:2013-10 Electromagnetic Compatibility (EMC) – Part 3-3: Acceptable Limits - Limitation of voltage changes, voltage fluctuations and flicker in public low-voltage supply, caused by receivers with phase rated current < or = 16A connected unconditionally.
PN-EN 55014-1:2012 Electromagnetic Compatibility – Requirements for household appliances, electric tools and similar equipment - Part 1: Emission.
PN-EN 55014-2:1999/A2:2009 Electromagnetic Compatibility (EMC) – Requirements for household appliances, electric tools and similar equipment - Electromagnetic interference resistance - Product family standard.
and Regulation No. 1935/2004 of the European Parliament and of the Council on materials and articles intended to come into contact with food and repealing Directives 80/590/EEC and 89/109/EEC. last two digits of the year in which the CE marking was applied:15 Issuer: Position Signature
Quality Supervisor Łukasz Stokowski
Entry in the registry: XIII Commercial Division of the National Court Register KRS 0000384800, NIP 524-273-42-28, share capital of PLN 12,006,000