user manual axxin t8-iso · page 7 of 77 d005566v3.1 user manual, t8 -iso instrument, axxin t8...
TRANSCRIPT

User Manual Axxin T8-ISO
T8-Isothermal Instrument
D005566
© 2007 - 2016 Axxin Pty Ltd
All Rights Reserved.
Commercial in Confidence

Page 3 of 77 D005566v3.1 User Manual, T8-ISO Instrument, Axxin T8-ISO.docx
Contents
1 Introduction .......................................................................................................................................................................... 6
2 T8-ISO instrument Specifications ......................................................................................................................................... 7
3 General Information ............................................................................................................................................................. 8
3.1 Abbreviations .............................................................................................................................................................. 8
3.2 Conventions ............................................................................................................................................................... 9
3.3 Warnings & Limitations ............................................................................................................................................... 9
3.4 Safety ....................................................................................................................................................................... 11
3.5 Symbols and Labels ................................................................................................................................................. 12
3.6 Contact Information .................................................................................................................................................. 13
4 Instrument Overview .......................................................................................................................................................... 14
4.1 Regulatory Compliance ............................................................................................................................................ 14
4.2 Intended Use ............................................................................................................................................................ 14
4.3 System Components ................................................................................................................................................ 15
4.4 Instrument Overview ................................................................................................................................................. 15
4.5 Front Status Light ..................................................................................................................................................... 16
4.6 Power Button ............................................................................................................................................................ 16
4.7 External Connections................................................................................................................................................ 16
4.8 Lid ............................................................................................................................................................................ 17
4.9 Test Tubes ............................................................................................................................................................... 17
4.10 Instrument Software Menus ...................................................................................................................................... 18
4.11 User Interface ........................................................................................................................................................... 19
5 Start up .............................................................................................................................................................................. 21
5.1 Initial Setup ............................................................................................................................................................... 21
5.2 Power up .................................................................................................................................................................. 22
5.3 Self Test (only shown if error is found) ...................................................................................................................... 22
5.4 User Login ................................................................................................................................................................ 22
5.5 Home Menu .............................................................................................................................................................. 23
6 User Types ........................................................................................................................................................................ 24
6.1 Standard User .......................................................................................................................................................... 24
6.2 Admin User ............................................................................................................................................................... 24
6.3 Factory User ............................................................................................................................................................. 24
6.4 Changing User Types ............................................................................................................................................... 25
7 Run Test ............................................................................................................................................................................ 26
7.1 Tube Results ............................................................................................................................................................ 27
7.2 Save Results ............................................................................................................................................................ 28
8 Test Results ....................................................................................................................................................................... 29
9 Settings.............................................................................................................................................................................. 30
9.1 About Screen ............................................................................................................................................................ 30
9.2 Audio Volume ........................................................................................................................................................... 31
9.3 Brightness ................................................................................................................................................................ 31
9.4 Help .......................................................................................................................................................................... 31
9.5 Legal ........................................................................................................................................................................ 31
10 Admin Settings ................................................................................................................................................................... 32
10.1 User List ................................................................................................................................................................... 32
10.2 User Login ................................................................................................................................................................ 33
10.3 Auto Logout .............................................................................................................................................................. 33
10.4 Change Admin Password ......................................................................................................................................... 34
10.5 Set Clock .................................................................................................................................................................. 34

Page 4 of 77 D005566v3.1 User Manual, T8-ISO Instrument, Axxin T8-ISO.docx
10.6 Test List .................................................................................................................................................................... 34
10.7 Default Test Settings ................................................................................................................................................ 35
10.8 Print Options ............................................................................................................................................................. 35
10.9 Language ................................................................................................................................................................. 35
10.10 Temperature ............................................................................................................................................................. 35
10.11 Update Software ....................................................................................................................................................... 36
10.12 Restore Defaults ....................................................................................................................................................... 36
10.13 Import Resources ..................................................................................................................................................... 36
10.14 Open Lid ................................................................................................................................................................... 37
10.15 Run Self Test ............................................................................................................................................................ 37
10.16 Export Logfile ........................................................................................................................................................... 37
11 Factory Settings ................................................................................................................................................................. 38
11.1 Reading Test ............................................................................................................................................................ 39
11.2 Function Tests .......................................................................................................................................................... 39
11.3 Motor Tests .............................................................................................................................................................. 40
11.4 Calibration Record .................................................................................................................................................... 40
11.5 Import Result Files .................................................................................................................................................... 40
11.6 Block Temperature Calibration.................................................................................................................................. 40
11.7 FAM/ROX/HEX Normalisation .................................................................................................................................. 41
12 Creating & Loading Test Type Packages ........................................................................................................................... 42
12.1 Importing Test Types from a USB ............................................................................................................................. 42
12.2 Generating a Test Type Barcode .............................................................................................................................. 43
13 Errors, Warnings and Information....................................................................................................................................... 46
14 Software Update ................................................................................................................................................................ 47
14.1 Update Software ....................................................................................................................................................... 47
15 Data Export and Archive .................................................................................................................................................... 50
15.1 Export Result Process .............................................................................................................................................. 50
16 Restoring Factory Defaults ................................................................................................................................................. 52
17 Comparison between T8-ISO and T16-ISO Instrument Specifications................................................................................ 53
18 12V Power Supply Adaptor Specifications ......................................................................................................................... 55
19 Peripherals ........................................................................................................................................................................ 56
19.1 USB Key ................................................................................................................................................................... 56
19.2 Barcode Scanner ...................................................................................................................................................... 56
19.2.1 Barcode Scanner Details .................................................................................................................................... 57
19.2.2 Barcode Scanner Cable ..................................................................................................................................... 58
19.3 Label Printer ............................................................................................................................................................. 59
19.3.1 Printed Report Format ........................................................................................................................................ 60
19.3.2 Label Printer Cable ............................................................................................................................................. 61
20 Cleaning & Decontamination .............................................................................................................................................. 62
21 Service & Maintenance ...................................................................................................................................................... 63
21.1 Software Issue Reporting ......................................................................................................................................... 63
21.2 Service & Repair Procedure ..................................................................................................................................... 66
21.3 Return for Service Request ....................................................................................................................................... 67
21.3.1 Quote for Services .............................................................................................................................................. 68
22 CE Declaration ................................................................................................................................................................... 70
23 RoHS Declaration .............................................................................................................................................................. 71
24 WEEE Directive Declaration............................................................................................................................................... 72
25 Warranty & End User License Agreement .......................................................................................................................... 73
25.1 Limitations ................................................................................................................................................................ 73
25.2 Design Life and Updates .......................................................................................................................................... 73

Page 5 of 77 D005566v3.1 User Manual, T8-ISO Instrument, Axxin T8-ISO.docx
25.3 Instrument Failure and Errors ................................................................................................................................... 73
25.4 General Notice ......................................................................................................................................................... 74
25.5 Licensing and Third Party Intellectual Property ......................................................................................................... 74
25.6 Intended Use ............................................................................................................................................................ 74
25.7 End-User License Agreement ................................................................................................................................... 74
25.8 Restrictions ............................................................................................................................................................... 75
25.9 Warranties and Disclaimer ........................................................................................................................................ 76
25.10 Copyright .................................................................................................................................................................. 77

Page 6 of 77 D005566v3.1 User Manual, T8-ISO Instrument, Axxin T8-ISO.docx
1 Introduction
This document describes setup, configuration and operation of the T8-ISO Isothermal Test Instrument.
Axxin’s advanced T8-ISO isothermal instrument operates at constant temperature and enables the
next generation of molecular testing in a compact, low cost, stand alone, high sensitivity instrument
suitable for both laboratory and field-based applications.
The T8-ISO Instrument is a portable research instrument that provides measurement of two
fluorophores. The standard instrument configuration is FAM and ROX fluorophores. A HEX
fluorescence module is also available as a build option.
This instrument is intended for research and development use only and is not intended for in vitro
diagnostic (IVD) medical use without further assay and application specific, verification, testing and
software.
When used in research work the T8-ISO instrument forms part of a larger test system including the
chemistry assay under test and risks for the overall system should be considered.
If the intended research use carries risks of loss or injury, additional tests or indicators must be
considered to mitigate these risks.
It is the user’s responsibility to follow all diagnostic test kit instructions for use with T8-ISO Instrument.
Any improper use leading to test failure such as contamination, lot expiry or incorrect sample handling
is the responsibility of the user and falls outside the scope of Axxin.

Page 7 of 77 D005566v3.1 User Manual, T8-ISO Instrument, Axxin T8-ISO.docx
2 T8-ISO instrument Specifications
Number of Tubes Configured for 8 tubes Accepts 8 x 200µL PCR tubes (standard 8 tube strip)
Scan Time 10, 15 or 20 seconds
Data Storage 50 test results can be stored on the instrument. History Records allow search and retrieval. Archive or export via USB/ Ethernet.
Multiple Assays, Test Types Supports multiple assay types and test protocols defined on the T8-ISO Desktop Utility. 10 test types can be stored on the instrument, imported from a USB data file or scanned from a QR code.
Measurement technology 2 Fluorescent Channels. FAM and ROX as standard. Optional FAM, HEX, ROX, Custom, or bioluminescence.
Colour Touch Screen 4.3 inch TFT LCD. Simple workflow management Ease of use; Colour icon driver menus and prompts.
Communications Ethernet Network Connection Mini USB Port for PC connection USB Port for Data Export, Software Update and Test Types import
Power 12 V DC from external AC/DC supplied plug pack. DC Voltage fluctuation ±10% DC Current consumption: 12V DC, 3.0 Amps Power supply adaptor is configured for different regions.
Dimensions Width 185mm (7.28") Depth 203mm (8.00") Height 110mm (4.33")
Weight 2.3 kg (5.1 lb)
Lifetime 5 year design life or 10,000 test whichever occurs first
Printer Support Label printer connected via Serial cable
Barcode Reader Barcode reader connected via Serial cable
Operating Environment Indoor Use. 10°C to 30°C, 10% to 80% RH (non-condensing). 0 to 2000m altitude. Pollution degree: 2 Pressure 0.763 bar (2000m) to 1.01 bar (sea level) Minimum light conditions of 100 LUX. Maximum light intensity of 5,000 LUX
Storage Environment 2°C to 45°C, 20% to 70% RH (non-condensing) for at least 7 days. Pressure 0.763 to 1.01 bar. 0 to 2000m altitude. Maximum duration 1 month (cumulative)
Cleaning Isopropyl Alcohol (IPA) or 10% bleach solution, on a damp, lint-free wipe. (No free liquid)

Page 8 of 77 D005566v3.1 User Manual, T8-ISO Instrument, Axxin T8-ISO.docx
3 General Information
3.1 Abbreviations
Ave. Average
Cal Calibration
ID Identification
IVD In Vitro Diagnostics
LCD Liquid Crystal Display
LED Light-Emitting Diode
LIS Laboratory Information System
PC Personal Computer
PCB Printed Circuit Board
Posn. Position
PWM Pulse Width Modulation
RID Run Identification
SID Sample Identification
USB Universal Serial Bus
Var. Variance
Ver Version
Page 9 of 77 D005566v3.1 User Manual, T8-ISO Instrument, Axxin T8-ISO.docx
3.2 Conventions
Warning: Indicative of a situation which if not avoided could result in injury of the user
and/or damage of the T8-ISO instrument.
NOTE Information: Critical information relating to procedures or use of the T8-ISO
instrument.
3.3 Warnings & Limitations
Warning: Hot Surface. The heater block in the T8-ISO instrument may cause contact
burns or damage to materials in contact with the heater.
Warning: Always operate the T8-ISO on a surface that is level, dry and not exposed to
direct sunlight.
Warning: Do not move the T8-ISO when conducting a test.
Warning: Do not drop the T8-ISO instrument.
Warning: Do not cover or place objects on top of or directly against the T8-ISO
instrument.
Warning: Only use approved listed peripheral accessories with the T8-ISO instrument.
Warning: Do not use this T8-ISO instrument in close proximity to sources of strong
electromagnetic radiation (e.g. unshielded intentional radio frequency sources), as these
may interfere with the proper operation.
Warning: Any changes or modifications not explicitly approved by Axxin Pty Ltd could
void the user's warranty and may introduce unintended risks to the operator.
Warning: If a USB extension cable is used with the T8-ISO instrument the total length
should not exceed 3.0 metres.
Warning: Maximum current supplied by all USB peripherals should not exceed 400mA
per USB port.
Warning: This T8-ISO instrument is designed to operate only with the provided power
supply plug pack. This module forms part of the system. Do not operate the system with
a different power supply module. The correct power supply is required to maintain the
safety and electromagnetic compatibility of the system.
Warning: Risk of electrical shock. Do not operate the T8-ISO instrument or the power
supply plug pack if it has been opened, damaged or exposed to moisture, condensation
or rain. The external power supply plug pack is sealed with no user serviceable parts. Do
not operate this module with any damaged or exposed parts.
Page 10 of 77 D005566v3.1 User Manual, T8-ISO Instrument, Axxin T8-ISO.docx
Warning: Do not open or attempt to repair the T8-ISO instrument or other accessories
as there is a risk of damage to the T8-ISO instrument. This T8-ISO instrument does not
contain serviceable parts and should be returned to the supplier for repair. Opening the
T8-ISO instrument will void the warranty.
The Real time clock coin battery included in the equipment will run for the operational life
and is not a user replaceable item.
Warning: Only operate the T8-ISO instrument for its intended purpose and in
accordance with this user manual and warnings. Protection provided by the equipment
may be impaired if the equipment is operated in a manner contradictory to the above.
This T8-ISO instrument (including power supply) is designed to operate within the
manufacturer’s specifications. Do not exceed the manufacturer’s specifications when in
use.
Warning: Position the T8-ISO instrument with clear access to connectors. Keep
connected cables clear of work areas such that tripping or catching will not pull the T8-
ISO instrument off its workbench. The mains socket outlet intended for use with the T8-
ISO external power pack should be located near the equipment and should be readily
accessible. It’s recommended that the user unplug the T8-ISO instrument when not in
use for extended periods.
Warning: USB, Serial and Ethernet Interfaces. If intended for connection to external
equipment, please ensure that interfaces of such equipment are separated from mains
by double reinforced insulation and present no risk of electrical shock.
Warning: In the instance of sudden power loss due to the power cable being removed or
instrument power failure, a test result file will not be retained during an existing test run.
The power loss will void the current test run data. All other tests previously run on the T8
instrument will be retained per normal.
Warning: It is the user’s responsibility to follow all diagnostic test kit instructions for use
with T8-ISO Instrument. Any improper use leading to test failure such as contamination,
lot expiry or incorrect sample handling is the responsibility of the user and falls outside
the scope of Axxin.
Warning: The user is responsible for confirming the instrument Time and Date settings
are correct before proceeding to performing any diagnostic tests. Failure to incorrectly
set the time and date could lead to incorrectly calling a lot expiry or incorrect time and
date stamp on a test result file.
NOTE: Failure to follow these warnings will void the T8-ISO instrument warranty.

Page 11 of 77 D005566v3.1 User Manual, T8-ISO Instrument, Axxin T8-ISO.docx
3.4 Safety
The T8-ISO instrument is intended to provide safe and reliable operation when used in accordance to
this User Manual. If the T8-ISO instrument is used in a manner that is not specified in the User
Manual, the protections provided by the equipment may be impaired.
The T8-ISO instrument is designed to operate safely under these conditions:
Indoor use (protected from water).
Altitude up to 2000 m.
Ambient temperature 10ºC to 30ºC.
Relative humidity 10% to 80% non-condensing.
Mains supply voltage fluctuations not to exceed ±10% of the nominal voltage.
Installation Categories (Overvoltage categories) II.
Pollution Category 2.
Use with specified and supplied external AC/DC power adaptor only.
Mains socket for AC/DC power pack should be readily accessible.
Set up T8-ISO instrument on a stable, level bench, in an office or laboratory environment.
The T8-ISO instrument is not intended as a hand-held device; only operate it on a flat and
level surface.
Install the T8-ISO instrument at least 100 mm from all edges.
Install cables so as to prevent risk of tripping or pulling that may cause damage to T8-ISO
instrument or personal injury.
The T8-ISO instrument is a non-serviceable part, opening the T8-ISO instrument will void the
T8-ISO instrument warranty.

Page 12 of 77 D005566v3.1 User Manual, T8-ISO Instrument, Axxin T8-ISO.docx
3.5 Symbols and Labels
The following definitions are provided for symbols used in this document or on product labels. The
Regulatory Compliance requirements are described in Section 4.1.
Axxin Pty Ltd Logo
MODEL T8-ISO
P003843 Device Model Number and Axxin Part Number.
CE Mark
RoHS: Restriction of Hazardous Substances Compliant
WEEE Directive Compliance: Where Axxin is the importer and distributer, the
product has WEEE registration for the UK and specific other countries as
required.
This device complies with the FCC Rules
Biological hazards (also known as biohazards): Potential contamination
with biological substances that pose a threat to the health.
Australian Regulatory Compliance Mark (RCM):
E1372 is the Axxin PTY LTD manufacture registration number
Refer to User Manual
Manufacturer: Axxin Pty Ltd, www.axxin.com, Made in Australia
USB Port: for connection of USB flash memory key or external barcode
scanner.
Network Port: to connect the T8-ISO instrument to a network.
Power Supply: to connect the supplier power supply to the T8-ISO instrument.
DC Power connector, for connection with supplied external AC/DC power pack.
12VDC, 3.0 A maximum
Power Button: Used to power on /off the T8-ISO instrument
Hot Surface: This symbol is used to indicate potentially hot instrument surfaces.

Page 13 of 77 D005566v3.1 User Manual, T8-ISO Instrument, Axxin T8-ISO.docx
The following example compliance label is affixed to the back of the T8-ISO instrument.
3.6 Contact Information
AXXIN PTY LTD
Original Equipment Manufacture
Ground Floor,
582 Heidelberg Rd,
Fairfield, 3078
Victoria, Australia
T + 61 3 9329 1167
F + 61 3 8732 0310
ABN 43 120 905 839

Page 14 of 77 D005566v3.1 User Manual, T8-ISO Instrument, Axxin T8-ISO.docx
4 Instrument Overview
4.1 Regulatory Compliance
The T8-ISO instrument complies with the emissions and immunity requirements of the following
standards IEC 61326-1 (complying with immunity test requirements for equipment intended for use in
industrial locations) and IEC 61326-2-6.
Refer to the CE Declaration, a copy of which has been provided in Section 22.
This equipment has been tested and found compliant with emissions limits required by CISPR11
Class A equipment.
This T8-ISO instrument complies with Part 15 of the FCC Rules. Operation is subject to the following
two conditions: (1) this T8-ISO instrument may not cause harmful interference, and (2) this T8-ISO
instrument must accept any interference received, including interference that may cause undesired
operation.
Where Axxin is the importer and distributer, the product has WEEE registration for the UK and specific
other countries as required.
The Axxin T8-ISO device is RoHS compliant. Please refer to RoHS Declaration, a copy of which has been provided in Section 23.
Refer to the WEEE Declaration, a copy of which has been provided in Section 24.
Axxin advises the user to assess the electromagnetic environment of the intended operational
environment of the T8-ISO instrument prior to use.
4.2 Intended Use
This T8-ISO instrument is intended for research and development use only and is not intended for any
diagnostic or medical use. This document is provided as an operational guide to describe the use of
the T8-ISO instrument. This document does not describe operation of the specific diagnostic test or
provide any input to the requirements, safety or processing of any diagnostic test which is outside the
scope of Axxin Pty Ltd.

Page 15 of 77 D005566v3.1 User Manual, T8-ISO Instrument, Axxin T8-ISO.docx
4.3 System Components
The following system components are supplied with the T8-ISO instrument:
T8-ISO Instrument
Power Supply and region specific power adapters
Printer Cable
Barcode Scanner Cable
4.4 Instrument Overview

Page 16 of 77 D005566v3.1 User Manual, T8-ISO Instrument, Axxin T8-ISO.docx
4.5 Front Status Light
The instrument has a fixed intensity white, front panel LED to indicate power status:
Rapid Flash 5 Hz: Instrument is in bootloader mode (shown during Instrument software
updates)
Medium Flash Instrument is heating up to set temperature (approx. 1 flash per second)
Slow Flash Instrument is in sleep mode (approx. 1 flash per 4 seconds)
On Solid Instrument is running and at set temperature
4.6 Power Button
The T8-ISO instrument incorporates a front mounted power button. Once power is connected to the
rear of the instrument, press the button for one second to power up and start the instrument. When the
instrument is running it can be turned off (shut down) by pressing and holding the power button for 3
seconds or longer.
4.7 External Connections
Desktop
application
via USB Printer Barcode Scanner Network Power

Page 17 of 77 D005566v3.1 User Manual, T8-ISO Instrument, Axxin T8-ISO.docx
4.8 Lid
The Lid is magnetically latched during testing to prevent test failure due to user opening.
The Lid is lifted by a cam mechanism at the completion of each test to allow user to access the test
tubes.
4.9 Test Tubes
The T8-ISO Instrument accepts 8 x 200µL PCR tubes (standard 8 tube strip) or single 200µL PCR
tubes. Axxin recommends the following tubes:
Axygen PCR-0208-C, 8 x 200µL PCR tube strip
Axygen PCR-02-C, single 200µL tube with flat cap
A minimum sample volume of 30 µL is recommended. Typical test volumes are in the range of 50 µL
to 100 µL. The tubes should have a good fit in the block and should not require force to insert.
Figure 1 T8-ISO Instrument compatible PCR 8 tube strip

Page 18 of 77 D005566v3.1 User Manual, T8-ISO Instrument, Axxin T8-ISO.docx
4.10 Instrument Software Menus
User
Sett
ing
s
Ad
min
Sett
ing
s
Facto
ry
Sett
ing
s
Home Screen
Test
Results
Settings
Audio Volume
About
Legal
Help
Brightness
User Login
User List
Set Clock
Set Admin Password
Auto Logout
Default Test Settings
Test List
Print Options
Temperature
Language
Import Resources
Restore Defaults
Update Software
Open Lid
Run Self Test
Export Logfile
Function Test
Reading Test
Calibration Record
Motor Tests
Lid Temp Cal
Block Temp Cal
Normalize ROX
Normalize FAM
Import Result File
Login Screen
Export Test Results
Print Test Results
Refer to section 6 for information on User Types and
instructions on how to switch between users.

Page 19 of 77 D005566v3.1 User Manual, T8-ISO Instrument, Axxin T8-ISO.docx
4.11 User Interface
Button: Touch the button to perform action.
Editable text: Touch the yellow text box to edit text.
If the text is a single digit, the digit will increase by 1 with each touch.
If the text is a number, the numerical keypad will be displayed:
If the text is a text string, the QWERTY keypad will be displayed:
Text: Text such as reading results or settings is displayed in a white text box.
This text is not editable.
Test: Touch the Test button / icon to run a new test.
Test Results: Touch the Test Result button to navigate to the Test Results menu
and access test result history.
Settings: Touch the Settings button to navigate to the settings menu.
In Standard User: Allows password input for user to change to either Admin or
Factory User
In Admin/Factory User: Allows access to Admin settings menu
Factory Settings: Available to Factory users only, touch the Factory Settings
icon to navigate to the factory settings menu.

Page 20 of 77 D005566v3.1 User Manual, T8-ISO Instrument, Axxin T8-ISO.docx
OK: Touch the OK icon to confirm an action, input or settings change,
acknowledge information or perform another action as specified by instructions
on screen. The OK icon must be touched to proceed.
Cancel: Touch the Cancel icon to cancel an action, input, settings change, or
perform another action as specified by instructions on screen. The cancellation of
an action may need to be confirmed e.g. when cancelling a running test.
Up / Down: Touch Up or Down icons to navigate through screens, e.g. through a
list or menu which flows over multiple screens.
Return / Next: Touch the Return or Next icon to navigate through screens.
Print: Touch the Print icon to print information on screen. Printer must be
connected to instrument.
Export: Touch the Export icon to export test result or other content as specified
by instructions on screen. An FAT32-formatted USB key must be connected to
instrument.
Import: Touch the Import icon to import test packages or other content as
specified by instructions on screen. An FAT32-formatted USB key must be
connected to instrument.
Error: An error screen is displayed when an action could not be completed, e.g.
a test could not be completed, USB key was not found, or the self test was failed.
Touch the icon to acknowledge the error.
Warning: A warning screen is displayed when confirmation of an action is
required e.g. user cancels a test in progress.
Touch the icon to confirm the action.
Touch the icon to cancel the action.
Information: An information screen is displayed to notify the user of information,
e.g. export was successful.
Touch the icon to acknowledge the information.
Waiting: A waiting screen is displayed when an action is in progress.
Touch the icon to cancel process.
Commercial in Confidence
Page 21 of 77 D005566v3.1 User Manual, T8-ISO Instrument, Axxin T8-ISO.docx
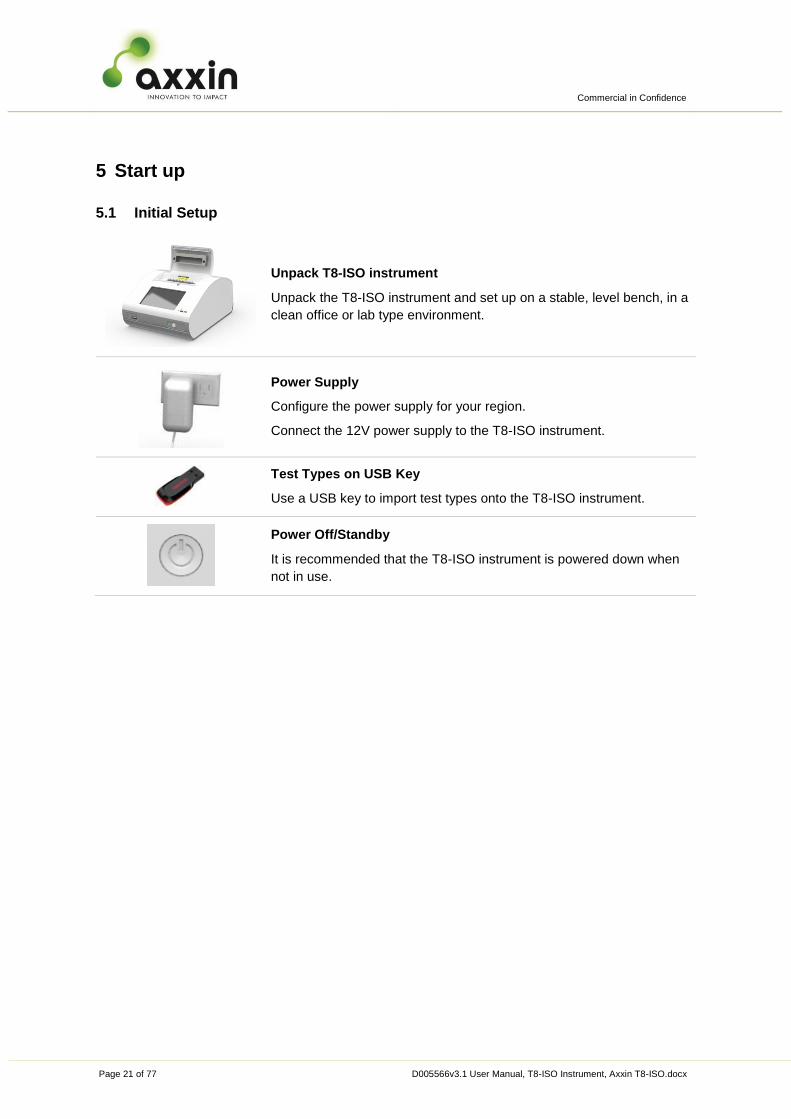
5 Start up
5.1 Initial Setup
Unpack T8-ISO instrument
Unpack the T8-ISO instrument and set up on a stable, level bench, in a
clean office or lab type environment.
Power Supply
Configure the power supply for your region.
Connect the 12V power supply to the T8-ISO instrument.
Test Types on USB Key
Use a USB key to import test types onto the T8-ISO instrument.
Power Off/Standby
It is recommended that the T8-ISO instrument is powered down when
not in use.

Commercial in Confidence
Page 22 of 77 D005566v3.1 User Manual, T8-ISO Instrument, Axxin T8-ISO.docx
5.2 Power up
Connect the 12V power supply adaptor to the
T8-ISO instrument.
Press and hold the power button until the
instrument shows the loading screen.
The instrument will perform a self test.
5.3 Self Test (only shown if error is found)
The instrument runs a self test sequence at start
up.
If all tests pass, the instrument will automatically
load to the “User Login” screen (below).
In the event of an error:
If the self test identifies a fault an error screen is
displayed. Click the icon to acknowledge self
test results.
Some errors will allow the user to continue to
use the instrument with limited functionality.
The user will not be able to run tests if doing so
in the presence of the fault puts the test at risk.
However, if possible, the user will be given
access to diagnostics and export tools to enable
servicing.
If the error persists and use of the instrument is
impaired, refer to Section 21 for service
instructions.
5.4 User Login
Enter User Name and password if requested.
(Login requirements are set by the Admin User
in Section 10.2.)
Standard User: A standard user has access to
the home menu, testing, result review and basic
settings.
Admin User: The admin user has access to the
all the same functionality as the standard user
as well as to the "Admin Settings" screens.

Commercial in Confidence
Page 23 of 77 D005566v3.1 User Manual, T8-ISO Instrument, Axxin T8-ISO.docx
Factory User: The factory user has access to
the all the same functionality as the standard
user as well as to the "Admin Settings" screens
and "Factory Settings" screens. Factory Mode is
indicated by a yellow header bar.
Refer to section 10.1 (User List) for details of setting
up, importing or exporting user lists.
5.5 Home Menu
The “Home Menu” is displayed after start up, self test
and user login.
The “Home Menu” screen provides access to the
following functions:
Test
Results History
Settings

Commercial in Confidence
Page 24 of 77 D005566v3.1 User Manual, T8-ISO Instrument, Axxin T8-ISO.docx
6 User Types
6.1 Standard User
The standard user has access to the home menu, testing, results review and basic settings.
The standard user can:
1. Run a test.
2. Review results.
3. Print a single result.
4. Export results to a USB key and delete the results at completion of export.
5. View the T8-ISO instrument "About" information.
6. Adjust the T8-ISO instruments audio settings.
7. Configure the LCD screen brightness level.
8. Review the T8-ISO instrument "Help & Legal" information.
6.2 Admin User
The admin user has access to the same functionality as the standard user as well as access to the
"Admin Settings" screens.
The admin user can:
9. Create and import ‘User Lists’ and login settings.
10. Change the time and date.
11. Import test types onto the T8-ISO instrument.
12. Change default Test settings.
13. Change printed report name.
14. Change language settings.
15. Review and set default temperatures.
16. Update the instrument software.
17. Return the T8-ISO instrument to factory default settings.
18. Import resources to change logo and icons.
19. Open the lid of the instrument
20. Run a Self-Test to check instrument functionality
21. Export instrument log file
6.3 Factory User
The factory user has access to the same functionality as the standard user and the admin user as
well as access to the "Factory Settings" screens.
The factory user can:
22. Perform reading tests on each tube independent of a test type.

Commercial in Confidence
Page 25 of 77 D005566v3.1 User Manual, T8-ISO Instrument, Axxin T8-ISO.docx
23. Run functional and motor tests of the instrument.
24. Review and print calibration records.
25. Import result files from a USB.
26. Set temperature calibration and normalization details.
6.4 Changing User Types
Login to Admin/Factory Users:
Touch on the settings icon on the home screen.
Touch on the icon to enter a password.
Depending on the password, either Admin
mode or Factory mode will be initiated.
Note:
“admin” is the default password for access to
Admin mode.
Logout:
Logout to return to Standard User mode.
Logout by touching on the icon repeatedly,
navigating to the screen displayed on the left.
Touch the icon to confirm logging out.

Commercial in Confidence
Page 26 of 77 D005566v3.1 User Manual, T8-ISO Instrument, Axxin T8-ISO.docx
7 Run Test
Run Test
Select the "Test" icon on the Home Screen.
Touch a Test Type in the list of test types
installed on the instrument.
Alternatively, scan a Test Type barcode.
Touch the icon to cancel.
Refer to section 10.6 for details of setting up, importing
or exporting test lists.
Refer to section 12.2 for details of setting up and using
the barcode scanner.
Edit Test Details, Run ID & Test ID
Enter a test name: touch the yellow “Run ID”
field.
Enter sample IDs: touch the yellow “Sample ID”
fields for Tube 1 to Tube 8.
Auto fill Sample IDs: enter text in the T1 field,
then touch the "Auto 1-8" button.
Touch the icon to continue.
Touch the icon to cancel.
Heating to Test Temperature
Wait for the heater block to reach the pre-set test
type temperature.
Touch the icon to cancel.
Factory users will be presented with a icon,
allowing them to perform diagnostics without the
instrument heating to test temperature.

Commercial in Confidence
Page 27 of 77 D005566v3.1 User Manual, T8-ISO Instrument, Axxin T8-ISO.docx
Insert Samples and Close Lid
Insert sample tubes.
Close the lid.
The instrument will detect that the lid is closed
and automatically proceed to the next screen.
Touch the icon to cancel.
7.1 Tube Results
The following results are possible for each tube:
Negative Result
Positive Result
Invalid Result
Test Running
The Run ID (“RID”) and Sample ID (“SID”)
entered in Section 7 are displayed on this screen.
The time remaining until test completion is shown
at the bottom of the screen.
Touch the icon to cancel.
Detailed results for each tube can be accessed
by touching its results icon ( ).
Touch the icon, or click the result to navigate
to the graph for the selected tube.
Touch the icons to navigate between
screens.
!

Commercial in Confidence
Page 28 of 77 D005566v3.1 User Manual, T8-ISO Instrument, Axxin T8-ISO.docx
Test Results screen
The “Results” screen is displayed when test is
completed.
Touch a Tube icon to view detailed results.
Touch the icon to print test result.
Touch the icon to export test result.
Touch the icon to run a new test.
Touch the icon to cancel and navigate to the
Home Screen.
Test Result Details
Detailed “Results” screens.
Touch the tube result (“Tube 1 NEGATIVE” in the
screenshot) to view the result graph (if enabled in
the test type).
Touch the icons to navigate between
screens displayed on the left.
7.2 Save Results
The application automatically saves test results to a location in the T8-ISO Instrument memory.
Refer to section 15 for details of exporting test results to a USB key.
The test results are .CSV files that can be opened and viewed on a PC and printed.

Commercial in Confidence
Page 29 of 77 D005566v3.1 User Manual, T8-ISO Instrument, Axxin T8-ISO.docx
8 Test Results
Results List Menu
Touch the "Results" icon on the Home Screen.
A list of test results is displayed.
Touch a test result in the list to view result.
Touch Export Results icon to export results
to a USB key.
Refer to section 15 for details of exporting test
results to a USB key.
Results screen
Touch a Tube icon to view detailed results.
Touch the icon to cancel and navigate to the
“Home Screen”.
Touch the icon to print test result (refer to
section 19.3).
Touch the icon to export test result (refer to
section 15).
Result Details
Detailed results screens.
Touch the Forward icon to navigate to the
next screen and the to go back to the
previous screen.

Commercial in Confidence
Page 30 of 77 D005566v3.1 User Manual, T8-ISO Instrument, Axxin T8-ISO.docx
9 Settings
The “Settings” menu is available to all Users.
Touch the Settings icon on the “Home Screen”.
Touch a menu button to navigate to that item.
9.1 About Screen
The “About” screen provides instrument
configuration information, including:
Model
Serial Number
Silicon ID
Hardware Version (Ver.)
Software Version
Bootloader Version
Test Package
Test Count
Scan Cycles
FAM/ROX/HEX Optical Module
Firmware (Compensation or Not)
IP Address
MAC Address
Touch the icons to navigate between
screens.
Touch the icon to print the information (refer
to section 19.3).
Touch the icon to return to the “Settings”
menu.

Commercial in Confidence
Page 31 of 77 D005566v3.1 User Manual, T8-ISO Instrument, Axxin T8-ISO.docx
9.2 Audio Volume
Touch the icons to adjust volume levels.
Touch the “Test” icons to play a test sound.
Touch the icon to save the settings for this
current session.
Touch the icon to cancel.
9.3 Brightness
Touch the icons to adjust LCD screen
brightness.
Touch the icon to save the settings for this
current session.
Touch the icon to cancel.
9.4 Help
Axxin contact information is provided:
www.axxin.com
Copyright information is also displayed.
9.5 Legal
Axxin contact website for accessing licensing
information is provided:
www.axxin.com
License details are also provided in the last
section of this user manual.

Commercial in Confidence
Page 32 of 77 D005566v3.1 User Manual, T8-ISO Instrument, Axxin T8-ISO.docx
10 Admin Settings
Admin settings are available to Admin and
Factory Users.
Navigate to the Admin Settings by touching the
icon on the “Settings” screen.
Touch a menu button to navigate to that item.
Touch the icons to navigate between
screens.
Touch the icon to return the basic settings
menu.
If the user is logged in as Factory User, the
icon will be visible on the “Admin
Settings” screens.
Touch the icon to access “Factory
Settings”.
10.1 User List
Touch the “User List” button to delete users or
edit user names and passwords.
Touch to navigate through the user list
screens.
Touch the Import icon to import a user list
from a USB device.

Commercial in Confidence
Page 33 of 77 D005566v3.1 User Manual, T8-ISO Instrument, Axxin T8-ISO.docx
Touch the Export icon to export the user
list to a USB device.
To make changes, touch a user name. Edit the
user name or password by typing in the yellow
fields.
Touch the “Delete User” button to delete that
user.
Touch to confirm settings or to cancel.
10.2 User Login
Touch “User Login” button to change user login
requirements. Touch button repeatedly to switch
between the following options:
-Password: requires password to login.
-User name: requires user name and password to
login.
-Not req’d: no password or username required.
10.3 Auto Logout
Touch the “Auto Logout” button to scroll through
logout settings. Touch button repeatedly to switch
between the following options:
-Never: the instrument will not auto logout.
-5 mins: Auto logout after 5 minutes idleness.
-10 mins: Auto logout after 10 minutes idleness.
-30 mins: Auto logout after 30 minutes idleness.
-60 mins: Auto logout after 60 minutes idleness.

Commercial in Confidence
Page 34 of 77 D005566v3.1 User Manual, T8-ISO Instrument, Axxin T8-ISO.docx
10.4 Change Admin Password
Enter a new admin password.
Touch to confirm.
Touch to cancel.
Re-enter the new admin password.
Touch to confirm.
Touch to cancel.
10.5 Set Clock
Touch to adjust selected value.
Touch to move to the next field.
Touch the “Display Mode” button to select 24
hour (24 hr) or 12 hour (AM/PM) time format.
Touch to confirm setting.
10.6 Test List
Touch the icons to enable or disable test
types. Enabled test types will be available to all
users in the “Test” menu.
Touch to navigate through the “Test List”
screens.
Touch the Import icon to import the Test
List from a USB device (refer to section 12.1).
Touch to confirm setting.

Commercial in Confidence
Page 35 of 77 D005566v3.1 User Manual, T8-ISO Instrument, Axxin T8-ISO.docx
10.7 Default Test Settings
To make changes, touch one of the yellow
fields and enter a numeric value in the prompt.
Touch to confirm setting.
10.8 Print Options
Touch the yellow field to enter a report name.
Touch to confirm setting.
10.9 Language
Touch the buttons to select language.
The instrument will reboot if the language is
changed.
Touch to confirm setting.
10.10 Temperature
Reports the temperatures measured in the
Block, Lid and Enclosure.
Set default temperatures for the Block and Lid
by touching on the corresponding yellow fields.
Touch to confirm setting.

Commercial in Confidence
Page 36 of 77 D005566v3.1 User Manual, T8-ISO Instrument, Axxin T8-ISO.docx
10.11 Update Software
Insert a USB device with the software HEX file.
Touch the “Update Software” button in admin
settings.
Touch to confirm new software update.
The instrument will load the new software and
reboot.
Touch to cancel.
Refer to section 14 for detailed software update
process description.
10.12 Restore Defaults
Touch the “Restore Defaults” button in admin
settings to restore all default settings.
Touch to confirm returning to default
settings.
Touch to cancel.
NOTE: Restoring Defaults deletes all User
Lists, Test Types and Test Results.
Refer to section 16 for list of all items that will
restore to factory settings.
10.13 Import Resources
Allows the user to import customisation files to
change icons and logos.
Insert a USB device with the software HEX file.
Touch to confirm import.

Commercial in Confidence
Page 37 of 77 D005566v3.1 User Manual, T8-ISO Instrument, Axxin T8-ISO.docx
10.14 Open Lid
Touch the “Open Lid” button to force the
instrument to open the lid.
10.15 Run Self Test
Touch the “Run Self-Test” button to run the
instrument self test.
10.16 Export Logfile
Click on “Export Logfile” (with a USB key
inserted) to export the instrument’s log.
The log file tracks the results of every Self-Test
run, instrument details, calibration records and
other pieces of information, and can be
exported out as a csv file.

Commercial in Confidence
Page 38 of 77 D005566v3.1 User Manual, T8-ISO Instrument, Axxin T8-ISO.docx
11 Factory Settings
The Factory Settings are intended for use by the instrument distributor or management group
responsible for managing a set of instruments. The factory screens are accessed by a passcode. This
passcode will be provided to instrument managers separately to this user manual. Contact
CAUTION: Only authorized, trained users should be provided with access to the factory
screens as incorrect setting of options and calibrations can cause measurement error or
incorrect operation of the instrument.
The factory screens are not accessible to a Standard User or Admin User and are intended to
administer specific calibrations, options and functions. Incorrect settings or calibrations entered in the
factory screens can cause measurement error or incorrect operation of the instrument.
Some instrument function can be tested using the Factory Setting screens for the purpose of
diagnostics and repair. These screens also provide the capability to calibrate the instrument.
Factory settings are available to Factory Users
only.
Touch the Factory icon on the “Admin Setting”
screen.
Touch a menu button to navigate to that item.

Commercial in Confidence
Page 39 of 77 D005566v3.1 User Manual, T8-ISO Instrument, Axxin T8-ISO.docx
11.1 Reading Test
Touch the yellow “Tube #” box to increment
through tube numbers.
Insert sample in the selected tube location in
the heater block and close the lid.
Touch the button to run a reading test for
the corresponding channel.
Touch or to return to the factory settings
menu.
11.2 Function Tests
Touch the “Function Test” buttons to test the
instrument functions. Blue text indicates the
current status of the part being tested.
LCD Test – Displays colours and B&W shades.
Touch Screen Test – Displays grid with X/Y
coordinates when touched.
LID Cam – Drives lid motor to open and close the
Instrument lid.
Case Fan – Turns on case fan for 10 seconds.
Block Fan – Turns on heater block fan for 10
seconds.
Lid Sensor – Displays lid open/close state.
Debug Button – Displays debug button state.
Home Sensor – Displays home sensor state.
Ethernet Ping – Displays status of Ethernet Ping.
Printer Port – Displays status of Printer Port.
Barcode Port – Displays status of Barcode Port.

Commercial in Confidence
Page 40 of 77 D005566v3.1 User Manual, T8-ISO Instrument, Axxin T8-ISO.docx
11.3 Motor Tests
These options are presented to allow a Factory
User to test specific motor and position
functions.
11.4 Calibration Record
A summary of instrument calibration settings is
displayed.
Touch the icon to print screen.
Touch to return to the “Factory Settings”
menu.
11.5 Import Result Files
Click on “Import Result Files” (with a USB key
inserted) to import previously saved result files.
Files must follow the following naming
convention:
TRxxx.CSV
Where xxx is the test number.
E.g.: TR002.CSV
11.6 Block Temperature Calibration
The block temperature set point setting is
displayed. The current set point can be
adjusted by touching the yellow box.
The current block temperature sensor reading
is displayed.
Adjust the block temperature offsets by
touching the yellow boxes.
Touch to save the calibration.
Touch to cancel details and return to the
“Factory Settings” menu.

Commercial in Confidence
Page 41 of 77 D005566v3.1 User Manual, T8-ISO Instrument, Axxin T8-ISO.docx
11.7 FAM/ROX/HEX Normalisation
Touch the yellow “Tube #” box to increment
through tube numbers.
Touch the yellow “Target box” and enter the
FAM/ROX/HEX target value of the reference
sample used for FAM/ROX/HEX normalization.
Touch the yellow box and enter the LED%
value of the reference sample used for
FAM/ROX/HEX normalization.
Close lid, then touch “Run”.
Normalization will run and a calibration factor is
calculated.
Touch icon to save and apply the
FAM/ROX/HEX calculated normalization factor
setting.
NOTE: Return Normalization to default value.
The “Clear” button can be used to clear the
current normalization and reset its factor to the
default setting of 1.00.

Commercial in Confidence
Page 42 of 77 D005566v3.1 User Manual, T8-ISO Instrument, Axxin T8-ISO.docx
12 Creating & Loading Test Type Packages
When the T8-ISO instrument is first shipped or after it is returned to the User Default state by an
admin user, a single default test will be available for selection by the user for the purposes of
evaluation and demonstration.
A user can create tests specific to their application using the associated Desktop application for the
T8 instrument. These customer specific tests can then be run on the T8-ISO instrument. Two
methods are provided to run user created tests on the instrument. These are:
Up to 10 tests types can be imported from a USB key and saved within the instrument
memory to be run at any time.
A test type can read from a 2 dimensional QR code using an attached barcode reader and
run immediately.
12.1 Importing Test Types from a USB
The user can create Test Types on the Desktop Application and import these onto the instrument
using a USB key.
Create Test Types & Export onto USB
After creating a Test Type on the Desktop Application, export it as a package onto a USB key.
Refer to D005842 User Manual, T8 Desktop Application, Axxin T8-ISO on how to create and export a Test Type Package.
NOTE:
Ensure that only 1 Test Type Package file (*.pkg) is present on the USB key.
Ensure that the Test Type Package is saved at the USB root level (not nested in any folders).
Insert USB into T8-ISO Instrument
Insert USB key with the Test Type Package file (*.pkg) into the T8-ISO instrument’s USB port, located on the front of the instrument.

Commercial in Confidence
Page 43 of 77 D005566v3.1 User Manual, T8-ISO Instrument, Axxin T8-ISO.docx
Import Test Types into T8-ISO Instrument
Log in as an admin/factory user (section 6.4).
Navigate to the Test List screen under admin settings (section 10).
Select the icon to import Test Type Package from the USB key.
Touch to import Test Type Package.
Touch to cancel and return to Test List
screen.
When the Test Type Package has been successfully imported, the Test Types will be available in the Test List screen.
12.2 Generating a Test Type Barcode
Any Test Type created in the Desktop Application can also be exported as a 2D QR barcode (2D) for
use by any T8-ISO instrument.
Refer to document D005842 (User Manual, T8 Desktop Application, Axxin T8-ISO)
for details on how to print QR-Code for test types.
A Test Type barcode can either be scanned from the “Home Screen” or the “New Test” screen.
An example test type printout report is shown on the next page.

Commercial in Confidence
Page 44 of 77 D005566v3.1 User Manual, T8-ISO Instrument, Axxin T8-ISO.docx
Image: Example of Test Type QR-Code Print
A flow chart showing operation of the QR Code test type scanning function within the instrument
workflow is shown on the next page.

Commercial in Confidence
Page 45 of 77 D005566v3.1 User Manual, T8-ISO Instrument, Axxin T8-ISO.docx
Scan QR code
Test error, test expired
Run test type, test workflow continues
Test Type Expired
Test Type Expired
No No
Yes
Yes
No
Yes
Return to HOME / TEST
screen
Test error, test expired
Scan QR code
Return to HOME / TEST
screen
Remain in current screen
(HOME / TEST)
User selects test
Test result
(Expiry date and lot
number are included in
this test result, if
available)
Finish
QR code
valid?
QR Code Type> Test type only
> Expiry date
> Lot #
> Test type
> Expiry date
> Lot #
QR Code Type> Test type only
> Expiry date
> Lot #
> Test type
> Expiry date
> Lot #
Expiry Date and Lot #
is overwritten with latest
values
Start
Expiry Date and Lot #
is overwritten with latest
values
Commercial in Confidence
Page 46 of 77 D005566v3.1 User Manual, T8-ISO Instrument, Axxin T8-ISO.docx
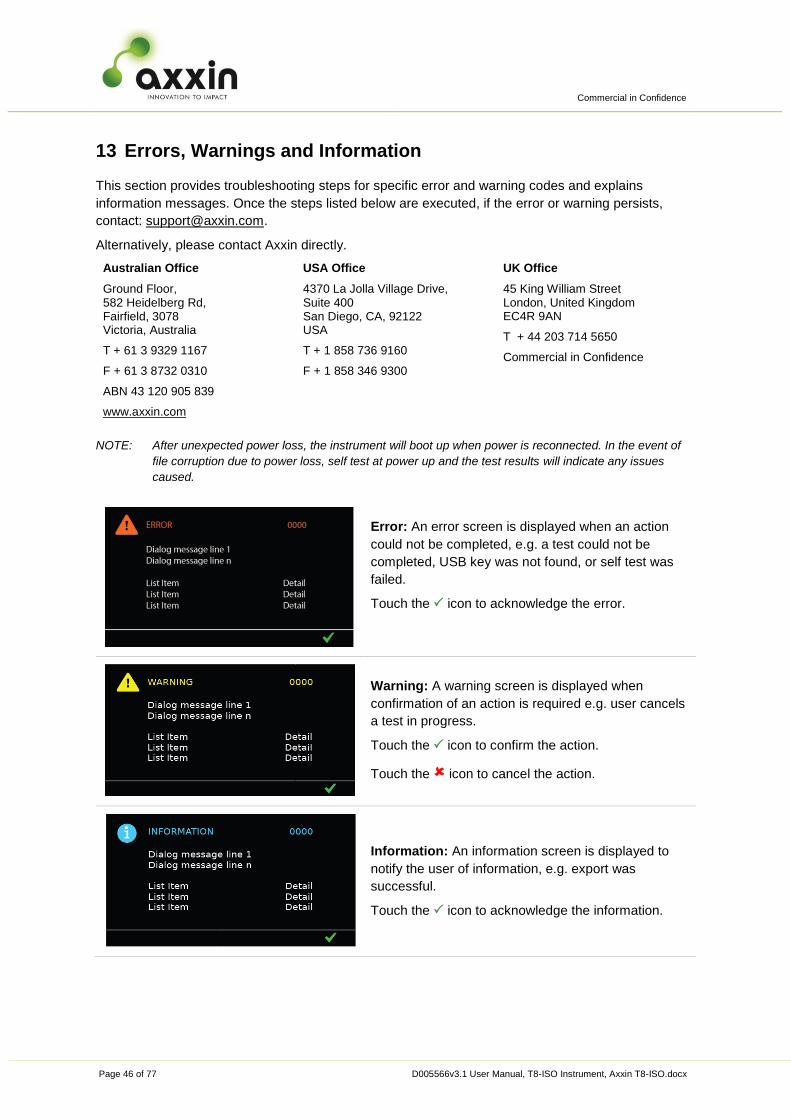
13 Errors, Warnings and Information
This section provides troubleshooting steps for specific error and warning codes and explains
information messages. Once the steps listed below are executed, if the error or warning persists,
contact: [email protected].
Alternatively, please contact Axxin directly.
Australian Office
Ground Floor, 582 Heidelberg Rd, Fairfield, 3078 Victoria, Australia
T + 61 3 9329 1167
F + 61 3 8732 0310
ABN 43 120 905 839
www.axxin.com
USA Office
4370 La Jolla Village Drive, Suite 400 San Diego, CA, 92122 USA
T + 1 858 736 9160
F + 1 858 346 9300
UK Office
45 King William Street London, United Kingdom EC4R 9AN
T + 44 203 714 5650
Commercial in Confidence
NOTE: After unexpected power loss, the instrument will boot up when power is reconnected. In the event of
file corruption due to power loss, self test at power up and the test results will indicate any issues
caused.
Error: An error screen is displayed when an action
could not be completed, e.g. a test could not be
completed, USB key was not found, or self test was
failed.
Touch the icon to acknowledge the error.
Warning: A warning screen is displayed when
confirmation of an action is required e.g. user cancels
a test in progress.
Touch the icon to confirm the action.
Touch the icon to cancel the action.
Information: An information screen is displayed to
notify the user of information, e.g. export was
successful.
Touch the icon to acknowledge the information.

Commercial in Confidence
Page 47 of 77 D005566v3.1 User Manual, T8-ISO Instrument, Axxin T8-ISO.docx
14 Software Update
The Instrument update process consists of a single file packaged release that is deployed on a USB
Flash Memory Key. This packaged release can be issued by email. It can be simply copied to a USB
Flash Memory Key and then used to update one or multiple instruments. The single file package
contains the Update Package Script, Axxin Firmware Updater and Axxin Application Software
Updater.
NOTE: The critical measurement calibrations parameters set in factory settings will not be affected by
a typical software update.
Caution: Stored test data may be at risk of being deleted during the software update
process! It is highly recommended that the test results saved on the T8-ISO instrument are
archived to an external formatted, USB Key prior to performing a software update.
14.1 Update Software
Copy the update file (“T8Update_vXXX.hex”)
onto a USB key.
NOTE: Ensure this is the only .hex file on
the USB, and do not place the file in a
folder.
Turn on the T8-ISO instrument.
Insert USB key with the software update file
into the T8-ISO instrument’s USB port, located
on the front of the instrument.
Touch on the “Settings” button from the home
screen.
Navigate to Admin Settings by touching on the
icon.
When prompted to log in, enter “admin” as the
password.
NOTE: “admin” is the default password and
can be changed.

Commercial in Confidence
Page 48 of 77 D005566v3.1 User Manual, T8-ISO Instrument, Axxin T8-ISO.docx
Touch the “Update Software” button located on
the second page of Admin Settings.
A warning message will display.
Touch to confirm installation of software
update.
An information page will display.
Wait for the transfer to complete.
The instrument will go to a black screen and
the front panel white LED will flash rapidly
during the software update process.
This process may take up to 3 minutes.
DO NOT remove power during the software
update.
When the update has completed, the front
panel white LED will return to a slow flash (idle)
mode.
Press the front panel power switch to start the
instrument.

Commercial in Confidence
Page 49 of 77 D005566v3.1 User Manual, T8-ISO Instrument, Axxin T8-ISO.docx
To confirm the software updated, navigate to
the About screen by touching on the “About”
button in the “Settings” menu.
The current running software version number
will be displayed.
The USB key can be removed.

Commercial in Confidence
Page 50 of 77 D005566v3.1 User Manual, T8-ISO Instrument, Axxin T8-ISO.docx
15 Data Export and Archive
The instrument has an internal test result memory capacity of 50 tests.
Test Results and Data Archive Recommendation: It is highly recommended that test results are
exported to an external USB Key and that this data is stored separately from the T8-ISO instrument
as a backup.
The results from each test on the T8-ISO instrument get saved as
- a test results .csv file, which contains all the test parameters, measured data and final results
- a summary .pdf file, which contains only the final results and corresponds to the printed
results page
The file names are structured in this fashion:
Instrument model - serial number – year – month – day - file number - test name.csv
e.g. T8-S000000-2014-09-07-12-Case 2.csv
A user can export individual test results or all test results on the instrument.
An admin or factory user can delete all tests on the instrument at the completion of a successful
export.
15.1 Export Result Process
Choose Test Result for Export
Touch to navigate through the “Results”
screens.
Touch the Test Name.
Touch the icon to export the selected test
to a USB device.
Touch the icon to cancel.
Insert a FAT32 formatted USB flash memory
key.
Touch the icon to export results.
Commercial in Confidence
Page 51 of 77 D005566v3.1 User Manual, T8-ISO Instrument, Axxin T8-ISO.docx
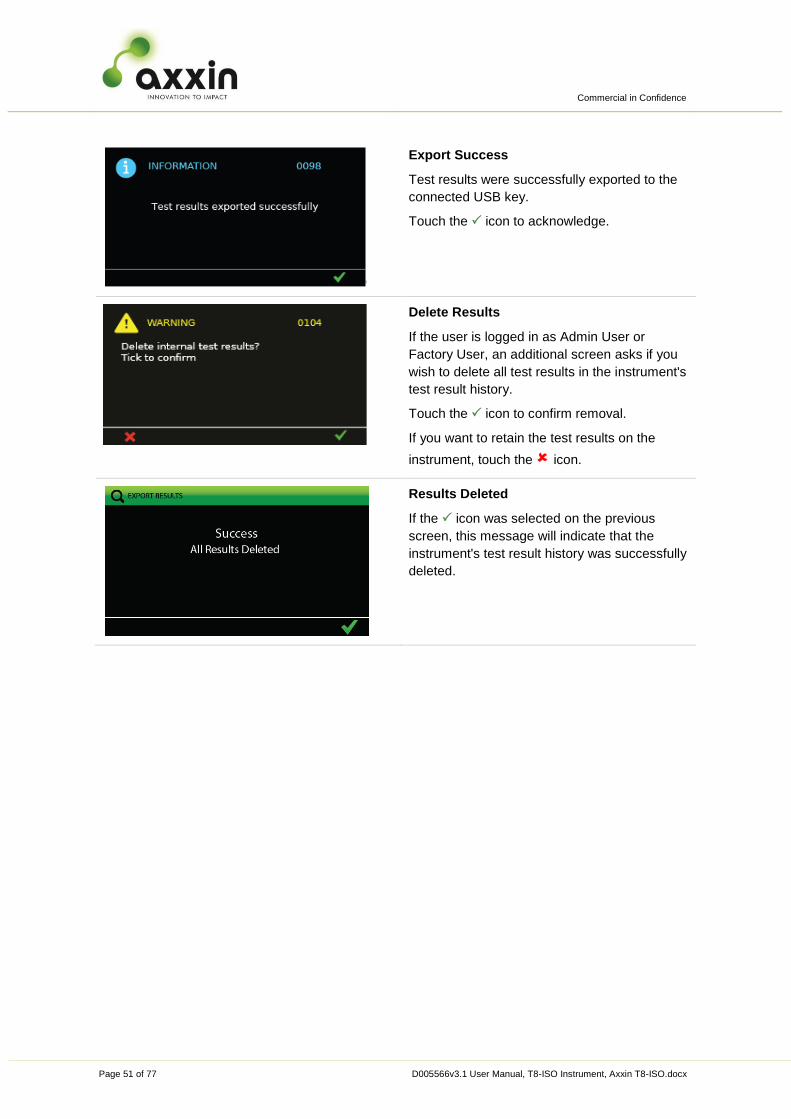
Export Success
Test results were successfully exported to the
connected USB key.
Touch the icon to acknowledge.
Delete Results
If the user is logged in as Admin User or
Factory User, an additional screen asks if you
wish to delete all test results in the instrument's
test result history.
Touch the icon to confirm removal.
If you want to retain the test results on the
instrument, touch the icon.
Results Deleted
If the icon was selected on the previous
screen, this message will indicate that the
instrument's test result history was successfully
deleted.

Commercial in Confidence
Page 52 of 77 D005566v3.1 User Manual, T8-ISO Instrument, Axxin T8-ISO.docx
16 Restoring Factory Defaults
Refer to section 10.12 for details of how to restore factory defaults.
NOTE: The calibrations parameters set in factory settings will not be affected by restoring default
settings.
The list below shows all parameters that will be updated after restoring default settings:
Parameter Item Default Setting
Settings Touch Volume 60
Alert Volume 80
Brightness 80
Results Test Results None (all deleted)
Admin Settings User List None (all deleted)
User Login None
Auto Logout Timer 0
Admin Password Admin
Test Type Package None (all deleted)
Default Test Edits -
Printed report name -
Network NA
LIS Settings NA
Misc Parameters Heater Set Point Max 70
Start Up Temp Set Point (Lid) 40
Start Up Temp Set Point (Heater Block) 40
Read Cycle Interval 10
Scan Duration 900
Opto PWM Duty FAM 20
Opto PWM Duty ROX 30
Results File Sequence Number 1

Commercial in Confidence
Page 53 of 77 D005566v3.1 User Manual, T8-ISO Instrument, Axxin T8-ISO.docx
17 Comparison between T8-ISO and T16-ISO Instrument
Specifications
T8-ISO T16-ISO Note
Number of tubes 8 16
Number of Fluorescence channels 2 2 or 3 FAM, HEX, ROX, Custom, or
bioluminescence.
Run Standalone, run decision
algorithm and display test results
Display on screen graphs
Run with a connected PC
application Desktop Research
Software
Import Test Types created on
Desktop Software
Import from USB memory key
Normalized Readings T8 and T16 have identical
readings response.
Heated Lid Option
Lid latched during test
Fan assisted, rapid cool down
Block Temperature range 37 to 70 °C 37 to 70 °C
Temperature Accuracy (as shipped) 1 °C 1 °C 0.5 °C with calibration
Temperature resolution 0.1 °C 0.1 °C
10/100 Ethernet Port
Embedded web page
Network Printing Serial attached printer for T8
Label Printer Support
serial
USB
Barcode Reader Support
serial
USB
No of test results stored in history
memory
50 99

Commercial in Confidence
Page 54 of 77 D005566v3.1 User Manual, T8-ISO Instrument, Axxin T8-ISO.docx
T8-ISO T16-ISO Note
Export Test results to USB memory
key
CSV
CSV, JSON
Ambient operation temperature
range
10 to 30 °C 10 to 30 °C
Size (mm) 185 W
203 D
110 H
380 W
125 D
140 H
Weight 2.3 Kg
5.1 lbs
2.0 Kg
4.4 lbs
Power Supply Requirements 12V DC,
3 Amps
12V DC,
3 Amps
Same power supply
Universal External Supply module
included
Adaptors for
AUS, US, Europe, UK
Packaging Cardboard product
box
Moulded
plastic
transit case
Upgrade to Wireless Option
Upgrade to Automated Cloud sync
of results
Option
Laboratory Information System
Interface LIS / LIMS
Option
Internal Self Test Reference Option

Commercial in Confidence
Page 55 of 77 D005566v3.1 User Manual, T8-ISO Instrument, Axxin T8-ISO.docx
18 12V Power Supply Adaptor Specifications
The T8-ISO shall be operated using only the specified and supplied
AC/DC power adaptor to ensure both the EMC and safety compliance
of the product.
The Axxin supplied Power adapter, 12V DC, 3.5A:
Part No: PC003354
Description: Power adapter Input:100-240V 50/60Hz Output:12V
3.5A Approval UL'CE; C-Tick; FCC and PSE 4 types plug can to fit
Australia type; UK type; US (Europe) type and China type.
Rated input voltage 100-240VAC
Rated input frequency 50/60Hz
Rated input current 0.4A max.
Operating Environment 0ºC to 40ºC.
10% to 80% RH (non-condensing).
Storage Environment -20ºC to 80ºC.
10% to 90% RH (non-condensing).
Output voltage 12 V
Output current: 3.5 Amps
The Axxin supplied power adapter (PC003354) is compliant with the following standards:
Arcanum Country Certified Status Standard
UL USA MEET UL 60950-1
CSA Canada MEET CSA C22.2 NO.950
TUV Europe MEET TUV/VDE-EN60950-1
CE Europe MEET Declared& CE Mark
PSE Japan / J60950(H19)/J55001(H14)
BSMI Taiwan / CNS13438
CCC CHINA / GB4943-2001
UK Britain MEET EN60950-1:2000

Commercial in Confidence
Page 56 of 77 D005566v3.1 User Manual, T8-ISO Instrument, Axxin T8-ISO.docx
19 Peripherals
19.1 USB Key
The SanDisk, Cruzer Blade key is an example of a typical USB key proven to
work with the T8-ISO instrument:
Formatted for FAT32, min 1GB with only 1 partition.
The USB Key doesn’t perform CD-ROM emulation
The USB Key does not require loaded proprietary software to run.
NOTE: There is only one USB Key present during a software update process.
Test Types on USB Key
Use a USB key to import test types onto the T8-ISO instrument.
Blank USB for Archive of Test Results
Use a blank USB key to export test results and instrument data from the T8-ISO instrument.
Software Update on USB Key
Use a USB key loaded with a software update to install the latest software onto the T8-ISO
instrument.
19.2 Barcode Scanner
The T8-ISO instrument accepts a serial connected barcode scanner.
A ‘Test Type’ QR-code can be scanned from either the ‘Home Screen’ or the ‘New Test’ screen to
initiate a new test.
The QR code can include test parameters such as:
1. Test Type – Temperature, test name, decision logic to apply).
2. Expiry Date
3. Lot number

Commercial in Confidence
Page 57 of 77 D005566v3.1 User Manual, T8-ISO Instrument, Axxin T8-ISO.docx
19.2.1 Barcode Scanner Details
Datalogic QuickScan Barcode Wand, QD2430
The T8-ISO Instrument will accept input from a barcode scanner.
The barcode scanner will supply a character string that appears in
the text box as if it was typed on the onscreen keyboard. The
instrument is configured to automatically accept barcode reader
inputs for User ID, Run ID and Test Type.
The recommended barcode scanner is the Datalogic QuickScan™
QD2430. The QD2430 scanner is connected to the instrument via a
specific cable supplied in the pack. (Refer to Section 19.2.2.) It is
also available as a spare part (Part number P004038). Once
connected, the scanner is typically operated in default mode and
will read both standard barcodes and 2D,QR-type barcodes.
Light Source LED
Roll (Tilt) Tolerance Up to ±360°
Pitch Tolerance ±65°
Skew (Yaw) Tolerance ±60°
Print Contrast Minimum 25% minimum reflectance
Operating Temperature 0° to 50°C (32°F to 122°F)
Storage Temperature -40° to 70°C (-40°F to 158°F)
Humidity 0% to 95% relative humidity, non condensing
Drop test Scanner withstands 18 drops from 1.5m (5ft)
Ambient Light Immunity Up to 86,000 Lux
ESD Level 16 KV
Supply Voltage 4.5-14.0 V (DC)
Operating Current 140mA (typical) 380mA (max)
Idle/Standby 50mA (typical)
Dimension Height: 163mm (6.4”) Length: 91mm (3.6”) Width: 41mm (1.6”)
Weight ~145g (~5.1oz) without cable
Types Code 39, EAN, PDF-417, DataMatrix, QR Code.
Interface RS232, Keyboard Wedge, SERIAL Com Std., SERIAL Keyboard, SERIAL OEM
More information is available at: http://www.datalogic.com/eng/products/automatic-data-
capture/general-purpose-handhelds/quickscan-qd2400-pd-612.html

Commercial in Confidence
Page 58 of 77 D005566v3.1 User Manual, T8-ISO Instrument, Axxin T8-ISO.docx
19.2.2 Barcode Scanner Cable
A specific cable is required to connect the scanner to the T8-ISO instrument.
Part number P004038 Cable Assembly, Barcode Scanner.
Refer to section 4.7 for the cable connection location on the rear of the T8-ISO instrument.

Commercial in Confidence
Page 59 of 77 D005566v3.1 User Manual, T8-ISO Instrument, Axxin T8-ISO.docx
19.3 Label Printer
The T8-ISO instrument supports a connected label printer. The recommended printer is the Seiko
SLP 650-SE operating in serial mode. The printer will print the instrument's test report on a receipt or
adhesive shipping label.
The SLP 650-SE label printer is connected to the instrument via a specific cable supplied in the pack.
(Refer to Section 19.3.2.) It is also available as a spare part (Part number P004037).
Serial Label Printer
Seiko SLP 650-SE
Label Part Number: SLP-SRL Label Size: 2-1/8” x 4” ( 53.98 x 101.6mm)

Commercial in Confidence
Page 60 of 77 D005566v3.1 User Manual, T8-ISO Instrument, Axxin T8-ISO.docx
19.3.1 Printed Report Format
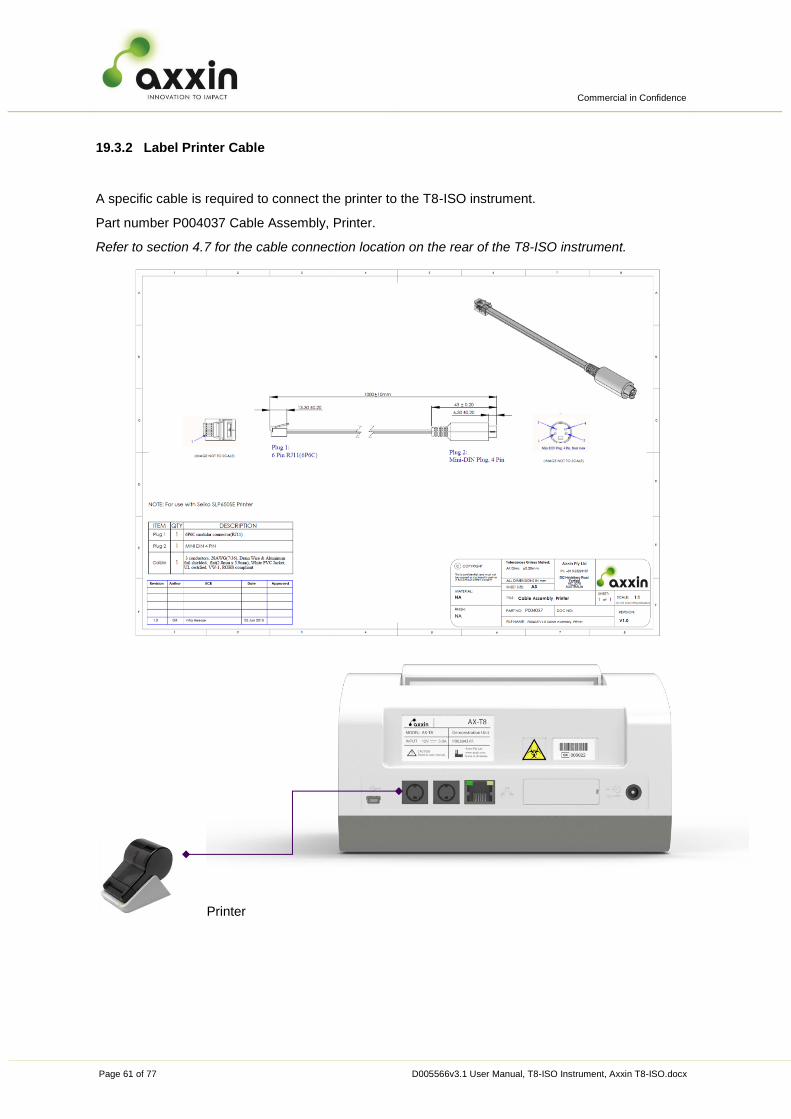
Commercial in Confidence
Page 61 of 77 D005566v3.1 User Manual, T8-ISO Instrument, Axxin T8-ISO.docx
19.3.2 Label Printer Cable
A specific cable is required to connect the printer to the T8-ISO instrument.
Part number P004037 Cable Assembly, Printer.
Refer to section 4.7 for the cable connection location on the rear of the T8-ISO instrument.
Printer

Commercial in Confidence
Page 62 of 77 D005566v3.1 User Manual, T8-ISO Instrument, Axxin T8-ISO.docx
20 Cleaning & Decontamination
WARNING: The isopropyl alcohol used in this procedure is flammable.
Ensure T8-ISO instrument is not powered.
Do not use isopropyl alcohol within 3 m of open flames or sources of ignition.
Avoid contact with skin.
WARNING: T8-ISO instrument may be contaminated.
Avoid contact with skin.
Wash hands with hand wash after completing decontamination.
Suggested materials:
Gloves: Disposable laboratory gloves
Wipes: Lint free wipes
Swabs: Foam Tipped Swab
Name: Chemtronics, Foamtips™ #140
Product No.: CF4050
Swab Length : 2.87" (7.3 cm)
Head Material: 100 ppi Open Cell Foam
Head W/L: 0.19" x 0.50" (4.8 x 12.7 mm)
Isopropyl Alcohol: 99% Isopropyl Alcohol in
a spray dispenser
Hand wash: Disinfectant hand wash
The T8-ISO instrument can be cleaned using a lint free wipe dampened with Isopropyl Alcohol (IPA).
Axxin does not recommend using free liquids to clean the T8-ISO instrument.
To clean the T8-ISO Tube wells Axxin advises the use of a Foam tip Swab such as the Chemtronics,
Foam Tip Swabs with Product Number CF4050.
1. Inspect: Inspect for damage or visible contamination.
2. Dispose: Dispose of any materials left on the instrument such as test parts.
3. Wipe surfaces: Wipe all surfaces of the instrument with wipes wetted with isopropyl alcohol.
Use sufficient alcohol such that the surfaces are clearly wetted by the cleaning process.
Surfaces include the LCD display and touch screen.
4. Dip: Dip the Foam tip Swap into the Isopropyl Alcohol and allow any excess fluid to flow off
the swap.
5. Insert: the swab into each T8-ISO Tube well and circle the tube wall. If any lint or dust
remains on the swab head once swab is removed after cleaning, dispose of swab
6. Dispose: Dispose of all used materials and gloves.
7. Wash hands: Wash hands with the disinfectant hand wash.

Commercial in Confidence
Page 63 of 77 D005566v3.1 User Manual, T8-ISO Instrument, Axxin T8-ISO.docx
21 Service & Maintenance
21.1 Software Issue Reporting
This user manual contains copies of the following forms that can be used for reporting a software
issue or requesting support:
T16-ISO/T8-ISO Instrument Support Request Form
T16-ISO/T8-ISO Desktop Utility Support Request Form
Axxin recommends completing the above mentioned forms and supplying them to Axxin via
[email protected]. The forms are also available on Axxin web site at
http://www.axxin.com/support.php
Some things to consider when reporting a software defect or bug:
1. Make sure your software is up to date.
2. Take note of what steps you performed to cause the defect to occur. Steps to reproduce are
the most important part of any defect report. If Axxin is able to reproduce the defect, the
defect can be investigated. If the steps are unclear, it might not even be possible for Axxin to
replicate the issue that you have found.
3. What where you expecting to see "expected result" and what happened instead "actual
result"?
4. If you are seeing an Error or Warning dialogue, please let us know the Error Code number
"0000" which can be found on the screen.
5. Take note of whether the issue is occurring on the device application or on the desktop
software.
6. Take note of how many instruments are affected.
7. Take note of how frequently you are seeing the defect.
8. Take note of what hardware is connected to the device such as printers, barcode scanners,
USBs or to a desktop computer via a network connection.
If you believe you are seeing multiple defects on the same instrument, please fill separate support
forms for each defect, rather than by device.

Commercial in Confidence
Page 64 of 77 D005566v3.1 User Manual, T8-ISO Instrument, Axxin T8-ISO.docx
Thank you for completing this form. Please send your response to [email protected]
T8-ISO INSTRUMENT SUPPORT FORM
Company
Name
Position
T8-ISO INSTRUMENT NOTE
Instrument serial number/s:
Revision Number:
The Instrument Serial Number & Revision Number are
located on a label on the back side of the instrument.
The serial number format is: S00XXXX
and revision number format is R1, R2, R3
Instrument Application Version x.x.x.x: If you are able to access the device application screens,
navigate to: Settings/About/. You will find the entire device
Software, Firmware and Hardware information here.
Description of Fault: Describe the problem in your own words. Which screen
were you looking at when the error occurred? Were any
USB devices such as a USB Memory key or Printer
attached? How frequently are you seeing the issue?
FOR FUTURE REFERENCE:
Please supply the instrument log file as an attachment.
Attach a USB Flash Memory Key to the T8-ISO Instrument.
If you are able to access the device application screens,
navigate to: Setting / Administrator Setting / Enter Admin
Password / Import and Export Functions / Export Logfile
to USB
This exports the device “Logfile” to an attached USB Flash
Memory Key. Please attach the device log file to this email.
Refer to the Instrument User Manual Import and Export
Functions for further information.

Commercial in Confidence
Page 65 of 77 D005566v3.1 User Manual, T8-ISO Instrument, Axxin T8-ISO.docx
Thank you for completing this form. Please send your response to [email protected]
T8-ISO DESKTOP UTILITY SUPPORT FORM
Company
Name
Position
T8-ISO DESKTOP SOFTWARE NOTE
Desktop software version Check the Desktop Software version number, go to:
T8-ISO Desktop Application / Support / About
Software Version of connected instrument
Instrument Application Version x.x.x.x:
If you are able to access the device application screens
navigate to the device information/about screen. You will find
the entire device Software, Firmware and Hardware
information here.
What Windows Operating System are you using?
E.g. Windows 7, 32 bit
To find your system specification go to:
Control Panel\All Control Panel Items\System
Record the Windows edition and the System type
How where you connected to the instrument? Using a network cable and connecting via Ethernet direct
adhoc connection or via Local Area Connection?
Or were you using a USB Cable to connect?
Description of Fault: Describe the problem In your own words. Which screen you
were looking at when the error occurred? At what stage does
the problem occur (e.g. on connection, temperature warm-up,
test run)? How frequent is the problem (e.g. intermittent -
every few tests)? Does the test run ever finish or does it
always crash before this?).
Are you able to take a screen shot of the error?
If so please attach.
If you are looking at the fault on screen, or are seeing an error
message you could take a screen shot of what you see. Hold
down the "Alt" key and press "Print Screen". Either attach or
paste a copy of the image into this email.
FOR FUTURE REFERENCE:
Please perform a self test on the Desktop Software.
Please send us a copy of the Self Test output file, conducted
on the instrument with the issue
Go to T8-ISO Desktop Application/ Instrument/ Self Test,
Run a Self Test and save the test result.CSV file and attach it
to this email. Refer to the Desktop User Manual for further
information. If you cannot access the self test, a log file can be
found at C:\Program Files\Axxin\Axxin T8-ISO
Desktop\Logs

Commercial in Confidence
Page 66 of 77 D005566v3.1 User Manual, T8-ISO Instrument, Axxin T8-ISO.docx
21.2 Service & Repair Procedure
Axxin recommends the following customer procedure for assessing instrument for return to service.
1. Refer to T8-ISO User Manual for information on instrument operation, troubleshooting, error
codes and self test as an initial step in resolving the issue.
2. If problem is not resolved then Axxin recommends contacting [email protected] for further
guidance and completing technical information from document T16-ISO/T8-ISO Support Form
to assist identification of the issue. Form is available on Axxin web site at
http://www.axxin.com/support.php or contact [email protected]
3. If problem is not resolved or instrument fails to operate correctly, fails self test, or hardware is
deemed to be faulty then contact [email protected] with a completed “Return for Service
Form”. Refer to Section 21.3 below for instructions.
4. Axxin will acknowledge the receipt of Return for Service Request within 5 business days.
5. Ship the decontaminated T8-ISO instrument to Axxin Australia with the Return for Service
Request marked to:
Axxin
Attn. Service & Repairs
Ground Floor,
582 Heidelberg Rd,
Fairfield, 3078
Victoria, Australia
6. On receipt of Instrument at Axxin:
The Instrument is inspected and assigned a service and repair tracking number.
The Instrument is allocated a service category / charge rate during service and
inspection and customer is provided a Quote within 5 business days.
Axxin will also confirm whether this is a warranty item or a chargeable service.
If Quote is accepted by the customer the repair is initiated within 10 business days
from date of approval.
If Quote is not accepted by customer or no response is received to Quote provided
within 7 business days the Instrument is returned to customer at customer's expense.
Axxin provides a report for all service and repair processes completed. A description of service
activity, fault diagnosis, repairs and testing activity are detailed in this report.

Commercial in Confidence
Page 67 of 77 D005566v3.1 User Manual, T8-ISO Instrument, Axxin T8-ISO.docx
21.3 Return for Service Request
The customer must complete and provide the Return for Service form (Refer to section 5) with any
instrument returned for service. Completed form may be supplied electronically via email or shipped
with the instrument.
The Return for Service Form is provided below.
Axxin must receive a completed form before any work, inspection or service of the instrument can
begin.
Instruments should be packed securely in the original packing materials before returning to Axxin.
Return for Service Checklist:
Return form completed and provided via email or shipped with the T8-ISO instrument.
Copy of the return form retained if required.
T8-ISO instrument serial number noted on shipping documents.
T8-ISO instrument cleared of risks and free of contamination for servicing.
(refer to Section 20 for instructions)
All data on the T8-ISO instrument is copied and retained in an archive.
T8-ISO instrument is packed in original packaging for shipping.
NOTES:
All data will be erased from the T8-ISO instrument during service.
Instruments not cleaned for return to service may be returned or an additional fee incurred.
Warranty is voided if the Axxin Warranty Void label has been removed. An additional fee
may be incurred to review this unit.
Instrument is to be shipped in original packaging or equivalent packaging. Instrument may
incur damage if not shipped with appropriate packaging material. Please contact
[email protected] if further advice is required on return packaging.
No new accessories are supplied with the repaired Instrument. For example, if Instrument is
returned without original cable or original power supply, then the Instrument is returned
without these.
If Axxin Quote is not accepted then instrument will be returned as supplied and an
inspection fee charged.

Commercial in Confidence
Page 68 of 77 D005566v3.1 User Manual, T8-ISO Instrument, Axxin T8-ISO.docx
21.3.1 Quote for Services
This table outlines the service category definition and charge rate.
SERVICE CATEGORY
DESCRIPTION TEST
APPLIED CHARGE
CATEGORY
Warranty Repair 12 months from original shipment date from Axxin. Complete
final test NIL
Inspection Fee If Axxin Quote for repairs is not accepted this fee is applicable
for inspecting and handling of returned instrument. N/A Inspection
No fault found No fault found from inspection and testing. Complete
final test
Minor repair
charges
Minor repair
Software or update issue.
Service inspection to return to known factory status.
Replacement of labels.
Correction of minor cosmetic or function items.
Complete
final test
Minor repair
charges
Standard repair
Replacement of a single plastic housing component: bottom,
top or LID.
Disassembly of instrument to correct internal or electrical
damage.
Broken connectors (e.g. USB, Ethernet, Power)
Replacement of a single optical module.
(Optical module parts cost is additional. See below)
Cleaning of heat block tube due to liquid ingress
Replacement of touch screen & LCD display
Complete
final test
Standard repair
charges
Major Repair
Replacement of more than one plastic housing component
(bottom, top, LID).
Replacement of single PCB
Water or moisture entry into heat block and instrument chassis
Replacement of more than one optical module (optical module
parts cost is additional. See below)
Replacement of motor or drive assembly
Complete
final test
Major repair
charges
Replacement
Instrument is considered beyond repair if:
internal chassis rebuild required
two of more PCBs require replacement
Purchase of a new replacement instrument may be offered.
This is subject to availability of instruments dependent on time
after last production.
Complete
final test
Replacement
instrument cost

Commercial in Confidence
Page 69 of 77 D005566v3.1 User Manual, T8-ISO Instrument, Axxin T8-ISO.docx
T8-ISO Return for Service Form
Instrument Serial No. Instrument Software Version
Contact Name
Contact Phone No.
Contact Email
Return Address for Shipping
Company Name
Street Address
State / Province
Country Zip / Post Code
Courier Name Courier Account No.
Service Information
All instrument data copied and archived?
YES
NO
Instrument cleaned and decontaminated, safe for service?
YES
NO
Is this a warranty repair?
YES
NO
Did the instrument suffer damage?
YES
NO
Description of fault:
Are you authorized to request this repair and authorize payment for service and shipping charges?
YES
NAME SIGNATURE DATE (dd month yyyy)
Completed form must be provided to Axxin electronically via email or shipped with the instrument
before any work, inspection or service of the instrument can begin.
Axxin Pty Ltd Ground Floor,
582 Heidelberg Rd, Fairfield, 3078
Victoria, Australia

Commercial in Confidence
Page 70 of 77 D005566v3.1 User Manual, T8-ISO Instrument, Axxin T8-ISO.docx
22 CE Declaration
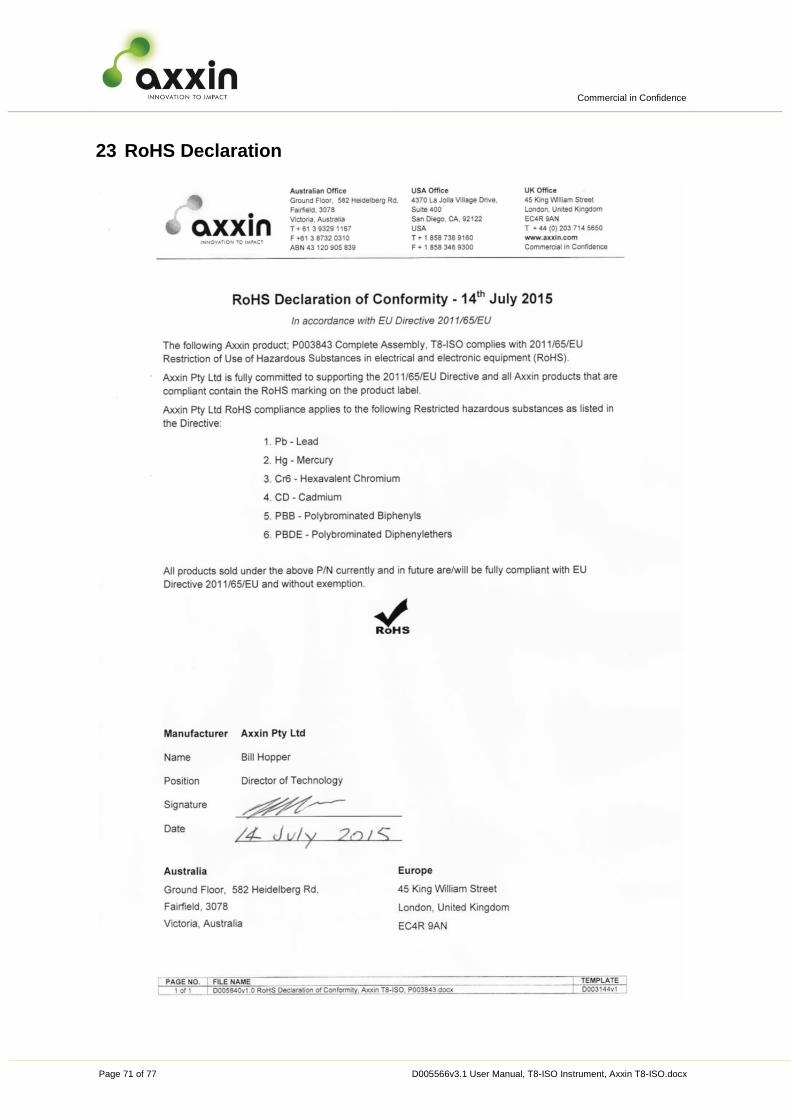
Commercial in Confidence
Page 71 of 77 D005566v3.1 User Manual, T8-ISO Instrument, Axxin T8-ISO.docx
23 RoHS Declaration

Commercial in Confidence
Page 72 of 77 D005566v3.1 User Manual, T8-ISO Instrument, Axxin T8-ISO.docx
24 WEEE Directive Declaration

Commercial in Confidence
Page 73 of 77 D005566v3.1 User Manual, T8-ISO Instrument, Axxin T8-ISO.docx
25 Warranty & End User License Agreement
The T8-ISO product is warranted against defects in materials and workmanship for a period of one (1)
year. For specific warranty information, contact the Axxin office in your country. If any defects should
occur during the warranty period, Axxin will replace the defective parts without charge. However, the
following defects are specifically excluded:
Defects caused by improper operation or by improper packaging of returned goods.
Repair or modifications done by anyone other than Axxin Pty. Ltd.
Materials not specified by Axxin Pty. Ltd.
Deliberate or accidental misuse.
Damage caused by disaster.
Damage due to use of improper solvent or sample.
The warranty does not apply to fuses.
For enquiry or request for repair service, contact Axxin after confirming the model and unique silicon
chip serial number of your T8-ISO instrument.
25.1 Limitations
This instrument is intended for use in research, development and investigation.
No guarantee or warranty, express or implied is provided for the operation and use of this equipment.
This system of device & software is provided solely for use as an experimental device for research
applications and is not approved for any diagnostic or medical applications.
In no event shall licensor or its suppliers be liable to you or any third party for any special, incidental,
indirect or consequential damages of any kind, or any damages whatsoever, including, without
limitation, those resulting from loss of use, data or profits, whether or not licensor had been advised of
the possibility of such damages, and on any theory of liability, arising out of or in connection with the
use of the licensed works. Some jurisdictions prohibit the exclusion or limitation of liability for
consequential or incidental damages, so the above limitations may not apply to you. These limitations
shall apply notwithstanding any failure of essential purpose of any limited remedy.
25.2 Design Life and Updates
This instrument is intended for desktop research only, and has a design life of five years or 10,000
tests, whichever occurs first. After this period, the equipment must be decommissioned and not used,
or specifically evaluated for any further application or extension of life and support. Axxin Pty. Ltd.
reserves the right to issue a “change notice” relating to the construction, software or use of the
instrument at any time. The instrument must be quarantined from use immediately after a change
notice is issued and until the update is completed.
25.3 Instrument Failure and Errors
The instrument and its associated software are constructed using standard components and methods.
The instrument and the software can fail or provide incorrect readings or result in error.
These risks should be considered by the intended user and where applicable mitigated by other
methods independent of the Axxin supplied equipment, such as:
Warnings

Commercial in Confidence
Page 74 of 77 D005566v3.1 User Manual, T8-ISO Instrument, Axxin T8-ISO.docx
Use of other indicators or readings.
Secondary, independent, testing or measurement.
25.4 General Notice
The Axxin instrument is intended as a general-purpose device for research use. No claim or
representation is intended for their use to identify any specific organism or for a specific clinical use
(diagnostic, prognostic, therapeutic or blood banking). It is the user’s responsibility to validate the
performance of Axxin instruments and kits for any particular use, since their performance
characteristics have not been validated for any specific use.
25.5 Licensing and Third Party Intellectual Property
The Axxin Instrument is a general purpose instrument and can run many different types of chemistry,
assays and test types. It is the responsibility of the user to ensure they have acquired the applicable
licenses or rights to use the intellectual property of others for a specific test protocol, reading protocol,
chemistry, assay or test type. The requirements may vary by the intended test type applicator, region
chemistry or applied test result method used.
25.6 Intended Use
This instrument is supplied for research testing and is not an IVD device suitable or intended for use
in clinical or human health applications. Where reliance on the test result, even for research is
important, additional independent tests or indicators must be used. Axxin does not accept any
consequent loss that would arise in relying on the readings of the Axxin instrument alone.
25.7 End-User License Agreement
CAREFULLY READ THE FOLLOWING TERMS AND CONDITIONS BEFORE USING THIS
PRODUCT. IT CONTAINS SOFTWARE, THE USE OF WHICH IS LICENSED BY AXXIN PTY LTD
(ACN 120 905 839), TO ITS CUSTOMERS FOR THEIR USE ONLY AS SET FORTH BELOW. IF YOU
DO NOT AGREE TO THE TERMS AND CONDITIONS OF THIS AGREEMENT, DO NOT USE THE
SOFTWARE. USING ANY PART OF THE SOFTWARE INDICATES THAT YOU ACCEPT THESE
TERMS.
GRANT OF LICENSE: Axxin Pty Ltd, Inc. (the "Licensor") grants to you this personal, limited, non-
exclusive, non-transferable, non-assignable license solely to use in a single copy of the Licensed Works
on a single computer for use by a single concurrent user only and solely provided that you adhere to all
of the terms and conditions of this Agreement. The foregoing is an express limited use license and not
an assignment, sale, or other transfer of the Licensed Works or any Intellectual Property Rights of
Licensor.
ASSENT: By opening the file containing this software, you agree that this Agreement is a legally binding
and valid contract, agree to abide by the intellectual property laws and all of the terms and conditions
of this Agreement, and further agree to take all necessary steps to ensure that the terms and conditions
of this Agreement are not violated by any person or entity under your control or in your service.
OWNERSHIP OF SOFTWARE: The Licensor and/or its affiliates or subsidiaries own certain rights that
may exist from time to time in this or any other jurisdiction, whether foreign or domestic, under patent
law, copyright law, publicity rights law, moral rights law, trade secret law, trademark law, unfair
competition law or other similar protections, regardless of whether or not such rights or protections are
registered or perfected (the "Intellectual Property Rights"), in the computer software and hardware,

Commercial in Confidence
Page 75 of 77 D005566v3.1 User Manual, T8-ISO Instrument, Axxin T8-ISO.docx
together with any related documentation (including design, systems and user) and other materials for
use in connection with such computer software in this package (collectively, the "Licensed
Works"). ALL INTELLECTUAL PROPERTY RIGHTS IN AND TO THE LICENSED WORKS ARE AND
SHALL REMAIN IN LICENSOR.
NO COMMERCIAL USE: This License Agreement grants you the right to use the Software solely for
the intended use with Axxin products.
PRODUCT ACTIVATION: Your use of the Software is governed by product activation technology that
limits the number of installations and total number of computers on which the Software. This product
activation technology may not be circumvented or otherwise disabled in any way.
25.8 Restrictions
(a) You are expressly prohibited from copying, modifying, merging, selling, leasing, redistributing,
assigning, or transferring in any matter, Licensed Works or any portion thereof.
(b) You may take a single copy of materials within the package or otherwise related to Licensed
Works only as required for backup purposes.
(c) You are also expressly prohibited from reverse engineering, decompiling, translating,
disassembling, deciphering, decrypting, or otherwise attempting to discover the source code of the
Licensed Works as the Licensed Works contain proprietary material of Licensor. You may not
otherwise modify, alter, adapt, port, or merge the Licensed Works.
(d) You may not remove, alter, deface, overprint or otherwise obscure Licensor patent, trademark,
service mark or copyright notices.
(e) You agree that the Licensed Works will not be shipped, transferred or exported into any other
country, or used in any manner prohibited by any government agency or any export laws, restrictions
or regulations.
(f) You may not publish or distribute in any form of electronic or printed communication the materials
within or otherwise related to Licensed Works, including but not limited to the object code,
documentation, help files, examples, and benchmarks.
TERM: This Agreement is effective until terminated. You may terminate this Agreement at any time
by uninstalling the Licensed Works and destroying all copies of the Licensed Works. Upon any
termination, you agree to uninstall the
Licensed Works and return or destroy all copies of the Licensed Works, any accompanying
documentation, and all other associated materials.

Commercial in Confidence
Page 76 of 77 D005566v3.1 User Manual, T8-ISO Instrument, Axxin T8-ISO.docx
25.9 Warranties and Disclaimer
EXCEPT AS EXPRESSLY PROVIDED OTHERWISE IN A WRITTEN AGREEMENT BETWEEN
LICENSOR AND YOU, THE LICENSED WORKS ARE NOW PROVIDED “AS IS” WITHOUT
WARRANTY OF ANY KIND, EITHER EXPRESS OR IMPLIED, INCLUDING, BUT NOT LIMITED TO,
THE IMPLIED WARRANTIES OF MERCHANTABILITY OR FITNESS FOR A PARTICULAR
PURPOSE, OR THE WARRANTY OF NON-INFRINGEMENT. WITHOUT LIMITING THE
FOREGOING, LICENSOR MAKES NO WARRANTY THAT (i) THE LICENSED WORKS WILL MEET
YOUR REQUIREMENTS, (ii) THE USE OF THE LICENSED WORKS WILL BE UNINTERRUPTED,
TIMELY, SECURE, OR ERROR-FREE, (iii) THE RESULTS THAT MAY BE OBTAINED FROM THE
USE OF THE LICENSED WORKS WILL BE ACCURATE OR RELIABLE, (iv) THE QUALITY OF THE
LICENSED WORKS WILL MEET YOUR EXPECTATIONS, (v) ANY ERRORS IN THE LICENSED
WORKS WILL BE CORRECTED, AND/OR (vi) YOU MAY USE, PRACTICE, EXECUTE, OR ACCESS
THE LICENSED WORKS WITHOUT VIOLATING THE INTELLECTUAL PROPERTY RIGHTS OF
OTHERS. SOME STATES OR JURISDICTIONS DO NOT ALLOW THE EXCLUSION OF IMPLIED
WARRANTIES OR LIMITATIONS ON HOW LONG AN IMPLIED WARRANTY MAY LAST, SO THE
ABOVE LIMITATIONS MAY NOT APPLY TO YOU. IF CALIFORNIA LAW IS NOT HELD TO APPLY
TO THIS AGREEMENT FOR ANY REASON, THEN IN JURISDICTIONS WHERE WARRANTIES,
GUARANTEES, REPRESENTATIONS, AND/OR CONDITIONS OF ANY TYPE MAY NOT BE
DISCLAIMED, ANY SUCH WARRANTY, GUARANTEE, REPRESENTATION AND/OR WARRANTY
IS: (1) HEREBY LIMITED TO THE PERIOD OF EITHER (A) THIRTY (30) DAYS FROM THE DATE OF
OPENING THE PACKAGE CONTAINING THE LICENSED WORKS OR (B) THE SHORTEST PERIOD
ALLOWED BY LAW IN THE APPLICABLE JURISDICTION IF A THIRTY (30) DAY LIMITATION
WOULD BE UNENFORCEABLE; AND (2) LICENSORS SOLE LIABILITY FOR ANY BREACH OF ANY
SUCH WARRANTY, GUARANTEE, REPRESENTATION, AND/OR CONDITION SHALL BE TO
PROVIDE YOU WITH A NEW COPY OF THE LICENSED WORKS.
IN NO EVENT SHALL LICENSOR OR ITS SUPPLIERS BE LIABLE TO YOU OR ANY THIRD PARTY
FOR ANY SPECIAL, INCIDENTAL, INDIRECT OR CONSEQUENTIAL DAMAGES OF ANY KIND, OR
ANY DAMAGES WHATSOEVER, INCLUDING, WITHOUT LIMITATION, THOSE RESULTING FROM
LOSS OF USE, DATA OR PROFITS, WHETHER OR NOT LICENSOR HAD BEEN ADVISED OF THE
POSSIBILITY OF SUCH DAMAGES, AND ON ANY THEORY OF LIABILITY, ARISING OUT OF OR
IN CONNECTION WITH THE USE OF THE LICENSED WORKS. SOME JURISDICTIONS PROHIBIT
THE EXCLUSION OR LIMITATION OF LIABILITY FOR CONSEQUENTIAL OR INCIDENTAL
DAMAGES, SO THE ABOVE LIMITATIONS MAY NOT APPLY TO YOU. THESE LIMITATIONS
SHALL APPLY NOTWITHSTANDING ANY FAILURE OF ESSENTIAL PURPOSE OF ANY LIMITED
REMEDY.
SEVERABILITY: In the event any provision of this License Agreement is found to be invalid, illegal or
unenforceable, the validity, legality and enforceability of any of the remaining provisions shall not in any
way be affected or impaired and a valid, legal and enforceable provision of similar intent and economic
impact shall be substituted therefore.
ENTIRE AGREEMENT: This License Agreement sets forth the entire understanding and agreement
between you and Licensor, supersedes all prior agreements, whether written or oral, with respect to the
Software, and may be amended only in a writing signed by both parties.

Commercial in Confidence
Page 77 of 77 D005566v3.1 User Manual, T8-ISO Instrument, Axxin T8-ISO.docx
25.10 Copyright
© 2007-2016 Axxin Pty. Ltd. All Rights Reserved.
This manual, as well as the hardware and software described in it, is provided under license and may
be used and/or copied only in accordance with the terms of such license. The content of this manual
is furnished for informational use only, is subject to change without notice and should not be
construed as a commitment by Axxin Pty. Ltd.
Axxin Pty. Ltd. assumes no responsibility or liability for any errors or inaccuracies that may appear in
this manual.
This document is provided as an operational summary to describe the use of the T8-ISO instrument.
This document does not describe operation of the specific diagnostic test or provide any input to the
requirements, safety or processing of the diagnostic test which is outside of the scope of Axxin Pty
Ltd.
Axxin Pty. Ltd. and the Axxin Pty. Ltd. Logo are trademarks of Axxin Pty. Ltd. in Australia and other
countries.
Commercial in Confidence